

Page 1

Instructions for use
WASHING MACHINE
GB
English, 1
PL
Polski, 37
WITL 100
HU
Magyar, 13
CZ
Český, 25
Contents
Installation, 2-3
Unpacking and levelling
Electric and water connections
The first wash cycle
Technical details
Washing machine description, 4-5
Control panel
How to open and shut the drum
Leds
Starting and Programmes, 6
Briefly: how to start a programme
Programme table
Personalisations, 7
Setting the temperature
Setting the spin cycle
Functions
Detergents and laundry, 8
Detergent dispenser
Bleach cycle
Preparing your laundry
Special items
GB
Precautions and advice, 9
General safety
Disposal
Saving energy and respecting the environment
Care and maintenance, 10
Cutting off the water or electricity supply
Cleaning your appliance
Caring for your appliance door and drum
Cleaning the pump
Checking the water inlet hose
Cleaning the detergent dispenser
Troubleshooting, 11
Service, 12
Before calling for Assistance
1
Page 2
Installation
GB
! Keep this instruction manual in a safe place for future refe-
rence. Should the appliance be sold, transferred or moved,
make sure the instruction manual accompanies the washing
machine to inform the new owner as to its operation and
features.
! Read these instructions carefully: they contain vital infor-
mation on installation, use and safety.
Unpacking and levelling
Unpacking
1. Unpack the washing
machine.
2. Check whether the
washing machine has been
damaged during transport.
If this is the case, do not
install it and contact your
retailer.
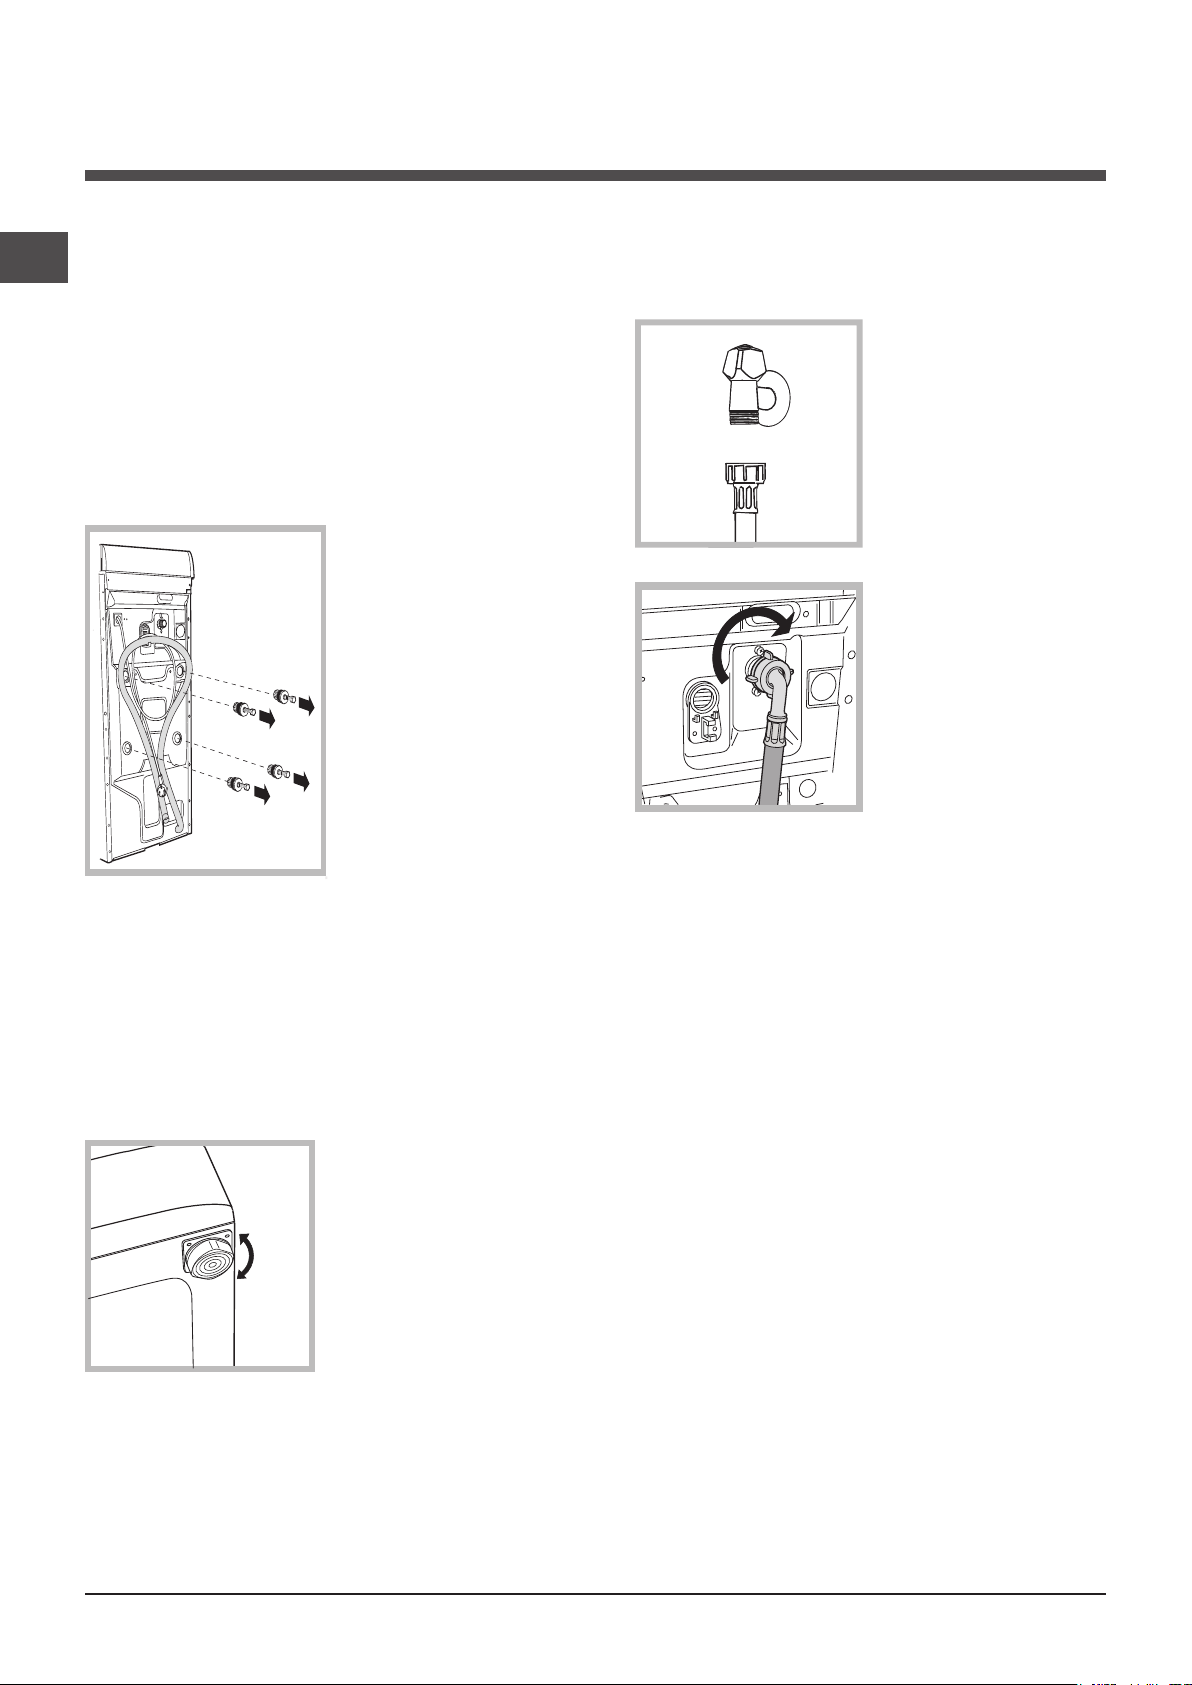
3. Remove the four protective screws and the rubber
washer with the respective
spacer, situated on the
rear of the appliance (see
figure).
4. Seal the gaps using the
plastic plugs provided.
5. Keep all the parts: you will need them again if the washing
machine needs to be moved to another location.
Warning: should the screws be re-used, make sure you fasten
the shorter ones at the top.
! Packaging materials are not children’s toys.
Levelling
Electric and water connections
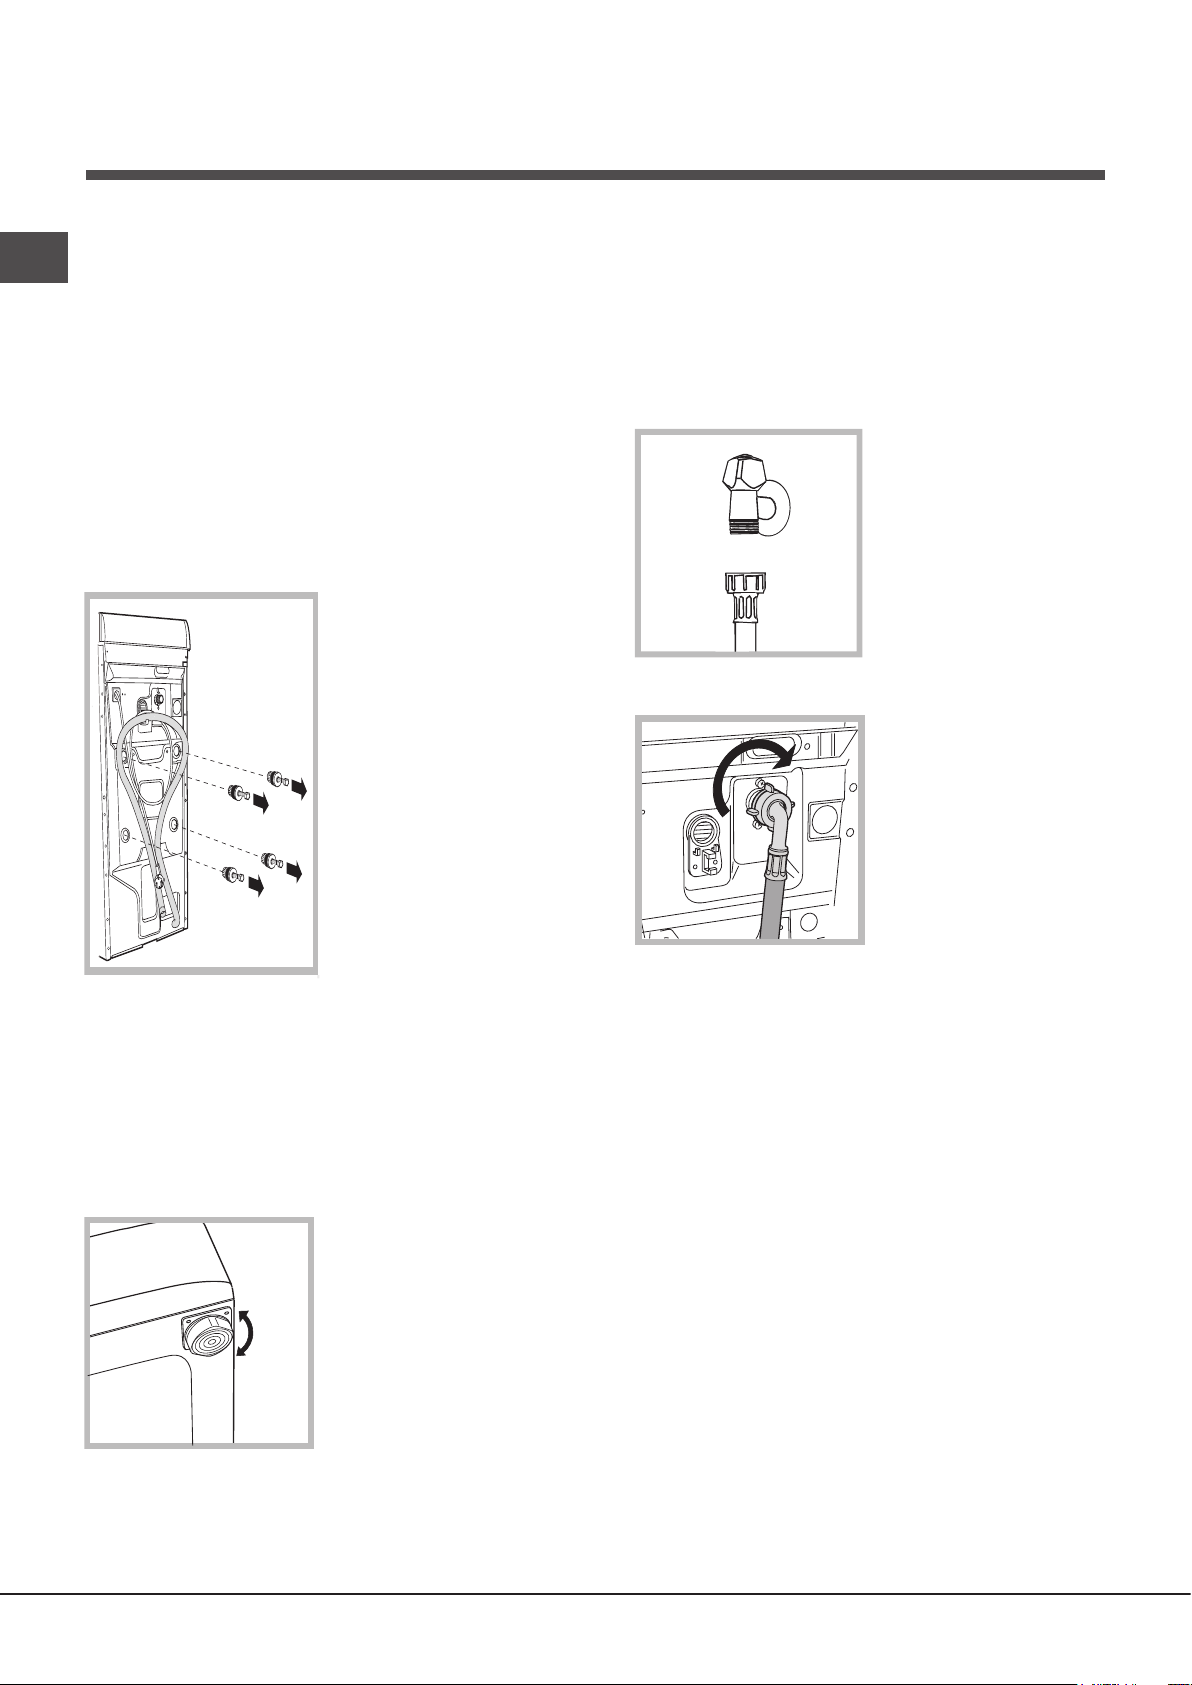
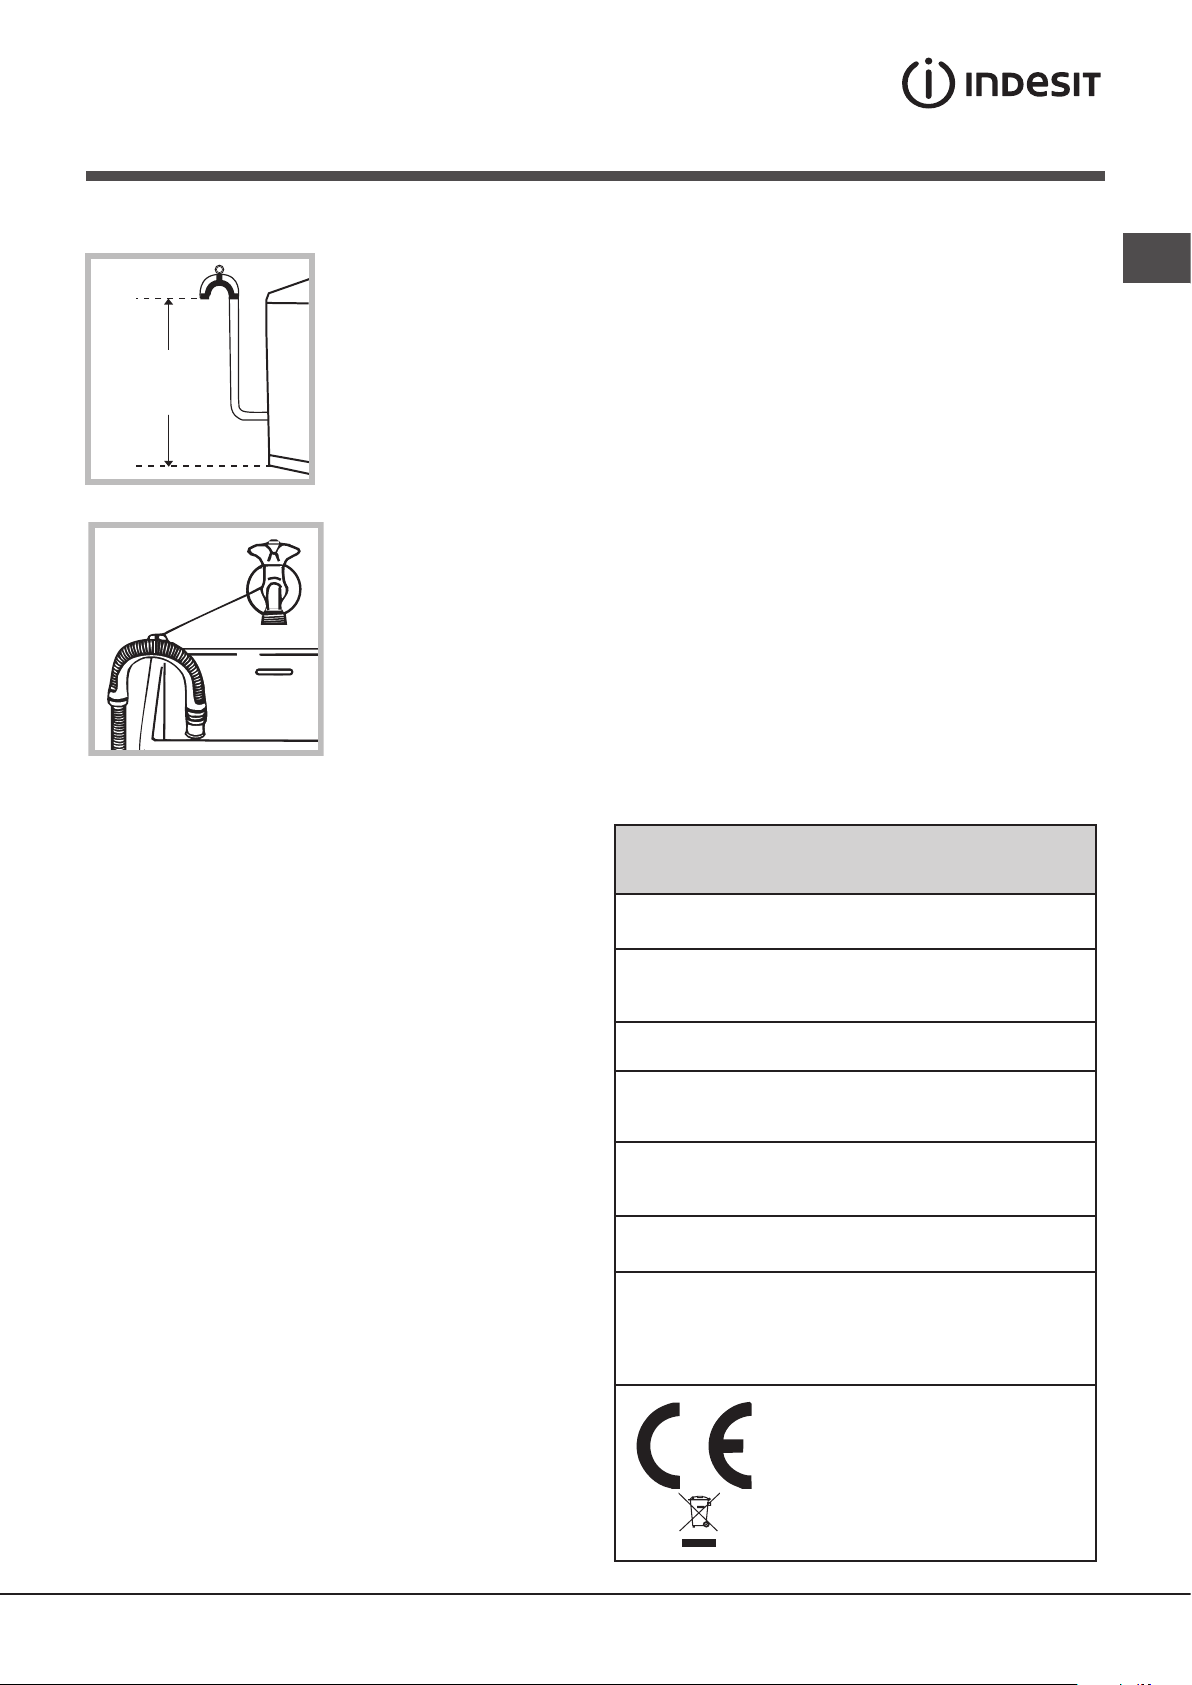
Connecting the water inlet hose
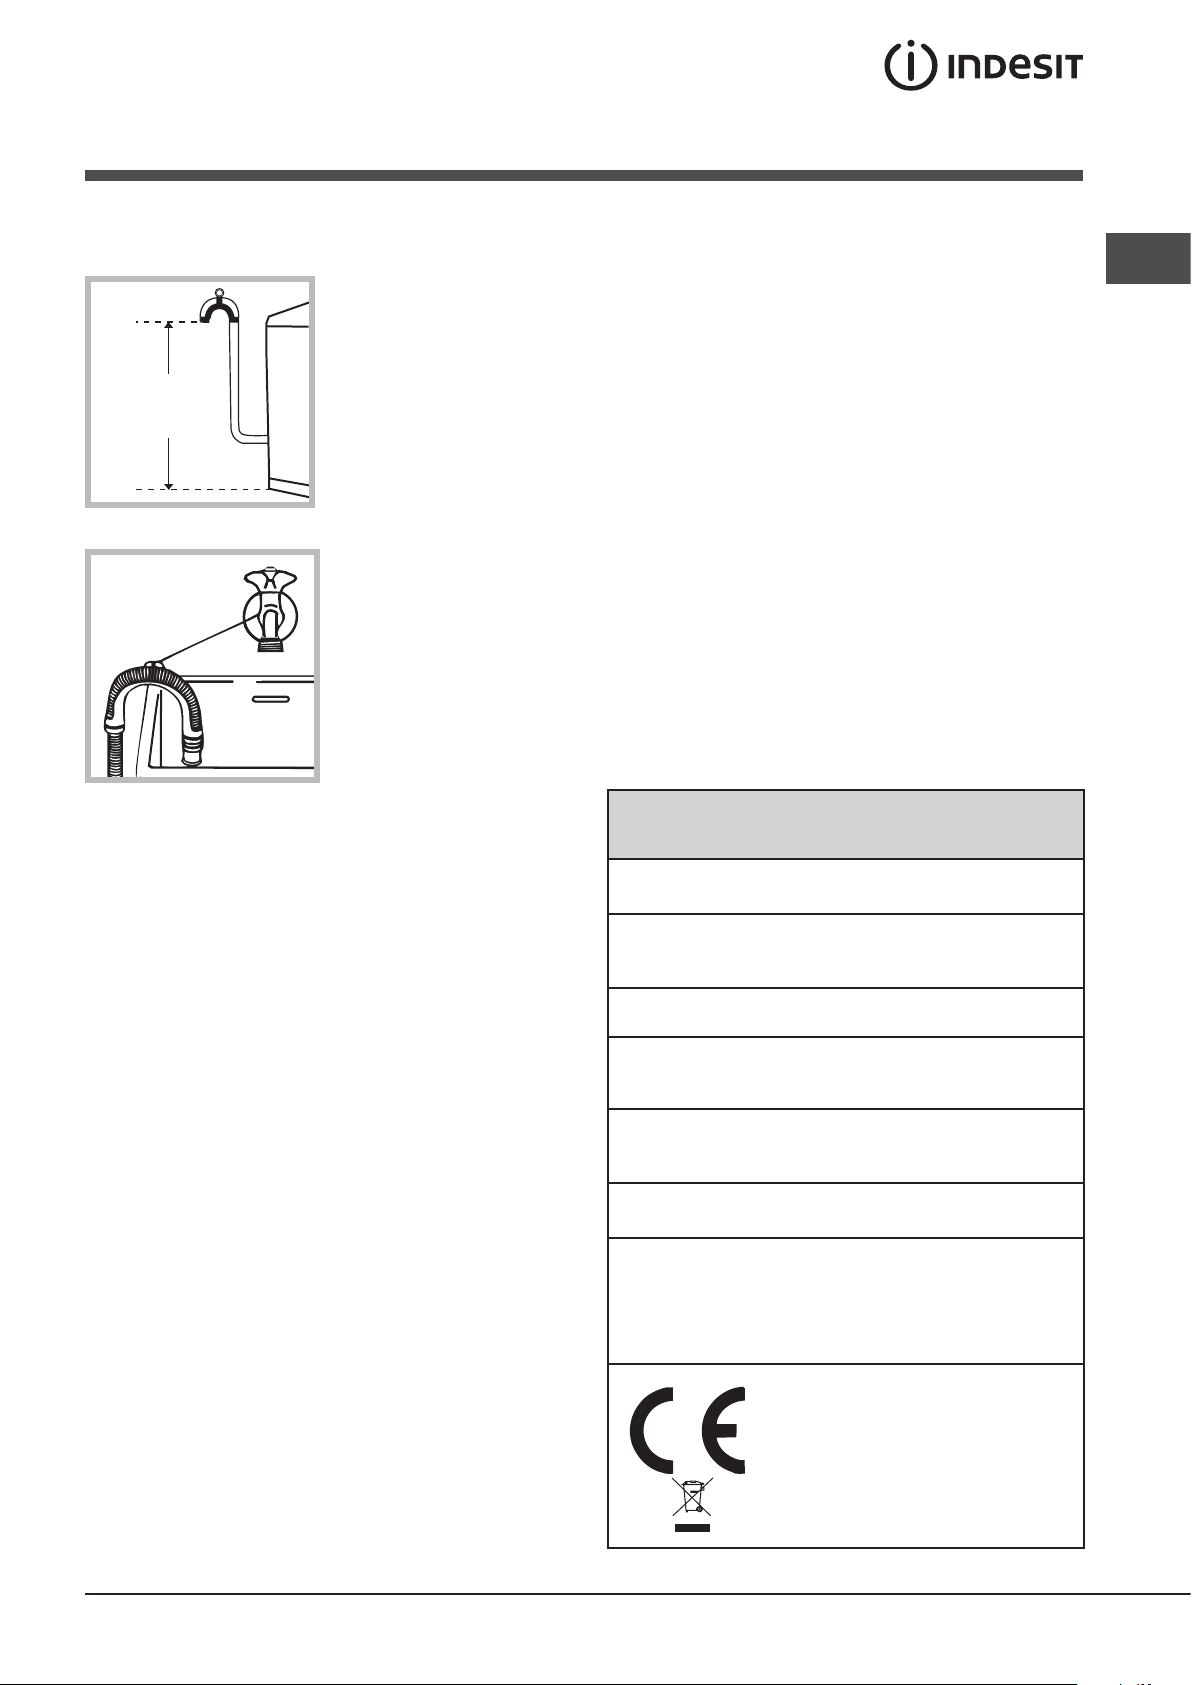
1. Connect the supply
pipe by screwing it to a
cold water tab using a ¾
gas threaded connection
(see figure).
Before performing the
connection, allow the
water to run freely until it is
perfectly clear.
2. Connect the other end of
the water inlet hose to the
washing machine,
screwing it onto the appliance’s cold water inlet, situated
on the top right-hand side
on the rear of the appliance
(see figure).
3. Make sure there are
no kinks or bends in the
hose.
! The water pressure at the tap must be within the values
indicated in the Technical details table
(on the next page).
! If the water inlet hose is not long enough, contact a
specialist store or an authorised serviceman.
! Never use hoses that have already been used.
1. Install the washing machine
on a flat sturdy floor, without
resting it up against walls,
furniture cabinets or other.
2. If the floor is not perfectly
level, compensate for any
unevenness by tightening or loosening the adjustable front feet
(see figure); the angle of inclination, measured according to the
worktop, must not exceed 2°.
Levelling your appliance correctly will provide it with stability
and avoid any vibrations, noise and shifting during operation.
If it is placed on a fitted or loose carpet, adjust the feet in
such a way as to allow enough room for ventilation beneath
the washing machine.
2
Page 3
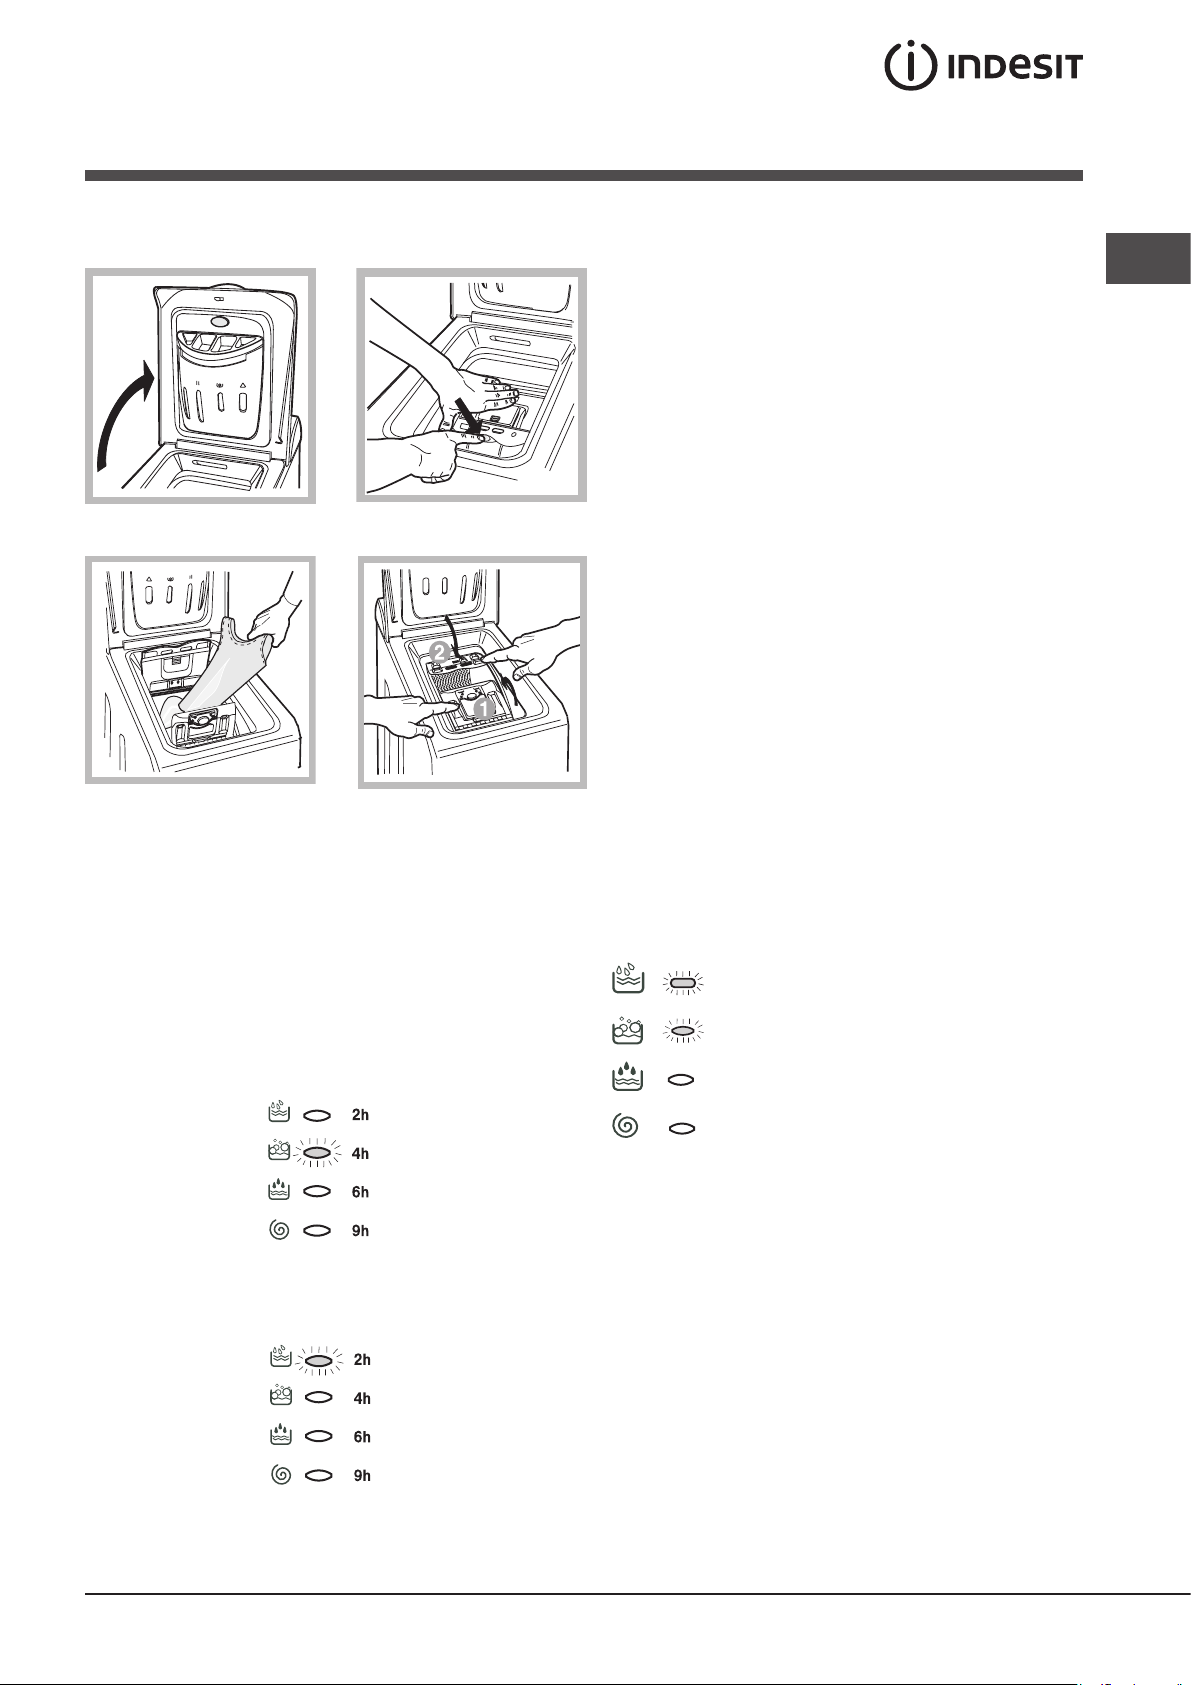
Connecting the drain hose
65 - 100 cm
Connect the drain hose,
without bending it, to a
draining duct or a wall
drain situated between 65
and 100 cm from the floor;
! Do not use extensions or multiple sockets.
! The power supply cable must never be bent or dange-
rously compressed.
! The power supply cable must only be replaced by an
authorised serviceman.
Warning! The company denies all liability if and when
these norms are not respected.
The first wash cycle
GB
alternatively, place it over
the edge of a basin, sink
or tub, fastening the duct
supplied to the tap (see
figure). The free end of
the hose should not be
underwater.
! We advise against the use of hose extensions; in case
of absolute need, the extension must have the same
diameter as the original hose and must not exceed 150
cm in length.
Electric connection
Before plugging the appliance into the mains socket,
make sure that:
• the socket is earthed and in compliance with the
applicable law;
• the socket is able to sustain the appliance’s
maximum power load indicated in the Technical
details table (on the right);
• the supply voltage is included within the values i
ndicated on the Technical details table
(on the right);
• the socket is compatible with the washing
machine’s plug. If this is not the case, replace
the socket or the plug.
! The washing machine should not be installed in an ou-
tdoor environment, not even when the area is sheltered,
because it may be very dangerous to leave it exposed to
rain and thunderstorms.
! When the washing machine is installed, the mains so-
cket must be within easy reach.
Once the appliance has been installed, and before you
use it for the first time, run a wash cycle with detergent
and no laundry, setting the 90°C programme without a
pre-wash cycle.
Technical details
Model
Dimensions
Capacity
Electric
connections
Water
connections
Spin speed
Control
programmes
according to
EN 60456
directive
WITL 100
40 cm wide
85 cm high
60 cm deep
from 1 to 5 kg
Please refer to the technical data plate
fixed to the machine.
maximum pressure 1 MPa (10 bar)
minimum pressure 0.05 MPa (0.5 bar)
drum capacity 42 litres
up to 1000 rpm
programme 2; temperature 60°C;
run with a load of 5 kg.
This appliance is compliant with
the following European Community
Directives:
- 89/336/CEE of 03/05/89 (Electromagnetic Compatibility) and subsequent amendments
- 2006/95/CE (Low Voltage)
- 2002/96/CE
3
Page 4

Washing machine description
GB
Control panel
LEDs
SPIN
knob
Detergent dispenser to add detergent and fabric softener (see page 8).
START/RESET
button
FUNCTION
Buttons
TEMPERATURE
knob
START/RESET key to start the programmes or cancel
incorrect settings.
LID LOCKED
LED
ON/OFF
button
PROGRAMME
knob
LEDs to find out which wash cycle phase is under way.
If the Delay Timer function has been set, the time left until the
programme starts will be indicated (see page 5).
FUNCTION keys to select the functions available.
The button corresponding to the function selected will
remain on.
SPIN SPEED knob to set the spin speed or exclude the
spin cycle completely (see page 7).
TEMPERATURE knob to set the temperature or the cold
wash cycle (see page 7).
ON/OFF key to turn the washing machine on and off.
ON-OFF/LID LOCK led:
If this LED is on, the appliance Lid is locked to prevent it from being opened accidentally; to avoid any damages, you must
wait for the lamp to flash before you open the Lid.
.
ON-OFF/LID LOCK led, to find out whether the washing machine is on (flashing) and if the lid may be opened
(see page 5).
PROGRAMME knob to set the programmes
(see page 6).
The knob stays still during the cycle.
Standby mode
This washing machine, in compliance with new energy saving regulations, is fitted with an automatic standby system
which is enabled after about 30 minutes if no activity is
detected. Press the ON/OFF button briefly and wait for the
machine to start up again.
! The rapid flashing of the ON-OFF/LID LOCK Led together with the flashing of at least one other LED indicates there is an
abnormality (see page 11).
4
Page 5
How to open and to close the drum
Fig. 1
Fig. 3
Fig. 2
Fig. 4
A) Opening (Fig. 1).
GB
Lift the external lid and open it completely.
B) Then open the drum using both hands as
shown in Fig. 2:
- press the button indicated by the arrow in Fig. 2
lightly downwards, with one hand firmly resting on
the doors to prevent them from suddenly opening
and hurting your fingers;
- therefore follow the appliance doors along as these
unhook and open easily.
C) Loading the washing machine. (Fig. 3).
D) Shutting (Fig. 4).
- close the drum fully by first shutting the front door
followed by the rear one;
- then ensure the hooks on the front door are perfectly
housed within the seat of the rear door;
- after the hooks have clicked into position, press both
doors lightly downwards to make sure they do not
come loose;
- finally shut the external lid.
Leds
The LEDS provide important information.
This is what they can tell you:
Delay set:
If the Delay Timer function has been enabled (see page.
7), once you have started the programme, the LED corre-
sponding to the delay set will begin to flash:
As time passes, the remaining delay will be displayed,
and the corresponding LED will flash:
Cycle phase under way:
During the wash cycle, the LEDs gradually illuminate on
to indicate the cycle phase under way:
Prewash
Wash
Rinse
Spin cycle
Note: during draining, the LED corresponding to the Spin
cycle phase will be turned on.
Function buttons
The FUNCTION BUTTONS also act like LEDS.
When a function is selected, the corresponding button is
illuminated.
If the function selected is incompatible with the programme set, the button will flash and the function will not be
enabled.
If you set a function that is incompatible with another function you selected previously, only the last one selected
will be enabled.
Once the set delay is complete, the flashing LED will turn
off and the programme set will start.
5
Page 6
Starting and Programmes
GB
Briefly: starting a programme
1. Switch the washing machine on by pressing button .
All the LEDS will light up for a few seconds and
the ON-OFF/DOOR LOCK Led will begin to flash.
2. Load your laundry into the washing machine, add
the detergent and any fabric softener (see page 8)
and shut the appliance door.
3. Set the PROGRAMME knob to the programme required.
4. Set the wash temperature (see page 7).
5. Set the spin speed (see page 7).
6. Start he programme by pressing the START/RESET
button. To cancel it, keep the START/RESET button
pressed for at least 2 seconds.
7. When the programme is finished, the ON-OFF/
DOOR LOCK Led will flash to indicate that the
appliance door can be opened. Take out your
laundry and leave the appliance door ajar to allow
the drum to dry thoroughly. Turn the washing
Programme table
Type of fabric and
degree of soil
Programmes
Tempe-
rature
Detergent
Pre-
wash
machine off by pressing button
Fabric
Stain remo-
softe-
Wash
ner
val option/
bleach
Cycle
length
(minutes)
.
Description of
wash cycle
Standard
Cotton: Extremely soiled whites
(sheets, tablecloths, etc.)
Cotton: Extremely soiled whites
(sheets, tablecloths, etc.)
Cotton: Heavily soiled whites and
fast colours
Cotton: Heavily soiled whites and
delicate colours
Cotton: Slightly soiled whites and delicate colours (shirts, jumpers, etc.)
Synthetics: Heavily soiled fast colours (baby linen, etc.)
Synthetics: Heavily soiled fast colours (baby linen, etc.)
Synthetics: Delicate fast colours
(slightly soiled)
Wool
Very delicate fabrics (curtains, silk,
viscose, etc.)
1
90°C • • • 167
2
90°C • •
2
60°C • •
2
40°C • •
3
40°C • •
4
60°C • •
4
40°C • •
5
40°C • •
6
40°C • • 50
7
30°C • • 52
Delicate/
Traditional
Delicate/
Traditional
Delicate/
Traditional
Delicate/
Traditional
Delicate
Delicate
Delicate
Pre-wash, wash cycle, rinse
cycles, intermediate and final
spin cycles
Wash cycle, rinse cycles, inter-
152
mediate and final spin cycles
Wash cycle, rinse cycles, inter-
150
mediate and final spin cycles
Wash cycle, rinse cycles, inter-
140
mediate and final spin cycles
Wash cycle, rinse cycles, inter-
99
mediate and final spin cycles
Wash cycle, rinse cycles, anti-
80
crease or delicate spin cycle
Wash cycle, rinse cycles, anti-
71
crease or delicate spin cycle
Wash cycle, rinse cycles, anti-
71
crease or delicate spin cycle
Wash cycle, rinse cycles, ,
delicate spin cycle
Wash cycle, rinse cycles, anticrease or draining cycle
Time 4 you
Cotton: Heavily soiled whites and
fast colours
Cotton: Slightly soiled whites and delicate colours (shirts, jumpers, etc.)
Synthetics: Delicate colours (all types
of slightly soiled garments)
Synthetics: Delicate colours (all types
of slightly soiled garments)
10
11
8
60°C • • 60
9
40°C • • 50
40°C • • 40
30°C • • 30
Wash cycle, rinse cycles, intermediate and final spin cycles
Wash cycle, rinse cycles, intermediate and final spin cycles
Wash cycle, rinse cycles,
delicate spin cycle
Wash cycle, rinse cycles and
delicate spin cycle
Sport
Sports shoes (MAX. 2 pairs)
Fabrics for sportswear (Tracksuits,
shorts, etc.)
12
13
30°C • • 50
30°C • • 63
Cold wash (without detergents), wash cycle, rinse
cycles, and delicate spin cycle
Wash cycle, rinse cycles, intermediate and final spin cycles
PARTIAL PROGRAMMES
Delicate/
Rinse
Spin Draining and spin cycle
Drain Draining
•
Traditional
Rinse cycles and spin cycle
Notes
-For programmes 8 and 9, we advise against exceeding a wash load of 3.5 kg.
-For programme 13 we advise against exceeding a wash load of 2 kg.
-For the anti-crease function: see Easy iron, opposite page. The information contained in the table is purely indicative.
Special programme
Daily Refresh (programme 11 for Synthetics) is designed to wash lightly soiled garments in a short amount of time: it
only lasts 30 minutes and allows you to save on both time and energy. By setting this programme (11 at 30°C), you can
wash different fabrics together (except for woollen and silk items), with a maximum load of 3 kg.
We recommend the use of liquid detergent.
6
Page 7
Personalisations
C
Setting the temperature
Turn the TEMPERATURE knob to set the wash temperature (see Programme table on page 6).
The temperature can be lowered, or even set to a cold wash (
Setting the spin speed
Turn the SPIN SPEED knob to set the spin speed for the programme selected.
The maximum spin speeds for each programme are as follows:
Programmes Maximum spin speed
Cottone 1000 rpm
Synthetics 800 rpm
Wool 600 rpm
Silk no
).
GB
The spin speed can be lowered, or the spin cycle can be excluded altogether by selecting symbol
.
The washing machine will automatically prevent you from selecting a spin speed higher than the maximum speed for each
programme.
Note. To avoid excessive vibrations, before every spin cycle the machine distributes the load in a uniform manner by continuously rotating the drum at a speed which is slightly faster than the normal washing speed.
When, despite repeated attempts, the load is still not evenly distributed, the machine spins at a lower speed than the set
frequency.
If the load is excessively unbalanced, the machine attempts to distribute it instead of spinning.
The balancing attempts may extend the total duration of the cycle, up to a maximum of 10 minutes.
Functions
To enable a function:
1. press the button corresponding to the desired function, according to the table below;
2. the function is enabled when the corresponding button is illuminated.
Note: The rapid flashing of the button indicates that the corresponding function cannot be selected for the programme set.
Option Effect Comments Enabled
Delays the start of the
wash by up to 9 hours.
Delay Timer
Bleaching cycle designed to remove the
toughest stains.
Bleaching
This option reduces
the amount of creasing
on fabrics, making
them easier to iron.
Pess the button repeatedly until the LED corresponding to the
desired delay is turned on. The fifth time the button is pressed, the
function will be disabled.
N.B.: Once you have pressed the Start/Reset button, the delay
can only be decreased if you wish to modify it.
Please remember to pour the bleach into extra compartment 4
(see page 8).
This option is incompatible with the EASY IRON option.
If you set this option, programmes 4, 5, 7 will be suspended, leaving the laundry to soak (Anti-crease) and icon will flash:
- to conclude the cycle, press the START/RESET button;
- to run the draining cycle alone, set the knob to the relative
symbol and press the START/RESET button.
with programmes:
All
2, 3, 4, 5,
Rinse
cycle.
3, 4, 5, 7,
8, 9, 10
and Rinse
cycle.
Easy iron
Increases the efficiency
of the rinse.
Extra Rinse
This option is incompatible with the BLEACHING option.
Recommended when the appliance has a full load or with large
quantities of detergent.
1, 2, 3, 4, 5,
8, 9, 10, 12,
13 and Rinse cycle.
7
Page 8
Detergents and laundry
GB
Detergent dispenser
Good washing results also depend on the correct dose of
detergent: adding too much detergent won’t necessarily
make for a more efficient wash, and may in fact cause build
up on the interior of your appliance and even pollute the
environment.
Open up the detergent
dispenser and pour in the
detergent and fabric softener, as follows.
compartment 1: Detergent for pre-wash (powder)
compartment 2: Detergent for the wash cycle
(powder or liquid)
Liquid detergent should only be poured in immediately prior
to the wash cycle start.
! Do not use hand wash detergent because it may form too
much foam.
compartment 3: Additives (fabric softeners, etc.)
When pouring the softener in compartment 3, avoid exceeding
the “max” level indicated.
The softener is added automatically into the machine during
the last wash. At the end of the wash programme, some
water will be left in compartment 3. This is used for the inlet of
denser fabric softeners into the machine, i.e. to dilute the more
concentrated softeners. Should more than a normal amount
of water remain in compartment 3, this means the emptying
device is blocked. For cleaning instructions, see page 10. The
fabric softener should not overflow from the grid.
Preparing your laundry
• Divide your laundry according to:
- the type of fabric/the symbol on the label.
- the colours: separate coloured garments from whites.
• Empty all pockets and check for loose buttons.
• Do not exceed theweight limits stated below,
which refer to the weight when dry:
Sturdy fabrics: max 5 kg
Synthetic fabrics: max 2.5 kg
Delicate fabrics: max 2 kg
Wool: max 1 kg
How much does your laundry weigh?
1 sheet 400-500 g
1 pillow case 150-200 g
1 tablecloth 400-500 g
1 bathrobe 900-1,200 g
1 towel 150-250 g
Special items
Curtains: fold curtains and place them in a pillow case or
mesh bag. Wash them separately without exceeding half
the appliance load. Use programme 7 which excludes the
spin cycle automatically.
Quilted coats and windbreakers: if they are padded
with goose or duck down, they can be machine-washed.
Turn the garments inside out and load a maximum of 2-3
kg, repeating the rinse cycle once or twice and using the
delicate spin cycle.
Wool: for best results, use a specific detergent, taking
care not to exceed a load of 1 kg.
compartment 4: Bleach
Bleach cycle
Traditional bleach should be used on sturdy white fabrics,
and delicate bleach for coloured fabrics, synthetics and for
wool.
When pouring in the bleach, be careful not to exceed the
“max” level indicated on compartment 4 (see figure).
To run the bleach cycle alone, pour the bleach into compartment 4 and set the Rinse programme
and push the button
8
Bleaching.
(for cotton fabrics)
Page 9

Precautions and advice
! The washing machine was designed and built in com-
pliance with the applicable international safety regulations. The following information is provided for your safety
and should consequently be read carefully.
General safety
• This appliance has been designed for non-
professional, household use and its functions must
not be changed.
• This appliance is not intended for use by persons
(including children) with reduced physical, sensory or
mental capabilities, or lack of experience and knowledge, unless they have been given supervision or
instruction concerning use of the appliance by a person
responsible for their safety. Children should be supervised to ensure that they do not play with the appliance.
• This washing machine should only be used by
adults and in accordance with the instructions
provided in this manual.
• Never touch the washing machine when barefoot
or with wet or damp hands or feet.
• Do not pull on the power supply cable to unplug
the appliance from the electricity socket. Pull the
plug out yourself.
• Do not touch the drain water as it could reach
very high temperatures.
Old appliances must be collected separately in order to
optimise the recovery and recycling of the materials they
contain and reduce the impact on human health and the
environment. The crossed out “wheeled bin” symbol on
the product reminds you of your obligation, that when you
dispose of the appliance it must be separately collected.
Consumers may take their old appliance to public waste
collection areas, other communal collection areas, or if
national legislation allows return it to a retailer when purchasing a similar new product.
All major household appliance manufacturers are active
in the creation of systems to manage the collection and
disposal of old appliances.
Saving energy and respecting the
environment
Environmentally-friendly technology
If you only see a little water through your appliance door,
this is because thanks to the latest technology, your
washing machine only needs less than half the amount
of water to get the best results: an objective reached to
respect the environment.
Saving on detergent, water, energy and time
• To avoid wasting resources, the washing machine
should be used with a full load. A full load instead
of two half loads allows you to save up to 50% on energy.
• The pre-wash cycle is only necessary on
extremely soiled garments. Avoiding it will save on
detergent, time, water and between 5 and 15% energy.
GB
• Never force the washing machine door: this could
damage the safety lock mechanism designed to
prevent any accidental openings.
• In the event of a malfunction, do not under any
circumstances touch internal parts in order to
attempt repairs.
• Always keep children well away from the
appliance while in operation.
• Should it have to be moved, proceed with the
help of two or three people and handle it with the
utmost care. Never try to do this alone, because
the appliance is very heavy.
• Before loading your laundry into the washing
machine, make sure the drum is empty.
Disposal
The European Directive 2002/96/EC on Waste Electrical
and Electronic Equipment, requires that old household
electrical appliances must not be disposed of in the normal
unsorted municipal waste stream.
• Treating stains with a stain remover or leaving
them to soak before washing will cut down the
need to wash them at high temperatures. A
programme at 60°C instead of 90°C or one at
40°C instead of 60°C will save up to 50% on energy.
• Use the correct quantity of detergent depending on
the water hardness, how soiled the garments are and
the amount of laundry you have, to avoid wastage and
to protect the environment: despite being biodegradable, detergents do contain ingredients that alter the
natural balance of the environment. In addition, avoid
using fabric softener as much as possible.
• If you use your washing machine from late in the
afternoon until the early hours of the morning, you
will help reduce the electricity board’s peak load.
The Delay Timer option (see page 7) helps to organise
your wash cycles accordingly.
• If your laundry has to be dried in a tumble dryer,
select a high spin speed. Having the least water
possible in your laundry will save you time and
energy in the drying process.
9
Page 10
Care and maintenance
GB
Cutting off the water or electricity supply
• Turn off the water tap after every wash. This will limit the wear
of your appliance’s water system and also prevent leaks.
• Unplug your appliance when cleaning it and during all
maintenance operations.
Cleaning your appliance
The exterior and rubber parts of your appliance can be cleaned with a soft cloth soaked in lukewarm soapy water. Do
not use solvents or abrasives.
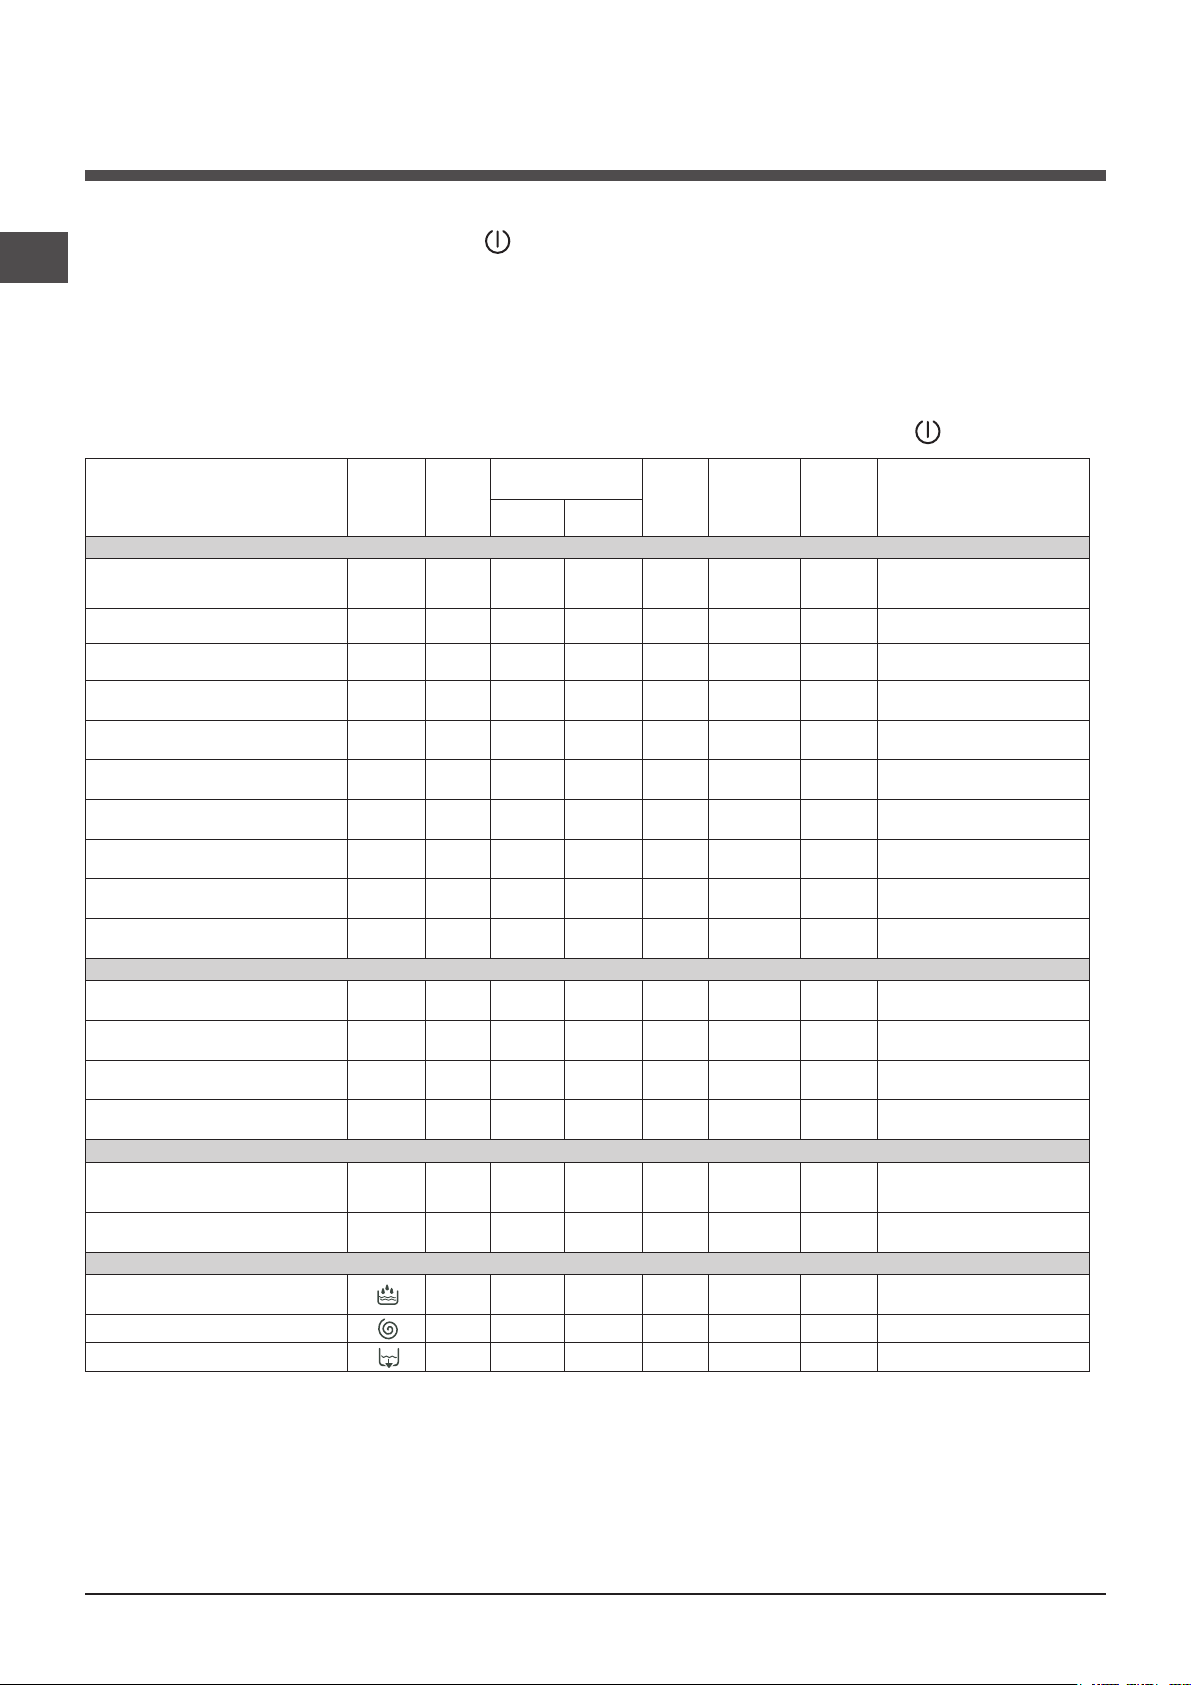
Cleaning the detergent dispenser
Remove the dispenser by raising it and pulling it out (see
figure). Wash it under running water; this operation should
be repeated frequently.
Caring for your appliance door and drum
• Always leave the appliance door ajar to prevent unpleasant odours from forming.
Cleaning the pump
The washing machine is fitted with a self-cleaning pump that
does not require any maintenance. Sometimes, small items
(such as coins or buttons) may fall into the pre-chamber that
protects the pump, situated in the lower part of the same.
! Make sure the wash cycle has ended and unplug the
appliance.
To recover any objects that have fallen into the prechamber:
1. remove the plinth at
the bottom on the front
side of the washing
machine by pulling from
the side with your hands
(see figure);
2. unscrew the lid
rotating it anticlock-wise
(see figure): a little water
may trickle out. This is
perfectly normal;
3. clean the interior
thoroughly;
4. screw the lid back on;
5. reposition the panel,
making sure the hooks
are securely in place
before you push it onto
the appliance.
Checking the water inlet hose
Check the water inlet hose at least once a year. If you
see any cracks, replace it immediately: during the wash
cycles, water pressure is very strong and a cracked hose
could easily split open.
How to clean the detergent dispenser
Disassembly:
Press lightly on the large
button on the front of the
detergent dispenser and pull
it upwards (fig. 1).
Fig. 1 Fig. 2
Cleaning:
Then clean the dispenser under a tap (fig. 3) using an old
toothbrush and, once the pair of siphons inserted in the
top of compartments 1 and 2 (fig. 4) have been pulled
out, check whether the same are not clogged and then
rinse them.
! Never use hoses that have already been used.
Reassembly:
Do not forget to reinsert
the pair of siphons into the
special housings and then to
replace the dispenser into its
seat, clicking it into place (fig.
4, 2 and 1).
Fig. 3
Fig. 4
10
Page 11

Troubleshooting
Your washing machine could fail to work. Before calling for Assistance (see page 12), make sure the problem can’t easily
be solved by consulting the following list.
Problem
The washing machine won’t start.
The wash cycle won’t start.
The washing machine fails to load
water.
The washing machine continuously loads and unloads water.
Possible causes/Solution:
• The appliance is not plugged into the socket, or not enough to
make contact.
• There has been a power failure.
• The appliance door is not shut properly. The Lid locked Led flashes.
• The button has not been pressed.
• The START/RESET button has not been pressed.
• The water tap is not turned on.
• A delayed start has been set (using the Delay Timer, see page 7).
• The water inlet hose is not connected to the tap.
• The hose is bent.
• The water tap is not turned on.
• There is a water shortage.
• The water pressure is insufficient.
• The START/RESET button has not been pressed.
• The drain hose is not fitted between 65 and 100 cm from the floor
(see page 3).
• The free end of the hose is underwater (see page 3).
• The wall drainage system doesn’t have a breather pipe.
GB
The washing machine does not
drain or spin.
The washing machine vibrates too
much during the spin cycle.
The washing machine leaks.
The ON-OFF/DOOR LOCK Led
flashes rapidly at the same time
as at least one other LED.
If the problem persists even after these checks, turn off the water tap, switch the
appliance off and call for Assistance. If the dwelling is on one of the upper floors of
a building, there may be drain trap problems causing the washing machine to load
and unload water continuously. In order to avoid such an inconvenience, special
anti-drain trap valves are available in shops.
• The programme does not foresee the draining: some programmes
require enabling the draining manually (see page 6).
• The Easy iron option is enabled: to complete the programme, press
the START/RESET button (see page 7).
• The drain hose is bent (see page 3).
• The drain duct is clogged.
• The drum was not unblocked correctly during installation (see page 2).
• The washing machine is not level (see page 2).
• The washing machine is closed in between furniture cabinets and
the wall (see page 2).
• The water inlet hose is not screwed on correctly (see page 2).
• The detergent dispenser is obstructed (to clean it, see page 10).
• The drain hose is not secured properly (see page 3).
• Switch off the machine and unplug the appliance; wait for
approximately 1 minute then switch it on again.
If the problem persists, contact Assistance.
There is too much foam.
• The detergent is not suitable for machine washing (it should bear
the definition “for washing machines” or “hand and machine wash”,or the like).
• You used too much detergent.
11
Page 12

Service
GB
Before calling for Assistance:
• Check whether you can solve the problem on your own (see page 11);
• Restart the programme to check whether the problem has been solved;
• If this is not the case, contact an authorised Technical Service Centre on the telephone number
provided on the guarantee certificate.
! Always request the assistance of authorised servicemen.
Notify the operator of:
• the type of problem;
• the appliance model (Mod.);
• the serial number (S/N).
This information can be found on the data plate situated on the rear of the washing machine.
12
Page 13

Használati utasítás
MOSÓGÉP
HU
Magyar
WITL 100
Összefoglalás
Üzembehelyezés, 14-15
Kicsomagolás és vízszintbe állítás
Víz és elektromos csatlakozás
Első mosási ciklus
Műszaki adatok
Mosógép leírása, 16-17
Vezérlőpanel
A forgódob kinyitása és bezárása
Visszajelző lámpák
Indítás és Programok, 18
Röviden: egy program elindítása
Programtáblázat
Program módosítások, 19
Hőmérséklet beállítása
Centrifugálás beállítása
Funkciók
Mosószerek és mosandók, 20
Mosószeradagoló ók
Mosandó ruhák előkészítése
Különleges bánásmódot igénylő darabok
Fehérítő program
HU
Óvintézkedések és tanácsok, 21
Általános biztonság
Hulladékelhelyezés
Környezetvédelem
Karbantartás és törődés, 22
A víz elzárása és az elektromos áram kikapcsolása
A mosógép tisztítása
A mosószertartó tisztítása
Az ajtó és a forgódob gondozása
A szivattyú tisztítása
A vízbevezető cső ellenőrzése
A mosószertartó tisztítása
Rendellenességek és elhárításuk, 23
Szerviz, 24
Mielőtt a Szervizhez fordulna
13
Page 14
Üzembehelyezés
HU
! E kézikönyv megőrzése azért fontos, hogy bármikor
elővehesse, és megnézhesse. Ha a mosógépet eladná,
átadná vagy másnál helyezné el, gondoskodjon arról, hogy
e használati utasítás a géppel együtt maradjon, hogy az új
tulajdonos is megismerhesse a mosógép funkcióit és az
ezekre vonatkozó gyelmeztetéseket.
! Figyelmesen olvassa el az utasításokat: fontos
információkat tartalmaznak az üzembehelyezésről, a
használatról és a biztonságról.
Kicsomagolás és vízszintbe állítás
Kicsomagolás
1. Csomagolja ki a
mosógépet.
2. Ellenőrizze, hogy a
mosógép nem sérült-e
meg aszállítás során. Ha a
gépen sérülést talál, ne
csatlakoztassa, és forduljon
a készülék eladójához.
3. Távolítsa el a hátoldalon
található, a szállításhoz
felszerelt 4 védőcsavart,
valamint a gumit a hozzá
tartozó távtartóval (lásd
ábra).
4. A furatokat zárja le
a tartozékként kapott
műanyag dugókkal.
5. Minden darabot őrizzen
meg: ha a mosógépet szállítani kell, előtte ezeket vissza
kell szerelni.
Figyelem: újbóli használat esetén a rövidebb csavarokat
felülre kell szerelni.
! A csomagolóanyag nem gyermekjáték
A pontos vízszintezés biztosítja a gép stabilitását, így
az a működés során nem fog vibrálni, zajt okozni vagy
elmozdulni. Szőnyegpadló vagy szőnyeg esetén a
lábakat úgy állítsa be, hogy a mosógép alatt elegendő
hely maradjon a szellőzésre.
Víz és elektromos csatlakozás
Vízbevezető cső csatlakoztatása
1. A vízbevezetõ csõ
csatlakoztatásához
csavarozza fel a csövet
egy 3/4”-os külsõ
menettel rendelkezõ
hidegvíz csapra (lásd
ábra).
A csatlakoztatás elõtt
eressze meg a csapot
addig, amíg a víz
teljesen átlátszóvá nem
válik.
2. Csatlakoztassa a
vízbevezető csövet a
mosógéphez úgy, hogy
azt a hátul jobboldalon
fent lévő vízbemeneti
csonkra csavarozza (lásd
ábra).
3. Ügyeljen arra, hogy a
csövön ne legyen törés
vagy szűkület.
! A csapnál a víznyomásnak a Műszaki adatok
táblázatban szereplő határértékek között kell lennie
(lásd a szemben lévő oldalt).
! Amennyiben a vízbevezető cső nem elég hosszú,
forduljon szaküzlethez vagy megbízott szakemberhez.
! Soha ne alkalmazzon már használt csöveket.
Vízszintezés
1. A mosógépet sík és
kemény padlóra állítsa,
úgy, hogy ne érjen falhoz,
bútorhoz vagy máshoz.
2. Ha a padló nem
tökéletese vízszintes,
az első lábak be-,
illetve kicsavarásával
kompenzálhatja azt (lásd
ábra). A dőlés a gép felső
burkolatán mérve nem lehet több, mint 2°.
14
Page 15
A leeresztőcső csatlakoztatása
65 - 100 cm
A leeresztőcsövet
csatlakoztassa lefolyóhoz
vagy a padlótól 65 és 100
cm közötti magasságban
lévő fali lefolyószifonhoz
anélkül, hogy megtörné,
vagy akassza a mosdó
vagy a kád szélére úgy,
hogy a tartozékok között
lévő vezetőt a csaphoz
erősíti (lásd ábra). A
leeresztőcső szabad
végének nem szabad
vízbe merülnie.
! Toldások használata nem javasolt. Amennyiben
feltétlenül szükséges, a toldás átmérője egyezzen meg
az eredeti csőével, és semmiképpen se legyen 150 cmnél hosszabb.
! Ne legyen a kábel megtörve vagy összenyomva.
! A hálózati kábelt csak megbízott szakember cserélheti.
Figyelem! A gyártó minden felelősséget elhárít,
amennyiben a fenti előírásokat gyelmen kívül hagyják.
Első mosási ciklus
Üzembehelyezés után, mielőtt a mosógépet használni
kezdené, végezzen egy 90°-os előmosás nélküli mosást
mosóporral de mosandó ruha nélkül.
Mûszaki adatok
HU
Elektromos bekötés
Mielőtt a csatlakozódugót az aljzatba dugná,
bizonyosodjon meg arról, hogy:
• az aljzat földelése megfelel a törvény által előírtnak;
• az aljzat képes elviselni a gép Műszaki adatait
tartalmazó táblázatban megadott maximális
teljesítményfelvételt (lásd szemben);
• a hálózat feszültsége a Műszaki adatokat tartalmazó
táblázatban szereplő értékek közé esik (lásd
szemben);
• Az aljzat legyen kompatibilis a gép
csatlakozódugójával. Ellenkező esetben cserélje ki
az aljzatot vagy a csatlakozódugót.
! A mosógép nem állítható fel nyílt téren, még akkor sem,
ha a tér tetővel van fedve, mert nagyon veszélyes, ha a gép
esőnek vagy zivataroknak van kitéve.
! A csatlakozódugónak könnyen elérhető helyen kell
lennie akkor is, amikor a gép már a helyén áll.
! Ne használjon hosszabbítót vagy elosztót.
Modell WITL 100
szélesség 40 cm
Méretek
Ruhatöltet: 1-tõl 5 kg-ig
Elektromos
csatlakozás
Vízcsatlakozások
Centrifuga
fordulatszám
EN 60456 szabvány
Szerinti
vezérlõprogramok
magasság 85 cm
mélység 60 cm
Lásd a készüléken található, muszaki jellemzoket tartalmazó adattáblát!
maximális nyomás 1 MPa (10 bar)
minimális nyomás 0,05 MPa (0,5 bar)
dob ûrtartalma 42 liter
1000 fordulat/perc-ig
2-as program; hõmérséklet 60°C;
5 kg ruhatöltettel végezve.
Ez a berendezés megfelel a következõ Uniós
Elõírásoknak:
- 89/05/03-i 89/336/CEE elõírás (Elektromágneses összeférhetõség) és annak módosításai
- 2006/95/CE (Alacsony feszültség)
- 2002/96/CE
15
Page 16

A mosógép leírása
HU
Vezérlő panel
Lámpák
Mosószer rekesz a mosószer és adalékanyagok
betöltésére (lásd 20. old.).
FUNKCIÓ
gombok
CENTRIFUGA
tekerőgomb
START/RESET
gomb
FEDŐ ZÁRVA
lámpa
BEKAPCSOLÁS/
KIKAPCSOLÁS
gomb
HŐMÉRSÉKLET
tekerőgomb
PROGRAMOK
tekerőgomb
START/RESET gomb a programok elindítására vagy a
helytelen beállítások törlésére.
Lámpák a mosási program állapotának jelzésére.
Ha a Késleltetés Időzítő funkció be lett állítva, a program
indításáig hátra lévő időt jelzik (lásd 17. oldal).
FUNKCIÓ gombok az elérhető funkciók kiválasztására. A
kiválasztott funkcióhoz tartozó gomb égve marad.
HŐMÉRSÉKLET tekerőgomb a mosási hőmérséklet vagy
a hidegmosás kiválasztására (lásd 19. old.).
CENTRIFUGA billentyű a centrifugálás fordulatszámának
beállítására illetve a centrifugálás kikapcsolására (lásd 19.
oldal).
KIKAPCSOLÁS/BEKACSOLÁS gomb a mosógép ki- és
bekapcsolására.
BEKAPCSOLVA/AJTÓ ZÁRVA lámpa:
A világító visszajelző lámpa azt jelzi, hogy a véletlen nyitás megakadályozására a mosógépajtó be van zárva; az
esetleges károk elkerülése érdekében, mielőtt kinyitná, várja meg, amíg a lámpa villogni kezd.
BEKAPCSOLVA/FEDŐ ZÁRVA lámpa a mosógép
bekapcsolt állapotát (villog) és a fedő nyitható állapotát
jelzi (folyamatosan ég) (lásd 17. old.).
PROGRAMOK tekerőgomb a programok beállítására
(lásd 18. old.).
A program futása alatt a tekerőgomb nem mozdul.
Készenléti üzemmód
Ez a mosógép - az energiatakarékosságra vonatkozó
legújabb eloírásoknak megfeleloen - automatikus
kikapcsolási (készenléti) rendszerrel van ellátva,
mely a használat 30 percnyi szüneteltetése esetén
bekapcsol. Nyomja meg röviden a BEKAPCSOLÁS/
KIKAPCSOLÁS gombot, és várjon, amíg a készülék
újrabekapcsol.
! A BEKAPCSOLVA/AJTÓ ZÁRVA lámpa gyors villogása és egy másik lámpa egyidejű felvillanása hibát jelez
(lásd 23. oldal).
16
Page 17

A forgódob kinyitása és bezárása
1. ábra
2. ábra
A) KINYITÁS (1. ábra).
és teljesen kinyitni.
Felemelni a külső fedőlapot
B) Ezután mindkét kézzel kinyitni a forgódobot,
mint azt a 2) ábra jelzi:
- a 2. ábrán nyíllal jelölt nyomógombot megnyomni
és enyhe nyomást gyakorolva lefelé az egyik kezet
rátámasztani, amivel elkerülhető, hogy az ajtók hirtelen
kinyílásával az ujjak megsérüljenek.
- végül kézzel vezetve az ajtók kikattannak és könnyen
kinyílnak.
C) RUHANEMŰ BEHELYEZÉSE. (3. ábra)
D) BEZÁRÁS. (4. ábra)
- először az elülső ajtót leeresztve majd a hátsót ráhajtva
jól bezárni a forgódobot.
- ellenőrizni, hogy az elülső ajtó kampói tökéletesen
illeszkednek-e a hátsó ajtóban levő helyükre.
- a kattanás „klak” észlelése után mindkét ajtóra enyhe
nyomást gyakorolni lefelé, melyeknek nem szabad
kikattanni.
- végül a külső fedőlapot bezárni.
HU
3. ábra
4. ábra
Visszajelző lámpák
A visszajelző lámpák fontos információkkal szolgálnak.
A következők olvashatók le róluk:
Beállított késleltetés:
Hogy a Késleltető Időzítő funkció be van-e kapcsolva
(lásd 19. oldal): a program elindítása után a kiválasztott
késleltetéshez tartozó visszajelző elkezd villogni:
Az idő múlásával a hozzá tartozó visszajelző villogásával
mindig a hátralévő késleltetési időt jelzi ki:
A kiválasztott késleltetés elteltével a villogó
visszajelző elalszik, és elkezdődik a beállított program
végrehajtása.
Folyamatban lévő mosási fázis:
A mosás során a visszajelzők egymás után gyulladnak
meg, ezzel jelezve a program előrehaladását:
Elemosás
Mosás
Öblítés
Centrifugálás
Megjegyzés: a vízürítés (szivattyúzás) során a
centrifugálási fázishoz tartozó visszajelző világít.
Funkció billentyűk
A FUNKCIÓ billentyűk visszajelző lámpaként is
működnek.
A funkció bekapcsolásakor a hozzá tartozó billentyű
világítani kezd.
Ha a kiválasztott funkció a beállított programmal nem
fér össze, a billentyű villog, és a funkció nem lesz
bekapcsolva.
Abban az esetben, ha egy másik, korábban kiválasztottal
össze nem férő funkciót kapcsol be, csak az utolsóként
választott marad bekapcsolva.
17
Page 18

Indítás és Programok
HU
Röviden: egy program elindítása
1. Az billentyű megnyomásával kapcsolja be
a mosógépet. Néhány másodpercre az összes
visszajelző felgyullad, majd elalszik, és a
BEKAPCSOLVA/AJTÓZÁR visszajelző kezd villogni.
2. Rakja be a mosnivalót, töltse be a mosószert és
adalékanyagokat (lásd 20. oldal), majd zárja össze
az dob szárnyait, és csukja le a fedelet!
3. A PROGRAMOK tárcsával állítsa be a kívánt
mosóprogramot.
4. Állítsa be a mosási hőmérsékletet (lásd 19. oldal).
5. Állítsa be a centrifugálási fordulatszámot (lásd 19. oldal).
6. A START/RESET billentyű megnyomásával indítsa
el a programot. A törléshez tartsa nyomva a START/
RESET billentyűt legalább 2 másodpercen keresztül.
7. A program végeztével a BEKAPCSOLVA/AJTÓZÁR
visszajelző villog, azt jelezve, hogy az ajtót ki lehet
nyitni. Vegye ki a mosott ruhát, és az ajtót hagyja
kicsit nyitva, hogy a dob kiszáradhasson.
Az
billentyűvel kapcsolja ki a mosógépet.
Programtáblázat
•
Folteltávo-
lító/
Fehérító
opció
Finom / Hag-
yományos
Finom / Hag-
yományos
Finom / Hag-
yományos
Finom / Hag-
yományos
Finom
Finom
Finom
Finom / Hag-
yományos
Ciklusidõ
(perc)
152
150
140
99
80
71
71
A mosási ciklus leírása
Elõmosás, mosás, öblítés,
középsõ és végsõ centrifugálás
Mosás, öblítés, középsõ és
végsõ centrifugálás
Mosás, öblítés, középsõ és
végsõ centrifugálás
Mosás, öblítés, középsõ és
végsõ centrifugálás
Mosás, öblítés, középsõ és
végsõ centrifugálás
Mosás, öblítés, gyûrõdésgátlás vagy finom centrifugálás
Mosás, öblítés, gyûrõdésgátlás vagy finom centrifugálás
Mosás, öblítés, gyûrõdésgátlás vagy finom centrifugálás
Mosás, öblítés, finom
centrifugálás
Mosás, öblítés, gyûrõdésgátlás vagy ürítés
Mosás, öblítés, középsõ és
végsõ centrifugálás
Mosás, öblítés, középsõ és
végsõ centrifugálás
Mosás, öblítés és finom
centrifugálás
Mosás, öblítés és finom
centrifugálás
Hidegmosás (mosópor
nélkül), mosás, öblítés és
finom centrifugálás
Mosás, öblítés, középsõ és
végsõ centrifugálás
Öblítés és centrifugálás
Pro-
Az anyag és a piszok természete
Szokásos
Pamut: Erõsen szennyezett fehér ruhák (lepe-
dõ, abrosz, stb.)
Pamut: Erõsen szennyezett fehér ruhák (lepe-
dõ, abrosz, stb.)
Pamut: Erõsen szennyezett fehér és magasabb
hõmérsékleten mosható színes ruhák
Pamut: Erõsen szennyezett finom fehér és
színes ruhák
Pamut: Enyhén szennyezett fehér és finom
színes ruhák (ingek, blúzok, stb.)
Szintetikus anyagok: Erõsen szennyezett ma-
gasabb hõmérsékleten mosható színes ruhák
(baba fehérnemû, stb.)
Szintetikus anyagok: Erõsen szennyezett magasabb hõmérsékleten mosható színes ruhák
(baba fehérnemû, stb.)
Szintetikus anyagok: Tartós színes anyagok
(mindenfajta enyhén szennyezett ruházat)
Gyapjú
Nagyon finom szövetek (függönyök, selyem,
viszkóz, stb.)
Idõ Önnek
Pamut: Erõsen szennyezett fehér és magasabb
hõmérsékleten mosható színes ruhák
Pamut: Enyhén szennyezett fehér és finom
színes ruhák (ingek, blúzok, stb.)
Szintetikus anyagok: Finom színes ruhák (bár-
milyen enyhén szennyezett fehérnemû)
Szintetikus anyagok: Finom színes ruhák (bár-
milyen enyhén szennyezett fehérnemû)
Sport
Sportcipõk (MAX. 2 pár.)
Sportruhák (tréningruhák, rövidnadrágok, stb.)
Részleges programok
Öblítés
Centrifugálás Ürítés és centrifugálás
Ürítés Ürítés
Hõmér-
gra-
séklet
mok
1
90°C • • • 167
2
90°C • •
2
60°C • •
2
40°C • •
3
40°C • •
4
60°C • •
4
40°C • •
5
40°C • •
6
40°C • • 50
7
30°C • • 52
8
60°C • • 60
9
40°C • • 50
10
40°C • • 40
11
30°C • • 30
12
30°C • • 50
13
30°C • • 63
Mosószer
elõmo-
sás
mosás
Lágyító-
szer
Megjegyzések
-A 8 - 9 programok esetén nem ajánlatos 3,5 kg ruhánál többet betenni.
-A 13 program esetén nem ajánlatos 2 kg ruhánál többet betenni.
-A gyűrődésgátlás leírásához: lásd Vasalj kevesebbet, szemben lévő oldal. A táblázatban szereplő értékek tájékoztató jellegűek.
Speciális program
Napközbeni 30’ (11-es program szintetikus anyagokhoz) programot kevéssé szennyezett ruhák gyors mosására fejlesztettük ki:
mindössze 30 percig tart, így energiát és időt takarít meg. A 11-es programot 30°C hőmérsékletre beállítva különböző jellegű anyagokat
együttesen lehet mosni (kivéve gyapjú és selyem), maximum 3 kg-os töltéssel. Folyékony mosószer használatát javasoljuk.
18
Page 19

Program módosítások
C
Hőmérséklet beállítása
A mosási hőmérsékletet a HŐMÉRSÉKLET tárcsa elforgatásával lehet beállítani (lásd a Programtáblázatot a 18). oldalon).
A hőmérsékletet a hideg vízzel történő mosásig lehet csökkenteni (
Centrifugálás beállítása
A kiválasztott programhoz a centrifugálás fordulatszámát a CENTRIFUGA tárcsa elforgatásával lehet beállítani.
A különféle programokhoz beállítható maximális fordulatszámok a következők:
Program Maximális fordulatszám
Pamut 1000 fordulat percenként
Szintetikus anyagok 800 fordulat percenként
Gyapjú 600 fordulat percenként
Selyem nem
).
HU
A centrifugálás fordulatszáma csökkenthető, vagy az
A gép automatikusan megakadályozza, hogy az egyes programokhoz maximálisan beállítható fordulatszámnál
magasabbon centrifugáljon.
jelre állítással teljesen kikapcsolható.
! A minden centrifugálás elején jelentkező túlzott vibrálás elkerülése érdekében a készülék egyenletesen elosztja a
bepakolt ruhákat a dob folyamatos, a mosási sebességnél valamivel gyorsabb forgatásával.
Ha azonban az ismételt próbálkozások ellenére sem sikerül a bepakolt ruhát tökéletesen elosztani, a készülék a
beállítottnál kisebb fordulatszámon fog centrifugálni.
Abban az esetben, ha túlságosan nagy a kiegyensúlyozatlanság, a készülék végzi el az elosztást a centrifuga helyett.A
kiegyensúlyozásra tett esetleges próbálkozások maximum 10 perccel nyújthatják meg a ciklus teljes időtartamát.
Funkciók
A mosógép különféle mosófunkciói lehetővé teszik a kívánt tisztítás és fehérség elérését. A funkciók bekapcsolásához:
1. nyomja meg a kívánt funkcióhoz tartozó billentyűt, az alábbi táblázat szerint;
2. a billentyű világítása azt jelzi, hogy a hozzá tartozó funkció be van kapcsolva.
Megjegyzés: A gyors villogás azt jelenti, hogy a beállított programhoz a billentyűhöz tartozó funkció nem kapcsolható be.
Funkciók Hatás Megjegyzések a használathoz A következõ
Késlelteti a gép indítását
max. 9 órát.
Késleltetõ idõzítõ
A fehérítés ciklus a
legmakacsabb foltok
eltávolítására alkalmas.
Fehérítés
Csökkenti az anyagok
gyûrését, ezzel könnyítve
a vasalást.
Vasalj
kevesebbet
Növeli az öblítés hatékonyságát.
Extra Öblítés
A késleltetés beállításához annyiszor nyomja meg a billentyût, hogy a
kívánt értékhez tartozó visszajelzõ világítson.
A billentyû ötödik megnyomására a funkció kikapcsol.
Megjegyzendõ:
Ha a Start/Reset billentyût megnyomta, a
késleltetés értékét csak csökkenteni lehet.
Ne felejtse al a fehérítõszert a 4-es berakható tartályba tölteni (lásd 20.
oldal).
Nem fér össze a VASALJ KEVESEBBET opcióval.
Ezen opciót beállítva a 4- 5-os, 7-es programok félbeszakad úgy, hogy
a mosott ruha az öblítõvízben marad (Gyûrõdésgátlás), és az
villog:
- a ciklus befejezéséhez nyomja meg a START/RESET billentyût;
- ha csak le akarja szivattyúzni a vizet, a tárcsát állítsa a szivattyúzás
szimbólumára
Nem fér össze a FEHÉRÍTÉS opcióval.
A mosógép teljes töltése esetén vagy nagymennyiségû mosószeradagolás
esetén javasolt.
, és nyomja meg a START/RESET billentyût.
ikon
programokkal
mûködik:
Mindegyik
2, 3, 4, 5
Öblítések.
3, 4, 5,
7, 8, 9, 10
Öblítések.
1, 2, 3, 4,
5, 8, 9, 10, 12,
13 Öblítések.
19
Page 20

Mosószerek és mosandók
HU
Mosószeradagoló ók
A mosás eredményessége függ a mosószer helyes
adagolásától is: ha túl sokat adagol belőle, a mosás nem
lesz hatékonyabb, de hozzájárul ahhoz, hogy lerakódás
képződjön a mosógépben, valamint a környezetet is
jobban szennyezi.
Húzza ki a
mosószeradagoló ókot,
és a következőképpen
tegye bele a mosószret
vagy az adalékot.
1. es tartály: Mosószer előmosáshoz (por)
2. rekesz: Mosószer (por vagy folyékony)
A folyékony mosószert helyezze közvetlen a rekeszbe az
erre a célra kialakított mérőedénybe.
3. rekesz: Adalékanyagok (lágyítószer, stb.)
Amikor a 3. rekeszbe betölti a lágyítószert, ügyeljen rá,
hogy ne lépje túl a “max” jelzést.
A lágyítószer automatikusan belekerül
a mosógépbe az utolsó öblítéskor. A program végén
a 3. rekeszben bizonyos mennyiségu víz marad. Ez
a túlságosan suru lágyítószer feloldására, vagy a
koncentrátumok higítására szolgál. Ha a 3. rekeszben
több víz marad, mint általában, az az ürítonyílás
eltömodését jelenti. A kitisztításához lásd 22. oldal.
4. rekesz:
! Ne használjon kézimosószert, mert túlzottan sok hab
képződik.
Fehérítő program
Fehérítőszer
Mosandó ruhák előkészítése
• Osztályozza a mosandókat a következők szerint:
- kelme típusa / címkén lévő szimbólum.
- színek: válogassa külön a színes ruhákat a
fehérektől.
• Ürítse ki a zsebeket, és vizsgálja meg a gombokat.
• Ne lépje túl a mosandók száraz súlyára vonatkozóan
megadott értékeket:
Tartós anyagok: max. 5 kg
Szintetikus anyagok: max. 2,5 kg
Kényes anyagok: max. 2 kg
Gyapjú: max. 1 kg
Milyen nehezek a mosandó ruhák?
1 lepedő 400-500 g.
1 párnahuzat 150-200 g.
1 asztalterítő 400-500 g.
1 fürdőköpeny 900-1200 g.
1 törülköző 150-250 g.
Különleges bánásmódot igénylő darabok
Függönyök: hajtogatva tegye párnahuzatba
(vászonzsákba) vagy hálós zacskóba. Külön mossa
őket, és ne lépje túl a fél töltésnyi mennyiséget.
használja a 7-es programot, amelyik automatikusan
kikapcsolja a centrifugálást.
Toll/pehely ágyneműk és tollkabátok: ha a benne lévő
liba vagy kacsatoll mosógépben mosható. Fordítsa ki a
darabokat, és egyszerre legfeljebb 2-3 kg-nyit mosson
úgy, hogy egyszer vagy kétszer megismétli az öblítést,
és kíméletes centrifugálást használ.
Teniszcipők: tisztítsa meg a sártól. Együtt moshatók
a farmer és más tartós anyagokkal, de nem a fehér
ruhadarabokkal.
Gyapjú: a legjobb eredmény elérése érdekében
használjon speciális mosószert (gyapjúmosószert), és
ne lépje túl az 1 kg ruhatöltetet.
A hagyományos fehérítő programot az erős fehér
szövetekhez, míg a kímélő fehérítést a színes, szintetikus
és gyapjú ruhákhoz használja.
A fehérítő adagolásakor ügyeljen arra, hogy ne lépje túl a
4-es rekesz “max” jelzését (lásd ábra).
A fehérítő adagolásakor ügyeljen arra, hogy ne lépje túl a
4-es rekesz “max” jelzését (lásd ábra).
Ha csak fehéríteni szeretne, öntse a fehérítőt a 4.
rekeszbe, állítsa be az Öblítés programot és nyomja
meg a Fehérítés funkciógombot.
20
Page 21

Óvintézkedések
és tanácsok
! A mosógépet a nemzetközi biztonsági szabványoknak
megfelelően tervezték és gyártották. Ezeket a
gyelmeztetéseket biztonsági okokból írjuk le, és
gyelmesen el kell olvasni őket.
Általános biztonság
• A mosógépet csak felnőtt használhatja, és csak az e
használati utasításban megadott utasítások szerint.
• A készüléket mûködtetésre alkalmatlan személyek
(a gyerekeket is beleértve) nem használhatják,
kivéve, amennyiben ezeket a személyeket egy, a
biztonságukért felelõs személy felügyeli, illetve a
készülék használatát nekik elmagyarázza. Ne hagyja
a gyerekeket felügyelet nélkül, és gyõzõdjön meg
arról, hogy nem játszanak a készülékkel.
• Ne érjen a géphez mezítláb, illetve vizes vagy
nedves kézzel vagy lábbal.
• A csatlakozódugót az aljzatból ne a kábelt, hanem a
csatlakozót fogva húzza ki.
• Ne nyissa ki a mosószeradagoló ókot, ha a
mosógép működik.
• Ne nyúljon a leeresztett vízbe, mert forró lehet.
• Semmiképpen ne feszegesse az ajtót: megsérülhet a
véletlen nyitást akadályozó biztonsági retesz.
• Hiba esetén semmiképpen se nyúljon a gép belső
részeihez, és ne próbálja megjavítani.
• Mindig ügyeljen arra, hogy gyerekek ne mehessenek
a működő gép közelébe.
• A mosás során az ajtó meleg lehet.
• Amennyiben a gépet át kell helyezni, két vagy három
személy végezze, maximális gyelemmel. Soha sem
egyedül, mert a gép nagyon súlyos.
• A mosandó berakása előtt ellenőrizze, hogy a
forgódob üres legyen.
Hulladékelhelyezés
• A régi elektronikus termékek megsemmisítése
Az elektromos készülékek megsemmisítésérol szóló
európai direktíva 2002/96/EC eloírja, hogy a régi
háztartási gépeket nem szabad a normál nem szelektív
hulladékgyujtési folyamat során összegyujteni. A
régi gépeket szelektíven kell összegyujteni, hogy
optimalizálni lehessen a bennük lévo anyagok
újrahasznosítását és csökkenteni lehessen az emberi
egészségre és környezetre gyakorolt hatásukat.
Az áthúzott “szemeteskuka” jele emlékezteti Önt arra,
hogy kötelessége ezeket a termékeket szelektíven
összegyujteni.
A fogyasztóknak a helyi hatóságot vagy kereskedőt kell
felkeresniük a régi háztartási gépek helyes elhelyezését
illetően.
• Öreg mosógép kidobása:
mielőtt a hulladékok közé helyezné, tegye
használhatatlanná úgy, hogy elvágja a hálózati
kábelt, és letépi az ajtót.
Környezetvédelem
Környezetvédelmet szolgáló technológia
Ha az ajtó üvegén keresztül kevés víz látszik, az
azért van, mert az új technológiának köszönhetően az
Aristonnak a felénél kevesebb víz is elég ahhoz, hogy
maximális tisztítóhatást érjen el: egy olyan cél, amelyet a
környezet megóvása érdekében tűztünk ki.
Takarítson meg mosószert, vizet, energiát és időt
• Annak érdekében, hogy ne pazaroljunk az
erőforrásokkal, a mosógépet teljes ruhatöltettel kell
használni. Egy teljes ruhatöltettel való mosás két
féltöltet helyett, akár 50% energia megtakarítást is
lehetővé tehet.
• Az előmosás csak nagyon szennyezett ruhák esetén
szükséges. Ha nem használja, azzal mosószert, időt
és 5-15% energiát takarít meg.
• Ha a foltokat a mosás előtt folttisztítóval kezeli,
és beáztatja, kevesebb szükség lesz a magas
hőmérsékletű mosásra. A 60°C-on történő mosás a
90°C helyett, vagy 40°C-on 60°C helyett akár 50%
energiamegtakarításhoz is vezethet.
• Ha a mosószert a víz keménysége, a
szennyezettség mértéke és a ruha mennyisége
alapján helyesen adagolja, elkerüli a pazarlást és
nem terheli feleslegesen a környezetet: még, ha
biológiailag lebomló fajtájúak is, a mosószerek olyan
összetevőket tartalmaznak, amelyek megváltoztatják
a természet egyensúlyát. Ezen kívül, kerülje az
öblítőszerek használatát, amennyire csak lehet.
• Ha a késő délután és a kora hajnal közötti
időszakban mos, akkor hozzájárul ahhoz, hogy
csökkentse az áramszolgáltató vállalatok terhelését.
A Késleltető időzítő (lásd 19. oldal) nagyon hasznos
a mosás időzítése szempontjából.
• Ha a mosott ruhákat utána szárítógépben szárítja,
magas fordulatszámú centrifugálást válasszon. Ha a
mosott ruhában kevés a víz, időt és energiát takarít
meg a szárítóprogramnál.
HU
21
Page 22

Karbantartás és törődés
HU
A víz elzárása és az elektromos áram
kikapcsolása
• Minden mosás után zárja el a vízcsapot. Így kíméli a
mosógép vízrendszerét, és megszünteti a vízszivárgás
kockázatát.
• Húzza ki a hálózati csatlakozódugót az aljzatból,
amikor a mosógépet tisztítja vagy karbantartást végez.
A mosógép tisztítása
A külső részeket és a gumi részeket langyos szappanos
vizes ronggyal tisztíthatja. Ne használjon oldószert vagy
súrolószert.
A mosószeradagoló ók tisztítása
Vegye ki a ókot úgy, hogy felemeli és kifelé húzza (lásd
ábra).
Folyóvíz alatt mossa ki. Ezt a tisztítást gyakran el kell
végezni.
Az ajtó és a forgódob gondozása
• Az ajtót hagyja mindig résre nyitva, nehogy
rossz szagok keletkezzenek.
A szivattyú tisztítása
A mosógép öntisztító szivattyúval van felszerelve,
melynek nincs szüksége tisztítási és karbantartási
műveletekre. Az azonban megtörténhet, hogy kis tárgyak
kerülnek (aprópénz, gomb) a szivattyút védő előkamrába,
ami a szivattyú alsó részén található.
! Győződjön meg róla, hogy a mosóprogram véget ért, és
húzza ki a hálózati csatlakozót.
Az esetlegesen a dob mellé esett tárgyak
kiemeléséhez:
1. vegye le a mosógép
elülső oldalán alul
elhelyezkedő részt
kézzel meghúzva a
szélén (lásd ábra); ábra);
2. az óra járásával
ellentétes irányban
forgatva csavarja le
a fedelet (lásd ábra):
természetes, hogy egy
kevés víz kifolyik;
3. gondosan tisztítsa ki
a belsejét;
4. csavarja vissza a
fedelet;
5. szerelje vissza
a panelt úgy, hogy
mielőtt azt a gép felé
nyomná, meggyőződik
arról, hogy a horgok
a hozzájuk tartozó
furatokba illeszkednek.
A vízbevezető cső ellenőrzése
Évente legalább egyszer ellenőrizze a gumicsövet. Ki
kell cserélni, ha repedezett vagy hasadozott: a mosás
során a nagy nyomás hirtelen szakadást okozhat.
! Soha ne alkalmazzon már használt csöveket.
A mosószertartó tisztítása
Kivétel:
Enyhe nyomást gyakorolni a
mosószertartó elülső részén
levő nagy nyomó-gombra és
felfelé kihúzni (1. ábra).
1. ábra 2. ábra 3. ábra
22
Tisztítás:
Ezután kitisztítani vízcsap alatt a tartót (3. ábra) egy régi fogkefe
segítségével és az 1-es és 2-es rekeszek felső részébe illesztett
két szivornyát kihúzva (4. ábra) megvizsgálni, hogy azok ne
legyenek eltömődve majd leöblíteni.
Visszahelyezés:
Ne felejtsd el visszailles-zteni
a két szivornyát a megfelelő
helyére és végül a tokjába
be akasztva vi sszatenn i a
tartót.
4. ábra
Page 23

Rendellenességek
és elhárírásuk
Megtörténhet, hogy a mosógép nem működik. Mielőtt felhívná a Szervizt (lásd 24. oldal) ellenőrizze, hogy nem olyan
problémáról van szó, amely a következő lista segítségével egyszerűen megoldható.
Rendellenességek:
Lehetséges okok / Megoldás:
HU
A mosógép nem kapcsol be.
A mosási ciklus nem indul el.
A mosógép nem vesz fel vizet.
A mosógép folytonosan szívja és
lereszti a vizet.
• A hálózati csatlakozódugó nincs bedugva az aljzatba, vagy nem eléggé
ahhoz, hogy jól érintkezzen.
• Nincs áram a lakásban.
• Az ajtó nincs jól becsukva (a Fedő Blokkolva lámpa villog).
• Nem nyomta meg az
• Nem nyomta meg a START/RESET billentyűt.
• A vízcsap nincs nyitva.
• Az indítás késletetése van beállítva (Késleltető időzítő, lásd 19. oldal).
• A vízbevezető cső nincs csatlakoztatva a csaphoz.
• A cső meg van törve.
• A vízcsap nincs nyitva.
• A lakásban nincs víz.
• Nincs elegendő nyomás.
• Nem nyomta meg a START/RESET billentyűt.
• A leeresztőcső nem a padlószinttől 65 és 100 cm közötti magasságban
van felszerelve (lásd 15. oldal).
• A leeresztőcső vége vízbe merül (lásd 15. oldal).
• A fali szifonnak nincs szellőzése.
Ha ezen vizsgálatok után a probléma nem oldódik meg, zárja el a
vízcsapot, kapcsolja ki a mosógépet és hívja ki a szervizszolgálatot. Ha
a lakás egy épület legfelsőbb emeleteinek egyikén található, lehetséges,
hogy a csatorna-szellőző eltömődésének jelensége (szivornyahatás)
lépett fel, ezért a mosógép folytonosan szívja és leereszti a vizet. Ezen
kellemetlenség elkerülésére a kereskedelmi forgalomban rendelkezésre
állnak csatorna-szellőző szelepek.
billentyűt.
A mosógép nem ereszti le a vizet,
vagy nem centrifugál.
A mosógép nagyon rázkódik a
centrifugálás alatt.
A mosógépből elfolyik a víz.
A BEKAPCSOLVA/AJTÓZÁR
visszajelző gyorsan villog legalább
egy másik visszajelzővel együtt.
Sok hab képződik.
• A program nem ereszti le a vizet: némelyik programnál manuálisan kell
elindítani (lásd 18. oldal).
• Be van kapcsolva a Vasalj kevesebbet opció: a program befejezéséhez
nyomja meg a START/RESET billentyűt (lásd 19. oldal).
• A leeresztőcső meg van törve (lásd 15. oldal).
• A lefolyó el van dugulva.
• Az üzembehelyezéskor nem távolították el a forgódob rögzítését
(lásd 14. oldal).
• A mosógép nem áll vízszintben (lásd 14. oldal).
• A mosógép a bútor és a fal köté van szorítva (lásd 14. oldal).
• A vízbevezető cső nincs jól felcsavarva (lásd 14. oldal).
• A mosószeradagoló ók eltömődött (a tisztítást lásd a 22. oldalon).
• A leeresztőcső nincs jól rögzítve (lásd 15. oldal).
• Kapcsolja ki a készüléket és húzza ki a dugót a konnektorból, várjon
körülbelül 1 percet, majd indítsa újra. Ha a hiba továbbra is fennáll,
forduljon a szervizhez.
• A mosószer nem mosógépekhez való (kell, hogy szerepeljen rajta, hogy
„gépi”, „kézi vagy gépi mosáshoz”, vagy hasonló).
• Túl sok mosószert használt.
23
Page 24

Szerviz
HU
Mielőtt a Szervizhez fordulna:
• Győződjön meg arról, hogy a hibát nem tudja maga is elhárítani (lásd 23. oldal);
• Újból indítsa el a programot, hogy lássa, elhárította-e a hibát;
• Ellenkező esetben forduljon a megbízott Szakszervizhez: a telefonszámot a garanciajegyen találja.
! Soha ne forduljon nem megbízott szerelőhöz.
Közölje:
• a meghibásodás jellegét;
• a mosógép modelljét (Mod.);
• a gyártási számot (Sorsz.).
Ezen információk a mosógép hátsó részére felerősített táblán találhatók.
24
Page 25

Návod k použití
PRAČKA
CZ
Český
WITL 100
Obsah
Instalace, 26-27
Rozbalení a vyrovnání do vodorovné polohy
Připojení k elektrické síti a k rozvodu vody,
První prací cyklus,
Technické údaje
Popis pračky, 28-29
Ovládací panel
Jak se otvírá a zavírá prací buben
Kontrolky
Uvedení do chodu a programy, 30
Ve zkratce: uvedení pracího programu do chodu
Tabulka programů
Nastavení činnosti dle potřeb uživatele, 31
Nastavení teploty
Nastaveni rychlost odstřeďování
Funkce
Prací prostředky a prádlo, 32
Dávkovač pracích prostředků
Cyklus bělení
Příprava prádla
Oděvy vyžadující zvláštní péči
CZ
Opatření a rady, 33
Základní bezpečnostní pokyny
Likvidace
Jak ušetřit a brát ohled na životní prostředí
Údržba a péče, 34
Uzavření přívodu vody a
vypnutí elektrického napájení
Čištění pračky
Čištění dávkovače pracích prostředků
Péče o dvířka a buben
Čištění čerpadla
Kontrola přítokové hadice
Jak se čistí dávkovač pracích prostředků
Poruchy a způsob jejich odstranění, 35
Servisní služba, 36
Před přivoláním servisní služby
25
Page 26

Instalace
CZ
! Je velmi důležité uschovat tento návod za účelem jeho
další konzultace. V případě prodeje, darování anebo
přestěhování pračky se ujistěte, že zůstane uložen
v blízkosti pračky, aby mohl posloužit novému majiteli při
seznámení se s činností a s příslušnými upozorněními.
! Pozorně si přečtěte uvedené pokyny: obsahují důležité
informace týkající se instalace, použití a bezpečnosti při
práci.
Rozbalení a vyrovnání do vodorovné polohy
Rozbalení
1. Rozbalte pračku.
2. Zkontrolujte, zda během
přepravy nedošlo k jejímu
poškození. V případě, že je
poškozena, nezapojujte ji a
obraťte se na prodejce.
3. Odstraňte čtyři šrouby
s gumovou podložkou
a s příslušnou rozpěrkou,
nacházející se v zadní části
(viz obrázek), sloužící na
ochranu během přepravy.
4. Uzavřete otvory po
šroubech plastikovými
krytkami.
5. Uschovejte všechny
díly: v případě opětovné přepravy pračky je bude třeba
namontovat zpátky.
Upozornění: v případě opětovného použití musí být kratší
šrouby použity na montáž v horní poloze.
! Obaly nejsou hračky pro děti
Připojení k elektrické síti a k rozvodu vody
Připojení přítokové hadice
1. Připojte přívodní hadici
jejím zašroubováním ke
kohoutku studené vody
s hrdlem se závitem 3/4"
(viz obrázek).
Před připojením hadice
nechte vodu odtékat,
dokud nebude čirá.
2. Připojte přítokovou
hadici k pračce
prostřednictvím
příslušného vstupního
hrdla, umístěného vpravo
nahoře (viz obrázek).
3. Dbejte na to, aby
hadice nebyla příliš
ohnuta anebo stlačena.
! Tlak v rozvodu vody se musí pohybovat v rozmezí
hodnot uvedených v tabulce s technickými údaji (viz
vedlejší strana).
! V případě, že délka přítokové hadice nebude
dostatečná, obraťte se na specializovanou prodejnu
anebo na autorizovaný technický personál.
! Nikdy nepoužívejte již použité hadice.
Vyrovnání do vodorovné polohy
1. Pračku je třeba umístit na
rovnou a pevnou podlahu, bez
toho, aby byla opřená o stěnu,
nábytek anebo něco jiného.
2. V případě, když podlaha
není dokonale vodorovná,
mohou být případné
rozdíly vykompenzovány
šroubovaním předních
nožek (viz obrázek).
Úhel sklonu, naměřen na
pracovní ploše, nesmí přesáhnout 2°.
Dokonalé vyrovnání do vodorovné polohy zabezpečí
stabilitu zařízení a zamezí vzniku vibrací a hluku během
činnosti. V případě instalace na podlahovou krytinu anebo
na koberec, nastavte nožičky tak, aby pod pračkou zůstal
dostatečný volný prostor pro ventilaci.
26
Page 27

Připojení odtokové hadice
65 - 100 cm
Připojte vypouštěcí hadici,
k odpadovému potrubí
anebo k odpadu ve stěně,
nacházejícímu se od 65 do
100 cm nad zemí; zamezte
jejímu ohybu;
anebo ji zachyťte na
okraj umývadla či vany, a
připevněte ji ke kohoutku
prostřednictvím držáku
z příslušenství (viz
obrázek). Volný konec
vypouštěcí hadice nesmí
zůstat ponořen do vody.
! Použití prodlužovacích hadic se nedoporučuje; je-li však
nezbytné, prodlužovaní hadice musí mít stejný průměr
jako originální hadice a její délka nesmí přesáhnout 150
cm.
Připojení k elektrické síti
Před zasunutím zástrčky do zásuvky se ujistěte, že:
• zásuvka je uzemněna a že vyhovuje normám;
• zásuvka je schopna snést maximální zátěž
odpovídající jmenovitému příkonu zařízení,
uvedenému v tabulce technickými údaji (viz vedle);
• hodnota napájecího napětí odpovídá údajům
uvedeným v tabulce s technickými údaji (viz vedle);
• zásuvka je kompatibilní se zástrčkou pračky.
V opačném případě je třeba vyměnit zástrčku.
! Pračka nesmí být umístěna venku – pod širým nebem, a
to ani v případě, kdyby se jednalo o místo chráněné před
nepřízní počasí, protože je velmi nebezpečné vystavit ji
působení deště a bouří.
! Po denitivním umístění pračky musí zásuvka zůstat
lehce přístupná.
! Nepoužívejte prodlužovaní kabely a rozvodky.
! Kabel nesmí být ohnut anebo stlačen.
! Výměna kabelu musí být svěřena výhradně
autorizovanému technickému personálu.
Upozornění! Výrobce neponese žádnou odpovědnost za
následky nerespektování uvedených předpisů.
První prací cyklus
Po nastavení pračky, před jejím použitím na praní prádla, je
třeba provést jeden zkušební cyklus, s pracím prostředkem
a bez náplně prádla, při teplotě 90°C, bez předpírání.
Technické údaje
Model WITL 100
šíøka 40 cm
Rozmìry
Kapacita od 1 do 5 kg
Napájení
Pøipojení k
rozvodu vody
Rychlost
odstøeïování
Kontrolní program
podle normy
EN 60456
Hluènost
(dB(A) re 1 pW)
výška 85 cm
hloubka 60 cm
Viz štítek s technickými údaji, aplikovaný na
zarízení.
maximální tlak 1 MPa (10 bar)
minimální tlak 0.05 MPa (0.5 bar)
kapacita bubnu 42 litrù
a¡z do 1000 otáèek za minutu
program 2; teplota 60°C;
náplò 5 kg prádla.
Toto zaøízení odpovídá následujícím normám
Evropské unie:
- 89/336/EHS z 03/05/89 (Elektromagnetická
kompatibilita)
v platném znìní
- 2006/95/CE (Nízké napìtí)
- 2002/96/CE
Praní: 66
Odstøeïování: 74
CZ
27
Page 28

Popis pračky
CZ
Ovládací panel
FUNKČNÍ
tlačítka
Kontrolky
Volič
RYCHLOSTI
ODSTŘEĎOVÁNÍ
Dávkovač pracích prostředků sloužící k dávkování
pracích a přídavných prostředků (viz str. 32).
Kontrolky sloužící ke kontrole průběhu pracího programu.
V případě, že byla nastavena funkce odložený start,
budou informovat o čase zbývajícím do startu pracího
programu (viz str. 29).
FUNKČNÍ tlačítka sloužící k volbě jednotlivých
nabízených funkcí. Po uskutečnění volby jednotlivé funkce
zůstane příslušné tlačítko podsvětleno.
Volič RYCHLOSTI ODSTŘEĎOVÁNÍ: slouží k nastavení
rychlosti odstřeďování anebo k jeho vyloučení (viz str. 31).
Volič TEPLOTY sloužící k nastavení teploty praní anebo
praní ve studené vodě (viz str. 31).
Tlačítko ZAPNUTÍ/VYPNUTÍ sloužící k zapnutí a vypnutí
pračky.
Tlačítko
START/
VYNULOVÁNÍ
Kontrolka
VÍKO
Volič
TEPLOTY
Tlačítko START/VYNULOVÁNÍ sloužící k zahájení
pracích programů nebo k vynulování chybného
nastavení.
Kontrolka ZAPNUTO/ZABLOKOVANÉ VÍKO
informující o tom, zda je pračka zapnuta (blikající
kontrolka) a zda lze otevřít víko (rozsvícená kontrolka)
(viz str. 29).
Volič PROGRAMŮ sloužící k nastavení programů (viz
str. 30). Během pracího programu zůstane ve stejné
poloze.
Pohotovostní režim
Za účelem shody s novými předpisy souvisejícími
s energetickou úsporou je tato pračka vybavena
systémem automatického vypnutí (přechodu do
pohotovostního režimu - standby), který je aktivován po
uplynutí 30 minut, když se pračka nepoužívá. Krátce
stiskněte tlačítko ZAPNUTÍ/VYPNUTÍ a vyčkejte na
obnovení činnosti zařízení.
PROGRAMŮ
ZABLOKOVANÉ
Volič
Tlačítko
ZAPNUTÍ/
VYPNUTÍ
Kontrolka ZAPNUTO/ZABLOKOVANÉ VÍKO:
Rozsvícení této kontrolky poukazuje na to, že dvířka jsou zablokována kvůli zamezení náhodnému otevření; aby se
předešlo poškození pračky, je třeba před otevřením víka vyčkat, až kontrolka začne blikat.
! Rychlé blikání kontrolky ZAPNUTO/ZABLOKOVANÉ VÍKO spolu s alespoň jednou další kontrolkou upozorňuje na
přítomnost poruchy (viz str. 31).
28
Page 29

Jak se otvírá a zavírá prací buben
Obr. 1
Obr. 3
Obr. 2
Obr. 4
CZ
A) OTEVÍRÁNÍ (Obr. 1): Nadzvedni vrchní kryt a
kompletně ho otevři.
B) Otevři prací buben podle návodu na obrázku;
použij přitom obě ruce (Obr. 2):
- stlač tlačítko označené na Obr.2 a zatlač ho lehce směrem
dolů. Během tohoto úkonu opři druhou ruku o dvířka pracího
bubnu, aby ti, při náhlém otevření, nestlačili prsty;
- doprovoď uvolněné dvířka během jejich snadného otevření
a uvolnění.
C) VKLÁDÁNÍ PRÁDLA (Obr. 3)
D) ZAVÍRÁNÍ (Obr. 4):
- dobře zavři prací buben a to tak že nejdříve spustíš přední
a pak i zadní dvířka;
- zkontroluj, zdali došlo k dokonalému zasunutí úchytů
předních dvířek do jejich uložení v zadních dvířkách;
- po uslyšení zvuku provázejícího zachycení, zatlač zlehka
směrem dolů nejdříve jedny a pak druhé dvířka, aby ses
ujistil, zdali nedojde k jejich uvolnění;
- na závěr zavři vrchní kryt.
Kontrolky
Kontrolky jsou zdrojem důležitých informací.
Informují nás o následujících skutečnostech:
Nastavený čas:
V případě, že byla nastavena funkce odložený start
(viz str. 31), po zapnutí pracího programu začne blikat
kontrolka odpovídající nastavenému času:
Bude zobrazován čas zbývající do startu, a
zobrazování bude provázeno blikáním příslušné
kontrolky:
Aktuální fáze pracího programu:
Během pracího cyklu dojde postupně k rozsvícení
jednotlivých kontrolek za účelem indikace průběhu praní:
Předpírání
Praní
Máchání
Odstřeďování
Poznámka: Během odčerpání vody se rozsvítí kontrolka
signalizující fázi odstřeďování.
Funkční tlačítka
FUNKČNÍ TLAČÍTKA slouží také jako kontrolky.
Po zvolení jednotlivé funkce dojde k podsvětlení příslušného
tlačítka.
V případě, že zvolená funkce není kompatibilní
s nastaveným pracím programem, příslušné tlačítko začne
blikat a funkce nebude aktivována.
V případě, že bude zvolena funkce, která není kompatibilní
s některou z předem zvolených funkcí, aktivována zůstane
pouze poslední zvolená funkce.
Po uplynutí zvoleného času dojde k zhasnutí kontrolky
odloženého startu a k zahájení nastaveného pracího
programu.
29
Page 30

Uvedení do chodu a programy
CZ
Ve zkratce: uvedení pracího programu do chodu
1. Zapněte pračku stisknutím tlačítka
Na několik
vteřin se rozsvítí všechny kontrolky, následně dojde
kjejich zhasnutí a začne blikat kontrolka ZAPNUTO/
ZABLOKOVANÁ DVÍŘKA.
2. Naplňte pračku prádlem, naplňte dávkovač pracími a
přídavnými prostředky (viz str. 32) a na závěr uzavřete
dvířka bubnu a víko.
3. Voličem PROGRAMŮ nastavte požadovaný prací program.
4. Nastavte teplotu praní (viz str. 31).
5. Nastavte rychlost odstřeďování (viz str. 31).
6. Uveďte nastavený prací program do chodu stisknu-tím
tlačítka START/VYNULOVÁNÍ.
Vynulování nastaveného programu se vykonává
stisknutím tlačítka START/VYNULOVÁNÍ na dobu
nejméně 2 vteřin.
7. Po ukončení pracího programu bude kontrolka ZAPNUTO/
ZABLOKOVANÁ DVÍŘKA blikat, poukazujíce na možnost
otevření dvířek. Vyndejte prádlo a nechte dvířka
pootevřená, aby mohlo dojít k vysušení bubnu. Vypněte
pračku stisknutím tlačítka
.
Tabulka programů
Volitelná funkce
Odstranìní skvrn
/ Bìlící prostøe-
dek
Na choul. prádlo/
Tradièní
Na choul. prádlo/
Tradièní
Na choul. prádlo/
Tradièní
Na choul. prádlo/
Tradièní
Na choul. prádlo/
Tradièní
Doba
cyklu (v
minutách)
152
150
140
99
Popis pracího cyklu
Pøedpírka, praní, máchání,
prùbì¡zné a závìreèné
odstøeïování
Praní, máchání, prùbì¡zné a
závìreèné odstøeïování
Praní, máchání, prùbì¡zné a
závìreèné odstøeïování
Praní, máchání, prùbì¡zné a
závìreèné odstøeïování
Praní, máchání, prùbì¡zné a
závìreèné odstøeïování
Praní, máchání, zabránìní
krèení anebo odstøeïování
pro choulostivé prádlo
Praní, máchání, zabránìní
krèení anebo odstøeïování
pro choulostivé prádlo
Praní, máchání, zabránìní
krèení anebo odstøeïování
pro choulostivé prádlo
Praní, máchání, odstøeïování pro choulostivé prádlo
Praní, máchání, zabránìní
krèení anebo vypouštìní vody
Praní, máchání, prùbì¡zné a
závìreèné odstøeïování
Praní, máchání, prùbì¡zné a
závìreèné odstøeïování
Praní, máchání, odstøeïování pro choulostivé prádlo
Praní, máchání, odstøeïování pro choulostivé prádlo
Praní ve studené vodì (bez
pracího prostøedku), praní,
máchání a odstøeïování
pro choulostivé prádlo
Praní, máchání, prùbì¡zné a
závìreèné odstøeïování
Máchání a odstøeïování
Vypouštìní vody a od-
støeïování
90°C
90°C
60°C
40°C
40°C
60°C
40°C
40°C
40°C
30°C
60°C
40°C
40°C
30°C
30°C
30°C
Prací prostøedek
Avivá¡z
pøedp. praní
• • • 167
• •
• •
• •
• •
• • Na choul. prádlo 80
• • Na choul. prádlo 71
• • Na choul. prádlo 71
• • 50
• • 52
• • 60
• • 50
• • 40
• • 30
• • 50
• • 63
Druh tkaniny a stupeò jejího zneèištìní
Standardní
Bavlna: Extrémnì zneèištìné bílé
prádlo (prostìradla, ubrusy, atd.)
Bavlna: Extrémnì zneèištìné bílé
prádlo (prostìradla, ubrusy, atd.)
Bavlna: Silnì zneèištìné bílé a barevné
prádlo z odolných tkanin
Bavlna: Silnì zneèištìné bílé a barevné
choulostivé prádlo
Bavlna: Èásteènì zneèištìné bílé a bare-
vné choulostivé prádlo (košile, trièka, atd.)
Syntetika:Silnì zneèištìné prádlo z
odolných barevných tkanin (kojenecké
prádlo, atd.)
Syntetika:Silnì zneèištìné prádlo z
odolných barevných tkanin (kojenecké
prádlo, atd.)
Syntetika:Èásteènì zneèištìné bílé a
barevné choulostivé prádlo (košile,
trièka, atd.)
Vlna 6
Prádlo z velice choulosti-vých tkanin
(záclony, hedvábí, viskóza, atd.)
Time 4 you
Bavlna: Silnì zneèištìné bílé a barevné
prádlo z odolných tkanin
Bavlna: Èásteènì zneèištìné bílé a bare-
vné choulostivé prádlo (košile, trièka, atd.)
Syntetika: Choulostivé barevné prádlo
(lehce zneèištìné prádlo všeho druhu)
Syntetika: Choulostivé barevné prádlo
(lehce zneèištìné prádlo všeho druhu)
Sport
Sportovní obuv (MAX. 2 páry.) 12
Tkaniny pro sportovní odìv
(teplákové soupravy, pono¡zky, atd.)
DÍLÈÍ PROGRA-MY
Máchání •
Odstøeïování
Vypouštìní vody Vypouštìní vody
Prací
programy
1
2
2
2
3
4
4
5
7
8
9
10
11
13
Teplota
Poznámky
-Při programech 8 - 9 se doporučuje nepřekročit náplň pračky 3,5 kg.
-Při programu 13 se doporučuje nepřekročit náplň pračky 2 kg.
-Popis ochrany před zmačkáním: viz Snadné žehlení, na vedlejší straně. Údaje uvedené v tabulce mají pouze informativní charakter.
Speciální program
Každodenní praní 30’ (program 11 pro syntetiku) je navržen speciálně pro praní lehce znečištěného prádla během krátké doby: trvá
pouze 30 minut a šetří tak energii a čas. Nastavením programu (11 při 30°C) je možné prát spolu prádlo různého druhu (s výjimkou
vlny a hedvábí) s náplní nepřesahující 3 kg. Doporučuje se použití tekutého pracího prostředku.
30
Page 31

C
Nastavení činnosti
dle potřeb uživatele
Nastavení teploty
Otáčením voliče TEPLOTY dojde k nastavení teploty praní (viz Tabulka programů na str. 30).
Teplota může být postupně snižována až po praní ve studené vodě (
).
Nastavení rychlosti odstřeďování
Otáčením voliče RYCHLOSTI ODSTŘEĎOVÁNÍ se nastavuje rychlost odstřeďování zvoleného pracího programu.
Maximální hodnoty rychlosti pro jednotlivé prací programy jsou:
Prací programy Maximální rychlost
Bavlna 1000 otáček za minutu
Syntetika 800 otáček za minutu
Vlna 600 otáček za minutu
Hedvábí ne
Rychlost odstřeďování může být snížena nebo odstřeďování může být vyloučeno volbou symbolu
Zařízení automaticky zabrání odstřeďování vyšší rychlostí než je maximální hodnota rychlosti pro každý prací program.
.
! Aby se zabránilo nadmerným vibracím, pracka pred každým odstredováním rovnomerne rozloží nápln tak, že se buben
nepretržite otácí rychlostí, která mírne prevyšuje rychlost použitou behem pracího cyklu.
Když se ani po nekolika pokusech nepodarí dokonale rozložit nápln, pracka provede odstredování nižší rychlostí, než je
predpokládaná rychlost.
V prípade nadmerného nevyvážení pracka provede rozložení namísto odstredování.
Prípadné pokusy o vyvážení mohou prodloužit celkovou dobu cyklu až o 10 minut.
Funkce
Jednotlivé funkce, kterými pračka disponuje umožňují dosáhnout požadovaný stupeň čistoty a bělosti praného prádla.
Způsob aktivace jednotlivých funkcí:
1. stiskněte tlačítko příslušné požadované funkce podle níže uvedené tabulky;
2. podsvětlení příslušného tlačítka signalizuje, že došlo k aktivaci zvolené funkce.
CZ
Poznámka: Rychlé blikání tlačítka poukazuje na to, že příslušná funkce je nepoužitelná během nastaveného pracího programu.
Funkce Efekt Poznámky k pou±zití Aktivní pøi
Slou±zí k ²odlo±zení startu
pracího cyklu a±z o 9
hodin.
Odlo±zený start
Bìlící cyklus vhodný na
odstranìní nejodolnìjších
skvrn.
Bìlení
Slou±zí ke sní±zení poètu
záhybù na tkaninách, ulehèujíc následné ±zehlení.
Snadné ±zehlení
Slou±zí ke zvýšení úèinnosti máchání.
Intenzivní
máchání
Opakovanì stisknìte tlaèítko az do rozsvícení kontrolky oznaèující
pozadovaný èas.
Po pátém stisknutí tlaèítka dojde k vylouèení uvedené funkce.
POZN.: Po stisknutí tlaèítka Start/Vynulování je mozné zmìnit
hodnotu èasu pouze jeho snízením.
Nezapomeòte na vlo±zení bìlícího prostøedku do pøídavné pøihrádky 4
(viz str. 32 ).
Není kompatibilní s pou±zitím volitelné funkcí SNADNÉ ZEHLENÍ.
Po nastavení této funkce dojde k pøerušení programù 4, 5
7, s prádlem ve vodì (ochrana pøed zmaèkáním), provázenému blikáním kontrolky Máchání
- dokonèení pracího cyklu je mo±zné po stisknutí tlaèítka
START/VYNULOVÁNÍ;
- pøejete-li si pouze vypustit vodu, nastavte otoèný voliè do
polohy oznaèené
Není kompatibilní s pou±zitím volitelné funkcí BÌLENÍ.
Její pou±zití se doporuèuje pøi zcela naplnìné praèce anebo pøi pou±zití
velkého mno±zství pracího prostøedku.
:
a stisknìte tlaèítk START/VYNULOVÁNÍ.
programech:
Všech
2, 3, 4, 5,
máchání.
3, 4, 5, 7, 8,
9, 10
máchání.
1, 2, 3, 4, 5, 8,
9, 10,
12, 13
máchání.
31
Page 32

Prací prostředky a prádlo
CZ
Dávkovač pracích prostředků
Dobrý výsledek praní
závisí také na správném
dávkování pracích
prostředků: použití jejich
nadměrného množství
snižuje efektivitu praní
a napomáhá tvorbě
vodního kamene na
vnitřních částech pračky
a znečištění životního
prostředí.
Při vytahování dávkovače pracích prostředků a při jeho plnění
pracími anebo přídavnými prostředky postupujte následovně:
přihrádka 1: Prací prostředek (práškový) pro
předpírání
přihrádka 2: Prací prostředek
(v prášku nebo tekutý)
Tekutý prací prostředek je vhodné nalít přímo do bubnu do
dávkovací kuličky.
přihrádka 3: Přídavné prostředky (aviváž atd.)
Při plnění oddílu 3 aviváží dávejte pozor, abyste nepřelili
maximální přípustnou úroveň, označenou „max”.
Aviváž je automaticky přiváděna do pračky v průběhu
posledního máchání. Na konci pracího programu zůstane
v oddílu 3 zbytek vody. Tato voda slouží pro přívod velmi
hustých prostředků nebo ke zředění koncentrovaných
prostředků. V případě, že v oddílu 3 zůstane více vody
než obvykle, znamená to, že je ucpán vyprazdňovací
mechanismus. Vyčištění mechanismu viz str. 34.
Odolné tkaniny: max. 5 kg
Syntetické tkaniny: max. 2.5 kg
Jemné tkaniny: max. 2 kg
Vlna: max. 1 kg
Kolik váží prádlo?
1 prostěradlo 400-500 g
1 povlak na polštář 150-500 g
1 ubrus 400-500 g
1 župan 900-1.200 g
1 ručník 150-250 g
Oděvy vyžadující zvláštní péči
Záclony: přehnout je a uložit dovnitř povlaku na
polštář anebo do sáčku ze síťoviny. Je třeba je prát
samotné a nepřekročit přitom poloviční náplň. Na praní
záclon použijte program 7, který automaticky vyloučí
odstřeďování.
Prošívané kabáty a větrovky: je možné je prát
v pračce v případě, že jsou plněny husím anebo
kachním prachovým peřím. Jednotlivé kusy oděvu
obraťte naruby, naplňte pračku náplní s hmotností
nepřesahující 2-3 kg, zopakujte jeden anebo víckrát
máchání a použijte jemné odstřeďování.
Tenisky: očistěte je od bahna. Můžete je prát spolu
s džínami a prádlem z odolných tkanin, nemůžete je
však prát spolu s bílým prádlem.
Vlna: abyste dosáhli nejlepších výsledků, je třeba
použít speci cký prací prostředek na praní vlny a
nepřekročit 1 kg náplně.
přídavná přihrádka 4: Bělící prostředek
! Nepoužívejte prací prostředky určené na ruční praní,
protože způsobují tvorbu nadměrného množstva pěny.
Cyklus bělení
Tradiční bělící prostředek se používá pro odolné bílé
prádlo, jemný pro barevné a syntetické prádlo a pro vlnu.
Při dávkování bělícího prostředku nepřekračujte “max”
označenou na přídavné přihrádce 4 (viz obrázek).
Přejete-li si provést samostatné bělení, nalijte bělicí
prostředek do přídavné přihrádky 4, nastavte speciální
program Máchání
Příprava prádla
• Roztřiďte prádlo podle:
- druhu tkaniny / symbolu na visačce.
- barvy: oddělte barevné prádlo od bílého.
• Vyprázdněte kapsy a zkontrolujte kno íky.
• Nepřekračujte povolenou náplň, vztahující se na
hmotnost suchého prádla:
a stiskněte funkční tlačítko Bělení.
32
Page 33

Opatření a rady
! Pračka byla navržena a vyrobena v souladu s platnými
mezinárodními bezpečnostním předpisy. Tato upozornění
jsou uváděna z bezpečnostních důvodů a je třeba si je
pozorně přečíst.
Základní bezpečnostní pokyny
• Pračku mohou používat pouze dospělé osoby, podle
pokynů uvedených v tomto návodě.
• Zařízení nesmí být používáno osobami (včetně
dětí) se sníženými fyzickými, senzorickými nebo
mentálními schopnostmi a s nedostatečnými
zkušenostmi a znalostmi, s výjimkou případu, kdy toto
použití probíhá pod dozorem nebo na základě pokynù
osoby zodpovědné za jejich bezpečnost. Děti musí
být pod dohledem, aby se zajistilo, že si nebudou se
zaøízením hrát.
• Nedotýkejte se zařízení bosí, anebo v případě, když
máte mokré ruce anebo nohy.
• Nevytahujte zástrčku ze zásuvky tahem za kabel, ale
uchopením za zástrčku.
• Neotvírejte dávkovač pracích prostředků během
činnosti zařízení.
• Nedotýkejte se vyčerpávané vody, protože může mít
velmi vysokou teplotu.
netrídeného domovního odpadu. Staré spotrebice musí
být odevzdány do oddeleného sberu, a to za úcelem
recyklace a optimálního využití materiálu, které obsahují,
a z duvodu predcházení negativním dopadum na lidské
zdraví a životní prostredí. Symbol “preškrtnuté popelnice”
na výrobku vás upozornuje na povinnost odevzdat
zarízení po skoncení jeho životnosti do oddeleného sberu.
Spotrebitelé by meli kontaktovat príslušné místní úrady
nebo svého prodejce ohledne informací týkajících se
správné likvidace starého zarízení.
• Likvidace staré pračky:
před její likvidací se postarejte o její znehodnocení,
odstřihnutím přívodního kabelu a oddělením dvířek.
Jak ušetřit a brát ohled na životní prostředí
Technika ve službách životního prostředí
Vysvětlením toho, že uvnitř pračky je vidět málo vody,
je skutečnost, že nový způsob praní Ariston umožňuje
dokonale vyprat prádlo s použitím méně než polovičního
množství vody: jedná se o dosažení vytýčeného cíle
s ohledem na životné prostředí.
Šetření pracími prostředky, vodou, energií a časem
• Aby nedocházelo k plýtvání, je třeba používat pračku
s plnou náplní. Jedna plná náplň, ve srovnání se
dvěmi polovičními, umožňuje ušetřit až 50% energie.
• Předpírání je potřebné pouze při praní silně
znečištěného prádla. Prací program bez předpírání
umožňuje ušetřit od 5 do 15% energie.
CZ
• Nepokoušejte se o násilné otevření dvířek: mohlo
by dojít k poškození bezpečnostního uzávěru, který
zabraňuje náhodnému otevření.
• Při výskytu poruchy se v žádné případě nepokoušejte
o opravu vnitřních částí zařízení.
• Vždy mějte pod kontrolou děti a zabraňte jejich
přiblížení se k pračce během pracího cyklu.
• Během pracího cyklu mají dvířka tendenci ohřát se.
• V případě potřeby přemísťujte pračku ve dvou nebo
ve třech, a věnujte celé operaci zvláštní pozornost.
Nikdy se nepokoušejte pračku přemísťovat sami, je
totiž velmi těžká.
• Před zahájením vkládání prádla zkontrolujte, zda je
buben prázdný.
Likvidace
• Likvidace starých elektrických zarízení
Evropská smernice 2002/96/EC o odpadních elektrických
a elektronických zarízeních stanovuje, že staré domácí
elektrické spotrebice nesmí být odkládány do bežného
• Při aplikaci příslušného prostředku proti skvrnám
anebo jejich namočením před zahájením praní, je
možné vyhnout se praní při vysokých teplotách.
Použití stejného pracího programu při teplotě 60°C
namísto 90°C anebo 40°C namísto 60°C, umožňuje
ušetřit až 50% energie.
• Správné dávkování pracího prostředku, s ohledem na
tvrdost vody, stupeň znečištění a množství praného
prádla zabraňuje plýtvání a chrání životní prostředí: i
když se jedná o biodegradabilní látky, prací prostředky
narušují přirozenou rovnováhu v přírodě. Dále se je
třeba, dle možností, vyhnout použití aviváže.
• Praní v podvečer nebo brzy ráno napomáhá nižší
zátěži rem, zabývajících se výrobou energie.
Volitelná funkce odložený start (viz str. 31) značně
napomáhá organizaci praní právě na základě
uvedených pravidel.
• V případě, že prádlo má být vysušeno v sušičce,
zvolte vysokou rychlost odstřeďování. Malé množství
vody umožňuje šetřit čas a energii během sušícího
programu.
33
Page 34

Údržba a péče
CZ
Uzavření přívodu vody a vypnutí
elektrického napájení
• Po každém praní uzavřete přívod vody. Tímto
způsobem dochází k omezení opotřebení pračky a
ke snížení nebezpečí úniku vody.
• Před zahájením čištění pračky a během operací
údržby je třeba vytáhnout zástrčku přívodního kabelu
ze zásuvky.
Čištění pračky
Vnější části a části z gumy mohou být čištěny hadrem
navlhčeným ve vlažné vodě a saponátu. Nepoužívejte
rozpouštědla anebo brusné prostředky.
Čištění dávkovače pracích prostředků
Vytáhněte dávkovač jeho nadzvednutím a vytáhnutím
směrem ven (viz obrázek).
Umyjte ho pod proudem vody; tento druh vyčištění je
třeba vykonávat pravidelně.
Péče o dvířka a buben
• Dvířka ponechte po každé pootevřeny, aby se
zabránilo tvorbě nepříjemných zápachů.
Čištění čerpadla
Součástí pračky je samočisticí čerpadlo, která
nevyžaduje zvláštní péči. Může se však stát, že
se v jeho vstupní části, určené na jeho ochranu, a
nacházející se v jeho spodní části, zachytí drobné
předměty (mince, knoíky).
! Ujistěte se, že prací cyklus byl ukončen a vytáhněte
zástrčku ze zásuvky.
K znovuzískání případných předmětů spadených do
vstupní části:
1. tahem rukou směrem
od bočnic sundat
podložku dolů na zadní
stranu pračky (viz
obrázek);
2. odšroubujte vrchní
kryt otáčením proti
směru hodinových
ručiček (viz obrázek):
vytečení malého
množství vody je zcela
běžným jevem;
3. dokonale vyčistěte
vnitřek vstupní části
čerpadla;
4. nasaďte zpátky
vrchní kryt;
5. namontujte zpátky
krycí panel, přičemž se,
před jeho přisunutím
k pračce ujistěte, že
došlo k správnému
zachycení háčků do
příslušných otvorů.
Kontrola přítokové hadice
Stav přítokové hadice je třeba zkontrolovat alespoň
jednou ročně. Jsou-li na ní viditelné praskliny anebo
trhliny, je třeba ji vyměnit: silný tlak působící na hadici
během pracího cyklu by mohl způsobit její náhlé
roztrhnutí.
! Nikdy nepoužívejte již použité hadice.
Jak se čistí dávkovač pracích prostředků
Demontáž:
Zlehka zatlačit na velké
tlačítko nacházející se ve
pře d ní č á sti d ávkov ače
p ra cí c h p ro s t ře d k ů a
vytáhnout ho směrem nahoru
(obr. 1).
Obr. 1 Obr. 2 Obr. 3 Obr. 4
34
Čištění:
Očistit dávkovač pod kohoutkem (obr. 3) s tekoucí vodou
pomocí starého zubního kartáčku a, po vytažení páru sifonů
uložených v horní části přihrádek 1 a 2 (obr. 4) zkontrolovat,
nejsou-li ucpány a omýt je pod vodou.
Zpětná montáž:
Ne z a p om eň vl ož i t n a
původní místo sifony a pak
vlož i dávkovač (obr. 4, 2, 1).
Page 35

Poruchy a
způsob jejich odstranění
Může se stát, že pračka nebude fungovat. Před telefonickým kontaktováním servisní služby (viz str. 36), zkontrolujte
prostřednictvím následujícího seznamu, zda se nejedná o jednoduše odstranitelný problém.
CZ
Poruchy:
Pračku nelze zapnout.
Nedochází k zahájení pracího cyklu.
Nedochází k napouštění vody do
pračky.
Dochází k nepřetržitému napouštění
a vyčerpávání vody.
Možné příčiny / Způsob jejich odstranění:
• Zástrčka není zasunuta v zásuvce, anebo ne natolik, aby došlo ke spojení
kontaktů.
• V celém domě je vypnut proud.
• Dvířka nejsou správně zavřena
• Nebylo stisknuto tlačítko
• Nebylo stisknuto tlačítko START/VYNULOVÁNÍ.
• Nebyl otevřen kohoutek přívodu vody.
• Byl nastaven odložený start (Odložený start, viz str. 31).
• Přívodní hadice není připojena k vodovodnímu kohoutku.
• Přívodní hadice je příliš ohnuta.
• Nebyl otevřen kohoutek přívodu vody.
• V celém domě je uzavřen přívod vody.
• V rozvodu vody není dostatečný tlak.
• Nebylo stisknuto tlačítko START/VYNULOVÁNÍ.
• Ústí vypouštěcí hadice se nachází mimo určené rozmezí od 65 do 100 cm
nad zemí (viz str. 27).
• Koncová část vypouštěcí hadice je ponořena ve vodě (viz str. 27).
• Odpad ve stěně není vybaven odvzdušňovacím otvorem.
Když ani po uvedených kontrolách nedojde k odstranění problému, uzavřete
přívod vody, vypněte pračku a přivolejte servisní službu. V případě, že se byt
nachází na jednom z nejvyšších poschodí, je možné, že dochází k sifonovému
efektu, jehož následkem pračka nepřetržitě napouští a odčerpává vodu.
Na odstranění uvedeného efektu jsou v prodeji běžně dostupné speciální
protisifónové ventily.
(kontrolka Zablokované víko bliká).
.
Nedochází k vyčerpání vody anebo
k odstřeďování.
Během odstřeďování je možné
pozorovat silné vibrace.
Dochází k úniku vody z pračky.
Kontrolka ZAPNUTO/ZABLOKOVANÁ
DVÍŘKA bliká rychle spolu s alespoň
jednou další kontrolkou.:
Dochází k tvorbě nadměrného
množství pěny.
• Odčerpání vody netvoří součást nastaveného programu: u některých programů
je potřebné jeho manuální uvedené do činnosti (viz str. 30).
• Byla aktivována volitelná funkce Snadné žehlení: dokončení pracího cyklu je
možné po stisknutí tlačítka START/VYNULOVÁNÍ (viz str. 31).
• Vypouštěcí hadice je příliš ohnuta (viz str. 27).
• Odpadové potrubí je ucpáno.
• Během instalace nebyl buben odjištěn předepsaným způsobem (viz str. 26).
• Pračka není vyrovnána do vodorovné polohy (viz str. 26).
• Pračka je namáčknuta mezi nábytkem a stěnou (viz str. 26).
• Přívodní hadice není správně připojena (viz str. 26).
• Dávkovač pracích prostředků je ucpán (způsob jeho vyčištění – viz str. 34).
• Vypouštěcí hadice není upevněna předepsaným způsobem (viz str. 27).
• Vypněte zařízení a vytáhněte zástrčku ze zásuvky, vyčkejte 1 minutu a
zařízení znovu zapněte.
Kdyz porucha přetrvává, obraťte se na servisní sluzbu.
• Použitý prací prostředek není vhodný pro použití v automatické pračce
(musí obsahovat označení „pro praní v pračce“, „pro praní v rukou nebo
v pračce“ anebo podobné označení).
• Bylo použito nadměrné množství pracích prostředků.
35
Page 36

Servisní služba
CZ
Před přivoláním servisní služby:
• Zkontrolujte, zda nejste schopni poruchu odstranit sami (viz str. 35);
• Opětovně uveďte do chodu prací program, s cílem ověřit, zda byla porucha odstraněna;
• V opačném případě se obraťte na autorizované centrum servisní služby, na telefonním čísle uvedeném na záručním
listě.
! Nikdy se neobracejte se žádostí o pomoc na techniky, kteří nejsou na vykonávání této činnost oprávněni.
Při hlášení poruchy uveďte:
• druh poruchy;
• model pračky (Mod.);
• výrobní číslo (S/N);
tyto informace jsou uvedeny na typovém štítku, nacházejícím se na zadní straně pračky.
36
Page 37

Instrukcja obsługi
PRALKA
PL
Polski
WITL 100
Spis treści
PL
Instalacja, 38-39
Rozpakowanie i wypoziomowanie
Podłączenie do sieci wodnej i elektrycznej
Pierwszy cykl prania
Dane techniczne
Opis pralki, 40-41
Panel kontrolny
Jak otwierać i zamykac kosz
Światełka sygnalizujące
Uruchomienie i Programy, 42
Krótko mówiąc: jak nastawić program
Tabela programów
Potrzeby indywidualne, 43
Nastawienie temperatury
Nastawić szybkość wirowania
Funkcje
Środki piorące i bielizna, 44
Szuadka na środki piorące
Cykl wybielania
Przygotowanie bielizny
Tkaniny wymagające szczególnej dbałości
Zalecenia i środki ostrożności, 45
Ogólne zasady bezpieczeństwa
Usuwanie odpadów
Oszczędność i ochrona środowiska
Konserwacja, 46
Wyłączenie wody i prądu elektrycznego
Czyszczenie pralki
Czyszczenie szuadki na środki piorące
Czyszczenie drzwiczek i bębna
Czyszczenie pompy
Kontrola rury doprowadzania wody
Jak czyścić szuadkę środków piorących
Anomalie i środki zaradcze, 47
Serwis Techniczny, 48
Przed zwróceniem się do Serwisu Technicznego
37
Page 38

Instalacja
PL
! Należy zachować niniejszą książeczkę instrukcji dla
przyszłych konsultacji. W razie sprzedaży, oddania, czy
przeniesienia pralki w inne miejsce należy upewnić się,
by przekazana została ona razem z instrukcją, aby nowy
właściciel zapoznać się mógł z działaniem urządzenia i
odpowiednimi informacjami.
! Należy uważnie przeczytać instrukcję obsługi, gdyż zawiera
ona ważne informacje dotyczące instalacji oraz właściwego i
bezpiecznego użytkowania pralki.
Rozpakowanie i wypoziomowanie
Rozpakowanie
1. Rozpakować pralkę.
2. Sprawdzić, czy nie doznała
ona uszkodzeń w czasie
transportu. Jeśli byłaby ona
uszkodzona, nie podłączać
jej i powiadomić sprzedawcę.
3. Odkręcić cztery śruby
ochronne, zamocowane
na czas transportu, oraz
zdjąć gumową podkładkę
z odpowiednią rozpórką,
znajdujące się w tylnej
ścianie i (zobacz rysunek).
4. Zatkać otwory przy
pomocy załączonych do
pralki plastykowych zaślepek.
5. Zachować wszystkie te części: gdyby okazało się
konieczne przewiezienie pralki w inne miejsce, powinny one
zostać ponownie zamontowane.
Uwaga: w razie ponownego użycia kròtsze srubki powinny
byc przymocowane u gòry.
! Części opakowania nie nadają się do zabawy dla dzieci
W razie ustawienia na dywanie lub wykładzinie
dywanowej należy tak wyregulować nóżki, aby pod
pralką pozostawała wolna przestrzeń niezbędna dla
wentylacji.
Podłączenie do sieci wodnej i elektrycznej
Podłączenie rury pobierania wody
Podłączyć przewód
zasilający poprzez
przykręcenie do zaworu
wody zimnej z końcówką
gwintowaną ¾ gas (patrz
rysunek).
Przed podłączeniem
spuszczać wodę do
momentu, aż stanie
się ona całkowicie
przezroczysta.
2. Podłączyć rurę
pobierania wody do
pralki, przykręcając
ją do odpowiedniego
otworu pobierania wody,
znajdującego się w tylnej
ścianie pralki, z prawej
strony u góry (zobacz
rysunek).
3. Zwrócić uwagę, by na
rurze nie było zgięć ani
ściśnięć.
! Ciśnienie hydrauliczne kurka powinno mieścić się
w przedziale podanym w tabeli Danych technicznych
(zobacz na sąsiedniej stronie).
! Jeśli rura doprowadzania wody okazałaby się za
krótka, należy zwrócić się do wyspecjalizowanego
sklepu lub do upoważnionego fachowca.
! Nigdy nie instalować rur używanych.
Wypoziomowanie
1. Ustawić pralkę na płaskiej i twardej podłodze; nie
opierać jej o ściany, meble itp.
2. Jeśli podłoga nie jest
dokładnie pozioma, należy
wypoziomować pralkę,
dokręcając lub odkręcając
przednie nóżki (zobacz
rysunek). Kąt nachylenia,
zmierzony na górnym
blacie pralki, nie powinien
przekraczać 2°.
Staranne wypoziomowanie
pralki zapewnia jej
stabilność i zapobiega
wibrowaniu, hałasom i przesuwaniu się urządzenia w
czasie pracy.
38
Page 39

Podłączenie rury usuwania wody
65 - 100 cm
Podłączyć rurę usuwania
wody, bez zginania jej, do
przewodu ściekowego lub
do ścieku w ścianie, które
powinny znajdować się na
wysokości od 65 do 100
cm od podłogi;
! Nie używać przedłużaczy ani wtyczek wielokrotnych.
! Kabel nie powinien mieć zgięć ani nie powinien być
zgnieciony.
! Kabel zasilania elektrycznego może być wymieniony
wyłącznie przez upoważnionego technika specialistę.
Uwaga! Producent uchyla się od wszelkiej
odpowiedzialności, jeśli nie przestrzega się powyższych
zasad.
PL
lub oprzeć ją na brzegu
zlewu lub wanny,
przymocowując do kranu
załączony do pralki
prowadnik (zobacz
rysunek). Wolny koniec
rury usuwania wody nie
powinien pozostawać
zanurzony w wodzie.
! Odradza się używanie rur-przedłużaczy; jeśli
przedłużacz jest jednak konieczny, powinien mieć on
ten sam przekrój, co rura oryginalna, i nie powinien
przekraczać 150 cm długości.
Podłączenia elektryczne
Przed wprowadzeniem wtyczki do gniazdka należy
upewnić się, czy:
• gniazdko ma odpowiednie uziemnienie i czy
odpowiada obowiązującym przepisom;
• gniazdko jest w stanie wytrzymać obciążenie
maksymalnej mocy urządzenia, podanej w tabeli
Danych Technicznych (zobacz obok);
• napięcie prądu elektrycznego w sieci zgodne jest
z danymi podanymi w tabeli Danych Technicznych
(zobacz obok);
Pierwszy cykl prania
Po zainstalowaniu, zanim zacznie się używać pralki, należy
wykonać jeden cykl prania ze środkiem piorącym, lecz
bez bielizny, nastawiając program na 90°C bez prania
wstępnego.
Dane techniczne
Model
Wymiary
PojemnoϾ
Dane pr¹du
elektrycznego
Dane sieci
wodoci¹gowej
SzybkoϾ
wirowania
WITL 100
szerokoϾ cm 40
wysokoϾ cm 85
g³êbokoœæ cm 60
od 1 do 5 kg
Dane techniczne umieszczone sa na
tabliczce na maszynie.
Maksymalne ciœnienie 1 MPa (10 barów)
ciœnienie minimalne 0,05 MPa (0,5 barów)
pojemnoœæ bêbna 42 litrów
do 1000 obrotów na minutê
• gniazdko odpowiada wtyczce pralki. W przeciwnym
razie należy wymienić gniazdko lub wtyczkę.
! Nie należy instalować pralki na otwartym powietrzu,
nawet jeśli miejsce to jest chronione daszkiem, gdyż
wystawienie urządzenia na działanie deszczu i burz,
jest bardzo niebezpieczne.
! Po zainstalowaniu pralki gniazdko elektryczne
powinno być łatwo dostępne.
Programy kontrolne zgodnie
z przepisami
EN 60456
program 2; temperatura 60°C;
wykonane przy 5 kg za³adowanej bielizny.
Urz¹dzenie to zosta³o wyprodukowane
zgodnie z nastêpuj¹cymi przepisami
EWG:
- 89/336/CEE z dn. 03/05/89
(o Kompatybilnoœci Elektromagnetycznej) wraz z kolejnymi zmianami
- 2006/95/CE (o Niskim Napiêciu)
- 2002/96/CE
39
Page 40

Opis pralki
PL
Panel kontrolny
Lampki
sygnalizujące
Przycisk
START/RESET
Przyciski
FUNKCYJNE
Pokrętło
WIROWANIA
Światełko sygnalizujące
POKRYWA
ZABLOKOWANA
Przycisk
WŁĄCZENIE/
WYŁĄCZENIE
Pokrętło
TEMPERATURY
Pokrętło
PROGRAMÓW
Szuadka na środki piorące służy do wsypania środków
piorących i dodatków (zobacz str. 44).
Lampki sygnalizujące: umożliwiają śledzenie stanu
zaawansowania programu prania.
Jeśli nastawiona została funkcja Delay Timer, wskażą one
czas pozostający do uruchomienia się programu (zobacz
str. 41).
Przyciski FUNKCJA służą do wybrania pożądanych
funkcji. Przycisk odnoszący się do wybranej funkcji
zaświeci się po jej nastawieniu.
Pokrętło WIROWANIA: służy do nastawienia lub
wykluczenia wirowania (zobacz str. 43).
Pokrętło
temperatury prania lub nastawienia prania w zimnej
wodzie (zobacz str. 43).
Przycisk WŁĄCZANIE/WYŁĄCZANIE służy do włączania
i wyłączania pralki.
TEMPERATURY
służy do ustawienia
Przycisk START/RESET służy do uruchamiania
programów lub do anulowania błędnie nastawionych.
Światełko sygnalizujące WŁĄCZENIE/POKRYWA
ZABLOKOWANA służy do zrozumienia, czy pralka
jest włączona (lampka pulsująca) i czy można otworzyć
pokrywę (światło stałe) (patrz str. 41).
Pokrętło
(patrz str. 42).
W czasie trwania programu pokrętło pozostaje nieruchome.
Funkcja stand by
Pralka ta, w myśl nowych norm europejskich
związanych z oszczędnością elektryczną, posiada system auto wyłączenia (stand by), który włącza się po 30
minutach nie użytkowania. Ponownies lekko wcisnąć
przycisk
pralka ponownie włączy się.
PROGRAMÓW
WŁĄCZENIE/WYŁĄCZENIE
do nastawiania programów
i poczekać, aż
Światełko sygnalizujące ZAPALENIE/ZABLOKOWANE DRZWICZKI:
To światełko sygnalizacyjne zapalone wskazuje, że drzwiczki pralki są zablokowane, aby zapobiec przypadkowemu
ich otwarciu; aby uniknąć szkód należy odczekać do momentu, w którym światełko zacznie pulsować, po czym można
otworzyć drzwiczki.
! Szybkie pulsowanie światełka ZAPALENIE/ZABLOKOWANE DRZWICZKI przy jednoczesnym pulsowaniu przynajmniej
jeszcze jednego innego światełka sygnalizacyjnego wskazuje nieprawidłowe działanie pralki (zobacz str. 43).
40
Page 41

Jak otwierać i zamykać kosz
A) OTWIERANIE. (Rys.1). Podnieść zewnętrzną
PL
pokrywę i całkowicie ją otworzyć.
B) Następnie otworzyć bęben, pomagając sobie
obiema rękami, jak pokazano na Rys. 2):
- przycisnąć wskazany strzałką na Rys. 2 przycisk i
lekko docisnąć w dół, trzymając opartą jedną dłón, aby
drzwiczki otwierając się nie zraniły palców;
- powoli poluzować drzwiczki, które się zwolnią i łatwo
otworzą.
Rys. 1
Rys. 3
Rys. 2
Rys. 4
Światełka sygnalizujące
Światełka sygnalizujące dostarczają ważnych
informacji. Informują one, co następuje:
Nastawione opóźnienie uruchomienia:
Jeśli została wybrana funkcja Delay Timer (zobacz
str. 43), po nastawieniu programu zacznie migotać
światełko sygnalizacyjne, wskazujące nastawione
opóźnienie:
C) WKŁADANIE BIELIZNY. (Rys.3)
D) ZAMKNIĘCIE. (Rys.4)
- dobrze zamknąć drzwiczki, opuszczając najpierw
drzwiczki przednie i opierając na nich drzwiczki tylne;
- upewnić się, czy zaczepy przednich drzwiczek dobrze
weszły na swoje miejsce w tylnych drzwiczkach;
- po usłyszeniu charakterystycznego “Klik”, co świadczy o
zaskoczeniu zaczepów, lekko docisnąć oboje drzwiczek,
które nie powinny się rozczepić.;
- na zakończenie zamknąć klapę zewnętrzną.
zaprogramowany cykl prania.
Aktualna faza prania: W trakcie cyklu prania poszczegól
ne światełka będą się zapalać, wskazując stan zaawans
owania prania w toku:
Pranie wstępne
Pranie
Płukanie
W miarę upływu czasu pokazywany będzie, przez
migotanie odpowiedniego światełka, czas pozostający
do rozpoczęcia prania przez pralkę:
Po upłynięciu wybranego opóźnienia migające
światełko sygnalizacyjne zgaśnie i rozpocznie się
Odwirowanie
Uwaga: w fazie usuwania wody zapali się światełko
odpowiadające fazie Wirowania.
Przyciski funkcyjne
PRZYCISKI FUNKCYJNE służą również jako światełka
sygnalizujące.
Po wybraniu danej funkcji zaświeci się odpowiedni
przycisk.
Jeśli wybrana funkcja nie może być nastawiona razem z
wybranym programem, przycisk funkcji będzie migotał, a
funkcja nie zostanie uruchomiona.
Jeśli nastawiona zostanie funkcja sprzeczna z uprzednio
wybraną inną funkcją, tylko jeden wybór będzie przyjęty.
41
Page 42

Uruchomienie i Programy
Pranie, p³ukania, funkcja przeciw
gnieceniu lub delikatne wirowania
Pranie, p³ukania, funkcja przeciw
gnieceniu lub delikatne wirowania
Pranie, p³ukania, funkcja przeciw
PL
Krótko mówiąc: jak nastawić program
1. Włączyć pralkę, przyciskając przycisk . Wszystkie światełka
sygnalizacyjne zapalą się na kilka sekund, a następnie
zgasną, po czym zacznie migotać światełko sygnalizacyjne
WŁĄCZENIE/ZABLOKOWANE DRZWICZKI.
2. Włożyć bielinę do pralki, wsypać proszek i dodatki (patrz
str. 44) i zamknąć pokryzwę.
3. Nastawić żądany pożądany program przy pomocy pokrętła
PROGRAMÓW.
Tabela programów
Rodzaj tkaniny oraz
stopieñ zabrudzenia
Standard
Bawe³na: Bielizna bia³a silnie zabrudzona
(poœciel, obrusy itp.)
Bawe³na: Bielizna bia³a silnie zabrudzona
(poœciel, obrusy itp.)
Bawe³na: Bielizna bia³a i kolorowa, wytrzyma³a,
mocno zabrudzona
Bawe³na: Bielizna bia³a i kolorowa, delikatna,
mocno zabrudzona
Bawe³na: Bielizna bia³a, s³abo zabrudzona oraz
kolorowa delikatna (koszule, bluzki itp.)
Syntetyki: Tkaniny syntetyczne o delikatnych kolo-
rach (wszystkie rodzaje bielizny, lekko zabrudzonej)
Syntetyki: Tkaniny syntetyczne o delikatnych kolo-
rach (wszystkie rodzaje bielizny, lekko zabrudzonej)
Syntetyki: Tkaniny syntetyczne o delikatnych kolorach
(wszystkie rodzaje bielizny, lekko zabrudzonej)
We³na
Ubrania i tkaniny wyj¹tkowo delikatne (firanki,
jedwab, wiskoza itp.)
Tempe-
Progr.
ratura
1
90°C • • • 167
2
90°C • •
2
60°C • •
2
40°C • •
3
40°C • •
4
60°C • •
4
40°C • •
5
40°C • •
6
40°C • • 50
7
30°C • • 52
Œrodek pior¹cy
pranie
wstêpne
4. Nastawić temperaturę prania (zobacz str. 43).
5. Nastawić szybkość wirowania (zobacz str. 43).
6. Uruchomić program, przyciskając przycisk START/RESET.
Aby anulować program, należy trzymać przyciśnięty przycisk
START/RESET przez conajmniej 2 sekundy.
7. Po zakończeniu programu świateło sygnalizacyjne
WŁĄCZENIE/ZABLOKOWANE DRZWICZKI zacznie
migotać, co wskazuje, że można otworzyć drzwiczki.
Wyjąć bieliznę i pozostawić drzwiczki pralki uchylone,
aby bęben mógł wyschnąć. Wyłączyć pralkę,
przyciskając przycisk
Œrodek
Pranie
w³aœciwe
zmiêk-
czaj¹cy
Opcja
Wybielanie/
Wybielacz
Delikatne /
Tradycyjne
Delikatne /
Tradycyjne
Delikatne /
Tradycyjne
Delikatne /
Tradycyjne
Delikatne
Delikatne
Delikatne
.
Czas trwa-
nia cyklu
(minuty)
152
150
140
99
80
71
71
Opis cyklu prania
Pranie wstêpne, pranie
w³aœciwe, p³ukania, wirowania
poœrednie i koñcowe
Pranie, p³ukania, wirowania
poœrednie i koñcowe
Pranie, p³ukania, wirowania
poœrednie i koñcowe
Pranie, p³ukania, wirowania
poœrednie i koñcowe
Pranie, p³ukania, wirowania
poœrednie i koñcowe
Pranie, p³ukania, wirowania
poœrednie i koñcowe
Pranie, p³ukania, delikatne
wirowania
gnieceniu lub spust wody
Time 4 you
Bawe³na: Bielizna bia³a i kolorowa, wytrzyma³a,
mocno zabrudzona
Bawe³na: Bielizna bia³a, s³abo zabrudzona oraz
kolorowa delikatna (koszule, bluzki itp.)
Syntetyki: Tkaniny syntetyczne o delikatnych kolo-
rach (wszystkie rodzaje bielizny, lekko zabrudzonej)
Syntetyki: Tkaniny syntetyczne o delikatnych kolo-
rach (wszystkie rodzaje bielizny, lekko zabrudzonej)
8
60°C • • 60
9
40°C • • 50
10
40°C • • 40
11
30°C • • 30
Pranie, p³ukania, wirowania
poœrednie i koñcowe
Pranie, p³ukania, wirowania
poœrednie i koñcowe
Pranie, p³ukania i delikatne
wirowania
Pranie, p³ukania i delikatne
wirowania
Sport
Buty sportowe
(MAKSYM. 2 pary.)
Tkaniny i ubrania sportowe
(Dresy, spodenki itp.)
PROGRAMY CZEŒCIOWE
P³ukanie
Wirowanie Spust wody i wirowania
Spust wody Spust wody
12
30°C • • 50
13
30°C • • 63
Delikatne /
•
Tradycyjne
Pranie w zimnej wodzie (bez
œrodka pior¹cego), pranie,
p³ukania i delikatne wirowania
Pranie, p³ukania, wirowania
poœrednie i koñcowe
P³ukania i wirowania
Uwagi
-Przy programach 8 - 9 zaleca się, by załadowana bielizna nie przekraczała 3,5 kg.
-Przy programie 13 zaleca się, by ładunek nie przekraczał 2 kg.
-Opis funkcji przeciw gnieceniu się tkanin, zobacz Łatwiejsze prasowanie, na następnej stronie. Podane w tabeli dane mają
charakter przybliżony.
Program specjalny.
Dzienny 30’ (program 11 dla tkanin syntetycznych) przeznaczony jest do prania bielizny mało zabrudzonej w krótkim czasie:
trwa tylko 30 minut i pozwala dzięki temu na zaoszczędzenie energii i czasu.
Nastawiając program (11 o temperaturze 30°C) można razem wyprać różnego rodzaju tkaniny (z wyjątkiem wełny i jedwabiu),
przy maksymalnym załadunku do 3kg. Zalecamy stosowanie płynnego środka piorącego.
42
Page 43

Potrzeby indywidualne
C
Nastawienie temperatury
Temperaturę prania nastawia się, obracając pokrętło TEMPERATURY (zobacz Tabelę programów na str. 42).
Temperaturę można zredukować, aż do prania w zimnej wodzie (
Nastawienie wirowania
Obracając pokrętło WIROWANIE, można nastawić szybkość odwirowywania dla wybranego programu.
Maksymalne szybkości przewidziane dla wybranych programów są następujące:
Programy Maksymalna szybkość
Bawełna 1000
Tkaniny syntetyczne 800
Wełna 600 obrotów na minutę
Jedwab no
obrotów na minutę
obrotów na minutę
).
PL
Szybkość wirowania może zostać zmniejszona lub można wirowanie zupełnie wykluczyć przez przyciśnięcie przycisku
.
Pralka zapobiegnie automatycznie wykonaniu wirowania szybszego, niż maksymalne wirowanie przewidziane dla
wybranego programu.
! W celu unikniecia nadmiernych wibracji przed kazdym odwirowaniem pralka rozklada ciezar wsadu w sposób jednolity,
nastepuje to poprzez wykonywanie stalych obrotów kosza z predkoscia nieco wyzsza od obrotów podczas prania.
Kiedy jednak, niezaleznie od powtarzanych prób, wsad nie zostanie rozlozony równomiernie, maszyna wykona wirowanie
z predkoscia nizsza od zaprogramowanej.
W przypadku pojawienia sie nadmiernego niezrównowazenia maszyna bedzie próbowala rozlozyc wsad zamiast
odwirowywac.
Ewentualne próby zrównowazenia wsadu moga wydluzyc laczny czas trwania cyklu o maksimum 10 minut.
Funkcje
Różne funkcje, w jakie wyposażona jest pralka, pozwalają na osiągnięcie pożądanych rezultatów prania. Aby uaktywnić
poszczególne funkcje, należy postępować w następujący sposób:
1. przycisnąć odpowiadający pożądanej funkcji przycisk, zgodnie z poniższą tabelą;
2. zaświecenie się odpowiedniego przycisku oznacza, że funkcja jest aktywna.
Uwaga: Szybkie migotanie przycisku oznacza, że danej funkcji nie można nastawić przy wybranym programie.
Funkcje Efekt Uwagi dotycz¹ce u¿ycia Opcja akt-
OpóŸnia uruchomienie urz¹dzenia a¿ do
9 godzin.
Delay timer
(Timer opó Ÿniaj¹cy)
Cykl wybielania pomocny przy usuwaniu
wytrzyma³ych plam.
Wybielanie
Zmniejsza gniecenie
siê tkanin, u³atwiaj¹c
prasowanie.
£atwiejsze
prasowanie
Zwiêksza skutecznoœæ p³ukania.
P³ukanie
dodatkowe
Przyciskaæ kilkakrotnie przycisk, a¿ do zaœwiecenia siê œwiate³ka
sygnalizacyjnego, odpowiadaj¹cego po¿¹danemu opóŸnieniu.
Po pi¹tym przyciœniêciu przycisk funkcyjny siê dezaktywuje.
Uwaga: Po przyciœniêciu przycisku Start/Reset, mo¿na zmieniæ
nastawione opóŸnienie tylko zmniejszaj¹c je.
Nale¿y pamiêtaæ o dodaniu wybielacza do dodatkowego pojemnika 4
(zobacz str. 44).
Funkcji tej nie mo¿na nastawiæ razem z funkcj¹ £ATWIEJSZE PRASOWANIE.
Po nastawieniu tej funkcji programy 4, 5, 7, zatrzymaj¹ siê z bielizn¹
namoczon¹ w wodzie (Funkcja zapobiegaj¹ca gnieceniu), a zacznie
migotaæ œwiate³ko sygnalizacyjne fazy
- aby zakoñczyæ cykl prania, nale¿y przycisn¹æ przycisk
START/RESET;
- aby wykonaæ tylko opró¿nienie z wody, ustawiæ pokrêt³o
na odpowiednim symbolu
START/RESET.
Funkcji tej nie mo¿na nastawiæ razem z funkcj¹ WYBIELANIE.
Zaleca siê stosowanie tej opcji przy pralce za³adowanej do pe³na lub
przy du¿ej iloœci u¿ytego œrodka pior¹cego.
i przycisn¹æ przycisk
P³ukania:
ywna przy
programach:
Wszystkie
2, 3, 4, 5,
P³ukania.
3, 4, 5, 7, 8,
9, 10
P³ukania
1, 2, 3, 4,
5, 8, 9, 10, 12
P³ukania.
43
Page 44

Środki piorące i bielizna
PL
Szu adka na środki piorące
Dobre rezultaty prania
zależą również od
właściwego dozowania
środka piorącego:
wsypując go za dużo,
wcale nie poprawia
się wydajności prania,
lecz przyczynia się do
odkładania się nalotów
na wewnętrznych
cześciach pralki i do
zanieczyszczania środowiska.
Wysunąć szu adkę i wsypać do niej środki piorące i
dodatkowe w następujący sposób
przegródka 1: Środek piorący do prania wstępnego (w
proszku)
przegródka 2: Środek piorący
(w proszku lub w płynie)
Środek piorący w płynie należy włożyć bezpośrednio do
bębna z zastosowaniem odpowiedniej kulki dozującej.
! Nie używać środków do prania ręcznego, ponieważ
tworzą za dużo piany.
przegródka 3: Środki dodatkowe (zmiękczające, itp.)
Kiedy wlewa się środek zmiękczający do przegródki 3, to
należy zwrócić uwagę, aby nie przekroczyć oznaczonego
poziomu “max”.
Środek zmiękczający jest automatycznie dodawany do
wody podczas ostatniego płukania. Na zakończenie
tego programu prania w przegródce 3 pozostaje reszta
wody. Służy ona dla skoncentrowanych środków
zmiękczających, to znaczy do ich rozprowadzenia z wodą.
Jeśliby w przegródce 3 pozostało więcej wody niż zwykle,
oznacza to, że urządzenie dozujące jest zatkane. Jak je
wyczyścić patrz strona 46.
Przygotowanie bielizny
• Podzielić bieliznę do prania według:
- rodzaju tkaniny / symbolu na etykietce.
- kolorów: oddzielić bieliznę kolorową od białej.
• Opróżnić kieszenie i sprawdzić guziki.
• Nie przekraczać wskazanego ciężaru bielizny
suchej:
Tkaniny wytrzymałe: max 5 kg
Tkaniny syntetyczne: max 2,5 kg
Tkaniny delikatne: max 2 kg
Wełna: max 1 kg
Ile waży bielizna?
1 prześcieradło 400-500 gr.
1 powłoczka na poduszkę 150-200 gr.
1 obrus 400-500 gr.
1 szlafrok 900-1.200 gr.
1 ręcznik 150-250 gr.
Tkaniny wymagające szczególnej dbałości
Firanki: włożyć je złożone do poszewki lub do
siatkowatego worka. Prać same, nie przekraczając
połowy załadunku. Stosować program 7, który
automatycznie wyklucza wirowanie.
Poduszki i kurtki: Jeśli wypełnione są one pierzem
gęsim lub kaczym, można je prać w pralce. Wywrócić
na lewą stronę i załadować nie więcej niż 2-3 kg;
powtórzyć płukania jeden lub dwa razy i stosować
delikatne odwirowanie.
Tenisówki: oczyścić z błota. Można je prać razem z
dżinsami i bielizną wytrzymałą, lecz nie białą.
Wełna: Aby uzyskać dobre rezultaty prania, należy
stosować specjalny środek piorący i nie przekraczać 1
kg załadunku.
przegródka 4: Wybielacz
Cykl wybielania
Tradycyjnego wybielacza używa się do białych tkanin
wytrzymałych, delikatnego - do tkanin kolorowych,
syntetycznych i do wełny.
Przy wlewaniu wybielacza nie należy przekroczyć
poziomu „max” wskazanego na środkowej ośce (zobacz
rysunek).
Aby wykonać tylko fazę wybielania, należy wlać wybielacz
do 4 przegródki, nastawić program Płukania
wcisnąć przycisk – Funkcja
44
Wybielanie .
marchia
Page 45

Zalecenia i środki ostrożności
! Pralka została zaprojektowana i wyprodukowana zgodnie z
międzynarodowymi przepisami bezpieczeństwa. Podajemy
Wam poniższe zalecenia, mając na względzie Wasze
bezpieczeństwo, i powinnieście je uważnie przeczytać.
Ogólne zasady bezpieczeństwa
• Pralki powinny używać wyłącznie osoby dorosłe i w sposób
zgodny z podanymi w niniejszej książeczce instrukcjami.
• Urządzenie to nie jest przeznaczone do użytkowania
przez osoby (w tym dzieci) o ograniczonej sprawności
zycznej, zmysłowej lub umysłowej oraz nieposiadające
odpowiedniego doświadczenia i wiedzy, chyba że używają
go pod nadzorem lub po otrzymaniu wskazówek od osoby
odpowiedzialnej za ich bezpieczeństwo. Należy pilnować,
aby dzieci nie bawiły się urządzeniem.
• Nie dotykać pralki, stojąc przy niej boso lub mając ręce
czy stopy mokre lub wilgotne.
• Nie wyjmować wtyczki z gniazdka, ciągnąc za kabel,
lecz trzymając za wtyczkę.
• Nie otwierać szuadki na środki piorące w trakcie prania.
• Nie dotykać usuwanej wody, gdyż może być ona bardzo
gorąca.
• W żadnym wypadku nie otwierać drzwiczek pralki na
siłę: mógłby bowiem ulec uszkodzeniu mechanizm
zabezpieczający drzwiczki przed przypadkowym
otworzeniem.
• W razie usterek nie należy w żadnym wypadku próbować
dostać się do wewnętrznych części pralki, próbując
samemu ją naprawiać.
• Skontrolować zawsze, by dzieci nie zbliżały się do
pracującej pralki.
• W czasie prania okrągłe drzwiczki pralki rozgrzewają się.
• Jeśli trzeba przenieść pralkę w inne miejsce, należy to
robić bardzo ostrożnie w kilka osób. Nigdy nie należy
tego robić samemu, gdyż pralka jest bardzo ciężka.
• Przed włożeniem bielizny sprawdzić, czy bęben jest pusty.
Usuwanie odpadów
• Pozbycie się materiałów opakowania:
stosować się do lokalnych przepisów; w ten sposób
opakowanie będzie mogło zostać ponownie
wykorzystane.
• Pozbywanie sie starych urzadzen elektrycznych.
Europejska Dyrektywa 2002/96/EC dotyczaca
Zuzytych Elektrycznych i Elektronicznych
Urzadzen (WEEE) zaklada zakaz pozbywania sie
starych urzadzen domowego uzytku jako
nieposortowanych smieci komunalnych.
Zuzyte urzadzenia musza byc osobno zbierane i
sortowane w celu zoptymalizowania odzyskania
oraz ponownego przetworzenia pewnych
komponentów i materialów. Pozwala to
ograniczyc zanieczyszczenie srodowiska i
pozytywnie wplywa na ludzkie zdrowie.
Przekreslony symbol „kosza” umieszczony na
produkcie przypomina klientowi o obowiazku
specjalnego sortowania.
Konsumenci powinni kontaktować się z władzami
lokalnymi lub sprzedawcą w celu uzyskania
informacji dotyczących postępowania z ich
zużytymi urządzeniami gospodarstwa domowego.
• Pozbycie się starej pralki:
przed oddaniem jej na złom należy ją uniezdatnić
do użytku odcinając kabel elektryczny i wyjmując
drzwiczki.
Oszczędność i ochrona środowiska
Technologia w służbie środowiska
Jeśli przez okrągłe drzwiczki pralki widać w czasie prania mało
wody, to dlatego, że przy nowej technologii Indesit wystarcza
mniej niż połowa wody do uzyskania maksymalnych
rezultatów prania: został w ten sposób osiągnięty jeden
z celów ochrony środowiska.
Oszczędność środka piorącego, wody, energii i czasu
• Aby nie trwonić zasobów, należy używać pralki
załadowanej do pełna. Jedno załadowane do pełna
pranie, zamiast dwóch załadowanych do połowy,
pozwala na zaoszczędzenie aż do 50% energii.
• Pranie wstępne konieczne jest tylko w przypadku
bielizny bardo brudnej. Unikanie prania wstępnego
pozwala na zaoszczędzenie środka piorącego; czasu,
wody oraz od 5 do 15% energii.
• Wywabiając plamy odplamiaczem i pozostawiając
bieliznę namoczoną w wodzie przed praniem, można
zredukować temperaturę prania. Stosując program
60°C zamiast 90°C lub program 40°C zamiast 60°C,
można zaoszczędzić aż do 50% energii.
• Dokładne dozowanie środka piorącego w zależności
od twardości wody, stopnia zabrudzenia i ilości
bielizny pozwala uniknąć jego trwonienia i wychodzi na
korzyść środowisku: środki piorące, mimo że ulegają
biodegradacji, zawsze zawierają jednak składniki, które
zakłócają środowisko naturalne. Należy również unikać,
gdy jest to możliwe, środka zmiękczającego.
• Dokonując prania późnym popołudniem i wieczorem, aż do
wczesnych godzin rannych, przyczynia się do zmniejszenia
obciążenia energetycznego elektrowni.
Opcja Delay Timer (zobacz str. 43) pomaga przy takim
zaprogramowaniu prania w czasie.
• Jeśli bielizna ma być wyszuszona w suszarce,
należy wybrać wysoką szybkość odwirowania.
Dobrze odwirowana z wody bielizna pozwala na
zaoszczędzenie czasu i energii przy suszeniu.
PL
45
Page 46

Konserwacja
PL
Wyłączenie wody i prądu elektrycznego
• Zamknąć kurek dopływu wody po każdym praniu.
Zmniejsza się w ten sposób zużycie instalacji
hydraulicznej pralki oraz niebezpieczeństwo
przecieków.
• Wyjąć wtyczkę z kontaktu przed przystąpieniem do
czyszczenia pralki oraz czynności konserwacyjnych.
Czyszczenie pralki
Obudowę zewnętrzną i gumowe części pralki należy
myć wilgotną ściereczką zmoczoną w wodzie z mydłem.
Nie stosować rozpuszczalników ani ostrych i ściernych
środków czyszczących.
Czyszczenie szuadki na środki piorące
Wysunąć szuadkę, unosząc ją lekko ku górze i wyciągając
na zewnątrz (zobacz rysunek).
Wypłukać ją pod bieżącą wodą. Czynność tę należy
powtarzać stosunkowo często.
Czyszczenie drzwiczek i bębna
• Należy zawsze pozostawiać uchylone drzwiczki pralki,
aby zapobiec tworzeniu się przykrych zapachów.
Czyszczenie pompy
Pralka wyposażona jest w pompę samooczyszczającą, która
nie wymaga zabiegów konserwacyjnych. Może się jednak
zdarzyć, że małe przedmioty (monety, guziki) wpadną do
przedsionka ochronnego pompy, znajdującego się w jej
dolnej części.
! Upewnić się, by cykl prania był zakończony i by wtyczka
była wyjęta z gniazdka.
Aby odzyskać ewentualne przedmioty, które upadły do
wstępnej komory:
1. Odczepić dolny
cokół w przedniej
części pralki pociągając
rękoma jej boczne
końce (patrz rysunek);
2. odkręcić przykrywkę,
obracając ją w kierunku
przeciwnym do ruchu
wskazówek zegara
(zobacz rysunek): fakt,
że wypłynie trochę
wody, jest zjawiskiem
normalnym;
3. dokładnie wyczyścić
wnętrze;
4. ponownie przykręcić
przykrywkę;
5. ponownie
przymocować panel,
pamiętając o wsunięciu
zaczepów w odpowiednie otwory przed dopchnięciem
go do urządzenia.
Kontrola rury doprowadzania wody
Przynajmniej raz do roku należy skontrolować rurę
doprowadzania wody. Jeśli widoczne są na niej rysy
i pęknięcia, należy ją wymienić: w trakcie prania
duże ciśnienie może bowiem spowodować jej nagłe
rozerwanie się.
! Nigdy nie instalować rur używanych.
Jak czyścić szuadkę środków piorących
Wymontowanie:
Lek ko pr zyci sną ć d u ży
przycisk w przedniej części
szuadki środków piorących i
pociągnąć ją do góry (Rys.1).
Rys. 1 Rys. 2 Rys. 3
46
Czyszczenie:
Wymyć. szuadkę pod bieżącą wodą (Rys. 3), pomagając
sobie starą szczoteczką do zębów i po wyjęciu pary
syfonków znajdujących się w górnej części przegródek 1 i
2 (Rys.4), sprawdzić, czy nie są one zatkane i wypłukać je.
Ponowne zamontowanie:
Po włożeniu pary syfon-ków,
wstaw szuadkę na swoje
miejsce, zaczepia jąc ją
(Rys. 4, 2, 1).
Rys. 4
Page 47

Anomalie i środki zaradcze
Może się zdarzyć, że pralka nie działa. Zanim wezwie się Serwis Techniczny (zobacz str. 48) należy sprawdzić, czy problemu
tego nie da się łatwo rozwiązać samemu, pomagając sobie poniższym wykazem.
PL
Nieprawidłowości w działaniu:
Pralka się nie włącza.
Cykl prania nie zaczyna się.
Pralka nie pobiera wody.
Pralka pobiera i usuwa wodę bez
przerwy.
Możliwe przyczyny/Porady:
• Wtyczka nie jest włączona do gniazdka, lub jest wsunięta niedostatecznie, tak
że nie ma kontaktu.
• W domu brak jest prądu.
• Drzwiczki nie są dobrze zamknięte
• Nie został przyciśnięty przycisk .
• Nie został przyciśnięty przycisk START/RESET.
• Kurek dopływu wody jest zamknięty.
• Nastawione zostało opóźnione uruchomienie (Delay Timer, zobacz str. 43).
• Rura pobierania wody nie jest podłączona do kurka.
• Rura jest zgięta.
• Kurek dopływu wody jest zamknięty.
• W domu brak jest wody.
• Ciśnienie wody nie jest wystarczające.
• Nie został przyciśnięty przycisk START/RESET.
• Rura usuwania wody nie została zainstalowana na wysokości od 65 do 100 cm
od podłogi (zobacz str. 39).
• Końcówka rury usuwania wody jest zanurzona w wodzie (zobacz str. 39).
• Usuwanie wody bezpośrednio w ścianie nie posiada odpowietrznika.
Jeśli po skontrolowaniu tych pozycji nieprawidłowość nadal się utrzymuje, należy
zamknąć kurek dopływu wody, wyłączyć pralkę i wezwać Serwis Techniczny.
Jeśli mieszkanie znajduje się na najwyższych piętrach budynku, może zaistnieć
efekt “syfonu”, w wyniku czego pralka nieustannie pobiera i usuwa wodę. W celu
wyeliminowania tej niedogodności w handlu dostępne są specjalne zawory.
(lampka Pokrywka Zablokowana miga).
Pralka nie usuwa wody i nie
odwirowuje.
Pralka mocno wibruje w fazie
odwirowywania.
Z pralki wycieka woda.
Wskaźnik WŁĄCZENIE/
ZABLOKOWANE DRZWICZKI
zacznie szybko migotać razem
z conajmniej jednym innym
światełkiem sygnalizacyjnym.
Tworzy się zbyt wiele piany.
• Program nie przewiduje usuwania wody: przy niektórych programach należy
uruchomić je manualnie (zobacz str. 42).
• Została nastawiona funkcja Łatwiejsze prasowanie: aby zakończyć program,
należy przycisnąć przycisk START/RESET (zobacz str. 43).
• Rura usuwania wody jest zgięta (zobacz str. 39).
• Rura usuwania wody jest zatkana.
• Bęben, w chwili instalacji pralki, nie został odpowiednio odblokowany (zobacz
str. 38).
• Pralka nie jest ustawiona dokładnie w poziomie (zobacz str. 38).
• Pralka jest wciśnięta między meble i ścianę (zobacz str. 38).
• Rura doprowadzania wody nie jest dobrze przykręcona (zobacz str. 38).
• Szuadka na środki piorące jest zatkana (aby ją oczyścić, zobacz str. 46).
• Rura usuwania wody nie jest dobrze przymocowana (zobacz str. 39).
• Wyłączyć maszynę i wyjąc wtyczkę z gniazdka, odczekać około 1 minuty,
następnie włączyć ponownie.
Jeśli niedogodność nie ustępuje wezwać Serwis.
• Środek piorący nie jest odpowiedni do pralek automatycznych (na opakowaniu
musi być napisane: “do pralek”, “do prania ręcznego i pralek” lub podobne).
• Użyto za dużo środka piorącego.
47
Page 48

Serwis Techniczny
195083522.00
02/2010 - Xerox Fabriano
PL
Przed zwróceniem się do Serwisu Technicznego:
• Sprawdzić, czy problemu nie można rozwiązać samemu (zobacz str. 47);
• Ponownie nastawić program i sprawdzić, czy problem został rozwiązany;
• W przypadku negatywnym skontaktować się z upoważnionym ośrodkiem Serwisu Technicznego pod numerem
podanym na karcie gwarancyjnej.
! Nigdy nie zwracać się do nieupoważnionych techników.
Należy podać:
• rodzaj defektu;
• model urządzenia (Mod.);
• numer seryjny (S/N).
Informacje te znajdują się na przymocowanej z tyłu pralki tabliczce znamionowej.
48
 Loading...