


WD 104 T
Washer-dryer
Instructions for installation and use
M
Стиральная машина с сушкой
Руководство по установке и эксплуатации
Lavante-séchante
Instruction pour l'installation et l'emploi
Waschtrockner
Installations- und Bedienungsanleitungen
Praèka se suièkou
Návod k instalaci a pouití
Práèka so suièkou
Rady na lepie pranie

Washer-dryer 1
GB
Instructions for installation and use
Стиральная машина с сушкой 15
CIS
Руководство по установке и эксплуатации
Lavante-séchante 29
F
Instruction pour l'installation et l'emploi
Waschtrockner 43
D
Installations- und Bedienungsanleitungen
Praèka se suièkou 57
CZ
Návod k instalaci a pouití
Práèka so suièkou 65
SK
Rady na lepie pranie
Quick guide
Here are the 12 topics explained in this manual. Read, learn and
have fun: you will discover many secret ways to get a better
wash, more easily and making your washer-dryer last longer .
1.
Installation and removal (p. 11)
Installation, after delivery or transport, is the most important operation
for the correct functioning of your washer-dryer . Alwa ys check:
1. That the electric system conforms to regulations;
2. That the inlet and draining pipes are connected correctly .
Never use pipes that have already been used.
3. That the washer-dryer is levelled properly; something
worth checking to aid the performance of your
washer-dryer;
4. That the drum's fixing screws have been removed from
the back of the washer-dryer;
2. What goes in your washer-dryer and how
to start it (p. 2)
A correct distribution of your laundry is vital to the successful
outcome of the wash and the life of the w asher-dryer . Learn all the
tips and secrets to dividing your linen: colour, type of fabric.
3.
Guide to understanding labels (p. 6)
The symbols on the labels of your garments are easy to understand
and equally important for the success of your wash. The guide
includes simple instructions to help you choose the right temperature, wash cycles and ironing methods.
4.
Useful tips to avoid mistakes (p. 7)
Years back, our g r andmothers were the ones who ga v e us good
advice - and in those days synthetic fibres did not exist: washing
was easy. Today, your washer-dryer offers you helpful advice
allowing you to wash wool even better than an expert laundress
would by hand.
5.
The detergent dispenser (p. 8)
How to use the detergent dispenser.
8. How to dry (p. 5)
A few handy tips to get the best drying cycle from your appliance.
9. Care and maintenance (p. 12)
With just a bit of care, it will repay you with loyalty and devotion.
With the necessary upkeep, it will wash for years and years to
come.
10.
Problems and solutions (p. 9 and 10)
Before calling a technician, read these pages: immediate solutions
may be found for a number of problems. If the problem persists,
call your local Indesit customer services who will be pleased to
help. Any failure will be repaired, as soon as possib le.
11.
Technical characteristics (p. 10)
Herein are the technical features of your washer-dryer: model type
number, electric and w ater specifications, size, capacity, speed of
the spin cycle and compliance with Italian and European regulations.
12. Safety for you and your family (p. 13)
6.
Understanding the control panel (p. 3)
Washer-dryer’s control panel is very simple. It has only a few
essential buttons to help you choose any type of wash cycle,
ranging from the most energetic, capable of cleaning a mechanic’ s
overalls, to the most delicate f or wool. F amiliarising yourself with it
will help you get the best out of your wash while helping your
washer-dryer last longer . It’s easy .
7. Guide to the wash programmes (p. 4)
Herein is an easy table to help you choose the right programme,
temperature, detergents and possible additives. Choose the right
programme and you will get better results with your wash while
saving time, water and energy, day after day.
1
Instructions for installation and use
Here you will find the necessary safety guidelines, and it is
important for you to read this section carefully .
M
What goes in your washer -dryer?
Before washing, you can do a great deal to ensure better results. Divide your garments
according to fabric and colour. Read the labels, follow their guidelines.
Before washing.
Divide your washing according
to the type of fabric and colour
fastness.
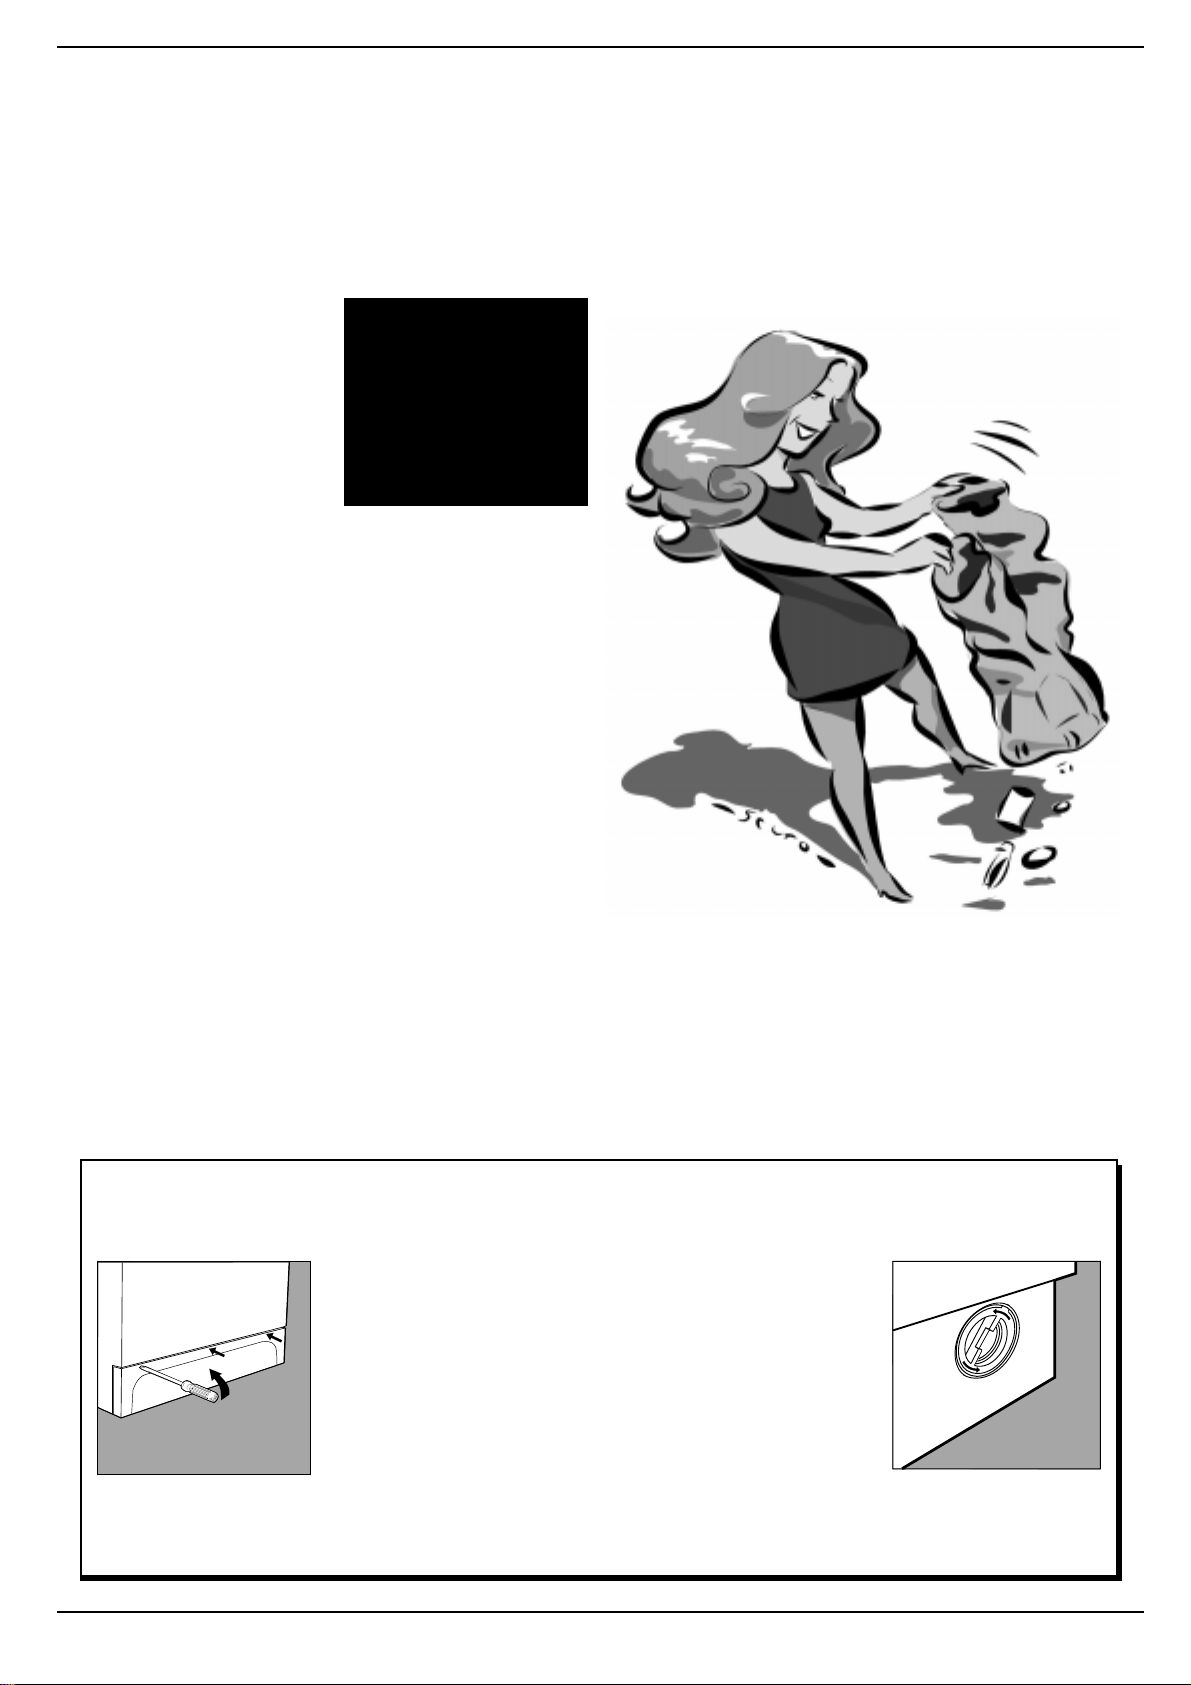
Empty all pockets (coins, paper ,
money and small obejects) and
ensure all loose buttons are
repaired or removed prior to
loading.
Starting the washer-dryer
After installing your new washer-dryer , start a wash cycle
by setting programme "1" at 90 degrees.
Starting your washer-dryer in
the right way is important for the
quality of your wash, to help
prevent future problems and
enhance life expectancy of your
appliance. Once you have
loaded your washer-dryer and
added the detergent together
with any fabric conditioner,
always check that:
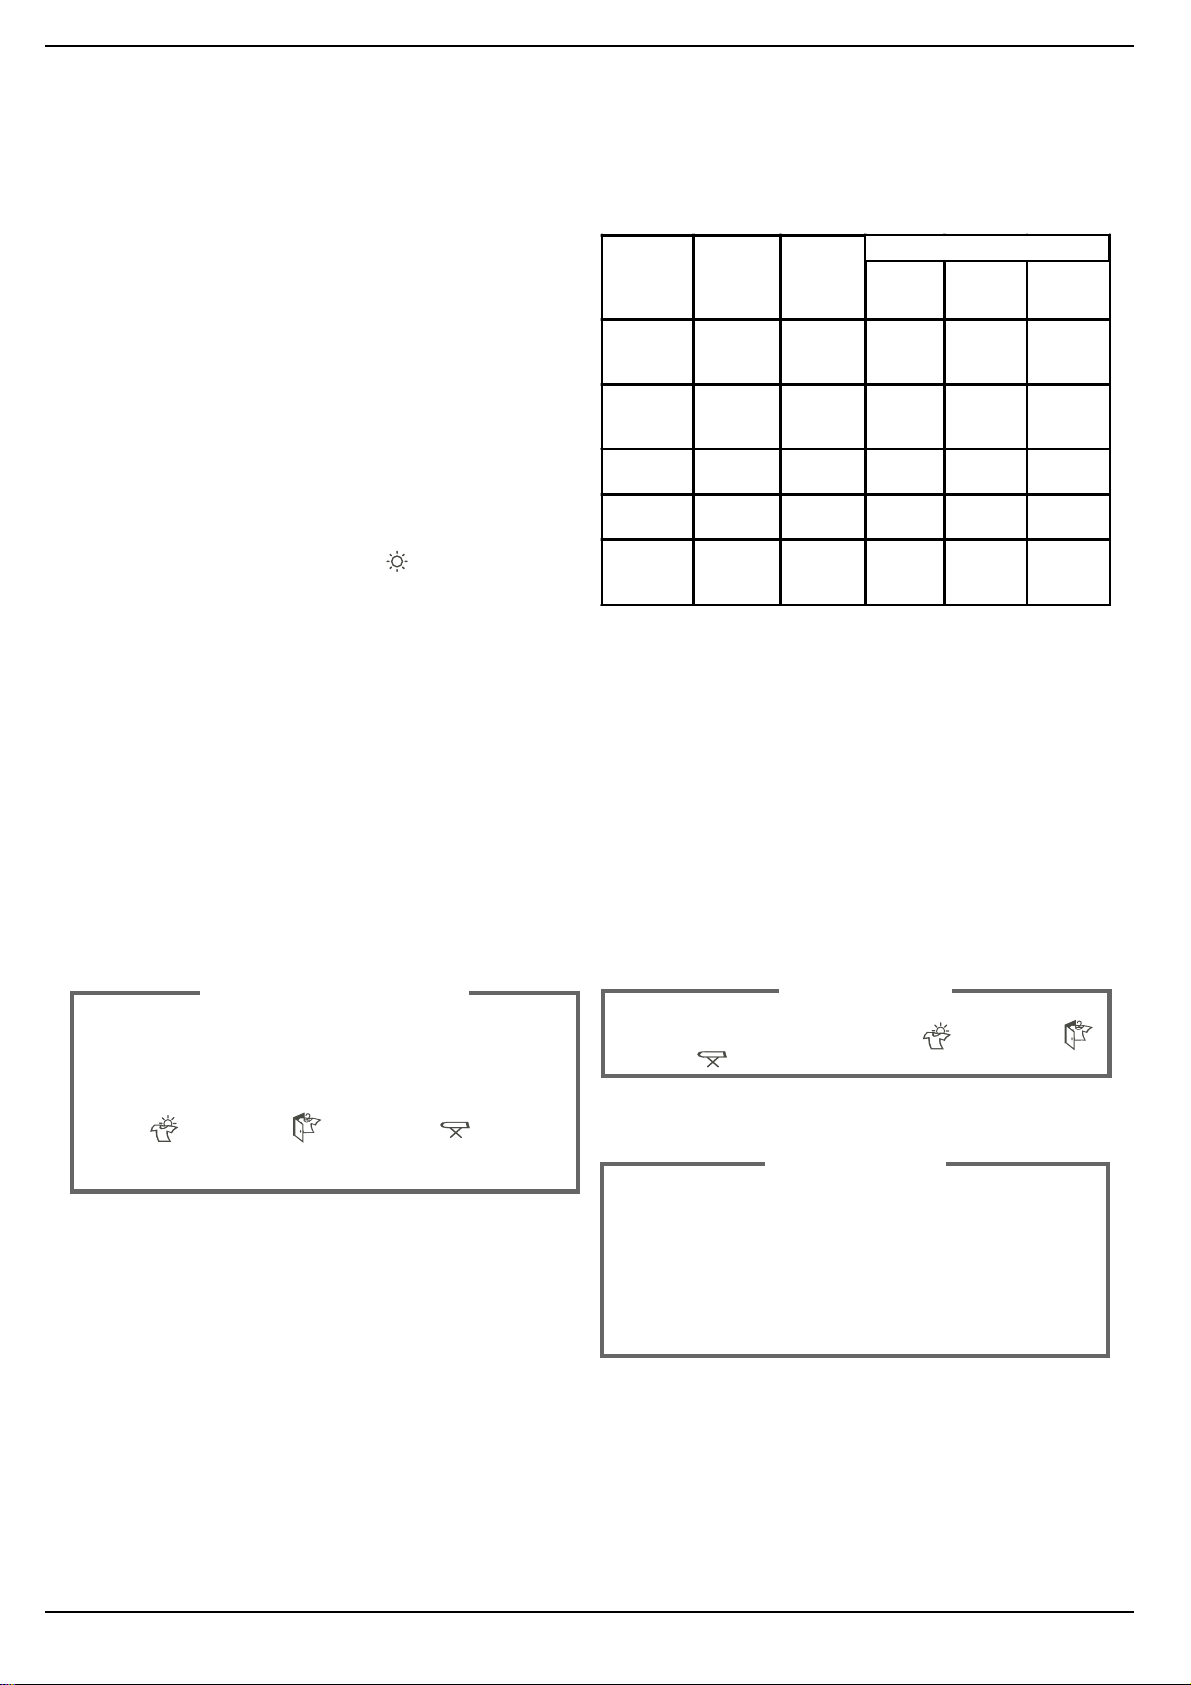
For more delicate
garments:
protect underwear, tights
and stockings and delicate
items by placing them in a
canvas pouch
The labels say it all.
Always look at the labels: they
tell you everything about your
garment and how to wash it in
the best possible way.
The table on page 6 shows all
meanings behind these
symbols. Their recommendations are important to
achieve better wash results.
1. The door is closed correctly.
2. The plug is secured in the
socket.
3. The water supply is turned
on.
4. Selector knob A is positioned
on one of the symbols
Reset).
Choose the desired programme
The programme is selected
according to the type of garments
that need to be washed. T o choose
a programme, refer to the table on
page 4. Turn knob A until the
selected programme is aligned
with the mark on the knob, turn
knob B to the desired temperatu-
re settings,check that knob C is
in the desired position, if
necessary use buttons E, F, G
and lastly, press on/off button H
(I position).
(Stop/
Big and small happily
together.
This washer-dryer has a special
electronic control device for even
distribution: before the spin cycle
starts, this device allows the
garments to positions
themselves, to minimise noise
and vibrations during the spin
cycle.
Remember that, if you want to
use it, the "programmed start"
should be set before the wash
cycle.
At the end of the wash cycle...
Lamp I will flash quickly for a few
seconds, then it will begin
flashing more slowly .
Then turn the washer-dryer off
by pressing on-off button H
(O position). You can now open
the washer-dryer door safely.
Dividing your garments
according to fabric and
colour, is very important
for good results
After having removed the
freshly cleaned washing, leave
the door open to allow air
circulation inside the drum.
Always disconnect electricity at
the socket and turn off the water
supply .
Remember that, in the event
of a power failure, or should
the washer-dryer switch itself
off, the programme chosen
will remain in its memory.
How to eliminate the most common stains
Ink and biro Dab with a wad of cotton soaked in methyl alcohol or alcohol at 90°.
Tar Dab with fresh butter, rub in turpentine then wash immediately.
Wax Scrape away, then run a hot iron between two sheets of absorbent paper. Then rub in cotton with turpentine or
methyl alcohol.
Chewing gum Rub in nail polish remover and wipe with a clean rag.
Mold Cotton and white linen should be placed in a solution of 5 parts water, one bleach and a spoon of vinegar, then
washed immediately. For other white fabrics, use hydrogen peroxide at 10 volumes and wash immediately.
Lipstick Dab with ether on wool or cotton. Use tricloroetilene for silk.
Nail polish Place a sheet of absorbent paper on the side of the stain, wet it with nail polish remover, shifting the
garment as the sheet gradually changes colour.
Grass Dab with a wad of cotton soaked in methyl alcohol.
Instructions for installation and use
2
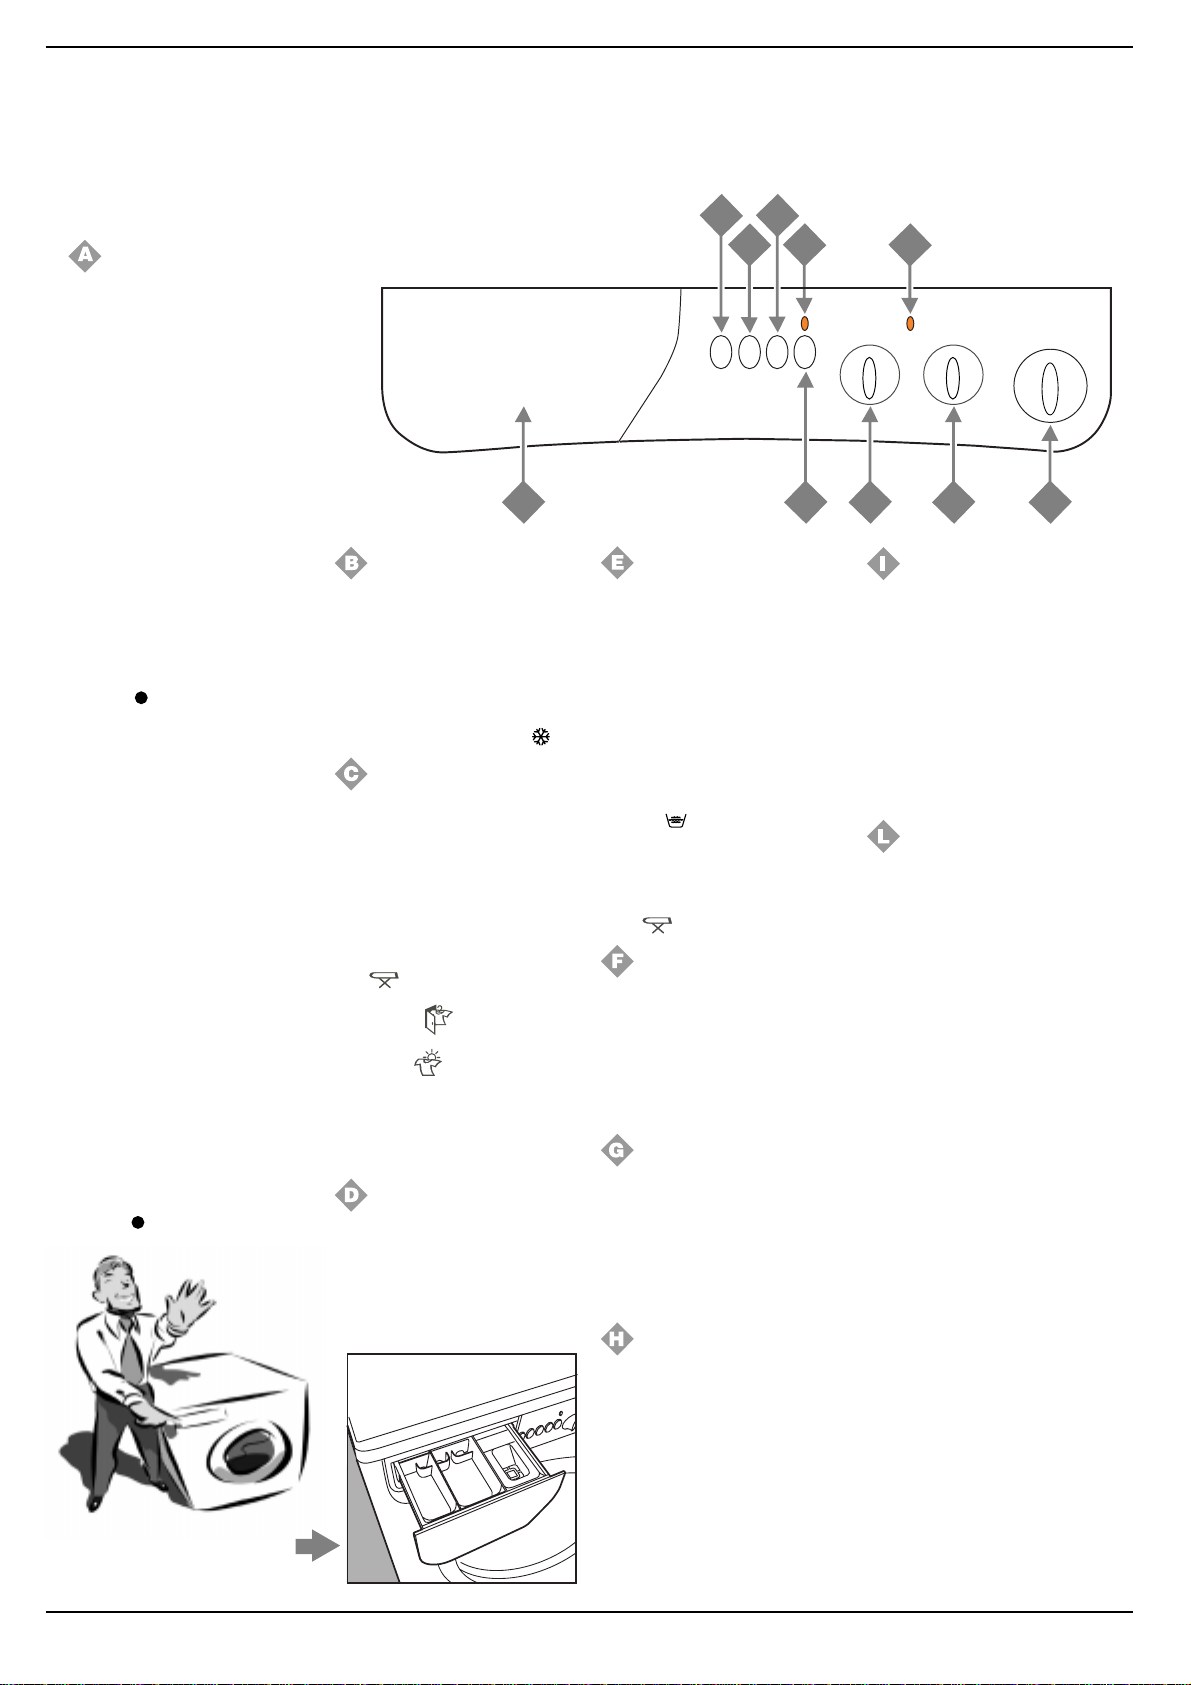
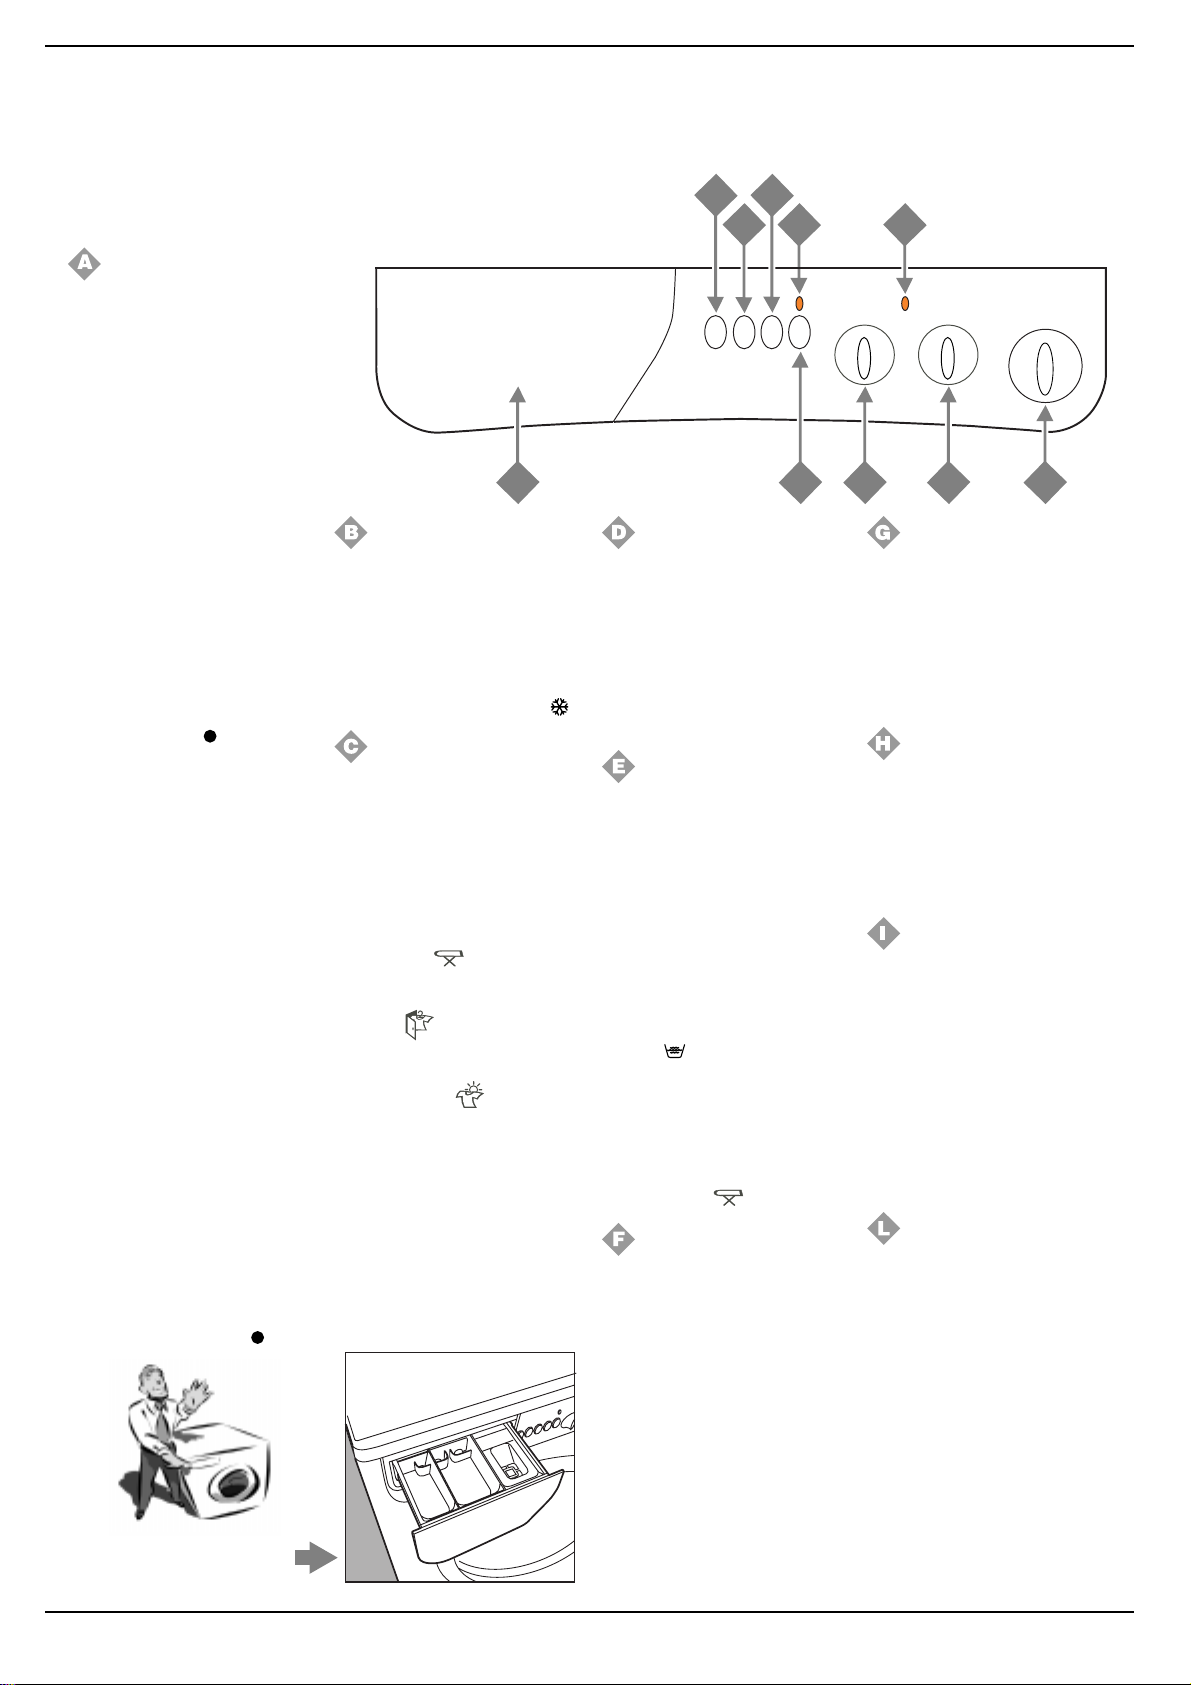
Understanding the control panel
Here I’m in command
Making the right choice is important. And it’s easy.
F
Programme selector knob
and programmed start
Use this knob to select the wash
programme.
T urn this knob clockwise only .
To select a programme, you
should turn the knob so that the
symbol/number of the desired
programme is in line with the
pointer on the knob.
Now press on/off button H
(position I), pilot lamp I will start
flashing.
After 5", the setting will be
accepted, pilot lamp I will stop
flashing (staying lit) and the wash
cycle will begin.
Should you wish to interrupt the
programme in progress or set a
new one, select one of the
symbols
5" : when the cancellation has
been accepted, pilot lamp I
flashes, and you can then turn the
appliance off.
You can use this knob to delay
the appliance's operation.
Select one of the 3 delay time
positions, press the on/off button
H (position I) and wait 5". The
setting has now been accepted
(pilot lamp I stays lit) and you can
select the programme you desire.
Pilot lamp I has a particular
flashing motion (2" on and 4" off)
to indicate that a delayed start
has been set.
During this phase, you can open
the appliance door and change
the washing load, should you
wish to do so.
After the wash cycle has been set
and accepted by the washerdryer, turning the knob will have
no effect (except for when it is on
position
(Stop/Reset) and wait
Stop/Reset).
Temperature contr ol knob
It is used to set the wash temperature in the recommended
programme table on pag. 4. It also
allows you to reduce the temperature recommended for the
selected programme, and even
to set a cold wash cycle (
Drying cycle knob
Use this knob to select the
desired drying cycle. Two
options are available:
A - Based on time:
From 40 minutes to 150.
B - Based on the damp level of
the dry clothes:
Iron
easy to iron.
Wardrobe
put away.
Extra dry
recommended for towelling and
bathrobes.
A cooling stage is foreseen at
the end of the drying cycle.
Detergent dispenser
It is divided into 3 compartments:
1.Detergent for pre-wash;
2.Detergent for the main cycle
3. F abric conditioner.
:slightly damp clothes,
: dry clothes to
: very dry clothes,
wash;
D
Easy iron
This function allows your
washing to come out of the
machine without creases,
making it much easier to iron.
Y ou can use it with programmes
3-4 (Cotton), 5-6 (Synthetics)
and 9 (Delicates).
).
Press this button in
programmes 5-6-9 and the wash
cycle will come to a stop on
symbol
by pressing button E again.
Note: If you also want to run the
drying cycle, this button is
enabled only if combined with
level
Slow spin
Use this button to reduce the
spinning speed from 1000 to
500 rpm for the cotton and linen
programmes and from 850 to
500 rpm for the synthetic
fabrics programmes.
Rapid wash
This button reduces the length
of the wash programme by
about 30%. It cannot be used
with special programmes (see
page 4) or those for wool and
silk.
. Y ou can complete it
(Iron).
GE
I
H
L
C
On-off lamp / door locked
Lamp I flashes slowly when the
appliance is switched on and
awaiting instructions and at the
end of a cycle, indicating that the
door can be opened. It flashes
quickly when the door should
not be opened. A steady light
means the appliance has
accepted the selected
programme.
Drying cycle lamp
When this lamp is on, it means
that knob C has been set on a
drying cycle and at the end of
the wash cycle, the appliance
will run the selected tumble
drying cycle.
B
A
The detergent dispenser is here.
3
Instructions for installation and use
On-off
When button H is pressed, the
washer-dryer is switched on,
when it is not the machine is
3
2
1
switched off.
Turning the appliance off
does not cancel the selected
programme.
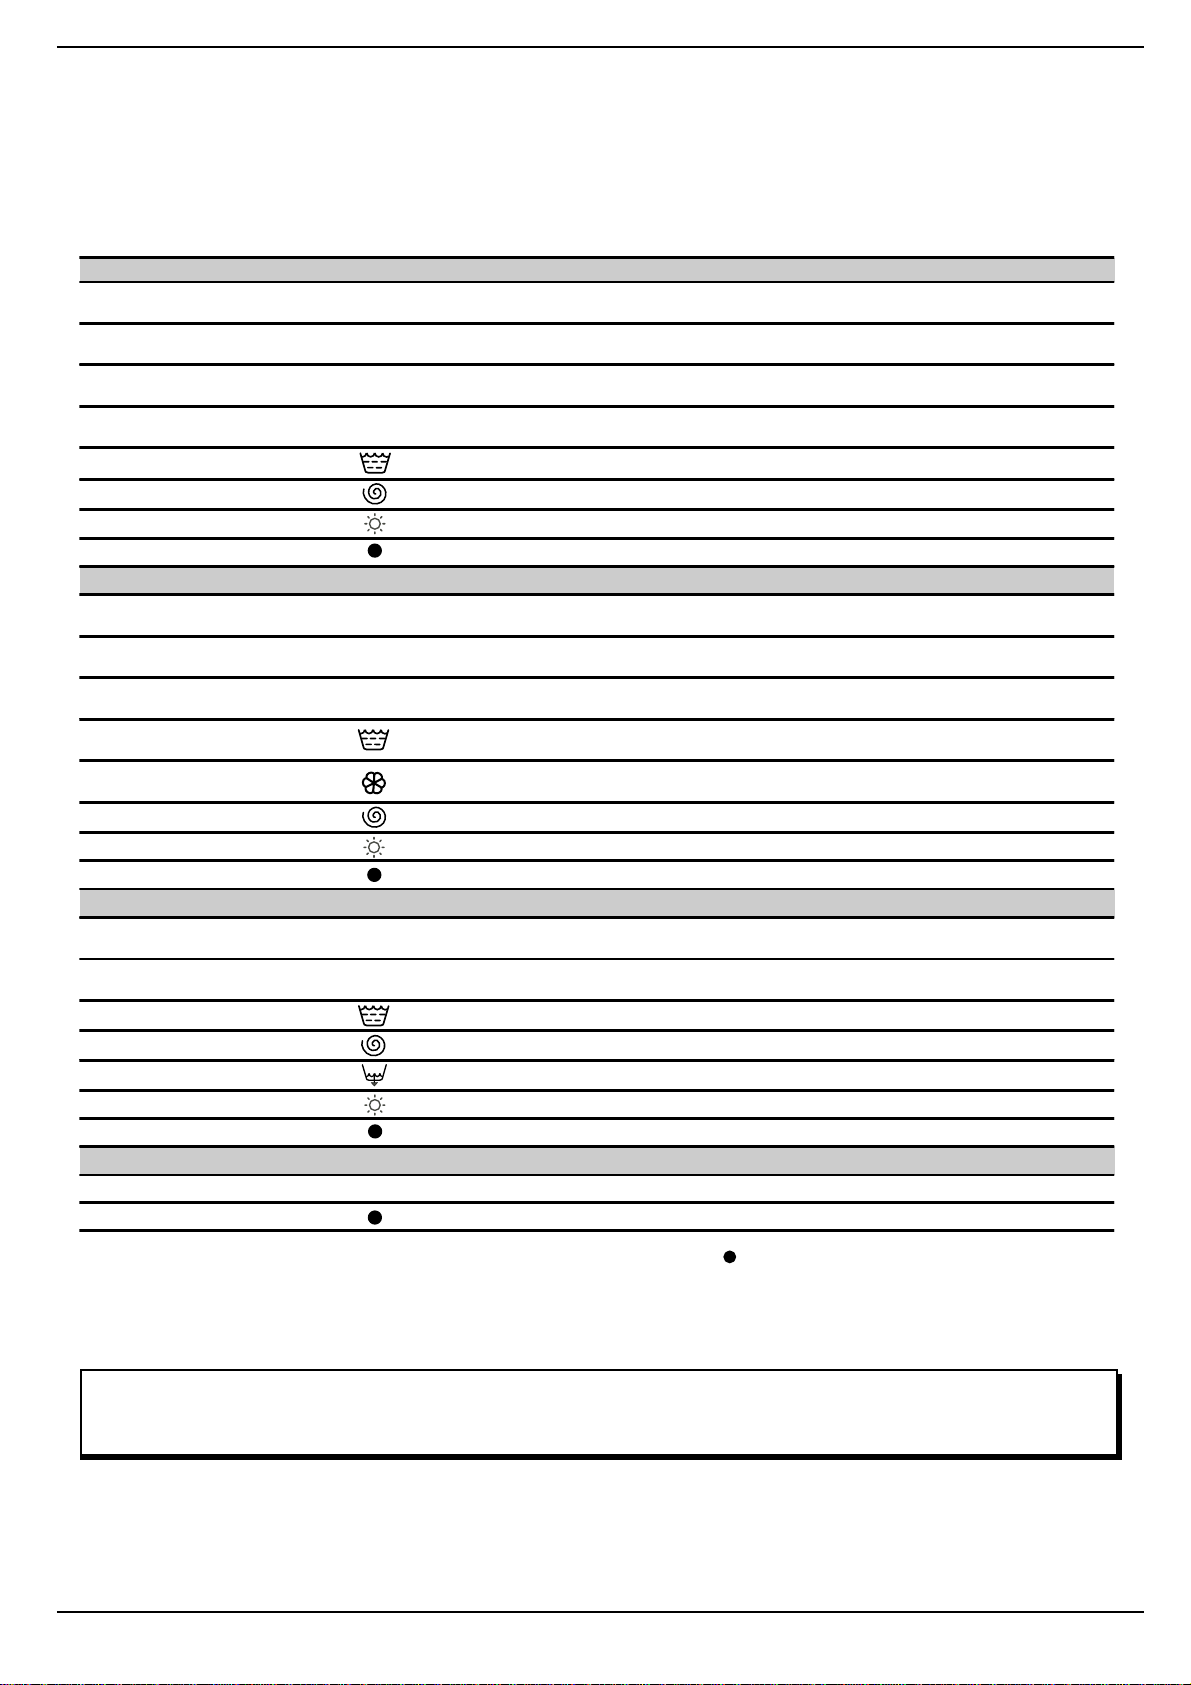
What are you washing today?
A programme for all seasons
Type of fabric and degree of soil Programme
COTTON
Exceptionally soiled whites
(sheets, tablecloth s, etc. )
Exceptionally soiled whites
(sheets, tablecloth s, etc. )
Heavily soiled whites and fast colours
Slightly soiled whites an d delica te
colours (shirts, jumpers, etc.)
Rinse cycles
Spin cycle Draining and final spin cycle
Drying cycle for cotton f ab rics
Stop/Reset
SYNTHETICS
Heavily soiled fast colour synthetics
(baby linen, etc.)
Delicate colour synthetics
(all types of slightly soiled garments)
Delicate colour synthetics (all types of
slightly soiled garments
Rinse cycles
Fabric softener
Spin cycle Draining and delicate spin cycle
Drying cycle for synthetic fab rics
Stop/Reset
DELICATES
Hand wash
Particularly delicate garments and
fabrics (curtains, silk, viscose, etc.)
Rinse cycles
Spin cycle Draining and delicate spin cycle
Draining Draining
Drying cycle for wool
Stop/Reset
PROGRAMMED START
12 - 9 - 3 ho ur d el ay Start is delayed by 12 - 9 - 3 hours
Stop/Reset
)
knob
Temperature
knob
1 90°C
2 90°C
3 60°C
4 40°C
5 60°C
6 40°C
7 30°C
8 40°C
9 30°C
Detergent
for prewash
Detergent
for wash
Fabric
softener
◆◆◆
◆◆
◆◆
◆◆
◆
◆◆
◆◆
◆◆
◆
◆
◆◆
◆◆
◆
Length of
the cycle
(minutes)
165
145
130
95
100
70
30
45
50
Description of wash cycle
Prewash cycle, wash cycle at 90°C, rinse
cycles, intermediate and fin al spin cycle s
Wash cycle at 90°C, rinse cycles,
intermediate an d fina l sp in c ycles
Wash cycle at 60°C, rinse cycles,
intermediate an d fina l sp in c ycles
Wash cycle at 40°C, rinse cycles,
intermediate an d fina l sp in c ycles
Rinse cycles, intermediate and final spin cycles
Interrupts/Cancels the selected programme
Wash cycle at 60°C, rinse cycles, anticrease or delicate spin cycle
Wash cycle at 40°C, rinse cycles, anticrease or delicate spin cycle
Wash cycle at 30°C, rinse cycles and
delicate spin cycle
Rinse cycles, anti-cre ase or delicat e spin
cycel
Rinse cycles with automatic in troducti on of
softener, anti-cr ea se or d elic a te spin cy cl e
Interrupts/Cancels the selected programme
Wash cycle at 40°C, rinse cycles and
delicate spin cycle
Wash cycle at 30°C, rinse cycles, anticrease or draining
Rinse cycles, anti- c re ase o r dr ain ing
Interrupts/Cancels the selected programme
Interrupts/Cancels the selected programme
Important: to cancel the wash programme you have just set, select one of the symbols (Stop/Reset) and wait for at least 5 seconds.
The data found in the table is purely indicative, and can vary according to the quantity and type of washing, the water system temperature and
the room temperature.
Special programme
Daily wash Y our washer-dryer has a programme available for the washing of lightly soiled garments in a short amount of time.
By setting programme 7 at a temperature of 30°C, you can wash different types of fabrics together (except for wool and silk), with a
maximum load of 3 kg. This programmes allows you to save on both time and energy as it only lasts around 30 minutes.
We recommend the use of liquid detergent.
Instructions for installation and use
4
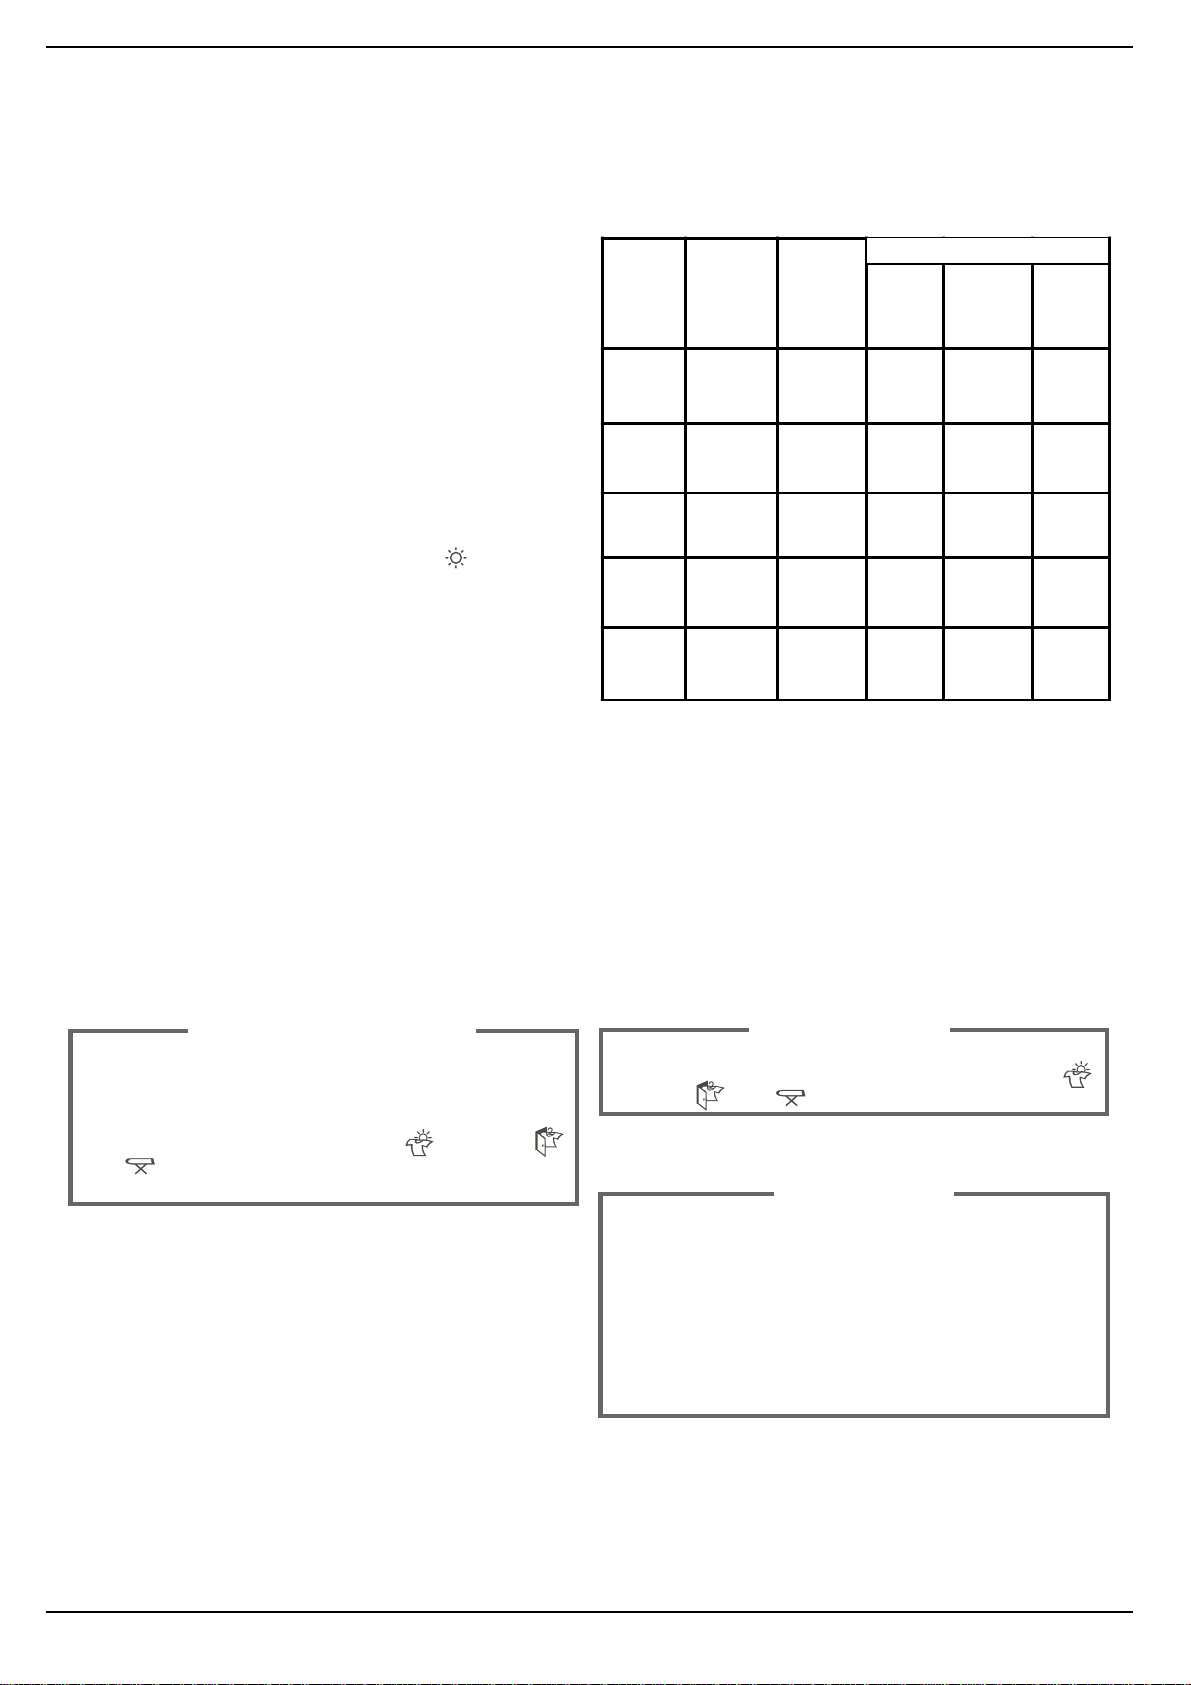
How to dry
A combined Washing
and Drying Programme
Look at table A to the side and
follow the instructions provided
for MAX load to have an
automatic washing and drying
cycle.
Follow the instructions for wash
only (see page 2, the paragraph
entitled "Starting the WasherDryer") and use knob C to set
the type of drying cycle desired,
then press button H (I position).
If the laundry load to be washed
and dried exceeds the
maximum load foreseen (see
table A), then follow the
instructions provided for wash
only (see page 2, the paragraph
entitled "Starting the WasherDryer").
When the wash cycle has
finished, remove your washing,
divide it up and replace part of it
inside the drum.
Now follow the instructions
provided for a dry only cycle.
Repeat this procedure for the
remainder of the load.
Dry only
Once you have loaded the
washing that needs drying (4 kg
max. for cottons, see table for
other fabrics ), make sure that:
- the door is shut correctly;
- the plug is inserted in the socket;
- the water tap is turned on;
- button H has not been pressed
(O position).
And now set the wash cycle
knob
Set knob A on the appropriate
drying setting
the type of fabric, select the type
of drying cycle required using
knob C and then press on-off
button H (I position).
At the end of the drying
cycle...
Wait for lamp I to flash slowly,
then turn the washer-dryer off by
pressing on-off button H
(O position). Now you can open
the appliance door. Once you
have removed the washing from
the appliance, leave the door
open or ajar to avoid the
formation of bad odours and
turn off the water tap.
depending on
A.
Extra
dry
Drying time (Min.)
Wardrobe Iron
Fabric
type
Cotton,
Linen
Cotton Terry
Teri t al,
Cotton
Acr yli c s Pyja mas,
Nylon Slips, tights,
The data contained in the table are purely indicative.
For cotton loads of less than 1 Kg, use the drying
programme designed for synthetic fabrics.
Load type Max. load
Cl o thing o f
diffe r e nt
sizes
towe ls
Sheets ,
Shirts
socks, etc.
stockings,
etc.
(kg)
4 150 145 140
4 150 145 140
2,5 100 90 85
1656060
1656060
WOOL DRYING CYCLE
The woollen garments drying cycle should only and
exclusively be run together with the selection of a specific
cycle time (150 - 100 - 60 - 40 minutes). We recommend a
60 minute drying cycle for a 1 kg load.
If one of the three levels (Extra dry
Iron
) is selected by mistake, the appliance will run a
drying cycle lasting the MAX time foreseen (150 minutes).
, Wardrobe ,
IMPORTANT
A spin cycle is carried out during the drying if you have set a
cotton programme and a level of dryness (Extra dry
Wardrobe
, Iron ).
W ARNING
- During the drying phase, the door tends to get quite hot.
- Do not use the appliance to dry clothes that have been
washed with flammable solvents (e.g. trichlorethylene).
- Do not use the appliance to dry foam rubber or similar
elastomers.
- Make sure that the water tap is turned on during the drying
cycles.
- This washer-dryer can only be used to dry clothes which
have been pre-washed in water.
,
5
Instructions for installation and use
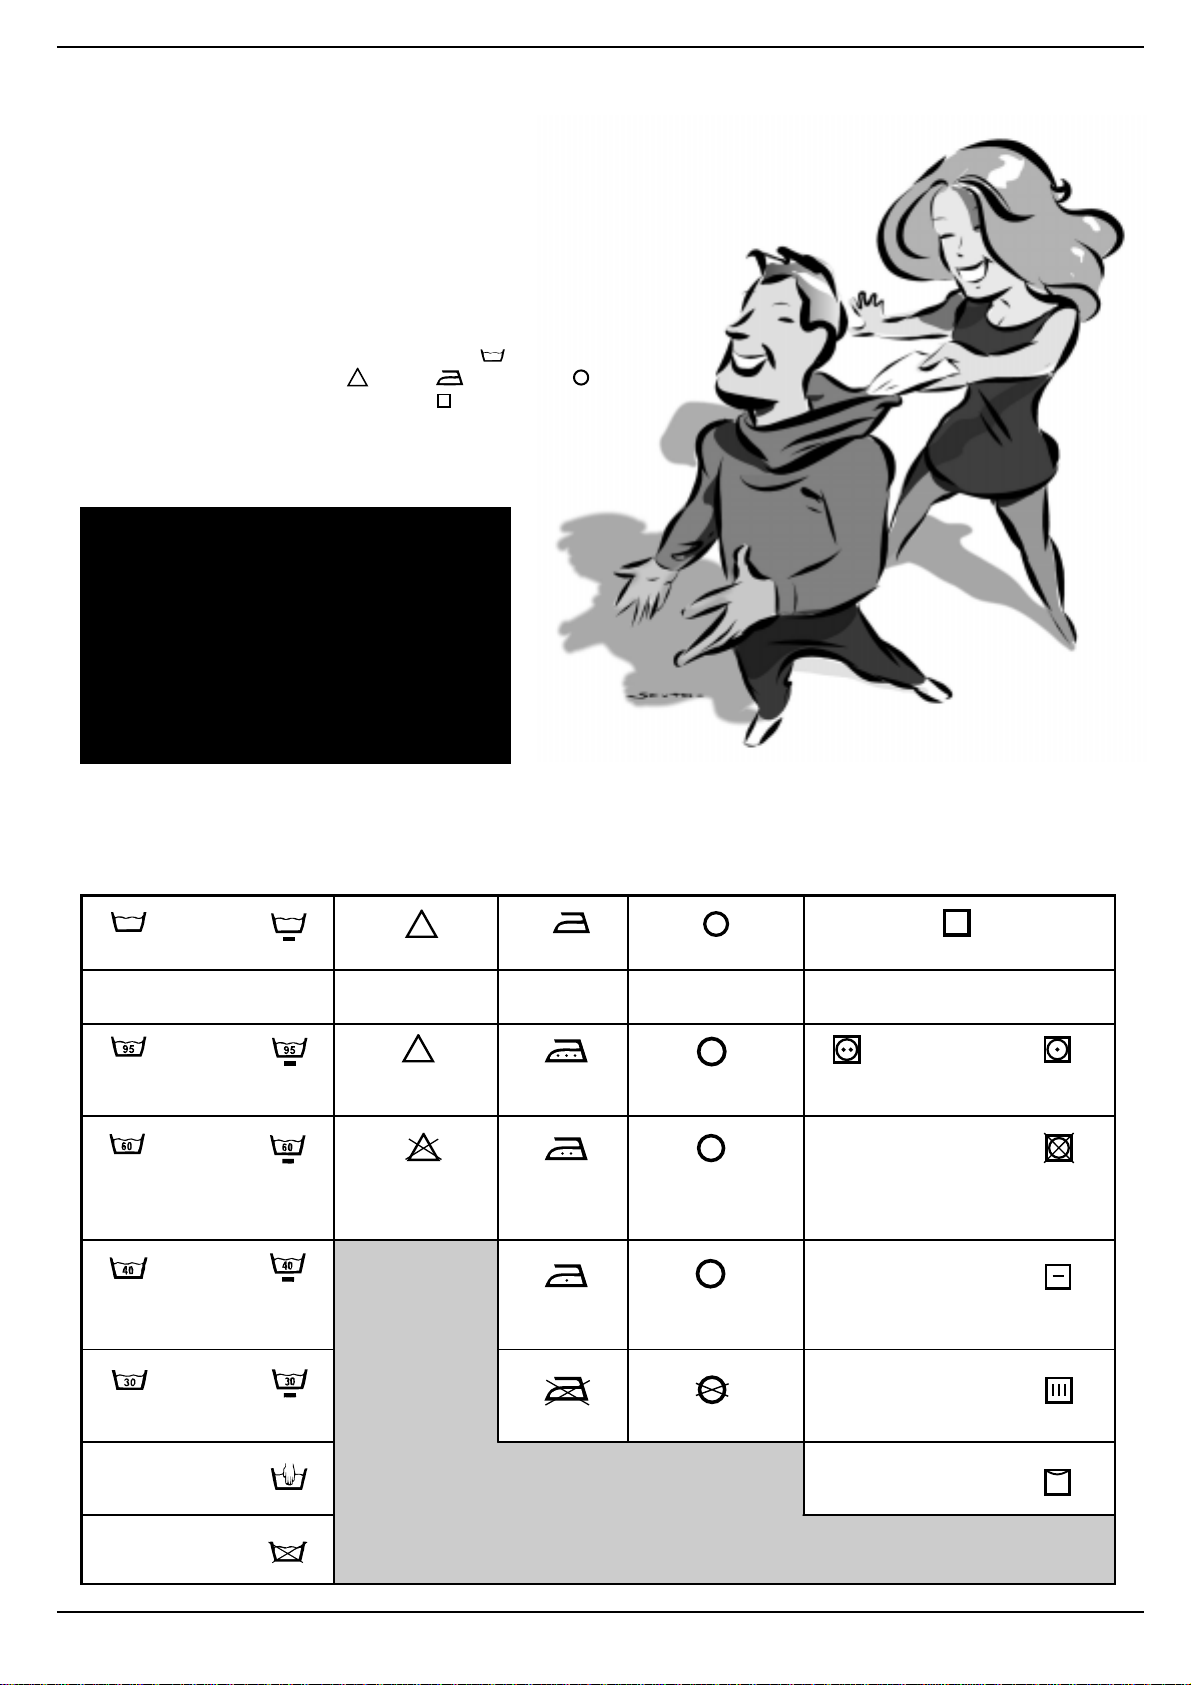
Understanding labels
Learn the meaning of these symbols and you will get better
results, your garments will last longer resulting in an
improved wash.
All over Europe, garment labels
contain messages expressed in
small yet important symbols.
Understanding them is very
important if you want to get
better results and treat your
garments the way they deserve
to be treated.
Useful tips
Turn shirts inside out to get better results
and make them last longer.
Always empty pockets of their contents.
Look at the label: it will always give you useful
advice.
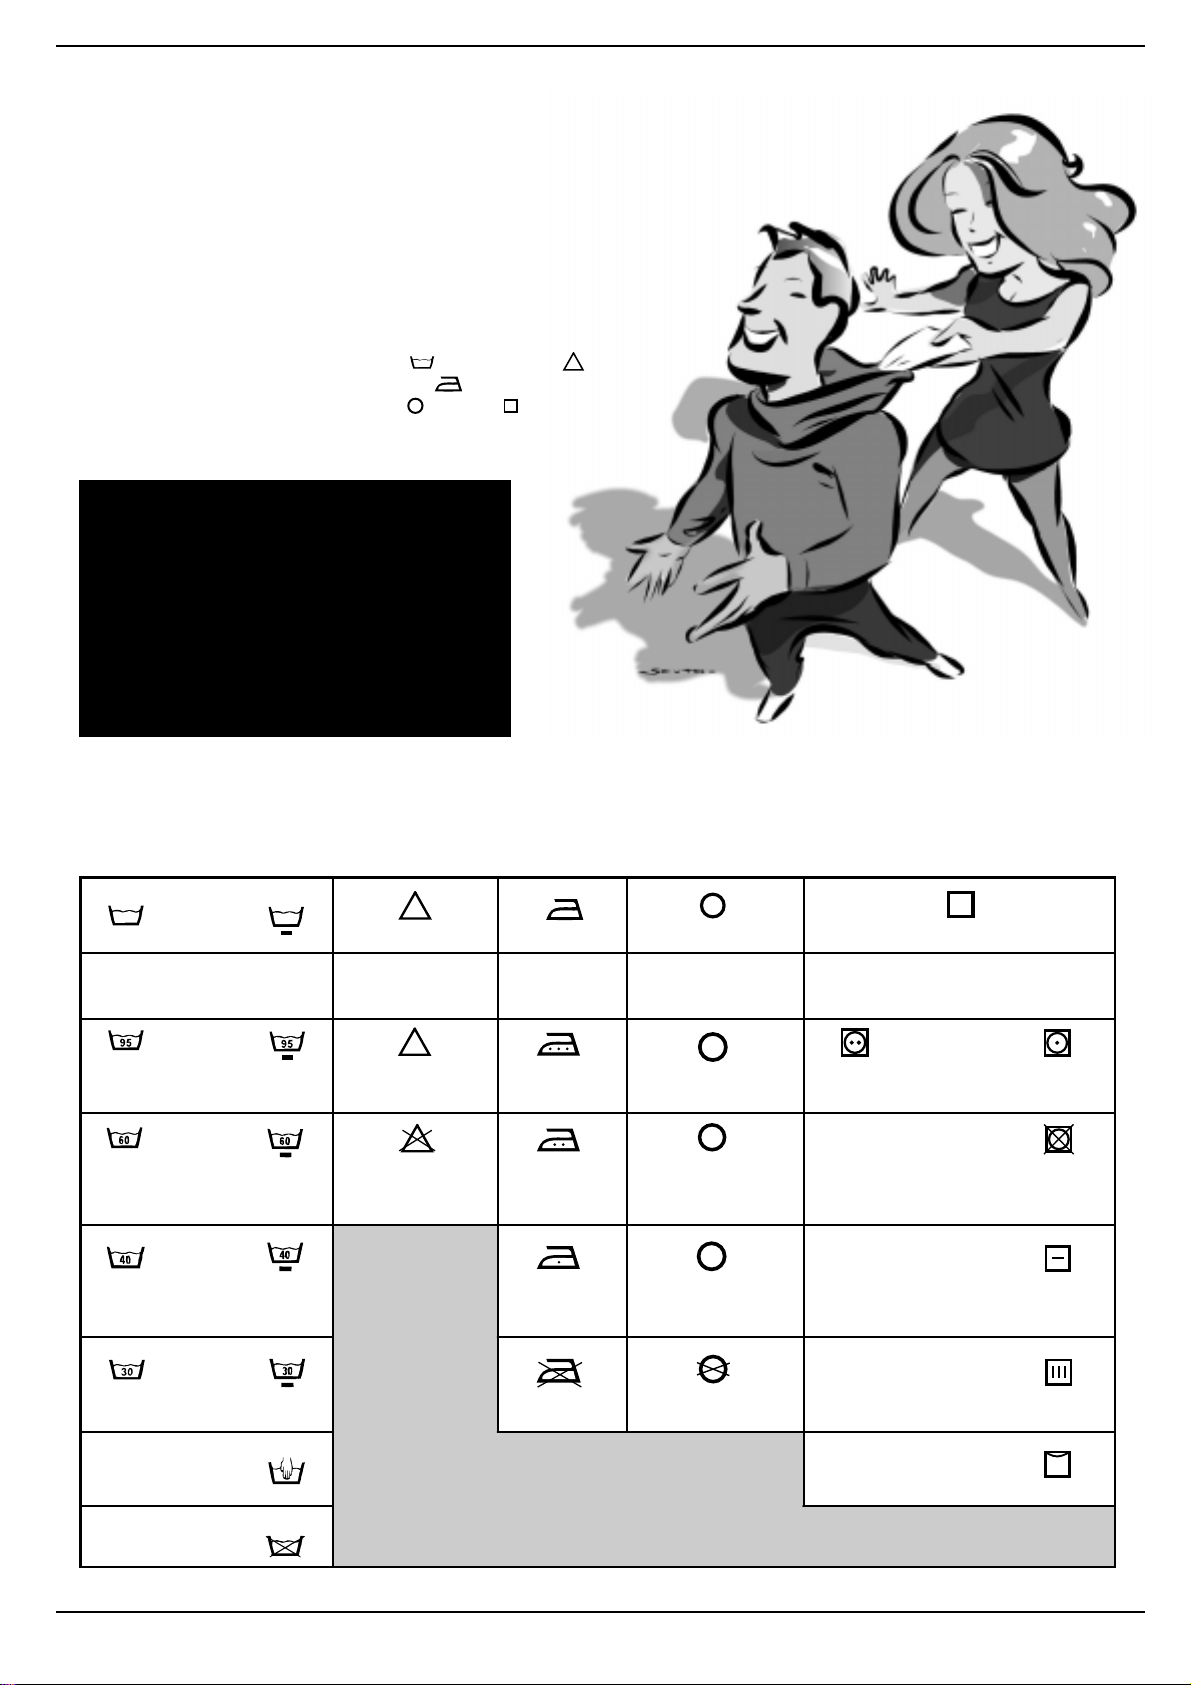
These symbols are divided in
five different categories and
shapes: washing
, bleaching
, ironing , dry cleaning
and drying .
When loading your washing, try to have a mixture
of large to small items.
Consult and learn the symbols in this table: they will help you
obtain a better wash, treat your clothes properly, and get a
better performance out of your washer-dryer.
Wash Bleaching Ironing Dry cleaning Drying
Strong
action
Wash at
95°C
Wash at
60°C Do not bleach
Wash at
40°C
Delicate
action
c
l
Bleaching only in
cold water
Hot iron at max
200°C
Medium hot
ironing at
max 150°C
Iron at max
110°C
Dry clean with any
Dry clean only with
perchloride, benzine
benzine, pure alcohol
Make sure you select the right
temperature!
High
Temp.
A
solvent Machine dryable
P
av., pure alcohol,
R111 and R113
Do not machine
F
Dry clean with av.
and R113 Spread to dry
Low
Temperat.
dry
Wash at
30°C Not ironable Do not dry clean
Hand wash
Not
washable in
water
Hang to dry
without s p in
drying
Dry on clothes
hanger
Instructions for installation and use
6
Useful tips
Never use your washer-
dryer to wash... torn, fraying or
non-hemmed linen. If it is
absolutely neccessary , place it in
a bag for protection. Do not wash
coloured linen with whites.
Watch the weight!
For best results, do not exceed
the weight limits stated below
(figures show weight of dry
garments):
- Resistant fabrics:
5,5 kg maximum
- Synthetic fabrics:
2.5 kg maximum
- Delicate fabrics:
2 kg maximum
- Pure new wool:
1 kg maximum
How much does it weigh?
1 sheet 400-500 gr.
1 pillow case 150-200 gr .
1 tablecloth 400-500 gr .
1 bathrobe 900-1,200 gr.
1 towel 150-250 gr .
Coloured T-shirts, printed
ones and shirts last longer if turned
inside out before washing.
Printed T-shir ts and sweatshirts
should always be ironed inside out.
Dungaree alert.
Very popular “salopette” type
overalls have straps with hooks
that can damage the drum of your
washer-dryer or ot her garments
during the wash. T o minimise the
risk, place hooks in the pocket
and fasten with safety pins.
Holidays: unplug the
appliance.
It is recommended that you
should unplug the machine from
the socket and turn off the water
supply. Leave the door ajar to
allow air circulation to the draw
and the door gasket area. This will
prevent unpleasant odours.
WOOL CYCLE
For best results, we
recommend you use a
specific detergent, taking
care not to wash more than
1 kg of laundry .
How to wash almost anything
Curtains.
Curtains tend to crease a great
deal. A useful tip to reduce
creasing: fold the curtains and
place them in a pillow case or
mesh bag. Do not load anything
else inside the appliance, this
will ensure that the overall
weight does not exceed the half
load. Remember to use the
specific programme 9 which
automatically excludes the spin
cycle.
Quilted coats and anorak.
Y ou can w ash quilted coats and
wind-cheaters, too, if they are
padded with goose or duck
down. Do not load more than
2-3 kg and never load 5,5 kg.
Repeat rinse once or twice
using the gentle spin.
Trainers.
Once you have removed mud
and dirt from trainers, you can
even wash them with jeans or
any other tough garments. Do
not wash trainers with whites.
7
Instructions for installation and use
It’ s important for a good wash
1
2
3
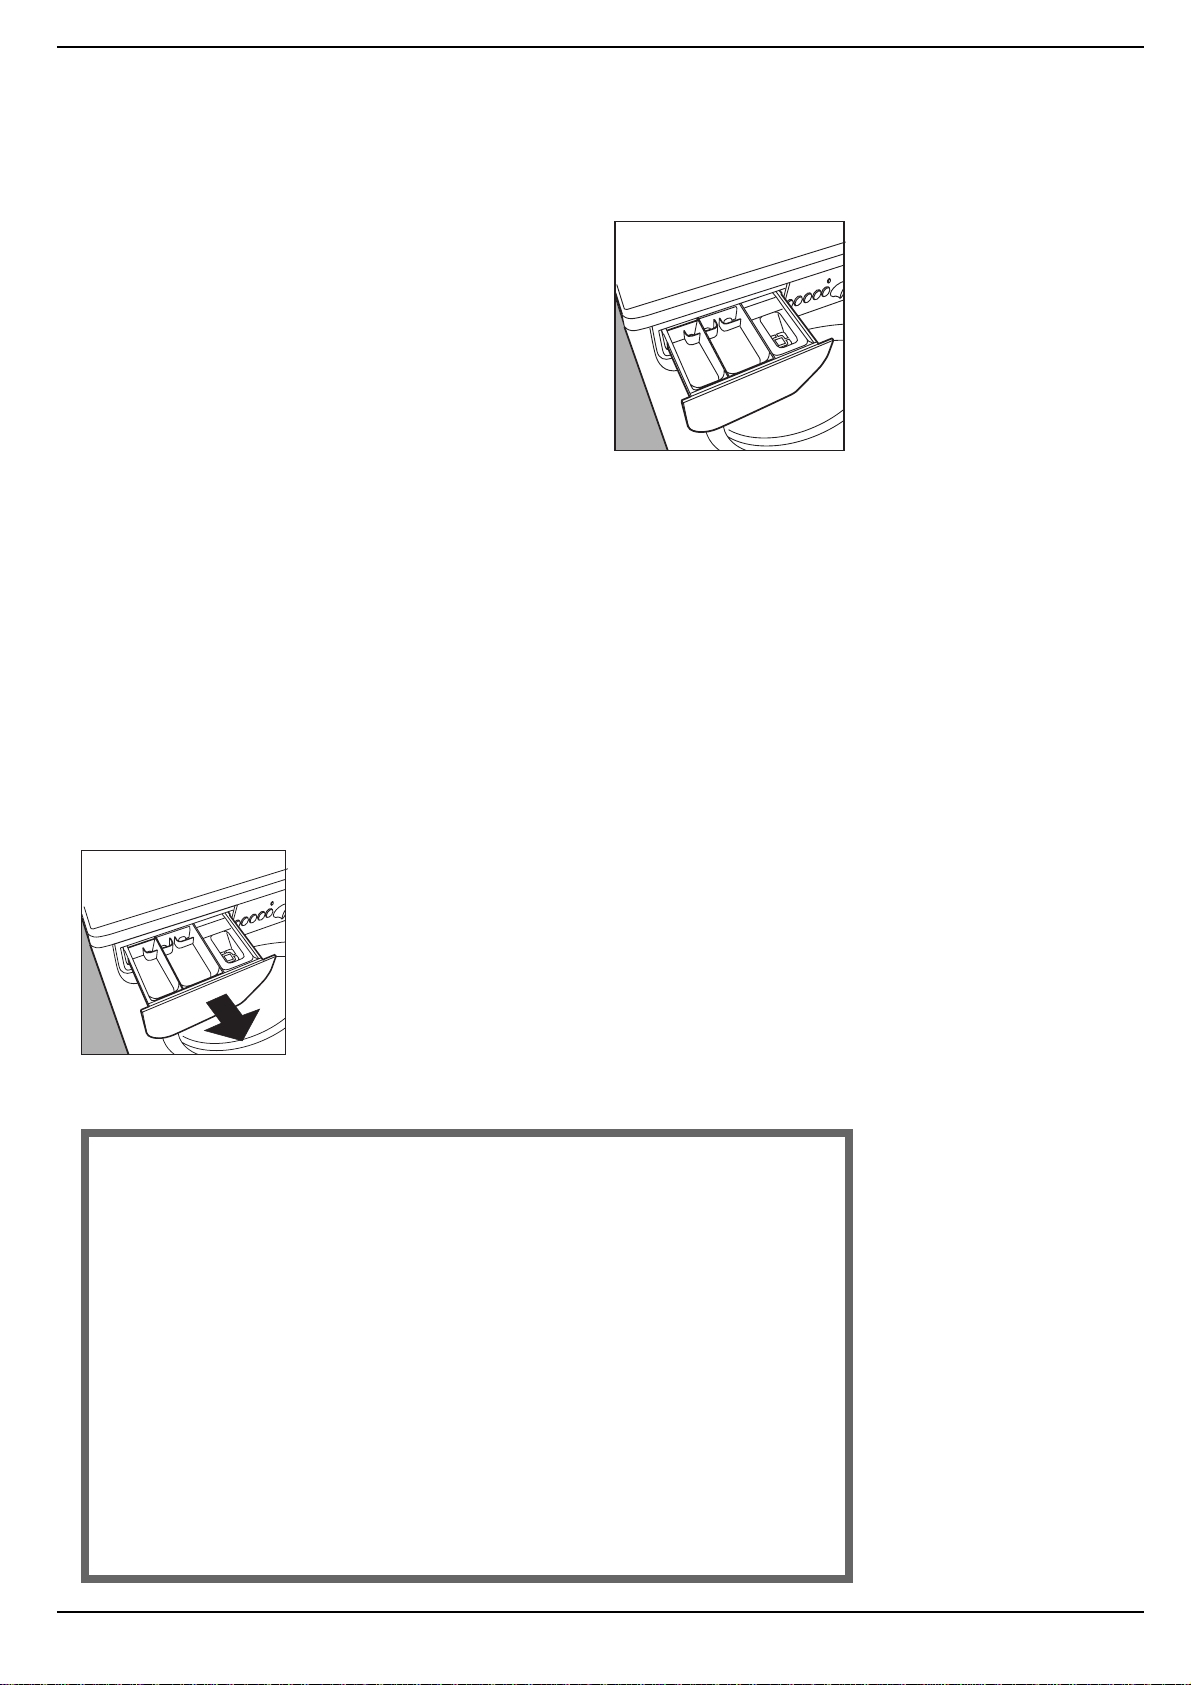
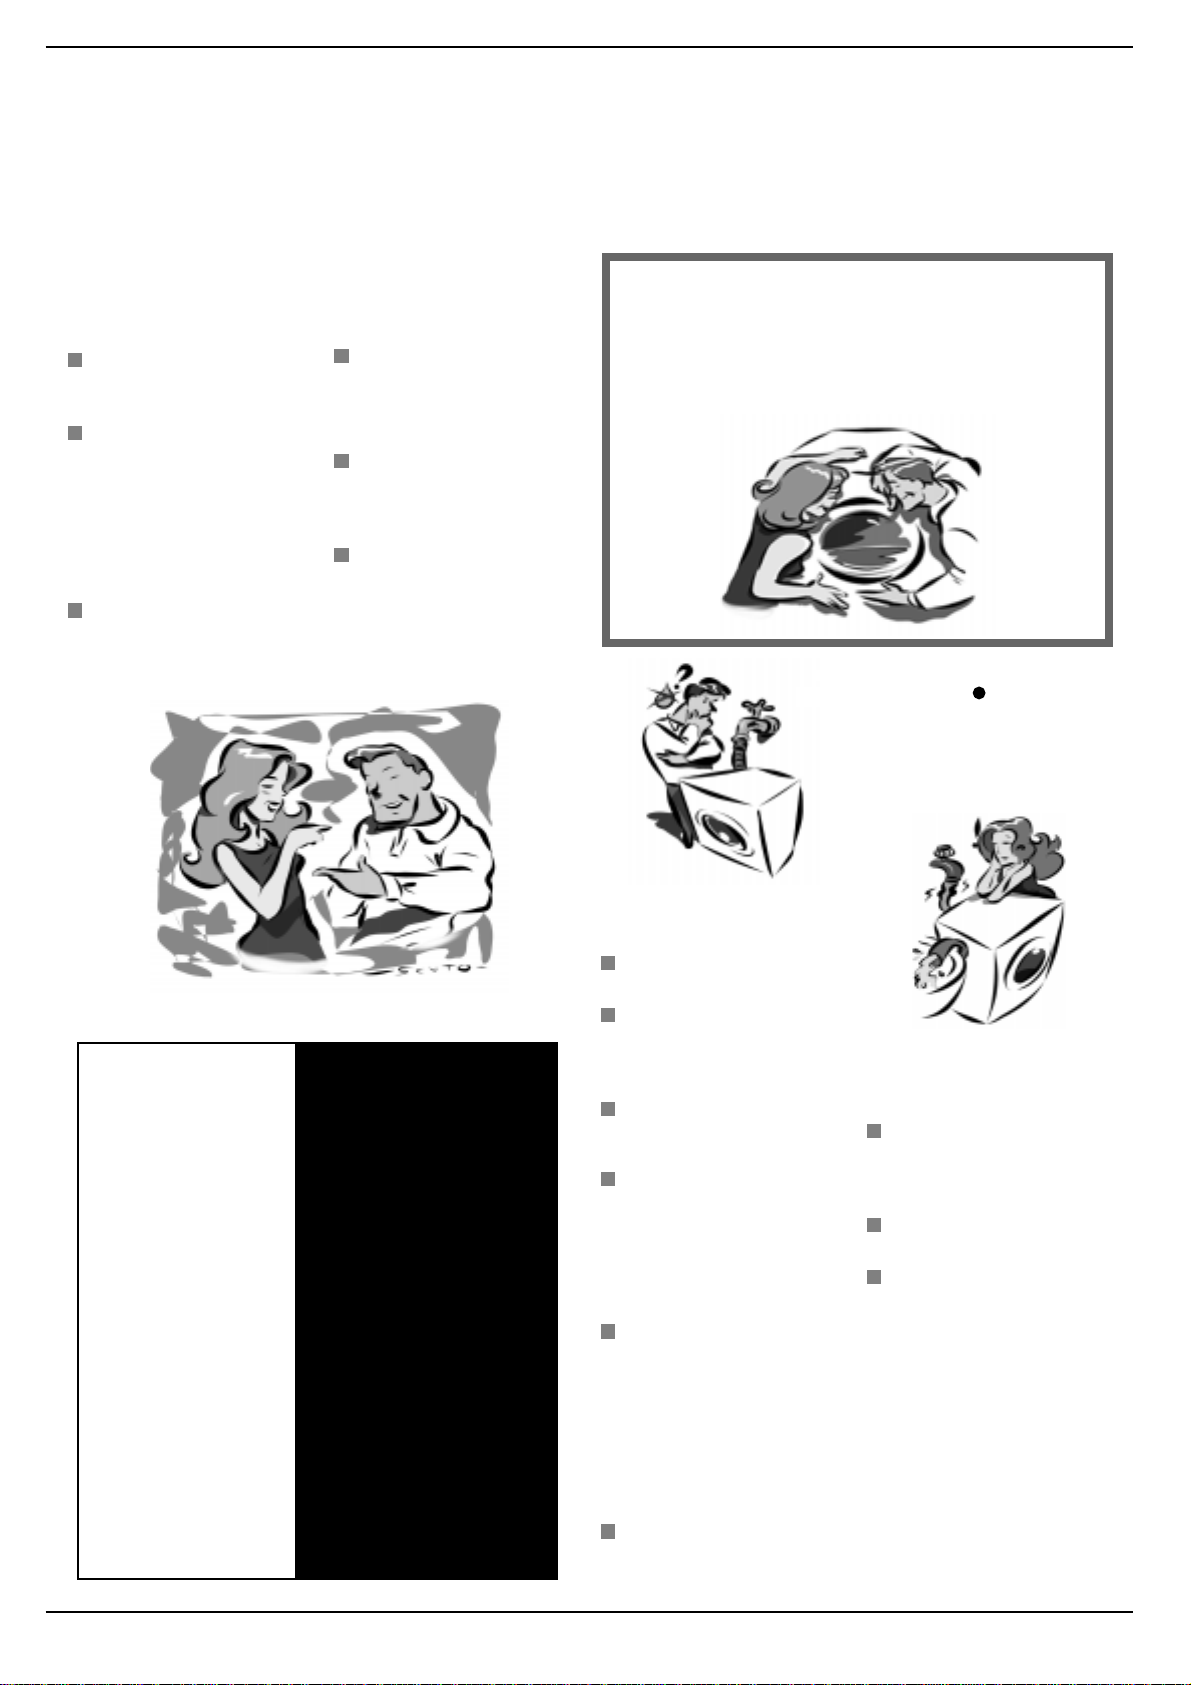
Useful tips about the detergent dispenser
The first secret is the easiest: the detergent dispenser is
opened by pull it outwards.
You must follow the dosage
recommendations provided by
the manufacturers when adding
detergent or fabric conditioner.
Doses will vary according to the
wash load, the water hardness
and how soiled the washing is.
Experience will help you select
the right dosage almost
automatically: it will become your
secret.
Ensure no overfilling when
adding fabric conditioner in
compartment 3.
The washer-dryer automatically
adds the softener to the wash in
each programme.
Liquid detergent is poured into
compartment 2 just a few
seconds before starting the
wash cycle.
Remember that liquid detergent
is only designed for wash
cycles of up to 60 degrees on
non pre-wash items.
Special containers are sold with
liquid or powder detergents for
placing inside the washer-dryer
drum, these are positioned
according to the instructions
found in the detergent box
Never use hand wash
detergent, because it may form
too much foam, which could
damage the washer-dryer.
Detergents that are specifically
formulated for both hand and
machine wash are an
exception.
One last secret: when washing
with cold water, alw a ys reduce
the amount of detergent you use:
it dissolves less easily in cold
water than in hot water , so part
of it would be wasted.
In compartment 1:
Detergent for pre-washing (powder)
In compartment 2:
Detergent for washing
(powder or liquid)
In compartment 3:
Additives (softeners, perfumes, etc.)
The detergent dispenser can be
removed and cleaned: pull it outwards,
as indicated in the figure. Then leave it
under running water for a few minutes.
Cutting costs efficiently
A guide to environmentally
friendly and economic use
of your appliance.
MAXIMISE THE LOAD SIZE
Achieve the best use of energy, water, detergent and time by using the recommended
maximum load size.
SAVE up to 50% energy by washing a full load instead of 2 half loads.
DO YOU NEED TO PRE-WASH?
For heavily soiled laundry only!
SAVE detergent, time, water and between 5 to 15% energy consumption by NOT
selecting Prewash for slight to normally soiled laundry.
IS A HOT W ASH REQUIRED?
Pretreat stains with stain remover or soak dried in stains in water before washing to
reduce the necessity of a hot wash programme.
SAVE up to 50% energy by using a 60°C wash programme.
BEFORE USING A DRYING PROGRAMME ...
SAVE energy and time by selecting the highest suitable spin speed to reduce the water
content in laundry before using a drying programme.
Instructions for installation and use
8
Troubleshooting
Before calling, read the f ollowing
In most cases, when your washer-dryer fails to work, the problems arising can
be easily solved without having to call for a technician. Before calling for
assistance, always check these points.
The washer-dryer fails to
start.
Is the plug correctly inserted
into the socket? It could have
been moved whilst cleaning.
Is there electricity in the
house?
A circuit breaker may have
switched off as a result of too
many electrical appliances
working at the same time. Or
maybe due to a general failure
in your entire area.
Is the washer-dryer door
closed properly?
For safety reasons, the
washer-dryer cannot work if
the door is open or not shut
properly.
Is the On/Off button
pressed?
If it is, then a programmed start
has been set.
Is the programmed start
knob, in the correct position
for those models
concerned?
Is the water supply turned
on? For safety reasons, if the
washer-dryer does not load
water, it cannot start a wash
cycle.
But where did all the water go?
Simple: with the new Indesit technology, you need less than
half of it, to get good results on twice as much!
This is why you cannot see the water through the door:
because there is little, very little of it, to respect the
environment yet without renouncing maximum cleanliness.
And, on top of that, you are also saving electricity.
off, select one of the symbols
stop/reset
back on. If the knob continues
to turn, call for assistance
because it is showing an
anomaly.
, then switch it
RIGHT WR ONG
Turn off the water
supply after use.
This will eliminate
the possibility of
leakage.
Always leave the
appliance door ajar
to avoid bad odours.
Clean the
appliance’s
exteriors gently.
To clean the
exteriors and the
rubber parts of the
appliance, always
use a soft cloth
dipped in warm and
soapy water.
Leave the washer-dryer
plugged in while
cleaning.
Even during maintenance,
the appliance should
always be unplugged.
Use solvents and
aggressive abrasives.
Never use solvents or
abrasives to clean the
external and rubber parts
of the washer-dryer.
Neglect the detergent
dispenser.
It is removable and can
easily be cleaned by
leaving it under running
water.
Go on holiday without
thinking about her.
Before leaving, always
make sure that the
washer-dryer is
unplugged and that the
water supply is turned off.
The washer-dryer fails to
fill with water .
Is the hose correctly
connected to the tap?
Is there a water shortage ?
There could be work in
progress in your building or
street.
Is there sufficient water
pressure? The autoclave
may be malfunctioning.
Is the tap filter clean? If the
water is very calcareous, or
if work has recently been
carried out on the water
piping, the tap filter could be
clogged with particles and
debris.
Is the rubber hose kinked?
The tract of the rubber hose
bringing water to washerdryer must be as straight as
possible. Make sure it is not
squashed or kinked.
The programme selector
knob keeps turning?
Wait a few minutes for the
drain pump to empty the
tub, switch the washer-dryer
The washer-dryer
continuously fills and
drains water .
Is the drain hose positioned
too low? It must be installed
at a height ranging from 60 to
100 cm.
Is the end of the hose
immersed in water?
Does the wall drainage
system have a breather
pipe? If the problem persists
even after these checks, turn
the water supply off the
machine and call for
assistance.
If you live on an upper floor of
your building, there may be a
problem with your drain trap .
To solve this problem, a
special valve must be
installed.
9
Instructions for installation and use
The washer-dryer does
not drain or spin.
Does the selected
programme incorporates
water draining? Some
programmes stop at the end
of the wash cycles and
draining will have to be
selected manually .
Is the “Easy ir on" function
-where provided - enabled?
This function requires manual
selection for draining.
Is the drain pump clogged?
T o chec k it, turn off the water
supply, unplug the washerdryer and follow the
instructions on page 12, or
call for technical assistance.
Always get
assistance from
authorised
technicians and
always insist on
original spare parts.
Is the drain hose kinked?
The tract of the drain hose
must be as straight as
possible. Make sure the drain
hose is not squashed or
kinked.
Is the washer-dryer’ s drain
duct clogged? Is there an
extension of the drain hose?
If so, is it positioned
incorrectly, blocking the
water flow?
Excessive vibration
during the spin cycle.
Have all transit screws been
removed durind installation? See the following
page on installation
procedures.
Has the washer-dryer been
levelled correctly? The
levelling of the appliance
should be checked
periodically. Adjust the feet
and check them with a level.
Is there space between the
machine and adjacent
units? If it is not a built-in
model, the washer-dryer will
oscillate a bit during the spin
cycle. A few cm of space
should therefore be left
around it.
The washer-dryer leaks.
Is the metal ring of the inlet
hose properly attached?
Turn off the water supply,
unplug the appliance and try
tightening its attachment
without forcing it.
Is the detergent dispenser
obstructed? Remove and
wash it under tap water .
Is the drain hose well
attached? Turn off the water
supply , unplug the appliance
and try tightening its
attachment.
Too much foam.
Is the detergent appropriate
for machine washing? Check
whether the definition on its
label reads “for machine wash”
or “hand and machine wash”,
or any other similar wording.
Is the correct amount being
used? An excessive amount of
detergent, besides producing
too much foam, does not
guarantee a more effective
wash, and causes scaling in the
internal parts of the appliance.
The washer-dryer does
not dry.
Check whether:
the plug has been correctly
inserted into the socket; there
is electricity in your home; the
appliance door has been shut
properly; a delayed start (if
available) has not been
selected; programme knob A
has been set to position
(Stop/Reset); the drying cycle
knob C has been set to
position 0.
Technical char acteristics
Model
Dimensions
Capacity
Electrical
connections
Water connections
Spinning speed
Control programs
in compliance with
IEC regulation 45 6
WD 104 T
width 59,5 cm
height 85 cm
depth 53,5 cm
from 1 to 5,5 kg for the wash progr amme; from 1 to 4 kg for the drying programme
voltage 220/230 Volt 50 Hz
maximum absorbed power 1850 W
maximum pressu re 1 MPa (10 b ar)
minimum pressure 0,05 MPa (0,5 bar)
drum capacity 46 litre
up to 1000 rpm
: programme 3; temperature 60°C; carried out with 5 kg load;
wash
drying
: run with a load of 2.5 kg and knob C set to position .
This appliance conforms with the following E.E.C. directives:
- 73/23/EEC of 19/02/73 (Low Voltage) and subsequent modifications
- 89/336/EEC of 03/05/89 (Electromagnetic Compatibility) and subsequent
modifications
The washer-dryer doesn't
dry properly.
Check whether:
the end of the drain hose is
underwater; the drain pump is
obstructed; the advice given
on the maximum loads has
been taken; the water tap has
been turned on.
If, despite all checks, the washerdryer fails to function and the
problem persists, call your
nearest authorised Customer
Service Centre, providing the
following information:
- the nature of malfunction
- the model type no. (Mod. ....)
- the serial number (S/N ....)
This information can be found on
the data plate situated at the back
of the washer-dryer.
Instructions for installation and use
10
Installation and removal
When the new washer dryer arrives
Whether new or just transported to a new house,
installation is extremely important for the correct
functioning of your washer-dryer.
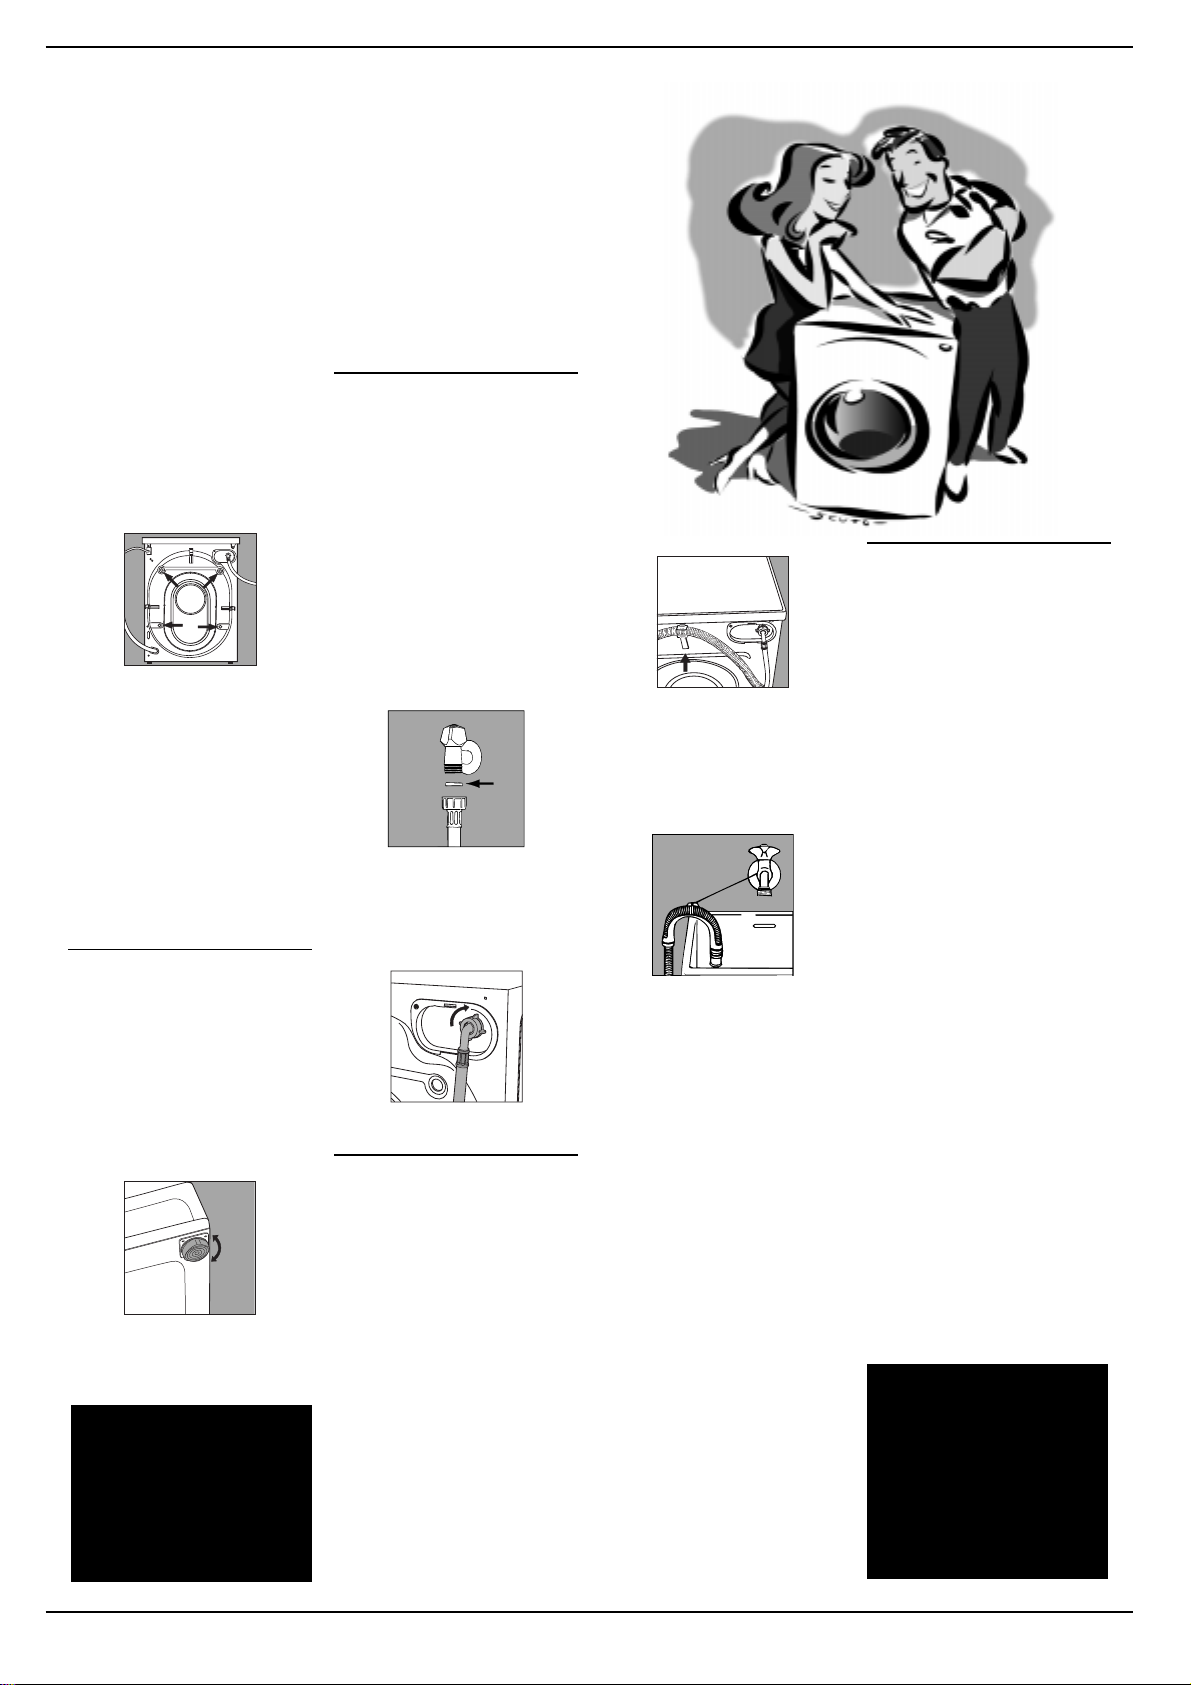
After removing the appliance from
its packaging, check that it is
intact. If in doubt, contact a
qualified technician immediately .
The inside of the machine is
supported, for transportation, by
four screws on the back panel.
Before using the washer-dryer,
remove the screws, remove the
spacers together with the rubber
tubes attached to them (keeping
all the parts) and use the plastic
plugs provided to fill in the holes.
Important: Use the cap (provided)
to close the 3 holes which housed
the stop pin, situated in the right-hand
part of the lower back of the
washer-dryer.
Levelling
The washer-dryer must be levelled
appropriatey in order to guarantee
its correct functioning. To level the
appliance, the front feet must be
adjusted; the angle of inclination,
measured according to the worktop,
must not exceed 2°. When placed
on carpet, make sure the ventilation
is not reduced.
The front feet are adjustable.
Retain the transit screws,
spacers and washers.
Should you move house
then these should be
replaced to support the
inside of the machine to
prevent damage when
transporting the machine.
Connection to the water
mains
Water pressure must range within
the values indicated on the data
plate on the rear of your washerdryer. If the water pipes are new or
left unused, then before connecting
the machine run the water until clear
to remove debris. Connect the inlet
hose to a cold water tap having a
¾ “ BSP thread. Ensure that the
rubber sealing washer-dryers are
fitted at each end of the inlet hose,
with the fitter washer-dryer at the
tap end.
A
The rubber gasket .
Connect the inlet hose to the
threaded connector on the
machine rear.
Water pipe inlet at the top right.
Connecting the drain hose
There are two hooks (right or left)
on the rear of your washer-dryer
to which the drain hose is to be
fixed. Insert the other end in a
stand pipe or place it on the edge
of a sink or tub avoiding excessive
kinks and bending. It should be
placed at a height ranging from 60
to 100 cm. If it is necessary to fix
the end of the hose at a height
below 60 cm from the ground, it
must be fixed in the appropriate
hook placed on the upper part of
the back panel.
The hook to be used in case the drain
hose ends at a height below 60 cm.
If the drains hose empties into a
tub or sink then fit the plastic guide and secure it to the tap.
The guide for draining into tubs and
sinks.
The end of the drain hose must
be positioned so that it cannot
become submerged.
Extensions are unadvisable. In
case of absolute need, the
extension must have the same
diameter as the original hose and
must not exceed 150 cm. In case
of wall draining pipes, their
efficiency must be checked by
a qualified technician. If the
dwelling is on one of the upper
floors of a building, there may be
drain trap problems causing the
washer-dryer to load and unload
water continuously .
In order to avoid such an
inconvenience, special anti-drain
trap valves are available in
shops.
Electric connection
Before connecting the appliance
to the electric socket, be sure that:
1) the electric socket is able to
sustain the appliance’s
maximum power load
indicated on the data plate
and in compliance with the
law;
2) the supply voltage is included
within the values indicated on
the data plate;
3) the socket is compatible with
the appliance’s plug. If not, do
not use adapters, but replace
either the socket or the plug;
4) electric household appliances
must be equipped with an
“earthing” system.
Warning!
The company denies all
liability if and when these
norms are not respected.
Plastic bags, expanded
styrofoam, nails and other
packaging parts are not
children’s toys, and are
potentially dangerous.
11
Instructions for installation and use
Easy Care and Maintenance
T reat your machine well and it will provide
many years of trouble free service
Your washer-dryer is a reliable companion in life and on the job. It is just as important for you to keep it in
shape.
Your washer-dryer is designed
to provide reliable service over
many years. A few simple steps
will help to prolong its life and
avoid problems. It is advisable,
to turn off water taps when the
machine is not to be used, this
protects the hoses, etc.
If the water in your area is too
hard, use a deliming product
(water is hard if it often leaves
whitish stains around taps or
drains, especially of bath tubs.
For more accurate information as
to the type of water in your
system, call the local water
works or a local plumber).
Pockets must always be
emptied removing even pins,
badges and any other hard
object.
The washer-dryer exterior
should be cleaned with a rag
dipped in lukewarm water and
soap.
It is important to wash
the detergent dispenser
regularly.
T o prevent dried washing
powder from
accumulating, place the
dispenser under running
water for a few minutes.
Never exaggerate with doses.
Normal detergents already
contain deliming agents. Only if
the water is particularly hard,
that is, rich in lime content, do
we recommend the use of a
specific product at every wash.
A periodical wash cycle with a
dose of a deliming product,
without detergents or washing,
may prove useful.
Never use too much detergent
or additives because this could
cause an excess amount of
foam, scaling and possible
damage to the component parts
of your washer-dryer.
Do not forget to empty all pockets: small objects can
cause damage to your washer-dryer.
When in need, c heck the pump and the rubber hose.
The washer-dryer comes equipped with a self-cleaning pump that does not require any cleaning or maintenance.
Small objects may accidentally fall into the pump: coins, hair clips, loose buttons and other small items. To avoid
possible damage, they are withheld in an accessible pre-chamber, situated at the lower end of the pump.
Attention: Before attempting to examine this pre-chamber, first
ensure that the machine has finished its programme and is empty.
Unplug the machine, as with any maintenance.
To gain access gently ease down the top of the plinth panel situated at
the base of the machine, with a screwdriver etc, to release it. Then
ease the top edge forward to allow it to be lifted clear (Fig. 1). Place
a shallow dish or tray below the cover of the pre-chamber to catch
the small amount of water present. Release the cover by turning anti-
Fig. 1
The water inlet hose
Check the rubber hose at least once a year. If you see any cracks, replace it immediately. When you use your washer-dryer,
water pressure is very strong and a cracked tube could easily split open.
clockwise (Fig. 2). Ensure that the cover is securely replaced.
Re-fit the plinth cover by inserting the hooks on its lower edge into
the slots and ease the top edge back into position.
Fig. 2
Instructions for installation and use
12
Important for the safe use of your washer-dryer
Your safety and that of
Your washer-dryer has been built in compliance
with the strictest international safety regulations.
your family
To protect you and all your family.
Read these instructions and all
the information in this manual
carefully: the y are an important
source, not only of numerous
useful tips, but also of vital
information on safety, use and
maintenance.
1. the machine should not be
installed in an outdoor
environment, not even
when a roof shelters the
area, because it may be very
dangerous to leave it
exposed to rain and
thunderstorms.
2. It must only be used by
adults and exclusively for
washing clothes following
the instructions provided in
this manual.
3. Should it have to be moved,
proceed with the help of two
or three people and handle
it with the utmost care.
Never try to do this alone,
because the appliance is
very heavy.
4. Before loading the washer-
dryer , make sure the drum
is empty .
5. Never touch the washer-
dryer when barefoot or
with wet or damp hands
or feet.
6. Never use extensions or
multiple plugs, which are
particularly dangerous in
humid environments. The
power supply cable must
never be bent or
dangerously compressed.
I only want an authorised
specialised technician with
original Indesit spare parts!
7. Never open the detergent
dispenser while the
appliance is functioning;
do not use hand wash
detergent because the
abundance of foam could
damage its internal parts.
8. Never pull on the supply
cable or the washer-dryer to
disconnect it from the wall
socket: it is extremely
dangerous.
9. While the appliance is
functioning, do not touch
the drain water as it could
reach very high temperatures. The appliance door ,
during wash cycles, tends
to become hot; ensure
that children do no touch
it. Never force the washer-
dryer door because this
could damage the safety
lock which prevents
accidental opening when the
nachine is working. Allow a
few minutes at the end of the
program for the lock to
release.
10. In case of malfunctioning,
first close the water tap
and unplug the appliance
from the wall socket; do
not under any circumstances touch internal parts
in order to attempt repairs.
How to change the power supply cable
The washer-dryer power
supply cable is special and
can be purchased exclusively
from authorised Technical
Service Centres.
To replace the cable:
1. Make sure that the machine
is switched off and unplugged.
I
Fig. 3 Fig. 4 Fig. 5 Fig. 6
13
Instructions for installation and use
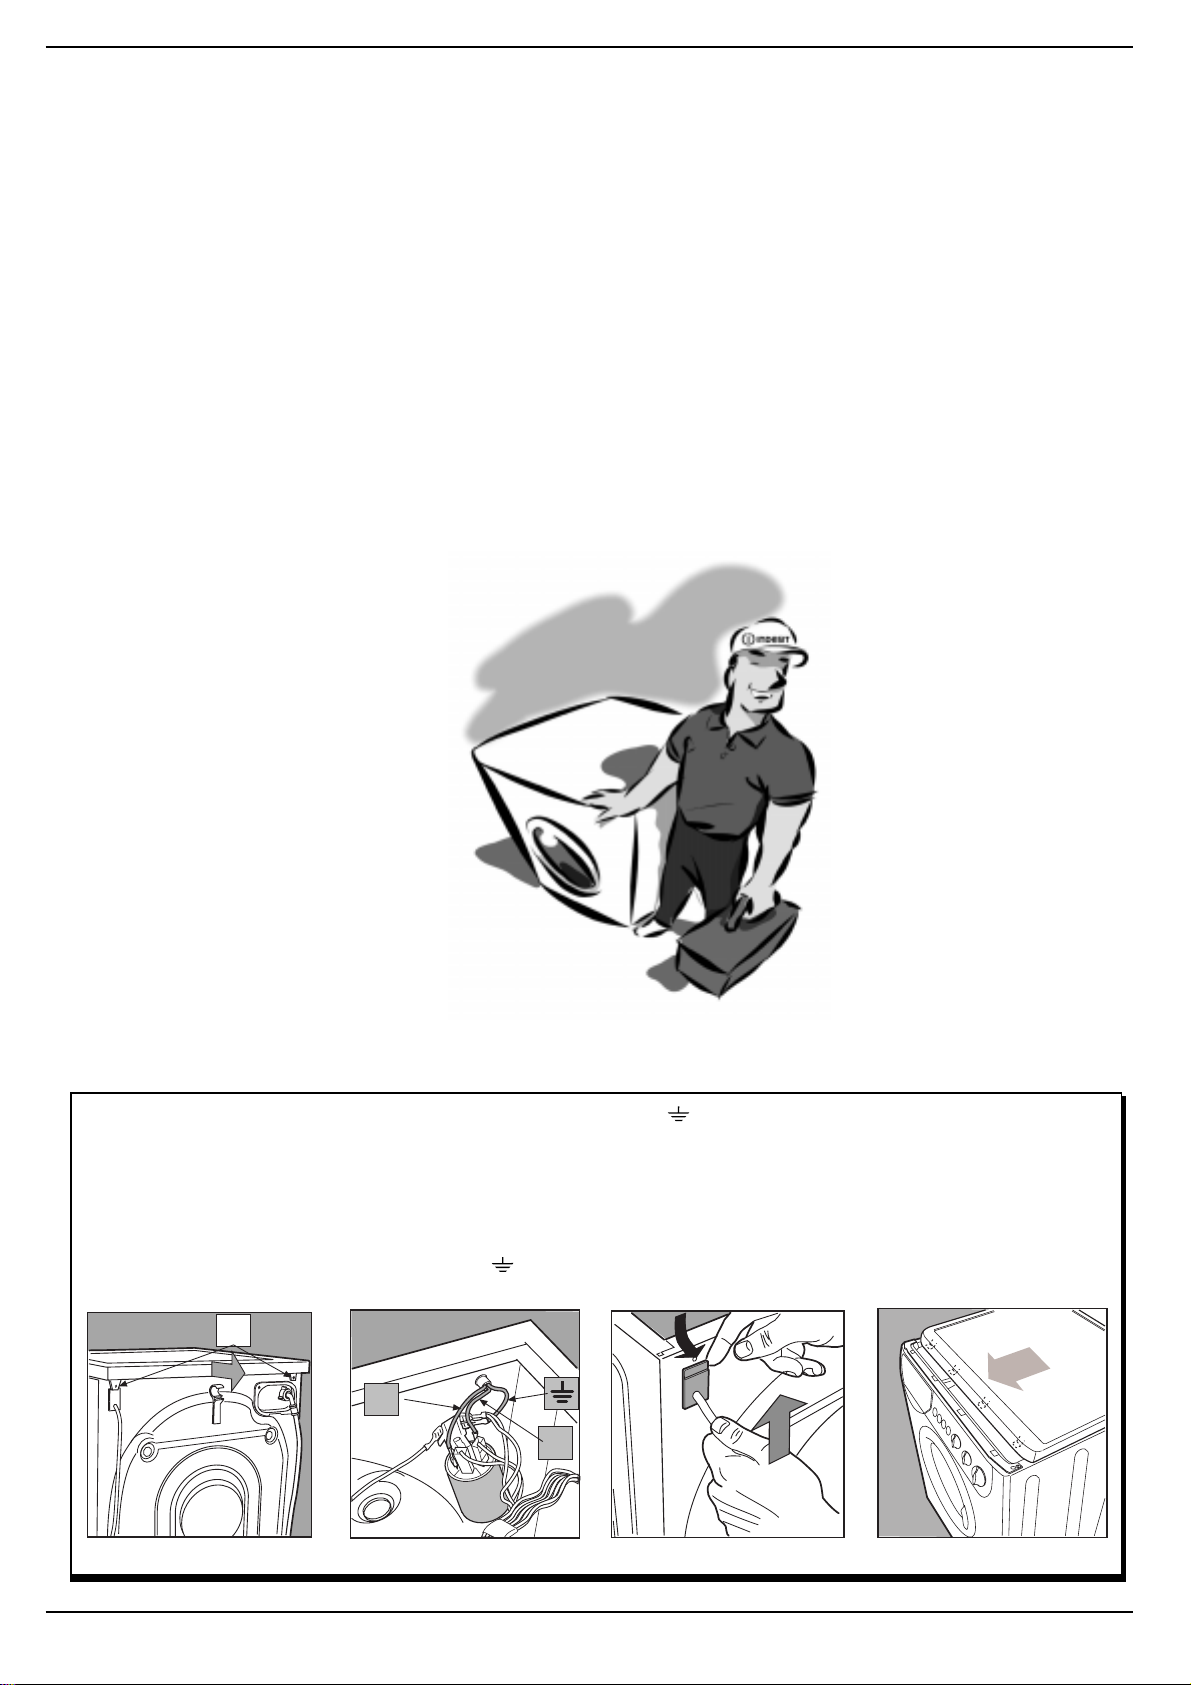
2. Remove the covering lid by
unscrewing the two screws I, and
then pull it towards you [fig. 3].
3. Disconnect the wires from
the radio interference
suppressor F [fig. 4] noting as
to their position (Blue=N wire;
Brown=L wire) leaving the
earth wire until last
N.B.: letters L, N and the
.
N
L
F
symbol
radio interference suppressor.
4. Remove the upper part of the
cable slightly from the back
panel of the appliance, pull the
power supply cable upwards and
take it out [fig. 5].
To connect the new power
supply cable, reverse the procedure.
are indicated on the
T o put the covering lid back on,
rest it on the washer-dryer
[fig. 6] and let it slide forwards
until the hooks situated on the
front slide into the special slots
formed into the control panel
and tighten the screws back on.

Instructions for installation and use
14
Краткий путеводитель
Прочитайте, изучите и извлеките
максимальную выгоду!
Настоящее Руководство содержит 12 разделов.
Внимательно изучите их. Вы откроете для себя
множество секретов эффективной стирки, узнаете возможности своей стиральной машины, научитесь обращаться с ней. Настоятельно рекомендуем обратить особое внимание на правила техники
безопасности.
1. Установка и подключение (с. 25)
Установка очень важная операция, от которой во многом зависит,
как будет работать ваша Стиральная машина с сушкой. Обязательно
проверьте:
1. Соответствие характеристик стиральной машины и электрической
сети в вашем доме.
2. Правильность подключения заливного и сливного шлангов.
Не используйте шланги повторно.
3. Горизонтальность установки это влияет на срок службы
стиральной машины и качество стирки.
4. Что фиксирующие барабaн болты, которые находятся нa зaдней стороне
мaшины, удaлены.
8.
Как высушить белье в стиральной машине.
Полезные советы (p. 19)
2. Подготовка белья и запуск машины (с. 16)
Правильный подбор стираемых вещей и равномерность загрузки
гарантируют высокое качество стирки и долгий срок службы машины.
В этом разделе вы найдете много полезных советов.
9. Обслуживание и уход (с. 26)
Cтиральная машина ваш настоящий друг. Проявите к нему внимание, и он ответит вам преданностью и благодарностью.
Не слишком обременительный уход за стиральной машиной продлит
срок ее службы на многие годы.
3. Что на этикетках (с. 20)
10. Возможные неисправности и способы
Вы должны научиться читать этикетки, прикреплямые к одежде и белью,
чтобы правильно выбирать режимы стирки, сушки и глажения.
Многие проблемы вы сможете решить сами, если внимательно изучите
4. Типичные ошибки и как их избежать (с. 21)
Раньше вы обращались за советами к своим бабушкам. Но в их времена
еще не было синтетических тканей и стирка считалась простым делом.
Сегодня лучший консультант Стиральная машина с сушкой. Благодаря
ей вы сможете стирать даже шерстяные изделия, и результат будет
лучше, чем при ручгой стирке.
5. Распределитель моющих средств (с. 22)
Как исполъзоватъ ячейку под моющие средства.
приведенные в этом разделе рекомендации. В сложных ситуациях
немедленно вызывайте техников сервисного центра Indesit.
11. Технические характеристики (с. 24)
Краткие технические данные, которые необходимо знать владельцу
стиральной машины: модель, потребление электроэнергии, расход воды,
габариты, скорость вращения барабана в разных режимах, соответствие
итальянским и европейским нормам и стандартам и пр.
12.Ваша безопасность и безопасность
6. Панель управления (с. 17)
Как обеспечить безопасность дома и семьи это самое главное, что
Конструкция панели управления Стиральная машина с сушкой проста:
всего несколько кнопок, с помощью которых вы выбираете режим
стирки (от интенсивного до деликатного). При правильном выборе
режима высокое качество стирки и долговечность машины
гарантированы.
вы должны знать как владелец и пользователь стиральной машины.
их устранения (с. 23 и 24)
ваших детей (с. 27)
7. Программы стирки (с. 18)
Таблица программ позволит вам правильно выбрать температурный
режим, моющие средства, ополаскиватели и смягчители. Правильный
выбор программы это не только высокое качество стирки, но и
существенная экономия электроэнергии и воды.
15 Руководство по установке и эксплуатации

M
Как пользоваться машиной
Вы сделаете большое дело, если перед стиркой рассортируете белье по материалу
и цвету, прочитаете этикетки на отдельных вещах и смешаете крупные вещи
с мелкими.
Подготовка белья.
Разберите белье по материалу и по устойчивости окраски. Белое и цветное белье стирайте отдельно.
Не забудьте вынуть все из
карманов, особенно мелкие
предметы, (монеты, значки,
иголки и др.), которые могут повредить машину.
Проверьте, хорошо ли держатся пуговицы и застегните молнии.
Запуск машины
После установки новой машины включите цикл стирки по программе 1 с температурой 90°С.
Правильный пуск машины
очень важен с точки зрения
повышения качества стирки и увеличения срока эксплуатации оборудования.
После загрузки машины и
заправки моющих средств и
различных добавок обязательно убедитесь в том, что:
Для защиты предметов
одежды из деликатных
тканей (нижнее белье,
чулки) поместите их
в холщевые мешочки
Сверяйтесь
с этикетками.
На одежде и белье имеются этикетки, показывающие как ухаживать за этими изделиями.
В таблице (см. с. 20) приведены символы, проставляемые на этикетках, и раскрыто их содержание. Соблюдение правил стирки надолго
сохранит ваши вещи.
1. Дверца машины надежно
закрыта.
2. Машина включена в
электрическую сеть.
3. Открыт кран подачи
воды.
4. Рукоятка А находится в
положении
Выбор программы
Выберите нужную программу
по таблице, которая приведена
на с. 18. Поверните рукоятку
программатора À так, чтобы
выбранная программа совпала
c отметкой на рукоятке; при
помощи рукоятки термостата
 установите необходимую
температуру; убедитесь, что
рукоятка выбора скорости
отжима Ñ находится в
требуемом положении, если
необходимо, нажмите кнопки
E, F, G затем нажмите кнопку
l
(Stop/Reset).
Смешивайте крупные и
мелкие вещи при
загрузке машины.
Машина оборудована электронным устройством, контролирующим загрузку барабана. Перед выполнением цикла отжима это устройство старается более
или менее равномерно распределить нагрузку по барабану, что, в свою оче-
включения/выключения H
(позиция I).
Напоминаем, что программный пуск, если вы хотите им
воспользоваться, должен
быть установлен до начала
цикла стирки.
По окончании стирки
Индикатор I в течение
нескольких секунд будет
мигать часто, затем замигает
реже.
Для получения
хороших результатов
очень важно разобрать
белье по ткани и цвету
редь, зависит как от типа
стираемых вещей, так и от
их начальной загрузки.
Если нагрузка распределена более или менее равномерно, то машина может
выполнять отжим на высоких оборотах без шума и
тряски.
Выключите стиральную
машину нажатием кнопки H
(положение O). Откройте
дверцу машины. Вынув
белье, оставьте дверцу
машины приоткрытой, чтобы
дать испариться оставшейся
влаге.
Перекройте кран подачи
воды.
В случае отключения электропитания или самопроизвольного выключения машины заданная программа
сохраняется в памяти.
Как избавиться от пятен: общие рекомендации
Паста шариковых ручек или фломастер: нанесите метиловый спирт на кусочек ваты и протрите пятно, затем стирайте при 90 °С.
Деготь и смазка: счистите толстый слой загрязнения, размягчите остаток маргарином или сливочным масом, оставьте на время;
затем снимите скипидаром и сразу же простирайте вещь.
Âîñê: счистите воск, положите ткань между двумя листами рыхлой бумаги и прогладьте горячим утюгом; сразу же обработайте
ватным тампоном, смоченным скипидаром или метиловым спиртом.
Жевательная резинка: удалите с помощью жидкостьи для снятия лака, затем протрите чистой тканью.
Плесень: хлопковые и льняные ткани замочите в растворе 1 части жидкого моющего средства на 5 частей воды и добавьте столовую
ложку уксуса. Тотчас простирайте. Загрязнения иных белых тканях смочите в 10%-ном растворе перекиси водорода и простирайте.
Губная помада: хлопок или шерсть обработайте жидким моющим средством и протрите; шелк очищайте пятновыводителем.
Лак для ногтей: положите ткань между двумя листами рыхлой бумаги, смочите жидкостью для снятия лака.
Пятна от травы: используйте тампон, смоченный этиловым спиртом.
Руководство по установке и эксплуатации
16
Панель управления
Управляя машиной главное сделать
правильный выбор. И это очень просто!
Переключатель программ и
пуска программы
Используйте эту рукоятку для
выбора программы стирки.
Поворачивайте рукоятку
только по часовой стрелке.
Для того, чтобы выбрать
программу, поверните рукоятку
программатора так, чтобы символ/
номер требуемой программы
совпал с отметкой на рукоятке.
Нажмите кнопку включения/
выключения H (позиция I),
индикатор Mначнет мигать.
Через 5 секунд установки будут
приняты и подтверждены, цикл
стирки начнется, когда индикатор
I перестанет мигать (останется
гореть). Если Вы хотите прервать
программу в процессе выполнения
или изменить установки, выберите
один из символов
и подождите 5 секунд: отмена
программы будет подтверждена
мерцанием индикатора I, после
этого Вы можете выключить
машину.
Вы можете использовать эту
рукоятку для установки операций
с отложенным стартом.
Выберите одну из четырех позиций
таймера, нажмите кнопку
включения/выключения H (позиция
I) и подождите 5 секунд.
Установкабудет подтверждена,
когда индикатор I загорится,
теперь вы можете установить
необходимую программу.
Мерцание индикатора I (2 ñåê
горит и через 4 сек) гаснет также
показывает, что установлена
программа с отложенным
стартом. В это время можно
открыть дверцу и перезагрузить
машину.
Когда программный пуск и
программа установлены, вращения
переключателя уже не имеют никакого значения, за исключением
установки в положение
Reset).
(Stop/Reset)
(Stop/
Рукоятка выбора программ
Рукоятка предназначена для
выбора температуры стирки
согласно таблице программ. Кроме
того, с помощью этой рукоятки вы
можете установить температуру
ниже рекомендованной или
выполнить холодную стирку
Рукоятка сушки
Используйте рукоятку для выбора
необходимой программы сушки:
A - Установите необходимое
время:
От 40 äî 150 минут.
B - Выберите в зависимости от
типа белья степень сушки:
Глажение
увлажненные ткани, вещи легко
гладить.
Гардероб
высушенные ткани, вещи можно
убрать.
Экстра-сушка
очень сухие ткани, рекомендуется
для вещей, которые не нужно
гладить (например, банные халаты,
полотенца).
Программа сушки завершается
охлаждением.
: результат - хорошо
1
D
( )
: результат -
: результат -
3
2
Распределитель моющих
средств
Распределитель моющих
средств имеет три отделения:
1 - моющее средство для предва-
2 - моющее средство для стирки
3 - добавки (смягчители, аромати-
.
Легкое глажение
Применение этой функции
позволяет Вам избежать
образования складок на белье и тем
самым обепечить более легкое
глажение.
Вы можете использовать функцию
вместе с программами 3-4
(Хлопок), 5-6 (Синтетика) и 9
(Деликатные ткани).
Нажмите кнопку на программах
5-6-9 и машина остановится на
символе
можете повторным нажатием
кнопки Å.
Внимание: Если вы также
хотите запустить цикл сушки,
этафункция может быть
использована только совместно с
уровнем сушки
Кнопка понижения
скорости отжима
Используйте кнопку для
понижения скорости отжима с
1000 до 500 об/мин для программ
стирки хлопчатобумажных и
льняных тканей и с 850 до 500 об/
мин для программ стирки
синтетических тканей.
F
рительной стирки
заторы и пр.)
. Завершить стирку Вы
(Глажение).
GE
I
H
L
C
Ускоренная стирка
При нажатии этой кнопки
продолжительность цикла стирки
сокращается приблизительно на
30%. Кнопка не используется в
специальных программах (см. с.
18), а также в программах стирки
изделий из шерсти и шелка.
Кнопка включения /
выключения
Нажатие на кнопку включает
машину. Если кнопка
не нажата, то машина выключена.
Выключение машины не отменяет заданную программу.
Индикатор включения/
выключения и
блокировки дверцы
Дверцу можно открывать, если
индикатор I мигает редко (машина
включена и ждет введения
программы или по окончанию
цикла стирки). Если индикатор
мигает часто, дверцу открывать
нельзя. Постоянное свечение
индикатора означает, что машина
приняла заданную программу.
Индикатор цикла стирки
Горящий индикатор обозначает,
что рукояткой Ñ задан цикл сушки,
который будет выполнен по
окончанию цикла стирки.
B
A
Распределитель моющих
средств находится здесь.
17 Руководство по установке и эксплуатации

M
Что стираем сегодня?
Программы на все случаи жизни
Ткань и степень загрязнения Програ-
ììà
Хлопок
Сил ьно з агрязненно е бело е белъе
(простъ²ни, скатерти и т.д)
Сил ьно з агрязненно е бело е белъе
(простъ²ни, скатерти и т.д)
Сил ьно з агрязненно е бело е и
линяющее цветное белъе
Сл а бо з аг ряз ненно е бе ло е и цвет ное
деликатное белъе
(рубашк и, т енниски и пр.)
Полоскание
Отжим Слив и окончат елъ ный отжим
Сушка хлопковых тканей
Остановка/запуск (Stop/Reset) Прерывание/отмена программы
СИН ТЕТИК А
Цв ет на я, л иняющ ая , с илъ но
за грязне нна я ( дет с к ая од ежд а и п р. )
Цветная, деликатная, слабо
за грязне нна я ( люба я оде жда )
Цветная, деликатная, слабо
за грязне нна я ( люба я оде жда )
Полоскание
Смягчение
Отжим Слив и окончат елъ ный отжим
Сушка синтетических тк аней
Остановка/запуск (Stop/Reset) Прерывание/отмена программы
ДЕЛИК АТ. ТК АНИ
Ручная стирка
Осбо деликатные изделия и ткани
(шторы, шелк, вискоза)
Полоскание
Отжим Слив и окончат елъ ный отжим
Ñëèâ Ñëèâ
Сушка шерст яных тканей
Остановка/запуск (Stop/Reset) Прерывание/отмена программы
ПРОГРАММНЫЙ ПУСК
С задержкой 1 2 - 9 - 3 час Пуск через1 2 - 9 - 3 час
Остановка/запуск (Stop/Reset) Прерывание/отмена программы
Температура
1 90°C
2 90°C
3 60°C
4 40°C
5 60°C
6 40°C
7 30°C
8 40°C
9 30°C
МС/предв. стирка
Моющеесред ство
Смягчитель
◆◆◆
◆◆
◆◆
◆◆
◆
◆◆
◆◆
◆◆
◆
◆
◆◆
◆◆
◆
Длителъностъ
цикла
(мин)
165
145
130
95
100
70
30
45
50
Описание цикла ст ирки
Пре два рит ел ьная с тирка в т еплой воде -,
Стирка п ри 90°C, п олоскание,
промежуточный и окончат елъный отжим
Стирка п ри 90°C, п олоскание,
промежуточный и окончат елъный отжим
Стирка п ри 60°C, п олоскание,
промежуточный и окончат елъный отжим
Стирка п ри 40° C, полоскание,
промежуточный и окончат елъный отжим
Пол оскание, промежуточный и
окончателъный отжим
Стирка п ри 60°C, п олоскание, ост ановка с
водо й или д ел ик ат ный от жим
Стирка п ри 40° C, полоскание, ост ановка
с водой или делик ат ный отжим
Стирка п ри 30°C, п олоскание и
деликатный отжим
Пол оскание, ост ановка с водой или
деликатный отжим
Полоскание, автоматическое добавление
смягчителя, остановка с водой или
деликатный отжим
Стирка п ри 40° C, полоскание и
деликатный отжим
Стирка п ри 30°C, п олоскание, ост ановка с
водой илслив
Пол оскание, ост ановка с водой илслив
Для отмены программы выберите любой символ (Stop/Reset) и ждите 5 сек.
Данные, приведенные в таблице, являются всего лишь справочными и могут меняться в зависимости от конкретных условий стирки
(объем стирки, температура воды в водопроводной системе, комнатная температура и др.)
Специальные программы
Повседневная стирка : программа быстрой стирки для слабо загрязненной одежды. Выберите программу 7 и температуру 30°C и можете стирать
одежду из самых разных тканей (кроме шерсти и шелка) при максимальной загрузке барабана 3 êã. Программа, длящаяся около 30 минут,
отличается экономным расходом электроэнергии. Рекомендуем пользоваться жидким моющим средством.
Руководство по установке и эксплуатации 18
Полезные советы
Комбинированная
программа стирки и
сушки
Если Вы собираетесь постирать и
высушить белье в количестве, не
превышающем указанного
(таблица А, графа ÌÀÕ), следуйте
инструкциям из раздела Стирка
(см. стр. 16, параграф Запуск
машины) и установите рукояткой
Ñ выбранную программу сушки,
затем нажмите кнопку H
(положение I - включено). В это
случае машина автоматически
перейдет по окончанию программы
стирки к программе сушки.
Если загрузка больше
рекомендуемой (таблица À, графа
ÌÀÕ), затем следуйте
инструкциям из раздела Стирка
(см. стр. 16, параграф Запуск
машины).
В конце программы стирки
разделите белье так, чтобы каждая
часть не превышала
рекомендуемого количества.
Теперь, следуя инструкциям из
раздела Сушка, высушите белье
по частям.
Сушка
Загрузите белье (4 кг - хлопковые
ткани, максимальную загрузку для
других тканей см. таблицу),
убедитесь, что:
- дверца закрыта;
- стиральная машина подключена
к электросети;
- включена подача воды;
- кнопка включения/выключения H
не нажата (находится в положении O).
Установите программу
Установите рукоятку À â
положение, отмеченное символом
сушки , в зависимости от типа
ткани; выберите при помощи
рукоятки Ñ тип цикла сушки,
затем включите машину кнопкой
включения/выключения H
(положение I).
По окончанию сушки
Вы можете выключить машину
нажатием кнопки включения/
выключения H (положение O),
когда индикатор I будет мигат
редко. Теперь можно открыть
машину. Вынув белье из машины,
оставьте дверцу приоткрытой во
избежание образования
неприятного запаха, перекройте
подачу воды.
A.
Тип т кани Закрузка М ак сим-
Хлопок,
лен
Õëîï îê Махровые
Õëîï îê Простыни,
Акрил Пижамы,
Нейлон Нижние
Данные, содержащиеся в таблице, исключительно
информативны.
При загрузке менее 1 кг хлопковых тканей используйте
программу сушки синтетических тканей.
Разнообразные
изделия
полотенца и т.п.
рубашк и
íîñ ê è
юбки,
белье
альная
загру зк а
(kg)
4150145140
4
2,5 100 90 85
1656060
1656060
Время сушки (минут)
Экстрасушка
Гардер-обГлажен-
150 145 140
èå
Цикл сушки шерсти
Цикл сушки шерстяных изделий следует использовать
только совместно с выбором ограниченного времени
(150 - 100 - 60 - 40). Мы рекомендуем 60 минутный цикл
сушки для 1 кг белья.
Если один из трех уровней выбран по ошибке (Экстрасушка , Гардероб , Глажение ), машина
автоматически запустит максимально продолжительный
цикл сушки (150 минут).
Важно
Если установлена программа сушки хлопковых тканей è
уровень сушки (Экстра-сушка , Гардероб ,
Глажение ), то во время сушки будет включаться отжим.
Внимание
- Сушить можно тольк белье, выстиранное в воде.
- Не сушите белье, которое было обработано
воспламеняющимися растворителями (например,
трихлорэтилен).
- Не сушите изделия, имеющие отделку из вспененной
резины и аналогичных эластомеров.
- Убедитесь, что в машину поступает вода, которая
необходима для конденсации влаги по время сушки.
19 Руководство по установке и эксплуатации
Символика на этикетках
Символы на этикетках, прикрепляемых к одежде, это
своего рода инструкции, выполнение которых позволит
вам добиться замечательных результатов при стирке
и дольше сохранит вашу одежду.
В странах Европы символика на этикетках одежды несет очень важную информацию. Вы должны научиться понимать эти символы,
чтобы правильно ухаживать за одеждой.
Полезные советы
Рубашки выверните наизнанку это позволит добиться лучших результатов при стирке
и рубашки прослужат дольше.
Обязательно выньте все из карманов.
Перед стиркой сверьтесь с этикетками на
одежде.
При загрузке машины смешивайте крупные
и мелкие предметы одежды.
Изучите предлагаемую таблицу, постарайтесь запомнить
символьные обозначения. Это поможет вам лучше ухаживать
за своей одеждой и использовать стиральную машину
Indesit Стиральная машина с сушкой с наибольшим эффектом.
Все символы разделяются на
пять групп:
стирка
глажение
, отбеливание ,
, õèì-
чистка и сушка .
M
Температуру надо выбирать
правильно!
Íîðì-
альная
Стирка Отбеливание Глажение Химчистка Сушка
Делик-
атная
Стирка при
95°C
Стирка при
60°C Не отбеливат ь
Отбеливать только
в холодной воде
c
l
Гладить при
max200°C
Гладить при
max 150° C
Химчистка с любым
спирт, R111 и R113
A
растворит елем
P
Химчистка: только
перхлорид, бензин,
Âûñî êàÿ
темпе-
ðàò óðà
Машинная
сушка
Нельзя сушить в
ìàø èíå
F
Стирка при
40°C
Стирка при
30°C Не гладить
Ручная
стирка
Гладить при
max110°C
Химчистка: бензин,
спирт и R1 13
Не подвергать
химчистке
Сушить
расправленным
Сушить на
веревк е
Сушить на
плечиках
Умеренная
òåì ïå ð à òóð à
Не стирать
Руководство по установке и эксплуатации 20

Типичные ошибки и как их избежать
Не стирайте в машине.
- ветхие, непрочные и нежные вещи. Если все-таки
требуется постирать эти вещи
в машине, поместите их в
льняной мешочек;
- глубоко окрашенные вещи
вместе с белыми вещами.
Не превышайте
рекомендованные нормы
загрузки.
Если вы хотите добиться
наилучших результатов стирки, не перегружайте машину.
Нормы загрузки сухого
белья приведены ниже:
Прочные ткани:
5,5 кг (максимум)
Синтетические ткани:
2,5 кг (максимум)
Деликатные ткани:
2 кг (максимум)
Шерсть:
1 кг (максимум)
Что и сколько весит?
1 простыня: 400-500 г
1 наволочка: 150-200 г
1 скатерть: 400-500 г
1 халат: 900-1200 г
1 полотенце: 150-200 г
Тенниски и бумажные
свитера, окрашенные или с
надписями, при стирке лучше
выворачивать наизнанку.
Гладить только с внутренней
стороны.
Комбинезоны.
Модные комбинезоны имеют
множество шнурков,
ремешков и замков, которые
могут повредить барабан
стиральной машины. Мелкие
детали одежды во время
стирки рекомендуется
поместить в отдельный мешочек или положить во внутренний карман.
Отпуск: выключите
электроприборы.
Если вы не собираетесь
пользоваться стиральной машиной достаточно долгое
время (например, во время
отпуска), то выключите ее из
электросети, перекройте кран
подачи воды и оставьте
дверцу слегка приоткрытой,
чтобы внутри машины не
скапливался неприятный
запах.
Шерсть
Для достижения
наилучших результатов
рекомендуем не загружать
более 1 êã белья и
использовать специальные
порошки для стирки
шерстяных изделий.
Стирать можно практически все
Занавески и шторы.
Занавески и шторы обычно
сильно мнутся. Чтобы этого
избежать, сложите их аккуратно и положите в наволочку. Стирайте отдельно,
убедившись, что вес не превышает половины рекомендуемой нормы загрузки.
Напоминаем, что существует программа 9, которая автоматически исключает
режим отжима.
Стеганые одеяла и вет-
ронепроницаемые куртки.
В машине можно стирать
пуховые одеяла и куртки, при
этом не следует загружать
более 2-3 кг изделий сразу.
Полоскание выполните 1-2
раза, отжим производите на
пониженной скорости.
Парусиновые туфли.
Парусиновые туфли предварительно очистите от грязи и
стирайте с прочными тканями
или джинсами, если
позволяет цвет. Не стирайте
с белыми вещами.
21 Руководство по установке и эксплуатации

M
1
2
3
Для качества стирки это важно
Секреты распределителя моющих средств
Первый секрет самый простой распределитель
открывается наружу.
Рекомендуемая дозировка
моющих средств и добавок
обычно указывается изготовителем на упаковке продукции. При заполнении распределителя моющих средств
следует учитывать объем предстоящей стирки, жесткость
воды и степень загрязненности
белья. В дальнейшем, приобретя некоторый опыт, Вы сможете сами определять, какое количество моющих средств и
добавок требуется в том или
ином случае. Это уже будет ваш
собственный секрет.
Не переполняйте ополаскивателями отделение 3 выше
решетки.
Действуя по программе, машина сама подает добавки
моющих средств в воду.
Жидкое моющее средство заливается в отделение 2 за непосредственно перед пуском
машины.
Помните, что жидкие моющие
средства пригодны для стирки
при температуре до 60°С и для
программ, не предусматривающих предварительную стирку.
Существуют порошки и жидкие
моющие средства в специальных контейнерах, которые
закладываются прямо в барабан.
Действуйте согласно
инструкции на упаковке этих
средств.
Не пользуйтесь средствами,
предназначенными только для
ручной стирки, поскольку
обильное пенообразование может вывести из строя стиральную машину.
В скором времени ожидается
появление моющих средств,
предназначенных и для ручной,
и для машинной стирки.
В заключение еще один секрет:
при стирке в холодной воде
уменьшайте количество
моющего средства, так как в
холодной воде оно растворяется лучше, чем в теплой.
Отделение 1:
моющее средство для
предварительной стирки
(порошок)
Отделение 2:
моющее средство для стирки
(порошок или жидкое)
Отделение 3:
Добавки (смягчители,
ароматизаторы и пр.)
Для того, чтобы помыть распределитель
моющих средств, потяните его на себя, как
указано на рисунке. Затем оставьте его под
струей воды на несколько минут.
Как снизить расходы
МАКСИМАЛЬНАЯ ЗАГРУЗКА
Старайтесь максимально загружать машину, этим вы сэкономите электроэнергию, воду,
моющие средства и время. Например, при полной загрузке расход электроэнергии будет
на 50% меньше, чем при загрузке наполовину.
НУЖНА ЛИ ПРЕДВАРИТЕЛЬНАЯ СТИРКА?
Программы предварительной стирки нужны только для сильно загрязненного белья!
Отказ от предварительной стирки сбережет моющие средства, воду и затраты электроэнергии на 5-15%, не говоря уже о вашем личном времени.
ТАК ЛИ НЕОБХОДИМА ГОРЯЧАЯ ВОДА?
Перед стиркой замочите белье, обработайте пятна специальными средствами, и вам не
потребуется слишком горячая вода. Стирка при 60
троэнергии.
ПЕРЕД ВЫБОРОМ ПРОГРАММЫ СУШКИ ...
После отжима белья на высоких оборотах сушка белья пойдет быстрее.
Экономная эксплуатация
бытовых приборов не наносит
ущерба окружающей среде.
°
С способна сэкономить до 50% элек-
Руководство по установке и эксплуатации 22

Неисправности и их устранение
Разберитесь с проблемой сами...
Возможно вам придется столкнуться с какой-либо неисправностью, но не торопитесь вызывать
мастера. Во многих случаях вы сами можете решить возникшие проьблемы
n
Машина не включается.
n
Вставлена ли вилка в розетку? Вы могли выклю-
чить машину на время
чистки.
n
Не отключено ли электричество? Из-за перегрузки
мог сработать автомат
электросети. Не исключено, что в вашем районе
произошла какая-то авария.
n
Закрыта ли дверца
машины? Стиральная
машина с сушкой не может
быть включена, если
дверца открыта. Это сделано из соображений
безопасности.
Нажата ли кнопка включения/выключения?
Если кнопка нажата, но машина все же не включается, то, значит, был задан
программный пуск (по таймеру).
n
Правильно ли установлена ручка программного пуска? Проверьте (на
тех машинах, где такая
ручка есть).
n
Открыт ли кран подачи
воды? Машина, не запол-
ненная водой, не может
включиться. Это сделано
из соображений безопасности.
Где же вода в машине?
Просто: с новой технологией Indesit вы затратите воды два
раза меньше, а эффект от стирки будет в два раза выше!
Вот почему вы не можете видеть воду через дверцу:
ее очень мало. Это забота об окружающей среде без отказа
от максимальной чистоты.
И вдобавок ко всему, вы экономите электричество.
l
, затем включите машину. Если вращение переключателя не
прекращается, обратитесь
в сервисный центр за
помощью.
ПРАВИЛЬНО
Закрывайте кран после
каждой стирки.
Ограничьте
использование
гидравлической
системы машины,
когда никого нет дома
этим вы уменьшите
опасность протечки.
Оставляйте дверцу в
приоткрытом
положении, чтобы в
машине не
скапливался
неприятный запах.
Внешние панели
машины протирайте
с большой
осторожностью. Корпус
машины и резиновые
детали протирайте
чистой тканью,
смоченной в теплой
воде с мылом.
НЕПРАВИЛЬНО
При чистке оставьте
стиральную машину
подключенной
к сети.
Во время обслуживания
машина всегда должна
быть отключена от сети.
Используйте растворители
и активные абразивы.
Никогда не применяйте
растворители или абразивы для чистки внешних
и резиновых частей
стиральной машины.
Не заботьтесь
о распределителе
моющих средств.
Съемный распределитель
можно легко промыть под
проточной водой.
Уезжая надолго,
не вспомните о машине.
Перед отъездом всегда
проверяйте, что стиральная машина отключена и
закрыт кран подачи воды.
Машина не заливает воду.
n
Правильно ли подсоединен шланг?
n
Не перекрыта ли подача
воды в доме? Возможно,
в вашем доме или поблизости ведется ремонт и
водоснабжение временно
отключено.
n
Достаточно ли давление в
водопроводе? Возможно,
неисправен автоклав.
n
Не засорен ли фильтр?
Фильтр на заливном
шланге может быть забит
известковыми частицами
или мусором, оставшимся после ремонта водопровода.
n
Не пережат ли шланг
подачи воды? Проследи-
те, как проложен шланг,
нет ли изгибов и переломов.
Вращается переключатель программ.
n
Подождите, пока насос
откачает воду, выключи-
те машину,выберите один
из символов Останов/пуск
Машина заливает и сливает воду одновременно.
n
Не слишком ли низко расположен сливной шланг?
Конец шланга должен
находится на высоте 60100 см.
n
Не оказался ли конец
шланга в воде?
n
Имеется ли отводная
трубка в сливной системе?
n
Если попытки устранить
неисправность не увенчались успехом, выключите
машину, перекройте воду
и обратитесь в сервисный
центр за помощью.
n
На верхних этажах зданий может сказаться так
называемый сифонный
эффект. Для его устранения устанавливают специальный антисифон.
23 Руководство по установке и эксплуатации

n
Не пережат ли сливной
шланг? Проследите, как
проложен шланг, нет ли
изгибов и переломов.
n
Нет ли засоров в канализации? В каком состянии
удлинитель сливного
шланга? Нестандартный
удлинитель может задерживать воду.
n
Достаточен ли зазор
между машиной, стеной
и окружающими предметами? Åñëè ýòî íå
встраиваемая модель, то
ей необходимо
обеспечить некоторое
пространство (несколько
сантиметров) для перемещений во время отжима.
Проблемы при сливе
воды и отжиме.
n
Предполагает ли выбранная программа автоматический слив? В некоторых
программа слив выполняется вручную.
n
Включен ли режим остановки с водой в машине?
Эта функция предполагает ручной слив воды из
машины.
n
Не засорен ли сливной насос? Для проверки зак-
ройте кран, выключите
машину из сети, далее
см. инструкции на с. 26.
При необходимости вызовите специалиста сервисного центра.
Не пользуйтесь
услугами лиц, не
уполномоченных
Производителем.
При ремонте
требуйте
использования
Сильная вибрация при
отжиме.
n
Сняты ли транспортировочные ограничители?
См. инструкции по установке машины на следующей странице.
n
Хорошо ли выровнена
машина? Регулярно про-
веряйте горизонтальность
установки машины. Отрегулируйте положение
ножек машины.
Протечки.
n
Плотно ли затянуто металлическое кольцо на
конце заливного шланга?
Закройте кран, выключите машину из сети, подтяните кольцо руками без
особыз усилий.
n
Нет ли засора в распределителе моющих
средств? Извлеките рас-
пределитель и промойте
его в проточной воде.
n
Надежно ли закреплен
сливной шланг? Закрой-
те кран, выключите машину из сети, подтяните
соединение.
оригинальных
запасных частей.
Технические характеристики
модель WD 104 T
рамеры ширина 59,5 см
загру зк а от 1 до 5,5 кг на программах стирки; от 1 до 4 кг на программах сушки
электрические
параметры
гидравлические
параметры
скорость
олтжима
Соответствие
программ
управления
нормам IEC 456
высота 85 см
глубина 53,5 см
напряжение 220/230, частота 50 Гц
max потребляемая мощность 1850 Вт
max д а вл ение 1 M П a ( 1 0 бa р)
min давление 0,05 MПa (0,5 бaр)
объем барабана 46 л
äî 1000 îá/ìèí
Стирка: программу 3; температуру 60°C; загрузка 5 кг.
Сушка: загрузка 2,5 кг, рукоятка С установлена в позицию .
Машина соответствует следующим директивам:
-73/23 ЕЕС от 19.02.73 (низкого напряжения) и последующие модификации
-89/336 ЕЕС от 03.05.89 (элект ромагнит ной совмест имост и) и п осл еду ющие
мод ифик а ц и и
M
Избыточное
пенообразование.
n
Подходит ли моющее
средство для данной машины? Проверьте, есть
упаковке надпись: Для машинной стирки или Для
ручной и машинной стирки.
n
Правильно ли вы дозируете моющее средство? Ïå-
редозировка моющего не
только ухудшает качество
стирки, но и может привести к поломке машины.
Машина не сушит.
Убедитесь, что:
Вилка вставлена в розетку; в
доме не отключено
электричество; дверца
закрыта плотно; не установлен
отложенный старт (если в
вашей машине есть такая
функция); рукоятка выбора
программ À находится в
положении
рукоятка выбора программ Ñ
находится в положении 0.
Неудовлетворительные
результаты сушки.
Убедитесь, что:
Нет проблем со сливом, не
засорен сливной насос,
правильно выбрано время
сушки и рекомендуемые
объемы загрузки; кран подачи
воды открыт.
Если после проверки машина продолжает работать не должным образом, свяжитесь с сервисным
центром, обслуживающим
продукцию марки Ariston, и не забудьте сообщить следующую
информацию:
характер неисправности;
модель стиральной
машины (Mod. ...);
заводской номер (S/N...).
Эти данные указаны в табличке на
задней стенке вашей стиральной
машины.
(Stop/Reset);
Руководство по установке и эксплуатации 24

Распаковка и установка
Распаковка и установка
Позаботьтесь о правильной установке стиральной
машины, и у вас не будет многих проблем.
Распакуйте машину. Убедитесь в
отсутствии внешних повреждений.
Если у вас возникли какие-то сомнения, не включайте машину немедленно свяжитесь с квалифицированным уполномоченным специалистом.
На время транспортировки подвижные узлы машины крепятся четырьмя винтами через заднюю стенку.
Транспортировочные винты должны быть удалены до того, как вы
начнете пользоваться машиной. Образовавшиеся отверстия закройте
пластиковыми заглушками (входят
в комплект поставки машины).
Внимание! Закупорите пробкой
(входящей в комплект) 3
отверстия, в которых была
размещена вилка и которые
расположены на задней части
стиральной машины, снизу.
Выравнивание
Правильное выравнивание очень
важно для работы машины. После
установки машины на место, отрегулируйте ее устойчивое положение путем вращения передних
ножек. Проверьте по уровню горизонтальность верхней крышки
корпуса. Отклонение от горизонтали не должно быть более 2°.
машина установлена на ковровом
покрытии, проверьте, не перекрыты
ли вентиляционные отверстия в
днище машины.
Сохраняйте блокирующие
винты и втулки, которые
могут опять понадобиться
при транспортировке
машины.
25 Руководство по установке и эксплуатации
Регулируемые передние ножки.
Подключение
к водопроводной сети
Давление воды в водопроводе
должно находиться в пределах,
указанных в информационной
табличке на задней панели
стиральной машины. Наверните заливной шланг на вывод водопровода, имеющий наружную резьбу
3/4 дюйма, и проверьте надежность
соединения. Соединение уплотняется резиновой прокладкой,
совмещенной с фильтром.
Фильтр на резиновом шланге.
Если машина подключается
к новому водопроводу или к
водопроводу, который долго не использовался, то перед подключением шланга
откройте кран и слейте грязную воду. Это предохранит
машину от повреждений.
Присоедините загнутый ко-
Åñëè
нец шланга к водоприемнику стиральной машины.
Водоприемник наверху, справа.
Подключение сливного
шланга
На задней стенке машины имеются
два крюка, правый и левый,
которыми крепится сливной
шланг.
Присоедините сливной шланг к
трубопроводу канализационной
системы или повесьте его конец на
край раковины или ванны. Шланг
не должен перегибаться. Верхняя
точка сливного шланга должна
располагаться на высоте 60-100 см.
Если необходимо закрепить конец
шланга на высоте ниже 60 см, то
зафиксируйте сливной шланг на задней стенке корпуса машины с помощью зажима.
A
Крюк, используемый для крепления
шланга на высоте ниже 60 см.
Если шланг вставляется в слив
раковины или ванной, используйте
пластиковую направляющую, которая будет держать конец шланга
строго вниз и предотвратит разбрызгивание воды.
Пластиковая направляющая и
крепление шланга в сливе ванной
(раковины).
Конец шланга ни при каких
условиях не должен находиться в
воде.
Допускается наращивание
сливного шланга другим шлангом
с таким же диаметром и длиной до
150 см.
Если сливной шланг встроен в канализацию, на верхних этажах
может создаться сифонный эффект машина одновременно
сливает и заливает воду. Для предотвращения подобного эффекта
на сливном шланге устанавливается антисифон (продается в хозяйственных магазинах).
Электрические
соединения
Перед включением машины в сеть
убедитесь, что:
1) Розетка и проводка соответствуют максимальной нагрузке,
указанной в табличке на задней
стенке машины, а также отвечают
требованиям действующих стандартов.
2) Напряжение питания находится
в пределах, указанных в табличке
на задней стенке машины.
3) Розетка и вилка должны быть
одного типа. В противном случае
замените розетку или вилку, но ни
в коем случае не пользуйтесь переходниками.
4) Все электрические домашние
приборы имеют надежное
заземление.
дением указанных норм установки.
Фирма снимает с себя всякую
ответственность, в случае
несоблюдения этих правил.
пенопласты, гвозды и другие
компоненты упаковки не
подходят для детских игр,
потенциальным источником
вызванный несоблю-
Внимание!
Целлофановые пакеты,
поскольку являются
опасности.
.

Уход и обслуживание это просто
M
При хорошем обращении Стиральная машина с
сушкой ваш друг
на долгие годы
Ваша машина предназначена
для обеспечения безопасной
работы в течение многих лет.
От вас требуется совсем не
многое, чтобы поддерживать
исправное состояние
машины. Во-первых, после
каждой стирки обязательно
закрывайте водопроводный
кран, так как постоянный
напор воды может привести
к короблению некоторых
деталей машины. Кроме
того, этим вы снизите риск
появления протечек.
Если вода в вашей местности слишком жесткая,
пользуйтесь средствами,
удаляющими известь.
(Жесткая вода обычно оставляет белесые следы на
кранах и сливных отверстиях. Обратитесь в жилищноэксплуатационную контору, если хотите получить
более подробную информацию о качестве воды в вашей местности.)
Перед стиркой одежды удалите из карманов все мелкие, твердые и острые предметы.
Корпус машины мойте теплой водой с мылом.
Важно регулярно
промывать распредели-
тель моющих средств.
Чтобы предотвратить
присыхание остатков
стирального порошка,
поместите на несколько
минут распределитель
под струю воды.
Не превышайте
рекомендованные дозы
моющих средств.
В состав всех средств, предназначенных для стиральных машин, входит антинакипин. Если вода в вашей
местности отличается особой жесткостью, то кроме
использования смягчителя
воды при каждой стирке,
изредка производите очистку, пустив машину на выполнение программы стирки без белья и моющего
средства с одним лишь удалителем накипи.
Не используйте слишком
много моющих средств и
добавок, так как это приводит к образованию избыточной пены, накипи и, в
конце концов, может повредить машину.
Ваша Стиральная машина с сушкой надежный
спутник и помощник в доме. Важно только следить,
чтобы машина всегда была в надлежащей форме.
Не забудьте проверить все корманы: маленькие
предметы могут повредить вашему другу
Стиральная машина с сушкой.
При необходимости проверяйте насос и резиновый шланг
Стиральная машина с сушкой оснащена насосом самоочищающегося типа, который не требует специальной чистки.
Однако мелкие предметы (монеты, пуговицы и пр.) могут случайно попасть в насос. Для их извлечения насос оборудован уловителем, или фильтром, доступ к которому закрыт нижней передней панелью.
С помощью отвертки откройте панель (рис. 1), поверните крышку против
часовой стрелки (рис. 2) и извлеките фильтр. Осмотрите фильтр.
Резиновый шланг
Проверяйте шланг не реже одного раза в год. При любых признаках течи
или повреждения немедленно замените шланг. Неисправный шланг, находящийся под давлением, может внезапно лопнуть во время работы машины.
Ðèñ. 1
Внимание: Перед тем как открыть панель и вынуть фильтр, а также перед выполнением любых операций по техническому обслужи-
ванию, убедитесь, что машина закончила цикл стирки, и выключите машину из сети. Во время извлечения фильтра может вылиться
немного воды это нормальное явление. Установите фильтр на место и плотно закройте крышку. Проследите, чтобы крюки в
нижней части вошли в соответствующие отверстия.
Руководство по установке и эксплуатации 26
Ðèñ. 2

Не просто важно, а сверхважно
Ваша собственная безопасность
Стиральная машина с сушкой
и безопасность ваших детей
Внимательно прочитайте
этот раздел. Он содержит информацию, касающуюся Вашей личной безопасности
при установке, эксплуатации
и техническом обслуживании стиральной машины.
1.Машина предназначена
для установки в помещении. Ни при каких обсто-
ятельствах не используйте
машину на улице, хотя бы
и под навесом (особенно
опасно во время дождя и
грозы).
2.Машина предназначена
для взрослых пользователей и только для бытовой
стирки при строгом соблюдении инструкций и
правил, изложенных в настоящем документе.
3.Машина обладает большим весом. Передвигайте
машину очень осторожно
и только с помощью двухтрех человек.
4.Перед загрузкой новой
порции белья проверяйте,
не осталось ли в машине
что-либо от предыдущей
стирки.
5.Не касайтесь работающей
машины, åñëè âàøè ðóêè
или ноги мокрые или сырые; не пользуйтесь машиной босиком.
6.Не пользуйтесь удлините-
лями или тройниками ýòî
опасно, особенно в среде с
повышенной влажностью.
Убедитесь в отсутствии перегибов, изломов и иных
повреждений на кабеле
электропитания.
Только квалифицированный
специалист и только подлинные
запасные детали Indesit!
7. Не пользуйтесь моющими
средствами для ручной
стирки, так как повышен-
ное пенообразование, характерное для этих
средств, может привести к
поломке машины.
сконструирована и изготовлена в
соответствии с самыми строгими
международными нормами и стандартами,
чтобы вы и ваша семья чувствовали себя
защищенными.
8.Не тяните провод, чтобы
вынуть вилку из розетки:
это очень опасно.
9.Будьте осторожны: âîäà,
сливаемая из работающей
машины, может быть
очень горячей. Дверца ма-
шины в процессе работы
также разогревается. Ñëå-
дите, чтобы дети не подходили к работающей
машине и не прикасались
к дверце. Не пытайтесь с
силой открыть дверцу, так
как это приведет к поломке механизма замка.
10. Если вы заметили что-то
необычное в работе машины, перекройте кран подачи воды и выньте вилку из
розетки. Не пытайтесь са-
мостоятельно вскрыть и
отремонтировать машину.
Как заменить питающий кабель
Стиральная машина с
сушкой оснащена
специальным питающим кабелем, который можно приобрести только в авторизованном Центре технического обслуживания.
Замена кабеля электропитания
выполняется следующим образом:
I
Ðèñ. 3 Ðèñ. 4 Ðèñ. 5 Ðèñ. 6
27 Руководство по установке и эксплуатации
1. Выключите машину из электросети.
2. Отверните два винта I, снимите крышку (рис. 3).
3. Отсоедините провода от подавителя радиопомех F (рис. 4).
Обратите внимание на цвет и
расположение проводов: синий
= провод N, коричневый = ïðî-
N
F
âîä L. Последним отсоедините
провод заземления
Примечание: Символы L, N è
нанесены на корпусе блока подавления радиопомех.
4. На задней стенке слегка выдвиньте кабельный ввод и движением вверх вытащите питающий
кабель (рис. 5).
L
.
Новый кабель электропитания устанавливается в обратном порядке.
Положите верхнюю крышку на
машину (рис. 6) и подвиньте ее
вперед так, чтобы замки вошли
в отверстия. Закрепите
крышку винтами.

M
Руководство по установке и эксплуатации 28

Guide rapide
Découvrez ci-dessous les 12 sujets qui seront développés
dans les pages de ce manuel. Lisez, apprenez, amusezvous: vous découvrirez un tas de petits secrets pour laver
mieux, avec moins d’efforts tout en augmentant la
longévité de votre lavante-séchante. Et surtout, en toute
sécurité.
1.
Installation et déménagement (page 39)
Pour un bon f onctionnement de la lavante-séchante, l’opér ation la
plus importante après sa livraison ou après un déménagement,
est sans aucun doute son installation. Vérifiez toujours:
1. si l’installation électrique est conforme;
2. si les tuyaux d’arrivée et de vidange de l’eau sont bien
raccordés correctement. Ne jamais utiliser des tuyaux usés.
3. si le lavante-séchante est bien de niv eau. C’est important: pour
la longévité de votre lavante-séchante et pour la qualité de votre
lavage.
4. que toutes les vis de fixation du tambour, situées à l'arrière du
lavante-séchante, ont bien été enlevées.
2.
Comment charger votre lavante-séchante et
mettre en service la machine (page 30)
T riez correctement votre linge: c’est une opération importante dont
la réussite de votre lessive dépend entièrement. Apprenez tous
les trucs et tous les secrets pour bien trier votre lessive: les
couleurs, les textiles, la tendance à produire des peluches, voilà
quels sont les critères les plus importants.
7.
Guide des programmes de lavage (page 32)
Un tableau facile à consulter pour cerner d’un seul coup d’oeil tous
les programmes, les températures, les produits lessiviels et
additionnels. Utilisez le bon et vous obtiendrez de meilleurs
résultats en économisant du temps, de l’eau et de l’électricité, jour
après jour.
8.
Comment s'y prendre pour sécher (p. 33)
Quelques bons conseils pour obtenir un séchage optimal.
3.
Guide pour comprendre les étiquettes (page 34)
Les symboles reportés sur les étiquettes des vêtements sont très
faciles à comprendre et importants quant à la réussite du lavage.
Ce guide vous aidera à vous y retrouver parmi les températures
conseillées, les types de lavage et de repassage.
4.
Conseils utiles pour ne pas vous tromper (page 35)
Autrefois, on suivait les bons conseils de grand-mère - et les
matières synthétiques n’existaient pas: il était donc facile de lav er .
Aujourd’hui, la votre lavante-séchante vous donne de bons
conseils et vous permet même de laver laine aussi bien qu’une
blanchisseuse.
5.
Le tiroir à produits lessiviels (page 36)
Comment utiliser le tiroir à produits lessiviels.
6.
Bien maîtriser le bandeau de commandes (page 31)
Le bandeau de commandes de la lavante-séchante est très simple.
Quelques commandes essentielles pour choisir les types de
lavage, du plus énergique, pour laver une combinaison de
mécanicien, jusqu’au plus délicat pour la laine. Apprenez à vous
en servir, vous laverez mieux et prolongerez la durée de vie de
votre lavante-séchante. C’est facile.
9.
Soin et entretien (page 40)
La votre lavante-séchante est une amie: quelques petites attentions
suffisent pour qu’elle vous rende la pareille en fidélité et dévotion.
Chouchoutez-la, elle lavera pour vous pendant des années et des
années.
10.
Problèmes et solutions (pages 37 et 38)
Avant d’appeler un technicien, lisez ces pages: de nombreux
problèmes peuvent trouver une solution immédiate. Si vous
n’arrivez pas à les résoudre, appelez alors le numéro de votre
SAV et en un rien de temps la panne sera réparée .
11.
V ous y trouverez les caractéristiques techniques de votre lav anteséchante: sigle du modèle, spécifications électriques et hydrauliques,
dimensions, capacité, vitesse d’essorage et conformité aux normes
et aux directives italiennes et européennes.
12.
V ous y trouverez tous les conseils indispensables à votre sécurité
et à celle de votre famille. C’est ce qu’il y a de plus important.
Caractéristiques techniques (page 38)
Sécurité pour vous et vos enfants (page 41)
29
Mode dinstallation et demploi

Que placer dans v otre
lav ante-séchante?
Quelques astuces pour mieux laver . T riez votre linge en tenant compte des textiles et
des couleurs. Attention aux étiquettes, suivez leurs indications. Alternez les petites
et les grandes pièces.
M
T riez votr e linge par type
de tissu et couleur: vous
obtiendrez de meilleurs
résultats
Avant de laver .
Triez votre linge selon le type de
tissu et la résistance des couleurs:
les tissus plus résistants doivent
être séparés des délicats.
Séparez les couleurs claires des
couleurs foncées.
Videz toutes les poches (pièces
de monnaie, papier, argent et petits
objets) et contrôlez les boutons.
Recousez tout de suite les
boutons ballants, vous éviterez
ainsi qu’ils ne se détachent en
cours de lavage.
Les étiquettes vous
disent tout ce qu’il faut.
Lisez toujours les étiquettes:
vous saurez tout sur vos
vêtements et sur leurs
meilleures conditions de lavage.
Page 34, nous vous dévoilerons
tous les secrets qui se cachent
derrière les symboles reportés
sur les étiquettes des
vêtements. Leurs indications
sont précieuses, elles vous
aideront à conserver la beauté
de vos vêtements.
Dispositif antibalourds.
Ce lavante-séchante est équipé
d’un dispositif spécial à contrôle
électronique pour bien équilibrer
le chargement: avant
l’essorage, ce dispositif veille à
ce que le linge soit bien réparti
à l’intérieur du tambour, compte
tenu du type de linge et de sa
disposition initiale.
Mise en marche lavante-séchante
Dès son installation, démarrez un cycle de lavage en
sélectionnant le programme "1" à 90 degrés.
Une bonne mise en service de
la votre lavante-séchante est
primordiale tant pour la qualité
du lavage que pour éviter des
problèmes et augmenter sa
longévité. Après avoir chargé le
linge et dosé les produits
lessiviels, contrôlez toujours si:
Chouchoutez votre linge:
placez vos pièces de
lingerie, vos bas et vos
vêtements délicats dans
un sachet en toile pour les
protéger
1. Le hublot est bien fermé.
2. La fiche est bien branchée
dans la prise.
3. Le robinet de l’eau est ouv ert.
4. Le bouton A est bien placé
en face de l’un des symboles
(Stop/Reset).
Choisissez un programme
Choisissez ce programme en
fonction du type de linge à laver .
Pour opérer ce choix, consultez
le tableau page 32. Tournez le
bouton A pour amener le
programme choisi en face du
repère situé dans le haut de le
bouton, programmez la température à l'aide du bouton B,
vérifiez que le bouton C est bien
dans la position que vous
désirez, sinon utilisez les
touches E, F et G, puis appuyez
sur le bouton marche/arrêt H
(position I).
N’oubliez pas enfin de
sélectionner, si v ous le désirez,
le "départ programmé" avant le
cycle de lavage.
Une fois le lavage terminé...
Le témoin I clignote d'abord
rapidement pendant quelques
minutes puis plus lentement.
Eteignez alors la lavanteséchante en appuyant sur la
touche marche-arrêt H
(position O).
Ainsi le lavante-séchante ne
vibre pas et ne fait pas de bruit
même à une vitesse maximum.
Vous pouvez alors ouvrir le
hublot en toute sécurité. Après
avoir sorti le linge, laissez le
hublot ouvert ou entrouvert pour
que l’humidité à l’intérieur puisse
s’évaporer .
Fermez toujours le robinet de
l’eau.
N’oubliez pas qu’en cas de
coupure de courant ou si
vous éteignez le lavanteséchante, le programme
sélectionné reste mémorisé.
Comment enlever les taches les plus courantes
Encre et stylo à bille Tamponnez avec du coton imbibé d’alccol méthylique ou d’alcool à 90°.
Goudron Tamponnez avec du beurre frais, passez de la térébenthine puis lavez immédiatement.
Cire Raclez puis repassez avec un fer bien chaud entre deux feuilles de papier buvard. Passez ensuite du coton imbibé
d’essence de térébenthine ou d’alcool méthylique.
Chewing-gum Passez du solvant pour vernis à ongles puis un chiffon propre.
Moisissure Plongez le coton et le lin blanc dans une solution formée de 5 parties d’eau, une d’eau de javel et une
cuillère à soupe de vinaigre, lavez aussitôt. Pour les autres tissus blancs, utilisez de l’eau oxygénée à 10 volumes puis
lavez aussitôt.
Rouge à lèvres Tamponnez à l’éther les tissus de laine ou de coton. Pour la soie, utilisez du trichloréthylène.
Vernis à ongles Posez le tissu du côté de la tache contre une feuille de papier buvard, mouillez de solvant, en déplaçant
le vêtement au fur et à mesure que la feuille se colore.
Herbe Tamponnez avec du coton imbibé d’alcool méthylique.
Mode dinstallation et demploi
30

Maîtrise du panneau de commandes
C’est vous qui commandez
Choisir les bons programmes: c’est important et c’est facile.
Bouton programmes et
départ différé
Il sert à sélectionner le programme
de lavage.
Ne tournez ce bouton que dans
le sens des aiguilles d'une
montre.
Pour sélectionner les programmes ,
amenez le symbole/numéro
correspondant au programme
désiré en face du repère situé sur le
bouton.
Appuyez alors sur la touche marche / arrêt H (position I), la lampetémoin I commence à clignoter . A u
bout de 5", la sélection est acceptée,
la lampe-témoin I cesse de clignoter
(mais reste allumée) et le cycle de
lavage débute.
Si vous désirez interrompre le
lavage en cours ou en programmer
un autre, sélectionnez l'un des
symboles
attendre 5" : quand l'annulation est
acceptée, la lampe-témoin I
clignote, vous pouvez alors éteindre
votre machine.
V ous pouvez utiliser ce bouton pour
différer le fonctionnement du lavante-séchante.
Sélectionnez une des 3 positions de
départ différé, appuyez sur la touche
marche/arrêt H (position I) et attendre
5". La sélection est alors acceptée
(la lampe-témoin I reste allumée) et
vous pouvez sélectionner le
programme souhaité.
L'indicateur lumineux I clignote de
façon particulière (2" allumé et 4"
éteint) pour signaler qu'il y a
programmation d'un départ différé.
Pendant cette phase, vous pouvez
ouvrir le hublot pour compléter votre
chargement de linge.
Une fois que le cycle de lavage a
été sélectionné et accepté par le
lavante-séchante, un
changement de position du bouton
n’aura aucune conséquence (sauf
dans la position
(Stop/Reset) et
Stop/Reset).
Bouton température
Il sert à sélectionner la température
de lavage indiquée dans le tableau
des programmes (voir page 32). Il
vous permet aussi de réduire la
température conseillée pour le
programme sélectionné, jusqu’au
lavage à froid (
Bouton de séchage
Ce bouton permet de choisir le
type de séchage désiré. Deux
possibilités sont offertes:
A - En fonction du temps:
De 40 à 150 minutes.
B - En fonction du niveau de
séchage:
Repassage
humide, facile à repasser .
Armoire
ranger.
Extra sec
conseillé pour serviettes
éponge et peignoirs.
Un cycle de refroidissement est
prévu quand le séchage est
terminé.
: linge légèrement
: linge sec à
: linge très sec,
D
).
Tiroir à produits lessiviels
Il est à trois bacs:
1.Produit de prélavage;
2.Produit de lavage;
3. Assouplissants, parfums...
Repassage facile
Grâce à cette fonction, votre
linge ne sera pas froissé et donc
beaucoup plus facile à repasser .
Vous pouvez l'utiliser avec les
programmes 3-4 (Coton), 5-6
(Synthétiques) et 9 (Délicats).
Si vous appuyez sur cette
touche en utilisant les
programmes 5-6-9 votre cycle
de lavage s'arrêtera en face du
symbole
appuyez à nouveau sur la
touche E.
Remarque: Si vous voulez
aussi effectuer le séchage, ce
bouton agit uniquement s'il est
utilisé avec le niveau
(Repassage).
Réduction de l'essorage
Ce touche réduit la vitesse
d'essorage de 1000 à 500 tours
par minute des programmes
pour tissus en coton et de 850
à 500 tours par minute des
programmes pour tissus
synthétiques.
, pour l'achever,
GE
F
I
H
L
C
Marche-arrêt
Appuyez sur la touche H pour
allumer votre lavante-séchante,
relachez-la pour l’éteindre.
L'arrêt de la machine n'annule
pas le programme sélectionné.
Témoin allumé - éteint /
hublot verrouillé
Le témoin I clignote lentement
quand la machine est allumée et
en attente d'être programmée ou
en fin de programme pour
permettre l'ouverture du hublot.
Il clignote rapidement quand le
hublot est verrouillé.
Le témoin allumé "fixe" indique
que le programme sélectionné
est accepté.
Témoin séchage
Le témoin allumé indique que le
bouton C est positionné sur un
type de séchage. La machine
procède au séchage une fois le
lavage terminé.
B
A
Le tiroir à produits lessiviels
est ici.
31
Mode dinstallation et demploi
Rapide
3
2
1
Cette touche réduit la durée du
programme de lavage d’environ
30%. A ne pas utiliser avec les
programme spéciaux (voir page
32) et les programmes laine et
soie.

Que laver , aujourd’hui?
Des programmes pour toutes les saisons
Nature des ti ssus et deg ré de
salissure
COTON
Blancs extrêmemen t sal es
(draps, nappes, etc.)
Blancs extrêmemen t sal es
(draps, nappes, etc.)
Blancs et couleur s r és is tan tes tr ès
sales
Blancs peu sales et couleurs déli cates
(chemises, pulls, etc.)
Rinçages
Essorage Vidange et esso ra ge fin al
Séchage tissus coton
Stop/Reset
SYNTHETIQUES
Synthétiques couleurs résistantes très
sales (linge de bébé, etc.)
Synthétiques couleurs délicates(linge en
tout genre légèrement sale)
Synthétiques couleurs délicates(linge en
tout genre légèrement sale)
Rinçages
Assouplissant
Essorage Vidange et esso ra ge d éli cat
Séchage tissus synthétiques
Stop/Reset
DELICATS
Lainage
Vêtements et tissus particulière-ment
délicats (rideaux, soie, viscose, etc.)
Rinçages
Essorage Vidange et esso ra ge d éli cat
Vidange Vidange
Séchage tissus delicats
Stop/Reset
DÉPART DIFFÉRÉ
Retard de 12 - 9 - 3 heures Diffère le départ de 12 - 9 - 3 heures
Stop/Reset
Bouton
program.
1 90°C
2 90°C
3 60°C
4 40° C
5 60°C
6 40°C
7 30°C
8 40°C
9 30°C
Bouton
températ.
Lessive
prélavage
Lessive
lavage
Assoupl. Durée du
◆◆◆
◆◆
◆◆
◆◆
◆
◆◆
◆◆
◆◆
◆
◆
◆◆
◆◆
◆
cycle
(minutes)
165
145
130
95
100
70
30
45
50
Description du cycle de lavage
Prélavage tiède, l avage à 90°C, rinçages,
essorages intermédiaire s et fin al
Lavage à 90°C, rinçag es, essor ages
intermédiaires et final
Lavage à 60°C, rinçag es, essor ages
intermédiaires et final
Lavage à 40°C, rinçag es, essor ages
intermédiaires et final
Rinçages, ess ora ges intermédiaires et fin al
Interrompt/Annule le programme sélectionné
Lavage à 60°C, rinçag es, anti- froissem ent
ou essorage dé li cat
Lavage à 40°C, rinçag es, anti- froissem ent
ou essorage dé li cat
Lavage à 30°C, rinçag es et essor age
délicat
Rinçages, anti-fro issemen t ou ess orag e
délicat
Rinçages avec prélèvement de l'assouplissant, antifroissement ou essorage délicat
Interrompt/Annule le programme sélectionné
Lavage à 40°C, rinçag es et essor age
délicat
Lavage à 30°C, rinçag es, anti- froissem ent
ou vidange
Rinçages, anti-froissement ou vidange
Interrompt/ Ann ule le prog ramm e sél ecti onn é
Interrompt/Annule le programme sélectionné
Important: pour annuler le programme de lavage que v ous venez de lancer, sélectionnez l’un des symboles (Stop/Reset) et attendez au moins 5”.
Les données reportées dans le tableau sont fournies à titre indicatif, elles peuvent varier selon la quantité et le type de linge, la température de
l'eau d'alimentation et la température ambiante.
Programme Spéciaux
Lavage express Votre lavante-séchante dispose d’un programme spécial permettant de laver des vêtements peu sales en un
rien de temps. En choisissant le programme 7 à 30°C, vous pouvez laver ensemble des tissus différents (sauf laine et soie),
avec une capacité maximum de 3 kg. Ce programme permet de faire des économies de temps et d’électricité, parce qu’il ne
dure que 30 minutes environ. Nous vous conseillons d’utiliser des lessives liquides.
Mode dinstallation et demploi
32

Comment s'y prendre pour sécher
Lavage et séchage
Consultez le tableau A ci-contre
et suivez les indications de
charge MAX pour effectuer le
lavage et le séchage en
automatique.
Suivez les instructions pour
lavage seulement (voir page
30 - paragraphe "Mise en marche lavante-séchante") et
programmez à l'aide du bouton
C le type de séchage désiré,
appuyez ensuite sur la touche
H (position I).
Si la charge de linge à laver et à
sécher dépasse exceptionnellement la charge maximum
prévue (voir tableau A), suivez
les instructions fournies pour
lavage seulement (voir page
30 - paragraphe "Mise en marche du lavante-séchante").
Une fois le programme terminé,
sortez le linge, séparez-le et
replacez-en une partie dans le
tambour.
Suivez à présent les
instructions prévues pour
procéder au séchage
seulement.
Procédez de même pour le linge
restant.
Séchage seulement
Après avoir chargé le linge
(4 kg max.) contrôlez que:
- le hublot soit bien fermé;
- la fiche soit bien branchée
dans la prise;
- le robinet de l'eau soit ouvert;
- la touche H ne soit pas
enfoncée (position O).
Choisissez le programme
T ournez le bouton A jusqu'à une
position de séchage
fonction du type de tissu,
sélectionnez le type de séchage
désiré à l'aide du bouton C et
appuyez enfin sur la touche
allumé-éteint H (position I).
Une fois le séchage terminé …
Attendez que le témoin I clignote
lentement, puis éteignez le lavelinge séchant en appuyant sur
la touche allumé- éteint H
(position O ) puis ouvrez le
hublot. Après av oir sorti le linge,
laissez le hublot ouvert ou
entrouvert pour éviter la
formation de mauvaises odeurs
et fermez le robinet de l'eau.
en
A.
Typ e de
tissu
Coton, lin Linge de
Coton Serviettes
Térita l,
coton
Acryliques Pyjamas,
Nylon Lingerie,
Les données indiquées dans le tableau ont une valeur purement
indicative.
Pour des chargements de textiles coton inférieurs à 1 Kg,
utilisez le programme de séchage pour textiles synthétiques.
Typ e de
charge
différentes
dimensions
éponge
Draps,
chemises
chaus settes
etc.
etc.
Charge
max.
(kg) Extra
4 150 145 140
4 150 145 140
2,5 100 90 85
16560 60
16560 60
T emps de séchage (Min.)
Armoire Repassage
sec
SECHAGE LAINE
Le séchage des tissus en laine ne doit être effectué que si
vous sélectionnez une durée de cycle (150-100-60-40
minutes). Pour un 1 kg de charge, nous conseillons un
séchage de 60 minutes.
Si par erreur vous sélectionnez un des trois niveaux (Extra-sec
effectuera un séchage d'une durée correspondant au temps
MAX prévu (150 minutes).
, Armoire , Repassage ), la machine
IMPORTANT
Pendant le séchage, la machine procède à un essorage si vous
avez programmé un des programmes coton et un des niveaux
de séchage (Extra sec
, Armoire , Repassage ).
A TTENTION
- Pendant le séchage, le hublot a tendance à chauffer.
- Ne mettez pas à sécher du linge lavé avec des solvants
inflammables (trichloréthylène par ex.).
- Ne mettez pas à sécher du caoutchouc-mousse ou des
élastomères du même genre.
- Vérifiez qu'au cours du séchage, le robinet de l'eau soit
bien ouvert.
- Ce lavante-séchante séchant ne peut être utilisé que pour
sécher du linge ayant été lavé à l'eau.
33
Mode dinstallation et demploi

Sachez lire les étiquettes
Apprenez à lire ces symboles, vous laverez mieux, votre
linge durera plus longtemps et votre lavante-séchante ne
vous en servira que mieux.
Partout en Europe, les
étiquettes contiennent des
messages sous forme de petits
mais très importants symboles.
Il est primordial d’apprendre à
les comprendre pour mieux
laver et traiter vos vêtements.
Conseils Utiles
Retournez les chemises, elles seront mieux lavées et
dureront plus longtemps.
Videz bien les poches.
Lisez les étiquettes: leurs conseils sont
précieux et utiles.
On compte cinq catégories de
sigles différents: lavage
Javel
, repassage ,
nettoyage à sec
séchage
.
,
et enfin
Dans le tambour, alternez grandes et petites pièces de linge.
Lisez et mémorisez les symboles de ce tableau:
vous apprendrez à mieux laver et traiter votre ling e et à
augmenter les performances de votre lavante-séchante Indesit.
Lavage Blanchissage Repassage Nettoyage à sec Séchage
Action
forte
Lavage à 95°
Lavage à 60° Ne pas blanchir
Lavage à 40°
Action
délic ate
c
l
On peut blanchir
dans l'eau froide
Repassage fort
max200°C
Repassage
moyen
max 150°C
Repassage
max 110°C
Nettoyage à sec avec
tous les solvan ts
Nettoyage à sec avec
perchlorure, benzine,
alcool pur, R111 et
Nettoyage à sec avec
benzine, alcool pur et
Attention à ne pas vous tromper
de température....
Temp.
élevée
A
Sécher en
machine
P
R113
Ne pas séc he r
en machine
F
R113 Sécher à plat
Temperat.
modérée
Lavage à 30°
Lavage
délicat
à la ma in
Ne pas laver
dans l'eau
Ne pas
repasser Ne pas nettoyer à sec
Sécher étendue
une pièce pas
essorée
Sécher sur
cintre
Mode dinstallation et demploi
34

Quelques conseils pour ne pas vous tr omper
Ne lavez jamais à la
machine... du linge non ourlé, ,
effiloché ou déchiré. Si vous
devez absolument le laver,
enfermez-le dans un sac. Du
linge aux couleurs vives avec
du linge blanc.
Attention au poids!
Pour obtenir d’excellents
résultats, ne dépassez jamais
les poids indiqués, se référant
à la capacité maximum de linge
sec:
- Tissus résistants:
maximum 5,5 kg
- Textiles synthétiques:
maximum 2,5 kg
- Textiles délicats:
maximum 2 kg
- Pure laine vierge:
maximum 1 kg
Mais combien pèsent-ils?
1 drap 400-500 g
1 taie d’oreiller 150-200 g
1 nappe 400-500 g
1 peignoir 900-1.200 g
1 serviette éponge 150-250 g
Les T ee-shirts couleur, les
imprimés et les chemises durent
plus longtemps si vous les
lavez à l’envers. Repassez
toujours vos Tee-shir ts et vos
sweats imprimés sur l’envers.
Alarme salopettes.
Elles ont du succès ces
combinaisons genre “salopette”
mais leurs bretelles ont des
crochets qui peuvent
endommager le tambour ou les
autres vêtements. P ourquoi ne
pas les enfiler dans la poche de
la bavette et les fixer avec des
épingles à nourrice pour
supprimer tout danger!
Vacances: débranchez la
fiche.
Quand vous partez en
vacances, mieux vaut
débrancher la fiche, fermer le
robinet d’arrivée de l’eau et
laisser le hublot entrouvert ou
ouvert. Ainsi, le tambour et le
joint resteront bien secs et vous
éviterez la formation de
mauvaises odeurs.
CYCLE LAINE
Pour obtenir de meilleurs
résultats, utilisez une lessive
spéciale laine et ne lavez pas
plus d'un kilo de linge à la fois.
Comment laver presque tout
Les rideaux.
Ils ont tendance à beaucoup se
froisser. Nous vous conseillons:
de bien les plier et de les glisser
dans une taie d’oreiller ou dans
un sac genre filet. Lavez-les
seuls de manière à ce que leur
poids total ne dépasse pas une
demi-charge. N’oubliez pas de
sélectionner le programme
spécial 9 qui supprime
automatiquement l’essorage.
Doudounes et anorak.
Les doudounes et les anoraks
aussi peuvent être lavés à la
machine s’ils sont en duvet d’oie
ou de canard. Ce qui compte
c’est de ne pas dépasser une
charge de 2-3 kg maximum, de
faire faire deux ou trois rinçages
de suite et un essorage léger.
Chaussures de tennis.
Débarassez les chaussures de
tennis de la boue et lavez-les
avec les jeans et les vêtements
plus résistants. Ne les lavez pas
avec du linge blanc.
35
Mode dinstallation et demploi

Important pour mieux laver
Le secret du tiroir à produits lessiviels
Son premier secret, le plus facile, c’est qu’il faut le faire
pivoter vers la gauche pour l’ouvrir .
Versez les produits lessiviels et
l’additif éventuel en ne dépassant
pas les doses conseillées par le
fabricant: celles-ci sont
généralement indiquées sur les
paquets. Les doses varient en
fonction de la charge, de la dureté
de l’eau et du degré de salissure.
L’expérience aidant, vous
apprendrez à doser les quantités
presque automatiquement: ce
sera votre secret.
Quand vous versez
l’assouplissant dans le bac 3,
attention à ce qu’il ne déborde pas
de la grille.
Le lavante-séchante prélève
automati-quement l’assouplissant
lors de chaque programme de
lavage.
Versez la lessiv e liquide dans le
bac 2 quelques instants avant de
brancher votre machine.
N’oubliez pas que la lessive liquide est particulièrment indiquée
pour des lavages à des
températures allant jusqu’à 60
degrés et pour les programmes
de lavage qui ne prévoient pas de
prélavage.
Vous trouverez dans le
commerce des lessives liquides
ou en poudre avec boule
doseuse à placer directement
dans le tambour, leur mode
d’emploi est indiqué sur le paquet.
N’utilisez jamais de lessive pour
lavage à la main, leur excès de
mousse risquerait d’endommager votre lavante-séchante.
Les lessives spéciales main et
machine font bien sûr exception.
Encore un petit secret: quand
vous lavez à l’eau froide, réduisez
la quantité de lessive car cette
dernière s’y dissout moins bien
que dans l’eau chaude et serait
en partie gaspillée.
Bac 1:
Lessive prélavage (en poudre)
Bac 2:
Lessive lavage
(en poudre ou liquide)
3
2
Bac 3:
Additifs (assouplissants,
parfums, etc.)
1
Le tiroir à produits lessiviels est
amovible. P our le lav er, sortez-le en
le tirant vers vous (voir figure) et
rincez-le à l’eau courante.
Des économies sur toute la ligne
Guide pour un emploi
économique et écologique des
électroménagers
CHARGE MAXIMUM
La meilleure façon d’éviter des gaspillages d’électricité, d’eau, de lessive et de temps,
c’est d’utiliser votre lave-linge au maximum de la charge conseillée.
Mieux vaut une pleine charge que deux demies, vous pourrez ECONOMISER jusqu’à
50% d’électricité.
UN PRELA VAGE EST-IL VRAIMENT NECESSAIRE?
Uniquement en cas de linge vraiment sale.
Programmer un lavage SANS prélavage pour du linge peu sale ou moyennement sale
permet d’ECONOMISER sur la lessive, le temps, l’eau et de 5 à 15% d’électricité.
UN LA VAGE A L’EAU CHAUDE EST-IL VRAIMENT NECESSAIRE?
Avant le lavage, traitez les taches avec un détacheur ou mettez a tremper le linge taché
dans l’eau, vous pourrez sélectionner un programme de lavage à l’eau chaude à une
température moins élevée.
Choisissez un programme de lavage à 60° pour ECONOMISER jusqu’à 50%
d’électricité.
AV ANT DE SELECTIONNER UN PROGRAMME DE SECHAGE ...
Sélectionnez une vitesse d’essorage très élevée pour éliminer le surplus d’eau avant de
lancer le programme de séchage. Vous ECONOMISEREZ du temps et de l’électricité.
Mode dinstallation et demploi
36

Problèmes et solutions
A vant de téléphoner , lisez ce qui suit
Il peut arriver que le lavante-séchante ne fonctionne pas bien. Il s’agit très
souvent de problèmes faciles à résoudre sans l’aide d’un technicien. Avant
d’appeler le SA V, effectuez les contrôles suivants.
Le lavante-séchante ne
démarre pas.
La fiche est-elle bien
branchée dans la prise? Elle
pourrait avoir été déplacée en
faisant le ménage.
Y a-t-il du courant?
Le disjoncteur pourrait s’être
déclenché parce qu’il y a trop
d’électroménagers branchés
en même temps. Ou bien il
peut y avoir une panne de
courant dans votre quartier.
Le hublot est-il bien fermé?
Par sécurité, le lavante-
séchante ne fonctionne pas si
le hublot est ouvert ou mal
fermé.
La touche Marche-arrêt
est-elle enfoncée?
Dans ce cas, un départ
différé a été programmé.
Le bouton de départ différé,
sur les modèles qui en
prévoit un, est-il dans une
position correcte?
Le robinet de l’eau est-il
ouvert? Par sécurité, s’il n’y
a pas d’arrivée d’eau, le
lavage ne démarre pas.
Mais l'eau, où donc est-elle passée?
C'est très simple: grâce à la nouvelle technologie Indesit, il en
faut moins que la moitié, pour bien laver le double de linge!
Voilà pourquoi vous ne voyez pas d'eau par le hublot:
parce qu'il y en a peu, très peu, pour protéger l'environnement
sans pour autant renoncer à une propreté éclatante.
Et ce n'est pas tout: vous faites en plus des économies
d'électricité.
Le bouton des programmes
tourne sans cesse?
A FAIRE
Fermer le robinet
après chaque lavage.
Cela réduit l’usure
de l’installation
hydraulique du
lavante-séchante et
évite le danger de
fuites quand il n’y a
personne à la
maison.
Laisser toujours le
hublot entrebaillé.
Pour éviter la
formation de
mauvaises odeurs.
Nettoyer l’extérieur
avec soin.
Pour nettoyer
l’extérieur et les
parties en
caoutchouc, utilisez
toujours un chiffon
imbibé d’eau et de
savon.
A NE P AS F AIRE
Laisser la fiche branchée
pendant le nettoyage du
lavante-séchante.
Même pendant les
travaux d’entretien, il
faut toujours débrancher
la fiche.
Utiliser des solvants et
des produits abrasifs
agressifs.
Ne jamais utiliser de
produits solvants ou
abrasifs pour nettoyer
l’extérieur et les parties
en caoutchouc.
Négliger le tiroir à
produits lessiviels.
Il est amovible, pour le
laver il suffit de le laisser
un peu sous un jet d’eau
courante.
Partir en vacances sans se
soucier de lui.
Avant de partir, il faut
toujours contrôler si la
fiche est bien débranchée
et le robinet de l’eau
fermé.
Il n’y a pas d’arrivée d’eau.
Le tuyau est-il bien
raccordé au robinet?
Panne d’eau? N’y a-t-il pas
des travaux en cours dans
votre immeuble ou dans la
rue?
La pression est-elle
suffisante? La moto-pompe
pourrait être en panne.
Le filtre du robinet est-il
propre? Si l’eau est très
calcaire, ou suite à des
travaux récents sur la
canalisation d’eau, le filtre
pourrait être bouché par des
détritus.
Le tuyau en caoutchouc
n’est-il pas plié? Le parcours
du tuyau en caoutchouc qui
amène l’eau au lavanteséchante doit être le plus
rectiligne possible. Contrôlez
s’il n’est pas écrasé ou plié.
Attendez quelques minutes
pour que la pompe de vidange
vide la cuve, éteignez la lavan-
te-séchante, sélectionnez l’un
des symboles stop/reset
rallumez. Si le bouton tourne
toujours, c’est un signal de panne, appelez le SA V .
, puis
Le lavante-séchante prend
l’eau et vidange
continuellement.
Le tuyau est placé trop bas?
Il faut l’installer entre 60 et 100
cm de haut.
L’embouchure du tuyau est
plongée dans l’eau?
L’évacuation murale a-t-elle
un évent? Si après ces
vérifications, le problème persiste, fermez le robinet de l’eau,
éteignez la machine et appelez
le SAV.
Si vous habitez en étage, il
pourrait y avoir des
phénomènes de siphonnement.
Pour les résoudre, il f aut monter
une soupape spéciale.
37
Mode dinstallation et demploi

V otre lavante-séchante ne
vidange pas et n’essore pas.
Est-ce que le tuyau
d’évacuation est plié? Le
parcours du tuyau doit être le
plus rectiligne possible.
Contrôlez s’il n’est pas écrasé
ou plié.
Est-ce que la conduite de
l’installation de vidange est
bouchée? S’il y a une rallonge,
est-ce qu’elle est bien montée ou
empêche-t-elle l’eau de passer?
Est-ce que la machine est
coincée entre des meubles
et le mur? A moins que ce soit
un modèle à encastrer, votre
lavante-séchante a besoin
d’osciller un peu pendant
l’essorage. Prévoyez quelques
cm de libres tout autour.
Il y a un excès de mousse.
Est-ce que le programme
choisi prévoit la vidange de
l’eau? Pour certains program-
mes de lavage il faut intervenir
pour lancer la vidange .
Est-ce que la fonction
“Repassage facile” - si elle est
prévues - est activé? Il faut là
aussi intervenir pour actionner la
vidange.
Est-ce que la pompe
d’évacuation est bouchée?
Pour l’inspecter, fermez le
robinet, débranchez la fiche et
suivez les instructions fournies
page 40 ou bien appelez le SAV .
Ne vous adressez
jamais à des
techniciens non
agréés et exigez
toujours l’emploi de
pièces détachées
V otre lavante-séchante
vibre beaucoup en phase
d’essorage.
Est-ce que le groupe
oscillant interne a bien été
débloqué lors de
l’installation? La page qui suit
est consacrée à l’installation.
Est-ce que la machine est
bien de niveau? Contrôlez
régulièrement sa mise à niveau.
A la longue, le lavanteséchante pourrait s’être
légèrement déplacé. Agissez
sur les pieds et contrôlez à
l’aide d’un niveau.
Le lavante-séchante a
des fuites.
Est-ce que la bague du
tuyau d’arrivée de l’eau est
bien vissée? Fermez le
robinet, débranchez la fiche et
essayez de la serrer sans
forcer.
Est-ce que le tiroir à
produits lessiviels est
engorgé? Essayez de le sor-
tir et de le laver à l’eau
courante.
Est-ce que le tuyau de
vidange n’est pas bien
fixé? Fermez le robinet,
débranchez la fiche et
essayez de mieux le fix er.
originales.
Caractéristiques techniques
Modèle
Dimensions
Capacité
Connexions
électriques
Connexions
hydrauliques
Vitesse
d'essorage
Programmes de
contrôle suivant
norme IEC 456
WD 104 T
largeur cm 59,5
hauteur cm 85
profondeur cm 53,5
de 1 à 5,5 kg pour le lavage; de 1 à 4 kg pour le séchage
tension à 220/230 Volt 50 Hz
puissance max. absorbée1850 W
pression maximum 1 MPa (10 bar)
pression minimum 0,05 MPa (0,5 bar)
capacité du tambour 46 litres
jusqu' à 1000 tours par minute
: programme 3; température 60°C; effectué pour une charge de 5,0 kg.
lavage
séchage
Cet appareil est conforme aux Directives Communautaires suivantes:
- 73/23/CEE du 19/02/73 (Basse Tension) et modifications successives
- 89/336/CEE du 03/05/89 (Compatibilité électromagnétique) et modifications successives
: effectué avec une charge de 2,5 kg et le bouton C dans la position .
Est-ce que vous utilisez
bien une lessive machine?
Vérifiez qu’il y ait bien
l’inscription: “pour lave-linge”
ou bien “main et machine”.
Est-ce que la quantité est
correcte? Un excès de
lessive produit plus de
mousse mais ne lave pas
mieux tout en produisant des
incrustations à l’intérieur du
lavante-séchante.
Pas de séchage
Contrôlez que:
La fiche soit bien branchée
dans la prise; qu'il n'y ait pas
de coupure de courant; que le
hublot soit bien fermé; que le
départ différé (s'il y en a un de
prévu) ne soit pas sélectionné;
que le bouton des programmes
A ne soit pas positionné sur
(Stop/Reset); que le bouton du
séchage C ne soit pas en
position 0.
Le lavante-séchante ne
sèche pas correctement.
Contrôlez que:
l'extrémité du tuyau de
chargement ne soit pas plongée
dans l'eau; que la pompe de
vidage ne soit pas bouchée; que
les conseils concernant les
charges maximum aient bien
été respectés; que le robinet de
l'eau soit bien ouvert.
Si malgré tous ces contrôles,
votre lavante-séchante ne
fonctionne pas et
l’inconvénient persiste,
appelez le SAV le plus pr oche
de votre domicile en
précisant:
- le type de panne
- le sigle (Mod. ....)
- le numéro de série (S/N ....)
Vous trouverez tous ces
renseignements sur la
plaquette signalétique située
sur le panneau arrière de
votre lavante-séchante.
Mode dinstallation et demploi
38

Installation et déménagement
Quand la lavanteséchante arrive
Que votre lavante-séchante soit neuf ou que vous veniez juste de
déménager, son bon fonctionnement dépend en grande partie de
son installation.
Après avoir déballé l’appareil,
vérifiez s’il est en bon état. En cas
de doute, faites appel à un
professionnel du secteur. Pour
permettre son transport,
l’intérieur du lavante-séchante a
été bloqué à l’aide de 4 vis sur le
panneau arrière de la machine.
Avant de brancher votre lavanteséchante, enlevez les vis, le
caoutchouc et la cale (conservez
bien toutes ces pièces) et bouchez
les trous à l’aide des cache-trous
en plastique fournis avec l’appareil.
Important: fermez à l'aide du
bouchon (fourni) les 3 trous où était
montée la fiche et qui se trouvent
sur le panneau arrière du llavanteséchante, en bas à droite.
Mise à niveau
Pour bien f onctionner, il est important
que votre lavante-séchante soit bien
posé à plat. Pour bien le niveler, il
suffit d’agir sur ses pieds avant; son
angle d’inclinaison , mesuré sur le
plan de travail, ne doit pas dépasser
2°. Si vous avez de la moquette,
attention à ce que la ventilation ne
soit pas bouchée au niveau du socle.
Les pieds avant sont réglables.
Conservez les vis de blocage
et la cale. En cas de
déménagement vous
pourrez vous en resservir
pour bloquer les pièces
internes du lavante-
séchante et le protéger
ainsi contre les chocs
pendant son transport.
Raccordement à la prise
d’eau
La pression de l’eau doit être
comprise entre les valeurs
indiquées sur la plaquette fixée
à l’arrière de l’appareil.
Raccordez le tuyau d’arrivée à
une prise d’eau froide à embout
fileté 3/4 gaz ou 20x27 en
interposant le joint en
caoutchouc.
A
Le joint en caoutchouc.
Si les canalisations d’eau sont
neuves ou inutilisées depuis
longtemps, faites couler l’eau
jusqu’à ce qu’elle soit limpide et
sans impuretés. Raccordez le
tuyau à la machine, au niveau
de la prise d’eau prévue en
haut, à droite.
Prise deau en haut à droite.
Raccordement du tuyau de
vidange
Deux crochets (droit ou gauche)
situés à l’arrière de la machine
vous permettent de fixer le
tuyau de vidange. Introduisez
l’autre extrémité dans un
conduit ou bien accrochez-le à
l’évier ou à la baignoire en
évitant de l’écraser ou de trop
le plier. Il faut absolument qu’il
débouche entre 60 et 100 cm
de haut. Si vous êtes obligés de
fixer l’extrémité à moins de 60
cm au-dessus du sol, il faut que
vous fixiez le tuyau au crochet
prévu dans le haut du panneau
arrière de la machine.
Le crochet à utiliser si le tuyau
débouche à moins de 60 cm de haut.
Si le tuyau évacue dans la
baignoire ou dans le lavabo,
appliquez le support en plastique
et attachez-le au robinet.
Le support pour évacuation dans
une baignoire ou dans un lavabo.
Ne le laissez jamais tremper dans
l’eau.
L’utilisation de rallonges est
absolument déconseillée. Si vous
ne pouvez vraiment pas vous en
passer, il f aut qu’elle ait le même
diamètre que le tuyau original et
moins de 150 cm de long. En cas
d’évacuation murale, faites
vérifier son efficacité par un
professionnel agréé. Si vous
habitez en étage dans un
immeuble, il peut y avoir des
phénomènes de siphonnement
qui font que votre lavanteséchante prend et évacue l’eau
continuellement.
Pour supprimer cet inconvénient,
vous pouvez trouver dans le
commerce des valves spéciales
anti-siphonnement.
Branchement électrique
Avant de br ancher la machine à
la prise de courant, contrôlez que:
1) la prise de courant est conforme aux normes et que sa
charge électrique est bien
apte à supporter la puissance
maximum de la machine
figurant sur la plaquette des
caractéristiques ;
2) la tension d’alimentation est
bien comprise entre les
valeurs figurant sur la
plaquette des
caractéristiques;
3) la prise est bien compatible
avec la fiche de la machine.
En cas d’incompatibilité,
n’utilisez pas d’adaptateurs
mais remplacez la prise ou la
fiche;
4) votre installation électrique
dis-pose bien d’une “mise à la
terre”.
Attention!
Nous déclinons toute
responsabilité en cas de
non respect des normes
énumérées ci-dessus.
Ne laissez pas les enfants
jouer avec les sachets
plastique, le polystyrène
expansé, les clous et les
autres éléments
d’emballage, ils
pourraient être
dangereux.
39
Mode dinstallation et demploi

Soins et Entretien facile
Chouchoutez-le et il vous sera toujours
Votre lavante-séchante est un vrai compagnon de vie et de
fidèle
La votre lavante-séchante est
conçu pour durer longtemps
sans causer de problèmes.
Quelques astuces vous
permettront de le garder
toujours en forme et
d’augmenter sa longévité. En
premier lieu, fermez toujours le
robinet de l’eau après chaque
lavage: la pression continue de
l’eau peut provoquer l’usure de
certains composants.
Vous éliminerez aussi tout
danger de fuites en votre
absence.
Si votre eau est trop dure,
utilisez un produit anticalcaire
(une eau dure laisse des traces
blanchâtres autour des robinets
ou bien au niveau des bondes,
notamment dans la baignoire).
Si vous désirez avoir des
renseignements plus précis à
propos de l’eau de votre
installation, adressez-vous au
Service des eaux municipal ou
bien à un plombier.
Il faut toujours vider les poches
et enlever les objets durs, les
broches ou les pin’s par
exemple.
Lavez l’extérieur du lavanteséchante avec un chiffon, de
l’eau tiède et du savon.
Lavez périodiquement le
tiroir à produits
Pour éviter que des
incrustations ne se
forment, placez-le sous un
jet d’eau courante.
N’ayez pas la main
lourde.
Les lessives normales
contiennent déjà des produits
anticalcaires. Donc, n’ajoutez à
votre lavage un produit
spécifique que si votre eau est
particulièrment dure, c’est à dire
très riche en calcaire.
Il peut être utile, de temps en
temps, d’effectuer un cycle de
lavage avec une dose de produit
anticalcaire, sans lessive et
sans linge.
N’ayez pas la main lourde avec
les produits lessiviels, l’excès
de mousse pourrait causer de
incrustations et abîmer les
composants de votre machine.
travail. Le garder en forme, cest important. Pour vous aussi.
lessiviels.
Videz toujours les poches: les petits objets peuvent
endommager votre lavante-séchante.
En cas de besoin, inspectez la pompe et le tuy au en caoutchouc.
La votre lavante-séchante est équipée d’une pompe autonettoyante qui n’exige aucune opération de nettoyage et
d’entretien. Il peut toutefois arriver que de menus objets tombent par mégarde dans la pompe: des pièces de monnaie,
des barrettes, des boutons etc. Pour éviter qu’ils n’endommagent la machine, ils sont bloqués dans une préchambre
accessible, située en bas de la pompe.
Pour accéder à cette préchambre, il suffit de démonter le panneau
situé en bas du lavante-séchante à l’aide d’un tournevis (figure 1);
enlevez ensuite le couvercle en le faisant tourner dans le sens inverse
des aiguilles d’une montre (figure 2) et inspectez soigneusement
l’intérieur.
Le tuyau en caoutchouc
Contrôlez le tuyau en caoutchouc au moins une fois par an.
Fig. 1
Attention: contrôlez que le cycle de lavage est bien terminé et débranchez la fiche avant d’enlever le couvercle et avant toute
opération d’entretien. Il est normal qu’un peu d’eau s’échappe quand vous enlevez le couvercle. Lorsque vous remontez le
panneau extérieur, attention à bien enfiler les crochets du bas dans les fentes avant de le pousser contre la machine.
Remplacez-le dès que vous remarquez des craquèlements et des
fissures qui pourraient entraîner des cassures.
Fig. 2
Mode dinstallation et demploi
40

Ce qui compte par dessus tout
Votre sécurité et celle de
La votre lavante-séchante a été fabriquée
selon les normes internationales de sécurité
les plus sévères. Pour vous protéger ainsi
vos enfants
que votre famille.
Lisez attentivement ces
conseils ainsi que toutes les
informations contenues dans
ce mode d’emploi: ils vous
fourniront no n seulement des
renseignements utiles mais
aussi des conseils importants
sur la sécurité, l’utilisation et
l’entretien.
1. La lavante-séchante ne
doit pas être installée
dehors, même à l’abri, car
il est très dangereux de la
laisser exposée à la pluie et
aux orages.
2. Elle ne doit être utilisée
que par des adultes et
exclusivement pour laver du
linge selon les instructions
reportées dans ce mode
d’emploi.
3. Deux ou trois personnes
sont nécessaires pour la
déplacer en faisant très
attention. Ne jamais la
déplacer seul car la
machine est très lourde ou
utilisez un engin de
manutention (“diable”).
4. Avant d’introduire votre
linge, contrôlez si le
tambour est bien vide.
5. Ne touchez jamais la
machine pieds nus ou bien
les mains ou les pieds
mouillés ou humides.
6. N’utilisez ni rallonges ni
prises multiples, dange-
reuses surtout dans des
J’exige un professionnel
qualifié et agréé
et des pièces de rechange
originales garanties
Indesit!
endroits humides. Le câble
d’alimentation ne doit être ni
plié ni écrasé.
7. N’ouvrez pas le tiroir à
produits lessiviels
pendant le fonctionnement de la machine;
n’utilisez jamais de
lessive pour lavage à la
main sa mousse abondante
pourrait endommager les
parties internes de la
machine.
8 . Ne tirez jamais sur le câble
ni sur le lavante-séchante
pour débrancher la fiche de
la prise murale: c’est
extrêmement dangereux.
9. En cours de fonctionnement, ne touchez pas à
l’eau évacuée, elle peut
atteindre des températures
très élevées. Pendant le
lavage, le hublot a
tendance à se réchauffer;
gardez vos enfants à bonne
distance. Ne forcez jamais
pour ouvrir le hublot
vous risqueriez d’endommager le mécanisme de
sécurité prévu pour prévenir
les ouvertures accidentelles.
10. En cas de panne, fermez
avant tout le robinet de
l’eau et débranchez la
fiche de la prise murale;
n’essayez en aucun cas
d’accéder aux mécanismes
internes pour la réparer.
Comment changer le câble d’alimentation
Le câble d’alimentation
de la lavante-séchante est
un câble spécial qui n’est
disponible qu’auprès des
SAV agréés.
I
Fig. 3 Fig. 4
41
Mode dinstallation et demploi
Pour le remplacer, procédez
comme suit:
1. Contrôlez que la lavanteséchante est bien éteinte et que
la fiche est bien débranchée.
2. Démontez le dessus en
dévissant les deux vis I puis
tirez-le vers vous [fig. 3].
3. Déconnectez les câbles du
filtre antiparasite F [fig. 4] en
repérant bien leur emplacement
N
L
F
(fil Bleu=N; fil Marron=L) en
laissant en dernier le fil de terre
.
Remarque: les lettres L, N et
le symbole
le filtre antiparasite.
4. Eloignez légèrement la partie
supérieure du passe-fil du
panneau arrière, tirez le câble
d’alimentation vers le haut,
sortez-le [fig. 5].
sont reportés sur
Fig. 5
Pour raccorder le nouveau
câble, procédez en sens inverse.
Pour remonter le dessus, posezle sur le lavante-séchante
[fig. 6] et faites-le glisser vers
l’avant jusqu’à ce que ses
crochets avant aillent se loger
dans les fentes spécialement
prévues sur le tableau de bord,
puis revissez les vis.
Fig. 6

Mode dinstallation et demploi
42

Kurzanleitung
Erkunden Sie hier die 12 Argumente, die auf
nachfolgenden Seiten dieses Handbuches näher erklärt
werden. Lesen Sie diese, merken Sie sich diese und haben
Sie viel Spaß dabei; Sie werden viele kleine Geheimnisse
entdecken, die Ihnen dazu verhelfen, besser und müheloser
zu waschen und Ihren W aschtrockner länger zu erhalten.
1.
Installation und Umzug (Seite 53)
Die Installation, sei es die eines neuen Gerätes oder die nach einem
Umzug, ist die wichtigste Voraussetzung für die optimale Betriebsweise Ihrer W aschtrockner . In jedem F alle ist sicherzustellen:
1. dass die Elektroanlage den einschlägigen V orschriften entspricht;
2. dass V ersorgungs- und Ab laufschläuche vorschriftsmäßig
angeschlossen wurden. V erwenden Sie niemals bereits
gebrauchte Schläuche;
3. dass der W aschtrockner eben aufgestellt wurde. Es macht
sich belohnt: durch längere Lebensdauer und beste Wasch
wirkung;
4. dass die auf der Rückwand des Waschtroc kner befindlichen
T rommel-Befestigungsschrauben abgenommen wurden.
2.
Was kann im W aschtroc kner gewaschen werden und
wie wird er in Betrieb gesetzt? (Seite 44)
Ein korrektes Sortieren Ihrer Wäsche ist nicht nur für ein optimales
Waschergebnis von äußerster Wichtigkeit, sondern auch für die
Lebensdauer des Gerätes. Lernen Sie die wichtigen Kniffe und
Tips, die beim Wäschesortieren zu beachten sind: Farben,
Gewebeart, Neigung zu Flusenbildung sind die wichtigsten
Kriterien.
3.
Leitfaden zur V er deutlic hung der Etiketten (Seite 48)
Die auf den in jedem Kleidungs- bzw. Wäschestück befindlichen
Etiketten abgebildeten Symbole sind leicht verständlich und
äußerst wichtig für ein optimales Waschergebnis. In diesem
Abschnitt erhalten Sie einige Tips zu den empfohlenen
T emperaturen, der Art der Behandlung, der Bügelweise.
4.
Praktische Ratschläge um Fehler zu
vermeiden (Seite 49)
Einmal waren es unsere Großmütter, die uns mit guten Ratschlägen
zur Seite standen, außerdem gab es damals noch keine Kunstfasern:
Heute ist es nicht mehr so einfach. Aber es gibt W aschtrockner , die
Ihnen mit guten Ratschlägen zur Seite steht. Sie können sogar
Wollwäsche bedenkenlos in der Maschine waschen.
7.
Leitfaden zur Wahl der Programme Ihrer
Waschtrockner (Seite 46)
Eine einfache, praktische, übersichtliche Tabelle hilft Ihnen bei der
Wahl der Temperaturen, des geeigneten Waschmittels und ev entueller Zusätze. Eine korrekte Wahl dieser K omponenten, eine angemessene Dosierung des Waschmittels sind eine Garantie für
optimale W aschergebnisse. Sie sparen Zeit, Wasser und Strom,
T ag für T ag.
8.
Wie trocknet man (p. 47)
Einige wertvolle Ratschläge zum optimalen Trocknen.
9.
Reinigung und Pflege (Seite 54)
Waschtrockner ist Ihre Freundin: Sie ve rlangt nur einige kleine Aufmerksamkeiten und dankt Ihnen dafür mit Treue und
Zuverlässigkeit.
Pflegen Sie sie, und Sie werden noch lange Freude an Ihrer
Maschine haben.
10.
Probleme und Lösungen (Seite 51 und 52)
Bevor Sie den Einsatz eines T echnik ers anfordern, lesen Sie diesen
Abschnitt: Für vieles findet sich eine einfache , sof ortige Lösung.
Sollten Sie jedoch keine geeignete Lösung finden, dann fordern
Sie den Indesit-Kundendienst an, der für eine sofortige Behebung
einer jeden Betriebsstörung sorgen wird.
11.
Tec hnische Eigenschaften (Seite 52)
5.
Die Waschmittelschublade (Seite 50)
Wo und wie werden Reiniger und eventuelle Zusätze eingefüllt?
6.
Machen Sie sich mit der Schalterblende
vertraut (Seite 45)
Die Schalterblende Ihrer W aschtrockner ist klar und übersichtlich.
Rasch übersehen Sie, welches Waschprogramm zu wählen ist
und wie es abgerufen werden kann, vom energischsten V ollwaschprogramm bis hin zum Schonprogramm für Wolle. Sie werden
sehen, es wird ganz leicht sein.
43
Installations- und Bedienungsanleitungen
Hier finden Sie die technischen Daten Ihres Waschtrockner:
Modellkennzeichen, Daten für den Elektro- und W asseranschluss,
Abmessungen, Kapazität, Schleudertouren und Übereinstimmungserklärung mit den italienischen und europäischen
Richtlinien und V orschriften.
12.
Hier finden Sie unentbehrliche Ratschläge für Ihre Sicherheit und
die Ihrer Familie. Die wichtigste V or aussetzung!
Ihre Sicherheit und die Ihrer Kinder (Seite 55)

M
Was darf in die Waschtrockner?
Sie können viel dazu beitragen, dass Ihre Wäsche besonders rein wird, noch bevor der W aschvorgang
beginnt. Trennen Sie die Wäsche nach Farben und Material. Kontrollieren Sie die Wäscheetiketten
und befolgen Sie die dort aufgezeichneten Waschanleitungen. Geben Sie abwechselnd kleine und
große Wäschestücke in die Wäschetrommel.
V or dem Waschen.
Trennen Sie die Wäsche nach
Material und nach Farbfestigkeit:
strapazierfähige Stoffe sollten nicht
gemeinsam mit Feinwäsche
gewaschen werden.
Helle Farben müssen stets von
dunklen getrennt gewaschen
werden.
Entleeren Sie alle T aschen (Kleingeld, Papier, Geldscheine und
Kleingegenstände) und kontrollieren Sie auch die Knöpfe. Wenn ein
Knopf lose ist, nehmen Sie ihn ab
oder nähen Sie ihn fest, denn er
könnte beim W aschen abspringen.
Die Wäscheetiketten
verraten Ihnen alles.
Kontrollieren Sie stets die
Wäscheetiketten: hieraus
gehen alle Informationen zum
Wäsche- oder Kleidungsstück
hervor, auch wie es am besten
gewaschen wird.
Auf Seite 48 wird die „Geheimsprache" aller Wäscheetik etten
entschlüsselt. Die Angaben, die
Sie dort finden, sind überaus
nützlich, um Ihre Wäsche materialgerecht zu waschen und
lange Ihre Freude daran zu
haben.
Starten des Waschtrockners
Gleichmäßige
Gewichtsverteilung.
Dieser Waschtrockner ist mit
einer speziellen elektronisch
gesteuerten Vorrichtung ausgestattet, wodurch das Gewicht
der Wäsche stets gleichmäßig
verteilt wird: vor dem
Schleudern sorgt diese
Vorrichtung dafür, dass die
Wäsche so gleichmäßig wie
möglich in der Wäschetrommel
Die Wäschestücke nach
Gewebe, Farbe und
Flusenbildung zu trennen,
ist ein wichtiger Schritt,
um gute Waschergebnisse
zu erzielen.
angeordnet wird, natürlich
immer so weit es der Wäschetyp und die anfängliche Lage gestatten. Dies ist auch der Grund
dafür, weshalb diese
Waschtrockner auch bei
höchster Drehzahl nicht vibriert
und somit äußerst geräuscharm
ist.
Nachdem Sie den Waschtrockner installiert haben, führen Sie den ersten
Waschvorgang mit Programm "1" und bei 90° C durch.
Es ist wichtig, dass Sie Ihre
Waschtrockner richtig in Betrieb
nehmen, und zwar nicht nur, um
eine gute Waschqualität zu
garantieren, sondern auch um
Probleme am Gerät zu vermeiden
und somit seine Lebensdauer zu
verlängern. Nachdem Sie die
Wäsche, das Waschpulver und
eventuelle Zusätze in den
Waschtrockner gegeben haben,
kontrollieren Sie stets, ob
1. die Tür gut geschlossen ist.
2. der Stecker in der Steckdose ist.
3. der Wasserhahn auf ist.
Für Feinwäsche: Geben
Sie Ihre Unterwäsche,
Damenstrümpfe und
andere Feinwäsche in ein
Stoffsäckchen, um sie zu
schützen.
4. sich der Schalter A auf einem
der Zeichen
befindet.
Das Programm auswählen
Das Programm wird nach dem
Wäschetyp, dem Schmutzgrad und
der Menge ausgewählt. Um das
richtige Programm auszuwählen,
siehe Tabelle auf Seite 46. Drehen
Sie den Programmwähler A bis das
gewählte Programm mit dem auf dem
oberen Rand des Drehknopfs
befindlichen Zeiger übereinstimmt,
stellen Sie mit der Programmierscheibe
B die T emperatur ein, stellen Sie sicher,
dass sich der Schalter C auf der von
Ihnen gewünschten Einstellung
befindet, drücken Sie gegebenenfalls
die T asten E, F, G und drück en Sie
daraufhin die Ein /Aus-Taste H
(Einstellung I).
(Stop/Reset)
Bitte vergessen Sie nicht, dass
die Funktion „Programmierter
Start" vor dem Waschvorgang
eingestellt werden muss.
Am Ende des Waschganges
Die Kontrollleuchte I blinkt sehr
schnell für einige Minuten, um
daraufhin auf langsameres
Blinken umzuschalten.
Dann schalten Sie Ihre
Waschtrockner aus, indem Sie
die Ein/Aus-T aste H drück en, so
dass sie auf O steht. Nun
können Sie die Tür ohne Gef ahr
öffnen. Lassen Sie die Tür immer
einen Spalt weit offen stehen,
nachdem Sie die Wäsche
herausgenommen haben, so
dass die Feuchtigkeit, die sich
angesammelt hat, verdunsten
kann.
Schließen Sie stets den
Wasserhahn.
Hinweis: Falls es zu einem
Stromausfall kommt oder die
Waschtrockner während des
Waschganges abgeschaltet
wird, bleibt das ausgewählte
Programm gespeichert.
So können Sie die gängigsten Flecken entfernen:
Tinte und Kugelschreiber: Betupfen Sie den Fleck mit einem Wattebausch, den Sie mit Methylalkohol oder mit 90°igem Alkohol
getränkt haben.
T eer: Betupfen Sie den Fleck mit frischer Butter, danach fahren Sie mit Terpentin darüber und waschen das Ganze dann sofort aus.
Wachs: Schaben Sie erst das feste Wachs ab und legen Sie dann den Fleck zwischen zwei Löschblätter: nun bügeln Sie mit dem heißen
Bügeleisen darüber. Daraufhin wischen Sie den Fleck noch mit einem Wattebausch mit Farblösungsmittel oder mit Methylalkohol ab.
Kaugummi: Reiben Sie den Kaugummi mit Nagellackentferner ab und trocknen Sie das Ganze dann mit einem sauberen Lappen nach.
Schimmel: Baumwolle und weißes Leinengewebe geben Sie in eine Lösung von 5 Teilen Wasser, einem Teil Bleichmittel und einem
Esslöffel Essig, danach sofort auswaschen. Für alle übrigen weißen Gewebe verwenden Sie Wasserstoffperoxyd (1:10) und waschen
daraufhin sofort das Gewebe aus.
Lippenstift: Reiben Sie den Fleck mit Äther ab, wenn es sich um Wolle oder Baumwolle handelt. Bei Seide verwenden Sie
Trichloräthylen.
Nagellack: Legen Sie das Gewebe mit dem Fleck nach unten auf ein Löschblatt, tränken Sie das Ganze mit Nagellackentferner und
verschieben Sie den Fleck stets, wenn sich das Löschpapier färbt.
Gras: Betupfen Sie den Fleck mit einem Wattebausch, den Sie mit Methylalkohol getränkt haben.
Installations- und Bedienungsanleitungen
44

Machen Sie sich mit der Schalterblende vertraut
Hier bestimmen Sie
Die Wahl des geeigneten Programms ist absolut wichtig und leicht.
Programmierscheibe- und
Startvorwahl
Mit diesem wählen Sie das
Waschprogramm. Drehen Sie diesen
Knebel bitte nur im Uhrzeigersinn.
Zur Wahl der Programme ist der auf
dem Drehknopf befindliche Zeiger mit
dem Symbol bzw. der Nummer des
entsprechenden, gewünschten
Programmes in Übereinstimmung zu
bringen. Drücken Sie daraufhin die Ein/
Aus-Taste H (Einstellung I), die
Anzeigeleuchte I blinkt. Nach 5"(sec.),
d.h. nachdem die Einstellung akz eptiert
wurde, stellt die Anzeigeleuchte I ihr
Blinken ein (sie bleibt jedoch
eingeschaltet) und der Waschgang
startet. Möchten Sie das laufende
Programm unterbrechen oder ein
neues einstellen, wählen Sie eines der
Symbole
Sie bitte 5"(sec.): Das Blinken der
Kontrolleuchte I ist ein Zeichen dafür,
dass das Löschen des Programms
akzeptiert wurde, nun können Sie Ihren
Waschtrockner ausschalten.
Mit diesem Knebel kann das
Einschalten Ihres Waschtr o ckner
verzögert werden. Wählen Sie eine der
3 Star tverzögerungs-Einstellungen,
drücken Sie die EIN/AUS-Taste H
(Einstellung I) und w arten Sie 5"(sec.).
Nach Ablauf dieser kurzen Zeit wird die
Einstellung akzeptiert (die
Anzeigeleuchte I bleibt eingeschaltet),
wählen Sie daraufhin das gewünschte
Programm.
Die Anzeigeleuchte I zeigt mit
unregelmäßig intermittierendem
Blinken (2 eingeschaltet und 4
ausgeschaltet) an, dass ein
verzögerter Start programmiert
worden ist. Während dieser Phase
kann die Tür noch geöffnet werden,
um die Wäscheladung zu ändern.
Im Anschluss einer W aschprogrammWahl und entsprechender Annahme
seitens des
ches Drehen dieses Knopfes (mit Ausnahme der Einstellung
keinen Einfluss mehr auf das
Waschprogramm.
(Stop/Reset) und warten
Waschtrockner hat jegli-
Stop/Reset)
TemperaturProgrammierscheibe
Mit dieser werden die entsprechenden, in der Programm-T abelle empfohlenen Waschtemperaturen (auch ein Kaltwaschprogramm) eingestellt (
Drehknopf Trocknen
Mit diesem Knopf wählen Sie die
T roc knungsart. Es stehen zwei
Möglichkeiten zur V erfügung:
A - Je nach der Zeit:
V on 40 bis 150 Minuten.
B - Je nach Feuchtigkeitsgrad
der getrockneten Wäsche:
Bügeltrocken
feuchte, einfach zu bügelnde
Wäscheteile.
Schranktrocken
schrankfertige Wäsche.
Extra trocken
trockene Wäsche, empfohlen für
Frotteetücher , Badetücher und mäntel.
Dem Abschluss des Trocknungsvorgangs folgt eine kurze
Abkühlzeit.
D
: noch leicht
:
: absolut
Waschmittelschublade
Diese ist in 3 Kammern unterteilt:
1.Waschmittel für die V orwäsche;
2.Waschmittel für den Hauptwaschgang;
3. Weichspüler , Stärke, Duftstoffe.
).
Bügelfreundlich
Wird diese Funktion abgerufen,
wird Ihre Wäsche knitterfrei
gewaschen, und ist somit
einfacher zu bügeln.
Diese Funktion kann zu den
Programmen 3-4 (Baumwolle),
5-6 (Kunstfasern) und 9
(Feinwäsche) hinzugeschaltet
werden.
Wird sie zu den Programmen
5-6-9 hinzugeschaltet, wird das
Waschprogramm auf dem
Symbol
erneutes Drücken der Taste E
wird das Programm fortgesetzt.
Anmerkung: Wenn Sie Ihre
Wäsche auch trocknen möchten,
kann diese Funktion nur
gleichzeitig mit der Trockenstufe
(Bügeltrocken) eingestellt
werden.
Schleuderwähltaste 1000/500
Mit dieser Taste kannn die
Schleudergeschwindigkeit von
1000 auf 5 00 U/min. bei den
Waschprogrammen Baumwolle
und Leinen, von 850 auf 500 U/
min. bei den Waschprogr ammen
Synthetiks herabgesetzt werden.
GE
F
I
H
angehalten, durch
L
C
Ein/Aus
Befindet sich die Taste H eingedrückt, ist Ihr Waschtroc kner eingeschaltet, ist diese nicht gedrückt, ist Ihr W aschtrockner ausgeschaltet.
Ein Ausschalten des Geräts
bewirkt kein Löschen des gewählten Programms.
EIN/AUS-Anzeigeleuchte /
Füllfenster blockiert
Bei eingeschaltetem Gerät blinkt
die Anzeigeleuchte I langsam,
und wartet auf Eingabe eines
Programmes, wie auch am Ende
desselben, als Zeichen dafür,
dass das Füllfenster nun geöffnet
werden kann. Blinkt sie sehr
schnell, kann das Füllfenster
nicht geöffnet werden.
Ein Umschalten auf
feststehendes Licht bedeutet,
dass das eingegebene
Programm akzeptiert wurde.
Anzeigeleuchte Trocknen
Ist diese Leuchte eingeschaltet,
bedeutet dies, dass der
Drehknopf C auf eine
T rocknungsart eingestellt wurde.
Nach Ablauf des Waschganges
schaltet das Gerät automatisch
auf T rocknen um.
B
A
Der Reinigerbehälter befindet
sich hier.
45
Installations- und Bedienungsanleitungen
3
2
1
Kurz
Diese ermöglicht Ihnen, für die
kurze Wäsche zwischendurch, die
Dauer des Waschprogr amms um
30% zu kürzen. Dies gilt nicht für
die Spezialprogramme (siehe Seite
46) und die für Wolle und Seide.

W as soll heute gewaschen werden?
Waschprogramme für jede Jahreszeit
Gewebeart und Verschmutzungsgrad Programm-
wähler
BAUMWOLLE
Kochwäsche (Bettücher, Tisc hdecke n usw.)
Kochwäsche (Bettücher, Tisc hdecke n usw.)
Widerstandsfähige, stark verschm utzte Weiß-
und Buntwäsche
Leicht verschmutzt e We iß wäsch e und
empfindliche Bunt wäsche (O berh emde n,
Maschenwareusw.)
Spülgänge
Schleuder Ablauf und Endschleuder n
Trocknen für Baumwolle
Stop/Reset Unterbricht/Löscht das eingestellte Pr og ra m m
SYNTHETIK
Stark verschmutzte, fa rb ech te
Kunstfasergewebe ( B ab ywäsch e usw.)
Zarte bunte Kunstfase rgeweb e (lei cht
verschmutzte Feinwäsche jeglicher Art)
Zarte bunte Kunstfase rgeweb e (lei cht
verschmutzte Feinwäsche jeglicher Art)
Spülgänge
Weichmacher
Schleuder Ablauf und sanftes Schle udern
Trocknen für Kunstfasern
Stop/Reset Unterbricht/Löscht das eingestellte Pr og ra m m
FEIN
Wolle
Sehr zarte Feinwäsche
(Gardinen, Seide, Viskose, usw.)
Spülgänge
Schleuder Ablauf und sanftes Schle udern
Ablauf Ablauf
Trocknen für Wolle
Stop/Reset Unterbricht/Löscht das eingestellte Pr og ra m m
STARTVORWAHL
12 - 9 - 3 Startvorwahl 12 - 9 - 3 Std.
Stop/Reset Unterbricht/Löscht das eingestellte Pr og ra m m
Temp.
Wähler
1 90°C
2 90°C
3 60°C
4 40°C
5 60°C
6 40°C
7 30°C
8 40°C
9 30°C
Reiniger
Vorwäsche
Waschmittel
Weich-
macher
◆◆◆
◆◆
◆◆
◆◆
◆◆
◆◆
◆◆
◆◆
◆◆
◆
◆
◆
◆
Wasch-dauer (Min.)
165
145
130
95
100
70
30
45
50
Beschreibung des Waschprogramms
Lauwarme Vorwäsche, waschen bei 90°C,
Spülgänge, Zwisch en - un d Endsch l eu der n
Waschen bei 90 °C, Sp ülg äng e, Z wi sche n-
und Endschleudern
Waschen bei 60 °C, Sp ülg äng e, Z wi sche n-
und Endschleudern
Waschen bei 40 °C, Sp ülg äng e, Z wi sche n-
und Endschleudern
Spülgänge, Zwisch en - un d Endsch l eu der n
Waschen bei 60 °C, Sp ülg äng e, K nitterschutz
oder sanftes Schleudern
Waschen bei 40 °C, Sp ülg äng e, K nitterschutz
oder sanftes Sc hleu de rn
Waschen bei 30°C, Spülg änge un d sanftes
Schleudern
Spülgänge, Knitterschutz oder sanftes
Schleudern
Spülgänge mit Einspülung des Weichmachers,
Knitterschutz oder sanftes Schleudern
Waschen bei 40°C, Spülg änge un d sanftes
Schleudern
Waschen bei 30 °C, Sp ülg äng e, Knitterschutz
oder Ablauf
Spülgänge, Knitterschutz oder Ablauf
Wichtig: Um ein soeben eingegebenes Programm zu löschen, wählen Sie bitte eines der Symbole ( Stop/Reset) und warten Sie
mindestens 5”.
Bei den in der Tabelle angegebenen Daten handelt es sich um Richtwerte, die je nach Menge und Art der Wäsche, der Temperatur der
Wasserzufuhr, der Raumtemperatur usw. variieren.
Spezialprogramme
Schnelle wäsche Die Waschtrockner stellt Ihnen ein Programm zur Verfügung, das Ihnen ermöglicht, leicht verschmutzte
Wäsche in kurzer Zeit wirtschaftlich zu waschen. Wählen Sie das Programm 7 und eine Temperatur von 30°C. Auch Gewebe
unterschiedlicher Art (mit Ausnahme von Wolle und Seide) können in diesem Programm, bei maximaler Lademenge von 3
kg, zusammen gewaschen werden. Mit diesem Programm sparen Sie Zeit und Energie, denn die Waschzeit beträgt nur ca. 30
Minuten. Es ist ratsam, flüssige Waschmittel einzusetzen.
Installations- und Bedienungsanleitungen
46

Wie tr oc knet man
A.
Waschen und T roc knen
Nehmen Sie die nebenstehende
T abelle A zu Hilfe und befolgen
Sie die Angaben hinsichtlich der
maximalen Lademenge MAX,
wenn Sie Waschen und
nachfolgend automatisch
T roc knen möchten.
Befolgen Sie die Anleitungen Nur
Waschen (siehe Seite 44,
Abschnitt "Starten des
Waschtrockners") und stellen Sie
mittels des Drehknopfes C den
gewünschten Trocknungsgrad
ein; drücken Sie daraufhin die
Taste H (Einstellung I).
Sollte die Menge der zum
Waschen und Trocknen
geladenen Wäsche die
vorgeschriebene Höchstmenge
einmal überschreiten (siehe Tabelle A), sind die unter dem
Abschnitt Nur Waschen (siehe
Seite 44, Abschnitt "Starten des
Waschtrockners") aufgeführten
Anleitungen zu befolgen.
Nach Ablauf des Programms
nehmen Sie die Wäsche aus dem
Waschtrockner , und füllen diesen
erneut mit nur jeweils der Hälfte
der Ladung.
Befolgen Sie zum Trocknen nun
die Anleitungen des Abschnitts
Nur T rocknen.
Wiederholen Sie dasselbe mit der
restlichen Wäschemenge.
Nur Trocknen
Nach Einfüllen der zu
trocknenden Wäsche (max. 4 kg)
stellen Sie sicher, dass:
- das Füllfenster gut geschlossen ist;
- der Stecker in der Steckdose ist;
- der Wasserhahn auf ist ;
- die Taste H auch nicht gedrückt
wurde (Einstellung O).
Wählen Sie nun das Programm
Drehen Sie den Knopf A auf eine
der zum Trocknen der jeweiligen
Gewebeart entsprechenden
Einstellungen
mittels des Drehknopfes C die
gewünschte Art und drücken Sie
anschließend die EIN/AUS-Taste
H (Einstellung I).
Am Ende des Trocknungsgangs …
Warten Sie, bis die
Anzeigeleuchte I nur noch
langsam blinkt, schalten Sie dann
den Waschtrockner, durch
Drücken der EIN/AUS-Taste H
(Einstellung O), aus. Nun kann
die Gerätetür geöffnet werden.
Lassen Sie diese nach
Herausnehmen der Wäsche halb
oder ganz aufstehen, um die
Bildung schlechter Gerüche zu
vermeiden und drehen Sie den
Wasserhahn zu.
, wählen Sie
Gewebeart
Baumwo-
lle,
Leinen
Baumwo-
lle
Teri t al,
Baumwo-
lle
Kuns tfas -
ern
Nylon Feinwäsche,
Die in der Tabelle angegebenen Zahlen haben
richtungsweisenden Charakter.
Bei Baumwollartikeln bis zu 1 Kg wählen Sie das
T rockenpr ogramm für synthetische Stoffe.
Art der
Ladung
Unterschiedl ic h gr oß e
Wäscheteile
Frotte ehandtücher
Bettwäsche,
Oberhemden 2,5 100 90 85
Schlafanzüge, S o c ke n
usw .
Damenstrümpf e usw .
Max.
Lademenge
(kg) Ex tra
4 150 145 140
4 150 145 140
1656060
1656060
Tr ockendauer (Min.)
trocken
Schranktrocken
Bügeltrocken
TROCKNEN VON WOLLE
Zum T r ocknen von Kleidungsstücken aus Wolle muss die
gewünschte Trockendauer eingestellt werden (150 - 100 60 - 40 Minuten). Die empfohlene Trockenzeit für eine
Lademenge von 1 kg beträgt 60 Minuten.
W enn aus Versehen eine der Trocknungsarten (Extra trocken
, Schranktrocken , Bügeltrocken ) eingestellt wird,
so führt die Maschine automatisch die längste Trocknungsart
(150 Minuten) durch.
47
Installations- und Bedienungsanleitungen
Während des Trocknens wird ein Schleudergang
zwischengeschaltet, wenn eines der Baumwollprogramme
und einer der Trocknungsarten (Extra Trocken
Schranktrocken
, Bügeltrocken ) eingestellt wurde.
ACHTUNG
- Während des Trocknens kann die Gerätetür heiß werden.
- Trocknen Sie keine Wäsche, die in brennbaren Lösemitteln
(wie Trielin) gewaschen wurde.
- Trocknen Sie weder Schaumgummi noch ähnliche
Elastomer bzw. Gummimaterialien.
- Vergewissern Sie sich, dass der Wasserhahn während des
Trocknens auf ist.
- Dieser Waschtrockner kann nur zum Trocknen von in
Wasser gewaschener Wäsche eingesetzt werden.
WICHTIG
,

Leitfaden zur V er deutlic hung der Wäscheetiketten
Prägen Sie sich diese wenigen Symbole ein. Ihre Wäsche
wird es Ihnen danken, sie wird sauberer , hält länger, bleibt
formschön und auch Ihr Waschtr ockner wird sein Bestes
geben.
Innerhalb Europas sprechen die
auf den Wäscheetik etten abgebildeten Symbole "dieselbe
Sprache". V ersuchen Sie, diese
zu verstehen und sich diese zu
eigen zu machen, sie werden
Ihnen eine wertvolle Stütze sein
bei der korrekten Behandlung
Ihrer Kleider und Wäscheteile.
Praktische Ratschläge
Ziehen Sie Oberhemden und Blusen auf links.
Entleeren Sie alle Taschen.
Kontrollieren Sie stets die Etiketten.
Füllen Sie große und kleine Wäscheteile abwechselnd in die
Wäschetrommel.
Sie werden in fünf Kategorien
unterteilt, und beziehen sich auf:
Waschen
geln
T rocknen
, Bleichen , Bü-
,chem. Reinigen und
.
Vergleichen Sie die Etiketten mit den Symbolen dieser Tabelle:
Ihre Wäsche wird es Ihnen danken, sie wird sauberer, hält länger, bleibt
formschön und auch Ihre Waschtrockner Indesit wird ihr Bestes geben.
Chemische
Energ-
isch
Waschen Chloren Bügeln
Mild
c
l
Waschen bei
95° Chlorbleiche möglich
Waschen bei
60°
Waschen bei
40°
Chlo r b le iche n ic h t
möglich
Heiß bügeln
max 200°C Mit allen Lösemitteln
Mäßig heiß
bügeln
max 150°C
Bügeln max
110°C
Reinig un g Trocknu n g
A
P
Mit Perchlorat
Flugbenzin, reinem
Alkohol, R111 und
R113
F
Mit Flugbenzin,
reinem Alkohol, und
R113
Hohe
tempe-
ratur
Wählen Sie die richtige
Temperatur
Trocknen in
Wäsch e-
trocknern
möglich
Trocknen in
Wäsch e-
trocknern nicht
möglich
Ausgebreitet
trocknen
Mäßige
temperatur
Waschen bei
30° Nicht bügeln
Handwäsche
Nicht
waschen
Keine chemische
Reinigung möglich
Aufgehängt
trocknen (nicht
geschleudert)
Auf Kleiderbügel
trocknen
Installations- und Bedienungsanleitungen
48

Praktische Ratschläge um Fehler zu vermeiden
Waschen Sie in der Maschi-
ne keine Wäsche, die unge-
säumt, ausgefranst oder zerrissen ist. Gegebenenfalls sind
solche Teile in einem
Kissenbezug zu waschen.
Waschen Sie Buntwäsche nicht
mit Weißwäsche zusammen.
Achten Sie auf das Gewicht!
Das angegebene Gewicht, das
sich auf die maximale Ladung an
Trockenwäsche bezieht, sollte
nicht überschritten werden:
Widerstandsfähige Gewebe:
max. 5,5 kg
Kunstfasergewebe:
max. 2,5 kg
Feinwäsche:
max. 2 kg
Reine Wolle:
max. 1 kg
Wie schwer ist Wäsche?
1 Bettuch 400-500 gr
1 Kissenbezug 150-00 gr
1 Tischdeck e 400-500 gr
1 Bademantel 900-1.200 gr
1 Handtuch 150-250 gr
Farbige T -Shirts, bedruc kte T-
Shirts und auch Oberhemden und
Blusen bleiben länger schön, wenn
sie vor dem Waschen auf links
gezogen werden.
T-Shirts und Sweatshir ts sollten
stets von links gebügelt werden.
Vor sicht bei Overalls.
Die weit verbreiteten und gern
getragenen Overalls des Typs
"Arbeiteranzug" haben Träger mit
Schnallen und Haken, die nicht nur
die Wäschetrommel, sondern auch
die anderen Wäschestücke
Wie wasche ich
beschädigen könnten. Stecken Sie
sie vor dem Waschen in die
Brusttasche und befestigen Sie
diese mit Sicherheitsnadeln, um
jegliche Gefahr auszuschließen.
Urlaub: Stecker herauszie-
hen!
Bevor Sie in Urlaub fahren, empfiehlt es sich, den Stecker aus der
Steckdose zu ziehen, den W asserhahn abzudrehen und die Tür offen, oder zumindest etwas vorstehen zu lassen. Hierdurch bleiben
Wäschetrommel und Gummimanschette trocken, wodurch die
Bildung unangenehmer Gerüche
vermieden wird.
WOLLWASCHGANG
Um bestmögliche W aschergebnisse zu erzielen empfiehlt
sich der Einsatz eines
Spezialwaschmittels. Achten
Sie auch darauf, die Lademenge
von 1 kg Trockenwäsche nicht
zu überschreiten.
Gardinen.
Da Gardinen sehr leicht knittern,
sollten diese zusammengefaltet in
einem Kissenbezug oder in einem netzartigen Beutel
gewaschen werden. Waschen
Sie diese allein und achten Sie
darauf, dass das Gesamtgewicht
die Hälfte der maximalen
Lademenge nicht übersteigt.
Stellen Sie das Spezialprogramm
9 ein, das ein automatisches
Ausschließen der Schleuder
vorsieht.
Skijacken und Anoraks.
Auch Skijacken und Anoraks
können in der Maschine
gewaschen werden, wenn es
sich um Gänse- oder
Entendaunen-federn handelt.
Wichtig ist, dass das Gerät nicht
mit einem Gewicht von 5,5 kg
beladen wird, sondern höchstens
2/3 kg, und dass der Spülgang ein
oder zweimal wiederholt wird, und
ein sanfter Schleudergang eingeschaltet wird.
Tennisschuhe.
Entfernen Sie eventuelle
Schlammreste. Tennisschuhe
können zusammen mit Jeans und
ähnlichen widerstandsfähigen
Wäschestücken gewaschen werden. Zusammen mit Weißwäsche
sollten sie jedoch nicht gewaschen werden.
49
Installations- und Bedienungsanleitungen
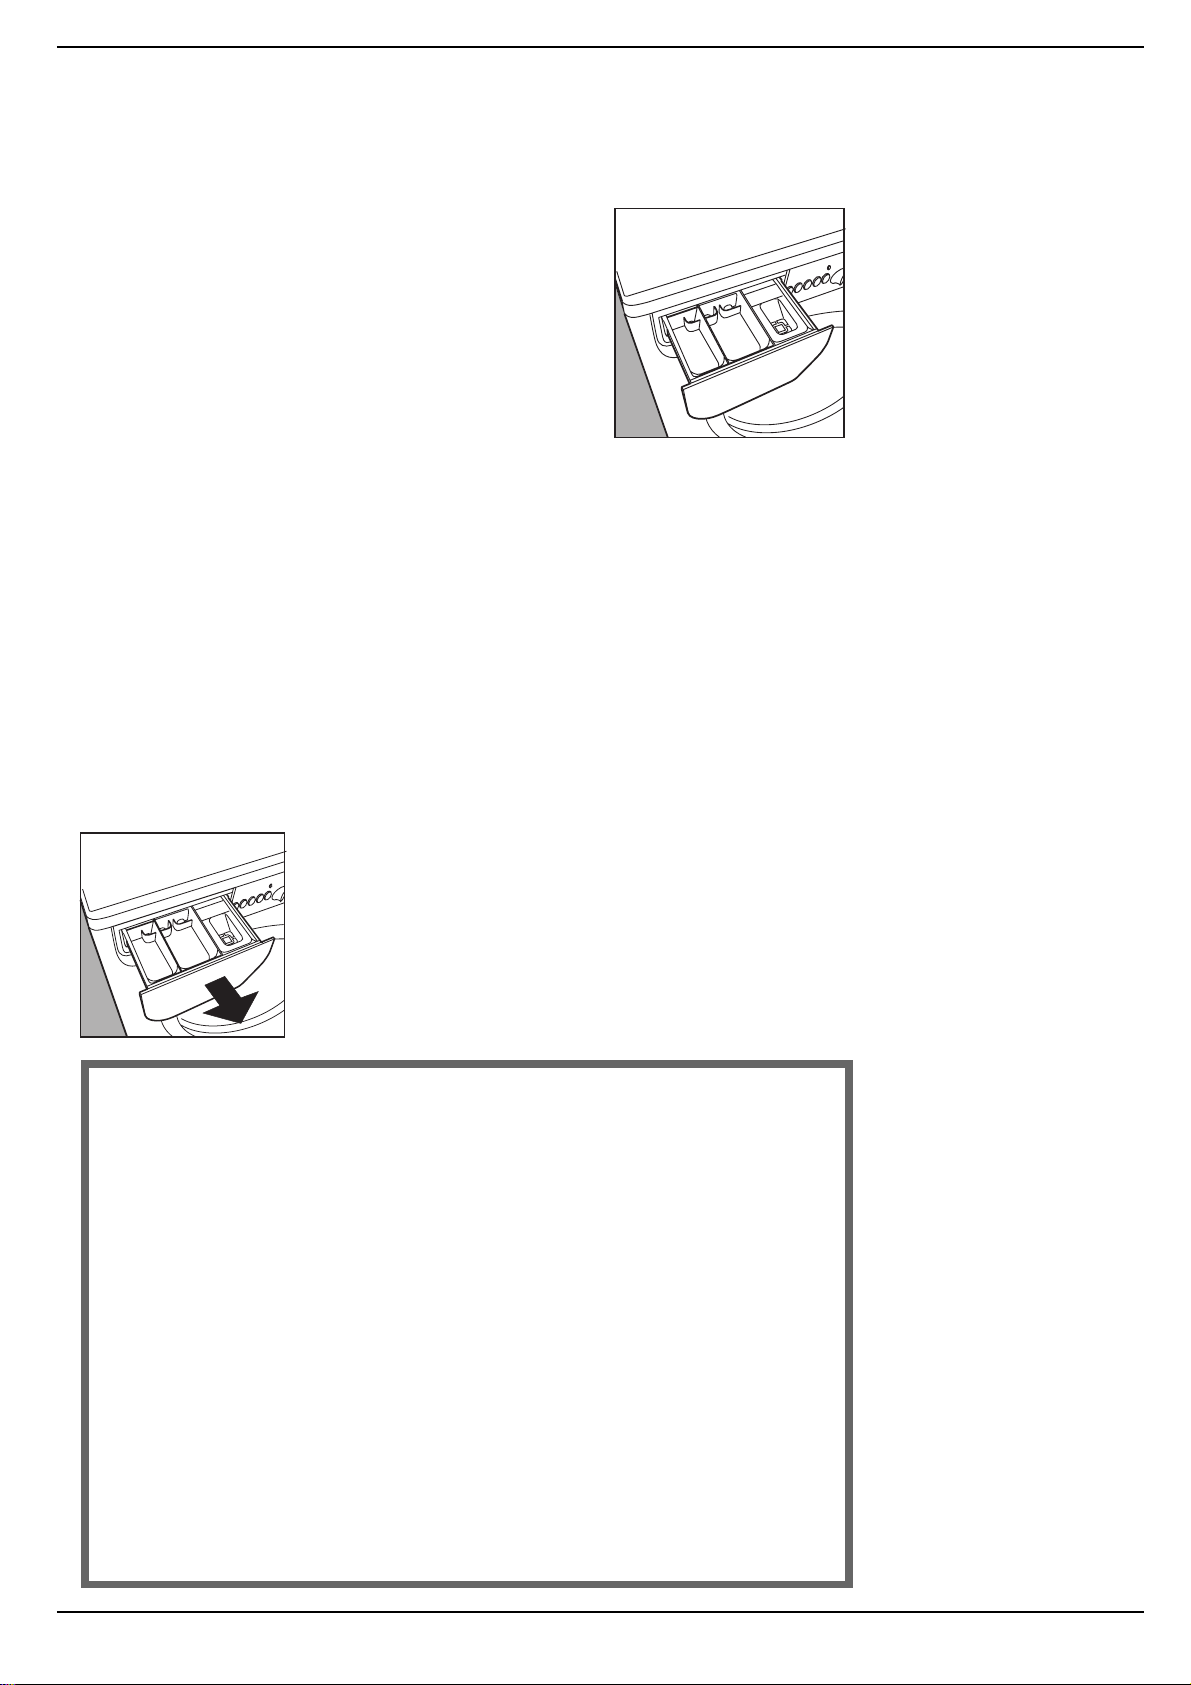
W ichtige Regeln für ein besseres W aschergebnis
1
2
3
Das Geheimnis der Waschmittelschublade
Der erste Geheimtip ist der leichteste: die
Waschmittelschublade öffnet sich, indem Sie sie nach
außen drehen.
Geben Sie das Waschmittel und
eventuelle Zusätze gemäß den
Mengenangaben des Herstellers
in die entsprechende Kammer:
normalerweise finden Sie alle
Informationen auf der
Verpackung. Die Waschmittelmenge ändert sich je nach
Wäschemenge, nach dem
Härtegrad des W assers und nach
der Verschmutzung der Kleider.
Mit ein bißchen Erfahrung werden
Sie lernen, die Mengen fast
automatisch zu dosieren: damit
werden auch Sie Ihren Geheimtip
haben.
Wenn Sie Weichspüler in die
Kammer 3 geben, achten Sie
darauf, dass dieser nicht über
das Gitter austritt.
Der Waschtroc kner entnimmt den
Weichspüler bei jedem Waschprogramm automatisch.
Flüssigwaschmittel werden in
Kammer 2 gegeben, aber erst
kurz vor dem Einschalten der
Waschtrockner.
Vergessen Sie nicht, dass
Flüssigwaschmittel besonders
geeignet sind für
Waschprogramme bis zu 60 Gra d
und für all jene Programme, die
keine V orwäsche benützen.
Sie finden sowohl Flüssigwaschmittel als auch
Waschpulver mit speziellen
Dosierbechern im Handel, die
direkt in die Wäschetrommel
gegeben werden, so wie auf der
Packung beschrieben.
V erwenden Sie nie Waschmittel
für die Handwäsche, denn sie
schäumen zu stark, was dem
Waschtrockneren gegebenenfalls schaden könnte.
Davon ausgenommen sind die
Waschmittel, die speziell sowohl
für die Handwäsche als auch für
die W aschtrockner geeignet sind.
Und nun noch ein letzter Geheimtip: wenn Sie mit kaltem W asser
waschen, reduzieren Sie stets die
Waschmittelmenge; im kalten
Wasser löst es sich nämlich
schlechter auf als im warmen,
daher wäre ein T eil v erschwendet.
In Kammer 1:
Waschpulver für die V orwäsche
(kein Flüssigwaschmittel)
In Kammer 2:
Waschmittel für die Hauptwäsche
(Waschpulver oder
Flüssigwaschmittel)
In Kammer 3:
Zusätze (Weichspüler, Duftstoff e usw.)
Die Waschmittelschublade ist
ausziehbar; um diese zu reinigen
ziehen Sie sie, wie auf der Abbildung
veranschaulicht, nach vorne hin heraus
und spülen diese dann unter
fließendem Wasser aus.
Sparsam und vernünftig
waschen
WÄSCHEKAPAZITÄT V OLL AUSNÜTZEN
Anleitungen zum
wirtschaftlichen und
umweltfreundlichen
Einsatz Ihres
Waschvollautomaten.
Die beste Weise, um weder Strom, Wasser, Waschmittel noch Zeit zu verschwenden,
besteht darin, die Waschmaschine mit der empfohlenen Höchstwäschemenge zu
benützen.
Bei einer vollen Auslastung Ihres Waschtrockner en können Sie verglichen mit zwei
halben Auslastungen bis zu 50% Energie SPAREN.
IST DIE VORWÄSCHE T A TSÄCHLICH NÖTIG?
Nur wenn die Wäsche wirklich sehr schmutzig ist.
Wählen Sie für wenig oder durchschnittlich schmutzige Wäsche einen Waschgang
OHNE Vorwäsche: auf diese Weise können Sie Waschmittel, Zeit, Wasser und von 5
bis 15% Energie SPAREN.
IST ES WIRKLICH NÖTIG, BEI HEIßEN TEMPERA TUREN ZU W ASCHEN?
Wenn Sie die Flecken vorab mit einem Fleckenlöser behandeln oder die
angetrockneten Flecken vor der Wäsche einweichen, können Sie in vielen Fällen auf
den Heißwaschgang verzichten.
Wenn Sie ein Waschprogramm mit 60° C benützen, so SPAREN Sie bis zu 50%
Energie.
BEVOR SIE EIN TROCKENPROGRAMM WÄHLEN …
Wählen Sie eine hohe Drehzahl für den Schleudergang aus: dadurch wird der
Wassergehalt in der Wäsche herabgesetzt, bevor Sie den Trockengang starten. Auf
diese Weise können Sie Zeit und Energie SPAREN.
Installations- und Bedienungsanleitungen
50

Probleme und Lösungen
Bevor Sie telefonieren, lesen Sie bitte Folgendes
Eventuell an Ihrem Waschtrockner auftretende Betriebsstörungen könnten
vielleicht behoben werden, ohne den Kundendienst anzufordern. Überprüfen Sie
demnach zuerst folgende Punkte.
Der Waschtrockner
startet nicht.
Steckt der Stecker fest in der
Steckdose? Bei den Hausar-
beiten könnte dieser etwas
herausgezogen worden sein.
Besteht ein Stromausfall?
Wurde vielleicht durch Überlastung (Einschalten mehrerer
Hausgeräte) ein Ansprechen
der Sicherung verursacht,
oder besteht vielleicht ein
Stromausfall im gesamten
Wohngebiet?
Ist die Tür gut geschlossen?
Aus Sicherheitsgründen wird
ein Start der Maschine ausge-
schlossen, wenn die Tür off enbleibt bzw. nicht richtig geschlossen wird.
Wurde die Ein/Aus-Taste
gedrückt?
Wenn ja, wurde vielleicht ein
Programm mit Startvorwahl
gespeichert.
Befindet sich der Startvorwahl-Knopf, bei den Modellen, die einen solchen vorsehen, auf der richtigen Einstellung?
Ist der Wasserhahn aufgedreht? Eine der Sicherheits-
vorrichtungen verhindert den
Start der Maschine, wenn diese kein W asser lädt.
Wo ist denn das ganze Wasser geblieben?
Einfach: mit der neuen Indesit-Technik, es genügt weniger
als die Hälfte, um die doppelte Wäschemenge gründlich zu
waschen!
Deshalb sehen Sie das Wasser nicht durch die Tür hindurch:
weil es wenig ist, äußerst wenig, um die Umwelt zu schonen,
ohne auf höchste Reinigungswirkung verzichten zu müssen.
Und außerdem sparen Sie dabei auch noch Strom.
Waschtrockner aus, wählen Sie
eines der Symbole Stop/Reset
und schalten Sie dann Ihre Maschine wieder ein. Sollte jedoch
die Programmwählerscheibe weiterhin drehen, liegt eine Betriebsstörung vor, f ordern Sie in diesem
Falle den Kundendienst an.
,
RICHTIG FALSCH
Nach dem Waschen
den Hahn wieder
schließen.
Verhindert einen
raschen Verschleiß der
Hydraulikanlage der
Waschtrockner und
verhindert Wasserschäden während
Ihrer Abwesenheit.
Tür stets vorstehen
lassen, um Geruchsbildung zu vermeiden.
Sanfte Reinigung der
Außenflächen.
Die äußeren Teile
sowie die Teile aus
Gummi sind mit
einem mit lauwarmer,
milder Spüllauge
angefeuchteten Tuch zu
reinigen.
Den Stecker nicht herauszuziehen, wenn die
Maschine gereinigt wird.
Auch während der
Wartungsarbeiten muss
der Stecker herausgezogen werden.
Der Einsatz von Löse- und
Scheuermitteln.
Diese dürfen zur Reinigung der äußeren Teile
und der Teile aus Gummi
nicht eingesetzt werden.
Die Waschmittelschublade zu vernachlässigen.
Sie kann herausgezogen
werden, und kann demnach unter laufendem
Wasser ausgespült werden.
Sich in Urlaub zu begeben,
ohne sich um die Maschine
zu kümmern.
Bevor Sie in Urlaub fahren
ist sicherzustellen, dass der
Stecker gezogen und der
Wasserhahn abgedreht
wurde.
Der Waschtrockner lädt
kein Wasser .
Ist der Schlauch korrekt am
Wasserhahn angeschlossen?
Fehlt Wasser? Vielleicht wur-
de die Wasserzufuhr auf-
grund eventueller Arbeiten in
Ihrem Wohnviertel kurzfristig
unterbrochen.
Ist der Druck ausreichend?
Vielleicht eine Störung an der
Druckpumpe.
Ist der Wasserfilter sauber?
Durch sehr kalkhaltiges W as-
ser, oder auch nach Arbeiten
an der Leitung könnte das
Sieb des Wasserhahns ver-
stopft worden sein.
Ist der Gummischlauch ein-
geklemmt oder geknickt?
Der Wasserzufuhrschlauch
muss möglichst gerade
verlegt werden. Stellen Sie
sicher, dass er weder einge-
klemmt noch geknickt wurde.
Dreht sich die Programmwählerscheibe ununterbrochen?
Warten Sie bitte einige Minuten,
bis das Wasser vollständig
abgepumpt ist, schalten Sie Ihre
Der Waschtrockner lädt
laufend Wasser und
pumpt es laufend ab.
Liegt der Ablaufschlauch zu
tief? Dieser muss in einer
Höhe von 60 bis 100 cm installiert werden.
Liegt das Schlauchende
vielleicht unter Wasser?
W urde der Mauerablauf mit
einer Entlüftungsöffnung
versehen? Sollte die Betriebs-
störung nach diesen Kontrollen
weiterhin bestehen, drehen Sie
bitte den Wasserhahn ab,
schalten die Maschine aus und
fordern den Kundendienst an.
Wohnen Sie sehr hoch (auf den
letzten Etagen) könnte es sich
auch um einen Syphonvakuumeffekt handeln.
In diesem Fall ist ein entsprechendes V entil zu installieren.
51
Installations- und Bedienungsanleitungen

Der Waschtr ockner pumpt
nicht ab und schleudert
nicht.
den Anleitungen auf Seite 54, oder
fordern Sie den Kundendienst an.
Ist der Ablaufschlauch geknickt? Dieser muss möglichst
gradlinig verlegt werden. Stellen
Sie sicher, dass er weder eingeklemmt noch geknickt wurde.
Ist die Ablaufleitung verstopft?
Wurde der Ablaufschlauch mit einer nicht ordnungsgemäßen V erlängerung versehen, die den Ablauf verhindert?
Wurde der W aschtrockner in
eine Küchenzeile integriert?
Sollte es sich um ein nicht integrierbares, bzw. nicht einbaufähiges Modell handeln, muss
der Waschtrockner während
des Schleuderns etwas oszillieren, und verlangt demnach
an allen Seiten einige freie
Zentimeter.
Es bildet sich zu viel
Schaum.
Sieht das eingestellte Programm den Wasserablauf vor?
Bei einigen Programmen muss
der Ablauf manuell gestartet werden.
Wurde die "Bügelfreundlich"Funktion - bei den Geräten, die
eine solche vorsehen - aktiviert? Bei dieser Funktion ist der
Schleudergang manuell zu aktivieren.
Ist die Ablaufpumpe verstopft?
Um dies zu überprüfen drehen Sie
bitte den W asserhahn ab, ziehen
den Stecker heraus und folgen Sie
Wenden Sie sich
ausschließlich an
autorisierte
Fachkräfte und
verlangen Sie den
Einsatz
von Original-
Ersatzteilen.
Der Waschtr ockner
vibriert zu stark während
des Schleuderns.
Wur de bei der Installation die
innere Schwingergruppe
korrekt befreit? Siehe näch-
ste Seite, Abschnitt Installation.
Wurde der Waschtrockner
eben aufgestellt? Dies sollte
regelmäßig kontrolliert werden.
Der W aschtrockner könnte im
Laufe der Zeit unmerklich verrückt sein. Regulieren Sie die
Stellfüße unter Zuhilfenahme
einer Wasserwaage.
T echnische Daten
Modell
Abmessungen
Fassungs-
vermögen
Stromanschluß
Wasseranschluße
Schleudergeschwindigkeit
Kontrollprogramm gemäß
der Norm IEC 456
WD 104 T
Breite cm 59,5
Höhe cm 85
Tiefe cm 53,5
1 bis 5,5 kg pro Waschvorgang; 1 bis 4 kg pro Trockenvorgang
Spannung 220/230 Volt 50 Hz
Höchstleistungsaufnahme 1850 W
Höchstdruck 1 MPa (10 bar)
Mindestdruck 0,05 MPa (0,5 bar)
Fassungsvermögen der Tromme 46 liter
Bis 1000 U/min
Waschen
Trocknen
Dieses Gerät entspricht den folgenden EG-Richtlinien:
- 73/23/EWG vom 19.02.73 (Niederspannung) und nachfolgenden Änderungen
- 89/336/EWG vom 03.05.89 (elektromagnetische Verträglichkeit) und
nachfolgenden Änderungen
: Programm 3; Temperatur 60°C; Bei einer Wäscheladung von 5 kg.
: Lademenge von 2,5 kg; Drehknopf C auf Position .
Der Waschtr ockner ist
undicht.
Wurde der Ablaufsc hlauch fest
aufgeschraubt? Drehen Sie den
Wasserhahn ab, ziehen Sie den
Stecker aus der Steckdose und
versuchen Sie, die Nutmutter etwas
mehr anzudrehen (nicht zu fest).
Ist die Waschmittelschublade
verstopft? Versuchen Sie , diese
abzunehmen reinigen Sie sie unter
laufendem Wasser.
Ist der Ablaufschlauch unzureichend befestigt? Drehen Sie den
Wasserhahn ab, ziehen Sie den
Stecker aus der Steckdose und
versuchen Sie, den Schlauch
besser zu befestigen.
Wurde ein maschinengeeignetes Waschmittel eingesetzt? Kontrollieren Sie, was auf
der V erpackung aufgedruckt ist:
"Für W aschmaschinen" oder "Für
Handwäsche" oder Ähnliches.
Wurde mit zuviel Waschmittel
gewaschen? Eine zu hohe
Reinigermenge, die außerdem zuviel Schaum erzeugen würde, führt
nur zu Verkrustungen im Innern des
Waschtrockner, der Reinigungseffekt wird dadurch nicht erhöht.
Der Waschtrockner
trocknet nicht.
Stellen Sie sicher , dass:
der Stecker fest in der Steckdose
steckt; kein Stromausfall
besteht; die Gerätetür
ordnungsgemäß geschlossen
wurde; keine Startzeit-Vorwahl
(falls vorhanden) erfolgte; der
Programmschalter A sich nicht
auf Einstellung
befindet; sich der Drehknopf
'Trocknen' C nicht auf
Einstellung 0 befindet.
(Stop/Reset)
Der Waschtr ockner
trocknet nur unzureichend.
Stellen Sie sicher , dass:
das Ablaufschlauchende nicht
in Wasser getaucht ist; die
Ablaufpumpe nicht verstopft ist;
die Anleitungen hinsichtlich der
maximalen Lademenge auch
eingehalten wurden; der
Wasserhahn auf ist.
Sollte trotz all dieser Kontrollen die
Betriebsstörung an Ihrem
Waschtrockner weiter bestehen
bleiben, dann wenden Sie sich an
die nächstgelegene autorisierte
Kundendienststelle und geben Sie
hierbei folgende Daten an:
- Art der Störung
- Modell-Kennzeichen
(Mod. ....)
- Seriennummer (S/N ....)
Diese Daten entnehmen Sie bitte
dem auf der Rückseite der Maschine befindlichen T ypenschild.
Installations- und Bedienungsanleitungen
52

Installation und Umzug
W aschtroc kner zieht
in Ihr Haus ein
Egal, ob Sie Ihren Waschtr ockner neu kaufen oder ob Sie ihn aufgrund eines
Umzugs neu anschließen müssen, die Installation ist ein überaus wichtiger
V organg für eine einwandfreie Funktion der W aschtrockner .
Nachdem Sie das Gerät ausgepackt
haben, vergewissern Sie sich in erster
Linie, dass es keinen Schaden erlitten hat.
Falls Sie irgendwelche Zweif el diesbezüglich haben, rufen Sie sofort einen
Fachmann zu Hilfe. Die Wäschetrommel
wird während des Transportes mit vier
Schrauben an der Rückwand des
Waschtrockner befestigt.
Bevor Sie den ersten Waschgang starten, nehmen Sie die Schrauben und
auch die Gummiringe sowie das
Distanzstück ab (bewahren Sie alles gut
auf) und verschließen Sie die Löcher
mit den Plastikstöpseln, die mit der
Waschtrockner mitgeliefert werden.
Wichtig: Die unten rechts auf der
Rückseite des Waschtrockner
befindlichen 3 Löcher, in denen der
Stecker untergebracht war , müssen mit
beiliegendem Stöpsel geschlossen
werden.
Standfläche
Wenn Ihr Waschtrocknergut funktionieren soll, ist es wichtig, dass er vollkommen gerade steht. Um dem Gerät
einen perfekten Stand zu verleihen,
brauchen Sie nur die vorderen Füße
entsprechend einzustellen; der Neigungswinkel der Waschtrockner, der
auf der Arbeitsfläche gemessen wird,
darf nicht mehr als 2% betragen. F alls
Sie als Unterlage einen T eppichboden
haben, vergewissern Sie sich, dass die
Belüftung auf der Standfläche nicht beeinträchtigt wird.
Bewahren Sie die
Schrauben und das
Distanzstück, mit dem Sie
den Innenteil der
Waschtrockner blockieren
können, auf.
Falls Sie umziehen sollten,
werden sie Ihnen dienlich
sein, um die
Wäschetrommel erneut zu
blockieren, wodurch sie
während des Transportes
gegen Schläge geschützt ist.
Die vorderen Füße sind regulierbar.
Wasseranschluss
Der Wasserdruck muss den Werten
entsprechen, die auf dem Typenschild auf dem Rückteil des
Waschtrockner angegeben sind.
Schließen Sie den Wasserschlauch
an einen Kaltwasserhahn mit einem
Gewindeanschluss zu ¾ Gas an und
geben Sie die Gummidichtung zwischen den Anschluss.
A
Die Gummidichtung.
Wenn die Wasserleitungen neu sein
sollten oder längere Zeit unbenutzt
waren, lassen Sie das Wasser so
lange laufen, bis es klar und frei von
allen Verunreinigungen ist, bevor
Sie den Schlauch anschließen. Daraufhin schließen Sie den Schlauch
an den W asserhahn an, der sich auf
dem Rückteil der Waschtrockner
oben rechts befindet.
Wasserhahn oben rechts.
Anschluss des Ablaufs
Auf der Rückseite des
Waschtrockner befinden sich zwei
Anschlüsse (rechts oder links), an die
Sie den Ablaufschlauch anschließen
können. Führen Sie das andere Ende
in eine Abwasserleitung ein oder
legen Sie es auf ein Waschbecken
oder eine Badewanne. Achten Sie
hierbei jedoch darauf, dass der
Schlauch nicht allzu stark gebogen
wird. Es ist wichtig, dass der Schlauch
auf einer Höhe von 60 bis 100 cm endet. Falls es unumgänglich ist, den
Schlauch auf einer geringeren Höhe
als 60 cm über dem Boden anzuschließen, so müssen Sie ihn in den
Haken einfügen, der auf dem oberen
T eil der Rückseite angebracht ist.
Dieser Haken muss verwendet
werden, wenn der Ablauf weniger
als 60 cm über dem Boden liegt.
Wenn der Ablaufschlauch in eine
Wanne oder ein Waschbecken geführt wird, so bringen Sie den
Kunststoffbogen an und binden den
Schlauch am W asserhahn fest.
Der Kunststoffbogen für den Wasserablauf in Wannen oder Waschbecken.
Der Schlauch darf nie im Wasser
liegen.Es sollten keine
V erlängerungsschläuche verwendet werden. Falls dies absolut unvermeidlich ist, so sollte die Verlängerung denselben Durchmesser haben wie der Originalschlauch und er darf in keinem Fall
länger als 150 cm sein. Falls Sie
über einen W andablauf verfügen,
lassen Sie bitte von einem Experten kontrollieren, ob dieser auch
geeignet ist. F alls Sie in einer der
obersten Etagen eines Gebäudes
wohnen, kann es passieren, dass
sich im Syphon ein V akuum bildet,
wodurch der W aschtrockner ständig Wasser ansaugt und wieder
abpumpt. Um dieses Problem zu
lösen, finden Sie im Handel spezielle Syphonventile.
Stromanschluss
Bevor Sie die Waschtrockner ans
Stromnetz anschließen, vergewissern Sie sich, dass folgende V oraussetzungen gegeben sind:
1) die Steckdose muss die Höchstleistung, die auf dem T ypenschild
auf der Rückseite der
Waschtrockner angegeben
ist,vertragen und den gesetzlichen Sicherheitsvorschriften entsprechen;
2) die Stromspannung muss den
Angaben entsprechen, die auf
dem Typenschild der
Waschtrockner v ermerkt sind;
3) der Stecker muss in die Steckdose passen. F alls dies nicht der
Fall ist, benützen Sie k eine Zwischenstecker, sondern lassen
den Stecker oder die Steckdose
austauschen;
4) die elektrischen Haushaltsgeräte müssen über eine Erdung
verfügen.
Achtung!
Der Hersteller lehnt jede
Verantwortung ab, falls
diese Vorschriften nicht
eingehalten werden
sollten.
Plastiktüten,
Schaumgummi, Nägel und
andere
Verpackungsmaterialien
sind kein Spielzeug für
Kinder: sie können eine
ernsthafte Gefahr
darstellen.
53
Installations- und Bedienungsanleitungen

Leichte Pflege und W artung
Behandeln Sie Ihre Waschtrockner gut und Sie
werden in ihr eine treue Freundin haben
Ihre W aschtrockner ist ein verlässlicher Lebens- und Arbeitspartner. Es ist
daher wichtig, sie fit zu halten. Auch für Sie.
Der W aschtrockner ist so gebaut
worden, dass Sie problemlos viele Jahre lang Ihre Freude daran
haben können. Einige einfache
V orkehrungen aber helfen Ihnen,
Ihr Gerät stets fit zu halten und
seine Lebensdauer zusätzlich zu
verlängern. In erster Linie müssen
Sie nach jeder Wäsche immer den
Wasserhahn schließen: der
ständige W asserdruck kann einigen Bestandteilen schaden. Außerdem vermeiden Sie auf diese
Weise eventuelle Wasseraustritte,
wenn niemand im Hause ist.
Wenn das W asser in Ihrer Gegend
allzu hart ist, benützen Sie ein
Entkalkungsmittel (das Wasser ist
hart, wenn es um den Wasserhahn oder den Ablauf herum leicht
weiße Spuren hinterlässt, was Sie
vor allem in der Badewanne feststellen können.
Um genauere Informationen zum
Wassertyp in Ihrer Sanitäranlage
zu erhalten, können Sie sich an
das Wasseramt Ihrer Gemeinde
oder an Ihren Klempner wenden.
Leeren Sie stets alle Taschen,
nehmen Sie auch Broschen, Abzeichen und alle übrigen harten
Gegenstände ab.
Die Außenwände des Waschtrockner werden mit einem
weichen Tuch und einer lauwarmem Seifenlauge gereinigt.
Es ist wichtig, die
ausziehbare
Waschmittelschublade
regelmäßig zu reinigen.
Um Ablagerungen
entgegenzuwirken,
brauchen Sie die
Schublade nur einige Zeit
lang unter fließendem
W asser zu lassen.
Nie mit der Waschmittelmenge übertreiben.
Normale Waschmittel enthalten
bereits einen Kalklöser. Nur wenn
das W asser ganz besonders hart
ist, das heißt, wenn es besonders
kalkreich ist, empfehlen wir Ihnen,
bei jeder Wäsche ein Spezialprodukt zu verwenden.
Gelegentlich können Sie auch einen Waschgang mit einem
Kalklöser durchführen, ohne
Waschmittel und ohne Wäsche .
Verwenden Sie nie allzu große
Mengen Waschmittel oder Zusätze, denn dies könnte zu starken
Schaumbildungen führen, was
Ablagerungen und Schaden an
einigen Bestandteilen der
Waschtrockner zur F olge haben
kann.
Leeren Sie stets alle Taschen: kleine Gegenstände
können Ihrer Waschtrockner schaden.
Bei Bedarf kontrollieren Sie die Pumpe und den Gummischlauch.
Waschtrockner verfügt über eine selbstreinigende Pumpe, die keinerlei Reinigung oder Wartung erfordert. Es
kann jedoch geschehen, dass versehentlich kleine Gegenstände (Kleingeld, Sicherheitsnadeln, Haarspangen,
abgesprungene Knöpfe und ähnliches) in die Pumpe fallen. Um Schäden zu vermeiden, bleiben diese Gegenstände
in einem Vorraum liegen, der sich auf der Unterseite der Pumpe befindet und zugänglich ist.
Um Zugang zu diesem Vorraum zu bekommen, brauchen Sie nur mit
einem Schraubenzieher das Abdeckpaneel abzuschrauben, das sich im
unteren T eil der Waschtrockner befindet (Abb. 1), und dann den Deckel
abnehmen, indem Sie ihn gegen den Uhrzeigersinn drehen (Abb. 2).
Daraufhin können Sie den Innenraum sorgfältig kontrollieren.
Der Gummischlauch
Kontrollieren Sie den Gummischlauch mindestens einmal im Jahr.
Wenn er Risse oder Verschleißstellen aufweist, muss er unmittelbar
ausgetauscht werden, denn während der Wäsche muss er einen starken
Abb. 1
Achtung: Vergewissern Sie sich stets, dass der Waschgang beendet ist und ziehen Sie den Stecker aus der Steckdose, bevor
Sie den Deckel abnehmen oder sonst irgendwelche Wartungsarbeiten vornehmen. Es ist normal, dass nach Abnahme des
Deckels etwas Wasser herausfließt. Wenn Sie das Abdeckpaneel wieder einsetzen, kontrollieren Sie, dass die Haken im
unteren Teil in die Halterungen einrasten, bevor Sie es gegen das Gerät drücken.
Druck aushalten, der ein plötzliches Reißen zur Folge haben könnte.
Installations- und Bedienungsanleitungen
Abb. 2
54

Absolut vorrangig
Ihre Sicherheit und die
Waschtr ockner wurde nach den strengsten internationalen
Sicherheitsvorschriften gebaut - zu Ihrer Sicherheit und
Ihrer Kinder
der Ihrer Familie.
Lesen Sie bitte aufmerksam die
nachstehenden Hinweise, sowie die
des gesamten Handbuches. Sie
liefern nicht nur zahlreiche
praktische Hinweise, sondern
wichtige Informationen hinsichtlich
der Sicherheit, dem Gebrauch und
der Wartung.
1. Waschtroc kner darf nicht im
Freien installiert werden,
auch nicht, wenn es sich um
einen geschützten und
überdachten Platz handelt. Es
ist gefährlich, Ihren
Waschtrockner Ge wittern und
Unwettern auszusetzen.
2. Ihr Waschtr ockner ist nur von
Erwachsenen zu
gebrauchen und ausschließ-
lich zum Waschen Ihrer Wäsche gemäß den in diesem
Handbuch enthaltenen Anweisungen.
3. Muß er versetzt werden, sollten hierfür mindestens 3 Personen verfügbar sein. (Vorsichtig
vorgehen). Versuchen Sie es
niemals allein, der
Waschtrockner ist äußerst
schwer.
4. Bevor Sie die Wäsche einfüllen,
stellen Sie bitte sicher, dass die
Tr ommel auch leer ist.
5. Bedienen Sie die Maschine
nicht barfuß, oder mit nassen
bzw. feuchten Händen, oder
wenn Sie auf feuchtem
Boden stehen.
Wenden Sie sich nur an
autorisiertes Fachpersonal und
verlangen Sie nur mit Garantie
versehene Indesit-Orig ina lErsatzteile!
6 . Verwenden Sie keine Verlän-
gerungen und Mehrfachstecker, die besonders in
feuchten Räumlichkeiten sehr
gefährlich sind.
7. Öffnen Sie die Waschmittelschublade nicht, wenn
die Maschine in Betrieb ist;
verwenden Sie keine Waschmittel für Handwäsche, diese
schäumen zu sehr und könnten die inneren Teile Ihrer Maschine beschädigen.
8. Ziehen Sie niemals den
Stecker am Versorgungskabel, oder am Gerät selbst
aus der Steckdose: dies ist zu
gefährlich.
9. Das Ablaufwasser kann äußerst heiß werden, berühren
Sie dieses demnach nicht.
Auch die Tür kann heiß wer den, halten Sie deshalb Kinder
fern. V ersuchen Sie niemals,
die Tür mit Kraft zu öffnen,
dies könnte den Sicherheitsmechanismus beschädigen, der
vor unabsichtlichem Öffnen der
Tür bei laufender Maschine
schützt.
10. Drehen Sie im Falle einer
Betriebsstörung den Wasserhahn ab und ziehen Sie
den Stecker aus der Steckdose, versuchen Sie nicht,
Schäden an inneren
Maschinenteilen selbst zu
beheben.
Austausch des Versorgungskabels
Beim Versorgungskabel Ihrer Waschtrockner handelt
es sich um ein Spezialkabel,
das nur bei den autorisierten Indesit-Kundendienstzentren erhältlich ist.
Dieses ist wie folgt auszutauschen:
1. Vergewissern Sie sich, dass
Ihre Waschtrockner ausgeschaltet, und der Stecker herausgezogen ist.
I
Abb. 3
55
I
nstallations- und Bedienungsanleitungen
2. Nehmen Sie den Deckel ab.
Schrauben Sie hierzu die beiden
Schrauben I aus, und ziehen Sie
den Deckel nach vorne hin ab.
[Abb. 3]
3. Nehmen Sie die Drähte vom
Entstörer F [Abb. 4] ab, achten
Sie hierbei auf die korrekten
Anschlussstellen (Blauer
Draht =N; Brauner Draht =L)
und lassen Sie den Erdleiter
bis zum Schluss.
N
L
F
Abb. 4
Anmerkung: die Buchstabe L,
N und das Symbol
dem Entstörer abgebildet.
4. Drücken Sie den oberen Teil
der Kabeldurchführung leicht von
der Rückwand weg, ziehen Sie
daraufhin das Versorgungskabel
nach oben hin heraus [Abb. 5].
Gehen Sie in umgekehrter
Reihenfolge vor , um das neue
Kabel anzuschließen.
sind auf
Abb. 5
Schieben Sie hierauf den Deckel
wieder auf, setzen Sie ihn hierzu
auf den Waschtrockner [Abb. 6]
und schieben Sie ihn nach vorne
und zwar so, dass seine vorderen
Haken in die entsprechenden
Schlitze der Schalterblende eingreifen, schrauben Sie abschließend die Schrauben wieder ein.
Abb. 6

Installations- und Bedienungsanleitungen
56

Zapnutí praèky se
I
L
A
B
C
H
D
F
GE
suièkou
Po instalaci nové praèky zapnìte praní s pouitím
programu "1" pøi 90° stupních.
Správné zahájení èinnosti praèky je
dùleité pro kvalitu praní, prevenci
problémù a pro dlouhou ivotnost
zaøízení. Po vloení prádla a pracího
prostøedku vdy zkontrolujte, zda:
1. Dvíøka jsou správnì zavøená.
2. Vidlice síového pøívodu je v
zásuvce.
3. Vodovodní kohoutek je otevøený.
4. Voliè A je nastaven na jednom ze
symbolù
(stop/reset).
Výbìr poadovaného programu
Program volíte podle typu prádla.
Podívejte se do tabulky na stranì 59.
Otáèejte knoflíkem A, a se zvolený
program bude krýt sukazatelem
umístìným na knoflíku, nastavte
teplotu pomocí knoflíku B, ujistìte se,
e knoflík C je vpoadované pozici a
vpøípadì potøeby pouijte tlaèítka E,
F a G a pak stisknìte tlaèítko zapnutí/
vypnutí H (poloha I).
Nezapomeòte, e pokud chcete
pouít "naprogramovaný start", musí
být nastaven pøed pracím cyklem.
Po ukonèení cyklu praní...
Kontrolka I bude nìkolik sekund
rychle blikat, pak zaène blikat
pomaleji.
Pak
praèka se suièkou
stisknutím tlaèítka zapnutí/vypnutí
H (poloha O ). Nyní mùete
bezpeènì otevøít dvíøka praèky. Po
vyjmutí vypraného prádla nechejte
dvíøka otevøená, aby vlhkost mohla
vyschnout.
Vdy zavøete vodovodní kohoutek.
Upozoròujeme, e pokud dojde k
výpadku proudu nebo pokud se
praèka se suièkou sama vypne,
zùstane zvolený program uloen
v pamìti.
Funkce ovládacích prvkù
vypnìte
Správný výbìr je dùleitý. A je to snadné.
Voliè programù a zahájení
programu
Slouí k volbì pracího programu.
Pamatujte na to, e knoflíkem se
smí otáèet pouze ve smìru
hodinových ruèièek.
Chcete-li zvolit program, musíte
otoèit knoflík tak, aby byl symbol/
èíslo zvoleného programu vjedné
linii sukazatelem na knoflíku.
Nyní stisknìte tlaèítko vypínání/
zapínání H (pozice I), kontrolka I
zaène blikat.
Po 5 sekundách je nastavení
akceptováno, kontrolka I pøestane
blikat (zùstane svítit) a cyklus praní
se zahájí.
Jestlie chcete pøeruit probíhající
program nebo nastavit nový, zvolte
jeden ze symbolù
poèkejte 5 sekund: kdy je zruení
akceptováno, kontrolka I bliká a Vy
mùete praèka se suièkou vypnout.
Toto tlaèítko mùete pouít i k
odloení zahájení èinnosti praèky.
Zvolte jednu ze ètyø poloh pro
naprogramovaný start, stisknìte
vypínací/zapínací tlaèítko H (pozice
I) a poèkejte 5 sekund. Pak je
nastavení akceptováno (kontrolka I
pøestane blikat a zùstane svítit) a Vy
mùete zvolit poadovaný program.
(Stop/Reset) a
Kontrolka I speciálním zpùsobem
bliká (
2 sekundy svítí a 4 sekundy
je zhasnuta
nastaven odloený start.
Bìhem této fáze je moné otevøít
dvíøka a zmìnit náplò praèky.
Po nastavení pracího cyklu a jeho
akceptováním praèkou nemá otáèení
knoflíku ádný efekt (kromì toho,
kdy je v poloze
Knoflík nastavování teploty
Slouí k nastavení teploty praní
uvedené v tabulce programù. Mùete
ovem také sníit teplotu
doporuèovanou pro zvolený
program, nebo dokonce nastavit
cyklus praní ve studené vodì (
), èím indikuje, e je
stop/reset).
Knoflík cyklu suení
Tímto knoflíkem zvolte poadovaný
cyklus suení. Jsou k dispozici dvì
monosti:
A - suení zaloené na èase:
Od 40 minut do 150 minut.
B - zaloené na poadavku, kolik
vlhkosti má mít usuené prádlo:
Na ehlení
navlhlé, vhodné pro snadné ehlení.
Do atníku
pøipravené k uloení.
Extra suché
prádlo, doporuèujeme pro ruèníky a
froté upany.
Na konci cyklu suení probìhne fáze
ochlazování.
).
: prádlo je trochu
: usuené prádlo
: velmi suché
Zásobník na prací prostøedky
Je rozdìlen do tøí oddílù:
1. Prací prostøedek pro pøedpírání
2. Prací prostøedek pro hlavní praní
3. Avivá.
3
2
1
57
Návod k instalaci a pouití

M
1
2
3
Snadné ehlení
Díky této funkci mùete vyndat prádlo
zpraèky, ani by bylo zmaèkané, take
se mnohem snadnìji ehlí.
Mùete ji pouít sprogramy 3-4
(bavlna), 5-6 (syntetické tkaniny) a 9
(choulostivé materiály).
Stisknìte toto tlaèítko u programù 5-6-
9 a cyklus praní se zastaví
. Program mùete ukonèit
opìtovným stisknutím tlaèítka E.
Poznámka: Chcete-li spustit také
cyklus suení, lze toto tlaèítko pouít
pouze vkombinaci svolbou úrovnì
(ehlení).
na symbolu
Pomalé odstøedování
Pouitím tohoto tlaèítka se regulují
otáèky odstøedování z 1000 na 500
ot/min u bavlnìných programù a ze
850 na 500 ot/min u syntetických
programù.
Rychlé praní
Toto tlaèítko zkrátí dobu pracího
programu o cca 30%. Nelze je pouít
se speciálními programy (viz str. 59)
nebo programy pro vlnu a hedvábí.
Zapnutí-vypnutí
Stisknutím tlaèítka H se praèka se
suièkou zapne. Kdy není stisknuto,
praèka se suièkou je vypnuta.
Vypnutím praèky se nezruí
zvolený program.
Kontrolka zapnutí-vypnutí /
blokování dvíøek
Kontrolka I pomalu bliká, je-li zaøízení
zapnuto a oèekává pokyny, nebo po
ukonèení cyklu, kdy lze dvíøka otevøít.
Pokud dvíøka nelze otevøít, bliká
rychle.
Nepøeruované svícení znamená, e
zaøízení akceptovalo zvolený
program.
Kontrolka cyklu suení
Pokud tato kontrolka svítí, znamená
to, e knoflík C je nastaven na cyklus
suení a po ukonèení pracího cyklu se
rozebìhne zvolený cyklus suení.
Tajemství zásobníku na prací prostøedky
První tajemství je jednoduché: zásobník otevøete jeho
otoèením smìrem ven.
Nyní musíte pøidat prací prostøedek
a ostatní aditiva podle doporuèení
výrobce: obecnì vzato, vechny
potøebné údaje naleznete na obalu.
Dávkování je rùzné podle náplnì
praèky, tvrdosti vody a stupnì
zapinìní prádla.
Zkuenostmi se nauèíte volit správné
dávkování témìø automaticky: to se
stane zase Vaím tajemstvím.
Pøi nalévání aviváe do pøihrádky 3
dbejte na to, aby nepøetekla pøes
møíku.
Praèka se suièkou pøi kadém
programu automaticky pøidává avivá
do praní.
Tekuté prostøedky vlévejte do
pøihrádky 2 pouze nìkolik sekund
pøed zahájením praní.
Upozoròujeme, e tekuté prací
prostøedky jsou vìtinou urèeny pro
praní do 60° stupòù a nevyadují
pøedpírání.
Nìkteré tekuté nebo prákové prací
prostøedky se prodávají spolu se
speciálním dávkovaèem, který se
vkládá pøímo do bubnu praèky.
Øiïte se návodem na krabici s
pracím prostøedkem.
Nikdy nepouívejte prací prostøedek
urèený pro praní v ruce, nebo by se
mohlo vytvoøit velké mnoství pìny
a dojít i k pokození praèky.
Výjimkou jsou prací prostøedky,
které jsou výslovnì urèeny k praní
jak v ruce, tak v praèce.
A jetì poslední tajemství: kdy
perete ve studené vodì, vdy snite
mnoství pouitého pracího práku:
ve studené vodì se toti rozpoutí
ponìkud hùøe ne v teplé vodì, a
proto byste jej mohli èást vyplýtvat.
Do pøihrádky 1:
Prostøedek pro pøedpírání (prákový)
Do pøihrádky 2:
Prostøedek pro praní
(tekutý nebo prákový)
Do pøihrádky 3:
Aditiva (avivá, vùnì apod.)
Zásobník na prací prostøedky lze vyjmout
a vyèistit: vytáhnìte jej ven, jak je
znázornìno na obrázku. Pak jej
proplachujte pod tekoucí vodou nìkolik
minut.
Návod k instalaci a pouití
58

Programy pro kadou pøíleitost
Druh prádla a stupeò zapinìní È. prog.
ODOLNÉ TKANINY
Extrémnì zapinìné bílé prádlo
(prostìradla, ubrusy apod.)
Extrémnì zapinìné bílé prádlo
(prostìradla, ubrusy apod.)
Silnì zapinìné bílé a stálobarevné
prádlo
Bílé a jemné barevné prádlo, které není
pøíli zapinìné (koile, trièka apod.)
Cykly máchání
Cyklus odstøedování
Cyklus suení pro bavlnìné tkaniny
Stop/Reset
SYNTETICKÉ TKANINY
Velmi silnì zapinìné stálobarevné
syntetické tkaniny (dìtské prádlo)
Choulostivé syntetické barevné tkaniny
(vechny typy mírnì zapinìného prádla)
Choulostivé syntetické barevné tkaniny
(vechny typy mírnì zapinìného prádla)
Cykly máchání
Avivá
Cyklus odstøedování
Cyklus suení pro syntetické látky
Stop/Reset
VLNA
Ruèní praní
Zvlátì choulostivé tkaniny (záclony,
hedvábí, viskóza atd.)
Cykly máchání
Cyklus odstøedování
Odèerpání vody
Cyklus suení pro vlnu
Stop/Reset
NAPROGRAMOVANÝ START
Odloení o 12 - 9 - 3 hodinu Start je odloen o 12 - 9 - 3 hodinu
Stop/Reset
190°C
290°C
360°C
440°C
560°C
640°C
730°C
840°C
930°C
Volba
teploty
Prací
práek
Avivá Délka
◆◆
◆◆
◆◆
◆◆
◆
◆◆
◆◆
◆◆
◆
◆
◆◆
◆◆
◆
pracího
cyklu
(min)
165
145
130
95
100
70
30
45
50
Popis pracího cyklu
Pøedpírání, praní pøi 90°C, máchání,
prùbìné a závìreèné dímání
Praní pøi 90°C, máchání, prùbìné a
závìreèné dímání
Praní pøi 60°C, máchání, prùbìné a
závìreèné dímání
Praní pøi 40°C, máchání, prùbìné a
závìreèné dímání
Máchání, prùbìné a závìreèné dímání
Vyputìní vody a závìreèné dímání
Pøeruení/zruení zvoleného programu
Praní pøi 60°C, máchání, ochrana pøed
zmaèkáním nebo etrné dímání
Praní pøi 40°C, máchání, ochrana pøed
zmaèkáním nebo etrné dímání
Praní pøi 30°C, máchání, ochrana pøed
zmaèkáním nebo etrné dímání
Máchání, ochrana pøed zmaèkáním nebo
etrné dímání
Máchání s automatickým pøidáním aviváe,
ochrana pøed zmaèkáním nebo etrné dímání
Vyputìní vody a etrné dímání
Pøeruení/zruení zvoleného programu
Praní pøi 40°C, máchání, a etrné
dímání
Praní pøi 30°C, máchání, ochrana pøed
zmaèkáním nebo vyputìní vody
Máchání, ochrana pøed zmaèkáním nebo
vyputìní vody
Vyputìní vody a etrné dímání
Vyputìní vody
Pøeruení/zruení zvoleného programu
Pøeruení/zruení zvoleného programu
Dùleité: chcete-li zruit prací program, který jste právì nastavili, zvolte jeden ze symbolù
(stop/reset) a poèkejte nejménì 5 sekund.
Údaje uvedené v tabulce jsou pouze informativní a mohou se liit v závislosti na mnoství a typu prádla, teplotì vody a pokojové teplotì.
Speciální programy
Denní praní
Praèka se suièkou má program pro krátké kadodenní pøepírání málo zapinìného prádla. Nastavíte-li v programu 7 teplotu 30
prádla spoleènì (s výjimkou vlny a hedvábí), pøi maximální náplni 3 kg. Díky tomuto programu mùete etøit èas i el. energii, jeliko trvá pouze asi 30 minut.
Doporuèujeme pouívat tekuté prací prostøedky.
59
Návod k instalaci a pouití
o
C, mùete prát rùzné druhy

Jak suit
Kombinovaný prací a
suící program
Chcete-li pouít automatický
cyklus praní a následného suení,
podívejte se do tabulky A a øiïte se
pokyny týkajícími se MAX náplnì.
Postupujte podle pokynù pro pouze
praní (viz strana 57, odstavec
Zapnutí praèky se suièkou) a
knoflíkem C nastavte typ
poadovaného cyklu suení. Pak
stisknìte tlaèítko H (poloha I).
Jestlie mnoství prádla, které chcete
prát a suit, pøesahuje uvedenou
maximální náplò (viz tabulka A),
postupujte podle pokynù uvedených
pro pouze praní (viz strana 57,
odstavec Zapnutí praèky se
suièkou).
Po skonèení cyklu praní vyjmìte
prádlo, rozdìlte je a èást prádla dejte
zpìt do bubnu.
Nyní postupujte podle pokynù pro
cyklus pouze suení.
Pak tento postup opakujte i pro
zbývající èást prádla.
Pouze suení
Po vloení prádla, které chcete suit
(max. 4 kg u bavlny, ostatní tkaniny
viz tabulka), zkontrolujte, zda:
- dvíøka jsou správnì zavøená;
- vidlice síového pøívodu je v zásuvce;
- vodovodní kohoutek je otevøený;
- tlaèítko H není stisknuto (poloha O).
A nyní nastavte knoflík pracího
cyklu
Nastavte knoflík A na pøísluné
nastavení
v závislosti na typu
tkaniny, zvolte poadovaný typ cyklu
suení pomocí knoflíku C a pak
stisknìte tlaèítko zapnutí-vynutí H
(poloha I).
Po ukonèení cyklu suení...
Poèkejte, a bude kontrolka I
pomalu blikat, pak praèku se
suièkou vypnìte stisknutím tlaèítka
zapnutí-vynutí H (poloha O). Nyní
mùete otevøít dvíøka pøístroje. Po
vyjmutí prádla ponechejte dvíøka
otevøená, abyste pøedeli vzniku
nepøíjemného zápachu, a zavøete
vodovodní kohoutek.
A.
Typ
tkaniny
Bavlna,
len
Bavlna Froté rucníky
Ter ital,
bavlna
Akrylát Pyzama,
Nylon Slipy,
Druh prádla Max.
Prádlo
ù
ruzných
velikostí
ì
Prosteradla,
koil e
ponozky
è
puncocháce,
ponozky, atd.
nápln (k g)
è
è
ò
4 150 145 140
4 150 145 140
2,5 100 90 85
1656060
1656060
Data obsaená v tabulce jsou pouze informativní.
Pøi praní bavlnìných látek o váze mení ne 1 kg pouívejte
suící program pro syntetické tkaniny.
Doba sušení (Min.)
Extra
suché
Do
atníkuNazehlení
CYKLUS SUENÍ VLNY
Cyklus suení pro vlnìné odìvy lze spustit pouze a výluènì
spoleènì svolbou urèité doby cyklu (150 100 60 40
minut). Doporuèujeme 60ti minutový suící cyklus.na 1 kg
náplnì.
Jestlie je omylem zvolena nìkterá ze tøí úrovní (extra suché
, do atníku , na ehlení ), zaøízení provede cyklus
suení trvající MAX dobu (150 minut).
Dùleité
Cyklus dímání probíhá bìhem suení, jestlie jste nastavili
program pro bavlnu a úroveò suení (extra suché
atníku
, na ehlení ).
, do
VÝSTRAHA
- Bìhem fáze suení jsou dvíøka dosti horká.
- Nepouívejte toto zaøízení k suení odìvù, které byly èitìny
hoølavými látkami (napø. trichloretylénem).
- Nepouívejte toto zaøízení k suení molitanu a podobných
elastomerù.
- Ujistìte se, e bìhem cyklu suení je vodovodní kohoutek
otevøený.
- Tato praèka se suièkou mùe být pouívána pouze k suení
odìvù, které byly pøedtím vyprány ve vodì.
Návod k instalaci a pouití
60

Odstraòování závad
Pøi provozu praèky mùe nìkdy dojít k chybì. Vìtinou lze vzniklé
problémy snadno vyøeit, ani by bylo nutné volat opraváøe. Ne se tedy
obrátíte na servis, zkontrolujte následující body.
Praèka se suièkou se
nerozbìhne.
Je síová zástrèka správnì
zasunuta do zásuvky? Mohla se
uvolnit.
Nedolo k výpadku
elektrického proudu?
Domovní pojistky nebo jistiè mohl
vypadnout, napø. v pøípadì, e
bylo zapnuto pøíli mnoho
spotøebièù souèasnì. Nebo mohlo
dojít k výpadku proudu v celé
oblasti.
Jsou správnì zavøena dvíøka
praèky?
Z bezpeènostních dùvodùpraèka
se suièkou nepracuje, jestlie
nejsou dvíøka správnì zavøena.
Je stisknuto tlaèítko zapnutí/
vypnutí?
Jestlie je, pak byl pravdìpodobnì
nastaven naprogramovaný
opodìný start.
Je tlaèítko naprogramovaného
startu (u modelù, které jsou jím
vybaveny) ve správné poloze?
Je otevøen vodovodní kohoutek?
Jestlie do praèky není dodávána
voda, z bezpeènostních dùvodù
se prací cyklus nezahájí.
Praèka se suièkou
nenapoutí vodu.
Je vodovodní kohoutek
správnì pøipevnìn k trubce?
Není zastavena dodávka vody?
Mohlo k tomu dojít napø. pøi
stavebních pracích ve vaí budovì
nebo v ulici.
Je dostateèný tlak vody?
Autokláv mohl mít poruchu.
Je filtr ve vodovodním
kohoutku èistý? Jestlie je voda
velmi vápenitá, nebo byla nedávno
provádìna na vodovodním
rozvodu nìjaká práce, mùe být
sítko filtru ucpané èásteèkami a
úlomky.
Není ohnuta gumová hadice?
Hadice, která pøivádí vodu do
praèky, musí být pokud mono
co nejvíce rovná. Zkontrolujte,
zda není pøiskøípnutá nebo pøíli
ohnutá.
Voliè programù se stále otáèí?
Poèkejte nìkolik minut, a
èerpadlo vypumpuje vechnu
vodu, pak praèka se suièkou
vypnìte, zvolte jeden ze symbolù
stop/reset
, pak praèka se
suièkou opìt zapnìte. Jestlie se
knoflík stále otáèí, zavolejte
servis, protoe to znaèí nìjakou
poruchu.
SPRÁVNÌ PATNÌ
Uzavøete vodovodní
kohoutek po kadém
praní. Limituje se
tím uívání
hydraulického
systému praèky a
eliminuje se
nebezpeèí vyteèení
vody, kdy není
nikdo doma.
Vdy nechávejte
dvíøka praèky
otevøená, aby
nedolo k tvorbì
zápachu.
Èistìte praèku
etrnì. Pro èitìní
vnìjích a
gumových èástí
praèky vdy
pouívejte hadøík
navlhèený vlanou
mýdlovou vodou.
Necháváte praèku
pøipojenou k síti pøi jejím
èitìní. I v prùbìhu
údrby musí být zaøízení
vdy odpojeno od sítì.
Pro èitìní pouíváte
rozpoutìdla a agresivní
brusné prostøedky. Nikdy
nepouívejte ádné
chemikálie nebo brusné
prostøedky k èitìní
vnìjích nebo gumových
èástí praèky.
Neèistíte zásobník na
prací prostøedky. Dá se
vyjmout a snadno vyèistit
pod tekoucí vodou.
Odjídíte na dovolenou a
na praèku si
nevzpomenete. Vdy se
ujistìte, e jste praèku
odpojili od sítì a uzavøeli
vodovodní kohoutek.
Praèka se suièkou trvale
napoutí a vypoutí vodu.
Není odpadní hadice umístìna
pøíli nízko? Musí být
nainstalována ve výce od 60 do
100 cm.
Není ústí hadice ponoøeno ve
vodì?
Nedochází u vaeho odpadního
systému k sifónovému efektu?
Jestlie problém pøetrvává i po
vech tìchto kontrolách, zavøete
vodovodní kohoutek, vypnìte
pøístroj a zavolejte odborný servis.
Jestlie bydlíte v horních
podlaích budovy, mùe být
problém v odpadním systému.
Tento problém mùe vyøeit
instalace speciálního ventilu pro
sifónový efekt.
Praèka se suièkou
nevypoutí vodu nebo
nedímá.
Obsahuje zvolený program
vyputìní vody? U nìkterých
pracích cyklù musíte nastavit
vyputìní vody manuálnì.
Není zvolena funkce "Snadné
ehlení"? Tato funkce vyaduje
manuální nastavení vyputìní
vody.
Není èerpadlo ucpané? Abyste
je zkontrolovali, uzavøete
vodovodní kohoutek, odpojte
praèka se suièkou od sítì a dále
postupujte dle pokynù na stranì
62, nebo se obrate na servis.
Není ohnuta výpustní hadice?
Výpustní hadice nesmí být
zkroucená nebo pøíli ohnutá.
Ujistìte se také, zda není
pøiskøípnutá.
Není odpad z praèky ucpaný?
Je pouita na výpustní hadici
prodluovací hadice? Pokud ano,
není umístìna nesprávnì a
neblokuje tok vody?
Praèka se suièkou pøi
dímání pøíli vibruje.
Je praèka se suièkou správnì
vyrovnána do vodorovné
polohy? Vyrovnání tohoto zaøízení
by se mìlo pravidelnì kontrolovat.
V prùbìhu èasu se mùe poloha
praèky zmìnit, ani to postøehnete.
Nastavte noky a zkontrolujte
vodorovné vyrovnání.
Není praèka se suièkou pøíli
uzavøena mezi nábytkem a zdí?
Pokud se nejedná o vestavný
model, praèka se suièkou bìhem
dímání osciluje a potøebuje kolem
sebe trochu místa. Proto kolem
ní ponechejte nìkolik centimetrù
prostoru.
Z praèky vytéká voda.
Je kovový krouek pøívodní
hadice správnì upevnìn?
Uzavøete vodovodní kohoutek,
odpojte praèka se suièkou od sítì
a zkuste jej utáhnout, nikoli vak
nadmìrnou silou.
Není ucpaný zásobník na prací
prostøedky? Zkuste jej vyjmout
a umýt pod tekoucí vodou.
Je výpustní hadice dobøe
pøipojena? Uzavøete vodovodní
kohoutek, odpojte praèka se
suièkou od sítì a zkuste ji
utáhnout.
Praèka se suièkou
nesuí.
Zkontrolujte, zda:
Vidlice síového pøívodu byla
správnì zasunuta do zásuvky, v
domácím el. rozvodu je elektøina,
dvíøka zaøízení byla správnì
zavøena, nebyl zvolen odloený
start (pokud je tato funkce k
dispozici), knoflík programù A byl
nastaven do polohy
(stop/reset),
knoflík cyklu suení C byl
nastaven do polohy 0.
Praèka se suièkou
nesuí správnì.
Controlla che:
Konec výpustní hadice není pod
vodou, èerpadlo není ucpáno, zda
byla dodrena maximální náplò,
vodovodní kohoutek je otevøený.
Pokud vak i nadále praèka se
suièkou nepracuje správnì a
problém pøetrvává, obrate se na
autorizované servisní støedisko,
pøièem udejte následující
informace:
- typ závady
- typové oznaèemí (Mod. .....)
a výrobní èíslo (S/N .........)
Tyto údaje naleznete na typovém
títku umístìném na zadní stìnì
praèky.
61
Návod k instalaci a pouití

V pøípadì potøeby zkontrolujte èerpadlo a gumovou hadici
Praèka se suièkou je vybavena samoèistícím èerpadlem, proto není nutné provádìt èitìní a údrbu. Nicménì nìkteré malé
pøedmìty, jako napø. mince, knoflíky apod., mohou nìkdy zapadnout do èerpadla. Aby tím nedolo k pokození èerpadla, je
èerpadlo vybaveno záchytnou komorou, její prostor je dostupný pøes pøední èást èerpadla.
Abyste se dostali k této komoøe, jednodue sejmìte krycí panel na spodní
èásti praèky pomocí roubováku (obrázek 1). Pak vyjmìte víèko otáèením
proti smìru hodinových ruèièek (obrázek 2) a peèlivì prohlédnìte obsah
vnitøku.
Hadice
Hadici nejménì jednou roènì zkontrolujte. Jakmile zjistíte jakékoli známky
jejího pokození, je tøeba ji okamitì vymìnit. Pøístroj je bìhem provozu
Obr. 1
Dùleité: pøed sejmutím víèka zkontrolujte, e prací cyklus skonèil a odpojte praèka se suièkou od sítì. Je normální, e pøi snímání víèka vyteèe
malé mnoství vody. Kdy znovu nasazujete krycí panel, ujistìte se, e západky umístìné na spodku jsou správnì vloeny do záøezù pøed tím, ne
zamáèknete panel na své místo na pøístroji.
vystaven silnému tlaku vody a naruená hadice by mohla náhle zcela
prasknout.
Obr. 2
Technické údaje
Model
Rozmìry
Kapacita
Elektrické pøipojení
Pøipojení na pøívod
vody
Rychlost dímání
Programy jsou
kompatibilní s
pøedpisem IEC 456
WD 104 T
íøka 59,5 cm
výka 85 cm
hloubka 53,5 cm
od 1 do 5,5 kg pro program praní; od 1 do 4 kg pro program suení
napìtí 220/230 V, 50 Hz
maximální pøíkon 1850 W
maximální tlak 1 MPa (10 bar)
maximální tlak 0,05 MPa (0,5 bar)
kapacita bubnu 46 litrù
a 1000 ot./ min
praní: provádìno pøi náplni 5 kg;
suení: probíhá snáplní 2,5 kg a knoflík C je nastaven do polohy .
Tento spotøebiè splòuje poadavky následujících pøedpisù Evropského spoleèenství:
- 73/23 EEC z 19/02/73 (Low Voltage - bezpeènostní pøedpisy) a následné zmìny
- 89/336 EEC z 03/05/89 (Electromagnetic Compatibility - odruení a
elektromagnetická kompatibilita) a následné zmìny
Návod k instalaci a pouití
62

Instalace a transport
Kdy pøichází nová
praèka se suièkou
A u jste praèka se suièkou právì zakoupili, nebo se
jen stìhujete do nového bytu, má instalace zásadní
dùleitost pro správnou funkci praèky.
Po vybalení se ujistìte, zda je praèka
se suièkou v poøádku. V pøípadì
pochybností praèka se suièkou
nepoutìte a obrate se na odborný
servis. Vnitøek praèky je z
pøepravních dùvodù zajitìn na
zadní stranì 4 rouby.
Pøed uvedením praèky do provozu
rouby demontujte, vyjmìte gumu
pomocí speciální rozpìrky (drí
vechny díly) a otvory zaslepte
pøiloenými plastovými krytkami.
Dùleitá informace: uzavøít 3
otvory, nacházející se vzadu, v pravé
spodní èásti praèky, ve kterých byla
zasunuta koncovka, pomocí zátky
(souèást pøísluenství).
Vyrovnání do vodorovné
polohy
Praèka se suièkou musí být
perfektnì vyrovnaná do vodorovné
polohy, aby byla zajitìna její správná
funkce. K vyrovnání pøístroje je
tøeba nastavit pøední noièky. Úhel
náklonu pracovního povrchu nesmí
pøekraèovat 2 stupnì. Je-li pøístroj
instalován na podlaze s kobercem,
zkontrolujte, zda je mezi podlahou
a spodkem praèky dostateèný
prostor pro zajitìní ventilace.
Nevyhazujte zajiovací
rouby a rozpìrky. V
pøípadì stìhování je
mùete pouít k
opìtovnému zablokování
komponentù uvnitø praèky
a chránit tak praèku
bìhem transportu.
Pøední noky lze nastavovat.
Pøipojení na vodovodní
sí
Zkontrolujte, zda tlak vody odpovídá
hodnotám uvedeným na typovém
títku, který je umístìn na zadní
èásti praèky. Pøívodní hadici
pøipojte na kohoutek se studenou
vodou pomocí trubkového závitu
3/4". Nezapomeòte vloit mezi
upevòovací matici a kohoutek
gumové tìsnìní.
A
Gumové tìsnìní.
Je-li vodovodní pøípojka nová nebo
nebyla-li dlouhou dobu pouívána,
pak jetì pøed pøipojením praèky
otevøete kohoutek a nechejte odtéci
kalnou vodu s neèistotami. Pøipojte
druhý konec hadice k pøístroji na
pøípojku v pravé horní èásti praèky.
Pøípojka vody v pravé horní èásti.
Pøipojení výpustní hadice
Na zadní èásti praèky jsou umístìny
dva dráky (vpravo nebo vlevo), na
které se má výpustní hadice upevnit.
Vyústìní výpustní hadice pøipojte k
odpadovému potrubí nebo je
umístìte do výlevky nebo vany,
pøièem se ujistìte e hadice není
zkroucená nebo pøíli ohnutá.
Konec hadice musí být umístìn ve
výi nejménì 60 - 100 cm nad
podlahou. Pokud je nezbytné upevnit
konec hadice ve výce mení ne 60
cm nad podlahou, musí být hadice
uchycena v dráku v horní èásti
zadního panelu pøístroje.
Drák pouitý v pøípadì, e výka
vyústìní výpustní hadice je nií ne
60 cm.
Pokud vede hadice do vany nebo
døezu, nainstalujte speciální
umìlohmotný drák a doporuèujeme
pøipevnit jej k vodovodnímu
kohoutku.
Drák pro vypoutìní do vany nebo
umyvadla.
Pamatujte na to, e konec hadice
nesmí být umístìn pod vodní
hladinou.
Nepouívejte ádné nastavovací
hadice. Pokud je absolutnì nezbytné
je pouít, pamatujte na to, e
prodluovací hadice nesmí být delí
ne 150 cm a musí mít stejný
prùmìr, jako originální hadice.
Jestlie pouíváte nástìnné vyústìní
odpadu, nechejte provìøit
odborníkem, zda je odpad
dostateèný. Jestlie je Vá byt v
posledním patøe budovy, mùe se
objevit sifonový efekt (nasávání). V
tomto pøípadì bude Vae praèka se
suièkou prùbìnì napoutìt i
vypoutìt vodu.
Tento problém je mono øeit
speciálním ventilem pro sifonový
efekt, který je dostupný na trhu, a je
tøeba jej v tomto pøípadì pøipevnit
na odpadní hadici.
Elekt
rické pøipojení
Pøed pøipojením zaøízení k síti
zkontrolujte následující:
1) zda je síová pøípojka a zásuvka
dimenzována na proud, který je
uveden na typovém títku. Navíc
zásuvka a její zapojení musí
odpovídat pøísluným normám
ÈSN.
2) zda napìtí a kmitoèet sítì odpo-
vídají hodnotám, uvedeným na
typovém títku.
3) zásuvka musí být vhodná pro
pøipojení vidlice tohoto pøístroje. V
pøípadì, e neodpovídá, nechte
zásuvku nebo vidlici vymìnit
odborným elektrikáøem, ale nikdy
nepouívejte adaptéry ani
rozdvojky. Síový pøívod zasuòte
do zásuvky s øádnì uzemnìným
ochranným kolíkem (jedná se o
bezpeènostní opatøení, které
pøedepisuje norma).
4) domovní rozvod el. sítì musí být
uzemnìný, nebo mít ochranu
nulováním, v souladu s pøíslunými
pøedpisy. V pøípadì, e Vá domovní
rozvod plnì neodpovídá normám a
pøedpisùm pro instalaci
automatické praèky, výrobce
nenese ádnou odpovìdnost za
pøípadné kody.
Výstraha!!
Výrobce nenese ádnou
odpovìdnost za kody, pokud
nejsou respektovány tyto
materiály nejsou hraèkou pro
dìti a mohou být pro dìti
pokyny.
Igelitové sáèky,
polystyrénové výplnì,
høebíky a jiné obalové
nebezpeèné.
63
Návod k instalaci a pouití

Pro vai bezpeènost a bezpeènost
Praèka se suièkou odpovídá nejpøísnìjím mezinárodním
bezpeènostním normám a pøedpisùm. Jste tak chránìni Vy
vaich dìtí
i celá Vae rodina.
Pøeètìte si prosím vechny
pokyny uvedené v tomto návodu
peèlivì, protoe obsahují velmi
dùleité informace o
bezpeènosti pøi instalaci,
obsluze i údrbì praèky.
1. Praèka se suièkou nesmí
být v ádném pøípadì
instalována ve venkovním
prostøedí, a to ani pod
støíkou, protoe mùe být
velmi nebezpeèné ponechat ji
vystavenou deti a jiným
povìtrnostním vlivùm.
2. Tuto praèka se suièkou smí
obsluhovat pouze dospìlá
osoba.
Praèka se suièkou
urèena pouze k praní prádla, a
to v souladu s tímto návodem
k pouití.
je
3. Pokud chcete praèka se
suièkou pøemístit, poádejte
o pomoc dva nebo tøi lidi.
Nikdy to nezkouejte sám,
protoe praèka se suièkou
je velmi tìká.
4. Ne budete vkládat nové prádlo,
zkontrolujte, zda je buben
prázdný.
5. Z bezpeènostních dùvodù se
nikdy nedotýkejte praèky,
jste-li naboso nebo máte
mokré ruce nebo nohy.
6. Nikdy nepouívejte
prodluovací kabely a
rozdvojky, které jsou zvlátì
nebezpeèné ve vlhkém
prostøedí. Síový pøívod nesmí
nikdy být nadmìrnì ohnutý
nebo nebezpeènì pøiskøípnutý.
7. Nikdy neotvírejte zásobník
na prací prostøedky, zatímco
je
praèka se suièkou
provozu. Nepouívejte
prostøedky pro praní v ruce,
protoe by se pøi nadmìrné
tvorbì pìny mohly pokodit
vnitøní díly pøístroje.
8. Nikdy netahejte za samotný
kabel nebo dokonce za praèka
se suièkou, chcete-li odpojit
síový pøívod ze zásuvky na zdi:
je to velmi nebezpeèné.
9. Je-li zaøízení v provozu,
nedotýkejte se vytékající
vody, jeliko mùe být velmi
horká. Dvíøka praèky se v
prùbìhu praní také
zahøívají, proto pøed nimi
chraòte malé dìti. Nikdy
v
neotvírejte dvíøka praèky
násilím, nebo by mohlo dojít
k pokození mechanismu
blokování dvíøek, který
zabraòuje jejich náhodnému
otevøení.
10. V pøípadì poruchy nejprve
uzavøete pøívod vody a
odpojte zaøízení od
elektrické zásuvky. Praèka se
suièkou nikdy nerozebírejte,
nedotýkejte se vnitøních dílù a
nesnate se je opravovat.
S ádostí o opravu se
vdy obracejte na
autorizovaný odborný
servis a vyadujte
pouití originálních
náhradních dílù.
Výmìna síového pøívodu
Síový pøívod pro praèka se
suièkou je speciální a lze jej
zakoupit pouze v
autorizovaných servisních
støediscích.
I
Obr. 3
Pøi výmìnì postupujte dle níe
uvedených pokynù:
1. Ujistìte se, e jste praèka se
suièkou vypnuli a odpojili ze sítì.
2. Odroubujte dva rouby I a
sejmìte kryt jeho vytaením
smìrem k sobì (obr. 3).
3. Odpojte malé kabely z
odruovacího èlenu F (obr. 4),
pøièem si zapamatujte jejich
N
F
L
Obr. 4
umístìní (modrý = N kabel,
hnìdý = L kabel), pøièem nechejte
na konec zemnící kabel
Pozn.: Písmena L, N a symbol
jsou uvedena na odruovacím
èlenu.
4. Posuòte horní èást síového pøívodu
mírnì pryè od zadního panelu,
zatáhnìte za síový pøívod smìrem
nahoru a vytáhnìte jej (obr. 5).
.
Obr. 5
Pøi pøipojování nového síového
pøívodu postupujte obrácenì.
Pøi opìtovném nasazování krytu
nasaïte kryt na
(obr. 6) a nechejte jej sklouznout
smìrem vpøed, a se háèky na jeho
pøední èásti zasunou do pøísluných
oèek na kontrolním panelu, pak pevnì
dotáhnìte rouby na zadní èásti.
praèka se suièkou
Obr. 6
Návod k instalaci a pouití
64

Zapnutie práèky so suièkou
Bezprostredne po intalácii práèka so suièkou vykonajte
jeden prací cyklus spouitím programu 1 pri 90 °C.
Správne uvedenie práèka so
suièkou do èinnosti je ve¾mi
dôleité ato z h¾adiska
zabezpeèenia kvality prania a
tiez vyhnutia sa problémom
týkajúcich sa predåenia
ivotnosti samotnej práèka so
suièkou. Po vloení bielizne,
naplnení dávkovaèa pracími
prostriedkami aprípadnými
prídavnými prostriedkami, vzdy
skontrolujte èi:
1. Dvierka sú správne zatvorené.
2. Zástrèka sieového prívodu je
v zásuvke.
3. Vodovodný kohútik je
otvorený.
4. Sa gombík A nachádza v polohe
odpovedajúcej niektorému zo
symbolov
(Stop/Reset).
Vo¾ba programu
Vo¾ba pracieho programu
prebieha na základe druhu
bielizne urèenej na pranie
astupòa jej zneèistenia. Pri
vo¾be programu si preèítajte
tabu¾ku na strane 67. Otáèaj
gombíkom Aa do bodu,
vktorom sa ukazovate¾
situovaný vo vrchnej èasti
gombíka zhoduje so zvoleným
programom. Prostredníctvom
gombíka B nastav teplotu a
skontroluj, èi sa gombík C
nachádza vsprávnej polohe. Ak
je to potrebné, poui tlaèidlá E,
F a G ana záver stlaè tlaèidlo
zapnutie/vypnutie H (pozícia I).
Pamätaj, e ak chce poui
oneskorený tart, musí ho
nastavi ete pred zahájením
pracieho cyklu.
Po ukonèení prania...
Kontrolka I bude nieko¾ko
minút rýchlo blika, apotom
zaène blika pomalie.
Potom práèku vypnite
stlaèením tlaèidla zapnutievypnutie H (pozícia O). Teraz
u koneène môzete otvori
dvierka práèka so suièkou. Po
vybratí práve vypraného prádla
nechajte dvierka otvorené alebo
aspoò pootvorené, aby mohlo
dôjs kodpareniu prebytoènej
vlhkosti.
Vdy zavrite vodovodný
kohútik.
Pamätajte e vprípade
preruenia dodávky
elektrickej energie alebo po
vypnutí aopätovnom zapnutí
práèka so suièkou, zvolený
prací program bude
pokraèova v tom bode
vktorom dolo kjeho
prerueniu.
Zoznámenie sa sovládacím panelom
Správny výber je dôleitý. A jednoduchý.
Voliè programov
aoneskoreného tartu
Slúi na vo¾bu pracieho programu.
Týmto volièom otáèajte výhradne
vsmere hodinových ruèièiek.
Pri vo¾be programov sa musí
ukazovate¾ umiestnený vo vrchnej
èasti gombíka zhodova so
symbolom/èíslom odpovedajúcim
zvolenému programu.
Na záver stlaè tlaèidlo zapnutie/
vypnutie H (pozícia I) a kontrolka
I zaène blika. Po uplynutí 5
sekúnd dôjde kakceptovaniu
vykonanej vo¾by, kontrolka I prestane blika (ostane zasvietená)
azaène sa prací cyklus.
Ak chce prerui aktuálny prací
program alebo chce nastavi
nový, zvo¾ jeden zo symbolov
(Stop/Reset) avyèkaj 5 sekúnd:
po akceptovaní povelu
vynulovania, kontrolka I bliká,
ateraz u môe práèku vypnú .
Prostredníctvom tohto gombíka
môe nastavi oneskorený tart
prania.
Zvo¾ jednu zo tyroch polôh
odpovedajúcich rôznym
hodnotám oneskoreného tartu,
stlaè tlaèidlo zapnutie/vypnutie H
(pozícia I) avyèkaj 5 sekúnd.
Následne dôjde kakceptovaniu
vykonanej vo¾by (kontrolka I
ostane zasvietená) amôe
pristúpi knastaveniu zvoleného
pracieho programu.
Kontrolka I signalizuje
akceptovanie nastavenia
oneskoreného tart osobitným
blikaním (2 sekundy zasvietená
a4 sekundy zhasnutá).
Poèas tejto fázy je moné otvori
dvierka ameni náplò prádla v
práèke.
Po nastavení pracieho cyklu apo
jeho následnom akceptovaní
práèkou, otáèanie gombíkom
nebude ma na èinnos práèka so
suièkou iadny vplyv (s
výnimkou polohy
Voliè teploty
Slúi na nastavenie doporuèenej
teploty prania, uvedenej vtabu¾ke
programov (viï str.67). Navye
Ti, vprípade potreby, umoní
zníi doporuèenú teplotu pri
zvolenom pracom programe, a
na hodnotu odpovedajúcu praniu
vstudenej vode (
Voliè suenia
Tento voliè slúi na vo¾bu
druhu suenia. K dispozícii sú
dve monosti:
D
Stop/Reset).
).
GE
F
I
H
A - Na základe zadaného
èasového intervalu:
Od 40 do 150 minút.
B - Na základe stupòa vlhkosti
sueného prádla:
ehlenie
jednoducho ehlite¾né.
Skriòa
urèené na odloenie do skrine.
Zvlá suché
suché prádlo, pouíva sa pre
froté uteráky a upany.
Po ukonèení suenia bude
vykonané ochladenie prádla.
Dávkovaè pracích
prostriedkov
Je rozdelený na tri priehradky:
1. Prací prostriedok na
predpieranie;
2. Prací prostriedok na pranie;
3. Avivá.
:vlhké prádlo,
: suché prádlo,
: zvlá
L
C
B
A
3
2
1
U¾ahèenie ehlenia
Výsledkom pouitia tejto funkcie
je menej pokrèené prádlo, ktoré
sa ¾ahie ehlí.
Môe ju poui pri programoch
3-4 (Bavlna), 5-6 (Syntetika) e
9 (Jemná bielizeò).
Po stlaèení tohto tlaèidla poèas
programov 5-6-9 sa prací cyklus
zastaví na symbole
dokonèi opätovným stlaèením
tlaèidla E.
, amôe ho
65
Rady na lepie pranie

M
Poznámka: Ak chce voli aj
suenie prádla, pamätaj, e toto
tlaèidlo je aktívne len vspojení
súrovòou
(ehlenie).
Regulácia mýkania
Toto tlacidlo slúi na zníenie
rýchlosti mýkania z 1000 na
500 otácok za minútu pocas
programov na pranie textílií z
bavlny a z 850 na 500 otácok za
minútu pocas programov na
pranie syntetických textílií.
Tajomstvo dávkovaèa pracích prostriedkov
Prvé tajomstvo je najjednoduchie: dávkovaè pracích
prostriedkov sa otvára jeho otoèením smerom von.
Pri dávkovaní pracích
aprípadných prídavných
prostriedkov sa musí riadi
pokynmi výrobcov: zvyèajne
nájde vetky potrebné
informácie na obale. Dávkovanie
záleí na druhu bielizne, tvrdosti
vody astupni zneèistenia.
S pribúdajúcimi skúsenosami
sa nauèí dávkova prací
prostriedok takmer
automaticky: stane sa to tvojím
tajomstvom.
Pri nalievaní aviváe do
priehradky 3 dávaj pozor, aby sa
nevyliala von z mrieky.
Práèka so suièkou je schopná
automaticky odobera potrebné
mnostvo aviváe pri kadom
pracom cykle.
Tekutý prací prostriedok sa
nalieva do priehradky 2
bezprostredne pred zapnutím
zariadenia.
Rýchle pranie
Toto tlaèidlo skrátenie pracieho
programu zhruba o 30%. Nesmie
by pouité pri peciálnych
programoch (viï str. 67) apri
vlne a hodvábe.
Zapnutie-vypnutie
Stlaèením tlaèidla H dôjde
kzapnutiu práèka so suièkou.
Keï nie je stlaèené, práèka so
suièkou je vypnutá.
Vypnutie zariadenia nemá za
následok vynulovanie
zvoleného programu.
Pamätaj, e tekutý prací
prostriedok je zvlá vhodný na
pranie pri teplotách do 60
stupòov apri pracích
programoch bez predpierania.
V predaji sú tekuté alebo
prákové pracie prostriedky so
peciálnymi nádobkamidávkovaèmi, ktoré sa vkladajú
priamo do bubna, pod¾a pokynov
uvedených na obale.
Pri praní vpráèke nikdy
nepouívaj pracie prostriedky
urèené na ruèné pranie, pretoe
ich pouitie je sprevádzané
tvorbou nadmerného mnostva
peny, potenciálne nebezpeènej
pre práèku.
Výnimku tvoria pecifické
pracie prostriedky urèené na
ruèné pranie ina pranie v práèke.
Posledné tajomstvo: pri praní
vstudenej vode zní mnostvo
pracieho prostriedku: vstudenej
vode sa toti rozpúa horie ako
vteplej apreto by jeho èas bola
pouzitá zbytoène.
Kontrolka zapnuté vypnuté / zablokované
dvierka
Kontrolka I bliká pomaly vtedy,
keï je zariadenie zapnuté aèaká
na zadanie programu, alebo po
ukonèení pracieho programu
aodblokovaní dverí. Rýchlo
bliká vtedy, keï nie je moné
otvori dvierka. Keï je
zasvietená, poukazuje na
akceptovanie nastaveného
pracieho programu.
3
2
1
Kontrolka suenia
Zasvietená kontrolka signalizuje,
e voliè C sa nachádza vjednej
zpolôh odpovedajúcich sueniu.
Práèka so suièkou po ukonèení
pracieho programu zaháji suenie.
Do priehradky 1:
Prací prostriedok na predpieranie
(prákový)
Do priehradky 2:
Prací prostriedok na pranie (prákový
alebo tekutý)
Do priehradky 3:
Prídavné látky (avivá, parfumy, atï.)
Dávkovaè pracích prostriedkov je
moné vytiahnu ato tak, e sa
naddvihne apotiahne smerom von,
ako je naznaèené na obrázku.
Umýva sa pod teèúcou vodou.
Rady na lepie pranie
66

Programy pre vetky roèné obdobia
Druh tkaniny a stupeò zneèistenia Voliè
BAVLNA
Ve¾mi zneèistené biele prádlo
(plachty, obrusy, atï.)
Ve¾mi zneèistené biele prádlo
(plachty, obrusy, atï.)
Znaène zapinené biele a farebné prádlo z odolných
tkanín
Málo zapinené biele prádlo a farebná jemná
bielizeò (koele, trièká, atï.)
Plákanie
Zmýkanie Závereèné vypútanie a zmýkanie
Suenie prádla z bavlny
Stop/Reset Preruí/Vynuluje zvolený prací program
SYNTETIKA
Ve¾mi zapinené prádlo zo syntetických tkanín s
odolnými farbami (bielizeò pre novorodencov, atï.)
Prádlo zo syntetických tkanín s málo odolnými
farbami (málo zneèistená bielizeò vetkého druhu)
Prádlo zo syntetických tkanín s málo odolnými
farbami (málo zneèistená bielizeò vetkého druhu)
Plákanie
Aviváz
Zmýkanie Vypútanie a jemné zmýkanie
Suenie prádla zo syntetických tkanín
Stop/Reset Preruí/Vynuluje zvolený prací program
JEMNÁ BIELIZEÑ
Ruèné pranie
Zvláz jemná bielizeò
(záclony, hodváb, viskóza, atï.)
Plákanie
Zmýkanie Vypútanie a jemné zmýkanie
Vypútanie Vypútanie
Suenie vlneného prádla
Stop/Reset Preruí/Vynuluje zvolený prací program
ONESKORENÝ TART
12 - 9 - 3 Odlozí zaèiatok prania o 12 - 9 - 3 hodín
Stop/Reset Preruí/Vynuluje zvolený prací program
programov
Voliè
teploty
1 90°C
2 90° C
3 60° C
4 40°C
5 60° C
6 40°C
7 30° C
8 40°C
9 30° C
Prací
prostriedok
◆◆
◆◆
◆◆
◆◆
◆◆
◆◆
◆◆
◆◆
◆◆
Aviváz Doba trvania
pracieho cyklu
(v minútach)
165
145
130
95
◆
100
70
30
◆
◆
45
50
◆
Popis pracieho cyklu
Predpieranie, pranie pri 90
závereèné zmýkanie
Pranie pri 90
zmýkanie
Pranie pri 60°, plákanie, priebezné a závereèné
zmýkanie
Pranie pri 40°, plákanie, priebezné a závereèné
zmýkanie
Plákanie, priebezné a závereèné zmýkanie
Pranie pri 60°, plákanie, zabránenie krèeniu alebo
jemné zmýkanie
Pranie pri 40°, plákanie, zabránenie krèeniu alebo
jemné zmýkanie
Pranie pri 30°, plákanie a jemné zmýkanie
Plákanie, zabránenie krèeniu alebo jemné zmýkanie
Plákanie s odoberaním aviváze, zabránenie krèeniu
alebo jemné zmýkanie
Pranie pri 40°, plákanie a jemné zmýkanie
Pranie pri 30°, plákanie, zabránenie krèeniu
Plákanie, zabránenie krèeniu alebo vypútanie
°,
plákanie, priebezné a závereèné
°,
plákanie, priebezné a
Dôleitá informácia: ak chce vynulova práve nastavený prací program, zvo¾ jeden zo symbolov
(Stop/Reset) avyèkaj aspoò 5 sekúnd.
Údaje uvedené vtabu¾ke sú len informaèného charakteru, môu sa líi vzávislosti od mnozstva a druhu bielizne, od teploty vody vo vodovodnom
rozvode a od teploty ovzduia.
peciálne programy
Kadodenné pranie. Tvoja práèka so suièkou má kdispozícii tie peciálny program na pranie málo zneèistenej bielizne vkrátkom èase. Nastavením
pracieho programu 7 pri teplote 30°C je moné pra spolu bielizeò zrôznorodých tkanín (s výnimkou vlny a hodvábu), smaximálnou náplòou 3 kg. Tento
program umoòuje uetri èas aenergiu, pretoe trvá len pribline 30 minút. ODPORÚÈAME POUÍVA TEKUTÝ PRACÍ PROSTRIEDOK.
67
Rady na lepie pranie

Ako sui
M
Pranie a sušenie
Pozri sa do ved¾ajej tabu¾ky
A, vktorej sú uvedené
doporuèené hodnoty náplne
MAX pri automatickom praní
a suení.
Sleduj uvedený postup pre
samotné pranie (viï str. 65,
odstavec Zapnutie práèky so
suièkou ) apoui voliè C na
vo¾bu druhu suenia aana záver
stlaè tlaèidlo H (poloha I).
Ak sa vo výnimoèných
prípadoch stane, e náplò práèka
so suièkou prádlom urèeným
na pranie asuenie je vyí ne
maximálna prípustná hodnota
(viï tabu¾ka A), je potrebné
riadi sa pokynmi pre samotné
pranie (viï str. 65, odstavec
Zapnutie práèky so suièkou ).
Po ukonèení pracieho cyklu
avybratí prádla, rozde¾ náplò
práèka so suièkou a jednu èas
vlo naspä do bubnu. V tomto
prípade je potrebné riadi sa
pokynmi pre samotné suenie.
Zopakuj rovnaký postup ipri
suení zvyného prádla.
Samotné suenie
Po naplnení práèka so suièkou
prádlom urèeným na suenie
(max. 4 Kg) skontroluj:
- èi sú dvierka správne
zatvorené;
- èi je zástrèka sieového
prívodu v zásuvke;
- èi je vodovodný kohútik
otvorený;
- èi tlaèidlo H nie je stlaèené
(poloha O).
A teraz u môe pristúpi
kvo¾be programu
Otoè voliè Ado jednej zpolôh
, odpovedajúcich zvolenému
druhu suenia, na základe druhu
tkaniny, zvo¾ poadovaný druh
suenia prostredníctvom volièa
C ana záver stlaè tlaèidlo
zapnutie-vypnutie H (poloha I).
Po ukonèení suenia...
Vyèkaj kým kontrolka I bude
pomaly blika, potom vypni
práèku so suièkou stlaèením
tlaèidla zapnutie-vypnutie H
(poloha O) ana záver otvor
dvierka. Po vybratí prádla nechaj
dvierka otvorené alebo
polootvorené, aby nedochádzalo
ktvorbe nepríjemného pachu
azavri prívod vody.
A.
Druh
tkaniny
Bavlna,
Lan
Bavlna Froté
Terital,
Bavlna
Akryl Pyzamá,
Nylon Spodnicky,
Údaje uvedené vtabu¾ke majú len informaèný charakter.
Pri náplni Práèka so suièkou prádlom zbavlny, menej ne
1 Kg, poui program suenia urèený pre prádlo zo
syntetických tkanín.
Druh
náplne
Prádlo
rôznych
rozmerov
uteráky
Prestieradlá,
koele
ponozky,
atd.
è
è
pancuchy,
atd.
Max.
nápln
(kg) Zvlát
suché
4150145140
4150145140
2,5 100 90 85
1656060
1656060
Doba suenia
ò
Skrina Zehlenie
SUENIE VLNY
Suenie prádla zvlny musí by uskutoènené výhradne
vo¾bou doby suenia (150-100-60-40 minút). Pri hmotnosti
prádla 1 Kg je doporuèená doba suenia 60 minút.
Ak dôjde kchybnej vo¾be jedného ztroch druhov suenia
(Zvlá suché
vykoná suenie rovnajúce sa MAX. zadanej dobe (150 minút).
, Skriòa , ehlenie ) zariadenie
DÔLEITÁ INFORMÁCIA
Ak si zvolil jeden zprogramov na pranie bavlny, aniektorý
druh suenia (Zvlá suché
poèas suenia bude prádlo vymýkané.
, Skriòa , ehlenie )
UPOZORNENIE
- Dvierka sa poèas suenia zohrievajú.
- Vsuièke nesu prádlo umývané vzápalných rozpúadlách
(napr. trichlóretylén).
- Vsuièke nesu materiály typu molitan alebo podobné.
- Ubezpeè sa, e poèas suenia bude prívod vody otvorený.
- Táto práèka so suièkou môe by pouitá iba na suenie
prádla praného vo vode.
Rady na lepie pranie
68

Problémy aich rieenia
Môe sa sta, e práèka so suièkou nefunguje. Vmnohých prípadoch sa jedná
oproblémy, ktoré je moné ¾ahko vyriei bez potreby vola servisného technika.
Skôr ako sa rozhodne ho zavola, skontroluj nasledujúce body.
Práèka so suièkou
sa nedá spusti.
Je zástrèka dobre zastrèená
v zásuvke? Mohlo dôjs kjej
pohnutiu pri upratovaní.
Nedolo kvýpadku prúdu v
dome?
Mohlo dôjs kzásahu istièa,
mono následkom pouívania
príli ve¾kého mnostva
elektrických spotrebièov
súèasne. Alebo dolo
kprerueniu dodávky prúdu
vcelej zóne.
Sú dvierka dobre
zatvorené?
Z bezpeènostných dôvodov
práèka so suièkou nefunguje,
ak sú dvierka otvorené alebo zle
zatvorené.
Je tlaèidlo Zapnutie/
Vypnutie stlaèené?
Ak áno, bol nastavený
oneskorený tart.
Voliè programov
aoneskoreného tartu,
umodelov, ktorých je
súèasou, sa nachádza
vsprávnej polohe?
SPRÁVNE NESPRÁVNE
Zatvori vodovodný
kohútik po kadom
praní.
Obmedzuje
opotrebovanie
vodovodného rozvodu
práèka so suièkou
azabraòuje
nebezpeèenstvu
úniku vody, vèase,
keï nikto nie je v
dome.
Necha stále
pootvorené dvierka.
Takto sa zabraòuje
tvorbe nepríjemného
zápachu.
Z¾ahka oèisti vonkají
povrch.
Pri èistení
vonkajieho povrchu
agumených súèastí
práèka so suièkou,
pouívaj handru
namoèenú vo vlanej
vode so saponátom.
Je prívod vody otvorený?
Z bezpeènostných dôvodov je
zabránený tart pracieho cyklu, ak
práèka so suièkou neèerpá vodu.
Práèka so suièkou
neèerpá vodu.
Je hadica dobre pripojená
kvodovodnému kohútiku?
Nechýba voda? Mohla by by
odstavená zdôvodov prác na
vodovodnom rozvode vo vaej
bytovke alebo ulici.
Je dostatoèný tlak vody? Mohlo
by sa jedna oporuchu autoklávu.
Je filter na vodovodnom
kohútiku èistý? Ak je voda
voblasti ve¾mi tvrdá, alebo ak boli
vposlednej dobe vykonané práce
na vodovodnom rozvode, filter na
vodovodnom kohútiku by mohol
by upchatý fragmentmi a
úlomkami.
Nie je gumová hadica ohnutá?
Gumová hadica privádzajúca vodu
práèka so suièkou musí by
do
èo najviac vyrovnaná. Skontroluj,
èi nie je stlaèená alebo ohnutá.
Necha zástrèku vzásuvke
pri èistení práèka so
suièkou. Aj poèas
operácií údrby, je vdy
potrebné vytiahnu
zástrèku zo zásuvky.
Pouíva rozpúadlá
aagresívne brúsne
prostriedky. Nikdy
nepouívaj pri èistení
vonkajieho povrchu
práèky asúèastí zgumy
rozpúadlá alebo brúsne
prostriedky.
Nevenova pozornos
dávkovaèu pracích
prostriedkov. Dá sa
vytiahnu ana jeho
vyèistenie staèí podra ho
chví¾u pod teèúcou vodou.
Ís na dovolenku
anespomenú si na òu.
Pred odchodom na dovolenku
vdy skontroluj, èi je zástrèka
vytiahnutá zo zásuvky aèi je
zatvorený vodovodný kohútik.
Voliè programov sa
neustále otáèa?
Vyèkaj nieko¾ko minút, a kým
vypúacie èerpadlo
nevyprázdni bubon, vypni práèku,
zvo¾ jeden zo symbolov
Reset, aopä ju zapni. Ak sa voliè
programov inaïalej otáèa,
zavolaj servisnú slubu, pretoe
sa jedná osignalizáciu poruchy.
Stop/
Práèka so suièkou
nepretrite napúa
avypúa vodu.
Nie je hadica umiestnená príli
nízko? Mala by sa nachádza vo
výke od 60 do 100 cm.
Nie je koncovka hadice
ponorená vo vode?
Je odpadové potrubie v stene
vybavené odvzduòovacím
otvorom? Ak po týchto kontrolách
nedôjde kodstráneniu problému,
zatvor vodovodný kohútik, vypni
práèku azavolaj servisnú slubu.
Ak býva na jednom zvyie
poloených poschodí, mohli by sa
vyskytnú problémy so sifónovým
efektom.
Na ich odstránenie je potrebné
naintalova prísluný ventil.
Práèka so suièkou
nevypúa alebo nemýka.
Je súèasou zvoleného
programu vypúanie vody? U
niektorých programov je potrebné
aktivova vypúanie ruène.
Je funkcia U¾ahèenie
ehlenia umodelov, ktorých
je súèasou - zapnutá? Pouitie
tejto funkcie vyaduje ruèné
zapnutie vypúania.
Nie je upchaté výstupné
èerpadlo? Pred zahájením jeho
kontroly zatvor vodovodný kohútik,
vytiahni zástrèku zo zásuvky
apotom postupuj pod¾a pokynov
uvedených na strane 70 alebo
zavolaj servisnú slubu.
Nie je odpadová hadica ohnutá?
Gumová hadica odvádzajúca vodu
z
práèka so suièkou musí by èo
najviac vyrovnaná. Skontroluj, èi nie
je stlaèená alebo ohnutá.
Nie je odpadové potrubie
upchaté? Nie je pouitý nadstavec
na hadici nevhodný anezabraòuje
priechodu vody?
Práèka so suièkou vo fáze
mýkania ve¾mi vibruje.
Bola práèka so suièkou
správne uvedená do vodorovnej
polohy? Uvedenie zariadenia do
vodorovnej polohy je treba
kontrolova pravidelne. Èasom by
sa mohla
nepatrne posunú. Vyrovnanie do
vodorovnej polohy sa vykonáva
zmenou výky noièieks pomocou
vodováhy.
Nie je práèka so suièkou
uzavretá medzi nábytok a stenu?
Ak sa nejedná omodel urèený na
zabudovanie, poèas mýkania
práèka so suièkou potrebuje
trochu vibrova. Preto je vhodné,
aby okolo nej zostalo nieko¾ko cm
vo¾ného priestoru.
Z práèka so suièkou uniká
voda.
Je objímka na prívodnej
hadici správne dotiahnutá?
Zatvor vodovodný kohútik, vytiahni
zástrèku zo zásuvky a skús ju
silnejie dotiahnu.
Nie je dávkovaè pracích
prostriedkov upchatý? Skús ho
vytiahnu aumy pod teèúcou
vodou.
Je odpadová hadica správne
pripevnená? Zavri vodovodný
kohútik, vytiahni zástrèku zo
zásuvky askús ju lepie pripevni.
Suièka nesuí.
Suièka dobre nesuí.
Ak aj po uskutoènení odporúèaných
kontrol práèka so suièkou
nefunguje azistená porucha sa
prejavuje naïalej, zavolaj do
najbliieho Centra Servisnej
sluby aoznám im tieto údaje:
- druh poruchy
- oznaèenie (Mod. ....)
- výrobné èíslo (S/N ....)
Tieto informácie nájde na
identifikaènom títku
umiestnenom na zadnej strane
práèka so suièkou.
práèka so suièkou
Skontroluj:
Ci je zástrcka dobre zasunutá do
zásuvky; ci nedolo k výpadku
elektrickej energie; ci sú
zatvorené dvierka; ci nebol
zvolený oneskorený tart (ak je
súcastou); ci sa volic programov
A nenachádza v polohe
Reset); ci sa volic druhu suenia
C nenachádza v polohe 0.
Skontroluj:
èi nie je odtoková hadica
ponorená vo vode; èi nie je
upchaté odtokové èerpadlo; èi
bola dodraná maximálna náplò;
èi je otvorený prívod vody.
(Stop/
69
Rady na lepie pranie

M
Keï to bude povaova za potrebné, skontroluj èerpadlo agumovú hadicu.
Práèka so suièkou je vybavená samoèistiacim èerpadlom, ktoré nevyaduje zvlátne èistenie a údrbu. Môe
sa vak sta, e neastnou náhodou sa do èerpadla dostanú malé predmety: mince, sponky, uvo¾nené gombíky
ainé malé veci. Aby sa predilo jeho pokodeniu, tieto predmety sú zachytávané vprístupnej predkomore,
umiestnenej vspodnej èasti èerpadla.
Prístup ktejto predkomore je zabezpeèený po odstránení krycieho panelu
umiestneného vspodnej èasti práèka so suièkou, pomocou skrutkovaèa
(obrázok 1); po uvo¾není krytu je potrebné ho odskrutkova otáèaním proti
smeru hodinových ruèièiek (obrázok 2) apozorne skontrolova vnútornú èas.
Gumová hadica
Kontroluj gumovú hadicu aspoò jedenkrát roène. Ak sa na nej, následkom
Obr.1
pôsobenia silných tlakov, ktoré znáa poèas prania, objavia praskliny a
trhliny, je potrebné ju ihneï vymeni, pretoe by mohlo dôjs kjej
náhlemu pretrhnutiu.
Upozornenie: pred akouko¾vek operáciou údrby skontroluj, èi bol prací cyklus ukonèený avytiahni zástrèku zo zásuvky. Je normálne,
e po odstránení krytu vyteèie von malé mnostvo vody. Pri spätnej montái krycieho panelu najprv zasuò háèiky do prísluných
otvorov spodnej èasti aa potom ho zatlaè smerom proti zariadeniu.
Obr. 2
Technické údaje
Model
Rozmery
Kapacita
Elektrické napájanie
Pripojenie k
vodovodnej sieti
Rýchlost' zmýkania
Kontrolné programy
vykonané podl'a
normy IEC456
WD 104 T
írka cm 59,5
výka cm 85
håbka cm 53,5
od 1 do 5,5 kg pri praní; od 1 do 4 kg pri suení
napätie 220/230 Volt 50 Hz
maximálny príkon 1850 W
maximálny tlak 1 MPa (10 bar)
minimálny tlak 0,05 MPa (0,5 bar)
kapacita bubna 46 litrov
a do 1000 otáèok za minútu
pranie: program 3; teplota
suenie: vykonané s 2,5 kg-náplnou, volicom C v polohe .
Toto zariadenie sa zhoduje s nasledovnými Nariadeniami Európskej Únie:
- 73/23/CEE z 19/02/73 (Nízke napätie) v pôvodnom znení a v znení neskorích predpisov
- 89/336/CEE z 03/05/89 (Elektromagnetická kompatibilita) v pôvodnom znení a v znení neskorích predpisov
vykonaný s náplòou 5 kg.
60°C;
òè
Rady na lepie pranie
70

Intalácia a premiestnenie
Keï prichádza
práèka so suièkou
Èi u sa jedná onovú práèku alebo len ojej presahovanie
do nového bytu, intalácia má zásadnú dôleitos pre jej
správnu èinnos.
Po vybalení zariadenia sa uisti,
èi je vporiadku aèi nedolo
kjeho pokodeniu. Vprípade
pochybností sa obrá na
kvalifikovaného servisného
technika. Vnútorná èas
práèka so suièkou je
zprepravných dôvodov
zaistená na zadnej strane
tyrmi skrutkami.
Pred uvedením práèka so
suièkou do èinnosti odstráò
skrutky, gumovú podloku
sprísluným ditanèným
èlenom (vetky diely uschovaj)
auzavri otvory prostredníctvom
dodaných umelohmotných
krytiek.
Dôleitá informácia: Uzavri
prostredníctvom krytky (súèas
vybavenia) 3 otvory, vktorých
bola zachytená zástrèka,
nachádzajúce sa dole vpravej
zadnej èasti práèka so suièkou.
Vyrovnanie do vodorovnej
polohy
Pre správnu èinnos práèka so
suièkou je dôleité, aby sa
nachádzala vo vodorovnej
polohe. Vyrovnanie do
vodorovnej polohy sa vykonáva
prostredníctvom predných
noièiek; ich sklon, vzh¾adom
kvodorovnej pracovnej ploche,
nesmie prevyova 2°.
Vprípade uloenia na koberec je
treba sa uisti, èi jeho
prítomnos neobmedzuje
ventiláciu spodnej èasti práèka
so suièkou.
Odlo si poistné skrutky
aditanèné èleny. Môu sa ti
hodi vprípade sahovania,
keï bude musie pred
prepravou práèka so
suièkou opätovne zaisti
vnútorné èasti práèka so
suièkou, aby nedolo kich
pokodeniu poèas prevozu.
Predné noièky sú nastavite¾né.
Pripojenie kvodovodnej
prípojke
Hodnota tlaku vo vodovodnej
sieti, dodávajúcej vodu do práèka
so suièkou sa musí pohybova
vrozmedzí uvedenom na
identifikaènom títku
umiestnenom nazadnej èasti.
Pripoji prívodnú hadicu
kvodovodnej prípojke so
studenou vodou prostredníctvom
trubky so závitom 3/4
agumového tesnenia.
A
Gumové tesnenie.
Ak je vodovodná prípojka nová
alebo ak nebola dlhiu dobu
pouívaná, tak ete pred
pripojením práèka so suièkou
otvor kohútik anechaj odtiec
vodu, aby sa odplavili neèistoty.
Pripoj druhý koniec hadice
kpríslunej prípojke,
nachádzajúcej sa vpravej hornej
èasti práèka so suièkou.
Prípojka na pripojenie prívodnej
hadice umiestnená vpravej hornej
èasti.
Pripojenie odpadovej
hadice
Na zadnej strane práèka so
suièkou sa nachádzajú dva
driaky (pravý alebo ¾avý), na
ktoré je moné zachyti
odpadovú hadicu. Druhý koniec
hadice zasuò do odpadového
potrubia alebo ho upevni na
umývadlo alebo vaòu ato tak, aby
nedolo kprílinému skrúteniu
alebo ohnutiu odpadovej hadice.
Je ve¾mi dôleité, aby hadica
vyúsovala vmieste
nachádzajúcom sa vo výke
najmenej 60 cm od podlahy. Je
potrebné, aby bola odpadová
hadica zachytená do prísluného
drziaka nachádzajúceho sa na
zadnej strane práèka so suièkou.
Driak na zachytenie odpadovej
hadice, ak vyúsuje niie ne 60
cm nad podlahou.
V prípade, e odpadová hadica
vyúsuje do vane alebo do
umývadla, intaluj za úèelom jej
zachytenia umelohmotný driak
apripevni ho ovodovodný
kohútik.
Driak na vypúanie do vane alebo
do umývadla.
Nesmie nikdy zosta ponorený
vo vode.
Nepouívaj iadne ïalie hadice
na predåenie odpadovej hadice.
Ak je ich pouitie nevyhnutné,
predlovacia hadica musí ma
rovnaký priemer ako originálna
hadica ajej dåka nesmie
presahova 150 cm. Vprípade
pripojenia kodpadovému
potrubiu v stene nechaj overi
jeho úèinnos odborníkovi
oprávnenému na takúto èinnos.
Ak sa tvoj byt nachádza na
jednom znajvyích poschodí
budovy, môe dojs kvzniku
sifónového efektu, následkom
ktorého bude práèka so suièkou
nepretrite napúa avypúa
vodu.
Tento problém je moné
odstráni pouitím peciálneho
ventilu zabraòujúceho
sifónovému efektu, dostupného
bene v predaji.
Pripojenie kelektrickej
sieti
Pred pripojením zariadenia do
elektrickej siete skontroluj:
1) èi je zásuvka elektrického
rozvodu dimenzovaná na
prúd, ktorý je uvedený na
identifikaènom títku aèi
samotná zásuvka, ijej
zapojenie, zodpovedajú
platným normám;
2) èi sa hodnota napätia
afrekvencie elektrického
napájania nachádza
vrozmedzí hodnôt
uvedených na
identifikaènom títku;
3) èi sa zásuvka zhoduje so
zástrèkou na napájacom
kábli zariadenia. Vopaènom
prípade nepouívaj adaptéry,
ale vymeò zásuvku alebo
zastrèku.
4) èi je domový rozvod
elektrickej siete uzemnený.
Upozornenie!
V prípade nerepektovania
týchto noriem výrobca
nezodpovedá za prípadné
následky.
Igelitové sáèky, penový
polystyrén, klince ainé
súèasti obalu nie sú
hraèkou pre deti, pretoe
sú potenciálnym zdrojom
nebezpeèenstva.
71
Rady na lepie pranie

M
Vau bezpeènos a bezbeènos
Práèka so suièkou bola vyrobená pod¾a
vaich detí
najprísnejích medzinárodných bezpeènostných
predpisov. Scie¾om ochráni teba aj tvoju rodinu.
Pozorne si preèítaj tieto
upozornenia avetky
informácie obsiahnuté vtomto
návode: jedná sa ove¾mi
dôleité údaje, pretoe okrem
ve¾kého mnostva uitoèných
rád sú tie zdrojom dôleitých
informácií týkajúcich sa
bezpeènosti, pouitia aúdrby.
1. Práèka so suièkou nie je
vhodná na intaláciu vonku,
ato ani vprípade, keï priestor
urèený na tento úèel je chránený
prístrekom, pretoe jej
vystavenie pôsobeniu daïa
abúrok je ve¾mi nebezpeèné.
2. Je urèená na výhradné
pouitie dospelými
dospelými osobami ato
len na pranie bielizne pod¾a
pokynov uvedených vtomto
návode.
3. Ak je potrebné ju presunú,
je dobré zveri tento úkon
dvom alebo trom osobám
avykona ho smaximálnou
pozornosou. Nikdy ju
nepremiestòuj sám, pretoe
je ve¾mi aká.
4. Pred vkladaním bielizne
skontroluj, èi je prací
bubon prázdny.
5. Nedotýkaj sa zariadenia,
ak si bosý alebo ak má
mokré alebo vlhké ruky èi
nohy.
6. Nepouívaj predlovacie
káble a rozdojovacie káble
ktoré sú zvlá nebezpeèné,
ak sa pouzívajúvo vlhkom
prostredí. Napájací kábel
nesmie by nebezpeène
ohýbaný alebo stláèaný.
7. Neotváraj dávkovaè
pracích prostriedkov,
pokia¾ je práèka so
suièkou v èinnosti;
nepouívaj prací
prostriedok na ruèné
pranie, pretoe bohatá pena
by mohla pokodi vnútorné
èasti práèka so suièkou.
8. Neahaj nikdy za kábel ani
za práèku scie¾om vytiahnu
zástrèku zo zásuvky: je to
ve¾mi nebezpeèné.
9. Poèas èinnosti práèka so
suièkou sa nedotýkaj
odpadovej vody, pretoe
môe dosiahnu vysokú
teplotu. Dvierka sa poèas
prania zohrievajú; udruj
deti vbezpeènej
vzdialenosti. Dvierka
neotváraj nikdy násilím
pretoe by mohlo dôjs
kpokodeniu bezpeènostného
mechanizmu, zabraòujúceho
náhodnému otvoreniu.
10.V prípade poruchy vzdy
zavri vodovodný kohútik
aodpoj zástrèku zo
zásuvky v stene. viadnom
prípade sa nepokúaj dosta
kvnútorným èastiam práèka
so suièkou scie¾om ich
opravy.
Nikdy sa neobracaj so
iadosou opomoc na
technikov, ktorí nie sú
na takúto èinnos
autorizovaní avdy
odmietni pouitie
neoriginálnych
náhradných dielov.
Ako postupova pri výmene napájacieho kábla
Napájací kábel práèka so
suièkou je peciálny amusí
by zakúpený výhradne
vautorizovaných Centrách
Servisnej sluby.
Pri jeho výmene je treba
postupova následovne:
1. Skontroluj, èi je práèka
so suièkou vypnutá aèi je
zástrèka odpojená.
I
Obr. 3 Obr. 4 Obr. 5 Obr. 6
2. Po odskrutkovaní dvoch
skrutiek Iodmontuj vrchný
kryt a vytiahni ho smerom k
sebe [obr. 3].
3. Odpoj najprv káble
odruovacieho filtra F [obr.
4] a venuj pozornos ich
polohe (Modrý kábel =N;
Hnedý kábel =L) aako
posledný odpoj uzemòovací
vodiè
.
N
F
Poznámka: písmená L, N
asymbol
odruovacom filtri.
4. Z¾ahka odstráò vrchnú èas
káblovej priechodky od zadnej
steny práèka so suièkou,
potiahni napájací kábel
smerom nahor avytiahni ho
[obr. 5].
Pri spätnom zapojení kábla
postupuj vopaènom poradí.
L
sú oznaèené na
Pri spätnej montái vrchného
krytu ho najprv opri o práèku
[obr. 6] azasuò ho dopredu
tak, aby háèiky umiestnené
vprednej èasti zapadli do
prísluných otvorov apotom
upevni skrutky.
Rady na lepie pranie
72

Merloni Elettrodomestici
Viale Aristide Merloni 47
60044 Fabriano
Italy
Tel +39 0732 6611
Fax +39 0732 662501
www.merloni.com
Leader for young Europe
10/2002 - 195029585.02 - XEROX BUSINESS SERVICES - DOCUTECH
 Loading...