

Page 1

Operating Instructions
COOKER AND OVEN
GB
English, 1
K6C32/G
K6C320/G
Contents
GB
Installation, 2-3
Positioning and levelling
Electrical connection
Technical data
Description of the appliance, 4
Overall view
Control panel
Start-up and use, 5
Starting the oven
Using the cooking timer
Cooking advice, 6-7
Oven cooking advice table
Using the glass ceramic hob, 8
Switching the cooking zones on and off
Cooking zones
Precautions and tips, 9
General safety
Disposal
Respecting and conserving the environment
Care and maintenance, 10
Switching the appliance off
Cleaning the appliance
Replacing the oven light bulb
Cleaning the glass ceramic hob
Assistance
Page 2
Installation
GB
Before operating your new appliance please read
this instruction booklet carefully. It contains important
information concerning the safe installation and
operation of the appliance.
Please keep these operating instructions for future
reference. Make sure that the instructions are kept with
the appliance if it is sold, given away or moved.
The appliance must be installed by a qualified
professional according to the instructions provided.
Any necessary adjustment or maintenance must be
performed after the appliance has been disconnected
from the electricity supply.
Positioning and levelling
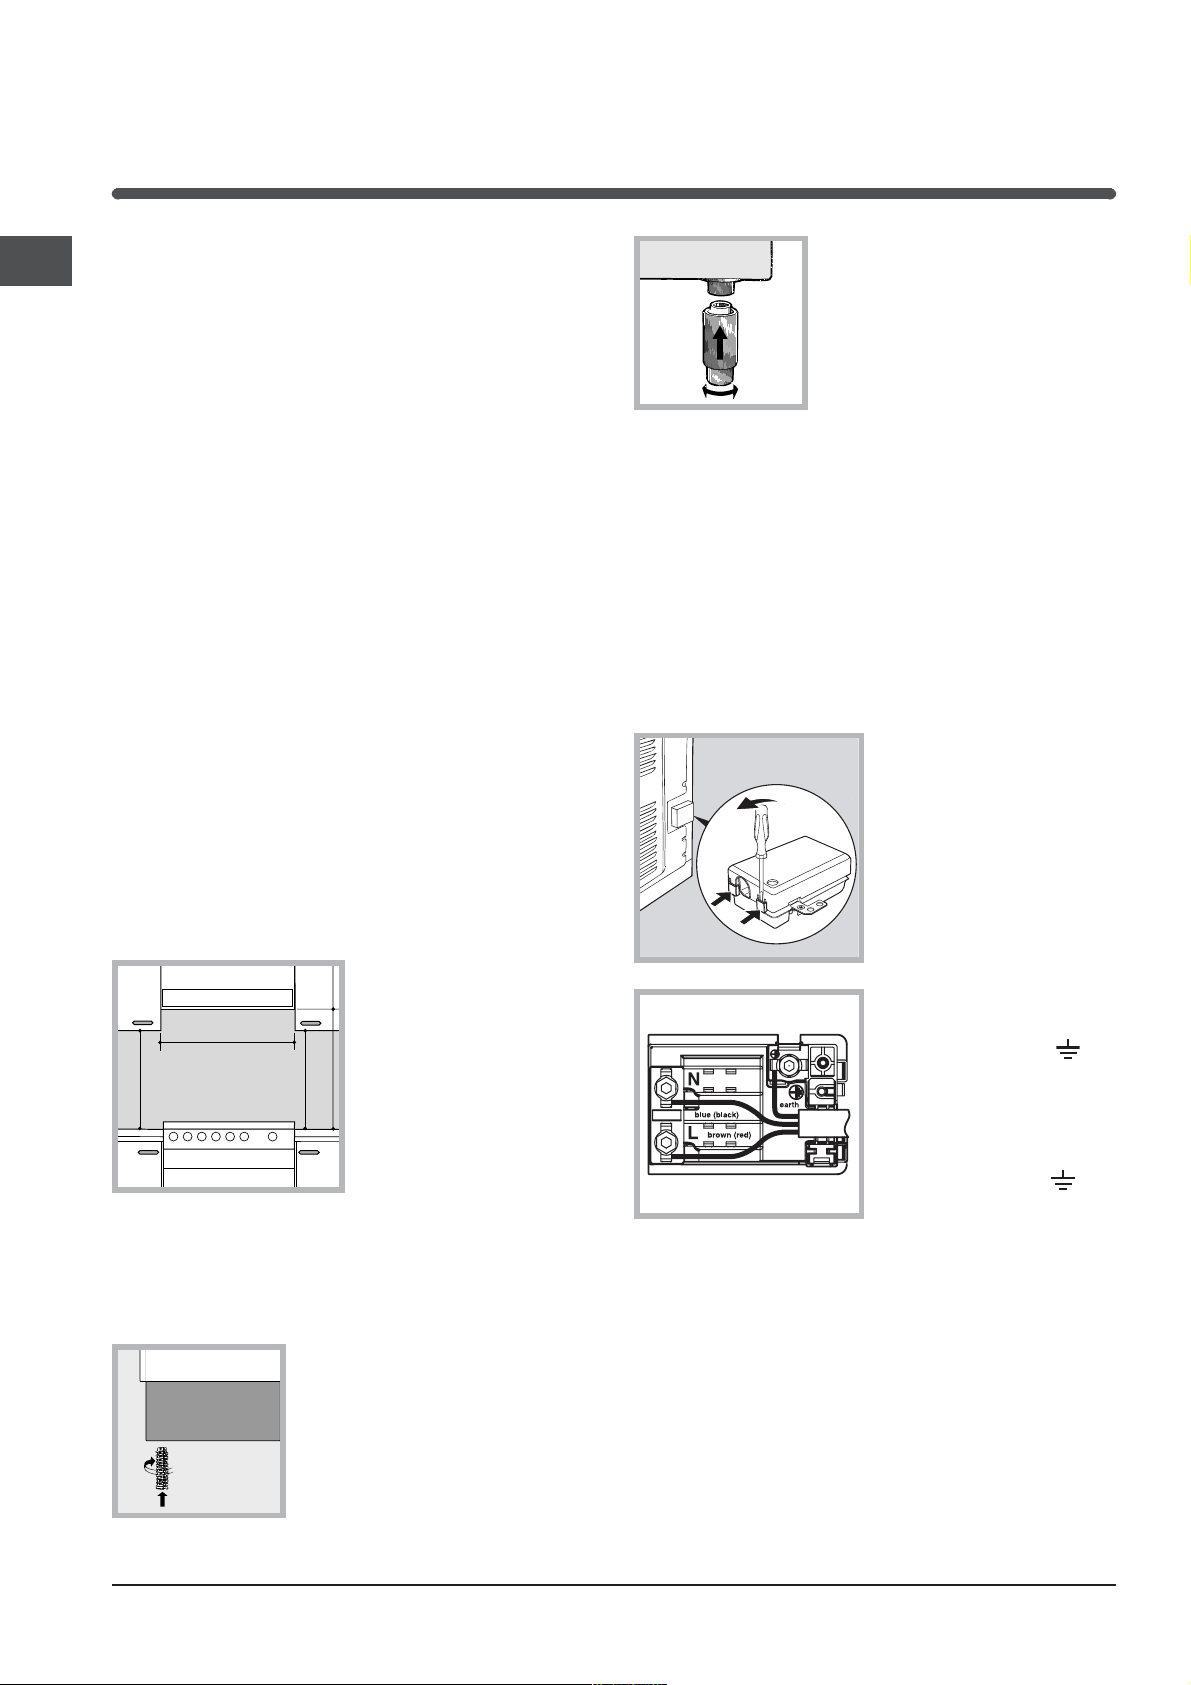
It is possible to install the appliance alongside
cupboards whose height does not exceed that of the
hob surface.
Make sure that the wall in contact with the back of
the appliance is made from a non-flammable, heatresistant material (T 90°C).
To install the appliance correctly:
Place it in the kitchen, dining room or the bed-sit
(not in the bathroom).
If the top of the hob is higher than the cupboards,
the appliance must be installed at least 200 mm
away from them.
If the cooker is
installed underneath a wall
cabinet, there must be a
minimum distance of 420
mm between this cabinet
mm. with hood
and the top of the hob.
420
mm. without hood
650
700
This distance should be
Min. mm.
min.
min.
increased to 700 mm if
the wall cabinets are
flammable (see figure).
mm.
420
Min.
HOOD
Min. mm.
600
The legs* provided with the
appliance fit into the slots on
the underside of the base of the
cooker.
Electrical connection
Electric cookers come without a power supply cable.
The cooker is designed to operate on an electricity
supply which conforms to the electrical data shown
on the Rating Plate. The cooker can be connected to
the mains only after removing the back panel of the
cooker itself with a screwdriver.
the following installation procedure must be carried
out by a qualified electrician. The electrical
installation must comply with the IEE Regulations,
Building & local By-Lays.
1. Open the terminal
board by inserting a
screwdriver into the
side tabs of the cover.
Use the screwdriver as
a lever by pushing it
down to open the cover
(see diagram).
2. Loosen the cable
clamp screw and remove
it, using a screwdriver as
a lever (see figure).
3. Remove the wire
contact screws L-N-
then fasten the wires
under the screw heads,
respecting the colour
code: Black/Blue (N),
Red/Brown (L) and Bare
Wire/Yellow-Green ( ).
,
Do not position blinds behind the cooker or less
than 200 mm away from its sides.
Any hoods must be installed according to the
instructions listed in the relevant operating manual.
Levelling
If it is necessary to level the
appliance, screw the adjustable
feet* into the places provided on
each corner of the base of the
cooker (see figure).
2
Once the connections have been made, tighten all
the terminal screws fully.
Fasten the supply cable in place with the clamp and
close the cover of the terminal board.
Only available in certain models.
*
Page 3
Connecting the supply cable to the mains
WARNINGS: THIS APPLIANCE MUST BE
EARTHED.
The cooker must be connected to the mains by a
switched (double pole) cooker outlet correctly fused
with a capacity appropriate to that shown on the
cooker Rating Plate. All electrical wiring from the
consumer unit to the cooker, via the switched double
pole cooker outlet, must be of an acceptable type
and current rating as above.
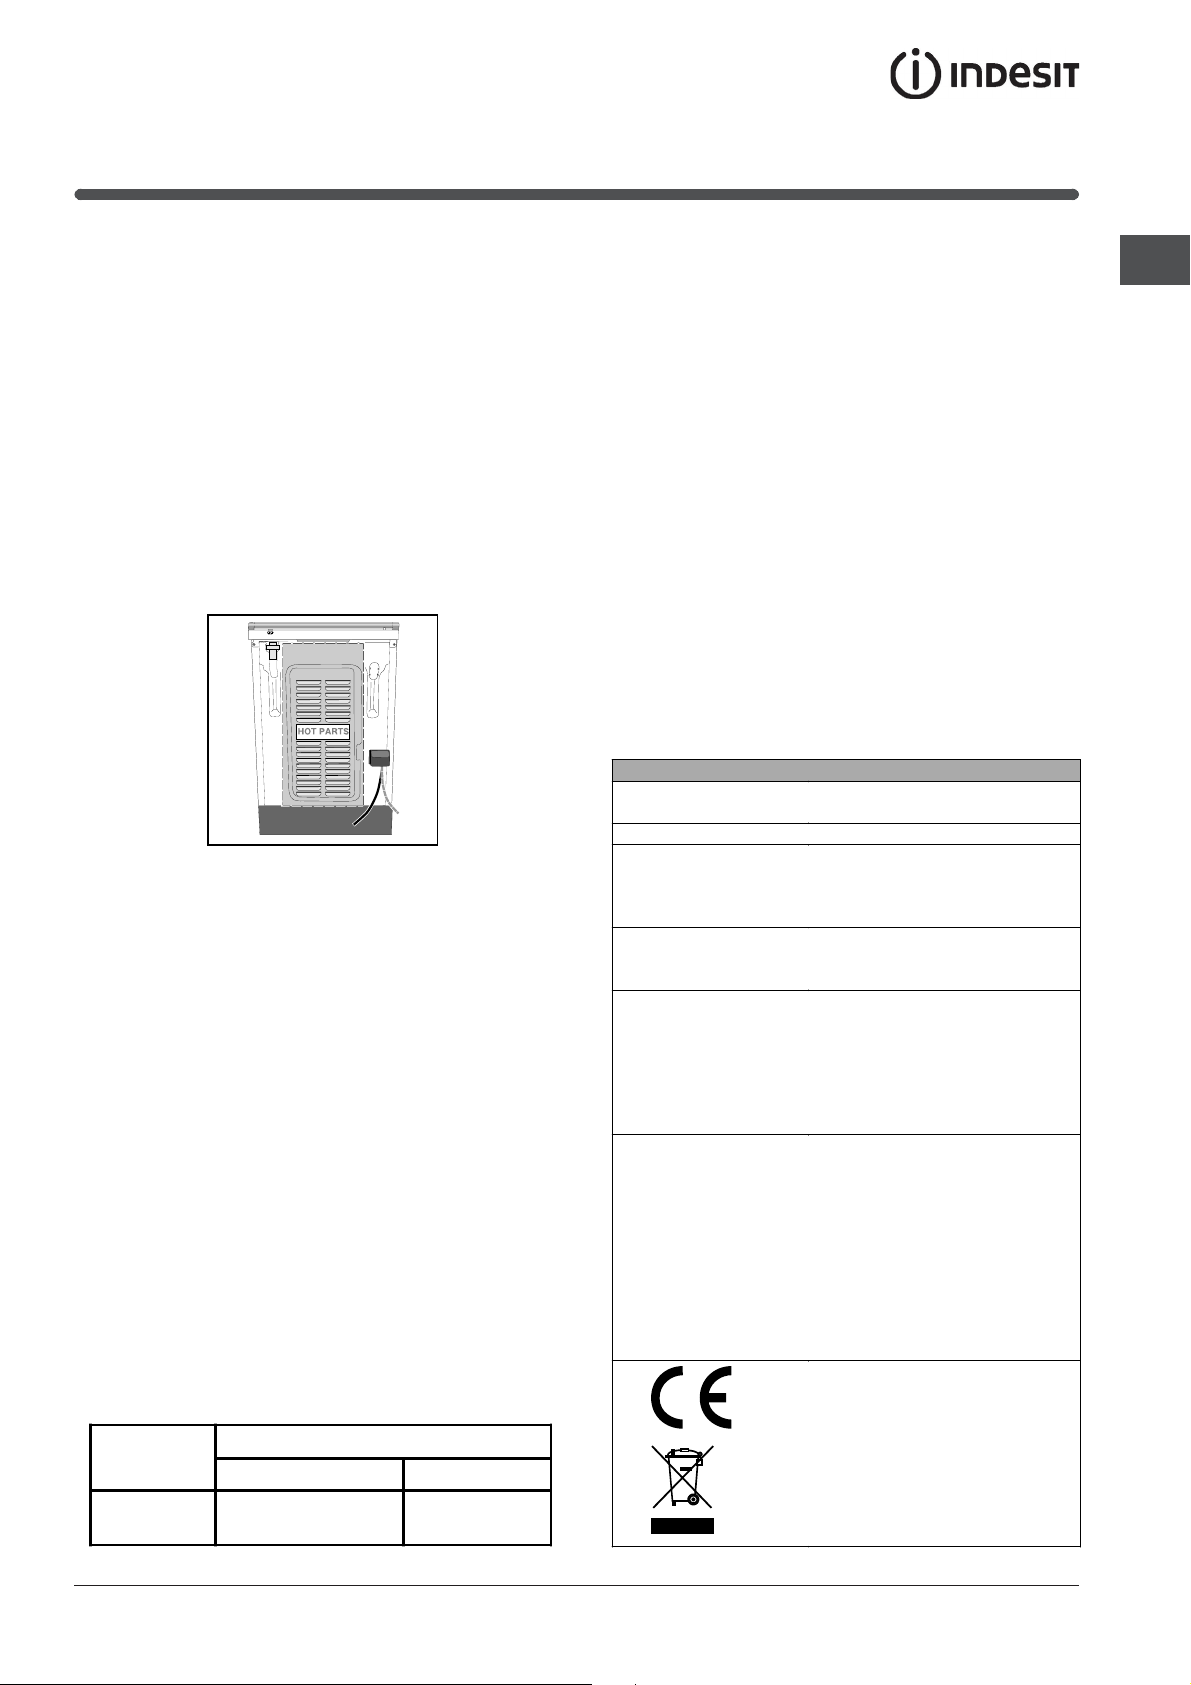
the supply cable must be positioned so that it
never reaches at any point a temperature 50°C
higher than the room temperature. The cable must
be routed away from the rear vents.
HOT PARTS
Mains frequency and voltage of the electrical
section
Model Electric section
Voltage Power (W)
K6C32/G
K6C320/G
240V~ 50/60 Hz 8600
TECHNICAL DATA
Oven dimensions
(HxWxD)
Volume
Useful
measurements
relating to the oven
compartment
Power supply
voltage and
frequency
Electric hob
Front left
Back left
Back right
Front right
Maximum absorption
of the electric hob
ENERGY LABEL
32x43,5x40 cm
56 l
width 42 cm
depth 44 cm
height 8,5 cm
see data plate
1700 W
1200 W
2100 W
1200 W
6200 W
Directive 2002/40/EC on the
label of electric ovens.
Standard EN 50304
Energy consumption for Natural
convection – heating mode:
Traditional mode;
Declared energy consumption
for Forced convection Class –
heating mode: Fan assisted
EC Directives: 2006/95/ECC
dated 12/12/06 (Low Voltage)
and subsequent amendments 89/336/EEC dated 03/05/89
(Electromagnetic Compatibility)
and subsequent amendments 93/68/EEC dated 22/07/93 and
subsequent amendments 2002/96/EC.
GB
3
Page 4
Description of the appliance
GB
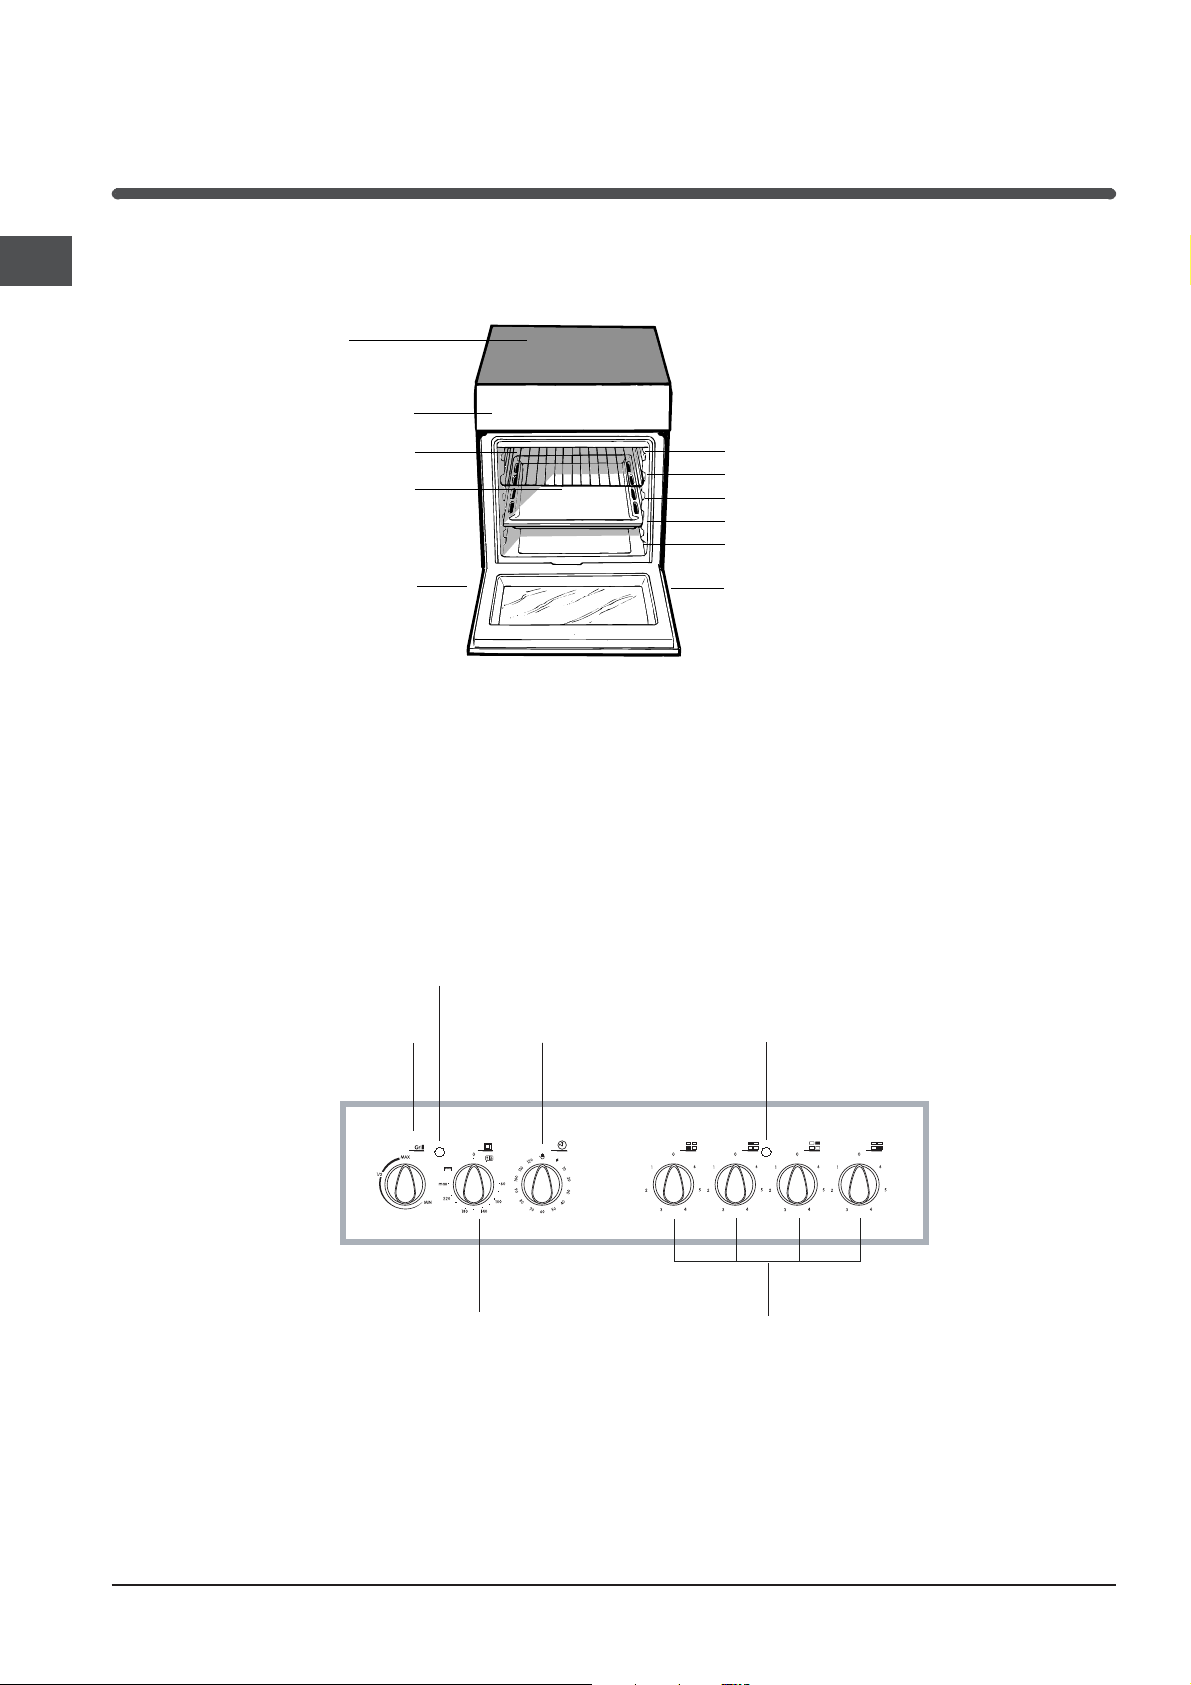
Overall view
Glass
ceramic hob
Control panel
GRILL rack
DRIPPING pan
Adjustable foot
GUIDE RAILS
for the sliding racks
position 5
position 4
position 3
position 2
position 1
Adjustable foot
Control panel
VARIABLE GRILL
knob
SELECTOR
knob
THERMOSTAT
indicator light
COOKING TIMER*
knob
ACTIVE HOTPLATE
indicator light
ELECTRIC HOTPLATE
control knobs
* Only on certain models
4
Page 5
Start-up and use
The first time you use your appliance, heat the
empty oven with its door closed at its maximum
temperature for at least half an hour. Ensure that the
room is well ventilated before switching the oven off
and opening the oven door. The appliance may emit
a slightly unpleasant odour caused by protective
substances used during the manufacturing process
burning away.
Before operating the product, remove all plastic
film from the sides of the appliance.
Starting the oven
When the SELECTOR knob is turned in a clockwise
direction to the symbol
will come on to assist in the defrosting of frozen
food. Rotating further to the complete range of
temperatures shown on the dial you can choose
which is most suitable for the food you are going to
cook (fan assisted mode). The temperature is
reached automatically and controlled by the oven
thermostat (from 60°C to 240°C).
! Whilst using tag oven for conventional cooking
VARIABLE GRILL knob must be set with MAX in
line with the reference mark on the control panel.
Grill
The top heating element will come on. On this
setting, food is cooked by the thermal radiation
given off in the downward direction by the electric
heating element. The very high temperature and
direct heat of the grill make it possible to brown
meats on the surface while locking in the juices to
keep them tender.
Never put objects directly on the bottom of the
oven; this will avoid the enamel coating being
damaged. Only use position 1 in the oven when
cooking with the rotisserie spit.
Always place cookware on the rack(s) provided.
THERMOSTAT indicator light
When this is illuminated, the oven is generating
heat. It switches off when the inside of the oven
reaches the selected temperature. At this point the
light illuminates and switches off alternately,
indicating that the thermostat is working and is
maintaining the temperature at a constant level.
the fan and oven light
Oven light
This is switched on by turning the SELECTOR knob
to any position other than 0. It remains lit as long
as the oven is operating. By selecting
knob, the light is switched on without any of the
heating elements being activated.
Cooling ventilation*
In order to cool down the external temperature of the
oven, some models are fitted with a cooling fan that
blows out air between the control panel and the oven
door.
! Once the cooking has been completed, the cooling
fan remains on until the oven has cooled down
sufficiently.
with the
Using the cooking timer*
1. To set the buzzer, turn the COOKING TIMER knob
clockwise almost one complete revolution.
2. Turn the knob anticlockwise to set the desired
time: align the minutes shown on the COOKING
TIMER knob with the indicator on the control panel.
3. When the selected time has elapsed, a buzzer
sounds and the oven turns off.
4. When the oven is off the cooking timer can be
used as a normal timer.
To use the oven manually, in other words when you
do not wish to use the end of cooking timer, turn the
COOKING TIMER knob until it reaches the '
symbol.
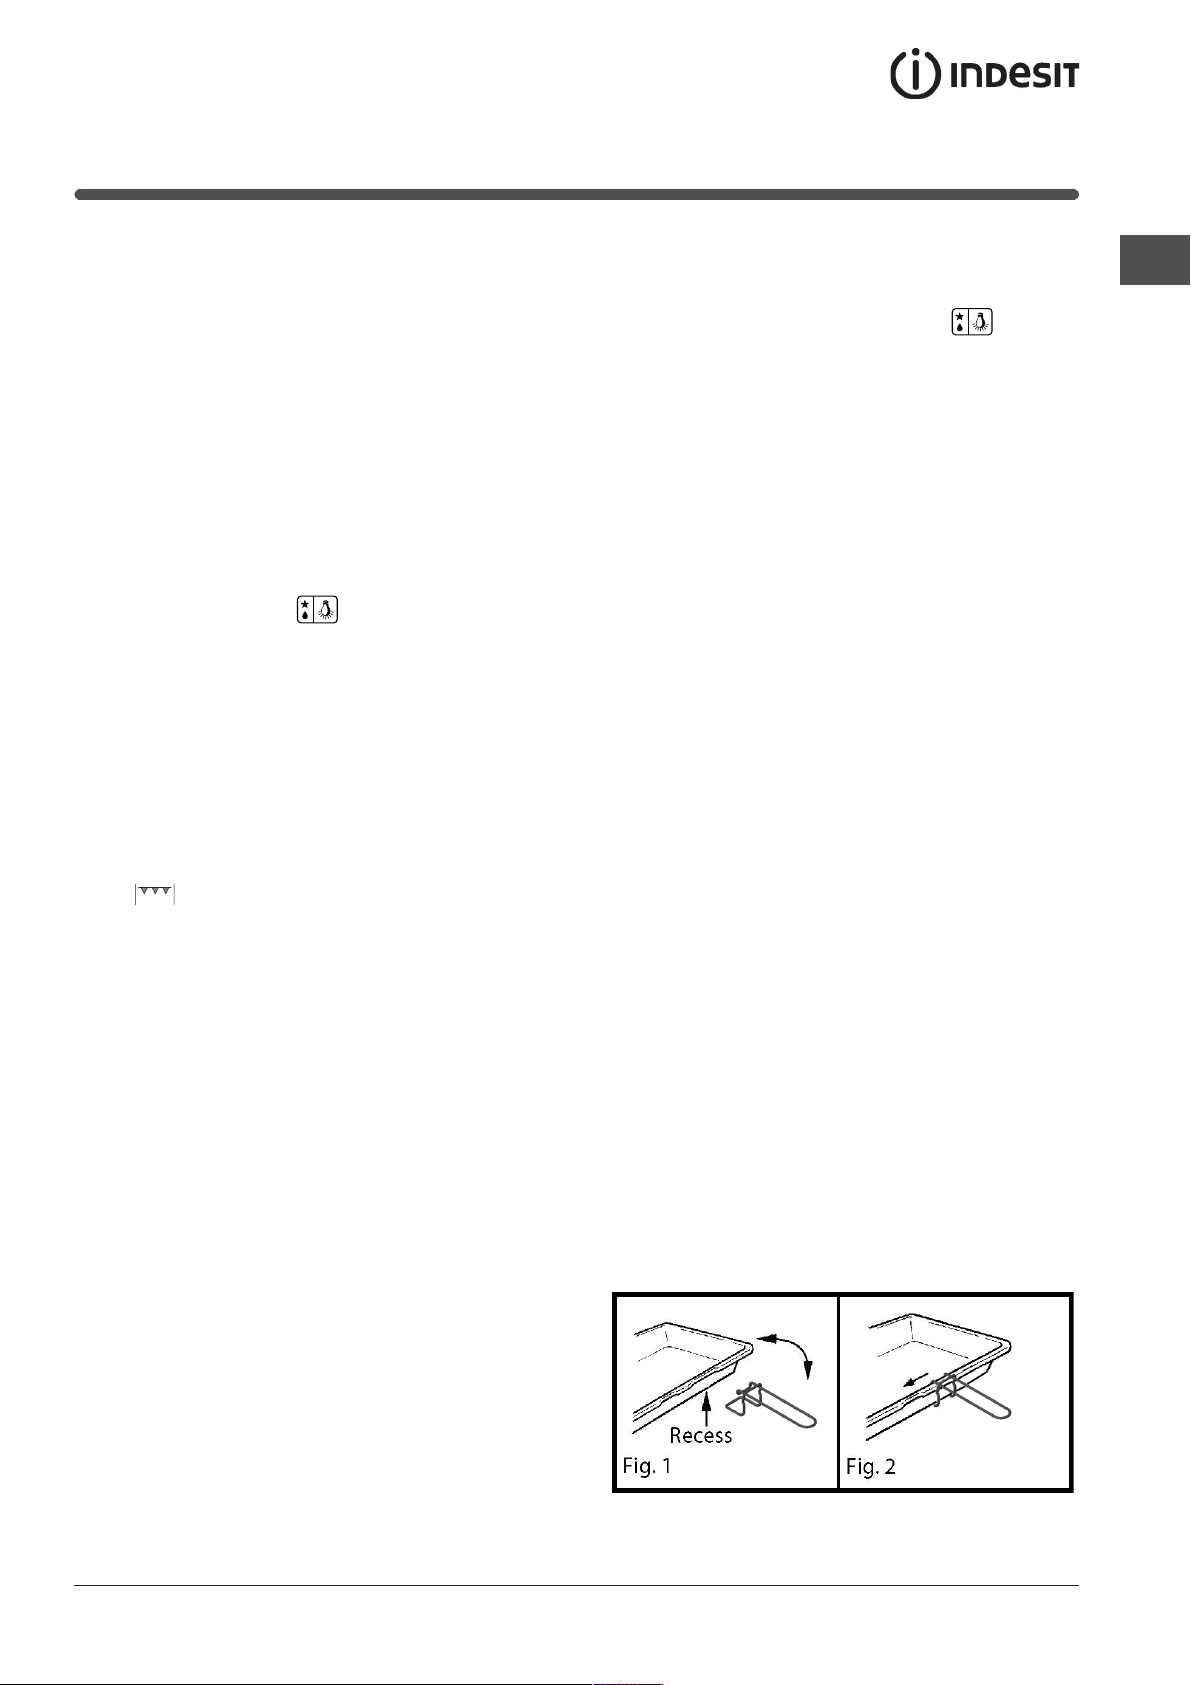
Using the grill pan kit
Position the handle on the grill pan so that it fits into
the small recess (fig. 1), tilt it upwards and slide it
towards the centre (fig. 2).
The food must be placed on the rack in the grill pan.
Position the grill pan on top of the oven rack. The
best results are achieved by placing the oven rack
on the uppermost shelves. Pouring a little water into
the grill pan will make the collection of grease
particles more efficient and prevent the formation of
smoke.
GB
* Only on certain models
5
Page 6
GB
Cooking advice
When using the oven, only one rack or drip pan
should be used at a time. The rack or pan should be
inserted into the bottom or top guides depending on
whether the food needs more heat from the top or
bottom.
Pastry is too dark on top
Place it on a lower rack, lower the temperature, and
increase the cooking time.
Preheating
If the oven must be preheated (this is generally
required for leavened foods), we recommend using
the "conventional" oven feature which makes it
possible to reach the temperature desired in a very
short time. After the oven has been preheated, the
thermostat light will turn off. At this point, you can
select the most suitable setting to cook the dish.
Cooking Fish and Meat
Meat must weigh at least 1 Kg in order to prevent it
from drying out. When cooking white meat, fowl and
fish, use low temperature settings (150°C-175°C). For
red meat that should be well done on the outside
while tender and juicy in the inside, it is a good idea
to start with a high temperature setting
(200°C-220°C) for a short time, then turn the oven
down afterwards. In general, the larger the roast, the
lower the temperature setting. Place the meat on the
centre of the rack and place the drip pan beneath it
to catch the fat.
Make sure that the rack is inserted so that it is in the
centre of the oven. If you would like to increase the
amount of heat from below, use the low rack heights.
For savory roasts (especially duck and wild game),
dress the meat with lard or bacon on the top.
Cooking Pastries
Always preheat the oven when cooking pastries. Do
not open the door in order to prevent the pastry from
dropping.
The batter or dough should not be too liquidy so that
the cooking time is not excessive. In general:
Pastry is too dry
Cooked well on the inside but sticky on the
outside
Use less liquid, lower the temperature, and increase
the cooking time.
The pastry sticks to the pan
Grease the pan well and sprinkle it with a dusting of
flour.
I used more than one level and they are not all at
the same cooking point
Use a lower temperature setting. It is not necessary to
remove the food from all the racks at the same time.
Using the Grill
Grilling may be carried out with a two stage heating
element situated in the top of the oven chamber. The
centre, or the complete area of the grill can be
selected by turning the SELECTOR knob in a
clockwise direction to align the symbols
the mark on the control panel. The VARIABLE GRILL
knob is positioned to right of the SELECTOR knob.
This knob will provide varying grill temperatures
when rotated from max to min and may be
adjusted to vary the level of heat at any time during
the grilling operation.
To operate the grill
1. Turn the SELECTOR knob clockwise until the
required grilling symbol is in line with the mark on
the control panel. The element is now on.
2. The VARIABLE GRILL knob can now be operated
to select the required heat.
with
Increase the temperature by 10°C and reduce the
cooking time.
Pastry dropped
Use less liquid or lower the temperature by 10°C.
6
When utilizing the grill, place the rack at the lower
levels (see cooking table). To catch grease or fat
and prevent smoke, place a drip pan at the bottom
rack level.
Page 7
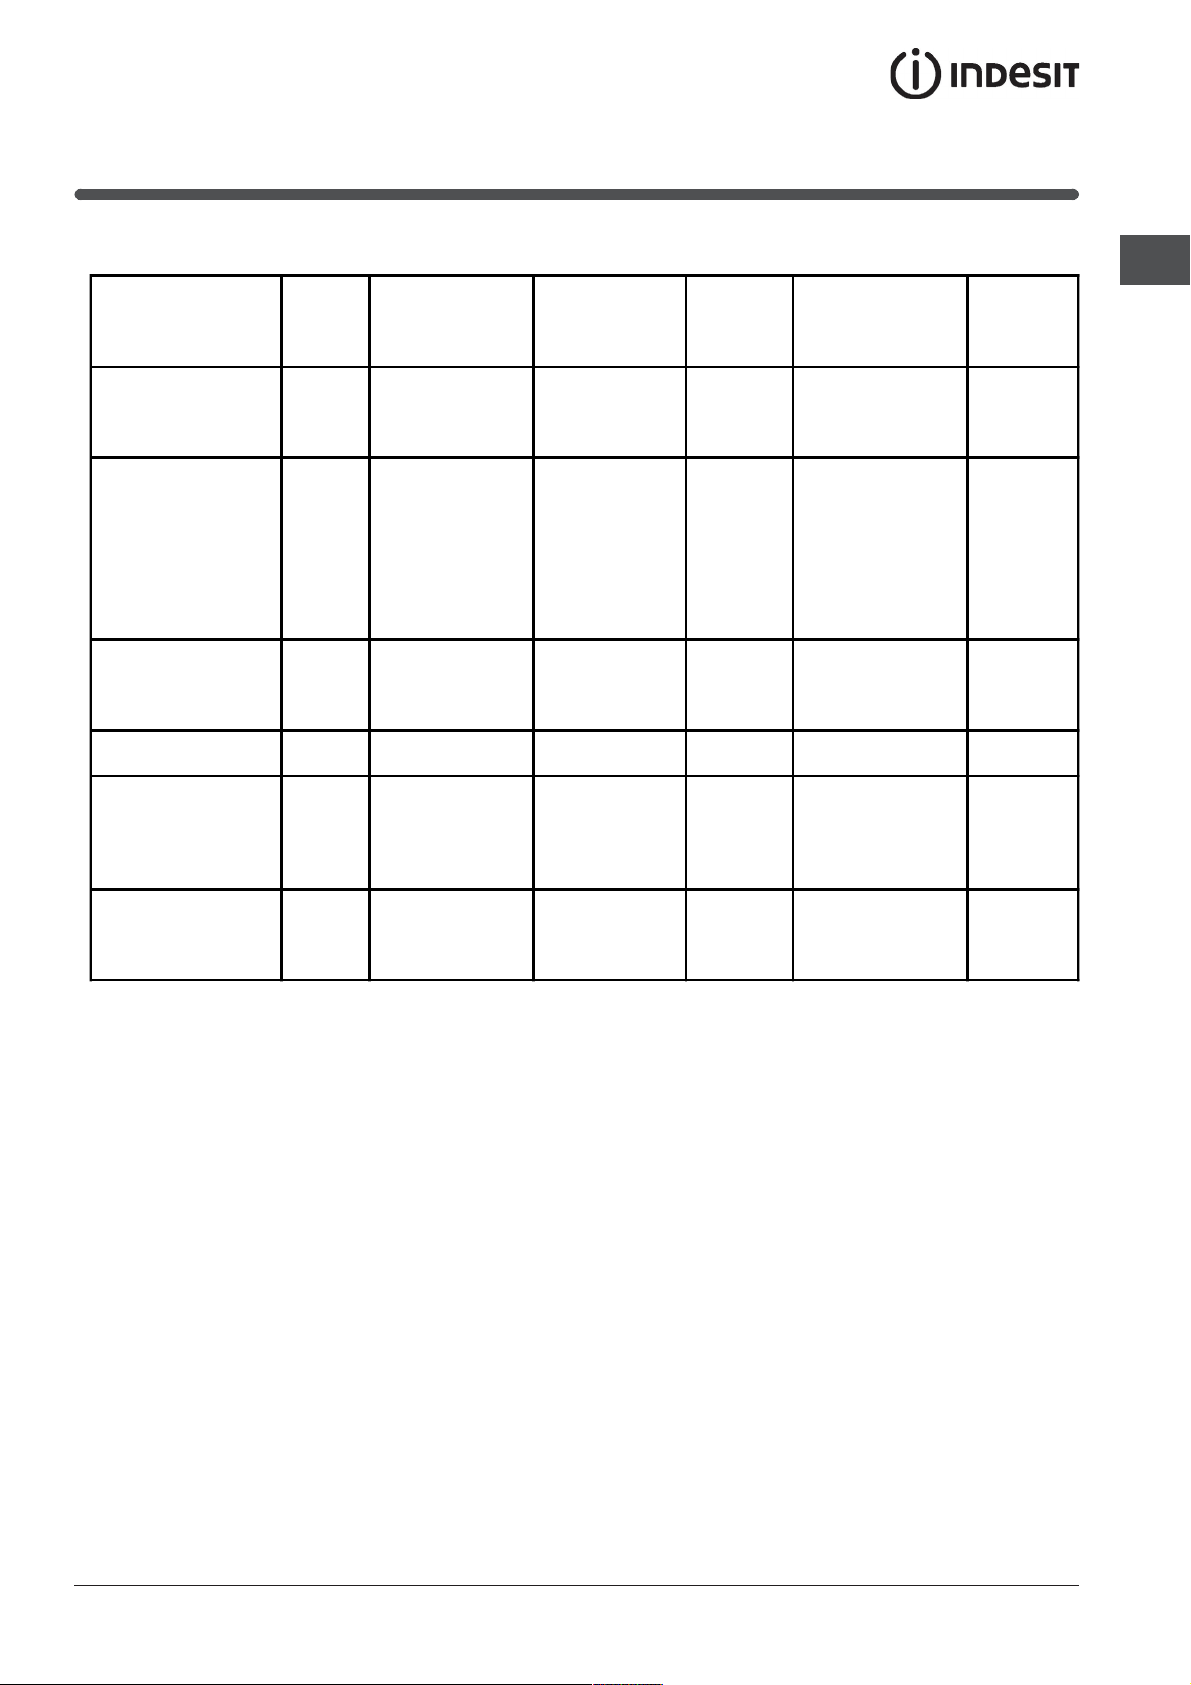
Oven cooking advice table
Food to be cooked Wt.
(wt)
Pasta
Lasagne 2.5 3 210 - 75-80
Cannelloni 2.5 3 210 MAX - 75-80
Oven-baked noodles 2.5 3 210 - 75-80
Meat
Veal 1.7 3 230 - 85-90
Chicken 1.5 3 220 - 110-115
Turkey 3.0 3 MAX MAX - 95-100
Duck 1.8 3 230 - 120/125
Rabbit 2 3 230 - 105/110
Pork 2.1 3 230 - 100/110
Lamb 1.8 3 230 - 90-95
Fish
Mackerel 1.1 3 210-230 - 55-60
Dentex 1.5 3 210-230 MAX - 60-65
Trout baked in paper 1.0 3 210-230 - 40-45
Pizza
Napolitan 1.0 3 MAX MAX 15 30-35
Cake
Biscuits 0.5 3 180 15 30-35
Tarts 1.1 3 180 MAX 15 30-35
Chocolate cake 1 3 200 15 45-50
Raised Cakes 1 3 200 15 50/55
Grill cooking
Toast n.° 4 4 5 5-6
Pork chops 1.5 4 3/4 5 20-30
Mackerel 1.1 4 5 20-30
Note: cooking times are approximate and may vary according to personal taste.
Cooking
position of
shelves from
bottom
Temperatu re
(°C)
Varia ble
grill
Pre-heating time
(min)
Cooking
time
(min.)
GB
7
Page 8
Using the glass ceramic hob
GB
The glue applied on the gaskets leaves traces of
grease on the glass. Before using the appliance, we
recommend you remove these with a special nonabrasive cleaning product. During the first few hours
of use there may be a smell of rubber which will
disappear very quickly.
Switching the cooking zones on and off
To switch on a cooking zone, turn the corresponding
knob in a clockwise direction.
To switch it off again, turn the knob in an
anticlockwise direction until it is in the "0" position.
If the ACTIVE HOTPLATE ON indicator light is lit,
this shows that at least one hotplate on the hob is
switched on.
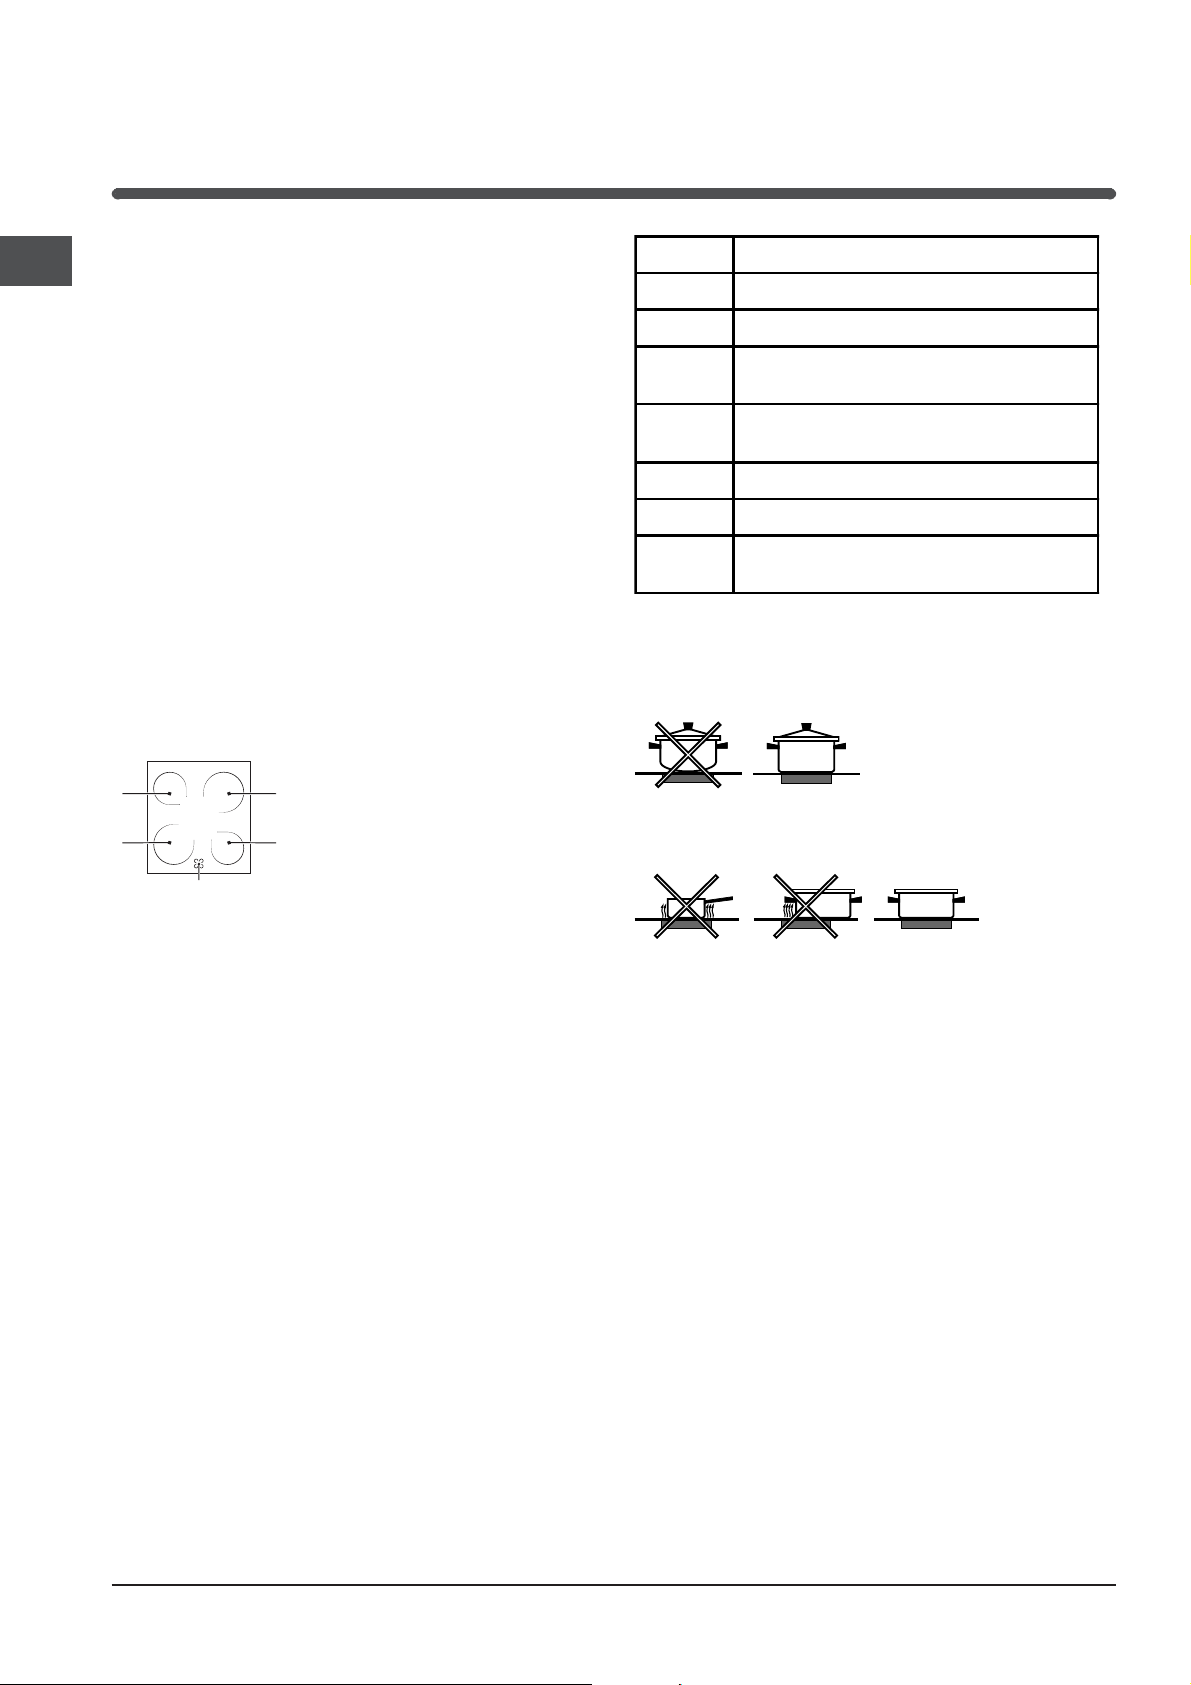
Cooking zones
The hobs have been provided with radiant electric
heaters. These heaters are incorporated under the
surface of the hob as zones which redden while they
are in use.
A
A
B
is greater than 60°C, even when the heating element
has been switched off but is still hot.
Cooking zones with heating elements
The radiant heating elements are composed of
circular heating elements. They only become red
after being turned on for 10-20 seconds.
Do not stare directly at the halogen heating elements.
Turn the corresponding knob in a clockwise
direction, to a position between 1 and 6.
A. Cooking area
A
B. The residual heat indicator
light: this indicates that the
A
temperature of the
corresponding cooking zone
Setting Normal or Fast Plate
Off
0
1
Cooking vegetables, fish
Cooking potatoes (using steam) soups,
2
chickpeas, beans.
Continuing the cooking of large quantities of
3
food, minestrone
4
For roasting (average)
For roasting (above average)
5
For browning and reaching a boil in a short
6
time.
Practical advice on using the hob
Use pans with a thick, flat base to ensure that
they adhere perfectly to the cooking zone.
Always use pans with a diameter that is large
enough to cover the hotplate fully, in order to use
all the heat produced.
Always make sure that the base of the pan is
completely clean and dry: this ensures that the
pans adhere perfectly to the cooking zones and
that both the pans and the hob last for a longer
period of time.
Avoid using the same cookware that is used on
gas burners: the heat concentration on gas
burners may have warped the base of the pan,
causing it not to adhere to the surface correctly.
Never leave a cooking zone switched on without a
pan on top of it, as doing so may cause the zone
to become damaged.
8
Page 9
Precautions and tips
This appliance has been designed and manufactured in
compliance with international safety standards.
The following warnings are provided for safety reasons and
must be read carefully.
General safety
These instructions are only valid for the countries whose
symbols appear in the manual and on the serial number
plate.
The appliance was designed for domestic use inside the
home and is not intended for commercial or industrial use.
appliance must not be installed outdoors, even in
The
covered areas. It is extremely dangerous to leave the
appliance exposed to rain and storms.
Do not touch the appliance with bare feet or with wet or
p hands and feet.
dam
The appliance must be used by adults only for the
preparation of food, in accordance with the instructions
provided in this booklet.
The instruction booklet accompanies a class 1 (ins
or class 2 - subclass 1 (recessed between 2 cupboards)
appliance.
When the appliance is in use, the heating elements and
some parts of the oven door become extremely hot.
Make sure you don't touch them
away.
Make sure that the power supply cables of other electrical
appliances do not come into contact with the hot parts of
the oven.
The openings used for the
must never be covered.
Do not place unstable or misshapen pans on the electric
hotplates; this will help to avoid spills. Position them on the
hob with the handles
appliance.
Always use oven gloves when placing cookware in the
oven or when removing it.
Do not use flammable liquids (alcohol, petrol, etc...) near the
appliance
Do not place flammable material in the lower storage
compartment or in the oven itself. If the appliance is
switched on accidentally, it could catch fire.
Always make sure
appliance is not in use.
When unplugging the appliance, always pull the plug from
the mains socket; do not pull on the
Never perform any cleaning or maintenance work without
having disconnected the appliance from the electricity
mains.
If the appliance breaks down, under no circumstances
should you attempt to repair the
carried out by inexperienced persons may cause injury or
further malfunctioning of the appliance. Contact Assistance.
Do not rest heavy objects on the open oven door.
while it is in use.
turned towards the centre of the
the knobs are in the 0 position when the
and keep children well
ventilation and dispersion of heat
cable.
appliance yourself. Repairs
ulated)
The internal sur
may become hot.
The glass ceramic hob is resistant to mechanical shocks,
but it may crack (or even break) if hit with a sharp object
such as a
from the electricity mains immediately and contact a
Service Centre.
If the surface of the hob is cracked, switch off the appliance
to prevent electric shock
Remember that the temperature of the cooking zones
remains relatively high for at least thirty minutes after they
have been switched off.
Keep any object that cou
example plastic and aluminium objects, or products with a
high sugar content. Keep plastic or aluminium objects
away from the hob: if you forget them on surfaces that are
still hot, they may cause serious damage to the hob.
The appliance should not be operated by people (including
children) with reduced physical, sensory or mental
capacities, by inexperienced individuals or by anyone who
is not familiar with the product. These individuals should, at
the very least, be supervised by someone who assumes
responsibility for their safety or receive preliminary
instructions relating to the operation of the appliance.
faces of the compartment (where present)
tool. If this happens, disconnect the appliance
s from occurring.
ld melt away from the hob, for
Disposal
When disposing of packaging material: observe local
legislation so that the packaging may be reused.
The European Directive 2002/96/EC relating to Waste
Electrical and Electronic Equipment (WEEE) states that
household appliances should not be disposed of using the
normal solid urban waste cycle. Exhausted appliances
should be collected separately in order to optimise the cost
of re-using and recycling the materials inside the machine,
while preventing potential damage to the atmosphere and
to public health. The crossed-out dustbin is marked on all
products to remind the owner of their obligations regarding
separated waste collection.
Exhausted appliances may be collected by the public
waste collection service, taken to suitable collection areas
in the area or, if permitted by current national legislation,
they may be returned to the dealers
deal for a new equivalent product.
All major manufacturers of household appliances
participate in the creation and organisation of systems for
the collection and disposal of
as part of an exchange
old and disused appliances.
Respecting and conserving the environment
You can help to reduce the peak load of the electricity
supply network companies by using the oven in the hours
between late afternoon and the early hours of the mornin
Check the door seals regularly and wipe them clean to
ensure they are free of debris so that they adhere properly
to the door, thus avoiding heat dispersion.
g.
GB
9
Page 10
Care and maintenance
GB
Switching the appliance off
Disconnect your appliance from the electricity supply
before carrying out any work on it.
Cleaning the appliance
Never use steam cleaners or pressure cleaners on
the appliance.
Clean the glass part of the oven door using a
sponge and a non-abrasive cleaning product, then
dry thoroughly with a soft cloth. Do not use rough
abrasive material or sharp metal scrapers as these
could scratch the surface and cause the glass to
crack.
The stainless steel or enamel-coated external parts
and the rubber seals may be cleaned using a
sponge that has been soaked in lukewarm water
and neutral soap. Use specialised products for the
removal of stubborn stains. After cleaning, rinse and
dry thoroughly. Do not use abrasive powders or
corrosive substances.
The inside of the oven should ideally be cleaned
after each use, while it is still lukewarm. Use hot
water and detergent, then rinse well and dry with a
soft cloth. Do not use abrasive products.
The accessories can be washed like everyday
crockery, and are even dishwasher safe.
Dirt and grease should be removed from the control
panel using a non-abrasive sponge or a soft cloth.
Stainless steel can be marked by hard water that
has been left on the surface for a long time, or by
aggressive detergents containing phosphorus. After
cleaning, rinse well and dry thoroughly. Any
remaining drops of water should also be dried.
+leaning the glass ceramic hob
Do not use abrasive or corrosive detergents (for example,
products in spray cans for cleaning barbecues and ovens),
stain removers, anti-rust products, powder detergents or
sponges with abrasive surfaces: these may scratch the
surface beyond repair.
It is usually sufficient simply to wash the hob using
a damp sponge and dry it with absorbent kitchen
roll.
If the hob is particularly dirty, rub it with a special
glass ceramic
dry thoroughly.
To remove more stubborn dirt, use a suitable
scraper (this is not supplied with the appliance).
Remove spills as soon as possible, without
for the appliance to cool, to avoid residues forming
crusty deposits. You can obtain excellent results by
using a rustproof steel wire sponge - specifically
designed for glass ceramic sur
soapy water.
If plastic or sugary substances have accidentally
been melted on the hob, remove them immediately
with the scraper, while the surface is still hot.
Once it is clean, the
special protective maintenance product: the
invisible film left by this product protects the
surface from drips during cooking. This
maintenance should be carried out
appliance is warm (not hot) or cold.
Always remember to rinse the appliance well with
clean water and dry it thoroughly: residues can
become encrusted during subsequent cooking
processes.
cleaning product, then rinse well and
waiting
faces - soaked in
hob may be treated with a
while the
Inspecting the oven seals
Check the door seals around the oven regularly. If the
seals are damaged, please contact your nearest Aftersales Service Centre. We recommend that the oven is
not used until the seals have been replaced.
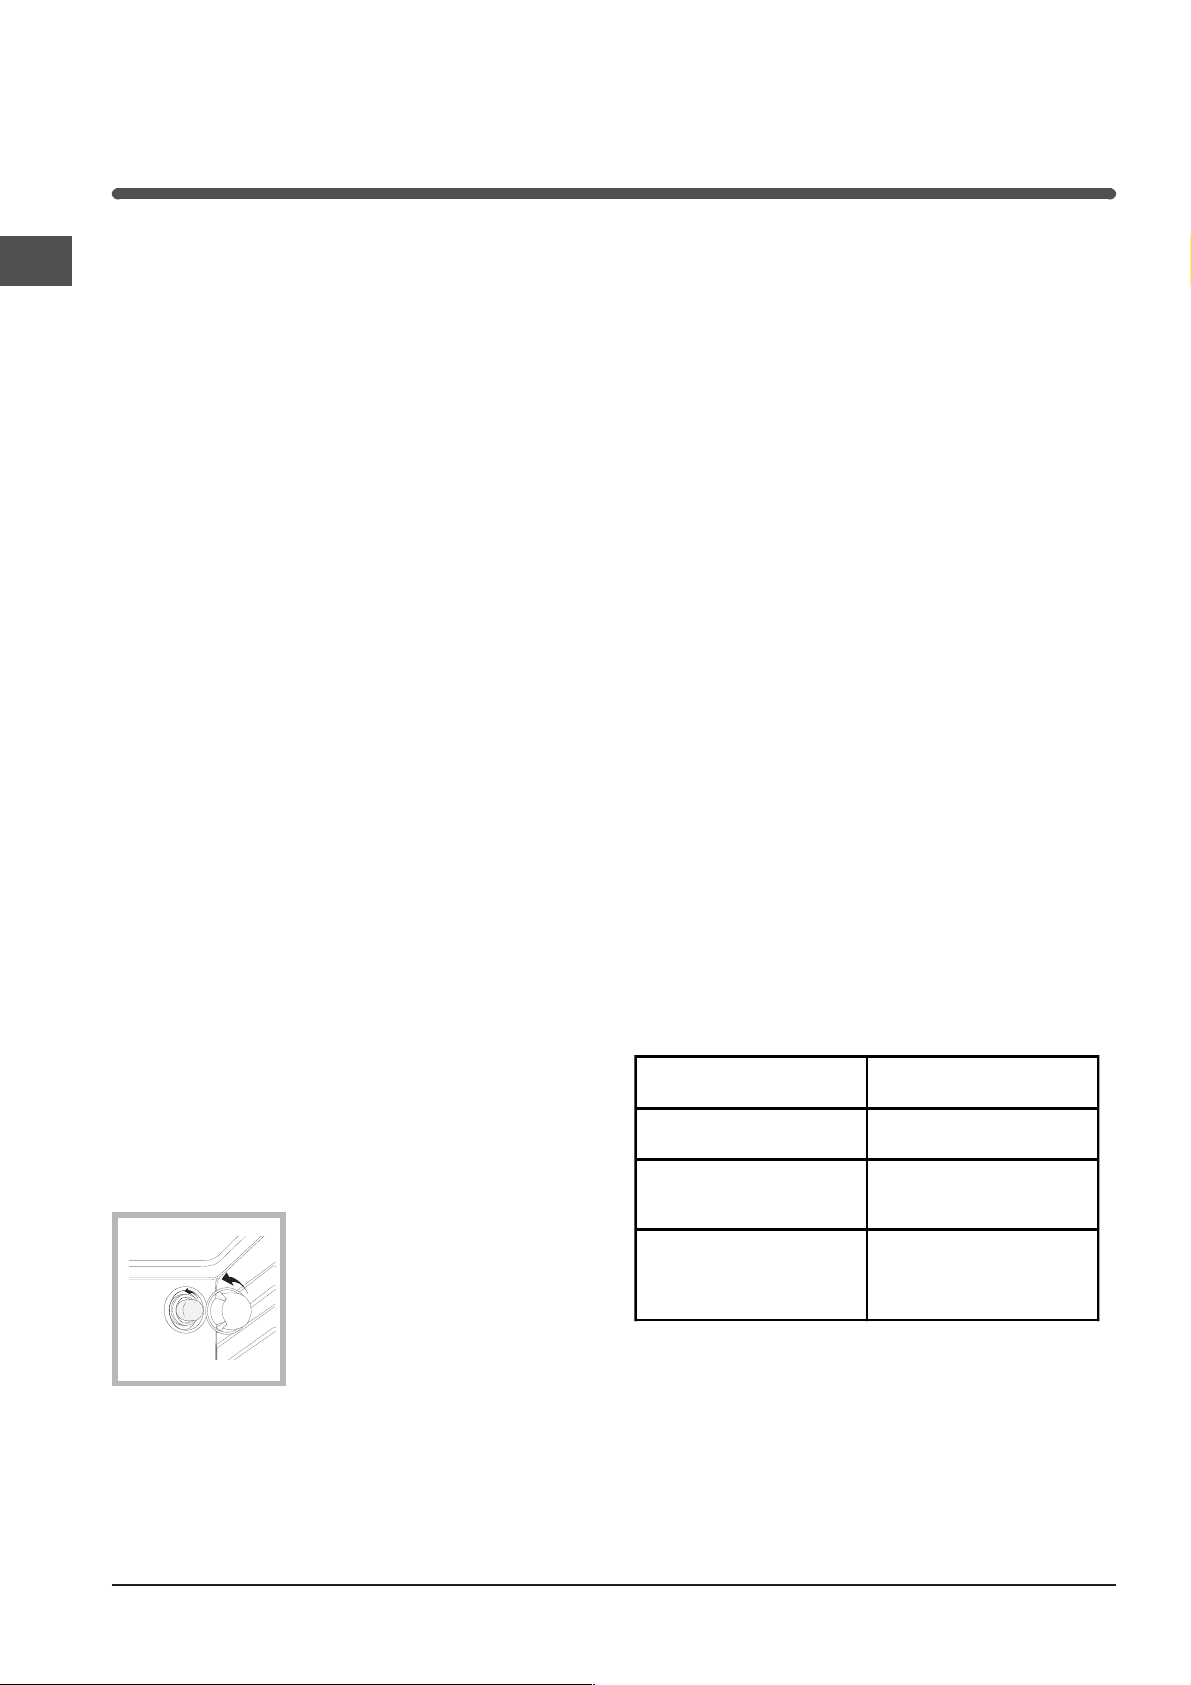
Replacing the oven light bulb
1. After disconnecting the oven
from the electricity mains,
remove the glass lid covering
the lamp socket (see figure).
2. Remove the light bulb and
replace it with a similar one:
voltage 230 V, wattage 25 W,
cap E 14.
3. Replace the lid and reconnect the oven to the
electricity supply.
10
Glass ceramic hob cleaners Available from
Window scraper Razor blade
scrapers
Replacement blades DIY Stores,
COLLO luneta
HOB BRITE
Hob Clean
SWISSCLEANER
DIY Stores
supermarkets,
chemists
Boots, Co-op stores,
department stores, Regional
Electricity Company shops,
supermarkets
Assistance
Please have the following information to hand:
The appliance model (Mod.).
The serial number (S/N).
This information can be found on the data plate located
on the appliance and/or on the packaging.
Page 11
GB
11
Page 12

GB
11/2007 - 195044862.03
XEROX BUSINESS SERVICES
12
 Loading...