

INDESIT IDL 42 SK User Manual

IDL 42
Dishwasher
Installation and use
Geschirrspuler
Installations und Gebrauch
Oppvaskmaskin
Instruksjoner for installasjon og bruk
Diskmaskin
Instruktioner för installation och användning
Opvaskemaskine
Instruktioner vedrørende installation og brug
Astianpesukone
Asennus- ja käyttöohjeet

IDL 42
GB
DE
NO
SE
DK
FI
Dishwasher 1
Instructions for installation and use
Geschirrspuler
Informationen für Installation und Gebrauch
Oppvaskmaskin 21
Installasjon og bruk
Diskmaskin 31
Installation och användning
Opvaskemaskine 41
Installation og brug
Astianpesukone 51
Asennus ja käyttö.
11
Safety, a good habit to get into
WARNING
Read the instructions contained in this manual carefully, as
they will provide you with important information on safety
when installing, using and servicing your appliance.
This dishwasher conforms to the following
European Community Directives:
- 73/23/CEE (Low Voltage Directive) and subsequent
amendments;
- 89/336/CEE (Electromagnetic Compatibility) and
subsequent amendments.
- 97/17/CE (Labelling)
1.Remove the packaging carefully and dispose of it.
2.After removing the packaging, check to make sure your
appliance is intact. If in doubt, contact a qualified professional.
3.This dishwasher must only be used by adults and for washing
household dishes.
4.Essential rules you should follow when using your appliance:
- do not touch the appliance with wet hands or feet or barefoot,
- we advise against the use of extension leads and multiple
plugs,
- during installation, the power supply wire must be completely
free of bends or large dangerous kinks,
- if the appliance is not operating properly or if maintenance
operations are necessary, disconnect the dishwasher from the
mains power supply.
5.Keep children away from the dishwasher when it is open
and keep detergents out of their reach.
6.Your dishwasher is not to be installed outdoors, not even if
the area is covered by a roof, and it is extremely dangerous to
leave it exposed to rain and thunderstorms.
7.Do not touch the heating element during or straight after a
wash cycle.
8.Do not lean or sit on the door when it is open, as this could
overturn the dishwasher.
9.If the appliance malfunctions, turn off the water inlet tap
and disconnect the plug from the wall socket. Then try to consult
the chapter entitled “Is there a problem?” and if you can’t find
a solution there, then call for assistance.
10.Out of use appliances must be made inoperable, by cutting
the power supply wire and damaging the door lock.
To guarantee the efficiency and safety of this appliance:
l only contact authorized technical assistance
service centres
l always ask that original spare parts be used
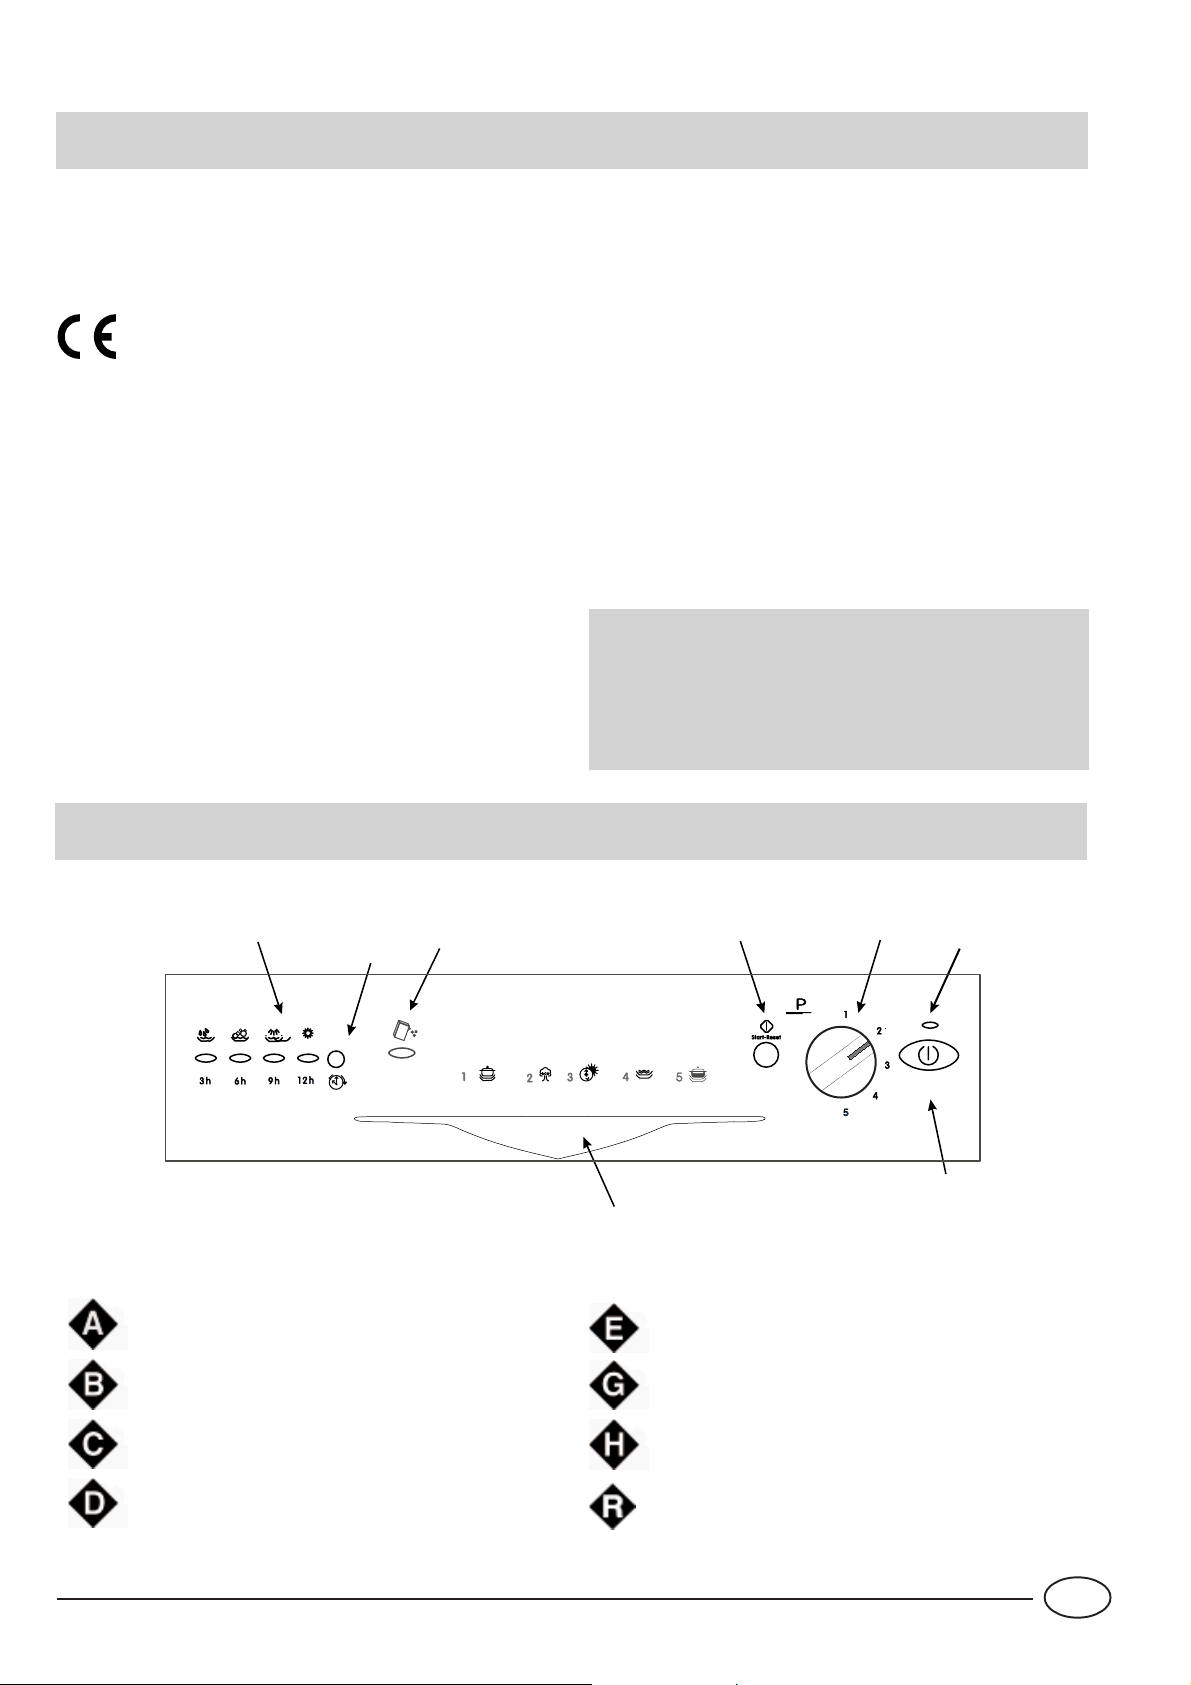
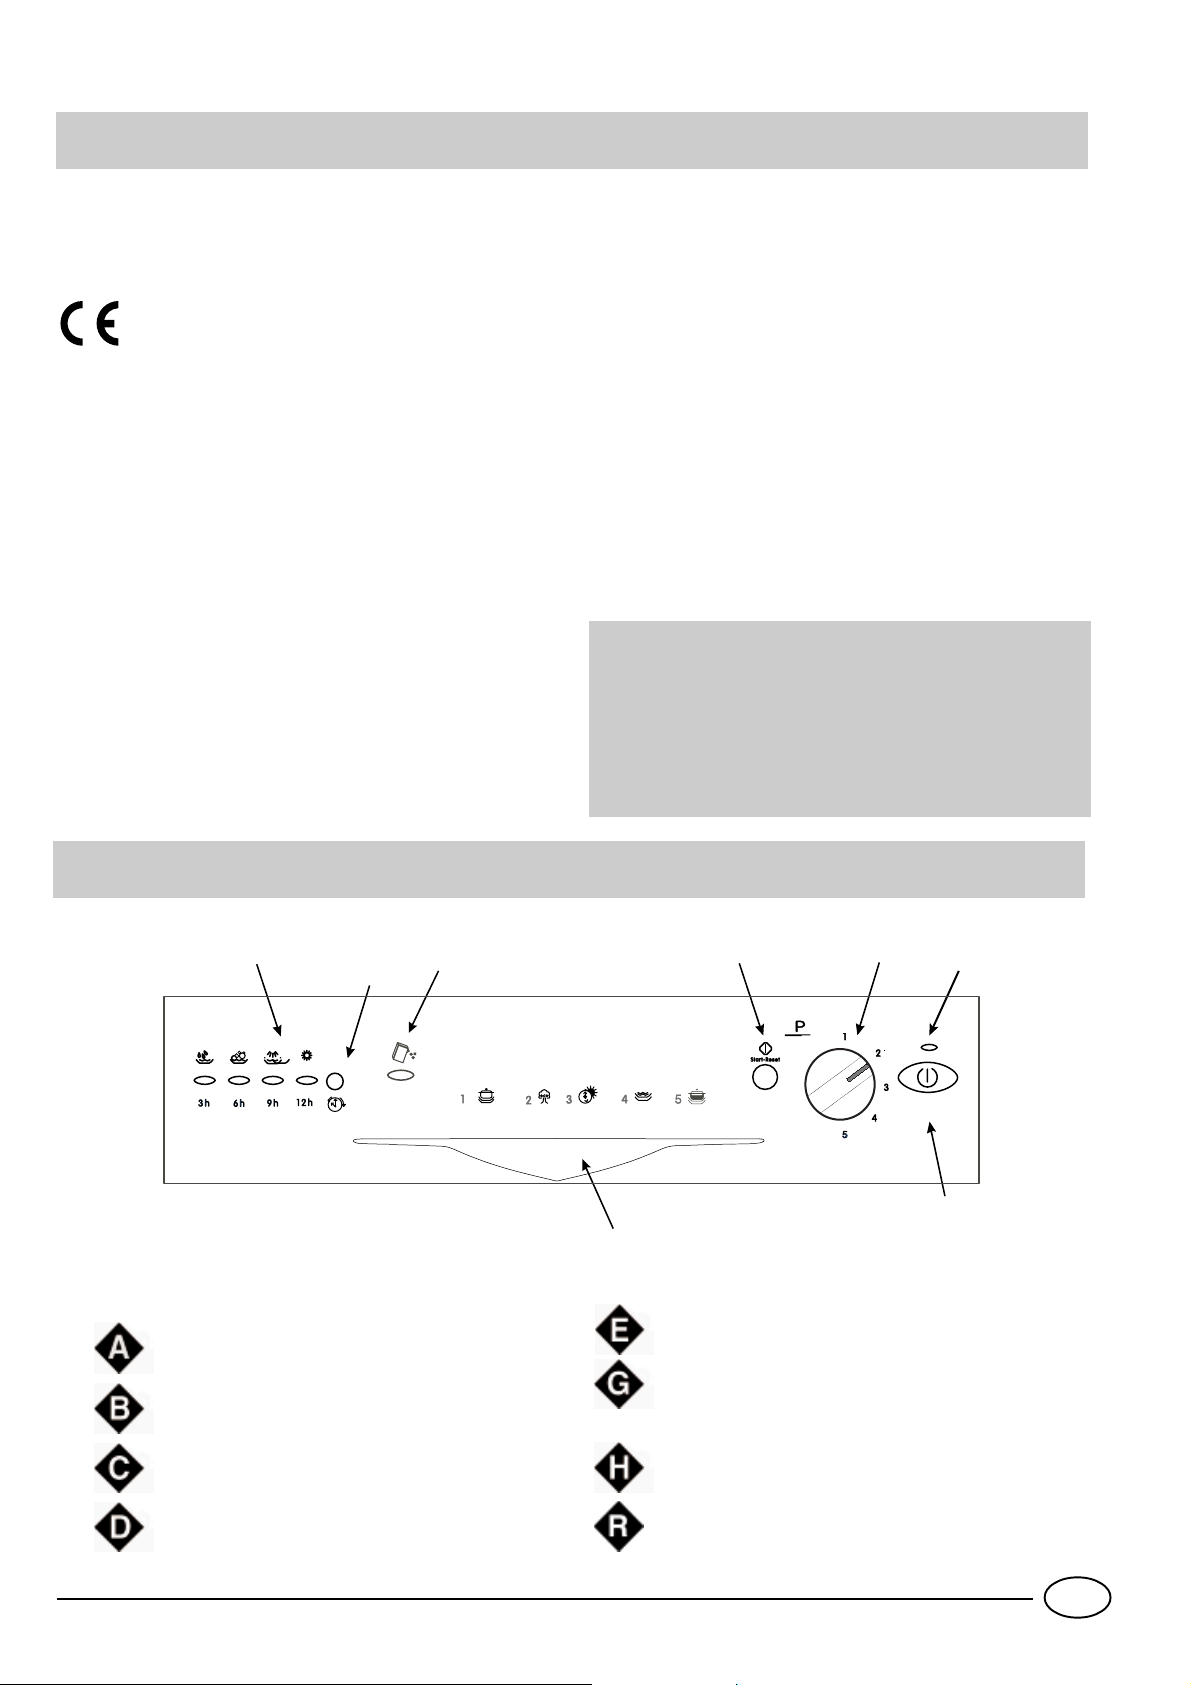
Close-up view (control panel)
G
H
ON-OFF Button
ON-OFF Indicator light
E
R
C
Low salt indicator light
Cycle phase and delayed start indicator lights
D
B
A
Door handle
Cycle selection knob
Delayed start select button
Start/Reset Button
1
GB
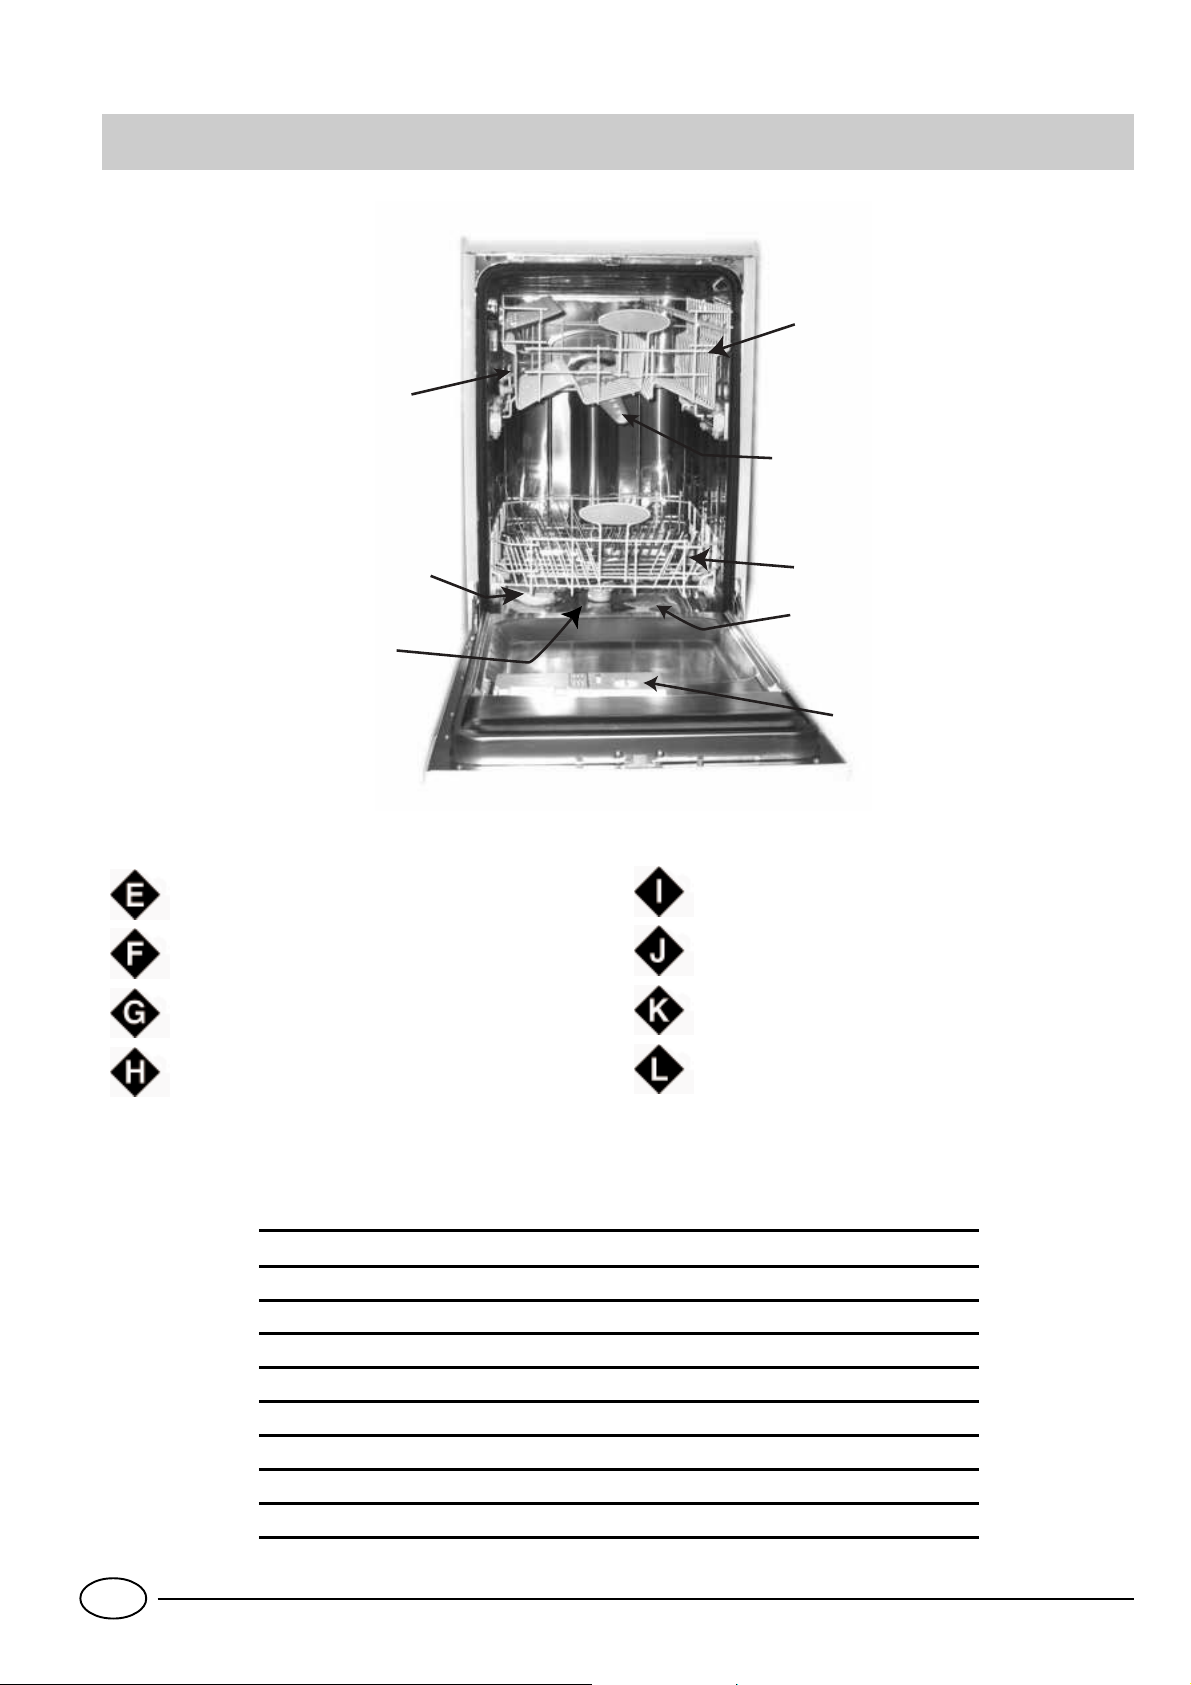
Close-up view (Inside)
G
E
F
I
Upper rack
T op sprayer arm
Rack height adjuster
Lower rack
J
H
K
L
Bottom sprayer arm
Salt container cap
Washing filter
Detergent and rinse aid dispenser
GB
Tech n ical chara cteristics
Width cm. 45
Depth cm. 60
Height cm . 85
Capacity 9 standard place settings
M ains wa ter pressure 4,3 psi - 145 psi 30KPa÷ 1M Pa (0,3 ÷10 bar)
Power voltage See data plate
Total absorber power See data plate
Fuse See data plate
2

Salt …
Salt
Water hardness varies according to where you live. If hard
water were to enter your dishwasher, scaly incrustations
would form on your dishes.
Thanks to a water softener which uses special dishwasher
salt, the limescale in the water is eliminated.
Loading salt into the water softener
Always use salt which is intended for dishwasher use.
The salt container is
situated underneath the
lower rack and should be
filled up as follows:
1.Pull out the lower rack
completely, unscrew and
remove the container cap.
2.If it is the first time you
load the salt container, fill
it up with water.
3.Put the funnel provided
on the hole and pour in
approximately two kilos of
salt. It is normal if some water comes out of the container.
4. Screw the cap back in place carefully.
Adjusting the salt consumption
Your dishwasher can adjust its
salt consumption according to
the hardness of the water used
in order to optimise and
customise the dishwasher’ s salt
consumption to the minimum
level necessary.
Y ou can find out what the level
of water hardness in your area
is from the company that
supplies the water there.
T o make the adjustment, follow
the instructions below:
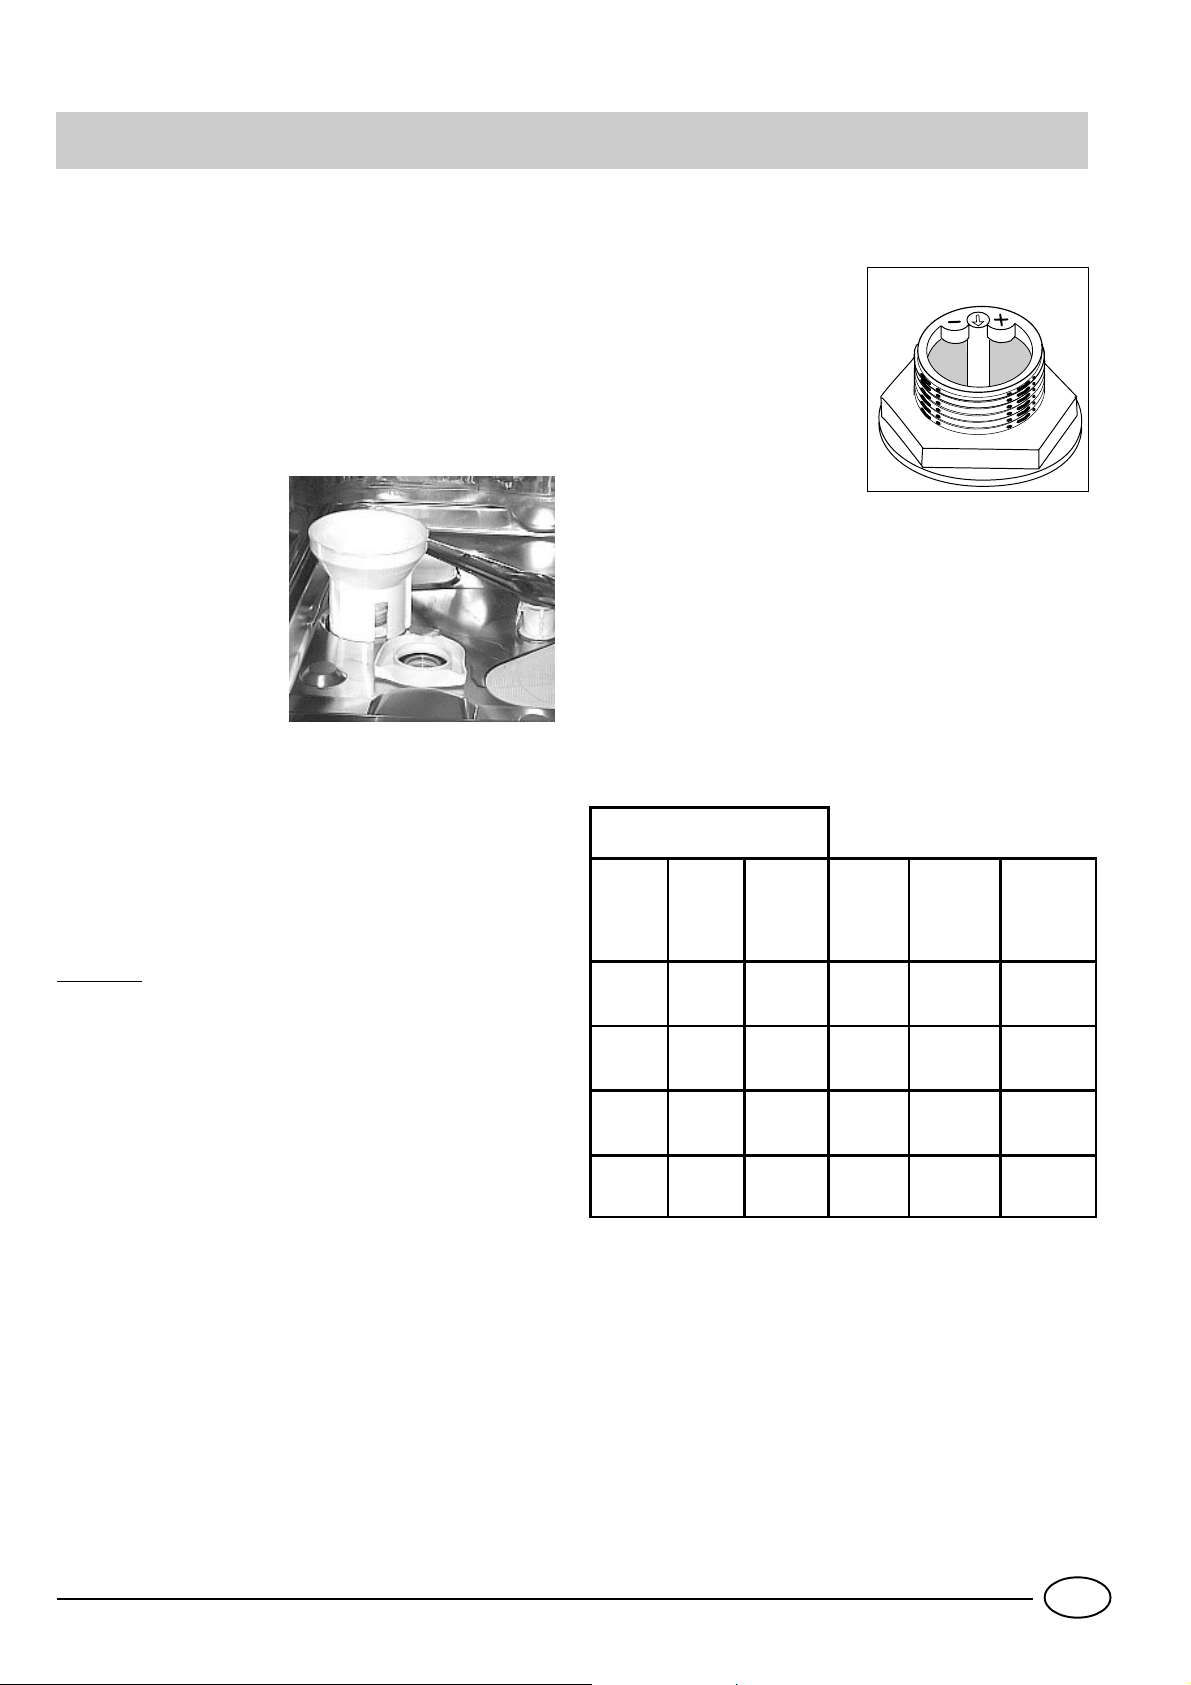
1. unscrew the salt container cap
2. there is an arrow on the neck of the container (see figure
on the right); if necessary , turn the arrow anti-clockwise from
the “-” setting to the “+” setting according to the hardness
of the water supplied.
We recommend you make the adjustment accor ding to the
following table:
Water Hardness
The salt container should be filled up when the low
salt indicator light “E” flashes.
Once you have loaded the salt for the first time, it is normal
that the low salt indicator light stays on or flashes for about
5 consecutive cycles.
Warning:To prevent rust from forming, load the salt just
before beginning a wash cycle.
Salt
Clarke
degrees
0 - 14 0 - 17 0 -1,7 / 0 /
14 - 36 18 - 44 1,8 - 4,4 "-" 20 60
36 - 71 45 - 89 4,5 - 8,9 MED 40 40
>71 > 89 > 8,9 "+" 60 25
°fH mmol/l
Selector
position
consumption
(grams/cycle)
Autonomy
(cycles\2kg)
3
GB
Detergent and rinse aid ….
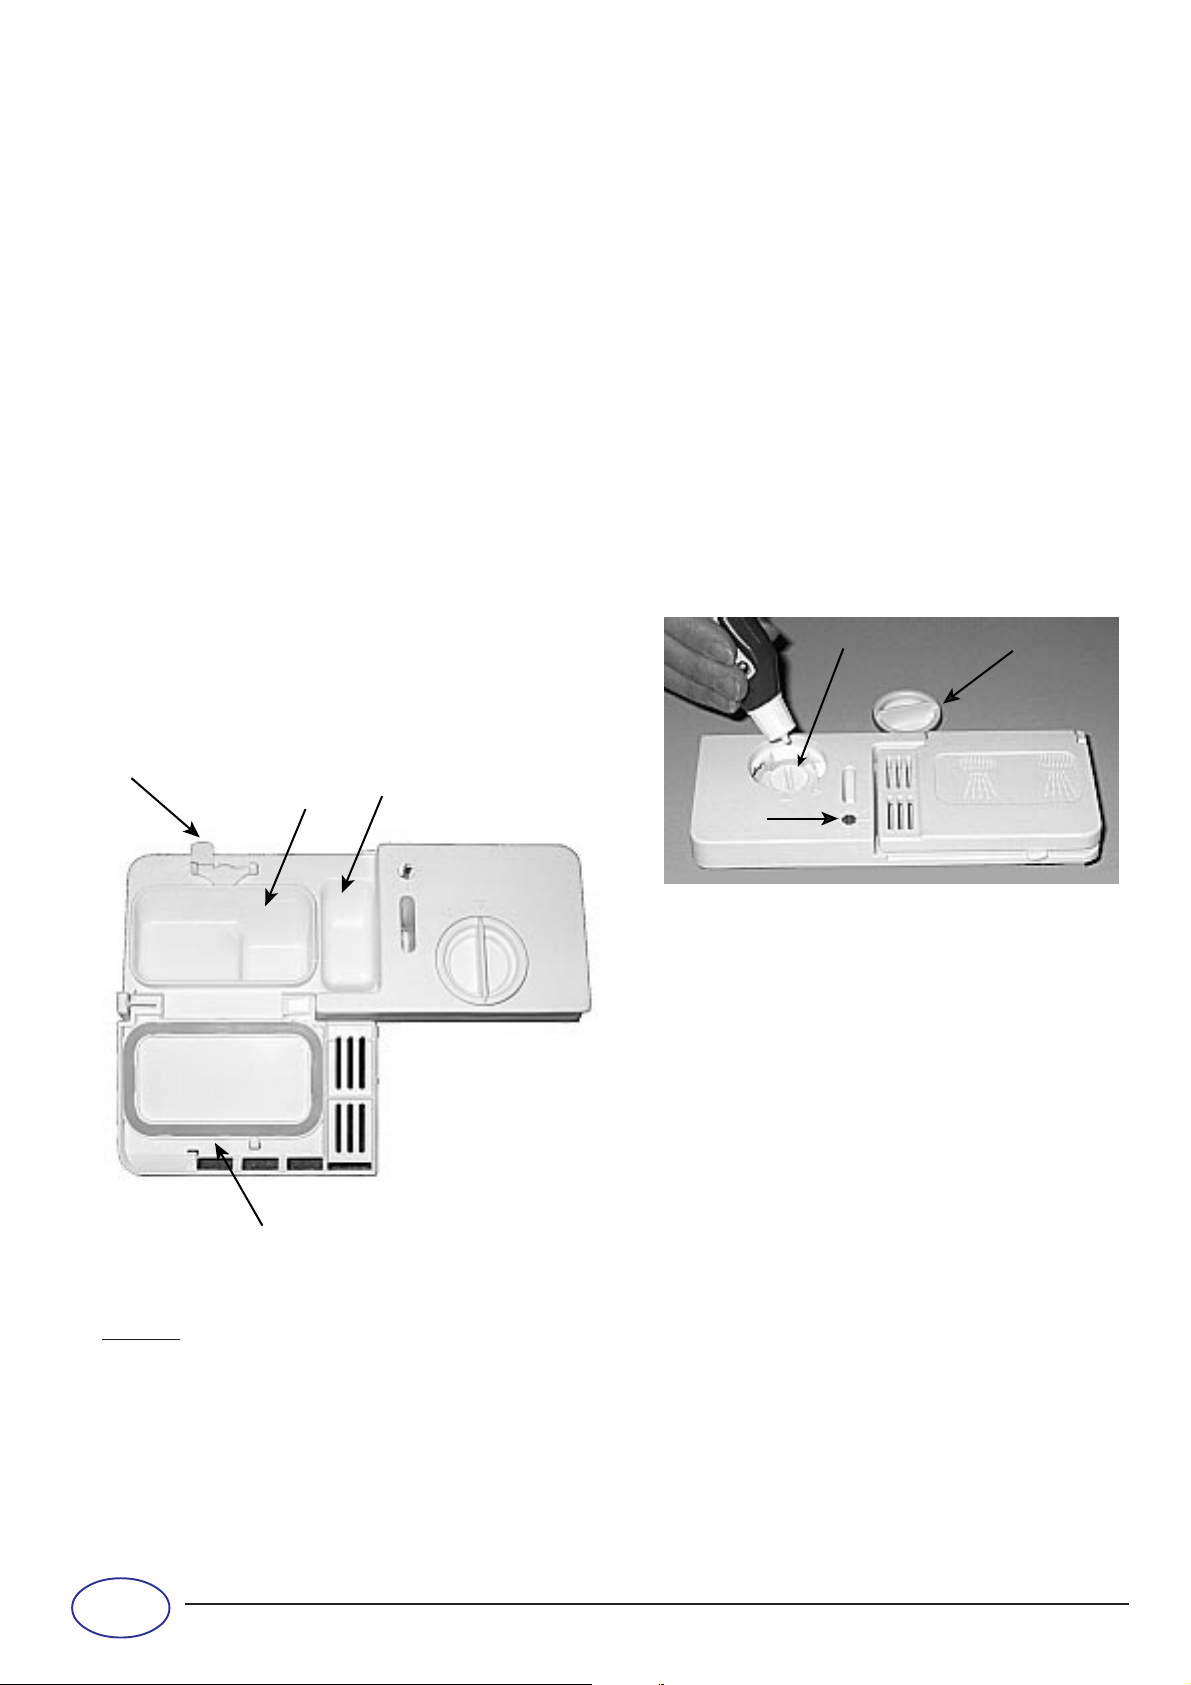
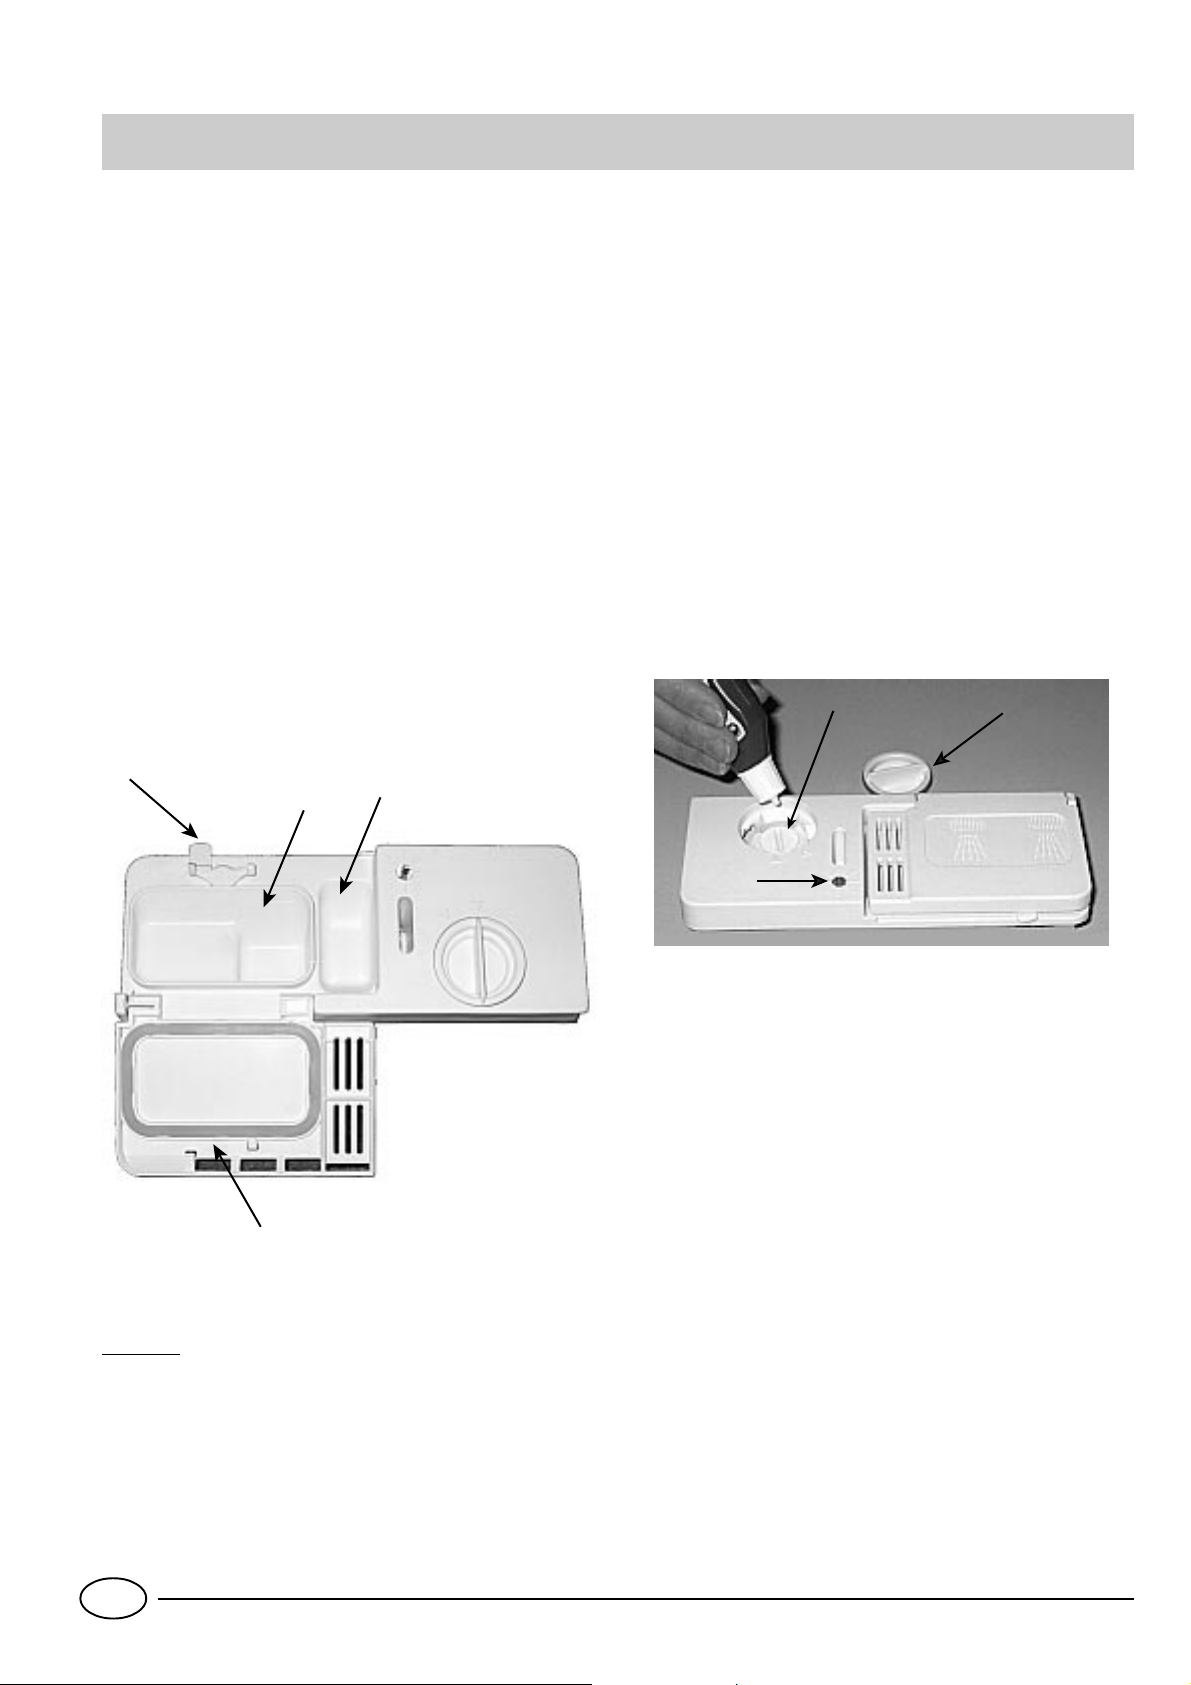
The detergent
Only use specific dishwasher detergents. The detergent
dispenser must be filled before each wash cycle begins
according to the instructions given in the “Wash cycle table”.
The detergent dispenser is situated on the inside of the
appliance door .
Loading the detergent
T o open lid “A”, press button “B”. The detergent should be
poured into the two containers “C” and “D” up to the rim.
After pouring in the detergent, replace the lid, pressing down
until it clicks.
Dishwasher detergent in tabs is now available on the market,
in which case you should place one tab into container “D”
and replace the lid.
To make sure the lid shuts properly, remove any
detergent residue from the edges of the container
before closing it.
B
D
C
The rinse aid
This product makes dishes sparkle more as it improves their
drying. The rinse aid container is situated on the inside of
the door. You should refill it when you see the container is
empty by means of indicator light “D”.
(If your dishwasher is fitted with a “low rinse aid” indicator
light, fill the container up when the indicator light flashes or
lights up).
Loading the rinse aid
T o open the dispenser, turn cap “C” anticlockwise and take
care when you pour in the rinse aid to avoid it overflowing.
You can adjust the amount of rinse aid used by the
dishwasher, by using a screwdriver to regulate the dosage
adjuster “F” you will find under lid “C”. There are 6 possible
settings; it is normally set to 4.
F
C
D
24 gr
.
3 gr.
Important:
Adjusting the rinse aid supply improves drying.
If drops of water remain on the dishes or spotting occurs,
turn the dosage adjuster to a higher setting. If, on the other
hand, the dishes have white streaks, then turn the dosage
adjuster down to a lower setting.
A
Warning
Three-in-one dishwasher tablets are now available on the market, and combine the detergent, salt and rinse aid all in one. If the
water in your area is hard or very hard, we still recommend you pour extra salt into the relevant dispenser to prevent the
formation of white streaks on your dishes or on the appliance interior .
Add rinse aid to the corresponding container only if you are dissatisfied with the results on your dishes.
In any case, please read the manufacturer’s instructions provided on the packet.
GB
4
Loading the dishes
Before placing the dishes in the racks, remove the largest
scraps of food left over on your plates, you will thus avoid
blocking the filter , which would r educe the efficacy of the
wash.
If the saucepans and frying pans are very dirty , allow them
to soak before being washed.
You will thus avoid having to wash them again.
To make it easier to load your dishes, pull the racks out
fully.
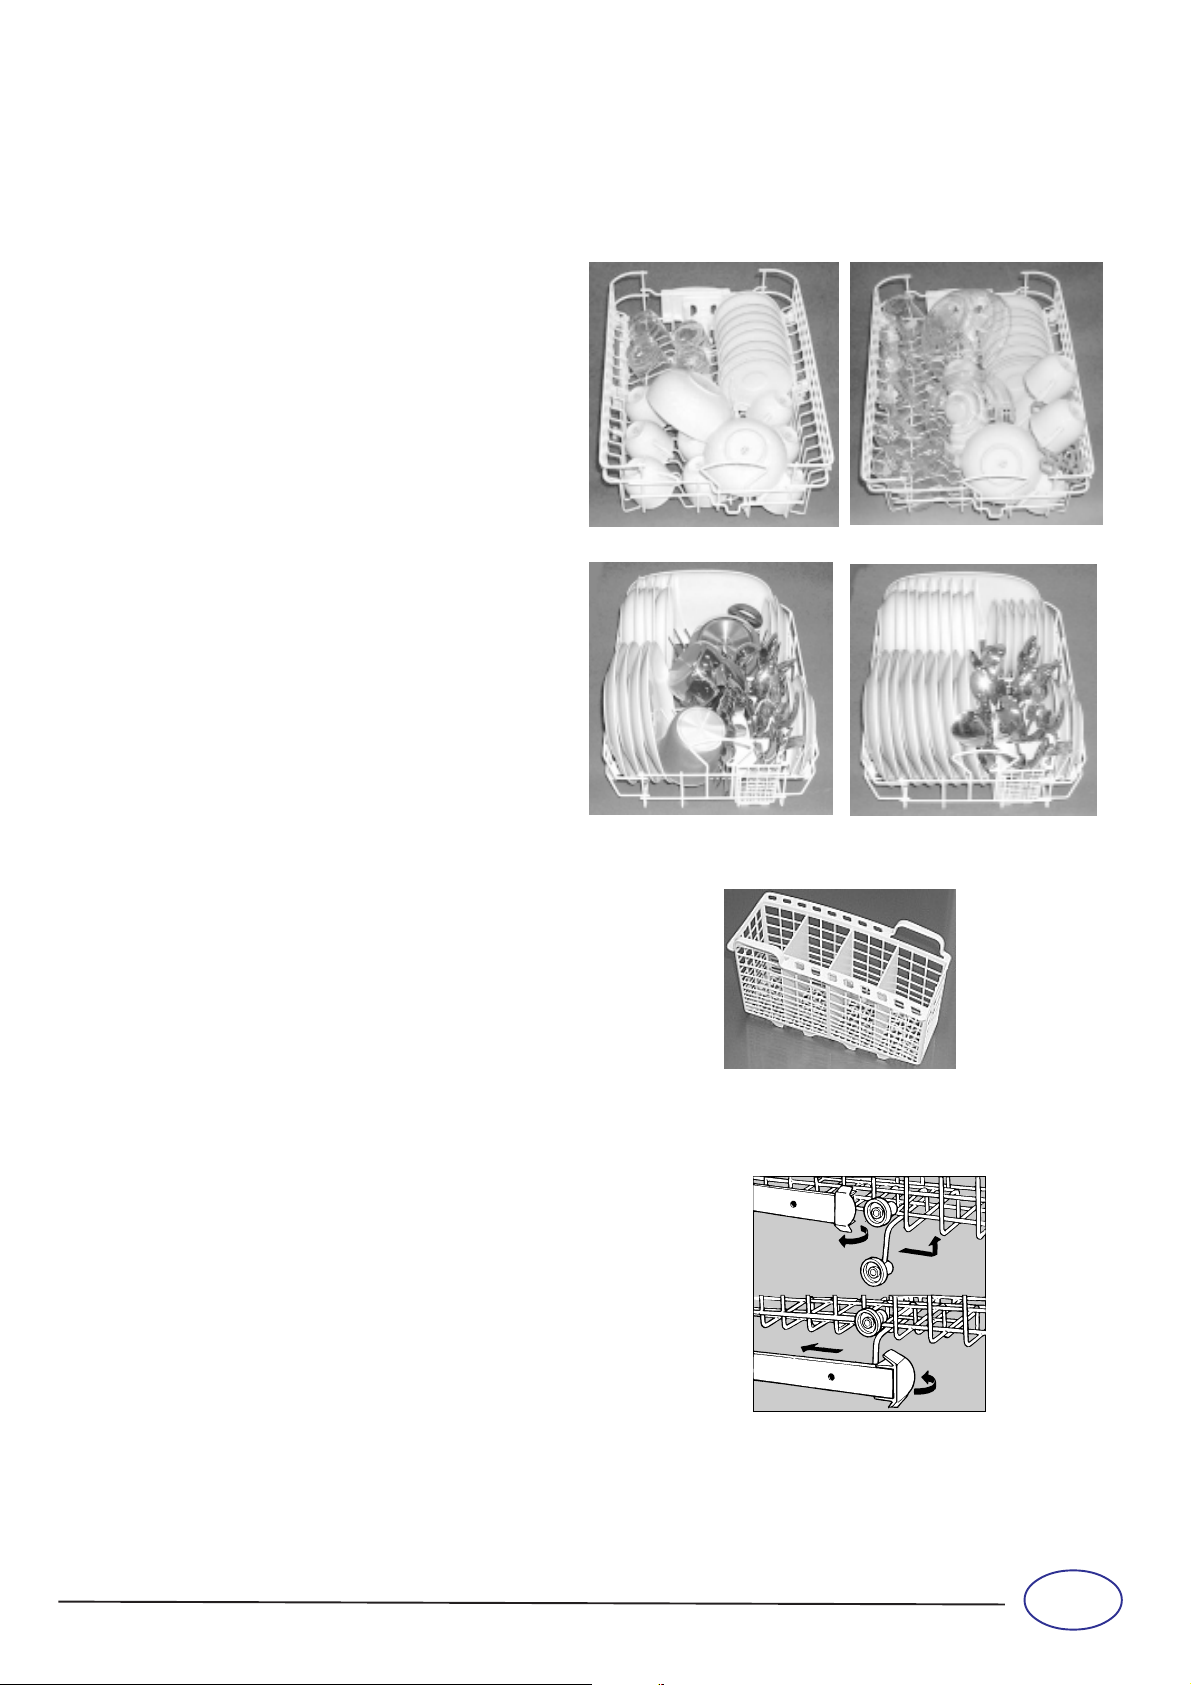
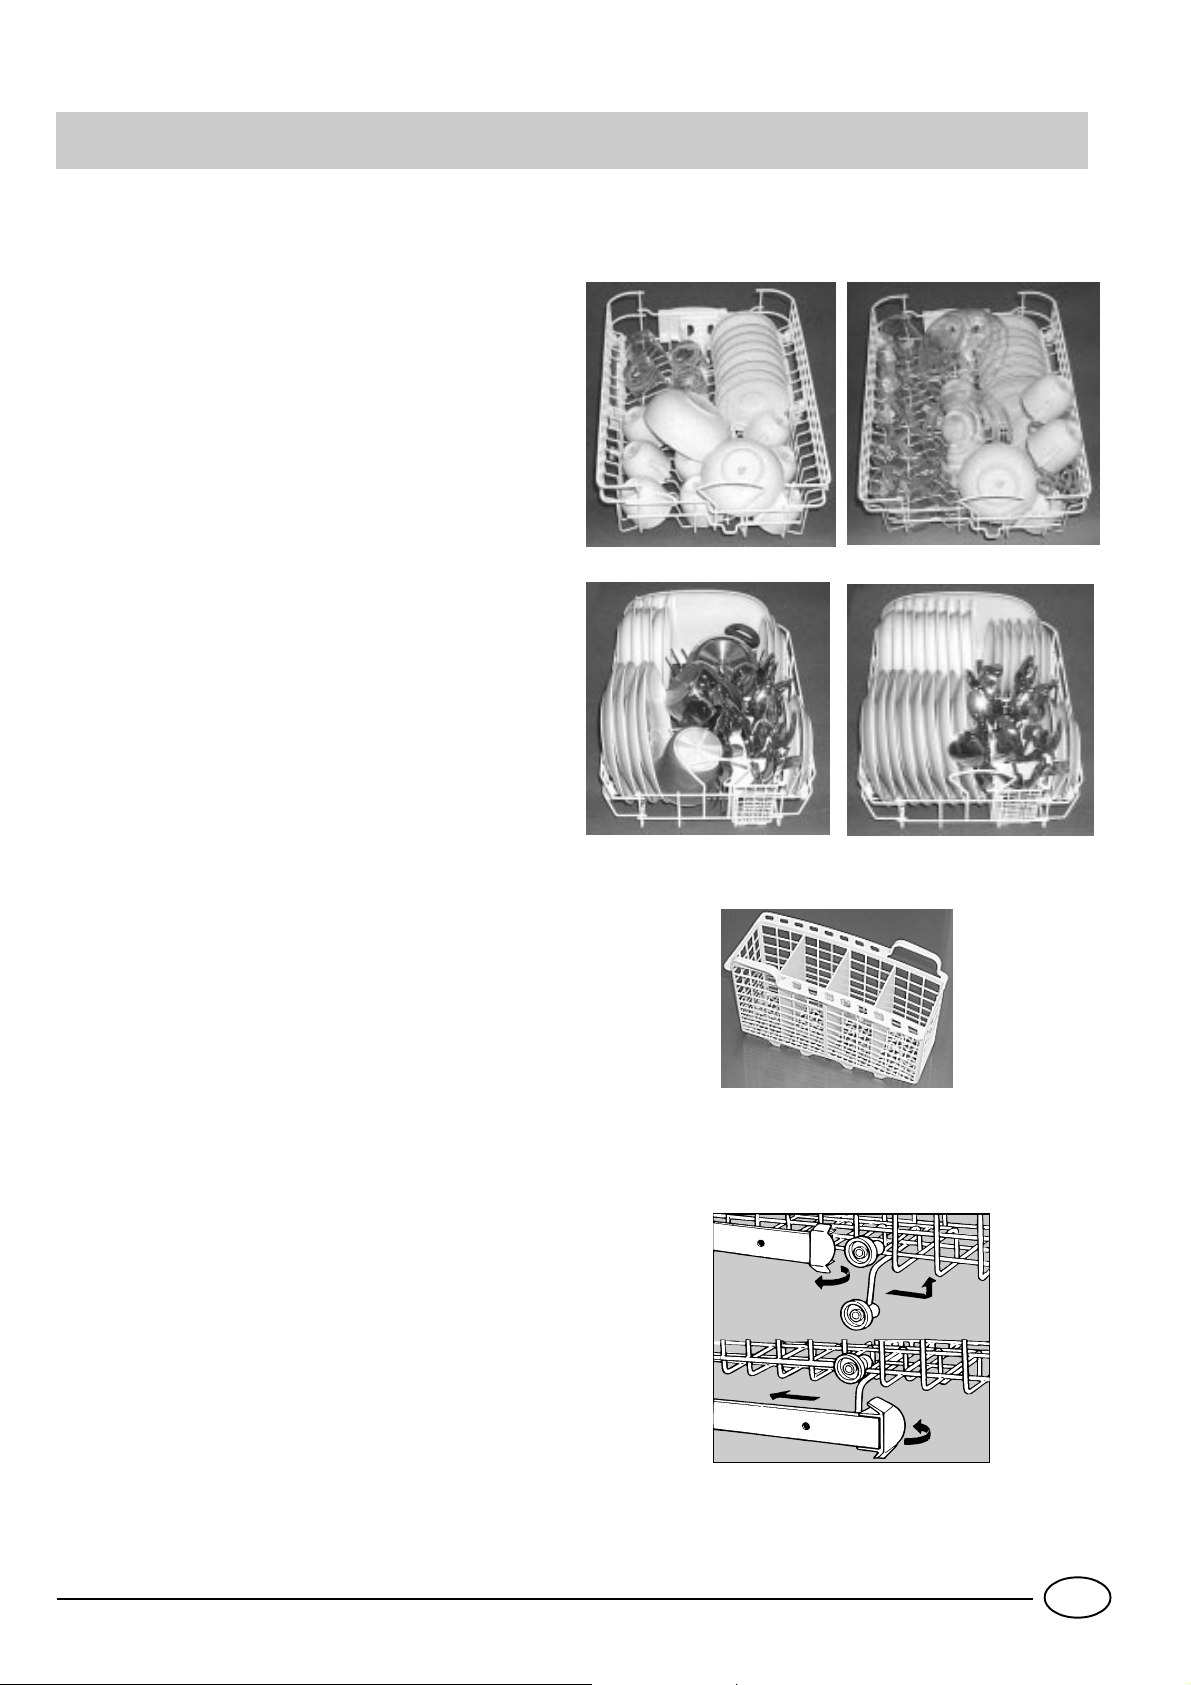
How to use the lower rack
We recommend you place the most difficult dishes to wash
into the lower rack:
pans, lids, dinner plates and soup plates as illustrated in
the figure to the left.
Serving dishes and large lids should preferably be placed
on the sides of the rack, without for that matter obstructing
the rotation of the top sprayer arm.
- pans, salad bowls etc. must always be placed upside down
- very deep dishes should be placed obliquely , thus allowing
water to run down them freely.
Lower rack
Load examples
Upper rack
- Insert the cutlery into the basket: knives and utensils
with sharp blades or tips should be positioned with the
sharp parts at the bottom. Position all cutlery items so that
they don't touch.
If the rack has side baskets, the spoons should be loaded
individually into the appropriate slots (see fig. A).
- Especially long utensils should be placed in the horizontal position at the front of the upper rack.
How to use the upper rack
Place delicate and lightweight dishes in the upper rack:
glasses, tea cups and coffee cups, saucers - but plates too
- shallow salad bowls, slightly dirty frying pans and shallow
pans (the photo illustrates a few examples).
Position lightweight dishes in such as way as to avoid their
being moved by the spray of water .
After loading the dishes, remember to check that the blades
on the sprayer arms can turn freely without knocking
against any dishes.
How to adjust the upper rack ….
The upper rack can be set in a high or low position. To do
so, open the rail stop flaps and pull the rack out completely;
now place it with the back wheels in high or low position,
then slide it along the guide rails until the front wheels
also go in; now close the rail stop flaps (see fig. F).
Fig. A
Fig. F
1
3
2
4
5
GB

How to start the dishwasher
How to start a wash cycle…
After performing all the operations described in the previous chapters,
turn the water tap on completely , press ON-OFF button “A” situated
on the control panel and indicator light “B” comes on.
At this point, the dishwasher is on and ready to be programmed.
Starting and selecting the cycle.
T urn the cycle selector knob “D” clockwise until the reference notch
on the knob corresponds with the number or symbol for the cycle
you wish to set (consult the wash cycle table on page 7, especially
when first using the appliance).
If the appliance door is shut, press the Start button “R” and you will
hear a beep; the cycle will start up within a few seconds.
Cycle phase indicator lights
The dishwasher is provided with 4 indicator lights “G” which come
on in sequence as the appliance is performing that specific phase of
the wash cycle.
These phases are:
pre-wash, wash, rinses, drying
Cancelling or modifying a wash cycle in progress…..
Premise: Y ou can cancel the wash cycle in progress, if it has only just
started.
To modify a wash cycle, keep the RESET button “R” pressed for
about 5 seconds: a prolonged beep will sound, followed by three
short beeps. Indicator light “G” will turn off and at this point, all the
settings will have been cancelled.
To select a new wash cycle, repeat the operations illustrated in the
paragraph entitled “starting and selecting the cycle”.
Warning: the knob must be turned clockwise from wash cycle 1 to
5, an anti-clockwise from wash cycle 5 to 1.
How to set the delayed start
When you have loaded the dishes, you can choose when to start
your dishwasher before setting the wash cycle desired. Press button
“H” to delay the start of the wash cycle by 12, 9, 6 or 3 hours. Each
time you press it, you will hear a short beep and the indicator light
“G” corresponding to the selected delay will light up.
Now you can select the desired wash cycle. Press the start button
“R” and after you hear the beep, the countdown to the delayed
start will begin.
Once this time is up, the indicator light will stop flashing and the
wash cycle will begin.
If you have set a 12 hour delay , for example, once you have selected
the wash cycle, the 12 hour indicator light will flash, followed by
the others in sequence until the set time delay is up. A quick look at
the indicator lights will keep you informed of the countdown progress
at all times.
Have you changed your mind?
If you change your mind, you can set a shorter time delay: press
button “H” to select it. You need not reset the wash cycle.
If on the other hand you want to cancel the delay set and you want
the cycle to start immediately , pr ess button “H” repeatedly until the
cycle starts and indicator light “G” corresponding to the cycle start
phase comes on.
Dual function of indicator lights “G”
1) flashing to indicate a delayed start:to remind you that you
have set a delayed start;
2) on and not flashing beneath the cycle phase symbol:
meaning the cycle has started and is in the phase indicated by the
symbol.
If you have left out a dish…
You can interrupt a wash cycle by pressing the ON- OFF button,
then place the dishes you had left out into the appliance, which will
start up from where it was interrupted when you turn it back on.
There’s been a power failure? Have you opened the
dishwasher door?
The wash cycle stops and then restarts when the electricity comes
back on or when the door is shut.
At the end of the wash cycle….
The end of the wash cycle is indicated by two short beeps and the
flashing of the drying phase indicator light.
• Press button “A” to turn the appliance off.
• Turn off the water tap.
• Wait a few minutes before unloading the dishes: if you wait a little
while they dry better thanks to the steam.
• Empty the lower rack first.
Warning:when you open the dishwasher door after the wash cycle
has just ended or is under way, take care not to scald yourself with
the hot steam.
GB
6
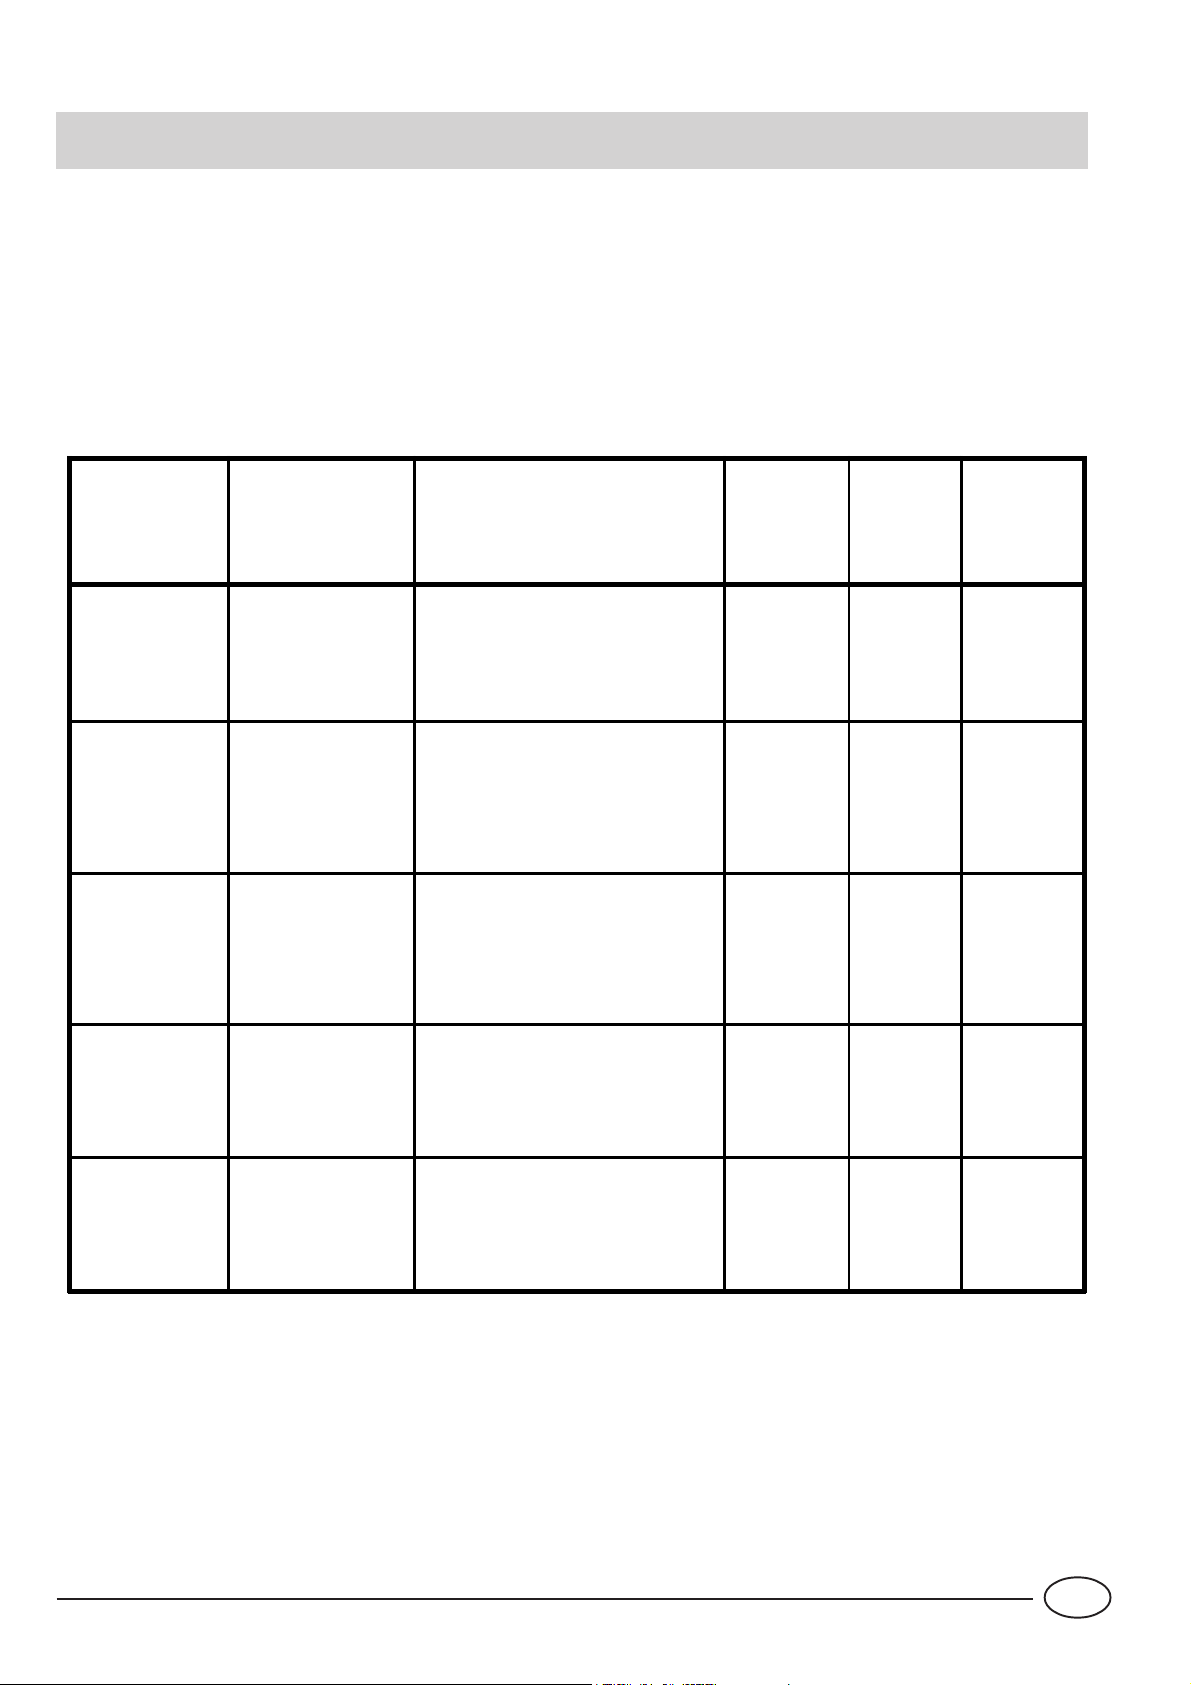
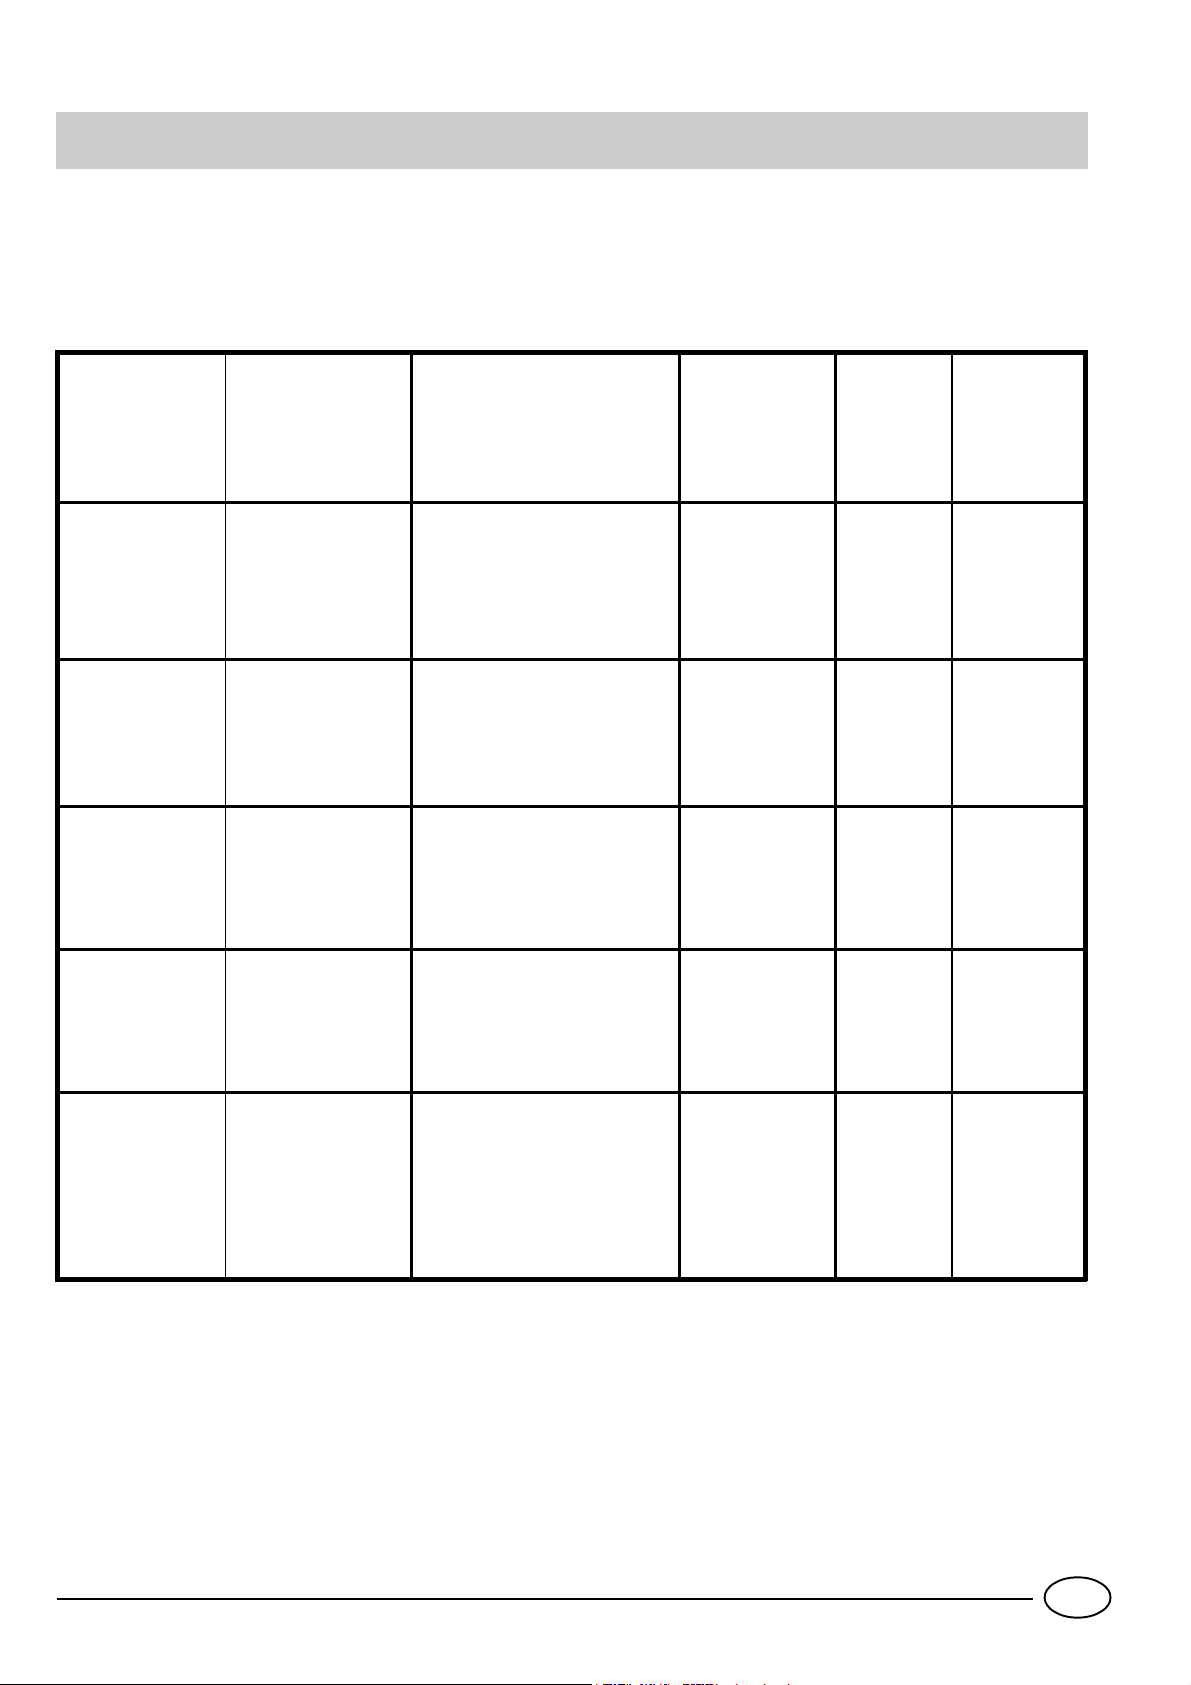
Wash cycle table
Dishwasher washing guarantees your dishes will be cleaned in a hygienic setting for
safer, cleaner results.
&\FOH
7LPH<RX
(FR
5DSLG
'U\
6RDN
&\FOHVHOHFWLRQ
LQVWUXFWLRQV
N o rmally dir t y p ans
and dishes. Standard
daily cycle.
Environmentally-friendly cycle, with low
ener gy c ons umpt io n
le vels, su it able for
nor ma lly dir t y p a ns
and dishes.
Economic and fast
cycle to be used for
slig htly dirty dishes.
Run cycle immediately
after use.
Preliminary wash cycle
for dishes and pans
awaiting completion of
the load with the dishes
from the next me a l.
&\FOHGHVFULSWLRQ
Wash at 60°C.
Cold rinse
Hot rinse at 70°C
Drying
2 p re -wa s hes with cold wa te r
Wash at 50°C
Hot rinse at 65°C
Drying
Short wash at 47°C
Rinse at 65°C
Drying
Short cold wash to prevent food from
drying onto the dishes.
'HWHUJHQW
SUHZDVK
ZD V K
J
J
J
5LQVH$LG
:DVKF\FOH
GXUDWLRQ
WROHUDQ FH
,QWHQVLYH
Very dirty dishes and
pans (not to be used
fo r delicate items ).
Pr e -was h with ho t wa t e r a t 4 0 ° C
Wash at 65°C
2 cold rinses
Hot rinse at 65°C
Drying
7
J
GB

Tips to help you save
- It is important that you try to use the dishwasher with a full
load only in order to optimise consumption levels; in the
meantime use the soak cycle to avoid the formation of bad
odours and caked-on food.
- Select the most suitable wash cycle: the choice of wash
cycle depends on the type of dishes to wash and on how
dirty they are.
- Use the right amount of detergent: if you use too much,
you will not get cleaner dishes, but just more environmental
pollution.
- There is no need to rinse the dishes before placing them
inside the dishwasher.
How to keep your dishwasher in shape
After every wash
After every wash, turn off the water tap and leave the
dishwasher door ajar, so that moisture and bad odours are
not trapped inside.
Unplug the appliance
Before carrying out any cleaning or maintenance on the
dishwasher, always remove the plug from the electricity
socket: this way you will avoid the risk of any danger.
No solvent or abrasive cleaning products
Do not use solvents or abrasive cleaning products to clean
the exterior and rubber parts of your appliance. Use a cloth
dampened with lukewarm soapy water only.
To remove any stains from the surface of the appliance
interior , use a cloth dampened with water and a little white
vinegar or a cleaning product specifically made for
dishwashers.
If you are off on holiday
When you go on holiday, we recommend you run a cycle
with the dishwasher empty , then unplug it, turn off the water
inlet tap and leave the dishwasher door ajar: this will help
the seals last longer and prevent unpleasant odours from
forming inside the appliance.
If you are moving home
Should the appliance have to be moved, try to keep it in a
vertical position.; if absolutely necessary , it can be positioned
on its back.
The seals.
One of the factors that cause unpleasant odours to form
inside the dishwasher is food that remains trapped in the
seals. Periodic cleaning using a damp sponge will prevent
this from occurring.
GB
8
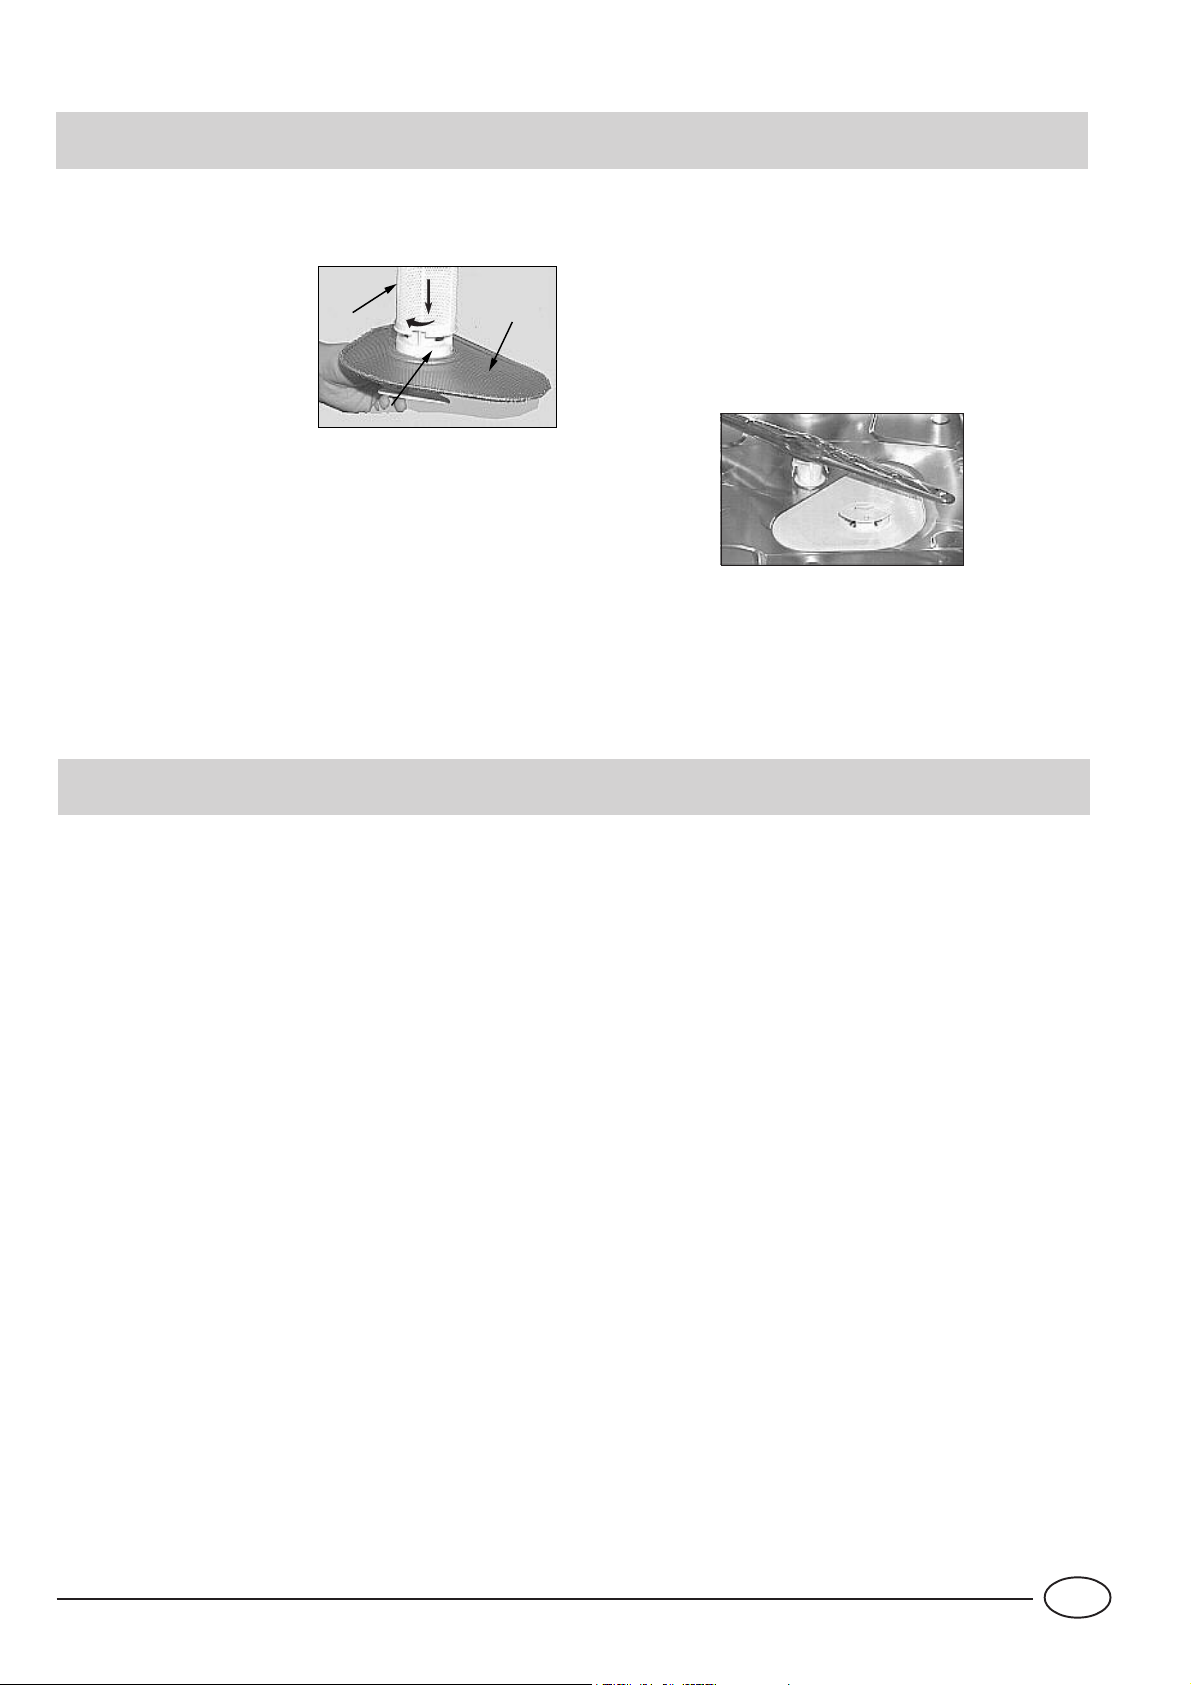
Cleaning and special maintenance
The filter assembly
If you want consistent good results from your dishwasher,
you need to clean the filter
assembly.
The food particles are removed
from the wash water , allowing
B
1
2
A
it to be recirculated during the
cycle, filtered perfectly . For this
reason, it is a good idea to
remove the larger food
C
particles trapped inside the cup
“C” and the semi-circular filter A after each wash; pull the
cup handle upwards to remove them. Just rinse them under
running water .
The entire filter assembly should be cleaned thoroughly once
a month: cup C + semi-circular filter A + cylindrical filter B.
Rotate filter “B” anticlockwise to remove it.
For cleaning, use a non metallic brush.
Reassemble the filter parts (as shown in the figure) and
reinsert the whole assembly into the dishwasher. Position it
into its housing and press downwards.
The dishwasher is not to be used without filters. Improper
replacement of the filters may reduce the efficiency of the
wash and even damage your dishwasher
.
Cleaning the sprayer arms
Food residue may become encrusted onto the sprayer arms
and block the holes where water comes out; check them on
a regular basis and clean them (see the Close-up View (inside)
letters F-I).
Cleaning the Water Inlet Filter
Periodically clean the water inlet filter (see figure 2 under
"Installation") located on the outlet of the water supply tap.
After turning off the water tap, unscrew the end of the water
supply hose, remove the filter and clean it carefully under
running water . Then, return the filter to its place and tighten
the water supply hose back into position.
Is there a problem?
Your dishwasher may not work or not function properly.
Before calling for assistance, let’s have a look at what can be
done: you may have forgotten to press a button or for some
reason or another you haven’t carried out a procedure
necessary for the appliance to operate correctly.
The dishwasher won’t start
Have you checked:
whether the tap has been turned on and is well connected
to the hose or whether there is no water throughout your
home or whether the pressure of the water supply is
sufficient, whether the hose is bent or the filter on the water
supply hose is blocked, whether the door is open?
The dishes are not clean
Have you checked:
whether the right amount of detergent is in the dispenser,
the wash cycle selected is suitable for the dishes loaded, or
whether the filter and the microfilter are clean and whether
the sprayer arms can turn freely?
The dishwasher won’t drain
Have you checked:
Is the drain hose bent?
Limescale deposits or a white film form on the dishes.
Have you checked:
whether the lid on the salt container is closed properly or
whether the amount of rinse aid has been adjusted correctly?
Error messages.
The dishwasher is equipped with a safety system which is able to
detect any operating anomalies. These anomalies are reported by
one or two wash cycle indicator lights “G” flashing rapidly. Take a
note of which lights are flashing, turn the appliance off and call for
technical assistance.
Tap off alarm
If you have forgotten to turn the water tap on, your appliance will
remind you of this by sounding a few short beeps for a few minutes.
Turn the tap on and your appliance will start up again after a few
minutes. Were you to be absent when these beeps are sounded,
the appliance will be blocked automatically and indicator lights 2
and 3 (wash and rinses) will flash rapidly. Turn the appliance off at
the ON-OFF button, turn on the water tap and wait approximately
20 seconds before turning the appliance back on, re-select a wash
cycle as indicated in the “Selecting the wash cycle” paragraph and
the appliance will start up again.
Clogged filter alarm
If the appliance is blocked and indicator lights 1 (pre-wash) and 3
(rinses) flash rapidly , this means the filter is clogged by large particles
of food residue. Turn the appliance off, clean the filter thoroughly,
reposition it in its seat and then turn the appliance on again. The
selected wash cycle will start up again.
Water load solenoid valve malfunction alarm.
If indicator light 2 (wash) flashes rapidly, TURN the dishwasher OFF
AND BACK ON AGAIN after one minute. If the alarm persists, first
turn off the water tap to avoid any flooding and then cut off the
electricity supply and call for technical assistance.
If any other indicator lights apart from the above-mentioned ones
flash rapidly , turn the appliance off and call for technical assistance.
If, despite all these checks, your dishwasher still won’t
work and the trouble you are having persists, call your
nearest authorised service centre, mentioning the
following information:
- the type of malfunction
- the model type no. (Mod. ....) and the serial number (S/N….)
indicated on the rating plate located on the inner door , to one side.
Never call upon the services of unauthorised technicians and
always refuse spare parts that are not originals.
9
GB

Installation
Positioning the appliance
Place your dishwasher where you want to install it. The
appliance can even be placed so that its sides or back panel
are side by side with furniture or up against the wall. The
dishwasher is provided with water supply and drain hoses,
which can be directed towards the left or right to facilitate
appropriate installation.
Levelling
Once the appliance is positioned, adjust the feet by screwing
them in or out depending on how high you want it and level
it so that it is horizontal; however it must not be tilted by
more than 2° under any circumstances.
If the appliance is level, this will help ensure its correct
operation.
This dishwasher model can be built under a single worktop (please
read the relevant instruction sheet).
Cold water connection.
This electric household appliance should be connected to
the water mains using the cold
water supply hose provided with
the appliance only. Do not use
a different hose. In the event of
replacements, use original spare
parts only .
Connect the cold water supply
hose to a threaded 3/4 (gas)
connector, inserting the small
filter supplied with the
dishwasher and making sure
that it is fastened tightly in place
(see figure 2).
If the water pipes are new or have not been used for an
extended period of time, let the water run to make sure that
the water is clear and free of impurities. If this precaution is
not taken, there is a risk that the water inlet can get blocked
and damage the appliance.
A
2
Drain hose connection
Fit the drain pipe into a drain line with a minimum diameter
of 4 cm or place it over the
sink. Avoid restricting or
bending it. Use the special
plastic elbow provided (see figure) to position it in the best
possible way. The part of the
pipe marked with the letter A
should be between 40 and
100 cm above the ground.
The pipe should not be
immersed in water .
Warning: the special plastic elbow should be fastened firmly
onto the wall to prevent the drain hose from moving and
allowing water to spill outside the drain.
Electrical connection
Plug the appliance into a socket provided with an efficient
earth connection (the system’s earthing is a guarantee of
safety provided for by law), after having checked that the
mains voltage and frequency values correspond to those stated
on the rating plate located on the stainless steel inner door
of the appliance and that the electrical system to which the
dishwasher is connected is sized for the maximum current
indicated on said rating plate. If the power socket to which
the appliance is connected is not compatible with the plug,
replace it with a suitable plug rather than using adapters or
multiple plugs as these could cause overheating or burns.
If the electricity supply wire is damaged, we recommend
you contact authorised Technical Assistance service centres
exclusively for a replacement.
A
Hot water connection
Your dishwasher can be supplied with hot water from the
mains supply (if you have a central heating system with
radiators) at a temperature of no more than 60°C.
In this case, the wash cycle time will be about 15 minutes
shorter and the wash will be slightly less effective.
The connection must be made to the hot water supply
following the same procedures as those indicated for the
cold water connection.
GB
10
Die Sicherheit - Eine gute Gewohnheit und unsere Verpflichtung
ACHTUNG
Lesen Sie bitte die Hinweise dieser Anleitung aufmerksam durch.
Sie enthalten wichtige Angaben über die Sicherheit bei der
Installation, Benutzung und Wartung des Gerätes.
Dieses Gerät entspricht den folgenden EGRichtlinien:
- 73/23/EWG (Niederspannung) und nachfolgenden
Änderungen;
- 89/336/EWG (elektromagnetische Verträglichkeit) und
nachfolgenden Änderungen.
- 97/17/CE (Etikettierung)
1.Entfernen Sie sorgfältig das Verpackungsmaterial.
2.Sollte das Gerät wider Erwarten auf dem T ransport zu Ihnen
beschädigt worden sein, nehmen Sie es nicht in Betrieb ohne
zuvor Rücksprache mit Ihrem Lieferanten gehalten zu haben.
3.Der Geschirrspüler darf nur von Erwachsenen benutzt werden
und ausschließlich für Geschirr des privaten Hausgebrauchs.
4.Befolgen Sie bitte die nachstehenden Grundregeln:
- Berühren oder bedienen Sie niemals das Gerät mit nassen
Händen oder barfuß, wenn Sie auf nassem Bodenbelag stehen.
- Vom Einsatz von Mehrfachsteckern, Adaptersteckern oder
Verlängerungen wir d abgeraten;
- Achten Sie bei der Installation darauf, daß das Speisekabel
nicht geknickt oder gefährlich eingeklemmt wird.
- Trennen Sie das Gerätz im Fehlerfall, bei der Wartung und
Reinigung vom Stromnetz.
5.Halten Sie Kinder von den Reinigungsmitteln und vom
geöffneten Geschirrspüler fern.
6.Das Gerät darf auf keinen Fall im Freien installiert werden,
auch dann nicht, wenn der Installationsraum überdacht sein
sollte. Es ist gefährlich, das Gerät Regen und Gewittern
auszusetzen.
7.Berühren Sie während oder sofort nach einem Spülgang nicht
den Elektrowiderstand.
8.Stützen oder setzen Sie sich nicht auf die geöffnete Tür , der
Geschirrspüler könnte nach vorne kippen.
9.Sollten Störungen auftreten, schließen Sie bitte sofort den
Wasserzufuhrhahn und ziehen Sie den Netzstecker aus der
Steckdose. Konsultieren Sie daraufhin den Abschnitt "Gibt's
ein Problem?". Sollten Sie die Lösung nicht finden, dann
wenden Sie sich bitte an die nächstgelegene Kundendienststelle.
10.Vor der Entsorgung des Altgerätes, schneiden Sie bitte das
Kabel durch und entfernen Sie das Schloß.
Um die Leistungsfähigkeit und Sicherheit dieses
Gerätes zu gewährleisten, bitte folgendes beachten:
l wenden Sie sich ausschließlich an unsere
autorisierten Service-Stellen
l verlangen Sie, daß nur Original-Ersatzteile
verwendet werden
Aus der Nähe betrachtet (Schalterblende)
G
ON/OFF-T aste
ON/OFF-Anzeigeleuchte
H
E
C
Salzmangelanzeige
Kontrollleuchten für Spülprogrammphasen
und Startzeivorwahl
R
D
B
A
Türgriff
Programmwählerknopf
11
T aste Startzeitvorwahl
Start/Reset-T aste
DE
Aus der Nähe betrachtet (Innenraum)
5
0
5
e
E
G
F
J
I
Oberkorb
Oberer Sprüharm
Höhenverstellung des Korbes
Unterkorb
H
K
L
Unterer Sprüharm
Salzbehälterdeckel
Filtereinsatz
Reiniger- und Klarspülbehälter
T echnische daten
Breite cm. 4
Tiefe cm. 6
Höhe cm. 8
Fassungsvermögen 9 m aßgedeck
Anschluß-W asserdruck 4,3 psi - 145 psi (30 KPa÷ 1MPa) (0,3 ÷10 bar)
Betriebsspannung Siehe Typenschild
Leistung Siehe Typenschild
Sicherung Siehe T ypen schild
DE
12
Salz....
Salz
Der Gehalt an Salzen im Wasser variiert je nach Ortschaft. Je
höher der Salzgehalt, desto höher die Wasserhärte. Würde
hartes Wasser in den Geschirrspüler eingelassen, käme es
zu Verkrustungen auf dem Geschirr .
Dank des Entkalkers, in den Geschirrspüler-Spezialsalz
eingefüllt werden muß, wird das Wasser vom Kalk befreit.
Einfüllen von Salz in den Entkalker
Verwenden Sie bitte nur Spezialsalz für Geschirrspüler.
Der Salzbehälter befindet
sich unter dem Unterkorb
und wird wie folgt gefüllt:
1. Den Unterkorb
herausnehmen und den
Stöpsel des Behälters
abschrauben.
2. Wird der Salzbehälter
zum ersten Mal gefüllt,
muß er zuerst mit Wasser
gefüllt werden.
3. Unter Verwendung des
Trichters ca. 2 kg Salz
einfüllen. Es ist normal, daß hierbei etwas Wasser austritt.
4. Den Stöpsel sorgfältig wieder aufschrauben.
Einstellen des Salzverbrauchs
Der Geschirrspüler ist für das Einstellen des Salzverbrauchs
je nach Härtebereich des
Wassers vorbereitet, so daß der
Salzverbrauch auf ein
notwendiges Minimum optimiert
und individuell gestaltet werden
kann.
Auskunft über den Härtegrad
des Wasser in Ihrem Wohngebiet
erhalten
Sie jederzeit bei Ihren
Stadtwerken.
Zum Einstellen befolgen Sie bitte die folgenden Anleitungen:
1) Schrauben Sie den Stöpsel des Salzvorratbehälters ab.
2) Auf dem Rand des Behälters befindet sich ein Pfeil (siehe
nebenstehende Abbildung),
Wenn nötig, drehen Sie den Pfeil vom Zeichen "_“ entgegen
den Uhrzeigersinn auf das Zeichen "+“ je nach der Härte
des zugeführten Wassers.
Wir empfehlen, das Einstellen nach dem folgenden Schema
vorzunehmen:
Der Salzbehälter muss dann nachgefüllt werden, wenn die
Salzanzeige "E" blinkt. Nachdem Sie zum ersten Mal Salz
eingefüllt haben könnte die Nachfüllanzeige für weitere 5
Spülgänge eingeschaltet bleiben bzw. blinken.
Achtung: Um Rostbildung zu verhindern empfiehlt es sich,
das Salz vor Beginn eines vollständigen Spülprogramms
einzufüllen.
W asserhä rte
°dH °fH mm ol/l
0 ¸ 10 0 ¸ 17 0 ¸ 1,7 / 0 /
10¸ 25 18 ¸ 44 1,8 ¸ 4,4
25 ¸ 50 45 ¸ 89 4,5 ¸ 8,9 MED 40 40
> 50 > 89 > 8,9
Positions-
wähler
Salzverbrauch(gramm/spülgang)
-
+
20 60
60 25
Reichweite
(Spulgange-
/2kg)
13
DE
Reiniger-und Klarspüler ....
Reiniger
Der Einsatz spezifischer Reiniger für Geschirrspüler garantiert
bessere Reinigungsergebnisse. Füllen Sie den Reiniger vor
Beginn des Spülgangs gemäß den Anweisungen des
Abschnitts "Programm-Tabelle" ein. Der Reinigerbehälter
befindet sich im Innern der Tür.
Einfüllen des Reinigers
Drücken Sie die Taste "B”, um den Deckel “A" zu öffnen.
Füllen Sie beide Kammern "C ", "D" bis zum Rand mit
Spülmittel.
Schließen Sie daraufhin den Deckel, bis er einrastet.
Sie finden auch Geschirrspülmittel in Tablettenform im
Handel. Falls Sie solche T abs benützen, geben Sie eine davon
in die Dosierkammer "D" und schließen Sie daraufhin die
Klappe.
Achtung: Um das Einrasten des Deckels zu erleichtern
säubern Sie bitte die Kammerkanten vor dem
Verschließen von eventuellen Reinigerresten.
B
D
C
Klarspüler
Der Klarspüler verleiht Ihrem Geschirr einen strahlenden Glanz,
denn er verbessert den Trockenprozess. Die
Klarspülerkammer befindet sich in der Innentür. Sie muss
aufgefüllt werden, wenn Sie anhand des Sichtfensters „D“
sehen, dass sie leer ist.
(Ist Ihr Geschirrspüler mit einer „Klarspüler-Kontr ollleuchte“
ausgestattet, dann füllen Sie die Kammer, wenn diese
Kontrollleuchte aufleuchtet bzw. blinkt.
Einfüllen des Klarspülers
Drehen Sie den Deckel "C" des Klarspülerbehälters nach
links ab; achten Sie bei Einfüllen darauf, daß kein Klarspüler
überläuft. Der Klarspüler kann durch Regulieren (mittels eines
Schraubenziehers) des unter dem Deckel "C" befindlichen
Reglers "F" dosiert werden. Es sind 6 verschiedene
Einstellungen möglich, normalerweise ist er auf Pos. 4
voreingestellt.
F
C
D
24 gr
.
3 gr.
Wichtig:
Eine geeignete Klarspüler-Dosierung ermöglicht ein optimales
T rocknen.
Sollten auf dem gespülten Geschirr Wassertropfen oder flecken hinterbleiben, muß der Dosierer auf höhere
Zahlenwerte gedreht werden. Sollten auf dem gespülten
Geschirr weiße Streifen hinterbleiben, muß der Dosierer auf
niedrigere Zahlenwerte gedreht werden.
A
Achtung
Der Handel stellt Ihnen Geschirrspülreiniger zur Verfügung, die Reiniger, Salz und Klarspüler beinhalten (3 in 1). Sollte das
Wasser Ihrer Wasserleitung jedoch kalkhaltig, oder sogar stark kalkhaltig sein, können Sie zuzüglich weiteres Salz in den
entsprechenden Behälter einfüllen, um weiße Streifen auf Gläsern und Gerätebottich zu verhindern.
Füllen Sie nur dann Klarspüler in den Behälter , wenn der Trockengrad Ihres Geschirrs nicht zufriedenstellen sein sollte.
Beachten Sie auf jeden Fall die Hinweise auf der Verpackung.
DE
14
Einsortieren des Geschirrs
Entfernen Sie die gröbsten Speisereste, bevor Sie das
Geschirr in die Körbe einsortieren, damit die Filter nicht
verstopfen, was die Reinigungskraft herabsetzen würde.
Stark verschmutzte Töpfe und Pfannen mit angetrockneten
Speiseresten sollten vorher eingeweicht werden. Sie
vermeiden hierdurch, Spülgänge wiederholen zu müssen.
Ziehen Sie die Körbe ganz heraus, Sie erleichtern sich
hierdurch das Einsortieren des Geschirrs.
Was gehört in den Unterkorb
Sortieren Sie in den Unterkorb Geschirr wie:
Töpfe, Deckel, flache und tiefe Teller, wie auf den
Abbildungen veranschaulicht.
Servierteller und große Deckel sollten ganz seitlich einsortiert
werden, und zwar so, daß der obere Sprüharm unbehindert
drehen kann.
- Töpfe, Salatschüsseln usw. müssen immer umgedreht,
d.h. mit dem Boden nach oben einsortiert werden;
- sehr hohes Geschirr sollte schräg einsortiert werden, damit
das Wasser besser ablaufen kann;
Ordnen Sie das Besteck in den Besteckkorb ein: Messer
mit scharfen Schneiden und andere spitze Küchenutensilien
sind mit nach unten gerichteten Schneiden bzw. Spitzen
einzuordnen.
Wenn der Besteckkorb über seitliche Öffnungseinsätze ver fügt, geben Sie die Tee-und Kaffeelöffelchen einzeln in
die dafür vorgesehenen LöcherOrdnen Sie das gesamte
Besteck so ein, dass sich die einzelnen T eile nicht berühren
(Abb. A).
Besonders langes Besteck muß vorne in den Oberkorb
eingelegt werden.
Beschickungsbeispiele
OberkorbUnterkorb
Was gehört in den Oberkorb
Sortieren Sie in den Oberkorb das empfindliche und
zarte Geschirr wie Gläser, Tee- und Kaffeetassen,
Untertassen, jedoch auch Teller, flache Schüsseln, leicht
verschmutzte flache Töpfe und Pfannen.
- Sortieren Sie zartes bzw . leichtes Geschirr so ein, daß
es durch den Wasserstrahl nicht umgeworfen wird.
Versetzen des Oberkorbs
Der Oberkorb ist höhenverstellbar , und kann demnach höher
oder tiefer eingesetzt werden. Öffnen Sie hierzu die
Sperrflügel der Laufschiene und ziehen Sie den Oberkorb
heraus. Setzen Sie diesen nun mit den hinteren Rollen
entweder höher oder tiefer ein, schieben ihn nun ganz
ein, bis sich auch die vorderen Rollen auf der gewünschten
Höhe der Laufschiene befinden. Sperrflügel nun wieder
schließen. (Abb. F).
Abb.A
Abb.F
1
3
2
4
15
DE

Inbetriebnahme des Gerätes
Einstellen eines Spülprogramms
Nach Abschluss sämtlicher Arbeitsschritte gemäß den
Hinweisen vorstehender Abschnitte, und der Kontrolle, dass
der Wasserhahn auch vollständig aufgedreht wurde, drücken
Sie die auf der Schalterblende befindliche ON/OFF-T aste "A",
die Anzeigeleuchte "B" leuchtet auf.
Der Geschirrspüler ist somit elektrisch eingeschaltet; wählen
Sie nun ein Spülprogramm.
Wahl und Start des Spülprogramms
Drehen Sie den Programmwählerknopf "D" im Uhrzeigersinn,
bis die auf dem Knopf befindliche Bezugskerbe mit der
Nummer oder dem Symbol des gewünschten Programms
übereinstimmt. (Ziehen Sie zur Programmwahl, besonders bei
erstmaligem Gebrauch des Gerätes, die Programmtabelle
dieses Handbuchs zu Rate).
Sobald die Gerätetür geschlossen und die Start-Taste "R"
gedrückt wird, vernehmen Sie ein akustisches Signal, worauf
sich innerhalb weniger Sekunden das Programm in Gang setzt.
Programmphasen-Anzeigeleuchten
Der Geschirrspüler ist mit 4 Anzeigeleuchten "G" ausgestattet;
diese leuchten der Reihe nach auf, und zeigen an, welche
Programmphase gerade läuft,und zwar:
Vorspülen, Spülen, Klarspülen, Trocknen
Löschen oder Ändern eines laufenden Programms
Anmerkung: Ein schon laufendes Programm kann nur dann
gelöscht werden, wenn es gerade erst in Gang gesetzt wurde.
Um ein Programm zu ändern, halten Sie für ca. 5 Sekunden
die Taste RESET "R" gedrückt: Sie vernehmen ein längeres
akustisches Signal gefolgt von 3 kurzen ‚Bip'-Tönen. Die
Anzeigeleuchte "G" erlischt; sämtliche Einstellungen wurden
gelöscht.
Stellen Sie nun gemäß der Hinweise des Abschnitts "Wahl
und Start des Spülprogramms" das neue Programm ein.
Achtung: Von Programm 1 bis Programm 5 muss der
Drehknopf im Uhrzeigersinn gedreht werden, von Programm
5 zurück zu Programm 1 dagegen muss er gegen den
Uhrzeigersinn gedreht werden.
Wenn Sie nachträglich noch etwas einsortieren möchten
Der Spülgang kann durch Drücken der ON/OFF-Taste
unterbrochen werden; füllen Sie daraufhin das noch
einzusortierende Geschirr ein. Nach erneutem Einschalten des
Geschirrspülers läuft der Spülgang an der Stelle weiter , an der
er unterbrochen wurde.
Ist der Strom ausgefallen? Haben Sie die Tür des Gerätes
geöffnet?
Das Programm unterbricht den Reinigungsvorgang bei
Stromausfall oder bei Öffnen der Gerätetür und nimmt ihn
wieder an derselben Stelle auf, sobald die Stromzufuhr wieder
gegeben ist bzw. sobald die Tür wieder geschlossen wird.
Ende eines Spülprogramms
Das Ende des Spülgangs wird durch 2 kurze Signaltöne und
durch Blinken der Trockengang-Anzeigeleuchte angezeigt.
• Schalten Sie das Gerät durch Druck auf die Taste "A" aus.
• Drehen Sie den Wasserhahn zu.
• Warten Sie einige Minuten, bevor Sie das Geschirr
herausnehmen: auf diese Weise trocknet das Geschirr durch
den heißen Dampf teilweise von selbst.
• Entleeren Sie zuerst den Unterkorb.
Vorsicht: Wird die Gerätetür währ end des Spülvorgangs oder
unmittelbar nach Beendigung des Spülprogramms geöffnet,
tritt heißer Wasserdampf aus. V erbrennen Sie sich nicht daran!
Bestimmen Sie, wann der Spülgang starten soll.
Nach Beschickung des Geschirrspülers können Sie vor der Wahl des
geeigneten Programms entscheiden, wann der Spülgang starten
soll.
Mittels der Drucktaste "H" kann der Spülgang um 12, 9, 6 und 3
Stunden verschoben, bzw. im Voraus programmiert werden. Bei
jedem Druck auf die Taste ertönt ein kurzes akustisches Signal, und
die der gewünschten "R" Startverzögerung entsprechende
Anzeigeleuchte "G" schaltet sich ein.
Nun kann das gewünschte Spülprogramm gewählt werden. Das
Ertönen eines akustischen Signals zeigt an, dass die rückwärtige
Zeitrechnung der vorgewählten Wartezeit läuft.
Wurde zum Beispiel eine Startverzögerung von 12 Std. eingestellt,
blinkt nach Einstellen des Programms die 12 Std.-Anzeigeleuchte,
daraufhin blinken nacheinander die übrigen Anzeigeleuchten, bis
zum Ablauf der gesamten Vorwahlzeit. Mit einem kurzen Blick wissen
Sie also sofort, in wie viel Stunden bzw. Minuten das Programm
startet.
Doppelfunktion der Anzeigeleuchten "G"
1) die der Vorwahlzeit entsprechende Anzeigeleuchte blinkt:
um darauf aufmerksam zu machen, dass ein verzögerter Start
eingestellt wurde
2) sie bleibt eingeschaltet, und zwar unter dem Symbol der
jeweiligen Programmphase, ohne zu blinken, was bedeutet, dass
die von diesem Symbol angezeigte Programmphase gerade läft.
Möchten Sie die Einstellung ändern?
Sollte dies der Fall sein, können Sie eine niedrigere Startverzögerung
einstellen: Drücken Sie die Taste "H", um diese anzuwählen. Eine
vorherige Nullstellung des Programms ist nicht erforderlich.
Möchten Sie jedoch die eingestellte Startverzögerung löschen, und
das Programm sofort starten, dann drücken Sie die Taste "H" so
lange hintereinander, bis sich das Spülprogramm in Gang setzt,
und sich demnach die der Programmstartphase entsprechende
Anzeigeleuchte "G" einschaltet.
DE
16
Programmtabelle
Spülen im Geschirrspüler garantiert höchste Hygienesicherheit und Sauberkeit.
6SOSUR JUDPP
7lJOLFKHU
$EZ DVFK
(FR
.XU]
7URFN H Q
+LQZHLVH]XU
3URJUDPP ZDKO
Normal verschmutztes
Ge s chir r un d Töp fe.
N ormaler täg lich er
Abw as ch
Öko-Sparprogramm
mit niedr ige m
Energieverbrauch,
geeignet für normal
verschmutztes
Geschirr.
Kurzes Sparprogramm
für nur leicht
verschmutztes, s ofort
nach dem Gebrauch
ge s pült es G e schir r
%HVFKUHLEXQJGHV6SOJDQJV
Ve r längert er Spülgang be i 60° C
Kaltes Klarspülen
Heißes Klarspülen bei 70°C
Trocknen
2x kaltes Vorspülen,
Verlängter Spülgang bei 50°C
Heißes Klarspülen bei 65°C
Trocknen
K ur ze r Sp ülga ng b e i 4 7° C
Heißes Klarspülen bei 65°C
Trocknen
6SOPLWWH O
9RUV SOJ DQJ
+DXSWV SOJ DQJ
JU
JU
JU
.ODUVSOHU
3URJ UDPP
GDXH U
7ROHUDQ]
(LQZHLFKHQ
,QWHQVLY
3URJUDPP
Abs pülen d e s
Geschirrs, das erst
später gespült werden
soll
Stark verschmutztes
Gesc hirr, Töp fe und
Pfannen ( n ic ht
ge e ignet für
e mpfi n dliches
Geschirr).
Kalter Kurzspülgang, um ein
Antrocknen der Speisereste zu
vermeiden
Wa rmes Vorspüle n (40°C)
Ve r längert er Spülgang be i 65° C
2x Kaltes Klarspülen
Heißes Klarspülen bei 65°C
Trocknen
JU
17
DE

Tips zum Sparen
- Schalten Sie den Geschirrspüler erst ein, wenn er voll
beladen ist. Sie sparen hierdurch wertvolle Energie. Schalten
Sie evtl. das Einweichprogram ein, um Geruchsbildung oder
ein Antrocknen der Speisereste zu vermeiden.
- Wählen Sie das geeignete Programm: Die Wahl des
Programms hängt von der Art des Geschirrs und dessen
Verschmutzungsgrad ab.
- Dosieren Sie die richtige Reinigermenge: Durch Einfüllen
einer zu hohen Reinigermenge wird Ihr Geschirr nicht sauberer ,
Sie belasten hierdurch nur die Umwelt.
- Es ist nicht nötig, das Geschirr vor dem Einsortieren
abzuspülen.
So halte ich das Gerät in Topform
Nach jedem Spülgang
Drehen Sie nach jedem Spülgang den Wasserhahn ab und
lassen Sie die Tür Ihres Geschirrspülers etwas vorstehen, um
die Bildung von Feuchtigkeit oder schlechten Gerüchen im
Geräteinnern zu vermeiden.
Netzstecker aus der Steckdose ziehen
Ziehen Sie vor jeder Reinigung bzw. Pflege den Netzstecker
aus der Steckdose.
Keine Lösungs- oder Scheuermittel verwenden
Reinigen Sie die äußeren Gehäuseteile des Gerätes weder
mit Lösungs- noch mit Scheuermitteln, sondern mit einer
lauwarmen, milden Seifenlauge.
Eventuelle Flecken auf den inneren Gehäuseteilen sind mit
einem mit Wasser und etwas Essig angefeuchteten Tuch,
oder mit einem Spezialreiniger für Geschirrspüler zu entfernen.
Vor den Ferien
Bei längerer Abwesenheit, z.B. vor Ihren Ferien, empfehlen
wir , einen Spülgang bei leerem Gerät durchlaufen zu lassen;
den Netzstecker aus der Steckdose zu ziehen und den
Wasserhahn abzudrehen. Lassen Sie die Gerätetür etwas
vorstehen. Sie schonen hierdurch nicht nur die Dichtungen,
sondern vermeiden die Bildung schlechter Gerüche.
Bei einem Umzug
Bei einem Umzug sollte das Gerät möglichst vertikal
transportiert werden, im Notfall ist es schräg nach hinten zu
halten.
Dichtungen
Zu den verantwortlichen Faktoren für die Bildung schlechter
Gerüche im Innern des Geschirrspülers gehören
zurückbleibende Speisereste in den Dichtungen. Letztere
sollten demnach regelmäßig mit einem feuchten Schwamm
gereinigt werden.
DE
18
 Loading...