


IDE 44
IDE 45
Lavastoviglie
Installazione e uso
Dishwasher
Installation and use
Lava-vasseille
Installation et emploi
Geschirrspuler
Installations und Gebrauch
Vaatwasser
Installatie en gebruik
Lavavajillas
Instalación y el uso
Máquina de lavar louça
IInstalação e o uso

IDE 44
IDE 45
Lavastoviglie 1
Istruzioni per l'installazione e l'uso
Dishwasher 12
Instructions for installation and use
Lave-vasseille 23
Instructions pour l'installation et l'emploi
Geschirrspuler 34
Informationen für Installation und Gebrauch
Vaatwasser 45
Gebruiksaanwijzingen voor de plaatsing en gebruik
Lavavajillas 56
Instrucciones para la instalación y el uso
Máquina de lavar louça
Instruções para a instalação e o uso
67
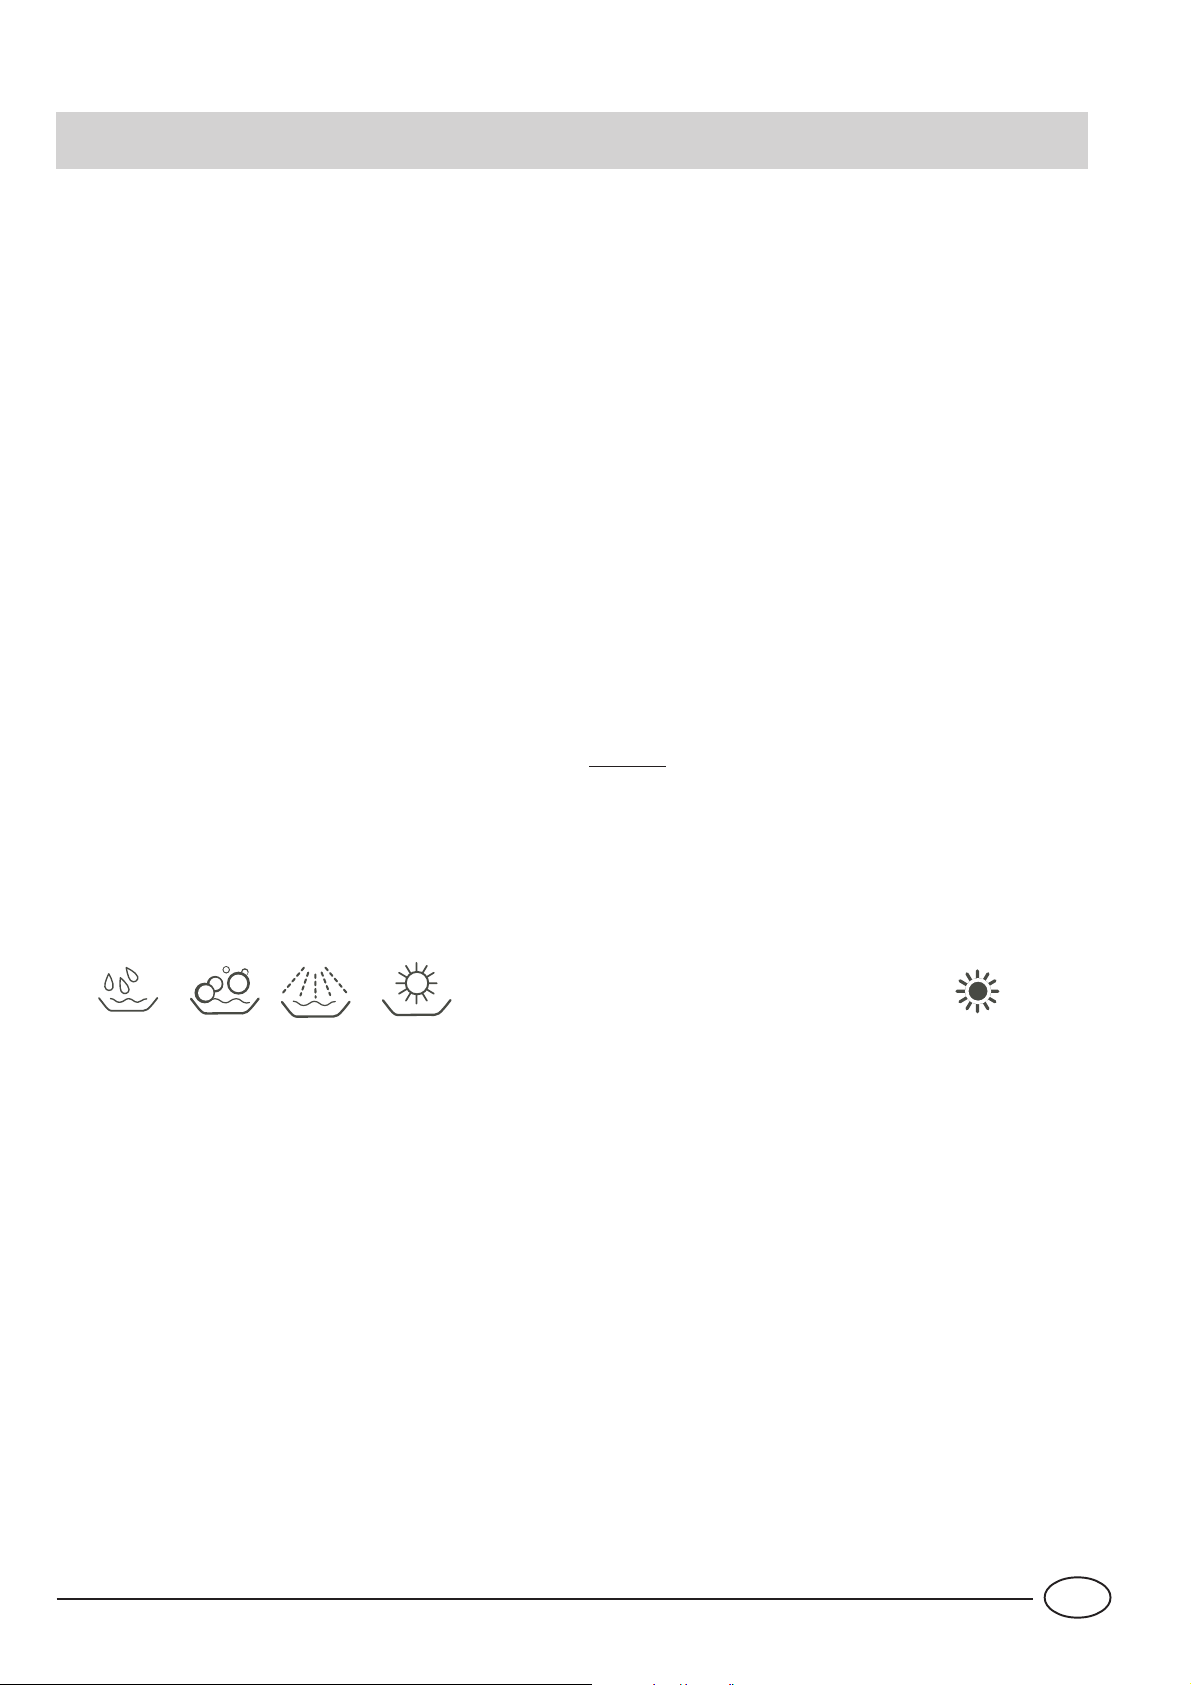
La sicurezza, una buona abitudine
ATTENZIONE
Leggete attentamente le avvertenze contenute nel presente
libretto in quanto forniscono importanti indicazioni riguardanti
la sicurezza di installazione, d’uso e di manutenzione.
Questa apparecchiatura è conforme alle seguenti
Direttive Comunitarie:
- 73/23/CEE (Basse Tensioni) e successive
modificazioni;
- 89/336/CEE (Compatibilità Elettromagnetica) e suc-
cessive modificazioni.
- 97/17 CEE (Etichettatura)
1.Eliminare con cura il materiale dell'imballaggio.
2.Dopo aver tolto l'imballaggio, verificate l'integrità dell'ap-
parecchio. In caso di dubbio, rivolgetevi a personale professionalmente qualificato.
3.La lavastoviglie deve essere usata esclusivamente da adulti e per il lavaggio di stoviglie di uso domestico.
4.Regole fondamentali da seguire nell'uso:
- non toccate la macchina a piedi nudi o con mani o piedi
bagnati,
- sconsigliamo di ricorrere a prolunghe e prese multiple,
- durante l'installazione il cavo di alimentazione non deve
subire piegature o compressioni rilevanti e pericolose,
- in caso di funzionamento anomalo o di lavori di manuten-
zione disinserire l'apparecchio dalla rete elettrica.
5.I bambini vanno tenuti lontano dai detersivi e dalla lavastoviglie quando é aperta.
6.La macchina non va mai installata all'aperto, nemmeno
se lo spazio é riparato da una tettoia, ed é molto pericoloso
lasciarla esposta a pioggia e temporali.
7.Non toccate la resistenza durante e subito dopo un ciclo di
lavaggio.
8.Non appoggiatevi e non sedetevi sullo sportello aperto,
potreste ribaltare la lavastoviglie.
9.In caso di guasto, chiudete il rubinetto di entrata acqua ed
estraete la spina dalla presa a muro. Poi provate a consultare il capitolo "C'é qualche problema" e se non trovate una
soluzione, contattate il centro assistenza.
10.Gli apparecchi fuori uso devono essere resi inutilizzabili,
tagliando il cavo di alimentazione e danneggiando il blocco
della porta.
Per garantire l’efficienza e la sicurezza di questo elettrodomestico:
l rivolgetevi esclusivamente a centri di
assistenza tecnica autorizzata
l richiedete sempre l’utilizzo di parti di
ricambio originali
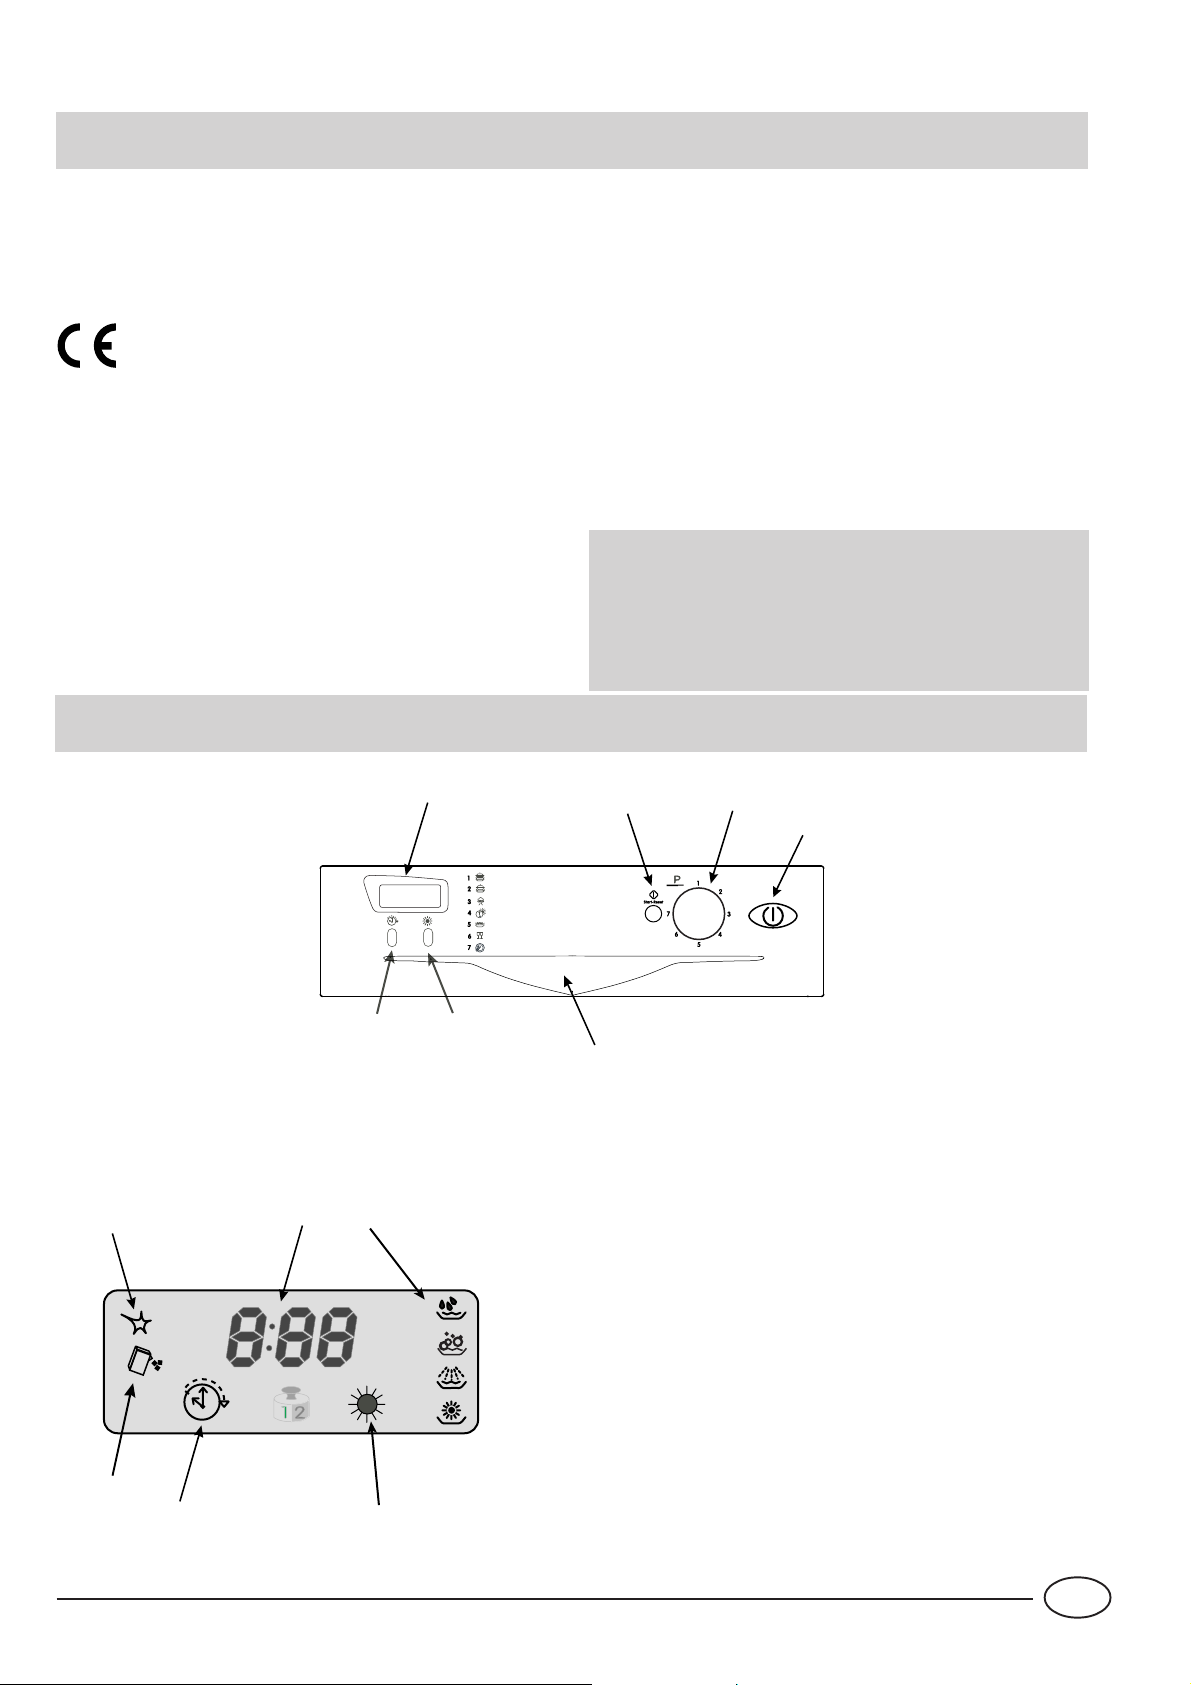
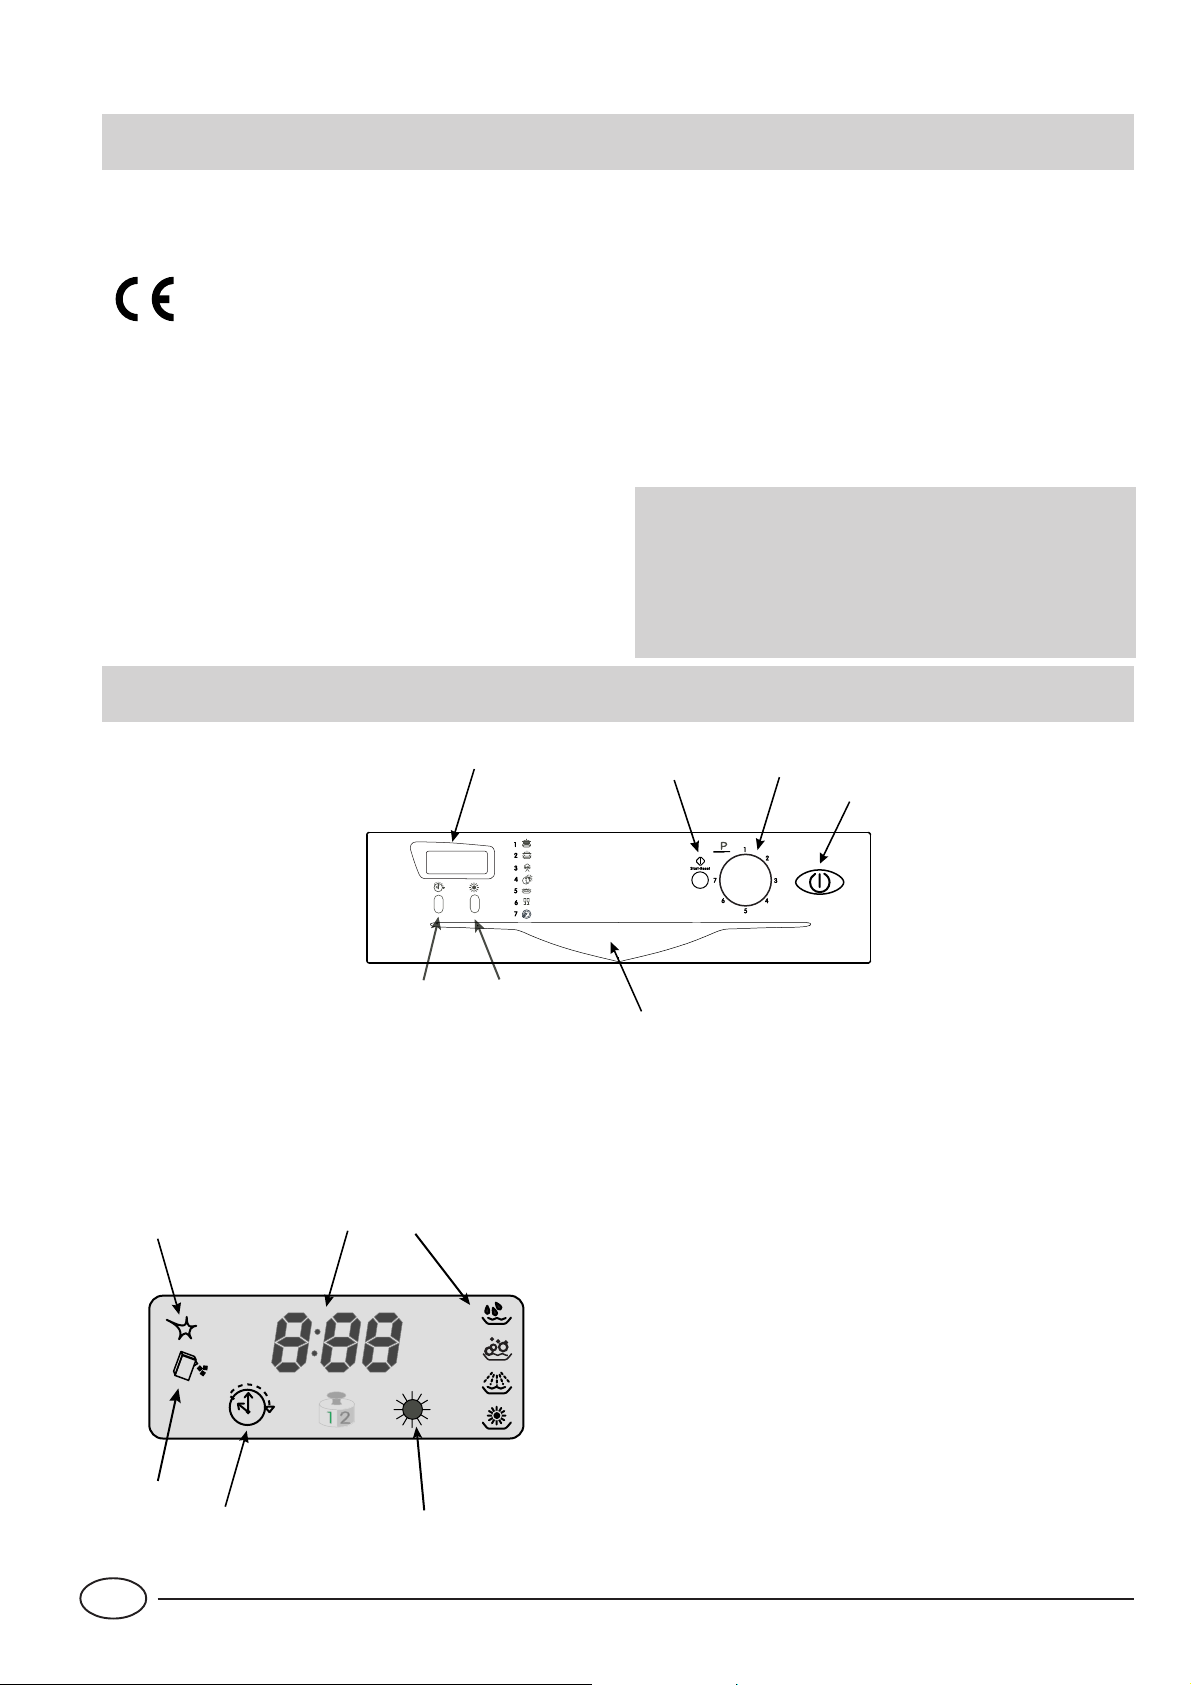
Vista da vicino (quadro comandi)
H
P
E
A: Pulsante On-Off
C: Maniglia apertura porta
D: Manopola selezione programmi
R: Pulsante di Start/Reset
T
L
H
R
C
D
A
H: Display
E: Pulsante "Extra asciugatura"
P: Pulsante selezione ritardo partenza
G: Spia extra asciugatura
H: Spie avanzamento ciclo
L: Indicatore alfanumerico
S: Spia mancanza sale
T : Spia mancanza brillantante
I: Spia ritardo partenza
S
I
G
1
IT
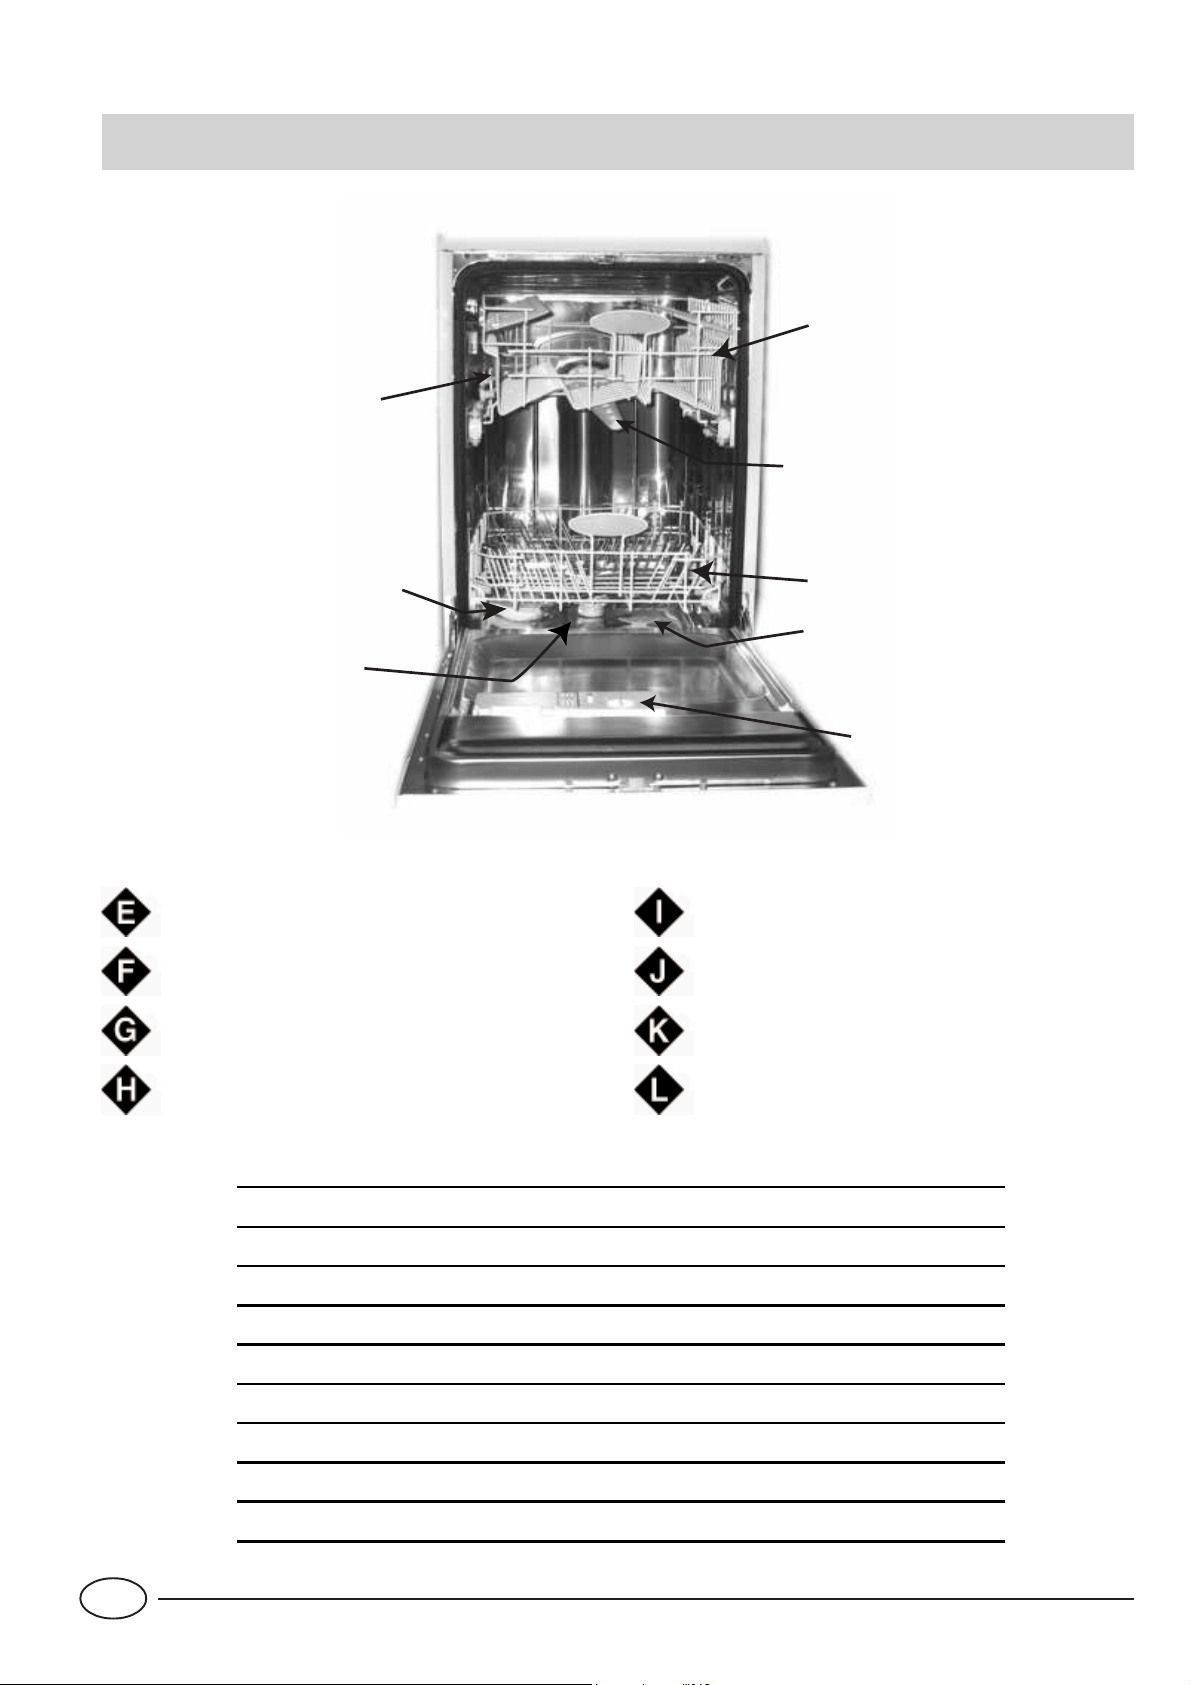
Vista da vicino (Interno)
G
E
F
J
I
Cestello superiore
Irroratore superiore
Regolazione altezza cestello
Cestello inferiore
H
K
L
Irroratore inferiore
T appo contenitore sale
Filtro lavaggio
Contenitore detersivo e brillantante
IT
& D UD WW HUL VWL F KHW HF QLFKH
Larghezza cm.45
Profondità cm. 60
Alte zza cm. 85
Capacità 9 coperti standard
Pressione acqua alimentazione 4,3 psi - 145 psi 30KPa÷ 1MPa (0,3 ÷10 b ar)
Tensione di alimentazione Vedi targhetta caratteristiche
Potenza totale assorbita Vedi targhetta caratter istiche
Fusibile Vedi targhetta caratter istiche
2
Sale ....
Il sale
La durezza dell'acqua varia a seconda della località. Se nella lavastoviglie entrasse acqua dura, si formerebbero
incrostazioni sulle stoviglie.
Grazie ad un decalcificatore che utilizza sale specifico per
lavastoviglie, si elimina il calcare dall'acqua.
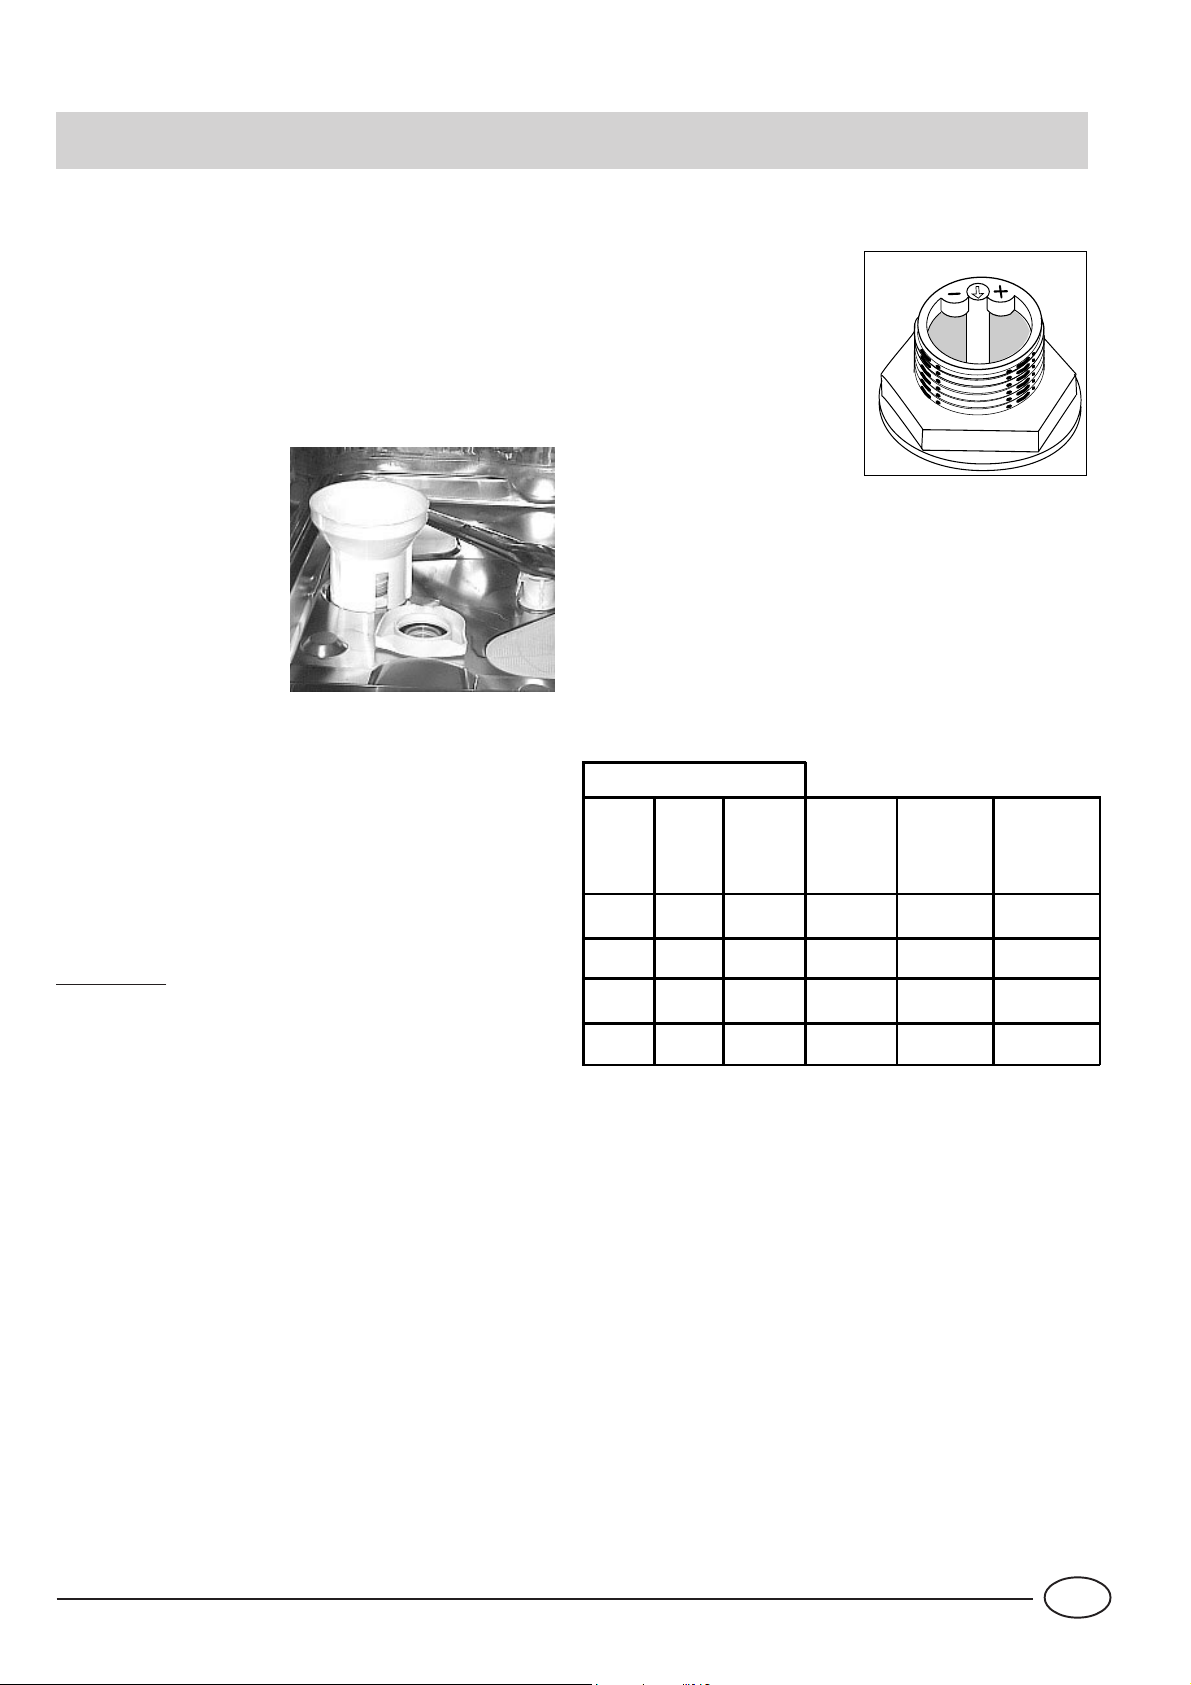
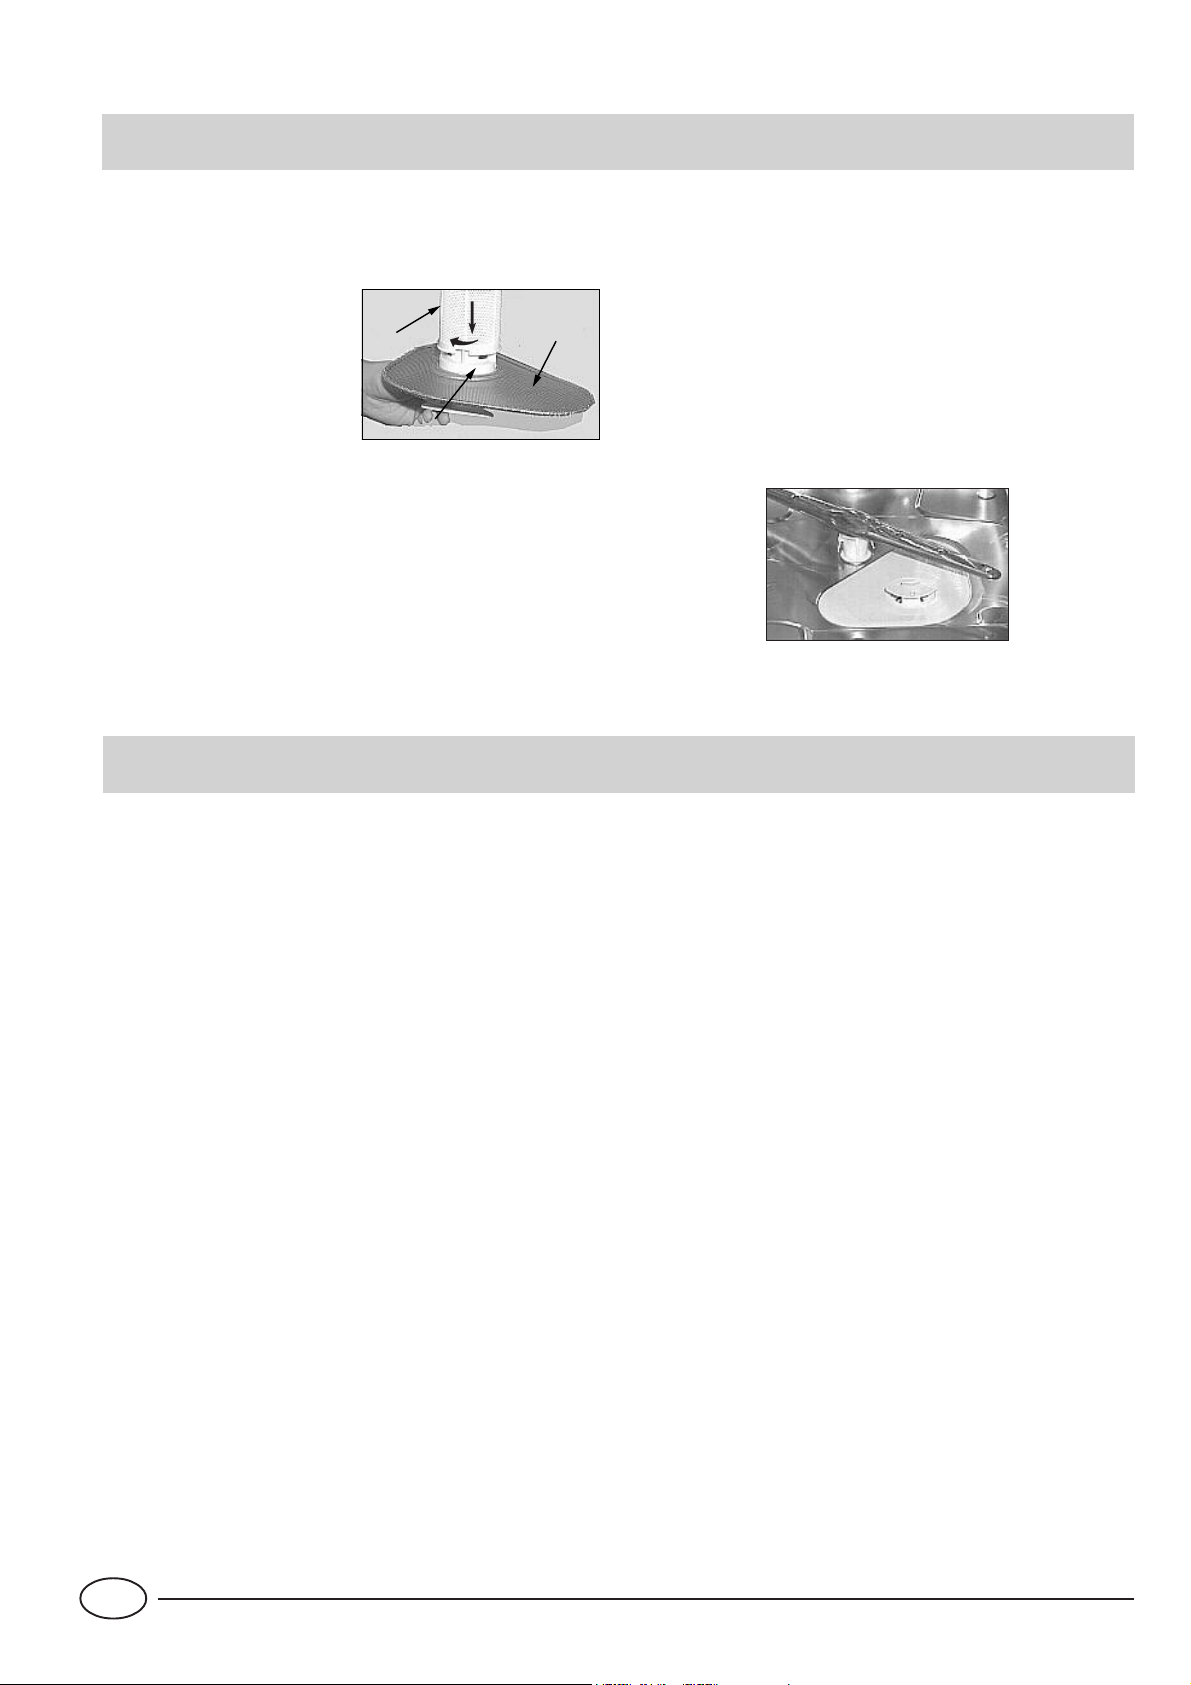
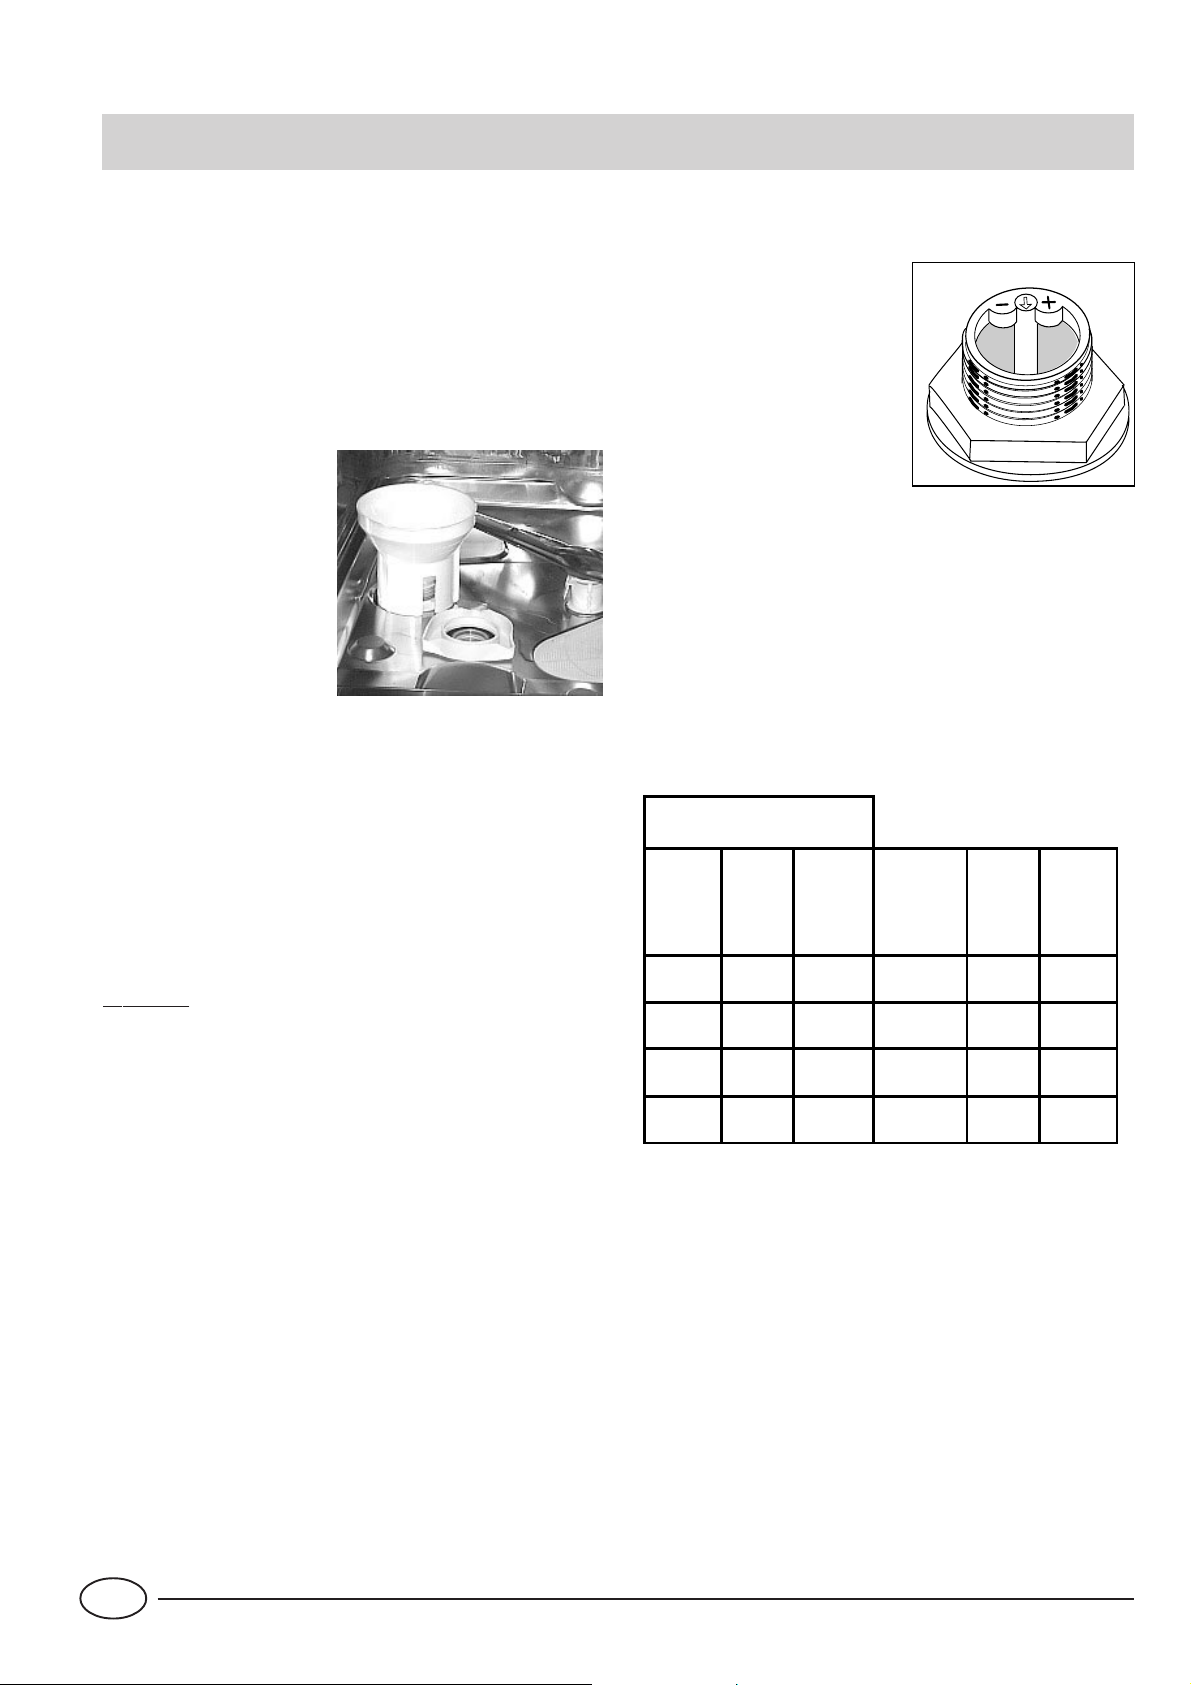
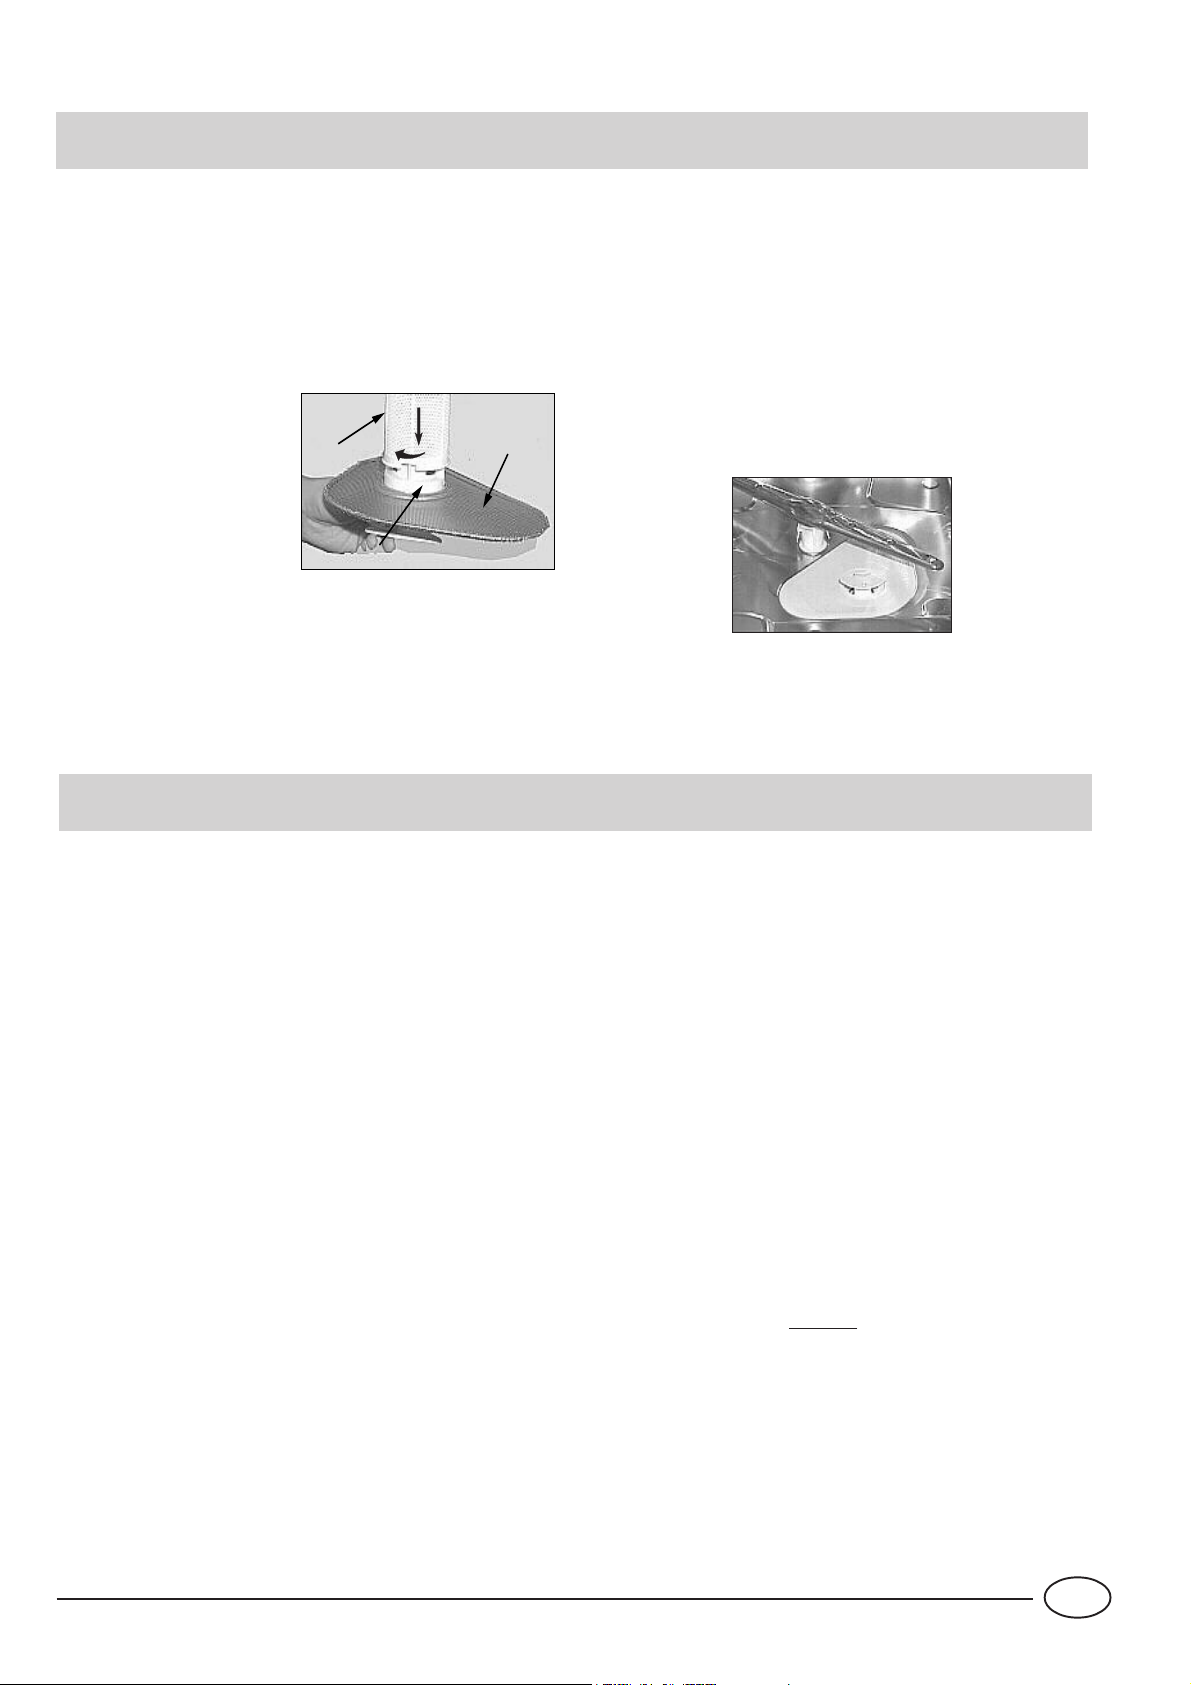
Caricamento del sale nel decalcificatore
Utilizzate sempre sale specifico per lavastoviglie.
Il serbatoio del sale é sotto
il cestello inferiore e va
riempito così:
1. Estraete il cesto inferiore, svitate e togliete il tappo del serbatoio.
2. Se state caricando il serbatoio per la prima volta,
riempitelo d'acqua.
3. Mettete l'imbuto in dotazione sul foro ed introducete circa 2 Kg di sale. E'
normale che un po' d'acqua fuoriesca dal serbatoio.
4. Riavvitate il tappo con cura.
Il serbatoio del sale va riempito quando lampeggia la
spia mancanza sale "S".
Dopo aver caricato il sale per la prima volta, è normale che
la spia di segnalazione mancanza sale rimanga accesa o
lampeggi per 5 cicli consecutivi.
Attenzione: Per evitare la formazione di ruggine consigliamo di caricare il sale prima di iniziare un ciclo di lavaggio.
Regolazione consumo sale
La lavastoviglie è predisposta
per la regolazione del consumo
di sale in funzione della durezza dell'acqua che si utilizza in
modo da ottimizzare e
personalizzare il consumo del
sale al livello minimo necessario.
Potete richiedere il grado di durezza dell’acqua all’Ente
erogatore dell’acqua potabile
della vostra zona.
Per la regolazione seguire le seguenti istruzioni:
1. svitare il tappo del serbatoio sale
2. sul collare del serbatoio è posta una freccia (vedi fig. accanto) ruotare, se necessario, la freccia dal segno "-" in
senso antiorario verso il segno "+" a seconda della durezza
dell'acqua di alimentazione.
Si consiglia di effettuare la regolazione secondo lo schema
seguente:
Durezza dell’acqua
Consumo
°dH °fH mmol/l
0 -10 0 - 17 0 - 1,7 / 0 /
10 - 25 18 - 44 1,8 - 4, 4
25 - 50 45 - 89 4,5 - 8,9 MED 40 40
Posizione
selettore
-
sale
(grammi/ciclo)
20 60
Autonomia
(cicli\2kg)
> 50 > 89 > 8,9
3
+
60 25
IT
Detersivo e brillantante .....
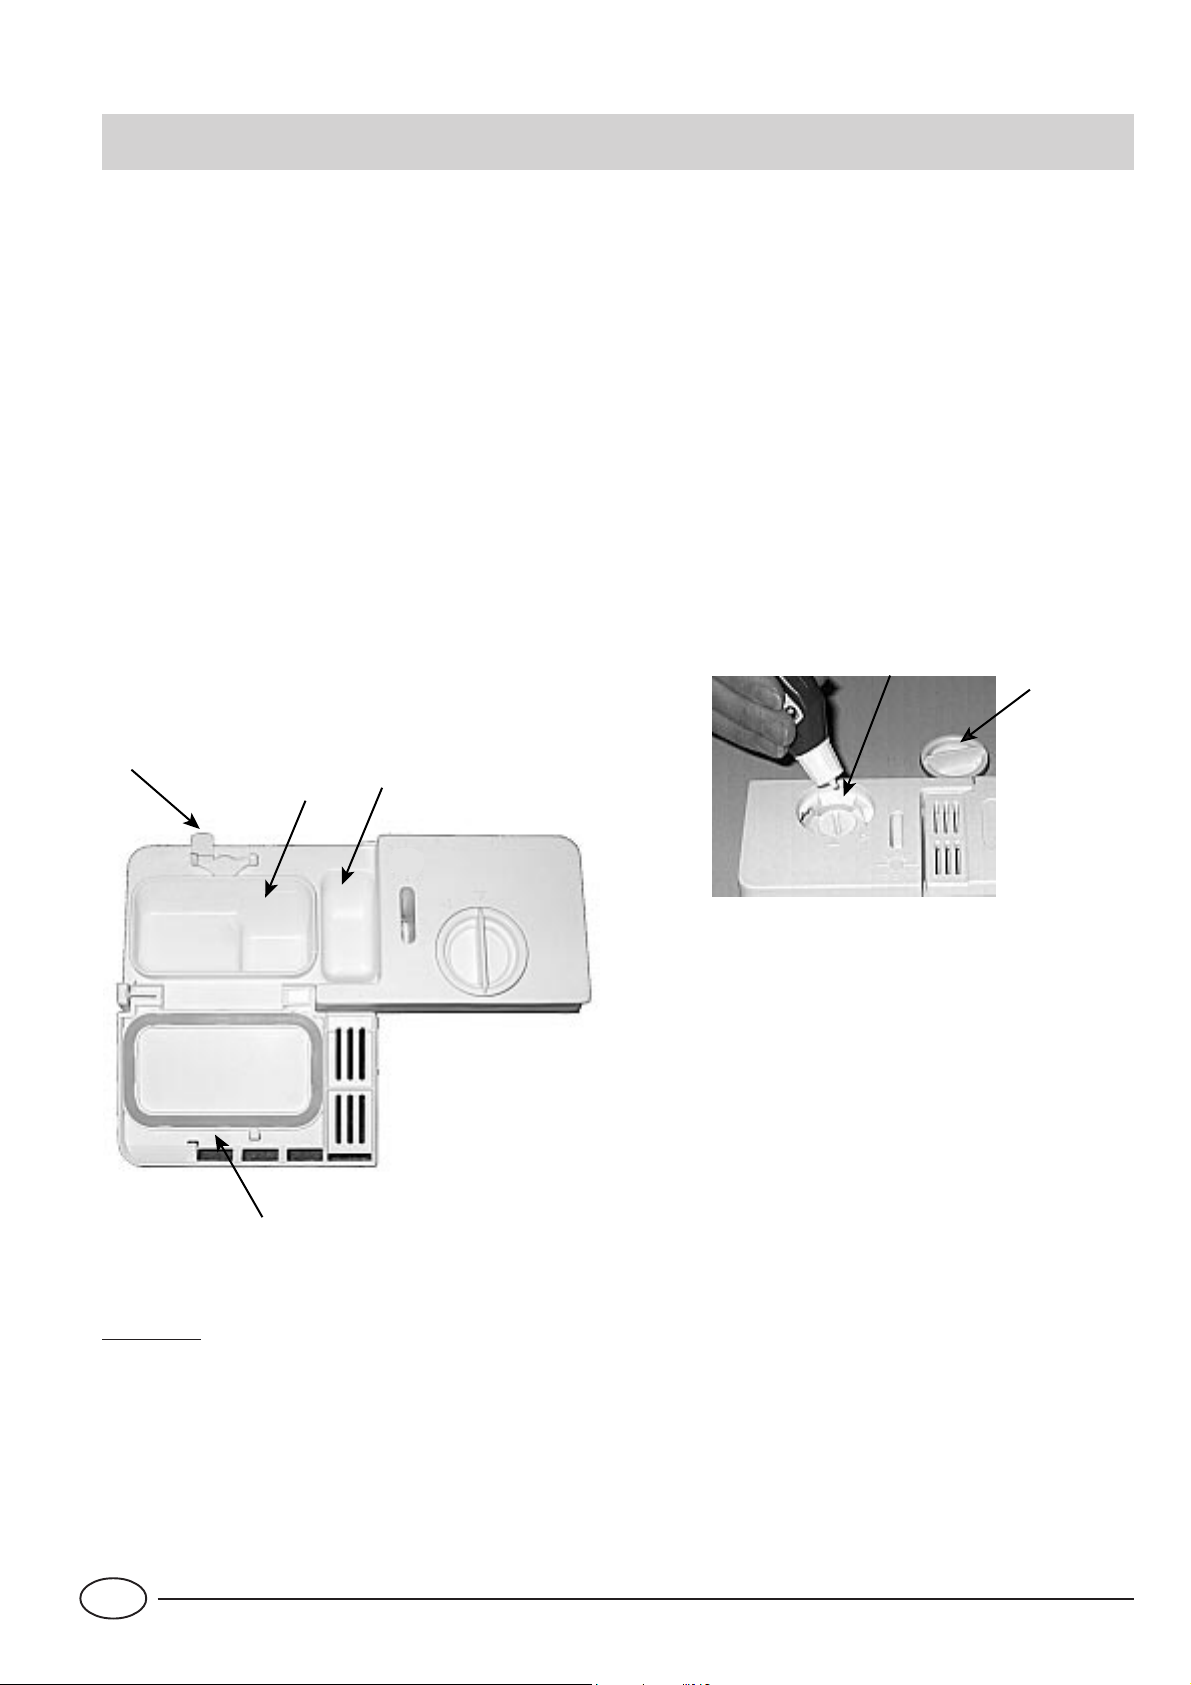
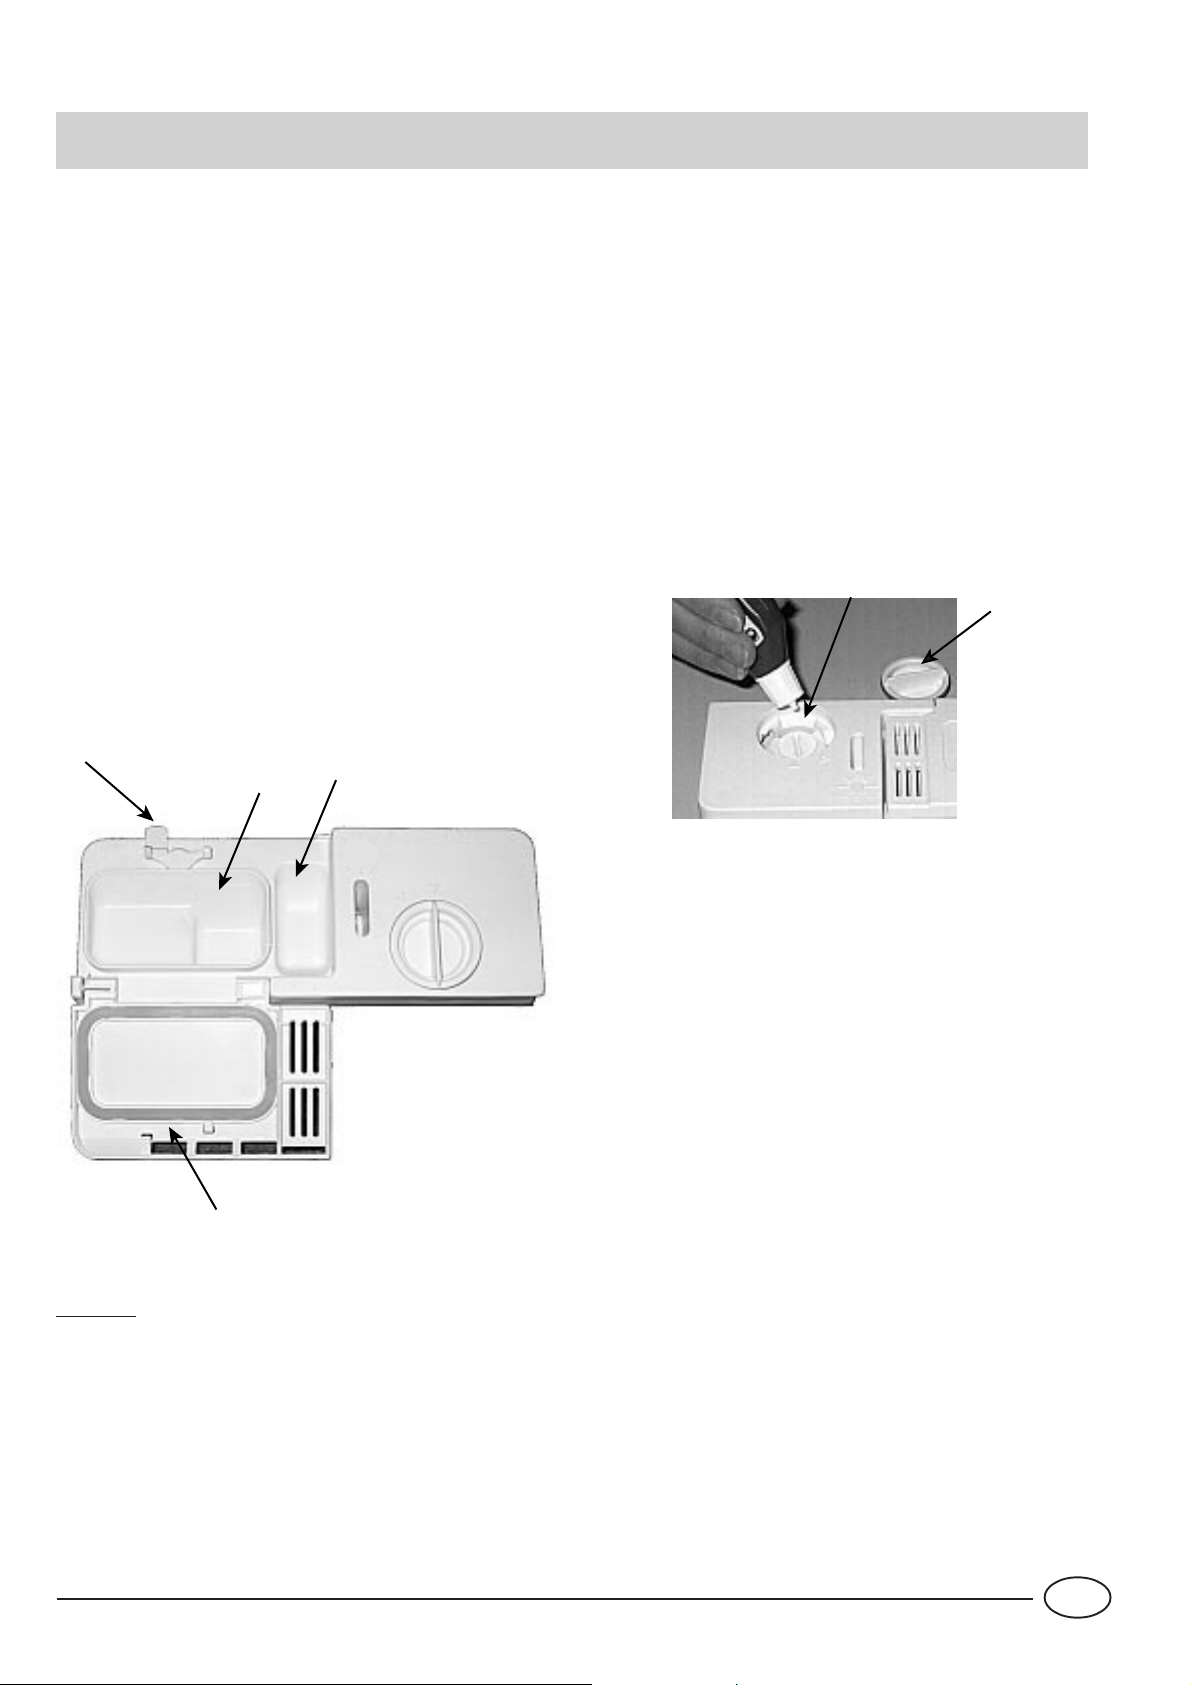
Il detersivo
Usare solamente detersivo specifico per lavastoviglie. Il rifor nimento del detersivo deve essere effettuato prima dell'inizio di ogni ciclo di lavaggio sulla base delle indicazioni fornite nella "Tabella cicli di lavaggio". Il distributore del detersivo si trova all'interno della porta.
Caricamento del detersivo
Per aprire il coperchio "A" premer e il pulsante "B". Il deter sivo va inserito nelle 2 vaschette "C" e "D" fino al bordo.
Dopo aver versato il detersivo chiudere il coperchio, premendolo fino allo scatto.
In commercio si può trovare del detersivo per lavastoviglie
in compresse, in questo caso mettere una compressa nella
vaschetta "D" e chiudere il coperchio.
Per facilitare l'aggancio del coperchio, eliminate, prima della chiusura, eventuali residui di detersivo caduti
sui bordi della vaschetta.
B
D
C
Il brillantante
Il brillantante rende le tue stoviglie più brillanti perché ne
migliora l’asciugatura. Il serbatoio del brillantante è posto
all’interno della porta. Dovrai riempirlo quando vedi il serbatoio vuoto attraverso la spia ottica “D”.
(Se la tua lavastoviglie è provvista di “spia mancanza
brillantante”, lo riempirai quando lampeggia o si illumina).
Caricamento del brillantante
Per aprire il contenitore occorre ruotare in senso antiorario il
tappo "C" e quando versate il brillantante evitate che questo fuoriesca. E' possibile regolare la quantità di prodotto
erogata, agendo con un cacciavite sul regolatore "F" posto
sotto il coperchio "C". Vi sono 6 posizioni possibili, normalmente é tarato sul 4.
F
C
24 gr
.
3 gr.
Importante:
La regolazione dell'erogazione del brillantante permette di
migliorare l'asciugatura.
Se sulle stoviglie lavate rimanessero gocce d'acqua o macchie, è necessario ruotare il regolatore verso i numeri più
alti. Se le stoviglie lavate presentassero delle striature bianche, ruotare il regolatore verso i numeri più bassi.
A
Attenzione
In commercio puoi trovare prodotti per il lavaggio delle stoviglie che contengono detersivo, sale e brillantante (3 in 1). Se la tua
acqua è dura o molto dura ti consigliamo di aggiungere comunque sale nell’apposito dispenser, per evitare la formazione di
striature bianche sulle stoviglie o sulla vasca.
Aggiungi il brillantante nel serbatoio solo se l’asciugatura delle stoviglie non è soddisfacente.
In ogni caso consulta attentamente le istruzioni del produttore sulle confezioni.
Se usi solo questi prodotti è normale che le spie sale e brillantante, dopo un certo numero di cicli, lampeggino in permanenza.
IT
4
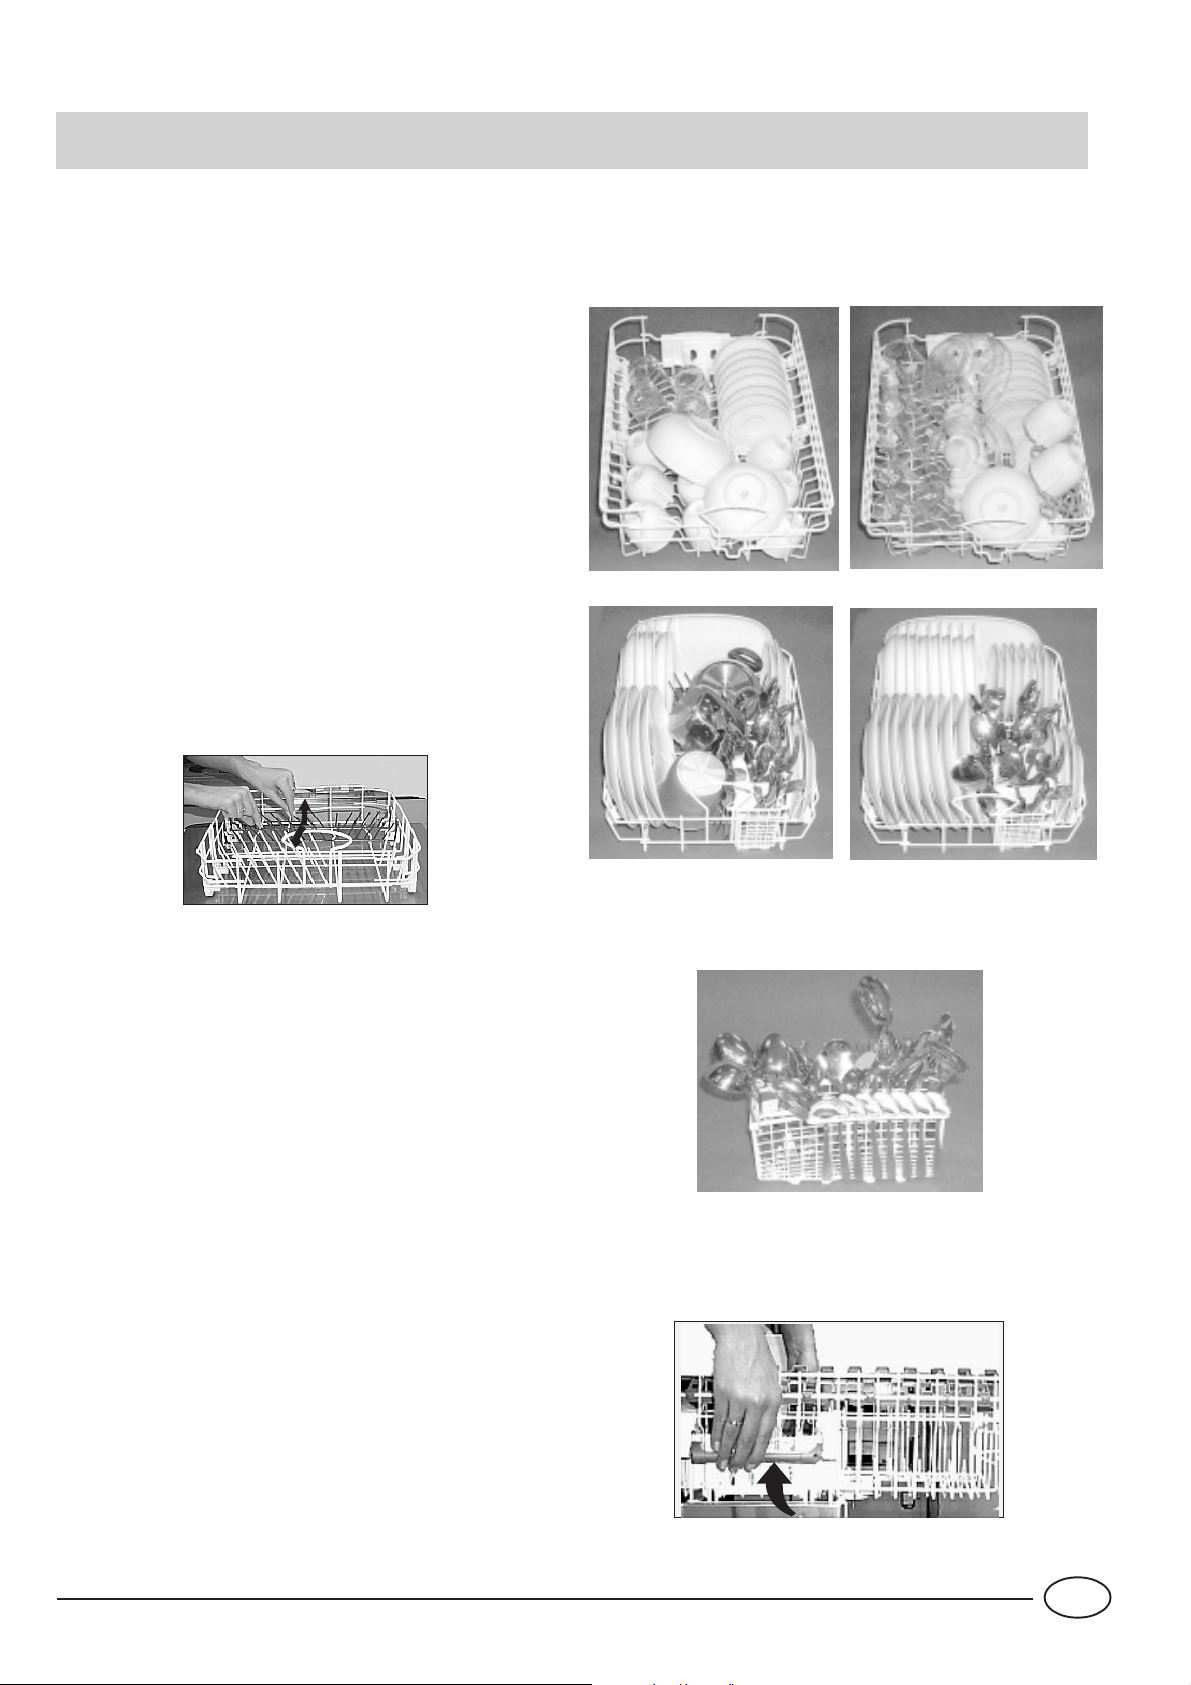
Caricamento delle stoviglie
Prima di disporre le stoviglie nei cestelli, asportate i residui
più grossi di cibo per evitare di intasare i filtri con conseguente riduzione dell'efficacia di lavaggio.
Qualora le pentole e le padelle fossero molto incrostate, vi
consigliamo di metterle a bagno in attesa del lavaggio.
Si eviteranno così ulteriori lavaggi.
Estrarre i cesti per facilitarel'operazione di carico delle stoviglie.
Come utilizzare il cestello inferiore
Nel cestello inferiore vi consigliamo di mettere le stoviglie
più difficili:
pentole, coperchi, piatti piani e fondi come indicato nelle
figure a lato.
I piatti da portata e coperchi grandi vanno sistemati di preferenza ai lati del cesto, senza però bloccare la rotazione
dell'irroratore superiore.
- pentole, insalatiere etc. devono essere sempre capovolte
- stoviglie molto fonde vanno sistemate in posizione obliqua, onde consentire all'acqua di defluire.
Il cesto inferiore ha i settori reclinabili (vedi la figura B),
potrai così sistemare ancora più pentole e padelle o fare
spazio a quelle più grandi.
Fig.B
1
Cesto inferiore
Esempi di caricamenti
Cesto superiore
2
Cestino posate
Questo cestino è dotato di una griglia asportabile: inserisci
le posate ad una ad una nelle feritoie.
I coltelli e gli utensili con punte taglienti devono essere
caricati con le punte in basso.
Sistema tutte le posate in modo che non si tocchino fra di
loro.
Se il cestino è dotato di inserti laterali i cucchiaini vanno
inseriti singolarmente nelle apposite feritoie (ved. fig. A).
Posate particolarmente lunghe vanno sistemate in posizione orizzontale nella parte anteriore del cestello superiore.
Come utilizzare il cestello superiore
Il cestello superiore è adatto a contenere stoviglie delicate
e leggere come bicchieri, tazze da the e caffè, piattini, ma
anche piatti, insalatiere basse, padelle e tegami bassi poco
sporchi.
- Collocare le stoviglie leggere in modo che non vengano
spostate dai getti d’acqua.
Come regolare il cestello superiore.
E’ possibile regolare il cestello superiore in posizione alta o
bassa. Ai lati del cestello superiore si trovano due maniglie: con quelle potete regolarne l’altezza (vedere figura
C).
fig. A
fig. C
5
IT

Come avviare la macchina
Come avviare un programma di lavaggio....
Dopo aver effettuato tutte le operazioni riportate nei capitoli
precedenti ed aver aperto completamente il rubinetto dell’acqua, premete il pulsante ON-OFF “A” posto sul quadro
comandi, il display si illumina e vedrete lampeggiare il tempo del programma sui cui è posizionata la manopola..
Selezione ed avvio del programma.
• Selezionate il programma ruotando la manopola "D"in
senso orario dal programma 1 al programma 7 e in senso
antiorario dal 7 all' 1; il display visualizza il tempo medio di
durata del programma e le fasi che lo compongono (per i
primi tempi vi consigliamo di consultare la tabella programmi a pag. 8).
• Premere il pulsante di Start "R"ed il programma si avvia
con un doppio segnale acustico, sul display potrete leggere il
tempo medio residuo alla fine del programma.
• Se il tempo indicato all'inizio del programma non corrisponde alla durata effettiva del programma, ciò è dovuto a
diversi fattori: temperatura dell'acqua in entrata, grado di
sporco, tentativi anche prolungati della macchina di ripulire
il filtro di lavaggio dai residui di cibo che lo intasano ecc.
Avete dimenticato di inserire una stoviglia?
E’ possibile interrompere il programma di lavaggio premendo il pulsante di On-Off quindi inserite le stoviglie ed all’accensione della macchina, dopo circa 10 secondi, il ciclo riprenderà dal punto in cui era stato interrotto.
E’ andata via la luce? E'stata aperta la porta della macchina?
Il programma si interrompe e sul display compaiono 3 trattini; riprenderà quando torna la luce o alla chiusura della porta.
Alla fine del lavaggio
La fine del ciclo è segnalata da 2 brevi segnali acustici e sul
display compare la scritta “END” lampeggiante.
• Spegnete la macchina premendo il pulsante di On-Off
• Chiudete il rubinetto dell’acqua.
• Svuotate per primo il cesto inferiore.
Avvertenza: quando aprite la porta della lavastoviglie, se il
ciclo di lavaggio è in corso o è appena terminato, fate attenzione al vapore caldo che fuoriesce, potreste scottarvi.
Lampade spia avanzamento ciclo
La lavastoviglie è dotata di 4 lampade spia "G" che si illuminano in successione quando la macchina sta eseguendo
quella fase del programma .
Queste fasi sono:
prelavaggio, lavaggio, risciacqui, asciugatura
Annullare o modificare un programma in corso.....
Premessa: Potete annullare un programma in corso solo se è
iniziato da poco.
Tenete premuto per circa 3 secondi il pulsante di Reset "R":
sentirete un segnale acustico prolungato seguito da 3 brevi
bip. Sul display lampeggerà il tempo del ciclo annullato.
Ruotate la manopola per selezionare un nuovo programma..
Come impostare l'extra asciugatura
Premere il pulsante "E", dopo un bip prolungato si accende
la spia "G" e sul visualizzatore lampeggia il tempo relativo
al programma selezionato.
Nota: Il tempo indicato è maggiorato per effetto dell'extra
asciugatura.
Per disinserire l'extra asciugatura premere lo stesso pulsante
e dopo un segnale acustico si spegne la spia "G".
Questa opzione non è compatibile con l’ammollo.
IT
6

Impostazione della partenza ritardata
Come programmare la partenza ritardata
Avete caricato la lavastoviglie, prima di impostare il programma migliore potete scegliere anche quando farla partire.
• Premendo ripetutamente il tasto “P” potete posticipare la
partenza del ciclo di lavaggio da 1h a 24h.
• Se premete ancora una volta compare “OFF” (nessuna
selezione).
Dopo aver effettuato la scelta controllate che la porta sia
chiusa e avviate il programma premendo il pulsante di ST ART.
Sul display si illumina il simbolo "I"e inizierà il conto alla
rovescia del tempo di attesa.
• T erminato il conto alla r ovescia il programma si avvia e sul
display potete leggere il tempo medio residuo alla fine del
programma.
Avete cambiato idea?
• Durante il tempo di attesa è possibile modificare il ritardo
impostato scegliendo un tempo inferiore.Premete in successione il pulsante “P”, senza resettare il programma.
• Se avete cambiato idea e volete far partire il ciclo subito
premete il pulsante “P” fino all’azzeramento. La spia “I” si
spegne ed il ciclo si avvia con un bip.
Sul display si illumina la spia relativa alla fase del programma in corso e parte il conto alla rovescia del tempo che
mediamente manca al termine del programma.
Attenzione: se all'accensione della lavastoviglie il display presen-
tasse la scritta "dON"significa che è attivo il programma demo. T ale
programma serve agli espositori per simulare i cicli di lavaggio senza
effettuarli realmente.
Per uscire da questa modalità tenere premuto il tasto "R" di START/
RESET per circa 4 secondi. Ad uscita effettuata sul display comparirà
la scritta "dOF".
7
IT
Tabella programmi
Con il lavaggio in lavastoviglie avrete la garanzia di un ambiente igienizzante e di un
pulito più sicuro.
'XUDWD GH O
SURJUDPPD
WROOH UDQ]D
VHQ]DH[WUD
DVFL XJDWX U D
3URJUDPPD
,QGLFD ]LRQL SH U OD
VFHOWDGH L
S U RJU DP P L
'HVFUL]LRQH
GHOFLFOR
'HWH UVLYR
SUHODYDJJLR
ODYDJJLR
%ULOODQWDQWH
,QW HQVLYR
1RUPDOH
(FR
5DSLGR
$VFLXJDWXUD
S t oviglie e pe n t o le
molto sporche (da non
usa r e p e r p e zzi
d elica ti).
S t oviglie e pe n t o le
normalmente sporche.
Ciclo standard
giornaliero.
Programma per un
la vagg io ec olo g ic o, a
b a s s i consumi
energetici, adatto a
s t o v iglie e pe nto le
normalmente sporche.
Ciclo economico e
ve loc e d a ut ilizz a r e p er
s t o v iglie p oc o s p or c h e
subito dopo l'uso.
Prelavaggio con acqua calda a 40°C
La va ggio a 65 °C.
2 Risciacqui con acqua fredda
Risciacquo caldo a 65°C
Asciugatura.
La va ggio a 60 °C.
Risciacquo freddo
Risciacquo caldo a 70°C
Asciugatura.
2 Prelavaggi con acqua fredda
La va ggio a 50 °C
Risciacquo caldo a 65°C
Asciugatura
Breve lavaggio a 47°C
Risciacquo a 65°C
Asciugatura
JU
JU
JU
' HOLF DWL
6SRUFR
IUHV FR
IT
$PPROOR
Lavaggio p re liminar e
d i pe nt ole e s t oviglie in
a t t e sa di c omp letar e il
carico al pasto
successivo.
Ciclo speciale da
utilizza re p e r p ezzi
d e lica t i, p iù s e n s ibili
alle alte tempe rature,
subito dopo l'uso.
Lavaggio ra p ido ed
economico per un
carico giornaliero di
stoviglie.
Breve lavaggio freddo per impedire
l' e ss ic azione d e i re s idui di c ibo s u lle
s t o v iglie.
La va ggio a 52 °C
Risciacquo a 45°C
Risciacquo caldo a 65°C
Asciugatura
La va ggio a 50 °C
Risciacquo caldo a 65°C
Asciugatura
8
JU
JU

Consigli per risparmiare
-E' importante attivare la lavastoviglie possibilmente a pieno
carico per ottimizzare i consumi; per evitare che nel frattempo si formino cattivi odori e incrostazioni, potete utilizzare il
ciclo ammollo.
- Scegliete il programma adeguato : la scelta del programma dipende dal tipo di stoviglie da lavare e dal loro grado di
sporco.
- Dosate la giusta quantità di detersivo: se eccedete con il
quantitativo di detersivo non otterrete stoviglie più pulite,
ma solamente un maggiore impatto ambientale.
- E' inutile sciacquare le stoviglie prima di posizionarle nella
macchina.
Come tenere in forma la lavastoviglie
Dopo ogni lavaggio
Dopo ogni lavaggio chiudete il rubinetto dell'acqua e lasciate socchiusa la porta in modo che non ristagnino nè umidità,
nè cattivi odori.
Staccare la spina
Prima di fare qualsiasi pulizia o manutenzione, staccate sempre la spina dalla presa: in questo modo non correrete alcun
pericolo.
Niente solventi nè abrasivi
Per pulire l'esterno e le parti in gomma della lavastoviglie
non occorre usare nè solventi nè abrasivi ma solo un panno
imbevuto di acqua tiepida e sapone.
Per eliminare eventuali macchie sulla superfice della vasca,
utilizzare un panno imbevuto di acqua ed un po' di aceto
bianco o prodotto specifico per la pulizia della lavastoviglie.
Se partite per le vacanze
Quando andate in vacanza, é consigliabile fare un lavaggio
a vuoto, dopodichè staccare la spina, chiudere il rubinetto di
ingresso acqua e lasciare socchiusa la porta: le guarnizioni
dureranno più a lungo ed all'interno non si formeranno odori
sgradevoli.
In caso di trasloco
In caso di trasloco possibilmente mantenete l'apparecchio in
posizione verticale; se fosse necessario, inclinatela sul lato
posteriore.
Le guarnizioni.
Uno dei fattori responsabili del ristagno di odori all'interno
della lavastoviglie é rappresentato dai residui di cibo che
rimangono nelle guarnizioni. Basterà pulirle periodicamente
con una spugnetta inumidita.
9
IT
Pulizia e manutenzioni particolari
Il gruppo filtrante
Se vuoi avere sempre buoni risultati di lavaggio, è necessario pulire il gruppo filtrante.
L’acqua di lavaggio viene pulita dai residui di cibo e rimessa in circolo perfettamente filtrata. Per questo, dopo ogni la-
B
1
2
A
vaggio, è meglio rimuovere i
residui più grossi che trovi trattenuti dal bicchiere “C” e dal
filtro semicircolare A; per
C
estrarli tira il manico del bicchere verso l’alto. Basterà sciacquarli sotto l’acqua corrente.
Una volta al mese è necessario pulire accuratamente tutto il
gruppo filtrante: bicchiere C + filtro semicircolare A + filtro
cilindrico B. Il filtro “B” si estrae ruotandolo in senso antiorario.
Per la pulizia aiutati con uno spazzolino non metallico.
Rimetti insieme i pezzi (come indicato nella figura) e reinserisci
il gruppo nella lavastoviglie. Posizionalo nel suo alloggiamento
facendo una pressione verso il basso.
La lavastoviglie non deve essere usata senza filtri. Se non
C'é qualche problema ?
inserisci correttamente i filtri si ridurrà l’efficacia di lavaggio,
e si potrebbe anche danneggiare la lavastoviglie.
Pulizia degli irroratori
Può succedere che residui di cibo si attacchino agli irroratori
ostruendo i fori; controllarli periodicamente e pulirli (vedere
Vista di vicino (interno) alle lettere F-I).
Può accadere che la lavastoviglie non funzioni o non funzioni bene. Prima di chiamare l'assistenza, vediamo insieme
cosa si può fare: può darsi che abbiate dimenticato di premere qualche tasto o non abbiate fatto, per distrazione, una
manovra necessaria affinchè la macchina funzioni.
La lavastoviglie non parte
Avete controllato se:
il rubinetto è aperto e ben collegato al tubo, manca l'acqua
in casa oppure non arriva con sufficiente pressione, il tubo è
piegato, il filtro del tubo di alimentazione acqua è intasato,
la porta è aperta.
Le stoviglie non sono pulite
Avete controllato se:
è stata messa la giusta dose di detersivo, il programma di
lavaggio selezionato è idoneo alle stoviglie da lavare, filtro e
microfiltro sono puliti, gli irroratori sono liberi.
La lavastoviglie non scarica
Avete controllato se:
il tubo di scarico è piegato.
Sulle lavastoviglie rimangono depositi calcarei o una
patina bianca
Avete controllato se:
il tappo del contenitore sale è chiuso bene, il dosaggio di
brillantante è regolato bene.
Messaggi di errore
La avastoviglie è dotata di un sistema di sicurezza in grado di segnalare eventuali anomalie di funzionamento.
Tali anomalie o guasti sono segnalati da alcuni codici composti da
lettere e cifre che lampeggiano sul visualizzatore.
Dopo aver preso nota del codice di errore, spegnere la macchina,
chiudere il rubinetto dell’acqua e chiamare l’assistenza tecnica.
Allarme rubinetto chiuso
Se avete dimenticato di aprire il rubinetto dell’acqua la macchina lo
segnala con una serie di bip prolungati e con la scritta H2O lampeggiante sul display. Aprite il rubinetto dell’acqua e vedrete che
entro pochi minuti il programma si avvia.
Se non siete presente in questa fase di segnalazione, la macchina
andrà in allarme e lampeggerà il codice “A06”.
Spegnete con il pulsante "A", aprite il rubinetto dell’acqua e dopo
aver atteso circa 20 secondi riaccendendo la macchina il programma si avvia.
Allarme filtri intasati
Se la macchina è bloccata e lampeggia il codice “A05” significa che
il filtro è intasato da massicci residui di cibo. Spegnete con il pulsante si ON-OFF , pulite accuratamente il filtro e dopo averlo risistemato
nella sua sede, riaccendete la macchina. Entro pochi secondi il programma si avvia regolarmente.
Allarme per guasto all' elettrovalvola di carico dell'acqua
Se lampeggia il codice "A02",SPEGNERE E RIACCENDERE la lavastoviglie dopo un minuto. Se l’allarme permane, per prima cosa
chiudere il rubinetto delll’acqua per evitare allagamenti poi togliere
corrente e chiamare l’assistenza tecnica.
Se nonostante tutti i controlli, la lavastoviglie non funziona
e l'inconveniente da voi rilevato continua ad esserci,
chiamate il centro assistenza autorizzato più vicino,
comunicando le seguenti informazioni:
- il tipo di guasto
- la sigla del modello (Mod. ....) ed il numero di serie(S/N
....) riportati sulla targhetta applicata nella parte laterale
delle controporta.
Non ricorrete mai a tecnici non autorizzati e rifiutate
sempre l'installazione di pezzi di ricambio non
originali.
IT
10
Installazione
Posizionamento
Sistemare la macchina nel punto prescelto. La macchina può
essere fatta aderire con i fianchi o con lo schienale ai mobili
adiacenti o alla parete. La lavastoviglie é munita di tubi per
l'alimentazione e lo scarico dell'acqua che possono essere
orientati verso destra o verso sinistra per consentire un'adeguata installazione.
Livellamento
Posizionare la macchina agire sui piedini avvitandoli e svitandoli al fine di regolare, se necessario, l'altezza della macchina e livellarla in modo che venga a trovarsi orizzontale;
non deve comunque, in nessun modo, essere inclinata di
oltre 2°.
Un buon livellamento assicurerà il corretto funzionamento
della lavastoviglie.
Questo modello di lavastoviglie può essere incassato sotto ad un piano
di lavoro continuo (leggere il foglio di istruzioni relativo).
Sicurezza antiallagamento
La lavastoviglie è dotata di un sistema che interrompe l’ingresso dell’acqua nel caso di perdite all'interno della macchina. E’ provvista inoltre di un tubo entrata acqua che sopporta pressioni molto alte e che in caso di rottura si colora in
rosso. La sicurezza in caso di allagamenti è garantita dal
secondo tubo trasparente che lo contiene. E’ molto importante controllarlo periodicamente e se lo si vede di colore
rosso si deve al più presto cambiarlo. Chiamare l’assistenza
tecnica autorizzata per l’intervento.
Collegamento alla presa d'acqua calda
La macchina può essere alimentata con acqua calda di rete
(impianto centralizzato, termosifoni) che non superi la temperatura di 60° C.
In questo caso il tempo di lavaggio sarà abbreviato di circa
15 minuti e l'efficacia del lavaggio lievemente ridotta.
Il collegamento deve essere effettuato alla presa d'acqua
calda, con le stesse modalità descritte per il collegamento
alla presa d'acqua fredda.
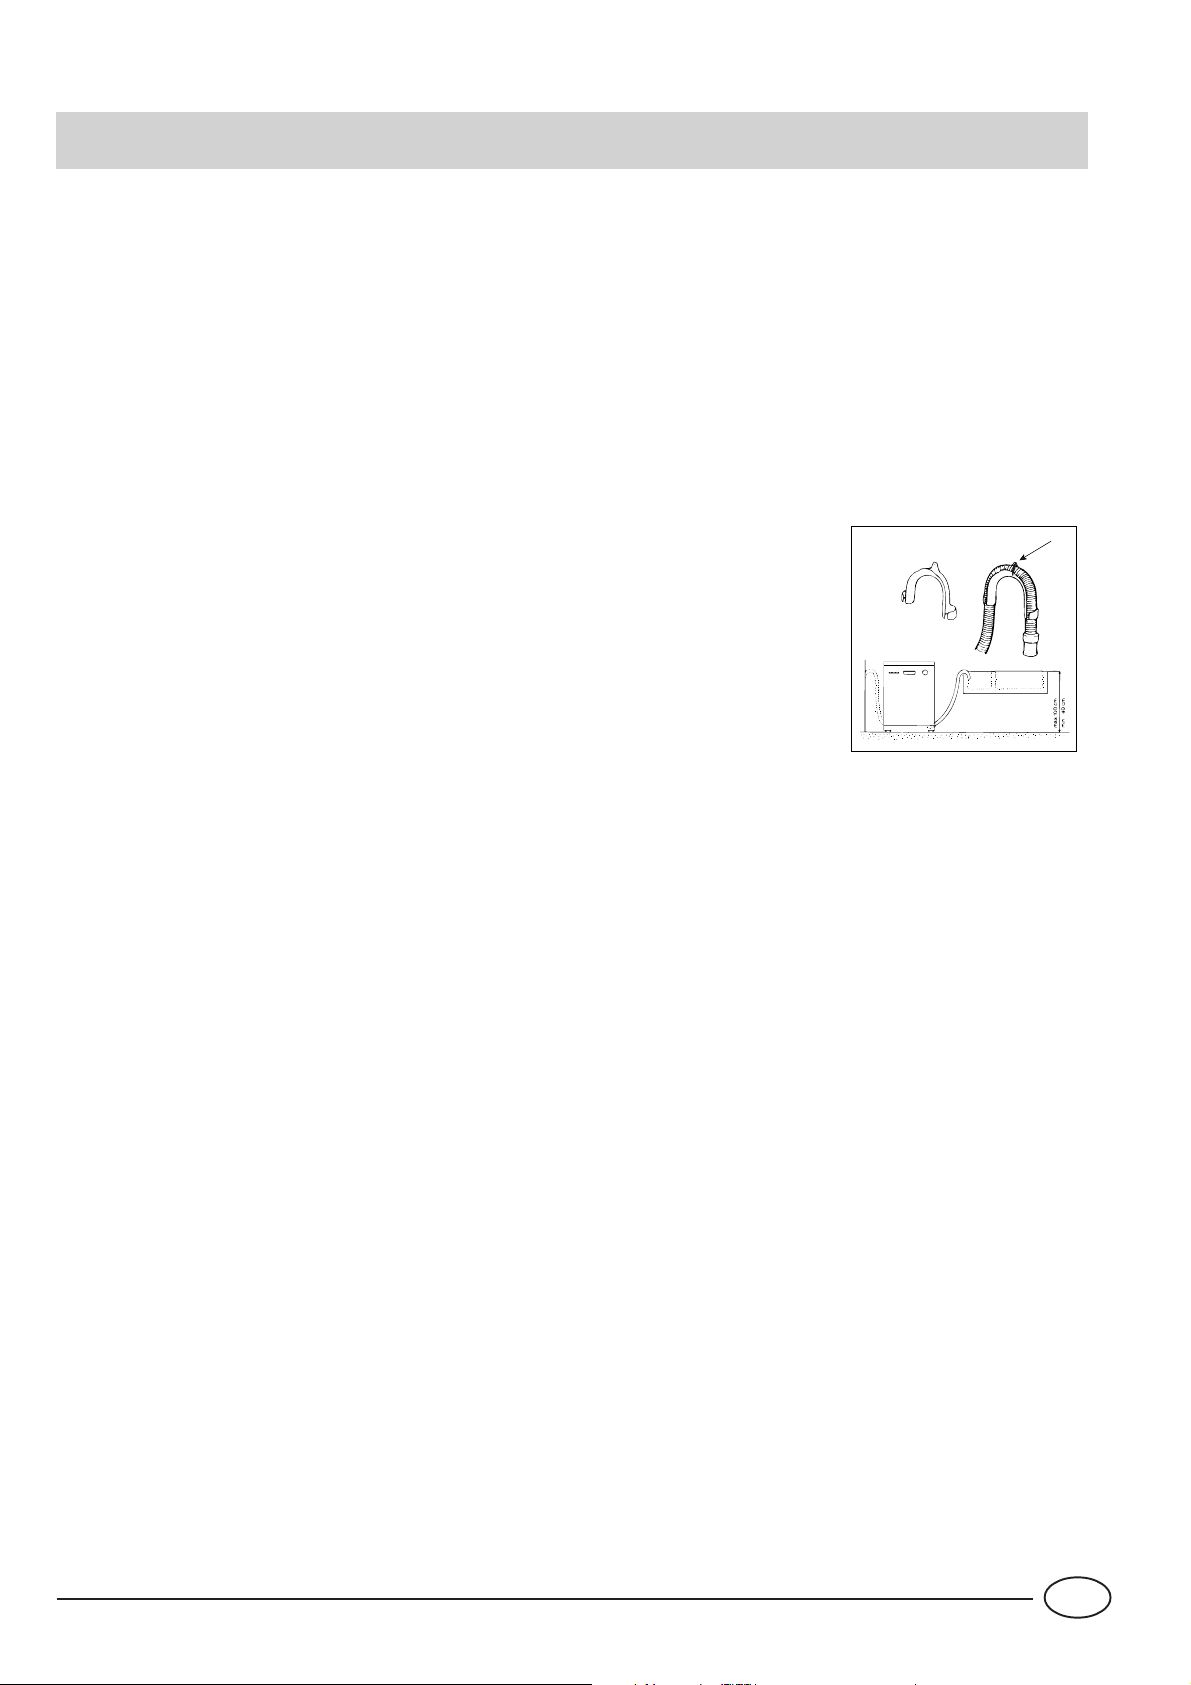
Collegamento al tubo di scarico
Inserire il tubo di scarico in una conduttura di scarico che
abbia un diametro minimo di
cm. 4 oppure appoggialo al lavandino. Evitare strozzature o
curvature eccessive. E' possibile metterlo in maniera
ottimale utilizzando lo speciale gomito in plastica in dotazione (ved. figura).La parte del
tubo contrassegnata con la lettera A deve essere ad una altezza compresa tra 40 e 100
cm.
Il tubo non deve essere immerso nell’acqua.
Attenzione: lo speciale gomito in plastica deve essere fissa-
to saldamente al muro per evitare che il tubo di scarico si
muova e non versi l'acqua fuori dallo scarico.
A
Collegamento alla presa d'acqua fredda.
L’allacciamento dell’elettrodomestico alla rete idrica deve
avvenire esclusivamente con il tubo di carico fornito con
l’apparecchio, non utilizzare tubi diversi. In caso di sostituzione utilizzare solo ricambi originali.
Allacciare il tubo di carico ad una presa d'acqua fredda con
bocca filettata da 3/4 gas avendo cura di avvitarlo strettamente al rubinetto.
Se la tubazione dell'acqua é nuova o é rimasta per lungo
inattiva, prima di fare l'allacciamento, assicurarsi, facendola
scorrere, che l'acqua diventi limpida e priva di impurità. Senza
questa precauzione c'é il rischio che l'entrata d'acqua si intasi, danneggiando la macchina.
Collegamento elettrico
Inserire la spina in una presa di corrente munita di un efficiente collegamento a terra (la messa a terra dell'impianto é
una garanzia di sicurezza prevista dalla legge), dopo aver
verificato che i valori della tensione e della frequenza di rete
corrispondano a quelli riportati sulla targhetta situata sulla
controporta inox della macchina e che l'impianto elettrico al
quale essa va collegata sia dimensionato per la corrente
massima indicata su tale targhetta. Se la presa di corrente
alla quale va collegata la macchina non corrisponde alla spina, sostituire quest'ultima con una spina adatta, piuttosto
che impiegare adattatori o derivatori in quanto essi potrebbero provocare riscaldamenti o bruciature.
Si raccomanda, in caso di cavo di alimentazione elettrica
danneggiato di rivolgersi, per la sostituzione, esclusivamente
ai Centri di Assistenza Tecnica autorizzata.
11
IT
Safety Is a Good Habit to Get Into
C
A
D
P
H
R
E
NOTICE
Carefully read the instructions contained in this manual, as they
provide important information which is essential to safe and proper
installation, use and maintenance of the appliance.
This appliance complies with the following EEC directives:
- 73/23/EEC of 19/02/73 (Low Voltage) and subsequent
modifications;
- 89/336/EEC of 03/05/89 (Electromagnetic Compatibility)
and subsequent modifications.
- 97/17/EEC Labelling
1.Carefully dispose of the packing material.
2.After removing the packing, check to make sure that the appliance
is not damaged. If in doubt, contact a qualified professional.
3.The dishwasher must only be used by adults for the washing of
household dishes and cooking utensils.
4.Fundamental rules to follow when using the appliance:
- Never touch the dishwasher when barefoot or with wet hands or
feet;
- We discourage the use of extension cords and multiple sockets;
- During installation, the power supply cord must not be excessively
or dangerously bent or flattened;
- If the appliance is not operating properly or maintenance must
be performed, disconnect the appliance from the power supply.
5.Keep detergents out of the reach of children, who must also be
kept away from the dishwasher when it is open.
6.This appliance cannot be installed outdoors, not even if the area in
which it is installed is covered by a roof; it is also very dangerous to
leave it exposed to the rain and elements.
7.Do not touch the heating element during or after a wash cycle.
8.Do not lean or sit on the door when it is open, as this could overturn
the dishwasher.
9.If the appliance malfunctions, turn off water supply to the appliance
and disconnect the plug from the wall socket. Then, consult the
section entitled, "Troubleshooting." If you cannot resolve the
problem, contact a service centre.
10.Appliances which are no longer being used must be made
inoperable by cutting the power supply cord and removing the door
lock.
To maintain the EFFICIENCY and SAFETY of this
appliance, we recommend:
Close-up View (control panel)
l call only the Service Centers authorized
by the manufacturer
l always use original Spare Parts
A: ON-OFF button
C: Door handle
D: Cycle selection Knob
H: Display
E: "Extra drying" button
P: Delayed start select button
R: Start/Reset Button
T
L
H
G: "Extra drying" indicator light
H: Cycle phase indicator lights
L: Alphanumeric indicator
S: Low salt indicator light
T: Low rinse aid indicator light
I: Delayed start indicator light
S
I
GB
G
12
Close-up View (Interior)
G
E
F
I
Upper Rack
T op Sprayer Arm
Rack Height Adjustor
Lower Rack
J
Bottom Sprayer Arm
Salt Container Cap
Washing Filter
Detergent and Rinse Aid Dispenser
H
K
L
Technical characteristics
Width cm. 45
Depth cm. 60
Height cm. 85
Capacity 9 standard place settings
Mains water pressure 4,3 psi - 145 psi 30KPa÷ 1MPa (0,3 ÷10 bar)
Power voltage See data plate
Total absorber power See data plate
Fuse See data plate
13
GB
Salt ......
Salt
The hardness of the water varies from place to place. If
hard water is used in the dishwasher, deposits will form on
the dishes and utensils.
The appliance is equipped with a special softener that uses
a salt specifically designed to eliminate lime and minerals
from the water.
Loading the Salt into the Softener
Always use salt intended
for use with dishwashers.
The salt container is
located beneath the
lower rack and should be
filled as follows:
1. Remove the lower rack
and then unscrew and
remove the cap from the
salt container;
2. If you are filling the
container for the first
time, fill it with water;
3. Place the end of the funnel (supplied) into the hole and
introduce about 2 kg of salt. It is normal for a small amount
of water to come out of the salt container.
4. Carefully screw the cap back on.
The salt container should be filled up when the low
salt indicator light "S" flashes.
Once you have loaded the salt for the first time, it is normal
that the low salt indicator light stays on or flashes for about
5 consecutive cycles.
Warning: To prevent rust from forming, we advise you to
load the salt before starting a wash cycle.
Adjusting Salt Consumption
The dishwasher is designed to allow for adjusting the
amount of salt consumed based
on the harness of the water
used. This is intended to
optimize and customize the
level of salt consumption so that
it remains at a minimum.
Your Local Water Board can
supply the degree of hardness
of the water
in your area.
T o adjust salt consumption, proceed as follows:
1) Unscrew the cap from the salt container.
2) There is a ring on the container with an arrow on it (see
figure to the side), if necessary, rotate the ring in the anticlockwise direction from the "_" setting towards the "+ "
sign, based on the hardness of the water being used.
It is recommended that adjustments be made in accordance with the following schema:
Water Hardness
Salt
Clarke
degrees
0 - 14 0 - 17 0 -1,7 / 0 /
14 - 36 18 - 44 1,8 - 4,4 "-" 20 60
°fH mmol/l
Selector
position
consumption
(grams/cycle)
Autonomy
(cycles\2kg)
GB
36 - 71 45 - 89 4,5 - 8,9 MED 40 40
>71 > 89 > 8,9 "+" 60 25
14
Detergent and Rinse Aid ....
Detergent
Detergent specifically intended for use with dishwashers
must be used. The dispenser must be refilled before the
start of each wash cycle following the instructions provided
in the "Wash Cycle Table." The detergent dispenser is
located on the inside panel of the door.
Loading the detergent
T o open lid "A", pr ess button "B". The cleaning detergent
should be introduced into the two containers "C"and
"D" up to the rim.
After pouring in the detergent, replace the lid, pressing
down until it clicks.
Dishwasher detergent in tablets is now available on the
market, in which case you should place one tablet into
container "D" and replace the lid.
Notice: To facilitate closing the cover, remove any
excess detergent on the edges of the dispenser.
B
D
C
Rinse Aid
This product makes dishes sparkle more as it improves their
drying. The rinse aid container is situated on the inside of
the appliance door; you should refill it when the low rinse
aid indicator light "T" flashes.
Loading the Rinse Aid
T o open the dispenser , turn the "C" cap in the anti-clockwise
direction and then pour in the rinse aid, making sure not to
overfill. The amount of rinse aid used for each cycle can be
regulated by turning the "F" dose adjustor , located beneath
the "C" cap, with a screwdriver. There are 6 different
settings; the normal dosage setting is 4.
F
C
24 gr
.
3 gr.
Important:
Proper dosage of the rinse aid improves drying.
If drops of water remain on the dishes or spotting occurs,
the dosage adjustor should be turned to a higher setting. If
the dishes have white streaks, turn the dosage adjustor to a
lower setting.
A
Warning
Three-in-one dishwasher tablets are now available on the market, and combine the detergent, salt and rinse aid all in one.
If the water in your area is hard or very hard, we still recommend you pour extra salt into the relevant dispenser to prevent the
formation of white streaks on your dishes or on the appliance interior .
Add rinse aid to the corresponding container only if you are dissatisfied with the results on your dishes.
In any case, please read the manufacturer's instructions provided on the packet.
If you use only these products, it is normal for the salt and rinse aid indicator lights to flash permanently after a certain
number of cycles.
15
GB

Loading the Dishwasher
Before placing the dishes in the racks, remove the largest
scraps of food left over on your plates, you will thus avoid
blocking the filter, which would reduce the efficacy of the
wash.
If the saucepans and frying pans are very dirty , allow them to
soak before being washed.
Y ou will thus avoid having to wash them again.
To make it easier to load your dishes, pull the racks out fully .
How to use the lower rack
We recommend you place the most difficult dishes to wash
into the lower rack: saucepans, lids, soup dishes and plates
(load examples are shown in the photo).
The lower rack has tip-up sectors (see figure B), so you can
place even more saucepans and frying pans or make room
for the larger one
Fig.B
1
2
upper rack
Load examples
lower rack
• Serving dishes and large lids: place them on the sides
of the rack.
• Saucepans, salad bowls: must always be placed upside
down.
• Very deep dishes: place them obliquely, thus allowing
water to run down them and cleaning them better.
The cutlery basket (Fig. A)
This basket is equipped with a grids: insert the cutlery one
by one into the slots; knives and utensils with sharp blades
or tips should be positioned with the sharp parts at the
bottom.
Position all cutlery items so that they don't touch.
Especially long utensils should be placed in the horizontal
position at the front of the upper rack.
How to Use the Upper Rack
The upper rack is designed to hold more delicate and
lighter dishware, such as glasses, coffee and tea cups
and saucers, as well as plates, small bowls and shallow
pans (as long as they are not too dirty).
After loading the dishes, remember to check that the blades
on the sprayer arms can turn freely without knocking
against any dishes.
fig. A
fig. C
How to adjust the upper rack ….
The upper rack can be set in a high or low position. There
are two handles on the sides of the upper rack: use these
to adjust its height (see figure C).
GB
16
Turning on the Appliance
First of all
Insert the plug into the electricity socket to power the
dishwasher . T urn on the water tap completely and press ONOFF button "A"; the display lights up and the wash cycle
time selected on the knob will flash.
Selecting and starting a wash cycle.
• Select the desired wash cycle by turning knob "D"
clockwise from wash cycle 1 to 7 and anticlockwise from 7
to 1; the display indicates the average duration of the wash
cycle and the cycle phases it consists of (consult the wash
cycle table contained on page 19, especially when first using
the appliance).
• Press the Start button "R" and the wash cycle starts up,
emitting a double beep; the approximate amount of time
left until the end of the wash cycle is displayed.
• If the time indicated at the start of the wash cycle does not
correspond to the actual duration of the cycle itself, this could
be for a number of reasons: the temperature of the inlet
water , the degree of soil, prolonged attempts by the appliance
to clean the wash filter from food residue clogging it, etc.
Cycle phase under way indicator
While the wash cycle is under way , the symbols corresponding
to the cycle phases light up in sequence.
Here are the symbols corresponding to each cycle phase:
You've left out a dish?
You can interrupt a wash cycle by pressing the "ON-OFF"
button, then place the forgotten dishes into the appliance,
which will start up, after approximately 10 seconds, from
where it was interrupted when you turn it back on.
There's been a power failure? Has the dishwasher door
been opened?
The wash cycle stops and 3 dashes appear on the display;
the cycle restarts as soon as the electricity comes back on or
when the door is shut.
At the end of the wash cycle
The end of the wash cycle is indicated by two short beeps
and the word "END" flashes on the display .
• Turn the appliance off at the ON-OFF button
• Turn off the water tap.
• Empty the lower rack first.
Make sure the wash cycle has ended before removing the
dishes!
Warning: when you open the dishwasher door after the wash
cycle has just ended or is under way, take care not to scald
yourself with the hot steam.
Pre-wash Wash Rinses Drying
Cancelling and modifying a wash cycle in progress
Premise: a wash cycle in progress can only be modified if it
hasn't been running for long.
Keep the Reset button "R" pressed for about 3 seconds:
a prolonged beep will sound, followed by three short beeps.
The cancelled cycle time will flash on the display. Turn the
knob to select a new wash cycle.
How to set the extra drying
Press button "E". After a prolonged beep, indicator light "G"
lights up and the time corresponding to the wash cycle
selected on the knob will flash on the display.
Note: The time indicated on the display is extended due to
the extra drying time.
To disable the extra drying option, press the same button
and indicator light "G" will be turned off after a beep is
sounded.
This option is incompatible with the soak cycle.
17
GB

Setting a delayed start
How to set a delayed start
When you have loaded the dishes, you can choose when to
start your dishwasher before setting the wash cycle desired.
• Press button "P" repeatedly to postpone the start of the
wash cycle from 1 hour to 24h.
• If you press the button again, the word "OFF" is displayed
(no selection made).
Once you have made your selection, make sure the appliance
door is shut and start the wash cycle by pressing the ST ART
button.
Symbol "I" lights up on the display and the countdown
begins.
• Once the countdown is up, the wash cycle begins and the
approximate amount of time left until the end of the wash
cycle is displayed.
Have you changed your mind?
• If you change your mind, you can set a shorter time delay:
press button "P" to select it. You need not reset the wash
cycle.
• If you have changed your mind and wish to start the wash
cycle immediately, press button "P" until the countdown is
fully reset. Indicator light "I" will turn off and the cycle will
start at the sound of a beep.
The indicator light corresponding to the cycle phase under
way will come up on the display and the countdown to the
estimated cycle end begins.
Warning: if the display indicates the word "dON" when you turn
your dishwasher on, this means the demo mode is in operation. This
mode is useful for exhibitors in that it simulates the wash cycles
without actually carrying them out.
To quit this mode, keep the START/RESET button "R" pressed for
approximately 4 seconds. The word "dOF" will be displayed once
you have quit the demo mode successfully.
GB
18
Wash Cycle Table
Dishwasher washing guarantees your dishes will be cleaned in a hygienic setting for
safer, cleaner results.
:DVKF\FOH
GXUDWLRQ
PDUJLQ
ZLWKR XW
GU\LQJ
&\FOH
,QWHQVLYH
&\FOHVHOHFWLRQ
LQVWUXFWLRQ V
Very dirty dishes and
pans (not to be used
fo r de lica t e items )
&\FOH GH V FULSWLRQ
Pre-wash with hot water at 4 0°C
Wash a t 6 5 ° C
2 cold rinses
Hot r inse at 6 5 °C
Drying.
'HWHUJHQW
IRUSUH
ZDVK
ZD V K
JU
5LQVH$LG
H[WUD
7LPH <RX
(FR
5DSLG ' U\
6RDN
No rmally dirty pans
and dishes. Standard
daily cycle.
Enviro nment ally-friendly cycle, with low
energy consumption
le vels , s uit ab le fo r
nor mally dirt y p a ns
and dishes.
Economic and fast
cycle to be used for
slightly dirty dishes.
Run cycle immediately
after use.
P re liminar y w as h c y c le
for dishes and pans
awaiting completion of
the load with the dishes
fro m the next mea l.
Wash a t 6 0 ° C.
Cold rinse
Hot r inse at 7 0 °C
Drying.
2 pre-washes with cold water
Wash a t 5 0 ° C
Hot r inse at 6 5 °C
Drying
Short wash at 47°C
Hot r inse at 6 5 °C
Drying
Short co ld wash to pre vent foo d
from drying onto the dishes.
JU
JU
JU
&U\VWDO&DUH
$IWHU'LQQHU
S pe cia l c y cle t o b e
used for delicate
items , wh ic h a re mor e
s e n s it iv e to hig h
temperatures.
Quick and economic
wash for a daily load
of dishes.
Wash a t 5 2 ° C
Rinse at 45 ° C
Hot r inse at 6 5 °C
Drying
Wash a t 5 0 ° C
Hot r inse at 6 5 °C
Drying
19
JU
JU
GB

Energy Saving Tips
- It is important to try and run the dishwasher when it is fully
loaded in order to save on energy . In or der to prevent odors
from forming and food from caking onto the dishes, you
can run the hold cycle.
- Choose the right wash cycle: the choice of cycle depends
on the type of dishware, cookware and utensils being
washed and how dirty they are.
- Use the right amount of detergent: if you use too much
detergent, the result will not be cleaner dishes, but, rather,
a greater negative impact on the environment.
- There is no utility in rinsing dishes, cookware and utensils
before placing them in the dishwasher.
How to Keep Your Dishwasher in Shape
After Every Wash
After every wash, turn off the water supply to the appliance
and leave the door slightly ajar so that moisture and odors
are not trapped inside.
Remove the Plug
Before cleaning or performing maintenance, always remove
the plug from the socket. Do not run risks.
No Solvents or Abrasive Cleaning Products
To clean the exterior and rubber parts of the dishwasher,
do not use solvents or abrasive cleaning products. Rather,
use only a cloth and warm soapy water.
To remove spots or stains from the surface of the interior,
use a cloth dampened with water and a little white vinegar ,
or a cleaning product made specifically for dishwashers.
When Y ou Go on Holiday
When you go on holiday , it is recommended that you run a
wash cycle with the dishwasher empty and then remove
the plug from the socket, turn off the water supply and
leave the door of the appliance slightly ajar. This will help
the seals last longer and prevent odors from forming within
the appliance.
Moving the Appliance
If the appliance must be moved, try to keep it in the vertical
position. If absolutely necessary, it can be positioned on its
back.
Seals
One of the factors that cause odors to form in the
dishwasher is food that remains trapped in the seals. Periodic
cleaning with a damp sponge will prevent this from occuring.
GB
20
Cleaning and Special Maintenance
The filter assembly
If you want consistent good results from your dishwasher,
you need to clean the filter assembly; this way the food
particles are removed from the wash water, allowing it to be
recirculated during the cycle, filtered perfectly. For this reason,
it is a good idea to remove the larger food particles trapped
inside the cup “C” and semi-circular filter “A” after each
wash. All you need to do is
rinse them under running
1
water; to remove these, pull
the cup handle upwards.
B
2
A
The entire filter assembly,
comprising a semi-circular
filter “A”, a cup “C”, and a
cylindrical filter “B” should
be cleaned thoroughly once
C
a month. Rotate filter “B”
anticlockwise to remove it. For cleaning, use a non metallic
brush.
Reassemble the three parts as shown in the figures and
reinsert the whole assembly into the dishwasher , positioning
it into its housing and pressing downwards.
The dishwasher is not to be used without filters. Improper
replacement of the filters may reduce the efficiency of the
wash and even damage your dishwasher.
Cleaning the Sprayer Arms
It may happen that food particle become encrusted on the
sprayer arms and block the holes (see "Close up view
(interior)", letters F-I). Check the sprayer arms periodically
and clean them when needed.
Troubleshooting
It may occur that the dishwasher does not function or does not
function properly. Before calling for assistance, let us see what can
be done first: have you forgot to press one of the buttons or to
perform an essential operation?
The Dishwasher Does Not Start
Have you checked whether:
- the plug is pushed into the socket correctly;
- the power is on in the house;
- the door is closed properly;
- the ON-OFF switch is on "ON";
- the water supply is turned on.
The Dishwasher Does Not Load Water
Have you checked whether:
- the water is turned on and the hose is connected properly;
- the water supply to the house is on and has sufficient
pressure;
- the water supply hose is crimped or bent;
- the filter for the water supply hose is clogged.
The Dishes Are Not Clean
Have you put the right amount of detergent into the dispenser?
Is the wash cycle suitable for the dishes you have placed inside the
appliance?
Are the filter and microfilter clean?
Can the sprayer arms turn freely?
The Dishwasher Does Not Drain
Have you checked whether:
- the drain hose is crimped or bent.
Lime Deposits or a White Film Form on the Dishes
Have you checked whether:
- the lid to the salt container is closed properly;
- the rinse aid dosage is correct.
If the display indicates the word "dON" when you turn your
dishwasher on, this means the demo mode is in operation.
Read the instructions on pages 18.
Error messages.
Your dishwasher is equipped with a safety system which is able to
detect any operating anomalies.
These anomalies or faults are signalled by several codes consisting of
letters and numbers that flash up on the display . Make a note of the
error code that appears, turn the appliance off, turn off the water
tap and call for technical assistance.
Tap off alarm
If you have forgotten to turn on the water tap, the appliance will
remind you with a series of prolonged beeps and the wording H2O
will flash up on the display. Turn the tap on and the wash cycle will
start up after a few minutes.
If you are not there when the H2O signal appears, the appliance will
switch to alarm mode and the code "A06" will flash on the display .
T urn the appliance off at button "A", turn on the water tap and wait
approximately 20 seconds before turning the appliance back on, the
wash cycle will start up again.
Clogged filter alarm
If the appliance is blocked and the code "A05" is flashing, this means
the filter is clogged by large particles of food residue. Turn the
appliance off at the ON-OFF button, clean the filter thoroughly and
reposition it in its seat, then turn the appliance back on. The wash
cycle will start up as normal after a few seconds.
Water load solenoid valve malfunction alarm
If the code "A02" flashes,
any flooding and then cut off the electricity supply and call for
assistance.
If, despite all these checks, the dishwasher still does not function
and/or the problem persists, contact the nearest authorised service
centre and provide them with the following information:
- the nature of the problem;
- the model type number (Mod. ...) and the serial number (S/N ....),
which are indicated on the plate located on the side of the inner part
of the door.
Never call on unauthorised technicians and refuse to allow
parts to be installed that are not original spare parts.
first of all turn off the water tap to avoid
21
GB

Installation
Positioning the Appliance
Position the appliance in the desired location. The back
should rest against the wall behind it, and the sides, along
the adjacent cabinets or wall. The dishwasher is equipped
with water supply and drain hoses that can be positioned
to the right or the left to facilitate proper installation.
Levelling the Appliance
Once the appliance is positioned, adjust the feet (screwing
them in or out) to adjust the height of the dishwasher,
making it level. In any case, the appliance should not be
inclined more than 2°.
If the appliance is level, it will help ensure proper performance.
This dishwasher model can be built under a single worktop
(please read the relevant instruction sheet).
Cold water connection.
Connect the cold water supply hose to a 3/4 gas threaded
connection, taking care to screw it tightly onto the tap. If the
water hoses are new or have been out of use for an extended
period of time, let the water run to make sure it is clear and
free of impurities before making the connection. If this
precaution is not taken, the water inlet could get blocked,
causing damage to your dishwasher .
Hot Water Connection
The water supply to the appliance can also be connected to
the house's hot water line (centralised system, heating
system), as long as it does not exceed a temperature of 60°
C.
In this case, the wash cycle time will be shortened by about
15 minutes and the wash efficiency slightly reduced.
The connection must be made to the hot water line following
the same procedures as those for the connection to the cold
water line.
Drain Hose Connection
Fit the drain pipe into a drain
line with a minimum diameter
of 4 cm or place it over the
sink. Avoid restricting or
bending it. Use the special
plastic elbow provided (see figure) to position it in the best
possible way. The part of the
pipe marked with the letter A
should be between 40 and 100
cm above the ground.
The pipe should not be immersed in water.
Attention: The special plastic hose support must be solidly
fastened to the wall to prevent the drain hose from moving
and allowing water to spill outside the drain.
Electrical Connection
After making sure that the voltage and frequency values for
the current in the home correspond to those on the rating
plate (located on the stainless steel inner door of the
appliance) and that the electrical system is sized for the
maximum voltage on the rating plate, insert the plug into
an electrical socket which is earthed properly (the earthing
of the appliance is a safety requirement mandated by law).
If the electrical socket to which the appliance must be
connected is not appropriate for the plug, replace the plug,
rather than using adpators or the like as they could cause
overheating and burns.
Should the electricity supply cable be damaged, we
recommend that you only contact authorised Technical
Service Centres for the replacement.
A
Anti-flooding protection
Your dishwasher is provided with a special system which
blocks the water supply in the event of leaks inside the
appliance. It is further equipped with a water inlet hose that
can withstand extremely high pressures and that turns bright
red in the event of breakage. Safety in the event of flooding
is ensured by the second clear hose that contains the former
and thus highlights the latter when it has turned bright red. It
is vital that you check it on a regular basis: if you see it has
turned bright red, then you know you have to replace it as
soon as possible. Call for an authorised technical engineer to
come and replace it.
GB
22

La sécurité, une bonne habitude
ATTENTION
Lisez attentivement cette notice car elle contient des instructions très
importantes concernant la sécurité en matière d’installation,
d’utilisation et d’entretien de votre appareil.
Cet appareil est conforme aux Directives Communautaires suivantes :
- 73/23/CEE (Basse Tension) et modifications successives ;
- 89/336/CEE (Compatibilité Electromagnétique) et modifications
successives.
- 97/17 CEE (Etiquetage)
1. Eliminez avec soin les éléments formant l’emballage.
2. Après avoir déballé l’appareil, contrôlez s’il est en bon état. Si vous
avez le moindre doute, adressez-vous à un professionnel du secteur.
3. Votre lave-vaisselle ne doit être utilisé que par des adultes. Vous
n’y laverez que la vaisselle de tous les jours.
4. Règles d’utilisation fondamentales à suivre :
- ne touchez pas à la machine quand vous êtes pieds nus ou si vous
avez les mains ou les pieds mouillés
- l’utilisation de rallonges et de bloc multi-prises est déconseillée.
- lors de l’installation, veillez à ce que le câble d’alimentation ne soit
pas excessivement plié ou comprimé pour éviter tout danger.
- en cas de mauvais fonctionnement ou de travaux d’entretien,
débranchez l’appareil de la ligne électrique.
5. Gardez les enfants à bonne distance des produits de lavage et du
lave-vaisselle ouvert.
6. N’installez jamais votre appareil à l’extérieur, même s’il est abrité
par un auvent. Il est extrêmement dangereux de le laisser sous la
pluie et les orages.
7. Ne touchez pas à la résistance pendant et dès la fin du cycle de
lavage.
8. Ne vous appuyez pas à la porte ouverte et ne vous asseyez pas
dessus, vous risqueriez de faire basculer le lave-vaisselle.
9. En cas de panne, fermez le robinet d’arrivée de l’eau et débranchez
la fiche de la prise murale. Essayez de trouvez une solution à votre
problème dans le paragraphe “Des problèmes ?” autrement,
adressez-vous à votre service après-vente.
10. Pour rendre inutilisable votre appar eil hors d’usage, coupez son
câble d’alimentation et cassez le système de verrouillage de sa porte.
Pour garantir un fonctionnement efficace de cet électroménager en toute sécurité :
Vue de près (tableau de bord)
H
R
l adressez-vous uniquement à des centres d’assistance
technique agréés
l exigez toujours l’utilisation de pièces détachées
originales
D
A
P
A: Touche On-Off
C: Poignée ouverture porte
D: Bouton sélection programmes
R: Touche de Start/Reset
T
L
H
S
I
E
C
H: Affichage
E: Touche "Séchage super"
P: Touche sélection départ différé
G: V oyant séchage super
H: V oyants déroulement du cycle
L: Indicateur alphanumérique
S: Voyant sel
T: Voyant produit de rinçage
I: V oyant départ différé
G
23
FR

Vue de près (Intérieur)
G
E
F
J
I
Paniersupérieur
Bras de lavage supérieur
Réglage hauteur du panier
Panier inférieur
H
K
L
Bras de lavage inférieur
Bouchon réservoir à sel
Filtre lavage
Distributeur produits de lavage et de rinçage
FR
Caractéristiques thecniques
Largeur cm. 45
Profondeur cm. 60
Hauteur cm. 85
Capacité 9 couverts standard
Pression eau alimentation 4,3 psi-145 psi (30 KPa÷ 1MPa) (0,3 ÷10 bar)
Tension d'alimentation Voir plaquette caractéristiques
Puissance totale absorbée Voir plaquette caractéristiques
Fusible Voir plaquette c ara ctéris tique s
24

Sel ....
Le sel
La dureté de l’eau varie d’un endroit à l’autre. Si l’eau est
dure, des dépôts blancs se forment sur la vaisselle.
Un adoucisseur d’eau qui utilise du sel spécial lave-vaisselle
permet d’éliminer le calcaire présent dans l’eau.
Chargement du sel dans l’adoucisseur
Utilisez toujours du sel spécial pour lave-vaisselle.
Le réservoir à sel est situé sous le panier inférieur, remplissez-le comme suit :
1. Sortez le panier inférieur ,
dévissez et enlevez le
bouchon du réservoir
2. Si c’est le premier chargement de sel que vous
effectuez, remplissez le réservoir d’eau.
3. Placez l’entonnoir fourni
dans le trou et introduisez
environ 2 Kg de sel. Il est
normal que de l’eau déborde du réservoir.
4. Revissez soigneusement le bouchon.
Remplissez le réservoir à sel dès que le voyant sel “S”
clignote.
Après avoir chargé le sel pour la première fois, il est tout à
fait normal que le voyant sel reste allumé ou clignote pendant 5 cycles de suite.
Réglage consommation sel
Votre lave-vaisselle peut régler
sa consommation de sel selon
la dureté de votre eau pour optimiser et personnaliser la
consommation de sel en la réduisant au minimum indispensable.
Vous pouvez demander quel est
le degré de dureté de votre eau
à l’organisme distributeur d’eau
potable de votre commune.
Pour le réglage, suivez les instructions suivantes :
1. dévissez le bouchon du réservoir à sel
2. vous verrez une flèche sur la collerette du réservoir (voir
figure ci-contre), tournez-la en cas de besoin dans le sens
inverse des aiguilles d’une montre en allant de “-” vers “+”
selon la dureté de votre eau.
Pour procéder à ce réglage, nous vous conseillons de suivre
le schéma suivant :
Durété de l'eau
°dH °fH mmol/l
Position
sélécteur
Consommation sel
(grammes-
/cycle)
Autono-
mie
(cycles/
2kg.)
Attention : Pour éviter la formation de rouille, chargez le
sel avant de démarrer un cycle de lavage.
0 ¸ 10 0 ¸ 17 0 ¸ 1,7 / 0 /
10¸ 25 18 ¸ 44 1,8 ¸ 4, 4
25 ¸ 50 45 ¸ 89 4,5 ¸ 8,9 MED 40 40
> 50 > 89 > 8,9
-
+
20 60
60 25
25
FR

Produit de lavage et de rinçage ……
Le produit de lavage
N’utilisez que du produit de lavage spécial lave-vaisselle.
Introduisez le produit de lavage avant de démarrer tout cycle de lavage conformément aux indications fournies par le
“Tableau cycles de lavage”. Le distributeur à produit de lavage se trouve à l’intérieur de la porte.
Chargement du produit de lavage
Pour ouvrir le couvercle “A” appuyez sur la touche “B”.
Versez le produit de lavage dans les 2 bacs “C” et “D” jusqu’à ras bord.
Après avoir introduit le produit de lavage, fermez le couver cle en appuyant jusqu’au déclic.
Si vous utilisez des produits de lavage en pastilles, mettez
une pastille dans le bac “D” et fermez le couvercle.
Pour pouvoir verrouiller le couvercle plus facilement,
éliminez, avant sa fermeture, les résidus de produit de
lavage qui se déposent parfois sur les bords du bac.
B
D
C
Le produit de rinçage
Le produit de rinçage fait briller votre vaisselle beaucoup
plus car il améliore son séchage. Le réservoir à produit de
rinçage est situé à l’intérieur de la porte. Il faudra le remplir
dès que vous verrez qu’il est vide à travers l’indicateur optique “D”.
(Si votre lave-vaisselle est équipé d’un voyant “produit de
rinçage”, remplissez le réservoir dès qu’il s’allume ou commence à clignoter).
Chargement du produit de rinçage.
Pour ouvrir le réservoir , tournez le bouchon “C” dans le sens
inverse des aiguilles d’une montre. Attention à ne pas faire
déborder le produit quand vous le versez. Pour régler la quantité de produit distribué, agissez avec un tournevis sur le
régulateur “F” situé sous le couvercle “C” . Vous pouvez
choisir parmi 6 positions, normalement il est réglé sur la
position 4.
F
C
24 gr
.
3 gr.
Important :
Le réglage de la quantité de produit de rinçage utilisé permet d’améliorer le séchage.
Si vous remarquez des gouttes d’eau ou des traces sur votre
vaisselle, tournez le dispositif de réglage vers les chiffres plus
élevés. Tandis que si vous remarquez des traces blanches,
tournez le régleur vers les chiffres plus bas.
A
Attention
Il existe dans le commerce des produits pour lave-vaisselle qui ont à la fois une fonction lavage, une fonction sel et une fonction
rinçage (3 en 1) Si votre eau est dure ou très dure, nous vous conseillons d’ajouter quand même du sel dans le réservoir prévu
à cet effet pour éviter la formation de traces blanches sur votre vaisselle ou à la surface de la cuve.
Ne remplissez votre réservoir à produit de rinçage que si le séchage de la vaisselle n’est pas satisfaisant.
Suivez toujours les recommandations du fabricant reportées sur l’emballage.
Si vous n’utilisez que des produits de ce genre, il est normal que les indicateurs lumineux sel et produit de rinçage se mettent à
clignoter , au bout d’un certain nombre de lavages.
FR
26

Chargement de la vaisselle
Avant de ranger la vaisselle dans les paniers, éliminez les
déchets de nourriture, ainsi les filtres ne se boucheront pas
et le lavage n'en sera que plus efficace.Si les casseroles et
les poêles sont très sales, nous vous conseillons de les mettre
tremper en attendant de les laver.Vous éviterez ainsi des
lavages supplémentaires.Sortez les paniers pour ranger
votre vaisselle plus facilement.
Utilisation du panier inférieur
Nous vous conseillons de placer dans le panier inférieur la
vaisselle plus difficile à laver : casseroles, couvercles, assiettes plates et creuses (les photos illustrent un exemple de
chargement).
• Plats et grands couvercles : rangez-les sur les côtés du
panier .
• Casseroles, saladiers : placez-les toujours sens dessus
dessous.
• Vaisselle très creuse : mettez ces pièces en position
oblique, l'eau pourra ainsi s'écouler et mieux les laver.
Le panier à couverts
Le panier inférieur a des secteurs inclinables (voir figure B);
vous pourrez ainsi charger davantage de casseroles et de
poêles ou faire de la place aux plus grandes.
Ce panier est équipé de une grille amovible : rangez les
couverts un par un dans les fentes, les pointes des couteaux
et des ustensiles de cuisine tranchants doivent être tournées
vers le bas. Rangez les couverts de manière à ce qu'ils ne
se touchent pas entre eux. Si le panier est du type avec
rangements latéraux, glissez les petites cuillères une par
une dans les fentes (voir la figure A).
Mieux vaut placer les couverts particulièrement longs à
l'horizontale à l'avant du panier supérieur .
Après avoir chargé le lave-vaisselle, n'oubliez pas de
contrôler si les bras du gicleur tournent bien, sans buter
contre la vaisselle.
Utilisation du panier supérieur
Chargez votre vaisselle fragile et légère dans le panier supérieur : verres, tasses à thé et à café, soucoupes, mais
aussi assiettes, saladiers bas, poêles et casseroles basses
peu sales (les photos vous montrent quelques exemples de
chargement).Placez la vaisselle légère de manière à ce
qu'elle ne risque pas d'être déplacée par les jets d'eau.Une
ou deux étagères rabattables peuvent être fournies pour
ranger des tasses, grandes et petites, mais aussi des cuillères, des fourchettes et des couteaux que vous introduirez
dans les fentes. Vous pourr ez aussi suspendr e dans les fentes des étagères rabattables vos verres à pied (voir fig. D).
Après avoir chargé votre lave-vaisselle, n'oubliez pas de
contrôler si les bras du gicleur tournent bien, sans buter
contre la vaisselle.
Réglage du panier supérieur
Vous pouvez choisir de régler la position, haute ou basse,
de votre panier supérieur. Deux poignées sur les côtés du
panier supérieur vous permettent de régler sa hauteur (voir
figure C).
Exemples de chargement
panier supérieur
1
2
Fig.B
panier inférieur
fig. A
fig. C
27
FR

Mise en marche de l'appareil
Tout d'abord
Branchez la fiche dans la prise pour mettre le lave-vaisselle
sous tension. Ouvrez à fond le robinet de l'eau et appuyez
sur la touche On-Off "A", l'écran s'allume et vous verrez
clignoter la durée du programme indiqué par le sélecteur.
Sélection et démarrage du programme.
• Pour sélectionner le programme, tournez le bouton "D"
dans le sens des aiguilles d'une montre du programme 1 au
programme 7 et dans le sens inverse des aiguilles d'une montre de 7 à 1; l'écran affiche la durée moyenne du programme
et les phases qui le composent (au début, nous vous conseillons de consulter le tableau des programmes page 30).
• Appuyez sur la touche de Start "R", un signal acoustique
répété signale le démarrage du programme, l'écran affiche
le temps moyen qui reste jusqu'à la fin du programme.
• Si le temps indiqué au début du programme ne correspond
pas à la durée effective du programme, ceci est dû à plusieurs facteurs : température d'arrivée de l'eau, degré de
salissure, tentatives prolongées de l'appareil de débarrasser
le filtre de lavage des résidus qui l'engorgent etc.
Indicateur déroulement du cycle
Pendant le déroulement du programme, les symboles correspondant aux phases du cycle s'allument tour à tour sur
l'écran. Symboles correspondant aux différentes phases :
Prélavage Lavage Rinçages Séchage
Annuler ou modifier un programme en cours
Rappel : un programme en cours ne peut être modifié que
s'il vient tout juste de démarrer.
Appuyez 3 secondes de suite sur la touche de Reset "R" :
un signal acoustique prolongé retentira suivi de 3 bip rapides. Le temps correspondant au cycle annulé se mettra à
clignoter sur l'écran. Tournez le bouton pour sélectionner
un nouveau programme.
Il y a une coupure de courant ? Vous avez ouvert la
porte de votre machine ?
Le programme s'interrompt et l'écran affiche 3 tir ets ; il repart dès que le courant revient ou que vous fermez la porte.
En fin de lavage
La fin du cycle est signalée par 2 brefs signaux acoustiques
et par "END" qui clignote sur l'écran.
• Eteignez l'appareil en appuyant sur la touche On-Off.
• Fermez le robinet de l'eau.
• Videz d'abord le panier inférieur.
Contrôlez que le programme est bien achevé avant de sortir
votre vaisselle !
Avertissement : lorsque vous ouvrez la porte du lave-vaisselle alors que le cycle de lavage est en cours ou vient juste
de finir, faites attention au nuage de vapeur chaude qui
s'échappe, vous risquez de vous brûler.
Sélection du séchage super
Appuyez sur la touche "E", un bip prolongé retentit suivi de
l'allumage du voyant "G" et sur l'afficheur le temps
correspondant au programme sélectionné à l'aide du bouton se met à clignoter.
Remarque : Le temps indiqué est supérieur du fait du séchage super .
Pour désactiver le séchage super, gardez la même touche
enfoncée, un bip prolongé retentit et le voyant "G" s'éteint
juste après.
Cette option est incompatible avec le trempage.
Vous avez oublié d'intr oduir e de la vaisselle ?
Vous pouvez interrompre le programme de lavage en appuyant sur la touche On-Off. Introduisez la vaisselle et allumez la machine, dans les 10 secondes qui suivent, le cycle
repartira de l'endroit où il a été interrompu.
FR
28

Sélection du départ différé
Comment programmer un départ différé
Vous avez chargé votr e lave-vaisselle, avant de sélectionner le
programme approprié, vous pouvez décider quand le faire démarrer .
• Si vous appuyez plusieurs fois de suite sur la touche "P" vous
pouvez différer le départ du cycle de lavage de 1 à 24heures.
• Si vous appuyez une autre fois, il y aura affichage de "OFF"
(aucune sélection).
Après avoir effectué votre choix, contrôlez si la porte est bien
fermée et appuyez sur la touche de Start "R" pour lancez le
programme.
Le symbole "I" s'allume sur l'écran et le compte à rebours
commence.
• Une fois le compte à rebours terminé, le programme démarre et l'écran affiche le temps moyen qui reste avant la fin
du programme.
Vous avez changé d'avis ?
• Pendant le délai d'attente, vous pouvez modifier le retard
sélectionné et choisir une durée inférieure. Appuyez plusieurs
fois de suite sur la touche "P", sans effectuer de Reset du
programme.
• Si vous avez changé d'idée et que vous voulez faire démarrer
le cycle immédiatement, appuyez sur la touche "P" jusqu'à
zéro. Le voyant "I" s'éteint et le cycle démarre signalé par un
bip.
Le voyant correspondant à la phase de programme en cours
s'allume et le compte à rebours du temps restant jusqu'à la fin
du programme commence.
Attention: si, à l'allumage du lave-vaisselle, l'écran affiche le message
"dON", c'est que le programme demo est activé. Ce programme
sert à simuler des cycles de lavage sans les effectuer réellement.
Pour quitter ce mode de fonctionnement, maintenez la touche "R"
de START/RESET enfoncée pendant 4 secondes environ. Dès que la
sortie est effectuée, l'écran affiche le message "dOF".
29
FR

Tableau des programmes
Le lavage en lave-vaisselle garantit un environnement hygiénisant et davantage de
propreté.
SURJUDPPH
V DQV
3URJUDPPH
,QWHQVLI
,QGLFDWLRQVV XUOHFKRL[GHV
SURJUDPPHV
Vaisselle et casseroles très
s a les ( dé co nse illé p our la
vaisselle fragile)
'HVFULSWLRQ GXF\FOH
Prélavage à l'eau chaude 40°C
Lava ge à 6 5 °C
2 rinçages à l'eau froide
Rinçage chaud à 65°C
Séchage
3URGXLWGH
ODYDJH
SUpODYDJH
ODYDJH
J
3URGXLW
GH
ULQoDJH
'XUpHGX
WROpUDQ FH
VpFKDJH
VXSHU
&ODVVH$
&KUR QR
(FR
([SUHVV
7UHPSDJH
&ULVWDO
Cycle pour vaisselle et
casseroles normalement sales.
Programme standard
quotidien.
Programme de lavage
é co lo g ique , à faib le
consommation d'électricité,
pour vaisselle et casseroles
normalement sales.
Cycle économique et rapide
c ons eillé e n ca s de v a iss e lle
peu sale, tout de suite après
l'usage.
Lava ge p r é a la b le d a ns
l'attente de compléter le
chargement au repas suivant
C y cle s pé cia l c onse illé po u r la
vais se ll e fr agil e ne s u pp or ta n t
pas les hautes températures
tout de suite après l'usage.
Lavage à 60°
Rinçage froid
Rinçage chaud à 70°C
Séchage
2 Prélavages à l'eau froide
Lava ge à 5 0 °C
Rinçage chaud à 65°C
Séchage
Lavage bref à 47°C
Rinçage à 65°C
Séchage
Lavage bref froid pour éviter
que les déchets ne sèchent sur
la vais s elle
Lava ge à 5 2 °C
Rinçage tiède à 45°C
Rinçage chaud à 65°C
Séchage
J
J
J
J
4XRWLGLH Q
FR
C y cle p our va iss e lle ut ilis ée ; à
dépoussiérer seulement.
Lava ge à 5 0 °C
Rinçage chaud à 65°C
Séchage
30
J

Quelques conseils pour faire des économies
- Faites fonctionner votre lave-vaisselle à pleine charge pour
optimiser vos consommations. Dans l’attente de le remplir,
utilisez le cycle trempage, vous éviterez ainsi la formation
d’incrustations et de mauvaises odeurs.
- Choisissez le programme approprié : le choix du programme
dépend du type de vaisselle que vous devez laver et de son
degré de salissure.
- Dosez juste la quantité de produit de lavage nécessaire : si
vous exagérez, vous n’obtiendrez pas une vaisselle plus propre et vous polluerez davantage.
- Inutile de rincer votre vaisselle avant de l’introduire dans la
machine.
Comment garder votre lave-vaisselle en forme
Après chaque lavage.
Après tout lavage, fermez le robinet de l’eau et laissez la
porte entrouverte pour éviter que l’humidité stagne à l’intérieur et que de mauvaises odeurs se forment.
Débranchez la fiche
Avant d’effectuer toute opération de nettoyage ou d’entretien, débranchez toujours la fiche de la prise de courant :
vous éviterez ainsi tout danger d’électrocution.
N’utilisez ni solvants ni produits abrasifs
Pour nettoyer l’extérieur et les parties en caoutchouc de votre lave-vaisselle, pas besoin d’utiliser de solvants ou de produits abrasifs, un chiffon mouillé d’eau tiède et un peu de
savon suffisent.
Pour éliminer les taches qui pourraient se former à la surface
de la cuve, utilisez un chiffon mouillé d’eau et d’un peu de
vinaigre blanc ou bien utilisez un produit de nettoyage spécial lave-vaisselle
Si vous partez en vacances
Avant de partir en vacances, il est conseillé d’effectuer un
lavage à vide puis de débrancher la fiche, fermer le robinet
d’arrivée de l’eau et laisser la porte entrouverte : les joints
dureront plus longtemps et il n’y aura pas formation de mauvaises odeurs à l’intérieur du lave-vaisselle.
En cas de déménagement
En cas de déménagement, gardez si possible l’appareil en
position verticale; en cas de besoin, vous pouvez l’incliner
sur le dos.
Les joints.
La formation de mauvaises odeurs à l’intérieur du lave-vaisselle est principalement due aux déchets d’aliments qui restent coincés dans les joints. Il vous suffira de les nettoyer de
temps en temps avec une éponge humide.
31
FR

Nettoyage et entretien particuliers
Le groupe filtrant
Si vous voulez toujours avoir d’excellents résultats de lavage,
nettoyez le groupe filtrant.
L’eau de lavage est débarrassée des déchets d’aliments et
remise en circulation parfaitement filtrée. V oilà pour quoi, il
vaut mieux enlever, après chaque lavage, les déchets les
plus gros arrêtés par le gobelet «C» et par le filtre semicirculaire A; pour les sortir, tirez la poignée du gobelet vers
le haut Il vous suffira alors de les rincer à l’eau courante.
Nettoyez soigneusement, une fois par mois, tout le groupe
filtrant: gobelet C + filtre semi-circulaire A + filtre cylindrique
B. Pour sortir le filtre “B” tournez-le dans le sens inverse des
aiguilles d’une montre.
Pour les nettoyer servez-vous d’une petite brosse non
métallique.Assemblez les pièces (comme illustré) et remontez
le groupe dans le lave-vaisselle. Faites-le entrer dans son
logement en poussant vers le bas.
N’utilisez pas votre lave-vaisselle sans filtres. Si les filtres ne
sont pas montés correctement, l’efficacité du lavage en
souffrira et vous risquez d’endommager l’appareil.
Des problèmes ?
1
B
2
C
A
Nettoyage des bras de lavage
Il peut arriver que des déchets restent collés aux bras de
lavage et bouchent les trous de sortie de l’eau ; contrôlezles donc de temps en temps et nettoyez-les (voir Vue de
près (intérieur) lettres F-I).
Il peut arriver que le lave-vaisselle fonctionne mal ou pas du
tout. Avant d’appeler le service après-vente, voyons ensemble quoi faire : vous avez peut-être oublié d’appuyer sur une
touche ou vous n’avez peut-être pas fait, par inadvertance,
une manœuvre indispensable au fonctionnement du lavevaisselle.
Le lave-vaisselle ne démarre pas
Avez-vous contrôlé :
si le robinet est ouvert et bien raccordé au tuyau, s’il n’ y a
pas par hasard une coupure d’eau ou bien si cette dernière
n’a pas assez de pression, si le tuyau est plié, si le filtre du
tuyau d’arrivée de l’eau est bouché, si la porte est ouverte.
La vaisselle n’est pas propre
Avez-vous contrôlé :
si la dose de produit de lavage utilisée est adéquate, si le
programme de lavage sélectionné est approprié à la vaisselle, si le filtre et le micro-filtre sont propres, si les bras de
lavage tournent librement.
Le lave-vaisselle ne vidange pas
Avez-vous contrôlé :
si par hasard le tuyau est plié.
Des dépôts de calcaire ou une couche blanche se déposent dans votre lave-vaisselle.
Avez-vous contrôlé :
si le bouchon du réservoir à sel est bien fermé et si le dosage
du produit de rinçage est bien réglé.
Si, à l'allumage du lave-vaisselle, l'écran affiche le
message "dON", c'est que le programme demo est activé.
Veuillez lire les instructions page 29.
Messages d’erreur
Votre lave-vaisselle monte un dispositif de sécurité à même de détecter des anomalies de fonctionnement.
Ces anomalies sont signalées par des codes clignotant sur
l'affichage.Après avoir pris note du code d’erreur , éteignez l’appareil,
fermez le robinet de l’eau et appelez votre service après-vente.
Alarme robinet fermé
Si vous avez oublié d'ouvrir le robinet de l'eau, votre appareil vous
avertit par une longue série de bips prolongés et par affichage
clignotant du message H2O. Ouvrez le robinet de l'eau, quelques
minutes après le programme démarrera.
Si vous n'êtes pas là quand les bips retentissent, l'appareil se mettra
en état d'alarme et le code "A06" se mettra à clignoter .
Eteignez l'appareil à l'aide de la touche "A", ouvrez le robinet de
l'eau et au bout de 20 secondes environ, rallumez-le, le programme
redémarrera.
Alarme filtres bouchés
Si la machine est bloquée et le code "A05" clignote, c'est que le
filtre est bouché par de gros résidus d'aliments. Eteignez l'appareil à
l'aide de la touche ON-OFF , nettoyez minutieusement le filtre et après
l'avoir remis en place, rallumez l'appareil. Au bout de quelques
secondes, le programme démarre normalement.
Alarme pour panne de l'électrovanne d'entrée de l'eau
Si le code "A02" clignote, il faut ETEINDRE votre lave-vaisselle et le
REMETTRE EN MARCHE au bout d'une minute. Si l'alarme persiste,
fermez avant tout le robinet de l'eau pour éviter tout risque
d'inondation puis coupez le courant et appelez le service de
dépannage.
Si malgré tous ces contrôles, le lave-vaisselle ne fonctionne pas et l’inconvénient que vous avez détecté
persiste, appelez le centre d’assistance technique le plus
proche de chez vous auquel vous signalerez :
- le type de panne
- le sigle du modèle (Mod. ....) et le numéro de série (S/N
....) que vous trouverez sur l’étiquette signalétique collée
sur le côté de la contre-porte.
Ne faites jamais appel à des techniciens non agréés et exigez
toujours l’installation de pièces détachées originales.
FR
32

Installation
Emplacement
Installez votre lave-linge à l’endroit voulu. Vous pouvez le
placer côte à côte avec des meubles ou contre le mur. Le
lave-vaisselle est équipé de tuyaux pour l’arrivée et l’évacuation de l’eau, ils peuvent être orientés vers la droite ou
vers la gauche pour une installation adéquate.
Mise à niveau
Après avoir installé la machine, vissez ou dévissez ses pieds
de réglage pour l’amener à la hauteur voulue et la mettre à
niveau afin qu’elle soit parfaitement à plat. V eillez à ce qu’elle
ne soit absolument pas inclinée de plus de 2°.
Une bonne mise à niveau garantira le bon fonctionnement
de votre lave-vaisselle.
Raccordement au tuyau d’évacuation
Introduisez le tuyau d’évacuation dans une conduite ayant
au moins 4 cm de diamètre ou
bien accrochez-le à l’évier.
Evitez tous étranglements ou
courbes excessifs Pour bien le
placer , utilisez le coude plastique spécialement fourni à cet
effet (voir figure). La portion
de tuyau repérée par la lettre
A doit se trouver à une hauteur
comprise entre 40 et 100 cm.
Le tuyau ne doit pas être
plongé dans l’eau.
Ce modèle de lave-vaisselle peu être encastré sous un plan de
travail continu (consultez la notice dinstructions
correspondante).
Raccordement à la prise d’eau froide.
Pour raccorder l’électroménager au réseau de distribution
de l’eau, utilisez le tuyau d’arrivée fourni avec l’appareil,
n’utilisez aucun autre type de tuyau. En cas de remplacement, n’utilisez que des pièces de rechange originales.
Raccordez le tuyau d’arrivée à une prise d’eau froide avec
embouchure filetée ¾ gaz ; vissez-le soigneusement au robinet.
Si la canalisation d’eau est neuve ou si elle est restée trop
longtemps inutilisée, avant d’effectuer le raccordement, faites couler l’eau jusqu’à ce qu’elle devienne limpide et dépourvue d’impuretés. Faute de quoi, vous risquez un engor gement au point d’arrivée de l’eau qui abîmerait votre lavevaisselle
Raccordement à la prise d’eau chaude
Le lave-vaisselle peut être alimenté avec de l’eau chaude de
réseau (installation centralisée, radiateurs) ne dépassant pas
60°C.
Dans ce cas, la durée du lavage sera plus courte de 15 minutes et l’efficacité du lavage légèrement réduite.
Pour le raccordement à la prise d’eau chaude, procédez
comme décrit pour le raccordement à la prise d’eau froide
Attention : fixez solidement le coude plastique spécial au
mur pour éviter que le tuyau d’évacuation ne bouge et verse
l’eau hors du conduit.
Branchement électrique
Insérez la fiche dans une prise de courant munie d’une liaison
à la terre efficace (la mise à la terre de l’installation est une
garantie de sécurité prévue par la loi), après avoir vérifié que
les valeurs de tension et de fréquence du réseau correspondent bien à celles qui sont indiquées sur l’étiquette placée
sur la contre-porte inox de la machine et que l’installation
électrique à laquelle vous la raccordez est bien dimensionnée
pour le courant maximum indiqué sur l’étiquette. Si la prise
de courant à laquelle vous raccordez la machine ne correspond pas à la fiche, remplacez cette dernière par une autre
appropriée plutôt que d’utiliser des adaptateurs ou des
déviateurs car ces derniers pourraient provoquer des surchauffes ou des brûlures.
Si le câble d’alimentation électrique est abîmé, nous vous
conseillons vivement de le faire remplacer par un service
après-vente agréé.
A
Sécurité anti-fuite
Votr e lave-vaisselle est équipé d’un dispositif qui coupe l’ar rivée de l’eau en cas de fuites à l’intérieur de la machine. Il
est également équipé d’un tuyau d’arrivée de l’eau qui supporte des pressions très élevées et qui, en cas de rupture,
devient rouge. La sécurité en cas de fuites est garantie par
le deuxième tuyau transparent qui l’englobe. T rès important
: contrôlez-le périodiquement, s’il est rouge c’est qu’il faut
le changer au plus tôt. Appelez le service d’assistance technique agréé pour l’intervention.
33
FR

Die Sicherheit - eine gute Gewohnheit
ACHTUNG
Lesen Sie bitte die Hinweise dieses Handbuches aufmerksam durch.
Sie enthalten wichtige Angaben hinsichtlich der Sicherheit bei der
Installation, dem Gebrauch und der Wartung.
Dieses Gerät entspricht folgenden EG-Richtlinien:
- 73/23/EWG (Niederspannung) und nachfolgenden
Änderungen;
- 89/336/EWG (Elektromagnetische Verträglichkeit)
und nachfolgenden Änderungen;
- 97/17 EWG (Etikettierung)
1. Nehmen Sie das Verpackungsmaterial vorsichtig ab.
2. Stellen Sie nach dem Auspacken sicher, dass das Gerät unversehrt
ist. Im Zweifelsfalle ziehen Sie bitte einen Fachmann zu Rate.
3. Der Geschirrspüler darf nur durch Erwachsene bedient werden
und dient ausschließlich zum Spülen von Haushaltsgeschirr.
4. Wichtige Grundregeln beim Einsatz des Gerätes:
- Berühren Sie das Gerät nicht, wenn Sie barfuß sind, und auch nicht
mit nassen oder feuchten Händen oder Füßen.
- Wir empfehlen Ihnen, keine Verlängerungskabel oder
Zwischenstecker zu verwenden.
- Während der Installation darf das Versorgungskabel weder stark
geknickt noch eingeklemmt werden, dies ist gefährlich.
- Bei nicht ordnungsgemäßer Funktionsweise oder vor der
Durchführung von Wartungsmaßnahmen muss das Gerät vom
Stromnetz getrennt werden.
5. Halten Sie Kinder von den Reinigungsmitteln und vom
Geschirrspüler, wenn dieser offen ist, fern.
6. Ihr Geschirrspüler darf niemals im Freien installiert werden, auch
dann nicht, wenn die Fläche überdacht ist: es ist sehr gefährlich, ein
Haushaltsgerät Regen oder Gewittern auszusetzen.
7. Berühren Sie die Heizstäbe nie während oder gleich nach einem
Spülvorgang.
8. Setzen oder stützen Sie sich nie auf die offene Gerätetür, der
Geschirrspüler könnte umkippen.
9. Im Falle von Störungen schließen Sie den Wasserzulaufhahn und
ziehen Sie den Stecker aus der Steckdose. Ziehen Sie daraufhin das
Kapitel “Gibt’ s ein Problem?” zu Rate. Sollten Sie keine Lösung finden,
dann wenden Sie sich bitte an die Kundendienststelle.
10. Altgeräte müssen unbrauchbar gemacht werden: schneiden Sie
das Stromkabel durch und zerstören Sie die Türverriegelung.
Um die Leistungsfähigkeit und Sicherheit dieses Gerätes
zu gewährleisten, bitten wir, Folgendes zu beachten:
l Wenden Sie sich ausschließlich an anerkannte
Kundendienstzentren.
l Verlangen Sie, dass nur Original-Ersatzteile
verwendet werden.
Aus der Nähe betrachtet (Bedienblende)
A: ON/OFF-T aste
C: Türgriff
D: Programmwählerknopf
T
L
S
I
H
G
H
P
E
R
C
D
A
R: Start/Reset-T aste
H: Display
E: T aste "Extratr ocken"
P: T aste Startvorwahl
G: Kontrollleuchte Extratrocken
H: Spülphasen-Anzeigeleuchten
L: Alphanumerische Anzeige
S: Salznachfüllanzeige
T: Klarspülernachfüllanzeige
I: Kontrollleuchte Startvorwahl
DE
34

Aus der Nähe betrachtet (Innenraum)
E
G
F
I
Oberkorb
Oberer Sprüharm
Höheneinstellung Oberkorb
Unterkorb
J
Unterer Sprüharm
Salzbehälterdeckel
Spülsiebe
Dosierkammer für Geschirrspülmittel und
Klarspüler
H
K
L
Techn ische d a te n
Breite cm. 45
Tiefe cm. 60
Höhe cm. 85
Fassungsvermögen 9 maßgedecke
Anschluß-Wasserdruck 4,3 psi - 145 psi (30 KPa÷ 1MPa) (0,3 ÷10 bar)
Betriebsspannung Siehe Typenschild
Leistung Siehe Typenschild
Sicherung Siehe Typenschild
35
DE

Salz ....
Salz
Der Härtegrad des Wassers ist von Ort zu Ort unterschiedlich. Würde hartes Wasser in den Geschirrspüler einlaufen,
würde sich Kalk auf dem Geschirr ablagern.
Dank einer Enthärtungsanlage, die Spezialsalz für Geschirrspüler verwendet, wird das Wasser von Kalk befr eit.
Einfüllen von Salz in die Enthärtungsanlage
Verwenden Sie ausschließlich Spezialsalz für Geschirrspüler.
Der Salzbehälter befindet
sich unter dem Unterkorb
und wird wie folgt gefüllt:
1. Ziehen Sie den Unterkorb heraus, schrauben Sie
den Behälterverschluss ab.
2. Handelt es sich um die
erste Salzeinfüllung, dann
muss der Behälter zuerst
mit Wasser gefüllt werden.
3. Setzen Sie den mitgelieferten Trichter auf die Einfüllöffnung und füllen Sie
ca. 2 kg Salz ein. Es ist normal, dass etwas Wasser aus dem
Behälter ausläuft.
4. Schrauben Sie den Behälterverschluss wieder sorgfältig
auf.
Regulierung des Salzverbrauchs
Der Geschirrspüler ist so konzipiert, dass der Salzverbrauch je
nach dem Härtegrad des Wassers eingestellt, und somit optimiert und auf das jeweils erforderliche Mindestmaß herabgesetzt werden kann.
Wenden Sie sich hinsichtlich des
Härtegrades Ihres Wassers an
das Wasserwerk Ihres Gebietes.
Zur Einstellung verfahren Sie
wie folgt:
1. Salzbehälter-Deckel abschrauben.
2. Am oberen Rand des Behälters sehen Sie einen Pfeil (siehe nebenstehende Abbildung), drehen Sie diesen Pfeil im
Uhrzeigersinn ggf. von „-“ auf „+“, je nach dem Härtegrad
des gelieferten Wassers.
Wir empfehlen eine Einstellung gemäß nachfolgendem Schema:
Wasserhärte
°dH °fH mmol/l
Positions-
wähler
Salzverbrauch(gramm/spülgang)
Reichweite
(Spulgange-
/2kg)
Der Salzbehälter muss dann nachgefüllt werden, wenn
die Salzmangelanzeige „S” blinkt.
Nach der erstmaligen Salzeinfüllung könnte die Salzmangelanzeige für weitere 5 Spülgänge eingeschaltet bleiben
bzw. blinken.
Achtung: Es empfiehlt sich, das Salz immer direkt vor Spülstart einzufüllen, dadurch vermeiden Sie jegliche Rostbildung.
0 ¸ 10 0 ¸ 17 0 ¸ 1,7 / 0 /
10¸ 25 18 ¸ 44 1,8 ¸ 4,4
25 ¸ 50 45 ¸ 89 4,5 ¸ 8,9 M ED 40 40
> 50 > 89 > 8,9
-
+
20 60
60 25
DE
36

Geschirrspülmittel und Klarspüler …..
Spülmittel
Verwenden Sie nur Spezialspülmittel für Geschirrspüler. Das
Spülmittel ist vor jedem Spülgang und gemäß der in der
“Programmtabelle” zum jeweiligen Spülgang gelieferten
Hinweise einzufüllen. Die Spülmittelkammer befindet sich
in der Innentür .
Einfüllen des Spülmittels
Drücken Sie die Taste „B“, um den Deckel „A“ zu öffnen.
Füllen Sie die beiden Spülmittel-Dosierkammern „C“ und
„D“ bis zum Rand.
Schließen Sie daraufhin den Deckel, bis er einrastet.
Im Handel sind Geschirrspülmittel in Tablettenform erhältlich. Falls Sie solche Tabs benutzen, geben Sie eine davon in
die Dosierkammer „D“ und schließen daraufhin den Dekkel.
Um ein ordnungsgemäßes Einrasten des Deckels zu
gewährleisten müssen eventuelle Spülmittelrückstände vom Rand der Dosierkammer entfernt werden.
B
D
C
Klarspüler
Der Klarspüler verleiht Ihrem Geschirr einen strahlenden
Glanz, denn er verbessert den T r ockenprozess. Die Klarspülerkammer befindet sich in der Innentür . Sie muss aufgefüllt
werden, sobald Sie anhand des Sichtfensters „D“ sehen, dass
sie leer ist.
(Ist Ihr Geschirrspüler mit einer “Klarspülermangelanzeige“
ausgestattet, dann füllen Sie die Kammer, wenn diese Anzeige aufleuchtet bzw. blinkt.)
Einfüllen des Klarspülers
Öffnen Sie die Klarspüler-Dosierkammer durch Drehen (gegen den Uhrzeigersinn) des Schraubdeckels „C“. Achten Sie
beim Einfüllen darauf, dass der Klarspüler nicht überläuft.
Durch Drehen des Reglers „F“ (befindlich unter dem Deckel
„C“) kann die Klarspülermenge dosiert werden. V erwenden
Sie hierzu einen Schraubenzieher. Es sind 6 Einstellungen
möglich; normalerweise befindet sich der Regler auf Einstellung 4.
F
C
24 gr
.
3 gr.
Wichtig:
Durch korrekte Einstellung der Klarspülermenge kann der
T rockengrad des Geschirrs erheblich verbessert werden.
Sollte Ihr Geschirr Wassertropfen oder Flecken aufweisen,
drehen Sie den Regulierpfeil auf einen höheren Wert. Weist
Ihr Geschirr dagegen weiße Streifen auf, dann drehen Sie
den Regulierpfeil auf einen niedrigeren Wert.
A
Achtung
Der Handel stellt Ihnen Geschirrspülreiniger zur Verfügung, die Reiniger , Salz und Klarspüler beinhalten (3 in 1). Sollte das W asser
Ihrer Wasserleitung jedoch kalkhaltig, oder sogar stark kalkhaltig sein, können Sie zuzüglich weiteres Salz in den entsprechenden Behälter einfüllen, um weiße Streifen auf Gläsern und Gerätebottich zu verhindern.
Füllen Sie nur dann Klarspüler in den Behälter , wenn der Trockengrad Ihres Geschirrs nicht zufriedenstellend sein sollte.
Beachten Sie auf jeden Fall die Hinweise auf der Verpackung.
Nehmen Sie nur diese Geschirrspülreiniger, ist es ganz normal, dass die Nachfüllanzeigen für Salz und Klarspüler nach einer
gewissen Anzahl von Spülgängen dauernd blinken.
37
DE

Einsortieren des Geschirrs
Bevor Sie das Geschirr in die Körbe geben, entfernen Sie gröbere
Essensreste; auf diese Weise vermeiden Sie, dass die Siebe verstopft
werden, was die Reinigungswirkung beeinträchtigen würde.
Weichen Sie stark verkrustete Töpfe oder Pfannen vor dem Spülen
ein. Sie ersparen sich so zusätzliches Spülen. Ziehen Sie die Körbe
heraus, um das Geschirr besser einordnen zu können.
Was gehört in den unteren Spülkorb?
Wir raten Ihnen, in den unteren Geschirrkorb das größere, häufig
stark verschmutzte Geschirr zu geben: Töpfe, Deckel, Teller und
Suppenteller (auf den Fotos sind Beschickungsbeispiele ersichtlich).
• Servierteller und große Deckel: Ordnen Sie diese am Rand
des Geschirrkorbes ein.
• Töpfe und Salatschüsseln: Sie müssen immer umgedreht
werden.
• Sehr tiefe Geschirrteile: vertikal und umgedreht anordnen; das
Wasser kann so besser abfließen und das Geschirr wird sauberer.
-Die Unterteilungen des unteren Korbes verfügen über einen
verstellbaren Winkel (siehe Abb. B), wodurch noch mehr Platz für
Töpfe und Pfannen geschaffen wird bzw. wodurch Sie auch sehr
große Töpfe unterbringen können.
Abb.B
1
2
Oberkorb
Beschickungsbeispiele
Unterkorb
Der Besteckkorb
Der Besteckkorb kann zweigeteilt werden.
Haben Sie nur wenig Besteck zu spülen, dann kann auch nur der
halbe Besteckkorb verwendet werden.
Ordnen Sie das Besteck in den Besteckkorb ein:Messer mit scharfen
Schneiden und andere spitze Küchenutensilien sind mit nach unten
gerichteten Schneiden bzw. Spitzen einzuordnen. Ordnen Sie das
gesamte Besteck so ein, dass sich die einzelnen Teile nicht
berühren.. Ist der Besteckkorb seitlich mit Schlitzen versehen,
werden Kaffeelöffel einzeln in diese Schlitze eingesteckt (Abb.A).
Besonders langes Besteck muß vorne in den Oberkorb eingelegt
werden.
Was gehört in den oberen Spülkorb?
In den oberen Geschirrkorb sortieren Sie empfindliches und leichtes
Geschirr ein: Gläser, Tee-, Kaffee- und Mokkatassen, Untertassen
und Dessertteller - aber auch große Teller - flache Salatschüsseln,
flache, nur leicht verschmutzte Pfannen und Töpfe (auf den Fotos
sind einige Beschickungsbeispiele ersichtlich).
Ordnen Sie vor allem das leichte Geschirr so ein, dass es fest steht
und nicht vom Wasserstrahl umgeworfen werden kann.
Zu dem Gerät können auch 1 oder 2 hochklappbare Spezialablagen
geliefert werden, auf die T assen und Mokkatassen, aber auch Löffel,
Servierbesteck und Messer (in die Schlitze einstecken) angeordnet
werden können. Kelchgläser können darin eingehängt werden.
Fügen Sie den Glasfuß in die Schlitze der Ablagen ein.
Stellen Sie nach der Beschickung Ihres Geschirrspülers sicher, dass
sich die Sprüharme problemlos drehen können, ohne durch das
Geschirr behindert zu werden.
So regulieren Sie den oberen Spülkorb
Der Oberkorb kann höhenversetzt eingeschoben werden. Auf den
beiden Seiten des oberen Geschirrkorbes befinden sich zwei Griffe:
mit Hilfe derer die Höhe reguliert werden kann. (Abb. C).
abb. A
Abb. C
DE
38

So starten Sie Ihren Geschirrspüler
Erster Schritt
Stecken Sie den Stecker in die Steckdose, der Geschirrspüler
ist jetzt mit Strom versorgt. Öffnen Sie den Wasserhahn
vollständig und drücken Sie die ON/OFF-Taste "A", das
Display leuchtet auf und die Zeitangabe des Programms, auf
das der Drehknopf eingestellt ist, blinkt.
Wahl und Start des Spülprogramms
• Die Wahl eines Programms erfolgt durch Drehen des
Knopfes "D", im Uhrzeigersinn von Programm 1 auf
Programm 7, oder gegen den Uhrzeigersinn von 7 auf 1.
Auf dem Display wir die durchschnittliche Dauer des
Programms sowie die Programmphasen, aus denen es
zusammengesetzt ist, angezeigt. (Ziehen Sie zur
Programmwahl, besonders bei erstmaligem Gebrauch des
Gerätes, die Programmtabelle auf Seite 41 zu Rate).
• Drücken Sie die Starttaste "R", der Programmstart wird
durch 2 Signaltöne angezeigt. Auf dem Display kann die bis
zum Programmende durchschnittlich noch bestehende
Restzeit abgelesen werden.
• Sollte die zu Beginn des Programms angegebene Zeit nicht
mit der effektiven Programmdauer übereinstimmen, kann
dies auf verschiedene Faktoren zurückgeführt werden:
Wasserzulauftemperatur , V erschmutzungsgrad des Geschirrs,
mehr oder weniger lange Versuche seitens der Maschine,
den Spülfilter von Speiseresten, durch die er verstopft ist, zu
befreien usw .
Anzeige der laufenden Programmphase
Während des Spülprogramms leuchten auf dem Display die
der durchlaufenden Programmphasen entsprechenden
Symbole auf. Folgende Symbole entsprechen den einzelnen
Programmphasen:
Vorspülen Spülen Klarspülen Trocknen
Löschen und Ändern eines laufenden Programms
Anmerkung: Ein bereits laufendes Spülprogramm kann nur
dann geändert werden, wenn es gerade erst in Gang gesetzt
wurde.
Halten Sie für ca. 3 Sekunden die Reset-T aste "R" gedrückt:
Sie vernehmen ein längeres akustisches Signal gefolgt von 3
kurzen ‚Bip'-Tönen. Auf dem Display blinkt die dem
gelöschten Programm entsprechende Zeitangabe. Drehen
Sie den Drehknopf zur Wahl eines neuen Pr ogrammes.
Möchten Sie nachträglich noch etwas einsortieren?
Das Spülprogramm kann durch Drücken der ON/OFF-Taste
unterbrochen werden; füllen Sie daraufhin das noch
einzusortierende Geschirr ein und schalten Sie das Gerät
wieder ein. Nach ca. 10 Sekunden läuft der Spülgang an
der Stelle weiter, an der er unterbrochen wurde.
Ist der Strom ausgefallen? Wurde die Gerätetür
geöffnet?
Das Programm unterbricht den Reinigungsvorgang und auf
dem Display werden 3 Striche angezeigt; sobald die
Stromzufuhr wieder hergestellt wird bzw. sobald die Tür
wieder geschlossen wird, startet das Spülprogramm erneut.
Ende eines Spülprogramms
Das Ende des Spülgangs wird durch 2 kurze Signaltöne und
durch Einblenden der Anzeige "END" auf dem Display
angezeigt.
• Schalten Sie das Gerät durch Drücken der ON/OFF-Taste
aus.
• Drehen Sie den Wasserhahn zu.
• Entleeren Sie zuerst den Unterkorb.
Vergewissern Sie sich, dass das Programm auch abgelaufen
ist, bevor Sie das Geschirr ausräumen!
Vorsicht: Wird die Gerätetür während des Spülvorgangs oder
unmittelbar nach Beendigung des Spülprogramms geöffnet,
tritt heißer Wasserdampf aus. Verbrennen Sie sich nicht
daran!
Einstellen der Funktion "Extratrocken"
Drücken Sie die T aste "E" gedrückt, nach einem verlängerten
Signalton leuchtet die Kontrollleuchte "G" auf und die
Zeitangabe des mittels des Drehknopfes gewählten
Programms schaltet auf Blinklicht.
Anmerkung: Die angegebene Zeit wird aufgrund des
Extratrocken-Gangs überzogen.
Zur Abschaltung der Extratrocken-Funktion halten Sie
dieselbe T aste gedrückt; nach einem verlängerten Signalton
erlischt die Kontrollleuchte "G".
Diese Option eignet sich nicht für das Programm
"Einweichen".
39
DE

Einstellen der Startvorwahl
So verfahren Sie zur Startvorwahl
Nach Beschickung des Geschirrspülers können Sie vor der
Wahl des geeigneten Programms entscheiden, wann der
Spülgang starten soll.
• Durch mehrmaligen Druck auf die Taste "P" können Sie
den Start des Spülgangs um 1 bis 24 Std. verschieben.
• Drücken Sie die Taste erneut, wird "OFF" (keine Vorwahl
erfolgt) eingeblendet.
• Drücken Sie die Starttaste "R", der Programmstart wird
durch 2 Signaltöne angezeigt.
Auf dem Display leuchtet das Symbol "I" auf, und die
rückwärtige Zeitrechnung der bis zum Start noch
verbleibenden Zeit setzt ein.
• Nach Ablauf der vorprogrammierten Zeit startet das
Programm; nun kann auf dem Display die bis zum Ablauf
des Programms durchschnittliche Restzeit abgelesen wer den.
Möchten Sie die Einstellung ändern?
• Während der Wartezeit kann die eingestellte
Zeitverschiebung noch geändert d.h. verkürzt werden.
Drücken Sie aufeinander folgend die Taste "P", ohne das
Programm auf Nullstellung zurückzuschalten.
Achtung: Sollte bei Einschalten des Geschirrspülers der Schriftzug
"dON" (Demo ON) auf dem Display aufleuchten, bedeutet dies, dass
das Programm "Vorführmodus" (Demo) eingeschaltet ist. Dieses
Programm ist für die Aussteller des Geräts bestimmt, um Spülzyklen
zu simulieren, ohne sie effektiv durchzuführen.
Um diese Funktion auszuschalten halten Sie für ca. 4 Sekunden die
START/RESET-Taste "R" gedrückt. Wurde die Funktion erfolgreich
ausgeschaltet, wird dies durch die Einblendung "dOF" (Demo Off)
angezeigt.
• Haben Sie es sich jedoch anders überlegt, und wünschen
einen Sofortstart des Spülprogramms, dann drücken Sie die
Taste "P" bis zum völligen Erlöschen der Vorwahl. Die
Kontrollleuchte "I" erlischt, das Programm startet mit einem
kurzen Tonsignal.
Auf dem Display leuchtet die der jeweilig laufenden
Spülphase entsprechende Kontrollleuchte auf, die
rückwärtige Zeitrechnung der bis zum Programmende noch
verbleibenden durchschnittlichen Restzeit läuft.
DE
40

Spülprogrammtabelle
Spülen im Geschirrspüler garantiert höchste Hygienesicherheit und Sauberkeit.
6S OP LWWHO
9RUV SOJDQJ
+DXSWV SOJDQJ
.ODUVSOHU
6SOSURJUDPP
+LQZ HLV H ]XU
3URJU DPPZDK O
%H V FKUHLEXQJ GH V 6SOJDQJV
3UR JUD PP
GDXH U 7 ROHUDQ]
RKQH
([WU D
WURFNQHQ
,QWHQVLY
3URJUDP P
7lJOLFKHU
$EZDV FK
(FR
.XU]
7UR F N QH Q
Stark verschmutztes
Geschirr, Töpfe und
Pfannen (nicht geeignet für
empfindliches Geschirr)
Normal verschmutztes
Geschirr und Töp fe.
Norma le r tägliche r
Abwasc h
Öko-Sparprogramm mit
niedrigem
Energieverbrauch, geeignet
für normal verschmutztes
Geschirr.
Kurzes Sparprogramm für
nur leicht verschmutzt es,
sofort nach dem Gebrauch
gespültes Geschirr.
Warmes Vorspülen 40°C
Ve r längerte r Spülgang bei 6 5°C
2x Kaltes Klarspülen
Heißes Klarspülen bei 65°C
Trocknen
Ve r längerte r Spülgang bei 6 0°C
Kaltes Klarspülen
Heißes Klarspülen bei 70°C
Trocknen
2x kaltes Vorspülen,
Ve r längter S pülgang bei 50° C
Heißes Klarspülen bei 65°C
Trocknen
Kurzer Spülgang b ei 47°C
Heißes Klarspülen bei 65°C
Trocknen
JU
J U
JU
JU
(LQZHLF KHQ
.ULV WD OOJ OlV H U
6RIRUW
6SOSJDQJ
Abspülen des Geschirrs,
das erst später, zusammen
mit weiterem Geschirr
gespült w erd en soll.
Spezial-Programm für
temperaturempfindliches,
sofort nach dem Gebrauch
zu reinigendes Geschirr.
Kurzes Sparprogramm für
den tägliche n Abwa sch.
Kalte r K urzsp ülgang, u m ein
Antrocknen der Speisereste zu
vermeiden
Spülgang bei 52° C
Lauwarmes Klarspülen bei 45°C
Heißes Klarspülen bei 65°C
Trocknen
Hauptspülga ng bei 50° C
Heißes Klarspülen bei 65°C
Trocknen
41
JU
JU
DE

Energiespartipps
- Zur Optimierung des Verbrauchs sollte der Geschirrspüler
möglichst bei maximaler Ladung in Betrieb gesetzt werden.
Um die Bildung schlechter Gerüche oder das Antrocknen
der Speisereste zu vermeiden, kann zwischendurch ein Einweichprogramm eingestellt werden.
- Wählen Sie stets das geeignete Programm: Die Wahl des
geeigneten Programms hängt sowohl vom Geschirrtyp als
auch vom Verschmutzungsgrad ab.
- Verwenden Sie die korrekte Menge an Spülmittel: Das Ergebnis einer zu hohen Dosierung ist kein saubereres Geschirr sondern eine erhöhte Umweltbelastung.
- Es ist nicht notwendig, das Geschirr vor Einsortieren in den
Geschirrspüler abzuspülen.
So halte ich das Gerät in Topform
Nach jedem Spülgang
Drehen Sie nach jedem Spülgang den Wasserhahn zu und
lassen Sie die Gerätetür nur angelehnt; auf diese Weise kann
sich keine Feuchtigkeit ansammeln und es kann zu keiner
Geruchsbildung kommen.
Netzstecker herausziehen
Ziehen Sie vor jeder Reinigungs- und Wartungsmaßnahme
stets den Stecker aus der Netzdose: Auf diese Weise vermeiden Sie jegliche Gefahr.
Keine Lösungsmittel! Keine Scheuermittel!
Zur Reinigung der Außenteile Ihres Geschirrspülers, sowie
zur Reinigung der Gummidichtungen ist der Einsatz von Lösungs- oder Scheuermitteln nicht erforderlich. Verwenden
Sie nur ein feuchtes, mit lauwarmer Seifenlauge getränktes
T uch.
Zur Beseitigung von evtl. Flecken im Innenraum des Gerätes
verwenden Sie ein feuchtes T uch, auf das Sie etwas weißen
Essig träufeln, oder ein Spezialprodukt für Geschirrspüler.
Vor dem Urlaub
Bevor Sie in Urlaub fahren empfiehlt es sich, einen Reinigungsgang bei leerem Geschirrspüler durchlaufen zu lassen;
ziehen Sie daraufhin den Netzstecker, drehen Sie den Wasserhahn zu und lehnen Sie die Gerätetür nur leicht an: Sie
verlängern hierdurch die Lebensdauer der Dichtungen und
es kommt zu keiner Geruchsbildung im Geräteinnern.
Im Falle eines Umzugs
Das Handling bzw. der Transport sollte möglichst in vertikaler Position erfolgen, falls erforderlich, Gerät zur Rückseite
hin neigen.
Die Dichtungen
Einer der Gründe zur Geruchsbildung im Geschirrspüler ist
das Anstauen von Essensresten unter den Dichtungen. Durch
eine regelmäßige Reinigung mit einem angefeuchteten
Schwamm wird dies vermieden.
DE
42

Außerordentliche Reinigung und Wartung
Die Siebkomposition
Wenn Sie jederzeit ein gutes Reinigungsergebnis wünschen,
müssen Sie die Siebkomposition sauber halten.
Anhand des Siebes wird das Spülwasser von Speiseresten
gereinigt und perfekt gefiltert in Umlauf gebracht. Es ist daher
empfehlenswert, nach jedem Spülgang die gröberen
Essensreste, die Sie im Grobsieb „C“ und im halbrunden Sieb
„A“ finden, zu entfernen. Zum Herausnehmen brauchen Sie
nur den Griff des Filtereinsatzes nach oben zu ziehen. Waschen
Sie nun die beiden Siebe unter fließendem Wasser aus.
Einmal im Monat muss die Siebkomposition sorgfältig gereinigt
werden: d.h. Grobsieb „C“ + halbrundes Feinsieb„A“+
Mikrosieb„B“.
Zum Herausnehmen des Filters„B“ drehen Sie diesen gegen
den Uhrzeigersinn.Verwenden Sie zum Reinigen eine kleine
Bürste (die nicht aus Metall sein sollte).
Fügen Sie die Einzelteile (wie in der Abbildung angegeben)
wieder zusammen und bauen Sie die Siebkomposition wieder
in die Spülmaschine ein. Stecken Sie sie in die vorgesehene
Halterung und drücken Sie sie nach unten.
Der Geschirrspüler darf nie ohne Siebe arbeiten. Wenn Sie die
Siebkombination nicht richtig montieren, wird das
Reinigungsergebnis beeinträchtigt und Ihr Geschirr kann
Schaden erleiden.Siebkombination nicht richtig montieren,
wird das Reinigungsergebnis beeinträchtigt und Ihr Geschirr
kann Schaden erleiden.
1
B
2
C
A
Reinigung der Sprüharme
Die Löcher bzw. Schlitze der Sprüharme könnten durch
Speisereste verstopft werden, kontrollieren und reinigen Sie
auch diese regelmäßig (siehe Abschnitt “Aus der Nähe
betrachtet” (Innenteile) Buchstabe F - I).
Gibt’s ein Problem?
Es kann sicherlich einmal vorkommen, dass der Geschirrspüler nicht
ganz ordnungsgemäß funktioniert. Bevor Sie jedoch den
Kundendienst anfordern, sollten einige Kontrollen vorab durchgeführt
werden: Vielleicht haben Sie irgendetwas vergessen, eine beliebige
Taste zu drücken, oder vielleicht irrtümlich irgendeine zur korrekten
Betriebsweise erforderliche Maßnahme unterlassen.
Der Geschirrspüler startet nicht
Bitte kontrollieren Sie, ob:
der Wasserhahn auch aufgedreht und or dnungsgemäß am Schlauch
angeschlossen wurde; ob die Wasserzufuhr evtl. unterbrochen, der
Wasserdruck unzureichend, der Schlauch einklemmt, das Filtersieb
der Versorgungsschlauches verstopft ist, oder ob die Tür of fen steht.
Das Geschirr ist nicht sauber geworden
Bitte kontrollieren Sie, ob:
die korrekte Reinigermenge eingefüllt wurde, das eingestellte
Programm sich für das zu reinigende Geschirr eignet, Sieb und
Mikrosiebfilter sauber sind, die Sprüharme ungehindert drehen.
Der Geschirrspüler pumpt das Wasser nicht ab
Bitte kontrollieren Sie, ob:
der Ablaufschlauch geknickt ist.
Auf dem Geschirr befinden sich Kalkablagerungen oder ein
weißer Belag.
Bitte kontrollieren Sie, ob:
der Salzbehälterdeckel auch gut geschlossen ist, die korrekte
Klarspülerdosierung eingestellt wurde.
Sollte bei Einschalten des Geschirrspülers der Schriftzug "dON"
(Demo ON) auf dem Display aufleuchten, bedeutet dies, dass
das Programm "Vorführmodus" (Demo) eingeschaltet ist.
Lesen Sie hierzu die Hinweise auf Seite 40
Fehlermeldungen
Ihr Geschirrspüler verfügt über ein Sicherheitssystem, das imstande
ist, etwaige Funktionsunregelmäßigkeiten zu erheben und zu
signalisieren.
Derartige Anomalien oder Störungen werden durch Blinkanzeigen
einiger, aus Buchstaben und Ziffern bestehender Fehlercodes
signalisiert. Merken Sie sich den eingeblendeten Fehlercode, schalten
Sie das Gerät aus, drehen Sie den Wasserhahn ab und fordern Sie
den Kundendienst an.
Alarmanzeige "Wasserhahn abgedreht"
Haben Sie vergessen, den Wasserhahn aufzudrehen, dann meldet
Ihr Geschirrspüler Ihnen dies durch eine Serie anhaltender Alarmtöne
und die Blinkanzeige H2O. Drehen Sie den Wasserhahn auf: Das
Programm wird innerhalb weniger Minuten gestartet.
Sollten Sie bei dieser Signalmeldung nicht anwesend sein, dann
schaltet sich das Alarmsystem ein und der Fehlercode "A06" blinkt
auf.
Schalten Sie das Gerät über die Taste "A" aus, drehen Sie den
Wasserhahn auf, warten Sie ca. 20 Sekunden, schalten Sie dann den
Geschirrspüler wieder ein, das Spülprogramm startet nun erneut.
Alarmanzeige "Siebe verstopft"
Leuchtet bei einer Funktionsstörung der Code "A05", dann bedeutet
dies, dass das Sieb durch erhebliche Speisereste verstopft ist. Schalten
Sie das Gerät über die ON/OFF-T aste aus, sorgen Sie für eine gründliche
Reinigung des Siebes, setzen Sie dieses dann wieder in seinen Sitz
ein. Schalten Sie das Gerät daraufhin wieder ein. Innerhalb weniger
Sekunden startet das Spülprogramm ordnungsgemäß.
Alarmanzeige aufgrund einer Störung des Magnetventils der
Wasserversorgung
Leuchtet der Fehlercode "A02", SCHALTEN Sie den Geschirrspüler
AUS und nach einer Minute wieder EIN. Besteht der Alarm
weiterhin, schließen Sie zuerst den Wasserhahn, um
Überschwemmungen zu verhindern. Stellen Sie dann den Strom
ab und fordern Sie den Kundendienst an.
Sollte Ihr Geschirrspüler trotz aller Kontrollen nicht
funktionieren, oder sollten Sie den Fehler nicht beheben
können, dann fordern Sie bitte, unter Angabe nachfolgender
Daten, den nächstgelegenen, autorisierten Kundendienst an:
- Art der Störung
- Kennnummer des Modells (Mod. ...) Seriennummer (S/N
....), ersichtlich auf dem seitlich an der Gegentür
angebrachten T ypenschild.
Lassen Sie die Fehler niemals durch nicht autorisiertes Personal
beheben und verweigern Sie die Installation von Ersatzteilen,
wenn es sich nicht um Originalteile handelt.
43
DE

Installation
Aufstellung
Stellen Sie das Gerät an der hierzu bestimmten Stelle auf.
Das Gerät kann mit den Seitenteilen oder mit der Rückwand
an die anliegenden Möbel oder an die Wand angelehnt
werden. Der Geschirrspüler verfügt über V ersorgungs- und
Ablaufschläuche, die sowohl nach rechts als auch nach links
ausgerichtet werden können, wodurch eine geeignete Installation gewährleistet wird.
Nivellieren
Stellen Sie das Gerät auf. Regulieren Sie ggf. durch Drehen der
Stellfüße nach links oder rechts die Höhe des Gerätes, und zwar
so, dass das Gerät waagerecht aufsteht. Eine eventuelle Neigung des Gerätes darf auf keinen Fall 2° übersteigen.
Eine ordnungsgemäße Nivellierung gewährleistet eine korrekte Funktion Ihres Geschirrspülers.
Dieses Geschirrspülermodell kann unter einer durchlaufenden
Anschluss des Ablaufschlauches
Führen Sie den Ablaufschlauch in eine Ablauföffnung mit
einem Durchmesser von mindestens 4 cm ein oder legen Sie
ihn über einen Spülbeckenrand. Vermeiden Sie hierbei,
dass er geknickt oder allzu
stark gebogen wird. Er kann
optimal verlegt werden, wenn
Sie sich der Kunststoffführung
bedienen, die dem Gerät beiliegt (siehe Abb.). Der mit dem
Buchstaben A versehene
Schlauchteil muss auf einer
Höhe von 40 - 100 cm liegen.
Der Schlauch darf nicht im
Wasser eingetaucht sein.
Arbeitsplatte eingebaut werden. (Wir verweisen hierzu auf die
entsprechenden Anleitungen.)
Anschluss an den Kaltwasserhahn
Der Anschluss an die Wasserleitung ist ausschließlich mittels
des mit dem Gerät gelieferten Versorgungsschlauches vorzunehmen. Verwenden Sie bitte keine anderen Schläuche.
Verwenden Sie bitte nur Originalersatzteile, wenn Teile ausgewechselt werden müssen.
Schließen Sie den Versorgungsschlauch an einen Kaltwasserhahn mit einem Gewindeanschluss von 3/4-Zoll „Gas”
an, und achten Sie dabei darauf, dass er gut festgezogen
wird.
Sollte es sich um neue oder für längere Zeit unbenutzte
Wasserschläuche handeln, ist vor dem Anschluss sicherzustellen, dass das Wasser auch klar und frei von Verunreinigungen ist; lassen Sie es hierzu einige Zeit lang fließen. In
Ermangelung einer solchen Vorsichtsmaßnahme könnte der
Wassereingang verstopfen, was eine Beschädigung des Gerätes zur Folge haben könnte.
Anschluss an den Warmwasserhahn
Der Geschirrspüler kann auch mit Warmwasser vom Brauchwassernetz versorgt werden (zentrale Heizanlage), welches
jedoch 60°C nicht überschreiten darf.
In dem Fall wird die Spülzeit um ca. 15 Minuten verkürzt
und die Reinigungswirkung leicht herabgesetzt.
Der Anschluss an die Warmwasserzapfstelle ist so vorzunehmen, wie der Anschluss an die Kaltwasserleitung.
Achtung:
Der Kunststoffbügel muss so an einer Mauer angebracht
werden, dass er sich nicht bewegen kann, um zu vermeiden, dass der Ablaufschlauch aus der Führung tritt und Ablaufwasser austritt.
Stromanschluss
Schließen Sie den Stecker an eine Steckdose an, die über
eine effiziente Erdung verfügt (die Erdung der Str omanlage
ist eine gesetzlich vorgeschriebene Sicherheitsgarantie), nachdem Sie sichergestellt haben, dass die Werte der Netzspannung und -frequenz mit denen des T ypenschildes (befindlich
auf der Edelstahl-Innentür des Gerätes) übereinstimmen, und
dass die Elektroanlage, an die das Gerät angeschlossen wird,
der auf dem Typenschild angegebenen Höchstleistung entspricht. Falls die Steckdose, an die Sie das Gerät anschließen, nicht für den Stecker geeignet ist, empfiehlt es sich,
den Stecker auszutauschen, als auf Adapter oder Zwischenstecker zurückzugreifen, denn diese könnten sich überhitzen oder durchschmelzen.
Es wird ausdrücklich darauf hingewiesen, dass ein beschädigtes Versorgungskabels ausschließlich durch ein autorisier tes Kundendienstzentrum ausgewechselt werden darf.
A
Schutz vor Überschwemmungen
Ihr Geschirrspüler verfügt über ein System, das die Wasserzufuhr unterbricht, falls es einen Wasserverlust im Gerät er mittelt. Außerdem ist er mit einem Zulaufschlauch ausgerüstet, der einem äußerst hohen Wasserdruck standhält, und
der sich im Falle einer Beschädigung rot verfärbt. Der Schutz
gegen Überschwemmungen ist durch den zweiten (durchsichtigen) Schlauch, in dem er untergebracht ist, gewährleistet. Eine regelmäßige Kontrolle des Schlauchs ist von größter Wichtigkeit, sobald Sie bemerken, dass er sich rot verfärbt hat, muss er ausgetauscht werden. Fordern Sie hierfür
den zuständigen Kundendienst an.
DE
44

Veiligheid, een goede gewoonte
BELANGRIJK
Lees deze gebruiksaanwijzing aandachtig door aangezien hij
belangrijke aanwijzingen bevat betreffende de veiligheid van
installeren, gebruik en onderhoud.
Deze vaatwasser voldoet aan de volgende EEG
richtlijnen:
- 73/23/EEG (laagspanning) en successievelijke modificaties;
- 89/336/EEG (Elektromagnetische Compatibiliteit) en
successievelijke modificaties.
- 97/17/EEG (Etikettering)
1. Verwijder het verpakkingsmateriaal zorgvuldig.
2. Als de machine is uitgepakt onderzoekt u of het apparaat geheel
gaaf is. Als u niet zeker bent wendt u zich tot een erkende installateur .
3. De vaatwasser mag alleen door volwassenen worden gebruikt en
uitsluitend voor het wassen van huishoudelijk vaatwerk.
4. Belangrijke regels voor het gebruik:
- raak de machine niet aan als u blootsvoet bent of met natte handen
of voeten,
- gebruik liefst geen verlengsnoeren en/of dubbelstekkers,
- gedurende het installeren mag de voedingskabel niet in bochten of
gekneld liggen,
Schakel altijd de stroom uit als de machine niet goed werkt en bij
onderhoudswerkzaamheden.
5. Houdt kleine kinderen op een afstand van de wasmiddelen en van
de vaatwasser als deze open is.
6. De vaatwasser mag niet buiten worden geïnstalleerd, ook niet
onder een afdak: het is gevaarlijk hem bloot te stellen aan regen en
onweer .
7. Raak de weerstand niet aan gedurende en onmiddelijk na een
afwascycle.
8. Leun niet tegen en ga niet zitten op de open deur.
9. Als er een storing is moet u de waterkraan dicht doen en de
stroom afsluiten. Probeer vervolgens het hoofdstuk "Storingen" te
raadplegen en als u de oplossing niet kunt vinden roept u de
installateur erbij.
10. Een machine die niet meer gebruikt wordt moet onklaar gemaakt
worden:snijd de voedingskabel door en beschadig de sluiting van de
deur .
Voor het garanderen van de ef ficiëntie en veiligheid van de
vaatwasser:
l wendt u zich uitsluitend tot een erkende installateur
l eis altijd originele onderdelen
Van dichtbij gezien (bedieningspaneel)
H
R
D
A
P
A: On-Off knop
C: Handvat deur
D: Knop programmakeuze
R: Start/Reset knop
T
L
S
I
E
C
H: Display
E: "Extra droog" knop
P: Keuzeknop voor uitgestelde start
H
G: Controlelampje extra droogbeurt
H: Controlelampjes verloop cycle
L: Alfanumerieke indicator
S: Controlelampje zoutgebrek
T: Controlelampje gebrek glansmiddel
I: Controlelampje uitgestelde start
G
45
NL

Van dichtbij gezien (Van binnen)
G
E
F
I
Bovenkorf
Bovenste sproeiarmen
Regelen hoogte korf
Onderkorf
J
Onderste sproeiarmen
Deksel zoutbak
Filter
Bakje afwasmiddel en glansmiddel
H
K
L
NL
Technische eigenschappen
Breedte cm.45
Diepte cm . 60
Hoogte cm. 85
Capaciteit 9 standaard couverts
Waterdruk 4,3 psi - 145 psi 30 KPa÷ 1MPa (0,3 ÷10 bar)
Spanning Zie label
Energieverbruik Zie label
Zekering Zie label
46

Zout ....
Het zout
De hardheid van het water variëert van plaats tot plaats. Als
hard water in de vaatwasser komt vormt zich kalkafzetting
op het vaatwerk.
Dankzij een ontkalker die speciaal zout voor vaatwassers
gebruikt wordt de kalk uit het water verwijderd.
Toevoeging zout in de ontkalker
Gebruik altijd speciaal zout voor vaatwassers.
Het zoutreservoir bevindt
zich onder de onderkorf en
wordt als volgt gevuld:
1. Trek de onderkorf eruit,
schroef de deksel van het
zoutreservoir los.
2. Als u het zoutreservoer
voor de eerste keer vult, vul
het met water.
3. Zet de bijgeleverde
trechter op het gat en giet
er ongeveer 2 Kg zout in.
Een beetje water kan uit
het reservoir lopen.
4. Schroef de deksel weer stevig vast.
Het zoutreservoir moet worden bijgevuld als het
controlelampje zoutgebrek "S" knippert.
Nadat u voor de eerste keer zout heeft toegevoegd is het
normaal dat het controlelampje 'zoutgebrek' aan blijft of
knippert voor ongeveer de volgende 5 afwasbeurten.
Regelen zoutgebruik
De vaatwasser is voorzien voor
het regelen van het zoutverbruik naar gelang de
hardheid van het water dat
wordt gebruikt, zodat het
zoutverbruik is aangepast aan
het minimum dat noodzakelijk
is.
U kunt de graad van hardheid
van het water aanvragen bij de
Waterstaat van uw zone
Voor het r egelen volgt u de volgende instructies:
1. Schroef de deksel van het zoutreservoir los.
2. op de kraag van het zoutreservoir is een pijl (zie afb. hiernaast), draai indien noodzakelijk de pijl van het teken "-"
tegen de klok in naar het teken "+" naar gelang de hardheid
van het water in uw leiding.
Voer het r egelen uit volgens het volgende schema:
Hardheid van het water.
°dH °fH mmol/l
0 ¸ 10 0 ¸ 17 0 ¸ 1,7 / 0 /
Keuze
positie.
Zout-gebruik.
(gram./ciclo)
Autono-
mie
(cycles\2-
kg)
Belangrijk: Vul het zout bij voordat u een afwascycle begint om roestvorming te vermijden.
10¸ 25 18 ¸ 44 1,8 ¸ 4,4
25 ¸ 50 45 ¸ 89 4,5 ¸ 8,9 MED 40 40
> 50 > 89 > 8,9
-
+
20 60
60 25
47
NL

Afwasmiddel en glansmiddel .....
Het afwasmiddel
Gebruik alleen speciaal afwasmiddel voor vaatwassers. Het
opvullen met afwasmiddel moet worden uitgevoerd voordat
de afwascycle begint op basis van de indicaties aangegeven
in de "T abel afwascycles". Het bakje bevindt zich in de deur .
Het opvullen met afwasmiddel
Voor het openen van het dekseltje "A" drukt u op het knopje
"B". Het afwasmiddel wordt in de 2 bakjes "C" en "D"
gegoten tot aan de rand.
Na het opvullen met afwasmiddel sluit u het dekseltje door
het dicht te drukken.
Er zijn ook afwasmiddelen in blokvorm in de handel, in dat
geval doet u een blokje in het bakje "D" en doet u het
dekseltje dicht.
Veeg eventueel overgelopen afwasmiddel van de rand
van het bakje zodat het dekseltje gemakkelijk dicht
gaat.
B
D
C
Het glansmiddel
Het glansmiddel maakt uw vaatwerk glanzender
aangezien het drogen wordt bevorderd. Het bakje voor
het glansmiddel bevindt zich in de deur . Het moet worden
opgevuld als u door het spionnetje "D" ziet dat het leeg
is.
(Als uw vaatwasser is voorzien van een controlelampje
"gebrek glansmiddel" moet u het opvullen wanneer het
lampje aangaat of knippert).
Opvullen glansmiddel
Draai de deksel C tegen de klok in voor het openen van
het reservoir. Let op dat het glansmiddel niet overloopt
bij het opvullen. U kunt de hoeveelheid van het
glansmiddel dat wordt losgelaten regelen door met een
schroevendraaier aan de afstelschroef "F" te draaien die
zich onder de deksel "C" bevindt. Er zijn 6 posities,
normaal staat hij op 4.
F
C
24 gr
.
3 gr.
Belangrijk:
Het regelen van de toevoer van glansmiddel verbetert
het drogen.
Als er druppels of vlekken op het vaatwerk zitten, stel
de afstelschroef dan op een hoger nummer. Als
daarentegen het vaatwerk witte strepen vertoont, zet
de afstelschroef dan op een lager nummer.
A
Belangrijk
Er zijn tegenwoordig producten voor de vaatwasser in de handel die tegelijkertijd afwasmiddel, zout en glansmiddel bevatten
(3 in 1). Als het water in uw waterleiding hard of heel hard is raden wij aan om toch zout in het zoutreservoir te doen, teneinde
het vormen van witte strepen op het vaatwerk of op de binnenkant van de machine te vermijden.
Voeg alleen glansmiddel toe, in het betreffende bakje, als het drogen van het vaatwerk niet bevredigend is.
In ieder geval moet u zich nauwkeurig aan de instructies op de verpakking houden.
Als u uitsluitend deze producten gebruikt is het normaal dat de controlelampjes van het zout en glansmiddel na een zeker
aantal cycles gaan knipperen.
NL
48

Het inladen van het vaatwerk
Voordat u het vaatwerk in de korven plaatst moeten
voedselresten eraf gespoeld worden zodat de filter niet
verstopt raakt.
Als de pannen en bakpannen erg zijn aangekoekt zet u ze
in de week voordat u ze in de vaatwasser doet.
Zo vermijdt u extra wasbeurten.
T rek de korven naar voren om het inladen van het vaatwerk
te vergemakkelijken.
Gebruik van de onderkorf
In de onderkorf gaat het vaatwerk dat moeilijk te wassen
is: pannen, deksels, borden, soepborden (in de foto ziet u
een voorbeeld).
• Schalen en grote deksels: zet ze aan de zijkant van de korf.
• Pannen, slabakken: altijd ondersteboven.
• Diepe schalen: zet ze schuin zodat het water er beter
afdruipt en beter wast.
De onderkorf heeft uitklapbare delen (afb.B), zodat u meer
pannen kunt plaatsen of plaats maken voor de grootste
pannen.Deze bestekkorf is voorzien van een uitneembare
roosters: plaats het bestek een voor een in de openingen
met de handvaten naar beneden.Het bestek wordt geplaatst
met de handvaten naar beneden; lepeltjes gaan in de
hiervoor bestemde vakjes, als de korf is voorzien van
zijvakjes (zie afb. A)
Voorbeelden van het inladen
bovenkorf
onderkorf
De messen en andere gebruiksvoorwerpen met scherpe
punten moeten met de punten naar beneden worder
geplaatst. Als u weinig bestek heeft te wassen kunt u dus
een halve korf gebruiken. Extra-lang bestek gaat horizontaal
aan de voorkant van de bovenkorf.Vergeet niet na het
inladen van het vaatwerk te controleren of de sproeiarmen
zich vrijelijk kunnen bewegen zonder tegen vaatwerk aan
te botsen.
Gebruik van de bovenkorf
De bovenkorf is bestemd voor het fijnere en lichtere
vaatwerk zoals glazen, theekopjes en koffiekopjes,
schoteltjes, maar ook weinig vuile borden, lage slabakken,
koekenpannen, hoge pannen en platte pannen (op de foto's
ziet u verschillende voorbeelden).
Plaats de lichte stukken zodanig dat ze niet verplaatst
worden door de waterstralen.
-Een of twee speciale opklaprekjes kunnen worden
bijgeleverd waarop u kopjes of bestek kunt leggen, dat in
de gleuven wordt geplaatst. Wijnglazen kunnen worden
opgehangen aan de klaprekjes, met de voet in de gleuven
(zie afb. D).
Vergeet niet na het inladen van het vaatwerk te contr oleren
of de sproeiarmen zich vrij kunnen bewegen zonder tegen
vaatwerk aan te botsen.
Het regelen van de bovenkorf ....
U kunt de bovenkorf hoger of lager zetten. Aan de zijkanten
van de bovenkorf bevinden zich tweehandvaten: hiermee
kunt u de hoogte regelen.(Afb. C)
Afb.B
Afb. A
1
2
Afb. C
49
NL

Het starten van de machine
Allereerst
Steek de stekker in het stopcontact, de vaatwasser staat nu
onder spanning. Open de waterkraan en druk op de On-Off
knop "A": de display wordt verlicht en de tijdsduur van het
programma waarop u de knop heeft gericht gaat knipperen.
Het kiezen en starten van het programma.
• Kies het programma door knop "D" met de klok mee te
draaien van programma 1 tot programma 7 en tegen de
klok in van 7 tot 1. De display vertoont de gemiddelde
tijdsduur van het programma en de fasen waaruit het bestaat
(wij raden aan bij het eerste gebruik de programmatabel op
blz.52 te raadplegen).
• Druk op de startknop "R" en het programma start,
vergezeld van een dubbel geluidssignaal. Op de display kunt
u de gemiddelde tijd aflezen die nog over is tot aan het
einde van het programma.
• Als de tijdsduur die aan het begin van het programma
wordt aangegeven niet klopt met de effectieve duur van
het programma, dan is dit te wijten aan verschillende
factoren: de temperatuur van het water dat is toegevoerd,
de vuilheidsgraad, pogingen, ook enigszins langdurend, van
de machine om de filter te bevrijden van etensresten die
hem verstoppen enz.
Indicatie fasen van het programma
Gedurende het verloop van het programma worden op de
display de symbolen verlicht die bij de fasen van het programma horen.
Ziehier de symbolen van de fasen:
Heeft u vergeten een stuk vaatwerk in te laden?
Het is mogelijk de wascycle te onderbreken door op de ONOFF knop te drukken, waarna u het stuk vaatwerk inlaadt:
bij het aan gaan van de machine, na ongeveer 10 seconden,
wordt het programma weer opgenomen op het punt waar
het onderbroken was.
Is de stroom uitgevallen? Is de deur van de wasmachine
geopend?
Het programma wordt onderbroken en op de display
verschijnen 4 streepjes; het programma wordt weer
opgenomen als de stroom terug is of de deur wordt
dichtgedaan.
Aan het einde van het afwasprogramma
Het einde van de cycle wordt aangegeven met 2 korte
geluidssignalen terwijl op de display het woord "END"
knipperend verschijnt.
• Schakel de machine uit door op de On-Off knop te drukken .
• Doe de waterkraan dicht.
• Maak eerst de onderste korf leeg.
Wees er zeker van dat het programma is afgelopen voordat
u het vaatwerk verwijdert!
Waarschuwing: als u de deur van de vaatwasser open doet
terwijl het programma bezig is of net geëindigd moet u
oppassen voor de hete stoom die eruit komt!
Voorwas Was Spoelen Drogen
Uitschakelen en veranderen van een reeds begonnen
programma
Belangrijk: een programma dat al is begonnen kan alleen
veranderd worden als het net is begonnen.
Houd de Reset-knop "R" ongeveer 3 seconden ingedrukt:
u hoort een aangehouden geluidssignaal gevolgd door 3
korte pieptonen. Op de display knippert de tijd van het
geannuleerde programma. Draai de knop voor het kiezen
van een nieuw programma:
NL
Het instellen van extra drogen
Houd knop "E" ingedrukt; na een pieptoon gaat het
controlelampje "G" aan en op de display knippert de tijd
van het met de knop gekozen programma.
N.B.: De tijdsduur die wordt aangegeven is verlengd vanwege
de extra droogbeurt.
Om het extra drogen weer te annuleren houdt u dezelfde
knop ingedrukt en na een pieptoon gaat het controlelampje
"G" uit.
Deze optie is niet verenigbaar met weken.
50

Het instellen van uitgestelde start
Het programmeren van de uitgestelde start
Het vaatwerk is ingeladen: voordat u een programma kiest
kunt u ook beslissen wanneer de machine moet starten.
• Door herhaaldelijk op knop "P" te drukken kunt u de
start van de wascycle uitstellen van 1 tot 24 uren
• Als u opnieuw drukt verschijnt "OFF" (geen keuze).
Nadat u uw keuze heeft gemaakt moet u controleren of de
deur goed dicht is en het programma (druk op de startknop
"R")
Op de display wordt het symbool "I" verlicht en begint het
aftellen van de wachttijd.
• Als het aftellen is afgelopen begint het programma te
werken en op de display kunt u de gemiddelde tijd aflezen
die over is tot het einde van het programma.
Bent u van idee veranderd?
• Gedurende de wachttijd kunt u het uitstel dat u heeft
ingesteld veranderen door een kortere tijd te kiezen. Druk
herhaaldelijk op knop "P", zonder dat u het programma
opnieuw hoeft in te stellen.
• Bent u van idee veranderd en wilt u het programma meteen
laten beginnen, druk dan op knop "P" tot aan nul. Het
controlelampje "I" gaat uit en het programma begint met
een pieptoon.
Op de display verschijnt het controlelampje dat hoort bij de
fase van het programma dat in werking is en het aftellen
van de tijd die resteerd tot het einde van het programma
begint.
BELANGRIJK: als bij het inschakelen van de vaatwasser op de display
het woord "dON" is te zien betekent het dat het demo-programma
actief is. Dit programma dient ervoor de wascycles te simuleren zonder
dat ze echt worden uitgevoerd.
Om uit de demo te komen drukt u voor ongeveer 4 seconden op de
START/RESET-knop "R". Als u eruit bent gekomen verschijnt het
woord "dOFF" op de display.
51
NL
Programma-tabel
Met het wassen in een vaatwasser is hygiëne en veilig schoonwassen gegarandeerd.
'XXUYDQ
SURJUDPPD
WROH UDQWLH
]RQGH U
H[WUD
GURJHQ
3URJUDPPD
,QWHQ VLYH
$DQZ LM]LQJH Q YRRU
SURJUDPPDNHX]H
Erg vuil vaatwerk en pannen
(niet voor breekbaar
vaatwerk)
%HVFKULMYLQJYDQGHF\FOH
Voorwa ssen met water 4 0 °C
Wa s 6 5°C.
2 koude spoelingen.
Warme spoeling 65°C.
Drogen.
: DVPLGGHO
YRRUZDVVH Q
HQZDVVHQ
JU
*ODQVPLGGHO
KHW
1 RUPDOH
(F R
6QHO
'URJHQ
:H N H Q
*ODV ZH UN
Normaal vuil vaatwerk en
panne n. D a ge lijk s e no r male
cycle.
Programma voor ecologische
was met laag energie
ver b ruik, ges c hikt vo o r
nor maa l vuil va a tw e rk en
panne n.
Zuinige snelle cycle voor
weinig v uil v a a twer k , d ir e ct
na ge bruik .
Voorwassen in afwachting van
de la d ing va n d e vo lgen d e
ma altij d.
Spe- ciale cycle voor fijn
vaatwerk dat gevoeliger is
vo o r ho ge te mp e ratur e n,
dir e c t na ge b r uik .
Wa s 6 0°.
Koud spoelen
Warme spoeling 70°C.
Drogen.
2 koude voorwassen
Wa s 5 0°C.
Warme spoeling 65°C.
Drogen.
Korte was met 47°C.
Warm spoelen met 65°C
Drogen.
Korte koude was om
aa nkoeke n van et e ns r e s te n t e
ver mij de n
Wa s 5 2°C.
Lauw spoelen 45°C
Warme spoeling 65°C.
Drogen.
J U
JU
J U
J U
0 H WH H Q
NL
ZDVVHQ
Snelle en economische
vaatwas voor een dagelijkse
lading.
Wa s 5 0°C.
Warme spoeling 65°C.
Drogen.
52
JU

Tips voor bezuiniging
- Het is belangrijk indien mogelijk de vaatwasser pas aan te
zetten als hij vol is; teneinde in de tussentijd luchtjes en aankoeken te vermijden kunt u de weekcycle gebruiken.
- De keuze van het programma hangt af van het soort vaatwerk dat gewassen moet worden en hoe vuil het is.
- Doseer de juiste hoeveelheid afwasmiddel: als u er teveel
in doet krijgt u niet schoner vaatwerk maar is het alleen
negatief voor het milieu.
- Het is nutteloos het vaatwerk af te spoelen voordat u het
in de machine doet.
Onderhoud van de vaatwasser
Na iedere afwasbeurt
Doe na iedere afwasbeurt de waterkraan dicht en laat de
deur op een kier staat zodat zich geen vochtigheid of muffe
lucht vormt.
Stekker uit het stopcontact
Voordat u overgaat tot reinigen of onderhoud moet altijd
eerst de stroom worden afgesloten: zo loopt u geen enkel
risico.
Geen oplosmiddelen! Geen schuurmiddelen!
Voor het schoonmaken van de buitenkant en de rubber onderdelen van de machine mag u geen oplosmiddelen of
schuurmiddelen gebruiken. Een doek en een sopje zijn genoeg.
Voor het verwijder en van eventuele vlekken aan de binnenkant kunt u een natte doek en een beetje witte azijn gebruiken, of een speciaal product voor het reinigen van
vaatwassers.
Als u op vakantie gaat
Het is goed om voordat u op vakantie gaat een cycle met
lege machine te laten draaien, dan de stekker uit het stopcontact te halen, de watertoevoer af te sluiten en de deur
op een kier te laten staan: de pakkingen blijven zo langer
goed en u krijgt geen muffe lucht in de machine.
In het geval van verhuizing
Als u verhuist moet de machine zo goed mogelijk vertikaal
blijven staan; indien noodzakelijk legt u hem op zijn achterkant.
De pakkingen
Een van de redenen van onaangename geuren in de vaatwasser is het aankleven van etensresten aan de pakkingen.
Maak ze af en toe schoon met een vochtige spons.
53
NL

Schoonmaken en speciaal onderhoud
De filter-unit
Voor goede resultaten van de afwas moet de filter-unit worden
schoon gemaakt. Het afwaswater wordt gereinigd van etensresten
en perfect gefilterd weer in circulatie gebracht. Het is daarom
noodzakelijk de grootste stukjes
die in de beker “C” en in de filter
“A” zijn achtergebleven te
B
verwijderen: trek de beker aan zijn
handvat naar boven. Spoel onder
stromend water.
Eens per maand moet de hele
filter-unit worden gereinigd: de
beker C + de halfcirkelvormige filter A + de cilindrische filter B. De
filter “B” wordt verwijderd door hem tegen de klok in te draaien.
Gebruik bij het reinigen een niet-metalen borstel.
Zet de onderdelen weer in elkaar (zoals aangegeven in de
afbeelding) en plaats de unit in de vaatwasser. Druk hem op zijn
plaats.
De vaatwasser mag niet zonder filters worden gebruikt. De afwas
wordt minder efficiënt uitgevoerd als de filters niet op de juiste
wijze in hun behuizing zijn geplaatst en de vaatwasser kan
eventuele schade oplopen.
1
2
C
A
Reinigen van de sproeiarmen
Het kan gebeuren dat kleine etensrestjes vastkleven aan de
sproeiarmen en de gaatjes verstoppen; controleer ze regelmatig en maak ze schoon (zie Van dichtbij gezien (binnenin)
bij de letter F-I).
Zijn er storingen?
Het kan gebeuren dat uw vaatwasser niet of slecht functioneert.
Voordat u de installateur erbij haalt kijken we even wat er aan gedaan
kan worden: misschien heeft u vergeten op een of andere knop te
drukken of heeft u per ongeluk een handeling niet uitgevoerd die
noodzakelijk is voor het functioneren van de machine.
De vaatwasser start niet
Heeft u gecontroleerd of:
de kraan open is en goed is aangesloten aan de slang, de waterdruk
te laag is, de slang gekneld ligt, de filter van de slang van de
watertoevoer is verstopt, de deur open is.
Het vaatwerk is niet schoon
Heeft u gecontroleerd of:
de juiste dosis afwasmiddel is toegevoegd, het gekozen afwasprogramma geschikt is voor het vaatwerk dat moet worden gewassen,
de filter en microfilter schoon zijn, de sproeiarmen ongehinderd zijn.
De vaatwasser loopt niet leeg
Heeft u gecontroleerd of:
de afvoerbuis gekneld ligt.
Er blijven in de vaatwasser kalkafzettingen achter of een witte
aanslag
Heeft u gecontroleerd of:
de deksel van het zoutreservoir goed dicht zit, de dosis glansmiddel
op de juiste wijze is ingesteld.
BELANGRIJK: als bij het inschakelen van de vaatwasser op de
display het woord "dON" is te zien betekent het dat het demoprogramma actief is.
Lees de instructies op blz. 51.
Storingssignalen
Uw vaatwasser is voorzien van een veiligheidssysteem dat eventuele
storingen kan opsporen.
Deze storingen worden aangegeven met codenummers die bestaan
uit letters en cijfers die knipperend op de display verschijnen. Schrijf
het codenummer van de storing op, schakel de vaatwasser uit, draai
de waterkraan dicht en bel de installateur.
Alarm kraan dicht
Als u bent vergeten de waterkraan open te draaien dan geeft de
vaatwasser dat aan met een serie lange pieptonen en met een
knippered H2O op de display. Open de waterkraan en u zult zien
dat het programma binnen een paar minuten begint.
Als u gedurende deze fase van storingssignalen niet aanwezig bent
gaat de machine door met signaleren en gaat het codenummer
"A06" knipperen.
Zet de machine uit met de knop "A", draai de waterkraan open,
wacht ongeveer 20 seconden en zet vervolgens de machine weer
aan; u zult zien dat het programma weer wordt opgenomen.
Alarm filters verstopt
Als de machine stil staat en het codenummer "A05" knippert, dan
betekent dit dat de filter is verstopt met etensresten. Schakel de
machine uit met de ON-OFF knop, maak de filter goed schoon en,
nadat u hem weer op zijn plaats heeft teruggezet, schakelt u de
machine weer in. Binnen een paar seconden gaat het programma
weer normaal door.
Alarm storing aan de elektroklep van de watertoevoer
Als het codenummer "A02" knippert moet u de vaatwasser na een
minuut UIT DOEN EN WEER AAN DOEN. Als het alarm aan blijft
moet u eerst de waterkraan dicht doen om overstroming te
vermijden, vervolgens de stroom afsluiten en dan de installateur
erbij roepen.
Mocht de vaatwasser ondanks alle controles nog niet
werken en de storing blijft bestaan, bel dan de installateur
met opgave van de volgende informatie:
- het soort storing
- het codenummer van het model (Mod. ....) en het
serienummer (S/N ....) dat u op het plaatje aan de zijkant
van de binnenkant van de deur vindt..
Wendt u zich altijd tot een erkende installateur en
eis altijd alleen originele onderdelen.
NL
54

Installatie
Plaatsing
Zet de machine op de door u gekozen plaats. De machine
kan met de zijkant en achterkant tegen de muur en aangrenzende kastjes worden geplaatst. De aan- en afvoerbuizen van het water kunnen naar rechts of naar links
worden gericht.
Het horizontaal zetten
Plaats de machine, draai aan de stelvoetjes om ze losser of
vaster te draaien voor het regelen van de hoogte, indien
noodzakelijk, en zet hem met een waterpas perfect horizontaal, of in ieder geval niet meer dan 2° hellend.
Een goede waterpas positie garandeert het perfect functioneren van de vaatwasser.
Dit model vaatwasser kan onder de aanrecht worden
Aansluiting aan de afvoerbuis
Steek de slang in een
afvoerleiding met een
minimum doorsnee van 4cm,
of hang hem in de gootsteen.
of hang hem in de gootsteen.
Vermijd knellingen of scherpe
bochten. U kunt hem het
beste plaatsen als u de speciale
bijgeleverde plastic bocht gebruikt (zie afbeelding). Het
stuk van de slang met de letter
A moet zich op een hoogte
tussen 40 en 100 cm bevinden.
De buis mag niet onder water liggen.
ingebouwd (zie betreffend instructieblad).
Aansluiting aan de koudwaterkraan
De aansluiting aan de waterleiding mag uitsluitend worden
uitgevoerd met de aanvoerbuis die bij het apparaat is bijgeleverd; gebruik geen ander soort buis. Als onderdelen
moeten worden vervangen mogen alleen originele onderdelen worden gebruikt.
Sluit de aanvoerbuis aan een koudwaterkraan aan met een
schroefdraad van ¾ gas en schroef hem goed vast aan de
kraan.
Als de waterleiding nieuw is of lange tijd niet gebruikt, laat
dan eerst water lopen voordat u de aansluiting tot stand
brengt, totdat het water helder is en zonder vuiltjes. Zonder
deze voorzorg zou de watertoevoer verstopt kunnen raken
met schade aan de machine.
Aansluiting aan de warmwaterkraan
De vaatwasser kan worden voorzien van warm water uit de
kraan (centrale verwarming, radiatoren) dat niet warmer mag
zijn dan 60°C.
In dit geval wordt de tijdsduur van de afwas verkort met
ongeveer 15 minuten en de doeltreffendheid enigszins ver minderd.
Het aansluiten aan de warmwaterkraan moet op dezelfde
wijze worden uitgevoerd als het aansluiten aan de koudwaterkraan.
Belangrijk: de speciale plastic bocht moet aan de muur
worden vastgemaakt om te voorkomen dat de afvoerbuis
beweegt en water knoeit buiten de afvoerleiding.
Elektrische aansluiting
Steek de stekker in een randgeaard stopcontact (het aarden
van de installatie is een veiligheidsmaatregel die is voorgeschreven door de wet), nadat u heeft gecontroleerd dat de
spanning en frequentie van uw net corresponderen met die
zijn aangegeven op het typeplaatje dat zich op de stalen
binnendeur bevindt, en dat uw net is gedimensioneerd voor
de maximum stroomsterkte die is aangegeven op het typeplaatje. Als de stekker niet in het stopcontact past moet
deze laatste vervangen worden met een die wel past; gebruik geen adaptors of dubbelstekkers aangezien die
verhitting of schroeien kunnen veroorzaken.
In het geval dat de voedingskabel geschadigd raakt moet u
zich voor het vervangen hiervan uitsluitend tot een erkende
Installateur wenden.
A
Beveiliging tegen overlopen
Uw vaatwasser is voorzien van een systeem dat de watertoevoer stopt op het moment dat er lekkage optreedt in de
machine zelf. De machine is bovendien voorzien van een
watertoevoerslang die bestendig is tegen zeer hoge druk
en die rood van kleur wordt wanneer hij breekt. De
beveiliging tegen overlopen wordt gegarandeerd door de
tweede, doorzichtige slang die zich om de toevoerslang heen
bevindt. Het is erg belangrijk dat u de slang regelmatig
controleert. Als u ziet dat hij rood is, weet u dat u hem zo
snel mogelijk moet vervangen. Bel een bevoegde installateur
voor deze ingreep.
55
NL

La seguridad, una buena costumbre
C
A
D
P
H
R
E
ATENCIÓN
Lea atentamente las advertencias contenidas en el presente manual
ya que brindan importantes indicaciones referidas a la seguridad de
instalación, de uso y de mantenimiento.
Este aparato es conforme con las siguientes
Directivas de la Comunidad:
- 73/23/CEE (Bajos Voltajes) y sucesivas
modificaciones;
- 89/336/CEE (Compatibilidad Electromagnética) y sucesivas
modificaciones.
- 97/17 CEE (Etiquetado)
1.Elimine con cuidado el material del embalaje.
2.Una vez quitado el embalaje, verifique la integridad del aparato. Si
tiene dudas, diríjase a personal profesionalmente calificado.
3.El lavavajilla debe ser utilizado exclusivamente por adultos y para el
lavado de vajilla de uso doméstico.
4.Reglas fundamentales que se deben respetar durante el uso:
- no toque la máquina cuando está descalzo o con las manos o pies
mojados,
- no es aconsejable recurrir a prolongaciones o tomas múltiples,
- durante la instalación, el cable de alimentación no debe ser plegado
ni sufrir compresiones importantes y peligrosas,
- en el caso de funcionamiento anómalo o de trabajos de
mantenimiento, desconecte el aparato de la red eléctrica.
5.Mantenga a los niños alejados de los detergentes y del lavavajilla
cuando está abierto.
6.El lavavajilla no se debe instalar nunca afuera, tampoco en un lugar
reparado por un cobertizo: es muy peligroso dejarlo expuesto a la
lluvia o a las tormentas.
7.No toque la resistencia durante o inmediatamente después de un
ciclo de lavado.
8.No se apoye ni se siente sobre la puerta abierta, podría hacer volcar
el lavavajilla.
9.En caso de avería, cierre el grifo de entrada de agua y desenchufe
el aparato. Luego consulte el capítulo “¿Hay algún problema?” y si
no encuentra una solución, llame al centro de asistencia técnica.
10.Los aparatos fuera de uso se deben inutilizar cortando el cable de
alimentación y dañando el bloqueo de la puerta.
Para garantizar la eficiencia y la seguridad de este
electrodoméstico:
l llame exclusivamente a centros de
asistencia técnica autorizada
l solicite siempre el uso de repuestos
originales
Vista de cerca (cuadro de mandos)
A: Botón On-Off
C: Manija de apertura de la puerta
D: Perilla de selección de programas
R: Botón Start/Reset
T
L
H
S
I
G
ES
H: Display
E: Botón "Secado extra"
P: Botón de selección de retraso del comienzo
G: Luz indicadora del secado extra
H: Luces indicadoras de avance del ciclo
L: Indicador alfanumérico
S: Luz indicadora de falta de sal
T : Luz indicadora de falta de abrillantador
I: Luz indicadora de retraso del comienzo
56

Vista de cerca (Interior)
G
E
F
J
I
Cesto superior
Rociador superior
Regulación de la altura del cesto
Cesto inferior
H
K
L
Rociador inferior
Tapa del recipiente de sal
Filtro de lavado
Recipiente para detergente y abrillantador
Características técnicas
Largo cm. 45
Profundidad cm. 60
Altura cm. 85
Capacidad 9 cubiertos normales
Presión agua alimentación 4,3 psi -145 psi- 30 KPa÷ 1MPa (0,3 ÷10 bar)
Tensión de alimentación Véase placa de características
Potencia total absorvida Véase placa de características
Fusible Véase placa de características
57
ES

Sal ....
La sal
La dureza del agua varía según las localidades. Si en el
lavavajilla entrara agua dura, se formarían incrustaciones
sobre la vajilla.
Gracias a un decalcificador que utiliza sal específica para
lavavajilla, se elimina la caliza del agua.
Carga de sal en el decalcificador
Utilice siempre sal específica para lavavajilla.
El depósito de sal está
debajo del cesto inferior,
llénelo de la siguiente
manera:
1. Extraiga el cesto inferior ,
desenrosque y quite la tapa
del depósito
2. Si está cargando el
depósito por primera vez,
llénelo de agua.
3. Coloque en el orificio el
embudo que se suministra
con el aparato e introduzca
aproximadamente 2 Kg. de sal. Es normal que se derrame
un poco de agua del depósito.
4. Vuelva a enroscar con cuidado la tapa.
Regulación del consumo de sal
El lavavajilla está preparado
para regular el consumo de sal
en función de la dureza del
agua que se utiliza y poder así
optimizar y personalizar el consumo de sal al nivel mínimo
necesario.
Podrá solicitar el grado de
dureza del agua a la Entidad
encargada de suministrar el
agua potable de su zona.
Para la regulación, respete las
siguientes instrucciones:
1. desenrosque la tapa del depósito de sal
2. en el collar del depósito se encuentra una flecha (ver la
figura), si es necesario, gírela en sentido antihorario desde
el signo “-“ hasta el signo “+” según la dureza del agua de
alimentación.
Es aconsejable realizar la regulación según el siguiente
esquema:
Dureza del agua
El depósito de sal se debe llenar cuando centellea la
luz indicadora de falta de sal “S”.
Después de haber cargado la sal por primera vez, es normal
que la luz indicadora de falta de sal permanezca encendida
o centellee aproximadamente durante 5 ciclos consecutivos.
Atención: Para evitar la formación de herrumbre,
aconsejamos cargar la sal antes de comenzar un ciclo de
lavado.
°dH °fH mmol/l
0 ¸ 10 0 ¸ 17 0 ¸ 1,7 / 0 /
10¸ 25 18 ¸ 44 1,8 ¸ 4,4
25 ¸ 50 45 ¸ 89 4,5 ¸ 8,9 MED 40 40
> 50 > 89 > 8,9
Posición
selector
-
+
Consumo
sal
(gramas/ciclo)
20 60
60 25
Autono-
mia
(ciclos\-
2kg)
ES
58

Detergente y abrillantador .....
El detergente
Use solamente detergente específico para lavavajilla. El
suministro del detergente se debe realizar antes del comienzo
de cada ciclo de lavado basándose en las indicaciones
contenidas en la “Tabla de ciclos de lavado”. El distribuidor
de detergente se encuentra en el interior de la puerta.
Carga del detergente
Para abrir la tapa “A” pulse el botón “B”. El detergente se
debe introducir en las 2 cubetas “C” y “D” hasta el borde.
Después de haber versado el detergente, cierre la tapa
presionándola hasta el enganche.
En los negocios se puede encontrar detergente para lavavajilla
en pastillas, en ese caso introduzca una pastilla en la cubeta
“D” y cierre la tapa.
Para facilitar el enganche de la tapa, antes de cerrarla
elimine los residuos que podrían haberse derramado
en los bordes de la cubeta.
B
D
C
El abrillantador
El abrillantador vuelve su vajilla más brillante porque mejora
su secado. El depósito del abrillantador está ubicado en la
parte interna de la puerta. Deberá llenarlo cuando vea el
depósito vacío a través de la mirilla “D”.
(Si su lavavajilla posee una “luz indicadora de falta de
abrillantador”, deberá llenarlo cuando la misma centellea o
se ilumina).
Carga del abrillantador
Para abrir el recipiente es necesario girar en sentido
antihorario la tapa “C”. Al verter el abrillantador evite que
se derrame. Es posible regular la cantidad de producto
suministrado accionando con un destornillador el regulador
“F” ubicado debajo de la tapa “C”. Hay 6 posiciones posibles,
normalmente está calibrado en la 4.
F
C
24 gr
.
3 gr.
Importante:
La regulación del suministro de abrillantador permite mejorar
el secado.
Si en la vajilla lavada quedaran gotas de agua o manchas,
gire el regulador hacia los números más altos. Si en cambio,
la vajilla lavada presentara estrías blancas, gire el regulador
hacia los números más bajos.
A
Atención
En los negocios, Ud. puede encontrar productos para el lavado de la vajilla que contienen detergente, sal y abrillantador (3 en
1). Si el agua con la que Ud. trabaja es dura o muy dura, le aconsejamos agregar sal en el correspondiente distribuidor para
evitar la formación de estrías blancas en la vajilla o en la cuba.
Agregue el abrillantador en el depósito sólo si el secado de la vajilla no es satisfactorio.
De todos modos, consulte atentamente las instrucciones del fabricante que se encuentran en los envases.
Si usa sólo estos productos, es normal que las luces testigo de sal y abrillantador, después de un cierto número de ciclos,
centelleen permanentemente.
59
ES

Carga de la vajilla
Antes de disponer la vajilla en los cestos, elimine los residuos más grandes de comida, de este modo, evitará atascar los filtros y reducir la eficacia del lavado.
Si las ollas y las sartenes tienen residuos muy pegados, le
aconsejamos colocarlas en remojo a la espera del lavado.
De ese modo, se evitarán ulteriores lavados.
Para facilitar la operación de carga de la vajilla, extraiga los
cestos.
Cómo utilizar el cesto inferior
En el cesto inferior le aconsejamos colocar la vajilla más
difícil de lavar: ollas, tapas, platos llanos y hondos (en las
fotos se pueden observar ejemplos de carga).
• Fuentes y tapas grandes: colóquelos a los costados del
cesto.
• Ollas, ensaladeras: deben estar siempre volcadas
• Vajilla muy honda: colóquela en posición oblicua, así
el agua podrá fluir para lavarla mejor
El cesto inferior tiene sectores que se pueden reclinar (ver
la figura B), gracias a ello Ud. podrá colocar más ollas o
sartenes o dejar más espacio para las más grandes.
Este cesto está dotado de una rejilla que se puede
extraer: introduzca los cubiertos de a uno en las
ranuras, con los mangos dirigidos hacia abajo.
Si el cesto es el que tiene los agregados laterales,
coloque las cucharitas, una en cada ranura (ver la
figura A).
Los cuchillos y los utensilios con puntas cortantes se
deben colocar con las puntas hacia abajo.
Colóquelos de modo que no se toquen entre sí.
Es mejor colocar los cubiertos particularmente largos
en posición horizontal en la parte delantera del cesto
superior .
Ejemplos de cargas
cesto superior
1
2
Fig.B
cesto inferior
fig. A
Cómo utilizar el cesto superior
En el cesto superior cargue la vajilla delicada y liviana:
vasos, tazas de té y café, platitos -también platos ensaladeras bajas, sartenes y cazuelas bajas que no estén
muy sucias (en las fotos se pueden observar ejemplos de
carga).
Coloque la vajilla liviana de modo tal que no sea desplazada por los chorros de agua.
Con la máquina se pueden suministrar uno o dos cestos adicionales especiales en los cuales colocar tazas, tacitas, y también cucharas, tenedores y cuchillos que se introducirán en
las ranuras. Las copas se podrán colgar de los cestos adicionales introduciendo el pie en las ranuras (ver la figura D).
Después de haber cargado el lavavajilla, recuerde controlar que las palas del rociador giren libremente, sin chocar
con la vajilla.
Cómo regular el cesto superior ...
Es posible regular el cesto superior en posición alta o baja.
A los costados del cesto superior se encuentran dos manijas: con ellas se puede regular su altura (ver la figura C).
ES
fig. C
60

Puesta en marcha del lavavajilla
Antes que nada
Introduzca el enchufe en una toma de corriente, el lavavajilla
quedará encendido. Abra completamente el grifo de agua y
pulse el botón de On-Off "A", el display se iluminará y verá
centellear el tiempo del programa sobre el cual está ubicada
la perilla.
Selección y comienzo del programa.
• Seleccione el programa girando la perilla "D" en sentido
horario desde el programa 1 hasta el programa 7 y en sentido antihorario del 7 al 1; el display visualizará el tiempo medio
de duración del programa y las fases que lo componen (las
primeras veces le aconsejamos consultar la tabla de
programas de la pág. 63).
• Pulse el botón de Start "R" y el programa comenzará con
una doble señal sonora, en el display podrá leer el tiempo
medio que falta para la finalización del programa.
• Si el tiempo indicado al comienzo del programa no corresponde a la duración efectiva del mismo, puede ser debido a
distintos factores: temperatura del agua de entrada, grado
de suciedad, intentos prolongados de la máquina de eliminar del filtro de lavado los residuos de comida que lo atascan, etc.
vamente la máquina, el ciclo recomenzará desde el punto
en el cual se había interrumpido, después de aproximadamente 10 segundos.
¿Se cortó la luz? ¿Abrió la puerta de la máquina?
El programa se interrumpe y en el display aparecen 3 guiones; se reanudará cuando vuelva la luz o cuando se cierre la
puerta.
Al finalizar el lavado
El final del ciclo está indicado por 2 señales sonoras breves y
porque en el display aparece la palabra "END" centelleante.
• Apague la máquina pulsando el botón On-Off .
• Cierre el grifo de agua.
• Vacíe primer o el cesto inferior.
¡Antes de extraer la vajilla, verifique que el programa haya
terminado!
Advertencia: cuando abra la puerta del lavavajilla, si el ciclo
de lavado aún continúa o recién ha terminado, tenga cuidado con el vapor caliente que sale, ¡se podría quemar!
Indicador de fases del programa en curso
Durante el desarrollo del programa, en el display se iluminan los símbolos correspondientes a las fases de avance de
dicho programa. He aquí los símbolos de las fases :
Prelavado Lavado Enjuagues Secado
Anular y modificar un programa en curso
Premisa: un programa en curso se puede modificar sólo si
está recién comenzado.
Mantenga presionado el botón Reset "R" durante aproximadamente 3 segundos:
escuchará una señal sonora prolongada seguida por 3 breves sonidos. En el display centelleará el tiempo de duración
del ciclo anulado. Gire la perilla para seleccionar un nuevo
programa.
¿Ha dejado afuera una vajilla?
Es posible interrumpir el programa de lavado pulsando el
botón On-Off, luego introduzca la vajilla y al encender nue-
Cómo seleccionar el secado extra
Mantenga presionado el botón "E", después de un sonido
prolongado se encenderá la luz testigo "G" y en el
visualizador centelleará el tiempo correspondiente al
programa seleccionado con la perilla.
Nota: El tiempo indicado es mayor debido al efecto del secado extra.
Para desactivar el secado extra, mantenga presionado el
mismo botón y después de un sonido prolongado, se apagará la luz testigo "G".
Esta opción no es compatible con el remojo.
61
ES

Selección del comienzo retrasado
Programación del comienzo retrasado
Si ya ha cargado el lavavajilla, antes de seleccionar el programa más adecuado, también puede elegir cuándo hacerlo comenzar.
• Pulsando varias veces el botón "P" podrá postergar el comienzo del ciclo de lavado en un tiempo que va de 1h a 24h.
• Si lo pulsa una vez más, aparecerá "OFF" (ninguna selección).
Después de haber realizado la elección, controle que la puerta
esté cerrada y ponga en marcha el programa ( pulse el botón
ST ART).
En el display se iluminará el símbolo "I" y comenzará la cuenta
al revés del tiempo de espera.
• Una vez finalizada la cuenta la revés, el programa comienza y en el display se puede observar el tiempo medio que
falta para la finalización del programa.
¿Ha cambiado de idea?
• Durante el tiempo de espera es posible modificar el retraso seleccionado, eligiendo un tiempo menor. Pulse varias
veces el botón "P", sin reiniciar el programa.
• Si ha cambiado de idea y desea hacer comenzar el ciclo
inmediatamente, pulse el botón "P" hasta la anulación del
retraso. La luz testigo "I" se apagará y el ciclo comenzará
con una señal sonora.
En el visualizador se iluminará la luz testigo correspondiente
a la fase del programa en curso y comenzará la cuenta al
revés del tiempo que falta para el final del programa.
ATENCIÓN: si al encender el lavavajilla, en el display aparece el
mensaje "dON" significa que el programa demo está activado. Dicho
programa sirve para simular los ciclos de lavado sin efectuarlos realmente.
Para salir de esta modalidad, mantenga presionado el botón "R" de
START/RESET durante aproximadamente 4 segundos. Una vez que
ha salido de la modalidad, en el display aparecerá el mensaje "dOF".
ES
62

Tabla de programas
Lavando en lavavajilla tendrá la garantía de un ambiente higiénico y de una limpieza más
segura.
'XUDFLyQ
GHO
3U RJUDP D
(QpUJLFR
,QG L FDFLRQ HVSDU DOD
VHOHFFLyQGH
SU RJUDP DV
Vajilla y olla s muy suc ias
(no usar para piezas
delicadas).
'HVFULSFLyQGHOFLFOR
Prelavado con agua caliente a 40°C
Lavado a 65°C.
2 aclarados con agua fría
Acla rado c alie n t e a 65 °C
Secado.
'H WHU JHQWH
SU HODYDGR
ODYDGR
JU
$E U L OODQ W DG RU
SU RJUDP D
WROHU DQFLD
VLQ
VHFDGR
H[WUD
5 iSLGR
&RWL GLDQR
(FR
5 iSLGR
5H PRMR
' HOLFDGRV
Vajilla y olla s nor malmen te
sucias. Ciclo estándar
diario.
Programa para un lavado
ecológico, de bajo
consumo energético,
a d ec uad o p a r a vajilla y
ollas normalmente sucias.
Ciclo económico y veloz
que se debe utilizar para
va jilla po co s u cia ,
inmediatamente después
del uso.
La v a do pr e liminar d e o lla s
y vaj illa a la es pe ra de
completar la carga con la
siguiente comida.
Ciclo económico y veloz
que se utiliza para piezas
más sensibles a las altas
temperaturas,
inmediatamente después
del uso.
Lavado a 60°C
Acla r ad o frío
Acla rado c alie n t e a 70 °C
Secado.
2 prelavados con agua fría
Lavado a 50°C
Acla rado c alie n t e a 65 °C
Secado
Breve lavado a 47°C
Aclarado a 65ºC
Secado
Breve lavado frío para impedir que los
residuos de comida se sequen sobre la
vajilla
Lavado a 52°C.
Aclarado tibio a 45ºC
Acla rado c alie n t e a 65 °C
Secado
JU
JU
JU
JU
6 XF LH GD G
IUHVFR
Lavado rápido y
económico para una carga
d iaria d e vajilla.
Lavado a 50°C.
Acla rado c alie n t e a 65 °C
Secado
63
J U
ES

Consejos para ahorrar
- Es importante utilizar el lavavajilla a plena carga para
optimizar el consumo. Para evitar que durante la espera se
produzcan malos olores e incrustaciones, puede utilizar el
ciclo remojo.
- Elija el programa adecuado: la elección del programa
depende del tipo de vajilla que debe lavar y de su grado de
suciedad.
- Dosifique la cantidad justa de detergente: si excede la
cantidad de detergente utilizada, no obtendrá una vajilla
más limpia, solamente producirá un mayor perjuicio al ambiente.
- Es inútil enjuagar la vajilla antes de colocarla en la máquina.
Cómo conservar en buenas condiciones el lavavajilla
Después de cada lavado
Después de cada lavado, cierre el grifo de agua y deje
semicerrada la puerta para evitar problemas de humedad y
malos olores.
Desenchufarlo
Antes de realizar cualquier operación de limpieza o
mantenimiento, desconecte siempre el aparato: de este
modo no correrá ningún peligro.
Nada de solventes ni de productos abrasivos
Para limpiar la parte externa y las partes de goma del
lavavajilla no es necesario usar solventes ni productos
abrasivos, use sólo un paño embebido en agua tibia y jabón.
Para eliminar las manchas de la superficie de la cuba, utilice
un paño embebido en agua y un poco de vinagre blanco o
un producto específico para la limpieza del lavavajilla.
Si se va de vacaciones
Cuando se va de vacaciones, es aconsejable hacer un lavado
en vacío, luego desenchufar el aparato, cerrar el grifo de
entrada de agua y dejar la puerta semicerrada: de este modo,
las juntas durarán más tiempo y en su interior no se formarán
olores desagradables.
En caso de mudanza
En el caso de un traslado, trate de mantener el aparato en
posición vertical, si fuera necesario inclínelo hacia atrás.
Las juntas.
Una de las causas del mal olor en el interior del lavavajilla es
el depósito de residuos de comida que se produce en las
juntas. Bastará limpiarlas periódicamente con una esponja
humedecida.
ES
64

Limpieza y cuidados especiales
El grupo filtrante
Si desea obtener siempre buenos resultados de lavado, es
necesario limpiar el grupo filtrante.Se eliminan los
residuos de comida del agua de lavado y se vuelve a
poner en circulación perfectamente filtrada. Por ello,
después de cada lavado, es
mejor eliminar los residuos
más grandes que encuentre
retenidos en el cartucho “C”
B
y en el filtro semicircular A;
para extraerlos tire del
mango del cartucho hacia
arriba. Bastará enjuagarlos
bajo el agua corriente.
Una vez por mes es necesario limpiar cuidadosamente todo
el grupo filtrante: cartucho C + filtro semicircular A + filtro
cilíndrico B. El filtro “B” se extrae girándolo en sentido
antihorario.
Para la limpieza puede utilizar un cepillo no metálico
.Vuelva a colocar juntas las piezas (como se indica en la
figura) y vuelva a introducir el grupo en el lavavajilla.
Colóquelo en su alojamiento ejerciendo una presión hacia
abajo.El lavavajilla no se debe utilizar sin filtros. Si no introduce correctamente los filtros se reducirá la eficacia del
lavado, e incluso se podría dañar el lavavajilla.
1
2
A
Limpieza de los rociadores
C
Puede suceder que los residuos de comida se adhieran a los
rociadores obstruyendo los orificios; contrólelos
periódicamente y límpielos (ver Vista de cerca (interior) letras
F-I).
¿Hay algún problema?
Puede suceder que el lavavajilla no funcione o funcione mal. Antes
de llamar a la asistencia técnica, veamos juntos qué se puede hacer:
puede ser que se haya olvidado de pulsar un botón cualquiera o, por
distracción, no haya realizado una maniobra necesaria para que la
máquina funcione.
El lavavajilla no arranca
Debe controlar que:
el grifo esté abierto y bien conectado al tubo, no falte agua en casa
o no llegue con suficiente presión, el tubo no esté plegado, el filtro
del tubo de alimentación de agua no esté atascado, la puerta esté
cerrada.
La vajilla no queda limpia
Debe controlar que:
se haya colocado la justa cantidad de detergente, el programa de
lavado seleccionado es el adecuado para la vajilla que se va a lavar , el
filtro y el microfiltro estén limpios, los rociadores estén libres.
El lavavajilla no descarga
Debe controlar que:
el tubo de descarga no esté plegado.
En el lavavajilla quedan depósitos calcáreos o una pátina
blanca.
Debe controlar que:
el recipiente de sal esté bien cerrado, la dosificación de abrillantador
esté bien regulada.
Si al encender el lavavajilla, en el display aparece el mensaje
"dON" significa que el programa demo está activado.
Lea las instrucciones de las pág. 62
Mensajes de error.
Su lavavajilla está dotado de un sistema de seguridad capaz de
detectar eventuales anomalías de funcionamiento.
Dichas anomalías o averías se señalan a través de algunos códigos
compuestos por letras y cifras que centellean en el display. Después
de haber tomado nota del código de error , apague la máquina, cierre
el grifo de agua y llame a la asistencia técnica.
AAlarma por grifo cerrado
Si se ha olvidado de abrir el grifo de agua, la máquina se lo indica
con una serie de sonidos prolongados y con el mensaje H2O centelleante en el display. Abra el grifo de agua y verá que en pocos
minutos el programa se pone en marcha.
Si Ud. no se encuentra presente durante esta fase de señalación, la
máquina emitirá una alarma y centelleará el código "A06".
Apáguela con el botón "A", abra el grifo de agua y después de
haber esperado aproximadamente 20 segundos vuelva a encender
la máquina, verá que comienza el programa.
Alarma por filtros atascados
Si la máquina está bloqueada y centellea el código "A05" significa
que el filtro está atascado con gran cantidad de residuos de alimentos. Apague la máquina con el botón ON-OFF, limpie cuidadosamente el filtro y después de colocarlo nuevamente en su lugar , vuelva
a encender la máquina. En pocos segundos, el programa se pondrá
en funcionamiento regularmente.
Alarma por avería en la electroválvula de carga de agua
Si centellea el código "A02",APAGUE Y VUELVA A ENCENDER el
lavavajilla después de un minuto. Si la alarma permanece, primero
cierre el grifo de agua para evitar inundaciones, luego desconecte el
aparato y llame a la asistencia técnica.
Si aún cuando se hayan realizado todos los controles, el
lavavajilla no funciona y el inconveniente detectado por
Ud. continúa existiendo, llame al centro de asistencia
técnica autorizado más cercano, comunicando la
siguiente información:
- el tipo de avería
- la sigla del modelo (Mod. ....) y el número de serie (S/N
....) que se encuentran en la placa aplicada en la parte
lateral de la contrapuerta.
No recurra nunca a técnicos no autorizados y rechace siempre
la instalación de repuestos no originales.
65
ES

Instalación
Colocación
Coloque la máquina en el lugar elegido. La máquina se puede
hacer adherir con los costados o con la parte posterior a los
muebles adyacentes o a la pared. El lavavajilla posee tubos
para la alimentación y la descarga del agua que se pueden
orientar hacia la derecha o hacia la izquierda para permitir
una adecuada instalación.
Nivelación
Al instalar la máquina, si es necesario, accione las patas
enroscándolas o desenroscándolas para regular su altura y
nivelarla logrando que se encuentre en posición horizontal,
nunca debe quedar inclinada más de 2º.
Una buena nivelación asegurará un correcto funcionamiento
del lavavajilla.
Este modelo de lavavajilla puede ser empotrado debajo de una
encimera continua (lea la hoja de instrucciones
correspondiente).
Conexión a una toma de agua fría.
La conexión del electrodoméstico a la red de agua se debe
realizar exclusivamente con el tubo de carga suministrado
con el aparato, no utilice tubos diferentes. En caso de
sustitución utilice sólo repuestos originales.
Conecte el tubo de carga a una toma de agua fría con boca
roscada de 3/4 gas, teniendo cuidado de enroscarlo
estrechamente al grifo.
Si los tubos de agua son nuevos o permanecieron inactivos
durante mucho tiempo, antes de realizar la conexión,
verifique, haciéndola correr, que el agua sea límpida y no
contenga impurezas. Si no se toma esta precaución, existe
el peligro de que la entrada de agua se atasque dañando la
máquina.
Conexión a una toma de agua caliente
El lavavajilla se puede alimentar con agua caliente de la red
(instalación central, termosifones) que no supere la temperatura de 60° C.
En ese caso, el tiempo de lavado disminuirá
aproximadamente 15 minutos y la eficacia del lavado se
reducirá levemente.
La conexión a la toma de agua caliente se debe realizar con
las mismas modalidades descritas para la conexión a la toma
de agua fría.
Conexión al tubo de descarga.
Introduzca el tubo de descarga en una tubería de descarga
que tenga un diámetro
mínimo de 4 cm. o apóyelo
en el lavamanos. Evite
estrangulaciones o curvas
excesivas. Es posible colocarlo
de manera óptima utilizando
un codo de plástico especial
suministrado con el aparato
(ver la figura). La parte del
tubo marcada con la letra A
debe estar a una altura
comprendida entre 40 y 100
cm.
El tubo no debe estar sumergido en agua.
Atención: el codo de plástico especial se debe fijar
firmemente a la pared para evitar que el tubo de descarga
se mueva y se vierta agua fuera de la descarga.
Conexión eléctrica
Introduzca el enchufe en una toma de corriente que posea
una correcta conexión a tierra (la conexión a tierra de la
instalación es una garantía de seguridad prevista por la ley)
después de haber verificado que los valores de la tensión y
la frecuencia de red concuerden con los indicados en la placa situada en la contrapuerta de acero inoxidable de la
máquina y que la instalación eléctrica a la cual se conecta
pueda soportar la corriente máxima indicada en dicha placa. Si la toma de corriente a la cual se conecta la máquina
no es la adecuada para el enchufe, sustitúyalo con uno
adecuado; no utilice adaptadores o desviaciones ya que
podrían provocar calentamientos o quemaduras.
Si el cable de alimentación eléctrica está dañado, para
sustituirlo se recomienda llamar exclusivamente a los Centros
de Asistencia Técnica autorizados.
A
Dispositivo de seguridad contra inundación
El lavavajilla está dotado de un sistema que interrumpe la
entrada de agua cuando se producen pérdidas en el interior
de la máquina. Además, está provista de un tubo de entrada
de agua que soporta presiones muy altas y que en caso de
rotura se colorea de rojo. En el caso de inundaciones, la
seguridad está garantizada por el segundo tubo transparente
que lo contiene. Es muy importante controlarlo
periódicamente y si se observa que se ha coloreado de rojo,
se debe cambiar lo más rápidamente posible. Llame a la
asistencia técnica autorizada para la intervención.
ES
66

A segurança, um bom hábito
ATENÇÃO
Leia com atenção as advertências contidas neste livrete porque
fornecem indicações importantes em relação à segurança na
instalação, na utilização e na manutenção.
Esta aparelhagem é em conformidade com as
seguintes Directivas Comunitárias:
- 73/23/CEE (Baixa Tensão) e posteriores
modificações;
- 89/336/EEC (Compatibilidade Electromagnética) e posteriores modificações.
- 97/17 CEE (Aplicação de rótulos)
1.Elimine com cuidado o material de embalagem.
2.Depois de retirar a embalagem, verifique se o aparelho está em
boas condições. Se tiver dúvidas, entre em contacto com pessoal
profissionalmente qualificado.
3.Esta máquina de lavar pratos deve ser utilizada exclusivamente por
adultos e para lavar utensílios de utilização doméstica.
4.Regras fundamentais a serem obedecidas na utilização:
- não toque a máquina com pés descalços nem com mãos ou pés
molhados,
- é desaconselhado recorrer a extensões e fichas múltiplas.
- durante a instalação, o cabo de alimentação não deve ser dobrado
nem sofrer compressões grandes ou perigosas,
- no caso de funcionamento anormal ou de operações de
manutenção, desligue o aparelho da rede eléctrica.
5.Mantenha as crianças afastadas dos detergentes e da máquina de
lavar louça quando estiver aberta.
6.Esta máquina de lavar louça nunca deve ser instalada ao aberto,
nem mesmo num lugar protegido por telhado, é muito perigoso
deixá-la exposta à chuva e aos temporais.
7.Não toque a resistência durante nem logo depois de um ciclo de
lavagem.
8.Não se apoie nem se sente na porta aberta, a máquina de lavar
louça poderá tombar.
9.No caso de defeitos, feche a torneira de entrada de água e retire a
ficha da tomada da parede. Tente, em seguida, consultar o capítulo
"Há algum problema" e, se não encontrar uma solução, contacte o
centro de assistência técnica.
10.Os aparelhos não mais em uso devem ser inutilizados, corte o
cabo de alimentação e quebre o bloqueio da porta.
Para garantir a eficiência e a segurança deste
electrodoméstico:
l dirija-se exclusivamente a centros de assistência
técnica autorizados
l peça sempre para utilizar peças de reposição
originais
Vista de perto (quadro de comandos)
H
R
D
A
P
A: Botão ON-OFF
C: Alça de abertura porta
D: Botão selector de programas
T
L
H
S
I
G
E
C
R: Botão de Start (Início)/Reset (Reinício)
H: Display
E: Botão "Extra Enxugada"
P: Botão de selecção para início posterior
G: Indicador luminoso da enxugada extra
H: Indicadores luminosos de avanço de ciclo
L: Indicador alfanumérico
S: Luz indicadora de falta de sal
T : Luz indicadora de falta de aditivo para brilho
I: Indicador de início posterior
67
PT

Vista de perto (Interior)
G
E
F
J
I
Cesto superior
Braço aspersor superior
Regulação da altura do cesto
Cesto inferior
H
K
L
Braço aspersor inferior
Tampinha do recipiente de sal
Filtro de lavagem
Recipiente para detergente e para aditivo para
brilho
PT
Características técnicas
Largura cm. 45
Profundidade cm. 6 0
Altura cm. 85
Capacidade 9 talheres standard
Pressão de água alimentaçáo 4,3 psi - 145 psi (30 KPa÷ 1MPa) (0,3 ÷10 bar)
Tensão de alimentaçáo Ver etiqueta caract erísticas
Potência total absorvida Ver etique ta característic as
Fusível Ver etique ta característic as
68
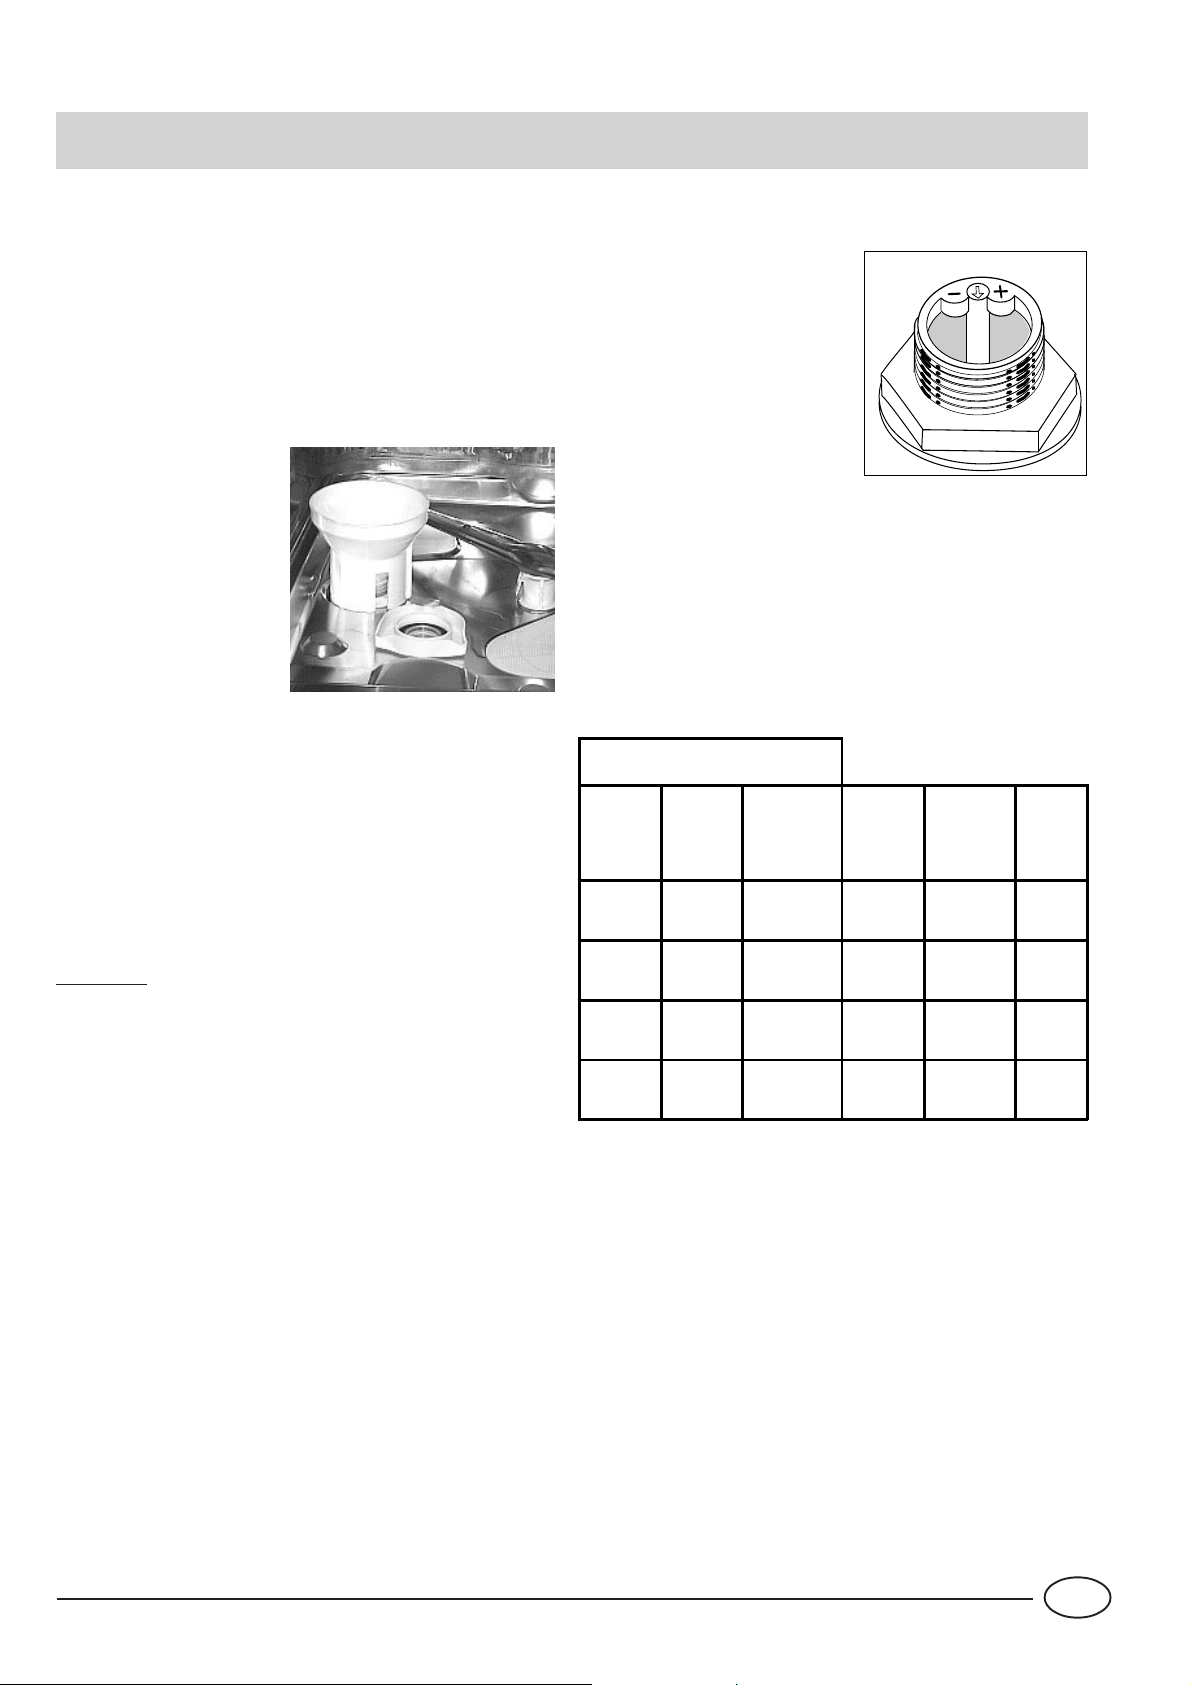
Sal ....
O sal
A dureza da água varia segundo o sítio. Se entrar água dura
na máquina de lavar pratos, formam-se crostas nos utensílios lavados.
Graças a um dispositivo para descalcificar que utiliza sal específico para máquinas de lavar pratos, elimina-se o calcário
da água.
Carregamento de sal no dispositivo para descalcificar
Utilize sempre sal específico para máquina de lavar
louça.
O recipiente do sal encontra-se embaixo do cesto
inferior , encha-o da seguinte maneira:
1. Retire o cesto inferior,
desatarraxe e retire a tampinha do recipiente.
2. Quando for carregar o
recipiente pela primeira
vez, encha-o de água.
3. Coloque o funil fornecido no furo e deite cerca de 2 Kg.
de sal. É normal sair um pouco de água do recipiente.
4. Atarraxe novamente a tampinha com cuidado.
É necessário encher de sal o recipiente quando se acender o indicador luminoso de falta de sal "S"
Depois de ter carregado de sal pela primeira vez, é normal
que o indicador luminoso de aviso de falta de sal permaneça
aceso ou a piscar os 5 ciclos seguintes, aproximadamente.
Regulação do consumo de sal
Esta máquina de lavar pratos é
predisposta para a regulação do
consumo de sal em função da
dureza da água que se utilizar,
para optimizar e personalizar o
consumo de sal no nível mínimo necessário.
Pode-se perguntar qual é o grau
de dureza da água ao organismo fornecedor da água potável
da vossa zona.
Para a regulação obedeça as
seguintes instruções:
1. desatarraxe a tampinha do recipiente de sal.
2. na argola do recipiente há uma seta (veja a fig. ao lado)
gire, se for necessário, a seta marcada "-" na direcção contrária aos ponteiros do relógio, rumo à marca "+", em função da dureza da água de alimentação.
É aconselhado efectuar a regulação segundo o seguinte esquema:
Dureza da água
°dH °fH mmol/l
0 ¸ 10 0 ¸ 17 0 ¸ 1,7 / 0 /
Posição
selector
Consumo
sal
(gramas/ciclo)
Auto-
nomia
(ciclos-
\2kg)
Atenção: para evitar a formação de ferrugem, é aconselhável deitar o sal imediatamente antes de iniciar um ciclo
de lavagem.
10¸ 25 18 ¸ 44 1,8 ¸ 4,4
25 ¸ 50 45 ¸ 89 4,5 ¸ 8,9 MED 40 40
> 50 > 89 > 8,9
-
+
20 60
60 25
69
PT

Detergente e aditivo para brilho .....
O detergente
Utilize somente detergente específico para máquina de lavar louça. O detergente deve ser deitado antes de começar
qualquer ciclo de lavagem e em base às indicações fornecidas
na "Tabela dos ciclos de lavagem". O distribuidor do detergente encontra-se no interior da porta.
Carregamento de detergente
Para abrir a tampa "A" carregue no botão "B". O detergente deve ser deitado nas 2 gavetas "C" e "D" até a beira.
Depois de ter deitado o detergente, feche a tampa e apertea até o 'clique'.
Nas lojas há a venda detergentes para máquinas de lavar
louça em pastilhas, se for empregá-los, coloque uma pastilha no recipiente "D" e feche a tampa.
Para enganchar mais facilmente a tampa, elimine, antes de fechar, os resíduos de detergente que tiverem
caído nas beiras da gaveta.
B
D
C
O aditivo para brilho
Este aditivo torna a louça mais brilhante porque enxuga-se
melhor. O tanquinho de aditivo para brilho está situado no
interior da porta. Deverá ser enchido quando vê-lo vazio
através do visor óptico "D".
(Se a máquina de lavar for equipada com "indicador luminoso de falta de aditivo para brilho", deite aditivo quando
piscar ou acender-se).
Carregamento do aditivo para brilho
Para abrir o recipiente, rode a tampinha "C" na direcção
contrária aos ponteiros do relógio e, quando deitar aditivo
para brilho, evite que vaze. É possível regular a quantidade
de aditivo fornecido, a empregar um chave de parafuso no
regulador "F" situado embaixo da tampinha "C". Há 6 posições possíveis, normalmente é regulado em 4.
F
C
24 gr
.
3 gr.
Importante:
A regulação do fornecimento de aditivo para brilho possibilita enxugar melhor .
Se notar gotas de água ou manchas nas peças lavadas, será
necessário colocar o regulador em números mais altos. Por
outro lado, se nas peças lavadas houver listras brancas, coloque o regulador em números mais baixos.
A
Atenção
No comércio há a venda produtos para lavar louça que já contêm detergentes, sal e aditivo para brilho (3 em 1). Se a sua água
for muito dura, é aconselhável acrescentar , em todo o caso, mais sal na respectiva gaveta, para evitar a formação de manchas
brancas na louça ou no tambor da máquina.
Deite aditivo para brilho no compartimento somente se a louça não estiver a enxugar-se de maneira satisfatória.
Em todo o caso, consulte com atenção nas embalagens as instruções do produtor .
Se usar somente estes produtos é normal que os indicadores luminosos do sal e do aditivo para brilho, depois de um determinado
número de ciclos, pisquem permanentemente.
PT
70

Carregar a louça
Antes de dispor a louça nos cestos, tire os restos de comida
maiores para evitar que os filtros entupam-se e desta maneira
reduzam a eficiência da lavagem.
Se as panelas e frigideiras tiverem muitos restos grudados, é
aconselhável deixá-las de molho a aguardar a lavagem.
Desta maneira se evita ter que lavar outra vez.
Para facilitar a operação de carregar a máquina, retir e os cestos.
Como utilizar o cesto inferior
No cesto inferior é aconselhável colocar o que for mais
difícil lavar: panelas, tampas, pratos rasos e fundos (nas
fotografias há exemplos de carregamento).
• Travessas e tampas grandes: arrume-os aos lados do
cesto.
• Panelas, tigelas: é necessário virá-las sempre com o
fundo para cima.
• Peças muito fundas: arrume-as em posição oblíqua,
desta maneira a água poderá defluir para lavá-las melhor.
O cesto inferior tem sectores inclináveis (veja a figura B),
para poder caber ainda mais e panelas e frigideiras ou
peças maiores.
Fig.B
1
Exemplos de carregamento
cesto superior
cesto inferior
2
O cestinho para talheres
Este cestinho é equipado com uma grade extraíveis:
(veja as figuras A).
Se tratar-se de um cestinho com aberturas laterais, coloque
as colherinhas uma por uma nas fendas (veja a figura A)
-As facas e os utensílios com cabos cortantes devem ser
carregados com os cabos para baixo. Dispor todos os talheres
de maneira que não se encostem um com os outros.
Como utilizar o cesto superior
No cesto superior coloque as peças delicadas e leves: copos, chávenas de chá e de café, pratinhos, mas também
pratos, tigelas baixas, frigideiras, caçarolas e panelas baixas e pouco sujas.
Arrume as peças leves de maneira que não se desloquem
com os jactos de água.
Depois de ter carregado a máquina de lavar louça, lembrese de verificar se as pás do distribuidor rodam livremente,
sem bater na louça.
fig. A
fig. C
Como regular o cesto superior ....
É possível regular o cesto superior na posição alta ou baixa. Aos lados do cesto superior encontram-se duas chaves
para regular a altura do mesmo (veja a figura C).
71
PT

Como iniciar a máquina
Antes de mais nada
Coloque a ficha eléctrica na tomada, a máquina de lavar
louça estará sob tensão. Abra inteiramente a torneira d'água
e carregue no botão On-Off "A" o display acende-se e o
tempo do programa em que estiver colocado o selector estará aceso intermitente.
Selecção de início do programa.
• Depois de ter seleccionado o programa a girar o selector
"D" na direcção dos ponteiros do relógio desde o pr ograma
1 até o programa 7 e na direcção contrária aos ponteiros do
relógio desde 7 até 1; no display será mostrado o tempo
médio da duração do programa e as fases que o constituírem (nas primeiras vezes, é aconselhável consultar a tabela
dos programas na pág. 74).
• Carregue no botão de Start "R" e o programa iniciará
com um duplo sinal acústica, será possível ler no display o
tempo médio restante até o final do programa.
• Se o tempo indicado no início do programa não
corresponder à duração efectiva do programa, é por causa
de vários factores: temperatura d'água na entrada, nível de
sujidade, tentativas mesmo prolongadas da máquina de limpar o filtro de lavagem a retirar os resíduos de comida que o
tenham entupido etc.
Houve interrupção da corrente eléctrica? A porta da
máquina foi aberta?
O programa interrompe-se e no display aparecem 3 traços;
poderá reiniciar quando a electricidade voltar ou quando a
porta for fechada.
No fim da lavagem
O final do ciclo é assinalado por 2 breves sinais que tocam e
aparecerá escrito no display "END" intermitente.
• Para desligar a máquina carregue no botão On-Off.
• Feche a torneira da água.
• Esvazie primeiro o cesto inferior.
Assegure-se que o programa tenha terminado antes de re-
tirar a louça de dentro!
Advertência: quando abrir a porta da máquina de lavar louça, se houver um ciclo de lavagem em curso ou recém terminado, tome cuidado com o vapor quente que sairá, poderá queimar-se.
Como programar uma enxugada extra
Indicador das fases de programa em curso
Durante a realização do programa, no display acendem-se
os símbolos correspondentes às fases de avanço do próprio
programa. São estes os símbolos das fases :
Pré-lavagem Lavagem Enxaguadas Enxugar
Anulação ou modificação de um programa em curso
Premissa: um programa em curso pode ser modificado somente logo depois que tiver iniciado
Mantenha 3 segundos pressionado o botão de
restabelecimento "R":
tocará um sinal prolongado seguido por 3 breves bips. No
display acende-se intermitente o tempo do ciclo anulado.
Rode o selector para seleccionar um novo programa:
Esqueceu-se de colocar algo na máquina?
É possível interromper o programa de lavagem se carregar
no botão On-Off' e, em seguida, colocar dentro a louça e,
se ligar novamente a máquina, depois de cerca de 10 segundos, o ciclo reiniciará do ponto em que tiver sido interrompido.
Mantenha pressionado o botão "E", depois de ter tocado
um 'bip' comprido acende-se o indicador luminoso "G" e
no visor estará aceso intermitente o tempo correspondente
ao programa seleccionado mediante o botão selector.
Observação: O tempo indicado será aumentado por causa
da enxugada extra.
Para desligar a enxugada extra, mantenha pressionado o
mesmo botão e, depois de ter tocado um 'bip' prolongado,
apaga-se o indicador luminoso "G".
Esta opção não é compatível com o ciclo de molho.
PT
72

Configuração do início posterior
Como programar para início posterior
Colocou na máquina de lavar pratos o que é necessário lavar ,
antes de definir o melhor programa, também poderá escolher
quando iniciar a lavar.
• Se carregar várias vezes na tecla "P" será possível programar para iniciar o ciclo de lavagem de 1h até 24h depois.
• Se carregar mais uma vez, aparecerá "OFF" (nenhuma
selecção).
Depois de ter efectuado a escolha, verifique se a porta está
fechada einicie o programa mediante START.
No display acende-se o símbolo "I" e começará a contagem
regressiva do tempo de espera.
• Depois da contagem regressiva ter terminado o programa
iniciará e no display aparecerá o tempo médio restante até
o final do programa.
Mudou de ideia?
• Durante o tempo de espera é possível mudar o início posterior e escolher um tempo mais curto. Carregue várias vezes a tecla "P", sem reconfigurar o programa.
• Se tiver mudado de ideia, e desejar iniciar imediatamente
o ciclo, carregue na tecla "P" chegar ao zero. O indicador
"I" apagar-se-á e o ciclo iniciará com um 'bip'.
No display aparecerá o indicador correspondente à fase do
programa em curso e começará a contagem regressiva do
tempo que, em média, faltar para acabar o programa.
ATENÇÃO: quando ligar a máquina de lavar louça, se no display
aparecer escrito "dON" significa que o programa de demonstração
está activo. Este programa serve para simular os ciclos de lavagem,
sem realmente efectuá-los.
Para sair deste modo de funcionamento mantenha cerca de 4
segundos pressionada a tecla "R" de START/RESET. Quando tiver
saído do programa, aparecerá escrito: "dOF".
73
PT

Tabela dos programas
Ao lavar na máquina de lavar louça, terá a garantia de um ambiente higienizador e de
uma limpeza mais segura.
'XUDomRGR
SURJUDPD
WROHUkQFLD
VHP
HQ[XJDGD
H[WUD
3URJUDPD
/DYDJHP
,QGLFDo}HV SDUD
HVFROKDGHSURJUDPDV
Louça e pa nelas muito
sujas (não use com peças
delicadas)
'HVFULomRGRFLFOR
Lavagem prévia com água quente a 4 0°C
Lavagem a 65°C.
2 enxaguadas com água fria
Enxagua a quente a 65°C.
Enxuga.
'H WHUJHQWH
SUpODYDJHP
ODYDJHP
JU
$GL WLYR
SDUD
EULOKR
1RUPDO
(FR
5 iSLGD
(Q[XJDU
0ROKR
&ULVWDLV
Ciclo para louça e panelas
normalment e s u jas.
Programa normal diário.
Programa para lavagem
ecológica, com baixos
consumos de energia,
adequado para louça e
pa ne las norma lmente
sujas.
Ciclo económico e veloz a
ser u t ilizad o p ara lo u ça
pouco suja, logo depois
de usada.
Lava g em p relimin ar a
aguardar completar a
carga na próxima refeição.
Ciclo especial a ser
ut ilizad o p ara p eç as mais
sensíveis às altas
temperaturas, logo depois
de usadas.
Lavagem a 60°C
Enxagua a frio
Enxaguada quente a 70°C
Enxugar
2 Pré -lav a ge ns c o m águ a fria
Lavagem a 50°C
Enxaguada quente a 65°C
Enxugar
Lavagem breve a 47°C.
Enxaguada quente a 65°C
Enxugar
Breve lavagem fria para impedir que os
restos de comida sequem-se na louça
Lavagem a 52°C
Enxaguada com água morna a 45°C
Enxaguada quente a 65°C
Enxugar
JU
JU
JU
JU
PT
6XMLGDGH
IUHVFD
Lavagem rápida e
económica para uma
quantidade diária de
lo uç as p ar a lava r
Lavagem a 50°C
Enxaguada quente a 65°C
Enxuga
74
JU

Conselhos para economizar
- É importante usar as máquinas de lavar pratos possivelmente com carga plena, para optimizar os consumos; entretanto, para evitar que se formem maus odores e crostas,
pode-se utilizar o ciclo de molho.
- A escolha do programa adequado depende do tipo de peças a serem lavadas e do grau de sujidade das mesmas.
- Deite a dose certa de detergente: se exagerar na quantidade de detergente, os utensílios não serão limpados melhor,
mas haverá somente um impacto ambiental maior.
- Não adianta enxaguar os utensílios, antes de colocá-los na
máquina.
Como manter a máquina de lavar pratos em forma
Depois de cada lavagem
Depois de cada lavagem, feche a torneira d'água e deixe a
porta entreaberta, de maneira que não se forme humidade
nem maus cheiros.
Desligue da tomada
Antes de realizar qualquer operação de limpeza ou manutenção, desligue sempre a ficha da tomada: desta maneira
não correrá qualquer risco.
Nada de solventes nem abrasivos!
Para limpar a parte exterior e as peças de borracha desta
máquina de lavar louça não é necessário empregar solventes
nem abrasivos, use somente um pano molhado de água
morna com sabão.
Para eliminar as manchas que se formarem na superfície do
tambor da máquina, utilize um pano molhado d'água e um
pouco de vinagre branco ou um produto específico para
limpeza de máquinas de lavar pratos.
Se for viajar de férias
Quando for viajar de férias, é aconselhável antes fazer uma
lavagem vazia e, em seguida, desligar a ficha da tomada,
feche a torneira de entrada d'água e deixe a porta entreaberta: as guarnições durarão mais e no interior não se formarão cheiros desagradável.
No caso de mudança
No caso de mudança mantenha possivelmente o aparelho
em posição vertical; se for necessário, deite-a para trás.
As guarnições.
Um dos factores responsáveis pelos cheiros desagradáveis
no interior da máquina de lavar louça são os restos de comida que permanecem nas guarnições. Será suficiente limpálas periodicamente com uma esponjinha molhada.
75
PT

Limpeza e manutenção das peças
O conjunto de filtros
Se desejar sempre bons resultados na lavagem, precisa limpar
o grupo de filtração.
A água de lavagem é limpa tirando os resíduos de comida e
colocada novamente em circulação perfeitamente filtrada.
Por isto, depois de cada lavagem, é melhor tirar os resíduos
mais grandes que ficarem no copo “C” e do filtro semi circular
A; para tirá-los, puxe a pega do copo para cima. É suficiente
enxaguá-lo em água corrente.
Uma vez por mês precisa limpar cuidadosamente o inteiro
grupo de filtração: copo C + filtro semi circular A + filtro
cilíndrico B. Para tirar o filtro “B” rode-o na direcção antiorária.
Para a limpeza empregue uma escovinha não de metal.
Monte novamente as peças (da maneira indicada na figura)
e coloque novamente o grupo na máquina de lavar louça.
Coloque-o no seu lugar a aperte-o para baixo.
A máquina de lavar louça não deve ser utilizada sem filtros.
Se os filtros não forem colocados direito, a eficiência de
lavagem reduz-se e pode até causar danos à máquina de
lavar louça.
Há algum problema ?
1
B
2
C
A
Limpeza dos distribuidores
Pode acontecer que restos de comida grudem nos braços
aspersores e tampem-se os seus furos; verifique-os periodicamente e limpe-os (veja Vista de perto (interior) nas letras F - I).
Pode acontecer que a máquina de lavar louça não funcione ou não
funcione bem. Antes de chamar a assistência técnica, vejamos juntos
o que se pode fazer: pode ser que tenha se esquecido de carregar
em alguma tecla ou não tenha feito, por distracção, uma manobra
necessária para a máquina poder funcionar.
A máquina de lavar louça não começa a funcionar
Verificou se:
a torneira está aberta e ligada correctamente no tubo, se está a
faltar água em casa, ou se não está a chegar com pressão suficiente,
o tubo está dobrado, o filtro do tubo de alimentação d'água está
entupido ou a porta está aberta.
A louça e as panelas são mal lavadas
Verificou se:
foi colocada a dose certa de detergente, o programa de lavagem
seleccionado é idóneo às peças a serem lavadas, o filtro e o microfiltro
estão limpos, os braços aspersores estão desimpedidos.
A água da máquina de lavar louça não se descarrega
Verificou se:
A mangueira de descarga está dobrada.
Nas peças lavadas permanecem depósitos de calcário ou
uma camada branca.
Verificou se:
a tampa do recipiente de sal está bem fechada, a dose de aditivo
para brilho está bem regulada.
Quando ligar a máquina de lavar louça, se no display aparecer
escrito "dON" significa que o programa de demonstração está
activo.
Leia as instruções nas páginas 73
Mensagens de erro.
Esta máquina de lavar louça é equipada com um sistema de segurança
capaz de avisar acerca de eventuais anomalias de funcionamento.
Estas anomalias ou defeitos são assinalados por alguns códigos
constituídos por letras e algarismos intermitentes no display. Depois
de ter tomado nota do código do erro, desligue a máquina, feche a
torneira d'água e chame a assistência técnica.
Alarme de torneira fechada
Se tiver esquecido de abrir a torneira de água, esta máquina avisará
mediante uma longa série de 'bips' compridos e a escrita H2O intermitente no display . Abra a torneira d'água e verá como em poucos
minutos o programa iniciará.
Se não estiver presente nesta fase de aviso, a máquina tocará um
alarme e o código "A06" estará intermitente.
Desligue mediante o botão "A", abra a torneira d'água e, depois de
aguardar aproximadamente 20 segundos, ligue a máquina novamente, o programa iniciará.
Alarme dos filtros entupidos
Se a máquina parar e o código "AL05" estiver aceso intermitente,
significa que o filtro entupiu-se com restos compactos de comida.
Desligue o botão ON-OFF, limpe com cuidado o filtro e, depois de
tê-lo recolocado no lugar, ligue novamente a máquina. Dentro de
poucos segundos o programa iniciará regularmente.
Alarme por causa de defeito da válvula eléctrica de carregamento d'água.
Se o código "A02"DESLIGAR E LIGAR DE NOVO a máquina de lavar
louça depois de um minuto. Se o alarme permanecer , como primeira
coisa fechar a torneira da água para evitar alagamentos depois tirar
a corrente e chamar a assistência técnica.
Se apesar de todas as verificações, a máquina de lavar pratos
não funcionar e o inconveniente detectado permanecer ,
chame o centro de assistência técnico autorizado mais perto e
comunique as seguintes informações:
- o tipo de defeito
- a sigla do modelo (Mod. ....) e o número de série (S/N .... )
indicados na placa de identificação situada na parte lateral da
contra-porta.
Nunca recorra a técnicos não autorizados e recuse
sempre a instalação de peças de reposição não originais.
PT
76

Instalação
Posicionamento
Coloque a máquina no sítio escolhido. A máquina pode ser presa nas laterais ou no fundo de móveis adjacentes ou numa parede. Esta máquina de lavar louça é dotada de tubos para alimentação e descarga de água que podem ser virados à direita ou à
esquerda, para consentir uma melhor instalação.
Nivelamento
Posicione a máquina, aja nos pezinhos a atarraxá-los e
desatarraxá-los, para regular, se for necessário, a altura da máquina e nivelá-la de maneira que se encontre na horizontal; em
todo o caso não deve, em nenhum modo, ser inclinada mais de
2°.
Um bom nivelamento assegurará um funcionamento correcto
da máquina de lavar louça.
Este modelo de máquina de lavar louça pode ser encaixado embaixo
de um plano de trabalho contínuo (leia a respectiva folha de
instruções).
Ligação da entrada de água fria.
A ligação do electrodoméstico à rede d'água deve ser efectuada
exclusivamente mediante a mangueira de carregamento fornecido junto com o aparelho, não utilize tubos diferentes. No caso
de substituições, utilize somente peças de reposição originais.
Ligue o tubo de carregamento numa entrada de água fria com
boca de rosca de 3/4 gás, tome cuidado para atarraxá-la apertada na torneira.
Se os tubos de água forem novos, ou se tiverem permanecido
muito tempo não utilizados, antes de realizar a ligação, deixe
escorrer água para certificar-se que esteja límpida e isenta de
impurezas. Sem esta precaução há risco que a entrada d'água
entupa-se e danifique a máquina.
Ligação da mangueira de escoamento
Coloque a mangueira de escoamento num conduto de descarga de diâmetro mínimo de 4 cm.
ou apoie-o dentro de um lavabo. Evite apertos e curvas excessivas. É possível colocá-lo de
maneira ideal, se utilizar o cotovelo especial de plástico fornecido (veja a figura). A parte do
tubo marcada com a letra A deve
estar numa altura entre 40 e 100
cm.
A mangueira não deve ser imersa na água.
Atenção: o cotovelo especial de matéria plástica deve ser preso
firmemente na parede para evitar que a mangueira de escoamento mova-se e vaze água fora da descarga.
Ligação eléctrica
Coloque a ficha numa tomada de corrente equipada com uma
ligação à terra eficiente (a ligação à terra do sistema é uma
garantia de segurança prevista pela legislação), depois de ter
verificado se os valores da tensão e da frequência de rede
correspondem aos indicados na placa de identificação situada
na contra-porta de inox da máquina e que o sistema eléctrico a
qual a mesma for ligado seja dimensionado para a corrente
máxima indicada nesta placa. Se a tomada de corrente eléctrica
à qual for ligar a máquina não corresponder à ficha, troque-a a
ficha por outra adequada; não empregue adaptadores nem
derivadores porque, poderão causar superaquecimento ou arder.
A
Ligação da entrada de água quente
É possível fornecer à esta máquina água de uma rede de água
quente (sistema centralizado de esquentador, radiadores), desde que não ultrapasse a temperatura de 60° C.
Neste caso o tempo de lavagem será aproximadamente 15 minutos mais curto e a eficácia da lavagem levemente reduzida.
A ligação deve ser efectuada na entrada d'água quente, da
mesma maneira descrita para a ligação à entrada d'água fria.
Segurança contra alagamentos
Esta máquina de lavar pratos é equipada com um sistema que
interrompe a entrada d'água no caso de vazamentos no interior
da máquina. Também é equipada com um tubo de entrada
d'água que suporta pressões muito altas e que, em caso de
ruptura, colora-se de encarnado. A segurança, no caso de alagamentos, é garantida por um segundo tubo transparente que
o contém. Portanto é muito importante controlá-lo periodicamente e se o vir de cor encarnada, será necessário substitui-lo
assim que possível. Chame a assistência técnica autorizada para
esta intervenção.
Recomenda-se, se o cabo de alimentação eléctrica danificar-se,
dirigir-se, para a sua substituição, exclusivamente aos Centros de
Assistência Técnica autorizados.
77
PT

Merloni Elettrodomestici
Viale Aristide Merloni 47
60044 Fabriano
Italy
Tel +39 0732 6611
Fax +39 0732 662501
www.merloni.com
P05/2004 - 195043899.00 - Xerox Business Services - DocuTech
 Loading...