

Indesit IDC 75 User Manual [de, es, fr, it, en]
EN
Instruction manual
Contents
Important information, 2-3
EN
English, 1
DE
Deutsch,37
I
Italiano,13
NL
Nederlands,49
FR
Français,25
ES
Español,61
Installation, 4
Where to install the tumble dryer
Ventilation
Electrical connections
Preliminary information
Description of the tumble dryer, 5
Features
Control panel
TUMBLE DRYER
PT
Português,73
IDC 75
! This symbol reminds you to read this instruction manual.
! Keep this manual at hand for immediate reference whenever
necessary. Always store this manual close to the tumble dryer and
remember to pass it on to any new owners when selling or transferring the appliance, so they may familiarise with the warnings
and suggestions herein contained.
! Read these instructions carefully: the following pages contain
important information on installation and useful suggestions for
operating the appliance.
How to carry out a drying cycle, 6
Starting a drying programme
Drying settings, 7
Drying times
Drying programmes and options
Laundry, 8
Sorting laundry
Care labels
Special items
Warnings and suggestions, 9
General safety
Saving energy and respecting the environment
Care and maintenance, 10
Disconnecting the power supply
Cleaning the filter after each cycle
Checking the drum after each cycle
Emptying the water container after each cycle
Cleaning the condenser unit
Cleaning the tumble dryer
Troubleshooting, 11
Assistance and Guarantee, 12
Spare parts
Information on recycling and disposal
1
EN
Important information
2
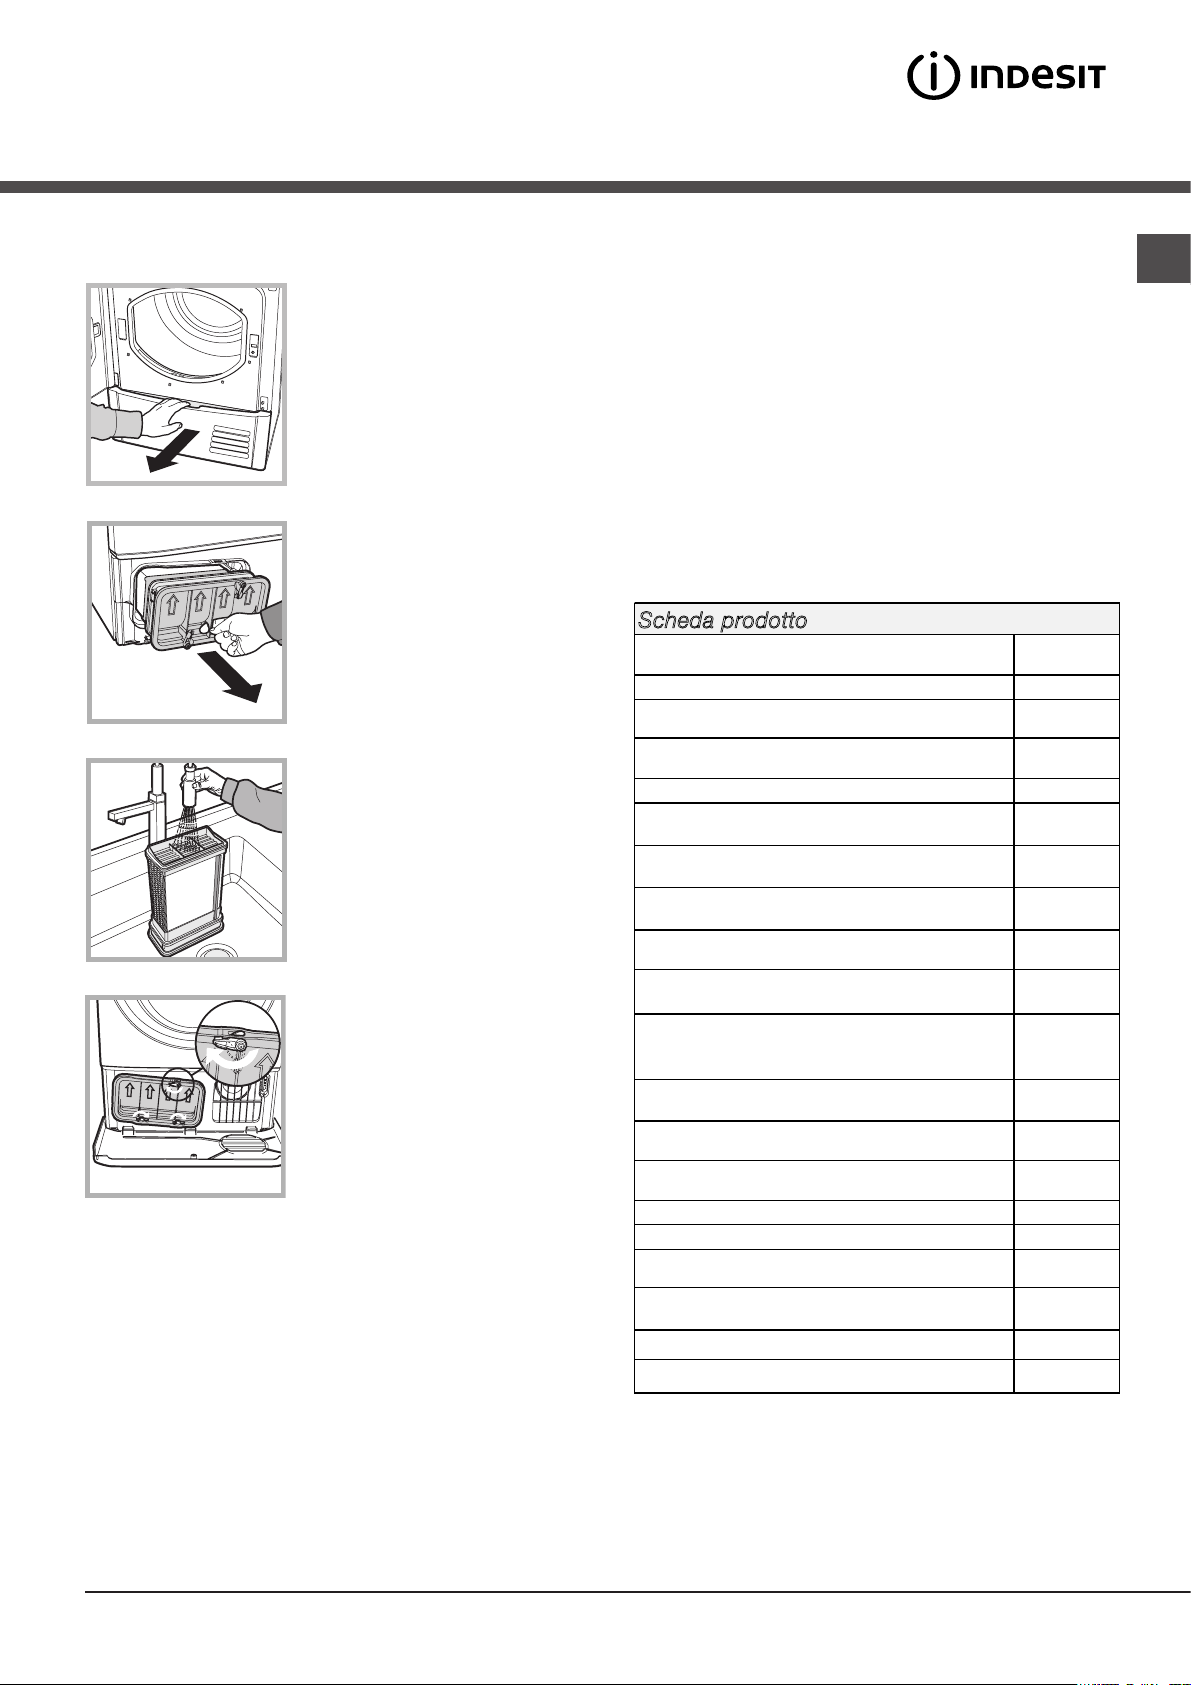
To ensure that the condenser dryer functions
efficiently, the following routine maintenance
procedures must be carried out:
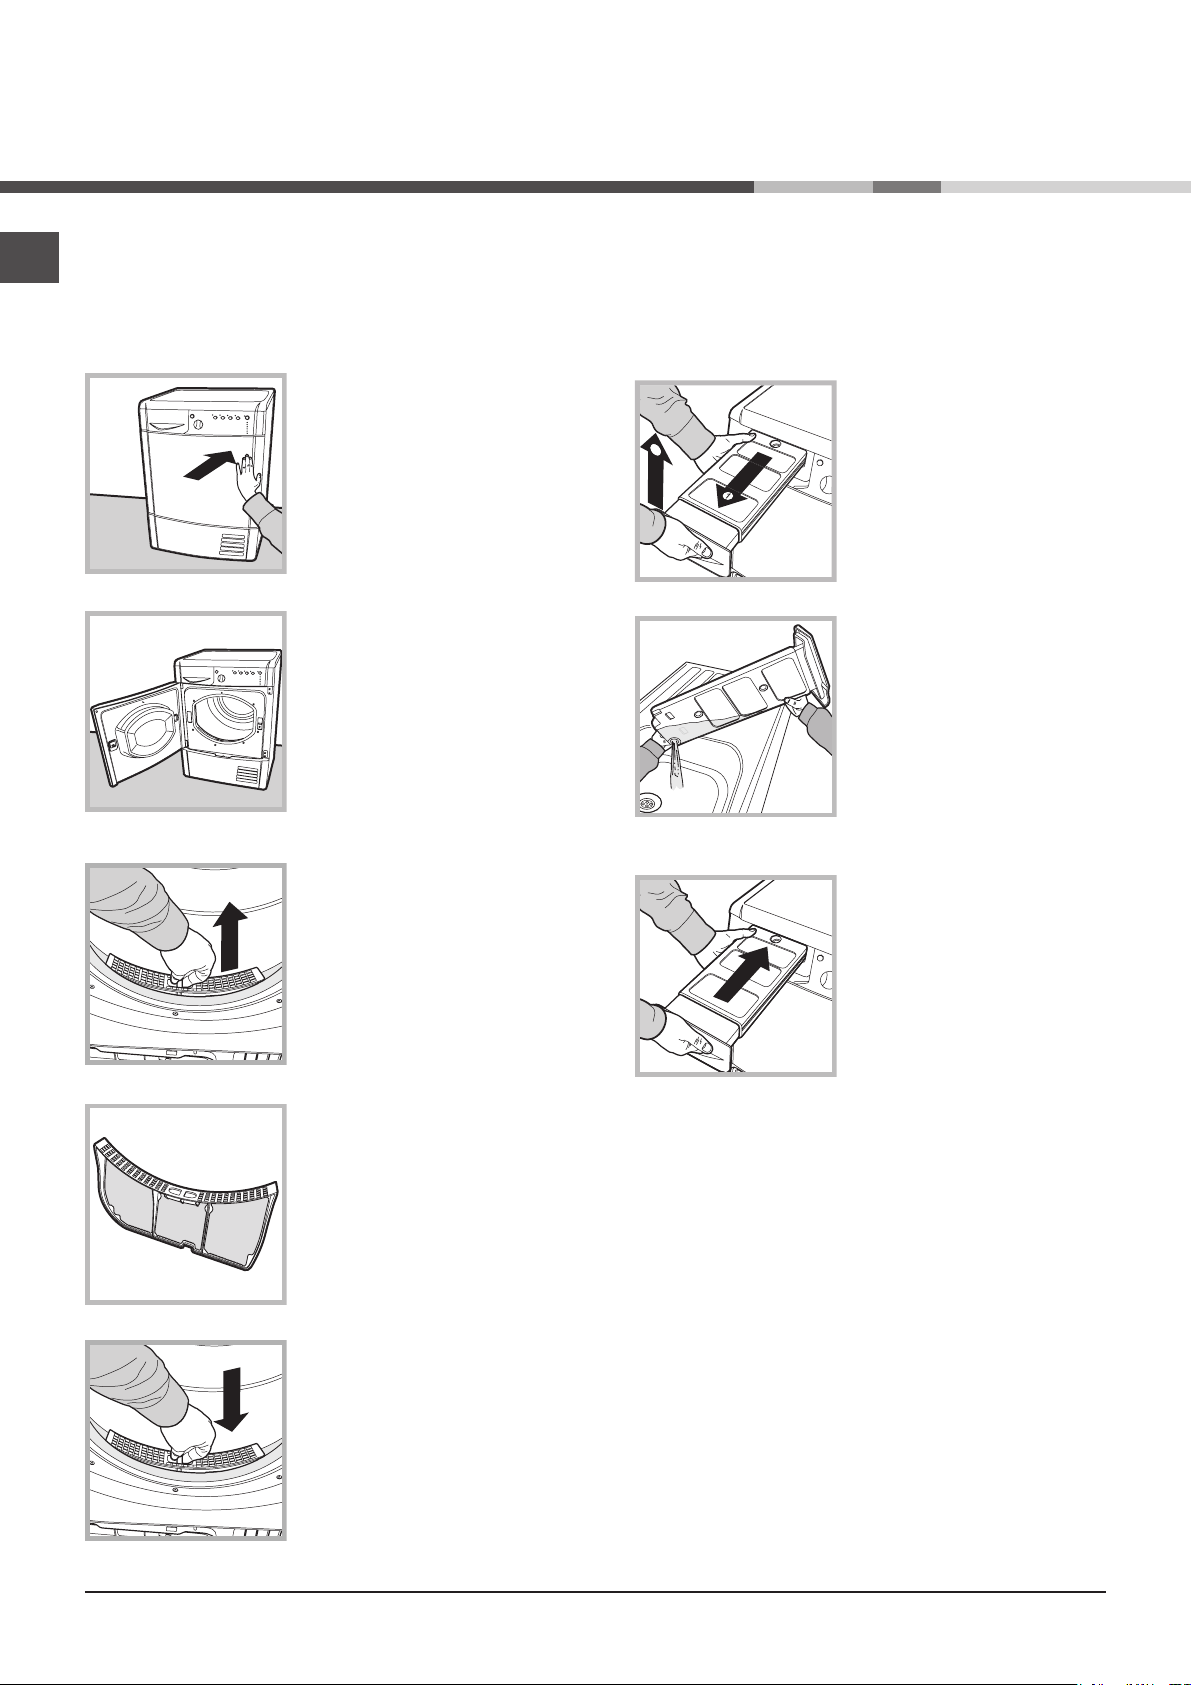
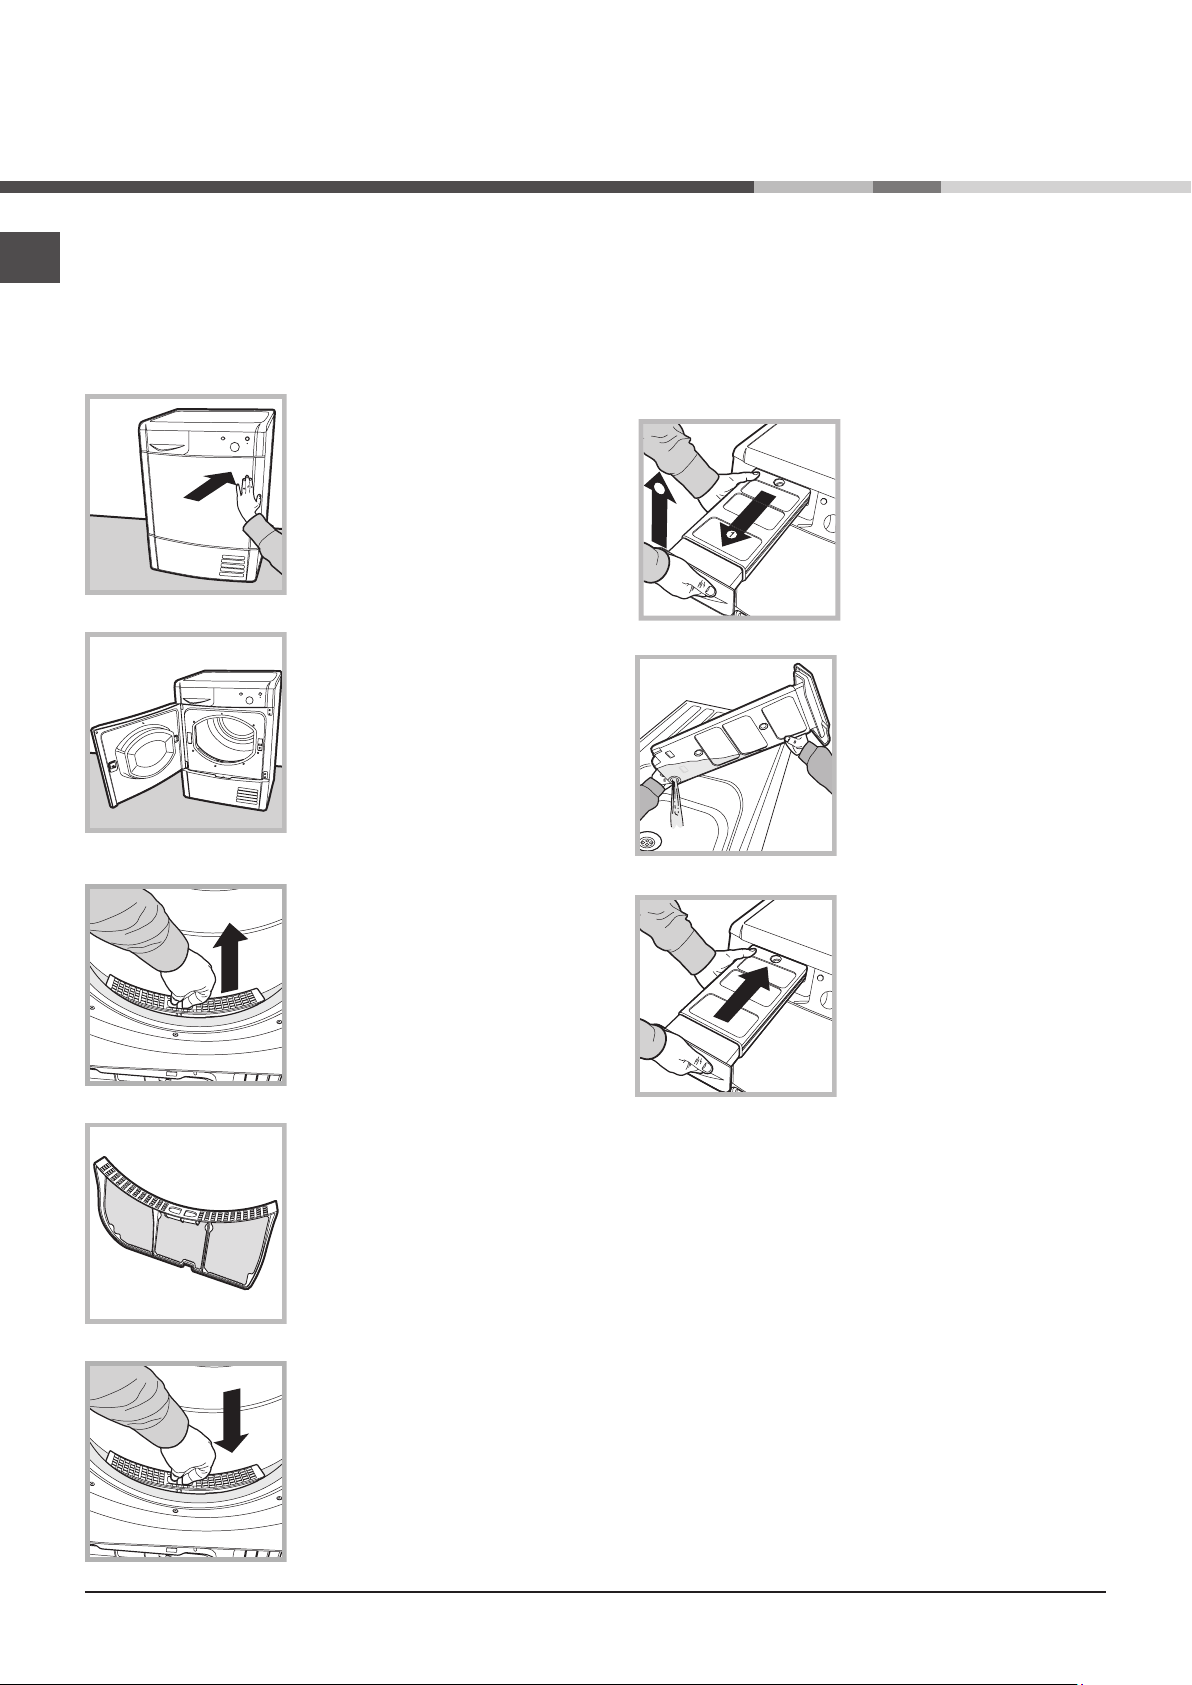
Fluff filter – CLEAN off any fluff build-up on the
filter after each drying cycle.
Step 1
Open the dryer door by pressing
it as shown in the picture.
Failure to clean the filter after each drying cycle
can undermine drying performance as the machine
takes longer to dry and thus consumes more
energy.
Water container – empty the water container after
each drying cycle.
Step 1
Pull the water container towards
you and remove it completely
from the dryer.
Step 2
Empty all the water in the water
container.
Step 2
Pull out the filter (using two
fingers).
Step 3
Clean off any fluff build-up on the
internal surface of the filter.
Step 4
Replace the filter – never operate
the dryer without the filter in
place.
Step 3
Replace the water container
making sure that it is securely
fixed.
Failure to empty the water container may cause the
following:
- The dryer stops heating (thus the load may still be
damp at the end of the drying cycle).
- The “Empty water container” LED activates to
show that the water container is full.
Filling of the Water Container
When the dryer is first used water will not
immediately enter the water container as the pump
needs to be primed. This is done automatically
and will take a few minutes, during this period the
efficiency of the drying process is not affected.
2
EN
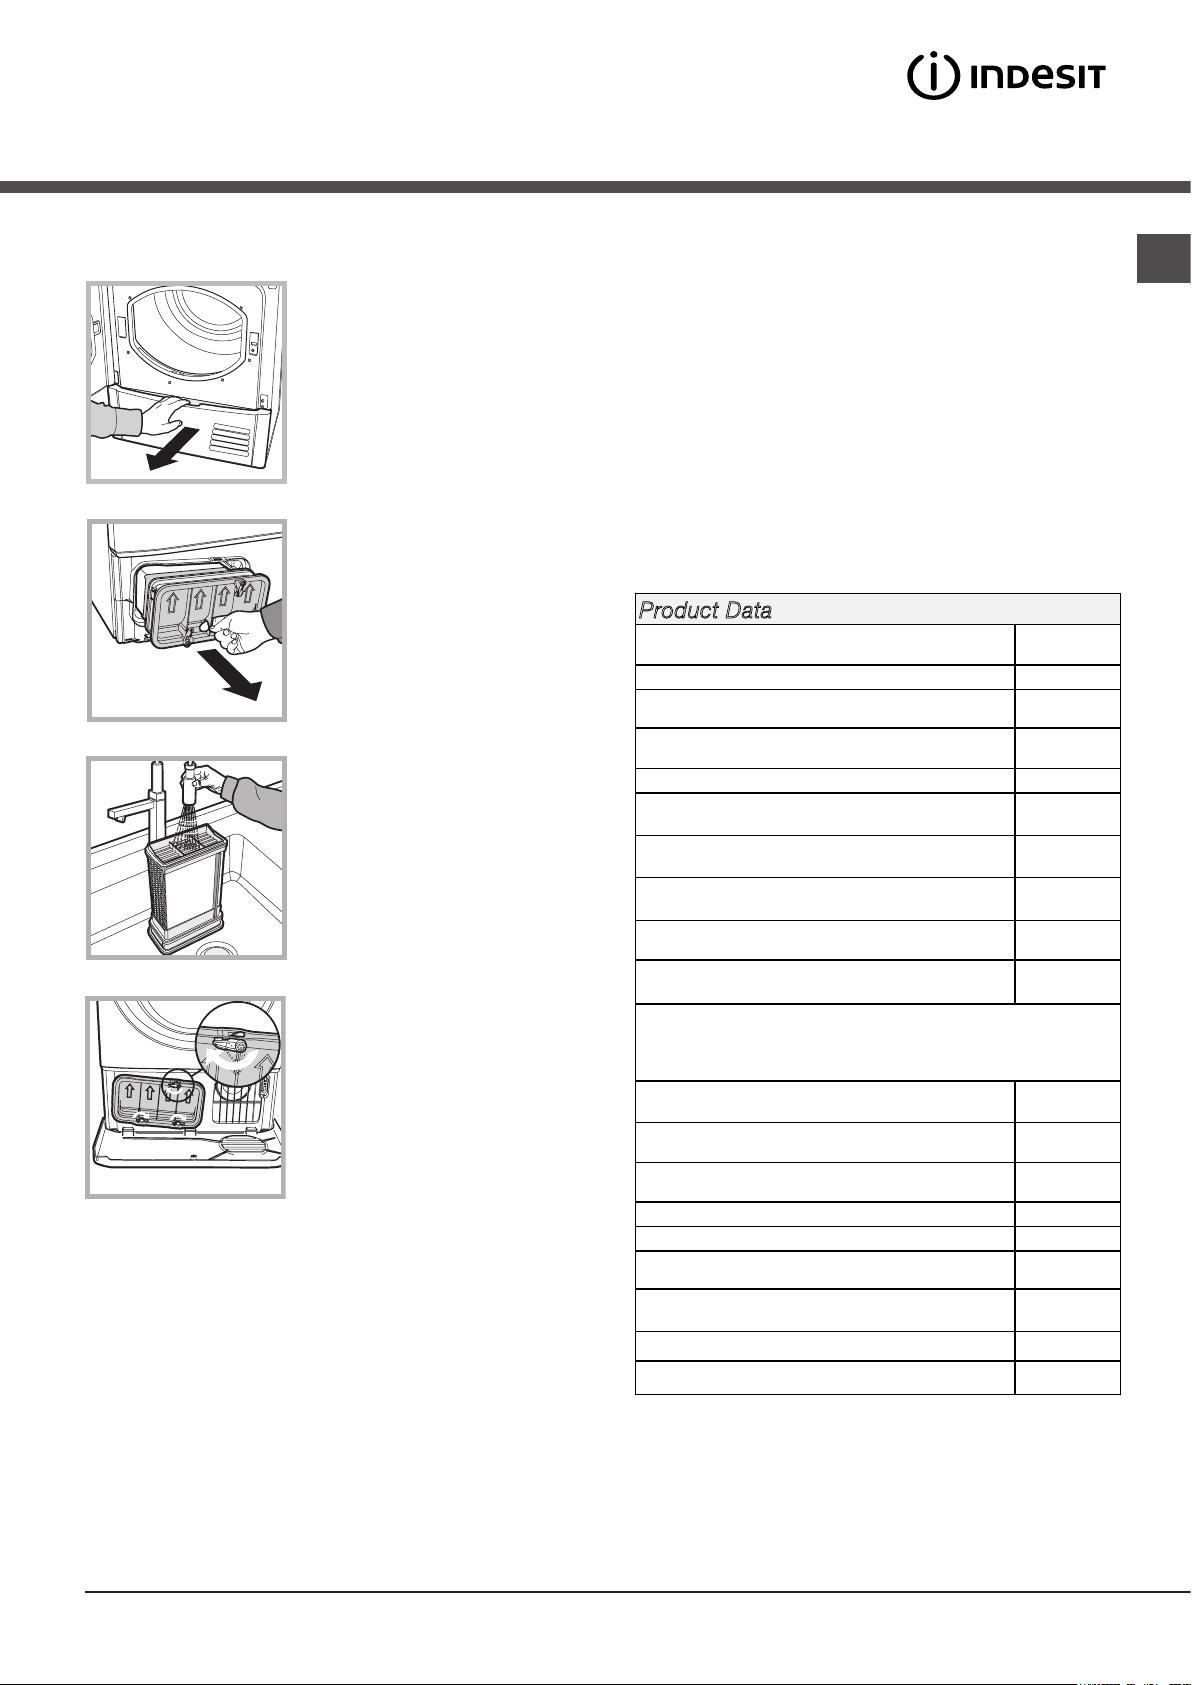
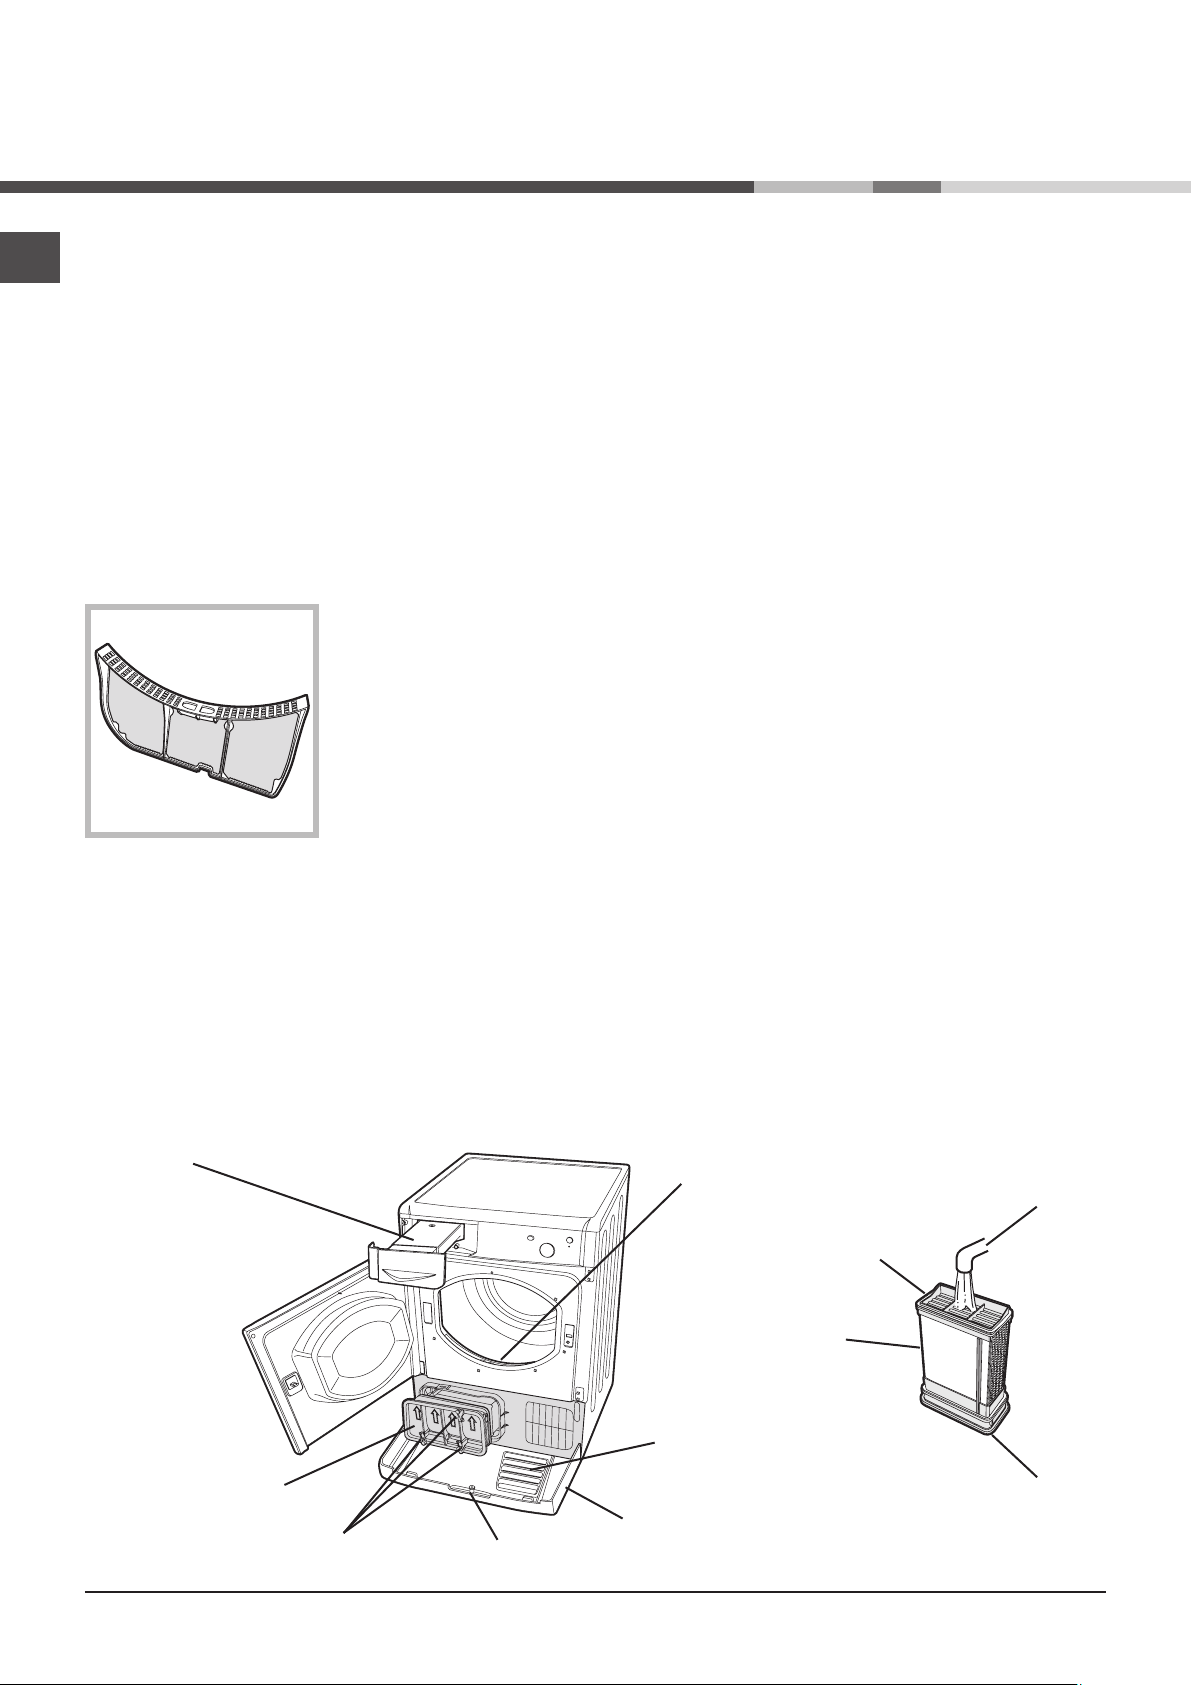
Condenser unit - remove any fluff build-up
from the condenser on a monthly basis.
Step 1
Open the condenser cover
- grip the handle and pull
towards you.
Step 2
Remove the condenser by
turning the 3 catches, then pull
the condenser towards you. (It is
normal for some residual water
to be left in the tubes).
Product Data
Rated capacity of cotton laundry for the "standard cotton
programme" at full load - kg
Energy efficiency class C
The weighted Annual Energy Consumption (AEc)* kWh 563,7
7
Step 3
Clean the condenser with
running water over the rear side
to remove any fluff deposits.
Step 4
Replace the condenser unit;
make sure that the unit is
securely in place, that all 3
catches are fixed and that the
position arrows on the front end
of the condenser are pointing
upwards.
Failure to clean the condenser unit may cause
premature failure of the dryer.
This household tumble drier is a Non-automatic
This household tumble drier is a Condenser
Energy consumption full load; Edry - kWh 4,77
Energy consumption partial load; Edry½ - kWh 2,59
Power consumption: off-mode (Po) - Watts 0,06
Power consumption: left-on mode (Pl) - Watts N/A
Duration of the 'left-on mode' for power management
system - minutes
The Standard Cotton Programme** suitable for drying normal wet cotton
landry that it is the most efficient programme in terms of energy
consumption for cotton used at full and partial load.
Prog. Time - weighted (Tt) full & partial load - minutes 97
Full load (Tdry) - minutes 128
Partial load (Tdry½) - minutes 73
Condensation efficiency class C
Average condensation efficiency - %
full load (Cdry) 70
partial load (Cdry½) 71
N/A
weighted (Ct) full & partial load 71
Airbone acoustical noise emissions - dB(A) re 1 pW 69
This is the test cycle in accordance with Regulation 392/2012.
See our website for all product fiche data:
http://www.indesit.com/indesit/.
*Consumption per year is based on 160 drying cycles of the
standard cotton programme at full and partial looad, and
the consumption of the low-power modes.
sumption per cycle will depend on how the appliance is used.
Actual energy con-
**The Standard Cotton Programme is Hight Heat
3
EN
m
Installation
Where to install the tumble dryer
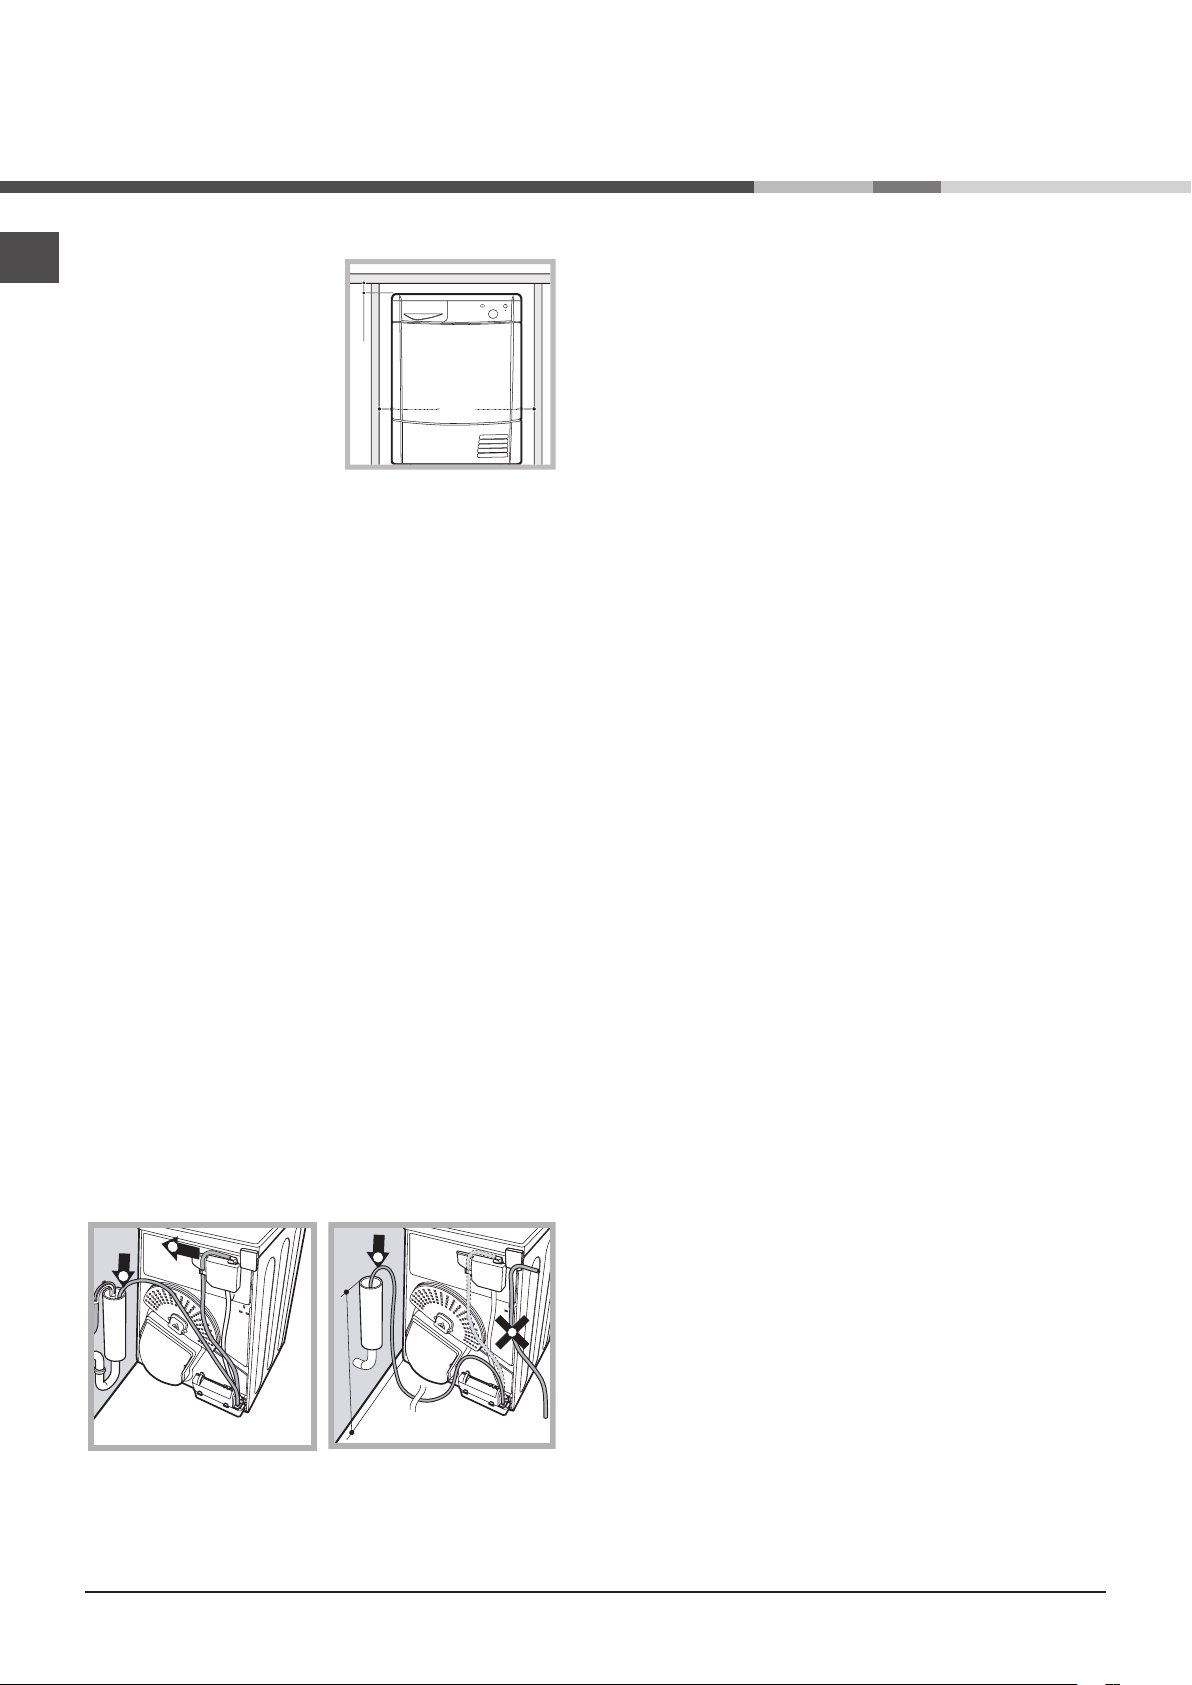
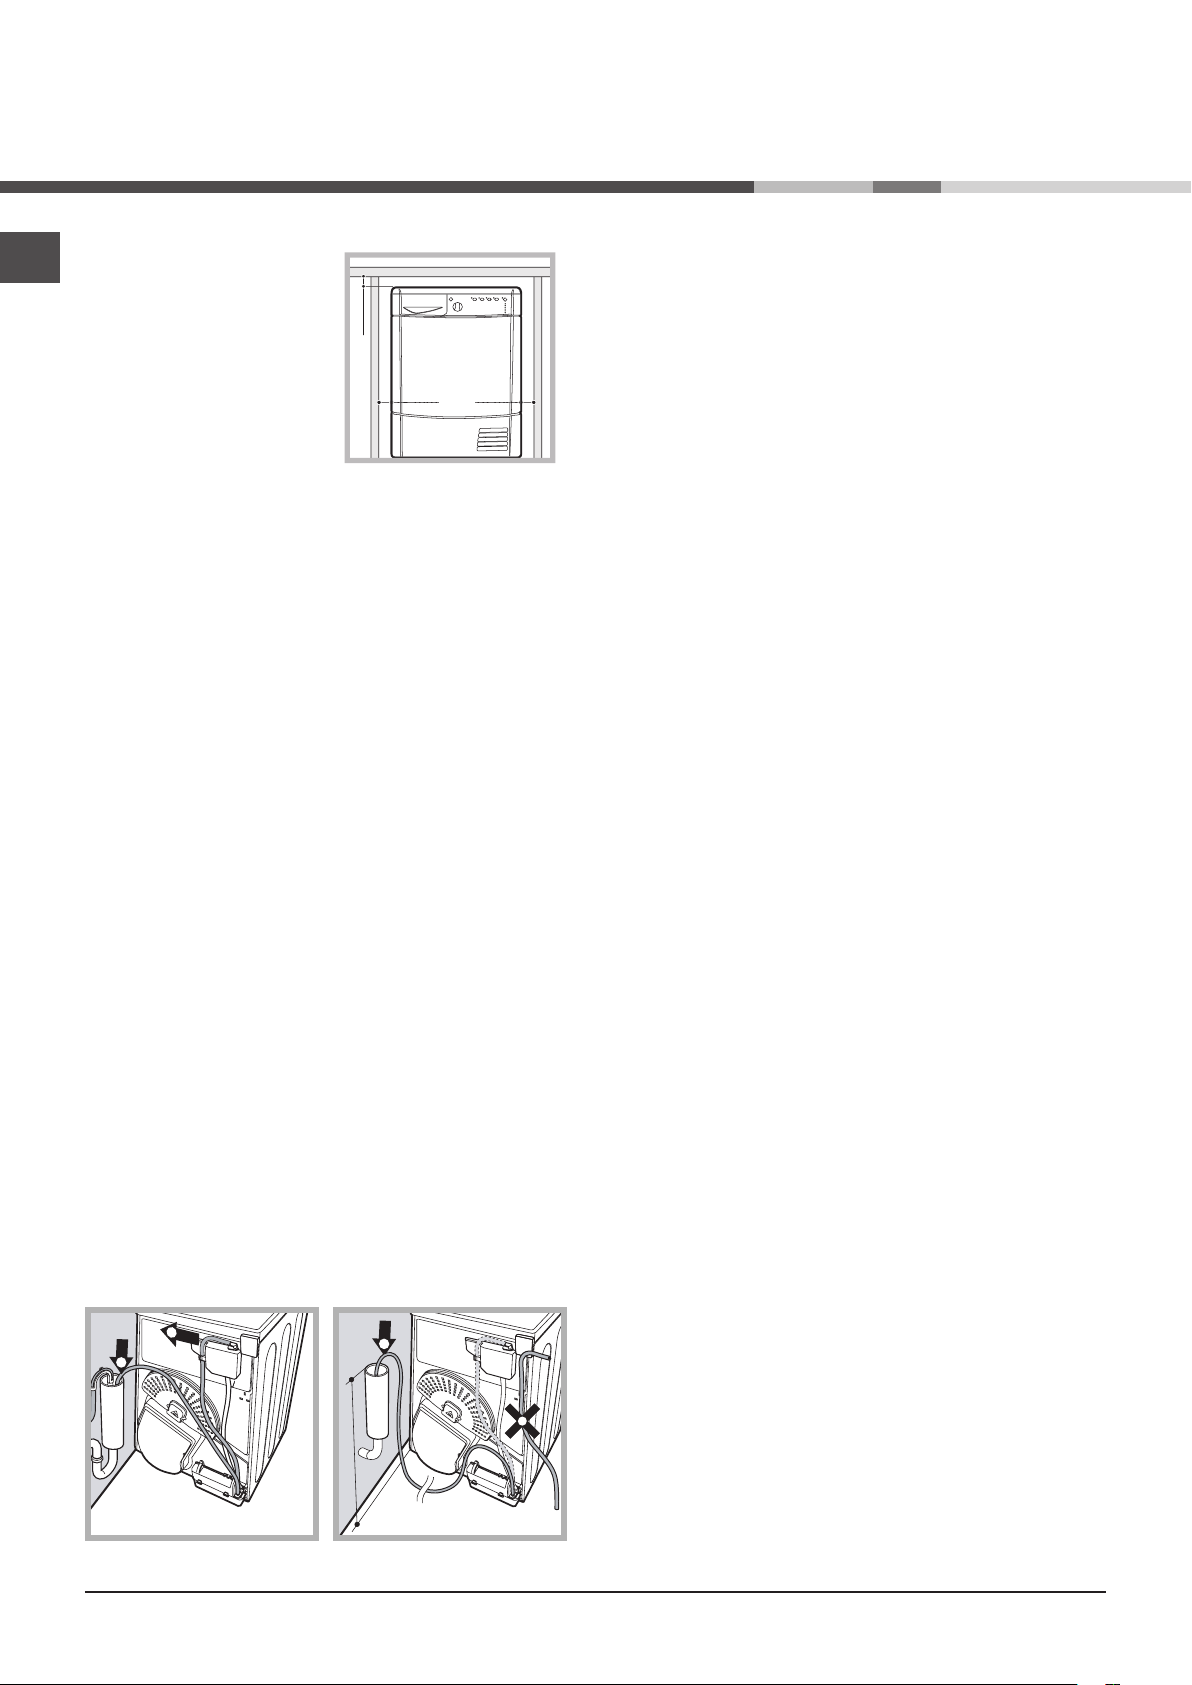
• Install the dryer far from gas
ranges, stoves, radiators or
hobs, as flames may damage it.
If the dryer is installed below a
worktop, ensure there are 10
mm between the upper panel of
the dryer and any objects above it, and 15 mm between the
sides of the machine and the
walls or furniture units adjacent
to it. This ensures adequate air
circulation.
Ventilation
• The room must be adequately ventilated while the dryer is
running. Make sure that the dryer is installed in a room free
of humidity and with adequate air circulation. The flow of
air around the dryer is essential to allow water to condense
during drying; the dryer will not function properly if it is placed
in an enclosed space or inside a cabinet.
! Some condensation may form if the dryer is used in a small
or cold room.
! We do not recommend that the dryer is installed in a cupbo-
ard but the dryer must never be installed behind a lockable
door, a sliding door or a door with a hinge on the opposite
side to that of the dryer door.
Water drain
If your dryer is installed next to a drain the water can be
plumbed into this drain. This does away with the need to
empty the water container. If the dryer is stacked onto or
installed next to a washing machine it can share the same
drain. The height of the drain must be less than 3’ (1 m)
from the bottom of the dryer.
Remove existing hose from position shown in picture A
and fit a suitable length of hose and connect as shown
in picture B.
Electrical connections
Before plugging the appliance into the socket, check the
following:
• Make sure your hands are dry.
• The socket must have an earth connection.
• The socket must be able to withstand the machine’s ma-
ximum power output as indicated on the Rating plate (see
Description of the tumble dryer).
• The power supply voltage must fall within the values indicated on the data plate (see Description of the tumble dryer).
• The socket must be compatible with the machine’s plug. If
not, either the socket or the plug must be replaced.
! Do not use extension cords.
! The tumble dryer must not be installed in outdoor spaces,
even if sheltered. It may be very dangerous to expose this
appliance to rain and thunderstorms.
! Once dryer installation is complete, the electric cord and
plug must be at hand.
! The electric cord must not be bent or crushed.
! If the plug to be replaced is of the moulded-on type, it must
be disposed of in a safe way. DO NOT leave it where it can
be plugged into a socket and cause electric shocks.{}
! The electric cord must be regularly checked and replaced
with a cord specifically designed for this dryer; it must then
be installed by an authorised technician only (see Assistan-
ce). New or longer electric cords are supplied by authorised
dealers at a supplementary cost.
! The manufacturer declines all responsibility for failure
to observe these instructions.
! When in doubt about the above indications, contact a
qualified electrician.
Preliminary information
Once the tumble dryer is installed, clean the inside of the drum before
operating it and remove any dirt accumulated during transportation.
! Make sure that the hose is not squashed or kinked
when the dryer is in its final location.
1
2
Picture A Picture B
4
2
Less than 1m
1
EN
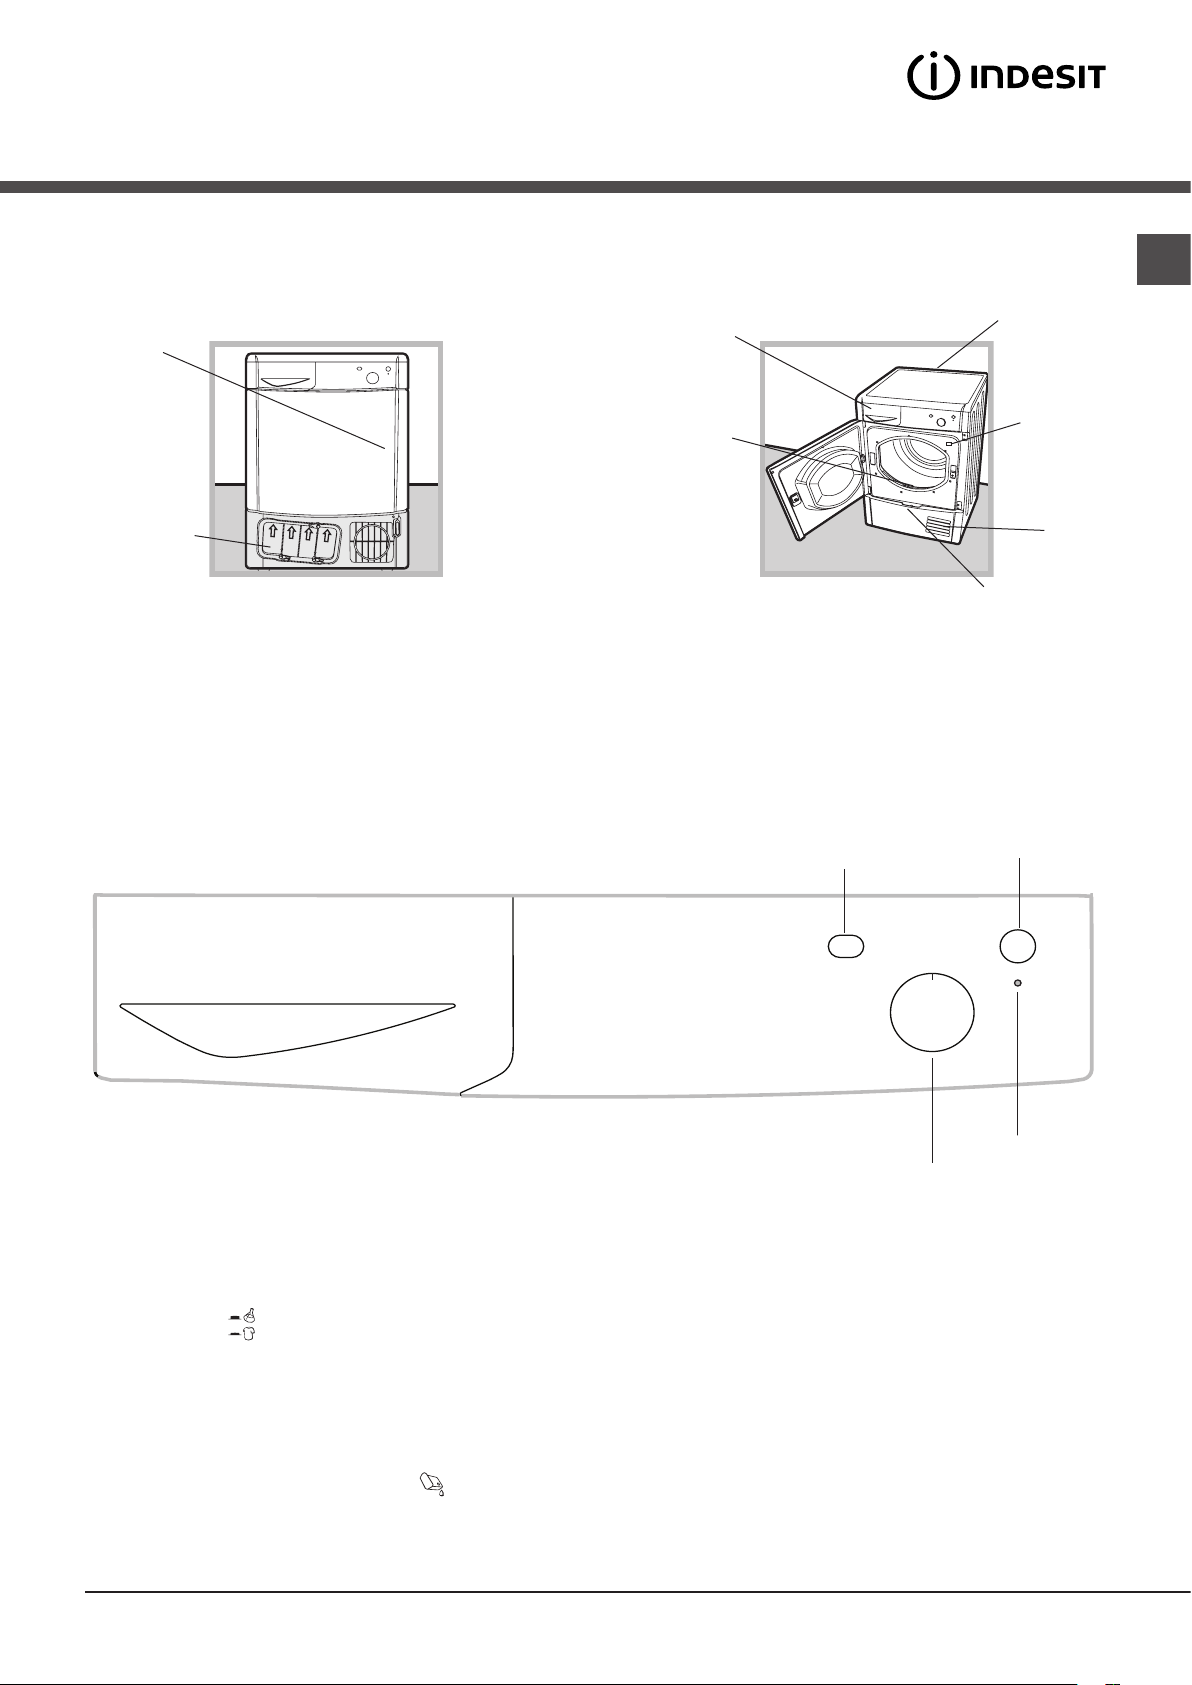
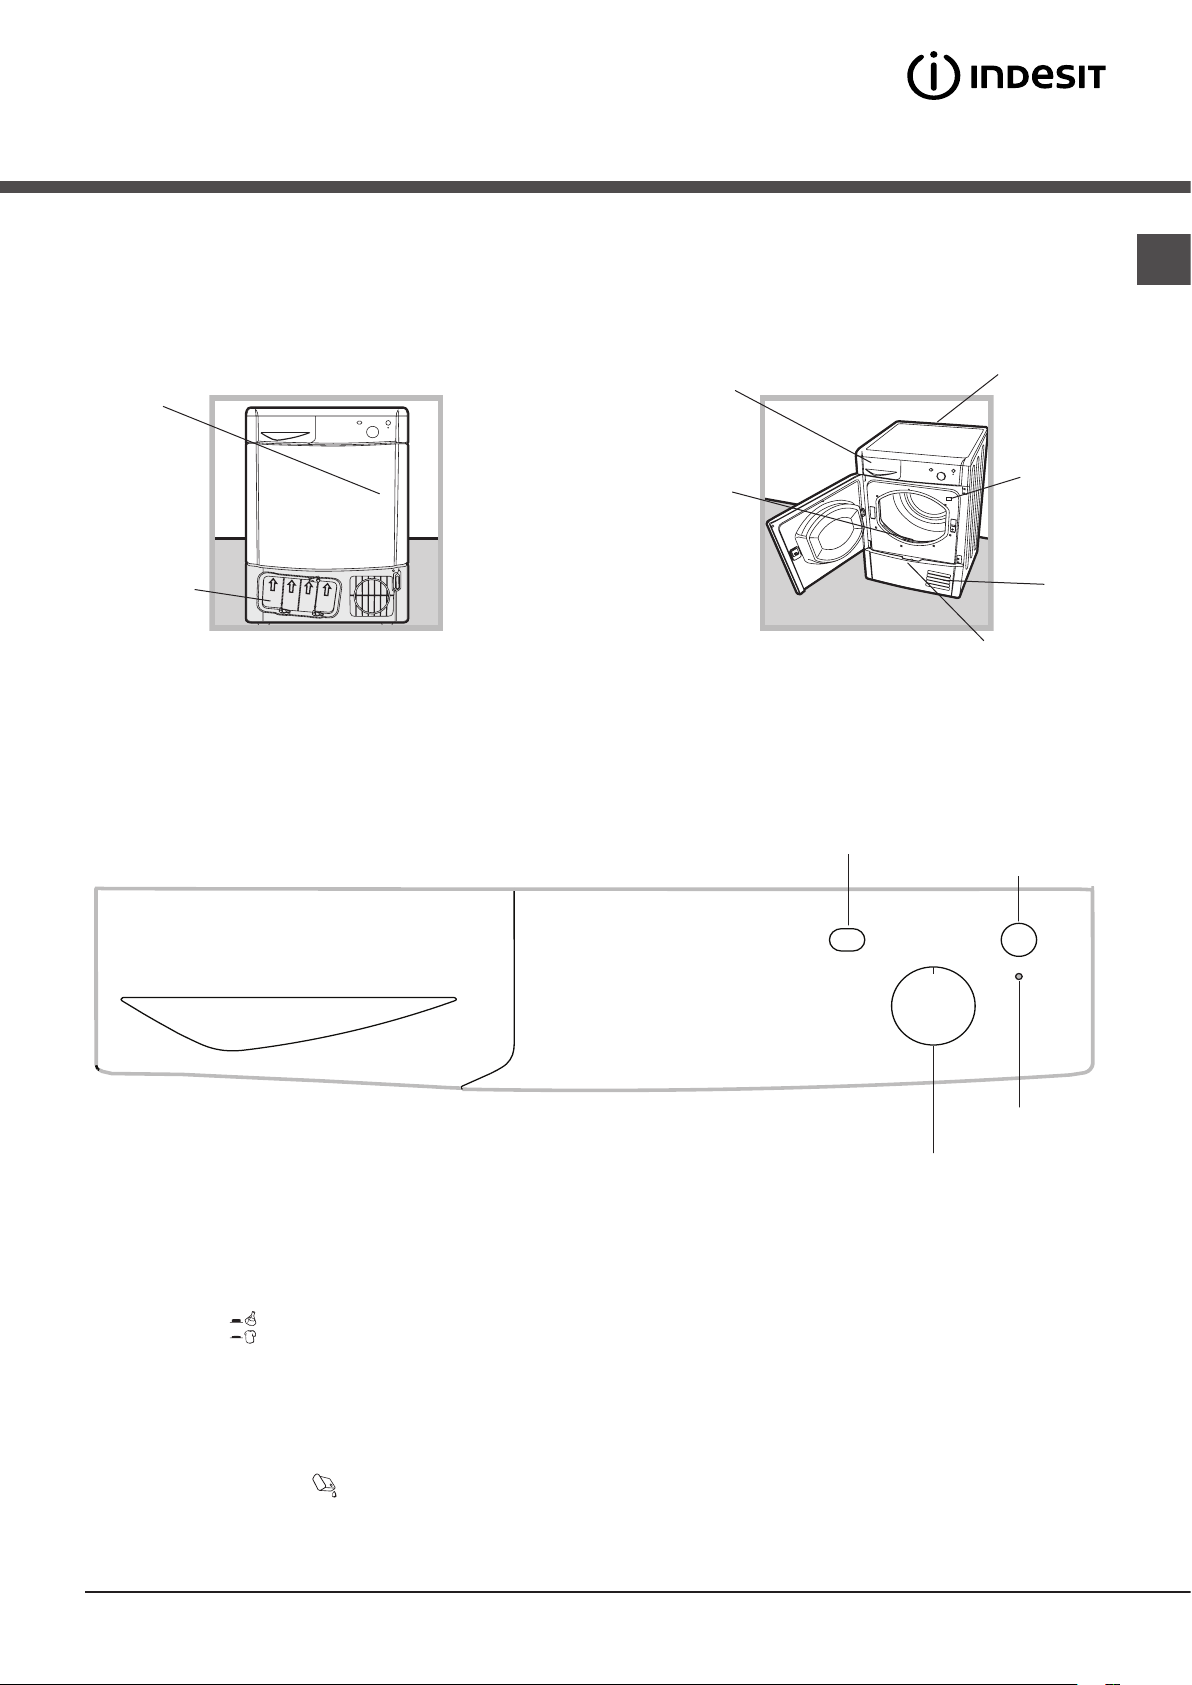
Description of
the tumble dryer
Opening the door
Press the
door
Condenser
unit (cover
open)
Control panel
Features
Water container
Filter
High Heat
button
Rating plate
Model
& Serial
Numbers
Air
intake
grille
Condenser cover
handle (pull to
open)
Start
button
Drying time
selector knob
Drying time selector knob
This is used to set the drying time: turn the knob in a clockwise direction until the indicator is set to the desired drying time (see
Drying settings). Do not attempt to turn the knob anticlockwise.
High Heat button
It can be used to customise the selected programme in accordance with your own requirements.
START button
Press the button to begin drying.
Empty water container indicator light
The “Empty water container” indicator light
If the container becomes full during the programme, the tumble dryer will automatically start the cold air cycle.
In order to avoid this procedure, always empty the water container after using the tumble dryer (see Care and maintenance).
signals that the water container must be emptied.
Empty water
container
indicator light
5

EN
How to carry out a drying cycle
Starting a drying programme
1. Plug the dryer into the power supply socket.
2. Select a suitable drying programme for the type of laundry (see Laundry).
3. Open the door, ensure that the filter is clean and securely placed and that the water container is empty and correctly slotted (see
Care and maintenance).
4. Load the machine, making sure that no piece of laundry gets between the door and the relative seal. Close the door.
5. Turn the “Drying time selector” knob until the indicator is pointing towards the most suitable drying time for the type of fabric in
that load. Use the table to check the relationship between fabric type and load capacity (see Drying settings), and make sure you
are familiar with the instructions provided for each type of fabric (see Laundry). Do not attempt to turn the knob anticlockwise.
6. If necessary, set the temperature using the HIGH HEAT button.
7. Press the START button to start the drying cycle.
Laundry can be checked while the drying programme runs and any garments already dry can be removed, while drying continues
for the remaining items. After closing the door, press the START button to resume machine operation.
8. The final Cool tumble phase (i.e. the fabrics are cooled) activates during the last few minutes of the drying programme; always
allow this phase to terminate.
9. Open the door, remove the laundry then clean the filter and replace it. Empty the water container and put it back in its slot (see
Care and maintenance).
10. Disconnect the dryer from the power supply.
6
EN
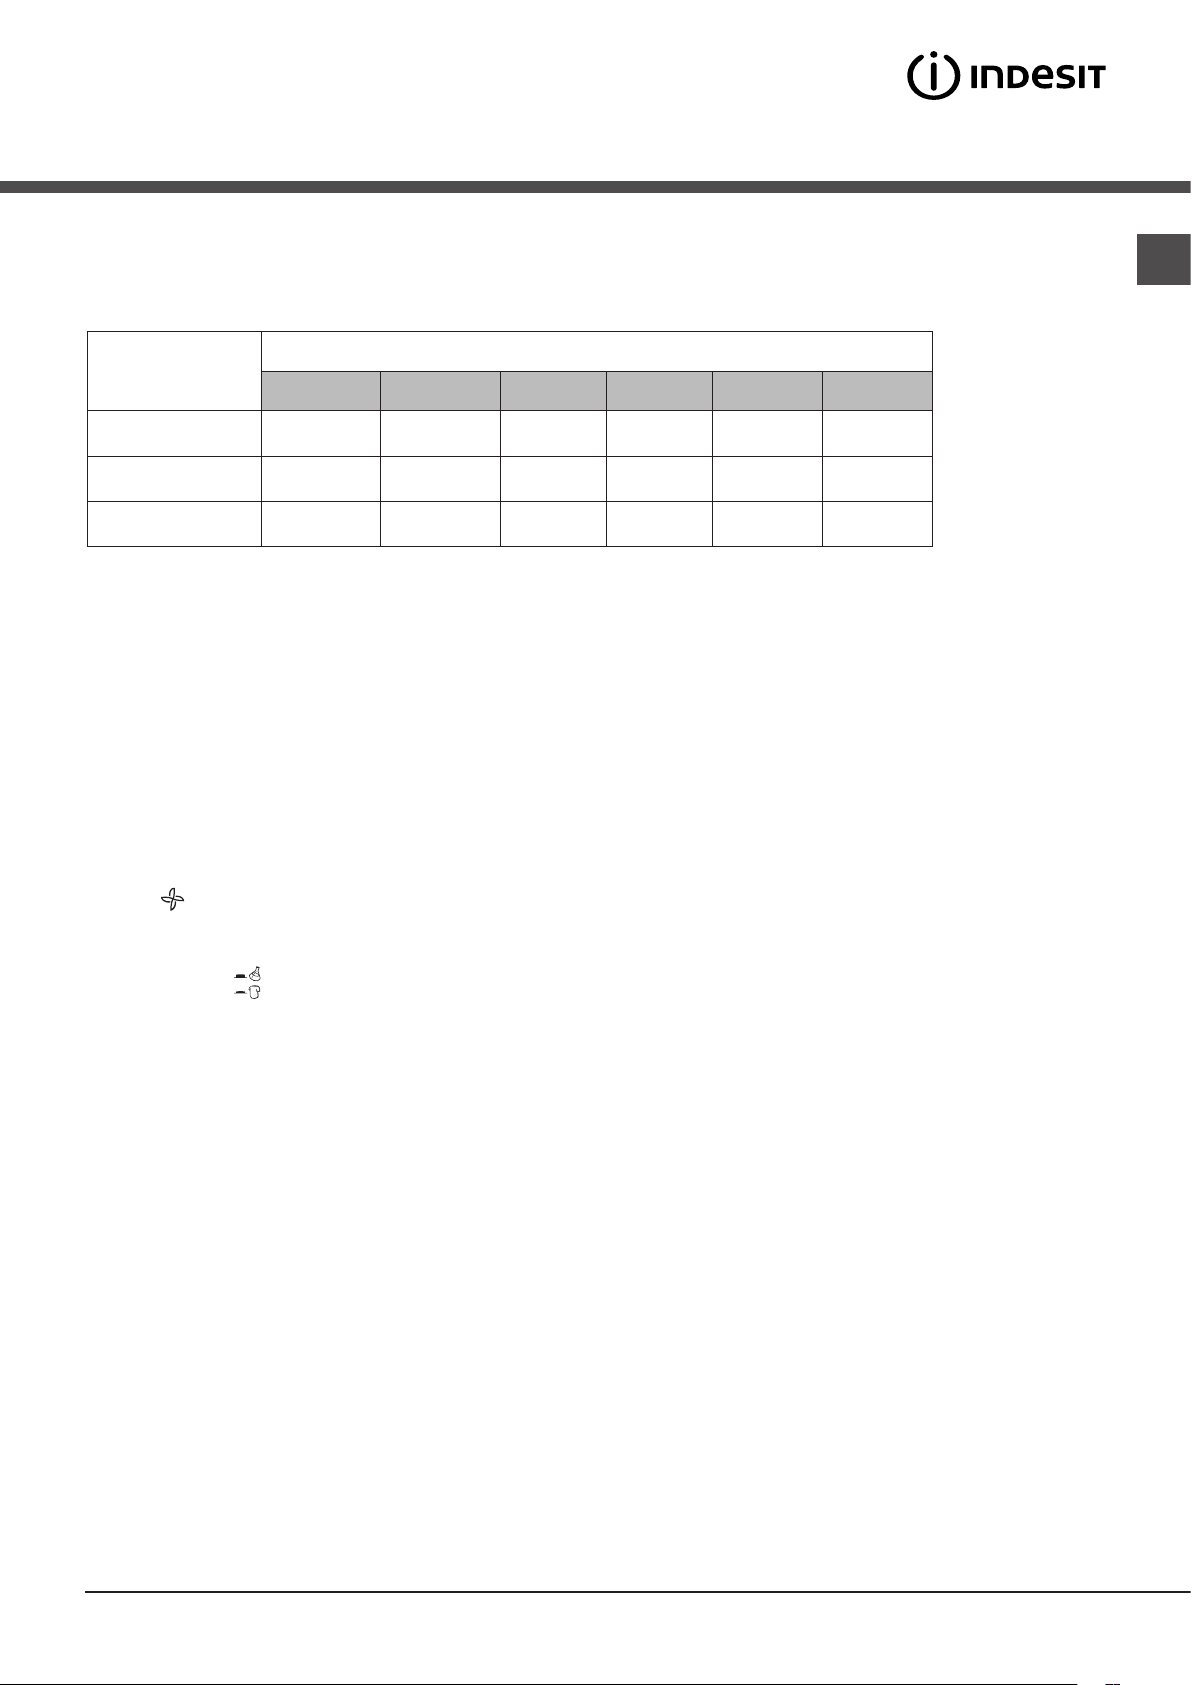
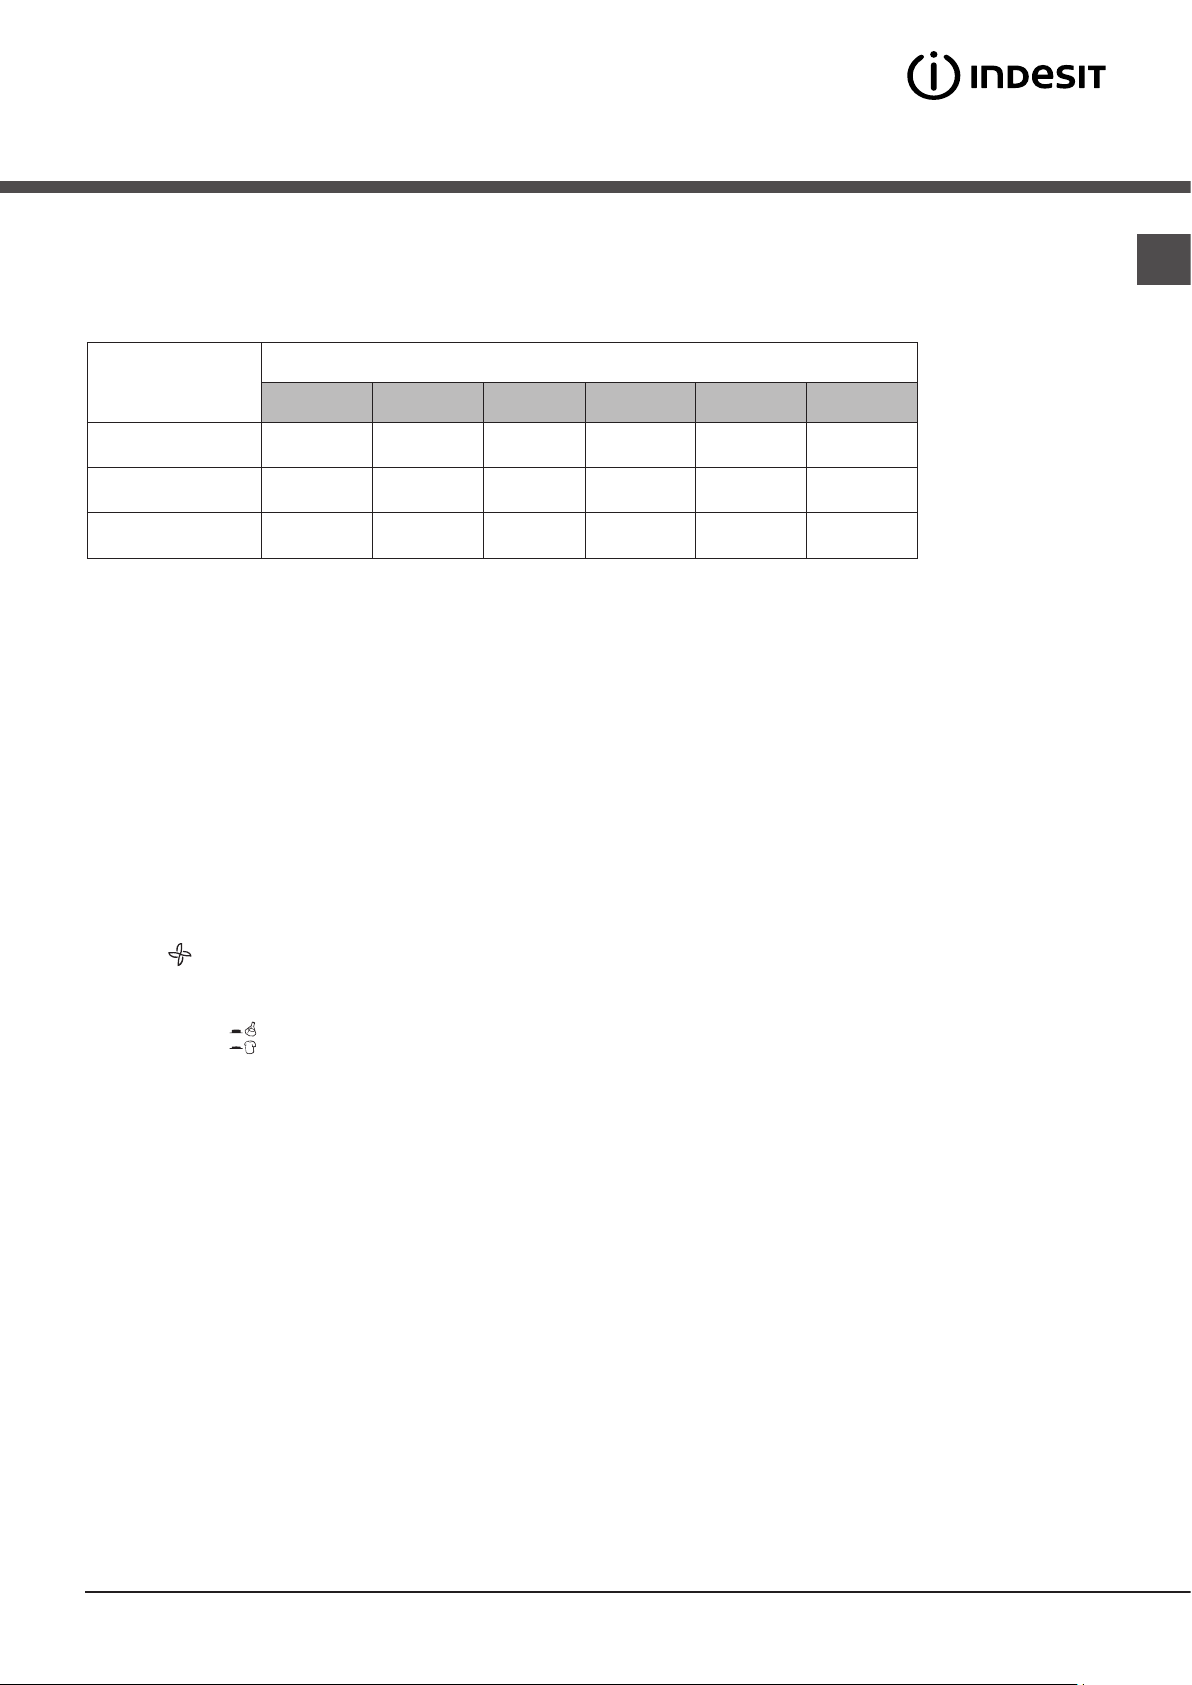
Drying settings
Drying times
The drying time depends on the size of the load and on the type of fabric it contains (see Table).
The cool tumble cycle runs during the final 10 minutes of the programme.
! For large loads, select the High Heat option if available.
Fabric
Cotton –
high heat
Synthetics –
low heat
Acrylics –
low heat
Drying times are approximate and may vary depending on the following:
• Amount of water retained by items after the spin cycle: towels and delicate items retain a lot of water.
• Fabrics: items of the same fabric, but with different texture and thickness may have different drying times.
• Amount of laundry: single items and small loads will take a short time to dry.
• Drying: if items are to be ironed, they can be removed from the dryer while still slightly damp. Items that require complete drying
can be left longer.
• Temperature of the room: the lower the temperature of the room, the longer it will take for the dryer to dry clothing.
• Bulk: certain bulky items require special care during the drying process. We suggest removing these items and replacing them in
the dryer once they have been shaken out: repeat this procedure several times during the course of the drying cycle.
1 kg 2 kg 3 kg 4 kg 5-6 kg 7 kg
30 or 40
minutes
40 or 50
minutes
40 or 60
minutes
40 or 55
minutes
50 or 70
minutes
55 or 75
minutes
Load
55 or 70
minutes
70 or 90
minutes
- - - -
70 or 80
minutes
- - -
80 or 120
minutes
120 or 140
minutes
! Do not over-dry items.
All fabrics contain natural dampness which helps to keep them soft and fluffy.
Drying programmes and options
Refresh
A short programme suitable for refreshing fibres and garments through the emission of cool air. It lasts about 10 minutes.
! As this is not a drying programme, it is not to be used for garments that are still wet.
High Heat button
The high heat button selects the drying temperature. When the button is out low heat is selected and when it is pushed in high heat
is selected.
7
EN
Laundry
Sorting laundry
• Check the symbols on the care labels of the various garments to verify whether the garments can be safely tumble
dried.
• Sort laundry according to the type of fabric.
• Empty all pockets and check for loose buttons.
• Close zips and hooks and fasten belts and strings without
tightening them.
• Wring out garments to remove the maximum amount of
water possible.
! Do not load the dryer when garments are dripping wet.
Maximum load sizes
Do not overload the drum.
The following values indicate the weight of dry garments:
Natural fibres: maximum 7 kg
Synthetic fibres: maximum 3 kg
! Do not overload the dryer as this may result is reduced
drying performance.
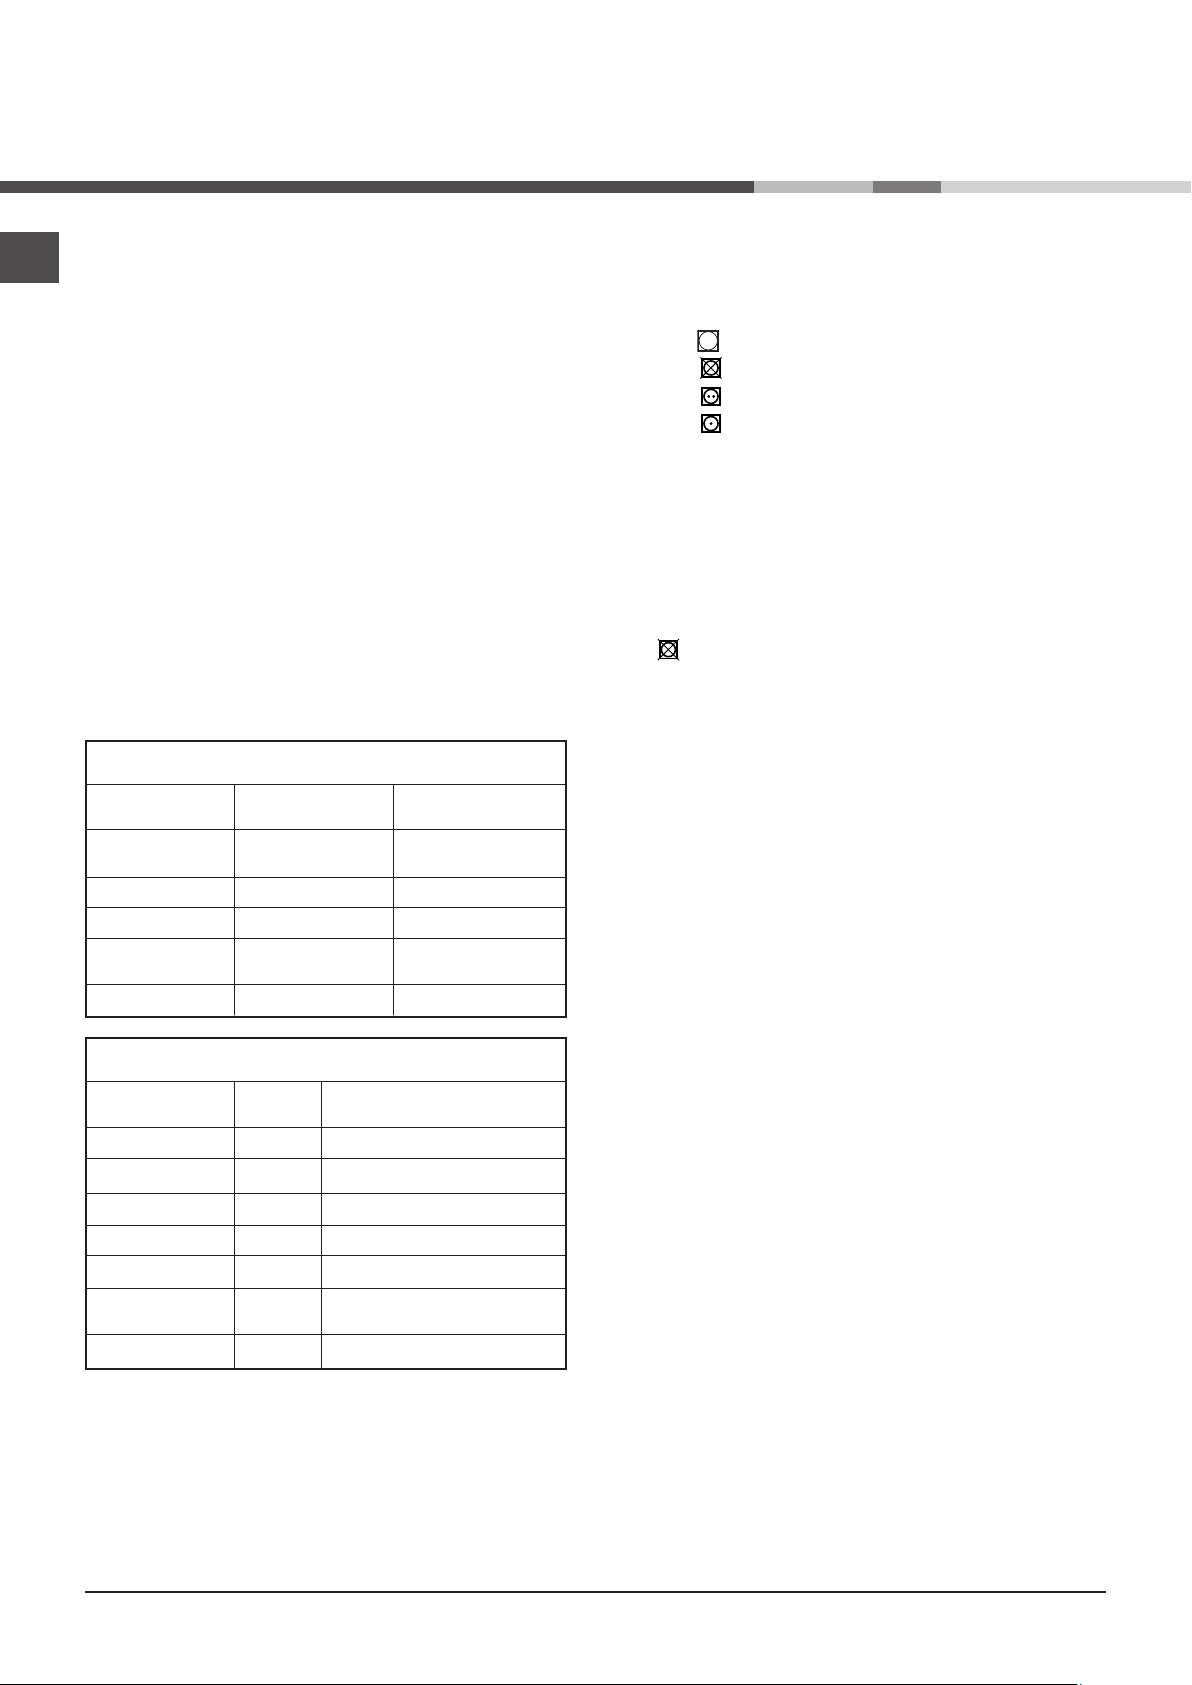
Typical weights
Note: 1 kg = 1000 g
Garments
Blouse
Dress
Jeans
10 Nappie
Shirt
T-shirt
Cotton
Other
Cotton
Other
Cotton
Other
150 g
100 g
500 g
350 g
700 g
1,000 g
300 g
200 g
125 g
Care labels
Always check the care labels, especially when placing
garments in the tumble dryer for the first time. Below are the
most commonly used symbols:
May be tumble dried.
Do not tumble dry.
Tumble dry – high heat.
Tumble dry – low heat.
Items not suitable for tumble drying:
• Items containing rubber parts or similar materials, or
plastic film covering (pillows, cushions or PVC sports
jackets), any type of inflammable object or objects containing inflammable substances (used towels containing
hairspray).
• Glass fibres (certain types of draperies).
• Items which have been previously dry cleaned.
• Items marked with the ITLC symbol (“Special garments”)
, which may be washed using special household pro-
ducts. Follow instructions carefully.
• Large bulky items (duvets, sleeping bags, pillows,
cushions, etc.) that expand when dried and hamper air
circulation inside the tumble dryer.
Special items
Blankets and bedcovers: acrylic items (Acilian, Courtelle,
Orion, Dralon) must be dried with great care at low heat.
Avoid drying for long periods.
Creased or pleated garments: read the drying instructions
supplied by the manufacturer.
Starched garments: do not dry together with non-starched
items. Remove the maximum amount of starch solution possible before placing these items in the dryer. Do not over-dry:
starch turns powdery leaving garments limp – this defeats its
purpose.
Household linen
Duvet cover (double
bed)
Large tablecloth
Small tablecloth
Tea cloth
Bath towel
Hand towel
Double bed
sheet
Single bed sheet
Cotton
Other
1,500 g
1,000 g
700 g
250 g
100 g
700 g
350 g
500 g
350 g
When mixing synthetic fibres with cotton garments, the latter
may still be damp at the end of the drying cycle. If this happens, simply put them through a short drying cycle.
8

EN
Warnings
and suggestions
! This appliance has been designed and built according to
international safety standards. These warnings are given for
safety reasons and must be followed carefully.
General safety
• This tumble dryer is not intended for use by persons
(including children) with reduced physical, sensory or
mental capabilities , or lack of experience and
knowledge, unless they have been given supervision or
instruction concerning use of the appliance by a person
responsible for there safety.
• This tumble dryer has been designed for home, and not
professional, use.
• Do not touch the appliance while barefoot or with wet
hands or feet.
• Unplug the machine by pulling on the plug, not the cord.
• Children must not be in proximity of the dryer when in
use. After using the dryer, turn it off and unplug it. Keep
the door closed to make sure that children do not use it
as a toy.
• Children should be supervised to ensure that they do
not play with the dryer.
• The appliance must be installed correctly and have
proper ventilation. The air intake at the front of the
dryer should never be obstructed (see Installation).
• Never use the dryer on carpeting where the pile height
would prevent air from entering the dryer from the base.
• Check to see if the dryer is empty before loading it.
•
The back of the dryer could become very hot.
Never touch it while in use.
• ●Do not use the dryer unless the filter, watercontainer and
condenser are securely in place (see Maintenance).
• Do not overload the dryer (see Laundry for maximum
loads).
• Do not load items that are dripping wet.
• ●Carefully check all instructions on clothing labels (see
Laundry).
• ●Do not tumble dry large, very bulky items.
• Do not tumble dry acrylic fibres at high temperatures.
• Complete each programme with its Cool Tumble Phase.
• Do not turn off the dryer when there are still warm items
inside.
• Clean the filter after each use (see Maintenance).
• Empty the water container after each use (see
Maintenance).
• ●Clean the condenser unit at regular intervals (see
Maintenance).
• ●Do not allow lint to collect around the dryer.
• Never climb on top of the dryer. It could result in damage.
• Always follow electrical standards and requirements (see
Installation).
• Always buy original spare parts and accessories (see
Service).
To minimise the risk of fire in your tumble dryer, the
following should be observed:
• Tumble dry items only if they have been washed with
detergent and water, rinsed and been through the spin cycle.
It is a fire hazard to dry items that HAVE NOT been washed
with water.
• ●Do not dry garments that have been treated with chemical
products.
• Do not tumble dry items that have been spotted or soaked
with vegetable or cooking oils, this constitutes a fire hazard.
Oil-affected items can ignite spontaneously,especially when
exposed to heat sources such as a tumble dryer. The items
become warm, causing an oxidisation reaction with the oil,
Oxidisation creates heat. If the heat cannot escape, items
can become hot enough to catch fire. Piling, stacking or
storing oil-effected items can prevent heat from escaping
and so create a fire hazard.If it is unavoidable that fabrics
containing vegetable or cooking oil or those that have been
contaminated with hair care products be placed in a tumble
dryer they should first be washed with extra detergent - this
will reduce, but not eliminate the hazard. The cool tumble
phase should be used to reduce the temperature of the
items. They should not be removed from the dryer and piled
or stacked while hot.
• Do not tumble dry items that have previously been cleaned
in or washed in, soaked in or soiled with petrol/gasoline,
dry cleaning solvents or other flammable or explosive
substances. Highly flammable substances commonly used
in domestic environments including cooking oil, acetone,
denatured alcohol, kerosene, spot removers, turpentine,
waxes and wax removers. Ensure these items have been
washed in hot water with an extra amount of detergent
before being dried in the tumble dryer.
• ●Do not tumble dry items containing foam rubber (also known
as latex foam), or similarly textured rubber like materials.
Foam rubber materials can, when heated, produce fire by
spontaneous combustion.
• ●Fabric softener or similar products should not be used in a
tumble dryer to eliminate the effects of static electricity unless
the practice is specifically recommended by the manufacturer
of the fabric softener product.
• Do not tumble dry undergarments that contain metal
reinforcements eg. bras with metal reinforcing wires. Damage
to the tumble dryer can result if the metal reinforcements
come loose during drying.
• ●Do not tumble dry rubber, plastic articles such as shower
caps or babies waterproof covers, polythene or paper.
• Do not tumble dry rubber backed articles, clothes fitted with
foam rubber pads, pillows, galoshes and rubber coated
tennis shoes.
• Remove all objects from pockets, especially lighters.
! WARNING: Never stop the dryer before the end of the drying
cycle unless all items are quickly removed and spread out so
that the heat is dissipated.
Save energy and respect the environment
• Wring out all items to eliminate excess water before
tumble drying (if you use a washing machine first, select
a high spin cycle). Doing this will save time and energy
during drying.
• Always dry full loads - you save energy: single items or
small loads take longer to dry.
• Clean the filter after each use to contain energy
consumption costs (see Maintenance).
9

EN
Care and maintenance
Disconnecting the power supply
! Disconnect the dryer when not in use or during cleaning
and maintenance operations.
Cleaning the filter after each cycle
The filter is a fundamental component of the dryer: its function is to collect lint and fluff that form during drying.
Clean the filter once drying is completed, by rinsing it under
running water or cleaning it with a vacuum cleaner. Should
the filter become clogged, the flow of air inside the dryer will
be seriously hampered: drying times becomes longer and
more energy is consumed. Moreover, the dryer may become
damaged.
The filter is located in front of the dryer seal (see Picture).
Removing the filter:
1. Pull the filter’s plastic
handle upwards (see Pic-
ture).
2. Clean the fluff off the filter
and replace it correctly. Ensure that the filter is pushed
fully home.
! Do not use the dryer unless
the filter has been replaced
in its holder.
Checking the drum after each cycle
Rotate the drum manually to remove smaller items (handkerchiefs) that could have been left inside the dryer.
Cleaning the drum
! Avoid using abrasives, steel wool or stainless steel cleaning
agents to clean the drum.
A coloured film may appear on the stainless steel drum
surface: it may be caused by a combination of water and/or
cleaning agents such as wash-softeners. This coloured film
does not affect the dryer’s performance.
Emptying the water container after
each cycle
Remove the water container and empty it into a sink or other
suitable drain outlet, then replace it correctly.
Always check the water container and empty it before starting a new drying cycle.
Cleaning the condenser unit
• Remove the condenser (see Picture below) unit regularly
(monthly) and clean off any fluff deposits from the plates
by rinsing it with cold water running on the rear end of the
condenser.
Removing the condenser:
1. Disconnect the dryer from the power supply and open the
door.
2. Open the condenser cover (see Picture below), unlock the
three catches by turning them 90° anti-clockwise, then
pull on the grip to remove the condenser.
3. Clean the surface of the seals and replace the unit with
the arrows pointing upwards, while making sure that the
catches are securely fixed.
Cleaning the tumble dryer
• The external metal, plastic and rubber parts can be clea-
ned with a damp cloth.
• Clean the front air intake grille regularly (every 6 months)
with a vacuum cleaner to remove any lint, fluff or dust
deposits. Furthermore, remove any lint deposits from the
front part of the condenser and from the filter area, using a
vacuum cleaner every so often.
! Do not use solvents or abrasives.
! Have the dryer checked regularly by authorised technical
personnel in order to ensure that the electrical and mechanical parts work safely (see Assistance).
10
Water container
Condenser unit
Catches
Filter
Tap
Rear
Condenser unit
Air intake
Front
Condenser cover
Handle

EN
Troubleshooting
If you feel that the dryer is not working properly, consult the following troubleshooting suggestions before contacting the Technical
Assistance Centre
Problem:
(see Assistance).
Possible causes / Solutions:
The dryer does not start.
Drying times are too long.
The dryer is noisy during the first
few minutes of operation.
• The plug has not been inserted far enough into the socket to make contact.
• There has been a power cut.
• The fuse has blown. Try connecting another appliance to the same socket.
• If an extension cord is used, try connecting the dryer plug directly into the socket.
• The door has not been closed properly.
• The programme has not been set correctly (see How to carry out a drying cycle).
• The START button has not been pressed (see How to carry out a drying cycle).
• The filter has not been cleaned (see Care and maintenance).
• The water container must be emptied? The “Empty water container” indicator light is
on (see Care and maintenance).
• The condenser needs to be cleaned (see Care and maintenance).
• An incorrect drying time was selected for the type of load (see Laundry).
• The air intake grille is blocked (see “Installation” and “Care and Maintenance”).
• The items are too wet (see Laundry).
• The dryer is overloaded (see Laundry).
• This is normal, especially if the dryer has not been used for a long time. If the noise
persists during the entire cycle, contact the Technical Assistance Centre.
11
EN
Assistance
Before contacting the Technical Assistance Centre:
• Follow the troubleshooting guide to check whether problems can be solved personally (see Troubleshooting).
• If not, switch the dryer off and contact the Technical Assistance Centre closest to you.
Provide the following data when contacting the
Technical Assistance Centre:
• name, address and postal code
• telephone number
• type of malfunction
• date of purchase
• the appliance model (Mod.)
• the dryer’s serial number (S/N)
This information can be found on the data plate located
behind the door.
Spare parts
This dryer is a complex machine. Attempting to repair it personally or with the aid of an unqualified personnel may put
the safety of people at risk, damage the machine or invalidate the spare parts guarantee.
Always contact a qualified technician when experiencing
problems with this machine.
Information on recycling and disposal
As part of our continual commitment towards environmental protection, we reserve the right to use recycled quality components to
reduce costs for our customers and to minimise materials wastage.
• Disposing of the packaging materials: follow local regulations to allow for recycling of packaging materials.
• In order to minimise the risk of injury to children, remove the door and plug, then cut the power supply cord flush with the ap-
pliance. Dispose of these parts separately to prevent the appliance from being connected to a power supply socket.
Disposal of old household appliances
European Directive 2002/96/EC concerning Waste Electrical and Electronic Equipment (WEEE) states that household
appliances should not be disposed of using the normal solid urban waste cycle. Exhausted appliances should be collected
separately in order to optimise the cost of re-using and recycling materials comprising the machine, while preventing poten-
tial damage to public health and the environment. The crossed-out wheeled bin symbol appears on all products to remind
owners of the obligations regarding separate waste collection.
Owners should contact their local authorities or appliance dealers for further information concerning the correct disposal of household appliances.
This appliance conforms to the following EC directives:
- 2006/95/EC (Low Voltage Directive)
- 2004/108/EC (Electromagnetic Compatibility Directive).
12

IT
Istruzioni per l’uso
Indice
Informazioni importanti, 14-15
IT
Italiano
Installazione, 16
Dove installare l’asciugatrice
Aerazione
Collegamento elettrico
Informazioni preliminari
Descrizione dell’asciugatrice, 17
Caratteristiche
Pannello comandi
Come effettuare un’asciugatura, 18
START di un’asciugatura
Impostazione dell’asciugatura, 19
Tempi di asciugatura
Programmi e opzioni di asciugatura
ASCIUGATRICE
IDC 75
! Questo simbolo ti ricorda di leggere questo libretto
istruzioni.
! Tenere a portata di mano il presente libretto così da poterlo
consultare facilmente a ogni evenienza. Tenere il libretto sempre
vicino all’asciugatrice; nel caso in cui l’apparecchio venga venduto
o ceduto ad altre persone, ricordarsi di consegnare loro questo
libretto, così da permettere anche ai nuovi possessori di conoscere
le avvertenze e i suggerimenti sull’utilizzo dell’asciugatrice.
! Leggere attentamente queste istruzioni: le pagine che seguono
contengono importanti informazioni sull’installazione e utili
suggerimenti sul funzionamento dell’elettrodomestico.
Bucato, 20
Suddivisione del bucato
Etichette di manutenzione
Capi particolari
Tempi di asciugatura
Avvertenze e suggerimenti, 21
Sicurezza generale
Informazioni per riciclaggio e smaltimento
Cura e manutenzione, 22
Interruzione dell’alimentazione elettrica
Pulizia del filtro dopo ogni ciclo
Controllo del cestello dopo ogni ciclo
Svuotamento del contenitore di raccolta dell’acqua dopo ogni
ciclo
Pulizia dell’unità di condensazione
Pulizia dell’asciugatrice
Problemi e soluzioni, 23
Assistenza, 24
Ricambi
Risparmio energetico e rispetto dell’ambiente
13

IT
Informazioni importanti
Per un funzionamento efficiente dell’asciugatrice a
condensazione è necessario seguire lo schema di
manutenzione regolare indicato qui sotto:
Filtro per lanugine – È NECESSARIO pulire la
lanugine che si deposita sul filtro dopo ogni ciclo di
asciugatura.
Fase 1
Aprire lo sportello
dell’asciugatrice premendolo
come indicato nella figura.
La mancata pulizia del filtro dopo ogni ciclo
di asciugatura influisce sulle prestazioni di
asciugatura della macchina, che impiega più tempo
ad asciugare e, di conseguenza, consuma più
elettricità durante l’asciugatura.
Contenitore di raccolta dell’acqua – È necessario
svuotare il contenitore di raccolta dell’acqua dopo
ogni ciclo di asciugatura.
Fase 1
Tirare il contenitore di raccolta
dell’acqua verso di voi e
rimuoverlo completamente
dall’asciugatrice.
Fase 2
Svuotare tutta l’acqua raccolta
nel contenitore.
Fase 2
Estrarre il filtro (usando due dita).
Fase 3
Pulire eventuali depositi di
lanugine dalla superficie interna
della rete del filtro.
Fase 4
Reinstallare il filtro – Non attivare
mai l’asciugatrice senza il filtro
inserito in posizione.
Fase 3
Reinstallare il contenitore di
raccolta dell’acqua accertandosi
che sia inserito completamente
in sede.
Il mancato svuotamento del contenitore di raccolta
dell’acqua potrebbe causare:
- L’arresto del riscaldamento della macchina (quindi
il carico potrebbe essere ancora umido alla fine del
ciclo di asciugatura).
- Il led ”Svuotare vaschetta” si illumina per
avvertire che il contenitore è pieno.
Caricamento del sistema di raccolta dell’acqua
Quando l’asciugatrice è nuova, il contenitore
di raccolta dell’acqua non raccoglie finché il
sistema non viene caricato. Questa operazione
può impiegare 1 o 2 cicli di asciugatura. Una volta
caricato, il sistema raccoglie acqua a ogni ciclo.
14
IT
Unità di condensazione - È necessario pulire la
carico (Cdry)
lanugine dal condensatore
La mancata pulizia del condensatore potrebbe
causare un guasto anticipato all’asciugatrice.
ogni mese.
Fase 1
Aprire il coperchio del
condensatore
- tenere la maniglia e tirare verso
di voi.
Fase 2
Rimuovere il condensatore
ruotando le 3 clip, quindi tirare
il condensatore verso di voi.
(Potrebbe essere presente acqua
nei tubi: ciò è normale).
Fase 3
Pulire il condensatore con acqua
facendola scorrere dalla parte
posteriore così da rimuovere
eventuali depositi di lanugine.
Fase 4
Reinstallare l’unità di
condensazione; assicurarsi che
il gruppo sia completamente
inserito in sede, che tutte e 3 le
clip siano fissate e che le frecce
di posizionamento sulla parte
anteriore del condensatore siano
dirette verso l’alto.
Scheda prodotto
Carico massimo in kg, "programma standard" per i
tessuti di cotone
Classe di efficienza energetica C
Consumo annuo ponderato di energia (AEc)* kWh 563,7
Asciugatrice
Asciugatrice Condens.
Consumo energetico in kWh del prog. standard pieno
carico (Edry)
Consumo energetico in kWh del prog. standard carico
parziale (Edry½)
Consumo di energia in Watts in modalità: spento a pieno
carico (Po)
Consumo di energia in Watts in modalità: lasciato
acceso (Pl)
La durata dello stand-by se l'asciugatrice è dotata in un
sistema di gestione elettronico - minuti
Programma Standard per tessuti in Cotone** il ciclo più
efficiente in termini di consumo di energia per il cotone
utilizzato a carico pieno e parziale.
Durata ponderata a pieno carico e carico parziale (Tt) minuti
Durata per tessuti di cotone a pieno carico (Tdry) - minuti 128
Durata per tessuti di cotone a carico parziale (Tdry½) minuti
Classe di efficienza apparecchio a condensazione C
Efficienza di condensazione - %
Percentuale di efficienza media di condensazione - pieno
Percentuale di efficienza media di condensazione - carico
parziale (Cdry½)
Percentuale pieno carico e a carico parziale (Ct) 71
Livello di potenza sonora in dB(A) re 1 pW 69
7
Non
automatico
4,77
2,59
0,06
N/A
N/A
97
73
70
71
Dati in accordo con il Regolamento n. 392/2012.
Consulta il nostro sito per tutte le schede prodotto:
http://www.indesit.com/indesit/.
*Consumo annuo basato su 160 cicli di asciugatura del programma “Cotone Standard“ a carico pieno e parziale e nella
modalità di basso consumo energetico. Consumo effettivo di
energia del ciclo dipenderà dall’utilizzo dell’appar
ogramma “Cotone Standard” è Temperatura Alta.
** Il pr
ecchio.
15
IT
Installazione
m
2
1
Less than 1m
Dove installare l’asciugatrice
• Le fiamme possono
danneggiare l’asciugatrice, che
deve pertanto essere installata
lontano da cucine a gas, stufe,
termosifoni o piani di cottura.
Se l’elettrodomestico deve
essere installato sotto un
banco da lavoro è necessario
lasciare uno spazio di 10
mm tra il pannello superiore
dell’elettrodomestico e altri
oggetti posti sopra di esso, e uno spazio di 15 mm tra i lati
dell’elettrodomestico e le pareti o gli arredi accanto a esso.
In questo modo viene garantita una sufficiente circolazione
d’aria.
Aerazione
• Quando l’asciugatrice è attiva deve essere presente una
sufficiente aerazione. Assicurarsi di installare l’asciugatrice in
un ambiente non umido e dotato di un’adeguata circolazione
d’aria. Il flusso d’aria attorno all’asciugatrice è fondamentale
per consentire la condensazione dell’acqua prodotta durante
il lavaggio; l’asciugatrice non funziona correttamente se
posizionata in uno spazio chiuso o all’interno di un mobile.
! Se l’asciugatrice viene utilizzata in una stanza piccola o
fredda è possibile che si generi un po’ di condensa.
! Non è consigliabile installare l’asciugatrice in un armadio;
l’elettrodomestico non deve mai essere installato dietro una
porta chiudibile a chiave, una porta scorrevole o una porta
con cardine sul lato opposto dello sportello dell’asciugatrice.
Scarico dell’acqua
Se la macchina viene collocata vicino a un tubo di scarico è
possibile far defluire l’acqua condensata direttamente senza
dover impiegare il contenitore di raccolta dell’acqua. In questo
caso non è più necessario svuotare il contenitore di raccolta
dell’acqua dopo ogni ciclo.
Se l’asciugatrice viene posizionata sopra o di fianco a una
lavatrice può condividere lo stesso scarico. È sufficiente
scollegare il tubo indicato alla figura A e collegarlo allo scarico.
Se lo scarico si trova più lontano della lunghezza del tubo,
per raggiungerlo è possibile acquistare e collegare un tubo di
diametro identico e della lunghezza necessaria.
Per installare il nuovo tubo è sufficiente sostituire quello
esistente come indicato alla figura B inserendolo nella stessa
posizione.
! Lo scarico deve trovarsi ad un’altezza inferiore ad
1 metro dal pavimento.
! Dopo avere installato l’asciugatrice accertarsi che il
tubo di scarico non sia piegato né contorto.
Collegamento elettrico
Prima di inserire la spina nella presa elettrica verificare
quanto segue:
• Accertarsi che le mani siano asciutte.
• La presa deve essere dotata di messa a terra.
• La presa deve essere in grado di supportare la potenza
massima prevista per la macchina, indicata sulla targhetta
dei dati di esercizio (vedi Descrizione dell’asciugatrice).
• La tensione di alimentazione deve essere compresa
nei valori indicati sulla targhetta dei dati di esercizio (vedi
Descrizione dell’asciugatrice).
• La presa deve essere compatibile con il tipo di spina
dell’asciugatrice. In caso contrario, provvedere alla
sostituzione della presa o della spina.
! Non utilizzare prolunghe.
! L’asciugatrice non può essere installata in ambienti esterni,
anche se riparati. Può essere infatti molto pericoloso esporre
questo elettrodomestico alla pioggia o a temporali.
! Dopo l’installazione dell’asciugatrice il cavo elettrico e la
spina devono rimanere a portata di mano.
! Il cavo elettrico non deve essere né piegato né schiacciato.
! Se la spina da sostituire è di tipo incorporato, è necessario
smaltirla in maniera sicura. NON lasciarla dove può essere
inserita in una presa e provocare scosse elettriche.
! Il cavo elettrico deve essere controllato periodicamente
e sostituito utilizzando un cavo specifico per questa
asciugatrice, che può essere installato unicamente da
tecnici autorizzati (vedi Assistenza). I cavi elettrici nuovi o più
lunghi vengono forniti dai rivenditori autorizzati a un costo
aggiuntivo.
! Il produttore declina qualsiasi responsabilità qualora
non ci si attenga a queste regole.
! In caso di dubbio su quanto sopra indicato, contattare
un elettricista qualificato.
Informazioni preliminari
Una volta installata l’asciugatrice, prima di metterla in
funzione pulire l’interno del cestello e rimuovere lo sporco
che può essersi accumulato durante il trasporto.
Fig. A
16
1
2
Fig. B
IT
Descrizione dell’asciugatrice
Apertura dello sportello
Premere sullo
sportello
condensazione
Unità di
(coperchio
aperto)
Pannello comandi
Caratteristiche
Contenitore di
raccolta dell’acqua
Filtro
Targhetta dei dati
di esercizio
e Numero
della presa
Maniglia del
coperchio del
condensatore
(tirare per aprire)
Modello
di serie
Griglia
d’aria
Pulsante
Temperatura alta
Manopola
tempi di
asciugatura
Manopola tempi di asciugatura
Consente di impostare il tempo di asciugatura: ruotare la manopola in senso orario fino a quando l’indicatore segnala il tempo di
asciugatura desiderato (vedi Impostazione dell’asciugatura).
Temperatura alta
Consente di personalizzare il programma selezionato in base alle proprie esigenze.
Pulsante START
Premere il pulsante per avviare l’asciugatura.
Pulsante
START
Spia svuotare
vaschetta
Spia “svuotare vaschetta”
La Spia “svuotare vaschetta”
Se il contenitore si riempie nel corso del programma, l’asciugatrice automaticamente avvia il ciclo aria fredda.
Per evitare questo procedimento svuotare sempre il contenitore di raccolta dell’acqua ad ogni utilizzo dell’asciugatrice (vedi
Manutenzione).
indica che è necessario svuotare il contenitore di raccolta dell’acqua.
17

IT
Come effettuare
un’asciugatura
START di un’asciugatura
1. Inserire la spina dell’asciugatrice nella presa di alimentazione elettrica.
2. Selezionare l’asciugatura in base al tipo di bucato (vedi Bucato).
3. Aprire lo sportello e accertarsi che il filtro sia pulito e in posizione, e che il contenitore di raccolta dell’acqua sia vuoto e
posizionato correttamente (vedi Manutenzione).
4. Caricare la macchina facendo attenzione che nessun capo si frapponga tra lo sportello e la relativa guarnizione. Chiudere lo
sportello.
5. Ruotare la “Manopola tempi di asciugatura” finché l’indicatore non è direzionato verso il tempo di asciugatura più adatto al
tipo di tessuto da asciugare. Controllare la tabella per il rapporto tra i tipi di tessuto e le capacità di carico (vedi Impostazione
dell’asciugatura) e le indicazioni per ciascun tipo di tessuto (vedi Bucato).
6. Se necessario impostare la temperatura mediante il pulsante “Temperatura alta”.
7. Per iniziare premere il pulsante START.
Durante il programma di asciugatura è possibile controllare il bucato ed estrarre i capi che si sono asciugati lasciando continuare gli
altri. Dopo avere richiuso lo sportello, premere START per mettere di nuovo in funzione la macchina.
8. Durante gli ultimi minuti dei programmi di asciugatura prima del termine del programma viene avviata la fase finale di
ASCIUGATURA A FREDDO (i tessuti vengono raffreddati); è necessario lasciare sempre terminare questa fase.
9. Aprire la porta, estrarre il bucato, pulire il filtro e reinserirlo in sede. Svuotare il contenitore di raccolta dell’acqua e reinserirlo in
posizione (vedi Manutenzione).
10. Scollegare l’asciugatrice dalla rete elettrica.
18
IT
Impostazione
dell’asciugatura
Tempi di asciugatura
Il tempo dell’asciugatura da selezionare dipende dal carico e dal tessuto da asciugare (vedi tabella).
Gli ultimi 10 minuti del programma sono dedicati al ciclo di asciugatura a freddo.
! Per grandi carichi selezionare l’opzione Temperatura Alta se disponibile.
Tessuto
Cotone –
alta temperatura
Sintetici –
bassa temperatura
Acrilici –
bassa temperatura
I tempi sono approssimativi e possono variare in base a:
• Quantità di acqua trattenuta dai capi dopo la centrifuga: gli asciugamani e i capi delicati trattengono molta acqua.
• Tessuti: i capi dello stesso tessuto, ma con trama e spessore differenti possono presentare tempi di asciugatura diversi.
• Quantità di bucato: capi singoli e piccoli carichi impiegano meno tempo per asciugarsi.
• Asciugatura: se i capi devono essere stirati possono essere estratti dalla macchina quando sono ancora un po’ umidi. I capi che
devono essere completamente asciutti possono invece essere lasciati più a lungo.
• Temperatura della stanza: più è bassa la temperatura della stanza in cui si trova l’asciugatrice più tempo sarà necessario per
l’asciugatura dei capi.
• Volume: alcuni capi voluminosi richiedono particolare cura nel processo di asciugatura. Si consiglia di estrarre questi capi,
scuoterli e inserirli nuovamente nell’asciugatrice: questa operazione deve essere ripetuta più volte durante il ciclo di asciugatura.
1 kg 2 kg 3 kg 4 kg 5-6 kg 7 kg
30 o 40
minuti
40 o 50
minuti
40 o 60
minuti
40 o 55
minuti
50 o 70
minuti
55 o 75
minuti
Carico
55 o 70
minuti
70 o 90
minuti
- - - -
70 o 80
minuti
- - -
80 o 120
minuti
120 o 140
minuti
! Non asciugare troppo i capi.
Tutti i tessuti contengono umidità naturale che serve a conservarne la morbidezza e la vaporosità.
Programmi e opzioni di asciugatura
Rinfresca
Programma breve adatto a rinfrescare fibre e capi attraverso l’emissione di aria fresca. Dura circa 10 minuti.
! Questo non è un programma di asciugatura e non va quindi utilizzato con capi ancora bagnati.
Temperatura alta
Selezionata un’asciugatura a tempo, premendo questo pulsante si seleziona una temperatura alta. I programmi a tempo hanno
preimpostata una temperatura bassa.
19

IT
Bucato
Suddivisione del bucato
• Controllare i simboli riportati sulle etichette dei vari capi
per verificare che i capi possano essere sottoposti ad
asciugatura a tamburo.
• Dividere il bucato in base al tipo di tessuto.
• Svuotare le tasche e controllare i bottoni.
• Chiudere le lampo e i ganci e allacciare cinture e lacci
senza stringere.
• Strizzare i capi per eliminare la maggior quantità di acqua
possibile.
! Non caricare l’asciugatrice con capi totalmente pieni
d’acqua.
Massime dimensioni di carico
Non caricare il cestello oltre la capacità massima.
I seguenti valori si riferiscono al peso dei capi asciutti:
Fibre naturali: massimo 7 kg
Fibre sintetiche: massimo 3 kg
! Per evitare un calo delle prestazioni dell’asciugatrice, non
sovraccaricarla.
Carico tipo
Capi
Nota: 1 kg = 1000 g
Camicetta
Abito
Jeans
10 pannolini
Camicia
T-shirt
Biancheria da casa
Copripiumone
(matrimoniale)
Tovaglia grande
Cotone
Altro
Cotone
Altro
Cotone
Altro
Cotone
Altro
1.500 g
1.000 g
700 g
150 g
100 g
500 g
350 g
700 g
1.000 g
300 g
200 g
125 g
Etichette di manutenzione
Controllare le etichette dei capi, specialmente quando questi
vengono inseriti per la prima volta in asciugatrice. Di seguito
sono riportati i simboli più comuni:
Può essere inserito nell’asciugatrice.
Non asciugabile in asciugatrice
Asciugare ad alta temperatura.
Asciugare a bassa temperatura.
Capi non adatti all’asciugatura a tamburo:
• Capi che contengono parti in gomma o materiali simili
oppure rivestimenti in plastica (guanciali, cuscini o giacche
a vento in PVC) e qualsiasi tipo di oggetto infiammabile
o oggetti che contengono sostanze infiammabili
(asciugamani sporchi di lacca per capelli).
• Fibre di vetro (alcuni tipi di tendaggi).
• Capi precedentemente sottoposti a pulitura a secco.
• Capi contrassegnati con il codice ITLC (“Capi particolari”)
, che possono essere puliti con prodotti speciali di
pulizia domestica. Seguire attentamente le istruzioni.
• Capi troppo voluminosi (piumoni, sacchi a pelo, guanciali,
cuscini, ecc.), che si espandono durante l’asciugatura e
impediscono la circolazione dell’aria nell’asciugatrice.
Capi particolari
Coperte e copriletto: i capi in acrilico (Acilian, Courtelle,
Orion, Dralon) devono essere asciugati con estrema cura
a temperatura bassa. Non impostare tempi di asciugatura
lunghi.
Capi con pieghe o plissettati: leggere le istruzioni di
asciugatura fornite dal produttore.
Capi inamidati: non asciugare questi capi con altri non
inamidati. Rimuovere la maggiore quantità di soluzione
inamidante prima di inserire i capi nell’asciugatrice. Non
asciugare eccessivamente: l’amido diventa polvere lasciando
i capi morbidi e venendo meno alla propria funzione.
Tovaglia piccola
Tovaglietta da tè
Telo da bagno
Asciugamano
Lenzuolo matrimoniale
Lenzuolo singolo
250 g
100 g
700 g
350 g
500 g
350 g
Se si mischiano capi in tessuto sintetico con capi in cotone,
questi ultimi potrebbero risultare ancora umidi al termine del
ciclo di asciugatura. In questo caso, è sufficiente avviare un
ulteriore breve ciclo di asciugatura.
Nota: quando si imposta la durata di asciugatura tenere
presente che gli ultimi 10 minuti dei programmi sono
dedicati alla fase di asciugatura a freddo, durante la quale
l’asciugatrice non asciuga la biancheria.
20

IT
Avvertenze e suggerimenti
! Questo elettrodomestico è stato progettato e realizzato nel
rispetto delle normative internazionali in materia di sicurezza.
Queste avvertenze vengono fornite per motivi di sicurezza e
devono essere osservate attentamente.
Sicurezza generale
• La presente asciugatrice non deve essere usata da persone
(compresi i bambini) con capacità fisiche, sensoriali o mentali
ridotte o senza esperienza e conoscenza, a meno che non
siano sottoposte a supervisione o ricevano istruzioni relative
all’uso del dispositivo da parte di una persona responsabile
della loro sicurezza.
• La presente asciugatrice è stata progettata per uso
domestico e non professionale.
• Non toccare l’elettrodomestico quando si è a piedi nudi
né con le mani o i piedi bagnati.
• Scollegare l’elettrodomestico dalla rete di alimentazione
tirando la spina e non il cavo.
• Non lasciare avvicinare i bambini all’elettrodomestico
in funzione. Dopo l’uso, spegnere l’asciugatrice e
scollegarla dalla rete di alimentazione. Tenere lo sportello
chiuso onde evitare che i bambini possano utilizzare
l’asciugatrice come un gioco.
• I bambini devono essere sorvegliati per assicurarsi che
non giochino con l’asciugatrice.
• L’elettrodomestico deve essere installato correttamente
e deve avere un’adeguata aerazione. La presa d’aria
sulla parte frontale dell’asciugatrice non deve mai essere
ostruita (vedi Installazione).
• Non utilizzare mai l’asciugatrice sulla moquette nel caso
in cui l’altezza del pelo sia tale da impedire l’ingresso
dell’aria attraverso la base dell’asciugatrice.
• Verificare che l’asciugatrice sia vuota prima di caricarla.
• La parte posteriore dell’asciugatrice può diventare
molto calda:
non toccarla mai quando la macchina è in funzione.
• Non utilizzare l’asciugatrice se il filtro, il contenitore di
raccolta dell’acqua e il condensatore non sono posizionati
correttamente (vedi Manutenzione).
• Non sovraccaricare l’asciugatrice (vedi Bucato per le
massime dimensioni di carico).
• Non inserire capi completamente bagnati.
• Seguire sempre con attenzione tutte le istruzioni riportate
sulle etichette per il lavaggio dei capi (vedi Bucato).
• Non caricare capi grandi, eccessivamente voluminosi.
• Non asciugare fibre acriliche ad alte temperature.
• Completare ogni programma con la relativa fase di
asciugatura a freddo.
• Non spegnere l’asciugatrice quando contiene ancora capi
caldi.
• Pulire il filtro dopo ogni uso (vedi Manutenzione).
• Svuotare il contenitore di raccolta dell’acqua dopo ogni
uso (vedi Manutenzione).
• Pulire regolarmente l’unità di condensazione (vedi
Manutenzione).
• Evitare l’accumulo di laniccio intorno all’asciugatrice.
• Non salire sul pannello superiore dell’asciugatrice, poiché
si potrebbe danneggiare la macchina.
• Rispettare sempre le norme e le caratteristiche elettriche
(vedi Installazione).
• Acquistare sempre accessori e ricambi originali (vedi
Assistenza).
Per ridurre il rischio di incendo dell’asciugatrice, è
necessario osservare i seguenti punti:
• Prima di essere caricati nell’asciugatrice, i capi devono essere
lavati con acqua e sapone, risciacquati e infine centrifugati.
L’asciugatura di capi che NON siano stati precedentemente
lavati con acqua, determina il pericolo di incendio.
• Non caricare nell’asciugatrice capi precedentemente
trattati con prodotti chimici.
• Non asciugare articoli macchiati o imbevuti di olio vegetale o
da cucina, ciò costituisce un rischio di incendio. Gli articoli
sporchi di olio possono infiammarsi spontaneamente,
specialmente quando vengono esposti a fonti di calore come
l’asciugatrice. Gli articoli possono diventare caldi, causando
una reazione di ossidazione con l’olio, l’ossidazione crea
calore. Se il calore non è in grado di fuoriuscire, gli articoli
possono scaldarsi tanto da prendere fuoco. L’accumulo,
l’impilamento o il deposito di capi sporchi/imbevuti di olio può
impedire la fuoriuscita del calore e causare un incendio.
Se non è possibile evitare di porre nell’asciugatrice articoli
sporchi/imbevuti di olio vegetale, olio da cucina o lacca, è
prima necessario lavarli con detergente supplementare, ciò
ridurrà, ma non eliminerà il rischio di incendio. E’ necessario
usare la fase di asciugatura a freddo per ridurre la temperatura
degli articoli, che non devono essere rimossi dall’asciugatrice
e impilati o ammucchiati quando sono ancora caldi.
• Non inserire nell’asciugatrice capi che sono stati
precedentemente lavati, puliti, imbevuti o lasciati in
ammollo in benzina, solventi a secco o altre sostanze
infiammabili o esplosive, le sostanze altamente
infiammabili usate comunenmente negli ambienti
domestici, compresi olio da cucina, acetone, alcol
denaturato, cherosene, sostanze antimacchia,
trementina, cere e sostanze di rimozione cere. Assicurarsi
che questi capi vengano lavati in acqua calda con una
quantità supplementare di detergente prima di essere
inseriti nell’asciugatrice.
• Non inserire nell’asciugatrice articoli contenenti schiuma di
gomma (detta anche schiuma di lattice), o materiali simili.
I materiali in schiuma di lattice quando vengono riscaldati
possono incendiarsi mediante la combustione spontanea.
• Non utillizzare ammorbidenti o prodotti simili
nell’asciugatrice per eiliminare gli effetti dell’elettricità
statica, se non consigliato espressamente dal produttore
dell’ammorbidente.
• Non inserire nell’asciugatrice indumenti intimi che
contengono rinforzi in metallo, es. reggiseni con ferretti in
metallo.
Se i ferretti si staccano durante l’asciugatura, possono
danneggiare l’asciugatrice.
• Non inserire nell’asciugatrice articoli in gomma solida, in
plastica, come cuffie per la doccia o teli impermeabili di
protezione per bambini, polietilene o carta.
• Non inserire nell’asciugatrice articoli foderati in gomma
solida, capi con imbottiture in schiuma di gomma, cuscini,
galosce e scarpe da tennis rivestite in gomma.
• Togliere tutti gli oggetti dalle tasche, specialmente gli
accendini (rischio di esplosione).
! ATTENZIONE: non arrestare mai l’asciugatrice prima della
fine del ciclo di asciugatura a meno che tutti i capi non siano
rimossi velocemente e stesi in modo da dissipare il calore.
Risparmio energetico e rispetto per l’ambiente
• Prima di asciugare i capi, strizzarli per eliminare la
maggiore quantità di acqua possibile (se viene prima
utilizzata una lavatrice impostare un ciclo di centrifuga). In
questo modo si risparmia energia durante l’asciugatura.
• Utilizzando sempre l’asciugatrice a pieno carico si
risparmia energia: capi singoli e piccoli carichi impiegano
più tempo per asciugarsi.
• Pulire il filtro alla fine di ogni ciclo in modo da contenere i
costi connessi al consumo energetico (vedi Manutenzione).
21
IT
Cura e manutenzione
Interruzione dell’alimentazione
elettrica
! Scollegare l’asciugatrice quando non è in funzione, nonché
durante le operazioni di pulizia e di manutenzione.
Pulizia del filtro dopo ogni ciclo
Il filtro è un componente fondamentale dell’asciugatura: la
sua funzione è quella di raccogliere il laniccio e la lanugine
che si formano durante l’asciugatura.
Al termine dell’asciugatura pulire quindi il filtro sciacquandolo
sotto acqua corrente o pulendolo con l’aspirapolvere. Nel
caso in cui il filtro si dovesse intasare il flusso d’aria all’interno
dell’asciugatrice verrebbe gravemente compromesso: i tempi
di asciugatura si allungano e si consuma più energia. Inoltre,
possono verificarsi danni all’asciugatrice.
Il filtro si trova davanti alla guarnizione dell’asciugatrice (vedi
figura).
Rimozione del filtro:
1. Tirare verso l’alto il manico
in plastica del filtro (vedi
figura).
2. Pulire il filtro dal laniccio e
riposizionarlo correttamente.
Assicurarsi che il filtro sia
inserito completamente
a filo con la guarnizione
dell’asciugatrice.
! Non utilizzare l’asciugatrice
senza avere prima reinserito
il filtro in sede.
Controllo del cestello dopo ogni ciclo
Ruotare il cestello manualmente per rimuovere i capi più
piccoli (fazzoletti) che potrebbero essere rimasti all’interno
dell’asciugatrice.
Pulizia del cestello
! Per la pulizia del cestello non usare abrasivi, lana di acciaio
o agenti di pulizia per acciaio inossidabile.
Potrebbe formarsi una patina colorata sul cestello in acciaio
inossidabile, fenomeno che potrebbe essere causato
da una combinazione di acqua e/o agenti di pulizia quali
l’ammorbidente del lavaggio. Questa patina colorata non ha
alcun effetto sulle prestazioni dell’asciugatrice.
Contenitore
di raccolta
dell’acqua
Svuotamento del contenitore di
raccolta dell’acqua dopo ogni ciclo
Estrarre il contenitore dall’asciugatrice e svuotarlo in un
lavandino o in altro scarico adatto, quindi riposizionarlo
correttamente.
Controllare sempre il contenitore di raccolta e svuotarlo
prima dell’START di un nuovo programma di asciugatura.
Pulizia dell’unità di condensazione
• Rimuovere periodicamente (ogni mese) l’unità di
condensazione e pulire l’eventuale accumulo di lanugine
dalle piastre sciacquandola sotto il rubinetto con acqua
fredda fatta scorrere sul lato posteriore del condensatore.
Rimozione del condensatore:
1. Scollegare l’asciugatrice dalla rete elettrica e aprire lo
sportello.
2. Aprire il coperchio del condensatore (vedi figura),
sbloccare i tre fermi ruotandoli di 90° in senso antiorario,
quindi estrarre il condensatore tirandolo per l’impugnatura.
3. Pulire la superficie delle guarnizioni e riposizionare l’unità
con le frecce dirette verso l’alto, accertandosi che i fermi
siano fissati saldamente.
Pulizia dell’asciugatrice
• Le parti esterne in metallo e in plastica e le parti in gomma
possono essere pulite con un panno umido.
• Periodicamente (ogni 6 mesi) pulire con l’aspirapolvere
la griglia della presa d’aria frontale e gli sfiati sul retro
dell’asciugatrice per rimuovere eventuali accumuli di
lanugine, laniccio e polvere. Inoltre, rimuovere gli accumuli
di lanugine dalla parte frontale del condensatore e delle
aree del filtro utilizzando occasionalmente l’aspirapolvere.
! Non usare solventi o abrasivi.
! Far controllare regolarmente l’asciugatrice da personale
tecnico autorizzato onde garantire la sicurezza delle parti
elettriche e meccaniche (vedi Assistenza).
Filtro
Rubinetto
22
Unità di condensazione
Fermi
Maniglia
Presa
d’aria
Coperchio del
condensatore
Posteriore
Unità di condensazione
Anteriore

IT
Problemi e soluzioni
Nel caso in cui si abbia la sensazione che l’asciugatrice non funzioni in modo corretto, prima di telefonare al Centro di assistenza
(vedi Assistenza) consultare attentamente i seguenti suggerimenti per la soluzione dei problemi.
Problema:
Cause probabili / Soluzioni:
L’asciugatrice non parte.
I tempi di asciugatura sono lunghi.
L’asciugatore è rumoroso nei primi
minuti di funzionamento.
• La spina non è inserita nella presa di corrente a muro abbastanza a fondo per fare
contatto.
• C’è stata una interruzione di corrente.
• Il fusibile è bruciato. Provare a collegare un altro elettrodomestico alla stessa presa.
• Se si utilizza una prolunga provare a inserire la spina dell’asciugatrice direttamente
nella presa.
• Lo sportello non è stato chiuso correttamente.
• Il programma non è stato impostato correttamente (vedi Come effettuare
un’asciugatura).
• Non è stato premuto il pulsante
• Il filtro non è stato pulito (vedi Manutenzione).
• Il contenitore di raccolta dell’acqua deve essere svuotato? La spia “Svuotare
vaschetta” lampeggia (vedi Manutenzione).
• Il condensatore deve essere pulito (vedi Manutenzione).
• Non è stato selezionato il tempo di asciugatura corretto per questo carico (vedi
Bucato).
• I capi sono troppo bagnati (vedi Bucato).
• L’asciugatrice è sovraccarica (vedi Bucato).
• Questo è normale, soprattutto se l’asciugatore non è stato utilizzato per un certo
tempo. Se il rumore persiste durante tutto il ciclo, contattare il centro di assistenza.
START (vedi Come effettuare un’asciugatura).
23
IT
Assistenza
Prima di telefonare al Centro di assistenza:
• Seguire la guida alla risoluzione dei problemi per vedere
se è possibile porre rimedio al guasto personalmente (vedi
Problemi e soluzioni).
• In caso contrario, spegnere l’asciugatrice e chiamare il più
vicino Centro di assistenza.
Dati da comunicare al Centro di assistenza:
• Nome, indirizzo e codice postale;
• numero di telefono;
• il tipo di guasto;
• la data di acquisto;
• il modello dell’apparecchio (Mod.);
• il numero di serie (S/N) dell’asciugatrice.
Queste informazioni si trovano sull’etichetta dati applicata
dietro l’oblò.
Assistenza Attiva 7 giorni su 7
In caso di necessità d’intervento chiamare il Numero Unico Nazionale 199.199.199*.
Un operatore sarà a completa disposizione per fissare un appuntamento con il Centro Assistenza Tecnico
Autorizzato più vicino al luogo da cui si chiama.
È attivo 7 giorni su 7, sabato e domenica compresi, e non lascia mai inascoltata una richiesta.
Ricambi
Questa asciugatrice è una macchina complessa. Tentando
di ripararla personalmente o affidandone la riparazione a
personale non qualificato si rischia di mettere a repentaglio
l’incolumità delle persone, di danneggiare la macchina e di
far decadere la garanzia sui ricambi.
In caso di problemi con l’utilizzo di questa macchina,
rivolgersi sempre a un tecnico autorizzato.
*
Informazioni per riciclaggio e smaltimento
Nell’ambito del nostro costante impegno in difesa dell’ambiente ci riserviamo il diritto di utilizzare componenti riciclati di qualità per
ridurre i costi del cliente e minimizzare lo spreco di materiali.
• Smaltimento dei materiali di imballaggio: seguire le normative locali, così da permettere di riciclare l’imballaggio.
• Per ridurre il rischio di incidenti ai bambini, rimuovere lo sportello e la spina, quindi tagliare il cavo di alimentazione a filo con
l’apparecchio. Smaltire queste parti separatamente per assicurarsi che l’elettrodomestico non possa più essere collegato a una
presa di corrente.
Smaltimento
La direttiva Europea 2002/96/CE sui rifiuti di apparecchiature elettriche ed elettroniche (RAEE), prevede che gli
elettrodomestici non debbano essere smaltiti nel normale flusso dei rifiuti solidi urbani. Gli apparecchi dismessi devono essere
raccolti separatamente per ottimizzare il tasso di recupero e riciclaggio dei materiali che li compongono ed impedire potenziali
danni per la salute e l’ambiente.
Questo asciugatore utilizza un Condensatore sigillato contenente gas fluorurati che devono essere recuperati e smaltiti.
Il simbolo del cestino barrato è riportato su tutti i prodotti per ricordare gli obblighi di raccolta separata.
Per ulteriori informazioni, sulla corretta dismissione degli elettrodomestici, i detentori potranno rivolgersi al servizio pubblico preposto
o ai rivenditori.
Il presente elettrodomestico è conforme alle seguenti direttive CE:
- 2006/95/CE (Direttiva bassa tensione);
- 2004/108CE (Compatibilità elettromagnetica).
* Al costo di 14,25 centesimi di Euro al minuto (iva inclusa) dal Lun. al Ven. dalle 08:00 alle 18:30, il Sab. dalle 08:00 alle 13:00 e di
5,58 centesimi di Euro al minuto (iva inclusa) dal Lun. al Ven. dalle 18:30 alle 08:00, il Sab. dalle 13:00 alle 08:00 e i giorni festivi, per
chi chiama da telefono fisso.
Per chi chiama da radiomobile le tariffe sono legate al piano tariffario dell’operatore telefonico utilizzato.
Le suddette tariffe potrebbero essere soggette a variazione da parte dell’operatore telefonico; per maggiori informazioni consultare il
sito www.aristonchannel.com.
24

FR
Mode d’emploi
FR
Français
SÈCHE-LINGE
Table des matières
Informations importantes, 26-27
Installation, 28
Où installer le sèche-linge
Ventilation
Raccordement électrique
Informations préliminaires
Description du sèche-linge, 29
Caractéristiques
Tableau de bord
Comment effectuer
un cycle de séchage, 30
Lancement du séchage
Paramètres de séchage, 31
Temps de séchage
Programmes et options de séchage
IDC 75
! Ce symbole vous rappelle de lire ce mode d’emploi.
! Conservez cette notice d’utilisation et d’installation à portée de
main de manière à pouvoir vous y référer si nécessaire. Conservez
cette notice toujours à côté du sèche-linge et si vous vendez cet
appareil ou que vous le donniez à un tiers, faites en sorte que
cette notice accompagne le sèche-linge de manière à ce que le
nouveau propriétaire soit informé des avertissements et des conseils concernant le fonctionnement de ce sèche-linge.
! Lisez attentivement ce mode d’emploi : les pages suivantes
contiennent des informations importantes concernant l’installation
et des conseils relatifs au fonctionnement de cet appareil.
Linge, 32
Tri du linge
Étiquettes d’entretien
Linge ou vêtements particuliers
Temps de séchage
Précautions et conseils, 33
Sécurité générale
Informations pour le recyclage et la mise au rebut
Économie d’énergie et protection de l’environnement
Soin et entretien, 34
Interruption de l’alimentation électrique
Nettoyage du filtre après chaque cycle
Contrôle du tambour après chaque cycle
Vidange du réservoir d’eau après chaque cycle
Nettoyage du groupe condenseur
Nettoyage du sèche-linge
Problèmes et solutions, 35
Assistance, 36
Pièces détachées
25
FR
Informations importantes
Pour assurer le bon fonctionnement du sèche-linge
à condensation il faut suivre le schéma d’entretien
ordinaire indiqué ci-dessous :
Filtre à peluches – IL EST NÉCESSAIRE d’éliminer
les peluches qui s’accumulent sur le filtre après
chaque cycle de séchage.
Étape 1
Ouvrez la porte du sèche-linge
en appuyant comme illustré par
la figure.
après chaque cycle de séchage, les performances
de l’appareil en sont affectées, car les temps de
séchage deviennent plus longs et, par conséquent,
la consommation d’électricité augmente pendant le
séchage.
Réservoir d’eau – Il est nécessaire de vider le
réservoir d’eau après chaque cycle de séchage.
Étape 1
Tirez la poignée du réservoir
d’eau vers vous et sortez-le
complètement du sèche-linge.
Étape 2
Videz toute l’eau contenue dans
le réservoir.
Étape 2
Sortez le filtre (en utilisant deux
doigts).
Étape 3
Éliminez tout dépôt de peluches
sur la surface intérieure de la
maille du filtre.
Étape 4
Remettez le filtre en place – Ne
mettez jamais le sèche-linge en
marche sans avoir remis le filtre
en place.
Étape 3
Remettez le réservoir d’eau en
place et assurez-vous qu’il est
inséré à fond dans son logement.
Si le réservoir d’eau n’est
pas vidé, les problèmes
suivants peuvent se vérifier :
- L’arrêt du chauffage de l’appareil (le linge pourrait
donc être encore humide à la fin du cycle de
séchage).
- La led « Vider l’eau » s’allume pour signaler que le
réservoir est plein.
Chargement du système de collecte de l’eau
Quand le sèche-linge est neuf, le réservoir d’eau
ne reçoit pas l’eau tant que le système n’est pas
chargé. Cette opération peut prendre 1 ou 2 cycles
de séchage. Une fois qu’il a été chargé, le système
commence à recevoir l’eau à chaque cycle.
Si le filtre n’est pas nettoyé
26
 Loading...