


ISTRUZIONI PER L’USO
OPERATING INSTRUCTIONS
MODE D’EMPLOI
BEDIENUNGSANLEITUNG
INSTRUCCIONES PARA EL USO
INSTRUÇÕES DE UTILIZAÇÃO
GEBRUIKSAANWIJZING
BRUGSANVISNING
LEGGERE ATTENTAMENTE LE ISTRUZIONI
READ CAREFULLY THE INSTRUCTIONS
LIRE ATTENTIVEMENT LES INSTRUCTIONS
DIE BEDIENUNGSANLEITUNG IST AUFMERKSAM ZU LESEN
LEER ATENTAMENTE LAS INSTRUCCIONES
LER ATENTAMENTE AS INSTRUÇÕES
LEES AANDACHTIG DE INSTRUCTIES
LÆS NØJE DISSE INSTRUKTIONER
FOR HOUSEHOLD
USE ONLY
USAGE DOMESTIQUE
SEULEMENT

• 2 •
Gentile Cliente,
ci congratuliamo per aver scelto la macchina da caffè espresso Gaggia for illy e la ringraziamo per la fi ducia accordataci.
Prima di mettere in funzione la macchina, le consigliamo di leggere attentamente le istruzioni contenute in questo manuale, che le spiega come utilizzarla, pulirla e mantenerla in perfetta efficienza.
Non ci resta che augurarle di poter degustare un perfetto espresso illy ogni volta che vuole grazie a Gaggia e a Metodo Iperespresso.
Le capsule illy Metodo Iperespresso sono in vendita sul sito www.illyeshop.com, al numero verde 800 821021 e presso i rivenditori autorizzati.
Per scoprire il rivenditore di capsule illy più vicino, basta cliccare sulla sezione“Trova illy”all’interno del sito www.illy.com.

GXI /01
Tasto erogazione caffè
Tasto ON/OFF
Cavo alimentazione
Pannello comandi
Leva apertura scompartimento
Scompartimento capsula
Erogatore caffè
Serbatoio acqua
Griglia appoggia tazze
Vasca raccogli gocce
• 3 •
|
GXI /02 |
|
|
Tasto erogazione caffè |
Italiano |
||
Tasto ON/OFF |
Tasto vapore |
||
|
|||
Pomello acqua calda/vapore
Tubo erogazione acqua calda / vapore
Cassetto raccogli capsule usate
Fig.A
Interruttore generale ON/OFF

• 4 •
INSTALLAZIONE
Operazioni preliminari
•Prelevare la macchina da caffè dall’imballo e posizionarla in un luogo idoneo.
Prima accensione

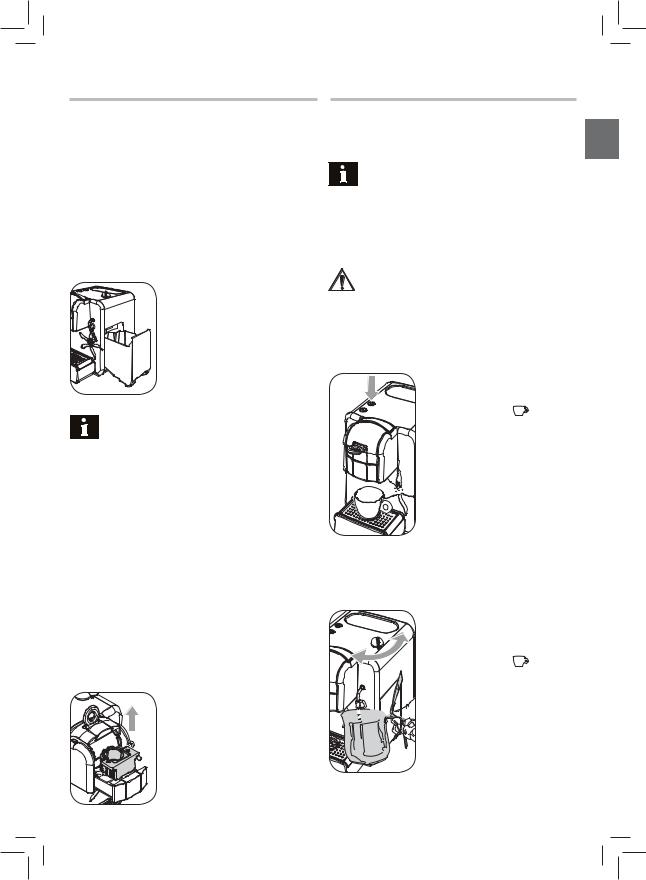
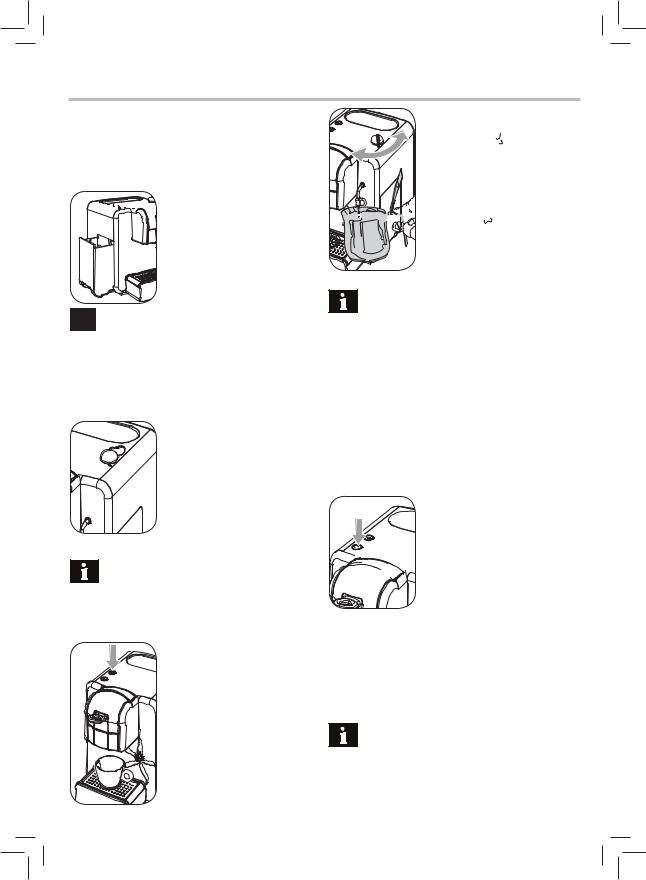
 • Estrarre il serbatoio acqua dalla sua sede,


 sciacquarlo e riempirlo con acqua potabile

 non gasata. Non superare il livello (MAX)
 riportato nel serbatoio. Reinserire il serba-
 toio nella sede apposita.
Acqua calda nonché altri liquidi possono danneggiare  il serbatoio e/o la macchina. Non mettere in funzione la macchina senza acqua: accertarsi che ve ne sia a sufficienza
all’interno del serbatoio.
•Inserire la spina nella presa di corrente sul retro della macchina (vedere Fig.A) ed inserire la spina dell’altro capo del cavo in una presa di corrente a parete di tensione adeguata.
• (GXI/02) - Assicurarsi che la manopola sia in posizione“/”; se necessario, ruotarlo fi no a portarla nella posizione indicata.
• Per accendere la macchina è sufficiente portare l’interruttore generale ON/OFF (posto sul retro) sulla posizione“I”.
 Nota:Primadiprocedereallaprimamessainfunzione o se il serbatoio acqua è stato svuotato completamen-
te, è necessario caricare il circuito idraulico.
Caricamento circuito
GXI/01
 • II tasto “
 “ si accende e lampeggia il tasto

 “
“  “.
“.
• Inserire una tazzina sotto l’erogatore.
• Premere il tasto “ “.
“.
Quando esce acqua in modo regolare premere nuovamente il tasto “ “ per terminare l’erogazione.
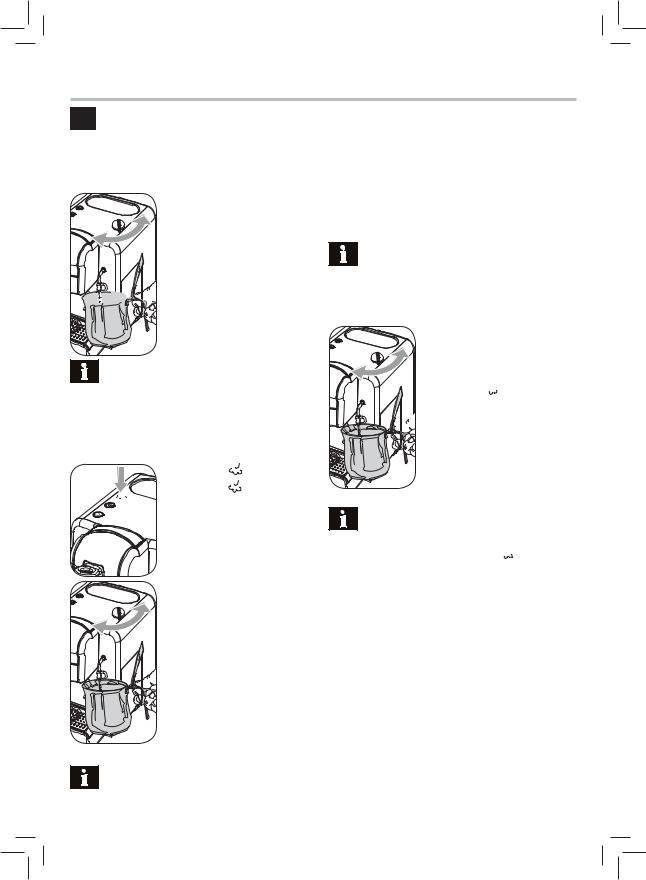
GXI /02
• II tasto “ “ si accende e lampeggiano i
tasti“ “ e“
“ e“ “.
“.
• Per caricare il circuito inserire un conteni-
tore sotto il tubo vapore.
• Ruotare il pomello acqua calda/vapore in
senso orario fino a fine corsa.


 Quando il tasto “
 “ si spegne ruotare il


 pomello in senso antiorario fi no a riportar-
  lo nella posizione originaria.
 Nota(pertuttiimodelli):Dopoavercaricatoilcircuito, utilizzando lo stesso procedimento, è consigliabile erogare un serbatoio completo di acqua. Al termine riempire
nuovamente il serbatoio con acqua fresca potabile.
Stand-by
La macchina è predisposta per il risparmio
 energetico.
Dopo 1 ora dall’ultimo utilizzo, la macchina si porta in stand-by automaticamente.
Quando la macchina è in stand-by, il tasto “ “ lampeggia lentamente, mentre gli altri tasti rimangono spenti.
Per riavviare la macchina è sufficiente premere il tasto“ “.
“.
E’possibile attivare manualmente la funzione di stand-by semplicemente premendo il tasto“ “.
“.
 Nota (per tutti i modelli): Al riavvio della macchina eseguire un’erogazione senza capsula per ottimizzare
il sistema.

• 5 •
EROGAZIONE CAFFÉ
La macchina è stata concepita per utilizzare esclusivamente capsule illy“Metodo Iperespresso”.
|
Prima di erogare caffè verificare che il tasto “ |
“sia |
|
acceso fisso e che il serbatoio acqua sia pieno. |
|
Non inserirvi le dita o qualsiasi altro oggetto. Le capsule monodose sono predisposte per erogare un solo caffè.
NON utilizzare le capsule dopo il loro impiego. All’avvio della fase di erogazione, la macchina esegue un ciclo di pre-infusione, durante il quale può non esserci fuoriuscita di caffè.
All’accensione della macchina eseguire un’erogazione senza capsula per ottimizzare il sistema.
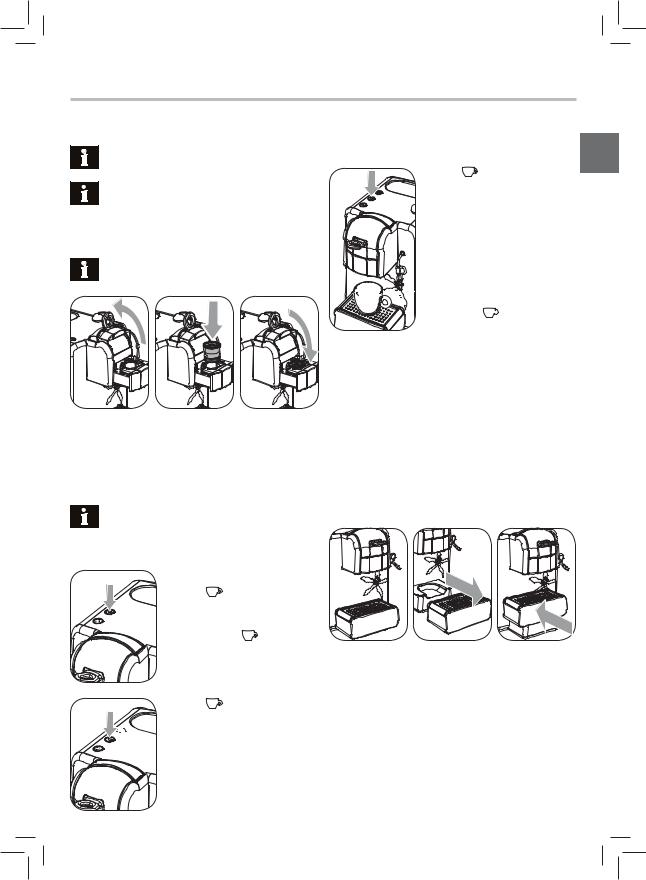
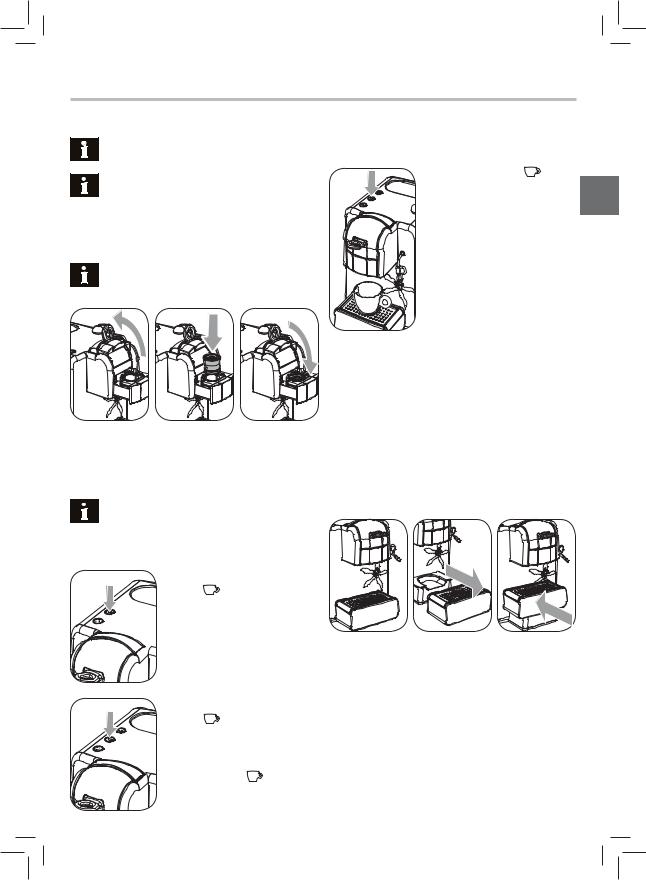
•Posizionare 1 tazzina sotto il beccuccio dell’erogatore.
•Sollevare la leva per apertura dello scompartimento porta capsule.
•Inserire la capsula come mostrato in fi gura.
•Abbassare la leva per chiudere lo scompartimento porta capsula.
 Nel caso in cui si presenti una certa difficoltà nel chiudere lo scompartimento, verificare il corretto posizionamento della capsula e che il cassetto capsule usate
non sia pieno.
Regolazione ca è in tazza (GXI/02)
La macchina permette di regolare la quantità di caffè erogato secondo i vostri gusti e le dimensioni delle vostre tazze/tazzine.
Ad ogni pressione del tasto “ “ la mac-
 china è già programmata per erogare un
caffè di circa 30 cc.
Questa quantità può essere ri-programma- ta a piacimento.
Per riprogrammare la quantità procedere
come segue:


 • Porre una tazzina sotto l’erogatore.
• Premere e mantenere premuto il tasto “ 
 “.
“.
•Quando, nella tazzina, è stato raggiunto il quantitativo di caffè desiderato, rilasciare il tasto“ “.
“.
A questo punto il tasto “ “ è programmato; ad ogni pressione, la macchina, provvede ad erogare la medesima quantità appena programmata.
Altezza raccogli gocce
La vasca raccogli gocce può essere posizionata nel modo più corretto in funzione delle tazze o tazzine che si desidera utilizzare.
Nella fi g.1 la macchina riporta la vasca raccogli gocce nella posizione ottimale per le tazze alte.
GXI/01 |
|
|
|
|
|
• Premere il tasto“ |
“. |
|
|
|
|
• Inizia l’erogazione |
del caffè. |
Quando |
|
|
|
viene raggiunta la quantità di caffè desi- |
|
|
|
||
derata, interrompere l’erogazione del caffè |
|
Fig.2 |
Fig.3 |
||
premendo nuovamente il tasto“ |
“. |
Fig.1 |
|||
GXI/02 |
“. |
• Premere il tasto“ |

 • L’erogazione del caffè si ferma automati-
camente quando viene raggiunto il livello
impostato; è comunque possibile inter-


 rompere l’erogazione del caffè premendo il
  tasto“
 “.
“.
Se invece si desidera usare una tazzina per espresso, la posizione ottimale è quella indicata in fi g.3.
Per modifi care il posizionamento della vasca raccogli gocce è necessario estrarla dalla propria sede tirandola verso l’esterno (fi g.2), posizionarla sulle guide del supporto e spingerla fino a fine corsa (fi g.3).
Italiano
• 6 •
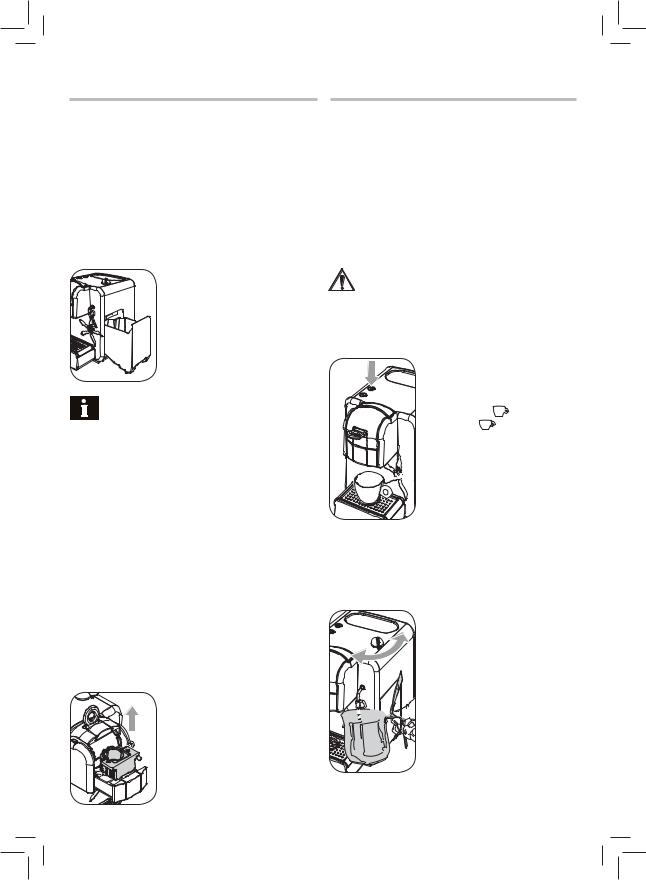
EROGAZIONE ACQUA CALDA / VAPORE / CAPPUCCINO MOD. GXI/02
Attenzione: all’inizio possono verificarsi brevi spruzzi  di acqua calda: pericolo di scottature. Il tubo di erogazione dell’acqua calda può raggiungere temperature elevate:
evitare di toccarlo direttamente con le mani.
Acqua calda
• Prima d’erogare acqua calda verifi care che
il tasto“ “ sia acceso in modo fi sso.
• Inserire un contenitore idoneo (preferibil-
mente metallico) sotto il tubo vapore;
• Ruotare il pomello acqua calda vapore in
senso orario fino a fine corsa.
• Erogare la quantità desiderata di acqua


 calda; per fermare l’erogazione dell’acqua
calda ruotare in senso antiorario fi no alla posizione originaria.
Con questa procedura si possono erogare al massimo 180cc di acqua.
Vapore / Cappuccino
Il vapore può essere utilizzato per montare il latte, per il cappuccino ma anche per il riscaldamento delle bevande.
• Premere il tasto“ |
“. |
• Quando il tasto “ |
“ si accende in modo |

 fi sso, la macchina è pronta.
• Inserire un contenitore sotto il tubo vapo-
re.
• Ruotare il pomello in senso orario fino
a fine corsa; inizia l’erogazione; in breve
tempo comincerà ad uscire solo vapore.
Riportare il pomello nella posizione origi-
naria per fermare l’erogazione del vapore.
• Per preparare la crema per un cappuccino, riempire 1/3 del contenitore (preferibilmente metallico) con del latte fresco.”
•Immergere il tubo vapore nel latte da riscaldare e ruotare fino a fine corsa il pomello in senso orario per erogare vapore.
•Far ruotare il recipiente con lenti movimenti dal basso verso l’alto per rendere uniforme la formazione di schiuma.
•Quando si è ottenuto il risultato desiderato, ruotare il pomello nella posizione originaria per fermare l’erogazione del vapore.
•Lo stesso sistema può essere utilizzato per il riscaldamento di altre bevande.
Dopo aver usato il tubo vapore, è necessario lavarlo accuratamente dai residui di latte come indicato nel
capitolo “Pulizia e Manutenzione”.
Dopo aver utilizzato il tubo vapore, prima di ogni altra operazione, procedere come segue:
• Inserire un contenitore idoneo sotto il
tubo vapore.
• Ruotare il pomello acqua calda/vapore in
senso orario fino a fine corsa.
Quando il tasto “ “ si spegne ruotare il
 pomello in senso antiorario fi no a riportar-
  lo nella posizione originaria.
 Lasciandola inattiva, la macchina si riporta automaticamente alla temperatura per l’erogazione del caffè, per ripristinare la giusta temperatura per
l’erogazione del vapore premere il tasto “ “.
“.
 Per garantire un miglior risultato nella preparazione del cappuccino, si consiglia di usare sempre latte a
temperatura di frigorifero.
• 7 •
PULIZIA E MANUTENZIONE
Pulizia generica
•Effettuare le operazioni di pulizia soltanto quando la macchina è fredda e scollegata dalla rete elettrica.
•Non immergere la macchina nell’acqua.
•Non inserire in lavastoviglie i componenti removibili.
•Non utilizzare oggetti acuminati o prodotti chimici aggressivi (solventi) per la pulizia.
•Per la pulizia dell’apparecchio utilizzare un panno morbido inumidito con acqua.
•Non asciugare la macchina e/o i suoi componenti utilizzando un forno a microonde e/o un forno convenzionale.
• Estrarre il cassetto raccogli capsule usate. Vuotare i liquidi presenti nel cassetto. Vuotare il cassetto dalle capsule usate. Lavare ed asciugare prima di reinserirlo.
 Verificare periodicamente che il cassetto capsule non sia pieno al fine d’evitare malfunzionamenti e danni
alla macchina.
•Dopo l’uso del tubo acqua calda/vapore, fare acqua calda a vuoto per qualche secondo. Pulire esternamente la lancia con un panno umido.
•Giornalmente vuotare e lavare la vasca raccogli gocce.
•Si consiglia di pulire quotidianamente il serbatoio dell’acqua:
-Estrarre il fi ltrino bianco posto all’interno del serbatoio e pulirlo con acqua corrente potabile.
-Riposizionare il fi ltrino bianco nel suo alloggiamento esercitando una leggera pressione combinata ad una leggera rotazione.
-Riempire il serbatoio con acqua fresca potabile.
• Eseguire settimanalmente per entrambi i modelli il lavaggio del porta capsule.
• Aprire lo scompartimento ed estrarre il porta capsule. Lavarlo con acqua tiepida ed asciugarlo prima di riporlo nella sua sede.
DECALCIFICAZIONE
La formazione del calcare è naturale conseguenza dell’uso dell’apparecchio; la decalcifi cazione è necessaria ogni 3-4 mesi o quando si osserva una riduzione della portata dell’acqua.
 Si raccomanda d’utilizzare il decalcificante Gaggia, che è stato studiato per rispettare le caratteristiche tecniche della macchina, mantenendo le sue performance nel tempo, in pieno rispetto della sicurezza per il consumatore. La soluzione decalcificante deve essere smaltita secondo quanto previsto dal costruttore e/o dalle norme vigenti nel
Paese d’utilizzo.
Attenzione! Non utilizzare in nessun caso l’aceto come decalcificante.
•Svuotare il serbatoio e riempirlo con una soluzione di decalcifi cante e acqua come specifi cato sulla confezione del prodotto decalcifi cante.
•Accendere la macchina con l’interruttore generale ON/OFF.
GXI/01
• Inserire un contenitore sotto l’erogatore. |
|
• Verifi care che il tasto “ |
“ sia acceso; |
erogare tutto il contenuto del serbatoio ad |
|
 intervalli, una tazza per volta, premendo il
tasto “ “; per fermare premere di nuo-
vo il tasto. Dopo ogni erogazione attendere
15 minuti prima d’eseguire la successiva


 erogazione.
• Terminata la soluzione decalcifi cante
presente nel serbatoio, lavarlo con cura e riempirlo con acqua fresca potabile.
•Erogare tutta l’acqua appena inserita nel serbatoio in un contenitore, premendo il tasto“ “.
“.
•Terminata l’acqua, fermare l’erogazione e riempire nuovamente il serbatoio. La macchina è pronta all’uso.
GXI/02
• Inserire un contenitore sotto il tubo vapore.
• Verifi care che il tasto “ |
“ sia acceso; |
erogare tutto il contenuto |
del serbatoio |
ad intervalli, una tazza per volta, ruotan-
do fino a fine corsa il pomello in senso


 orario; per fermare riportare il pomello in
posizione originaria. Dopo ogni erogazione
attendere 15 minuti prima d’eseguire la
successiva erogazione.
 • Terminata la soluzione decalcifi cante presente nel serbatoio, lavarlo con cura e riempirlo con acqua fresca potabile.
Italiano

• 8 •
SEGNALAZIONI MACCHINA
•Erogare tutta l’acqua appena inserita nel serbatoio in un contenitore ruotando il pomello in senso orario.
•Terminata l’acqua, fermare l’erogazione e riempire nuovamente il serbatoio. La macchina è pronta all’uso.
PANNARELLO OPZIONALE
Il pannarello può essere acquistato separatamente presso il rivenditore di fiducia.
Il pannarello vi consente di preparare dei cremosi cappuccini. Per l’utilizzo del pannarello si deve preparare la macchina per l’erogazione dell’acqua calda e del vapore come descritto nei relativi paragrafi .
Settimanalmente il pannarello deve essere smontato e lavato completamente.
Tutti i modelli
Acceso fisso
 Macchina alimentata.
Lampeggiante lento
Macchina in Stand-by. Premere il tasto per attivare la macchina.
GXI/01
Acceso fisso
 Macchina pronta per l’erogazione del caffè.
Lampeggiante lento
Macchina in fase di riscaldamento per l’erogazione del caffè.
SMALTIMENTO
Ai sensi dell’art. 13 del Decreto Legislativo 25 luglio 2005, n. 151”Attuazione delle Direttive 2002/95/CE, 2002/96/CE e 2003/108/CE, relative alla riduzione dell’uso di sostanze pericolose nelle apparecchiature elettriche ed elettroniche, nonché allo smaltimento dei rifiuti”
Il simbolo del cassonetto barrato riportato sull’apparecchiatura o sulla sua confezione indica che il prodotto alla fi ne della propria vita utile deve essere raccolto separatamente dagli altri rifi uti. L’utente
dovrà, pertanto, conferire l’apparecchiatura giunta a fi ne vita agli idonei centri di raccolta differenziata dei rifi uti elettronici ed elettrotecnici, oppure riconsegnarla al rivenditore al momento dell’acquisto di una
nuova apparecchiatura di tipo equivalente, in ragione di uno a uno. L’adeguata raccolta differenziata per l’avvio successivo dell’apparecchiatura dismessa al riciclaggio, al trattamento e allo smaltimento ambientalmente compatibile contribuisce ad evitare possibili effetti negativi sull’ambiente e sulla salute e favorisce il reimpiego e/o riciclo dei materiali di cui è composta l’apparecchiatura. Lo smaltimento abusivo del prodotto da parte dell’utente comporta l’applicazione delle sanzioni amministrative previste dalla normativa vigente.
GXI/02
Acceso fisso
 Macchina pronta per l’erogazione del caffè


 e dell’acqua calda.
Lampeggiante lento
Macchina in fase di riscaldamento per l’erogazione del caffè e dell’acqua calda.
Acceso fisso
 Macchina pronta per l’erogazione del va-

 pore.
pore.
Lampeggiante lento
Macchina in fase di riscaldamento per l’erogazione del vapore.
Lampeggianti insieme
 Macchina in sovratemperatura (procedere

 con il caricamento del circuito)
Circuito idraulico scarico (procedere con il caricamento del circuito)


 Pomello acqua calda/vapore aperto (chiudere il pomello ruotandolo in senso antiorario)

• 9 •
RISOLUZIONE PROBLEMI
Comportamenti |
Cause |
|
Rimedi |
|
|
|
|
La macchina non si accende. |
La macchina non è collegata alla rete elettrica. |
Collegare la macchina alla rete elettrica. |
|
|
Italiano |
||
|
|
|
Rivolgersi al centro assistenza. |
|
|
||
La macchina impiega molto tempo per |
L’apparecchio ha molto calcare. |
Decalcifi care l’apparecchio. |
|
|
|
|
|
|
|
|
|
||||
scaldarsi. |
|
|
|
|
|
|
|
La pompa è rumorosa |
Manca acqua nel serbatoio. |
Rabboccare con acqua fresca potabile. |
|
|
|
||
|
Il serbatoio è stato riempito senza eseguire il ciclo |
Eseguire il ciclo di caricamento del circuito idraulico (Ve- |
|||||
|
di caricamento del circuito idraulico. |
dere sezione“Caricamento circuito”). |
|
|
|
||
La leva non raggiunge la posizione di ero- |
Cassetto capsule usate pieno. |
Vuotare il cassetto capsule usate. Ripetere la sequenza |
|||||
gazione. |
|
|
di caricamento capsula; se non è sufficiente intervenire |
||||
|
|
|
manualmente per scaricare la capsula dal |
condotto |
|||
|
|
|
dopo aver scollegato la macchina dalla rete elettrica |
|
|||
|
Capsula inserita in modo errato. |
Ripetere la sequenza di caricamento della capsula. |
|
||||
il caffè è freddo. |
(GXI/01) - Il tasto “ |
“ era lampeggiante quan- |
Attendere che il tasto“ |
“ si accenda in modo fi sso. |
|||
|
do è stato premuto il tasto. |
|
|
|
|
|
|
|
Non è stato erogato un caffè senza capsula come |
Erogare un caffè senza capsula e successivamente ero- |
|||||
|
consigliato. |
|
gare il caffè utilizzando la capsula. |
|
|
|
|
Il caffè sgorga troppo velocemente o non |
Capsula usata. |
|
Inserire una nuova capsula e ripetere le operazioni. |
||||
viene erogato un caffè cremoso. |
|
|
|
|
|
|
|
Il caffè non sgorga o sgorga a gocce. |
(GXI/02) - Il tasto “ |
“ era lampeggiante quan- |
Attendere che il tasto“ |
“ si accenda in modo fi sso. |
|||
|
do è stato premuto il tasto. |
|
|
|
|
|
|
|
Manca acqua nel serbatoio |
Rabboccare con acqua fresca potabile. |
|
|
|
||
|
Circuito idraulico scarico. |
Ricaricare il circuito (paragrafo“Prima accensione”). |
|||||
Nessuna erogazione di acqua calda o vapo- |
Lancia vapore otturata. |
|
Pulire il beccuccio con un ago. |
|
|
|
|
re (GXI/02) |
|
|
(La macchina deve essere spenta, fredda ed il po- |
||||
|
|
|
mello acqua calda /vapore deve essere chiuso). |
|
|||
|
Pomello acqua calda/vapore aperto in modo er- |
Ruotare il pomello acqua calda/vapore fi no a fi ne corsa. |
|||||
|
rato. |
|
|
|
|
|
|
Non si forma la schiuma del latte. |
Latte non adatto. |
|
Utilizzare latte fresco, parzialmente scremato. |
|
|
|
|
|
Latte troppo caldo. |
|
Usare latte a temperatura di frigorifero. |
|
|
|
|
Per i guasti non contemplati dalla suddetta tabella o in caso che i rimedi suggeriti non li risolvano, rivolgersi ad un centro assistenza.
DATI TECNICI
Il costruttore si riserva il diritto di modifi care le caratteristiche tecniche del prodotto.
Tensione nominale - Potenza nominale - Alimentazione . . . . . . . . . . . . . . . . . . . . . . . . . . . . . . . . . . . . . . . . . . . . Vedi targhetta posta all’interno dello sportello Materiale corpo . . . . . . . . . . . . . . . . . . . . . . . . . . . . . . . . . . . . . . . . . . . . . . . . . . . . . . . . . . . . . . . . . . . . . . . . . . . . . . . . . . . . . . . . . . . . . . . . . . . . . . . . . . Termoplastico Dimensioni (larghezza x profondità x altezza) (mm) . . . . . . . . . . . . . . . . . . . . . . . . . . . . . . . . . . . . . . . . . . . . . . . . . . . . . . . . . . . . . . . . . . . . . . . . . . . 216 x 332 x 273 Peso . . . . . . . . . . . . . . . . . . . . . . . . . . . . . . . . . . . . . . . . . . . . . . . . . . . . . . . . . . . . . . . . . . . . . . . . . . . . . . . . . . . . . . . . . . . . . . . . . . . . . . . . . . . . . . . . . . . . . . . . . . . . .4 Kg Lunghezza cavo . . . . . . . . . . . . . . . . . . . . . . . . . . . . . . . . . . . . . . . . . . . . . . . . . . . . . . . . . . . . . . . . . . . . . . . . . . . . . . . . . . . . . . . . . . . . . . . . . . . . . . . . . . . . . . . . . .1,2 m Pannello di comando . . . . . . . . . . . . . . . . . . . . . . . . . . . . . . . . . . . . . . . . . . . . . . . . . . . . . . . . . . . . . . . . . . . . . . . . . . . . . . . . . . . . . . . . . . . . . . . . Sulla parte superiore Serbatoio acqua . . . . . . . . . . . . . . . . . . . . . . . . . . . . . . . . . . . . . . . . . . . . . . . . . . . . . . . . . . . . . . . . . . . . . . . . . . . . . . . . . . . . . . . . . . . . . . . . . . . . . . .1,0 litri - Estraibile Capacità contenitore capsule usate . . . . . . . . . . . . . . . . . . . . . . . . . . . . . . . . . . . . . . . . . . . . . . . . . . . . . . . . . . . . . . . . . . . . . . . . . . . . . . . . . . . . . . . . . . . . . . . . . . . . 12 Pressione pompa . . . . . . . . . . . . . . . . . . . . . . . . . . . . . . . . . . . . . . . . . . . . . . . . . . . . . . . . . . . . . . . . . . . . . . . . . . . . . . . . . . . . . . . . . . . . . . . . . . . . . . . . . . . 15 ÷ 19 bar Caldaia . . . . . . . . . . . . . . . . . . . . . . . . . . . . . . . . . . . . . . . . . . . . . . . . . . . . . . . . . . . . . . . . . . . . . . . . . . . . . . . . . . . . . . . . . . . . . . . . . . . . . . . . . . . . . . . . . . . . . . . . . . .Inox Dispositivi di sicurezza . . . . . . . . . . . . . . . . . . . . . . . . . . . . . . . . . . . . . . . . . . . . . . . . . . . . . . . . . . . . . . . . . . . . . . . . . . . . . . . . . . . . . . . . . . . . . . . . . . . . . .Termofusibile
R
Type Sin 030H - Sin 030HRD
C US

• 10 •
NORME DI SICUREZZA
Mai mettere a contatto dell’acqua le parti sotto corrente: pericolo di cortocircuito! Il vapore e l’acqua calda possono provocare scottature! Mai dirigere il getto di vapore o dell’acqua calda verso parti del corpo; toccare con precauzione il beccuccio vapore / acqua
calda prendendolo per l’apposita presa: pericolo di scottature!
Destinazione d’uso
La macchina per caffè è prevista esclusivamente per l’impiego domestico.
È vietato apportare modifi che tecniche e ogni impiego illecito, a causa dei rischi che essi comportano! L’apparecchio non è destinato ad essere utilizzato da persone (compresi i bambini) con ridotte capacità fi siche, mentali o sensoriali o con esperienza e/o competenze insufficienti, a meno che non siano sotto la supervisione di una persona responsabile della loro sicurezza o non vengano da essa istruite sull’uso dell’apparecchio.
Alimentazione di corrente - Cavo d’alimentazione
Allacciare la macchina per caffè soltanto ad una presa di corrente adeguata.
La tensione deve corrispondere a quella indicata sulla targhetta dell’apparecchio. Mai usare la macchina per caffè se il cavo d’alimentazione è difettoso. Se il cavo d’alimentazione è danneggiato, deve essere sostituito con uno idoneo avente le medesime caratteristiche di quello fornito con la macchina. Non far passare il cavo d’alimentazione per angoli e su spigoli vivi, sopra oggetti molto caldi e proteggerlo dall’olio. Non portare o tirare la macchina per caffè tenendola per il cavo. Non estrarre la spina tirandola per il cavo oppure toccarla con le mani bagnate. Evitare che il cavo d’alimentazione cada liberamente da tavoli o scaffali.
Protezione d’altre persone
Tenere i bambini sotto supervisione, per evitare che giochino con l’apparecchio. I bambini non si rendono conto del pericolo connesso agli elettrodomestici. Non lasciare alla portata dei bambini i materiali utilizzati per imballare la macchina.
Pericolo d’ustioni
Evitare di dirigere contro se stessi e/o altri il getto di vapore e/o d’acqua calda: pericolo di scottature! All’inizio dell’erogazione possono verifi carsi brevi spruzzi di acqua calda. Il tubo acqua calda/vapore può raggiungere temperature elevate: evitare di toccarla direttamente con le mani, utilizzare l’apposita manopola.
Ubicazione - Spazio per l’uso e la manutenzione
Per una corretta gestione si consiglia di:
•Scegliere un piano d’appoggio sicuro, ben livellato, dove nessuno può rovesciarla o venirne ferito.
•Scegliere un ambiente sufficientemente illuminato, igienico e con presa di corrente facilmente accessibile.
•Prevedere una distanza minima dalle pareti della macchina di circa 15 cm.
Non tenere la macchina a temperatura inferiore a 0°C; c’è il pericolo che il gelo possa danneggiare la macchina. Non usare la macchina per caffè all’aperto. Non posare la macchina su superfi ci molto calde e nelle vicinanze di fi amme libere per evitare che la carcassa fonda o comunque si danneggi.
Custodia della macchina - Pulizia
Prima di pulire la macchina, è indispensabile spegnere la macchina con l’interruttore generale ON/OFF, poi staccare la spina dalla presa di corrente ed aspettare che la macchina si raffreddi. Mai immergere la macchina nell’acqua!
È severamente vietato cercare d’intervenire all’interno della macchina. (Solo il modello GXI/02) - Se la macchina dovrà rimanere inutilizzata per un periodo prolungato, erogare acqua dal tubo vapore e lavare con cura il tubo vapore; successivamente spegnerla con l’interruttore generale ON/OFF e staccare la spina dalla presa. Custodirla in luogo asciutto e non accessibile ai bambini. Proteggerla dalla polvere e dallo sporco.
Serbatoio acqua:
Immettere nel serbatoio soltanto acqua fresca potabile non gasata. Non mettere in funzione la macchina se l’acqua non supera almeno il livello minimo indicato sul serbatoio. Non utilizzare, per scopi alimentari, l’acqua rimasta nel serbatoio per alcuni giorni.
Scompartimento capsule:
Nello scompartimento capsule devono essere inserite solo capsule illy “Metodo Iperespresso”; non inserire le dita o qualsiasi altro oggetto. Le capsule devono essere usate una sola volta. É vietato aprire lo scompartimento capsule durante l’erogazione del caffè.
Riparazioni / Manutenzione
Nel caso di guasti, difetti o sospetto di difetto dopo una caduta, staccare subito la spina dalla presa. Mai mettere in funzione una macchina difettosa. Soltanto i Centri di Assistenza Autorizzati possono effettuare interventi e riparazioni. Nel caso di interventi non eseguiti a regola d’arte, si declina ogni responsabilità per eventuali danni. Conservare l’imballo per un eventuale trasporto.
Antincendio
In caso di incendio utilizzare estintori ad anidride carbonica (CO2). Non utilizzare acqua o estintori a polvere.
• 11 •
DICHIARAZIONE DI CONFORMITA’CE
ANNO 09
EC 2006/95, EC 2004/108,
Gaggia S.p.A.
20087 Robecco sul Naviglio (MI) Italy
dichiariamo sotto la nostra responsabilità che il prodotto :
MACCHINA PER CAFFE' SINGOLA
TIPO : SIN 030H - SIN 030HRD
al quale si riferisce questa dichiarazione è conforme alle seguenti norme :
•Sicurezza di elettrodomestici e apparecchi elettrici - Requisiti generali
EN 60335-1 (2002) + A1(2004) + A2(2006) + A11(2004) + A12 (2006) + A13(2008)
•Sicurezza di elettrodomestici e apparecchi elettrici - Parte 2-15 Requisiti specifi ci per apparecchi per riscaldare liquidi
EN 60 335-2-15 (2002) + A1(2005)
•Sicurezza apparecchi per uso domestico e similare. Campi elettromagnetici Metodi per la valutazione e le misure EN 50366 (2003) + A1 (2006).
•Limiti e metodi di misurazione dei disturbi radio caratteristici di apparecchi con motore elettrico e termici per uso domestico e simili scopi, strumenti elettrici e simili apparecchiature elettriche - EN 55014-1 (2006).
•Compatibilità elettromagnetica (EMC)
Parte 3^ Limiti - Sezione 2 : Limiti per le emissioni di corrente armonica (corrente in ingresso dell’apparecchiatura ≤ 16A per fase) - EN 61000-3-2 (2006).
•Compatibilità elettromagnetica (EMC)
Parte 3^ Limiti - Sezione 3 : Limitazione delle fl uttuazioni e dei picchi di tensione nei sistemi di alimentazione a bassa tensione per apparecchiature con corrente nominale ≤ 16A. EN 61000-3-3 (1995) + corr.(1997) + A1(2001) + A2 (2005).
•Requisiti di immunità per elettrodomestici, strumenti e apparecchi similari. Norma per famiglia di prodotti EN 55014-2 (1997) + A1 (2001)
secondo le disposizioni delle direttive : EC 2006/95 , EC 2004/108.
Robecco sul Naviglio 28/04/2009
R & D Manager
Ing. Andrea Castellani
Italiano

• 12 •
IMPORTANT SAFEGUARDS
When using electrical appliances, basic safety precautions should always be followed, including the following:
1.Read all instructions.
2.Do not touch hot surfaces. Use handles or knobs.
3.To protect against fire, electric shock and injury to person do not immerse cord, plugs, or machine in water or other liquid.
4.Close supervision is necessary when the appliance is used by or near children.
5.Unplug from outlet when not in use and before cleaning. Allow to cool before putting on or taking off parts, and before cleaning the appliance.
6.Do not operate any appliance with a damaged cord or plug or after the appliance malfunctions, or has been damaged in any manner. Return appliance to the nearest authorized service facility for examination, repair or adjustment.
7.The use accessory attachments not recommended by the appliance manufacturer may result in fire, electric shock or injury to persons.
8.Do not use outdoors.
9.Do not let cords hang over edge of table or counter, or touch hot surfaces.
10.Do not place on or near a hot gas or electric burner, or in a heated oven.
11.Always attach plug to appliance first, then plug cord into wall outlet. To disconnect, turn any control to “off”, then remove plug from wall outlet.
12.Do not use appliance for other than intended use.
13.Save these Instructions.
SAVE THESE INSTRUCTIONS

• 13 •
INSTRUCTIONS FOR THE POWER
SUPPLY CORD
A.A short power-supply cord (or detachable power-supply cord) is to be provided to reduce risks resulting from becoming entangled in or tripping over a longer cord.
B.Longer detachable power-supply cords or extension cords are available and may used if care is exercised in their use.
C.If a long detachable power-supply cord or extension cord is used,
1.The marked electrical rating of the detachable power-supply cord or extension cord should be at least as great as the electrical rating of the appliance
2.If the appliance is of the grounded type, the extension cord should be a grounding-type 3-wire cord, and
3.The longer cord should be arranged so that it will not drape over the counter top or table top where it can be pulled on by children or tripped over.
English

• 14 •
Dear Customer,
Thank you for purchasing the “Gaggia for illy” espresso coff ee machine and for your confi dence in our products.
Before operating the machine, we recommend you to carefully read the operating instructions in this manual, which explain how to use, clean and maintain the machine in perfect working order.
And now, just enjoy a perfect illy espresso coffee whenever you wish thanks to Gaggia and Metodo Iperespresso.
illy Metodo Iperespresso capsules can be purchased via www.illy.com.

GXI/01
Coffee brew button
ON/OFF button
Power cord
Control panel
Compartment opening lever
Capsule compartment
Brew unit
Water tank
Cup stacking surface
Drip tray
• 15 •
|
GXI/02 |
Coffee brew button |
|
ON/OFF button |
Steam button |
English
Hot water/steam knob
Hot water/steam wand
Used capsule drawer
Fig.A
ON/OFF power button

• 16 •
INSTALLATION
Preliminary Operations
•Remove the coffee machine from the packaging and position it in a suitable place.
Using the Machine for the First Time

 • Remove the water tank from its seat, rinse


 it and fi ll it with still drinking water. Do not

 exceed the level (MAX) indicated on the
 water tank. Put the water tank back in its
 seat.
seat.
Hot water or any other liquid may damage the tank  and/or the machine. Do not turn on the machine when the tank is empty: Make sure there is enough water
in the tank.
GXI/02 |
|
|
• The “ |
“ button turns on and the “ |
“ |
and“ |
“ buttons blink. |
|
• To prime the watercircuit,place a container
below the steam wand.
• Turn the hot water / steam knob clockwise
to its limit stop.


 When the “
 “ button turns off, rotate the


 switch counter-clockwise to set it back to its
  former position.
 Note (for all the machine models): After priming the water circuit, it is recommended to use the same procedure to dispense an entire water tank. At the end of this
operation, fill the tank again with fresh drinking water.
•Insert the plug into the socket on the back of the machine (see Fig. A) and insert the plug of the other end of the cable into a wall socket with suitable power voltage.
• (GXI/02) - Make sure the switch is on “/” position; if this is not the case, turn it onto that position.
• To switch on the machine, set the power button ON/OFF (on the back of the machine) to“I”.
 Note: Before starting the machine for the first time or if the water tank has been completely emptied,
prime the water circuit.
Priming the Water Circuit
GXI/01
 • The “
 “ button turns on and the “
 “
“

 button blinks..
• Place a cup under the dispensing spout.
• Press the “ “ button.
When water is dispensed correctly, press the “ “ button again to stop dispensing.
Stand-by
The machine is designed for energy saving.
 The machine automatically goes into standby mode after 1 hour of inactivity.


 When the machine is in standby mode, the
“ “ button blinks slowly, while the other buttons are off.
To turn the machine on again simply press the “ “ button.
It is possible to manually activate the stand-by function by pressing the“ “ button.
 Note (for all the machine models): When restarting the machine, brew once without capsule to optimize
the system.
• 17 •
COFFEE BREWING
The machine has been specifically designed to use “Metodo Iperespresso”illy capsules.
Before brewing coffee, check that the “ “ button light is steady one and that the water tank is full.
 Do not put your fingers or any other object in the compartment. Single-dose capsules brew a single coffee.
DO NOT use capsules more than once. When the brewing phase starts, the machine performs a prebrewing cycle. During this cycle, coffee cannot be brewed.
When starting the machine, brew once without capsule to optimize the system.
•Place 1 cup under the dispensing spout.
•Lift the capsule compartment opening lever.
•Insert the capsule as shown in the fi gure.
•Lower the lever to close the capsule compartment.
 If the compartment closing operation proves to be difficult, check that the capsule is correctly inserted
and that the used capsule drawer is not full.
Adjusting the Brewed Co ee (GXI/02)
The machine allows you to adjust the amount of brewed coffee ac- |
|
||
cording to your taste and the size of your cups. |
English |
||
Each time “ |
“ is pressed, the machine is |
||
|
|||
set to brew a coffee of approximately 30 cc. |
|
||
This amount may be reprogrammed to your |
|
||
taste. |
|
|
|
Proceed as follows to reprogram this quan- |
|
||
tity: |
|
|
|
• Place a cup under the dispensing spout. |
|
||


 • Press and hold the“
 “ button.
• Release the “  “ button when the


 amount of coffee in the cup reaches the desired level.
At this point the button “ “ is programmed; each time it is released, the machine will brew the same amount of coffee that was just programmed.
Drip Tray Height
The drip tray height can be adjusted to adapt to the cups to be used.
Figure 1 shows how the drip tray has been adjusted to the best height for tall cups.
GXI/01 |
|
|
|
|
• Press the “ |
“ button. |
|
|
|
• Coffee brewing begins. Once the desired |
|
|
||
quantity of coff ee has been reached, stop |
|
|
||
brewing by pressing “ |
“ once again. |
Fig.2 |
Fig.3 |
|
|
|
Fig.1 |
||
GXI/02 |
“ button. |
• Press the “ |
• Coffee brewing stops automatically when

 the pre-programmed level is reached; however, it is possible to interrupt coffee brewing by pressing the “
 “ button.
For espresso cups, the best height is shown in fi gure 3.
To change the height of the drip tray, remove it from its seat by pulling it outwards (fi g. 2). Place it on the support guides and push it to its limit stop (fi g. 3).

• 18 •
DISPENSING HOT WATER / STEAM / CAPPUCCINO MOD. GXI/02
Warning: At the beginning, short spurts of hot water  may come out: Danger of scalding. The hot water wand may reach high temperatures: Never touch it with
bare hands.
Hot Water
• Before dispensing hot water, check that
the“ “ button is steady on.
• Place a suitable container (preferably, a
metal one) under the steam wand.
• Turn the hot water / steam knob clockwise
to its limit stop.
• Dispense the desired quantity of hot


 water; turn the knob counter-clockwise to


 its original position to stop dispensing hot
  water.
With this procedure max 180 cc of water can be dispensed.
Steam / Cappuccino
Steam may be used to froth milk for a cappuccino, as well as to reheat other beverages.
• Press the “ “ button.
• When the “ “ button is steady on, the
machine is ready.
• Place a container under the steam wand.
• Turn the knob clockwise to its limit stop;
the machine will start dispensing; after a
brief moment, only steam will come out of
the wand.
Turn the knob to its original position to stop
dispensing steam.
• To prepare froth for cappuccinos, fi ll 1/3 of the container (preferably, a metal one) with fresh milk.
•Immerse the steam wand in the milk to be heated and turn the knob clockwise to its limit stop to dispense steam.
•Whilst rotating the container, gently move it up and down to obtain uniform foam.
•Once the desired result has been achieved, turn the knob to its original position to stop dispensing steam.
•The same procedure can be used to heat other beverages.
After using the steam wand, clean it thoroughly to removeanymilkresidue,asdescribedinthe“Cleaning
and Maintenance” section.
After using the steam wand, proceed as follows before performing any other operation:
• Place a suitable container under the steam
wand.
• Turn the hot water / steam knob clockwise
to its limit stop.
When the “ “ button turns off, rotate the switch counter-clockwise to set it back to its former position.
If idle, the machine reaches automatically its coffee brewing temperature. To restore the correct
temperature for steam dispensing, press the “ “ button.
For better cappuccinos, always use milk at fridge temperature.
• 19 •
CLEANING AND MAINTENANCE
General Cleaning
•Cleaning can only be carried out when the machine is cold and disconnected from the electric network
•Do not immerse the machine in water.
•Do not wash any of its parts in the dishwasher.
•Do not use sharp objects or harsh chemical products (solvents) for cleaning.
•Use a soft, dampened cloth to clean the machine.
•Do not dry the machine and/or its components using a microwave and/or standard oven.
• Remove the used capsule drawer. Empty the drawer from the liquids. Empty the drawer from used capsules. Clean and dry before inserting it again.
 Check periodically that the capsule drawer is not full so as to avoid malfunctioning and damages to
the machine.
•After using the hot water/steam wand, dispense hot water for some seconds. Clean the wand externally with a damp cloth.
•Empty and wash the drip tray daily.
•It is recommended to clean the water tank daily:
-Remove the small white fi lter in the water tank and wash it under running drinking water.
-Reposition the small white fi lter in its housing by gently pressing and turning it at the same time.
-Fill the water tank with fresh drinking water.
• Rinse the capsule compartment weekly for both models.
• Open the compartment and remove the capsule compartment. Wash it with lukewarm water and dry it before inserting it back in its seat.
DESCALING
Limescale normally builds up with the use of the appliance. The ma- |
|
|
chine needs descaling every 3 - 4 months or whenever a reduction |
|
|
in water fl ow is noticed. |
English |
|
|
It is recommended to use Gaggia descaling solution, |
|
|
|
|
|
whose formula has been designed to respect the |
|
technical features of the machine, ensuring its performance |
|
|
will not decrease with time, and for a safe and risk-free use. |
|
|
The descaling solution is to be disposed of according to the |
|
|
manufacturer’s instructions and/or regulations in force in |
|
|
the country of use. |
|
|
|
Warning! Never use vinegar as a descaling solution. |
|
•Drain the tank and fi ll it up with descaling solution mixed with water, as specifi ed on the descaling solution package.
•Turn the machine on by means of the ON/OFF power button.
GXI/01
• Place a container under the dispensing |
|
spout. |
|
• Check that the “ |
“ button light is |
on; press the “ |
“button to dispense |
the whole water tank content at regular
intervals, a cup at a time; press the “ “
“
button again to stop dispensing. After each


 dispensing operation, wait for 15 minutes
before the next one.
• When the descaling solution in the tank is


 fi nished, wash the tank thoroughly, and fi ll it with fresh drinking water.
• Dispense all the water just introduced in the tank into a container, by pressing the “ “ button.
•Once the tank is empty, stop dispensing and fi ll the tank again. The machine is now ready for use.
GXI/02
• Place a container under the steam wand.
• Check that the “ “ button light is on;
turn the knob clockwise to its limit stop
to dispense the whole water tank content
at regular intervals, a cup at a time; set the
knob back to its original position to stop


 dispensing. After each dispensing operation,
wait for 15 minutes before the next one.
• When the descaling solution in the tank is
fi nished, wash the tank thoroughly, and fi ll it with fresh drinking water.
•Dispense all the water just introduced in the tank into a container, by rotating the knob clockwise.

• 20 •
MACHINE WARNINGS
•Once the tank is empty, stop dispensing and fi ll the tank again. The machine is now ready for use.
PANNARELLO OPTIONAL
The Pannarello can be bought separately from your dealer.
The Pannarello allows preparing creamy cappuccinos. In order to use the Pannarello you need to prepare the machine for dispensing hot water and steam as described in the relevant section.
The Pannarello must be removed and completely washed once a week.
All models
Steady on
 Machine power ON.
Slow blinking
Machine in Stand-by. Press the button to start the machine.
GXI/01
Steady on
 The machine is ready for coffee brewing.
Slow blinking
The machine is warming up for coffee brewing.
MACHINE DISPOSAL
This product complies with EU Directive 2002/96/EC.
The symbol on the product or on its packaging indicates that this product may not be treated as household waste. Instead it shall be handed over to the applicable collection point for the recycling of electrical and elec-
tronic equipment.
By ensuring this product is disposed of correctly, you will help prevent potential negative consequences for the environment and human health, which could otherwise be
caused by inappropriate waste handling of this product. For more detailed information about recycling of this product, please contact your local city office, your household waste disposal service or the shop where you purchased the product.
GXI/02
Steady on
 The machine is ready for espresso coffee


 brewing and hot water dispensing.
Slow blinking
The machine is warming up to brew coffee and dispense hot water.
Steady on
 The machine is ready for steam dispensing.
Slow blinking
The machine is warming up for steam dispensing.
Blinking simultaneously
 The machine is overheating (prime the

 circuit)
The water circuit is empty (prime the cir-
cuit)


 The hot water/steam knob is open (close it by turning it counter-clockwise).
• 21 •
TROUBLESHOOTING
Machine Actions |
Causes |
|
Solutions |
|
The machine does not switch on. |
The machine is not connected to the electric |
Connect the machine to the electric network. |
||
|
network. |
|
|
|
|
|
|
Contact the authorized service centre. |
|
The machine requires a lot of time to |
The appliance is full of limescale. |
Descale the machine. |
||
heat up. |
|
|
|
|
The pump is noisy |
No water in the tank. |
|
Refi ll with fresh drinking water. |
|
|
The tank has been filled without priming the |
Prime the water circuit (see section “Priming the water cir- |
||
|
water circuit. |
|
cuit”). |
|
The lever cannot reach the dispensing |
Used capsule drawer full. |
Empty the used capsules drawer. Insert the capsule by repeat- |
||
position. |
|
|
ing the whole sequence. If this should not prove successful, dis- |
|
|
|
|
connect the machine from the electric network and intervene |
|
|
|
|
manually to remove the capsule from the compartment |
|
|
The capsule is not inserted correctly. |
Insert the capsule again. |
||
The coffee is cold. |
(GXI/01) - The “ |
“ button was blinking |
Wait until the “ |
“ button turns on and remain fi xed. |
|
when pressed. |
|
|
|
|
No coffee without capsule (as suggested) has |
Brew a coffee without capsule and then brew another one with |
||
|
been brewed. |
|
a capsule. |
|
The coffee is brewed too fast or the |
Used capsule. |
|
Insert a new capsule and repeat the steps. |
|
brewed coffee is not creamy. |
|
|
|
|
Coffee is not brewed or brewed in drips |
(GXI/02) - The “ |
“ button was blinking |
Wait until the “ |
“ button turns on and remain fi xed. |
only. |
when pressed. |
|
|
|
|
No water in the tank. |
|
Refi ll with fresh drinking water. |
|
|
The water circuit is empty. |
Prime the circuit (section “Using the Machine for the First |
||
|
|
|
Time”). |
|
Hot water or steam not dispensed |
Clogged steam wand. |
|
Clean the spout with a needle. |
|
(GXI/02) |
|
|
(The machine should be turned off and cold, and the |
|
|
|
|
hot water / steam knob should be closed). |
|
|
The hot water/steam knob is open incorrectly. |
Turn the hot water / steam knob to its limit stop. |
||
The milk does not froth. |
Not suitable milk. |
|
Use fresh, partially skimmed milk. |
|
|
The milk is too hot. |
|
Use milk at fridge temperature. |
|
Please contact customer service for any problems not covered in the above table or when the suggested solutions do not solve the problem.
English
TECHNICAL SPECIFICATIONS
The manufacturer reserves the right to make changes to the technical specifi cations of the product. |
|
Nominal Voltage - Power Rating - Power Supply . . . . . . . . . . . . . . . . . . . . . . . . . . . . . . . . . . . . . . . . . . . . . . . . . . . . . . . |
See label on the inside of the service door |
Housing material . . . . . . . . . . . . . . . . . . . . . . . . . . . . . . . . . . . . . . . . . . . . . . . . . . . . . . . . . . . . . . . . . . . . . . . . . . . . . . . . . |
. . . . . . . . . . . . . . . . Thermoplastic material |
Size (width x depth x height) (mm) . . . . . . . . . . . . . . . . . . . . . . . . . . . . . . . . . . . . . . . . . . . . . . . . . . . . . . . . . . . . . . . . . . . |
. . . . . . . . . . . . . . . . . . . . . . 216 x 332 x 273 |
Weight . . . . . . . . . . . . . . . . . . . . . . . . . . . . . . . . . . . . . . . . . . . . . . . . . . . . . . . . . . . . . . . . . . . . . . . . . . . . . . . . . . . . . . . . . . . |
. . . . . . . . . . . . . . . . . . . . . . . . . . . . . . . . 4 kg |
Power Cord Length . . . . . . . . . . . . . . . . . . . . . . . . . . . . . . . . . . . . . . . . . . . . . . . . . . . . . . . . . . . . . . . . . . . . . . . . . . . . . . . . . |
. . . . . . . . . . . . . . . . . . . . . . . . . . . . . . .1.2 m |
Control Panel . . . . . . . . . . . . . . . . . . . . . . . . . . . . . . . . . . . . . . . . . . . . . . . . . . . . . . . . . . . . . . . . . . . . . . . . . . . . . . . . . . . . . . |
. . . . . . . . . . . . . . . . . . . . On the upper part |
Water Tank . . . . . . . . . . . . . . . . . . . . . . . . . . . . . . . . . . . . . . . . . . . . . . . . . . . . . . . . . . . . . . . . . . . . . . . . . . . . . . . . . . . . . . . |
. . . . . . . . . . . . . . . . 1.0 litres – Removable |
Used capsule drawer capacity . . . . . . . . . . . . . . . . . . . . . . . . . . . . . . . . . . . . . . . . . . . . . . . . . . . . . . . . . . . . . . . . . . . . . . . . |
. . . . . . . . . . . . . . . . . . . . . . . . . . . . . . . . . 12 |
Pump pressure . . . . . . . . . . . . . . . . . . . . . . . . . . . . . . . . . . . . . . . . . . . . . . . . . . . . . . . . . . . . . . . . . . . . . . . . . . . . . . . . . . . . |
. . . . . . . . . . . . . . . . . . . . . . . . . 15 ÷ 19 bar |
Boiler . . . . . . . . . . . . . . . . . . . . . . . . . . . . . . . . . . . . . . . . . . . . . . . . . . . . . . . . . . . . . . . . . . . . . . . . . . . . . . . . . . . . . . . . . . . . |
. . . . . . . . . . . . . . . . . . . . . . . Stainless steel |
Safety mechanisms . . . . . . . . . . . . . . . . . . . . . . . . . . . . . . . . . . . . . . . . . . . . . . . . . . . . . . . . . . . . . . . . . . . . . . . . . . . . . . . . |
. . . . . . . . . . . . . . . . . . . . . . . . Thermal fuse |
R
Type Sin 030H - Sin 030HRD
C US
• 22 •
SAFETY REGULATIONS
Never allow water to come into contact with any of the electrical parts of the machine: Danger of short circuit! Steam and hot water may cause scalding! Do not direct the steam or hot water jet towards body parts. Carefully handle the steam/hot water spout by its
grip: Danger of scalding!
Intended Use
The coffee machine is intended for domestic use only. Do not make any technical changes or use the machine for unauthorised purposes since this would create serious hazards! The appliance is not to be used by persons (including children) with reduced physical, mental or sensory abilities or with limited experience and/or expertise, unless they are supervised by a person responsible for their safety, or they are instructed by this person on how to properly use the machine.
Power Supply - Power Cord
Only connect the coffee machine to a suitable socket.
The voltage must correspond to that indicated on the machine label. Never use the coffee machine if the power cord is defective or damaged. If the power cord is damaged, it must be replaced with a proper cord having the same features of the one provided with the machine. Do not pass the power cord around corners, over sharp edges or over hot objects and keep it away from oil. Do not use the power cord to carry or pull the coffee machine. Do not pull out the plug by the power cord or touch it with wet hands. Do not let the power cord hang freely from tables or shelves.
For the Safety of Others
Prevent children from playing with the machine. Children are not aware of the risks related to electric household appliances. Do not leave the machine packaging materials within the reach of children.
Danger of Burns
Never direct the jet of hot steam and/or hot water towards yourself or others: Danger of scalding! Brewing may be preceded by small jets of hot water. The steam / hot water wand can reach very high temperatures: Never touch it with bare hands, use the appropriate knob.
Machine Location - Suitable Location for Operation and Maintenance
For best use, it is recommended to:
•Choose a safe, level surface, where there will be no danger of overturning it or being injured.
•Choose a location that is sufficiently well-lit, clean and near an easily reachable socket.
•Allow for a minimum distance of approximately 15 cm from the sides of the machine.
Do not keep the machine at a temperature below 0°C. Frost may damage the machine. Do not use the coffee machine outdoors. In order to prevent its housing from melting or being damaged, do not place the machine on very hot surfaces and close to open fl ames.
Storing the Machine - Cleaning
Before cleaning the machine, turn the power button to OFF, and unplug the machine from the socket: Wait until it has cooled down. Never immerse the machine in water!
It is strictly forbidden to tamper with the internal parts of the machine. (Only for GXI/02 model) - If the machine will not be used for a long time, dispense water from the steam wand, and clean it thoroughly, then turn the machine off by means of the ON/OFF power button and unplug it from the socket. Store it in a dry place, out of the reach of children. Keep it protected from dust and dirt.
Water Tank:
Fill the tank only with fresh, non-sparkling, drinking water. Do not operate the machine if the water is not at least above the minimum level indicated on the tank. Do not use the water left in the tank for some days for food purposes.
Capsule Compartment:
Only “Metodo Iperespresso” illy capsule can be inserted in the capsule compartment; do not put your fi ngers or any other object in. Capsules can only be used once. Do not open the capsule compartment when brewing coffees.
Repairs / Maintenance
In case of failure, problems or a suspected fault resulting from the falling of the machine, immediately remove the plug from the socket. Never attempt to operate a faulty machine.
Servicing and repairs may only be carried out by authorised service centres. All liability for damages resulting from work not carried out by professionals is declined. Keep the packaging for future transport.
Fire Safety Precautions
In case of fi re, use carbon dioxide (CO2) extinguishers. Do not use water or dry powder extinguishers.
• 23 •
EC DECLARATION OF CONFORMITY
YEAR 09
EC 2006/95, EC 2004/108,
Gaggia S.p.A.
20087 Robecco sul Naviglio (MI) Italy
declare under our responsibility that the product :
COFFEE MAKER
TYPE : SIN 030H - SIN 030HRD
to which this declaration relates is in conformity with the following standards or other normative documents :
•Safety of household and electrical appliances - General requirements
EN 60335-1(2002 ) + A1(2004) + A2(2006) + A11(2004) + A12(2006)+ A13(2008).
•Safety of household and electrical appliances - Part 2-15 Particular requirements for appliances for heating liquids EN 60335-2-15(2002) + A1(2005)
•Household and similar electrical appliances - Electromagnetic fi elds - methods for evaluation and measurement EN 50366 (2003) + A1 (2006).
•Electromagnetic compatibility (EMC) - Requirements for household appliances , electric tools and similar apparatus - Part 1
Emission EN 55014-1 (2006).
•Electromagnetic compatibility (EMC)
Part. 3^ Limits - Section 2 : Limits for harmonic current emissions (equipment input current ≤ 16A for phase) - EN 61000-3-2 (2006).
•Electromagnetic compatibility (EMC)
Part 3^ : Limits - Section 3 : Limitation of voltage changes , voltage fl uctuations and fl icker in public low - voltage supply systems , for equipment with rated current ≤ 16 A for phase
and not subject to conditional connection EN 61000-3-3 (1995) + corr.(1997) + A1 (2001) + A2 (2005).
•Electromagnetic compatibility - Requirements for household appliances , electric tools and similar apparatus - Part 2.
Immunity - Product family standard EN 55014-2 (1997) + A1 (2001)
following the provisions of the Directives : EC 2006/95 , EC 2004/108.
Robecco sul Naviglio |
R & D Manager |
2009 - 04 - 28 |
Mr. Andrea Castellani |
|
English

• 24 •
Sehr geehrter Kunde,
wir gratulieren Ihnen zum Kauf einer Espressomaschine Gaggia for illy und danken Ihnen für Ihr Vertrauen.
Bevor Sie die Maschine in Betrieb nehmen, empfehlen wir Ihnen, die Hinweise im vorliegenden Handbuch aufmerksam zu lesen, in dem der Gebrauch, die Reinigung und die Pfl ege beschrieben werden.
Nun wünschen wir Ihnen jederzeit den Genuss eines köstlichen Espressos illy mit Gaggia und der Metodo Iperespresso.
Die Kapseln illy Metodo Iperespresso sind erhältlich
über die Internetseite www.illy.com.

GXI/01
Ausgabetaste Kaffee
Taste EIN/AUS
Netzkabel
Bedienfeld
Öffnungshebel Fach
Kapselfach
Kaffeeauslauf
Wassertank
Tassenabstellrost
Abtropfschale
• 25 •
|
GXI/02 |
Ausgabetaste Kaffee |
|
Taste EIN/AUS |
Dampftaste |
Deutsch
Drehknopf Heißwasser/Dampf
Heißwasser-/Dampfdüse
Auffangbehälter leere Kapseln
Abb. A
Hauptschalter EIN/AUS
• 26 •
INSTALLATION
Vorbereitende Arbeiten
•Die Kaffeemaschine aus der Verpackung nehmen und an einem geeigneten Ort aufstellen.
Erste Einschaltung

 • Den Wassertank aus seiner Aufnahme her-


 ausnehmen, ausspülen und mit frischem

 Trinkwasser ohne Kohlensäure füllen. Der
 im Tank angegebene maximale Füllstand

 (MAX) darf nicht überschritten werden. Den
  Tank wieder in seine Aufnahme einsetzen.
Heißes Wasser oder andere Flüssigkeiten können den  Tank oder die Maschine beschädigen. Die Maschine darf ohne Wasser keinesfalls in Betrieb gesetzt werden: sicherstellen, dass im Tank eine ausreichende Menge Wasser
vorhanden ist.
GXI/02
• Die Taste “ “ schaltet sich ein und die
Tasten“ “ und“
 “ blinken.
• Um das System zu entlüften, einen Behäl-
ter unter die Dampfdüse stellen.
• DenDrehknopfHeißwasser/DampfimUhr-
zeigersinn bis zum Anschlag drehen.


 Wenn die Taste“
 “ sich ausschaltet, wird


 der Drehknopf im Gegenuhrzeigersinn in die
  Ausgangsposition zurückgedreht.
 Hinweis (für alle Modelle): Nach der Entlüftung des Systemswirdempfohlen,mitdergleichenVorgehensweise einen vollständigen Wassertank abzulassen. Anschlie-
ßend den Tank erneut mit frischem Trinkwasser füllen.
•Den Stecker in die Steckdose auf der Rückseite der Maschine (siehe Abb. A) und den Stecker am anderen Ende des Kabels in eine Wandsteckdose mit geeigneter Spannung
einstecken.
• (GXI/02) - Sicherstellen, dass der Dreh-
schalter sich in der Position “/” befi ndet.
Soweit erforderlich, muss der Schalter in
die angegebene Position gedreht werden.
• Zum Einschalten der Maschine muss lediglich der Hauptschalter EIN/AUS (auf der Rückseite) auf die Position “I” gestellt
werden.
 Hinweis: Vor der ersten Inbetriebnahme oder wenn der Wassertank vollständig geleert wurde, muss das
Wassersystem entlüftet werden.
Entlüftung des Systems
GXI/01

 • Die Taste “
 “ schaltet sich ein und die

 Taste“
 “ blinkt.
• Eine Tasse unter den Kaffeeauslauf stel-
len.
• Die Taste“ “ drücken.
Wenn das Wasser regelmäßig austritt, wird erneut die Taste “ “ gedrückt, um die Ausgabe zu beenden.
Standby
Die Maschine verfügt über einen Energie-
 sparmodus.
Nach einem Zeitraum von 1 Stunde nach


 der letzten Benutzung schaltet die Maschi-


 ne automatisch in den Standby-Modus.
Wenn sich die Maschine in Standby befi n- det, blinkt die Taste “ “ mit langen Inter-
vallen, während alle anderen Tasten ausgeschaltet sind.
Um die Maschine wieder zu starten, muss lediglich die Taste “ “ gedrückt werden.
Die Funktion Standby kann manuell aktiviert werden, indem einfach die Taste“ “ gedrückt wird.
 Hinweis (für alle Modelle): Beim Neustart der Maschine sollte eine Ausgabe ohne Kapsel vorgenommen
werden, um das System zu optimieren.
• 27 •
KAFFEEAUSGABE
Die Maschine wurde ausschließlich für die Verwendung von Kapseln illy“Metodo Iperespresso”entwickelt.
Vor der Ausgabe des Kaffees prüfen, ob die Taste “ “ dauerhaft aufleuchtet und ob der Wassertank gefüllt ist.
 KeineGegenständeoderdieFingereinführen.Mitden Portionskapseln kann lediglich ein einziger Kaffee ausgegeben werden. Diese dürfen nach dem Gebrauch NICHT wiederverwendetwerden.ZuBeginnderAusgabephaseführt die Maschine einen Vorbrühzyklus aus, während dem kein
Kaffee ausgegeben werden kann.
 Bei Einschaltung der Maschine sollte eine Ausgabe ohne Kapsel vorgenommen werden, um das System
zu optimieren.
•1 Tasse unter der Kaffeeauslaufdüse positionieren.
•Den Hebel für die Öffnung des Kapselfachs anheben.
•Die Kapsel einsetzen, wie in der Abbildung gezeigt.
•Den Hebel absenken, um das Kapselfach zu schließen.
 Falls beim Schließen des Fachs ein gewisser Widerstand zu spüren ist, überprüfen, ob die Kapsel richtig eingesetzt wurde und ob der Kapselbehälter eventuell voll
ist.
Einstellung Ka eemenge in der Tasse (GXI/02)
Bei dieser Maschine kann die ausgegebene Kaffeemenge je nach Ihrem Geschmack und der Tassengröße eingestellt werden.
Bei jedem Druck der Taste “ |
“ gibt die |
|
Maschine eine bereits programmierte Kaf- |
Deutsch |
|
feemenge von etwa 30 ml aus. |
|
|
|
|
|
Diese Menge kann nach Belieben neu pro- |
|
|
grammiert werden. |
|
|
Die Neuprogrammierung der Menge erfolgt |
|
|
auf folgende Weise: |
|
|
• Eine Tasse unter den Kaffeeauslauf stel- |
|
|
len. |
|
|
 • Die Taste“
 “ gedrückt halten.
• Sobald die gewünschte Kaffeemenge in die Tasse ausgegeben wurde, die Taste“ “ loslassen.
Nun ist die Taste“ “ programmiert. Bei jedem Druck gibt die Maschine die soeben programmierte Menge aus.
Höhe Abtropfschale
Die Abtropfschale kann je nach Höhe der verwendeten Tassen passend positioniert werden.
In Abb. 1 befi ndet sich die Abtropfschale der Maschine in der optimalen Position für hohe Tassen.
GXI/01 |
|
• Die Taste“ |
“ drücken. |
 • Die Ausgabe des Kaffees beginnt. Sobald die gewünschte Kaffeemenge erreicht ist, die Kaffeeausgabe abbrechen, indem erneut

 die Taste“
 “ gedrückt wird.
Abb.1 |
Abb.2 |
Abb.3 |
Die optimale Position für die Benutzung von Espressotassen wird hingegen in Abb. 3 gezeigt.
GXI/02 |
“ drücken. |
• Die Taste“ |
 • Die Kaffeeausgabe wird automatisch beendet, wenn die eingestellte Menge erreicht ist. Die Kaffeeausgabe kann jedoch auch
durch Druck der Taste “ |
“ abgebrochen |
werden. |
|
Um die Position der Abtropfschale zu ändern, muss diese aus ihrer Aufnahme herausgenommen werden, indem sie nach außen gezogen wird (Abb. 2). Dann auf den Führungen der Halterung positionieren und bis zum Anschlag schieben (Abb. 3).
 Loading...