

Page 1

GB
DE
FRAMTID
OV9
FR
IT
Page 2

Page 3

ENGLISH 4
DEUTSCH 18
FRANÇAIS 33
ITALIANO 49
Page 4
ENGLISH 4
Contents
Safety information 4
Product description 5
Before first use 6
Daily use 6
Cooking tables 10
Care and cleaning 10
Subject to change without notice
What to do if… 12
Technical data 13
Installation 14
Electrical connection 14
Environment concerns 15
IKEA GUARANTEE 15
Safety information
For your safety and correct operation of
the appliance, read this manual carefully
before installation and use. Always keep these
instructions with the appliance even if you
move or sell it. Users must fully know the operation and safety features of the appliance.
Correct use
• Do not leave the appliance unattended dur-
ing operation.
• The appliance is designed exclusively for
domestic use.
• The appliance must not be used as a work
surface or as a storage surface.
• Do not place or store flammable liquids,
highly inflammable materials or fusible objects (e.g. plastic film, plastic, aluminium) in
or near the appliance.
• Watch out when connecting electric appli-
ances to sockets nearby. Do not allow connecting leads to come into contact with or to
catch beneath the hot oven door.
• Do not keep moist dishes and food in the
oven after finishing the cooking as the moist
can damage the enamel or get into the units.
• Do not do repairs yourself to prevent injury
and damage to the appliance. Always contact your local Service Centre.
• Do not use harsh abrasive or sharp metal
scrappers to clean the oven door glass since
they can scratch the surface, which may result in shattering of the glass.
Note on enamel coating
Changes in the colour of the oven enamel
coating as a result of use do not affect the appliance suitability for normal and correct use.
They therefore do not constitute a defect in the
sense of the warranty law.
Child safety
• Only adults can use this appliance. Children
must get supervision to make sure that they
do not play with the appliance.
• Keep all packaging away from children.
There is a risk of suffocation.
• Keep children away from the appliance
when the door is open.
General safety
• This appliance is not intended for use by
persons (including children) with reduced
physical, sensory or mental capabilities, or
lack of experience and knowledge, unless
they have been given supervision or instruction concerning use of the appliance by a
person responsible for their safety.
• Risk of burns! The interior of the oven be-
comes hot during use.
• Always stand back from the appliance when
opening the oven door during cooking or at
the end of it to allow any build up of steam
or heat to release.
Installation
• Make sure that the appliance is not dam-
aged because of transport. Do not connect
a damaged appliance. If necessary, contact
the supplier.
Page 5
ENGLISH 5
• Only an authorised service engineer can repair this appliance. Use only original spare
parts.
• Built-in appliances can only be used after
they are built-in to suitable built-in units and
work surfaces that meet standards.
• Do not change the specifications or modify
this product. Risk of injury and damage to
the appliance.
Warning! Carefully obey the instructions
for electrical connections.
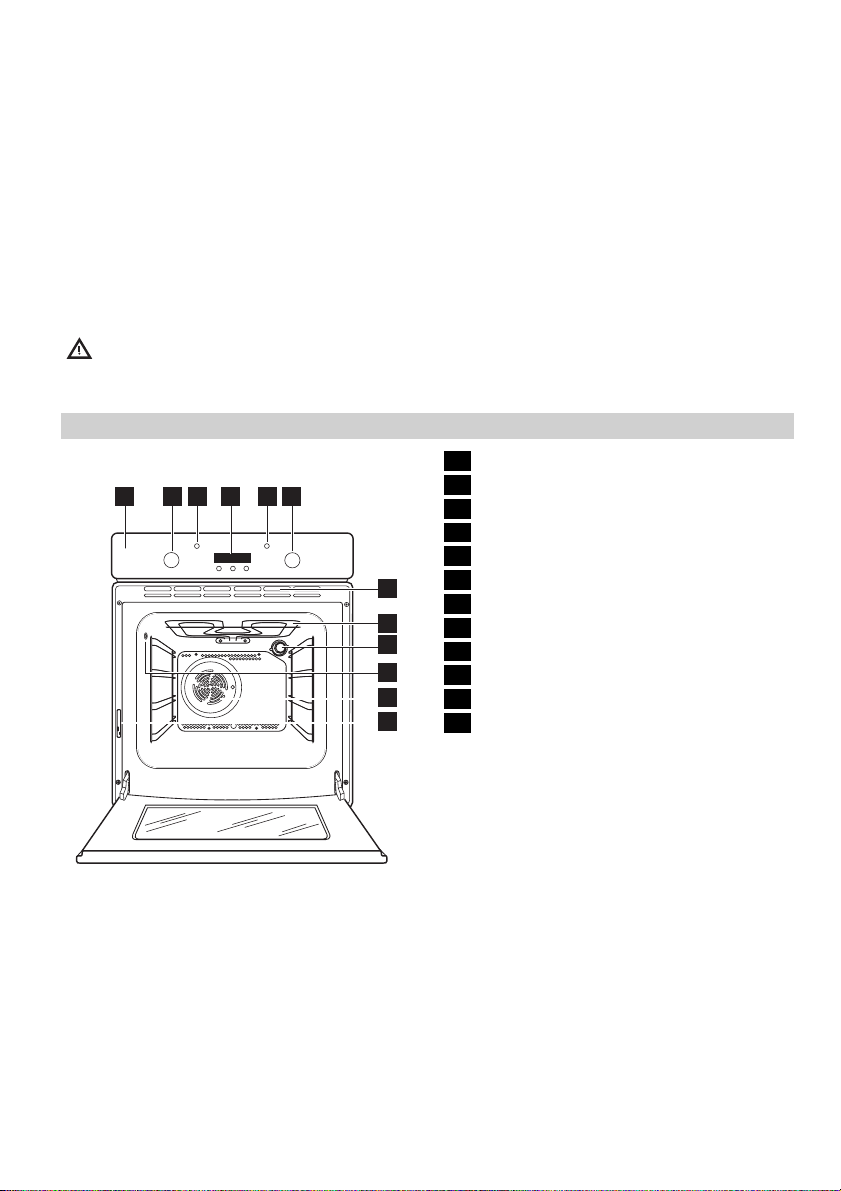
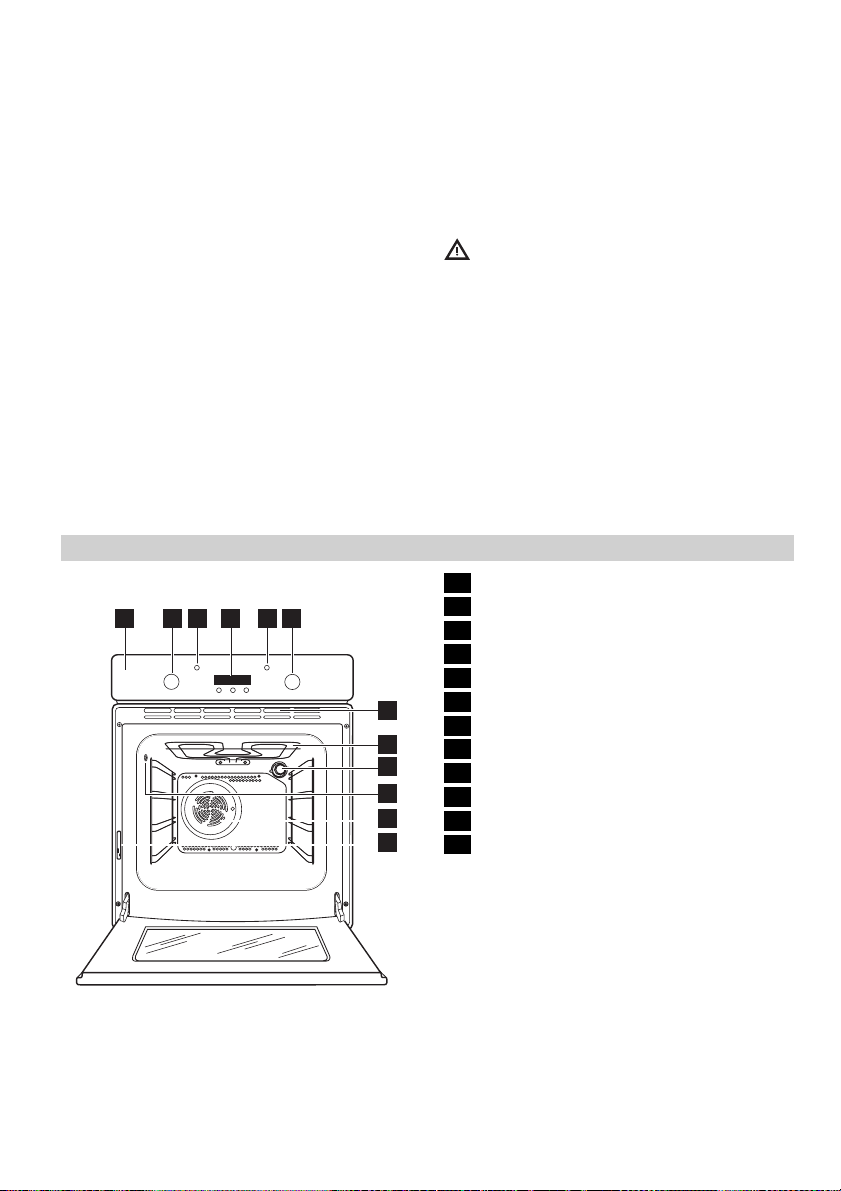
Product description
General overview
4
2
1
3
6
5
7
8
9
10
11
12
Information on acrylamides
Important! According to the latest scientific
knowledge, intensive browning of food,
especially in products containing starch, can
constitute a health risk due to acrylamides.
Therefore, we recommend cooking at the
lowest possible temperatures and not
browning foods too much.
1 Control panel
2 Temperature control knob
3 Temperature indicator
4 Display
5 Power indicator
6 Control knob for oven function
7 Air vents for cooling fan
8 Grill
9 Oven lamp
10 Meat probe socket
11 Fan
12 Rating plate
Page 6
ENGLISH 6
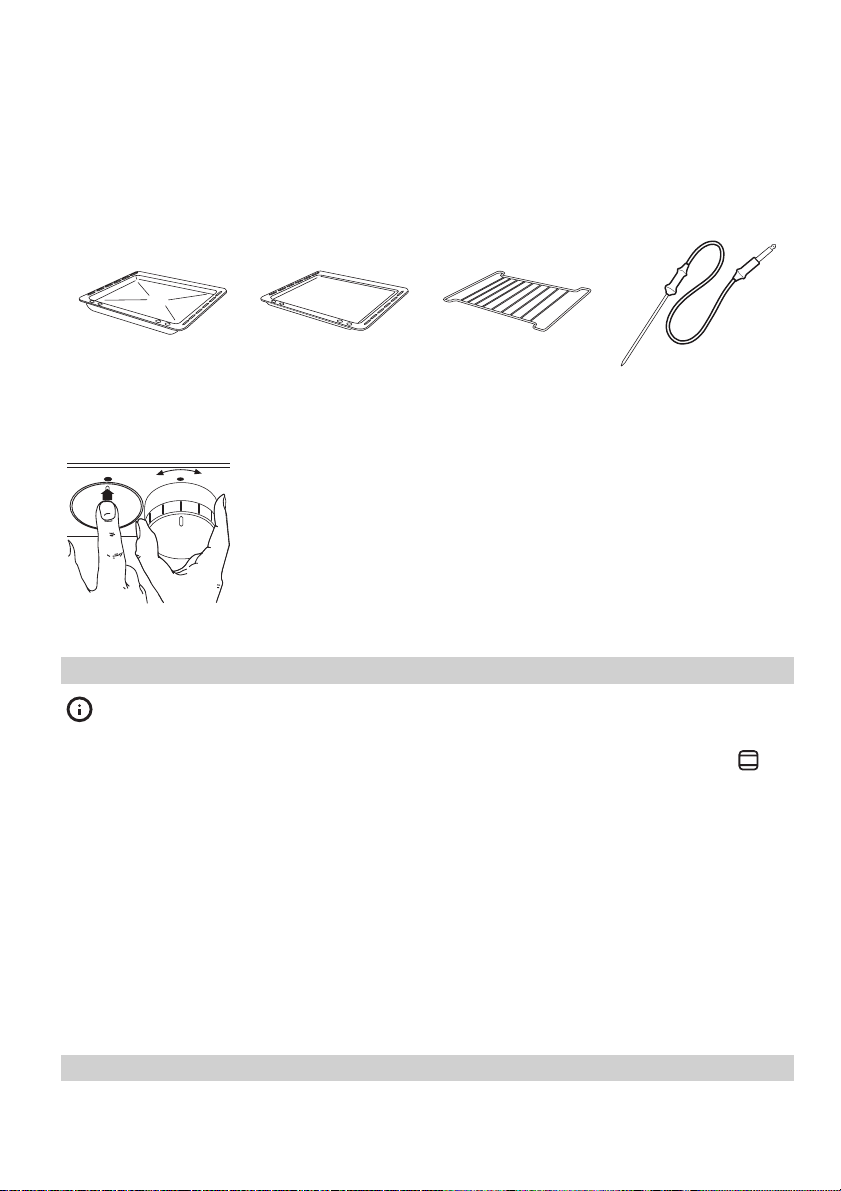
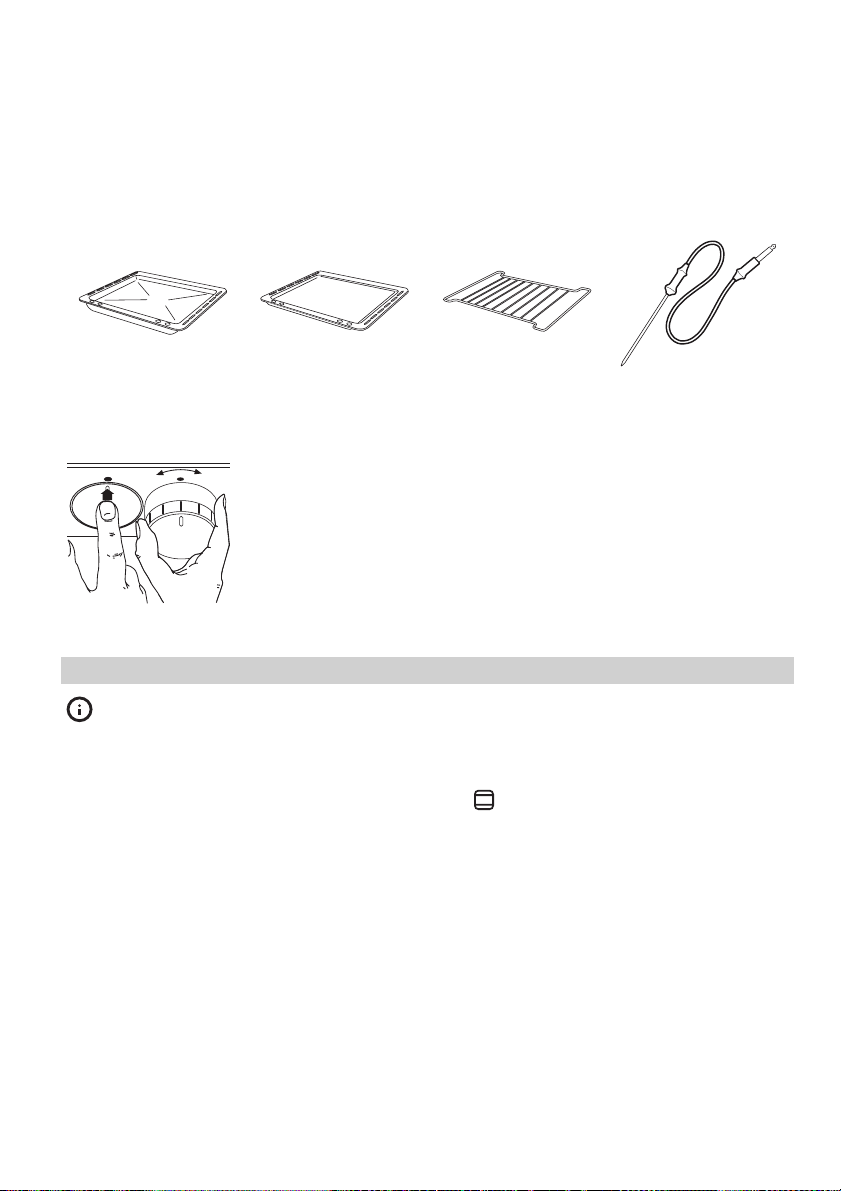
Oven accessories
Dripping pan
Baking tray
Grid
Meat probe
1x
Push-pull control knobs The oven is provided with push-pull control
1x
knobs. You can sunk the push-pull control
knobs inside the control panel when the oven
is off.
Turn the push-pull control knobs clockwise to
set the temperature and the oven function.
1x
1x
Before first use
Remove all packaging, both inside and
outside the oven, before using the appli-
ance. Do not remove the rating plate.
When you connect the appliance to the elec-
tr ical suppl y or in case of a po wer cut, t he T ime
function indicator flashes automatically.
To set the current time use " + " or " - " button.
After approx. 5 seconds the flashing stops and
the clock displays the time of the day set.
If the time of the day is not set the appliance
does not work.
Initial cleaning
Clean the appliance before first use. Clean the
accessories and the oven interior with a soft
cloth with warm water and soap.
After that preheat the oven up without food.
Preheating
Turn the oven function control knob to
run the oven for 45 minutes at maximum temperature, to burn off any residue from the cavity surface. Accessories can become hotter
th an in no rm al us e. Du ri ng th is pe ri od an odo ur
can be emitted. This is normal. Make sure the
room is well ventilated.
and
Daily use
Switching the appliance on
Set the oven function and the temperature.
Page 7
ENGLISH 7
Setting the oven function
Turn the control knob for oven functions (refer
to "Product description").
Setting the temperature
Turn the temperature control knob (refer to
"Product description"). You can set the temperature between 50 °C and 250 °C.
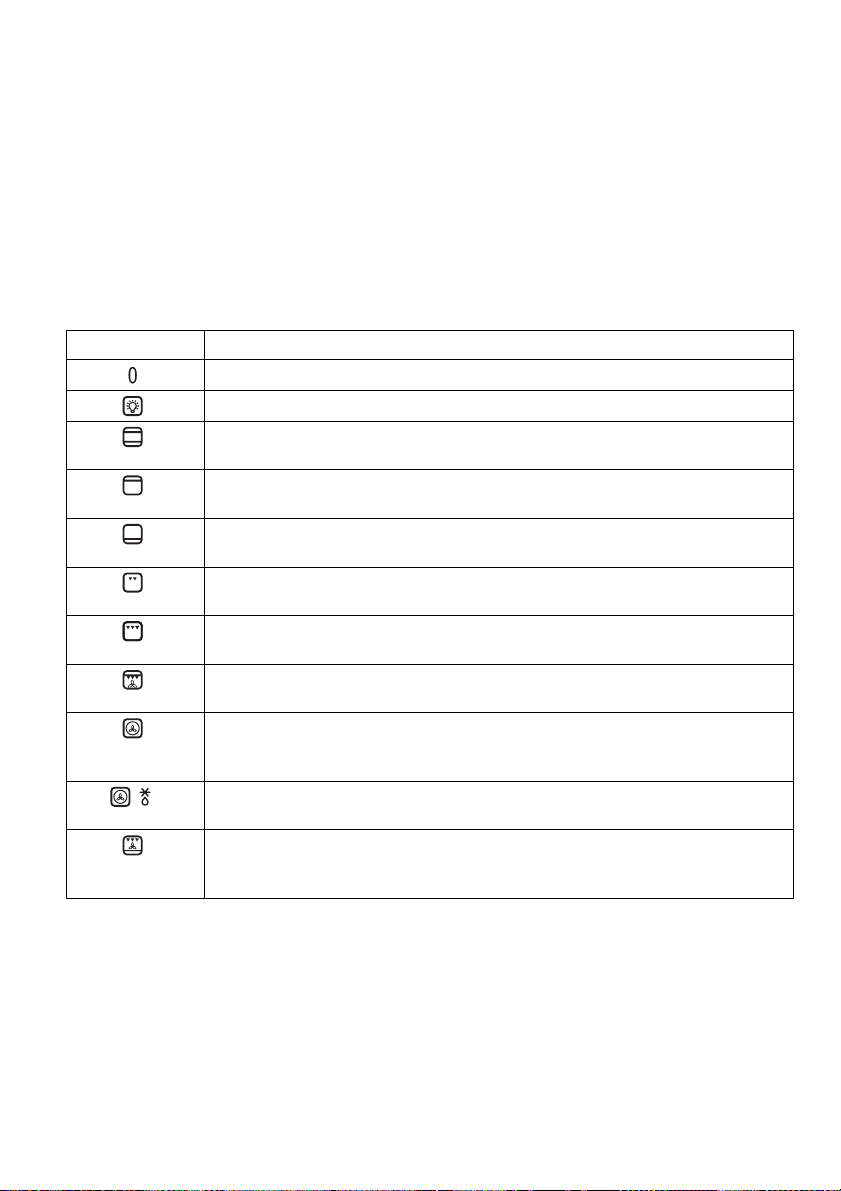
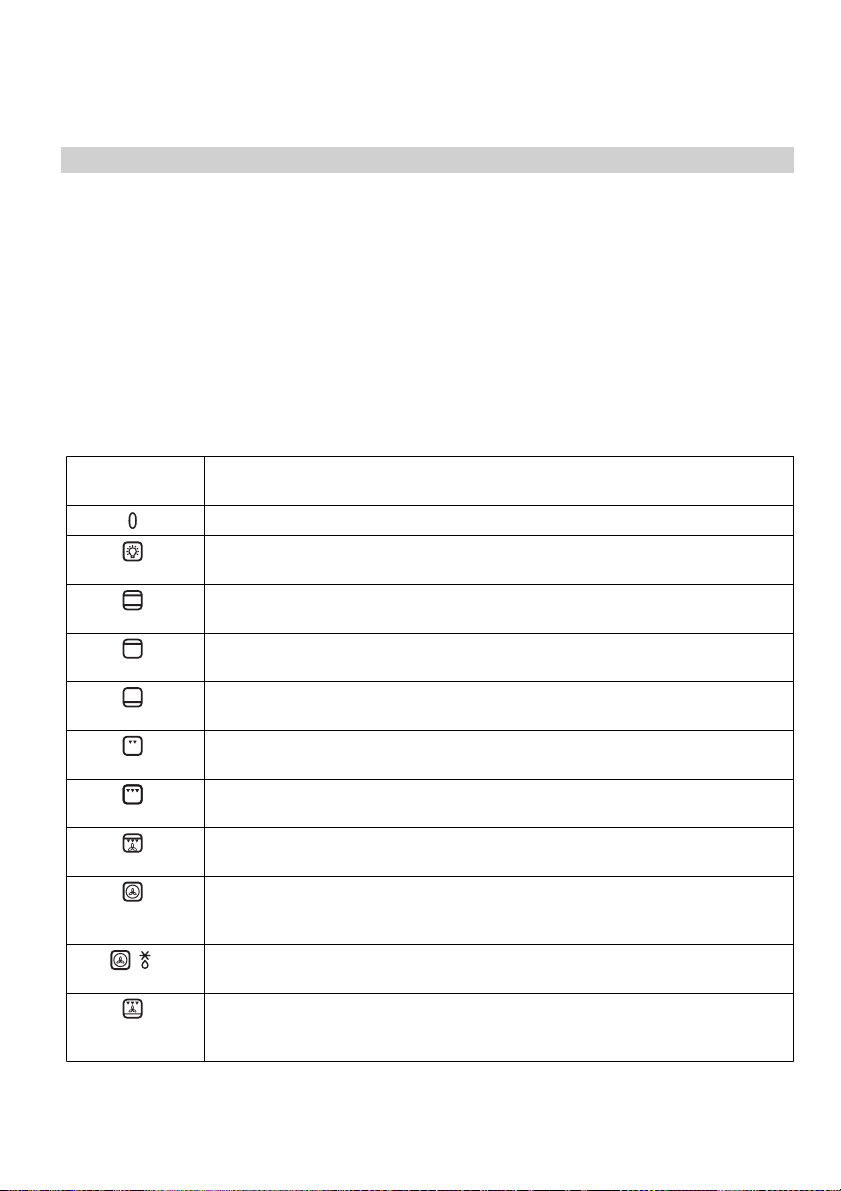
Oven functions
Oven function Application
OFF position
Oven lamp - lights up without any cooking function.
Conventional cooking - heats both from the top and bottom element. To bake
and roast on one oven level.
Top heating element - heats only from the top of the oven. To finish cooked
dishes.
Bottom heating element - heats only from the bottom of the oven. To bake
cakes with crispy or crusty bases.
Grill - to grill flat food items in small quantities in the middle of the shelf. To
make toasts.
Full grill - the full grill element is on. To grill flat food items in large quantities.
To make toasts.
Thermal grilling - the grill element and the oven fan operate together and
circulate hot air around the food. To cook large pieces of meat.
Fan cooking - to roast or roast and bake the food that requires the same
cooking temperature, using more than one shelf, without flavour transference.
Power indicator
The power indicator (refer to "Product description") comes on when the control knob for oven
function is set.
Temperature indicator
The temperature indicator (refer to "Product
description") comes on when the oven heats
up. It goes off when the oven reaches the correct temperature. It then cycles on and off to
show the temperature adjusts.
Defrost - thaws frozen food. The temperature control knob must be on off
position.
Pizza - the bottom element pro vi de s di re c t h ea t to th e ba se of pi z za s, q ui ch e s
or pies, while the fan ensures air is circulated to cook the pizza toppings or
pie fillings.
Switching the appliance off
Turn the temperature and oven functions control knobs to the off position.
Safety thermostat
To prevent dangerous overheating (through
incorrect use of the appliance or defective
components), the oven is fitted with a safety
thermostat, which interrupts the power supply.
The oven switches back on again automatically, when the temperature drops.
Should the safety thermostat fail to work, do
not attempt to fix it yourself. Please contact After Sales Service.
Page 8
ENGLISH 8
The cooling fan
The cooling fan (not visible) keeps the front
panel, the knobs and the oven door handle
cool. When the oven is on the cooling fan
switches on automatically. Warm air blows out
through the air vents near the oven door handle. To keep the controls cool, the cooling fan
can still run after the oven is off.
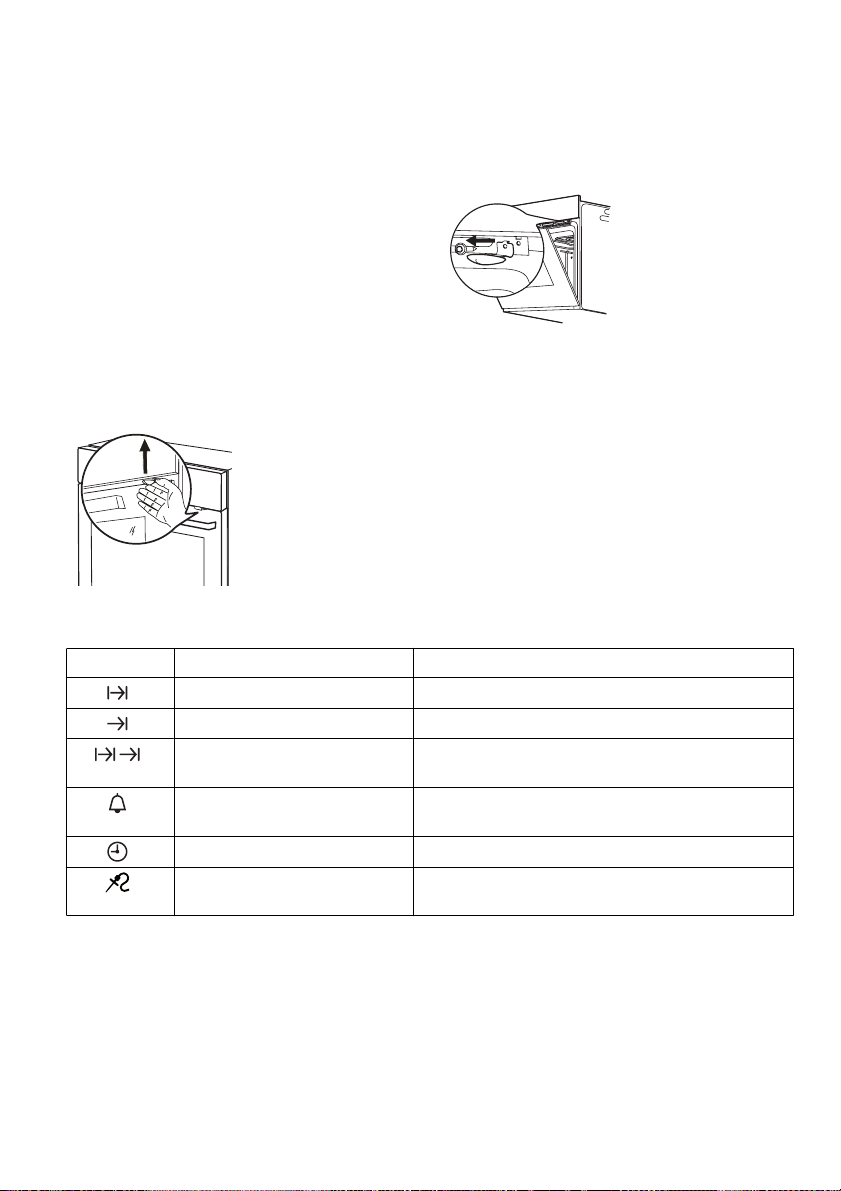
Mechanical child lock
The appliance is delivered with fixed and activated child lock. It is situated just below the
oven control panel on the right side.
To open the oven
door with the child
lock inserted, pull the
child lock handle up
as shown in the picture.
Close the oven door
without pulling the
child lock.
Clock functions
Symbol Function Description
Cooking duration To set how long the oven is to be in use
End of cooking To set when the oven is to switch off
Cooking duration and End of
cooking combined
Minute minder To set a countdown. A signal sounds when the
Clock To set the time of the day
Meat probe Measures the core temperature while roasting
To set delayed start of the appliance
time elapses
larger pieces of meat
To remove the child
lock open the oven
door and unscrew it
using the torx key included in the oven fitting bag.
Page 9
ENGLISH 9
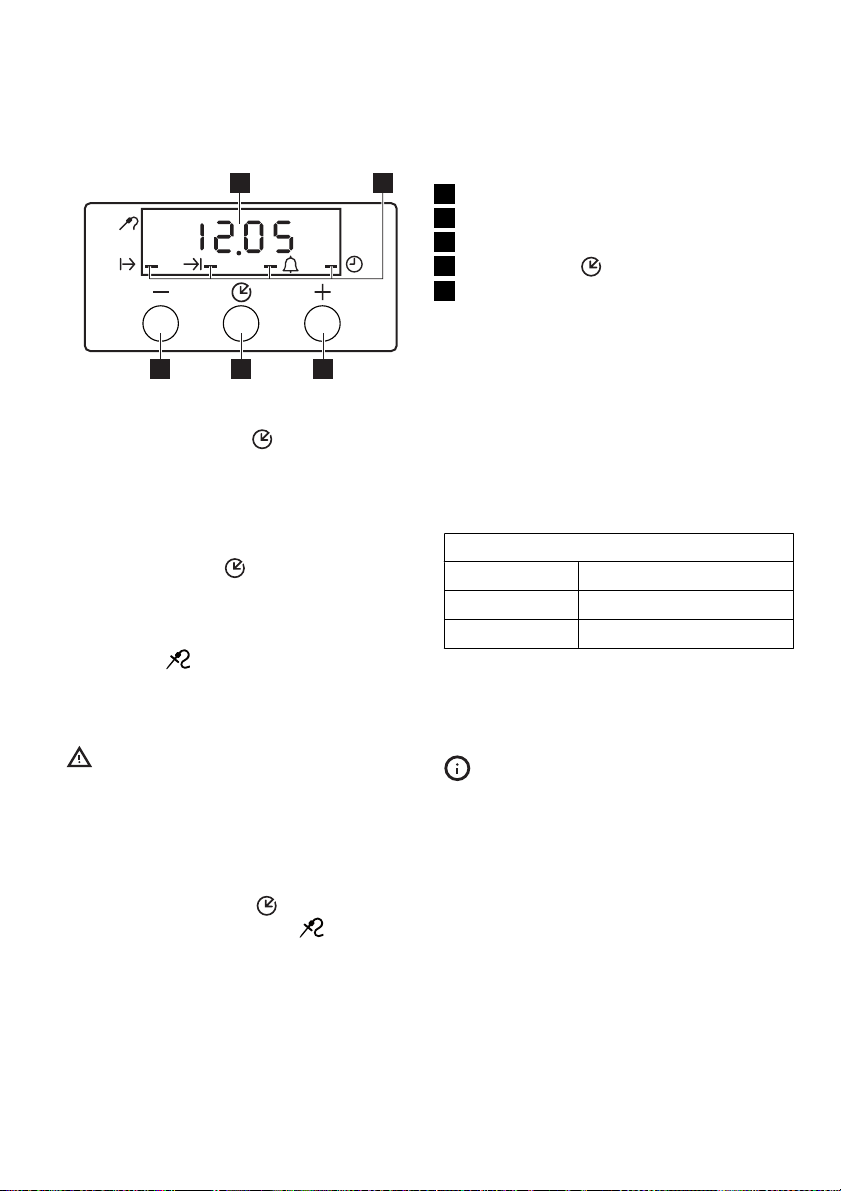
1
45 3
Setting the clock functions
•
Push selector button
until the desired function indicator flashes.
• To set or modify the time use" + " / " - " in
the next 5 seconds. After that the set time
begins to run.
Cancelling the clock function
Push selector button
the function indicator shows the right function
and push " - " button. After few seconds the
clock function goes out.
Meat probe
Meat probe measures the core temperature of
the meat. When the meat reaches set temperature the oven switches off automatically.
Warning! The meat probe is hot! Risk of
burns! Be careful when you remove the tip
and plug of the meat probe.
1. Insert the meat probe plug into the socket
in the side wall of the oven.
2. Insert the meat probe point in the middle
of the meat, as far as it goes.
3.
Push selector button
until Meat probe indicator
4. Use " + " / " - " buttons to set the desired
core temperature. You can set the temperature from 30 °C to 99 °C.
again and again
again and again until
again and again
2
flashes.
1 Time and meatprobe temperature display
2 Function indicators
3 Button " + "
4
Selector button
5 Button " - "
Refer to suggested values in the table.
5. Use control knobs to set the desired oven
cooking function and temperature.
6. When the meat reaches set core temperature, the oven switches off automatically.
7. Remove the meat probe.
Suggested core temperatures
50 °C Rare
60 °C Medium
70 °C Well done
In case the level of cooking is not satisfactory
do above steps once again and set higher core
temperature.
Switching off the display
You can save energy by switching off the
clock display.
1. Push " + " and " - " buttons at the same time
and hold for 5 seconds.
The display switches off.
2. To switch on the display push any button.
Page 10
ENGLISH 10
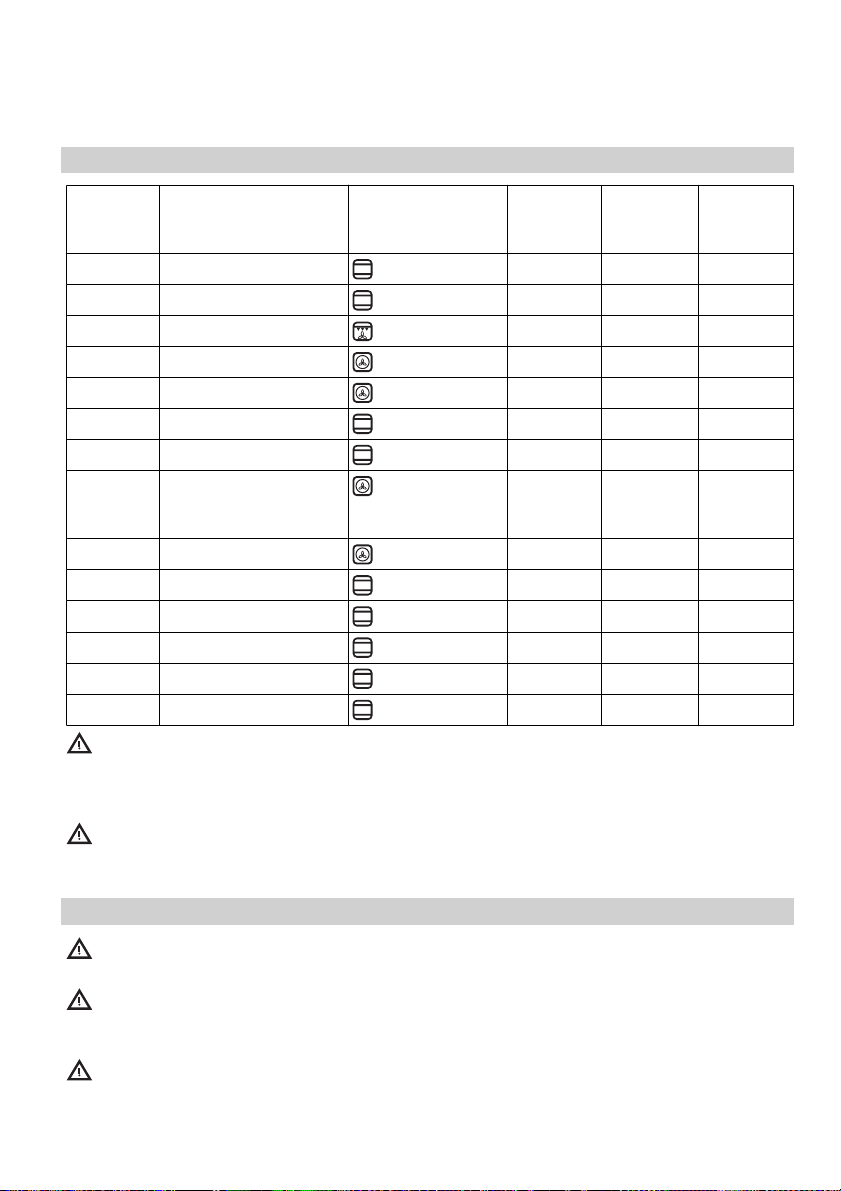
Cooking tables
Weight
(kg)
1Pork / lamb
1Veal / Beaf
1,2 Chicken/Rabbit
1,5 Duck
3 Goose
4Turkey
1Fish
1 Stuffed Pepperoni To-
Instant cakes
1Pies
Biscuits
2 Lasagne
1 White Bread
1 Pizza
Warning! Do not line the oven with
aluminium foil and do not place a roasting
pan or baking tray on the floor. Build-up heat
can damage the oven enamel.
Warning! Always cook with the oven
door closed, even while grilling. Be careful
Food Oven Function Level Oven
matos/Roasted Potatos
temperature (°C)
2 180 100-110
2 190 70-100
2 200 70-80
1 160 120-150
1 160 150-200
1 180 210-240
2 190 30-40
2 190 50-70
2 160 45-55
2 160 80-100
3 140 25-35
2 180 45-60
2 190 50-60
1 190 25-35
when opening the drop down oven door. Do
not allow it to fall open - support the door using
the door handle, until it is fully open.
Cooking
Time
(min)
Care and cleaning
Warning! Switch the appliance off and
let it cool down before you clean it.
Warning! For safety reasons, do not
clean the appliance with steam blasters
or high-pressure cleaners.
Warning! Keep the appliance clean at
all times. A build-up of fats or other
foodstuffs can cause a fire, especially in the
dripping pan.
Outside of the appliance
• Clean the front of the appliance with a soft
cloth and warm water with soap.
• For metal fronts, use normal cleaning
agents.
• Do not use scouring agents and abrasive
sponges.
Oven interior
• Turn the oven lamp on before cleaning.
Page 11
ENGLISH 11
• Clean the oven with a soft cloth with warm
water and soap and leave it to dry .
Accessories
Clean all slide-in units with a soft cloth with
warm water and soap (shelf, baking tray, shelf
support rails etc.) after each use and dry well.
Soak briefly to make them easier to clean.
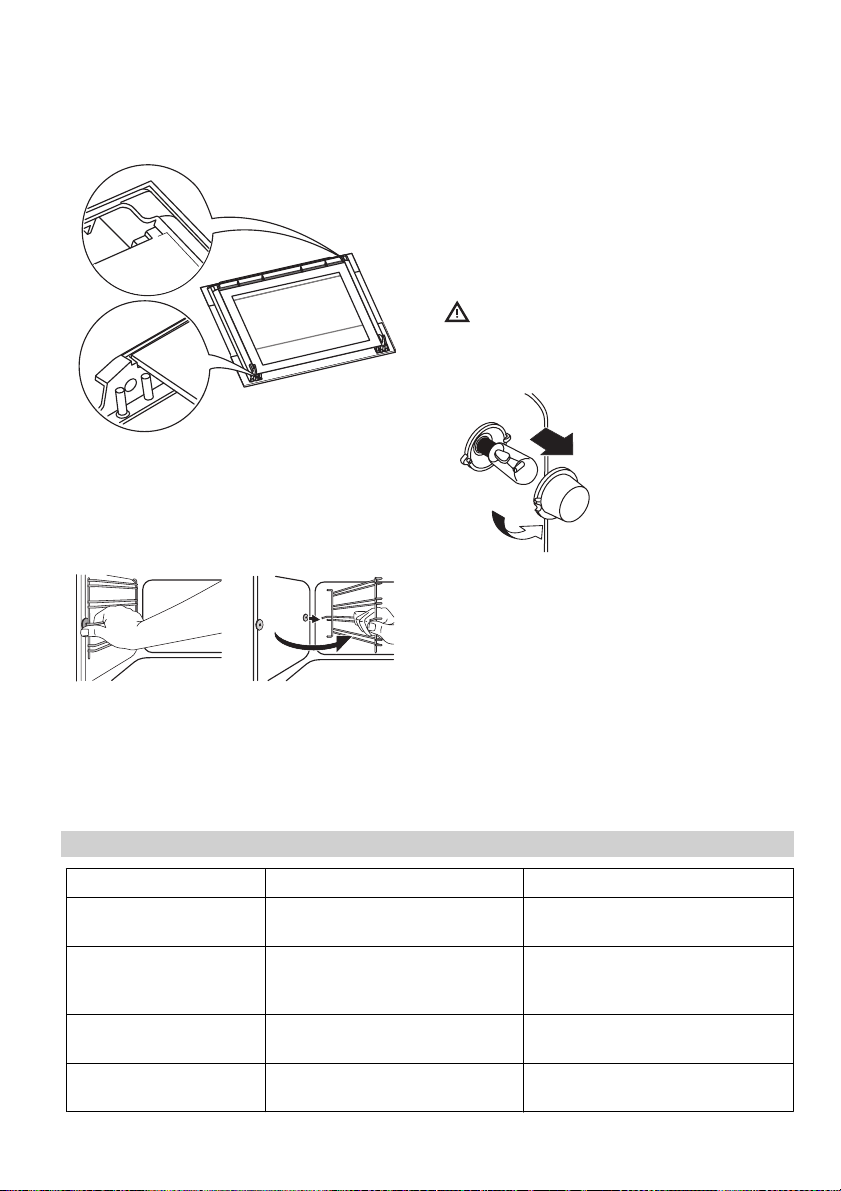
Cleaning the oven door
The oven door has two panels of glass installed
one behind the other. To make the cleaning
easier remove the oven door and the internal
panel of glass.
Warning! The oven door can close if you
try to remove the internal panel of glass
when the door is still assembled.
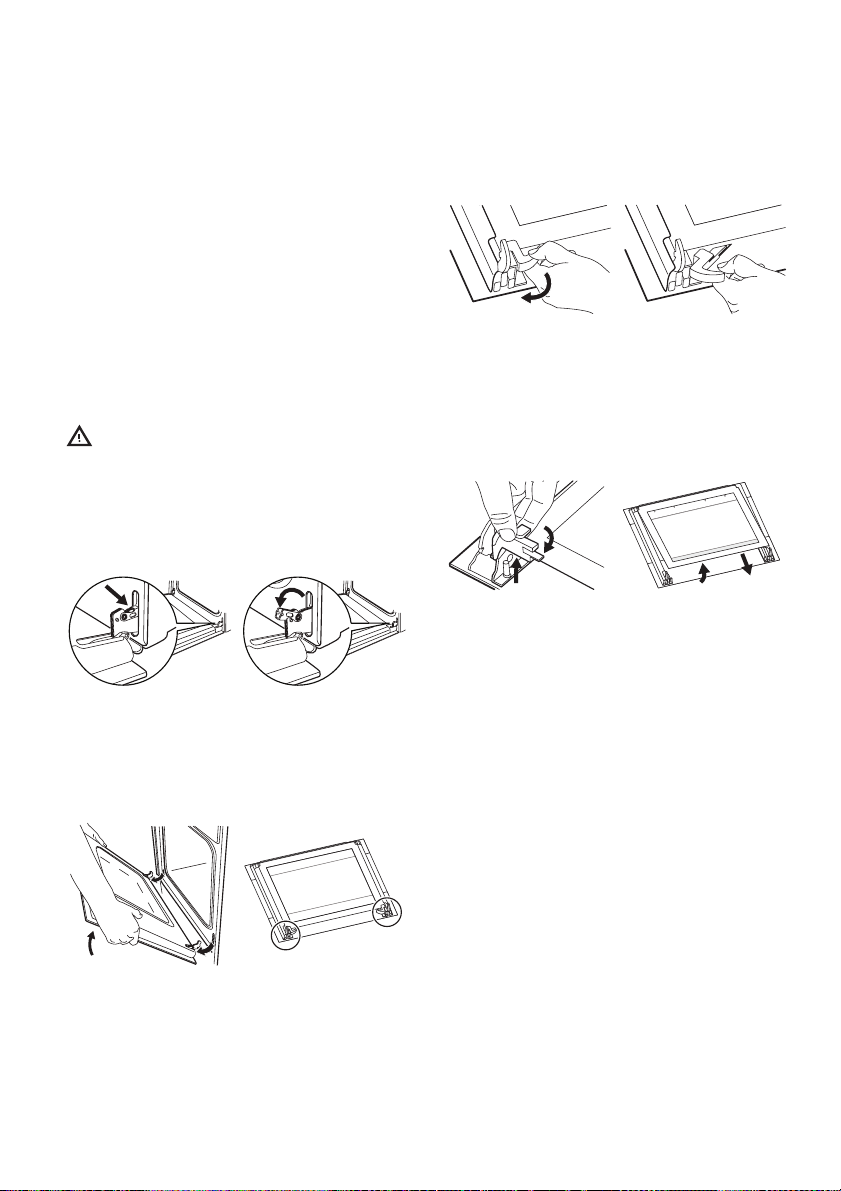
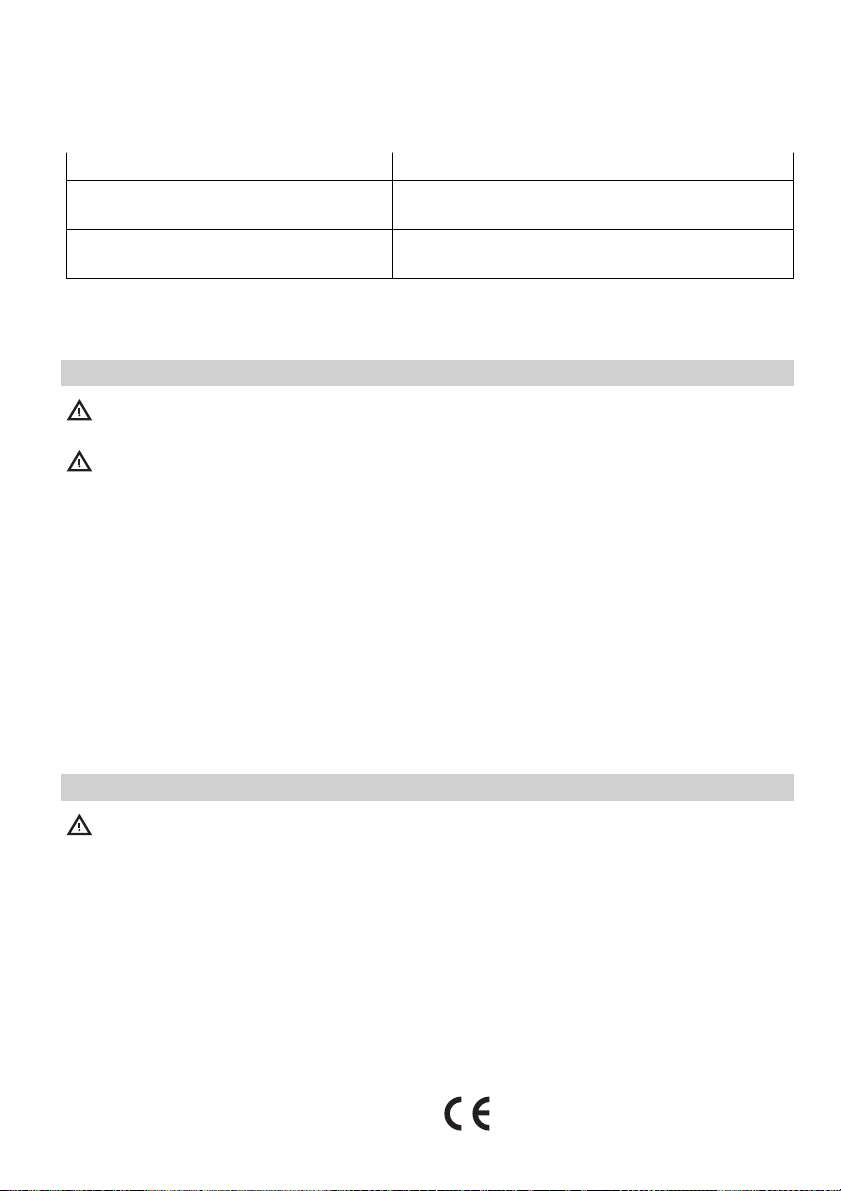
Removing the oven door and the glass panel
1
Open the door fully
and hold the two
door hinges .
3
Close the oven door
to the first opening
position (approx.
45°). Then pull forward and remove it
from its seat.
2
Lift and turn the levers on the two hinges.
4
Place the door on a
stable surface protected by a soft cloth.
5
Release the locking
system to remove the
internal panel of
glass.
7
90°
Turn 2 fasteners by
90° and remove
them from their seats.
Clean the glass panel with water and soap.
Dry it carefully.
Inserting the door and the glass panel
When the cleaning procedure is completed,
insert the glass panel and the oven door. To
do so, follow the steps in reverse.
The inner glass panel must be assembled
keeping the decorative frame (screen-printing) turned towards outside of the oven. To
double check you did the above operation in
a proper way simply pass your fingers on the
inner glass surface. If the panel of glass is assembled correctly you should not feel any
roughness.
Insert the internal panel of glass into the right
seats as shown below.
6
8
2
1
Carefully lift and remove the panel of
glass.
Page 12
ENGLISH 12
To put the side rails back, follow the instruction
in reverse.
Important! The rounded ends of the guide
bars must point to the front.
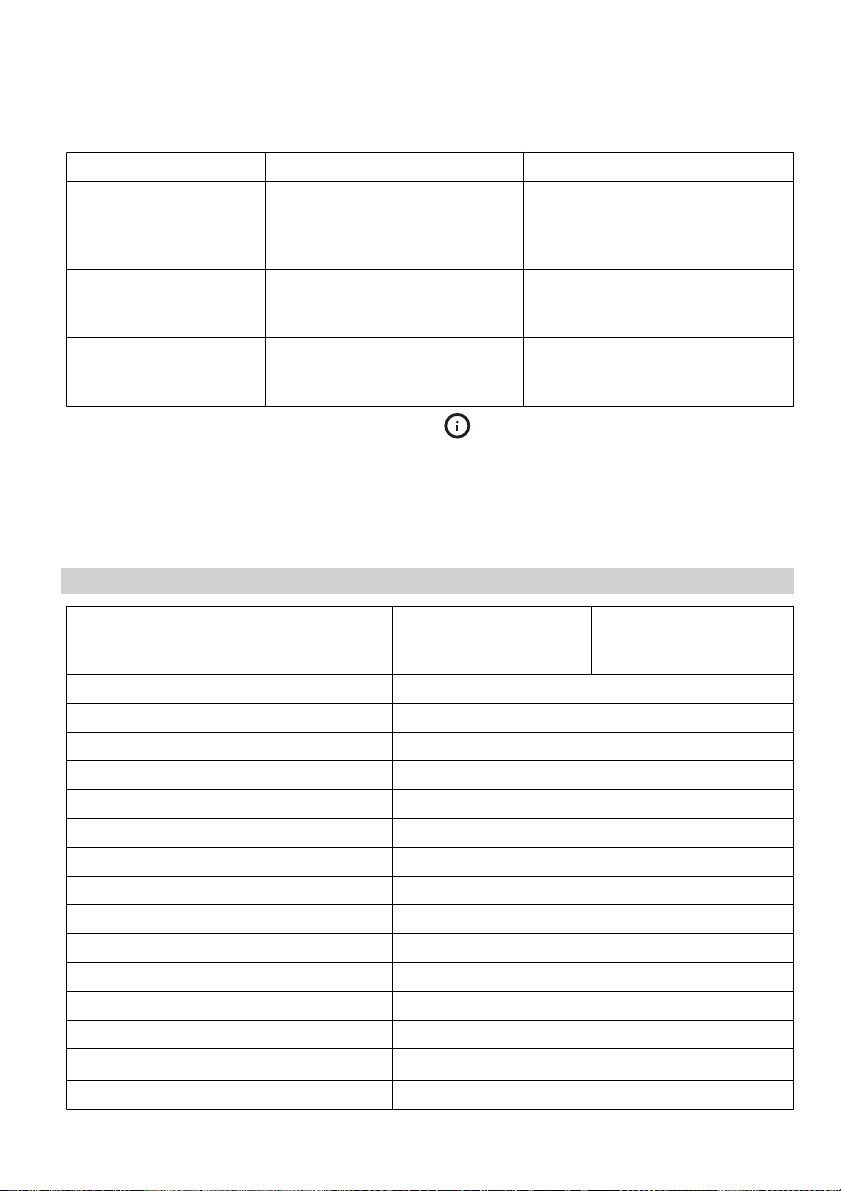
Changing the oven lamp and cleaning the
glass cover
Warning! Before you change the oven
lamp (refer to "Product description"),
switch off the appliance and disconnect it from
the electrical supply.
Side rails
To clean the side walls of the oven cavity, remove the side rails.
1
2
1. Turn the glass cover anti - clockwise and
2
1
remove it. Clean the glass cover.
2. If necessary, replace the old oven lamp
with a 15/25 watt, 230V (50Hz), 300 °C
heat resistant oven lamp (Connection type:
E14).
3. Refit the glass cover.
Pull the rails away
from the oven wall at
the front.
What to do if…
Problem Possible cause Solution
The oven does not operate
The oven does not operate
The temperature indicator does not come on
The oven lamp is not
working
Then unhook the rails
at the back.
The required setting have not
been set
The appliance is not correctly
connected or/and the mains
supply to the oven is not on
The required setting have not
been set
The oven lamp bulb is faulty Replace the oven lamp bulb
check if cooking function and temperature are selected
Check if the appliance is correctly
connected and the mains supply
to the oven is on
Select the cooking function and
temperature
Page 13
ENGLISH 13
Problem Possible cause Solution
Steam and condensation settle on the food
and in the oven cavity
“12.00” appears on the
display and the clock
LED is flashing
F11 appears on the display
If there is a fault, first try to find a solution to
the problem yourself. If you cannot find a solution to the problem yourself, contact your
dealer or the After Sales Service.
Dishes have been left in the oven
for too long
Interruption of the power supply.
The plug of the meat probe is not
firmly in position in the socket
If you operated the appliance wrongly, or
the installation was not carried out by a
registered engineer, the visit from the After
Sales Service technician or dealer may not
take place free of charge, even during the
warranty period.
Do not leave the dishes standing
in the oven for longer than 15-20
minutes after the cooking process
ends
Reset the time
Insert the meat probe plug into the
socket in the side wall of the oven
as far as it can go
Technical data
Dimensions (internal) Width
Usable volumes 53 l
Area of largest baking sheet (net surface) 1130 cm²
Bottom heating element 1000 W
Top heating element 800 W
Full oven (Top + Bottom) 1800 W
Grill 1650 W
Full grill 2450 W
Thermal grill 2450 W
Fan cooking 2025 W
Pizza 2675 W
Oven lamp 25 W
Cooling fan 25 W
Hot air fan motor 25 W
Total rating
Number of functions 9
1)
Height
Depth
2700 W
395
335
400
Page 14
ENGLISH 14
Energy consumption 0,78 kWh
Energy Consumption with a standard
load and bottom heating
Energy Consumption with a standard
load forced air oven
1) Information on the electrical connection, voltage and overall power is given on the rating plate (refer to
"Product description").
0,79 kWh
0,78 kWh
Installation
Caution! Refer to the assembly
instructions for the installation.
Warning! Only a qualified and
competent person must do the installation
of the appliance. If you do not contact qualified
or competent person, the guarantee becomes
invalid if there is damage.
• Before you built in the appliance to the kitch-
en cabinet make sure that the recess dimensions are suitable.
• Make sure that there is anti-shock protection
for the installation.
• According to the regulations of force, all
parts which ensure the anti-shock protection
must be fixed in such a way that they cannot
be undone without tools.
• The appliance can be placed with its back
and one side close to the higher appliances
or walls. The other side must be placed close
to the furniture with the same height.
• The built-in unit must meet the stability requirements of DIN 68930.
• Built-in ovens and built-in cooking surfaces
are fitted with special connection systems.
For safety reasons, you must only combine
appliances from the same manufacturer.
Electrical connection
Warning! Only a qualified electrician
and competent person must do the
electrical installation.
• The manufacturer is not responsible if you
do not follow these safety precautions.
• Ground the appliance according to safety
precautions.
• Make sure that the rated voltage and type
of power on the rating plate agree with the
voltage and the power of the local power
supply.
• This appliance is supplied with a mains cable without plug.
• Any electrical component must be installed
or replaced by the After Sales Service technician or qualified service personnel.
• Always use a correctly installed shockproof
socket.
• Do not use multi-way plugs, connectors and
extension cables. There is a risk of fire.
• Make sure that the mains plug is accessible
after installation.
• Do not pull the mains cable to disconnect the
appliance. Always pull the mains plug.
• Connect the appliance to the mains using a
device that allows to disconnect the appliance from the mains at all poles with a contact opening width of at least 3 mm, eg. automatic line protecting cut-out, earth leakage trips or fuse.
Page 15
ENGLISH 15
This appliance complies with the E.E.C. Directives.
Environment concerns
The symbol on the product or on its
packaging indicates that this product may not
be treated as household waste. Instead it
should be taken to the appropriate collection
point for the recycling of electrical and
electronic equipment. By ensuring this product
is disposed of correctly, you will help prevent
potential negative consequences for the
environment and human health, which could
otherwise be caused by inappropriate waste
handling of this product. For more detailed
information about recycling of this product,
please contact your local council, your
household waste disposal service or the shop
where you purchased the product.
Packaging materials
The materials with the symbol
ble. Dispose the packaging in a suitable collection containers to recycle it.
are recycla-
Before disposal of appliance
Warning! Do these steps to dispose the
appliance:
• Pull the mains plug out of the mains socket.
• Cut off the mains cable and discard it.
• Discard the door catch. This prevents the
children to close themselves inside the appliance. Risk of suffocation.
IKEA GUARANTEE
How long is the IKEA guarantee valid?
This guarantee is valid for five (5) years from
the original date of purchase of Your appliance at IKEA, unless the appliance is named
LAGAN in which case two (2) years of guarantee apply. The original sales receipt is required as proof of purchase. If service work is
carried out under guarantee, this will not extend the guarantee period for the appliance,
Which appliances are not covered by the
IKEA five (5) years guarantee?
The range of appliances named LAGAN and
all appliances purchased in IKEA before 1st of
August 2007
Who will execute the service?
IKEA service provider will provide the service
through its own service operations or authorized service partner network.
What does this guarantee cover?
The guarantee covers faults of the appliance,
which have been caused by faulty construction
or material faults from the date of purchase
from IKEA. This guarantee applies to domestic
use only. The exceptions are specified under
the headline “What is not covered under this
guarantee?” Within the guarantee period, the
costs to remedy the fault e.g. repairs, parts, labour and travel will be covered, provided that
the appliance is accessible for repair without
special expenditure. On these conditions the
EU guidelines (Nr. 99/44/EG) and the respective local regulations are applicable. Replaced
parts become the property of IKEA.
Page 16

ENGLISH 16
What will IKEA do to correct the problem?
IKEA appointed service provider will examine
the product and decide, at its sole discretion,
if it is covered under this guarantee. If considered covered, IKEA service provider or its authorized service partner through its own service operations, will then, at its sole discretion,
either repair the defective product or replace
it with the same or a comparable product.
What is not covered under this guarantee?
• Normal wear and tear.
• Deliberate or negligent damage, damage
caused by failure to observe operating instructions, incorrect installation or by connection to the wrong voltage, damage
caused by chemical or electro-chemical reaction, rust, corrosion or water damage including but not limited to damage caused by
excessive lime in the water supply, damage
caused by abnormal environmental conditions.
• Consumable parts including batteries and
lamps.
• Non-functional and decorative parts which
do not affect normal use of the appliance,
including any scratches and possible color
differences.
• Accidental damage caused by foreign objects or substances and cleaning or unblocking of filters, drainage systems or soap
drawers.
• Damage to the following parts: ceramic
glass, accessories, crockery and cutlery baskets, feed and drainage pipes, seals, lamps
and lamp covers, screens, knobs, casings
and parts of casings. Unless such damages
can be proved to have been caused by production faults.
• Cases where no fault could be found during
a technician’s visit.
• Repairs not carried out by our appointed
service providers and/or an authorized
service contractual partner or where nonoriginal parts have been used.
• Repairs caused by installation which is faulty
or not according to specification.
• The use of the appliance in a non-domestic
environment i.e. professional use.
• Transportation damages.
• Cost for carrying out the initial installation of
the IKEA appliance, unless it is due to a repair or a replacement for faulty parts.
This restriction does not apply to fault-free
work carried out by a qualified specialist using
our original parts in order to adapt the appliance to the technical safety specifications of
another EU country.
How country law applies
The IKEA guarantee gives You specific legal
rights, which covers or exceed local demands.
However these conditions do not limit in any
way consumer rights described in the local
legislation
Area of validity
For appliances which are purchased in one EU
country and taken to another EU country, the
services will be provided in the framework of
the guarantee conditions normal in the new
country. An obligation to carry out services in
the framework of the guarantee exists only if
the appliance complies and is installed in accordance with:
• the technical specifications of the country in
which the guarantee claim is made;
• the Assembly Instructions and User Manual
Safety Information;
The dedicated SERVICE for IKEA appliances
Please do not hesitate to contact IKEA appointed SERVICE to:
• make a service request under this guarantee;
• ask for clarification on installation of the
IKEA appliance in the dedicated IKEA kitchen furniture. The service won’t provide clarifications related to:
– the overall IKEA kitchen installation;
– connections to electricity (if machine
comes without plug and cable), to water
and to gas since they have to be executed
by an authorized service engineer.
• ask for clarification on user manual contents
and specifications of the IKEA appliance.
To ensure that we provide you with the best
assistance, please read carefully the Assembly
Instructions and/or the User Manual section of
this booklet before contacting us.
Page 17

ENGLISH 17
How to reach us if You need our service
Please refer to the last page of this manual for
the full list of IKEA appointed Service Providers
and relative national phone numbers.
Important! In order to provide You with a
quicker service, we recommend that You use
the specific phone numbers listed at the end of
this manual. Always refer to the numbers listed
in the booklet of the specific appliance You
need an assistance for. Before calling us,
assure that You have to hand the IKEA article
number (8 digit code) for the appliance of
which you need our assistance.
Important! SAVE THE SALES RECEIPT! It is
Your proof of purchase and required for the
guarantee to apply. Note that the receipt
reports also the IKEA article name and number
(8 digit code) for each of the appliances you
have purchased.
Do You need extra help?
For any additional question, not listed in the
above paragraph “The dedicated SERVICE for
IKEA appliances”, please do not use the specific phone numbers in the last page of this
booklet, but contact our nearest IKEA store
Call Center. We recommend that you carefully
read the appliance documentation before
contacting us.
Page 18
DEUTSCH 18
Inhalt
Sicherheitshinweise 18
Gerätebeschreibung 19
Vor der ersten Inbetriebnahme 20
Täglicher Gebrauch 21
Kochtabellen 24
Reinigung und Pflege 25
Änderungen vorbehalten
Was tun, wenn … 27
Technische Daten 28
Gerät aufstellen 29
Elektrischer Anschluss 29
Umwelttipps 30
IKEA GARANTIE 30
Sicherheitshinweise
Lesen Sie diese Bedienungsanleitung bit-
te sorgfältig durch, bevor Sie das Gerät
anschließen und benutzen, um Gefahren zu
vermeiden und einen korrekten Betrieb des
Geräts zu gewährleisten. Bewahren Sie diese
Bedienungsanleitung in der Nähe des Geräts
auf, auch wenn Sie dieses anderswo aufstellen
oder verkaufen. Jeder, der dieses Gerät benutzt, muss mit der Bedienung und den Sicherheitsmerkmalen gut vertraut sein.
Bestimmungsgemäße Verwendung
•Lassen Sie das Gerät bei Betrieb nicht un-
beaufsichtigt.
• Das Gerät ist ausschließlich zur Verwen-
dung im Haushalt bestimmt.
• Das Gerät darf nicht als Arbeits- oder Ab-
stellfläche verwendet werden.
• Brennbare Flüssigkeiten, leicht entzündliche
Materialien oder schmelzbare Materialien
(z.B. Folien, Kunststoff, Aluminium) dürfen
nicht auf dem Gerät oder in dessen Nähe
abgestellt oder gelagert werden.
• Vorsicht bei Anschluss von Elektrogeräten
an Steckdosen in Gerätenähe. Die Anschlussleitungen dürfen nicht unter der heißen Backofen-Tür eingeklemmt werden
oder damit in Berührung kommen.
• Lassen Sie nach dem Abschalten des Geräts
keine feuchten Gefäße oder Speisen im
Backofeninnenraum stehen. Die Feuchtigkeit könnte das Email schädigen oder sich im
Gerät niederschlagen.
• Versuchen Sie nicht, selbst Reparaturen aus-
zuführen. Andernfalls besteht Unfallgefahr
und das Gerät könnte beschädigt werden.
Wenden Sie sich in jedem Fall an den Kundendienst vor Ort.
• Benutzen Sie keine Scheuermittel oder Metallschwämmchen zum Reinigen der Ofenglastür; sie können die Glasfläche verkratzen und zum Zersplittern der Scheibe führen.
Hinweis zur Email-Beschichtung
Farbliche Veränderungen an der EmailBeschichtung des Backofens als Folge des Gebrauchs beeinträchtigen nicht die Eignung des
Gerätes zur gewöhnlichen bzw. vertragsgemäßen Verwendung. Sie stellen daher keinen
Mangel im Sinne des Gewährleistungsrechtes
dar.
Sicherheit für Kinder
• Nur Erwachsene dürfen dieses Gerät bedie-
nen. Kinder müssen beaufsichtigt werden, so
dass sie nicht mit dem Gerät spielen können.
• Halten Sie das Verpackungsmaterial von
Kindern fern. Andernfalls besteht Erstickungsgefahr.
• Halten Sie Kinder vom geöffneten Gerät
fern.
Allgemeine Sicherheit
• Personen (einschließlich Kinder), die auf-
grund ihrer physischen, sensorischen oder
geistigen Fähigkeiten oder ihrer Unerfahrenheit oder Unkenntnis nicht in der Lage
sind, das Gerät sicher zu bedienen, sollten
dieses Gerät nicht ohne Aufsicht oder Anweisung durch eine verantwortliche Person
benutzen.
• Verbrennungsgefahr! Bei Betrieb wird der
Backofeninnenraum heiß.
Page 19
DEUTSCH 19
• Stellen Sie sich daher nicht direkt vor den
Backofen, wenn Sie die Tür während des
Betriebs oder danach öffnen, damit Hitze
und Dampf gegebenenfalls gefahrlos abziehen können.
Installation
• Vergewissern Sie sich, dass das Gerät beim
Transport nicht beschädigt wurde. Schließen
Sie ein beschädigtes Gerät nicht an. Wenden Sie sich bei Bedarf an den Hersteller.
• Das Gerät darf nur von einem Servicetechniker einer autorisierten Kundendienststelle
repariert werden. Dabei dürfen ausschließlich Originalersatzteile verwendet werden.
• Einbaugeräte dürfen nur nach dem Einbau
in normgerechte, passende Einbauschränke
und Arbeitsplatten betrieben werden.
Gerätebeschreibung
Gesamtansicht
4
2
1
3
6
5
7
8
9
10
11
12
• Nehmen Sie weder technische noch anderweitige Modifikationen am Gerät vor. Andernfalls besteht Unfallgefahr und das Gerät könnte beschädigt werden.
Warnung! Beachten Sie genau sämtliche
Anweisungen zu den elektrischen
Anschlüssen.
Hinweis zu Acrylamid
Wichtig! Nach neuesten wissenschaftlichen
Erkenntnissen kann eine intensive Bräunung
von Lebensmitteln, speziell bei stärkehaltigen
Produkten, eine gesundheitliche Gefährdung
durch Acrylamid verursachen. Daher
empfehlen wir, möglichst bei niedrigen
Temperaturen zu garen und die Speisen nicht
zu stark zu bräunen.
1 Bedienfeld
2 Temperatur-Wahl
3 Temperatur-Kontrolllampe
4 Anzeigen
5 Betriebsanzeige
6 Bedienknopf für Backofen-Funktion
7 Lüftungsöffnungen für den Ventilator
8 Rost
9 Lampe der Innenbeleuchtung
10 Steckdose Messfühler
11 Ventilator
12 Typschild
Page 20
DEUTSCH 20
Zubehör Backofen
Auffangblech
Backblech
Rost
Messfühler
1x
Bedienknöpfe Der Ofen ist mit Bedienknöpfen ausgerüstet,
1x
die gedreht, gedrückt und gezogen werden
können. Die Bedienknöpfe können im Bedienfeld versenkt werden, wenn der Backofen nicht
in Betrieb ist.
Temperatur und Backofen-Funktion werden
durch Drehen der entsprechenden Bedienknöpfe im Uhrzeigersinn eingestellt.
1x
1x
Vor der ersten Inbetriebnahme
Entfernen Sie das gesamte Verpackungs-
material innen und außen am Backofen,
bevor Sie ihn in Betrieb nehmen. Entfernen Sie
das Typenschild nicht.
Nach dem elektrischen Anschluss des Geräts
oder einem Stromausfall blinkt die Zeitanzeige
automatisch.
Die aktuelle Uhrzeit kann mit den Tasten " + "
und " - " eingestellt werden. Nach ca. 5 Sekunden erlischt das Blinken und die Uhr zeigt
die eingestellte Uhrzeit an.
Der Backofen funktioniert erst nach dem Einstellen der Uhrzeit.
Erstes Reinigen
Reinigen Sie das Gerät vor dem ersten Gebrauch. Feuchten Sie ein weiches Tuch mit warmem Wasser und etwas Spülmittel an und reinigen Sie damit das Zubehör und den Backofeninnenraum.
Heizen Sie den Backofen danach ohne Lebensmittel darin einmal auf.
Aufheizen
Drehen Sie den Schalter Backofen-Funktion
und lassen Sie den Backofen 45 Minu-
auf
ten lang mit maximaler Temperatur laufen, damit alle Rückstände im Innenraum komplett
verbrennen. Das Zubehör kann heißer werden
als beim normalen Gebrauch. Außerdem kann
es dabei zu Geruchsentwicklung kommen. Das
ist normal. Sorgen Sie für eine gute Raumbelüftung.
Page 21
DEUTSCH 21
Täglicher Gebrauch
Einschalten des Gerätes
Stellen Sie die gewünschte Backofen-Funktion
und Temperatur ein.
Einstellen der Backofen-Funktion
Drehen Sie den Schalter für die Backofenfunktionen (siehe "Produktbeschreibung").
Einstellen der Temperatur
Drehen Sie den Schalter für die Temperaturwahl (siehe "Produktbeschreibung"). Sie können die Temperatur auf 50 °C bis 250 °C einstellen.
Menü
Backofen-
Funktion
Position AUS
Innenbeleuchtung - leuchtet auch, wenn keine Backofen-Funktion eingestellt
ist.
Ober- und Unterhitze - Die Hitze kommt von den Heizelementen oben und
unten im Backofen. Zum Backen und Braten auf einer Ebene.
Oberhitze - Die Hitze kommt ausschließlich vom Heizelement oben im Back-
ofen. Zum Bräunen bereits fertiger Gerichte.
Unterhitze - Die Hitze kommt ausschließlich vom Heizelement unten im Back-
ofen. Zum Nachbacken von Kuchen mit krossen Böden.
Grill - Zum Grillen flacher Lebensmittel in kleinen Mengen in der Mitte des
Rostes und zum Toasten.
Großflächengrill - Das gesamte Grillelement schaltet sich ein. Zum Grillen
flacher Lebensmittel in größeren Mengen und zum Toasten.
Heißluftgrillen - Der Großflächengrill und das Gebläse laufen zusammen und
wälzen die Heißluft um die Speisen um. Zum Garen größerer Fleischstücke.
Heiß-/Umluft - Bei dieser Einstellung können Speisen, mit der gleichen Gar-
temperatur auf mehreren Ebenen gleichzeitig braten bzw. braten und backen, ohne dass es zu einer Aromaübertragung kommt.
Auftauen - zum Auftauen von Gefriergut. Der Temperaturwahlschalter muss
ausgeschaltet sein.
Pizza - Das untere Heizelement liefert direkte Hitze für Pizza-, Quiche- oder
Pastetenböden, während das Gebläse die Luft um den Belag bzw. die Füllung zirkulieren lässt.
Ausschalten des Gerätes
Drehen Sie die Schalter Temperatur-Wahl und
Backofen-Funktion auf die Position Aus.
Geeignet zum
Page 22

DEUTSCH 22
Betriebsanzeige
Die Betriebsanzeige (siehe "Produktbeschreibung") leuchtet auf, wenn mit dem Bedienknopf für die Backofen-Funktion eine Funktion
eingestellt wurde.
Temperatur-Kontrolllampe
Die Temperatur-Kontrolllampe (siehe "Produktbeschreibung") leuchtet auf, wenn sich der
Backofen aufheizt. Sie erlischt, wenn der Backofen die richtige Temperatur erreicht hat. Danach leuchtet und erlischt sie abwechselnd,
während der Backofen die Temperatur nachjustiert.
Sicherheitsabschaltung
Um eine gefährliche Überhitzung (durch unsachgemäßen Gebrauch des Gerätes oder
defekte Bestandteile) zu vermeiden, ist der
Backofen mit einer Sicherheitsabschaltung
ausgestattet, der die Stromversorgung unterbricht. Die Wiedereinschaltung erfolgt automatisch bei Temperaturabfall.
Sollte die Sicherheitsabschaltung ausfallen,
versuchen Sie auf keinen Fall, sie selbst zu reparieren. Wenden Sie sich an den Kundendienst.
Ventilator
Der Backofen ist mit einem Ventilator (nicht zu
sehen) ausgestattet, der das Bedienfeld, die
Schalter und den Griff der Backofen-Tür kühl
hält. Der Kühlventilator schaltet sich automatisch ein, wenn der Ofen in Betrieb ist. Aus der
Öffnung beim Griff der Backofen-Tür tritt warme Luft aus. Es kann sein, dass der Ventilator
zum Kühlen der Schalter auch nach dem Ausschalten des Backofens weiterläuft.
Uhr-Funktionen
Symbol Funktion Beschreibung
Gardauer Einstellung der Betriebszeit des Ofens
Garzeitende Einstellung der Abschaltzeit des Ofens
Gardauer und Garzeitende
(gemeinsame Einstellung)
Kurzzeitwecker Einstellung einer Vorwahlzeit. Nach Ablauf der
Mechanische Kindersicherung
Das Gerät ist mit einer Kindersicherung ausgestattet, die bei Lieferung aktiviert ist. Sie befindet sich knapp unterhalb des Bedienfelds
auf der rechten Seite.
Einstellung des verzögerten Betriebs des Ofens
Zeit ertönt ein Signalton
Zum Öffnen der
Backofen-Tür mit aktivierter Kindersicherung ziehen Sie den
Griff der Kindersicherung wie in der
Abbildung gezeigt
nach oben.
Schließen Sie dann
die Backofen-Tür,
ohne an der Kindersicherung zu ziehen.
Wenn Sie die Kindersicherung entfernen
wollen, öffnen Sie die
Backofen-Tür und
schrauben Sie sie ab.
Den Schlüssel dafür
finden Sie im mitgelieferten Beipack.
Page 23

DEUTSCH 23
Symbol Funktion Beschreibung
Uhr Einstellen der Uhrzeit
Messfühler Misst beim Braten die Temperatur im Inneren ei-
1
45 3
2
1 Uhrzeit- und Messfühler-Temperaturan-
2 Funktionskontrolllampen
3 Taste " + "
4
5 Taste " - "
nes größeren Fleischstücks
zeige
Auswahltaste
Einstellen der Uhrzeit
•
Drücken Sie die Auswahltaste
bis die gewünschte Kontrolllampe leuchtet.
• Die Zeit kann durch Betätigen der Tasten "
+ " / " - " innerhalb der nächsten 5 Sekunden eingestellt/geändert werden. Danach
beginnt die eingestellte Zeit abzulaufen.
Ausschalten der Uhrzeit
Drücken Sie die Auswahltaste
die rechte Kontrolllampe leuchtet, und drücken
Sie die Taste ". Die Uhrzeit erlischt nach einigen Sekunden.
Messfühler
Der Messfühler misst die Temperatur im Inneren eines Fleischstücks. Wenn im Innern des
Fleischstücks die eingestellte Solltemperatur
erreicht wird, schaltet sich der Ofen automatisch ab.
Warnung! Der Messfühler ist heiß!
Verbrennungsgefahr! Seien Sie beim
Herausziehen des Messfühlers aus dem Fleisch
und des Messfühlersteckers aus der Steckdose
vorsichtig.
1. Stecken Sie den Messfühlerstecker in die
Steckdose an der Seitenwand des Ofens.
2. Stecken Sie den Messfühler soweit wie
möglich in die Mitte des Fleischstücks.
solange,
solange, bis
3.
Drücken Sie die Auswahltaste
bis das Messfühler-Symbol
4. Stellen Sie mit den Tasten " + " / " - " die
gewünschte Temperatur im Innern des
Fleischstücks ein. Die Temperatur kann im
Bereich von 30 °C bis 99 °C eingestellt
werden.
Richtwerte finden Sie in der folgenden Tabelle.
5. Stellen Sie mit den entsprechenden Bedienknöpfen die gewünschte BackofenFunktion und Temperatur ein.
6. Wenn das Fleisch die eingestellte Messfühler-Temperatur erreicht hat, schaltet
sich der Ofen automatisch ab.
7. Entfernen Sie den Messfühler.
Empfohlene Temperaturen im Innern eines
Fleischstücks
50 °C Englisch
60 °C Innen rosa
70 °C Innen durchgebraten
Falls das Fleisch nicht wie gewünscht gegart
sein sollte, müssen Sie die o. g. Schritte wiederholen und eine höhere Innentemperatur
einstellen.
solange,
blinkt.
Page 24

DEUTSCH 24
Ausschalten der Anzeige
Durch das Ausschalten der Zeitanzeige
können Sie Energie einsparen.
1. Tasten " + " und " - " gleichzeitig drücken
und 5 Sekunden lang gedrückt halten.
Kochtabellen
Gewicht
(kg)
1Schwein/Lamm
1Kalb/Rind
1,2 Hähnchen/Kaninchen
1,5 Ente
3Gans
4 Truthahn/Pute
1Fisch
1 Gefüllte Paprika oder
Kuchen
1 Pasteten, Kuchen usw
Kleingebäck
2 Lasagne
1Weißbrot
1 Pizza
Warnung! Kleiden Sie den Backofen
nicht mit Alufolie aus und stellen Sie auch
keinen Bräter bzw. kein Backblech auf den
Boden. Andernfalls könnte das Email durch
den Hitzestau beschädigt werden.
Warnung! Auch beim Grillen stets mit
geschlossener Backofen-Tür garen. Seien
Speise Backofenfunktion Ebene Tempera-
Tomaten/Ofenkartoffeln
Die Anzeige wird ausgeschaltet.
2. Drücken Sie eine beliebige Taste, um die
Anzeige wieder einzuschalten.
tur (°C)
2 180 100-110
2 190 70-100
2 200 70-80
1 160 120-150
1 160 150-200
1 180 210-240
2 190 30-40
2 190 50-70
2 160 45-55
2 160 80-100
3 140 25-35
2 180 45-60
2 190 50-60
1 190 25-35
Sie beim Öffnen der Backofen-Tür vorsichtig.
Die Tür klappt nach unten auf. Lassen Sie die
Tür beim Öffnen nicht herunterfallen, sondern
halten Sie sie am Griff, bis sie vollständig
geöffnet ist.
Garzeit
(Min.)
Page 25

DEUTSCH 25
Reinigung und Pflege
Warnung! Schalten Sie das Gerät vor
dem Reinigen aus und lassen Sie es
abkühlen.
Warnung! Aus Sicherheitsgründen darf
das Gerät nicht mit einem Dampfstrahl-
oder Hochdruckreiniger gereinigt werden.
Warnung! Halten Sie das Gerät jederzeit
sauber. Ablagerungen von Fett oder
Lebensmittelresten können einen Brand
auslösen, insbesondere in der Grillpfanne.
Außenseite des Gerätes
• Feuchten Sie ein weiches Tuch mit warmem
Wasser und etwas Reinigungsmittel an und
reinigen Sie damit die Vorderseite des Gerätes.
• Verwenden Sie bei Edelstahlfronten han-
delsübliche Pflegemittel.
• Verwenden Sie keine Scheuermittel oder
Scheuerschwämme.
Backofeninnenraum
• Schalten Sie vor der Reinigung die Innenbe-
leuchtung ein.
• Feuchten Sie ein weiches Tuch mit warmem
Wasser und etwas Spülmittel an, reinigen
Sie damit den Backofeninnenraum des Gerätes und lassen Sie ihn trocknen.
Zubehör
Feuchten Sie ein weiches Tuch mit warmem
Wasser und etwas Spülmittel an, reinigen Sie
damit nach jedem Gebrauch Backbleche, Roste, die Einschubschienen an den Seitenwänden usw. und lassen Sie sie gut trocknen. Wenn
Sie das Zubehör kurz einweichen lassen, ist es
einfacher zu reinigen.
Reinigung der Backofen-Tür
Die Backofen-Tür ist mit zwei hintereinander
angebrachten Glasscheiben ausgestattet. Um
die Reinigung des Backofens zu erleichtern,
können Sie die Backofen-Tür und die innere
Glasscheibe abnehmen.
Warnung! Wenn Sie versuchen, die
innere Glasscheibe abzunehmen,
solange die Backofen-Tür noch am Gerät
montiert ist, kann diese zuklappen.
Ausbau von Backofen-Tür und Glasscheibe
1
Klappen Sie die
Backofen-Tür ganz
auf und greifen Sie
an die beiden Türscharniere.
3
Schließen Sie die
Backofen-Tür bis zur
ersten Raststellung
zu (ca. 45°). Ziehen
Sie sie dann nach
vorn aus der Halterung.
2
Heben Sie die Hebel
an den beiden
Scharnieren an und
klappen Sie sie nach
vorne.
4
Legen Sie die Backofen-Tür auf einer
ebenen Fläche auf
eine Decke.
Page 26

DEUTSCH 26
5
6
Öffnen Sie die Arretierung, um die innere Verblendung der
Glasscheibe zu entfernen.
7
90°
Drehen Sie die 2 Befestigungen um 90°
und nehmen Sie sie
8
2
1
Heben Sie die Glasscheibe vorsichtig
nach oben heraus.
aus der Halterung.
Reinigen Sie die Glasscheibe mit Wasser und
Spülmittel. Trocknen Sie sie sorgfältig ab.
Einbau von Backofen-Tür und Glasscheibe
Setzen Sie nach der Reinigung die BackofenTür und die Glasscheibe wieder ein. Führen Sie
dazu die Schritte in umgekehrter Reihenfolge
aus.
Die innere Glasscheibe muss mit dem Dekorrahmen (der bedruckten Seite) nach außen an
der Backofen-Tür montiert werden. Fahren Sie
mit dem Finger über die innere Glassscheibe,
um zu überprüfen, dass sie ordnungsgemäß
eingesetzt wurde. Wenn die Glasscheibe richtig eingesetzt wurde, muss sie sich glatt anfühlen.
Setzen Sie die innere Glasscheibe wie auf der
folgenden Abbildung gezeigt in die richtigen
Halterungen ein.
Backauszüge
Zur Reinigung der Seitenwände können die
Backauszüge entfernt werden.
1
Backauszüge hinten
von der Backofen-
2
2
1
Backauszug dann
aushängen.
wand nach vorn
wegziehen.
Zum Einsetzen der Backauszüge die obigen
Schritte in umgekehrter Reihenfolge ausführen.
Wichtig! Die abgerundeten Enden der
Führungsstäbe müssen nach vorne weisen.
Austauschen der Lampe für die
Innenbeleuchtung und Reinigen der
Glasabdeckung
Warnung! Bevor Sie die Backofen-
Lampe für die Innenbeleuchtung
austauschen (näheres siehe
"Produktbeschreibung"), schalten Sie das
Gerät aus und trennen Sie es von der
Stromversorgung.
Page 27

DEUTSCH 27
2. Tauschen Sie bei Bedarf die Lampe für die
Innenbeleuchtung gegen eine neue, bis
300 °C hitzebeständige Backofenlampe
(15/25 Watt, 230 V, 50 Hz) aus (Fassung:
E14).
3. Bringen Sie dann die Glasabdeckung wie-
der an.
1. Drehen Sie die Glasabdeckung gegen den
Uhrzeigersinn und nehmen Sie sie ab. Reinigen Sie die Glasabdeckung.
Was tun, wenn …
Störung Mögliche Ursache Abhilfe
Der Backofen funktioniert nicht
Der Backofen funktioniert nicht
Die Temperatur-Kontrolllampe leuchtet nicht
auf
Die Innenbeleuchtung
funktioniert nicht
Dampf und Kondenswasser schlagen sich auf
den Speisen und im
Backofen nieder
Auf dem Display erscheint "12.00" und die
LED-Uhr blinkt
Im Display erscheint F11 Der Messfühler hat Kurzschluss
Die erforderlichen Einstellungen
wurden nicht vorgenommen
Das Gerät ist nicht ordnungsgemäß angeschlossen oder die
Stromversorgung des Geräts ist
ausgeschaltet
Die erforderlichen Einstellungen
wurden nicht vorgenommen
Die Lampe der Innenbeleuchtung ist defekt
Sie haben die Speisen zu lange
im Backofen stehen lassen
Unterbrechung in der Stromversorgung.
oder der Stecker des Messfühlers sitzt nicht fest in der Buchse
Überprüfen Sie, ob Sie eine Funktion und eine Temperatur ausgewählt haben
Prüfen Sie, ob das Gerät ordnungsgemäß angeschlossen und
die Stromversorgung eingeschaltet ist
Wählen Sie eine Backofen-Funktion und eine Temperatur aus
Tauschen Sie die Lampe der Innenbeleuchtung aus
Lassen Sie die Speisen nach Beendigung des Gar- oder Backvorgangs nicht länger als 15-20 Minuten im Backofen stehen
Zeit zurücksetzen
Stecker des Messfühlers bis zum
Endanschlag in die Steckdose an
der Backofen-Seitenwand einstecken
Page 28

DEUTSCH 28
Versuchen Sie, die Ursache des Problems herauszufinden und das Problem selbst zu beheben. Wenn Sie das Problem nicht selbst lösen
können, wenden Sie sich an den Händler oder
Kundendienst.
Wenn Sie das Gerät falsch bedient haben
oder es nicht von einer autorisierten
Fachkraft angeschlossen wurde, kann auch
während der Garantiezeit für den Besuch eines Kundendiensttechnikers oder Händlers eine Gebühr anfallen.
Technische Daten
Abmessungen (innen) Breite
Innenvolumen 53 l
Größe des größten Backblechs (nutzbare
Fläche)
Heizelement für Unterhitze 1.000 W
Heizelement für Oberhitze 800 W
Heizelemente insgesamt (Ober- und Un-
terhitze)
Grill 1.650 W
Großflächengrill-Element 2.450 W
Umluftgrill 2.450 W
Heiß-/Umluft 2.025 W
Pizza 2.675 W
Lampe der Innenbeleuchtung 25 W
Ventilator 25 W
Motor des Heißluftgebläses 25 W
Gesamtleistung
Anzahl der Funktionen 9
Energieverbrauch 0,78 kWh
Leistungsaufnahme bei Standardbela-
dung und Unterhitze
Leistungsaufnahme bei Standardbela-
dung und Umluft
1) Angaben zu elektrischen Anschlusswerten, Spannung und Gesamtleistung finden Sie auf dem Typenschild
(siehe "Produktbeschreibung").
1)
Höhe
Tiefe
1.130 cm²
1.800 W
2.700 W
0,79 kWh
0,78 kWh
395
335
400
Page 29

DEUTSCH 29
Gerät aufstellen
Vorsicht! Beachten Sie bei der
Installation die Montageanleitung.
Warnung! Der elektrische Anschluss des
Gerätes darf nur von einer qualifizierten
Fachkraft vorgenommen werden. Wenn Sie
die Installation nicht durch eine qualifizierte
Fachkraft durchführen lassen und es zu
Schäden kommt, entfällt der
Garantieanspruch.
• Vor dem Einbau des Gerätes in die Küchen-
landschaft müssen die Einbaumöbel bzw.
die Einbaunische geeignete Abmessungen
aufweisen.
• Stellen Sie für die Installation sicher, dass ein
Berührungsschutz gegen Elektroschock vorhanden ist.
• Gemäß den bestehenden Vorschriften müssen alle Teile, die den Berührungsschutz gewährleisten, so befestigt sein, dass sie nicht
ohne Werkzeug abgenommen werden können.
• Das Gerät kann mit der Rückseite und mit
einer Seite an höheren Geräten oder Wänden aufgestellt werden. Die andere Seite
muss gegen Möbel oder Geräte mit gleicher
Höhe platziert werden.
• Die Standsicherheit des Einbauschrankes
muss DIN 68930 genügen.
• Einbaubacköfen und Einbaukochfelder sind
mit einem speziellen Anschlusssystem ausgestattet. Sie dürfen aus Sicherheitsgründen
nur mit Geräten des gleichen Herstellers
kombiniert werden.
Elektrischer Anschluss
Warnung! Der elektrische Anschluss darf
nur von einer qualifizierten Fachkraft
vorgenommen werden.
• Der Hersteller haftet nicht für Schäden aufgrund der Nichtbeachtung folgender Sicherheitshinweise.
• Erden Sie das Gerät gemäß den Sicherheitshinweisen.
• Vergewissern Sie sich, dass die Netzspannung und -frequenz in Ihrer Region mit den
auf dem Typenschild angegebenen Anschlusswerten übereinstimmen.
• Das Gerät wird mit einem Netzkabel ohne
Stecker geliefert.
• Elektrische Bauteile dürfen nur vom Kundendienst oder von einer kompetenten Fachkraft installiert oder ausgewechselt werden.
• Schließen Sie das Gerät unbedingt an eine
sachgemäß installierte Schutzkontaktsteckdose an.
• Verwenden Sie keine Mehrfachsteckdosen,
Steckverbinder oder Verlängerungskabel.
Andernfalls besteht Feuergefahr.
• Wählen Sie eine Netzsteckdose, die auch
nach der Installation des Geräts noch zugänglich ist.
• Ziehen Sie nicht am Netzkabel, wenn Sie das
Gerät vom Netzstrom trennen möchten. Ziehen Sie dazu immer direkt am Netzstecker.
• In der elektrischen Installation ist eine Einrichtung vorzusehen, die es ermöglicht, das
Gerät mit einer Kontaktöffnungsbreite von
mindestens 3 mm allpolig vom Netz zu trennen, beispielsweise durch automatische
Überlastschalter, Erdschlüsse oder Sicherungen.
Das Gerät entspricht den EU-Richtlinien.
Page 30

DEUTSCH 30
Umwelttipps
Das Symbol auf dem Produkt oder seiner
Verpackung weist darauf hin, dass dieses
Produkt nicht als normaler Haushaltsabfall zu
behandeln ist, sondern an einem Sammelpunkt
für das Recycling von elektrischen und
elektronischen Geräten abgegeben werden
muss. Durch Ihren Beitrag zum korrekten
Entsorgen dieses Produkts schützen Sie die
Umwelt und die Gesundheit Ihrer
Mitmenschen. Umwelt und Gesundheit
werden durch falsches Entsorgen gefährdet.
Weitere Informationen über das Recycling
dieses Produkts erhalten Sie von Ihrem
Rathaus, Ihrer Müllabfuhr oder dem Geschäft,
in dem Sie das Produkt gekauft haben.
Verpackungsmaterialien
Die Materialien mit dem Symbol
derverwertbar. Bitte entsorgen Sie das Verpackungsmaterial in geeigneten RecyclingSammelbehältern.
sind wie-
Vor der Entsorgung des Gerätes
Warnung! Bitte führen Sie vor der
Entsorgung des Gerätes folgende Schritte
durch:
• Ziehen Sie den Netzstecker aus der Netzsteckdose.
• Schneiden Sie das Netzkabel ab und entsorgen Sie es.
• Entfernen Sie die Türverriegelung und entsorgen Sie diese. Dadurch verhindern Sie,
dass sich Kinder im Gerät einsperren können. Erstickungsgefahr.
IKEA GARANTIE
Wie lang ist die IKEA Garantie gültig?
Diese Garantie ist für (5) fünf Jahre gültig ab
dem Originalkaufdatum Ihres Gerätes bei
IKEA; sollte das Gerät die Bezeichnung "LAGAN" tragen, gilt die Garantie in diesem Fall
nur (2) zwei Jahre. Als Kaufnachweis ist der
Originalkassenbon oder die Originalrechnung
erforderlich. Werden im Rahmen der Garantie
Arbeiten ausgeführt, so verlängert sich dadurch die Garantiezeit weder für das Gerät
noch für die neuen Teile.
Welche Geräte sind nicht durch die IKEA (5)
Fünfjahresgarantie abgedeckt?
Die Geräte-Serie LAGAN und alle Geräte, die
vor dem 1. August 2007 bei IKEA gekauft wurden.
Wer übernimmt den Kundendienst?
Der IKEA Kundendienst wird diesen Service
über seinen eigenen Kundendienst oder über
ein autorisiertes Partner-Netzwerk durchführen lassen.
Was deckt die Garantie ab?
Die Garantie deckt Material- und Produktionfehler ab. Sie gilt ab dem Datum, an dem das
Elektrogerät bei IKEA gekauft wurde. Diese
Garantie gilt nur für private Haushalte. Die
Ausnahmen sind unter der Rubrik “Was ist
nicht durch diese Garantie abgedeckt?” beschrieben. Innerhalb des Garantiezeitraums
werden die Kosten zur Behebung eines Fehlers
wie Reparaturen, Ersatzteile, Arbeitszeit und
Fahrtkosten abgedeckt, vorausgesetzt, dass
das Gerät ohne besonderen Kostenaufwand
für die Reparatur zugänglich ist und dass der
Fehler direkt auf einen Konstruktionsfehler
oder einen Materialfehler zurückgeht, der
durch die Garantie abgedeckt ist. Bei diesen
Bedingungen gelten die EU-Richtlinien (Nr.
99/44/EG) und die entsprechenden gesetzlichen Vorschriften. Teile, die ersetzt wurden,
gehen in das Eigentum von IKEA über.
Page 31

DEUTSCH 31
Was wird IKEA zur Lösung de s Problems tun?
IKEA hat Kundendienste, die das Produkt untersuchen und eigenständig entscheiden, ob
das Problem durch die Garantie abgedeckt ist
oder nicht. Wenn entschieden wird, dass der
Fall unter die Garantie fällt, repariert der IKEA
Kundendienst oder ein autorisierter ServicePartner über seinen eigenen Service eigenständig das defekte Produkt, oder sie ersetzen
es durch ein gleiches oder durch ein gleichwertiges Produkt.
Was ist nicht durch diese Garantie
abgedeckt?
• Der normale Verschleiß.
• Bewusste oder durch Fahrlässigkeit entstandene Schäden, die durch eine Missachtung
der Bedienungsanweisung, eine unsachgemäße Installation oder durch den Anschluss
an eine falsche Spannung, sowie Schäden,
die durch eine chemische oder elektrochemische Reaktion (Rost, Korrosion oder Wasserschäden eingeschlossen - aber nicht darauf beschränkt) - Schäden, die durch übermäßigen Kalk in der Wasserzuleitung entstanden sind, und Schäden, die durch ungewöhnliche Umweltbedingungen entstanden
sind.
• Verbrauchsgüter wie Batterien und Lampen.
• Nicht-funktionale und dekorative Teile, die
den normalen Betrieb des Gerätes nicht beeinträchtigen, einschließlich Kratzer und
möglicher Farbunterschiede.
• Versehentliche Beschädigung durch Fremdobjekte der Substanzen und Reinigung oder
Loslösen von Filtern, Drainagesystemen
oder Reinigungsmittel-Schubladen.
• Beschädigung folgender Teile: Glaskeramik, Zubehör, Geschirr und Besteckkörbe,
Zuleitungen und Drainageschläuche-/rohre, Lampen und Lampenabdeckungen,
Knöpfe/Wählschalter, Gehäuse und Teile
des Gehäuses; es sei denn, es kann nachgewiesen werden, dass diese Schäden
durch Produktionsfehler verursacht wurden.
• Fälle, in denen bei einem Besuch des Kundendienstes kein Fehler gefunden werden
konnte.
• Reparaturen, die nicht durch unser autorisiertes Kundendienstpersonal und/oder
das autorisierte Kundendienstpersonal unserer Vertragspartner ausgeführt wurden,
oder Fälle, in denen keine Originalteile verwendet wurden.
• Reparaturen, die durch fehlerhafte und nicht
gemäß der Anleitung durchgeführte Installation verursacht wurden.
• Die Nutzung des Gerätes in einer professionellen Art und Weise, d.h. nicht im privaten
Haushalt.
• Transportschäden.
• Die Kosten zur Durchführung der Installation
des IKEA Gerätes, es sei denn, sie sind aufgrund einer Reparatur oder eines Ersatzes
defekter Teile erforderlich.
Diese Einschränkung gilt nicht für fehlerfreie
Arbeiten, die von qualifiziertem Fachpersonal
durchgeführt wurden, um das Gerät an den
technischen Sicherheitsstandard eines anderen EU-Landes anzupassen.
Wie gilt die geltende Gesetzgebung des
Landes
Die IKEA Garantie gibt Ihnen spezielle gesetzliche Rechte, die alle lokalen gesetzlichen Anforderungen abdecken oder übertreffen, die
einer Änderung von Land zu Land unterworfen
sind.
Gültigkeitsbereich
Für Geräte, die in einem EU-Land gekauft und
in ein anderes EU-Land mitgenommen werden, stehen die Kundendienstleistungen im
Rahmen der Garantiebedingungen bereit, die
im neuen Land gültig sind. Eine Verpflichtung,
Dienstleistungen im Rahmen der Garantie
auszuführen, besteht nur dann, wenn:
• das Gerät den technischen Spezifikationen
des Landes, in dem der Garantieanspruch
gemacht wird, entspricht, und es in Übereinstimmung mit diesen technischen Spezifikationen des Landes installiert wurde;
• das Gerät in Übereinstimmung mit den
Montageanleitungen und den Sicherheitsinformationen im Benutzerhandbuch installiert wurde und diesen Anleitungen und Informationen entspricht.
Page 32

DEUTSCH 32
Der spezielle KUNDENDIENST (SERVICE) für
IKEA Geräte
Bitte zögern Sie nicht, den speziellen IKEA
KUNDENDIENST (SERVICE) zu kontaktieren
für:
• einen Anspruch unter dieser Garantie;
• die Bitte um Klärung von Fragen zur Installation des IKEA Gerätes im speziellen IKEA
Küchenmöbel. Der Kundendienst kann keine Fragen beantworten zu:
– der gesamten IKEA Kücheninstallation;
– Anschlüsse an die Elektrik (falls das Gerät
ohne Netzkabel und Stecker kommt), Anschlüsse an Wasser und Gas, da diese Arbeiten von einem autorisierten Kundendiensttechniker ausgeführt werden müssen.
• die Bitte um Klärung von Fragen zu Inhalten
des Benutzerhandbuchs und zu Spezifikationen des IKEA Geräts.
Um sicherzustellen, dass wir Sie stets optimal
unterstützen, lesen Sie bitte die Montageanleitung und/oder den Bedienungsanleitungsabschnitt dieser Broschüre durch, bevor Sie
sich an uns wenden.
Wie können Sie uns erreichen, wenn Sie uns
benötigen?
für einen Garantieanspruch unerlässlich. Bitte
beachten Sie, dass auf diesem Kaufbeleg auch
die IKEA Artikelbezeichnung und die Nummer
(der 8-stellige Zifferncode) für jedes der
Geräte, die Sie gekauft haben, vermerkt sind.
Benötigen Sie zusätzlich Hilfe?
Für alle weiteren Fragen, die nicht im obigen
Abschnitt “Der spezielle KUNDENDIENST
(SERVICE) für IKEA Geräte” angesprochen
wurden, benutzen Sie bitte nicht die speziellen
Telefonnummern auf der letzten Seite dieser
Broschüre, sondern wenden Sie sich an das
Call Center der nächsten IKEA-Einrichtung.
Wir empfehlen Ihnen, die Dokumentation zu
Ihrem Gerät sorgfältig durchzulesen, bevor Sie
uns kontaktieren.
Auf der letzten Seite dieser Broschüre finden
Sie eine vollständige Liste von offiziellen IKEA
Kundendienststellen mit den jeweiligen nationalen Telefonnummern.
Wichtig! Damit Sie bei Fragen rasch die
zuständige Stelle erreichen, empfehlen wir
Ihnen, die am Ende dieser Broschüre
aufgelisteten speziellen Telefonnummern zu
benutzen. Beziehen Sie sich bitte stets auf die
Telefonnummern, die in der Broschüre zu dem
jeweiligen Gerät aufgelistet sind, zu dem Sie
Fragen haben. Bevor Sie uns anrufen, sollten
Sie die IKEA-Artikelnummer (den 8-stelligen
Zifferncode) Ihres Gerätes zur Hand haben.
Wichtig! BITTE BEWAHREN SIE DEN
KAUFBELEG AUF! Er ist Ihr Kaufnachweis und
Page 33

FRANÇAIS 33
Sommaire
Consignes de sécurité 33
Description de l'appareil 35
Avant la première utilisation 36
Utilisation quotidienne 36
Tableaux de cuisson 39
Entretien et nettoyage 40
En cas d'anomalie de fonctionnement 43
Sous réserve de modifications
Caractéristiques techniques 43
Installation 44
Branchement électrique 45
En matière de protection de l'environnement
45
GARANTIE IKEA 46
Consignes de sécurité
Pour votre sécurité et pour garantir une
utilisation correcte de l'appareil, lisez attentivement cette notice d'utilisation, ainsi que
ses conseils et avertissements, avant d'installer
et d'utiliser l'appareil pour la première fois.
Conservez cette notice d'utilisation avec l'appareil. Si l'appareil devait être vendu ou cédé
à une autre personne, assurez-vous que la notice d'utilisation l'accompagne, afin que le
nouvel utilisateur soit correctement informé du
fonctionnement de celui-ci et des avertissements s'y rapportant. Pour éviter toute erreur
ou accident, veillez à ce que toute personne
qui utilise l'appareil connaisse bien son fonctionnement et ses options de sécurité.
Utilisation
• Ne laissez pas l'appareil sans surveillance
en cours de fonctionnement.
• Votre appareil est destiné à un usage do-
mestique normal.
• L'appareil ne peut en aucun cas servir de
plan de travail ou de support.
• Ne posez pas ou ne stockez pas des liquides
ou des matériaux inflammables ou bien des
objets susceptibles de fondre (plastique,
aluminium) dans ou à proximité de l'appareil.
• Soyez prudent lorsque vous utilisez un ap-
pareil électrique à fil à proximité de votre
appareil. Les câbles ne doivent pas être en
contact avec la porte chaude du four ou être
coincés dessous.
• Ne laissez pas d'aliments ou de plats tièdes
à l'intérieur du four une fois la cuisson terminée car la vapeur d'eau peut endommager l'émail ou s'infiltrer dans les éléments du
four.
• Vous ne devez pas réparer vous-même
l'appareil. Une réparation non conforme
peut être la cause de graves dommages
(corporel ou matériel). Les réparations ne
doivent être effectuées que par un service
après vente qualifié.
•N'utilisez jamais d'objets abrasifs durs,
d'objets tranchant ou coupant ou de racloirs
pointus en métal pour nettoyer la porte en
verre du four car ils peuvent en rayer la surface, ce qui pourrait avoir pour effet, à terme, de briser le verre.
Remarque sur l'émail
L'usage du four peut provoquer des modifications de couleur du revêtement en émail
qui n'influent aucunement sur la performance
de l'appareil s'il est utilisé dans des conditions
normales. De ce fait, elles ne constituent pas
une malfaçon entrant dans le cadre de la garantie.
Sécurité des enfants
• Cet appareil a été conçu pour être utilisé par
des adultes. Veillez à ce que les enfants n'y
touchent pas et ne l'utilisent pas comme un
jouet.
• Ne laissez pas les emballages à portée de
main des enfants. Risque d'asphyxie.
• Tenez les enfants éloignés de l'appareil
lorsque la porte est ouverte.
Page 34

FRANÇAIS 34
Consignes générales de sécurité
• Cet appareil n'est pas destiné à être utilisé
par des enfants ou des personnes dont les
capacités physiques, sensorielles ou mentales, ou le manque d'expérience et de connaissances les empêchent d'utiliser l'appareil sans risque lorsqu'ils sont sans surveillance ou en l'absence d'instructions d'une
personne responsable qui puisse leur assurer une utilisation de l'appareil sans danger.
• Risque de brûlures ! L'intérieur du four devient chaud en cours d'utilisation.
• Veillez à vous positionner un peu à l'écart
lorsque vous ouvrez la porte du four durant
la phase de cuisson ou au terme de celle-ci,
pour permettre le dégagement de la vapeur
ou de la chaleur produite sans risquer de
vous brûler.
Installation
• Vérifiez que l'appareil n'a pas été endommagé pendant le transport. Ne branchez
jamais un appareil endommagé. Si l'appareil est endommagé, contactez votre magasin vendeur.
• Les réparations ne doivent être effectuées
que par un service après vente qualifié. Une
réparation non conforme peut être la cause
de graves dommages. En cas d'intervention
sur l'appareil, exigez du service après vente
les pièces de rechange Certifiées Constructeur.
• Les appareils encastrables ne peuvent être
mis en fonctionnement qu'après avoir été
installés dans des meubles et des plans de
travail homologués et adaptés.
• Ne modifiez pas ou n'essayez pas de modifier les caractéristiques de cet appareil.
Cela représenterait un danger pour vous.
Avertissement Les opérations
d'installation et de branchement doivent
être réalisées par un technicien qualifié.
Conseils relatifs à l'acrylamide
Important Selon les connaissances
scientifiques les plus récentes, faire brunir les
aliments de manière intensive, en particulier
les produits contenant de l'amidon, peut nuire
à la santé à cause de l'acrylamide. C'est
pourquoi nous vous recommandons de faire
cuire les aliments à basse température et de
ne pas trop les faire brunir.
Page 35

FRANÇAIS 35
Description de l'appareil
Description de l'appareil
4
2
1
3
6
5
7
8
9
10
11
12
1 Bandeau de commande
2 Thermostat
3 Voyant du thermostat
4 Affichage
5 Voyant Marche
6 Sélecteur de fonctions du four
7 Orifices d'aération du ventilateur de re-
froidissement
8 Gril
9 Eclairage du four
10 Douille de sonde à viande
11 Ventilateur
12 Plaque signalétique
Accessoires du four
Lèchefrite
1x
Plaque à pâtisserie1xGrille
1x
Sonde à viande
1x
Manettes de commande pousser-tirer Le four est équipé de manettes de commande
pousser-tirer. Vous pouvez enfoncer les manettes de commande dans le bandeau de
commandes quand le four est à l'arrêt.
Tournez les manettes dans le sens horaire pour
sélectionner la température et la fonction du
four.
Page 36

FRANÇAIS 36
Avant la première utilisation
Avant d'installer et d'utiliser l'appareil,
retirez tous les éléments constituant l'emballage, y compris les étiquettes et tout éventuel film protecteur. Ne retirez pas la plaque
signalétique.
Lorsque vous branchez l'appareil ou en cas de
coupure de courant, le symbole de l'heure clignote automatiquement.
Réglez l'heure du jour à l'aide de la touche "
+ " ou " - ". Après 5 secondes environ, le symbole cesse de clignoter et l'affichage indique
l'heure du jour réglée.
Le four fonctionne uniquement si l'heure du
jour a été réglée.
Premier nettoyage
Nettoyez l'appareil avant de l'utiliser pour la
première fois. Nettoyez les accessoires et l'intérieur du four à l'aide d'un chiffon doux humidifié d'eau tiède savonneuse en prenant
soin de bien rincer et essuyer.
Ensuite, avant la première utilisation de votre
four, faites-le chauffer une fois à vide.
Préchauffe
Positionnez le sélecteur de fonctions sur
faites fonctionner le four pendant 45 minutes
à la température maximum, pour éliminer les
éventuels résidus de fabrication à l'intérieur du
four. Les accessoires peuvent chauffer davantage que dans des conditions normales d'utilisation. Pendant ce temps, il peut se dégager
une odeur désagréable. Ceci est absolument
normal et est causé par des résidus de fabrication. Aérez convenablement la pièce pour
limiter les odeurs et le dégagement de fumées.
et
Utilisation quotidienne
Mise en fonctionnement de l'appareil
Sélectionnez une fonction du four et réglez la
température.
Sélection de la fonction
Tournez le sélecteur de fonctions du four (voir
chapitre "Description de l'appareil")
Fonctions du four
Fonction du
four
Off (arrêt)
Eclairage du four - Il s'allume même si aucune fonction de cuisson n'est sé-
lectionnée.
Cuisson traditionnelle - La chaleur est produite tant par l'élément chauffant
supérieur que par l'élément chauffant inférieur. Pour cuire et rôtir sur un seul
niveau.
Réglage de la température
Tournez la manette du thermostat (voir chapitre "Description de l'appareil"). La température peut être réglée entre 50 °C et 250 °C.
Mise à l'arrêt du four
Positionnez le sélecteur de fonctions et le thermostat sur la position Arrêt.
Utilisation
Page 37

FRANÇAIS 37
Fonction du
four
Cuisson par l'élément chauffant supérieur - La chaleur provient uniquement
de l'élément chauffant supérieur. Pour terminer la cuisson des plats.
Cuisson par l'élément chauffant inférieur - La chaleur provient uniquement
de l'élément chauffant inférieur. Pour la cuisson de gâteaux au fond croustillant.
Gril - Pour faire griller des aliments peu épais en petites quantités au centre
de la grille. Pour toaster.
Gril complet - Le gril complet est activé. Pour faire griller des aliments peu
épais en grandes quantités. Pour toaster.
Gril à chaleur tournante - L'élément chauffant du gril et le ventilateur du four
fonctionnent simultanément pour faire circuler de l'air chaud autour des aliments. Pour cuire de grosses pièces de viande.
Multichaleur tournante - Cette fonction permet de cuire ou de rôtir simultanément sur plusieurs gradins des aliments nécessitant une température de
cuisson identique, sans que les odeurs ne se mélangent.
Voyant Marche
Le voyant Marche (reportez-vous au chapitre
"Description de l'appareil") s'allume dès que
le sélecteur de fonctions du four est activé.
Voyant du thermostat
Le voyant du thermostat (voir chapitre "Description de l'appareil") s'allume pendant le
préchauffage du four. Il s'éteint lorsque la température du four sélectionnée est atteinte. Il
s'allume et s'éteint ensuite par intermittence
pour indiquer les ajustements de température.
Thermostat de sécurité
Afin d'éviter tout risque de surchauffe (résultant d'une utilisation incorrecte de l'appareil
ou d'un composant défectueux), le four est doté d'un thermostat de sécurité destiné à couper
l'alimentation électrique. Le four se remet automatiquement en marche en cas de baisse de
température.
Décongélation - Cette fonction permet de décongeler des aliments surgelés.
La manette du thermostat doit être placée sur Arrêt (Off).
Pizza - L'élément chauffant inférieur fournit directement de la chaleur à la
base des pizzas, des quiches ou des tourtes, tandis que le ventilateur fait
circuler de l'air pour favoriser la cuisson des garnitures de pizzas ou des
farces de tourtes.
Utilisation
En cas de défaillance du thermostat de sécurité, n'essayez pas de le réparer vous-même.
Contactez votre service après vente.
Ventilateur de refroidissement
Le ventilateur de refroidissement (non visible)
sert à refroidir la façade, le bandeau de commandes et la poignée de porte du four. Le
ventilateur de refroidissement s'enclenche automatiquement lorsque le four est mis en fonctionnement. De l'air chaud est expulsé par les
ouvertures d'aération situées à proximité de la
poignée de la porte du four. Il se peut que le
ventilateur continue de tourner après l'arrêt du
four pour refroidir les manettes.
Sécurité enfants
L'appareil est équipé d'une sécurité enfants
fixée et opérationnelle. Elle se trouve juste en
dessous du bandeau de commandes du four
sur le côté droit.
Page 38

FRANÇAIS 38
Pour ouvrir la porte
du four avec la sécurité enfants activée,
tirez la manette du
verrou vers le haut
comme illustré sur la
figure.
Fermez la porte du
four sans abaisser la
sécurité enfants.
Fonctions de l'horloge
Symbole Fonction Description
Durée de cuisson Pour régler la durée de fonctionnement du four
Fin de cuisson Pour régler l'heure de fin de cuisson
Utilisation simultanée des
fonctions "Durée de cuisson"
et "Heure de fin de cuisson"
Compte-minutes Pour régler la minuterie. Un signal retentit une
Symbole Pour régler l'heure du jour
Sonde à viande Elle permet de mesurer la température au cœur
1
Pour que le four démarre ultérieurement et se
mette à l'arrêt automatiquement à l'heure indi-
fois la durée écoulée
de grosses pièces de viande
2
1 Affichage de l'heure et de la température
au cœur
2 Symboles des fonctions
3 Touche " + "
4
Touche de sélection de la fonction
5 Touche " - "
quée
Pour retirer la sécurité enfants, ouvrez la
porte du four et dévissez la sécurité à
l'aide de la clé à six
lobes fournie dans le
kit d'installation du
four.
45 3
Régler les fonctions de l'horloge
•
Appuyez plusieurs fois sur la touche
qu'à ce que le symbole de la fonction souhaitée clignote.
• Pour régler ou modifier l'heure, appuyez sur
la touche" + " / " - " dans les 5 secondes
qui suivent. Le décompte de la durée sélectionnée démarre.
, jus-
Annulation de la fonction de l'horloge
Appuyez plusieurs fois sur la touche
qu'à ce que le symbole de la fonction correcte
s'affiche, puis appuyez sur la touche " - ". La
fonction de l'horloge s'éteint après quelques
secondes.
, jus-
Page 39

FRANÇAIS 39
Sonde à viande
La sonde à viande permet de mesurer la température au cœur de la viande. Le four s'éteint
automatiquement dès que la viande atteint la
température réglée.
Avertissement La sonde à viande est
brûlante ! Risque de brûlures ! Soyez
particulièrement prudent au moment de retirer
la tige et la pointe.
1. Enfoncez la tige de la sonde à viande jus-
qu'à la butée dans la fiche située dans la
paroi latérale du four.
2. Enfoncez la pointe de la sonde à viande au
centre du morceau de viande.
3.
Appuyez plusieurs fois sur la touche
jusqu'à ce que le symbole de la sonde à
viande
4. Réglez la température au cœur souhaitée
à l'aide des touches " + " / " - ". La tem-
pérature peut être réglée entre 30 °C et 99
°C.
Reportez-vous au tableau indiquant les
températures conseillées.
5. Sélectionnez la fonction du four et la tem-
pérature souhaitées à l'aide des manettes
respectives.
clignote.
6. Le four s'éteint automatiquement dès que
la viande atteint la température au cœur
réglée.
7. Retirez la sonde à viande.
Températures au cœur conseillées
50 °C Saignant
60 °C A point
70 °C Bien cuit
Si vous n'êtes pas satisfait du niveau de cuisson, sélectionnez une température au cœur
plus élevée en répétant les étapes décrites cidessus.
Désactivation de l'affichage
,
Désactiver l'affichage de l'horloge permet d'économiser de l'énergie.
1. Appuyez simultanément sur les touches "
+ " et " - " et maintenez-les appuyées pendant 5 secondes.
L'affichage est désactivé.
2. Pour allumer l'affichage, appuyez sur une
touche quelconque.
Tableaux de cuisson
Poids (kg) Mets Fonction du four Gradin Tempéra-
1 Porc / agneau
1 Veau / bœuf
1,2 Poulet/lapin
1,5 Canard
3Oie
4Dinde
1 Poisson
2 180 100-110
2 190 70-100
2 200 70-80
1 160 120-150
1 160 150-200
1 180 210-240
2 190 30-40
ture du
four (°C)
Temps de
cuisson
(min)
Page 40

FRANÇAIS 40
Poids (kg) Mets Fonction du four Gradin Tempéra-
1 Tomates farcies aux
pepperonis/Pommes
de terre au four
Gâteaux prêts à cuire
1 Tartes
Biscuits
2 Lasagnes
1 Pain blanc
1 Pizzas
Avertissement Ne placez jamais de
papier d'aluminium (ou tout autre
ustensile, plat et accessoire) directement en
contact avec la sole. La chaleur accumulée
pourrait entraîner une détérioration de l'émail
ou de l'appareil.
Avertissement Toutes les cuissons
doivent être effectuées porte fermée.
Faites attention lorsque vous ouvrez la porte
du four. Evitez de la laisser tomber.
Maintenez-la à l'aide de la poignée jusqu'à ce
qu'elle soit complètement ouverte.
2 190 50-70
2 160 45-55
2 160 80-100
3 140 25-35
2 180 45-60
2 190 50-60
1 190 25-35
ture du
four (°C)
Entretien et nettoyage
Avertissement Avant de procéder au
nettoyage, assurez-vous que toutes les
manettes se trouvent sur la position "arrêt",
qu'il soit débranché électriquement et qu'il soit
complètement refroidi.
Avertissement N'utilisez jamais
d'appareil à vapeur ou à haute pression
pour nettoyer le four.
Avertissement L e f ou r do it ê tr e m a in te n u
propre en permanence. L'accumulation
de graisses ou d'autres résidus alimentaires,
surtout dans la lèchefrite, pourrait provoquer
un inflammation des graisses lors d'une
prochaine cuisson (risque d'incendie).
Extérieur du four
• Nettoyez la façade du four avec une épon-
ge humide additionnée d'un détergent
doux. Rincez et séchez.
• Pour nettoyer les parties avants en métal,
utilisez des produits de nettoyage classiques.
• N'employez jamais de produits abrasifs ou
caustiques, ni d'éponge avec grattoir,
d'éponge métallique, d'objets tranchants,
tels que couteaux, grattoir pour procéder au
nettoyage de votre appareil.
Intérieur du four
• Mettez en fonctionnement l'éclairage du
four avant de le nettoyer.
• Nettoyez l'enceinte du four à l'aide d'un
chiffon doux humidifié d'eau tiède savonneuse. Rincez et séchez.
Temps de
cuisson
(min)
Page 41

FRANÇAIS 41
Accessoires
Lavez tous les accessoires à l'eau savonneuse
après chaque utilisation en prenant bien soin
des les rincer et de les essuyer avec un chiffon
doux. Faites-les tremper pour faciliter le nettoyage.
Nettoyage de la porte du four
La porte du four est équipée de deux vitres
appliquées l'une derrière l'autre. Pour un nettoyage plus facile, il est possible de démonter
la vitre interne et la porte du four.
Avertissement Si vous tentez d'extraire
le panneau interne en verre lorsque la
porte est encore installée sur le four, celle-ci
pourrait se refermer brutalement du fait de son
allègement et vous blesser.
Retrait de la porte du four et du panneau
interne en verre
1
Ouvrez complètement la porte et saisissez les deux charnières.
2
Soulevez les leviers
sur les 2 charnières et
basculez-les vers
l'avant.
3
Fermez la porte du
four jusqu'à atteindre la première position d'accrochage
(env. 45°). Tirez la
porte vers l'avant et
retirez-la de son logement.
5
Désengagez le système de verrouillage
afin de retirer les vitres intérieures.
7
4
Déposez la porte sur
un support doux et
plan, par exemple
une couverture, afin
d'éviter de la rayer.
6
8
90°
Faites pivoter les 2 fixations de 90° et retirez-les de leurs logements.
2
1
Soulevez le panneau
interne en verre avec
précaution et retirezle.
Page 42

FRANÇAIS 42
Lavez le panneau interne en verre avec un
chiffon humidifié d'eau savonneuse Séchez-le
soigneusement.
Remise en place de la porte et du panneau
interne en verre.
Une fois le nettoyage terminé, remontez le
panneau interne en verre et la porte du four.
Pour ce faire, suivez la même procédure dans
l'ordre inverse.
La vitre interne doit être montée avec le cadre
décoratif (la sérigraphie) orienté vers l'extérieur du four. Pour vérifier la bonne exécution
de l'opération décrite ci-dessus, passez vos
doigts sur la surface de la vitre interne. Si la
vitre a été remontée correctement, vous ne
devriez sentir aucune rugosité.
Insérez la vitre interne dans les logements
adéquats, comme indiqué ci-dessous.
1
Tirez sur l'avant des
glissières pour les
dégager de la paroi
du four.
Pour réinstaller les glissières, procédez dans
l'ordre inverse.
Important Les extrémités arrondies des tiges
de guidage doivent être orientées vers l'avant.
Remplacement de l'ampoule d'éclairage du
four et nettoyage du globe
Avertissement Avant de remplacer
l'ampoule, (reportez-vous au chapitre
"Description de l'appareil"), mettez à l'arrêt le
four et débranchez-le de l'alimentation
électrique.
2
2
1
Puis soulevez les glissières pour les décrocher à l'arrière.
Glissières latérales
Il est possible de retirer les glissières latérales
des parois du four pour les nettoyer.
1. Dévissez le globe en le tournant dans le
sens inverse des aiguilles d'une montre.
Nettoyez-le.
2. Si besoin est, remplacez l'ampoule défec-
tueuse par un modèle identique apte à
supporter des hautes températures
(300°C) et ayant les caractéristiques suivantes : 15/25 W, 230 V (50 Hz), Type de
connexion : E14).
3. Remontez le diffuseur.
Page 43

FRANÇAIS 43
En cas d'anomalie de fonctionnement
Symptôme Cause possible Remède
Le four ne fonctionne
pas
Le four ne fonctionne
pas
Le voyant du thermostat
ne s'allume pas
L'éclairage du four ne
s'allume pas
De la vapeur et de l'eau
de condensation se déposent sur les aliments
et dans l'enceinte du
four
L'écran affiche "12.00"
et la LED horloge clignote
F11 s'affiche à l'écran La tige de la sonde à viande
Nous vous recommandons vivement de faire
les vérifications suivantes sur votre appareil
avant de contacter votre service après vente.
Il se peut que le problème soit simple et que
vous puissiez y remédier vous-même. Si après
avoir vérifié ces différents points l'anomalie
persiste, contactez votres service après vente.
Les réglages nécessaires n'ont
pas été effectués
L'appareil n'est pas correctement branché et/ou l'alimentation électrique du four est interrompue
Les réglages nécessaires n'ont
pas été effectués
L'ampoule du four est défectueuse
Vous avez laissé les plats dans
le four trop longtemps
Coupure de l'alimentation électrique.
n'est pas enfoncée correctement dans la prise
Si un problème résulte d'une mauvaise
utilisation ou si l'installation de l'appareil
n'a pas été réalisée par un professionnel qualifié, le déplacement du technicien du service
après vente ou du revendeur peut être facturé
même en cours de garantie.
Vérifiez que la température et la
fonction de cuisson ont été sélectionnées
Vérifiez que l'appareil est correctement branché
Sélectionnez la fonction de cuisson et la température
Remplacez l'ampoule du four
Une fois le processus de cuisson
terminé, ne laissez pas les plats
dans le four au-delà de 15 à 20
minutes
Réinitialisez l'heure
Enfoncez la tige de la sonde à
viande jusqu'à la butée dans la fiche située dans la paroi latérale
du four
Caractéristiques techniques
Dimensions (internes) Largeur
Volume utile 53 l
Superficie de la plaque de cuisson la plus
grande (surface nette)
Hauteur
Profondeur
1130 cm²
395
335
400
Page 44

FRANÇAIS 44
Élément chauffant inférieur 1000 W
Élément chauffant supérieur 800 W
Eléments chauffants inférieur et supérieur 1800 W
Cuisson au gril 1650 W
Gril complet 2450 W
Gril à chaleur tournante 2450 W
Multichaleur tournante 2025 W
Pizzas 2675 W
Eclairage du four 25 W
Ventilateur de refroidissement 25 W
Moteur du ventilateur d'air pulsé 25 W
Puissance totale
Nombre de fonctions 9
Consommation d'énergie 0,78 kWh
Consommation d'énergie avec charge
standard et élément chauffant inférieur
en fonctionnement
Consommation d'énergie avec un four à
air pulsé à charge standard
1) Les informations concernant le branchement électrique, la tension et la puissance totale figurent sur la
plaque signalétique (voir chapitre "Description de l'appareil").
1)
2700 W
0,79 kWh
0,78 kWh
Installation
Attention Consultez les instructions de
montage pour l'installation.
Avertissement L'installation de
l'appareil doit être réalisée par un
professionnel qualifié. Si vous ne contactez pas
un professionnel qualifié, les éventuels
dommages dûs à une mauvaise installation ne
seront pas couverts par la garantie.
• Afin d'assurer le fonctionnement optimal de
l'appareil, il est nécessaire que le meuble de
cuisine ou la niche dans laquelle il sera encastré possède les dimensions appropriées.
• Veillez à garantir une protection anti-chocs
lors de l'encastrement de l'appareil.
• Conformément aux règlementations en vigueur, toutes les pièces assurant la protection anti-chocs des éléments sous tension ou
isolés doivent être fixées de manière telle à
empêcher leur retrait sans outils.
• L'appareil peut être placé avec sa paroi arrière ou latérale posée contre des meubles
de cuisine, des appareils ou des parois
d'une hauteur supérieure. Quoi qu'il en soit,
seuls d'autres meubles ayant une hauteur
identique à celle du four peuvent être installés contre l'autre paroi latérale .
• Le niveau de sécurité de l'élément encastré
doit être conforme à la norme DIN 68930.
Page 45

FRANÇAIS 45
• Les fours et plaques de cuisson encastrables
sont équipés de connexions particulières.
Par mesure de sécurité, vous devez unique-
Branchement électrique
Avertissement Le branchement
électrique doit être uniquement confié à
un électricien qualifié.
• Le fabricant ne peut pas être tenu responsable si vous ne respectez pas ces consignes
de sécurité.
• L'appareil doit être relié à la terre conformément aux normes de sécurité.
• Vérifiez que la tension nominale et le type
d'alimentation figurant sur la plaque signalétique correspondent aux valeurs d'alimentation locales.
• Cet appareil est fourni avec un cordon électrique sans prise.
• Tout composant électrique doit être installé
ou remplacé par un technicien du service
après-vente ou des techniciens d'entretien
spécialisés.
• Utilisez toujours une prise électrique protégée contre les chocs et installée dans les règles de l'art.
ment associer des appareils du même fabricant.
• N'utilisez pas de prises multiples, de connecteurs ni de prolongateurs. Risque d'incendie.
• Assurez-vous que la prise électrique est accessible après l'installation.
• Ne tirez pas sur le cordon électrique pour
débrancher l'appareil mais tirez toujours sur
la prise.
• Le branchement de l'appareil au secteur
doit être effectué à l'aide d'un interrupteur
à coupure omnipolaire ayant une distance
d'ouverture des contacts d'au moins 3 mm,
par exemple, un coupe-circuit automatique,
un disjoncteur différentiel ou des fusibles.
Cet appareil est conforme aux directives CEE.
En matière de protection de l'environnement
Le symbole sur le produit ou son emballage
indique que ce produit ne peut être traité
comme déchet ménager. Il doit être remis au
point de collecte dédié à cet effet (collecte et
recyclage du matériel électrique et
électronique).
En procédant à la mise au rebut de l'appareil
dans les règles de l’art, nous préservons
l'environnement et notre sécurité, s’assurant
ainsi que les déchets seront traités dans des
conditions optimum.
Pour obtenir plus de détails sur le recyclage de
ce produit, veuillez prendre contact avec les
services de votre commune ou le magasin où
vous avez effectué l'achat.
Matériaux d'emballage
Tous les matériaux marqués par le symbole
sont recyclables. Déposez-les dans une déchetterie prévue à cet effet (renseignez-vous
auprès des services de votre commune) pour
qu'ils puissent être récupérés et recyclés.
Page 46

FRANÇAIS 46
Mise au rebut de l'appareil
Avertissement Pour mettre au rebut
l'appareil, procédez comme suit :
• Retirez la fiche de la prise secteur.
• Coupez le câble d'alimentation et mettez-le
au rebut.
GARANTIE IKEA
Pendant combien de temps la garantie IKEA
est-elle valable ?
Cette garantie est valable cinq (5) ans à compter de la date d'achat de votre appareil chez
IKEA, à moins qu'il ne s'agisse d'un appareil
LAGAN, auquel cas la garantie ne dure que
deux (2) ans. Le ticket de caisse original est
nécessaire et constitue la preuve d'achat. Les
réparations effectuées sous couvert de la garantie ne prolongent pas la durée de garantie,
ni pour l'appareil ni pour les pièces échangées.
Quels appareils ne sont pas couverts par
cette garantie IKEA de cinq (5) ans ?
La gamme d'appareils LAGAN et tous les appareils achetés chez IKEA avant le 1er août
2007.
Qui se chargera du service après vente ?
Le service après-vente IKEA se chargera du
service par le biais de ses propres services ou
du réseau de partenaires autorisés.
• Éliminez le dispositif de verrouillage de porte. Ceci pour empêcher que des enfants ne
restent enfermés à l'intérieur de l'appareil.
Ils pourraient s'asphyxier !
Que couvre cette garantie ?
Cette garantie couvre les dommages dus à des
composants défectueux ou des défauts de fabrication survenant après la date d'achat chez
IKEA. Cette garantie est valable uniquement
lorsque l’appareil est utilisé pour un usage domestique. Les exceptions sont indiquées dans
le paragraphe “Qu'est-ce qui n'est pas couvert par la garantie ?” Pendant la durée de la
garantie, les coûts des réparations, des pièces
de rechange, de la main-d'œuvre et du déplacement seront pris en charge à condition
que l'appareil soit disponible pour réparation
sans occasionner de dépenses spéciales et
que le dommage soit lié à une défectuosité
d’un composant ou à un défaut de fabrication
couvert par la garantie. Dans ces conditions,
la directive européenne (99/44/CE) et les réglementations locales doivent être appliquées. Les pièces remplacées deviennent la
propriété d'IKEA.
Que fait IKEA en cas de problème ?
Le service après-vente choisi par IKEA examine le produit et décide, à sa seule discrétion,
si la défectuosité est couverte par la garantie.
Si tel est le cas, le service après-vente IKEA par
le biais de ses propres services ou d'un partenaire autorisé, procède alors, à sa seule discrétion, à la réparation du produit défectueux
ou à son remplacement par un produit équivalent.
Qu'est-ce qui n'est pas couvert par la
garantie ?
•L'usure normale.
Page 47

FRANÇAIS 47
• Les dommages causés délibérément ou par
négligence, les dommages résultant du nonrespect des instructions d'utilisation, d'une
installation incorrecte ou d’un branchement
non conforme de l'appareil, les dommages
causés par une réaction chimique ou électrochimique, l'oxydation, la corrosion ou un
dégât des eaux, incluant sans s'y limiter, les
dommages causés par une quantité excessive de calcaire au niveau du raccordement
à l'eau, les dégâts résultant de conditions
environnementales anormales.
• Les consommables tels que les piles et ampoules.
• Les pièces non fonctionnelles et décoratives,
qui n'ont pas d'incidence sur l'utilisation normale de l'appareil, de même que les rayures
et éventuelles variations de couleur.
• Les dégâts accidentels causés par une substance ou un corps étranger, le nettoyage
ou débouchage de filtres, systèmes d'évacuation ou compartiments de produits de
lavage.
• Les dommages constatés sur les éléments
suivants : vitrocéramique, accessoires, paniers à vaisselle et à couverts, tuyaux d'alimentation et de vidange, joints, ampoules et
diffuseurs, écrans, manettes et touches carrosserie et éléments de la carrosserie. Sauf
s'il est possible de prouver que ces dommages ont été causés par des défauts de fabrication.
• Les cas où aucune défectuosité n'a été constatée par le technicien.
• Les réparations qui n'ont pas été effectuées
par des techniciens de service après-vente
désignés et/ou un partenaire contractuel
autorisé ni celles où l'on n'a pas utilisé des
pièces d'origine.
• Les dommages résultant d'une installation
incorrecte ou non respectueuse des spécifications d’installation.
• L'utilisation de l'appareil dans un environnement non domestique (par exemple pour
un usage professionnel).
• Dommages dus au transport.
• Les frais d'installation de l'appareil IKEA,
sauf s'ils sont liés à une réparation ou au
remplacement de pièces défectueuses.
Cette restriction ne concerne pas les cas où un
service après vente qualifié a travaillé sans
faire d'erreur et en utilisant les pièces d'origine
afin d'adapter l'appareil aux normes de sécurité techniques d'un autre pays de l'Union européenne.
Application de la garantie légale
La garantie IKEA vous donne des droits spécifiques, qui couvrent ou dépassent toutes les
exigences légales locales qui peuvent varier
d'un pays à l'autre.
Zone de validité
Pour les appareils achetés dans un pays de
l'Union européenne et transportés dans un autre pays de l'Union européenne, les services
seront fournis dans le cadre des conditions de
garantie valables dans ce dernier. L'obligation de fournir des services dans le cadre de la
garantie n'existe que si :
• l'appareil est conforme et installé conformément aux spécifications techniques du pays
dans lequel la demande de garantie est effectuée ;
• l'appareil est conforme et installé conformément aux instructions de montage et consignes de sécurité indiquées dans la notice
d'utilisation ;
Le SERVICE APRES-VENTE dédié aux
appareils IKEA
N'hésitez pas à contacter le SERVICE APRESVENTE d’IKEA pour :
• effectuer une réclamation dans le cadre de
cette garantie ;
• demander une précision pour installer votre
appareil IKEA dans des meubles de cuisine
IKEA. Le service après-vente ne fournira pas
de précision en ce qui concerne :
– l'installation d'ensemble de la cuisine
IKEA ;
– les raccordements électriques (si l'appa-
reil est fourni sans prise et sans câble), à
l'eau et au gaz car ils doivent être effectués par un professionnel qualifié.
• la demande de précisions sur le contenu de
la notice d'utilisation et les caractéristiques
de l'appareil IKEA.
Page 48

FRANÇAIS 48
Pour que nous puissions vous fournir la meilleure assistance, lisez attentivement les instructions de montage et/ou le chapitre concerné de la présente notice d'utilisation avant
de nous contacter.
Comment nous contacter en cas de besoin ?
Vous trouverez la liste complète des services
après-vente recommandés par IKEA et leurs
numéros de téléphone respectifs à la fin de
cette notice.
Important Pour que nous puissions vous
fournir un service rapide et compétent, nous
vous conseillons d'utiliser les numéros de
téléphone spécifiques indiqués à la fin de cette
notice. Vous trouverez tous les numéros de
téléphone utiles dans la notice d'utilisation
correspondant à votre appareil. Avant de
nous appeler, cherchez et conservez à portée
de main le numéro de l'article IKEA (code à 8
chiffres) correspondant à l'appareil pour
lequel vous avez besoin d'assistance.
Important CONSERVEZ VOTRE TICKET DE
CAISSE !
C'est votre preuve d'achat ; il vous sera demandé pour tout appel sous garantie. Veuillez
noter que le ticket de caisse contient aussi le
nom et le numéro de l'article IKEA (code à 8
chiffres) de chaque appareil acheté.
Avez-vous besoin d'aide supplémentaire ?
Pour toute autre question, ne figurant pas dans
le paragraphe ci-dessus “Le SERVICE APRESVENTE dédié aux appareils IKEA”, n'utilisez
pas les numéros de téléphone indiqués à la fin
de la présente notice, mais adressez-vous à
votre magasin IKEA le plus proche . Nous vous
recommandons de lire attentivement la notice
d'utilisation de l'appareil avant de nous contacter.
Page 49

ITALIANO 49
Indice
Informazioni per la sicurezza 49
Descrizione del prodotto 50
Preparazione al primo utilizzo 51
Utilizzo quotidiano 52
Tabelle di cottura 55
Pulizia e cura 55
Con riserva di modifiche
Cosa fare se… 58
Dati tecnici 58
Installazione 59
Collegamento elettrico 60
Considerazioni ambientali 60
GARANZIA IKEA 61
Informazioni per la sicurezza
Per la sicurezza dell'utente e per il buon
funzionamento dell'apparecchio, è importante leggere attentamente il presente libretto di istruzioni prima dell'installazione e
dell'uso. Conservare sempre queste istruzioni
assieme all'apparecchio anche in caso di trasferimento o vendita dell'apparecchio stesso.
L'utente deve acquisire dimestichezza con le
funzioni e dotazioni di sicurezza dell'apparecchio.
Impiego conforme allo scopo previsto
• Non lasciare mai l'apparecchio incustodito
durante il funzionamento.
• L'apparecchio è destinato esclusivamente
all'uso domestico.
• L'apparecchio non deve essere utilizzato
come superficie di lavoro o di appoggio.
• Sull'apparecchio o nelle sue immediate vi-
cinanze non appoggiare né conservare liquidi infiammabili, materiali facilmente incendiabili oppure oggetti che possono fondere (come pellicola per alimenti, plastica,
alluminio).
• Prestare attenzione nel collegare elettrodo-
mestici a prese installate in prossimità dell'apparecchio. Non lasciare che i cavi di collegamento vengano a contatto o rimangano intrappolati sotto la porta del forno caldo.
• Non lasciare alimenti o piatti bagnati nel
forno al termine della cottura poiché l'umidità può danneggiare lo smalto o i componenti interni.
• Non eseguire da soli interventi di riparazione. Vi è il rischio di ferirsi o danneggiare
l'apparecchio. Contattare sempre il Servizio
assistenza locale.
• Per pulire il vetro della porta del forno, non
utilizzare prodotti abrasivi o raschietti di
metallo che potrebbero rigare la superficie
e causare la rottura del vetro.
Nota sul rivestimento smaltato
Le variazioni di colore del rivestimento
smaltato durante l'utilizzo del forno non pregiudicano l'idoneità all'uso dell'apparecchio.
Tali variazioni non costituiscono pertanto un
difetto cui opporre il diritto alla garanzia.
Sicurezza bambini
• Questo apparecchio deve essere utilizzato
esclusivamente da persone adulte. Sorvegliare i bambini per assicurarsi che non giochino con l'apparecchio.
• Tenere i materiali di imballaggio al di fuori
della portata dei bambini. Vi è il rischio di
soffocamento.
• Tenere lontani i bambini dall'apparecchio
quando la porta è aperta.
Sicurezza generale
• Questo apparecchio non deve essere utiliz-
zato da persone (inclusi i bambini) con capacità fisiche, sensoriali o mentali ridotte, o
la cui mancanza di esperienza e conoscenza impedisca loro l'utilizzo sicuro dell'apparecchio, se non sotto la supervisione o le
istruzioni di una persona responsabile.
Page 50

ITALIANO 50
• Pericolo di scottature! L'interno del forno
raggiunge temperatura elevate durante l'uso.
• Al momento di aprire la porta del forno, durante o dopo la cottura, prestare attenzione
al flusso di vapore o di aria calda che fuoriesce dall'apparecchio.
Installazione
• Controllare che l'apparecchio non abbia subito danni durante il trasporto. Non collegare l'apparecchio se è danneggiato. Se
necessario, contattare il fornitore.
• Le riparazioni sull'apparecchio devono essere eseguite esclusivamente da personale
autorizzato. Devono essere utilizzati esclusivamente ricambi originali.
• Gli apparecchi da incasso possono essere
messi in funzione solo dopo l'installazione in
idonei piani di lavoro e mobili da incasso
conformi alle norme.
Descrizione del prodotto
Vista generale
4
2
1
3
6
5
7
8
9
10
11
12
• Non apportare modifiche alle specifiche o
al prodotto. Vi è il rischio di ferirsi o danneggiare l'apparecchio.
Avvertenza Seguire attentamente le
istruzioni per i collegamenti elettrici.
Avvertenza sull'acrilamide
Importante Secondo le ultime scoperte
scientifiche, una cottura intensa degli alimenti,
in particolare di quelli contenenti amido, può
costituire un rischio per la salute a causa
dell'acrilamide. Si raccomanda perciò di
cucinare a temperature relativamente basse e
di non rosolare eccessivamente gli alimenti.
1 Pannello comandi
2 Manopola di regolazione della tempera-
tura
3 Spia di controllo della temperatura
4 Display
5 Indicatore di alimentazione
6 Manopola di regolazione del forno
7 Fessure di ventilazione per la ventola di
raffreddamento
8 Grill
9 Lampadina del forno
10 Presa della termosonda
11 Ventola
12 Targhetta di identificazione
Page 51

ITALIANO 51
Accessori del forno
Leccarda
Piastra da forno
Griglia
Termosonda
1x
Manopole di regolazione a scomparsa Il forno è dotato di manopole di regolazione a
1x
scomparsa che possono essere inserite all'interno del pannello comandi quando il forno
non è in funzione.
Ruotare le manopole di regolazione a scomparsa in senso orario per impostare la temperatura e la funzione del forno.
1x
1x
Preparazione al primo utilizzo
Prima di usare il forno, rimuovere tutti i
materiali di imballaggio presenti sia all'interno sia all'esterno dell'apparecchio. Non
rimuovere la targhetta di identificazione.
Quando si collega il forno alla rete elettrica o
in caso di ripristino della corrente dopo un'interruzione, sul display lampeggia automaticamente il simbolo dell'ora.
Per regolare l'ora utilizzare il tasto " + " o " ". Dopo circa 5 secondi la spia smette di lampeggiare e l'orologio indica l'ora impostata.
L'apparecchio non funziona se non è impostata l'ora.
Prima pulizia
Pulire il forno prima di utilizzarlo per la prima
volta. Pulire gli accessori e l'interno del forno
con un panno morbido inumidito con acqua
tiepida saponata.
Al termine della pulizia, preriscaldare il forno
senza alimenti all'interno.
Preriscaldamento
Ruotare la manopola di regolazione del forno
e accendere il forno per 45 minuti alla
su
massima temperatura per bruciare eventuali
residui presenti sulla superficie del vano cottura. Gli accessori possono raggiungere temperature superiori a quelle raggiunte durante
il normale utilizzo. Durante questa accensione
l'apparecchio può produrre un odore sgradevole. Questo è assolutamente normale. Arieggiare bene l'ambiente.
Page 52

ITALIANO 52
Utilizzo quotidiano
Accensione dell'apparecchio
Selezionare la funzione di cottura e regolare
la temperatura.
Selezione della funzione di cottura
Ruotare la manopola di regolazione del forno
(vedere "Descrizione del prodotto").
Regolazione della temperatura
Ruotare la manopola di regolazione della
temperatura (vedere "Descrizione del prodotto"). La temperatura può essere impostata tra
50 °C e 250 °C.
Funzioni del forno
Funzione del
forno
Posizione Off
Lampadina del forno - Si accende senza funzioni di cottura attivate.
Cottura tradizionale - Il calore proviene dalle resistenze superiore e inferiore
del vano cottura. Per cuocere e arrostire su un solo livello.
Cottura dall'alto - Il calore proviene esclusivamente dalla resistenza supe-
riore del vano cottura. Per rifinire la cottura di alimenti.
Cottura dal basso - Il calore proviene esclusivamente dalla resistenza infe-
riore del vano cottura. Per dorare torte con fondi friabili.
Grill - Per cuocere al grill cibi di ridotto spessore in piccole quantità. Per
tostare.
Grill grande - Si accende l'intero elemento grill. Per cuocere al grill cibi di
ridotto spessore in grandi quantità. Per tostare.
Grill ventilato - L'elemento grill e la ventola funzionano contemporanea-
mente facendo circolare l'aria calda nel vano cottura. Per la cottura di grossi
pezzi di carne.
Cottura ventilata - Per cuocere e/o arrostire su più livelli alla stessa temperatura senza che gli aromi degli alimenti si mescolino.
Indicatore di alimentazione
L'indicatore di alimentazione (vedere "Caratteristiche del prodotto") si accende quando si
imposta la manopola di regolazione del forno.
Scongelamento - Per scongelare cibi congelati. La manopola di regolazione
della temperatura deve essere in posizione off.
Cottura Pizza - La resistenza in basso fornisce il calore diretto alla base per
la cottura di pizze, quiche o torte salate, mentre la ventola fa circolare l'aria
per dorare in superficie la pizza o cuocere uniformemente le torte farcite.
Spegnimento dell'apparecchio
Ruotare la manopola di regolazione del forno
e la manopola di regolazione della temperatura su Off.
Consigliata per
Spia di controllo della temperatura
La spia di controllo della temperatura (vedere
"Descrizione del prodotto") si accende quando il forno è in fase di riscaldamento e si spe-
Page 53

ITALIANO 53
gne non appena il forno ha raggiunto la temperatura impostata. In seguito, la spia si accende a intermittenza per indicare la regolazione della temperatura sul valore impostato.
Termostato di sicurezza
Per evitare un pericoloso surriscaldamento
(dovuto a un utilizzo improprio dell'apparecchio o a componenti difettosi), il forno è dotato
di un termostato di sicurezza che interrompe
l'alimentazione di corrente elettrica in caso di
aumento della temperatura. Quando la temperatura si abbassa, l'apparecchio si riaccende automaticamente.
In caso di rottura o malfunzionamento del termostato di sicurezza, non tentare di ripararlo
da soli. Contattare sempre il Servizio assistenza.
Ventola di raffreddamento
La ventola di raffreddamento (non visibile)
evita il surriscaldamento del pannello anteriore, delle manopole e della maniglia di apertura della porta. All'accensione del forno la
ventola di raffreddamento si attiva automaticamente. L'aria calda è soffiata attraverso le
fessure di ventilazione poste vicino alla maniglia di apertura della porta. Per mantenere
fresche le manopole sul pannello comandi, la
ventola di raffreddamento può continuare a
funzionare dopo lo spegnimento del forno.
Funzioni tempo
Simbolo Funzione Descrizione
Durata della cottura Per impostare la durata di funzionamento del
Fine della cottura Per impostare l'ora di spegnimento del forno
Durata e fine della cottura
combinate
Contaminuti Per l'impostazione di un tempo breve. Entra in
Orologio Per l'impostazione dell'ora
Termosonda Per misurare la temperatura interna di grossi ta-
Blocco di sicurezza bambini
L'apparecchio è fornito con un blocco di sicurezza per i bambini già inserito e attivato. Il
blocco di sicurezza è posizionato appena sotto il pannello comandi del forno sul lato destro.
forno
Per impostare la durata della cottura con avvio
posticipato del forno
funzione un segnale acustico alla scadenza del
tempo impostato
gli di carne durante la cottura
Per aprire la porta
del forno con il blocco di sicurezza inserito, sollevare l'impugnatura del blocco di
sicurezza come illustrato in figura.
Non far leva sul blocco di sicurezza per
chiudere la porta del
forno.
Per rimuovere il blocco di sicurezza, aprire la porta del forno
e svitare il blocco utilizzando la chiave a
stella fornita nel sacchetto accessori.
Page 54

ITALIANO 54
1
45 3
Impostazione di una funzione tempo
• Premere ripetutamente il tasto di selezione
finché lampeggia la spia della funzione
desiderata.
• Per impostare o modificare il tempo impo-
stato, utilizzare il tasto " + " / " - " nei successivi 5 secondi. A questo punto inizia il
conteggio del tempo residuo.
Annullamento di una funzione tempo
Premere ripetutamente il tasto di selezione
finché si accende la spia della funzione desiderata, quindi premere il tasto " - ". Dopo
alcuni secondi la funzione tempo si disattiva.
Termosonda
La termosonda misura la temperatura interna
della carne. Quando la carne raggiunge la
temperatura impostata, il forno si spegne automaticamente.
Avvertenza La termosonda è calda!
Pericolo di scottature! Prestare
attenzione nel rimuovere la punta e la spina
della termosonda.
1. Inserire la spina della termosonda nella
presa sulla parete laterale del forno.
2. Infilare la punta della termosonda in pro-
fondità fino a posizionarla al centro del taglio di carne.
3. Premere ripetutamente il tasto di selezione
finché lampeggia la spia della fun-
zione desiderata.
2
1 Disply per l'ora e la temperatura della ter-
mosonda**
2 Spie delle funzioni
3 Tasto " + "
4
Tasto di selezione
5 Tasto " - "
4. Utilizzare i tasti " + " / " - " per impostare
la temperatura interna desiderata. La temperatura può essere impostata tra 30 °C e
99 °C.
Fare riferimento ai valori indicati in tabella.
5. Utilizzare le manopole di regolazione per
impostare la funzione di cottura e la temperatura desiderate.
6. Quando la carne raggiunge la temperatura interna impostata, il forno si spegne automaticamente.
7. Togliere la termosonda.
Temperature interne consigliate
50 °C Al sangue
60 °C Media
70 °C Ben cotta
Se il livello di cottura non è soddisfacente, ripetere le operazioni sopra descritte per impostare una temperatura interna più alta.
Come spegnere il display
Lo spegnimento del display dell'ora vi
permette di risparmiare energia.
1. Tenere premuti contemporaneamente i tasti " + " e " - " per 5 secondi.
Il display si spegne.
2. Per accendere il display, premere un tasto
qualsiasi.
Page 55

ITALIANO 55
Tabelle di cottura
Peso (Kg) Alimento Funzione del for-noLivello Tempera-
1 Suino / Agnello
1 Vitello / Manzo
1,2 Pollo / Coniglio
1,5 Anatra
3Oca
4Tacchino
1Pesce
1 Peperoni o pomodori
ripieni / Patate arrosto
Dolci istantanei
1 Torte dolci o salate
Biscotti
2 Lasagne
1 Pane bianco
1 Cottura pizza
Avvertenza Non rivestire il forno con
fogli di alluminio e non appoggiare sul
fondo tegami, teglie o piastre da forno.
L'accumulo di calore può danneggiare la
smaltatura.
Avvertenza Tutte le cotture, anche la
grigliatura, devono essere eseguite con la
porta del forno chiusa. Prestare attenzione al
momento di aprire la porta del forno. Non
aprire la porta lasciandola cadere - sostenere
la porta mediante l'apposita maniglia finché
non è completamente aperta.
2 180 100-110
2 190 70-100
2 200 70-80
1 160 120-150
1 160 150-200
1 180 210-240
2 190 30-40
2 190 50-70
2 160 45-55
2 160 80-100
3 140 25-35
2 180 45-60
2 190 50-60
1 190 25-35
tura del
forno (°C)
Durata
della cottura
(min.)
Pulizia e cura
Avvertenza Spegnere il forno e lasciarlo
raffreddare prima di procedere alla
pulizia.
Avvertenza Per motivi di sicurezza, è
vietata la pulizia del forno con
idropulitrici a vapore o ad alta pressione.
Avvertenza Tenere sempre il forno
pulito. Gli accumuli di grasso o i residui di
alimenti potrebbero causare incendi,
soprattutto negli teglia del grill.
Page 56

ITALIANO 56
Parti esterne dell'apparecchio
• Pulire il lato anteriore dell'apparecchio con
un panno morbido inumidito con acqua tiepida saponata.
• Per le superfici metalliche utilizzare i normali
prodotti detergenti in commercio.
• Non utilizzare sostanze o spugne abrasive.
Parti interne del forno
• Per la pulizia accendere la lampadina del
forno.
• Pulire il forno con un panno morbido inumidito con acqua tiepida saponata e lasciarlo
asciugare.
Accessori
Dopo ogni utilizzo, pulire tutte le parti estraibili
con un panno morbido inumidito con acqua
tiepida saponata (ripiano, piastra, guide ecc.)
e asciugarle accuratamente. Lasciarle brevemente immerse nell'acqua tiepida saponata
per facilitare la pulizia.
Pulizia della porta del forno
La porta del forno ha due pannelli di vetro
applicati uno dietro l'altro. Per facilitare la pulizia, rimuovere la porta del forno e il pannello
di vetro interno.
Avvertenza La porta del forno potrebbe
richiudersi se si tenta di rimuovere il
pannello di vetro interno quando la porta del
forno è ancora montata.
Rimozione della porta del forno e del
pannello di vetro
1
2
3
Chiudere la porta del
forno fino alla prima
posizione di apertura (circa 45°). Tirare
in avanti la porta sfilandola dalla sua sede.
5
Sganciare il sistema
di bloccaggio per rimuovere il pannello
di vetro interno.
7
90°
4
Appoggiare la porta
su una superficie stabile e coperta da un
panno morbido.
6
8
2
1
Aprire completamente la porta e afferrare le due cerniere .
Alzare e ruotate le
levette poste sulle
due cerniere.
Ruotare di 90° le 2
chiusure e sfilarle
dalle loro sedi.
Pulire il pannello di vetro con acqua e sapone,
quindi asciugarlo accuratamente.
Sollevare leggermente e rimuovere il
pannello di vetro.
Page 57

ITALIANO 57
Rimontaggio della porta e del pannello di
vetro
Al termine della pulizia, rimontare il pannello
di vetro e la porta del forno. Per farlo, seguire
la procedura in ordine inverso.
Il pannello di vetro interno deve essere rimontato con la cornice decorativa (serigrafia) rivolta verso la parte esterna del forno. Per verificare di aver eseguito l'operazione in maniera appropriata, basta passare le dita sulla
superficie interna del vetro. Il pannello di vetro
è montato correttamente se non si avvertono
parti in rilievo passando le dita sulla superficie.
Rimontare il pannello di vetro interno nella sua
sede come illustrato qui sotto.
Per rimontare le guide, seguire le istruzioni in
ordine inverso.
Importante Le estremità arrotondate delle
aste di guida devono essere rivolte in avanti.
Sostituzione della lampadina del forno e
pulizia della calotta di vetro
Avvertenza Prima di sostituire la
lampadina del forno (vedere
"Descrizione del prodotto"), spegnere
l'apparecchio e scollegarlo dall'alimentazione
di corrente elettrica.
1. Ruotare la calotta di vetro in senso antio-
rario per estrarla. Pulire la calotta di vetro.
2. Se necessario, sostituire con una lampadi-
na da 15/25 watt, 230V (50Hz), con resistenza a temperature fino a 300 °C e connessione E14.
3. Riapplicare la calotta di vetro.
Guide di inserimento
Estrarre le guide di inserimento per pulire le
pareti laterali del forno.
1
Sfilare le guide dalla
parete di fondo del
forno, tirandole in
avanti.
2
2
1
Sganciare le guide
dalla parte posteriore.
Page 58

ITALIANO 58
Cosa fare se…
Problema Possibile causa Soluzione
Il forno non funziona Non sono state eseguite le im-
Il forno non funziona L'apparecchio non è collegato
La spia di controllo della
temperatura non si accende
L'illuminazione del forno
non funziona
Vapore e acqua di condensa si depositano sugli alimenti e nel vano
cottura
"Sul display appare l'indicazione "12.00" e il
LED dell'orologio lampeggia
Sul display appare l'indicazione F11
Se si verifica un guasto, tentare di risolvere da
soli il problema. Se non si riesce a individuare
una soluzione, contattare il rivenditore o il Servizio assistenza.
postazioni necessarie
in maniera corretta e/o l'alimentazione di rete al forno non
è attiva
Non sono state eseguite le impostazioni necessarie
La lampadina del forno è guasta
Gli alimenti sono stati lasciati
troppo a lungo nel forno
Interruzione dell'alimentazione
elettrica.
La spina della termosonda non
è saldamente inserita nella presa
personale qualificato, l'intervento del tecnico
del Servizio assistenza o del rivenditore potrà
essere effettuato dietro richiesta di pagamento anche durante il periodo di garanzia.
Controllare se è stata impostata
la funzione di cottura e selezionata una temperatura
Controllare se l'apparecchio è
collegato in maniera corretta e
l'alimentazione di rete al forno è
attiva
Selezionare la funzione di cottura
e regolare la temperatura
Sostituire la lampadina del forno
Al termine della cottura, non lasciare gli alimenti nel forno per più
di 15-20 minuti
Reimpostare l'ora
Inserire a fondo la spina della termosonda nella presa sulla parete
laterale del forno
In caso di utilizzo improprio dell'appa-
recchio o installazione non eseguita da
Dati tecnici
Dimensioni (interne) Larghezza
Volumi utili 53 l
Area della piastra da forno più larga (su-
perficie netta)
Altezza
Profondità
1130 cm²
395
335
400
Page 59

ITALIANO 59
Resistenza inferiore 1000 W
Resistenza superiore 800 W
Forno (resistenza superiore + resistenza
inferiore)
Cottura a grill 1650 W
Grill grande 2450 W
Grill ventilato 2450 W
Cottura ventilata 2025 W
Cottura pizza 2675 W
Lampadina del forno 25 W
Ventilatore di raffreddamento 25 W
Motore della ventola per aria calda 25 W
Potenza totale installata
Numero di funzioni 9
Consumo di energia 0,78 kWh
Consumo di energia con carico normale
e cottura dal basso
Consumo di energia con carico normale
e circolazione d'aria nel forno
1) Le informazioni sul collegamento elettrico e sui valori di tensione e potenza sono fornite sulla targhetta di
identificazione (vedere "Caratteristiche del prodotto").
1)
1800 W
2700 W
0,79 kWh
0,78 kWh
Installazione
Attenzione Consultare le istruzioni di
montaggio per l'installazione.
Avvertenza L'installazione
dell'apparecchio deve essere eseguita
solo da personale qualificato e competente. In
caso contrario si estingue qualsiasi diritto alla
garanzia per gli eventuali danni insorti.
• Prima di inserire l'apparecchio in un mobile
da incasso, verificare l'idoneità delle dimensioni del vano.
• Verificare che sia presente una protezione
da scosse elettriche per l'installazione.
• Come previsto dalle norme in vigore, tutti i
componenti di protezione da scosse elettriche devono essere fissati in modo tale da
non poter essere disattivati senza l'uso di
attrezzi.
• L'apparecchio con il suo lato posteriore o
con un fianco può essere appoggiato a una
parete o a un mobile più alto. L'altro fianco
deve essere appoggiato a un mobile della
stessa altezza dell'apparecchio.
• La stabilità del mobile da incasso deve essere conforme alla norma DIN 68930.
Page 60

ITALIANO 60
• I forni e i piani cottura integrati sono provvisti di sistemi di collegamento speciali. Per
motivi di sicurezza, è opportuno abbinare
Collegamento elettrico
Avvertenza L'installazione dell'impianto
elettrico deve essere eseguita solo da
personale qualificato e competente.
• Il costruttore non risponde di eventuali danni
dovuti alla mancata osservanza delle precauzioni di sicurezza.
• Dotare l'apparecchio di un idoneo collegamento a terra come prescritto dalle norme
di sicurezza.
• Verificare che i valori di tensione e corrente
della rete di alimentazione locale corrispondano ai valori indicati sulla targhetta di
identificazione dell'apparecchio.
• La dotazione standard dell'apparecchio al
momento della fornitura prevede un cavo di
rete senza spina.
• Qualunque componente elettrico deve essere sostituito da un tecnico del Servizio assistenza o da personale qualificato.
• Utilizzare sempre una presa di corrente con
contatto a terra correttamente installata.
esclusivamente apparecchi dello stesso costruttore.
• Non utilizzare connettori o spine multivia e
cavi di prolunga. Vi è il rischio di incendio.
• Verificare che la spina di alimentazione rimanga accessibile dopo l'installazione.
• Non tirare il cavo di alimentazione per scollegare l'apparecchio. Sfilare sempre la spina dalla presa di corrente.
• Nell'impianto elettrico deve essere previsto
un dispositivo (per esempio un sezionatore
di linea, uno sganciatore di protezione verso terra o un fusibile) che permetta di separare l'apparecchio dalla rete in modo onnipolare con un'apertura tra i contatti di almeno 3 mm.
Questo apparecchio è conforme alle direttive
CEE.
Considerazioni ambientali
Il simbolo sul prodotto o sulla confezione
indica che il prodotto non deve essere
considerato come un normale rifiuto
domestico, ma deve essere portato nel punto
di raccolta appropriato per il riciclaggio di
apparecchiature elettriche ed elettroniche.
Provvedendo a smaltire questo prodotto in
modo appropriato, si contribuisce a evitare
potenziali conseguenze negative per
l’ambiente e per la salute, che potrebbero
derivare da uno smaltimento inadeguato del
prodotto. Per informazioni più dettagliate sul
riciclaggio di questo prodotto, contattare
l’ufficio comunale, il servizio locale di
smaltimento rifiuti o il negozio in cui è stato
acquistato il prodotto.
Materiali di imballaggio
I materiali contrassegnati dal simbolo
riciclabili. Smaltire i materiali di imballaggio
negli appositi contenitori per il riciclaggio.
Smaltimento dell'apparecchio
Avvertenza Per lo smaltimento
dell'apparecchio procedere come segue:
• Sfilare la spina dalla presa di corrente.
• Tagliare il cavo di alimentazione e smaltirlo
adeguatamente.
•Rimuovere e smaltire adeguatamente il
blocco porta per evitare che i bambini possano chiudersi all'interno dell'apparecchio.
Vi è il rischio di soffocamento.
sono
Page 61

ITALIANO 61
GARANZIA IKEA
Validità della garanzia
La presente garanzia è valida per cinque (5)
anni a partire dalla data di acquisto originale
del Vostro elettrodomestico presso un punto
vendita IKEA. Per gli elettrodomestici LAGAN,
la garanzia è di due (2) anni soltanto. Lo scontrino originale è indispensabile come ricevuta
d'acquisto. Una riparazione effettuata nell'ambito della garanzia non estende il periodo
di garanzia per l'elettrodomestico o per i nuovi
pezzi di ricambio.
Elettrodomestici non coperti dalla garanzia
IKEA di cinque (5) anni
La garanzia IKEA di cinque anni non è valida
per gli elettrodomestici con il nome LAGAN e
tutti gli elettrodomestici acquistati presso un
punto vendita IKEA prima dell'1 agosto 2007.
Chi fornisce il servizio ai clienti?
L'assistenza ai clienti sarà garantita dal fornitore del servizio nominato da IKEA attraverso
la propria organizzazione o la propria rete di
partner di assistenza autorizzati.
Cosa copre la garanzia?
La garanzia copre gli eventuali difetti legati ai
materiali e o alla costruzione dell'elettrodomestico ed è valida a partire dalla data di acquisto dell'elettrodomestico presso un punto
vendita IKEA. La garanzia è valida solo su
elettrodomestici destinati all'impiego domestico. Le eccezioni sono descritte alla voce
"Cosa non copre la garanzia". Nel periodo di
validità della garanzia, il fornitore del servizio
nominato da IKEA sosterrà i costi per la riparazione, i pezzi di ricambio, la manodopera e
le trasferte del personale di manutenzione,
ammesso che il prodotto possa essere riparato
senza costi troppo elevati e che il difetto legato
ai materiali o alla costruzione rientri nella copertura dell garanzia. Queste condizioni sono
conformi alle direttive EU (N. 99/44/CE) e alle
norme e disposizioni locali applicabili. Le parti
sostituite diventeranno di proprietà di IKEA.
Come interverrà IKEA per risolvere il
problema?
Il fornitore del servizio nominato da IKEA esaminerà il prodotto e deciderà a propria esclusiva discrezione se lo stesso rientra nella copertura della garanzia. In caso affermativo, il
fornitore del servizio nominato da IKEA o un
suo partner di assistenza autorizzato provvederà a propria esclusiva discrezione a riparare il prodotto difettoso o a sostituirlo con un
prodotto uguale o equivalente.
Cosa non copre la garanzia
• Normale usura.
• Danni provocati deliberatamente o per negligenza e danni provocati dalla mancata
osservanza delle istruzioni di funzionamento, da un'installazione non corretta o dal
collegamento a un voltaggio errato. Danni
provocati da reazioni chimiche o elettrochimiche, ruggine, qualità dell'acqua (per
esempio presenza di eccessivo calcare nelle
condutture idriche), eventi atmosferici o condizioni ambientali anomale.
• Parti soggette ad usura, per esempio batterie e lampadine.
• Danni a parti decorative e non funzionali
che non influiscono sul normale utilizzo dell'elettrodomestico, per esempio graffi e variazioni di colore.
• Danni a parti come vetroceramica, accessori, cesti per stoviglie e posate, tubi di alimentazione e scarico, guarnizioni, lampadine e relative coperture, schermi, pomelli,
rivestimenti e parti di rivestimenti o involucri,
salvo
• Danni a parti come vetroceramica, accessori, cesti per stoviglie e posate, tubi di alimentazione e scarico, guarnizioni, lampadine e relative coperture, schermi, pomelli,
rivestimenti e parti di rivestimenti o involucri,
salvo qualora si possa provare che tali danni sono stati causati da difetti di produzione.
• Casi in cui non siano rilevati difetti durante
la visita di un tecnico.
Page 62

ITALIANO 62
• Riparazioni non effettuate dal fornitore del
servizio nominato da IKEA o da un partner
di assistenza autorizzato o riparazioni in cui
siano state utilizzate parti non originali.
• Riparazioni causate da installazione impropria o non conforme alle specifiche.
• Uso dell'elettrodomestico in ambiente non
domestico, per esempio per uso professionale o commerciale.
• Danni dovuti al trasporto.
• Costo per effettuare l'installazione dell'elettrodomestico IKEA, salvo se dovuto alla riparazione o alla sostituzione di parti difettose.
Tali limitazioni non si applicano a lavori eseguiti a regola d'arte da personale qualificato
e con l'uso di parti originali per adattare l'elettrodomestico alle norme di sicurezza di
un'altra nazione dell'UE.
Applicabilità delle leggi nazionali
La garanzia IKEA conferisce al cliente diritti
legali specifici in aggiunta ai diritti previsti dalla legge e variabili a seconda dei paesi.
Area di validità
Per gli elettrodomestici acquistati in una nazione UE e trasferiti in un'altra nazione UE, i
servizi saranno forniti in base alle condizioni di
garanzia applicabili nella nuova nazione.
L'obbligo di fornire il servizio in base alle condizioni della garanzia sussiste solo se:
• l'elettrodomestico è conforme alle specifiche tecniche del paese in cui è richiesta l'applicazione della garanzia;
• l'elettrodomestico è conforme e installato
conformemente alle Istruzioni di montaggio
e alle informazioni per la sicurezza contenute nel Manuale d'uso;
Il SERVIZIO ASSISTENZA dedicato agli
elettrodomestici IKEA
Non esitate a contattare il SERVIZIO ASSISTENZA nominato da IKEA per:
• usufruire della garanzia;
• chiedere chiarimenti sull'installazione degli
elettrodomestici IKEA nei mobili da incasso
specifici di IKEA. Il servizio non fornirà assistenza o chiarimenti in merito a:
– installazione di cucine complete IKEA;
– collegamenti elettrici (se l'apparecchio è
fornito senza cavi e spine), allacciamenti
idraulici e collegamenti all'impianto del
gas che devono essere eseguiti da un tecnico di assistenza autorizzato.
• chiedere chiarimenti sul contenuto del manuale d'uso e su specifiche dell'elettrodomestico IKEA.
Per garantirvi la migliore assistenza, Vi preghiamo di leggere attentamente le Istruzioni
di montaggio e/o il Manuale d'uso prima di
contattarci.
Come contattarci se avete bisogno del
nostro intervento
Consultare l'elenco completo dei fornitori di
servizio nominati da IKEA e dei relativi numeri
di telefono nell'ultima pagina del presente
manuale.
Importante Per garantirVi un servizio più
rapido, raccomandiamo di utilizzare i numeri
di telefono elencati alla fine del presente
manuale. Quando richiedete assistenza, fate
sempre riferimento ai codici specifici
dell'elettrodomestico che trovate nel presente
manuale. Prima di contattarci, assicurateVi di
avere a portata di mano il codice prodotto
IKEA (8 cifre) relativo all'elettrodomestico per
il quale richiedete assistenza.
Importante CONSERVATE LO SCONTRINO!
E' la Vostra prova di acquisto ed è necessario
esibirlo per poter usufruire della garanzia. Sullo scontrino sono riportati anche il nome e il
codice (a 8 cifre) dell'elettrodomestico IKEA
che avete acquistato.
Page 63

ITALIANO 63
Vi serve altro aiuto?
Per ulteriori domande rispetto a quanto specificato nel precedente paragrafo “Il SERVIZIO
ASSISTENZA dedicato agli elettrodomestici
IKEA”, non utilizzare i numeri di telefono elencati nell'ultima pagina del presente manuale,
ma contattare il Call Center del più vicino punto vendita IKEA. Vi preghiamo di leggere attentamente la documentazione dell'apparecchio prima di contattarci.
Page 64

France 0170 36 02 05
Germany 01803-334532 (0,09€/Min. aus dem Festnetz der DTAG;
Mobilfunkpreise abweichend)
Italy 02 00620818
Spain 91 1875537
UK 020 3347 0044
Holland 0172 468 568
Sweden 0770 330015
Norway 815 22052
Denmark 07922 1368
Belgium 070 246016
Austria 081 300486 zum Ortstarif
Switzerland 031 5500 324
Portugal 211 557 985
Czech Republic 246 019721
Poland 012 297 8787
Russia 495 666 2929
Hungary 061 998 0549
Finland 0207 85 1000
Slovakia 012 3300 2554
Romania 212 121 224
Cyprus 22 030 529
Ukraine 044 586 2078
Turkey 212 244 0769
Greece 211 176 8276
Bulgaria 0700 10 218
646566
Page 65

Page 66

Page 67

67
Page 68

397117701-A-032009
© Inter IKEA Systems B.V. 2008 AA-401752-1
 Loading...