

Page 1

Air Puriers
AP 100
EN Operating Instructions
EN Please read and follow all safety rules and instructions in this manual
before operating.
Page 2

- 40 -
AP 100
EN TABLE OF CONTENTS
Caution |
Safety precautions
1. W
hen Installing 44
2. When Using 45
3. When Cleaning 48
Preparation |
Names of Each Part
49
Screen Composition
51
Installing and Preparing
1. S
elect Installation Location 54
2. Filter Installation 55
Use |
Using
1. I
nitial Action 58
2. Auto Mode 60
3. Set Fan Speed (Manual Mode) 60
4.
PlasmaWave®
61
5. Sleep Mode 61
6. Set Timer 62
7. Set Wi-Fi Connection 63
8. Set Brightness 65
9. Set Volume 65
How to Manage and Clean
1. How to Replace Filter 68
2. How to Clean Pre-Filter 70
3. How to Clean Fine Dust Sensor 71
4. Cleaning exterior / cleaning interior 72
Others |
Malfunction and Checking Measures
73
Product Specifications
76
Warranty
77
Page 3

- 41 -
Cleansing
filter section
Replacement
filter section
Replacement
filter section
Fixed
section
Stage 1: Fine Mesh Cleancel® Pre-Filter
Filters large household particles such as dust, pet hair,
pollen, and lint.
Stage 2:
PM2.5 Filter
Removes 99.9% of ultrafine pollutants measuring 2.5µm
by mounting a PM2.5 exclusive filter.
Stage 3: Antimicrobial Material
Removes 99.9% of viruses, bacteria, and mold that
cause diseases.
Stage 4: Active
Carbon Filter
Removes foul smells and harmful gases indoors by
absorbing odor particles from food, mold, cigarette
smoke, etc, in the activated carbon micro orifice with a
high-performance granular active filter.
Stage 6: True
HEPA Filter
Filters not only PM2.5 ultrafine dust but also 99.97% of
fine pollutants that measure 0.3µm.
Stage 5: PlasmaWave ®
Provides clean air by removing various harmful substances
from the air as well as bacteria and mold that can cause
diseases.
Stage 1 Stage 4 Stage 5 Stage 6
Fine Mesh
Cleancel® Pre-Filter
Stage 2
PM2.5 Filter
Stage 3
Antimicrobial
Material
Active Carbon Filter
PlasmaWave®
True HEPA Filter
Page 4

- 42 -
AP 100
PACKAGE CONTENTS
Product Instruction manual
FEATURES
Smart sensor
Operates automatically by
comprehensively analyzing and
detecting indoor air contamination
levels through dust/smell/
illumination level sensors.
Full-Color LCD touch screen
The 4-inch Full-Color LCD touch
screen provides innovatively
improved usability and convenience.
Various operation modes
Various functions, such as auto,
manual, and sleep modes can be
selected as desired depending on the
living environment.
IAM artificial intelligence system
This allows a clean and pure living
environment to be maintained at all
times by responding automatically to
the condition of indoor air, and can
be controlled remotely even from
outside when the user goes out, goes
to work, or goes on a trip.
Outdoor/indoor
environment information
The home screen shows local weather
data, as temperature, weather
conditions and Pollution level
(dust PM2.5) along with the indoor air
conditions.
Automatic filter management
The current condition of the filter can
be seen through an exclusive APP and
the LCD touch screen, and an alarm
and message informs the user in
advance when it is time to replace a
filter.
Mobile remote control
A mobile device can be used as an
indoor remote control and used to
check the condition of the indoor air
by connecting it to the air purifier.
Timer setup
The timer can be set to run the
product between 1 and 12 hours and
to power off automatically.
Luftreiniger
Air Puriers
Puricateur
AP 100
DE Betriebsanleitung
EN Operating Instructions
FR Mode d´emploi
DE Bitte lesen Sie vor Inbetriebnahme des Gerätes unbedingt diese
Betriebsanleitung und beachten Sie die Sicherheitshinweise.
EN Please read and follow all safety rules and instructions in this manual
before operating.
FR Nous vous prions de lire attentivement le mode d’emploi avant d’utiliser la
machine, et attirons votre attention sur les consignes de sécurité.
Page 5

- 43 -
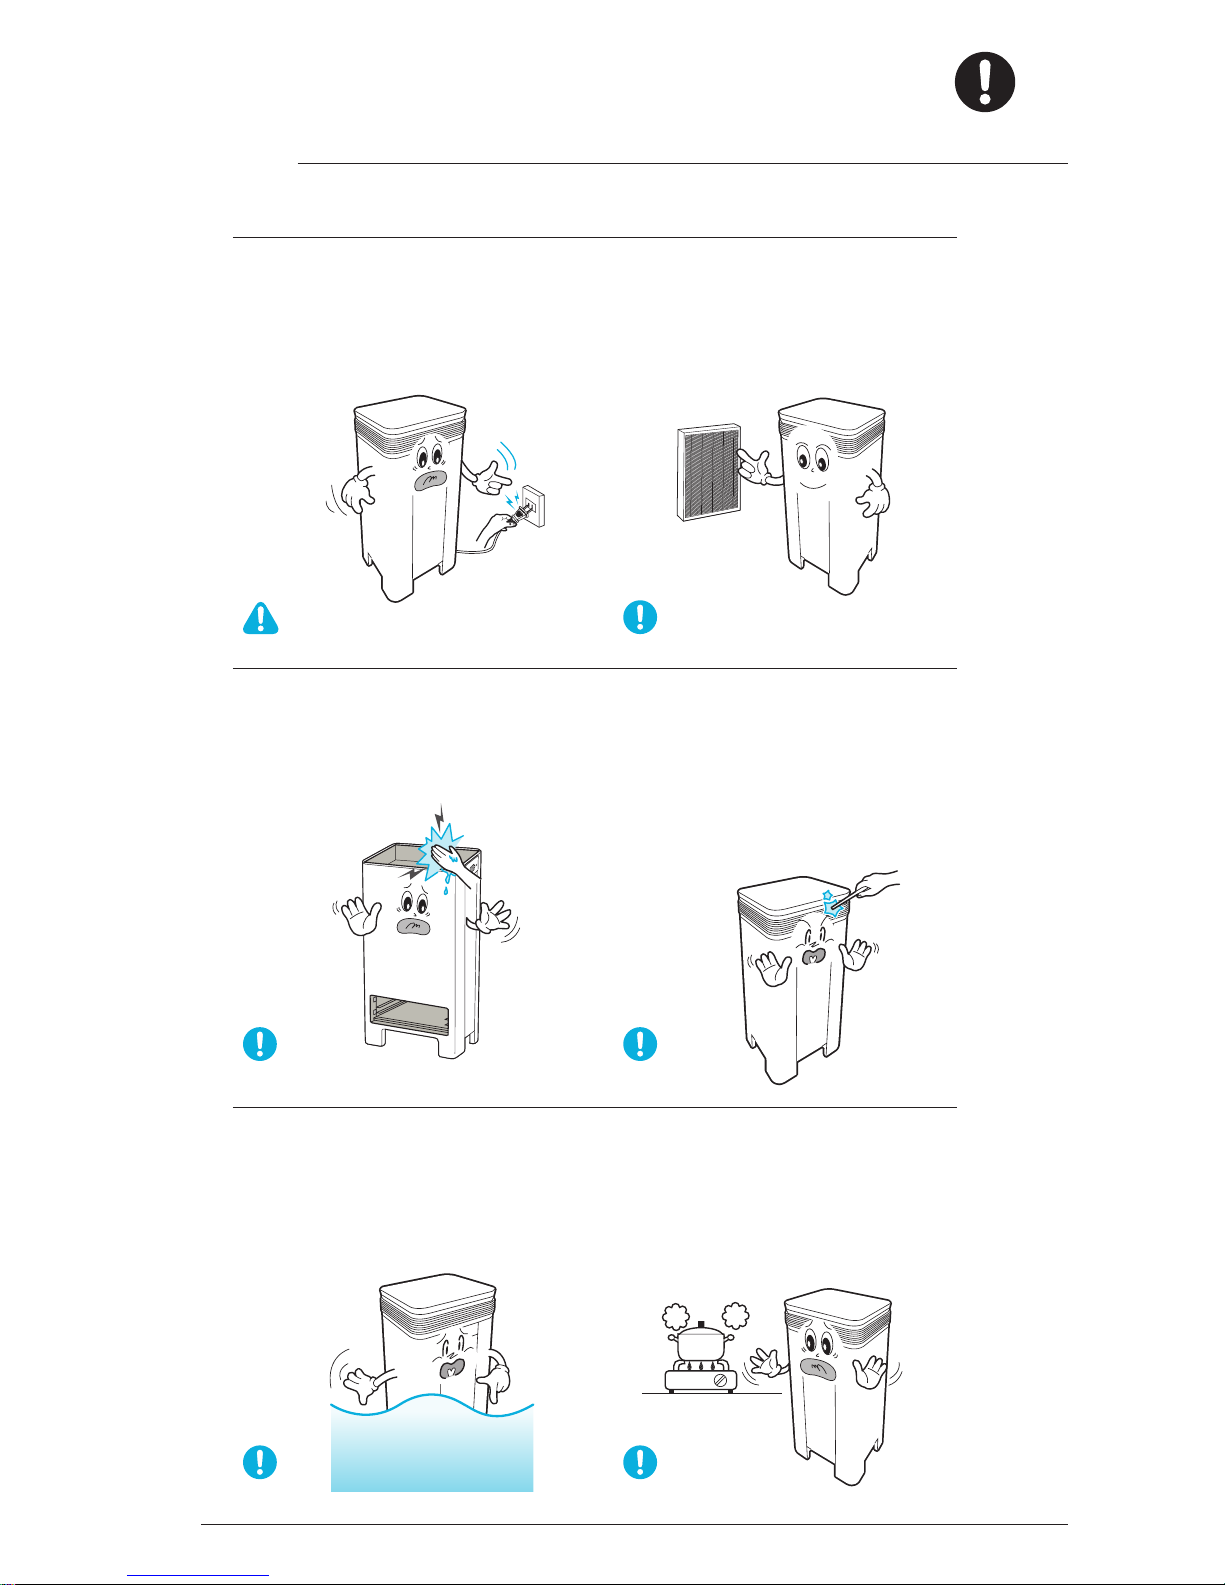
Installation
Do not place near flammable
materials (aerosol sprays, fuel oil,
gases, etc.).
This may cause an explosion or fire.
Do not install below an electrical
outlet.
This may cause fire.
Do not place near any gas- or heatproducing appliances, such as gas
appliances, heaters, and fireplaces.
This may cause the unit to become
deformed, discolored, or to catch fire.
Do not install where large
quantities of noxious gases are
present, including carbon
monoxide and gases emitted by
animals.
This may cause the unit to break down.
Product Specifications
Before operating this equipment, carefully read and follow these safety cautions and
instructions to avoid damage and ensure safe use.
WARNING
Follow these instructions to reduce the risk of serious
injury or death.
NOTICE
Failure to follow these safety instructions may lead to
personal injury or property damage.
Safety Instructions | Installation
Page 6

- 44 -
AP 100
Installation | Safety Instructions
Installation
Do not install near electronics such
as TVs, radios, or air conditioners.
Electromagnetic interference may cause
the unit to malfunction.
Do not place the unit facing into
wind or drafts.
This may cause the sensors to fail.
Do not install under direct
sunlight, lighting fixtures with
inverters, or lighting fixtures with
automatic detection sensors.
This may cause the unit’s sensors to
malfunction.
Do not use around mist or fumes
from industrial oil or around large
quantities of metallic dust.
This may result in fire or may cause
product failure.
Do not install in confined spaces or
on slanted or uneven surfaces.
This may cause product failure or
deformation.
Do not install in any sort of
transport (motor vehicles, boats,
ships, etc.).
Page 7

- 45 -
Operation
Do not use in places that are very
humid or moist or where the unit
may get wet, such as bathrooms.
This may result in fire or electric shock.
Unplug the power cord when not
in use for long periods.
Leaving it plugged in could cause the
insulation to deteriorate, posing a risk of
short circuit and fire.
Do not plug other appliances into
the same outlet. Provide an
exclusive outlet for this unit.
Also, do not arbitrarily extend the power
cord. Risk of electric shock or fire may
result from plugging several appliances
into one outlet, modifying the power
cord, or using an extension cord.
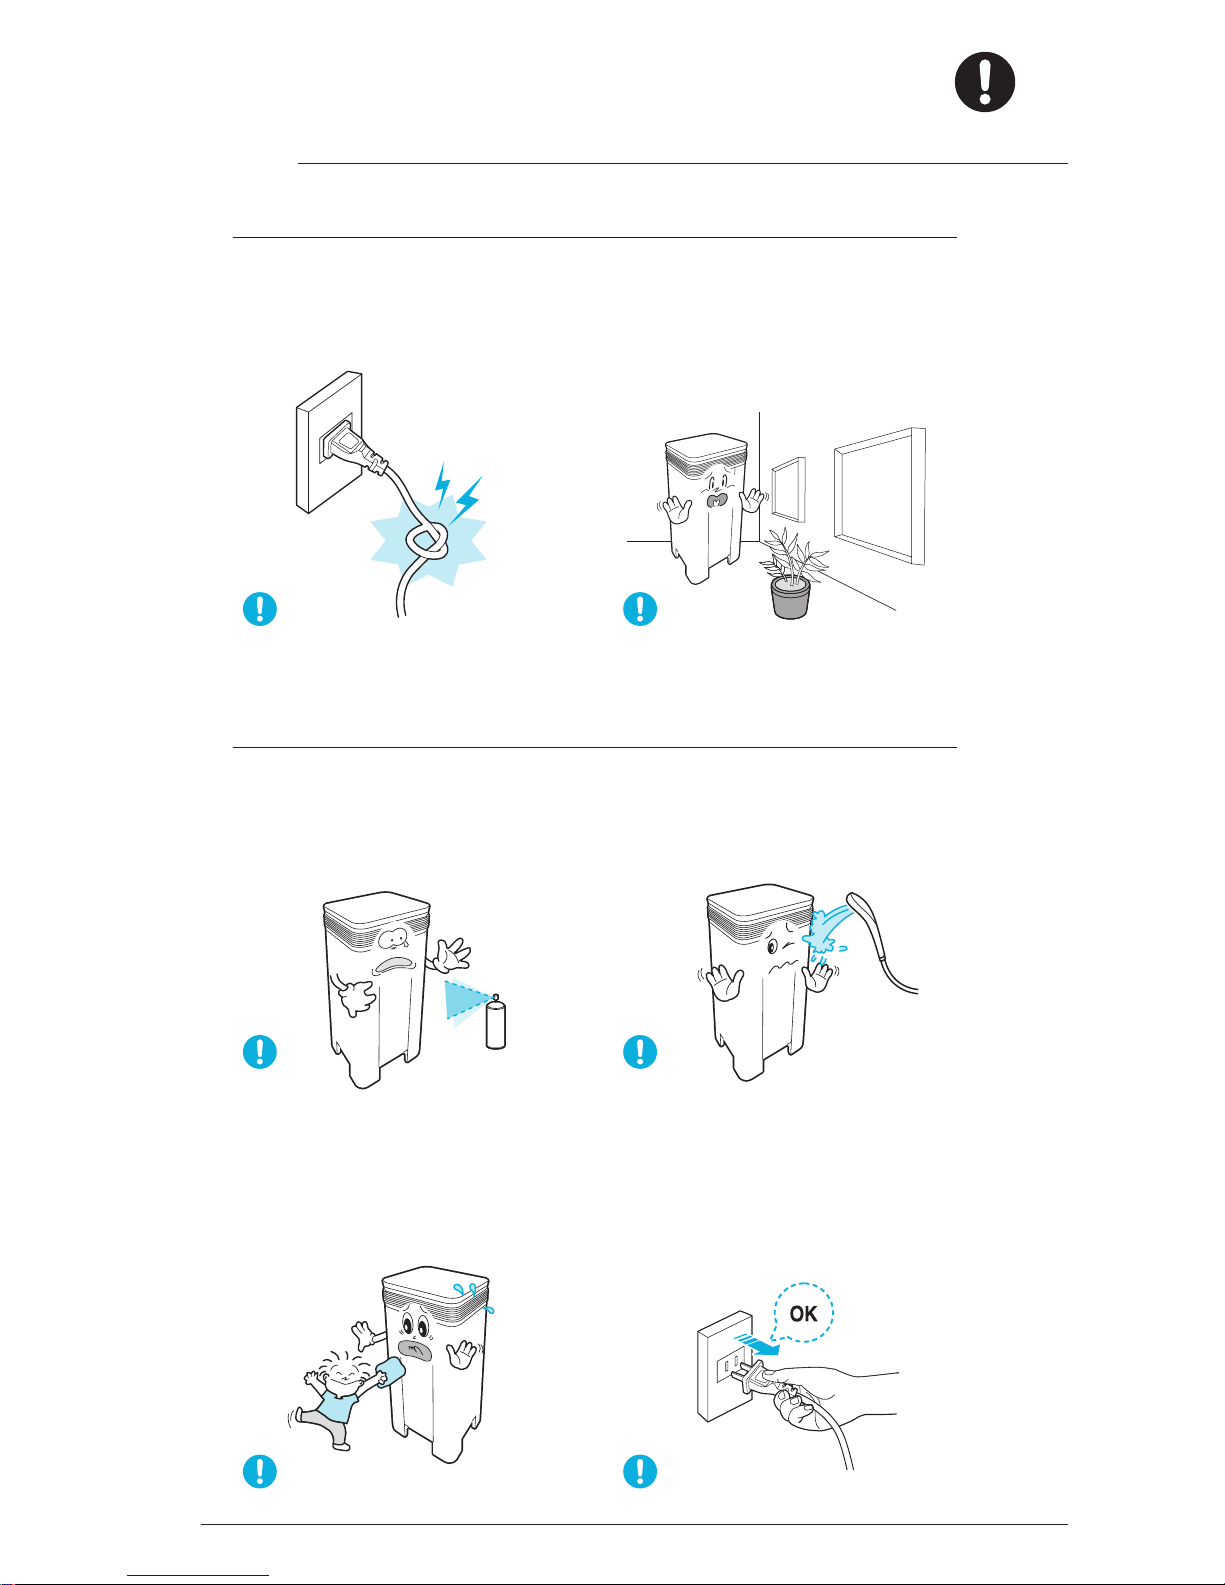
Do not pull on the power cord
when unplugging the unit.
This may cause electric shock or fire.
Do not touch the plug with wet
hands.
This may result in electric shock.
Do not damage the power cord by
forcefully bending, pulling,
twisting, bundling, or pinching it,
or by placing heavy objects on it.
Damaging the power cord could lead to a
short circuit, resulting in electric shock or
fire.
Safety Instructions | Operation
Page 8
- 46 -
AP 100
Operation
Do not unplug or move the unit
while it is running.
This may cause product failure or fire.
Make sure the filters have been
inserted before running the unit.
Running it without filters shortens the
product’s service life and may cause
electric shock or injury.
Do not touch the interior of the
unit with wet hands.
The high voltage may cause electric
shock.
Do not insert foreign objects into
the vents, such as pins, rods, and
coins.
Make especially sure that children follow
safety rules around the unit. Unsafe
behavior may result in product failure or
injury from burns or electric shocks.
If the unit becomes submerged in
water, unplug it and contact the
service center.
If you attempt to dry and operate the unit after
it has been submerged, this could result in
product failure, electric shock, fire, or injury.
When cooking foods with strong
odors, reduce use of the unit as
much as possible.
The filters may become permeated with
the cooking odors, possibly affecting the
filters’ performance and service life.
Operation | Safety Instructions
Page 9

- 47 -
Operation
Do not step on or place heavy
objects on top of the unit.
This could result in personal injury, or
may cause product failure or
deformation.
Do not use in places with
extremely high or low
temperatures.
This product is for indoor use (5-30˚C).
Using it outside this temperature range
may cause deformation, discoloration, or
shortened filter life.
If the product emits unusual
noises, smells, or smoke, unplug
the power cord immediately and
contact the IDEAL service center.
Such occurrences may lead to electric
shock or fire.
Never disassemble, repair or
modify this product yourself.
This may cause product failure, electric
shock, or fire. If repairs are needed,
contact the service center.
Do not subject the product to
strong blows or physical shocks.
This may lead to product failure.
Do not allow intake or outlet vents
to become blocked, for instance by
furniture, laundry, curtains, or
other objects.
Such blockage may lead to increased
internal temperatures, causing product
deformation.
Safety Instructions | Operation
Page 10
- 48 -
AP 100
Cleaning | Safety Instructions
Operation
Do not tie up or bundle the power
cord when operating the unit.
This may cause electric shock or fire.
Do not use for specialized
purposes or sites, such as places
devoted to animals and plants,
precision instruments, or art
conservation.
Cleaning
Do not use flammable sprays or
liquid detergents.
This may cause product failure, electric
shock or fire.
Do not let water run over the Unit.
This may lead to product failure, electric
shock or fire.
Do not allow children to clean or
maintain the unit by themselves.
Adult supervision is absolutely necessary.
Before cleaning or performing
maintenance, unplug the power
cord and be sure the fan has
stopped.
Not doing so could result in electric
shock or injury.
Page 11

- 49 -
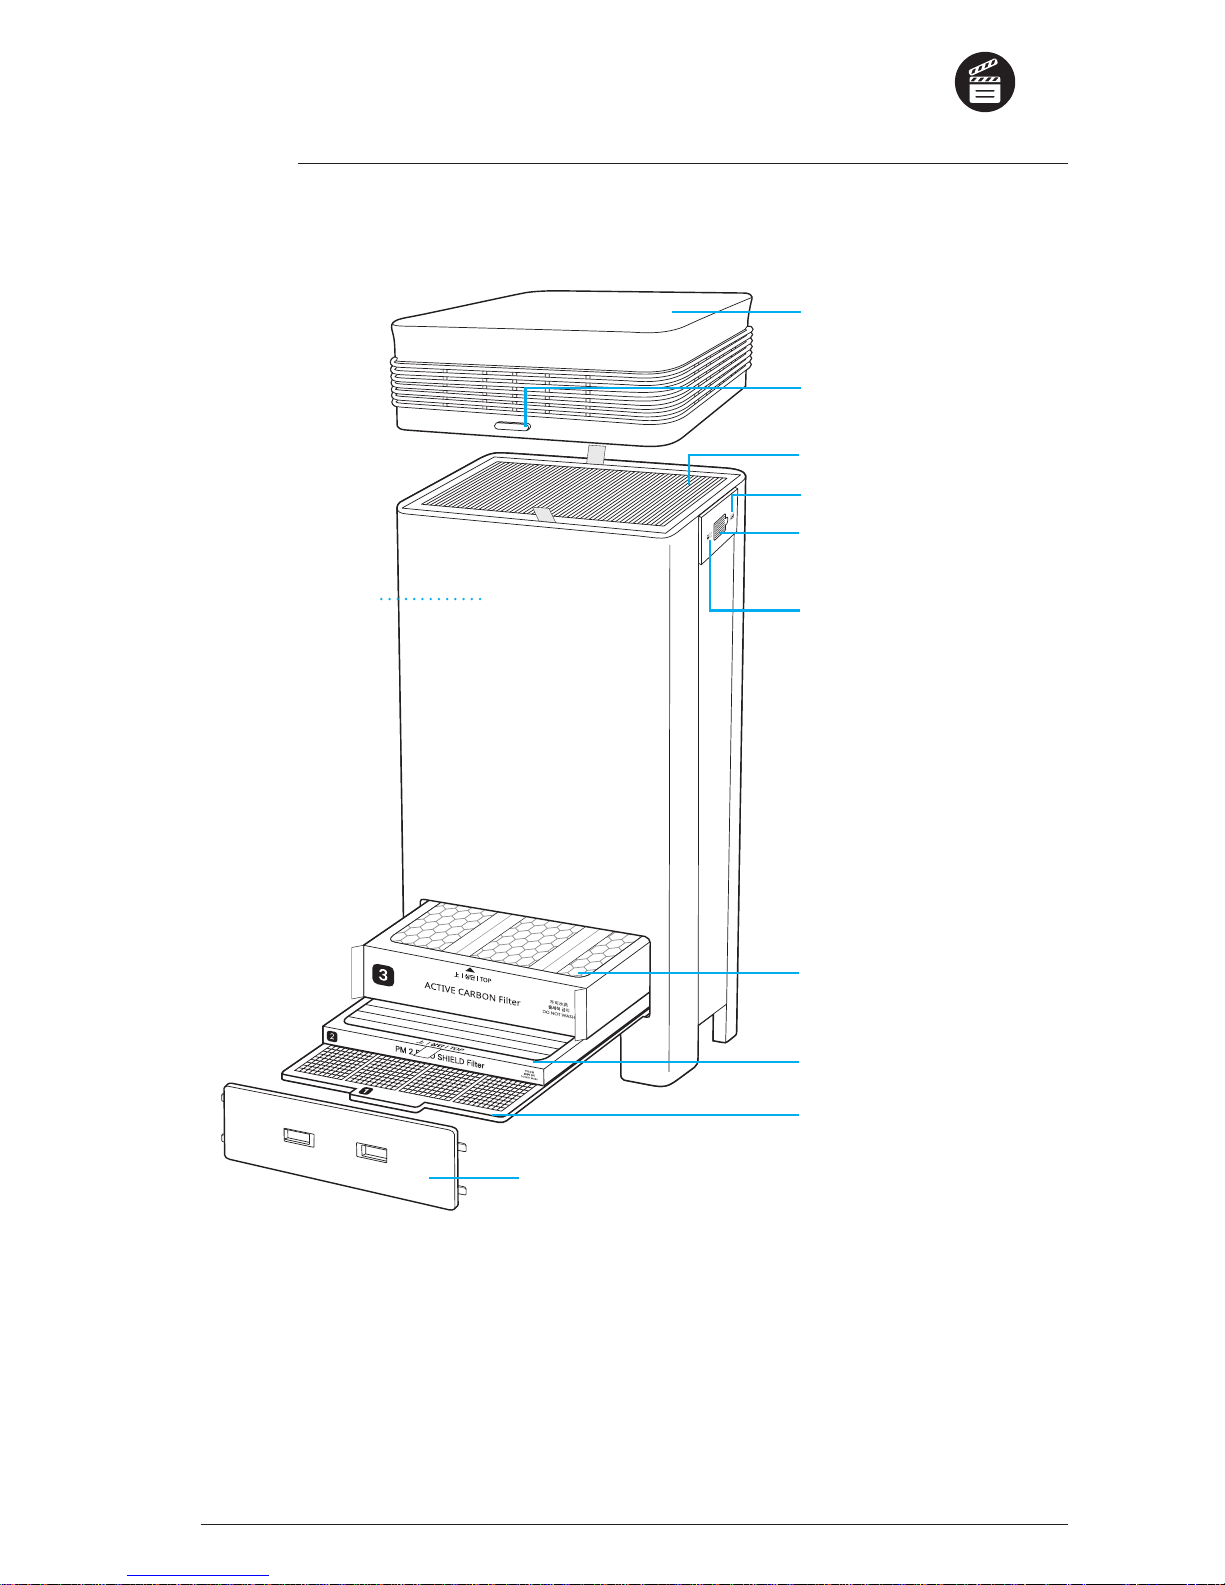
| Front |
Name of Each Part
Power plug
(120V)
Full Color LCD Touch
screen
Air vent (4 directions)
Light detecting sensor
Top cover
Castor
Set-up | Names of parts
Page 12
- 50 -
AP 100
| Back |
3Active
Carbon Filter
2Antimicrobial
PM2.5 Filter
1Fine Mesh Cleancel®
Pre-Filter
Filter cover
PlasmaWave ®
(interior)
4
True HEPA Filter
Top cover
release button
Top cover
Dust sensor
Detects dust density
Speaker
Smell sensor
Detects indoor smells
Names of parts | Set-up
Page 13

- 51 -
| Main (Home) Screen |
Screen Composition
Temperature
condition display
Current
temperature
Manual mode
The user can set the
desired mode.
Current fine
dust
Sleep mode
Sleep mode can
be setup.
Current
weather
Power off
reservation time
Auto mode
Automatically sets wind
speed depending on the
condition of indoor air.
Wi-Fi
Current exterior
environment
information
PlasmaWave®
Displays when
PlasmaWave is in
operation.
Contamination level
information
Displays indoor contamination level
along with the main screen color.
Power
The power to the
air purifier can be
turned off.
Menu
Selecting the menu
will display 6 menu
items at the bottom
of the screen.
Fan speed
condition
Displays wind speed
currently in operation.
The color of the main screen will change depending on the condition of the indoor
air.
Brown: poor / Green: fair / Blue: good
see
page 52
Set-up | Names of parts
Page 14

- 52 -
AP 100
| Menu Screen |
Filter replacement
Can check the condition of
the filterindoor air quality.
Setup
Sets up the Wi-Fi,
brightness, volume,
and filter.
Set fan speed
4 fan speeds can be
set: <Low Mid
High Turbo>
Sleep mode
Operates in sleep mode
and darkens display.
PlasmaWave®
Can be used as an air
purification function.
Set timer
Use when wishing to
operate only during a
specific time.
Home (Main Screen)
This is used to return to the
main screen.
Set Wi-Fi
The Wi-Fi function
can be turned on or
off.
Set volume
Set brightness
Set language
German, English,
French
Names of parts | Set-up
Page 15

- 53 -
| Alert/Verification Window |
Verification pop-up window
Appears when a problem occurs with the product, when
asking for verification for Wi-Fi initialization, and when
power is turned off during operation.
Alert pop-up window
Appears when the filter replacement time is
notified, when the filter cover is opened, and when
the filter cover is closed
Set-up | Names of parts
Page 16

- 54 -
AP 100
Installation and set-up
1.
Choosing a location
A location that has low
humidity and is well
ventilated
There may be a risk of electric
shock or product malfunction
due to rust.
Place it in an indoor location
away from direct sun.
Direct sun may cause product
malfunction or failure.
Choose a location an
adequate distance from TVs, radios,
and other electronic products.
Electromagnetic interference from certain
electronics may cause product
malfunction.
Place at least 4 inch
from any wall.
Allow at least 12-18 inch of
space around the unit.
Place on a hard, flat surface
Placement on flimsy or slanted
surfaces may result in abnormal
noise and vibrations.
Installation and set-up | Set-up
12~18 inch
4 inch
Page 17

- 55 -
2.
Filter Installation
All filters are assembled and packaged before being shipped out of the factory.
The packaging of filters must be removed before use.
Failure to remove the packaging before operating the product may result in
malfunction.
Filters must be replaced only while the power is turned off.
1 Fine Mesh Cleancel® Pre-Filter, 2
Antimicrobial PM2.5 Filter
,
3
Activated Carbon Filter installation
①
Push the two buttons on the filter
cover at the bottom of the product
towards the middle and take the
cover off by pulling it towards you.
②
Pull the new filter from the vinyl
packaging.
③
Remove the vinyl packaging from
the new filters.
X
Failure to remove the vinyl packaging before use may result in
abnormal noise, product deformation or fire caused by
overheating of the motor.
Set-up | Installation and set-up
Page 18

- 56 -
AP 100
①
1Fine Mesh Cleancel® Pre-Filter
2
Antimicrobial PM2.5 Filter
3
Active
Carbon Filter
. Push the lters in this order
to the very back of the product.
x
X
Please make sure that the pre-filter is not flipped upside down
before inserting. Dust filtered during operation will fall to the
bottom of the air purifier during filter changes if the pre-filter is
flipped upside down.
②
Push the two buttons on the lter
cover towards the middle to attach it
to the product.
3
Active Carbon Filter
2
Antimicrobial PM2.5 Filter
1Fine Mesh Cleancel® Pre-Filter
D
E
Installation and set-up | Set-up
Page 19

- 57 -
4
True HEPA Filter
installation
①
Press the release buttons on either
side of the top cover and lift the
cover off.
②
Pull the new filter out and remove
its vinyl packaging.
x
F
ailure to remove the vinyl packaging
before use may result in abnormal
noise, product deformation or re
caused by overheating of the motor.
③
Insert the new 4
True HEPA Filter
.
④
Press the release buttons on either
side of the top cover and attach it to
the product.
⑤
Filter cleaning and replacement
cycle.
Filter type Cleaning cycle Replacement cycle
1
Fine Mesh Cleancel®
Pre-Filter
2 times per month Semi-permanent
2
Antimicrobial
PM2.5 Filter
- 12 months
3
Active Carbon Filter
- 12 months
4 True
HEPA Filter
- 12 months
There may be a difference in the filter replacement cycle depending on usage
environment.
Filter purchase inquiries: www.ideal-health.de
▶
Please refer to pages 68~69 for details on how to replace filters
Set-up | Installation and set-up
Page 20
- 58 -
AP 100
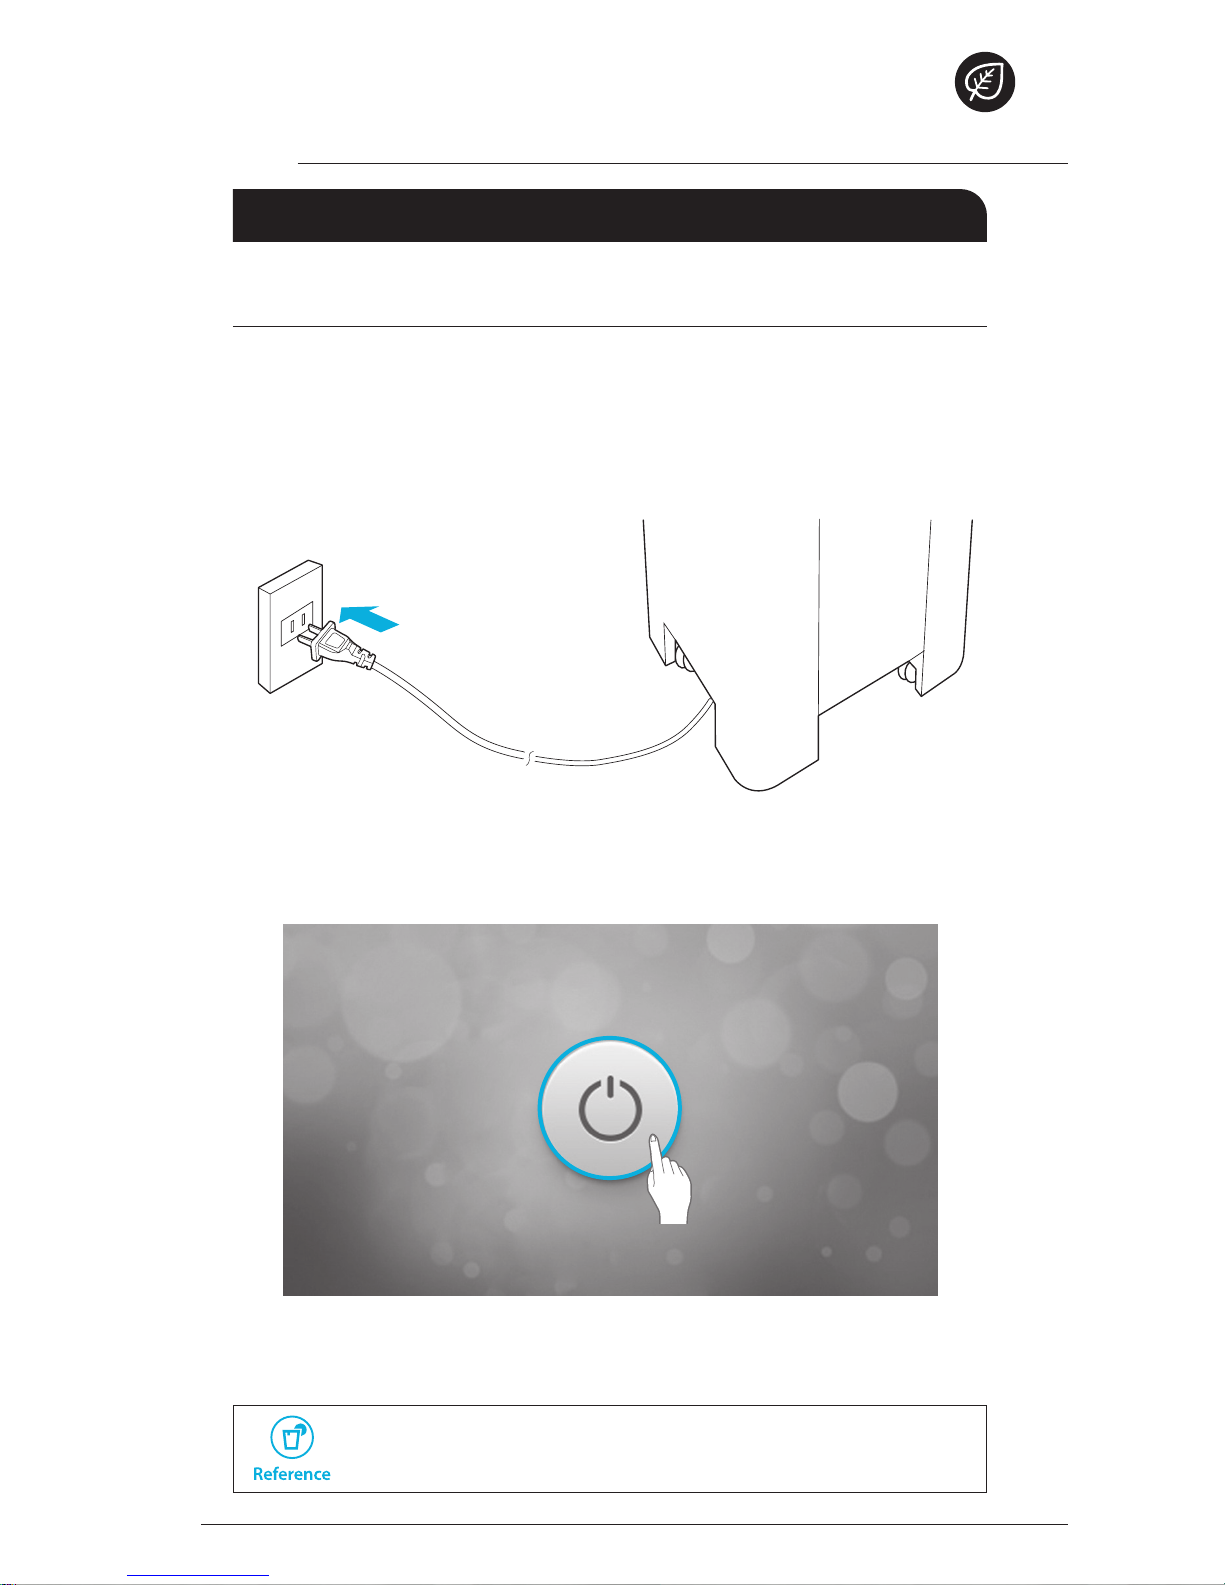
②
Press the "Power" button.
xA start video will play along with music as the power is turned on.
①
Insert the power plug into a power outlet.
power plug into a power outlet (❷).
xThe Display Panel lights will turn on and then o.
How to Use
1.
Initial action
▶
For the first 4 minutes, the product’s smart sensor will measure
the surrounding air cleanliness level.
How to Use | Operation
Page 21

- 59 -
①
"Auto", "PLASMAWAVE", "Regional Info", etc.
will be displayed and the product will run.
x
The fan speed will be set automatically depending on the indoor air
contamination level and PlasmaWave® will run to remove harmful substances in
the air.
x
The color of the main button will change to brown (poor), green (fair),
or blue (good) depending on the condition of the indoor air.
fBrown: Poor
fGreen: Fair
iBlue: Good
To turn the power off
Press the "Power" button.
x
When you press the "Power" button, the power goes off.
C
Operation | How to use
Page 22
- 60 -
AP 100
g
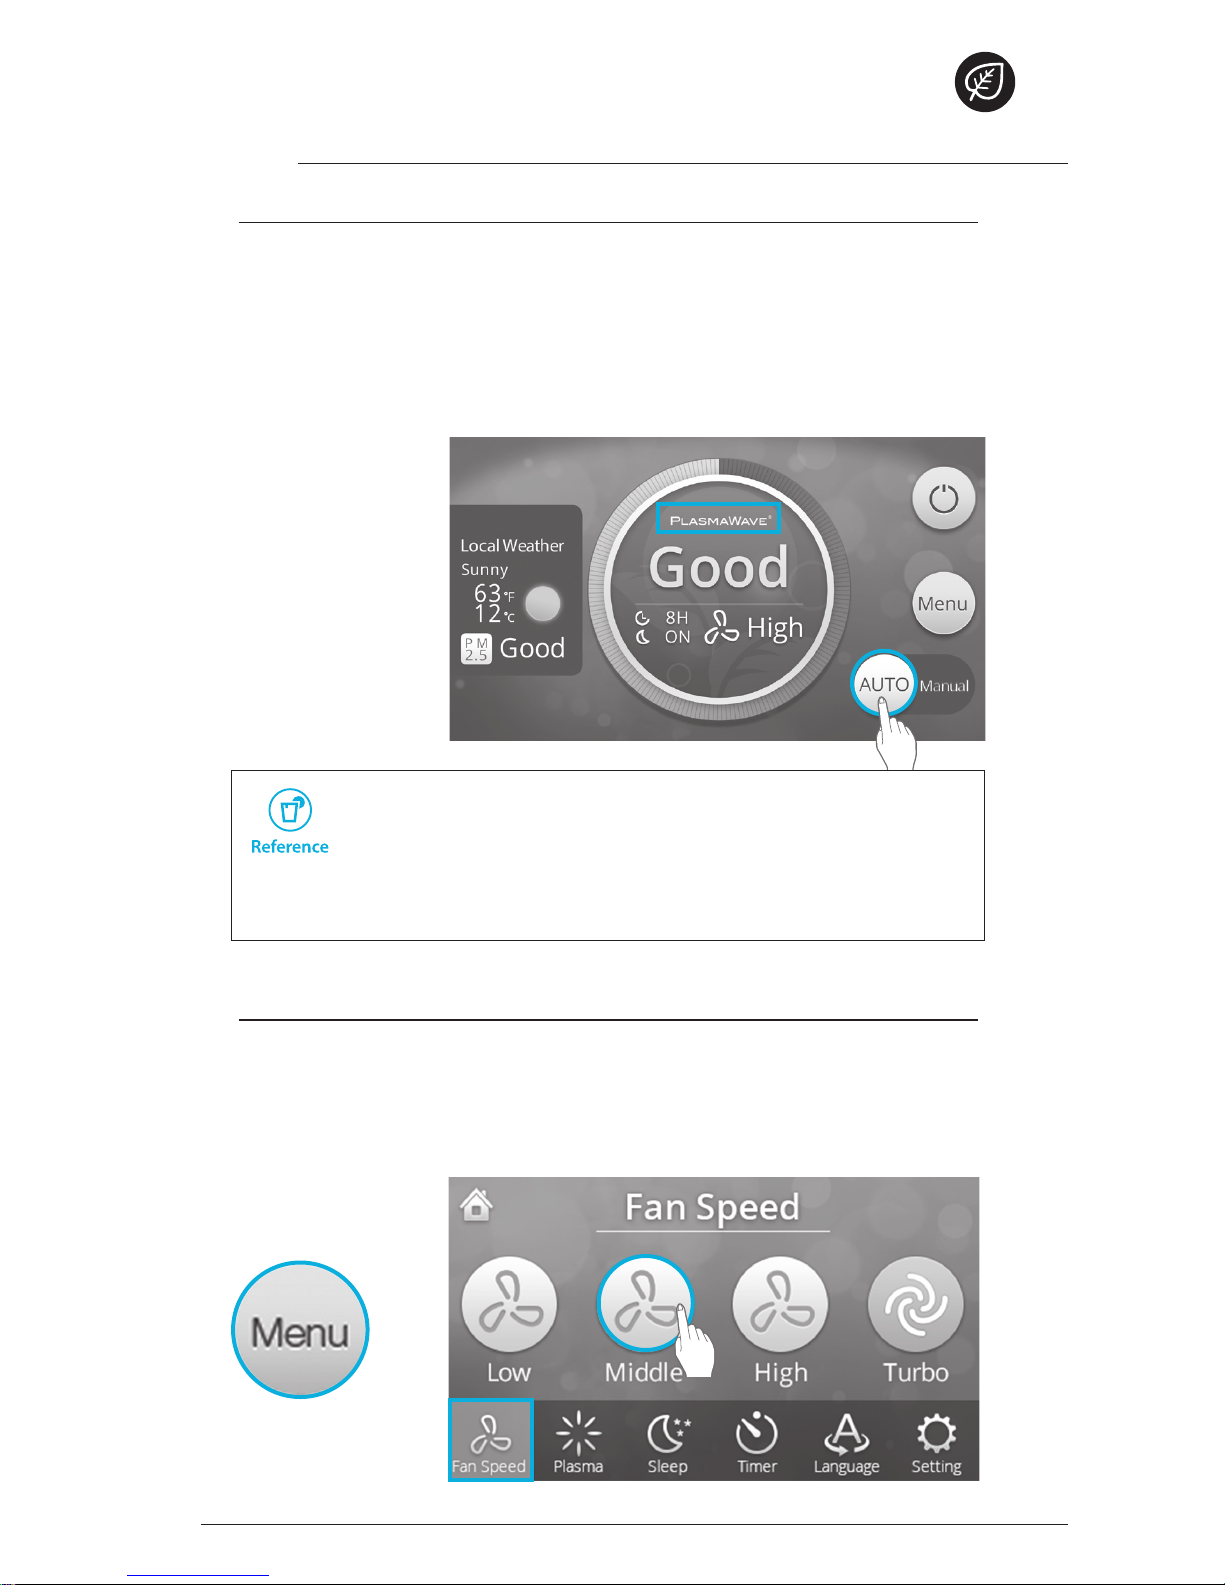
2.
Auto Mode
Runs automatically by detecting indoor air contamination level.
Select "Auto".
xThe product will run with "PlasmaWave®" displayed.
xThe fan speed will be adjusted automatically depending on indoor
air contamination level and PlasmaWave® will run to remove harmful
substances from the air.
3.
Fan speed setup (manual mode)
Runs automatically by detecting indoor air contamination level.
①
Select "Menu".
②
Select "Fan speed setup" and select the desired "Fan speed".
▶
Once the indoor air is cleaned, the wind speed will be set to
run continuously as "low".
▶
The electric noise that emanates during operation is the
normal sound produced by PlasmaWave and does not signify
a malfunction.
How to Use | Operation
Page 23
- 61 -
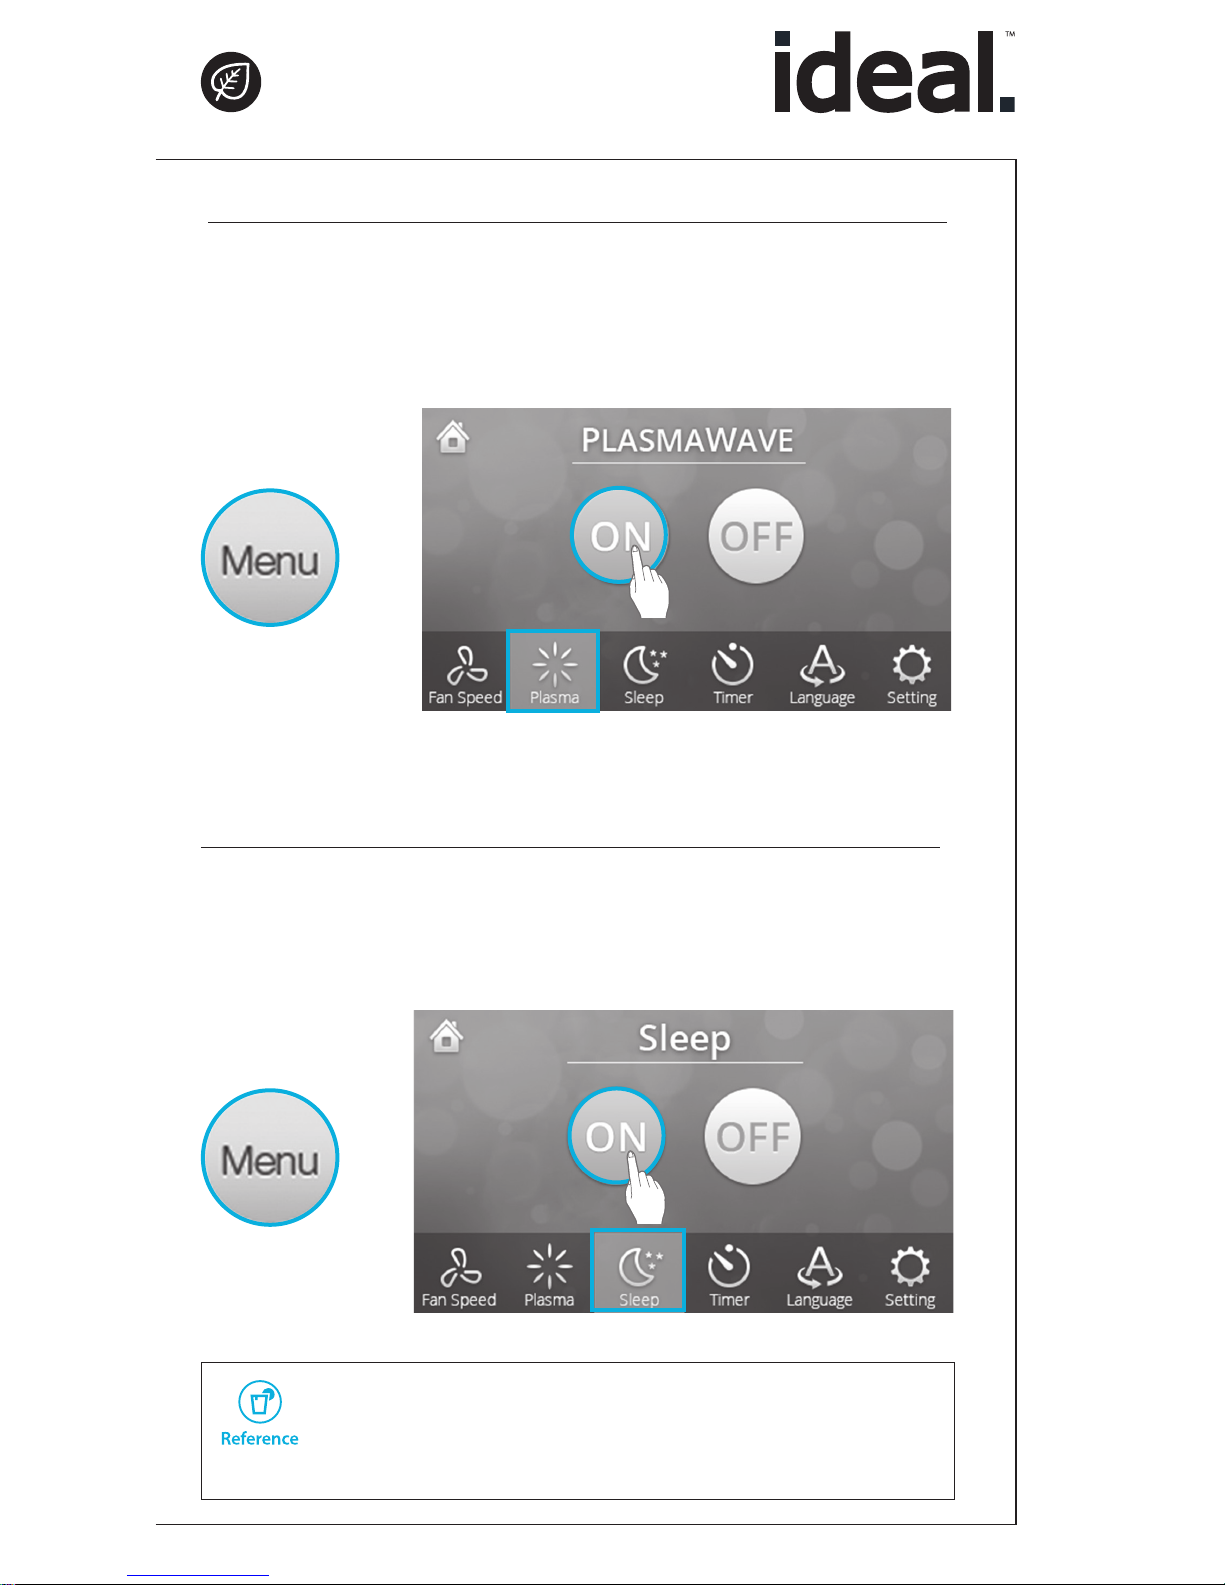
4.
PlasmaWave®
This air purification function removes harmful substances from the air.
①
Select "Menu".
②
Select "PlasmaWave®" and then select "ON".
x
PlasmaWave® will begin running.
g
5.
Sleep Mode
①
Select "Menu".
②
Select "Sleep" and then select "ON".
x
Sleep mode will run and the display will darken.
g
▶
If the wind speed is changed by pressing the "Fan speed"
button, sleep mode will be cancelled and the product will
return to manual mode.
▶
Selecting sleep mode will automatically turn off PlasmaWave®.
Operation | How to use
Page 24
- 62 -
AP 100
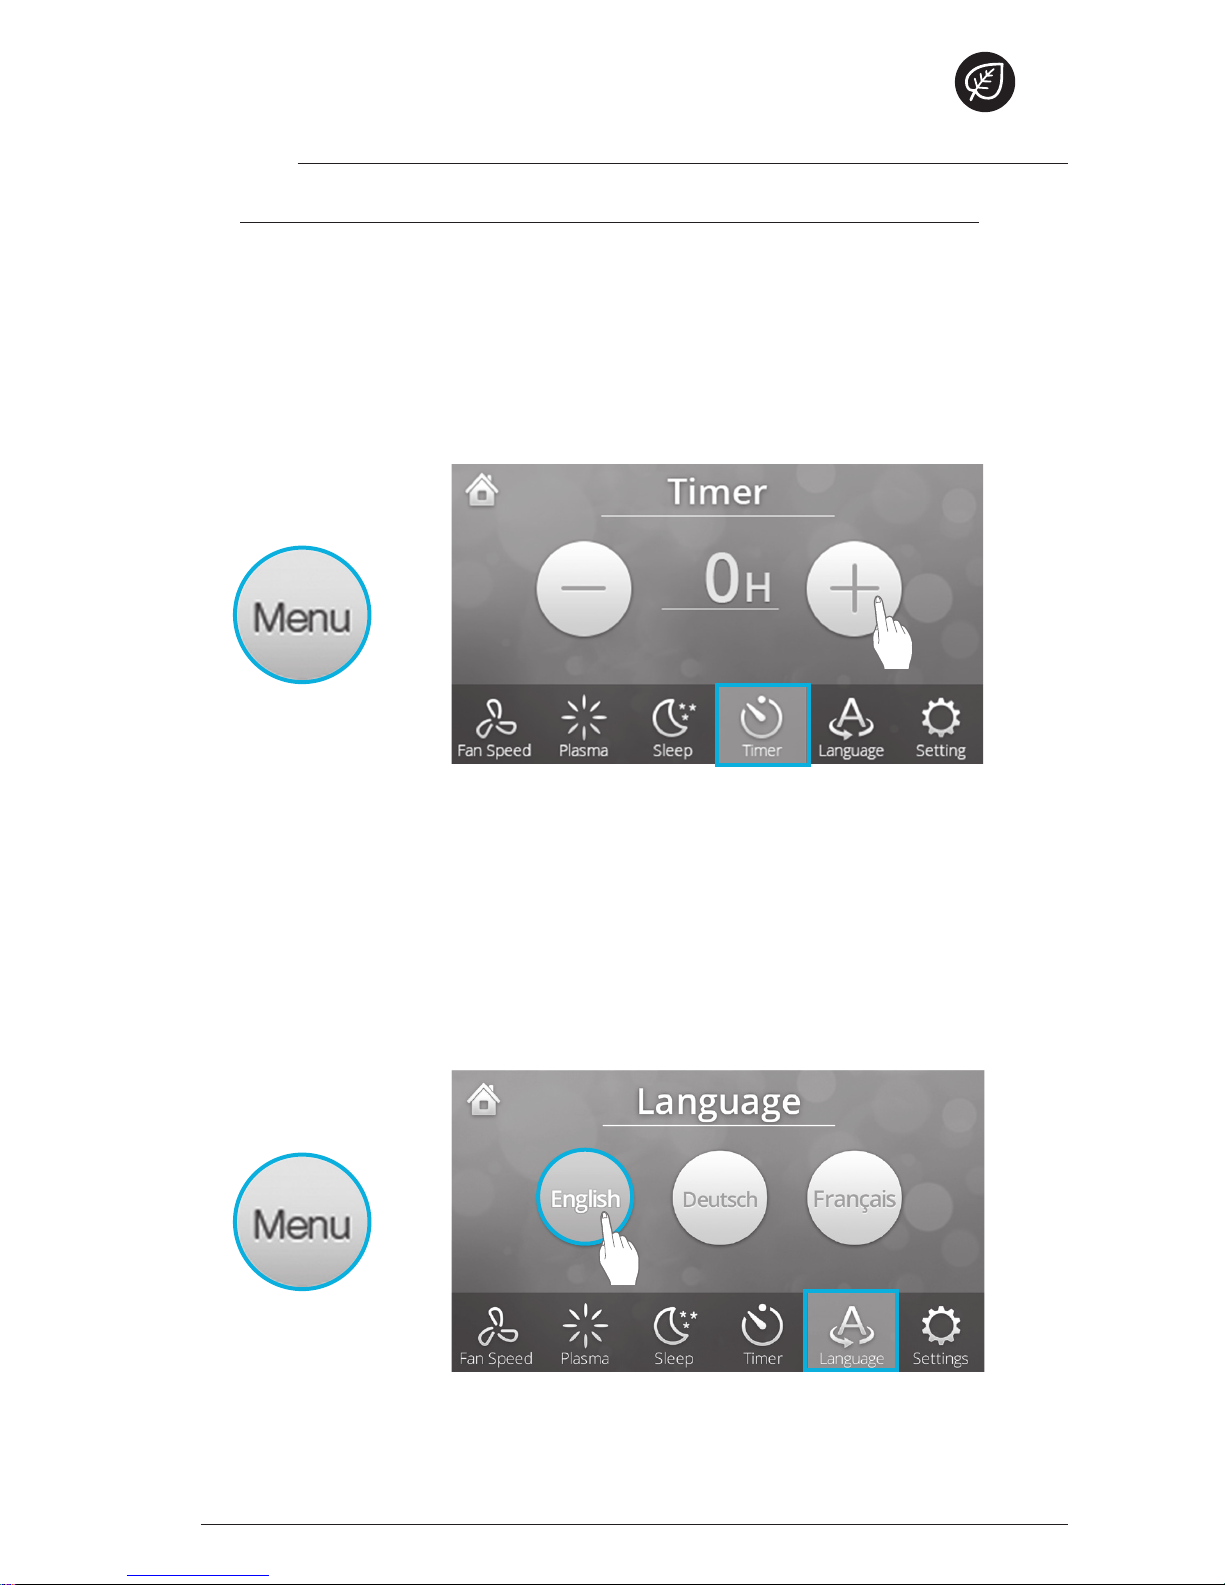
6.
Timer Setup
Select this if you wish to run the product during a specified time.
①
Select "Menu".
②
Select "Power off reservation" and then select "-" or "+".
x
You can set up to "12 hours".
x
Selecting " - " will decrease by 1 hour, while selecting " + " will increase by 1
hour.
g
How to Use | Operation
Language
The LCD language can be set to English, German and French.
1. Select the Menu Screen.
2. Select the Language Screen.
3. Select which language to displayed.
g
Page 25
- 63 -
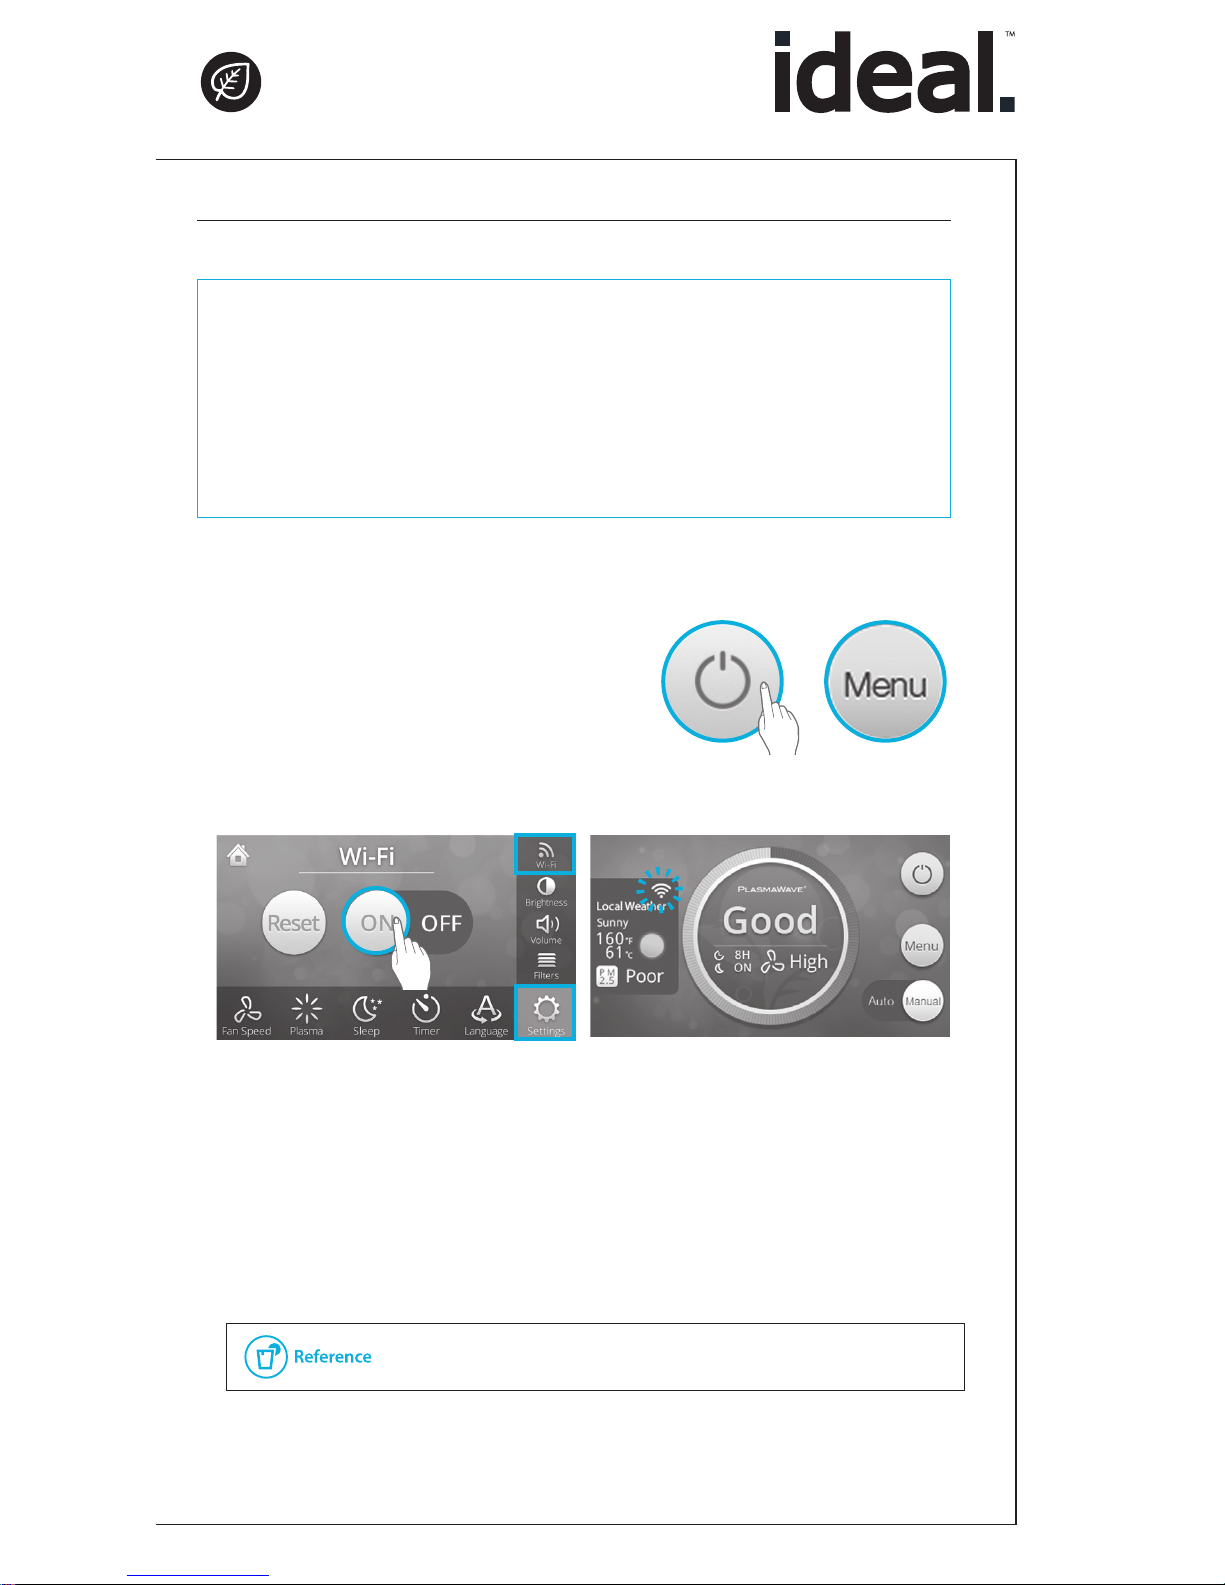
Initial setup.
When connecting for the first time after being shipped from the factory.
①
Select "Power" and then select "Menu".
②
Select "Setup", select "Wi-Fi", select "ON".
x
T h e "Wi-Fi" icon will flicker.
③
To install the IDEAL air app, search for "IDEAL air" in the
App Store or in the Google Play Store.
④
Run the downloaded exclusive APP and follow the app’s
instructions to register the wireless router.
x
Enter the name and password of the Wi-Fi you wish to use.
⑤
Check the Wi-Fi connection.
x
Wi-Fi is connected once the "Wi-Fi" icon stops blinking.
x
Wi-Fi icon can keep blinking up to for 3 minutes depends on local
weather data reception status even wifi connection is done.
7.
Set Wi-Fi connection
Things to know before connecting to Wi-Fi
x
Prepare the wireless router to be connected to the air purifier.
x
An error will occur during setup if two or more wireless routers are connected.
x
If several air purifiers are to be set up, do it individually one by one.
x
The air purifier, wireless router, and mobile device must be within 32 ft in order to be
connected and setup.
x
Before registering, check the Wi-Fi name and password of the location you wish to install
in.
g
▶
Please check the Wi-Fi name and password in advance.
Operation | How to use
Page 26

- 64 -
AP 100
Re-setup
∙
If you wish to use it in an area that is different from the Wi-Fi area that was initially setup.
∙
If you wish to delete the mobile device that was being used and register a new mobile device.
①
Select "Menu" and then select "Setup".
②
Select "Wi-Fi" and then
select "Reset".
x
A pop-up window will appear that
asks to confirm Wi-Fi initialization.
③
Select "Yes ".
x
Wi-Fi setup will be initialized.
④
To install the IDEAL air app, search for "IDEAL air" in
the App Store or in the Google Play Store.
⑤
Run the downloaded exclusive APP and follow the
app’s instructions to register the wireless router.
x
Enter the name and password of the Wi-Fi you wish to use.
⑥
Check the Wi-Fi connection.
x
Wi-Fi is connected once the "Wi-Fi" icon stops blinking.
x
Wi-Fi icon can keep blinking up to for 3 minutes depends on local
weather data reception status even wifi connection is done.
▶
Please check the Wi-Fi name and password in advance.
How to Use | Operation
Page 27

- 65 -
g
g
8.
Set Brightness
①
Select "Menu" and then select "Setup".
②
Select "Brightness" and then select "-" or "+".
x
Selecting "-" will gradually darken the screen, while selecting "+" will gradually
brighten the screen.
9.
Set Volume
①
Select "Menu" and then select "Setup".
②
Select "Volume" and then select "-" or "+".
x
The volume can be set to 6 levels
x
Selecting "-" gradually decreases the volume, while selecting "+" gradually
increases the volume
Operation | How to use
Page 28

- 66 -
AP 100
How to Manage and Clean
1.
How to Replace Filter
Checking the filter
①
When it appears, touch the
pop-up window that alerts you
it is time to replace the filter.
②
You can check each filter’s
extent of use by going to the
filter setup screen.
x
Each block on the scale in the filter
setup screen represents 1 month, and
filters whose scale is empty must be
replaced.
Filter Setup
①
Close the filter cover once the filter is replaced.
(Please refer to pages 68~69 for how to replace filter)
▶
A pop-up window will appear when it is time to replace a
filter.
▶
The pop-up window will disappear if you touch anywhere on
the screen other than the pop-up window.
Unused period
1 month
Used period
X
A pop-up window will appear and an
alert tone will ring if the filter cover is
not closed properly.
Operating the air cleaner | Operation
Page 29

- 67 -
①
Select "YES" if a pop-window
appears asking to reset a filter.
②
Select "Reset" for filters that
have been replaced.
③
Select "Yes " if a pop-up window appears asking to confirm
initialization.
x
The filter setup will be initialized.
④
Filter cleaning and replacement cycle.
Filter type Cleaning cycle Replacement cycle
1Fine Mesh Cleancel®
Pre-Filter
2 times per month Semi-permanent
2 Antimicrobial
PM2.5 Filter
- 12 months
3 Active Carbon filter
- 12 months
4 True HEPA filter
- 12 months
There may be a difference in the filter replacement cycle depending on usage
environment.
Filter purchase inquiries: www.ideal-health.de
▶
g
C
D
E
B
Operation | Operating the air cleaner
Page 30

- 68 -
AP 100
1 Fine Mesh Cleancel® Pre-Filter, 2Antimicrobial PM2.5 Filter,
3Active Carbon Filter replacement
①
Push the two buttons on the filter
cover at the bottom of the product
towards the middle and take the
cover off by pulling it towards you.
②
Hold the grips on either side of the
3 Active carbon filter and pull it
out. Hold the grips of the
2Antimicrobial PM2.5 filter and
pull it out. Hold the grip on the front
of 1Fine Mesh Cleancel® Pre-filter
and pull it out.
③
1Fine Mesh Cleancel® Pre-Filter
2
Antimicrobial PM2.5 lter 3Activated
carbon lter. Push the lters in this
order to the very back of the product.
④
Push the two buttons on the filter
cover towards the middle to attach
it to the product.
X
Please make sure that the
pre-filter is not flipped upside
down before inserting.
X
Only genuine IDEAL filters must be used.
3 Active Carbon
filter
2Antimicrobial
PM2.5 filter
1Fine Mesh Cleancel®
Pre-Filter
Operating the air cleaner | Operation
Page 31

- 69 -
4True HEPA filter replacement
①
Press the release buttons on either
side of the top cover and lift the
cover off.
②
Hold the grips on either side and
pull the filter out.
③
Insert the new 4True HEPA filter.
x
Make sure to remove the vinyl packaging
from the new filter set before using.
x
Failure to remove the vinyl packaging
before use may result in abnormal noise,
product deformation or fire caused by
overheating of the motor.
④
Press the release buttons on either
side of the top cover and attach it to
the product.
X
A pop-up window will appear and an
alert tone will ring if the filter cover is
opened.
Operation | Operating the air cleaner
Page 32
- 70 -
AP 100
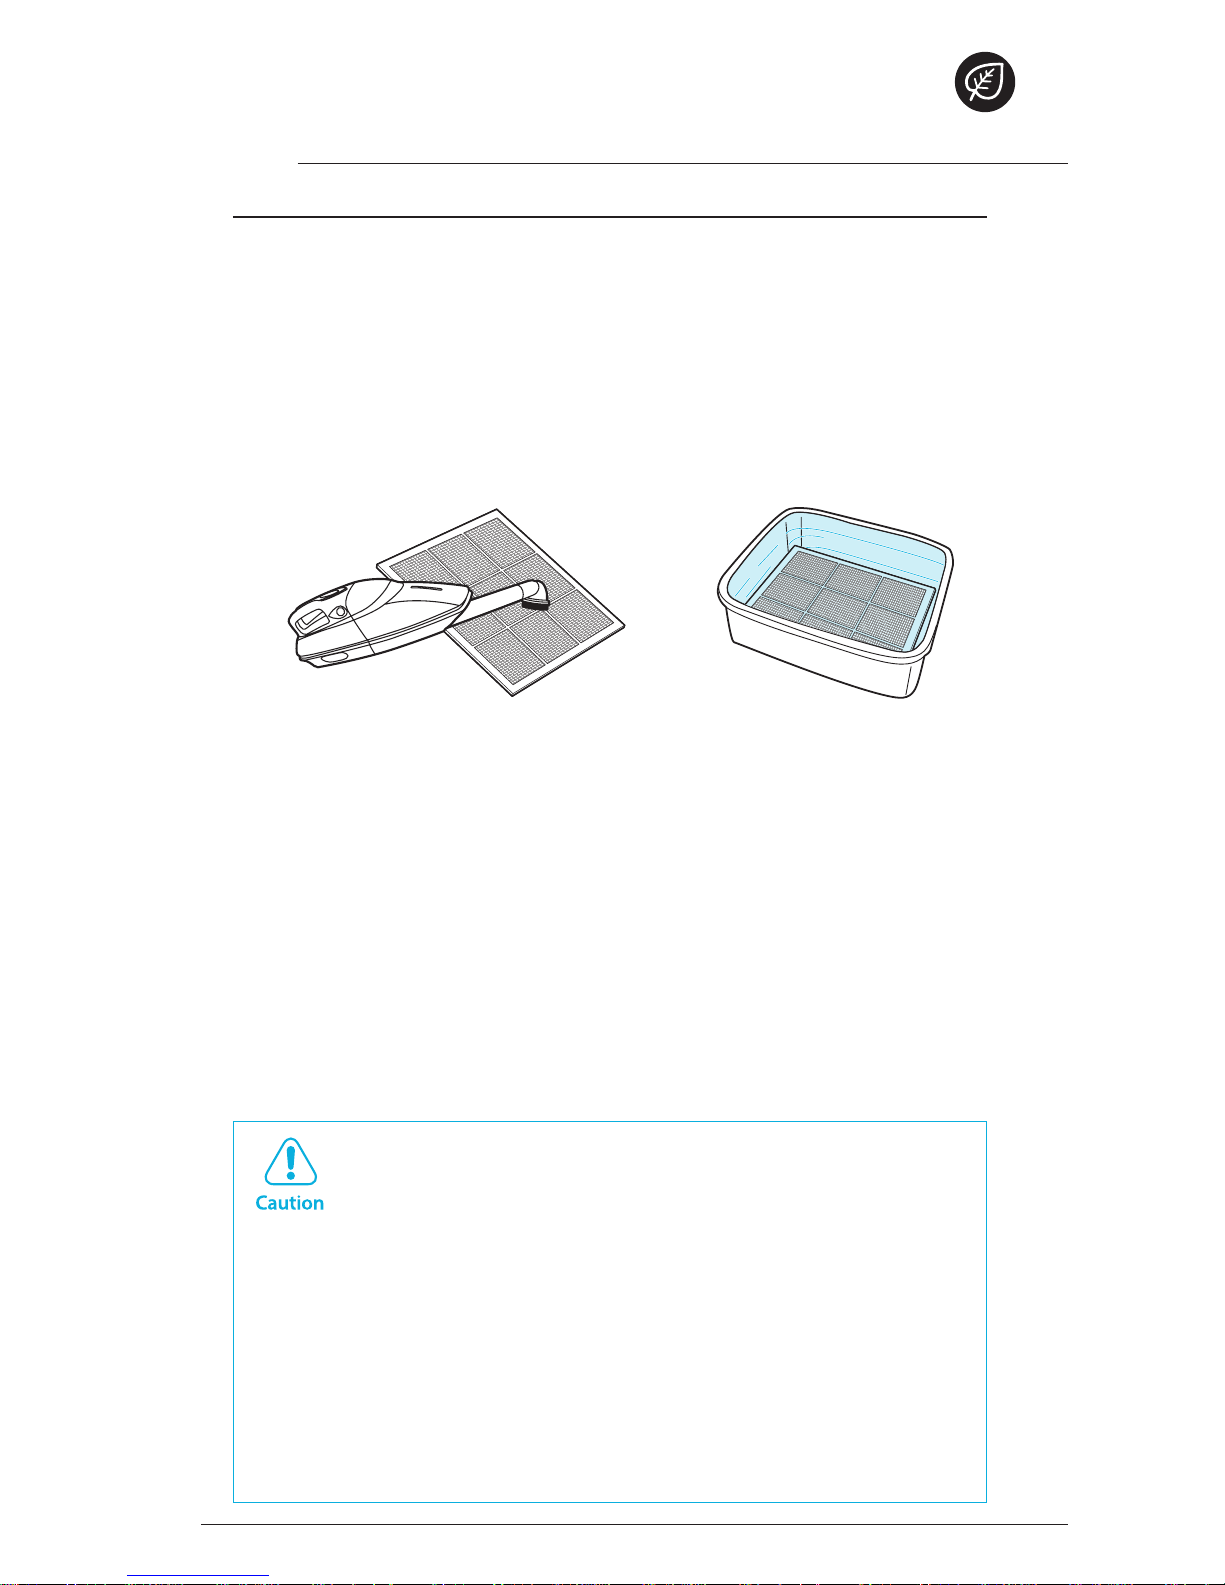
2.
How to Clean Pre-Filter
The filter cleaning time may differ depending on the surrounding contamination
levels.
Clean using a vacuum cleaner or a soft brush, and use a neutral
detergent to clean if it is heavily contaminated.
xWith the exception of water, do not clean using volatile substances,
alcohol, acetone, etc.
xCleaning around 2 times per month will allow you to use a filter semi-
permanently.
X
Make sure to unplug and allow the product to cool down
completely before cleaning.
X
Do not use benzene, alcohol, or other volatile detergents as
they may cause damage or discoloration.
X
The pre-filter can be cleaned and reused.
X
Do not use volatile liquids such as water that is hotter than
40°C or thinners.
X
Filters must be replaced if the contamination is severe to the
point that cleaning is not possible.
X
Filters must be dried completely in a place where air flows
well because filters that are not dried completely can result in
them giving off a bad smell.
Operating the air cleaner | Operation
Page 33
- 71 -
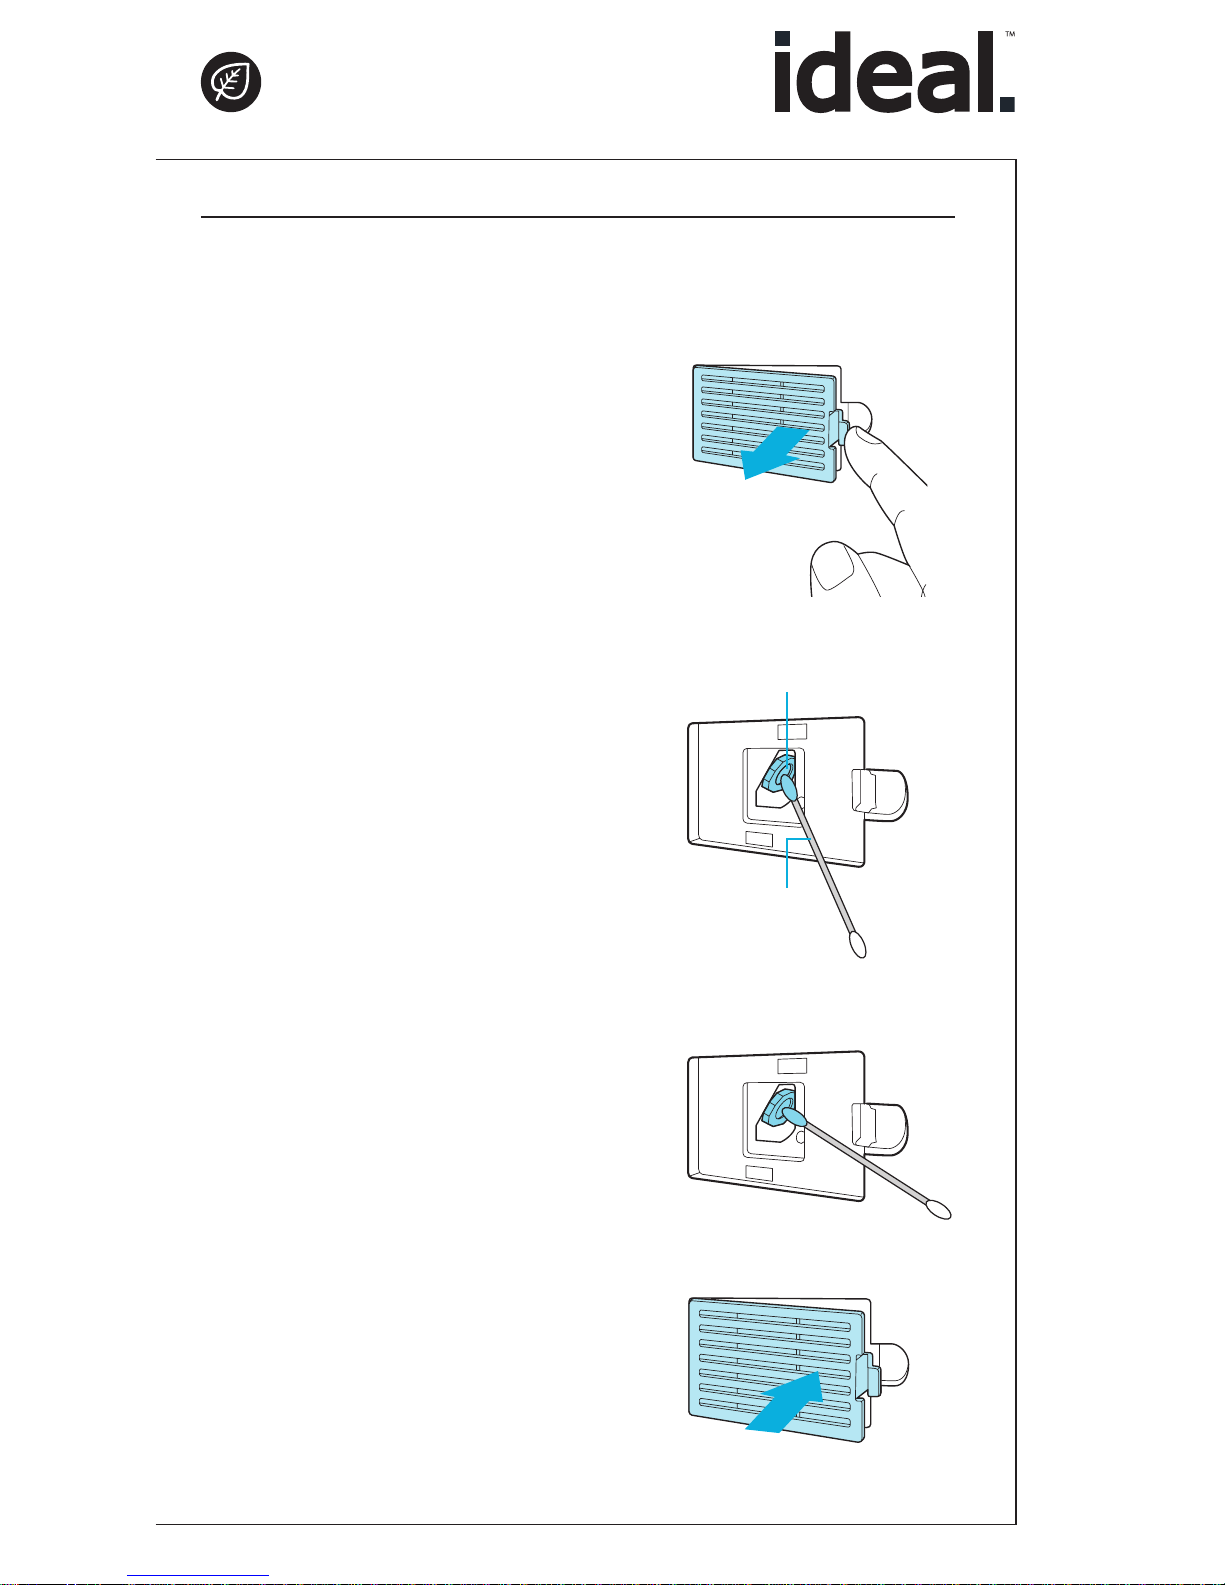
3.
How to Clean Fine Dust Sensor
The dust sensor detects the contamination level of dust, so it is recommended to
clean the sensor once every two months for the air purifier to function optimally.
Please clean the sensor more often if the product is used in a location where there
is a greater amount of dust.
①
Open the dust sensor cover.
②
Clean the dust sensor lens and the
inlet with a damp cotton swab.
xWith the exception of water, do not clean
the sensor area with volatile substances,
alcohol, acetone, etc.
③
Wipe the moisture off with a dry
cotton swab.
④
Close the dust sensor cover.
xThe dust sensor cover can be cleaned
with a vacuum cleaner.
Lens
Cotton
swab
Operation | Operating the air cleaner
Page 34

- 72 -
AP 100
4.
Cleaning the exterior / Cleaning the interior
Exterior
Wipe the product with a soft cloth
made wet with water mixed in with a
neutral detergent, and then wipe it with
a dry cloth.
xClean the air vent on the top cover with a
vacuum cleaner or a duster around
1~2 times per month.
Interior
Open the top cover and clean with a
vacuum cleaner.
xClean the interior with a vacuum cleaner
or a duster around 1~2 times per month.
Operating the air cleaner | Operation
Page 35

- 73 -
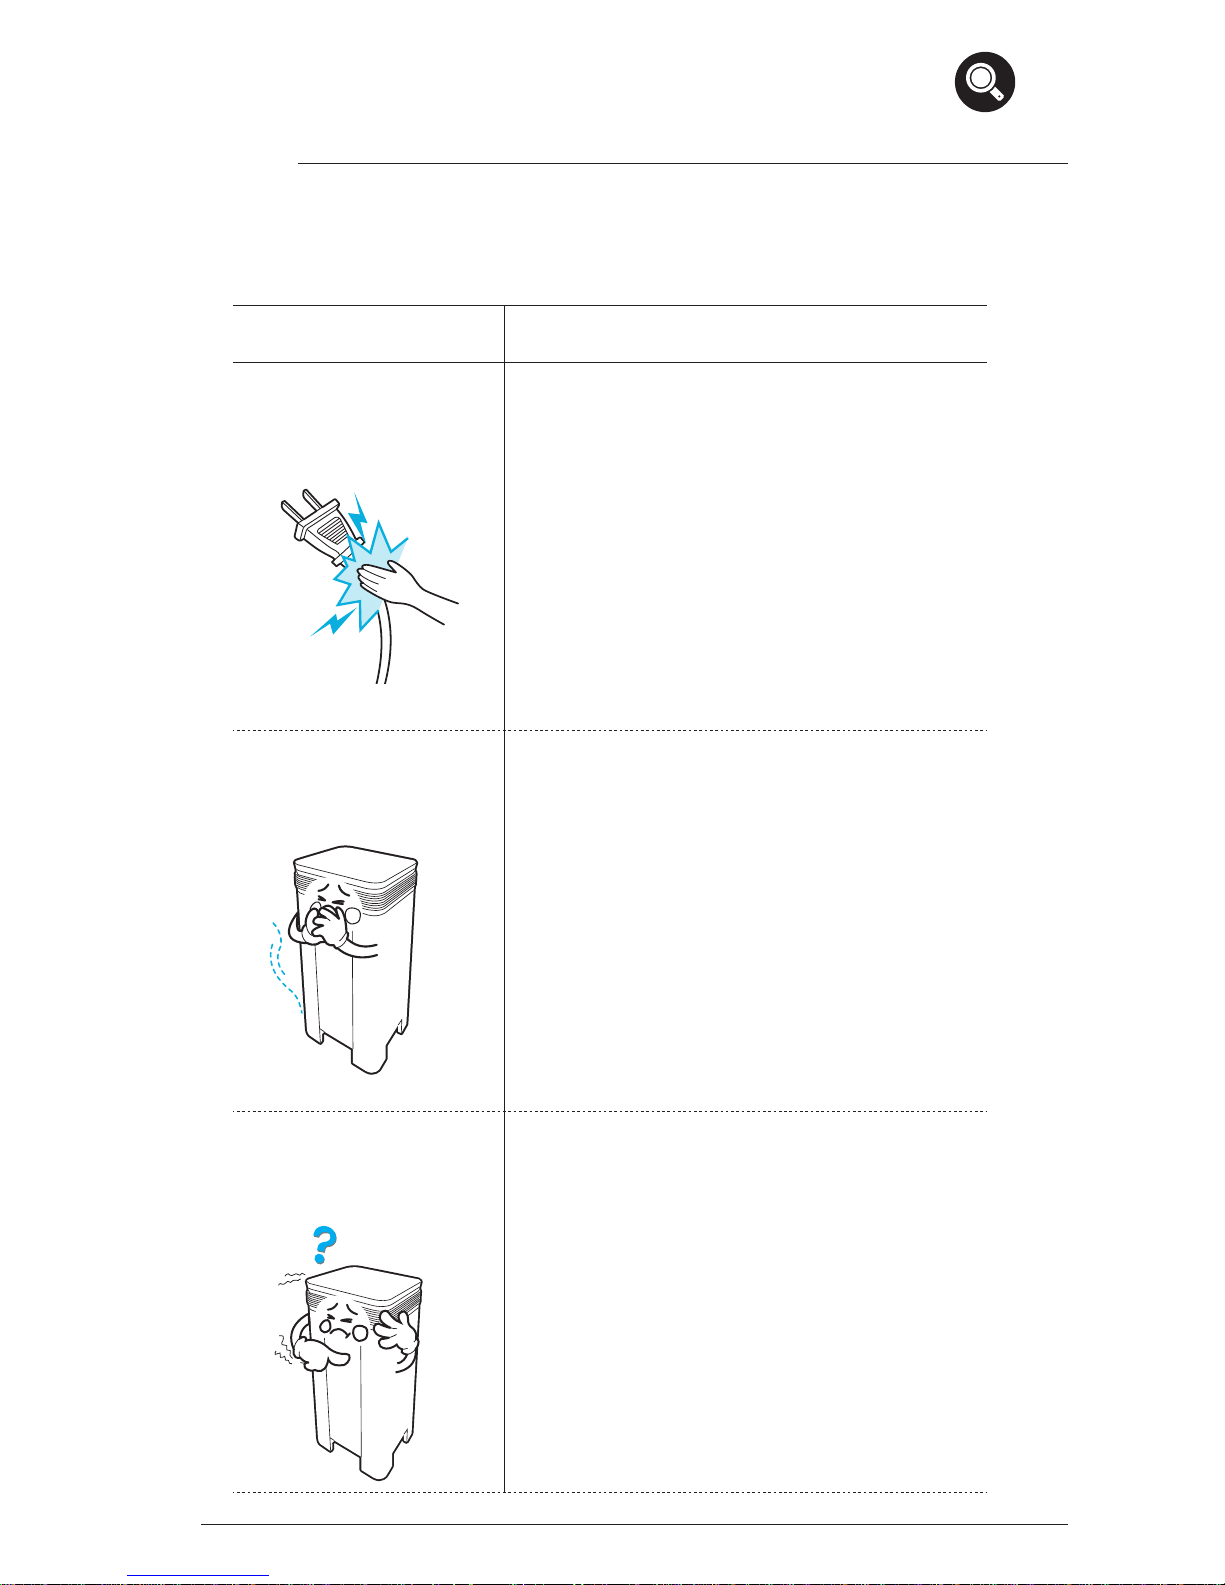
Troubleshooting
Problem Check / Measures
It does not turn on
at all
▶
Is the power cord securely attached to the
socket on the back of the unit?
Check both ends of the power cord to make
sure it is plugged in and the power connections
are secure.
▶
Is there a power outage?
Check to see if other lights and electrical
equipment are working and try again.
It doesn’t work in
Automatic mode.
▶
Is the power cord securely attached to the
socket on the back of the unit?
Try turning it on again after detaching and
reattaching the power cord.
▶
Has Automatic mode been selected?
Press the Mode button until Automatic mode is
selected.
▶
Is the sensor blocked or clogged?
Clear the sensor using a vacuum cleaner.
It vibrates and makes
a lot of noise.
▶
Is it running on a slanted surface?
Move the unit to a hard, flat area of the floor.
Other | Troubleshooting
Page 36
- 74 -
AP 100
Problem Check / Measures
The power plug and
power outlet are hot.
▶
Is the power plug plugged in correctly?
Plug in the power plug correctly.
There is a strange
smell.
▶
Are you using it in a place with large amount of
smoke, dust, or smell?
The effects of air purifiers can be reduced if
used in a place with large amount of smoke or
smell. Please open a window and ventilate the
room before using.
The wind speed is
weak. The air does not
get purified.
▶
Does the filter replacement alert pop-up
window appear?
A pop-up window will appear that informs you
it is time to replace the filter from 1 month
before the filter replacement time.
Troubleshooting | Other
Page 37
- 75 -
Problem Check / Measures
The display is dark.
▶
Is there any debris on the illumination level
sensor window?
Remove the debris from the illumination level
sensor.
▶
Is it in sleep mode?
If the indoor lighting becomes dark, the
product will be automatically set to sleep mode
and the display area will darken.
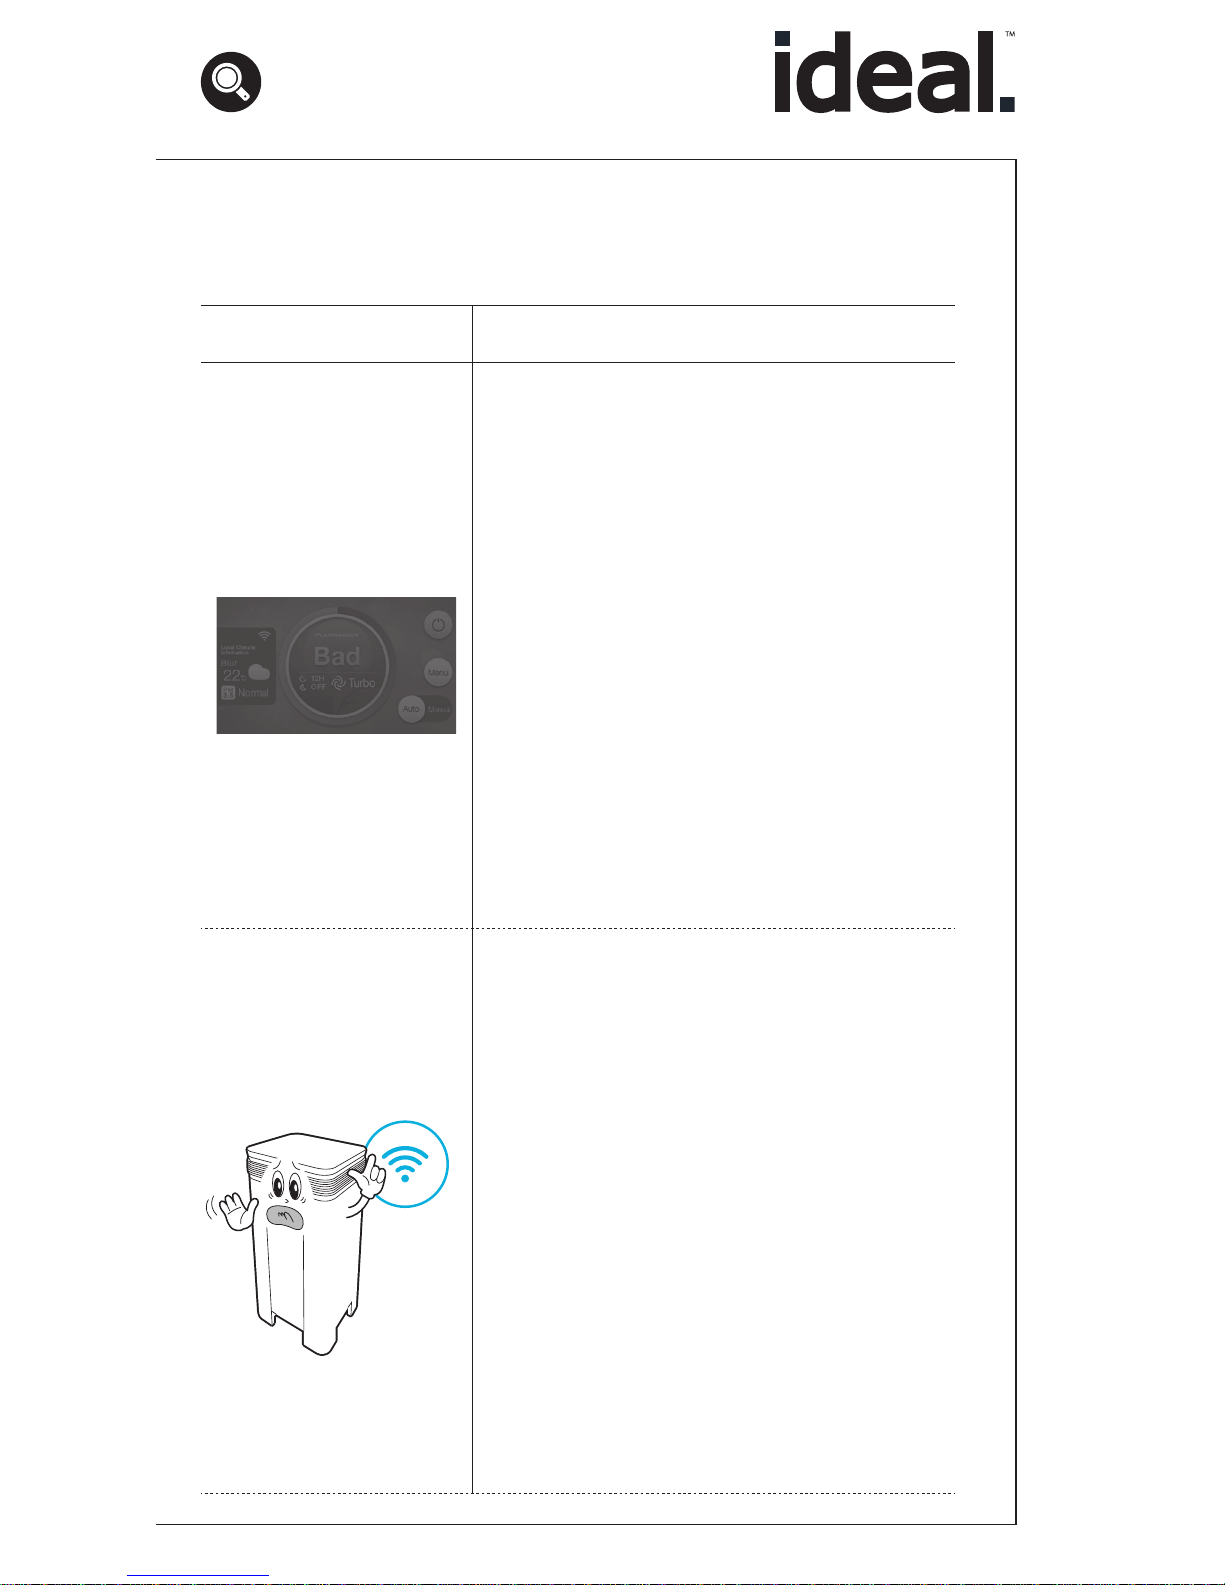
The Wi-Fi function
does not work.
▶
Is the Wi-Fi turned off?
Turn the Wi-Fi on.
Other | Troubleshooting
Page 38
- 76 -
AP 100
Product Specifications
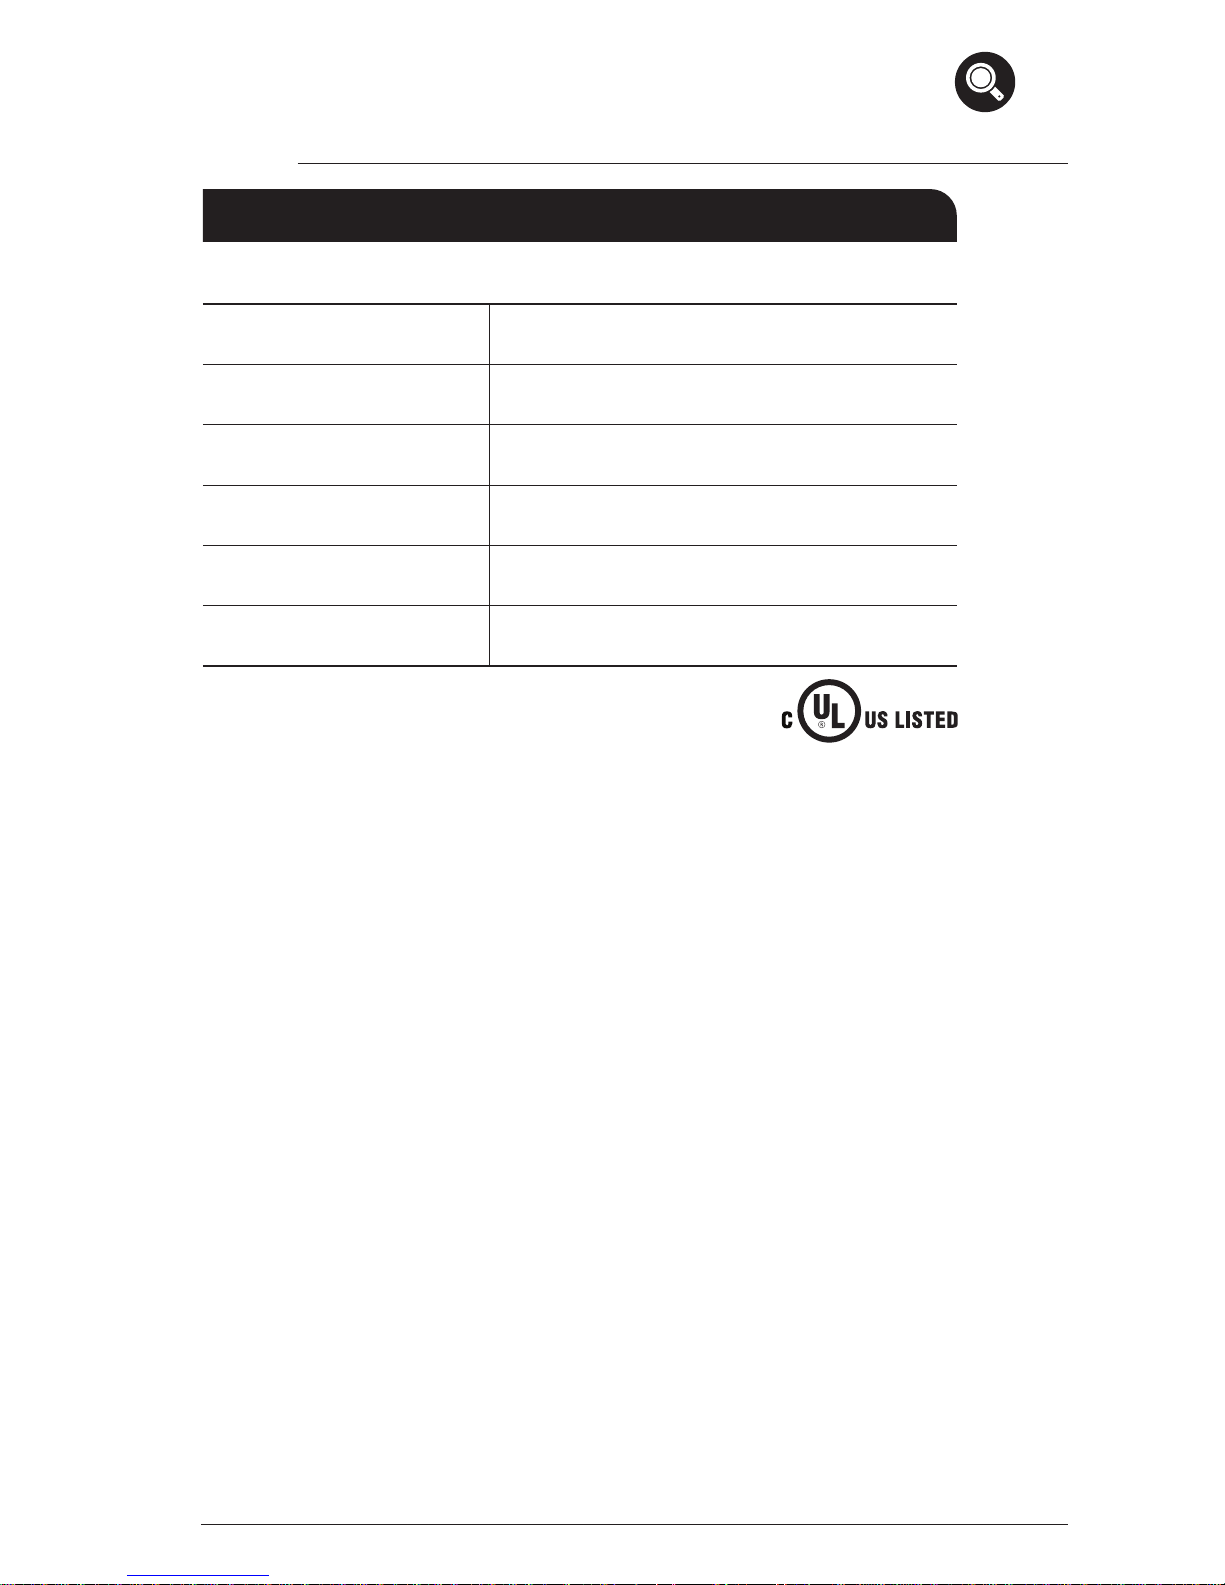
Model Name AP 100
Power Voltage
AC 120V, 60 Hz
Power Rate
200 W
Siutable for room
sizes up to
697,5 sq. ft.
Weight
68,3 lb
Dimensions
21,1 inch (W) x 21,0 inch (D) x 44,8 inch (H)
Authorized representative for technical documentation
MBM Corporation
3134 Industry Drive
North Charleston, SC 29418
800-223-2508
www.mbmcorp.com
01.04.2016
Date
Subject to technical modications.
Made in South Korea
Safety instructions
- If the supply cord is damaged, it must be replaced by a special cord or assembly
available from the manufacturer or its service agent.
- This appliance is not intended for use by person (including children) with
reduced physical sensory or mental capabilities, or lack of experience and
knowledge, unless they have been given supervision or instruction concerning
use of the appliance by a person responsible for their safety.
- Children should be supervised to ensure that they do not play with the
appliance.
- To reduce the risk of electric shock, this equipment has a polarized plug (one
blade is wider than the other). This plug will t in a polarized outlet only one
way. If the plug does not t fully in the outlet, reverse the plug. If it still does not
t, contact qualied personnel to install the proper outlet. Do not alter the plug
in any way.
- RISK OF ELECTRIC SHOCK – These servicing instructions are for use by qualied
personnel only. To reduce the risk of electric shock, do not perform any
servicing other than that contained in the operating instructions unless you are
qualied to do so.
Product Specifications | Other
Page 39

- 77 -
Disposal
Pass the outdated Air Purier onto your specialized retailer for
professional disposal. You can nd out about further disposal
possibilities from your municipality.
Spare parts and accessories
You can purchase spare parts from specialized
retailers. Only original parts from the
manufacturer can be used.
Repairs
All further repairs may only be carried out from professionals
or the service department. This also applies to a faulty
power cord. Through improper repairs, considerable danger
for the operator can result and warranty claims lapse.
Guarantee agreements
Thank you for choosing an IDEAL device.
IDEAL grants a guarantee on its products. Warranty
stipulations are determined by our national representation.
• If defects due to faulty materials and workmanship occur
within this guarantee period, IDEAL will repair or replace
the device at its expense.
• IDEAL will only repair or replace the device, if convincing
proof is provided, for example by a receipt and if the claim
is made within the guarantee period.
• The guarantee is not given on wearing parts or service
parts like lter.
• The guarantee is not valid if the device was not set up, run
and serviced right (as according to the devices manual)
• The guarantee is not valid if lters haven’t been replaced
regularly with original IDEAL lters according to the
description in the manual and/or the indication on the
device itself.
• The guarantee is not valid if the device was connected to a
power supply not matching the rating label on the machine.
Page 40

IDEAL Health
IDEAL • 04-2016 / 12.05.2016 zm
For fresh air.
For more health, vitality and
quality of life. Perceptible.
With every breathe you take.
•
MBM Corporation • North Charleston • South Carolina • www.mbmcorp.com
•
 Loading...