

Icom IC-A220, IC-A220E Instruction Manual
INSTRUCTION MANUAL
VHF AIR BAND TRANSCEIVERS
iA220
iA220E
This device complies with Part 15 of the FCC
Rules. Operation is subject to the condition that
this device does not cause harmful interference.

IMPORTANT
FCC INFORMATION
READ ALL INSTRUCTIONS carefully and completely
before using the transceiver.
SAVE THIS INSTRUCTION MANUAL — This in-
struction manual contains important operating instructions
for the IC-A220 and IC-A220E.
EXPLICIT DEFINITIONS
The explicit definitions below apply to this instruction manual.
WORD DEFINITION
RWARNING!
CAUTION
NOTE
CAUTION: Changes or modifications to this transceiver, not
expressly approved by Icom Inc., could void your authority to
operate this transceiver under FCC regulations.
Icom, Icom Inc. and Icom logo are registered trademarks of Icom Incorporated
(Japan) in Japan, the United States, the United Kingdom, Germany, France,
Spain, Russia, Australia, New Zealand, and/or other countries.
i
Personal injury, fire hazard or electric
shock may occur.
Equipment damage may occur.
If disregarded, inconvenience only. No risk
of personal injury, fire or electric shock.
• FOR CLASS A UNINTENTIONAL RADIATORS:
This equipment has been tested and found to comply with the
limits for a Class A digital device, pursuant to part 15 of the
FCC Rules. These limits are designed to provide reasonable
protection against harmful interference when the equipment
is operated in a commercial environment. This equipment
generates, uses and can radiate radio frequency energy and,
if not installed and used in accordance with the instruction
manual, may cause harmful interference to radio communications. Operation of this equipment in a residential area is
likely to cause harmful interference in which case the user will
be required to correct the interference at his own expense.
• POUR LES RAYONNEMENTS NON INTENTIONNELS DE
CLASSE A:
Cet équipement a été testé et reconnu conforme aux limites fixées
pour un appareil numérique de classe A, conformément au point
15 de la réglementation FCC. Ces limites sont définies de façon à
fournir une protection raisonnable contre le brouillage préjudiciable
lorsque cet appareil est utilisé dans un environnement commercial.
Cet équipement génère, utilise et peut émettre un rayonnement de
fréquence radio. S'il n'a pas été installé conformément aux instructions, il peut par ailleurs créer des interférences perturbant les communications radio.
L'utilisation de cet appareil dans une zone résidentielle peut provoquer un brouillage préjudiciable, auquel cas l'utilisateur sera tenu de
corriger la situation à ses frais.

PRECAUTIONS
R WARNING! NEVER operate the transceiver with
an earphone or other audio accessories at high volume levels. Continuous high volume operation may cause a ringing
in your ears. If you experience ringing, reduce the volume
level or discontinue use.
R WARNING! NEVER connect the transceiver to an
AC outlet or to a power source of more than 28 V DC. Such a
connection will damage the transceiver.
CAUTION: NEVER connect the transceiver to a power
source that is DC fused at more than 10 A. Accidental reverse
connection will be protected by this fuse, higher fuse values
will not give any protection against such accidents and the
transceiver will be damaged.
DO NOT operate the transceiver near unshielded electric
blasting caps or in an explosive atmosphere.
DO NOT connect the transceiver to a power source using
reverse polarity. This connection will not only blow fuses but
also may damage the transceiver.
DO NOT place unit in a non-secure place to avoid inadver-
tent use by children.
DO NOT push the PTT when not actually intending to
transmit.
DO NOT use or place the transceiver in direct sunlight
or
in areas with temperatures below –20°C (–4°F) or above
+55°C (+131°F).
DO NOT place the transceiver in excessively dusty envi-
ronments.
DO NOT use harsh solvents such as benzine or alcohol to
clean the transceiver, as they will damage the transceiver’s
surfaces. If the transceiver becomes dusty or dirty, wipe it
clean with a soft, dry cloth.
BE CAREFUL! The transceiver will become hot when
operating continuously for long periods.
CAUTION: Use of 8.33 kHz Channel Spacing of this radio
is strictly prohibited and shall not be used in Canada.
ii

PRÉCAUTIONS
R NE JAMAIS utiliser l’émetteur-récepteur avec un
casque ou d’autres accessoires audio ayant un volume trop
élevé. Un volume continu trop fort peut entraîner un bourdonnement dans vos oreilles. Si vous entendez une sonnerie
baissez le niveau sonore ou interrompez l'utilisation.
R NE JAMAIS relier l'émetteurrécepteur à une prise
d'alimentation de plus de 28 V. Un tel branchement endommagerait votre émetteur-récepteur.
NE JAMAIS brancher l’émetteur-récepteur à une ali-
mentation continue dont le fusible de protection excède 10
A. Ce fusible protège contre l’inversion accidentelle des
branchements.
NE PAS utiliser l'émetteur-récepteur près d'amorces élec-
triques non blindées ou en atmosphère explosive.
NE JAMAIS brancher le transceiver à une source
d'alimentation employant la polarité inversée.
NE PAS appuyer sur la touche PTT lorsqu’on ne souhaite
pas émettre.
NE PAS d’utiliser ou d’exposer l’émetteur-récepteur en
plein soleil ou à une tem pérature ambiante inférieure à –20°C
ou supérieure à +55°C.
NE PAS placer l'émetteur-récepteur dans des endroits ex-
cessivement poussiéreux.
NE PAS nettoyer l'appareil avec des solvants agressifs tels
que benzène ou alcool, susceptibles d'endommager les surfaces exposées du boîtier. En cas de dépôt de poussière ou
de salissures sur l'émetteur-récepteur, il faut l'essuyer avec
chiffon doux et sec.
ATTENTION! Le transceiver devient chaud lors
d'utilisations continues de longue durée. L’émetteur-récepteur
chauffe en cas d’utilisation continue sur une longue durée.
L'antenne doit être placée à au moins un mètre de la position
de chacune des personnes à bord de l'aéronef.
MISE EN GARDE: Utilisation de 8,33 kHz Espacement des
canaux de cette radio est strictement interdite et ne doit
pas être utilisé au Canada.
iii
SAFETY TRAINING INFORMATION
Your Icom radio generates RF electromag-
netic energy during transmit mode. This
radio is designed for and classied as “Occupational Use Only,” meaning it must be
used only during the course of employment
by individuals aware of the hazards, and the
ways to minimize such hazards. This radio is
NOT intended for use by the “General Population” in an uncontrolled environment.
• For compliance with FCC and Industry Canada RF Exposure Requirements, the transmitter antenna installation
shall comply with the following two conditions:
1. The transmitter antenna gain shall not exceed 0 dBi.
2. The antenna is required to be located outside of a ve-
hicle and kept at a distance of 40 centimeters or more
between the transmitting antenna of this device and any
persons during operation. For a small vehicle, the antenna as worst case, the antenna shall be located on the
roof top at any place on the centre line along the vehicle
in order to achieve 40 centimeters separation distance.
In order to ensure this distance is met, the installation of
the antenna must be mounted at least 40 centimeters
away from the nearest edge of the vehicle in order to
protect against exposure to bystanders.
To ensure that your exposure to RF electromagnetic energy is within the FCC allowable limits for occupational use, always
adhere to the following guidelines:
• DO NOT operate the radio without a proper antenna at-
tached, as this may damage the radio and may also cause
you to exceed FCC RF exposure limits. A proper antenna is
the antenna supplied with this radio by the manufacturer or
an antenna specifically authorized by the manufacturer for
use with this radio.
• DO NOT transmit for more than 50% of total radio use time
(“50% duty cycle”). Transmitting more than 50% of the time
can cause FCC RF exposure compliance requirements to
be exceeded. The radio is transmitting when the “TX” indicator appears. You can cause the radio to transmit by pressing
the PTT switch.
Electromagnetic Interference/Compatibility
During transmissions, your Icom radio generates RF energy
that can possibly cause interference with other devices or
systems. To avoid such interference, turn off the radio in areas where signs are posted to do so. DO NOT operate the
transmitter in areas that are sensitive to electromagnetic radiation such as hospitals, aircraft, and blasting sites.
iv
INFORMATION EN MATIÈRE DE SÉCURITÉ
AVERTISSEMENT
MISE EN GARDE
Votre radio Icom produit une énergie électromagnétique de radiofréquences (RF), en mode
de transmission. Cette radio est conçue pour
un «usage professionnel seulement» et classée
comme tel, ce qui signie qu'elle doit être utilisée uniquement dans le cadre d'un travail par
des personnes conscientes des dangers et des
mesures visant à minimiser ces dangers. Elle
N'EST PAS conçue pour une «utilisation grand
public», dans un environnement non contrôlé.
• An de satisfaire aux exigences de la FCC et
d'Industrie Canada en matière d'exposition aux RF,
il est nécessaire que l'antenne soit installée conformément aux deux conditions suivantes:
1. Le gain de l'antenne du radio émetteur ne doit pas dépasser 0
dBi.
2. Il faut que l'antenne émettrice de cet appareil soit placée à
l'extérieur d'un véhicule et tenue éloignée d'au moins 40 centimètres de toute personne pendant le fonctionnement. Dans le
pire des cas, pour un petit véhicule, l'antenne doit être placée
sur le toit, n'importe où dans l'axe central du véhicule, afin de
respecter une distance de 40 cm du bord le plus rapproché
du véhicule et ainsi éviter que les personnes présentes soient
exposées.
An de vous assurer que votre exposition à une
énergie électromagnétique de RF se situe dans les
limites permises par la FCC pour une utilisation
grand public, veuillez en tout temps respecter les
directives suivantes:
•
NE PAS faire fonctionner la radio sans qu'une antenne appropriée
y soit fixée, car ceci risque d'endommager la radio et causer une
exposition supérieure aux limites établies par la FCC. L'antenne appropriée est celle qui est fournie avec cette radio par le fabricant
ou une antenne spécialement autorisée par le fabricant pour être
utilisée avec cette radio.
• NE PAS émettre pendant plus de 50% du temps total d'utilisation
de l'appareil («50% du facteur d'utilisation»). Émettre pendant plus
de 50% du temps total d'utilisation peut causer une exposition aux
RF supérieure aux limites établies par la FCC. La radio est en train
d’émettre lorsque le témoin du mode de transmission s'affiche sur
l'écran ACL. La radio émettra si vous appuyez sur le bouton du
microphone.
Interférence électromagnétique et compatibilité
En mode de transmission, votre radio Icom produit de l'énergie de
RF qui peut provoquer des interférences avec d'autres appareils ou
systèmes. Pour éviter de telles interférences, mettez la radio hors
tension dans les secteurs où une signalisation l’exige. NE PAS faire
fonctionner l'émetteur dans des secteurs sensibles au rayonnement
électromagnétique tels que les hôpitaux, les aéronefs et les sites de
dynamitage.
v

TABLE OF CONTENTS
IMPORTANT .......................................................................... i
EXPLICIT DEFINITIONS ....................................................... i
FCC INFORMATION .............................................................i
PRECAUTIONS .................................................................... ii
PRÉCAUTIONS ................................................................... iii
SAFETY TRAINING INFORMATION ................................... iv
INFORMATION EN MATIÈRE DE SÉCURITÉ ..................... v
TABLE OF CONTENTS ....................................................... vi
1 PANEL DESCRIPTION ................................................1
■ Front panel ................................................................... 1
■ Rear panel ...................................................................2
■ Function display ...........................................................3
2 BASIC OPERATION ....................................................4
■ General description ...................................................... 4
■ Receiving and transmitting ...........................................5
■ Directly setting the frequency .......................................6
■ Squelch settings ...........................................................6
3 MEMORY OPERATION ...............................................7
■ General description ...................................................... 7
■ Basic operation ............................................................8
■ Editing Regular memory/Group memory channels ......8
■ Selecting a
■ History memory channel ............................................12
■Selecting a GPS memory channel .............................13
weather memory channel .........................12
■ Editing GPS memory .................................................13
■ Protecting memory .....................................................13
4 OTHER FUNCTIONS .................................................14
■ Dualwatch operation ..................................................14
■ Priority watch .............................................................14
■ Using the lock function ............................................... 15
■ Accessing the 121.5 MHz emergency frequency .......15
■ Enabling the intercom ................................................16
■ Opening the squelch for test ......................................16
■ Setting the frequency step .........................................16
■ Using the remote control ............................................ 16
■ Scanning the weather memory channels ...................17
5 MENU MODE .............................................................18
■ Using the menu mode ................................................ 18
■ Settings menu items ..................................................20
■ Configuration menu
6 OPTIONS ...................................................................26
7 SPECIFICATIONS .....................................................27
8 INFORMATION .......................................................... 29
■ Country code list ........................................................29
■ Disposal .....................................................................29
INDEX ............................................................................30
items
..........................................22
vi
1
RCL
MEM
OFF
VOL
PUSH
TEST
COMM
DUAL
EC
CH09 SAMPLE
121.52
5
118.00
RX
MEMORY
eytriouqw
PANEL DESCRIPTION
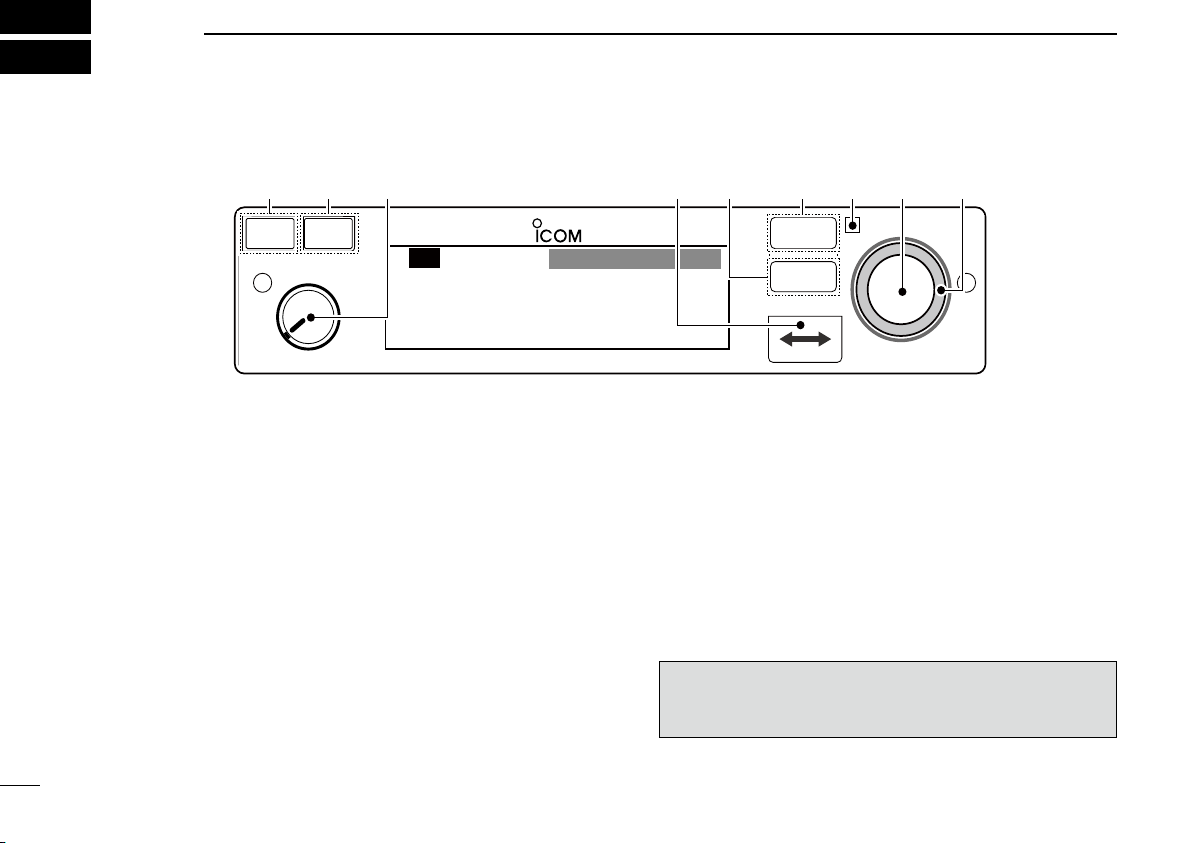
■ Front panel
1
q DUAL SWITCH [DUAL]
➥ Push to turn Dualwatch operation ON or OFF. (p. 14)
➥ Hold down for two seconds to turn the intercom func-
tion ON or OFF.
w EMERGENCY CHANNEL SWITCH [EC]
➥ Push to set the emergency frequency (121.5 MHz) as
the standby frequency. (p. 15)
➥ Hold down for two seconds to enter the direct frequency
setting mode (p. 6), and set the emergency frequency
(121.5 MHz). (p. 15)
e VOLUME/POWER SWITCH [VOL]
➥ Turn [VOL] to switch the power ON or OFF.
➥ Adjusts the audio output level.
The volume level bar is displayed while rotating [VOL].
➥ Hold down for two seconds to enter the AM squelch
level “SQL LEVEL” item in the Settings menu. (p. 6)
➥ Push to set the squelch test function ON or OFF.
(p. 16)*
* When the squelch test function is ON, and the Auto squelch
“AUTO SQL” item in the Configuration menu (p. 22) is set to
“USER SET,” push [VOL] again to switch the squelch mode.
(p. 6)
CAUTION: DO NOT turn ON power until the en-
gines have been started. Otherwise, the power supply
circuit may damage.
PANEL DESCRIPTION
q
w
1
r FREQUENCY EXCHANGE (FLIP-FLOP) SWITCH [ ]
➥ Push to exchange the standby frequency with the ac-
tive frequency. (p. 5)
➥ Hold down for two seconds to enter the direct frequen-
cy setting mode. (p. 6)
t MEMORY SWITCH [MEM]
Hold down for two seconds to enter a displayed frequency
into any blank regular memory channel or delete or revive
the selected memory channel (depending on the operating
mode).
y RECALL SWITCH [RCL]
➥ Push to enter and exit the memory mode. (p. 8)
➥ Hold down for two seconds to enter the Settings menu.
(p. 18)
➥ Push to exit the Settings menu. (p. 18)
u LIGHT-SENSITIVE DETECTOR
This detector senses ambient light. The detector is used to
automatically adjust “DISP LOW” or “DISP HIGH” (pp. 23,
24) when the “DISP MODE” (p. 23) is set to ‘AUTO.’
i INNER (Small) TUNING DIAL [DIAL]
➥ Rotate to set the standby frequencies (kHz digit) (p.
5), memory channels (p. 8), and menu mode settings.
(pp. 18, 19)
➥ Hold down for two seconds to turn ON the dial/panel
lock mode. (p. 15)
o OUTER (Large) TUNING DIAL [O-DIAL]
Rotate to set the standby frequency (MHz digit) (p. 5),
group memory channel (p. 8), select the input digit for
group name (p. 10), and so on.
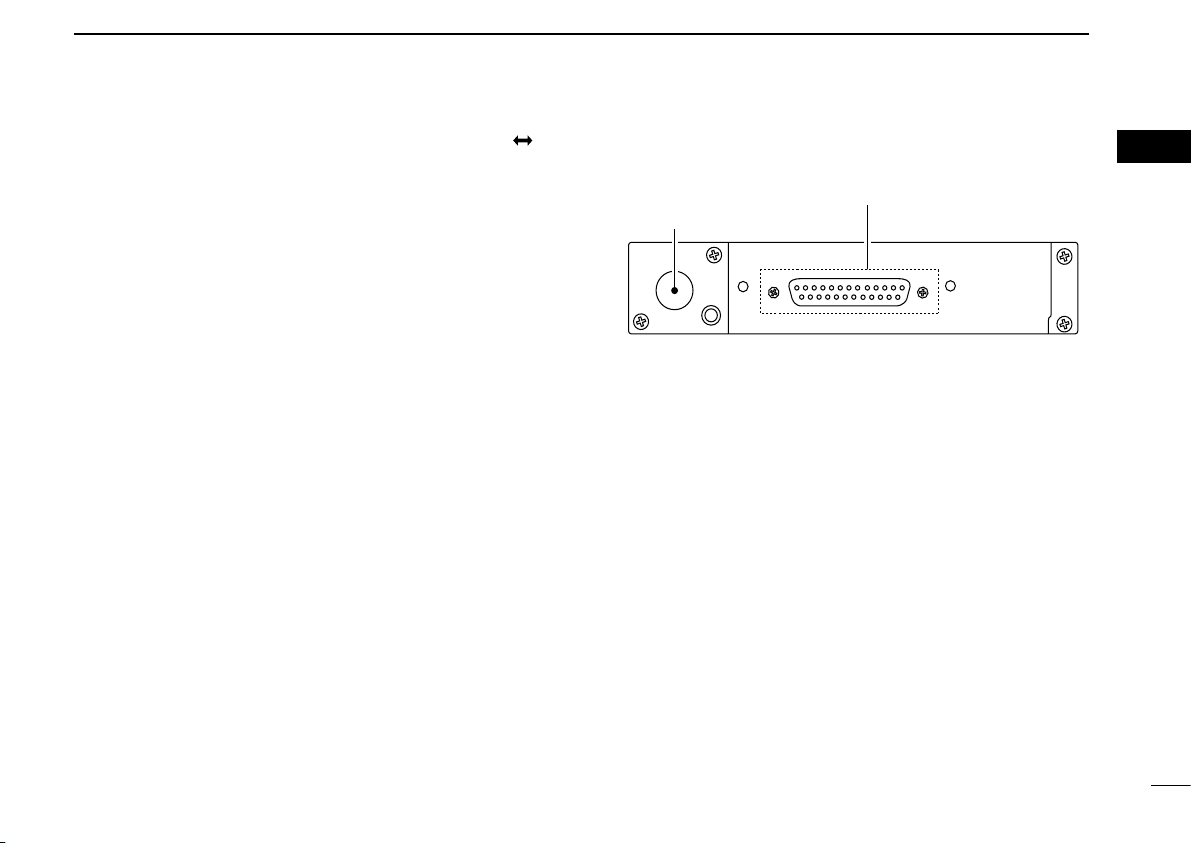
Rear panel ■
q ANTENNA CONNECTOR
Connect the antenna connector.
w D-SUB 25 PIN CONNECTOR
Connect a 13.8 V or 27.5 V DC power supply, speaker,
headset and third party GPS receiver*.
Refer to ‘INSTALLATION GUIDE’ for details.
*
Ask your dealer for available GPS receiver details.
01
2
PANEL DESCRIPTION
CH09 SAMPLE
TEST
121.525
118.00
RX
DUAL
MEMORY
RX
ICS
O
F
D
TX
AU
etr y e
io!
2
uq
!
1
w
!
0
TEST
O
F
D
O
F
P
1
3
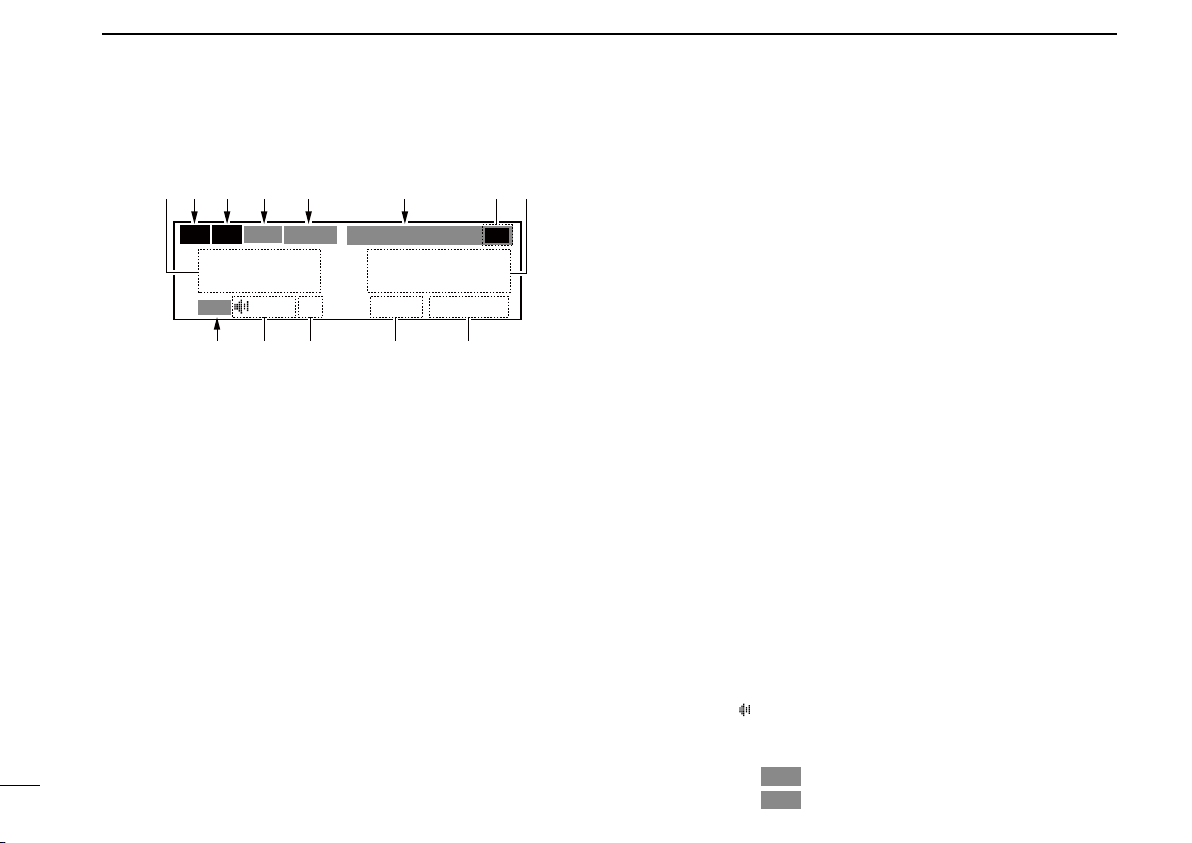
■ Function display
q ACTIVE FREQUENCY READOUT
➥ Displays the active frequency. (p. 5)
➥ Displays the menu mode items in the menu mode.
(p. 18)
w TX INDICATOR
Displayed while transmitting. (p. 5)
e RX INDICATOR
➥ Displayed when receiving a signal on the active fre-
quency. (p. 5)
➥ Displayed when receiving a signal on the standby fre-
quency during Dualwatch operation. (p. 14)
➥ Displayed when opening the active frequency’s squelch
function. (p. 5)
3
r INTERCOM READOUT
Displays “ICS” when the intercom function is in use.
(p. 16)
t DUALWATCH READOUT
Displays “DUAL” when the Dualwatch function is ON.
(p. 14)
y MEMORY TYPE READOUT
➥ Displays “MEMORY” when the regular memory channel
is selected. (p. 8)
➥ Displays “GRP01”–“GRP05” when the group memory
channel is selected. (p. 8)
The group name is also displayed if the name has been
entered.
➥ Displays “HISTORY” when the history memory chan-
nel is selected. (p. 12)
➥ Displays “WEATHER” when the weather memory chan-
nel is selected. (p. 12)*
*For only U.S.A. version transceivers.
➥ Displays “GPS” when the GPS memory channel is se-
lected. (p. 13)
• A third party GPS receiver is required.
u STANDBY FREQUENCY READOUT
➥ Displays the standby frequency. (p. 5)
➥ Displays the setting values in the menu mode. (p. 18)
i CHANNEL NAME READOUT
Displays the channel name in the memory mode. (p. 10)
o MEMORY CHANNEL READOUT
Displays the selected memory channel number in the
memory mode. (p. 8)
!0 SQUELCH MODE READOUT
Displays the squelch mode status. (pp. 6, 20)
!1 TEST INDICATOR
Displays “
(p. 16)
!2 LOCK INDICATOR (p. 15)
➥ Displays “
➥ Displays “
while the squelch test function is ON.
”
while the dial lock function is in use.
”
while the panel lock function is in use.
”
BASIC OPERATION
2
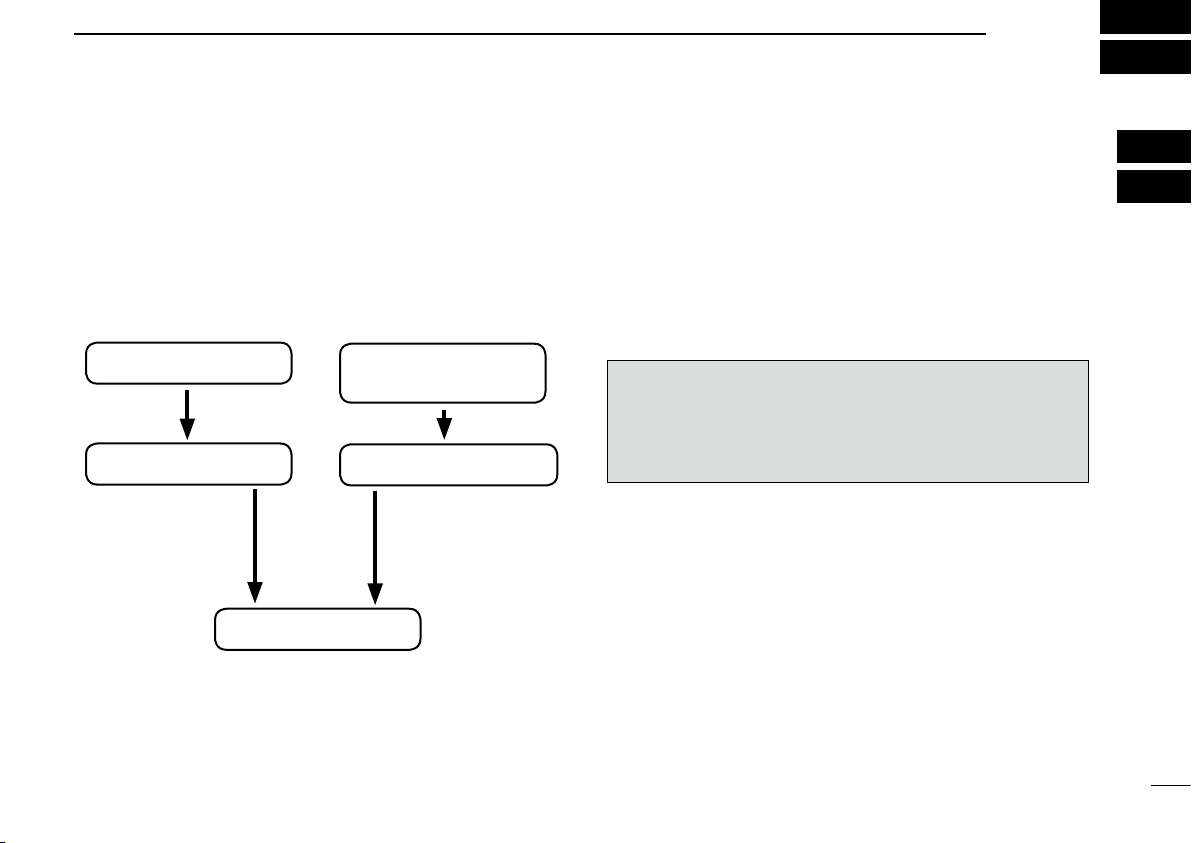
General description ■
The flow chart below shows the basic operating procedures.
You need to set the frequency, activate the frequency, and
receive or transmit.
There are two ways to set the frequency. Refer to page 5 and
6 for details.
• Set the frequency normally • Set the frequency directly
Set the standby frequency.
Activate the frequency.
Receive/transmit
Enter the direct frequency
setting mode.
Set the operating frequency.
Set the frequency normally
Set the desired frequency which will be used for the next operating frequency in the standby frequency display. Then exchange the active frequency for the standby frequency.
Set the frequency directly
You can directly enter the desired frequency.
Refer to ‘Directly setting the frequency.‘
TIP: For quick frequency setting, you can enter often-used
frequencies into memory channels. Refer to “MEMORY OPERATION” for details. (pp. 7–13)
When you recall a memory channel, the previous standby
frequency is erased.
01
02
4
BASIC OPERATION
126.405
134.80
MEMORY
134.805
126.40
134.805
126.40
RX
134.805
126.40
TX
2
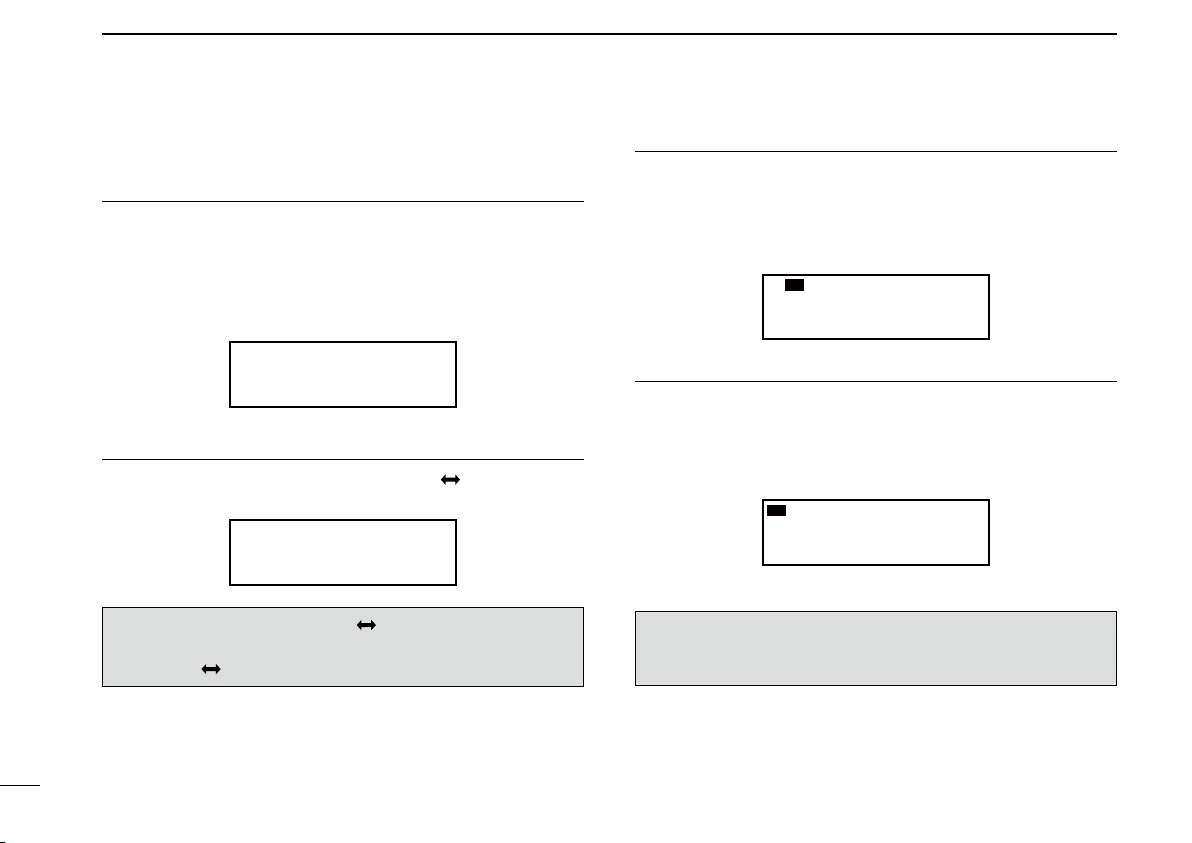
■ Receiving and transmitting
Setting the standby frequency1.
Rotate [DIAL] and [O-DIAL] to select the desired frequency
as the standby frequency.
• The active frequency is not affected.
• Rotate [O-DIAL] to set above 1 MHz digit.
• Rotate [DIAL] to set below 100 kHz digit.
• You can set the frequency step in the Settings menu. (p. 21)
Exchanging the frequency2.
After setting the standby frequency, push [
with the active frequency.
NOTE: DO NOT hold down [ ] continuously. Otherwise
the standby frequency disappears. If this happens, again
hold down [
] until the standby frequency reappears.
] to exchange it
,
Receiving3.
When receiving a signal, “RX” is displayed and audio is
heard.
• Rotate [VOL] to adjust the audio level.
• Adjust the squelch if necessary. Refer to ‘Squelch settings’ for de-
tails.
Transmitting4.
Hold down PTT switch, and then speak at your normal q
voice level.
• “TX” is displayed.
• DO NOT hold the microphone too closely to your mouth or speak
too loudly. This may distort your signal.
Release the PTT switch to receive. w
NOTE: To prevent interference, listen on the frequency
before transmitting. If the frequency is busy, wait until it is
clear.
5
 Loading...