

Page 1
BASIC MANUAL
VHF AIR BAND TRANSCEIVERS
|A16
|A16E
This device complies with Part 15 of
the FCC Rules. Operation is subject to
the condition that this device does not
cause harmful interference.
Page 2
Thank you for choosing this Icom product.
This product is designed and built with Icom’ s state of the art technology and craftsmanship.
With proper care, this product should provide you with years of trouble-free operation.
■ Important
READ ALL INSTRUCTIONS carefully and completely before using the transceiver.
SAVE THIS INSTRUCTION MANUAL — This instruction manual contains important
operating instructions for the IC-A16 and IC-A16E.
For Advanced features and instructions, see the FULL MANUAL on the Icom website for
details.
http://www.icom.co.jp/world/support/download/manual
■ Explicit denitions
WORD DEFINITION
R DANGER! Personal death, serious injury or an explosion may occur.
R WARNING! Personal injury, re hazard or electric shock may occur.
CAUTION Equipment damage may occur.
NOTE If disregarded, inconvenience only. No risk of personal injury, re or
electric shock.
■ Features
z 25 kHz/8.33 kHz channel spacing compatible
z Bluetooth
z Compact, waterproof durable design (IP67/IP54*2 and MIL-STD-810-G)
z 17 hours battery life (With the BP-280)
*1 For only transceivers with the built-in Bluetooth unit.
2
*
®
function that can connect your Wireless headset*
Only when the battery, antenna, and jack cap are attached.
1
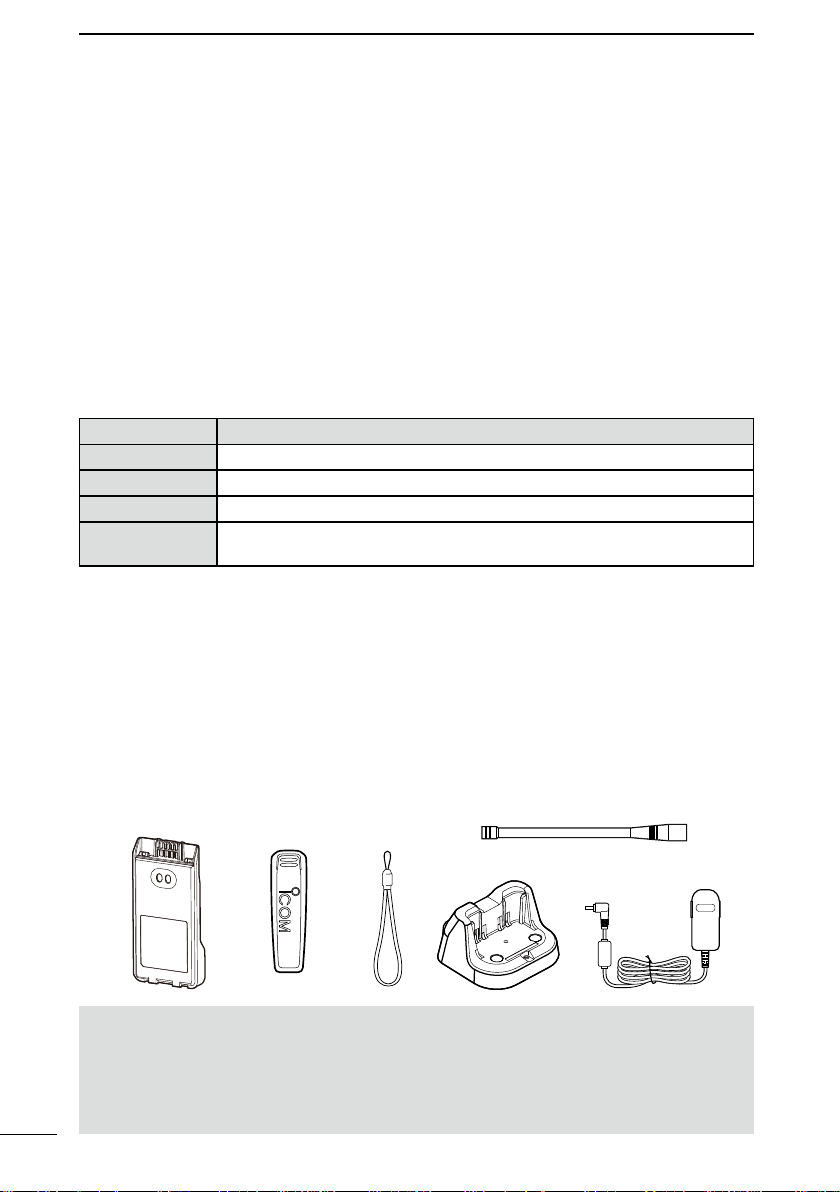
■ Supplied accessories
Battery pack
BASIC MANUAL
NOTE:
• Some accessories are not supplied, or the shape is different, depending on the
transceiver version.
• Conrm both battery sliding locks are locked in place, when attaching the battery pack
or the battery case to the transceiver. Both sliding locks make a ‘click’ sound when
locked.
Belt clip
Handstrap
Battery charger
Antenna
Power adapter
i
Page 3

■ Precautions
R DANGER! NEVER use or charge Icom
battery packs with non-Icom transceivers
or non-Icom chargers. Only Icom battery
packs are tested and approved for use with
Icom transceivers or charged with Icom
chargers. Using third-party or counterfeit
battery packs or chargers may cause
smoke, re, or cause the battery to burst.
R WARNING! NEVER hold the
transceiver so that the antenna is very
close to, or touching exposed parts of the
body, especially the face or eyes, while
transmitting.
R WARNING! NEVER operate the
transceiver with a headset or other
audio accessories at high volume levels.
The continuous high volume operation
may cause a ringing in your ears. If you
experience the ringing, reduce the volume
level or discontinue use.
CAUTION: DO NOT short the terminals of
the battery pack. Shorting may occur if the
terminals touch metal objects such as a
key, so be careful when placing the battery
packs (or the transceiver) in bags, and so
on. Carry them so that shorting cannot
occur with metal objects. Shorting may
damage not only the battery pack, but also
the transceiver.
CAUTION: DO NOT use harsh solvents
such as Benzine or alcohol when cleaning.
This could damage the equipment
surfaces. If the surface becomes dusty or
dirty, wipe it clean with a soft, dry cloth.
CAUTION: DO NOT place or leave
the transceiver in excessively dusty
environments. This could damage the
transceiver.
DO NOT place or leave the transceiver in
direct sunlight or in areas outside of the
specied temperature range:
IC-A16: –10°C (–14˚F) ~ +60°C (+140˚F)
IC-A16E: –20°C ~ +55°C
BE CAREFUL! The transceiver meets:
IP67/IP54* requirements (IP67: Dust
tight and waterproof protection, IP54:
Dust protection and splash resistance).
However, once the transceiver has been
dropped, dust and waterproof protections
cannot be guaranteed due to the fact that
the transceiver may be cracked, or the
waterproof seal damaged, and so on.
* Only when the jack cover or the optional
speaker microphone is attached.
This transceiver is NOT approved
for use by the general population in
an uncontrolled environment. This
transceiver is restricted to occupational
use, work related operations only where
the transceiver operator must have the
knowledge to control.
This equipment is not suitable for use in
locations where children are likely to be
present.
CAUTION: In Canada, use of 8.33 kHz
Channel Spacing of this radio is strictly
prohibited and shall not be used.
Icom, Icom Inc. and Icom logo are registered
trademarks of Icom Incorporated
(Japan) in Japan, the United States, the United
Kingdom, Germany, France, Spain, Russia,
Australia, New Zealand, and/or other countries.
®
The Bluetooth
trademarks owned by Bluetooth SIG, Inc. and any
use of such marks by Icom Inc. is under license.
Other trademarks and trade names are those of their
respective owners.
3M, PELTOR, and WS are trademarks of 3M Company.
All other products or brands are registered
trademarks or trademarks of their respective holders.
word mark and logos are registered
Icom is not responsible for the destruction,
damage to, or performance of any Icom or
non-Icom equipment, if the malfunction is
because of:
• Force majeure, including, but not limited to,
res, earthquakes, storms, oods, lightning,
other natural disasters, disturbances, riots,
war, or radioactive contamination.
• The use of Icom transceivers with any
equipment that is not manufactured or
approved by Icom.
1
2
3
4
5
6
7
8
9
10
11
12
13
14
15
16
17
18
BASIC MANUAL
ii
Page 4

■ Précautions (pour le Canada)
R DANGER! N’utilisez JAMAIS et ne
rechargez JAMAIS des blocsbatteries
Icom avec des émetteurs-récepteurs
non-Icom ou des chargeurs non-Icom.
Seuls les blocs-batteries Icom sont testés
et homologués pour être utilisés avec
des émetteurs-récepteurs Icom ou pour
être rechargés avec des chargeurs Icom.
L’utilisation de blocs-batteries ou de
chargeurs tiers ou de contrefaçon peut être
à l’origine de fumées, d’incendie ou peut
faire éclater la batterie.
R AVERTISSEMENT! NE JAMAIS
l’émetteur-récepteur de sorte que l’antenne
soit très proche des parties exposées du
corps, en particulier du visage ou des
yeux, et ne les touche pas pendant la
transmission.
R AVERTISSEMENT! N’utilisez JAMAIS
l’émetteur-récepteur avec un casque ou
d’autres accessoires audio à des niveaux
de volume élevés. Le fonctionnement
continu à volume élevé peut provoquer
une sonnerie dans vos oreilles. Si vous
ressentez la sonnerie, réduisez le volume
ou cessez d’utiliser.
ATTENTION: NE PAS court-circuiter les
bornes de la batterie. Un court-circuit peut
se produire si les bornes touchent des
objets métalliques tels qu’une clé. Soyez
donc prudent lorsque vous placez les
batteries (ou l’émetteur-récepteur) dans
des sacs, etc. Transportez-les de manière
à ce qu’il n’y ait pas de court-circuit avec
des objets métalliques. Un court-circuit
peut endommager non seulement la
batterie, mais également l’émetteurrécepteur.
ATTENTION: NE PAS utiliser de
dissolvants agressifs tels que du Benzène
ou de l’alcool lors du nettoyage, car
BASIC MANUAL
ils endommageraient les surfaces de
l’émetteur-récepteur. Si l’émetteurrécepteur est poussiéreux ou sale,
nettoyez-le avec un tissu doux et sec.
ATTENTION: NE PAS placer l’émetteurrécepteur dans des environnements
excessivement poussiéreux. Cela pourrait
endommager l’émetteur-récepteur.
NE PAS placer ou laisser l’émetteurrécepteur en plein soleil ou dans un
environnement soumis à des températures
inférieures à –30°C (–22˚F) ou supérieures
à +60°C (+140˚F).
MISE EN GARDE: L’émetteur-récepteur
répond aux exigences IP67/IP54* (IP67:
Protection étanche à la poussière et à
l’eau, IP54: Protection contre la poussière
et résistance aux éclaboussures).
Cependant, une fois l’émetteur-récepteur
tombé, la protection contre la poussière et
la protection contre l’eau ne peuvent être
garanties du fait que l’émetteur-récepteur
peut être ssuré ou que le joint étanche à
l’eau est endommagé, etc.
* Uniquement lorsque le cache-prise ou le
microphone à haut-parleur en option est
installé.
MISE EN GARDE: Utilisation de 8,33 kHz
Espacement des canaux de cette radio
est strictement interdite et ne doit pas être
utilisé au Canada.
iii
Page 5

■ Recommendation
CLEAN THE TRANSCEIVER
THOROUGHLY IN A BOWL OF FRESH
WATER after exposure to saltwater,
and dry it before operating. Otherwise,
the transceiver’s keys, switches, and
controllers may become unusable, due
to salt crystallization, and/or the charging
terminals of the battery pack may corrode.
■ Table of contents
■ Important .................................... i
■ Explicit denitions....................... i
■ Features ..................................... i
■ Supplied accessories ................. i
■ Precautions ................................ ii
■ Précautions (pour le Canada) .... iii
■ Recommendation ....................... iv
■ Table of contents ........................iv
1 PANEL DESCRIPTION ..................1
■ Front, top and side panels.......... 1
■ Keypad ....................................... 2
■ Function display ......................... 3
2 BATTERY CHARGING ..................4
■ Battery caution ........................... 4
■ Charging caution ........................ 5
■ Battery charger........................... 6
3 SET MODE .....................................7
■ Using the Set mode.................... 7
4 BASIC OPERATION ......................8
■ Receiving and transmitting ......... 8
■ Selecting the 121.5 MHz
emergency frequency ................8
5 HEADSET CONNECTION .............9
■ Using a Bluetooth
■ Using a wired headset................ 10
6 SPECIFICATIONS AND OPTIONS 11
■ Specications ............................ 11
■ Options ....................................... 12
®
headset .......9
NOTE: If the transceiver’s waterproof
protection appears defective, carefully clean
it with a soft, damp (fresh water) cloth, then
dry it before operating. The transceiver may
lose its waterproof protection if the case, jack
cap, or connector cover is cracked or broken,
or the transceiver has been dropped. Contact
your Icom distributor or your dealer for advice.
7 INFORMATION ..............................13
■ Channel ID list ............................ 13
■ About CE and DOC .................... 14
■ Disposal ..................................... 14
■ Firmware version identication... 14
■ FCC information ......................... 14
■ Information FCC ......................... 14
■ Safety training information ......... 15
■ Infomation en matiére
de sécurité .................................16
■ INDEX ........................................ 17
1
2
3
4
5
6
7
8
9
10
11
12
13
14
15
16
17
18
BASIC MANUAL
iv
Page 6

1
PANEL DESCRIPTION
■ Front, top and side panels
1 9
8
2
Microphone
3
4
1 ANTENNA CONNECTOR
Connect the supplied antenna.
2 PTT SWITCH [PTT]
Hold down to transmit, release to receive.
3 SQUELCH ADJUSTMENT KEYS [SQL∫]/[SQL√]
Push to adjust the squelch level.
4 UP/DOWN KEYS [∫]/[√]
z Push to change or select the frequency, Memory channel, Set mode settings, and
so on.
z While scanning, push to change the scanning direction.
5 CLEAR/HOME KEY [CLR]/[HOME]
z Push to return to the VFO mode.
6 MEMORY/MEMORY WRITE KEY [MR]/[MW]
z Push to enter the Memory Channel Selection mode.
z Push [FUNC], and then push this key to enter the Memory Write mode.
7 HEADSET JACK
Connects a third party headset through the optional headset adapter.
8 LOCK KEY [
z Push to lock the keypad.
BASIC MANUAL
z Hold down for 2 seconds to unlock the keypad.
9 VOLUME/POWER SWITCH [VOL]
z Rotate to turn the transceiver ON or OFF.
z Rotate to adjust the audio output level.
]
7
6
5
Keypad
1
Page 7

PANEL DESCRIPTION
■ Keypad
z Push to set the frequency, select a Memory channel, and so on.
z Push [FUNC], and then push or hold down another key within 3 seconds to use the
secondary functions listed below.
KEYS FUNCTIONS
Push [1]/[ANL] Turn the Automatic Noise Limiter (ANL) function ON or OFF.
Push [2]/[SCAN] Start a scan.
Push [3]/[GRP] In the Memory mode, enter the Memory Selection mode.
Push [4]/[WX-ALT]* Turn the Weather Alert function ON or OFF.
Push [5]/[DUP-W]* Enter the Duplex Frequency Entry mode.
Push [6]/[DUP]* Turn the Duplex function ON or OFF.
Push [7]/[WX]* Enter the Weather Channel Selection mode.
Push [8]/[BEEP] Turn the Key beep ON or OFF.
Push [9]/[TAG] Tag or untag the selected Memory channel or Weather Channel*.
Hold down
[ENT]/[SET] for 1
second
Push [0]/[121.5] Select the emergency frequency.
*For only the USA version.
L Push [CLR] to stop a scan.
L Conrm the NAV band frequency is selected.
L Conrm the NAV band frequency is selected.
Enter the Set mode.
1
1
2
3
4
5
6
7
8
9
10
11
12
13
14
15
16
17
18
BASIC MANUAL
2
Page 8
1
PANEL DESCRIPTION
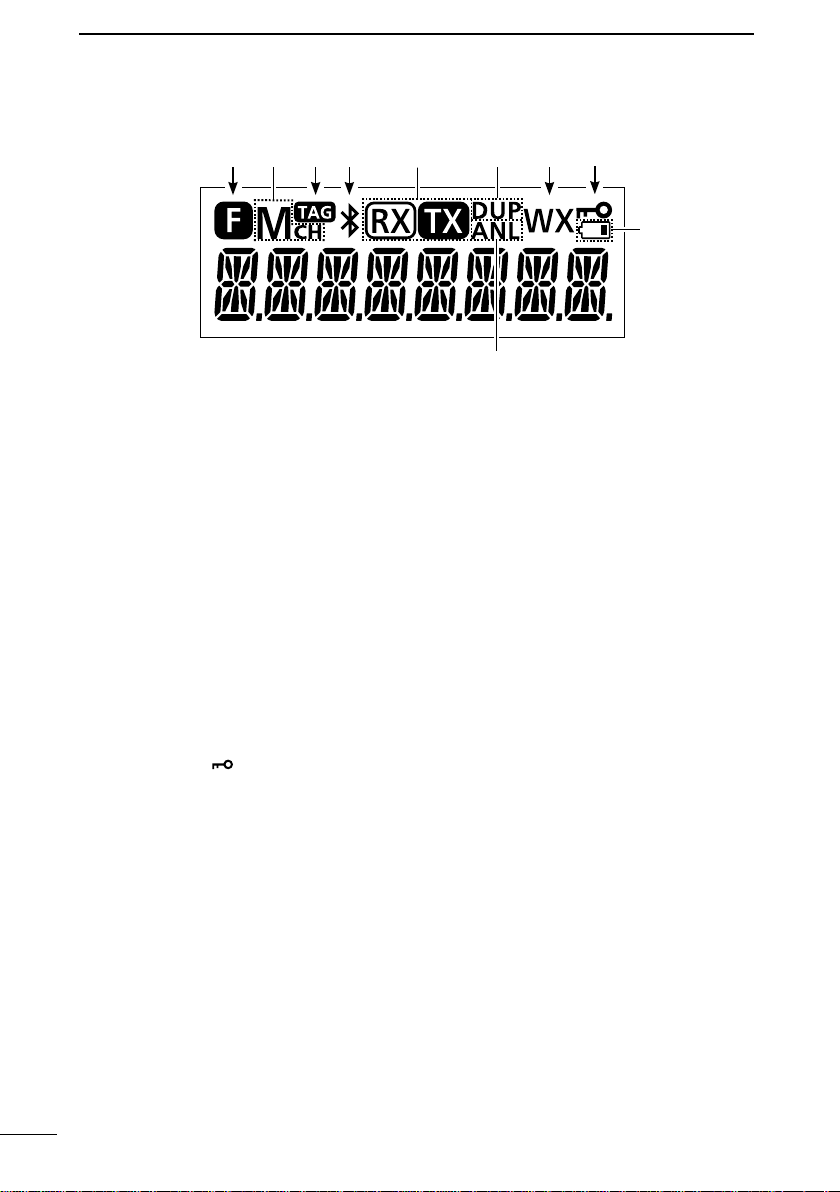
■ Function display
1 86
1 FUNCTION ICON
Displayed for 3 seconds when you push [FUNC], to use secondary functions assigned
to a key.
2 MEMORY CHANNEL ICON
Displayed when a Memory channel is selected.
3 TAG ICON
Displayed when a tagged Memory channel is selected.
4 BLUETOOTH ICON
Displayed when a Bluetooth headset is connected.
5 RX/TX ICON
Displayed while receiving or transmitting.
6 DUPLEX ICON
z Displayed when the Duplex function is ON.
z Blinks while entering the duplex frequency to a Memory channel.
7 AUTOMATIC NOISE LIMITER ICON
Displayed when the Automatic Noise Limiter function is ON.
8 WEATHER ALERT ICON (For only the USA version.)
Displayed when the Weather Alert function is ON.
9 LOCK ICON [
Displayed when the Lock function is ON.
LOW BATTERY ICON
z Displayed when charging is required.
z Blinks when the battery exhausted.
]
432 9
5
7
BASIC MANUAL
3
Page 9

BATTERY CHARGING
■ Battery caution
Misuse of Li-ion batteries may result in the
following hazards: smoke, re, or the battery
may rupture. Misuse can also cause damage
to the battery or degradation of battery
performance.
R DANGER! NEVER solder the battery
terminals, or NEVER modify the battery pack.
This may cause heat generation, and the
battery may burst, emit smoke or catch re.
R DANGER! NEVER place or leave battery
packs in areas with temperatures above 60°C
(140°F). High temperature buildup in the
battery cells, such as could occur near res
or stoves, inside a sun-heated vehicle, or in
direct sunlight for long periods of time may
cause the battery cells to rupture or catch re.
Excessive temperatures may also degrade
the battery pack’s performance or shorten the
battery cell’s life.
R DANGER! NEVER strike or otherwise
impact the battery pack. Do not use the
battery pack if it has been severely impacted
or dropped, or if the pack has been subjected
to heavy pressure. Battery pack damage may
not be visible on the outside of the case. Even
if the surface of the battery does not show
cracks or any other damage, the cells inside
the battery may rupture or catch re.
R DANGER! NEVER place battery packs
near a re. Fire or heat may cause them to
rupture or explode. Dispose of used battery
packs in accordance with local regulations.
R DANGER! NEVER let uid from inside
the battery get in your eyes. This can cause
blindness. Rinse your eyes with clean water,
without rubbing them, and immediately go to
a doctor.
R WARNING! NEVER put the battery pack in
a microwave oven, high-pressure container,
or in an induction heating cooker. This could
cause a re, overheating, or cause the battery
cells to rupture.
R WARNING! NEVER Iet uid from inside the
battery cells come in contact with your body. If
it does, immediately wash with clean water.
2
CAUTION: DO NOT continue to use the
battery pack if it emits an abnormal odor,
heats up, or is discolored or deformed. If any
of these conditions occur, contact your Icom
dealer or distributor.
CAUTION: DO NOT expose the battery pack
to rain, snow, saltwater, or any other liquids.
Do not charge or use a wet pack. If the pack
gets wet, be sure to wipe it with a clean dry
cloth before using.
CAUTION: DO NOT use the battery pack
out of the specied temperature range for
the transceiver (–30°C ~ +60°C (–22°F ~
+140°F)) and the battery itself (–20°C ~
+60°C (–4°F ~ +140°F)). Using the battery out
of its specied temperature range will reduce
its performance and battery cell’s life. Please
note that the specied temperature range of
the battery may exceed that of the transceiver.
In such cases, the transceiver may not work
properly because it is out of its operating
temperature range.
CAUTION: DO NOT leave the pack fully
charged, completely discharged, or in an
excessive temperature environment (above
50°C, 122°F) for an extended period of time. If
the battery pack must be left unused for a long
time, it must be detached from the transceiver
after discharging. You may use the battery
pack until the remaining capacity is about half,
then keep it safely in a cool and dry place at
the following temperature range:
–20°C ~ +50°C (–4°F ~ +122°F)
(within a month)
–20°C ~ +40°C (–4°F ~ +104°F)
(within three months)
–20°C ~ +20°C (–4°F ~ +68°F)
(within a year)
BE SURE to replace the battery pack with
a new one approximately ve years after
manufacturing, even if it still holds a charge.
The material inside the battery cells will
become weak after a period of time, even
with little use. The estimated number of times
you can charge the pack is between 300 and
500. Even when the pack appears to be fully
charged, the operating time of the transceiver
may become short when:
• Approximately 5 years have passed since
the pack was manufactured.
• The pack has been repeatedly charged.
1
2
3
4
5
6
7
8
9
10
11
12
13
14
15
16
17
18
BASIC MANUAL
4
Page 10

2
BATTERY CHARGING
■ Charging caution
R DANGER! NEVER charge the battery
pack in areas with extremely high
temperatures, such as near res or stoves,
inside a sun-heated vehicle, or in direct
sunlight. In such environments, the safety/
protection circuit in the battery will activate,
causing the battery to stop charging.
R WARNING! NEVER charge the
transceiver during a lightning storm. It may
result in an electric shock, cause a re or
damage the transceiver. Always disconnect
the power adapter before a storm.
R WARNING! NEVER charge or leave the
battery in the battery charger beyond the
specied time for charging. If the battery
is not completely charged by the specied
time, stop charging and remove the battery
from the battery charger. Continuing to
charge the battery beyond the specied
time limit may cause a re, overheating, or
the battery may rupture.
CAUTION: DO NOT insert the transceiver
(battery attached to the transceiver) into
the charger if it is wet or soiled. This could
corrode the battery charger terminals or
damage the charger. The charger is not
waterproof.
CAUTION: DO NOT charge the battery
pack outside of the specied temperature
range: 10˚C ~ 40˚C (50˚F ~ 104˚F).
Otherwise, the charging time will be
longer, but the battery will not reach a full
charge. While charging, at a point after
the temperature goes out of the specied
range, the charging will automatically stop.
BASIC MANUAL
5
Page 11

BATTERY CHARGING
■ Battery charger
NOTE: Before attaching or detaching a battery pack, BE SURE to turn OFF the
transceiver by rotating [VOL] fully counter clockwise until it makes a “click” sound.
Otherwise, a transceiver malfunction could occur.
D Supplied battery charger
Charging time:
Approximately 3.5 hours for the BP-280
Power adapter*
Turn OFF
Battery
pack
D Optional BC-214
MULTI CHARGER
Charging time:
Approximately 2 to 3 hours for the BP-280
Additionally needed item
(purchase separately):
The BC-157S AC ADAPTER or
the OPC-656 DC POWER CABLE
CAUTION: DO NOT reverse the polarity
when connecting the OPC-656 to a power
source. This will ruin the battery charger.
Red: +, Black: _
2
1
2
3
4
5
6
7
8
9
Battery charger
Charging indicator
Lights orange: Charging
Lights green: Charged
The CP-23L (for a 12 V cigarette lighter socket)
can be used instead of the power adapter.
* May not be supplied, or the shape may
be different, depending on the transceiver
version.
NOTE: If the charging indicator alternately
blinks green and orange, remove the
battery pack or the transceiver from the
charger, then reinsert it.
Turn OFF
Battery
pack
Charger adapter*
*1 A different type, or no power adapter is
supplied, depending on the charger version.
*2 Charger adapter’s shape may differ,
depending on the charger version.
2
OPC-656
Connect to a DC power supply:
12 to 16 V, at least 7 A
Red: +, Black: _
Power
adapter*
1
10
11
12
13
14
15
16
17
18
BASIC MANUAL
6
Page 12

3
SET MODE
■ Using the Set mode
You can use the Set mode to set
infrequently changed values or function
settings.
1. Push [FUNC], and then hold down
[ENT]/[SET] for 1 second.
• The Set mode item is displayed.
2. Push [MR]/[MW] to select an item.
L Push [ENT]/[SET] to go to the next
tree level, go back a level by pushing
[CLR]/[HOME].
3. Push [∫] or [√] to select an option.
4. Push [CLR]/[HOME] to exit the Set
mode.
D Set mode items
ITEM
Backlight “
MIC gain “
MIC Audio Input “
VOX setting “
VOX Level “
VOX delay “
TOT “
Battery voltage “
Bluetooth settings “
Bluetooth “
Auto connect “
Connect/Disconnect
“
Pairing “
Headset settings “
SCO “
SP Output “
Icom headset “
Initialize Bluetooth unit “
CPU version “
Bluetooth unit version “
”
”
”
”
”
”
” / “ ”
”
Power save “
PTT “
PTT Beep “
”
”
”
”
”
”
”
”
”
”
”
”
”
”
”
BASIC MANUAL
See the FULL MANUAL for each menu item’s details. You can download the FULL
MANUAL from the Icom website.
L The Set mode items contained in the transceiver may be different, depending on the
transceiver’s version or presettings. Ask your dealer for details.
http://www.icom.co.jp/world/support/download/manual
7
Page 13

BASIC OPERATION
■ Receiving and transmitting
D Setting the frequency
L If the transceiver is in the Memory mode,
push [CLR]/[HOME] to exit the Memory
mode.
z Use the keypad to set the frequency.
Selecting a Memory channel
1. Push [MR]/[MW] to enter the Memory
mode.
• “ ” is displayed.
• The memory channelʼs frequency or
name is displayed, if it is entered.
2. Push [∫] or [√] to select a channel.
TIP: To change the selected group:
L Conrm the transceiver is in the
Memory mode.
1. Push [FUNC], and then push
[GRP].
2. Push [∫] or [√] to select a group,
and then push [ENT]/[SET].
D Receiving
When receiving a signal, “RX” is displayed
and audio should be heard.
L Rotate [VOL] to adjust the audio output
level.
D Adjusting the squelch level
z Push [SQL∫]/[SQL√] to adjust the
squelch level until the noise just
disappears, when no signal is received.
• The squelch level is displayed while
adjusting.
4
D Using the Automatic Noise
Limiter (ANL) function
The function reduces noise components in
the received signal, such as those caused
by engine ignition systems.
z Push [FUNC], and then push [ANL] to
turn the function ON or OFF.
• “ANL” is displayed while the function is ON.
D Transmitting
CAUTION: DO NOT transmit without an
antenna.
z Hold down [PTT], and then speak at
your normal voice level.
• “TX” is displayed.
NOTE: When the battery is exhausted,
beep sounds and the transceiver stops
transmitting, even if you hold down [PTT].
■ Selecting the
121.5 MHz emergency
frequency
In case of emergency, you can immediately
select the 121.5 MHz emergency frequency.
z Push [FUNC], and then push [121.5] to
select the emergency frequency.
L Push [CLR] to return to the previously
selected frequency.
1
2
3
4
5
6
7
8
9
10
11
12
13
14
15
16
17
18
BASIC MANUAL
8
Page 14

5
HEADSET CONNECTION
■ Using a Bluetooth
(For only transceivers with the built-in Bluetooth unit)
Transceivers with the built-in Bluetooth unit
can operate with Bluetooth headsets.
The communication range of Bluetooth is
approximately 10 meters (33 ft).
®
Bluetooth
NOTE:
• The Bluetooth communication range
may vary, depending on the environment
where you operate the device.
D Electromagnetic Interference
When you use a Bluetooth device, pay
attention to the following:
Bluetooth devices operate in the 2.4 GHz
band. The 2.4 GHz band is also used
by other devices, such as Wireless LAN
products, microwave ovens, RFID systems,
amateur radio stations, and so on.
When using this device near such devices,
interference may occur, causing a decrease
in communication speed, and an unstable
connection.
In such cases, use this device away from
the other devices, or stop using those
devices.
BASIC MANUAL
Bluetooth headset
(Example:
Optional VS-3)
®
headset
You can pair maximum of 4 Bluetooth
headsets to the transceiver.
1. Turning ON the transceiver’s
1. Push [FUNC], and then hold down
2. Select “BT SET,” and then push
3. Select “ON,” and then push [ENT]/
4. Push [CLR]/[HOME] to exit the Set
2. Entering the VS-3 Pairing mode
Refer to the VS-3’s instruction manual for
details.
3. Pairing and connecting the
1. Push [FUNC], and then hold down
2. Select “PAIRING,” and then push
3. Push [CLR]/[HOME] twice to exit the
D Pairing with a device
L These instructions describe pairing with
the VS-3 Bluetooth
example.
Bluetooth function
[ENT]/[SET] for 1 second to enter the
Set mode.
[ENT]/[SET].
[SET].
mode.
Bluetooth headset
[ENT]/[SET] for 1 second to enter the
Set mode.
[ENT]/[SET].
BT SET > PAIRING
• The transceiver searches for a headset.
L Push [CLR] to cancel searching.
• “SUCCESS” and “
headset or device is correctly connected.
Set mode.
®
headset, as an
” is displayed if the
9
Page 15

HEADSET CONNECTION
5
D Disconnecting a paired device
You can disconnect a paired Bluetooth
device if it is not being used.
1. Push [FUNC], and then hold down
[ENT]/[SET] for 1 second to enter the
Set mode.
2. Select “DISCON,” and then push
[ENT]/[SET].
BT SET > DISCON
• “SUCCESS” is displayed and the
headset is disconnected.
3. Push [CLR]/[HOME] twice to exit the
Set mode.
D Unpairing a device
Before unpairing a connected headset or
device, disconnect it by following the steps
shown to the left.
1. Push [FUNC], and then hold down
[ENT]/[SET] for 1 second to enter the
Set mode.
2. Select “CONNECT,” and then push
[ENT]/[SET].
BT SET > CONNECT
• A paired deviceʼs name is displayed.
L Push [MR]/[MW] to display the
Bluetooth device address.
L Push [∫] or [√] to select other paired
headsets, if necessary.
3. Push [FUNC], and then push
[CLR]/[HOME].
• “DELETE?” is displayed.
4. Push [ENT]/[SET].
5. Push [CLR]/[HOME] twice to exit the
Set mode.
■ Using a wired headset
Connect your headset through the optional OPC-2401 headset adapter.
PTT switch (User supplied, if necessary)
Use a PTT switch with a 3.5 mm (1/8 inch) plug.
1
2
3
4
5
6
7
8
9
10
11
12
13
14
15
16
OPC-2401
17
18
Headset
(User supplied)
BASIC MANUAL
10
Page 16

6
SPECIFICA TIONS AND OPTIONS
■ Specications
L All stated specications are subject to change without notice or obligation.
Measurements made without an antenna.
D General
Frequency range: IC-A16
IC-A16E
Channel spacing: 25 kHz/8.33 kHz
Mode: IC-A16 6K00A3E/5K60A3E
IC-A16E 6K80A3E/5K00A3E
Number of Memory channels:
Antenna impedance: 50 Ω nominal
Antenna connector: BNC type
Power supply requirement: 7.2 V DC standard
Current drain: Less than 1.8 A
Operating temperature range: IC-A16
IC-A16E
Dimensions*1 : 52.2 (W) × 111.8 (H) × 34.1 (D) mm,
Weight (approximately): 257 g, 9.1 oz with BP-280
TX
RX
WX
TX/RX
16K0G3E (WX)
200 Channels
–10˚C ~ +60˚C, 14˚F ~ 140˚F
–20˚C ~ +55˚C
2.1 (W) × 4.4 (H) × 1.3 (D) inches
118.000 ~ 136.99166 MHz
108.000 ~ 136.99166 MHz
161.650 ~ 163.275 MHz
118.000 ~ 136.99166 MHz
D Transmitter
Output power: 6.0 W (PEP), 1.8 W (CW)
Modulation limiting (IC-A16):
Modulation depth (IC-A16E):
Audio harmonic distortion: IC-A16
IC-A16E
Ham and Noise ratio: More than 35 dB
Spurious emissions: IC-A16
IC-A16E
Frequency stability: IC-A16
IC-A16E
70 ~ 100%
85%
Less than 10% (at 60% modulation)
Less than 10% (at 85% + 3dB modulation)
More than 46 dB*
Less than –36 dBm*
±0.4 kHz
±1 ppm
2*3
4
D Receiver
Receive system: Double conversion superheterodyne
Intermediate frequencies: 1st 46.35 MHz, 2nd 450 kHz
Sensitivity: IC-A16
IC-A16E
BASIC MANUAL
Squelch sensitivity (Threshold): COM/NAVWXLess than 0 dBμ
Spurious response rejection ratio: IC-A16
IC-A16E
11
COM
NAV
WX
COM/NAVWXMore than 60 dB
Less than 0 dBμ (at 6 dB S/N)
Less than 3 dBμ (at 6 dB S/N)
Less than –8 dBμ (at 12 dB SINAD)
Less than 0 dBμ
(at 12 dB SINAD with CCITT)
Less than –5 dBμ
More than 30 dB
More than 70 dB
Page 17

SPECIFICA TIONS AND OPTIONS
6
Audio output power:
(At 10% distortion)
1
*
Projections not included.
2
*
Except operating frequency ±62.5 kHz in 25 kHz channel spacing.
3
*
Except operating frequency ±20.825 kHz in 8.33 kHz channel spacing.
4
*
Except for operating frequency ±1 MHz.
Int. SP
Ext. SP
1500 mW (Typical) into an 8 Ω load
More than 350 mW into an 8 Ω load
■ Options
D Battery packs
• BP-278/BP-279/BP-280 BATTERY PACKS
Battery pack Voltage Capacity
BP-278 7.2 V 1130 mAh (minimum) 1190 mAh (typical)
BP-279 7.2 V 1485 mAh (minimum) 1570 mAh (typical)
BP-280 7.2 V 2280 mAh (minimum) 2400 mAh (typical)
D Chargers/Adapters/DC cables
• BC-213 DESKTOP CHARGER + BC-123S AC ADAPTER
To rapidly charge a single battery pack.
• BC-214 MULTI CHARGER + BC-157S AC ADAPTER+ AD-130 CHARGER ADAPTER
To rapidly charge up to 6 battery packs.
• CP-23L CIGARETTE LIGHTER CABLE
Use when charging the battery pack from a 12 V cigarette lighter socket.
(Use with the BC-213)
• OPC-515L DC POWER CABLE
Used when charging battery packs using a 13.8 V DC power source instead of the
power adapter. (Use with the BC-213)
• OPC-656 DC POWER CABLE
Use with a 13.8 V power source instead of the power adapter. (Use with the BC-214)
D Others
• FA-B02AR ANTENNA
• OPC-2401 HEADSET ADAPTER
To connect a wired headset to the transceiver.
• HM-240 SPEAKER MICROPHONE
• MB-130 CHARGER BRACKET
Mounts the BC-213 desktop charger on a variety of places in a vehicle.
• MB-133 BELT CLIP
• MB-96F/MB-96FL/MB-96N BELT HANGERS
• VS-3 Bluetooth
The Bluetooth headset with a [PTT] switch.
About the third party Bluetooth headsets:
Icom has checked the PTT operation with some 3M Peltor headsets, such as the WS Headset
XP, WS ProTac XP and WS Alert XP. (Compatibility not guaranteed.)
Some options may not be available in some countries. Ask your dealer for details.
All options and those specications are subject to change without notice or obligation.
See the FULL MANUAL for the latest informations, if necessary. You can download the FULL
MANUAL from the Icom website.
http://www.icom.co.jp/world/support/download/manual
®
HEADSET
1
2
3
4
5
6
7
8
9
10
11
12
13
14
15
16
17
18
BASIC MANUAL
12
Page 18

7
INFORMATION
■ Channel ID list
• Channel spacing: 8.33 kHz
Operating Frequency (MHz) Channel ID (Displayed Frequency)
118.0000 118.005
118.0083 118.010
118.0167 118.015
118.0250 118.030
118.0333 118.035
118.0417 118.040
118.0500 118.055
118.0583 118.060
118.0667 118.065
118.0750 118.080
118.0833 118.085
118.0917 118.090
118.1000 118.105
• Channel spacing: 25 kHz (Actual frequency is displayed.)
Operating Frequency (MHz) Channel ID (Displayed Frequency)
118.0000 118.000
118.0250 118.025
118.0500 118.050
118.0750 118.075
118.1000 118.100
L These tables show just the display example between 118.0000 MHz and 118.1000 MHz.
Not all frequencies in the band are shown.
CAUTION: In Canada, use of 8.33 kHz Channel Spacing of this radio is strictly
prohibited and shall not be used.
BASIC MANUAL
13
Page 19

INFORMATION
7
■ About CE and DOC
Hereby, Icom Inc.
declares that the
versions of IC-A16E
which have the “CE”
symbol on the product,
comply with the essential requirements of
the Radio Equipment Directive, 2014/53/
EU, and the restriction of the use of certain
hazardous substances in electrical and
electronic equipment Directive, 2011/65/
EU. The full text of the EU declaration of
conformity is available at the following
internet address:
http://www.icom.co.jp/world/support/
■ Disposal
The crossed-out wheeledbin symbol on your product,
literature, or packaging reminds
you that in the European Union,
all electrical and electronic
products, batteries, and accumulators
(rechargeable batteries) must be taken
to designated collection locations at the
end of their working life. Do not dispose
of these products as unsorted municipal
waste. Dispose of them according to the
laws in your area.
■ Firmware version
identication
You can identify your transceiver’s rmware
version in the Set mode.
1. Push [FUNC], and then hold down
[ENT]/[SET] to enter the Set mode.
2. Select “CPU.”
• The rmware version is displayed.
■ FCC information
This equipment has been tested and
found to comply with the limits for a Class
A digital device, pursuant to part 15 of the
FCC Rules. These limits are designed
to provide reasonable protection against
harmful interference when the equipment is
operated in a commercial environment. This
equipment generates, uses, and can radiate
radio frequency energy and, if not installed
and used in accordance with the instruction
manual, may cause harmful interference
to radio communications. Operation of this
equipment in a residential area is likely to
cause harmful interference in which case
the user will be required to correct the
interference at his own expense.
CAUTION: Changes or modications to
this transceiver, not expressly approved
by Icom Inc., could void your authority
to operate this transceiver under FCC
regulations.
■ Information FCC
Cet équipement a été testé et reconnu
conforme aux limites xées pour un
appareil numérique de classe A,
conformément au point 15 de la
réglementation FCC. Ces limites sont
dénies de façon à fournir une protection
raisonnable contre le brouillage
préjudiciable lorsque cet appareil est utilisé
dans un environnement commercial. Cet
équipement génère, utilise et peut émettre
un rayonnement de fréquence radio.
S’il n’a pas été installé conformément
aux instructions, il peut par ailleurs
créer des interférences perturbant les
communications radio. L’utilisation de cet
appareil dans une zone résidentielle peut
provoquer un brouillage préjudiciable,
auquel cas l’utilisateur sera tenu de
corriger la situation à ses frais.
MISE EN GARDE: Tout changement ou
modication, non expressément approuvé
par Icom Inc., peut annuler l’autorisation
de l’utilisateur à utiliser cet appareil
conformément à la réglementation FCC.
1
2
3
4
5
6
7
8
9
10
11
12
13
14
15
16
17
18
BASIC MANUAL
14
Page 20

BASIC MANUAL
WARNING
CAUTION
15
7
INFORMATION
■ Safety training information
Your Icom radio generates
RF electromagnetic energy
while transmitting. This radio is
designed for and classied as
This means it must be used only during
the course of employment by individuals
aware of the hazards, and the ways to
minimize such hazards. This radio is
NOT intended for use by the “General
Population” in an uncontrolled environment.
This radio has been tested and complies
with the FCC and IC RF exposure limits
for “Occupational Use Only”. In addition,
your Icom radio complies with the following
Standards and Guidelines with regard to
RF energy and electromagnetic energy
levels and evaluation of such levels for
exposure to humans:
• FCC KDB Publication 447498 D03,
Evaluating Compliance with FCC Guidelines
for Human Exposure to Radio Frequency
Electromagnetic Fields.
• American National Standards Institute
(C95.1-2010), IEEE Standard for Safety
Levels with Respect to Human Exposure to
Radio Frequency Electromagnetic Fields, 3
kHz to 300 GHz.
• American National Standards Institute
(C95.3-2002), IEEE Recommended
Practice for the Measurement of Potentially
Hazardous Electromagnetic Fields– RF and
Microwave.
• The accessories listed on page i are
authorized for use with this product. Use of
accessories other than those specied may
result in RF exposure levels exceeding the
FCC requirements for wireless RF exposure.
• Health Canada Safety Code 6 - Limits of
Human Exposure to Electromagnetic Energy
in the Frequency Range from 3 kHz to
300 GHz.
for “Occupational Use Only.”
To ensure that your expose
to RF electromagnetic energy
is within the FCC allowable
limits for occupational use,
always adhere to the following
guidelines:
• DO NOT operate the radio without a proper
antenna attached, as this may damage the
radio and may also cause you to exceed
FCC RF exposure limits. A proper antenna
is the antenna supplied with this radio by
the manufacturer or an antenna specically
authorized by the manufacturer for use with
this radio.
• DO NOT transmit for more than 50% of
the total radio use time (“50% duty cycle”).
Transmitting more than 50% of the time
can cause FCC RF exposure compliance
requirements to be exceeded. The radio is
transmitting when “TX” is displayed on the
function display. You can cause the radio to
transmit by pushing the [PTT] switch.
• ALWAYS keep the antenna at least 2.5
cm (1 inch) away from the body when
transmitting and only use the Icom beltclips which are listed on page 12 when
attaching the radio to your belt, or other
place, to ensure FCC and IC RF exposure
compliance requirements are not exceeded.
The information listed above provides the
user with the information needed to make
him or her aware of RF exposure, and what
to do to assure that this radio operates
within the FCC RF exposure limits of this
radio.
Electromagnetic Interference/
Compatibility
During transmissions, your Icom radio
generates RF energy that can possibly
cause interference with other devices
or systems. To avoid such interference,
turn off the radio in areas where signs
are posted to do so. DO NOT operate the
transmitter in areas that are sensitive to
electromagnetic radiation such as hospitals
and blasting sites.
Occupational/Controlled Use
The radio transmitter is used in situations
in which persons are exposed as
consequence of their employment provided
those persons are fully aware of the
potential for exposure and can exercise
control over their exposure.
Page 21

professionnel seulement» et classée comme
A
VERTISSEMENT
MISE EN GARDE
tel, ce qui signie qu’elle doit être utilisée
uniquement dans le cadre d’un travail par
des personnes conscientes des dangers et
des mesures visant à minimiser ces dangers.
Elle N’EST PAS conçue pour une «utilisation
grand public », dans un environnement
non contrôlé. Cet appareil a été évalué et
jugé conforme, aux limites d’exposition aux
RF de la FCC et d’IC, pour une «utilisation
grand public». En outre, votre radio Icom
satisfait les normes et directives qui suivent
en matière de niveaux d’énergie et d’énergie
électromagnétique de RF et d’évaluation de
tels niveaux en ce qui concerne l’exposition
humaine:
■ Infomation en matiére de sécurité
Votre radio Icom produit une
énergie électromagnétique de
radiofréquences (RF), en mode
de transmission. Cette radio
est conçue pour un «usage
• Publication 447498 D03 de la FCC KDB,
«Evaluating Compliance with FCC Guidelines
for Human Exposure to Radio Frequency
Electromagnetic Fields».
• Norme de l’American National Standards
Institute (ANSI): IEEE C95.1-2010 sur
les niveaux de sécurité compatibles
avec l’exposition humaine aux champs
électromagnétiques de radiofréquences
(3 kHz à 300 GHz).
• Norme de l’ANSI: IEEE C95.3-2002 sur la
méthode d’évaluation recommandée du champ
magnétique potentiellement dangereux des
radiofréquences et des micro-ondes.
• Les accessoires illustrés dans “Options” de
la feuille d’instructions sont approuvés pour
une utilisation avec ce produit. L’utilisation
d’accessoires autres que ceux précisés peut
entraîner des niveaux d’exposition aux RF
supérieures aux limites établies par la FCC et
d’IC en matière d’exposition aux RF sans l.
• Le Code de sécurité 6 de Santé Canada Les limites d’exposition humaine à l’énergie
électromagnétique dans la gamme de
fréquences de 3 kHz à 300 GHz.
An de vous assurer que votre exposition
à une énergie électromagnétique de RF
se situe dans les limites permises par la
FCC pour une utilisation grand public,
veuillez en tout temps respecter les
directives suivantes :
• NE PAS faire fonctionner la radio sans qu’une
antenne appropriée y soit xée, car ceci
risque d’endommager la radio et causer une
exposition supérieure aux limites établies par
la FCC. L’antenne appropriée est celle qui est
fournie avec cette radio par le fabricant ou une
antenne spécialement autorisée par le fabricant
pour être utilisée avec cette radio.
• NE PAS émettre pendant plus de 50% du
temps total d’utilisation de l’appareil («50%
du facteur d’utilisation»). Émettre pendant
plus de 50% du temps total d’utilisation peut
causer une exposition aux RF supérieure aux
limites établies par la FCC. La radio est en train
d’émettre lorsque le témoin du “TX” s’afche
sur l’écran ACL. La radio émettra si vous
appuyez sur le bouton du microphone.
• TOUJOURS tenir l’antenne éloignée d’au moins
2,5 cm de votre corps au moment d’émettre
et utiliser uniquement l’attache pour ceinture
Icom illustrée à la p. 12, lorsque vous attachez
la radio à votre ceinture, ou à autre chose, de
façon à vous assurer de ne pas provoquer une
exposition aux RF supérieure aux limites xées
par la FCC. Pour offrir à vos interlocuteurs la
meilleure qualité de transmission possible,
tenez l’antenne à au moins 5 cm de votre
bouche et légèrement de côté.
Les renseignements ci-dessus fournissent à
l’utilisateur toute l’information nécessaire sur
l’exposition aux RF et sur ce qu’il faut faire
pour assurer que cette radio fonctionne en
respectant les limites d’exposition aux RF
établies par la FCC.
Interférence électromagnétique et
compatibilité
En mode de transmission, votre radio Icom
produit de l’énergie de RF qui peut provoquer
des interférences avec d’autres appareils ou
systèmes. Pour éviter de telles interférences,
mettez la radio hors tension dans les secteurs
où une signalisation l’exige. NE PAS faire
fonctionner l’émetteur dans des secteurs
sensibles au rayonnement électromagnétique
tels que les hôpitaux, les aéronefs et les sites
de dynamitage.
Usage professionnel/contrôlé
Ce radio émetteur est utilisé dans des cas où
des personnes sont exposées en raison de
leur travail, pourvu qu’elles soient conscientes
du risque d’expositionet qu’elles puissent
exercer un contrôle sur cette exposition.
INFORMATION
7
1
2
3
4
5
6
7
8
9
10
11
12
13
14
15
16
17
18
BASIC MANUAL
16
Page 22

INDEX
A
Accessories, supplied ............................................................................................i
Automatic noise limiter .........................................................................................2
B
Battery
Caution ..........................................................................................................4
Charging ........................................................................................................6
C
Channel ID list ....................................................................................................13
E
Emergency frequency........................................................................................... 8
F
Firmware version ................................................................................................14
Function display ....................................................................................................3
H
Headset connection ...............................................................................................9
O
Options ................................................................................................................12
P
Panel description ..................................................................................................1
R
Receiving ...............................................................................................................8
S
Set mode ...............................................................................................................7
Specications ......................................................................................................11
Squelch..................................................................................................................1
T
Transmitting ..........................................................................................................8
BASIC MANUAL
17
Page 23

MEMO
1
2
3
4
5
6
7
8
9
10
11
12
13
14
15
16
17
18
BASIC MANUAL
18
Page 24

A7497D-1EX
Printed in Japan
© 2019 Icom Inc. Jan. 2019
1-1-32 Kamiminami, Hirano-ku,
Osaka 547-0003, Japan
 Loading...