

Icom IC-A16, IC-A16E Full Manual

FULL MANUAL
INTRODUCTION
1 ACCESSORIES ATTACHMENTS
2 PANEL DESCRIPTION
3 BATTERY CHARGING
4 BASIC OPERATION
VHF AIR BAND TRANSCEIVERS
iA16
iA16E
5 SCAN OPERATION
6 MEMORY OPERATION
7 OTHER FUNCTIONS
8 HEADSET CONNECTION
9 SET MODE
10 SPECIFICATIONS AND OPTIONS
11 TROUBLESHOOTING
INDEX

INTRODUCTION
Thank you for choosing this Icom product.
This product is designed and built with Icom’s state of the art technology and craftsmanship.
With proper care, this product should provide you with years of trouble-free operation.
Important
READ ALL INSTRUCTIONS carefully before using the transceiver.
This FULL MANUAL contains advanced features and operating instructions for the IC-A16 and IC-A16E.
READ also the BASIC MANUAL that supplied with the transceiver.
KEEP MANUALS, because it contains important operating information that may be useful in the future.
Table of contents
INTRODUCTION ..................................................... i
Important ....................................................... i
■
1 ACCESSORIES ATTACHMENTS .................... 1
Supplied accessories .................................... 1
■
Attaching accessories ................................... 1
■
2 PANEL DESCRIPTION ..................................... 4
Front, top, and side panels ............................ 4
■
Keypad .......................................................... 4
■
Function display ............................................ 5
■
3 BATTERY CHARGING ..................................... 6
Battery charger .............................................. 6
■
4 BASIC OPERATION ......................................... 7
Receiving and transmitting ............................ 7
■
Selecting the 121.5 MHz emergency frequency
■
5 SCAN OPERATION .......................................... 8
Using the Scan function ................................ 8
■
Scan types..................................................... 8
■
TAG setting .................................................... 8
■
6 MEMORY OPERATION .................................... 9
Description .................................................... 9
■
Editing Memory channels .............................. 9
■
7 OTHER FUNCTIONS ........................................ 11
Using the Home function ............................... 11
■
Using a Weather channel .............................. 11
■
Using the Duplex function ............................ 11
■
. 7
8 HEADSET CONNECTION ................................ 12
Using a Bluetooth
■
Using a wired headset ................................... 13
■
9 SET MODE ........................................................ 14
Using the Set mode ....................................... 14
■
Set mode items ............................................. 14
■
10
SPECIFICATIONS AND OPTIONS ................... 16
Specications ............................................... 16
■
Options .......................................................... 17
■
11 TROUBLESHOOTING ...................................... 18
Troubleshooting ............................................. 18
■
INDEX..................................................................... 19
®
headset ......................... 12
Icom, Icom Inc. and the Icom logo are registered trademarks of Icom Incorporated (Japan) in Japan, the United States, the
United Kingdom, Germany, France, Spain, Russia, Australia, New Zealand and/or other countries.
The Bluetooth
Icom Inc. is under license.
Other trademarks and trade names are those of their respective owners.
3M, PELTOR, and WS are trademarks of 3M Company.
All other products or brands are registered trademarks or trademarks of their respective holders.
®
word mark and logos are registered trademarks owned by Bluetooth SIG, Inc. and any use of such marks by
i
1
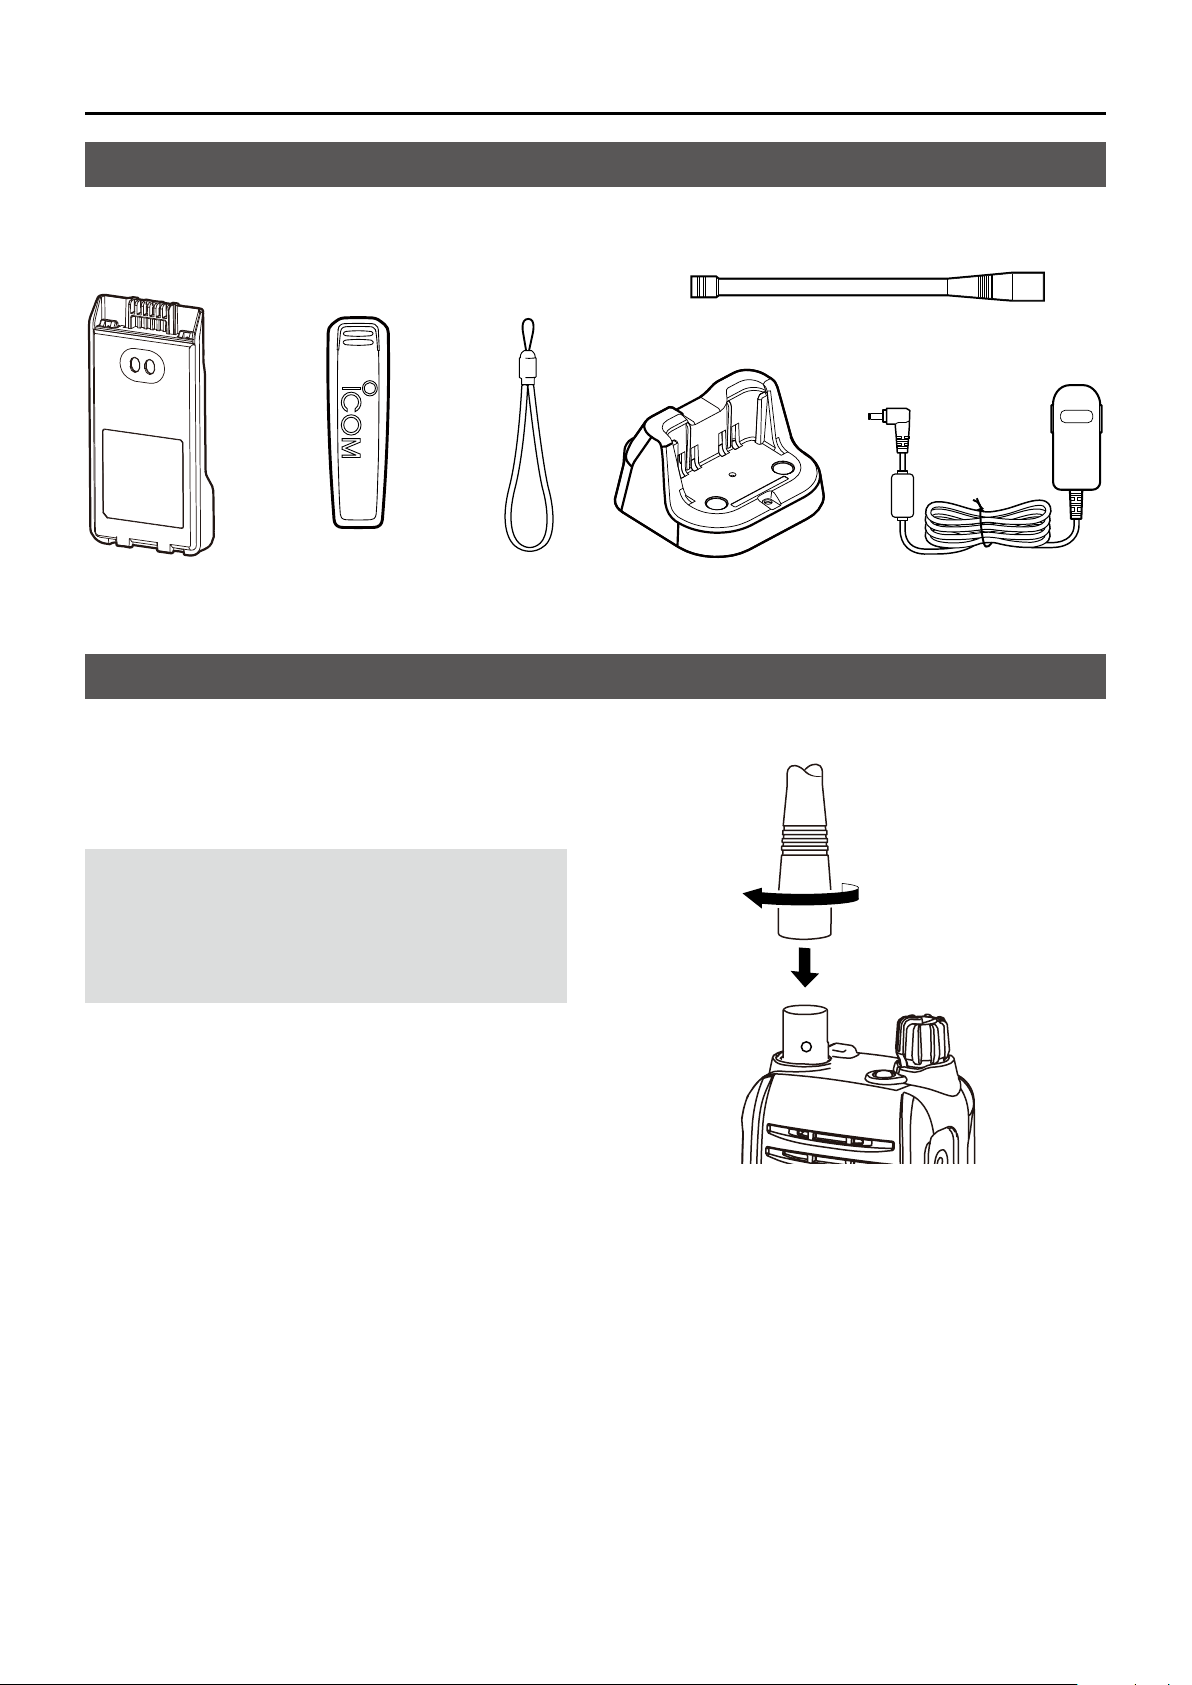
ACCESSORIES ATTACHMENTS
Supplied accessories
Belt clip HandstrapBattery pack
* May not be supplied, or the shape may be different, depending on the transceiver version.
Attaching accessories
D Antenna
Connect the supplied antenna to the antenna
connector.
Antenna
Power adapter*Battery charger*
CAUTION:
• DO NOT carry the transceiver by holding only the
antenna.
• DO NOT connect an antenna other than the
supplied antenna, or those listed in this manual.
• DO NOT transmit without an antenna.
1
1
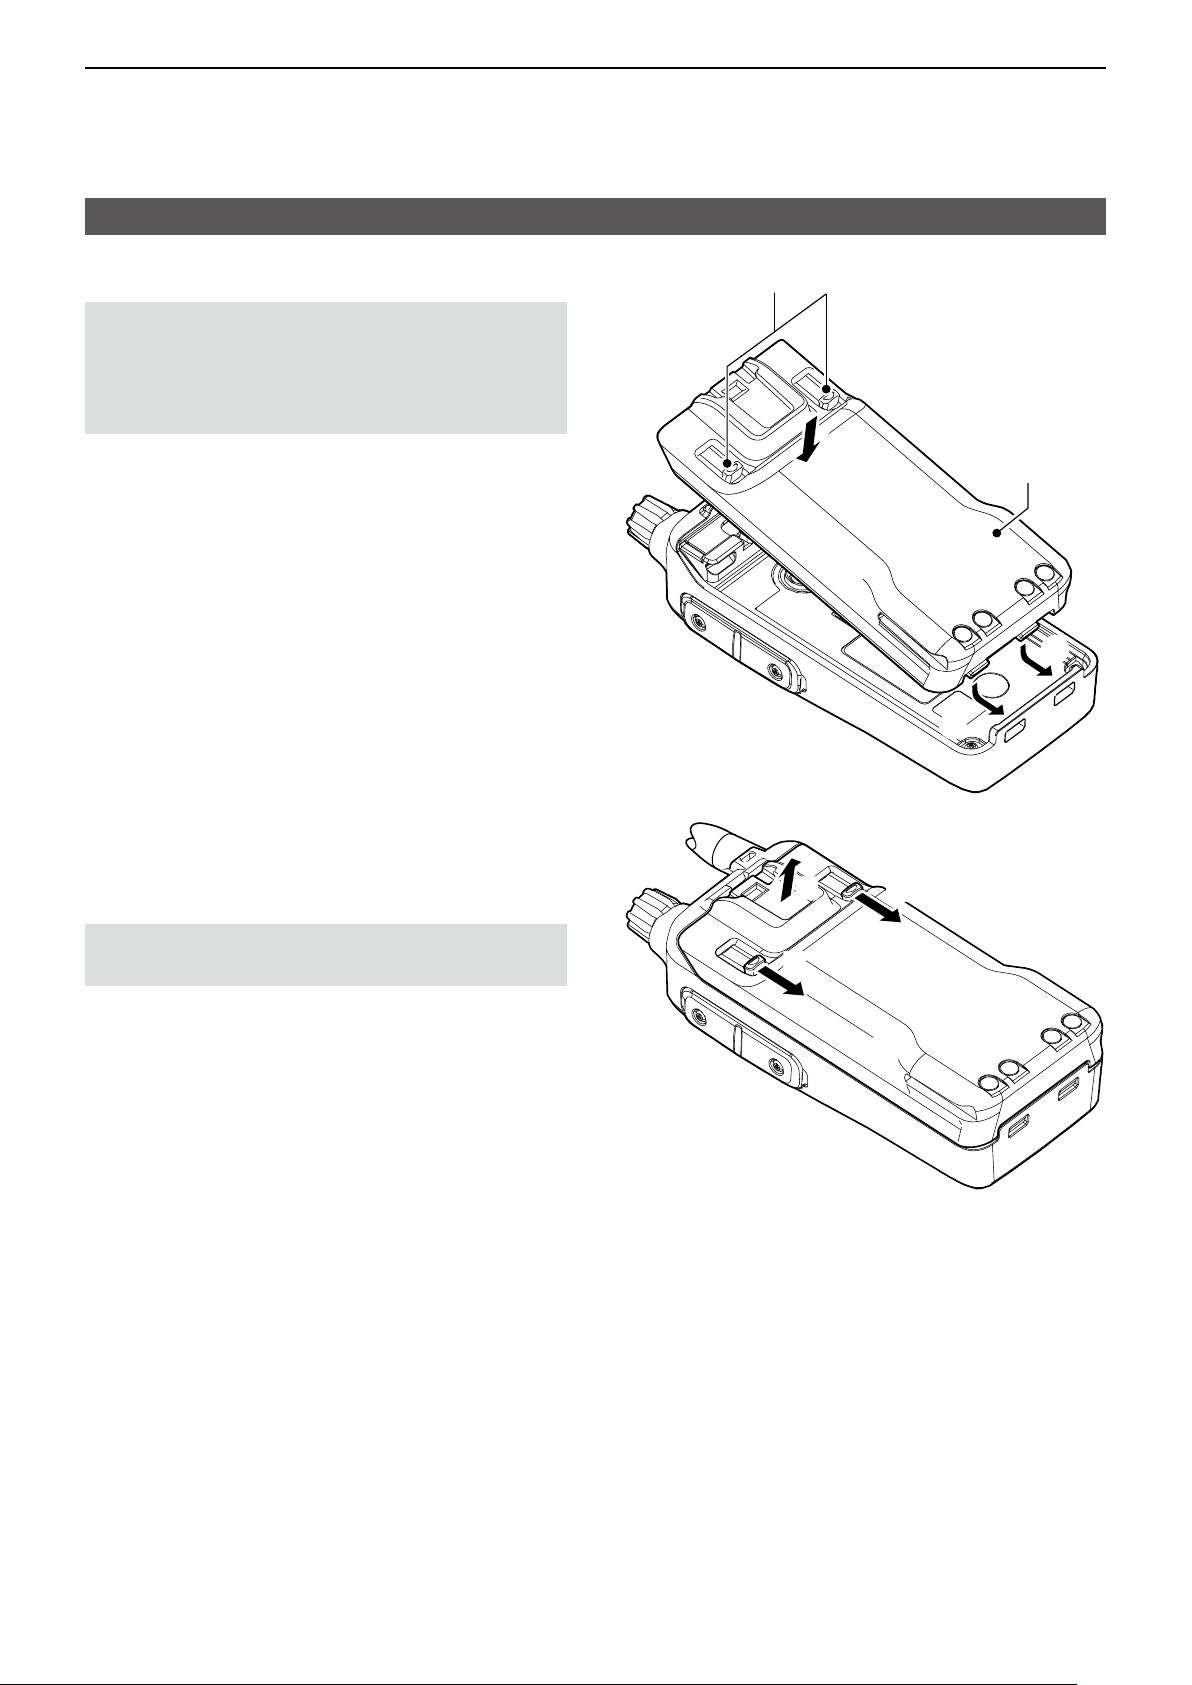
ACCESSORIES ATTACHMENTS
Attaching accessories (Continued)
D Battery pack/Battery case
CAUTION: DO NOT attach or detach the battery
pack or the battery case when the transceiver is wet
or soiled. This may result in water or dust getting into
the transceiver, battery pack, or battery case and
may damage them.
To attach:
1. Slide the battery pack in the direction of the arrow.
(q)
2. Push the battery pack until the battery sliding
locks make a ‘click’ sound. (w)
To detach:
1. Pull both battery sliding locks in the direction of
the arrow. (z)
• The battery pack is then released.
2. Lift up to detach the battery pack. (x )
Battery sliding locks
w
x
Battery pack
q
q
z
NOTE: Keep the battery pack terminals clean. It’s a
good idea to occasionally clean them.
z
2
1
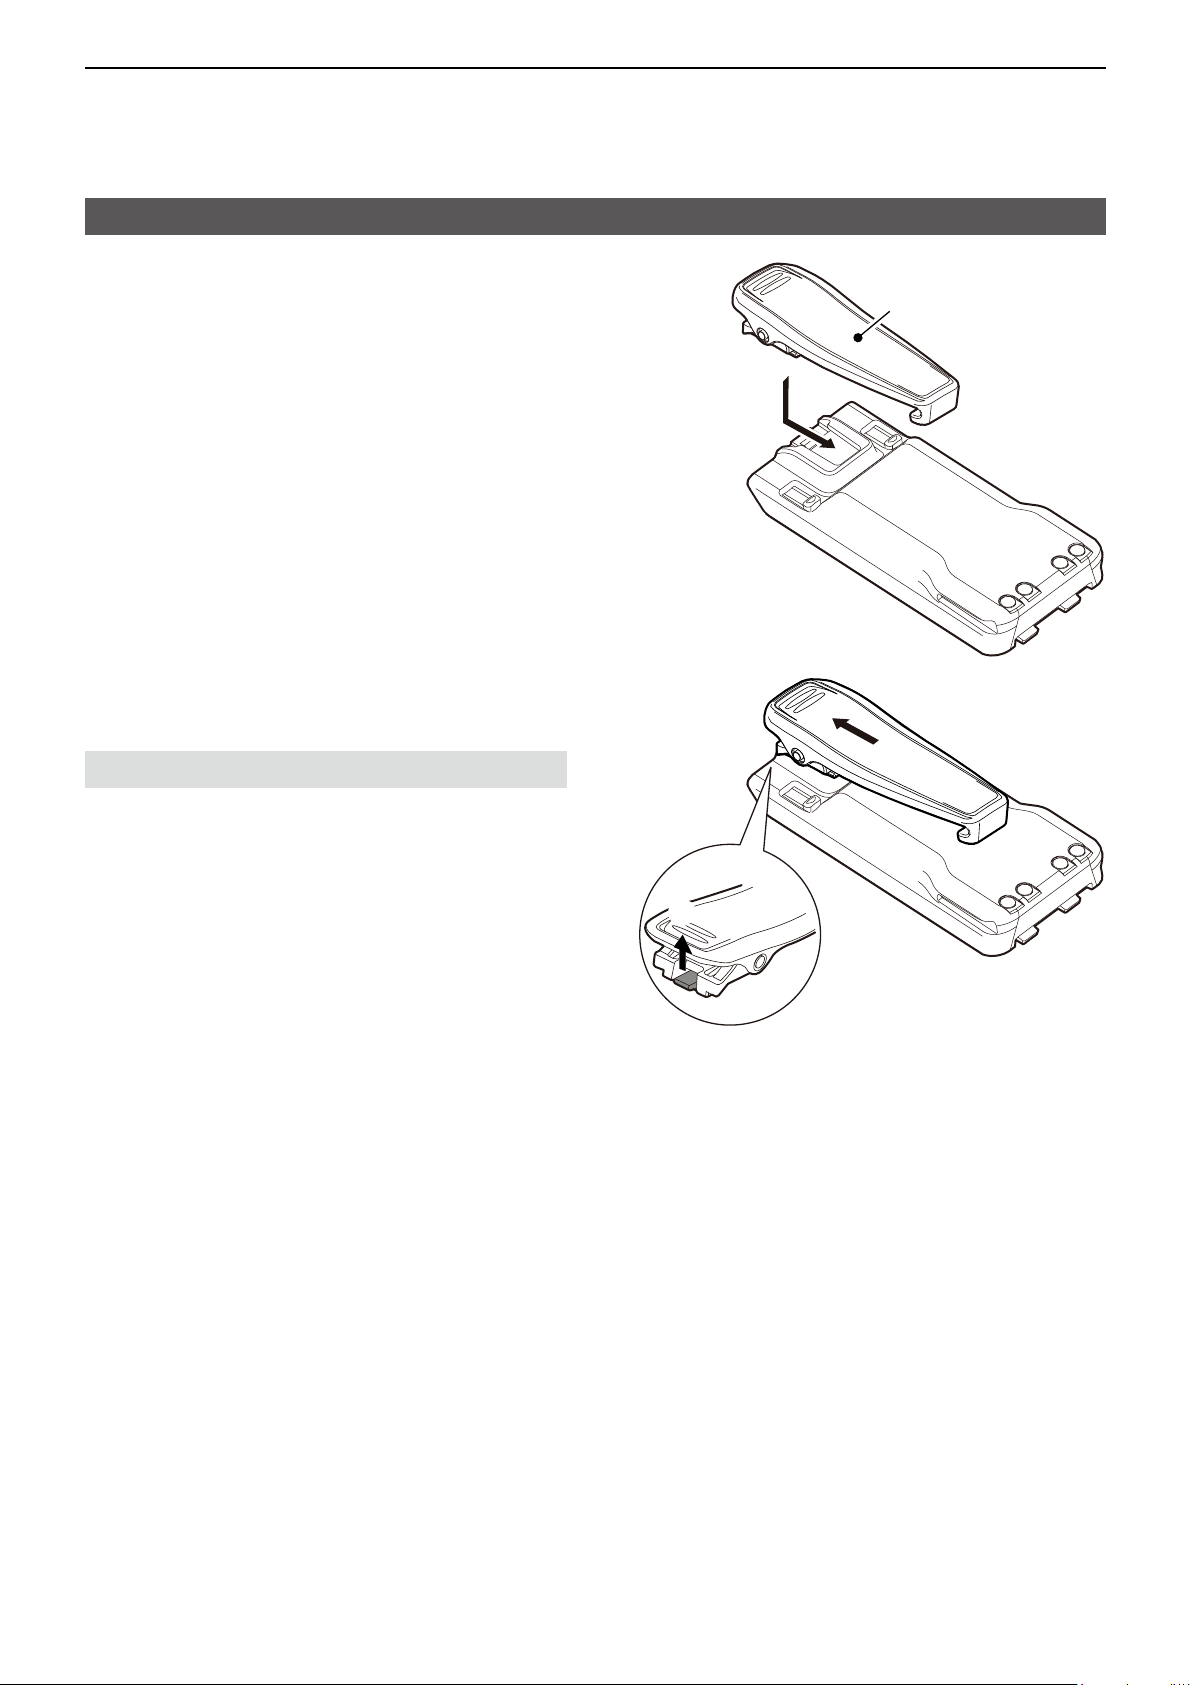
ACCESSORIES ATTACHMENTS
Attaching accessories (Continued)
D Belt clip
To attach:
1. Remove the battery pack from the transceiver, if it
is attached.
2. Slide the belt clip in the direction of the arrow until
the belt clip is locked and makes a ‘click’ sound.
To detach:
Lift the tab up (1), and slide the belt clip in the
direction of the arrow (2).
BE CAREFUL! Don’t break your ngernail.
Belt clip
2
1
3
2
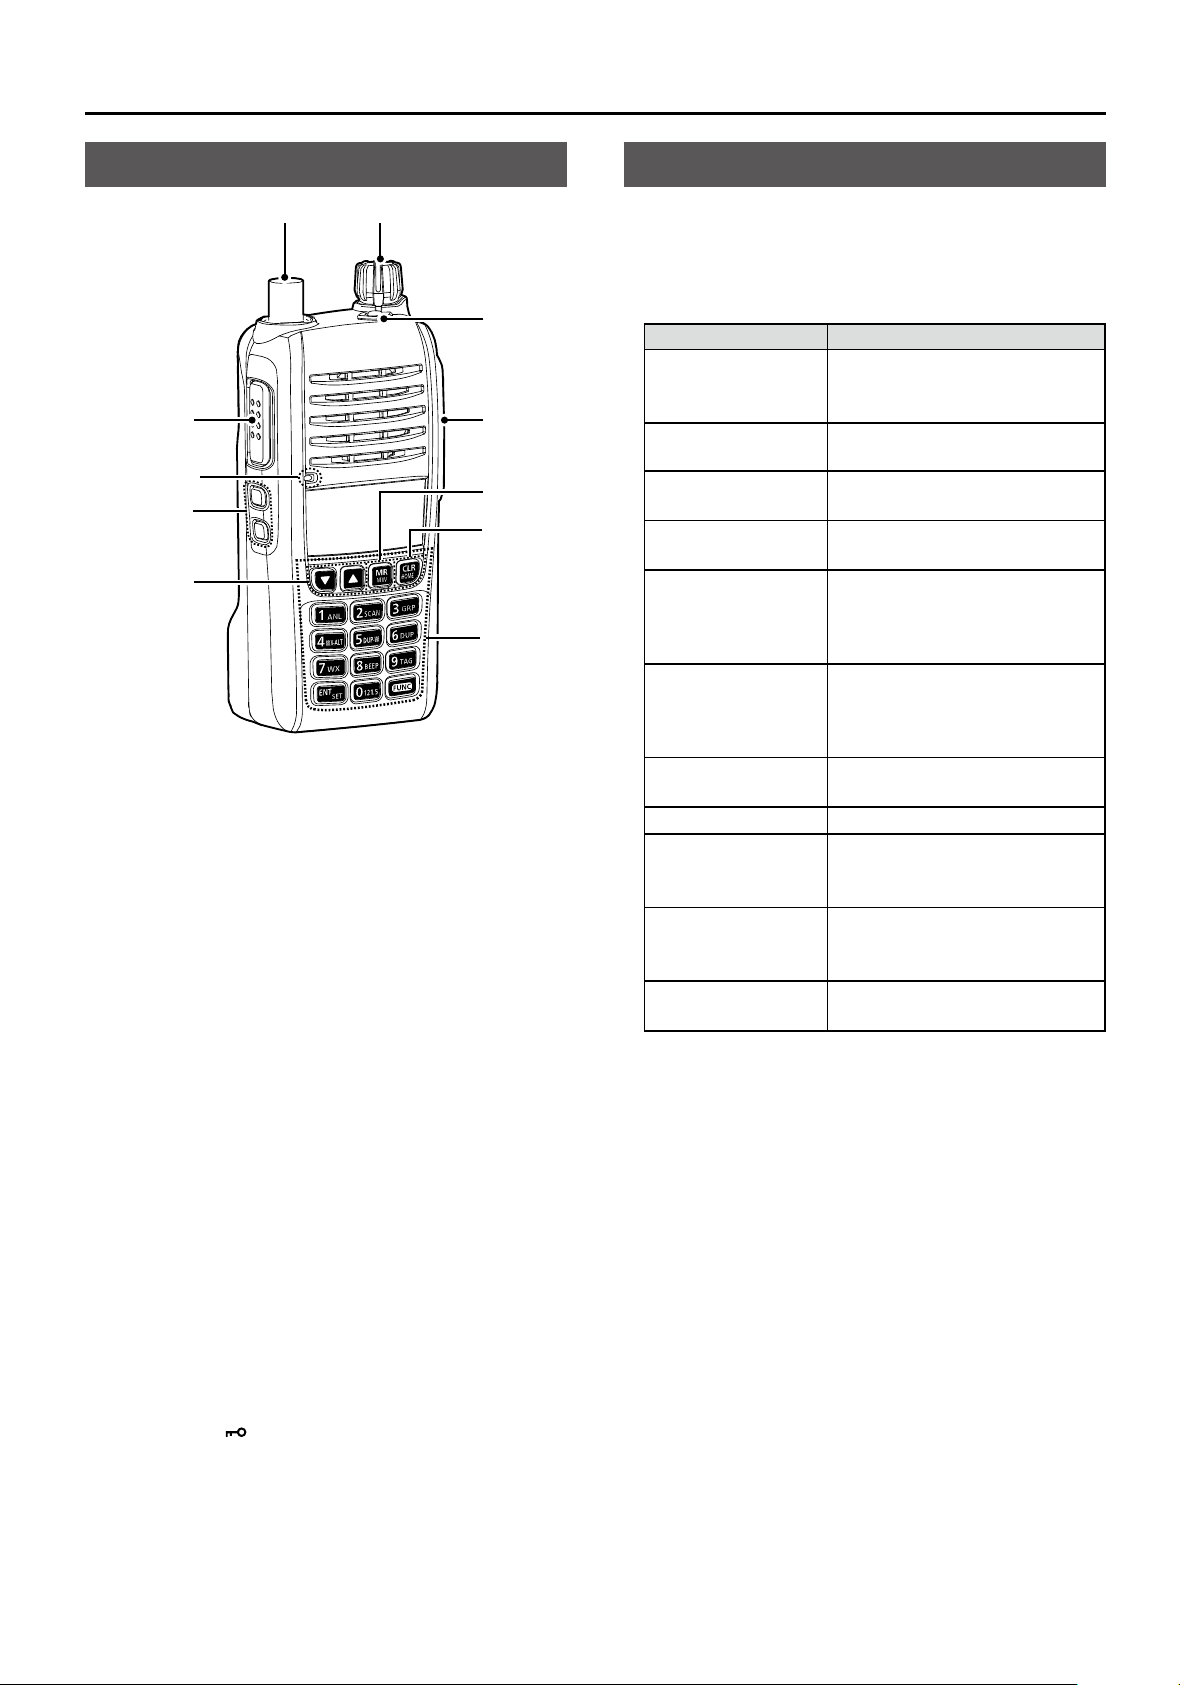
PANEL DESCRIPTION
Front, top, and side panels
1
2
Microphone
3
4
1 ANTENNA CONNECTOR
Connect the supplied antenna. (p. 1)
2 PTT SWITCH [PTT]
Hold down to transmit, release to receive. (p. 7)
3 SQUELCH ADJUSTMENT KEYS [SQL∫]/[SQL√]
Push to adjust the squelch level.
4 UP/DOWN KEYS [∫]/[√]
z Push to change or select the frequency, Memory
channel, Set mode settings, and so on.
z While scanning, push to change the scanning
direction.
9
8
7
6
5
Keypad
Keypad
z Push to set the frequency, select a Memory
channel, and so on.
z Push [FUNC], and then push or hold down another
key within 3 seconds to use the secondary functions
listed below.
KEYS FUNCTIONS
Push [1]/[ANL] Turn the Automatic Noise
Limiter (ANL) function ON or
OFF.
Push [2]/[SCAN] Start a scan.
L Push [CLR] to stop a scan.
Push [3]/[GRP] In the Memory mode, enter
the Memory Selection mode.
Push [4]/[WX-ALT]* Turn the Weather Alert
function ON or OFF.
Push [5]/[DUP-W]* Enter the Duplex Frequency
Entry mode.
L Conrm the NAV band
frequency is selected.
Push [6]/[DUP]* Turn the Duplex function ON
or OFF.
L Conrm the NAV band
frequency is selected.
Push [7]/[WX]* Enter the Weather Channel
Selection mode.
Push [8]/[BEEP] Turn the Key beep ON or OFF.
Push [9]/[TAG] Tag or untag the selected
Memory channel or Weather
Channel*.
Hold down
[ENT]/[SET] for 1
second
Push [0]/[121.5] Select the emergency
*For only the USA version.
Enter the Set mode.
frequency.
5 CLEAR/HOME KEY [CLR]/[HOME]
z Push to return to the VFO mode.
z Hold down for 2 seconds to reset the Set mode
settings to default.
6 MEMORY/MEMORY WRITE KEY [MR]/[MW]
z Push to enter the Memory Channel Selection
mode. (p. 7)
z Push [FUNC], and then push this key to enter the
Memory Write mode. (p. 9)
7 HEADSET JACK
Connects a third party headset through the optional
headset adapter. (p. 13)
8 LOCK KEY [
z Push to lock the keypad.
z Hold down for 2 seconds to unlock the keypad.
9 VOLUME/POWER SWITCH [VOL]
z Rotate to turn the transceiver ON or OFF.
z Rotate to adjust the audio output level.
]
4
2
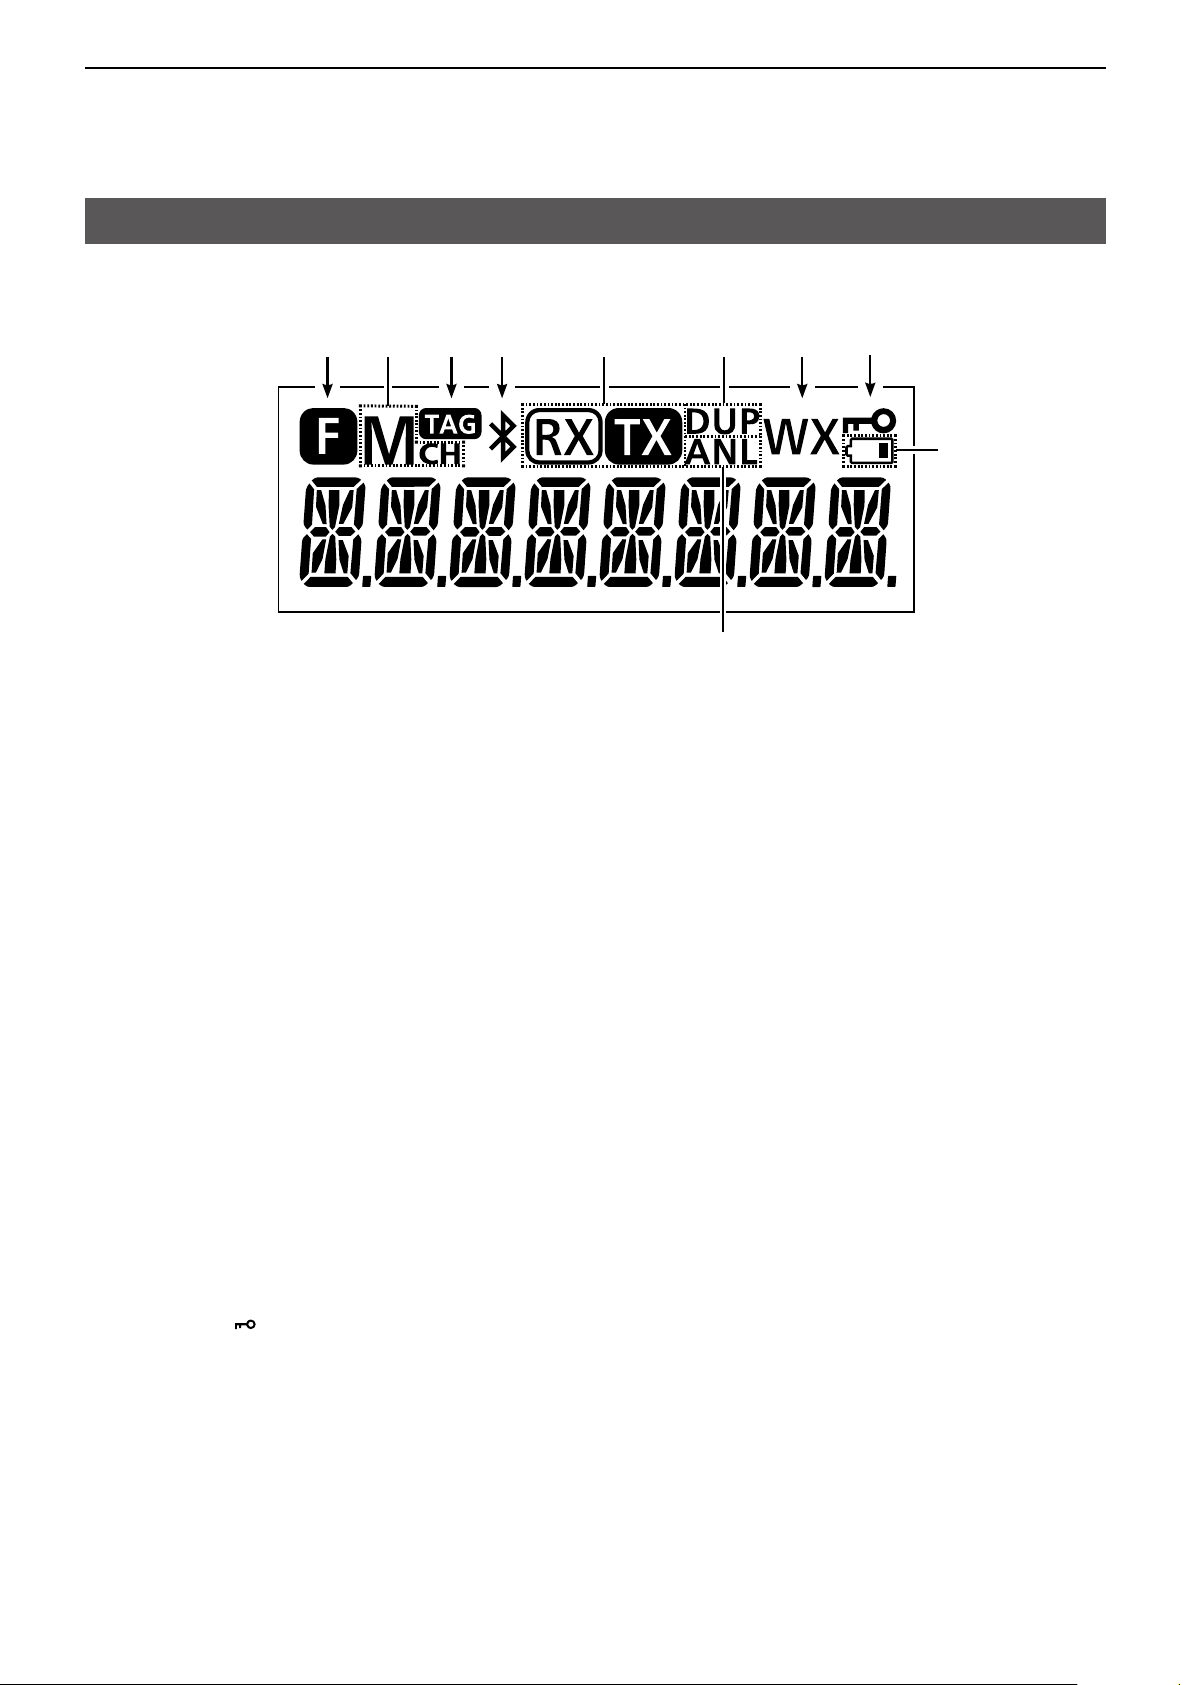
PANEL DESCRIPTION
Function display
1 2 3 4 5 6
7
1 FUNCTION ICON
Displayed for 3 seconds when you push [FUNC], to use secondary functions assigned to a key.
2 MEMORY CHANNEL ICON
Displayed when a Memory channel is selected. (p. 7)
3 TAG ICON
Displayed when a tagged Memory channel is selected. (p. 8)
8 9
4 BLUETOOTH ICON (For only the transceiver with the built-in Bluetooth unit)
Displayed when a Bluetooth headset is connected. (p. 12)
5 RX/TX ICON
Displayed while receiving or transmitting. (p. 7)
6 DUPLEX ICON
z Displayed when the Duplex function is ON. (p. 11)
z Blinks while entering a duplex frequency into a Memory channel. (p. 11)
7 AUTOMATIC NOISE LIMITER ICON
Displayed when the Automatic Noise Limiter function is ON. (p. 7)
8 WEATHER ALERT ICON (For only the USA version.)
Displayed when the Weather Alert function is ON. (p. 11)
9 LOCK ICON [
Displayed when the Lock function is ON. (p. 4)
LOW BATTERY ICON
z Displayed when charging is required.
z Blinks when the battery exhausted.
]
5
 Loading...