

Page 1
VOICE & MUSIC
DM-20
DM-10
INSTRUCTIONS
INSTRUCTIONS
EN
MODE D’EMPLOI
FR
INSTRUCCIONES
ES
Thank you for purchasing an Olympus
Please read these instructions for information
about using the product correctly and safely.
Keep the instructions handy for future reference.
Digital Voice Recorder.
To ensure successful recordings, we recommend that
you test the record function and volume before use.
EN
1
Page 2

Table of Contents
Table of Contents ....................................... 2
Safe and Proper Usage ............................. 4
General Precautions .................................. 4
1 Getting Started
Main Features ............................................ 6
Identification of Parts ................................. 8
Inserting Batteries ................................... 10
Using the AC Adapter .............................. 11
Switching Between the Voice Recorder
and Music Player............................... 11
Setting Time/Date (TIME&DATE) ............12
Installing Software ................................... 14
2 When Using the Recorder as
a Voice Recorder
Recording ................................................ 18
Using the Variable Control
Voice Actuator (VCVA) ...................... 20
Recording with External Microphone ...... 22
Recording Modes (REC MODE) ............. 23
Microphone Sensitivity (MIC SENSE) ..... 24
Playing ..................................................... 25
Repeat Playback...................................... 27
Noise Cancel Function ............................ 29
Index Marks ............................................. 30
Menu List (VOICE mode) ........................ 31
3 Managing Files on Your PC
Using DSS Player Software .................... 32
Using Online Help ................................... 33
Connecting to Your PC ............................ 34
Running DSS Player ................................ 38
4 Using the Recorder as a
Music Player
Using the Recorder as a Music Player .... 40
Using Windows Media Player .................. 40
Window Names
(Windows Media Player) ................... 42
Copying Music from CD .......................... 43
Transferring Music File to the Recorder..... 44
Music Playback ........................................ 45
Increasing the WOW effect
(WOW EFFECT) ............................... 48
Menu List (MUSIC mode) ........................ 50
5 Feature Common to the Voice
Recorder and Music Player
Erasing ..................................................... 51
Hold.......................................................... 54
2
Page 3

6 Using the Recorder as a
Reader / Writer
1
Using the Recorder as a
Reader/Writer .................................... 55
7 Other Information
Alarm Message List ................................. 56
Troubleshooting ....................................... 58
Accessories (optional) .............................59
Specifications .......................................... 59
Technical Assistance And Support ......... 61
2
3
4
5
6
7
3
Page 4

Safe and Proper
Usage
Before using your new recorder, read this
manual carefully to ensure that you know
how to operate it safely and correctly.
Keep this manual in an easily accessible
location for future reference.
•
The warning symbols indicate important
safety related information. To protect yourself
and others from personal injury or damage
to property, it is essential that you always
read the warnings and information provided
.
Using the Online Manual
When you install the DSS Player 2002 on your PC
from the CD-ROM, you can use an online expanded
version of this instruction manual, allowing you to learn
more about the digital voice recorder.
If the DSS Player is installed, click on the [Start] button,
select [All Programs], then [ OLYMPUS DSS Player 2002],
then click on [DM-20/10 ONLINE INSTRUCTIONS]. You
can read more about the items listed below.
Operating Environment ............................... 14
Uninstalling Software .................................. 19
Listening While Audio Is Recorded
(Recording Monitor) .............................. 26
Recording Sound Played Back
by Another Device ................................ 29
Continuous Playback (ALL PLAY) .............. 34
Auto Backspace review
(BACK SPACE)..................................... 35
Assigning File Comments
(COMMENT) ......................................... 40
LCD Display Information
(VOICE mode) ...................................... 41
Window Names (DSS Player) ..................... 52
4
Download Voice Files from the
Recorder ............................................... 53
Play a Voice File .......................................... 55
Upload Voice Files to the Recorder ............ 56
Send Voice Files with E-mail....................... 58
Changing User ID ........................................ 58
Changing a Folder Name ............................ 59
Editing File Comments ................................ 59
Editing a Template ....................................... 60
Changing the User Equalizer
(USER EQ) ........................................... 71
LCD Display Information
(MUSIC mode) ...................................... 73
Changing Playback Order of Music File ..... 75
Locking Files (LOCK) .................................. 80
Alarm Playback Function (ALARM) ............ 81
LCD Contrast Adjustment
(CONTRAST) ........................................ 84
Backlight (BACKLIGHT) .............................. 85
System Sounds (BEEP) .............................. 86
Assigning Folder Names
(FOLDER NAME) ................................. 87
Moving Files Across Folders ....................... 90
Formatting the Recorder (FORMAT) .......... 92
General Precautions
● Do not leave the recorder in hot, humid
locations such as inside a closed
automobile under direct sunlight or on
the beach in the summer.
● Do not store the recorder in places
exposed to excessive moisture or dust.
● Do not use organic solvents such as
alcohol and lacquer thinner to clean the
unit.
● Do not place the recorder on top of or
near electric appliances such as TVs or
refrigerators.
Page 5

● Avoid recording or playing back near
cellular phones or other wireless
equipment, as they may cause
interference and noise. If you
experience noise, move to another
place, or move the recorder further away
from such equipment.
● Avoid sand or dirt. These can cause
irreparable damage.
● Avoid strong vibrations or shocks.
● Do not disassemble, repair or modify
the unit yourself.
● Do not operate the unit while operating
a vehicle (such as a bicycle, motorcycle,
or go-cart).
● Keep the unit out of the reach of
children.
<Warning regarding data loss>
Recorded content in memory may be
destroyed or erased by operating mistakes,
unit malfunction, or during repair work.
It is recommended to back up and save
important content to other media such as a
computer hard disk.
Batteries
Warning
• Batteries should never be exposed to
flame, heated, short-circuited or
disassembled.
• Do not attempt to recharge alkaline,
lithium or any other non-rechargeable
batteries.
• Never use any battery with a torn or
cracked outer cover.
• Keep batteries out of the reach of
children.
• If you notice anything unusual when
using this product such as abnormal
noise, heat, smoke, or a burning odor:
1 remove the batteries immediately while
being careful not to burn yourself, and;
2 call your dealer or local Olympus
representative for service.
AC Adapter
Warning
• Do not attempt to disassemble, repair or
modify the AC adapter in any way.
• Keep foreign objects including water,
metal, or flammable substances from
getting inside the product.
• Do not moisten the AC adapter or touch
it with a wet hand.
• Do not use the AC adapter in the vicinityof flammable gas (including gasoline,
benzine and lacquer thinner).
In case
• ... the internal parts of the AC adapter
are exposed because it has been
dropped or otherwise damaged:
• ... the AC adapter is dropped in water, or
if water, metal flammable substances or
other foreign objects get inside it:
• ... you notice anything unusual when
using the AC adapter such as abnormal
noise, heat, smoke, or a burning odor:
1 do not touch any of the exposed parts;
2 immediately disconnect the power
supply plug from the power outlet, and;
3 call your dealer or local Olympus
representative for servicing. Continued
use of the AC adapter under these
circumstances could result in electric
shock, fire or injury.
5
Page 6

Main Features
● Dual function recorder as a Digital Voice
1
Recorder and a Digital Music Player (☞
P.18,40).
Main Features
● Includes the Olympus DSS Player software
and Windows Media Player (☞ P.14).
● Includes a dual function Remote Controller
and Microphone (☞ P.22).
● A Ear/Mic/Remote Controller Jack with
switch-over depending on the application.
● A USB connected Cradle for data download
from the recorder to the PC (☞ P.34).
● The recorder can also be used as a
removable external memory reader/writer
(☞ P.55).
● The large LCD screen with backlight can
be easily read even in the dark.
● You may assign your own names to folders.
Main features of the Digital
Voice Recorder
● The recorder stores highly compressed
DSS and WMA format voice messages in
integrated flash memory.
● The recorder supports three recording
modes, HQ (High Quality) mode, SP
(Standard Playback) mode and LP (Long
Playback) mode. If a stereo microphone
(optional) is used, you can enjoy recording
in SHQ (Stereo High Quality) mode (☞
P.23).
*2
Recording time*
• DM-20 (128MB)
SHQ mode : 4 hours 20 minutes
HQ mode : 8 hours 45 minutes
SP mode : 20 hours 55 minutes
*1
LP mode : 44 hours 45 minutes
• DM-10 (64MB)
SHQ mode : 2 hours 10 minutes
HQ mode : 4 hours 20 minutes
SP mode : 10 hours 25 minutes
LP mode : 22 hours 20 minutes
● The five folders can hold 199 files each,
for the maximum of 995 recordings (☞
P.18).
● You can input file comments.
● The recorder has a Noise Cancel Function
(☞ P.29).
● Recorded files may be moved from one
folder to another.
● You can insert or delete index marks (☞
*4
P.30).
● The recorder has Fast Playback and Slow
Playback functions to control playback
speed (☞ P.26).
● Comes with DSS Player software (☞ P.32).
3
*4
6
Page 7
Main features of the Digital
Music Player
● Can play back music files in MP3 and WMA
format.
Playback time*
DM-20 (128 MB) : 100 to 340 minutes
DM-10 (64 MB) : 50 to 170 minutes
● Has built-in WOW (☞ P.48).
● You can change the playback equalizer
settings.
*1: Depending on the product you purchased, the remote
controller microphone may not be included. For the
supplied components, see the descriptions on the
package.
*2: DSS format in SP and LP mode recording, and WMA
format in SHQ and HQ mode recording.
*3: Available recording time for one continuous file.
Available recording time may be shorter if many short
recordings are made. (The displayed available recording
time and recorded time are approximate indications.)
*4: For WMA files, these functions are only available for
files recorded with this recorder or the IC recorders from
Olympus.
*5: The total storage time will vary depending on the bit
rate of each music file.
5
IBM and PC/AT are the trademarks or registered
trademarks of International Business Machines
Corporation.
Microsoft, Windows and Windows Media are
registered trademarks of Microsoft Corporation.
Apple, Macintosh, iMac, Mac, and PowerMac are
trademarks or registered trademarks of Apple
Computer, Inc.
Intel and Pentium are registered trademarks of Intel
Corporation.
Adobe and Acrobat Reader are registered
trademarks of Adobe Systems Incorporated.
WOW, SRS and
Labs, Inc.
WOW technology is incorporated under license from
SRS Labs, Inc.
CORTOLOGIC is a registered trademark of
Cortologic AG.
Other product and brand names mentioned herein
may be the trademarks or registered trademarks of
their respective owners.
symbol are trademarks of SRS
1
Main Features
7
Page 8

Identification of Parts
1
Identification of Parts
^
%
$
#
@
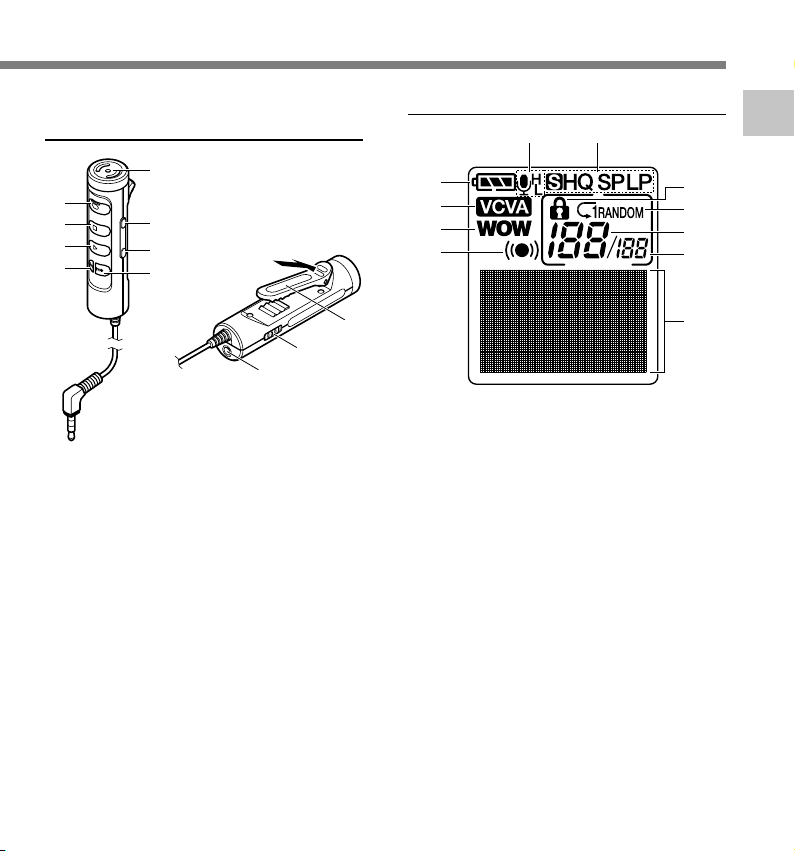
1 EAR/MIC/REMOTE jack
2 Built-in microphone
3 Record/Play indicator lamp
4 REC (Record) button
5 STOP button
6 PLAY button
7 FF (Fast Forward) button
8 REW (Rewind) button
9 VOL (+) button
0 VOL (–) button
! PC (USB) terminal
@ ERASE button
1
2
3
4
5
6
7
8
9
0
!
q
=
-
&
*
)
(
# FOLDER/REPEAT button
$ INDEX/EQ button
% DISPLAY/MENU button
^ Display (LCD panel)
& Strap hole
* Power jack
( Battery cover
) Cradle attachment point
- Mode (VOICE/MUSIC) switch
= HOLD switch
q Built-in speaker
8
Page 9
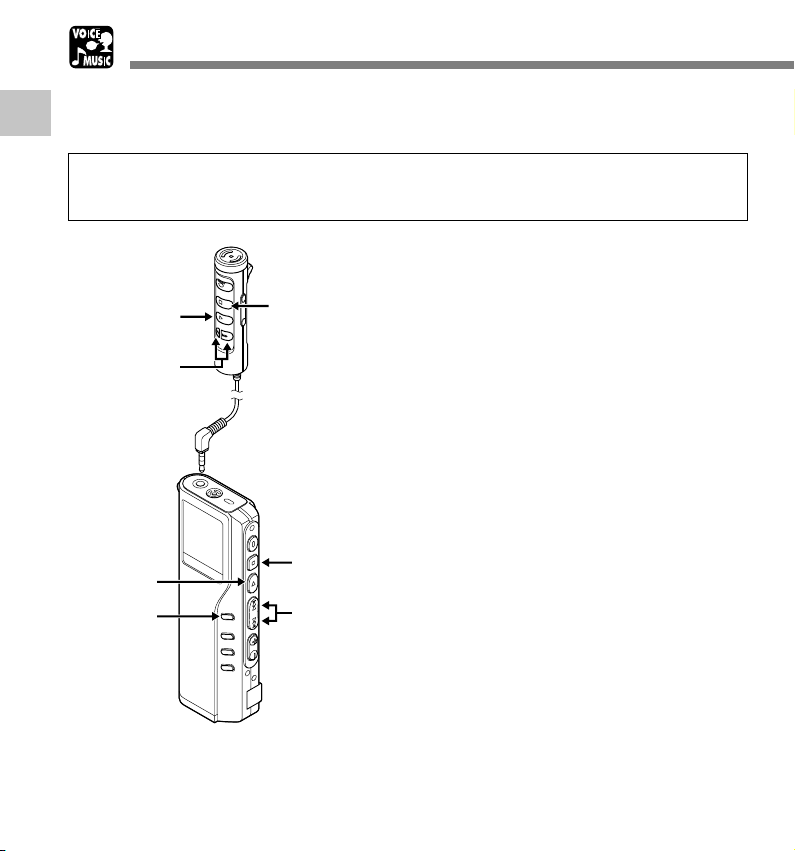
Remote Controller
Microphone
1
8
7
6
5
2
3
4
Display (LCD Panel)
65
1
2
3
4
1
Identification of Parts
7
8
9
0
9
0
!
1 Built-in microphone
2 VOL (+) button
3 VOL (–) button
4 FF (Fast Forward) button
5 REW (Rewind) button
6 PLAY button
7 STOP button
8 REC (Record) button/
REC indicator lamp
9 Clip
0 HOLD switch
! EAR jack
Depending on the product you purchased, the
remote controller microphone may not be included.
For the supplied components, see the descriptions
on the package.
!
1 Battery indicator
2 VCVA (Variable Control Voice
Actuator) indicator
3 WOW indicator
4 Alarm indicator
5 Microphone sensitivity display
6 Record mode indicator
7 Erase lock indicator
8 Repeat, Random play indicator
9 Current file number
0 Total number of recorded files in
the folder
! Character Information display
9
Page 10
Inserting Batteries
1
1
Inserting Batteries
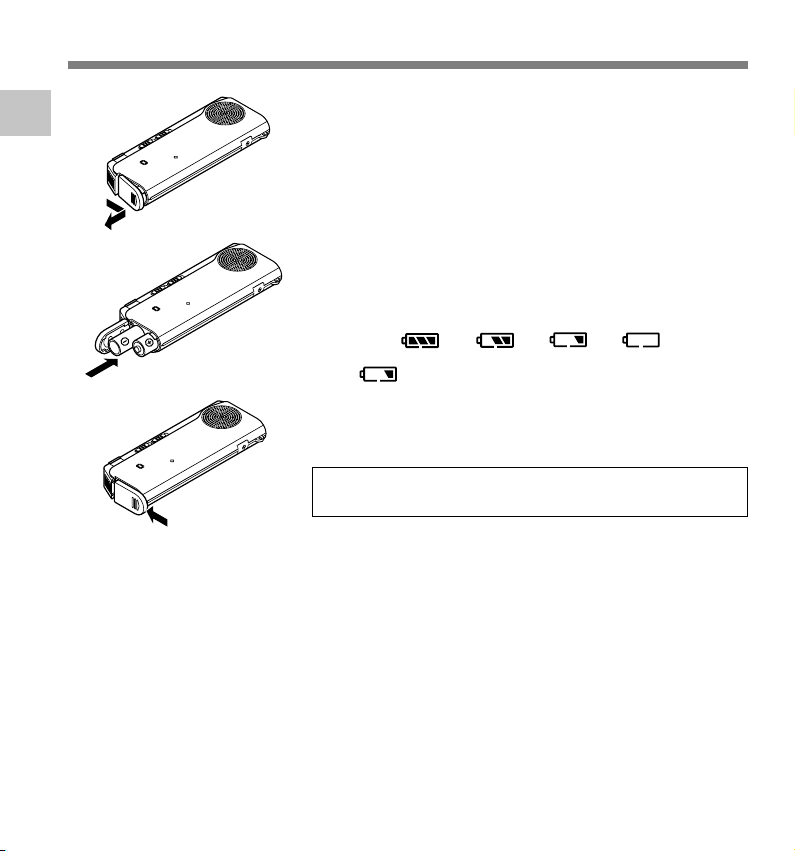
Lightly press down on the arrow and slide the
battery cover open.
1
Insert two AAA alkaline batteries, observing the
correct polarity.
2
Close the battery cover completely.
3
2
3
.................................................................................................................................................................
Notes
• Be sure to stop the recorder before replacing the batteries. Unloading the batteries while the recorder
is in use may corrupt the file. If you are recording into a file and the batteries run out, you will lose your
currently recorded file because the file header will not be able to close. It is crucial to change the batteries
once you see only one Hash mark in the battery icon.
• Be sure to replace both batteries at the same time.
• Never mix old and new batteries, or batteries of different types and/or brands.
• If it takes longer than 1 minute to replace dead batteries, you may have to reset the time when you load
fresh batteries (☞ P.12).
• Remove the batteries if you are not going to use the recorder for an extended period of time.
Replacing batteries
The battery indicator on the display changes as the batteries
lose power.
→ → →
When appears on the display, replace the batteries as
soon as possible.
When the batteries are too weak, the recorder shuts down
and “BATTERY LOW” appears on the display. AAA alkaline
batteries are recommended.
An optional Ni-MH Rechargeable Battery from Olympus
can be used for the recorder (☞ P.59).
10
Page 11
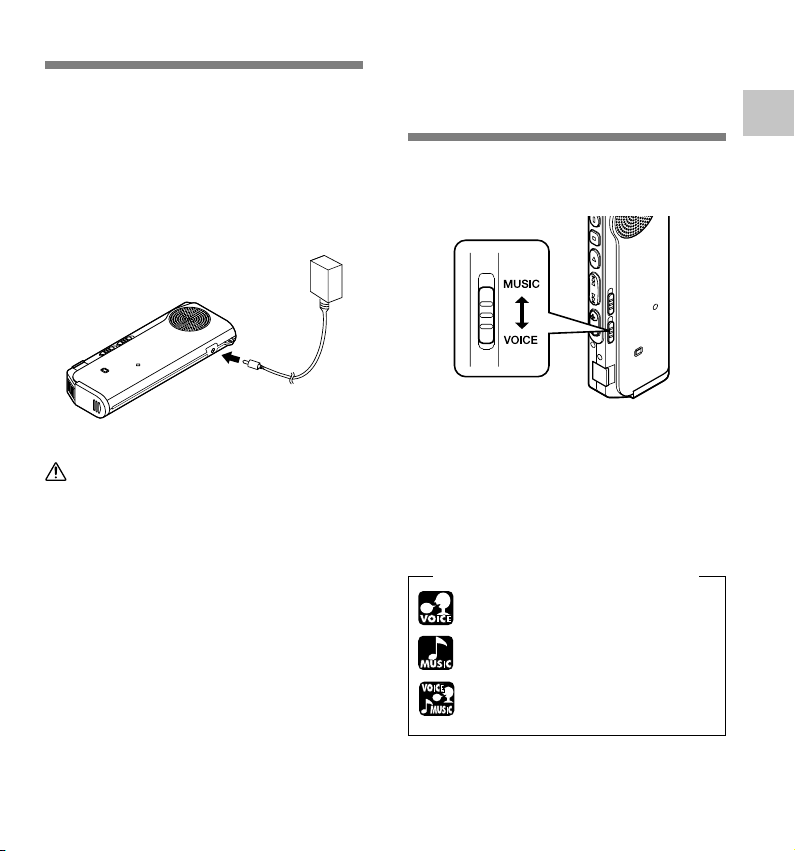
Using the AC Adapter
Switching Between
Plug the optional AC adapter (Olympus Model
A321 or A322) into household power outlet
and connect the power plug to the recorder’s
power connector (DC 3 V) as shown in the
illustration. Always stop recording before
connection. Otherwise it may not be possible
to play back the voice data being recorded.
Warning
• Always stop recording before
connection or disconnection.
• When the AC adapter is not in use,
disconnect the power supply plug from
the power outlet.
• Use only the correct power supply
voltage as indicated on the adapter.
• Do not use the AC adapter when
connecting the recorder to the USB port.
the Voice Recorder
and Music Player
This device can be used as a voice recorder
or as a music player.
Using the mode switch, choose between
VOICE or MUSIC option.
VOICE : For recording or playing back voice
MUSIC: For listening to music files.
files.
Meaning of icons in this manual
Set the mode switch to VOICE before
operating the recorder.
Set the mode switch to MUSIC before
operating the recorder.
Convenient features that can be used
with both the Voice Recorder and
Music Player.
1
Using the AC Adapter/Switching Between the Voice Recorder and Music Player
11
Page 12
Setting Time/Date (TIME&DATE)
If you have set the time and date, information as to when an audio file is recorded is stored
automatically with that file. The time and date should be set to ease file management tasks. The
1
time and date setting is also needed to perform the alarm playback function.
Setting Time/Date (TIME&DATE)
The hour indicator will flash automatically when you load batteries before using the
recorder for the first time, or after the recorder hasn't been used for a long time. Proceed
from step 1.
Set the hour.
1 Press the FF button or REW button to
1
PLAY button
FF/REW
button
PLAY button
(accepts a choice
and moves on to
the next item)
MENU
button
(switching the
data displayed)
When the remote controller microphone is
connected, buttons with the same names as
those on the recorder work analogously.
12
STOP button
STOP
button
(Exits the menu)
FF/REW
button
(alters a choice)
set the hour.
2 Press the PLAY button to accept t h e
hour.
• You can choose between 12 and 24 hour
display by pressing the MENU button
while setting the hour and minute.
Example: 5:45 P.M.
PM 5:45 ←→ 17:45
(Initial setting)
Set the minute.
1 Press the FF button or REW button to
2
set the minute.
2 Press the PLAY button to accept t h e
minute.
Set the year.
1 Press the FF button or REW button to
3
set the year.
2 Press the PLAY button to accept t h e
year.
• You can choose the order of the year,
month, day by pressing the MENU button
while setting them.
Page 13

Example: March 14, 2003
3M 14D 2003Y (Initial setting)
↓
14D 3M 2003Y
↓
2003Y 3M 14D
Set the month.
1 Press the FF button or REW button to
4
set the month.
2 Press the PLAY button to accept t h e
month.
Changing the Time/Date
1
3
1
2
2
3
Follow the same steps starting at step 1 in “Setting Time/Date”
(☞ P.12).
Set the date.
1 Press the FF button or REW button to
5
set the date.
2 Press the PLAY button to accept the
date.
Press the STOP button to close the
menu.
6
..........................................................................
Note
If you press the STOP button during the setup
operation, the recorder will save the items that were
set to that point.
Press and hold the MENU button
for 1 second or longer.
The menu opens (☞ P.31,50).
Press the FF or REW button until “TIME
&DATE” flashes on the display.
Press the PLAY button.
Time/Date screen appears. The hour
indicator flashes, indicating the start of the
Time/Date setup process.
1
Setting Time/Date (TIME&DATE)
13
Page 14

Installing Software
Before you connect the recorder to your PC and use it, you must first install the utility software
from the included Software CD.
1
Applications included with “Voice & Music DM Series Utility Software”
Installing Software
• DSS Player: Recorded voice files can be downloaded to the PC for complete file management and playback
solution.
• Windows Media Player: Music data can be converted into music files and uploaded to the recorder.
• Acrobat Reader is installed on your PC. It is required to view the accompanying manual in PDF format.
Be sure to confirm the following before installation:
• Exit all running applications.
• Eject the floppy disk if you are using one.
• If you are running Windows2000/XP or Mac OS X on the network, you need to log on as an Administrator.
14
Page 15
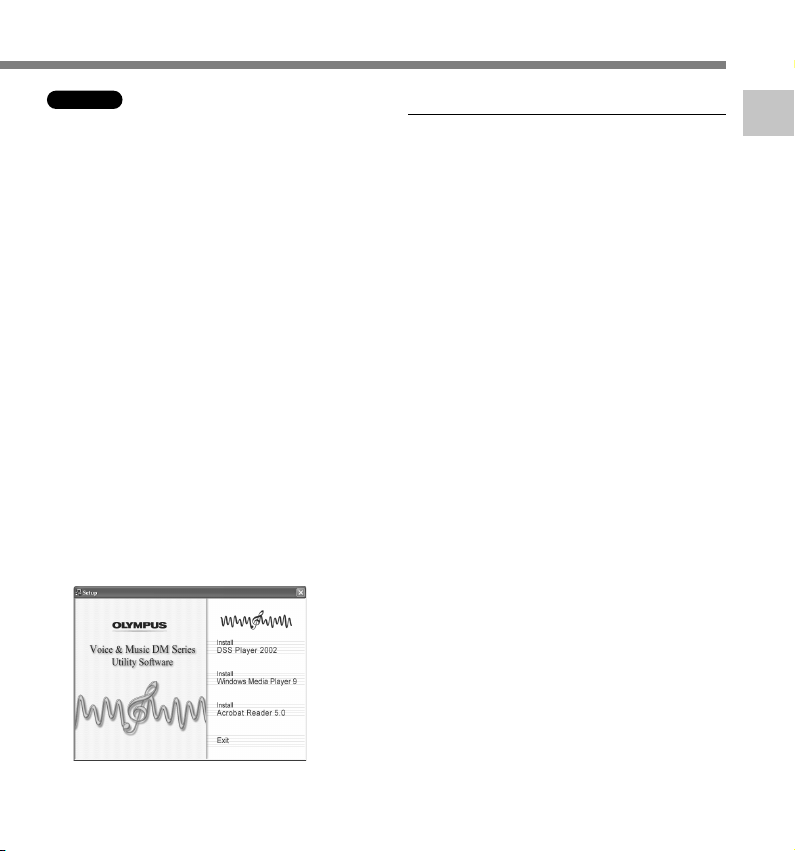
Windows
Insert OLYMPUS Voice & Music DM
Series Utility Software into the CD-
1
ROM drive.
The installation program will start
automatically. Once the program starts,
jump to step 4. If it does not, follow the
procedures in steps 2 and 3.
Click the [Start] button and select
[Run].
2
Enter “D:\setup.exe” in the [Open]
field and click [OK] .
3
This is assuming the CD-ROM drive is D.
The installation Language Selection
dialog box opens.
4
Click the desired language to select it.
Select the necessary software, when
the OLYMPUS Voice & Music DM
5
Series Utility Software opening
screen appears.
Installing DSS Player
Confirm your acceptance of the
terms of the Licensing Agreement.
6
You must accept the terms of the
Licensing Agreement to install DSS
Player. If you accept them, click [Yes].
Register user information.
Register user information. Enter your
7
name, company name, and license ID
number (serial number).
The license ID number is printed on the
license ID card. Click [Next]. A
confirmation dialog box opens, click
[Yes].
Select where to install DSS Player.
This lets you specify the folder in which
8
to install DSS Player. Click [Browse] to
find the desired installation folder. To
accept the default folder, click [Next].
Note
If the installation folder does not exist,
a confirmation dialog box opens to get
your permission to create a folder for
this purpose. Click [Yes].
Select a program menu folder.
You may change the program menu
9
folder to another one, such as [Start Up].
To accept the default folder, click [Next].
Authorizing the start of file
copying.
10
Confirm all “Current Settings”. To accept
them, click [Next].
1
Installing Software
15
Page 16
Installing Software
Note
1
Installing Software
To change the program menu folder or
installation folder, click [Back].
Copy files.
Wait until DSS Player is installed on
11
your PC, then click [Finish].
The screen returns to the opening
screen automatically.
If you would like to install Windows Media
Player at this time, please select “Install
Windows Media Player” and proceed to step
12 below.
Installing Windows Media
Player
Confirm acceptance of the terms
of the Licensing Agreement.
12
You must accept the terms of the
Licensing Agreement to install Windows
Media Player. If you accept them, click
[I Accept].
Installing Windows Media Player.
Select your Privacy Options.
You can set up your privacy options on
13
this screen. If you want to install the
software applying to your environment,
change the check in the checkbox.
To select the default, click [Next].
Customize the Installation
Option.
14
Select the installation options. To select
the default, click [Finish]. Installation is
complete and Windows Media Player
will start up. Close Windows Media
Player to return to the opening screen.
If you would like to install Acrobat Reader at
this time, please select “Install Acrobat
Reader” and proceed to step 15 below.
Install Acrobat Reader
Install Acrobat Reader according
to the directions on the screen.
15
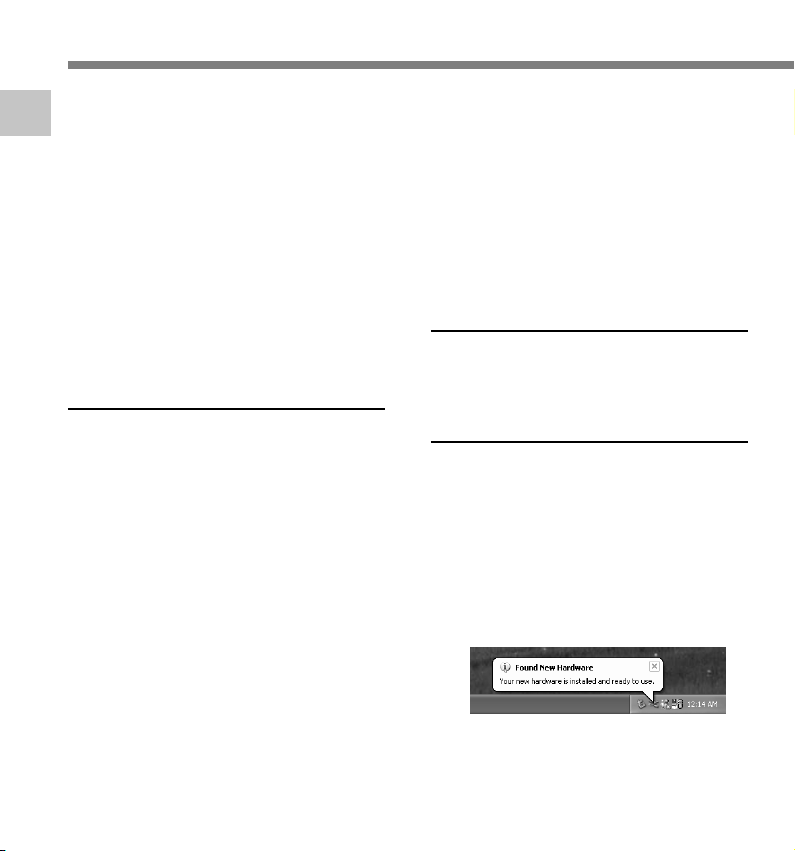
Installing the Device Driver
Connect the recorder to your PC,
referring to “Connecting to Your
16
PC” (☞ P.34).
When you connect the recorder to your
PC for the first time after installing DSS
Player, the recorder's driver will be
installed automatically. If the driver is
installed properly, DSS Player will start
automatically.
16
Page 17
Macintosh
Insert OLYMPUS Voice & Music DM
Series Utility Software into the CD-
1
ROM drive.
Double-click CD icon.
Double-click the desired language to
2
select it.
Double-click the following icon.
(OS 9.x)
3
DSS Player for Mac Installer
(OS X)
DSS Player (for Mac) Installer OS X
Click [Continue] when the DSS
Player for Mac opening screen
4
appears.
Confirm your acceptance of the
terms of the Licensing Agreement.
5
You must accept the terms of the Licensing
Agreement to install DSS Player for Mac.
If you accept them, click [Agree].
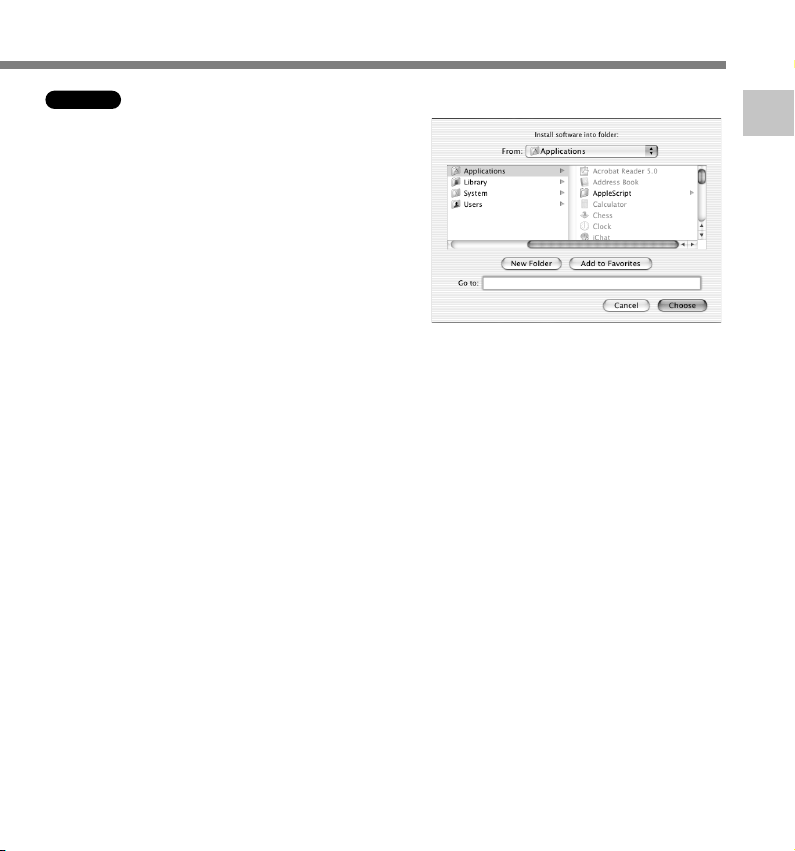
Select where to install DSS Player
for Mac.
6
This lets you specify the folder in which to
install DSS Player for Mac. To accept the
default folder, click [Choose].
Installing DSS Player for Mac.
Completing setup.
Installation has finished. Click [Quit].
7
If you installed the software into the OS
9.x, you need restart your PC after
completing the installation.
1
Installing Software
17
Page 18
When Using the Recorder as a Voice Recorder
b
a
c
f
e
d
Recording
The recorder provides five folders, A, B, C, D and E, and each message recorded in a folder is
saved as a Digital Speech Standard (DSS) file or a Windows Media Audio (WMA) file. These five
2
folders can be selectively used to distinguish the kind of recording; for example, Folder A might
be used to store private information, while Folder B might be dedicated to holding business
Recording
information. Up to 199 messages can be recorded per folder.
Microphone
2
3
Microphone
2
3
1
18
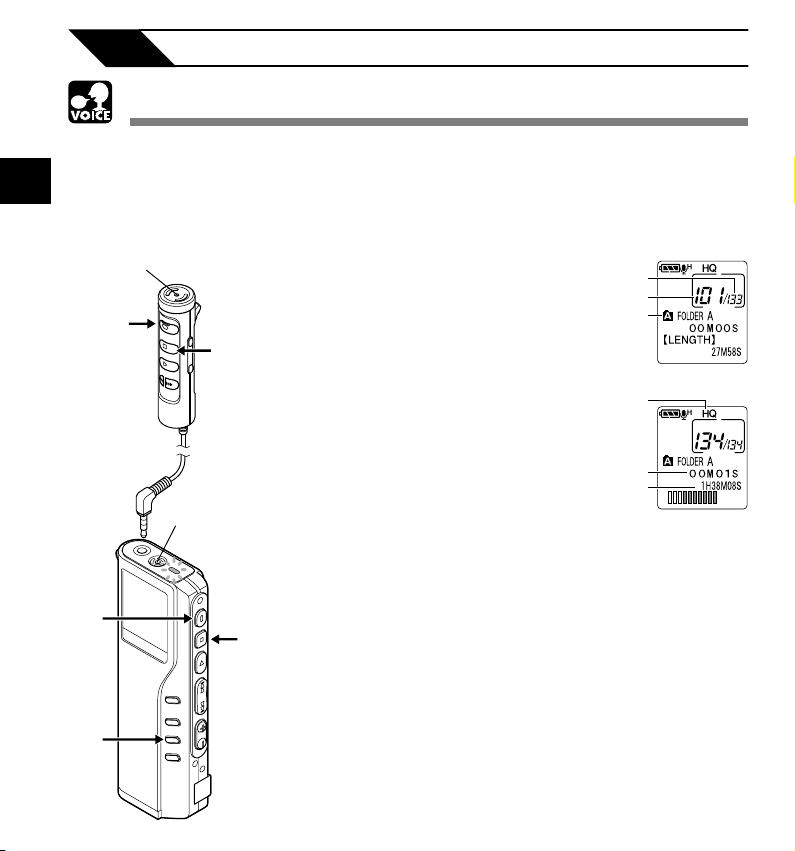
Press the FOLDER button to
choose a folder.
1
The folder name is displayed.
a Total number of recorded files in the
folder
b Current file number
c Current folder
Press the REC button to start
recording.
2
The record/play indicator lamp glows red.
Aim the microphone at the sound source.
When using the remote controller
microphone for recording, the indicator
lamp and internal microphone of the
recorder are switched off.
d Current recording mode
e Recording time
f Remaining recording time
Press the STOP button to stop
recording.
3
Page 19

Recording
Notes
• A beep will sound when remaining recording time
reaches 60 seconds, 30 seconds, and 10 seconds
while recording.
•“MEMORY FULL” or “FOLDER FULL” will be
displayed when the memory or folder capacity is
full. Delete any unnecessary files before recording
any further (☞ P.51) or transfer voice files to your
computer using DSS Player Software.
Recording functions
Pause Recording
Pause
Press the REC button while recording.
➥ “REC PAUSE” will flash on the display.
Resume Recording
Press the REC button again.
➥ Recording will resume at the point of
interruption.
Note
The recorder will time out after 10 minutes when
left in “REC PAUSE”.
2
Recording
19
Page 20

Using the Variable Control Voice Actuator (VCVA)
When the microphone senses that sounds have reached a preset threshold volume level, the
built-in Variable Control Voice Actuator (VCVA) starts recording automatically, and stops when
the volume drops below the threshold level.
The VCVA feature help extend recording time and conserve memory by turning off recording
during silent periods. This helps make the playback, with no lulls or dead space, more efficient
and convenient.
2
Using the Variable Control Voice Actuator (VCVA)
3,5
6
Press and hold the MENU button for
1 second or longer.
1
The menu opens (☞ P.31).
Press the FF or REW button until
“VCVA” flashes on the display.
2
2,4
Press the PLAY button.
The VCVA setup process begins.
3
Press the FF or REW button to choose
between ON and OFF.
4
ON : Will start recording in VCVA mode.
OFF : Will resume recording in normal mode.
20
3,5
1
6
2,4
Press the PLAY button to complete
the setup screen.
5
Press the STOP button to close the
menu.
6
When ON is selected, a VCVA indication will
be displayed on the screen.
Page 21
7
a
b
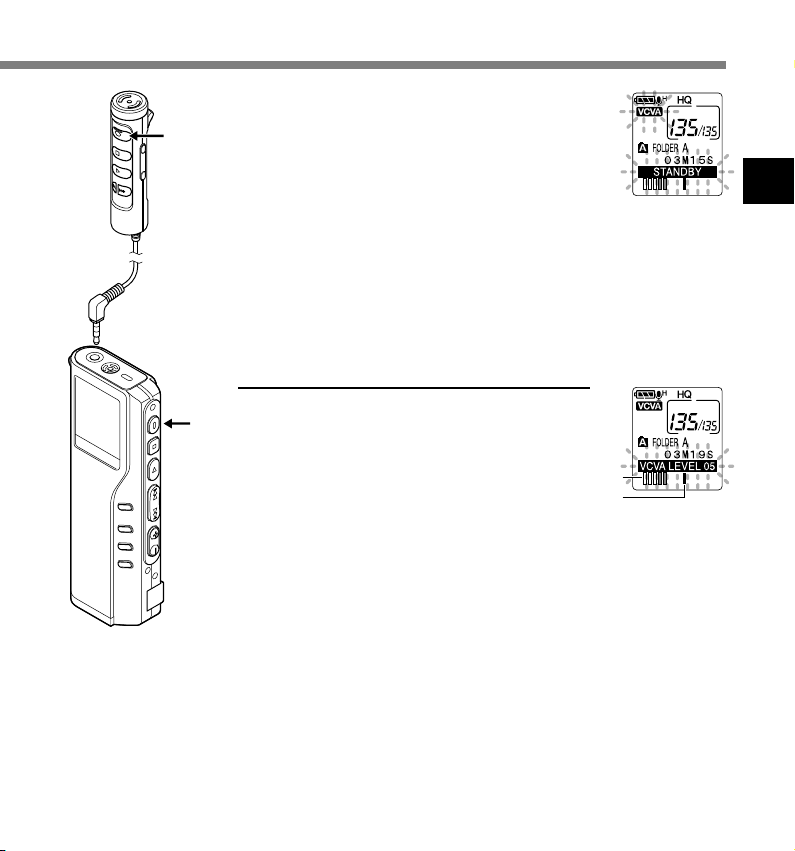
Press the REC button to start recording.
When the sound volume is lower than the
7
preset threshold sound level, recording
automatically stops after 1 sec approximately,
recording automatically pauses after
approximately 1 second, and “STANDBY”
flashes on the display. The record/play indicator
lamp glows when recording starts and flashes
when recording pauses.
* When the remote controller is connected, the REC
indicator lamp on the remote controller lights up but
the record/play indicator lamp on the recorder will
be switched off.
Adjust the start/stop actuation
level
Press the FF or REW button to adjust the
pause sound level during recording.
7
The VCVA level can be set to any of 15 different
values. The higher the value, the more sensitive
the recoder to sounds. At the highest value, even
the faintest sound will activate recording.
The VCVA pause sound level can be adjusted
according to the ambient (background) noise.
a Level meter (varies according to the sound
volume being recorded)
b Start level (moves to the right/left according to
the set level)
................................................................................................................
Notes
• The start/stop actuation level also varies depending on the selected
microphone sensitivity mode (☞ P.24).
• To ensure successful recordings, prior testing and adjustment of the start/
stop actuation level is recommended.
2
Using the Variable Control Voice Actuator (VCVA)
21
Page 22

Recording with External Microphone
To enhance sound quality during recording, use the Remote Controller Microphone or an optional
external microphone. If a stereo microphone is used, recording in SHQ (Stereo High-Quality)
mode is possible. Please note, when a microphone is connected to the jack on the recorder, the
jack functional switch-over is made automatically.
2
Recording with External Microphone
Make sure that the recorder has stopped.
1
Connect to the jack on the recorder.
If an external microphone is connected to the jack on the
2
recorder, the built-in microphone is disabled.
Applicable external microphones
● Remote controller microphone: MR12
MR12 contains a non-directional microphone. With a clip, you can attach
the microphone on your jacket's pocket, etc. This microphone is used to
record your voice or voices of people close to you.
● Noise-Cancellation microphone: ME12 (optional)
(Dictation microphone)
This microphone is used to record your own voice while minimizing
surrounding noise.
● Stereo microphone: ME50S (optional)
When using a stereo microphone, the recorder will switch-over to SHQ
mode automatically and recording in WMA format, noise-free sound can
be accomplished. Stereo recording is only possible in SHQ mode.
..............................................................................................................
Notes
• Do not insert or remove a microphone into or from the jack while recording.
• If an earphone is connected to the remote controller recording is not
possible.
• If an earphone is connected to the remote controller EAR jack while
recording, recording will stop automatically.
22
Page 23

Recording Modes (REC MODE)
You can select from among three recording modes: HQ (High Quality) mode, SP (Standard
Playback) mode and LP (Long Playback) mode.
If an optional stereo microphone is used, the only possible recording mode is SHQ (Stereo High
Quality).
2,4
3
2,4
1
5
Press and hold the MENU button
for 1 second or longer.
1
“REC MODE” will be displayed on the
screen (☞ P.31).
Press the PLAY button.
The recording mode setup process
2
begins.
Press the FF or REW button to
choose from HQ, SP and LP.
3
Press the PLAY button to complete
the setup screen.
4
5
3
Press the STOP button to close the
menu.
5
.......................................................................................................
Note
Choose SHQ/HQ or SP mode for recording meetings or lectures with
crisp clarity.
2
Recording Modes (REC MODE)
23
Page 24

Microphone Sensitivity (MIC SENSE)
Microphone sensitivity is adjustable to meet recording needs.
Press and hold the MENU button
for 1 second or longer.
1
2
Microphone Sensitivity (MIC SENSE)
3,5
6
The menu opens (☞ P.31).
Press the FF or REW button until
“MIC SENSE” flashes on the
2
display.
2,4
Press the PLAY button.
The microphone sensitivity setup process
3
begins.
Press the FF or REW button to
choose between CONFERENCE
4
and DICTATION.
CONFERENCE: High-sensitivity mode
6
24
3,5
1
2,4
DICTATION: Low-sensitivity mode suited
Press the PLAY button to complete
the setup screen.
5
Press the STOP button to close the
menu.
6
.......................................................................................................
Notes
• If you want to record clear or noise-free dictation, select DICTATION
mode and place the microphone 3 to 4 inches from the source.
• If the ambient (background) noise is too loud to get a clear recording
even in DICTATION mode, we recommend that you use an ME12
single directional microphone (sold separately).
that records sounds in all
directions.
for dictation.
Page 25

Playing
b
a
5
3
2
3
1
4
5
2
4
Press the FOLDER button to
choose folder.
1
Press the FF or REW button to
choose the file that you want to
2
play.
If you keep pressing the FF or REW button
in stop mode, the recorder continuously
skips to the beginnings of files.
Press the PLAY button to start
playback.
3
The record/play indicator lamp glows
green.
a Current playback time
b Total recording time of the file being
played
Press the VOL (+) or VOL ( –) button
to select the proper sound volume.
4
The display shows the volume level. You
can choose between 0 to 30.
Press the STOP button at any point
you want to stop the playback.
5
Resume playback by pressing PLAY
button again.
2
Playing
.......................................................................................................
Note
You can listen to audio playback through the earphone connected to
the jack on the recorder or the EAR jack on the remote controller.
25
Page 26

Playing
Playback
Operation
How to Cancel
functions
Fast
Playback
(F.PLAY)
2
Slow
Playing
Playback
(S.PLAY)
Cue
(CUE)
Review
(REVIEW)
Skipping to
beginning
of a file*
*1: As in normal playback, operations such as playback stop, file cueing, and index mark (☞ P.30) insertion are possible in fast
playback and slow playback.
*2: If you keep pressing the FF or REW button in stop mode, the recorder continuously skips to the beginnings of files (F.SKIP/
B.SKIP).
*3: If an index mark is encountered midway, playback begins at that point.
Press the PLAY button once while playing a file.*
➥ The recorder plays back at approximately 50%
faster than normal rate.
Press the PLAY button once while fast playing back.*
➥ The recorder plays back at approximately 25%
slower than normal rate.
Hold the FF button while playing a file.
➥ The recorder stops when it reaches the end of the
file. Continue pressing the FF button to proceed
with the cue from the beginning of the next file.
Hold the REW button while playing a file.
➥ The recorder stops when it reaches the beginning
of the file. Continue pressing the REW button to
proceed with the review from the end of the
previous file.
Press the FF button during playback, fast playback, or
slow playback.*
2
➥ The next file is cued and playback starts at the
original speed.
Press the REW button during playback, fast playback,
or slow playback.*
➥ The file being played is cued and playback starts
at the original speed.
3
3
1
Press the PLAY button 2 times
while fast playing back.
➥ Playback returns to normal rate.
1
Press the PLAY button once while
slow playing back.
➥ Playback returns to normal rate.
Release the FF button.
➥ Replays at the original speed.
Release the REW button.
➥ Replays at the original speed.
Note
If you set Noise Cancel to “LOW” or “HIGH”, you cannot use the Fast Playback and Slow Playback functions.
26
Page 27

Repeat Playback
This function enables repeated playback of part of the file being played. If the continuous playback
function is used together, two or more files can be repeatedly replayed as long as they are in the
same folder.
1
1
2,3
Choose the file for Repeat Playback,
and press the PLAY button.
1
File playback begins.
Press the REPEAT button briefly at
the point you want to start Repeat
2
Playback.
“REPEAT END?” flashes until you
designate the end point.
Press the REPEAT button briefly
again at the position you want
3
Repeat Playback to end.
The recorder repeatedly plays back the
section between the start and the end
positions until you cancel Repeat
Playback.
If continuous playback is set to ON, the
end position can be set to the extent of
the last file in the folder.
2
Repeat Playback
27
Page 28

Repeat Playback
2
Repeat Playback
4
Press the STOP button.
Repeat Playback is cancelled.
4
You can use Fast Playback and Slow Playback functions, insert
and delete index marks, and use the Noise Cancel function.
.......................................................................................................
Notes
• If no end position is designated, the end of the file becomes
automatically the end position. If continuous playback is set to “ON”,
the end of the last file in the folder is set to the end position and then
repeated playback starts.
• If you pass the start or end position by pressing the REW or FF
button, Repeat Playback will be cancelled.
• To use this function, briefly press the REPEAT button. If you hold it 1
second or longer, the Moving Files screen appears.
4
28
Page 29

Noise Cancel Function
If recorded audio is difficult to understand because of noise, adjust the Noise Cancel setting
level. Noise will be reduced in the file when its played back for better sound quality.
Press and hold the MENU button
for 1 second or longer while the file
1
is playing.
Displays currently set Noise Cancel level.
Press the MENU button again to
choose a noise cancel level.
1,2
2
The levels switch in the following rotation,
“OFF” “LOW” “HIGH”.
If the display is already set to Noise Cancel,
start from step 2.
Change the Noise Cancel level within 8
seconds, otherwise the level is set at the
displayed level and the display returns to its
original view.
.......................................................................................................
Notes
• If you set it to “LOW” or “HIGH”, the display flashes the Noise Cancel
level for about 2 seconds when a file is played back.
• If you set Noise Cancel to “LOW” or “HIGH”, the setting remains
valid until it's set to “OFF”.
• If you set Noise Cancel to “LOW” or “HIGH”, you cannot use the
Fast Playback and Slow Playback functions.
• If Noise Cancel is used for files recorder in SHQ, the files will be
played in monaural mode.
2
Noise Cancel Function
29
Page 30
Index Marks
Index marks can be placed in a file during recording or playback to provide and quick and easy
way of keeping track of important sections in the file.
Setting an Index Mark
2
Index Marks
30
1
4
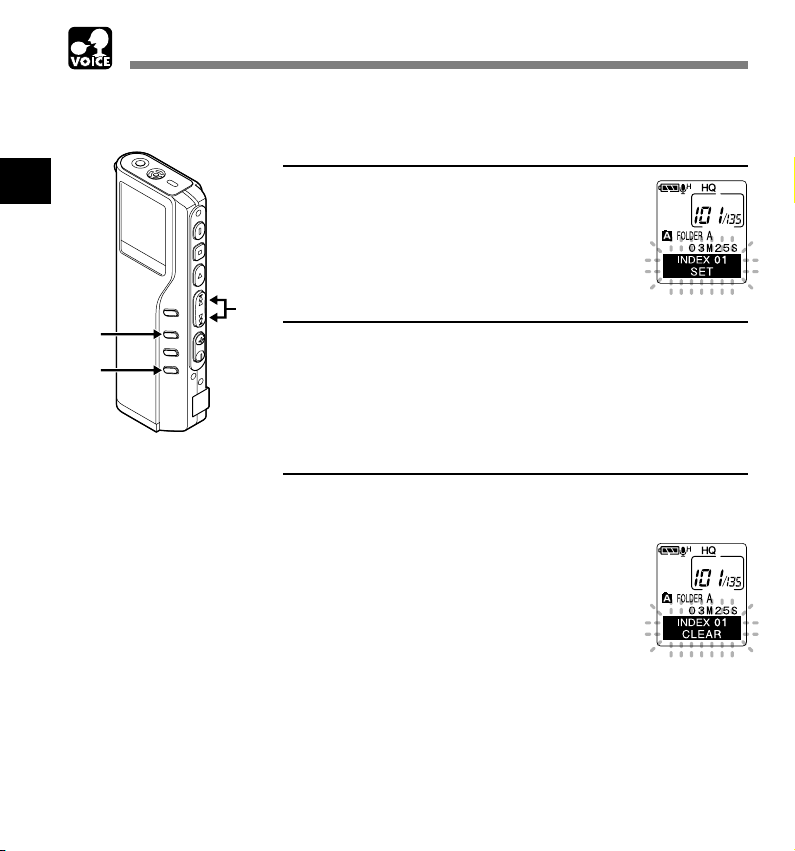
Press the INDEX button during
recording or playback to set an index
1
mark.
An index number appears on the display.
Locating an Index Mark
2
Hold the FF or REW button while playing
a file.
2
The recorder stops for 1 second when it reaches
the index mark.
Clearing an Index Mark
Locate the index mark you want to clear.
3
Press the ERASE button while the index
number appears for approximately 2
4
seconds on the display.
The index mark is erased.
.....................................................................................................................
Notes
• Up to 16 index marks can be set in a file. Attempting to set more index
marks will cause “INDEX FULL” to appear on the display.
• Index marks cannot be set or cleared in a locked file.
• In case of WMA files, index marks can only be placed in files recorded
with Olympus recorders.
Page 31

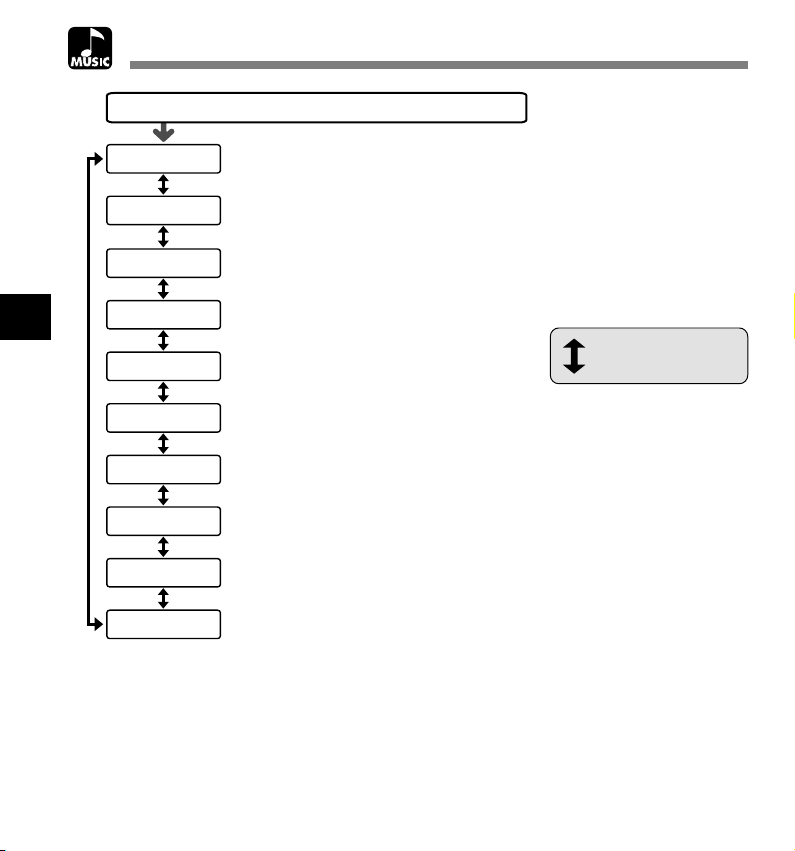
Menu List (VOICE mode)
Press and hold the MENU button for 1 second or longer.
REC MODE
MIC SENSE
LOCK
BACK SPACE
ALL PLAY
TIME&DATE
FORMAT
CONTRAST
BEEP
BACKLIGHT
EXT.INPUT
COMMENT
FOLDER NAME
ALARM
VCVA
Selection from HQ, SP and LP modes.
Mic sense setting (☞P.24). Selection between
CONFERENCE (high-sensitivity mode) and
DICTATION (low-sensitivity mode).
Locking files setting. Selection between ON
(locked) and OFF (unlocked).
Back space setting. Selection from OFF,
1 SEC SKIP and 2 SEC SKIP.
Continuous playback setting. Selection
between ON (enabled) and OFF (disabled).
Time/Date setting. In order of hour, minute,
year, month and day (☞P.12).
Recorder formatting.
LCD contrast adjustment. Adjust the level from
1 to 12.
System sounds setting. Selection between ON
(enabled) and OFF (disabled).
Backlight setting. Selection between ON
(enabled) and OFF (disabled).
EXT.INPUT setting. Selection from AUTO
SELECT, STEREO INPUT and MONAURAL
INPUT.
Assigning file comments.
Folder naming.
Alarm playback setting. Selection between ON
(enabled) and OFF (disabled).
VCVA setting (☞P.20). Switch between ON
(enabled) and OFF (disabled).
2
Menu List (VOICE mode)
Press the FF button
or REW button.
Notes
• Part of the menu is common
with the MUSIC mode.
• If you press the STOP button
or the REC button, during a
menu setup operation, the
recorder will stop and apply
the items that were set to that
point.
• The recorder will stop if you
leave it idle for 3 minutes during
a menu setup operation, when
a selected item is not applied.
31
Page 32

Managing Files on Your PC
Using DSS Player Software
The DSS Player Software can be used to do the following:
• Playback voice files on your PC and on the recorder when connected via USB. Download files
from the recorder to the PC or upload files from the PC to the recorder.
• Change the order of the music files stored in the recorder.
Precautions on using the recorder connected to a PC
3
Using DSS Player Software
● When you are downloading a file from
the recorder or uploading a file to the
recorder, do not remove the USB cable
even if the screen is indicating you can.
Data is still being transferred while the
record/play indicator lamp is blinking.
When removing the USB cable, be sure
to follow the description in ☞P35. If the
USB cable is removed before the drive
is stopped, data may not be
successfully transferred.
● On a PC, do not format the drive of the
recorder. Initialization is not successfully
achieved on a PC. For initialization, follow
the instructions in the menu screen of the
recorder.
● Folder (directory) names displayed by
file management tools such as Explorer
attached to Microsoft Windows and
Finder attached to Mac OS are different
from the folder names settable with the
recorder or DSS player.
● If folders or files stored on the recorder
are moved or renamed by using a file
management tool such as Explorer or
Finder, the order of files may be
changed or files may become
unrecognizable.
● Data can be written or uploaded to the
recorder eventhough the attribute of the
recorder drive is shown as Read-only
by the operating system of the PC.
● As the noise may cause adverse effects
on electronics devices nearby the
recorder, unplug the earphone and
remote controller when you connect the
recorder to a PC.
32
Page 33

Using Online Help
To open Online Help, you have the following options.
(Windows)
• Click the [Start] button, select [All Programs], then [Olympus DSS Player 2002], then click [Help].
• While DSS Player is running, choose [Contents] from the [Help] menu.
• While DSS Player is running, press [F1] on the keyboard.
(Macintosh)
• While DSS Player is running, choose [DSS Player for Mac Help] from the [Help] menu.
Search by Contents
Once the Online Help screen appears, click
the Contents tab.
1
Double-click the icon of the desired topic
heading.
2
The title of the topic is displayed.
Double-click the icon of the desired topic.
An explanation of the topic is displayed.
3
Search by Key word
Once the Online Help screen appears, click
the Index tab.
1
Enter text.
Matcing keywords are located automatically.
2
Choose a topic, then click [Display].
An explanation of the topic is displayed.
3
1
2
3
1
2
3
.................................................................................................................................................................
Note
For more information on menus and operations, refer to Online Help. You will be able to use Online Help after
DSS Player is installed.
3
Using Online Help
33
Page 34

Connecting to Your PC
Be sure to finish installing DSS Player before connecting the recorder.
Connecting to your PC using the USB
cable
Release the HOLD switch.
1
3
Connecting to Your PC
Insert end A of the USB cable to
your PC's USB port or USB hub.
2
Confirm that the recorder is not in
use before attaching end b of the
3
USB cable to the terminal port of
the recorder.
“REMOTE” is displayed on recorder if the
USB cable is connected.
Windows
When the recorder is connected
and “My Computer” is opened, a
removable disk drive is displayed.
If “Add New Hardware Wizard”
appears, cancel the wizard by
pressing the [Cancel] button and
then install DSS Player.
REMOTE
34
Macintosh
If the recorder is connected to Mac OS, an icon with a drive
name of “unlabeled” appears.
Page 35

Disconnecting from Your PC
Windows
Confirm that the record/play indicator lamp on the recorder is not flashing. Rightclick the Removable Disk icon in My Computer and select [Eject].
1
Disconnect the USB cable.
98/98 SE
2
Windows
Click the on the task bar
located at the lower-right corner
1
of the screen. Click [Safely
remove USB Mass Storage
Device-Drive].
It will read [Stop USB Disk-Drive] for
Windows Me. The drive letter will differ
depending on the computer being used.
When the Safe To Remove Hardware window appears, click [OK].
Me/2000/XP
1
2
Disconnect the USB cable.
3
3
Connecting to Your PC
35
Page 36

Connecting to Your PC
Macintosh
Move the icon of the recorder's drive displayed on desktop to trash box by drag
and drop.
1
Disconnect the USB cable.
2
.................................................................................................................................................................
3
Notes
Connecting to Your PC
• NEVER disconnect the USB cable while the record/play indicator lamp is flashing. If you do, the data will be
destroyed.
• Refer to the user's manual for your PC regarding the USB port or USB hub on your PC.
• Be sure that you connect the USB cable either directly to the USB port on your PC or the self-power (AC
adapter connection) USB hub.
• Be sure to push the cable connector all the way in. Otherwise, the recorder may not operate properly.
• Release the HOLD switch.
Connecting to your PC using the cradle
Place the recorder on the cradle
Insert end A of the USB cable to your PC's
USB port or USB hub.
1
Connect the end b of the USB cable to the
cradle.
2
Make sure that the recorder is off, and place
it in the cradle.
3
1 Set the recorder vertically.
36
2
1
Page 37

2 While pushing down the top of the recorder, set
the recorder on the cradle. In this case, make sure
that concavity on the rear of the recorder fits
convexity of the cradle.
“REMOTE” is displayed on recorder if the USB cable
is connected.
Remove the recorder from the cradle
Follow step 1 in “Disconnecting from Your PC” (☞ P.35).
Make sure that the recorder's record/play
indicator lamp isn't flashing, and remove the
1
recorder from the cradle.
Hold the cradle with your hand, and raise the recorder
from the top end to remove it from the hook, as shown
in the illustration.
.................................................................................................................................................................
Notes
• Do not touch the connection point on the front of the cradle (at the low end), as that may cause bad
connection.
• The cradle does not have the recharging function.
3
Connecting to Your PC
37
Page 38

Running DSS Player
Windows
By connecting the recorder to your PC, you can automatically start the application.
Disabling automatic start
Right click the icon in the System Tray in the lower right-hand corner of the
screen, then click Select startup application.
1
3
Select and click [DSS Player 2002].
The check mark on [DSS Player 2002] disappears. For automatic start, select and click DSS
2
Running DSS Player
Player to reinstate again.
Manual start
23
Start Windows.
1
Click the [Start] button, select [All
Programs], then [Olympus DSS Player
2
2002].
Click [Olympus DSS Player 2002].
3
.................................................................................................................................................................
Notes
•
You can not run more than one DSS Player program or multiple copies of the same program simultaneously.
• If you connect the recorder before installing DSS Player, the “Add New Hardware Wizard” dialog box will
open. If this happens, click [Cancel] to exit the wizard, then install DSS Player.
38
2
Page 39

Macintosh
To start, open the “DSS Player for Mac” folder created upon installation and double-click the
icon.
.................................................................................................................................................................
Note
DSS Player for Mac does not have the automatic start function.
3
Running DSS Player
39
Page 40

Using the Recorder as a Music Player
Using the Recorder as a Music Player
The recorder supports music files in MP3 and WMA formats, which can be transferred from the
PC to the corresponding music folder of the recorder.
Using Windows Media Player
Windows
By using Windows Media Player, music
4
files from music CDs can be converted
Using the Recorder as a Music Player
/Using Windows Media Player
(ripped) (☞ P.43) and music files that you
bought from any music distribution sites
can be easily transferred to the recorder
(☞ P.44).
Macintosh
Windows Media Player included with the recorder is for Windows only. Please use your favorite
application software according to your use.
Copyright and copyright protection feature (DRM)
By the Copyright Act, any voice/music files and music CDs downloaded from the Internet without
the copyright holder’s permission may not be reproduced, distributed, publicized/re-publicized
on the Internet, or converted into MP3 or WMA files for the purpose of commercial business or
sale.
A WMA file may be provided with DRM (Digital Right Management) for copyright protection.
DRM limits the file to copy or distribute music files that are converted (ripped) from a music CD
or downloaded from music distribution services. To transfer a WMA file with DRM to the recorder,
you need to use appropriate methods such as Windows Media Player. Copying the music files
with DRM purchased from online music distribution service to a portable device such as this
recorder may be restricted.
Internet
Music CD
40
Page 41

Using Windows Media Player
Windows Media Audio License and Distribution Agreement
• You have acquired an item (“DM-20/10”) that includes software licensed by OLYMPUS from Microsoft Licensing
Inc. or its affiliates (“MS”). Those installed software products of MS origin, as well as associated media, printed
materials, and “online” or electronic documentation (“SOFTWARE”) are protected by copyright laws and international
copyright treaties, as well as other intellectual property laws and treaties. The SOFTWARE is licensed, not sold.
* [Approved alternative text if OLYMPUS does not mention MS in the EULA text: “You have acquired an item(“DM-20/10”)
which includes software licensed by OLYMPUS from one or more software licensors (“OLYMPUS’s Software Suppliers”).
Such software products, as well as associated media, printed materials, and “online” or electronic documentation
(“SOFTWARE”) are protected by copyright laws and international copyright treaties, as well as other intellectual property
laws and treaties.”]
• IF YOU DO NOT AGREE TO THIS END USER LICENSE AGREEMENT (“EULA”), DO NOT USE THE DM-20/10
OR COPY THE SOFTWARE. INSTEAD, PROMPTLY CONTACT OLYMPUS FOR INSTRUCTIONS ON RETURN
OF THE UNUSED DM-20/10(S) FOR A REFUND. ANY USE OF THE SOFTWARE, INCLUDING BUT NOT LIMITED
TO USE ON THE DM-20/10, WILL CONSTITUTE YOUR AGREEMENT TO THIS EULA (OR RATIFICATION OF
ANY PREVIOUS CONSENT).
• GRANT OF LICENSE. The SOFTWARE is licensed, not sold. This EULA grants you the following rights to the
SOFTWARE:
➢ You may use the SOFTWARE only on the “DM-20/10”.
➢ NOT FAULT TOLERANT. THE SOFTWARE IS NOT FAULT TOLERANT. [OLYMPUS] HAS INDEPENDENTLY
DETERMINED HOW TO USE THE SOFTWARE IN THE “DM-20/10”, AND MS HAS RELIED UPON [OLYMPUS] TO
CONDUCT SUFFICIENT TESTING TO DETERMINE THAT THE SOFTWARE IS SUITABLE FOR SUCH USE.
➢ NO WARRANTIES FOR THE SOFTWARE. THE SOFTWARE is provided “ASIS” and with all faults. THE ENTIRE RISK
AS TO SATISFACTORY QUALITY, PERFORMANCE, ACCURACY, AND EFFORT (INCLUDING LACK OF NEGLIGENCE)
IS WITH YOU. ALSO, THERE IS NO WARRANTY AGAINST INTERFERENCE WITH YOUR ENJOYMENT OF THE
SOFTWARE OR AGAINST INFRINGEMENT. IF YOU HAVE RECEIVED ANY WARRANTIES REGARDING THE “DM20/10” OR THE SOFTWARE, THOSE WARRANTIES DO NOT ORIGINATE FROM, AND ARE NOT BINDING ON, MS.
➢ Note on Java Support. The SOFTWARE may contain support for programs written in Java. Java technology is not fault
tolerant and is not designed, manufactured, or intended for use or resale as online control equipment in hazardous
environments requiring fail-safe performance, such as in the operation of nuclear facilities, aircraft navigation or
communication systems, air traffic control, direct life support machines, or weapons systems, in which the failure of Java
technology could lead directly to death, personal injury, or severe physical or environmental damage. Sun Microsystems,
Inc. has contractually obligated MS to make this disclaimer.
➢ No Liability for Certain Damages. EXCEPT AS PROHIBITED BY LAW, MS SHALL HAVE NO LIABILITY FOR ANY
INDIRECT, SPECIAL CONSEQUENTIAL OR INCIDENTAL DAMAGES ARISING FROM OR IN CONNECTION WITH
THE USE OR PERFORMANCE OF THE SOFTWARE. THIS LIMITATION SHALL APPLY EVEN IF ANY REMEDY FAILS
OF ITS ESSENTIAL PURPOSE...
➢ Limitations on Reverse Engineering, Decompilation, and Disassembly. You may not reverse engineer, decompile, or
disassemble the SOFTWARE, except and only to the extent that such activity is expressly permitted by applicable law
not withstanding this limitation.
➢ SOFTWARE TRANSFER ALLOWED BUT WITH RESTRICTIONS. You may permanently transfer rights under this EULA
only as part of a permanent sale or transfer of the “DM-20/10”, and only if the recipient agrees to this EULA. If the
SOFTWARE is an upgrade, any transfer must also include all prior versions of the SOFTWARE.
➢
EXPORT RESTRICTIONS. You acknowledge that the SOFTWARE, or any part thereof, or any process or service that is
the direct product of the SOFTWARE(the foregoing collectively referred to as the “Restricted Components”) are of U.S.
origin. You agree to comply with all applicable international and national laws that apply to these products, including the
U.S. Export Administration Regulations, as well as end-user, end-user and destination restrictions issued by U.S. and
other governments. For additional information on exporting Microsoft products, see http://www.Microsoft.com/exporting/.
4
Using Windows Media Player
41
Page 42

Window Names (Windows Media Player)
1
4
Window Names (Windows Media Player)
7
8
34 56 ! 0
2
9
42
1 Features taskbar
2 Quick Access box
3 Play button
4 Stop button
5 Previous button
6 Next button
7 Seek slider
8 Rewind button
9 FastFoword button
0 Volume slider
! Mute button
Page 43

Copying Music from CD
Windows
Insert CD into the CD-ROM drive
and start Windows Media Player.
1
From the Features taskbar, click
the [Copy from CD] menu.
2
Click [Find Album Info] of Quick
Access box.
3
If Internet connectivity is available, CD
information is searched.
Put a check mark on the music file
that you want to copy.
4
Click [Copy Music] of Quick Access box.
Files copied to a PC are stored in WMA format. Music files copied are categorized by artist,
5
album, genre, etc. and added to the play list.
4
Copying Music from CD
43
Page 44

Transferring Music File to the Recorder
Windows
Connect the recorder to a PC and
start Windows Media Player.
1
From Features taskbar, click [Copy
to CD or Drive].
2
Select the play list to be transferred
to the recorder and put the check
3
marks on the music file that you
4
want to transfer.
The order of music pieces can be changed
Transferring Music File to the Recorder
by Drag & Drop of the music file in the
play list displayed.
From Item on Device, select the drive corresponding to the recorder.
The recorder is recognized as a Removable Disk. If you skip to step 6 below, the music file is
4
transferred to the music A folder (root of the device's drive).
Select the destination folder.
To transfer to the music A folder; select the blank part*1 from Item on Device.
5
To transfer to the music B folder; select DSS_FLDF.
Click the [Copy] button of Quick Access box.
The file is transferred to the recorder. The music file transferred to the recorder is displayed
6
in Item on Device.
................................................................................................................................................................
Note
Copying the music files with DRM purchased online music distribution service to a portable device such as
this recorder may be restricted.
blank part
*1
44
Page 45

Music Playback
b
a
d
c
The recorder has 2 music folders; music A and music B, to store music files transferred from a
PC. 2 folders can be conveniently used depending on the genre of music files.
Insert the stereo earphone or remote
controller into the jack on the recorder.
1
If a remote controller is used, insert the
earphone into the EAR jack.
4
3
1
1
4
2
5
Press the FOLDER button to choose a
folder.
2
Press the FF or REW button to choose
the music file that you want to play.
3
The filename and the length of the music track
will be displayed.
If you hold the FF or REW, files are skipped
continuously.
a File being selected
b Length of the file being selected
Press the PLAY button to start playback.
The record/play indicator lamp will flash in
4
green, and the title and artist name will scroll
on the left side of the screen.
c Title and artist name of the file being played
d Play time of the file being played
3
Press the VOL (+) or VOL (–) button
to select the proper sound volume.
5
5
The display shows the volume level. You can
choose between 0 to 30.
4
Music Playback
The next track will automatically start once the
track being played is finished.
45
Page 46

Music Playback
Notes
• The proper bit rate for playback on the recorder
are 32 kbps to 160 kbps for both the MP3 and
WMA format.
• It is possible to play back files with different bit
rates (converting the bit rate within one file);
however, the displayed time may not be accurate.
• When using the earphones, do NOT set the
volume too high. Listening at very high volume
may lead to hearing loss.
• It is possible to listen to music without the
earphones, using the internal speakers; however,
4
the sound will be in mono, not stereo.
• Up to 40 characters per track can be used to list
Music Playback
title and artist name.
Playback Functions
Skip a Music File While Playing It
Press the FF button while playing a music file.
➥ The recorder skips to the beginning of
the next track and starts playing it.
Press the REW button while playing a music file.
➥ The recorder skips to the beginning of
the current track and starts playing it.
Fast Forward
Hold the FF button while playing a music file.
➥ Will fast-forward to the end of the track
and stop at the beginning of the next
track.
Canceling Fast Forward
Release the FF button where you want the
music file played.
➥ Playback begins.
Fast Rewind
Hold the REW button while playing a music file.
➥ Will rewind to the beginning of the
current track and resume playback.
Canceling Fast Rewind
Release the REW button where you want the
music file played.
➥ Playback begins.
Canceling Playback
Press the PLAY or STOP button.
➥ Will stop playing the current track.
46
Page 47
Various Playback Features
Equalizer
The equalizer mode is selected in the following order each time the EQ (equalizer) button is
pressed.
→ FLAT → ROCK → POP→ JAZZ → USER
You can set/create your own equalizer preferences using the user equalizer (USER EQ) function.
• If no action is taken within 2 seconds after the EQ button is pressed, the display will revert to the normal
indication.
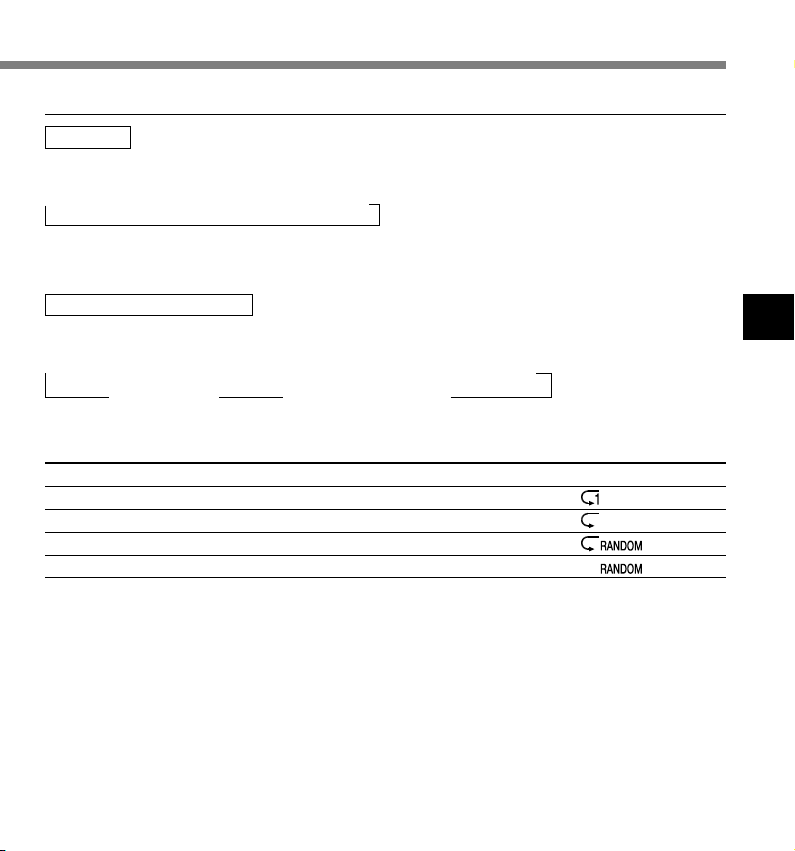
Repeat and Random Play
The play mode is switched in the following order each time the REPEAT button is pressed more
than 1 second with playback stopped or is pressed during playback.
→ Normal play → Single music repeat play → All music repeat play
Random play ← Random repeat play ←
4
Music Playback
Function
Normal play
Single music repeat play
All music repeat play
Random repeat play
Random play
Explanation
Will stop after all the tracks been played.
Will play one track repeatedly.
Will play all the tracks from first to last continuously.
Will continuously play all the tracks in random order.
Will stop after all the tracks have been played in random order.
Display indicator
No indication
47
Page 48

Increasing the WOW effect (WOW EFFECT)
The recorder has WOW, an audio processing technology that increases sound clarity and bass
quality. The level of the surround effect (SRS 3D) and the bass effect (TruBass) may be individually
adjusted through three levels of processing or turned off.
Surround effect (SRS 3D):Increases the sound-expansion effect and sound clarity.
Bass effect (TruBass): Enriches the low sounds.
Press and hold the MENU button
for 1 second or longer.
1
“WOW EFFECT” will be displayed on the
2,4
4
Increasing the WOW effect (WOW EFFECT)
3
2,4
screen (☞ P.50).
Press the PLAY button.
The surround effect setup process begins
2
(SRS 3D).
Press the FF or REW button to
select the surround effect level.
3
The levels switch in the following rotation,
“OFF” “LOW” “MIDDLE” “HIGH”.
Press the PLAY button to register
your setting.
4
The bass effect setup process begins
(TruBass).
SRS 3D
48
1
3
Page 49

Tru Bass
6
5
7
Press the FF or REW button to select
the bass effect level.
5
The levels switch in the following rotation,
“OFF” “LOW” “MIDDLE” “HIGH”.
Press the PLAY button to save your
setting.
6
Press the STOP button to close the
menu.
7
If you wish to set other menus, press and
hold the PLAY button for more than 1
second without pressing the STOP button.
If you want to change the WOW level while listening to sound,
press the MENU button for at least 1 second during playback
and then start procedure from step 3.
4
Increasing the WOW effect (WOW EFFECT)
6
7
5
.......................................................................................................
Notes
• Both the surround effect and bass effect are OFF as the WOW default
settings.
• If there is no action taken within 8 seconds during the WOW settings
during playback, the recorder will revert to normal play.
•“ WOW ” will be displayed on the screen if the surround effect or the
bass effect is set.
• The WOW effect will be weakened if the bit rate for any music file is
less than 32 kbps.
• Depending on the song, the WOW effect will be heightened, and
may sound like noise. If this happens, adjust the WOW effect.
49
Page 50
Menu List (MUSIC mode)
Press and hold the MENU button for 1 second or longer.
WOW EFFECT
USER EQ
LOCK
4
Menu List (MUSIC mode)
TIME&DATE
FORMAT
CONTRAST
BEEP
BACKLIGHT
FOLDER NAME
ALARM
Set the surround effect and bass effect (☞
P.48).
Register your equalizer settings.
Locking files setting. Selection between ON
(locked) and OFF (unlocked).
Time/date setting. In order of hour, minute,
year, month and day (☞ P.12).
Recorder formatting.
LCD contrast adjustment. Adjust the level from
1 to 12.
System sounds setting. Selection between ON
(enabled) and OFF (disabled).
Backlight setting. Selection between ON
(enabled) and OFF (disabled).
Folder naming.
Alarm playback setting. Selection between ON
(enabled) and OFF (disabled).
Press the FF button
or REW button.
Notes
• Part of the menu is common
with the VOICE mode.
• If you press the STOP button
or the REC button, during a
menu setup operation, the
recorder will stop and apply
the items that were set to that
point.
• The recorder will stop if you
leave it idle for 3 minutes during
a menu setup operation, when
a selected item is not applied.
50
Page 51

Features Common to the Voice Recorder and Music Player
a
Erasing
Erasing One File at a Time
A selected file can be erased from a folder.
Press the FOLDER button to
choose a folder.
1
Press the FF or REW button to
choose the file you want to erase.
2
a File to be erased
2
Press the ERASE button.
“FILE ERASE?” flashes on the display for
3
approximately 8 seconds.
Press the ERASE button once more
when “FILE ERASE?” is flashing.
4
The display changes to "FILE ERASE!"
and erasing will start.
2
“ERASE DONE” is displayed when the file is
1
erased. File numbers will be reassigned
automatically.
3,4
5
Erasing
{
51
Page 52

Erasing
a
Erase All Files from a Folder
All files in a folder can be erased simultaneously, except for locked files.
Press the FOLDER button to
choose the folder you want to
1
erase all files.
a Folder from which to erase files
Press the ERASE button for 3
seconds or longer.
2
“ALL ERASE?” flashes on the display for
approximately 8 seconds.
Erasing
52
1
2,3
Press the ERASE button once more
when “ALL ERASE?” is flashing.
3
The display changes to “ALL ERASE!” and
erasing will start.
“ERASE DONE” is displayed when the files
are erased. Locked files are reassigned file
numbers in ascending order.
{
5
Page 53

Notes
• An erased file cannot be restored.
• If the ERASE button is not pressed within the 8 seconds after “FILE ERASE?” or “ALL ERASE?” starts
flashing, the recorder will revert to stop status.
• Completion of erasing may take 10 seconds. Never do anything during this period because data may be
corrupted. Battery removal and AC adapter setting/removal are not permissible, whether or not the battery
is set in the recorder.
5
Erasing
53
Page 54

Hold
Setting the HOLD switch to the HOLD position.
If you set the recorder to HOLD status by sliding
the HOLD switch in the direction of the arrow, the
current conditions will be preserved, and all buttons
and switches except the HOLD switch will be
disabled. This feature is useful when the recorder
has to be carried in a bag or pocket.
Remember to reset the HOLD switch when using
the recorder.
Running state when HOLD is set
1: State of the recorder, 2: HOLD of the recorder, 3: HOLD of the remote controller, 4: Button
operation on the recorder, 5: Button operation on remote controller
2
5
Hold
1
STOPS
Running
On
On
Off
On
On
Off
3
Not
connected
Off
On
Not
connected
Off
On
4
The display goes out after “HOLD”
blinks for 2 seconds.*
The display goes out after “HOLD”
blinks for 2 seconds.*
Normal operation
If HOLD is applied during playback
(recording), operation is disabled with the
playback (recording) state unchanged.*
If HOLD is applied during playback
(recording), operation is disabled with the
playback (recording) state unchanged.*
Normal operation
1
1
2
2
5
Normal operation. If the recorder
stops after button operation, the
display goes out 20 seconds later.
Button operation on the remote controller
is invalid.
Normal operation. If the recorder
stops after button operation, the
display goes out 20 seconds later.
Button operation on the remote controller
is invalid. However, the REC lamp is lit
while the recorder is recording.
*1: Pressing any button makes clock display blink for 2 seconds but the recorder does not start.
*2: The recorder stops when playback completes or recording terminates due to no memory space.
Note
The alarm will sound at the scheduled time even if the recorder is set to hold. The recorder begins to play the
file associated with the alarm when you press any button.
54
Page 55

Using the Recorder as a Reader/Writer
Using the Recorder as a Reader/Writer
With the recorder connected to your PC, you can download data from the memory to your PC
and upload data stored on your PC to the memory.
• You will need to install the Olympus DSS Player Software if you are using Windows 98/ 98SE.
Example: Copying Data from PC to Recroder using Explorer or Finder
Start Windows.
1
Connecting the recorder to your PC.
For the connection procedure, refer to “Connecting to Your PC using the USB cable”
2
(☞ P.34).
Open the Explorer or Finder window.
The recorder will appear as a removable drive icon.
3
Copy the data.
While the data are being written or copied, the record/play indicator lamp on the recorder will
4
flash.
Before disconnecting the recorder from your PC, refer to “Disconnecting from Your PC”
(☞ P.35).
................................................................................................................................................................
Note
NEVER disconnect the USB cable while the record/play indicator lamp is flashing. If you do, the data will be
destroyed.
6
Using the Recorder as a Reader/Writer
55
Page 56

Alarm Message List
Message
BATTERY LOW
LOCK ON
INDEX FULL
INDEX CAN’T
BE ENTERED
FOLDER FULL
OVER-FLOW
COMMENT
CAN’T BE
7
ENTERED
Alarm Message List
MEMORY
ERROR
LICENCE
MISMATCH
MEMORY FULL
Meaning
Low battery
power
Erase-locked
Index full
File not
supporting index
Folder full
Maximum number
Too many
characters input
File not
supporting
comment
Error in the
internal flash
memory
Illegally copied
file
Zero remaining
memory
Explanation
Battery power is getting low.
Tried to delete a locked file.
The file is full of index marks
(maximum of 16 marks).
Tried to incorporate WMA file
index marks into the music
files or the files not recorded
with the recorder.
The folder is full of files
(maximum of 199 files).
The destination folder already
has the maximum number of
files (199).
Exceeds the maximum number
of characters that can be
registered.
Tried to incorporate comments
into WMA files.
Error in the internal memory.
The music files copied illegally.
No remaining internal memory.
Action
Replace with new batteries
(☞ P.10).
Unlock the file.
Erase index marks that are no
longer required (☞ P.30).
You can incorporate index
marks into the voice files
recorded with the recorder or IC
recorders from Olympus only.
Erase unnecessary files (☞ P.51).
Erase unnecessary files (☞ P.51).
Reduce the number of characters
within the limit. Up to 12
characters can be used for a
folder name.
Up to 100 characters can be used
for a file comment.
You can incorporate comments
into the voice files recorded with
the recorder or IC recorders
from Olympus only.
This is a malfunction, so go to the
store where you purchased the
recorder or an Olympus service
station for repair.
Delete the file (☞ P.51).
Erase unnecessary files (☞ P.51).
56
Page 57

Message
NO FILE
FORMAT
ERROR
SAME FILE
SYSTEM
ERROR
Meaning
No file
Formatting error
Same named file
System error
Explanation
No files were found in the
folder.
There was an error while
formatting the recorder's
memory.
Tried to create or store a file
that has same name as a file
in the folder.
System error detected in the
recorder.
Action
Select another folder.
Reformat the memory.
Change the file name.
This is a mulfunction. Contact
the place of purchase or
Olympus Service Center for
repair.
7
Alarm Message List
57
Page 58

Troubleshooting
Symptom
Nothing appears
on the display
Won’t start
Unable to record
No playback tone
heard
Unable to erase
Noise heard
during playback
Recording level
too low
7
Troubleshooting
Unable to set
index marks
Won’t work with
AC adapter
Cannot find the
downloaded file
Cannot find the
recorded voice
Probable cause
The batteries are not loaded properly.
The batteries are dead.
The recorder is in HOLD mode.
The recorder is in HOLD mode.
The batteries are dead.
Low remaining internal flash memory.
The maximum number of files has been
reached.
MUSIC mode is active.
The earphone is connected.
The VOLUME button is set to 0.
The file is locked.
The recorder was shaken during recording.
The recorder was placed near a cell phone
or fluorescent lamp while recording or
during playback.
The microphone sensitivity is too low.
The maximum number of index marks (16)
has been reached.
The file is locked.
A non-standard AC adapter is being used.
The destination folder for downloading was
other than the music A folder.
VOICE mode is active.
MUSIC mode is active.
Wrong folder.
Action
Verify polarity is correct.
Replace with new batteries (☞ P.10).
Release the recorder from HOLD
(☞ P.54).
Release the recorder from HOLD
(☞ P.54).
Replace with new batteries (☞ P.10).
Erase unnecessary files (☞ P.51).
Check another folder.
Switch to VOICE mode (☞ P.11).
Unplug the earphones to use the
internal speaker.
Adjust the VOLUME button.
Unlock the file.
Move the recorder.
Set the microphone sensitivity to
CONFERENCE mode and try again
(☞ P.24).
Erase unnecessary index marks
(☞ P.30).
Unlock the file.
Use the Olympus A321 (for US,
Canada) or A322 (for Europe except
U.K) AC adapter (Optional).
Copy the music file into the music A
folder.
Switch to MUSIC mode (☞ P.11).
Switch to VOICE mode (☞ P.11).
Switch to the right folder.
58
Page 59

Accessories
Specifications
(optional)
Stereo Microphone: ME50S
To create stereo recodings in WMA format
with clear sound and reduced noise.
Noise-Cancellation microphone: ME12
(Dictation microphone)
Used to get crisp recordings of your own voice
by reducing the effects of ambient noise.
AC adapter: A321 (US and Canada) or A322
(Europe except U.K.)
Ni-MH Rechargeable Battery Charger: BU400
Charger for AA batteries (1 to 4) or 1 to 2
AAA batteries.
Ni-MH Rechargeable Battery: BR401
High-efficiency rechargeable long life
batteries.
Connecting cord: KA232*
Use to connect the microphone jack of this
unit to a radio or other sound source.
Plug adapter: PA3
A mini plug adapter to connect 2.5 mm miniplug devices such as microphone to the
recorder 3.5 mm mini-jack.
* Use this accessory with the PA3 plug adapter.
For the Digital Voice Recorder
Recording format
DSS (Digital Speech Standard)
WMA (Windows Media Audio)
Input level –70 dBv
Sampling frequency
SHQ mode: 44.1 kHz
HQ mode: 44.1 kHz
SP mode: 12 kHz
LP mode: 8 kHz
Overall frequency response
SHQ mode: 300 to 8,000 Hz
HQ mode: 300 to 7,000 Hz
SP mode: 300 to 5,000 Hz
LP mode: 300 to 3,000 Hz
Recording time
DM-20 (128 MB)
SHQ mode: 4 hours 20 minutes
HQ mode: 8 hours 45 minutes
SP mode: 20 hours 55 minutes
LP mode: 44 hours 45 minutes
DM-10 (64 MB)
SHQ mode: 2 hours 10 minutes
HQ mode: 4 hours 20 minutes
SP mode: 10 hours 25 minutes
LP mode: 22 hours 20 minutes
Alkaline battery life
Recording: Approx. 16 hours
Playback: Approx. 9 hours
Ni-MH Rechargeable Battery life
Recording: Approx. 12 hours
Playback: Approx. 8 hours
7
Accessories (optional)
/Specifications
59
Page 60

Specifications
For the Digital Music Player
Compatible data format
WMA, MP3 format
Sampling frequency
44.1 kHz
Frequency band
20 to 20,000 Hz
Playback time
DM-20 (128 MB)
100 to 340 minutes
DM-10 (64 MB)
50 to 170 minutes
(Time may vary depending on the bit rate
of the music data.)
Maximum headphone output
5mW + 5mW (at load of 32 Ω)
Alkaline battery life
Approx. 10 hours
Ni-MH Rechargeable Battery life
Approx. 8 hours
7
Specifications
Common specifications
Recording medium
Built-in flash memory
128 MB (DM-20)
64 MB (DM-10)
Speaker
Built-in ø23 mm round dynamic speaker
MIC/EAR/REMOTE jack
ø3.5 mm mini-jack, impedance MIC 2kΩ,
EAR 8Ω or more
Maximum working output (3 V DC)
180 mW or more (8 Ω speaker)
Input power requirement
Rated voltage: 3 V
Batteries: Two AAA Alkaline batteries
(LR03 or R03) or Two Ni-MH
rechargeable batteries
External power supply: AC adapter
External dimensions
109.5 x 39.5 x 15 mm
(without protrusions)
Weight
85 g (including alkaline batteries)
* Specifications and design are subject to
change without notice.
* Battery life is measured by Olympus. It
varies greatly according to the type of
batteries used and the conditions of use.
60
Page 61

Technical Assistance And Support
The following are contact information for technical support for Olympus recorders and software
only.
◆ Technical Hotline Number in the U.S. and Canada
1-888-553-4448
◆ User Support E-mail address in the U.S. and Canada
distec@olympus.com
◆ Technical Hotline Number in Europe
Toll free number
00800 67 10 83 00
available for Austria, Belgium, Denmark, Finland, France, Germany, Italy, Luxemburg,
Netherlands, Norway, Portugal, Spain, Sweden, Switzerland, United Kingdom
Charged numbers for the Rest of Europe
+49 180 567 1083
+49 40 23773 899
◆ User Support E-mail address in Europe
dss.support@olympus-europa.com
7
Technical Assistance And Support
61
Page 62

63
7
 Loading...