

Page 1

OWNER'S MANUAL
A030A01TB-GAT
Operation
Maintenance
Specifications
A030A01TB
All information in the Owner's Manual is current at the time of publication. Hyundai reserves the right to make
changes at any time as part of our policy of continual product improvement may be carried out.
This manual applies to all Hyundai models and includes descriptions and explanations of optional as
well as standard equipment. As a result, you may find material in this manual that does not apply to your
specific vehicle.
Please note that some models are equipped with Right-Hand Drive (RHD). The explanations and illustrations for
some operations in RHD models are opposite of those written in this manual.
Page 2

A040A01A-AAT
FOREWORD
Thank you for choosing Hyundai. We are pleased to welcome you to the growing number of
discriminating people who drive Hyundais. The advanced engineering and high-quality construction of each Hyundai we build is something of which we're very proud.
Your Owner's Manual will introduce you to the features and operation of your new Hyundai. It is
suggested that you read it carefully since the information it contains can contribute greatly to the
satisfaction you receive from your new car.
The manufacturer also recommends that all service and maintenance on your car be performed
by an authorized Hyundai dealer. Hyundai dealers are prepared to provide high-quality service,
maintenance and any other assistance that may be required.
A050A04A-AAT
HYUNDAI MOTOR COMPANY
Note: Because future owners will also need the information included in this manual, if you sell this
Hyundai, please leave the manual in the vehicle for their use. Thank you.
!
CAUTION:
Severe engine and transaxle damage may result from the use of poor quality fuels and
lubricants that do not meet Hyundai specifications. You must always use high quality fuels
and lubricants that meet the specifications listed on Page 9-4 in the Vehicle Specifications
section of the Owner's Manual.
Copyright 2005 Hyundai Motor Company. All rights reserved. No part of this publication may be
reproduced, stored in any retrieval system or transmitted in any form or by any means without the
prior written permission of Hyundai Motor Company.
Page 3

A020A01A-AAT
RESPONSIBILITY FOR MAINTENANCE
The maintenance requirements for your new Hyundai are found in Section 5. As the
owner, it is your responsibility to see that all maintenance operations specified by the
manufacturer are carried out at the appropriate intervals. When the vehicle is used
in severe driving conditions, more frequent maintenance is required for some
operations. Maintenance requirements for severe operating conditions are also
included in Section 5.
Page 4

A070A01A-GAT
Modification of components may void the manufacturer's warranty
Your Hyundai should not be modified in any way. Modifications may adversely affect
the safety, durability and performance of your Hyundai. Components which are
subjected to modification or are added to the vehicle resulting in consequential
damage are not covered by the vehicle manufacturer's warranty.
!
CAUTION: MODIFICATIONS TO YOUR HYUNDAI
A080A01S-AAT
TWO-WAY RADIO OR CELLULAR TELEPHONE INSTALLATION
Your vehicle is equipped with electronic fuel injection and other electronic components. It is possible for an improperly installed/adjusted two-way radio or cellular
telephone to adversely affect electronic systems. For this reason, we recommend
that you carefully follow the radio manufacturer's instructions or consult your Hyundai
dealer for precautionary measures or special instructions if you choose to install one
of these devices.
Page 5
A090A01A-AAT
SAFETY AND VEHICLE DAMAGE WARNING
This manual includes information titled as WARNING, CAUTION and NOTE.
These titles indicate the following:
!
WARNING:
This indicates that a condition may result in harm, serious injury or death to
you or other persons if the warning is not heeded. Follow the advice provided
with the warning.
!
CAUTION:
This indicates that a condition may result in damage to your vehicle or its
equipment if the caution is not heeded. Follow the advice provided with the
caution.
NOTE:
This indicates that interesting or helpful information is being provided.
Page 6

A100A01L-GAT
GUIDE TO HYUNDAI GENUINE
PARTS
1.What are Hyundai Genuine Parts?
Hyundai Genuine Parts are the same
parts used by Hyundai Motor Company to manufacture vehicles. They
are designed and tested for the
optimum safety, performance, and
reliability to our customers.
2. Why should you use genuine parts?
Hyundai Genuine Parts are engineered and built to meet rigid original manufacturing requirements.
Using imitation, counterfeit or used
salvage parts are not covered under
the Hyundai New Vehicle Limited
Warranty or any other Hyundai warranty. In addition, any damage to or
failure of Genuine Hyundai Parts
caused by the installation or failure
of an imitation, counterfeit or used
salvage part is not covered by
Hyundai Motor Company.
3. How can you tell if you purchasing
Hyundai Genuine Parts?
Look for the Hyundai Genuine Parts
Logo on the package (see below).
The export specifications are written in English only.
Hyundai Genuine Parts are only
sold through authorized Hyundai
Dealership and Service Center.
A100A03L
A100A01L
A100A02L A100A04L
Page 7

TABLE OF CONTENTS
SECTION PAGE
1. FEATURES OF YOUR HYUNDAI ....................................................................... 1-1
2. DRIVING YOUR HYUNDAI .................................................................................. 2-1
3. WHAT TO DO IN AN EMERGENCY ................................................................... 3-1
4. CORROSION PREVENTION & APPEARANCE CARE ...................................... 4-1
5. VEHICLE MAINTENANCE REQUIREMENTS..................................................... 5-1
6. DO-IT-YOURSELF MAINTENANCE ................................................................... 6-1
7. EMISSION CONTROL SYSTEMS ....................................................................... 7-1
8. CONSUMER INFORMATION .............................................................................. 8-1
9. VEHICLE SPECIFICATIONS ............................................................................... 9-1
10. INDEX ................................................................................................................ 10-1
1
2
3
4
5
6
7
8
9
10
Page 8

YOUR VEHICLE AT A GLANCE
B250A01TB-GAT
INSTRUMENTS AND CONTROLS (LEFT-HAND DRIVE)
B250A01TB
Page 9

YOUR VEHICLE AT A GLANCE
1. Headlight Leveling Switch (If installed)
2. Front Fog Light Switch (If installed)
3. Multi-Function Light Switch
4. Instrument Cluster
5. Horn and Driver's Airbag (If installed)
6. Windshield Wiper/Washer Switch
7. Digital Clock
8. Hazard Warning Light
9. Audio System (If installed)
10.Passenger's Airbag (If installed)
11.Glove Box
!
CAUTION:
When installing a container of liquid air freshener inside a vehicle, do not place it near the instrument cluster nor
on the instrument panel pad surface. If there is any leakage from the air freshener onto these areas (instrument
cluster, instrument panel pad or air ventilator), it may damage these parts.If the liquid from the air freshener does
leak onto these areas, wash them with water immediately.
12.Hood Release Lever
13.Fuse Box
14.Audio Remote Control Switch (If installed)
15.Heating/Air Conditioning Control Panel
(If installed)
16.Cigarette Lighter
17.Ashtray
18.Front Drink Holder
19.Shift Lever (If installed)
20.Parking Brake Lever
21.Rear Drink Holder
Page 10

YOUR VEHICLE AT A GLANCE
B250B01TB-GAT
INSTRUMENTS AND CONTROLS (RIGHT-HAND DRIVE)
B250B01TB
Page 11
YOUR VEHICLE AT A GLANCE
1. Glove Box
2. Passenger's Airbag (If installed)
3. Audio System (If installed)
4. Hazard Warning Light
5. Digital Clock
6. Windshield Wiper/Washer Switch
7. Horn and Driver's Airbag (If installed)
8. Instrument Cluster
9. Multi-Function Light Switch
10. Headlight Leveling Switch (If installed)
11. Rear Drink Holder
!
CAUTION:
When installing a container of liquid air freshener inside a vehicle, do not place it near the instrument cluster nor
on the instrument panel pad surface. If there is any leakage from the air freshener onto these areas (instrument
cluster, instrument panel pad or air ventilator), it may damage these parts. If the liquid from the air freshener does
leak onto these areas, wash them with water immediately.
12. Parking Brake Lever
13. Shift Lever (If installed)
14. Front Drink Holder
15. Ashtray
16. Power Outlet (If installed)
17. Heating/Air Conditioning Control Panel
(If installed)
18. Audio Remote Control Switch (If installed)
19. Fuse Box
20. Hood Release Lever
Page 12
YOUR VEHICLE AT A GLANCE
B255A01TB-GAT
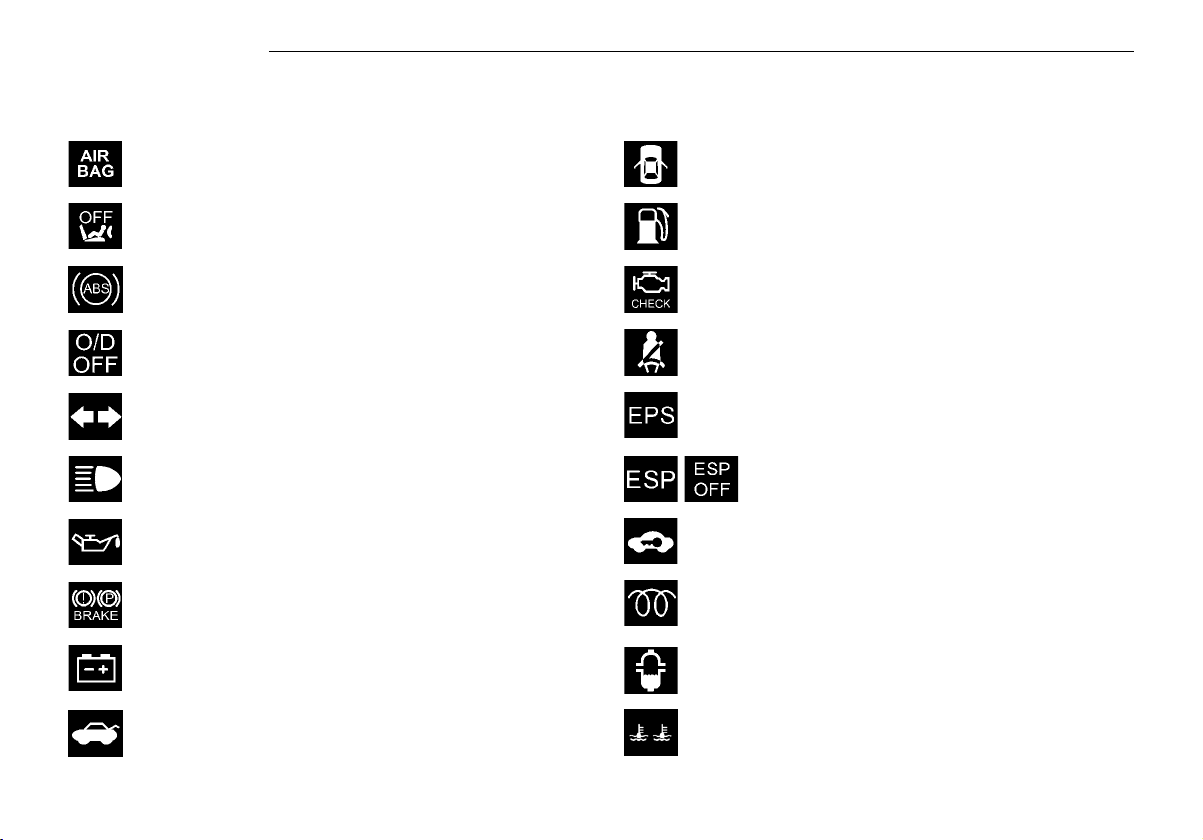
INDICATOR SYMBOLS ON THE INSTRUMENT PANEL
SRS (Airbag) Service Reminder
Indicator
Passenger's Front Airbag OFF
Indicator Light (If Installed)
Door Ajar Warning Light and Chime
Low Fuel Level Warning Light
ABS Service Reminder Indicator
O/D OFF Indicator
(Automatic transaxle only)
Turn Signal Indicator Lights
High Beam Indicator Light
Low Oil Pressure Warning Light
Parking Brake/Brake Fluid Level
Warning Light
Charging System Warning Light
Tail Gate Open Warning Light
* A detail explanations of these items will be found on page 1-50
Malfunction Indicator Light
Seat Belt Warning Light
Electric Power Steering System (EPS)
Warning Light
Electronic Stability Program Indicator
Lights (If Installed)
Immobilizer Warning Light
Diesel Pre-heat Indicator Light (Diesel only)
Fuel Filter Warning Light (Diesel only)
Engine Coolant Temperature Indicator
Page 13

1. FEATURES OF YOUR HYUNDAI
Fuel Recommendations ...................................................................1-2
Breaking in Your New Hyundai ........................................................1-3
key (Immobilizer system) .................................................................1-4
Door locks (Theft-alarm system) .....................................................1-7
Power windows .............................................................................. 1-12
Seat ................................................................................................1-13
Seat Belt ......................................................................................... 1-21
Child restraint system ....................................................................1-28
Supplemental restraint (AIRBAG) system ..................................... 1-36
Instrument cluster and indicator lights ............................................ 1-46
Warning Light and Indicator ............................................................ 1-50
Trip computer .................................................................................1-59
Multi-Function Light Switch ............................................................1-61
Windshield wiper/Washer Switch ...................................................1-63
Sunroof ........................................................................................... 1-69
Mirror .............................................................................................. 1-73
Hood Release ................................................................................ 1-77
How to use luggage Room ............................................................. 1-80
Heating and cooling control ............................................................ 1-86
Stereo sound system ..................................................................... 1-95
Audio system .................................................................................1-97
Antenna ........................................................................................1-120
1
Page 14

1- 2 FEATURES OF YOUR HYUNDAI
B010A01O-GAT
FUEL RECOMMENDATIONS
Use Unleaded Gasoline
B010A01TB
Unleaded gasoline with a Pump Octane
Rating of 87 (Research Octane Number
91) or higher must be used in Hyundai
vehicle. If leaded gasoline is used, it
will cause the catalytic converter to
become ineffective and the emission
control system to malfunction. This
can also result in increased maintenance expense. To avoid accidental
use of leaded fuel, the large nozzle
used with leaded gasoline at service
stations can not be inserted into fuel
tank opening of Hyundai vehicle.
NOTE:
o For some countries, Hyundai ve-
hicles are designed to use leaded
gasoline. When you are going to
use leaded gasoline, ask to
Hyundai dealer whether leaded
gasoline in your vehicle is available or not.
o Octane Rating of leaded gaso-
line is same with unleaded one.
Use Diesel
Diesel fuel of 52 to 54 cetane is used in
Hyundai vehicle. If two types of diesel
fuel are available, use summer or winter fuel properly according to the following temperature conditions.
o Above -5°C (23°F) ... Summer type
diesel fuel.
o Below -5°C (23°F) ... Winter type
diesel fuel.
Watch the fuel level in the tank very
carefully : If the engine stops through
fuel failure, the circuits must be completely purged to permit restarting.
!
CAUTION:
o Do not let any gasoline or water
enter the tank. This would make
it necessary to drain it out and to
bleed the lines to avoid jamming
the injection pump and damaging the engine.
o In winter, in order to cut down
incidents due to freezing, paraffin oil may be added to the fuel if
the temperature drops to below 10°C. Never use more than 20%
paraffin oil.
B010B01A-AAT
What About Gasohol?
Gasohol (a mixture of 90% unleaded
gasoline and 10% ethanol or grain
alcohol) may be used in your Hyundai.
However, if your engine develops
driveability problems, the use of 100%
unleaded gasoline is recommended.
Fuels with unspecified quantities of
alcohol, or alcohols other than ethanol,
should not be used.
Page 15

FEATURES OF YOUR HYUNDAI 1- 3
B010D01S-AAT
Do not Use Methanol
Fuels containing methanol (wood alcohol) should not be used in your
Hyundai. This type of fuel can reduce
vehicle performance and damage components of the fuel system.
!
CAUTION:
Your Hyundai's New Vehicle Limited Warranty may not cover damage to the fuel system and performance problems that are caused by
the use of methanol or fuels containing methanol.
B010E01A-AAT
Gasolines for Cleaner Air
To help contribute to cleaner air,
Hyundai recommends that you use
gasolines treated with detergent additives, which help prevent deposit formation in the engine. These gasolines
will help the engine run cleaner and the
Emission Control System performance.
B010F01A-AAT
Operation in Foreign Countries
If you are going to drive your Hyundai
in another country, be sure to:
o Observe all regulations regarding
registration and insurance.
o Determine that acceptable fuel is
available.
B020A01S-GAT
BREAKING IN YOUR NEW
HYUNDAI
During the First 2,000 Km (1,200
Miles)
(Gasoline Engine)
No formal "break-in" procedure is required with your new Hyundai. However, you can contribute to the economical operation and durability of your
Hyundai by observing the following
recommendations during the first 2,000
km (1,200 miles).
o Don't drive faster than 88 km/h (55
mph).
o While driving, keep your engine
speed (rpm, or revolutions per
minute) between 2,000 rpm and
4,000 rpm.
o Use moderate acceleration. Don't
start, depress the accelerator pedal
fully.
o For the first 300 km (200 miles), try
to avoid hard stops.
o Don't lug the engine (in other words,
don't drive so slowly in toohigh a
gear that the engine "bucks": shift to
a lower gear).
o Whether going fast or slow, vary
your speed from time to time.
o Don't let the engine idle longer than
3 minutes at one time.
o Don't tow a trailer during the first
2,000 km (1,200 miles) of operation.
Page 16

1- 4 FEATURES OF YOUR HYUNDAI
B020B01FC-GAT
BREAKING IN YOUR NEW
HYUNDAI
During the First 1,000 Km (600
Miles)
(Diesel Engine)
No formal "break-in" procedure is required with your new Hyundai. However, you can contribute to the economical operation and durability of your
Hyundai by observing the following
recommendations during the first 1,000
km (600 miles).
o While driving, keep your engine
speed (rpm, or revolutions per
minute) within 3,000 rpm.
o While driving, keep under three quar-
ters of maximum speed.
o Use moderate acceleration. Don't
start, depress the accelerator pedal
fully.
o For the first 300 km (200 miles), try
to avoid hard stops.
o Don't lug the engine (in other words,
don't drive so slowly in too-high a
gear that the engine "bucks": shift to
a lower gear).
o Whether going fast or slow, vary your
speed from time to time.
o Don't let the engine idle longer than
3 minutes at one time.
o Don't tow a trailer during the first
1,000 km (600 miles) of operation.
B030A01A-AAT
KEYS
B030A01E
For greater convenience, the same key
operates all the locks in your Hyundai.
However, because the doors can be
locked without a key, carrying a spare
key is recommended in case you accidentally lock one key inside the car.
B030B01A-AAT
Record Your Key Number
B030B01E
A code number is stamped on the
number plate that came with the keys
to your Hyundai. This key number
plate should not be left with the keys
but kept in a safe place, not in the
vehicle. The key number should also
be recorded in a place where it can be
found in an emergency.
If you need additional keys, or if you
should lose your keys, your authorized
Hyundai dealer can make new keys if
you can supply the key number.
Page 17

FEATURES OF YOUR HYUNDAI 1- 5
B880A01A-GAT
IMMOBILIZER SYSTEM
(If Installed)
The immobilizer system is an anti-theft
device, designed to deter automobile
theft.
B880B04A-GAT
Keys
AX10020A-1
All of the locks fitted to the vehicle are
operated by the same key. However,
since it is possible to lock the doors
without the use of the key, care should
be exercised to ensure that the key
does not become locked inside the
vehicle by mistake.
NOTE:
If you make your own duplicate key,
you will not be able to cancel the
system or start the engine.
!
CAUTION:
When starting the engine, do not use
the key with other immobilizer keys
around. Otherwise the engine may
not start or may stop soon after it
starts.
Keep each key separately not to have
any malfunction after you receive
your new vehicle.
B880C02A-GAT
Key Numbers
AX10030A-1
The vehicle key number is recorded
upon a metal tag attached to the keys
when the vehicle is first delivered to
you.
The key number should be recorded
and kept in a safe place in case the
need to order further keys arises. New
keys are available from any Hyundai
dealer by quoting the relevant key number.
In the interest of security, the metal tag
attached to the keys which bears the
key number should be removed from
the key ring after you receive your new
vehicle. In addition, key numbers cannot be provided by Hyundai for security
reasons.
If you need additional keys or if you
should lose your keys, your authorized
Hyundai dealer can make new keys.
Page 18
1- 6 FEATURES OF YOUR HYUNDAI
B880D02A-GAT
Limp home procedures
HNF2011
In case the immobilizer warning indicator blinks for five seconds when the
ignition key is turned to "ON" position,
this indicates that the immobilizer system is out of order. And you cannot
start the engine without the limp home
procedures with ignition key.
The following procedure is how to start
the engine with the function of the limp
home. (0, 1, 2, 3 as a sample password).
NOTE:
You can get the limp home password when the vehicle is first delivered to you. If you do not have the
password, consult your authorized
Hyundai dealer.
1. To set the password you may turn
the ignition key "ON" and then turn
it "OFF" according to the digit numbers, then the immobilizer indicator
will blink along with the operation of
the ignition key. For example, turn
the ignition key once for digit number "1", and twice for "2", and so on.
However, for the digit number "0",
you must turn the ignition key for 10
times.
2. Wait for 3~10 seconds.
3. You may set the remaining number
of digits by following the same procedures 1 and 2.
4. If all of four digits have been tried
successfully, turn the ignition key
"ON" and check that the immobilizer indicator illuminates. From this
time, you have to start your engine
within 30 seconds. If you start your
engine after 30 seconds, your engine will not start.
NOTE:
If the engine dies while driving after
limp home procedure, you can start
your engine within 8 seconds without limp home procedure again.
5. If the immobilizer indicator blinks for
five seconds, you have to try the
limp home procedure again from
the beginning.
After doing the limp home procedure,
you have to consult with your authorized Hyundai dealer as soon as possible.
!
CAUTION:
o If you fail to try the limp home
procedure with the sequence of
three times, you have to wait for
about one hour to do the limp
home procedure again.
o If you cannot start your engine in
spite of limp home procedure,
have your vehicle towed by an
authorized Hyundai dealer.
Page 19

FEATURES OF YOUR HYUNDAI 1- 7
B040A02Y-AAT
DOOR LOCKS
!
WARNING:
o Unlocked doors can be danger-
ous. Before you drive away (especially if there are children in
the car), be sure that all the doors
are securely closed and locked
so that the doors cannot be inadvertently opened from the inside.
This helps ensure that doors will
not be opened accidentally. Also,
when combined with the proper
use of seat belts, locking the
doors helps keep occupants from
being ejected from the car in case
of an accident.
o Before opening the door, always
look for and avoid oncoming traffic.
o In case of accident, the door is
unlocked automatically (If Installed).
B040B01A-AAT
Locking and Unlocking Front
Doors With a Key
UNLOCK
LOCK
HTB056
o The door can be locked or unlocked
with a key.
o Lock the door by turning the key
toward the front of the vehicle and
unlock it by turning the key toward
the rear.
B040C01FC-GAT
Locking From the Outside
HTB062
The doors can be locked without a key.
To lock the doors from the outside, first
push the inside lock switch to the
"LOCK" position, so that the red mark
on the switch is not visible, then close
the door.
The door will not lock if the key is left in
the ignition switch when the front doors
close. This is normal. (If installed)
NOTE:
o When locking the door this way,
be careful not to lock the door
with the ignition key left in the
vehicle.
Page 20

1- 8 FEATURES OF YOUR HYUNDAI
o To protect against theft, always
remove the ignition key, close all
windows, and lock all doors and
tail gate when leaving your vehicle unattended.
B040D01FC-GAT
Locking From the Inside
LOCK
UNLOCK
HTB057
To lock the doors from the inside, simply close the door and push the lock
switch to the "LOCK" position. When
this is done, neither the outside nor the
inside door handle can be used.
NOTE:
When the door is locked, the red
mark on the switch is not visible and
the character "LOCK" on the switch
is visible.
B040E04A-AAT
CHILD-PROTECTOR
REAR DOOR LOCK
HTB058
Your Hyundai is equipped with a "childprotector" rear door lock assembly.
When the lock mechanism is engaged,
the rear door cannot be opened from
the inside. It's use is recommended
whenever there are small children in
the rear seat.
To engage the child-protector feature
so that the door cannot be opened from
the inside, move the child-protector
lever to the " " position and close the
door. Move the lever to the " " position when normal door operation is de-
sired.
If you wish to be able to open the door
from the outside, the outside door
handle will function normally.
B040G01FC-GAT
Central Door Lock (If Installed)
HTB212
Page 21
FEATURES OF YOUR HYUNDAI 1- 9
The central door locking is operated by
pushing the driver's door lock switch
toward the front or rear of the vehicle.
If the passenger and rear doors are
open when the switch is pushed, the
door will remain locked when closed.
NOTE:
o When pushing the switch toward
the rear, all doors and tail gate
will unlock.
When pushing the switch toward
the front, all doors and tail gate
will lock.
o When the door is unlocked, the
red mark on the switch is visible
and the character "LOCK" on the
switch is visible.
o The central door locking is oper-
ated by turning the key (with theftalarm system: driver's door and
passenger's door, without theftalarm system: driver's door only)
toward the front or rear of the
vehicle.
B070A01A-AAT
THEFT-ALARM SYSTEM
(If Installed)
This system is designed to provide
protection from unauthorized entry into
the car. This system is operated in
three stages: the first is the "Armed"
stage, the second is the "Alarm" stage,
and the third is the "Disarmed" stage.
If triggered, the system provides an
audible alarm with blinking of the turn
signal lights.
B070B01O-GAT
Armed Stage
B070B01TB
Park the car and stop the engine. Arm
the system as described below.
1) Remove the ignition key from the
ignition switch.
2) Make sure that the engine hood and
tail gate are locked.
3) Lock the doors using the transmitter
of the keyless entry system.
After completion of the steps above,
the turn signal lights will blink once to
indicate that the system is armed.
NOTE:
1) If any door, tail gate or engine
hood remains open, the system
will not be armed.
2) If this happens, rearm the system
as described above.
!
CAUTION:
Do not arm the system until all
passengers have left the car. If the
system is armed while a
passenger(s) remains in the car,
the alarm may be activated when
the remaining passenger(s) leaves
the car.
Page 22

1- 10 FEATURES OF YOUR HYUNDAI
B070C01FC-GAT
Alarm Stage
The alarm will be activated if any of the
following occurs while the car is parked
and the system is armed.
1) A front or rear door is opened without using the transmitter.
2) The tail gate is opened without using the transmitter.
3) The engine hood is opened.
The alarming horn will sound and the
turn signal light will blink continuously
for 27 seconds (E.C only/ Except E.C
3 times). To turn off the system, unlock
the door or tail gate with the transmitter.
B070D01TB-AAT
Disarmed Stage
HTB202
The system will be disarmed when the
driver's or passenger's door is unlocked by depressing the button on the
transmitter.
After completion of the step above, the
turn signal lights will blink twice to
indicate that the system is disarmed.
NOTE:
Once the system has been disarmed, it can not be rearmed except
by repeating the arming procedures.
!
CAUTION:
Only the transmitter can disarm the
armed stage. If the transmitter does
not disarm the system, it is necessary to take the following steps;
1. Unlock the door with the key,
which will cause, the alarm to be
activated.
2. Insert the key in the ignition key
cylinder and turn the ignition key
to "ON" position.
3. Wait for 30 seconds.
After completing the steps above,
the system will be disarmed.
Page 23

FEATURES OF YOUR HYUNDAI 1- 11
B070F01TB-GAT
Keyless Entry System
(If Installed)
Locking doors
1. Close all doors.
2. Push the button on the transmitter.
3. At the same time all doors lock, the
turn signal lights will blink once to
indicate that the system is armed.
Unlocking doors
1. Push the button on the transmitter.
2. At the same time all doors unlock,
the turn signal light will blink twice to
indicate that the system is disarmed.
B070E01TB-GAT
Replacing the battery
When the transmitter's battery begins
to get weak, it may take several pushes
on the button to lock or unlock the
doors, and the LED will not light. Replace the battery as soon as possible.
Battery type : CR1220
Replacement instructions:
HTB053
1. Remove the screw with a phillips
screwdriver.
2. Carefully separate the case with a
flat-head screwdriver as shown in
the illustration.
HTB054
3. Remove four screws back side of the
built-in circuit.
Battery
HTB055
4. Remove the old battery from the
case and note the polarity. Make
sure the polarity of the new battery
is the same (+side facing up), then
insert it in the transmitter.
Page 24

1- 12 FEATURES OF YOUR HYUNDAI
B050A01A-AAT
WINDOW GLASS
HTB257
To raise or lower the window, turn the
window regulator handle clockwise or
counterclockwise.
!
WARNING:
When opening or closing the windows, make sure your passenger's
arms, hands and body are safely
out of the way.
B060A01E-AAT
POWER WINDOWS (If Installed)
(1)
HTB064
The power windows operate when the
ignition key is in the "ON" position. The
main switches are located on the
driver's armrest and control the front
and rear windows on both sides of the
vehicle. The windows may be opened
by depressing the appropriate window
switch and closed by pulling up the
switch. To open the window on the
driver's side, press the switch(1) down.
The window moves as long as the
switch is operated.
HTB066
In order to prevent operation of the
passenger front and rear windows, a
window lock switch is provided on the
armrest of the driver's door. To disable
the power windows, press the window
lock switch.
To revert to normal operation, press
the window lock switch a second time.
Auto-Down Window
(Driver's Side)
The Auto-Down window is moved to its
fully open position by pushing the
switch. To stop at the desired position
push the switch again.
Page 25

!
WARNING:
1) Be careful that someone's head,
hands and body are not trapped
by a closing window.
2) Never try to operate the main
switch on the driver's door and
the individual door window
switch in opposing directions at
the same time. If this is done, the
window will stop and cannot be
opened or closed.
3) Do not leave children alone in the
car. Always remove the ignition
key for their safety.
B080A01A-GAT
ADJUSTABLE FRONT SEATS
!
WARNING:
Never attempt to adjust the seat
while the vehicle is moving. This
could result in loss of control, or an
accident which may cause death,
serious injury, or property damage.
B080B02A-GAT
FRONT SEATS
Adjusting Seat Forward and
Rearward
HTB024
To move the seat toward the front or
rear, pull the lock release lever upward. This will release the seat on its
track so you can move it forward or
rearward to the desired position. When
you find the position you want, release
the lever and slide the seat forward or
rearward on its track until it locks into
the desired position and cannot be
moved further.
FEATURES OF YOUR HYUNDAI 1- 13
!
WARNING:
To ensure the seat is locked securely, attempt to move the seat forward or rearward without using the
lock release lever.
B080C01A-AAT
Adjusting Seatback Angle
HTB026
To recline the seatback, lean forward to
take your weight off it, then pull up on
the recliner control lever at the outside
edge of the seat. Now lean back until
the desired seatback angle is achieved.
To lock the seatback into position,
release the recliner control lever.
Page 26

1- 14 FEATURES OF YOUR HYUNDAI
B080D02JM-AAT
! !
WARNING:
Adjustable Headrests
To minimize risk of severe injury in
the event of a collision or a sudden
stop, both the driver and passenger seatbacks should always be in
an upright position while the vehicle is in motion. The protection
provided by the seat belts and
Lock knob
airbags may be reduced significantly when the seatbacks are reclined.
There is greater risk that the driver
and passenger will slide under the
seat belt which may result in serious injury if a crash occurs when
the seatbacks are reclined. The seat
belt cannot provide full protection
to an occupant if the seat back is
reclined.
Headrests are designed to help reduce
the risk of neck injuries.
To raise the headrest, pull it up. To
lower it, push it down while pressing the
lock knob. To remove the headrest,
raise it as far as it can go then press the
HFC2028
lock knob while pulling upward. This
should only be done when the seat is
not occupied.
WARNING:
B080D01JM
o For maximum effectiveness in case
of an accident, the headrest should
be adjusted so the middle of the
headrest is at the same height as
the top of the occupant's eyes. For
this reason, the use of a cushion
that holds the body away from the
seatback is not recommended.
Page 27
FEATURES OF YOUR HYUNDAI 1- 15
o Do not operate the vehicle with the
headrests removed as severe injury to an occupant may occur in
the event of an accident. Headrests may provide protection
against severe neck injuries when
properly adjusted.
o Do not adjust the headrest hejght
while the vehicle is in motion.
B083D01NF-AAT
Active Headrests (If Installed)
HNF2041-1
The active headrest is designed to
move forward and upward during a rear
impact. This helps to prevent the driver's
and front passenger's head from moving backward and thus helps prevent
neck injuries.
B080E01O-AAT
Lumbar Support Control
(Driver's Seat Only) (If Installed)
HTB027
To adjust the lumbar support, turn the
handle on the outboard or left side of
the seat. To increase the amount of
lumbar support, pull the lever forward.
To decrease it, push the lever toward
the rear.
Page 28

1- 16 FEATURES OF YOUR HYUNDAI
B080F01S-AAT
Seat Cushion Height Adjustment
(Driver's Seat Only) (If Installed)
HTB025
To raise or lower the front part of the
seat cushion, turn the front knob forward or rearward. To raise or lower the
rear part of the seat cushion, turn the
rear knob forward or rearward.
B080G01A-GAT
Adjusting Armrest Angle
(Driver's side only)
HTB2049
The armrest will be raised or lowered
manually.
To raise the armrest, pull it up.
To lower it, press the armrest down.
B130A01A-AAT
REAR SEAT ENTRY
(For 3-door model)
(1)
(2)
HTB258
The front passenger seatback should
be tilted to enter the rear seat.
By pulling up on the recliner control
lever (1) at the outside of the front
passenger seat, the seatback will tilt
forward and the seat will automatically
slide forward.
Rear seat occupants can tilt the front
passenger seatback by depressing the
foot lever (2) as shown in the illustration.
Page 29

!
WARNING:
Passengers sitting in the rear seat
should be careful not to accidentally press the foot lever (2) while
the vehicle is moving, as this may
cause the seatback to move forward and injure a front seat occupant.
B080I01FC-GAT
REAR SEAT
Adjusting Seatback Angle
Seatback
folding lever
B080I01TB
To recline the seatback, push the
seatback folding lever toward the headrest, and release it after the desired
seatback angle is achieved.
When you recline the seatback to desired position, always be sure it has
locked into position.
FEATURES OF YOUR HYUNDAI 1- 17
!
CAUTION:
When reclining the seatback you
should adjust the seatback folding
lever while standing.
Page 30

1- 18 FEATURES OF YOUR HYUNDAI
B099A02F-AAT
BEFORE FOLDING THE REAR
SEATS
Outboard Rear Seat Belt
HTB294
Rear Seat Center's 3 Point Type Seat
Belt (If installed)
In order to prevent the shoulder belt
from being damaged while folding the
rear seat, the shoulder belt must be
passed through the hanger to keep it
out of the way.
!
CAUTION:
Seat belts must be removed from the
hanger when in use.
B090B01TB-GAT
Folding Rear Seatback and Seat
Cushion
For greater convenience, the entire
seatback and seat cushion may be
folded down and up.
Seatback folding lever
1. Push the headrest down to the lowest position.
2. To fold down the seatback , push
and hold the seatback folding lever
toward the headrest, then push down
the seatback.
HTB2006
HTB300
Page 31

FEATURES OF YOUR HYUNDAI 1- 19
A Type
B Type
Securing Strap
Seat cushion release handle
Securing Strap
Seat cushion release handle
HTB030
HTB030A
3. A Type: Pull the seat cushion release handle rearward, then lift up
the entire seat cushion.
B Type: Pull the seat cushion release handle rearward, then lift up a
desired seat cushion.
Securing strap
HTB031
4. To secure the seat, hook the securing strap under the seat back to the
headrest stay of front driver and
passenger seat.
5. To return the seatback and seat
cushion to its normal position, reverse the above procedure.
o When you return the seatback to its
upright position, always be sure it is
locked into position by pulling and
pushing on the top of seatback.
!
WARNING:
o When you return the folded down
seatback to its upright position,
make sure the seat belts are in
position to be accessible and to
function properly.
o When you return the folded down
seatback to its upright position,
be careful not to get your fingers
or legs in.
o The purpose of the fold down
rear seatback and the fold forward rear seat cushion is to increase cargo space. Do not allow
passengers to sit in the cargo
area while the car is moving. This
is not a proper seating position
and no seat belts are available
for use when the seatback is
folded down. Passengers who
are not properly seated and wearing seat belts could sustain serious injuries or death in case of
an accident or a sudden stop.
Page 32

1- 20 FEATURES OF YOUR HYUNDAI
o Objects should not extend higher
than the top of the front
seatbacks. This could allow cargo
to slide forward and cause injury
or damage during sudden stops.
o When you return the folded down
seatback to its upright position,
always be sure to install the headrests in their proper positions.
Headrests are important to the
safety of occupants in a rear collision. If the headrests are not
installed in their proper position,
serious injury or death could result if a rear end collision occurs.
B100A01TB-GAT
SEAT WARMER (If installed)
HTB194
The seat warmer is provided to warm
the front seats during cold weather.
With the ignition key in the "ON" position, push either of the switches to
warm the driver's seat or the passenger's
seat.
During mild weather or under conditions
where the operation of the seat warmer
is not needed, keep the switches in the
"OFF" position.
NOTE:
o The seat warmer will not operate if
the ambient temperature is higher
than 37°C (98.6°F).
o If the seat warmer doesn't work
when ambient temperature is
lower than 28°C (82.4°F), it should
be checked at an authorized dealer.
!
WARNING:
It is recommended that the seat
heater not be used when elderly
people or people who are ill occupy
the seat. Also, do not use the seat
warmer if the occupant is sleeping.
Page 33

FEATURES OF YOUR HYUNDAI 1- 21
B140A01B-GAT
REAR SEAT WARNING
B140A01TB
For the safety of all passengers, luggage or other cargo should not be piled
higher than the top of the seatback.
B150A02A-GAT
SEAT BELT PRECAUTIONS
All occupants of the vehicle should
wear their seat belts at all times. Indeed, your province's laws may require that some or all occupants of the
vehicle use seat belts.
The possibility of injury or the severity
of injury in an accident will be decreased if this elementary safety precaution is observed. In addition, the
following recommendations are made:
B150B01Y-GAT
Infant or Small Child
Some countries require the use of
child restraint systems for infants and
small children. Whether this is required
by law or not, it is strongly recommended that a child restraint seat or
infant restraint system be used for
infants or small children weighing less
than 18 kilograms (40 pounds).
NOTE:
Small children are best protected in
an accident when properly restrained by a child restraint system.
B150C02A-AAT
Larger Children
Children who are too large for child
restraint systems should occupy the
rear seat and use the available lap/
shoulder belts. The lap portion should
be fastened snug on the hips and as
low as possible. Check belt fit periodically. A child's squirming could put the
belt out of position. Children are afforded the most safety in the event of
an accident when they are restrained
by a proper restraint system in the rear
seat. If a larger child (over age 13)
must be seated in the front seat, the
child should be securely restrained by
the available lap/shoulder belt and the
seat should be placed in the rearmost
position. Children under the age of 13
should be restrained securely in the
rear seat. NEVER place a rear facing
child seat in the front seat of a vehicle.
Page 34

1- 22 FEATURES OF YOUR HYUNDAI
B150D01S-AAT
Pregnant Women
The use of a seat belt is recommended
for pregnant women to lessen the
chance of injury in an accident. When
a seat belt is used, it should be placed
as low and snugly as possible on the
hips, not across the abdomen. For
specific recommendations, consult a
physician.
B150E01A-AAT
Injured Person
A seat belt should be used when an
injured person is being transported.
When this is necessary, you should
consult a physician for recommendations.
B150F01A-AAT
One Person Per Belt
Two people (including children) should
never attempt to use a single seat belt.
This could increase the severity of
injuries in case of an accident.
B150G01A-AAT
Do Not Lie Down
To reduce the chance of injuries in the
event of an accident, and to achieve
maximum effectiveness of the restraint
system, all passengers should be sitting up and the front seats should be in
an upright position when the car is
moving. A seat belt cannot provide
proper protection if the person is lying
down in the rear seat or if the front seat
is in a reclined position.
!
WARNING:
Sitting in a reclined position or lying down when your vehicle is in
motion can be dangerous. Even if
you buckle up, your seat belts can't
do their job when you're reclined.
The shoulder belt can't do its job
because it won't be against your
body. Instead, it will be in front of
you. In a crash you could go into it
with great force, receiving serious
neck or other injuries.
The lap belt can't do its job either. In
a crash the belt could go up over
your abdomen. The belt forces
would be applied there, not at your
pelvic bones.
This could cause serious internal
injuries.
For proper protection when the vehicle is in motion, have the seatback
upright. Then sit back in the seat
and wear your seat belt properly. See
page 1-25.
B160A01A-AAT
CARE OF SEAT BELTS
Seat belt systems should never be
disassembled or modified. In addition,
care should be taken to assure that
seat belts and belt hardware are not
damaged by seat hinges, doors or
other abuse.
!
WARNING:
When you return the rear seatback
to its upright position after the rear
seatback was folded down, be careful not to damage the seat belt webbing or buckle. Be sure that the
webbing or buckle does not get
caught or pinched in the rear seat.
Page 35

FEATURES OF YOUR HYUNDAI 1- 23
B160B01A-AAT
Periodic Inspection
It is recommended that all seat belts
be inspected periodically for wear or
damage of any kind. Parts of the system that are damaged should be replaced as soon as possible.
B160C01A-AAT
Keep Belts Clean and Dry
Seat belts should be kept clean and
dry. If belts become dirty, they can be
cleaned by using a mild soap solution
and warm water. Bleach, dye, strong
detergents or abrasives should not be
used because they may damage and
weaken the fabric.
B160D01A-AAT
When to Replace Seat Belts
Entire in-use seat belt assembly or
assemblies should be replaced if the
vehicle has been involved in an accident. This should be done even if no
damage is visible. Additional questions concerning seat belt operation
should be directed to your Hyundai
Dealer.
B170A04A-AAT
HEIGHT ADJUSTABLE FRONT
SEAT SHOULDER BELT
(If Installed)
B170A01L
You can adjust the height of the shoulder belt anchor to one of the 4 positions.
If the height of the adjusting seat belt is
too near your neck, you will not be
getting the most effective protection.
The shoulder portion should be adjusted so that it lies across your chest
and midway over your shoulder nearest
the door and not your neck.
To adjust the height of the seat belt
anchor, lower or raise the height adjuster into an appropriate position. To
raise the height adjuster, pull it up. To
lower it, push it down while pressing the
height adjuster button.
Release the button to lock the anchor
into position. Try sliding the release
button to make sure that it has locked
into the position.
!
WARNING:
o The height adjuster must be in
the locked position when the
vehicle is moving.
o The misadjustment of height of
the shoulder belt could reduce
the effectiveness of the seat belt
in a crash.
Page 36

1- 24 FEATURES OF YOUR HYUNDAI
B180A02A-GAT
SEAT BELTS 3-Point System
with Emergency Locking Retractor (If Installed)
To Fasten Your Belt
B180A01NF
To fasten your seat belt, pull it out of the
retractor and insert the metal tab into
the buckle. There will be an audible
"click" when the tab locks into the
buckle.
The seat belt automatically adjusts to
the proper length only after the lap belt
is adjusted manually so that it fits
snugly around your hips. If you lean
forward in a slow, easy motion, the belt
will extend and let you move around. If
there is a sudden stop or impact, however, the belt will lock into position. It
will also lock if you try to lean forward
too quickly. Check to make sure that
the belt is properly locked and that the
belt is not twisted.
B260E01TB-GAT
Seat Belt Warning Light
(Except E.C)
The seat belt warning light blinks for
about 6 seconds when the ignition key
is turned from the "OFF" position to the
"ON".
B265E01TB-GAT
Seat Belt Warning Light
and Chime (E.C only)
The seat belt warning light and chime
will activate to the following table.
User (Driver) Condition
Seat Belt Ignition Switch
Unbuckled ON Stay on until buckled up
Buckled ON Come on for 6 seconds
Unbuckled ON *1Blink until buckled up
→→
Buckled
→
→→
Unbuckled
Seat Belt WarningLight
ON Blink until buckled up*
2
*1) When the ignition key is turned from
"OFF" position to "ON" within 1
minute.
*2) If the vehicle speed exceeds 9km/
h, the seat belt chime also sounds
for about 1~2 minutes.
If the vehicle speed is below 9km/h,
1 minute later the seat belt chime
also sounds for about 1~2 minutes.
NOTE:
If the driver's seat belt is operated in
this order "unbuckled
unbuckled
→→
→ buckled
→→
→→
→ buckled
→→
→ →
→ unbuck-
→ →
led" within 9 seconds after the seat
belt is buckled, the seat belt warning
light and chime will not activate.
→→
→
→→
Page 37

FEATURES OF YOUR HYUNDAI 1- 25
B200A01S-GAT
Adjusting Your Seat Belt
B200A02NF
You should place the belt as low as
possible on your hips, not on your
waist. If the belt is located too high on
your body, you could slide under it in
case of accident or a sudden stop.
This could result of death, serious
injury or property damage. Both arms
should not be under or over the
belt. Rather, one should be over and
the other under, as shown in the illustration.
Never wear the seat belt under the arm
nearest the door.
B210A01A-AAT
To Release the Seat Belt
B210A01NF
The seat belt is released by pressing
the release button in the locking buckle.
When it is released, the belt should
automatically draw back into the retractor.
If this does not happen, check the belt
to be sure it is not twisted, then try
again.
B220A01A-AAT
SEAT BELTS (2-Point Static
Type) (Rear Seat Center)
(If Installed)
To Fasten Your Seat Belt
B220A04NF
To fasten a 2-point static type belt,
insert the metal tab into the locking
buckle. There will be an audible "click"
when the tab locks into the buckle.
Check to make sure the belt is properly
locked and that the belt is not twisted.
Page 38

1- 26 FEATURES OF YOUR HYUNDAI
B220B01A-AAT
Adjusting Your Seat Belt
Too
high
Correct
B220B01NF
With a 2-point static type seat belt, the
length must be adjusted manually so it
fits snugly around your body. Fasten
the belt and pull on the loose end to
tighten. The belt should be placed as
low as possible on your hips, not on
your waist. If the belt is too high, it
could increase the possibility of your
being injured in an accident.
B220C01A-AAT
To Release the Seat Belt
B220C01TB
When you want to release the seat belt,
press the button in the locking buckle.
!
WARNING:
The center lap belt latching mechanism is different from those for the
rear seat shoulder belts. When fastening the rear seat shoulder belts
or the center lap belt, make sure
they are inserted into the correct
buckles to obtain maximum protection from the seat belt system and
assure proper operation.
B220D02Y-GAT
SEAT BELTS - Rear Seat
Center's 3-Point System With
Emergency Locking Retractor
(If installed)
(c)
(d)
1. Before fastening the rear seat center
belt, confirm the metal tab (a) and
buckle (b) are latched together.
2. After confirming that (a) and (b) are
latched, pull the seat belt out of the
retractor and insert the metal tab (c)
into the buckle (d).
There will be an audible "click" when
the tab locks in the buckle. The seat
belt automatically adjusts to the proper
length only after the lap belt is adjusted
manually so that it fits snugly around
(a)
(b)
B220D01TB
Page 39

B220A02Y-D
your hips. If you lean forward in a slow,
easy motion, the belt will extend and
let you move around. If there is a
sudden stop or impact, the belt will lock
into position. It will also lock if you try to
lean forward too quickly.
!
WARNING:
o When using the rear seat center
belt, you must lock all metal tabs
and buckles. If any metal tab or
buckle is not locked, it will increase the chance of injury in the
event of collision.
o Never unlock the metal tab (a)
and the buckle (b) with the following exceptions.
(1)In case of folding rear
seatbacks down.
(2)If transporting an object on
the rear seat may cause damage to the rear seat center
belt.
o Lock the metal tab (a) and the
buckle (b) immediately after folding rear seatbacks up.
FEATURES OF YOUR HYUNDAI 1- 27
B220D02TB
o To disconnect the metal tab (a)
from the buckle (b), insert a narrow-ended tool into the groove
located on the buckle (b).
Page 40

1- 28 FEATURES OF YOUR HYUNDAI
B220C01Y-GAT
To Release the Seat Belt
(If installed)
B220C02TB
When you want to release the seat belt,
press the button in the locking buckle.
!
WARNING:
The center belt latching mechanism
is different from those for the rear
seat shoulder belts. When fastening the rear seat shoulder belts or
the rear seat center belt, make sure
they are inserted into the correct
buckles to obtain maximum protection from the seat belt system and
assure proper operation.
B230A03A-GAT
CHILD RESTRAINT SYSTEM
(If Installed)
Children riding in the car should sit in
the rear seat and must always be
properly restrained to minimize the
risk of injury in an accident, sudden
stop or sudden maneuver. According
to accident statistics, children are safer
when properly restrained in the rear
seats than in the front seat. Larger
children not in a child restraint should
use one of the seat belts provided.
You are required by law to use safety
restraints for children. If small children
ride in your vehicle you must put them
in a child restraint system (safety seat).
Children could be injured or killed in a
crash if their restraints are not properly
secured. For small children and babies, a child seat or infant seat must be
used. Before buying a particular child
restraint system, make sure it fits your
car and seat belts, and fits your child.
Follow all the instructions provided by
the manufacturer when installing the
child restraint system.
!
WARNING:
o A child restraint system must be
placed in the rear seat. Never
install a child or infant seat on
the front passenger's seat.
Should an accident occur and
cause the passenger side airbag
to deploy, it could severely injure or kill an infant or child seated
in an infant or child seat. Thus,
only use a child restraint in the
rear seat of your vehicle.
o Since a safety belt or child re-
straint system can become very
hot if it is left in a closed vehicle,
be sure to check the seat cover
and buckles before placing a
child there.
o When the child restraint system is
not in use, store it in the luggage
compartment or fasten it with a
safety belt so that it will not be
thrown forward in the case of a
sudden stop or an accident.
Page 41

FEATURES OF YOUR HYUNDAI 1- 29
o Children who are too large to be in
a child restraint should sit in the
rear seat and be restrained with
the available lap/shoulder belts.
Never allow children to ride in the
front passenger seat.
o Always make sure that the shoul-
der belt portion of the outboard
lap/shoulder belt is positioned
midway over the shoulder, never
across the neck or behind the
back. Moving the child closer to
the center of the vehicle may help
provide a good shoulder belt fit.
The lap belt portion of the lap/
shoulder belt or the center seat
lap belt must always be positioned as low as possible on the
child's hips and as snug as possible.
o If the seat belt will not properly fit
the child, Hyundai recommends
the use of an approved booster
seat in the rear seat in order to
raise the child's seating height so
that the seat belt will properly fit
the child.
o Never allow a child to stand up or
kneel on the seat.
o Never use an infant carrier or child
safety seat that "hooks" over a
seatback; it may not provide adequate security in an accident.
o Never allow a child to be held in a
person's arms while they are in a
moving vehicle, as this could result in serious injury to the child
in the event of an accident or a
sudden stop. Holding a child in a
moving vehicle does not provide
the child with any means of protection during an accident, even if
the person holding the child is
wearing a seat belt.
o If the child restaint seat is not
anchored properly, the risk of a
child being seriously injured or
killed in a collision greatly increases.
B230G01A-GAT
Installation on Outboard Rear
Seats
B230G01TB
To install a child restraint system in the
outboard rear seats, extend the shoulder/lap belt from its retractor. Install
the child restraint system, buckle the
seat belt and allow the seat belt to take
up any slack. Make sure that the lap
portion of the belt is tight around the
child restraint system and the shoulder
portion of the belt is positioned so that
it cannot interfere with the child's head
or neck. After installation of the child
restraint system, try to move it in all
directions to be sure the child restraint
system is securely installed.
Page 42

1- 30 FEATURES OF YOUR HYUNDAI
If you need to tighten the belt, pull more
webbing toward the retractor. When you
unbuckle the seat belt and allow it to
retract, the retractor will automatically
revert back to its normal seated passenger emergency locking usage condition.
NOTE:
o Before installing the child re-
straint system, read the instructions supplied by the child restraint system manufacturer.
o If the seat belt does not operate
as described, have the system
checked immediately by your
authorized Hyundai dealer.
!
WARNING:
Do not install any child restraint system in the front passenger seat.
Should an accident occur and cause
the passenger side airbag to deploy,
it could severely injure or kill an
infant or child seated in an infant or
child seat. Therefore, only use a child
restraint system in the rear seat of
your vehicle.
B230B02A-GAT
Using a Child Restraint System
with "Tether Anchorage" System
Holder Bolt (5/16"-30 mm)
Washer, Conical Spring
Holder, Child Restraint Hook
Spacer (10mm), Child
Restraint Hook Holder
Retainer Washer
B230B01TB
For small children and babies, the use
of a child seat or infant seat is strongly
recommended. This child seat or infant
seat should be of appropriate size for
the child and should be installed in
accordance with the manufacturer's instructions. It is further recommended
that the seat be placed in the vehicle's
rear seat since this can make an important contribution to safety. Your vehicle
is provided with three child restraint
hook holders for installing the child seat
or infant seat.
B230E02FC-GAT
Securing a Child Restraint System with "Tether Anchorage"
System
Three child restraint hook holders are
located on the vertical back panel.
(behind rear bumper bar)
1. Route the child restraint seat strap
over the seatback.
For vehicles with adjustable headrests, route the tether strap under
the headrest and between the headrest posts, otherwise route the tether
strap over the top of the seatback.
Page 43

Covering shelf
!
WARNING:
To install the Child Restraint Seat,
for safety reasons the Seat should
be positioned rearmost with the
seatback in a vertical position, not
reclined.
FEATURES OF YOUR HYUNDAI 1- 31
B230D04E-GAT
Using a Child Restraint System
with "ISOFIX" System and
"Tether Anchorage" System
Attaching clip
Back panel
Front of Vehicle
B230E01TB
2. Remove the load space cover.
3. Connect the tether strap hook to the
child restraint hook holder and tighten
to secure the seat.
HTB193
ISOFIX is a standardised method of
fitting child seats that eliminates the
need to use the standard adult seat belt
to secure the seat in the vehicle. This
enables a much more secure and positive location with the added benefit of
easier and quicker installation.
An ISOFIX-seat can only be installed if
it has vehicle-specific approval in accordance with the requirements of ECER44. For your Hyundai, the Hyundai
ISOFIX GR1 / Hyundai Duo / Römer
ISOFIX GR1 and the Römer Duo ISOFIX
/ Britax Duo ISOFIX is approved ac-
Page 44

1- 32 FEATURES OF YOUR HYUNDAI
cording to the requirement ECE-R44.
This seat has been tested extensively
by Hyundai and is recommended for
your Hyundai.
NOTE:
At present, this seat is the only one
complying with that provision. In
case that other manufacturers will
furnish proof of a respective certification, Hyundai is going to evaluate
this seat carefully and will give a
recommendation provided that seat
complies to the law. Please ask your
Hyundai dealer in this respect.
ISOFIX
Anchor
ISOFIX Anchor
Indicator Button
On each side of the rear seat, between
the cushion and backrest, are located a
pair of ISOFIX anchorage points together with a top tether mounting on the
luggage compartment. During the installing, the seat has to be engaged at
the anchorage-points in a way you can
hear it clicking (check by pulling!) and
has to be fixed with the Top Tether-belt
on the belonging point in the luggagecompartment. The installing and the
use of a child-seat has to be done
according to the installing-manual,
which is added to the ISOFIX-seat.
NOTE:
An ISOFIX-child-seat can only be
installed if the seat has a vehiclespecific approval according to ECER44. Before using the ISOFIX-childseat, which was bought for another
car, ask your Hyundai-dealer whether
this seat-type is approved and recommended for your Hyundai.
To secure the child restraint seat
B230C02TB
1. To engage the child restraint seat to
the ISOFIX anchor, insert the child
restraint seat latch into the ISOFIX
anchor. Listen for the audible "click"
sound.
2. Connect the tether strap hook to the
child restraint hook holder and tighten
to secure the seat. Refer to "Securing a Child Restraint System with the
Tether Anchorage System" on page
1-30.
B230C01TB
Page 45

FEATURES OF YOUR HYUNDAI 1- 33
!
WARNING:
o Do not install a child restraint seat
at the center of the rear seat using
the vehicle's ISOFIX anchors. The
ISOFIX anchors are only provided
for the left and right outboard rear
seating positions. Do not misuse
the ISOFIX anchors by attempting
to attach a child restraint seat in
the middle of the rear seat to the
ISOFIX anchors. In a crash, the
child restraint seat ISOFIX attachments may not be strong enough
to secure the child restraint seat
properly in the center of the rear
seat and may break, causing serious injury or death.
o When using the vehicle’s “ISOFIX”
system to install a child restraint
system in the rear seat, all unused
vehicle rear seat belt metal latch
plates or tabs must be latched
securely in their seat belt buckles
and the seat belt webbing must be
retracted behind the child restraint
to prevent the child from reaching
and taking hold of unretracted seat
belts.
Unlatched metal latch plates or
tabs may allow the child to reach
the unretracted seat belts which
may result in strangulation and a
serious injury or death to the child
in the child restraint.
o Do not mount more than one child
restraint to a child restraint lower
anchorage point. The improper
increased load may cause the anchorage points or tether anchor to
break, causing serious injury or
death.
o Attach the ISOFIX or ISOFIX-com-
patible child restraint seat only to
the appropriate locations shown
in the illustration.
o Always follow the installation and
use instructions provided by the
manufacturer of the child restraint.
B230H01TB-GAT
Child Seat Restraint Suitability
For Seat Position
Use child safety seats that have been
officially approved and are appropriate
for your children. When using the child
safety seats, refer to the following table.
Seating Position
Age Group
0 : Up to 10 kg
(0 ~ 9 months)
0+ : Up to 13 kg
(0 ~ 2 years)
I : 9kg to 18kg
(9 months ~ 4
years)
II & III : 15kg to
36kg (4 ~ 12
years)
Front
Passenger
X
X
X U, L1 X
XUFX
Rear
Outboard
Rear
Center
UX
U
X
Page 46

1- 34 FEATURES OF YOUR HYUNDAI
U : Suitable for "universal" category
restraints approved for use in this
mass group
UF: Suitable for forward-facing "univer-
sal" category restraints approved
for use in this mass group
L1 : Suitable for "Römer ISOFIX GR1"
approved for use in this mass group
(Approval No: E1 R44-03301133)
X : Seat position not suitable for chil-
dren in this mass group
B180B01A-GAT
Pre-tensioner Seat Belt
(With A/BAG) (If Installed)
Your Hyundai vehicle is equipped with
driver's and front passenger's pretensioner seat belts. The purpose of
the pre-tensioner is to make sure that
the seat belts fit tightly against the
occupant's body in certain frontal collisions.
The pre-tensioner seat belts can be
activated with the airbags.
HXG229
The pre-tensioner seat belt operates in
the same way as an Emergency Locking Retractor (ELR) type of seat belt.
When the vehicle stops suddenly, or if
the occupant tries to lean forward too
quickly, the seat belt retractor will lock
into position. However, in certain frontal
collisions, the pre-tensioner will activate and pull the seat belt into tighter
contact against the occupant's body.
Driver's airbag
2
Passenger's
1
airbag
3
HTB198
The seat belt pre-tensioner system
consists mainly of the following components.
Their locations are shown in the illustration.
1. SRS airbag warning light
2. Seat belt pre-tensioner assembly
3. SRS control module
Page 47

FEATURES OF YOUR HYUNDAI 1- 35
!
WARNING:
To obtain maximum benefit from a
pre-tensioner seat belt:
1. The seat belt must be worn correctly.
2. The seat belt must be adjusted to
the correct position.
NOTE:
o Both the driver's and front
passenger's pre-tensioner seat
belts will be activated in certain
frontal collisions. The pretensioner seat belts can be activated with the airbags. The pretensioners will be activated under these conditions even if the
seat belts are not being worn at
the time of the collision.
o When the pre-tensioner seat belts
are activated, a loud noise may
be heard and fine dust, which
may appear to be smoke, may be
visible in the passenger compartment. These are normal operating conditions and are not
hazardous.
o Although it is harmless, the fine
dust may cause skin irritation and
should not be breathed for prolonged periods. Wash your hands
and face thoroughly after an accident in which the pre-tensioner
seat belts were activated.
!
CAUTION:
o Because the sensor that activates
the SRS airbag is connected with
the pre-tensioner seat belt, the SRS
airbag warning light on the
instrument panel will blink for approximately 6 seconds after the
ignition key has been turned to the
"ON" position, and then it should
turn off.
o If the pre-tensioner seat belt is
not working properly, this warning light will illuminate even if
there is no malfunction of the
SRS airbag system . If the SRS
airbag warning light does not
illuminate when the ignition key
is turned to "ON", or if it remains
illuminated after blinking for approximately 6 seconds, or if it
illuminates while the vehicle is
being driven, please have an authorized Hyundai dealer inspect
the pre-tensioner seat belt or SRS
airbag system as soon as possible.
!
WARNING:
o Pre-tensioners are designed to
operate only one time. After activation, pre-tensioner seat belts
must be replaced. All seat belts,
of any type, should always be
replaced after they have been
worn during a collision.
o The pre-tensioner seat belt as-
sembly mechanisms become hot
during activation. Do not touch
the pre-tensioner seat belt assemblies for several minutes after they have been activated.
o Do not attempt to inspect or re-
place the pre-tensioner seat belts
yourself. This must be done by
an authorized Hyundai dealer.
o Do not strike the pre-tensioner
seat belt assemblies.
Page 48

1- 36 FEATURES OF YOUR HYUNDAI
o Do not attempt to service or repair
the pre-tensioner seat belt system
in any manner.
o Improper handling of the pre-
tensioner seat belt assemblies,
and failure to heed the warnings
to not strike, modify, inspect, replace, service or repair the pretensioner seat belt assemblies
may lead to improper operation
or inadvertent activation and serious injury.
o Always wear the seat belts when
driving or riding in a motor vehicle.
B240A01TB-GAT
SUPPLEMENTAL RESTRAINT
(AIRBAG) SYSTEM (If Installed)
Driver's Airbag
B240B01TB
Your Hyundai is equipped with a Supplemental Restraint (Airbag) System. The
indications of the system's presence
are the letters "SRS AIR BAG" embossed on the airbag pad cover in the
steering wheel and printed on the
passenger's side front panel pad above
the glove box.
The Hyundai SRS consists of airbags
installed under the pad covers in the
center of the steering wheel and the
passenger's side front panel above the
glove box. The purpose of the SRS is to
provide the vehicle's driver and/or the
front passenger with additional protection than that offered by the seat belt
system alone, in case of a frontal impact of sufficient severity.
NOTE:
Be sure to read information about
the SRS on the labels provided on
the backside of the sun visor and in
the glove box.
!
WARNING:
o As its name implies, the SRS is
designed to work with, and be
supplemental to, the driver's and
the passenger's three point seat
belt systems and is not a substitute for them. Therefore your seat
belts must be worn at all times
while the vehicle is in motion. In
addition, the airbags deploy only
in certain frontal impact conditions severe enough to cause
significant injury to the vehicle
occupants.
Page 49

FEATURES OF YOUR HYUNDAI 1- 37
o The SRS is designed to deploy the
airbags only when an impact is
sufficiently severe and when the
impact angle is less than 30° from
the forward longitudinal axis of
the vehicle and will not deploy in
side, rear or rollover impacts. Additionally, the airbags will only
deploy once. Thus, seat belts
must be worn at all times.
Rear impact
Rollover
Side Impact
HTB203
o Front airbags are not intended to
deploy in side-impact, rear-impact or rollover crashes. In addition, airbags will not deploy in
frontal crashes below the deployment threshold speed.
o The driver should sit back as far as
possible while still maintaining
control of the vehicle. If you are
sitting too close to the airbag, it
can cause death or serious injury
when it inflates.
o No objects should be placed over
or near the airbag modules on
the steering wheel, instrument
panel, and the front passenger's
panel above the glove box,
because any such object could
cause harm if the vehicle is in a
crash severe enough to cause
the airbags to deploy.
o If the airbags deploy, they must
be replaced by an authorized
Hyundai dealer.
o Do not tamper with or discon-
nect SRS wiring, or other components of the SRS system. Doing so could result in injury, due
to accidental firing of the airbags
or by rendering the SRS inoperative.
o Do not install a child restraint
system in the front passenger
seat position. A child restraint
system must never be placed in
the front seat. The infant or child
could be severely injured or killed
by an airbag deployment in case
of an accident.
o Do not allow children to ride in
the front passenger seat. If older
children (teenagers and older)
must ride in the front seat, make
sure they are always properly
belted and that the seat is moved
back as far as possible.
o For maximum safety protection
in all types of crashes, all occupants including the driver should
always wear their seat belts
whether or not an airbag is also
provided at their seating position to minimize the risk of severe injury or death in the event
of a crash. Do not sit or lean
unnecessarily close to the airbag
while the vehicle is in motion.
o The SRS airbag system must de-
ploy very rapidly to provide protection in a crash. If an occupant
is out of position because of not
wearing a seat belt, the airbag
may forcefully contact the occupant causing serious or fatal injuries.
Page 50

1- 38 FEATURES OF YOUR HYUNDAI
B240B01FC-GAT
SRS Components and Functions
B240B01L
The SRS consists of the following components:
- Driver's Airbag Module
- Passenger's Airbag Module
- SRS Service Reminder Indicator
(SRI)
- SRS Control Module (SRSCM)
The SRSCM continually monitors all
elements while the ignition is "ON" to
determine if a frontal or near-frontal
impact is severe enough to require
airbag deployment.
B240B02L
The SRS service reminder indicator
(SRI) on the instrument panel will blink
for about 6 seconds after the ignition
key is turned to the "ON" position or
after the engine is started, after which
the SRI should go out.
B240B03L
The airbag modules are located both in
the center of the steering wheel and in
the front passenger's panel above the
glove box. When the SRSCM detects a
considerable impact to the front of the
vehicle, it will automatically deploy the
airbags.
Page 51

Passenger's Airbag
HTB204
Upon deployment, tear seams molded
directly into the pad covers will separate under pressure from the expansion of the airbags. Further opening of
the covers then allows full inflation of
the airbags.
A fully inflated airbag in combination
with a properly worn seat belt slows
the driver's or the passenger's forward
motion, thus reducing the risk of head
or chest injury.
!
CAUTION:
Do not install or place any accessories (drink holder, cassette holder,
sticker, etc) on the front passenger's
panel above the glove box in a vehicle with passenger's air bag. Such
objects may become dangerous
projectiles and cause injury if the
passenger's air bag inflates.
Passenger's Airbag
B240B05L
After complete inflation, the airbag immediately starts deflating, enabling the
driver to maintain forward visibility.
FEATURES OF YOUR HYUNDAI 1- 39
!
CAUTION:
When installing a container of liquid air freshener inside a vehicle,
do not place it near the instrument
cluster nor on the instrument panel
pad surface. If there is any leakage
from the air freshener onto these
areas (instrument cluster, instrument panel pad or air ventilator), it
may damage these parts. If the liquid from the air freshener does leak
onto these areas, wash them with
water immediately.
!
WARNING:
o When the SRS is activated, there
may be a loud noise and fine dust
will be released throughout the
vehicle. These conditions are
normal and are not hazardous.
However, the fine dust generated
during airbag deployment may
cause skin irritation. Be sure to
wash your hands and face thoroughly with lukewarm water and
a mild soap after an accident in
which the airbags were deployed.
Page 52

1- 40 FEATURES OF YOUR HYUNDAI
o The SRS can function only when
the ignition key is in the "ON"
position. If the SRS SRI does not
come on, or continuously remains on, after flashing for about
6 seconds when the ignition key
is turned to the "ON" position, or
after the engine is started, or
comes on while driving, the SRS
is not working properly. If this
occurs, have your vehicle immediately inspected by your
Hyundai dealer.
o Before you replace a fuse or dis-
connect a battery terminal, turn
the ignition key to the "LOCK"
position or remove the ignition
key. Never remove or replace the
air bag related fuse(s) when the
ignition key is in the "ON" position. Failure to heed this warning
will cause the SRS SRI to illuminate.
B990A01TB-GAT
Passenger's Front Airbag ON/
OFF Switch (If Installed)
(1)
B990A01TB
The passenger's front airbag can be
deactivated by the passenger's front
airbag ON/OFF switch (1) if a child
restraint is installed on the front
passenger's seat or if the front
passenger's seat is unoccupied by a
person.
To ensure the safety of your child, the
passenger's front airbag must be deactivated when it should be necessary to
install a rearward facing child seat on
the front passenger seat in exceptional
circumstances.
To deactivate or reactivate the
passenger's front airbag
To deactivate the passenger's front
airbag, insert the master key into the
passenger's front airbag ON/OFF switch
on the right side of the crash pad and
turn it to the "OFF" position. The
passenger's front airbag OFF indicator
will illuminate and stay on until the
passenger's front airbag is reactivated.
To reactivate the passenger's front
airbag, insert the master key into the
passenger's front airbag ON/OFF switch
and turn it to the "ON" position. The
passenger's front airbag OFF indicator
will go out.
Page 53

FEATURES OF YOUR HYUNDAI 1- 41
B240C01NF
!
CAUTION:
o If the passenger's front airbag ON/
OFF switch is not working properly, the SRS warning light on the
instrument panel will illuminate.
If this occurs, have an authorized
Hyundai dealer inspect the
passenger's front airbag ON/OFF
switch, the pre-tensioner seat belt
system and the SRS airbag system as soon as possible.
o If the SRS airbag warning light
does not illuminate when the ignition key is turned to the "ON"
position, or if it illuminates while
the vehicle is being driven, have
an authorized Hyundai dealer inspect the passenger's front airbag
ON/OFF switch, pre-tensioner seat
belt and the SRS airbag system as
soon as possible.
!
WARNING:
o The driver is responsible for the
proper position of the passenger's
front airbag ON/OFF switch.
o Deactivate the front passenger's
airbag only when the ignition
switch is switched off, or the malfunction may occur in the SRSCM
(SRS Control Module). And there
may be a danger that the driver's
and/or passenger's front and/or
side airbag may fail to trigger, or
not trigger correctly during a collision.
o Never install a rearward facing
child seat on the front passenger's
seat. The infant or child could be
severely injured or killed by an
airbag deployment in case of an
accident.
Page 54

1- 42 FEATURES OF YOUR HYUNDAI
o Even though your vehicle is
equipped with the passenger's
airbag ON/OFF switch, do not install a child restraint system in the
front passenger's seat. A child restraint system must never be
placed in the front seat. Children
who are too large for child restraint systems should always
occupy the rear seat and use the
available lap/shoulder belts. Children are afforded the most safety
in the event of an accident when
they are restrained by a proper
restraint system in the rear seat.
o As soon as deactivation is no
longer needed, reactivate the front
passenger's airbag.
B990B01TG-GAT
Side Impact Airbag (If Installed)
B990B02Y
Your Hyundai is equipped with a side
airbag in each front seat. The purpose
of the airbag is to provide the vehicle's
driver and/or the front passenger with
additional protection than that offered
by the seatbelt alone. The side impact
airbags are designed to deploy only
during certain side impact collisions,
depending on the crash severity, angle,
speed and point of impact. The air
bags are not designed to deploy in all
side impact situations.
Side airbag
sensor
HTB072
Important Safety Notes on the
Side Impact Airbag system
Following is a number of safety points
concerning this system which should
always be observed to ensure risk of
injury is reduced in an accident.
!
WARNING:
o The side impact airbag is supple-
mental to the driver's and the
passenger's seat belt systems and
is not a substitute for them. Therefore your seat belts must be worn
at all times while the vehicle is in
motion.
Page 55

FEATURES OF YOUR HYUNDAI 1- 43
The airbags deploy only in certain
side impact conditions severe
enough to cause significant injury
to the vehicle occupants.
o For best protection from the side
impact airbag system and to avoid
being injured by the deploying
side impact airbag, both front seat
occupants should sit in an upright position with the seat belt
properly fastened. The driver's
hands should be placed on the
steering wheel at the 9:00 and 3:00
o'clock positions. The passenger's
arms and hands should be placed
in their laps.
o Do not use any accessory seat
covers.
o Use of seat covers could reduce or
prevent the effectiveness of the
system.
o Do not install any accessories on
the side or near the side impact
airbag.
o Do not use excessive force on
the side of the seat.
o Do not place any objects over the
airbag or between the airbag and
yourself.
o Do not place any objects (an um-
brella, bag, etc.) between the front
door and the front seat. Such objects may become dangerous projectiles and cause injury if the
supplemental side impact air bag
inflates.
o To prevent unexpected deploy-
ment of the side impact air bag
that may result in personal injury,
avoid impact to the side airbag
sensor when the ignition key is
on.
B240C01Y-GAT
SRS Care
The SRS is virtually maintenance-free
and there are no parts you can safely
service by yourself. The entire SRS
system must be inspected by an authorized Hyundai dealer in 10 years
after the date that the vehicle was
manufactured.
Any work on the SRS system, such as
removing, installing, repairing, or any
work on the steering wheel must be
performed by a qualified Hyundai technician. Improper handling of the SRS
system may result in serious personal
injury.
Page 56

1- 44 FEATURES OF YOUR HYUNDAI
B240C01HP
!
WARNING:
o Extreme Hazard! Do not use a re-
ward facing restraint on a seat
protected by an airbag in front of
it!
o Modification to SRS components
or wiring, including the addition
of any kind of badges to the pad
covers or modifications to the body
structure, can adversely affect SRS
performance and lead to possible
injury.
o For cleaning the airbag pad cov-
ers, use only a soft, dry cloth or
one which has been moistened
with plain water. Solvents or cleaners could adversely affect the
airbag covers and proper deployment of the system.
o No objects should be placed over
or near the airbag modules on the
steering wheel, instrument panel,
and the front passenger's panel
above the glove box, because any
such object could cause harm if
the vehicle is in a crash severe
enough to cause the airbags to
inflate.
o If the airbags inflate, they must be
replaced by an authorized Hyundai
dealer.
o Do not tamper with or disconnect
SRS wiring, or other components
of the SRS system. Doing so could
result in injury, due to accidental
firing of the airbags or by rendering the SRS inoperative.
o Do not install a child restraint sys-
tem in the front passenger seat
position.
o A child restraint system must
never be placed in the front seat.
The infant or child could be severely injured by an airbag deployment in case of an accident.
o If components of the airbag sys-
tem must be discarded, or if the
vehicle must be scrapped, certain
safety precautions must be observed. Your Hyundai dealer
knows these precautions and can
give you the necessary information. Failure to follow these precautions and procedures could
increase the risk of personal injury.
Page 57

o If you sell your vehicle, make cer-
tain that this manual is transferred
to the new owner.
o If your car was flooded and has
soaked carpeting or water on flooring, you shouldn't try to start engine; have the car towed to authorized Hyundai dealer.
FEATURES OF YOUR HYUNDAI 1- 45
Page 58

1- 46 FEATURES OF YOUR HYUNDAI
B260A01TB-GAT
INSTRUMENT CLUSTER AND INDICATOR LIGHTS
A Type (Without Trip Computer)
B260A01TB
Page 59

FEATURES OF YOUR HYUNDAI 1- 47
1. Tail Gate Open Warning Light
2. Immobilizer Warning Indicator Light (If installed)
3. Tachometer
4. Turn Signal Indicator Light
5. Automatic Transaxle Position Indicator Light
(If installed)
6. Fuel Gauge
7. Odometer/Trip Odometer
8. Speedometer
9. Electric Power Steering Warning Light (If installed)
10. Malfunction Indicator Light (MIL) (If installed)
11. Diesel Pre-heat Indicator Light (Diesel only)
12. High Beam Indicator Light
13. Engine Coolant Temperature Indicator Light
14. Parking Brake/Brake Fluid Level Warning Light
15. Door Ajar Warning Light
16. Passenger's Front Airbag OFF Indicator Light
(If installed)
17. SRS (Airbag) Warning Light
(If installed)
18. Low Fuel Warning Light
19. Electronic Stability Program (ESP) Indicator Light
(If installed)
20. ABS Warning Light (If installed)
21. Fuel Filter Warning Light (Diesel only)
22. Seat Belt Warning Light
23. Oil Pressure Warning Light
24. Charging System Warning Light
25. Overdrive off Indicator Light (Auto T/A only)
Page 60

1- 48 FEATURES OF YOUR HYUNDAI
B260B01TB-GAT
B Type (With Trip Computer)
B260B01TB
Page 61

FEATURES OF YOUR HYUNDAI 1- 49
1. Tail Gate Open Warning Light
2. Immobilizer Warning Indicator Light (If installed)
3. Tachometer
4. Turn Signal Indicator Light
5. Automatic Transaxle Position Indicator Light
(If installed)
6. Odometer/Trip Odometer
7. Fuel Gauge
8. Trip Computer (If installed)
9. Speedometer
10. Electric Power Steering Warning Light (If installed)
11. Malfunction Indicator Light (MIL) (If installed)
12. Diesel Pre-heat Indicator Light (Diesel only)
13. High Beam Indicator Light
14. Engine Coolant Temperature Indicator Light
15. Parking Brake/Brake Fluid Level Warning Light
16. Door Ajar Warning Light
17. Passenger's Front Airbag OFF Indicator Light
(If installed)
18. SRS (Airbag) Warning Light (If installed)
19. Low Fuel Warning Light
20. Electronic Stability Program (ESP) Indicator Light
(If installed)
21. ABS Warning Light (If installed)
22. Fuel Filter Warning Light (Diesel only)
23. Seat Belt Warning Light
24. Oil Pressure Warning Light
25. Charging System Warning Light
26. Overdrive Off Indcator Light (Auto T/A only)
Page 62

1- 50 FEATURES OF YOUR HYUNDAI
B260B01S-GAT
SRS (Airbag) Service
Reminder Indicator (SRI)
(If Installed)
The SRS service reminder indicator
(SRI) comes on and flashes for about
6 seconds after the ignition key is
turned to the "ON" position or after the
engine is started, after which it will go
out.
This light also comes on when the SRS
is not working properly. If the SRI does
not come on, or continuously remains
on after flashing for about 6 seconds
when you turned the ignition key to the
"ON" position or started the engine, or
if it comes on while driving, have the
SRS inspected by an authorized
Hyundai Dealer.
B230T02NF-GAT
Passenger's Front Airbag
OFF Indicator Light
(If Installed)
The passenger's front airbag OFF indicator illuminates for about 4 seconds
after the ignition key is turned to the
"ON" position or after the engine is
started, and then it will go off in 3
seconds.
The passenger's front airbag OFF indicator also comes on when the
passenger's front airbag ON/OFF switch
is set to "OFF" position and turns off
when the passenger's front airbag ON/
OFF switch is set to "ON" position.
!
CAUTION:
If there is a malfunction of the
passenger's front airbag ON/OFF
switch, the passenger's front airbag
OFF indicator will not illuminate and
the passenger's front airbag will inflate in frontal impact crashes even if
the passenger's front airbag ON/OFF
switch is set to the "OFF" position.
If the passenger's front airbag OFF
indicator will not illuminate when
the passenger's front airbag ON/OFF
switch is set to the "OFF" position,
have an authorized Hyundai dealer
inspect the passenger's front airbag
ON/OFF switch and the SRS airbag
system as soon as possible.
Page 63

FEATURES OF YOUR HYUNDAI 1- 51
B260P02Y-GAT
ABS Service Reminder
Indicator (SRI)
(If Installed)
When the key is turned to the "ON"
position, the Anti-Lock Brake System
will come on and then go off in a few
seconds. If the ABS SRI remains on,
comes on while driving, or does not
come on when the key is turned to the
"ON" position, this indicates that there
may be a problem with the ABS.
If this occurs, have your vehicle
checked by your Hyundai dealer as
soon as possible. The normal braking
system will still be operational, but
without the assistance of the anti-lock
brake system.
!
WARNING:
If both ABS SRI and Parking Brake/
Brake fluid level warning lights remain "ON" or come on while driving, there may be a problem with
E.B.D (Electronic Brake Force Distribution).
If this occurs, avoid sudden stops
and have your vehicle checked by
your Hyundai dealer as soon as
possible.
B260C01A-AAT
O/D OFF Indicator
(Automatic transaxle
only) (If Installed)
When the overdrive switch is turned
on, the overdrive off indicator will go
out. This amber indicator will be illuminated when the overdrive switch is
turned off.
B260D01A-AAT
Turn Signal Indicator
Lights
The blinking green arrows on the instrument panel show the direction indicated by the turn signals. If the arrow
comes on but does not blink, blinks
more rapidly than normal, or does not
illuminate at all, a malfunction in the
turn signal system is indicated. Your
dealer should be consulted for repairs.
B260F01A-AAT
High Beam Indicator
Light
The high beam indicator light comes
on whenever the headlights are
switched to the high beam or flash
position.
Page 64

1- 52 FEATURES OF YOUR HYUNDAI
B260G01A-AAT
Oil Pressure Warning
Light
!
CAUTION:
If the oil pressure warning light
stays on while the engine is running, serious engine damage may
result. The oil pressure warning
light comes on whenever there is
insufficient oil pressure. In normal
operation, it should come on when
the ignition switch is turned on,
then go out when the engine is
started. If the oil pressure warning
light stays on while the engine is
running, there may be a serious
malfunction. If this happens, stop
the car as soon as it is safe to do so,
turn off the engine and check the oil
level. If the oil level is low, fill the
engine oil to the proper level and
start the engine again. If the light
stays on with the engine running,
turn the engine off immediately. In
any instance where the oil light stays
on when the engine is running, the
engine should be checked by an
authorized Hyundai dealer before the
car is driven again.
B260H03A-AAT
Parking Brake/Brake
Fluid Level Warning
Light
!
WARNING:
If you suspect brake trouble, have
your brakes checked by a Hyundai
dealer as soon as possible. Driving
your car with a problem in either the
brake electrical system or brake
hydraulic system is dangerous, and
could result in a serious injury or
death.
Warning Light Operation
The parking brake/brake fluid level
warning light should come on when the
parking brake is applied and the ignition switch is turned to "ON" or
"START". After the engine is started,
the light should go out when the parking brake is released.
If the parking brake is not applied, the
warning light should come on when the
ignition switch is turned to "ON" or
"START", then go out when the engine
starts. If the light comes on at any
other time, you should slow the vehicle
and bring it to a complete stop in a safe
location off the roadway.
The brake warning light indicates that
the brake fluid level in the brake master
cylinder is low and hydraulic brake fluid
conforming to DOT 3 or DOT 4 specifications should be added. After adding
fluid, if no other trouble is found, the car
should be immediately and carefully
driven to a Hyundai dealer for inspection. If further trouble is experienced,
the vehicle should not be driven at all
but taken to a dealer by a professional
towing service or some other safe
method.
Your Hyundai is equipped with dualdiagonal braking systems. This means
you still have braking on two wheels
even if one of the dual systems should
fail. With only one of the dual systems
working, more than normal pedal travel
and greater pedal pressure are required to stop the car. Also, the car will
not stop in as short a distance with only
half of the brake system working. If the
brakes fail while you are driving, shift
to a lower gear for additional engine
braking and stop the car as soon as it is
safe to do so.
Page 65

FEATURES OF YOUR HYUNDAI 1- 53
B260J01S-GAT
Charging System
Warning Light
The charging system warning light
should come on when the ignition is
turned on, then go out when the engine
is running. If the light stays on while the
engine is running, there is a malfunction in the electrical charging system. If
the light comes on while you are driving, stop, turn off the engine and check
under the hood. First, make certain the
generator drive belt is in place. If it is,
check the tension of the belt.
And then, have the system checked by
your Hyundai dealer.
!
CAUTION:
If the drive belt (generator belt) is
loosen, broken, or mission while the
vehicle is driving, there may be a
serious malfunction, engine could
overheat because this belt also
drives the water pump.
B260K01B-GAT
Tail Gate Open Warning
Light
This light remains on unless the tail
gate is completely closed.
B260L01A-GAT
Door Ajar Warning Light
The door ajar warning light warns you
that a door is not completely closed.
B260M01A-AAT
Low Fuel Level Warning
Light
The low fuel level warning light comes
on when the fuel tank is approaching
empty. When it comes on, you should
add fuel as soon as possible. Driving
with the fuel level warning light on or
with the fuel level below "E" can cause
the engine to misfire and damage the
catalytic converter.
B260N02FC-GAT
Malfunction Indicator
Light (If installed)
This light illuminates when there is a
malfunction of an exhaust gas related
component, and the system is not
functioning properly so that the exhaust
gas regulation values are not satisfied.
This light will illuminate when the ignition key is tuned to the "ON" position,
and will go out after the engine start. If
it illuminates while driving, or does not
illuminate when the ignition key is turned
to the "ON" position, take your car to
your nearest authorized Hyundai dealer
and have the system checked.
B260E01TB-GAT
Seat Belt Warning Light
(Except E.C)
The seat belt warning light blinks for
about 6 seconds when the ignition key
is turned from the "OFF" position to the
"ON".
Page 66

1- 54 FEATURES OF YOUR HYUNDAI
B265E01TB-GAT
Seat Belt Warning Light
and Chime (E.C only)
The seat belt warning light and chime
will activate to the following table.
User (Driver) Condition
Seat Belt Ignition Switch
Unbuckled ON Stay on until buckled up
Buckled ON Come on for 6 seconds
Unbuckled ON *1Blink until buckled up
→→
Buckled
→
→→
Unbuckled
*1) When the ignition key is turned from
"OFF" position to "ON" within 1
minute.
*2) If the vehicle speed exceeds 9km/
h, the seat belt chime also sounds
for about 1~2 minutes.
If the vehicle speed is below 9km/h,
1 minute later the seat belt chime
also sounds for about 1~2 minutes.
Seat Belt WarningLight
ON Blink until buckled up*
2
NOTE:
If the driver's seat belt is operated in
this order "unbuckled
unbuckled
→→
→ buckled
→→
→→
→ buckled
→→
→ →
→ unbuck-
→ →
led" within 9 seconds after the seat
belt is buckled, the seat belt warning
light and chime will not activate.
→→
→
→→
B260T01TB-GAT
Electric Power
SteeringSystem (EPS)
Warning Light
(If installed)
This indicator light comes on about 4
seconds after the ignition key is turned
to the "ON" position or after the engine
is started, it will go out.
This light also comes on when the EPS
has some troubles. If it comes on while
driving, have your vehicle inspected by
an authorized Hyundai Dealer.
!
CAUTION:
When you move the electric power
steering back-end and forth-end
continuously in stop position, steering wheel plays heavily to operate
anti-overload system. It is normal
condition. It returns to be normal
getting time.
Page 67

FEATURES OF YOUR HYUNDAI 1- 55
B265C01LZ-AAT
Electronic Stability
Program Indicator Lights
(If installed)
The electronic stability program indicators change operation according to the
ignition switch position and whether the
system is in operation or not.
They will illuminate when the ignition
key is turned to the "ON" position, but
should go out after three seconds. If the
ESP or ESP-OFF indicator stays on,
take your car to your authorized Hyundai
dealer and have the system checked.
See section 2 for more information
about the ESP.
B260U01TB-GAT
Immobilizer Indicator
Light (If installed)
This indicator light comes on for some
seconds after the ignition key is turned
to the "ON" position. At this time, you
can start the engine. The light goes out
after the engine is running. In case this
light goes out before you start the engine, you must turn to the "LOCK"
position and restart the engine. In case
this light blinks for five seconds when
the ignition key is turned to "ON" position, this indicates that the immobilizer
system is out of order. At this time,
refer to the explanation of the Limp
home procedure(See page 1-6) or consult to the Hyundai dealer.
B260S01B-GAT
Diesel Pre-heat Indicator
Light-Amber
(Diesel Engine)
The indicator light illuminates amber
when the ignition switch is placed at
the "ON" position. The engine can be
started after the pre-heat indicator light
goes off. The illuminating time varies
with the water temperature, air temperature and battery condition.
NOTE:
If the engine were not started 10
seconds after the preheating is completed, turn the ignition key once
more to the "LOCK" position, and
then to the "ON" position, in order
to preheat again.
Page 68

1- 56 FEATURES OF YOUR HYUNDAI
B265A01B-GAT
Fuel Filter Warning
Light-Red (Diesel Engine)
This light illuminates when the ignition
switch is set to the "ON" position and
goes off after the engine has started. If
it lights up while the engine is running,
it indicates that water has accumulated inside the fuel filter. If this happens, remove the water from the fuel
filter. (Refer to "6-28 page")
B290A01TB-AAT
Engine Coolant Tempera-
ture Indicator
!
WARNING:
Never remove the radiator cap when
the engine is hot. The engine coolant is under pressure and could
erupt and cause severe burns. Wait
until the engine is cool before removing the radiator cap.
These indicators show the temperature
of the engine coolant when the ignition
switch is ON. Red indicator illuminates
if the temperature of the engine coolant
is above 120±3°C (393±5.5°F).
Blue indicator Illuminates if the temperature of the engine coolant is below
60±3°C (140±5.5°F).
If the red indicator illuminates, pull over
and stop as soon as possible and turn
off the engine. Then open the hood and
check the coolant level (See "If the
engine overheats" on the page 3-4.) and
the water pump drive belt. If you suspect cooling system trouble, have your
cooling system checked by a Hyundai
dealer as soon as possible.
NOTE:
If the red engine temperature indicator illuminates, it indicates overheating that may damage the engine.
B900A01A-GAT
ACOUSTIC WARNING SOUND
(If Installed)
The acoustic warning chime sounds
when the tail lights are on and the door
in driver side is open. This prevents the
battery from discharging when the car
is left with the tail lights on. The chime
sounds until the tail lights are turned
off.
B270A01A-AAT
BRAKE PAD WEAR WARNING
SOUND
The front disc brake pads have wear
indicators that should make a highpitched squealing or scraping noise
when new pads are needed. The sound
may come and go or be heard all the
time when the vehicle is moving. It
may also be heard when the brake
pedal is pushed down firmly. Excessive rotor damage will result if the worn
pads are not replaced. See your
Hyundai dealer immediately.
Page 69

FEATURES OF YOUR HYUNDAI 1- 57
B280A01A-AAT
FUEL GAUGE
HTB2019
The needle on the gauge indicates the
approximate fuel level in the fuel tank.
The fuel capacity is given in Section 9.
B300A01A-GAT
SPEEDOMETER
A Type
Your Hyundai's speedometer is calibrated in kilometers per hour or miles
per hour.
B Type
B300A01TB
B330A02A-AAT
TACHOMETER
A Type
The tachometer registers the speed of
your engine in revolutions per minute
(rpm).
!
CAUTION:
The engine should not be raced to
such a speed that the needle enters
the red zone on the tachometer face.
This can cause severe engine damage and may void your warranty.
B Type
B330A01TB
Page 70

1- 58 FEATURES OF YOUR HYUNDAI
B310B02TB-GAT
ODOMETER/TRIP ODOMETER
A Type
B Type
B310B01TB
A TYPE
(WITH TRIP COMPUTER)
1. Odometer
The odometer records the total driving
distance in kilometers or miles, and is
useful for keeping a record for maintenance intervals.
NOTE:
Any alteration of the odometer may
void your warranty coverage.
2. Trip odometer
o This mode indicates the drive dis-
tance travelled since the last drive
time reset.
o Pressing the trip switch for more
than 1 second, when the drive distance is being displayed, clears the
drive distance to zero.
o Refer to the explanation of the trip
computer (see page 1-61, Drive Distance).
B TYPE
(WITHOUT TRIP COMPUTER)
Function of digital odometer/trip
odometer
Pushing in the reset switch when the
ignition switch is turned "ON" will display the following sequence:
1. Odometer
1
2
3
HTB010
The odometer records the total driving
distance in kilometers or miles, and is
useful for keeping a record for maintenance intervals.
NOTE:
Any alteration of the odometer may
void your warranty coverage.
2,3 Trip odometer
Records the distance of 2 trips in kilometers or miles.
Page 71

FEATURES OF YOUR HYUNDAI 1- 59
TRIP A: First distance you have traveled from your origination point to a
first destination.
TRIP B: Second distance from the first
destination to the final destination.
To shift from TRIP A to TRIP B, press
the trip switch. When pressed for 1
second, it will reset to 0.
B400B03TB-GAT
TRIP COMPUTER (If Installed)
B400B01TB
The trip computer is the microcomputer-controlled driver information
gauge that displays information related to driving, such as outside temperature distance to empty, drive distance and average consumption on
the LCD.
B400B06TB
Trip Computer Switch
o The trip computer switch is used to
zero the multi-functional display
mode.
o Pushing in the trip computer switch
changes the display as follows;
OUTSIDE TEMPERATURE
DISTANCE TO EMPTY
AVERAGE CONSUMPTION
DRIVE DISTANCE
Page 72

1- 60 FEATURES OF YOUR HYUNDAI
1. Outside temperature
B400B02TB
This mode indicates the outside temperature between -40 C (-40 F) and
75 C (167 F) .
2. Distance to empty
o This mode indicates the estimated
distance to empty from the current
fuel in the fuel tank and distance to
empty symbol.
o When refueling with more than 6
liters, the trip computer will recognize refueling.
o When the battery has been rein-
stalled after being discharged or
disconnected, drive more than 64km
for an accurate distance to empty.
NOTE:
o When the distance to empty is less
than 50 km, the symbol will always come on and the distance to
empty digits will indicate "---" with
flash until more fuel is added.
o The distance to empty can differ
from the actual tripmeter according to driving conditions.
o The distance to empty can vary
according to the driving conditions, driving pattern or vehicle
speed.
3. Average Consumption
B400B05TB
o This mode indicates the average
consumption since the data reset.
o It displays per 10 seconds after you
drive over 50m and 10 seconds.
o Calculation Method
MPG =
L/100km =
Total Cruise Distance(Miles)
Total Fuel Consumption (G)
Total Fuel Consumption(L) x 100
Total Cruise Distance (km)
B400B03TB
Page 73

FEATURES OF YOUR HYUNDAI 1- 61
4. Drive Distance
B400B04TB
o This mode indicates the drive dis-
tance travelled since the last drive
time reset.
o Pressing the trip computer switch for
more than 1 second, when the drive
distance is being displayed, clears
the drive distance to zero.
B340A01A-AAT
COMBINATION TURN SIGNAL,
HEADLIGHT AND HIGH-BEAM
SWITCH
Turn Signal Operation
Pulling down on the lever causes the
turn signals on the left side of the car to
blink. Pushing upwards on the lever
causes the turn signals on the right
side of the car to blink. As the turn is
completed, the lever will automatically
return to the center position and turn
off the turn signals at the same time. If
either turn signal indicator light blinks
more rapidly than usual, goes on but
does not blink, or does not go on at all,
there is a malfunction in the system.
Check for a burned-out fuse or bulb or
see your Hyundai dealer.
B340B01A-AAT
Lane Change Signal
HTB018
To indicate a lane change, move the
lever up or down to a point where it
begins flashing.
The lever will automatically return to
the center position when released.
Page 74

1- 62 FEATURES OF YOUR HYUNDAI
B340C02FC-GAT
Headlight Switch
HTB015
To operate the headlights, turn the barrel on the end of the multi-function
switch. The first position turns on the
parking lights, sidelights, tail lights and
instrument panel lights. The second
position turns on the headlights.
NOTE:
The ignition must be in the "ON"
position to turn on the headlights.
Parking light auto cut
(If installed)
If you do not turn the parking lights
"OFF" after driving, the parking light
will automatically shut "OFF" when the
driver's door is opened.
To turn them "ON" again you must
simply turn the ignition key to the "ON"
position.
B340F01A-GAT
Daytime Running Lights
(If Installed)
Your Hyundai is equipped with daytime running lights. The daytime running lights are used to improve visibility for oncoming traffic. Your vehicle
daytime running lights are designed to
remain on continuously when the engine is operating even though the headlight switch is in the "OFF" position.
However, the daytime running lights
will be off while the parking brake is
applied.
B340D01A-AAT
High-beam Switch
To turn on the headlight high beams,
push the lever forward (away from
you). The high beam indicator light will
come on at the same time. For low
beams, pull the lever back toward you.
B340E01A-AAT
Headlight Flasher
HTB017
To flash the headlights, pull the switch
lever toward you, then release it. The
headlights can be flashed even though
the headlight switch is in the "OFF"
position.
Page 75

FEATURES OF YOUR HYUNDAI 1- 63
B350A01A-AAT
WINDSHIELD WIPER AND
WASHER SWITCH
HTB019A
The windshield wiper switch has three
positions:
1. Intermittent wiper operation
2. Low-speed operation
3. High-speed operation
NOTE:
To prevent damage to the wiper
system, do not attempt to wipe away
heavy accumulations of snow or
ice. Accumulated snow and ice
should be removed manually. If
there is only a light layer of snow or
ice, operate the heater in the defrost
mode to melt the snow or ice before
using the wiper.
B350B01O-GAT
Windshield Washer Operation
HTB021A
To use the windshield washer, pull the
wiper/washer lever toward the steering wheel. When the washer lever is
operated, the wipers automatically
make two passes across the windshield. The washer continues to operate until the lever is released.
NOTE:
o Do not operate the washer more
than 15 seconds at a time or
when the fluid reservoir is empty.
o In icy or freezing weather, be sure
the wiper blades are not frozen to
the glass prior to operating the
wipers.
o In areas where water freezes in
winter, use windshield washer
antifreeze.
Mist Wiper Operation
HTB022A
If a single wipe is desired in mist, push
the windshield wiper and washer control lever upwards.
Page 76

1- 64 FEATURES OF YOUR HYUNDAI
B350C01FC-GAT
Adjustable Intermittent Wiper
Operation (If Installed)
HTB020A
To use the intermittent wiper feature,
place the wiper switch in the "INT"
position. With the switch in this position, the interval between wipes can be
varied from approximately 1 to 18 seconds by turning the interval adjuster
barrel.
B350A01TB-AAT
Tail Gate Wiper And Washer
Switch (If installed)
HTB023A
1. : The washer fluid will be sprayed
onto the rear window and the
wiper operates while the rear window wiper barrel is placed in this
position.
2.ON : When the point indicates "ON",
the rear window wiper operates continuously.
3.OFF
B370A01A-AAT
HAZARD WARNING SYSTEM
HTB2031
The hazard warning system should be
used whenever you find it necessary
to stop the car in a hazardous location.
When you must make such an emergency stop, always pull off the road as
far as possible.
The hazard warning lights are turned
on by pushing in on the hazard switch.
This causes all turn signal lights to
blink. The hazard warning lights will
operate even though the key is not in
the ignition.
To turn the hazard warning lights off,
push in on the switch a second time.
Page 77

FEATURES OF YOUR HYUNDAI 1- 65
B380A01HP-AAT
REAR WINDOW DEFROSTER
SWITCH
HTB039
The rear window defroster is turned on
by pushing in on the switch. To turn the
defroster off, push in on the switch a
second time. The rear window defroster automatically turns itself off after about 20 minutes. To restart the
defroster cycle, push in on the switch
again after it has turned itself off.
!
CAUTION:
Do not clean the inner side of the
rear window glass with an abrasive
type of glass cleaner or use a scraper
to remove foreign deposits from
the inner surface of the glass as
this may cause damage to the defroster elements.
NOTE:
The engine must be running for the
rear window defroster to operate.
B360B01FC-GAT
FRONT FOG LIGHT SWITCH
(If Installed)
HTB2030
To turn on the front fog lights, push the
switch in the "ON" position. They will
come on when the headlight switch is
in the first or second position.
Page 78

1- 66 FEATURES OF YOUR HYUNDAI
B360A01Y-GAT
REAR FOG LIGHT SWITCH
(If Installed)
B360A01TB
To turn on the rear fog lights, push the
switch. They will come on when the
headlight switch is in the second position and the key is in the "ON" position.
B400A01A-AAT
DIGITAL CLOCK
HTB2033
There are three control buttons for the
digital clock. Their functions are:
HOUR - Push "H" to advance the hour
indicated.
MIN -Push "M" to advance the
minute indicated.
RESET - Push "R" to reset minutes to
":00" to facilitate resetting the
clock to the correct time.
When this is done:
Pressing "R" between 10 : 30 and 11 :
29 changes the readout to 11 : 00.
Pressing "R" between 11 : 30 and 12 :
29 changes the readout to 12 : 00.
B420A02A-AAT
CIGARETTE LIGHTER
HHR2098A
For the cigarette lighter to work, the key
must be in the "ACC" position or the
"ON" position.
To use the cigarette lighter, push it all
the way into its socket. When the element has heated, the lighter will pop
out to the "ready" position.
Do not hold the cigarette lighter pressed
in. This can damage the heating element and create a fire hazard.
If it is necessary to replace the cigarette lighter, use only a genuine Hyundai
replacement or its approved equivalent.
Page 79

!
CAUTION:
Do not use electric accessories or
equipment other than the Hyundai
genuine parts in the socket.
B500D01TG-GAT
POWER OUTLET (If installed)
B500D01TB
These supply 12V electric power to
operate electric accessories or equipment only when the key is in the "ON"
or "ACC" position.
!
CAUTION:
o Use when the engine is running
and remove a plug from the power
outlet after using the electric appliance. Using when the engine
stops or remaining the electric
appliance with plugged in for many
hours may cause the battery to be
discharged.
o Do not use the power outlet to
connect electric accessories or
equipment other than those designed to operate on 12 volts.
o Some electronic devices can cause
electronic interference when
plugged into the power outlet.
These devices may cause excessive audio noise and malfunctions
in other electronic systems or devices used in your vehicle.
FEATURES OF YOUR HYUNDAI 1- 67
B430A01TB-GAT
FRONT ASHTRAY
HTB2036
The front ashtray may be opened by
pulling it up by its top edge. To close
the ashtray cover firmly, let the lid grip
protrude outside. To remove the ashtray to empty or clean it, pull the cover
up all the way out.
Either holder can be a drink holder or a
ashtray holder.
Page 80

1- 68 FEATURES OF YOUR HYUNDAI
B450A01TB-GAT
DRINK HOLDER (If Installed)
Front side
The drink holder is used for holding
cups or cans.
Either holder can be a drink holder or a
ashtray holder.
Rear side
HTB105
B455A01TB-GAT
CONSOLE TRAY
HTB2037
There is multipurpose receipts to accept pens or CD case in the console
tray.
B340G01S-GAT
HEADLIGHT LEVELING DEVICE
SYSTEM (If Installed)
HTB181
To adjust the headlight beam level according to the number of the passengers and the loading weight in the luggage area, turn the beam leveling switch.
The higher the number of the switch
position, the lower the headlight beam
level. Always keep the headlight beam
at the proper leveling position, or headlights may dazzle other road users.
Listed below are the examples of proper
switch settings. For loading conditions
other than those listed below, adjust
the switch position so that the beam
level may be the nearest as the condition obtained according to the list.
Page 81

FEATURES OF YOUR HYUNDAI 1- 69
Loading condition
Driver only
Driver + front passenger
Full passengers (including
driver)
Full passengers (including
driver) + full trunk loading
(or light trailer loading)
Driver + full trunk loading
(or maximum trailer loading)
Switch
position
0
0
1
2
3
B460A01Y-AAT
SUNROOF (If installed)
Sun Shade
B470A01FC
Your HYUNDAI is equipped with a
sliding sunshade which you can manually adjust to let in light with the sunroof
closed, or to block sunlight.
!
WARNING:
Never adjust the sunshade while
driving.
B460B01GK-GAT
Opening the Sunroof System
HFC2021
The sunroof can be electrically opened
or closed with the ignition key in the
"ON" position. The sunroof is moved to
its fully open position by pushing the
"Open" switch, and to stop at the desired position, push in any switches
(Open, Close, Up, Down). To close,
press and hold the "CLOSE" button.
Release the button when the sunroof
reaches the desired position.
Page 82

1- 70 FEATURES OF YOUR HYUNDAI
!
WARNING:
o Do not close a sunroof if anyone’s
hands, arms or body are between
the sliding glass and the sunroof
sash, as this could result in injury.
o Do not place your head or arms
out of the sunroof opening at any
time.
!
CAUTION:
o Do not open the sunroof in se-
verely cold temperature or when
it is covered with ice or snow.
o Periodically remove any dirt that
may have accumulated on the
guide rails.
B460C01GK-GAT
Tilting the Sunroof System
HFC2022
The sunroof is moved to its fully tilt up
position by pushing the "UP" switch,
and to stop at the desired position,
push in any switches (Open, Close,
Up, Down).
To tilt down, press and hold the
"DOWN" button. Release the button
when the sunroof reaches the desired
position.
NOTE:
After washing the car or after there
is rain, be sure to wipe off any water
that is on the sunroof before operating it.
B460D02TB-AAT
Manual Operation of Sunroof
If the sunroof does not electrically operate:
HGK032
1. Remove the cap located in the rear
roof panel by using a screw driver.
Page 83

FEATURES OF YOUR HYUNDAI 1- 71
HGK033
2. Insert the hexagonal head wrench
provided with the vehicle into the
socket. This wrench can be found in
the vehicle’s tailgate or glove box.
3. Turn the wrench counterclockwise
to open or clockwise to close the
sunroof.
B460E01TB-GAT
Resetting the Sunroof System
If the battery has been recharged,
disconnected, if the sunroof is operated with the hexagonal head wrench
manually, or if the sunroof operation is
stopped by that ignition key is turned to
the "OFF" position while it is moving,
you may need to reset the sunroof.
To do this;
1. Turn the ignition switch "OFF".
2. With pressing "open" "up" button at
the same time, turn the ignition
switch "ON".
3. If the sunroof is set like this, the
sunroof is reset with tilting up/down
automatically once for all.
!
CAUTION:
If the sunroof is not reset, it may not
be operated properly.
B480A01E-AAT
FRONT INTERIOR LIGHT
Map Light
With Sunroof
The two map light switches are located
on both sides of the front overhead
console. Push in the map light switch
to turn the light on or off. This light
produces a spot beam for convenient
use as a map light at night or as a
personal light for the driver and the
passenger.
Without Sunroof
HTB050
Page 84

1- 72 FEATURES OF YOUR HYUNDAI
B490A01TB-AAT
INTERIOR LIGHT
With Sunroof
The interior courtesy light has a button
of three positions. The three positions
are:
Without sunroof
HTB303
oDR
Type A
In the "DR" position, the interior courtesy light comes on when any door is
opened regardless of the ignition key
position. The light goes out when the
door is closed.
Type B
In the "DR" position, the interior courtesy light comes on when any door is
opened regardless of the ignition key
position. The light goes out gradually 6
seconds after the door is closed.
oON
In the "ON" position, the light stays on
at all times.
o OFF
In the "OFF" position, the light stays off
at all times even though a door is open.
B491A01TB-GAT
SPECTACLE CASE (If Installed)
HTB102
The spectacle case is located on the
driver side of roof trim.
Pull the end of the cover to open the
spectacle case.
Page 85

!
WARNING:
Do not keep objects such as sharp
or unsuitable things inside the spectacle case. Such objects can be
thrown out in the event of a sudden
stop or an accident, possibly injuring the passengers in the vehicle.
!
WARNING:
To avoid the possibility of injury in
case of an accident or a sudden
stop, the glove box door should be
kept closed when the car is in motion.
o To open the glove box, pull on the
glove box release lever.
FEATURES OF YOUR HYUNDAI 1- 73
B510A01A-AAT
OUTSIDE REAR VIEW MIRROR
Manual Type (If installed)
B500A01A-AAT
GLOVE BOX
HTB101
B500B01O-AAT
Illuminated Glove Box
Opening the glove box will automatically turn on the light when the multifunction switch is turned to the first/
second position.
HTB306
The outside rearview mirrors are
equipped with a remote control for
your convenience. It is operated by the
control lever in the bottom front corner
of the window.
Before driving away, always check
that your mirrors are positioned so you
can see behind you, both to the left and
right sides, as well as directly behind
your vehicle. When using the mirror,
always exercise caution when attempting to judge the distance of vehicles
behind or along side of you.
Page 86

1- 74 FEATURES OF YOUR HYUNDAI
!
CAUTION:
If the mirror control is jammed with
ice, do not attempt to break it free
using the control handle or by manipulating the face of the mirror.
Use an approved spray de-icer (not
radiator antifreeze) to release the
frozen mechanism or move the vehicle to a warm place and allow the
ice to melt.
B510B01FC-GAT
Electric Type (If installed)
HTB104
The outside rearview mirrors can be
adjusted to your preferred rear vision,
both directly behind the vehicle, and to
the rear of the left and right sides.
The remote control outside rearview
mirror switch controls the adjustments
for both right and left outside mirrors.
To adjust the position of either
mirror:
1. Move the selecting switch to the
right or left to activate the adjustable
mechanism for the corresponding
door mirror.
2. Now, adjust mirror angle by depressing the appropriate perimeter
switch as illustrated.
HTB213
Page 87

FEATURES OF YOUR HYUNDAI 1- 75
!
CAUTION:
o Do not operate the switch con-
tinuously for an unnecessary
length of time.
o Scraping ice from the mirror face
could cause permanent damage.
To remove any ice, use a sponge,
soft cloth or approved de-icer.
!
WARNING:
Be careful when judging the size or
distance of any object seen in the
passenger side rear view mirror. It
is a convex mirror with a curved
surface. Any objects seen in this
mirror are closer than they appear.
B510D01HP-AAT
OUTSIDE REARVIEW MIRROR
HEATER (If Installed)
HTB039
The outside rearview mirror heater is
actuated in connection with the rear
window defroster. To heat the outside
rearview mirror glass, push in the switch
for the rear window defroster. The
rearview mirror glass will be heated for
defrosting or defogging and will give
you improved rear vision in inclement
weather conditions. Push the switch
again to turn the heater off. The outside rearview mirror heater automatically turns itself off after 20 minutes.
B510C01A-AAT
FOLDING THE OUTSIDE REARVIEW MIRRORS
HTB205
To fold the outside rearview mirrors,
push them towards the rear.
The outside rearview mirrors can be
folded rearward for parking in narrow
areas.
!
WARNING:
Do not adjust or fold the outside
rearview mirrors while the vehicle
is moving. This could result in loss
of control, and an accident which
could cause death, serious injury
or property damage.
Page 88

1- 76 FEATURES OF YOUR HYUNDAI
B520A01A-AAT
DAY/NIGHT INSIDE REARVIEW
MIRROR
HTB103
Your Hyundai is equipped with a day/
night inside rearview mirror. The "night"
position is selected by flipping the tab
at the bottom of the mirror toward you.
In the "night" position, the glare of
headlights of cars behind you is reduced.
B530A01A-AAT
PARKING BRAKE
HTB3024
Always engage the parking brake before leaving the car. This also turns on
the parking brake indicator light when
the key is in the "ON" or "START"
position. Before driving away, be sure
that the parking brake is fully released
and the indicator light is off.
o To engage the parking brake, pull
the lever up as far as possible.
o To release the parking brake, pull
up the lever and press the thumb
button. Then, while holding the button in, lower the brake lever.
B550A01S-GAT
HIGH-MOUNTED REAR STOP
LIGHT (If Installed)
B550A01TB
In addition to the lower-mounted rear
stop lights on either side of the car, the
high mounted rear stop light in the
center of the rear window or inserted in
the rear spoiler also lights when the
brakes are applied.
Page 89

FEATURES OF YOUR HYUNDAI 1- 77
B570A03A-GAT
HOOD RELEASE
HTB070
1. Pull the release knob to unlatch the
hood.
HTB2003
2. Push the secondary latch lever to
the left and lift the hood.
HTB308
3. Pull the support rod from the hood.
HTB288
4. Hold the hood open with the support
rod.
Before closing the hood, return the
support rod to its clip to prevent it from
rattling. Lower the hood until it is about
30 cm (1 ft.) above the closed position
and let it drop. Make sure that it locks
into place.
!
CAUTION:
Make sure that the support rod has
been released prior to closing the
hood.
!
WARNING:
o Always double check to be sure
that the hood is firmly latched
before driving away. If it is not
latched, the hood could fly open
while the vehicle is being driven,
causing a total loss of visibility,
which might result in an accident.
o The support rod must be inserted
completely into the hole provided
in the hood whenever you inspect the engine compartment.
This will prevent the hood from
falling and possibly injuring you.
Page 90

1- 78 FEATURES OF YOUR HYUNDAI
o Do not move the vehicle with the
hood in the raised position, as
vision is obstructed and the hood
could fall or be damaged.
B560A02A-AAT
REMOTE FUEL-FILLER LID RELEASE
HTB115
The fuel-filler lid may be opened from
inside the vehicle by pulling up on the
fuel-filler lid opener located on the front
floor area on the left side of the car.
NOTE:
If the fuel-filler lid will not open
because ice has formed around it,
tap lightly or push on the lid to
break the ice and release the lid. Do
not pry on the lid. If necessary, spray
around the lid with an approved deicer fluid (do not use radiator antifreeze) or move the vehicle to a warm
place and allow the ice to melt.
HTB068
!
WARNING:
o Gasoline vapors are dangerous.
Before refueling, always stop the
engine and never allow sparks or
open flames near the filler area. If
you need to replace the filler cap,
use a genuine Hyundai replacement part.
If you open the fuel filler cap during high ambient temperatures, a
slight "pressure sound" may be
heard. This is normal and not a
cause for concern.
Whenever you open the fuel filler
cap, turn it slowly.
o Automotive fuels are flammable/
explosive materials. When refueling, please note the following
guidelines carefully.
o Before touching the fuel nozzle or
fuel filler cap, have one's hands in
contact with metal parts away from
the filler neck to discharge static
electricity.
Page 91

FEATURES OF YOUR HYUNDAI 1- 79
o Do not get back in the vehicle
while refueling. Do not operate
anything that can produce static
electricity. Static electricity discharge can ignite fuel vapors resulting in explosion.
o When using a portable fuel con-
tainer be sure to place the container on the ground while refueling. Static electricity discharge
from the container can ignite fuel
vapors causing a fire. While starting refueling contact should be
maintained until the filling is complete.
o Do not use cellular phones around
a gas station. The electric current
or electronic interference from
cellular phones can ignite fuel
vapors causing a fire.
o When refueling always shut the
engine off. Sparks by electrical
equipment of the engine can ignite fuel vapors causing a fire.
After refueling, check to make sure
the fuel filler cap is securely closed,
and then start the engine.
o Do not smoke or try to light ciga-
rettes around a gas station. Automotive fuels are flammable.
B540A01FC-GAT
TAIL GATE
HTB067
!
WARNING:
The tail gate should always be kept
completely closed while the vehicle
is in motion. If it is left open or ajar,
poisonous exhaust gases may enter the car resulting in serious illness or death to the occupants. See
additional warnings concerning exhaust gases on page 2-2.
o The tail gate can be locked or un-
locked with a key.
o The tail gate is opened by pulling the
outside handle up, raising the tail
gate manually.
o To close, lower the tail gate, then
press down on it until it is closed. To
be sure the tail gate is fully closed,
always try to pull it up again without
using the outside handle.
Page 92

1- 80 FEATURES OF YOUR HYUNDAI
B540A02TB-GAT
SEATBACK HOLDER
HTB279
The seatback holder are fitted on the
front passenger's seatback to hang a
shopping bag and so on. When not in
use, return it to the original position.
!
CAUTION
o Do not hang a bag beyond 3 kg. It
may cause damage to the seatback
holder.
o Return it to the original position
after using the seatback holder.
!
WARNING:
Do not use when the passenger (especially the child) is in the rear seat,
as the seatback holder could result
in serious injury to the passenger in
the event of an accident or sudden
stop.
B540B01TB-GAT
SEAT POCKET (If installed)
HTB298
Seat side pocket is located on the front
passenger seat to accept scratch paper and so on.
There are seatback pockets on the
backside of the front seats (If installed)
B545A01TB-GAT
HOW TO USE LUGGAGE ROOM
B650A01FC-GAT
Cargo Area Cover (If installed)
HTB2039
Nothing should be carried on top of the
luggage cover. Loose materials could
result in injury to vehicle occupants
during sudden braking.
Page 93

FEATURES OF YOUR HYUNDAI 1- 81
Luggage Side Trim
HTB2038
There are multipurpose receipts to accept small commodities in the luggage
side trim.
B545B01TB-GAT
Luggage Under Tray (If installed)
HTB295
There is a multipurpose receipt space
under the luggage room mat.
Mat hanger
HTB296
Before use the luggage under tray,
hang the luggage room mat to the mat
hanger. Mat hanger is located beneath
the center of the cargo area cover.
!
CAUTION:
Should install the luggage under
tray on the spare tire. Unless, it may
cause transformation of the luggage
room mat.
Page 94

1- 82 FEATURES OF YOUR HYUNDAI
B540D02FC-GAT
Luggage Net (If Installed)
HTB289
Some objects can be kept in the net in
the luggage compartment.
Use the luggage net on the floor or at
the back of the luggage compartment
to prevent objects from sliding.
!
CAUTION:
To prevent damage to the goods or
the vehicle, care should be taken
when carrying fragile or bulky objects in the luggage compartment.
!
WARNING:
Avoid eye injury. DO NOT overstretch. ALWAYS keep face and body
out of recoil path. DO NOT use when
strap has visible signs of wear or
damage.
B545C01TB-GAT
Luggage Board (If installed)
Luggage
Board
Supporter
For greater convenience, your Hyundai
can devide the cargo space with the
luggage board. Fix the luggage board
to the luggage board supporter. Fold
the board to pull the grip upward and
push forward.
HTB299
!
CAUTION:
o When you want to enlarge the
cargo space, remove the luggage
board from the luggage board
supporter after folding the rear
seat.
o Do not load cargo beyond 30kg.
It may cause damage to the luggage board.
HTB301
Page 95

FEATURES OF YOUR HYUNDAI 1- 83
o To use the luggage board with
unfolding, fix it in the luggage
board supporter. There will be an
audible "Click" when the luggage
board fixes in the supporter.
o The luggage board can be thrown
out in the event of a sudden stop
or an accident. Unfold the luggage board stablely to prevent
cargo damage.
HTB302
B560B01O-GAT
AUTO FUEL CUT SWITCH
(Gasoline Engine) (If installed)
HTB304
The auto fuel cut switch is located on
the driver's side of the engine compartment.
In the event of a collision or sudden
impact, the auto fuel cut device cuts off
the fuel supply. If this device is activated, it must be reset by pressing in
on the top of the switch before the
engine can be restarted.
!
WARNING:
Before resetting the auto fuel cut
switch, the fuel line should be
checked for fuel leaks.
B580A01TB-GAT
SUN VISOR
A Type
B Type
HTB098
HTB148
Page 96

1- 84 FEATURES OF YOUR HYUNDAI
Your Hyundai is equipped with sun
visors to give the driver and front passenger either frontal or side ward shade.
The sun visors are fitted on both sides
on all models. To reduce glare or to
shut out direct rays of the sun, turn the
sun visor down to block the annoyance. A ticket holder is provided on the
back of the sun visor for the driver.
Vanity mirrors are provided on the
back of the sunvisor for the driver and
the front passenger (If installed).
NOTE:
The Supplemental Restraint System (SRS) label containing useful
information can be found on the
front of each sun visor.
!
WARNING:
Do not place the sun visor in such
a manner that it obscures visibility
of the roadway, traffic or other objects.
B600A01A-AAT
STEERING WHEEL TILT LEVER
(If Installed)
To Adjust the Steering Wheel:
B600A01TB
1. Push the lever downward to unlock.
2. Raise or lower the steering wheel to
the desired position.
3. After adjustment, securely tighten
the lever by pulling it upward.
!
WARNING:
Do not attempt to adjust the steering wheel while driving as this may
result in loss of control of the vehicle which may cause serious injury or death.
B610B01A-GAT
HORN
B240B01TB
Press the center hub of the steering
wheel to sound the horn.
Page 97

FEATURES OF YOUR HYUNDAI 1- 85
B610A01TB-GAT
AUDIO REMOTE CONTROL
SWITCH
(If Installed)
B610A01TB
The steering wheel audio remote control switch is installed to promote safe
driving.
NOTE:
Do not operate audio remote control
switches simultaneously.
MODE Switch
Press the MODE switch to select Radio, Tape, CD (Compact Disc).
Each press of the switch changes the
display as follows:
RADIO (FM1 → FM2 →AM) → TAPE → CD
→
SEEK Switch
Press the SEEK switch 1 sec. or more.
1. RADIO mode
When the upper SEEK switch is pressed,
the unit will automatically tune to the
next higher frequency and when the
lower SEEK switch is pressed, it will
automatically tune to the next lower
frequency.
2. TAPE mode
o Pressing the upper SEEK switch will
play the beginning of the next music
segment.
o Pressing the lower SEEK switch will
start replay at the beginning of the
music just listened to.
3. CD (Compact Disc) mode
o Press the upper SEEK switch once
to skip forward to the beginning of the
next track.
o Press the lower SEEK switch once
to skip back to the beginning of the
track.
VOL Switch
o Press the upper VOL switch to in-
crease volume.
o Press the lower VOL switch to de-
cease volume.
Page 98

1- 86 FEATURES OF YOUR HYUNDAI
B710A01TB-GAT
HEATING AND COOLING CONTROL (If Installed)
B710A01S-AAT
VENTILATION
To operate the ventilation system:
o Set the air intake control to "Fresh"
mode( ).
o To direct all intake air to the dash-
board vents, set the air flow control
to "Face".
o Adjust the fan speed control to the
desired speed.
o Set the temperature control between
"Cool" and "Warm".
B710B01A-AAT
Center Ventilator
The center ventilators are located in
the middle of the dashboard.
To change the direction of the air flow,
turn the control knob on the middle of
the ventilator as desired.
1. Side defrost nozzle
2. Side Ventilator
3. Windshield Defrost Ventilator
4. Center Ventilator
B710A01TB
Page 99

FEATURES OF YOUR HYUNDAI 1- 87
B710C01Y-AAT
Side Ventilator
The side vent knobs control the amount
of outside air entering the vehicle
through the side vents. These vents
can also be closed, so no air enters
through the side vents. To change the
direction of the air flow, turn the control
knobs as desired.
B670A01TB-GAT
HEATING AND VENTILATION
(If Installed)
1
4
2
56
1. Temperature control switch
2. Fan speed control switch
3. Air flow control switch
4. Air conditioning switch
5. Air intake control switch
6. Rear window defroster switch
3
HTB033
B670B01A-AAT
Fan Speed Control
(Blower Control)
HTB034
This is used to turn the blower fan on
or off and to select the fan speed.
This blower fan speed, and therefore
the volume of air delivered from the
system, may be controlled manually
by setting the blower control between
the "1" and "4" positions.
Page 100

1- 88 FEATURES OF YOUR HYUNDAI
B670C02A-AAT
Air Intake Control
HTB036
This is used to select fresh outside air
or recirculation inside air.
Fresh
Recirculation
With the " " mode selected, air
enters the vehicle from outside and is
heated or cooled according to the other
functions selected.
With the " " mode selected, air from
within the passenger compartment is
drawn through the heating system and
heated or cooled according to the other
functions selected.
NOTE:
It should be noted that prolonged
operation of the heating system in
" " mode will give rise to misting
of the windshield and side windows and the air within the passenger compartment will become stale.
In addition prolonged use of the air
conditioning with the " " mode
selected may result in the air within
the passenger compartment becoming excessively dry.
B670D01TB-AAT
Air Flow Control
HTB038
This is used to direct the flow of air. Air
can be directed to the floor, dashboard
outlets, or windshield. Five symbols
are used to represent Face, Bi-Level,
Floor, Floor-Defrost and Defrost air
position.
 Loading...