

Page 1
OWNER'S MANUALOWNER'S MANUAL
OWNER'S MANUAL
OWNER'S MANUALOWNER'S MANUAL
Operation
Maintenance
Specifications
All information in the Owner's Manual is current at the time of publication.
However, Hyundai reserves the right to make changes at any time as part of our
policy of continual product improvement may be carried out.
This manual applies to all Hyundai models and includes descriptions and explanations of optional as well as standard equipment. As a result, you may find
material in this manual that does not apply to your specific vehicle.
F1
Page 2
A070A01A-AAT
CAUTION: MODIFICATIONS TO YOUR HYUNDAI
!
Your Hyundai should not be modified in any way. Such modifications may adversely affect the
performance, safety or durability of your Hyundai and may, in addition, violate conditions of the limited
warranties covering the vehicle. Certain modifications may also be in violation of regulations
established by the U.S. Department of Transportation and other federal or state agencies.
F2
A080A01S-AAT
TWO-WAY RADIO OR CELLULAR TELEPHONE INSTALLATION
Your vehicle is equipped with electronic fuel injection and other electronic components. It is possible
for an improperly installed/adjusted two-way radio or cellular telephone to adversely affect electronic
systems. For this reason, we recommend that you carefully follow the radio manufacturer's instructions or consult your Hyundai dealer for precautionary measures or special instructions if you choose
to install one of these devices.
Page 3
A090A01A-AAT
This manual includes information titled as WARNING, CAUTION and NOTE.
These titles indicate the following:
!
WARNING:
This indicates that a condition may result in harm, serious injury or death to you or other persons
if the warning is not heeded. Follow the advice provided with the warning.
!
This indicates that a condition may result in damage to your vehicle or its equipment if the caution
is not heeded. Follow the advice provided with the caution.
NOTE:
This indicates that interesting or helpful information is being provided.
CAUTION:
SAFETY AND VEHICLE DAMAGE WARNING
F3
Page 4

A110A02A-AAT
VEHICLE DATA COLLECTION AND EVENT DATA RECORDERS
This vehicle is equipped with an event data recorder (EDR). The main purpose of an EDR is to
record, in certain crash or near crash-like situations, such as an air bag deployment or hitting
a road obstacle, data that will assist in understanding how a vehicle's systems performed. The
EDR is designed to record data related to vehicle dynamics and safety systems for a short
period of time, typically 30 seconds or less. The EDR in this vehicle is designed to record such
data as:
o How various systems in your vehicle were operating;
o Whether or not the driver and passenger safety belts were buckled/fastened;
These data can help provide a better understanding of the circumstances in which crashes and
injuries occur. NOTE: EDR data are recorded by your vehicle only if a non-trivial crash situation
occurs; no data are recorded by the EDR under normal driving conditions and no personal data
(e.g., name, gender, age, and crash location) are recorded. However, other parties, such as law
enforcement, could combine the EDR data with the type of personally identifying data routinely
acquired during a crash investigation.
To read data recorded by an EDR, special equipment is required, and access to the vehicle or
the EDR is needed. In addition to the vehicle manufacturer, other parties, such as law
enforcement, that have the special equipment, can read the information if they have access to
the vehicle or the EDR.
F4
Page 5

A040A01A-AAT
FOREWORD
Thank you for choosing Hyundai. We are pleased to welcome you to the growing number of discriminating
people who drive a Hyundai. The advanced engineering and high-quality construction of each Hyundai we
build is something of which we're very proud.
Your Owner's Manual will introduce you to the features and operation of your new Hyundai. It is suggested
that you read it carefully because the information it contains can contribute greatly to the satisfaction you
receive from your new car.
The manufacturer also recommends that all service and maintenance on your car be performed by an
authorized Hyundai dealer. Hyundai dealers are prepared to provide high-quality service, maintenance and
any other assistance that may be required.
A050A05A-AAT
HYUNDAI MOTOR AMERICA
Note: Because future owners will also need the information included in this manual, if you sell this Hyundai,
please leave the manual in the vehicle for their use. Thank you.
!
Severe engine and transaxle damage may result from the use of poor quality fuels and lubricants that
do not meet Hyundai specifications. You must always use high quality fuels and lubricants that meet
the specifications listed on Page 9-4 in the Vehicle Specifications section of the Owner's Manual and
which also appear in the Service Station Information on the back cover of the Owner's Manual.
CAUTION:
Copyright 2010 Hyundai Motor America. All rights reserved. No part of this publication may be reproduced,
stored in any retrieval system or transmitted in any form or by any means without the prior written permission
of Hyundai Motor America.
F5
Page 6
A100A03A-AAT
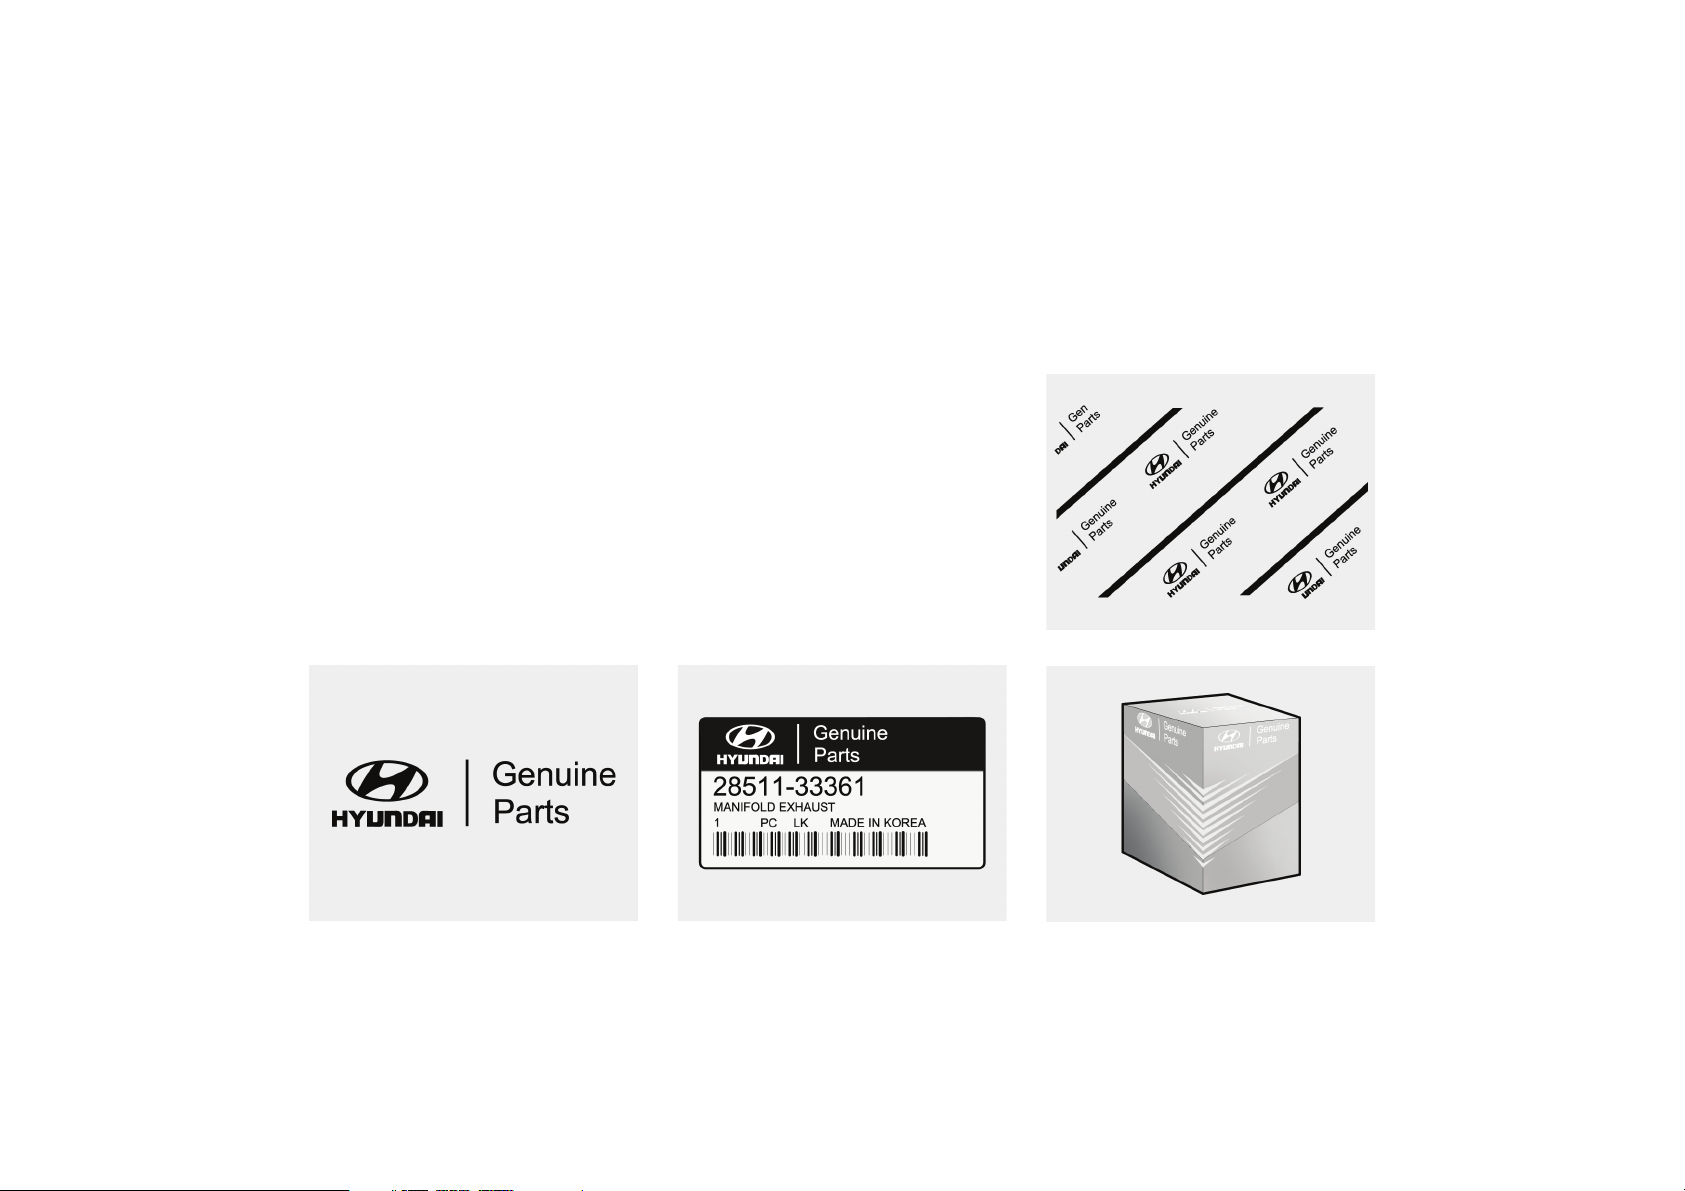
Guide to Hyundai Genuine Parts
1. What are Hyundai Genuine Parts?
Hyundai Genuine Parts are the same
parts used by Hyundai Motor Company
to manufacture vehicles. They are designed and tested for the optimum safety,
performance, and reliability to our customers.
2. Why should you use genuine parts?
Hyundai Genuine Parts are engineered
and built to meet rigid manufacturing
requirements. Using imitation, counterfeit or used salvage parts is not covered
under the Hyundai New Vehicle Limited Warranty or any other Hyundai
warranty. In addition, any damage to or
failure of Genuine Hyundai Parts caused
by the installation or failure of an imitation, counterfeit or used salvage part is
not covered by any Hyundai Warranty.
3. How can you tell if you are purchasing
Hyundai Genuine Parts?
Look for the Hyundai Genuine Parts
Logo on the package (see below).
Hyundai Genuine Parts exported to the
United States are packaged with labels
written only in English.
Hyundai Genuine Parts are only sold
through authorized Hyundai
Dealerships.
" To find the closest authorized dealer
call 1-800-826-CARS "
A100A03L
F6
A100A01L A100A02L A100A04L
Page 7

TABLE OF CONTENTS
SECTION
FEATURES OF YOUR HYUNDAI
DRIVING YOUR HYUNDAI
WHAT TO DO IN AN EMERGENCY
CORROSION PREVENTION & APPEARANCE CARE
VEHICLE MAINTENANCE REQUIREMENTS
DO-IT-YOURSELF MAINTENANCE
EMISSION CONTROL SYSTEMS
CONSUMER INFORMATION, REPORTING SAFETY DEFECTS &
BINDING ARBITRATION OF WARRANTY CLAIMS
VEHICLE SPECIFICATIONS
INDEX
1
2
3
4
5
6
7
8
9
10
F7
Page 8
B250A02MC-AAT
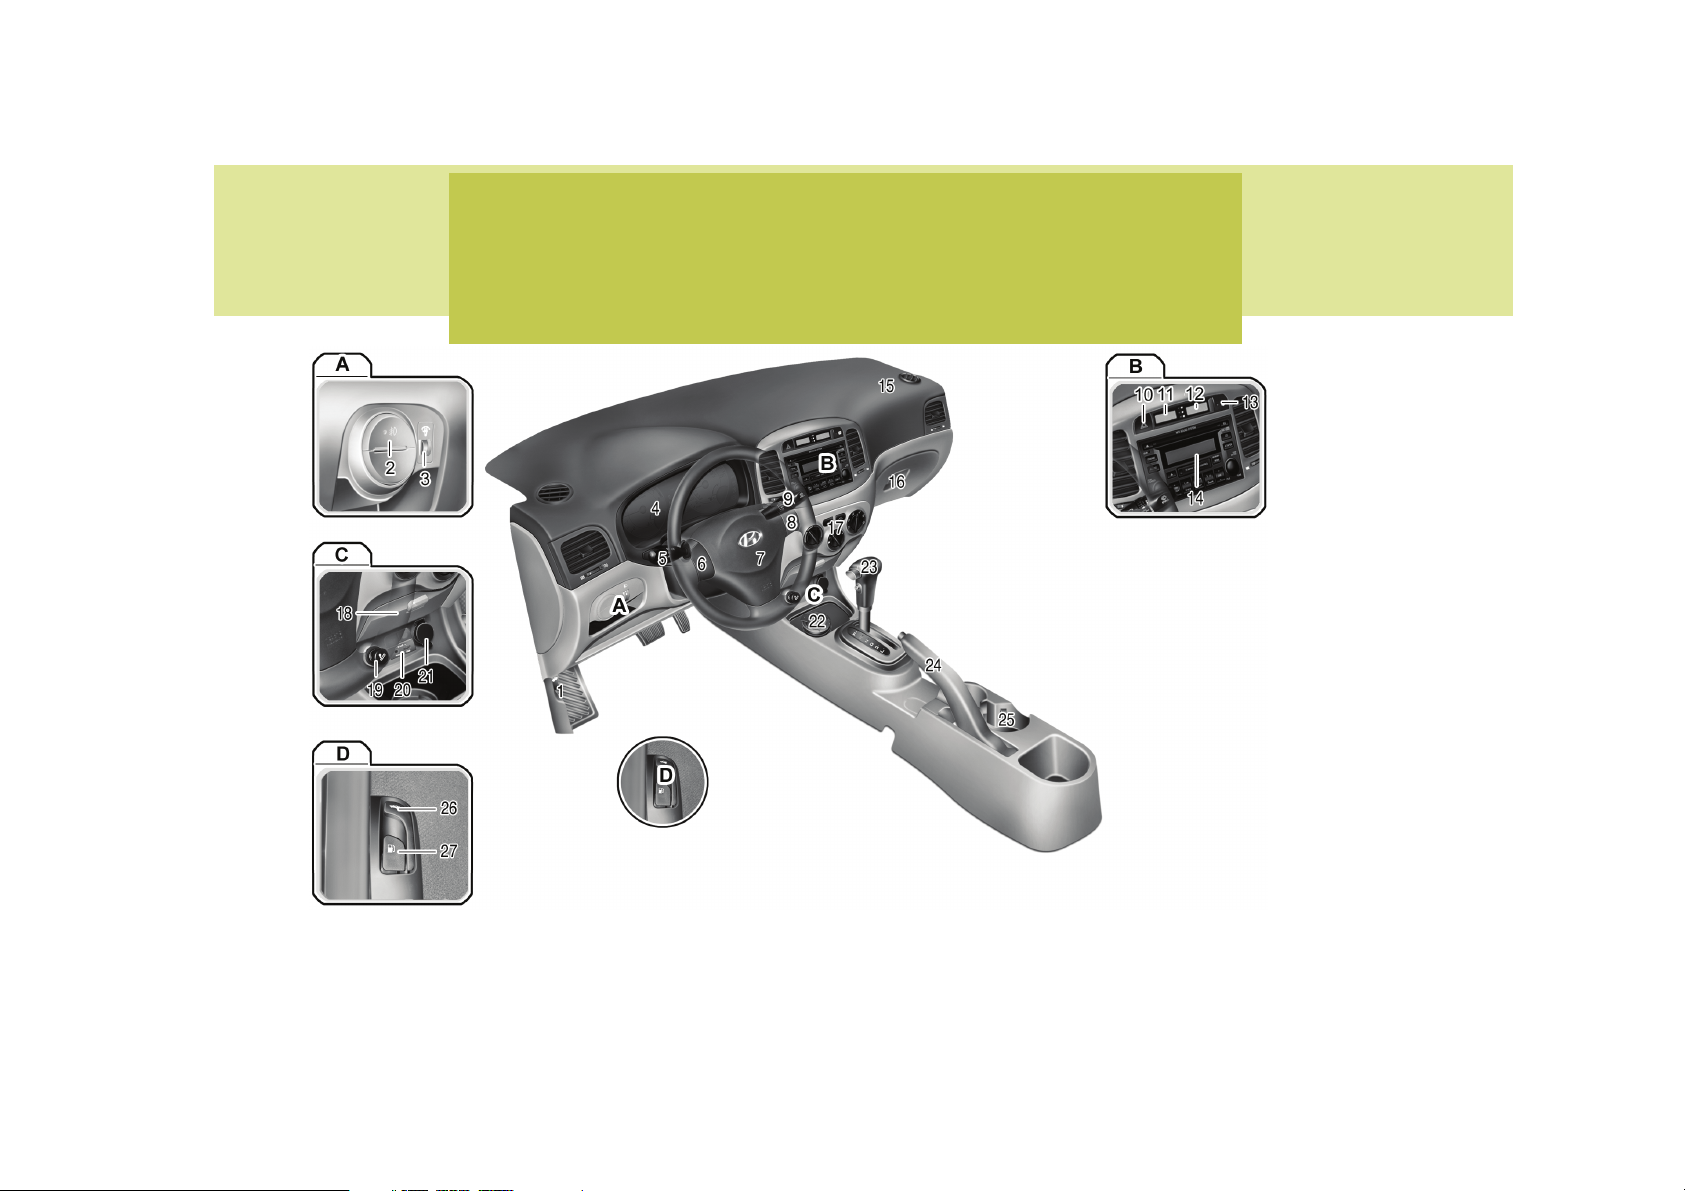
INSTRUMENTS AND CONTROLS
F8
OMC010001N-2
Page 9
1. Hood Release Lever................................................... 1-93
2. Front Fog Light Switch (If Installed) ............................ 1-82
3. Panel Brightness Control Knob (Rheostat Switch) .... 1-80
4. Instrument Cluster....................................................... 1-60
5. Multi-Function Light Switch ......................................... 1-76
6. Cruise Control Switches (If Installed) ....................... 1-103
7. Horn and Driver's Front Airbag ........................ 1-101, 1-42
8. Audio Remote Control Switch (If Installed) ............... 1-102
9. Windshield Wiper/Washer Switch
(Front and Rear) (If Installed) ...................................... 1-78
10. Hazard Warning Light Switch ..................................... 1-81
11. Digital Clock ................................................................ 1-82
12. "PASSENGER AIR BAG OFF" Indicator ..................... 1-49
13. Rear Window Defroster Switch ................................... 1-81
!
When installing a container of liquid air freshener inside the vehicle, do not place it near the instrument cluster
nor on the instrument panel surface. If there is any leakage from the air freshener onto these areas
(Instrument cluster, instrument panel or air ventilator), it may damage these parts. If the liquid from the air
freshener does leak onto these areas, wash them with water immediately.
CAUTION:
14. Audio System (If Installed) ........................................ 1-123
15. Passenger's Front Airbag ........................................... 1-42
16. Glove Box .................................................................... 1-88
17. Heating/Air Conditioning Control Panel (If Installed) 1-109
18. Multi Box ..................................................................... 1-89
19. Cigarette Lighter ......................................................... 1-82
20. AUX, USB and iPod
21. Power Outlet ............................................................... 1-83
22. Ashtray ........................................................................ 1-83
23. Shift Lever ..................................................................... 2-9
24. Parking Brake Lever ................................................... 1-91
25. Front Drink Holder ...................................................... 1-84
26. Trunk Lid Release Lever (If Installed) ........................ 1-97
27. Fuel Filler Lid Release Lever ..................................... 1-94
®
Port ......................................... 1-107
F9
Page 10

YOUR VEHICLE AT A GLANCE
B255A03MC-AAT
INDICATOR SYMBOLS ON THE INSTRUMENT PANEL
SRS (Airbag) Warning Light
ABS Service Reminder Indicator (If Installed)
O/D OFF Indicator
(Automatic transaxle only)
Turn Signal Indicator Lights
High Beam Indicator Light
Automatic Transaxle Position Indicator Light
(If Installed)
Manual Transaxle Shift Indicator (If Installed)
Low Oil Pressure Warning Light
Parking Brake/Low Brake Fluid Level
Warning Light
Charging System Warning Light
Door Ajar Warning Light and Chime
Trunk Lid / Tail Gate Open Warning Light
Low Fuel Level Warning Light
Check Fuel Filler Cap Warning Light
Malfunction Indicator Light
Seat Belt Warning Light and Chime
Engine Coolant Temperature Warning Light
Cruise Indicator Light (If Installed)
Cruise SET Indicator Light (If Installed)
Low Tire Pressure Telltale (If Installed)
TPMS (Tire Pressure Monitoring System) Malfunction
Indicator (If Installed)
ECO
ECO Indicator (If Installed)
* More detailed explanations of these items will be found begining on page 1-64.
F10
Page 11

!
CALIFORNIA PROPOSITION
65 WARNING:
Items contained in motor vehicles or
emitted from them are known to the
State of California to cause cancer and
birth defects or reproductive harm.
These include:
o Gasoline and its vapors
o Engine exhaust
o Used engine oil
o Interior passenger compartment
components and materials
o Component parts which are subject
to heat and wear
In addition, battery posts, terminals and
related accessories contain lead, lead
compounds and other chemicals known
to the State of California to cause cancer
and reproductive harm.
F11
Page 12

FEATURES OF YOUR HYUNDAI
Fuel Recommendations ................................................ 1-2
Breaking in Your New Hyundai .................................... 1-3
Keys.............................................................................. 1-3
Door Locks ................................................................... 1-4
Theft-Alarm System ...................................................... 1-8
Window Glass ............................................................ 1-11
Seats........................................................................... 1-13
Seat Belts ................................................................... 1-22
Child Restraint System............................................... 1-31
Advanced Supplemental Restraint (AIRBAG)
System ...................................................................... 1-41
Instrument Cluster and Indicator Lights ..................... 1-60
Warning and Indicator Lights ...................................... 1-64
Trip Computer ............................................................. 1-73
Multi-Function Light Switch ......................................... 1-76
Windshield Wiper and Washer Switch ....................... 1-78
Sunroof ....................................................................... 1-84
Mirror ........................................................................... 1-89
Hood Release ............................................................. 1-93
Cruise Control System ............................................. 1-103
Heating and Cooling Control .................................... 1-108
Stereo Sound System .............................................. 1-119
Antenna ..................................................................... 1-122
Audio System ........................................................... 1-122
1
1
Page 13
FEATURES OF YOUR HYUNDAI
1
FUEL RECOMMENDATIONS
2
B010A02MC-AAT
Use Unleaded Gasoline
UNLEADED
FUEL ONLY
B010A01MC-A
Unleaded gasoline with a Pump Octane
Rating of 87 (Research Octane Number
91) or higher must be used in your
Hyundai.
!
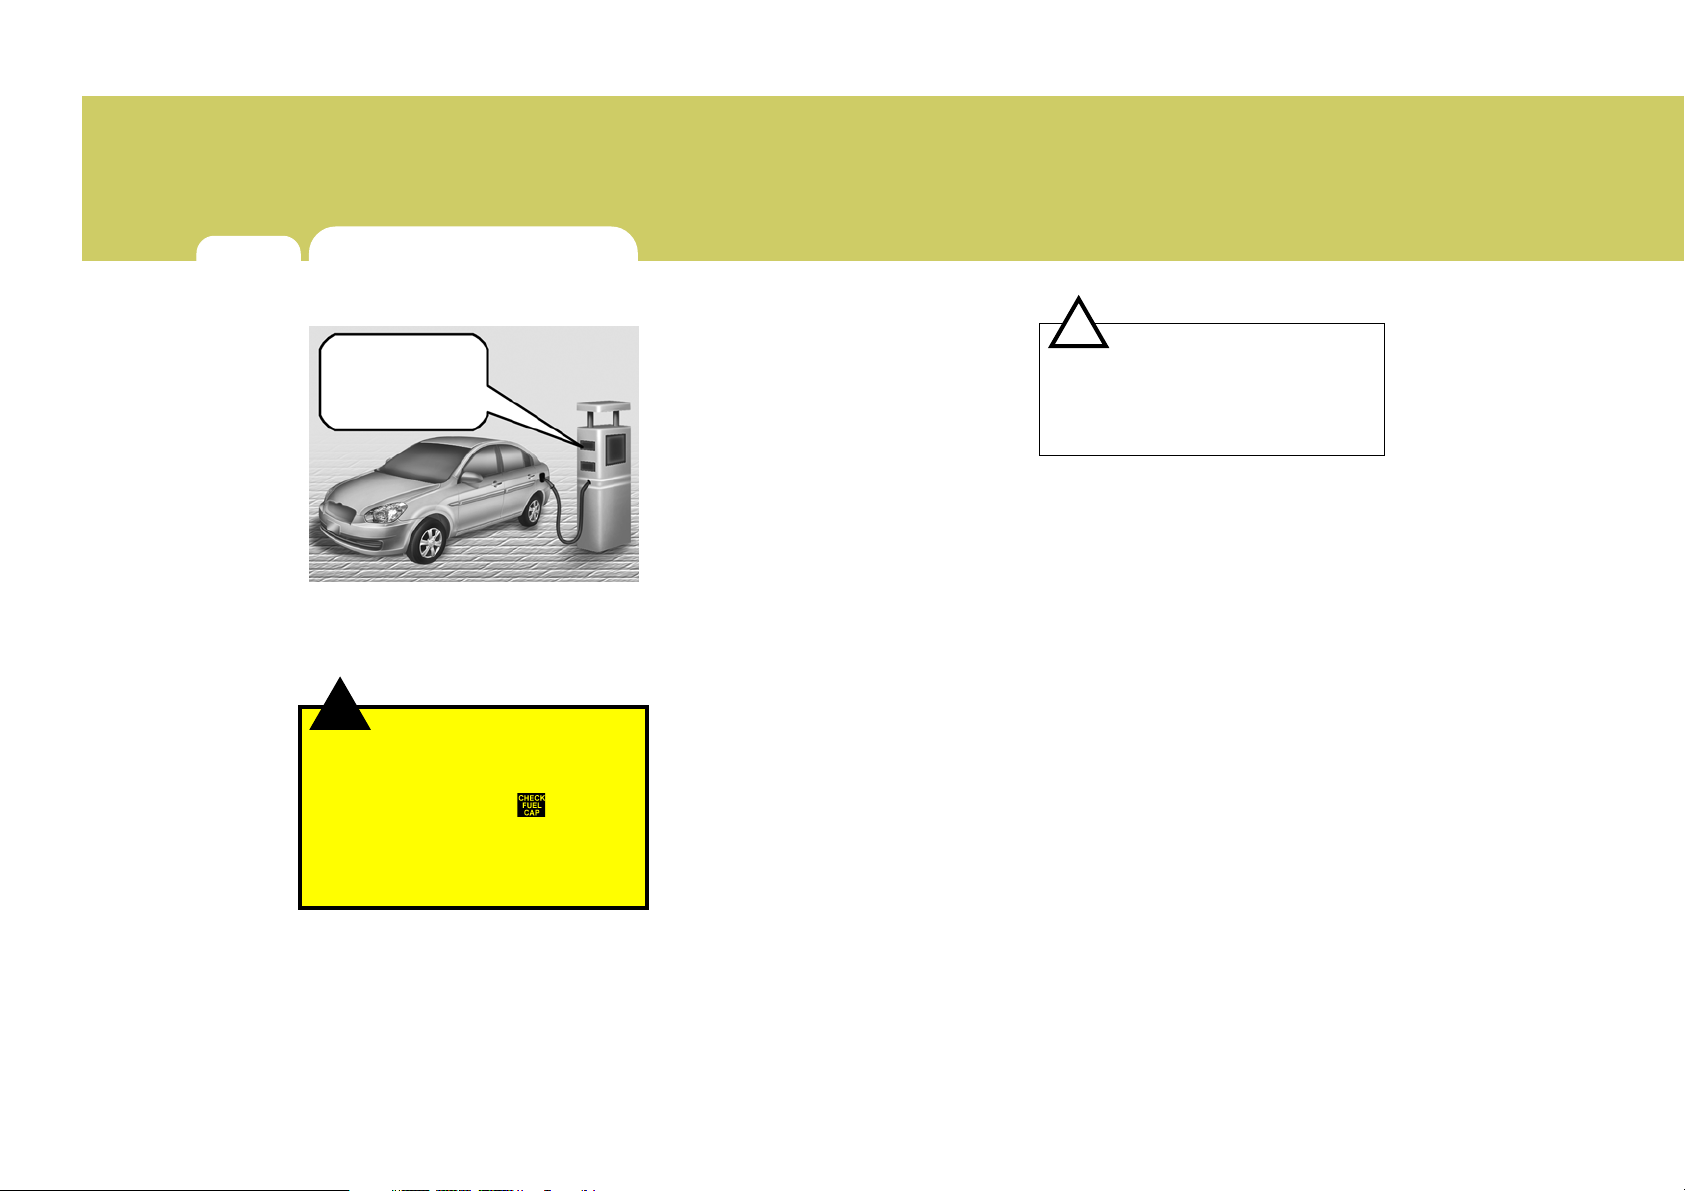
o Do not "top off" after the nozzle au-
o Tighten the cap until it clicks one
o Always check that the fuel cap is
WARNING:
tomatically shuts off when refueling.
time, otherwise the "
illuminate.
installed securely to prevent fuel
spillage in the event of an accident.
" light will
B010B01A-AAT
What About Gasohol?
Gasohol (a mixture of 90% unleaded
gasoline and 10% ethanol or grain alcohol) may be used in your Hyundai. However, if your engine develops driveability
problems, the use of 100% unleaded
gasoline is recommended. Fuels with
unspecified quantities of alcohol, or
alcohols other than ethanol, should not
be used.
Use of E85 fuel
E85 fuel is an alternative fuel composed
of 85 percent ethanol and 15 percent
gasoline, and is manufactured for use in
Flexible Fuel Vehicles. E85 is not compatible with your vehicle. Use of E85 may
result in poor engine performance and
damage to your vehicle's engine and fuel
system. Damage resulting from the use of
E85 is not covered under Hyundai warranties.
B010D01A-AAT
Do Not Use Methanol
Fuels containing methanol (wood alcohol) should not be used in your Hyundai.
This type of fuel can reduce vehicle performance and damage components of
the fuel system.
!
Your Hyundai's New Vehicle Limited Warranty may not cover damage to the fuel
system and any performance problems
that are caused by the use of fuels containing methanol.
B010E01A-AAT
CAUTION:
Gasolines for Cleaner Air
To help contribute to cleaner air, Hyundai
recommends you use gasolines treated
with detergent additives, which help prevent deposit formation in the engine.
These gasolines will help the engine run
cleaner and enhance performance of the
Emission Control System.
B010F01A-AAT
Operation in Foreign Countries
If you are going to drive your Hyundai in
another country, be sure to:
o Observe all regulations regarding reg-
istration and insurance.
o Determine that acceptable fuel is avail-
able.
Page 14
BREAKING IN YOUR NEW
HYUNDAI
B020A01S-AAT
During the First 1200 Miles (2000
Km)
No formal "break-in" procedure is required
with your new Hyundai. However, you
can contribute to the economical operation and durability of your Hyundai by
observing the following recommendations during the first 1200 miles (2000
km).
o Don't drive faster than 55 MPH (88 km/
h).
o While driving, keep your engine speed
(rpm, or revolutions per minute) between 2,000 rpm and 4,000 rpm.
o Use moderate acceleration. Don't start
quickly or depress the accelerator
pedal fully.
o For the first 200 miles (300 km), try to
avoid hard stops.
o Don't lug the engine (in other words,
don't drive so slowly in too high a gear
that the engine "bucks"-shift to a lower
gear).
o Whether going fast or slow, vary your
speed from time to time.
o Don't let the engine idle longer than 3
minutes at one time.
o Don't tow a trailer during the first 1,200
miles (2,000 km) of operation.
FEATURES OF YOUR HYUNDAI
FEATURES OF YOUR HYUNDAI
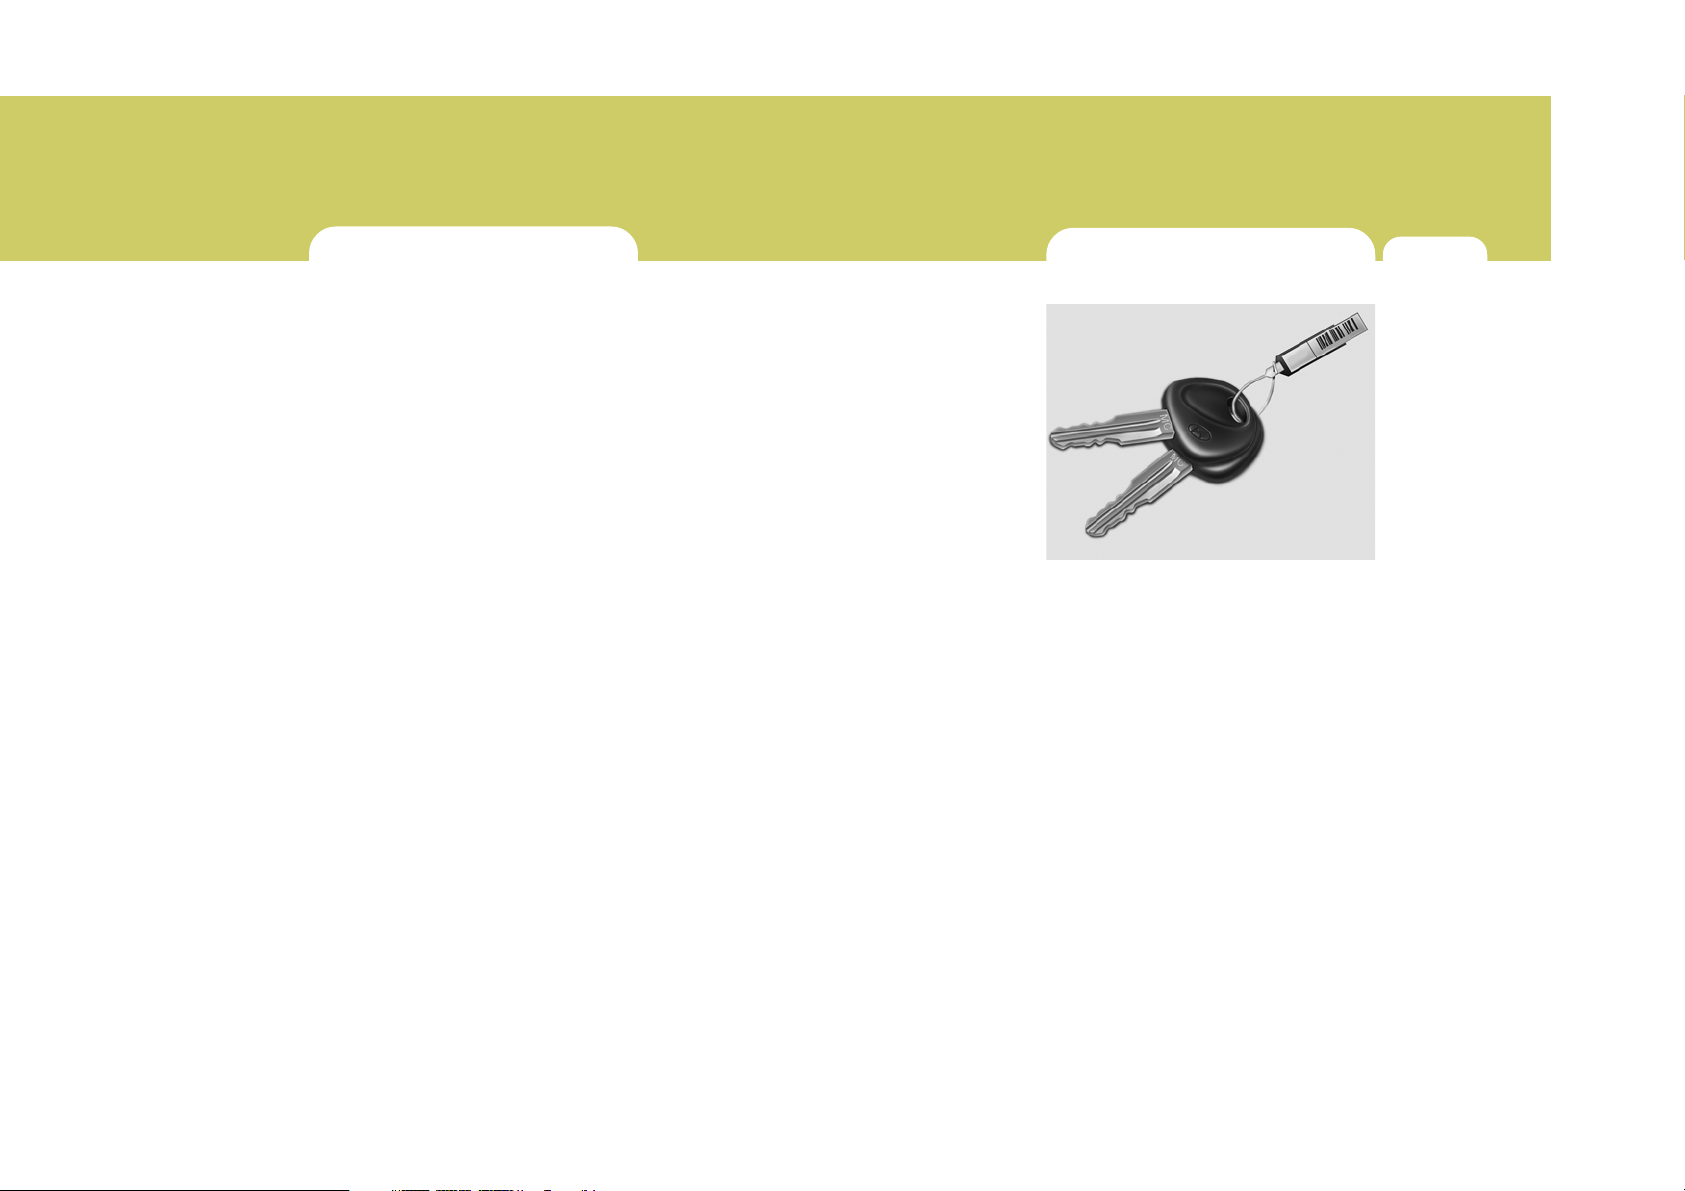
KEYS
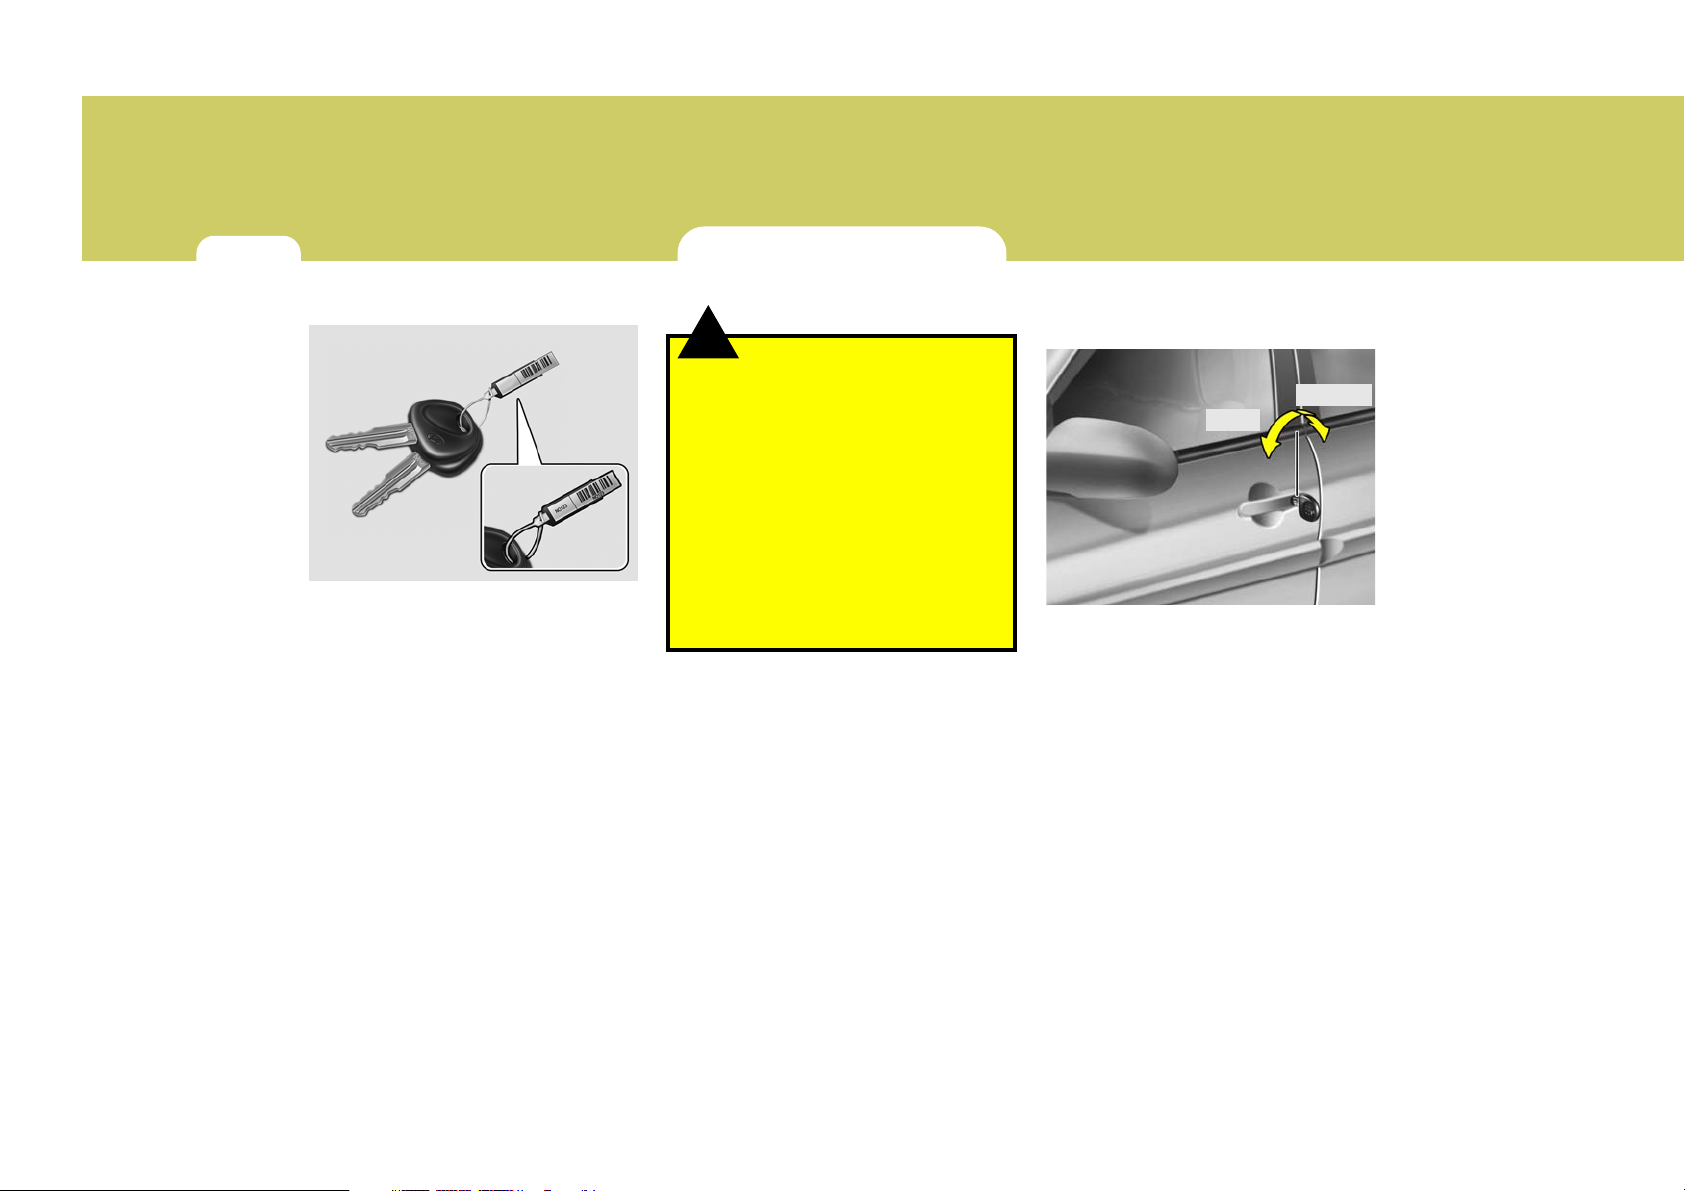
B030A01A-AAT
OMC025001
For greater convenience, the same key
operates all the locks in your Hyundai.
However, because the doors can be
locked without a key, carrying a spare key
is recommended in case you accidentally
lock one key inside the car.
1
1
3
3
Page 15
FEATURES OF YOUR HYUNDAI
1
4
DOOR LOCKS
B030B01NF-GAT
Record Your Key Number
B030B01MC
A code number is recorded on the number tag that came with the keys to your
Hyundai. This key number tag should not
be left with the keys but kept in a safe
place, not in the vehicle. The key number
should also be recorded in a place where
it can be found in an emergency.
If you need additional keys, or if you
should lose your keys, your authorized
Hyundai dealer can make new keys if you
can supply the key number.
B040A01A-AAT
!
WARNING:
o Unlocked doors can be dangerous.
Before you drive away (especially if
there are children in the car), be sure
that all the doors are securely closed
and locked so that the doors cannot
be opened from the inside. This helps
ensure that the doors will not be
opened accidentally. Also, when combined with the proper use of seat
belts, locking the doors helps keep
occupants from being ejected from
the car in case of an accident.
o Before opening the door, always look
for and avoid oncoming traffic.
B040B02A-AAT
Locking and Unlocking Front Doors
with a Key
UNLOCK
LOCK
OMC025005
o The door can be locked or unlocked
with a key.
o Lock the door by turning the key to-
ward the front of the vehicle and unlock it by turning the key toward the
rear.
NOTE:
o The driver's door can be unlocked by
turning the key once toward the rear.
If you wish to unlock all doors, turn
the key again toward the rear within
4 seconds (With the central door
locking system).
Page 16
FEATURES OF YOUR HYUNDAI
FEATURES OF YOUR HYUNDAI
1
1
5
5
o If your vehicle is equipped with a
transmitter, you can change the system to unlock all doors by turning the
key once toward the rear. If you want
this feature (central door unlock
mode), refer to the "Keyless entry
system" in this section.
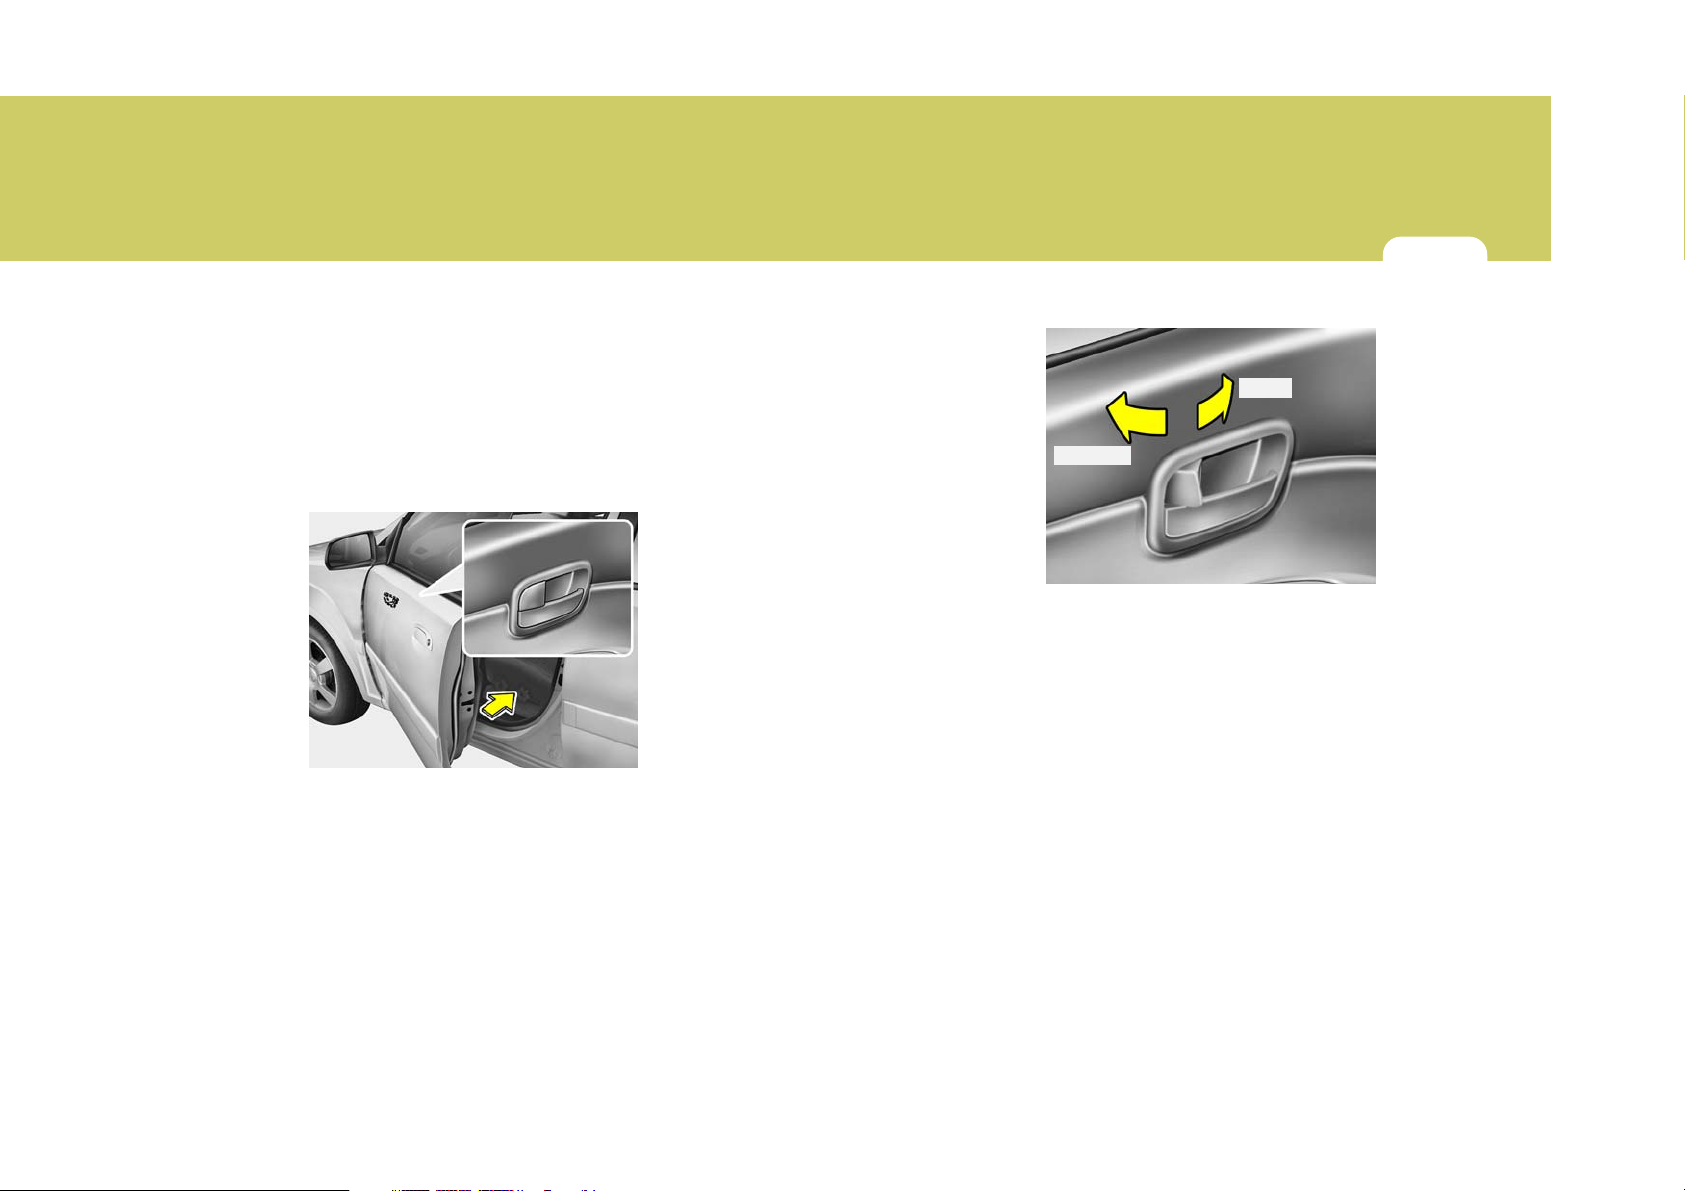
B040C01MC-AAT
Locking from Outside
B040C04MC
The doors can be locked without a key.
To lock the doors, first push the inside
lock switch to the "LOCK" position so that
the red mark on the switch is not visible,
then close the door.
NOTE:
o When pushing the lock switch of the
passenger's door to the "LOCK" position, all doors can be locked.
o If your vehicle is equipped with the
central door locking system, the door
will not lock if the key is left in the
ignition switch when the front doors
are closed.
o When locking the door from outside,
be careful not to lock the door with
the ignition key left in the vehicle.
o To protect against theft, always re-
move the ignition key, close all windows, and lock all doors and the
trunk lid (4 Door) / tail gate (3 Door)
when leaving your vehicle unattended.
B040D01MC-AAT
Locking from the Inside
LOCK
UNLOCK
OMC025006
To lock the doors from the inside, simply
close the door and push the lock switch
to the "LOCK" position.
NOTE:
o When pushing the lock switch of the
passenger's door to the "LOCK" position, all doors can be locked.
o When the door is locked, the red
mark on the switch is not visible.
o The driver's door can be opened by
pulling the inside door handle even if
the inside lock switch is pushed to
the "LOCK" position.
Page 17
FEATURES OF YOUR HYUNDAI
1
6
!
WARNING:
Be careful not to pull the inside door
handle while driving. If you pull the inside
door handle, the door can be opened and
you may be ejected from the vehicle and
can be injured or killed.
B040E04A-AAT
CHILD-PROTECTOR REAR DOOR
LOCK (4 Door)
B040E01MC
Your Hyundai is equipped with left and
right side "child-protector" rear door locks.
When the lock mechanism is engaged,
the rear door cannot be opened from the
inside. Its use is recommended whenever there are small children in the rear
seat.
To engage the child-protector feature so
that the door cannot be opened from the
inside, move the child-protector lever to
" position and close the door. Move
the "
the lever to the "
" position when nor-
mal door operation is desired.
To open the door from the outside, pull
the outside door handle.
B040G01MC-AAT
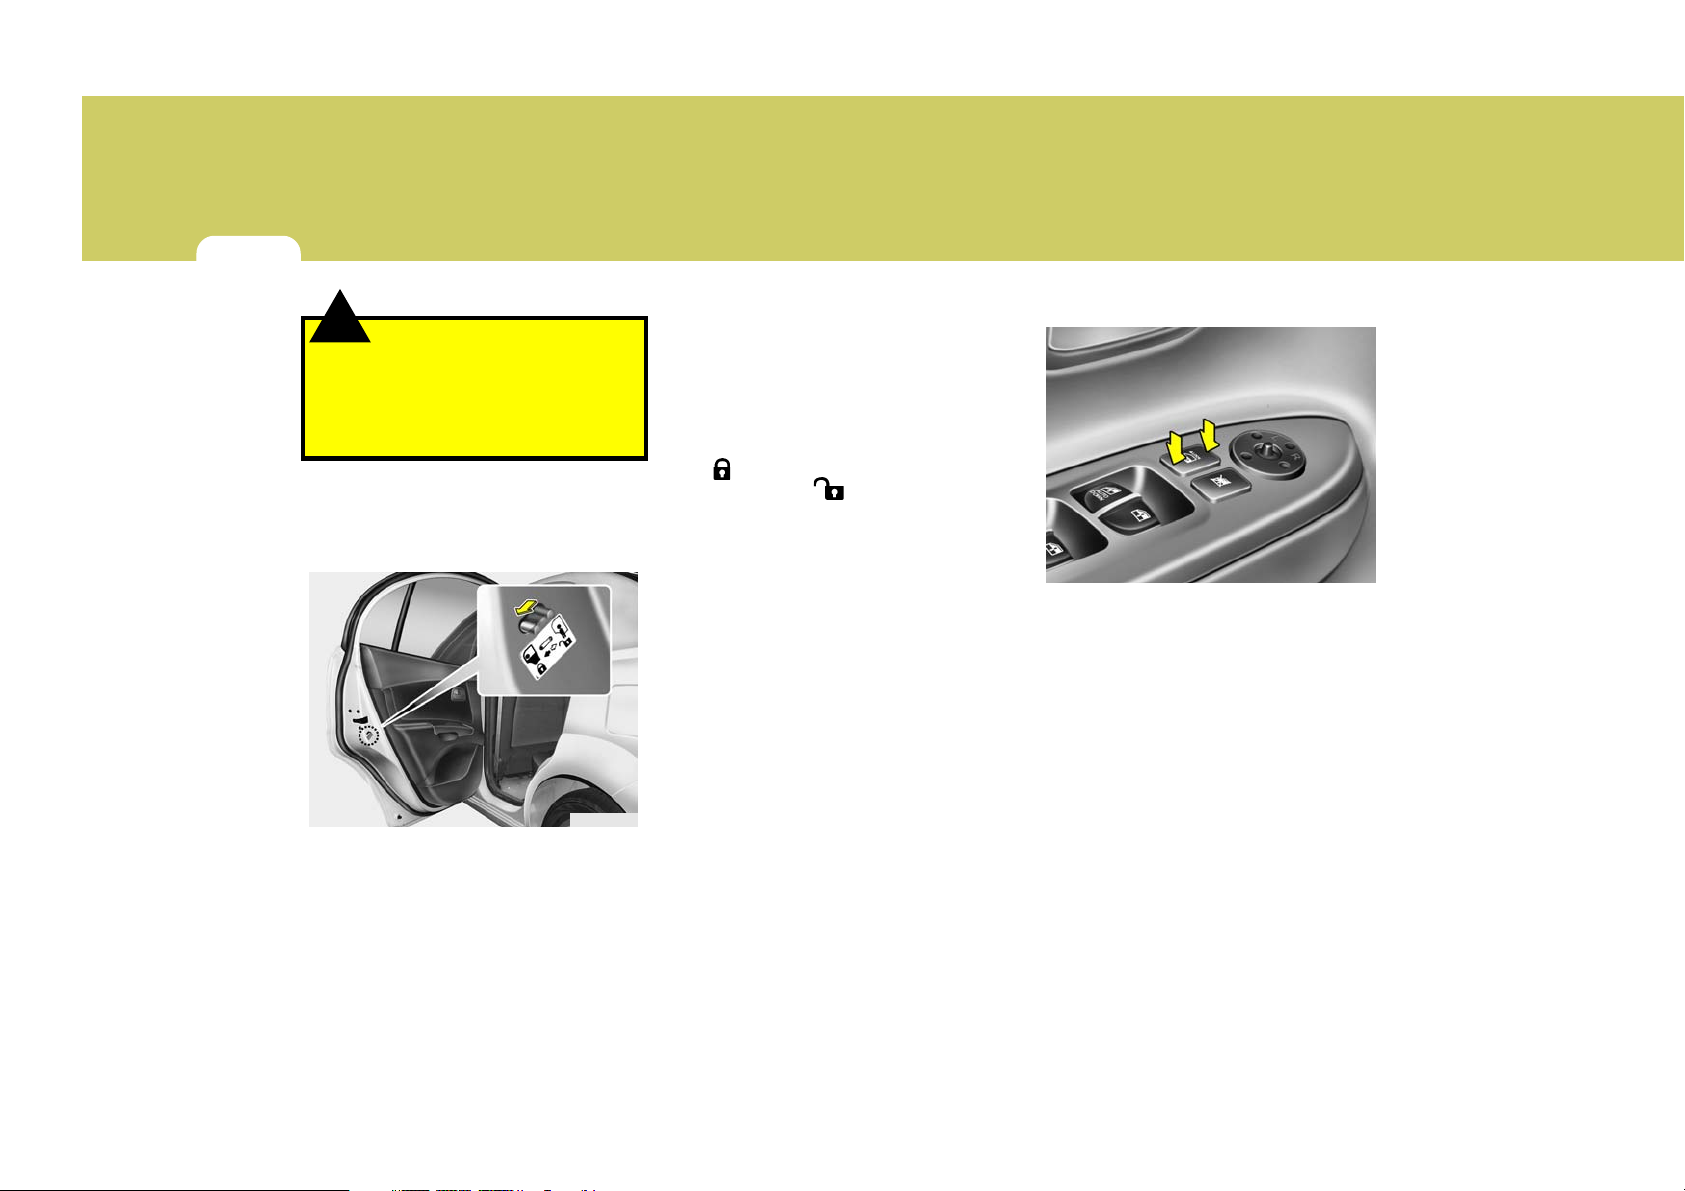
Central Door Locks (If Installed)
UNLOCK
The central door locking switch is located on the driver's armrest. It is operated by depressing the door lock switch.
If any door is open when the switch is
depressed to the "LOCK" position, the
door will remain locked when closed.
LOCK
OMC029047
NOTE:
o When depressing the front portion
of the door lock switch, all vehicle
doors will lock.
o When depressing the rear portion of
the switch, all vehicle doors will unlock.
Page 18
FEATURES OF YOUR HYUNDAI
FEATURES OF YOUR HYUNDAI
1
1
7
7
o The driver's door can be opened by
pulling the inside door handle even if
the front portion of the central door
locking switch has been depressed
to lock the doors.
o If the door is locked/unlocked mul-
tiple times in rapid succession with
either the vehicle key or door lock
switch, the system may stop operating temporarily in order to protect
the circuit and prevent damage to
system components.
o The central door locking is operated
by turning the key in the driver's
door lock toward the front or rear of
the vehicle.
!
Be careful not to pull the inside door
handle while driving. If you pull the inside door handle, the door can be opened
and you may be ejected from the vehicle and can be injured or killed.
WARNING:
B070F03O-AAT
KEYLESS ENTRY SYSTEM
(If Installed)
This device complies with Part 15 of the
FCC rules.
Operation is subject to the following two
conditions:
1. This device may not cause harmful
interference, and
2. This device must accept any interference received, including interference
that may cause undesired operation.
!
Changes or modifications not expressly
approved by the party responsible for
compliance could void the user’s authority to operate the equipment. If the
keyless entry system is inoperative
due to changes or modifications not
expressly approved by the party responsible for compliance, it will not be
covered by your manufacturer’s vehicle warranty.
WARNING:
Locking doors
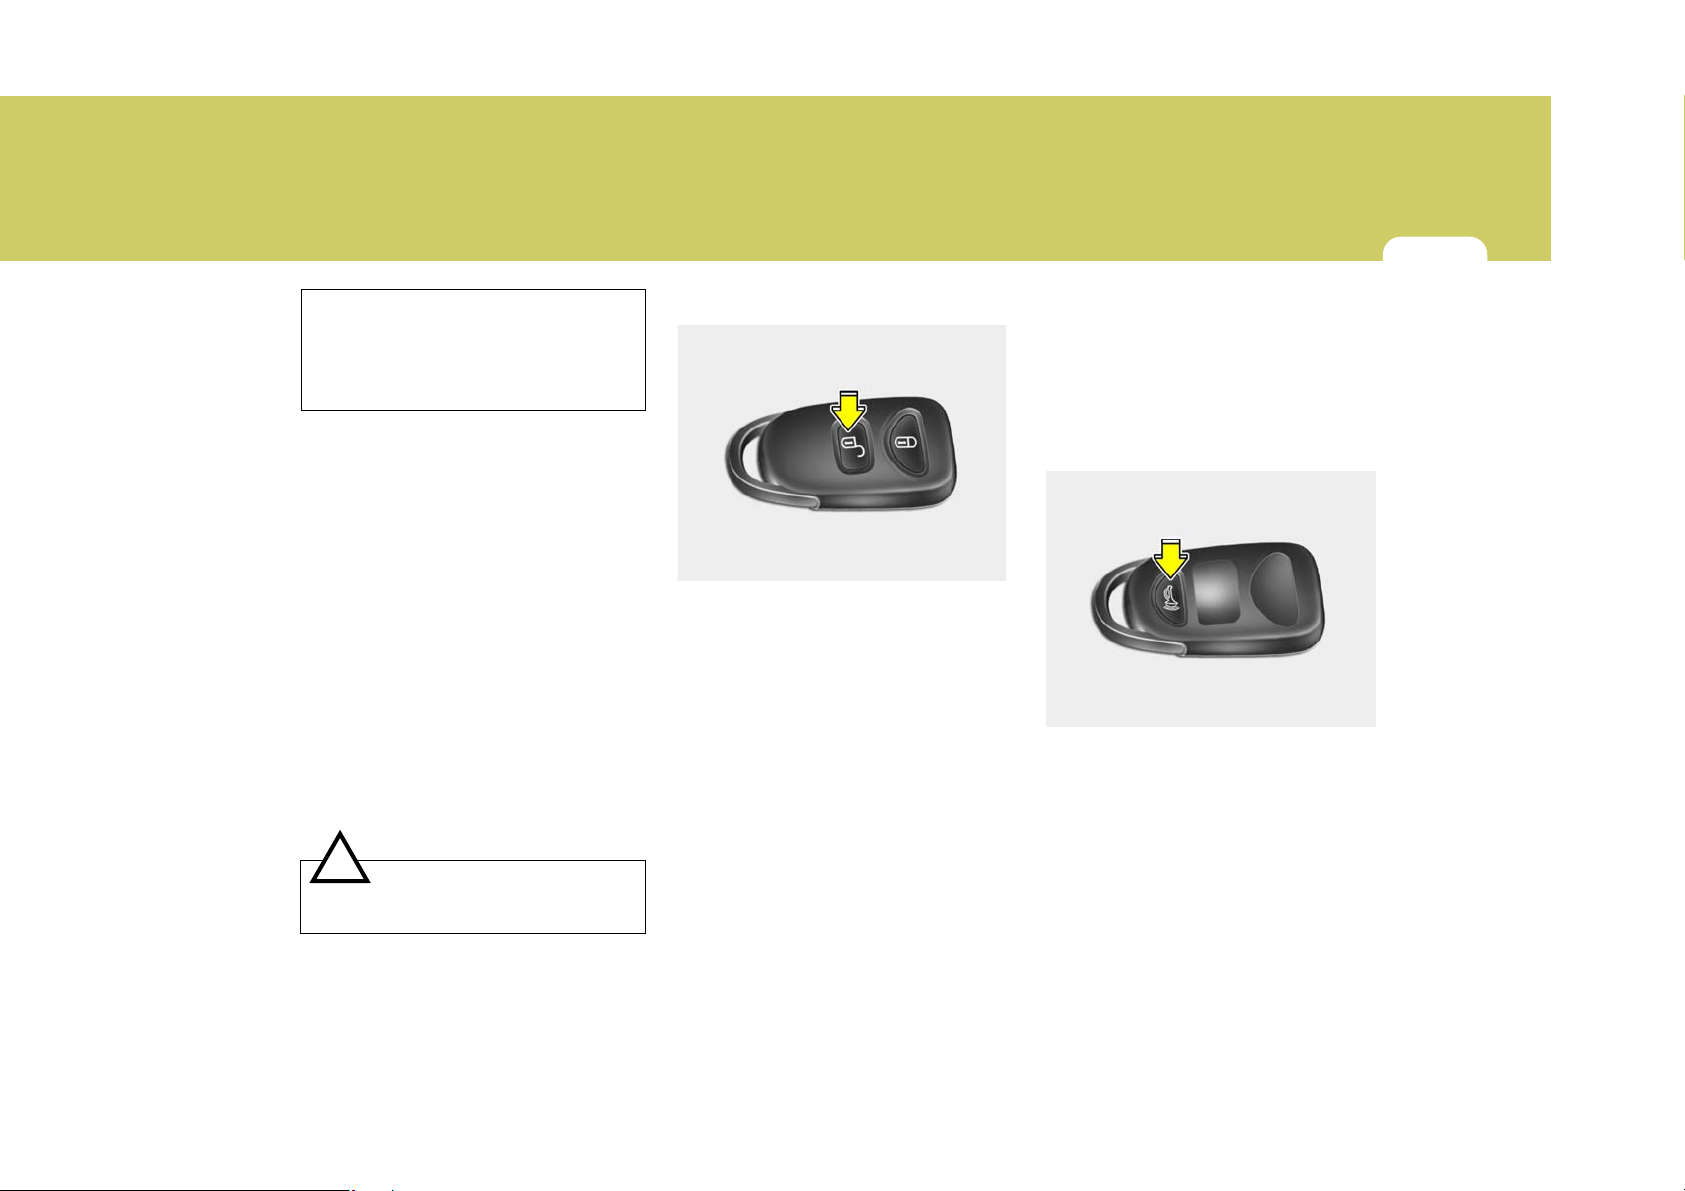
1. Close all doors.
2. Push the "LOCK" button on the transmitter.
3. At the same time all doors lock, the
turn signal light will blink once to indicate that the system is locked.
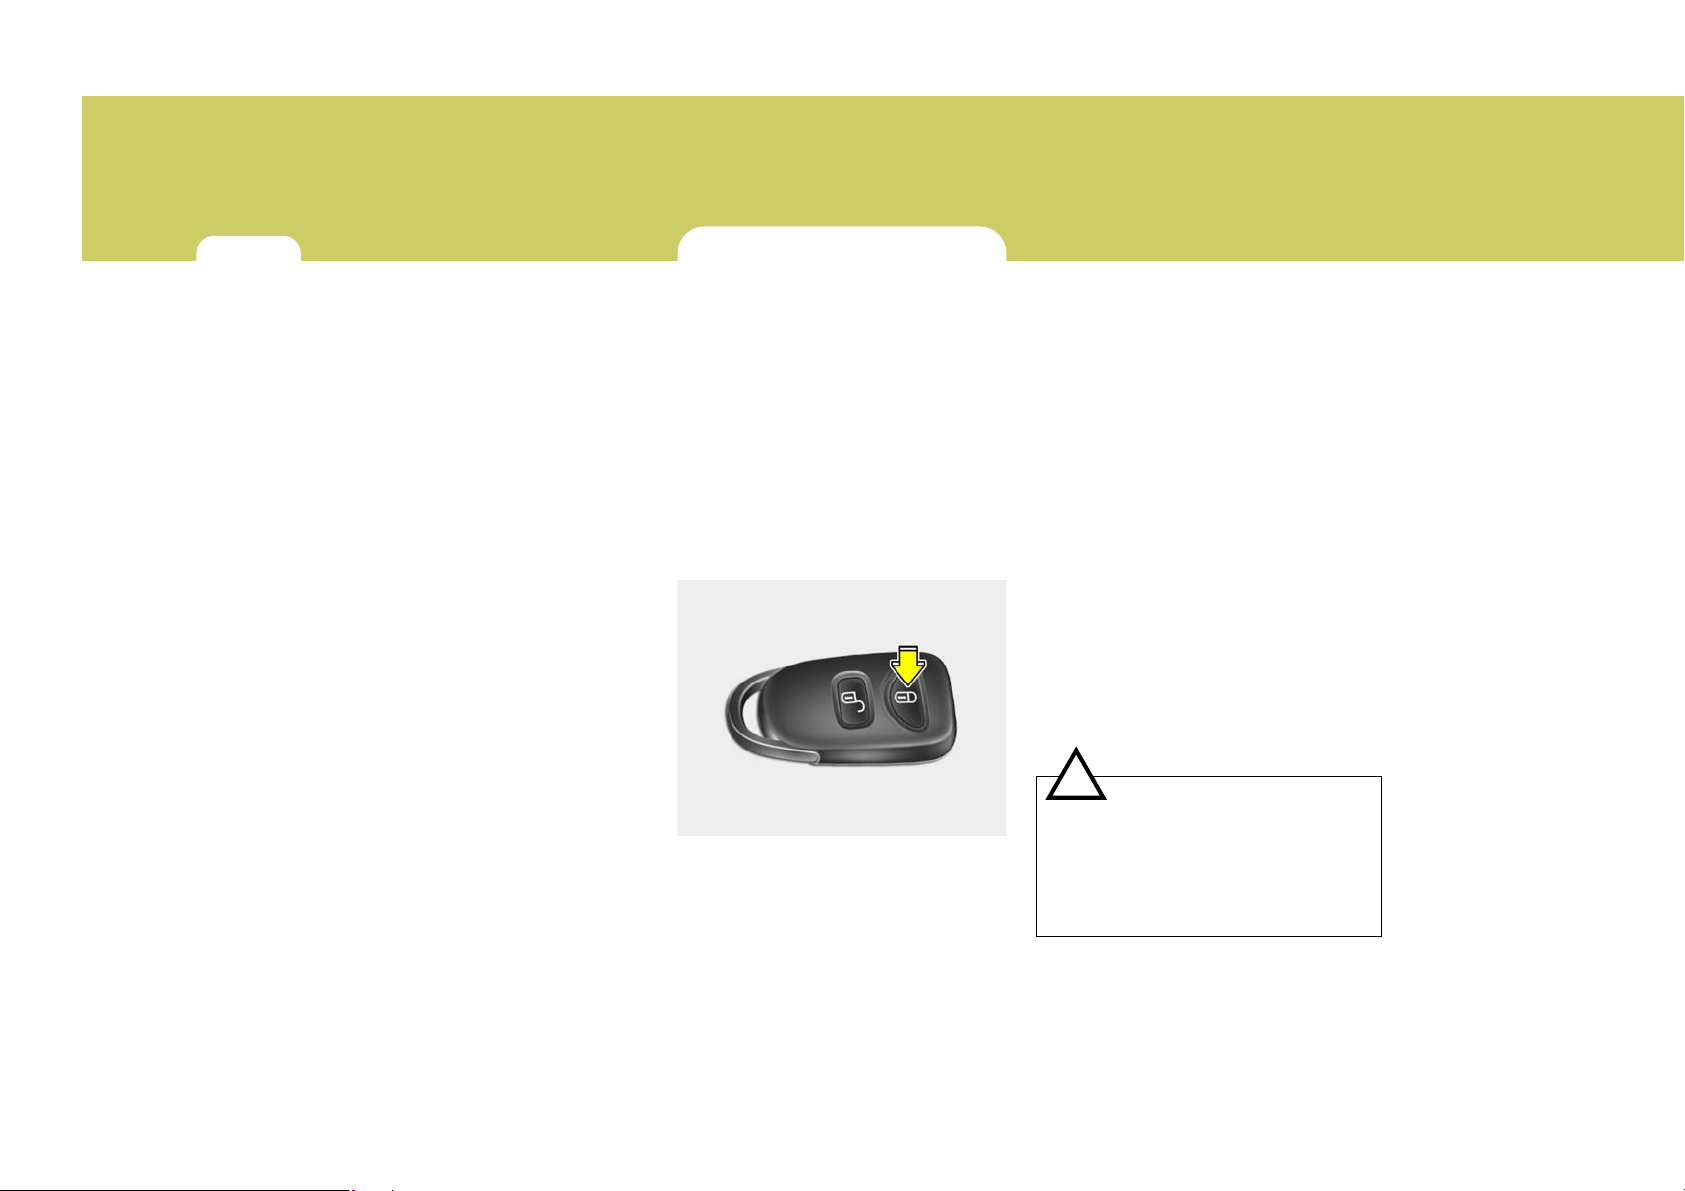
Unlocking doors
1. Push the "UNLOCK" button on the
transmitter.
2. Two turn unlock mode
At the same time the driver's door unlocks, the turn signal light will blink twice
to indicate that the system is unlocked.
If you wish to unlock all doors, press the
"UNLOCK" button on the transmitter
again within 4 seconds.
Central door unlock mode (If Installed)
At the same time all doors unlock, the
turn signal light will blink twice to indicate that the system is unlocked.
NOTE:
Unlock mode conversion (two turn unlock mode
(If Installed)
The unlock mode is changed alternately
by pressing the lock button and unlock
button at the same time for 4 seconds or
more. The turn signal light will blink four
times to indicate that the mode conversion is completed.
↔ ↔
↔ central door unlock mode)
↔ ↔
Page 19
FEATURES OF YOUR HYUNDAI
1
8
THEFT-ALARM SYSTEM
NOTE:
The transmitter will not work if any of
following occur:
- The ignition key is in ignition switch.
- You exceed the operating distance
limit (10 m).
- The battery in the transmitter is weak.
- Other vehicles or objects may be
blocking the signal.
- The weather is extremely cold.
- The transmitter is close to a radio
transmitter such as a radio station
or an airport which can interfere with
normal operation of the transmitter.
When the transmitter does not work
correctly, open and close the door with
the ignition key. If you have a problem
with the transmitter, contact an authorized Hyundai Dealer.
NOTE:
Keep the transmitter away from water or
any liquid. If the keyless entry system is
inoperative due to exposure to water or
other liquids, it will not be covered by
your manufacturer vehicle warranty.
B070A01A-AAT
(If Installed)
This system is designed to provide protection from unauthorized entry into the
car. This system is operated in three
stages: the first is the "Armed" stage, the
second is the "Alarm" stage, and the third
is the "Disarmed" stage. If triggered, the
system provides an audible alarm with
blinking of the turn signal lights.
B070B02MC-AAT
Armed Stage
LOCK
B070B02MC-A
Park the car and stop the engine. Arm the
system as described in the following paragraph.
1) Remove the ignition key from the ignition switch.
2) Make sure that all doors, tail gate (3
Door) and engine hood are closed
and latched.
3) Lock the doors using the transmitter of
the keyless entry system.
After completion of the steps above, the
turn signal lights will blink once to indicate that the system is armed.
The system can be armed by locking the
doors with the key from the front doors or
tail gate (3 Door). However, the hazard
warning lights are not operated.
NOTE:
If any door, tail gate (3 Door) or engine
hood remains open, the system will not
be armed. If this happens, rearm the
system as described above.
!
o Do not arm the system until all pas-
CAUTION:
sengers have left the car. If the system is armed while a passenger(s)
remains in the car, the alarm may be
activated when the remaining
passenger(s) leaves the car.
Page 20
FEATURES OF YOUR HYUNDAI
FEATURES OF YOUR HYUNDAI
1
1
9
9
o If the "LOCK" button is pressed once
more within 4 seconds after pushing
the "LOCK" button on the transmitter, the alarming horn will sound once
to indicate that the system is armed.
B070C02MC-AAT
Alarm Stage
The alarm will be activated if any of the
following occurs while the car is parked
and the system is armed.
1) Any door, tail gate (3 Door) included,
is opened without using the transmitter
or the ignition key.
2) The engine hood is opened.
The alarming horn will sound and the turn
signal lights will blink continuously for 27
seconds (This happens 3 times). To turn
off the system, unlock the door with the
transmitter or the ignition key.
!
Avoid trying to start the engine while the
system is armed.
CAUTION:
B070D02MC-AAT
Disarmed Stage
UNLOCK
B070D02MC-A
The system will be disarmed when the
following step is taken:
The doors are unlocked by depressing
the "UNLOCK" button on the transmitter
or unlocked with the ignition key.
After depressing unlock button, the hazard warning lights will blink twice to indicate that the system is disarmed.
If any door, tail gate (3 Door) included, is
not opened within 30 seconds, the system will be rearmed.
NOTE:
When the system is disarmed with the
interior light switched to "DOOR", the
interior light will illuminate for 30 seconds.
B070E01MC-AAT
Panic Warning
B070E02MC-A
1. Push the "PANIC" button on the transmitter.
2. At the same time, the alarming horn
will sound and the turn signal lights
will blink continuously for 30 seconds.
3. To turn off the system, push any button
on the transmitter or lock/unlock the
doors by turning the key.
Page 21
FEATURES OF YOUR HYUNDAI
1
10
!
Do not change, alter or adjust the theftalarm system because it could cause
the theft-alarm system to malfunction.
The system should only be serviced by
an authorized Hyundai dealer.
Malfunctions caused by improper alterations, adjustments or modifications to
the theft-alarm system are not covered
by your vehicle manufacturer warranty.
CAUTION:
B070E02MC-AAT
Replacing the battery
When the transmitter's battery begins to
get weak, it may take several pushes on
the button to lock or unlock the doors, and
the LED will not light. Replace the battery
as soon as possible.
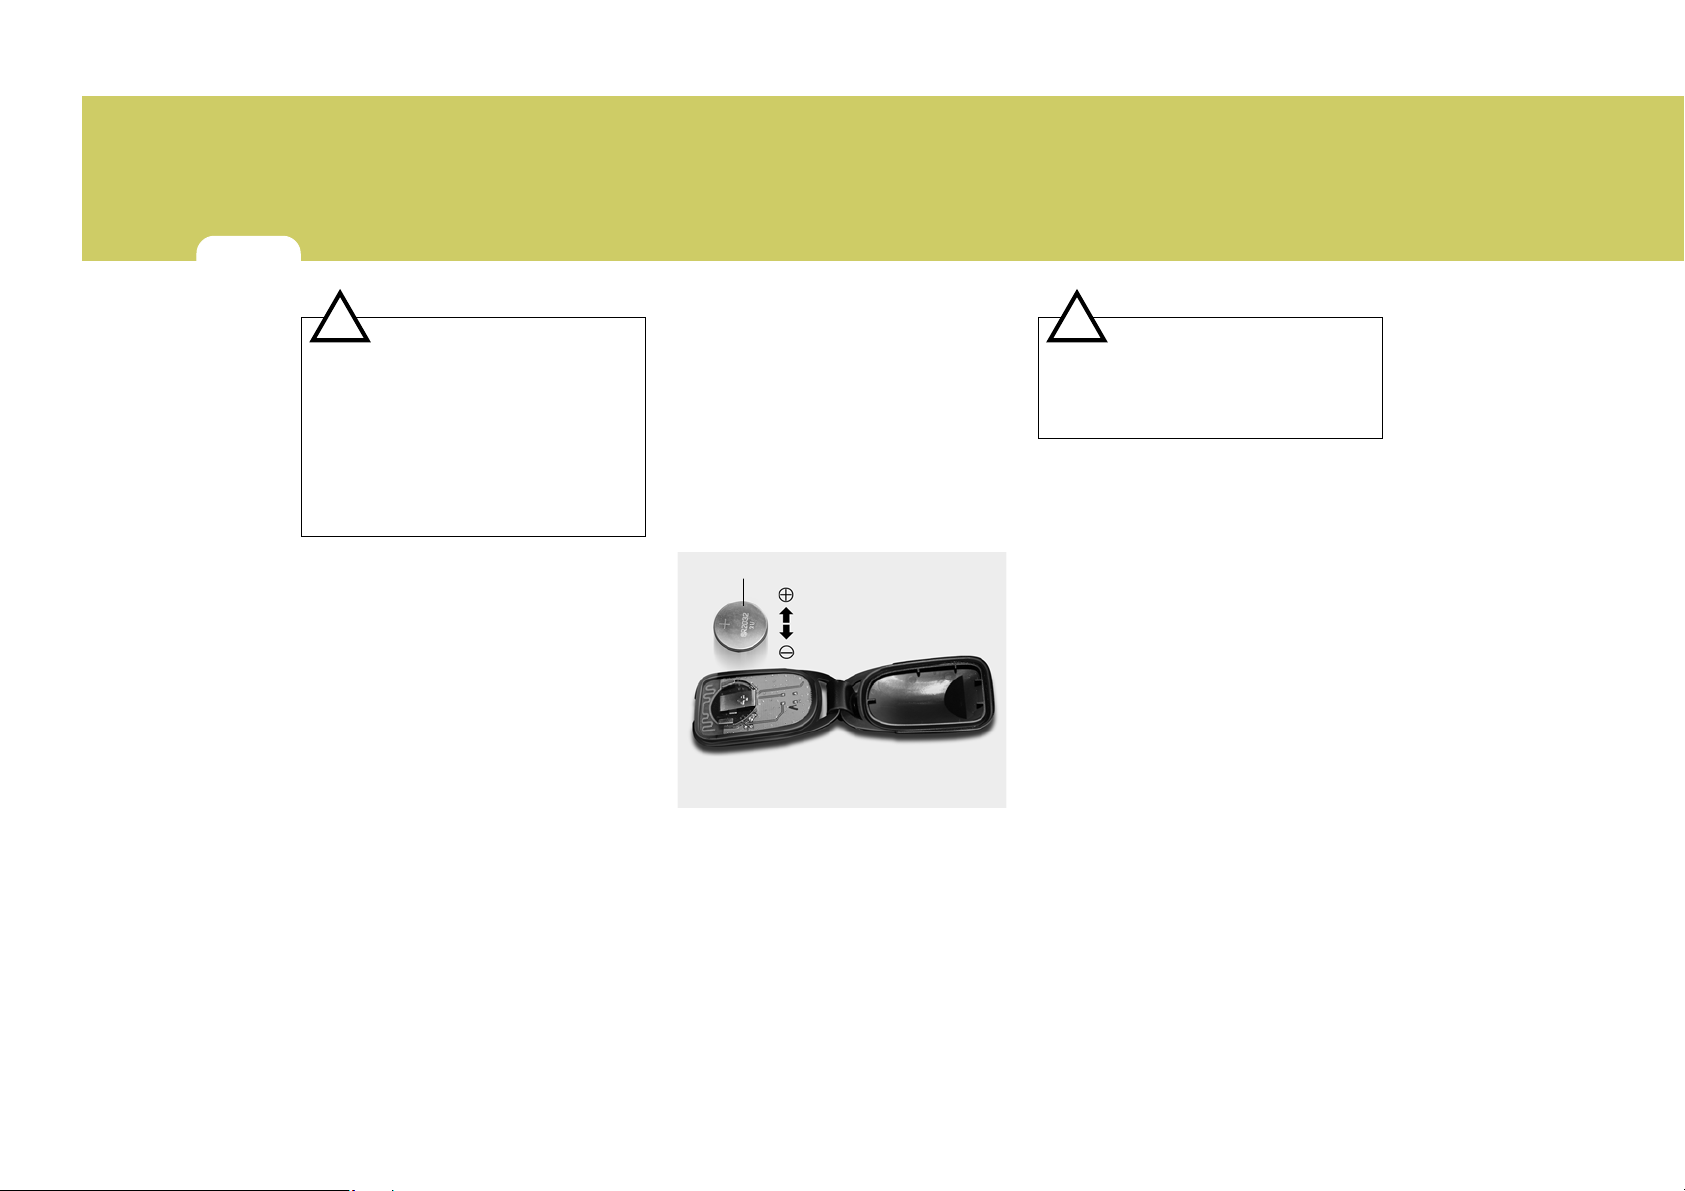
Battery type : CR2032
Replacement instructions:
1. Carefully separate the case with a
blade screwdriver.
Battery
!
An inappropriately disposed battery can
be harmful to the environment and human health. Dispose the battery according to your local law(s) or regulation.
CAUTION:
1KMA2003
2. Remove the old battery from the case
and note the polarity. Make sure the
polarity of the new battery is the
same(+side facing up), then insert it in
the transmitter.
Page 22
WINDOW GLASS
FEATURES OF YOUR HYUNDAI
FEATURES OF YOUR HYUNDAI
1
1
11
11
B050A01MC-AAT
3FDA2015
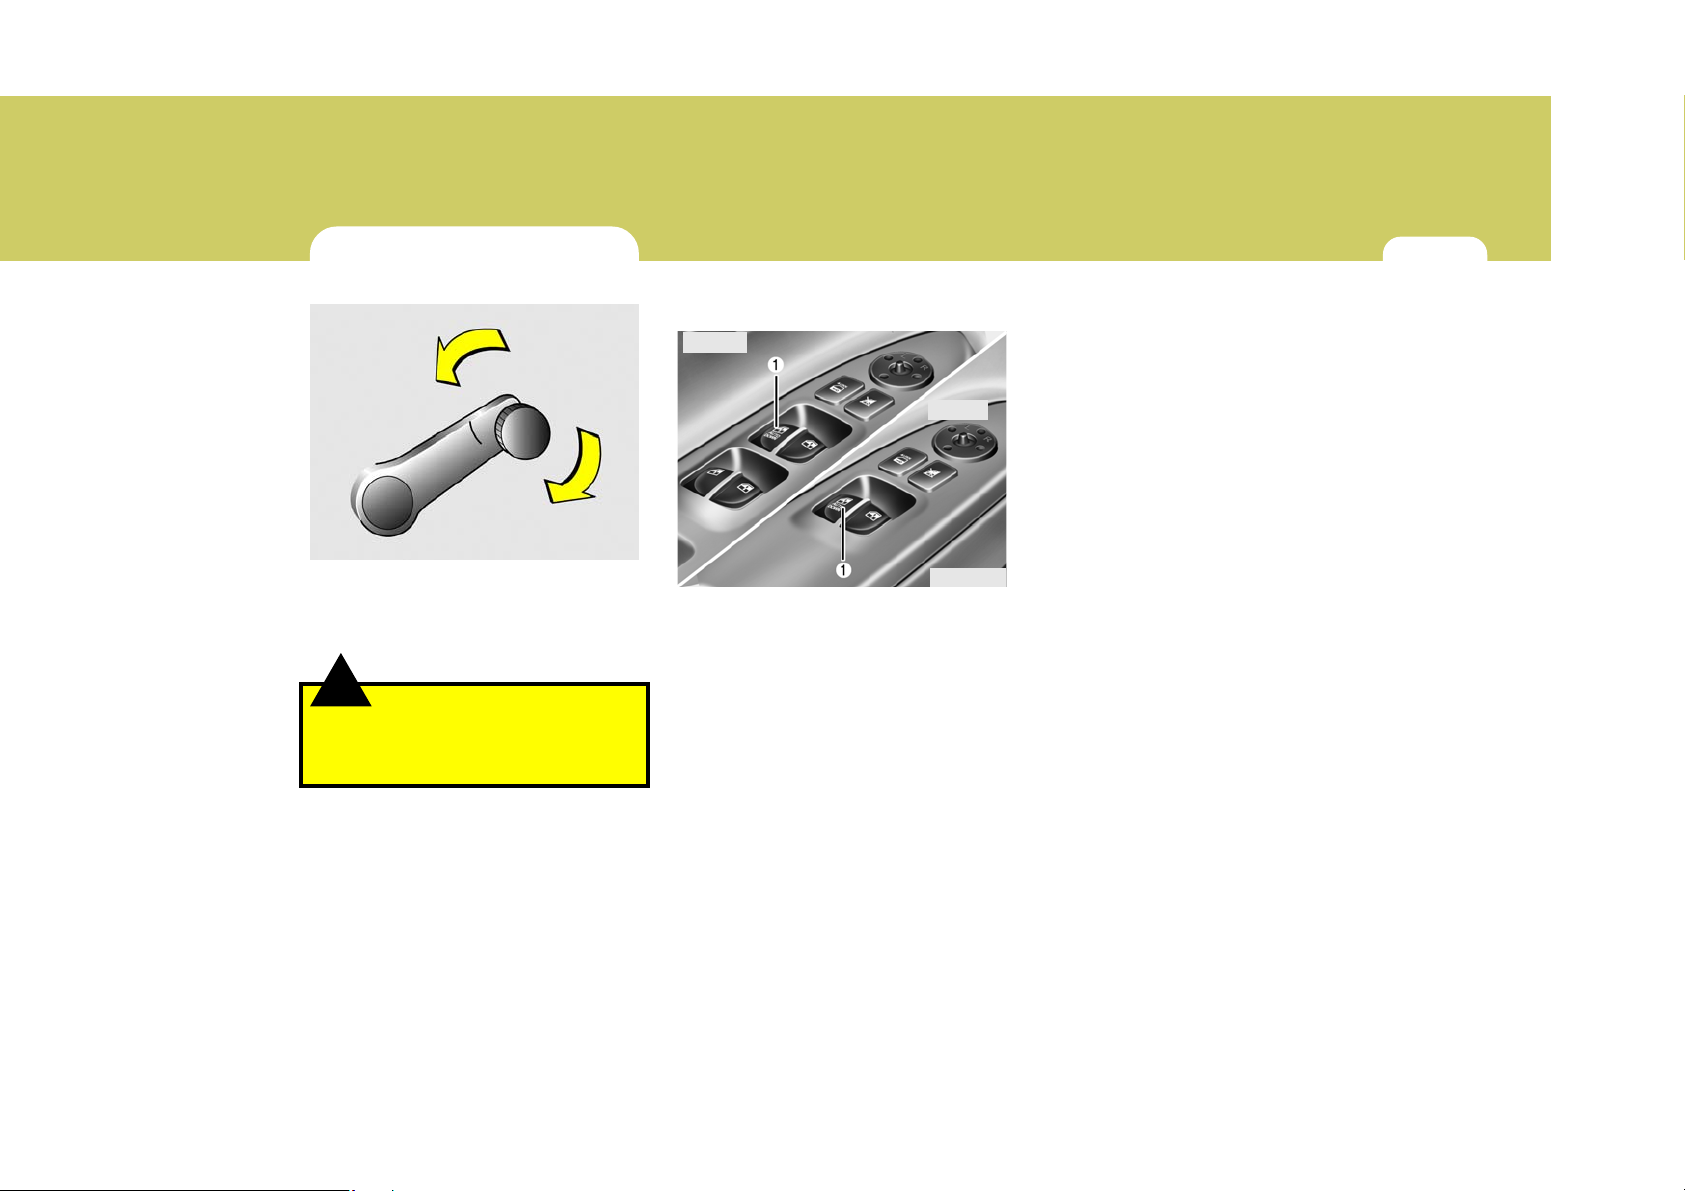
To lower or raise the window, turn the
window regulator handle clockwise or
counterclockwise.
!
When opening or closing the windows,
make sure your passenger's arms,
hands and body are safely out of the way.
WARNING:
B060A03MC-AAT
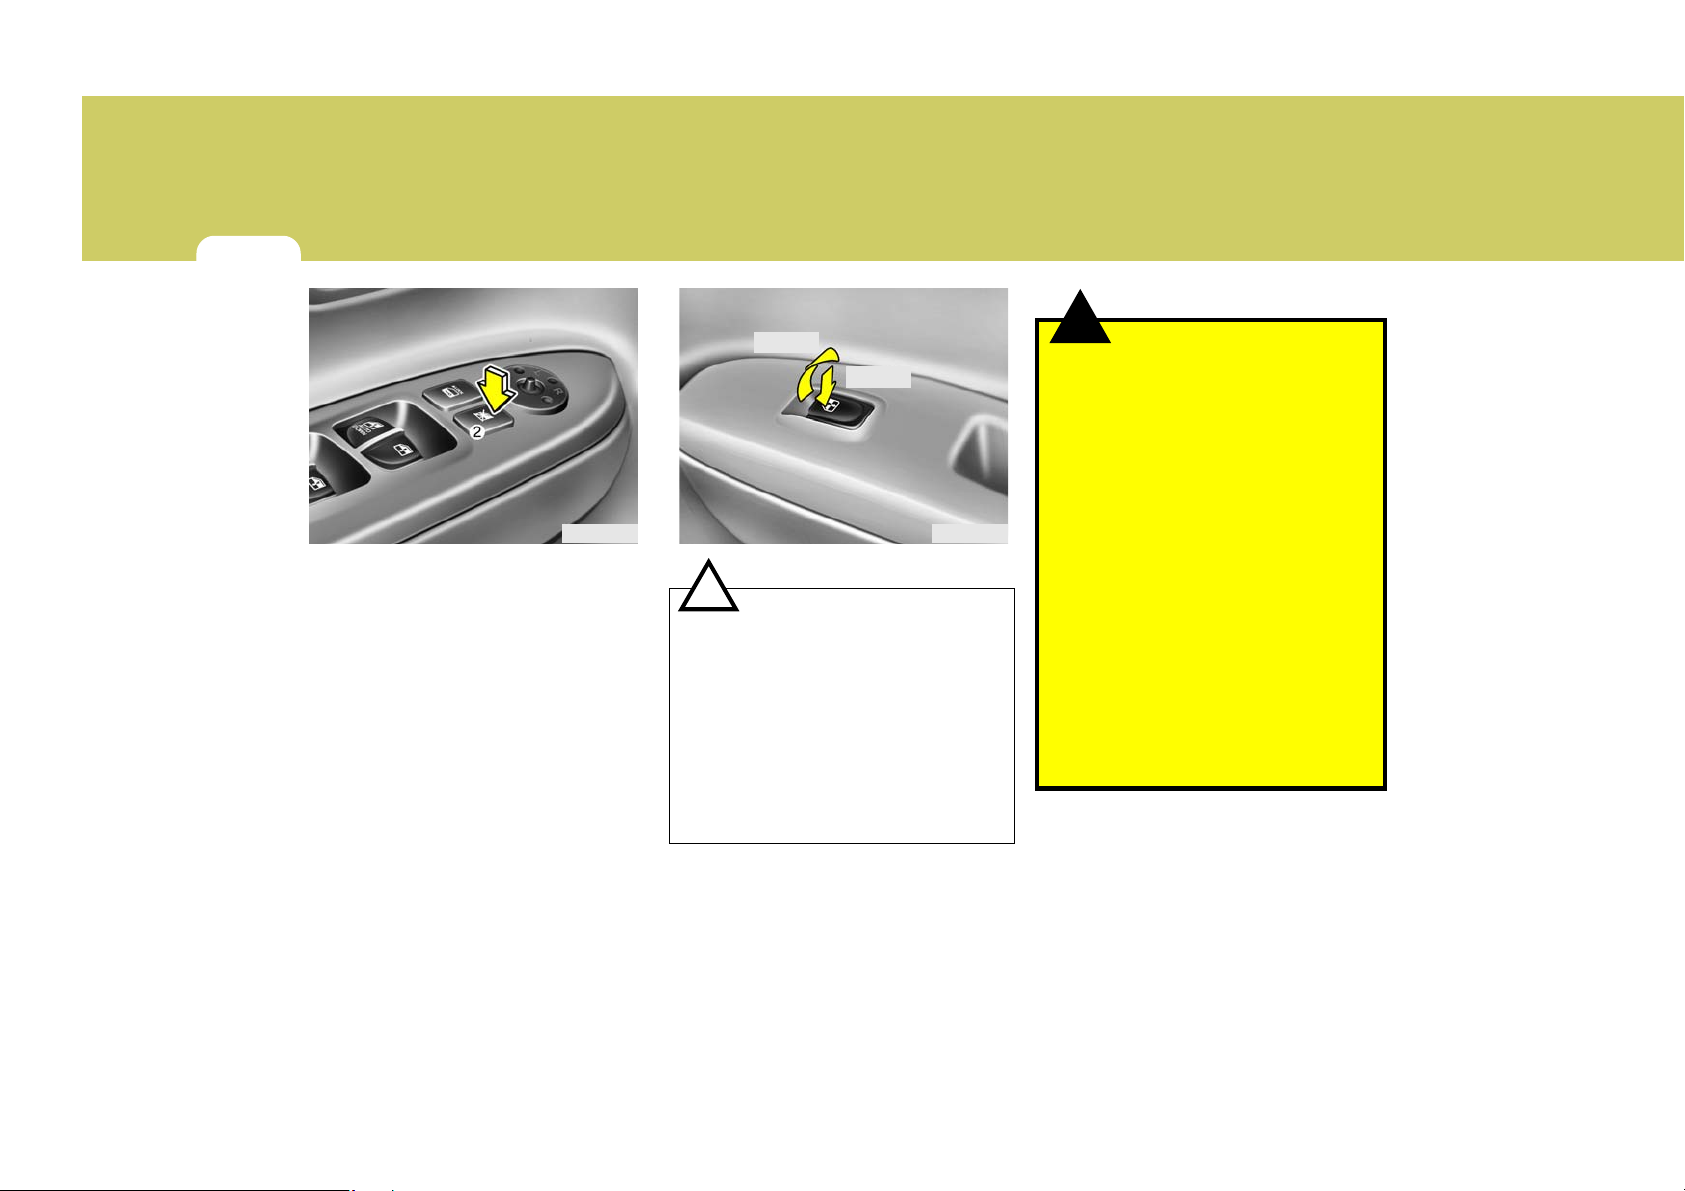
POWER WINDOWS (If Installed)
4 Door
3 Door
OMC029048
The power windows operate when the
ignition key is in the "ON" position. The
main switches are located on the driver's
armrest and control the front (4/3 Door)
and rear windows (4 Door) on both sides
of the vehicle. The windows may be
opened by depressing the appropriate
window switch and closed by pulling up
the switch. To open the window on the
driver's side, press the switch (1) halfway
down. The window moves as long as the
switch is operated. To fully open the
driver's window automatically, press the
switch fully down.
In automatic operation, the window will
fully open even if you let go of the switch.
To stop at the desired opening, pull up
and release the switch.
NOTE:
While driving with the rear windows down
or with the sunroof (if installed) in an open
(or partially open) position, your vehicle
may demonstrate a wind buffeting
or pulsation noise. This noise is a normal occurrence and can be reduced or
eliminated by taking the following actions. If the noise occurs with one or
both of the rear windows down,
partially lower both front windows approximately one inch. If you experience
the noise with the sunroof open, slightly
reduce the size of the sunroof opening.
Page 23
FEATURES OF YOUR HYUNDAI
1
12
OMC029049
In order to prevent operation of the passenger front (4/3 Door) and rear windows
(4 Door), a window lock switch (2) is
provided on the armrest of the driver's
door. To disable the power windows,
press the window lock switch. To revert to
normal operation, press the window lock
switch a second time.
NOTE:
The power windows can be operated for
30 seconds after the ignition key is
turned to the "ACC" or "LOCK" positions, or removed from the ignition
switch. If the front doors are opened
during this 30 second period, the power
windows can no longer be operated without the ignition key turned to the "ON"
position.
CLOSE
OPEN
OMC025015
!
o To prevent possible damage to the
o Never try to operate the main switch
CAUTION:
power window system, do not open
or close two windows or more at the
same time. This will also ensure the
longevity of the fuse.
on the driver's door and the individual door window switch in opposing directions at the same time. If
this is done, the window will stop and
cannot be opened or closed.
!
WARNING - WINDOWS
o NEVER leave the ignition key in the
vehicle.
o NEVER leave any child unattended
in the vehicle. Even very young children may inadvertently cause the
vehicle to move, entangle themselves in the windows, or otherwise
injure themselves or others.
o Always double check to make sure
all arms, hands, head and other obstructions are safely out of the way
before closing a window.
o Do not allow children to play with the
power windows. Keep the driver’s
door power window lock switch in the
LOCK position (depressed). Serious
injury can result from unintentional
window operation by the child.
o Do not extend any head or arms
outside through the window opening
while driving.
Page 24
SEATS
FEATURES OF YOUR HYUNDAI
FEATURES OF YOUR HYUNDAI
1
1
13
13
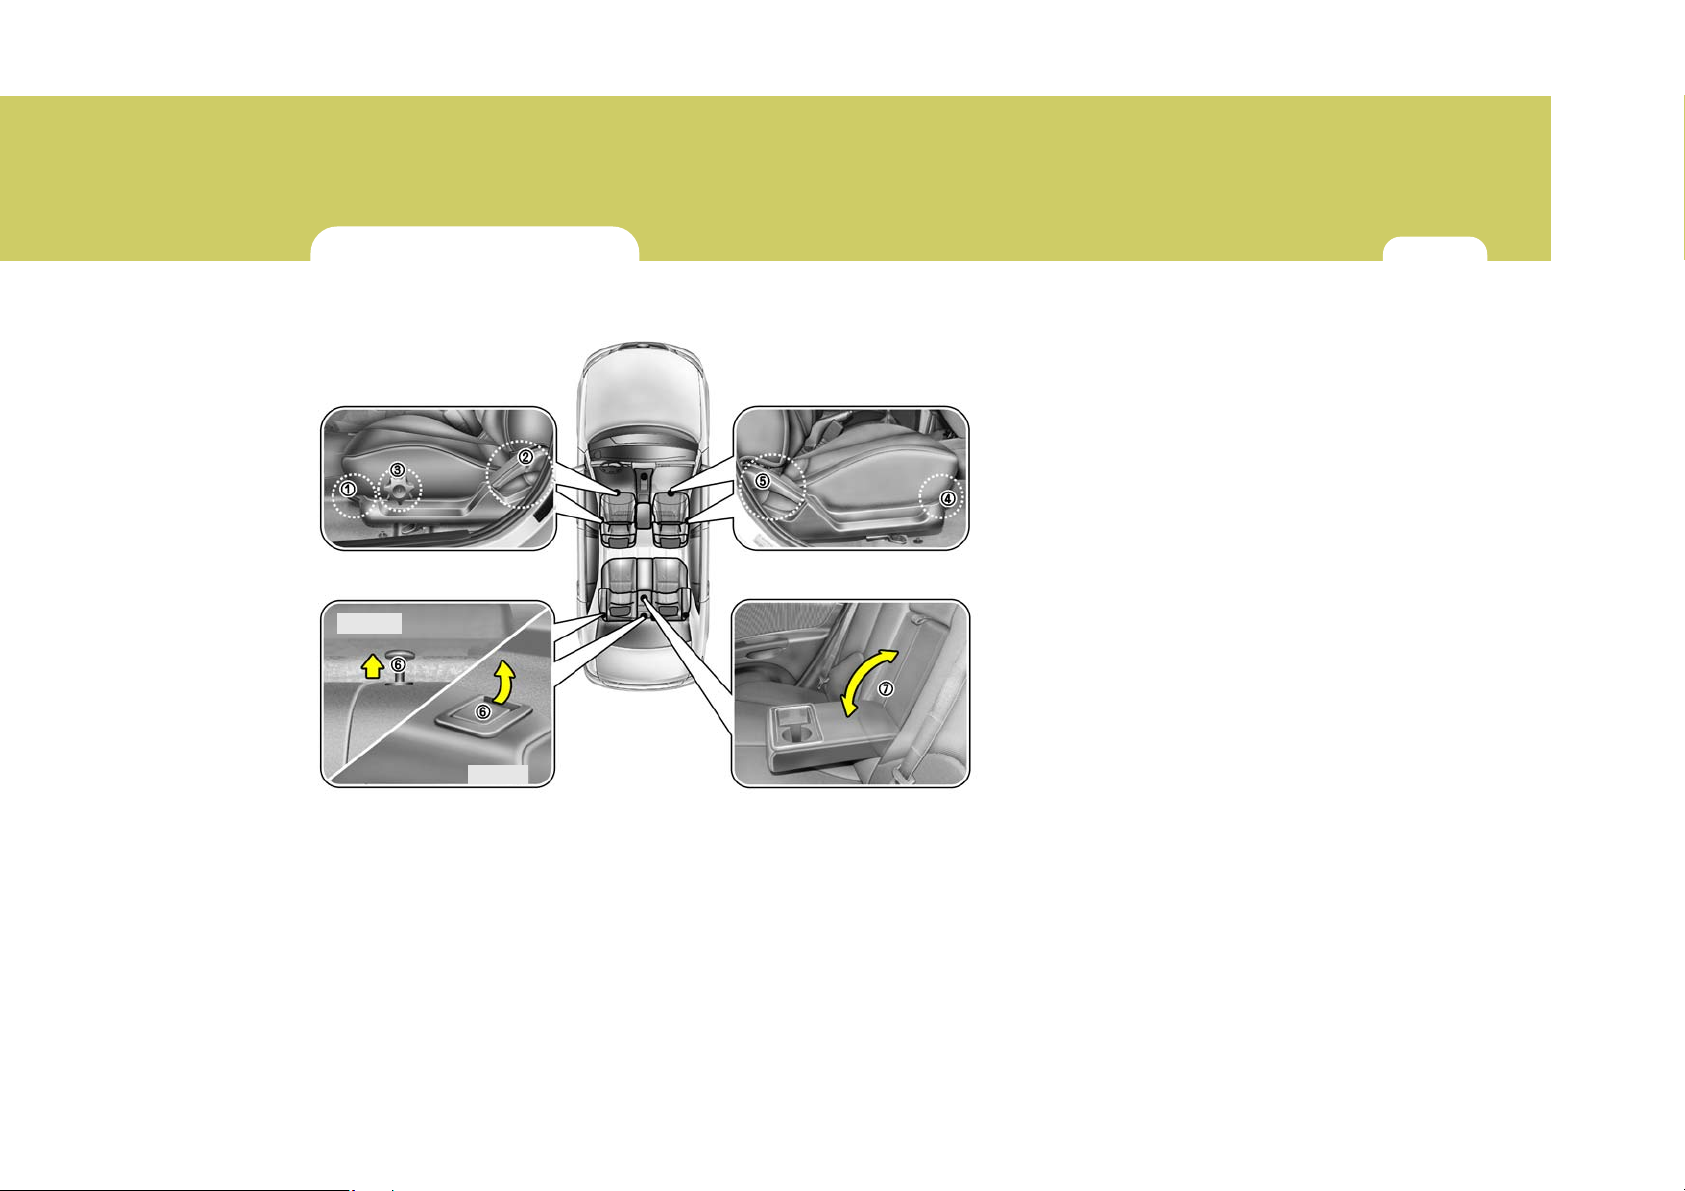
B080A01MC-AAT
4 Door
Driver’s seat
1. Seat forward/rearward lock release
lever
2. Seatback recliner control lever
3. Seat cushion height control lever
Front passenger’s seat
4. Seat forward/rearward lock release
lever
5. Seatback recliner control lever
Rear seats
6. Seatback folding lever (If Installed)
7. Armrest (If Installed)
3 Door
OMC029025B
Page 25
FEATURES OF YOUR HYUNDAI
1
14
B080A01FC-AAT
ADJUSTABLE SEATS
!
o Never adjust the driver’s seat while
o Do not sit or lean unnecessarily close
WARNING:
the vehicle is moving. Any sudden
or unexpected movement of the seat
could cause you to lose control of
the vehicle resulting in an accident.
Only adjust the driver’s seat when
the vehicle is stationary.
to the airbag. Position the seat so
that you can sit as far back as possible from the airbag and still comfortably reach all controls.
B080B03A-AAT
FRONT SEATS
Adjusting Seat Forward and Rearward
OMC029026
To move the seat toward the front or rear,
pull the lock release lever upward. This
will release the seat on its track so you
can move it forward or rearward to the
desired position.
When you find the position you want,
release the lever and slide the seat forward or rearward on its track until it locks
into the desired position and cannot be
moved further.
!
After adjusting the seat, always check
that it is securely locked into place by
attempting to move the seat forward or
rearward without using the lock release
lever. Sudden or unexpected movement of the driver's seat could cause
you to lose control of the vehicle resulting in an accident.
WARNING:
Page 26
FEATURES OF YOUR HYUNDAI
FEATURES OF YOUR HYUNDAI
1
1
15
15
B080C02A-AAT
Adjusting Seatback Angle
OMC029027
To recline the seatback, lean forward to
take your weight off it, then pull up on the
recliner control lever at the outside edge
of the seat. Now lean back until the desired seatback angle is achieved. To lock
the seatback into position, release the
recliner control lever.
!
Riding with a reclined seatback increases your chance of serious or fatal
injuries in the event of a collision or
sudden stop. The protection of your
restraint system (seat belts and airbags)
is greatly reduced by reclining your seat.
Seat belts must be snug against your
hips and chest to work properly. The
more the seatback is reclined, the greater
the chance that an occupant's hips will
slide under the lap belt or the occupant's
neck will strike the shoulder belt. Drivers and passengers should always sit
well back in their seats, properly belted,
and with the seatbacks upright.
WARNING:
C010104AMC
Headrest
OBH038075L
The driver's and front passenger's seats
are equipped with a headrest for the
occupant's safety and comfort.
The headrest not only provides comfort
for the driver and front passenger, but
also helps to protect the head and neck
in the event of a collision.
Page 27
FEATURES OF YOUR HYUNDAI
1
16
!
o For maximum effectiveness in case
o Do not operate the vehicle with the
o Do not adjust the headrest position
WARNING:
of an accident, the headrest should
be adjusted so the middle of the
headrest is at the same height as the
center of gravity of an occupant's
head. Generally, the center of gravity of most people's head is similar
with the height of the top of their
eyes. Also, adjust the headrest as
close to your head as possible. For
this reason, the use of a cushion that
holds the body away from the
seatback is not recommended.
headrests removed as severe injury
to the occupants may occur in the
event of an accident. Headrests may
provide protection against neck injuries when properly adjusted.
of the driver's seat while the vehicle
is in motion.
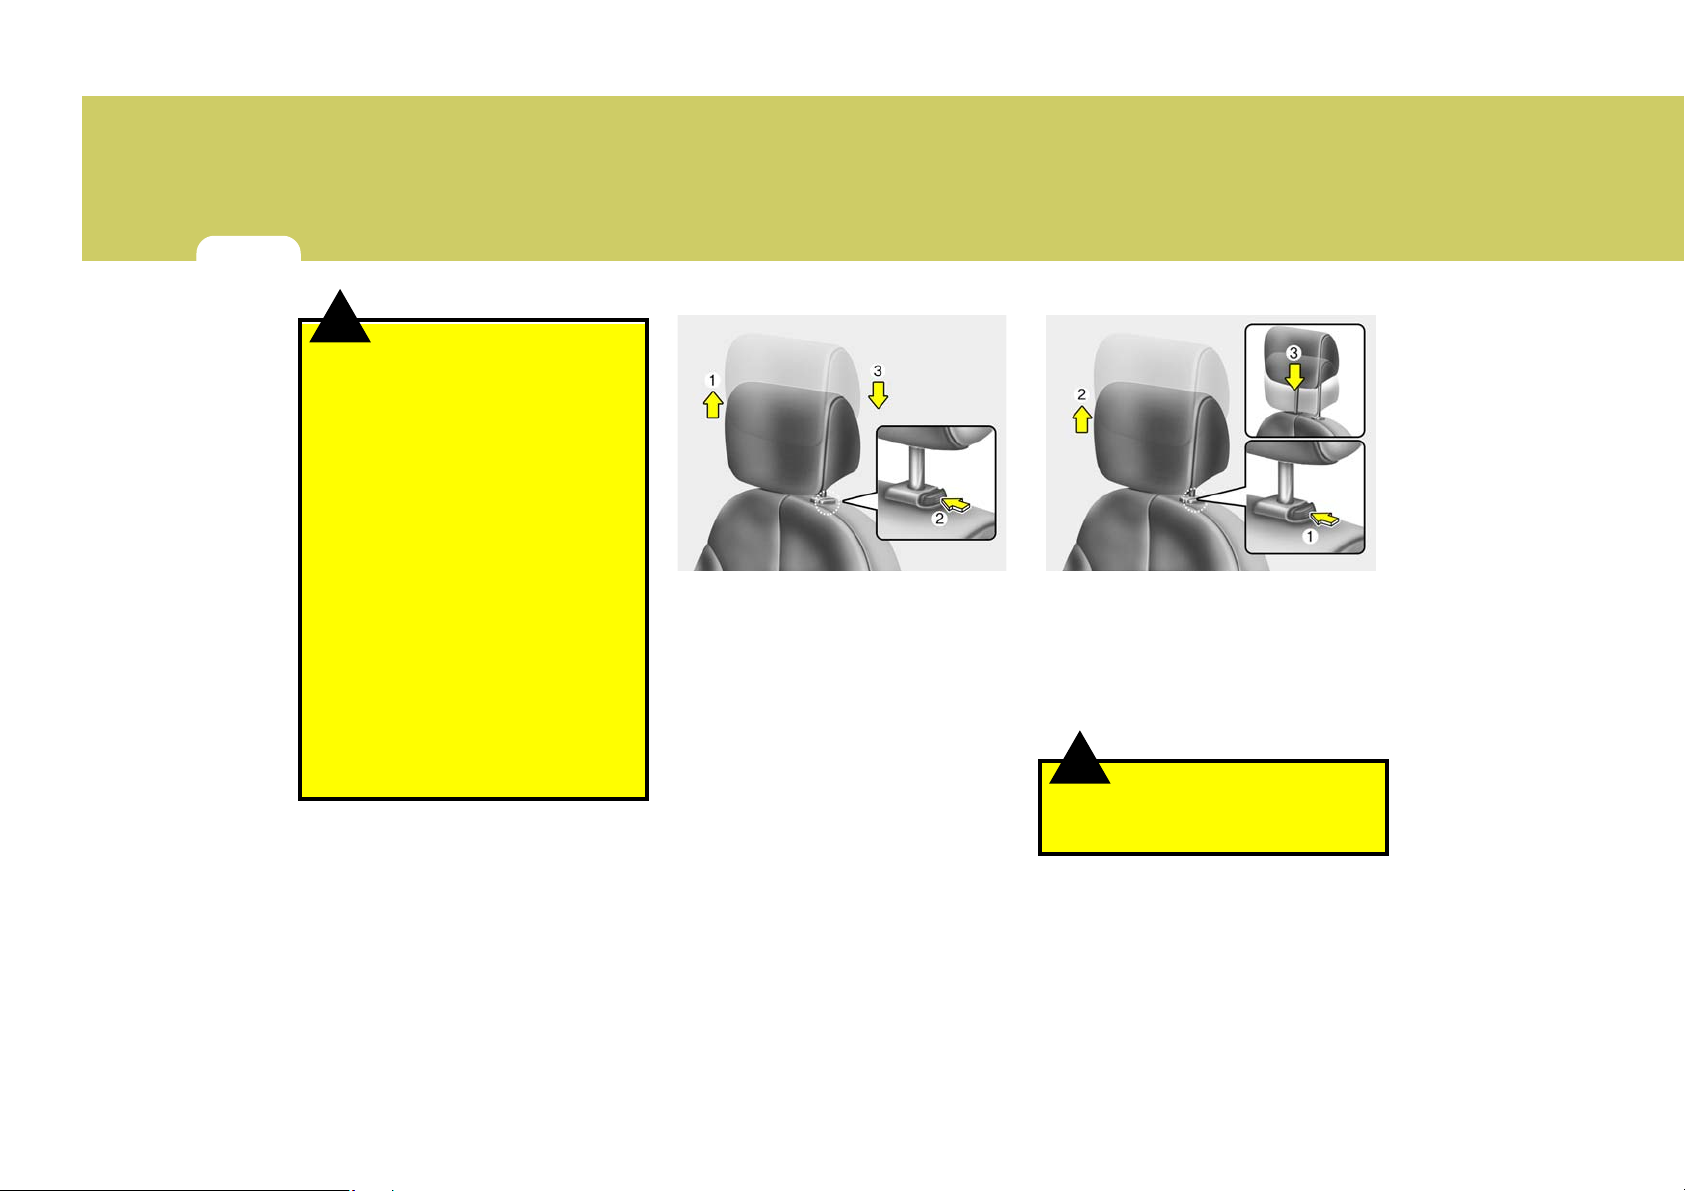
Adjusting the height up and down
OMC029029 OMC029030
To raise the headrest, pull it up to the
desired position (1). To lower the headrest, push and hold the release button (2)
on the headrest support and lower the
headrest to the desired position (3).
Removal and installation
To remove the headrest, raise it as far as
it can go then press the release button (1)
while pulling upward (2).
To reinstall the headrest, put the headrest
poles (3) into the holes while pressing the
release button (1). Then adjust it to the
appropriate height.
!
Make sure the headrest locks in position
after adjusting it to properly protects the
occupants.
WARNING:
Page 28
FEATURES OF YOUR HYUNDAI
FEATURES OF YOUR HYUNDAI
1
1
17
17
B080F01MC-AAT
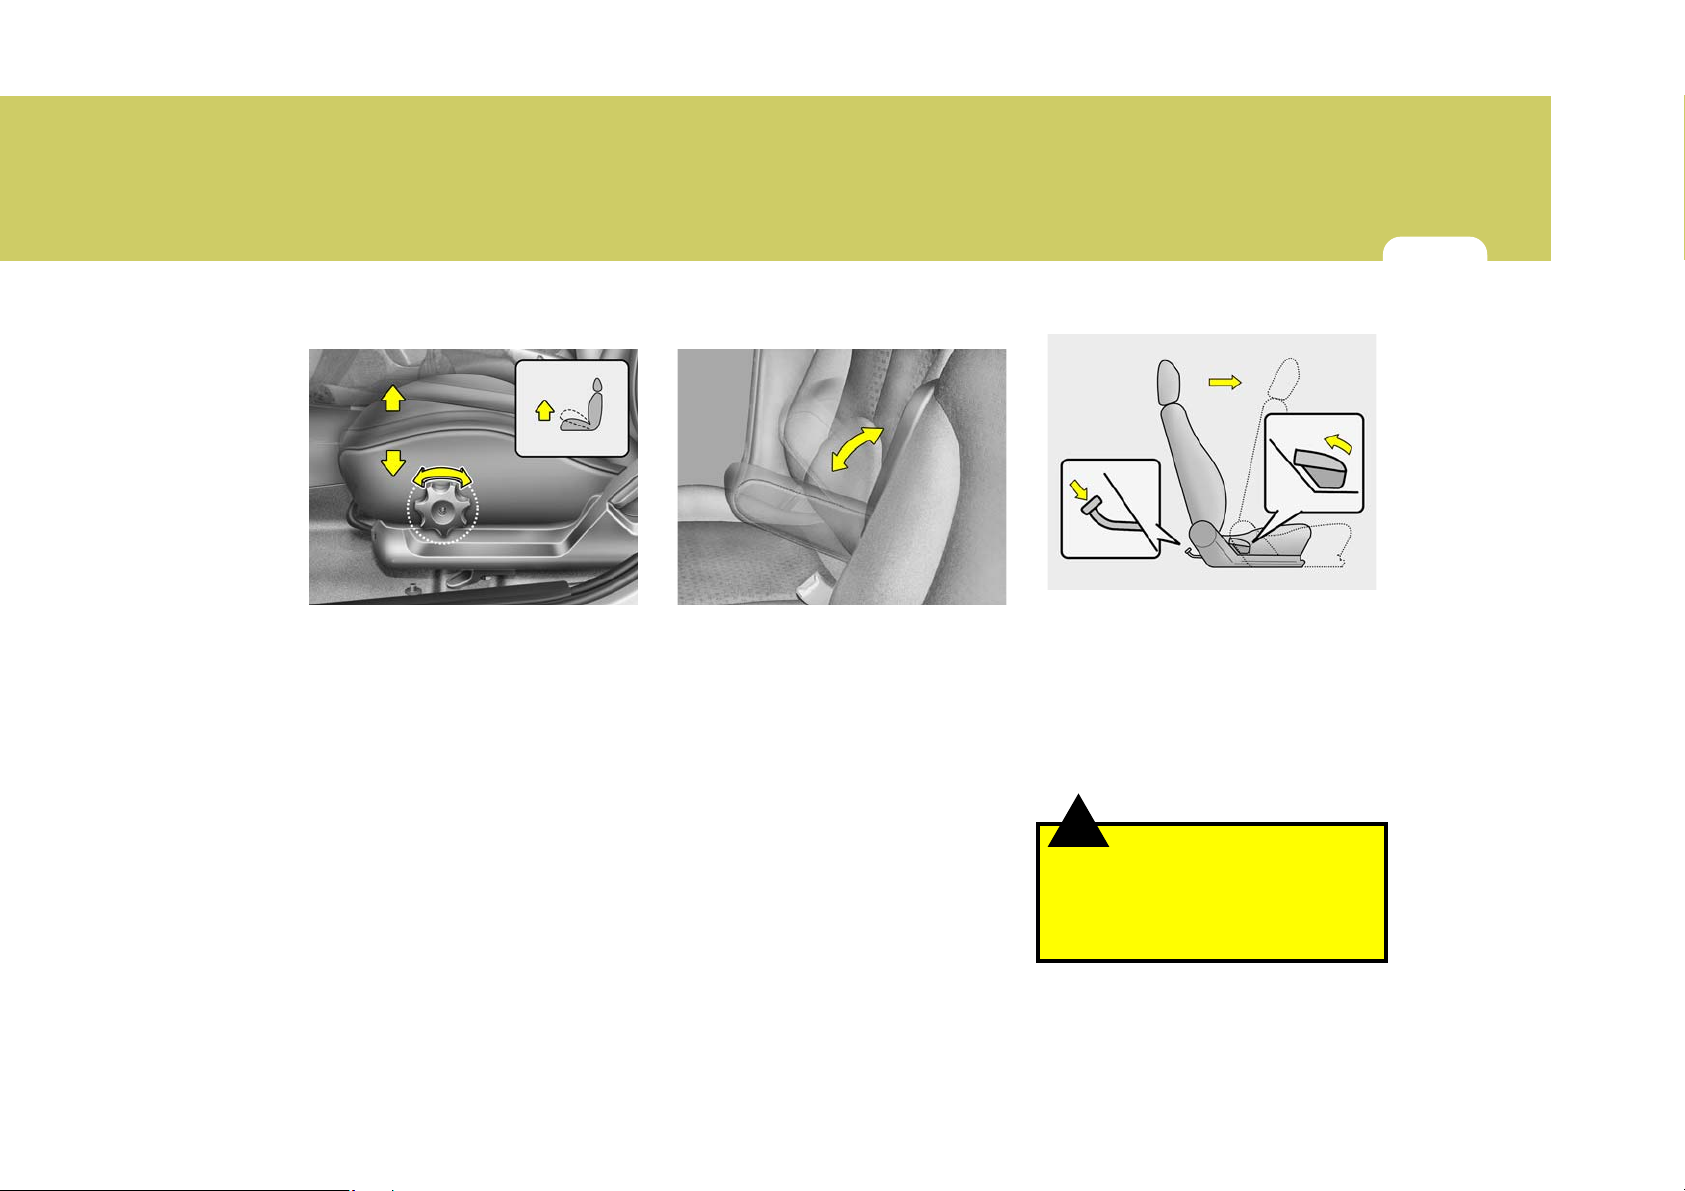
Seat Cushion Height Adjustment
(Driver's Seat only)
OMC029028
To raise or lower the front part of the seat
cushion, turn the knob forward or rearward.
B080G01A-GAT
Adjusting Armrest Angle
(Driver's side only)
OMC025031
The armrest will be raised or lowered
manually.
To raise the armrest, pull it up.
To lower it, press the armrest down.
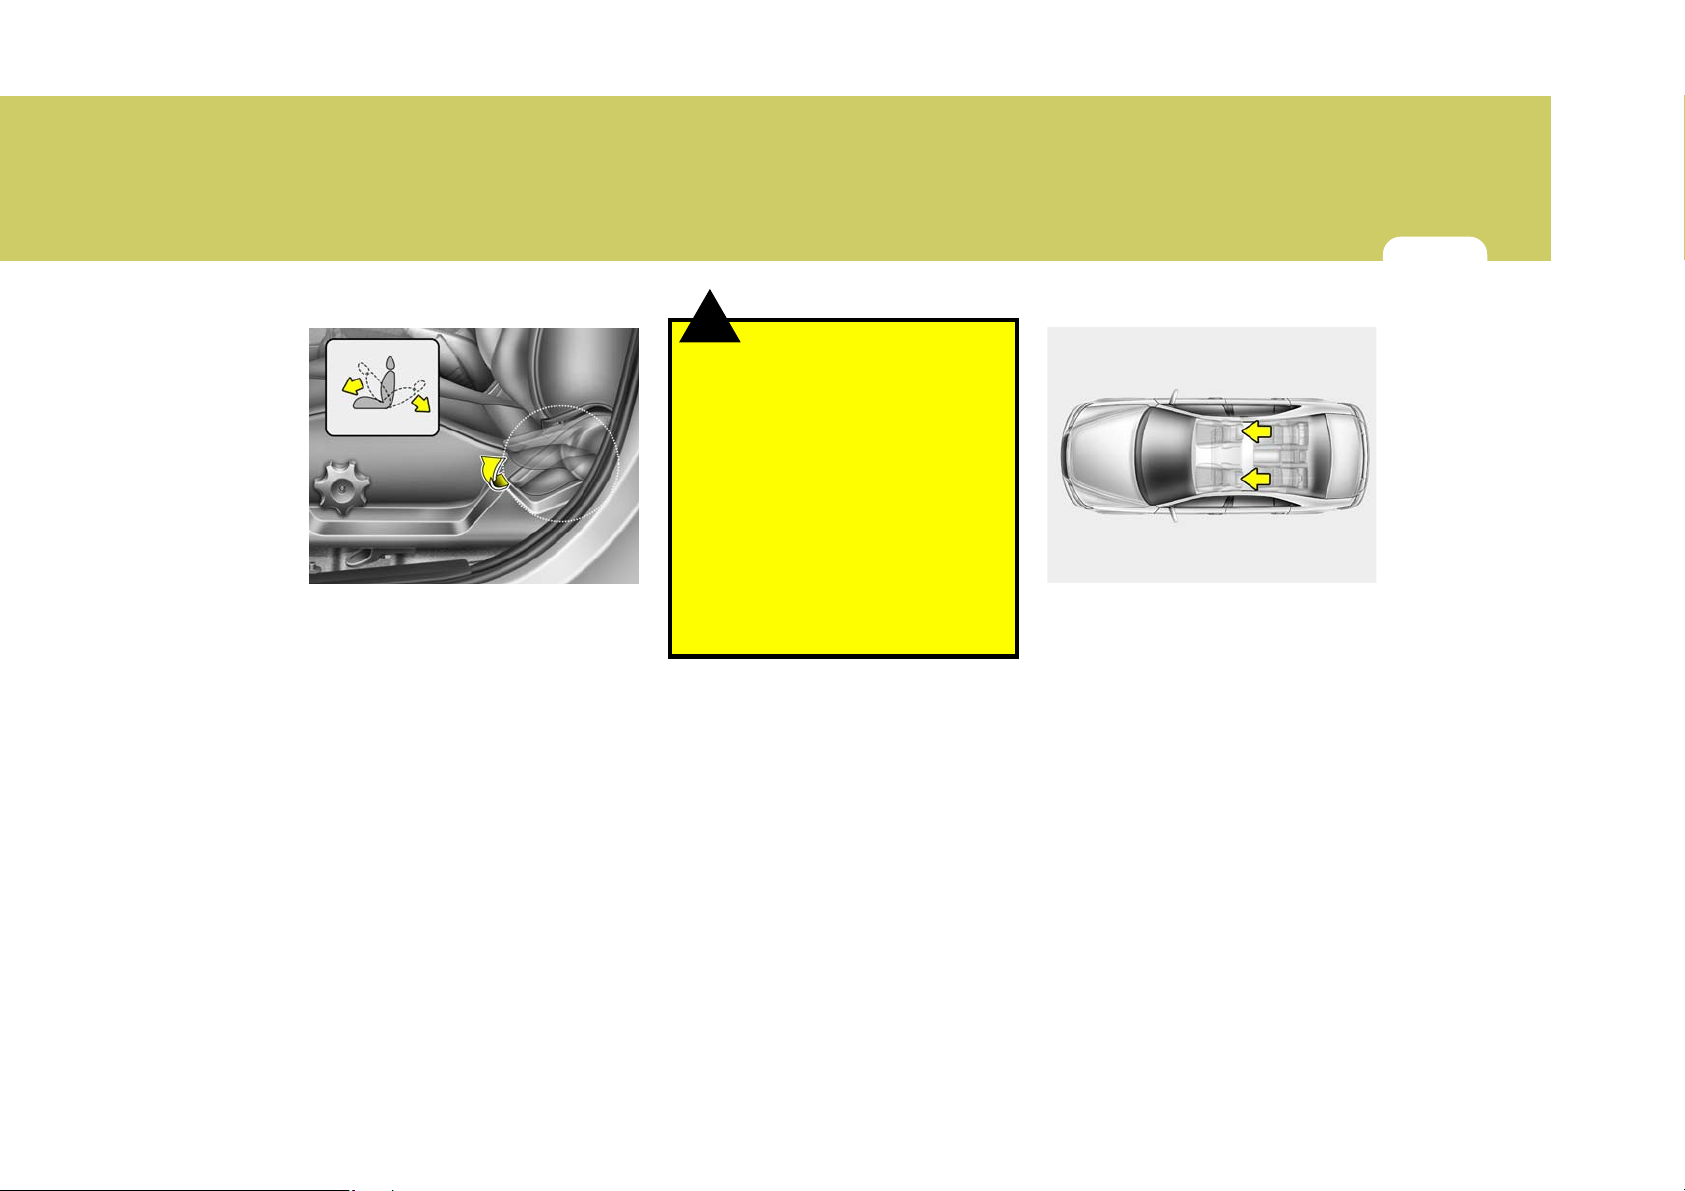
B130A01A-AAT
REAR SEAT ENTRY (3 Door)
(1)
(2)
HTB258
The front passenger's seatback should
be tilted to enter the rear seat.
By pulling up on the recliner control lever
(1) at the outside of the front passenger's
seat, the seatback will tilt forward and the
seat will automatically slide forward.
Rear seat occupants can tilt the front
passenger's seatback by depressing the
foot lever (2) as shown in the illustration.
!
Passengers sitting in the rear seat should
be careful not to accidentally press the
foot lever (2) while the vehicle is moving,
as this may cause the seatback to move
forward and injure a front seat occupant.
WARNING:
Page 29

FEATURES OF YOUR HYUNDAI
1
18
B085A01MC-GAT
REAR SEAT
Adjusting seatback angle (3 Door)
(1)
B085A01MC
To recline the seatback, pull up the
seatback folding lever (1) and push the
seatback rearward.
To return the seatback to an upright position, pull up the seatback folding lever
(1) and pull the seatback forward until the
seatback locks into upright position.
After adjusting the seatback angle, always check that it is securely locked into
place.
C010303BUN
Headrest
OBH038076L
The rear seat(s) is equipped with headrests in all the seating positions for the
occupant's safety and comfort.
The headrest not only provides comfort
for passengers, but also helps to protect
the head and neck in the event of a
collision.
!
o For maximum effectiveness in case
o Do not operate the vehicle with the
WARNING:
of an accident, the headrest should
be adjusted so the middle of the
headrest is at the same height as the
center of gravity of an occupant's
head. Generally, the center of gravity of most people's head is similar
with the height of the top of their
eyes. Also, adjust the headrest as
close to your head as possible. The
use of a cushion that holds the body
away from the seatback is not recommended.
headrests removed as severe injury
to an occupant may occur in the
event of an accident. Headrests may
provide protection against severe
neck injuries when properly adjusted.
!
Do not adjust the seatback angle while
the vehicle is in motion.
WARNING:
Page 30
FEATURES OF YOUR HYUNDAI
FEATURES OF YOUR HYUNDAI
1
1
19
19
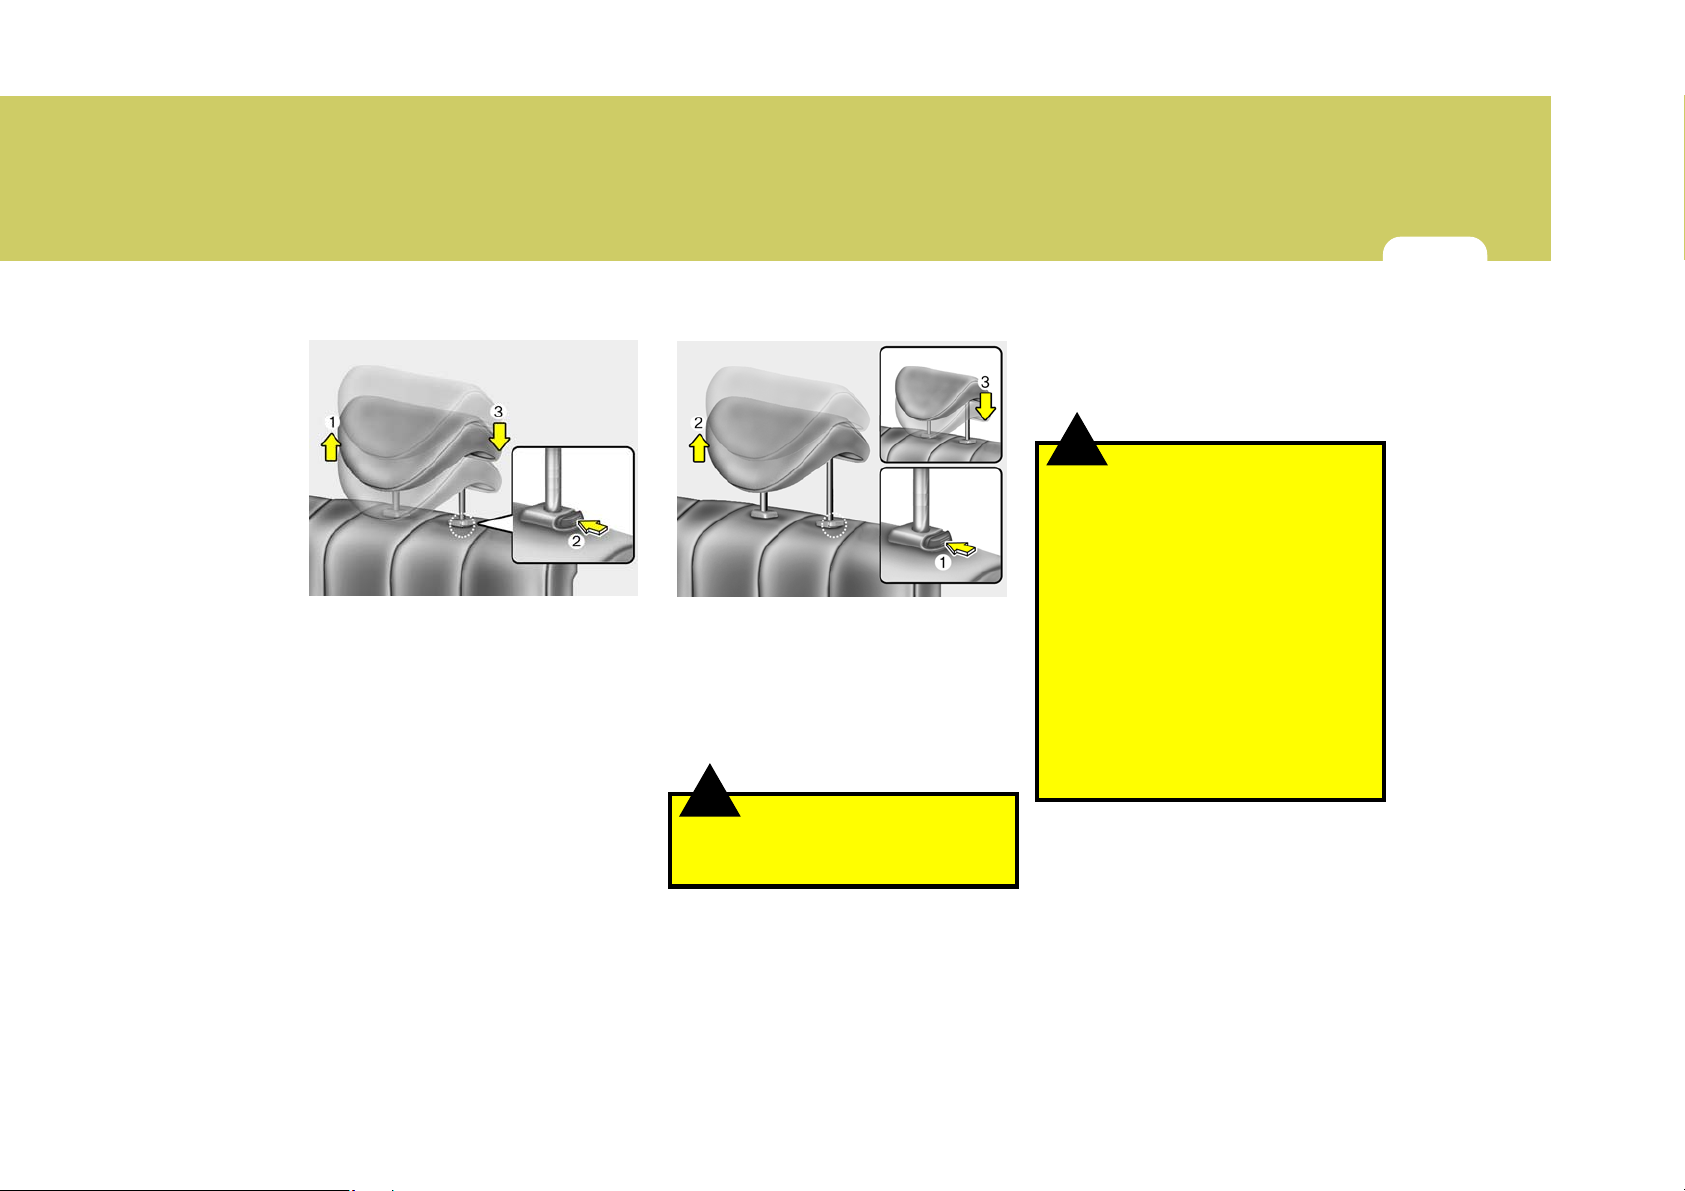
Adjusting the height up and down
(If Installed)
OMC029045
To raise the headrest, pull it up to the
desired position (1). To lower the headrest, push and hold the release button (2)
on the headrest support and lower the
headrest to the desired position (3).
Removal and installation
(If Installed)
OMC029046
To remove the headrest, raise it as far as
it can go then press the release button (1)
while pulling upward (2).
To reinstall the headrest, put the headrest
poles (3) into the holes while pressing the
release button (1). Then adjust it to the
appropriate height.
!
Make sure the headrest locks in position
after adjusting it to properly protect the
occupants.
WARNING:
B110A02MC-AAT
Folding Rear Seatbacks
The rear seatbacks may be folded to
facilitate carrying long items or to increase
the luggage capacity of the vehicle.
!
The purpose of the fold-down rear
seatbacks is to allow you to carry longer
objects than could otherwise be accommodated.
Never allow passengers to sit on top of
the folded down seatback or cargo area
while the car is moving as this is not a
proper seating position and no seat belts
are available for use. This could result in
serious injury or death in case of an
accident or sudden stop. Objects carried on the folded down seatback should
not extend higher than the top of the front
seats. This could allow cargo to slide
forward and cause injury or damage
during sudden stops.
WARNING:
Page 31

FEATURES OF YOUR HYUNDAI
1
20
To fold down the seatback :
1. Slide the front seats forward and adjust the front seatbacks to be upright
before folding the rear seatbacks down.
2. Lower the rear seat headrests to the
lowest position.
!
CAUTION:
B220D05MC
o In order to prevent the center shoul-
der belt from being damaged while
folding the rear seat, disconnect the
metal tab (A) from the buckle (B). To
disconnect the metal tab (A) from
the buckle (B) , insert a narrow-ended
tool into the groove located on the
buckle (B).
B110A01MC
o Before folding the seatback, insert
the buckle in the pocket. This can
prevent the buckle from being damaged by the seatback.
4 Door
B090A02MC
3 Door
OMC029041
3. Pull up the seatback folding lever to
release the seatback.
Page 32

!
4 Door
CAUTION:
4 Door
FEATURES OF YOUR HYUNDAI
FEATURES OF YOUR HYUNDAI
1
1
21
21
OMC025039
3 Door
OMC029039
o Move the rear lap/shoulder belt to
the outside so that they don't interfere with the seatback when folding.
OMC025040
3 Door
OMC029040
o Move the rear lap/shoulder belt to
the side so that it is clear of the
seatback when returning to its upright position.
o Place the rear seat belt to the proper
position.
OMC039100
4. Fold down the seatback forward.
When you return the seatback to its upright position, always be sure it has locked
into position by pushing on the top of the
seatback.
Page 33

FEATURES OF YOUR HYUNDAI
1
22
!
When you return the rear seatback to its
upright position after being folded down:
Be careful not to damage the seat belt
webbing or buckle. Do not allow the seat
belt webbing or buckle to get caught or
pinched in the rear seat. Ensure that the
seatback is completely locked into its
upright position by pushing on the top of
the seatback. Otherwise, in an accident
or sudden stop, the seat could fold down
and allow cargo to enter the passenger
compartment, which could result in serious injury or death.
WARNING:
!
B140A01S-AAT
REAR SEAT WARNING
B140A01MC
For the safety of all passengers, luggage
or other cargo should not be piled higher
than the top of the seatback. In addition,
do not place objects on the rear shelf as
they may move forward during braking or
in an accident and strike vehicle passengers.
SEAT BELTS
B150A02S-AAT
SEAT BELT PRECAUTIONS
!
All occupants of the vehicle must wear
their seat belts at all times. Seat belts
and child restraints reduce the risk of
serious or fatal injuries for all occupants
in the event of a collision or sudden stop.
Without a seat belt, occupants could be
shifted too close to a deploying airbag,
strike the interior structure or be thrown
from the vehicle. Properly worn seat
belts greatly reduce these hazards. Even
with advanced airbags, unbelted occupants can be severely injured by a deploying airbag. Always follow the precautions about seat belts, airbags and
occupant safety contained in this
manual.
WARNING:
Page 34

FEATURES OF YOUR HYUNDAI
FEATURES OF YOUR HYUNDAI
1
1
23
23
B150B03A-AAT
Infant or Small Child
All 50 states have child restraint laws.
You should be aware of the specific requirements in your state. Child and/or
infant safety seats must be properly placed
and installed in the rear seat. Information
about the use of these restraints begins
on page 1-31.
!
Every person in your vehicle needs to be
properly restrained at all times, including infants and children. Never hold a
child in your arms or lap when riding in a
vehicle. The violent forces created during a crash will tear the child from your
arms and throw the child against the
interior. Always use a child restraint
appropriate for your child's height and
weight, see page 1-31.
WARNING:
NOTE:
Small children are best protected from
injury in an accident when properly restrained in the rear seat by a child restraint system that meets the requirements of the Federal Motor Vehicle
Safety Standards. Before buying any
child restraint system, make sure that it
has a label certifying that it meets Federal Motor Vehicle Safety Standard 213.
The restraint must be appropriate for
your child's height and weight. Check
the label on the child restraint for this
information. See page 1-31.
B150C02A-AAT
Larger Children
Children who are too large for child restraint systems should always occupy the
rear seat and use the available lap/
shoulder belts. The lap portion should be
fastened snug on the hips and as low as
possible. Check belt fit periodically. A
child's squirming could put the belt out of
position. Children are afforded the most
safety in the event of an accident when
they are restrained by a proper restraint
system in the rear seat. If a larger child
(over age 13) must be seated in the front
seat, the child should be securely restrained by the available lap/shoulder
belt and the seat should be placed in the
rearmost position. Children under the age
of 13 should be restrained securely in the
rear seat. NEVER place a child under
the age of 13 in the front seat. NEVER
place a rear facing child seat in the front
seat of a vehicle.
Page 35

FEATURES OF YOUR HYUNDAI
1
24
C020302AKM
Restraint of pregnant women
Pregnant women should wear lap/shoulder belt assemblies whenever possible
according to specific recommendations
by their doctors. The lap portion of the belt
should be worn AS SNUGLY AND LOW
AS POSSIBLE on the hips, not a cross the
abdomen.
!
Pregnant women must never place the
lap portion of the safety belt over the
area of the abdomen where the fetus is
located or above the abdomen where the
belt could crush the fetus during an impact.
B150E01A-AAT
WARNING - Pregnant women
Injured Person
A seat belt should be used when an
injured person is being transported. When
this is necessary, you should consult a
physician for recommendations.
B150F01A-AAT
One Person Per Belt
Two people (including children) should
never attempt to use a single seat belt.
This could increase the severity of injuries in case of an accident.
B150G02A-AAT
Do Not Lie Down
To reduce the chance of injuries in the
event of an accident and to achieve maximum effectiveness of the restraint system, all passengers should be sitting up
and the front seats should be in an upright position when the car is moving. A
seat belt cannot provide proper protection if the person is lying down in the rear
seat or if the front seat is in a reclined
position.
!
Riding with a reclined seatback increases your chance of serious or fatal
injuries in the event of a collision or
sudden stop. The protection of your
restraint system (seat belts and airbags)
is greatly reduced by reclining your seat.
Seat belts must be snug against your
hips and chest to work properly. The
more the seatback is reclined, the greater
the chance that an occupant's hips will
slide under the lap belt causing serious
internal injuries or the occupant's neck
could strike the shoulder belt. Drivers
and passengers should always sit well
back in their seats, properly belted (see
page 1-26), and with the seatbacks upright.
WARNING:
Page 36

FEATURES OF YOUR HYUNDAI
FEATURES OF YOUR HYUNDAI
1
1
25
25
B160A02A-AAT
CARE OF SEAT BELTS
Seat belt systems should never be disassembled or modified. In addition, care
should be taken to assure that seat belts
and belt hardware are not damaged by
seat hinges, doors or other abuse.
!
When you return the rear seatback to its
upright position after the rear seatback
was folded down, be careful not to damage the seat belt webbing or buckle. Be
sure that the webbing or buckle does not
get caught or pinched in the rear seat. A
seat belt with damaged webbing or buckle
will not be as strong and could possibly
fail during a collision or sudden stop,
resulting in serious injury.
WARNING:
B160B01A-AAT
Periodic Inspection
It is recommended that all seat belts be
inspected periodically for wear or damage of any kind. Parts of the system that
are damaged should be replaced as soon
as possible.
B160C01A-AAT
Keep Belts Clean and Dry
Seat belts should be kept clean and dry.
If belts become dirty, they can be cleaned
by using a mild soap solution and warm
water. Bleach, dye, strong detergents or
abrasives should not be used because
they may damage and weaken the fabric.
B160D01A-AAT
When to Replace Seat Belts
Entire in-use seat belt assemblies should
be replaced if the vehicle has been involved in an accident. This should be
done even if no damage is visible. Additional questions concerning seat belt
operation should be directed to your
Hyundai Dealer.
B170A02MC-AAT
HEIGHT ADJUSTABLE FRONT SEAT
SHOULDER BELT
B170A01MC
You can adjust the height of the shoulder
belt anchor to one of the 4 positions for
maximum comfort and safety.
If the height of the seat belt is too near
your neck, you will not be getting the most
effective protection. The shoulder portion
should be adjusted so that it lies across
your chest and midway over your shoulder nearest the door and not your neck.
To adjust the height of the seat belt anchor, lower or raise the height adjuster
into an appropriate position. To raise the
height adjuster, pull it up.
Page 37

FEATURES OF YOUR HYUNDAI
1
26
To lower it, push it down while pressing
the height adjuster button. Release the
button to lock the anchor into position. Try
sliding the height adjuster to make sure
that it has locked into the position.
!
o Adjust the shoulder belt height when
o When adjusting the shoulder belt
o If the shoulder belt anchor is not
CAUTION:
you sit well back in the seat.
OMC025042-1
height, grip the height adjuster button securely and slide the height
adjuster up or down.
moved, grasp the shoulder part of
the belt and pull forward to the full.
!
o Verify the shoulder belt anchor is
o Failure to replace seat belts after an
WARNING:
locked into position at the appropriate height. Never position the shoulder belt across your neck or face.
Improperly positioned seat belts can
cause serious injuries in an accident.
accident could leave you with damaged seat belts that will not provide
protection in the event of another
collision leading to personal injury or
death. Replace your seat belts after
being in an accident as soon as possible.
B180A01MC-AAT
SEAT BELT-Driver's 3-Point System
with Emergency Locking Retractor
To Fasten Your Belt
B180A01NF
To fasten your seat belt, pull it out of the
retractor and insert the metal tab into the
buckle. There will be an audible "click"
when the tab locks into the buckle.
The seat belt automatically adjusts to the
proper length only after the lap belt is
adjusted manually so that it fits snugly
around your hips. If you lean forward in a
slow, easy motion, the belt will extend
and let you move around. If there is a
sudden stop or impact, however, the belt
will lock into position. It will also lock if you
try to lean forward too quickly.
Page 38

FEATURES OF YOUR HYUNDAI
FEATURES OF YOUR HYUNDAI
1
1
27
27
NOTE:
If the seat belt is not fastened when the
ignition key is turned from the "OFF"
position to the "ON" position, the seat
belt warning will activate to remind the
driver to fasten the seat belt as follows.
B265E01MC-AAT
Seat Belt Warning Light
and Chime
The driver's seat belt warning light and
chime will activate to the following table
when the ignition switch is in "ON" position.
Conditions Warning Pattern
Seat Belt Vehicle Speed Light-Blink Chime-Sound
Unbuckled
Buckled
→→
Buckled
→ Unbuckled
→→
Above 6mph
(10 km/h)
Unbuckled
↓
Below 3mph
(5 km/h)
*1) Warning pattern repeats 11 times with
an interval of 24 seconds. If the driver's
seat belt is buckled, the light will stop
within 6 seconds and chime will stop
immediately.
*2) The light will stop within 6 seconds
and chime will stop immediately.
6 seconds
6 seconds None
6 seconds
6 seconds *1)
↓
Stop *2)
B190A03A-AAT
SEAT BELTS-Front Passenger and
Rear Seat 3-Point System with Combination Locking Retractor :
To Fasten Your Belt
Combination retractor type seat belts are
installed in the rear seat outboard and
center positions to help accommodate
the installation of child restraint systems.
Hyundai strongly recommends that children always be seated in the rear seat.
NEVER place any infant restraint system
in the front seat of the vehicle.
This type of seat belt combines the features of both an emergency locking retractor seat belt and an automatic locking
retractor seat belt. To fasten your seat
belt, pull it out of the retractor and insert
the metal tab into the buckle. There will
be an audible "click" when the tab locks
into the buckle. When not securing a child
restraint, the seat belt operates in the
same way as the driver's seat belt (Emergency Locking Retractor Type). It automatically adjusts to the proper length only
after the lap belt portion of the seat belt is
adjusted manually so that it fits snugly
around your hips.
Page 39

FEATURES OF YOUR HYUNDAI
1
28
When the seat belt is fully extended from
the retractor to allow the installation of a
child restraint system, the seat belt operation changes to allow the belt to retract,
but not to extend (Automatic Locking
Retractor Type). See page 1-38.
NOTE:
Although the combination retractor provides the same level of protection for
seated passengers in either emergency
or automatic locking modes, it is recommended that seated passengers use the
emergency locking feature for improved
convenience. The automatic locking
function is intended to facilitate child
restraint installation. To convert from
the automatic locking feature to the
emergency locking operation mode, allow the unbuckled seat belt to fully retract.
!
o For maximum restraint system pro-
o Seat belts are most effective when
WARNING:
tection, seat belts must always be
used whenever the car is moving.
seatbacks are in the upright position.
!
WARNING:
o Children age 12 and younger must
always be properly restrained in the
rear seat. Never allow children to
ride in the front passenger seat. If a
child over 13 must be seated in the
front seat, he/she must be properly
belted and the seat should be moved
as far back as possible.
o Never wear the shoulder belt under
your arm or behind your back. An
improperly positioned shoulder belt
can cause serious injuries in a crash.
The shoulder belt should be positioned midway over your shoulder
across your collarbone.
o Avoid wearing twisted seat belts. A
twisted belt can't do its job as well. In
a collision, it could even cut into you.
Be sure the belt webbing is straight
and not twisted.
o Be careful not to damage the belt
webbing or hardware. If the belt webbing or hardware is damaged, replace it.
B200A01A-AAT
Adjusting Your Seat Belt
B200A01NF
!
You should place the lap belt portion as
low as possible and snugly across your
hips, not on your waist. If the lap belt is
located too high on your waist, it may
increase the chance of injury in the event
of a collision. Both arms should not be
under or over the belt. Rather, one should
be over and the other under, as shown in
the illustration.
Never wear the seat belt under the arm
nearest the door.
WARNING:
Page 40

FEATURES OF YOUR HYUNDAI
FEATURES OF YOUR HYUNDAI
1
1
29
29
B210A01A-AAT
To Release the Seat Belt
B210A01NF
The seat belt is released by pressing the
release button in the locking buckle. When
it is released, the belt should automatically draw back into the retractor.
If this does not happen, check the belt to
be sure it is not twisted, then try again.
B220D02MC-AAT
SEAT BELTS - Rear Seat Center 3Point System With Emergency Locking Retractor
B220D01MC
1. Before fastening the rear seat center
belt, confirm the metal tab (A) and
buckle (B) are latched together.
B220D02MC
2. After confirming that (A) and (B) are
latched, pull the seat belt out of the
retractor and insert the metal tab (C)
into the buckle (D).
Page 41

FEATURES OF YOUR HYUNDAI
1
30
NOTE:
Confirm the metal tab and the buckle
marked "CENTER" are latched together.
B220D03MC
B220D04MC
There will be an audible "click" when the
tab locks in the buckle. The seat belt
automatically adjusts to the proper length
only after the lap belt is adjusted manually so that it fits snugly around your hips.
If you lean forward in a slow, easy motion,
the belt will extend and let you move
around. If there is a sudden stop or impact, the belt will lock into position. It will
also lock if you try to lean forward too
quickly.
!
o Never let anyone ride in the rear
o Never unlock the metal tab (A) and
WARNING:
center seat without fastening all
metal tabs and buckles as described
in this section. This seat belt is
designed to function as a typical 3point restraint (lap/shoulder belt).
Using only the shoulder portion or
lap portion of the belt can result in
serious or fatal injuries in the event
of a collision or sudden stop.
the buckle (B) with the following exceptions.
(1) In case of folding rear seatbacks
down.
(2) If transporting an object on the
rear seat may cause damage to
the rear seat center belt.
Page 42

FEATURES OF YOUR HYUNDAI
FEATURES OF YOUR HYUNDAI
CHILD RESTRAINT SYSTEM
1
1
31
31
B220D05MC
To disconnect the metal tab (A) from the
buckle (B), insert a narrow-ended tool
into the groove located on the buckle (B).
!
Always lock metal tab (A) into buckle (B)
immediately after returning the rear
seatbacks to an upright position. This
portion of the rear center seat belt should
only be unbuckled when the rear
seatback is folded down.
WARNING:
B220C02A-GAT
To Release the Seat Belt
B210A01NF
When you want to release the seat belt,
press the button in the locking buckle.
!
When fastening the outboard seat belts
or the center seat belt, make sure they
are inserted into the correct buckles to
obtain maximum protection from the seat
belt system and assure proper operation.
WARNING:
B230A05A-AAT
Children riding in the car should sit in the
rear seat and must always be properly
restrained to minimize the risk of injury in
an accident, sudden stop or sudden
maneuver. According to accident statistics provided by the National Highway
Traffic Safety Administration (NHTSA),
children are safer when properly restrained in the rear seats than in the front
seat. Larger children not in a child restraint should use one of the seat belts
provided.
All 50 states have child restraint laws.
You should be aware of the specific requirements in your state. Child and/or
infant safety seats must be properly placed
and installed in the rear seat. You must
use a commercially available child restraint system that meets the requirements
of the Federal Motor Vehicle Safety Standards (FMVSS).
Child restraint systems are designed to
be secured in vehicle seats by lap belts
or the lap belt portion of a lap/shoulder
belt, or by a LATCH system.
Children could be injured or killed in a
crash if their restraints are not properly
secured.
Page 43

FEATURES OF YOUR HYUNDAI
1
32
For small children and babies, a child
seat or infant seat must be used. Before
buying a particular child restraint system,
make sure it fits your car seat and seat
belts, and fits your child. Follow all the
instructions provided by the manufacturer
when installing the child restraint system.
!
o A child restraint system must be
o Since a safety belt or child restraint
WARNING:
placed in the rear seat. Never install
a child or infant seat on the front
passenger's seat.
Should an accident occur and cause
the passenger side airbag to deploy,
it could severely injure or kill an
infant or child seated in an infant or
child seat. Thus, only use a child
restraint in the rear seat of your
vehicle.
system can become very hot if it is
left in a closed vehicle, be sure to
check the seat cover and buckles
before placing a child there.
!
o When the child restraint system is
o Children may be seriously injured or
To reduce the chance or serious or fatal
injuries:
o Children of all ages are safer when
o Always follow the instructions for
o Always make sure the child seat is
WARNING:
not in use, store it in the trunk or
fasten it with a safety belt so that it
will not be thrown forward in case of
a sudden stop or an accident.
killed by an inflating airbag. All children, even those too large for child
restraints, must ride in the rear seat.
restrained in the rear seat. A child
riding in the front passenger seat
can be forcefully struck by an inflating airbag resulting in serious or fatal injuries.
installation and use of the child restraint maker.
secured properly in the car and your
child is securely restrained in the
child seat.
!
WARNING:
o Never hold a child in your arms or lap
when riding in a vehicle. The violent
forces created during a crash will
tear the child from your arms and
throw the child against the car’s interior.
o Never put a seat belt over yourself
and a child. During a crash, the belt
could press deep into the child causing serious internal injuries.
o Never leave children unattended in a
vehicle – not even for a short time.
The car can heat up very quickly,
resulting in serious injuries to children inside. Even very young children may inadvertently cause the
vehicle to move, entangle themselves in the windows, or lock themselves or others inside the vehicle.
o Never allow two children, or any two
persons, to use the same seat belt.
o Children often squirm and reposition
themselves improperly. Never let a
child ride with the shoulder belt under their arm or behind their back.
Always properly position and secure
children in rear seat.
Page 44

FEATURES OF YOUR HYUNDAI
FEATURES OF YOUR HYUNDAI
1
1
33
33
!
WARNING:
o Never allow a child to stand-up or
kneel on the seat or floorboard of a
moving vehicle. During a collision or
sudden stop, the child can be violently thrown against the vehicle's
interior, resulting in serious injury.
o Never use an infant carrier or a child
safety seat that "hooks" over a
seatback, it may not provide adequate security in an accident.
o Seat belts can become very hot, es-
pecially when the car is parked in
direct sunlight. Always check seat
belt buckles before fastening them
over a child.
o Always store or secure a child seat,
even when it is not in use. During a
collision or sudden stop, the child
seat could be thrown inside the vehicle.
B230B01E-AAT
Using a Child Restraint System with
the "Tether Anchorage" System
For small children and babies, the use of
a child seat or infant seat is required. This
child seat or infant seat should be of
appropriate size for the child and should
be installed in accordance with the
manufacturer's instructions. It is further
required that the seat be placed in the
vehicle's rear seat since this can make an
important contribution to safety. Your vehicle is provided with three child restraint
hook holders for installing the child seat
or infant seat.
B230C02MC-AAT
Installing a Child Restraint Seat with
the "Tether Anchorage" System
(4 Door)
Three child restraint hook holders are
located on the rear seat package tray.
To install the child restraint seat
B230C01MC
1. Open the tether anchor cover on the
rear seat package tray.
Page 45

FEATURES OF YOUR HYUNDAI
1
34
2. Route the child restraint seat tether
strap over the seatback.
For vehicles with adjustable headrests,
route the tether strap under the headrest and between the headrest posts,
otherwise route the tether strap over
the top of the seatback.
3. Connect the tether strap hook (2) to the
child restraint hook holder (1) and
tighten to secure the seat.
B230C02MC
!
o A child can be seriously injured or
o Never mount more than one child
WARNING:
killed in a collision if the child restraint is not properly anchored.
Always follow the child seat
manufacturer’s instructions for installation and use.
restraint to a single tether anchor or
to a single lower anchorage point.
The increased load caused by multiple seats may cause the tethers or
lower anchorage points to break,
causing serious injury or death.
B230E02MC-AAT
Installing a Child Restraint Seat with
the "Tether Anchorage" System
(3 Door)
Three child restraint hook holders are
located on the rear floor panel.
To install the child restraint seat
B230E01MC
1. Open the tether anchor cover on the
rear floor panel.
Page 46

B230C02MC
2. Route the child restraint seat tether
strap over the seatback.
For vehicles with adjustable headrests,
route the tether strap under the headrest and between the headrest posts,
otherwise route the tether strap over
the top of the seatback.
3. Connect the tether strap hook (2) to the
child restraint hook holder (1) through
the hole on the covering shelf and
tighten to secure the seat.
!
o A child can be seriously injured or
o Never mount more than one child
WARNING:
killed in a collision if the child restraint is not properly anchored.
Always follow the child seat
manufacturer’s instructions for installation and use.
restraint to a single tether anchor or
to a single lower anchorage point.
The increased load caused by multiple seats may cause the tethers or
lower anchorage points to break,
causing serious injury or death.
FEATURES OF YOUR HYUNDAI
FEATURES OF YOUR HYUNDAI
B230D08E-AAT
Securing the Child Restraint Seat
with the "Child Seat Lower Anchor"
system
B230D01MC
Some child seat manufacturers make
safety seats that are labeled as LATCH or
LATCH-compatible child seats. LATCH
stands for "Lower Anchors and Tethers
for Children". These seats include two
rigid or webbing mounted attachments
that connect to two LATCH anchors at
specific seating positions in your vehicle.
This type of child seat eliminates the
need to use seat belts to attach the child
seat in the rear seats.
LATCH anchors have been provided in
your vehicle. The LATCH anchors are
located in the left and right outboard rear
seating positions.
1
1
35
35
Page 47

FEATURES OF YOUR HYUNDAI
1
36
Their locations are shown in the illustration. There is no LATCH anchor provided
for the center rear seating position.
!
o A child can be seriously injured or
o Never install a child restraint using
o Never mount more than one child
WARNING:
killed in a collision if the child restraint is not properly anchored.
Always follow the child seat
manufacturer’s instructions for installation and use.
the LATCH lower anchors at the center position of the rear seat. In a
crash, the LATCH lower anchors may
break if a car seat is improperly
placed in the center position resulting in serious or fatal injuries. Only
place a LATCH or LATCH-compatible child seat in the left or right outboard rear seating positions (as
shown) to the appropriate LATCH
anchors provided.
restraint to a single tether or to a
single lower anchorage point. The
increased load caused by multiple
seats may cause the tethers or anchorage points to break, causing
serious injury or death.
!
WARNING:
o When using the vehicle’s “LATCH”
system to install a child restraint
system in the rear seat, all unused
vehicle rear seat belt metal latch
plates or tabs must be latched securely in their seat belt buckles and
the seat belt webbing must be retracted behind the child restraint to
prevent the child from reaching and
taking hold of unretracted seat belts.
Unlatched metal latch plates or tabs
may allow the child to reach the
unretracted seat belts which may
result in strangulation and a serious
injury or death to the child in the child
restraint.
Lower Anchor
Position Indicator
Lower Anchor
OMC029201N
Child restraint symbols are located on the
left and right rear seatbacks to indicate
the position of the lower anchors for child
restraints.
Page 48

B230D03MC
Follow the child seat manufacturer's instructions to properly install child restraint
seats with LATCH or LATCH-compatible
attachments.
Once you have installed the LATCH child
restraint seat, assure that the seat is properly attached to the LATCH and tether
anchors. Also, test the safety seat before
you place the child in it. Tilt the seat from
side to side. Also try to tug the seat forward. Check to see if the anchors hold the
seat in place.
!
!
CAUTION:
WARNING:
Do not allow the rear seat belt webbing to
get scratched or pinched by the child
seat latch and LATCH anchor during the
installation.
A child can be seriously injured or killed
in a collision if the child restraint is not
properly anchored to the car and the
child is not properly restrained in the
child restraint. Always follow the child
seat manufacturer’s instructions for installation and use.
FEATURES OF YOUR HYUNDAI
FEATURES OF YOUR HYUNDAI
B230F01A-AAT
Child Restraint System Installation
on Rear Seat Center Position
B230F02MC
Use the center seat belt for the rear seat
to secure the child restraint system as
illustrated. After installation of the child
restraint system, rock the child seat back
and forth, and side to side to ensure that
it is properly secured by the seat belt. If
the child seat moves, readjust the length
of the seat belt. Then, if equipped, insert
the child restraint tether strap hook into
the child restraint hook holder and tighten
to secure the seat. Always refer to the
child restraint system manufacturer's recommendation before installing the child
restraint system in your vehicle.
1
1
37
37
Page 49

FEATURES OF YOUR HYUNDAI
1
38
B230G02MC-AAT
Child Restraint System Installation
on Outboard Rear Seats
OMC039304
To install a child restraint system in the
outboard rear seats, extend the shoulder/
lap belt entirely from its retractor until a
"click" is felt. This will engage the seat belt
retractor automatic locking feature, which
allows the seat belt to retract but not
extend. Install the child restraint system,
buckle the seat belt and allow the seat
belt to take up any slack. Make sure that
the lap portion of the belt is tight around
the child restraint system and the shoulder portion of the belt is positioned so that
it cannot interfere with the child's head or
neck. Also, double check to be sure that
the retractor has engaged the automatic
locking feature by trying to extend webbing out of the retractor.
If the retractor is in the automatic locking
mode, the belt will be locked. After installation of the child restraint system, try to
move it in all directions to be sure the
child restraint system is securely installed.
If you need to tighten the belt, pull more
webbing toward the retractor. When you
unbuckle the seat belt and allow it to
retract, the retractor will automatically
revert back to its normal seated passenger emergency locking usage condition.
NOTE:
o Before installing the child restraint
system, read the instructions supplied by the child restraint system
manufacturer.
o If the seat belt does not operate as
described, have the system checked
immediately by your authorized
Hyundai dealer.
!
o If the retractor is not in the Auto-
o Do not install any child restraint sys-
o Before installing a Child Restraint
WARNING:
matic Locking mode, the child restraint can move when your vehicle
turns or stops suddenly. A child can
be seriously injured or killed if the
child restraint is not properly anchored to the car, including setting
the retractor to the Automatic Locking mode.
tem in the front passenger seat.
Should an accident occur and cause
the passenger side airbag to deploy,
it could severely injure or kill an
infant or child seated in an infant or
child seat. Therefore, only use a child
restraint system in the rear seat of
your vehicle.
System to vehicles fitted with Curtain
Airbags, always refer to safety notices for Curtain Airbag systems in
this manual. Whenever installing child
restraints, use only approved devices
and refer to the "Child Restraint System" section to ensure correct installation and that occupant protection is
maximized.
Page 50

FEATURES OF YOUR HYUNDAI
FEATURES OF YOUR HYUNDAI
1
1
39
39
B180C03MC-AAT
Pre-Tensioner Seat Belt
Your Hyundai vehicle is equipped with
driver's and front passenger's pretensioner seat belts. The purpose of the
pre-tensioner is to make sure that the
seat belts fit tightly against the occupant's
body in certain frontal collisions. The pretensioner seat belts can be activated alone
or, where the frontal collision is severe
enough, together with the airbags.
OED030300
When the vehicle stops suddenly, or if the
occupant tries to lean forward too quickly,
the seat belt retractor will lock into position. In certain frontal collisions, the pretensioner will activate and pull the seat
belt into tighter contact against the
occupant's body.
Driver's airbag
2
The seat belt pre-tensioner system consists mainly of the following components.
Their locations are shown in the illustration.
1. SRS airbag warning light
2. Seat belt pre-tensioner assembly
3. SRS control module
Passenger's
1
airbag
3
B180D01MC
!
To obtain maximum benefit from a pretensioner seat belt:
The seat belt must be work correctly and
adjusted to the proper position (see
pages 1-25 and 1-26). Please read and
follow all of the important information
and precautions about your vehicle’s
occupant safety features – including seat
belts and advanced airbags – that are
provided in this manual.
WARNING:
NOTE:
o Both the driver's and front
passenger's pre-tensioner seat belts
will be activated in certain frontal
collisions. The pre-tensioner seat
belts can be activated alone or,
where the frontal collision is severe
enough, together with the airbags.
The pre-tensioners will not be activated if the seat belts are not being
worn at the time of the collision.
Page 51

FEATURES OF YOUR HYUNDAI
1
40
o When the pre-tensioner seat belts
are activated, a loud noise may be
heard and fine dust, which may appear to be smoke, may be visible in
the passenger compartment. These
are normal operating conditions and
are not hazardous.
o Although it is harmless, the fine dust
may cause skin irritation and should
not be breathed for prolonged periods. Wash your hands and face thoroughly after an accident in which the
pre-tensioner seat belts were activated.
!
o The sensor that activates the SRS
o If the pre-tensioner seat belt is not
CAUTION:
airbag is connected with the pretensioner seat belt. The SRS airbag
warning light on the instrument
panel will illuminate for approximately
6 seconds after the ignition key has
been turned to the "ON" position,
and then it should turn off.
working properly, this warning light
will illuminate even if there is no malfunction of the SRS airbag.
If the SRS airbag warning light does
not illuminate when the ignition key
is turned to the "ON" position, remains illuminated after approximately 6 seconds when the ignition
key is turned to the "ON" position, or
if it illuminates while the vehicle is
being driven, have an authorized
Hyundai dealer inspect the advanced
SRS airbag system as soon as possible.
!
o Pre-tensioners are designed to op-
o The pre-tensioner seat belt assem-
WARNING:
erate only one time. After activation,
pre-tensioner seat belts must be
replaced. All seat belts, of any type,
should always be replaced after they
have been worn during a collision.
bly mechanisms become hot during
activation. Do not touch the pretensioner seat belt assemblies for
several minutes after they have been
activated.
!
WARNING:
o Do not attempt to inspect or replace
the pre-tensioner seat belts yourself. This must be done by an authorized Hyundai dealer.
o Do not strike the pre-tensioner seat
belt assemblies.
o Do not attempt to service or repair
the pre-tensioner seat belt system in
any manner.
o Improper handling of the pre-
tensioner seat belt assemblies, and
failure to heed the warnings to not
strike, modify, inspect, replace, service or repair the pre-tensioner seat
belt assemblies may lead to improper operation or inadvertent activation and serious injury.
o Always wear the seat belts when
driving or riding in a motor vehicle.
o If the vehicle or pre-tensioner seat
belt must be discarded, contact an
authorized HYUNDAI dealer.
Page 52

ADVANCED SUPPLEMENTAL RESTRAINT (AIRBAG) SYSTEM (SRS)
B240D01MC-AAT
(If Installed)
FEATURES OF YOUR HYUNDAI
FEATURES OF YOUR HYUNDAI
1. Driver's front airbag
2. Passenger's front airbag
3. Side impact airbag
4. Curtain airbag
!
Even in vehicles with air bags, you and
your passengers must always wear the
seat belts provided in order to minimize
the risk and severity of injury in the event
of a collision or rollover.
WARNING:
1
1
41
41
B240D01MC
Page 53

FEATURES OF YOUR HYUNDAI
1
42
B240A03NF-AAT
Driver's and Passenger's Front
Airbag
Driver's Front Airbag
B240A01MC
Your Hyundai is equipped with an advanced Supplemental Restraint (Airbag)
System and lap/shoulder belts at both the
driver and passenger seating positions.
The indications of the system's presence
are the letters "SRS AIRBAG" embossed
on the airbag pad cover in the steering
wheel and the passenger's side front
panel pad above the glove box.
The Hyundai SRS consists of airbags
installed under the pad covers in the
center of the steering wheel and the
passenger's side front panel above the
glove box.
The purpose of the SRS is to provide the
vehicle's driver and/or the front passenger with additional protection than that
offered by the seat belt system alone in
case of a frontal impact of sufficient severity. The SRS uses sensors to gather information about the driver's and front
passenger's seat position, the driver's and
front passenger's seat belt usage and
impact severity.
The driver's and front passenger's seat
track position sensors (If Installed), which
are installed on the seat track, determine
if the seats are fore or aft of a reference
position. The seat belt buckle sensors
determine if the driver and front
passenger's seat belts are fastened.
These sensors provide the ability to control the SRS deployment based on how
close the driver's seat is to the steering
wheel, how close the passenger's seat is
to the instrument panel, whether or not
the seat belts are fastened, and how
severe the impact is.
The advanced SRS offers the ability to
control the airbag inflation within two levels. A first stage level is provided for
moderate-severity impacts. A second
stage level is provided for more severe
impacts.
According to the impact severity, seating
position and seat belt usage, the
SRSCM(SRS Control Module) controls
the airbag inflation. Failure to properly
wear seat belts can increase the risk or
severity of injury in an accident.
Additionally, your Hyundai is equipped
with an occupant classification system in
the front passenger's seat. The occupant
classification system detects the presence of a passenger in the front
passenger's seat and will turn off the front
passenger's airbag under certain conditions. For more detail, see "Occupant Classification System" later in this section.
Page 54

!
If a seat track position sensor or an
occupant classification system is not
working properly, the SRS airbag warning light on the instrument panel
will illuminate because the SRS airbag
warning light is connected with the seat
track position sensor and the occupant
classification system. If the SRS airbag
warning light does not illuminate when
the ignition key is turned to the "ON"
position, remains illuminated after approximately 6 seconds when the ignition
key is turned to the "ON" position, or if it
illuminates while the vehicle is being
driven, have an authorized Hyundai
dealer inspect the advanced SRS airbag
system as soon as possible.
WARNING:
AIR
BAG
!
o Modification to the seat structure
o Do not place any objects underneath
o Do not place any objects that may
WARNING:
can adversely affect the seat track
position sensor and cause the airbag
to deploy at a different level than
should be provided.
the front seats as they could damage the seat track position sensor or
interfere with the occupant classification system.
cause magnetic fields near the front
seat. These may cause a malfunction of the seat track position sensor.
FEATURES OF YOUR HYUNDAI
FEATURES OF YOUR HYUNDAI
NOTE:
o Be sure to read information about
the SRS on the labels provided on
the topside of the sun visor.
o Advanced airbags are combined with
pre-tensioner seat belts to help provide enhanced occupant protection
in frontal crashes. Front airbags are
not intended to deploy in collisions in
which sufficient protection can be
provided by the pre-tensioner seat
belt.
o If you are considering modification
of your vehicle due to a disability,
please contact the Hyundai Customer Assistance Center at 1-800633-5151.
1
1
43
43
Page 55

FEATURES OF YOUR HYUNDAI
1
44
!
Always use seat belts and child restraints
– every trip, every time, everyone!
Airbags inflate with considerable force
and in the blink of an eye. Seat belts help
keep occupants in proper position to
obtain maximum benefit from the airbag.
Even with advanced airbags, improperly belted and unbelted occupants can
be severely injured when the airbag inflates. Always follow the precautions
about seat belts, airbags and occupant
safety contained in this manual.
To reduce the chance of serious or fatal
injuries and receive the maximum safety
benefit from your restraint system:
o Never place a child in any child or
o ABC – Always Buckle Children in the
o Front and side impact airbags can
WARNING:
booster seat in the front seat (see
child restraints 1-31).
back seat. It is the safest place for
children of any age to ride.
injure occupants improperly positioned in the front seats.
!
WARNING:
o Move your seat as far back as prac-
tical from the front airbags, while still
maintaining control of the vehicle.
o Never sit or lean unnecessarily close
to the front or side airbags.
o Never lean against the door or cen-
ter console – always sit in an upright
position.
o Do not allow an adult passenger to
ride in the front seat when the “Passenger Airbag OFF” indicator is illuminated, because the airbag will not
deploy in the event of a moderate or
severe frontal crash.
o Never place objects over or near
any airbag module (front or side impact airbags), because these objects
can injure passengers in a crash.
o Never place covers, blankets or
aftermarket seat warmers on the
passenger seat as these may interfere with the occupant classification
system.
!
WARNING:
o Do not tamper or disconnect SRS
wiring or other components. Injuries
could result from inadvertent deployment or failure of the airbag to deploy in a crash.
o If the SRS airbag warning light (see
pg 1-64) remains illuminated while
the vehicle is being driven, have an
authorized Hyundai dealer inspect
the airbag system as soon as possible.
o Airbags can only be used once –
have an authorized Hyundai dealer
replace the airbag immediately after
deployment.
o The SRS is designed to deploy the
front airbags only when an impact is
sufficiently severe and when the impact angle is within a range as measured from the forward longitudinal
axis of the vehicle. The front airbags
will not deploy in side, rear or rollover
impacts. Additionally, the airbags will
only deploy once. Seat belts must be
worn at all times.
Page 56

FEATURES OF YOUR HYUNDAI
FEATURES OF YOUR HYUNDAI
1
1
45
45
!
WARNING:
o Front airbags are not intended to
deploy in side-impact, rear-impact
or rollover crashes. In addition, front
airbags will not deploy in frontal
crashes below the deployment
threshold.
Rear impact
Side Impact
Rollover
o Move your seat as far back as prac-
tical from the front airbags, while still
maintaining control of the vehicle.
You and your passengers should
never sit or lean unnecessarily close
to the airbags. Improperly positioned
drivers and passengers can be severely injured by inflating airbags.
B240A02MC
!
WARNING:
o No objects should be placed over or
near the airbag modules on the steering wheel, instrument panel, and the
front passenger's panel above the
glove box, because any such object
could cause harm if the vehicle is in
a crash severe enough to cause the
airbags to deploy.
o If the airbags deploy, they must be
replaced by an authorized Hyundai
dealer. Deployed airbags WILL NOT
inflate again and will provide no protection in subsequent collisions.
o Do not tamper with or disconnect
SRS wiring or other components of
the SRS system. Doing so could
result in injury, due to accidental
deployment of the airbags or by rendering the SRS inoperative.
o Even though your vehicle is equipped
with the occupant classification system, do not install a child restraint
system in the front passenger seat
position. A child restraint system
must never be placed in the front
seat.
!
WARNING:
An infant or child could be severely
injured or killed by an airbag deployment in case of an accident.
o Children younger than 13 years must
always be properly restrained in the
rear seat. Never allow children to
ride in the front passenger seat. If a
child over 13 must be seated in the
front seat, he or she must be properly belted and the seat should be
moved as far back as possible.
o For maximum safety protection in all
types of crashes, all occupants including the driver should always wear
their seat belts whether or not an
airbag is also provided at their seating position to minimize the risk of
severe injury or death in the event of
a crash. Do not sit or lean unnecessarily close to the airbag while the
vehicle is in motion.
Page 57

FEATURES OF YOUR HYUNDAI
1
46
!
WARNING:
o Sitting improperly or out of position
can result in serious or fatal injury in
a crash. All occupants should sit
upright with the seat back in an upright position, centered on the seat
cushion with their seat belt on, legs
comfortably extended and their feet
on the floor until the vehicle is parked
and the ignition key is removed.
o The SRS airbag system must deploy
very rapidly to provide protection in
a crash. If an occupant is out of
position because of not wearing a
seat belt, the airbag may forcefully
contact the occupant causing serious or fatal injuries.
B240B02MC-AAT
SRS Components and Functions
B240B01NF
The SRS consists of the following components:
1. Front Impact Sensor
2. "PASSENGER AIR BAG OFF" Indicator
(Front passenger's seat only)
3. SRS "AIR BAG" warning light
4. Knee Bolster
5. Passenger's Airbag Module
6. Driver's Airbag Module
7. SRS Control Module (SRSCM)
8. Occupant Classification System
(Front passenger's seat only)
9. Driver's and Front Passenger's Seat
Track Position Sensors (If Installed)
10. Driver's and Front Passenger's Seat
Belt Buckle Sensors
11. Side Impact Sensor (If Installed)
12. Retractor Pre-tensioner Assemblies
13. Side Impact Airbag Module (If Installed)
14. Curtain Airbag Module (If Installed)
Page 58

The SRSCM continually monitors all elements while the ignition is "ON" to determine if a frontal or near-frontal impact is
severe enough to require airbag deployment or pre-tensioner seat belt deployment.
The SRS "AIR BAG" warning light on the
instrument panel will illuminate for about
6 seconds after the ignition key is turned
to the "ON" position or after the engine is
started, after which the "AIR BAG" warning light should go out.
B240B02L
Upon deployment, tear seams molded
directly into the pad covers will separate
under pressure from the expansion of the
airbags. Further opening of the covers
then allows full inflation of the airbags.
FEATURES OF YOUR HYUNDAI
FEATURES OF YOUR HYUNDAI
B240B03L
A fully inflated airbag, in combination with
a properly worn seat belt, slows the driver's
or the passenger's forward motion, reducing the risk of head and chest injury.
After complete inflation, the airbag immediately starts deflating, enabling the driver
to maintain forward visibility and the ability to steer or operate other controls.
1
1
47
47
B240B01L
The airbag modules are located both in
the center of the steering wheel and in the
front passenger's panel above the glove
box. When the SRSCM detects a sufficiently severe impact to the front of the
vehicle, it will automatically deploy the
front airbags.
Page 59

FEATURES OF YOUR HYUNDAI
1
48
Passenger's Front Airbag
B240B01MC-A
!
o Do not install or place any accesso-
CAUTION:
ries (drink holder, cassette holder,
sticker, etc.) on the front passenger's
panel above the glove box in a vehicle with a passenger's airbag. Such
objects may become dangerous projectiles and cause injury if the
passenger's airbag inflates.
o When installing a container of liquid
air freshener inside the vehicle, do
not place it near the instrument cluster nor on the instrument panel surface. If there is any leakage from the
air freshener onto these areas (instrument cluster, instrument panel
or air ventilator), it may damage these
parts. If the liquid from the air freshener does leak onto these areas,
wash them with water immediately.
Passenger's Front Airbag
B240B05L
!
o If an airbag deploys, there may be a
o The SRS can function only when the
WARNING:
loud noise followed by a fine dust
released in the vehicle. These conditions are normal and are not hazardous - the airbags are packed in
this fine powder. The dust generated
during airbag deployment may cause
skin or eye irritation as well as aggravate asthma for some persons.
Always wash all exposed skin areas
thoroughly with lukewarm water and
a mild soap after an accident in which
the airbags were deployed.
ignition key is in the "ON" position. If
the SRS "AIR BAG" warning light
does not illuminate, or continuously
remains on after illuminating for
about 6 seconds when the ignition
key is turned to the "ON" position, or
after the engine is started, comes on
while driving, the SRS is not working
properly. If this occurs, have your
vehicle immediately inspected by
your Hyundai dealer.
Page 60

FEATURES OF YOUR HYUNDAI
FEATURES OF YOUR HYUNDAI
1
1
49
49
!
WARNING:
o Before you replace a fuse or discon-
nect a battery terminal, turn the ignition key to the "LOCK" position and
remove the ignition key. Never remove or replace the airbag related
fuse(s) when the ignition key is in the
"ON" position. Failure to heed this
warning will cause the SRS "AIR
BAG" warning light to illuminate.
OMC029200N
Occupant classification system
Your vehicle is equipped with an occupant classification system in the front
passenger's seat.
The occupant classification system creates a field which is designed to detect
the presence of a properly-seated front
passenger and determine if the
passenger's front air bag should be enabled (may inflate) or not. The driver's
front air bag is not affected or controlled
by the occupant classification system.
Main components of occupant classification system
• An Electronic Capacity measurement
system in the front passenger seat
which detects major characteristics of
a person or object on the seat.
• Electronic system to determine whether
the passenger air bag systems (both
front and side) should be activated or
deactivated.
• A warning light located on the instrument panel which illuminates the words
"PASSENGER AIR BAG OFF" indicating the front passenger air bag system
is deactivated.
• The instrument panel air bag warning
light is interconnected with the occupant classification system.
If the front passenger seat is occupied by
a person that the system determines to be
of an appropriate size, and he/she sits
properly, the "PASSENGER AIR BAG
OFF" indicator will be turned off and the
front passenger's air bag will be able to
inflate, if necessary, in frontal crashes
(sitting properly means sitting upright with
the seatback in an upright position, centered on the seat cushion with their seat
belt on, legs comfortably extended and
their feet on the floor).
You will find the "PASSENGER AIR BAG
OFF" indicator on the center facia panel.
This system detects the conditions 1~4 in
the following table and activates or deactivates the front passenger air bag based
on these conditions.
Page 61

FEATURES OF YOUR HYUNDAI
1
50
Always be sure that you and all vehicle
occupants are seated and restrained properly (sitting upright with the seat in an
upright position, centered on the seat
cushion, with the person's legs comfortably extended, feet on the floor, and
wearing the safety belt properly) for the
most effective protection by the air bag
and the safety belt.
• The OCS may not function properly if
the passenger takes actions which can
affect the detection system. These include:
(1) Failing to sit in an upright position.
(2) Leaning against the door or center
console.
(3) Sitting towards the sides or the
front of the seat.
(4) Putting legs on the dashboard or
resting them on other locations.
(5) Improperly wearing the safety belt.
(6) Reclining the seatback.
(7) The seat covering change and/or
blanket use.
Condition and operation in the front passenger occupant classification system
Indicator/Warning light Devices
Condition detected by the
occupant classification system
1. Adult or child*
2. Child restraint system*
3. Unoccupied
4. There is a malfunction
in the system
1
2
"PASSENGER AIR
BAG OFF" indicator
light
Off
On
On
Off
SRS warning light
Off
Off
Off
On
Front passenger
air bag
Activated
Deactivated
Deactivated
Activated
*1) The OCS system uses a field to evalu-
ate a person's size to determine
whether the airbag should deploy. It is
possible for a child to be detected and
activate the OCS, thus allowing the
airbag to deploy. To maximize safety,
do not allow children to ride in the
front passenger seat.
*2) Never install a child restraint system
on the front passenger seat.
!
WARNING:
Riding in an improper position or placing
weight on the front passenger's seat
when it is unoccupied by a passenger
adversely affects the occupant classification system (OCS). Your OCS is designed to resist electronic waves, but do
not place an electronic device such as
laptop computer on or near the seat
cushion since it may defeat the proper
functioning of the OCS.
Page 62

FEATURES OF YOUR HYUNDAI
FEATURES OF YOUR HYUNDAI
1
1
51
51
Proper position
B990A01O
When an adult is seated in the front
passenger seat, if the “PASSENGER AIR
BAG OFF” indicator is on, turn the ignition
switch to the LOCK position and ask the
passenger to sit properly (sitting upright
with the seat back in an upright position,
centered on the seat cushion with their
seat belt on, legs comfortably extended
and their feet on the floor). Restart the
engine and have the person remain in
that position for about 30 seconds. This
will allow the system to detect the person
and to enable the passenger air bag.
If the "PASSENGER AIR BAG OFF" indicator is still on, ask the passenger to
move to the rear seat.
!
Do not allow an adult passenger to ride
in the front seat when the “PASSENGER
AIR BAG OFF” indicator is illuminated
because the air bag will not deploy in the
event of a crash. If the "PASSENGER
AIR BAG OFF" indicator remains illuminated after the adult passenger repositions themselves properly and the car is
restarted, it is recommended that passenger move to the rear seat because
the passenger's front air bag will not
deploy.
Front seat passengers must stay properly seated to avoid serious injury from
a deploying air bag.
WARNING:
NOTE:
The "PASSENGER AIR BAG OFF" indicator illuminates for about 4 seconds
after the ignition switch is turned to the
ON position or after the engine is started.
If the front passenger seat is occupied,
the occupant classification sensor will
then classify the front passenger after
several more seconds.
!
Do not put a heavy load or an active
electronic device (ex. laptop computer,
navigation etc..) in the front passenger
seatback pocket or on the front passenger seat. Do not hang onto the front
passenger seat. Do not hang any items
such as seatback table on the front passenger seatback. Do not place feet on
the front passenger seatback. Do not
place any items under the front passenger seat. Any of these could interfere
with proper sensor operation.
WARNING:
Page 63

FEATURES OF YOUR HYUNDAI
1
52
!
o Riding in an improper position or
WARNING:
placing weight on the front
passenger's seat when it is unoccupied by a passenger adversely affects the occupant classification
system (OCS).
B990A08O
- Never put a heavy load or an active
electronic device (ex. laptop computer, navigation, blanket etc) on
the front passenger seat.
!
WARNING:
B990A03O
- NEVER excessively recline the
front passenger seatback.
B990A02O
- NEVER sit with hips shifted towards
the front of the seat.
!
WARNING:
B990A07O
- NEVER lean on the center console.
- NEVER lean on the door trim.
- NEVER sit on one side of the front
passenger seat.
Page 64

FEATURES OF YOUR HYUNDAI
FEATURES OF YOUR HYUNDAI
1
1
53
53
!
WARNING:
B990A05O
- NEVER place feet on the dashboard.
o Even though your vehicle is equipped
WARNING:
with the occupant classification system, never install a child restraint
system in the front passenger's seat.
A deploying air bag can forcefully
strike a child resulting in serious
injuries or death. Any child age 12
and under should ride in the rear
seat. Children too large for child
restraints should use the available
lap/shoulder belts. No matter what
type of crash, children of all ages are
safer when restrained in the rear
seat.
o If the "PASSENGER AIR BAG OFF"
indicator is illuminated when the front
passenger's seat is occupied by an
adult and he/she sits properly (sitting upright with the seatback in an
upright position, centered on the seat
cushion with their seat belt on, legs
comfortably extended and their feet
on the floor), have that person sit in
the rear seat.
!!
o If the front passenger seat is occu-
o Do not modify or replace the front
o Do not place sharp objects on the
o Do not use accessory seat covers
WARNING:
pied by a child who is not in a CRS,
the "PASSENGER AIRBAG OFF" indicator may or may not be on and the
passenger airbag may or may not
deploy in a collision. Have the child
move to a rear seat to increase their
safety.
passenger seat. Don't place anything
on or attach anything such as a blanket or seat heater to the front passenger seat. This can adversely affect the occupant classification system.
front passenger seat. These may
damage the occupant classification
system, if they puncture the seat
cushion.
on the front seats.
Page 65

FEATURES OF YOUR HYUNDAI
1
54
!
o Accident statistics show that chil-
o Air bags can only be used once –
o The occupant classification system
o Do not place an electronic device
WARNING:
dren are safer if they are restrained
in the rear, as opposed to the front
seat. It is recommended that child
restraints be secured in a rear seat,
including an infant riding in a rearfacing infant seat, a child riding in a
forward-facing child seat and an older
child riding in a booster seat.
have an authorized HYUNDAI dealer
replace the air bag immediately after
deployment.
may not work properly if water, coffee or any other liquid including rain
gets on the seat. Keep the front seat
dry at all times.
such as a laptop computer on the
front passenger seat. Its electronic
field may cause the OCS to switch to
the "on" condition and thus allow the
passenger airbag to deploy needlessly in a collision, increasing your
repair costs.
!
If the occupant classification system is
not working properly, the SRS air bag
warning light on the instrument panel
will illuminate because the passenger's
front air bag is connected with the occupant classification system. If there is a
malfunction of the occupant classification system, the "PASSENGER AIR BAG
OFF" indicator will not illuminate and the
passenger's front air bag will inflate in
frontal impact crashes even if there is no
occupant in the front passenger's seat.
If the SRS air bag warning light does not
illuminate when the ignition switch is
turned to the ON position, remains illuminated after approximately 6 seconds
when the ignition switch is turned to the
ON position, or if it illuminates while the
vehicle is being driven, have an authorized HYUNDAI dealer inspect the occupant classification system and the SRS
air bag system as soon as possible.
WARNING:
B990B02MC-AAT
Side Impact Airbag
B990B02LZ
Your Hyundai is equipped with a side
impact airbag in each front seat. The
purpose of the airbag is to provide the
vehicle's driver and/or the front passenger with additional protection than that
offered by the seat belt alone. The side
impact airbags are designed to deploy
only during certain side-impact collisions,
depending on the crash severity, angle,
speed and point of impact. The side impact airbags are not designed to deploy
in all side impact situations.
Page 66

FEATURES OF YOUR HYUNDAI
FEATURES OF YOUR HYUNDAI
1
1
55
55
Side impact sensor
B990B01MC
Important Safety Notes on the Side
Impact Airbag System
Following are a number of safety points
concerning this system which should always be observed to ensure risk of injury
is reduced in an accident.
!
o The side impact airbag is supple-
o For best protection from the side
o Do not use any accessory seat cov-
WARNING:
mental to the driver's and the
passenger's seat belt systems and
is not a substitute for them. Therefore your seat belts must be worn at
all times while the vehicle is in motion. The airbags deploy only in certain side impact conditions severe
enough to cause significant injury to
the vehicle occupants.
impact airbag system and to avoid
being injured by the deploying side
impact airbag, both front seat occupants should sit in an upright position with the seat belt properly fastened. The driver's hands should be
placed on the steering wheel at the
9:00 and 3:00 positions. The
passenger's arms and hands should
be placed on their laps.
ers.
Use of seat covers could reduce or
prevent the effectiveness of the system.
!
WARNING:
o Do not install any accessories on the
side or near the side impact airbag.
o Do not place any objects over the
airbag or between the airbag and
yourself.
o Do not place any objects (an um-
brella, bag, etc.) between the front
door and the front seat. Such objects
may become dangerous projectiles
and cause injury if the supplemental
side impact airbag inflates.
o To prevent unexpected deployment
of the side impact airbag that may
result in personal injury, avoid impact to the side impact sensor when
the ignition key is on.
Page 67

FEATURES OF YOUR HYUNDAI
1
56
B990C01JM-GAT
Curtain Airbag
Curtain Airbag
B990C01MC
Curtain airbags are located along both
sides of the roof rails above the front and
rear doors. They are designed to help
protect the heads of the front seat occupants and the rear outboard seat occupants in certain side impact collisions.
The curtain airbags are designed to deploy only during certain side impact collisions, depending on the crash severity,
angle, speed and impact. The curtain
airbags are not designed to deploy in all
side impact situations, collisions from the
front or rear of the vehicle or in most
rollover situations.
Important Safety Notes for Curtain
Airbag Systems
Following are a number of safety points
concerning this system which should always be observed to ensure risk of injury
is reduced in an accident.
!
o Before installing child restraints ,
o Make sure that the occupant does
o Ensure the opening for the Curtain
WARNING:
always refer to “Child Restraint System” section to ensure correct installation and that occupant protection is maximized.
not have any body parts (head, arms
& legs) protruding outside the restraining system. An inflating airbag
that strikes an infant or child could
cause serious injury.
Airbag System remains unobstructed at all times, so that the
airbags can inflate properly if needed.
!
o The space between the occupant and
o Do not move the sun visor out to
o Do not install sun blinds to the rear
o Do not install any accessories or
WARNING:
the curtain airbag must never be
occupied by children, passengers or
pets. Occupants should never lean
out or have any parts of their body
protruding from the window while the
engine is running.
cover the side window if there is an
item attached to it such as a garage
door remote control, pens, air fresheners or the like. These objects could
cause injury if the Curtain Airbag is
deployed.
doors, these must not obstruct or
impair the airbag in any way.
children’s toys in the Curtain Airbag
deployment zones, as this may impair the operation of the system or
throw parts of them into the vehicle
cabin causing injury to occupants if
the system is deployed.
Page 68

!
o To maintain the integrity of the Cur-
WARNING:
tain Airbag system, any work, removal or installation of the airbag
and associated components (such
as roof lining and side trims) should
only be performed by an authorized
Hyundai dealer.
B240C02NF-AAT
SRS Care
The SRS is virtually maintenance-free
and there are no parts you can safely
service by yourself. If the SRS "AIR BAG"
warning light does not illuminate, or continuously remains on, have your vehicle
immediately inspected by your Hyundai
dealer.
Any work on the SRS system, such as
removing, installing, repairing, or any work
on the steering wheel must be performed
by a qualified Hyundai technician. Improper handling of the SRS system may
result in serious personal injury.
FEATURES OF YOUR HYUNDAI
FEATURES OF YOUR HYUNDAI
!
o Do not install a child restraint sys-
o Modification to SRS components or
o For cleaning the airbag pad covers,
WARNING:
tem in the front passenger seat position.
A child restraint system must never
be placed in the front seat. The infant
or child could be severely injured by
an airbag deployment in case of an
accident.
wiring, including the addition of any
kind of badges to the pad covers or
modifications to the body structure,
can adversely affect SRS performance and lead to possible injury.
use only a soft, dry cloth or one
which has been moistened with plain
water. Solvents or cleaners could
adversely affect the airbag covers
and proper deployment of the system.
1
1
57
57
HSM393
Page 69

FEATURES OF YOUR HYUNDAI
1
58
!
WARNING:
o No objects should be placed over or
near the airbag modules on the steering wheel, instrument panel, and the
front passenger's panel above the
glove box, because any such object
could cause harm if the vehicle is in
a crash severe enough to cause the
airbags to inflate.
o If the airbags inflate, they must be
replaced by an authorized Hyundai
dealer.
o Do not tamper with or disconnect
SRS wiring, or other components of
the SRS system. Doing so could result in injury, due to accidental inflation of the airbags or by rendering
the SRS inoperative.
o If components of the airbag system
must be discarded, or if the vehicle
must be scrapped, certain safety
precautions must be observed. Your
Hyundai dealer knows these precautions and can give you the necessary information. Failure to follow
these precautions and procedures
could increase the risk of personal
injury.
!
WARNING:
o If your car was flooded and has
soaked carpeting or there is water
on the floor, do not start the engine;
have the car towed to an authorized
Hyundai dealer.
B240D02NF-AAT
Additional Safety Precautions
o Never let passengers ride in the
cargo area (trunk) or on top of a
folded-down back seat. All occupants
should sit upright, fully back in their
seats with their seat belts on and their
feet on the floor.
o Passengers should not move out of
or change seats while the vehicle is
moving. A passenger who is not wear-
ing a seat belt during a crash or emergency stop can be thrown against the
inside of the vehicle, against other
occupants, or out of the vehicle.
o Each seat belt is designed to re-
strain one occupant. If more than one
person uses the same seat belt, they
could be seriously injured or killed in
a collision.
o Do not use any accessories on seat
belts. Devices claiming to improve occupant comfort or reposition the seat
belt can reduce the protection provided by the seat belt and increase the
chance of serious injury in a crash.
o Passengers should not place hard or
sharp objects between themselves
and the airbags. Carrying hard or
sharp objects on your lap or in your
mouth can result in injuries if an airbag
inflates.
Page 70

FEATURES OF YOUR HYUNDAI
FEATURES OF YOUR HYUNDAI
1
1
59
59
o Keep occupants away from the airbag
covers. All occupants should sit up-
right, fully back in their seats with their
seat belts on and their feet on the floor.
If occupants are too close to the airbag
covers, they could be injured if the
airbags inflate.
o Do not attach or place objects on or
near the airbag covers. Any object
attached to or placed on the front or
side impact airbag covers could interfere with the proper operation of the
airbags.
o Do not modify the front seats. Modi-
fication of the front seats could interfere with the operation of the supplemental restraint system sensing components or side impact airbags.
o Do not place items under the front
seats. Placing items under the front
seats could interfere with the operation of the supplemental restraint system sensing components and wiring
harnesses.
o Never hold an infant or child on your
lap. The infant or child could be seriously injured or killed in the event of a
crash. All infants and children should
be properly restrained in appropriate
child safety seats or seat belts in the
rear seat.
!
o Sitting improperly or out of position
o Always sit upright with the seatback
WARNING:
can cause occupants to be shifted
too close to a deploying airbag, strike
the interior structure or be thrown
from the vehicle resulting in serious
injury or death.
in an upright position, centered on
the seat cushion with your seat belt
on, legs comfortably extended and
your feet on the floor.
Adding Equipment to or Modifying
Your Airbag-Equipped Vehicle.
If you modify your vehicle by changing
your vehicle's frame, bumper system, front
end or side sheet metal or ride height, this
may adversely affect the operation of your
vehicle's airbag system.
Page 71

FEATURES OF YOUR HYUNDAI
1
INSTRUMENT CLUSTER AND INDICATOR LIGHTS
60
B260A02MC-AAT
Type A
OMC029505N
Page 72

FEATURES OF YOUR HYUNDAI
FEATURES OF YOUR HYUNDAI
1
1
61
61
1. Tachometer
2. Turn Signal Indicator Lights
3. High Beam Indicator Light
4. Automatic Transaxle Position Indicator Light
(If Installed)
5. Odometer/Trip Odometer/Trip Computer (If Installed)
6. Overdrive Off Indicator Light (Automatic transaxle only)
7. Speedometer
8. Check Fuel Cap Warning Light
9. Low Tire Pressure Telltale (If Installed)
10. TPMS (Tire Pressure Monitoring System) Malfunction
Indicator (If Installed)
11. Door Ajar Warning Light
12. Charging System Warning Light
13. Parking Brake/Low Brake fluid Level Warning Light
14. SRS (Airbag) Warning Light
15. Seat Belt Warning Light
16. ECO Indicator (If Installed)
17. Fuel Gauge
18. Engine Coolant Temperature Warning Light
19. Low Oil Pressure Warning Light
20. Low Fuel Warning Light
21. Trunk Lid/Tail Gate Open Warning Light
22. Malfunction Indicator Light (MIL)
23. ABS Service Reminder Indicator Light (If Installed)
24. Cruise Control Indicator Lights (If Installed)
Page 73

FEATURES OF YOUR HYUNDAI
1
62
B260B02MC-AAT
Type B
OMC029510N
Page 74

FEATURES OF YOUR HYUNDAI
FEATURES OF YOUR HYUNDAI
1
1
63
63
1. Tachometer
2. Turn Signal Indicator Lights
3. Low Oil Pressure Warning Light
4. Automatic Transaxle Position Indicator Light
(If Installed)
5. Odometer/Trip Odometer
6. SRS (Airbag) Warning Light
7. Malfunction Indicator Light (MIL)
8. Speedometer
9. Check Fuel Cap Warning Light
10. Low Tire Pressure Telltale (If Installed)
11. TPMS (Tire Pressure Monitoring System)
Malfunction Indicator (If Installed)
12. Door Ajar Warning Light
13. Charging System Warning Light
14. Parking Brake/Low Brake fluid Level Warning Light
15. Seat Belt Warning Light
16. High Beam Indicator Light
17. ECO Indicator (If Installed)
18. Fuel Gauge
19. Engine Coolant Temperature Warning Light
20. Overdrive Off Indicator Light (Automatic transaxle only)
21. Low Fuel Warning Light
22. Trunk Lid/Tail Gate Open Warning Light
23. ABS Service Reminder Indicator Light (If Installed)
24. Cruise Control Indicator Lights (If Installed)
Page 75

FEATURES OF YOUR HYUNDAI
1
WARNING AND INDICATOR
64
LIGHTS
B260B01JM-AAT
The SRS warning light comes on for
approximately 6 seconds after the key is
turned to the "ON" position or after the
engine is started, after which it will go out.
This light also comes on when the SRS is
not working properly. If the AIR BAG warning light does not come on, or continuously remains on after operating for about
6 seconds when you turned the ignition
key to the "ON" position or started the
engine, or if it comes on while driving,
have the SRS inspected by an authorized
Hyundai dealer.
SRS (Airbag) Warning Light
B260P02Y-GAT
ABS Service Reminder Indicator (SRI) (If Installed)
When the key is turned to the "ON" position, the Anti-Lock Brake System SRI will
come on and then go off in a few seconds.
If the ABS SRI remains on, comes on
while driving, or does not come on when
the key is turned to the "ON" position, this
indicates that there may be a problem
with the ABS.
If this occurs, have your vehicle checked
by your Hyundai dealer as soon as possible. The normal braking system will still
be operational, but without the assistance of the anti-lock brake system.
!
If both ABS SRI and Parking Brake/Brake
fluid level warning lights remain "ON" or
come on while driving, there may be a
problem with E.B.D. (Electronic Brake
Force Distribution).
If this occurs, avoid sudden stops and
have your vehicle checked by your
Hyundai dealer as soon as possible.
WARNING:
B260C01A-AAT
O/D OFF Indicator
(Automatic Transaxle only)
When the overdrive switch is turned on,
the overdrive off indicator will go out. This
amber indicator will be illuminated when
the overdrive switch is turned off.
B260D01A-AAT
Turn Signal Indicator
Lights
The blinking green arrow on the instrument panel shows the direction indicated
by the turn signals. If the arrow comes on
but does not blink, blinks more rapidly
than normal, or does not blink at all, a
malfunction in the turn signal system is
indicated. Your dealer should be consulted for repairs.
B260F01A-AAT
High Beam Indicator Light
The high beam indicator light comes on
whenever the headlights are switched to
the high beam or flash position.
Page 76

FEATURES OF YOUR HYUNDAI
FEATURES OF YOUR HYUNDAI
1
1
65
65
D150312AUN
Automatic Transaxle Position
Indicator Light (If Installed)
The indicator displays which automatic
transaxle shift position is selected.
Manual Transaxle Shift Indicator (If Installed)
This indicator informs you which gear is
desired while driving to save fuel.
For example:
: Indicates that shifting up to the 3rd
gear is desired (currently the shift
lever is in the 2nd gear).
: Indicates that shifting down to the
3rd gear is desired (currently the
shift lever is in the 4th gear).
NOTE :
When the system is not working properly, up & down arrow indicator will blink
(Gear is not displayed.).
B260G01A-AAT
Low Oil Pressure Warning
Light
!
If the oil pressure warning light stays on
while the engine is running, serious engine damage may result. The oil pressure warning light comes on whenever
there is insufficient oil pressure. In normal operation, it should come on when
the ignition switch is turned on, then go
out when the engine is started. If the oil
pressure warning light stays on while
the engine is running, there is a serious
malfunction.
If this happens, stop the car as soon as
it is safe to do so, turn off the engine and
check the oil level. If the oil level is low,
fill the engine oil to the proper level and
start the engine again. If the light stays
on with the engine running, turn the engine off immediately. In any instance
where the oil light stays on when the
engine is running, the engine should be
checked by a Hyundai dealer before the
car is driven again.
CAUTION:
B260H03A-AAT
Parking Brake/
Low Brake Fluid Level
Warning Light
!
If you suspect brake trouble, have your
brakes checked by a Hyundai dealer as
soon as possible. Driving your car with
a problem in either the brake electrical
system or brake hydraulic system is
dangerous, and could result in serious
injury or death.
CAUTION:
Warning Light Operation
The parking brake/brake fluid level warning light should come on when the parking brake is applied and the ignition switch
is turned to "ON" or "START". After the
engine is started, the light should go out
when the parking brake is released.
If the parking brake is not applied, the
warning light should come on when the
ignition switch is turned to "ON" or
"START", then go out when the engine
starts.
Page 77

FEATURES OF YOUR HYUNDAI
1
66
If the light comes on at any other time, you
should slow the vehicle and bring it to a
complete stop in a safe location off the
roadway. The brake fluid level warning
light indicates that the brake fluid level in
the brake master cylinder is low and
brake fluid conforming to DOT 3 or DOT
4 specifications should be added. After
adding fluid, if no other trouble is found,
the car should be immediately and
carefully driven to a Hyundai dealer
for inspection. If further trouble is experienced, the vehicle should not be driven at
all but taken to a dealer by a professional
towing service.
Your vehicle is equipped with a dualdiagonal braking system. This means you
still have braking on two wheels even if
one of the brake circuits is damaged or
malfunctions. With only one of the circuits
working, more than normal pedal travel
and greater pedal pressure are required
to stop the car. Also, the car will not stop
in as short a distance with only a portion
of the brake system working. If the brakes
fail while you are driving, shift to a lower
gear for additional engine braking and
stop the car as soon as it is safe to do so.
B260J01MC-AAT
Charging System Warning
Light
The charging system warning light should
come on when the ignition is turned on,
then go out when the engine is running.
If the light stays on while the engine is
running, there is a malfunction in the
electrical charging system. If the light
comes on while you are driving, have the
system checked by your Hyundai dealer
as soon as possble.
B260L02HP-GAT
Door Ajar Warning Light
and Chime
The door ajar warning light warns you
that a door is not completely closed and
the chime warns you that the key is in the
ignition switch.
NOTE :
The warning chime only sounds whenever the key is in the ignition switch and
the driver's side front door is open simultaneously. The chime sounds until the
key is removed from the ignition switch
or the driver's side front door is closed.
B260K02A-AAT
Trunk Lid/Tail Gate
Open Warning Light
This light remains on unless the trunk lid/
tail gate is completely closed and latched.
B260M01A-AAT
Low Fuel Level Warning Light
The low fuel level warning light comes on
when the fuel tank is approaching empty.
When it comes on, you should add fuel as
soon as possible. Driving with the fuel
level warning light on or with the fuel level
below "E" can cause the engine to misfire
and damage the catalytic converter.
B260O01MC-AAT
Check Fuel Filler Cap Warn-
ing Light
This warning light indicates the fuel filler
cap is not tight securely.
Always make sure that the fuel filler cap
is tight.
Page 78

FEATURES OF YOUR HYUNDAI
FEATURES OF YOUR HYUNDAI
1
1
67
67
B260N01MC-AAT
Malfunction Indicator Light
This light illuminates when there is a
malfunction of an exhaust gas related
component and the system is not functioning properly. This light will also illuminate when the ignition key is turned to the
"ON" position, and will go out in a few
seconds after the engine is started. If it
illuminates while driving, or does not illuminate when the ignition key is turned to the
"ON" position, take your car to your nearest
authorized Hyundai dealer and have the
system checked.
!
Prolonged driving with the Emission
Control System Malfunction Indicator
Light illuminated may cause damage to
the emission control systems which
could effect drivability or fuel economy.
If the Emission Control System Malfunction Indicator Light begins to flash ON
and OFF, potential catalytic converter
damage is possible. This could result in
loss of engine power. Have the Engine
Control System inspected as soon as
possible by an authorized Hyundai
dealer.
CAUTION:
B265E01MC-AAT
Seat Belt Warning Light
and Chime
The driver's seat belt warning light and
chime will activate to the following table
when the ignition switch is in "ON" position.
Conditions Warning Pattern
Seat Belt Vehicle Speed Light-Blink Chime-Sound
Unbuckled
Buckled
→→
Buckled
→ Unbuckled
→→
Above 6mph
(10 km/h)
Unbuckled
↓
Below 3mph
(5 km/h)
*1) Warning pattern repeats 11 times with
an interval of 24 seconds. If the driver's
seat belt is buckled, the light will stop
within 6 seconds and chime will stop
immediately.
*2) The light will stop within 6 seconds
and chime will stop immediately.
6 seconds
6 seconds None
6 seconds
6 seconds *1)
↓
Stop *2)
B290A02MC-AAT
Engine Coolant Temperature
Warning Light
!
WARNING:
Never remove the radiator cap when the
engine is hot. The engine coolant is under pressure and could erupt and cause
severe burns. Wait until the engine is
cool before removing the radiator cap.
This warning light shows the temperature
of the engine coolant when the ignition
switch is ON. The warning light illuminates if the temperature of the engine
coolant is above 253.4±5.4°F (123±3°C).
If the warning light illuminates, pull over
and stop as soon as possible and turn off
the engine. Then open the hood and
check the coolant level (See "If the engine overheats" on the page 3-4.) and the
water pump drive belt. If you suspect
cooling system trouble, have your cooling system checked by a Hyundai dealer
as soon as possible.
NOTE:
If the engine coolant temperature warning light illuminates, it indicates overheating that may damage the engine.
Page 79

FEATURES OF YOUR HYUNDAI
1
68
D150325AMC
Cruise Indicator (If Installed)
CRUISE Indicator
The indicator light illuminates when the
cruise control system is enabled.
The cruise indicator light in the instrument cluster is illuminated when the cruise
control ON/OFF button on the steering
wheel is pushed.
The indicator light turns off when the
cruise control ON/OFF button is pushed
again. For more Information about the
use of cruise control, refer to page 1-103.
Cruise SET Indicator
The indicator light illuminates when the
cruise function switch (-/SET or RES/+) is
ON.
The cruise SET indicator light in the instrument cluster is illuminated when the
cruise control switch (-/SET or RES/+) is
pushed. The cruise SET indicator light
does not illuminate when the cruise control switch (CANCEL) is pushed or the
system is disengaged.
B260W02JM-AAT
Low Tire Pressure Telltale
(If Installed)
The low tire pressure telltale comes on for
3 seconds after the ignition key is turned
to the "ON" position.
If the warning light does not come on, or
continuously remains on after comming
on for about 3 seconds when you turned
the ignition key to the "ON" position, the
Tire Pressure Monitoring System is not
working properly. If this occurs, have your
vehicle checked by an authorized
Hyundai dealer as soon as possible.
This warning light will also illuminate one
or more of your tires is significantly underinflated. You should stop and check your
tires as soon as possible. If the warning
light illuminates while driving, reduce vehicle speed immediately and stop the
vehicle.
Avoid hard braking and overcorrecting at
the steering wheel. Inflate the tires to the
proper pressure as indicated on the
vehicle’s tire information placard.
!
Significantly low tire pressure makes
the vehicle unstable and can contribute
to loss of vehicle control and increased
braking distances.
Continued driving on low pressure tires
will cause the tires to overheat and fail.
WARNING:
Page 80

FEATURES OF YOUR HYUNDAI
FEATURES OF YOUR HYUNDAI
1
1
69
69
B265W01MC-AAT
TPMS (Tire Pressure Monitoring System) Malfunction
Indicator (If Installed)
TPMS malfunction indicator comes on for
3 seconds after the ignition key is turned
to the "ON" position. If the warning light
does not come on, or continuously remains on after comming on for about 3
seconds when you turned the ignition key
to the "ON" position, the Tire Pressure
Monitoring System is not working porperly.
If this occurs, have your vehicle checked
by an authorized Hyundai dealer as soon
as possible.
The warning light also comes on and
stays on when there is a problem with the
Tire Pressure Monitoring System.
If this happens, the system may not monitor the tire pressure. Have the system
checked by an authorized Hyundai dealer
as soon as possible.
!
o The TPMS cannot alert you to severe
o If you feel any vehicle instability, im-
WARNING:
and sudden tire damage caused by
external factors.
mediately take your foot off the accelerator, apply the brakes gradually and with light force, and slowly
move to a safe position off the road.
D150340AMC-EU
ECO
The ECO indicator is displayed to help
you improve fuel efficiency when you are
driving.
o The ECO indicator (green) will turn on
o The indicator will turn off when the
o The fuel efficiency depends on the
o The ECO indicator does not function in
Don't keep watching the indicator while
driving. It will distract you and cause an
accident that results in severe personal
injury.
ECO Indicator (If Installed)
when you drive fuel efficiently in the
ECO ON mode. If you don't want the
indicator displayed, you can turn the
ECO ON mode to OFF mode by pressing the TRIP button.
system is not working properly in the
ECO ON mode.
driver's driving habit and road condition.
P (Park), N (Neutral), and R (Reverse).
!
WARNING:
B270A01A-AAT
BRAKE PAD WEAR WARNING
SOUND
The front disc brake pads have wear
indicators that should make a high-pitched
squealing or scraping noise when new
pads are needed. The sound may come
and go or be heard all the time when the
vehicle is moving. It may also be heard
when the brake pedal is pushed down
firmly. Expensive rotor damage will result
if the worn pads are not replaced. See
your Hyundai dealer immediately.
Page 81

FEATURES OF YOUR HYUNDAI
1
INSTRUMENT CLUSTER
70
B280A02TG-AAT
FUEL GAUGE
Type A Type B
OMC029420K
The needle on the gauge indicates the
approximate fuel level in the fuel tank.
The fuel capacity is given in Section 9.
NOTE:
The " " symbol means the fuel filler
lid is placed on the left side of the vehicle.
!
Avoid driving with a very low fuel level. If
you run out of fuel, it could cause the
engine to misfire and result in excessive
loading of the catalytic converter.
CAUTION:
B330A03A-AAT
TACHOMETER
OMC029512N
The tachometer registers the speed of
your engine in revolutions per minute
(rpm).
!
The engine should not be increased to
such a speed that the needle enters the
red zone on the tachometer face. This
can cause severe engine damage and
may void your warranty.
CAUTION:
B300A01A-AAT
SPEEDOMETER
OMC029513N
Your Hyundai's speedometer is calibrated
in miles per hour (on the outer scale) and
kilometers per hour (on the inner scale).
Page 82

FEATURES OF YOUR HYUNDAI
FEATURES OF YOUR HYUNDAI
1
1
71
71
B310B01O-AAT
ODOMETER/TRIP ODOMETER
(Without Trip Computer)
Type A
Type B
B310B01MC-A
1. Odometer
The odometer records the total driving
distance in miles, and is useful for keeping a record for maintenance intervals.
NOTE:
Federal law forbids alteration of the odometer of any vehicle with the intent to
change the number of the odometer. The
alteration may void your warranty coverage.
2. Trip Odometer
OMC029054
Pushing in the trip switch for less than 1
second when the ignition switch is turned
"ON" displays the following sequence:
Type A
B310B02MC-A
Type B
B310B03MC-A
Trip odometer records the distance of 2
trips in miles.
Page 83

FEATURES OF YOUR HYUNDAI
1
72
o TRIP A: Distance you have traveled
from your origination point to
a first destination.
o TRIP B: Distance from the first desti-
nation to the final destination.
When the trip switch is pressed for more
than 1 second, trip odometer will reset to
0.
o ECO ON/OFF Mode (If Installed)
Type A
OMC029514
Type B
OMC029515
You can turn the ECO indicator on/off on
the instrument cluster in this mode.
If you push the TRIP button more than 1
second in the ECO ON mode, ECO OFF
is displayed and the ECO indicator ( )
ECO
turns off.
If you want to display the ECO indicator
ECO
( ) again, press the TRIP button more
than 1 second in the ECO OFF mode and
then ECO ON mode is displayed.
For more detailed explanations, refer to
"Warnings and indicator lights" in section
1.
B310C01O-AAT
ODOMETER/TRIP ODOMETER
(With Trip Computer)
Trip Odometer
Odometer
B400B03MC-E
1. Odometer
The odometer records the total driving
distance in miles, and is useful for keeping a record for maintenance intervals.
NOTE:
Federal law forbids alteration of the odometer of any vehicle with the intent to
change the number of the odometer. The
alteration may void your warranty coverage.
Page 84

TRIP COMPUTER
FEATURES OF YOUR HYUNDAI
FEATURES OF YOUR HYUNDAI
1
1
73
73
2. Trip Odometer
o This mode indicates the drive distance
travelled since the last drive time reset.
o Refer to the explanation of the trip
computer (see page 1-74, Tripmeter).
B400B01MC-AAT
(If Installed)
B400B01MC-A
The trip computer is a microcomputercontrolled driver information gauge that
displays information related to driving
such as outside temperature, tripmeter,
average fuel consumption and distance
to empty on the LCD.
TRIP Switch
OMC029054
Pushing in the TRIP switch for less than
1 second when the ignition switch is in
"ON" position changes the display as
follows;
Outside temperature
Tripmeter
Average fuel consumption
Distance to empty
ECO ON/OFF mode (if installed)
Page 85

FEATURES OF YOUR HYUNDAI
1
74
1. Outside Temperature (°F)
Outside Temperature
Odometer
B400B02MC-A
This mode indicates the outside temperature between -40°F (-40°C) and
176°F (80°C) .
2. Tripmeter (miles)
Tripmeter
Odometer
B400B03MC-E
o This mode indicates the total distance
travelled since the last tripmeter reset.
Total distance is also reset to zero if
the battery is disconnected.
o Pressing the TRIP switch for more than
1 second when the tripmeter is being
displayed clears the tripmeter to zero.
o The meter's working range is from 0 to
999.9 miles (999.9 kms).
3. Average Fuel Consumption
(MPG)
Average Fuel Consumption
Odometer
B400B04MC-A
o This mode calculates the average fuel
consumption from the total fuel used
and the distance since the last average consumption reset.
o The total fuel used is calculated from
the fuel consumption input.
o Average fuel consumption is reset to
zero (--) if the battery is disconnected.
o To reset the average fuel consumption
to zero (--), press the TRIP switch for
more than 1 second.
o When you drive 0.5 mile (0.5 km) and
less after resetting, the average fuel
consumption will be displayed to '--'.
Page 86

FEATURES OF YOUR HYUNDAI
FEATURES OF YOUR HYUNDAI
1
1
75
75
4. Distance to Empty
(miles)
Distance to empty
Odometer
OMC049500
o This mode indicates the estimated dis-
tance to empty from the current fuel
level in the fuel tank.
o The trip computer may not register
additional fuel if less than 1.36 gallons
(6 liters) of fuel are added to the vehicle.
B400B06MC-A
o When the distance to empty is less
than 30 miles (50 km), the distance to
empty digits (----) will blink until more
fuel is added.
NOTE:
o The distance to empty can differ from
the actual tripmeter according to
driving conditions.
o The distance to empty can vary ac-
cording to the driving conditions, driving pattern or vehicle speed.
5. ECO ON/OFF Mode (If Installed)
OMC029514
You can turn the ECO indicator on/off on
the instrument cluster in this mode.
If you push the TRIP button more than 1
second in the ECO ON mode, ECO OFF
is displayed and the ECO indicator ( )
turns off.
If you want to display the ECO indicator
( ) again, press the TRIP button more
ECO
than 1 second in the ECO OFF mode and
then ECO ON mode is displayed.
For more detailed explanations, refer to
"Warnings and indicator lights" in section
1.
ECO
Page 87

FEATURES OF YOUR HYUNDAI
1
MULTI-FUNCTION LIGHT
76
SWITCH
B340A01A-AAT
COMBINATION TURN SIGNAL,
HEADLIGHT AND LOW-BEAM
SWITCH
Turn Signal Operation
Pulling down on the lever causes the turn
signals on the left side of the car to blink.
Pushing upward on the lever causes the
turn signals on the right side of the car to
blink. As the turn is completed, the lever
will automatically return to the center
position and turn off the turn signals at the
same time. If either turn signal indicator
light blinks more rapidly than usual, goes
on but does not blink, or does not go on
at all, there is a malfunction in the system.
Check for a burned-out fuse or bulb or
see your Hyundai dealer.
B340B01A-AAT
Lane Change Signal
OMC049600
To indicate a lane change, move the
lever up or down to a point where it
begins flashing.
The lever will automatically return to the
center position when released.
B340C05A-AAT
Headlight Switch
OMC049601
To operate the headlights, turn the barrel on
the end of the multi-function switch. The first
position turns on the parking lights, sidelights, tail lights and instrument panel lights.
The second position turns on the headlights.
NOTE:
The ignition must be in the "ON" position
to turn on the headlights.
Page 88

FEATURES OF YOUR HYUNDAI
FEATURES OF YOUR HYUNDAI
1
1
77
77
Battery saver function
o The purpose of this feature is to pre-
vent the battery from being discharged.
The system automatically turns off the
headlights and parking lights when
the driver removes the ignition key and
opens the driver-side door (in that order).
o With this feature, the parking lights will
be turned off automatically if the driver
parks on the side of road at night.
If necessary, to keep the lights on
when the ignition key is removed, perform the following :
1) Open the driver-side door.
2) Turn the parking lights OFF and
ON again using the light switch on
the steering column.
!
If the driver gets out of the vehicle through
other doors (except driver’s door), the
battery saver function does not operate.
Therefore, it causes the battery to be
discharged. In this case, make sure to
turn off the lamp before getting out of the
vehicle.
CAUTION:
B340D01A-AAT
High-Beam Switch
OSA049093
To turn on the headlight high beams,
push the lever forward (away from you).
The High Beam Indicator Light will come
on at the same time. For low beams, pull
the lever back toward you.
B340E01A-AAT
Headlight Flasher
OSA049094
To flash the headlights, pull the switch
lever toward you, then release it. The
headlights can be flashed even though
the headlight switch is in the "OFF" position.
Page 89

FEATURES OF YOUR HYUNDAI
1
WINDSHIELD WIPER/WASHER SWITCH
78
Windshield wiper/washer
Rear window wiper/washer
(If Installed)
OMC048901N
OSA049904
A : Wiper speed control
· MIST – Single wipe
· OFF – Off
· INT – Intermittent wipe
· LO – Low wiper speed
· HI – High wiper speed
B : Intermittent wipe time adjustment
C : Wash with brief wipes
D : Rear wiper/washer control
·
– Wash with brief wipes
· ON – Continuous wipe
· OFF – Off
B350A01MC-AAT
Windshield Wiper
(A)
(B)
(C)
OMC048902N
The windshield wiper switch has three
positions:
A) Intermittent wiper operation
B) Low-speed operation
C) High-speed operation
NOTE:
To prevent damage to the wiper system,
do not attempt to wipe away heavy accumulations of snow or ice. Accumulated
snow and ice should be removed manually. If there is only a light layer of snow
or ice, operate the heater in the defrost
mode to melt the snow or ice before
using the wiper.
Page 90

FEATURES OF YOUR HYUNDAI
FEATURES OF YOUR HYUNDAI
1
1
79
79
B350B01A-AAT
Windshield Washer Operation
OMC048903N
To use the windshield washer, pull the
wiper/washer lever toward the steering
wheel.
When the washer lever is operated, the
wipers automatically make three passes
across the windshield. The washer continues to operate until the lever is released.
NOTE:
o Do not operate the washer more than
15 seconds at a time or when the
fluid reservoir is empty.
o In icy or freezing weather, be sure
the wiper blades are not frozen to the
glass prior to operating the wipers.
o In areas where water freezes in win-
ter, use windshield washer antifreeze.
Mist Wiper Operation
OMC048904N
If a single wipe is desired in mist, move
the windshield wiper and washer control
lever up.
Page 91

FEATURES OF YOUR HYUNDAI
1
80
B350C01MC-GAT
Adjustable Intermittent Wiper Operation
To use the intermittent wiper feature, place
the wiper switch in the "INT" position. With
the switch in this position, the interval
between wipes can be varied from approximately 1 to 15 seconds by turning
the interval adjuster barrel (1).
OMC048905N
B390A01MC-AAT
Rear Window Wiper and Washer
(If Installed)
OSA049905
1. : The washer fluid will be sprayed
onto the rear window and the wiper
operates while the rear window
wiper barrel is placed in this position.
2.ON : The rear window wiper starts to
operate continuously.
3.OFF
INSTRUMENT PANEL LIGHT
CONTROL (RHEOSTAT)
B410A01A-AAT
B410A01MC
The instrument panel lights can be made
brighter or dimmer by turning the instrument panel light control knob.
Page 92

HAZARD WARNING SYSTEM
B370A01A-AAT
OMC025067
The hazard warning system should be
used whenever you find it necessary to
stop the car in a hazardous location.
When you must make such an emergency stop, always pull off the road as far
as possible.
The hazard warning lights are turned on
by pushing in the hazard switch. This
causes all turn signal lights to blink. The
hazard warning lights will operate even
though the key is not in the ignition.
To turn the hazard warning lights off,
push the switch a second time.
REAR WINDOW DEFROSTER
SWITCH
B380A01MC-AAT
OMC025072
The rear window defroster is turned on by
pushing in the switch. To turn the defroster off, push the switch a second time.
The rear window defroster automatically
turns itself off after about 20 minutes. To
restart the defroster cycle, push in the
switch again after it has turned itself off.
FEATURES OF YOUR HYUNDAI
FEATURES OF YOUR HYUNDAI
!
Do not clean the inner side of the rear
window glass with an abrasive type of
glass cleaner or use a scraper to remove foreign deposits from the inner
surface of the glass as this may cause
damage to the defroster elements.
CAUTION:
NOTE:
The engine must be running for the rear
window defroster to operate.
1
1
81
81
Page 93

FEATURES OF YOUR HYUNDAI
1
FRONT FOG LIGHT SWITCH
82
CIGARETTE LIGHTERDIGITAL CLOCK
B360A04A-AAT
(If Installed)
OMC025062
To turn on the front fog lights, push the
switch. They will light when the headlight
switch is in the second position and the
key is in the "ON" position.
NOTE:
If you turn on the headlight high beams,
the front fog lights will be turned off.
B400A01A-AAT
OMC029098N
There are three control buttons for the
digital clock. Their functions are:
HOUR - Push "H" to advance the hour
indicated.
MIN - Push "M" to advance the minute
indicated.
RESET - Push "R" to reset minutes to
":00" to facilitate resetting the clock to
the correct time. When this is done:
Pressing "R" between 10 : 30 and 11 : 29
changes the readout to 11 : 00. Pressing
"R" between 11 : 30 and 12 : 29 changes
the readout to 12 : 00.
B420A01A-AAT
HHR2098A
For the cigarette lighter to work, the key
must be in the "ACC" position or the "ON"
position.
To use the cigarette lighter, push it all the
way into its socket. When the element has
heated, the lighter will pop out to the
"ready" position.
Do not hold the cigarette lighter pressed
in. This can damage the heating element
and create a fire hazard.
If it is necessary to replace the cigarette
lighter, use only a genuine Hyundai replacement or its approved equivalent.
Page 94

POWER OUTLET
ASHTRAY
FEATURES OF YOUR HYUNDAI
FEATURES OF YOUR HYUNDAI
1
1
83
83
B500D01MC-GAT
OMC029106
These supply 12V electric power to operate electric accessories or equipment.
!
CAUTION:
o Only use the power outlet when the
engine is running. Unplug the plug
from the power outlet when the engine is off if the key will be left in the
"ACC" or "ON" (not recommended)
positions, to prevent discharging the
battery. Using when the engine stops
or leaving the electric appliance
plugged in for many hours may cause
the battery to discharge.
o Do not use the power outlet to con-
nect electric accessories or equipment other than those designed to
operate on 12 volts.
o Some electronic devices can cause
electronic interference when plugged
into the power outlet. These devices
may cause excessive audio noise
and malfunctions in other electronic
systems or devices used in your
vehicle.
B430A01MC-GAT
OMC025103
To use the ashtray, open the cover. To
remove the ashtray to empty or clean it,
pull it all the way out.
Page 95

FEATURES OF YOUR HYUNDAI
1
DRINK HOLDER
84
SUNROOF
B450A02O-AAT
FRONT DRINK HOLDER
OMC025108
The drink holder is located on the main
console for holding cups or cans.
!
o Use caution when using the drink
o Do not place objects other than cups
WARNING:
holders. A spilled beverage that is
very hot can injure you or your passengers. Spilled liquids can damage
interior trim and electrical components.
or cans in the drink holder. Objects
can be thrown out in the event of a
sudden stop or an accident, possibly
injuring the passengers in the vehicle.
B450B01MC-GAT
REAR DRINK HOLDER (If Installed)
OMC025034
The rear drink holder is located in the rear
seat armrest for holding cups or cans.
The rear drink holder can be used by
pulling the rear seat armrest.
!
Use caution when using the drink holders. A spilled beverage that is very hot
can injure your passengers. Spilled liquids can damage interior trim.
WARNING:
B460A02Y-AAT
(If Installed)
Sun Shade
1JBA3110
Your HYUNDAI is equipped with a sliding
sunshade which you can manually adjust
to let in light with the sunroof closed, or to
block sunlight.
!
Never adjust the sunshade while driving. This could result in loss of control
and an accident that may cause death,
serious injury, or property damage.
WARNING:
Page 96

FEATURES OF YOUR HYUNDAI
FEATURES OF YOUR HYUNDAI
1
1
85
85
B460B01MC-GAT
Opening the Sunroof System
OMC025021
If your vehicle is equipped with this feature, you can slide or tilt your sunroof with
the sunroof control buttons located on the
overhead console.
The sunroof can only be opened, closed,
or tilted when the ignition switch is in the
"ON" position.
Auto slide open
To use the auto slide feature, press the
SLIDE OPEN button on the overhead
console for more than 1 second. The
sunroof will slide all the way open. To
stop the sunroof sliding at any point, press
any sunroof control button.
Manual slide open
Press the SLIDE OPEN button on the
overhead console for less than 0.5 second.
Manual slide close
To close the sunroof, press the TILT UP
button on the overhead console and hold
it until the sunroof is closed.
!
Be careful that someone’s head, hands
and body are not trapped by a closing
sunroof.
WARNING:
B460C01TG-AAT
Tilting the Sunroof System
OMC025021
Auto tilt up
To use the auto tilt feature, press the TILT
UP button on the overhead console for
more than 1 second. The sunroof will tilt
all the way open. To stop the sunroof
tilting at any point, press any sunroof
control button.
Manual tilt up
Press the TILT UP button on the overhead console for less than 0.5 second.
Page 97

FEATURES OF YOUR HYUNDAI
1
86
Manual tilt down
To close the sunroof, press the SLIDE
OPEN button on the overhead console
and hold it until the sunroof is closed.
NOTE:
After washing the car or after there is
rain, be sure to wipe off any water that is
on the sunroof before operating it.
!
o Do not close a sunroof if anyone's
o Do not place your head or arms out
o While the vehicle is moving, always
WARNING:
hands, arms or body are between
the sliding glass and the sunroof
sash, as this could result in injury.
of the sunroof opening at any time.
keep the head, hands and other parts
of the body of all occupants away
from the roof opening. Otherwise,
you could be seriously injured if the
vehicle stops suddenly or if the vehicle is involved in an accident.
!
o Do not open the sunroof in severely
o Periodically remove any dirt that may
o Do not press any sunroof control
CAUTION:
cold temperature or when it is covered with ice or snow.
have accumulated on the guide rails.
button longer than necessary.
Damage to the motor or system components could occur.
B460E02TG-GAT
Resetting the sunroof
Whenever the vehicle battery is disconnected or discharged, you have to reset
your sunroof system as follows:
1. Turn the ignition key to the "ON" position.
2. Press the TILT UP button for more than
1 second to tilt up the sunroof completely when the sunroof is fully closed.
Then, release the button.
3. Press and hold the TILT UP button
once again until the sunroof has returned to the original position of TILT
UP after it is raised a little higher than
the maximum TILT UP position. Then,
release the button.
4. Press and hold the TILT UP button
within 5 seconds until the sunroof is
operated as follows;
TILT DOWN → SLIDE OPEN → SLIDE
CLOSE
Then, release the button.
!
If the sunroof is not reset, it may not
operate properly.
CAUTION:
Page 98

INTERIOR LIGHT
FEATURES OF YOUR HYUNDAI
FEATURES OF YOUR HYUNDAI
1
1
87
87
B480A02MC-GAT
Map Light (If Installed)
Type A
OMC020068
o
Push in the map light switch to turn the
light on or off.
Type B
OMC020068K
o
Push in the map light switch to turn the
light on or off.
o "DOOR"
In the "DOOR" position, the map light
comes on when any door is opened regardless of the ignition key position and
the light goes out after approximately 20
minutes even though the door is open.
The light goes out gradually after 30 seconds if the door is closed. However if the
ignition switch is ON or all doors are
locked, map light will turn off even within
30 seconds.
B490A02MC-AAT
Interior Light
B490A03MC
The interior courtesy light switch has three
positions. The three positions are:
o "DOOR"
In the "DOOR" position, the interior courtesy light comes on when any door is
opened regardless of the ignition key
position and the light goes out after approximately 20 minutes even though the
door is open. The light goes out gradually
after 30 seconds if the door is closed.
However if the ignition switch is ON or all
doors are locked, interior light will turn off
even within 30 seconds.
Page 99

FEATURES OF YOUR HYUNDAI
1
88
SUNGLASS HOLDER
GLOVE BOX
o"ON"
In the "ON" position, the light stays on at
all times.
!
Do not leave the switch in this position
for an extended period of time when the
vehicle is not running.
CAUTION:
o "OFF"
In the "OFF" position, the light stays off at
all times even though a door is open.
B491A03O-AAT
(If Installed)
B491A03MC
The sunglass holder is located on the
front overhead console. Push the end of
the cover to open the sunglass holder.
!
o Do not keep objects except sunglass
o Do not open the sunglass holder while
WARNING:
inside the sunglass holder. Such objects can be thrown from the holder
in the event of a sudden stop or an
accident, possibly injuring the passengers in the vehicle.
the vehicle is moving. The rear view
mirror of the vehicle can be blocked
by an open sunglass holder.
B500A01A-AAT
B500A01MC
!
To avoid the possibility of injury in case
of an accident or a sudden stop, the
glove box door should be kept closed
when the car is in motion.
o To open the glove box, pull on the
WARNING:
glove box release lever.
Page 100

MULTI BOX
B500B01MC-GAT
OMC025105
The multi box is opened by pushing the
knob downward.
OUTSIDE REARVIEW MIRROR
B510A01A-AAT
Manual Type
OMC025049
The outside rearview mirrors are
equipped with a remote control for your
convenience. It is operated by the control
lever in the bottom front corner of the
window.
Before driving away, always check that
your mirrors are positioned so you can
see behind you, both to the left and right
sides, as well as directly behind your
vehicle. When using the mirror, always
exercise caution when attempting to judge
the distance of vehicles behind or along
side of you.
FEATURES OF YOUR HYUNDAI
FEATURES OF YOUR HYUNDAI
!
If the mirror control is jammed with ice,
do not attempt to break it free using the
control handle or by manipulating the
face of the mirror. Use an approved
spray de-icer (not radiator antifreeze) to
release the frozen mechanism or move
the vehicle to a warm place and allow the
ice to melt.
CAUTION:
1
1
89
89
 Loading...