


DA2
(영어 | 일반) 디오디오2
Car Multimedia System | User's Manual
Kona
J9MS2-DA000


[ The functions and services described in this guide are subject to change without prior notice for performance improvement. If the
system software is updated, the screenshots in this guide may appear different than the actual images on the system.
[ The functions and services described in this guide may differ from those provided in your vehicle. For precise information related to
your vehicle, refer to the owner's manual or catalog of your vehicle.
[ The design and specification of the system may change without prior notice for performance improvement.
[ This multimedia system contains open source software, including without limitation, software distributed and/or modified under the
GNU General Public license, Version 2, June 1991, and the GNU lesser General Public License, Version 2.1, February 1999.
For additional information and to obtain related materials including without limitation, the previous referred to licenses and software,
please contact us at MOBIS_OSSrequest@mobis.co.kr
1

Available information for users
Car Multimedia System
User's Manual
Quick Guide This guide is the help built into the system. You can access basic information on
This guide introduces your system's functions and explains how to use them. To
use your system correctly and safely, read this guide before using the system.
how to control the system and a brief description of major functions directly on
the system screen.
• How to access the guide: On the Home screen, touch All Menus > Quick
Guide.
For safety, this quick guide will not be displayed while the vehicle is moving.
Park your vehicle in a safe location before accessing the quick guide.
2
Symbols used in this guide
Indicates important information related to user safety. Failure to follow warnings may
Warning
Caution
Note
result in death or serious personal injury.
Indicates important information related to user safety. Failure to follow cautions may result
in personal injury, or damage or malfunction your vehicle.
Indicates helpful information for convenient use.
*if equipped
Indicates descriptions for optional features.
This guide covers all specifications, including all trim models and optional specifications. It
may include descriptions for features that are not equipped in your vehicle.
3

Safety warnings
For safety, follow the instructions below. Failure to do so may
increase the risk of a traffic accident, which may result in death
or personal injury.
Ü About driving
Do not operate the system while driving.
• Driving while distracted may result in a loss of vehicle control, potentially
leading to an accident, severe personal injury, or death. The driver’s
primary responsibility is the safe and legal operation of a vehicle, and any
handheld devices, equipment, or vehicle systems which divert the driver’s
attention from this responsibility should never be used during operation
of the vehicle.
Avoid watching the screen while driving.
• Driving while distracted may lead to a traffic accident.
• Stop your vehicle in a safe location before using functions that require
multiple operations.
Stop your vehicle first before using your mobile phone.
• Using a mobile phone while driving may lead to a traffic accident.
• If necessary, use the Bluetooth Handsfree feature to make calls and keep
the call as short as possible.
Keep the volume low enough to hear external sounds.
• Driving without the ability to hear external sounds may lead to a traffic
accident.
• Listening to a loud volume for a long time may cause hearing damage.
Ü About handling the system
Do not disassemble or modify the system.
• Doing so may result in an accident, fire, or electric shock.
Do not allow liquids or foreign substances to enter the
system.
• Liquids or foreign substances may cause noxious fumes, a fire, or a
system malfunction.
Stop using the system if it malfunctions, such as no audio
output or display.
• If you continue using the system when it is malfunctioning, it may lead to
a fire, electric shock, or system failure.
Û Note
If you experience any problems with the system, contact your
place of purchase or dealer.
4

Safety cautions
For safety, follow the instructions below. Failure to do so may
result in personal injury or damage to the system.
Ý About operating the system
Use the system with the engine running.
• Using the system for a long time when the engine is stopped may
discharge the battery.
Do not install unapproved products.
• Using unapproved products may cause an error while using the system.
• System errors caused by installing unapproved products are not covered
under the warranty.
Ý About handling the system
Do not apply excessive force to the system.
• Excessive pressure on the screen may damage the LCD panel or the
touch panel.
When cleaning the screen or button panel, make sure to
stop the engine and use a soft, dry cloth.
• Wiping the screen or buttons with a rough cloth or using solvents
(alcohol, benzene, paint thinner, etc.) may scratch or chemically damage
the surface.
If you attach a liquid-type air freshener to the fan louver,
the surface of the louver may become deformed due to the
flowing air.
Û Note
If you experience any problems with the system, contact your
place of purchase or dealer.
5

Contents
1
Component names and functions 1-2
Turning the system on or off 1-5
Controlling the touch screen 1-7
Getting to know the Home screen 1-8
Getting to know the rear view screen 1-9
2
Setting up My Menu 2-2
Using Voice Memo 2-2
Using phone projection 2-3
System overview
Useful features
Editing My Menu 2-2
Connecting your iPhone via Apple CarPlay 2-4
Connecting your Android smartphone via Android Auto 2-6
3
Turning on the radio 3-2
Using the radio 3-3
Using the radio with the RDS (*if equipped) 3-6
4
Using the media player 4-2
Using the USB mode 4-5
Radio
Changing the radio mode 3-3
Scanning for available radio stations 3-4
Searching for radio stations 3-4
Saving radio stations 3-4
Listening to saved radio stations 3-5
Deleting saved radio stations 3-5
Changing the radio mode 3-6
Scanning for available radio stations 3-6
Searching for radio stations 3-6
Saving radio stations 3-7
Listening to saved radio stations 3-7
Media player
Controlling the media player 4-3
Listening to music 4-5
6

Using the iPod mode 4-7
Using the AUX mode 4-10
5
Connecting Bluetooth devices 5-2
Using a Bluetooth audio device 5-6
Using a Bluetooth phone 5-7
Bluetooth
Pairing devices with your system 5-2
Connecting a paired device 5-4
Disconnecting a device 5-5
Deleting paired devices 5-5
Making a call 5-8
Answering calls 5-11
Using options during a call 5-12
Setting up your favorites list 5-14
Setting the system environments 6-5
Setting the display language 6-5
Setting the time and date 6-6
Setting the keyboard 6-6
Setting advanced options 6-7
Viewing system information 6-7
7
Solutions 7-2
Troubleshooting
Sound and display 7-2
USB playback 7-4
iPod/iPhone playback 7-5
AUX mode 7-6
Bluetooth connection 7-7
Phone projection 7-8
System operation 7-9
6
Setting sounds 6-2
Setting the system screen 6-3
Setting the Home screen 6-4
Setting the screen saver 6-4
Setting Bluetooth 6-5
Settings
Setting the system sound 6-2
8
System status icons 8-2
FAQ 8-3
System specifications 8-7
Index 8-12
Appendix
7


System overview
Component names and functions
Turning the system on or off
Controlling the touch screen
Getting to know the Home screen
Getting to know the rear view screen
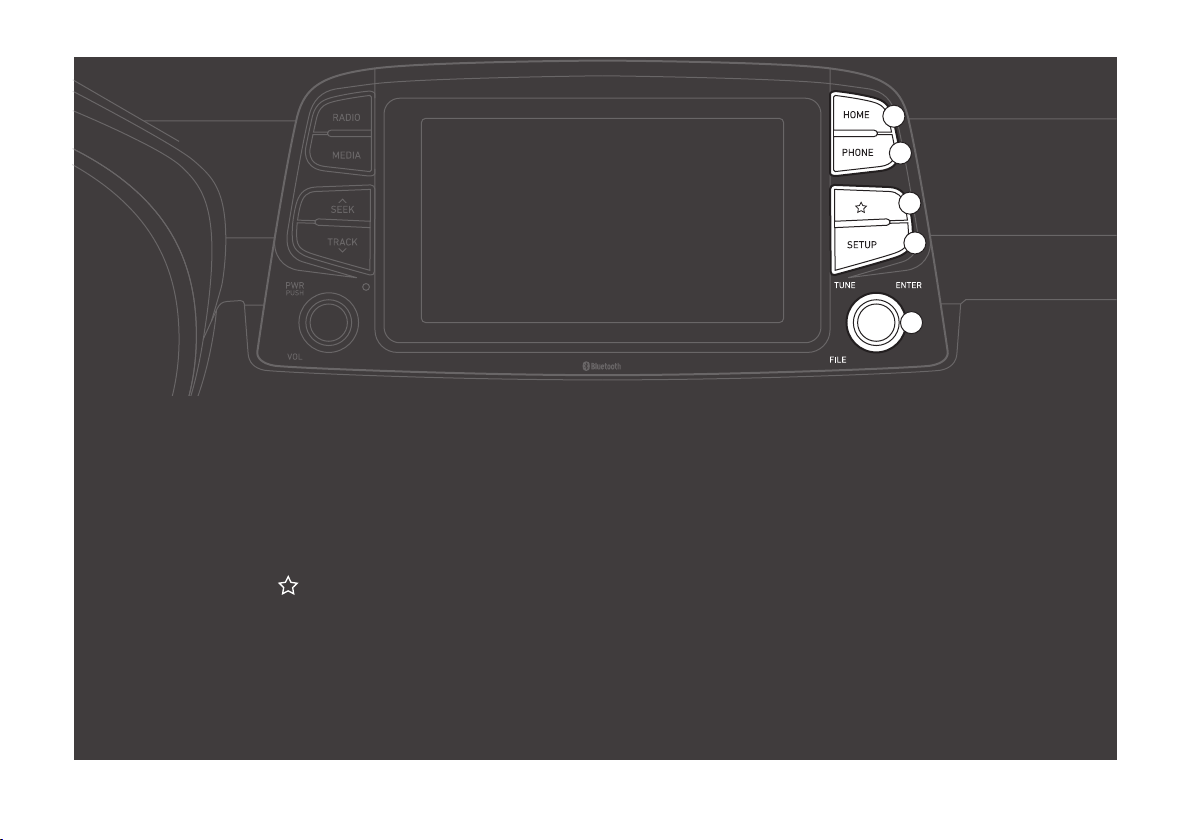
1

Component names and functions
1
2
Control panel
1-2
3
4
5
a RADIO button
• Press to turn on the radio. While listening to the radio, press to
change the radio mode.
b MEDIA button
• Press to play content from a media storage device.
• If you have multiple media storage devices, select one from the
media selection window.
c SEEK/ TRACK button
• While using an AV function, change the station/track/file
(except for the AUX mode).
• While listening to the radio, press and hold to search for a
station.
• While playing media, press and hold to rewind or fast forward
(except for the AUX and Bluetooth audio modes).
Note: Depending on vehicle models and specifications, the illustration above may differ from the product's actual
d Reset button
e PWR button/VOL knob
• Press to turn AV (radio/media) on or off.
• Press and hold to turn off the screen and the sound.
• Turn to the left or right to adjust the system sound volume.
appearance and layout.
6
7
8
9
10
f HOME button
• Press to access the Home screen.
g PHONE button
• Press to start connecting a mobile phone via Bluetooth.
• After a Bluetooth phone connection is made, press to access
your call history.
h Custom button ( )
• Press to use a custom function.
i SETUP button
• Press to access the settings screen.
j TUNE knob/FILE knob/ENTER button
• While listening to the radio, turn to adjust the frequency or
change the station.
• While playing media, turn to search for a track/file.
• During a search, press to select the current track/file.
Note: Depending on vehicle models and specifications, the illustration above may differ from the product's actual
appearance and layout.
1-3

a Voice recognition button ( )
1
1
3
4
5
6
1
2
• Press to start voice recognition of a connected smartphone via phone projection.
• Press and hold to end voice recognition.
b MODE button
• Press to switch between AV (radio/media) modes.
• Press and hold to turn AV (radio/media) on or off.
c Volume lever (VOL +/VOL -)/Mute button ( )
• Push up or down to adjust the volume.
• Press to mute or unmute the system.
• While playing media, press to pause or resume playback (except for the iPod
mode).
d Up/Down lever ( / )
• While using an AV function, change the station/track/file (except for the AUX
mode).
• While listening to the radio, push and hold to search for a station.
Steering wheel remote control
• While playing media, push and hold to rewind or fast forward (except for the AUX
and Bluetooth audio modes).
e Call/Answer button ( )
• Press to start connecting a mobile phone via Bluetooth.
• After a Bluetooth phone connection is made, press to access your call history.
Press and hold to dial the most recent phone number. When a call comes in, press
to answer the call.
• During a call, press to switch between the active call and the held call. Press and
hold to switch the call between the system and the mobile phone.
f Call end button ( )
1-4
Note: Depending on vehicle models and specifications, the illustration above may differ from the product's actual
appearance and layout.

Turning the system on or off
To turn on the system, start the engine.
1
When the safety warning appears, read it and
2
touch Confirm.
• To change the display language, touch Language.
• If you do not want to use the system while driving, you
can turn off the screen and the sound by pressing and
holding the [PWR] button on the control panel. To use
the system again, press the [PWR] button.
The system turns off when you stop the engine (ACC Off).
• When you turn back on the system, the previous mode and
settings will remain intact.
1-5
Ü Warning
• Some functions may be disabled for safety reasons while
the vehicle is moving. They work only when the vehicle
stops. Park your vehicle in a safe location before using any
of them.
• Stop using the system if it malfunctions, such as no audio
output or display. If you continue using the system when
it is malfunctioning, it may lead to a fire, electric shock, or
system failure.
Ý Caution
• You can turn on the system when the key ignition switch is
placed in the "ACC" or "ON" position. Using the system for
an extended period without the engine running drains the
battery. If you plan on using the system for a long time,
start the engine.
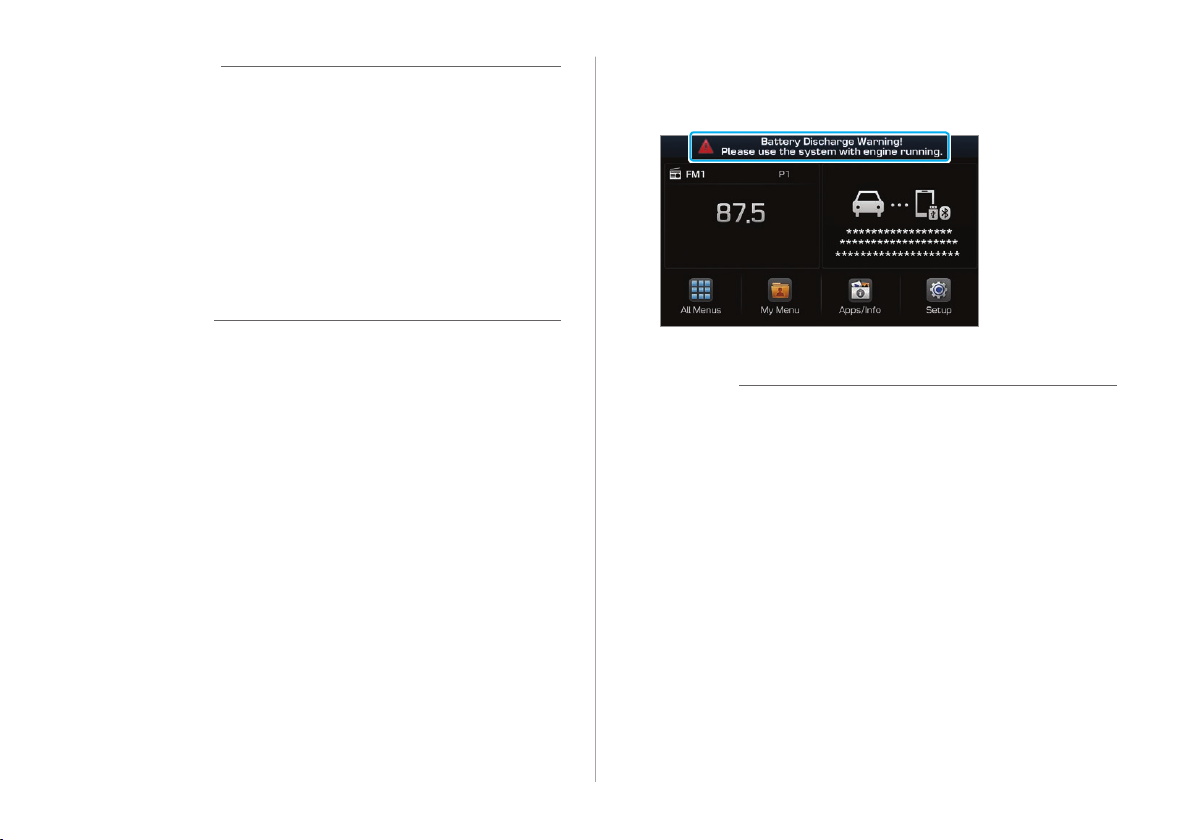
• If you turn on your system without starting the engine, a
battery warning will appear. Once the engine starts, the
battery warning will disappear.
Û Note
To avoid having audio play at an excessive volume when you
start the engine, adjust the volume level before stopping the
engine. You can also set the system to decrease the volume
level automatically. On the Home screen, touch All Menus >
Setup > Sound > Priority and activate the Start-up Volume
Limit option.
1-6

Controlling the touch screen
Your system is equipped with a touch screen. You can perform
various functions via touch inputs.
Ý Caution
• Do not apply excessive pressure to the touch screen or
touch it with a pointed object. Doing so may damage the
touch screen.
• Do not let any electrically conductive material contact the
touch screen. A shock from static electricity may cause the
system or the touch screen to malfunction.
Û Note
If you wear regular gloves, you will not be able to control the
touch screen. Remove your gloves or wear gloves designed for
use with a touch screen.
Touch
Touch an object lightly and lift your finger. You can perform
a function or select an option.
Touch and hold
Touch an object and hold it for at least one second without
lifting your finger. You can rewind or fast forward media by
touching and holding an appropriate button.
1-7

Drag
Touch and hold an object, drag it, and then drop it on a
new location. You can move the selected object to another
location or skip ahead or replay part of a song.
Getting to know the Home
screen
From the Home screen, you can access various functions.
a b
c d
fe g h
1-8
Swipe
Swipe the screen lightly in an appropriate direction. This is
an easy way to scroll through a menu or list quickly.
a Current time and date
b System status icons >See p.8-2 "System status icons."
c AV information. Touch to activate the corresponding AV
mode in full screen.
d Connection information. The connection status and
function icons are displayed.
e Access the All Menus screen.
f Access the My Menu screen. >See p.2-2 "Setting up My
Menu."
g Run applications and view the quick guide.
h Access the settings screen.

Û Note
To move to the Home screen from another screen, touch .
Getting to know the rear view
screen
• Driving direction lines (yellow) ab
These lines show the directions of the vehicle according to
the steering angle.
• Neutral direction lines (blue) c
These lines indicate your vehicle's expected path with
the steering wheel in the neutral position. It can help you
determine whether the vehicle is in the correct position in
a parking space and prevent you from parking too close to
the next vehicle.
When you put the transmission shift lever in the "R" (Reverse)
position while the engine is running, the system screen will
automatically display what is behind you.
The rear view and the parking guides provide a safer
experience when you park your vehicle.
c
b
a
d
• Crash warning lines (red) d
These lines are to prevent a collision.
Ü Warning
When backing up, make sure to follow the guidelines below:
• Before entering your vehicle, always check the area behind
your vehicle.
• Do not solely rely on the rear view camera when backing
up. Always ensure that it is safe to back up by checking
behind you and looking in the rearview mirrors.
• Always back up slowly and stop immediately if you suspect
that a person, especially a child, might be behind you.
1-9

Ý Caution
The distance shown in the rear view screen may differ from the
actual distance. For safety, be sure to visually check the rear,
left, and right sides of your vehicle.
Û Note
• The rear view screen remains active while you are backing
up. When you move the transmission shift lever to any
position other than the "R" (Reverse) position after backing
up, the rear view screen will be deactivated and the system
will display the previous screen automatically.
• As you steer your vehicle, the parking guides change
accordingly to indicate your vehicle's path.
• Depending on vehicle models, the steering-interactive
parking guides may not be supported.
• If an object comes too close to your vehicle as you are
backing up, a warning beep will sound. To prevent an
accident that might result if you do not hear the beep, you
can set the system to decrease the volume level of any
media playing automatically when the vehicle is in reverse.
On the Home screen, touch All Menus > Setup > Sound >
Priority > Back-up Warning Priority.
1-10

Useful features
Setting up My Menu
Using Voice Memo
Using phone projection
2

Setting up My Menu
Add your frequently used functions or favorites to My Menu to
access them quickly from the Home screen. You can add up to
24 items to My Menu.
On the Home screen, touch My Menu > Add to
1
My Menu.
• If you have already added items, on the My Menu
screen, touch Menu > Add.
You can delete the items added to My Menu.
On the Home screen, touch My Menu > Menu
1
> Delete.
Select items to delete and touch Delete > Yes.
2
Using Voice Memo
Select items to add and touch Add > Yes.
2
Editing My Menu
You can rearrange the items added to My Menu.
On the Home screen, touch My Menu > Menu
1
> Rearrange.
Drag an item to a desired location.
2
2-2
You can record voice memos using the microphone installed in
your vehicle and play voice memos on your system.
On the Home screen, touch All Menus > Voice
Memo.
a
b c d

a Display the options list.
• Delete: Delete voice memos.
• Save to USB Device: Save voice memos to a USB storage
device. This option is available only for USB storage
devices formatted in FAT16/32 formats.
• Storage Info: View information on the storage space
used for your voice memos.
b List of your voice memos. Touch a voice memo to play it.
c Record/Pause button
• Touch to start recording.
• Touch to pause recording.
d Stop button
• Touch to stop recording. The recorded memo is
added to the voice memos list on the left of the screen.
• You can also press the [ ] button on the steering
wheel.
Û Note
• Voice memo recording mutes the function in operation or
pauses media playback.
• If you make or answer a call while recording a voice memo,
the recording pauses. If an emergency call is connected,
the recording will stop and the recorded voice memo will be
saved automatically.
Using phone projection
Phone projection enables you to connect your Android
smartphone or iPhone to your system and use their functions
via the system. You can perform and control your smartphone
applications by using the larger screen and enhance your use
of the system.
Ý Caution
• Use only applications that are compatible with phone
projection. Using incompatible applications may cause
problems for your system or smartphone.
• Only compatible applications will be displayed on the
phone projection screen. You can also check compatible
applications by visiting the following websites:
- Apple CarPlay: https://www.apple.com/ios/carplay
- Android Auto: https://www.android.com/auto
2-3
Connecting your iPhone via Apple
CarPlay
Before using Apple CarPlay, be sure to check the following:
Apple CarPlay support on your iPhone
Visit the Apple homepage (https://www.apple.com/ios/
carplay) and check the iPhone models that support Apple
CarPlay.
Apple CarPlay activated or updated on your
iPhone
On your iPhone, ensure that Apple CarPlay is activated.
If your iPhone does not have the function, update the
iPhone's operating system to the latest version.
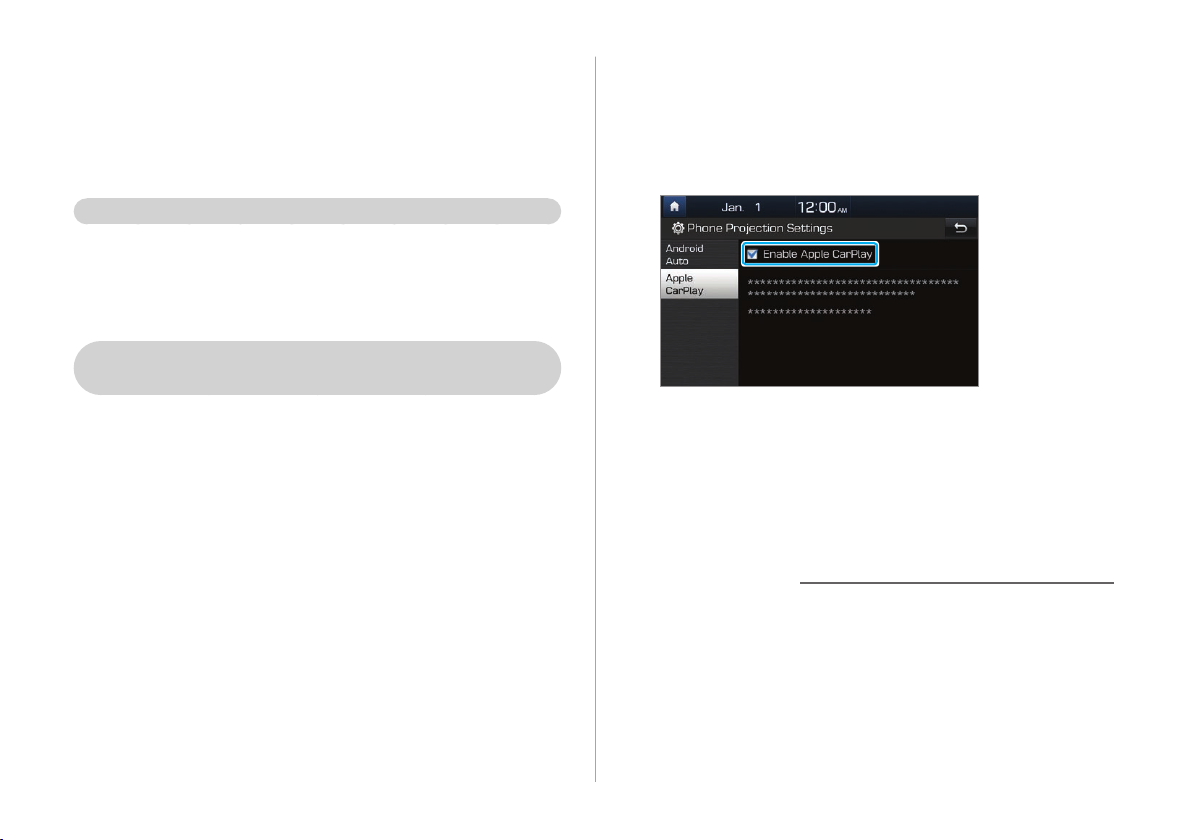
Start Apple CarPlay by following the steps below:
On the Home screen, touch All Menus > Setup
1
> Phone Projection > Apple CarPlay > Enable
Apple CarPlay.
Connect your iPhone to the USB port in your
2
vehicle via the cable supplied with the iPhone.
• If you are connecting the device for phone projection for
the first time, read the message on the notification popup window and touch OK.
Ý Caution
Do not connect and disconnect a USB connector
repeatedly in a short time. Doing so may cause an error in
the device or a system malfunction.
2-4

If your iPhone is locked, unlock it and agree to
3
use phone projection.
• When the iPhone is recognized successfully, Apple
CarPlay appears on the Home screen.
On the Home screen, touch Apple CarPlay.
4
Use your iPhone's functions, such as calling and
5
messaging, on your system.
• Touch an icon on the screen to run an application or
perform a function.
- Touch the Apple home icon ( ) to move to the main
screen of Apple CarPlay.
- Touch the HYUNDAI icon ( ) to move to the Home
screen of your system.
• Press the [ ] button on the steering wheel to start Siri.
• Press the [MODE] button on the steering wheel to select
and start a media player installed on your smartphone,
in addition to the system's AV modes.
• Press the [ ] button on the steering wheel to answer
an incoming call.
To end Apple CarPlay, remove the USB cable
6
from your system.
Û Note
• When a USB cable is connected to your system, you cannot
change the phone projection settings.
• Depending on Apple's policies, applications or functions
that are compatible with Apple CarPlay, such as navigation
apps or media players, may change. To check compatible
applications, visit the Apple homepage (https://www.apple.
com/ios/carplay).
• To use phone projection in optimized environments, update
your smartphone's operating system to the latest version.
2-5

• Depending on the connected device's hardware, firmware,
and operating system versions, the recognition time may
vary.
• Using phone projection may result in mobile
communication charges.
• Depending on the network signal status, some functions
may not work correctly.
• Avoid controlling your smartphone while phone projection
is in use.
• While you are using Apple CarPlay, the following functions
are unavailable:
- Bluetooth
- USB and iPod modes
- Volume control (depending on the connected device)
- Searches using the [TUNE/FILE] knob
- Android Auto
Connecting your Android smartphone
via Android Auto
Before using Android Auto, be sure to check the following:
Android Auto support on your smartphone
Visit the Google homepage (https://www.android.com/
auto) and check the regions, device types, and models that
support Android Auto.
Android Auto installed on your smartphone
Download and install the Android Auto application from
Google Play. If you are in a region where Android Auto is
not supported, you cannot install the application.
2-6

Start Android Auto by following the steps below:
On the Home screen, touch All Menus > Setup
1
> Phone Projection > Android Auto > Enable
Android Auto.
Connect your smartphone to the USB port in
2
your vehicle via the cable supplied with the
smartphone.
• If you are connecting the device for phone projection for
the first time, read the message on the notification popup window and touch OK.
Ý Caution
If your smartphone is locked, unlock it and
3
agree to use phone projection.
• When the smartphone is recognized successfully,
Android Auto appears on the Home screen.
On the Home screen, touch Android Auto.
4
Use your smartphone's functions, such as
5
calling and messaging, on your system.
• Touch an icon on the screen to run an application or
perform a function.
• Press the [ ] button on the steering wheel to start
Google voice recognition.
• Press the [MODE] button on the steering wheel to select
and start a media player installed on your smartphone,
in addition to the system's AV modes.
• Press the [ ] button on the steering wheel to start
using Bluetooth call functions.
To end Android Auto, remove the USB cable
6
from your system.
Do not connect and disconnect a USB connector
repeatedly in a short time. Doing so may cause an error in
the device or a system malfunction.
2-7

Û Note
• When a USB cable is connected to your system, you cannot
change the phone projection settings.
• Depending on Google's policies, the icons on the main
screen of Android Auto may change.
• Depending on Google's policies, applications or functions
that are compatible with Android Auto may change. To
check compatible applications, visit the Android homepage
(https://www.android.com/auto).
• To use phone projection in optimized environments, update
your smartphone's operating system to the latest version.
• Depending on the connected device's hardware, firmware,
and operating system versions, the recognition time may
vary.
• Using phone projection may result in mobile
communication charges.
• Depending on the network signal status, some functions
may not work correctly.
• Avoid controlling your smartphone while phone projection
is in use.
• While you are using Android Auto, the following functions
are unavailable:
- Bluetooth audio
- USB and iPod modes
- Searches using the [TUNE/FILE] knob
- Apple CarPlay
2-8

Radio
Turning on the radio
Using the radio
Using the radio with the RDS (*if equipped)
3

Turning on the radio
On the Home screen, touch All Menus > Radio.
Depending on the system's specifications, one of the following
types of radio is available.
c Move to the previous screen.
d Radio station information
e Preset list
f Preview each radio station for five seconds and select
the station you want.
g Save radio stations to the preset list.
3-2
Radio
a b c
d
e f g
a Select a radio mode.
b Display the options list.
• Auto-sort Presets: Sort the preset list in frequency
order.
• Delete Presets: Delete saved radio stations from the
preset list.
• Sound Settings: Customize the system sound
settings.
>See p.6-2 "Setting the system sound."
Radio with the radio data system (RDS)
a b c
d
e f g
a Select a radio mode.
b Display the options list.
• Sound Settings: Customize the system sound
settings.
c Move to the previous screen.
d Radio station information
>See p.6-2 "Setting the system sound."
 Loading...