

Page 1

Oper ator’s manual
Manuel d’utilisation Manual de instrucciones
T540 XP
Please r ead the operator’ s man ual car efull y and mak e sur e y ou understand the instructions bef or e using the machine .
Lir e attentiv ement et bien assimiler le man uel d’utilisation a vant d’utiliser la machine .
Lea detenidamente el man ual de instrucciones y asegúr ese de entender su contenido antes de utilizar la máquina.
EEEEnnnngggglllliiiisssshhhh ((((2222----44444444))
FFFFrrrreeeennnncccchhhh ((((44445555----88889999))
SSSSppppaaaannnniiiisssshhhh ((((99990000----111133335555))
))
))
))
Page 2
2
W
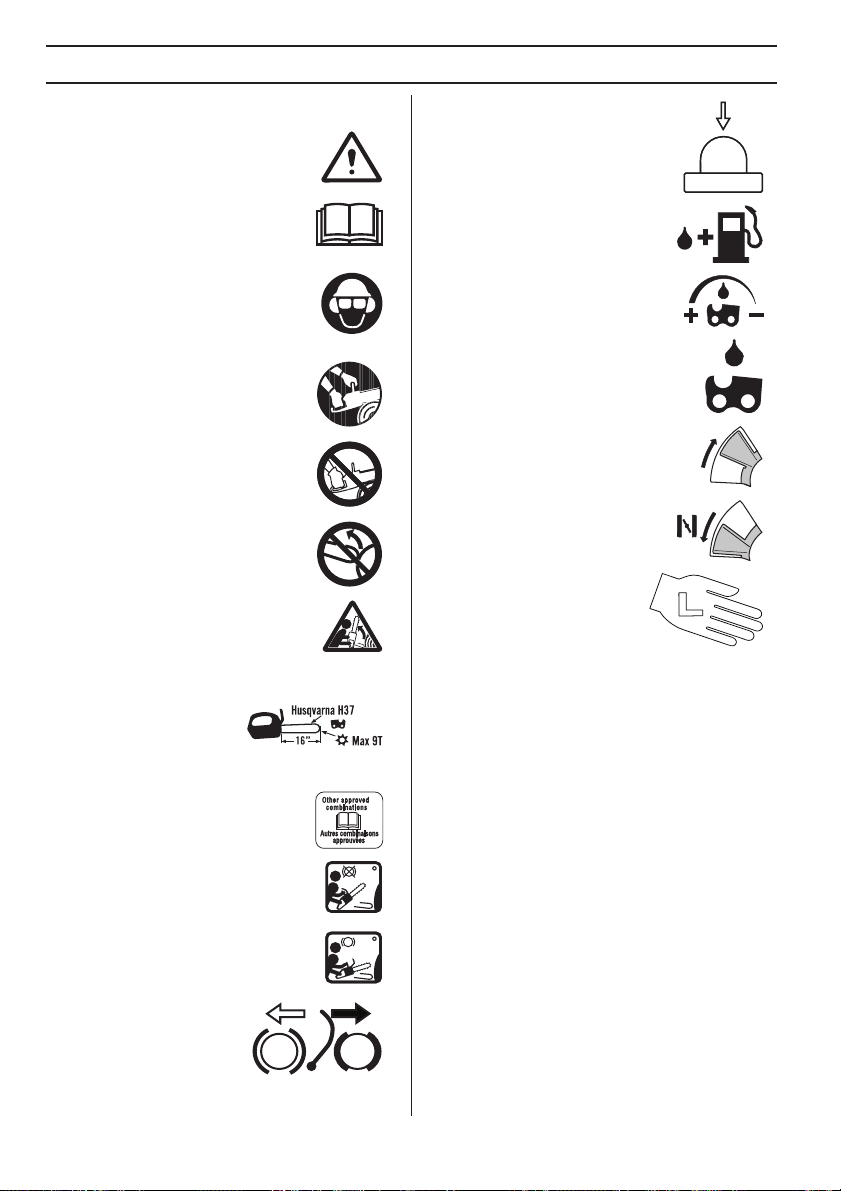
Symbols on the mac hine:
ARNING! Chain saws can be
dangerous! Careless or improper use can
result in serious or fatal injury to the
operator or others.
Please read the operator’s manual
carefully and make sure you understand
the instructions before using the
machine.
Always wear:
• Approved protective helmet
• Approved hearing protection
• Protective goggles or a visor
Both of the operator ′ s hands must be
used to operate the chain saw.
Never operate a chain saw holding it with
one hand only.
Never let the guide bar tip come in
contact with any object.
WARNING! Kickback may occur when
the nose or tip of the guide bar touches an
object, and cause a lightning fast reverse
reaction, kicking the guide bar up and
towards the operator. May cause serious
personal injury.
Recommended cutting
equipment in this example:
- Bar length 16 inches
- Max. nose radius 9 Teeth
- Chain type Husqvarna H37
Other approved bar and chain
combinations in Operator’s Manual.
KEY T O SYMBOLS
Air purge
Refuelling.
Adjustment of the oil pump
Chain oil fill.
Working position.
Choke.
Handle insert size.
Other symbols/decals on the mac hine refer to special
certification requirements for certain markets.
Measured maximum kickback value
without triggering the brake, for the bar and
chain combination on the label.
Measured maximum kickback value
without chain brake for the bar and chain
combination on the label.
Chain brake, activated (right)
Chain brake, not activated
(left)
– English
XX
XX
Page 3
EP
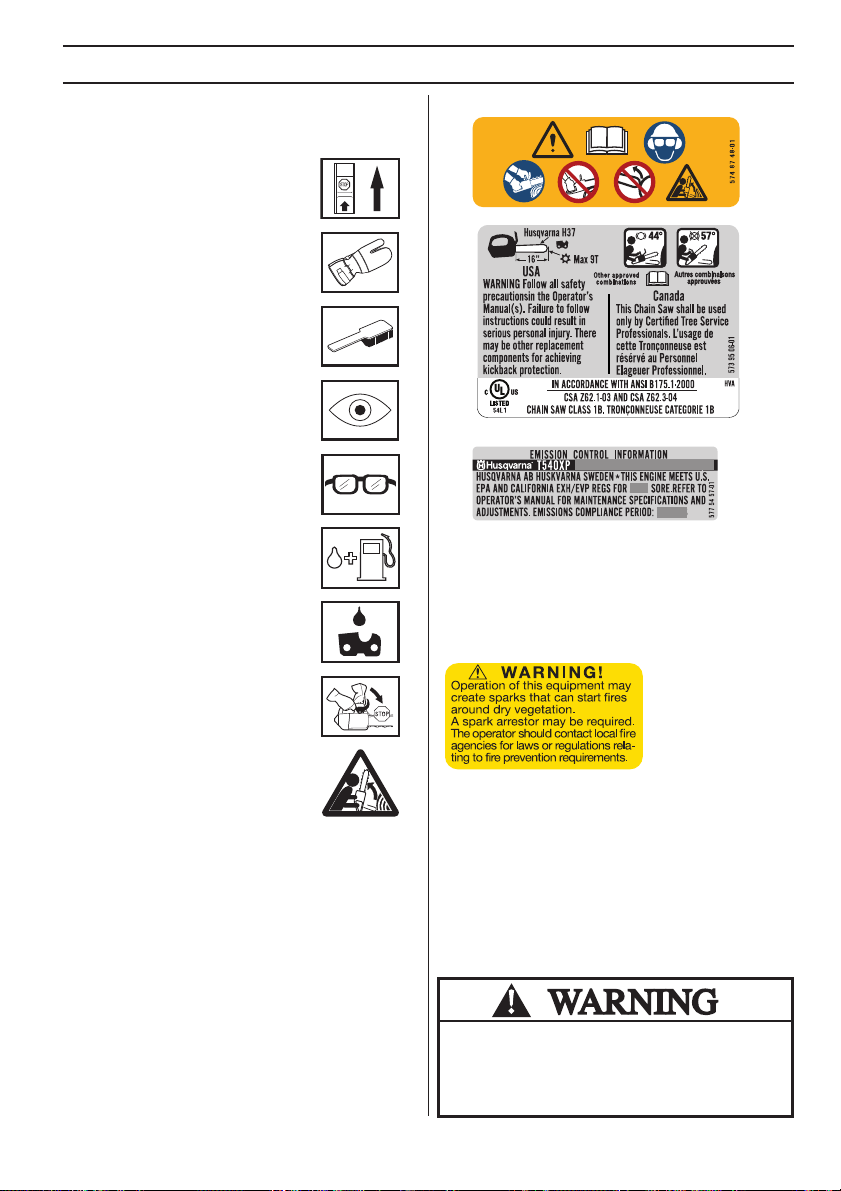
Symbols in the operator’ s manual:
Switch off the engine before carrying
out any checks or maintenance.
KEY T O SYMBOLS
You will find the following labels on your chain saw:
Always wear approved protective
gloves.
Regular cleaning is required.
Visual check.
Protective goggles or a visor must be
worn.
Refuelling.
Filling with oil and adjusting oil flow.
The chain brake must be engaged
when the chain saw is started.
WARNING! Kickback may occur when
the nose or tip of the guide bar touches
an object, and cause a lightning fast
reverse reaction, kicking the guide bar
up and towards the operator. May
cause serious personal injury.
A III
The Emissions Compliance P eriod referred to on the
Emission Compliance label indicates the number of
operating hours for which the engine has been shown to
meet Federal and California emissions requirements.
Maintenance, replacement, or repair of the emission
control devices and system may be performed by any
nonroad engine repair establishment or individual.
The engine exhaust from this product
contains chemicals known to the State
of California to cause cancer, birth
defects or other reproductive harm.
English
–
3
Page 4

4
ST
W
T
Y
CONTENTS
Contents
KEY TO SYMBOLS
Symbols on the machine: ...................................... 2
Symbols in the operator’s manual: ........................ 3
CONTENTS
Contents ............................................................... 4
INTR ODUCTION
Dear customer! ..................................................... 5
WHA T IS WHAT?
What is what on the chain sa w? ........................... 6
GENERAL SAFETY PRECA UTIONS
Bef ore using a new chain saw .............................. 7
Important .............................................................. 8
Always use common sense .................................. 8
Personal protective equipment ............................. 8
Machine ′ s safety equipment ................................. 9
Cutting equipment ................................................. 12
ASSEMBL Y
Fitting the bar and chain ....................................... 18
FUEL HANDLING
Fuel ....................................................................... 19
Fueling .................................................................. 20
Fuel safety ............................................................ 21
ARTING AND STOPPING
Star ting and stopping ............................................ 22
ORKING TECHNIQUES
Bef ore use: ............................................................ 24
General working instructions ................................ 24
How to avoid kickback ........................................... 31
MAINTENANCE
Gener al ................................................................. 32
Carburetor adjustment .......................................... 32
Checking, maintaining and servicing chain saw
safety equipment ..................................................
Muffler ................................................................... 34
Starter housing ..................................................... 34
Air filter .................................................................. 36
Spark plug ............................................................. 36
Lubricating the bar tip sprocket ............................. 37
Needle bearing lubrication .................................... 37
Adjustment of the oil pump ................................... 37
Cooling system ..................................................... 37
Winter use ............................................................. 37
Temperature -5 ° C (23 ° F) or colder ....................... 38
Maintenance schedule .......................................... 39
TECHNICAL D ATA
echnical data ....................................................... 40
Guide bar and saw chain combinations ................ 41
Saw chain filing and file gauges ........................... 41
FEDERAL AND CALIFORNIA EMISSIONS
CONTROL WARRANTY STATEMENT
OUR WARRANTY RIGHTS AND OBLIGATIONS 42
AMERICAN ST ANDARD SAFETY
PRECAUTIONS
Saf ety precautions for chain saw users ................ 44
32
– English
Page 5

′
′
INTR ODUCTION
Dear customer!
Cong ratulations on your choice to buy a Husqvarna product! Husqvarna is based on a tradition that dates back to 1689,
when the Swedish King Karl XI ordered the construction of a factory on the banks of the Huskvarna River, for production
of muskets. The location was logical, since water power was harnessed from the Huskvarna River to create the waterpowered plant. During over 300 years of continuous operation, the Husqvarna factory has produced a lot of different
products, from wood stoves to modern kitchen appliances, sewing machines, bicycles, motorcycles etc. In 1956, the first
motor driven lawn mowers appeared, followed by chain saws in 1959, and it is within this area Husqvarna is working
today.
Today Husqvarna is one of the leading manufacturers in the world of forest and garden products, with quality as our
highest priority. We develop, manufacture and market high quality motor driven products for forestry and gardening as
well as for building and construction industry.
Your purchase gives you access to professional help with repairs and service whenever this may be necessary. If the
retailer who sells your machine is not one of our authorized dealers, ask for the address of your nearest servicing dealer.
It is our wish that you will be satisfied with your product and that it will be your companion for a long time. Think of this
operator
s manual as a valuable document. By following its ′ content (using, service, maintenance etc) the life span and
the second-hand value of the machine can be extended. If you ever lend or sell this machine, make sure that the borrower
or buyer gets the operator
Thank you for using a Husqvarna product.
Husqvarna AB has a policy of continuous product development and therefore reserves the right to modify the design and
appearance of products without prior notice.
s manual, so they will also know how to properly maintain and use it.
English – 5
Page 6
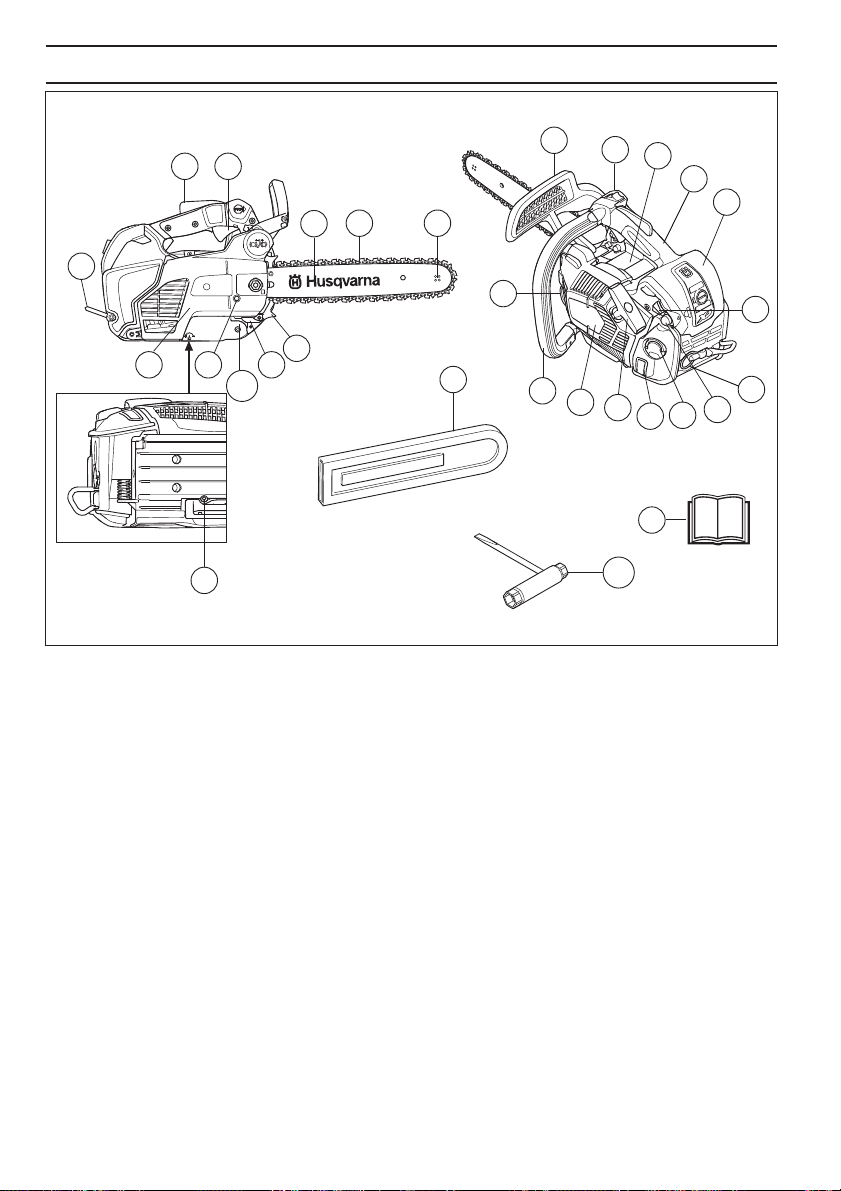
WHA T IS WHA T?
6
1
19
18
20
21
22
23
26
What is what on the c hain saw?
Front hand guard
2 Stop switch
3 Information and warning decal
4 Top handle
5 Filter cover
6 Choke control
7 Rope eyelet
8 Air purge
9 Fuel tank
10 Fuel level window
11 Starter handle
12 Starter housing
13 Front handle
14 Chain oil tank
15 Bar tip sprocket
24
25
17
16
1
2
15
14
27
13
12
11
29
16 Saw chain
17 Guide bar
18 Throttle trigger
19 Throttle trigger lockout
20 Belt eyelet
21 Clutch cover
22 Chain tensioning screw
23 Product and serial number plate
24 Chain catcher
25 Bumper spike
26 Oil pump adjustment screw
27 Guide bar cover
28 Operator’s manual
29 Combination spanner
10
28
3
4
5
6
7
8
9
– English
Page 7
!
!
!
!
GENERAL SAFETY PRECA UTIONS
•
W
W
W
W
W
W
W
W
W
Bef ore using a new chain saw
Please read this manual carefully.
• Check that the cutting equipment is correctly fitted and
adjusted. See instructions under the heading
Assembly.
• Refuel and start the chain saw. See the instructions
under the headings Fuel Handling and Starting and
Stopping.
• Do not use the chain saw until sufficient chain oil has
reached the chain. See instructions under the heading
Lubricating cutting equipment.
• Long-term exposure to noise can result in permanent
hearing impairment. So always use approved hearing
protection.
ARNING! Under no circumstances may
the design of the machine be modified
!
without the permission of the
manufacturer. Always use genuine
accessories. Non-authorized
modifications and/or accessories can
result in serious personal injury or the
death of the operator or others. Your
warranty may not cover damage or
liability caused by the use of nonauthorized accessories or replacement
parts.
ARNING! A chain saw is a dangerous
tool if used carelessly or incorrectly and
!
can cause serious, even fatal injuries. It
is very important that you read and
understand the contents of this
operator’s manual.
ARNING! When using a chain saw, a
fire extinguisher should be available.
ARNING! Keep handles dry, clean and
free of oil.
ARNING! Beware of carbon monoxide
poisoning. Operate the chainsaw in well
ventilated areas only.
ARNING! Do not attempt a pruning or
limbing operation in a standing tree
unless specifically trained to do so.
ARNING! The inside of the muffler
contain chemicals that may be
!
carcinogenic. Avoid contact with these
elements in the event of a damaged
muffler.
ARNING! Long term inhalation of the
engine’s exhaust fumes, chain oil mist
!
and dust from sawdust can represent a
health risk.
ARNING! This machine produces an
electromagnetic field during operation.
!
This field may under some
circumstances interfere with active or
passive medical implants. To reduce the
risk of serious or fatal injury, we
recommend persons with medical
implants consult their physician and the
medical implant manufacturer before
operating this machine.
English
–
7
Page 8

GENERAL SAFETY PRECA UTIONS
!
Impor tant
IMPORTANT!
This chain saw for tree service is designed for pruning
and dismantling standing tree crowns.
You should only use the saw with the bar and chain
combinations we recommend in the chapter Technical
data.
Never use the machine if you are fatigued, while under
the influence of alcohol or drugs, medication or anything
that could affect your vision, alertness, coordination or
judgement.
Wear personal protective equipment. See instructions
under the heading ”Personal protective equipment”.
Do not modify this product or use it if it appears to have
been modified by others.
Never use a machine that is faulty. Carry out the safety
checks, maintenance and service instructions
described in this manual. Some maintenance and
service measures must be carried out by trained and
qualified specialists. See instructions under the heading
Maintenance.
Never use any accessories other than those
recommended in this manual. See instructions under
the headings Cutting equipment and Technical data.
CAUTION! Always wear protective glasses or a face
visor to reduce the risk of injury from thrown objects. A
chain saw is capable of throwing objects, such as wood
chips, small pieces of wood, etc, at great force. This can
result in serious injury, especially to the eyes.
as well as help you to use your chain saw both efficiently
and safely.
Work is constantly in progress to improve the design and
technology - improvements that increase your safety and
efficiency. Visit your dealer regularly to see whether you
can benefit from new features that have been introduced.
Personal protective equipment
WARNING! Most chain saw accidents
happen when the chain touches the
operator. You must use approved
personal protective equipment whenever
you use the machine. Personal protective
equipment cannot eliminate the risk of
injury but it will reduce the degree of
injury if an accident does happen. Ask
your dealer for help in choosing the right
equipment.
CAUTION! Never use a chain saw by holding it with one
hand. A chain saw is not safely controlled with one hand;
you can cut yourself. Always have a secure, firm grip
around the handles with both hands.
8
WARNING! Running an engine in a
confined or badly ventilated area can
!
result in death due to asphyxiation or
carbon monoxide poisoning.
WARNING! Faulty cutting equipment or
the wrong combination of bar and saw
!
chain increases the risk of kickback!
Only use the bar/saw chain combinations
we recommend, and follow the filing
instructions. See instructions under the
heading Technical data.
Always use common sense
It is not possible to cover every conceivable situation you
can face when using a chain saw. Always exercise care
and use your common sense. Avoid all situations which
you consider to be beyond your capability. If you still feel
uncertain about operating procedures after reading these
instructions, you should consult an expert before
continuing. Do not hesitate to contact your dealer or us if
you have any questions about the use of the chain saw.
We will willingly be of service and provide you with advice
– English
• Approved protective helmet
• Hearing protection
• Protective goggles or a visor
• Gloves with saw protection
• Trousers with saw protection
• Use appropriate protections for arm.
• Boots with saw protection, steel toe-cap and non-slip
sole
• Always have a first aid kit nearby.
Page 9
GENERAL SAFETY PRECAUTIONS
!
B
B
A
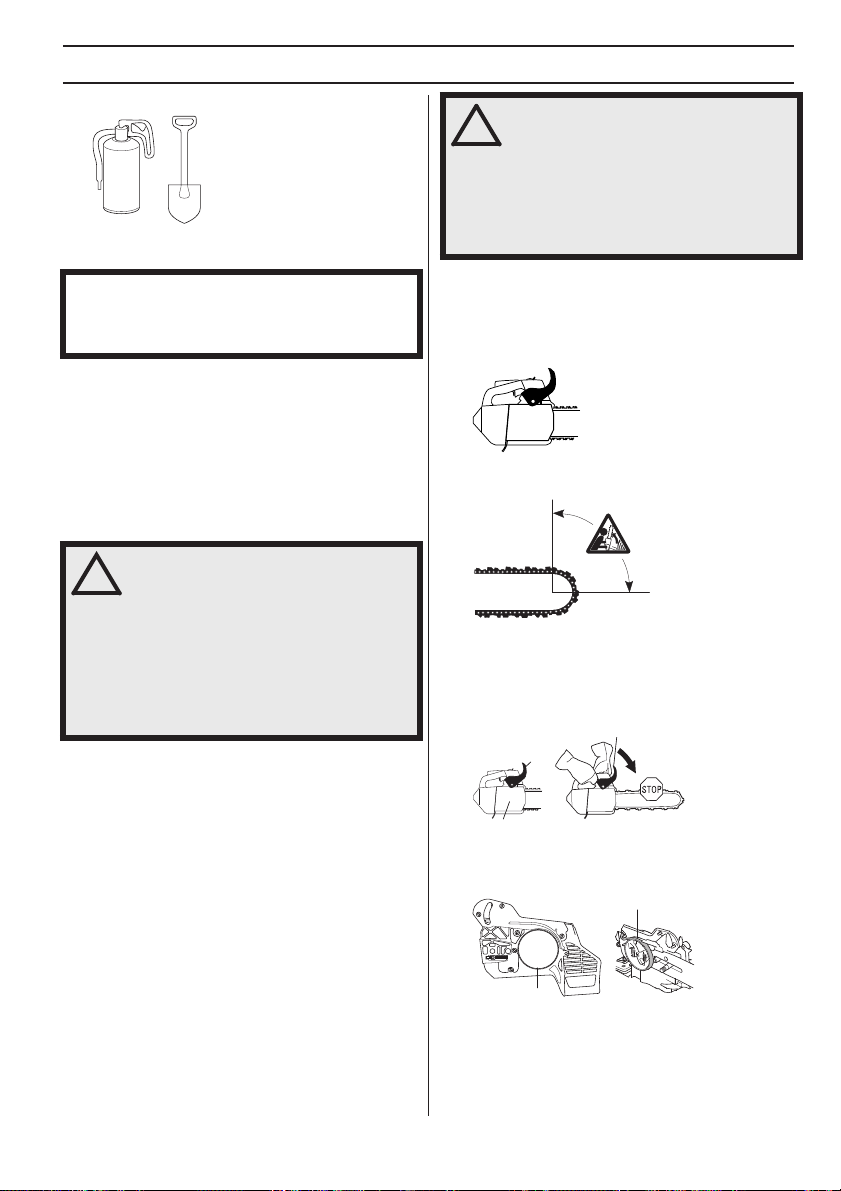
• Fire Extinguisher and Shovel
Generally clothes should be close-fitting without
restricting your freedom of movement.
IMPORTANT! Sparks can come from the muffler, the bar
and chain or other sources. Always have fire
extinguishing tools available if you should need them.
Help prevent forest fires.
This top handle chainsaw is designed specifically for tree
surgery and maintenance in the tree. Due to the special
compact handle design (closely spaced handles), there is
an increased risk of losing control. For this reason these
special chainsaws should be used only for work in a tree
by persons who are trained in special cutting and working
techniques and who are properly secured (lift bucket,
ropes, safety harness). Regular chainsaws (with wider
spaced handles) are recommended for all other cutting
work at ground level.
WARNING! Working in a tree requires the
use of special cutting and working
!
techniques which must be observed in
order to reduce the increased risk of
personal injury. Never work in a tree
unless you have received specific,
professional training for such work,
including training in the use of safety
and other climbing equipment, such as
harnesses, ropes, belts, climbing irons,
snap hooks, carabiners, etc.
WARNING! Never use a machine with
defective safety components. Safety
equipment must be inspected and
maintained. See instructions under the
heading Checking, maintaining and
servicing chain saw safety equipment. If
your machine does not pass all the
checks, take the saw to a servicing
dealer for repair.
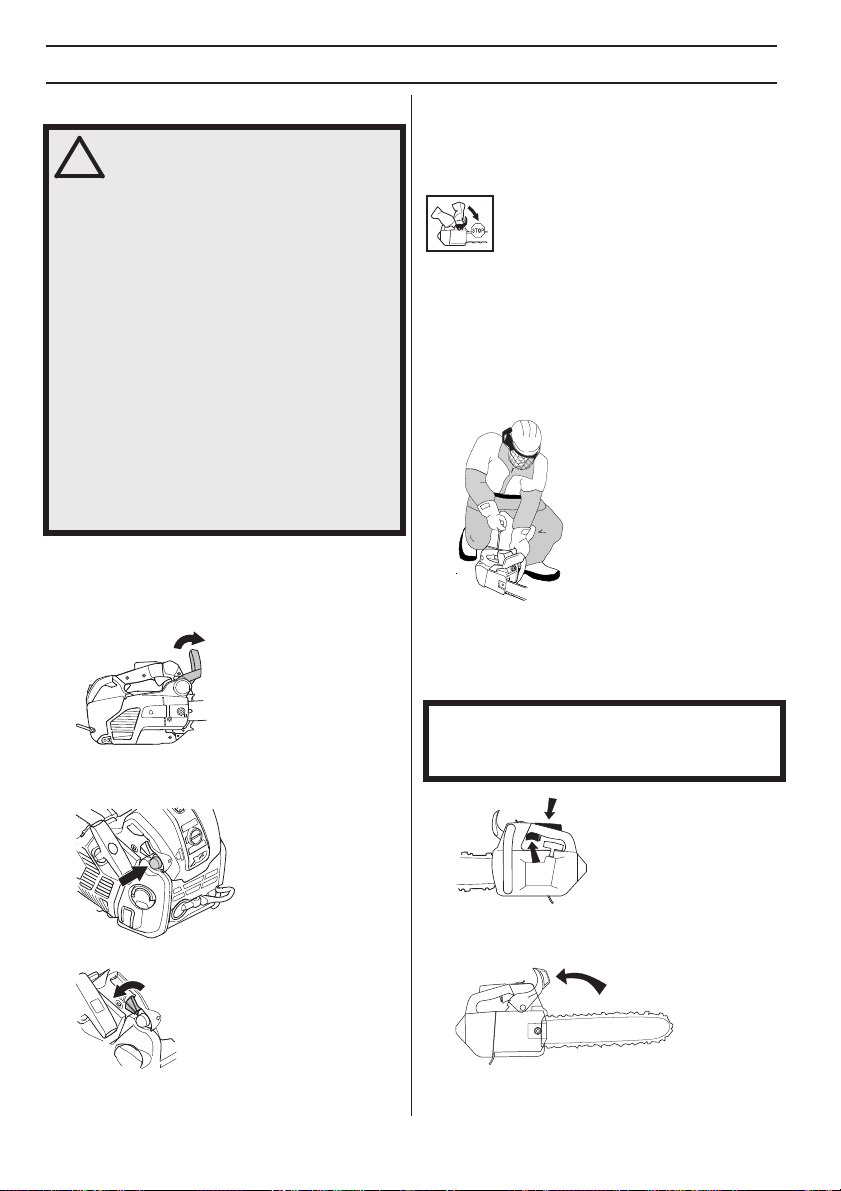
Chain brake and front hand guard
Your chain saw is equipped with a chain brake that is
designed to stop the chain if you get a kickback. The chain
brake reduces the risk of accidents, but only you can
prevent them.
Take care when using your saw and make sure the
kickback zone of the bar never touches any object.
• The chain brake (A) can either be activated manually
(by your left hand) or automatically by the inertia
release mechanism.
• The brake is applied when the front hand guard (B) is
pushed forwards.
Machine′′′′s safety equipment
In this section the machine’s safety features and their
function are explained. For inspection and maintenance
see instructions under the heading Checking, maintaining
and servicing chain saw safety equipment. See
instructions under the heading, What is what?, to find
where these parts are located on your machine.
The life span of the machine can be reduced and the risk
of accidents can increase if machine maintenance is not
carried out correctly and if service and/or repairs are not
carried out professionally. If you need further information
please contact your nearest servicing dealer.
• This movement activates a spring-loaded mechanism
that tightens the brake band (C) around the engine
drive system (D) (clutch drum).
D
C
• The front hand guard is not designed solely to activate
the chain brake. Another important feature is that it
English – 9
Page 10
GENERAL SAFETY PRECAUTIONS
reduces the risk of your left hand hitting the chain if
you lose grip of the front handle.
• The chain brake must be engaged when the chain
saw is started to prevent the saw chain from rotating.
• Use the chain brake as a ”parking brake” when
starting and when moving over short distances, to
reduce the risk of moving chain accidentally hitting
your leg or anyone or anything close by.
• To release the chain brake pull the front hand guard
backwards, towards the front handle.
designed to be activated by the inertia in the kickback
direction.
If the kickback is less violent or the kickback zone of
the bar is closer to you the chain brake is designed to
be activated manually by the movement of your left
hand.
• In the felling position the left hand is in a position that
makes manual activation of the chain brake
impossible. With this type of grip, that is when the left
hand is placed so that it cannot affect the movement
of the front hand guard, the chain brake can only be
activated by the inertia action.
• Kickback can be very sudden and violent. Most
kickbacks are minor and do not always activate the
chain brake. If this happens you should hold the chain
saw firmly and not let go.
• The way the chain brake is activated, either manually
or automatically by the inertia release mechanism,
depends on the force of the kickback and the position
of the chain saw in relation to the object that the
kickback zone of the bar strikes.
If you get a violent kickback while the kickback zone of
the bar is farthest away from you the chain brake is
10 – English
Will my hand always activate the chain brake during a kickback?
No. It takes a certain force to move the hand guard
forward. If your hand only lightly touches the front guard
or slips over it, the force may not be enough to trigger the
chain brake. You should also maintain a firm grip of the
chain saw handles while working. If you do and
experience a kickback, your hand may never leave the
front handle and will not activate the chain brake, or the
chain brake will only activate after the saw has swung
around a considerable distance. In such instances, the
chain brake might not have enough time to stop the saw
chain before it touches you.
There are also certain positions in which your hand
cannot reach the front hand guard to activate the chain
brake; for example, when the saw chain is held in felling
position.
Will my inertia activated chain brake always activate during kickback in the event of a kickback?
No. First your brake must be in working order. Second the
kickback must be strong enough to activate the chain
brake. If the chain brake is too sensitive it would activate
all the time which would be a nuisance.
Page 11
GENERAL SAFETY PRECAUTIONS
!
!
Will my chain brake always protect me from injury in the event of a kickback?
No. First, the chain brake must be in working order to
provide the intended protection. Second, it must be
activated during the kickback as described above to stop
the saw chain. Third, the chain brake may be activated but
if the bar is too close to you the brake might not have
enough time to slow down and stop the chain before the
chain saw hits you.
Only you and proper working technique can eliminate
kickback and its danger.
Throttle trigger lockout
The throttle lockout is designed to prevent accidental
operation of the throttle control. When you press the lock
(A) (i.e. when you grasp the handle) it releases the throttle
control (B). When you release the handle the throttle
control and the throttle lockout both move back to their
original positions. This arrangement means that the
throttle control is automatically locked at the idle setting.
A
B
Chain catcher
The chain catcher is designed to catch the chain if it snaps
or jumps off. This should not happen if the chain is
properly tensioned (see instructions under the heading
Assembly) and if the bar and chain are properly serviced
and maintained (see instructions under the heading
General working instructions).
The machine′s vibration damping system reduces the
transfer of vibration between the engine unit/cutting
equipment and the machine
chain saw, including the cutting equipment, is insulated
from the handles by vibration damping units.
Cutting hardwoods (most broadleaf trees) creates more
vibration than cutting softwoods (most conifers). Cutting
with cutting equipment that is blunt or faulty (wrong type
or badly sharpened) will increase the vibration level.
WARNING! Overexposure to vibration
can lead to circulatory damage or nerve
damage in people who have impaired
circulation. Contact your doctor if you
experience symptoms of overexposure
to vibration. Such symptoms include
numbness, loss of feeling, tingling,
pricking, pain, loss of strength, changes
in skin colour or condition. These
symptoms normally appear in the
fingers, hands or wrists. These
symptoms may be increased in cold
temperatures.
′s handle unit. The body of the
Stop switch
Use the stop switch to switch off the engine.
Vibration damping system
Your machine is equipped with a vibration damping
system that is designed to reduce vibration and make
operation easier.
Muffler
The muffler is designed to keep noise levels to a minimum
and to direct exhaust fumes away from the user.
In areas with a hot, dry climate there is a high risk of fires.
WARNING! The exhaust fumes from the
engine are hot and may contain sparks
which can start a fire. Never start the
machine indoors or near combustible
material!
CAUTION! The muffler gets very hot during and after
use. This also applies during idling. Be aware of the fire
hazard, especially when working near flammable
substances and/or vapours.
English – 11
Page 12
GENERAL SAFETY PRECAUTIONS
!
!
WARNING! Never use a saw without a
muffler, or with a damaged muffler. A
!
damaged muffler may substantially
increase the noise level and the fire
hazard. Keep fire fighting equipment
handy.
Cutting equipment
This section describes how to choose and maintain your
cutting equipment in order to:
• Reduce the risk of kickback.
• Reduce the risk of the saw chain breaking or jumping
off the bar.
• Obtain optimal cutting performance.
• Extend the life of cutting equipment.
• Avoid increasing vibration levels.
General rules
• Only use cutting equipment recommended by us!
See instructions under the heading Technical data.
• Keep the chain’s cutting teeth properly
sharpened! Follow our instructions and use the
recommended file gauge.
sharpened chain increases the risk of accidents.
A damaged or badly
Cutting equipment designed to reduce kickback
WARNING! Faulty cutting equipment or
the wrong combination of bar and saw
chain increases the risk of kickback!
Only use the bar/saw chain combinations
we recommend, and follow the filing
instructions. See instructions under the
heading Technical data.
The only way to avoid kickback is to make sure that the
kickback zone of the bar never touches anything.
By using cutting equipment with ”built-in” kickback
reduction and keeping the chain sharp and wellmaintained you can reduce the effects of kickback.
Guide bar
The smaller the tip radius the lower the chance of
kickback.
Saw chain
A chain is made up of a number of links, which are
available in standard and low-kickback versions.
IMPORTANT! No saw chain design eliminates the
danger of kickback.
WARNING! Any contact with a rotating
saw chain can cause extremely serious
injuries.
• Maintain the correct depth gauge setting! Follow
our instructions and use the recommended depth
gauge clearance.
the risk of kickback.
• Keep the chain properly tensioned! If the chain is
slack it is more likely to jump off and lead to increased
wear on the bar, chain and drive sprocket.
• Keep cutting equipment well lubricated and
properly maintained!
more likely to break and lead to increased wear on the
bar, chain and drive sprocket.
12 – English
Too large a clearance increases
A poorly lubricated chain is
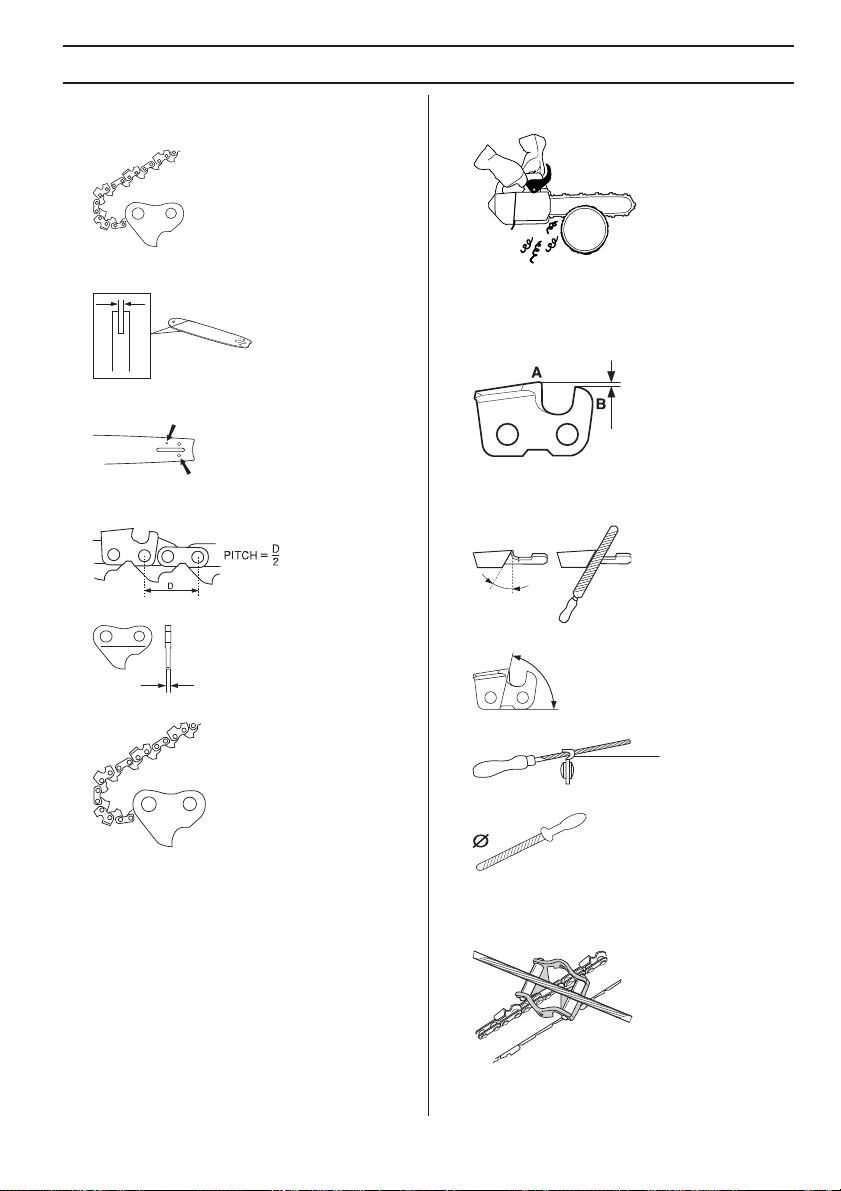
Some terms that describe the bar and chain
To maintain the safety features of the cutting equipment,
you should replace a worn or damaged bar or chain with
a bar and chain combinations recommended by
Husqvarna. See instructions under the heading Technical
Data for a list of replacement bar and chain combinations
we recommend.
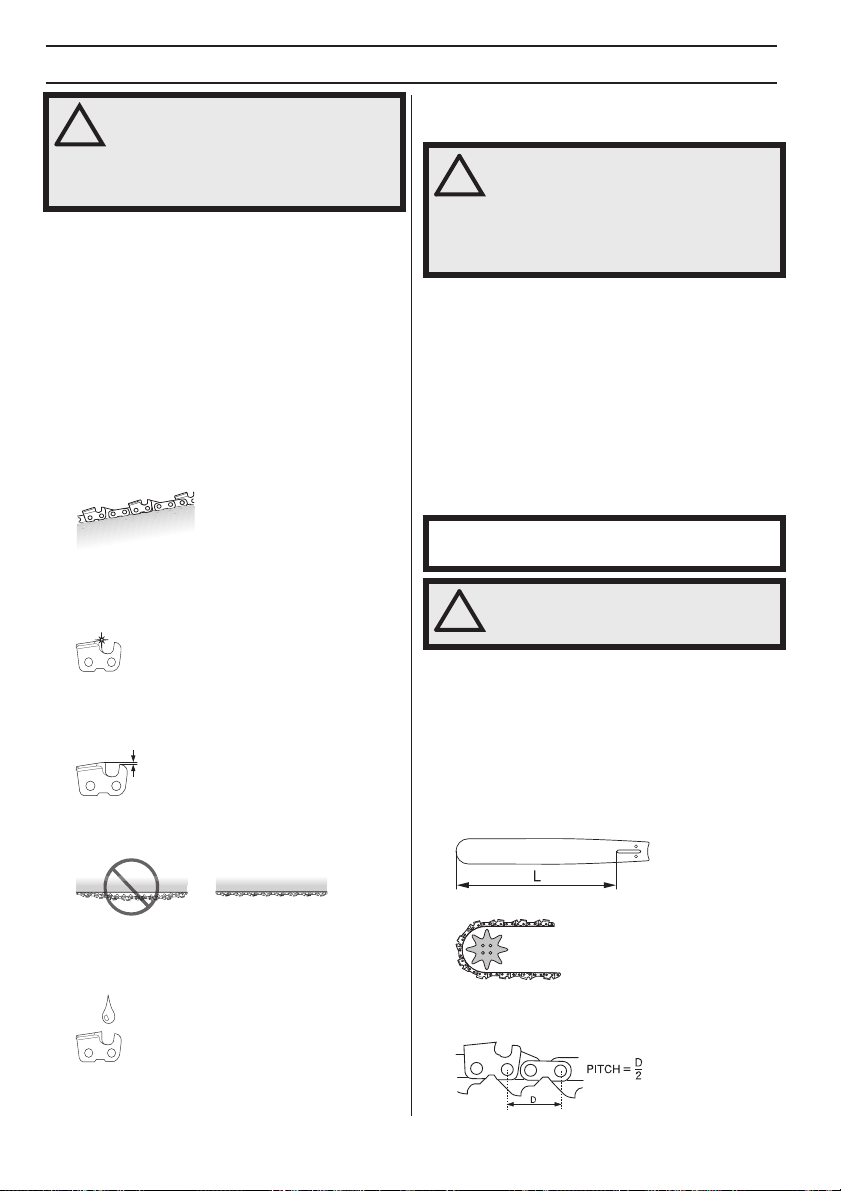
Guide bar
• Length (inches/cm)
• Number of teeth on bar tip sprocket (T).
• Chain pitch (inches). The spacing between the drive
links of the chain must match the spacing of the teeth
on the bar tip sprocket and drive sprocket.
Page 13
GENERAL SAFETY PRECAUTIONS
• Number of drive links. The number of drive links is
determined by the length of the bar, the chain pitch
and the number of teeth on the bar tip sprocket.
• Bar groove width (inches/mm). The groove in the bar
must match the width of the chain drive links.
• Chain oil hole and hole for chain tensioner. The bar
must be matched to the chain saw design.
Saw chain
• Chain pitch (inches)
• Drive link width (mm/inches)
• A sharp chain eats its way through the wood and
produces long, thick chips or shavings.
• The cutting part of the chain is called the cutter and
consists of a cutting tooth (A) and the depth gauge
(B). The cutters cutting depth is determined by the
difference in height between the two (depth gauge
setting).
When you sharpen a cutting tooth there are four important
factors to remember.
1 Filing angle
2 Cutting angle
• Number of drive links.
Sharpening your chain and adjusting depth gauge setting
General information on sharpening cutting teeth
• Never use a blunt chain. When the chain is blunt you
have to exert more pressure to force the bar through
the wood and the chips will be very small. If the chain
is very blunt it will produce wood powder and no chips
or shavings.
3 File position
4 Round file diameter
It is very difficult to sharpen a chain correctly without the
right equipment. We recommend that you use our file
gauge. This will help you obtain the maximum kickback
reduction and cutting performance from your chain.
See instructions under the heading Technical data for
information about sharpening your chain.
English – 13
Page 14
WARNING! Departure from the
!
sharpening instructions considerably
!
increases the risk of kickback.
Sharpening cutting teeth
GENERAL SAFETY PRECAUTIONS
data to find the correct depth gauge setting for your
particular chain.
To sharpen cutting teeth you will need a round file and a
file gauge. See instructions under the heading Technical
data for information on the size of file and gauge that are
recommended for the chain fitted to your chain saw.
• Check that the chain is correctly tensioned. A slack
chain will move sideways, making it more difficult to
sharpen correctly.
• Always file cutting teeth from the inside face. Reduce
the pressure on the return stroke. File all the teeth on
one side first, then turn the chain saw and file the teeth
on the other side.
• File all the teeth to the same length. When the length
of the cutting teeth is reduced to 5/32 inch (4 mm) the
chain is worn out and should be replaced.
WARNING! The risk of kickback is
increased if the depth gauge setting is
too large!
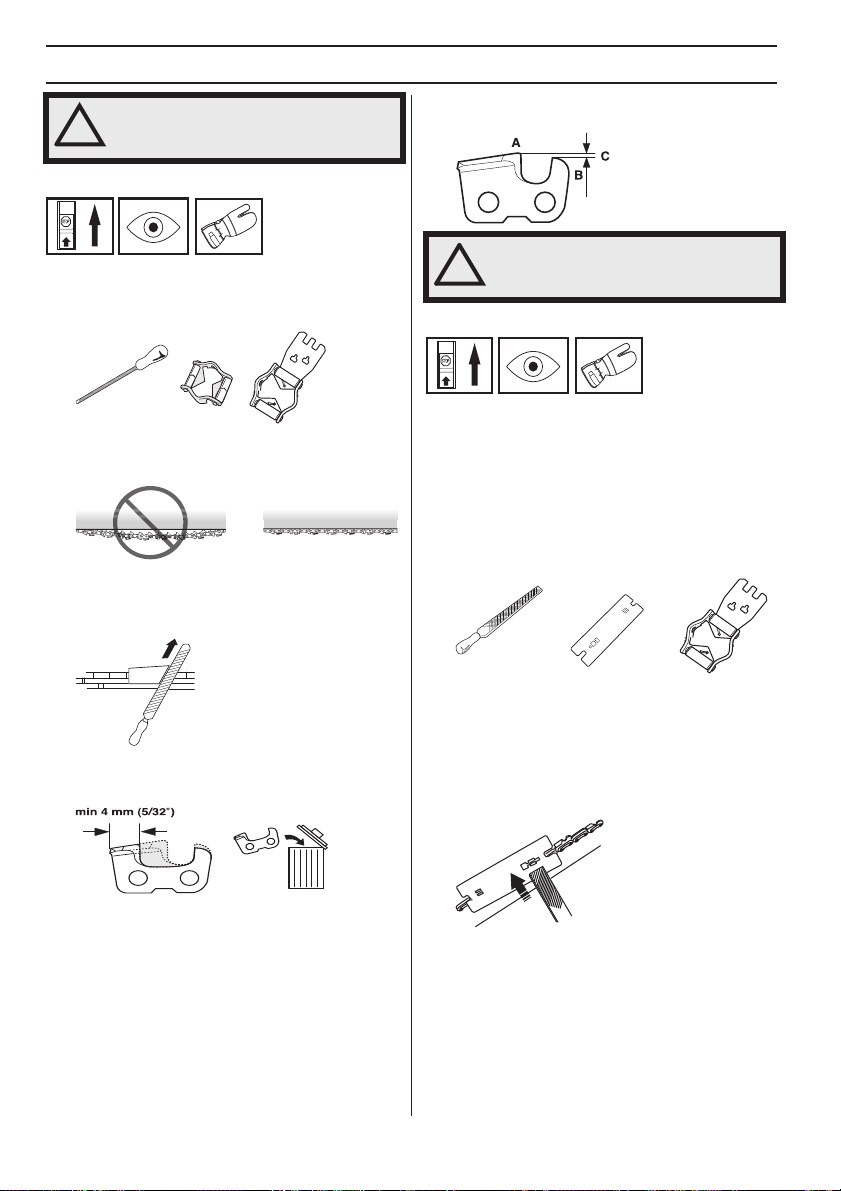
Adjustment of depth gauge setting
• The cutting teeth should be newly sharpened before
adjusting the depth gauge setting. We recommend
that you adjust the depth gauge setting every third
time you sharpen the cutting teeth. NOTE! This
recommendation assumes that the length of the
cutting teeth is not reduced excessively.
• You will need a flat file and a depth gauge tool. We
recommend that you use our depth gauge tool to
acheive the correct depth gauge setting and bevel for
the depth gauge.
• Place the depth gauge tool over the chain. Detailed
information regarding the use of the depth gauge tool,
will be found on the package for the depth gauge tool.
Use the flat file to file off the tip of the depth gauge that
protrudes through the depth gauge tool. The depth
gauge setting is correct when you no longer feel
resistance as you draw the file along the depth gauge
tool.
General advice on adjusting depth gauge setting
• When you sharpen the cutting tooth (A) the depth
gauge setting (C) will decrease. To maintain optimal
cutting performance the depth gauge (B) has to be
filed down to achieve the recommended depth gauge
setting. See instructions under the heading Technical
14 – English
Page 15
GENERAL SAFETY PRECAUTIONS
!
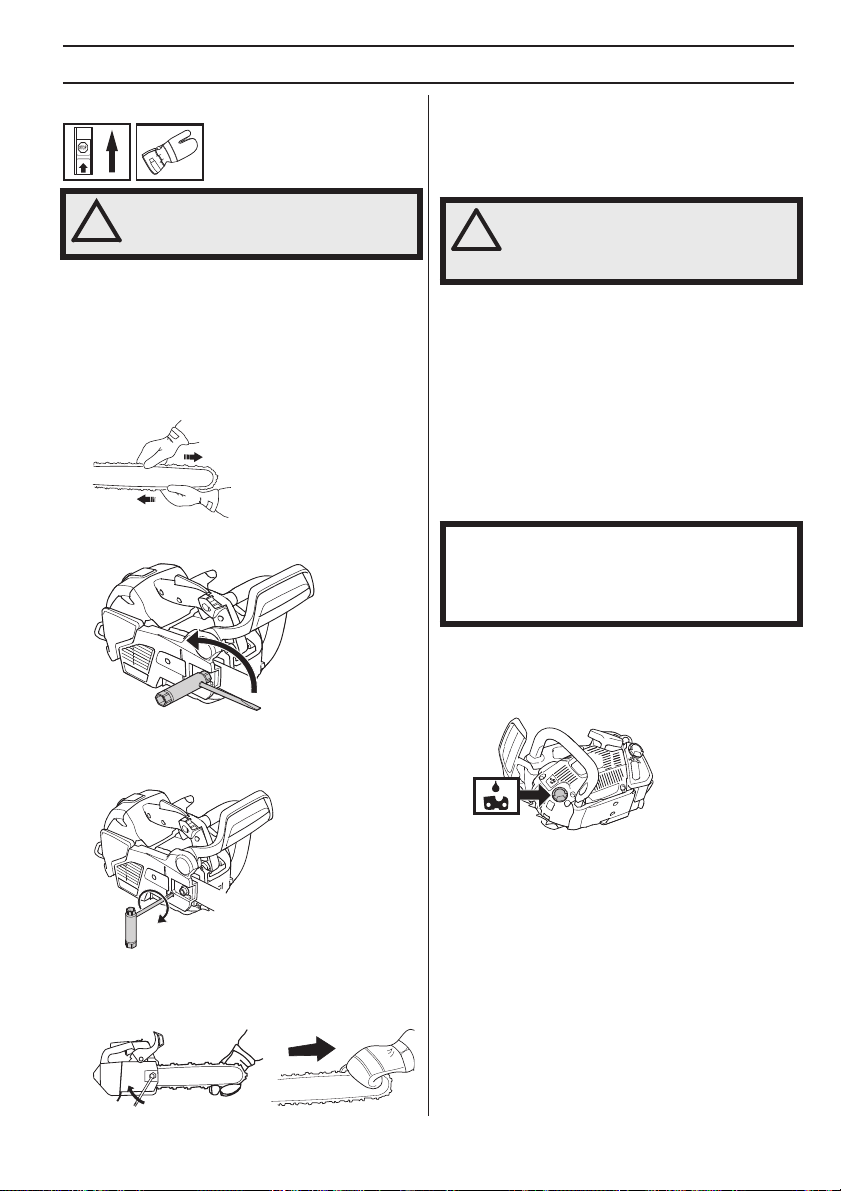
Tensioning the chain
WARNING! A slack chain may jump off
the bar and cause serious or even fatal
!
injury.
The more you use a chain the longer it becomes. It is
therefore important to adjust the chain regularly to take up
the slack.
Check the chain tension every time you refuel. NOTE! A
new chain has a running-in period during which you
should check the tension more frequently.
Tension the chain as tightly as possible, but not so tight
that you cannot pull it round freely by hand.
• Loosen the bar nut that holds the clutch cover and
chain brake. Use the combination spanner.
• Raise the tip of the bar and stretch the chain by
tightening the chain tensioning screw using the
combination spanner. Tighten the chain until it does
not sag from the underside of the bar.
The position of the chain tensioning screw on our chain
saws varies from model to model. See instructions under
the heading What is what? to find out where it is on your
model.
Lubricating cutting equipment
WARNING! Poor lubrication of cutting
equipment may cause the chain to snap,
which could lead to serious, even fatal
injuries.
Chain oil
Chain oil must demonstrate good adhesion to the chain
and also maintain its flow characteristics regardless of
whether it is warm summer or cold winter weather.
As a chain saw manufacturer we have developed an
optimal chain oil which has a vegetable oil base. We
recommend the use of our own oil for both maximum
chain life and to minimise environmental damage. If our
own chain oil is not available, standard chain oil is
recommended.
Never use waste oil! Using waste oil can be dangerous
to you and damage the machine and environment.
IMPORTANT! When using vegetable based saw chain
oil, dismantle and clean the groove in the bar and saw
chain before long-term storage. Otherwise there is a risk
of the saw chain oil oxidizing, which will result in the saw
chain becoming stiff and the bar tip sprocket jamming.
Filling with chain oil
• All our chain saws have an automatic chain lubrication
system. On some models the oil flow is also
adjustable.
• Use the combination spanner to tighten the bar nut
while holding up the tip of the bar. Check that you can
pull the saw chain round freely by hand, and that there
is no slack on the underside of the bar.
• The saw chain oil tank and the fuel tank are designed
so that the fuel runs out before the saw chain oil.
However, this safety feature requires that you use the
right sort of chain oil (if the oil is too thin it will run out
before the fuel), and that you also use the
recommended cutting equipment (a bar that is too
long will use more chain oil).
Checking chain lubrication
• Check the chain lubrication each time you refuel. See
instructions under the heading Lubricating the bar tip
sprocket.
Aim the tip of the bar at a light coloured surface about
20 cm (8 inches) away. After 1 minute running at 3/4
English – 15
Page 16
GENERAL SAFETY PRECAUTIONS
throttle you should see a distinct line of oil on the light
surface.
If the chain lubrication is not working:
• Check that the oil channel in the bar is not obstructed.
Clean if necessary.
• Check that the groove in the edge of the bar is clean.
Clean if necessary.
• Check that the bar tip sprocket turns freely and that
the lubricating hole in the tip sprocket is not blocked.
Clean and lubricate if necessary.
If the chain lubrication system is still not working after
carrying out the above checks and associated measures
you should contact your servicing dealer.
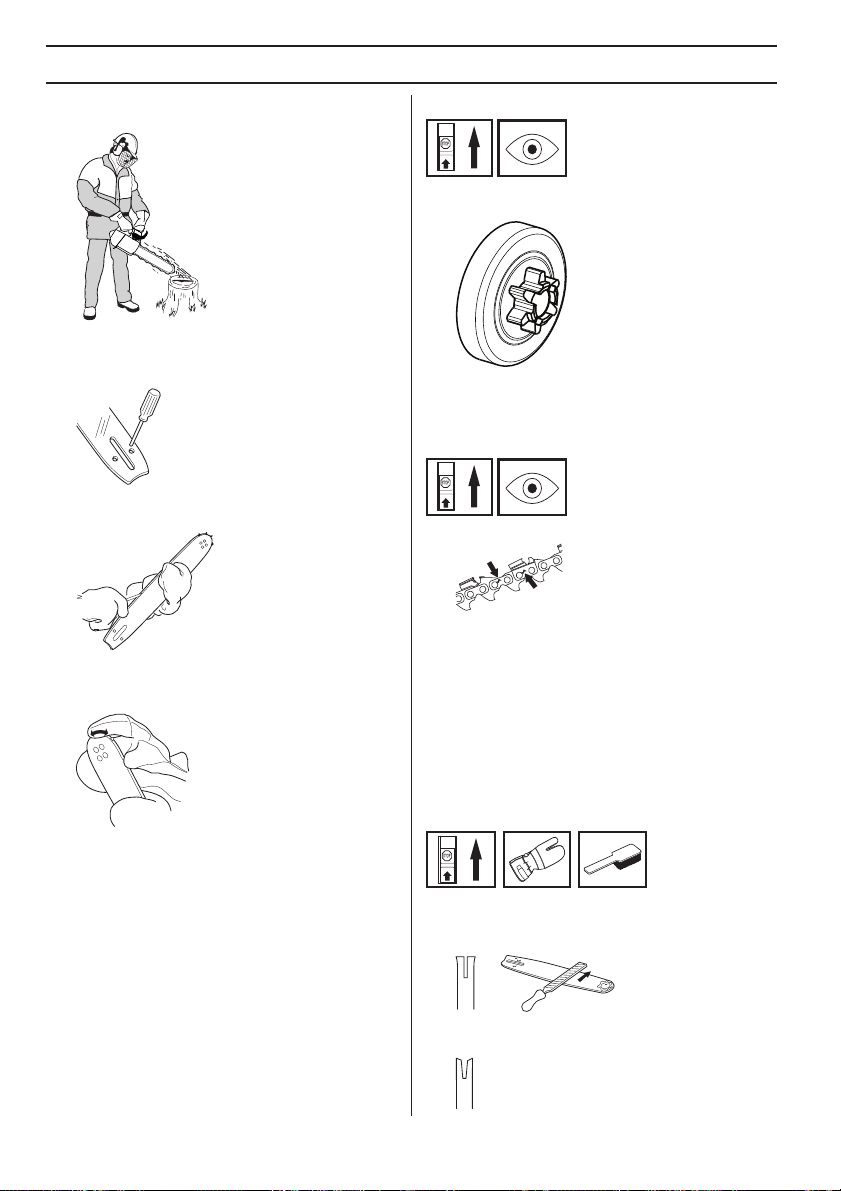
Chain drive sprocket
The clutch drum is fitted with a Spur sprocket (the chain
sprocket is welded on the drum).
Regularly check the degree of wear on the drive sprocket.
Replace if wear is excessive. Replace the drive sprocket
whenever you replace the chain.
Checking wear on cutting equipment
Check the chain daily for:
• Visible cracks in rivets and links.
• Whether the chain is stiff.
• Whether rivets and links are badly worn.
Replace the saw chain if it exhibits any of the points
above.
We recommend you compare the existing chain with a
new chain to decide how badly the existing chain is worn.
When the length of the cutting teeth has worn down to
only 5/32 inch (4 mm) the chain must be replaced.
Guide bar
Check regularly:
• Whether there are burrs on the edges of the bar.
Remove these with a file if necessary.
16 – English
• Whether the groove in the bar has become badly
worn. Replace the bar if necessary.
Page 17
GENERAL SAFETY PRECAUTIONS
• Whether the tip of the bar is uneven or badly worn. If
a hollow forms on the underside of the bar tip this is
due to running with a slack chain.
• To prolong the life of the bar you should turn it over
daily.
WARNING! Most chain saw accidents
happen when the chain touches the
!
operator.
Wear personal protective equipment. See
instructions under the heading ”Personal
protective equipment”.
Do not tackle any job that you feel you
are not adequately trained for. See
instructions under the headings
Personal protective equipment, How to
avoid kickback, Cutting equipment and
General working instructions.
Avoid situations where there is a risk of
kickback. See instructions under the
heading Machine
Use the recommended protective
equipment and check its condition. See
instructions under the headings
Technical data and General safety
precautions.
Check that all the chain saw safety
features are working. See instructions
under the headings General working
instructions and General safety
precautions.
Never use a chain saw by holding it with
one hand. A chain saw is not safely
controlled with one hand. Always have a
secure, firm grip around the handles with
both hands.
′′′′s safety equipment.
English – 17
Page 18
ASSEMBLY
Fitting the bar and chain
WARNING! Always wear gloves, when
working with the chain.
!
• Check that the chain brake is in disengaged position
by moving the front hand guard towards the front
handle.
• Unscrew the bar nut and remove the clutch cover
(chain brake). Take off the transportation guard.
• Fit the bar over the bar bolt. Place the bar in its
rearmost position. Place the chain over the drive
sprocket and in the groove on the bar. Begin on the top
side of the bar.
• Tension the chain by turning the chain tensioning
screw clockwise using the combination spanner. See
instructions under the heading Tensioning the chain.
• The chain is correctly tensioned when there is no
slack on the underside of the bar, and it can still be
turned easily by hand. Tighten the bar nut with the
combination spanner while holding up the tip of the
bar.
• When fitting a new chain, the chain tension has to be
checked frequently until the chain is run-in. Check the
chain tension regularly. A correctly tensioned chain
ensures good cutting performance and long life.
Note: If clutch cover is difficult to remove, tighten bar
nut(s), engage brake and rerelease (an audible click will
be heard if released properly).
Assembling the handle insert
• To make the upper handle suit different hand sizes,
the chain saw is available with three different handle
insert sizes - M, L and XL. The L size is fitted to the
chain saw when it is delivered. Contact your service
workshop to change the size of the handle insert.
• Make sure that the edges of the cutting links are facing
forward on the top edge of the bar.
• Fit the clutch cover (chain brake) and locate the chain
adjuster pin in the cut-out in the bar. Check that the
drive links of the chain fit correctly on the drive
sprocket and that the chain is in the groove on the bar.
Tighten the bar nut finger-tight.
18 – English
Assembling the belt eyelet
The chain saw is fitted with two eyelets on the rear edge
of the chain saw cover, a rope eyelet and a belt eyelet. The
rope eyelet is fitted on delivery.
The belt eyelet is not fitted on delivery and is used by
chain saw users as a simple way to fasten the saw to a
belt or a harness. For more information, please see the
Working techniques section.
To fit a belt eyelet - contact your service agent.
Page 19
FUEL HANDLING
Fuel
Note! The machine is equipped with a two-stroke engine
and must always be run using a mixture of gasoline and
two-stroke oil. It is important to accurately measure the
amount of oil to be mixed to ensure that the correct
mixture is obtained. When mixing small amounts of fuel,
even small inaccuracies can drastically affect the ratio of
the mixture.
WARNING! Always ensure there is
adequate ventilation when handling fuel.
!
Gasoline
• Use good quality unleaded gasoline.
• The lowest recommended octane grade is 87
((RON+MON)/2). If you run the engine on a lower
octane grade than 87 so-called knocking can occur.
This gives rise to a high engine temperature and
increased bearing load, which can result in serious
engine damage.
• When working with continuous high revs (e.g. limbing)
a higher octane is recommended.
Environment fuel
HUSQVARNA recommends the use of alkylate fuel or
environmental fuel for four-stroke engines blended with
two-stroke oil as set out below.
Ethanol fuel
HUSQVARNA recommends commercial available fuel
with maximum 10% ethanol content.
Running-in
Avoid running at a too high speed for extended periods
during the first 10 hours.
Two-stroke oil
• For best results and performance use HUSQVARNA
two-stroke engine oil, which is specially formulated for
our air-cooled two stroke-engines.
• Never use two-stroke oil intended for water-cooled
engines, sometimes referred to as outboard oil (rated
TCW).
• Never use oil intended for four-stroke engines.
Mixing ratio
1:50 (2%) for all engines.
Gasoline, litre
5 0,10
10 0,20
15 0,30
20 0,40
US gallon US fl. oz.
1 2 1/2
2 1/2 6 1/2
5 12 7/8
Two-stroke oil,
litre
2% (50:1)
Mixing
• Always mix the gasoline and oil in a clean container
intended for fuel.
• Always start by filling half the amount of the gasoline
to be used. Then add the entire amount of oil. Mix
(shake) the fuel mixture. Add the remaining amount of
gasoline.
• Mix (shake) the fuel mixture thoroughly before filling
the machine’s fuel tank.
• Do not mix more than one month’s supply of fuel at a
time.
• If the machine is not used for some time the fuel tank
should be emptied and cleaned.
Chain oil
• We recommend the use of special oil (chain oil) with
good adhesion characteristics.
• Never use waste oil. This results in damage to the oil
pump, the bar and the chain.
• It is important to use oil of the right grade (suitable
viscosity range) to suit the air temperature.
• In temperatures below 32°F (0°C) some oils become
too viscous. This can overload the oil pump and result
in damage to the oil pump components.
• Contact your service agent when choosing chain oil.
English – 19
Page 20
FUEL HANDLING
Fueling
WARNING! Taking the following
precautions, will lessen the risk of fire:
!
Do not smoke and do not place any hot
objects in the vicinity of fuel.
Always stop the engine and let it cool for
a few minutes before refueling.
When refuelling, open the fuel cap slowly
so that any excess pressure is released
gently.
Tighten the fuel cap carefully after
refueling.
Always move the machine away from the
refueling area and source before
starting.
Clean the area around the fuel cap. Clean the fuel and
chain oil tanks regularly. The fuel filter must be replaced
at least once a year. Contamination in the tanks causes
malfunction. Make sure the fuel is well mixed by shaking
the container before refuelling. The capacities of the chain
oil tank and fuel tank are carefully matched. You should
therefore always fill the chain oil tank and fuel tank at the
same time.
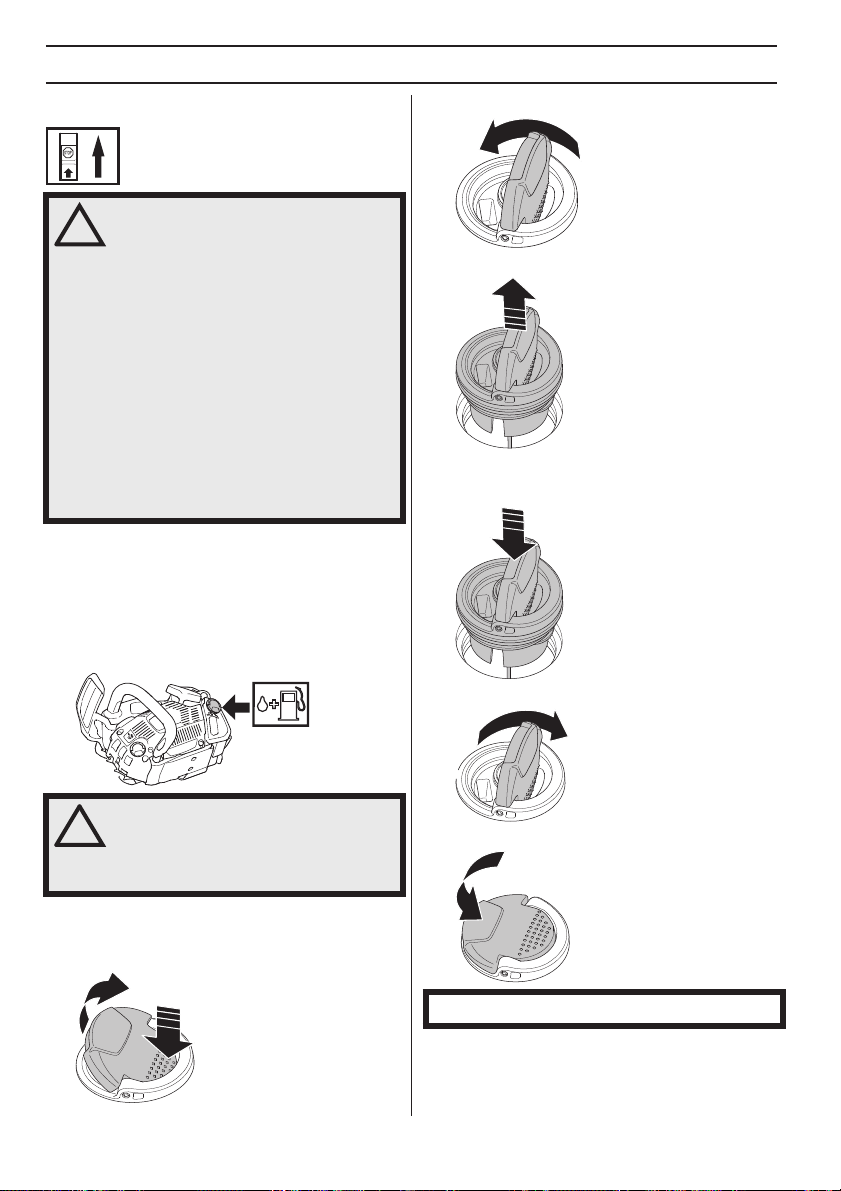
• Loosen the cap by turning it counterclockwise.
• Remove the cap.
Replacing fuel cap and chain oil cap
• Insert the cap with the flip lever in an upright position.
WARNING! Fuel and fuel vapor are highly
flammable. Take care when handling fuel
!
and chain oil. Be aware of the risks of
fire, explosion and those associated with
inhalation.
Removing fuel cap and chain oil cap
• Press down on the textured area of the flip lever and
lift to an upright position.
20 – English
• Tighten the cap securely by turning it clockwise.
• Fold the flip lever down.
IMPORTANT! Always replace a damaged cap.
Page 21

FUEL HANDLING
Fuel safety
• Never refuel the machine while the engine is running.
• Make sure there is plenty of ventilation when refuelling
or mixing fuel (gasoline and 2-stroke oil).
• Move the machine at least 10 ft (3 m) from the
refuelling point before starting it.
• Never start the machine:
1 If you have spilled fuel or chain oil on the machine.
Wipe off the spillage and allow remaining fuel to
evaporate.
2 If you have spilled fuel on yourself or your clothes,
change your clothes. Wash any part of your body that
has come in contact with fuel. Use soap and water.
3 If the machine is leaking fuel. Check regularly for leaks
from the fuel cap and fuel lines.
WARNING! Never use a machine with
visible damage to the spark plug guard
!
and ignition cable. A risk of sparking
arises, which can cause a fire.
Transport and storage
• Always store the chain saw and fuel so that there is no
risk of leakages or fumes coming into contact with
sparks or naked flames from electrical equipment,
electric motors, relays/switches, boilers and the like.
• Always store fuel in an approved container designed
for that purpose.
• For longer periods of storage or for transport of the
chain saw, the fuel and chain oil tanks should be
emptied. Ask where you can dispose of waste fuel and
chain oil at your local gas station.
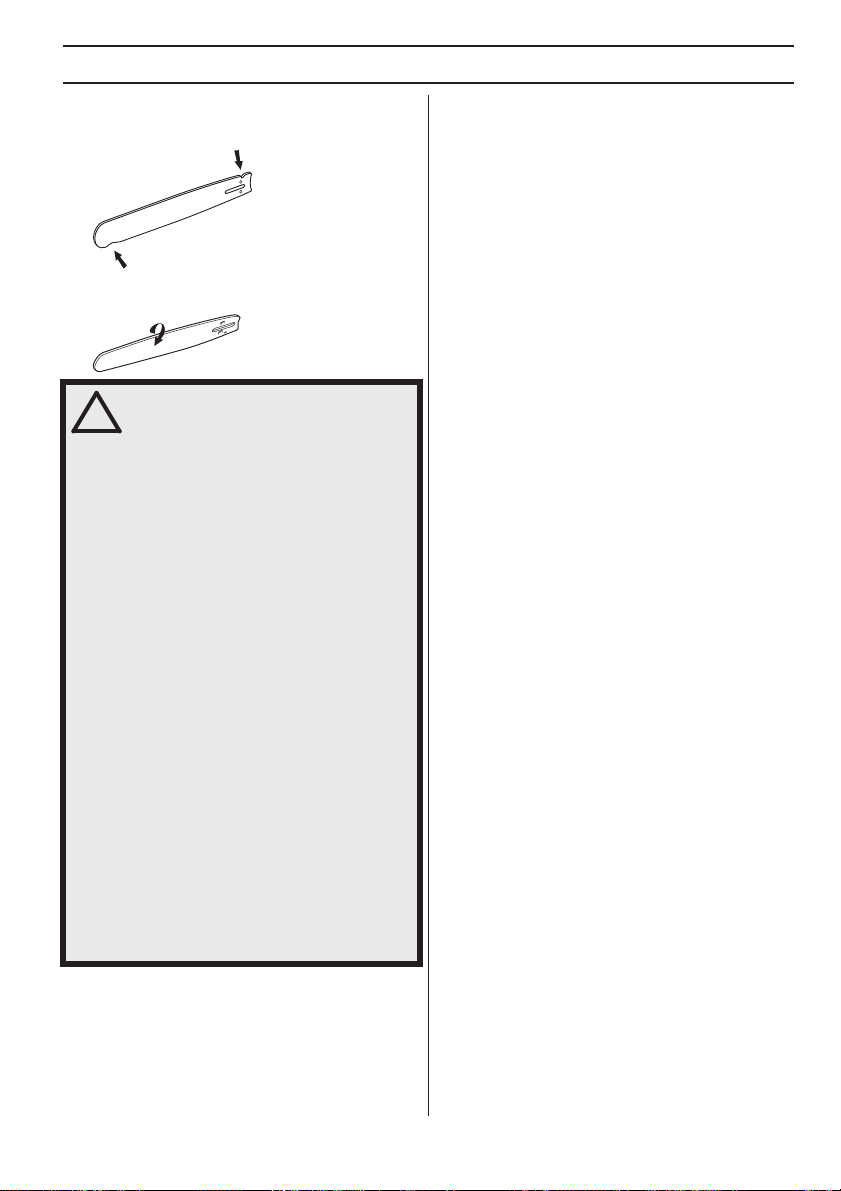
• The guide bar cover must always be fitted to the
cutting attachment when the machine is being
transported or in storage, in order to prevent accident
contact with the sharp chain. Even a non-moving
chain can cause serious cuts to yourself or persons
you bump into with an exposed chain.
• Secure the machine during transport.
Long-term storage
Empty the fuel/oil tanks in a well ventilated area. Store the
fuel in approved cans in a safe place. Fit the guide bar
cover. Clean the machine. See instructions under the
heading Maintenance schedule.
Ensure the machine is cleaned and that a complete
service is carried out before long-term storage.
English – 21
Page 22
STARTING AND STOPPING
Starting and stopping
WARNING! Note the following before
starting:
!
The chain brake must be engaged when
the chain saw is started to reduce the
chance of contact with the moving chain
during starting.
Never start a chain saw unless the bar,
chain and all covers are fitted correctly.
Otherwise the clutch can come loose and
cause personal injuries.
Place the machine on firm ground. Make
sure you have a secure footing and that
the chain cannot touch anything.
If you need to start the chain saw in the
tree, see instructions under the heading
Starting the saw in the tree, under the
section Working techniques.
Keep people and animals well away from
the working area.
Cold engine
Starting: The chain brake should be activated when
starting the chain saw. Activate the chain brake by
pushing the front hand guard forwards.
Primer bulb: Press the air purge repeatedly until fuel
begins to fill the bulb. The bulb need not be completely
filled.
Warm engine
Use the same starting procedure as for a cold engine but
without setting the choke control in the choke position.
Starting
Grip the front handle with your left hand and push the
chain saw to the ground. Grip the starter handle with your
right hand and pull out the starter cord slowly until you feel
a resistance (as the starter pawls engage) and then pull
firmly and rapidly.
your hand
CAUTION! Do not pull the starter cord all the way out and
do not let go of the starter handle when the cord is fully
extended. This can damage the machine.
Push down the choke control as soon as the engine fires
which can be heard through a "puff" sound. Keep on
pulling the cord powerfully until the engine starts. When
the engine starts, quickly apply full throttle; the throttle
start lock will automatically disengage.
IMPORTANT! As the chain brake is still activated the
engine must return to idling speed as soon as possible
by disengaging the throttle latch in order to avoid
unnecessery wear on the clutch assembly.
Never wrap the starter cord around
Choke: Set the choke control in the choke position.
22 – English
Note! Pull the front hand guard towards the front handle.
The chain brake is now disengaged. Your saw is ready for
use.
Page 23
STARTING AND STOPPING
WARNING! Long term inhalation of the
engine’s exhaust fumes, chain oil mist
!
and dust from sawdust can represent a
health risk.
• Never start a chain saw unless the bar, chain and all
covers are fitted correctly. See instructions under the
heading Assembly. Without a bar and chain attached
to the chain saw the clutch can come loose and cause
serious injury.
• The chain brake should be activated when starting. Se
instructions under the heading Start and stop. Do not
drop start. This method is very dangerous because
you may lose control of the saw.
• Never start the machine indoors. Exhaust fumes can
be dangerous if inhaled.
• Observe your surroundings and make sure that there
is no risk of people or animals coming into contact with
the cutting equipment.
Stopping
The engine is stopped by pushing the stop switch to the
stop position.
• Always hold the saw with both hands. The right hand
should be on the top handle, and the left hand on the
front handle. All people, whether right or left handed,
should use this grip. Use a firm grip with thumbs and
fingers encircling the chain saw handles.
English – 23
Page 24
WORKING TECHNIQUES
Before use:
1
3
2
4
5, 7
8
6
1 Check that the chain brake works correctly and is not
damaged.
2 Check that the throttle lockout works correctly and is
not damaged.
3 Check that the stop switch works correctly and is not
damaged.
4 Check that all handles are free from oil.
5 Check that the anti vibration system works and is not
damaged.
6 Check that the muffler is securely attached and not
damaged.
7 Check that all parts of the chain saw are tightened
correctly and that they are not damaged or missing.
8 Check that the chain catcher is in place and not
damaged.
9 Check the chain tension.
General working instructions
IMPORTANT!
This section describes basic safety rules for using a
chain saw. This information is never a substitute for
professional skills and experience. If you get into a
situation where you feel unsafe, stop and seek expert
advice. Contact your chain saw dealer, service agent or
an experienced chain saw user. Do not attempt any task
that you are not sure you can handle!
Before using a chain saw you must understand the
effects of kickback and how to avoid them. See
instructions under the heading How to avoid kickback.
Before using a chain saw you must understand the
difference between cutting with the top and bottom
edges of the bar. See instructions under the headings
How to avoid kickback and Machine’s safety equipment.
9
Wear personal protective equipment. See instructions
under the heading ”Personal protective equipment”.
Basic safety rules
1 Look around you:
• To ensure that people, animals or other things cannot
affect your control of the machine.
• To make sure that none of the above might come
within reach of your saw or be injured by falling trees.
CAUTION! Follow the instructions above, but do not use a
chain saw in a situation where you cannot call for help in
case of an accident.
2 All tree maintenance work above ground level must be
carried out by two or more persons with the right
training (see instructions under the heading
Important). At least one person should be on the
ground to carry out safe rescue procedures and/or get
help should an emergency arise.
3 During tree maintenance work above ground level, the
working area should always be secured and marked
out with signs, tape or the like. The person(s) on the
ground should always inform the person(s) working
above before they enter the secure working area.
4 Do not use the machine in bad weather, such as
dense fog, heavy rain, strong wind, intense cold, etc.
Working in bad weather is tiring and often brings
added risks, such as icy ground, unpredictable felling
direction, etc.
5 Take great care when removing small branches and
avoid cutting bushes (i.e. cutting many small branches
at the same time). Small branches can be grabbed by
the chain and thrown back at you, causing serious
injury.
During tree maintenance work above ground level the
chain saw must be secured. Secure the chain saw by
attaching a safety line to the rope eyelet on the chain saw.
24 – English
6 Make sure you can move and stand safely. Check the
area around you for possible obstacles (roots, rocks,
branches, ditches, etc.) in case you have to move
Page 25
WORKING TECHNIQUES
suddenly. Take great care when working on sloping
ground.
7 Take great care when cutting a tree that is under
tension. A tree that is under tension may spring back
to its normal position before or after being cut. If you
position yourself incorrectly or make the cut in the
wrong place the tree may hit you or the machine and
cause you to lose control. Both situations can cause
serious personal injury.
WARNING! Sometimes chips get stuck in
the clutch cover causing the chain to
!
jam. Always stop the engine before
cleaning.
8 Before moving your chain saw switch off the engine
and lock the chain using the chain brake. Carry the
chain saw with the bar and chain pointing backwards.
Fit a guard to the bar before transporting the chain
saw or carrying it for any distance.
handles. You should use this grip whether you are
right-handed or left-handed. This grip minimizes the
effect of kickback and lets you keep the chain saw
under control.
3 Most kickback accidents happen during limbing. Make
sure you are standing firmly and that there is nothing
in the way that might make you trip or lose your
balance.
Lack of concentration can lead to kickback if the
kickback zone of the bar accidentally touches a
branch, nearby tree or some other object.
Have control over the workpiece. If the pieces you
intend to cut are small and light, they can jam in the
saw chain and be thrown towards you. Even if this
does not need to be a danger, you may be surprised
and lose control of the saw. Never saw stacked logs or
branches without first separating them. Only saw one
log or one piece at a time. Remove the cut pieces to
keep your working area safe.
4 Never use the chain saw above shoulder height
and avoid cutting with the tip of the bar. Never use
the chain saw one-handed!
9 When you put the chain saw on the ground, lock the
saw chain using the chain brake and ensure you have
a constant view of the machine. Switch the engine off
before leaving your chain saw for any length of time.
General rules
1 If you understand what kickback is and how it happens
then you can reduce or eliminate the element of
surprise. By being prepared you reduce the risk.
Kickback is usually quite mild, but it can sometimes be
very sudden and violent.
2 Always hold the chain saw firmly with your right hand
on the top handle and your left hand on the front
handle. Wrap your fingers and thumbs around the
5 Always use a fast cutting speed, i.e. full throttle.
English – 25
Page 26
WORKING TECHNIQUES
6 If you have to cut branches or the like that are above
shoulder height, a working platform or scaffold tower
is recommended.
7 Take great care when you cut with the top edge of the
bar, i.e. when cutting from the underside of the object.
This is known as cutting with a pushing chain. The
chain tries to push the chain saw back towards the
user. If the saw chain is jamming, the saw may be
pushed back at you.
8 Unless the user resists this pushing force there is a
risk that the chain saw will move so far backwards that
only the kickback zone of the bar is in contact with the
tree, which can lead to a kickback.
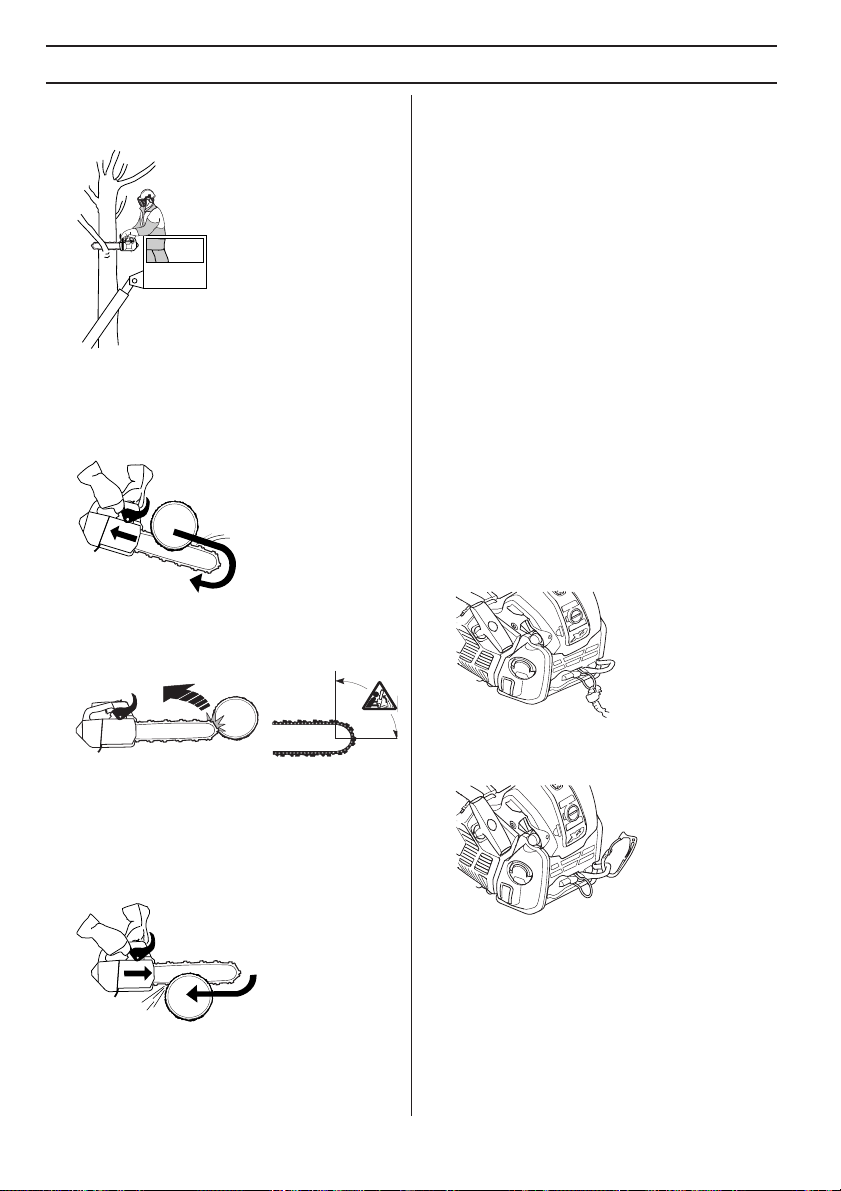
Working with tree service chain-saws from a rope and harness
This chapter sets out working practices to reduce the risk
of injury from tree service chainsaws when working at
height from a rope and harness. While it may form the
basis of guidance and training literature, it should not be
regarded as a substitute for formal training.
General requirements working at height
Operators of tree service chainsaws working at height
from a rope and harness should never work alone. A
competent ground worker trained in appropriate
emergency procedures should assist them.
Operators of tree service chainsaws for this work should
be trained in general safe climbing and work positioning
techniques and shall properly equipped with harnesses,
ropes, strops, karabiners and other equipment for
maintaining secure and safe working positions for both
themselves and the saw.
Preparing to use the saw in the tree
The chain saw should be checked, fuelled, started and
warmed up by the ground worker and the chain brake
should be engaged before it is sent up to the operator in
the tree. The chainsaw should be fitted with a suitable
strop for attaching to the operator’s harness:
a) attach the rope around the rope eyelet on the rear of the
saw.
Cutting with the bottom edge of the bar, i.e. from the
top of the object downwards, is known as cutting with
a pulling chain. In this case the chain saw pulls itself
towards the tree and the front edge of the chain saw
body rests naturally on the trunk when cutting. Cutting
with a pulling chain gives the operator better control
over the chain saw and the position of the kickback
zone.
9 Follow the instructions on sharpening and maintaining
your bar and chain. When you replace the bar and
chain use only combinations that are recommended
by us. See instructions under the headings Cutting
equipment and Technical data.
26 – English
b) provide suitable karabiners to allow indirect (i.e. via the
strop) and direct attachment (i.e. at the attachment point
on the saw) of saw to the operators harness.
CAUTION! The belt eyelet is not dimensioned for use with
a so-called safety rope. Use the rope eyelet for this
purpose.
c) ensure the saw is securely attached when it is being
sent up to the operator.
d) ensure the saw is secured to the harness before it is
disconnected from the means of ascent.
The saw should only be attached to the recommended
attachment points on the harness. These may be at midpoint (front or rear) or at the sides. Where possible
attaching the saw to centre rear mid-point will keep it clear
Page 27

WORKING TECHNIQUES
of climbing lines and support its weight centrally down the
operator’s spine.
When moving the saw from any attachment point to
another, operators should ensure it is secured in the new
position before releasing it from the previous attachment
point.
Using the chainsaw in the tree
An analysis of accidents with these saws during tree
service operations shows the primary cause as being
inappropriate one-handed use of the saw. In the vast
majority of accidents, operators fail to adopt a secure
work position witch allows them to hold both handles of
the saw. This results in an increased risk of injury due to:
• not having a firm grip on the saw if it kicks back.
• a lack of control of the saw such that it is more liable
to contact climbing lines and operators body
(particularly the left hand and arm)
• loosing control from insecure work position resulting
in contact with the saw (unexpected movement during
operation of the saw)
Securing the work position for two-handed use
To allow the operator to hold the saw with both hands,
they should as general rule, aim for secure work position
where they are operating the saw at:
• hip level when cutting horizontal sections.
• solar plexus level when cutting vertical sections.
Where the operator is working close into vertical stems
with a low lateral forces on their work position, then a good
footing may be all that is needed to maintain a secure
work position. However as operators move away from the
stem, they will need to take steps to remove or counteract
the increasing lateral forces by, for example, a re-direct of
the main line via a supplementary anchor point or using
an adjustable strop direct from the harness to a
supplementary anchor point.
Gaining a good footing at the working position can be
assisted by use of a temporary foot stirrup created from
an endless sling.
Starting the saw in the tree
When starting the saw in the tree, the operator should:
a) apply the chain brake before starting.
b) hold saw on either the left or right of the body when
starting:
1 on the left side hold the saw with the left hand on the
front handle and thrust the saw away from the body
while holding the pull starter cord in the other hand.
2 on the right side, hold the saw with the right hand on
either handle and thrust the saw away from the body
while holding the pull starter cord in the left hand.
The chain brake should always be engaged before
lowering a running saw onto its strop. Operators should
always check the saw has sufficient fuel before
undertaking critical cuts.
One-hand use of the chainsaw
Operators should never use a chain saw onehanded.
Operators should never:
• cut with the kickback zone at the tip of the chainsaw
guide bar
• ‘hold and cut’ sections.
• attempt to catch falling sections.
• Cut in the tree when he/she is only secured with one
rope, always use 2 secured lines.
• check condition of harness, belt and ropes at regular
frequent intervals.
Freeing a trapped saw
If the saw should become trapped during cutting,
operators should:
• switch off the saw and attach it securely to the tree
inboard (i.e. towards the truck side) of the cut or to a
separate tool line.
• pull the saw from the kerf whilst lifting the branch as
necessary.
• if necessary, use a handsaw or second chain saw to
release the trapped saw by cutting a minimum of 30
cm away from the trapped saw.
Whether a handsaw or a chainsaw is used to free a stuck
saw, the release cuts should always be outboard (toward
the tips of the branch), in order to prevent the saw being
taken with the section and further complicating the
situation.
Basic cutting technique
General
• Always use full throttle when cutting!
• Reduce the speed to idle after every cut (running the
engine for too long at full throttle without any load, i.e.
without any resistance from the chain during cutting,
can lead to serious engine damage).
• Cutting from above = Cutting with a pulling chain.
• Cutting from below = Cutting with pushing chain.
Cutting with a pushing chain increases the risk of
kickback. See instructions under the heading How to
avoid kickback.
Terms
Cutting = General term for cutting through wood.
Limbing = Cutting branches off a felled tree.
Splitting = When the object you are cutting breaks off
before the cut is complete.
English – 27
Page 28
WORKING TECHNIQUES
There are five important factors you should consider
before making a cut:
1 Make sure the cutting equipment will not jam in the
cut.
2 Make sure the object you are cutting will not split.
3 Make sure the chain will not strike the ground or any
other object during or after cutting.
risk that the chain will touch the ground when you finish
the cut.
Cut all the way through the log from above. Avoid letting
the chain touch the ground as you finish the cut. Maintain
full throttle but be prepared for what might happen.
- If it is possible (can you turn the log?) stop cutting about
2/3 of the way through the log.
4 Is there a risk of kickback?
5 Do the conditions and surrounding terrain affect how
safely you can stand and move about?
Two factors decide whether the chain will jam or the object
that you are cutting will split: the first is how the object is
supported before and after cutting, and the second is
whether it is in tension.
In most cases you can avoid these problems by cutting in
two stages; from the top and from the bottom. You need to
support the object so that it will not trap the chain or split
during cutting.
WARNING! If the chain jams in the cut:
stop the engine! Don’t try to pull the
!
chain saw free. If you do you may be
injured by the chain when the chain saw
suddenly breaks free. Use a lever to open
up the cut and free the chain saw.
The following instructions describe how to handle the
common situations you are likely to encounter when using
a chain saw.
Cutting
The log is lying on the ground. There is little risk of the
chain jamming or the object splitting. However there is a
- Turn the log and finish the cut from the opposite side.
The log is supported at one end. There is a high risk
that it will split.
Start by cutting from below (about 1/3 of the way through).
- Finish by cutting from above so that the two cuts meet.
The log is supported at both ends. There is a high risk
that the chain will jam.
28 – English
Page 29
WORKING TECHNIQUES
!
- Start by cutting from above (about 1/3 of the way
through).
- Finish by cutting from below so that the two cuts meet.
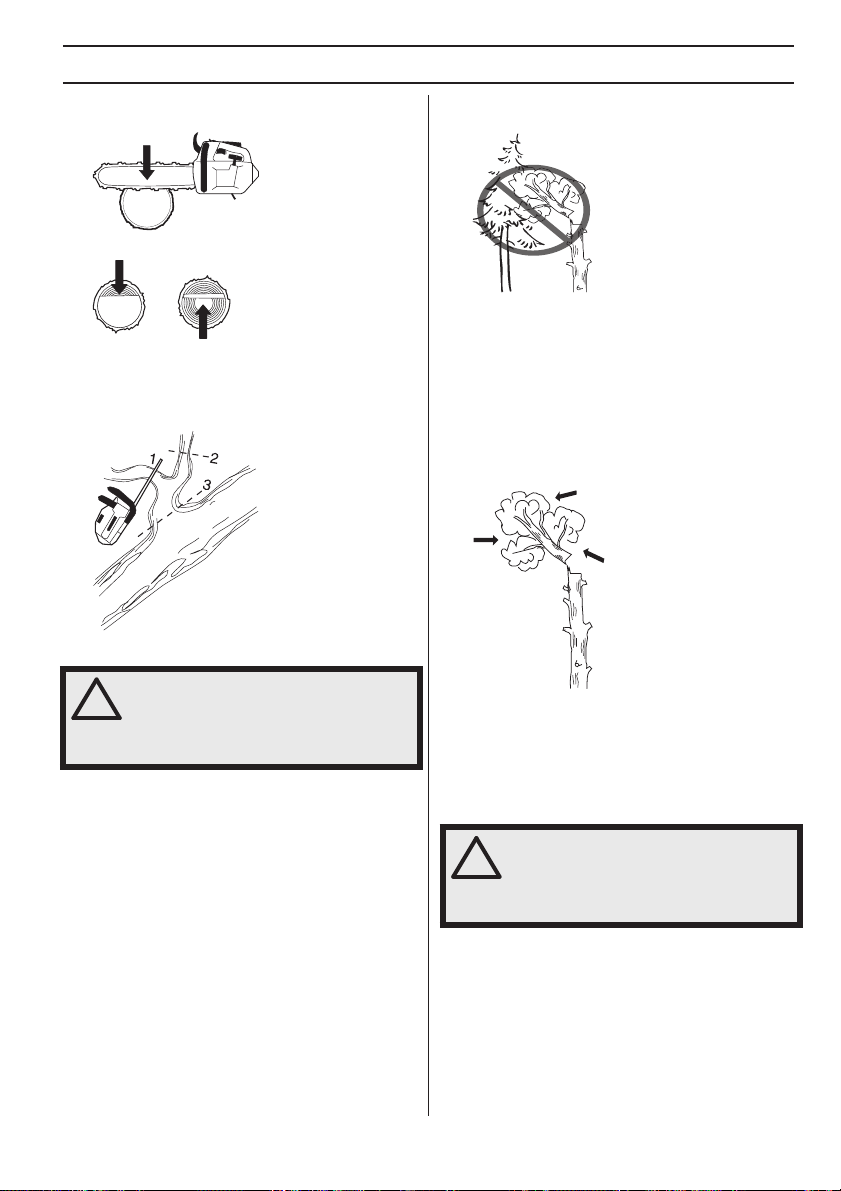
Limbing
When limbing thick branches you should use the same
approach as for cutting.
Cut difficult branches piece by piece.
Felling technique for tree tops
”jammed” tree top is very dangerous (see point 4 in this
section).
Once you have decided which way you want the top of the
tree to fall you must assess which way the top of the tree
would fall naturally.
Several factors affect this:
• Lean of the tree
• Bend
• Wind direction
• Arrangement of branches
• Weight of snow
WARNING! It takes a lot of experience to
fell a tree. Inexperienced users of chain
!
saws should not fell trees. Do not
attempt any task beyond your experience
level!
Safe distance
During tree maintenance work above ground level, the
working area must always be secured and marked out
with signs, tape or the like. The safe distance between the
top of the tree that is to be felled and the nearest
workplace must be at least 2 1/2 times the height of the
tree. Make sure that no-one else is in this risk zone before
or during felling.
Felling direction
The aim is to fell the tree in a position where you can limb
and cross-cut the log as easily as possible. You want it to
fall in a location where you can stand and move about
safely. The main thing to avoid is that the falling tree top
should get jammed in another tree. Taking down a
You may find you are forced to let the tree-top fall in its
natural direction because it is impossible or dangerous to
try to make it fall in the direction you first intended.
Another very important factor, which does not affect the
felling direction but does affect your safety, is to make sure
the tree has no damaged or dead branches that might
break off and hit you during felling.
WARNING! During critical felling
operations, hearing protectors should be
lifted immediately when sawing is
completed so that sounds and warning
signals can be heard.
Topping a tree
Topping a tree is done using three cuts. First you make the
directional cuts, which consist of the top cut and the
bottom cut, then you finish with the felling cut. By placing
these cuts correctly you can control the felling direction
very accurately.
Directional cuts
To make the directional cuts you begin with the top cut.
Aim using the chain saw’s felling direction mark (1)
towards a predetermined target in an appropriate
English – 29
Page 30
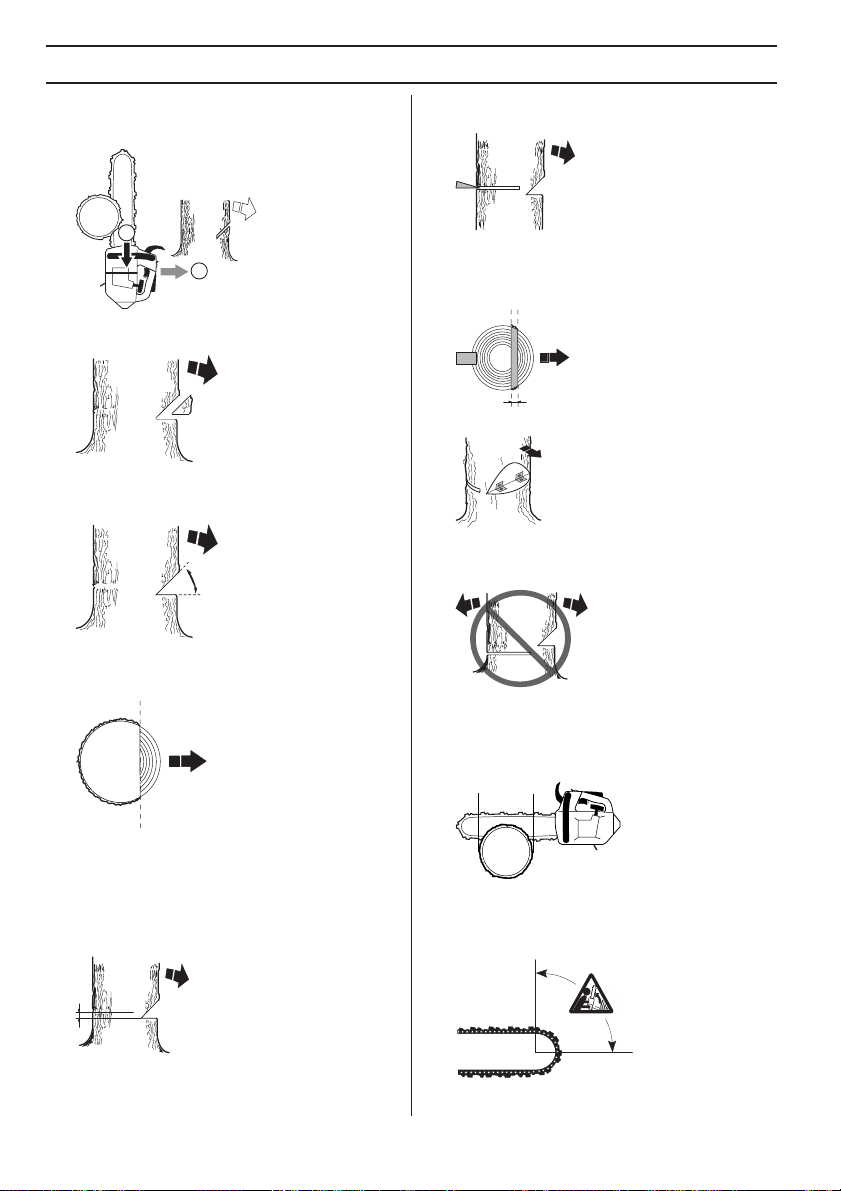
WORKING TECHNIQUES
direction (2). Try to maintain your position in the tree on
the right side and cut on the pull stroke. Ensure that you
can see the bar during the whole part of your operation.
a wedge or breaking bar into the cut as soon as it is deep
enough.
1
2
Next make the bottom cut so that it finishes exactly at the
end of the top cut.
The directional cuts should run 1/4 of the diameter
through the trunk and the angle between the top cut and
bottom cut should be 60
The line where the two cuts meet is called the directional
cut line. This line should be perfectly horizontal and at
right angles (90
° - 70°.
°) to the chosen felling direction.
Finish the felling cut parallel with the directional cut line so
that the distance between them is at least 1/10 of the
trunk diameter. The uncut section of the trunk is called the
felling hinge.
The felling hinge controls the direction that the tree falls in.
All control over the felling direction is lost if the felling
hinge is too narrow or non-existent, or if the directional
cuts and felling cut are badly placed.
We recommend that you use a bar that is longer than the
diameter of the tree, so that you can make the felling cut
and directional cuts with single cutting strokes. See the
Technical data section to find out which lengths of bar are
recommended for your saw.
Felling cut
The felling cut is made from the opposite side of the tree
and it must be perfectly horizontal. Try to take a correct
position so you are able to cut on the pull stroke.
Make the felling cut about 0-1.5 inches (0-3 cm) above the
bottom directional cut.
Use full throttle and bring the bar and chain slowly into the
tree. Make sure the tree does not start to move in the
opposite direction to your intended felling direction. Drive
30 – English
There are methods for felling trees with a diameter larger
than the bar length. However these methods involve a
much greater risk that the kickback zone of the bar will
come into contact with the tree.
Page 31

WORKING TECHNIQUES
WARNING! Unless you have special
training we advise you not to fell trees
!
with a diameter larger than the bar length
of your saw!
Freeing a tree that has fallen badly
Cutting trees and branches that are in tension
Preparations:
Work out which side is in tension and where the point of
maximum tension is (i.e. where it would break if it was
bent even more).
Decide which is the safest way to release the tension and
whether you are able to do it safely. In complicated
situations the only safe method is to put aside your chain
saw and use a winch.
General advice:
Position yourself so that you will be clear of the tree or
branch when the tension is released.
Make one or more cuts at or near the point of maximum
tension. Make as many cuts of sufficient depth as
necessary to reduce the tension and make the tree or
branch break at the point of maximum tension.
What is kickback?
The word kickback is used to describe the sudden
reaction that causes the chain saw and bar to jump off an
object when the upper quadrant of the tip of the bar,
known as the kickback zone, touches an object.
Kickback always occurs in the cutting plane of the bar.
Normally the chain saw and bar are thrown backwards
and upwards towards the user. However, the chain saw
may move in a different direction depending on the way it
was being used when the kickback zone of the bar
touched the object.
Kickback only occurs if the kickback zone of the bar
touches an object.
Cutting the trunk into logs
See instructions under the heading Basic cutting
technique.
Never cut straight through a tree or branch that is in
tension!
How to avoid kickback
WARNING! Kickback can happen very
suddenly and violently; kicking the chain
!
saw, bar and chain back at the user. If
this happens when the chain is moving it
can cause very serious, even fatal
injuries. It is vital you understand what
causes kickback and that you can avoid
it by taking care and using the right
working technique.
English – 31
Page 32

MAINTENANCE
General
The user must only carry out the maintenance and
service work described in this manual. More extensive
work must be carried out by an authorized service
workshop.
Carburetor adjustment
Your Husqvarna product has been designed and
manufactured to specifications that reduce harmful
emissions.
AutoTune
The engine is equipped with AutoTune, so manual
adjustment of the carburettor’s H and L needles and the Tscrew no longer applies. Both needles and the T-screw
have been removed. AutoTune is a function that adjusts
the carburettor electronically, always resulting in optimal
adjustment.
WARNING! If the saw chain rotates while
idling, contact your servicing dealer. Do
!
not use the chain saw until it has been
properly adjusted or repaired.
Function
• The carburetor governs the engine’s speed via the
throttle control. Air and fuel are mixed in the
carburetor. The air/fuel mixture is adjustable.
• The automatic adjustment of the carburettor means
that the engine is adapted to local conditions, e.g. the
climate, altitude, petrol and the type of 2-stroke oil.
This function is controlled by AutoTune.
Engine adjustment
The following steps should be taken when the chain saw
is started for the first time or when outside circumstances
change (fuel, altitude, air filter etc.):Start the engine.
Accelerate the engine and saw a number of cuts in a thick
log (3-5 min.).
The chain saw must be run (8,000 - 12,000 rpm) the entire
time so that the carburettor can adjust itself.
Conditions
NOTE! There is an integrated speed governor in the
ignition system that limits the maximum speed. When the
speed governor is activated, you will get the same sound
experience as when the chain saw 4-cycles.
Checking, maintaining and servicing chain saw safety equipment
Note! All servicing and repair work on the machine
requires special training. This is especially true of the
machine
′s safety equipment. If your machine fails any of
the checks described below we recommend you to
contact our servicing dealer.
Chain brake and front hand guard
Checking brake band wear
• Brush off any wood dust, resin and dirt from the chain
brake and clutch drum. Dirt and wear can impair
operation of the brake.
• Regularly check that the brake band is at least 0.024
inch (0,6 mm) thick at its thinnest point.
Checking the front hand guard
• Make sure the front hand guard is not damaged and
that there are no visible defects such as cracks.
• Move the front hand guard forwards and back to make
sure it moves freely and that it is securely anchored to
the clutch cover.
32 – English
Checking the brake trigger
• Place the chain saw on firm ground and start it. Make
sure the chain does not touch the ground or any other
Page 33

MAINTENANCE
object. See the instructions under the heading Start
and stop.
• Start the chain saw and apply full throttle. Release the
throttle control and check that the chain stops and
remains stationary. If the chain rotates when the
throttle trigger is in the idle position, contact your
servicing dealer.
Chain catcher
• Grasp the chain saw firmly, wrapping your fingers and
thumbs around the handles.
• Apply full throttle and activate the chain brake by tilting
your left wrist forward onto the front hand guard. Do
not let go of the front handle.
immediately.
The chain should stop
Throttle trigger lockout
• Make sure the throttle control is locked at the idle
setting when the throttle lockout is released.
• Press the throttle lockout and make sure it returns to
its original position when you release it.
• Check that the chain catcher is not damaged and is
firmly attached to the body of the chain saw.
Vibration damping system
• Regularly check the vibration damping units for cracks
or deformation.
• Make sure the vibration damping units are securely
attached to the engine unit and handle unit.
Stop switch
• Start the engine and make sure the engine stops
when you move the stop switch to the stop setting.
• Check that the throttle trigger and throttle lockout
move freely and that the return springs work properly.
English – 33
Page 34

MAINTENANCE
!
Muffler
• Never use a machine that has a faulty muffler.
• Regularly check that the muffler is securely attached
to the machine.
The muffler is designed to reduce the noise level and to
direct the exhaust gases away from the operator. The
exhaust gases are hot and can contain sparks, which may
cause fire if directed against dry and combustible
material.
The muffler is equipped with a special spark arrestor
screen. The spark arrestor screen should be cleaned
once a month. This is best done with a wire brush. A
blocked screen will cause the engine to overheat and may
lead to serious damage.
Note! The screen must be replaced if it is damaged. If the
screen is blocked the machine will overheat and this will
cause damage to the cylinder and piston. Never use a
machine with a muffler that is in poor condition.
use a muffler if the spark arrestor screen is missing
or defective.
Never
Starter housing
WARNING! When the recoil spring is
wound up in the starter housing it is
under tension and can, if handled
carelessly, pop out and cause personal
injury.
Care must be exercised when replacing
the return spring or the starter cord.
Wear protective glasses and protective
gloves.
Changing a broken or worn starter cord
• Loosen the screws that hold the starter against the
crankcase and remove the starter.
• Pull out the cord approx. 30 cm (12 inches) and hook
it into the notch in the rim of the pulley. Release the
recoil spring by letting the pulley rotate slowly
backwards.
34 – English
Page 35

MAINTENANCE
• Undo the bolt in the centre of the pulley and remove
the pulley.
• Hold the starter handle and pull the starter cord so
that at least 10mm (0.40”) of the spring guide is
visible. Press the starter handle cover at the same
time and slide it out of the starter handle.
10mm
• If the starter cord is broken inside the starter handle,
press down the cover and push it sideways with the
combination spanner.
• Make a simple knot with approximately 10mm (0.40”)
of the free end protruding (1). Turn the protruding part
parallel to the starter cord and press down the knot
into its position in the spring guide (2).
1
10mm
• Pull the starter cord against the starter handle so at
least 10mm (0.40”) of the spring guide is visible. Insert
the starter handle cover.
2
10mm
• Assemble the starter and tighten the screws.
Tensioning the recoil spring
• Hook the starter cord in the notch in the pulley and
turn the starter pulley about 2 turns clockwise.
Note! Check that the pulley can be turned an
additional 1/2 turn when the starter cord is pulled all
the way out.
• Insert and fasten a new starter cord to the pulley. Wind
approx. 3 turns of the starter cord on the starter pulley.
Fit the starter pulley against the return spring so that
the ends of the return spring hook into the starter
pulley. Fit the screw into the centre of the starter
pulley.
• Insert the starter cord through the hole in the starter
housing. Insert the starter cord through the starter
handle and the spring guide.
Changing a broken recoil spring
• Lift up the starter pulley. See instructions under the
heading Changing a broken or worn starter cord.
Remember that the recoil spring is coiled under
tension in the starter housing.
• Remove the cassette with the recoil spring from the
starter.
English – 35
Page 36

MAINTENANCE
• Lubricate the recoil spring with light oil. Fit the
cassette with recoil spring in the starter. Fit the starter
pulley and tension the recoil spring.
The filter can be cleaned more thoroughly by washing it in
water and detergent.
An air filter that has been in use for a long time cannot be
cleaned completely. The filter must therefore be replaced
with a new one at regular intervals.
must always be replaced.
A damaged air filter
Fitting the starter
• To fit the starter, first pull out the starter cord and place
the starter in position against the crankcase. Then
slowly release the starter cord so that the pulley
engages with the pawls.
• Fit and tighten the screws that hold the starter.
Air filter
The air filter must be regularly cleaned to remove dust and
dirt in order to avoid:
• Carburettor malfunctions.
• Starting problems.
• Loss of engine power.
• Unnecessary wear to engine parts
• Excessive fuel consumption.
• Remove the air filter after taking off the air filter cover.
When refitting make sure that the air filter seals tightly
against the filter holder. Clean the filter by brushing or
shaking it.
A HUSQVARNA chain saw can be equipped with different
types of air filters according to working conditions,
weather, season, etc. Contact your dealer for advice.
Spark plug
The spark plug condition is influenced by:
• An incorrect fuel mixture (too much or incorrect type of
oil).
• A dirty air filter.
These factors cause deposits on the spark plug
electrodes, which may result in operating problems and
starting difficulties.
If the machine is low on power, difficult to start or runs
poorly at idle speed: always check the spark plug first
before taking any further action. If the spark plug is dirty,
clean it and check that the electrode gap is 0.020 inch (0,5
mm). The spark plug should be replaced after about a
month in operation or earlier if necessary.
Note! Always use the recommended spark plug type! Use
of the wrong spark plug can damage the piston/cylinder.
Check that the spark plug is fitted with a suppressor.
36 – English
Page 37

MAINTENANCE
!
Lubricating the bar tip sprocket
Lubricate the bar tip sprocket each time you refuel. Use
the special grease gun and a good quality bearing grease.
clockwise will increase the oil flow, turning it anticlockwise
will reduce the oil flow.
The oil tank should become nearly empty by time fuel is
used up. Be sure to refill the oil tank every time when
refueling the saw.
WARNING! The engine must be stopped
when making adjustments.
Needle bearing lubrication
The clutch drum has a needle bearing on the output shaft.
This needle bearing must be lubricated regularly (once a
week).
When lubricating, remove the clutch cover by loosening
the bar nut. Lay the saw on its side with the clutch drum
upwards.
Lubrication involves grease being squirted into the centre
of the crankshaft using a grease gun.
Adjustment of the oil pump
The oil pump is adjustable. Adjustments are made by
turning the screw with a screwdriver. Turning the screw
Cooling system
To keep the working temperature as low as possible the
machine is equipped with a cooling system.
The cooling system consists of:
1 Air intake on the starter.
2 Air guide plate.
3 Fins on the flywheel.
4 Clutch cover
4
3
2
1
Clean the cooling system with a brush once a week, more
often in demanding conditions. A dirty or blocked cooling
system results in the machine overheating which causes
damage to the piston and cylinder.
Winter use
Running problems can occur when using the machine in
the cold and snowy conditions caused by:
• Too low engine temperature.
• Icing of the air filter and carburetor.
Special measures are therefore often required:
• Partly mask the air inlet on the starter to increase the
working temperature of the engine.
English – 37
Page 38

MAINTENANCE
Temperature -5°°°°C (23°°°°F) or colder
For running the machine in cold weather or powder snow,
a special cover is available, which is mounted on the
starter housing. This reduces the intake of cold air and
prevents large amounts of snow from being sucked in.
Part number: 579 38 48-01.
CAUTION! If the special winterising kit has been fitted or
any measures have been taken to increase the
temperature these changes must be reversed before the
machine is used in normal temperature conditions.
Otherwise there is a risk of overheating, resulting in
severe damage to the engine.
38 – English
Page 39

MAINTENANCE
Maintenance schedule
The following is a list of the maintenance that must be performed on the machine. Most of the items are described in the
Maintenance section.
Daily maintenance Weekly maintenance Monthly maintenance
Check the brake band on the chain
Clean the outside of the machine. Check the cooling system weekly.
Check that the components of the
throttle trigger work safely. (Throttle
lockout and throttle trigger.)
Clean the chain brake and check that
it operates safely. Make sure that the
chain catcher is undamaged, and
replace it if necessary.
The bar should be turned daily for
more even wear. Check the
lubrication hole in the bar, to be sure it
is not clogged. Clean the bar groove.
If the bar has a sprocket tip, this
should be lubricated.
Check that the bar and chain are
getting sufficient oil.
Check the saw chain with regard to
visible cracks in the rivets and links,
whether the saw chain is stiff or
whether the rivets and links are
abnormally worn. Replace if
necessary.
Sharpen the chain and check its
tension and condition. Check the drive
sprocket for excessive wear and
replace if necessary.
Clean the starter units air intake.
Check that nuts and screws are tight.
Check that the stop switch works
correctly.
Check that there are no fuel leaks
from the engine, tank or fuel lines.
Check the condition of the air filter.
Check that the chain does not rotate
when the engine is idling.
Check the starter, starter cord and
return spring.
Check that the vibration damping
elements are not damaged.
Lubricate the clutch drum bearing. Clean the outside of the carburetor.
File off any burrs from the edges of
the bar.
Clean or replace the spark arrestor
screen on the muffler.
Clean the carburetor compartment.
Clean the air filter. Replace if
necessary.
brake for wear. Replace when less
than 0.024 inch (0,6 mm) remains at
the most worn point.
Check the clutch centre, clutch drum
and clutch spring for wear.
Clean the spark plug. Check that the
electrode gap is 0.020 inch (0,5 mm).
Check fuel hose for cracks or other
damage. Change if necessary.
Empty the fuel tank and clean the
inside.
Empty the oil tank and clean the
inside.
Check all cables and connections.
English – 39
Page 40

TECHNICAL DATA
Technical data
T540XP
Engine
Cylinder displacement, cu.in/cm
Cylinder bore, inch/mm 1.57/40
Stroke, inch/mm 1.18/30
Idle speed, rpm 3000
Power, kW/hp @ rpm 1,8/2,5 @ 10 200
Emissions Durability Period according to California Air
Resources Board, h.
Ignition system
Spark plug NGK CMR6H
Electrode gap, inch/mm 0.02/0,5
Fuel and lubrication system
Fuel tank capacity, US pint/litre 0.72/0,34
Oil pump capacity at 9,000 rpm, ml/min 5-12,5
Oil tank capacity, US pint/litre 0.42/0,20
Type of oil pump Adjustable
Weight
Chain saw without bar or chain, empty tanks, lb/kg 8,6/3,9
Chain/bar
Standard bar length, inch/cm 16”/41
Usable cutting length, inches/cm 15”/38
Pitch, inch/mm 3/8" /9,52
Thickness of drive links, inch/mm 0.050/1,3
Drive sprocket type/teeth Spur/6
Chain speed at 133% of maximum engine power
speed, ft/s / m/s.
NOTE! This spark ignition system complies with the Canadian ICES-002 standard.
3
2.3/37,7
125
84.6 / 25,8
40 – English
Page 41

TECHNICAL DATA
Recommended cutting equipment for USA
Following is a list of recommended cutting equipment for Husqvarna chainsaw model T540XP. This chainsaw model
equipped with either of the listed bar and saw chain combination(s), fulfills the requirements according to ANSI B175.12000 (Gasoline Powered Chain Saws - Safety Requirements).
The following list is the chain saw manufacturers recommendations. There may be other combinations available, which
will also achieve kickback reduction.
Chainsaw model Husqvarna T540XP met the kickback performance requirements of ANSI B175.1-2000 when tested
with the combinations of bars and saw chains listed below. The saw chain Husqvarna H37 is also classified as a low
kickback saw chain since it met the requirements for low kickback saw chain outlined in ANSI B175.1-2000. We
recommend to use only the listed combinations of bars and chains for chainsaw model Husqvarna T540XP. Other
chainsaw models may not meet the kickback requirements when equipped with the listed guide bar and saw chain
combinations.
Recommended cutting equipment for Canada
Following is a list of recommended cutting equipment for the Husqvarna chainsaw model T540XP. The listed
combination(s) of powerhead, bar and saw chain meet all requirements outlined in Canadian Standards Assosiation
Z62.1-03 (Chain Saws) and Z62.3-04 (Chain Saw Kickback).
Furthermore the saw chain Husqvarna H37 is evaluated and listed as a Type C Low Kickback Saw Chain according to
the provisions in Z62.3-04.
Kickback information
The guide bar nose radius is determined by either the maximum number of teeth in the nose sprocket or the
corresponding maximum nose radius of a solid bar.
As we are listing the maximum guide bar nose radius, you may use a guide bar with smaller nose radius than in our list.
For guide bars of the same length, all sprocket-nose guide bars of the same pitch and having the same number of
sprocket teeth may be considered to have equivalent kickback energy.
Guide bar and saw chain combinations
The following recommended combinations of bar and saw chain are type approved for your chain saw.
Guide bar Saw chain
Length, inch Pitch, inch Gauge, inch Max. nose radius Type Drive link count
12
14 52
16 56
3/8 0.050 9T
Husqvarna H37,
Husqvarna H36
45
Saw chain filing and file gauges
English – 41
Page 42

FEDERAL AND CALIFORNIA EMISSIONS CONTROL WARRANTY STATEMENT
IMPORTANT: This product is compliant with U.S. EPA
Phase 3 regulations for exhaust and evaporative
emissions. To ensure EPA Phase 3 compliance, we
recommend using only genuine Husqvarna brand
replacement parts. Use of non-compliant replacement
parts is a violation of federal law.
YOUR WARRANTY RIGHTS AND OBLIGATIONS
The EPA (U.S. Environmental Protection Agency), CARB
(California Air Resources Board), Environment Canada
and Husqvarna Forest & Garden are pleased to explain
the emissions control system’s warranty on your 20152016* small off-road engine. In U.S. and Canada, small
off-road engines must be designed, built, and equipped to
meet the applicable Federal or California stringent antismog standards. Husqvarna Forest & Garden must
warrant the emissions control system on your small offroad engine for the period of time listed below provided
there has been no abuse, neglect or improper
maintenance of your small off-road engine. Your emission
control system may include parts such as the carburetor,
fuel-injection system, the ignition system, catalytic
convertor, fuel tanks, fuel lines, fuel caps, valves,
canisters, filters, vapor hoses, clamps, connectors, and
other associated emission-related components. For
engines less than or equal to 80 cc, only the fuel tank is
subject to the evaporative emission control warranty
requirements of this section (California only). Where a
warrantable condition exists, Husqvarna Forest & Garden
will repair your small off-road engine at no cost to you
including diagnosis, parts and labor.
MANUFACTURER′′′′S WARRANTY
COVERAGE
The emissions control system is warranted for two years.
If any emissions-related part on your small off-road
engine is defective, the part will be repaired or replaced by
Husqvarna Forest & Garden.
OWNER′′′′S WARRANTY
RESPONSIBILITIES
• As the small off-road engine owner, you are
responsible for performance of the required
maintenance listed in your operator’s manual.
Husqvarna Forest & Garden recommends that you
retain all receipts covering maintenance on your small
off-road engine, but Husqvarna Forest & Garden
cannot deny warranty solely for the lack of receipts or
your failure to ensure the performance of all
scheduled maintenance.
• As the small off-road engine owner, you should
however be aware that Husqvarna Forest & Garden
may deny you warranty coverage if your small off-road
engine or a part has failed due to abuse, neglect, or
improper maintenance or unapproved modifications.
• You are responsible for presenting your small off-road
engine to a Husqvarna Forest & Garden distribution
center or service center as soon as the problem
42 – English
exists. The warranty repairs should be completed in a
reasonable amount of time, not to exceed 30 days. If
you have any questions regarding your warranty
coverage, you should contact Husqvarna Forest &
Garden in USA at 1-800-487-5951, in CANADA at 1800-805-5523 or send e-mail correspondence to
emissions@husqvarnagroup.com.
WARRANTY COMMENCEMENT DATE
The warranty period begins on the date the engine or
equipment is delivered to an ultimate purchaser.
LENGTH OF COVERAGE
Husqvarna Forest & Garden warrants to the ultimate
purchaser and each subsequent owner that the engine or
equipment is designed, built, and equipped so as to
conform with all applicable regulations adopted by EPA
and CARB, and is free from defects in materials and
workmanship that causes the failure of a warranted part
for a period of two years.
WHAT IS COVERED
REPAIR OR REPLACEMENT OF PARTS Repair or
replacement of any warranted part under the warranty
must be performed at no charge to the owner at a
warranty station. Warranty services or repairs will be
provided at all Husqvarna Forest & Garden distribution
centers that are franchised to service the subject engines.
Throughout the emissions warranty period of two years,
Husqvarna Forest & Garden must maintain a supply of
warranted parts sufficient to meet the expected demand
for such parts.
WARRANTY PERIOD Any warranted part that is
scheduled for replacement as required in the
maintenance schedule, is warranted for the period of time
prior to the first scheduled replacement point for that part.
If the part fails prior to the first scheduled replacement, the
part will be repaired or replaced by Husqvarna Forest &
Garden at no cost. Any such part repaired or replaced
under warranty is warranted for the remainder of the
period prior to the first scheduled replacement point for
the part. Any warranted part that is not scheduled for
replacement as required in the maintenance schedule, is
warranted for two years. If any such part fails during the
period of warranty coverage, it will be repaired and
replaced by Husqvarna Forest & Garden at no cost. Any
such part repaired or replaced under the warranty is
warranted for the remaining warranty period. Any
warranted part that is scheduled only for regular
inspection in the maintenance schedule will be warranted
for a period of two years. A statement in such written
instructions to the effect of ”repair or replace as
necessary” will not reduce the period of warranty
coverage. Any such part repaired or replaced under
warranty will be warranted for the remaining warranty
period.
DIAGNOSIS The owner must not be charged for
diagnostic labor that leads to the determination that a
warranted part is in fact defective, provided that such
diagnostic work is performed at a warranty station.
Page 43

FEDERAL AND CALIFORNIA EMISSIONS CONTROL WARRANTY STATEMENT
CONSEQUENTIAL DAMAGES Husqvarna Forest &
Garden is liable for damages to other engine components
proximately caused by a failure under warranty of any
warranted part.
EMISSION WARRANTY PARTS LIST
1 Carburetor and internal parts
2 Intake pipe, airfilter holder and carburetor bolts.
3 Airfilter and fuelfilter covered up to maintenance
schedule.
4 Spark Plug, covered up to maintenance schedule
5 Ignition Module
6 Fuel tank, line and cap
WHAT IS NOT COVERED
All failures caused by abuse, neglect or improper
maintenance are not covered.
ADD -ON OR MODIFIED PARTS
Add-on or modified parts that are not exempted by CARB
or EPA may not be used. The use of any non-exempted
add-on or modified parts will be grounds for disallowing a
warranty claim. Husqvarna Forest & Garden will not be
liable to warrant failures of warranted parts caused by the
use of a non-exempted add-on or modified part.
HOW TO FILE A CLAIM
If you have any questions regarding your warranty rights
and responsibilities, you should contact your nearest
authorized servicing dealer or call Husqvarna Forest &
Gardenin USA at 1-800-487-5951, in CANADA at 1-800805-5523 or send e-mail correspondence to
emissions@husqvarnagroup.com.
WHERE TO GET WARRANTY SERVICE
Warranty services or repairs are provided through all
Husqvarna Forest & Garden authorized servicing dealers.
MAINTENANCE, REPLACEMENT AND REPAIR OF EMISSION-RELATED PARTS
Any replacement part may be used in the performance of
any warranty maintenance or repairs and must be
provided without charge to the owner. Such use will not
reduce the warranty obligations of the manufacturer.
MAINTENANCE STATEMENT
The owner is responsible for the performance of all
required maintenance, as defined in the operator’s
manual.
*Current and following model year will be updated
annually in the warranty statement provided to the
consumer. For example, in 2012 model year, 2012-2013
will be specified.
English – 43
Page 44

AMERICAN STANDARD SAFETY PRECAUTIONS
!
Safety precautions for chain saw users
(ANSI B175.1-2000 Annex C)
Kickback safety precautions
WARNING! Kickback may occur when the
nose or tip of the guide bar touches an
!
object, or when the wood closes in and
pinches the saw chain in the cut.
Tip contact in some cases may cause a
lightning fast reverse reaction, kicking
the guide bar up and back towards the
operator.
Pinching the saw chain along the top of
the guide bar may push the guide bar
rapidly back towards the operator.
Either of these reactions may cause you
to lose control of the saw which could
result in serious personal injury.
Do not rely exclusively upon the safety
devices built into your saw. As a chain
saw user, you should take several steps
to keep your cutting jobs free from
accident or injury.
With a basic understanding of kickback, you can reduce
or eliminate the element of surprise. Sudden surprise
contributes to accidents.
Keep a good firm grip on the saw with both hands, the
right hand on the rear handle, and the left hand on the
front handle, when the engine is running. Use a firm grip
with thumbs and fingers encircling the chain saw handles.
A firm grip will help you reduce kickback and maintain
control of the saw. Don’t let go.
Make sure that the area in which you are cutting is free
from obstacles. Do not let the nose of the guide bar
contact a log, branch, or any other obstacle which could
be hit while you are operating the saw.
Cut at high engine speeds.
Do not overreach or cut above shoulder height.
Follow manufacturer’s sharpening and maintenance
instructions for the saw chain.
Only use replacement bars and chains specified by the
manufacturer or the equivalent.
Other safety precautions
WARNING! Do not operate a chain saw
with one hand! Serious injury to the
operator, helpers, bystanders or any
combination of these persons may result
from one-handed operation. A chain saw
is intended for two-handed use.
Do not operate a chain saw when you are fatigued.
Use safety footwear; snug-fitting clothing, protective
gloves, and eye, hearing and head protection devices.
Use caution when handling fuel. Move the chain saw at
least 10 feet (3 m) from the fueling point before starting
the engine.
Do not allow other persons to be near the chain saw when
starting or cutting with the chain saw. Keep bystanders
and animals out of the work area.
Do not start cutting until you have a clear work area,
secure footing and a planned retreat path from the falling
tree.
Keep all parts of your body away from the saw chain when
the engine is running.
Before you start the engine, make sure that the saw chain
is not contacting anything.
Carry the chain saw with the engine stopped, the guide
bar and saw chain to the rear, and the muffler away from
your body.
Do not operate a chain saw that is damaged, improperly
adjusted, or not completely and securely assembled. Be
sure that the saw chain stops moving when the throttle
control trigger is released.
Shut off the engine before setting the chain saw down.
Use extreme caution when cutting small size brush and
saplings because slender material may catch the saw
chain and be whipped toward you or pull you off balance.
When cutting a limb that is under tension be alert for
springback so that you will not be struck when the tension
in the wood fibers is released.
Keep handles dry, clean and free of oil or fuel mixture.
Operate the chain saw only in well-ventilated areas.
Do not operate a chain saw in a tree unless you have
been specifically trained to do so.
Do not operate a chain saw above shoulder height.
All chain saw service, other than the items listed in the
operator’s/owner’s safety and maintenance instructions,
should be performed by competent chain saw service
personnel. (For example, if improper tools are used to
remove the flywheel or if an improper tool is used to hold
the flywheel in order to remove the clutch, structural
damage to the flywheel could occur and subsequently
cause the flywheel to burst.)
When transporting your chain saw, use the appropriate
guide bar guard.
Note: This Annex is intended primarily for the consumer or
occasional user.
44 – English
Page 45

EXPLICATION DES SYMBOLES
Symboles sur la machine:
AVERTISSEMENT! Cette tronçonneuse
peut être dangereuse! Une utilisation
erronée ou négligente peut occasionner
des blessures graves, voire mortelles pour
l’utilisateur ou une tierce personne.
Lire attentivement et bien assimiler le
manuel d’utilisation avant d’utiliser la
machine.
Toujours utiliser:
• Casque de protection homologué
• Protecteurs d’oreilles homologués
• Lunettes protectrices ou visière
Toujours utiliser les deux mains pour
manipuler la tronçonneuse.
Ne jamais utiliser une seule main pour
manipuler la tronçonneuse.
Ne jamais laisser le nez du guide entrer
en contact avec un objet.
AVERTISSEMENT! Il risque de se
produire un rebond si le nez du guide
entre en contact avec un objet et entraîne
une réaction qui projette le guide vers le
haut et vers l’utilisateur. Ceci risque de
causer de graves blessures personnelles.
Equipement de coupe
recommandé dans cet
exemple: - Longueur de guidechaîne: 16 pouces
- Rayon maximum du nez: 9 dents
- Type de chaîne: Husqvarna H37
Autre combinaisons approuvées de
guides et chaînes, consulter le Manuel
d’utilisation.
Taux de rebond maximum mesuré sans
activer le frein de chaîne, pour la
combinaison de guide-chaîne et chaîne
indiquée sur l’étiquette.
Valeur de recul maximum mesurée sans
frein de chaîne pour la combinaison guidechaîne et chaîne sur l’étiquette.
Frein de chaîne, activé (droit)
Frein de chaîne, non activé
(gauche)
Pompe à carburant
Remplissage d’essence.
Réglage de la pompe à huile
Remplissage d’huile de chaîne.
Position de marche.
Starter.
Taille de la pièce de poignée.
Les autres symboles/autocollants présents sur la
machine concernent des exigences de certification
spécifiques à certains marchés.
XX
XX
French – 45
Page 46

EXPLICATION DES SYMBOLES
Symboles dans le manuel:
Tout contrôle et/ou entretien doit être
effectué avec le moteur à l’arrêt.
L’autocollant comportant ce symbol d’avertissement est
placé sur la tronçonneuse:
Toujours porter des gants de protection
homologués.
Un nettoyage régulier est
indispensable.
Examen visuel.
Porter des lunettes protectrices ou une
visière.
Remplissage d’essence.
Remplissage d’huile et réglage du
débit d’huile.
Le frein de chaîne doit être activé
quand la tronçonneuse est démarrée.
AVERTISSEMENT! Il risque de se
produire un rebond si le nez du guide
entre en contact avec un objet et
entraîne une réaction qui projette le
guide vers le haut et vers l’utilisateur.
Ceci risque de causer de graves
blessures personnelles.
EPA III
La période de conformité des émissions à laquelle il est
fait référence sur l’étiquette de conformité des émissions
indique le nombre d’heures de fonctionnement pour
lesquelles il a été établi que le moteur répond aux
exigences californiennes et fédérales en matière
d’émissions.
L’entretien, le remplacement ou la réparation des
dispositifs et des systèmes antipollution peuvent être
effectués par tout établissement ou personne qui répare
des produits motorisés manuels.
46 – French
Page 47

SOMMAIRE
Sommaire
EXPLICATION DES SYMBOLES
Symboles sur la machine: .................................... 45
Symboles dans le manuel: ................................... 46
SOMMAIRE
Sommaire ............................................................. 47
INTRODUCTION
Cher client, ........................................................... 48
QUELS SONT LES COMPOSANTS?
Quels sont les composants de la tronçonneuse? . 49
INSTRUCTIONS GÉNÉRALES DE SÉCURITÉ
Mesures à prendre avant de mettre en usage une
tronçonneuse neuve .............................................
Important! ............................................................. 51
Utilisez toujours votre bon sens ........................... 51
Équipement de protection personnelle ................. 51
Équipement de sécurité de la machine ................ 52
Équipement de coupe .......................................... 55
MONTAGE
Montage du guide-chaîne et de la chaîne ............ 61
MANIPULATION DU CARBURANT
Carburant .............................................................. 63
Remplissage de carburant ................................... 64
Sécurité carburant ................................................ 65
DÉMARRAGE ET ARRÊT
Démarrage et arrêt ............................................... 66
TECHNIQUES DE TRAVAIL
Avant chaque utilisation: ....................................... 68
Méthodes de travail .............................................. 68
Mesures anti-rebond ............................................ 75
ENTRETIEN
Généralités ........................................................... 76
Réglage du carburateur ........................................ 76
Contrôle, maintenance et entretien des
équipements de sécurité de la tronçonneuse .......
Silencieux ............................................................. 78
Lanceur ................................................................ 78
Filtre à air ............................................................. 80
Bougie .................................................................. 80
Graissage du pignon d’entraînement du guide .... 81
Graissage du roulement à aiguilles ...................... 81
Réglage de la pompe à huile ................................ 81
Système de refroidissement ................................. 81
Utilisation hivernale .............................................. 82
Température de -5°C ou moins ............................ 82
Schéma d’entretien .............................................. 83
CARACTÉRISTIQUES TECHNIQUES
Caractéristiques techniques ................................. 84
Combinaisons guide-chaîne et chaîne ................. 85
Affûtage de la chaîne et gabarits d’affûtage ......... 85
DÉCLARATION DE GARANTIE CONTRÔLE
DES ÉMISSIONS EN CALIFORNIE ET AU
NIVEAU FÉDÉRAL
VOS DROITS ET OBLIGATIONS EN GARANTIE 86
PRÉCAUTIONS SÉCURITAIRES
CONFORMANT AUX NORMES AMÉRICAINES
Consignes de sécurité pour les utilisateurs de
tronçonneuses ......................................................
50
76
88
French – 47
Page 48

INTRODUCTION
Cher client,
Félicitations pour ce choix d’un produit Husqvarna. Husqvarna a vu le jour en 1689 lorsque le roi Karl XI décida de
construire un arsenal pour la fabrication des mousquets au bord de la rivière Huskvarna. Le choix de l’emplacement était
logique puisque la rivière Huskvarna servait à produire de l’énergie hydraulique et constituait donc une sorte de centrale
hydraulique. En plus de 300 ans d’existence, l’usine Husqvarna a fabriqué de nombreux produits, depuis les cuisinières
à bois jusqu’aux équipements de cuisine modernes, sans oublier les machines à coudre, les bicyclettes, les motos, etc.
La première tondeuse à moteur a été lancée en 1956, suivie en 1959 de la première tronçonneuse. C’est dans ce
secteur que Husqvarna est actif aujourd’hui.
Husqvarna est aujourd’hui un des plus grands fabricants du monde de produits destinés à l’entretien des forêts et des
jardins. La qualité et les performances sont nos priorités. Notre concept d’affaires est de développer, fabriquer et
commercialiser des produits à moteur pour l’entretien des forêts et des jardins et pour les entreprises de construction et
d’aménagement des sols. L’objectif d’Husqvarna est aussi d’être à la pointe du progrès en matière d’ergonomie, de
facilité d’utilisation, de sécurité et de protection de l’environnement; un grand nombre d’innovations ont été développées
pour améliorer les produits dans ces domaines.
Nous sommes persuadés que vous apprécierez la qualité et les performances de nos produits pendant de longues
années. L’achat d’un de nos produits vous garantit une assistance professionnelle au niveau du service et des
réparations en cas de besoin. Si la machine n’a pas été achetée chez un de nos revendeurs autorisés, demandez à un
revendeur l’adresse de l’atelier d’entretien le plus proche.
Nous espérons que cette machine vous donnera toute satisfaction et qu’elle vous accompagnera pendant de longues
années. N’oubliez pas que ce manuel d’utilisation est important. En suivant les instructions qu’il contient (utilisation,
révision, entretien, etc.), il est possible d’allonger considérablement la durée de vie de la machine et d’augmenter sa
valeur sur le marché de l’occasion. En cas de vente de la machine, ne pas oublier de remettre le manuel d’utilisation au
nouveau propriétaire.
Nous vous remercions d'utiliser un produit Husqvarna !
Husqvarna AB travaille continuellement au développement de ses produits et se réserve le droit d’en modifier, entre
autres, la conception et l’aspect sans préavis.
48 – French
Page 49

QUELS SONT LES COMPOSANTS?
19
18
16
17
20
25
21
22
24
23
26
Quels sont les composants de la tronçonneuse?
1 Arceau protecteur
2 Gâchette d’arrêt
3 Autocollant d’information et d’avertissement
4 Poignée supérieure
5 Capot de filtre
6 Commande de starter
7 Œillet de câble
8 Pompe à carburant
9 Réservoir d’essence
10 Fenêtre de niveau de carburant
11 Poignée de lanceur
12 Lanceur
13 Poignée avant
14 Réservoir d’huile pour chaîne
15 Pignon avant
1
2
3
15
14
27
13
12
11
10
9
28
29
16 Chaîne
17 Guide-chaîne
18 Commande de l’accélération
19 Blocage de l’accélération
20 Œillet de courroie
21 Carter d’embrayage
22 Vis de tendeur de chaîne
23 Plaque de numéro de série et de produit
24 Capteur de chaîne
25 Patin d’ébranchage
26 Vis de réglage de la pompe à huile
27 Fourreau protecteur du guide-chaîne
28 Manuel d’utilisation
29 Clé universelle
4
5
6
7
8
French – 49
Page 50

INSTRUCTIONS GÉNÉRALES DE SÉCURITÉ
!
!
!
!
!
Mesures à prendre avant de mettre en usage une tronçonneuse neuve
• Lisez attentivement ce manuel d’utilisation.
• Vérifier le montage et le réglage de l’outil de coupe.
Voir les instructions au chapitre Montage.
• Remplissez de carburant et démarrez la
tronçonneuse. Voir les instructions aux chapitres
Manipulation du carburant et Démarrage et arrêt.
• Ne pas utiliser la tronçonneuse avant que la chaîne ait
reçu une quantité suffisante d’huile de chaîne. Voir les
instructions au chapitre Lubrification de l’équipement
de coupe.
• Une exposition prolongée au bruit risque de causer
des lésions auditives permanentes. Toujours utiliser
des protecteurs d'oreille agréés.
AVERTISSEMENT! Ne jamais modifier
sous aucun prétexte la machine sans
!
l’autorisation du fabricant. N’utiliser que
des accessoires et des pièces d’origine.
Des modifications non-autorisées et
l’emploi d’accessoires non-homologués
peuvent provoquer des accidents graves
et même mortels, à l’utilisateur ou
d’autres personnes. Votre garantie ne
couvre ni les dommages ni la
responsabilité qu’entraîne l’utilisation de
pièces ou d’accessoires non autorisés.
AVERTISSEMENT! Utilisée de manière
erronée ou négligente, la tronçonneuse
!
peut être un outil dangereux pouvant
causer des blessures personnelles
graves, voire mortelles. Il importe donc
de lire attentivement et de bien assimiler
le contenu de ce manuel d’utilisation.
AVERTISSEMENT! Cette machine génère
un champ électromagnétique en
fonctionnement. Ce champ peut dans
certaines circonstances perturber le
fonctionnement d’implants médicaux
actifs ou passifs. Pour réduire le risque
de blessures graves ou mortelles, les
personnes portant des implants
médicaux doivent consulter leur
médecin et le fabricant de leur implant
avant d’utiliser cette machine.
AVERTISSEMENT! Ayez un extincteur à
portée de main, lorsque vous utilisez une
tronçonneuse.
AVERTISSEMENT! Maintenir les
poignées sèches, propres et exemptes
d’huile.
AVERTISSEMENT! Faire attention à
l’intoxication par monoxyde de carbone.
Utiliser la tronçonneuse seulement dans
des endroits bien aérés.
AVERTISSEMENT! Ne pas tenter
d’émonder ou d’ébrancher un arbre sur
pied sauf si vous êtes spécialment formé
pour la faire.
50 – French
AVERTISSEMENT! L’intérieur du
silencieux contient des produits
!
chimiques pouvant être cancérigènes.
Eviter tout contact avec ces éléments si
le silencieux est endommagé.
AVERTISSEMENT! Une inhalation
prolongée des gaz d’échappement du
!
moteur, du brouillard d’huile de chaîne et
de la poussière de copeaux peut
constituer un danger pour la santé.
Page 51

INSTRUCTIONS GÉNÉRALES DE SÉCURITÉ
!
Important!
IMPORTANT!
Cette tronçonneuse est conçue pour l’élagage et le
destruction de cimes d’arbres encore en position
verticale.
Utilisez seulement les combinaisons guide-chaîne/
chaîne recommandées au chapitre Caractéristiques
techniques.
N’utilisez jamais la machine si vous êtes fatigué, avez
bu de l’alcool ou pris des médicaments susceptibles
d’affecter votre vue, votre jugement ou la maîtrise de
votre corps.
Utiliser les équipements de protection personnelle. Voir
au chapitre ”Équipement de protection personnelle”.
Ne modifiez jamais cette machine de façon à ce qu’elle
ne soit plus conforme au modèle d’origine et n’utilisez
jamais une machine qui semble avoir été modifiée.
Ne jamais utiliser une machine qui n’est pas en parfait
état de marche. Appliquer les instructions de
maintenance et d’entretien ainsi que les contrôles de
sécurité indiqués dans ce manuel d’utilisation.
Certaines mesures de maintenance et d’entretien
doivent être confiées à un spécialiste dûment formé et
qualifié. Voir les instructions à la section Maintenance.
N’utiliser que les accessoires recommandés dans ce
manuel. Voir les chapitres Équipement de coupe et
Caractéristiques techniques.
REMARQUE! Utilisez toujours des lunettes de
protection ou une visière faciale pour vous protéger
d’une éventuelle projection d’objet. Une tronçonneuse
peut projeter avec violence des objets, de la sciure et de
petits morceaux de bois par exemple. Il peut en résulter
des blessures graves, surtout au niveau des yeux.
AVERTISSEMENT! Faire tourner un
moteur dans un local fermé ou mal aéré
!
peut causer la mort par asphyxie ou
empoisonnement au monoxyde de
carbone.
AVERTISSEMENT! Un équipement de
coupe inapproprié ou une mauvaise
!
combinaison guide-chaîne/chaîne
augmente le risque de rebond ! N’utilisez
que les combinaisons chaîne et guidechaîne recommandées et respectez les
instructions d’affûtage. Voir les
instructions au chapitre Caractéristiques
techniques.
maîtriser. Si, après avoir lu ces instructions, vous n’êtes
toujours pas sûr de la procédure à suivre, demandez
conseil à un expert avant de poursuivre. N’hésitez pas à
prendre contact avec votre revendeur ou avec nous si
vous avez des questions sur l’utilisation de la
tronçonneuse. Nous sommes à votre disposition et vous
conseillons volontiers pour vous aider à mieux utiliser
votre tronçonneuse en toute sécurité.
Nous travaillons en permanence à l’amélioration de la
conception et de la technique, des améliorations qui
augmentent votre sécurité et votre efficacité. Rendez
régulièrement visite à votre revendeur pour vous tenir au
courant des nouveautés qui peuvent vous être utiles.
Équipement de protection personnelle
AVERTISSEMENT! La plupart des
accidents surviennent quand la chaîne
de la tronçonneuse touche l’utilisateur.
Un équipement de protection
personnelle homologué doit
impérativement être utilisé lors de tout
travail avec la machine. L’équipement de
protection personnelle n’élimine pas les
risques mais réduit la gravité des
blessures en cas d’accident. Demander
conseil au concessionnaire afin de
choisir un équipement adéquat.
REMARQUE! Ne jamais utiliser une tronçonneuse en le
tenant seulement d’une main. Une tronçonneuse ne
peut pas être contrôlée en toute sécurité d’une seule
main et l’utilisateur risque de se couper. Toujours
conserver une prise stable et ferme sur les poignées
avec les deux mains.
Utilisez toujours votre bon sens
Il est impossible de prévoir toutes les situations que vous
pouvez rencontrer lorsque vous utilisez une
tronçonneuse. Soyez toujours prudent et utilisez votre
bon sens. Évitez les situations que vous n’êtes pas sûr de
• Casque de protection homologué
• Protecteur d’oreilles
French – 51
Page 52

INSTRUCTIONS GÉNÉRALES DE SÉCURITÉ
!
B
B
A
• Lunettes protectrices ou visière
• Gants protecteurs anti-chaîne
• Pantalon avec protection anti-chaîne
• Utiliser les protections conformes pour les bras.
• Bottes avec protection anti-chaîne, embout acier et
semelle antidérapante
• Une trousse de premiers secours doit toujours être
disponible.
• Extincteur et pelle
Porter des vêtements près du corps et ne risquant pas de
gêner les mouvements.
IMPORTANT! Des étincelles peuvent être produites par
le silencieux, le guide-chaîne ou la chaîne par exemple.
Veillez à toujours disposer des outils nécessaires à
l’extinction d’un feu. Vous pouvez ainsi éviter des feux
de forêt.
Cette tronçonneuse avec poignée de maintien supérieure
a été spécialement conçue pour la chirurgie et l’entretien
arboricoles. En raison du design compact spécial des
poignées (poignées proches), le contrôle de l’appareil est
bien plus délicat. C’est la raison pour laquelle il convient
que ces tronçonneuses spéciales soient exclusivement
utilisées pour des travaux de coupe au sein d’un arbre par
du personnel formé en matière de coupe et de techniques
de travail spéciales, sécurisé de façon adéquate (nacelle
élévatrice, cordage, harnais de sécurité). Des
tronçonneuses standard (avec poignées éloignées) sont
recommandées pour tout autre travail de coupe au sol.
AVERTISSEMENT! Travailler à même
l’arbre nécessite l’utilisation de
!
techniques de coupe et de travail
particulières qui doivent être respectées
afin de réduire le risque accru de
blessures corporelles. Ne jamais
travailler dans un arbre sauf si vous avez
suivi une formation professionnelle
spécifique à un tel travail, incluant une
formation relative à l’utilisation d’un
équipement de sécurité et autre
équipement de grimpée comme des
harnais, des cordages, des ceintures,
des étriers, des mousquetons, etc.
voir les instructions au chapitre Contrôle, maintenance et
entretien des équipements de sécurité de la
tronçonneuse. Voir le chapitre Quels sont les
composants? pour savoir où se trouvent équipements sur
la machine.
La durée de vie de la machine risque d'être écourtée et le
risque d'accidents accru si la maintenance de la machine
n'est pas effectuée correctement et si les mesures
d'entretien et/ou de réparation ne sont pas effectuées de
manière professionnelle. Pour obtenir de plus amples
informations, contacter l'atelier de réparation le plus
proche.
AVERTISSEMENT! N’utilisez jamais une
machine dont les équipements de
sécurité sont défectueux. Les
équipements de sécurité doivent être
contrôlés et entretenus. Voir les
instructions au chapitre Contrôle,
maintenance et entretien des
équipements de sécurité de la
tronçonneuse. Si les contrôles ne
donnent pas un résultat positif, faites
réparer votre machine par un atelier
d’entretien.
Frein de chaîne avec arceau protecteur
Votre tronçonneuse est équipée d’un frein de chaîne
conçu pour arrêter la chaîne en cas de rebond. Le frein de
chaîne réduit le risque d’accidents, mais seul l’utilisateur
peut prévenir les accidents.
Observer la plus grande prudence en utilisant la
tronçonneuse et s’assurer que la zone de rebond du
guide-chaîne ne touche rien.
• Le frein de chaîne (A) est activé soit manuellement
(de la main gauche), soit avec la fonction d’inertie.
• Pousser l’arceau (B) vers l’avant pour activer le frein
de chaîne.
Équipement de sécurité de la machine
Cette section traite des équipements de sécurité de la
machine et de leur fonction. Pour le contrôle et l’entretien,
52 – French
Page 53

INSTRUCTIONS GÉNÉRALES DE SÉCURITÉ
• Ce mouvement actionne un mécanisme à ressort qui
tend le ruban du frein (C) autour du système
d’entraînement de la chaîne (D) (le tambour
d’embrayage).
D
C
• L’arceau protecteur ne déclenche pas seulement le
frein de chaîne. Il réduit aussi le risque que la main
gauche ne se blesse à la chaîne en cas de perte de la
prise sur la poignée avant.
• Le frein de chaîne doit être activé quand la
tronçonneuse est démarrée pour empêcher que la
chaîne ne se mette à tourner.
• Utilisez le frein de chaîne comme 'frein de
stationnement' au démarrage et lors de courts
déplacements, pour éviter une mise en marche
involontaire de la tronçonneuse et les accidents.
nécessairement le frein de chaîne. Dans ce cas, tenir
fermement la tronçonneuse et ne pas la lâcher.
• Le mode d’activation du frein de chaîne (manuel ou
automatique par inertie) dépend de l’ampleur du
rebond et de la position de la tronçonneuse par
rapport à l’objet rencontré par la zone de danger du
guide.
Si le rebond est violent et si la zone de danger du
guide se trouve loin de l’utilisateur, le frein de chaîne
est activé par le contrepoids (inertie) du frein de
chaîne dans le sens du rebond.
En cas de rebond moins violent ou si, en raison de la
situation de travail, la zone de danger du guide est
proche de l’utilisateur, le frein de chaîne est activé
manuellement par la main gauche.
• Tirer l’arceau vers l’arrière contre la poignée avant
pour désactiver le frein de chaîne.
• Un rebond peut être rapide et très violent. Toutefois la
plupart des rebonds sont courts et n’activent pas
• En position d’abattage, la main gauche se trouve dans
une position qui rend l’activation manuelle du frein de
chaîne impossible. Dans cette position, quand la main
gauche ne peut pas agir sur le mouvement de la
protection anti-rebond, le frein de chaîne ne peut être
activé que par inertie.
Ma main active-t-elle toujours le frein de chaîne en cas de rebond?
Non. Il faut une certaine force pour pousser la protection
anti-rebond vers l’avant. Si votre main ne fait qu’effleurer
la protection anti-rebond ou glisse dessus, la force peut
ne pas suffire pour déclencher le frein de chaîne. Vous
devez aussi tenir fermement la poignée de la
tronçonneuse quand vous travaillez. Ainsi, vous ne lâchez
French – 53
Page 54

INSTRUCTIONS GÉNÉRALES DE SÉCURITÉ
!
peut être jamais la poignée avant en cas de rebond et
n’activez pas le frein de chaîne, ou n’activez pas le frein
de chaîne avant que la tronçonneuse n’ait eu le temps de
tourner sur une certaine distance. Dans un tel cas, il se
peut que le frein de chaîne n’ait pas le temps d’arrêter la
chaîne avant qu’elle ne vous heurte.
Certaines positions de travail empêchent aussi votre main
d’atteindre la protection anti-rebond pour activer le frein
de chaîne, quand la tronçonneuse est tenue en position
d’abattage par exemple.
L’inertie du frein de chaîne est-elle toujours activée en cas de rebond?
Non. Le frein doit fonctionner. Le rebond doit aussi être
suffisamment violent pour activer le frein de chaîne. Si le
frein de chaîne était trop sensible, il serait continuellement
activé, ce qui serait gênant.
Le frein de chaîne me protège-t-il toujours des blessures en cas de rebond?
Non. Tout d’abord, votre frein doit fonctionner pour
assurer la protection souhaitée. Ensuite, il doit être activé
comme décrit ci-dessus pour arrêter la chaîne en cas de
rebond. Pour finir, le frein de chaîne peut être activé mais
si le guide-chaîne est trop près de vous, le frein peut ne
pas avoir le temps de ralentir et arrêter la chaîne avant
que la tronçonneuse ne vous heurte.
La seule façon d’éviter les rebonds et le danger qu’ils
représentent est de faire attention et d’utiliser une
méthode de travail correcte.
Blocage de l’accélération
Le blocage de l’accélération est conçu pour empêcher
toute activation involontaire de la commande de
l’accélération. Quand le cliquet (A) est enfoncé dans la
poignée (= quand l’utilisateur tient la poignée), la
commande de l’accélération (B) est libérée. Lorsque la
poignée est relâchée, la commande de l’accélération et le
blocage de l’accélération reviennent à leurs positions
initiales. Cette position signifie que la commande
d’accélération est alors automatiquement bloquée sur le
ralenti.
A
B
Capteur de chaîne
Le capteur de chaîne est construit pour rattraper une
chaîne qui a sauté ou s’est brisée. Dans la plupart des
cas, ces situations peuvent être évitées par une tension
correcte de la chaîne (voir le chapitre Montage) et en
54 – French
entretenant correctement le guide et la chaîne (voir le
chapitre Méthodes de travail).
Système anti-vibrations
La machine est équipée d’un système anti-vibrations
conçu pour assurer une utilisation aussi confortable que
possible.
Le système anti-vibrations réduit la transmission des
vibrations de l’unité moteur/l’équipement de coupe à
l’unité que constituent les poignées. Le corps de la
tronçonneuse, y compris l’équipement de coupe, est
suspendu à l’unité poignées par l’intermédiaire de blocs
anti-vibrants.
Le sciage de bois durs (la plupart des feuillus) produit
davantage de vibrations que celui des bois tendres (la
plupart des conifères). Si la chaîne est mal affûtée ou
défectueuse (type inadéquat ou affûtage défectueux), le
taux de vibrations augmente.
AVERTISSEMENT! Une exposition
excessive aux vibrations peut entraîner
des troubles circulatoires ou nerveux
chez les personnes sujettes à des
troubles cardio-vasculaires. Consultez
un médecin en cas de symptômes liés à
une exposition excessive aux vibrations.
De tels symptômes peuvent être:
engourdissement, perte de sensibilité,
chatouillements, picotements, douleur,
faiblesse musculaire, décoloration ou
modification épidermique. Ces
symptômes affectent généralement les
doigts, les mains ou les poignets. Ces
symptômes peuvent être accentués par
le froid.
Page 55

INSTRUCTIONS GÉNÉRALES DE SÉCURITÉ
!
Bouton d’arrêt
Le bouton d’arrêt est utilisé pour arrêter le moteur.
Silencieux
Le silencieux est conçu pour réduire au maximum le
niveau sonore et détourner les gaz d’échappement loin
de l’utilisateur.
Dans les régions chaudes et sèches, les risques
d’incendie sont élevés.
AVERTISSEMENT! Les gaz
d’échappement du moteur sont très
!
chauds et peuvent contenir des
étincelles pouvant provoquer un
incendie. Par conséquent, ne jamais
démarrer la machine dans un local clos
ou à proximité de matériaux
inflammables!
REMARQUE! Un silencieux devient très chaud en cours
d’utilisation et le reste après l’arrêt. Cela est également
vrai pour le régime au ralenti. Soyez très attentif aux
risques d’incendie, surtout quand vous manipulez des
gaz et/ou des substances inflammables.
AVERTISSEMENT! N’utilisez jamais une
tronçonneuse dont le silencieux est
!
absent ou défectueux. Si le silencieux
est défectueux, le niveau sonore et le
risque d’incendie augmentent
considérablement. Veillez à disposer des
outils nécessaires à l’extinction d’un feu.
Équipement de coupe
Cette section explique comment, grâce à l’utilisation du
bon équipement de coupe et grâce à un entretien correct:
• Réduire le risque de rebond de la machine.
• Réduit le risque de saut ou de rupture de chaîne.
• Permet des performances de coupe optimales.
• Augmenter la durée de vie de l’équipement de coupe.
• Évite l’augmentation du niveau de vibration.
Règles élémentaires
• N’utiliser que l’équipement de coupe
recommandé!
Caractéristiques techniques.
Voir les instructions au chapitre
• Veiller à ce que les dents de la chaîne soient
toujours bien affûtées! Suivre les instructions et
utiliser le gabarit d’affûtage recommandé.
chaîne émoussée ou endommagée augmente le
risque d’accidents.
• Veillez à travailler avec une épaisseur de copeau
correcte! Suivez les instructions et utilisez le
gabarit d’épaisseur de copeau recommandé.
épaisseur de copeau trop importante augmente le
risque de rebond.
• Veiller à ce que la chaîne soit toujours bien
tendue!
Une tension de chaîne insuffisante
augmente le risque de rupture de chaîne ainsi que
l’usure du guide, de la chaîne et du pignon.
• Maintenir l’équipement de coupe bien lubrifié et
bien entretenu!
lubrifié augmente le risque de rupture de chaîne ainsi
que l’usure du guide, de la chaîne et du pignon.
Un équipement insuffisamment
Une
Une
Équipement de coupe anti-rebond
AVERTISSEMENT! Un équipement de
coupe inapproprié ou une mauvaise
combinaison guide-chaîne/chaîne
augmente le risque de rebond ! N’utilisez
que les combinaisons chaîne et guidechaîne recommandées et respectez les
instructions d’affûtage. Voir les
instructions au chapitre Caractéristiques
techniques.
La seule manière d’éviter un rebond est de s’assurer que
la zone de danger du nez du guide n’entre jamais en
contact avec un objet.
L’utilisation d’un équipement de coupe avec fonction antirebond ”intégrée” et un affûtage et un entretien corrects
de la chaîne permettent de réduire les effets de rebond.
Guide-chaîne
Plus le rayon du nez est petit, plus la tendance au rebond
est petite.
French – 55
Page 56

INSTRUCTIONS GÉNÉRALES DE SÉCURITÉ
Chaîne
Une chaîne comporte un certain nombre de maillons, tant
en modèle standard qu’en version anti-rebond.
IMPORTANT! Aucune chaîne n’élimine le risque de
rebond.
AVERTISSEMENT! Chaque contact avec
une chaîne en rotation peut entraîner des
!
blessures graves.
Terminologie concernant le guide-chaîne et la chaîne
Afin de maintenir toutes les fonctions de sécurité sur
l’équipement de coupe, vous devez remplacer les
combinaisons chaîne/guide-chaîne usées ou abîmées
par un guide-chaîne et une chaîne recommandés par
Husqvarna. Voir le chapitre Caractéristiques techniques
pour les combinaisons chaîne/guide-chaîne
recommandées.
Guide-chaîne
• Longueur (pouces/cm)
• Nombre de dents par pignon (T).
• Pas de chaîne (=pitch) (pouces). Le pignon du nez et
le pignon d’entraînement doivent correspondre à
l’espace entre les maillons.
• Nombre de maillons entraîneurs (pce). La longueur du
guide, le pas de chaîne et le nombre de dents au
pignon donnent un nombre déterminé de maillons
entraîneurs.
• Trou de graissage de chaîne et trou du tendeur de
chaîne. Le guide-chaîne doit correspondre au modèle
de tronçonneuse.
Chaîne
• Pas de chaîne (=pitch) (pouces)
• Jauge du maillon entraîneur (mm/pouces)
• Nombre de maillons entraîneurs (pce)
Affûtage et réglage de l’épaisseur du copeau de la chaîne
Généralités concernant l’affûtage des dents
• N’utilisez jamais une tronçonneuse dont les dents
sont émoussées. Les dents de la chaîne sont
considérées comme émoussées quand il faut forcer
sur l’équipement de coupe pour qu’il traverse le bois
et quand les copeaux sont très petits. Une chaîne très
émoussée ne produit pas de copeaux du tout,
seulement de la poudre de bois.
• Une chaîne bien affûtée avance tout seule dans le
bois, laissant de gros et longs copeaux.
• Jauge du guide-chaîne (mm/pouces). Celle-ci doit
correspondre à la jauge des maillons entraîneurs de
la chaîne.
56 – French
• La partie coupante de la chaîne consiste en un
maillon coupant qui comporte une dent (A) et un
limiteur d’épaisseur de copeau (B). La distance
Page 57

INSTRUCTIONS GÉNÉRALES DE SÉCURITÉ
verticale entre ces éléments détermine la profondeur
de coupe.
Quatre dimensions doivent être prises en compte lors de
l’affûtage d’une dent.
1 Angle d’affûtage
2 Angle d’impact
Affûtage de la dent
Pour affûter une dent, une lime ronde et un gabarit
d’affûtage sont nécessaires. Vous trouverez des
informations sur le diamètre de lime ronde et le gabarit
d’affûtage recommandés pour la chaîne de votre
tronçonneuse au chapitre Caractéristiques techniques.
• S’assurer que la chaîne est tendue. Une tension
insuffisante rend la chaîne instable latéralement,
gênant ainsi l’affûtage de la chaîne.
3 Position de la lime
4 Diamètre de la lime ronde
Il est très difficile d’affûter correctement une chaîne de
tronçonneuse sans outils spéciaux. Nous recommandons
donc d’utiliser notre gabarit d’affûtage qui assure un
affûtage permettant une réduction du risque de rebond et
des performances de coupe optimales.
Vous trouverez les informations nécessaires pour
l’affûtage de la chaîne de votre tronçonneuse au chapitre
Caractéristiques techniques.
AVERTISSEMENT! La tendance au
rebond augmente considérablement si
!
les instructions d’affûtage ne sont pas
respectées.
• Toujours limer de l’intérieur de la dent vers l’extérieur.
Soulager la lime sur le mouvement de retour.
Commencer par limer toutes les dents du même côté,
retourner la tronçonneuse et limer de l’autre côté.
• Limer de manière à amener toutes les dents à la
même hauteur. Si la hauteur de dent est inférieure à 4
mm (5/32"), la chaîne est usée et doit être remplacée.
Généralités sur le réglage de l’épaisseur du copeau
• Quand la dent est affûtée, l’épaisseur du copeau
(=profondeur de coupe) diminue. Pour conserver une
capacité de coupe maximale, le limiteur d’épaisseur
du copeau doit être abaissé au niveau recommandé.
Voir trouverez l’épaisseur de copeau recommandée
pour la chaîne de votre tronçonneuse au chapitre
Caractéristiques techniques.
French – 57
Page 58

INSTRUCTIONS GÉNÉRALES DE SÉCURITÉ
AVERTISSEMENT! Une épaisseur de
copeau excessive augmente la tendance
!
au rebond de la chaîne!
Réglage de l’épaisseur du copeau
• Le réglage de l’épaisseur du copeau doit être effectué
sur des dents nouvellement affûtées. Nous
recommandons de régler l’épaisseur du copeau tous
les trois affûtages de chaîne. REMARQUE! Cette
recommandation suppose que les dents n’ont pas été
anormalement réduites lors de l’affûtage.
• Pour le réglage de l’épaisseur du copeau, une lime
plate et un gabarit d’épaisseur sont nécessaires.
Nous vous recommandons d’utiliser notre gabarit
d’affûtage pour l’épaisseur afin d’obtenir l’épaisseur
souhaitée et le bon angle pour le limiteur d’épaisseur
du copeau.
• Mettez le gabarit d’affûtage sur la chaîne. Vous
trouverez des informations sur l’utilisation du gabarit
d’affûtage sur l’emballage. Utilisez une lime plate pour
retirer l’excès sur la partie qui dépasse du limiteur
d’épaisseur du copeau. L’épaisseur est correcte
quand vous pouvez passer la lime sur le gabarit sans
ressentir de résistance.
une période de rodage durant laquelle il faudra vérifier la
tension plus souvent.
En règle générale, il faut tendre la chaîne au maximum,
mais pas au point de ne plus pouvoir la faire tourner
manuellement.
• Dévisser l’écrou du guide-chaîne fixant le carter
d’embrayage/frein de chaîne. Utiliser la clé
universelle.
• Soulever le nez du guide et tendre la chaîne en
serrant la vis du tendeur de chaîne avec la clé
universelle. Tendre la chaîne jusqu’à ce qu’elle ne soit
plus molle sous le guide.
Tension de la chaîne
AVERTISSEMENT! Une tension
insuffisante de la chaîne augmente le
!
risque que la chaîne saute et donc de
blessures graves, voire mortelles.
Plus on utilise une chaîne, plus elle s’allonge.
L’équipement de coupe doit être réglé après une telle
altération.
La tension de la chaîne doit être contrôlée après chaque
plein d’essence. REMARQUE! Une nouvelle chaîne exige
58 – French
• Utiliser la clé universelle pour serrer l’écrou du guidechaîne tout en tenant levé le nez du guide. Contrôler
que la chaîne peut tourner manuellement et qu’elle ne
pend pas sous le guide.
L’emplacement de la vis du tendeur de chaîne varie avec
les modèles de tronçonneuses. Voir le chapitre Quels
sont les composants? pour savoir où elle se trouvre sur
votre modèle.
Page 59

INSTRUCTIONS GÉNÉRALES DE SÉCURITÉ
Lubrification de l’équipement de coupe
AVERTISSEMENT! Une lubrification
insuffisante de l’équipement de coupe
!
augmente le risque de rupture de chaîne
et donc de blessures graves, voire
mortelles.
Huile de chaîne de tronçonneuse
L’huile de chaîne doit bien adhérer à la chaîne et
posséder d’excellentes qualités de fluidité par tous les
temps, aussi bien en été qu’en hiver.
En tant que constructeur de tronçonneuses, nous avons
développé une huile de chaîne optimale à base d’huile
végétale. Nous recommandons l’utilisation de cette huile
pour une durée de vie maximale de la chaîne et pour la
protection de l’environnement. Si notre huile de chaîne
n’est pas disponible, nous recommandons l’utilisation
d’une huile de chaîne ordinaire.
Ne jamais utiliser de l’huile usagée! Cela représente un
danger pour vous, pour la machine et pour
l’environnement.
marche à 3/4 de régime, l’objet clair doit nettement
présenter un film d’huile en forme de ruban.
En cas de mauvais fonctionnement de la lubrification de
la chaîne:
• Vérifier que le canal de graissage du guide-chaîne est
bien ouvert. Le nettoyer au besoin.
IMPORTANT! Si de l’huile de chaîne végétale est
utilisée, démontez et nettoyez la gorge du guide-chaîne
et la chaîne avant de les remiser pour une période
prolongée. Si vous ne le faites pas, l’huile de chaîne
risque de s’oxyder et la chaîne pourrait se raidir et le
pignon du nez gripper.
Remplissage d’huile de chaîne
• Toutes nos tronçonneuses sont dotées d’un dispositif
de lubrification automatique de la chaîne. Certains
modèles ont également un débit réglable.
• Le réservoir d’huile de chaîne et le réservoir de
carburant sont dimensionnés pour que le carburant
prenne fin avant l’huile de chaîne.
Cette fonction de sécurité suppose l’utilisation d’une
huile de chaîne appropriée (une huile trop fluide
viderait le réservoir d’huile avant l’essence)et un
équipement de coupe bien choisi (un guide-chaîne
long demande davantage d’huile de chaîne).
Contrôle de la lubrification de la chaîne
• Vérifier la lubrification à chaque plein d’essence. Voir
les instructions au chapitre Lubrification du pignon de
nez du guide-chaîne.
Diriger le nez du guide sur un objet fixe clair à une
distance de 20 cm (8 pouces). Après 1 minute de
• S’assurer que la gorge du guide est propre. La
nettoyer au besoin.
• Vérifier que le pignon du nez tourne librement et que
l’orifice de graissage est propre. Nettoyer et graisser
au besoin.
Si, après les contrôles et mesures ci-dessus, la
lubrification de la chaîne n’est toujours pas satisfaisante,
s’adresser obligatoirement à un atelier spécialisé.
French – 59
Page 60

INSTRUCTIONS GÉNÉRALES DE SÉCURITÉ
!
Pignon d’entraînement
• Que la gorge du guide n’est pas anormalement usée.
Remplacer le guide si nécessaire.
Le tambour d’embrayage est équipé d’un pignon droit (le
pignon de chaîne est soudé sur le tambour).
Vérifier régulièrement le degré d’usure du pignon. Le
remplacer en cas d’usure excessive. Le pignon doit être
remplacé en même temps que la chaîne.
Contrôle de l’usure de l’équipement de coupe
Vérifier quotidiennement l’état de la chaîne et s’assurer:
• Que les rivets et les maillons ne comportent pas de
fissures.
• Que la chaîne n’est pas raide.
• Que les rivets et les maillons ne sont pas
anormalement usés.
Jetez la chaîne si un des points ci-dessus est vérifié.
Il est recommandé de comparer avec une chaîne neuve
pour évaluer le degré d’usure.
Si la hauteur de dent est inférieure à 4 mm (5/32 pouce),
la chaîne est usée et doit être remplacée.
Guide-chaîne
Vérifier régulièrement:
• Qu’il n’y a pas de bavures sur les côtés extérieurs de
la gorge. Les limer au besoin.
• Que le nez n’est pas anormalement ou
irrégulièrement usé. Si un creux s’est formé à
l’extrémité du rayon du nez (bord inférieur), la chaîne
n’était pas suffisamment tendue.
• Retourner le guide quotidiennement pour assurer une
durée de vie optimale.
AVERTISSEMENT! La plupart des
accidents surviennent quand la chaîne
de la tronçonneuse touche l’utilisateur.
Utiliser les équipements de protection
personnelle. Voir au chapitre
”Équipement de protection personnelle”.
L’utilisateur se doit d’éviter tous les
travaux pour lesquels il se sent mal
préparé. Voir aux chapitres Équipement
de protection personnelle, Mesures antirebond, Équipement de coupe et
Méthodes de travail.
Éviter les situations susceptibles de
provoquer des rebonds. Voir le chapitre
Équipement de sécurité de la machine.
Utiliser les équipements de coupe
recommandés et en vérifier le bon état.
Voir aux chapitres Caractéristiques
techniques et Instructions générales de
sécurité.
Vérifier le bon fonctionnement des
équipements de sécurité de la
tronçonneuse. Voir aux chapitres
Méthodes de travail et Instructions
générales de sécurité.
N’utilisez jamais une tronçonneuse en la
tenant d’une seule main. Il n’est pas
possible de contrôler correctement une
tronçonneuse d’une seule main. Tenez
toujours fermement les poignées des
deux mains.
60 – French
Page 61

MONTAGE
Montage du guide-chaîne et de la chaîne
AVERTISSEMENT! Utiliser des gants
pour toute manipulation de la chaîne.
!
pignon et que la chaîne est correctement placée dans
la rainure du guide. Serrer l’écrou du guide à la main.
• S’assurer que le frein de chaîne ne s’est pas
déclenché en amenant l’arceau protecteur contre
l’étrier de la poignée avant.
• Dévisser l’écrou du guide-chaîne et retirer le carter
d’embrayage (frein de chaîne). Déposer la protection
de transport.
• Monter le guide-chaîne sur le boulon du guide. Placer
le guide sur sa position la plus reculée. Placer la
chaîne sur le pignon d’entraînement et dans la rainure
du guide-chaîne. Commencer par le dessus du guidechaîne.
• S’assurer que la face tranchante des dents est vers
l’avant sur le dessus du guide.
• Monter le carter d’embrayage (frein de chaîne) et
localiser le goujon de tension de la chaîne dans la
rainure du guide. S’assurer que les maillons
d’entraînement de la chaîne s’engagent dans le
• Tendre la chaîne en tournant la vis du tendeur de
chaîne vers la droite à l’aide de la clé universelle.
Tendre la chaîne jusqu’à ce qu’elle ne pende plus
sous le guide. Voir les instructions à la section Tension
de la chaîne.
• La chaîne est tendue correctement quand elle ne
pend pas sous le guide et peut toujours être avancée
à la main sans difficulté. Serrer l’écrou du guidechaîne avec la clé universelle tout en maintenant
relevé le nez du guide.
• La tension d’une chaîne neuve doit être vérifiée
fréquemment pendant son rodage. Vérifier
régulièrement la tension. Une tension correcte est
synonyme de bonne capacité de coupe et de longue
durée de vie.
Montage de la pièce de poignée
• La tronçonneuse est disponible avec des pièces de
poignée de trois tailles différentes - M, L et XL - pour
permettre à la poignée supérieure de s’adapter à des
mains plus ou moins grandes. La tronçonneuse est
livrée avec une pièce de taille L. Contactez votre
atelier d’entretien pour modifier la taille de la pièce de
poignée.
French – 61
Page 62

MONTAGE
Montage de l’œillet de courroie
Deux œillets se situent sur le bord arrière du capot de la
tronçonneuse
L’œillet de câble est livré fixé.
L’œillet de courroie n’est pas livré fixé ; il permet aux
utilisateurs d’accrocher simplement la tronçonneuse à
une courroie ou à un harnais. Pour de plus amples
informations, consultez la rubrique « Techniques de
travail ».
Pour monter un œillet de courroie, contactez votre atelier
spécialisé.
: un œillet de câble et un œillet de courroie.
62 – French
Page 63

MANIPULATION DU CARBURANT
Carburant
Remarque! La machine est équipée d’un moteur deux
temps et doit toujours être alimentée avec un mélange
d’essence et d’huile deux temps. Afin d’assurer un
rapport de mélange correct, il est important de mesurer
avec précision la quantité d’huile à mélanger. Pour le
mélange de petites quantités de carburant, même de
petites erreurs au niveau de la quantité d’huile affectent
sérieusement le rapport du mélange.
AVERTISSEMENT! Veiller à une bonne
aération pendant toute manipulation de
!
carburant.
Essence
• Utiliser une essence de qualité, sans plomb.
• L’indice d’octane le plus bas recommandé est de 87
((RON+MON)/2). Si le moteur utilise une essence
d’un indice d’octane inférieur à 87, des cognements
risquent de se produire. Ceci résulte en une
augmentation de la température du moteur et une
charge élevée au niveau des paliers pouvant causer
de graves avaries moteur.
• Pour les travaux utilisant un régime élevé continu
(l’élagage, par ex.), il est recommandé d’utiliser un
taux d’octane supérieur.
Carburant écologique
HUSQVARNA recommande l’utilisation d’essence
respectueuse de l’environnement (appelée carburant
Alkylate) soit une essence respectueuse de
l’environnement pour moteurs à quatre temps mélangée
avec de l’huile à deux temps selon les proportions
indiquées ci-dessous.
Carburant à l’éthanol
HUSQVARNA recommande l’utilisation de carburant
commercial à l’éthanol présentant une teneur maximale
en éthanol de 10 %.
Rodage
La conduite à un régime trop élevé pendant de longues
période doit être évitée pendant les 10 premières heures.
Huile deux temps
• Pour obtenir un fonctionnement et des résultats
optimaux, utiliser une huile moteur deux temps
HUSQVARNA fabriquée spécialement pour nos
moteurs deux temps à refroidissement à air.
• Ne jamais utiliser d’huile deux temps pour moteurs
hors-bord refroidis par eau, appelée huile outboard
(désignation TCW).
• Ne jamais utiliser d’huile pour moteurs à quatre
temps.
Rapport de mélange
1:50 (2%) pour tous les moteurs.
Essence, litres
5 0,10
10 0,20
15 0,30
20 0,40
US gallon US fl. oz.
1 2 1/2
2 1/2 6 1/2
5 12 7/8
Huile deux
temps, litres
2% (1:50)
Mélange
• Mélangez toujours l’essence et l’huile dans un
récipient propre approuvé pour l’essence.
• Toujours commencer par verser la moitié de l’essence
à mélanger. Verser ensuite la totalité de l’huile.
Mélanger en secouant le récipient. Enfin, verser le
reste de l’essence.
• Mélanger (secouer) soigneusement le mélange avant
de faire le plein du réservoir de la machine.
• Ne jamais préparer plus d’un mois de consommation
de carburant à l’avance.
• Si la machine n’est pas utilisée pendant une longue
période, vidanger et nettoyer le réservoir.
Huile pour chaîne
• Il est recommandé d’utiliser une huile spéciale (huile
pour chaîne) possédant de bonnes qualités
d’adhérence pour la lubrification.
• Ne jamais utiliser d’huile usagée. Ceci
endommagerait la pompe à huile, le guide-chaîne et
la chaîne.
• Il est important d’utiliser une huile adaptée à la
température de l’air (viscosité appropriée).
• Les températures inférieures à 0°C rendent certaines
huiles visqueuses. Ceci peut causer une surcharge de
French – 63
Page 64

MANIPULATION DU CARBURANT
la pompe à huile, endommageant les pièces de la
pompe.
• Contacter l’atelier spécialisé pour obtenir des conseils
sur le choix d’une huile de chaîne adéquate.
Remplissage de carburant
AVERTISSEMENT! Les mesures de
sécurité ci-dessous réduisent le risque
!
d’incendie:
Ne fumez jamais ni ne placez d’objet
chaud à proximité du carburant.
Arrêter le moteur et le laisser refroidir
pendant quelques minutes avant de faire
le plein.
Ouvrir le bouchon du réservoir lentement
pour laisser baisser la surpression
pouvant régner dans le réservoir.
Serrer soigneusement le bouchon du
réservoir après le remplissage.
Éloignez toujours la machine de la zone
et de la source du plein en carburant
avant de la mettre en marche.
Essuyer le pourtour des bouchons des réservoirs.
Nettoyer régulièrement les réservoirs de carburant et
d’huile pour chaîne. Remplacer le filtre à carburant au
moins une fois par an. Des impuretés dans les réservoirs
sont causes de mauvais fonctionnement. Veiller à obtenir
un mélange homogène en secouant le récipient avant de
remplir le réservoir. Les contenances des réservoirs de
carburant et d’huile pour chaîne sont adaptées l’une à
l’autre. Toujours faire le plein des réservoirs de carburant
et d’huile à la même occasion.
Retrait du bouchon du réservoir de carburant et d’huile de chaîne
• Appuyez sur la partie texturée du levier de relevage et
déplacez-le en position relevée.
• Desserrez le bouchon en le tournant dans le sens
inverse des aiguilles d’une montre.
• Retirez le bouchon.
Repositionnement du bouchon du réservoir de carburant et d’huile de chaîne
• Insérez le bouchon avec le levier de relevage en
position relevée.
!
64 – French
AVERTISSEMENT! Le carburant et les
vapeurs de carburant sont extrêmement
inflammables. Observer la plus grande
prudence en manipulant le carburant et
l’huile de chaîne. Penser au risque
d’explosion, d’incendie ou
d’empoisonnement.
Page 65

MANIPULATION DU CARBURANT
• Serrez fermement le bouchon en le tournant dans le
sens des aiguilles d’une montre.
• Baissez le levier de relevage.
IMPORTANT! Remplacez toujours un bouchon
endommagé.
Sécurité carburant
• Ne jamais effectuer le remplissage de la machine
lorsque le moteur tourne.
• Veiller à une bonne aération lors du remplissage et du
mélange de carburant (essence et huile 2 temps).
• Avant de mettre la machine en marche, la déplacer à
au moins 3 mètres de l’endroit où a été fait le plein.
Transport et rangement
• Remiser la tronçonneuse et le carburant de sorte que
ni fuites ni émanations ne puissent entrer en contact
avec une étincelle ou flamme. Par exemple machines
électriques, moteurs électriques, contacteurs ou
interrupteurs électriques, chaudières, etc.
• Lors du remisage du carburant, n’utiliser que des
récipients spécialement destinés à contenir du
carburant.
• En cas de longues périodes de remisage ou de
transport de la tronçonneuse, les réservoirs de
carburant et d’huile devront être vidés. Pour se
débarrasser du surplus, s’adresser à la stationservice la plus proche.
• La protection pour le transport doit toujours être
montée sur l’équipement de coupe au cours du
transport et du remisage de la machine, pour éviter
tout contact involontaire avec la chaîne acérée. Même
une chaîne immobile peut blesser gravement la
personne qui la heurte.
• Sécurisez la machine pendant le transport.
Remisage prolongé
Videz les réservoirs de carburant et d’huile dans un
endroit bien aéré. Conservez le carburant dans des
bidons approuvés dans un endroit sûr. Montez la
protection du guide-chaîne. Nettoyez la machine. Voir les
instructions au chapitre Schéma d’entretien.
Avant de remiser la machine pour une période prolongée,
veiller à ce qu'elle soit bien nettoyée et que toutes les
mesures d'entretien aient été effectuées.
• Ne jamais démarrer la machine:
1 Si du carburant ou de l’huile de chaîne ont été
répandus sur la machine. Essuyer soigneusement
toute trace et laisser les restes d’essence s’évaporer.
2 Si vous avez renversé du carburant sur vous ou sur
vos vêtements, changez de vêtements. Lavez les
parties du corps qui ont été en contact avec le
carburant. Utilisez de l’eau et du savon.
3 S’il y a fuite de carburant. Vérifier régulièrement que
le bouchon du réservoir et la conduite de carburant ne
fuient pas.
AVERTISSEMENT! N’utilisez jamais une
machine présentant des dommages
!
visibles sur la protection de bougie et
sur le câble d’allumage. Des étincelles
pourraient être générées et provoquer un
incendie.
French – 65
Page 66

DÉMARRAGE ET ARRÊT
Démarrage et arrêt
AVERTISSEMENT! Contrôler les points
suivants avant la mise en marche:
!
Le frein de chaîne doit être activé lors du
démarrage de la tronçonneuse afin de
réduire le risque de contact avec la
chaîne en rotation.
Ne pas démarrer la tronçonneuse si le
guide, la chaîne et tous les capots ne
sont pas montés. Sinon, l’embrayage
risque de se détacher et de causer des
blessures personnelles.
Placer la machine sur un support stable.
Veiller à adopter une position stable et à
ce que la chaîne ne puisse pas entrer en
contact avec quoi que ce soit.
Si vous devez démarrer la tronçonneuse
dans un arbre, il convient de lire les
instructions sous le titre Démarrage de la
tronçonneuse dans un arbre, sous le
chapitre Techniques de travail.
Veiller à ce qu’aucune personne non
autorisée ne se trouve dans la zone la
travail.
Moteur froid
Démarrage: Le frein de chaîne doit être activé lors du
démarrage de la tronçonneuse. Activer le frein de chaîne
en poussant l’arceau protecteur vers l’avant.
Moteur chaud
Suivre la même procédure que pour le démarrage moteur
froid, mais sans mettre la commande de starter en
position starter.
Démarrage
Saisir la poignée avant de la main gauche. Maintenir la
tronçonneuse au sol en plaçant votre pied droit dans la
poignée arrière. Prendre la poignée du lanceur de la
main droite et tirer lentement jusqu’à ce qu’une résistance
se fasse sentir (les cliquets se mettent en prise). Tirer
ensuite plusieurs fois rapidement et avec force.
jamais enrouler la corde du lanceur autour de la main.
REMARQUE! Ne pas sortir complètement la corde du
lanceur et ne pas lâcher la poignée avec la corde du
lanceur complètement sortie. Cela pourrait endommager
la machine.
Ne
Pompe à carburant: Appuyer sur la poche en
caoutchouc de la pompe à carburant plusieurs fois
jusqu’à ce que le carburant commence à remplir la poche.
Il n’est pas nécessaire de remplir la poche complètement.
Starter: Tirer la commande de starter.
66 – French
Enfoncer la commande du starter dès que le moteur
s’allume. Il émet alors un son de «
Continuer de tirer le lanceur avec force jusqu’à ce que le
moteur démarre. Quand le moteur démarre, le faire
tourner brièvement à plein régime. Ceci désenclenche
automatiquement le ralenti accéléré.
IMPORTANT! Danse la mesure où le frein de chaîne est
encore activé, le moteur doit repasser le plus tôt
possible au ralenti en libérant la gâchette d’accélération
afin d’éviter toute usure inutile de l’embrayage.
Remarque! Tirer l’arceau protecteur vers la poignèe
avant. Le frein de chaîne est alors libèrè. La tronçonneuse
est maintenant prête à être utilisée.
soufflement ».
Page 67

DÉMARRAGE ET ARRÊT
AVERTISSEMENT! Une inhalation
prolongée des gaz d’échappement du
!
moteur, du brouillard d’huile de chaîne et
de la poussière de copeaux peut
constituer un danger pour la santé.
• Ne jamais démarrer une tronçonneuse tant que le
guide, la chaîne et tous les capots n’ont pas été mis
en place correctement. Voir les instructions au
chapitre Montage. Si le guide et la chaîne ne sont pas
montés sur la tronçonneuse, l’accouplement peut se
détacher et causer des dommages graves.
• Le frein de chaîne doit être activé au démarrage. Voir
les instructions au chapitre Démarrage et arrêt. Ne
jamais démarrer la tronçonneuse en l’air. Cette
méthode est très dangereuse. Vous pourriez en effet
facilement perdre le contrôle de la tronçonneuse.
• Ne jamais mettre la machine en marche à l’intérieur.
Les gaz d’échappement du moteur sont nocifs.
• S’assurer que la zone de travail est bien dégagée et
qu’aucune personne et aucun animal ne risquent
d’entrer en contact avec l’équipement de coupe.
la poignée de la tronçonneuse avec les pouces et les
doigts.
Arrêt
Le moteur est arrêté en poussant l’interrupteur d’arrêt en
position d’arrêt.
• Toujours tenir la tronçonneuse des deux mains. Tenir
la poignée supérieure de la main droite et la poignée
avant de la main gauche. L’utilisateur, qu’il soit droitier
ou gaucher, doit la tenir de la sorte. Saisir fermement
French – 67
Page 68

TECHNIQUES DE TRAVAIL
Avant chaque utilisation:
1
3
2
4
5, 7
8
6
1 Contrôler que le frein de chaîne fonctionne
correctement et n’est pas endommagé.
2 Contrôler que le blocage de l’accélération fonctionne
correctement et n’est pas endommagé.
3 Contrôlez que l’interrupteur d’arrêt fonctionne
correctement et est en bon état.
4 Contrôler que toutes les poignées ne comportent pas
d’huile.
5 Contrôler que le système anti-vibrations fonctionne
correctement et n’est pas endommagé.
6 Contrôler que le silencieux est bien attaché et qu’il
n’est pas endommagé.
7 Contrôler que tous les éléments de la tronçonneuse
sont serrés et qu’ils ne sont ni endommagés ni
absents.
8 Contrôler que le capteur de chaîne est bien en place
et qu’il n’est pas endommagé.
9 Contrôlez la tension de la chaîne.
Méthodes de travail
IMPORTANT!
Ce chapitre concerne les mesures élémentaires de
sécurité en utilisant la tronçonneuse. Mais aucune
information ne peut remplacer l’expérience et le savoirfaire de l’opérateur. En cas de doute ou de difficulté, il
est recommandé de s’adresser à un spécialiste, soit le
concessionnaire habituel, soit l’atelier le plus proche,
soit enfin un professionnel expérimenté (consulter
l’annuaire du téléphone à la rubrique exploitation
forestière). Eviter tout emploi de la tronçonneuse pour
lequel on ne se sent pas suffisamment qualifié!
Avant d’utiliser la tronçonneuse, il convient de
comprendre le phénomène de rebond et de savoir
comment l’éviter. Voir au chapitre Mesures anti-rebond.
Avant d’utiliser la tronçonneuse, il faut connaître les
différences entre les deux méthodes de sciage: sciage
avec la partie supérieure ou sciage avec la partie
inférieure de la chaîne. Voir les instructions aux
chapitres Mesures anti-rebond et Équipement de
sécurité de la machine.
9
En cas de travaux en hauteur, sécurisez la tronçonneuse
en attachant une corde de sécurité à l’œillet de câble de
la tronçonneuse.
Utiliser les équipements de protection personnelle. Voir
au chapitre ”Équipement de protection personnelle”.
Règles élémentaires de sécurité
1 Bien observer la zone de travail:
• S’assurer qu’aucune personne, aucun animal ou
aucun autre facteur ne risque de gêner l’utilisateur de
la machine.
• S’assurer que les susnommés ne risquent pas
d’entrer en contact avec la chaîne de la tronçonneuse
ou d’être blessés par la chute de l’arbre coupé.
REMARQUE! Observer les règles ci-dessus mais ne
jamais utiliser une tronçonneuse sans s’assurer la
possibilité de pourvoir appeler à l’aide en cas d’accident.
2 Tout travail d’entretien en hauteur doit être effectué
par deux ou plusieurs personnes possédant la
formation appropriée (voir les instructions au chapitre
Important). Une personne au moins doit rester au sol
afin de pouvoir prendre les mesures nécessaires et/
ou appeler de l’aide en cas de situation d’urgence.
3 En cas de travaux d’entretien en hauteur, il est
nécessaire d’assurer la sécurité dans la zone de
travail et de la signaler par des panneaux, rubans et
autres. La(les) personne(s) qui se trouve(nt) au sol
doit(doivent) toujours informer la(les) personne(s) qui
travaille(nt) en hauteur avant de pénétrer dans la zone
de sécurité.
4 Ne pas travailler par mauvais temps: brouillard épais,
pluie diluvienne, vent violent, grand froid, etc.
Travailler par mauvais temps est cause de fatigue et
peut même être dangereux: sol glissant, direction de
chute d’arbre modifiée, etc.
5 Observer la plus grande prudence en élaguant les
petites branches et éviter de scier un bosquet (ou
plusieurs branchettes en même temps). Les
branchettes peuvent se coincer dans la chaîne, être
68 – French
Page 69

TECHNIQUES DE TRAVAIL
projetées vers l’utilisateur et causer des blessures
personnelles graves.
6 S’assurer de pouvoir se tenir et se déplacer en toute
sécurité. Repérer les éventuels obstacles en cas de
déplacement imprévu: souches, pierres, branchages,
fondrières, etc. Observer la plus grande prudence lors
de travail sur des terrains en pente.
7 Observer la plus grande prudence lors de l’abattage
des arbres sous tension. Avant et après le sciage, les
arbres sous tension risquent de brutalement retrouver
leur position initiale. Un mauvais placement de
l’utilisateur ou de l’entaille d’abattage peut entraîner
un choc avec l’arbre pouvant résulter en une chute ou
en une perte du contrôle de la machine. Ces deux cas
de figure sont susceptibles de provoquer des
blessures graves.
AVERTISSEMENT! Des copeaux se
coincent parfois dans le carter de
!
l’embrayage, ce qui bloque la chaîne.
Arrêtez toujours le moteur avant le
nettoyage.
9 Quand vous posez la tronçonneuse par terre, bloquez
la chaîne avec le frein de chaîne et veillez à toujours
voir la machine. Coupez toujours le moteur en cas de
'stationnement' prolongé.
Règles élémentaires
1 En comprenant en quoi consiste et comment se
produit un rebond, il est possible de limiter et même
d’éliminer l’effet de surprise qui augmente le risque
d’accident. La plupart des rebonds sont courts, mais
certains peuvent être extrêmement rapides et
violents.
2 Toujours tenir la tronçonneuse fermement, la main
droite sur la poignée supérieure et la gauche, sur la
poignée avant. Tenir les poignées solidement avec
les doigts et les pouces. Il convient de toujours tenir
la tronçonneuse de la sorte, que l’on soit droitier ou
gaucher. Une prise solide aide à maîtriser les
rebonds et à avoir un meilleur contrôle de la
tronçonneuse.
3 La plupart des accidents dus à un rebond se
produisent lors de l’élagage. Se tenir fermement sur
les jambes et s’assurer que la zone de travail est bien
dégagée pour ne pas risquer de trébucher ou de
perdre l’équilibre.
Par manque d’attention, la zone de rebond du nez du
guide peut buter sur une souche, un rondin, une
branche ou un arbre voisin et occasionner un rebond.
8 Pour se déplacer, bloquer la chaîne avec le frein de
chaîne et couper le moteur. Porter la tronçonneuse
avec le guide et la chaîne tournés vers l’arrière. Pour
un transport prolongé, utiliser le fourreau du guidechaîne.
Gardez le contrôle de la pièce de travail. Si les pièces
que vous sciez sont petites et légères, elles peuvent
se coincer dans la chaîne et être projetées sur vous.
Même si cela n’est pas dangereux en soi, vous
pouvez être surpris et perdre le contrôle de la
tronçonneuse. Ne sciez jamais des branches ou des
billes empilées sans les séparer. Sciez seulement une
bille ou un morceau à la fois. Retirez les morceaux
sciés pour que votre zone de travail reste sûre.
4 Ne jamais se servir de la tronçonneuse à un
niveau trop élevé, plus haut que les épaules, et
French – 69
Page 70

TECHNIQUES DE TRAVAIL
éviter de couper avec la pointe du guide-chaîne.
Ne jamais tenir la tronçonneuse d’une seule main!
5 Toujours travailler à la vitesse maximale, c’est à dire à
plein régime.
6 Pour couper les branches d’un arbre plus hautes que
les épaules, il est recommandé d’utiliser une plateforme ou un support de travail.
7 Observer la plus grande prudence en utilisant le
tranchant supérieur du guide-chaîne, c’est à dire en
sciant la pièce par en dessous (de bas en haut). Ceci
s’appelle travailler en poussée. La force réactionnelle
de la chaîne pousse la tronçonneuse vers l’utilisateur.
Si la chaîne se coince, la tronçonneuse peut être
rejetée contre vous.
8 Il importe de résister à la poussée en arrière du guide-
chaîne. En effet, si le guide-chaîne est repoussé
suffisamment en arrière pour que la zone de rebond
du nez se trouve en contact avec l’arbre, un rebond
peut se produire.
méthode ”poussée”. La tronçonneuse est attirée vers
l’arbre et le bord avant de la tronçonneuse devient un
appui naturel contre l’arbre. Dans ce cas, l’utilisateur
contrôle mieux à la fois sa tronçonneuse et la zone de
rebond du nez.
9 Suivre les instructions du fabricant relatives à
l’affûtage et à l’entretien. Lors du remplacement du
guide et de la chaîne, n’utiliser que les combinaisons
chaîne et guide-chaîne recommandées. Voir aux
chapitres Équipement de coupe et Caractéristiques
techniques.
Utilisation d’un tronçonneuse dans un arbre, avec cordage et harnais
Ce chapitre vous présente des pratiques d’utilisation qui
réduisent les risques de blessure avec une tronçonneuse
lors de tâches à effectuer en hauteur, suspendu à un
cordage et un harnais. Bien que les instructions
suivantes pourraient constituer une matière de base en
guidage et formation, elles ne peuvent en aucun cas se
substituer à une formation officielle.
Consignes générales pour le travail en hauteur
Il convient que les utilisateurs de tronçonneuse opérant
en hauteur, suspendus à un cordage et à un harnais, ne
travaillent jamais seuls. Une personne compétente et
formée aux procédures d’urgence adéquates doit les
assister au sol.
Les utilisateurs de tronçonneuses doivent être formés aux
techniques de sécurité générales pour la grimpée et le
positionnement au travail, et doivent être équipés de
harnais, de cordages, d’estropes, de mousquetons et
autre équipement nécessaire à des positions de travail
sûres, à la fois pour eux-mêmes et pour la tronçonneuse.
Préparation à l’utilisation de la tronçonneuse dans
l’arbre
La tronçonneuse doit être vérifiée, alimentée en
carburant, démarrée et chauffée par le travailleur au sol.
Il convient par ailleurs d’engager le frein de chaîne avant
d’envoyer l’appareil à l’utilisateur dans l’arbre. La
tronçonneuse doit être équipée d’une estrope appropriée
lui permettant d’être attachée au harnais de l’utilisateur :
a) attachez la corde autour de l’œillet de câble à l’arrière
de la tronçonneuse.
Le tronçonnage avec la partie inférieure de la chaîne,
c’est à dire par dessus (de haut en bas), s’appelle
70 – French
b) utilisez des mousquetons adéquats pour permettre une
attache indirecte (via l’estrope) et une attache directe (au
Page 71

TECHNIQUES DE TRAVAIL
point d’attache de la tronçonneuse) de la tronçonneuse
au harnais de l’utilisateur.
REMARQUE! Les dimensions de l’œillet de courroie ne
permettent pas de l’utiliser avec une corde dite de
sécurité. Utilisez alors l’œillet de câble.
c) vérifiez que la tronçonneuse est solidement attachée
avant de la hisser à l’utilisateur.
d) vérifiez que la tronçonneuse est solidement attachée
au harnais avant de la détacher des cordages utilisés
pour le hissage.
Il convient de n’attacher la tronçonneuse qu’aux points
d’attache du harnais recommandés. Ils peuvent être
situés au centre (avant ou arrière) ou sur les côtés.
L’éventuelle attache de la tronçonneuse au point central
arrière ne gênera pas les cordes de grimpée et permet un
soutien central du poids dans le bas de la colonne
vertébrale de l’utilisateur.
Avant de changer de point d’attache, l’utilisateur doit
vérifier si la tronçonneuse est sécurisée dans sa nouvelle
position avant de la détacher du point d’attache
précédent.
Utilisation de la tronçonneuse dans un arbre
Il ressort d’une analyse des accidents survenus avec ce
type de tronçonneuse pendant des tâches d’élagage que
la principale cause d’accident est une utilisation impropre,
à une seule main, de la tronçonneuse. Dans la grande
majorité des accidents, il s’avère que les utilisateurs
adoptent une position de travail risquée qui les empêche
de saisir les deux poignées de la tronçonneuse. Ce qui
augmente le risque de blessures dues à :
• une prise trop souple de la tronçonneuse en cas de
rebond.
• un manque de maîtrise de la tronçonneuse qui peut
dès lors entrer en contact avec les cordages ou
l’utilisateur lui-même (en particulier la main et le bras
gauches).
• la perte de contrôle, due elle-même à une position de
travail dangereuse, ce qui peut engendrer un contact
avec la tronçonneuse (mouvement inattendu au cours
de l’utilisation de la tronçonneuse).
Sécurisation de la position de travail pour une
utilisation à deux mains
Pour permettre à l’utilisateur de tenir sa tronçonneuse des
deux mains, lors de l’utilisation de l’appareil, elles doivent
en général être aux niveaux suivants pour une position de
travail sûre :
• niveau des hanches pour des coupes horizontales ;
• niveau du plexus solaire pour des coupes verticales.
Lorsque l’utilisateur travaille sur des troncs verticaux
présentant de faibles forces latérales sur le point de
travail, un bon calage avec le pied peut suffire pour
garantir une position de travail sûre. Toutefois, si
l’utilisateur s’éloigne du tronc, il devra faire le nécessaire
pour ôter ou neutraliser les forces latérales croissantes,
par exemple en redirigeant la corde de grimpée principale
à l’aide d’un point d’ancrage supplémentaire ou en
utilisant une estrope réglable directement du harnais à un
point d’ancrage supplémentaire.
L’on peut obtenir un bon calage du pied en position de
travail à l’aide d’un étrier temporaire, confectionné à l’aide
d’une corde sans fin.
Démarrage de la tronçonneuse dans un arbre
Lors du démarrage de la tronçonneuse dans un arbre,
l’utilisateur doit :
a) enclencher le frein de chaîne avant le démarrage.
b) tenir la tronçonneuse à sa gauche ou à sa droite lors
du démarrage :
1 du côté gauche, tenir la tronçonneuse la main gauche
sur la poignée frontale. Éloignez la tronçonneuse de
votre corps tout en tenant la corde du lanceur de la
main droite.
2 du côté droit, tenir la tronçonneuse la main droite sur
l’une ou l’autre poignée. Éloignez la tronçonneuse de
votre corps tout en tenant la corde du lanceur de la
main gauche.
Le frein de chaîne doit toujours être enclenché avant de
suspendre une tronçonneuse en marche sur son estrope.
L’utilisateur doit toujours vérifier si la tronçonneuse
dispose d’assez de carburant avant d’amorcer des
coupes difficiles.
Utilisation d’une tronçonneuse à une seule main
L’utilisateur ne peut en aucun cas tenir la tronçonneuse
d’une seule main.
L’utilisateur ne peut jamais :
• procéder à une coupe, la zone de rebond au bout du
guide-chaîne de la tronçonneuse.
• tenir les tronçons qu’il est en train de couper.
• tenter d’attraper des tronçons en pleine chute.
• Couper dans l’arbre s’il/elle n’est sécurisé(e) que par
une seule corde. Toujours utiliser 2 cordes sécurisées.
• Il convient de vérifier l’état du harnais, de la ceinture
et du cordage à intervalles réguliers.
Dégagement d’une tronçonneuse coincée
Si, pendant la coupe, la tronçonneuse venait à se coincer,
l’utilisateur doit :
• éteindre la tronçonneuse et l’attacher fermement au
côté intérieur de l’arbre (à savoir vers le tronc) ou à
une autre corde.
• dégager la tronçonneuse de la saignée et soulever la
branche si nécessaire.
French – 71
Page 72

TECHNIQUES DE TRAVAIL
!
• si nécessaire, utiliser une scie manuelle ou une
seconde tronçonneuse et couper à un minimum de 30
cm de la tronçonneuse coincée pour la dégager.
Si l’on utilise une scie manuelle ou une autre
tronçonneuse pour dégager une tronçonneuse coincée, il
convient de toujours procéder aux coupes de
dégagement du côté extérieur (du côté de la pointe de la
branche) afin d’éviter que la tronçonneuse soit prise dans
la section coupée, ce qui pourrait compliquer la situation.
Technique de base pour la coupe
Généralités
• Toujours travailler à plein régime!
• Mettre le moteur au ralenti après chaque coupe (la
maintenance du régime maximal hors charge, c’est à
dire sans que le moteur ait à supporter le travail de la
chaîne, risque d’endommager gravement le moteur).
• Scier de haut en bas = méthode ”tirée”
• Scier de bas en haut = méthode ”poussée” .
Scier en utilisant la méthode ”poussée” implique un risque
accru de rebond. Voir au chapitre Mesures anti-rebond.
Terminologie
Sciage = consiste à scier le tronc de part en part.
Élagage = consiste à ébrancher un arbre abattu.
Fendage = consiste à casser la pièce avant que l’entaille
ne soit terminée.
Avant toute opération de sciage, observer les cinq
facteurs suivants:
1 Ne pas coincer l’outil de coupe dans l’entaille.
Si la chaîne se coince ou si la pièce à scier se casse, cela
dépend de deux raisons: le support de la pièce avant et
après le sciage et l’état de tension de la pièce.
Il est en général possible d’éviter les inconvénients
indiqués ci-dessus en effectuant le sciage en deux temps,
soit de haut en bas, soit de bas en haut. Il s’agit alors de
neutraliser la tendance naturelle de la pièce à coincer la
chaîne ou à se fendre.
AVERTISSEMENT! Si la chaîne se coince
dans l’entaille, couper immédiatement le
moteur! Ne pas tirer sur la tronçonneuse
pour la dégager afin de ne pas se blesser
à la chaîne au moment où la
tronçonneuse se décoince subitement.
Utiliser un bras de levier pour décoincer
la tronçonneuse.
La liste suivante indique comment se tirer des situations
les plus couramment rencontrées par les utilisateurs de
tronçonneuses.
Sciage
Le tronc est couché à même le sol. Il n’y a aucun risque
de coinçage de la chaîne ou de fendage de la pièce à
scier. Par contre, il existe un risque important que la
chaîne rencontre le sol après le sciage.
Couper le tronc de haut en bas. Faire attention à la fin de
l’entaille pour éviter que la chaîne ne rencontre le sol.
Maintenir le plein régime et se préparer à toute
éventualité.
2 Ne pas casser la pièce en cours de sciage.
3 La chaîne ne doit rencontrer ni le sol ni tout autre
obstacle pendant ou après le sciage.
4 Y a-t-il risque de rebond?
5 L’aspect du site et du terrain peut-il gêner la sécurité
de la position de travail et des déplacements?
72 – French
- Si cela est possible (= s’il est possible de retourner le
tronc), interrompre de préférence l’entaille aux 2/3 du
tronc.
- Retourner le tronc de manière à pouvoir couper le 1/3
restant de haut en bas.
Page 73

TECHNIQUES DE TRAVAIL
!
Une extrémité du tronc repose sur un support. Risque
important de fendage.
Commencer par couper le tronc par en bas (environ 1/3
du diamètre).
- Finir la coupe par en haut, de manière que les deux
traits de coupe se rencontrent.
Les deux extrémités du tronc reposent sur des
supports.
- Commencer par couper le tronc par le haut (environ 1/
3 du diamètre).
Risque important de coinçage de la chaîne.
Techniques d’abattage des cimes d’arbre
AVERTISSEMENT! L’abattage d’un arbre
demande beaucoup d’expérience. Un
utilisateur non expérimenté ne doit pas
effectuer d’abattages. L’utilisateur se doit
d’éviter toute utilisation qu’il ne maîtrise
par suffisamment!
Distance de sécurité
En cas de travaux en hauteur, il est nécessaire d’assurer
la sécurité dans la zone de travail et de la signaler par des
panneaux, rubans et autres. La distance de sécurité à
respecter entre la cime de l’arbre à abattre et le lieu de
travail le plus proche doit être de 2 1/2 fois la hauteur de
l’arbre. Veiller à ce que personne ne se trouve dans cette
zone dangereuse avant et pendant l’abattage.
Sens d’abattage
Le but consiste à placer l’arbre abattu de façon à ce que
l’ébranchage et le tronçonnage ultérieurs du tronc
puissent être effectués sur un terrain aussi favorable que
possible. Chercher à sécuriser au maximum la position de
travail. Il convient avant tout d’éviter que la cime d’arbre
qui tombe ne s’accroche à un autre arbre. Décrocher une
cime d’arbre ”coincée” peut s’avérer très dangereux (voir
le point 4 de ce chapitre).
- Finir la coupe par en dessous, de manière que les traits
de coupe se rencontrent.
Élagage
Lors de l’élagage de branches épaisses, procéder
comme pour le sciage ordinaire.
Couper les branches gênantes par étapes, une par une.
Après avoir décidé du sens d’abattage de la cime de
l’arbre, estimer dans quel sens la cime de l’arbre aura
tendance à s’abattre naturellement.
Les facteurs déterminants sont:
• L’inclinaison
• La courbure
• La direction du vent
• La densité des branches
• Le poids éventuel de la neige
French – 73
Page 74

TECHNIQUES DE TRAVAIL
Il se pourrait que vous n’ayez pas d’autre choix que de
laisser tomber l’arbre dans son sens de chute naturel s’il
est impossible ou dangereux de tenter de le faire tomber
dans le sens que vous aviez initialement prévu.
Un autre facteur important (qui n’a aucune incidence sur
le sens d’abattage mais concerne la sécurité), est la
présence éventuelle de branches mortes ou abîmées qui,
en se détachant, risquent de provoquer des blessures.
AVERTISSEMENT! Lors de délicates
opérations d’abattage, les protecteurs
!
d’oreilles devront être retirés dès la fin
du tronçonnage afin que tout bruit ou
signal d’avertissement puisse être
entendu.
Abattage d’un arbre
Un abattage s’effectue à l’aide de trois entailles. On
procède tout d’abord aux entailles directionnelles, à
savoir une entaille supérieure et une entaille inférieure,
puis au trait d’abattage. Un emplacement approprié de
ces entailles vous permet de contrôler le sens de la chute
de l’arbre de façon très précise.
Encoche
Effectuez les encoches en commençant par l’entaille
supérieure. Alignez la marque de sens de chute de la
tronçonneuse (1) sur une cible prédéfinie, dans une
direction appropriée (2). Essayez de maintenir votre
position dans l’arbre du côté droit et coupez en tirant.
Veillez à garder le guide-chaîne dans votre champ de
vision à tout moment durant l’opération.
La ligne de jointure entre les deux entailles s’appelle le
trait de chute. Le trait de chute doit être horizontal et
former un angle de 90
Trait de chute
Le trait d’abattage se fait de l’autre côté du tronc et doit
être parfaitement horizontal. Essayez de prendre une
position adéquate vous permettant de couper en tirant.
Placer le trait de chute à environ 0-3 cm (0-1.5 pouces)
au-dessus du plan horizontal de l’encoche.
Scier à plein régime et enfoncer graduellement le guidechaîne dans le tronc. Attention si l’arbre se déplace dans
le sens opposé au sens de chute choisi. Introduire un coin
ou un bras de levier dans le trait de chute dès que la
profondeur de coupe le permet.
° avec le sens de chute prévu.
1
2
Effectuer ensuite l’entaille inférieure de façon que les
deux entailles correspondent.
L’encoche doit faire 1/4 du diamètre du tronc et l’angle
entre les deux entailles doit être d’au moins 60
74 – French
° - 70°.
Le trait de chute doit s’achever parallèlement à l’encoche,
l’espace entre les deux étant 1/10 du diamètre du tronc.
La partie non coupée du tronc s’appelle la charnière.
La charnière guide le tronc dans la direction de chute.
Le contrôle de la direction de chute de l’arbre fonctionne
mal si la charnière est trop petite ou coupée trop
profondément ou si les deux entailles ne coïncident pas.
Page 75

TECHNIQUES DE TRAVAIL
!
Nous recommandons une longueur de guide-chaîne
supérieure au diamètre du tronc, ce qui simplifie que le
trait de chute et l’encoche s’effectuent avec un simple trait
de scie. Voir aux Caractéristiques techniques les
longueurs de guide-chaîne recommandées pour chaque
modèle de tronçonneuse.
Il existe des méthodes d’abattage spécifiques pour les
troncs dont le diamètre est supérieur à la longueur du
guide-chaîne. Ces méthodes comportent un risque
important de choc entre la zone de rebond du guidechaîne et un objet.
AVERTISSEMENT! Il est déconseillé aux
utilisateurs non expérimentés d’abattre
!
un arbre dont le diamètre du tronc est
supérieur à la longueur du guide-chaîne!
Solution à un abattage raté
Sciage d’un arbre ou d’une branche pliés
Préparations:
Apprécier la direction dans laquelle l’arbre ou la branche
est susceptible de se détendre, ainsi que son point de
rupture (en cas de flexion supplémentaire).
S’assurer de pouvoir agir sans risque et déterminer si une
solution de toute sécurité est possible. En cas de
difficulté, le plus sûr moyen est de ne pas se servir de la
tronçonneuse et d’avoir recours à un treuil.
Règles générales:
Se placer de façon à ne pas se trouver dans la trajectoire
de la branche/de l’arbre lors de la détente.
dans la branche/l’arbre et donc provoquer la cassure de
la branche/de l’arbre au point de rupture.
Ne jamais scier de part en part un arbre ou une
branche pliés!
Mesures anti-rebond
AVERTISSEMENT! Un rebond peut-être
soudain, rapide et violent et renvoyer la
tronçonneuse, le guide-chaîne et la
chaîne en direction de l’utilisateur. Si la
chaîne est alors en rotation, les
blessures encourues sont graves et
quelquefois mortelles. Il convient donc
de comprendre les raisons d’un rebond
afin de pouvoir éviter ce phénomène
grâce à une bonne méthode de travail et
un comportement prudent.
Qu’est-ce qu’un rebond?
Un rebond est la réaction de recul qui peut se produire
quand le quart supérieur du nez du guide-chaîne (la zone
de rebond) touche un objet quelconque.
Le rebond se produit toujours dans le plan du guidechaîne. En général, tronçonneuse et guide-chaîne sont
relevés simultanément en direction de l’utilisateur.
Néanmoins, la direction du rebond peut varier suivant la
position de la tronçonneuse au moment où la zone de
rebond du guide-chaîne touche un objet quelconque.
Le rebond ne peut se produire que quand la pointe ou nez
du guide-chaîne (zone de rebond) touche un objet
quelconque.
Tronçonnage en rondins
Voir les instructions au chapitre Technique de base pour
la coupe.
Faire plusieurs entailles à proximité du point de rupture en
nombre et de profondeur suffisants pour libérer la tension
French – 75
Page 76

ENTRETIEN
Généralités
L’utilisateur ne peut effectuer que les travaux d’entretien
et de révision décrits dans ce manuel d’utilisation. Les
mesures plus importantes doivent être effectuées dans
un atelier d’entretien agréé.
Réglage du carburateur
Votre produit Husqvarna a été conçu et fabriqué selon des
spécifications qui visent à réduire les émissions nocives.
AutoTune
Le moteur est équipé de AutoTune ; le réglage manuel
des pointeaux H et L et de la vis T du carburateur n’est
donc plus nécessaire. Les pointeaux et la vis T ont été
supprimés. La fonction AutoTune règle le carburateur de
façon électronique et permet ainsi de toujours obtenir un
réglage optimal.
AVERTISSEMENT! Si la chaîne continue
de tourner pendant le ralenti, veuillez
!
contacter votre atelier d’entretien.
N’utilisez pas la tronçonneuse tant
qu’elle n’est pas correctement réglée ou
réparée.
Fonctionnement
• Le carburateur détermine le régime du moteur via la
commande de l’accélération. C’est dans le
carburateur que l’air est mélangé à l’essence. Ce
mélange est réglable.
• Le réglage automatique du carburateur signifie que le
moteur s’adapte continuellement aux conditions
locales, comme par exemple les conditions
climatiques, l’altitude, le type d’essence et d’huile 2
temps. Cette fonction est réglée par AutoTune.
Réglage du moteur
Les étapes suivantes doivent être respectées lorsque la
tronçonneuse est mise en marche pour la première fois
ou lorsque les conditions extérieures changent
(carburant, altitude, filtre à air, etc.)
accélérer la vitesse du moteur et effectuer quelques
entailles dans un gros rondin
La tronçonneuse doit fonctionner tout le temps (à 8 000 12
000 trs/min) afin de permettre au carburateur de
s’ajuster.
Conditions
REMARQUE! Le système d’allumage comporte un
limiteur de régime intégré. Quand le limiteur de régime est
activé, le son est similaire à celui émis par la
tronçonneuse quand elle tourne sur quatre temps.
: démarrer le moteur,
(3-5 min.).
Contrôle, maintenance et entretien des équipements de sécurité de la tronçonneuse
Remarque! L’entretien et la réparation de la machine
exigent une formation spéciale, et plus particulièrement
l’équipement de sécurité de la machine. Si les contrôles
suivants ne donnent pas un résultat positif, nous vous
recommandons de prendre contact avec votre atelier
d’entretien.
Frein de chaîne avec arceau protecteur
Contrôle de l’usure du ruban de frein
• Nettoyer le frein de chaîne et le tambour d’embrayage
(sciure, résine, saletés). La saleté et l’usure
compromettent le bon fonctionnement du frein.
• Vérifier régulièrement le ruban qui doit avoir au moins
0,6 mm d’épaisseur à son point le plus usé.
Contrôle de l’arceau protecteur
• Vérifier que l’arceau est intact et sans aucun défaut
apparent tel que fissures.
• Actionner l’arceau d’avant en arrière pour s’assurer
qu’il se meut librement et qu’il est solidement fixé à
son articulation dans le carter d’embrayage.
76 – French
Page 77

ENTRETIEN
Contrôle de l’effet de freinage
• Placer la tronçonneuse sur une surface solide et la
mettre en marche. Vérifier que la chaîne ne touche
pas le sol ou tout autre obstacle. Voir les instructions
au chapitre Démarrage et arrêt.
• Tenir fermement la tronçonneuse des deux mains, les
doigts et le pouce épousant bien les poignées.
• Donner le plein régime puis activer le frein de chaîne
en poussant le poignet gauche contre l’arceau
protecteur. Ne pas lâcher la poignée avant.
doit s’arrêter immédiatement.
La chaîne
• Vérifier que le blocage de l’accélération, la commande
d’accélération et leurs ressorts de rappel fonctionnent
correctement.
• Mettre la tronçonneuse en marche et accélérer au
maximum. Lâcher la commande de l’accélération et
s’assurer que la chaîne s’arrête et demeure immobile.
Si la chaîne tourne lorsque la gâchette d’accélération
est en position «
atelier d’entretien.
ralenti », veuillez contacter votre
Capteur de chaîne
• Vérifier que le capteur de chaîne est en bon état et
qu’il est bien fixé dans le corps de la tronçonneuse.
Blocage de l’accélération
• Vérifier d’abord que la commande de l’accélération
est bloquée en position de ralenti quand le blocage de
l’accélération est en position initiale.
• Appuyer sur le blocage de l’accélération et vérifier
qu’il revient de lui-même en position initiale quand il
est relâché.
Système anti-vibrations
• Vérifier régulièrement l’état des éléments afin de
détecter fissures et déformations.
• S’assurer que les éléments sont bien fixés entre le
moteur et les poignées.
French – 77
Page 78

ENTRETIEN
!
Bouton d’arrêt
• Mettre le moteur en marche et s’assurer qu’il s’arrête
lorsque le bouton d’arrêt est amené en position
d’arrêt.
silencieux sans grille antiflamme ou avec une grille
antiflamme défectueux.
Lanceur
Silencieux
• Ne jamais utiliser une machine dont le silencieux est
défectueux.
• Vérifier régulièrement la fixation du silencieux dans la
machine.
Le silencieux est conçu pour atténuer le bruit et dévier le
flux des gaz d’échappement loin de l’utilisateur. Ces gaz
sont chauds et peuvent transporter des étincelles
risquant de causer un incendie si elles entrent en contact
avec un matériau sec et inflammable.
Le silencieux est équipé d'une grille antiflamme spécial.
La grille antiflamme doit être nettoyé une fois par mopis.
Le nettoyer de préférence à l'aide d'une brosse
métallique. Un pare-étincelles colmaté risque de causer
la surchauffe du moteur et de provoquer de sérieuses
avaries du moteur.
Remarque! Remplacer la grille si elle est endommagée.
Une grille encrassée cause une surchauffe du moteur,
entraînant des détériorations au niveau du cylindre et du
piston. Ne jamais se servir d’une machine dont le
silencieux est endommagé.
Ne jamais utiliser un
AVERTISSEMENT! Le ressort de rappel
est tendu et risque, en cas de
manipulation imprudente, de sortir du
boîtier et de causer des blessures.
Observez la plus grande prudence lors
du remplacement du ressort de
démarrage ou de la corde de lanceur.
Utilisez des lunettes et des gants de
protection.
Remplacement d’une corde de lanceur rompue ou usée
• Déposer les vis maintenant le lanceur contre le carter
moteur et sortir le lanceur.
• Tirer la corde d’environ 30 cm et la sortir de la gorge
à la périphérie de la poulie. Mettre à zéro le ressort de
rappel en laissant tourner prudemment la poulie en
arrière.
78 – French
Page 79

ENTRETIEN
• Déposer la vis au centre de la poulie et enlever la
poulie.
• Tenez la poignée du démarreur et tirez sur le câble
afin de laisser apparaître au moins 10
du ressort. Appuyez simultanément sur le cache de la
poignée du démarreur et faites la coulisser hors de la
poignée du démarreur.
10mm
• Si le câble du démarreur est cassé à l’intérieur de la
poignée, appuyez sur le cache et poussez-le
latéralement à l’aide d’une clé plate.
mm du guide
• Faites un nœud simple en laissant dépasser
l’extrémité libre d’environ 10
partie qui dépasse pour la placer parallèlement au
câble du démarreur, puis enfoncez le nœud à sa place
dans le guide du ressort (2).
1
10mm
• Tirez la corde du lanceur contre la poignée du lanceur
de sorte qu’au moins 10
visible. Placez le carter de la poignée du lanceur.
mm (1). Faites tourner la
2
mm du guide du ressort soit
10mm
• Monter le lanceur et serrer les vis.
Mise sous tension du ressort
• Placer la corde dans la gorge de la poulie et faire
tourner la poulie d’environ deux tours dans le sens
des aiguilles d’une montre.
Remarque! Veiller à ce que la poulie puisse effectuer
un demi-tour supplémentaire avec la corde
entièrement déroulée.
• Installez et bloquez une nouvelle corde sur la poulie.
Enroulez la corde du lanceur d’environ 3 tours sur la
poulie du lanceur. Montez la poulie du lanceur contre
le ressort de rappel de telle sorte que l’extrémité du
ressort de rappel s’accroche dans la poulie du
lanceur. Placez la vis au centre de la poulie du
lanceur.
• Passez la corde du lanceur à travers le trou situé dans
le corps du lanceur. Passez la corde du lanceur dans
la poignée du lanceur et le guide du ressort.
Remplacement d’un ressort de rappel rompu
• Sortir la poulie du lanceur. Voir au chapitre
Remplacement de corde de lanceur rompue ou usée.
French – 79
Page 80

ENTRETIEN
Garder à l’esprit que le ressort de rappel se trouve à
l’état tendu dans le boîtier du lanceur.
• Démonter la cassette avec le ressort de rappel hors
du lanceur.
• Lubrifier le ressort de rappel avec de l’huile fluide.
Monter la cassette avec le ressort de rappel dans le
lanceur. Monter la poulie du lanceur et tendre le
ressort de rappel.
Montage du lanceur
• Monter le lanceur en commençant par dévider la
corde avant de mettre le lanceur en place contre le
carter moteur. Lâcher ensuite la corde lentement pour
permettre aux cliquets de s’enclencher dans la poulie.
• Mettre en place et serrer les vis de maintien du
lanceur.
Filtre à air
Le filtre à air doit être maintenu propre pour éviter:
• Un mauvais fonctionnement du carburateur.
• Des problèmes de démarrage.
• Une perte de puissance.
• Une usure prématurée des éléments du moteur
• Une consommation anormalement élevée de
carburant
• Pour déposer le filtre à air, commencer par retirer le
capot du filtre. Lors du remontage, veiller à assurer
une bonne étanchéité entre le filtre à air et son
support. Nettoyer le filtre en le tapotant ou à l’aide
d’une brosse.
Pour un nettoyage plus sérieux, laver le filtre à l’eau
savonneuse.
Un filtre ayant servi longtemps ne peut plus être
complètement nettoyé. Le filtre à air doit donc être
remplacé à intervalles réguliers.
doit être remplacé immédiatement.
Une tronçonneuse HUSQVARNA peut être équipée de
différents types de filtre à air suivant le lieu de travail, le
temps qu’il fait, la saison, etc. Demandez conseil à votre
revendeur.
Tout filtre endommagé
Bougie
L’état de la bougie dépend de:
• Mauvais mélange de l’huile dans le carburant (trop
d’huile ou huile inappropriée).
• La propreté du filtre à air.
Ces facteurs peuvent concourir à l’apparition de calamine
sur les électrodes, ce qui à son tour entraîne un mauvais
fonctionnement du moteur et des démarrages difficiles.
Si la puissance de la machine est trop faible, si la machine
est difficile à mettre en marche ou si le ralenti est
irrégulier, toujours commencer par contrôler l’état de la
bougie avant de prendre d’autres mesures. Si la bougie
est encrassée, la nettoyer et vérifier que l’écartement des
électrodes est de 0,5 mm. Remplacer la bougie une fois
par mois ou plus souvent si nécessaire.
80 – French
Page 81

ENTRETIEN
!
Remarque! Toujours utiliser le type de bougie
recommandé! Une bougie incorrecte peut endommager
le piston/le cylindre. S’assurer que la bougie est dotée
d’un antiparasites.
Graissage du pignon d’entraînement du guide
Lubrifier le pignon du guide à chaque plein d’essence.
Utiliser pour cela une burette spéciale et une graisse pour
roulement de bonne qualité.
Graissage du roulement à aiguilles
Réglage de la pompe à huile
La pompe à huile est réglable. Le réglage s’effectue en
tournant la vis à l’aide d’un tournevis. Le débit d’huile
augmente lorsque l’on tourne la vis dans le sens des
aiguilles d’une montre et il diminue lorsque l’on tourne la
vis dans le sens contraire des aiguilles d’une montre.
En principe, quand le carburant est épuisé, le réservoir
d’huile est pratiquement vide. Veillez à remplir le réservoir
d’huile à chaque fois que vous réapprovisionnez la
tronçonneuse en carburant.
AVERTISSEMENT! Arrêter le moteur
avant d’effectuer le réglage.
Système de refroidissement
L’axe de sortie du tambour d’embrayage est doté d’un
roulement à aiguilles. Ce roulement à aiguilles doit être
graissé régulièrement (une fois par semaine).
Lors de la lubrification, l´écrou du guide sont desserrés
pour démonter le carter d’embrayage. Posez la
tronçonneuse sur le côté avec le tambour d’embrayage
vers le haut.
La lubrification est effectuée en vaporisant de la graisse
dans le centre du vilebrequin à l’aide d’une pompe à
graisse.
La machine est équipée d’un système de refroidissement
permettant d’obtenir une température de fonctionnement
aussi basse que possible.
Le système de refroidissement est composé des
éléments suivants:
1 La prise d’air dans le lanceur.
2 La tôle-guide d’air.
3 Les ailettes de ventilation sur le volant.
4 Carter d’embrayage
4
3
2
1
Nettoyer le système de refroidissement avec une brosse
une fois par semaine, voire plus souvent dans des
conditions difficiles. Un système de refroidissement sale
ou colmaté provoque la surchauffe de la machine,
endommageant le cylindre et le piston.
French – 81
Page 82

ENTRETIEN
Utilisation hivernale
Lors de l’utilisation par temps froid et en neige poudreuse,
des troubles de fonctionnement peuvent apparaître, dus
à:
• Un moteur trop froid.
• Le givrage du filtre à air et du carburateur.
Prendre les dispositions suivantes:
• Diminuer partiellement l’admission d’air afin
d’augmenter la température du moteur.
Température de -5°°°°C ou moins
Un cache spécial à monter sur le boîtier du lanceur est
disponible pour l’utilisation par temps froid ou en neige
poudreuse. Ce cache réduit la quantité d’air froid admise
tout en arrêtant la majeure partie de la neige qui pourrait
être aspirée.
Numéro d’article : 579 38 48-01.
REMARQUE ! Si le kit spécial hiver est utilisé ou si des
mesures sont prises pour augmenter la température, il
convient de revenir au réglage normal, dans la mesure
où la machine est alors utilisée dans des conditions de
températures normales. Sinon il y a risque de
surchauffe avec pour conséquence de graves
dommages au moteur.
82 – French
Page 83

ENTRETIEN
Schéma d’entretien
La liste ci-dessous indique l’entretien à effectuer sur la machine. La plupart des points sont décrits à la section Entretien.
Entretien quotidien Entretien hebdomadaire Entretien mensuel
Inspectez le degré d’usure du ruban
Nettoyer l’extérieur de la machine.
Vérifier que les composants de la
commande de l’accélération
fonctionnent correctement en ce qui
concerne la sécurité. (Blocage de
l’accélération et commande de
l’accélération.)
Nettoyer le frein de chaîne et en
contrôler le bon fonctionnement.
S’assurer que le capteur de chaîne
est en bon état, le remplacer si
nécessaire.
Retourner le guide-chaîne tous les
jours afin de répartir l’usure. S’assurer
que le trou de lubrification n’est pas
obturé. Nettoyer la gorge de la
chaîne. Lubrifier la roulette si le guide
en comporte une.
S’assurer que le guide et la chaîne
sont correctement alimentés en huile.
Vérifier que les rivets et les maillons
de la chaîne sont dépourvus de
fissures, que la chaîne n’est pas raide
et que les rivets et les maillons ne
sont pas anormalement usés.
Remplacer au besoin.
Affûter la chaîne et en contrôler la
tension et l’état général. Examiner le
pignon d’entraînement de la chaîne et
le remplacer s’il est usé.
Nettoyer la prise d’air du lanceur.
S’assurer que toutes les vis et tous les
écrous sont bien serrés.
Contrôler le bon fonctionnement du
contacteur d’arrêt.
Vérifier qu’il n’y a pas de fuite de
carburant du moteur, du réservoir ou
des conduits de carburant.
Contrôler l’état du filtre à air.
Vérifiez que la chaîne ne tourne pas
lorsque le moteur est au ralenti.
Contrôlez le système de
refroidissement chaque semaine.
Contrôlez le lanceur, la corde de
lanceur et le ressort de rappel.
S’assurer que les éléments antivibrations ne sont pas endommagés.
Graisser le roulement du tambour
d’embrayage.
Limer les bavures éventuelles sur les
côtés du guide-chaîne.
Nettoyer ou remplacer la grille
antiflamme du silencieux.
Nettoyer le compartiment du
carburateur.
Nettoyer le filtre à air. Le remplacer si
nécessaire.
de freinage du frein de chaîne.
Remplacez-le quand les parties les
plus usées sont inférieures à 0,6 mm.
Inspecter le degré d’usure du moyeu,
du tambour d’embrayage et du
ressort d’embrayage.
Nettoyer la bougie. Vérifier
l’écartement des électrodes (0,5 mm).
Nettoyer l’extérieur du carburateur.
Vérifier que le tuyau à carburant ne
présente pas de fissures et qu’il n’est
pas endommagé. Le remplacer au
besoin.
Vider le réservoir de carburant et le
nettoyer à l’intérieur.
Vider le réservoir d’huile et le nettoyer
à l’intérieur.
Inspecter tous les câbles et
connexions.
French – 83
Page 84

CARACTÉRISTIQUES TECHNIQUES
Caractéristiques techniques
T540XP
Moteur
Cylindrée, po3/cm
Alésage, po/mm 1.57/40
Course, po/mm 1.18/30
Régime de ralenti, tr/min 3000
Puissance, kW/hp @ tr/min 1,8/2,5 @ 10 200
Période de durabilité des émissions selon la commission
californienne chargée de la qualité de l'air.
Système d’allumage
Bougie NGK CMR6H
Écartement des électrodes, po/mm 0.02/0,5
Système de graissage/de carburant
Contenance du réservoir de carburant, pint/litres 0.72/0,34
Débit de la pompe à huile à 9000 tr/min, ml/min 5-12,5
Contenance du réservoir d’huile, pint/litre 0.42/0,20
Type de pompe à huile Réglable
Poids
Tronçonneuse sans guide, ni chaîne et avec réservoirs
vides, lb/kg
Chaîne/guide-chaîne
Longueur de guide standard, pouces/cm 16”/41
Longueur de coupe utile, pouces/cm 15”/38
Pas, pouces/mm 3/8" /9,52
Épaisseur au maillon d’entraînement, pouces/mm 0.050/1,3
Type de pignon/dents Spur/6
Vitesse de la chaîne à 133 % du régime du moteur
maximum, m/s.
REMARQUE ! Ce système d’allumage par étincelle de véhicule est conforme à la norme NMB-002 du Canada.
3
2.3/37,7
125
8,6/3,9
25,8
84 – French
Page 85

CARACTÉRISTIQUES TECHNIQUES
Équipement de coupe recommandé pour Canada
Ce qui suit est une liste de combinaisons recommandées pour tronçonneuses Husqvarna T540XP. La/les
combinaison(s) répertoriée(s) de tête motrice, guide-chaîne et chaîne répond(ent) à toutes les exigences indiquées par
les normes Z62.1-03 (Tronçonneuses) et Z62.3-04 (Rebond des tronçonneuses) de l’Association canadienne de
normalisation.
De plus, la tronçonneuse Husqvarna H37 est évaluée et répertoriée en tant que tronçonneuse à faible rebond de Type
C, selon la norme Z62.3-04.
Information de rebond
Le rayon de la pointe du guide-chaine est déterminé soit par le nombre maximal de dents de la roue dentée de la pointe,
soit par le rayon de pointe maximal correspondant à un guide-chaîne massive.
Du fait que nous ayons listé les rayons maximums des guide-chaîne, vous pouvez utiliser un guide-chaîne avec un rayon
de pointe inférieur à ceux de notre liste. Pour les guide-chaîne de mêmes longueurs, toutes les guide-chaîne à pointe à
roue dentée et ayant le même nombre de dents peuvent être considérés comme ayant des valeurs énergétiques de
rebond équivalentes.
Combinaisons guide-chaîne et chaîne
Les combinaisons de guides et chaînes suivantes sont recommandées et homologuées pour votre tronçonneuse.
Guide-chaîne Chaîne
Longueur,
pouces
12
14 52
16 56
Pas, pouches Jauge, pouces
3/8 0.050 9T
Nombre max. de
dents, pignon avant
Type
Husqvarna H37,
Husqvarna H36
Affûtage de la chaîne et gabarits d’affûtage
Lonngueur,
maillons
entraîneurs (pce)
45
French – 85
Page 86

DÉCLARATION DE GARANTIE CONTRÔLE DES ÉMISSIONS EN CALIFORNIE ET AU NIVEAU FÉDÉRAL
IMPORTANT: Ce produit est conforme à la
réglementation de la Phase 3 de l’Agence de Protection
de l’Environnement des États-Unis (EPA) en ce qui
touche les emissions d’échappement et d’évaporation.
Pour assurer la conformité à la Phase 3 de l’EPA, nous
recommandons le recours à des pièces de remplacement
d’origin Husqvarna uniquement. L’utilisation de pièces de
remplacement non conformes est une infraction à la
législation fédérale.
VOS DROITS ET OBLIGATIONS EN GARANTIE
L’EPA (Environmental Protection Agency, l’agence de
protection de l’environnement des États-Unis), le CARB
(California Air Resources Board
ressources atmosphériques de Californie),
Environnement
sont heureux de détailler pour vous la garantie du
système antipollution de votre petit moteur hors
route
2015–2016*. Aux États-Unis et au Canada, les
petits moteurs hors route doivent être conçus, fabriqués
et équipés de manière à respecter les normes strictes
fédérales ou californiennes antipollution applicables.
Husqvarna Forest & Garden doit garantir les systèmes de
contrôle antipollution de votre petit moteur hors route
pendant la période figurant sur la liste ci-dessous à
condition que votre petit moteur hors route ne présente
aucun signe d’abus, de négligence ou d’entretien
inapproprié. Votre système de contrôle antipollution peut
comprendre des pièces telles qu’un carburateur, un
système d’injection de carburant, un système d’allumage,
un pot catalytique, des réservoirs de carburant, des
canalisations d’essence, des bouchons de réservoir de
carburant, des clapets, des absorbeurs, des filtres, des
durites de vapeur, des pinces, des connecteurs et
d’autres composants associés reliés aux émissions. Pour
les moteurs inférieurs ou égaux à 80
seul le réservoir de carburant doit répondre aux
exigences de la garantie de contrôle des émissions
d’évaporation de carburant de cette section (Californie
uniquement). Si la garantie est applicable, Husqvarna
Forest & Garden s’engage à réparer votre petit moteur à
ses frais, diagnostic, pièces et main d’oeuvre compris.
Canada et Husqvarna Forest & Garden
GARANTIE DU FABRICANT
Le système antipollution est garanti deux ans. Si une
pièce de votre moteur liée aux émissions est défectueuse,
elle doit alors être réparée ou remplacée par Husqvarna
Forest & Garden.
CHARGES DE LA GARANTIE DE L’UTILISATEUR
• En tant que propriétaire d’un petit moteur, vous êtes
responsable d’effectuer la maintenance décrite dans
le manuel de l’utilisateur de la machine. Husqvarna
Forest & Garden vous recommande de conserver
toutes les factures prouvant que des mesures de
maintenance ont été effectuées ; Cependant,
Husqvarna Forest & Garden ne peut en aucun cas
refuser une demande de prise en charge selon les
86 – French
: direction des
centimètres cubes,
termes de la garantie si les factures ne peuvent pas
être produites ou si toutes les mesures de
maintenance prescrites n’ont pas été effectuées.
• En tant que propriétaire d’un petit moteur, vous devez
néanmoins savoir que Husqvarna Forest & Garden
peut refuser votre demande en garantie si la panne du
moteur ou d’un de ses composants est due à une
utilisation abusive, à des négligences, à une
maintenance inappropriée ou des modifications non
approuvées.
• Il vous imcombe d’apporter votre moteur à un centre
de distribution ou d’entretien Husqvarna Forest &
Garden dès que le problème est détecté. Les
réparations couvertes par la garantie doivent être
effectuées dans des délais raisonnables inférieurs à
30 jours. Pour toute question relative à la couverture
de votre garantie, communiquez avec Husqvarna
Forest & Garden au CANADA au 1-800-805-5523, ou
aux ÉTATS-UNIS au 1-800-487-5951, ou envoyez un
courriel à l’adresse
emissions@husqvarnagroup.com.
DATE D’ENTRÉE EN VIGUEUR DE LA GARANTIE
La période de garantie commence à la date à laquelle le
moteur ou l’équipement est livré à l’acheteur final.
DURÉE DE LA GARANTIE
Husqvarna Forest & Garden garantit à l’acheteur final et
à tout propriétaire ultérieur que le moteur ou l’équipement
est conçu, construit et équipé conformément à toutes les
réglementations applicables adoptées par EPA et CARB
et qu’il ne comporte pas de défauts de matériel ou de
fabrication pouvant causer la panne d’une pièce sous
garantie durant une période de deux (2) ans.
CE QUI EST COUVERT PAR LA GARANTIE
RÉPARATION OU REMPLACEMENT DE PIÈCES: La
réparation ou le remplacement de toute pièce sous
garantie, dans le cadre de la garantie, doit être effectué
sans frais pour le propriétaire dans un atelier agréé. Les
révisions ou réparations couvertes par la garantie seront
disponibles dans tous les centres de distribution
Husqvarna Forest & Garden agréés pour l’entretien de ce
type de moteur. Durant la période de garantie de deux
ans des systèmes de contrôle des émissions, Husqvarna
Forest & Garden s’engage à maintenir un stock adéquat
des pièces sous garantie afin de répondre à la demande
pour ce type de pièces.
PÉRIODE DE GARANTIE: Toute pièce sous garantie
devant être remplacée conformément au calendrier de
maintenance est garantie pour la période de temps
précédant le premier remplacement planifié pour cette
pièce. Si la pièce tombe en panne avant le premier
remplacement planifié, elle sera réparée ou remplacée
gratuitement par Husqvarna Forest & Garden. Toute pièce
réparée ou remplacée durant la période de garantie est
garantie pour le reste de la période précédant le premier
Page 87

DÉCLARATION DE GARANTIE CONTRÔLE DES ÉMISSIONS EN CALIFORNIE ET AU NIVEAU FÉDÉRAL
remplacement planifié pour cette pièce. Toute pièce qui
n’est pas supposée être remplacée comme requis dans le
calendrier de maintenance est garantie deux (2) ans. Si la
pièce tombe en panne durant la période de garantie, elle
sera réparée ou remplacée gratuitement par Husqvarna
Forest & Garden. Toute pièce réparée ou remplacée
durant la période de garantie est garantie pour la période
de garantie restante. Toute pièce couverte par la garantie
et devant être inspectée régulièrement conformément au
calendrier de maintenance, sera garantie pour une
période de deux (2) ans. L’indication ”réparer ou
remplacer selon les besoins” dans les instructions ne
limite pas la période de garantie. Toute pièce réparée ou
remplacée durant la période de garantie est garantie pour
la période de garantie restante.
DIAGNOSTIC: Les mesures de diagnostic permettant de
déterminer le dysfonctionnement d’une pièce sous
garantie ne sont pas à la charge du propriétaire à
condition que ces mesures soient effectuées dans un
alelier agréé selon la garantie.
DOMMAGES INDIRECTS: Husqvarna Forest & Garden
est responsable des dommages aux autres composants
du moteur causés par une panne de toute pièce sous
garantie survenant durant la période de garantie.
LISTE DES PIÈCES GARANTIE ÉMISSIONS
1 Carburateur et pièces internes
2 Conduit d’entrée, porte-filtre du filtre à air et boulons
du carburateur
3 Filtre à air et filtre à carburant garantis selon l’entretien
prévu
4 Bougie garantie selon l’entretien prévu
5 Module d’allumage
6 Réservoir de carburant, conduite et bouchon
CE QUI N’EST PAS COUVERT PAR LA GARANTIE
Aucune défaillance résultant de l’abus, de la négligence
et de l’entretien contraire aux instructions n’est couverte
par la garantie.
AJOUT OU MODIFICATION DE PIÈCES
Des pièces supplémentaires ou modifiées qui ne sont pas
acceptées par CARB ou EPA ne doivent pas être
utilisées. L’utilisation de pièces supplémentaires ou
modifiées non acceptées annule la garantie. Husqvarna
Forest & Garden n’est pas responsable des pannes des
pièces sous garantie si ces pannes sont causées par
l’utilisation de pièces supplémentaires ou modifiées non
acceptées.
DEMANDE D’INDEMNITÉ
Pour toute question relative à vos droits et responsabilités
relativement à la garantie, communiquez avec le centre
de services agréé le plus proche, appelez Husqvarna
Forest & Garden au CANADA au 1-800-805-5523, ou aux
ÉTATS-UNIS au 1-800-487-5951, ou bien envoyez un
courriel à l’adresse emissions@husqvarnagroup.com.
SERVICE APRÈS-VENTE
Les révisions ou réparations sous garantie sont
disponibles auprès de tous les revendeurs agréés
Husqvarna Forest & Garden.
ENTRETIEN, REMPLACEMENT ET RÉPARATION DES PIÈCES DU SYSTÈME DE LUTTE CONTRE LES ÉMISSIONS
Les pièces de rechange utilisées pour des travaux de
maintenance ou de réparation couverts par la garantie ne
doivent pas être débitées au propriétaire. Une telle
utilisation ne réduit pas les obligations du fabricant en
matière de garantie.
DÉCLARATION D’ENTRETIEN
L’utilisateur est chargé d’effectuer l’entretien prévu tel qu’il
est défini dans le Manuel de l’utilisation.
*L’année modèle courante et suivante sera mise à jour
annuellement dans la déclaration de garantie fournie au
consommateur. Par exemple, 2012-2013 sera spécifié
pour l’année modèle 2012.
French – 87
Page 88

PRÉCAUTIONS SÉCURITAIRES CONFORMANT AUX NORMES AMÉRICAINES
!
Consignes de sécurité pour les utilisateurs de tronçonneuses
(ANSI B175.1-2000 Annexe C)
Précautions à prendre pour se protéger des rebonds
AVERTISSEMENT! Un rebond peut se
produire quand le nez ou l’extrémité du
!
guide heurte un objet ou quand le bois
se referme et coince la chaîne dans
l’entaille.
Un contact entre l’extrémité et un objet
peut engendrer un soudain mouvement
de réaction vers l’arrière, repoussant le
guide-chaîne vers le haut et l’arrière, en
direction de l’utilisateur.
Le pincement de la chaîne le long du
sommet du guide peut aussi engendrer
un mouvement rapide du guide vers
l’arrière, en direction de l’utilisateur.
Chacun de ces mouvements de réaction
peut vous faire perdre le contrôle de la
tronçonneuse et causer des blessures
graves.
Ne faites pas une confiance aveugle
dans les dispositifs de sécurité intégrés
dans la tronçonneuse. En tant
qu’utilisateur de la tronçonneuse, vous
devez prendre les mesures nécessaires
pour éviter tout accident et blessure au
cours de vos travaux de coupe.
Avec des connaissances de base sur le phénomène du
rebond, vous pouvez réduire ou éliminer l’élément de
surprise. Toute surprise est par principe inattendue et
contribue aux accidents.
Maintenez fermement la tronçonneuse des deux mains
quand le moteur est en marche
poignée arrière et la main gauche sur la poignée avant.
Maintenez fermement avec les pouces et les autres
doigts entourant les poignées de la tronçonneuse. Un
maintien ferme vous aide à réduire le risque de rebond et
à garder le contrôle de la tronçonneuse. Ne lâchez pas.
Assurez-vous de l’absence d’obstacle dans votre zone de
travail. Faites attention de ne pas heurter une bille, une
branche ou tout autre obstacle avec le nez du guidechaîne quand vous utilisez la tronçonneuse.
Coupez à un régime de moteur élevé.
Ne tendez pas les bras trop loin ni ne coupez au-dessus
de la hauteur de vos épaules.
Respectez les instructions de maintenance et d’affûtage
du fabricant de la tronçonneuse.
N’utilisez que des chaînes et des guides de
remplacement spécifiés par le fabricant ou des
équivalents.
: la main droite sur la
Autres consignes de sécurité
AVERTISSEMENT! N’utilisez pas une
tronçonneuse en la tenant d’une seule
main. Une utilisation d’une seule main
peut causer des blessures graves à
l’utilisateur et aux personnes se trouvant
à proximité. Une tronçonneuse est
prévue pour être utilisée à deux mains.
N’utilisez pas une tronçonneuse si vous êtes fatigué.
Utilisez des chaussures de sécurité, des vêtements bien
ajustés, des gants de protection, des protections
auditives, des lunettes de protection et un casque.
Manipulez le carburant avec précaution. Éloignez la
tronçonneuse d’au moins 3 m de l’endroit où vous l’avez
remplie de carburant avant de démarrer le moteur.
Personne ne doit se trouver à proximité de la
tronçonneuse lors de son démarrage et de la coupe.
Personnes et animaux doivent rester en dehors de la
zone de travail.
Ne commencez pas à couper avant que votre zone de
travail soit dégagée, avant d’avoir trouvé une position bien
stable sur vos pieds et avant d’avoir identifié un chemin de
retraite pour vous éloigner de l’arbre en train de tomber.
Conservez toutes les parties de votre corps à distance de
la tronçonneuse quand le moteur est en marche.
Avant de démarrer le moteur, assurez-vous que la
tronçonneuse n’est pas en contact avec quoi que ce soit.
Transportez la tronçonneuse avec le moteur à l’arrêt, le
guide-chaîne et la chaîne vers l’arrière et le silencieux à
distance de votre corps.
N’utilisez pas une tronçonneuse endommagée, mal
réglée ou n’étant pas correctement assemblée. Assurezvous que la chaîne s’arrête quand la gâchette de
commande des gaz est relâchée.
Arrêtez le moteur avant de poser la tronçonneuse.
Faites preuve d’une grande précaution quand vous
coupez des broussailles et de jeunes arbres car ils
peuvent se prendre dans la chaîne et être projetées vers
vous ou vous faire perdre l’équilibre.
Prenez garde au retour quand vous coupez une branche
sous tension
dans les fibres du bois est relâchée.
Veillez à la propreté des poignées : elles doivent être
sèches et exemptes d’huile et de mélange de carburant.
Utilisez toujours la tronçonneuse dans des endroits bien
aérés.
Ne coupez pas un arbre avec la tronçonneuse sans avoir
reçu une formation spécifique.
N’utilisez pas la tronçonneuse au-dessus de la hauteur de
vos épaules.
À part les opérations indiquées dans les instructions de
maintenance et dans la section sécurité du propriétaire/
utilisateur, tout entretien de la tronçonneuse doit être
: elle peut vous heurter quand la tension
88 – French
Page 89

PRÉCAUTIONS SÉCURITAIRES CONFORMANT AUX NORMES AMÉRICAINES
effectué par du personnel d’entretien compétent en
matière de tronçonneuse. (Par exemple, si un outil
incorrect est utilisé pour retirer le rotor volant magnétique
ou pour le tenir lors du retrait de l’embrayage, le rotor
volant magnétique peut subir des dommages qui
entraîneront son explosion ultérieurement.)
Utilisez la protection de guide-chaîne appropriée lors de
tout transport de votre tronçonneuse.
Remarque: Cette annexe est essentiellement prévue
pour le consommateur et l’utilisateur occasionnel.
French – 89
Page 90

ACLARACION DE LOS SIMBOLOS
Símbolos en la máquina:
¡ATENCION! ¡Las motosierras pueden
ser peligrosas! Su uso descuidado o
erróneo puede provocar heridas graves o
mortales al operador o terceros.
Lea detenidamente el manual de
instrucciones y asegúrese de entender
su contenido antes de utilizar la máquina.
Utilice siempre:
• Casco protector homologado
• Protectores auriculares homologados
• Gafas protectoras o visor
El operador debe manejar la motosierra
con ambas manos.
No manejar nunca una motosierra
sujetándola sólo con una mano.
Posición de funcionamiento.
Estrangulador.
Tamaño de la pieza del mango.
Los demás símbolos/etiquetas que aparecen en la
máquina corresponden a requisitos de
homologación específicos en determinados
mercados.
No permita nunca que la punta de la
espada entre en contacto con ningún
objeto.
¡ATENCION! Si la punta de la espada
toca en un objeto se puede producir
reculada que lanza la espada hacia
arriba y atrás contra el usuario. Ello
puede causar daños personales graves.
Freno de cadena, activado
(derecha). Freno de cadena,
no activado (izquierda).
Bomba de combustible.
Carga de combustible.
Ajuste de la bomba de aceite
Rellenado de aceite para cadena.
90 – Spanish
Page 91

ACLARACION DE LOS SIMBOLOS
Símbolos en el manual de instrucciones:
Los trabajos de control y/o
mantenimiento deben efectuarse con
el motor desconectado.
Utilice siempre guantes protectores
homologados.
Etiquetas que se encuentran en la motosierra:
La máquina debe limpiarse
regularmente.
Control visual.
Debe utilizarse gafas protectoras o
visor.
Carga de combustible.
Carga de aceite y regulación del
caudal de aceite.
El freno de cadena debe estar activado
al poner en marcha la motosierra.
¡ATENCION! Si la punta de la espada
toca en un objeto se puede producir
reculada que lanza la espada hacia
arriba y atrás contra el usuario. Ello
puede causar daños personales
graves.
EPA III
El período de cumplimiento de emisiones mencionado en
la etiqueta de cumplimiento de emisiones indica el
número de horas de funcionamiento en el que el motor ha
demostrado cumplir con los requisitos federales y
California en materia de emisiones.
El mantenimiento, sustitución o reparación de aparatos y
sistemas de control de las emisiones puede efectuarlos
cualquier establecimiento o individuo dedicado a la
reperación de motores no de carretera.
Spanish – 91
Page 92

INDICE
Índice
ACLARACION DE LOS SIMBOLOS
Símbolos en la máquina: ...................................... 90
Símbolos en el manual de instrucciones: ............. 91
INDICE
Índice .................................................................... 92
INTRODUCCION
Apreciado cliente: ................................................. 93
¿QUE ES QUE?
¿Qué es qué en la motosierra? ............................ 94
INSTRUCCIONES GENERALES DE
SEGURIDAD
Medidas a tomar antes de utilizar una motosierra
nueva ....................................................................
Importante ............................................................ 95
Emplee siempre el sentido común ........................ 95
Equipo de protección personal ............................. 96
Equipo de seguridad de la máquina ..................... 96
Equipo de corte .................................................... 100
MONTAJE
Montaje de la espada y la cadena ........................ 106
MANIPULACION DEL COMBUSTIBLE
Carburante ............................................................ 108
Repostaje .............................................................. 109
Seguridad en el uso del combustible .................... 110
ARRANQUE Y PARADA
Arranque y parada ................................................ 111
TECNICA DE TRABAJO
Antes de utilizar la máquina: ................................. 113
Instrucciones generales de trabajo ....................... 113
Medidas preventivas de las reculadas .................. 121
MANTENIMIENTO
Generalidades ...................................................... 122
Ajuste del carburador ............................................ 122
Control, mantenimiento y servicio del equipo de
seguridad de la motosierra ...................................
Silenciador ............................................................ 124
Mecanismo de arranque ....................................... 124
Filtro de aire .......................................................... 126
Bujía ...................................................................... 126
Engrase del cabezal de rueda de la espada ........ 127
Lubricación del cojinete de agujas ........................ 127
Ajuste de la bomba de aceite ............................... 127
Sistema refrigerante ............................................. 127
Utilización en invierno ........................................... 127
Temperaturas de -5°C (23°F) o inferiores ............. 128
Programa de mantenimiento ................................ 129
95
122
DATOS TECNICOS
Datos técnicos ...................................................... 130
Combinaciones de espada y cadena .................... 131
Afilado y calibres de afilado de la cadena de sierra 131
DECLARACIÓN DE GARANTÍA DE CONTROL
DE EMISIONES FEDERAL Y CALIFORNIANA
SUS DERECHOS Y OBLIGACIONES DE
GARANTIA ............................................................
PRECAUCIONES DE SEGURIDAD DE LA
NORMA AMERICANA
Precauciones de seguridad para usuarios de
motosierras ...........................................................
132
134
92 – Spanish
Page 93

INTRODUCCION
Apreciado cliente:
¡Felicidades por haber adquirido un producto Husqvarna! La historia de Husqvarna data del año 1689, cuando el Rey
Karl XI encargó la construcción de una fábrica en la ribera del río Huskvarna para la fabricación de mosquetes. La
ubicación junto al río Huskvarna era lógica, dado que el río se utilizaba para generar energía hidráulica. Durante los más
de 300 años de existencia de la fábrica Husqvarna, se han fabricado productos innumerables; desde estufas de leña
hasta modernas máquinas de cocina, máquinas de coser, bicicletas, motocicletas, etc. En 1956 se introdujo el primer
cortacésped motorizado, seguido de la motosierra en 1959; y es en este segmento en el que actualmente trabaja
Husqvarna.
Husqvarna es hoy uno de los principales fabricantes del mundo de productos de bosque y jardín, con la calidad y las
prestaciones como principal prioridad. La idea de negocio es desarrollar, fabricar y comercializar productos motorizados
para silvicultura y jardinería, así como para las industrias de construcción y obras públicas. Husqvarna tiene como
objetivo estar en la vanguardia en lo que respecta a ergonomía, facilidad de empleo, seguridad y consideración
ambiental; motivo por el cual ha desarrollado una serie de detalles para mejorar los productos en estas áreas.
Estamos convencidos de que usted apreciará con satisfacción la calidad y prestaciones de nuestro producto por mucho
tiempo en adelante. Con la adquisición de alguno de nuestros productos, usted dispone de asistencia profesional con
reparaciones y servicio en caso de ocurrir algo. Si ha adquirido el producto en un punto de compra que no es uno de
nuestros concesionarios autorizados, pregúnteles por el taller de servicio más cercano.
Esperamos que su máquina le proporcione plena satisfacción y le sirva de ayuda por mucho tiempo en adelante. Tenga
en cuenta que este manual de instrucciones es un documento de valor. Siguiendo sus instrucciones (de uso, servicio,
mantenimiento, etcétera) puede alargar considerablemente la vida útil de la máquina e incrementar su valor de reventa.
Si vende su máquina, entregue el manual de instrucciones al nuevo propietario.
¡Gracias por utilizar un producto Husqvarna!
Husqvarna AB trabaja constantemente para perfeccionar sus productos y se reserva, por lo tanto, el derecho a introducir
modificaciones en la construcción y el diseño sin previo aviso.
Spanish – 93
Page 94

¿QUE ES QUE?
19
18
17
20
25
21
22
24
23
26
¿Qué es qué en la motosierra?
1 Protección contra reculadas
2 Mando de parada
3 Etiqueta adhesiva de información y advertencia
4 Mango superior
5 Tapa del cilindro
6 Estrangulador
7 Ojal de la cuerda
8 Bomba de combustible.
9 Depósito de combustible
10 Indicador de nivel de combustible
11 Empuñadura de arranque
12 Mecanismo de arranque
13 Mango delantero
14 Depósito de aceite de cadena
15 Cabezal de rueda
16
1
2
3
15
14
27
13
12
11
10
28
29
16 Cadena
17 Espada
18 Acelerador
19 Fiador del acelerador
20 Ojal de la correa
21 Cubierta del embrague
22 Tornillo de tensado de cadena
23 Placa de identificatión
24 Captor de cadena
25 Apoyo de corteza
26 Tornillo de ajuste, bomba de aceite
27 Protección de la espada
28 Manual de instrucciones
29 Llave combinada
4
5
6
7
8
9
94 – Spanish
Page 95

INSTRUCCIONES GENERALES DE SEGURIDAD
!
!
Medidas a tomar antes de utilizar una motosierra nueva
• Lea detenidamente el manual de instrucciones.
• Compruebe el montaje y ajuste del equipo de corte.
Vea las instrucciones bajo el título Montaje.
• Ponga combustible y arranque la motosierra. Vea las
instrucciones en los capítulos Manipulación del
combustible y Arranque y parada.
• No utilice la motosierra hasta que haya llegado
suficiente aceite lubricante a la cadena. Lea las
instrucciones bajo el título Lubricación del equipo de
corte.
• La exposición prolongada al ruido puede causar
daños crónicos en el oído, Por consiguiente, use
siempre protectores auriculares homologados.
¡ATENCION! Bajo ninguna circunstancia
debe modificarse la configuración
!
original de la máquina sin autorización
del fabricante. Utilizar siempre
recambios originales. Las
modificaciones y/o la utilización de
accesorios no autorizadas pueden
ocasionar accidentes graves o incluso la
muerte del operador o de terceros. Su
garantía podría no abarcar daños o
responsabilidades causados por el uso
de accesorios o piezas de repuesto no
autorizados.
¡ATENCION! La utilización errónea o
descuidada de una motosierra puede
!
convertirla en una herramienta peligrosa
que puede causar accidentes graves e
incluso mortales. Es muy importante que
lea y comprenda el contenido de este
manual de instrucciones.
¡ATENCION! En el interior del
silenciador hay sustancias químicas que
!
pueden ser cancerígenas. Evitar el
contacto con estas sustancias si se daña
el silenciador.
¡ATENCION! La inhalación prolongada
de los gases de escape del motor, la
!
neblina de aceite de cadena y el polvo de
serrín puede poner en riesgo la salud.
¡ATENCION! Esta máquina genera un
campo electromagnético durante el
!
funcionamiento. Este campo magnético
puede, en determinadas circunstancias,
interferir con implantes médicos activos
o pasivos. Para reducir el riesgo de
lesiones graves o letales, las personas
que utilizan implantes médicos deben
consultar a su médico y al fabricante del
implante antes de emplear esta máquina.
Importante
¡IMPORTANTE!
Esta motosierra está concebida para la poda y
reducción de copas de árboles erectos.
Utilice solamente las combinaciones de espada/cadena
de sierra recomendadas en el capítulo Datos técnicos.
Nunca utilice la máquina si está cansado, si ha ingerido
alcohol o si toma medicamentos que puedan afectarle
la vista, su capacidad de discernimiento o el control del
cuerpo.
Utilice el equipo de protección personal. Vea las
instrucciones bajo el título ”Equipo de protección
personal”.
No modifique nunca esta máquina de forma que se
desvíe de la versión original, y no la utilice si parece
haber sido modificada por otras personas.
No utilice nunca una máquina defectuosa. Lleve a cabo
las comprobaciones de seguridad y siga las
instrucciones de mantenimiento y servicio de este
manual. Algunas medidas de mantenimiento y servicio
deben ser efectuadas por especialistas formados y
cualificados. Consulte las instrucciones del apartado
Mantenimiento.
Nunca utilice otros accesorios que los recomendados
en este manual. Vea las instrucciones bajo los títulos
Equipo de corte y Datos técnicos.
¡NOTA! Utilice siempre gafas protectoras o visera para
reducir el riesgo de daños causados por objetos
lanzados. Una motosierra puede lanzar con gran fuerza
objetos como virutas, trozos de madera pequeños, etc.
Ello comporta riesgo de daños personales graves,
especialmente en los ojos.
¡ATENCION! Si se hace funcionar el
motor en un local cerrado o mal
ventilado, se corre riesgo de muerte por
asfixia o intoxicación con monóxido de
carbono.
¡ATENCION! Un equipo de corte
defectuoso o una combinación errónea
de espada/cadena de sierre aumentan el
riesgo de reculadas. Utilice solamente
las combinaciones de espada/cadena de
sierra recomendadas y siga las
instrucciones. Vea las instrucciones bajo
el titular Datos técnicos
Emplee siempre el sentido común
Es imposible abarcar todas las situaciones imaginables
que se pueden producir al utilizar una motosierra.
Proceda con cuidado y emplee el sentido común. Evite
todo uso para el cual no se sienta suficientemente
calificado. Si después de leer estas instrucciones todavía
se siente inseguro en cuanto al procedimiento de uso,
Spanish – 95
Page 96

INSTRUCCIONES GENERALES DE SEGURIDAD
!
consulte con un experto antes de proseguir. No dude en
ponerse en contacto con el distribuidor o con nosotros si
tiene alguna duda en cuanto al empleo de la motosierra.
Estamos a su disposición para darle consejos que le
ayuden a emplear su motosierra de forma mejor y más
segura.
Se realiza un trabajo constante de mejoras del diseño y
la técnica, que aumentan su seguridad y eficacia. Visite al
distribuidor local regularmente para averiguar qué
provecho pueden proporcionarle las novedades que se
introducen.
Equipo de protección personal
¡ATENCION! La mayoría de los
accidentes con la motosierra se
!
producen cuando la cadena toca al
usuario. Para trabajar con la máquina
debe utilizarse un equipo de protección
personal homologado. El equipo de
protección personal no elimina el riesgo
de lesiones, pero reduce su efecto en
caso de accidente. Pida a su distribuidor
que le asesore en la elección del equipo.
¡NOTA! Nunca utilice la motosierra sosteniéndola con
una mano solamente. Una motosierra no puede
controlarse de manera segura con una sola mano; Ud.
puede sufrir cortes. Agarre siempre los mangos con
ambas manos, de manera firme y segura.
• Tenga siempre a mano el equipo de primeros auxilios.
• Extintor de incendios y pala
Utilice prendas ajustadas que no limiten su movilidad.
¡IMPORTANTE! Pueden producirse chispas en el
silenciador, la espada y la cadena o en otra fuente.
Tenga siempre a mano herramientas para extinguir
incendios, por si fueran necesarias. Así ayudará a
prevenir incendios forestales.
Esta motosierra con mango superior está diseñada
específicamente para la cirugía arbórea y el
mantenimiento de árboles. A causa del diseño compacto
especial de los mangos (poco separados), hay más
riesgo de lesiones. Por ese motivo, estas motosierras
especiales solo deben usarlas para realizar trabajos en
árboles las personas con formación en técnicas
especiales de trabajo y corte y convenientemente
protegidas (cesta de podar, cuerdas, arnés de
seguridad). Para todos los demás trabajos de corte a ras
del suelo, es recomendable utilizar las motosierras
normales (con mangos más separados).
¡ATENCION! Los trabajos en árboles
requieren conocimientos de técnicas
especiales de trabajo y corte, que deben
aplicarse para contrarrestar el aumento
del riesgo de lesiones. Nunca lleve a
cabo trabajos en árboles, a menos que
haya recibido formación profesional
específica para tales trabajos, incluida la
formación en el uso de equipos de
seguridad y otros equipos de escalada,
como arneses, cuerdas, cinturones,
trepadoras, mosquetones, etcétera.
• Casco protector homologado
• Protectores auriculares
• Gafas protectoras o visor
• Guantes con protección anticorte
• Pantalones con protección contra sierra
• Utilice protecciones apropiadas para brazos.
• Botas con protección anticorte, puntera de acero y
suela antideslizante
96 – Spanish
Equipo de seguridad de la máquina
En este capítulo se explican los componentes de
seguridad de la máquina y sus funciones. Para el control
y mantenimiento, vea las instrucciones del capítulo
Control, mantenimiento y servicio del equipo de
seguridad de la motosierra. Vea el capítulo Componentes
de la máquina para ver dónde están situados estos
componentes en su máquina.
La vida útil de la máquina puede acortarse y el riesgo de
accidentes puede aumentar si el mantenimiento de la
máquina no se hace de forma adecuada y si los trabajos
de servicio y/o reparación no se efectúan de forma
profesional. Para más información, consulte con el taller
de servicio oficial más cercano.
Page 97

INSTRUCCIONES GENERALES DE SEGURIDAD
¡ATENCION! No emplee nunca una
máquina con equipo de seguridad
!
defectuoso. El equipo de seguridad se
debe controlar y mantener. Vea las
instrucciones del capítulo Control,
mantenimiento y servicio del equipo de
seguridad de la motosierra. Si el control
de su máquina no da resultado
satisfactorio, hay que acudir a un taller
de servicio para la reparación.
Freno de cadena con protección contra reculadas
Su motosierra está equipada con un freno de cadena
diseñado para detener la cadena de sierra en caso de
reculada. Un freno de cadena reduce el riesgo de
accidentes, pero sólo es usted, el usuario, quien puede
impedirlos.
Proceda con cuidado en la utilización de la sierra,
procurando que el sector de riesgo de reculada de la
espada nunca toque ningún objeto.
reduce el riesgo de que la mano izquierda toque la
cadena si el usuario suelta el mango delantero.
• El freno de cadena debe estar activado cuando se
arranca la motosierra, para impedir que la cadena
gire.
• Utilice el freno de cadena como 'freno de
estacionamiento' al arrancar y para los traslados
cortos a fin de prevenir accidentes por contacto
involuntario de usted o el entorno con la cadena de
sierra en movimiento.
• El freno de cadena (A) se activa bien manualmente
(con la mano izquierda) o por efecto de la inercia.
• La activación se produce al empujar hacia delante la
protección contra reculadas (B).
B
B
A
• El movimiento activa un mecanismo de muelle que
tensa la cinta del freno (C) alrededor del sistema de
arrastre de la cadena (D) en el motor (tambor de
embrague).
D
C
• La protección contra reculadas no sólo activa el freno
de cadena. También cumple otra función importante:
• El freno de cadena se desacopla empujando la
protección contra reculadas hacia atrás, contra el
mango delantero.
• Las reculadas pueden ser rapidísimas y muy
violentas. La mayoría de las reculadas son pequeñas
y, por tanto, no siempre activan el freno de cadena. En
estos casos debe sujetarse la motosierra con fuerza,
sin soltarla.
• El modo de activación del freno de cadena, manual o
por inercia, depende de la fuerza de la reculada y de
la posición de la motosierra en relación al objeto con
el que toca el sector de riesgo de reculada de la
espada.
Spanish – 97
Page 98

INSTRUCCIONES GENERALES DE SEGURIDAD
En reculadas fuertes y con el sector de riesgo de
reculada de la espada lo más lejos posible del
usuario, el freno de cadena está diseñado para ser
activado por su propio contrapeso (inercia) en el
sentido de reculada.
En las reculadas poco violentas, o al trabajar con el
sector de riesgo de reculada cerca del usuario, el
freno de cadena se activa manualmente con la mano
izquierda.
• En posición de tala, la mano izquierda está en una
posición que permite la activación manual del freno
de cadena. Con este agarre, cuando la mano
izquierda está colocada de forma que no puede influir
en el movimiento de la protección contra reculada, el
freno de cadena sólo se puede activar mediante la
función de inercia.
¿Se activa siempre por inercia el freno de cadena cuando se produce una reculada?
No. En primer lugar, su freno debe funcionar. En segundo
lugar, la reculada debe tener la fuerza suficiente para
activar el freno de cadena. Si el freno de cadena fuera
demasiado sensible, se activaría constantemente, lo que
sería molesto.
¿Me protegerá siempre el freno de cadena contra daños si se produce una reculada?
No. En primer lugar, su freno debe funcionar para
proporcionar la protección prevista. En segundo lugar, el
freno se debe activar tal como se describe arriba para
detener la cadena de sierra en una reculada. En tercer
lugar, el freno de cadena se puede activar, pero si la
espada está demasiado cerca de usted puede ocurrir que
el freno no tenga tiempo de reducir la velocidad y parar la
cadena antes de que la motosierra le toque.
Solamente usted y empleando una técnica de trabajo
correcta puede eliminar el efecto de reculada y los
riesgos que comporta.
Fiador del acelerador
El fiador del acelerador está diseñado para impedir la
activación involuntaria del acelerador. Cuando se oprime
el fiador (A) en el mango (= cuando se agarra el mango),
se desacopla el acelerador (B). Cuando se suelta el
mango, el acelerador y el fiador vuelven a sus posiciones
originales. Ambas funciones se efectúan con sistemas
independientes de muelles de retorno. Con esta posición,
el acelerador queda automáticamente bloqueado en
ralentí.
A
¿Activará siempre mi mano el freno de cadena en caso de reculada?
No. Hace falta una fuerza determinada para mover la
protección contra reculada hacia adelante. Si su mano
sólo roza la protección contra reculada o resbala sobre
ella, puede ocurrir que la fuerza no sea suficiente para
activar el freno de cadena. También debe agarrar con
firmeza la empuñadura de la motosierra cuando trabaja.
Si lo hace y se produce una reculada, puede ocurrir que
no suelte el agarre de la empuñadura delantera y que no
active el freno de cadena, o que el freno de cadena no se
active hasta que la sierra haya girado bastante. En casos
así puede suceder que el freno de cadena no tenga
tiempo de detener la cadena antes de que le toque a
usted.
Ello ocurre también en determinadas posturas de trabajo
que impiden que su mano llegue a la protección contra
reculada para activar el freno de cadena; por ejemplo,
cuando se sujeta la sierra en posición de tala.
98 – Spanish
B
Captor de cadena
El captor de cadena está diseñado para captar las
cadenas que se sueltan o se rompen. Normalmente esto
se evita con el tensado correcto de la cadena (vea las
instrucciones bajo el título Montaje) y con un
mantenimiento adecuado de la espada y la cadena (vea
Page 99

INSTRUCCIONES GENERALES DE SEGURIDAD
!
!
!
las instrucciones bajo el título Instrucciones generales de
trabajo).
Sistema amortiguador de vibraciones
Su máquina incorpora un sistema amortiguador diseñado
para reducir al máximo posible las vibraciones y optimizar
la comodidad de uso.
El sistema amortiguador de vibraciones de la máquina
reduce la transmisión de vibraciones entre la parte del
motor/equipo de corte y la parte de los mangos de la
máquina. El cuerpo de la motosierra, incluyendo el
equipo de corte, va suspendido de la parte de los mangos
con un elemento antivibratorio.
El corte de maderas duras (la mayoría de los árboles
caducifolios) produce más vibraciones que el de maderas
blandas (la mayoría de las coníferas). El corte con un
equipo de corte desafilado o incorrecto (modelo
incorrecto o mal afilado) incrementa el nivel de
vibraciones.
¡ATENCION! La sobreexposición a las
vibraciones puede provocar problemas
circulatorios y dolencias de carácter
nervioso, especialmente en personas
con patologías circulatorias. Acuda a un
médico si nota síntomas corporales que
puedan relacionarse con la
sobreexposición a las vibraciones. Son
ejemplos de tales síntomas la pérdida de
sensibilidad, el 'cosquilleo', las
'punzadas', el dolor, la pérdida o
reducción de la fuerza normal o los
cambios en el color y la superficie de la
piel. Estos síntomas se presentan
normalmente en dedos, manos y
muñecas. Los síntomas pueden
aumentar en temperaturas frías.
Botón de parada
El botón de parada se utiliza para parar el motor.
Silenciador
El silenciador está diseñado para reducir al máximo
posible el nivel sonoro y para apartar los gases de escape
del usuario.
En regiones de clima cálido y seco, puede haber un
riesgo de incendio considerable.
¡ATENCION! Los gases de escape del
motor están calientes y pueden contener
chispas que pueden provocar incendio.
Por esa razón, ¡nunca arranque la
máquina en interiores o cerca de
material inflamable!
¡NOTA! El silenciador está muy caliente durante el
funcionamiento y después de parar. Esto también es
aplicable al funcionamiento en ralentí. Preste atención
al riesgo de incendio, especialmente al emplear la
máquina cerca de sustancias y/o gases inflamables.
¡ATENCION! No utilice nunca una
motosierra sin silenciador o con el
silenciador defectuoso. Un silenciador
defectuoso puede incrementar
considerablemente el nivel de ruido y el
riesgo de incendio. Tenga a mano
herramientas para la extinción de
incendios.
Spanish – 99
Page 100

INSTRUCCIONES GENERALES DE SEGURIDAD
!
!
Equipo de corte
Este capítulo describe cómo Ud., con un mantenimiento
correcto y utilizando el equipo de corte adecuado, podrá:
• Reducir la propensión a las reculadas de la máquina.
• Reduce la ocurrencia de salidas y roturas de la
cadena de sierra.
• Proporciona un resultado de corte óptimo.
• Aumentar la duración del equipo de corte.
• Evita el aumento de los niveles de vibraciones.
Reglas básicas
• ¡Utilice solamente el equipo de corte
recomendado por nosotros!
bajo el titular Datos técnicos
• ¡Mantenga los dientes cortantes de la cadena bien
y correctamente afilados! Siga nuestras
instrucciones y utilice el calibrador de limado
recomendado.
aumenta el riesgo de accidentes.
Una cadena mal afilada o defectuosa
Vea las instrucciones
Equipo de corte reductor de reculadas
¡ATENCION! Un equipo de corte
defectuoso o una combinación errónea
de espada/cadena de sierre aumentan el
riesgo de reculadas. Utilice solamente
las combinaciones de espada/cadena de
sierra recomendadas y siga las
instrucciones. Vea las instrucciones bajo
el titular Datos técnicos
Las reculadas sólo puede evitarlas Ud. el usuario,
impidiendo que el sector de riesgo de reculada de la
espada toque algún objeto.
El efecto de las reculadas puede reducirse utilizando un
equipo de corte con reducción de reculada ”incorporada”,
así como con un afilado y mantenimiento correctos de la
cadena.
Espada
Cuanto más pequeño es el radio de punta, menor es la
propensión a la reculada.
Cadena
Una cadena de sierra consta de distintos eslabones que
se presentan en versión estándar y en versión reductora
de reculada.
• ¡Mantenga la profundidad de corte correcta! Siga
nuestras instrucciones y utilice el calibrador de
profundidad recomendado.
corte demasiado grande aumenta el riesgo de
reculada.
• ¡Mantenga la cadena correctamente tensada! Con
un tensado insuficiente se incrementa el riesgo de
solturas de la cadena y se aumenta el desgaste de la
espada, la cadena y el piñón de arrastre.
• ¡Mantenga el equipo de corte bien lubricado y
efectúe el mantenimiento adecuado!
lubricación insuficiente se incrementa el riesgo de
roturas de cadena y se aumenta el desgaste de la
espada, la cadena y el piñón de arrastre.
100 – Spanish
Una profundidad de
Con una
¡IMPORTANTE! Ninguna cadena de sierra elimina el
riesgo de reculada.
¡ATENCION! Cualquier contacto con una
sierra de cadena en girando puede
causar daños muy graves.
Expresiones características de la espada y cadena
Para conservar la eficacia de todos los componentes de
seguridad del equipo de corte, debe sustituir las
combinaciones de espada/cadena de sierra gastadas o
dañadas por una espada y una cadena recomendadas
por Husqvarna. Vea las instrucciones del capítulo Datos
técnicos para información sobre las combinaciones de
espada/cadena de sierra que recomendamos.
Espada
• Longitud (pulgadas/cm)
• Número de dientes en el cabezal de rueda (T).
• Paso de cadena (=pitch) (pulgadas). El cabezal de
rueda de la espada y el piñón de arrastre de la cadena
 Loading...