


ST 224, ST 227P, ST 230P, ST 224P
Default Operator's manual 2-25
ES-MX Manual del usuario 26-51
FR-CA Manuel d’utilisation 52-77

79
C
Contents
2
Introduction.....................................................................3
Safety..............................................................................5
Assembly........................................................................ 8
Operation......................................................................11
Maintenance................................................................. 15
Troubleshooting............................................................22
Transportation, storage and disposal........................... 24
Technical data.............................................................. 25
694 - 002 -
I
Introduction
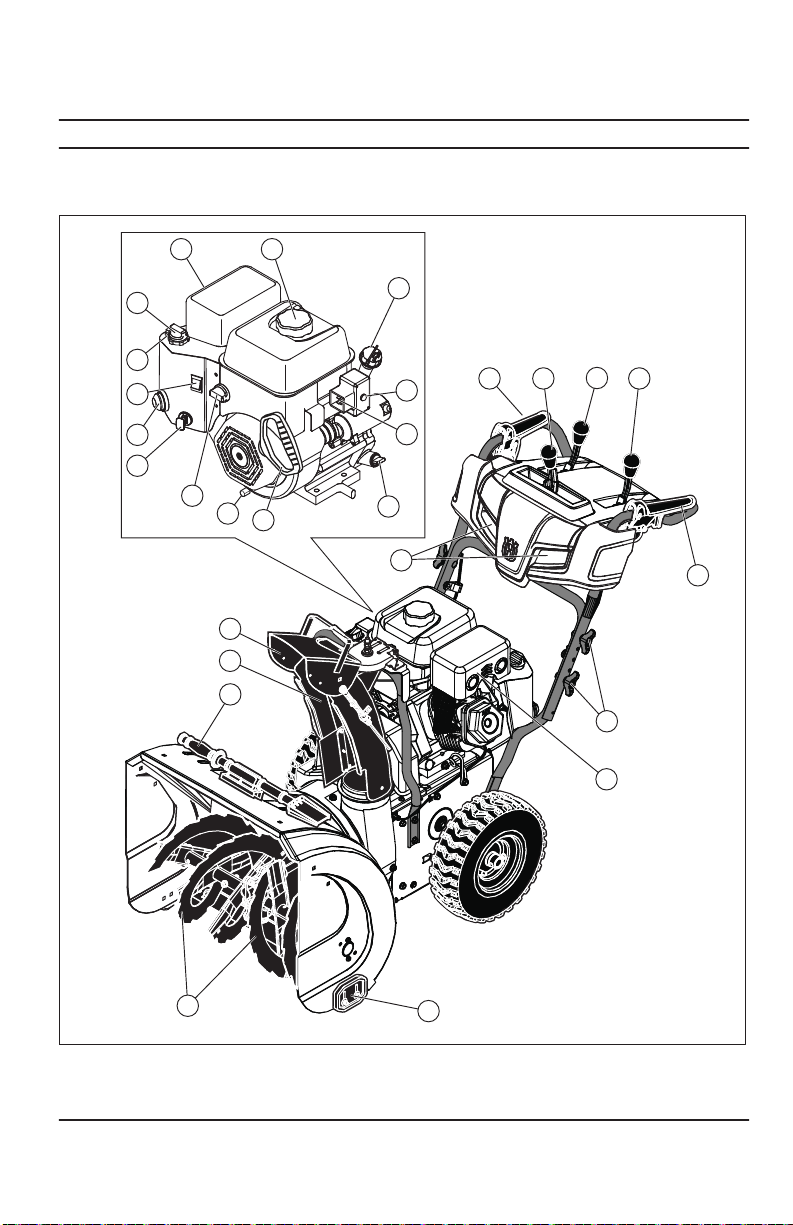
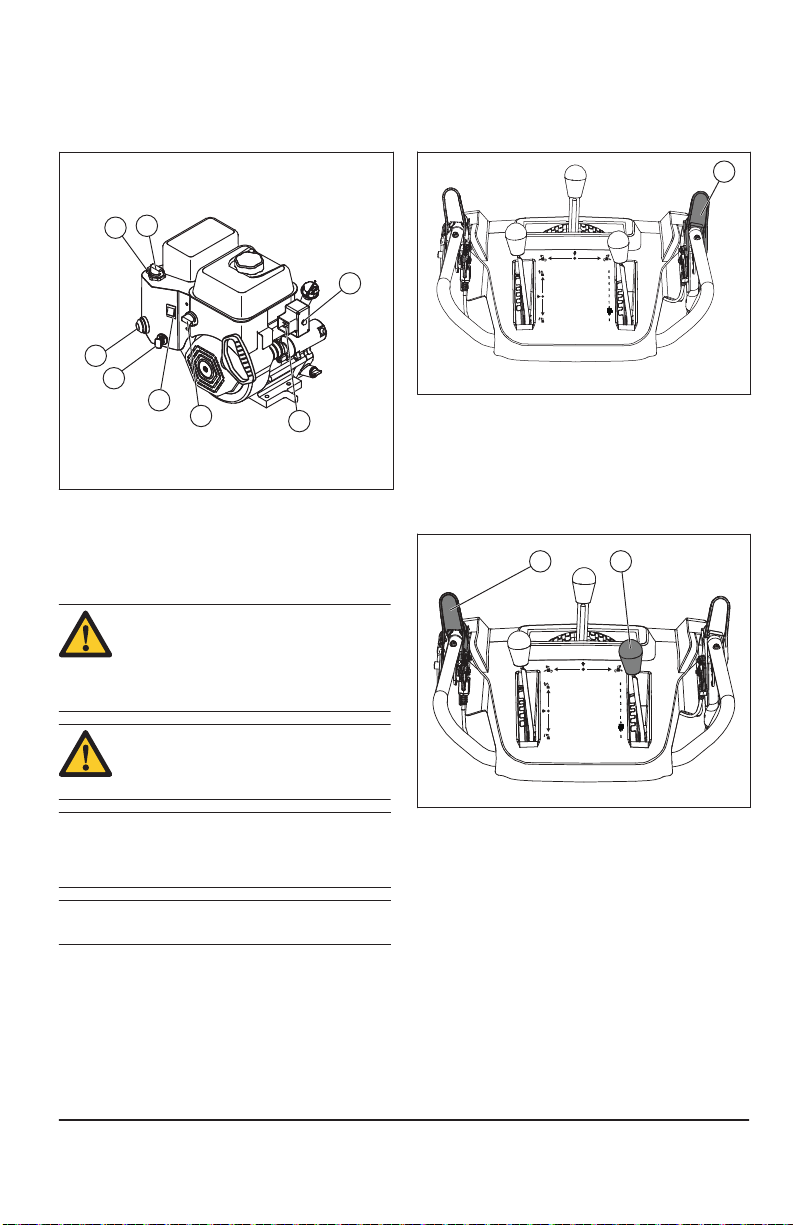
Product overview
3
8 22
21
20
19
18
17
16
15
13
12
11
14
26
23
24
25
6
1 2
3
4
5
7
8
10
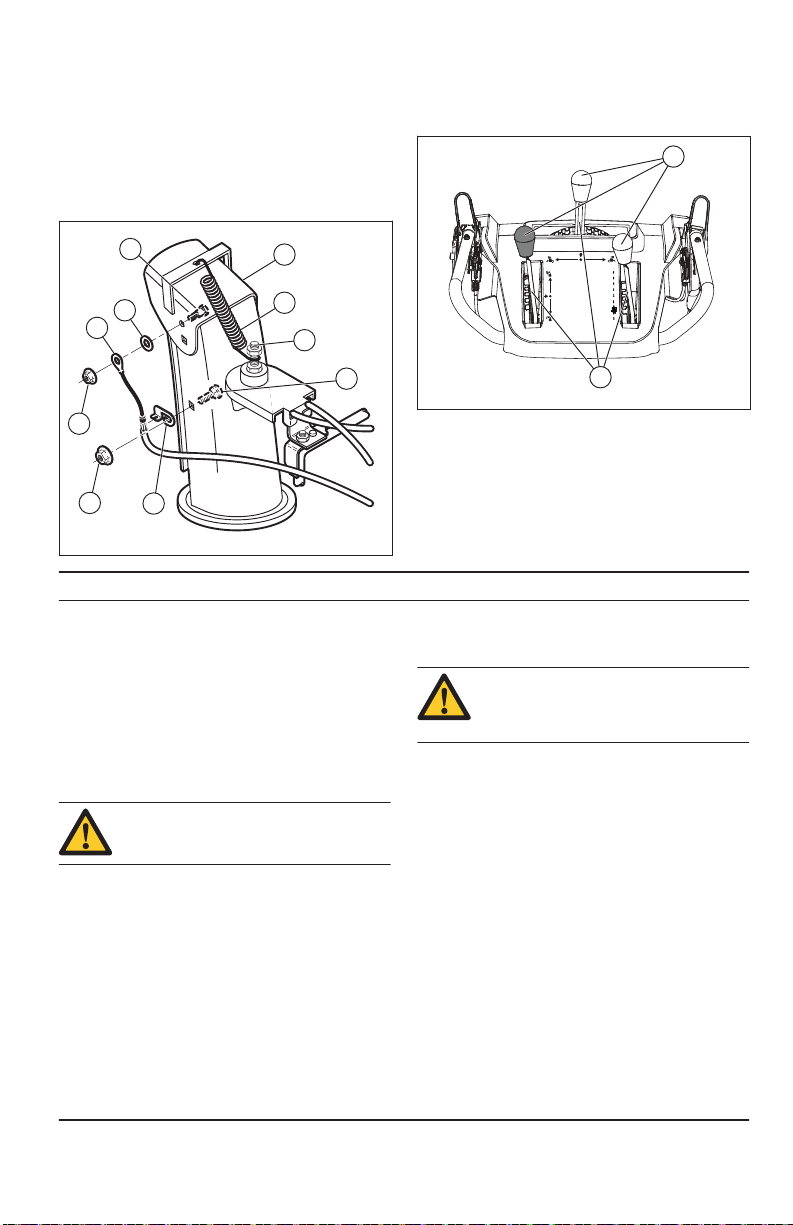
1. Auger engagement
2. Discharge chute control lever
694 - 002 -
9
3. Drive speed control lever
4. Deflector remote control lever
Transport, entreposage et mise au rebut
Transport et entreposage
Mise au rebut
Données techniques
Données techniques
Remarque :
ST 224 ST 227P ST 230P ST 224P
Dimensions
Moteur
Système électrique
77
5. Drive engagement
Product description
Intended use
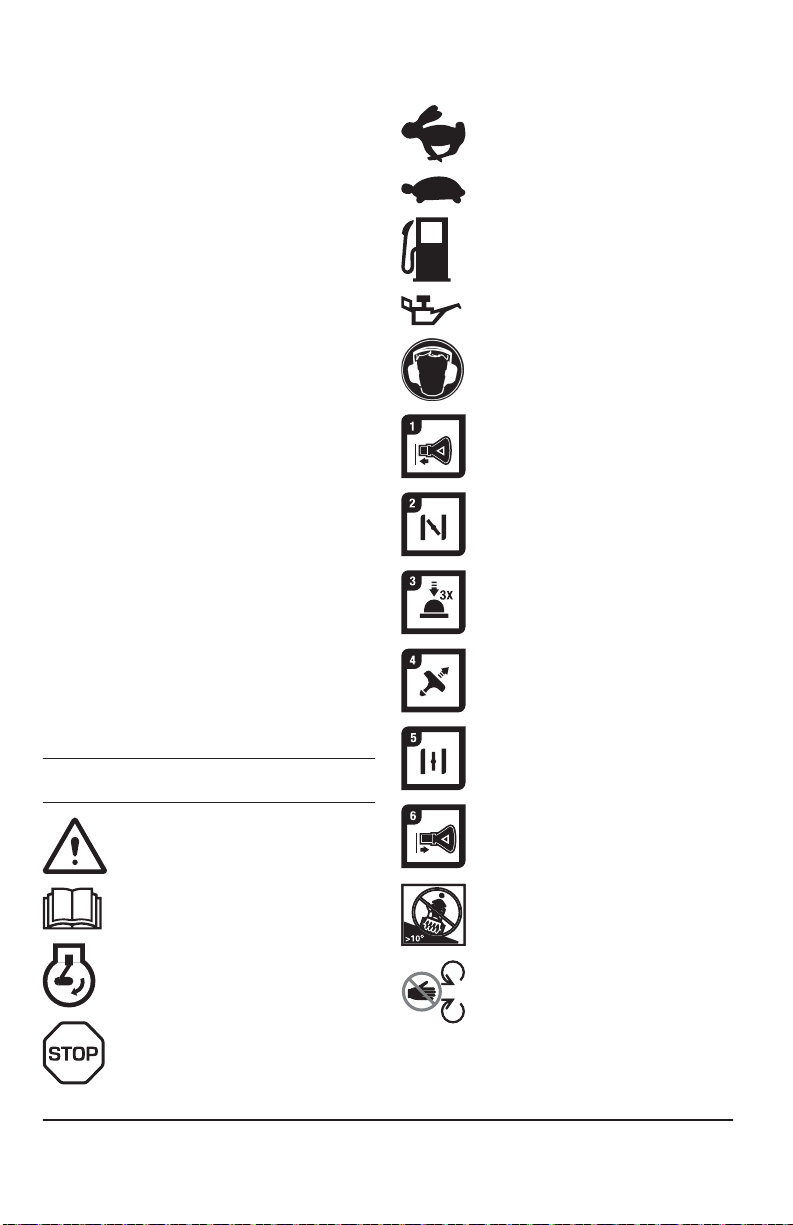
Symbols on the product
Note
4
6. Light
7. Handle knob
8. Muffler
9. Skid plate
10. Augers
11. Clean-out tool
12. Discharge chute
13. Chute deflector
14. Starter rope handle
15. Oil drain plug
16. Fuel switch
17. ON/OFF key
18. Primer
19. ON/OFF switch
20. Throttle control
21. Choke
22. Gasoline filler cap
23. Oil fill (ST 227P, ST 230P), Dipstick (ST 227P)
24. Electric start button
25. Connection, electric start
26. Oil fill (ST 224, ST 224P), Dipstick (ST 224, ST
230P, ST 224P)
P
The product is a wheeled snow thrower that is used to
remove snow from the ground.
This product can be used to remove snow from fields,
roads, walkways and driveways. Do not use it on slopes
that are greater than 20°. Do not use the product in
areas where there is much debris, dirt and protruding
stones.
Fast.
Slow.
Fuel.
Oil.
Ear protection recommended.
ON/OFF key. Insert to start and run.
Choke closed (start).
Primer.
Pull starter rope handle to start.
If the decals on the product are damaged, contact
the distributor to replace them.
Warning.
Read the operator's manual.
Engine on
Engine off.
Choke open (run).
ON/OFF key. Pull out to stop.
No operation on slopes more than 10
degrees.
Do not remove shields while engine is
running.
694 - 002 -

Remove spark plug cable before
Product liability
Safety
Safety definitions
WARNING
CAUTION
Note
5
maintenance.
Traction drive off/on.
Snow discharge off/on.
Snow discharge.
Beware of thrown objectskeep bystanders away.
Warning, keep hands
away.
Warning, keep feet away.
Forward/reverse.
Steer left.
Steer right.
Traction drive control.
The definitions below give the level of severity for each
signal word.
Injury to persons.
694 - 002 -
Rotate left/push down/
rotate right.
As referred to in the product liability laws, we are not
liable for damages that our product causes if:
• the product is incorrectly repaired.
• the product is repaired with parts that are not from
the manufacturer or not approved by the
manufacturer.
• the product has an accessory that is not from the
manufacturer or not approved by the manufacturer.
• the product is not repaired at an approved service
center or by an approved authority.
Damage to the product.
This information makes the product easier to use.

Problème Cause possible Solution
75
G
General safety instructions
Safety instructions for operation
6
• Use the product correctly. Injury or death is a
possible result of incorrect use. Only use the product
• Obey the instructions in this manual. Obey the safety
• Do not discard this manual. Use the instructions to
• Do not use a damaged product. Obey the
• This manual cannot include all situations that can
• Disconnect the spark plug cable before you
• Do not use the product if it is changed from its initial
• Do not breathe in the fumes from the engine. Long
• Do not start the product indoors or near flammable
• When you use this product the engine makes an
• Do not let a child operate the product. Do not let a
• Make sure that you always monitor a person, with
• Lock the product in an area that children and
for the tasks found in this manual. Do not use the
product for other tasks.
symbols and the safety instructions. If the operator
does not obey the instructions and the symbols,
injury, damage or death is a possible result.
assemble, to operate and to keep your product in
good condition. Use the instructions for correct
installation of attachments and accessories. Only
use approved attachments and accessories.
maintenance schedule. Only do the maintenance
work that you find an instruction about in this
manual. An approved service center must do all
other maintenance work.
occur when you use the product. Be careful and use
your common sense. Do not operate the product or
do maintenance to the product if you are not sure
about of the situation. Speak to a product expert,
your dealer, service agent or approved service
center for information.
assemble the product, put the product into storage or
do maintenance.
specification. Do not change a part of the product
without approval from the manufacturer. Only use
parts that are approved by the manufacturer. Injury
or death is a possible result of incorrect
maintenance.
term inhalation of the engine's exhaust fumes is a
health risk.
material. The exhaust fumes are hot and can contain
a spark which can start a fire. Not sufficient airflow
can cause injury or death because of asphyxiation or
carbon monoxide.
electromagnetic field. The electromagnetic field can
cause damage to medical implants. Speak to your
physician and medical implant manufacturer before
you operate the product.
person, without knowledge of the instructions
operate the product.
decreased physical capacity or mental capacity, that
uses the product. A responsible adult must be there
at all times.
unapproved persons cannot access.
• The product can eject objects and cause injuries.
Obey the safety instructions to decrease the risk of
injury or death.
• Do not go away from the product when the engine is
on.
• The operator of the product is responsible if an
accident occurs.
• Before and while you walk rearward, look behind and
down for small children, animals or other risks that
can cause you to fall.
• Make sure that parts are not damaged before you
use the product.
• Make sure that you are at a minimum 15 m (50 ft)
away from other persons or animals before you use
the product. Make sure that a person in adjacent
area knows that you will use the product.
• Refer to national or local laws. They can prevent or
decrease the operation of the product in some
conditions.
• Do not put hands or feet near or under rotating parts.
Keep clear of the discharge opening at all times.
• Exercise extreme caution when operating on or
crossing gravel drives, walks, or roads. Stay alert for
hidden hazards or traffic.
• After striking a foreign object, stop the engine
(motor), remove the wire from the spark plug,
disconnect the cord on electric motors, thoroughly
inspect the product for any damage, and repair the
damage before restarting and operating the product.
• If the product starts to vibrate abnormally, stop the
engine (motor) and check immediately for the cause.
Vibration is generally a warning of trouble.
• Stop the engine (motor) whenever you leave the
operating position, before unclogging the auger
housing or chute deflector, and when making any
repairs, adjustments or inspections.
• When cleaning, repairing or inspecting the product,
stop the engine and make certain the augers and all
moving parts have stopped. Disconnect the spark
plug wire and keep the wire away from the plug to
prevent someone from accidentally starting the
engine.
• Do not run the engine indoors, except when starting
the engine and for transporting the product in or out
of the building. Open the outside doors; exhaust
fumes are dangerous.
• Exercise extreme caution when operating on slopes.
• Never operate the product without proper guards,
and other safety protective devices in place and
working.
• Never direct the chute deflector toward people or
areas where property damage can occur. Keep
children and others away.
• Do not overload the product capacity by attempting
to clear snow at too fast a rate.
694 - 002 -

• Never operate the product at high transport speeds
Work area safety
Personal protective equipment
Safety devices on the product
Muffler
CAUTION
Fuel safety
WARNING
7
on slippery surfaces. Look behind and use care
when operating in reverse.
• Disengage power to the augers when the product is
transported or not in use.
• Use only attachments and accessories approved by
the manufacturer of the product (such as wheel
weights, counterweights, or cabs).
• Never operate the product without good visibility or
light. Always be sure of your footing, and keep a firm
hold on the handles. Walk; never run.
• Never touch a hot engine or muffler.
W
• Thoroughly inspect the area where the equipment is
to be used and remove all doormats, sleds, boards,
wires, and other foreign objects.
• Disengage all clutches and shift into neutral before
starting the engine (motor).
• Do not operate the product without wearing
adequate winter garments. Avoid loose fitting
clothing that can get caught in moving parts. Wear
footwear that will improve footing on slippery
surfaces.
• Handle fuel with care; it is highly flammable.
• Use an approved fuel container.
• Never add fuel to a running engine or hot engine.
• Fill fuel tank outdoors with extreme care. Never
fill fuel tank indoors.
• Never fill containers inside a vehicle or on a truck
or trailer bed with a plastic liner. Always place
containers on the ground, away from your
vehicle, before filling.
• When practical, remove gas-powered equipment
from the truck or trailer and refuel it on the
ground. If this is not possible, then refuel such
equipment on a trailer with a portable container,
rather than from a gasoline dispenser nozzle.
• Keep the nozzle in contact with the rim of the fuel
tank or container opening at all times, until
refueling is complete. Do not use a nozzle lockopen device.
• Replace gasoline cap securely and wipe up
spilled fuel.
• If fuel is spilled on clothing, change clothing
immediately.
• Use extension cords and receptacles as specified by
the manufacturer for all units with electric drive
motors or electric starting motors.
• Adjust the auger housing height to clear gravel or
crushed rock surface.
• Never attempt to make any adjustments while the
engine (motor) is running (except when specifically
recommended by the manufacturer).
• Always wear safety glasses or eye shields during
operation or while performing an adjustment or
repair to protect eyes from foreign objects that may
be thrown from the machine.
Always use the correct personal protective equipment
when you operate the product. This includes, at
minimum, sturdy footwear, eye protection and hearing
protection. Personal protective equipment does not
erase the risk of injury but may decrease the grade of
injury if an accident occurs.
• Always wear safety glasses or eye protection while
you operate the product or do maintenance or
repairs.
• Always wear appropriate winter garments when you
operate the product.
• Always use heavy-duty slip-resistant boots with good
ankle support while you operate the product.
• Do not wear loose fitting clothing that can get caught
in moving parts.
• Use approved protective gloves, if necessary. For
example, when attaching, examining or cleaning the
blade.
• Always use approved ear protection while you
operate the product. Noise for a long period can
cause noise-induced hearing loss.
• Make sure that you regularly do the maintenance to
the product.
• The life of the product increases.
• The risk of accidents decreases.
Let an approved dealer or an approved service
center regularly examine the product to do
adjustments or repairs.
• Do not use a product with damaged protective
equipment. If the product is damaged, speak to an
approved service center.
The muffler keeps the noise levels to a minimum and
sends the exhaust fumes away from the operator.
Do not use the product if the muffler is missing or
defective. A defective muffler increases the noise level
and the risk of fire.
Examine the muffler regularly to make sure that it is
attached correctly and not damaged.
The muffler becomes very hot
Read the warning instructions
during and after use and when the engine
operates at idle speed. Be careful near
flammable materials and/or fumes to prevent
fire.
that follow before you use the product.
694 - 002 -
Pour nettoyer l’outil
73
• Do not start the product if there is fuel or engine oil
Proposition 65
Safety instructions for maintenance
WARNING
Assembly
To remove the product from the carton
Loose parts
8
on the product. Remove the unwanted fuel/oil and let
the product dry.
• If you spill fuel on your clothing, change clothing
immediately.
• Do not get fuel on your body, it can cause injury. If
you get fuel on your body, use soap and water to
remove the fuel.
• Do not start the product if the engine has a leak.
Examine the engine for leaks regularly.
• Be careful with fuel. Fuel is flammable and the fumes
are explosive and can cause injuries or death.
• Do not breathe in the fuel fumes, it can cause injury.
Make sure that there is a sufficient airflow.
• Do not smoke near the fuel or the engine.
P
• Do not put warm objects near the fuel or the engine.
• Do not add the fuel when the engine is on.
• Make sure that the engine is cool before you refuel.
• Before you refuel, open the fuel tank cap slowly and
release the pressure carefully.
• Do not add fuel to the engine in an indoor area. Not
sufficient airflow can cause injury or death because
of asphyxiation or carbon monoxide.
• Tighten the fuel tank cap fully. If the fuel tank cap is
not tightened, there is a risk of fire.
• Move the product a minimum of 3 m (10 ft) from the
position where you filled the tank before a start.
• Do not put too much fuel in the fuel tank.
WARNING
The engine exhaust from this product
contains chemicals known to the State of
California to cause cancer, birth defects
or other reproductive harm.
• The exhaust fumes from the engine contain carbon
• Before you do the maintenance on the product, stop
• Use protective gloves when you do maintenance on
1. Remove loose parts included with the product. Cut
2. Remove the two screws that attach the auger
3. Cut the cable ties that hold the product to the pallet
that follow before you use the product.
monoxide, an odorless, poisonous and very
dangerous gas. Do not start the engine indoors or in
closed spaces.
the engine and remove the ignition cable from the
spark plug.
the blades. The blades are very sharp and cuts can
easily occur.
the four corners of the carton and put the end panels
down flat.
housing to the pallet. Remove the steel brackets
from the skid plates if they have it.
and remove them.
Read the warning instructions
• Accessories and changes to the product that are not
approved by the manufacturer, can cause serious
injury or death. Do not change the product. Always
use accessories that are approved by the
manufacturer.
• If the maintenance is not done correctly and
regularly, the risk of injury and damage to the
product increases.
• Only do the maintenance as given in this operator's
manual. All other servicing must be done by an
approved service agent.
• Let an approved service agent do servicing on the
product regularly.
• Replace damaged, worn or broken parts.
4. Remove all package materials.
5. Remove the product from the carton and make sure
no loose parts are left in the carton.
Knob (3)
694 - 002 -
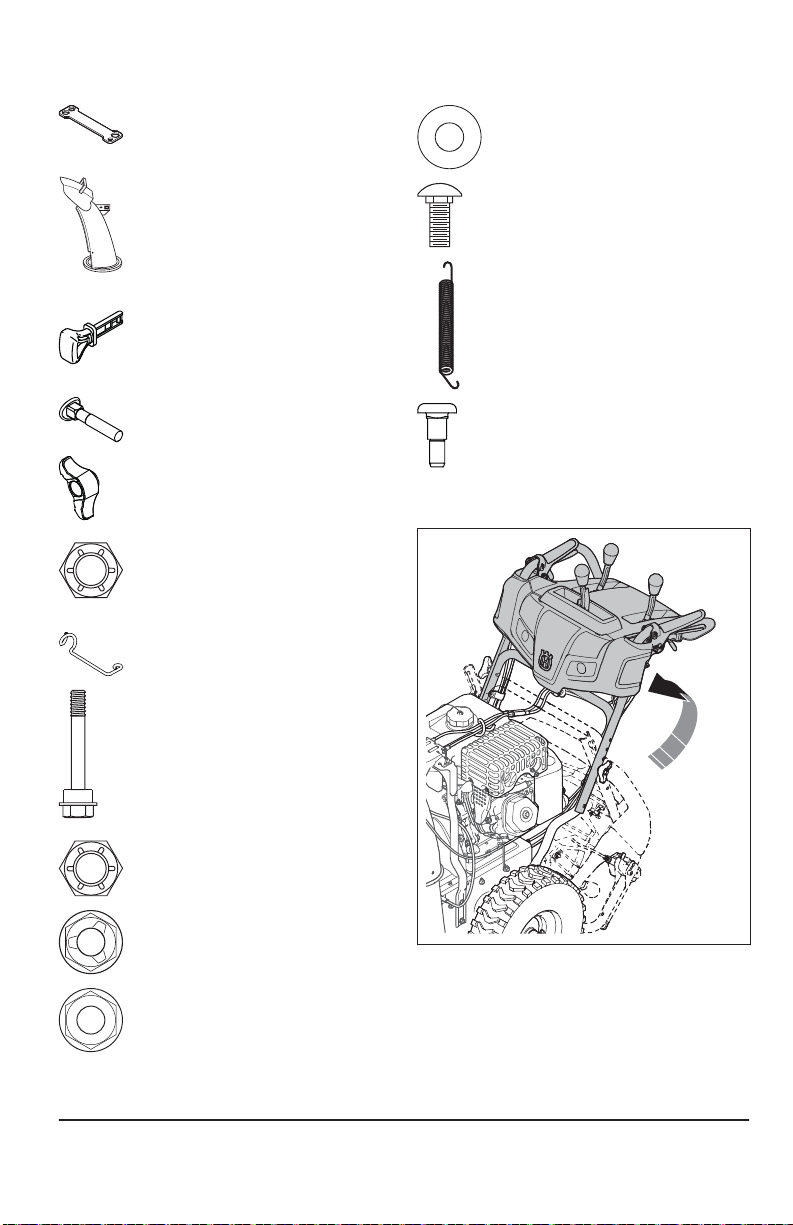
Multi-wrench (1)
To install the handle
9
Discharge chute (1)
ON/OFF key (s)
Carriage bolts 5/16-18 x 2 ¼” (2)
Nylon washer (1)
Carriage bolt 5/16-18 x 5/8 (1)
Spring (1)
Shoulder bolt ¼-20 (1)
Handle knobs (2)
Locknut 3/8 (1)
Cable guide (1)
Shear pins ¼-20 x 1-¾ (6)
Locknuts ¼-20 (6)
Locknut 5/16-18 (1)
Locknut ¼-20 (1)
1. Raise the upper handle to the operating position.
694 - 002 -

Installation du carter de la courroie
Retrait de la courroie de tarière
Installation de la courroie de tarière
MISE EN GARDE :
71
2. Adjust the handle position to one of the mounting
To install the chute deflector and chute
rotator head
To install the chute deflector remote
control
10
holes (B) and tighten the handle knobs (C) with the
carriage bolts (D).
B
D
C
3. Install more carriage bolts (D) and handle knobs (C)
to secure the upper handle (A) to the lower handle
(E).
A
2. Put the chute rotator head (A) on the chute bracket
(B). Rotate the chute assembly to align the pins
under the chute rotator head with the holes in the
chute bracket if it is necessary.
3. Put the chute rotator head on the pin (C) and the
threaded stud (D) on the mounting bracket (E).
4. Attach a locknut (G) on the threaded stud and
tighten.
A
FG
B CDE
5. Put the cables through the cable guide (F) and the
double clip (I) to attach the rotator cable (H) to the
lower handle.
H
F
D
C
E
1. Put the chute deflector assembly on the top of the
chute base with the discharge opening in the
direction of the front of the product.
I
1. Attach the remote cable bracket (A) to the discharge
chute with a carriage bolt (B) and a 5/16-18 locknut
(D). Tighten the bolt.
694 - 002 -
2. Install the remote cable eyelet (E) to the chute
Operation
Before you start the product
To fill the engine with oil
CAUTION
To fill fuel
CAUTION
To adjust the discharge chute and the
chute deflector
11
deflector (F) with a shoulder bolt (G), a nylon washer
(C), and tighten with a ¼-20 locknut (K). The cable
eyelet will be loose on the shoulder bolt.
3. Attach the spring (L) between the hex nut (M) on the
chute rotator head and the hole on the chute
deflector.
4. Attach the lever control knobs (N) by pressing them
down on the control levers (O).
N
G
C
E
F
L
M
B
K
D
• Keep persons and animals away from the work area.
• Do daily maintenance. See
on page 15
• Make sure the ignition lead fits correctly on the spark
plug.
• Add oil or gasoline, if necessary. See
on page 25
1. Remove the oil cap and clean the dipstick. See
Product overview on page 3
dipstick.
2. Add oil to the top mark on the dipstick. Use the
dipstick to do a check of the oil level at regular
intervals.
3. Put the oil cap back.
If available, use low-emission/alkylate gasoline. If lowemission/alkylate gasoline is not available, use good
quality unleaded gasoline or leaded gasoline. Use
A
.
.
you check the oil. Do not fill above the mark.
Maintenance schedule
Technical data
Do not rotate the dipstick when
for the location of the
O
gasoline with an octane number of 90 RON out of North
America (87 AKI in North America) or higher, and with a
maximum of 10% ethanol (E10).
octane number less than 90 RON out of
North America (87 AKI in North America).
This can cause damage to the product.
1. Open the fuel tank cap slowly to release the
pressure.
2. Fill slowly with a fuel can. If you spill fuel, remove it
with a cloth and let remaining fuel dry off.
3. Clean the area around the fuel tank cap.
4. Tighten the fuel tank cap fully. If the fuel tank cap is
not tightened, there is a risk of fire.
5. Move the product a minimum of 3 m (10 ft) from the
position where you filled the tank, before a start.
1. To adjust the discharge chute position, move the
discharge chute control lever (A) back and to the left
or right direction.
Do not use gasoline with an
694 - 002 -

Pour examiner les pneus
Dégagement d’un déflecteur de
goulotte bouché
AVERTISSEMENT :
Remplacement de la barre de racleur
Courroies d’entraînement
AVERTISSEMENT :
AVERTISSEMENT :
Remarque :
Remarque :
Préparation du remplacement des courroies
69
2. To adjust the snow throwing distance of the chute
To start the engine, manual start
CAUTION
CAUTION
Note
To start the engine, electric start
WARNING
CAUTION
CAUTION
12
deflector, move the deflector remote control lever (B)
down to decrease the distance and up to increase
the distance.
AB
quickly. Move it back to the start position
much rope out of the starter as possible and release
the starter rope handle. If the engine does not start,
repeat the procedure or use the electric starter.
6. If the choke was used to start the engine, slowly
move the choke (D) to the OFF position.
7. Run the engine 2-3 minutes at idling speed before
you start to throw snow.
8. If the engine does not run as it should, turn it off.
slowly.
If the rope starter has frozen, slowly pull out as
Do not release the grip
1. Insert the ON/OFF key (A) into the ignition slot until it
clicks. Do not turn the key.
D
B
E
A
C
F
G
2. Turn the fuel ON/OFF switch (F) to the ON position.
3. Put the throttle control (B) to the FAST position.
4. Put the ON/OFF switch (C) to the ON position.
a) If the engine is cold, rotate the choke (D) to the
FULL position and push the primer (E) three
times.
engine. It can prevent the engine
from starting. If the engine is over
primed, wait a few minutes before
attempting to start and do not push
the primer.
5. Pull the starter rope handle (G).
Do not over prime the
1. Insert the ON/OFF key (A) into the ignition slot until it
2. Turn the fuel ON/OFF switch (F) to the ON position.
3. Put the throttle control (B) to the FAST position.
4. Put the ON/OFF switch (C) to the ON position.
5. Push the primer (E) three times.
6. Connect the extension cord to the connector on the
7. Connect the other end of the extension cord into a
8. Push the electric start button (H) until the engine
electric starter. Do not use the electric
starter if your house is not a 120 V A.C.
three-wire grounded system. Serious
personal injury or damage to the product
could occur. The electric starter has a threewire power plug, and is designed to use 120
V A.C. household current. Make sure that
your house is a 120 V A.C. three-wire
grounded system. If you are uncertain, ask a
licensed electrician.
clicks. Do not turn the key.
a) If the engine is cold, turn the choke (D) to the
FULL position.
engine (G).
three-hole grounded 120 V A.C. receptacle.
starts.
The product has a 120 V A.C.
It can prevent the engine from starting. If
the engine is over primed, wait a few
minutes before trying to start and do not
push the primer.
than five continuous seconds between
each time you try to start. Wait 5 to 10
seconds between each try.
Do not over prime the engine.
Do not crank the engine more
694 - 002 -
9. If the choke was used to start the engine, release the
To operate the product
CAUTION
CAUTION
Note
Note
13
electric start button and slowly move the choke (D)
to the OFF position.
D
B
H
E
A
C
F
10. Disconnect the extension cord from the receptacle
first and then from the engine.
11. Run the engine 2-3 minutes at idling speed before
you start to throw snow.
G
T
water to lubricate the auger blades. Incorrect
use can cause high temperatures in the
auger blades, especially if the product is
new. This can cause damage to the auger
blades and scraper bar.
Do not operate without snow or
1. To engage the auger blades, push the auger
engagement (A) to the handle to engage the auger
and throw snow.
A
2. Raise the drive speed control lever (B) from the
middle position to make the product move forward
when the drive engagement (C) is engaged. Do not
change the speed when the augers are engaged.
This can cause damage to the transmission.
3. Lower the drive speed control lever from the middle
position to make the product move rearward when
the drive engagement is engaged.
C B
auger levers for an extended period of time;
this can lead to premature wear or burning
of the belts.
When both the drive engagement and auger
engagement are engaged, the drive engagement will
lock the auger engagement in position. Use the right
hand to control the snow discharge chute.
Do not change the speed when the augers are
engaged. This can cause damage to the transmission.
694 - 002 -
Do not partially engage drive or
4. To make the product move in the selected direction,
hold the drive engagement against the handle .
Entretien Quotidien 20 heures 50 heures 100 heures
Remarque :
Pour effectuer une inspection générale
Vérification du niveau d’huile
MISE EN GARDE :
Vidange de l’huile
AVERTISSEMENT :
Lubrification de la machine
Silencieux
MISE EN GARDE :
67
5. If the product has power steering, hold the left
To stop the product
To use the throttle control
To use the fuel switch
To use the choke control
To adjust the skid plates
To prevent freeze-up after use
Note
14
steering trigger (D) to turn left. Hold the right steering
trigger to turn right.
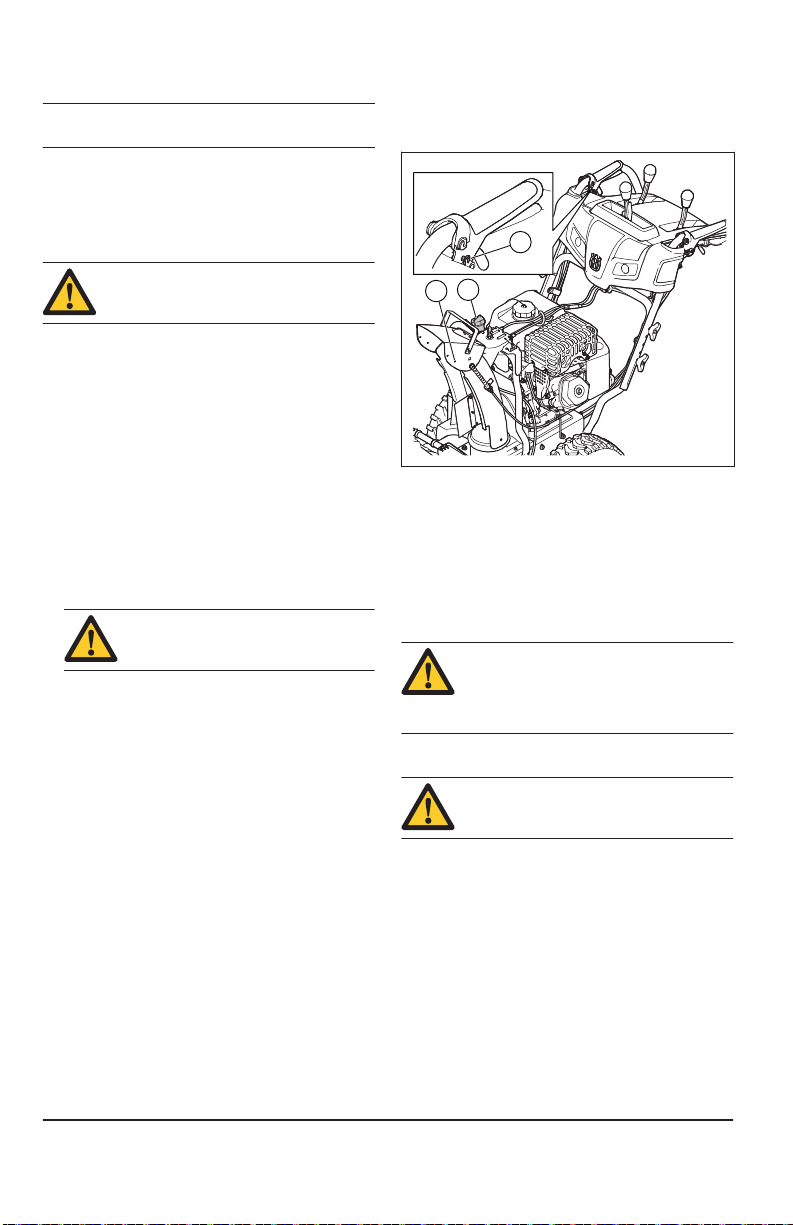
• Turn the choke (A) to open or close the choke valve.
Use the choke to start a cold engine.
D
1. Move the ON/OFF switch to the OFF position.
2. Remove the ON/OFF key.
• Turn the throttle control (A) to change the amount of
fuel used. Always operate the engine at full throttle.
CONTROL
CHOKE
A
TRUCTIONS
• Turn the fuel switch to open or close the fuel valve.
Operate the product with the fuel switch in the OPEN
position.
A
CHOKE
TRUCTIONS
CONTROL
No adjustment is required for normal installation.
1. When the lock nut (B) is loose or the skid plate (A) is
not high enough from the ground, unlock the lock nut
(B) with a 13 mm open-ended wrench, to move the
skid plate up or down.
2. On flat surfaces, like asphalt roads, raise the skid
plates (A) 5-6 mm (0.2-0.25 in) off the ground. On
uneven surfaces, like gravel roads, make the
clearance between the ground and the product
larger with the skid plates to get the scraper bar
above the top of the gravel. Make sure that the
gravel and stones do not enter into the product. It
can cause personal injuries if objects are ejected at
high speed.
3. Tighten the lock nut (B).
A
B
OFF
FUELCONTROL
INSTRUCTIONS
ON
Controls and moving parts can be blocked by ice.
Do not apply much force to the controls. If you cannot
operate a control or a part, start the engine and let it
operate for some minutes.
1. Start the engine and let it operate for some minutes.
Stop the engine and wait for all moving parts to stop.
694 - 002 -

2. Remove snow and loose ice from the product.
To get a good result
Maintenance
Introduction
Maintenance schedule
Maintenance Daily 20 hours 50 hours 100 hours
15
3. Remove snow and loose ice from the base of the
chute.
4. Turn the chute deflector to the left direction and to
the right direction to remove ice and water.
5. Set the key to the "OFF" position.
6. If the product does not have an electric starter, pull
the starter rope handle several times to remove ice
and water.
7. If the product has an electric starter, connect the
product to power and push the start button once to
remove ice and water.
T
• Always run the engine at full throttle or near full
throttle.
• Always adapt the speed of the product to the snow
situation and adjust the speed with the drive speed
control lever. Make sure that the product throws
snow evenly.
When the product is in use, bolts can loosen and
components can become worn. This can cause
• It is easier and more efficient to remove snow
immediately after it falls.
• Always throw snow downwind whenever possible.
• On flat surfaces, like asphalt roads, raise the skid
plates up to 5-6 mm (0.2-0.25 in) off the ground.
• The scraper bar is reversible. When it becomes worn
almost to the edge of the housing, reverse it.
Replace the scraper bar if it is damaged, or if both
sides are worn.
• Do not dispatch the chute deflector if it is clogged.
• If the product does not move forward due to
unforeseen circumstances, release the drive
engagement immediately or pull out the ON/OFF key
to OFF position.
malfunction like incorrect tolerance clearance, increased
oil consumption, or misalignment of various
components. Do regular maintenance on the product to
prevent malfunction.
Make sure that nuts
and screws are tightened
Do a check of the engine oil level
Replace oil
Make sure there are
no fuel or oil leaks
Remove clogging,
foreign objects in
auger
Inspect the tire pressure
Inspect and change
the spark plug
1
2
3
X
X
XXX
X
X
X
X
1
Replace the oil after the first 20 h, 50 h, 100 h and then every 100 h.
2
See Technical data for correct tire pressure.
3
Check and clean spark plug before use each year.
694 - 002 -
Utilisation de la commande
d’accélérateur
Utilisation du commutateur de
carburant
Utilisation de la commande du volet de
départ
Réglage des plaques de protection
65
N
Note
To do a general inspection
To do a check of the oil level
CAUTION
To replace the engine oil
WARNING
To lubricate the product
Muffler
CAUTION
To examine the spark plug
CAUTION
16
It is not necessary to add grease or to do other
maintenance to the gearbox.
• Make sure that the nuts and screws on the product
are tightened.
• Apply a small amount of lithium grease to the
interlock bosses (C) at the beginning of each season
or every 25 hours of use.
C
1. Put the product on level ground.
2. Remove the oil tank cap with the attached dipstick.
3. Clean the oil from the dipstick.
4. Put the dipstick fully into the oil tank to give a correct
5. Remove the dipstick.
6. Examine the oil level on the dipstick.
7. If the oil level is low, fill with engine oil and do a
to the engine. Do a check of the oil level
before you start the product.
picture of the oil level.
check of the oil level again.
A too low oil level can do damage
1. Run the engine a few minutes to make the oil warm.
Warm oil flows better and includes more
contaminants.
skin contact with the used engine oil.
2. Put the product on level ground.
3. Remove the ON/OFF key.
4. Put a container below the oil drain plug.
5. Remove the oil drain plug, tip the product and drain
the used oil in the container.
6. Put the product back to the operating position.
7. Install the oil drain plug and tighten it by hand.
8. Fill the engine with oil, see
on page 11
• Lubricate the pivot points (A) with oil.
• Lubricate the engine (B) with oil.
.
The engine oil is hot. Avoid
To fill the engine with oil
B
A
The muffler keeps the noise levels to a minimum and
sends the exhaust fumes away from the operator.
Do not use the product if the muffler is missing or
defective. A defective muffler increases the noise level
and the risk of fire.
Examine the muffler regularly to make sure that it is
attached correctly and not damaged.
during and after use and when the engine
operates at idle speed. Be careful near
flammable materials and/or fumes to prevent
fire.
• Examine the spark plug if the engine is low on
• To decrease the risk of unwanted material on the
spark plug type. Incorrect spark plug type
can cause damage to the product.
power, is not easy to start or does not operate
correctly at idle speed.
spark plug electrodes, obey these instructions:
a) Make sure that the idle speed is correctly
adjusted.
b) Make sure that the fuel mixture is correct.
c) Make sure that the air filter is clean.
The muffler becomes very hot
Always use the recommended
694 - 002 -

• If the spark plug is dirty, clean it and make sure that
To inspect the augers and the scraper
bar
To replace the auger shear pins
CAUTION
To replace the impeller shear pins
CAUTION
17
the electrode gap is correct, see
page 25
.
• Replace the spark plug if it is necessary.
1. Before each use, inspect the augers and the scraper
bar for wear.
2. If the edge of the scraper bar is worn, reverse the
scraper bar. If the scraper bar has damages or is
worn on both edges, replace it.
3. If the edges of the augers are worn, contact an
authorized service center to replace them.
The auger shear pins protect the product from damage.
The auger shear pins break if an object comes into the
moving parts.
shear pins supplied with the product.
1. If an auger shear pin breaks, stop the engine and
2. Remove the ON/OFF key and disconnect the spark
3. Align the hole in the auger hub (B) with the hole in
wait for the moving parts to stop.
plug cable.
the auger shaft (C) and install a new ¼ - 20 x 2
shear pin (A)
Use only original equipment
Technical data on
4. Install a ¼-20 locknut (D) and tighten.
A B
C
DB
5. Put the ON/OFF key in the ignition and connect the
spark plug cable to the spark plug.
The impeller shear pins protect the product from
damage. The impeller shear pins break if an object
comes into the moving parts.
shear pins supplied with the product.
1. If an impeller shear pin breaks, stop the engine and
2. Remove the ON/OFF key and disconnect the spark
3. Align the hole in the impeller hub (A) with the holes
wait for the moving parts to stop.
plug cable.
in the impeller shaft (B) and install a new ¼-20 shear
pin (C).
Use only original equipment
694 - 002 -

MISE EN GARDE :
MISE EN GARDE :
Remarque :
Démarrage du moteur (électrique)
AVERTISSEMENT :
MISE EN GARDE :
MISE EN GARDE :
63
4. Install a ¼-20 locknut (D) on the shear pin and
To examine the tires
To clear a clogged chute deflector
WARNING
To replace the scraper bar
Drive belts
WARNING
WARNING
Note
Note
To prepare for replacement of the belts
18
tighten.
A C B
1. Put the scraper bar (A) in a reversed position when it
is worn to the edge of the housing.
A
2. Replace the scraper bar if it is worn on both sides or
if it is damaged.
D
5. Put the ON/OFF key in the ignition and connect the
spark plug cable to the spark plug.
• Keep the tires free of fuel, oil and chemicals to
prevent damage to the rubber.
• Keep the tires away from stumps, stones, ruts, sharp
objects and other objects which can cause damage
to the tires.
• Keep the tire pressure correct, see
on page 25
Do not unclog the chute deflector before the following
operations are made.
1. Release the auger engagement and the drive
engagement at the same time.
2. Wait 10 seconds to make sure that the augers have
stopped.
3. Stop the product.
4. Use the clean-out tool (at least 15" long, included in
some models) to remove the clog.
.
the chute deflector or inside the auger
housing.
Do not put your hands into
Technical data
adjustable. Replace the belts if they are damaged or
begin to slip from wear. It is recommended to have the
belts replaced by a qualified service center.
auger belt at the same time.
1. Remove the fuel from the fuel tank.
of special construction and should be
replaced by original equipment manufacturer
(OEM) belts available from your nearest
service center. Using other than OEM belts
can cause personal injury or damage to the
product.
separation of the product. While separating
the auger housing from the frame, it is
important that an assistant stands in the
operating position and holds the product
handles. Serious personal injury and/or
damage to the product could occur if the
product falls during the belt replacement
process.
The auger and traction drive belts are not
It is recommended to replace the drive belt and
The v-belts on your product are
The belt replacement requires
694 - 002 -

2. Loosen the lock nut (A) that secures the chute
To remove the drive belt
To install the drive belt
Note
19
rotator head (B) to the mounting bracket (C) to
remove the discharge chute.
B
2. Remove the tensioner spring (A) attached to the
drive belt tensioner arm (B).
E
FG
A
C
3. Loosen the two screws (A) that secure the belt cover
(B) to the frame (C) and remove the belt cover.
C A
B
1. Remove the auger belt. See
belt on page 20
.
To remove the auger
B
A
H
I
C
J
D
3. Remove the return spring (C) holding the swing plate
(D) in place.
4. Remove the arm bolt (E) and drive belt tensioner
arm.
5. Remove the pulley bolt (F), engine pulley (G) and
drive belt (H) from the engine.
6. Remove the top bolt (I) holding the swing plate to the
frame
7. Pivot and hold the swing plate away from the product
and remove the drive belt from the drive pulley (J).
1. Pivot and hold the swing plate (D) away from the
product.
E
B
A
FG
H
I
C
J
D
694 - 002 -
2. Put the drive belt (H) onto the drive pulley (J).
Make sure that the drive belt is routed in the
drive pulley groove properly before you lower the
swing plate.
3. Install and tighten the top bolt (I).

Installation de la télécommande du
déflecteur de goulotte
61
4. Put the drive belt in the grove of the engine pulley
To install the belt cover
To remove the auger belt
To install the auger belt
CAUTION
20
(G) before installing on the engine shaft.
5. Install the pulley bolt (F) and attach the engine pulley
on the engine. Tighten the pulley bolt (30-35 Ft.
Lbs. / 41-47 Nm).
6. Install the drive belt tensioner arm (B) and tighten
the arm bolt (E) on the engine.
7. Install the return spring (C) on the swing plate.
8. Install the tensioner spring (A) on the tensioner arm.
9. Operate all controls to make sure that the drive belt
is installed correctly and that all components are
moving correctly.
T
1. Install the belt cover (B) on the frame (C) and tighten
the two screws (A).
C A
B
2. Install the discharge chute.
1. Remove the 5/16'' bolts (A) and the lower ¼" bolts
(B) from the 2 sides of the frame assembly. Do not
discard the bolts.
A
C
B
2. Loosen but do not remove the lower 5/16" bolts (C)
on the 2 sides of the frame assembly.
3. Remove the auger belt from the engine pulley.
4. Tilt the rear section down. The front section is tilted
forward at the same time. The bottom bolt (C) is a
hinge between the front and rear sections.
5. Put a wooden block below the hinge point to set the
product in the tilted position.
6. Move the auger belt tensioner arm and remove the
auger belt from around the arm.
1. Move the belt tensioner arm and put the auger belt
around and in the groove of the auger pulley.
caught between the frame and auger
housing as you put the unit together.
2. Remove the wooden block from below the product.
3. Lift the handle to tilt the rear section up. The front
section will tilt back and pivot to attach the rear
section.
4. Make sure that the belt is put in the auger pulley
groove correctly.
Make sure that the belt is not
694 - 002 -

5. Install the 5/16'' bolts (A), (C) and tighten (8-12
To adjust the tension of the cable for
the discharge chute deflector
To adjust the auger control cable
Note
Note
To remove the wheels
21
Ft.Lbs / 11-16 Nm).
A
C
B
6. Install the ¼'' bolts (B) and tighten (4-6 Ft.Lbs / 5-8
Nm).
7. Install the auger belt on the engine pulley. Make sure
that the belt is put correctly around the idler pulley
and installed correctly in the engine pulley groove.
8. Operate all controls to make sure that the auger belt
is installed correctly and that all components are
moving correctly.
1. Loosen the jam nuts (B) to adjust the tension of the
cable for the discharge chute adjacent to the
adjuster turnbuckle (A).
A B
C
If you do not feel comfortable making this
adjustment yourself, please contact an authorized
service center. Adjustments can be needed if the
impeller and auger rotation is sluggish when engaging
the auger control lever, or if the auger belt has been
replaced.
1. Loosen the jam nuts (B) next to the turn buckle (A) to
adjust the cable tension in the auger control cable
(D).
A B
D
2. Hold the short section and turn the long section.
Turn it 360 degrees.
3. Test the auger engagement. Repeat the adjustment
until only a small amount of tension remains in the
cable when the lever is disengaged.
4. Tighten the bottom jam nut to lock in the tension.
5. Ask an assistant to stand 10 feet / 3 meters in front
of the product, on the opposite side of the chute. The
assistant observes the rotation of the auger and
measures the time it takes for the auger to stop
rotating after the lever is released. If the auger stops
rotating after 5 seconds, adjust the cable by rotating
the center barrel 360 degrees, to contract the
adjuster. Test the auger engagement and measure
the stop time again. If the auger stops rotating in less
than 5 seconds, continue with the next step.
6. Tighten the jam nut on the auger cable.
If the adjustment does not resolve the problem,
replace the auger belt. See
on page 20
.
To remove the auger belt
2. Hold the short section and turn the long section to
increase the adjuster.
3. Adjust until the cable for the discharge chute
deflector (C) has a tight fit. Tighten the jam nuts.
694 - 002 -
1. Remove the wheel pin (A) and the retainer pin (B).

Consignes de sécurité pour la
maintenance
AVERTISSEMENT :
Montage
Retrait du produit du carton
Pièces libres
59
2. Remove the wheel from the axle (C).
To clean the product
Troubleshooting
Troubleshooting
Problem Possible cause Solution
22
• Clean plastic parts with a clean and dry cloth.
A
C
• Do not use a high pressure washer to clean the
product.
• Do not flush water directly on the motor.
• Use a brush to remove leaves, grass and dirt.
B
The product does not start The safety ignition key is not inserted. Insert the safety ignition key.
The product is out of fuel. Fill the fuel tank with fresh, clean
The ON/OFF key is OFF. Move the ON/OFF key to ON posi-
The choke is in OFF (CLOSE) position. Move the choke to ON (FULL,
The primer is not depressed. Press the primer.
The engine is flooded. Wait a few minutes before restarting,
The spark plug cable is not connected. Connect the cable to the spark plug.
The spark plug is bad. Replace the spark plug.
There is water in the fuel or the fuel is too old. Empty the fuel tank and carburetor.
There is vapor locked in the fuel line. Make sure that all the fuel line is be-
Other causes. Inspect the starting procedures care-
The fuel switch (if equipped) is in CLOSE (OFF)
position.
The throttle is in STOP position. Move the throttle to FAST position.
gasoline.
tion.
OPEN) position.
DO NOT prime.
Restart the engine while full throttle
and the choke in OFF (CLOSE) position.
Fill the fuel tank with fresh, clean
gasoline.
low the outlet of the fuel tank. The
fuel line should run continuously
down from fuel tank to carburetor.
fully in this manual.
Turn the fuel switch to OPEN (ON)
position.
694 - 002 -

P
Problem Possible cause Solution
23
Decreased power The spark plug cable is not connected. Connect the cable to the spark plug.
The product throws too much snow. Decrease the speed and the width of
The fuel tank cap is covered with ice or snow. Remove the ice and the snow on and
the swath.
around the fuel tank cap.
The muffler is dirty or clogged. Clean or replace the muffler.
Improper cable length. Adjust the cable.
The engine idles or runs
roughly
The muffler is blocked. Make sure that the engine is cool.
The air intake of the carburetor is blocked. Make sure that the engine is cool.
The choke is in ON (FULL, OPEN) position. Move the choke to OFF (CLOSE) po-
Clear the blockage.
Clear the blockage.
sition.
The fuel line is blocked. Clean the fuel line.
There is water in the fuel or the fuel is too old. Empty the fuel tank and carburetor.
Fill the fuel tank with fresh, clean
gasoline.
The carburetor needs to be replaced. Contact an authorized service center.
The belt is stretched. Replace the auger v-belt.
Excessive vibration / Handle movement
The starter rope handle is
hard to pull
Some parts are loose. The augers are damaged.
The handles are not positioned correctly. Make sure that the handles are
The adjustment lever nuts are loose. Tighten the nuts until the handle feels
The starter rope handle is frozen. Slowly pull out as much rope out of
The starter rope is interfering with components. The starter rope should not touch any
Tighten all fasteners. Replace the
damaged parts. If vibration remains,
contact an authorized service center.
locked into position.
safe.
the starter as possible and release
the starter rope handle. If the engine
does not start, repeat the procedure
or use the electrical starter.
cables or hoses.
694 - 002 -

Sécurité de l’aire de travail
Équipement de protection personnelle
57
P
Problem Possible cause Solution
Transportation, storage and disposal
Transportation and storage
24
Loss of traction drive/
slowing of drive speed
Loss of snow discharge or
slowing of snow discharge
Failure of auger rotation
after the grip is released
The lights are not on (if so
equipped)
The chute rotator is difficult to move
The product turns to one
side
The belt slips. Adjust the cable. Adjust the belt.
The belt is worn. Check / replace the belt. Adjust the
The belt is off the pulley. Check / reinstall the belt. Adjust the
The chute deflector is clogged. Clean the chute deflector.
Foreign objects clog the augers. Remove the debris or the foreign ob-
The shear pin is broken. Replace the broken shear pin.
Excessive snow and ice build up in between
track components.
The friction drive wheel is worn. Contact an authorized service center.
The friction disc is wet Let the friction disc dry
The drive belt is not aligned. Adjust the drive belt.
The discharge deflector is not aligned. Adjust the discharge deflector.
The engine is not running. Start the engine.
The cable connection is loose. Check the cable connections at the
The LED is burnt out. Replace the LED light module. Indi-
There is debris in the chute rotator mechanism. Clean the internal parts of the chute
The cables are kinked or damaged. Make sure that the cables are not
The tire pressure is not equal. Adjust the tire pressure and fill the
The product drives with only one wheel. Inspect the tire lock pin.
Uneven sled adjustment. Adjust the skid plates and the sledge.
Uneven skid plates adjustment. Adjust the skid plates and the sledge.
pulley.
pulley.
ject from the augers.
Remove snow and ice build up from
in between track components.
engine and the lights.
vidual LEDs can not be replaced.
rotator mechanism.
kinked. Replace the cables that are
damaged.
tire.
• For storage and transportation of the product and
fuel, make sure that there are no leaks or fumes.
Sparks or open flames, for example from electrical
devices or boilers, can start a fire.
• Always use approved containers for storage and
transportation of fuel.
• Empty the fuel tank before you put the product in
storage for a long period of time. Discard the fuel at
an applicable disposal location
• Safely attach the product during transportation to
prevent damage and accidents.
• Keep the product in a locked area to prevent access
for children or persons that are not approved.
• Keep the product in a dry and frost free area.
694 - 002 -

D
Disposal
Technical data
Technical data
Note
ST 224 ST 227P ST 230P ST 224P
Dimensions
Engine
Electrical system
25
• Obey the local recycling requirements and applicable
regulations.
• Discard all chemicals, such as engine oil or fuel, at a
service center or at an applicable disposal location.
• When the product is no longer in use, send it to a
Husqvarna dealer or discard it at a recycling
location.
All data, images and specifications are typical and
for reference only, and may be changed due to product
improvement without prior notice.
Weight, lb / kg 198.6 / 90 212 / 96 237.8 / 108 198.6 / 90
Max Operating Tire Pressure, PSI 18 18 20 18
Brand / Model
Displacement, cc 208 254 291 208
Fuel type Unleaded regular (maximum 10% ethanol)
Fuel capacity, gallons / liters 0.31 / 1.17 0.35 / 1.33 0.62 / 2.35 0.31 / 1.17
Oil SAE 5W30 (below 0°C (32°F))
Oil capacity ounces / liters 16 / 0.47 20 / 0.59 32 / 0.95 16 / 0.47
Spark plug F6RTC
Spark plug gap (in / mm) 0.030 / 0,762 mm
Husqvarna Husqvarna Husqvarna Husqvarna
694 - 002 -

Responsabilité concernant le produit
Sécurité
Définitions relatives à la sécurité
AVERTISSEMENT :
55
C
Contenido
26
Introducción.................................................................. 27
Seguridad..................................................................... 29
Montaje.........................................................................33
Funcionamiento............................................................ 36
Mantenimiento.............................................................. 40
Solución de problemas................................................. 48
Transporte, almacenamiento y eliminación de
residuos........................................................................ 50
Datos técnicos.............................................................. 51
694 - 002 -

I
Introducción
Descripción general de la máquina
27
21
20
19
18
17
8 22
16
15
14
13
12
11
26
23
24
25
6
1 2
3
4
5
7
8
10
1. Acoplamiento del barreno
2. Palanca de control del conducto de expulsión
694 - 002 -
9
3. Palanca de ajuste del régimen de velocidad
4. Palanca del control remoto del deflector

Introduction
Présentation de la machine
53
5. Acoplamiento de la transmisión
Descripción de la máquina
Uso específico
Símbolos en el producto
Tenga en cuenta:
28
6. Luz
7. Perilla del mango
8. Silenciador
9. Plancha protectora
10. Barrenos
11. Herramienta de limpieza
12. Conducto de expulsión
13. Deflector del conducto
14. Empuñadura de la cuerda de arranque
15. Tapón de vaciado de aceite
16. Interruptor de combustible
17. Llave de encendido/apagado (ON/OFF)
18. Cebador
19. Interruptor ENCENDER/APAGAR
20. Control del acelerador
21. Estrangulador
22. Tapón de llenado de gasolina
23. Llenado del aceite (ST 227P, ST 230P), varilla de
nivel (ST 227P)
24. Botón de arranque eléctrico
25. Conexión, arranque eléctrico
26. Llenado del aceite (ST 224, ST 224P), varilla de
nivel (ST 224, ST 230P, ST 224P)
D
El producto es un quitanieves con ruedas que se utiliza
para retirar la nieve del suelo.
Este producto puede utilizarse para retirar la nieve de
campos, caminos, senderos y accesos. No lo utilice en
pendientes superiores a 20°. No utilice el producto en
áreas con muchos residuos, suciedad y piedras
protuberantes.
Motor apagado.
Rápido.
Lento.
Combustible.
Aceite.
Protectores auriculares recomendados.
Llave para encender/apagar la máquina.
Colóquela para encender la máquina y
ponerla en marcha.
Estrangulador cerrado (arranque).
Cebador.
dañadas, comuníquese con el distribuidor para
sustituirlas.
Si las etiquetas del producto están
¡Advertencia!
Lea el manual de instrucciones.
Motor en marcha
Tire la empuñadura de cuerda de arranque
para poner la máquina en marcha.
Estrangulador abierto (puesta en marcha).
Llave para encender/apagar la máquina.
Sáquela para detener la máquina.
Sin funcionamiento en pendientes de más
de 10 grados.
694 - 002 -

No retire las protecciones mientras el motor
Responsabilidad del fabricante
Seguridad
Definiciones de seguridad
ADVERTENCIA:
29
se encuentre funcionando.
Retire el cable de la bujía antes del
mantenimiento.
Tracción activada/desactivada.
Descarga de nieve activada/desactivada.
Girar a la izquierda.
Girar a la derecha.
Descarga de nieve.
Tenga cuidado con los objetos que salgan disparados; mantenga a los
transeúntes lejos de la
máquina.
Advertencia: Mantenga
las manos alejadas.
Advertencia: Mantenga
los pies alejados.
Marcha hacia delante/
atrás.
Girar a la izquierda/presionar/girar a la derecha.
Como se menciona en las leyes de responsabilidad del
fabricante, no nos hacemos responsables de los daños
que cause nuestro producto si:
• el producto se repara incorrectamente
• el producto se repara con piezas que no son del
fabricante o que este no autoriza
• el producto tiene un accesorio que no es del
fabricante o que este no autoriza
• el producto no se repara en un centro de servicio
autorizado o por una autoridad aprobada.
Control de tracción.
Las siguientes definiciones proporcionan el nivel de
gravedad de cada palabra clave.
694 - 002 -
Lesiones a personas.

Eliminación
Datos técnicos
Datos técnicos
Tenga en cuenta:
ST 224 ST 227P ST 230P ST 224P
Dimensiones
Motor
Sistema eléctrico
51
A
AVISO:
Tenga en cuenta:
Instrucciones generales de seguridad
Instrucciones de seguridad para el
funcionamiento
30
Daños en el producto.
Esta información hace que el
producto sea más fácil de usar.
• Utilice el producto correctamente. Las lesiones
• Obedezca las instrucciones contenidas en este
• No deseche este manual. Utilice las instrucciones
• No use un producto dañado. Cumpla con el
• En este manual no se pueden abarcar todas las
• Desconecte el cable de la bujía antes de montar o
• No utilice el producto si cambia su especificación
• No respire los humos del motor. La inhalación
• No encienda el producto en interiores o cerca de
• Cuando utilice este producto, el motor crea un
graves o fatales son un posible resultado de un uso
incorrecto. Solo utilice el producto para las tareas
que aparecen en este manual. No utilice el producto
para otras tareas.
manual. Obedezca los símbolos y las instrucciones
de seguridad. Si el usuario no obedece las
instrucciones y los símbolos, es posible que se
produzcan daños y lesiones tanto graves como
fatales.
para montar, operar y mantener el producto en buen
estado. Utilice las instrucciones para la correcta
instalación de piezas y accesorios. Utilice solamente
piezas y accesorios homologados.
programa de mantenimiento. Realice solamente las
tareas de mantenimiento en las que se detallan
instrucciones en este manual. Un centro de servicio
autorizado debe realizar todos los demás trabajos
de mantenimiento.
situaciones que pueden ocurrir cuando se utiliza el
producto. Tenga cuidado y use el sentido común. No
haga funcionar el producto ni realice mantenimientos
si no está seguro acerca de la situación. Hable con
un experto en el producto, su distribuidor, el agente
de servicio o un centro de servicio autorizado para
obtener más información.
almacenar el producto, o realizar tareas de
mantenimiento.
inicial. No cambie una parte del producto sin la
aprobación del fabricante. Utilice solamente las
piezas que están aprobadas por el fabricante. Las
lesiones graves o fatales son un posible resultado
de un mantenimiento incorrecto.
prolongada de los gases de escape es un riesgo
para la salud.
materiales inflamables. Los gases de escape están
muy calientes y pueden crear incendios debido a la
creación de chispas. Un flujo de aire insuficiente
puede causar lesiones graves o fatales por asfixia o
debido al monóxido de carbono.
campo electromagnético. El campo
electromagnético puede causar daños a implantes
médicos. Hable con su médico y fabricante del
implante antes de utilizar el producto.
• No deje que un niño utilice el producto. No permita
que una persona que no conozca las instrucciones
utilice el producto.
• Asegúrese de supervisar siempre a una persona con
capacidades físicas o mentales limitadas que utilice
el producto. Debe haber un adulto responsable en
todo momento.
• Mantenga el producto en un área a la cual los niños
y las personas no autorizadas no puedan acceder.
• El producto puede expulsar objetos y causar
lesiones. Siga las instrucciones de seguridad para
reducir el riesgo de lesiones graves o fatales.
• No se aleje del producto cuando el motor esté en
marcha.
• El operador del producto es responsable en caso de
un accidente.
• Antes de caminar hacia atrás y mientras lo hace,
mire hacia atrás y hacia abajo para cerciorarse de
que no haya niños pequeños, animales u otros
riesgos que puedan provocar caídas.
• Asegúrese de que las piezas no estén dañadas
antes de utilizar el producto.
• Asegúrese de estar al menos 15 m (50 pies) de
distancia de otras personas o animales antes de
utilizar el producto. Asegúrese de que una persona
en el área adyacente sepa que utilizará el producto.
• Consulte las leyes locales o nacionales. Estas
pueden evitar o disminuir el funcionamiento del
producto en algunas condiciones.
• No ponga las manos ni los pies cerca o debajo de
las piezas giratorias. Manténgase alejado de la
abertura de descarga en todo momento.
• Tenga extremo cuidado cuando trabaje en caminos,
pasos o accesos de grava o pase por ellos.
Manténgase alerta para detectar riesgos ocultos o
tránsito
• Después de golpear un objeto extraño, detenga el
motor, desconecte el cable de la bujía o desconecte
el hilo en los motores eléctricos. Inspeccione
atentamente la máquina para detectar daños y
repárelos antes de volver a encender y ocupar el
producto.
• Si el equipo comienza a vibrar de manera anormal,
detenga el motor y revise de inmediato para
encontrar la causa. La vibración es generalmente
una advertencia de problemas.
• Detenga el motor siempre que abandone la posición
de operación, antes de destapar la carcasa del
barreno o el deflector del conducto y también
cuando realice reparaciones, ajustes o inspecciones.
• Cuando realice la limpieza, reparación o inspección
del producto, detenga el motor y asegúrese de que
694 - 002 -

los barrenos y todas las piezas móviles se
Seguridad en el área de trabajo
Equipo de protección personal
31
detuvieron. Desconecte el cable de la bujía y
manténgalo lejos de la bujía para evitar que alguien
arranque el motor accidentalmente.
• No haga funcionar el motor en interiores, excepto
cuando arranque el motor y para el transporte del
producto dentro o fuera del edificio. Abra las puertas
externas; los gases de escape son peligrosos.
• Ponga extrema atención cuando trabaje en
pendientes.
• Nunca haga funcionar el producto sin las debidas
protecciones ni los dispositivos protectores de
seguridad en su lugar y en funcionamiento.
• Nunca dirija el deflector del conducto hacia las
personas o hacia zonas donde puedan ocurrir daños
a la propiedad. Mantenga alejados a los niños y a
otras personas.
• No sobrecargue la capacidad del producto
intentando retirar nieve a una velocidad demasiado
rápida.
• Nunca haga funcionar el producto a una alta
velocidad de transporte en superficies resbaladizas.
Mire hacia atrás y tenga cuidado cuando retroceda.
• Desconecte la alimentación de los barrenos para
transportar el producto o cuando no esté en uso.
• Utilice solamente los implementos y accesorios
homologados por el fabricante del producto, por
ejemplo, los pesos de las ruedas, contrapesos o
cabinas.
• Nunca haga funcionar el producto sin buena
visibilidad o luz. Preste atención mientras camina y
mantenga firmes las empuñaduras. Camine, nunca
corra.
• Nunca toque un motor o silenciador calientes.
S
• Inspeccione atentamente el área donde se va a
utilizar el equipo y retire todos los tapetes, trineos,
tablas, cables y otros objetos extraños.
• Desacople todos los embragues y ponga el cambio
en neutro antes de arrancar el motor.
• No maneje el producto sin usar la indumentaria de
invierno adecuada. Evite usar ropa floja que pueda
quedar atrapada en las piezas móviles. Utilice
calzado que mejore la postura en superficies
resbaladizas.
• Manipule el combustible con cuidado; es altamente
inflamable.
• Use un recipiente de combustible aprobado.
• Nunca agregue combustible a un motor en
marcha o caliente.
• Llene el depósito de combustible en el exterior,
con máximo cuidado. Nunca llene el depósito de
combustible en interiores
• Nunca llene los recipientes de combustible
dentro de un vehículo, en un camión o sobre la
plataforma de un remolque con revestimiento
plástico. Siempre coloque los recipientes en el
suelo, alejados del vehículo, antes de rellenar.
• Cuando sea posible, retire el equipo a gasolina
del camión o tráiler y reabastézcalo en el suelo.
Si no es posible, entonces reabastezca el equipo
en un tráiler con un recipiente portátil, en lugar
de hacerlo directamente con la boquilla del
dispensador de gasolina.
• Mantenga la boquilla en contacto con el borde
del depósito o recipiente de combustible
abriéndolo siempre hasta que el abastecimiento
de combustible esté completo. No use un
dispositivo que mantenga abierto el seguro de la
boquilla.
• Vuelva a colocar la tapa de la gasolina con
seguridad y limpie todo el combustible que se
haya derramado.
• Si el combustible se derrama sobre la ropa,
cámbiesela de inmediato.
• Utilice los cables de extensión y receptáculos
especificados por el fabricante para todas las
unidades con motores de transmisión eléctrica o de
arranque eléctrico.
• Ajuste la altura de la carcasa del barreno para
limpiar superficies rocosas o de grava.
• Nunca intente realizar ajustes con el motor en
marcha, excepto si el fabricante lo recomienda
específicamente.
• Siempre utilice gafas protectoras o protectores
oculares durante el funcionamiento o cuando realice
ajustes o reparaciones a fin de proteger los ojos de
objetos extraños que puedan ser eyectados de la
máquina.
Utilice siempre el equipo de protección personal
adecuado cuando use el producto. Esto incluye, como
mínimo, calzado resistente, protección ocular y
protectores auriculares. El equipo de protección
personal no elimina el riesgo de lesiones, pero puede
disminuir el grado de las lesiones en caso de accidente.
• Siempre use gafas de seguridad o protección ocular
cuando opere el producto o realice tareas de
mantenimiento o reparación.
• Utilice siempre indumentaria de invierno adecuada
cuando opere el producto.
• Utilice siempre botas antideslizantes de servicio
pesado con buen soporte de tobillo durante el
funcionamiento del producto.
• No utilice ropa floja que pueda quedar atrapada en
las piezas móviles.
• Utilice guantes protectores homologados, si es
necesario. Por ejemplo, al instalar, examinar o
limpiar la cuchilla.
• Use siempre protectores auriculares autorizados
cuando utilice el producto. Escuchar ruidos durante
un largo período puede provocar pérdida de
audición inducida por el ruido.
694 - 002 -

Problema Causa posible Solución
49
D
Dispositivos de seguridad en el producto
Silenciador
AVISO:
Seguridad de combustible
ADVERTENCIA:
Propuesta 65
32
• Asegúrese de realizar el mantenimiento del producto
frecuentemente.
• No use un producto con equipo de protección
El silenciador mantiene los niveles de ruido al mínimo y
envía los gases de escape lejos del operador.
No utilice el producto si el silenciador no está instalado
o está defectuoso. Un silenciador defectuoso aumenta
el nivel de ruido y el riesgo de incendio.
Examine el silenciador con regularidad para asegurarse
de que está instalado correctamente y que no esté
dañado.
• No arranque el producto si hay combustible o aceite
• Esto aumenta la vida útil del producto.
• Disminuye el riesgo de accidentes.
Permita que un concesionario autorizado o un centro
de servicio autorizado examinen frecuentemente el
producto para realizar ajustes o reparaciones.
dañado. Si el producto está dañado, comuníquese
con un centro de servicio autorizado.
El silenciador se calienta mucho
durante y después del uso y cuando el
motor funciona en régimen de ralentí. Tenga
cuidado cerca de materiales o vapores
inflamables para prevenir incendios.
instrucciones de advertencia siguientes
antes de usar el producto.
de motor en el producto. Quite el combustible o
aceite no deseado y deje secar el producto.
Lea atentamente las
• Si derrama combustible en su ropa, cámbiese la
ropa inmediatamente.
• No permita que le caiga combustible en el cuerpo,
ya que puede causar lesiones. Si le cae combustible
en el cuerpo, utilice jabón y agua para quitarlo.
• No arranque el producto si el motor tiene una fuga.
Examine frecuentemente el motor en busca de
fugas.
• Tenga cuidado con el combustible. El combustible
es inflamable y los gases son explosivos y pueden
causar lesiones graves o fatales.
• No respire los gases del combustible, ya que
pueden causar lesiones. Asegúrese de que haya
suficiente flujo de aire.
• No fume cerca del combustible o del motor.
• No coloque objetos calientes cerca del combustible
o del motor.
• No agregue combustible cuando el motor esté en
marcha.
• Asegúrese de que el motor se enfríe antes de llenar
el depósito de combustible.
• Antes de llenar el depósito de combustible, abra
lentamente la tapa del depósito de combustible y
libere la presión con cuidado.
• No agregue combustible al motor en un área interior.
Un flujo de aire insuficiente puede causar lesiones
graves o fatales por asfixia o debido al monóxido de
carbono.
• Apriete bien la tapa del depósito de combustible. Si
no aprieta la tapa del depósito de combustible, se
genera un riesgo de incendio.
• Mueva el producto a un mínimo de 3 m (10 pies) de
la posición en la que se llenó el depósito antes de
empezar a usarlo.
• No ponga demasiado combustible en el depósito de
combustible.
¡ADVERTENCIA!
694 - 002 -

I
Instrucciones de seguridad para el
mantenimiento
ADVERTENCIA:
Montaje
Para extraer el producto de la caja de
cartón
Piezas sueltas
33
• Los gases de escape del motor contienen monóxido
• Antes de realizar el mantenimiento del producto,
• Utilice guantes protectores cuando realice las tareas
instrucciones de advertencia siguientes
antes de usar el producto.
de carbono, un gas inodoro, tóxico y muy peligroso.
No arranque el motor en interiores o en espacios
cerrados.
detenga el motor y quite el cable de encendido de la
bujía.
de mantenimiento en las cuchillas. Las cuchillas son
muy afiladas y pueden producir cortes con facilidad.
Lea atentamente las
1. Retire las piezas sueltas que se incluyen con el
producto. Recorte las cuatro esquinas de la caja y
coloque los paneles del extremo en una superficie
plana.
2. Extraiga los dos tornillos que sujetan la carcasa del
barreno al palé. Extraiga los soportes de acero de
las planchas protectoras, si tienen.
3. Corte las bridas para cable que sujetan el producto
al palé y sáquelas.
4. Retire todos los materiales de embalaje.
5. Retire el producto de la caja y asegúrese de que no
queden piezas sueltas en la caja.
• Accesorios y modificaciones en el producto que no
estén aprobados por el fabricante pueden causar
lesiones graves o la muerte. No modifique el
producto. Siempre utilice accesorios aprobados por
el fabricante.
• Si el mantenimiento no se realiza de manera
correcta y regular, aumenta el riesgo de sufrir
lesiones y causar daños en el producto.
• Solo realice tareas de mantenimiento como se indica
en el presente manual del usuario. Todas las demás
tareas de mantenimiento se deben realizar en un
taller de servicio aprobado.
• Procure realizar las tareas de mantenimiento con
regularidad en un taller de servicio aprobado.
• Cambie las piezas dañadas, desgastadas o rotas.
Llave(s) de encendido/apagado (ON/OFF)
Tornillo de 5/16-18 x 2 ¼" (2)
Perillas de la empuñadura (2)
Contratuerca de 3/8 (1)
Perilla (3)
Llave multiuso (1)
Conducto de expulsión (1)
694 - 002 -
Guía del cable (1)
Pasadores fusibles de ¼-20 x 1-¾ (6)
Contratuercas de ¼-20 (6)

Para quitar las ruedas
Para limpiar el producto
47
Contratuerca de 5/16-18 (1)
Para instalar la empuñadura
34
Contratuerca de ¼-20 (1)
Arandela de nailon (1)
Tornillo de 5/16-18 x 5/8 (1)
Muelle (1)
Perno de tope de ¼-20 (1)
1. Levante la empuñadura superior hasta la posición
de funcionamiento.
2. Ajuste la posición de la empuñadura en uno de los
orificios de montaje (B) y apriete las perillas de la
empuñadura (C) con los tornillos (D).
B
D
C
694 - 002 -

3. Instale más tornillos (D) y perillas de la empuñadura
Para instalar el deflector del conducto y
el cabezal del rotador del conducto
Para instalar el control remoto del
deflector del conducto
35
(C) para fijar la empuñadura superior (A) a la
empuñadura inferior (E).
A
D
C
4. Fije una contratuerca (G) en el espárrago roscado y
apriétela.
A
FG
E
1. Coloque el montaje del deflector del conducto en la
parte superior de la base del conducto con la
apertura de descarga orientada hacia la parte
delantera del producto.
2. Coloque el cabezal del rotador del conducto (A) en
el soporte del conducto (B). Gire el montaje del
conducto para alinear los pasadores bajo el cabezal
del rotador del conducto con los orificios en el
soporte del conducto si es necesario.
3. Coloque el cabezal del rotador del conducto en el
pasador (C) y el espárrago roscado (D) en el soporte
de montaje (E).
B CDE
5. Coloque los cables a través de la guía del cable (F)
y del sujetador doble (I) para fijar el cable del rotador
(H) a la empuñadura inferior.
H
F
I
1. Fije el soporte del cable remoto (A) al conducto de
expulsión con un tornillo (B) y una contratuerca de
5/16-18 (D). Apriete el perno.
2. Instale el ojal del cable remoto (E) en el deflector del
conducto (F) con un perno de tope (G) y una
arandela de nailon (C), y apriete con una
contratuerca de ¼-20 (K). El ojal del cable se
aflojará en el perno de tope.
694 - 002 -

Para instalar la cubierta de la correa
Para quitar la correa del barreno
Para instalar la correa del barreno
AVISO:
45
3. Instale el muelle (L) entre la tuerca hexagonal (M) en
Funcionamiento
Antes de arrancar el producto
Para llenar el motor con aceite:
AVISO:
Para abastecer de combustible
AVISO:
Para ajustar el conducto de expulsión y
el deflector del conducto
36
el cabezal del rotador del conducto y el orificio en el
deflector del conducto.
G
F
4. Coloque las perillas de control de la palanca (N)
presionándolas contra las palancas de control (O).
N
C
E
L
M
B
K
D
A
• Mantenga a las personas y animales alejados de la
zona de trabajo.
• Realice un mantenimiento diario. Consulte
de mantenimientoen la página40
• Asegúrese de que el cable de encendido se ajuste
correctamente a la bujía.
• Agregue aceite o gasolina, si es necesario. Consulte
Datos técnicosen la página51
No gire la varilla de nivel cuando
1. Retire el tapón de aceite y limpie la varilla. Consulte
2. Llene con aceite hasta la marca superior de la varilla
3. Vuelva a colocar el tapón del aceite.
Si es posible, utilice gasolina de bajas emisiones/
alquilato. Si no dispone de gasolina de bajas emisiones/
alquilato, utilice gasolina con o sin plomo de buena
calidad. Utilice gasolina con un octanaje de 90 RON
fuera de EE. UU. (87 AKI en EE. UU.) o más, y con un
máximo de 10 % de etanol (E10).
revise el aceite. No llene por encima de la
marca.
Descripción general de la máquinaen la página27
para ver la ubicación de la varilla de nivel.
de nivel. Utilice la varilla de nivel para examinar el
nivel de aceite en intervalos regulares.
.
.
Programa
O
No utilice gasolina con un octanaje
inferior a 90 RON fuera de EE. UU. (87 AKI
en de EE. UU.). Esto puede provocar daños
al producto.
1. Abra lentamente la tapa del depósito de combustible
para liberar la presión.
2. Llene lentamente con un bidón de combustible. Si
derrama combustible, límpielo con un paño y deje
que se sequen los restos.
3. Limpie el área alrededor del tapón del depósito de
combustible.
4. Apriete bien la tapa del depósito de combustible. Si
no aprieta la tapa del depósito de combustible, se
genera un riesgo de incendio.
5. Mueva el producto a un mínimo de 3 m (10 pies) de
la posición en la que llenó el depósito antes de
ponerlo en marcha.
1. Para ajustar la posición del conducto de expulsión,
mueva la palanca de control del conducto de
expulsión (A) hacia atrás y hacia la izquierda o
derecha.
694 - 002 -

2. Para ajustar la distancia del quitanieves del deflector
Para arrancar el motor con arranque
manual
AVISO:
AVISO:
Tenga en cuenta:
Para arrancar el motor con arranque
eléctrico
ADVERTENCIA:
AVISO:
37
del conducto, mueva la palanca de control remoto
del deflector (B) hacia abajo para disminuir la
distancia y hacia arriba para aumentarla.
AB
1. Introduzca la llave de encendido/apagado (ON/OFF)
(A) en la ranura de encendido hasta que encaje. No
gire la llave.
D
B
E
A
C
F
G
2. Coloque el interruptor de encendido/apagado (ON/
OFF) de combustible en la posición ON (Encendido).
3. Mueva el acelerador (B) hasta la posición FAST
(Rápido).
4. Mueva el interruptor de encendido/apagado (ON/
OFF) (C) a la posición ON (Encendido).
a) Si el motor está frío, gire el estrangulador (D)
hasta la posición FULL (Máximo) y presione el
cebador (E) tres veces.
No cebe en exceso el motor.
Esto puede impedir que el motor
arranque. Si el motor se ceba en
exceso, espere unos minutos antes
de intentar arrancarlo y no presione
el cebador.
5. Tire la empuñadura del cordón de arranque (G).
No suelte el agarre con rapidez.
Vuelva a colocarla en la posición de
arranque lentamente.
congeló, tire lentamente hacia afuera la mayor
cantidad de cordón posible y suelte la empuñadura
del cordón de arranque. Si el motor no arranca,
repita el procedimiento o utilice el arranque eléctrico.
6. Si se usó el estrangulador para arrancar el motor,
mueva lentamente el estrangulador (D) a la posición
OFF (Apagado).
7. Haga funcionar el motor entre 2 y 3 minutos en
ralentí antes de comenzar a quitar la nieve.
8. Si el motor no funciona como debería, apáguelo.
1. Introduzca la llave de encendido/apagado (ON/OFF)
(A) en la ranura de encendido hasta que encaje. No
gire la llave.
2. Coloque el interruptor de encendido/apagado (ON/
OFF) de combustible en la posición ON (Encendido).
3. Mueva el acelerador (B) hasta la posición FAST
(Rápido).
4. Mueva el interruptor de encendido/apagado (ON/
OFF) (C) a la posición ON (Encendido).
a) Si el motor está frío, gire el estrangulador (D)
hasta la posición FULL (Máximo).
5. Presione el cebador (E) tres veces.
Si el arranque de cordón se
arranque eléctrico de 120 V CA. No utilice el
arranque eléctrico si su hogar no cuenta con
un sistema a tierra trifilar de 120 V CA.
Pueden producirse daños personales
graves o daños al producto. El arranque
eléctrico consta de un enchufe trifilar y está
diseñado para usarse con corriente de uso
doméstico de 120 V CA. Asegúrese de que
su hogar cuente con un sistema a tierra
trifilar de 120 V CA. Si tiene dudas, consulte
a un electricista autorizado.
Esto puede impedir que el motor
arranque. Si el motor se ceba en
exceso, espere unos minutos antes de
intentar arrancarlo y no presione el
cebador.
El producto tiene un
No cebe en exceso el motor.
694 - 002 -

AVISO:
Para examinar los neumáticos
Para eliminar obstrucciones del
deflector del conducto:
ADVERTENCIA:
Para reemplazar la espada del
raspador
Correas de transmisión
ADVERTENCIA:
ADVERTENCIA:
Tenga en cuenta:
43
6. Conecte el cable de extensión al conector del motor
AVISO:
Para hacer funcionar el producto
AVISO:
AVISO:
Tenga en cuenta:
Tenga en cuenta:
38
(G).
7. Conecte el otro extremo del cable de extensión en
un receptáculo de 120 V CA con conexión a tierra de
tres clavijas.
8. Presione el botón de arranque eléctrico (H) hasta
que el motor arranque.
9. Si se usó el estrangulador para arrancar el motor,
suelte el botón de arranque eléctrico y mueva
lentamente el estrangulador (D) a la posición OFF
(Apagado).
A
No haga girar el motor más de
cinco segundos seguidos entre cada
intento de arranque. Espere de 5 a
10 segundos entre cada intento.
D
B
H
acoplamiento de la transmisión como el del barreno, el
acoplamiento de la transmisión bloqueará el
acoplamiento del barreno en su posición. Utilice la mano
derecha para manipular el conducto de expulsión de
nieve.
barrenos estén acoplados. Esto puede dañar la
transmisión.
1. Para acoplar las hojas del barreno, presione el
acoplamiento del barreno (A) contra la empuñadura
para conectar el barreno y quitar nieve.
Cuando se conectan tanto el
No cambie la velocidad cuando los
A
E
A
C
F
10. Desconecte el cable de extensión primero del
receptáculo y, después, del motor.
11. Haga funcionar el motor entre 2 y 3 minutos en
ralentí antes de comenzar a quitar la nieve.
No haga funcionar el equipo sin
nieve o agua para lubricar las hojas del
barreno. El uso incorrecto puede provocar
altas temperaturas en las hojas del barreno,
especialmente si el producto es nuevo. Esto
puede causar daños en las hojas del
barreno y la espada del raspador.
No acople parcialmente la palanca
de la transmisión o del barreno durante un
período prolongado, ya que esto puede
provocar un desgaste prematuro de las
correas o que estas se quemen.
G
2. Levante la palanca de control de velocidad de la
transmisión (B) desde la posición central para mover
el producto hacia delante cuando esté conectado el
acoplamiento de la transmisión (C). No cambie la
velocidad cuando los barrenos estén acoplados.
Esto puede dañar la transmisión.
3. Baje la palanca de control de velocidad de la
transmisión desde la posición central para mover el
producto hacia atrás cuando esté conectado el
acoplamiento de la transmisión.
C B
4. Para que el producto se mueva en la dirección
seleccionada, sostenga el acoplamiento de la
transmisión contra la empuñadura.
694 - 002 -

5. Si el producto cuenta con dirección asistida,
Para detener la máquina
Para utilizar el control del acelerador
Para utilizar el interruptor de
combustible
Para utilizar el estrangulador
Para ajustar las planchas protectoras:
39
sostenga el gatillo de dirección izquierdo (D) para
girar hacia la izquierda. Sujete el gatillo de dirección
derecho para girar hacia la derecha.
• Gire el interruptor de combustible para abrir o cerrar
el paso de combustible. Haga funcionar el producto
con el interruptor de combustible en la posición
OPEN (Abierto).
D
1. Mueva el interruptor de encendido/apagado (ON/
OFF) a la posición de apagado (OFF).
2. Retire la llave de encendido/apagado (ON/OFF).
• Gire el acelerador (A) para cambiar la cantidad de
combustible utilizado. Siempre haga funcionar el
motor en aceleración máxima.
CONTROL
CHOKE
A
TRUCTIONS
OFF
FUELCONTROL
INSTRUCTIONS
ON
• Gire el estrangulador (A) para abrir o cerrar la
válvula estranguladora. Use el estrangulador para
arrancar el motor en frío.
A
No es necesario realizar ajustes en el caso de una
instalación normal.
1. Si la contratuerca (B) está suelta o la plancha
protectora (A) no está lo suficientemente alta desde
el suelo, destrabe la contratuerca (B) con una llave
abierta de 13 mm (0,51"), para mover la plancha
protectora hacia arriba o hacia abajo.
2. En superficies planas, como caminos asfaltados,
levante las planchas protectoras (A) entre 5 y 6 mm
(0,2 y 0,25") desde el suelo. En superficies
irregulares, como caminos de grava, aumente la
separación entre el suelo y el producto con las
planchas protectoras para subir la espada del
raspador por encima de la superficie de la grava.
Asegúrese de que no entren piedras o grava al
producto. Se pueden producir daños personales si
estos objetos salen eyectados a gran velocidad.
CHOKE
TRUCTIONS
CONTROL
694 - 002 -

Mantenimiento Diario 20 horas 50 horas 100 horas
Tenga en cuenta:
Para hacer una inspección general
Para comprobar el nivel de aceite
AVISO:
Para cambiar el aceite del motor:
ADVERTENCIA:
Para lubricar el producto
41
3. Apriete la contratuerca (B).
Para evitar el congelamiento después
de su uso
Tenga en cuenta:
Para conseguir un buen resultado
Mantenimiento
Introducción
Programa de mantenimiento
Mantenimiento Diario 20 horas 50 horas 100 horas
40
A
6. Si el producto no tiene arranque eléctrico, tire la
empuñadura del cordón de arranque varias veces
para quitar el hielo y el agua.
7. Si el producto tiene arranque eléctrico, conecte el
producto a la alimentación eléctrica y presione el
botón de arranque una vez para quitar el hielo y el
agua.
B
• Siempre haga funcionar el motor en aceleración
máxima o cerca de la aceleración máxima.
• Adapte siempre la velocidad del producto a la
situación de la nieve. Ajuste la velocidad con la
palanca de ajuste del régimen de velocidad.
P
pueden obstruir con el hielo. No aplique demasiada
fuerza a los controles. Si no puede manipular un control
o una pieza, arranque el motor y déjelo funcionar
durante unos minutos.
1. Arranque el motor y déjelo funcionar durante unos
minutos. Detenga el motor y espere a que se
detengan todas las piezas móviles.
2. Retire la nieve y el hielo suelto del producto.
3. Retire la nieve y el hielo suelto de la base del
conducto.
4. Gire el deflector del conducto hacia la izquierda y
hacia la derecha para quitar el hielo y el agua.
5. Coloque la llave en la posición de apagado (OFF).
Los controles y las piezas móviles se
Asegúrese de que el producto lance la nieve de
manera uniforme.
• Es más fácil y eficiente retirar la nieve
inmediatamente después de que cae.
• Siempre que sea posible, arroje la nieve en la
dirección del viento.
• En superficies planas, como caminos asfaltados,
levante las planchas protectoras entre 5 y 6 mm (0,2
y 0,25") desde el suelo.
• La espada del raspador es reversible. Cuando se
desgasta casi hasta el borde de la carcasa, úsela
por el otro lado. Reemplace la espada del raspador
si está dañada o si ambos lados están desgastados.
• No despache el deflector del conducto si está
obstruido.
• Si el producto no se mueve hacia delante debido a
circunstancias imprevistas, suelte el acoplamiento
de la transmisión inmediatamente o mueva la llave
de encendido/apagado (ON/OFF) a la posición OFF
(Apagado).
tolerancia incorrecta, mayor consumo de aceite o la
Cuando el producto esté en uso, los pernos se pueden
aflojar y los componentes se pueden desgastar. Esto
puede causar alteraciones, como una holgura de
Asegúrese de que
las tuercas y los tornillos estén apretados
Compruebe el nivel
de aceite del motor
Cambio del aceite
4
Cambie el aceite después de las primeras 20 h, 50 h y 100 h, y luego cada 100 h.
4
X
X
alineación incorrecta de los diversos componentes.
Realice un mantenimiento periódico al producto para
evitar que funcione de manera incorrecta.
XXX
694 - 002 -

M
Mantenimiento Diario 20 horas 50 horas 100 horas
Tenga en cuenta:
Para hacer una inspección general
Para comprobar el nivel de aceite
AVISO:
Para cambiar el aceite del motor:
ADVERTENCIA:
Para lubricar el producto
41
Asegúrese de que no
haya fugas de combustible o aceite
Retire la suciedad u
otros objetos extraños del barreno
Revise la presión de
los neumáticos
Inspeccione y cambie
la bujía
5
6
X
X
X
X
realizar otras tareas de mantenimiento en caja de
cambios.
• Asegúrese de que las tuercas y los tornillos en el
producto estén apretados.
1. Coloque el producto en un terreno plano.
2. Retire el tapón del depósito de aceite junto con la
varilla de nivel incluida.
3. Limpie el aceite de la varilla de nivel.
4. Vuelva a colocar la varilla de nivel completa en el
depósito de aceite para tener una idea correcta del
nivel de aceite.
5. Quité la varilla de nivel.
6. Examine el nivel de aceite con la varilla de nivel.
7. Si el nivel de aceite es bajo, llene con aceite de
motor y revise nuevamente.
1. Haga funcionar el motor durante unos minutos para
entibiar el aceite. El aceite tibio fluye mejor y
transporta menos contaminantes.
2. Coloque el producto en un terreno plano.
3. Retire la llave de encendido/apagado (ON/OFF).
No es necesario agregar grasa o
Un nivel de aceite demasiado bajo
puede dañar el motor. Revise el nivel de
aceite antes de utilizar el producto.
caliente. Evite que el aceite de motor
usado entre en contacto con la piel.
El aceite del motor está
4. Coloque un recipiente debajo del tapón de vaciado
de aceite.
5. Quite el tapón de vaciado de aceite, incline el
producto y drene el aceite utilizado en el recipiente.
6. Vuelva a poner el producto en la posición de
funcionamiento.
7. Coloque el tapón de vaciado de aceite y apriételo
con la mano.
8. Llene el motor con aceite; consulte
motor con aceite:en la página36
información.
• Lubrique los puntos de pivote (A) con aceite.
• Lubrique el motor (B) con aceite.
• Aplique una pequeña cantidad de grasa de litio a los
cubos de interbloqueo (C) en el inicio de cada
temporada o cada 25 horas de uso.
Para llenar el
para obtener más
C
B
A
5
Consulte Datos técnicos para conocer la presión correcta de los neumáticos.
6
Revise y limpie la bujía antes de utilizarla cada año.
694 - 002 -

Para detener la máquina
Para utilizar el control del acelerador
Para utilizar el interruptor de
combustible
Para utilizar el estrangulador
Para ajustar las planchas protectoras:
39
S
Silenciador
AVISO:
Para examinar la bujía
AVISO:
Para inspeccionar los barrenos y la
espada del raspador:
Para reemplazar los pasadores fusibles
del barreno
AVISO:
Para reemplazar los pasadores fusibles
del propulsor
42
El silenciador mantiene los niveles de ruido al mínimo y
envía los gases de escape lejos del operador.
No utilice el producto si el silenciador no está instalado
o está defectuoso. Un silenciador defectuoso aumenta
el nivel de ruido y el riesgo de incendio.
Examine el silenciador con regularidad para asegurarse
de que está instalado correctamente y que no esté
dañado.
El silenciador se calienta mucho
durante y después del uso y cuando el
motor funciona en régimen de ralentí. Tenga
cuidado cerca de materiales o vapores
inflamables para prevenir incendios.
Utilice siempre el tipo de bujía
• Examine la bujía si el motor tiene una potencia
• Para disminuir el riesgo de material no deseado en
• Si la bujía está sucia, límpiela y asegúrese de que la
recomendada. El tipo de bujía incorrecto
puede causar daños en el producto.
demasiado baja, no arranca fácilmente o no
funciona correctamente al régimen de ralentí.
los electrodos de la bujía, siga estas instrucciones:
a) Asegúrese de que el régimen de ralentí esté
ajustado correctamente.
b) Asegúrese de que la mezcla de combustible es
la correcta.
c) Asegúrese de que el filtro de aire esté limpio.
distancia entre los electrodos es correcto, consulte
Datos técnicosen la página51
.
3. Si los bordes de los barrenos están desgastados,
comuníquese con un centro de servicio autorizado
para reemplazarlos.
Los pasadores fusibles protegen el producto de daños.
Los pasadores fusibles del barreno se rompen si un
objeto entra en contacto con las piezas móviles.
Utilice únicamente los pasadores
fusibles originales que se suministran con el
producto.
1. Si un pasador fusible del barreno se rompe, detenga
2. Retire la llave de encendido/apagado (ON/OFF) y
3. Alinee el orificio del cubo del barreno (B) con el
4. Instale una contratuerca de ¼-20 (D) y apriétela.
el motor y espere a que las piezas móviles se
detengan.
desconecte el cable de la bujía.
orificio del eje del barreno (C) e instale un nuevo
pasador fusible de ¼-20 x 2 (A).
A B
• Reemplace la bujía si es necesario.
1. Antes de cada uso, inspeccione los barrenos y la
espada del raspador para ver si muestras signos de
desgaste.
2. Si el borde de la espada del raspador está
desgastado, úsela por el otro lado. Si la espada del
raspador tiene daños o desgaste en ambos bordes,
reemplácela.
C
DB
5. Coloque la llave de encendido/apagado (ON/OFF)
en el encendido y conecte el cable de la bujía a la
bujía.
Los pasadores fusibles del propulsor protegen el
producto de daños. Los pasadores fusibles del
propulsor se rompen si un objeto entra en contacto con
las piezas móviles.
694 - 002 -

A
AVISO:
Para examinar los neumáticos
Para eliminar obstrucciones del
deflector del conducto:
ADVERTENCIA:
Para reemplazar la espada del
raspador
Correas de transmisión
ADVERTENCIA:
ADVERTENCIA:
Tenga en cuenta:
43
Utilice únicamente los pasadores
fusibles originales que se suministran con el
producto.
1. Si un pasador fusible del propulsor se rompe,
2. Retire la llave de encendido/apagado (ON/OFF) y
3. Alinee el orificio del cubo del propulsor (A) con los
4. Instale una contratuerca de ¼-20 (D) en el pasador
detenga el motor y espere a que las piezas móviles
se detengan.
desconecte el cable de la bujía.
orificios del eje del barreno (B) e instale un nuevo
pasador fusible de ¼-20 (C).
fusible y apriétela.
A C B
1. Libere el acoplamiento del barreno y de la
transmisión al mismo tiempo.
2. Espere 10 segundos para asegurarse de que los
barrenos se detuvieron.
3. Detenga la máquina.
4. Utilice la herramienta de limpieza (de al menos
381 mm [15"] de longitud, que se incluye en algunos
modelos) para eliminar la obstrucción.
en el deflector del conducto o en el
interior de la carcasa del barreno.
1. Coloque la espada del raspador (A) invertida cuando
se haya desgastado hasta el borde de la carcasa.
No ponga las manos
A
2. Reemplace la espada del raspador si está
desgastada en ambos lados o si está dañada.
D
5. Coloque la llave de encendido/apagado (ON/OFF)
en el encendido y conecte el cable de la bujía a la
bujía.
• Mantenga los neumáticos libres de combustible,
aceite y productos químicos para evitar dañar el
caucho.
• Mantenga los neumáticos alejados de tocones,
piedras, baches, objetos filosos y otros objetos que
puedan dañarlos.
• Mantenga la presión de los neumáticos correcta;
consulte
Datos técnicosen la página51
más información.
No elimine la obstrucción del deflector del conducto sin
haber realizado las siguientes operaciones:
694 - 002 -
para obtener
tracción y del barreno no son ajustables. Reemplace las
correas si están dañadas o si empiezan a deslizarse
debido al desgaste. Se recomienda reemplazar las
correas en un centro de servicio calificado.
del producto son de fabricación especial y
deben cambiarse por correas del fabricante
del equipo original (OEM, por su sigla en
inglés) disponibles en su centro de servicio
más cercano. Usar correas no fabricadas
por el OEM puede conllevar a daños
personales o daños al producto.
correas, es necesario desmontar el
producto. Al desmontar la carcasa del
barreno del bastidor, es importante que un
ayudante se ubique en la posición de
manipulación del producto y sostenga las
empuñaduras. Pueden producirse daños
personales graves o daños al producto si
este se cae durante el reemplazo de las
correas.
Las correas de transmisión de la
Las correas trapezoidales
Para reemplazar las

Para arrancar el motor con arranque
manual
AVISO:
AVISO:
Tenga en cuenta:
Para arrancar el motor con arranque
eléctrico
ADVERTENCIA:
AVISO:
37
T
Tenga en cuenta:
Para preparar el reemplazo de las correas
Para retirar la correa de transmisión
Para instalar la correa de transmisión
Tenga en cuenta:
44
de transmisión y la correa del barreno a la vez.
1. Vacíe el combustible del depósito de combustible.
2. Afloje la contratuerca (A) que fija el cabezal del
rotador del conducto (B) al soporte de montaje (C)
para retirar el conducto de expulsión.
Se recomienda reemplazar la correa
B
2. Retire el muelle tensor (A) fijado al brazo del tensor
de la correa de transmisión (B).
E
B
A
FG
H
I
C
J
D
A
C
3. Afloje los dos tornillos (A) que fijan la cubierta de la
correa (B) al bastidor (C) y retire la cubierta de la
correa.
C A
B
1. Retire la correa del barreno. Consulte
correa del barrenoen la página45
Para quitar la
.
3. Retire el muelle de retorno (C) que sujeta la placa
oscilante (D) en su sitio.
4. Retire el perno del brazo (E) y el brazo del tensor de
la correa de transmisión.
5. Retire el perno de la polea (F), la polea del motor
(G) y la correa de transmisión (H) del motor.
6. Retire el perno superior (I) que sujeta la placa
oscilante al bastidor
7. Gire y mantenga la placa oscilante alejada del
producto y retire la correa de transmisión de la polea
de transmisión (J).
1. Gire y mantenga la placa oscilante (D) alejada del
producto.
E
B
A
FG
H
I
C
J
D
2. Coloque la correa de transmisión (H) en la polea de
transmisión (J).
transmisión se coloque correctamente en la ranura
Asegúrese de que la correa de
694 - 002 -

de la polea de transmisión antes de bajar la placa
Para instalar la cubierta de la correa
Para quitar la correa del barreno
Para instalar la correa del barreno
AVISO:
45
oscilante.
3. Instale y apriete el perno superior (I).
4. Coloque la correa de transmisión en la ranura de la
polea del motor (G) antes de instalarla en el eje del
motor.
5. Instale el perno de la polea (F) y fije la polea del
motor en el motor. Apriete el perno de la polea
(30-35 pies libras / 41-47 Nm).
6. Instale el brazo del tensor de la correa de
transmisión (B) y apriete el perno del brazo (E) en el
motor.
7. Instale el muelle de retorno (C) en la placa oscilante.
8. Instale el muelle tensor (A) en el brazo del tensor.
9. Haga funcionar todos los controles para asegurarse
de que la correa de transmisión esté correctamente
instalada y de que todos los componentes se
muevan correctamente.
P
1. Instale la cubierta de la correa (B) en el bastidor (C)
y apriete los dos tornillos (A).
C A
B
1. Retire los pernos de 5/16'' (A) y los pernos inferiores
de ¼" (B) de los dos lados del conjunto del bastidor.
No bote los pernos.
A
C
B
2. Afloje, sin retirar, los pernos inferiores de 5/16" (C)
de los dos lados del conjunto del bastidor.
3. Retire la correa del barreno de la polea del motor.
4. Incline la sección trasera hacia abajo. La sección
delantera se inclinará hacia delante al mismo
tiempo. El perno inferior (C) es una bisagra entre las
secciones delantera y trasera.
5. Coloque un bloque de madera debajo del punto de
bisagra para mantener el producto inclinado.
6. Mueva el brazo del freno del barreno y retire la
correa del barreno de alrededor del brazo.
2. Instale el conducto de expulsión.
694 - 002 -
1. Mueva el brazo del tensor de correa y coloque la
correa del barreno alrededor del brazo y en la ranura
de la polea del barreno.
Asegúrese de que la correa no
quede atrapada entre el bastidor y la
carcasa del barreno cuando junte la
unidad.
2. Retire el bloque de madera de abajo del producto.
3. Levante la empuñadura para inclinar la sección
trasera hacia arriba. La sección delantera se
inclinará hacia atrás y girará para unirse a la sección
trasera.
4. Asegúrese de colocar correctamente la correa en la
ranura de la polea del barreno.

Para instalar el deflector del conducto y
el cabezal del rotador del conducto
Para instalar el control remoto del
deflector del conducto
35
5. Instale los pernos de 5/16'' (A), (C) y apriételos (8 a
Para ajustar la tensión del cable del
deflector del conducto de expulsión
Para ajustar el cable de control del
barreno
Tenga en cuenta:
Tenga en cuenta:
46
12 pies-libras/11 a 16 Nm).
A
3. Ajuste hasta que el cable del deflector del conducto
de expulsión (C) quede bien apretado. Apriete las
tuercas de inmovilización.
C
B
6. Instale los pernos de ¼'' (B) y apriételos (4 a 6 pieslibras/5 a 8 Nm).
7. Instale la correa del barreno en la polea del motor.
Asegúrese de que la correa se coloque
correctamente alrededor de la polea tensora e
instale adecuadamente en la ranura de la polea del
motor.
8. Haga funcionar todos los controles para asegurarse
de que la correa del barreno esté correctamente
instalada y de que todos los componentes se
muevan correctamente.
1. Afloje las tuercas de inmovilización (B) para ajustar
la tensión del cable del conducto de expulsión
adyacente al torniquete del ajustador (A).
A B
2. Sostenga la parte corta y gire la parte larga para
aumentar el ajustador.
C
ajuste, póngase en contacto con un centro de servicio
autorizado. Es posible que se requieran ajustes si la
rotación del propulsor y del barreno es lenta cuando se
conecta la palanca de control del barreno o si la correa
del barreno se ha reemplazado.
1. Suelte las tuercas de inmovilización (B) junto al
tensor (A) para ajustar la tensión del cable en el
cable de control del barreno (D).
Si no se siente cómodo haciendo este
A B
D
2. Sostenga la sección corta y gire la sección larga.
Gírela en 360 grados.
3. Pruebe el acoplamiento del barreno. Repita el ajuste
hasta que la holgura del cable sea poca cuando la
palanca esté desacoplada.
4. Apriete la tuerca de inmovilización inferior para
bloquear la tensión.
5. Solicítele a una persona que se pare 10 pies/
3 metros en frente del producto en el lado opuesto
del conducto. La persona debe observar la rotación
del barreno y medir el tiempo que tarda en dejar de
girar después de que se suelta la palanca. Si el
barreno deja de girar después de 5 segundos, ajuste
el cable girando el cañón central en 360 grados para
contraer el ajustador. Pruebe la conexión del
barreno y mida el tiempo de detención nuevamente.
Si el barreno deja de girar en menos de 5 segundos,
continúe con el siguiente paso.
6. Apriete la tuerca de inmovilización en el cable del
barreno.
problema, cambie la correa del barreno. Consulte
Para quitar la correa del barrenoen la página45
Si el ajuste no resuelve el
.
694 - 002 -

P
Para quitar las ruedas
Para limpiar el producto
47
1. Extraiga el pasador de la rueda (A) y el pasador de
retención (B).
2. Quite la rueda del eje (C).
A
C
B
• Limpie las piezas de plástico con un paño limpio y
seco.
• No use limpiadores de alta presión para limpiar el
producto.
• No arroje agua directamente sobre el motor.
• Utilice un cepillo para retirar las hojas, el césped y la
suciedad.
694 - 002 -

Instrucciones de seguridad para el
mantenimiento
ADVERTENCIA:
Montaje
Para extraer el producto de la caja de
cartón
Piezas sueltas
33
S
Solución de problemas
Solución de problemas
Problema Causa posible Solución
48
El producto no arranca La llave de encendido de seguridad no se en-
cuentra inserta.
El producto no tiene combustible. Llene el depósito de combustible con
La llave de encendido/apagado (ON/OFF) está
en la posición OFF (Apagado).
El estrangulador se encuentra en la posición
OFF (CLOSE) (Apagado [Cerrado]).
El cebador no se encuentra presionado. Presione el cebador.
El motor está inundado. Espere unos minutos antes de volver
El cable de la bujía no está conectado. Conecte el cable a la bujía.
La bujía está defectuosa. Reemplace la bujía.
Hay agua en el combustible o el combustible es
demasiado antiguo.
Hay vapor en la tubería de combustible. Asegúrese de que toda la tubería de
Otras causas. Inspeccione con cuidado los procedi-
El interruptor de combustible (si está equipado)
está en la posición CLOSE (Cerrado) (OFF
[Apagado]).
El acelerador está en la posición STOP (Detención).
Inserte la llave de encendido de seguridad.
gasolina nueva y limpia.
Mueva la llave de encendido/apagado (ON/OFF) a la posición ON (Encendido).
Mueva el estrangulador a la posición
ON (FULL, OPEN) (Encendido [Máximo, Abierto]).
a arrancar, NO presione el cebador.
Vuelva a arrancar el motor con la
aceleración máxima y el estrangulador en la posición OFF (CLOSE)
(Apagado [Cerrado]).
Vacíe el depósito de combustible y el
carburador. Llene el depósito de
combustible con gasolina nueva y
limpia.
combustible esté por debajo de la
salida del depósito de combustible.
La tubería de combustible debe fluir
de forma continua hacia abajo desde
el depósito de combustible hasta el
carburador.
mientos de arranque de este manual.
Coloque el interruptor de combustible
en la posición OPEN (ON) (Abierto
[Encendido]).
Mueva el acelerador hasta la posición FAST (Rápido).
694 - 002 -

P
Problema Causa posible Solución
49
Potencia reducida El cable de la bujía no está conectado. Conecte el cable a la bujía.
El motor funciona en ralentí o de forma irregular
Movimiento del manillar o
vibración excesiva
Cuesta extraer la empuñadura del cordón de arranque
El producto lanza demasiada nieve. Disminuya la velocidad y el ancho de
La tapa del depósito de combustible está cubierta de hielo o nieve.
El silenciador está sucio u obstruido. Limpie o reemplace el silenciador.
Longitud incorrecta del cable. Ajuste el cable.
El silenciador está obstruido. Asegúrese de que el motor esté frío.
La toma de aire del carburador está obstruida. Asegúrese de que el motor esté frío.
El estrangulador está en la posición ON (FULL,
OPEN) (Encendido [Máximo, Abierto]).
La tubería de combustible está obstruida. Limpie la tubería de combustible.
Hay agua en el combustible o el combustible es
demasiado antiguo.
Se debe reemplazar el carburador. Comuníquese con un centro de ser-
La correa se encuentra estirada. Reemplace la correa en V del bar-
Algunas piezas están sueltas. Los barrenos están dañados.
Los manillares no están colocados de manera
correcta.
Las tuercas de la palanca de ajuste están sueltas.
La empuñadura del cordón de arranque está
congelada.
El cordón de arranque interfiere en los componentes.
la hilera.
Retire el hielo y la nieve del tapón del
depósito de combustible y alrededor
de él.
Limpie la obstrucción.
Limpie la obstrucción.
Ponga el estrangulador en la posición de OFF (CLOSE) (Apagado
[Cerrado]).
Vacíe el depósito de combustible y el
carburador. Llene el depósito de
combustible con gasolina nueva y
limpia.
vicio autorizado.
reno.
Apriete todas las sujeciones. Reemplace todas las piezas dañadas. Si la
vibración persiste, comuníquese con
un centro de servicio autorizado.
Asegúrese de que los manillares estén trabados en su posición.
Apriete las tuercas hasta que el manillar se sienta firme.
Tire lentamente hacia afuera la mayor cantidad de cordón posible del
mecanismo de arranque y suelte la
empuñadura del cordón de arranque.
Si el motor no arranca, repita el procedimiento o utilice el mecanismo de
arranque eléctrico.
El cordón de arranque no debe tocar
cables ni mangueras.
694 - 002 -

Seguridad en el área de trabajo
Equipo de protección personal
31
P
Problema Causa posible Solución
Transporte, almacenamiento y eliminación de residuos
Transporte y almacenamiento
50
Pérdida de tracción o ralentización de la velocidad
de transmisión.
Pérdida o ralentización de
la descarga de nieve.
Falla en la rotación del
barreno después de soltar
la empuñadura.
Las luces no están encendidas (si están equipadas)
Es difícil mover el rotador
del conducto
El producto se gira hacia
un lado.
La correa patina. Ajuste el cable. Ajuste la correa.
La correa está desgastada. Revise o reemplace la correa. Ajuste
La correa se salió de la polea. Revise o vuelva a instalar la correa.
El deflector del conducto está obstruido. Limpie el deflector del conducto.
Objetos extraños obstruyen los barrenos. Retire la suciedad o los objetos ex-
El pasador fusible está roto. Reemplace el pasador fusible roto.
Exceso de hielo y nieve acumulados entre los
componentes de la vía.
La rueda motriz de fricción está desgastada. Comuníquese con un centro de ser-
El disco de fricción está mojado Deje secar el disco de fricción
La correa de transmisión no está alineada. Ajuste la correa de transmisión.
El deflector de descarga no está alineado. Ajuste el deflector de descarga.
El motor no está en marcha. Arranque el motor.
La conexión de los cables está suelta. Compruebe las conexiones de los
El LED está quemado. Reemplace el módulo de luz LED.
Hay suciedad en el mecanismo del rotador del
conducto.
Los cables están torcidos o dañados. Asegúrese de que los cables no es-
La presión de los neumáticos no es igual. Ajuste la presión de los neumáticos y
El producto se mueve con una sola rueda. Inspeccione el pasador de bloqueo
Ajuste del trineo irregular. Ajuste las planchas protectoras y el
Planchas protectoras con ajuste no uniforme. Ajuste las planchas protectoras y el
la polea.
Ajuste la polea.
traños de los barrenos.
Retire el hielo y nieve acumulados
entre los componentes de la vía.
vicio autorizado.
cables del motor y las luces.
Los LED individuales no se pueden
reemplazar.
Limpie las piezas internas del mecanismo del rotador del conducto.
tén torcidos. Reemplace los cables
dañados.
llene los neumáticos.
de los neumáticos.
trineo.
trineo.
• Para el almacenamiento y el transporte del producto
y del combustible, asegúrese de que no haya fugas
o vapores. Las chispas o llamas, por ejemplo, de
dispositivos eléctricos o calderas, pueden iniciar un
incendio.
694 - 002 -

• Siempre use contenedores aprobados para el
Eliminación
Datos técnicos
Datos técnicos
Tenga en cuenta:
ST 224 ST 227P ST 230P ST 224P
Dimensiones
Motor
Sistema eléctrico
51
almacenamiento y el transporte del combustible.
• Vacíe el depósito de combustible antes de
almacenar el producto durante un largo tiempo.
Deseche el combustible en un sitio adecuado para
tal propósito.
• Asegure bien el producto durante el transporte para
evitar daños y accidentes.
• Mantenga el producto en un área cerrada para evitar
que los niños u otras personas sin autorización
puedan acceder a él.
• Mantenga el producto en un lugar seco y sin
escarcha.
especificaciones son comunes y solo se usan con fines
Todos los datos, las imágenes y las
E
• Obedezca las regulaciones vigentes y requisitos de
reciclaje locales.
• Deseche todos los productos químicos, como el
combustible o el aceite del motor, en un centro de
servicio o en un sitio adecuado para tal propósito.
• Cuando el producto se deja de utilizar, envíelo a un
distribuidor de Husqvarna o deséchelo en un sitio de
reciclaje.
de referencia. Además, se podrían cambiar debido a las
actualizaciones del producto sin previo aviso.
Peso, lb/kg 198,6/90 212/96 237,8/108 198,6/90
Presión de funcionamiento máxima de los
neumáticos, PSI
Marca/modelo
Cilindrada, cc 208 254 291 208
Tipo de combustible Regular sin plomo (con un máximo de un 10 % de etanol)
Capacidad de combustible, galones/litros 0,31/1,17 0,35/1,33 0,62/2,35 0,31/1,17
Aceite SAE 5W30 (inferior a 0 °C [32 °F])
Capacidad de aceite, onzas/litros 16/0,47 20/0,59 32/0,95 16/0,47
Bujía F6RTC
Distancia de la bujía (pulg/mm) 0,030/0,762 mm
18 18 20 18
Husqvarna Husqvarna Husqvarna Husqvarna
694 - 002 -

www.husqvarna.com
Original instructions
Instrucciones originales
Instructions d’origine
1159957-49
2018-06-29
 Loading...