


EN Operator's manual 2-25
ES-MX Manual del usuario 26-50
FR-CA Manuel d’utilisation 51-75
128LX
LT28CSHV

Contents
Introduction..................................................................... 2
Safety..............................................................................5
Assembly...................................................................... 11
Operation...................................................................... 14
Maintenance................................................................. 20
Introduction
Troubleshooting............................................................ 23
Transportation and storage...........................................24
Technical data.............................................................. 24
Accessories.................................................................. 24
Product description
The product is a grass trimmer with a combustion
engine.
Work is constantly in progress to increase your safety
and efficiency during operation. Speak to your servicing
dealer for more information.
Intended use
Use the product with a grass blade or a trimmer head to
cut grass. Do not use the product for other tasks than
grass trimming and grass clearing.
Note: National or local regulations can set limit to the
operation of the product.
Only use the product with accessories that are approved
by the manufacturer. Refer to
Accessories on page 24
.
2 1570 - 001 - 14.10.2020
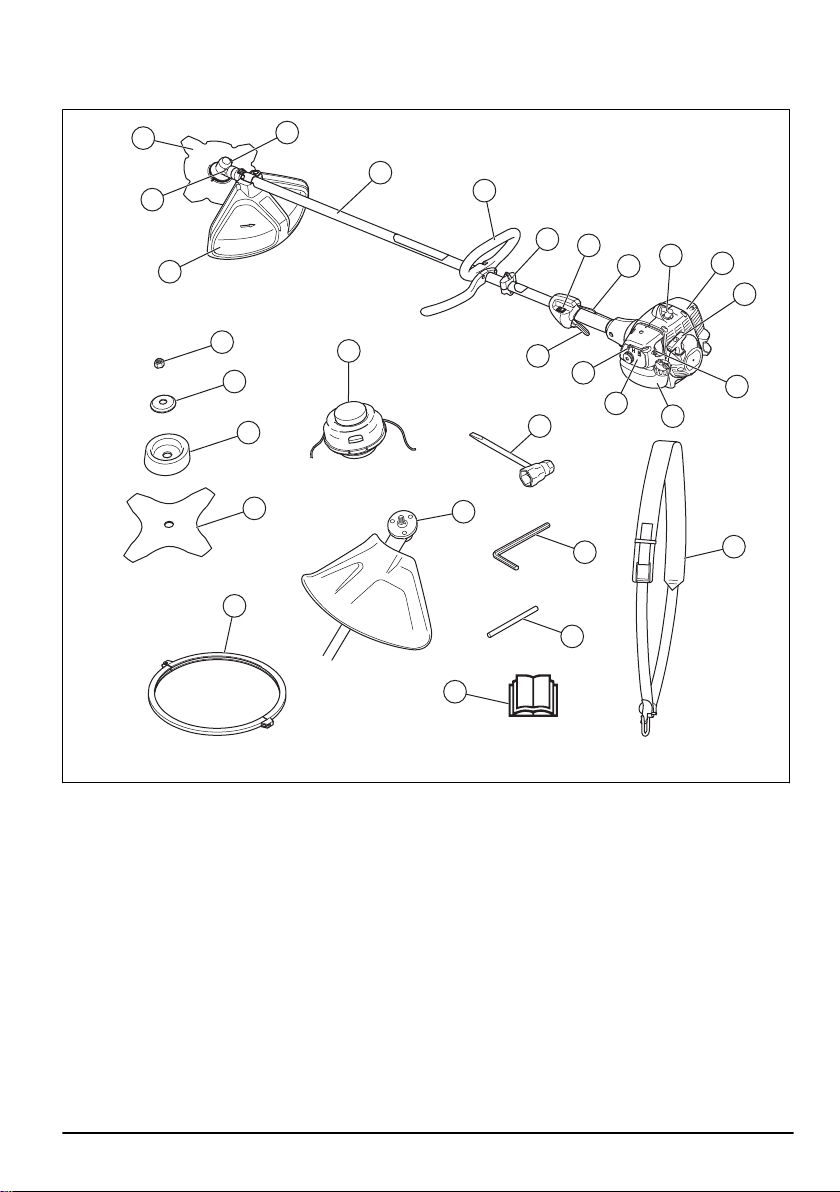
Product overview
18
19
20
1
24
21
23
25
26
28
27
1
3
5
6
7
8
10
11
12
13
15
17
9
16
14
4
2
22
1. Grass blade
2. Grease filler cap
3. Bevel gear
4. Cutting attachment guard
5. Shaft
6. J-handle
7. Harness clamp
8. Stop switch
9. Throttle trigger
10. Throttle trigger lockout
11. Spark plug cap and spark plug
12. Cylinder cover
13. Starter rope handle
14. Air purge bulb
15. Fuel tank
16. Air filter cover
17. Choke control
18. Locknut
19. Support flange
20. Support cup
21. Drive disc
22. Trimmer head
23. Combination wrench
24. Transport guard
25. Hex key
26. Locking pin
27. Harness
28. Operator's manual
1570 - 001 - 14.10.2020 3
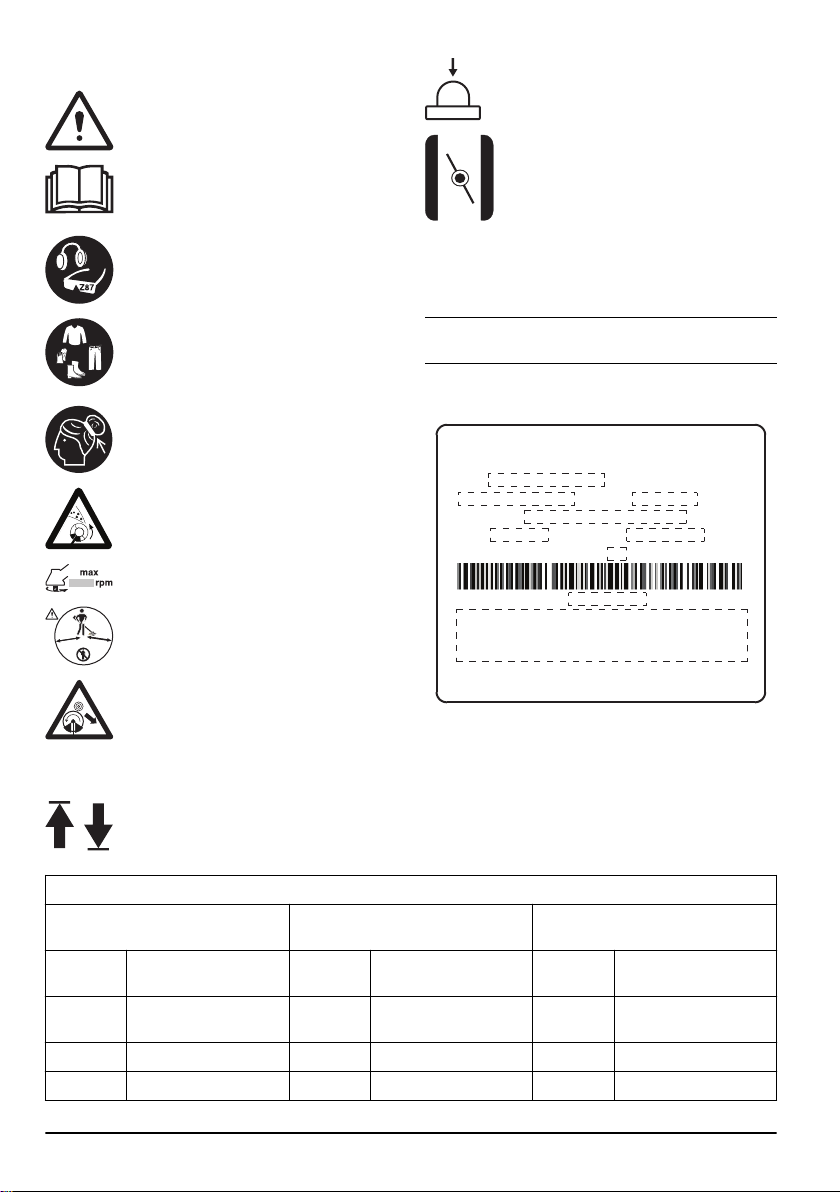
Symbols on the product
5
0
FT
1
5
m
50F
T
15 m
EMISSION CONTROL INFORMATION
REFER TO OWNER'S MANUAL FOR
MAINTENANCE SPECIFICATIONS AND ADJUSTMENTS.
SN:
THIS ENGINE MEETS EXH AND EVP EMISSIONS REGULATIONS
FOR SMALL OFF ROAD ENGINES
FAMILY/DISP
PLT # SKU #
EMISSION COMPLIANCE PERIOD
(XX:XX)
WARNING! Be careful and use the product
correctly. This product can cause serious
injury or death to the operator or others.
Read the operator's manual carefully and
make sure that you understand the
instructions before use.
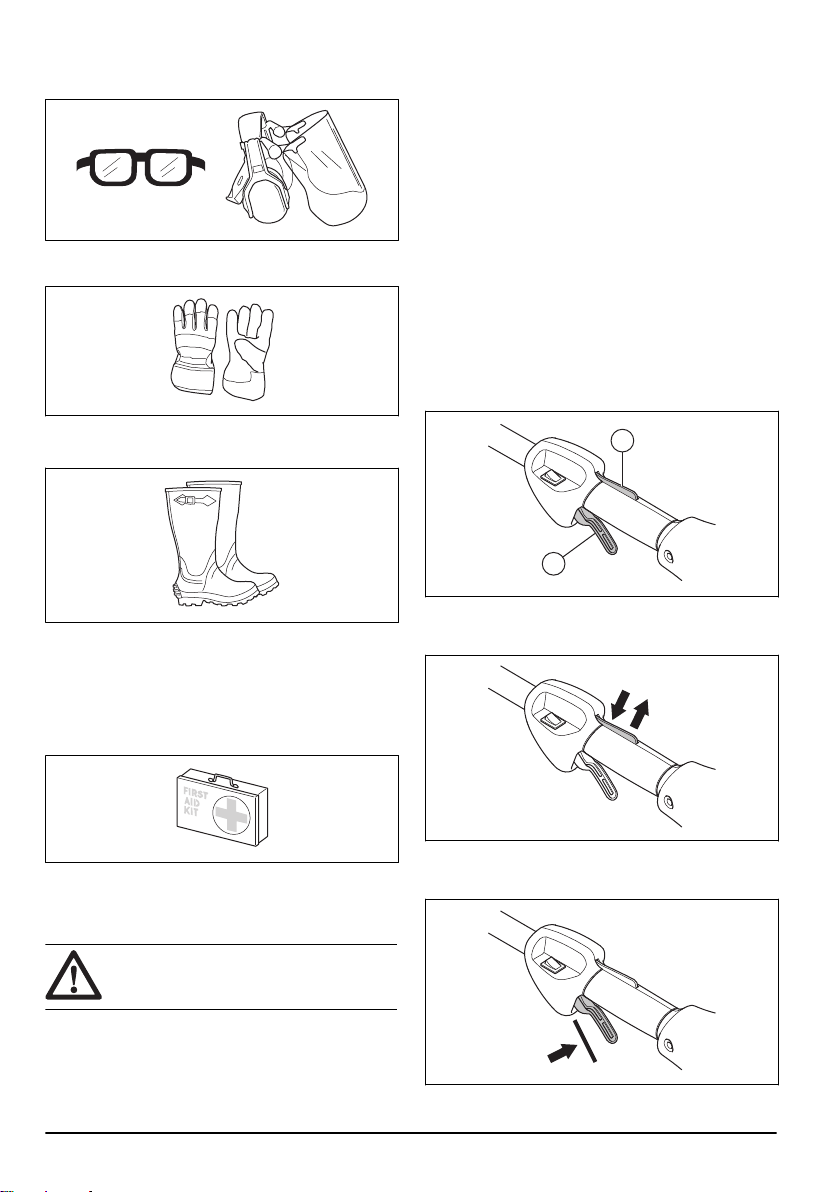
Use approved hearing protection. Use
approved eye protection.
Use approved protective gloves during
operation and maintenance. Use protective
boots or shoes with non-slip soles. Use
clothing of strong fabric and of full length.
Make sure that long hair is put above your
shoulders.
The product can cause objects to eject,
which can cause injury.
Maximum speed of the output shaft.
Keep a minimum distance of 15 m / 50 ft. to
persons and animals during operation of the
product.
Air purge bulb.
Choke.
yyyywwxxxx The rating plate shows the serial
number. yyyy is the production year
and ww is the production week.
Note: Other symbols/decals on the product refer to
certification requirements for other commercial areas.
EPA III
Risk of blade thrust if the cutting equipment
touches an object that it does not
immediately cut. The product can cut off
body parts. Keep a minimum of 15 m / 50 ft.
distance to persons and animals during
operation of the product.
The Emissions Compliance Period referred to on the
Emission Compliance label indicates the number of
operating hours for which the engine has been shown to
meet Federal and California emissions requirements.
The arrows shows the limit for the handle
position.
EMISSION CONTROL LABEL ABBREVIATIONS
ECS Emission control system ECM Engine control module
EXH/EVP Exhaust and Evapora-
tive
EM Engine modification N Nylon
(Autotune)
tems
C Coextruded (Multilayer)
General Exhaust emission control systems Evaporative emission control sys-
HRS Hours OC Oxidizing Catalyst P Treated HDPE or PE
REGS Regulations TWC Three way catalyst S Sealed
4 1570 - 001 - 14.10.2020
EMISSION CONTROL LABEL ABBREVIATIONS
WARNING!
The engine exhaust from this
product contains chemicals known
to the State of California to cause
cancer, birth defects or other
reproductive harm.
General Exhaust emission control systems Evaporative emission control sys-
SORE Small off road engines
US EPA United States Environ-
mental Protection Agency
CAL California
EVAP Evaporative
DISPL Displacement
tems
California Proposition 65
Product liability
As referred to in the product liability laws, we are not
liable for damages that our product causes if:
• the product is incorrectly repaired.
• the product is repaired with parts that are not from
the manufacturer or not approved by the
manufacturer.
• the product has an accessory that is not from the
manufacturer or not approved by the manufacturer.
• the product is not repaired at an approved service
center or by an approved authority.
Safety
Safety definitions
Warnings, cautions and notes are used to point out
specially important parts of the manual.
WARNING: Used if there is a risk of injury or
death for the operator or bystanders if the
instructions in the manual are not obeyed.
CAUTION: Used if there is a risk of damage
to the product, other materials or the
adjacent area if the instructions in the
manual are not obeyed.
Note: Used to give more information that is necessary in
a given situation.
General safety instructions
WARNING: Read the warning instructions
that follow before you use the product.
• A clearing saw, brushcutter or trimmer can be
dangerous if used carelessly or incorrectly and can
cause serious injury or death to the operator or
others. It is extremely important that you read and
understand the contents of this operator’s manual.
• Under no circumstances may the design of the
product be modified without the permission of the
manufacturer. Never use a product that has been
modified in any way from its original specification
and always use original accessories. Non-authorized
modifications and/or accessories can result in
serious personal injury or the death of the operator
or others.
• The inside of the muffler contain chemicals that may
be carcinogenic. Avoid contact with these elements
in the event of a damaged muffler.
• This product produces an electromagnetic field
during operation. This field may under some
circumstances interfere with active or passive
medical implants. To reduce the risk of serious or
fatal injury, we recommend persons with medical
implants to consult their physician and the medical
implant manufacturer before operating this product.
Safety instructions for assembly
WARNING: Read the warning instructions
that follow before you use the product.
1570 - 001 - 14.10.2020 5

• Use approved protective gloves when you assemble
the product and cutting attachment.
• Remove the spark plug cap from the spark plug
before you assemble the product.
• Make sure that the correct handlebar and cutting
attachment guard are assembled before you operate
the product.
• A defective or incorrect cutting attachment guard can
cause injury. Do not use a cutting attachment without
an approved cutting attachment guard.
• Attach the clutch cover and shaft correctly before
you start the product.
• The drive disc and support flange must engage
correctly in the center hole of the cutting attachment.
A cutting attachment that is attached incorrectly can
cause injury or death.
• Attach the harness to the product to prevent injury to
the operator or others.
Safety instructions for operation
WARNING: Read the warning instructions
that follow before you use the product.
• Never use a harness with a defective quick release.
When using a brush cutter it must always be hooked
securely to the harness. Otherwise you will be
unable to control the brush cutter safely and this can
result in injury to yourself or others.
• Always hold the product with both hands. Hold the
product on the right side of your body. Keep the
cutting attachment below waist level. Connect the
product to the suspension ring on the harness. Keep
all parts of your body away from the hot surfaces.
Keep all parts of your body away from the rotating
cutting attachment.
• Learn and understand the difference between
forestry clearing, grass clearing and grass trimming
before you use the product.
• Never use a product that has been modified in any
way from its original specification.
• Never use a product that is faulty. Carry out the
safety checks, maintenance and service instructions
described in this manual. Some maintenance and
service measures must be carried out by trained and
qualified specialists. Refer to
on page 20
• Use personal protective equipment. Refer to
.
Personal protective equipment on page 7
• Do not use the product in bad weather, such as
dense fog, heavy rain, strong wind, intense cold, etc.
Working in bad weather is tiring and often brings
added risks, such as icy ground, unpredictable felling
direction, etc.
• The only accessories you can operate with this
engine unit are the cutting attachments we
recommend. Refer to
Maintenance schedule
.
Accessories on page 24
.
• Watch out for thrown objects. Always wear approved
eye protection. Never lean over the cutting
attachment guard. Stones, rubbish, etc. can be
thrown up into the eyes causing blindness or serious
injury.
• Never use the product if you are tired, if you are ill, if
you have consumed alcohol, or if you are taking
other drugs or medication that can affect your vision,
judgement or coordination.
• Long-term exposure to noise can result in permanent
hearing loss. Always use approved hearing
protection.
• Listen for warning signals and loud voices when you
use hearing protection. Always remove your hearing
protection when the engine stops.
• Carry out an overall inspection of the product before
use. Refer to
page 14
• Never use the product if it is changed or defective.
• Make sure that the spark plug cap and ignition lead
are not damaged to prevent the risk of electrical
shock.
• Look around the work area to make sure that no
persons, animals or objects have a negative effect
on the safety of the operation of the product.
• Look around the work area to make sure that no
persons or animals touch the cutting attachment or
are hit by objects that are ejected from the cutting
attachment.
• Examine the work area. Remove all loose objects,
such as stones, broken glass, nails, steel wire and
string, that can eject or wind around the cutting
attachment.
• Do not use the product in a situation or location
where you can not get aid if an accident occurs.
• Do not use the product without a guard.
• Make sure that persons or animals keep a distance
of a minimum of 15 m/50 ft during work. Always look
behind you before you turn around with the product.
Stop the product immediately if a person or animal
enters the 15 m/50 ft safety zone. If more than one
operator does work in the same area, keep a
minimum safety distance of 15 m/50 ft.
• Make sure that you can move safely and have a safe
stance. Examine the area around you for obstacles
such as roots, rocks, branch and ditches. Be careful
during work on slopes.
• Do not overreach. Keep a stable position of the feet
and a good balance at all times.
• Before you start the product, put it on a flat surface,
at a minimum of 3 m from the fuel source and from
where you fill fuel. Make sure that there are no
objects near or touching the cutting attachment.
• If the cutting attachment rotates at idle speed, let a
service agent adjust it. Do not use the product until it
is adjusted or repaired.
• Look out for thrown objects. Always use approved
eye protection and keep away from the cutting
attachment guard. Stones and other small objects
Before you operate the product on
.
6
1570 - 001 - 14.10.2020
can eject into your eyes and cause blindness or
other injuries.
• Do not put the product down with the engine on
unless you have it in clear view.
• Do not remove the cut material, or let other persons
remove cut material, while the engine is on or the
cutting equipment rotates, as this can result in
serious injury.
• The bevel gear can get hot during use and may
remain so for a while afterwards. You could get burnt
if you touch it.
• Always stop the engine and make sure that the
cutting equipment does not rotate before you remove
material that is wound around the blade shaft or
caught between the guard and the cutting
attachment. The cutting equipment continues to
rotate even after the throttle has been released.
Ensure that the cutting attachment has stopped
completely and disconnect the spark plug cap before
you start to work on it.
• Be careful when you remove material from around
the cutting equipment. The bevel gear gets hot
during operation and can cause burn injuries.
• The exhaust fumes from the engine are hot and can
contain sparks. Risk of fire. Be careful around dry
and flammable material.
• Stop the engine before you move to a new work
area. Always attach the transport guard before you
move the equipment.
• Never use the product indoors or in spaces lacking
proper ventilation. Exhaust fumes contain carbon
monoxide, an odourless, poisonous and highly
dangerous ga can result in death due to asphyxiation
or carbon monoxide poisoning.
• Never allow children to use or be in the vicinity of the
product. As the product is equipped with a springloaded stop switch and can be started by low speed
and force on the starter handle, even small children
under some circumstances can produce the force
necessary to start the product. This can mean a risk
of serious personal injury. Therefore remove the
spark plug cap when the product is not under close
supervision.
• Overexposure to vibration can lead to circulatory
damage or nerve damage in persons who have poor
circulation. Speak to your physician if you
experience symptoms of overexposure to vibration.
Such symptoms include numbness, loss of feeling,
tingling, pricking, pain, loss of strength, changes in
skin color or condition. These symptoms usually
show in the fingers, hands or wrists. The risk
increases at low temperatures.
• Check that the cutting equipment is correctly fitted
and adjusted.
• If you encounter a situation where you are uncertain
how to proceed you should ask an expert. Contact
your dealer or your service workshop.
• Avoid all usage which you consider to be beyond
your capability.
• Do not use the product unless you are able to call for
help in the event of an accident.
• Using an incorrect cutting attachment or an
incorrectly sharpened blade increases the risk of
blade thrust.
• Products fitted with grass blades can be thrown
violently to the side when the blade comes into
contact with a fixed object. This is called blade
thrust. A blade thrust can be violent enough to cause
the product and/or operator to be propelled in any
direction, and possibly lose control of the product.
Blade thrust can occur without warning if the product
snags, stalls or binds. Blade thrust is more likely to
occur in areas where it is difficult to see the material
being cut.
• Avoid cutting with the area of the blade between the
12 o'clock and 3 o'clock positions. Because of the
speed of rotation of the blade, blade thrust can occur
if you attempt to cut thick stems with this area of the
blade.
• Mufflers fitted with catalytic converters get very hot
during use and remain so for some time after
stopping. This also applies at idle speed. Contact
can result in burns to the skin. Remember the risk of
fire.
• Only use cutting attachments with the guards we
recommend. Refer to
Accessories on page 24
.
Personal protective equipment
WARNING: Read the warning instructions
that follow before you use the product.
• Always use approved personal protective equipment
when you use the product. Personal protective
equipment cannot fully prevent injury but it
decreases the degree of injury if an accident does
occur. Let your dealer help you select the correct
equipment.
• Use approved hearing protection.
• Use approved eye protection. If you use a visor, you
must also use approved protective goggles.
Approved protective goggles must comply with the
1570 - 001 - 14.10.2020
7
ANSI Z87.1 standard in the USA or EN 166 in EU
A
B
countries.
• Use gloves when it is necessary, for example when
you attach, examine or clean the cutting equipment.
• Use protective boots with steel toe-cap and non-slip
soles.
• Use clothing made of a strong fabric. Always use
heavy, long pants and long sleeves. Do not use
loose clothing that can catch on twigs and branches.
Do not use jewelry, short pants or sandals. Do not
go with bare feet. Put your hair up safely above
shoulder level.
• Keep first aid equipment near.
• Do not make changes to safety devices. Do not use
the product if protective covers, safety switches or
other protective devices are not attached or are
defective.
• For all service and repair work on the product,
especially for the safety devices, special training is
necessary. If the safety devices fail the checks given
in this operator's manual, you must let a service
agent help you. We guarantee that professional
repairs and service is available. If your dealer is not
a service agent, speak to them for information about
the nearest service agent.
• Do not use a cutting attachment without an approved
and correctly attached cutting attachment guard. See
Accessories on page 24
To do a check of the throttle trigger lockout
1. Make sure that the throttle trigger lockout (A) and
throttle trigger (B) move freely and that the return
spring works correctly.
2. Push down the throttle trigger lockout and make sure
that it goes back to its initial position when you
release it.
.
Safety devices on the product
For information about where to find the safety devices,
see
Introduction on page 2
WARNING:
that follow before you use the product.
• Do not use a product with defective safety devices.
Do a check of and do maintenance on the safety
devices regularly. If the safety devices are defective,
speak to your Husqvarna service agent.
8
.
Read the warning instructions
3. Make sure that the throttle trigger is locked at the
idle position when the throttle trigger lockout is
released.
1570 - 001 - 14.10.2020
4. Start the product and apply full throttle.
5. Release the throttle trigger and make sure that the
blades stop and stay stationary.
WARNING: If the blades move when the
throttle trigger is in the idle position, then
the carburetor idle speed must be
adjusted. Refer to
speed on page 21
To do a check of the stop switch
1. Start the engine.
2. Move the stop switch to the stop position and make
sure that the engine stops.
To do a check of the cutting attachment guard
The cutting attachment guard prevents injuries and
stops objects that eject in the direction of the operator.
1. Stop the engine.
2. Do a visual check for damages, for example cracks.
3. Replace the cutting attachment guard if it is
damaged.
To adjust the idle
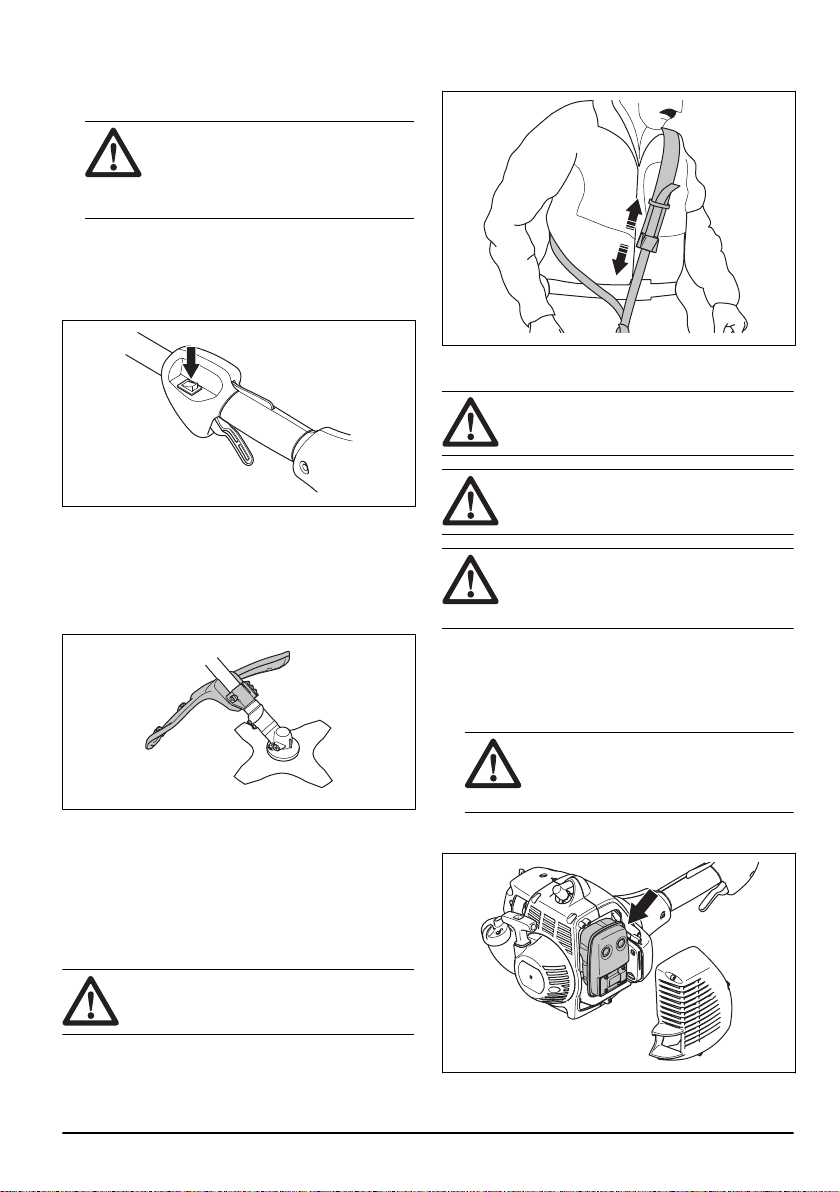
.
3. Adjust the length of the harness until the support
hook is approximately level with your right hip.
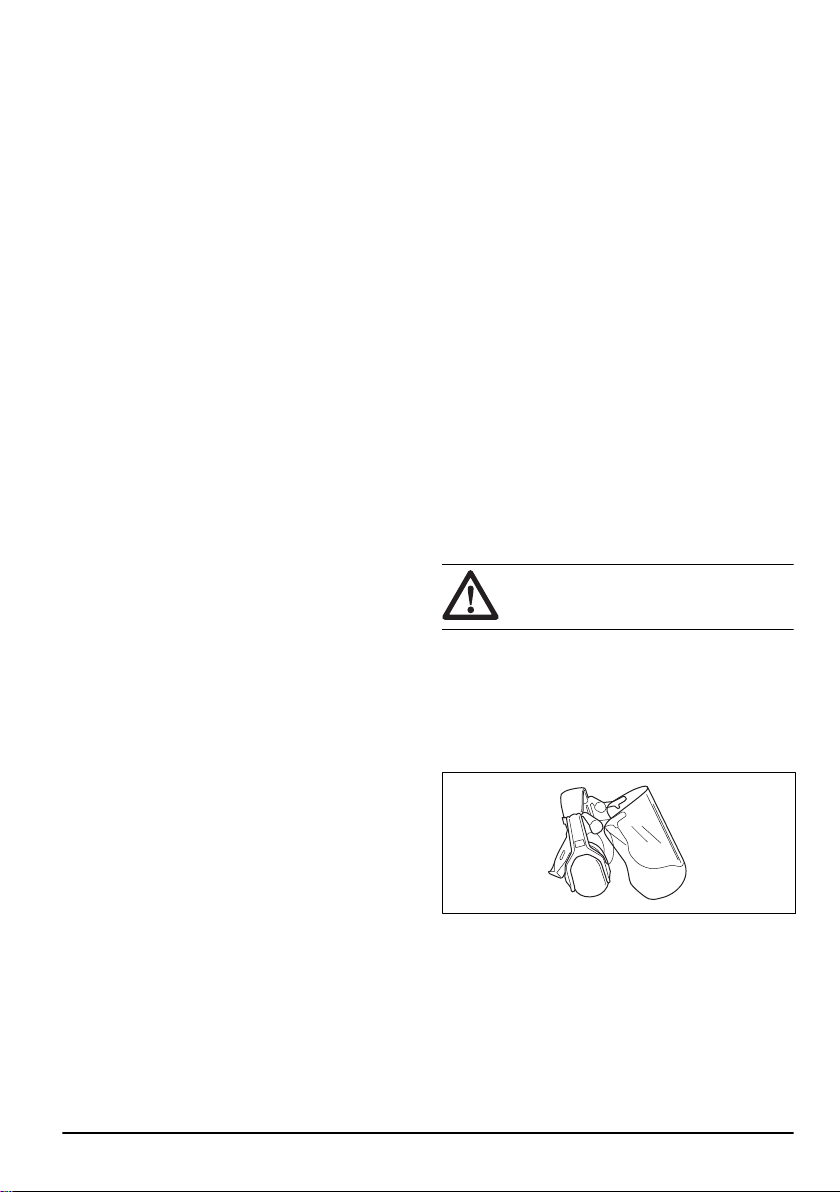
To do a check of the muffler
WARNING: Do not use a product that has a
defective muffler.
WARNING: Do not use the product if the
spark arrester screen on the muffler is
missing or defective.
WARNING: The muffler becomes very hot
during and after operation and also at idle
speed. Use protective gloves to prevent
burn injuries.
The muffler keeps noise levels to a minimum and points
exhaust fumes away from the operator.
1. Stop the engine.
2. Examine the muffler for damage and defects.
WARNING:
muffler contain chemicals that can cause
cancer. Be careful not to touch these
elements if the muffler is damaged.
3. Make sure that the muffler is correctly attached to
the product.
The inner surfaces of the
To adjust the harness
Always use the harness when you operate the product.
The harness gives maximum control during operation of
the product. The harness decreases the risk of tiredness
in your arms and back.
WARNING: Do not use a defective harness.
1. Examine the harness for damage and wear. Always
replace a damaged harness.
2. Put on the harness.
1570 - 001 - 14.10.2020
9
4. Do a visual check of the spark arrester screen.
a) Replace the spark arrester screen if it is
damaged.
b) Clean the spark arrester screen if it is blocked.
CAUTION: If the spark arrester
screen is blocked the product
becomes too hot and this causes
damage to the cylinder and piston.
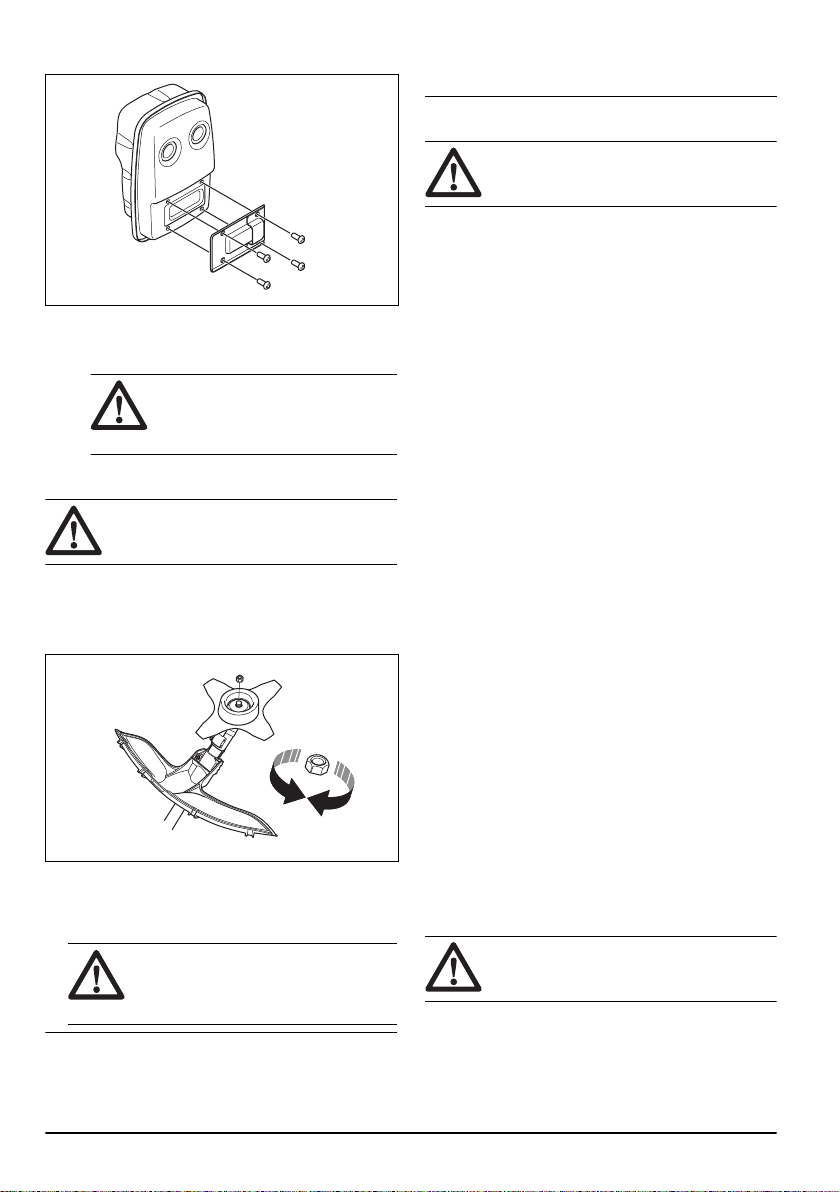
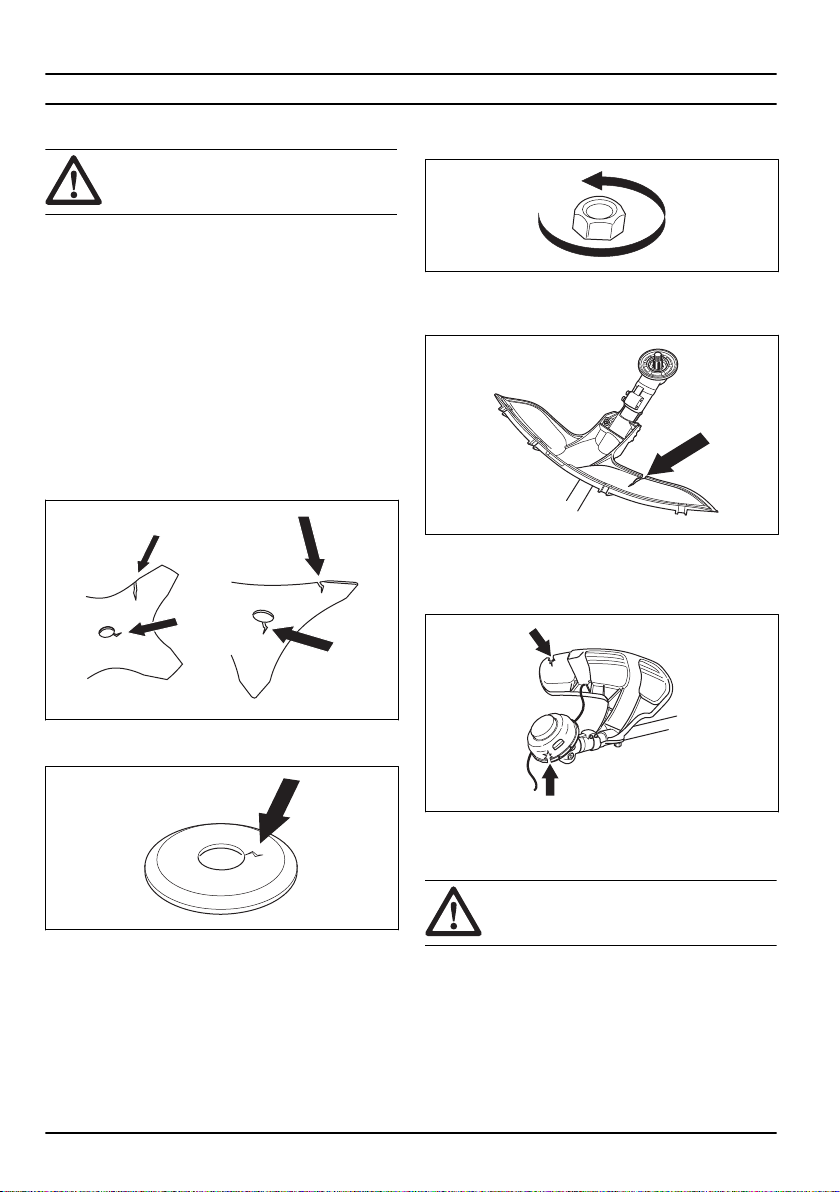
To install and remove the locknut
WARNING: Stop the engine, use protective
gloves and be careful around the sharp
edges of the cutting attachment.
A locknut is used to attach some types of cutting
attachments. The locknut has a left hand thread.
• To install the locknut, turn the locknut in the opposite
direction from the direction of rotation.
• To remove the locknut, remove the locknut in the
direction of rotation.
• To loosen or tighten the locknut, use a socket
wrench with a long shaft.
WARNING:
tighten the locknut there is a risk of injury
from the cutting attachment. Be careful
and do not touch the cutting attachment.
Note: Make sure that you can not turn the locknut by
hand. Replace the locknut after it has been put on
When you loosen and
approximately 10 times. The locknut must be replaced
after it has been put on approximately 10 times.
Cutting attachment
WARNING: Read the warning instructions
that follow before you use the product.
• Do the regular maintenance. Let an approved
service center regularly examine the cutting
attachment to do adjustments or repairs.
• The performance of the cutting attachment
increases.
• The life of the cutting attachment increases.
• The risk of accidents decreases.
• Only use an approved cutting attachment guard.
Refer to
• Do not use a damaged cutting attachment.
Accessories on page 24
Grass trimmer head
• Make sure that you wind the grass trimmer line
tightly and equally around the drum to decrease the
vibration.
• Use only the approved grass trimmer heads and
grass trimmer lines. Refer to
page 16
• Use a correct length of the grass trimmer line. A long
• Make sure that the cutter on the cutting attachment
• Soak the grass trimmer line in water for 2 days
• Refer to the instructions for the cutting attachment to
Grass blade
• Use correctly sharpened blades. An incorrectly
• Use correctly set blades. An incorrectly set blade
.
grass trimmer line uses more engine power than a
short grass trimmer line.
guard is not damaged.
before you attach the grass trimmer line to the
product. This increases the life of the grass trimmer
line.
use the correct procedure to load the cord and the
correct cord diameter.
sharpened or damaged blade increases the risk of
injury. Refer to the instructions on the blade
packaging.
increases the risk of injury and damage.
.
To trim the grass on
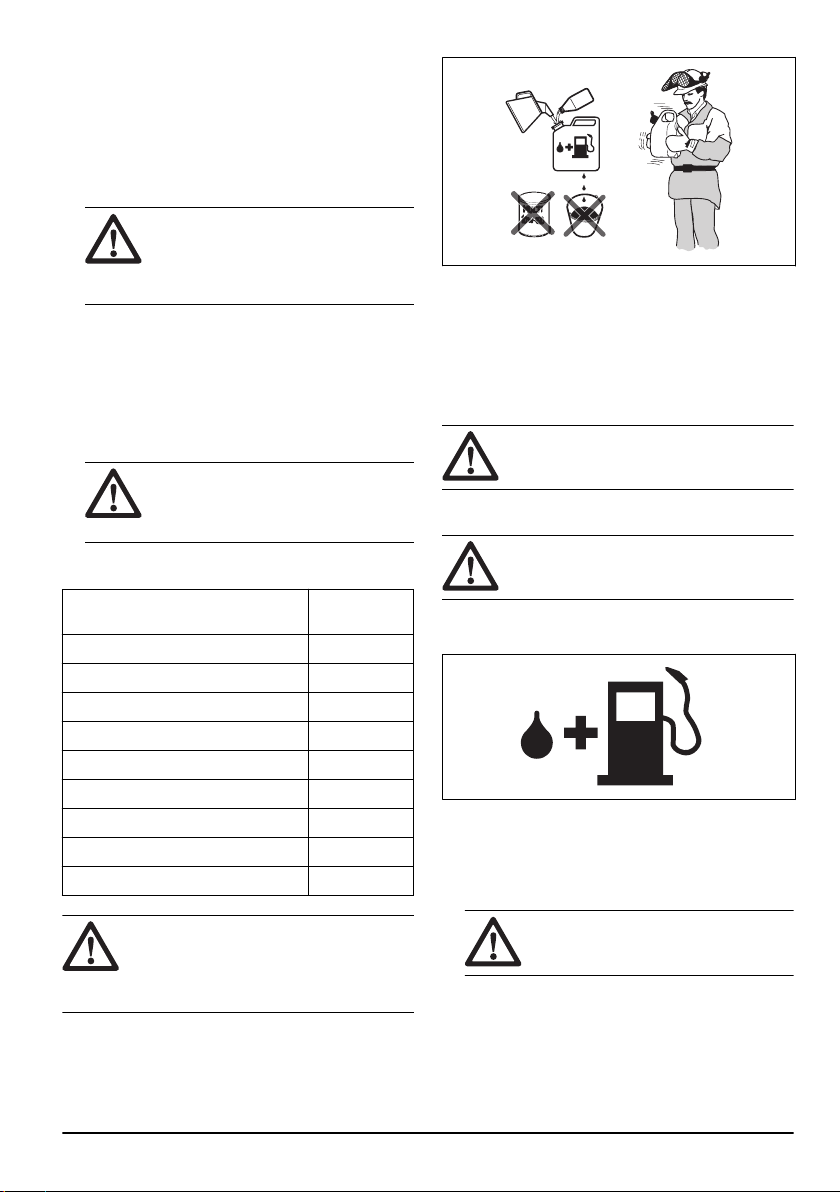
Fuel safety
WARNING:
that follow before you use the product.
• Do not mix the fuel indoor or near a heat source.
• Do not start the product if there is fuel or engine oil
on the product. Remove the unwanted fuel/oil and let
the product dry. Remove unwanted fuel from the
product.
Read the warning instructions
10
1570 - 001 - 14.10.2020

• If you spill fuel on your clothing, change clothing
immediately.
• Do not get fuel on your body, it can cause injury. If
you get fuel on your body, use a soap and water to
remove the fuel.
• Do not start the engine if you spill oil or fuel on the
product or on your body.
• Do not start the product if the engine has a leak.
Examine the engine for leaks regularly.
• Be careful with fuel. Fuel is flammable and the fumes
are explosive and can cause injuries or death.
• Do not breathe in the fuel fumes, it can cause injury.
Make sure that there is sufficient airflow.
• Do not smoke near the fuel or the engine.
• Do not put warm objects near the fuel or the engine.
• Do not add the fuel when the engine is on.
• Make sure that the engine is cool before you refuel.
• Before you refuel, open the fuel tank cap slowly and
release the pressure carefully.
• Make sure there are sufficient airflow when refueling
and mixing fuel (petrol and two-stroke oil) or draining
the fuel tank.
• Fuel and fuel vapor are highly flammable and can
cause serious injury when inhaled or allowed to
come into contact with the skin. For this reason,
observe caution when handling fuel and make sure
there is sufficient airflow.
• Tighten the fuel tank cap carefully or a fire can
occur.
• Move the product at a minimum of 3 m (10 ft) from
the position where you filled the tank before a start.
• Do not put too much fuel in the fuel tank.
• Make sure that a leak cannot occur when you move
the product or fuel container.
• Do not put the product or a fuel container where
there is an open flame, spark or pilot light. Make
sure that the storage area does not contain an open
flame.
• Only use approved containers when you move the
fuel or put the fuel into storage.
• Empty the fuel tank before long-term storage. Obey
the local law on where to dispose fuel.
• Clean the product before long-term storage.
• Remove the spark plug cap before you put the
product into storage to make sure that the engine
does not start accidentally.
Safety instructions for maintenance
WARNING: Read the warning instructions
that follow before you use the product.
• Stop the engine, make sure that the cutting
attachment stops and let the product cool down
before you do the maintenance.
• Disconnect the spark plug cap before you do the
maintenance.
• The exhaust fumes from the engine contain carbon
monoxide, an odorless, poisonous and very
dangerous gas that can cause death. Do not run the
product indoors or in closed spaces.
• The exhaust fumes from the engine are hot and can
contain sparks. Do not run the product indoors or
near flammable material.
• Accessories and changes to the product that are not
approved by the manufacturer, can cause serious
injury or death. Do not change the product. Always
use original accessories.
• If the maintenance is not done correctly and
regularly, there is an increased risk of injury and
damage to the product.
• Only do the maintenance as this operator's manual
recommends. Let an approved Husqvarna service
agent do all other servicing.
• Let an approved Husqvarna service agent do
servicing on the product regularly.
• Replace damaged, worn or broken parts.
Assembly
Introduction
WARNING: Before you assemble the
product, you must read and understand the
safety chapter.
WARNING: Remove the spark plug cable
from the spark plug before you assemble the
product.
1570 - 001 - 14.10.2020 11
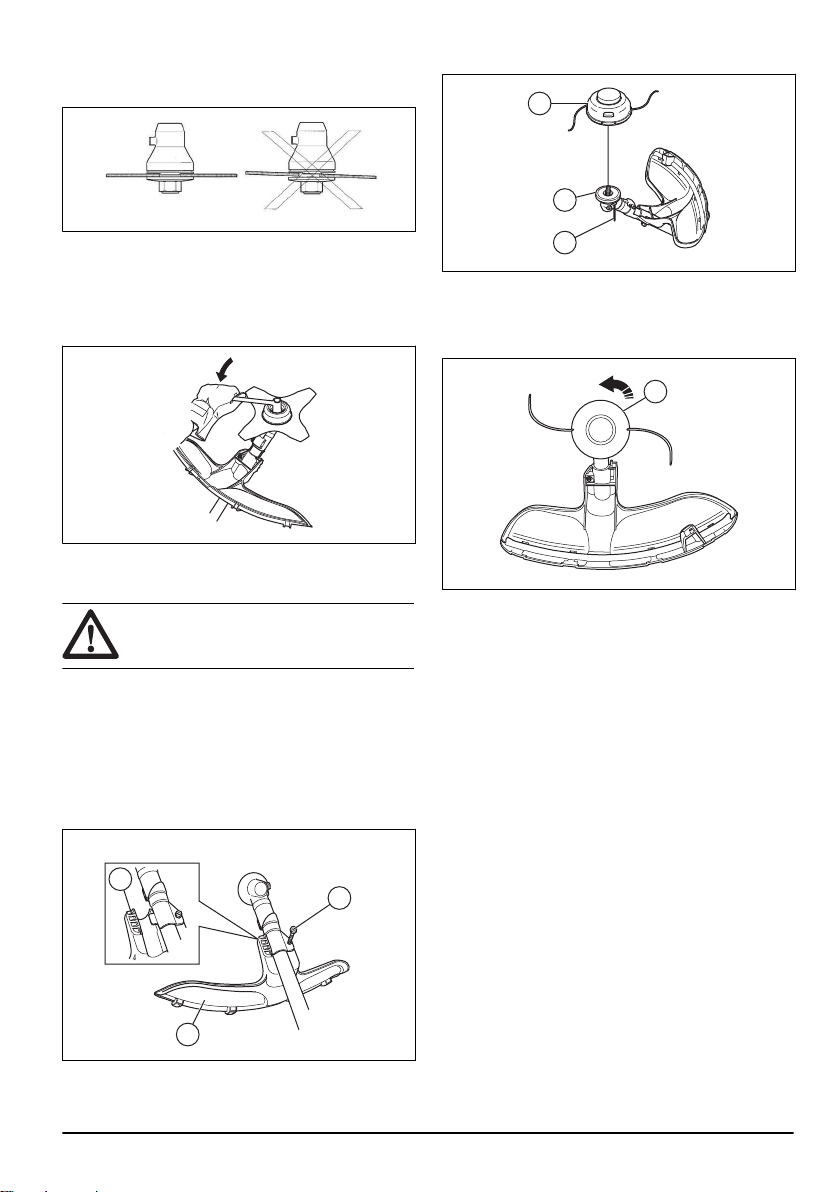
To install the J-handle
WARNING: Use only grass blades or
trimmer heads with the J-handle.
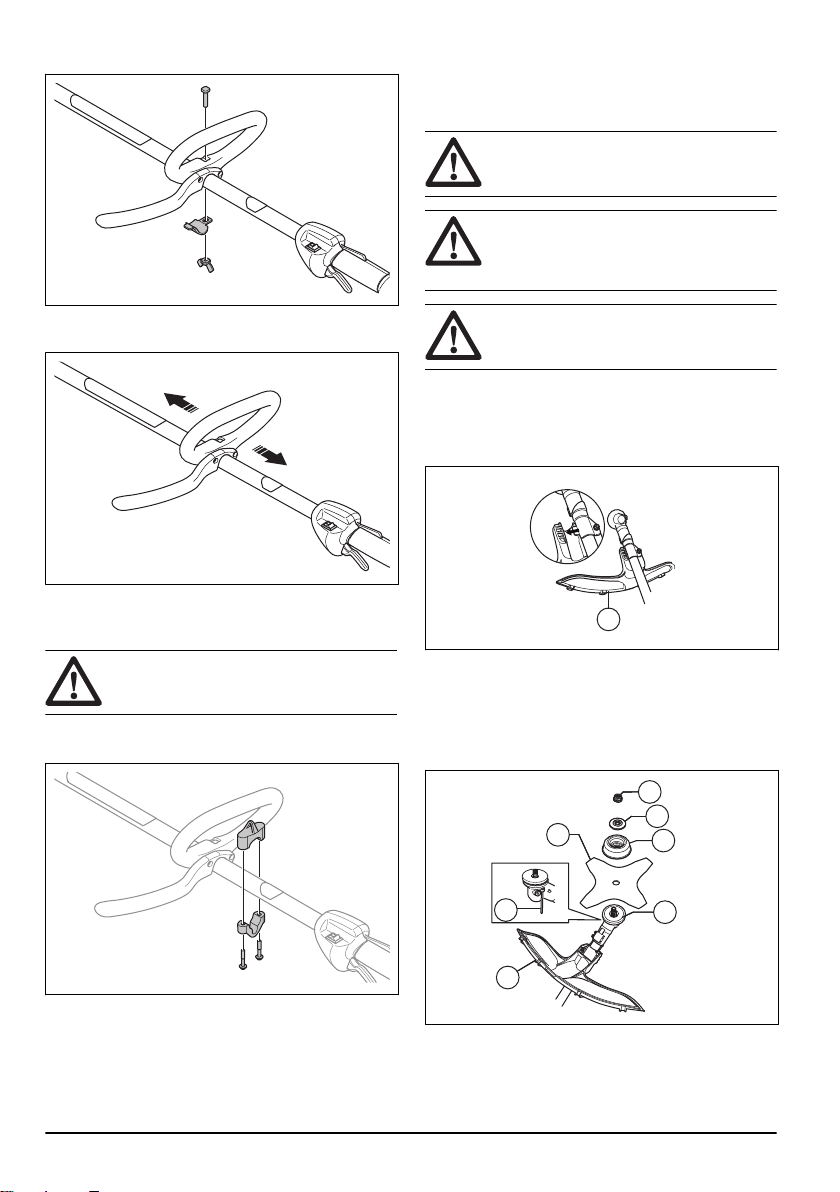
1. Put the J-handle between the 2 arrows on the shaft.
A
F
G
E
D
C
B
A
To assemble the cutting equipment
The cutting equipment includes a cutting attachment and
a cutting attachment guard.
WARNING: Use protective gloves.
WARNING: Always use the cutting
attachment guard that is recommended for
the cutting attachment. See
page 24
.
Accessories on
2. Install the screw, the plate and the wing nut.
3. Adjust the J-handle to a good work position.
4. Tighten the wing nut fully.
To install the harness clamp
WARNING:
safely to the harness clamp when you
operate the product.
1. Put the 2 halves of the harness clamp onto the shaft
and align the screw holes.
The harness must be attached
WARNING: An incorrectly attached cutting
attachment can result in injury or death.
To install the cutting attachment guard and the grass blade
1. Put the cutting attachment guard (A) onto the shaft
and tighten the bolt.
2. Turn the output shaft to align one of the holes in the
drive disc (B) with the related hole in the gear
housing.
3. Put the locking pin (C) in the hole to lock the shaft.
4. Put the grass blade (D), the support cup (E) and the
support flange (F) on the output shaft.
2. Install the 2 screws.
3. Adjust the harness clamp to the correct position
4. Tighten the 2 screws fully.
12
above the arrow.
1570 - 001 - 14.10.2020
5. Make sure that the drive disc and support flange
A
C
B
F
D
E
F
engages correctly in the center hole of the grass
blade.
6. Attach the nut (G).
7. Tighten the nut with the socket wrench. Hold the
shaft of the socket wrench near the cutting
attachment guard. Tighten in the opposite direction
to how the cutting attachment rotates. Torque the nut
to 35–50 Nm.
To install the cutting attachment guard and the trimmer head
CAUTION: Make sure that the guard
extension is assembled.
4. Install the drive disc (D) on the output shaft.
5. Turn the output shaft until 1 of the holes in the drive
disc aligns with the related hole in the gear housing.
6. Put the locking pin (E) in the hole to lock the shaft.
7. Install the trimmer head (F) counterclockwise.
8. To remove the trimmer head and the cutting
attachment guard, follow the instructions in the
opposite sequence.
1. Install the cutting attachment guard (A) intended for
operation with the trimmer head.
2. Hang the cutting attachment guard on the 2 hooks
on the plate holder (B).
3. Bend the cutting attachment guard around the shaft
and tighten the screw (C) on the opposite side of the
shaft. Use the combination wrench to tighten the
screw.
1570 - 001 - 14.10.2020
13
Operation
Introduction
WARNING: Before you operate the product,
you must read and understand the safety
chapter.
Before you operate the product
• Examine the work area to make sure that you know
the type of terrain, the slope of the ground and if
there are obstacles such as stones, branches and
ditches.
• Do an overhaul inspection of the product.
• Do the safety inspections, maintenance and
servicing that are given in this manual.
• Make sure that all covers, guards, handles and the
cutting equipment are correctly attached and not
damaged.
• Make sure that there are no cracks at the bottom of
the grass blade teeth or by the center hole of the
blade. Replace the blade if it is damaged.
the cutting attachment sufficiently and you must
replace it.
• Examine the blade guard for damages or cracks.
Replace the blade guard if it has been hit or if it has
cracks.
• Examine the trimmer head and cutting attachment
guard for damages or cracks. Replace the trimmer
head and cutting attachment guard if they have been
hit or if they have cracks.
• Examine the support flange for cracks. Replace the
support flange if it is damaged.
• Make sure that the locknut can not be removed by
hand. If you can remove it by hand, it does not lock
14
Fuel
This product has a two-stroke engine.
CAUTION: Incorrect type of fuel can result in
engine damage. Use a mixture of gasoline
and two-stroke oil.
Premixed fuel
• Use Husqvarna premixed alkylate fuel for best
performance and extension of the engine life. This
fuel contains less harmful chemicals compared to
regular fuel, which decreases harmful exhaust
fumes. The quantity of remains after combustion is
1570 - 001 - 14.10.2020
lower with this fuel, which keeps the components of
the engine more clean.
To mix fuel
Gasoline
• Use good quality unleaded gasoline with a maximum
of 10% ethanol contents.
CAUTION: Do not use gasoline with an
octane grade less than 90 RON/87 AKI.
Use of a lower octane grade can cause
engine knocking, which causes engine
damages.
Two-stroke oil
• For best results and performance use Husqvarna
two-stroke oil.
• If Husqvarna two-stroke oil is not available, use a
two-stroke oil of good quality for air-cooled engines.
Speak to your servicing dealer to select the correct
oil.
CAUTION: Do not use two-stroke oil for
water-cooled outboard engines, also
referred to as outboard oil. Do not use oil
for four-stroke engines.
1. Fill half the quantity of gasoline in a clean container
for fuel.
2. Add the full quantity of oil.
3. Shake the fuel mixture.
4. Add the remaining quantity of gasoline to the
container.
5. Carefully shake the fuel mixture.
CAUTION: Do not mix fuel for more than 1
month at a time.
To fill the fuel tank
To mix gasoline and two-stroke oil
Gasoline, liter Two-stroke oil,
liter
2% (50:1)
5 0.10
10 0.20
15 0.30
20 0.40
US gallon US fl. oz.
1 2 ½
2 1/2 6 ½
5 12 ⅞
CAUTION: Small errors can influence the
ratio of the mixture drastically when you mix
small quantities of fuel. Measure the quantity
of oil carefully and make sure that you get
the correct mixture.
WARNING: Obey the procedure that follows
for your safety.
1. Stop the engine and let the engine become cool.
2. Clean the area around the fuel tank cap.
3. Shake the container and make sure that the fuel is
fully mixed.
4. Remove the fuel tank cap slowly to release the
pressure.
5. Fill the fuel tank.
CAUTION: Make sure that there is not
too much fuel in the fuel tank. The fuel
expands when it becomes hot.
6. Tighten the fuel tank cap carefully.
7. Clean fuel spillage on and around the product.
8. Move the product 3 m/10 ft or more away from the
refueling area and fuel source before you start the
engine.
1570 - 001 - 14.10.2020
15
Note: To see where the fuel tank is on your product,
refer to
Introduction on page 2
.
To prepare for grass clearing
1. Apply support to the product with the harness during
grass clearing.
2. Make sure that the cutting equipment is parallel to
the ground.
To start a cold engine
1. Push the air purge bulb 10 times.
2. Move choke control to the full choke position.
CAUTION:
until it stops. Do not let go of the starter
rope when it is fully extended. Release
the starter rope slowly. Failure to obey
these instructions can cause damage to
the engine.
5. Move the choke control to the half choke position.
6. Pull the starter rope handle until the engine starts.
7. Let the engine run for 10 seconds.
8. Move the choke control to the no choke position.
Do not pull the starter rope
To start a warm engine
1. Slowly push the air purge bulb 10 times.
2. Move the choke lever to the HALF CHOKE position.
3. Pull the starter rope handle quickly until the engine
runs.
4. Move the choke lever to the NO CHOKE position.
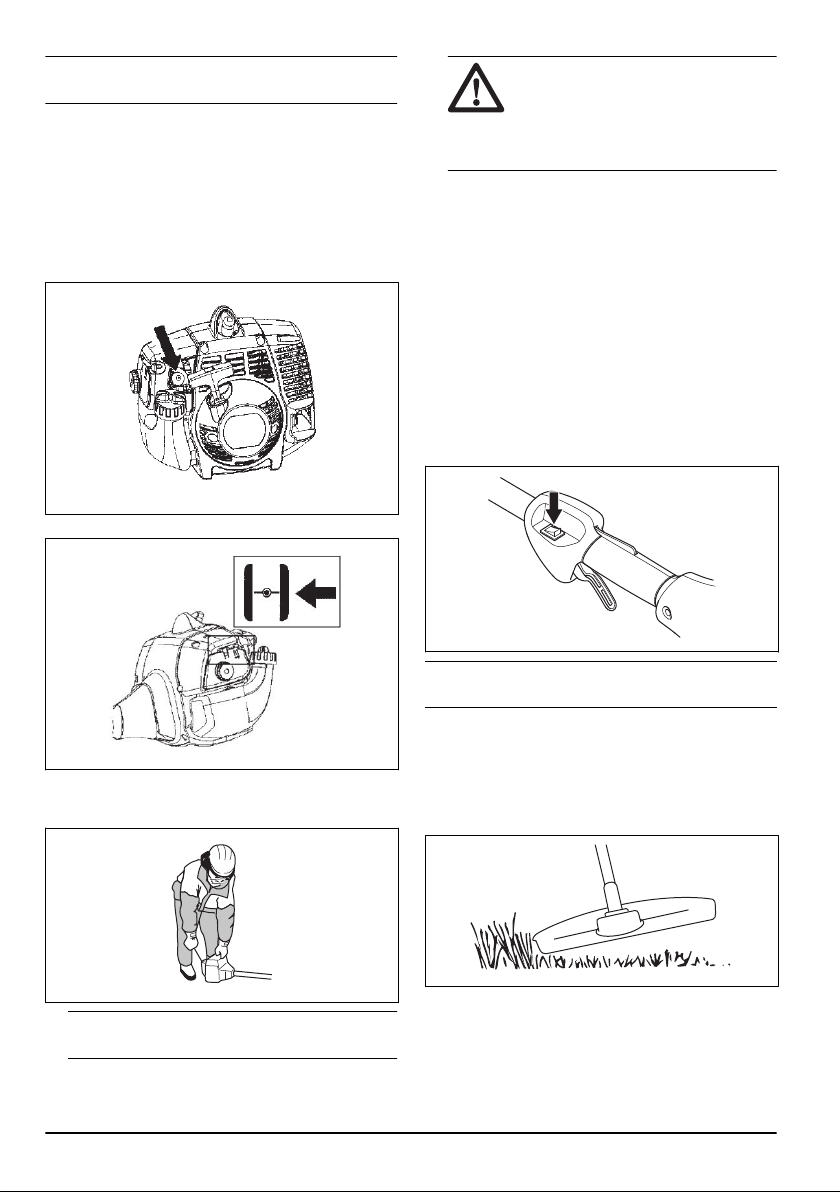
To stop the product
• Push the stop switch to stop the engine.
3. Hold the body of the product on the ground with your
left hand. Do not step on the product. Pull the starter
rope handle slowly until you feel some resistance.
Do not pull the throttle trigger while you start
Note:
the engine.
4. Pull the starter rope handle 3 times with force.
16
Note: The stop switch automatically goes back to its
initial position.
Grass trimming with a trimmer head
To trim the grass
1. Hold the trimmer head immediately above the
ground at an angle. Do not push the trimmer line into
the grass.
2. Decrease the length of the trimmer line by 10-12
cm / 4-4.75 in.
3. Decrease the engine speed to decrease the risk of
damage to plants.
1570 - 001 - 14.10.2020
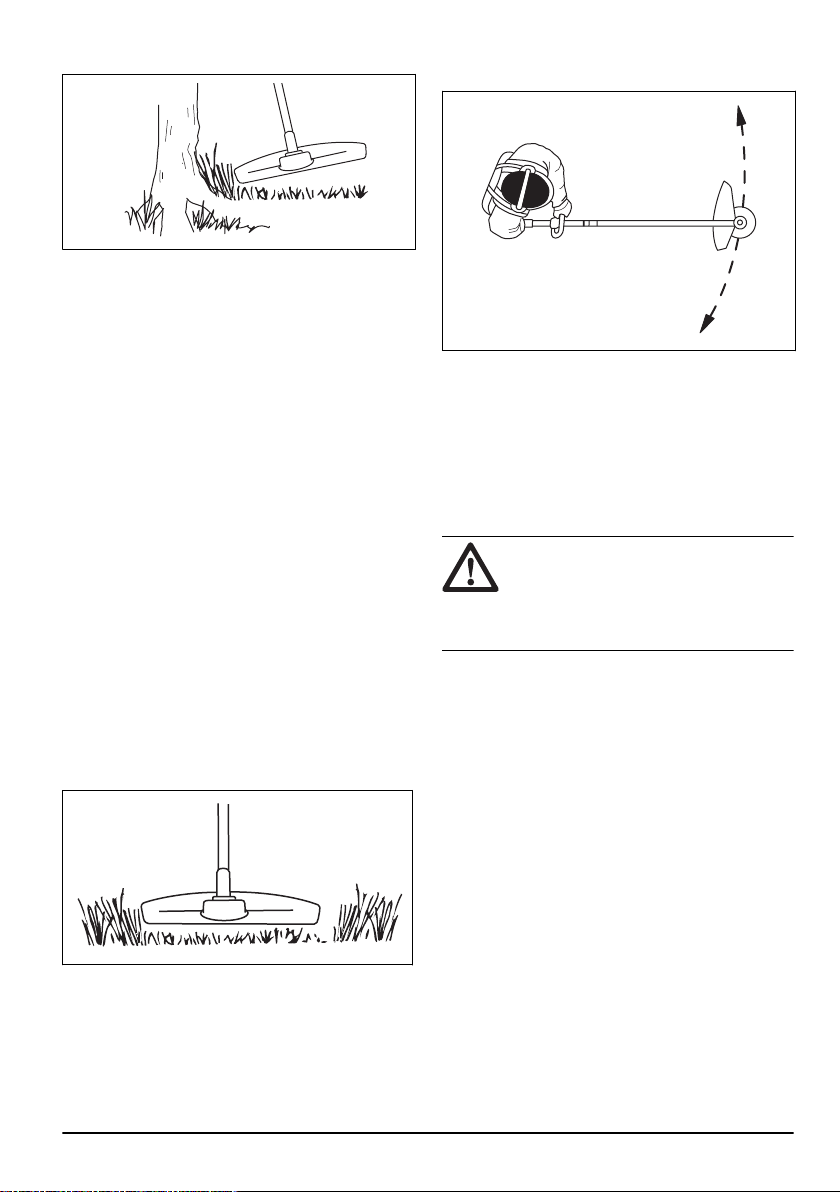
4. Use 80 % throttle when you cut grass near objects.
To clear grass with a grass blade
1. Grass blades and grass cutters must not be used on
woody stems.
2. A grass blade is used for all types of tall or coarse
grass.
3. The grass is cut down with a sideways, swinging
movement, where the movement from right-to-left is
the clearing stoke and the movement from left-toright is the return stoke. Let the left-hand side of the
blade (between 8 and 12 o'clock) do the cutting.
4. if the blade is angled to the left when clearing grass,
the grass will collect in a line, which makes it easier
to collect, e.g. by raking.
5. Try to work rhythmically. Stand firmly with your feet
apart. Move forward after the return stoke and stand
firmly again.
6. Let the support cup rest lightly against the ground. It
is used to protect the blade from hitting the ground.
7. Reduce the risk of material wrapping around the
blade by always work at full throttle and avoid the
previously cut material during the return stoke.
8. Stop the engine, unclip the harness and place the
machine on the ground before you start to collect the
cut material.
To cut the grass
1. Make sure that the trimmer line is parallel to the
ground when you cut the grass.
3. Move the product from side to side when you cut
grass. Use full speed.
To sweep the grass
The airflow from the rotating trimmer line can be used to
remove cut grass from an area.
1. Hold the trimmer head and the trimmer line parallel
to the ground and above the ground.
2. Apply full throttle.
3. Move the trimmer head from side to side and sweep
the grass.
WARNING: Clean the trimmer head cover
each time you assemble new trimmer line to
prevent unbalance and vibrations in the
handles. Also do a check of the other parts
of the trimmer head and clean it if
necessary.
2. Do not push the trimmer head to the ground. This
can cause damage to the product.
1570 - 001 - 14.10.2020 17
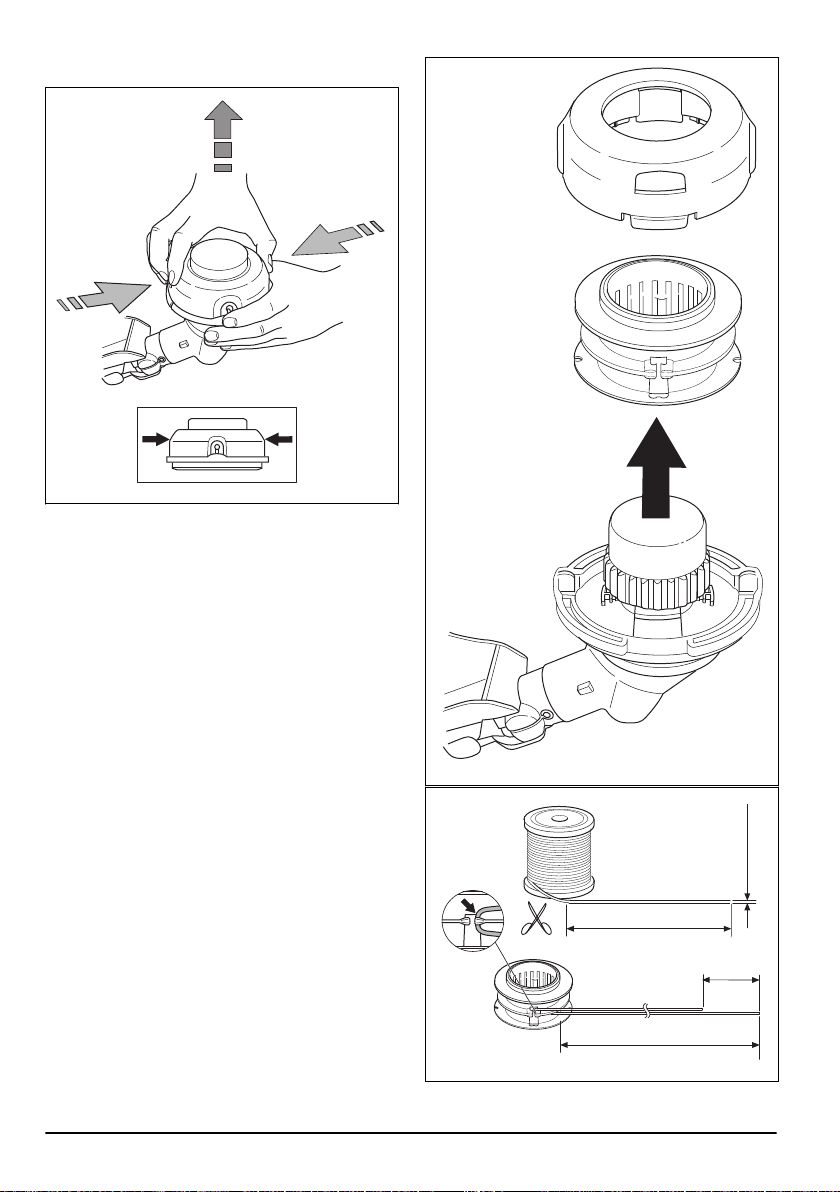
To replace the trimmer line
6,0 m
18'
3,05 m
9'
2,0-2,4 mm
.079-.095"
10 cm
4"
18 1570 - 001 - 14.10.2020
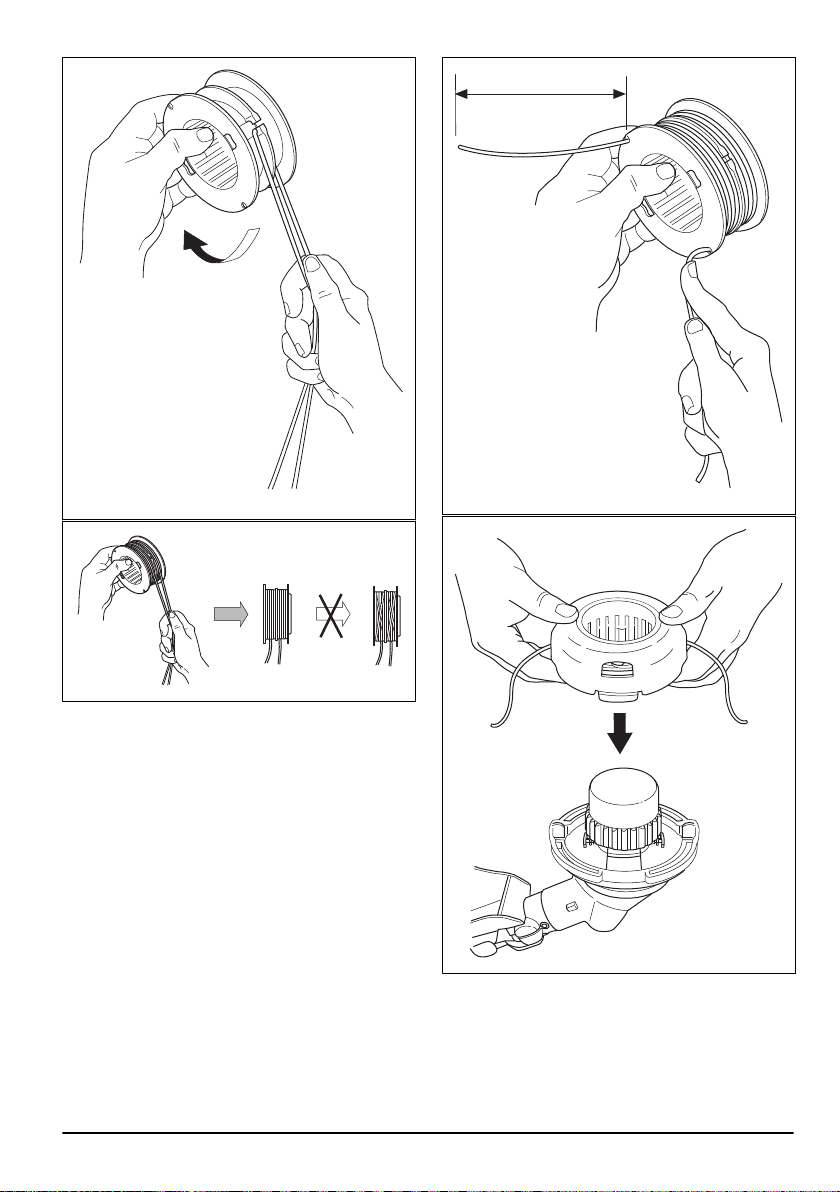
6"
15 cm
1570 - 001 - 14.10.2020 19
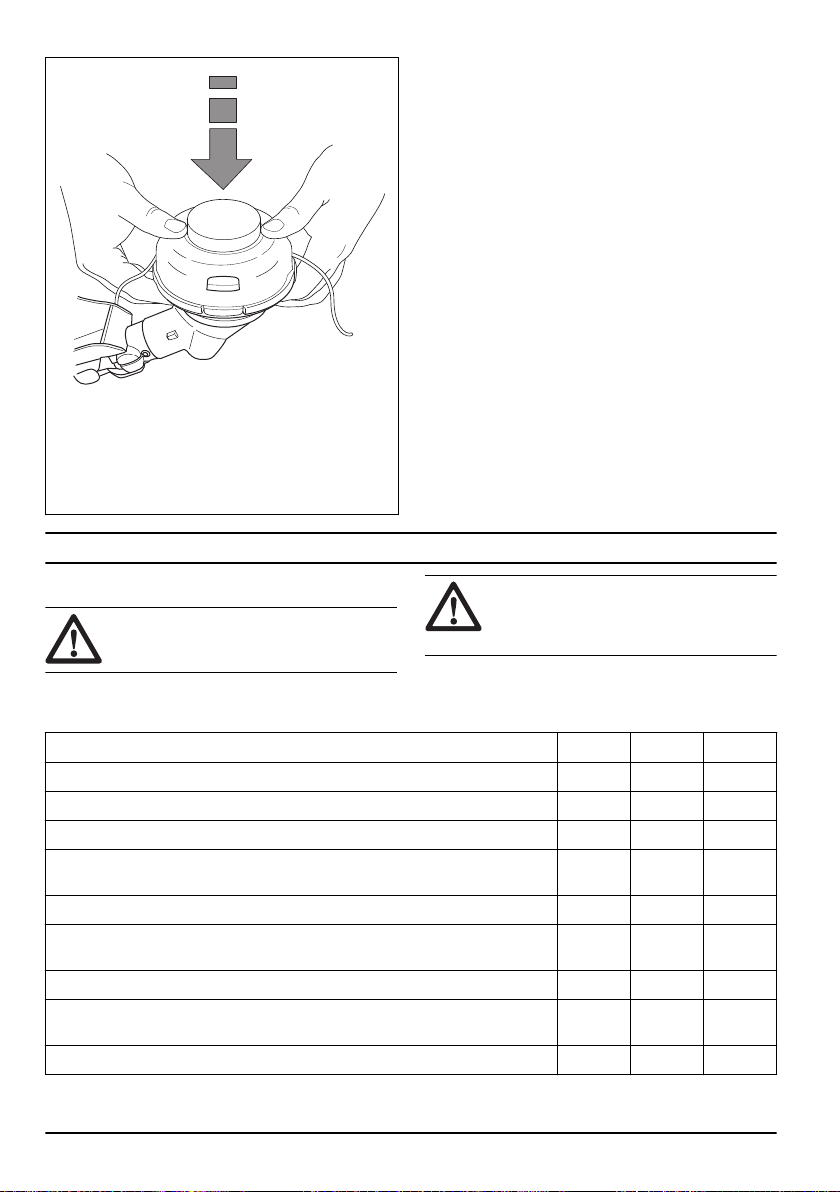
"Click"
Maintenance
Introduction
WARNING: Read and understand the safety
chapter before you do maintenance on the
product.
CAUTION: To prevent accidental start,
remove the spark plug cap from the spark
plug before you do maintenance on the
product.
Maintenance schedule
Maintenance Daily Weekly Monthly
Clean the external surface. X
Examine the harness for damages. X
Do a check for damages on the suspension ring. X
Do a check of the throttle trigger lockout and the throttle trigger. Refer to
check of the throttle trigger lockout on page 8
Make sure that the cutting attachment does not rotate at idle speed. X
Do a check of the stop switch. Refer to
9
.
Examine the cutting attachment guard for damages and cracks. X
Make sure that the grass blade is aligned with the center. Make sure that the
grass blade is sharp and that the blade or center hole is not damaged.
Examine the trimmer head for damages and cracks. Replace if it is damaged. X
20 1570 - 001 - 14.10.2020
.
To do a
To do a check of the stop switch on page
X
X
X

Maintenance Daily Weekly Monthly
Examine the handle and handlebar for damage and make sure that they are attached correctly.
X
For cutting attachments with a support cup, tighten the locking screw fully. X
For cutting attachments with a locknut, tighten the locknut fully. X
Examine the transport guard for damage and make sure that it can be attached
correctly.
X
Examine the engine, the fuel tank and the fuel lines for leaks. X
Clean the air filter. Replace if it is necessary. X
Tighten nuts and screws. X
Examine the fuel filter for contamination and the fuel hose for cracks and other
defects. Replace if it is necessary.
X
Examine all cables and connections. X
Examine the starter and the starter rope for damages. X
Examine the vibration damping units for damages and cracks. X
Examine the spark plug. Refer to
To do a check of the spark plug on page 22
. X
Clean the cooling system. X
Make sure that the bevel gear is filled to ¾ with grease. X
Clean the external surface of the carburetor and the area around it. X
Clean the spark plug. Remove the spark plug and do a check of the electrode
gap.
X
Clean or replace the spark arrester screen on the muffler. X
Examine the clutch, clutch springs and the clutch drum for wear. Replace if it is
necessary.
X
Replace the spark plug. X
Lubricate the drive shaft.
Make sure that the safety release on the harness is not damaged and operates
correctly.
1
X
X
Examine and clean the spark arrester screen on the muffler. X
To adjust the idle speed
Your Husqvarna product is made to specifications that
decrease harmful emissions.
1. Make sure that the air filter is clean and that the air
filter cover is attached to the product.
1
At an interval of 6 months.
1570 - 001 - 14.10.2020 21
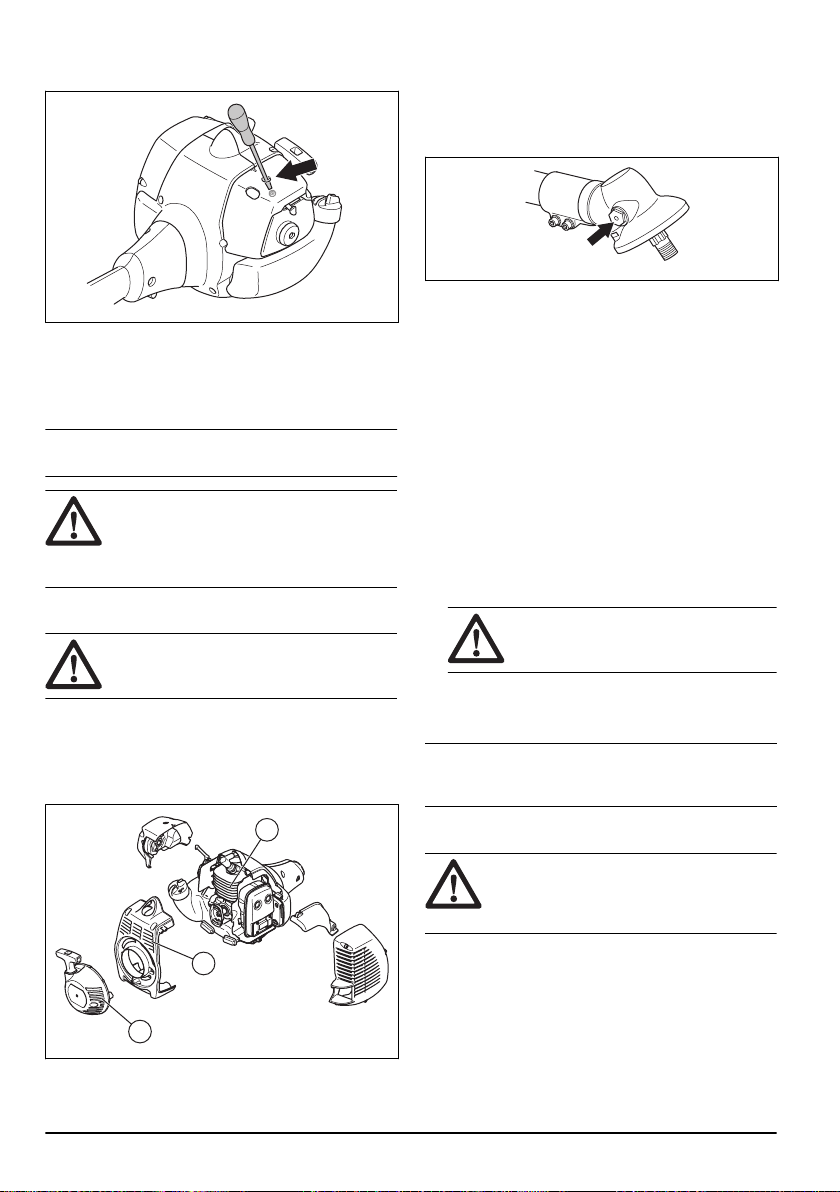
2. Turn the idle speed screw (T) clockwise until the
A
B
C
cutting attachment starts to turn.
3. Turn the idle speed screw (T) counterclockwise until
the cutting attachment stops.
The idle speed is correct when the engine operates
smoothly in all positions. The idle speed must be below
the speed when the cutting attachment starts to turn.
Note: Refer to
recommended idle speed.
Technical data on page 24
WARNING: If the cutting attachment does
not stop when you adjust the idle speed,
speak to your servicing dealer. Do not use
the product until it is correctly adjusted or
repaired.
for the
To clean the cooling system
CAUTION:
can make the product too hot, which can
cause damage to the product.
The parts of the cooling system are the air intake on the
starter (A), the cooling fins on the cylinder (B) and the
cylinder cover (C).
1. Clean the cooling system with a brush weekly or
more frequently if it is necessary.
A dirty or blocked cooling system
Bevel gear
The bevel gear is filled with the correct quantity of
grease at the factory. Before you use the product, make
sure that the bevel gear is 3/4 full of grease. Use
Husqvarna special grease.
The grease in the bevel gear is replaced by your
servicing dealer.
Air filter
Remove dust and dirt from the air filter to keep it clean
and prevent these problems:
• Carburetor malfunctions.
• Problems when you start the product.
• Loss of engine power.
• Increased wear to engine parts.
• Too much fuel consumption.
To clean the air filter
1. Remove the air filter cover and remove the filter.
2. Hit the filter against a flat surface to make the
particles fall off.
CAUTION: Do not use solvent or
compressed air to clean the air filter.
3. Put the air filter back. Make sure that the air filter
fully seals against the air filter holder.
4. Put the air filter cover back.
An air filter that is used for a long time cannot be
Note:
fully cleaned. Replace the air filter at regular intervals.
Always replace a damaged air filter.
2. Make sure that the cooling system is not dirty or
22
blocked.
To do a check of the spark plug
CAUTION:
plug. Refer to
An incorrect spark plug can cause damage
to the product.
1. If the product is not easy to start or to operate or if
the product operates incorrectly at idle speed,
examine the spark plug for unwanted materials. To
decrease the risk of unwanted material on the spark
plug electrodes, do these steps:
a) make sure that the idle speed is correctly
adjusted.
b) make sure that the fuel mixture is correct.
Use the recommended spark
Technical data on page 24
1570 - 001 - 14.10.2020
.

c) make sure that the air filter is clean.
2. Clean the spark plug if it is dirty.
3. Make sure that the electrode gap is correct. Refer to,
Technical data on page 24
.
4. Replace the spark plug monthly or more frequently if
necessary.
Troubleshooting
The engine starts but stops again
Product part to examine Possible cause Action
Fuel tank Incorrect fuel type. Drain the fuel tank and fill with cor-
Carburetor The idle speed is not correct. Speak to your servicing dealer.
Air filter Clogged air filter. Clean or replace the air filter.
Fuel filter Clogged fuel filter. Replace the fuel filter.
The engine does not start
rect fuel.
Check
Stop switch. The stop switch is in the stop position. Set the stop switch to the start position.
Starter pawls. The starter pawls cannot move freely. Remove the starter cover and clean around
Fuel tank. Incorrect fuel type. Drain the fuel tank and fill with correct fuel.
Spark plug. The spark plug is dirty or wet. Make sure that the spark plug is dry and
1570 - 001 - 14.10.2020 23
Possible cause Procedure
the starter pawls.
Let an approved service agent help you.
clean.
The spark plug electrode gap is incorrect. Clean the spark plug. Make sure that the
electrode gap is correct. Make sure that the
spark plug has a supressor.
Refer to technical data for correct electrode
gap.
The spark plug is loose. Tighten the spark plug.

Transportation and storage
• For storage and transportation of the product and
fuel, make sure that there are no leaks or fumes.
Sparks or open flames, for example from electrical
devices or boilers, can start a fire.
• Always use approved containers for storage and
transportation of fuel.
• Empty the fuel tank before transportation or longterm storage. Discard the fuel at an applicable
disposal location.
• Use the transportation guard on the product to
prevent injuries or damage to the product. A blade
that does not move can also cause serious injuries.
• Remove the spark plug cap from the spark plug.
• Attach the product safely during transportation.
Technical data
Technical data
128LX, LT28CSHV
Engine
Cylinder displacement, cu.in/cm
Idle speed, rpm 2300–3200
Recommeded max. speed, rpm 8000
Maximum engine power acc. to ISO 8893, kW/hp @ rpm 0.7/0.94 @ 8000
Catalytic converter muffler Yes
Maximum output shaft rotation 7200
Ignition system
Spark plug Champion RCJ 8Y
Electrode gap, in./mm 0.024/0.6
Fuel and lubrication system
Fuel tank capacity, US pint/l 0.85/0.4
Weight
Weight, lb/kg 11.0/5.0
2
3
1.7/28
Accessories
Accessories
Approved accessories
Center hole in blades/cutters, Ø 25.4 mm
2
This spark ignition system complies with the Canadian ICES-002 standard.
24 1570 - 001 - 14.10.2020
Accessory type Cutting attachment guard, art. no.

Approved accessories Accessory type Cutting attachment guard, art. no.
Output shaft thread M10 LH
Grass blade/grass cutter Multi 255-4 (Ø 255 4 teeth) 580 44 66-06
Trimmer head T25 (Ø 2.4 mm cord) 580 44 66-06
Support cup 503 89 01-01 N/A
1570 - 001 - 14.10.2020 25

Contenido
Introducción.................................................................. 26
Seguridad..................................................................... 29
Montaje......................................................................... 36
Funcionamiento............................................................ 38
Mantenimiento.............................................................. 45
Introducción
Descripción del producto
El producto es una recortadora de césped con un motor
de combustión.
Se realiza un trabajo constante para aumentar su
seguridad y la eficiencia durante la operación. Póngase
en contacto con su taller de servicio para obtener más
información.
Uso previsto
Utilice el producto con una hoja para hierba o un
cabezal de corte para césped. No utilice el producto
Solución de problemas................................................. 48
Transporte y almacenamiento...................................... 49
Datos técnicos.............................................................. 49
Accesorios.................................................................... 50
para otras tareas que no sean cortar y desbrozar
césped.
Tenga en cuenta: Las normativas nacionales o locales
pueden establecer límites para el funcionamiento del
producto.
Utilice el producto solo con accesorios aprobados por el
fabricante. Consulte
Accesorios en la página 50
.
26 1570 - 001 - 14.10.2020

Descripción general del producto
18
19
20
1
24
21
23
25
26
28
27
1
3
5
6
7
8
10
11
12
13
15
17
9
16
14
4
2
22
1. Hoja para hierba
2. Tapón de llenado de grasa
3. Engranaje angulado
4. Protección del equipo de corte
5. Eje
6. Mango en J
7. Abrazadera de arnés
8. Interruptor de detención
9. Acelerador
10. Bloqueo del acelerador
11. Sombrerete de bujía y bujía
12. Cubierta del cilindro
13. Empuñadura de la cuerda de arranque
14. Bulbo de la purga de aire
15. Depósito de combustible
16. Cubierta del filtro de aire
17. Estrangulador
18. Contratuerca
19. Brida de apoyo
20. Cazoleta de apoyo
21. Disco de arrastre
22. Cabezal de corte
23. Llave combinada
24. Protección para transporte
25. Llave hexagonal
26. Pasador de bloqueo
27. Arnés
28. Manual del usuario
1570 - 001 - 14.10.2020 27

Símbolos en el producto
5
0
FT
1
5
m
50F
T
15 m
EMISSION CONTROL INFORMATION
REFER TO OWNER'S MANUAL FOR
MAINTENANCE SPECIFICATIONS AND ADJUSTMENTS.
SN:
THIS ENGINE MEETS EXH AND EVP EMISSIONS REGULATIONS
FOR SMALL OFF ROAD ENGINES
FAMILY/DISP
PLT # SKU #
EMISSION COMPLIANCE PERIOD
(XX:XX)
ADVERTENCIA: Tenga cuidado y utilice el
producto correctamente. Este producto
puede causar daños graves o fatales al
operador o a otras personas.
Lea atentamente el manual de instrucciones
y asegúrese de que entiende las
instrucciones antes de usar el producto.
Use protección auricular aprobada. Use
protección ocular aprobada.
Bulbo de la purga de aire.
Estrangulador.
aaaassxxxx La placa de características muestra el
número de serie. aaaa es el año de
producción y ss es la semana de pro-
ducción.
Utilice guantes protectores aprobados
durante el funcionamiento y mantenimiento.
Utilice botas o zapatos de protección con
suelas antideslizantes. Utilice ropa de tejido
resistente y que lo cubra por completo.
Tenga en cuenta: Otros símbolos o etiquetas del
producto hacen referencia a requisitos de certificación
para otras zonas comerciales.
EPA III
Si tiene el cabello largo, asegúrese de
amarrarlo sobre sus hombros.
El producto puede provocar que los objetos
salgan expulsados, lo que puede causar
lesiones.
Régimen máximo del eje de salida.
Manténgase a un mínimo de 15 m/50 ft de
distancia de las personas y los animales
durante el funcionamiento del producto.
Existe riesgo de lanzada de la hoja si el
equipo de corte entra en contacto con un
objeto que no se corta inmediatamente. El
producto puede cortar partes del cuerpo.
Manténgase a un mínimo de 15 m/50 ft de
distancia de las personas y los animales
mientras funcione el producto.
El Período de cumplimiento de emisiones al que se
hace referencia en la etiqueta de Cumplimiento de
emisiones indica la cantidad de horas de
funcionamiento en la que se ha demostrado que el
motor cumple los requisitos de emisiones federales y de
Las flechas muestran el límite de la posición
California.
del mango.
ABREVIATURAS DE LA ETIQUETA DE CONTROL DE EMISIONES
Información general Sistemas de control de emisiones de
ECS Sistema de control de
EXH/EVP Escape y evaporación EM Modificación del motor N Nailon
emisiones
escape
ECM Módulo de control del
motor (afinación automática)
Sistemas de control de emisiones
por evaporación
C Coextrusionado (multi-
capa)
28 1570 - 001 - 14.10.2020

ABREVIATURAS DE LA ETIQUETA DE CONTROL DE EMISIONES
¡ADVERTENCIA!
Los gases de escape del motor de este
producto contienen sustancias químicas
conocidas en el Estado de California
como causantes de cáncer, defectos
congénitos y otros daños reproductivos.
Información general Sistemas de control de emisiones de
escape
HRS Horas OC Catalizador oxidante P HDPE o PE tratados
REGS Reglamentos TWC Catalizador de tres vías S Sellado
SORE Motores todoterreno pe-
queños
US EPA Agencia de Protección
Ambiental de Estados
Unidos
CAL California
EVAP Evaporación
DISPL Desplazamiento
Sistemas de control de emisiones
por evaporación
Propuesta 65 de California
Responsabilidad del fabricante
Como se menciona en las leyes de responsabilidad del
fabricante, no nos hacemos responsables de los daños
que cause nuestro producto si:
• el producto se repara incorrectamente
• el producto se repara con piezas que no son del
fabricante o que este no autoriza
• el producto tiene un accesorio que no es del
fabricante o que este no autoriza
• el producto no se repara en un centro de servicio
autorizado o por una autoridad aprobada.
Seguridad
Definiciones de seguridad
Las advertencias, precauciones y notas se utilizan para
señalar las piezas particularmente importantes del
manual.
ADVERTENCIA: Se utilizan para señalar el
riesgo de lesiones graves o mortales para el
operador o para aquellos que se encuentren
cerca si no se siguen las instrucciones del
manual.
AVISO: Se utilizan para señalar el riesgo de
dañar la máquina, otros materiales o el área
adyacente si no se siguen las instrucciones
del manual.
Tenga en cuenta: Se utilizan para entregar más
información necesaria en situaciones particulares.
1570 - 001 - 14.10.2020 29
Instrucciones generales de seguridad
ADVERTENCIA: Lea atentamente las
instrucciones de advertencia siguientes
antes de usar el producto.
• Una desbrozadora, un quita arbustos o una
recortadora pueden resultar peligrosos si se utilizan
de manera inapropiada o incorrecta, ya que pueden
causar daños graves o fatales al operador u otras
personas. Es muy importante que lea y comprenda
el contenido de este manual de usuario.
• Bajo ninguna circunstancia se puede modificar el
diseño del producto sin autorización del fabricante.
No utilice nunca un producto que ha sido modificado
de cualquier modo con respecto a la especificación
original y utilice siempre accesorios originales. Las
modificaciones o accesorios no autorizados pueden
provocar daños personales o la muerte del operador
u otras personas.
• El interior del silenciador contiene productos
químicos que pueden ser cancerígenos. Evite el

contacto con estos elementos en caso de que se
dañe el silenciador.
• En este producto se genera un campo
electromagnético durante su funcionamiento. Este
campo puede, en determinadas circunstancias,
interferir con implantes médicos activos o pasivos.
Para reducir el riesgo de lesiones graves o fatales,
recomendamos a las personas con implantes
médicos consultar a su médico y al fabricante del
implante médico antes de usar esta máquina.
Instrucciones de seguridad para el montaje
ADVERTENCIA: Lea atentamente las
instrucciones de advertencia siguientes
antes de usar el producto.
• Utilice guantes protectores homologados cuando
monte el producto y el equipo de corte.
• Retire el sombrerete de bujía de la bujía antes de
montar el producto.
• Asegúrese de que el manillar y la protección del
equipo de corte correctos están montados antes de
utilizar el producto.
• Una protección defectuosa o un equipo de corte
incorrecto pueden provocar lesiones. No utilice un
equipo de corte sin una protección aprobada.
• Antes de arrancar el producto, conecte
correctamente la cubierta del embrague y el eje.
• El disco de arrastre y la brida de apoyo se deben
acoplar correctamente en el orificio central del
equipo de corte. Un equipo de corte mal colocado
puede causar daños o incluso la muerte.
• Fije el arnés al producto para evitar daños al
operador o a otras personas.
Instrucciones de seguridad para el funcionamiento
ADVERTENCIA: Lea atentamente las
instrucciones de advertencia siguientes
antes de usar el producto.
• Nunca utilice un arnés con un sistema de liberación
rápida defectuoso. Cuando utilice un quita arbustos,
debe estar siempre enganchado firmemente al
arnés. De lo contrario no podrá controlar el cepillo
de la cortadora de forma segura y esto puede
resultar en lesiones hacia usted o hacia otros.
• Siempre sujete el producto con ambas manos.
Mantenga el producto al lado derecho de su cuerpo.
Mantenga el equipo de corte por debajo de la
cintura. Conecte el producto al anillo de suspensión
del arnés. Mantenga todas las partes del cuerpo
lejos de las superficies calientes. Mantenga todas
las partes del cuerpo lejos del equipo de corte
giratorio.
• Antes de utilizar el producto, aprenda y comprenda
la diferencia entre el desbrozamiento forestal, el
desbrozamiento de césped y el corte de césped.
• Nunca utilice un producto que se haya modificado
de cualquier modo con respecto a la especificación
original.
• Nunca utilice un producto que esté defectuoso.
Realice las comprobaciones de seguridad, el
mantenimiento y las instrucciones de servicio
descritas en este manual. Especialistas capacitados
y calificados deben llevar acabo algunas medidas de
mantenimiento y servicio. Consulte
mantenimiento en la página 45
• Utilice equipo de protección personal. Consulte
Equipo de protección personal en la página 32
• No utilice el producto en condiciones climáticas
desfavorables, como niebla densa, lluvia intensa,
vientos fuertes, frío intenso, etc. Trabajar con mal
tiempo es agotador y a menudo conlleva más
riesgos, como suelo congelado, dirección de derribo
impredecible, etc.
• Los únicos accesorios que pueden utilizarse con
esta unidad del motor son los equipos de corte que
recomendamos. Consulte
50
.
• Esté atento a que no salgan objetos despedidos.
Use siempre protección ocular homologada. No se
apoye nunca sobre la protección del equipo de
corte. Es posible que las piedras, residuos, etc.
salgan despedidos en dirección a los ojos y le
causen ceguera o lesiones graves.
• Nunca utilice el producto si está cansado o enfermo,
si ha bebido alcohol o si consume drogas o
medicamentos que puedan afectar la visión, el juicio
o la coordinación.
• La exposición prolongada al ruido puede provocar la
pérdida permanente de la audición. Use siempre
protectores auriculares aprobados.
• Cuando utilice protectores auriculares, esté atento a
las señales de advertencia y voces fuertes. Siempre
retire sus protectores auriculares cuando se detenga
el motor.
• Realice una inspección general del producto antes
de utilizar. Consulte
página 38
• No utilice el producto si se ha modificado o si se
encuentra defectuoso.
• Asegúrese de que el sombrerete de bujía y el cable
de encendido no se encuentren dañados para evitar
el riesgo de sacudida eléctrica.
• Revise el área de trabajo para asegurarse de que no
haya personas, animales ni objetos que puedan
afectar de manera negativa la seguridad de
funcionamiento del producto.
• Revise el área de trabajo para asegurarse de que no
haya personas ni animales que toquen el equipo de
corte o que puedan resultar golpeados por los
objetos que salgan expulsados del equipo de corte.
.
Antes de usar el producto en la
Programa de
.
.
Accesorios en la página
30
1570 - 001 - 14.10.2020

• Inspeccione la zona de trabajo. Quite todos los
objetos sueltos, como piedras, cristales rotos,
clavos, alambre de acero, cuerdas, etc., que puedan
salir expulsados o enredarse en el equipo de corte.
• No utilice el producto en una situación o lugar en el
que no pueda pedir ayuda si se produce un
accidente.
• No utilice el producto sin protección.
• Asegúrese de que se mantenga una distancia
mínima de 15 m/50' respecto de personas o
animales durante el trabajo. Siempre mire hacia
atrás antes de dar la vuelta con el producto.
Detenga el producto de inmediato si una persona o
un animal ingresa a la zona de seguridad de 15 m/
50'. Si más de un operador trabaja en la misma
zona, mantenga una distancia de seguridad mínima
de 15 m/50 ft.
• Asegúrese de poder moverse sin problemas y tener
una postura segura. Revise el área a su alrededor
en busca de obstáculos como raíces, rocas, ramas y
zanjas. Tenga cuidado cuando trabaje en
pendientes.
• No se estire demasiado. Mantenga los pies en una
posición estable y un buen equilibrio en todo
momento.
• Antes de arrancar el producto, colóquelo en una
superficie plana, a un mínimo de 3 m de la fuente de
combustible y de donde se carga el combustible.
Asegúrese de que no haya objetos cerca del equipo
de corte o que lo toquen.
• Si el equipo de corte gira a régimen de ralentí,
solicite a un taller de servicio que lo ajuste. No utilice
el producto hasta que se haya ajustado o reparado.
• Esté atento a que no salgan objetos despedidos.
Utilice siempre protección ocular aprobada y
manténgase alejado de la protección del equipo de
corte. Pueden salir expulsados piedras y otros
objetos pequeños, caerle en los ojos y provocarle
ceguera u otras lesiones.
• No suelte el producto con el motor encendido, a
menos que lo tenga a la vista.
• No retire el material de corte, ni deje que otras
personas lo hagan, mientras el motor se encuentre
encendido o el equipo de corte siga girando, ya que
puede provocar daños graves.
• El engranaje angulado puede calentarse durante el
uso y es posible que permanezca caliente por un
largo tiempo. Si lo toca, puede quemarse.
• Siempre detenga el motor y asegúrese de que el
equipo de corte no gire antes de retirar material
enrollado en el eje de la hoja o atrapado entre la
protección y el equipo de corte. El equipo de corte
sigue girando incluso después de soltar el
acelerador. Asegúrese de que el equipo de corte se
haya detenido completamente y desconecte el
sombrerete de la bujía antes de empezar a trabajar
en él.
• Tenga cuidado al quitar material alrededor del
equipo de corte. El engranaje angulado se calienta
durante el funcionamiento y puede provocar
quemaduras.
• Los gases de escape del motor están calientes y
pueden contener chispas. Riesgo de incendio.
Tenga cuidado cuando circule cerca de material
seco e inflamable.
• Detenga el motor antes de pasar a una nueva área
de trabajo. Siempre coloque la protección para
transportes antes de mover el equipo.
• Nunca utilice el producto en un espacio interior o en
espacios sin ventilación adecuada. Los gases de
escape contienen monóxido de carbono, un gas
inodoro, venenoso y altamente peligroso que puede
causar la muerte debido a asfixia o envenenamiento
por monóxido de carbono.
• Nunca permita que los niños utilicen el producto o
que estén cerca de este. Debido a que el producto
está equipado con un interruptor de detención que
se acciona por resorte y se puede arrancar con baja
velocidad y fuerza desde la empuñadura de
arranque, incluso niños pequeños pueden, en
determinadas circunstancias, lograr la fuerza
necesaria para arrancar el producto. Esto puede
significar riesgo de daños personales graves. Por
consiguiente, saque el sombrerete de bujía cuando
no se supervise el producto atentamente.
• La sobreexposición a las vibraciones puede producir
trastornos vasculares o daños al sistema nervioso
en personas que padecen de problemas de
circulación. Comuníquese con su médico si
experimenta síntomas de sobreexposición a las
vibraciones. Estos síntomas son entumecimiento,
pérdida de sensibilidad, hormigueo, ardor, dolor,
pérdida de fuerza, cambios en el color o el estado
de la piel. Normalmente, estos síntomas se
presentan en los dedos, las manos o las muñecas.
El riesgo aumenta a bajas temperaturas.
• Verifique que el equipo de corte está correctamente
montado y ajustado.
• Si se encuentra en una situación en la que no está
seguro de cómo proceder, debe preguntarle a un
experto. Póngase en contacto con el distribuidor o el
taller de servicio.
• Evite todos los usos que considere que están más
allá de su capacidad.
• No utilice el producto a menos que sea capaz de
pedir ayuda en caso de accidente.
• El uso incorrecto de un equipo de corte o una hoja
mal afilada aumenta el riesgo de una lanzada de
hoja.
• Existe la posibilidad de que los productos equipados
con hojas para hierba salgan eyectados
violentamente hacia un costado cuando la hoja entra
en contacto con un objeto fijo. Esto se denomina
lanzada de hoja. Una lanzada de hoja puede ser lo
suficientemente violenta como para hacer que la
máquina o el operador salgan lanzados en cualquier
dirección, lo que podría hacer que se pierda el
control de la máquina. La lanzada de hoja puede
suceder sin previa advertencia si la máquina se
1570 - 001 - 14.10.2020
31

enreda, atasca o enlaza. La lanzada de hoja tiene
más probabilidades de ocurrir en áreas donde es
difícil ver el material que se corta.
• Evite cortar con la zona de la hoja entre las
posiciones de las 12:00 y las 15:00 horas. Debido a
la velocidad de rotación de la hoja, puede producirse
la lanzada de hoja cuando se intenta ramas gruesas
con esta área de la hoja.
• Los silenciadores equipados con catalizadores se
calientan mucho durante su uso y permanecen así
durante tiempo después de detenerse. Esto también
se aplica al régimen de ralentí. Tocar el motor puede
quemar su piel. Considere el riesgo de incendio.
• Solo use el equipo de corte con las protecciones que
recomendamos. Consulte
50
.
Accesorios en la página
Equipo de protección personal
• Use botas de protección con punta de acero y
suelas antideslizantes.
ADVERTENCIA: Lea atentamente las
instrucciones de advertencia siguientes
antes de usar el producto.
• Utilice siempre el equipo de protección personal
adecuado cuando use el producto. El equipo de
protección personal no puede impedir el riesgo de
lesiones, pero disminuirá el grado de lesión si ocurre
un accidente. Permita que su distribuidor lo ayude a
seleccionar el equipo correcto.
• Use protección auricular aprobada.
• Use protección ocular homologada. Si utiliza un
visor, también debe usar gafas protectoras
homologadas. Las gafas protectoras homologadas
deben cumplir con la norma ANSI Z87.1 de EE. UU.
o EN 166 para países de la UE.
• Utilice guantes cuando sea necesario, por ejemplo,
cuando conecte, examine o limpie el equipo de
corte.
• Utilice ropa de material resistente. Use siempre
pantalones largos y gruesos, y mangas largas. Evite
usar ropas holgadas que se puedan enganchar con
ramas. No utilice joyas, pantalones cortos o
sandalias. No esté descalzo. Asegure su cabello por
encima del nivel de los hombros.
• Mantenga cerca el equipo de primeros auxilios.
Dispositivos de seguridad en el producto
Para obtener información sobre dónde encontrar
dispositivos de seguridad, consulte
página 26
• No utilice un producto con dispositivos de seguridad
• No realice ninguna modificación en los dispositivos
• Para todos los trabajos de servicio y reparación del
.
ADVERTENCIA: Lea atentamente las
instrucciones de advertencia siguientes
antes de usar el producto.
defectuosos. Revise los dispositivos de seguridad y
realíceles mantenimiento de forma regular. Si los
dispositivos de seguridad están defectuosos,
comuníquese con su taller de servicio Husqvarna.
de seguridad. No utilice el producto si las cubiertas
protectoras, los interruptores de seguridad u otros
dispositivos protectores no están montados o están
defectuosos.
producto, especialmente para los dispositivos de
seguridad, se requiere una capacitación especial. Si
los dispositivos de seguridad no cumplen con las
condiciones indicadas en el presente manual de
usuario, solicite asistencia a un taller de servicio.
Garantizamos la disponibilidad de reparaciones y
Introducción en la
32
1570 - 001 - 14.10.2020

servicios profesionales. Si el concesionario no
A
B
cuenta con un taller de servicio, pídale información
acerca del taller de servicio más cercano.
• No utilice un equipo de corte sin una protección para
equipo de corte aprobada y correctamente acoplada.
Consulte
Comprobación del fiador del acelerador
1. Asegúrese de que el bloqueo del acelerador (A) y el
acelerador (B) se muevan libremente y que el muelle
de retorno funcione de manera correcta.
2. Presione el bloqueo del acelerador hacia abajo y
asegúrese de que vuelva a su posición inicial
cuando lo suelte.
Accesorios en la página 50
.
ajustar el régimen de ralentí en la página
47
.
Para comprobar el interruptor de detención
1. Arranque el motor.
2. Mueva el interruptor de detención a la posición de
detención y asegúrese de que el motor se detenga.
Comprobación de la protección del equipo de corte
La protección del equipo de corte evita lesiones y
detiene los objetos sueltos que salen expulsados en
dirección al usuario.
1. Detenga el motor.
2. Realice una comprobación visual para determinar si
existen daños, por ejemplo, grietas.
3. Asegúrese de que el acelerador esté bloqueado en
la posición de ralentí cuando el bloqueo del
acelerador esté liberado.
4. Encienda el producto y aplique la aceleración
máxima.
5. Suelte el acelerador y asegúrese de que las hojas
se detengan y permanezcan inmóviles.
ADVERTENCIA:
cuando el acelerador está en la posición
de ralentí, se debe ajustar el régimen de
ralentí del carburador. Consulte
1570 - 001 - 14.10.2020
Si las hojas se mueven
Para
3. Reemplace la protección del equipo de corte si está
dañada.
Para ajustar el arnés
Use siempre el arnés cuando utilice el producto. El
arnés permite el máximo nivel de control durante el
funcionamiento del producto. El arnés disminuye el
riesgo de cansancio en brazos y espalda.
ADVERTENCIA: No utilice un arnés
defectuoso.
1. Verifique el arnés en busca de daños y desgaste.
Sustituya siempre un arnés dañado.
2. Colóquese el arnés.
33

3. Ajuste la longitud del arnés hasta que el gancho de
sujeción esté aproximadamente al nivel de su
cadera derecha.
Para revisar el silenciador
ADVERTENCIA: No utilice un producto que
tenga un silenciador defectuoso.
ADVERTENCIA: No utilice el producto si
falta la rejilla apagachispas en el silenciador
o si está defectuosa.
ADVERTENCIA: El silenciador se calienta
mucho durante el funcionamiento y después
de este, así como en el régimen de ralentí.
Utilice guantes protectores para evitar
quemaduras.
El silenciador mantiene los niveles de ruido al mínimo y
dirige los gases de escape lejos del operador.
1. Detenga el motor.
2. Verifique el silenciador en busca de daños y
defectos.
ADVERTENCIA:
del silenciador contienen químicos que
pueden causar cáncer. Tenga cuidado
de no tocar estos elementos si el
silenciador presenta daños.
Las superficies internas
3. Asegúrese de que el silenciador esté correctamente
unido al producto.
4. Realice una inspección visual de la rejilla
apagachispas.
a) Cambie la rejilla apagachispas si está dañada.
b) Limpie la rejilla apagachispas si está bloqueada.
Si se bloquea la rejilla
AVISO:
apagachispas, el producto se
sobrecalienta y esto provoca daños
al cilindro y al pistón.
Instalación y extracción de la contratuerca
ADVERTENCIA:
guantes protectores y tenga cuidado
alrededor de los bordes afilados del equipo
de corte.
Se utiliza una contratuerca para montar algunos tipos de
equipos de corte. La contratuerca tiene un enrosque
hacia la izquierda.
Pare el motor, utilice
34
1570 - 001 - 14.10.2020

• Para instalar la contratuerca, gírela en sentido
opuesto al de rotación.
• Para quitar la contratuerca, retírela en el sentido de
rotación.
• Para aflojar o apretar la contratuerca, utilice una
llave de cubo con eje largo.
ADVERTENCIA: Cuando se afloja y se
aprieta la contratuerca, existe el riesgo
de lesionarse con el equipo de corte.
Tenga cuidado y no toque el equipo de
corte.
Tenga en cuenta: Asegúrese de que no poder girar la
contratuerca con la mano. Sustituya la contratuerca
después de haberla puesto aproximadamente 10 veces.
La contratuerca se debe sustituir después de haberla
apretado unas 10 veces.
Equipo de corte
ADVERTENCIA: Lea atentamente las
instrucciones de advertencia siguientes
antes de usar el producto.
• Realice el mantenimiento periódico. Permita que un
centro de servicio autorizado examine
frecuentemente el equipo de corte para realizar
ajustes o reparaciones.
• El rendimiento del equipo de corte aumenta.
• La vida útil del equipo de corte aumenta.
• Disminuye el riesgo de accidentes.
• Solamente utilice una protección aprobada para el
equipo de corte. Consulte
50
.
• No utilice un equipo de corte dañado.
Cabezal de corte para hierba
• Asegúrese de enrollar el hilo de la recortadora de
césped firme y equitativamente alrededor del tambor
para disminuir la vibración.
• Utilice solamente cabezales e hilos de corte para
hierba aprobados. Consulte
en la página 41
• Utilice una longitud correcta de hilo para la
recortadora. Un hilo largo para la recortadora utiliza
más potencia del motor que un hilo corto.
.
Accesorios en la página
Para recortar el césped
• Asegúrese de que la cortadora en la protección del
equipo de corte no está dañada.
• Empape el hilo de la recortadora de césped en agua
durante 2 días antes de conectarlo al producto. Esto
aumenta la vida útil del hilo de la recortadora de
césped.
• Consulte las instrucciones del equipo de corte para
usar el procedimiento adecuado para cargar el hilo
de la recortadora y su diámetro adecuado.
Hoja para hierba
• Utilice hojas correctamente afiladas. Una hoja mal
afilada o dañada aumenta el riesgo de lesiones.
Consulte las instrucciones del empaque de la hoja.
• Utilice hojas ajustadas correctamente. Una hoja mal
ajustada aumenta el riesgo de lesiones y daños.
Seguridad de combustible
ADVERTENCIA: Lea atentamente las
instrucciones de advertencia siguientes
antes de usar el producto.
• No mezcle el combustible en interiores o cerca de
una fuente de calor.
• No arranque el producto si hay combustible o aceite
de motor en el producto. Quite el combustible o
aceite no deseado y deje secar el producto. Quite el
combustible no deseado del producto.
• Si derrama combustible en su ropa, cámbiese la
ropa inmediatamente.
• No permita que le caiga combustible en el cuerpo,
ya que puede causar lesiones. Si le cae combustible
en el cuerpo, utilice jabón y agua para quitarlo.
• No arranque el motor si derrama aceite o
combustible en el producto o en su cuerpo.
• No arranque el producto si el motor tiene una fuga.
Examine frecuentemente el motor en busca de
fugas.
• Tenga cuidado con el combustible. El combustible
es inflamable y los gases son explosivos y pueden
causar lesiones graves o fatales.
• No respire los gases del combustible, ya que
pueden causar lesiones. Asegúrese de que haya
suficiente flujo de aire.
• No fume cerca del combustible o del motor.
• No coloque objetos calientes cerca del combustible
o del motor.
• No agregue combustible cuando el motor esté en
marcha.
• Asegúrese de que el motor se enfríe antes de llenar
el depósito de combustible.
• Antes de llenar el depósito de combustible, abra
lentamente la tapa del depósito de combustible y
libere la presión con cuidado.
• Asegúrese de que haya suficiente flujo de aire
cuando recargue y mezcle combustible (gasolina y
aceite para motores de dos tiempos) o cuando vacíe
el depósito de combustible.
1570 - 001 - 14.10.2020
35

• El combustible y sus gases son altamente
inflamables y pueden causar lesiones graves si se
inhalan o entran en contacto con la piel. Por esta
razón, tenga precaución al manipular el combustible
y asegúrese de que haya suficiente ventilación.
• Apriete la tapa del depósito de combustible con
cuidado para evitar incendios.
• Mueva el producto a un mínimo de 3 m (10 pies) de
la posición en la que se llenó el depósito antes de
empezar.
• No ponga demasiado combustible en el depósito de
combustible.
• Asegúrese de que no se puedan provocar fugas
cuando mueva el producto o el recipiente de
combustible.
• No coloque el producto ni un recipiente de
combustible donde haya una llama expuesta, una
chispa o una fuente de calor. Asegúrese de que no
haya una llama expuesta en el área de
almacenamiento.
• Utilice solamente contenedores aprobados cuando
mueva el combustible o coloque el combustible en el
almacenamiento.
• Vacíe el depósito de combustible antes de un
almacenamiento a largo plazo. Cumpla con las leyes
locales en cuanto al lugar en dónde se puede
deshacer del combustible.
• Limpie el producto antes de un almacenamiento a
largo plazo.
• Retire el sombrerete de bujía antes de almacenar el
producto para asegurarse de que el motor no
arranque accidentalmente.
Instrucciones de seguridad para el mantenimiento
• Detenga el motor, asegúrese de que el equipo de
corte se detenga y deje que se enfríe antes de
realizar el mantenimiento.
• Desconecte el sombrerete de bujía antes de realizar
el mantenimiento.
• Los gases de escape del motor contienen monóxido
de carbono, un gas inodoro, tóxico y muy peligroso
que puede causar la muerte. No arranque el
producto en interiores o en espacios cerrados.
• Los gases de escape del motor están calientes y
pueden contener chispas. No encienda el producto
en interiores ni cerca de materiales inflamables.
• Accesorios y modificaciones en el producto que no
estén aprobados por el fabricante pueden causar
lesiones graves o la muerte. No modifique el
producto. Siempre utilice accesorios originales.
• Si el mantenimiento no se realiza de manera
correcta y regular, aumenta el riesgo de que se
produzcan lesiones y que el producto se dañe.
• Solo realice mantenimiento según lo que se indica
en este manual de usuario. Solicite que un
Husqvarna taller de servicio realice todos los otros
servicios.
• Permita que un taller de servicio Husqvarna
aprobado realice trabajos de mantenimiento en el
producto con regularidad.
• Cambie las piezas dañadas, desgastadas o rotas.
ADVERTENCIA: Lea atentamente las
instrucciones de advertencia siguientes
antes de usar el producto.
Montaje
Introducción
ADVERTENCIA: Antes de montar el
producto, debe leer y entender el contenido
del capítulo sobre seguridad.
ADVERTENCIA: Retire el cable de la bujía
de la bujía antes de montar el producto.
Para instalar el mango en J
ADVERTENCIA: Utilice únicamente hojas
para hierba o cabezales de corte con el
mango en J.
36 1570 - 001 - 14.10.2020
1. Coloque el mango en J entre las 2 flechas del eje.
2. Instale el tornillo, la placa y la tuerca de mariposa.

3. Ajuste el mango en J en una buena posición de
A
F
G
E
D
C
B
A
trabajo.
4. Apriete completamente la tuerca de mariposa.
Para instalar la abrazadera del arnés
ADVERTENCIA: Un equipo de corte mal
colocado puede provocar lesiones o incluso
la muerte.
Para instalar la protección del equipo de corte y la hoja para hierba
1. Coloque la protección del equipo de corte (A) en el
eje y apriete el perno.
ADVERTENCIA: El arnés debe estar fijado
de forma segura a la abrazadera del arnés
cuando utilice el producto.
1. Coloque las 2 mitades de la abrazadera del arnés en
el eje y alinee los orificios de los tornillos.
2. Instale los 2 tornillos.
3. Ajuste la abrazadera del arnés a la posición correcta
encima de la flecha.
4. Apriete completamente los 2 tornillos.
Para montar el equipo de corte
El equipo de corte incluye otro equipo de corte y una
protección para este equipo de corte.
ADVERTENCIA: Use guantes protectores.
ADVERTENCIA: Utilice siempre la
protección del equipo de corte recomendada
para el equipo de corte. Consulte
Accesorios en la página 50
.
2. Gire el eje de salida hasta que uno de los orificios en
el disco de arrastre (B) se alinee con el orificio
correspondiente en la caja de engranajes.
3. Coloque el pasador de bloqueo (C) en el orificio para
bloquear el eje.
4. Coloque la hoja para hierba (D), la cazoleta de
apoyo (E) y la brida de apoyo (F) en el eje de salida.
5. Asegúrese de que el disco de arrastre y la brida de
apoyo se fijen correctamente en el centro del orificio
de la hoja para hierba.
6. Coloque la tuerca (G).
1570 - 001 - 14.10.2020
37

7. Apriete la tuerca con la llave de cubo. Sostenga el
A
C
B
F
D
E
F
eje de la llave de cubo cerca de la protección del
equipo de corte. Apriete en la dirección opuesta a la
que gira el accesorio de corte. Apriete la tuerca a
35-50 Nm.
Para instalar la protección del equipo de corte y el cabezal de corte
AVISO: Asegúrese de que la extensión de la
protección esté instalada.
1. Instale la protección del equipo de corte (A)
destinada al funcionamiento con el cabezal de corte.
2. Cuelgue la protección del equipo de corte en los
2 ganchos del soporte de la placa (B).
3. Doble la protección del equipo de corte alrededor del
eje y apriete el tornillo (C) en el lado opuesto del eje.
Utilice la llave combinada para apretar el tornillo.
4. Instale el disco de arrastre (D) en el eje de salida.
5. Gire el eje de salida hasta que uno de los orificios en
el disco de arrastre se alinee con el orificio
correspondiente en la caja de engranajes.
6. Coloque el pasador de bloqueo (E) en el orificio para
bloquear el eje.
7. Instale el cabezal de corte (F) hacia la izquierda.
8. Para retirar el cabezal de corte y la protección del
equipo de corte, siga las instrucciones en el orden
opuesto.
Funcionamiento
Introducción
ADVERTENCIA: Antes de utilizar el
producto, debe leer y entender el capítulo
sobre seguridad.
Antes de usar el producto
• Inspeccione el área de trabajo para asegurarse de
que conoce el tipo de terreno, la pendiente del
38 1570 - 001 - 14.10.2020
terreno y para notar la presencia de obstáculos
como piedras, ramas y zanjas.
• Realice una inspección de reacondicionamiento del
producto.
• Haga las inspecciones de seguridad, mantenimiento
y servicio que figuran en este manual.
• Asegúrese de que todas las cubiertas, las
protecciones, las manijas y el equipo de corte estén
fijados correctamente y que no presenten daños.
• Asegúrese de que no haya grietas en la parte
inferior de los dientes de la hoja para hierba ni junto

al orificio central de la hoja. Reemplace la hoja si
está dañada.
accesorio de corte si recibieron golpes o si
presentan grietas.
• Inspeccione la brida de apoyo en busca de grietas.
Reemplace la brida de apoyo si está dañada.
• Asegúrese de que la contratuerca no se pueda
retirar manualmente. Si puede quitarla de forma
manual, no bloquea correctamente el equipo de
corte y se debe reemplazar.
• Inspeccione la protección de la hoja para determinar
si presenta daños o grietas. Reemplace la hoja o la
protección de la hoja si han sido expuestas a golpes
o están agrietadas.
• Inspeccione el cabezal de corte y la protección del
equipo de corte para determinar si presentan daños
o grietas. Reemplace el cabezal de corte y el
Combustible
Este producto tiene un motor de dos tiempos.
AVISO: Usar el tipo incorrecto de
combustible puede causar daños en el
motor. Utilice una mezcla de gasolina y de
aceite para motores de dos tiempos.
Combustible premezclado
• Utilice combustible de alquilato premezclado
Husqvarna para obtener el mejor rendimiento y
prolongar la vida útil del motor. Este combustible
contiene menos químicos dañinos en comparación
con el combustible normal, lo cual disminuye los
gases de escape dañinos. La cantidad de restos
después de la combustión es menor con este
combustible, que mantiene más limpios los
componentes del motor.
Para mezclar combustible
Gasolina
• Utilice gasolina sin plomo de buena calidad con un
contenido máximo de un 10 % de etanol.
No utilice gasolina con un
AVISO:
octanaje inferior a 90 RON/87 AKI. El
uso de gasolina de octanaje inferior
puede causar el golpeteo del motor, lo
que provoca daños en el motor.
Aceite para motores de dos tiempos
• Para obtener los mejores resultados y el mejor
rendimiento, utilice aceite para motores de dos
tiempos Husqvarna.
• Si el aceite para motores de dos tiempos Husqvarna
no está disponible, utilice un aceite para motores de
dos tiempos de buena calidad para motores
enfriados por aire. Contáctese con su concesionario
de servicio para seleccionar el aceite correcto.
AVISO: No utilice aceite para motores
de dos tiempos para motores fueraborda
refrigerados por agua, también conocido
1570 - 001 - 14.10.2020 39

como aceite para fueraborda. No utilice
aceite para motores de cuatro tiempos.
Para mezclar gasolina y aceite para motores de dos tiempos
Gasolina, litros Aceite para
motores de
dos tiempos, litro
2 % (50:1)
5 0,10
10 0,20
15 0,30
20 0,40
Galón estadounidense Onza líquida
EE. UU.
1 2 ½
2 1/2 6 ½
5 12 ⅞
AVISO: Los errores pequeños pueden influir
drásticamente en la proporción de la mezcla
cuando se mezclan cantidades pequeñas de
combustible. Mida cuidadosamente la
cantidad de aceite y asegúrese de obtener
la mezcla correcta.
Para llenar el depósito de combustible
ADVERTENCIA: Para su seguridad, siga el
procedimiento que se indica a continuación.
1. Detenga el motor y deje que se enfríe.
2. Limpie el área alrededor del tapón del depósito de
combustible.
3. Agite el recipiente y asegúrese de que el
combustible esté totalmente mezclado.
4. Retire lentamente la tapa del depósito de
combustible para liberar la presión.
5. Llene el depósito de combustible.
AVISO: Asegúrese de que el depósito
de combustible no esté demasiado lleno.
El combustible se expande cuando se
calienta.
6. Apriete bien la tapa del depósito de combustible
cuidadosamente.
7. Limpie los derrames de combustible en el producto y
los alrededores.
8. Antes de arrancarlo, aleje el producto 3 m/10’ o más
del área de recarga de combustible y de la fuente de
combustible.
Tenga en cuenta:
depósito de combustible en el producto, consulte
Introducción en la página 26
Para conocer la ubicación del
.
1. Llene la mitad de la cantidad de gasolina en un
recipiente limpio para combustible.
2. Agregue la cantidad total de aceite.
3. Agite la mezcla de combustible.
4. Agregue la cantidad restante de gasolina al
recipiente.
5. Agite cuidadosamente la mezcla de combustible.
AVISO: No mezcle el combustible durante
más de 1 mes cada vez.
40
Para prepararse para desbrozar el césped
1. Aplique soporte al producto con el arnés durante el
desbroce de césped.
2. Asegúrese de que el equipo de corte esté paralelo al
suelo.
1570 - 001 - 14.10.2020

Para arrancar un motor frío
1. Presione el bulbo de la bomba de combustible de
aire 10 veces.
2. Mueva el estrangulador a la posición de
estrangulamiento totalmente abierta.
3. Mantenga el cuerpo del producto en el suelo con la
mano izquierda. No se pare sobre el producto. Tire
de la empuñadura de la cuerda de arranque
lentamente hasta que sienta resistencia.
estas instrucciones, se pueden producir
daños en el motor.
5. Mueva el estrangulador a la posición de
estrangulamiento media.
6. Tire de la empuñadura de la cuerda de arranque
hasta que el motor arranque.
7. Deje que el motor se caliente durante 10 segundos.
8. Mueva el estrangulador a la posición de
estrangulamiento apagada.
Para arrancar un motor caliente
1. Presione lentamente el bulbo de la purga de aire 10
veces.
2. Mueva la palanca del estrangulador a la posición
HALF CHOKE (Estrangulador en posición media).
3. Tire de la empuñadura de la cuerda de arranque
rápidamente hasta que arranque el motor.
4. Mueva la palanca del estrangulador a la posición NO
CHOKE (Estrangulador apagado).
Para detener el producto
• Presione el interruptor de detención para detener el
motor.
Tenga en cuenta: El interruptor de detención regresa
automáticamente a su posición inicial.
Tenga en cuenta:
arranque el motor.
4. Tire de la empuñadura de la cuerda de arranque tres
veces con fuerza.
1570 - 001 - 14.10.2020
No tire del acelerador cuando
No tire de la cuerda de arranque
AVISO:
hasta que se detenga. No suelte la
cuerda de arranque cuando esté
totalmente extendida. Suelte la cuerda
de arranque lentamente. Si no se siguen
Recorte de césped con cabezal de corte
Para recortar el césped
1. Sostenga el cabezal de corte inmediatamente sobre
el nivel del suelo en un ángulo. No presione el hilo
de la recortadora de césped contra este último.
2. Disminuya la longitud del hilo de la recortadora entre
10 y 12 cm/4 y 4,75”.
41

3. Disminuya el régimen del motor para reducir el
riesgo de dañar las plantas.
4. Use una aceleración de un 80 % cuando corte el
césped cerca de objetos.
Para arrancar el pasto con una hoja para hierba
1. Las hojas para hierba y las cortadoras de césped no
se deben utilizar para tallos leñosos.
2. Una hoja para hierba se utiliza para todos los tipos
de césped alto o hierba gruesa.
3. La hierba se corta con un movimiento lateral y
oscilante, donde el movimiento de derecha a
izquierda es de limpieza y el movimiento de
izquierda a derecha es de retorno. Deje que el lado
izquierdo de la hoja (levemente inclinada hacia la
izquierda y hacia el frente) realice el corte.
4. Si la hoja está inclinada a la izquierda cuando corta
la hierba, esta se acumulará en una línea, lo que
hace que sea más sencillo juntarla, por ejemplo, con
un rastrillo.
5. Intente trabajar a compás. Párese firmemente con
los pies separados. Avance después del movimiento
de retorno y vuelva a pararse firme.
6. Deje que la cazoleta de apoyo descanse
ligeramente sobre el suelo. Se utiliza para evitar que
la hoja golpee el suelo.
7. Reduce el riesgo de que el material envuelva la hoja
trabajando siempre a máxima velocidad y evitando
el material cortado anteriormente durante el
movimiento de retorno.
8. Detenga el motor, desenganche el arnés y coloque
la máquina en el suelo antes de comenzar a juntar el
material cortado.
Para cortar el césped
1. Asegúrese de que el hilo de la recortadora de
césped esté paralelo al suelo cuando corte.
2. No presione el cabezal de corte contra el suelo. Esto
puede provocar daños al producto.
3. Mueva el producto de un lado a otro cuando corte.
Utilice la máxima velocidad.
Para barrer el césped
El flujo de aire del hilo giratorio de la recortadora puede
usarse para eliminar el césped cortado de una zona.
1. Mantenga el cabezal de corte y el hilo de la
recortadora paralelos al suelo y por sobre él.
2. Acelere al máximo.
3. Mueva el cabezal de corte de lado a lado y barra la
hierba.
ADVERTENCIA:
cabezal de corte cada vez que monte el
nuevo hilo de la recortadora para evitar
desestabilizaciones y vibraciones en los
manillares. También realice una
comprobación de las demás piezas del
cabezal de corte y límpielo si es necesario.
Limpie la cubierta del
42 1570 - 001 - 14.10.2020

Para sustituir el hilo de la recortadora
6,0 m
18'
3,05 m
9'
2,0-2,4 mm
.079-.095"
10 cm
4"
1570 - 001 - 14.10.2020 43

6"
15 cm
44 1570 - 001 - 14.10.2020

"Click"
Mantenimiento
Introducción
ADVERTENCIA: Lea detenidamente el
capítulo de seguridad antes de realizar
mantenimiento en el producto.
AVISO: Para evitar un arranque accidental,
retire el sombrerete de bujía antes de
realizar el mantenimiento del producto.
Programa de mantenimiento
Mantenimiento
Diario
Limpie la superficie externa. X
Examine el arnés en busca de daños. X
Compruebe si hay daños en el anillo de suspensión. X
Compruebe el bloqueo del acelerador y el acelerador. Consulte
del fiador del acelerador en la página 33
Asegúrese de que el equipo de corte no gire en régimen de ralentí. X
Compruebe el interruptor de detención Consulte
de detención en la página 33
Examine la protección del equipo de corte en busca de daños y grietas. X
Asegúrese de que la hoja para hierba esté alineada con el centro. Asegúrese de
que la hoja para hierba esté afilada y que la hoja o el orificio central no estén
dañados.
1570 - 001 - 14.10.2020 45
.
.
Para comprobar el interruptor
Comprobación
Una vez
por sem-
X
X
X
ana
Una vez
por mes

Mantenimiento
Diario
Revise el cabezal de corte en busca de daños y grietas. Reemplácelos si es
necesario.
Examine la empuñadura y el manillar en busca de daños y asegúrese de que se
encuentren acoplados de manera correcta.
Para los equipos de corte que poseen una cazoleta de apoyo, apriete el tornillo
de bloqueo por completo.
Para los equipos de corte que poseen una contratuerca, apriete la tuerca de bloqueo por completo.
Examine la protección para transporte en busca de daños y asegúrese de que
se pueda acoplar correctamente.
Examine el motor, el depósito de combustible y los conductos de combustible
para determinar si hay fugas.
Una vez
por sem-
ana
Una vez
por mes
X
X
X
X
X
X
Limpie el filtro de aire. Reemplácelos si es necesario. X
Apriete tuercas y tornillos. X
Inspeccione el filtro de combustible para determinar si presenta contaminación y
la manguera de combustible para determinar si presenta grietas u otros defec-
X
tos. Reemplácelos si es necesario.
Examine todos los cables y conexiones. X
Examine el arranque y la cuerda de arranque en busca de daños. X
Inspeccione los amortiguadores de vibraciones para determinar si presentan daños y grietas.
Examine la bujía. Consulte
Para comprobar la bujía en la página 48
. X
X
Limpie el sistema de refrigeración. X
Asegúrese de que el engranaje angulado esté lleno de grasa hasta los ¾. X
Limpie la superficie exterior del carburador y el espacio que lo rodea. X
Limpie la bujía. Retire la bujía y compruebe la distancia entre los electrodos. X
Limpie o reemplace la rejilla apagachispas en el silenciador. X
Revise si el embrague, el muelle de embrague y el tambor de embrague presentan desgaste. Reemplácelos si es necesario.
Reemplace la bujía. X
Lubrique el eje propulsor.
3
Asegúrese de que la liberación de seguridad del arnés no esté dañada y de que
funciona correctamente.
Examine y limpie la rejilla apagachispas en el silenciador. X
X
X
X
3
En un intervalo de 6 meses.
46 1570 - 001 - 14.10.2020

Para ajustar el régimen de ralentí
A
B
C
El producto Husqvarna está fabricado de conformidad
con especificaciones que reducen las emisiones de
gases de escape tóxicos.
1. Asegúrese de que el filtro de aire esté limpio y de
que tenga la cubierta del filtro instalada.
2. Gire el tornillo de régimen de ralentí (T) hacia la
izquierda hasta que el equipo de corte comience a
moverse.
3. Gire el tornillo de régimen de ralentí (T) hacia la
izquierda hasta que el equipo de corte se detenga.
El régimen de ralentí es el correcto cuando el motor
funciona correctamente en todas las posiciones. El
régimen de ralentí debe ser inferior a la velocidad
cuando el equipo de corte empieza a girar.
Tenga en cuenta: Consulte
49
para conocer el régimen de ralentí recomendado.
Datos técnicos en la página
1. Limpie el sistema de refrigeración con un cepillo
semanalmente o con mayor frecuencia si es
necesario.
2. Asegúrese de que el sistema refrigerante no esté
sucio ni obstruido.
Engranaje angulado
Durante su fabricación, el engranaje angulado se llena
con una cantidad adecuada de grasa. Pero, antes de
utilizar la máquina, asegúrese de que el engranaje
angulado esté lleno 3/4 con grasa. Utilice la grasa
especial de Husqvarna.
ADVERTENCIA: Si el equipo de corte no se
detiene cuando ajusta el régimen de ralentí,
consulte con su concesionario de
mantenimiento. No utilice la máquina hasta
que esté correctamente ajustada o
reparada.
Para limpiar el sistema de refrigeración
AVISO:
Un sistema refrigerante sucio o
bloqueado puede producir el
sobrecalentamiento del producto, y dañarlo.
Las piezas del sistema refrigerante son la toma de aire
del motor de arranque (A), las aletas de refrigeración del
cilindro (B) y la cubierta del cilindro (C).
1570 - 001 - 14.10.2020
El servicio autorizado reemplaza la grasa del engranaje
angulado.
Filtro de aire
Retire el polvo y la suciedad del filtro de aire para
mantenerlo limpio y evitar los siguientes problemas:
• Fallas del carburador
• Problemas cuando se arranca el producto
• Pérdida de energía
• Aumento del desgaste de las piezas del motor
• Demasiado consumo de combustible
Para limpiar el filtro de aire
1. Quite la cubierta del filtro de aire y retire el filtro.
2. Golpee el filtro contra una superficie plana para que
caigan las partículas.
No utilice disolventes ni aire
AVISO:
comprimido para limpiar el filtro de aire.
3. Vuelva a colocar el filtro de aire. Asegúrese de que
el filtro de aire se selle bien en el soporte del filtro de
aire.
47

4. Vuelva a colocar la cubierta del filtro de aire.
Tenga en cuenta: Si un filtro de aire se ha utilizado
durante mucho tiempo, nunca quedará completamente
limpio. Reemplace el filtro de aire a intervalos regulares.
Siempre reemplace un filtro de aire dañado.
Para comprobar la bujía
AVISO: Utilice la bujía recomendada.
Consulte
Datos técnicos en la página 49
Una bujía incorrecta puede causar daños al
producto.
1. Si el producto presenta dificultades para arrancar o
funcionar, o si no funciona correctamente a régimen
de ralentí, examine la bujía en busca de materiales
no deseados. Para disminuir el riesgo de material no
deseado en los electrodos de la bujía, realice estos
pasos:
a) asegúrese de que el régimen de ralentí esté
ajustado correctamente.
.
Solución de problemas
El motor arranca, pero se detiene de nuevo.
b) asegúrese de que la mezcla de combustible es
la correcta.
c) asegúrese de que el filtro de aire esté limpio.
2. Limpie la bujía si está sucia.
3. Asegúrese de que la distancia entre los electrodos
sea la correcta. Consulte
página 49
4. Reemplace la bujía cada mes o más a menudo si es
necesario.
.
Datos técnicos en la
Pieza del producto que se va a examinar
Depósito de combustible Tipo de combustible incorrecto Vacíe el depósito de combustible y
Carburador El régimen de ralentí no es correcto. Consulte a su concesionario de ser-
Filtro de aire Filtro de aire obstruido. Limpie o reemplace el filtro de aire.
Filtro de combustible Filtro de combustible obstruido. Reemplace el filtro de combustible.
Causa posible Acción
llénelo con combustible correcto.
vicio.
El motor no arranca
Verificar
Interruptor de detención
Ganchos de arranque
Depósito de combustible
48 1570 - 001 - 14.10.2020
Causa posible Procedimiento
El interruptor de detención está en la posición de detención.
Los ganchos de arranque no se pueden
mover libremente.
Tipo de combustible incorrecto Vacíe el depósito de combustible y llénelo
Mueva el interruptor de detención hacia la
posición de arranque.
Retire la cubierta del arranque y limpie alrededor de los ganchos de arranque.
Permita que un taller de servicio aprobado lo
ayude.
con combustible correcto.

Verificar Causa posible Procedimiento
Bujía La bujía está sucia o mojada. Asegúrese de que la bujía esté limpia y se-
La distancia entre los electrodos de la bujía
es incorrecta.
La bujía está floja. Ajuste la bujía.
ca.
Limpie la bujía. Asegúrese de que la distancia entre los electrodos sea la correcta. Asegúrese de que la bujía está equipada con un
supresor.
Consulte los datos técnicos para comprobar
la distancia entre los electrodos.
Transporte y almacenamiento
• Para el almacenamiento y el transporte del producto
y del combustible, asegúrese de que no haya fugas
o vapores. Las chispas o llamas, por ejemplo, de
dispositivos eléctricos o calderas, pueden iniciar un
incendio.
• Siempre use contenedores aprobados para el
almacenamiento y el transporte del combustible.
• Vacíe el depósito de combustible antes del
transporte o de un almacenamiento prolongado.
Deseche el combustible en un lugar adecuado para
tal propósito.
• Utilice protección para transportes en el producto
para evitar lesiones o daños en el producto. Una
cuchilla que no se mueve también puede provocar
lesiones graves.
• Quite el sombrerete de bujía de la bujía.
• Fije el producto de manera segura durante el
transporte.
Datos técnicos
Datos técnicos
128LX, LT28CSHV
Motor
Cilindrada, cm3/pulg. cúb 28/1,7
Régimen de ralentí, rpm 2300-3200
Velocidad máxima recomendada, rpm 8000
Potencia máxima del motor, según la norma ISO 8893,
kW/hp a rpm
Silenciador con catalizador Sí
Rotación máxima del eje de salida 7200
Sistema de encendido
Bujía Champion RCJ-8Y
Distancia entre los electrodos, mm/pulg. 0,6/0,024
Combustible y sistema de lubricación
Capacidad del depósito de combustible, l/pinta EE. UU. 0,4/0,85
4
Este sistema de encendido por chispa cumple con la norma canadiense ICES-002.
1570 - 001 - 14.10.2020 49
4
0,7/0,94 a 8000

128LX, LT28CSHV
Peso
Peso, kg/lb 5,0/11,0
Accesorios
Accesorios
Accesorios aprobados Tipo de accesorio Protección del equipo de corte, art.
Orificio central en hojas/cortadoras; 25,4 mm de diámetro
Rosca del eje de salida M10 LH
Hoja para hierba o cortadora de césped
Cabezal de corte T25 (hilo de Ø 2,4 mm) 580 44 66-06
Cazoleta de apoyo 503 89 01-01 N/A
Multi 255-4 (Ø 255 mm, 4 dientes) 580 44 66-06
n.°
50 1570 - 001 - 14.10.2020

Table des matières
Introduction................................................................... 51
Sécurité.........................................................................54
Montage........................................................................61
Fonctionnement............................................................ 63
Entretien....................................................................... 70
Introduction
Dépannage................................................................... 73
Transport et entreposage............................................. 74
Données techniques..................................................... 74
Accessoires.................................................................. 75
Description du produit
Le produit est un coupe-herbe avec moteur à
combustion.
Le travail est constamment en cours pour augmenter
votre sécurité et l’efficacité pendant l’utilisation. Pour
obtenir de plus amples renseignements, communiquer
avec votre centre de services.
Utilisation prévue
Utiliser le produit avec une lame à herbe ou une tête de
désherbage pour couper l’herbe. Ne pas utiliser le
produit pour des tâches autres que la coupe d’herbe.
Remarque : Les réglementations nationales ou locales
peuvent limiter l’utilisation du produit.
Utilisez la machine seulement avec des accessoires
homologués par le fabricant. Se reporter à la section
Accessoires à la page 75
.
1570 - 001 - 14.10.2020 51

Présentation de la machine
18
19
20
1
24
21
23
25
26
28
27
1
3
5
6
7
8
10
11
12
13
15
17
9
16
14
4
2
22
1. Lame à herbe
2. Bouchon de remplissage de graisse
3. Pignon conique
4. Protection de l’outil de coupe
5. Arbre
6. Guidon en J
7. Attache du harnais
8. Interrupteur d’arrêt
9. Commande des gaz
10. Dispositif de verrouillage de la gâchette de
l’accélérateur
11. Capuchon de bougie et bougie d’allumage
12. Couvercle de vérin
13. Corde du lanceur
14. Pompe de purge d’air
15. Réservoir de carburant
16. Couvercle du filtre à air
17. Commande de l’étrangleur
18. Contre-écrou
19. Bride de support
20. Bol de garde au sol
21. Disque d’entraînement
22. Tête de coupe
23. Clé à usages multiples
24. Protection de transport
25. Clé hexagonale
26. Goupille de blocage
27. Harnais
28. Manuel d'utilisation
52 1570 - 001 - 14.10.2020

Symboles figurant sur le produit
5
0
FT
1
5
m
50F
T
15 m
EMISSION CONTROL INFORMATION
REFER TO OWNER'S MANUAL FOR
MAINTENANCE SPECIFICATIONS AND ADJUSTMENTS.
SN:
THIS ENGINE MEETS EXH AND EVP EMISSIONS REGULATIONS
FOR SMALL OFF ROAD ENGINES
FAMILY/DISP
PLT # SKU #
EMISSION COMPLIANCE PERIOD
(XX:XX)
AVERTISSEMENT! Faire attention et utiliser
le produit correctement. Cet outil peut
causer des blessures graves, ou même
mortelles, à l’utilisateur et à d’autres
personnes.
Pompe à carburant.
Avant d’utiliser la tondeuse, lire
attentivement le manuel d’utilisation et
veiller à bien comprendre les directives.
Utiliser un dispositif de protection
homologué pour les oreilles. Utiliser un
dispositif de protection homologué pour les
yeux.
Utiliser des gants de protection homologués
pendant l’utilisation et l’entretien. Utiliser des
bottes de protection ou des chaussures
avec semelles antidérapantes. Utiliser des
vêtements en tissus résistants longs.
Prendre soin de retenir les cheveux longs
au-dessus des épaules
L’outil peut engendrer des projections
d’objets, ce qui peut causer des blessures.
Vitesse de rotation maximale de l’arbre de
sortie.
Tenir les personnes et les animaux à une
distance minimale de 15 m (50 pi) pendant
l’utilisation du produit.
Il existe un risque de rebond si l'outil de
coupe touche un objet qu'il ne coupe pas
immédiatement. L'appareil peut couper des
parties corporelles. Tenir les personnes et
les animaux à une distance minimale de
15 m (50 pi) pendant l’utilisation du produit.
Volet de départ.
yyyywwxxxx La plaque signalétique indique le nu-
méro de série où yyyy représente
l’année de production et ww la sem-
aine de production.
Remarque : Les autres symboles/autocollants présents
sur l’outil renvoient aux exigences en matière de
certification pour d’autres zones commerciales.
EPA III
La période de conformité aux réglementations
antipollution de l'autocollant de conformité d'émissions
indique le nombre nominal d'heures de fonctionnement
du moteur conformément aux réglementations du
gouvernement fédéral américain et de la Californie.
Les flèches indiquent la limite de la position
du guidon.
ABRÉVIATIONS SUR LES ÉTIQUETTES DU SYSTÈME DE CONTRÔLE DES ÉMISSIONS
Généralités Systèmes de contrôle des émissions
ECS Système de contrôle
EXH/EVP Échappement et évapo-
des émissions
d’échappement
ECM Module de commande
du moteur (Autotune)
EM Modification du moteur N Nylon
ration
1570 - 001 - 14.10.2020 53
Systèmes de contrôle des émissions
par évaporation
C Coextrudé (multicou-
che)

ABRÉVIATIONS SUR LES ÉTIQUETTES DU SYSTÈME DE CONTRÔLE DES ÉMISSIONS
ATTENTION!
Les émissions du moteur de cet outil
contiennent des produits chimiques
qui, d’après l’État de Californie, peuvent
causer le cancer, des malformations
congénitales ou autre danger pour
la reproduction
Généralités Systèmes de contrôle des émissions
d’échappement
HRS Heures OC Catalyseur oxydant P Polyéthylène ou poly-
REGS Règlements TWC Catalyseur trifonctionnel S Fermé hermétiquement
SORE Petits moteurs hors
route
US EPA Office de protection de
l'environnement des
États-Unis
CAL Californie
EVAP Évaporation
DISPL Cylindrée
Systèmes de contrôle des émissions
par évaporation
éthylène haute densité
traité
Proposition 65 de la Californie
Responsabilité concernant le produit
Comme indiqué dans les lois en vigueur sur la
responsabilité concernant les produits, nous ne serons
pas tenus responsables des dommages que notre
produit causerait dans les situations suivantes :
• Le produit n’est pas réparé de façon adéquate.
• Le produit est réparé avec des pièces qui ne sont
pas fournies ou homologuées par le fabricant.
• Le produit comprend un accessoire qui n’est pas
fourni ou homologué par le fabricant.
• Le produit n’est pas réparé par un centre de service
après-vente agréé ou par une autorité homologuée.
Sécurité
Définitions relatives à la sécurité
Les avertissements, recommandations et remarques
soulignent des points du manuel qui revêtent une
importance particulière.
AVERTISSEMENT: Indique la présence
d’un risque de blessure ou de décès de
l’utilisateur ou de personnes à proximité si
les instructions du manuel ne sont pas
suivies.
MISE EN GARDE : Indique la présence d’un
risque de dommages au produit, à d’autres
appareils ou à la zone adjacente si les
instructions du manuel ne sont pas suivies.
Remarque : Utilisé pour donner des renseignements
plus détaillés qui sont nécessaires dans une situation
donnée.
54 1570 - 001 - 14.10.2020
Consignes générales de sécurité
AVERTISSEMENT: Lire les messages
d’avertissement qui suivent avant d’utiliser
l’outil.
• Une scie d’éclaircissement, un coupe-herbes ou un
taille-haie peuvent être dangereux s’ils sont utilisés
avec négligence ou de manière incorrecte et
peuvent entraîner des blessures graves ou mortelles
pour l’opérateur ou d’autres personnes. Il est
extrêmement important de lire et de comprendre le
contenu de ce manuel de l’opérateur.
• La conception du produit ne peut en aucun cas être
modifiée sans l’autorisation du fabricant. Ne jamais
utiliser un produit qui a été modifié de quelque
manière que ce soit par rapport aux spécifications
d’origine et toujours utiliser des accessoires
d’origine. Les modifications et/ou les accessoires
non autorisés peuvent entraîner des blessures

graves ou la mort de l’opérateur ou d’autres
personnes.
• L’intérieur du silencieux contient des produits
chimiques pouvant être cancérigènes. Éviter tout
contact avec ces éléments si le silencieux est
endommagé.
• Ce produit produit un champ électromagnétique
pendant le fonctionnement. Ce champ magnétique
peut, dans certains cas, nuire aux implants
médicaux actifs ou passifs. Pour réduire le risque de
blessures graves ou mortelles, nous recommandons
aux personnes ayant des implants médicaux de
consulter leur médecin et le fabricant de l’implant
médical avant d’utiliser le produit.
Consignes de sécurité pour l’assemblage
AVERTISSEMENT: Lire les messages
d’avertissement qui suivent avant d’utiliser
l’appareil.
• Utilisez des gants de protection approuvés pour
assembler le produit et l'équipement de coupe.
• Débrancher le chapeau de bougie de la bougie
d’allumage avant d’assembler le produit.
• S’assurer que le bon guidon et la bonne protection
d’équipement de coupe sont installés avant d’utiliser
le produit.
• Un équipement de coupe défectueux ou incorrect
peut causer des blessures. Ne pas utiliser un outil de
coupe dépourvu du dispositif de protection
homologué.
• Fixer correctement le carter de l’embrayage et
l’arbre avant de démarrer le produit.
• Le disque d’entraînement et la bride de support
doivent s’engager correctement dans le trou central
de l’équipement de coupe. Un outil de coupe qui
n’est pas correctement fixé peut engendrer des
blessures ou la mort.
• Fixer le harnais au produit pour éviter de blesser
l’opérateur ou d’autres personnes.
Consignes de sécurité pour l’utilisation
AVERTISSEMENT: Lire les messages
d’avertissement qui suivent avant d’utiliser
l’appareil.
• Ne jamais utiliser un harnais dont le dispositif de
détachement rapide est défectueux. Lorsqu’on utilise
une débroussailleuse, elle doit toujours être
accrochée solidement au harnais. Sinon, il ne sera
pas possible de contrôler la débroussailleuse en
toute sécurité, ce qui pourrait vous blesser ou
blesser d’autres personnes.
• Toujours tenir l’appareil des deux mains. Tenir
l’appareil sur le côté droit du corps. Tenir l’outil de
coupe sous la taille de l’utilisateur. Attacher le
produit à l’anneau de suspension sur le harnais.
Tenir toute partie du corps à l’écart des surfaces
chaudes. Tenir toute partie du corps à l’écart de
l’outil de coupe en rotation.
• Lire et comprendre la différence entre
l’éclaircissement forestier et la coupe d’herbe avant
d’utiliser le produit.
• Ne jamais utiliser un appareil qui a été modifié de
quelque manière que ce soit par rapport aux
spécifications d’origine.
• Ne jamais utiliser un appareil défectueux. Effectuer
les vérifications de sécurité, de maintenance et
d’entretien conformément aux instructions fournies
dans ce manuel. Certaines mesures de maintenance
et d’entretien doivent être effectuées par des
spécialistes formés et qualifiés. Se reporter à la
section
• Utiliser de l’équipement de protection individuelle. Se
Calendrier d’entretien à la page 70
reporter à la section
personnelle à la page 57
• Ne pas utiliser ce produit par mauvais temps, par
exemple, en cas de brouillard épais, de forte pluie,
de vent violent, de grand froid, etc. Travailler par
mauvais temps est éprouvant et ajoute des risques
comme un sol glissant.
• Les seuls accessoires qui peuvent être utilisés avec
cette unité à moteur sont les outils de coupe
recommandés. Se reporter à la section
à la page 75
• Faire preuve de prudence à l’égard des projections
d’objets. Toujours porter des lunettes de protection
homologuées. Ne jamais se pencher au-dessus du
dispositif de protection de l’outil de coupe. Des
pierres, des débris, etc. peuvent être projetés dans
vos yeux, causant la cécité ou des blessures graves.
• Ne jamais utiliser l’outil en cas de fatigue, de
maladie, d’absorption d’alcool ou d’autres drogues,
ni en cas de prise de médicaments pouvant nuire à
l’acuité visuelle, au jugement et à la coordination.
• L’exposition prolongée au bruit peut causer une
perte auditive permanente. Toujours utiliser un
dispositif de protection homologué pour les oreilles.
• Écouter s’il y a des signaux d’avertissement ou des
voix fortes lors de l’utilisation d’un dispositif de
protection pour les oreilles. Toujours enlever le
dispositif de protection pour les oreilles dès que le
moteur s’arrête.
• Effectuer une inspection générale de l’appareil avant
de l’utiliser. Se reporter à la section
produit à la page 63
• Ne jamais utiliser le produit s’il est modifié ou
défectueux.
• S’assurer que le capuchon de bougie d’allumage et
le fil d’allumage ne sont pas endommagés, afin
d’éviter le risque de décharge électrique.
• Regarder tout autour de la zone de travail pour
s’assurer qu’aucune personne ni aucun animal ou
objet ne présente aucune une incidence négative sur
la sécurité lors de l’utilisation du produit.
Équipement de protection
.
.
.
.
Accessoires
Avant d’utiliser le
1570 - 001 - 14.10.2020
55

• Regarder tout autour de la zone de travail pour
s’assurer qu’aucune personne ni aucun animal ne
touche l’outil de coupe ou n’est heurté par des objets
projetés hors de l’outil de coupe.
• Vérifier la zone de travail. Retirer tous les objets
mobiles tels que les pierres, le verre cassé, les
clous, les fils de fer et les cordes, qui peuvent être
projetés ou poussés par le vent autour de l’outil de
coupe.
• Ne pas utiliser le produit dans une situation ou un
endroit où vous ne pourrez pas recevoir de l’aide en
cas d’accident.
• Ne pas utiliser l’outil sans un dispositif de protection.
• S’assurer que les personnes ou les animaux gardent
une distance d’au moins 15 m (50 pi) pendant le
travail. Toujours regarder derrière avant de faire
demi-tour avec le produit. Arrêter immédiatement le
produit si une personne ou un animal pénètre dans
la zone de sécurité de 15 m (50 pi). Si plusieurs
opérateurs travaillent dans la même zone, garder
une distance de sécurité d’au moins 15 m (50 pi).
• S’assurer de pouvoir se déplacer en toute sécurité et
de disposer d’une distance de sécurité. Examiner les
alentours de l’aire de travail pour voir s’il y a des
obstacles tels que les racines, les pierres, les
branches et les fossés. Faire attention pendant le
travail sur un terrain en pente.
• Ne pas trop se pencher en avant. Se tenir bien
campé dans une position stable et en parfait
équilibre.
• Avant de démarrer le produit, le placer sur une
surface plane, à au moins 3 m de la source de
carburant et de l’endroit où l’appoint de carburant est
effectué. S’assurer qu’aucun objet ne se trouve à
proximité de l’outil de coupe ou ne touche celui-ci.
• Si l’outil de coupe tourne au régime de ralenti,
laisser un agent d’entretien le régler. Ne pas utiliser
le produit jusqu’à ce qu’il soit réglé ou réparé.
• Faire preuve de prudence à l’égard des projections
d’objets. Toujours porter des lunettes de protection
homologuées et s’éloigner du dispositif de protection
de l’outil de coupe. Des pierres et d’autres petits
objets peuvent être projetés dans les yeux et causer
la cécité ou d’autres blessures.
• Ne pas déposer l’outil alors que le moteur est en
marche à moins de l’avoir sous les yeux.
• Ne pas retirer l’herbe coupée ou laisser d’autres
personnes retirer l’herbe coupée lorsque le moteur
est en marche ou que l’équipement de coupe tourne,
car il peut en résulter des blessures graves.
• Le pignon conique peut être très chaud en cours
d’utilisation et rester chaud pendant un certain temps
après l’utilisation. Vous pourriez être brûlé si vous le
touchez.
• Toujours arrêter le moteur et s’assurer que
l’équipement de coupe ne tourne pas avant de retirer
l’herbe enroulée autour de l’axe de lame ou coincée
entre le dispositif de protection et l’outil de coupe.
L’équipement de coupe continue de tourner, même
après que l’accélérateur soit relâché. S’assurer que
l’outil de coupe est complètement arrêté et
débrancher le capuchon de bougie d’allumage avant
de commencer à travailler dessus.
• Soyez prudent lorsque vous dégagez des matériaux
autour de l’équipement de coupe. Le renvoi d’angle
devient très chaud pendant le fonctionnement de la
machine et peut causer des brûlures graves.
• Les gaz d’échappement du moteur sont chauds et
peuvent contenir des étincelles. Risque d’incendie.
Faire preuve de prudence des matériaux secs et
inflammables.
• Arrêter le moteur avant de passer à une nouvelle
zone de travail. Toujours fixer la protection de
transport avant de déplacer l’équipement.
• Ne jamais utiliser le produit à l’intérieur ou dans des
endroits n’ayant pas une ventilation convenable. Les
gaz d’échappement contiennent du monoxyde de
carbone, un gaz inodore, toxique et très dangereux
qui peut entraîner la mort par asphyxie ou un
intoxication au monoxyde de carbone.
• Ne jamais laisser des enfants utiliser le produit ou se
tenir à proximité de celui-ci. Puisque le produit est
équipé d’un interrupteur de marche-arrêt à ressort et
peut être démarré à bas régime ou en exerçant une
légère force sur la poignée du lanceur, même des
jeunes enfants dans certaines circonstances
peuvent produire la force nécessaire pour démarrer
le produit. Cela peut entraîner un risque de graves
blessures. Par conséquent, retirer le capuchon de
bougie d’allumage lorsque le produit n’est pas sous
une surveillance stricte.
• Une surexposition aux vibrations peut entraîner des
problèmes circulatoires ou des troubles nerveux, en
particulier chez les personnes ayant des troubles
circulatoires. Parler à un médecin en cas de
symptômes liés à une surexposition aux vibrations.
Voici certains de ces symptômes : engourdissement,
perte de sensibilité, fourmillement, picotement,
douleur, faiblesse musculaire, décoloration ou
modification de l’épiderme. Ces symptômes
apparaissent habituellement aux doigts, aux mains
et aux poignets. Les risques augmentent à basse
température.
• Vérifier que l’équipement de coupe est correctement
monté et réglé.
• Il est recommandé de consulter un expert en cas de
doute. Communiquer avec votre concessionnaire ou
votre atelier d’entretien.
• Éviter toutes les utilisations qui vous semblent
difficiles.
• Ne pas utiliser le produit s’il est impossible d’appeler
de l’aide en cas d’accident.
• L’utilisation d’un outil de coupe inadéquat ou d’une
lame mal affûtée augmente le risque de rebond de la
lame.
• Les produits équipés de lames débroussailleuses
peuvent être projetées violemment sur le côté
lorsque la lame entre en contact avec un objet fixe.
Cette situation s’appelle poussée de lame. Un
rebond peut être suffisant pour propulser le produit
56
1570 - 001 - 14.10.2020

et l’opérateur à l’écart, occasionnant une perte de
contrôle du produit. Un rebond peut se produire de
façon inattendue si le produit s’accroche, cale ou se
coince. Un rebond est plus susceptible de se
produire dans les zones où il est difficile de voir le
matériau à découper.
• Éviter de couper avec la zone de la lame entre les
positions 12 h et 3 h. Du fait de la vitesse de rotation
de la lame, un rebond peut se produire lors de la
tentative de coupe des tiges épaisses avec cette
zone de la lame.
• Les silencieux équipés d’un pot catalytique
deviennent très chauds en cours d’utilisation et
restent chauds pendant un certain temps après
l’arrêt. C’est également le cas lorsque le moteur
tourne au ralenti. Un contact pourrait entraîner des
brûlures. Ne pas oublier le risque d’incendie.
• Utiliser les outils de coupe avec les protections
recommandées uniquement. Se reporter à la section
Accessoires à la page 75
.
Équipement de protection personnelle
• Utiliser des gants au besoin, par exemple lors de la
fixation, de l’examen ou du nettoyage de l’outil de
coupe.
• Utiliser des bottes de protection à embout en acier et
semelles antidérapantes.
AVERTISSEMENT: Lire les messages
d’avertissement qui suivent avant d’utiliser
l’appareil.
• Toujours utiliser un équipement de protection
personnelle homologué lors de l’utilisation de
l’appareil. Cet équipement de protection personnelle
n’élimine pas complètement les risques de
blessures, mais il peut en réduire la gravité en cas
d’accident. Laisser le distributeur vous aider à
sélectionner l’équipement adéquat.
• Utiliser un dispositif de protection homologué pour
les oreilles.
• Utiliser un dispositif de protection homologué pour
les yeux. Porter également des lunettes de
protection homologuées en cas d’utilisation d’une
visière. Les lunettes de protection homologuées
doivent être conformes à la norme ANSI Z87.1 aux
États-Unis ou à la norme EN 166 dans les pays de
l’Union européenne.
• Utiliser des vêtements faits de tissus résistants.
Toujours utiliser des pantalons longs et lourds et des
manches longues. Ne pas porter des vêtements
amples qui peuvent se prendre dans les broussailles
et les branches. Ne pas porter de bijoux, de
pantalons courts ni de sandales. Ne pas travailler
pieds nus. Garder les cheveux au-dessus des
épaules.
• Maintenir l’équipement de premiers secours à
proximité.
Dispositifs de sécurité sur l’outil
Pour obtenir des renseignements sur l’emplacement de
ces dispositifs de sécurité, voir
51
.
AVERTISSEMENT: Lire les messages
d’avertissement qui suivent avant d’utiliser
l’outil.
• Ne pas utiliser un outil dont les dispositifs de
protection sont défectueux. Vérifier et effectuer
régulièrement l’entretien des dispositifs de sécurité.
Si les dispositifs de sécurité sont défectueux, parler
à votre agent d’entretien Husqvarna.
• Ne pas modifier les dispositifs de sécurité. Ne pas
utiliser le produit si les couvercles de protection, les
interrupteurs de sécurité ou d’autres dispositifs de
protection ne sont pas fixés ou sont défectueux.
Introduction à la page
1570 - 001 - 14.10.2020
57

• Pour tous les travaux d’entretien et de réparation sur
A
B
le produit, en particulier sur les dispositifs de
sécurité, une formation spécifique est nécessaire. Si
les dispositifs de sécurité échouent les vérifications
mentionnées dans ce manuel d’utilisation, laisser un
agent d’entretien vous aider. Nous garantissons que
des réparations et des entretiens professionnels sont
offerts. Si un distributeur n’est pas un agent
d’entretien, communiquer avec lui pour connaître
l’agent d’entretien le plus proche.
• Ne pas utiliser un outil de coupe dépourvu de
dispositif de protection d’outil de coupe homologué
et correctement fixé. Voir
Pour vérifier le verrouillage de la gâchette de l’accélérateur
1. Vérifier que le dispositif de verrouillage de la
gâchette de l’accélérateur et la gâchette
d’accélération bougent librement et que le ressort de
retour fonctionne correctement.
2. Appuyer sur le dispositif de verrouillage de la
gâchette et s’assurer qu’il retourne à sa position
initiale lorsqu’on le relâche.
Accessoires à la page 75
4. Démarrer le produit et le lancer à plein régime.
5. Relâcher la gâchette de l’accélérateur et s’assurer
que la lame s’arrête et s’immobilise.
AVERTISSEMENT: Si les lames
tournent lorsque la gâchette
d’accélération se trouve à la position de
ralenti, le régime de ralenti du
carburateur doit être réglé. Se reporter à
la section
la page 72
.
Pour vérifier l’interrupteur d’arrêt
1. Démarrer le moteur.
2. Déplacer l’interrupteur d’arrêt en position d’arrêt et
s’assurer que le moteur s’arrête.
Pour vérifier le dispositif de protection de l’outil de coupe
Le dispositif de protection de l’outil de coupe permet
d’éviter des blessures et arrête les objets projetés en
direction de l’opérateur.
1. Couper le moteur.
2. Effectuer une inspection visuelle pour détecter
d’éventuels dommages, par exemple des fissures.
Réglage du régime de ralenti à
.
3. S’assurer que la gâchette de l’accélérateur est
verrouillée en position de ralenti lorsque le dispositif
de verrouillage de la gâchette de l’accélérateur est
relâché.
3. Remplacer le dispositif de protection de l’unité de
coupe s’il est endommagé.
Réglage du harnais
Toujours porter le harnais lors de l’utilisation de la
machine. Le harnais assure un contrôle maximal
pendant l’utilisation du produit. Le harnais diminue le
risque de fatigue au niveau des bras et du dos.
AVERTISSEMENT: Ne pas utiliser le
harnais s’il est défectueux.
58 1570 - 001 - 14.10.2020

1. Vérifier l’état et l’usure du harnais. Toujours
remplacer un harnais endommagé.
2. Enfiler le harnais.
3. Régler la longueur du harnais jusqu’à ce que le
crochet de suspension soit à peu près à la hauteur
de votre hanche droite.
Pour vérifier le silencieux
AVERTISSEMENT: Ne pas utiliser un
produit dont le silencieux est défectueux.
3. S’assurer que le silencieux est bien fixé sur le
produit.
4. Contrôler visuellement le pare-étincelles.
AVERTISSEMENT: Ne pas utiliser le produit
si l’écran pare-étincelles du silencieux est
manquant ou défectueux.
AVERTISSEMENT: Le silencieux devient
très chaud pendant et après utilisation, ainsi
que lorsque le moteur tourne au ralenti.
Utiliser des gants de protection pour éviter
des brûlures.
Le silencieux maintient le niveau de bruit au minimum et
achemine les gaz d’échappement loin de l’utilisateur.
1. Couper le moteur.
2. Examiner le silencieux pour détecter d’éventuels
dommages ou défauts.
AVERTISSEMENT:
internes du silencieux contiennent des
produits chimiques pouvant causer des
cancers. Faire attention à ne pas toucher
ces éléments si le silencieux est
endommagé.
Les surfaces
a) Si l’écran pare-étincelles est endommagé, le
remplacer.
b) Si l’écran pare-étincelles est bloqué, le nettoyer.
MISE EN GARDE :
étincelles est obstrué, le produit
surchauffe et entraîne ainsi des
dommages au niveau du cylindre et
du piston.
Pour installer et retirer le contre-écrou
AVERTISSEMENT:
utiliser des gants de protection et faire
attention autour des bords tranchants de
l’outil de coupe.
Un contre-écrou est utilisé pour fixer certains types
d’outils de coupe. Le contre-écrou présente un filetage à
gauche.
Si l’écran pare-
Arrêter le moteur,
1570 - 001 - 14.10.2020
59

• Pour installer le contre-écrou, le tourner dans le sens
opposé au sens de rotation.
• Pour retirer le contre-écrou, tourner le contre-écrou
dans le sens de rotation.
• Pour desserrer ou serrer le contre-écrou, utiliser une
clé à douille munie d’un arbre long.
AVERTISSEMENT: Lors du desserrage
et du serrage du contre-écrou, il y a un
risque de blessure causée par l’outil de
coupe. Faire attention et ne pas toucher
l’équipement de coupe.
Remarque : S’assurer de ne pas pouvoir tourner le
contre-écrou à la main. Remplacer le contre-écrou après
l’avoir réutilisé environ 10 fois. Remplacer le contreécrou après l’avoir réutilisé environ 10 fois.
Outil de coupe
AVERTISSEMENT: Lire les messages
d’avertissement qui suivent avant d’utiliser
l’appareil.
• Effectuer l’entretien de routine. Communiquer avec
un centre agréé pour examiner régulièrement l’outil
de coupe et effectuer les réglages et les réparations.
• Cette précaution augmente les performances de
l’outil de coupe.
• Cette précaution augmente la durée de vie de
l’outil de coupe.
• Cette précaution réduit le risque d’accident.
• Utiliser seulement un dispositif de protection d’outil
de coupe homologué. Se reporter à la section
Accessoires à la page 75
• Ne pas utiliser un équipement de coupe
endommagé.
Tête de coupe d’herbe
• Vérifier que le fil coupe-herbe est fermement et
uniformément enroulé autour du tambour; cette
précaution réduit les vibrations.
• Utiliser seulement des têtes de coupe-herbe et des
fils coupe-herbe homologués. Se reporter à la
section
Tonte du gazon à la page 67
.
.
• Utiliser un fil coupe-herbe de longueur adéquate. Un
fil coupe-herbe plus long utilise plus de puissance de
moteur qu’un fil coupe-herbe court.
• Vérifier que le couteau monté sur le dispositif de
protection de l’outil de coupe n’est pas endommagé.
• Tremper le fil coupe-herbe dans de l’eau pendant
deux jours avant de monter le fil coupe-herbe sur le
produit. Cette précaution permet d’augmenter la
durée de vie du fil coupe-herbe.
• Se reporter aux instructions relatives à l’équipement
de coupe pour connaître la bonne façon de charger
le fil et le diamètre de fil approprié.
Lame à herbe
• Utiliser correctement les lames affûtées. Une lame
mal affûtée ou endommagée augmente les risques
de blessure. Voir les instructions sur l’emballage de
la lame.
• Utiliser des lames bien réglées. Une lame mal réglée
augmente le risque de blessures et de dommages.
Sécurité – carburant
AVERTISSEMENT: Lire les messages
d’avertissement qui suivent avant d’utiliser
l’outil.
• Ne pas mélanger le carburant à l’intérieur ou à
proximité d’une source de chaleur.
• Ne pas démarrer l’outil s’il y a du carburant ou de
l’huile moteur sur l’outil. Nettoyer le carburant ou
l’huile et laisser sécher l’outil. Nettoyer tout carburant
qui souille l’outil.
• Si du carburant se déverse sur les vêtements,
changer immédiatement de vêtement.
• Ne pas déverser du carburant sur le corps; cela
pourrait causer des blessures. Si du carburant se
déverse sur le corps, se nettoyer au savon doux et à
l’eau.
• Ne pas démarrer le moteur si de l’huile ou du
carburant se renverse sur l’outil ou sur le corps.
• Ne pas démarrer l’outil si le moteur présente une
fuite. Vérifier régulièrement le moteur à la recherche
de fuites.
• Faire preuve de prudence lors de la manipulation du
carburant. Celui-ci est inflammable et ses vapeurs
sont explosives et peuvent causer des blessures ou
la mort.
• Ne pas respirer les vapeurs de carburant, car elles
peuvent causer des blessures. S’assurer que la
ventilation est suffisante.
• Ne pas fumer à proximité du carburant ou du
moteur.
• Ne pas placer des objets chauds à proximité du
carburant ou du moteur.
• Ne pas faire le plein de carburant lorsque le moteur
tourne.
• Vérifier que le moteur est froid avant de faire le plein.
60
1570 - 001 - 14.10.2020
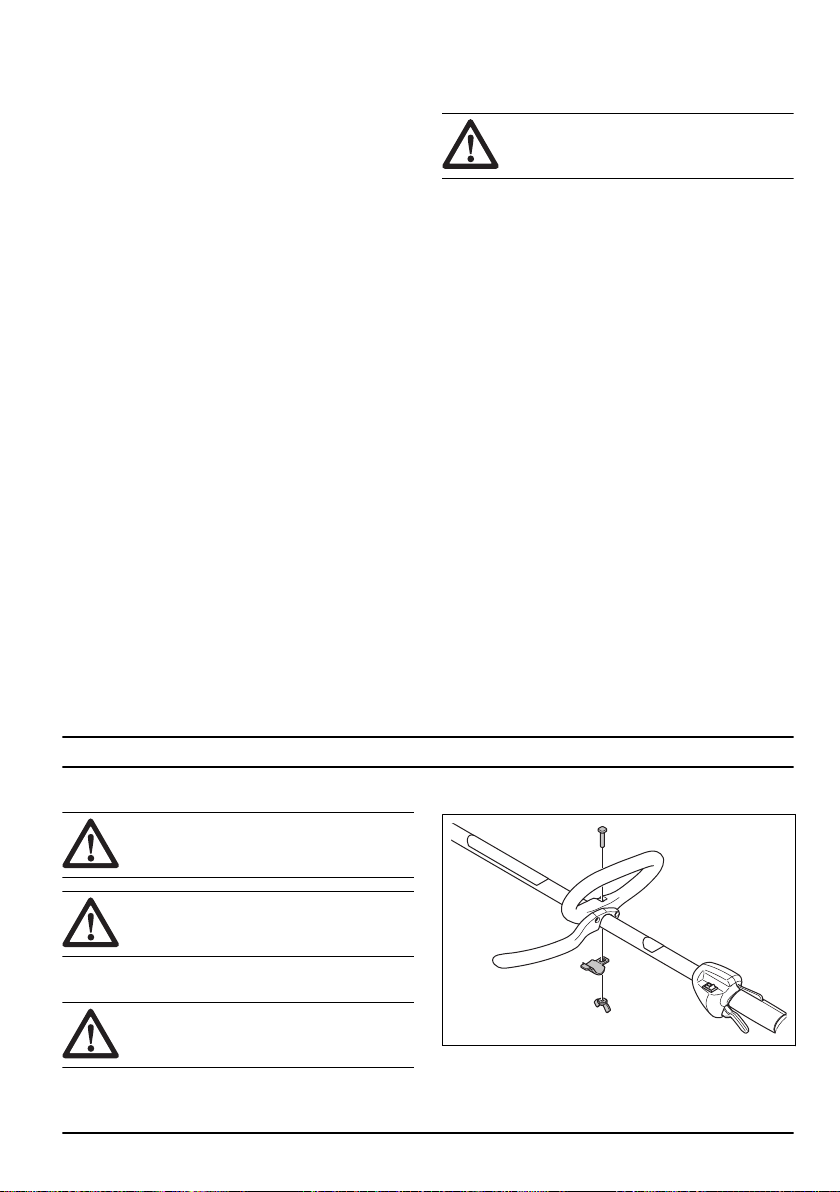
• Avant de faire le plein, ouvrir lentement le couvercle
du réservoir de carburant et relâcher la pression
avec précaution.
• S’assurer que le débit d’air est suffisant lors du
ravitaillement et du mélange de carburant (essence
et huile deux temps) ou lors de la vidange du
réservoir de carburant.
• Le carburant et les vapeurs de carburant sont
extrêmement inflammables et peuvent causer des
blessures très graves en cas d’inhalation ou de
contact avec la peau. Pour cette raison, faire preuve
de prudence lors de la manipulation du carburant et
s’assurer que le débit d’air est suffisant.
• Serrer le couvercle du réservoir de carburant avec
précaution, car un feu pourrait se déclencher.
• Avant de démarrer l’outil, le déplacer à au moins 3 m
(10 pi) de la position où le plein de carburant a été
fait.
• Ne pas mettre trop de carburant dans le réservoir de
carburant.
• Vérifier qu’une fuite ne peut se produire lorsqu’on
déplace l’outil ou le bidon d’essence.
• Ne pas placer l’outil ou un bidon d’essence dans un
espace où il y a une flamme nue, des étincelles ou
une veilleuse. Vérifier que la zone de stockage ne
contient pas de flamme nue.
• Utiliser seulement des conteneurs agréés pour
transporter ou stocker le carburant.
• Vider le réservoir de carburant avant de le remiser
pour une période prolongée. Toujours respecter la
législation locale sur la façon de mettre le carburant
au rebut.
• Nettoyer l’outil avant de le remiser pour une période
prolongée.
• Débrancher le chapeau de bougie avant de remiser
le produit, pour que le moteur ne démarre pas par
inadvertance.
Consignes de sécurité pour la maintenance
AVERTISSEMENT: Lire les messages
d’avertissement qui suivent avant d’utiliser
l’outil.
• Arrêter le moteur, s’assurer que l’équipement de
coupe s’arrête et laisser le produit refroidir avant de
faire l’entretien.
• Débrancher la bougie d’allumage avant de procéder
à l’entretien.
• Les gaz d’échappement du moteur contiennent du
monoxyde de carbone, un gaz inodore, toxique et
très dangereux qui peut causer la mort. Ne pas
démarrer le produit à l’intérieur ou dans des espaces
fermés.
• Les gaz d’échappement du moteur sont chauds et
peuvent contenir des étincelles. Ne pas démarrer
l’outil dans un local clos ou à proximité de matériaux
inflammables.
• Les accessoires et les modifications apportées au
produit qui ne sont pas approuvés par le fabricant
peuvent causer des blessures graves, voire
mortelles. Ne pas modifier l’outil. Utilisez toujours
des accessoires d’origine.
• Si l’entretien n’est pas effectué correctement et
régulièrement, le risque de blessures et de
dommages à l’outil augmente.
• N’effectuer que les travaux d’entretien recommandés
dans ce manuel d’utilisation. Laisser un agent
d’entretien agréé Husqvarna effectuer toutes les
autres opérations d’entretien.
• Demander régulièrement à un agent d’entretien
agréé Husqvarna d’effectuer l’entretien de l’outil.
• Remplacer les pièces endommagées, usées ou
brisées.
Montage
Introduction
AVERTISSEMENT: Avant d’assembler le
produit, lire et bien comprendre le chapitre
sur la sécurité.
AVERTISSEMENT: Débrancher le câble de
la bougie d’allumage de la bougie
d’allumage avant d’assembler le produit.
Installation de la poignée en J
AVERTISSEMENT: Utiliser uniquement des
lames à herbe ou des têtes de désherbage
avec la poignée en J.
1570 - 001 - 14.10.2020 61
1. Placer la poignée en J entre les 2 flèches dessinées
sur l’arbre.
2. Installer la vis, la plaque et l'écrou à ailettes.

3. Régler la poignée en J pour que la position de travail
A
F
G
E
D
C
B
A
soit adéquate.
4. Serrer l’écrou à ailettes.
Installation de l’attache du harnais
AVERTISSEMENT: Un outil de coupe mal
fixé peut entraîner des blessures voire la
mort.
Pour installer le dispositif de protection de l'équipement de coupe et la lame à herbe.
1. Placer le dispositif de protection de l'équipement de
coupe (A) sur l’arbre et serrer le boulon.
AVERTISSEMENT: Le harnais doit être fixé
en toute sécurité à son attache lorsque vous
utilisez le produit.
1. Placer les 2 moitiés de l’attache du harnais sur
l'arbre et l’aligner avec les trous de vis.
2. Installer les 2 vis.
3. Régler l’attache du harnais à la position appropriée
au-dessus de la flèche.
4. Serrer à fond les 2 vis.
Pour assembler l’équipement de coupe
L’équipement de coupe comprend un outil de coupe et
un dispositif de protection de l’outil de coupe.
AVERTISSEMENT:
protection.
AVERTISSEMENT: Toujours utiliser le
dispositif de protection de l’outil de coupe
recommandé pour l’outil de coupe. Voir
Accessoires à la page 75
Porter des gants de
.
2. Tourner l’arbre de sortie pour aligner l’un des trous
dans le disque d’entraînement (B) avec le trou
correspondant dans le carter d’engrenage.
3. Placer la goupille de blocage (C) dans le trou pour
bloquer l’arbre.
4. Placer la lame à herbe (D), le bol de garde au sol (E)
et la bride de support (F) sur l’arbre de sortie.
5. S’assurer que le disque d’entraînement et la bride de
support s’engagent correctement dans le trou situé
au centre de la lame à herbe.
6. Installer l’écrou (G).
62
1570 - 001 - 14.10.2020

7. Serrer l’écrou au moyen de la clé à douille. Tenir le
A
C
B
F
D
E
F
manche de la clé à douille à proximité du dispositif
de protection de l'équipement de coupe. Serrer dans
le sens opposé à la rotation de l’équipement de
coupe. Serrer les écrous à un couple de 35 à 50 Nm.
Pour installer le dispositif de protection de l'équipement de coupe et la tête de désherbage
MISE EN GARDE : S’assurer que la rallonge
du dispositif de protection est attachée.
1. Installer le dispositif de protection de l’équipement
de coupe (A) destiné au fonctionnement avec la tête
de désherbage.
2. Accrocher le dispositif de protection de l’équipement
de coupe (A) sur les deux crochets du porteplaque (B).
3. Plier le dispositif de protection de l’équipement de
coupe autour de l’arbre et serrer la vis (C) du côté
opposé de l’arbre. Utiliser la clé mixte pour serrer la
vis.
4. Installer le disque d’entraînement (D) sur l’arbre de
sortie.
5. Tourner l’arbre de sortie jusqu’à ce que l’un des
trous dans le disque d’entraînement s’aligne avec le
trou correspondant dans le carter d’engrenage.
6. Placer la goupille de blocage (E) dans le trou pour
bloquer l’arbre.
7. Faire tourner la tête de désherbage (F) dans le sens
des aiguilles d’une montre pour l’installer.
8. Pour retirer la tête de désherbage et le dispositif de
protection de l'équipement de coupe, suivez les
instructions dans l'ordre inverse.
Fonctionnement
Introduction
AVERTISSEMENT: Avant d’utiliser le
produit, lire et bien comprendre le chapitre
sur la sécurité.
1570 - 001 - 14.10.2020 63
Avant d’utiliser le produit
• Examiner la zone de travail pour s’assurer de
connaître le type de terrain, l’inclinaison du sol et s’il
y a des obstacles tels que des pierres, des branches
et des fossés.

• Effectuer une inspection relative à la révision du
produit.
• Effectuer les inspections de sécurité, les réparations
et l’entretien indiqués dans ce manuel.
• S’assurer que tous les couvercles, toutes les
protections, toutes les poignées et tous les
équipements de coupe sont correctement fixés et en
bon état.
• S’assurer qu’il n’y ait aucune fissure dans la partie
inférieure des dents de la lame à herbe ou au niveau
du trou situé au centre de la lame. Remplacer la
lame si elle est endommagée.
• Examiner la bride de support pour s’assurer qu’elle
ne présente pas de fissures. Remplacer la bride de
support si elle est endommagée.
• Examiner le protège-lame pour détecter d’éventuels
dommages ou fissures. Remplacer le protège-lame
s’il a subi des chocs ou s’il présente des fissures.
• Examiner la tête de désherbage et le dispositif de
protection de l’outil de coupe pour détecter
d’éventuels dommages ou fissures. Remplacer la
tête de désherbage et le dispositif de protection de
l’outil de coupe s’ils ont subi des chocs ou s’ils
présentent des fissures.
• S’assurer que le contre-écrou ne puisse pas être
retiré à la main. S’il peut être retiré à la main, il ne
verrouille pas suffisamment l’outil de coupe et doit
être remplacé.
64
Carburant
Cet outil est équipé d’un moteur à deux-temps.
MISE EN GARDE :
inapproprié peut endommager le moteur.
Utiliser un mélange d’essence et d’huile
pour moteur à deux-temps.
Carburant prémélangé
• Utiliser du carburant alkylat prémélangé Husqvarna,
pour atteindre une performance optimale et un
prolonger la durée de vie du moteur. Ce carburant
contient moins de substances chimiques nocives par
rapport à un carburant régulier, ce qui réduit les gaz
d’échappement nocifs. La quantité de dépôts après
combustion est inférieure avec ce carburant, ce qui
maintient les composants du moteur plus propres.
Pour mélanger le carburant
Essence
• Utiliser de l’essence sans plomb de bonne qualité
contenant au maximum 10 % d’éthanol.
Un type de carburant
1570 - 001 - 14.10.2020

MISE EN GARDE : Ne pas utiliser
d’essence à indice d’octane inférieur à
90 RON (87 AKI). L’utilisation d’un indice
d’octane inférieur peut entraîner le
cognement du moteur, ce qui provoque
des dommages au moteur.
Huile à moteur deux temps
• Pour obtenir un meilleur résultat et un
fonctionnement optimal, utiliser l’huile pour moteur à
deux-temps Husqvarna.
• Si l’huile pour moteur à deux temps Husqvarna n’est
pas disponible, utiliser une huile pour moteur à deux
temps de bonne qualité destinée aux moteurs
refroidis à l’air. Communiquer avec votre centre de
services pour sélectionner l’huile appropriée.
MISE EN GARDE : Ne pas utiliser l’huile
pour moteur à deux temps dans des
moteurs hors-bord refroidis à l’eau,
également appelée huile pour moteur
hors-bord. Ne pas utiliser l’huile pour des
moteurs à quatre temps.
Pour mélanger l’essence et l’huile pour moteur à deux temps
Essence, litre Huile pour mo-
teur à deux
temps, Iitre
2 % (50:1)
5 0,10
10 0,20
15 0,30
20 0,40
gallon US once liquide
US
1 2 ½
2 1/2 6 ½
5 12 ⅞
MISE EN GARDE : De petites erreurs
peuvent influencer considérablement le ratio
de mélange lors du mélange de petites
quantités de carburant. Mesurer
soigneusement la quantité d’huile et
s’assurer d’obtenir le mélange approprié.
1. Remplir la moitié de la quantité d’essence dans un
récipient propre destiné à contenir du carburant.
2. Ajouter la quantité totale d’huile.
3. Agiter le mélange de carburant.
4. Ajouter la quantité restante d’essence dans un
récipient.
5. Agiter avec précaution le mélange de carburant.
MISE EN GARDE : Ne pas mélanger le
carburant pendant plus de 1 mois à la fois.
Remplissage du réservoir de carburant
AVERTISSEMENT: Respecter la procédure
suivante pour assurer la sécurité.
1. Couper le moteur et le laisser refroidir.
2. Nettoyer la zone autour du bouchon du réservoir de
carburant.
3. Secouer le bidon et s’assurer que le carburant est
complètement mélangé.
4. Retirer le bouchon du réservoir de carburant
lentement pour libérer la pression.
5. Remplir le réservoir de carburant.
MISE EN GARDE :
pas trop de carburant dans le réservoir.
Le carburant se dilate lorsqu'il devient
chaud.
6. Serrer fermement le bouchon du réservoir de
carburant.
7. Nettoyer le déversement de carburant sur le produit
et autour de celui-ci.
S’assurer qu’il n’y a
1570 - 001 - 14.10.2020
65

8. Éloigner le produit de 3 m (10 pi) ou plus de la zone
de remplissage et de la source de carburant avant
de démarrer.
Remarque : Pour connaître l'emplacement du réservoir
de carburant sur votre machine, se reporter à
Introduction à la page 51
.
Pour préparer le débroussaillage
1. Soutenir le produit avec le harnais pendant le
débroussaillage.
2. Vérifier que l’équipement de coupe est parallèle au
sol.
Démarrage d’un moteur froid
1. Appuyer 10 fois sur la pompe à carburant.
2. Déplacer le levier d’étrangleur en position fermée
(position de démarrage).
3. Maintenir l’outil sur le sol à l’aide de la main gauche.
Ne pas marcher sur l’outil. Tirer lentement sur la
poignée de la corde du lanceur jusqu’à ce que vous
sentiez une résistance.
Remarque : Ne pas tirer la gâchette de l’accélérateur
lors du démarrage du moteur.
4. Tirer la poignée du câble du lanceur à 3 reprises
avec force.
MISE EN GARDE : Ne pas tirer sur la
corde du démarreur tant qu’il ne s’est
pas arrêté. Ne pas lâcher la corde du
démarreur lorsqu’elle est complètement
déployée. Relâcher lentement la corde
du démarreur. Le non-respect de ces
instructions peut causer des dommages
au moteur.
5. Déplacer le levier d’étrangleur en position Étrangleur
à mi-course.
6. Tirer sur la poignée du câble du lanceur jusqu’à ce
que le moteur démarre.
7. Laisser le moteur tourner pendant 10 secondes.
8. Déplacer le levier d’étrangleur en position Étrangleur
ouvert (position de marche).
Démarrage d’un moteur chaud
1. Appuyer lentement 10 fois sur l’ampoule de purge
d’air.
2. Déplacer le levier d’étrangleur en position
ÉTRANGLEUR À MI-COURSE.
3. Tirer vivement sur la corde du lanceur jusqu’à ce
que le moteur démarre.
4. Déplacer le levier d’étrangleur en position
ÉTRANGLEUR OUVERT.
66
1570 - 001 - 14.10.2020

Arrêt de la machine
• Appuyer sur l’interrupteur pour arrêter le moteur.
Remarque : L’interrupteur revient automatiquement à sa
position initiale.
Désherbage au moyen d’une tête de coupe
Tonte du gazon
1. Tenir la tête de coupe tout juste au-dessus du sol,
en l’inclinant. Ne pas appuyer le fil de coupe dans
l’herbe.
3. Faucher l’herbe d’un mouvement de balancier
latéral, le mouvement de la droite vers la gauche
constituant la course aller et le mouvement de la
gauche vers la droite la course de retour. Le côté
gauche de la lame (entre la position 8 h et la position
12 h) effectue le travail de coupe.
4. Si on penche légèrement la lame vers la gauche
pendant le désherbage, l’herbe coupée est disposée
en bandes, ce qui facilite le ramassage, par exemple
lors du ratissage.
5. Essayer d’adopter un rythme de travail régulier.
Prendre une position stable, les pieds écartés. Faire
un pas en avant après la course de retour et
reprendre la même position stable.
6. Laisser le bol de garde au sol. Son rôle est de
protéger la lame contre tout contact avec le sol.
7. Éviter que les matériaux s’enroulent autour de la
lame en travaillant toujours à plein régime et en
évitant de toucher le matériau végétal coupé lors de
la course de retour.
8. Arrêter le moteur, ouvrir le harnais et poser la
machine par terre avant de rassembler le matériau
végétal coupé.
Pour couper l’herbe
1. Pour effectuer une coupe, vérifier que le fil de coupe
est parallèle au sol.
2. Diminuer la longueur du fil de coupe de 10-12 cm
(4-4,75 po).
3. Réduire le régime du moteur pour réduire le risque
d’endommager les plantes.
4. Utiliser 80 % de l’accélération lorsqu’on doit couper
l’herbe à proximité d’objets.
Coupe de l’herbe au moyen d’une lame à herbe
1. Ne pas utiliser les lames et les couteaux à herbe
pour les tiges ligneuses.
2. La lame à herbe s’utilise pour tous les types d’herbe
haute ou épaisse.
1570 - 001 - 14.10.2020
2. Ne pas appuyer la tête de coupe sur le sol. Cela
pourrait endommager le produit.
3. Déplacer le produit d'un côté à l'autre pendant la
coupe. Faire tourner le moteur à plein régime.
67

Pour balayer l’herbe
6,0 m
18'
3,05 m
9'
2,0-2,4 mm
.079-.095"
10 cm
4"
Le débit d’air du fil de coupe en rotation peut être utilisé
pour souffler l’herbe coupée d’une zone.
1. Maintenir la tête de désherbage et le fil surélevés et
parallèles au sol.
2. Faire tourner le moteur à plein régime.
3. Déplacer la tête de coupe d’un côté à l’autre et
balayer l’herbe.
AVERTISSEMENT: Nettoyer le couvercle de
la tête de désherbage à chaque
remplacement du fil de coupe afin d’éviter
un déséquilibre et des vibrations dans les
poignées. En outre, vérifier les autres
parties de la tête de coupe et les nettoyer au
besoin.
Remplacement du fil coupe-herbe
68 1570 - 001 - 14.10.2020

6"
15 cm
1570 - 001 - 14.10.2020 69

"Click"
Entretien
Introduction
AVERTISSEMENT: Lire et comprendre le
chapitre sur la sécurité avant de faire
l’entretien du produit.
MISE EN GARDE : Afin d’éviter tout
démarrage accidentel, retirer le capuchon
de bougie d’allumage avant d’effectuer
l’entretien du produit.
Calendrier d’entretien
Entretien
Nettoyer la surface externe. X
Examiner le harnais pour détecter d’éventuels dommages. X
Vérifier l’absence de dommages sur l’anneau de suspension. X
Vérifier le dispositif de verrouillage de la gâchette d’accélération et la gâchette.
Se reporter à la section
teur à la page 58
S’assurer que l’outil de coupe ne tourne pas au régime de ralenti. X
Vérifier l’interrupteur d’arrêt. Se reporter à la section
d’arrêt à la page 58
Vérifier le dispositif de protection de l’outil de coupe pour détecter d’éventuels
dommages et fissures.
70 1570 - 001 - 14.10.2020
.
Pour vérifier le verrouillage de la gâchette de l’accéléra-
Pour vérifier l’interrupteur
.
Quotidien
Hebdo-
madaire
X
X
X
Mensuel

Entretien
Quotidien
Hebdo-
madaire
Mensuel
S’assurer que la lame à herbe est alignée avec le centre. S’assurer que la lame
à herbe est affûtée et qu’elle ne présente pas de dommages au niveau du tran-
X
chant ou du trou central.
Examiner la tête de coupe pour s’assurer qu’elle ne présente pas de dommages
ou de fissures. Le remplacer s’il est endommagé.
Examiner la poignée et le guidon afin de détecter d’éventuels dommages et
s’assurer qu’ils sont correctement fixés.
Pour des outils de coupe avec un bol de garde au sol, serrer la vis de blocage
complètement.
Pour des outils de coupe avec un contre-écrou, serrer le contre-écrou complètement.
Examiner la protection de transport afin de détecter d’éventuels dommages et
s’assurer qu’elle peut être fixée correctement.
Examiner le moteur, le réservoir de carburant et les conduites de carburant pour
détecter d’éventuelles fuites.
X
X
X
X
X
X
Nettoyer le filtre à air. Les remplacer au besoin. X
Serrer les écrous et les vis. X
Examiner le filtre à carburant pour voir s’il y a une contamination et le tuyau à
carburant pour voir s’il y a des fissures et d’autres défauts. Les remplacer au be-
X
soin.
Vérifier tous les câbles et toutes les connexions. X
Examiner le lanceur et la corde du lanceur pour détecter d’éventuels dommages. X
Examiner les éléments antivibrations pour s’assurer qu’ils ne présentent pas de
dommages ou de fissures.
Vérifier la bougie d’allumage. Se reporter à la section
lumage à la page 73
.
Pour vérifier la bougie d’al-
X
X
Nettoyer le système de refroidissement. X
Vérifier que le pignon conique est rempli de graisse au 3/4 de graisse. X
Nettoyer la surface externe du carburateur et ses zones adjacentes. X
Nettoyer la bougie d’allumage. Retirer la bougie d’allumage et vérifier l’écartement des électrodes.
X
Nettoyer ou remplacer l'écran pare-étincelles sur le silencieux. X
Vérifier l’embrayage, les ressorts d’embrayage et le tambour d’embrayage pour
détecter toute usure. Les remplacer au besoin.
Remplacer la bougie d’allumage X
Lubrifier l’arbre d’entraînement.
5
S’assurer que le mécanisme de sécurité du harnais n’est pas endommagé et
qu’il fonctionne correctement.
X
X
X
5
Dans un intervalle de 6 mois.
1570 - 001 - 14.10.2020 71

Entretien
A
B
C
Nettoyer ou remplacer l’écran pare-étincelles sur le silencieux. X
Quotidien
Hebdo-
madaire
Mensuel
Réglage du régime de ralenti
Votre produit Husqvarna est fabriqué conformément aux
spécifications permettant de diminuer les émissions
nocives.
1. S’assurer que le filtre à air est propre et que le
couvercle de filtre à air est fixé au produit.
2. Tourner la vis de réglage de régime de ralenti (T)
dans le sens horaire jusqu’à ce que l’outil de coupe
commence à tourner.
3. Tourner la vis de réglage de régime de ralenti (T)
dans le sens antihoraire jusqu’à ce que l’outil de
coupe s’arrête.
Le régime de ralenti est adéquat lorsque le moteur
fonctionne sans à-coups dans toutes les positions. Le
régime de ralenti doit être inférieur à la vitesse lorsque
l’outil de coupe commence à tourner.
Remarque :
Se reporter à la section
techniques à la page 74
ralenti recommandé.
pour obtenir le régime de
Données
refroidissement du cylindre (B) et le capot du cylindre
(C).
1. Nettoyer le système de refroidissement au moyen
d’une brosse une fois par semaine ou plus
fréquemment au besoin.
2. S’assurer que le système de refroidissement n’est
pas sale ou obstrué.
Pignon conique
Le pignon conique est rempli de la quantité de graisse
nécessaire en usine. Mais, avant d’utiliser le produit,
s’assurer que le pignon conique est rempli au 3/4 de
graisse. Utiliser de la graisse spéciale Husqvarna.
AVERTISSEMENT: Si l’équipement de
coupe ne s’arrête pas lors du réglage du
régime de ralenti, communiquer avec son
fournisseur de services d’entretien. Ne pas
utiliser le produit jusqu’à ce qu’il soit réglé
ou réparé correctement.
Nettoyage du système de refroidissement
MISE EN GARDE :
refroidissement encrassé ou bloqué peut
entraîner une surchauffe du produit, ce qui
peut endommager ce dernier.
Les pièces du système de refroidissement comprennent
la prise d’air sur le démarreur (A), les ailettes de
72
Un système de
La graisse du pignon conique est remplacée par votre
centre de services.
Filtre à air
Enlever la poussière et la saleté du filtre à air pour le
garder propre afin d’éviter ces problèmes :
• Mauvais fonctionnement du carburateur.
• Problèmes au démarrage du produit.
• Une perte de puissance du moteur
• Une usure accrue des pièces du moteur.
• Une consommation excessive de carburant.
Nettoyage du filtre à air
1. Retirer le couvercle du filtre à air et retirer le filtre.
2. Frapper le filtre contre une surface plane pour faire
tomber les particules.
1570 - 001 - 14.10.2020

MISE EN GARDE : Ne pas utiliser un
solvant ou de l’air comprimé pour
nettoyer le filtre à air.
3. Remettre le filtre à air en place. S'assurer que le
filtre à air est complètement scellé contre le support
de filtre à air.
4. Remettre le couvercle du filtre à air.
Remarque : Un filtre à air utilisé pendant une longue
période ne peut pas être complètement nettoyé.
Remplacer le filtre à air à intervalles réguliers. Toujours
remplacer les filtres à air endommagés.
Pour vérifier la bougie d’allumage
MISE EN GARDE : Utiliser la bougie
recommandée. Se reporter à la section
Données techniques à la page 74
bougie inadéquate peut endommager l’outil.
1. Si le produit n’est pas facile à démarrer ou à faire
fonctionner ou s’il fonctionne mal au régime de
ralenti, examiner la bougie d’allumage pour détecter
d’éventuels matériaux indésirables. Afin de réduire le
risque de matériau indésirable sur les électrodes de
la bougie d’allumage, effectuer les étapes
suivantes :
. Une
Dépannage
Le moteur démarre mais s’arrête à nouveau
a) Vérifier que le régime de ralenti est réglé de
façon adéquate.
b) Vérifier que le mélange de carburant est correct.
c) Vérifier que le filtre à air est propre.
2. Nettoyer la bougie si elle est sale.
3. Vérifier que l’écartement des électrodes est correct.
Se reporter à la section
page 74
.
4. Remplacer la bougie d’allumage une fois par mois
ou plus fréquemment, au besoin.
Données techniques à la
Pièce du produit à examiner Cause possible Mesure
Réservoir de carburant Type de carburant inapproprié. Vidanger le réservoir de carburant et
Carburateur Le régime de ralenti n’est pas cor-
rect.
Filtre à air Filtre à air bouché. Nettoyer ou remplacer le filtre à air.
Filtre à carburant Filtre à carburant obstrué. Remplacer le filtre à carburant.
faire le plein avec le carburant correct.
Communiquer avec votre centre de
services.
Le moteur ne démarre pas.
Vérifier
Interrupteur d’arrêt. L’interrupteur d’arrêt est à la position d’arrêt. Régler l’interrupteur d’arrêt à la position de
1570 - 001 - 14.10.2020 73
Cause possible Procédure
démarrage.

Vérifier Cause possible Procédure
Cliquets de lanceur à
rappel.
Réservoir de carburant.
Bougie d’allumage. La bougie d’allumage est sale ou humide. S’assurer que la bougie est propre et sèche.
Les cliquets de lanceur à rappel ne peuvent
se déplacer librement.
Type de carburant inapproprié. Vidanger le réservoir de carburant et faire le
L’écartement des électrodes de la bougie
d’allumage est incorrect.
La bougie d’allumage est desserrée. Serrer la bougie d’allumage.
Retirer le couvercle du démarreur et nettoyer
autour des cliquets de lanceur à rappel.
Laisser un agent d’entretien agréé vous aider.
plein avec le carburant correct.
Nettoyer la bougie d’allumage. Vérifier que
l’écartement des électrodes est correct. S’assurer que la bougie d’allumage est dotée
d’un suppresseur.
Consulter les caractéristiques techniques
pour connaître l’écartement correct des électrodes.
Transport et entreposage
• Pour le stockage et le transport du produit et du
carburant, s’assurer qu’il n’y a pas de fuite ou de
vapeur. Les étincelles ou les flammes nues, par
exemple avec des appareils électriques ou des
chaudières, peuvent démarrer un incendie.
• Utiliser toujours des contenants agréés pour
entreposer ou transporter le carburant.
• Vider le réservoir de carburant avant tout transport
ou remisage pendant une période prolongée. Mettre
au rebut le carburant à un emplacement adéquat.
• Utiliser le fourreau de transport sur le produit afin
d’éviter des blessures ou des dommages au produit.
Une lame immobile peut également provoquer des
blessures graves.
• Retirer le chapeau de la bougie.
• Fixer le produit de façon sécuritaire pendant le
transport.
Données techniques
Données techniques
128LX, LT28CSHV
Moteur
Cylindrée, po3/cm
Régime de ralenti, tr/min 2 300 – 3 200
Régime maximal recommandé, tr/min 8000
Puissance max. du moteur, conformément à la norme
ISO 8893, kW/hp à tr/min
Silencieux du pot catalytique Oui
Rotation maximale de l’arbre de sortie 7200
74 1570 - 001 - 14.10.2020
3
1,7/28
0,7/0,94 @ 8000

128LX, LT28CSHV
Système d’allumage
Bougie d'allumage Champion RCJ 8Y
Écartement des électrodes, po/mm 0,024/0,6
Circuits d'alimentation et de lubrification
Capacité du réservoir de carburant, pte US/l 0,85/0,4
Poids
Poids, lb/kg 11,0/5,0
6
Accessoires
Accessoires
Accessoires homologués
Trou central des lames/couteaux, diam. de 25,4 mm
Filetage de l’arbre sortant M10 LH
Lame à herbe et couteau à herbe Multi 255-4 (4 dents de 255 de diam.) 580 44 66-06
Tête de désherbage T25 (fil de 2,4 mm de diam.) 580 44 66-06
Bol de garde au sol 503 89 01-01 S.O.
Type d’accessoires Protection de l’outil de coupe, réf.
art.
6
Ce système d’allumage par étincelles est conforme à la norme ICES-002 du Canada.
1570 - 001 - 14.10.2020 75

www.husqvarna.com
Original instructions
Instrucciones originales
Instructions d’origine
1142513-49
2020-10-20
 Loading...