


LGB-26TPVR
GB
LCD D
Digital 2 Tuner PVR Built-in
igital andAnalogue
TV
LCD Digital and
Analogue TV
Caution
To reduce the risk of electric shock, do not remove cover(or back).
No user serviceable parts inside. Refer servicing to qualified service personnel.
Indicates a situation which, if not avoided, could damage the equipment or
other apparatus.
This symbol indicates dangerous voltage inside the LCD-TV that presents a
risk of electric shock or personal injury. Indicates a hazardous situation which,
if not avoided, could result in serious injury.
This symbol indicates important instructions accompanying the LCD-TV.
Read this manual carefully and make sure you understand the instructions provided.
For your safety, check what the result of each action will be. Throughout the whole
manual, pay special attention to the following marks that indicate hazardous situations.
Indicates additional information to the user to make the user aware of possible
problems and information of any importance to help the user to understand, to use
and to maintain the installation.
The information in this document is subject to change without notice.
Copyright (Copyrightཱྀ2005 HUMAX Corporation)
Not to be copied, used or translated in part or whole without HUMAX's prior
consent in writing except approval of ownership of copyright and copyright law.
Warranty
HUMAX does not have any responsibility for direct, indirect, accidental and other
damage caused by the use of the information contained in this manual.
Trademarks
VIACCESSTMis a trademark of France Telecom.
CryptoWorks(TM) is a trademark of Philips Electronics N.V.
Irdeto is a trademark of Mindport BV.
Nagravision is a registered trademark of KUDELSKI S.A.
Conax is a trademark of Telenor Conax AS.
'Dolby' and the double-D symbol are trademarks of Dolby Laboratories.
Manufactured under the license from Dolby Laboratories.
is a trademark of SRS Labs, Inc.
TruSurround XT technology is incorporated under license from SRS Labs, Inc.
Thank you for purchasing a HUMAX LCD-TV. Please read this user manual
carefully in order to safely install, use and maintain the LCD-TV at maximum
performance. Keep this user manual next to your LCD-TV to ensure the best
performance possible.
2. Caution
Safety Instructions
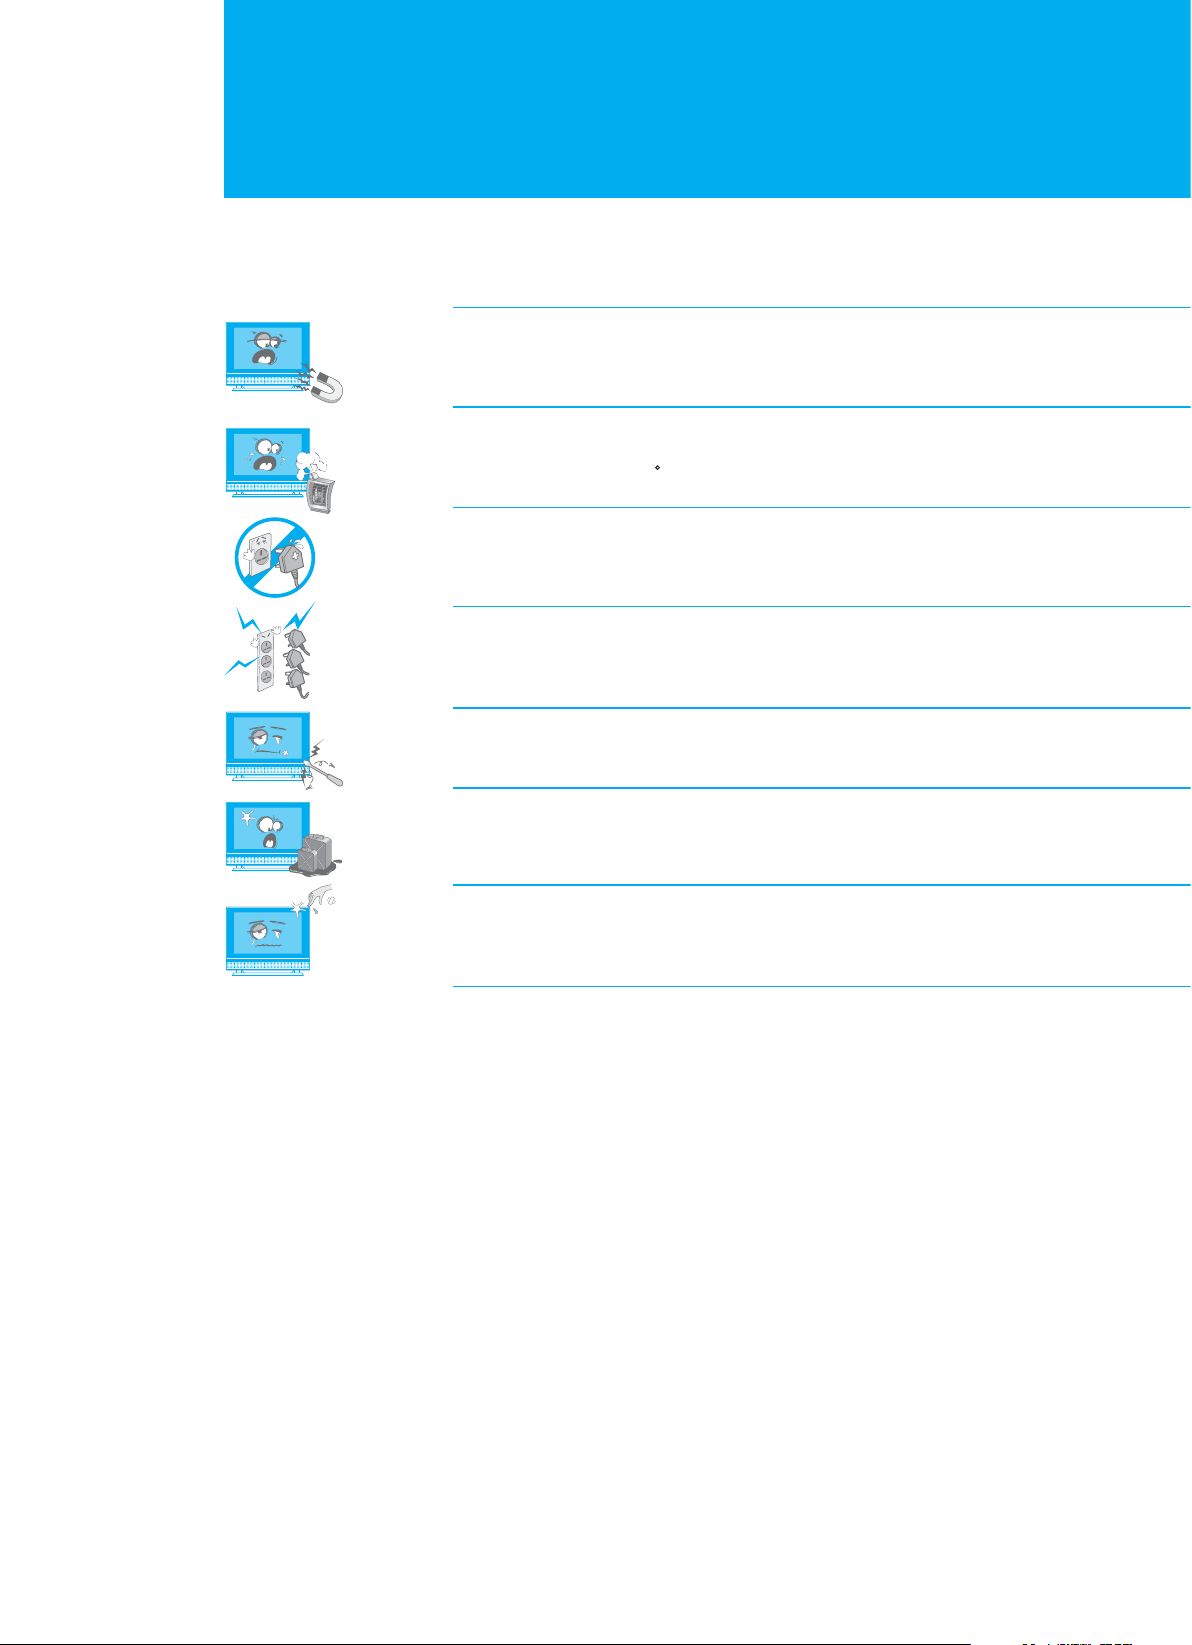
This LCD-TV has been engineered and manufactured to assure your safety. You
can prevent serious electrical shock and other hazards by keeping in mind the
following:
Do not place anything heavy, wet or magnetic on the LCD TV or the power
cord. Never cover the ventilation openings with any material and never touch
them with metalic or inflammable materials.
Avoid operating the LCD-TV in extreme heat, humidity or areas affected by dust.
+ Temperature : 0~50 C + Humidity : 20~90RH
Be sure to turn the LCD-TV off before plugging the power cord into the socket.
Make sure that the power cord and the other cords are securely and correctly
connected.
Overloaded AC outlets and extension cords are dangerous, as are frayed power
cords and broken plugs, which may cause electric shock or fire. Call your service
technician for replacement.
Do not use sharp tools such as a pin or a pencil near the LCD-TV, as they may
scratch the LCD surface.
Do not use a solvent, such a benzene, to clean the LCD-TV, as it will damage
the LCD surface.
The apparatus shall not be exposed to dripping or splashing.
Be careful when touching the LCD-TV.
When you touch the LCD-TV, be careful not to get a cut on your fingers with an
acrylic surface of the LCD-TV.
Warning
1 Follow these directions in order not to damage the power cord or plug.
Do not modify the power cord or plug. Do not bend or twist the power cord
too much. Make sure to disconnect the power cord using the plug rather than
the power code. Keep heating appliances as far as possible from the power cord
in order to prevent the cover vinyl from melting.
2 Follow these directions. Failure to follow one of them may cause an electrical
shock. Do not open the main body. Do not insert metals or inflammable objects
inside the LCD-TV. Do not touch the power plug with wet hands. Disconnect the
power cord in case of lightning.
3 Do not use the LCD-TV when it is out of order. If you continue to use the
LCD-TV when defective, serious damage can be caused to it. Make sure to
contact your local LCD-TV distributor if the LCD-TV is out of order.
4 Please do not insert metal or alien substances into the slots for the modules
and smart cards. In doing so it can cause damage to the LCD-TV and reduce its
life span.
5 Hard Disk Drive : Do not move the LCD-TV or turn the power off suddenly
while the hard disk drive is running. The company shall not be liable for any
corruption of data on the hard disk drive caused by the carelessness or misuse
of users. This LCD-TV provides up to 40GB of hard disk drive. Do contact your
LCD-TV provider when you change the hard disk drive.
3. Safety Instructions

Contents
Before Using the TV
Setting Up the TV
Using the Analogue TV
Package Contents
Front Panel
Rear Panel
Remote Control
+ Main Remote Control
+ Simple Remote Control
+ Inserting the Batteries
Mounting Device
+ Assembling the Stand-Base
+ Installing on the Wall
Connecting the External Equipment
+ Connecting the Aerial
+ Connecting the PC
+ Connecting the External Devices
+ Connecting the DVD
+ Connecting the DVI
Setting the Analogue Channels
+ Setting the Analogue Channels Automatically
+ Setting the Analogue Channels Manually
+ Editing the Analogue Channels
Basic Operation
+ Powering the TV On/Off
+ Changing the Input Mode
+ Volume Control
+ Selecting the Channel
+ Choosing your Language
+ Listing Channels
+ Using the OK Button
+ Using the Audio Button
+ Setting the Sleep Time
07
08
09
10
10
13
14
15
15
15
16
16
16
17
17
17
18
18
19
20
21
21
21
21
21
21
22
22
22
22
Setting the Picture
+ Mode
+ Colour Temperature
Setting the PIP/TWIN
+ PIP/TWIN
+ Using the PIP Buttons in the Remote Control
+ Using the Digital Channels in PIP/TWIN Mode
Changing the Sound
+ Effect
+ Auto Volume Level
+ TruSurround XT
+ Sound Source
+ Using the Sound Button in the Remote Control
Setting the Time
+ Setting the Current Time
+ Automatically Turning the TV On and Off
Setting the System
+ Language
+ OSD Transparency
+ AV2 Output
+ Antenna Power
+ Aspect Ratio
+ Backlight Brightness
Displaying the Teletext Information
Setting the PC Input
23
23
23
24
24
25
25
26
26
26
26
26
26
27
27
27
28
28
28
28
28
28
28
29
30
4. Contents - Analogue TV

Contents
Recording and Playback
(PVR function)
Recording
+ Instant Recording
- Setting the Recording Quality
+ Recording Reservation
- Adding Recording Reservations
- Editing Recording Reservations
+ Time Shifted Recording
Playback
+ Programme Playback
+ Editing Recorded Programmes
- Editing Title
- Delete File
- Copy File to External Device
- Connecting the External HDD
+ Playback Control
- Play / Pause
- Rewind to Previous Scene
- Fast forward to Next Scene
- Recording
- Direct Jump
- Instant Reply
- Repeat between A and B
- Bookmark
HDD Control
+ Checking the Hard Disk Drive
+ Connecting the External HDD
31
31
32
33
33
34
35
37
37
39
39
39
39
40
41
41
41
41
41
41
42
42
42
43
43
44
5. Contents - PVR

Contents
Using the Digital TV
Digital TV Channel Setup
Basic Operation
+ Switching Channel
+ Changing the Subtitle Language
+ Changing an Audio Language
+ Programme Information - Information Banner (I-Plate)
+ MHEG Application
Channel List
+ Displaying and Switching Channel List
+ Editing Channels
+ Editing Favourite Channels
Programme Guide
+ Viewing Programme Guide Information
+ Finding a Programme
+ Adding Reservations by Guide
Setting the Preferences
+ Parental Control
+ Local Setting
+ Miscellaneous Settings
Installation
+ Automatic Search
+ Manual Search
+ Default Setting
45
46
46
46
46
47
48
49
49
49
52
53
53
54
55
56
56
57
59
60
60
61
62
Appendix
Software Upgrade
+ OTA (Over the Air)
+ Software Update from PC
System Information
+ Status
+ Signal Detection
+ Common Interface
Game
Menu Map
+ LCD TV Menu
+ PC Main Menu
+ Digital TV Menu
Troubleshooting
+ Troubleshooting
+ Error Message
Specification
Glossary
Service and Support
63
63
66
67
67
67
68
68
69
69
69
70
71
71
72
74
75
76
6. Contents - Digital TV
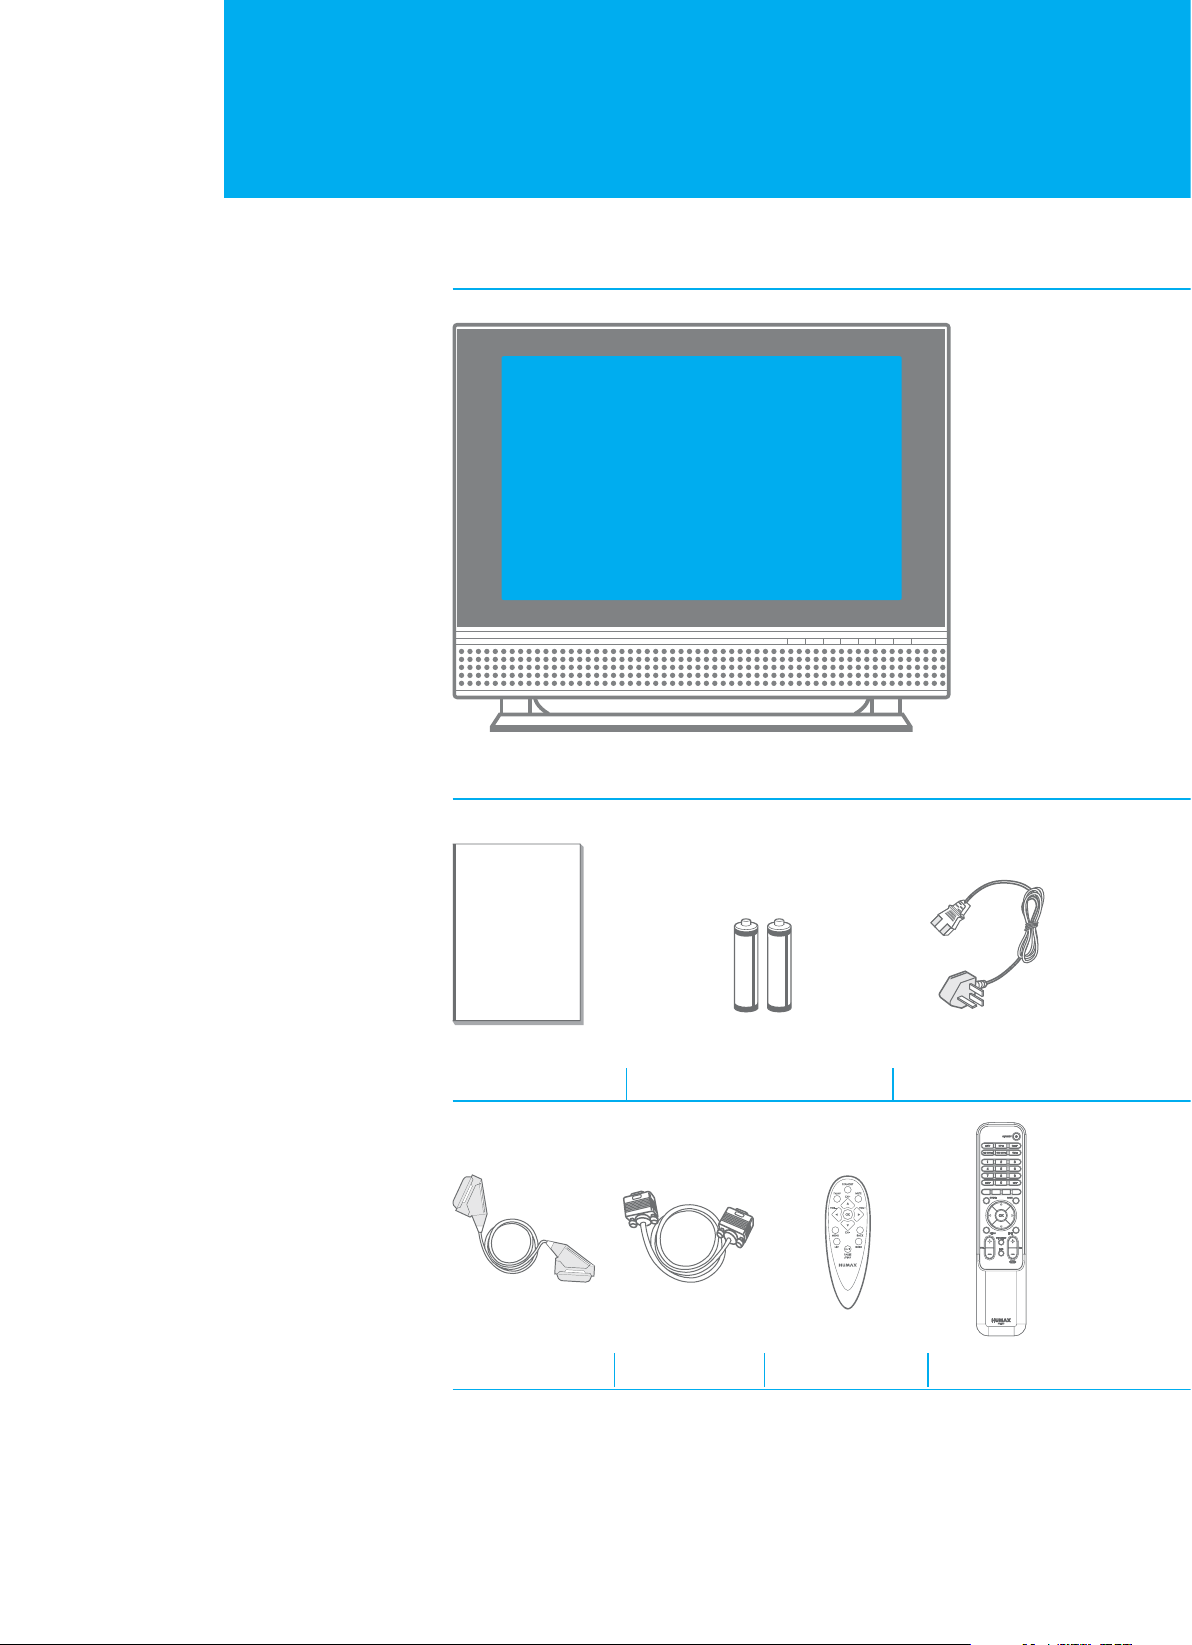
Package Contents
+ Please check all package contents before using your LCD-TV.
+ Package Contents may be different according to the area.
LCD-TV
User's Manual Power Cable
AAA Batteries (x2)
Scart Jack
7. Package Contents
PC Cable
Simple Remote Control
(SR-10)
Main Remote Control
(NR-102)
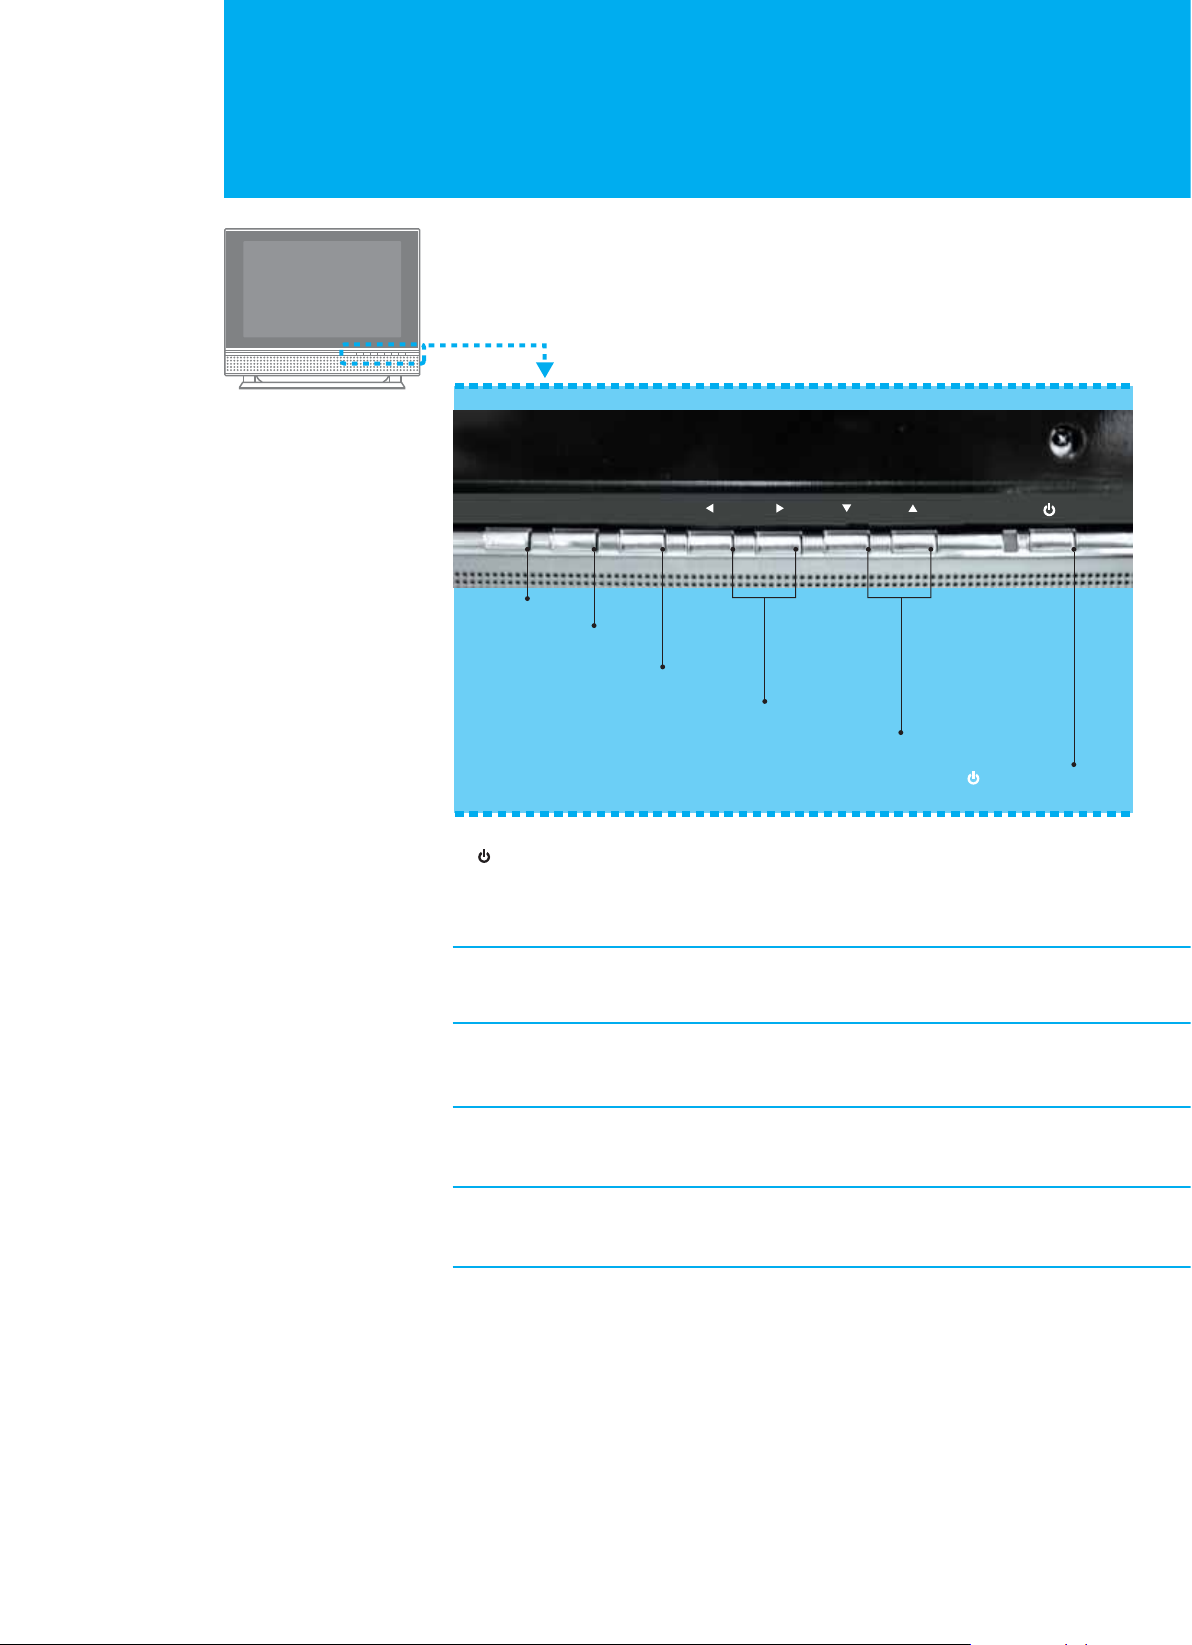
Front Panel
TV/AV
TV/AV 6
MENU VOL
OK CH
OK 5
MENU 4
ൖ VOL ൘G 3
GGCH G 2
1. : STANDBY
Switches between Operation and Standby modes.
Displays Red colour when the set is in standby mode.
Changes to Green colour when the set is switched on.
2. GGCH
Selects a programme or a menu item.
3. ൖ VOL ൘
Adjusts the volume. Adjusts the menu setting.
4. MENU
Displays the menu.
5. OK
Selects a menu or confirms the selected operation.
STANDBY 1
6. TV/AV
Selects the input signal (Digital TV, Analog TV, AV1, AV2, AV3, AV4, S-Video,
Component, PC, DVI ).
8. Front Panel
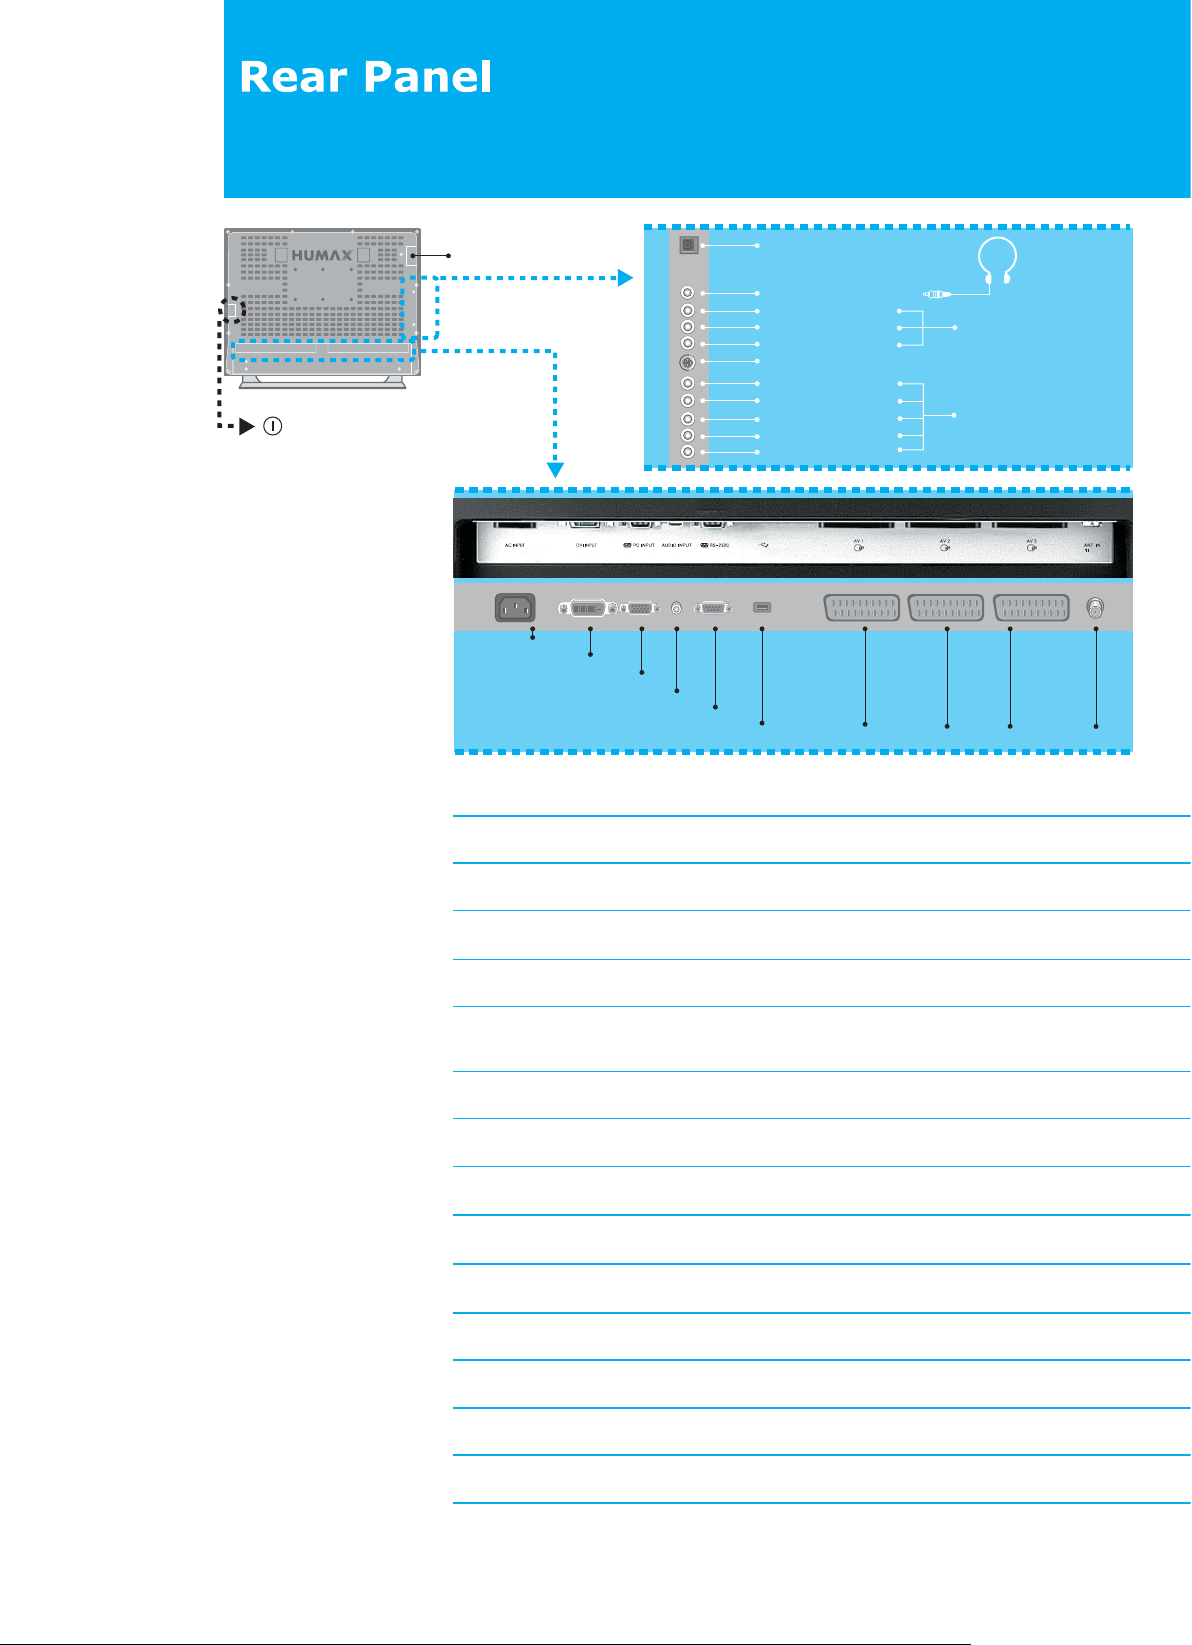
16. MAIN POWER
14. COMMON INTERFACE
15. SMARTCARD SLOT
AC INPUT 1
DVI INPUT 2
PC INPUT 3
AUDIO INPUT 4
1. AC INPUT
Connect the supplied AC power cord.
2. DVI INPUT
Connect to the digital video output jack of an external device with DVI output.
3. PC INPUT
Connect to the video output jack on your PC, using the PC cable supplied.
4. AUDIO INPUT
Connect to the audio output jack on your PC or your external device with DVI output.
5. RS-232C
Connect to the RS-232C port on your PC for software upgrade.
6. USB MASTER PORT
Connect to the USB port on an external HDD for moving the various digital data to/from an
external HDD.
7. AV1 (SCART 1), AV2 (SCART 2), AV3 (SCART 3)
Connect for the video and audio input/output to external devices with SCART cables.
8. ANT IN (Antenna In)
Connect to your aerial for digital and analogue TV signal.
9. S/PDIF
Connect to Dolby digital decoder for the digital audio signal output.
10. H/P (Headphone)
Connect to your headphone.
11. AV4 (RCA)
Connect for the video and audio input to external devices with RCA cable.
12. S-VIDEO
Connect to an external device with S-Video output.
13. COMPONENT
Connect to an external device with Component output, such as DVD.
14. COMMON INTERFACE
Use for one CA Module with a smart card.
15. SMARTCARD SLOT
Slot for Smartcard.
16. MAIN POWER
Main Power Button.
RS-232C 5
USB MASTER PORT 6
9. S/PDIF
10. H/P (Headphone)
Red3 : AUDIO : R
White : AUDIO : L
Yellow : VIDEO
12. S-VIDEO
Red2 : AUDIO : R
White : AUDIO : L
Red1 : Pr
Blue : P
Green : Y
b
AV1 7
11. AV 4 (RCA)
13. COMPONENT
AV2 7 AV3 7
75ⵕ
ANT IN 8
9. Rear Panel
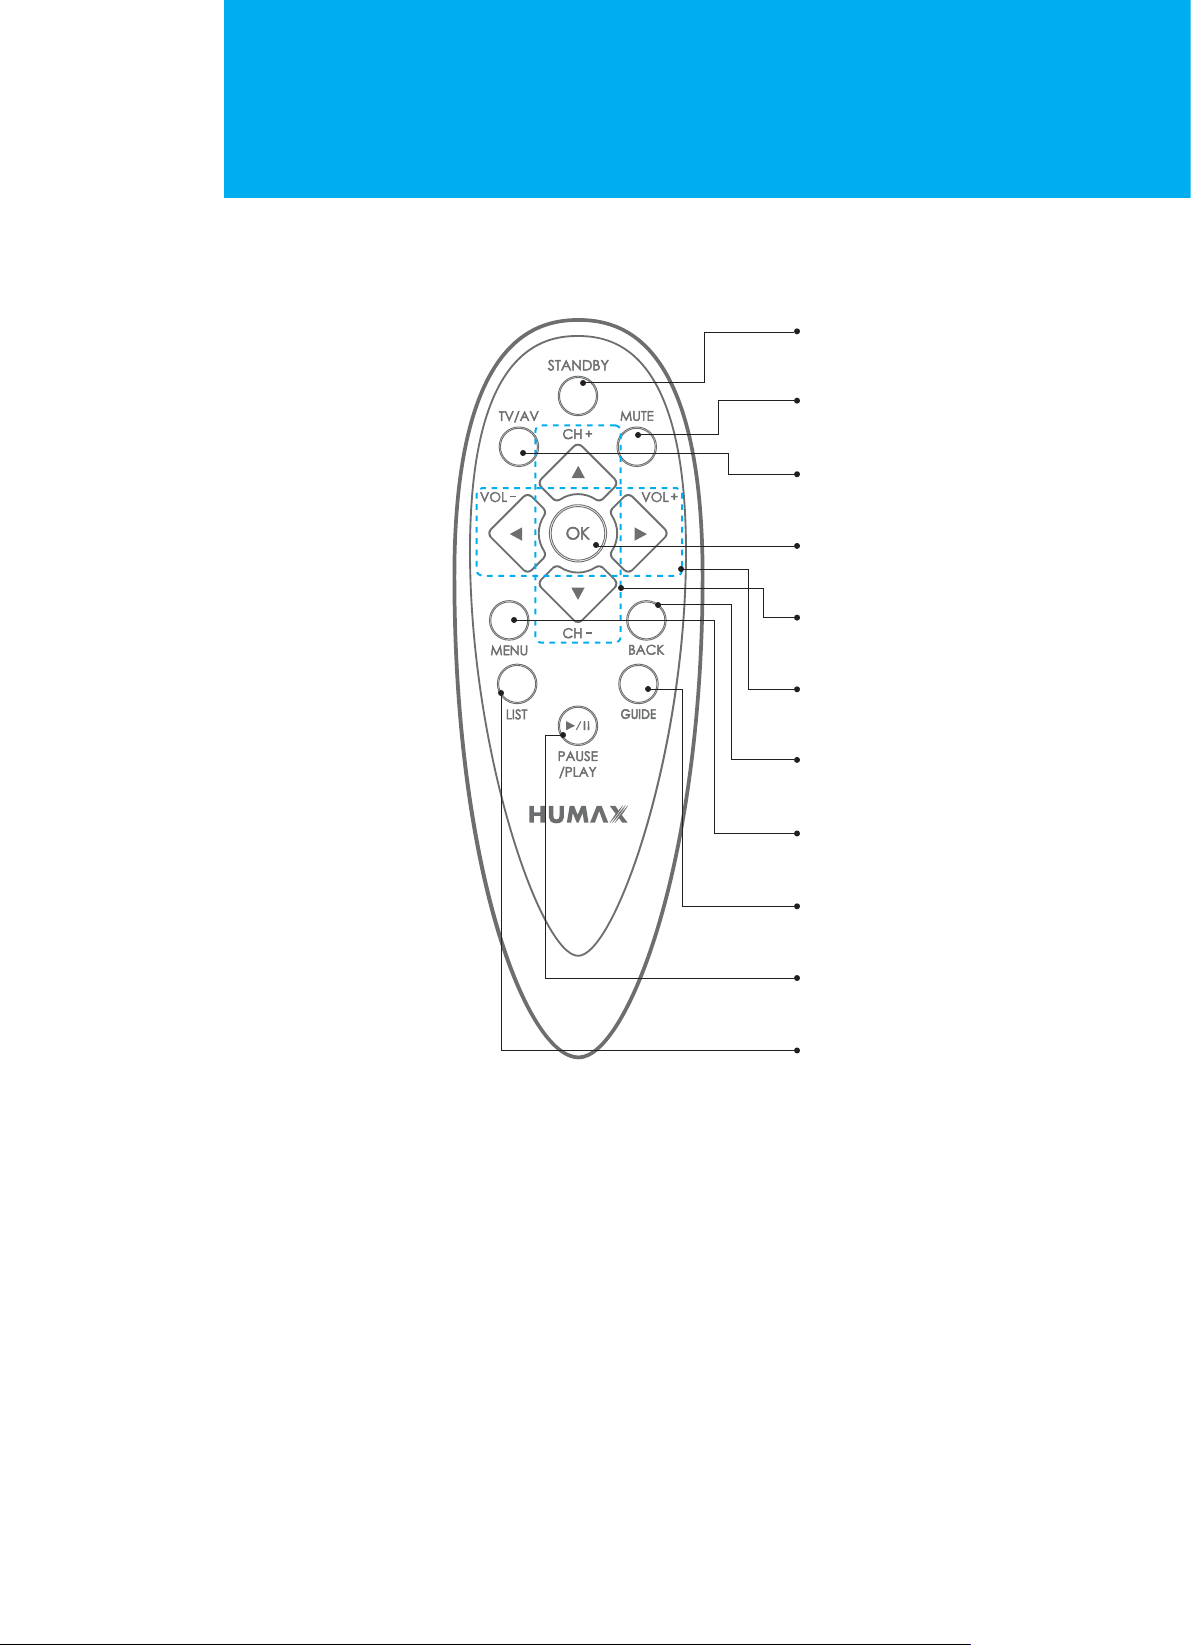
Remote Control
All the functions can be controlled with the Remote Control handset. Some function
can also be adjusted with the buttons on the front panel of the set.
Both the Main Remote Control to control the all functions and the
Simple Remote Control to control the some simple functions are provided.
Before you use the Remote Control handset, please install the batteries.
Main Remote Control
EFFECT
10. Remote Control
+/-
+-
+/-
25. SUBTITLE
26. SOUNDTRACK/AUDIO
27. PIP and TSR BUTTONS
28. TELETEXT BUTTONS
/ PLAYBACK BUTTONS

Remote Control
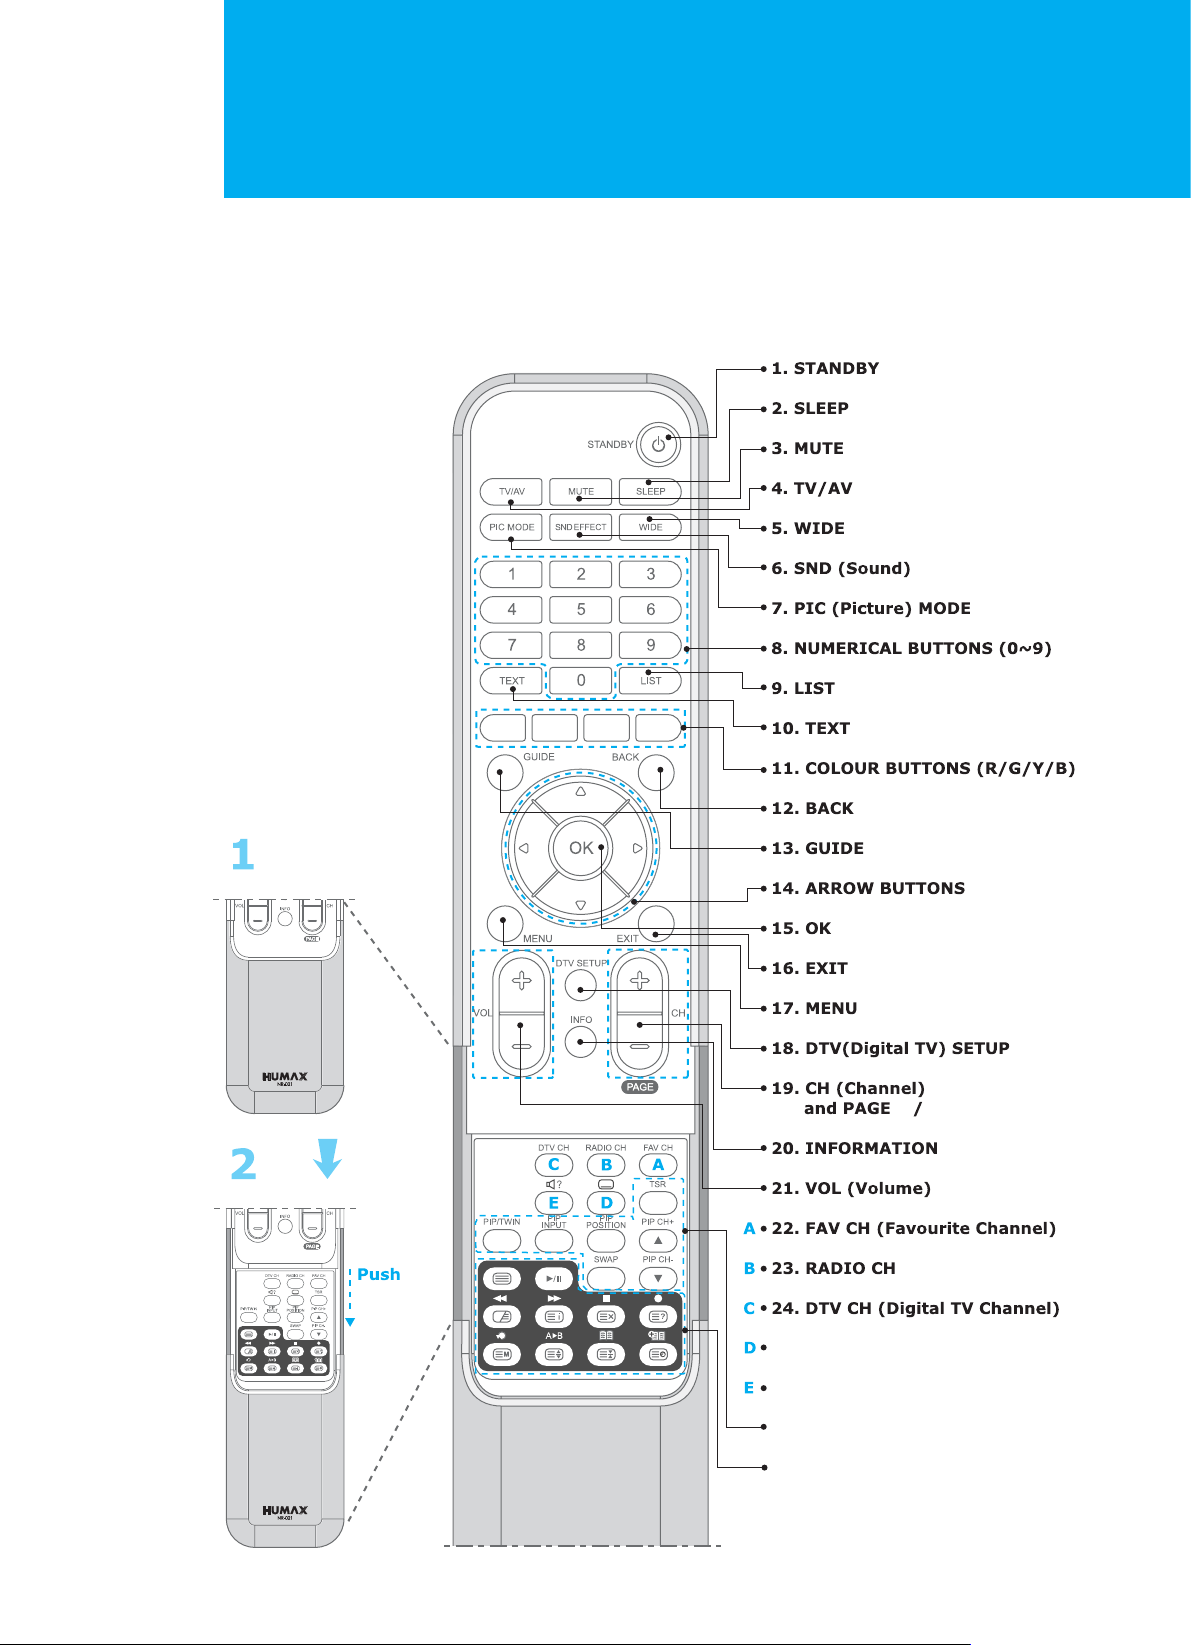
1. STANDBY
Switches between Operation
and Standby modes.
2. SLEEP
Sets the sleep time.
3. MUTE
Mutes the audio.
4. TV/AV
Selects input signal between TV
and another signals.
5. WIDE
Sets the display format.
6. SND (Sound) EFFECT
Changes the sound mode.
7. PIC (Picture) MODE
Changes the picture mode.
8. NUMERICAL BUTTONS (0~9)
Enters a channel number or menu
option number.
9. LIST
Displays the channel list.
10. TEXT
Use the MHEG application
11. COLOUR BUTTONS (R/G/Y/B)
Selects colour keys for MHEG or EPG
in the Digital TV mode.
Selects color keys for teletext in the
Analog TV and Digital TV modes.
12. BACK
Returns to the previous menu and
screen.
13. GUIDE
Displays the Programme Guide.
14. ARROW BUTTONS ( , , , )
Moves the cursor to the up, down,
left or right menu option.
15. OK
Selects a menu, or confirms the
selected operation and displays
the channel list whilst watching
a programme.
16. EXIT
Exits the main menu or Guide
screen.
17. MENU
Displays the main menu.
18. DTV Setup
Displays the DTV Setup menu in
the Digital TV mode.
19. CH +/- and PAGE +/-
Changes the Channel or Page.
20. INFORMATION
Displays the information about
the channel and programme
in the Digital TV mode.
21. VOL +/-
Adjusts the audio volume.
A
22. FAV CH
Displays the Favourite Channel
List in the Digital TV mode.
B
23. RADIO CH
Switches to digital Radio
channel in the Digital TV mode.
C
24. DTV CH
Switches to digital TV channel
in the Digital TV mode.
D
25. SUBTITLE
Changes the subtitle language
in the Digital TV mode.
E
26. SOUNDTRACK/AUDIO
Lists alternative soundtracks
enable stereo, dual or mono
sound in the Digital TV mode.
11. Remote Control
Remote Control
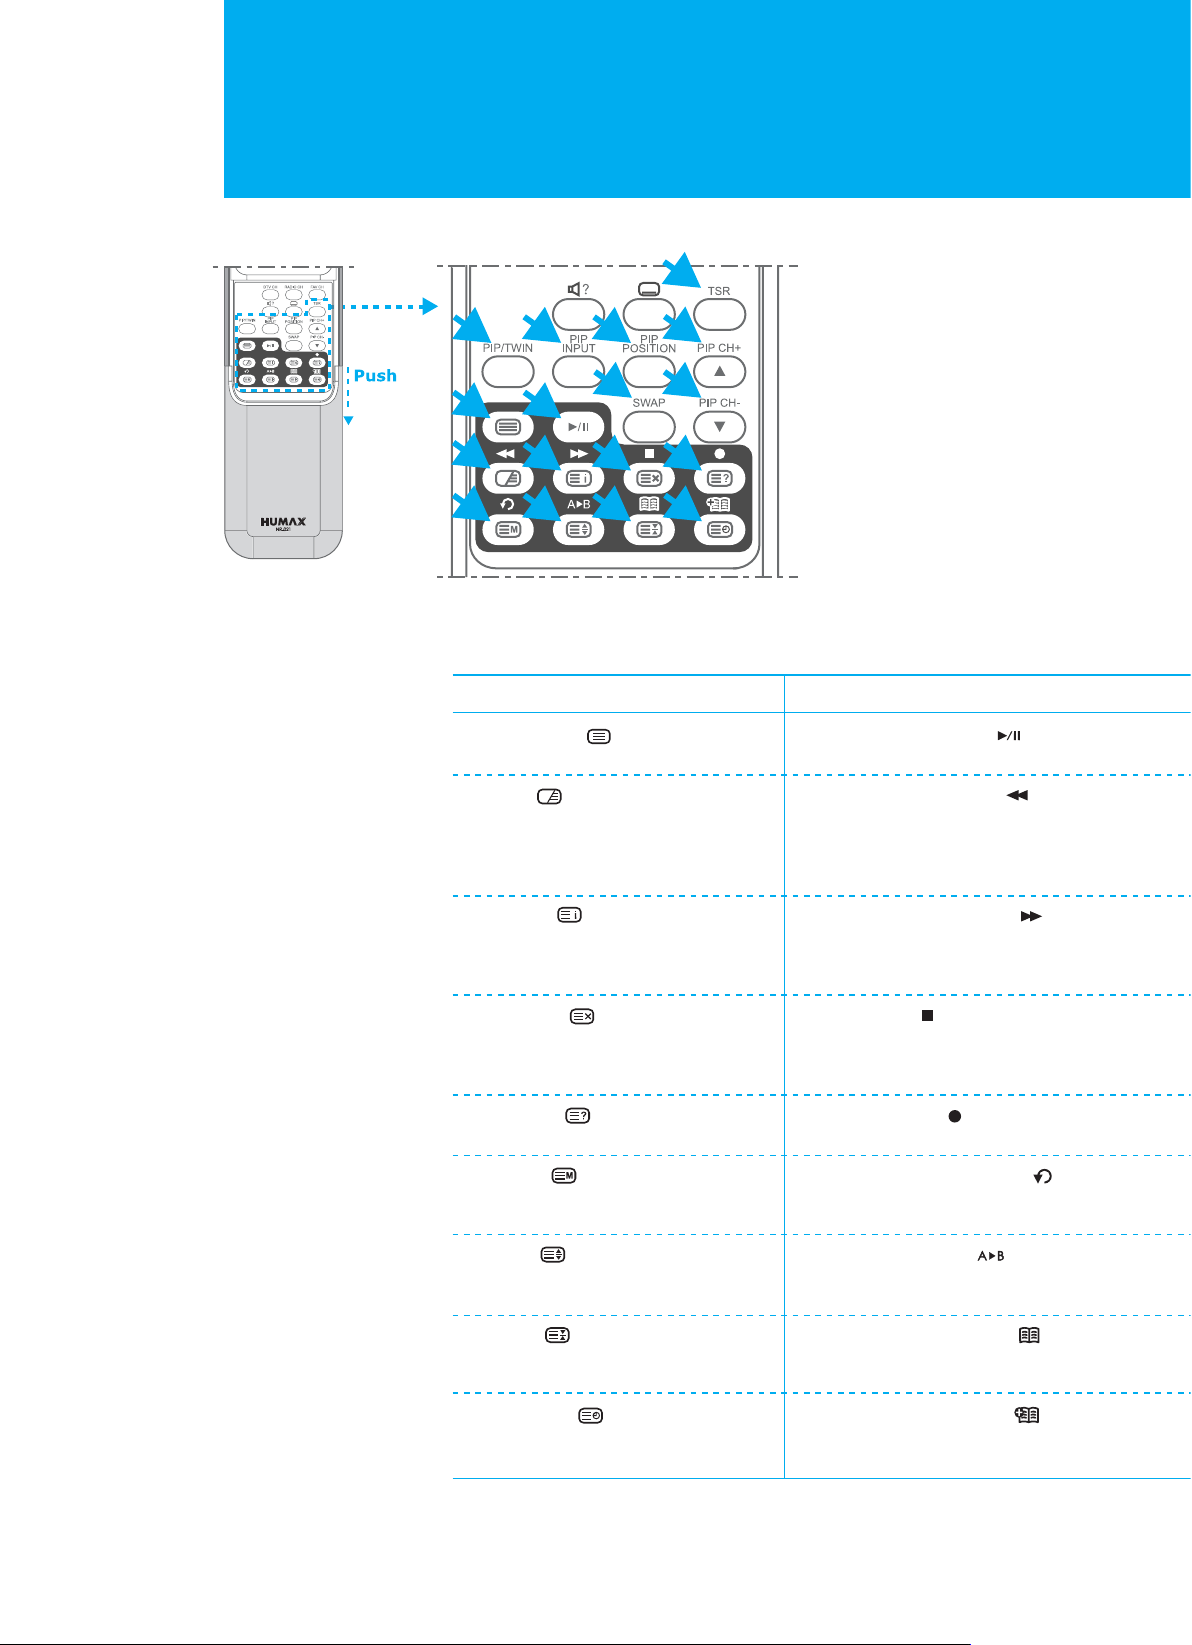
PIP AND TSR BUTTONS
K
L
M
N
O
A
C
G
TELETEXT BUTTONS
A. TELETEXT ( )
Activate/Deactivate the teletext service.
C. MIX ( )
Displays the teletext with the
broadcasting screen.
B
D
H
E
I J
P
P
F
K. TSR
(TIME SHIFTED RECORDING)
Switches the Time Shifted
Recording On and Off.
L. PIP/TWIN
Changes PIP/TWIN mode.
M. PIP INPUT
Change the PIP input mode.
N. PIP POSITION
Control the PIP position.
O. SWAP
Switch between main screen
and PIP screen.
P. PIP CH +/ -
Change the PIP channel.
PLAYBACK BUTTONS (for PVR)
B. PLAY / PAUSE ( )
Plays or pause a programme.
C. FAST REWIND ( )
Rewinds a programme. Each time
you press this button, the scenes
is rewound more faster divided into
4 steps.
D. INDEX ( )
Displays the teletext index page.
E. UPDATE ( )
Displays the TV picture on the
screen whilst waiting for the new
teletext page.
F. REVEAL ( )
Displays the concealed information.
G. MODE ( )
Programme a colour button in LIST
mode.
H. SIZE ( )
Selects a text size.
I. HOLD ( )
Holds function during teletext display.
Stop the automatic page change.
J. SUBPAGE ( )
Search the sub-page using the
sub-code.
D. FAST FORWORD ( )
Fast forwards a programme. Each
time you press this button, the scene
is forwarded faster divided into 4 steps.
E. STOP ( )
Stops a programme.
F. RECORD ( )
Records a programme.
G. INSTANT REPLAY ( )
Replays the programme from 7
seconds previous scene.
H. A-B REPEAT ( )
Plays back a specified block
repeatedly.
I. BOOKMARK LIST ( )
Displays the list of saved viewing
positions.
J. ADD BOOKMARK ( )
Saves the present viewing position
as a bookmark.
12. Remote Control
Remote Control
Simple Remote Control
1. STANDBY
2. MUTE
3. TV/AV
4. OK
5. CH (Channel) /
1. STANDBY
Switches between Operation
and Standby modes.
2. MUTE
Mutes the audio.
3. TV/AV
Selects input signal between
TV and another signals.
4. OK
Selects a menu, or confirms the
selected operation and displays
the channel list whilst watching
a programme.
5. CH (Channel) +/-
Changes the Channel.
6. VOL (Volume) /
7. BACK
8. MENU
9. GUIDE
10. PAUSE / PLAY
11. LIST
6. VOL (Volume) +/-
Adjusts the audio volume.
7. BACK
Returns to the previous menu
and screen.
8. MENU
Displays the main menu.
9. GUIDE
Displays the Programme Guide.
10. PAUSE/PLAY
Plays or pause a programme.
11. LIST
Displays the channel list.
13. Remote Control
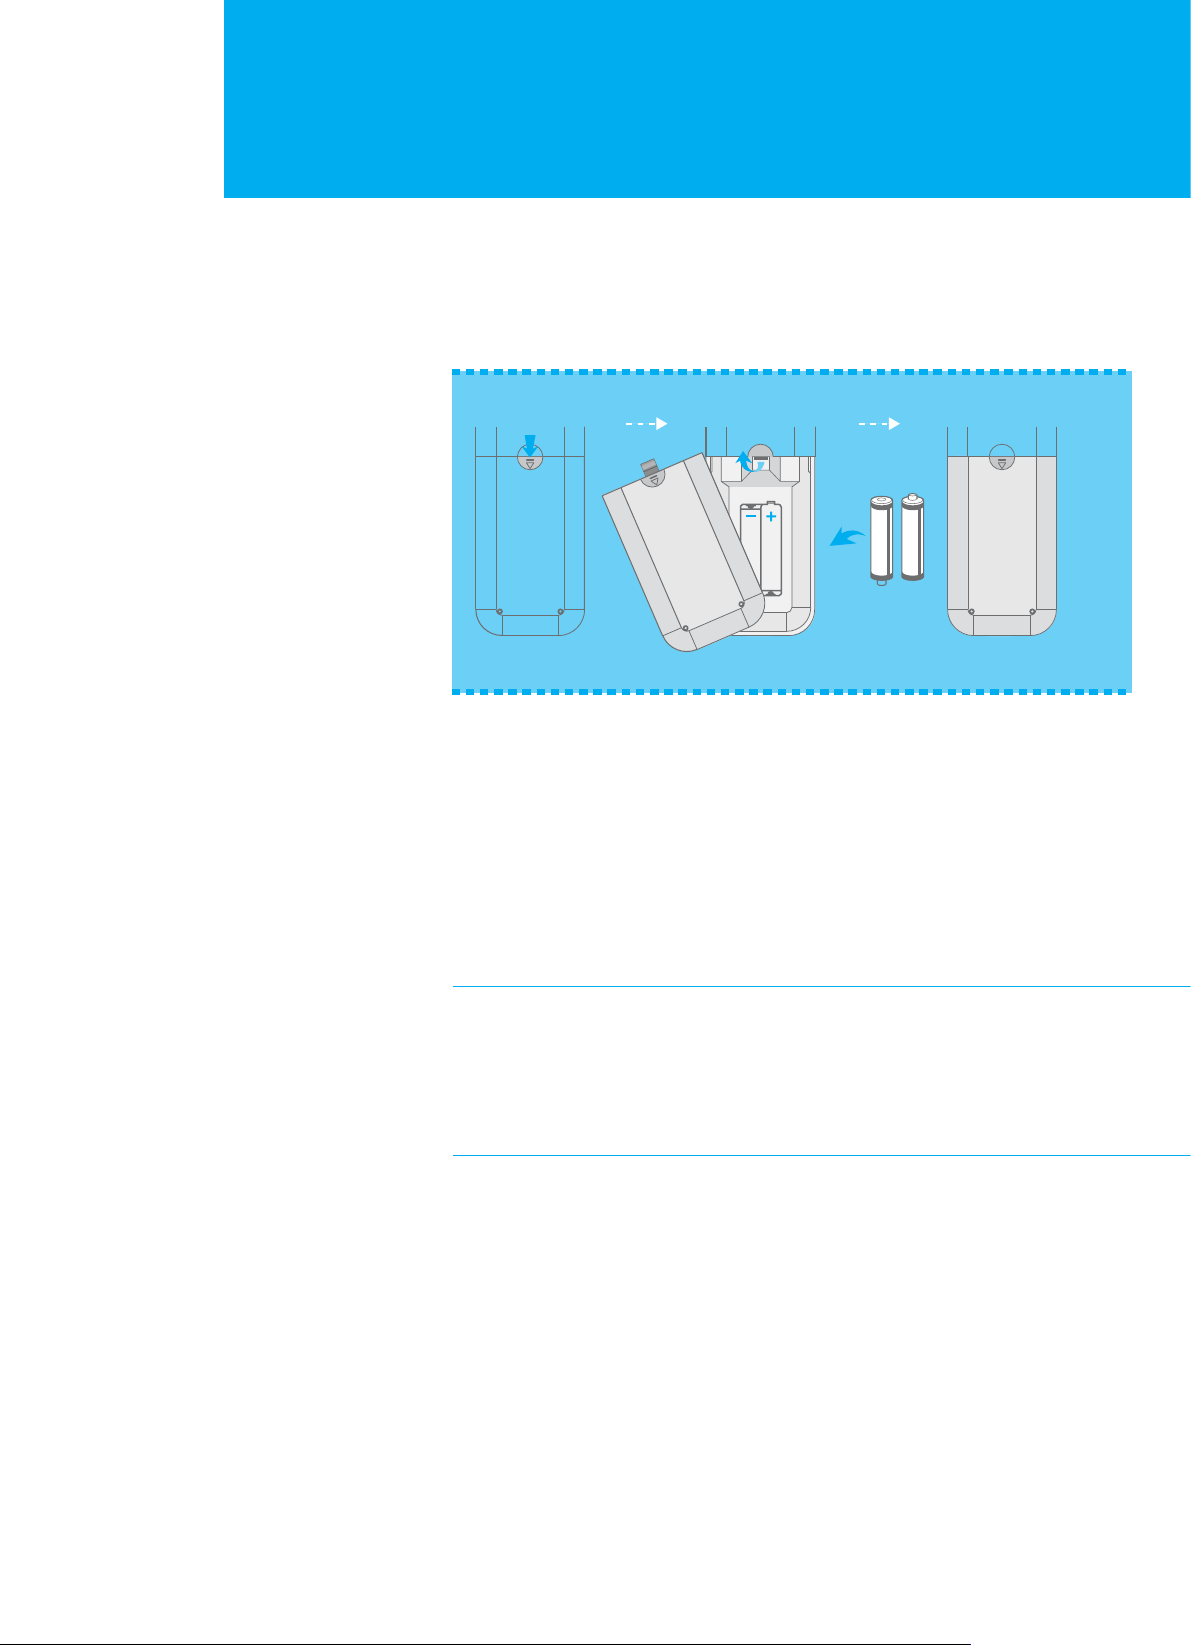
Remote Control
Inserting the Batteries
You must insert or replace the batteries in the remote control when you:
+ Purchase the TV.
+ Find that the remote control is no longer operating correctly.
Push
12 3
1. Pull the battery cover upward in the arrow direction to remove.
2. Insert the batteries as illustrated in the battery compartment.
3. Put the battery cover back.
4. For Simple Remote Control, insert the batteries in the same way.
+ Apply two 1.5V . batteries of AAA type. Don˅t mix used batteries with new
batteries.
+ Remove batteries when you don˅t use the remote control for long periods.
Liquid leakage from old batteries may cause operation failure.
Pull
Insert
Lock
Notes for using remote control
+ Make sure these are no objects between the remote control and its sensor.
+Don˅t place the remote control near a heater or damp place. Strong
impact on remote controller may cause operation failure.
+ The signal from the remote control may be subjected to interference
from sunlight or other strong light.
14. Remote Control
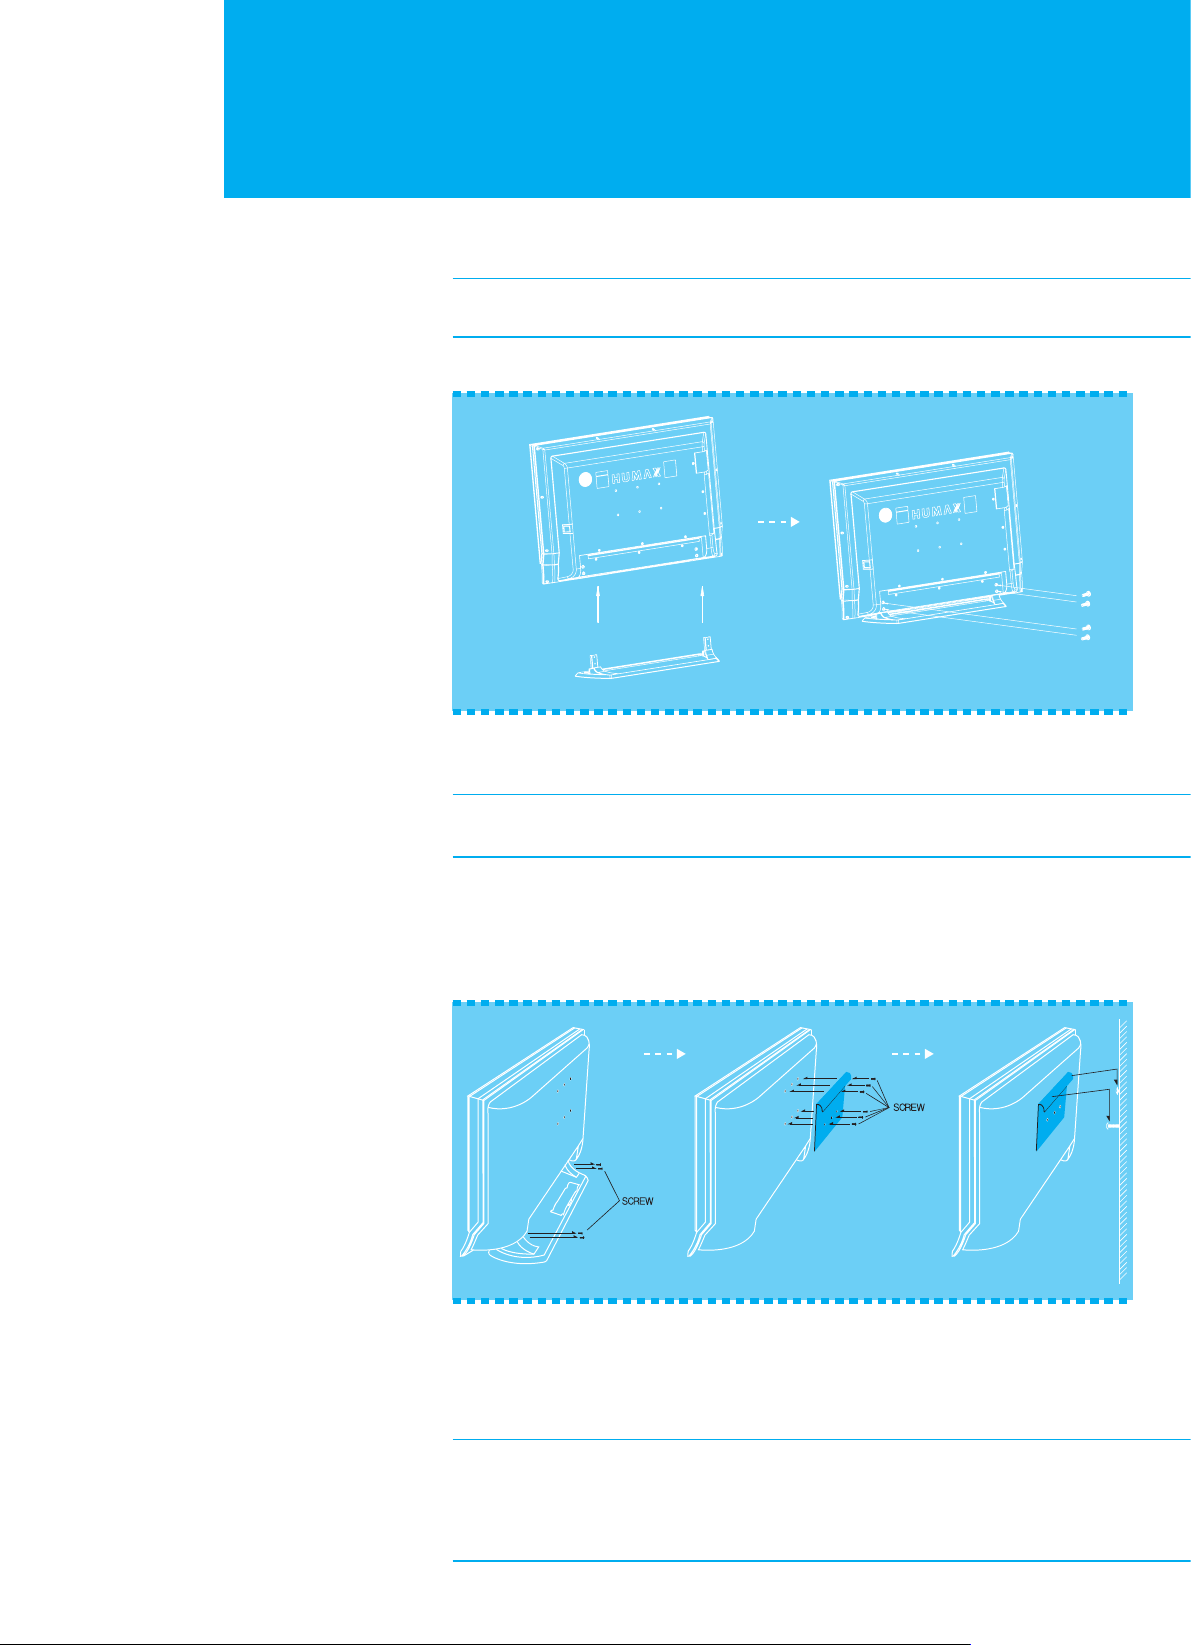
Mounting Device
This describes how to set up the LCD-TV. Select the most appropriate procedure
depending on your requirements.
If you encounter any problem when setting up the LCD-TV, please contact
your local LCD-TV distributor.
Assembling the Stand-Base
1
1. Attach your LCD-TV with the stand-base.
2. Firmly fix the stand-base and the LCD-TV using the 4 screws.
Note : Firmly fix the stand-base for the LCD-TV before moving it,
as the stand-base may fall and could cause serious injury.
2
Installing on the Wall
You can install the LCD-TV on the wall using a mounting bracket (sold separately).
To reduce the risk of damage from falling, this LCD-TV should be secured at all times.
(The LCD TV in the picture may not look exactly like yours.)
12 3
1. Before you install, separate the LCD-TV and stand-base.
2. Attach your main body bracket on the LCD-TV and fix using screws firmly.
3. Stick the LCD-TV with main body bracket into the wall bracket attached on the wall.
4. Tighten up a safety-screw.
Note :
_ Do not install the set on a weak surface such as plaster or foam board.
_ Be at enough distance to open CI door between the LCD-TV and the wall
when installing on the wall. If the LCD-TV is not at proper distance from the
wall, the CI door may be not opened enough.
15. Mounting Device
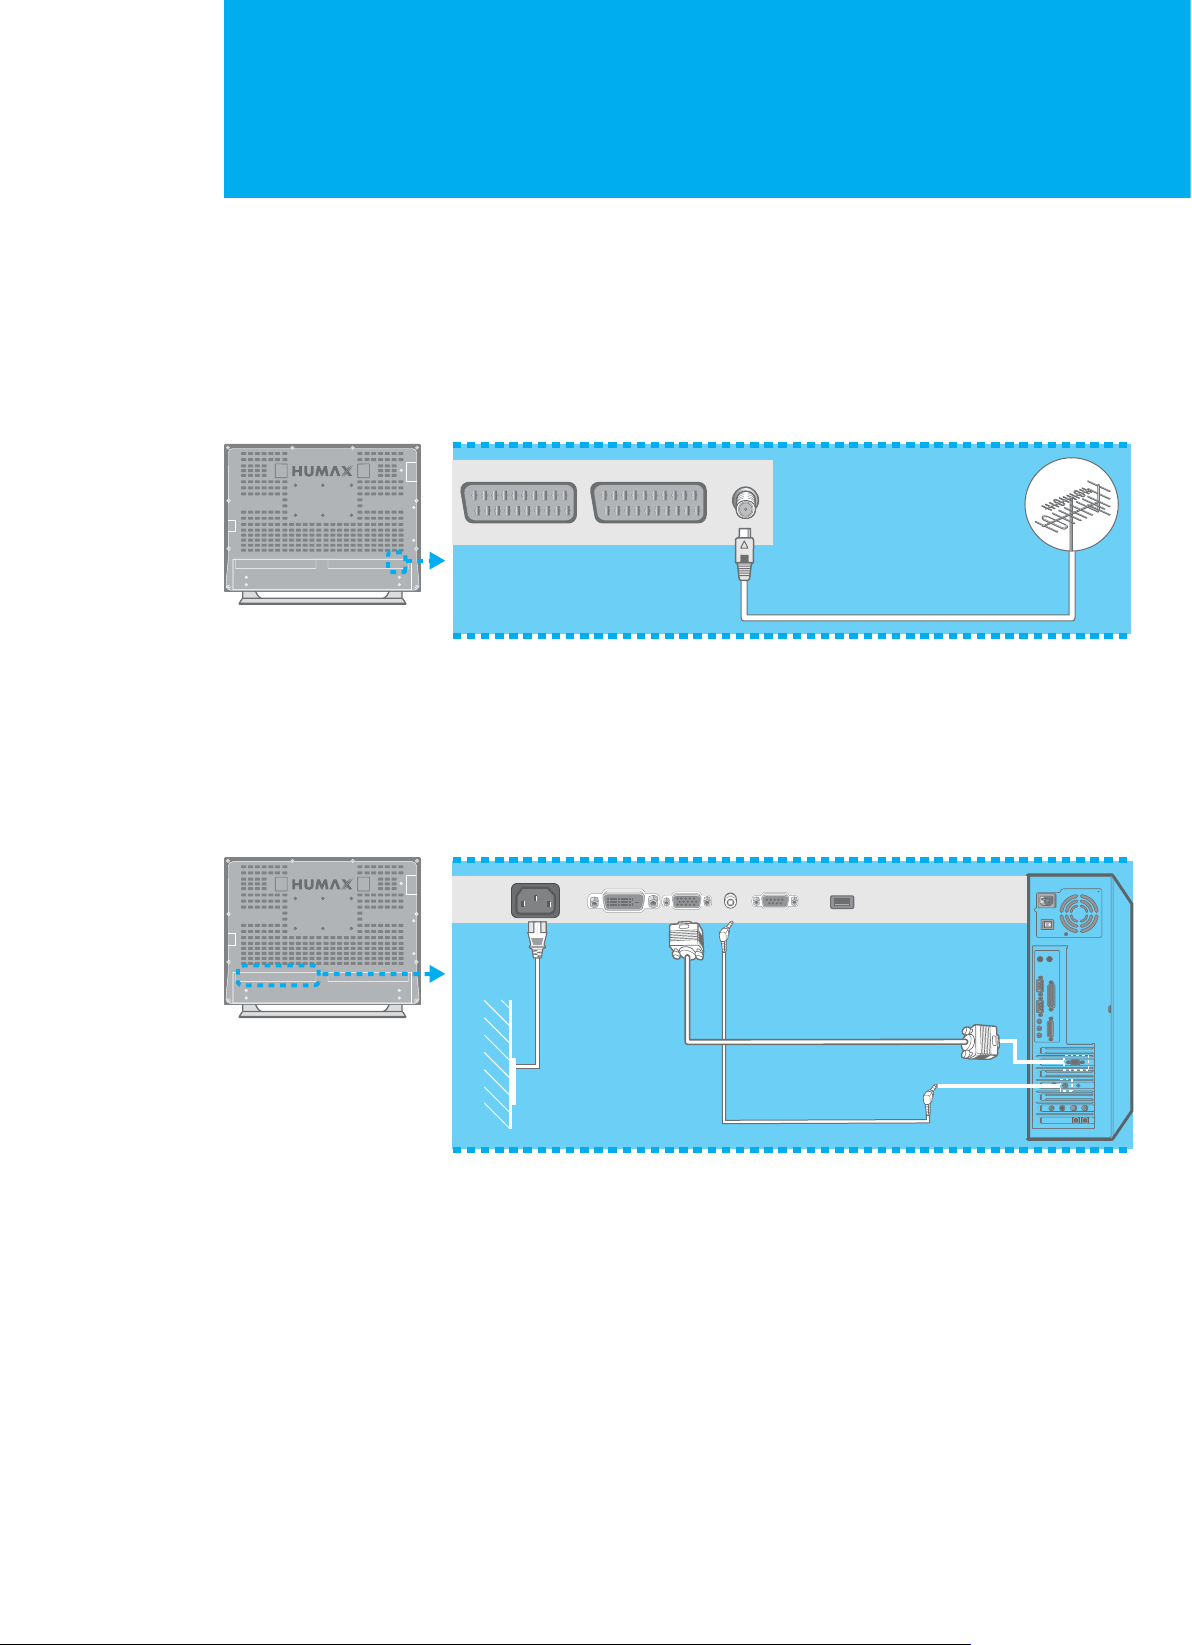
Connecting the External Equipment
You can connect additional equipment, such as VCRs, DVD, etc. to your set.
Examples are shown below.
Connecting the Aerial
To view television channels correctly, a signal must be received by the set
from one of following sources :
+ An outdoor aerial
+ An indoor aerial ( not recommended )
ANT IN
1. Connect the aerial to the ANT IN on the bottom of the LCD-TV.
2. Press the TV/AV button on the remote control.
3. Select Analog TV or Digital TV.
Connecting the PC
PC INPUT
AC INPUT
1. Turn off your computer and LCD-TV.
2. Connect a PC D-Sub cable between your PC and PC INPUT of the LCD-TV and
then fasten the screws of both sides on the cable.
AUDIO INPUT
3. Connect a PC Audio Cable between the Sound Output jack of the sound card
on your PC and the AUDIO INPUT of the LCD-TV.
4. Connect the Power cable to the AC INPUT jack on the rear of your LCD-TV.
And connect power code to a power outlet.
5. Power on your PC before turning on the LCD-TV.
16. Connecting the External Equipment
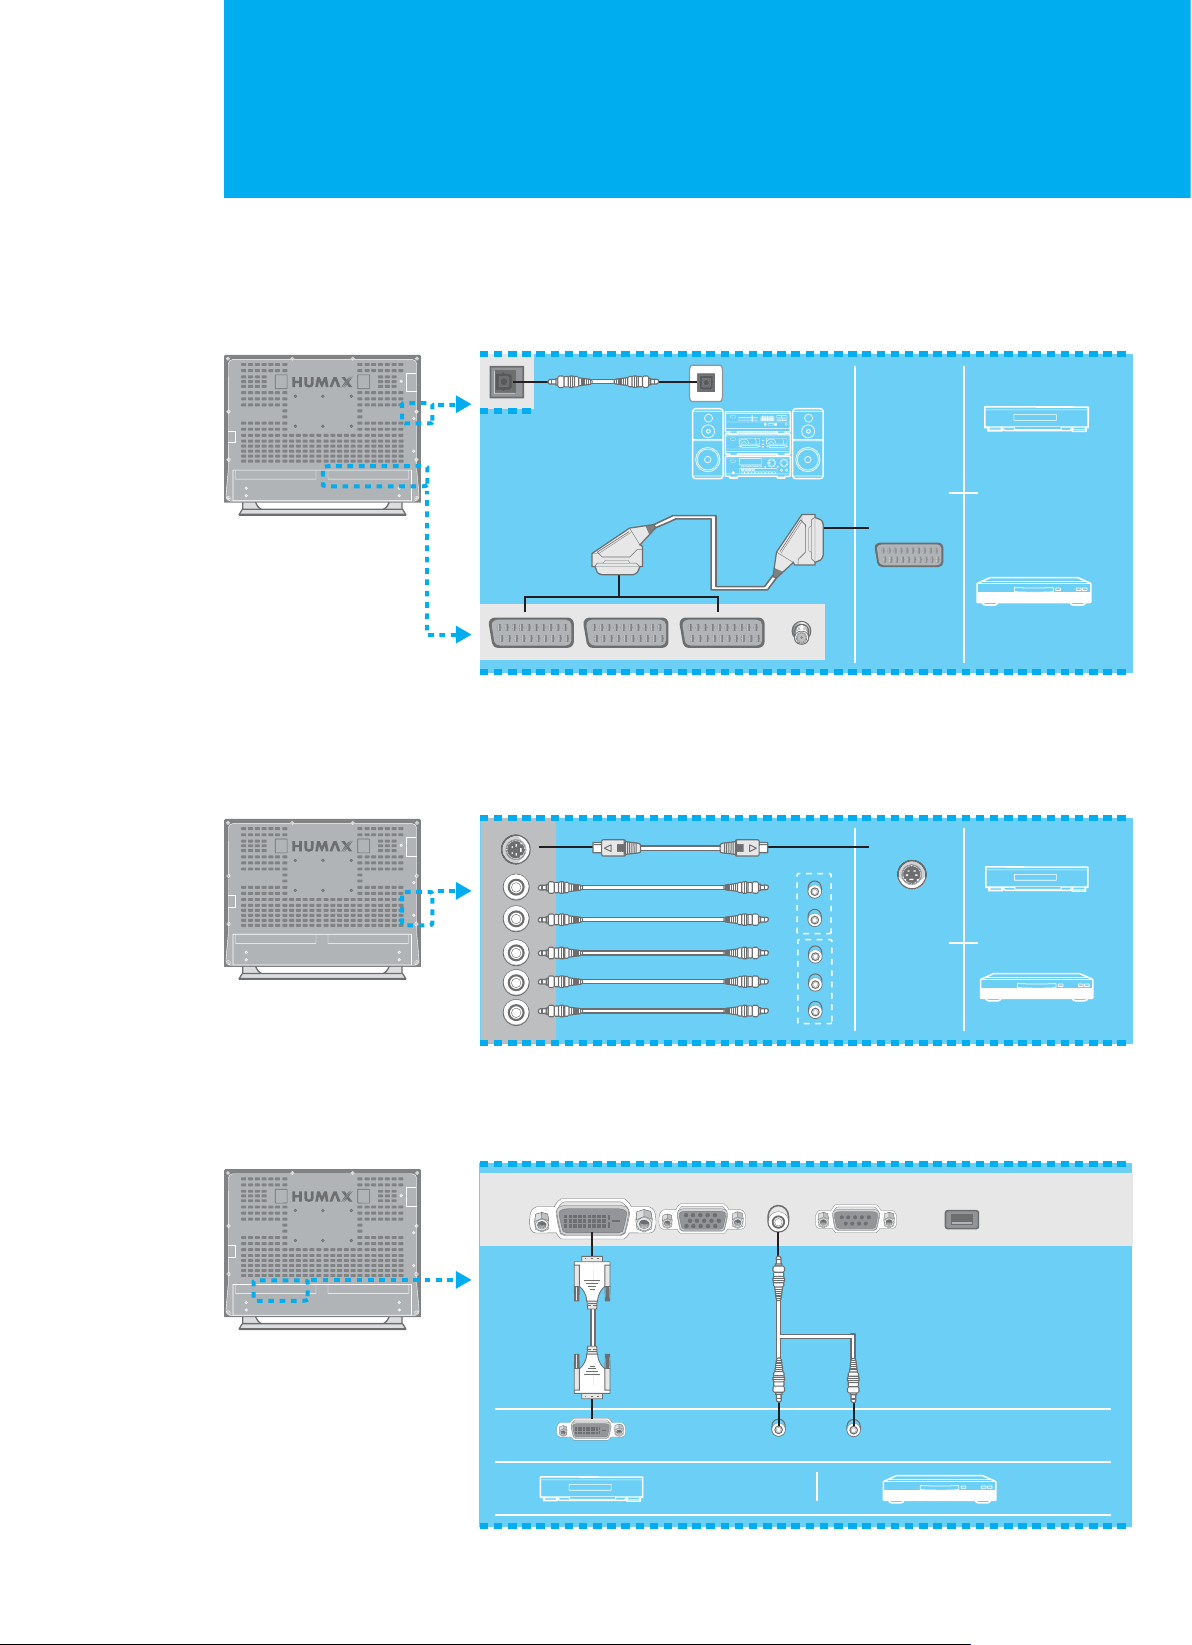
Connecting the External Equipment
Connecting the External Devices
1. Connect video/audio cable as indicated in the diagram.
2. For optimal visual image, use S-VIDEO lead(cable not supplied).
3. If you wish to connect the optical S/PDIF terminal and Dolby Digital decoder
to listen digital audio, connect as follows. (cable not supplied)
S/PDIF
VCR
SCART
DVD
Connecting the DVD
Connect AUDIO L/R to AUDIO OUT connector of the DVD.
For viewing, use S-Video or Component Video Input (Y, P
For listening, use Component Audio Input (Audio L/R).
R
L
Pr
Pb
Y
b,Pr).
S-Video
Connecting the DVI
Connect the DVI cable and Audio cable as follows.
For viewing, use DVI INPUT. For listening, use AUDIO INPUT.
DVI INPUT
AUDIO INPUT
SET-TOP BOX
DVD
DVI
SET-TOP BOX
L - ADUIO - R
17. Connecting the External Equipment
DVD
Setting the Analogue Channels
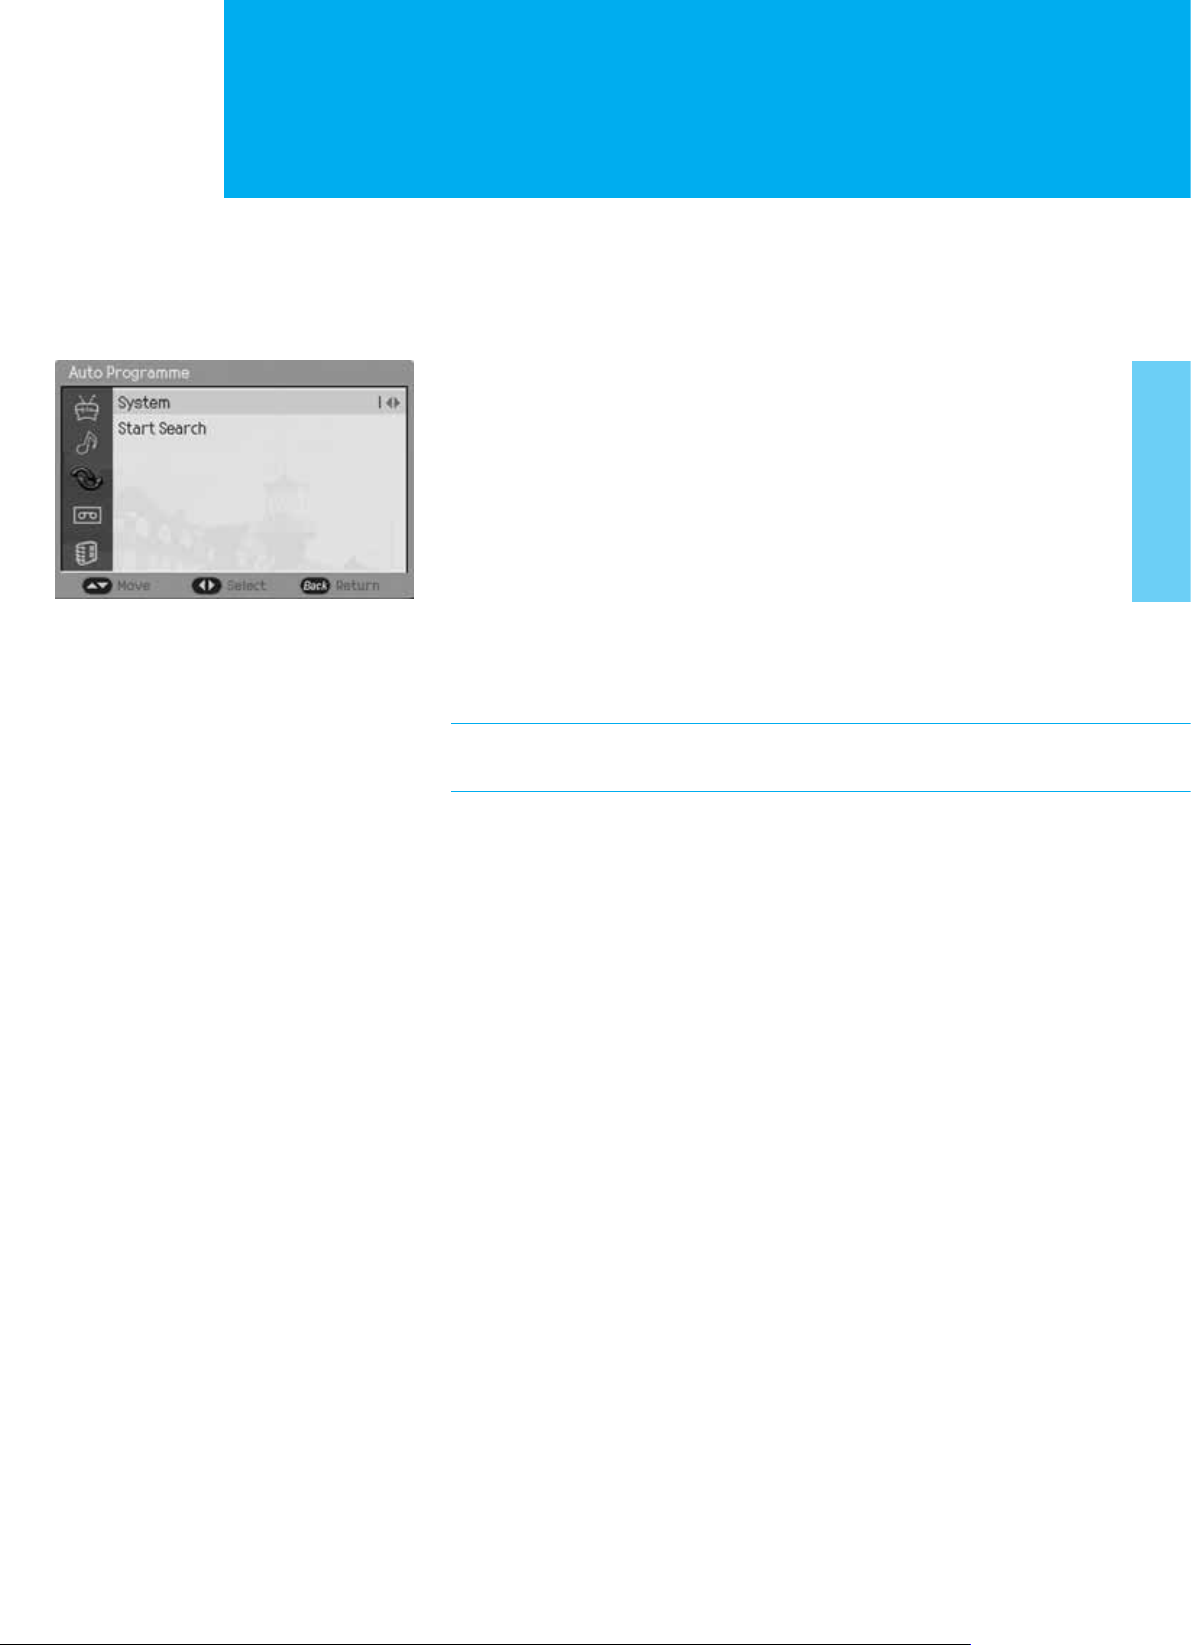
Setting the Analogue Channels Automatically
You can scan for the frequency ranges available to you (and availability depends on
your country.) However you can sort numbers manually and clear any channels
you do not wish to watch. It˅s only for analogue TV mode.
1. Press the MENU button.
2. Select Channel using the / button, and press the OK or ൘Gbutton.
3. Select Auto Programme using the / button, and press the OK or ൘ button.
4. Select System using the / button, and press the ൖGor ൘ button to select
a particular system.
I:DK:BG
5. Select Start Search using the / button, and press the OK or ൘ button
to start auto scanning. To stop the search before it has finished, press
the BACK button.
The search will end automatically. Channels are sorted and stored in an order,
and then the programme originally selected is displayed.
In the digital TV mode, you can select Setup Digital Channel menu instead
of Channel menu.
18. Setting the Analogue Channels

Setting the Analogue Channels
Setting the Analogue Channels Manually
The Manual Programme allows you to manually tune and arrange the channels in the
order you desire. You can also assign a channel name with characters to each channel
number. It's only for analogue TV mode.
1. Press the MENU button.
2. Select Channel using the / button, and press the OK or ൘ button.
3. Select Manual Programme using the / button, and press the
OK or ൘ button.
4. Select System using the / button, and press the ൖGor ൘ button to select
a particular system.
I:DK:BG
5. Select Band using the / button, and press the ൖGor ൘ button to select
a particular system.
V/UHF : Cable
6. If you know the channel number to be stored, select Channel using the /
button, and press the ൖ, ൘ or NUMERICAL (0~9) button to select number.
If you do not know the channel number, select Search using the /Gbutton,
and press the ൖGor ൘ button to start search.
7. Select Programme No. using the /Gbutton, and press the ൖ, ൘ or
NUMERICAL (0~9) button to assign a programme number into the
channel.
8. Select Name
to change a name.
To select a letter (A~Z, 0~9, +, -), press the /Gbutton.
To move on the previous or next letter, press the ൖGor ൘ button.
To store the changing name, press the OK button.
9. Select Fine Tune using the /Gbutton, and press the ൖGor ൘ button to
fine-tune the channel manually. If the signal is weak or distorted, you may
have to fine-tune the channel manually.
10. When you are satisfied with your choice, press the BACK button to
store the current setting values.
using the /Gbutton, and press the OK or ൘Gbutton
19. Setting the Analogue Channels
Setting the Analogue Channels
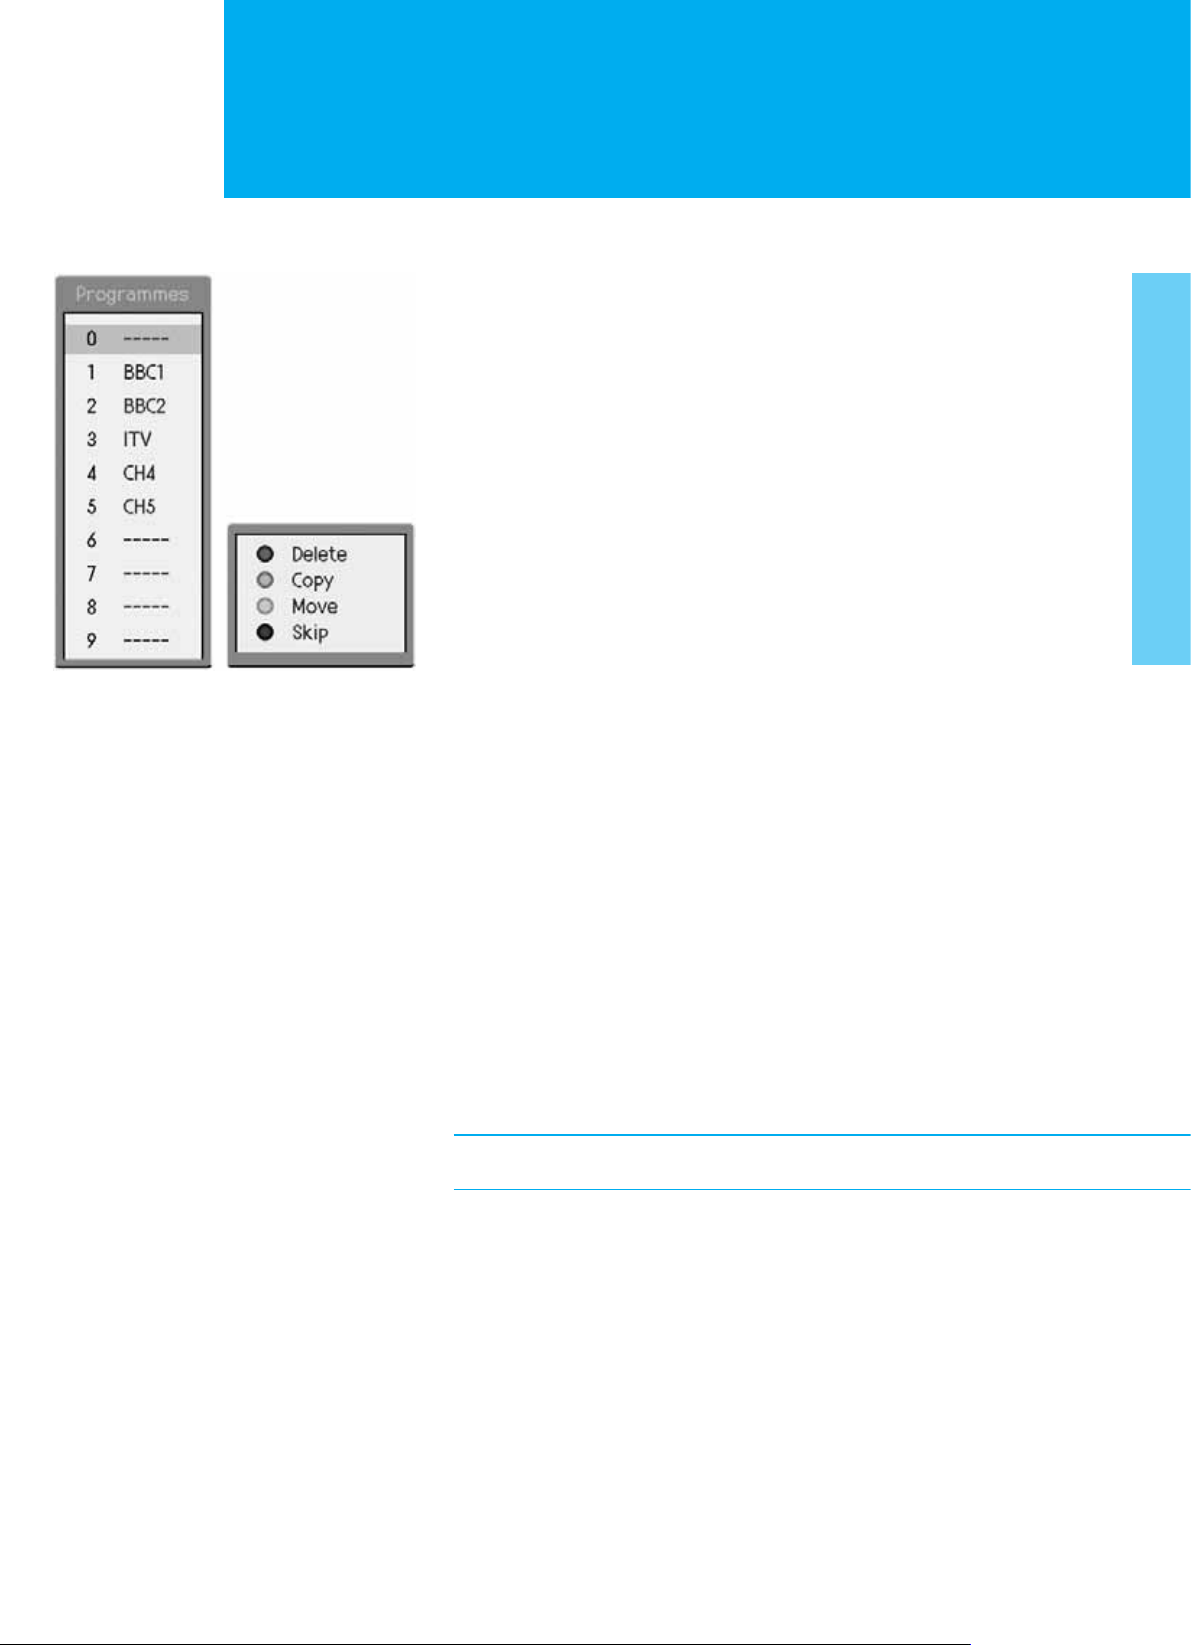
Editing the Analogue Channls
This function enables you to delete, copy, move, or skip the stored channel. It˅s only
for analogue TV mode.
1. Press the MENU button.
2. Select Channel using the / button, and press the OK or ൘ button.
3. Select Edit Programme using the / button, and press the OK or ൘Gbutton.
The programme list is displayed in the main screen.
4. Select the programme name to edit with //ൖ/൘ button and press
the Colour (R/G/Y/B) buttons to delete, copy, move, or skip the programme.
+ Delete button : RED + Copy button : GREEN
+ Move button : YELLOW + Skip button : BLUE
Skipping a Channel
_ Select a channel to skip with the //ൖ/൘ button.
_ Press the BLUE button, the channel selected will change to the blue colour.
Thereafter these channels will be skipped when using the CH +/- button.
_ To return to normal status, select the skipped channel and then press again
the BLUE button for 2~3 seconds.
Moving a Channel
_ Select a channel to move with the //ൖ/൘ button.
_ Press the YELLOW button to select the channel you wish to move.
Use the //ൖ/൘ button to move the channel to the desired position,
and then press the YELLOW button again to store.
Copying a Channel
_ Select a channel to copy with the //ൖ/൘ button.
_ Press the GREEN button.
Deleting a Channel
_ Select a channel to delete with the //ൖ/൘ button.
_ Press the RED button. If you press the RED button again, the selected channel
will be deleted.
While editing the programme, you can switch to the channel you select.
20. Setting the Analogue Channels
Basic Operation
Powering the TV On/Off
1. Connect the plug to the wall outlet.
2. Press the MAIN POWER button on the rear of the LCD-TV to turn the TV power on.
3. Press the STANDBY, TV/AV or CH +/- button on the front of the LCD-TV or
press the STANDBY, TV/AV, CH +/- or NUMERICAL (0~9) buttons on the
remote control to switch the TV on.
Note : To place the TV in standby mode, press the STANDBY button
again on the remote control or on the front of the LCD-TV.
It can be useful when you wish to interrupt viewing temporarily
(during a meal, for example).
4. To turn the TV power off, press the MAIN POWER button on the rear of the
LCD-TV.
Note : Do not leave the TV in standby mode for too long (on holiday,
for example). Turn the TV off by pressing the MAIN POWER button
on the rear of the LCD-TV. It is best to disconnect the power cord.
Changing the Input mode
1. Press the TV/AV button to change the input mode.
2. Select your desired mode using the / button, and press the OK button.
You can also change the input mode by pressing the TV/AV button repeatedly.
Volume Control
1. Press the VOL +/- buttons to adjust the audio volume.
2. Press the MUTE button to mute the sound.
Selecting the Channel
1. Press the CH +/- or NUMERICAL (0~9) buttons to change the
channel number.
Choosing Your Language
When you start using your television for the first time, you must select the language
which will be used for displaying menus and indications.
1. Press the MENU button.
2. Select System using the / button, and press the OK or ൘ button.
3. Select Language using the / button, and press the ൖGor ൘ button to
select a particular language.
4. When you are satisfied with your choice, press the EXIT button to return
to normal viewing.
21. Basic Operation
Basic Operation
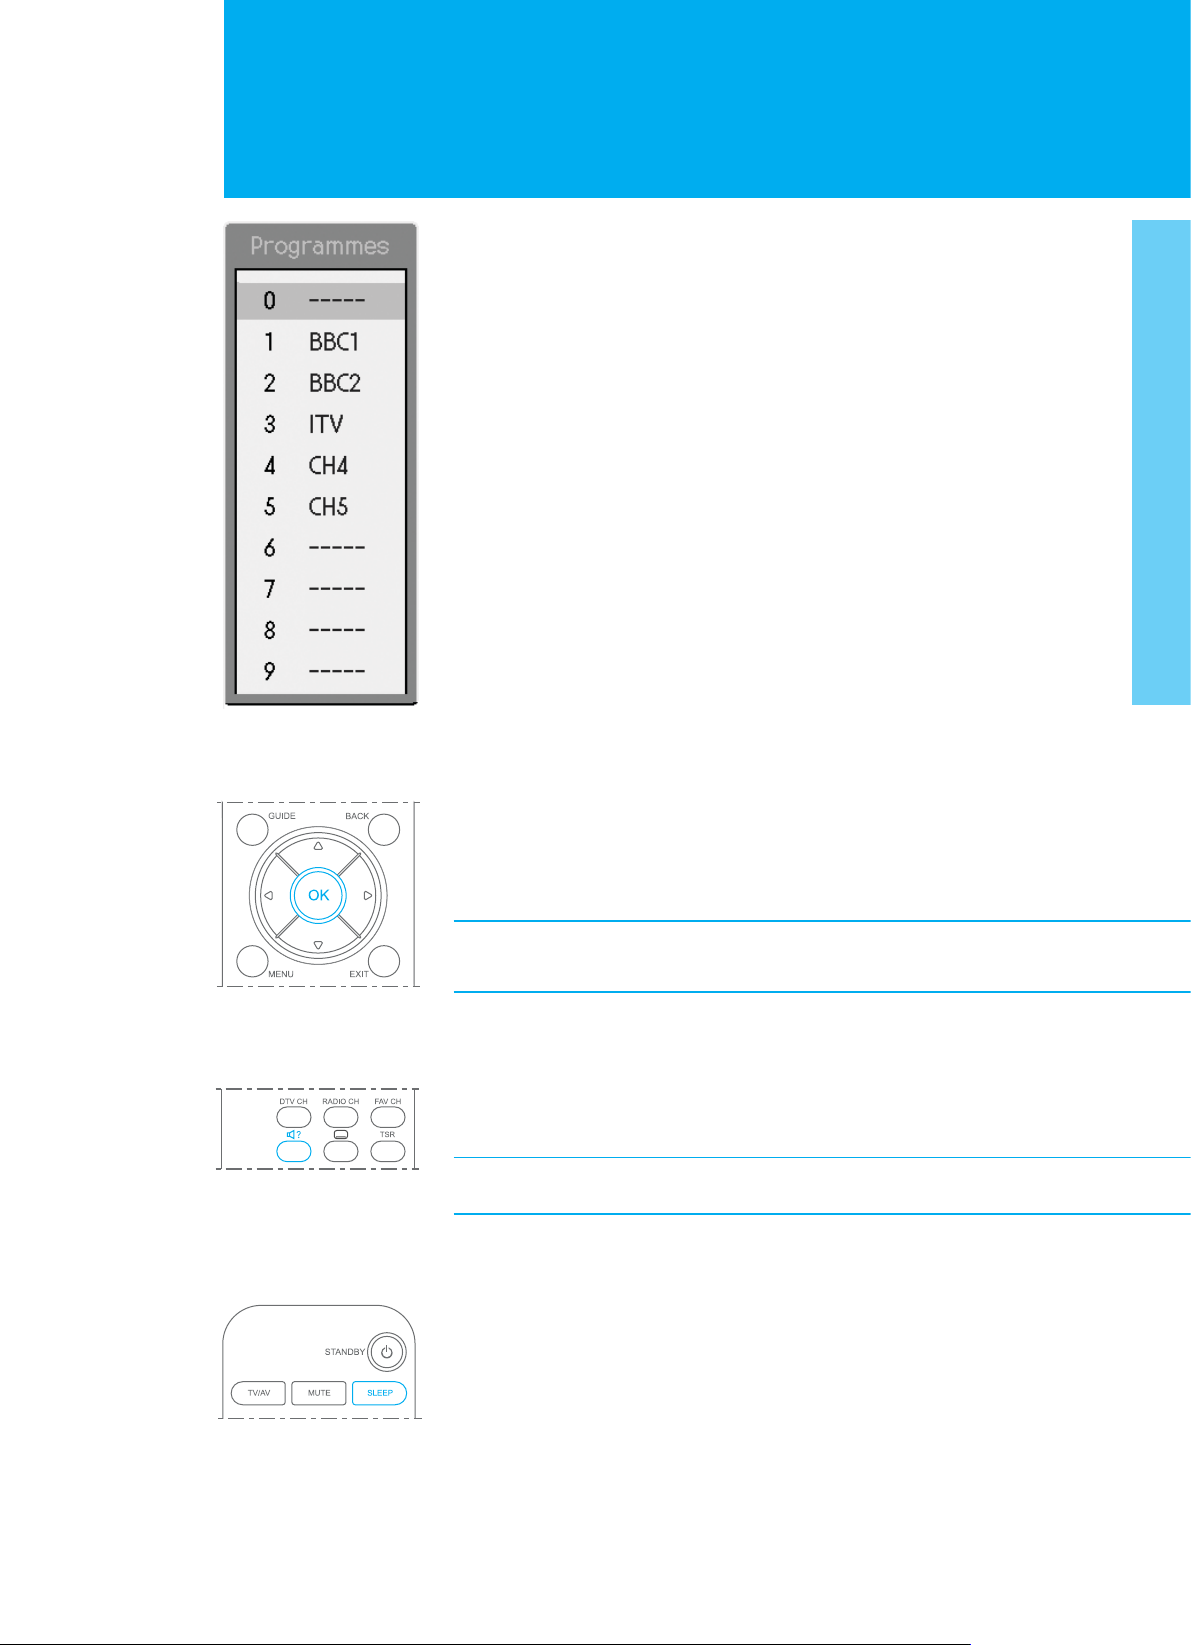
Listing Channels
You can watch the programme list while watching analogue TV.
1. Press the LIST button.
2. Select a channel using the / button, and press the OK button to switch
to the selected channel. You can also move to the next or previous list page
using the PAGE +/- button.
Using the OK button
When you press the OK button, the information of the channel appears :
_ Channel number, channel name, and current time in the Analog TV mode
_ External input mode and current time in the AV input mode.
_ The information of Main and PIP screen in the PIP mode.
If you wish to disappear the information, press the OK button again.
In the audio mode also, the information appears.
Using the Audio button
You can hear the sound with various modes. ( Mono, Stereo, Dual mode)
Press the
If it is not switched, it's the channel that various modes are not supplied.
SOUNDTRACK/AUDIO
button repeatedly to switch into other mode.
Setting the Sleep Time
You can select a time for the TV to turn off automatically.
Press the SLEEP button repeatedly until the desired time appears.
The number changes from Off . 10 . 20 . 30 . 60 . 90 . 120 . 180 . 240.
When the selected time is out, the TV will turn off automatically.
To cancel the sleep time, press the SLEEP button repeatedly and select
--- (Sleep Off).
22. Basic Functions
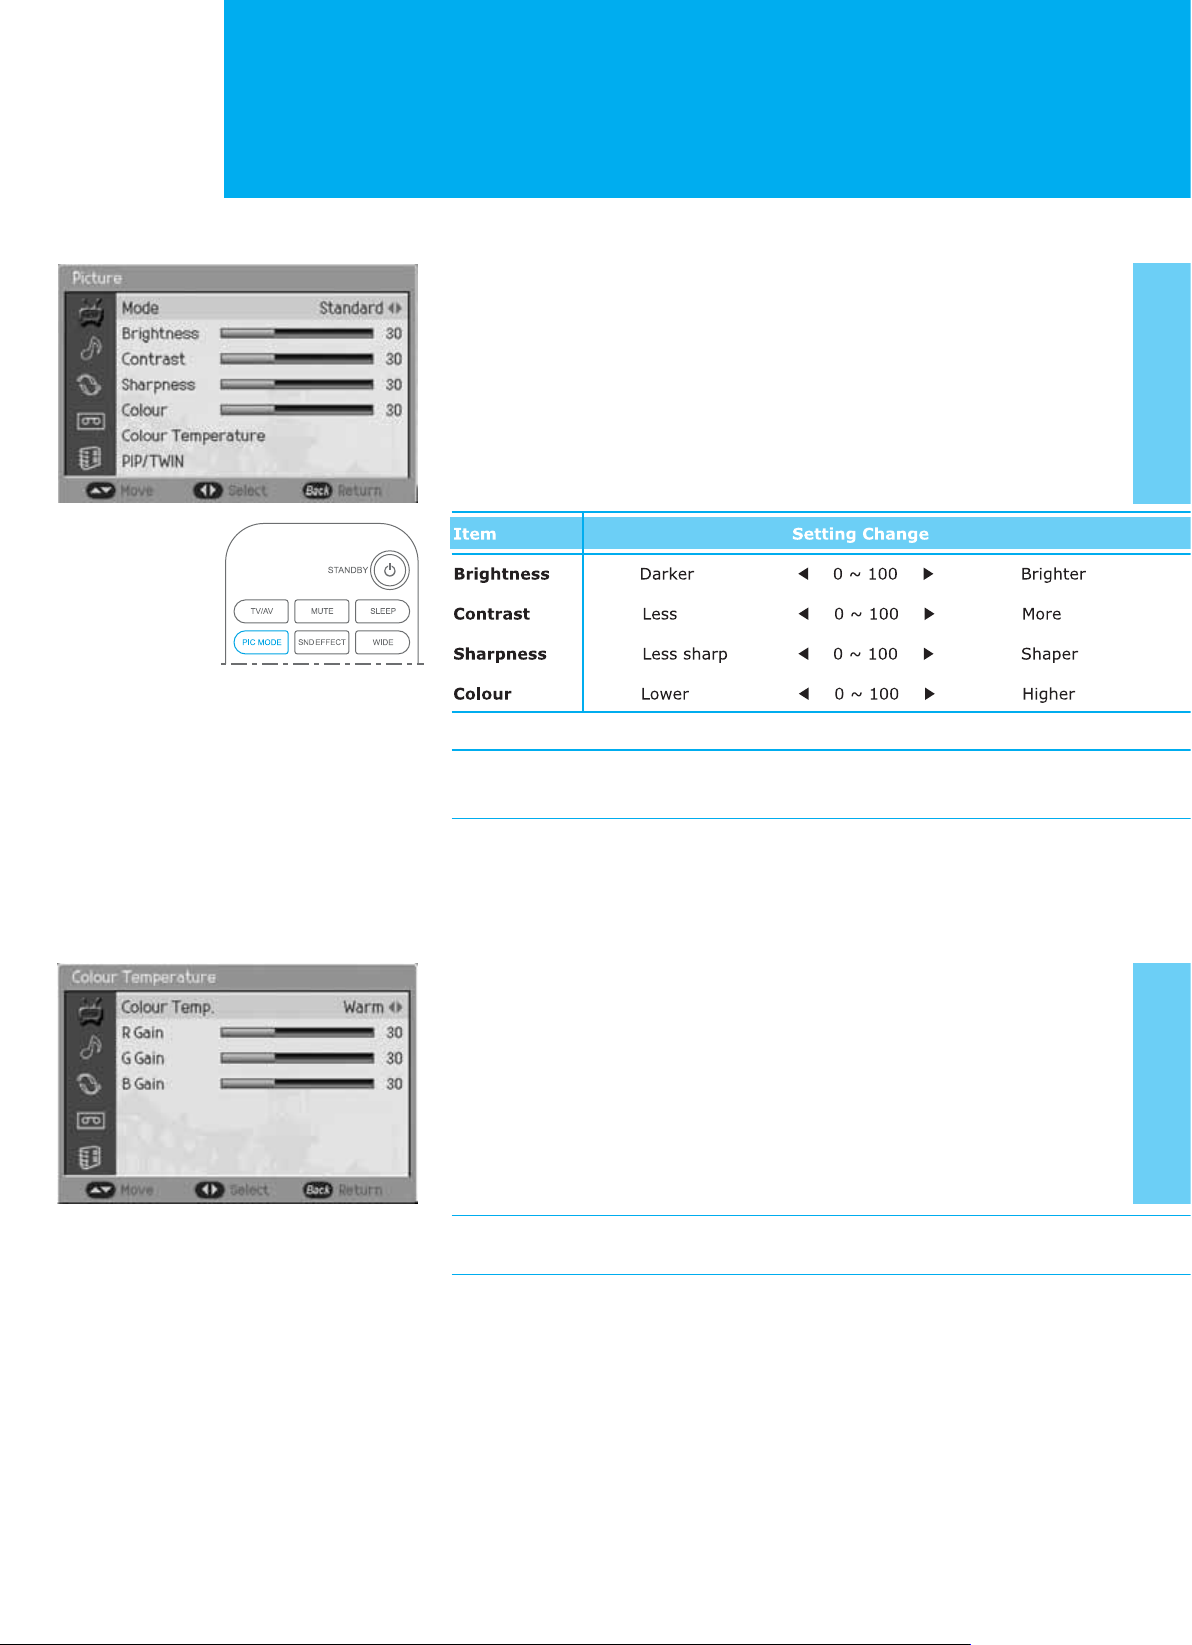
Setting the Picture
Mode
You can select the picture type you prefer.
1. Press the MENU button.
2. Select Picture using the /Gbutton, and press the OK or ൘Gbutton.
3. Select Mode using the /Gbutton and press the ൖGor ൘ button to select
a particular mode. If you select User, you can control the value manually.
Standard : Dynamic : Movie : Mild : User
4. On the Standard, Dynamic, Movie, or Mild, the value of the Brightness,
Contrast, Sharpness and Colour is changed automatically. You can also set
these options simply by pressing the PIC MODE (Picture Mode) button.
Note : If you change the value of the Brightness, Contrast, Sharpness
and Colour, the User is selected automatically.
Colour Temperature
You can select the picture colour tone you prefer.
1. Press the MENU button.
2. Select Picture using the /Gbutton, and press the OK or ൘ button.
3. Select Colour Temperature using the /Gbutton and press the
OK or ൘Gbutton.
4. Select Colour Temp using the /Gbutton, and press the ൖGor ൘ button
to select a particular colour tone. If you select User, you can control the
value manually.
Normal : Cool : Warm : User
5. On the Normal, Cool, or Warm, the value of the R/G/B Gain is changed
automatically.
Note : If you change the value of the R/G/B Gain, the User is selected
automatically.
23. Setting the Picture

Setting the PIP/TWIN
PIP/TWIN
With PIP, Picture in Picture, you can call up a small screen within the main screen.
This enables you to watch two different input sources at the same time. In this way,
you can watch TV programme or monitor the video input from any connected
devices while watching TV or other video input.
1. Press the MENU button.
2. Select Picture using the /Gbutton, and press the OK or ൘Gbutton.
3. Select PIP/TWIN using the / button, and press the OK or ൘Gbutton.
4. Select Main Input using the / button, and press the ൖ or ൘ button to
select a particular thing.
Digital TV : Analog TV : AV1 : AV2 : AV3 : AV4 : S-Video : Component : PC : DVI
5. Select PIP/TWIN using the / button, and press the ൖGor ൘ button to
select a particular thing.
_ Off : Switch PIP mode off.
_ PIP (Picture in Picture) : Switch PIP mode on.
_ TWIN 1, TWIN 2 : Switch two Twin screen modes on.
(Twin screen 1, Twin screen 2)
6. Select PIP/TWIN Input using the / button, and press the ൖ or ൘
button to select a particular thing.
Digital TV : Analog TV : AV1 : AV2 : AV3 : AV4 : S-Video : Component : PC : DVI
Note : You can only select different inputs between Main Input and
PIP/TWIN Input except Digital TV mode.
You can enjoy two digital channels simultaneously in each screen.
7. Select PIP Position using the / button, and press the ൖGor ൘ button to
move the PIP picture to another corner of the screen.
Left-Top
Left-Bottom
Right-Top
Right-Bottom
Note : If you wish to select PIP Position, you must set the PIP/TWIN
mode to PIP.
24. Setting the PIP/TWIN

Setting the PIP/TWIN
8. Select Swap using the / button, and press the ൘ button to exchange the
picture in the main screen and small screen. Not available in PC Mode.
In case of PIP
1
In case of TWIN1 or TWIN2
2
2
2
1
Using the PIP Buttons in the Remote Control
You can use the PIP buttons on the remote control. Press PIP/TWIN button
repeatedly during watching TV channel to switch into PIP or TWIN mode.
Press PIP INPUT button repeatedly to change the input mode in the small screen.
Press PIP POSITION button repeatedly to move the position of the small screen.
Press the PIP CH+ / PIP CH- button to change the TV Channels in the small screen.
Press SWAP button to exchange the picture in the main screen and small screen.
2
1
1
Using the Digital Channels in PIP/TWIN Mode
You can watch two digital channels simultaneously using PIP/TWIN mode.
1. Press PIP/TWIN button during watching digital TV channel.
2. Press PIP INPUT button repeatedly, and change to Digital TV
mode in the small screen.
3. Press PIP CH+ / PIP CH- to change the channel in the small screen.
Note : There are the programme which you cannot watch in the small
screen such as scrambled programmes or data programmes.
25. Setting the PIP/TWIN

Changing the Sound
You can select the preferred sound settings which corresponds with the personal
sound settings.
1. Press the MENU button.
2. Select Sound using the / button, and press the OK or ൘ button.
Effect
3. Select Effect using the / button and press the ൖGor ൘button to select
a particular thing. If you select User, you can control the value manually.
Flat : Speech : Movie : Music : User
4. On the Flat, Speech, Movie, or Music, the value of the Bass, Treble, and
Balance is changed automatically. You can also set these options simply
by pressing the SND EFFECT (Sound Effect) button.
Item Setting Change
Bass ൖ 0 ൘ Adjusts low sounds
Treble ൖG 0 ൘ Adjusts high sounds
Balance ൖ 0 ൘ Adjusts left and right volumes
Note : If you change the value of the Bass, Treble, and Balance, the User
is selected automatically.
Auto Volume Level
5. Select Auto Volume Level using the / button and press the ൖGor ൘ button
to select On or Off.
Note : Auto Volume Level can adjust the volume every time the channel
is changed.
TruSurround XT
6. Select TruSurround XT using the / button and press the ൖGor ൘ button
to select On or Off.
Note : The benefits of TruSurround XT sound are enormous. You can be
completely enveloped in sound: just as if you were at a concert
hall or cinema.
Sound Source
7. Select Sound Source using the /Gbutton and press the ൖGor ൘ button
to select Main or PIP/TWIN.
Note : You can hear the sound of small screen or main screen
according to your selecting.
Using the Sound Button in the Remote Control
You can use the Sound button in the remote control. Press the MUTE button
to mute the sound. If you press again, the sound will be reactivated.
26. Changing the Sound

Setting the Time
Setting the Current Time
You can set the current time. If you wish to use the Power On or Off Time,
you must also set the Local Time.
1. Press the MENU button.
2. Select System using the / button, and press the OK or ൘ button.
3. Select Time Setting using the / button, and press the OK or ൘Gbutton.
4. Select Date using the /Gbutton, and press the OK or ൘Gbutton.
5. Press the //ൖ/൘Gbutton to set the current date.
6. When you are satisfied with your choice, press the OK button to store the date.
7. Select Local Time using the / button, and press the OK or ൘ button.
8. Press the //ൖ/൘ button to set the current time.
9. When you are satisfied with your choice, press the OK button
to store the time.
Note : The LCD-TV sets and updates the time automatically by the air,
if you successfully search digital terrestrial channels.
You must set the GMT Offset value in DTV Setup menu. Refer
DTV SETUP - Preferences - Local Setting menu for more detail
information.
Automatically Turning the TV On and Off
You can automatically switch on or off at the time you select.
1. Press the MENU button.
2. Select System using the / button, and press the OK or ൘ button.
3. Select Time Setting using the / button, and press the OK or ൘ button.
4. Select Power On/Off Time using the / button, and press the
GGGGൖ or ൘ button to select Enable or Disable.
5. In the Enable mode, Select Timer using the / button, and press
the OK or ൘ button.
6. Press the //ൖ/൘ button to set the time.
7. When you are satisfied with your choice, press the OK button to store the time.
8. Select Auto Power Off using the /Gbutton, and press the ൖ or ൘ button
to select Enable or Disable. In setting the Auto Power Off to Enable,
the LCD TV turns off automatically if there is no signal.
27. Setting the Time

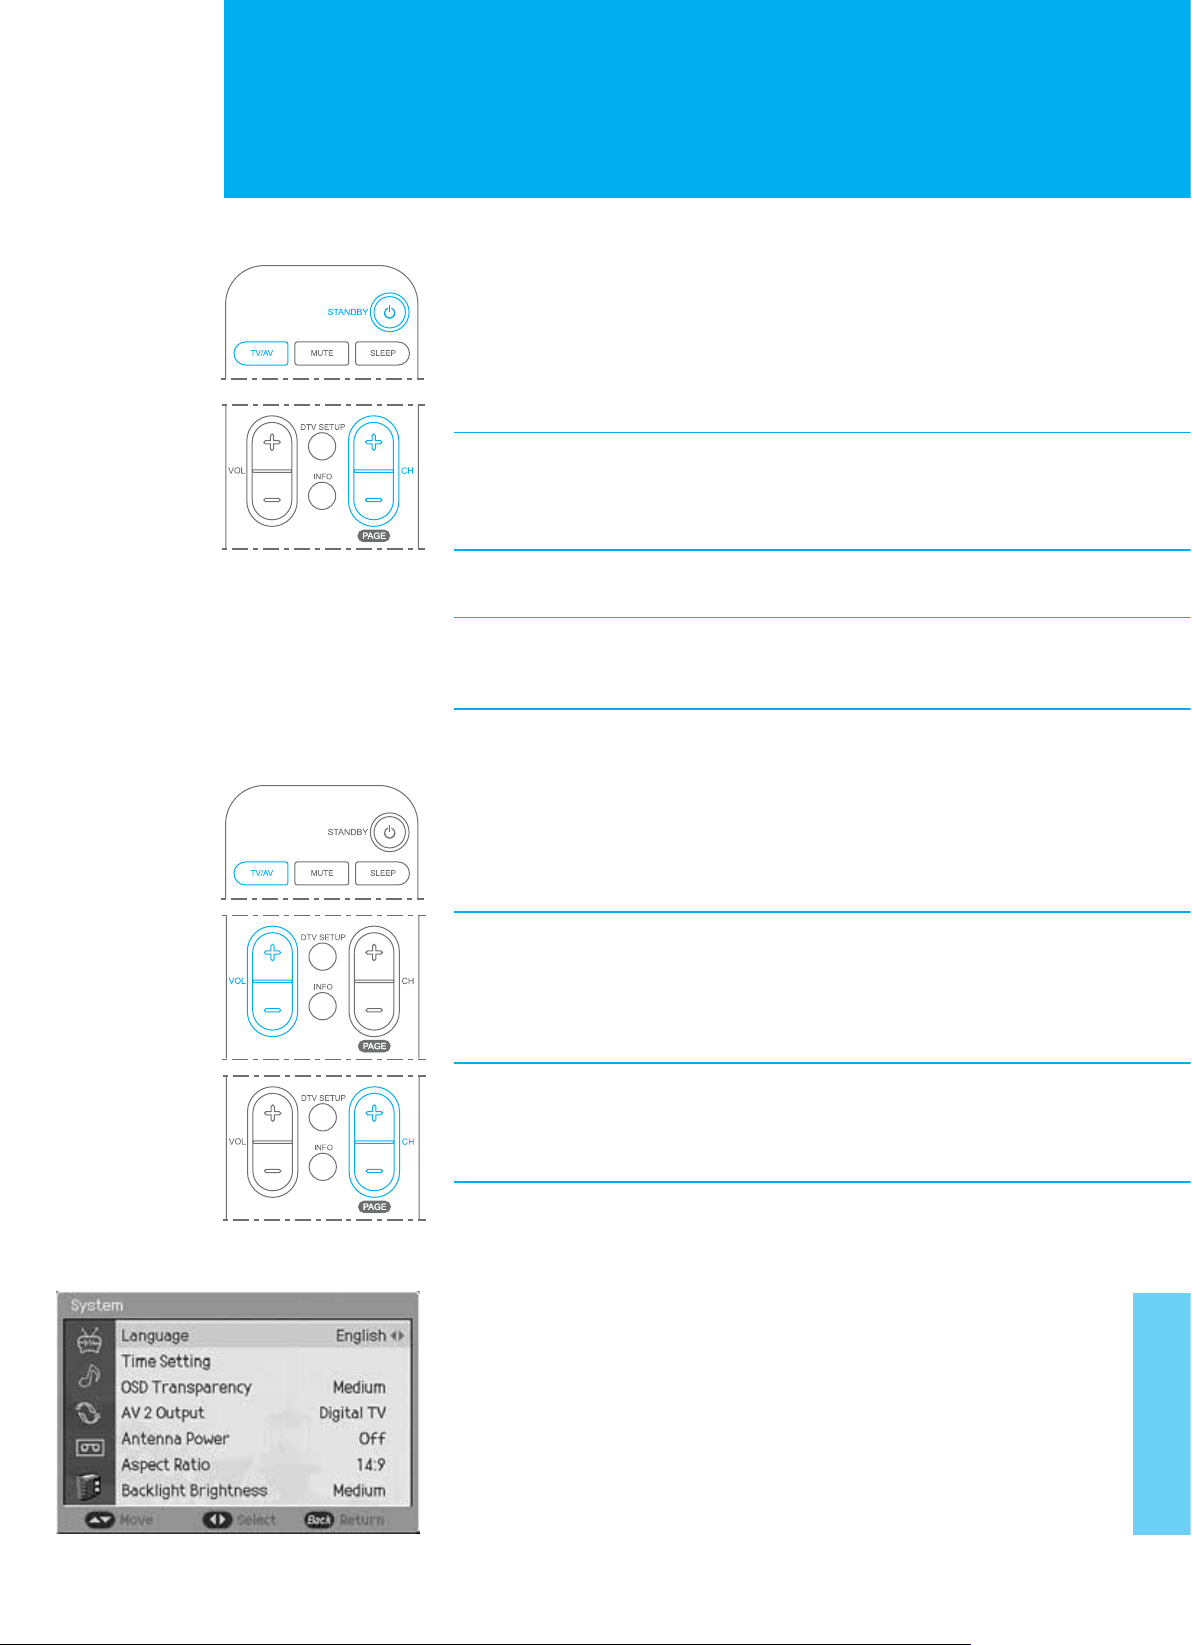
Language
1. Press the MENU button.
2. Select System using the / button, and press the OK or ൘ button.
3. Select Language using the / button, and press the ൖ or ൘ button to
select a particular language.
OSD Transparency
1. Press the MENU button.
2. Select System using the / button, and press the OK or ൘ button.
3. Select OSD Transparency using the / button, and press the ൖ or ൘ button
to set the transparency.
High : Medium : Low
AV2 Output
1. Press the MENU button.
2. Select System using the / button, and press the OK or ൘ button.
3. Select AV2 Output using the / button, and press the ൖ or ൘ button to
select a particular thing.
Digital TV : Analog TV : AV1 : AV3
Antenna Power
1. Press the MENU button.
2. Select System using the / button, and press the OK or ൘ button.
3. Select Antenna Power using the /Gbutton, and press the ൖ or ൘ button
to select On or Off.
Aspect Ratio
You can select the picture format you prefer.
1. Press the MENU button.
2. Select System using the / button, and press the OK or ൘ button.
3. Select Aspect Ratio using the /Gbutton, and press the ൖ or ൘ button
to select a particular thing. You can also set the Aspect Ratio simply
by pressing the WIDE button.
_ Auto : The screen format will automatically become enlarged,
allowing you to view the picture at its maximum size.
_ 4:3 , 14:9 , 16:9 : Setting for the 4:3, 14:9, or 16:9 screen format.
_ Zoom1, Zoom2 : Expansion to the Zoom1 or Zoom2 ratio.
Note : If you wish to change the Aspect Ratio, you must set the
PIP/TWIN mode to Off.
Backlight Brightness
1. Press the MENU button.
2. Select System using the / button, and press the OK or ൘ button.
3. Select Backlight Brightness using the / button, and press the ൖ or ൘ button
to set the brightness of LCD panel.
High : Medium : Low
28

Displaying the Teletext Information
You can display Teletext information at any time on your TV.
Most TV channels broadcast information via teletext. Each channel which broadcasts
teletext transmits a page with information on how to use its teletext system.
Depending on the TV channel, teletext is transmitted in different systems. The colours
used in the options line correspond with the colour buttons of your remote control.
For Teletext information to be displayed correctly, channel reception must be
stable, otherwise:
+ Information may be missing
+ Some pages may not be displayed
Press the TELETEXT ( ) button to display teletext.
And you can control the Teletext functions using the following buttons.
Special Teletext Functions
TELETEXT Activate/Deactivate the teletext service.
MIX Displays the teletext with the broadcasting screen.
INDEX Displays the teletext index page.
UPDATE Display the TV picture on the screen while waiting
for the new teletext page.
REVEAL Displays the concealed information.
MODE Displays the mode.
SIZE Displays the text size as double size.
HOLD Hold function during teletext display.
SUBPAGE Search the sub-page using the sub-code.
You are in teletext mode, so only teletext functions are available.
29. Displaying the Teletext Information

Setting the PC Input
1. Press the TV/AV button to switch to PC mode.
2. Select PC using the / button, and press the OK button.
3. Press the MENU button.
PC INPUT
4. Select PC Input Setting using the / button, and press the OK or ൘ button.
5. Select the following item using the / button, and press the OK orG൘ button.
_ Auto Configure : Automatically optimizes the status of screen.
This is recommended when connecting a new PC.
_ Position : Move the screen to the right, left, bottom or Up.
_ Clock : Adjusts the horizontal size of screen by increasing or
decreasing the number of pixels.
_ Phase : Sets the focus of screen.
30. Setting the PC Input

Recording
Instant Recording
Since the LCD-TV has a hard disk drive inside, you can record a programme with
out an external media device such as a VCR.
1. Press the RECORD ( ) button on the remote control to record the
2. You can change the recording duration time by pressing the RECORD ( )
3. To stop the recording, press the STOP ( ) button. If there is no time delay
current programme instantly.
button repeatedly.
30min -> 60min -> 90min -> 120min -> 240min -> 24hr Max
while recording a programme, it will stop recording and return to the live
broadcasting instantly. Otherwise, if there is a time delay, it will jump to the
current point and return to the live broadcasting by pressing the STOP ( )
button once again.
Note :
_ When beginning the recording, REC ( ) icon is displayed on the upper
right-hand side of the screen for about 3 seconds.
_ You can reset the recording time while recording.
_ Ensure that there is enough free space before recording, because if
the free space on the hard disk drive is insufficient, recording will stop.
Recording 1 hour of programme may require up to about 1GB of free
space of hard disk space. The space for recording 1 hour of programme may
be different depending on the programme recorded and the recorded quality.
_ It is possible that you may not record the scrambled programme or
data programme normally.
_ You cannot change to other channel during recording analogue channel
or scrambled digital programme.
_ Recording is not available in Component, DVI or PC Input sources.
_ You can change to other input source during recording
_ You can playback the recorded programme during recording using
trick play functions (FF, RW, Instant Replay, Repeat between A and
B, Bookmark List and Add Bookmark). See the Playback Control.
_ When you are recording the channel which is watching currently,
the subtitle is recorded according to subtitle-setting in start of
recording. When you are recording the channel which is not watching
currently, the subtitle is recorded according to subtitle-setting in Menu
(DTV SETUP - Preferences - Local Setting - Subtitle Language/Display).
_ During the Standby mode, the LCD panel goes out, but the recording
is continued.
31. Recording

Recording
Setting the Recording Quality
1. Press the MENU button.
2. Select Recording using the /Gbutton, and press the OK or ൘ button.
3. Select Recording Quality using the /Gbutton, and press the ൖGor ൘ button
Decreasing the record quality decreases the amount of disk space required
to store the images, due to a higher compression scheme.
to select a particular thing.
HQ (High Quality) : SP (Standard Play) : LP (Long Play)
32. Recording

Recording
Recording Reservation
You can reserve recording to record your desired programme automatically.
You can reserve recording of a programme using Menu - Recording
- Recording Schedule.
Adding Recording Reservations
1. Press the MENU button.
2. Select Recording using the / button, and press the OK or ൘ button.
3. Select Recording Schedule using the / button, and press the
4. Select a blank list using the / button, and press the OK button
5. Select Channel using the / button, and press the OK or ൘ button to
GGGG//ൖ/൘/NUMERICAL(0~9) button. Press the OK to save the changed channel.
OK or ൘ button.
to add a new recording schedule.
change the channel. Change the Input source and channel No. using the
6. Select Date using the / button, and press the OK or ൘ button to change
the date. Change the date using the //ൖ/൘/ NUMERICAL (0~9) button
and press OK to save the changed date.
7. Select Start Time using the /Gbutton, and press the OK or
the start time. Change the start time using the //ൖ/൘/ NUMERICAL(0~9)
button and press OK to save the changed start time.
8. Select Duration using the / button, and press the OK or ൘ button
to change the recording duration. Change the recording duration using
the //ൖ/൘/NUMERICAL(0~9) button and press OK to save the
changed recording duration. (2 min ~ 24 hours)
9. Select Repeat using the / button, and select one among Once ( ),
Daily ( ) and Weekly ( ) using the ൖV൘ button.
10. Select Title using the / button, and press the OK or ൘ button to
display a keyboard on the screen. Enter the desired title on the screen
keyboard using the //ൖ/൘Gbutton.
11. Select Recording Quality using the / button, and select one among
HQ (High Quality), SP (Standard Play) and LP (Long Play) using the ൖV൘
button.
12. Select Save and press the OK button to complete the editing.
൘ button to change
Select Delete and press the OK button to delete the editing.
13.
14. Select Cancel and press the OK button to cancel the editing.
In Recording Schedule, you can move easily to the Recorded
Programmes or HDD Control using the RED or GREEN buttons
on the remote control.
33. Recording

Recording
Editing Recording Reservations
1. Press the MENU button.
2. Select Recording using the / button, and press the OK or ൘ button.
3. Select Recording Schedule using the / button, and press the OK or ൘ button.
4. Select a reserved item which you want to edit using the /Gbutton,
5. The next editing procedure is the same as Adding recording reservations.
and press the OK button.
When the reserved start time comes, the following message will be
displayed on the screen ;
If you select Yes and press OK button, the recording of the reserved
programme is started.
Note :
_ If the reserved start time comes in the standby mode, no sooner
have you turn on the LCD-TV than the confirm message will be displayed
on the screen.
_ If the programme to reserve overlaps with the existing one, adjust
the reservation so as not to overlap.
_ If you want to stop on recording, press the STOP ( ) button.
_ When you are recording the channel which is watching currently,
the subtitle is recorded according to subtitle-setting in start of
recording. When you are recording the channel which is not watching
currently, the subtitle is recorded according to subtitle-setting in Menu
(DTV SETUP - Preferences - Local Setting - Subtitle Language/Display).
_ During the Standby mode, the LCD panel goes out, but the recording
is continued.
34. Recording

Recording
Time Shifted Recording
This LCD-TV automatically saves the programme on air in the installed hard disk
drive temporarily, so that users can watch programmes as they watch a video tape
using functions such as rewind, fast forward, instant replay and pause.
1. On watching TV, press the TSR on the remote control until when Time Shift On
_ If you press the TSR button on watching TV, the current state of time
_ On the channel during time shifted recording, if you press the OK button,
Note : If you press the PLAY/PAUSE ( ) button on the Time Shift
message appears, and the time shifted recording will be started.
shifted recording will be displayed with a message (Time Shift On or
Time Shift Off). If you press it once again, the message will be changed
to the other state.
TSR On message is shown.
Off state, it will be switched to the Time Shift On automatically
and start the time shifted recording.
2. During time shifted recording, you can press the various playback buttons such
as PLAY/PAUSE ( ), FORWARD ( ), REWIND ( ) or INSTANT
REPLAY ( ) to playback the recording data saved temporarily in TSR buffer
of the programme you are watching.
Note :
_ You cannot perform Repeat A-B ( ) or Bookmark ( , )
function during time shifted recording.
_ If you want to playback the programme which is viewing-restricted
or locked, will need the password.
3. If you press a playback button, the TSR time bar will be displayed as following and
the data will be played according to each playback function. For more information
of the playback buttons, refer to Playback Control.
TSR Time Bar
TSR time bar displays the current operation status for playback of TSR data.
1
3
2
78
4
5
6
1. Start time of TSR time bar
2. Watching point
3. Live or broadcasting point
4. Total amount of programme saved to TSR buffer (max 30 minutes)
5. End time of TSR time bar
6. Play status (The speed is shown in playing of fast-forward, fast-rewind,
slow-forward, slow-rewind.)
7. The time of watching point
8. Current time (The time of live or broadcasting point)
When the play status is PLAY or LIVE on TSR time bar, if you take no action
for about 3 seconds, TSR time bar will disappear.
35. Recording

Recording
4. If you press the STOP ( ) button, the TSR time bar will disappear and
5. To stop the time shifted recording, press the TSR button until
Note :
_ It is possible that you may not record the scrambled programme
_ Total TSR buffer is limited.
_ During the TSR playback or Programme Playback, the TruSurround XT
the playback will be stopped.
when Time Shift Off message appears.
or data programme normally.
and Auto Volume Level menus are disabled.
36. Recording

Playback
Programme Playback
You can watch the recorded programme by selecting a desired
programme in the Menu - Recording - Recorded Programmes
and pressing the OK or PLAY/PAUSE ( ) button.
1. Press the MENU button.
2. Select Recording using the / button, and press the OK or ൘ button.
3. Select Recorded Programmes using the / button, and press the
OK or ൘ button to display the recorded programme list.
4. Select a desired programme to playback using the ൖV൘ button, and then
press the OK or PLAY/PAUSE ( ) button to playback the programme.
5. Time bar appears as following and starts playback of the selected programme
instantly.
Time Bar
Time bar displays the current operation status.
1
1. The playing time of watching point
2. The played amount of programme
3. Watching point
4. The non-played amount of programme
5. The total recorded time of programme
6. Play status (The speed is shown in playing of fast-forward, fast-rewind,
slow-forward, slow-rewind.)
7. Input source mode of the recorded programme (Digital, Analog, AV1/2/3/4,
S-Video)
8. Channel number
9. Programme name
2
34
78 9
5
6
When the play status is PLAY on Time bar, if you take no action for
about 3 seconds, Time bar will disappear.
6. You can perform trick play functions like VCR functions such as rewind,
forward, slow motion, pause, skip, and replay using the playback control or
the additional buttons on the remote control during playback a programme.
37. Playback

_ The playback programmes can be output to external device through
AV 3 (SCART 3) port.
currently on recording.
_
During the TSR playback or Programme Playback, the TruSurround XT
and Auto Volume Level menus are disabled.
38.

Playback
Editing Recorded Programmes
Select Menu - Recording - Recorded Programmes, and then select the desired
recorded programme to edit the information of the programme.
Editing Title
You can edit the title of a recorded programme.
1. Select your desired programme in the list using the ൖV൘Gbutton.
2. Select Edit Title using the / button, and press the OK button
to display a keyboard on the screen.
3. Enter the desired programme title on the screen keyboard using the
GGGG//ൖ/൘ button.
4. After finishing editing, select Save, and then press the OK button
to complete.
Delete File
You can delete the recorded programme.
1. Select your desired programme in the list using the ൖ/൘Gbutton.
2. Select Delete File using the /G button, and press the OK button.
Display a message. (Do you want to delete this recorded programme?)
3. Select Yes using the ൖ/൘ button, and then press the OK button to delete
the file. If you don't delete the file, select No and press the OK button.
Copy File to External Device
You can copy the recorded programme from/to external device.
1. Select your desired programme in the list using the ൖV൘Gbutton.
2. Select Copy file to external device using the /Gbutton, and press the
OK button. Display the progressing status including copied rate,
elapsed time and remaining time. Please wait to copy to external device
completely.
3. When the file copy is finished, press the OK button. If you want to
cancel the copying, select Cancel and press the OK button.
Note : The file format of external device must be FAT32 or Linux file
format for copying to external device. If the file format of
external device is mismatched to these file format, initialize the
external device at Menu-Recording-HDD control menu.
39. Playback

Playback
Connecting the External HDD
You can also save/backup the recorded data to external storage device via
USB port located on the rear of the LCD-TV. Connect a USB cable between
an external storage device and USB port of the LCD-TV. Then, the External
menu will be enabled.
USB
HDD
Note : It may not be compatible with the TV according to the sort of
external HDD or its case.
40. Playback

Playback
Playback Control
You can perform playback control using playback buttons of the
remote controller. You can use trick play functions during instant
recording, time shifted recording or playing recorded programme.
PLAY/PAUSE
If you press PLAY/PAUSE ( ) button on the remote controller on
playing, the playing is paused. If you press PLAY/PAUSE ( ) button
on pausing, the playing is resumed from paused point.
Note : If you press PLAY/PAUSE ( ) button during watching TV or
AV input, time shifted recording is started automatically.
Rewind to Previous Scene
Press the REWIND ( ) button on the remote controller to watch backward
the scene passed by. Whenever you press the REWIND ( ) button, the
rewind speed increases (x2, x4, x8, x16, x24). If you press the PLAY/PAUSE
()button, the programme is played at normal speed. If you press the
REWIND ( ) button on the pause state, the programme is played backward
at slow speed (x1/2, x1/4, x1/8, x1/16, x1/24).
Fast Forward to Next Scene
Press the FORWARD ( ) button on the remote controller to fast forward
the programme. Whenever you press the FORWARD ( ) button, the fastforward speed increases (x2, x4, x8, x16, x24). If you press the PLAY/PAUSE
()button, the programme is played at normal speed. If you press the
FORWARD ( ) button on the pause state, the programme is played forward
at slow speed (x1/2, x1/4, x1/8, x1/16, x1/24).
Recording
Press the RECORD ( ) button on the remote controller to start recording the current
programme. For more information about recording refer to Instant Recording.
Direct Jump
If you press the ൖGor ൘ button during playback, the moving focus appears in
the progress bar. Move this arrow to a desired time point using the ൖV൘ button.
Press the OK button to play the programme at the moved time point.
To return the arrow to original play position, press the BACK button.
41. Playback

Playback
Instant Replay
If you press the INSTANT REPLAY ( ) button, the current programme
is played from the 10 seconds before.
Repeat between A and B
You can play special section repeatedly. You can set the section by pressing the
A-B ( ) button twice. Press the A-B ( ) button once at the desired
starting point, and press again at the desired ending point. Then, a mark for
the A-B section repetition will be displayed and the section is played repeatedly.
To stop the repetition play and return to the normal play, press the A-B ( )
button once again.
Bookmark
You can set bookmark where you want to save.
Add Bookmark
Press the ADD BOOKMARK ( ) button, when you want to save where you
watch. No. and time of the added bookmark are shown on the screen. You can
go to that position directly using bookmark list.
Note : The bookmark can be saved up to 5. If you save bookmark over 5,
the first bookmark is deleted.
Go to Bookmark
Press the BOOKMARK LIST ( ) button, and then the bookmark list appears.
Select a bookmark where you want to go using the ൖV൘Gbutton, and press
the OK button to play.
Note : If you press the ADD BOOKMARK ( ) button on displaying
the bookmark list, you can add the watching position to bookmark
list instead of the selected bookmark.
42. Playback

HDD Control
Checking the Hard Disk Drive
You can check the free space of the hard disk drive, and can
format the disk drive if necessary.
1. Press the MENU button.
2. Select Recording using the / button, and press the OK or ൘ button.
3. Select HDD Control using the /Gbutton, and press the OK orG൘ button.
4. Select Internal Device or External Device (if connected) using the
GGGGൖ/൘Gbutton.
5. You can check the total, TSR buffer, recorded and free space of each HDD.
6. Select Diagnosis and press the OK button to diagnose the HDD.
Diagnosing progress bar appears. After finishing diagnosing, confirm the
message and press the OK button.
7. Select Format and press the OK button to remove all the recorded
programmes saved on the HDD and initialize the HDD.
8. Select Yes and press the OK button for the format confirm message,
and then is started formatting the HDD. Formatting progress bar appears.
To abort formatting, select Cancel and press the OK button, and then
select Yes and press the OK button.
Note :
_ You have to be careful because performing format deletes all the
recorded programmes saved on the HDD.
_ In case of External Device, Remount or Disconnection menu appears.
Please connect/disconnect safety using these menus.
_ The file format of external device must be FAT32 or Linux file format
for copying to external device. If the file format of external device is
mismatched to these file format, you should initialize the external
device at Menu-Recording-HDD control menu.
_ Don't unplug the power cord during format. If you did unplug it, you
shoud perform the format again.
In HDD Control, you can move easily to the Recorded Programmes or
Recording Schedule using the RED or GREEN buttons on the remote
control.
43. HDD Control

HDD Control
Connecting the External HDD
You can also save/backup the recorded data to external storage device via USB
port located on the rear of the LCD-TV. Connect a USB cable between an external
storage device and USB port of the LCD-TV. Then, the External menu will be enabled.
USB
Note : It may not be compatible with the TV according to the sort of
external HDD or its case.
HDD
44. HDD Control

Digital TV Channel Setup
When you purchase your LCD-TV, you can run the Automatic Search.
It immediately performs Channel Search.(You can also run the digital TV channel
setup in Default Setting.)
1.
Turns on the TV in the Digital TV mode.
2. Starts the Automatic Search
immediately. Please wait for
finishing the Channel Search.
If you want to stop the Channel
Search, select the OK button.
If the Channel Search is stopped
or finished, press the OK button
to save the result of the channel
search.
Once the channel search has
finished, you can enjoy digital
television.
Warning : If you exit the Automatic Search without fully completing
the channel searching procedure, you may not have any
digital TV channels stored. In this case, you can use the
Installation Menu to configure your LCD-TV as required.
45. Digital TV Channel Setup

Basic Operation
This chapter describes functions such as switching channel, changing language,
and basic features for watching programmes.
Switching Channel
You can switch the current channel using one of the following methods.
1. Press the CH +/- button.
2. Enter your desired channel number using the NUMERICAL (0~9) button
to move to the channel directly.
3. Press the DTV CH or RADIO CH button to switch between TV channel
and Radio channel.
Note : You can switch channel using the channel list or programme guide.
Changing the Subtitle Language
If the current prog ramme provides
Subtitle information, you can select the
language for the Subtitle.
1. Press the SUBTITLE button to
display the subtitle language list.
2. Select your desired subtitle language
using the / button, and press
the OK button. Then the subtitle
will be displayed in the selected
language at the bottom of the screen.
3. Select OFF from the subtitle language list if you do not wish to display subtitles
in the screen.
Note :
_ You can select a default subtitle language by selecting DTV SETUP -
Preferences - Local Setting - Subtitle Language menu.
_InPIP/TWIN Input screen, the subtitle is not displayed.
Changing an Audio Language
If the current prog ramme is available in
multiple audio languages, you can select
the language that you wish to listen in.
1. Press the SOUNDTRACK/AUDIO
button to display soundtrack list.
2. Select your desired audio language
using the /Gand OK button
to change the audio soundtrack.
3. Select Audio preference(left, right,
stereo) using the ൖ/൘ buttons.
4. Press the EXIT or SOUNDTRACK/AUDIO button to exit the soundtrack list.
46. Basic Operation

Basic Operation
Note :
_ you can select your desired default audio language by selecting
DTV SETUP- Preferences - Local Setting - Audio Language menu.
_ If the programme is broadcast in Dolby Digital one, you cannot
set the audio preference such as left, right, and stereo.
_ If you select Dolby Digital by selecting DTV SETUP - Preferences -
Local Setting - Audio Priority menu, Dolby Digital soundtrack
is automatically used in preference to the default audio language.
Programme Information-Information Banner (I-plate)
Programme information is always displayed for a specific period of time whenever
you switch channels. You can view the programme information by pressing the INFO
button twice while watching a programme. Press the EXIT button to hide the I-plate.
General Information
The General Information is displayed at the bottom of the screen as followings.
1. Channel number and channel name
2. Programme name
3. Current time
4. Detailed programme information : displayed if detailed programme information
is provided.
5. Next programme Information : displayed if next programme information is
provided. Press the ൘Gbutton to display the next programme information.
Note : If there is no available programme information, programme
information is not displayed.
47. Basic Operation

Basic Operation
Detailed Programme Information
You can see detailed information about
the current programme.
Press the INFO button.
Note :
_ Press the INFO button again
to hide the information box.
_ If the detailed programme
information is more than one
page, use / button to move to
the previous or next page.
Icons
Represents the recommended minimum age for the current programme.
Displayed only when the channel is a locked channel.
Displayed only when the channel is a scrambled channel.
Displayed only when subtitle information is available.
Displayed only when there is any teletext information.
Displayed only when the programme is broadcast in Dolby Digital.
MHEG Application
The MHEG application makes possible not only access to the Internet and exchange
e-mail through TV but also put the receiver directly into conventional television state.
1. Press the TEXT button or the key which the data programme help you
to press.
2. Select your desired application using the button, and press the
OK or ൘Gbutton.
Note : Please refer to the detailed information of each MHEG application
if you operate the MHEG application.
48. Basic Operation

Channel List
Displaying and Switching Channel List
You can display channel list using LIST button and switch to other channels
on the channel list.
1. Press the LIST button while
watching a channel to display the
channel list.
2. Select your desired channel using
the / button and press the
OK button to change the channel.
3. Enter the channel number directly
using NUMERICAL (0~9) button
to move cursor on to your desired
channel. And then press the
OK button to change to the
selected channel.
Note :
_ Within the channel list, press the PAGE +/- buttons to move on
page-by-page basis.
_ Whenever you press the DTV CH or RADIO CH button while the
channel list is displayed, the channel list will be switched
between the TV and Radio channel list.
Editing Channels
You can edit all channels or each channel by channel list group.
1. Press the DTV SETUP button.
2. Select Edit Channels using the
GGGG/ button, and press the
OK or ൘Gbutton.
3. Select Edit Channel Lists using
the / button, and press the
OK or ൘Gbutton.
4. You will be prompted to enter your
password. Enter your password using
NUMERICAL (0~9) buttons.
Note :
_ The Default Password is 0000. If you have forgotten your Password,
please contact your local LCD-TV distributor.
_ Press the BACK or ൖ button to save the changes and return to
the previous menu, press the EXIT button to exit the menu screen.
_ You can easily navigate all menus using the assigned number for each
menu. Press the DTV SETUP button then select the numbers 2,1 to
select Edit Channel Lists menu.
49. Channel List

Channel List
Select a Channel Group
You can select the channel list group to edit TV or Radio.
1. Press the OK or ൘Gbutton in Group
to display channel list group.
2. Select your desired channel list group
using the / button, and press
the OK button.
Note :
_ Press the DTV CH or RADIO CH button to move to TV or RADIO
channel list directly.
_ For editing Favourite channel list,movetoDTV SETUP - Edit Channels -
Edit Favourite Channels menu.
Delete Channels
You can delete one or more channels.
1. Move the cursor to the channel list
using the ൖ/൘Gbutton.
2. Select your desired channel,
and then press the OK button.
You can select multiple channels.
3. Select Delete in the right using
the ൘ button, and press the
OK button.
50. Channel List

Channel List
Lock/Unlock Channels
You can lock or unlock one or more
channels.
1. Move the cursor to the channel list
using the ൖ/൘ button.
2. Select your desired channel, and
then press the OK button.
You can select multiple channels.
3. Select Lock in the right using
the ൘ button, and press the
OK button.
Select/Unselect All Channels
You can select/unselect all channels
at a time.
1. Select Select All in the right
and press the OK button to select
all channels.
2. Select Unselect All in the right
and press the OK button to unselect
all the selected channels.
51. Channel List

Channel List
Editing Favourite Channels
You can edit Favourite channel or Favourite channel list.
1. Press the DTV SETUP button.
2. Select Edit Channels using
the / button, and press the
OK button.
3. Select Edit Favourite Channels
using the /Gbutton, and press
the OK or ൘ button.
4. Select a channel using the
GGGG/ button, and press the
OK button. The selected channel
is moved into the Favourite.
5. Move between TV and Favourite using the ൖ/൘Gbutton. In this way,
you can return the channel.
Note :
_ Press the DTV CH or RADIO CH button to move to TV or RADIO
channel list directly.
_ Press the BACK or ൖ button to save the changes and return to
the previous menu. Press the EXIT button to exit the Menu screen.
52. Channel List

Programme Guide
The Programme Guide displays programme information about each channel,
based on the date and time. You can also schedule your recording using
the information given.
Note : Press the GUIDE button to exit the Guide screen.
Viewing Programme Guide Information
You can view programme information for all channels.
1. Press the GUIDE button.
2. Move to previous or next programme
within the same channel using the
ൖ/൘ button.
3. Move to other desired channel using
GGGG/ button. If there are multiple
channels, use PAGE +/- button
to move to channels by page. Also,
you can enter your desired channel
number using the
buttons on the remote control to
move to the channel directly.
NUMERICAL (0~9)
4. Select your desired programme, and press the OK button.
Then you can watch the programme if it is on air, or you can reserve it
if it is the future programme.
5. Press the INFO button in the selected programme to view
Extended Information for the selected programme.
Viewing Guide Information by Another Group
You can view programme information for desired channel list by groups.
1. Press the GUIDE button.
2. Press the RED button to change the channel list group or press the
DTV CH, RADIO CH,orFAV CH buttons.
3. The Programme Guide for selected channel list is displayed.
Note : Press the DTV CH or RADIO CH button to move to TV or
RADIO channel list directly.
53. Programme Guide

Programme Guide
Viewing Programme Information Using Time Bar
You can quickly search for your desired time slot using the Time bar.
G
1. Press the GUIDE button.
2. Press the GREEN button to display
the Time Bar.
3. Select the each button using the
GGGGൖ/൘ button, and press the
OK button to move as your desired
amount of time. If you press the
button repeatedly, the same
operation is repeated.
4. Each button functions as follows.
Now : Moves to the current programme
where the cursor is located.
ൖ : Moves to the previous programme or 30 minutes before.
൘ : Moves to the next programme or 30 minutes after.
: Moves to 2 hours before.
: Moves to 2 hours after.
ൖDay : Moves to one day before.
Day൘ : Moves to one day after.
5. Select and press the OK button to exit the Time Bar.
Note : The guide provides programme information from the previous
day to the next 7 days.
Finding a Programme
You can find your desired programme by programme name or genre.
Finding a Programme by Programme Name
B
1. Press the GUIDE button.
2. Press the BLUE button to display
Find screen.
3. Enter the programme name directly
using the keyboard displayed on the
screen.
4. When completing entering programme
name, select the Find, and press the
OK button.
Note :
_ Select //ൖ/൘ button and then press OK button to enter the
programme name on the keyboard screen.
_ If you select Previous or Next on the Keyboard displayed on the screen
and press OK button, the keyboard layout is switched.
54. Programme Guide

Programme Guide
Finding a Programme by Programme Genre
B
1. Press the GUIDE button.
2. Press the BLUE button to display
Genre screen.
3. Select By Genre and press the
OK button to search programme
by genre.
4. Select your desired genre using
GGGG//ൖ/൘ button and press the
OK button.
5. If you select your desired programme
from the Found Programme List
screen and press the OK button,
you can watch the programme
if it is on air.
Note : The Found Programme List
may differ depending on the
provided programme
information.
Adding Reservations by Guide
You can automatically reserve to watch your desired programme.
1. Select the scheduled programme
and pressing the OK button.
2. Select OK using ൖ/൘Gbutton and
press the OK button.
3. When reservation has been completed,
the icon ()is displayed on the
reserved programme.
When you cancel the reservation
1. Select the reserved programme and press the OK button.
The message will be displayed.
2. Select OK and press the OK button to cancel the reservation.
Note : You can look into reservation schedule using YELLOW button
in guide.
55. Programme Guide

Setting the Preferences
You can set censorship classification, password, time and other options to enhance
your viewing pleasure.
Note :
_ Press the BACK or ൖ button to save the changes and return to
the previous menu. Press the EXIT button to exit the Menu screen.
_ You can easily select all menu items using the assigned numerical
button for each menu.
Parental Control
You can set parental control for each programme. You can also change your password.
1. Press the DTV SETUP button.
2. Select the Preferences using
the / button, and press the
OK or ൘ button.
3. Select the Parental Control using
the / button, and press the
OK or ൘Gbutton.
4. When prompting message is
displayed to ask Password,
enter the Password using the
NUMERICAL (0~9) buttons.
Setting Censorship Classification
Censorship Classification allows you to
block programmes according to the age
level you have set.
1. Select the
using the / button, and press
the OK or ൘Gbutton.
2. Select your desired Age Level
using the / button, and press
the OK button.
View All : All programmes can be watched because there is no age limitation.
7:Programmes are blocked under the age of 7.
12 : Programmes are blocked under the age of 12.
15 : Programmes are blocked under the age of 15.
18 : Programmes are blocked under the age of 18.
Lock All : All Programmes are blocked without considering the age level.
Note : You have to enter your password to watch the programme which
Censorship Classification
is blocked by the age restriction.
56. Setting the Preferences

Setting the Preferences
Changing Password
You can change the current password into a new one.
1. Select Change Password using
the / button, and press the
OK or ൘ button.
2. Enter New Password using the
NUMERICAL (0~9) button, and
select OK and press OK button.
3. Enter the New Password again to
confirm the Verify Password, and
select OK and press the OK button.
Note : The Default Password is 0000. If you have forgotten your Password,
please contact your local LCD-TV distributor.
Local Setting
You can set a Language for Audio, and Subtitles and set the current time.
1. Press the DTV SETUP button.
2. Select Preferences using the
GGGG/ button, and press the
OK orG൘ button.
3. Select Local Setting using the
GGGG/ button, and press the
OK or ൘ button.
Setting Current Time
You can set the GMT Offset for the current time.
1. Select GMT Offset using the / button.
2. Press the OK or ൘Gbutton to display GMT list. GMT can be changed
in 30 minutes / 1 hour steps.
3. Select your GMT offset using the / buttons, and press the OK button.
Note : The current time is set automatically whenever GMT Offset changes.
The default item is Auto. If GMT Offset is Auto, the time will change
to summer time (BST).
57. Setting the Preferences

Setting the Preferences
Audio/Subtitle Language
You can set the language for Audio and Subtitles. The default language is English.
1. Select Audio / Subtitle Language using the / button.
2. Press the OK or ൘ button to display the available Language List.
3. Select your desired language using the / button, and press the OK button.
Audio Priority
You can select the audio priority between language and Dolby Digital.
1. Select Audio Priority using the / button.
2. Press the OK or ൘ button to display either Language or Dolby Digital.
3. Select your desired option using the / button, and press the OK button.
+ Language : You can watch a programme in the selected language.
+ Dolby Digital : You can listen in Dolby Digital sound.
Subtitle Display
You can select whether or not to display the Subtitle automatically if provided.
1. Select Subtitle Display using the / button.
2. Select your desired option using the OK or ൘ button.
+ Auto : Subtitles are displayed automatically in the predefined
subtitle language.
+ Manual : Subtitles are displayed in the language when you select
the subtitle language by pressing the SUBTITLE button
on the remote control.
Subtitle Font
You can select the Subtitle font.
1. Select the Subtitle Font using the / buttons.
2. Select your desired option using the OK or ൘ button.
+ Variable : Uses the horizontally variable Subtitle Font.
+ Fixed : Uses the fixed Subtitle Font.
58. Setting the Preferences

Setting the Preferences
Miscellaneous Settings
1. Press the DTV SETUP button.
2. Select Preferences using the
/ button, and press the
OK or ൘Gbutton.
3. Select Miscellaneous Settings
using the / button, and press
the OK or ൘Gbutton.
i-Plate Display Time
You can set the duration during which the Information box is to be automatically
displayed when you switch the channel.
1. Select i-Plate Display Time using the / button, and press the OK or ൘ button.
2. Select a value between Disable,1~20seconds using the / button,
and press the OK button.
59. Setting the Preferences

Installation
Automatic Search
If your LCD-TV is connected to a suitable aerial(outdoor aerial recommended)
you can automatically search channels without entering any other information.
1. Press the DTV SETUP button.
2. Select Installation using the
GGGG/ button, and press the
OK or ൘ button.
3. Select Automatic Search from
Installation menu using the
GGGG/ button, and press the
OK or ൘ button.
Search
Please wait while the LCD-TV searches for the channels, this may take a few minutes.
1. During the automatic search
procedure, the cursor is located at
Stop. If you press the OK button
during the search, the operation is
stopped and the channels found thus
far will be displayed.
2. If despite successful completion of
search operation the some or all
channels have been not found,
press the OK button and perform
to reset the search operation again
if necessary.
3. You can delete unnecessary channels
from the found channels. Select your
desired channels to delete and press
the OK button. Then select Delete
and press the OK button.
To delete all channels, select
Select All to select all channels,
select Delete, and press the
OK button.
4. When completing Channel Search
and deleting unnecessary channels,
select Save to save the changes.
60. Installation

Installation
Manual Search
You can search channels manually by searching parameters, if you know the
multiplex-parameters(check with your local broadcaster).
1. Press the DTV SETUP button.
2. Select Installation using the
GGGG/ button, and press the
OK or ൘ button.
3. Select Manual Search from
Installation menu using the
GGGG/ button, and press the
OK or ൘ button.
4. Select Channel, Frequency, Mode,
Guard Interval,or
using the / button, and press
the OK or ൘ button.
Network Search
Channel Number
Enter your desired frequency channel number to search. When entering frequency
channel number, the appropriate frequency value is automatically displayed in Frequency.
Select one of channel using the / button, press the OK button.
Frequency
Enter your desired frequency to search directly. When entering the frequency,
the appropriate channel for the entered frequency is automatically displayed in Channel.
Enter frequency using the NUMERICAL (0~9) button and press OK button.
Mode
Required for Channel Search. If you don't know the value, please select Auto.
Select among Auto, 2k and 8k using the V button, and press the OK button.
Guard Interval
Required for Channel Search. If you don't know the value, please select Auto.
Select one option among Auto, 1/4,1/8,1/16 and 1/32 using the / button,
and press the OK button.
Network Search
If specified frequency channel information and other channel information are
provided together, the channel, which belongs to other frequency channel,
is also searched. Select one option between Enable and Disable using the
൘ button.
61. Installation

Installation
Default Setting
Default Setting restores the LCD-TV to the default settings
Warning : Please Note that once you perform Default Setting, all data
such as Aerial Setting information Channel List, and User
Configured data are deleted.
To perform Factory Default:
1. Press the DTV SETUP button.
2. Select Installation using the
/ button, and press the
OK or ൘ button.
3. Select Default Setting using
the /Gbutton, press the
OK or ൘ button.
4. Select Yes and press the OK button
to restore all setting to Factory
Default. Select No and press the OK
or BACK button to return to the previous menu.
5. Confirm again to start loading default setting. Enter Password using the
NUMERICAL (0~9) buttons to confirm that you wish to restore the default
settings.
6. When default setting is completed, Installation Wizard is automatically
displayed, which helps Channel Search. For detailed information about
Installation Wizard, refer to Digital TV Channel Setup.
Note : In the Default Setting, you need a Password to enter. The Default
Password is 0000. If you have forgotten your Password, please
contact your local LCD-TV distributor.
62. Installation

Software Upgrade
In order to maintain proper performance of this LCD-TV, it is essential to have
the most up-to-date software. The latest news and release of software versions
may be found at the HUMAX website . http://www.humaxdigital.com.
It is recommended that you periodically check for the availability of software update.
OTA (Over the Air)
OTA, an abbreviation of Over-the-Air, means that the software can be downloaded
through your aerial. The manufacturer reserves the right to decide when and where
to release software by this process. The software update via your aerial will only
occur under the following circumstances.
1. The equipment should have appropriate loader software inside LCD-TV.
Caution : Please note that if you don't have the official loader software,
the equipment may not function correctly after a software update.
2. The manufacturer decides to release software downloading via a designated
antenna system.
3. The equipment must be tuned properly following the guidelines within this
manual.
4. Upgrade software when the quality of the receiving signal strength is high.
If poor weather conditions where the quality of receiving signal is not high,
please perform the software update later.
Caution :
ΐPlease be careful to keep the power on and the power cord plugged
in during software update.
ΐPlease be careful not to pull out the aerial (co-axial Cable) during
software update. The update may be interrupted and the LCD-TV
may not work.
Note :
_ Other functions of the LCD-TV will not work at all during software
update.
_ Scheduling operation will not work during software update.
63. Software Upgrade

Software Upgrade
If new software is found when powering on
1. A message will be displayed to notify that new software is found.
2. Select Yes and press the OK button to update the software.
3. Starts downloading new software. Please wait until the updated is completed.
4. When completing the software update, the equipment is automatically powered
off and on again.
If updating software from Menu
1. Press the DTV SETUP button.
2. Select Installation using the
GGGG/ button, and press the
OK or ൘ button.
3. Select Software update using
the / button, and press the
OK or ൘ button.
Automatic Update
You can set the LCD-TV to find HUMAX software updates and update software
automatically.
1. Select Automatic Update using
the / button, and press the
OK or ൘ button. Automatically
search for new software.
2. When detecting updated software,
the following result is displayed.
If new software is not found by
Automatic Update, use
Manual Update.
3. Select Yes and press the OK button
to start updating. Select No and
press the OK button to return to
the previous menu without updating. Select Later and press the
OKbutton to update later. That means the update menu displays
as soon as you turn on the LCD-TV next time.
4. Performs Software Update. Please wait until it is completed.
5. When completing the software update, the LCD-TV is automatically powered
off and on again.
64. Software Upgrade

Software Upgrade
Manual Update
You can perform Manual Update only if you know the multiplex information
of the software update correctly.
1. Select Manual Update using
theG/ button, and press the
OK or ൘ button.
2. Select the channel number which
provides updated software. You can
also enter the frequency instead of
channel number in which updated
software is provided.
3. Select Mode. If the information is
not known, then Auto can be
selected.
4. Select Guard Interval. If the information is not known, then
Auto can be selected.
Note : How to set parameters in Manual Update is the same as how to
set parameters in Manual Search. Refer to Manual Search.
5. Select Search and Press the
OK button to search software.
6. It will display whether or not New
Software exist. If new software
does not exist, press the OK button
to return to the Manual Update
Menu.
7. Select Yes and press the OK button
to start updating. Select No and
press the OK button to return to
the previous menu. Select Later
and press the OK button to update later.
8. Performs Software Update. Please wait until it is completed.
9. When completing the software update, the LCD-TV is automatically powered
off and on again.
65. Software Upgrade

Software Upgrade
Software Auto-Detecting and Time
You can specify the software detecting time. If the LCD-TV powers on during
software auto-detecting, Detecting will stop.
1. Select Software Auto - Detecting using the /Gbutton, and press
the OK or ൘Gbutton.
2. Select Enable or Disable and press the OK or ൘Gbutton whether or not
setting the software detecting time automatically.
3. When you select Enable, you can set the detecting time in the
Auto - Detecting Time.
Software Update from PC
You can connect your LCD-TV to the PC directly and update your software by
transferring the new software from the PC. Follow these steps to download new
software from a PC to this LCD-TV.
1. Download new software file(HDF) suitable for this LCD-TV model from our
website into your computer (http://www.humaxdigital.com).
2. Download and install download tool from our website into your computer.
3. Connect your PC to this LCD-TV with an RS-232C serial cable(not supplied).
4. Execute installed download tool, and then follow the instructions contained
within the download tool.
5. Reconnect the power cable of the LCD-TV and press the STANDBY button
to start download.
You can also start download using only the STANDBY button.
Switch off the LCD-TV by pressing the STANDBY button and press again
the STANDBY button after about 1 minute.
RS-232C
66. Software Upgrade

System Information
You can view all system information, and signal detection.
1. Press the DTV SETUP button.
2. Select System using the / button,
and press the OK or ൘ button.
Status
You can view the System information
1. Select Status using the / button,
and press the OK or ൘ button.
2. Confirm the information about
Hardware version,
Software version, Loader version,
System ID, and Update Date.
Signal Detection
You can view the signal strength and signal quality reception for the channel
that is currently being viewed.
1. Select Signal Detection using
the / button, and press the
OK or ൘ button.
2. Display information about the aerial
and multiplex, which current channel
belongs to and the graphs and
percentage of Signal Strength and
Quality of the channel.
67. System Information

System Information
Common Interface
You can view the current status of the CI module.
1. Select Common Interface using
the / button, and press the
OK or ൘ button.
2. Select Slot 1, and press the
OK or ൘ button.
3. If Common Interface is available,
you can view information about
each Slot.
Note : The displayed information
about each Common Interface may differ depending on
Common Interface type.
Game
This LCD-TV provides various games for user's entertainment.
1. Press the DTV SETUP button.
2. Select Games using the / button, and press the OK or ൘ button.
3. According to the instruction displayed on screen, you can enjoy the game
usingGൖ/൘ and OK button.
Note : Press the EXIT or BACK button to exit the game.
68. System Information / Game

Menu Map
LCD TV Menu
Picture
Sound
Mode
Brightness
Contrast
Sharpness
Colour
Colour Temperature
PIP/TWIN
Effect
Bass
Treble
Balance
Auto Volume Level
TruSurround XT
Sound Source
Analogue TV
Digital TV
Channel
Setup Digital
Channel
Recording
System
PC Main Menu
Auto Programme
Manual Programme
Edit Programme
Recorded Programmes
Recording Schedule
HDD Control
Recording Quality
Language
Time Setting
OSD Transparency
AV2 Output
Antenna Power
Aspect Ratio
Backlight Brightness
PC Input
Setting
69. Menu Map
Auto Configure
Position
Clock
Phase

Menu Map
Digital TV MENU
Preferences
Edit Channels
Parental Control
Local Setting
Miscellaneous Settings
Edit Channel Lists
Edit Favourite Channels
Automatic Search
Installation
System
Games
Manual Search
Software Update
Default Setting
Status
Signal Detection
Common Interface
70. Menu Map

Troubleshooting
Troubleshooting
Before contacting your local service dealer, please make sure you refer to the
following guide. If the LCD-TV does not work normally after completing the
following trouble shooting, please contact your local LCD-TV distributor or
service centre.
1. No message is displayed on the front panel or the LCD-TV has no power
+ Check the main power cable and check that it is plugged into a suitable power outlet.
+ Check whether the Power Switch is On.
2. No picture
+ Make sure that the LCD-TV is in Operation Mode.
+ Make sure that the AV Cable(SCART, SVHS, etc) is firmly connected to the LCD-TV.
+ Make sure that the aerial is correctly connected to the equipment.
+ Make sure that the aerial Setting is correct.
+ Check the brightness level of the LCD-TV.
+ Check the channel is on air.
3. Poor picture & sound quality
+ Install aerial make sure to avoid putting mobile phone or mircrowave oven near
around the equipment.
+ Use 75 ˟ coaxial cable to connecting LCD-TV and aerial.
4. No or poor sound
+ Check the volume level of the LCD-TV.
+ Check the Mute status of the LCD-TV.
+ Press the Audio button to change the Sound Track type.
5. Remote Control does not operate
+ To manipulate the equipment with Remote Control, the remote control's emitting
part should be pointed directly towards the receiving part of LCD-TV's remote sensor .
+ Check the battery of remote control.
71. Troubleshooting

s
Error message
No or bad signal
The channel is
scrambled or not
available.
The channel is
scrambled.
Possible causes
+ The aerial is not
installed correctly.
+ The channel has a signal
but no audio or video.
+ The channel is for data
broadcasting.
+ This digital terrestrial
receiver does not support
the service that enables
descrambling of the
scrambled channels.
What to do
+ Adjust aerial.
+ Check the cable from
the aerial. If you cannot
resolve the problem you
may need to have your
aerial and installation
tested by a professional.
+ Confirm if the channel
is currently on air.
+ You cannot watch the
channel in the usual way.
+ Please contact your local
dealer for an appropriate CI
Module and viewing card.
The audio is not
available.
The fan is out of
control:
please turn it off.
+ The channel has signal,
but no Audio.
+ The fan is out of order.
+ Press the DTV / AUDIO
button to confirm if the
channel has Audio.
+ Please turn it off.
*Contact the call center
immediately.
72. Troubleshooting

Troubleshooting
Error Message
Problem
No picture on
screen and No
sound from
speakers.
No picture /
No picture from
AV terminal.
Picture is
displayed, But no
sound from the
Speakers.
Picture is too light.
Picture is too dark.
Remote controller
does not work.
The picture is not
sharp.
The picture moves.
Check item
+ Insert the AC power cord plug securely in AC power outlet.
+ Make sure the remote control is not in the standby mode
(The POWER/Standby indicator is Orange colour.)
+ T urn on the MAIN POWER button on the bottom of the display.
+ Check the brightness setting of the display .
+ Lamp may have malfunctioned.
+ Check the cable from the VIDEO INPUT terminal.
+ Check the sound setting.
+ Make sure the sound is not muted.
+ Make sure headphones are not connected.
+ Check the setting of AV OUTPUT terminal.
+ Check the COLOUR and CONTRAST settings.
+ Make sure the BRIGHTNESS setting is not set too low.
+ Change the batteries.
+ Make sure the LCD-TV remote sensor is not facing a strong
light source.
+ The reception may be weak.
+ The quality of the broadcast may also be poor.
+ Make sure the aerial is facing the right direction.
+ Make sure the outside aerial is not disconnected.
The picture is
double or tripled.
The picture is
spotted.
There are strips
on the screen or
colours fade.
+ Make sure the antenna is facing the right direction.
+ The signal may be reflected from mountains or buildings.
+ There may be interference from cars, trains, high voltage
lines, neon lights, etc.
+ There may be interference between the aerial cable and
power cable.
+ T ry positioning them further apart.
+ Is the unit receiving interference from other devices ?
+ T ransmission antennas of radio broadcasting stations and
transmission antenna of amateur radios and cellular phones
may also cause interference.
+ Use the unit as far apart as possible from devices that may cause
possible interference.
73. Troubleshooting

Specification
Specification
Item
LCD Panel
PC Monitor
+Type
+ Display Area
+ Display Colour
+ Pixel Pitch
+ Max. Resolution
+ Interface
+ Viewing Angle
+ Contrast Ratio
+ Brightness
+ Horizontal
Frequency
+ Vertical
Frequency
+ Dimension
+Sync
+Horizontal
Frequency
+ Vertical
Frequency
+ Max. Resolution
Specification
- Colour active matrix TFT-LCD
- 26.0" (566.4(W) x 339.84(H) mm)
- 16.7 M
- 147.5༁ x 421.5༁ xRGB
- 1366 x 768 pixels
- LVDS Interface with 1 pixel / clock
- R/L : 176 , U/D : 176 (CR ˻G10)
- 600:1 (Typ)
- 500 cd/m (Typ)
- 47.4 kHz (Typ)
- 60Hz (Typ)
- 626.0 (H) x 373.0 (V) x 44.1 (D) mm (Typ)
- Separate
- 31~61kHz
- 56~75Hz
- 1280 x 768 pixels@60Hz
Input /
Output
TV Signal
Regulation
Others
+ Video Input
+ Audio Input
+ Audio Output
+Data Interface
+Area
+ Antenna Input
+ Tuning System
+ Colour System
+ Sound System
+ VHF Low
+ VHF High
+UHF
+ Teletext
+ Safety
+EMI
+Power
+ Speaker Output
+ Plug & Play Level
+ Weight
+ Power Supply
+HDD
- Analog Tuner(1), Digital Tuner(2), SCART(3), RCA, RGB,
S-Video, Component, DVI
- PC Audio, Component (R / L), RCA (R / L)
- S/PDIF, Speaker, Headphone
- RS-232C (for S/W Upgrade), USB 2.0 (for PVR)
Analogue
-EU
- IEC 169-2 Female
-FS
- BG, I, DK
- Nicam, A2
- 48.25 ~ 158.00MHz
- 160.00 ~ 442.00MHz
- 442.00 ~ 863.25MHz
-Yes
-CE
-CE
- 145 Watt (Typ)
- 7W x 2EA
- DDC 1/2B
- NET 22.5Kg / Gross27.5Kg
- AC 100 ~ 240V, 50/60 Hz
- 40G
Digital
-EU(MHEG)
- IEC 169-2 Female
-OFDMDVB-T
-BG, I,DK
- MPEG1 Layer 1/2
- 51MHz ~ 858MHz
-Yes
74. Specification

75.

Service and Support
You can get information such as a troubleshooting guide, software upgrades and
product support guide from the following web sites and call center (Hotline).
Please try to contact to your local dealers first when you have any problem.
Web site and e-mail
Homepage
http://www.humaxdigital.com (English)
http://www.humaxdigital.com (Deutsch)
http://www.humaxarabia.com (Arabic)
HCSA (Humax Customer Service Area)
Software Download, Information and Technical Q&A
http://www.humaxdigital.com / hcsa (English)
http://www.humaxdigital.com /Deutsch / hcsa (Deutsch)
E-mail (Technical Q&A)
tech-info@humax-digital.co.uk (Europe & North Africa)
techinfo@humax-digital.de (Germany)
callcenterME@humaxdigital.com (Middle East)
Webmaster@humaxdigital.com (Asia & Other area)
Call Center
HUMAX Hotline (United Kingdom)
Tel : 0870 247 8800
Fax : +44 2891 812 932
E-mail: uksupport@humax-digital.co.uk
Open : Local Time in UK (GMT+0)
08:30~18:00 (Monday - Friday)
Support Language : English
HUMAX Hotline (Germany)
Germany: 01805 778 870 ( 0,12/Min)
Other Countries: + 49 1805 778 870 ( 0,12/Min+ International Call Charge)
Open: Local Time in Germany (GMT+1)
08:00 - 20:00 (Monday - Friday)
08:00 - 18:00 (Saturday)
Support Language: Deutsch/English
HUMAX Hotline (Italy)
Tel : 899 100080
Fax : +39 0471 543749
E-mail : info@mediasat.com
Open : Local Time in Italy (GMT+1)
08:00~18:00 (Monday - Friday)
Support Language : Italian
For hardware repair, please refer to support website. (Homepage or HCSA)
76. Service and Support

LCD-TV
Digital and Analogue
HTVGB26TPVRL2_100GB
P/N 20010-0680
 Loading...