

Page 1

HUMAX USA, INC.
Please contact us at:
866.Humax.USA
(866.486.2987)
Humax USA, Inc.
3601 West Garry Ave
Santa Ana, CA 92704
www.humaxusa.com
L3040
OWNER’S MANUAL
Page 2

2
Page 3

3
Important Safety Instructions
WARNING :
DO NOT EXPOSE THIS DEVICE TO DRIPPING OR SPLASHING, OR PLACE OBJECTS FILLED
WITH LIQUIDS, SUCH AS VASES, ON THIS DEVICE.
This symbol alerts you that important literature concerning operation
and maintenance has been included with this device.
CAUTION :
TO REDUCE THE RISK OF ELECTRIC SHOCK, DO NOT REMOVE COVER OR BACK.
NO USER-SERVICEABLE PARTS INSIDE.
REFER SERVICING TO QUALIFIED SERVICE PERSONNEL.
This symbol indicates high voltage is present inside.
It is dangerous to make any kind of contact with any inside part
of this device.
WARNING
TO REDUCE THE RISK OF FIRE OR ELECTRIC SHOCK, DO NOT EXPOSE THIS
DEVICE TO RAIN OR MOISTURE.
FCC NOTICE
A Class B digital device
This equipment has been tested and found to comply with the limits for a Class B digital device,
pursuant to Part 15 of the FCC Rules. These limits are designed to provide reasonable protection
against harmful interference in a residential installation. This equipment generates, uses, and can
radiate radio frequency energy, and if not installed and used according to the instructions, may cause
harmful interference to radio communications. There is no guarantee, however, that interference will
not occur in a particular installation. If this equipment does cause harmful interference to radio or
television reception, which can be determined by turning the equipment off and on, the user is
encouraged to try to correct the interference with one or more of the following measures:
- Reorient or relocate the receiving antenna.
- Increase the distance between the equipment and the receiver.
- Connect the equipment in an outlet on a circuit different from that to which the receiver is connected.
- Consult the dealer or an experienced radio/TV technician for assistance.
Any changes or modifications not expressly approved by the party responsible for compliance
may void the user's authority to operate the equipment.
CAUTION
The stand is intended for use only with this LCD TV. If used with other
devices, it can be unstable and cause injury.
Page 4

Important Safety Instructions
4
Important Safeguards for You and Your New Device
Always be careful when using your LCD TV. To reduce the risk of fire, electric shock, and other injuries,
keep these safety precautions in mind when installing, using, and maintaining your LCD TV.
1. Read these instructions.
2. Keep these instructions
3. Heed all warnings.
4. Follow all instructions
5. Do not use this device near water.
6. Clean only with a dry cloth.
7. Do not block any of the ventilation openings.
8. Install according to the manufacturer's instructions. Do not install near heat sources such as
radiators, heat registers, stoves, or any other apparatus (including amplifiers) that produces heat.
9. Do not defeat the safety purpose of the polarized or grounding type plug. A polarized plug has two
blades, one wider than the other. A grounding type plug has two blades and a third grounding
prong. The wide blade or the third prong is provided for your safety. When the plug provided does
not fit into your outlet, consult an electrician to replace the obsolete outlet.
10. Protect the power cord from being walked on or pinched, particularly at the plugs, convenience
receptacles, and the point where they exit from the device.
11. Use only attachments/accessories specified by the manufacturer.
12. Use only with a cart, stand, tripod, bracket, or table specified by the
manufacturer, or sold with the device. When using a cart, use caution
when moving the cart/device combination to avoid injury from tip-over.
13. Unplug this device during lightning storms or when not used for long
periods of time.
14. Refer all servicing to qualified service personnel. Servicing is required
when the device has been damaged in any way, such as when the power supply cord or plug is
damaged; liquid has been spilled or objects have fallen into the device; the device has been
exposed to rain or moisture, does not operate normally, or has been dropped.
15. Do not place this device on a slippery or tilted surface, or on an unstable cart, stand, tripod,
bracket, or table. The device may slide or fall, causing serious injury to a child or adult and serious
damage to the device.
16. When mounting the device, follow the manufacturer's instructions, and use a mounting accessory
recommended by the manufacturer
17. Avoid overhead power lines. Do not place an outside antenna system in the vicinity of overhead
power lines or other electric light or power circuits, or where it could fall into such power lines or
circuits. When installing an outside antenna system, be extremely careful not to touch the power
lines or circuits. Contact with such lines can be fatal.
Page 5

5
Important Safety Instructions
18. If an outside antenna or cable system is connected to
the device, be sure the antenna or cable system is
grounded so as to provide some protection against
voltage surges and built-up static charges. Article
810 of the U.S. National Electrical Code, ANSI/NFPA
70 provides information with regard to proper
grounding of the mast and supporting structure,
grounding of the lead-in wire to an antenna discharge
unit, size of grounding conductors, location of
antenna-discharge unit, connection to grounding
electrodes, and requirements for the grounding
electrode.
19. Never push objects of any kind through the openings into this device as they may touch dangerous
voltage points or short out parts and cause a fire or electric shock. Never spill liquid of any kind on
the device.
20. If you make adjustments yourself, adjust only the controls covered in the operating instructions.
Adjusting other controls may result in damage, and will often require extensive work by a
qualified technician to restore the LCD TV to normal.
21. When replacement parts are required, be sure the service technician uses replacement parts
specified by the manufacturer that have the same characteristics as the original part.
Unauthorized substitutions may result in fire, electric shock, or other hazards.
22. Upon completion of any service or repair to this device, ask the service technician to perform
routine safety checks to determine that the device is in proper operating condition.
The LCD Panel consists of 3 million cells. It is
therefore possible that a few cells might be
flawed. We allow a maximum of 6 defective cells
for the device to be in proper running order.
Please recognize that a device with 6 or fewer
defective cells cannot be exchanged or
refunded.
LCD Cells
Page 6

6
User Instructions
Like all phosphor-based display devices and all TFT LCD Displays, LCD TV' s can be susceptible to
phosphor burn under certain circumstances. Certain operating conditions, such as the continuous
display of a static image over a prolonged period of time, can result in phosphor burn if proper
precautions are not taken. To protect your investment in this LCD TV, please adhere to the following
guidelines and recommendations for minimizing the occurrence of image burn.
Recommendation to Avoid or Minimize Phosphor Burn-in:
1. Always enable and use your computer's screen-saver function during use with a computer
input source.
2. Display a moving image whenever possible.
3. Change the position of the menu display from time to time.
4. Always power down the LCD TV when you are finished using it.
5. Lower the brightness and contrast levels as much as possible without impairing image
readability.
6. Display an image with many colors and color gradations (i.e. photographic or photorealistic
images).
7. Create image content with minimal contrast between light and dark areas, for example white
characters on black backgrounds. Use complementary or pastel colors whenever possible.
8. Avoid displaying images with few colors and distinct, sharply defined borders between colors.
9. Refer to the "Long Life Functions" section in this manual to minimize image burn.
Burn-in is not covered by the warranty.
Cell Defect
The TFT LCD panel consists of fine cells. Although the panels are produced with more than 99.9
percent active cells, there may be some cells that do not produce light or remain lit.
Warranty
Warranty Period: One year from the date of purchase of your LCD TV.
Warranty does not cover any damage caused by image retention.
Page 7

7
Table of Contents
START-UP
● Part Names and Functions ..............................8~9
● Checking Parts ..................................................10
● Battery Installation and Replacement ................10
CONNECTION
● Connecting VHF and UHF Antennas.................11
● Connecting a Video/S-VHS ...............................12
●
Connecting a DVD Player(Component Video)
......12
●
Connecting a DTV Receiver(Component Video)
...13
● Connecting a DTV Receiver (DVI).....................14
● Connecting a PC(DVI) .......................................15
● Connecting a PC(RGB) .....................................16
REMOTE CONTROL
● Remote Control Buttons ....................................17
● LCD Window Feature ........................................18
● How to Control Other Brand Products .........19~20
● How to Confirm the MBR Code .........................21
● PUNCH Buttons.................................................22
● RESET...............................................................23
BASIC OPERATION
●
Turning the LCD TV On and Off...........................24
●
Viewing the OSD Menu........................................24
●
Displaying Status Information .............................25
●
Selecting your Language .....................................25
CHANNEL
● Setting up Channels Automatically ...................26
● Adding and Erasing Channels ...........................26
● Using the LNA(LowNoiseAmplifier) ....................27
● Fine Tuning Channels.........................................27
DIRECT ACCESS FEATURES
●
Selecting Channels
..............................................28
●
Using the FAV button to Select the previous channel
...28
●
Adjusting the Volume
..............................................28
●
Switching the Sound Off Temporarily
....................28
● Selecting a Device from External Sources.........29
PICTURE
● Changing the Picture standard .........................30
● Customizing the Picture.....................................30
SOUND
● Changing the Sound Standard ..........................31
● Customizing the Sound......................................31
● Setting the BBE Mode .......................................32
● Setting the Surround Effect ...............................32
● Selecting the Stereo Sound ..............................33
● Using the Auto Volume(AVL).............................33
SETUP
● Changing the Screen Size..................................34
● Protecting Screen burn (Long Life).....................35
● Setting the Clock................................................36
● Setting the Sleep Timer ....................................37
● Viewing the Closed Captions.............................37
● Factory Reset ....................................................38
PIP (Picture In Picture)
● Viewing the Picture In Picture...........................39
● Freezing the Sub-Picture ...................................39
● Operating conditions of PIP ...............................40
OSD
● Setting the OSD Time Out .................................41
● Changing the OSD Position...............................41
V-CHIP
● V-CHIP Operation........................................42~47
OPERATION WITH A PC
● Display Settings ...........................................48~49
● Picture Color Adjustment ...................................50
● Picture Position Adjustment...............................51
● Frequency Adjustment.......................................51
● Phase Adjustment..............................................52
● Automatic Quality Adjustment............................52
● Serial Control Using RS-232C .....................53~54
● General RS-232 Command Structure................55
APPENDIX
● Troubleshooting .................................................56
● Specifications.....................................................57
● Manufacturer MBR Codes ...........................58~60
● How to Set Up the Lockout Function .................61
● APPENDIX.........................................................62
Page 8

FRONT VIEW
Part Names and Functions
8
POWER/LED
IR Receiver
SPEAKER
Menu : Displays the On screen Display (OSD).
Source : Displays an available video source (i.e. RGB, DVI, Video, S-Video, TV, Component1
and Component2). Also functions as the Select button in the On screen Display
(OSD).
Volume Up and Down : Volume Up and Down : Adjusts the volume. Also functions as
Adjust (-/+) button in the On screen Display.
Channel Up and Down : Changes the channel. Also Functions as Move in the On screen
Display (OSD).
Page 9

REAR VIEW
9
Part Names and Functions
VHF/UHF
For connecting outdoor Antenna
RS-232C
This terminal is used when control functions
need to be operated externally by PC.
DVI
Input a digital video signal (TMDS/HDCP)
from your PC or DTV receiver.
RGB(D-sub 15pin)
Input an analog RGB signal from your PC.
Audio(PC/DTV)
Input an audio signal from your PC or
DTV receiver.
Component1 (Y, Cb/Pb, Cr/Pr)
Input a video signal from a DVD player or
DTV receiver.
Component2 (Y, Cb/Pb, Cr/Pr)
Input a video signal from a DVD player or
DTV receiver.
Component1 Audio
Input an audio signal from a DVD player or DTV
receiver.
Component2 Audio
Input an audio signal from a DVD player or DTV
receiver.
S-Video
Input an S-VHS signal from VCR or DVD player.
Video
Input a video (CVBS) signal from your VCR.
Video & S-Video Audio
Input an audio signal for Video or S-Video.
Monitor output - output a video signal.
AC Input
Connect the included power cord here.
Screw Mounting Holes(4EA)
Mounting Screw Specifications
- four (4 ea) 5 mm .8 pitch x 10 mm threaded
long screws.
Bottom View
Page 10

Battery Installation and Replacement
10
Checking Parts
Insert four AAA batteries. Make sure to insert them with the proper polarity.
Press and open the cover.
1
Align the batteries according
to the (+) and (-) as
indicated inside the case.
2
Close the cover.
3
Checking parts
User’s Manual Remote Control Batteries(AAA) Power Cord Warranty Card
Page 11

11
Connection
Connecting VHF and UHF Antennas
Connecting an Outdoor Antenna
For the best reception, we recommend you use an outdoor antenna. Severely
weathered antennas and antenna cables can reduce the signal quality. Before making
any connections, inspect all antenna hardware; any service center can explain the
various outdoor antennas available to you.
300-Ohm Flat wire
1. Connect the 300-ohm flat wire to the screws on the 300-ohm adapter.
2. Push the end of 300- to 75-ohm adapter into the 75-ohm antenna jack.
75-Ohm Coaxial cable
1. Connect the 75-ohm coaxial cable directly to the 75-ohm antenna jack.
Connecting a CATV Cable
If you subscribe to a CATV system, make the antenna connection as described below.
1. Remove the 300-ohm to 75-ohm adapter or the cable from the TV, if attached.
2. Connect the CATV cable (75-ohm coaxial cable) to the antenna jack.
Page 12

12
1. Connect video cable(not supplied) to the VIDEO INPUT jack on the LCD TV and the video
output jack on the external equipments.(VCR/Cable box, etc.,)
2. Connect audio cables(not supplied) to the AUDIO INPUT(L, R) jack on the LCD TV and the
audio output jack on the external equipments.(VCR/Cable box, etc.,)
To Play VCR / Cable box :
1. Turn on your external equipments(VCR / Cable box, etc.,)
and press the play button.
2. Turn on the LCD TV and press the SOURCE button on the
LCD TV remote control.
3. Select the VIDEO mode.
Connecting a VCR (Composite Video)
Connection
1. Connect video cable(not supplied) to the S-VIDEO INPUT jack on the LCD TV and the video
output jack on the external equipments.(VCR/Cable box, etc.,)
2. Connect audio cables(not supplied) to the AUDIO INPUT(L, R) jack on the LCD TV and the
audio output jack on the external equipments.(VCR/Cable box, etc.,)
To Play external equipments :
1. Turn on your external equipments(VCR/Cable Camcorder/
Video game device, etc.,) and press the play button.
2. Turn on the LCD TV and press the SOURCE button on the
LCD TV remote control.
3. Select the S-VIDEO mode.
Connecting a VCR (S-Video)
Rear of the LCD TV
VCR / Cable box
Rear of the LCD TV
External equipments(VCR/Cable Camcorder/Video game device, etc.,)
Page 13

13
Connecting a DTV Receiver (Component Video)
1. Connect video cables(not supplied) to the Y, Cb/Pb, Cr/Pr input jacks (Component 1 or 2)
on the LCD TV and the video output jacks on the digital Set-Top Box.
2. Connect audio cables(not supplied) to the AUDIO INPUT jacks (Component 1 or 2) on the
LCD TV and the output jacks on the digital Set-Top Box.
NOTE : You must match the color-coded connectors with a compatible Digital Set-Top Box.
To Watch DTV :
1. Turn on your Digital Set-Top Box.
2. Turn on the LCD TV and press the SOURCE button
on the LCD TV remote control.
3. Select the Component2 mode (if the component2 jack
is connected).
Connection
Connecting a DVD player (Component Video)
1. Connect video cables(not supplied) to the Y, Cb/Pb, Cr/Pr input jacks(Component 1 or 2)
on the LCD TV and the video output jacks on the DVD player.
2. Connect audio cables(not supplied) to the AUDIO INPUT jacks(Component 1 or 2) on the
LCD TV and the output jacks on the DVD player.
NOTE : You must match the color-coded connectors with a compatible DVD player.
To Play DVD :
1. Turn on your DVD player; insert a disc and press the
Play button on the DVD remote control.
2. Turn on the LCD TV and press the SOURCE button
on the LCD TV remote control.
3. Select the Component1 mode (if the component1 jack
is connected).
Rear of the LCD TV
DVD Player
Rear of the LCD TV
Digital Set-Top Box
Page 14

14
Connecting a DTV receiver( DVI )
1. Connect a DVI cable(not supplied) to the DIGITAL PC INPUT jack on the LCD TV and DVI with
HDCP OUTPUT jack on the digital Set-Top Box.
2. Connect audio cables(not supplied) to the AUDIO INPUT jacks on the LCD TV and audio output jacks
on the digital Set-Top Box.
To Watch DTV :
1. Turn on the your Digital Set-Top-Box.
2. Turn on LCD TV and press the SOURCE button to select DVI
3. Adjust the DVI screen.
Connection
Rear of the LCD TV
DVI-I 29pin Cable
Audio Cable
Digital Set-Top Box
Page 15

15
Connecting a PC ( DVI )
1. Connect a DVI 29pin cable(not supplied) to the DIGITAL PC INPUT jack on the LCD TV and DVI
output jack on the PC.
2. Connect audio cables(not supplied) to the AUDIO INPUT jacks on the LCD TV and audio output
jack on the PC.
NOTE : When you connect a DVI, Please note the Analog input is not supported.
To watch the PC screen :
1. Turn on LCD TV and press the SOURCE button to select the DVI.
2. Turn on PC and check for PC system requirements. Refer to the
‘Operation with a PC’ section.
3. Adjust the PC screen.
Setting up Your LCD TV Plug and Play
Our adoption of the new VESA®Plug and Play solution eliminates complicated and time consuming setup.
It allows you to install your LCD TV in a Plug and Play compatible system without the usual hassles and
confusion. Your PC system can easily identify and configure itself for use with your display. This LCD TV
automatically tells the PC system its Extended Display Identification Data(EDID) using Display Data
Channel(DDC) protocols so the PC system can automatically configure itself to use the flat panel display.
Connection
Rear of the LCD TV
DVI-I 29pin Cable
Audio Cable
PC
Page 16

16
1. Connect a PC cable, D-sub 15pin(not supplied) to the ANALOG PC INPUT jack on the LCD TV and
RGB output jack on the PC.
2. Connect audio cables(not supplied) to the AUDIO INPUT jacks on the LCD TV and audio output jack
on the PC.
To watch the PC screen :
1. Turn on LCD TV and press the SOURCE button to select the RGB.
2. Turn on PC and check for PC system requirements.
Refer to the ‘Operation with a PC’ section.
3. Adjust the PC screen.
Setting up Your LCD TV Plug and Play
Our adoption of the new VESA®Plug and Play solution eliminates complicated and time consuming setup.
It allows you to install your LCD TV in a Plug and Play compatible system without the usual hassles and
confusion. Your PC system can easily identify and configure itself for use with your display. This LCD TV
automatically tells the PC system its Extended Display Identification Data(EDID) using Display Data
Channel(DDC) protocols so the PC system can automatically configure itself to use the flat panel display.
Connection
Rear of the LCD TV
PC cable (D-sub 15pin)
Audio Cable
Connecting a PC ( RGB)
PC
Page 17

17
Remote Control Buttons
POWER : Switches Power ON/OFF.
SOURCE : Press this button to select a video
source from among Video, SVideo, Component1, Component2,
RGB and DVI.
MUTE : Mutes the sound.
S-SWAP : Exchanges main sound with sub-
sound.
SELECT : Press this button to select a menu
item or to enter the sub-menu.
JOYSTICK :
Adjust, Move.
Use these buttons to move the
cursor and adjust the values of the
menu items.
SURROUND : Press this button to hear 3D
sound.
STILL : Freezes the PIP picture.
V-SWAP : Exchanges Main Picture with Sub-
picture.
SOURCE : Selects the PIP video source.
PIP : Turns the PIP on/off.
SIZE : Changes the size of the PIP.
SOUND : Changes the sound mode.
PICTURE : Switches the picture modes.
SLEEP : Sets the automatic power-off time.
ASPECT : Changes the size of the picture.
MENU : Displays the OSD (On screen Display).
VOL +/– : Increases or decreases the sound
level.
AUTO : Searches for activated channel
automatically in TV mode; adjusts the
position, frequency, and phase
automatically in PC mode.
MODE : Selects a product.
CHANNEL : Moves to the next higher or lower
channel.
Page 18

18
LCD Window Feature
LCD
window feature
Select when you want to control a product
other than this LCD TV.
Select when you want to know the code
for this remote control.
Select when you want to set the fixed button.
Indicates that the button you pressed is
not operating.
Indicates that the button pressed is
operating.
Indicates that the battery is empty.
Indicates the product currently
controlled by this remote control.
1. Function Icons
2. Status Icons
3. Product Indication Window
This remote control is MBR (Multi-Brand Remote Control). This means you can control all
products (TV, MNT, VCR, DVD, CBL, STB), including other manufacturers, using this
remote control.
Page 19

19
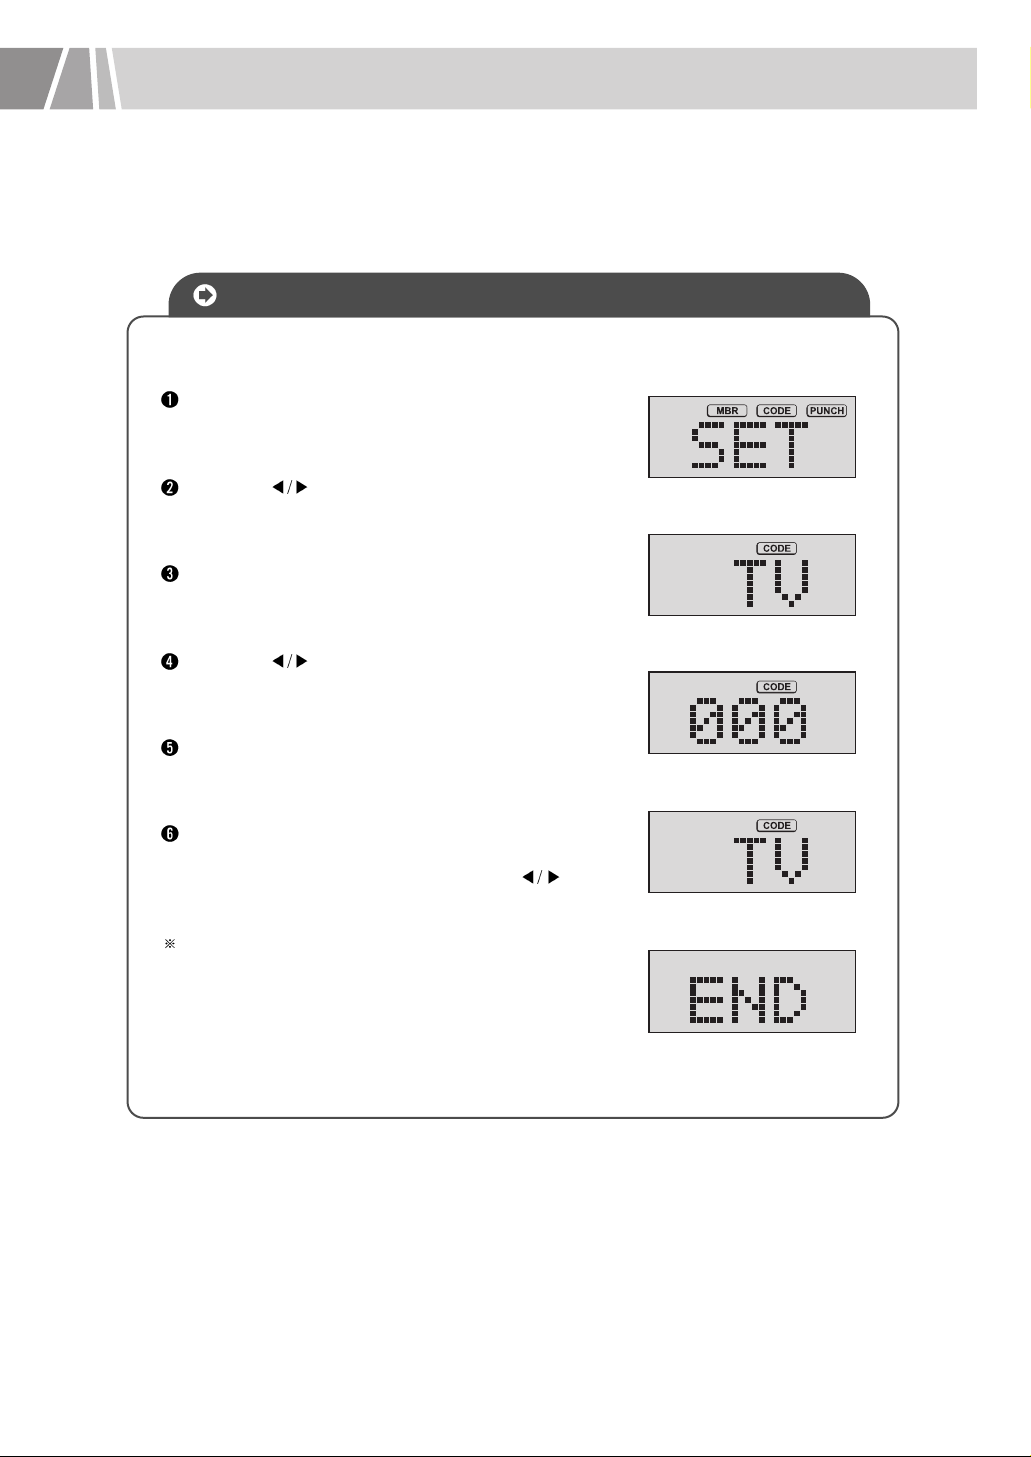
Turn on the product you want to control.
Press the MENU + SEL buttons simultaneously for 2
seconds (until the function icons appear).
The MBR icon will appear and blink.
Press the SEL button. The word TV will appear in the
product indication window.
Using the
buttons, select the product you want
to control (TV, VCR, DVD, CBL, SAT). Note that you
cannot set up the MBR for MNT.
Press the SEL button. The sign --- will appear in the
product indication window.
Refer to the "MBR Code Table" to find the product's
corresponding code, then input the three-number code
in sequence.
Press the SEL button. The current code is saved and
the OK! sign appears.
Press the CANCEL button to finish the setup. Test the
remote control.
If the remote control doesn't work with the product,
return to step 2 above and set up the MBR repeatedly
until you find the correct code.
To stop the process during the MBR setup, press the
CANCEL button.
If the remote control doesn't work after you have input
all the codes in the "MBR Code Table," refer to CASE
2 on the following page.
CASE 1
Follow the process below when you know the remote control code of
the product you want to control, or when you have the code table as on
page 58~60.
How to Control Other Brand Products
Setting Up the MBR
Page 20

20
Turn on the product you want to control.
Press the MENU + SEL buttons simultaneously for 2
seconds (until the function icons appear).
The MBR icon will appear and blink.
Press the SEL button. The word TV will appear
in the product indication window.
Using the
buttons, select the product you want
to control (TV, VCR, DVD, CBL, SAT). Note that you
cannot set up the MBR for MNT.
Press the SEL button. The - - - sign will appear in the
product indication window.
Press the OR button at 1-second intervals. Each
time you press the button, a new signal is transmitted.
As soon as the product turns off, release the button.
Press the SEL button. The OK! sign appears, the
current code is saved, and the setup process
automatically returns to step 5. If you want to set up
another product, repeat steps 5 to 7. When you have
completed the MBR setup up process, press the
CANCEL button.
Test whether the remote control works with the
product. If not, return to step 2 above and set up the
MBR repeatedly until you find the correct code.
To stop the process during the MBR setup, press the
CANCEL button.
CASE 2
Follow the process below when you don't know the remote control code
of the product you want to control, or when you don't have the code
table as on page 58~60.
Setting Up the MBR
Page 21
21
Confirming the MBR Code in Your Remote Control
Press the MENU + SEL buttons simultaneously for 2
seconds (until the function icons appear).
Using the buttons, move to the CODE icon and
press the SEL button.
The word TV will appear in the product indication
window.
Using the
buttons, select the product you want
to confirm (TV, VCR, DVD, CBL, SAT). Press the SEL
button. The three-number MBR code will appear.
After 3 seconds, the process will automatically return
to step 3.
If you want to confirm the MBR code of another
product, select the product using the buttons, then
press the SEL button. Press the CANCEL button
if you want to exit this process.
To stop the MBR code confirmation process, press
the CANCEL button.
How to Confirm the MBR Code
Page 22

22
PUNCH Buttons
How to Set Up the Fixed Buttons - PUNCH Buttons
Types of PUNCH Button.
TV :
VOLUME ( ) , MUTE
If you select the TV PUNCH, these buttons are operated only on the TV.
VCR
If you select the VCR PUNCH, these buttons are operated only on the VCR.
DVD
If you select the DVD PUNCH, these buttons are operated only on the DVD.
DEL
Cancel the PUNCH setting.
Press the MENU + SEL buttons simultaneously for 2
seconds (until the function icons appear).
Using the
buttons, select the PUNCH icon and
press the SEL button.
The word TV will appear in the product indication
window.
Using the Using the buttons, select the PUNCH
mode from among TV, VCR, DVD, and DEL.
Press the SEL button. The OK! sign will appear and
the PUNCH mode is saved.
The process automatically returns to step 3.
If you don't want to set another PUNCH mode, press
the CANCEL button.
When you press the buttons you have set to PUNCH
mode, the product name will show along with the
PUNCH icon in the product indication window.
To stop the PUNCH setup process, press the
CANCEL button.
PUNCH
PUNCH
PUNCH
PUNCH
Page 23

23
How to Reset the Remote Control
Press the MENU + SEL buttons simultaneously for 2
seconds (until the function icons appear).
The MBR icon will appear and blink.
Press the SEL button. The word TV will appear in the
product indication window.
Press the SEL button. The - - - sign will appear in the
product indication window.
Input the reset code "975" and press the SEL button.
The remote control will return to its initial state.
PUNCH
Reset
Page 24

24
Basic operation
Connect the Power Cord to the AC input on the back of your
LCD TV.
Insert the Plug for the LCD TV into a nearby electrical outlet.
The standby indicator lights up on the front panel.
Press the POWER ( ) button on the remote control.
The LED lamp will change to light off and your
LCD TV will be turned on.
To switch your LCD TV off, press the POWER ( ) button
again.
1
2
3
Turning the LCD TV On and Off
4
Status Lamp
Standby Mode Blue
Power On Light off
Power Saving Flickering
Indicator Lights
With the power on, press the MENU ( ) button on the
remote control.
The main menu appears on the screen.
Use the
or button to move the cursor on the OSD menu.
Use the
or button to adjust the selected items.
Use the SEL ( ) button to select the sub-menu.
1
2
3
Viewing the OSD Menu
The OSD(On-Screen Display) disappears automatically
after a few seconds without pressing other buttons or
you can also press the MENU button to return to the
previous menu or press the MENU button once or more
to exit the OSD.
Page 25
25
Basic operation
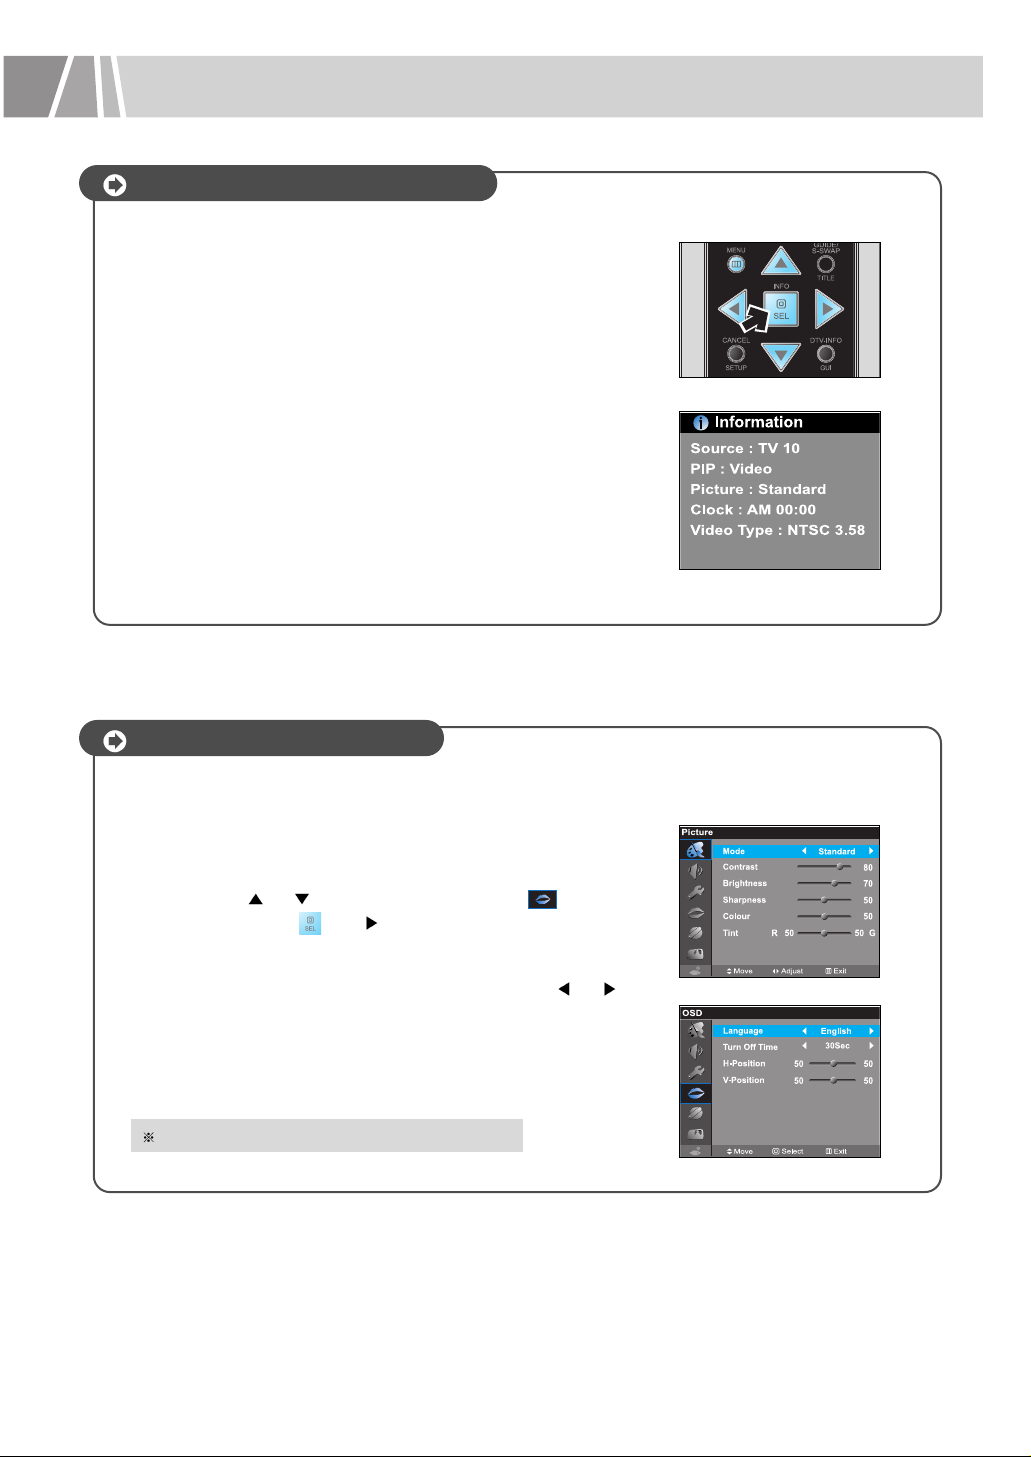
With the OSD, press the INFO button on the remote control.
The LCD TV will display the external source, Picture
Mode, Aspect Ratio, Clock and Video type.
1
Displaying Status Information
Selecting your Language
After adjustment: Press the MENU button to exit.
When the LCD TV is initially powered ON, you must select the language in which to display
all on-screen menus.
Press the MENU button.
Press the
or button to select the OSD ( ) icon; then
press the SEL ( ) or
button to select the Language.
Select the appropriate language by pressing the
or
button repeatedly.
You can choose one of 9 languages.
1
2
3
Page 26
26
Channel
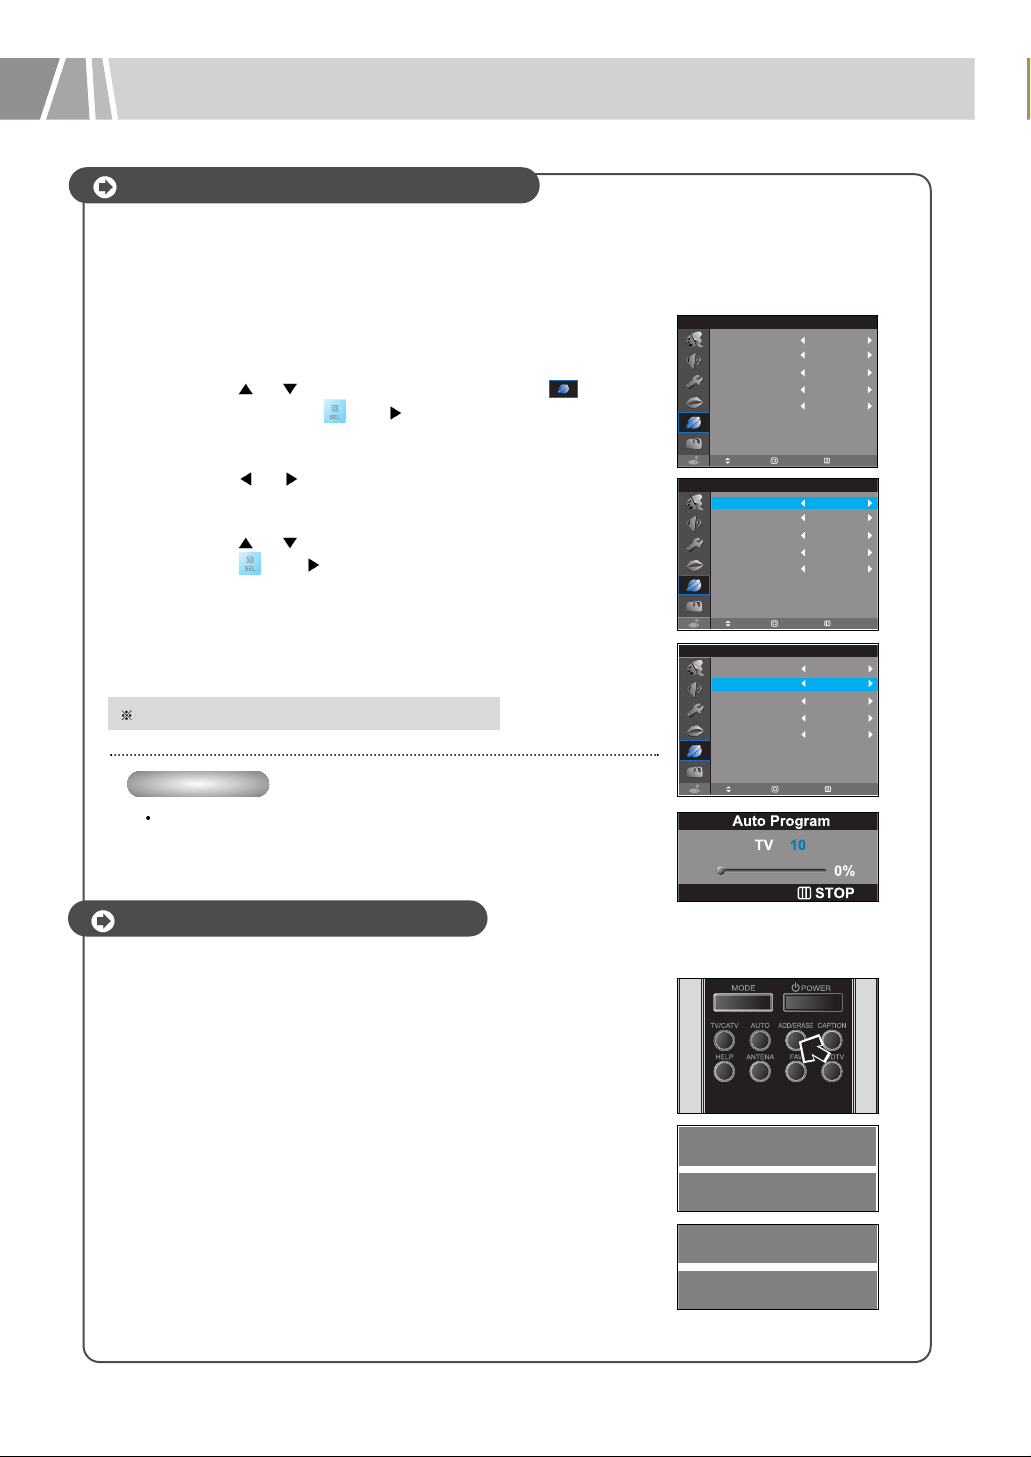
Press the MENU button.
Press the
or button to select the Channel ( ) icon;
then press the SEL ( ) or
button to select Channel Mode.
Press the or button to select the option ( TV or CATV ).
Press the or button to select Auto Program; then press
the SEL ( ) or button.
The LCD TV will begin memorizing all of the available
channels.
To stop the search before it has finished, press
MENU button.
1
2
3
Setting up Channels Automatically
4
Channel
Channel Mode
Auto Program
TV
LNA
Channel Memory
Pro
Off
Added
Fine Tune
0
Move Exit
Select
After adjustment: Press the MENU button to exit.
Your LCD TV can memorize and store all of the available channels for both "TV(antenna)
and cable channels.
Therefore you must specify the type of signal source that is connected to the LCD TV.
Quick Way
Press the AUTO button on the remote control.
Select channel that you wish to add or erase by directly
pressing the numeric buttons on the remote control.
Press the ADD/ERASE button on the remote control.
Repeatedly pressing this button will alternate between
Added and Erased.
Added Channel : display in Green.
Erased Channel : display in Yellow.
1
2
Adding and Erasing Channels
TV 10
Added
Channel
Channel Mode
Auto Program
TV
LNA
Channel Memory
Pro
Off
Added
Fine Tune
0
Move Exit
Select
Channel
Channel Mode
Auto Program
TV
LNA
Channel Memory
Pro
Off
Added
Fine Tune
0
Move Exit
Select
TV 10
Erased
Page 27

27
Channel
After adjustment: Press the MENU button to exit.
Using the LNA(Low Noise Amplifier)
Press the MENU button.
Press the
or
button to select the Channel ( ) icon;
then press the SEL ( )
or button.
Press the
or button to select to the LNA.
Press the or button to select On or Off.
1
2
If the LCD TV is operating in a weak-signal area, sometimes the LNA function can improve
the reception.
3
4
Channel
Channel Mode
Auto Program
TV
LNA
Channel Memory
Pro
Off
Added
Fine Tune
0
Move Exit
Select
Press the MENU button.
Press the or button to select the Channel ( ) icon;
then press the SEL ( ) or
button.
Press the
or button to select the Fine Tune.
Press the
or button to adjust the Fine Tuning.
Fine Tuning Channels
Channel
Channel Mode
Auto Program
TV
LNA
Channel Memory
Pro
Off
Added
Fine Tune
16
Move Exit
Select
Channel
Channel Mode
Auto Program
TV
LNA
Channel Memory
Pro
Off
Added
Fine Tune
0
Move Exit
Select
After adjustment: Press the MENU button to exit.
If the reception signal is weak or distorted, you can adjust channel to manually using the
fine tuning.
1
2
3
4
Channel
Channel Mode
Auto Program
TV
LNA
Channel Memory
Pro
Off
Added
Fine Tune
0
Move Exit
Select
Channel
Channel Mode
Auto Program
TV
LNA
Channel Memory
Pro
On
Added
Fine Tune
0
Move Exit
Select
Page 28

28
Direct Access Features
Using the FAV button to select the previous channel
Press the FAV button on the remote control.
The LCD TV will switch to the last viewed channel.
1
1
Press the VOL+ or VOL- button to increase or decrease the
Volume on the remote control.
Adjusting the Volume
50
Switching the Sound Off Temporarily
You can temporarily cut off the sound using the Mute button.
Press the MUTE button on the remote control.
The sound is switched off and " Mute" is displayed.
When you wish to turn the sound back on, press the MUTE
button again.
1
2
Mute
Press the CH or CH button to selecting channels.
When you press the
or button, the LCD TV
changes channels in sequence. But you will not see
channels that were either erased or not memorized.
1
Selecting Channels
After adjustment: Press the MENU button to exit.
Using the Channel Buttons
Press the numeric buttons to select directly to a channel.
Two digit channel selection:
For example, to select channel 36, press 3 then 6.
Three digit channel selection:
For channel 115, press 1, then 1, then 5 or press 100
button and then 1, then 5.
1
Using the Direct Access Buttons
Page 29
29
Direct Access Features
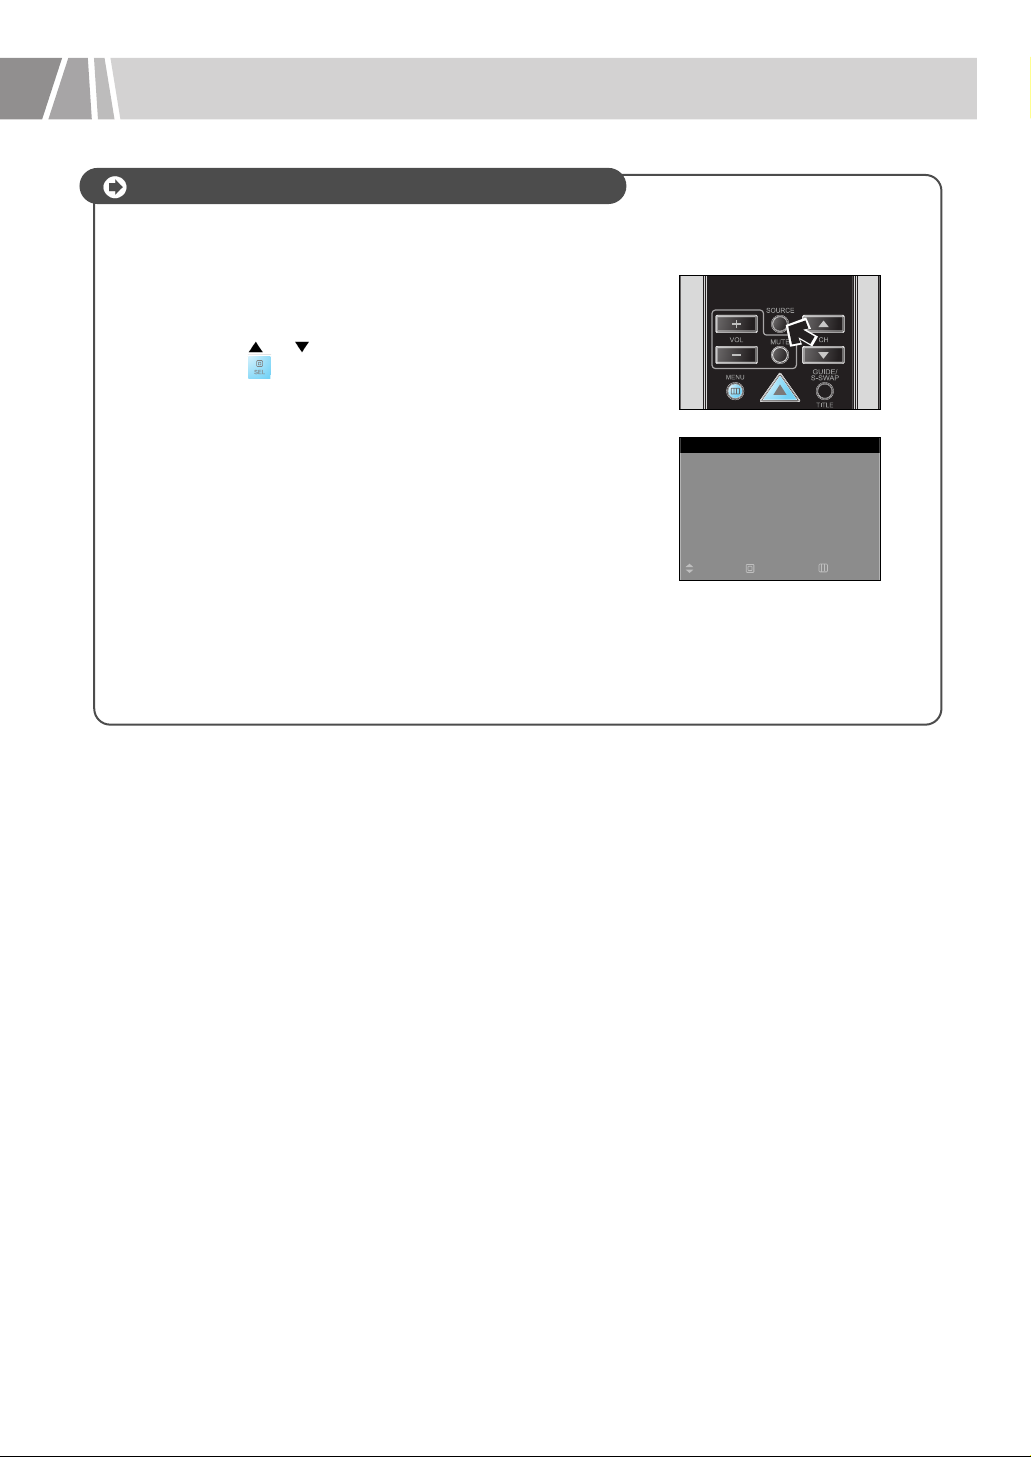
Press the SOURCE button on the remote control.
Press the
or button to select signal source, then press
the SEL ( ) button.
1
2
Selecting a Device from External Sources
Source
Video Connected
TV TV
Component2
Move Select Exit
Connected
Component1 Connected
S-Video Not Connected
RGB
Not Connected
DVI
Not Connected
You can select the favorite signal from connected external sources such as DVD, VCR, STB,
and TV(Antenna or Cable).
Page 30
30
Picture
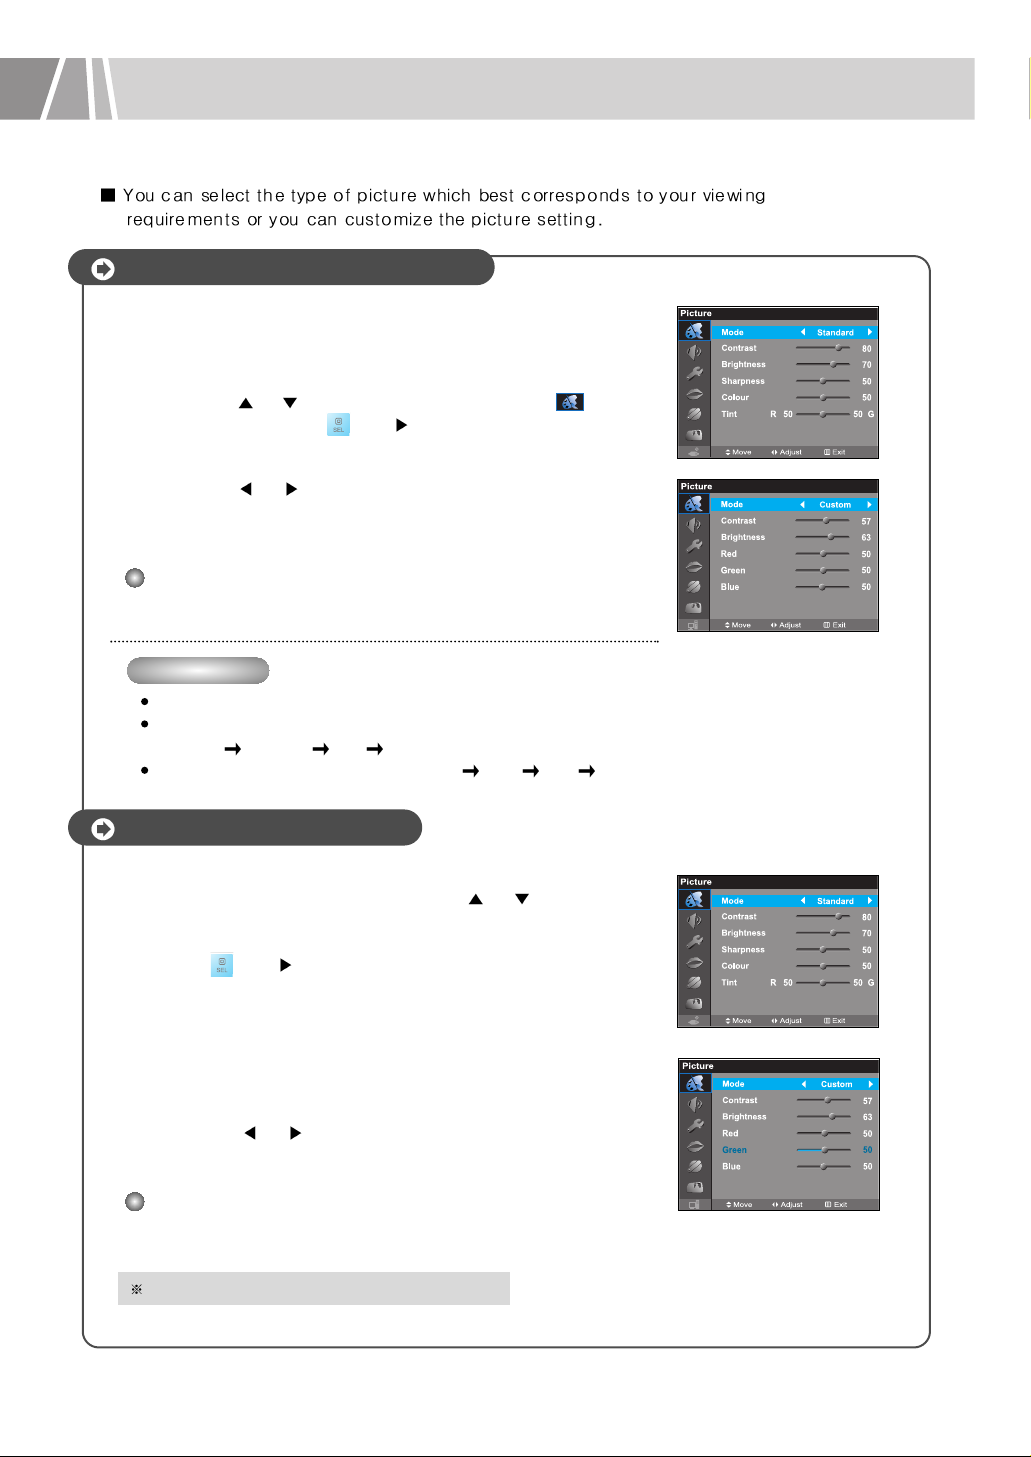
Press the MENU button.
Press the
or button to select the PICTURE ( ) icon;
then press the SEL ( ) or button.
Press the
or button to select Standard, Dynamic, Mild,
or Custom picture setting.
1
2
3
Changing the Picture standard
With Picture menu selected, press the
or button to
select an option (Contrast, Brightness, Sharpness, Color,
or Tint-NTSC only) that you wish to change : then press the
SEL ( ) or button.
If you adjust the Contrast, Brightness, Sharpness,
Color, or Tint (NTSC only) settings on the Picture
menu, the picture standard is automatically switched
to custom.
Press the
or button to change the value of the item.
4
5
Customizing the Picture
After adjustment: Press the MENU button to exit.
NOTE : You can select a mode from among Middle, High, Low, or
Custom modes in RGB/DVI input Sources.
NOTE : In the PC/DVI mode, the Sharpness, Color, or Tint feature
does not work.
Quick Way
Press the PICTURE button on the remote control.
While pressing the button continuously, you can select the picture mode in the following sequence:
Standard
Dynamic Mild Custom
In RGB/DVI mode, you can select : Middle
High Low Custom
Page 31
31
Picture
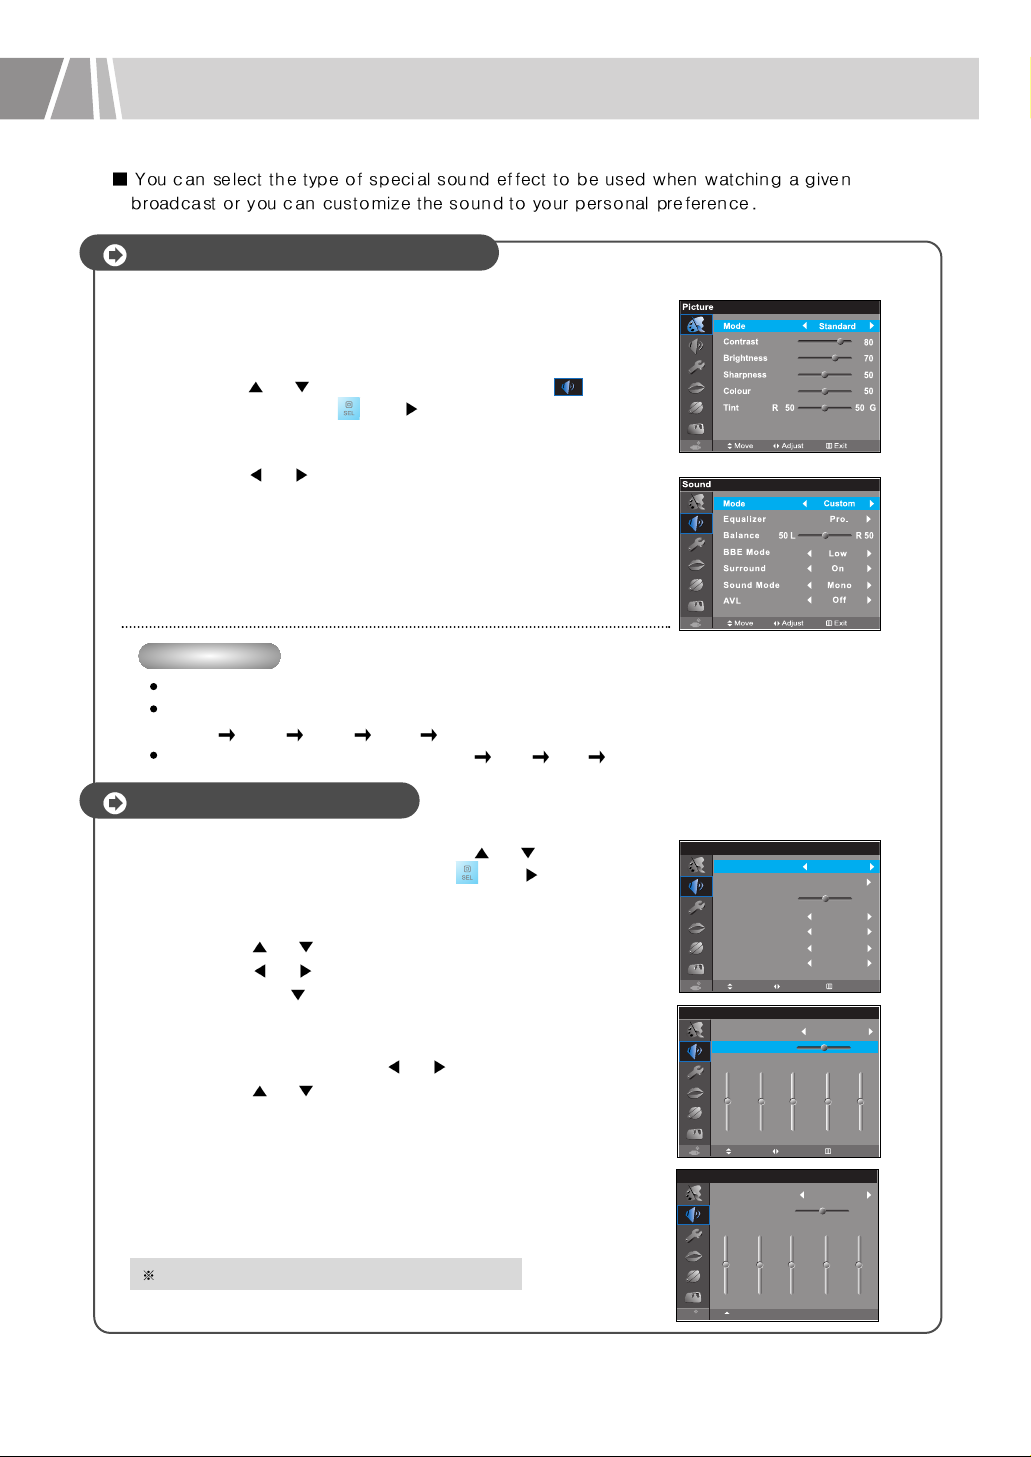
Press the MENU button.
Press the
or button to select the SOUND ( ) icon;
then press the SEL ( ) or button.
Press the
or button to select Drama, Movie, Music,
News, or Custom sound setting.
1
2
3
Changing the Sound Standard
With Sound menu selected,press the
or button to select
an Equalizer; then press the SEL ( ) or
button.
The Equalizer menu is displayed with mode selected.
Press the or button to select Balance.
Press the
or button to reach the required setting;
then press the
button.
Select a frequency(100Hz, 300Hz, 1KHz, 3KHz, or 10KHz)
to be adjusted by pressing or button.
Press the
or button to reach the required setting.
4
5
6
Customizing the Sound
Sound
Mode
Equalizer Pro.
Custom
Balance
BBE Mode
Surround
Sound Mode
AVL
5050 L R
On
Low
Mono
Off
Move Adjust Exit
After adjustment: Press the MENU button to exit.
Quick Way
Press the SOUND button on the remote control.
While pressing the button continuously, you can select the sound mode in the following sequence:
Drama
Movie Music News Custom
In RGB/DVI mode, you can select : Middle
High Low Custom
Sound
Mode
100Hz 300Hz 1KHz 3KHz 10KHz
51 50 50 50 50
Custom
Move Adjust Exit
Balance
5050 L R
Sound
Mode
Balance
51 50 50 50 50
100Hz 300Hz 1KHz 3KHz 10KHz
Move Adjust Exit
Custom
5050 L R
Page 32

32
Sound
1
2
3
Setting the BBE Mode
4
Sound
Mode
Equalizer Pro.
Custom
Balance
BBE Mode
Surround
Sound Mode
AVL
5050 L R
On
Middle
Mono
Off
Move Adjust Exit
Sound
Mode
Equalizer Pro.
Custom
Balance
BBE Mode
Surround
Sound Mode
AVL
5050 L R
On
Low
Mono
Off
Move Adjust Exit
After adjustment: Press the MENU button to exit.
After adjustment: Press the MENU button to exit.
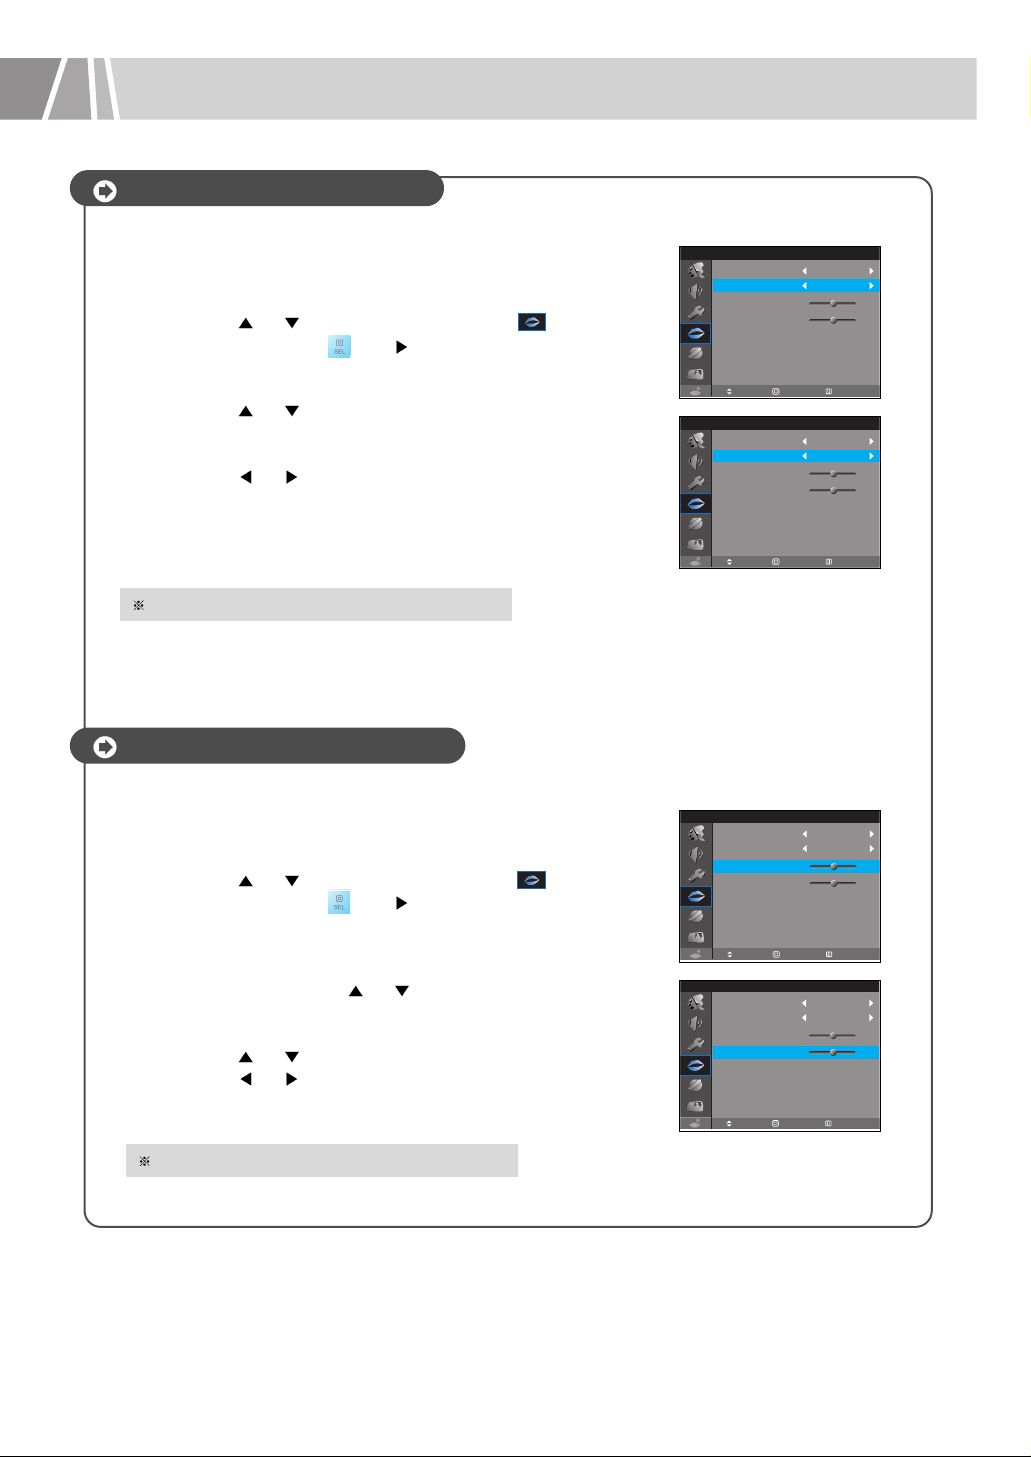
Press the MENU button.
Press the
or button to select the SOUND ( ) icon;
then press the SEL ( ) or button.
Press the
or
button to select BBE Mode; then press the
SEL ( ) or
button.
Press the
or button to select Off, Low, Middle, or High.
This is a live sound effect . you can select an option (Off, Low, Middle, or High) to enjoy live
sound when listening to music.
1
2
3
Setting the Surround Effect
4
Sound
Mode
Equalizer Pro.
Custom
Balance
BBE Mode
Surround
Sound Mode
AVL
5050 L R
Off
Low
Mono
Off
Move Adjust Exit
Press the MENU button.
Press the
or button to select the SOUND ( ) icon;
then press the SEL ( ) or
button.
Press the
or button to select Surround.
Press the
or button to select On or Off
This feature allows the TV's L/R speakers to provide a home theater-like surround are mixed
into L/R speakers.
Sound
Mode
Equalizer Pro.
Custom
Balance
BBE Mode
Surround
Sound Mode
AVL
5050 L R
On
Low
Mono
Off
Move Adjust Exit
Page 33

33
Sound
Selecting the Stereo Sound
1
2
3
4
Sound
Mode
Equalizer Pro.
Custom
Balance
BBE Mode
Surround
Sound Mode
AVL
5050 L R
On
Low
Stereo
Off
Move Adjust Exit
Sound
Mode
Equalizer Pro.
Custom
Balance
BBE Mode
Surround
Sound Mode
AVL
5050 L R
On
Low
Mono
Off
Move Adjust Exit
After adjustment: Press the MENU button to exit.
Press the MENU button.
Press the
or button to select the SOUND ( ) icon;
then press the SEL ( ) or button.
Press the
or button to select Sound Mode; then press
the SEL ( ) or
button.
Press the
or button to select Mono, Stereo or SAP.
Depending on the particular program broadcast, you can listen Stereo, Mono, SAP.
Stereo : Stereo broadcasting.
Mono : Mono broadcasting, or when the stereo signal is weak.
SAP : When you listen to the foreign language translation.
Quick Way
Press the MTS button on the remote control.
Press the MENU button.
Press the or button to select the SOUND ( ) icon;
then press the SEL ( ) or
button.
Press the
or buttons to select AVL.
Press the
or button On or Off.
The interval ranges from 5 to 120 minutes.
1
2
3
Using the Auto Volume(AVL)
4
After adjustment: Press the MENU button to exit.
Each broadcasting channel has its own signal conditions which can make it necessary to
adjust the volume every time the channel is changed. AVL lets you automatically adjust the
volume between one channel and another.
Sound
Mode
Equalizer Pro.
Custom
Balance
BBE Mode
Surround
Sound Mode
AVL
5050 L R
On
Low
Mono
Off
Move Adjust Exit
Sound
Mode
Equalizer Pro.
Custom
Balance
BBE Mode
Surround
Sound Mode
AVL
5050 L R
On
Low
Mono
On
Move Adjust Exit
Page 34

34
Setup
Press the MENU button.
Press the
or button to select the Setup ( ) icon; then
press the SEL ( ) or
button.
With Aspect Ratio selected, press the or button to select
the screen size you want.
1
2
3
Changing the Screen Size
After adjustment: Press the MENU button to exit.
Quick Way
Press the ASPECT button on the remote control.
Zoom2
Normal
Wide
Zoom1
Panorama
Setup
Aspect Ratio
Wide
Long Life
Sleep Timer
Pro.
Off
Caption
Off
V-CHIP
Pro.
Time
Pro.
Reset
OK
Select ExitMove
Page 35

35
Setup
1
2
3
Protecting Screen burn(Long Life)
4
5
Displaying a still image on the LCD TV for more than several minutes can cause screen
image retention. This image retention is also known as “screen burn”.
The Long Life function reduces such image retention.
Press the MENU button.
Press the
or button to select the Setup ( ) icon;
then press the SEL ( ) or
button.
Press the or button to select Long Life; then press the
SEL ( ) or button.
Select an option (Auto Pixel Shift, lnverse, Screen Wiper,
or Side Panel Gray) you wish to adjust by pressing
or
button.
Press
or button to reach the required setting.
After adjustment: Press the MENU button to exit.
Auto Pixel Shift
•This feature moves image 1 pixel per 2 minute, and after
moving the set range, image starts to go back to the original
position.
Inverse
•This feature allows you to display white screen instead of
noisescreen.
Screen Wiper
•This feature allows you to filter out, reduce the image noise
and improve picture quality automatically.
Side Panel Gray
•This feature allows you to protect the LCD screen.
•If the picture size is 4 : 3, you can change the gray scale
of the background picture.
Page 36

36
Setup
Press the MENU button.
Press the
or button to select the Setup ( ) icon;
then press the SEL ( ) button.
Press the
or button to select Time ; then press the
SEL ( ) or button.
With Clock selected, press the button to move to the
AM/PM, hour or minute; then Press the or button to
adjust item.
Press the MENU button to set the setting.
Press the
or button to select On Time; then set the
time at which you wish the LCD TV to be switched on as
above step.
In the same way, set the Off Time to switch off automatically.
To set the channel at which you wish the LCD TV to be
switched on, press the
or button to select On Channel;
then press the
or button to set channel.
To set the volume level at which you wish the LCD TV to be
switched on, press the
or button to select Volume; then
press the
or button to adjust the volume level.
1
2
3
Setting the Clock
4
5
6
7
8
Setup
Clock
AM
- - : - - Off
AM
01 : 02 Off
AM
12 : 00 Off
2
11
Select Exit
On Time
On Channel
Volume
Off Time
Setup
Aspect Ratio
Wide
Long Life
Sleep Timer
Pro.
Off
Caption
Off
V-CHIP
Pro.
Time
Pro.
Reset
Cancel
Move Select Exit
After adjustment: Press the MENU button to exit.
Your LCD TV decodes and displays the closed captions that are broadcast with certain TV
shows.
Setup
Clock
AM
08 : 00 Off
AM
01 : 02 Off
AM
12 : 00 Off
2
11
Select Exit
On Time
On Channel
Volume
Off Time
Adjust
Setup
Clock
AM
08 : 00 Off
AM
01 : 02 Off
AM
12 : 00 Off
2
11
Select Exit
On Time
On Channel
Volume
Off Time
Adjust
Setup
Clock
AM
08 : 00 Off
AM
01 : 02 Off
AM
12 : 00 Off
2
11
Select Exit
On Time
On Channel
Volume
Off Time
Adjust
Page 37

37
Setup
Press the MENU button.
Press the
or button to select the Setup ( ) icon;
then press the SEL ( ) or
button.
Press the
or buttons to select Sleep Timer.
Press the
or button to select the preset time interval for
the LCD TV to stay on.
The interval ranges from 5 to 120 minutes.
1
2
3
Setting the Sleep Timer
4
OK
Setup
Aspect Ratio
Wide
Long Life
Sleep Timer
Pro.
120 Min.
Caption
Off
V-CHIP
Pro.
Time
Pro.
Reset
Move Select Exit
Setup
Aspect Ratio
Wide
Long Life
Sleep Timer
Pro.
Off
Caption
Off
V-CHIP
Pro.
Time
Pro.
Reset
OK
Move Select Exit
After adjustment: Press the MENU button to exit.
Quick Way
Press the SLEEP button on the remote control.
Press the MENU button.
Press the
or button to select the Setup ( ) icon;
then press the SEL ( ) or
button.
Press the or buttons to select Caption.
Press the
or button to select Off, CCD1, CCD2, TEXT1,
or TEXT2 .
1
2
3
Viewing the Closed Captions
4
Setup
Aspect Ratio
Wide
Long Life
Sleep Timer
Pro.
Off
Caption
CCD1
V-CHIP
Pro.
Time
Pro.
Reset
OK
Move Select Exit
Setup
Aspect Ratio
Wide
Long Life
Sleep Timer
Pro.
Off
Caption
Off
V-CHIP
Pro.
Time
Pro.
Reset
OK
Move Select Exit
After adjustment: Press the MENU button to exit.
Your LCD TV decodes and displays the closed captions that are broadcast with certain TV
shows.
Quick Way
Press the CAPTION button on the remote control.
Page 38

38
Setup
Press the MENU button.
Press the
or button to select the Setup ( ) icon;
then press the SEL ( ) or
button.
Press the or buttons to select Reset.
Press the or button to select OK or Cancel.
1
2
3
Factory Reset
4
Setup
Aspect Ratio
Wide
Long Life
Sleep Timer
Pro.
120Min.
Caption
CCD1
V-CHIP
Pro.
Time
Pro.
Reset
Cancel
Move Select Exit
Setup
Aspect Ratio
Wide
Long Life
Sleep Timer
Pro.
120Min.
Caption
CCD1
V-CHIP
Pro.
Time
Pro.
Reset
OK
Move Select Exit
After adjustment: Press the MENU button to exit.
This feature reset the LCD TV to factory defaults.
Page 39

39
PIP(Picture In Picture)
Press the MENU button.
Press the or
button to select the PIP( ) icon; then
press the SEL ( ) button.
Press the
or
button to select On.
When the PIP is on, the Sub-menu is activated.
Press the
or button to select Type.
Select a Type (Small, Double1, Double2, or Large) of
the sub picture by pressing the or button.
Press the or button to select Source.
Select a Source of the sub picture by pressing the
or button.
Only the sources that are connected to LCD TV
can be displayed.
Press the
or button to select position.
Select a Position (Right-Top, Left-Top, Left-Bottom,
and Right-Bottom) of the Sub picture by pressing the
or
button.
When the mode of sub picture is set to Double,
this feature does not work.
Press the or button to select Swap.
The main picture and the sub picture are
interchanged.
Press the or button to select Sound Source.
Select a Sound Source (Main or Sub) by pressing the
or button.
1
2
3
Viewing the Picture In Picture
4
5
6
7
8
9
After adjustment: Press the MENU button to exit.
Quick Way
Press the PIP buttons on the remote control.
Press the STILL button on the remote control.
To return to normal viewing, press it again.
1
2
Freezing the Sub-Picture
Page 40

40
PIP(Picture In Picture)
Main Picture
TV
CVBS
DVD/480i
DVD/480p
DTV/480i
DVD/480i
DVD/480p
DTV/480i
RGB
DVI
TV
CVBS
DVD/
480i
DVD/
480p
DTV/
480i
DTV/480p,
720p, 1080i
DVD/
480i
DVD/
480p
DTV/
480i
DTV/480p,
720p, 1080i
RGB
DVI
Sub-Picture
COMP 1
COMP 2
DTV/480p,
720p, 1080i
DTV/480p,
720p, 1080i
■ Table1. Operating conditions of PIP
COMP2
COMP1
SVHS
XO O O OO O OOO O OO
OX O O OO O OOO O OO
OO X O O O O OOO O OO
OO
X
XXX X XOX O OO
OO O X X X X OXO X XX
OO O X X X X XOX O OO
OO O X X X X OOO O XX
OO O X O X O XXX X OO
OO O O X O X XXX X XX
OO O X O X O XXX X OO
OO O O X O X XXX X XX
OO O O X O X OXO X XX
OO O O X O X OXO X XX
Operating conditions of PIP
Page 41
41
OSD
Press the MENU button.
Press the
or button to select the OSD ( ) icon;
then press the SEL ( ) or
button.
Press the or buttons to select Turn off Time.
Press the or button to set up the time length of
OSD display.
you can adjust time length from 3 to 59 seconds.
1
2
3
Setting the OSD Time Out
4
After adjustment: Press the MENU button to exit.
Press the MENU button.
Press the
or button to select the OSD ( ) icon;
then press the SEL ( ) or
button.
Select a item(H-Position or V-Position) that you wish to
change by pressing the
or button.
Press the
or button to move OSD to up or down.
Press the or button to move OSD to left or right.
1
2
3
Changing the OSD Position
4
After adjustment: Press the MENU button to exit.
OSD
Language
Turn Off Time
English
H-Position
V-Position
50
50
50
50
3Sec
Move Exit
Select
OSD
Language
Turn Off Time
English
H-Position
V-Position
50
50
50
50
30Sec
Move Exit
Select
OSD
Language
Turn Off Time
English
H-Position
V-Position
50
50
50
50
30Sec
Move Exit
Select
OSD
Language
Turn Off Time
English
H-Position
V-Position
50
50
50
50
30Sec
Move Exit
Select
Page 42
42
V-CHIP Operation
The V-CHIP is a microprocessor control circuit that recognizes TV and Motion Picture Ratings.
These ratings are contained in a special electronic identification signal that is part of many
television programs and recorded videotapes.
An on screen menu allows parents to set a secret 4-digit personalized key combination Password.
(Please note that we have set an initial Password at the factory.
This initial Password is the number 0,0,0,0).
Once set, the television will display only programs whose ratings fall within the standards the
parent has chosen. Programs that do not fall within the standards the parent has chosen will not
be displayed unless the Password is entered.
Some TV programs and movies may not be compatible with V-CHIP ratings.
As shipped from the factory, the V-CHIP is not operational until you perform the following procedure:
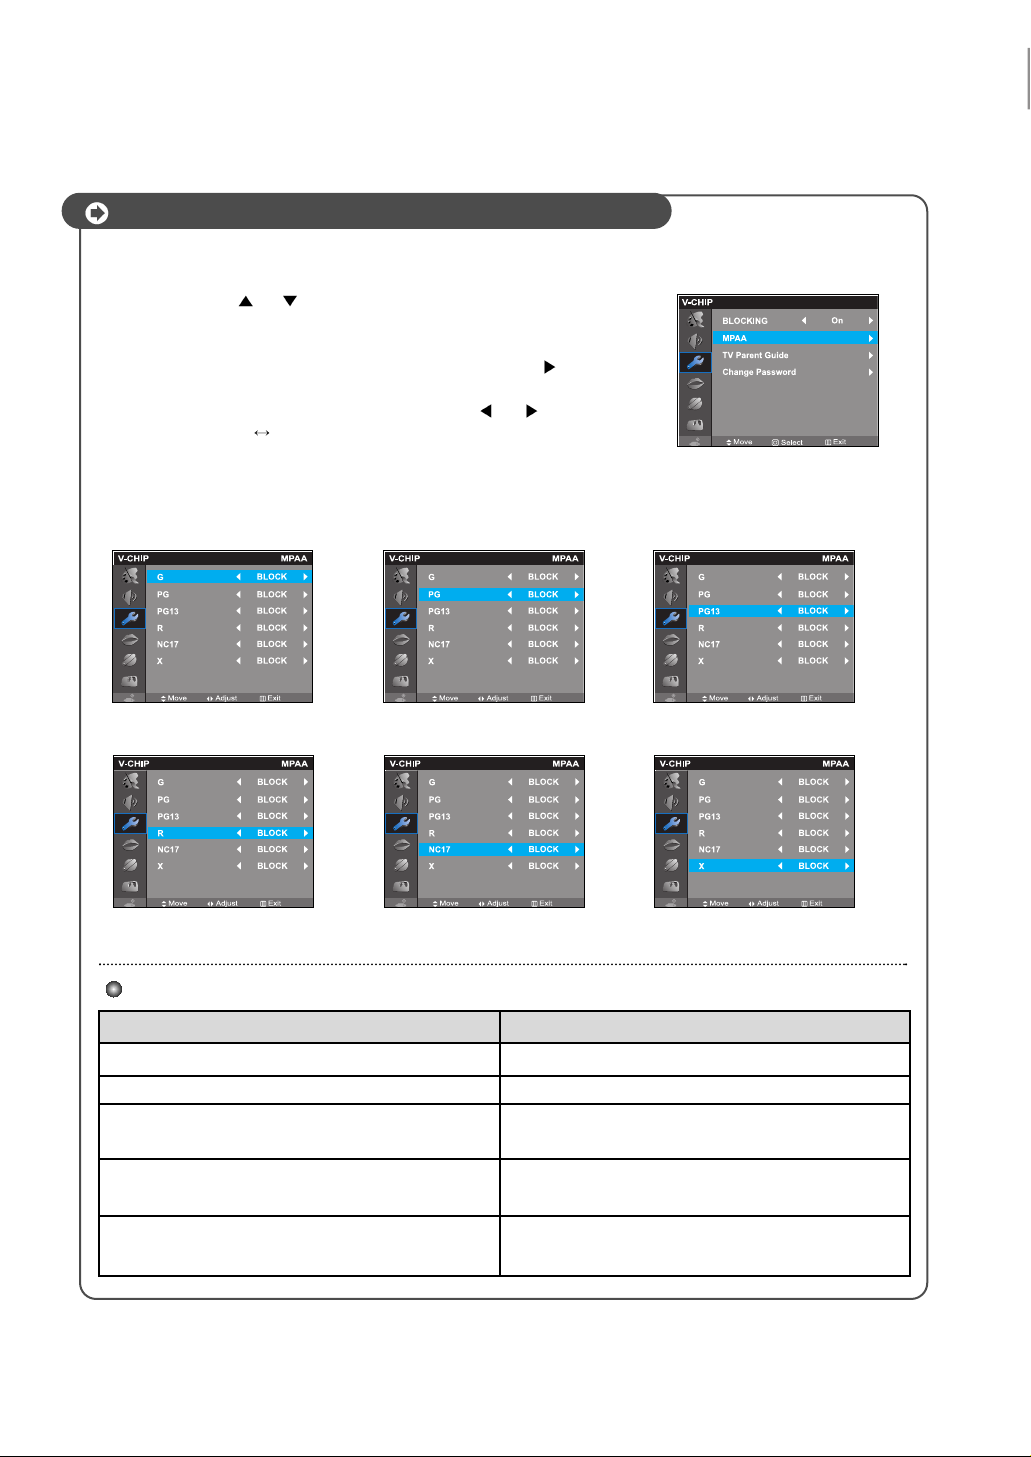
Enter your 4-digit Password to bring up the blocking menu.
For initial setup, we strongly recommend that you use the factory preset Password of 0,0,0,0.
Instructions on changing the Password are at the end of this section.
Enable MPAA rating and choose the MPAA ratings you wish to block.
Enable TV Parental Guide Ratings and choose the TV Parental Guide Ratings you wish to
block.
What is the V-CHIP?
General Procedure
IMPORTANT NOTICE-READ BEFORE PROCEEDING FURTHER
We urge you to read the entire V-CHIP section in this manual and make certain you understand it
thoroughly before proceeding further.
Once chosen and enabled, programs whose ratings have been blocked CANNOT be viewed unless
you enter the 4-digit key combination Password.
If you forget the Password, the only way you can clear the settings is to take the television to an
authorized service center. This is NOT covered under the warranty.
PLEASE NOTE THAT INITIAL V-CHIP PASSWORD AS SHIPPED FROM OUR FACTORY IS
0,0,0,0 (Press the 0 number key 4 times.)
Page 43

43
V-CHIP Operation
Press the MENU button.
Press the
or
button, to select the Setup( ) icon;
then press the SEL( ) or
button.
Use the
or button to select V-CHIP.
Press SEL( ) or button.
SETUP MENU
V-CHIP MENU
Enter the passwords you have chosen.
For initial set-up, use the factory.
As soon as you press the password, the
BLOCKING menu appears on the screen.
After adjustment : Press the MENU button to exit.
PASSWORD
BLOCKING MENU
1
2
3
4
Page 44
44
Press the or button to select the ratings which you wish
to block.
If you wish to select the MPAA menu, press the
button.
To change the selected rating, press the or button.
(UNBLOCK BLOCK)
RATING REMARKS
G(general audience) All ages admitted.
PG(Parental guidance suggested) Some material may not be suited for children.
PG13(Parents strongly cautioned)
Some material may not be inappropriate for
for children under age 13
R(Restricted)
Under 17 requires accompanying parent or
adult guardian.
NC17(No one 17 and under admitted)
X(Adult only)
MPAA RATINGS
MPAA (Motion Picture Association of America)
children under age 13
adult guardian.
1
2
3
Page 45

45
V-CHIP Operation
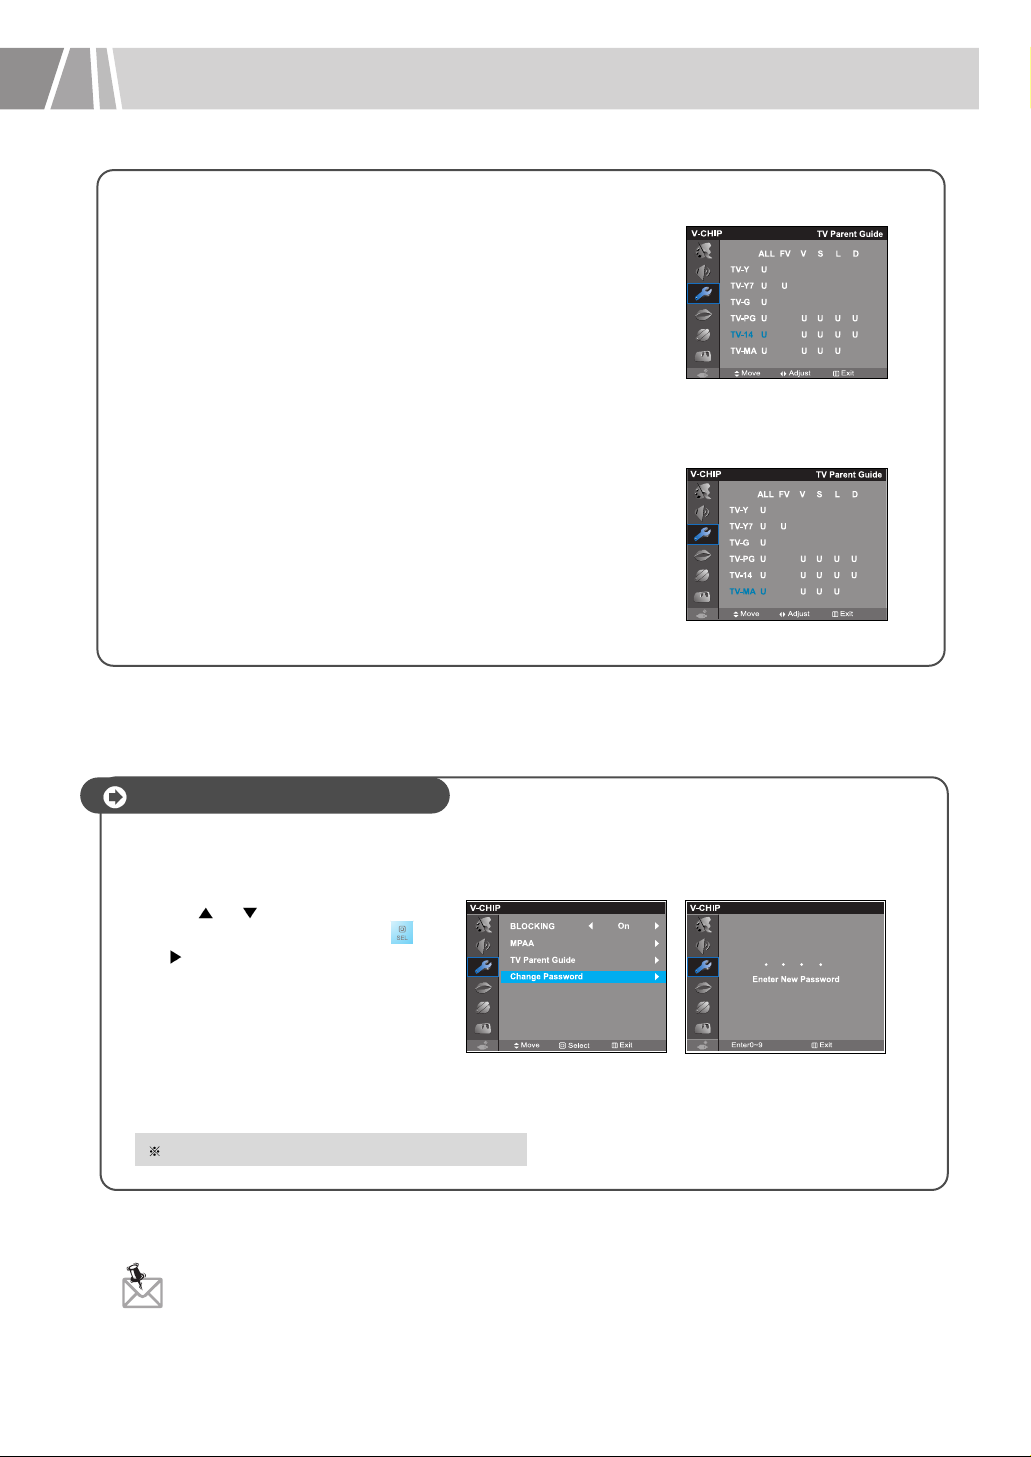
This procedure allows parents to block programs that contains TV Parental Guide Ratings they
consider inappropriate. Content labels are designed to indicate specific contents of TV programs
within each TV Parental Guide Rating.
For example, if a program rated TV-Y7 has strong Fantasy Violence content, the program will be
labeled as TV- Y7-FV. The TV Parental Guide menu allows you to block all FV labeled programs
but view all regular TV-Y7 programs
Note : Each rating has a different set of content labels that you can choose to block or View.
Labels that show --- cannot be changed within the selected rating.
Refer to the rating and content label guides on the following pages.
TV Parental Guidelines may have one or more letters added
to the basic rating to let parent know that a program contains
higher levels of potentially offensive material.
Note that the content Label should be considered with
respect to its associated rating.
For example, a “V”label is likely to designate considerably
more intense violence when associated with a TV-MA rated
program than when associated with a TV-PG rated program.
Note :
•You do not need to block each TV Parental Guide rating individually.The TV-Y and TV-Y7
ratings are handled as a group, and the TV-G, TV-PG, TV-14, and TV-MA ratings are
handled as a group.
For example, if you choose a program with a TV-14 rating, the V-CHIP will automatically
also block TV-MA rated programs. Likewise, passing(unblocking) the TV-MA as passes
TV-14 rated programs.
Content Labels
•Also note that you have the option of pass or block programs based on their content
label (D,L,S,V,FV) without necessarily blocking all programs that carry a special rating.
For example, you may pass some TV-PG programs, but not those that also carry a “V”
(moderate violence) content label.In this case, the V-CHIP will automatically block TV-14
and TV-MA rated programs labeled “V”.
V Violence D Suggestive dialogue
S Sexual situations FV Fantasy violence
L Coarse or crude indecent language
TV Parental Guide Rating
Before proceeding with the TV Parental Guide Rating, please read the following to content labels.
Page 46

46
TV-Y (All children)
This rating is designed to be appropriate for all children.
Whether animated or live action, the themes and elements in
this program are specifically designed for a very young
audience, including from 2~6.
All content labels are blocked
TV-Y7 (FV : Directed to older children)
This program is designed for children age 7 and above. It may
be more appropriate for children who have acquired the
developmental skills needed to distinguish between makebelieve and reality.
Themes and elements in this program may include mild
fantasy violence or comedic violence that may frighten
children under the age of 7. Therefore, parents may wish to
consider the suitability of this program for their very young
children.
Note : Programs in which fantasy violence may be
more intense or more combative than other programs
in this category may be designated TV-Y7-FV.
TV-G (General audience)
Most parents would find this rating suitable for all ages.
Although this rating dose not signify a program designed
specifically for children, most parents may let younger children
watch TV-G programs unattended. They contains little or no
violence, no strong language, and little or no sexual dialogue
or situations.
TV-PG (D/L/S/V : Parental guidance suggested)
This rating contains material that parents may find unsuitable
for younger children. Many parents may want to watch it with
their younger children. The theme itself may call for parental
guidance, and/or the program contains one or more of the
following.
Moderate violence(V), some sexual situations(S), Infrequent
coarse language(L), or some suggestive dialogue(D).
TV Parental Guide Rating
Page 47
47
V-CHIP Operation
TV-14
(D/L/S/V : Parental caution recommended)
This rating contains some material that many parents would
find unsuitable for children under 14 years of age.
Parents are strongly urged to exercise great care in monitoring
these programs, and are cautioned against letting children
under the age of 14 watch unattended.
TV-14 rated programs contain one or more of the following:
Intense violence(V), intense sexual situations(S), strong
coarse language(L), or intense suggestive dialogue(D).
TV-MA (L/S/V : Mature audience only)
This rating is specifically designed to be viewed by adults and
may, therefore, be unsuitable for children under age 17.
TV-MA rated programs contain one or more of the following:
Graphic violence(V), explicit sexual activity(S), or crude
indecent language(L).
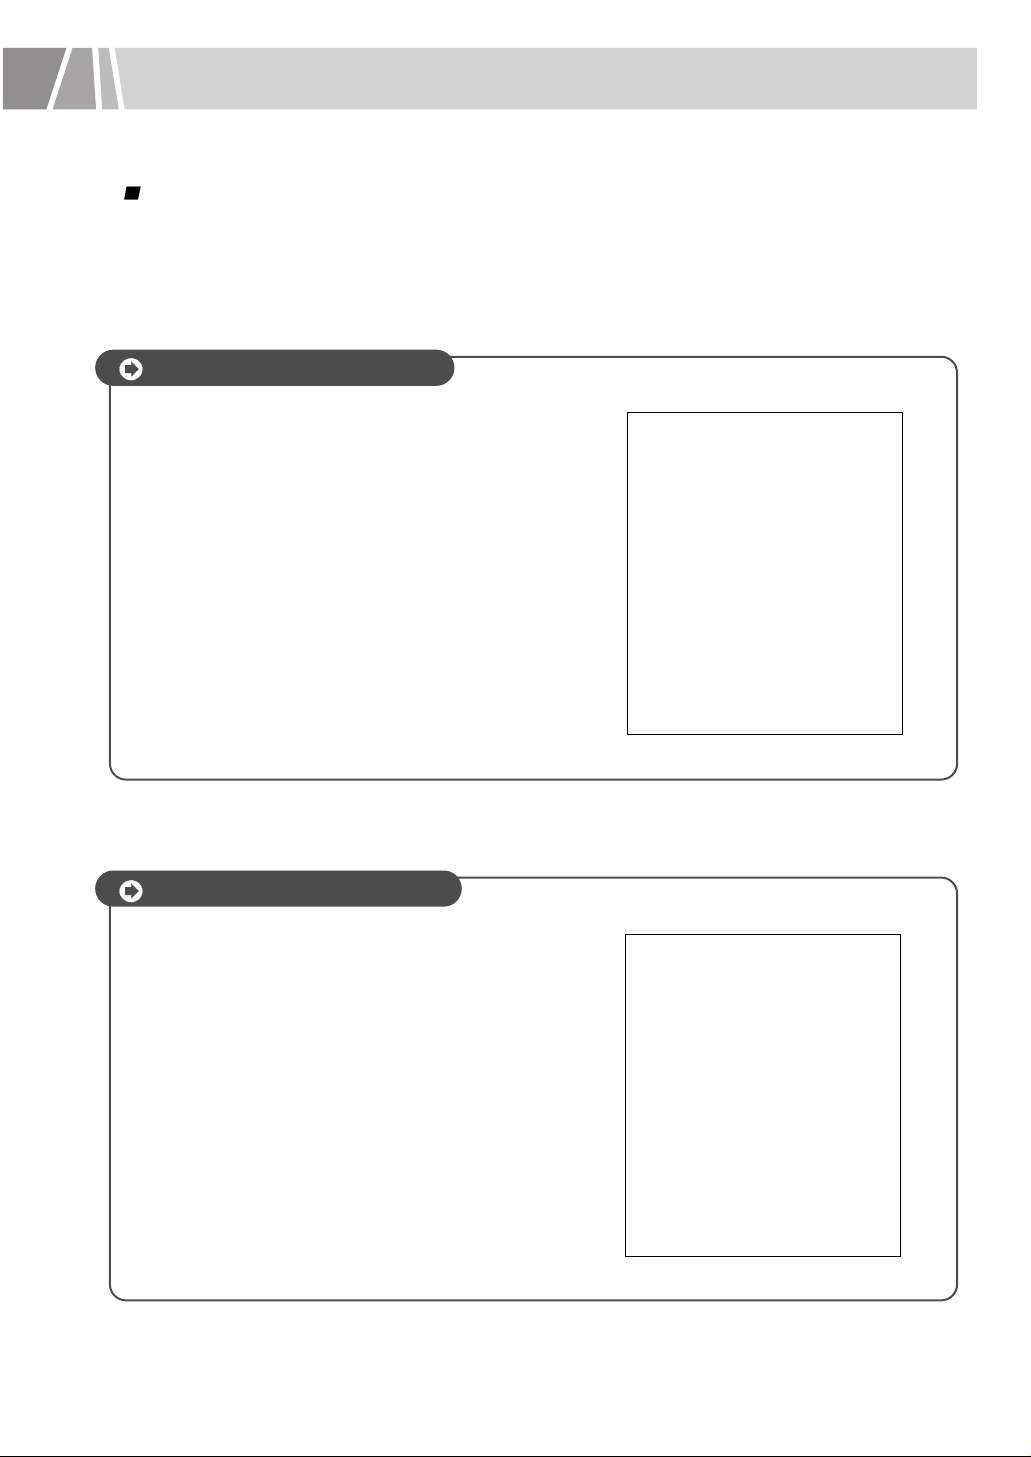
Press
or button to select
Change Pass word; then SEL( )
or
button.
‘Enter New Password’ screen will
appear.
Enter a new 4 digit Password; then
‘Password change successful’ screen
will appear.
•This procedure allows you to choose a private 4 digit key combination to the Password.
Input the new 4-digit key combination in the vacant spaces.
Note :
•The Power, Video, Up/Down keys may not be used for the 4-digit Password Combination.
•If you forget the Password, the only way that you can clear the settings is to take the TV
to an authorized service center.
Changing the Password
After adjustment: Press the MENU button to exit.
1
2
Page 48

48
Display Settings
How to Set Up Your Display Setting (for Windows)
The Windows display settings for a typical computer are shown below. The actual screens on your PC,
however, will probably be different, depending upon your particular version of Windows and your
particular video card. But even if your actual screens look different, the same basic setup information will
apply in most cases. (If not, contact your computer manufacturer.)
On the Windows screen, select in the following
sequence : Start
Settings Control Panel.
When the control panel screen appears, double
click the Display icon and a display dialog
box will appear.
Select the "Settings" tab in the display dialog
box. The two key variables that apply to the
LCD TV interface are "resolution" and "colors."
The correct settings for these two variables are
as follows:
Size (resolution): 1024 x 768 pixels
Color: 24-bit color (16 million colors)
If a vertical-frequency option exists in your
display settings dialog box, the correct value
is 60 or 60 Hz. Otherwise, simply click OK
and exit the dialog box.
NOTE : When this LCD TV is used as a PC display, 24-bit color is supported (over 16 million colors).
Your PC display screen may be different, depending on the manufacturer and your particular
version of Windows.
Page 49

49
Display Settings
The LCD TV might operate abnormally if a non-standard video format is selected.
The best resolution for this LCD TV is 1024X768 60Hz.
This LCD TV provides plug and play capability.
Dot x Line
Vertical Horizontal DDC Protocol
Frequency(Hz) Frequency(KHz) Support
640 X 350 70.086 31.469
EGA 85.080 37.861
640 X 400 85.080 37.861
720 X 480 70.087 31.469 O
85.039 37.927 O
640 X 480 59.940 31.469 O
VGA 66.670 35.000 O
72.809 37.861 O
75.000 37.000 O
85.008 43.269 O
848 X 480 60.000 29.838
72.000 35.156
75.000 36.072
IBM PC/AT
Compatibles
Or
Apple MAC
Both screen position and size will vary, depending on the type of PC monitor and its resolution.
The table below shows all the display modes that are supported:
Page 50

50
Picture Color Adjustment
Press the MENU button.
Press the
or button to select the Picture ( ) icon;
then press the SEL( ) or
button.
Press the
or
button to select Custom Mode.
Press the
or button to select the item you wish to
change.
Press the
or button to adjust the color.
1
2
3
Adjusting RGB Color
4
5
After adjustment: Press the MENU button to exit.
Page 51

51
Picture Position Adjustment
Press the MENU button.
Press the
or button to select the Setup ( ) icon;
then press the SEL( ) or
button.
Press the SEL( ) or button to select Position; then
press the
or
buttons to adjust the position of the
screen.
1
2
3
Changing the image position
Frequency Adjustment
Press the MENU button.
Press the
or button to select the Setup( ) icon;
then press the SEL( ) or
button.
Press the
or button to select Frequency.
Press the
or button to remove picture noise on the
screen.
1
2
3
Fine Tuning of the Image
4
After adjustment: Press the MENU button to exit.
After adjustment: Press the MENU button to exit.
Page 52

52
Phase Adjustment
Press the MENU button.
Press the
or button to select the Setup ( ) icon;
then press the SEL( ) or
button.
Press the or buttons to select Phase.
Press the or button to remove picture noise on the screen.
1
2
3
Adjusting Phase
4
Automatic Quality Adjustment
Press the MENU button.
Press the
or button to select the Setup ( ) icon;
then press the SEL( ) or
button.
Press the
or button to select Auto Adjustment.
Press the SEL( ) or
button to execute Auto.
1
2
3
Adjusting the PC Screen Automatically
4
This function adjusts the Position, Frequency and Phase automatically.
Quick Way
Press the AUTO button on the remote control.
This function is for automatic adjustment of the screen position,
clock, and phase. The displayed image will disappear for a few
seconds while the Auto-Adjustment is in progress.
After adjustment: Press the MENU button to exit.
After adjustment: Press the MENU button to exit.
Page 53
53
Serial Control Using RS-232C
Serial Control Using RS-232C Cable (optional)
Use RS-232C cable when you control the LCD TV using the PC.
This function is called PC Remote Control and is the same as the physical Remote control.
It will provide you an additional convenience when you use the LCD TV connected with a PC.
(The RS-232C cable is not included with the LCD TV. Separately sold RS-232C cable is required.)
First, connect the RS-232C cable between the PC and the LCD TV RS-232C input port. Refer to
the following method for using this function.
Installing Hyper terminal
From the Windows original disks.
On most Windows 95/98/2000 machines, Hyperterminal should be installed without explicitly
requesting it. If you need to install a copy of the
standard Hyperterminal program, go to the Start
menu, chose the setting option, and click on
Control Panels option.
Double Click on the Add/Remove Programs icon
and click on the Windows Setup tab at the top of
the window. Hyperterminal is located in the
Communications group.
Using the Hyper terminal
The program that starts Hyperterminal is
HYPERTRM.EXE. It is located under Start Menu;
Go to Start Programs Accessories
(communications) Hyperterminal.
Page 54

54
Serial Control Using RS-232C
Using the Hyper terminal
At the connected Hyperterminal Window:
File Preference Setup ASCII Setup dialog window
1. Check the two items in the ASCII Sending section.
2. Check the first and third items in the ASCII receiving
section.
You have completed the preparations to communicate with the LCD TV using your PC. If
you enter the following commands in Hyperterminal, the LCD TV will execute your
commands.
Using the Hyper Terminal
Hyperterminal is an application for serial
communications. It is offered as part of the basic
MS Windows operating system.
After executing Hyperterminal, set up as
follows.
[COM1 Property dialog window]
Bits/sec : 9600 bps
Data Bits : 8 bits
Parity Bits : None
Stop Bits : 1 bit
Flow Control : None
Page 55

55
Mode Command Remark
Power pwr=0 power off
pwr=1 power on
Source inp=rf
inp=vid
inp=svd
inp-rgb
inp=yuv
inp=vga
inp=dvi
Volume vol=12
Contrast con(rf)=24
Brightness bri(vid)+16 Range
0~31
Color col(vga)-10
Tint tin(rf)=?
IR Spoofing sir=vup vup=volume up button
sir=vdn vdn=volume down button
sir=mnu mnu=menu button
sir=aup aup=arrow up button
sir=and and=arrow down button
sir=alt alt=arrow left button
sir=art art=arrow right button
sir=ke0 ke0=number pad 0
sir=ke1 ke1=number pad 1
sir=ke2 ke2=number pad 2
sir=ke3 ke3=number pad 3
sir=ke4 ke4=number pad 4
sir=ke5 ke5=number pad 5
sir=ke6 ke6=number pad 6
sir=ke7 ke7=number pad 7
sir=ke8 ke8=number pad 8
sir=ke9 ke9=number pad 9
Red gain gar(vga)+178
Green gain gag(vga)=? Range
0~255
Blue gain gab(dvi). 57
Miscellaneous ind=0 .ind.
display information mode
ind=1 .0.
infor off
.1.
infor on
mnu=0 .mnu.
on screen display mode
mnu=1 .0.
menu off
.1.
menu on
General RS-232C command structure
•Refer
1) Red, Green, Blue gains operate only RGB, DVI mode
2) + increase value
– decrease value
= change into input value
? return to previous value before change
3) rf = TV, vid=VIDEO, svd=S-VIDEO, rgb=COMPONENT1, yuv=COMPONENT2, vga=RGB, dvi=DVI
Refer to 1)
Refer to 1)
2)
Refer to 1)
2)
3)
Page 56

56
Troubleshooting
•
Before you call a service technician, please review this list of problems and possible solutions. It may save
you time and money.
Problems Possible Solution
No Power Make sure the power cord is connected to the AC outlet.
Make sure the power cord is connected to a wall socket
correctly.
Poor or no picture Check all wire connections.
Check for source of reception disturbance.
Try another channel.
Check CATV connection or VHF/UHF ANT.
At PC(RGB) mode, check the resolution.
- The best resolution for this LCD TV is 1024 x 768, 60Hz.
Poor or no Sound
Try another channel.
Press Mute button again on the remote control.
Press the VOL ▶button to increase the volume.
Check CATV connection or VHF/UHF ANT.
No image on a specific channel Make sure the channel selection is correct.
Change the antenna direction to the right or left.
Adjust the fine tuning of the channel.
TV shuts off
Set sleep timer to “OFF”.
Closed Caption does not
Try another channel.
working Press the CAPTION button on the remote control.
V-CHIP does not working
Set the Block item “ON”.
properly V-CHIP does not work in the PIP(picture in picture)
Set the ratings as desired.
No CATV reception
Set TV/CATV to CATV.
Remote control does not Batteries could be weak. Replace the batteries to a new ones.
working
Locate the LCD TV at least one meter away from
fluorescent lights.
Clean the transmission window of the remote control.
Sometimes there is a rapping
This could be caused by the deflation or expansion of plastic
sound in the middle of products due to a change in the surrounding environment,
viewing or after viewing such as humidity, temperature etc.
When you turn the LCD TV on and off, a rapping sound
indicates a high voltage charge/discharge in the LCD TV.
Please note that this is not a defect.
Page 57

57
Specifications
Design and specifications are subject to change without notice.
Model Name L3040
Panel Size 30.0 inch Diagonal
Display Size 29.53" (Diagonal)
Type a-si TFT active matrix
Pixel pitch 0.5025mm
0.1675mm RGB
Viewing Angle 85
(H) / 85 (V)
Frequency Horizontal 30 ~ 61 kHz
Vertical 56 ~ 85 Hz
Display Color 16.7 M colors
Display Resolution Maximum Mode 1280 x 768 @ 75 Hz
Aspect Ratio 15 : 9
Input Terminals TV 1 ~ 125 channels
VIDEO 1.0Vp-p / 75Ω
S-Video Y: 1.0Vp-p / 75Ω
C: 0.3Vp-p / 75Ω
Component1 Y : 1.0Vp-p / 75Ω
(D-TV, DVD) Pb(cb) : 0.7Vp-p / 75Ω
Pr(cr) : 0.7Vp-p / 75Ω
Component2 Y : 1.0Vp-p / 75Ω
(D-TV, DVD) Cb(pb) : 0.7Vp-p / 75Ω
Cr(pr) : 0.7Vp-p / 75Ω
RGB (Analog) Mini D-SUB 15 pin
DVI (Digital) DVI-I 29 pin (But, the Analog input is not supported)
Input Sound Stereo RCA(L/R) x 4
(Video & S-Video, Component1, Component2,
DVI & RGB)
Output Terminals Sound Stereo L/R x 1, (Attached speaker)
Max 14W(7W/7W), 8Ω
Stereo RCA(L/R) 500mV rms
Video RCA(Monitor out) x 1
Power Supply AC 120V, 60Hz
Power Consumption 160 W
Dimensions (W x H x D) 34.45 x 21.89 x 7.48 inch ( 875 x 556 x190mm )
Weight 44.09 Ibs (20 kg)
External Control RS-232C D-SUB 9 pin
Page 58

58
MANUFACTURER
CODE
ANAM 000 001 002 003 004 005
CROWN 076
DAEWOO 110 113 097 056 112 114 117 102 074 107 076
084 053 062 063
FUTURETECH 076
GE 057 058 073 106
LG(GOLDSTAR) 106 104 118 103 100 101 109
HITACHI 060 059 053 085
INKEL 115
JCP 051 058
JVC 075 089
KEC 076
KENWOOD 093
MARANTZ 051
MITSUBISHI 051 053 071 106
NEC 051 053 056 062 065 106
NIKEL 076
PANASONIC 042 073 120
PHILCO 010 051 052 053 106
PHILIPS 051 052 053 106
PIONEER 069 064 070
RADIO SHARK 065 076 079
RCA 051 053
SAMPO 051 062
SAMSUNG 012 106 119 072 091 104 118 099 096 087
SANYO 056 066 067 072 082
SHARP 044 065 068
SONY 088 077 095
TAEKWANG 094
TECHWOOD 053
TOSHIBA 092 056 061 096 119
UNIVERSAL 057 058
YAMAHA 053
TV
Manufacturer MBR Codes
Individual Manufacturer's MBR Code Table
Page 59

59
MANUFACTURER
CODE
ANAM 000 001 002 003 004 005
AIWA 066 071
CANNON 060 063 065
DAEWOO 109 114 116 122 082 083 043 040 038 118 093
126 115
EMERSON 039 050 057 059 061 066 067 068 069 073 103
GE 063 065
LG(GOLDSTAR) 103 112 045 046 053 091 092 096 124 097 100
108 120
HITACHI 037 046 051 053 058 066 098 102
JVC 063 065 127 074
KENWOOD 047
MARANTZ 045 063 065
MINOLTA 046 053
MITSUBISHI 035
NEC 045 048 056
PANASONIC 063 065 128 101
PENTAX 046 053 063 065
PHILCO 063 065 066
PHILIPS 063 065 066 081
PILOT 103
PIONEER 054
RCA 046 053 063 065
SAMSUNG 104 072 064 107 110 088 106 111 113 117 121
119 123
SANYO 036 040 047 089
TAEKWANG 094
TEAC 066
TOSHIBA 041 050 110
YAMAHA 045 066
ZENITH 076 078
VCR
Page 60

MANUFACTURER
CODE
ANAM 000 001 002
APEN 015 025
HARMAN/KARDON 009
JVC 008
KENWOOD 023
LG 005
MEGAVOX 024
MITSUBISHI 019
ONKYO 024
PANASONIC 013
PIONEER 021 014 026
PROSCAN 020
RCA 020
SAMSUNG 004 017
SHERWOOD 016 004
SONY 022
TECHNICS 013
TOSHIBA 024
ZENITH 024 010
DVD
MANUFACTURER
CODE
NOW 042
DONGGUK 040
SAEWOO 041
WOOYOUNGTECH 044
PACIFIC 039
LG 035 037
SAMSUNG 040
TAEKWANG 043
TAIHAN 038
CBL
MANUFACTURER
CODE
ANAM 000
KIRYUNG 025
DAERYUNG 046 047 048 055
IELEC 050
HUNGCHANG 056
AIWA 036
ASHIN 031
DABONE 030
LG 051
HITACHI 029
HYUNDAI 027
INAX 032
KMEN 022
KONIC 054
MIRAERO 031
PANASONIC 057 058
SAMSUNG 019 020 054
SANYO 034 040
SATVILLE 033
SKY LIFE 001
SONY 028
STAR TRAK EIGHT
052
STS 041
SUNLINE 024 035 038 039
TELESAT 037
TOSHIBA 023
UNISAT 042
VALIANT 031 043 044 045
SAT
60
Page 61

61
How to Set Up the Lockout Function
Function
Remote Key Combination
Lock/ Front Key lock on HELP +1 + 0 + 3
Unlock Front Key lock off HELP +1 + 0 + 2
Function Remote Key Combination
Power Power on HELP +1 + 0 + 0
On/Off Power off HELP +1 + 0 + 1
Function Remote Key Combination
Source TV HELP +2 + 0 + 0
On/Off Video HELP +2 + 0 + 1
S - Video HELP +2 + 0 + 2
Componet 1 HELP +2 + 0 + 3
Componet 2 HELP +2 + 0 + 4
RGB HELP +2 + 0 + 5
DVI HELP +2 + 0 + 6
•
Lockout : This is a function to Lock/Unlock the Front button by using a Remote Key Combination.
Set Up the Lockout Function of the Front Button Using a Remote Key Combination.
Combination key: + number + number + number
Page 62

62
APPENDIX
Care and Maintenance
•With proper care, your LCD TV will give you many years of service.
Please follow these guidelines to get the maximum performance from your LCD TV.
Identifying Problems
•Do not put the LCD TV near extremely hot, cold, humid, or dusty places.
•Do not put the LCD TV near appliances that create magnetic fields.
•Keep the ventilation openings clear.
•Do not place the LCD TV on a rough and slanted surface, such as cloth or paper.
Liquids
•Do not handle liquids near or on the LCD TV.
Cabinet
•Never open the cabinet or touch the parts inside.
•Wipe your LCD TV with a clean, dry cloth. Never use water, cleaning fluids, wax,
or chemicals.
•Do not place heavy objects on top of the cabinet.
Temperature
•If your LCD TV is suddenly moved from a cold to a warm place, unplug the power
cord for at least two hours so any moisture that may have formed inside the unit can
dry completely.
Page 63

63
Memo
Page 64

Memo
64
Page 65

KQF1T422Z3
 Loading...