

Huawei U8665 User Manual

used, you will not be prompted to enter the password again unless you have reset
your mobile phone to its default settings.
On the Wi-Fi settings screen, touch Add Wi-Fi network to add a new Wi-Fi
network.
7.3 Sharing Your Phone’s Data Connection
You can share your mobile phone's data connection with a singl e computer via a USB
cable: USB tethering. You can share your mobile phone's data connection with a
number of devices at the same time, by turning your phone into a portable Wi-Fi
hotspot.
7.3.1 Installing the USB tethering Driver
If your computer is running Windows 7 or a recent distribution of some fl avors of
Linux (such as Ubuntu), you typically do not need to prepare your computer for
tethering. But if you are running an earlier version of Windows or another operating
system, you may need to prepare your computer to establish a network connection
via USB.
Install the USB tethering driver in the following steps:
1. Connect a USB cable to a computer. The computer will automatically recognize the
phone.
2. Choose Sta
3. Open the drivers folder
Double-click the link DownloadActiveSync.url.
4. Download and install Act
5. After the installation, you are able to use USB tethering.
7.3.2 Sharing Your Phone’s Data Connection via USB
To use USB tethering in different operating systems, you may need to prepare your
computer to establish a network connection via USB.
You cannot share your mobile phone’s data connection and access its microSD
card via USB at the same time.
1. Touch > Settings.
2. Touch Wi
34
rt > My Computer, and then double-click Mobile Partner.
and then open the usbnet_driver_win2k_xp folder.
iveSync 4.5 or a later version.
reless & networks > Tethering & portable hotspot.

3. Select the USB tethering check box to share your data connection.
7.3.3 Sharing Your Phone’s Data Connection as a Portable Wi-Fi Hotspot
1. Touch > Sett
2. Touch Wi
3. Select the Portable Wi-F i hotspot
When Portable Wi-Fi hotspot is selected, you can touch Portable Wi-Fi hotspot
settings to change its network name or secure it.
ings.
reless & networks > Tethering & portable hotspot.
check box to share your data connection.
7.4 WPS
The Wi-Fi Protected Setup (WPS) function simplifies the operations to s et up Wi-Fi
networks and configure network security settings.
When connecting to a Wi-Fi network via WPS, ensure that the Wi-Fi access point
to be connected supports the WPS function.
7.4.1 Connecting to a Wireless Network via the WPS Button
1. Tu rn on Wi -Fi, a nd then acces s the Wi-Fi settings screen.
2. Touch W
3. Press the WPS button of the Wi-Fi access point. When your phone connects to the
net
7.4.2 Connecting to a Wireless Network via the WPS PIN
1. Tu rn on Wi -Fi, a nd then acces s the Wi-Fi se
2. In the Wi
Then select WPS PIN connection in the options menu. Your phone displays the PIN
of the selected Wi-Fi access point.
3. Enter the PIN on the Wi-Fi access point. Whe
it displays a message.
PS button connection.
work, it displays a message.
ttings screen.
-Fi networks section, press and hold the Wi-Fi network to be connected.
n your phone connects to the network,
To add a new Wi-Fi network, touch Add Wi-Fi network on the Wi-Fi settings screen,
and then enter the Service Set Identifier (SSID) of the network.
35

7.5 Browser
Your mobile phone comes with an Internet browser pre-installed.
7.5.1 Opening the Browser
Touch > Web to open the home page.
When known or open Wi-Fi networks and mobile data networks are available at the
same time, your phone will preferably select a Wi-Fi network for Internet access.
Touch to open the browser options menu and perform one of the following
operations:
• New window: Touch to open a new window.
• Bo
okmarks: Touch to display bookmarks.
• Win
dows: Touch to view thumbnails of open browser windows. You can switch to
another browser window or open a new one on this screen.
sh: Touch to refresh the current webpage.
• Refre
• Forward: T
• More: Touc
selecting text, downloading, or setting options.
7.5.2 Opening a Webpage
1. In a browser window, touch the URL field at
2. Use the keyboard to enter a web
page address by voice.
3. As you enter the address, matching webpage addresses will appear on the screen.
If
you see the address you want, touch it and go directly to that webpage or
complete entering your desired webpage.
7.5.3 Setting a Home Page
1. In a browser window, touch .
2. Touch More > Settings > Set home
3. Enter the address of the desired home page, and then touch OK.
ouch to browse the next web page.
h to open other menus and perform operations such as searching,
the top of the screen.
page address. You can touch to enter the web
page.
36

7.5.4 Managing Bookmarks
You can store as many bookmarks as you want on your mobile phone.
Adding a Bookmark
1. In a brow ser win dow, go to the webpag e you wa nt to sa ve as a bookma rk.
2. Touch , and then touch Bookm
3. Edit the bookmark name and then touch OK.
Opening a Bookmark
1. In a browser window, touch , and then touch Bo
On the Bookmarks s
visited, or touch the Most visited tab to view the pages you have visited most
frequently.
2. Touch the bookmark of the website you want to open.
7.5.5 Customizing Browser Settings
ustomize the browser to suit your browsing style. Use Web to set page content,
C
privacy, and security preferences. In a browser window, touch , and then touch
More > Settings.
creen, touch the History tab to view the pages you have
arks > Add.
okmarks.
7.6 Bluetooth
Your mobile phone has Bluetooth, which allows you to create a wireless connection
with other Bluetooth devices so you can share files with your friends, talk hands-free
with a Bluetooth headset, or even transfer photos from your phone to your PC.
If you are using Bluetooth, remember to stay within 10 meters (33 feet) of the ot her
Bluetooth devices to which you want to connect. Be aware that obstacles like walls or
other electronic equipment may interfere with your Bluetooth connection.
7.6.1 Turning On Bluetooth
1. Touch > Sett
2. Touch Wi
Bluetooth. When Bluetooth is turned on, the Bluetooth icon appears in the
notification bar.
ings.
reless & networks, and then select the Bluetooth check box to turn on
37

3. Touch Bluetooth settings, and then select the Discoverable to make y our mob ile
phone visible to other Bluetooth devices.
7.6.2 Pairing with and Connecting to a Bluetooth Device
ur mobile Bluetooth lets you do the following:
Yo
• Hands Free Profile (HFP): allows you to use a hands-free Bluetooth device.
• Headset Profile (HSP): allows you to use a mono Bluetooth headset.
• Object Push Profile (OPP): allows you to transfer files
• Advanced Audio Distribution Profile (A2DP):
over a Bluetooth connection.
allows you to use a stereo Bluetooth
headset.
• A/V Remote Control Profile (AVRCP): allows you to control audio playing using a
luetooth headset remotely.
B
Before you use Bluetooth, pair your mobile pho
ne with another Bluetooth device as
follows:
1. Ensure that the Bluetooth function on your mobile phone is enabled.
2. On the Home screen, touch > Settings > Wireless
settings. Your mobile phone will then scan for Bluetooth devices in range.
& networks > Bluetooth
3. Touch the device you want to pair your mobile phone with.
4. If required, enter the pairing password to complete the connection.
7.6.3 Sending Files via Bluetooth
Wit
h Bluetooth, you can share pictures, videos, or music files wi th your family and
friends. To send files via Bluetooth:
1. To uch and hold t he file to be se nt in y our mob ile pho ne or S D card. The act ive
op
tions menu is displayed.
2. Touch Share, t
hen Bluetooth to select a paired device.
7.6.4 Disconnecting from or Unpairing with a Bluetooth Device
1. Touch > Sett
2. Navigate to the B
which you are connected.
3. Touch Unpair to
38
ings > Wireless & networks > Bluetooth settings.
luetooth devices section, and then touch and hold the device to
disconnect from the device.
8 Entertainment
In addition to being a communication device and personal assistant, your mobile
phone also provides you with a multitude of entertainment possibilities. You can take
photos, create videos and audio clips, and download and listen to music.
8.1 Taking Photos and Recording Videos
The camera is a combination of camera and camcorder that you can use to shoot
and share pictures and videos.
8.1.1 Opening Your Camera
• Touch > Camera
ready to take a picture or record a video.
• Touch to close the camera.
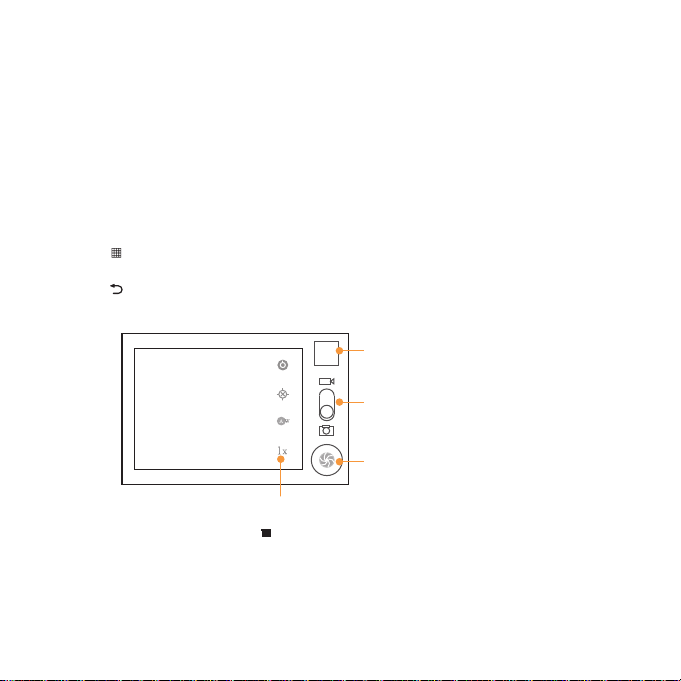
Capture Screen
Touch to customize the camera settings.
On the capture screen, touch to show
8.1.2 Taking a Photo
1. Op en you r camer a appli cation and
2. If necessary, change the camera settings. The preview changes as you change the
set
tings.
to open the camera. The camera opens in landscape mode,
Thumbnail of last photo.
Touch to preview the
photos or videos.
Drag up to record videos,
drag down to take photos.
Touch to take a photo.
the capture panel.
switch it to camera mode.
3
5
39

3. Frame your photo within the photo capture screen.
4. Touch to take your photo.
Photos taken are displayed for a moment. You
photos.
can take another photo or review your
8.1.3 Viewing Your Photos
1. After taking a photo, a thumbnail of the photo you have just taken is shown in the
upper r
ight corner of the capture screen. Touch the thumbnail to view it.
2. Touch the onscreen button to do any of the following:
• Touch Share t
• Touch De
• Touch More > Set as to set the phot
o send the photo in a message or post it online.
lete to delete the photo.
o as a contact icon or the wallpaper.
8.1.4 Recording a Video
1. Open the camera application, and then switch it to camcorder mode.
2. If necessary, change the camcorder settings.
3. Frame the scene with which you want to start your video.
4. Touch to start recording a video.
5. Touch to stop recording.
8.1.5 Viewing Your Videos
1. After recording a video, a thumbnail of the vid
the upper right corner of the capture screen. Touch the thumbnail to view it.
eo you have just recorded is shown in
2. Touch the onscreen buttons to do any of the following:
• Touch Share t
• Touch De
On the video playback screen, touch the controls to fa
play or pause the video.
o send the video in a message or post it online.
lete to delete the video.
st-forward or rewind or to
3. If you wa nt to vi ew more videos , flic k your f inger l eft or r ight a cross t he scre en.
40

8.2 Using the Gallery
Your Gallery application can automatically search for pictures and videos on your
mobile phone and microSD card. Use Gallery to sort photos and videos into folders,
view and edit pictures, watch videos, and set a picture as wallpaper or as a photo for a
contact.
8.2.1 Opening the Gallery
On the Home screen, touch > Gallery.
The Gallery application categorizes your pictures and videos by storage location and
displays these files in folders. Touch a folder to view the pictures or videos inside.
8.2.2 Viewing a Picture
llery, touch the folder that contains the pictures you want to view.
1. In Ga
2. Touch the picture to view it in fu
3. Touch the screen. Then the zoom panel appears. You can zoom in or zoom out on
e picture.
th
The picture viewer supports the automatic rotation function. When you rotate
your mobile phone, the picture adjusts itself to the rotation.
8.2.3 Rotating a Picture
1. When viewing a picture, touch to display the operations panel.
2. Touch More.
3. Select either Rotate L
orientation.
eft or Rotate Right. The picture is saved with the new
8.2.4 Cropping a Picture
1. When viewing a picture, touch to display the operation panel, and then touch
More > Crop.
2. Use the cropping tool to select the portion of the picture to crop.
• Drag from the inside of the cropping tool to move it.
• Drag an edge of the cropping
• Drag a corner of the cropping tool to resize the image.
ll-screen mode.
tool to resize the image.
41

3. Touch Save to save the cropped picture. Touch Discard to discard the changes.
8.3 Enjoying Music
You can download music files to your PC or insert a CD and copy the files to your
microSD card so you can listen to music on your mobile phone.
Once you have done this, the player will search for music on the microSD card. After
the search is complete, you will be able to view all available music files in the music
library.
8.3.1 Copying Music to the microSD Card
1. Connect the phone to your computer w
card.
2. On the PC, navigate to the USB
3. Create a folder in the root directo
4. Co py the music f rom yo
5. After copying music, unmount or eject the drive as requ
sys tem to s afely r emove t he mobi le pho ne.
6. Disconnect the mobile phone from the PC.
8.3.2 Opening the Media Library
Touch > Mus
The Music application organizes your music files by storage location. It contains four
tabs: Artists, Albums, Songs and Playlists.
8.3.3 Playing Music
1. Touch a category on th
2. Touch the song you want to play.
When you are listening to music, touch , to use another application. Your music
continues to play. To return to the music controls, open the notification panel and
then touch the song.
ic to display the media library.
ur computer to the folder you have created.
e music library screen.
ith a USB cable and mount the microSD
drive and open it.
ry of the microSD card (for example, Music).
ired by your PC’s operating
42

8.3.4 Adding Music to a Playlist
1. Touch a category on th
2. In the list that appears, select the song you want to add to the playlist.
3. Touch and hold the song, and then touch Add
• Touch Current playli
• Touch New to
8.3.5 Playing a Playlist
1. Touch the P
2. Touch and hold the playlist you want to play.
3. Touch Play to p
laylists tab on the music library screen.
e music library screen.
to playlist in the options menu.
st to add the song to an existing playlist.
create a playlist and add the song to it.
lay the playlist.
8.4 Listening to the FM Radio
The FM radio lets you listen to FM radio programs on your mobile phone. Since the FM
radio uses the provided wired stereo headset as its antenna, before opening the
application, connect the headset to your phone’s the audio jack.
8.4.1 Opening the FM Radio
1. On the Home screen, touch > FM Radio to
2. The first time you open FM radio, touch Auto tuning, w
available FM channels, saves them as presets, and plays the first FM channel found.
8.4.2 Tuning the FM Radio
Open the FM Radio app
• Touch or to tune the radio to the previous or next channel.
• Slide the knob left or right to perform precision tuning. When a channel is found,
to
uch , then Save cha
an empty channel to save the new channel to the channel list.
• Touch > Auto tuning to scan
lication, and then do the following:
nnel. Enter the channel name, touch OK, and then select
automatically for available FM channels.
open the application.
hich automatically scans for
43

9 Google Services
Availability of Google applications, services, and features may vary according to
your country or carrier. Please follow local laws and regulations to use them.
When you turn on your mobile phone for the first time, touch a Google services such
as Talk, Gmail, or Play Store, and you will b e prompted to sign in to your Google
account.
Ensure that your mobile phone has an active data connection (3G/GPRS) before
you sign in to your Google account.
If you already have a Google account, touch Sign in and enter your username and
password.
9.1 Creating a Google Account
If you do not have a Google account, you can create one:
1. After reading the setup information, touch Next.
2. Touch Create.
3. Enter the first name, last name, and user na
touch Next. The mobile phone will connect to a Google server to check whether the
username is available. If the username you entered is already in use, you will be
prompted to choose another one or select one from a list.
4. Enter and confirm your G
oogle account password.
me for your Google account, and then
5. Select a security question from the drop-down menu, and then enter the answer.
6. Touch Create.
7. When the Google
8. Enter the characters that appear on the screen, and then touch Ne
To use another Google account, go to the Accounts & sync settings screen, and
Terms of Service screen appears, touch I agree, Next.
xt.
touch Add account to select which type of accounts you want to add.
9.2 Gmail
Gmail is Google’s web-based email service. When you first set up your phone, you
may have configured it to use an existing Gmail account or create a new accoun t.
44

The first time you open the Gmail application on your phone, your Inbox will contain
the messages from your Gmail web account.
9.2.1 Opening Gmail
On the Home screen, touch > Gmail. The Inbox mail list appears. Any emails you
decide to keep on your mobile phone will go to your Inbox fo lder.
9.2.2 Switching Between Accounts
1. In the mail list, touch , and then touch Accounts.
2. Touch the account that contains the email you want to read.
9.2.3 Creating and Sending an Email
1. In the mail list, touch , and then touch Co
2. Enter the message recipient’s email address in the To field
email to several recipients, separate the email addresses with commas. You can
add as many message recipients as you want.
mpose.
. If you are sending the
If you want to send a copy (Cc) or a blind copy (Bcc) of the email to other
ipients, touch , and then touch Ad
rec
d Cc/Bcc.
3. Enter the email subject and write your email.
If you want to add a picture attachment, touch , and then touch Attac
select the picture you want to attach.
h to
4. After writing your email, touch .
9.2.4 Replying to or Forwarding an Email
1. In the mail list, touch the email that you want to reply to or forward.
2. Touch to reply. You can also touch , and then touch Rep
ly, Reply all, or
Forward.
3. Do one of the following:
• If you selected Re
• If you selected Fo
text you want to include in the forwarded message.
ply or Reply all, enter your message.
rward, specify the message recipients and add any additional
4. Touch to send, or touch to save as a draft.
45
 Loading...