

Huawei U8600-1 Users Manual

Contents
Getting to Know Your Mobile Phone . . . . . . . . . . . . . . . . . . . . 1
What's in Your Box. . . . . . . . . . . . . . . . . . . . . . . . . . . . . . . . . . . . . . . . . . . . 1
Mobile Phone View . . . . . . . . . . . . . . . . . . . . . . . . . . . . . . . . . . . . . . . . . . . 2
Installing the SIM Card . . . . . . . . . . . . . . . . . . . . . . . . . . . . . . . . . . . . . . . . 3
Using the microSD Card. . . . . . . . . . . . . . . . . . . . . . . . . . . . . . . . . . . . . . . 7
Starting Up. . . . . . . . . . . . . . . . . . . . . . . . . . . . . . . . . . . . . . . . . . . . . . . . . . . 8
Using the Touchscreen . . . . . . . . . . . . . . . . . . . . . . . . . . . . . . . . . . . . . . 10
Accessing your top six applications with Task List . . . . . . . . . . . . . . 11
Customizing Your Mobile Phone Settings . . . . . . . . . . . . . . . . . . . . . . 11
Home Screen . . . . . . . . . . . . . . . . . . . . . . . . . . . . . . . . . . . . . . . . 14
Getting to know your Home screen . . . . . . . . . . . . . . . . . . . . . . . . . . . . 14
Notification and status icons . . . . . . . . . . . . . . . . . . . . . . . . . . . . . . . . . . 15
Notifications panel. . . . . . . . . . . . . . . . . . . . . . . . . . . . . . . . . . . . . . . . . . . 17
How to switch the Home screen . . . . . . . . . . . . . . . . . . . . . . . . . . . . . . 17
How to customize the Home screen . . . . . . . . . . . . . . . . . . . . . . . . . . . 19
Canvas . . . . . . . . . . . . . . . . . . . . . . . . . . . . . . . . . . . . . . . . . . . . . . . . . . . . . 20
Calling . . . . . . . . . . . . . . . . . . . . . . . . . . . . . . . . . . . . . . . . . . . . . 26
Making a Call . . . . . . . . . . . . . . . . . . . . . . . . . . . . . . . . . . . . . . . . . . . . . . . 26
Answering and Rejecting a Call . . . . . . . . . . . . . . . . . . . . . . . . . . . . . . . 28
Using the Call log. . . . . . . . . . . . . . . . . . . . . . . . . . . . . . . . . . . . . . . . . . . . 31
Using the Airplane Mode . . . . . . . . . . . . . . . . . . . . . . . . . . . . . . . . . . . . . 32
MyPhonebook . . . . . . . . . . . . . . . . . . . . . . . . . . . . . . . . . . . . . . . 33
How to get started with MyPhonebook . . . . . . . . . . . . . . . . . . . . . . . . . 33
Organize your Contacts with MyPhonebook . . . . . . . . . . . . . . . . . . . . 33
Change your device easily . . . . . . . . . . . . . . . . . . . . . . . . . . . . . . . . . . . . 34
Your Contacts . . . . . . . . . . . . . . . . . . . . . . . . . . . . . . . . . . . . . . . . . . . . . . . 34
Groups . . . . . . . . . . . . . . . . . . . . . . . . . . . . . . . . . . . . . . . . . . . . . . . . . . . . . 39
1

Text Input . . . . . . . . . . . . . . . . . . . . . . . . . . . . . . . . . . . . . . . . . . . 40
Using the Onscreen Keyboard . . . . . . . . . . . . . . . . . . . . . . . . . . . . . . . . 40
Customising the Input Settings . . . . . . . . . . . . . . . . . . . . . . . . . . . . . . . . 43
Inputting Text, Numbers, and Symbols . . . . . . . . . . . . . . . . . . . . . . . . . 43
Messaging . . . . . . . . . . . . . . . . . . . . . . . . . . . . . . . . . . . . . . . . . . 47
SMS and MMS . . . . . . . . . . . . . . . . . . . . . . . . . . . . . . . . . . . . . . . . . . . . . . 47
Email . . . . . . . . . . . . . . . . . . . . . . . . . . . . . . . . . . . . . . . . . . . . . . . . . . . . . . . 54
Getting Connected . . . . . . . . . . . . . . . . . . . . . . . . . . . . . . . . . . . 61
GPRS/3G . . . . . . . . . . . . . . . . . . . . . . . . . . . . . . . . . . . . . . . . . . . . . . . . . . 61
Wi-Fi . . . . . . . . . . . . . . . . . . . . . . . . . . . . . . . . . . . . . . . . . . . . . . . . . . . . . . . 62
Sharing Your Phone’s Data Connection . . . . . . . . . . . . . . . . . . . . . . . . 64
Browser . . . . . . . . . . . . . . . . . . . . . . . . . . . . . . . . . . . . . . . . . . . . . . . . . . . . 64
Bluetooth . . . . . . . . . . . . . . . . . . . . . . . . . . . . . . . . . . . . . . . . . . . . . . . . . . . 68
VPNs . . . . . . . . . . . . . . . . . . . . . . . . . . . . . . . . . . . . . . . . . . . . . . . . . . . . . . 70
Working with Secure Certificates . . . . . . . . . . . . . . . . . . . . . . . . . . . . . . 71
Modem Behaviour . . . . . . . . . . . . . . . . . . . . . . . . . . . . . . . . . . . . . . . . . . . 71
Entertainment . . . . . . . . . . . . . . . . . . . . . . . . . . . . . . . . . . . . . . . 73
Using the Music Palyer . . . . . . . . . . . . . . . . . . . . . . . . . . . . . . . . . . . . . . . 73
Using the Camera. . . . . . . . . . . . . . . . . . . . . . . . . . . . . . . . . . . . . . . . . . . . 78
Using the Gallery . . . . . . . . . . . . . . . . . . . . . . . . . . . . . . . . . . . . . . . . . . . . 81
Listening to the FM Radio. . . . . . . . . . . . . . . . . . . . . . . . . . . . . . . . . . . . . 85
Google Services . . . . . . . . . . . . . . . . . . . . . . . . . . . . . . . . . . . . . 88
Creating a Google Account . . . . . . . . . . . . . . . . . . . . . . . . . . . . . . . . . . . 88
Using Gmail. . . . . . . . . . . . . . . . . . . . . . . . . . . . . . . . . . . . . . . . . . . . . . . . . 89
Using Talk . . . . . . . . . . . . . . . . . . . . . . . . . . . . . . . . . . . . . . . . . . . . . . . . . . 92
Using Maps . . . . . . . . . . . . . . . . . . . . . . . . . . . . . . . . . . . . . . . . . . . . . . . . . 95
Using YouTube . . . . . . . . . . . . . . . . . . . . . . . . . . . . . . . . . . . . . . . . . . . . . 99
Using Market . . . . . . . . . . . . . . . . . . . . . . . . . . . . . . . . . . . . . . . . . . . . . . 100
Synchronizing Information . . . . . . . . . . . . . . . . . . . . . . . . . . . 104
Managing Your Accounts . . . . . . . . . . . . . . . . . . . . . . . . . . . . . . . . . . . 104
Customizing Your Account Synchronization . . . . . . . . . . . . . . . . . . . 106
Using the Hi Suite to Synchronize. . . . . . . . . . . . . . . . . . . . . . . . . . . . . 107
Using Other Applications . . . . . . . . . . . . . . . . . . . . . . . . . . . . 110
Using the Clock . . . . . . . . . . . . . . . . . . . . . . . . . . . . . . . . . . . . . . . . . . . . 110
Using the Calendar . . . . . . . . . . . . . . . . . . . . . . . . . . . . . . . . . . . . . . . . . 112
2

Using the Notepad. . . . . . . . . . . . . . . . . . . . . . . . . . . . . . . . . . . . . . . . . . 119
Using the Calculator . . . . . . . . . . . . . . . . . . . . . . . . . . . . . . . . . . . . . . . . 119
Using the File Manager. . . . . . . . . . . . . . . . . . . . . . . . . . . . . . . . . . . . . . 119
Managing Your Mobile Phone . . . . . . . . . . . . . . . . . . . . . . . . 124
Setting the Date and Time . . . . . . . . . . . . . . . . . . . . . . . . . . . . . . . . . . . 124
Setting the Display . . . . . . . . . . . . . . . . . . . . . . . . . . . . . . . . . . . . . . . . . 125
Setting Ringers . . . . . . . . . . . . . . . . . . . . . . . . . . . . . . . . . . . . . . . . . . . . 126
Setting Phone Services . . . . . . . . . . . . . . . . . . . . . . . . . . . . . . . . . . . . . 128
Other Settings. . . . . . . . . . . . . . . . . . . . . . . . . . . . . . . . . . . . . . . . . . . . . . 130
Protecting Your Mobile Phone . . . . . . . . . . . . . . . . . . . . . . . . . . . . . . . 131
Managing Applications . . . . . . . . . . . . . . . . . . . . . . . . . . . . . . . . . . . . . 133
Managing the Memory . . . . . . . . . . . . . . . . . . . . . . . . . . . . . . . . . . . . . . 135
Backing Up My Settings . . . . . . . . . . . . . . . . . . . . . . . . . . . . . . . . . . . . 135
Resetting Your Mobile Phone . . . . . . . . . . . . . . . . . . . . . . . . . . . . . . . . 136
Legal Notice. . . . . . . . . . . . . . . . . . . . . . . . . . . . . . . . . . . . . . . . 137
Trademarks and Permissions . . . . . . . . . . . . . . . . . . . . . . . . . . . . . . . . 137
Please note . . . . . . . . . . . . . . . . . . . . . . . . . . . . . . . . . . . . . . . . . . . . . . . . 138
NO WARRANTY . . . . . . . . . . . . . . . . . . . . . . . . . . . . . . . . . . . . . . . . . . . . 138
Import and Export Regulations . . . . . . . . . . . . . . . . . . . . . . . . . . . . . . . 139
Safety Precautions . . . . . . . . . . . . . . . . . . . . . . . . . . . . . . . . . . 140
Warnings and Precautions . . . . . . . . . . . . . . . . . . . . . . . . . . . 142
How to remove the battery. . . . . . . . . . . . . . . . . . . . . . . . . . . . . . . . . . . 152
FAQ . . . . . . . . . . . . . . . . . . . . . . . . . . . . . . . . . . . . . . . . . . . . . . . 156
3

4

Getting to Know Your Mobile
Phone
Ready to get hands-on with your touchscreen? To take every last
gadget and gizmo for a spin? Great – here is where you will get to grips
with the basics and best bits of your new mobile phone. So thumb
through our manual and get up to speed with your mobile phone!
What's in Your Box
Take a peak in your mobile phone box and you will find much more in
there than your new mobile phone– in fact, you will have all these
handy items to play with:
Mobile phone
Battery (internal)
Charger
USB cable
3.5 mm headset
Quick start guide
1

Getting to Know Your Mobile Phone
Mobile Phone View
Phone at a Glance
Note: If you apply protective film on the phone, please use the
protective film with good transmittance.
Key features at a glance
Press and hold to power on your mobile phone.
Press and hold to open the
Press to lock the screen when your mobile phone is
active.
Touch to return to the Home screen.
Touch and hold to show the most recently used
applications.
Touch to open the menu on an active screen.
Headset
jack
Earpiece
Camera
Volume
key
Charge/Data port
Phone options menu.
2
Getting to Know Your Mobile Phone
Touch to return to the previous screen.
Touch to exit any application you are running.
Touch to hide the keyboard.
Touch to open Google search for searching your mobile
phone and the web.
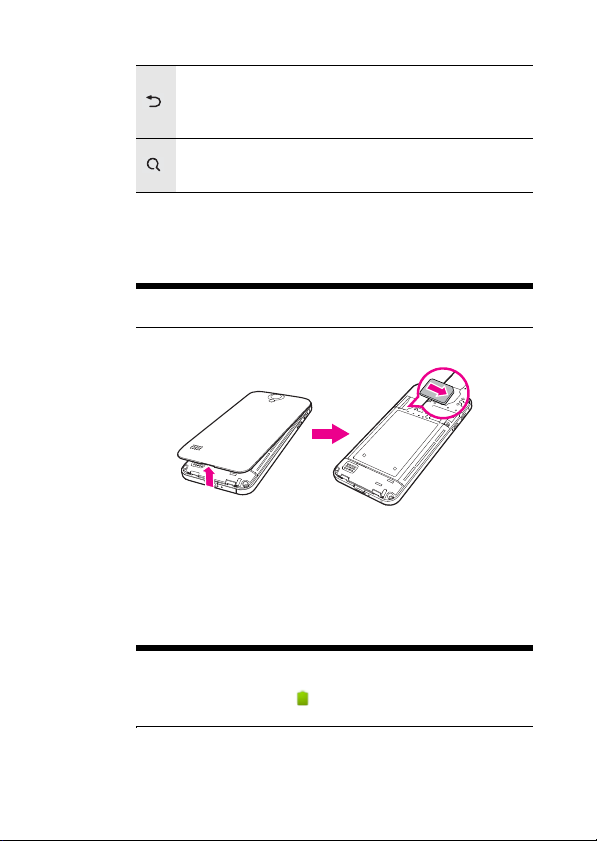
Installing the SIM Card
How to slot in your SIM card
Caution: Tur n off your mobil e pho ne be fore y ou sl ot in o r out your SIM
card.
It takes just three simple steps to install your SIM card:
1. Turn off your mobile phone.
2. Remove the battery cover.
3. Insert the SIM card.
How to charge your mobile phone
Your mobile phone has an internal rechargeable battery.
Note: If your mobile phone is charged when it is powered on, the
battery icon on the Notification bar shows the charging status. When
the battery icon changes to
fully charged.
, it indicates that your mobile phone is
3

Getting to Know Your Mobile Phone
To charge your mobile phone through charger
1. Connect the USB cable that came with your mobile phone to the
charger.
2. Connec
3. Plug in the connector of the charger to an electrical outlet. The
To charge
t the USB cable to your mobile phone.
phone begins charging.
your mobile phone through computer
Connect your mobile phone to the computer with the USB cable that
came with your mobile phone. Then the phone begins charging.
Note: It takes longer time to charging through computer than through
charger.
4

Getting to Know Your Mobile Phone
How to keep your battery in top shape
If the battery has not been used for a long period of time, you may
not be able to power on your mobile phone immediately after you
begin charging the battery. The icon as shown in the following
figure is displayed on the screen.
Allow the battery to charge for a few minutes with the phone
powered off. When the chargi
screen, power the phone on.
Using data services increases demand for electrical power and will
hence the stand-
The time required to charge the battery depends on the ambient
temperature and the age of the bat
charge at room temperature (20°C–22°C).
When the battery is low, the phone plays an alert and displays a
message. When the battery power
phone will power off automatically.
The battery undergoes aging which results in a decrease of the
capacity with time. This will be n
reduction of the stand-by and talk time of the device. In order to
revert to the original stand-by and talk time it is recommended to
replace the battery with a new one of the same type.
by and talk time of the device.
ng animotion is displayed on the
tery. We recommend you to
charge is almost drained, your
oticeable by some incremental
5

Getting to Know Your Mobile Phone
We recommend you to not replace the battery by yourself. Instead
any Huawei or a Huawei authorized service provider will be happy
to offer a battery replacement to you. In case you choose to
replace the battery by yourself, please refer to .
Battery saving advice
The stand-by and talk time also depends on the network that you
connect to, and how you use your mobile phone.
Try the following to conserve battery power:
When you do not need 3G services, set your phone to connect to
a 2G network: on the Hom
Wireless & networks > Mobile networks, then sel
networks.
When your mobile phone is not in use, press the key to switch
off the screen.
Reduce the time until the display illumination goes off when in idle
: on the Home scr
mode
Scree
n timeout.
Lower the display brightness: on the Home screen, touch >
ttings > Display > Brightness.
Se
Use the AC a
source whenever po
Turn Bluetooth off when you’re not using it. Only make your phone
le to other Bluetooth devices when you need to establish a
visib
Bluetooth connection: on the Home screen, touch > Settings
> Wireless & networks > Bluetooth settings.
Switch off Wi-F
touch > Settings > Wireless & ne
Turn off your phone connection to GPS satellites when you’re not
using it: on the Home
security, and then
Lower the volume.
Close power-draining programs, like t
when you don’t need them.
e screen, touch > Settings >
een, touch > Settings > Display >
dapter to plug your phone into an external power
ssible.
i when you’re not using it: on the Home screen,
screen, touch > Settings > Location &
r the Use GPS satellites check box.
clea
tworks > WiFi settings.
he Camera application,
ect Use only
2G
6
Getting to Know Your Mobile Phone
Turn off the data service: on the Home screen, touch >
Settings > Wireless & networks > Mobile networks, clear Data
led and Data always on check boxes.
enab
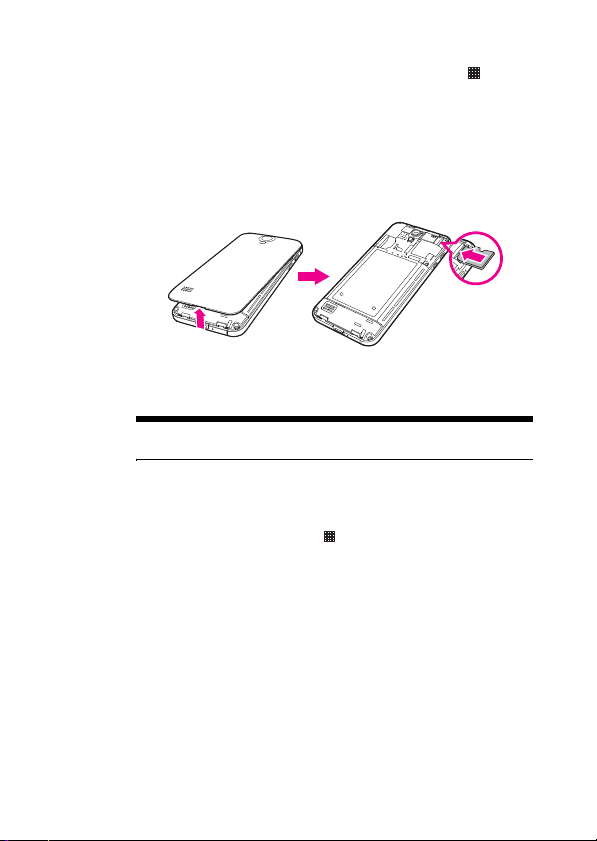
Using the microSD Card
How to install the microSD card
1. Remove the battery cover.
2. Insert the microSD card as shown in the diagram.
Note: When inserting the microSD card, make sure that the golden
contact is facing downwards.
How to remove the microSD card while your mobile phone
is on
1. On the Home screen, touch > Settings.
2. Scroll down the screen, and then touch Storage > Unm
card.
3. Carefully remove the microSD card.
How to use the microSD card as the USB mass storage
To transfer all your favorite music and pictures from your PC onto your
mobile phone’s microSD card, set the microSD card as the USB mass
storage.
1. Connect your mobile phone to your PC with the USB cable. Your
PC will detect the microSD card as a remo
2. Open the notification bar, and then touch USB connected.
vable disk.
ount SD
7

Getting to Know Your Mobile Phone
3. Touch Turn on USB storage in the dialog box that opens to
confirm that you want to transfer files.
You can now transfer files from your PC to your mobile phone’s
microSD card.
Note: When your microSD card acts as the USB mass storage, your
mobile phone will not use this memory space. Your PC will tell you how
to safely disconnect the USB mass storage device (that is your mobile
phone by the way) when you have finished transferring files.
Starting Up
Setting up your T-mobile move balance involves just a few simple
steps.
How to turn your mobile phone on and off
To turn on your mobile phone
Press . The first time you power on your phone, you will be asked to
sign in to your account and set up your mobile phone.
Note: When personal identification number (PIN) protection is
enabled on your mobile phone, you need to enter the PIN before using
the mobile phone.
To set up your mobile phone
The first time you power on your mobile phone, the phone displays a
setup wizard to instruct you on how to set up the phone.
The setup wizard includes the following parts:
Using the onscreen keyboard
Setting up your accounts
Important settings
1. Touch the Android image to learn a few important things to get the
2. Touch Begin to
most out
of your phone.
earning how to use the onscreen keyboard.
start l
8
Getting to Know Your Mobile Phone
3. Touch the text field to open keyboard and try to start typing, or
touch Skip to continue.
4. Touch the Google account, or Email account icon to access the
relevant settings.
Tip: On the Setting up your accounts screen, you can touch , and
then touch APN settings to set the APN. When a SIM card has been
installed on your phone, the phone can automatically read the APN
settings from the SIM card. Contact your operator for details.
5. After you set an email account, a tick appears on the relevant email
icon. You can also touch Skip to set an account later and go to the
next step.
6. If you want to enable the data service, select the Enable da
service check box, and then touch Next.
7. You'll be prompted whether to enable the Google location service.
This service
without using GPS. Then touch Next to g o to the next st ep.
8. Set the date and time. If you want to set the time manually rather
than use the system
touch Next to fi nish an d go to t he Home screen.
To turn off your mobile phone
1. Press and hold to open the Phone options menu
2. Touch Power off.
Tip: When the mobile phone is in an abnormal state and can not be
turned off properly, you can press
phone.
gives you basic information about your location
time, clear the Automatic check box, and then
at least 8 seconds to turn off the
ta
.
How to lock and unlock the screen
To lock the screen
When your mobile phone is on, press to lock the screen. When
the screen is locked, you can still receive messages and calls.
9
 Loading...