

Page 1

User Guide
Page 2

Contents
Exciting new features
Unboxing your phone
Transferring data
Pro camera mode 1
Smart fingerprint 2
Knuckle screenshots 3
Screen recorder 6
Opening two apps on one screen 9
Getting to know your phone 12
Inserting a SIM card and microSD card 12
Charging your phone 14
Turning your phone on and off 15
Using the Backup app to transfer data 16
Transferring data between your phone and a
computer 18
Copying contacts from an old phone to a new
phone 18
First use and initial setup
First use 20
Dual SIM settings 23
Connecting to the Internet 24
Themes and wallpaper 27
Notification and permission settings 30
Configuring the fingerprint sensor 31
Gestures and navigation settings 32
Installing apps
Installing an app from a microSD card 36
Installing an app shared by another phone 37
Uninstalling an app 39
i
Page 3

Getting to know your phone
Locking and unlocking the screen 41
Touchscreen gestures 42
Status and notification icons 44
Home screen 46
Notification 53
Using fingerprint recognition 56
Accessing applications 59
Personalizing your phone 62
Entering text 65
Tips and tricks
Adding contact details quickly 68
Taking snapshots when the screen is off 68
Perfect selfie 69
Using time-lapse mode to fast forward the action 70
Taking photos while recording a video 70
Calling contacts when the screen is off 71
Using voice wakeup 72
Answering or rejecting a call using voice commands 72
Finding applications quickly 73
Using Wi-Fi+ to connect to the Wi-Fi network with the
strongest signal 74
Easy one-handed operation on large phones 75
Sharing your QR card 76
Using your phone while wearing gloves 76
Pocket mode 77
Rapidly adjusting the system volume 78
Using the floating dock instead of phone keys 78
Aligning home screen apps automatically 79
Touch-disable mode 79
Contents
Call & Contacts
Opening Dialer 81
Answering or rejecting a call 84
Functions available during a call 85
Answering a third-party call 85
Making a conference call 86
ii
Page 4

Viewing the call log 86
Turning on pocket mode 87
Call settings 88
Creating a contact 90
Adding contact details quickly 90
Importing or exporting contacts 91
Managing contacts 93
Finding a contact 94
Viewing contacts from different accounts 95
Adding a contact to your favorites 95
Contact groups 95
Messaging and email
Viewing a text message 98
Sending an text message 98
Replying to a message 99
Deleting a thread 99
Managing messages 100
Managing common phrases 100
Adding an email account 101
Sending an email 102
Checking your emails 103
Managing VIP contacts 104
Configuring account settings 105
Contents
Camera and Gallery
Accessing the viewfinder 107
Taking a photo 107
Capture modes 108
Time-lapse mode 116
Slow motion recording 117
Pro camera mode 117
Light Painting mode 119
Panoramic shots 123
Launching the camera from Gallery 125
Shooting a video 126
Video settings 126
Camera settings 127
iii
Page 5

Viewing photos and videos 128
Adding notes to an image 131
Organizing photos and videos 131
Sharing images or videos 133
Editing an image 134
Using Camera or Gallery to scan a QR code 135
Music and video
Adding songs to your phone 136
Searching for local music 136
Listening to music 137
Creating a playlist 138
Playing a playlist 139
Setting a song as the ringtone 139
Playing a video 139
Accessing the Internet
Using mobile data to access the Internet 141
Using Wi-Fi to connect to the Internet 141
Sharing your mobile Internet with other devices 143
Transferring data using Bluetooth 146
Transferring data using Wi-Fi Direct 147
Transferring data between your phone and a
computer 149
Transferring data between your phone and a USB
storage device 149
Multi-screen 151
Using NFC to transfer data between phones 152
Contents
Backup and restore
Using the Backup app to back up and restore data 154
Restoring factory settings 155
Updating your phone 155
File management
Viewing files 157
Sharing files 158
Creating folders 159
iv
Page 6

Contents
Renaming files 159
Copying, moving, or deleting files 159
Creating or extracting archives 160
Excluding small images 160
Storing private files in a safe 160
Using your phone to view files shared by a
computer 162
Power management
Monitoring your power usage 164
Viewing power usage 164
Enabling the Ultra power plan 165
Closing background apps when the screen is
locked 166
Preventing background apps from accessing the
Internet 166
Configuring display and sound settings 167
Phone Manager – round-the-clock protection
for your phone
Optimizing your system 168
Managing data usage 169
Harassment filter 170
Battery management 171
App lock 172
Convenient features, making life easier for you
Calendar 173
Clock 174
Weather 176
Notepad 178
FM Radio 180
Calculator 181
Sound recorder 181
Mirror 183
Settings
Enabling location access 185
v
Page 7

Configuring the display settings 186
Sound settings 187
Changing the screen unlock method 188
Airplane mode 189
Using the floating dock 190
Setting your SIM card PIN 191
Setting up an account 192
Setting the date and time 193
Changing the system language 194
Accessibility features
About your phone's accessibility features 195
TalkBack 195
Captions 198
Using magnification gestures 198
Using the power button to end a call 200
Adjusting the screen response time 200
Color correction 201
Safety information
Contents
Safety information 202
Personal Information and Data Security 207
Legal Notice 208
vi
Page 8
Exciting new features
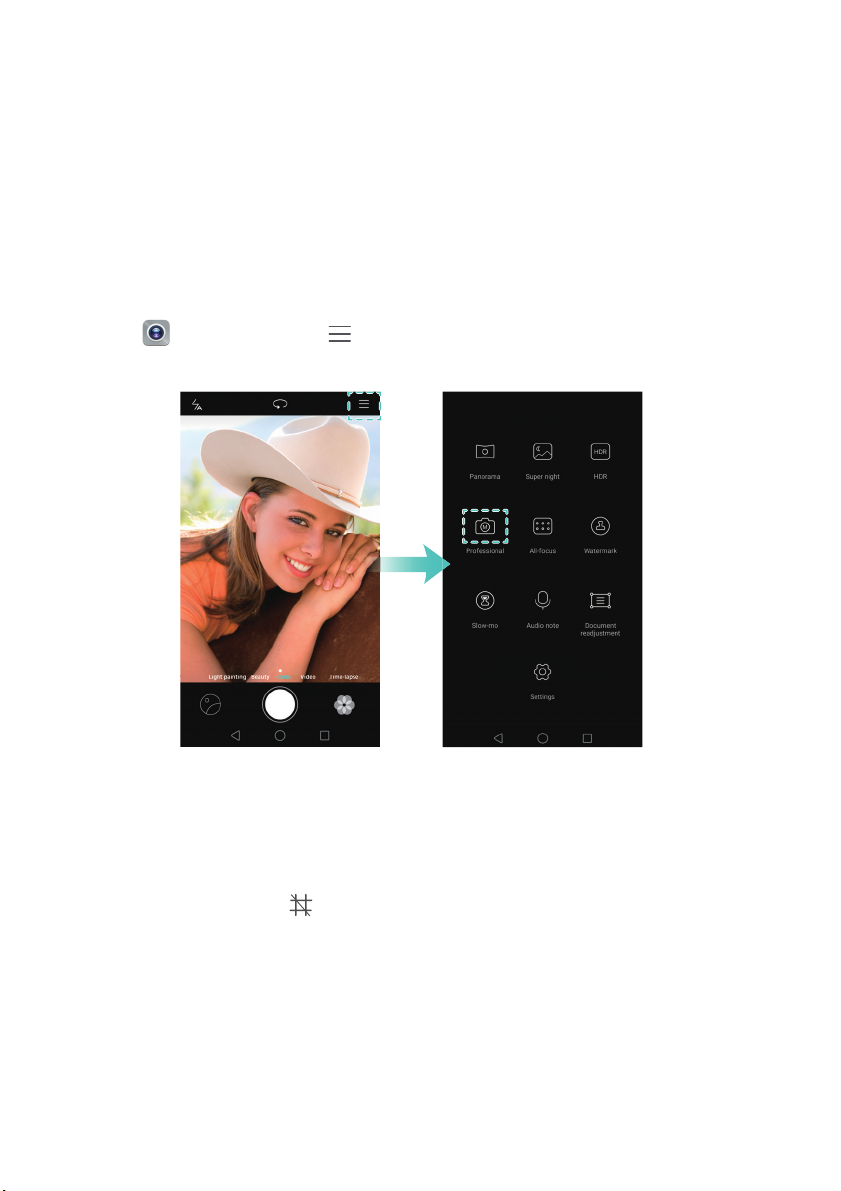
Pro camera mode
Photography is all about light and composition. When combined effectively, these two
elements can produce stunning, soul-stirring images. Pro camera mode lets you fine-tune
photos and gives you full control over composition, exposure, and shutter speed.
1
Open
Camera
and touch >
Professional
.
2
On the Pro camera settings screen, you can enable grid lines, or configure parameters
such as lighting, exposure, and shutter speed. For more information, refer to
camera settings.
•
Grid lines
3 grid, phi grid, or a spiral-shaped overlay. These overlays have been designed by
professionals to help you compose interesting, professional-looking shots.
•
Shutter speed and exposure control
screen to produce a perfectly-exposed shot. You can set the ISO, shutter speed,
white balance, exposure compensation, focus mode, and metering mode.
: Touch the icon at the top of the screen. You can choose from a 3 x
: Adjust the parameters at the bottom of the
Pro
1
Page 9

Exciting new features
For more information, refer to Pro camera mode.
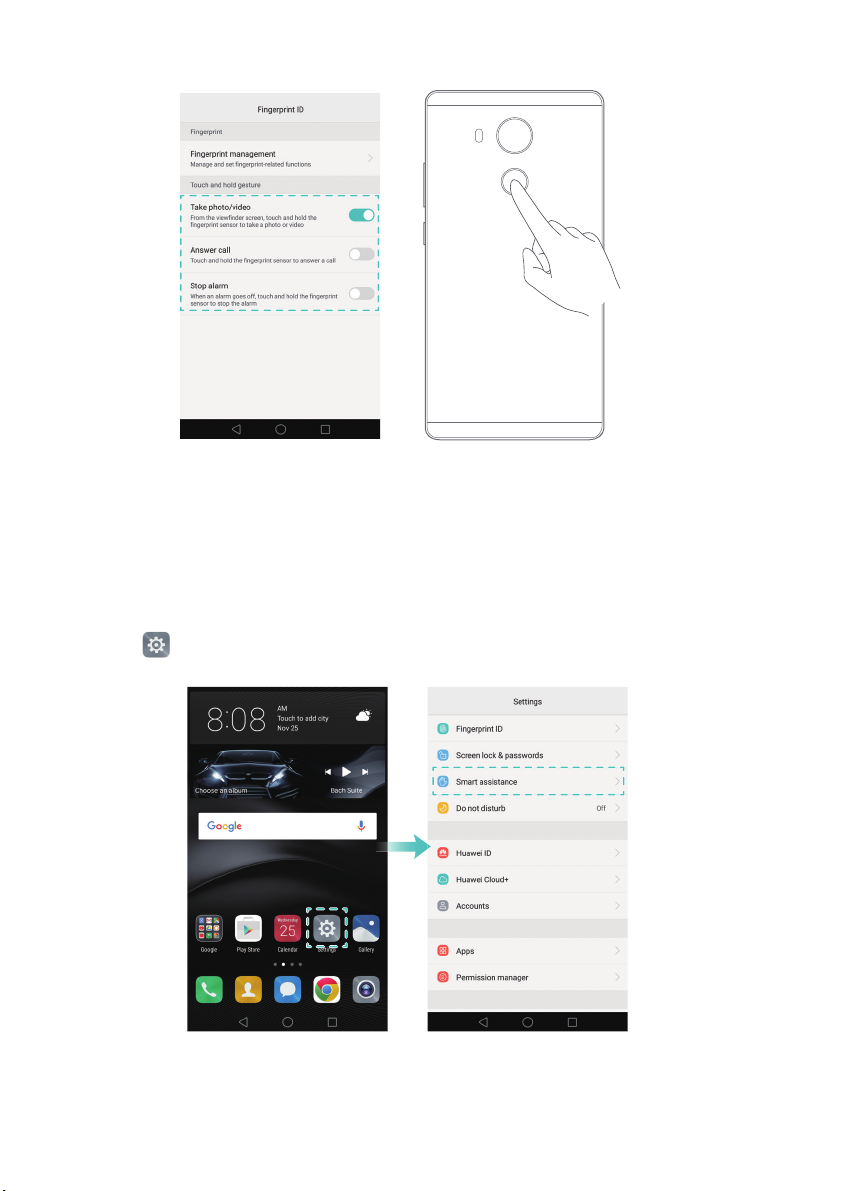
Smart fingerprint
Smart fingerprint makes using your phone even easier. Fingerprints aren't just for
unlocking. Touch the sensor with any finger to activate commonly-used features. Say
goodbye to tedious screen tapping.
1
Open
2
In the
enable.
•
Take photo/video
fingerprint sensor to take a picture.
•
Answer call
to answer it.
•
Stop alarm
disable it.
Settings
Touch and hold gesture
and select
: When using the camera viewfinder, touch and hold the
: When you have an incoming call, touch and hold the fingerprint sensor
: When your alarm goes off, touch and hold the fingerprint sensor to
Fingerprint ID
section, turn on switches for those features you want to
.
2
Page 10
Exciting new features
Knuckle screenshots
Want to show off your video game achievements to your friends? Now, you can use a
knuckle to take a screenshot of the whole screen, or part of it.
1
2
Open
Touch
Settings
Motion control
and select
Smart assistance
>
Smart screenshot
.
and turn on the
Smart screenshot
switch.
3
Page 11

•
Full screenshot
current screen in full.
Exciting new features
: Knock the screen firmly with your knuckle twice to capture the
•
Partial screenshot
around the area you want to capture, and then return to the starting point. Your
selection is displayed on screen; the area inside the blue line will be captured. You can
also select the screenshot box at the top of the screen for different screenshot shapes.
Touch to save a screenshot.
: Knock the screen firmly with your knuckle. Drag your knuckle
4
Page 12

Exciting new features
After creating a screenshot, touch
Share
to share it with friends. For more information
about sharing, refer to Sharing images or videos.
By default, screenshots are stored in
Gallery
, within the
Screenshots
folder.
5
Page 13

Exciting new features
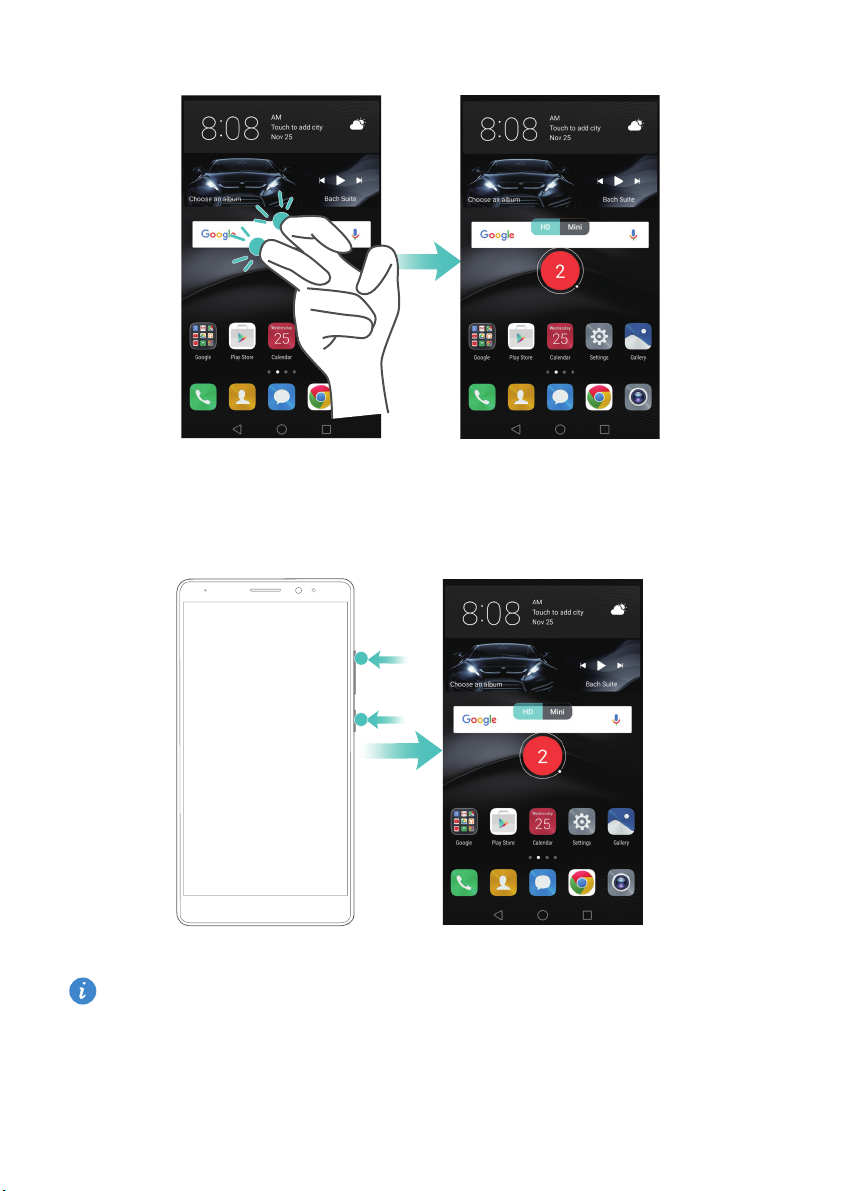
Screen recorder
Use the screen recorder feature to teach friends and family how to use phone features
or record video game footage.
Before making a screen recording, ensure your phone is unlocked.
Starting the recording
You can enable screen recorder using one of the following methods:
•
Knock the screen twice with two knuckles, and then choose a video format.
6
Page 14
Exciting new features
•
Press the volume up and power buttons simultaneously, and then choose a video
format.
While making a screen recording, you can also record sound by talking into the
microphone.
Stopping the recording
You can stop a screen recording using one of the following methods:
7
Page 15
•
Knock the screen twice with two knuckles.
•
Press the volume up and power buttons simultaneously.
Exciting new features
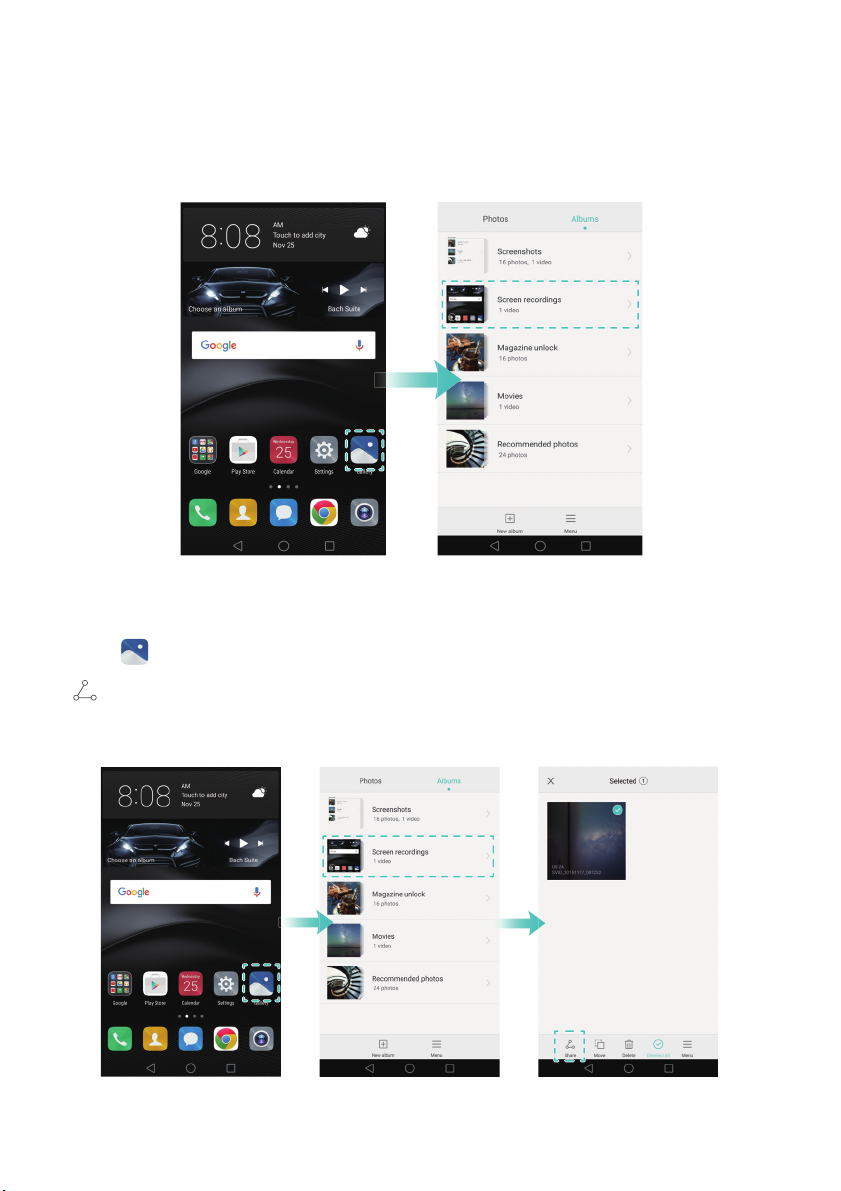
By default, video recordings are stored in
Sharing screen recordings
Open
Gallery
. Touch and hold the recording you want to share, and then touch
to share it with friends.
Gallery
, within the
Screen recordings
folder.
8
Page 16
Exciting new features
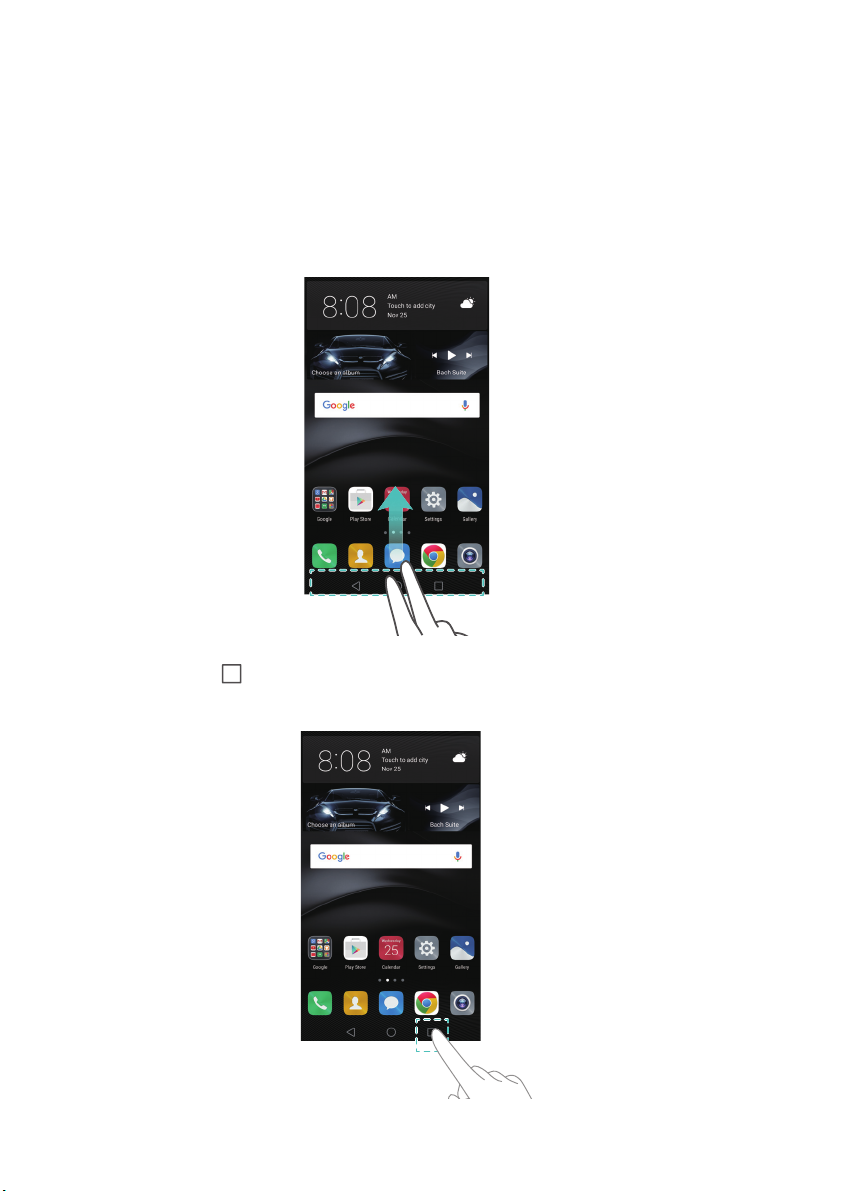
Opening two apps on one screen
Want to watch a film while you create this week's shopping list? This is now possible with
dual windows, a feature that lets you view two apps on screen at once.
You can enable dual windows using one of the following methods:
•
Swipe upwards with two fingers from the bottom of the virtual navigation bar.
•
Touch and hold
Recent
.
9
Page 17
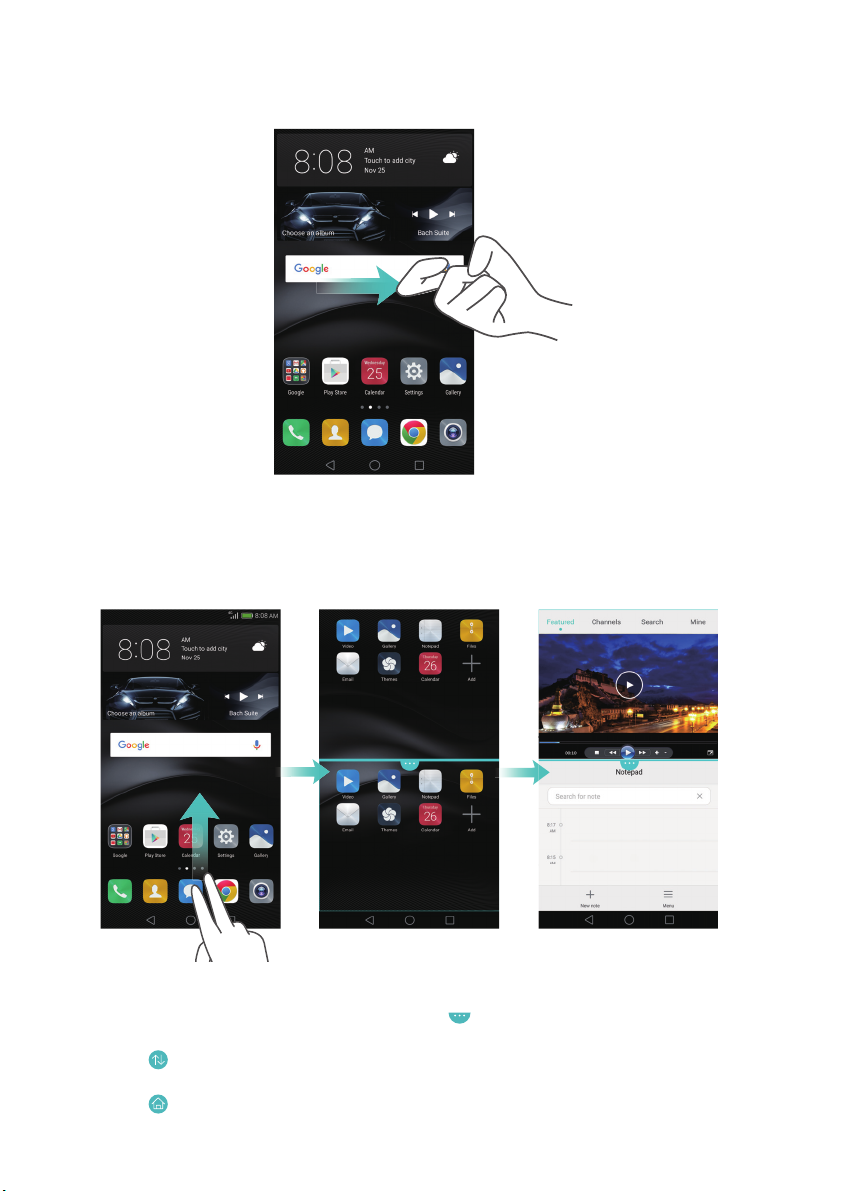
Exciting new features
•
Slide a knuckle across the screen horizontally.
In dual windows view, the screen is divided into two windows. One app can be opened
Video
in each window (for example, open
in one window and
Notepad
in the other).
Skiing with children this weekend
-Dinner with Amy on Sunday
Drag the edge of a window to resize, or touch to open the dual windows menu:
•
Touch to swap the two windows.
•
Touch to switch to the app selection screen.
10
Page 18

•
Touch to exit dual windows.
Exciting new features
11
Page 19

Unboxing your phone
Microphone
Camera
Headset
jack
NFC
Flash
Volume button
Fingerprint
scanner
Speaker
Power
button
Status
indicator Earpiece
Front camera
Proximity sensor
Noise reduction
microphone
Microphone
Card
slot
Micro USB port
Getting to know your phone
The HUAWEI MATE 8 sports a Kirin 950 processor, a 6-inch full HD screen with 368 ppi,
a 4000 mAh battery, a full metal body, and a 16 MP rear camera. It comes with the all-
new EMUI 4.0 user interface, which offers a whole new range of smart, secure, and easy-
to-use features.
Do not cover the proximity sensor, as this will affect some of the phone's functions.
If you use a screen protector, do not cover the sensor. Use a screen protector that is
designed for your phone with a purpose-built hole for the sensor.
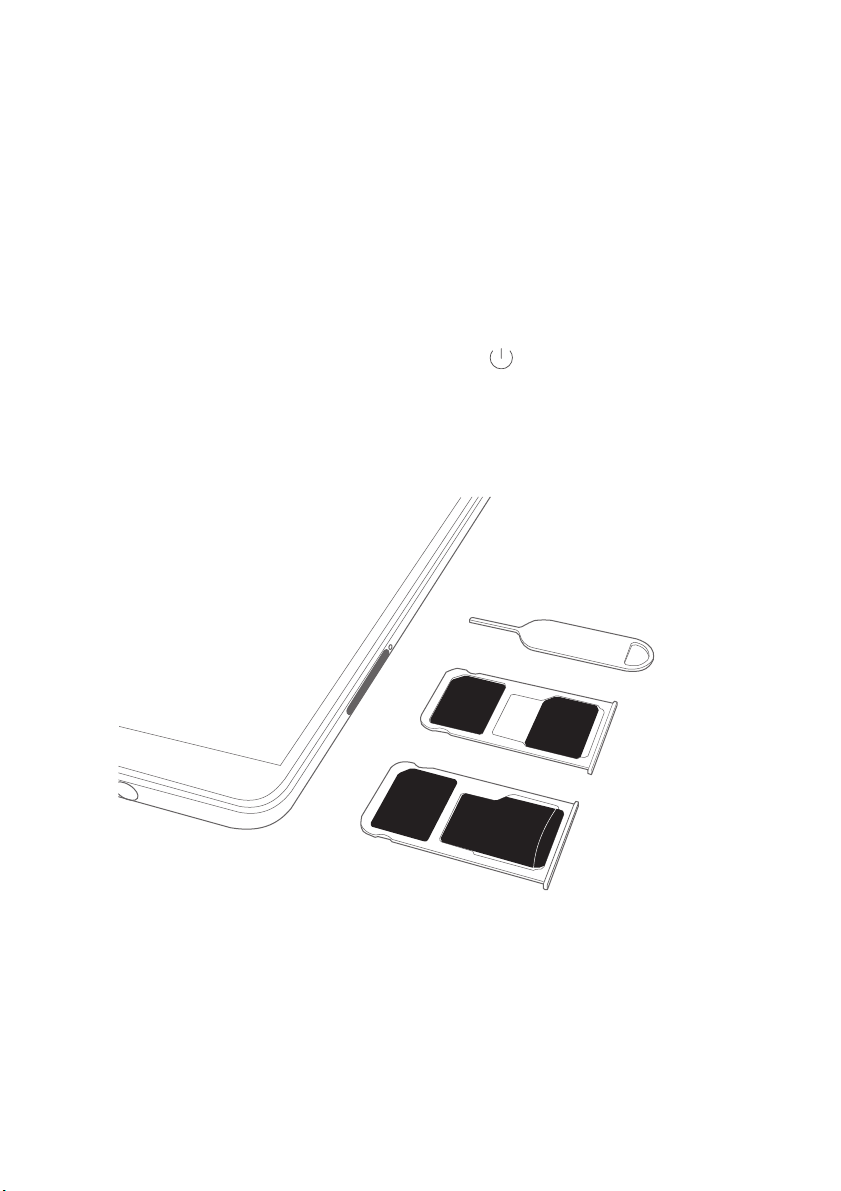
Inserting a SIM card and microSD card
The HUAWEI MATE 8 features a 2-in-1 card slot, which is located on the upper left side
of the phone. You can insert two nano-SIM cards, or one nano-SIM card and one microSD
card.
12
Page 20
Unboxing your phone
1DQR6,0
1DQR6,0
PLFUR6'
1DQR6,0
or
Tips:
•
Ensure that the card is correctly oriented and keep the card tray level when inserting it
into your phone.
•
Only use standard nano-SIM cards. Inserting non-standard cards may damage the SIM
card tray.
•
Be careful not to hurt yourself or damage your phone when using the SIM eject tool.
•
Store the SIM eject tool out of the reach of children to prevent them from swallowing
it or hurting themselves.
1
Press and hold the power button, and then select to turn off your phone.
2
To remove the card tray, insert the SIM eject tool included with your phone into the
small hole next to the card tray.
3
Insert a SIM card or microSD card into the card tray.
4
Insert the card tray back into your phone in the correct orientation.
13
Page 21

Unboxing your phone
Charging your phone
The HUAWEI MATE 8 comes with optimized power management software and a 4000
mAh battery to deliver impressive battery life.
Using your battery
•
Your battery can be recharged hundreds of times, but all batteries have a limited
lifespan. If you notice a significant deterioration in your phone's battery life, contact
an authorized Huawei service center for a replacement battery. The battery is built into
the phone and is not removable. Do not attempt to remove the battery yourself.
•
Your phone may become warm after prolonged use or when exposed to high ambient
temperatures. This is entirely normal. If your phone becomes hot to touch, stop
charging it, and disable unnecessary features. Place your phone in a cool location and
allow it to cool down to room temperature. Avoid prolonged contact with the surface
of your phone if it becomes hot.
•
When charging your phone, only use genuine Huawei batteries, chargers, and USB
cables. Using third-party accessories may impair your phone's performance and
constitutes a safety hazard. Avoid using your phone when it is charging. Do not cover
your phone or the power adapter.
•
Charging times may vary depending on the ambient temperature and the remaining
battery level.
•
A low battery warning will be displayed when the battery level is low.
•
Your phone will switch off automatically when the battery is nearly empty.
Battery status indicator
The battery status is indicated by your phone's indicator light and the battery icon in the
status bar.
•
If the status indicator blinks red and the battery icon changes to , the battery level
is below 10%.
•
The status indicator and the battery icon indicate the battery status during charging. If
the status indicator is red and the battery icon is
If the status indicator is yellow and the battery icon is , the battery level is
between 10% and 80%. If the status indicator is green and the battery icon is , the
, the battery level is below 10%.
14
Page 22

Unboxing your phone
battery level is between 80% and 100%. If the status indicator is green and the battery
icon is
your phone.
If your phone does not respond when you press the power button, this indicates that the
battery is empty. Charge your battery for at least 10 minutes using a genuine Huawei
charger and then turn on your phone.
, the battery is fully charged and you can unplug the charging cable from
Turning your phone on and off
Before you can get started with your phone, you need to know how to turn it on and off.
•
To turn on your phone, press and hold the power button until your phone vibrates and
the screen turns on.
•
To turn off your phone, press and hold the power button, and then touch .
If your phone does not respond after holding down the power button for 20 seconds,
the battery may be empty. If so, connect your phone to a charger to charge the
battery.
15
Page 23

Transferring data
Using the Backup app to transfer data
Easy backups help ensure you never lose your data. You can initiate a local backup to
copy data to your phone's internal storage or a microSD card.
Features may vary depending on your network operator.
Create new backup
Backup history
More settings
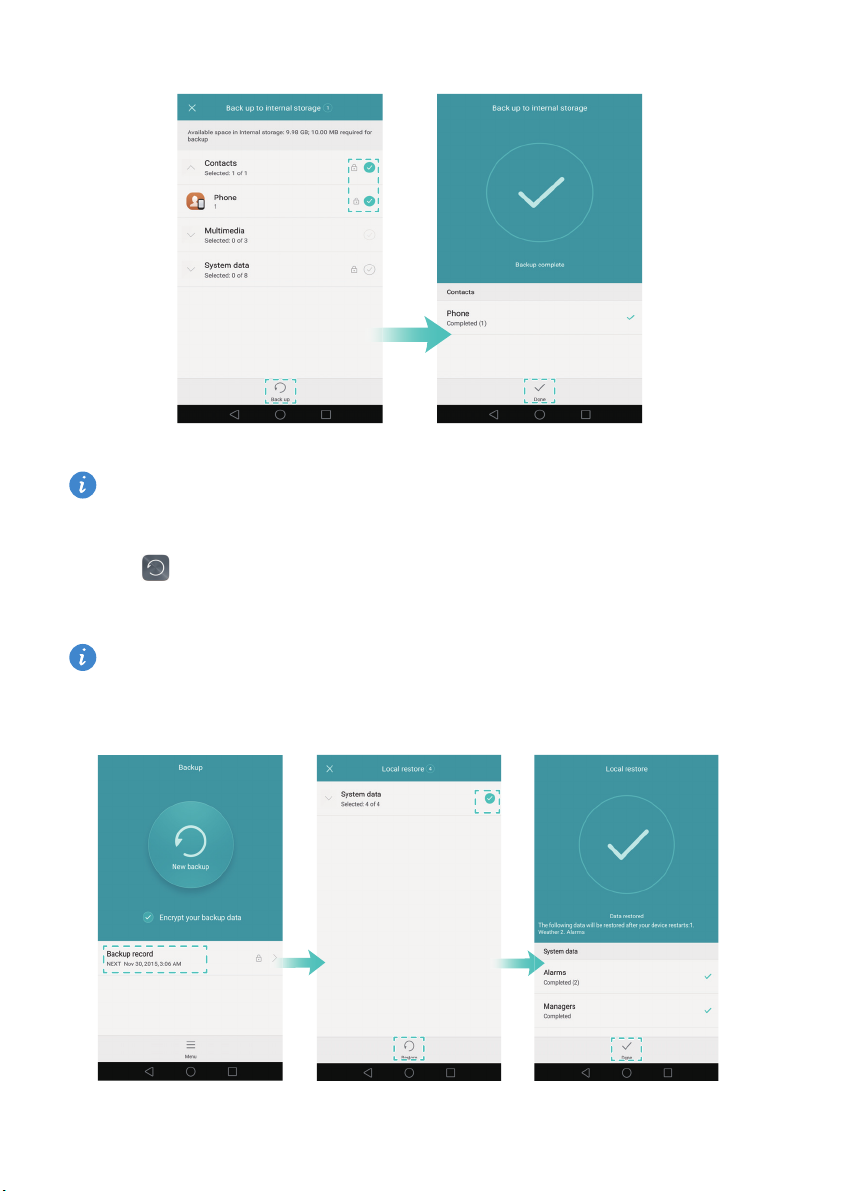
Backing up data to local storage
1
Open
2
Touch
3
Select the data you want to back up, and then follow the onscreen instructions to
perform the backup.
If data encryption is selected, enter a password when prompted and ensure you
remember it.
Backup
New backup
.
.
Password protection
16
Page 24
Transferring data
By default, backup data is saved to the
HuaweiBackup
folder in
Files
Restoring data from local storage
1
Open
2
Select the backup you want to restore.
Backup
.
If the backup data is encrypted, enter the encryption password when prompted.
.
3
Select the data you want to restore, and then touch
Restore
.
17
Page 25

Transferring data
Transferring data between your phone and a
computer
Use a computer to view photos stored on your phone, or transfer files between your
phone and a computer.
Connect your phone to a computer using a USB cable. Select
computer will automatically install any necessary drivers. Once installed, double-click the
new disk drive that appears to manage files. The drive name should be your phone model.
•
Photos
: View photos that are stored on your phone.
•
Files
: Transfer files between your phone and a computer.
Photos
or
Files
. Your
Touch for more
information
Touch to change the
USB connection
method
•
If no connection type is specified, your phone will remain in charging mode.
Copying contacts from an old phone to a new
phone
When you upgrade your phone, one of the first things you need to do is copy contacts
from your old device. Below are a number of easy methods you can use to copy contacts
from your old phone to your new phone.
18
Page 26

SIM card
Storage device
Bluetooth
Backup
Transferring data
Use the SIM import feature to copy SIM card contacts to your new
phone. For more information, refer to
SIM card.
If both phones support a microSD slot, export your contacts to a
microSD card in vCard format on the old phone, and then copy the
contacts to the new phone. For more information, refer to
Importing contacts from a storage device.
Enable Bluetooth on both your old and new phones, and transfer
contacts wirelessly. For more information, refer to
contacts using Bluetooth.
Use the Huawei Backup app on your old phone to export contacts
(if supported) and then use the same app on your new phone to
restore them. For details, see
restore data.
Using the Backup app to back up and
Importing contacts from a
Importing
Computer
Other methods
Sync contacts on your old phone to a computer, and then sync
these to a new phone using a phone manager.
•
Install social media apps and synchronize your contacts.
•
Log in to your Exchange account and synchronize your contacts.
19
Page 27

First use and initial setup
First use
Before using your phone, read the quick start guide that came with the phone and check
that the SIM card is inserted correctly. After you turn on your phone, the system will
guide you through the initial setup. Follow the onscreen setup instructions to start using
your new phone.
1
Select your language and region, and then touch
Next
.
2
Proceed to the
hotspots if there are any nearby. Select the network you want to connect to and then
enter the password to access the Internet.
Wi-Fi settings
screen. Your phone will automatically detect free Wi-Fi
20
Page 28
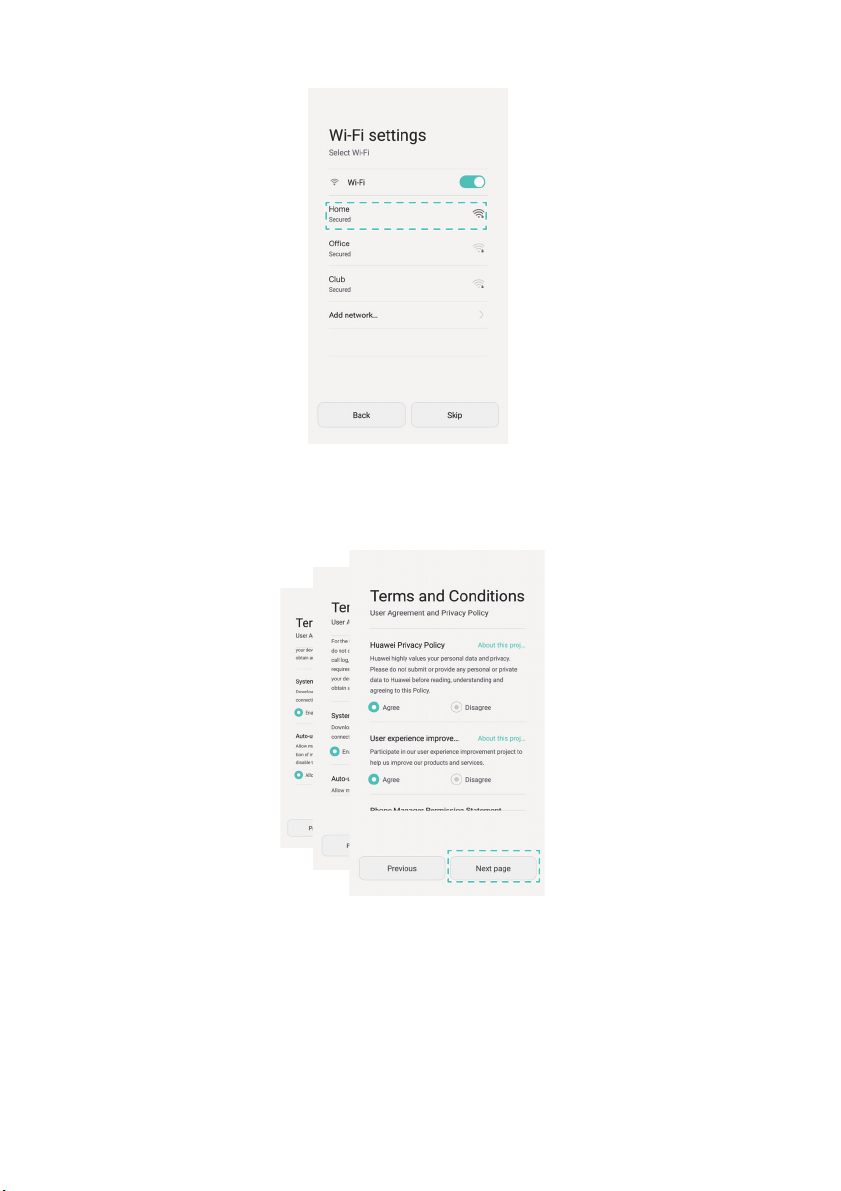
3
On the
Terms and Conditions
First use and initial setup
screen, accept the default settings and touch
Next page
.
4
Follow the onscreen instructions to enable Wi-Fi+.
21
Page 29

First use and initial setup
5
If your phone has a fingerprint sensor, follow the onscreen instructions to add a
fingerprint. After adding a fingerprint, you will also need to create a PIN or password
that you can use in combination with your fingerprint to unlock your phone.
6
On the
Configuration successful
Wait for a moment and the EMUI interface should launch. You can now start using
your phone.
screen, touch
Begin
to complete the configuration.
22
Page 30

First use and initial setup
Enable or disable a SIM card
Select 3G/4G SIM
Select default SIM for data services
Dual SIM settings
Switch freely between two SIM cards. Manage your work and private life on one device.
This feature is only available on dual SIM phones.
Open
as desired.
Settings
and touch
Dual card management
. You can configure both SIM cards
23
Page 31

First use and initial setup
•
If you disable a SIM card, you will be unable to use it to make calls, send messages
or access the internet.
•
Select
Dual SIM calling
manually or use the default SIM card each time you make a call. If you choose to
use the default SIM card, your phone will use that SIM card for all outgoing calls.
. You can configure whether you want to select a SIM card
Select SIM card display mode
for phone calls
Connecting to the Internet
Stay connected round the clock with your phone's Wi-Fi or mobile data connection.
Connecting to a Wi-Fi network
1
Swipe down from the status bar to open the notification panel.
2
In the
Shortcuts
tab, touch and hold to open the Wi-Fi settings screen.
24
Page 32

3
Turn on the Wi-Fi switch. Your phone will list available Wi-Fi networks.
First use and initial setup
4
Select the Wi-Fi network you want to connect to. If the Wi-Fi network is encrypted,
enter the password when prompted.
25
Page 33

First use and initial setup
Using mobile data
Before using mobile data, ensure that you have a data plan with your network operator.
1
Swipe down from the status bar to open the notification panel.
2
In the
Shortcuts
tab, touch to enable mobile data.
When you don't need to access the Internet, disable mobile data to save battery
power and reduce data usage.
26
Page 34

First use and initial setup
Themes and wallpaper
When you log in with your Huawei ID, you can download a range of different themes and
wallpapers to personalize your phone.
Changing the theme
Spice up your phone and configure a unique theme that reflects your personality.
Open
lock screen methods, wallpapers, app icons, fonts, and more.
Changing the wallpaper
Set your favorite photo or image as your phone's wallpaper.
1
Open
Themes
Settings
, select a theme, and then touch . Touch to mix and match
and select
Display
.
27
Page 35

2
Touch
Wallpaper
, and then touch
Lock screen wallpaper
First use and initial setup
or
Home screen wallpaper
.
•
Set the wallpaper
then follow the onscreen instructions to set it as the wallpaper.
: In the
Wallpapers
or
Live wallpaper
tabs, select an image, and
28
Page 36

First use and initial setup
You can also open
>
Wallpaper
as
•
Shake your phone to change the wallpaper
. Follow the onscreen instructions to set the image as the wallpaper.
Gallery
, touch and hold an image, and then touch >
: Turn on the
Shake to change
The wallpaper will change every time you shake your phone. Turn on the
switch, and then set
change
Interval
and
Album to display
. Your phone will
automatically change the wallpaper at the specified time interval.
Set
switch.
Random
29
Page 37

First use and initial setup
Notification and permission settings
Manage app and notification permissions to improve your phone's privacy and security.
Configuring notification permissions
1
Open
Settings
and touch
Notification panel & status bar
>
Notification center
.
2
Select an app to configure its notification permissions. For example, select
turn on the
you will receive status bar, home screen, and lock screen notifications.
Status bar, Banners
, and
Lock screen
switches. When you receive an email,
Email
and
30
Page 38

First use and initial setup
Configuring the fingerprint sensor
If you don't trust ordinary unlock passwords, try fingerprint unlock. Use your fingerprint
to unlock the screen, access encrypted files and protected apps, and complete payments
in third-party payment apps.
1
Open
Settings
and select
Fingerprint ID
>
Fingerprint management
.
2
Select
password.
PIN
or
Password
, and then follow the onscreen instructions to set a screen lock
31
Page 39

First use and initial setup
3
Once you have set a password, touch
4
Place your fingertip on the fingerprint sensor. Press down lightly on the sensor until
your phone vibrates. Repeat this step using different parts of your fingertip until your
phone has successfully added your fingerprint.
Enroll
to add your fingerprint.
5
Once you have added your fingerprint, touch OK. You can now use your fingerprint to
unlock your phone.
Gestures and navigation settings
You can control your phone easily using simple gestures. For example, flip your phone to
mute ringtones or hold it to your ear to answer calls or dial a number.
Gestures
Open
you want to enable.
•
Flip
Settings
: Mute sounds and disable vibrations for incoming calls, alarms, and timers.
. Touch
Smart assistance
>
Motion control
and then select the motions
32
Page 40

First use and initial setup
•
Pick up
: Pick up the phone to reduce the ringtone volume for incoming calls, alarms,
and timers.
•
Raise to ear
can also hold the phone to your ear when viewing call log details or contact details to
call someone. When calling in handsfree mode or with a Bluetooth headset, you can
raise the phone to your ear to switch to earpiece mode.
: When there is an incoming call, hold the phone to your ear to answer. You
•
Tilt
: In home screen editing mode, touch and hold an icon or widget and tilt your
phone to the left or right to move the icon to the next screen.
33
Page 41

First use and initial setup
•
Smart screenshot
in full, or capture part of the screen by using your knuckle to draw a closed shape on
the screen. Knock twice on the screen using two knuckles to start or stop screen
recording.
•
Draw
: Use your knuckle to draw a letter on the screen and launch a predefined app.
: Knock twice on the screen using your knuckle to capture the screen
•
Dual windows gesture
enable dual windows.
Navigation bar
Open
navigation bar.
Settings
: Use your knuckle to draw a straight line across the screen and
, and then touch
Smart assistance
>
Navigation bar
to configure the
34
Page 42

First use and initial setup
Choose a custom navigation bar layout
Choose a custom navigation bar layout. If you select a navigation bar containing ,
you can touch for fast access to the notification panel.
35
Page 43

Installing apps
Installing an app from a microSD card
You can save installation packages to a microSD card and share them with other phones.
•
Installation packages from third-party sources may contain viruses or malicious
software and should be installed with caution. It is preferable to only install apps
that were downloaded from trusted sources.
•
Before installing an app from a microSD card, touch
Security
permission to install third-party apps. After installing an app, make sure that you
return to
switch.
and turn on the
Settings
>
Advanced settings
Unknown sources
>
Security
switch. This grants your phone
Settings
and turn off the
>
Advanced settings
Unknown sources
>
1
Copy the installation package to the microSD card.
2
Insert the microSD card into your phone.
3
Locate the installation package on the microSD card and touch to install.
After installation, the app will be visible on your home screen.
36
Page 44

Installing apps
Installing an app shared by another phone
If your friends have an app you would like on their phone, they can send it to your phone
using Bluetooth or Wi-Fi Direct.
•
Before using Bluetooth or Wi-Fi Direct to receive apps, touch
settings
phone permission to install third-party apps. After installing an app, make sure
that you return to
Unknown sources
•
App sharing using Wi-Fi Direct is only supported when both the sender and
recipient use Huawei phones.
>
Security
and turn on the
Settings
switch.
>
Advanced settings
Unknown sources
>
Security
switch. This grants your
Settings
and turn off the
>
Advanced
1
Enable Bluetooth on both phones and pair them. Alternatively, enable Wi-Fi on both
phones and establish a Wi-Fi Direct connection. For more information, refer to
Enabling Bluetooth and pairing your phone with another device and Transferring data
using Wi-Fi Direct.
2
On the other phone, go to the home screen and touch and hold the app you want to
share. Drag it to the
to share the app.
icon at the top of the screen. Select
Bluetooth
or
Wi-Fi Direct
37
Page 45

Installing apps
3
A
File transfer
To view transfer progress, swipe down from the status bar and open the notification
panel.
dialog box will appear on your phone. Touch
Accept
to accept the file.
4
Once the transfer is complete, touch the message in the notification panel to open the
folder where the file is stored. Touch the installation package to install the app.
38
Page 46

Installing apps
5
After installing the app, touch
DONE
. The app will then be visible on your home screen.
Uninstalling an app
You can free up space on your phone by removing unused apps. This will boost your
phone's performance.
Some pre-installed system apps cannot be removed.
•
On the home screen, touch and hold the app you want to uninstall and drag it to the
icon.
•
Touch
Settings
>
Apps
, select the app you want to uninstall, and then touch
Uninstall
.
39
Page 47

Installing apps
40
Page 48

Getting to know your phone
Locking and unlocking the screen
Locking the screen
•
Method 1: Press the power button to manually lock the screen.
•
Method 2: After being idle for a specified period of time, the screen will lock
automatically.
To change the screen-off time, touch
Unlocking the screen
When the screen is off, press the power button to wake the screen. Slide your finger in
any direction to unlock the screen.
Settings
, and then touch
Display
>
Sleep
.
Magazine Unlock
Magazine Unlock brings your lock screen to life. Each magazine contains a selection of
images that are displayed in turn when your screen is locked.
Swipe up from the bottom of the lock screen to display the Magazine Unlock options.
41
Page 49

View, add, or delete images from your magazine
Swipe up to open the camera
Getting to know your phone
Add image to favorites
Configure lock screen type, image
update method, and magazine type
App shortcuts
Add magazines to the viewing list
: Touch >
Subscriptions
to add your favorite
magazines to the viewing list.
Updating your Magazine Unlock images requires an Internet connection. Set your
phone to update images over Wi-Fi to avoid excessive data usage. Touch , and
then turn on the
Manage your Magazine Unlock images
Add images to your favorites
Auto-update over Wi-Fi
: Touch to add or delete images.
: Touch to add an image to your favorites and prevent
switch.
your phone from automatically replacing it with a new image when a magazine is
updated.
Touchscreen gestures
You can use simple touchscreen gestures to perform a variety of tasks, such as open apps,
scroll through lists, and zoom images.
42
Page 50

Getting to know your phone
Touch
: Touch an item once. For example, touch to
select an option or open an app.
Double touch
: Touch the target area of the screen
twice in quick succession. For example, double touch
an image to zoom in or out.
Touch and hold
: Touch and hold the target area of
the screen for at least 2 seconds. For example, touch
and hold a blank area on the home screen to enter
the home screen editing mode.
Swipe
: Swipe your finger on the screen. For
example, in the
Notifications
tab in the notification
panel, swipe left or right on a notification to dismiss
it. Swipe vertically or horizontally to go to other
home screens, scroll through a document, and more.
43
Page 51

Getting to know your phone
Drag
: Touch and hold an item and then move it to
another position. For example, you can use this
gesture to rearrange apps and widgets on the home
screen.
Spread fingers apart
the screen. For example, spread two fingers apart to
zoom in on a picture or web page.
Pinch fingers together
on the screen. For example, pinch two fingers
together to zoom out on a picture or web page.
Swipe up with two fingers
using two fingers. For example, swipe up on the
virtual navigation bar with two fingers to enable dual
windows mode.
: Spread two fingers apart on
: Pinch two fingers together
: Swipe up on the screen
Status and notification icons
Status and notification icons may vary according to your region or network operator.
Status icons
44
Page 52

Getting to know your phone
Status icons are displayed on the right-hand side of the status bar. Status icons display
information about your phone's status, such as network connection information, signal
strength, battery level, and time information.
Signal strength No signal
Connected over GPRS Connected over 3G
Connected over EDGE Connected over HSPA
Connected over HSPA+ Connected over LTE
Airplane mode enabled Roaming
Receiving location data from
GPS
Bluetooth on
Silent mode enabled Vibration mode enabled
Charging Alarms enabled
Battery low Battery full
Headset plugged in No SIM card found
Notification icons
Notification icons are displayed on the left-hand side of the status bar when you receive
a new message or notification.
Missed calls Call in progress
New emails New messages
Select an input method New voicemail
Connected to Wi-Fi Wi-Fi network available
Downloading data Uploading data
Upcoming events Phone memory full
Synchronizing data Synchronization failed
Login or synchronization
problem
More notifications
45
Page 53

Getting to know your phone
Status bar: Displays notifications and status icons
Display area: Displays app icons, folders, and widgets
Screen position indicator: Indicates which home screen is displayed
Dock: Displays frequently used applications
Navigation bar: Displays virtual navigation keys
Portable Wi-Fi hotspot on Connected to a VPN
USB tethering on USB debugging mode enabled
Home screen
Getting to know your home screen
Your home screens are where you can find your favorite widgets and all your apps. We
removed the application list to give you a more convenient and direct path to your apps.
Virtual navigation bar keys
•
Back
: Touch to return to the previous screen or close an app . When enter ing te xt,
touch to close the onscreen keyboard.
•
Home
: Touch to return to the home screen.
•
Recent
: Touch to access the list of recently used apps, or touch and hold to enable
dual windows mode.
:
Switching between home screens
Swipe left or right to view the extended home screens. Touch
default home screen.
Home
to return to the
46
Page 54

Getting to know your phone
On the home screen, pinch two fingers together or touch and hold a blank area on the
screen to enter the home screen editing mode. You can:
•
Set the default home screen
chosen home screen as the default home screen.
: Touch at the top of the home screen to set the
•
Move a home screen:
•
Add a home screen
•
Delete a blank home screen
Drag the home screen to the desired location.
: Touch on the home screen furthest to the left or right.
: Touch at the bottom of a blank screen.
Automatic screen rotation
When you rotate your phone, some apps will automatically adjust the screen orientation
to make them easier to use. This feature also lets you use tilt-controlled applications,
such as racing games.
Swipe down from the status bar to open the notification panel, and then touch
in the
rotate
Shortcuts
tab to enable or disable automatic screen rotation.
Auto-
47
Page 55

Getting to know your phone
Organizing applications and widgets on the home screen
Adding a widget to the home screen
Add frequently used widgets to the home screen for quick access.
On the home screen, pinch two fingers together to enter home screen editing mode.
Touch
Widgets
and select a widget. The widget will be added to a blank area on the home
screen.
You must have enough space on the home screen to add widgets. If there is not
enough space, add another home screen or free up some space.
48
Page 56

Getting to know your phone
Moving a widget or icon
On the home screen, touch and hold a widget or app icon until your phone vibrates. You
can then drag the app icon or widget to the desired location.
Deleting a widget or icon
On the home screen, touch and hold the app icon or widget you want to delete until
is displayed at the top of the screen. Drag the unwanted app icon or widget to .
After you have moved/deleted an app icon, a blank space will appear on the home
49
Page 57

Getting to know your phone
screen. You can sort app icons automatically; for more information, refer to Aligning
home screen apps automatically.
Creating a folder
You can create home screen folders to organize your apps by type. For example, you can
Games
create a
folder that contains all of your game apps.
On the home screen, drag an icon on top of another icon to create a folder containing
both apps. To rename the folder, open the folder and then touch the folder name.
50
Page 58

Getting to know your phone
Hiding applications
On the home screen, spread two fingers apart. Touch , select the apps you want to
OK
hide, and then touch
hidden.
. Apps will not appear on the home screen after they have been
Taking a screenshot
Your phone offers a quick and convenient way to take screenshots and share them with
your friends.
By default, screenshots are saved to the
Using the power and volume down buttons to take a screenshot
Press the power and volume down buttons at the same time to take a screenshot.
Screenshots
folder in
Gallery
.
51
Page 59

Using the screenshot shortcut switch
Getting to know your phone
Open the notification panel, and then touch in the
Shortcuts
tab to take a
screenshot.
Using your knuckle to take a screenshot
You can use your knuckle to take a screenshot of the whole screen, or part of it. For more
information, refer to Knuckle screenshots.
Touch
Share
when viewing a screenshot to share it with your friends.
52
Page 60

Getting to know your phone
Notification
Status indicator
The status indicator on your phone indicates the following status information:
•
Blinking red: The battery level is extremely low.
•
Steady red (when charging): The battery level is low.
•
Steady yellow (when charging): The battery level is medium.
•
Steady green (when charging): The battery is almost full or already full.
•
Blinking green: There are unread messages or notifications.
Reminders
Reminders let you know if you have notifications. For example, the number on the phone
icon indicates the number of missed calls.
Open apps with reminders to view more details about the notifications.
If you want to disable reminders for an app, pinch two fingers together on the home
screen to enter home screen editing mode, and then touch
app icons
and turn off the switch next to the corresponding app.
More settings
>
Badge
Notification panel
Swipe down from the status bar to open the notification panel and view notifications.
53
Page 61

Touch to view notification details
Swipe left or right to dismiss
notifications
Clear all notifications
Swipe left on the notification panel to go to the shortcuts tab.
Getting to know your phone
Shortcut switches
Adjust screen brightness
You can edit the shortcuts tab. Swipe up on the shortcuts tab, and then touch
Edit
to display all the shortcuts. Drag the shortcut icons to the desired location to
rearrange their layout.
Viewing notifications on the lock screen
You can view new notifications (such as missed calls and messages) on the lock screen.
54
Page 62

Getting to know your phone
1
Open
2
Touch
switch to enable lock screen notifications.
By default, your phone will only display lock screen notifications for certain apps. If
you want to enable lock screen notifications for more apps, refer to Notification and
permission settings.
Once you have enabled lock screen notifications, new notifications will be displayed on
the lock screen. Swipe right on a notification to view more detailed information.
Settings
Screen lock & passwords
.
, and then turn on the
Show detailed notification info
Notification panel and status bar settings
Open
down and display settings for the notification panel and status bars.
Configuring the drop-down settings
•
Touch
phone will go to the notifications tab if you have new notifications; otherwise it will
go to the shortcuts tab.
•
Touch
status bar to open the notifications tab, or swipe down from the right of the status bar
to open the shortcuts tab.
Settings
Drag actions
Drag actions
, and then touch
Notification panel & status bar
>
Smart selection
>
Notifications left, shortcuts right
. When you open the notification panel, your
to configure the drop-
. Swipe down from the left of the
55
Page 63

Getting to know your phone
•
Turn on the
is locked.
You cannot access the notification panel from the lock screen if you have set a screen
lock password.
Configuring the display settings
Notification panel
switch to access the notification panel when the screen
Turn the
switches on or off to configure the content that is displayed in the status bar.
Display carrier name, Display network speed
, or
Remaining battery percentage
Using fingerprint recognition
In addition to waking and unlocking the screen, the fingerprint sensor can also be used
to take a photo, answer an incoming call, and disable an alarm.
Adding a fingerprint for the first time
To better protect your privacy, you can only use the fingerprint screen unlock feature
PIN
or
when the unlock method is set to
1
Open
2
Touch
3
Select
PIN or password.
4
Once you have set a PIN or password, touch
5
Place your fingertip on the fingerprint sensor. Press down lightly on the sensor until
your phone vibrates. Repeat this step using different parts of your fingertip until your
phone has successfully added your fingerprint.
Settings
Fingerprint ID
PIN
or
Password
.
>
Fingerprint management
, and then follow the onscreen instructions to set a screen lock
Password
.
.
Enroll
to add your fingerprint.
56
Page 64

Getting to know your phone
6
Once you have added your fingerprint, touch OK. You can now use your fingerprint to
unlock your phone.
You will be asked to enter your backup PIN or password when you restart your phone
or if fingerprint recognition fails.
Adding, deleting, or editing fingerprints
1
Open
2
Touch
3
Enter the screen lock password, and then touch
4
In the
•
Touch
•
Touch a previously added fingerprint to rename or delete it.
Settings
Fingerprint ID
Fingerprint list
New fingerprint
.
>
Fingerprint management
Next
.
section, you can:
to add other fingerprints. You can add up to five fingerprints.
Accessing Safe with your fingerprint
Before you can access Safe with your fingerprint, you need to enable
you have enabled Safe, you will be prompted to associate a fingerprint with your
account. Touch
can also enable this feature as follows:
Associate
to access Safe using your fingerprint. If you skip this step, you
Safe
in
Files
. Once
57
Page 65

1
Open
2
Touch
3
Enter the screen lock password, and then touch
4
Touch
password and enable fingerprint recognition.
Settings
Fingerprint ID
Access safe
, and then follow the onscreen instructions to enter your Safe
.
>
Fingerprint management
.
Next
.
Accessing App Lock with your fingerprint
Getting to know your phone
Before you can access App Lock with your fingerprint, you need to enable
Phone Manager
fingerprint with your account. Touch
using your fingerprint. If you skip this step, you can also enable this feature as follows:
1
Open
2
Touch
3
Enter the screen lock password, and then touch
4
Touch
Lock password and enable fingerprint recognition.
. Once you have enabled App Lock, you will be prompted to associate a
Settings
Fingerprint ID
Access app lock
.
Phone Manager
>
Fingerprint management
, and then follow the onscreen instructions to enter your App
to access App Lock and locked apps
.
Next
.
App lock
in
Fingerprint sensor touch gestures
Touch the sensor with any finger to perform common tasks. Say goodbye to tedious
screen tapping.
1
2
3
Open
Touch
In the
enable.
Settings
Fingerprint ID
Touch and hold gesture
.
.
section, turn on switches for features you want to
•
Take photo/video
fingerprint sensor to take a picture.
•
Answer call
to answer it.
: When using the camera viewfinder, touch and hold the
: When you have an incoming call, touch and hold the fingerprint sensor
58
Page 66

Getting to know your phone
•
Stop alarm
disable it.
: When your alarm goes off, touch and hold the fingerprint sensor to
Accessing applications
Opening and switching between applications
Opening applications from the lock screen
Press the power button to wake the screen, and then swipe up on the icon to open
the camera app. You can also swipe up from the bottom of the screen and touch a
shortcut icon to quickly launch the corresponding app.
Opening an application from the home screen
On the home screen, touch an icon to open the corresponding app.
59
Page 67

Switching between applications
Getting to know your phone
To switch to another app, touch
the icon of the app you want to open.
Searching for applications
Home
to return to the home screen, and then touch
60
Page 68

Getting to know your phone
Finding an application
•
Swipe left or right to search for the desired app.
•
Swipe down from the middle of the screen to access the search bar, and then enter the
name of the app that you are looking for. The search results will be displayed
underneath the search bar. For more information, refer to
Viewing recently used applications
Finding applications quickly.
Touch
Viewing recently used applications.
Searching for hidden applications
On the home screen, spread two fingers apart to view your hidden apps.
Recent
to display the list of recently used apps. For more information, refer to
Viewing recently used applications
Touch
Recent
to display the list of recently used apps.
61
Page 69

Getting to know your phone
•
Touch a thumbnail to open the corresponding app.
•
Swipe left or right to display recently used apps.
•
Swipe up on a thumbnail to close the corresponding app.
•
Swipe down on a thumbnail to lock the corresponding app. will appear next to the
application. Swipe down again on the thumbnail to unlock the app.
•
Touch to close all unlocked apps.
Personalizing your phone
Simple home screen
The simple home screen uses larger icons and fonts and was designed with older users in
mind.
1
Open
2
Touch
screen.
3
On the simple home screen, you can:
•
Touch app icons or widgets to open them.
Settings
Home screen style
.
>
Simple
, and then touch to enable the simple home
62
Page 70

Getting to know your phone
•
Touch and hold an icon to enter home screen editing mode and add or delete app
icons.
•
Touch
Others
to open the app list and view or open apps.
•
Touch to add contacts or apps to the home screen.
•
Touch
Standard home
to exit the simple home screen.
Changing the theme
You can change the home screen wallpaper, icon style, font, and more. For more
information, refer to Themes and wallpaper.
Changing the wallpaper
You can set your favorite images or photos as your phone's wallpaper. For more
information, refer to Themes and wallpaper.
Assigning ringtones to contacts
You can assign a unique ringtone to each contact so that you can easily tell who is
contacting you.
1
Open
2
Select the desired contact, and then touch
Contacts
.
Phone ringtone
.
63
Page 71

Getting to know your phone
3
Select the desired ringtone or music file, and then touch .
Set a ringtone for this contact
For more information on how to configure call and message ringtones and vibration
settings, refer to Sound settings.
Changing the font size
The phone's font size can be increased to make it easier for older users to use their
phone.
Open
•
View mode
Select
Settings
Large
, and then touch
: Change the size of the font, images, and other user interface elements.
to increase the font size or
Display
. You can configure the following settings:
Small
to fit more content on one screen.
64
Page 72

•
Font size
The selected display mode
: Set the system font size.
The
Extra large
font size will only be displayed in messages, contacts, and the dialer
app.
Getting to know your phone
Switch display mode and view
a preview
Entering text
Switching text input methods
You can switch between text input methods as desired.
1
On the text input screen, swipe down from the status bar to open the notification
panel.
2
Touch
Select input method
method.
If there are no input methods to choose from, go to
>
settings
Language & input
turn on the switch next to the corresponding input method.
Huawei Swype input method
You can quickly enter words by swiping on the keyboard.
in the
Notifications
>
Default keyboard
tab, and then select the desired input
Settings
>
Configure input methods
, touch
Advanced
, and then
65
Page 73

Getting to know your phone
U
Swipe letters to input words
Toggle between upper and lower case
Input method settings
Enter a space
Toggle Chinese and English input
Enter numbers and symbols
Android input method
Toggle between upper and lower case
Enter numbers and symbols
Touch and hold to open the input
Enter a comma
options menu
Enter a space
Touch and hold to choose another input method
Editing text
You can select, cut, copy, and paste text on your phone.
Backspace
Switch to voice input
Backspace
Enter a period
Touch and hold to enter symbols
•
Select text
: Touch and hold the text to bring up . Drag or to select more
or less text, or touch
$VU
$PQZ 4IBSF
4IBMMXFHPTPNFXIFSFBUUIFXFFLFOE
HPTPNFXIFSFBU
Select all
to selec t all t ext in a text box.
66
Page 74

•
Copy text
•
Cut text
•
Paste text
Getting to know your phone
: Select text and touch
: Select text and touch
: Touch and hold where you want to insert the text, and then touch
Cut
Copy
.
.
Paste
.
•
Share text
6GYZK
4IBMMXFHPTPNFXIFSFBUUIFXFFLFOE
: Select text, and then touch
9KRKIZGRR
Share
to select a sharing method.
67
Page 75

Tips and tricks
Amy Yang
Amy Yang
'JJXKYY .
[G]KO.7
2UTMMGTM*
OYZXOIZ9
NKT`NKT6
8)
S
XKIZUX
Adding contact details quickly
Use the camera to take a photo of a contact card. Your phone will recognize the contact
details and add them automatically. In
Contacts
, touch
Business cards
>
Scan
.
Amy Yang
'JJXKYY .[G]KO.72UTMMGTM*OYZXOIZ9NKT`NKT68)
3UHORK
3UHORK
2GTJROTK
2GTJROTK
+SGOR 'S_&N[G]KOIUS
+SGOR 'S_&N[G]KOIU
9GRKYJOXKIZUX
9GRKYJO
Taking snapshots when the screen is off
Ever missed a great photo opportunity because you couldn't turn on the camera in time?
Now you can take rapid snapshots with your phone, even when the screen is off.
On the camera settings screen, touch
snapshot
. When the screen is off, point your phone at a subject and press the volume
down button twice. The phone will take a photo and display how fast it was captured.
Ultra snapshot
>
Open camera and take quick
68
Page 76

Tips and tricks
Press the volume down button twice
For more information, refer Ultra Snapshot.
Perfect selfie
Enable perfect selfie mode and configure your custom beauty settings to make sure you
shine in group photos.
On the camera settings screen, touch
then configure your custom beauty settings.
Beauty
Next, switch to
face and apply your custom beauty settings to make sure you stand out in a group shot.
For more information, refer to Perfect Selfie mode.
mode and touch to take a photo. Your phone will detect your
Perfect selfie
. Turn on the
Perfect selfie
switch and
69
Page 77

Tips and tricks
Using time-lapse mode to fast forward the
action
Time-lapse mode lets you capture and accelerate subtle changes in scenery, such as a
sunrise, sunset, or the movement of clouds.
On the camera screen, swipe left or right to switch to
and then touch to start capturing video.
For more information, refer to Time-lapse mode.
Time-lapse
. Hold the phone steady,
Taking photos while recording a video
Ever wanted to take a photo while capturing a video?
On the camera screen, swipe left or right to switch to
Video
. While recording a video,
touch to take photos.
70
Page 78

Tips and tricks
Calling contacts when the screen is off
Enable quick calling to ring people even when the screen is switched off. To enable quick
calling, refer to Enabling quick calling.
When the screen is off, press and hold the volume down button. When you hear the alert
sound, say the name of the contact you want to call. Your phone will automatically call
the contact.
71
Page 79

Using voice wakeup
Tips and tricks
Open
the
wakeup commands. You can:
•
•
Settings
Voice wakeup
Find your phone
location.
Make a call
Voice wakeup only recognizes English voice commands.
. Touch
switch and follow the onscreen instructions to enter your voice
: Say "OK phone, call Jane". Your phone will make a call to Jane.
Smart assistance
: Say "OK phone, where are you?". Your phone will ring to reveal its
>
Voice control
>
Voice wakeup
, then touch
Answering or rejecting a call using voice
commands
Go to
with voice control
If your hands are occupied when a call comes in, simply say "Answer" or "Decline" to
answer or decline the call.
Settings
, touch
switch.
Smart assistance
>
Voice control
, then turn on the
Answer calls
72
Page 80

Touch
Voice command language
to change the voice command language.
Finding applications quickly
Tips and tricks
When you have lots of apps installed on your phone, you can use the search feature to
save yourself looking for an app screen by screen.
Swipe down from the middle of the screen to access the search bar, and then enter the
name of the app that you are looking for. The search results will be displayed underneath
the search bar.
73
Page 81

Tips and tricks
Using Wi-Fi+ to connect to the Wi-Fi network
with the strongest signal
After enabling Wi-Fi+, your phone will monitor Wi-Fi networks and mobile data and
select the connection with the best signal and fastest data transfer speeds.
Swipe down from the status bar to open the notification panel. In the
Wi-Fi+
touch and hold and select
. Turn on the
Wi-Fi+
switch to enable this feature.
Shortcuts
tab,
74
Page 82

Tips and tricks
For more information, refer to Connecting to the Wi-Fi network with the strongest signal.
Easy one-handed operation on large phones
How do I switch to one-handed mode?
Open
turn on the one-handed mode switch.
Settings
. Select
Smart assistance
>
One-hand UI
>
Mini screen view
and then
75
Page 83

Tips and tricks
Sharing your QR card
Share your contact details with new friends using a QR code and wave goodbye to the
hassle of manually entering phone numbers. On the contact details screen, touch the QR
code at the top of the screen to display your personal QR code.
Using your phone while wearing gloves
With gloves mode enabled, you can continue to use your phone easily even in the coldest
of weather.
Open
Settings
, and then touch
Smart assistance
>
Gloves mode
.
76
Page 84

Tips and tricks
Pocket mode
If you often miss calls when your phone is in your pocket, try enabling pocket mode. Your
phone gradually increase the ringtone volume and vibration intensity when you receive
an incoming call.
To enable pocket mode, open
on the
Pocket mode
switch.
Dialer
. Touch >
Settings
in the
Dialer
tab and turn
77
Page 85

Tips and tricks
Rapidly adjusting the system volume
When playing games or listening to music in public places, you may want to reduce the
volume to avoid disturbing others. Likewise, in noisy places, you may need to increase
your ringtone volume to avoid missing important calls. Adjusting the volume on your
phone is quick and easy.
On any screen, press the volume buttons on the side of the phone to adjust the volume.
Touch to adjust individual volume levels for ringtones, multimedia, alarms, and
phone calls.
Using the floating dock instead of phone
keys
The floating dock gives you rapid access to frequently-used phone functions, making it
easier to use your phone with one hand. Once enabled, the floating dock is displayed on
most screens. You can use the floating dock to quickly perform common tasks, such as
returning to the home screen or cleaning up phone memory.
Open
Settings
switch.
, touch
Smart assistance
>
Floating dock
, and then turn on the
Floating dock
78
Page 86

Tips and tricks
Aligning home screen apps automatically
Gaps may appear on the home screen after you uninstall apps or move them into folders.
You can arrange apps neatly on the home screen by using the automatic align feature.
Pinch two fingers together to enter home screen editing mode. Touch
Shake
then turn on the
editing mode. Shake your phone to realign app icons and fill any gaps.
switch. Touch and hold the home screen to enter home screen
More settings
and
Touch-disable mode
When your phone is in a pocket or a bag, accidental presses might cause it to dial a
number or waste your mobile data. To prevent accidental presses, switch on touch-
disable mode.
79
Page 87

Tips and tricks
Open
Settings
, touch
Smart assistance
, and then turn on the
Touch-disable mode
switch. If you switch on your phone while the top of the screen is covered, you will be
unable to swipe the screen. The touchscreen will function properly once you uncover the
top of the screen.
80
Page 88

Call & Contacts
1
2
Opening Dialer
Smart dialing
Enter the name or initials of a contact in the dialer. Your phone will show contacts that
match.
1
Open
2
Enter the name or initials of a contact in the dialer (for example, John Smith or JS).
Your phone will search your contacts and call log and list the results above the dialer.
Dialer
.
3
From the list, select the contact you want to call. If your phone has dual SIM support,
touch
4
Touch to end the call.
or to make a call.
Enabling quick calling
Call people quickly even when the screen is switched off.
1
Open
2
Touch >
Once quick calling is enabled, press and hold the volume down button when the screen
is off. When you hear the alert sound, say the name of the contact you want to call. The
phone will dial their number.
Dialer
on the home screen.
Settings
>
Quick calling
and then turn on the
Quick calling
switch.
Making a call from Contacts
81
Page 89

Call & Contacts
1
2
1
2
1
Open
2
Touch the search bar and enter the name or initials of the person you want to call. For
more information on searching for contacts, refer to
3
Touch the contact's number. If your phone has dual SIM support, touch or to
Contacts
.
Finding a contact.
initiate the call.
Making a call from the call log
View incoming and outgoing calls in the call log and dial the corresponding numbers.
1
Open
2
Slide the list up and down to view all calls. Touch the name or number of the person
Dialer
.
that you want to call. If your phone has dual SIM support, touch
or to initiate
the call.
Making an emergency call
In the event of an emergency, you can make emergency calls from your phone, even
without a SIM card. However, you must be in an area with network coverage.
1
Open
2
Enter the emergency number for your location in the dialer, and then touch .
Dialer
.
You can dial an emergency number even when the screen is locked. On the lock
screen, touch
Emergency call
, enter your local emergency number, and then touch
.
The ability to make emergency calls can depend on local regulations and network
operators in your region. Poor network usability or environmental interference may
prevent your call from being connected. Never rely solely on your phone for essential
communication during emergencies.
Speed-dialing
Configure speed-dialing for people you call frequently. Simply touch and hold a number
key to dial their number.
1
is the default key for voicemail. It cannot be used as a speed-dial number.
82
Page 90

Call & Contacts
1
2
1
2
1
Open
2
Touch and hold a number key to associate it with a contact.
3
Return to the dialer and touch and hold a number key to call the associated contact. If
Dialer
.
you are using a dual SIM phone, touch and hold a number key, and then select
or
to call the associated contact.
To delete a key association, open the dialer and touch >
Select the contact association you want to remove and then touch
number
.
Settings
Clear assigned
>
Speed dial
Making an international call
Before making a long-distance call, contact your network operator to activate an
international calling or roaming service.
1
Open
2
On the dialer screen, touch and hold the 0 key to enter a + symbol, and then enter the
Dialer
.
international code, area code, and phone number.
3
Touch . If your phone has dual SIM support, touch or .
Auto redial
Do you find it frustrating when a call fails to connect? Auto redial can keep redialing a
contact's number until your call is connected.
.
•
Single redial
: The first time a call does not connect or is interrupted, your phone will
display the single redial screen. Touch to redial the number once.
•
Infinite redial
: If the single redial fails, your phone will display the infinite redial
screen. Touch to redial the number until the call connects.
•
Ensure you touch promptly. The redial screen will close if you don't redial
within 10 seconds.
•
To cancel a redial attempt, touch .
83
Page 91

Call & Contacts
Answering or rejecting a call
When a call comes in, you can press the volume button to mute the ringtone.
While the screen is locked:
•
Drag right to answer the call.
•
Drag left to reject the call.
•
Touch to reject the call and send the caller a custom or predefined text message.
•
Touch to configure a callback reminder.
While the screen is unlocked:
•
Touch to answer the call.
•
Touch to reject the call.
•
Touch to reject the call and send the caller a custom or predefined text message.
•
Touch to configure a callback reminder.
On the dialer screen, touch >
predefined text messages.
Settings
>
Reject calls with SMS
to edit the
84
Page 92

Functions available during a call
During a call, your phone will display an in-call menu.
Call & Contacts
Open Calendar
Mute the call
Start a three-way call
Enable hands-free mode
•
Hide the in-call menu
touch the green status bar at the top of the screen.
•
Start a three-way call
this feature. For more information, refer to Making a conference call.
•
Adjust the volume
down button to decrease the volume.
: Touch
: Please contact your network operator to find out how to use
: Press the volume up button to increase the volume, or the volume
Home
or
Return
Place the current call on hold
View your notes
Display your contacts
Open the dialer
End the call
. To return to the in-call menu,
Answering a third-party call
Before enabling this feature, check that you have subscribed to a call holding service
and enabled call waiting on your phone. For more information on enabling call
waiting, refer to Enabling call waiting. For details, contact your network operator.
1
When in a call, if you receive another incoming call, touch . You can then answer
the incoming call, while holding the other line.
2
Touch to switch between the two calls.
85
Page 93

Call & Contacts
Making a conference call
It is easy to set up a conference call using the multi-party call feature on your phone. Call
one number (or receive a call), and then call another number to add it to the conference
call.
Conference calling requires network support. Please ensure you have activated this
service. For details, contact your network operator.
1
Call the first participant.
2
Once the call is connected, touch , and then dial the second participant's number.
The first participant will be placed on hold.
3
When the second call is connected, touch to start a conference call.
4
To add more people to the call, repeat steps 2 and 3.
5
Touch to end the call.
Viewing the call log
Adding a number from the call log
Select a number from the call log and save it to your contacts.
86
Page 94

1
Open
2
In the call log, touch the next to the number you want to add and do the
following:
•
Touch to create a new contact. For more information, refer to Creating a
contact.
•
Touch to add the number to an existing contact.
Dialer
.
Clearing the call log
Call & Contacts
Open
•
Delete one entry
•
Delete multiple entries
to delete. Touch >
Dialer
and do the following:
: Touch and hold a log entry, and then touch
: Touch >
Delete
.
Delete call log
Delete entry
and select the entries you want
.
Turning on pocket mode
Pocket mode makes sure you don't miss calls when your phone is in your pocket.
1
Open
2
Touch >
3
Turn on the
If your phone is in a pocket or handbag when someone calls you, the phone's ringtone
volume and vibration intensity will gradually increase until you answer.
Dialer
.
Settings
Pocket mode
.
switch.
87
Page 95

Call & Contacts
Call settings
Enabling call forwarding
If you are unavailable to take a call, you can configure your phone to forward calls to
another number.
1
Open
2
Touch >
3
Touch
then
4
Select a forwarding method, enter the destination number, and then touch
When call forwarding is enabled, your phone will forward calls that meet certain
conditions (such as forward when busy) to the number you specified.
Dialer
.
Settings
Call forwarding
Call forwarding
.
. If your phone has dual SIM support, touch
.
Card 1
or
Card 2
Enable
, and
.
Enabling call waiting
Call waiting allows you to take an incoming call when you are already in a call. You can
then switch between the two conversations.
1
Open
2
Touch >
Dialer
Settings
.
.
88
Page 96

Call & Contacts
3
Touch
Additional settings
SIM support, touch
Call waiting
the
After enabling call waiting, when you receive an incoming call while already in a call,
touch to answer the new call, or to switch between the two calls.
switch.
and turn on the
Card 1
or
Card 2
, and then select
Call waiting
switch. If your phone has dual
Additional settings
and turn on
Enabling do not disturb mode
Do not disturb mode allows you to work or relax in peace and quiet. Your phone will only
notify you about important calls or messages.
1
Open
2
Touch
3
Touch
contacts to the whitelist.
When do not disturb mode is enabled, your phone will only ring or vibrate when chosen
contacts call or message you. Your phone will mute ringtones or vibrations for any other
calls or messages. Notifications for these can be viewed in the notification panel.
Settings
Do not disturb
Define priority interruptions
.
and turn on the
Do not disturb
>
Whitelist for calls and messages
switch.
> to add
Configuring the harassment filter
The harassment filter automatically blocks calls and messages from unknown or
blacklisted sources. The blacklist is constantly updated, ensuring that you are never
disturbed.
Open
blacklists or whitelists. For more information, refer to Harassment filter.
You can also open
harassment filter.
Phone Manager
Dialer
, and then touch
and then touch >
Harassment filter
to configure filter rules and
Harassment filter
to configure the
Configuring voicemail
Divert calls to your voicemail when your phone is switched off or unavailable. Callers can
leave a voice message which you can listen to later.
Voicemail must be supported by your network operator. Please ensure that you have
subscribed to this service. Contact your network operator for information about their
voicemail service.
89
Page 97

Call & Contacts
1
Open
2
Touch >
3
Touch
settings
4
Touch
When you receive a voicemail message, the icon is displayed in the status bar. Dial
the voicemail number to retrieve the message.
Dialer
.
Settings
Additional settings
or
Card 1
Voicemail
.
, and then
>
Voicemail number
. If your phone has dual SIM support, touch
Card 2
.
, and then enter your voicemail number.
Additional
Creating a contact
1
Open
2
Touch .
3
Select a location to save the contact from the options menu.
4
Enter the contact's name, phone number, and other information, and then touch .
Contacts
.
If you want to save a number from your call log, touch the next to the number you
want to save, and then select or . You can also save phone numbers or email
addresses in
Messaging
or
Email
to your contacts.
Adding contact details quickly
Enter contact information on your phone more rapidly. Simply scan or take pictures of
contact cards to automatically add names, phone numbers, and other information to your
contacts.
1
Open
2
Touch
3
You can then:
Contacts
Business cards
.
>
Scan
.
90
Page 98

Call & Contacts
Amy Yang
Amy Yang
'JJXKYY .
[G]KO.7
2UTMMGTM*
OYZXOIZ9
NKT`NKT6
8)
S
XKIZUX
•
Take a photo of one card:
Place the contact card on a flat surface and hold the
phone in a landscape orientation. Adjust the viewfinder frame so that the card fits
the guidelines, and then touch
Amy Yang
'JJXKYY .[G]KO.72UTMMGTM*OYZXOIZ9NKT`NKT68)
3UHORK
3UHORK
2GTJROTK
2GTJROTK
+SGOR 'S_&N[G]KOIU
+SGOR 'S_&N[G]KOIUS
•
Take photos of multiple cards:
.
9GRKYJOXKIZUX
9GRKYJO
Switch to
Burst
mode and follow the onscreen
instructions to photograph multiple cards.
After you have finished scanning or taking photos, contact information will automatically
be saved to
Business cards
.
Importing or exporting contacts
Your phone supports
information, including names, addresses, and phone numbers.
.vcf
contact files.
VCF
is a standard file format for storing contact
Importing contacts from a storage device
1
Open
2
Touch >
3
Select one or more
Importing contacts from a SIM card
1
Open
2
Touch >
can choose whether to import from SIM 1 or SIM 2.
3
Select the contacts you want to import, and then touch .
Contacts
.
Import/Export
.vcf
Contacts
.
Import/Export
>
Import from storage
files, and then touch OK.
>
Import from SIM
. If your phone has dual SIM support, you
.
91
Page 99

Call & Contacts
4
Choose the location to import contacts to. Your phone will automatically import the
contacts.
Importing contacts using Bluetooth
1
Open
2
Touch >
3
Select
4
Enable Bluetooth on the device from which you want to import contacts and set the
device to be visible to other Bluetooth devices.
5
Touch
devices.
6
Touch the Bluetooth device from which you want to import contacts. Once connected,
your phone will automatically import contacts from the other Bluetooth device.
Contacts
Supports Bluetooth
Next
. Your phone will automatically turn on Bluetooth and search for nearby
.
Import/Export
>
Import from another phone
and then touch
Next
.
.
Importing contacts using Wi-Fi Direct
1
Open
2
Touch >
3
Select
enable Wi-Fi and scans for Wi-Fi Direct devices.
4
Select the Wi-Fi Direct device you want to connect to. Once connected, your phone
will automatically import contacts from the other device.
Contacts
Import via Wi-Fi Direct
.
Import/Export
>
Import from another phone
and then touch
Next
. The phone then prompts you to
.
Exporting contacts to a storage device
1
Open
2
Touch >
3
Touch
4
Choose where you want to export the contacts from and touch OK.
The exported
default. You can open
Contacts
Export
.vcf
.
Import/Export
.
file is saved to the root directory of your phone's internal storage by
>
Export to storage
Files
to view the exported file.
.
92
Page 100

Exporting contacts to a SIM card
1
Open
2
Touch >
can choose whether to import from SIM 1 or SIM 2.
3
Select the contacts you want to export, and then touch .
4
Touch OK.
Contacts
.
Import/Export
>
Export to SIM
. If your phone has dual SIM support, you
Sharing a contact
1
Open
2
Touch >
3
Select the contacts you want to share, and then touch .
4
Choose your sharing method, and then follow the onscreen instructions.
Contacts
.
Import/Export
>
Share contact
.
Managing contacts
Call & Contacts
Editing a contact
After creating a contact, you can edit their contact information at any time. This includes
adding or deleting default information such as phone numbers or email addresses. You
can also add a birthday or nickname, or choose a custom ringtone.
1
Open
2
Touch and hold the contact you want to edit, and then touch
3
Enter new contact information, and then touch .
Contacts
.
Edit
.
Merging duplicate contacts
When you add contacts to your phone from different sources, you may end up with
duplicate entries. These duplicate entries can be merged into one to help keep your
contacts organized.
1
Open
Contacts
.
93
 Loading...