

Page 1
HUAWEI HG532c
Home Gateway Quick Start
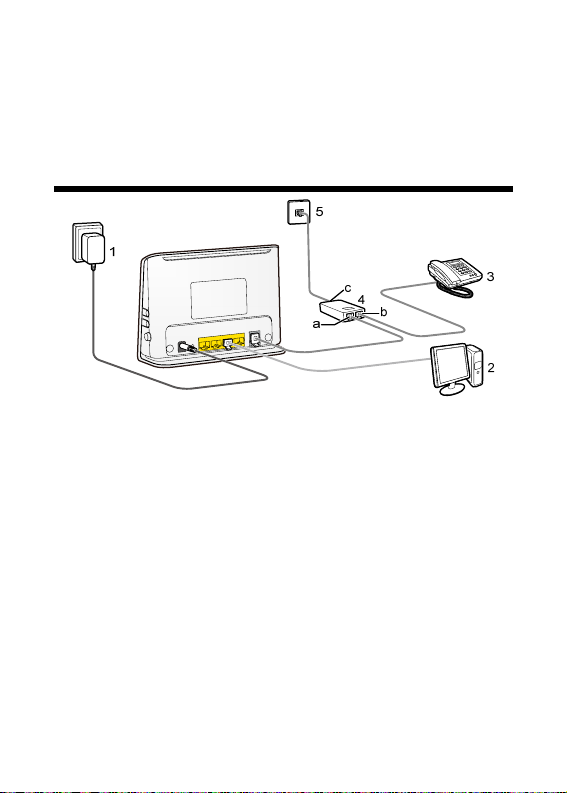
1 Connecting the Cables
a. MODEM interface b. PHONE interface
c. LINE interface 1. Power adapter
2. Computer 3. Telephone
4. Splitter 5. Telephone jack on the wall
To connect the cables, do as follows:
Connect the telephone jack on the wall to the LINE interface on the
Step 1
splitter with a telephone line. Connect the telephone to the PHONE
interface on the splitter with a telephone line.
Connect the ADSL interface on the HG532c to the MODEM
Step 2
interface on the splitter with a telephone line.
Connect the LAN interface on the HG532c to the Ethernet interface
Step 3
on the computer with a network cable.
Connect the Power interface on the HG532c to the power socket
Step 4
with the power adapter.
1
Page 2

2 Getting Started
Press down the ON/OFF button on the side of the HG532c to power on the
HG532c.
After you power on the HG532c, the Power indicators turns on and the
ADSL indicator blinks (for less than three minutes), which indicates that the
HG532c is being activated. After the ADSL indicator blinking, the Power
and ADSL indicators keep solid on, which indicates that the HG532c is
working properly.
3 Setting the Internet Access Parameters
To configure the HG532c, do as follows:
Verify the HG532c and the PC have connected properly, and the PC
Step 1
has obtained the IP address automatically.
Power off the HG532c if the embedded dial-up function is enabled but
the HG532c is not used for network access. Otherwise, even if you have
shut down your computer, the network operator may still charge you for
network access.
Log in to the Web-based configuration utility.
Step 2
1. Launch the Internet Explorer on the computer. Enter
http://192.168.1.1 in the address bar and press Enter.
2. In the displayed dialog box, enter the user name (admin by
default) and the password (admin by default), and then click Login.
After the password authentication is passed, you can access the
Web-based configuration utility.
Enable the embedded dial-up function.
Step 3
1. In the navigation tree on the left, choose Basic > WAN.
2. Click New to create a WAN connection.
3. Select DSL from the Link Type option button.
4. Select Enable for WAN connection.
5. Enter the VPI and VCI parameters that are provided by the
network operator in the VPI/VCI text boxes.
6. Select INTERNET from the Service list option button.
2
Page 3

7. Select PPP(oE) from the Connection type drop-down combo
box.
8. Enter the user name and password that are provided by the
network operator in the User name and Password text boxes, keep
the default settings of other parameters.
9. Click Submit.
After you complete the preceding settings, you can surf the Internet.
You need to perform the preceding operations on a computer only once. The
next time when you power on the computer, you can surf the Internet
without performing any configuration.
4 Configuring the Wireless Network Connection
If a wireless network adapter is installed on your computer, you can connect
you computer to the HG532c through a wireless connection. To configure
the wireless network connection, do as follows:
Enable the wireless network function, and set the wireless network
Step 1
name and access password of the HG532c, do as follows (taking the
authentication type WPA-PSK as an example):
1. Log in to the Web-based configuration utility.
2. In the navigation tree on the left, choose Basic > WLAN.
3. Choose the WLAN page.
4. Select the Enable WLAN option.
5. Enter a wireless network name in the SSID text box.
6. Select WPA-PSK from the Security drop-down combo box.
7. Enter an access password in the WPA pre-shared key text box.
8. Select AES from the WPA encryption drop-down combo box.
9. Click Submit.
Enable the wireless configuration service on your computer, do as
Step 2
follows (taking the Windows XP operating system as an example):
1. Right-click My Computer, and then choose Manage from the
shortcut menu.
2. In the Computer Management window, choose Computer
Management (Local) > Services and Applications >Services.
3
Page 4

3. From the services listed in the right pane of the Computer
Management window, right-click Wireless Zero Configuration,
and then choose Properties from the shortcut menu.
4. In the Wireless Zero Configuration Properties (Local
Computer) dialog box, check whether Service status is Started. If
not, click Start.
5. Click OK to close the dialog box, and then close the Computer
Management window.
Configure the wireless network connection on your computer, do as
Step 3
follows (taking the Windows XP operating system as an example):
1. Choose Start > All Programs > Accessories >
Communications > Network Connections.
2. In the Network Connections window, right-click Wireless
Network Connection to display a shortcut menu, and then select
View Available Wireless Networks from the shortcut menu.
3. Select the wireless network that is configured in Step 1, and then
click Connect in the lower right corner of the window.
4. In the displayed dialog box, enter the access password that is
preset in Step 1, and then click Connect.
After the password is verified, Connected appears on the icon of the
wireless network in the wireless network list, which indicates that the
computer is connected to the HG532c through a wireless connection.
Copyright © Huawei Technologies Co., Ltd. 2010. All
rights reserved.
THIS DOCUMENT IS FOR INFORMATION PURPOSE
ONLY, AND DOES NOT CONSTITUTE ANY KIND OF
WARRANTIES.
Issue: 01 (2010-07-26)
Part Number: 201216
4
 Loading...