

Page 1

HUAWEI FP2025/2225
Fixed Wireless Terminal
USER GUIDE
Page 2

Copyright © Huawei Technologies Co., Ltd. 2010. All rights reserved.
No part of this document may be reproduced or transmitted in any form or by any means without prior
written consent of Huawei Technologies Co., Ltd.
The product described in this manual may include copyrighted software of Huawei Technologies Co.,
Ltd and possible licensors. Customers shall not in any manner reproduce, distribute, modify,
decompile, disassemble, decrypt, extract, reverse engineer, lease, assign, or sublicense the said
software, unless such restrictions are prohibited by applicable laws or such actions are approved by
respective copyright holders under licenses.
Trademarks and Permissions
, HUAWEI, and are trademarks or registered trademarks of Huawei Technologies Co.,
Ltd.
Other trademarks, product, service and company names mentioned are the property of their
respective owners.
Notice
Some features of the product and its accessories described herein rely on the software installed,
capacities and settings of local network, and may not be activated or may be limited by local network
operators or network service providers, thus the descriptions herein may not exactly match the
product or its accessories you purchase.
Huawei Technologies Co., Ltd reserves the right to change or modify any information or specifications
contained in this manual without prior notice or obligation.
NO WARRANTY
THE CONTENTS OF THIS MANUAL ARE PROVIDED “AS IS”. EXCEPT AS REQUIRED BY
APPLICABLE LAWS, NO WARRANTIES OF ANY KIND, EITHER EXPRESS OR IMPLIED,
INCLUDING BUT NOT LIMITED TO, THE IMPLIED WARRANTIES OF MERCHANTABILITY AND
FITNESS FOR A PARTICULAR PURPOSE, ARE MADE IN RELATION TO THE ACCURACY,
RELIABILITY OR CONTENTS OF THIS MANUAL.
TO THE MAXIMUM EXTENT PERMITTED BY APPLICABLE LAW, IN NO CASE SHALL HUAWEI
TECHNOLOGIES CO., LTD BE LIABLE FOR ANY SPECIAL, INCIDENTAL, INDIRECT, OR
CONSEQUENTIAL DAMAGES, OR LOST PROFITS, BUSINESS, REVENUE, DATA, GOODWILL
OR ANTICIPATED SAVINGS.
Import and Export Regulations
Customers shall comply with all applicable export or import laws and regulations and will obtain all
necessary governmental permits and licenses in order to export, re-export or import the product
mentioned in this manual including the software and technical data therein.
Page 3
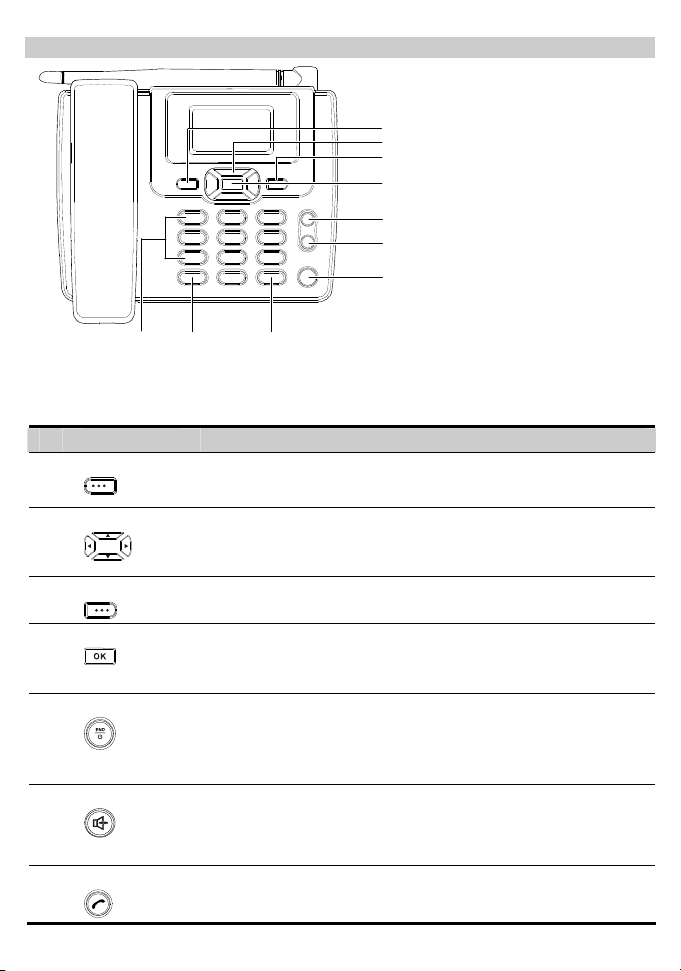
Your Fixed Wireless Terminal
1
2
3
4
5
6
7
8910
Note:
The figures of the FWT (Fixed Wireless Terminal) are only for your reference, please refer
color and shape to product.
No. Item Description
1 Left soft key
2 Scroll keys
3 Right soft key
4 OK key
5 End key
Select the option displayed on the lower left corner of the screen.
Access the shortcut screen in standby mode.
Adjust the microphone and the earpiece volume during a call.
Select the option displayed on the lower right corner of the screen.
Access the main menu in standby mode.
Select the option displayed on the lower left corner of the display
screen.
End a call or reject an incoming call.
Power on or off the FWT in standby mode (by pressing and holding
it).
Return to the standby mode.
6 Hands-free key
Activate/deactivate the hands-free mode in standby mode.
Cancel the dialing, when dialing a number in the hands-free mode.
End the current call during a call in the hands-free mode.
7 Call/Redial key
Make or answer a call.
View the call history in standby mode.
1
Page 4

No. Item Description
8 # key
Lock the keypad in standby mode (by pressing and holding it).
Switch between different input modes in editing mode.
9
* key
Activate/deactivate the quiet profile in standby mode (by pressing and
holding it).
Access the symbol screen in editing mode.
10 Number keys
Number keys from 0 to 9: Enter numbers and characters.
Number keys from 1 to 9: Press and hold a key to speed dial a phone
number in standby mode.
Screen Icons
Icon Description Icon Description
Network signal strength
Alarm clock is on
Message received
Voice message received
/
Calling / No service
Hands-free mode
Powered by the power adapter
Battery power level
Menu Tree
Phone Book Messages CallHistory
1. Search
2. Add New
3. Groups
4. Speed Dial
5. Copy All(Optional)
6. Delete All
7. My Phone Num
1. Write Message
2. Inbox
3. Outbox
4. Draft
5. Voice Mail
6. Message Settings
7. Delete All
1. Missed Calls
2. Received Calls
3. Dialed Calls
4. Call Duration
5. Delete All
8. Memory Status
Recorder (Optional) Fun&Utility Profiles
1. Guest
Announcements
2. Recorder Settings
1. Alarm
2. Schedule
3. Calculator
1. General
2. Outdoor
3. Quiet
4. Stopwatch
5. World Clock
6. Line Game
7. Smash Game
2
Page 5

Settings FM Radio (Optional)
1. Display
2. Call Settings
3. Phone Settings
4. Security
Installing the UIM Card (Optional)
Consult the service provider whether the UIM card is needed.
Power off the FWT and remove the power supply cable, and install the UIM card as shown. Make
sure that the golden contact on the UIM card is facing downwards.
Installing the Battery
Power off the FWT and remove the power supply cable, and install the battery as shown. Make sure
that the battery cord plug matches the battery jack. Do not insert the battery reversely.
Using the Power Adapter and Charging the Battery
Connect one end of the power adapter cable to the FWT and the other to the power socket.
Note:
Remove the battery if the FWT is left unused for a long period.
If the battery has not been used for a long time or the battery is exhausted, the screen of
the FWT may not function when you charge the battery again. This is normal. After the
battery is being charged for a while, you can power on the FWT for use.
3
Page 6

In normal conditions, the FWT depends on the power adapter for power supply and will
use the battery only in the case that the electricity has failed and the power adapter is
unavailable. As the battery can supply power only for a limited period, you must make
sure that the battery has been fully charged before putting it into use.
Using the Menu
1. In standby mode, press to display the main menu.
2. Press / to select a menu item.
3. Press to display submenu.
4. Access the submenu in either of the ways:
Press / to scroll to a submenu item and press to access it.
Press the number key corresponding to the number of a submenu to access it.
5. Press to return to the previous menu or return to the home screen.
6. Press to return to the standby mode.
Making a Call
1. In standby mode, enter a phone number.
2. Press to dial the number.
3. Press to end the call.
Note:
In standby mode, press to view the call history. Select a record and press to
dial this number.
Select a phone number from the phonebook and press to call this contact.
Answering a Call
When there is an incoming call, press , , or pick up the handset to answer it. Press
to reject it.
If the any-key answer function is activated, you can press any key except
an incoming call.
and to answer
Setting the Quiet Mode
Method 1: In standby mode, press and hold the * key to activate/deactivate the quiet mode.
Method 2: Choose Menu > Profiles > Quiet to activate the quiet mode.
Creating a Message
1. Choose Menu > Messages > Write Message.
2. Write the message.
4
Page 7

3. Press to select Send or Send&Save.
4. Insert recipients. Do the following:
Enter the phone number directly.
Insert a contact from the phone book.
Insert group.
5. Press to send a message.
Viewing a Message
The inbox stores received messages.
1. Choose Menu > Messages > Inbox.
2. Press / to scroll the messages.
3. Press to view the message.
4. Press to reply, delete, or forward a short message, or call or save the phone number of a
message.
Changing Text Input Modes
In editing mode, the current text input mode is displayed. Press the # key to change the input mode.
Note:
In the editing mode, press once to delete the letter on the left of the cursor. Press
and hold
to delete all the entered letters.
In the "ABC" "Abc" or "abc" input mode, press 0 once to enter a space, press 0 for two
consecutive times to enter a "0", and press 0 for three consecutive times to start a new
line.
In the "ABC" "Abc" or "abc" input mode, press 1 repeatedly to select and enter the
commonly used punctuations.
Entering English (ABC, Abc or abc)
In "ABC" "Abc" or "abc" input mode, press number keys to enter English letters.
If the letter you want to enter is on the same key as the previous one, you can enter the letter only
after the cursor appears again or after you move the cursor to the next space.
If you hope the initial letter is capitalized, you need to change the input mode into "Abc" manually
before you enter the word.
Intelligent Input (eZiEn)
In " eZiEn" input mode, press number keys to enter English words.
1. According to the word to be entered, press the corresponding number keys once, and the FWT
makes out the candidate words.
2. Press / or press * repeatedly to select the word.
3. Press / to confirm your selection. The word is displayed in the input area. Alternatively,
press the 0 key to confirm your selection and enter a space behind the word.
5
Page 8

Entering Numbers
In the "123" input mode, press a key labeled with the desired number.
Entering Symbols
1. In any input mode, press the * key to display a symbol list.
2. Press / to scroll up or down the symbol list.
3. Press the corresponding number key to enter the symbol.
Using the Voice Caller ID Function (Optional)
You can use the Voice Caller ID function so that you can hear a voice caller ID when there is an
incoming call.
1. Choose Menu > Settings > Call Settings > Voi ce Caller ID.
2. Press / to enable or disable the Voic e Caller ID function.
Using the Recorder (Optional)
You can use the recorder so that the FWT can automatically answer an incoming call and record the
voice of a caller.
Note:
When the FWT is recording the voice of the caller, you can press to answer the
call. In this case, the FWT stops recording without saving the recorded clip.
When the list of recorded clips is full, the FWT automatically deletes old clips.
Playing a Recorded Clip
1. Choose Menu > Recorder > Guest Announcements.
2. Press / to select the recorded clip.
3. The FWT automatically plays the recorded clip.
Enabling or Disabling the Recorder
1. Choose Menu > Recorder > Recorder Settings > Recorder On/Off.
2. Press / to enable or disable the recorder.
Setting the Auto Answer Function
1. Choose Menu > Recorder > Recorder Settings > Auto Answer.
2. Press / to select the interval between the ringing of the FWT and the
automatic answer of the phone.
Enabling or Disabling the Recording Monitoring Function
When the FWT is recording the voice of a caller, you can listen to the recording and determine
whether to answer the call.
1. Choose Menu > Recorder > Recorder Settings > Recording Monitoring.
2. Press / to enable or disable the Recording Monitoring function.
FWT Lock
The FWT lock protects your FWT from unauthorized use. The default FWT lock code is 000000. You
6
Page 9

can change it into any numeric string of 4 to 8 digits.
When the FWT is locked, enter the lock code to unlock the FWT first; otherwise, you can only make
emergency calls or answer calls.
PIN and PUK (Optional)
The personal identity number (PIN) protects your UIM card from unauthorized use. The PIN
unblocking key (PUK) can unblock the blocked PIN. If you enter wrong PIN codes for multiple times,
your UIM card is locked. In this case, you need to enter the PUK code to unlock the UIM card. Both
the PIN and PUK are delivered with the UIM card. For details, consult your service provider.
Keypad Lock
In standby mode, press and hold the # key to lock the keypad.
In standby mode, press
In standby mode, if the automatic keypad lock function is enabled and the standby time exceeds the
preset period, the keypad will be automatically locked.
and then press the * key to unlock the keypad.
Version: V100R001_01 Part Number: 31010DHF
7
 Loading...