

Page 1
B890 LTE Wireless Gateway
Quick Start
HUAWEI TECHNOLOGIES CO., LTD.
Page 2
Note:
Figures in this guide are only for your reference. For details about the particular
model you have chosen, contact your service provider.
Check the information about the product and its accessories when you purchase it.
Some accessories are not provided in the product package. If necessary, contact your
local dealer to purchase them.
This guide briefly describes the device functions. For details about how to set the
management parameters, see the help information on the web management page.
1 Getting to Know Your Device
Application Scenarios
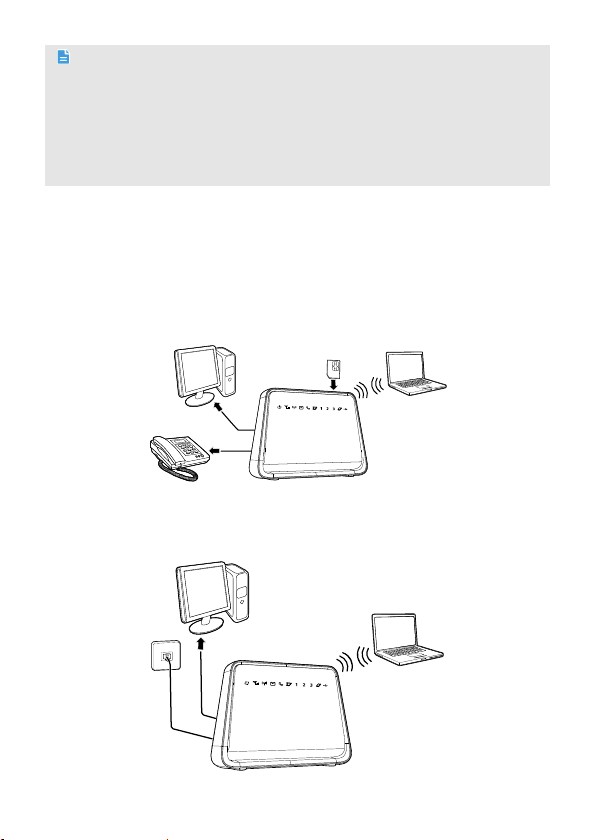
Scenario 1:
With USIM card inserted and work properly in the device, you can connect your
computer to the device to access the Internet, and connect your telephone to the
device to answering or making a call.
Scenario 2:
With connecting to the Ethernet, you can connect your computer to the device to
access the Internet.
1
Page 3
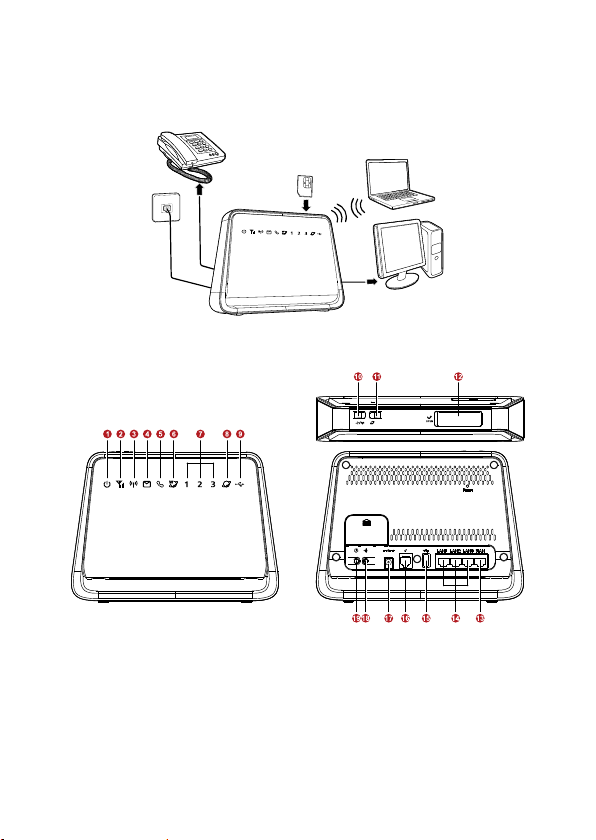
Scenario 3:
With connecting to the Ethernet and working with a USIM card, you can connect
your computer to the device to access the Internet though Ethernet, and answering
or making a call thought the USIM card.
Appearance
1. Power indicator
2. Network status indicator
3. Wi-Fi/WPS indicator
4. SMS indicator
5. Telephone indicator
6. Wireless dialing indicator
7. LAN indicators
8. WAN indicator
9. USB indicator
10. Wi-Fi/WPS button
11. Dial-up button
12. SIM card slot
13. WAN port
14. LAN ports
15. USB port
16. Telephone port
17. Power port
18. Register button(not supported at
this time)
19. Power button
2
Page 4
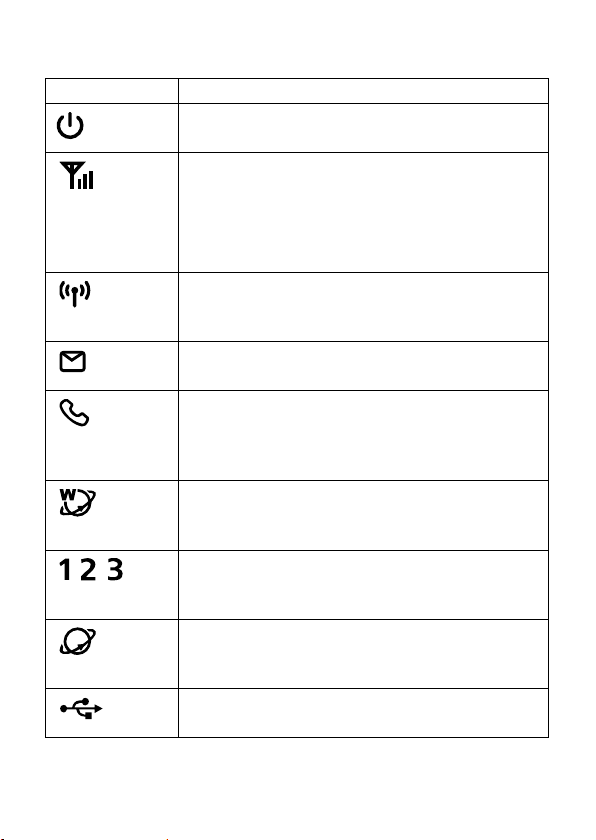
Indicators
Indicator Status
/ /
Steady on: device powered on.
Off: device powered off.
Blinking red fast: Subscriber Identity Module (SIM) card
Steady yellow: device registered with the network.
Steady green: device connected to the Internet.
Off: no signal received.
Steady on: Wi-Fi turned on or data transfer in progress.
Blinking: WPS connection being set up.
Off: Wi-Fi turned off.
Steady on: The inbox is already full.
Blinking:you have new SMS(s).
Steady on: At least one handset registered.
Fast blinking: Handset registration in progress.
Slow blinking: Handset paging in progress.
Off: No handsets registered.
Steady on: Wireless dial-up successful.
Blinking slowly: Wireless dial-up in progress.
Blinking fast: Wireless dial-up failed.
Steady on: network cable connected.
Blinking: data transfer in progress.
Off: network cable not connected.
Steady on: Ethernet dial-up successful.
Blinking slowly: Ethernet dial-up in progress.
Blinking fast: Ethernet dial-up failed.
Steady on: USB storage device connected.
Off: USB storage device not connected.
unavailable (SIM card not installed or malfunctioning, or PIN
code not verified).
3
Page 5

2 Installation
Preparing Internet Connection
You r device not only support the mobile data network to access the Internet through
USIM card, and also support connected to Ethernet to access to the Internet.
Method 1: Installing the USIM Card
Step 1 Open and rotate the protective cover, to expose the SIM card slot.
Step 2 Insert the USIM card into the card slot. Ensure that the beveled edge of the
USIM card aligns with that of the card slot.
Step 3 Rotate and close the protective cover.
Attention:
Before removing the SIM card, ensure that the device is powered off and disconnected
from the power outlet.
Method 2: Connecting Ethernet cable
Step 1 Use a Ethernet cable, insert one of the end into the WAN port of the device.
Step 2 Insert another end of the cable into the Ethernet port of the wall.
4
Page 6

Connecting Cables
The following figure shows an example of how to connect the cables. In this example,
the device is connected to a desktop computer, a laptop computer, and a telephone.
If you do not inserted the USIM card to the device, you will not able to answering or
making a call,you can skip to connect the telephone.
1. Power adapter
2. Telephone (Optional)
3. Desktop computer
4. Laptop
Note:
Using an incompatible power adapter may damage the device..
Radio signals can interfere with telephone call connection and quality. To eliminate
the risk of possible interference, place the telephone at least 1 meter (3.28 feet) away
from the device.
Use an Ethernet cable that is not longer than 100 meters (328 feet), to connect a
computer to one of the device's LAN ports.
5
Page 7

(Optional) Installing an External Antenna
In areas with poor network coverage, connect an external antenna to the device's
external antenna port. Screw the external antenna in fully, as shown in the following
figure.
Note:
Skip this section if you do not need to connect an external antenna to the device.
Before using an external antenna, log in to the web management page
(http://192.168.1.1) and set antenna mode to external. For details, see the help
information on the web management page.
Only use the external antenna indoors.
You cannot switch between the internal antenna and the external antenna while
using a voice or data service.
(Optional) Connecting to a USB device
Connect a USB flash drive, portable hard disk drive, or USB printer to the device's USB
port, as shown in the following figure. For details, see the help information on the
web management page.
Note:
Do not connect a computer to the device's USB port.
The device's USB port can supply a maximum current of 500 mA to power connected
USB devices. If the current required by a portable hard disk drive (or other
peripherals) connected to the device is higher than 500 mA, the device may fail to
recognize the hard disk drive. In this case, use an auxiliary power supply for the hard
disk drive. For more information, contact your service provider.
6
Page 8

3 Powering the Device On or Off
After connecting to a power outlet, the device will power on automatically.
To manually power the device on, press and hold until all indicators turn on.
To power the device off, press and hold until all indicators turn off.
Note:
Keep your device stand placed when powered on, to avoid excessive heat to even
damage the device. .
4 Setting Up a Wireless Connection
Note:
Before setting up a Wi-Fi connection, ensure that a wireless network adapter has been
installed on your computer. If the wireless network adapter is functioning correctly, you
will be able to find a wireless network connection in your computer's connection
manager application.
Turning the Device's Wi-Fi On
By default, the device's Wi-Fi
automatically turns on when the device is
powered on.
To manually turn Wi-Fi on, press and
hold
on.
To manually turn Wi-Fi off, press and
hold
release your finger. The
turns off.
until turns steady
for 2 seconds, and then
indicator
7
Page 9

Setting Up a Wi-Fi Connection Manually
Step 1 Ensure that is steady on.
Step 2 Scan for available wireless network connections using your computer's
connection manager application.
Step 3 Connect to the wireless network that has the same service set identification
(SSID) as the device.
Note:
If a security mechanism has been enabled for the wireless network connection, enter
the correct network key.
The SSID and the network key are printed on the device label.
To protect your wireless network from unauthorized access, change the SSID and Wi-
Fi key. For details, see the help information on the web management page.
Setting Up a Wi-Fi Connection through the WPS
If the client to which your device connects supports WPS, a network key is generated
automatically.
To set up a WPS connection:
Step 1 Ensure that
Step 2 Press and hold
on your device.
Step 3 Activate the WPS connection on the client.
Note:
For details about the client's operations, see its user guide.
is steady on.
until
blinks to activate the WPS connection
5 Accessing the Internet
If you want to swith wireless mode to
wired mode, press and hold
steady on.
If you want to swith wired mode to
wireless mode, press and hold
steady on.
until
until
8
Page 10

After a connection between your device and the client is set up, you can access the
Internet using the modes listed in the following table.
Mode Description
Auto After being powered on, the device will automatically connect to the
Manual
On
Demand
Internet. Once connected, the device will not automatically disconnect
from the Internet.
Press , when turns steady green, that indicates you are
connected to the Internet.
Log in to the web management page, and then connect to or
disconnect from the Internet as prompted.
After being powered on, if there is data being transferred, the device
will automatically connect to the Internet. If no data is transferred
within a pre-defined period, the device will automatically disconnect
from the Internet.
Note:
Select an appropriate mode according to your data service charging plan. For example, if
you are charged according to the length of time you are connected to the Internet, it is
recommended that you select manual mode. For details about your data service
charging plan, contact your service provider.
6 Logging in to the management page
You can configure and manage the device settings using the web management page.
1. Launch a web browser, and enter http://192.168.1.1 in the address bar.
2. Enter the password, and log in to the web management page. The default
password is printed on the device label.
Note:
To protect your device, only one user can log in to the web management page at a
time.
To protect your account, change the password promptly. For details, see the help
information on the web management page.
9
Page 11

7 Restoring Factory Defaults
If you are uncertain of which settings you have configured or changed, you can restore the
factory defaults that the device came with, and then reconfigure the device.
To restore the factory defaults, Use a sharp-pointed object to press and hold the RESET
button until the signal indicators on the bottom blink.
After the factory defaults are restored, the device will restart automatically.
Note: Restoring factory defaults will delete all the device's user-defined settings and restore
all settings on the web management page to their defaults.
8 Further Tips
If the device does not work properly:
See the help information on the web management page.
Restart the device.
Restore the device to its factory defaults.
Contact your service provider.
10
Page 12

Copyright © Huawei Technologies Co., Ltd. 2012. All
rights reserved.
THIS DOCUMENT IS FOR INFORMATION PURPOSES ONLY, AND DOES NOT
CONSTITUTE ANY KIND OF WARRANTIES.
Please visit
hotline and email address in your country or region.
www.huaweidevice.com/worldwide/support/hotline for recently updated
Version: V100R001_01 Part Number: 9672XXXX
 Loading...