

Page 1
B681 Quick Start
Note:
Figures in this guide are only for your reference. For details about the
particular model you have chosen, contact your service provider.
Check the information about the product and its accessories when you
purchase it. Some accessories are not provided in the product package. If
necessary, contact your local dealer to purchase them.
This guide briefly describes the device functions. For details about how to
set the management parameters, see the help information on the web
management page.
1 Getting to Know Your Device
Application Scenarios
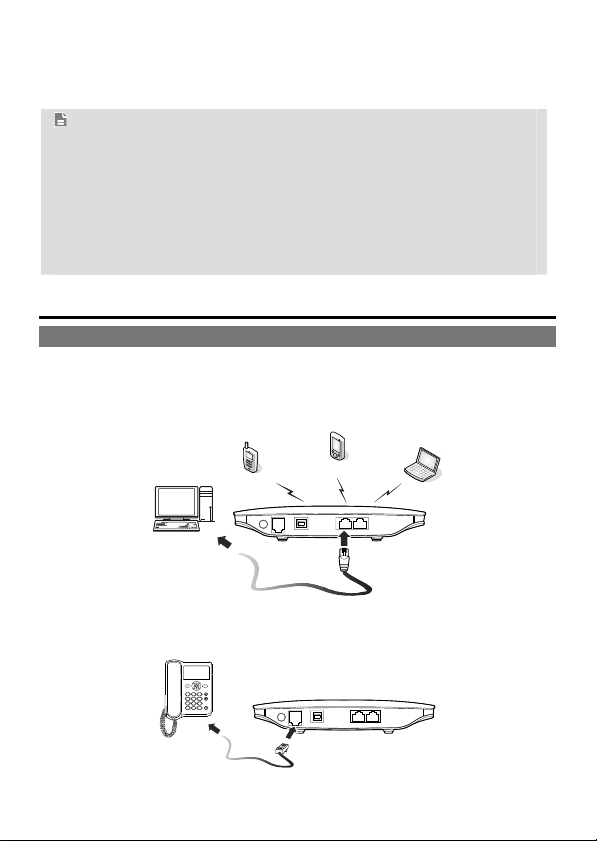
Scenario 1:
You can connect your computer to the device to access the Internet. The specific
connection steps depend on your computer's operating system. Follow the
displayed instructions to connect the device to your computer.
Scenario 2:
You can connect a telephone to the device's telephone port to make voice calls.
1
Page 2
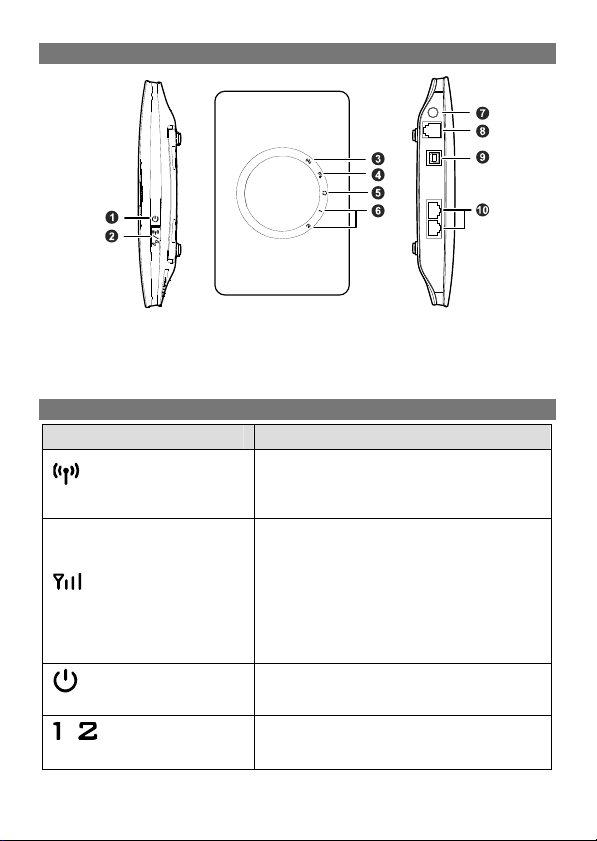
Appearance
1. Power button
2. Wi-Fi/WPS button
3. Wi-Fi/WPS indicator
4. Network status indicator
5. Power indicator
Indicators
Indicator Status
Steady on: Wi-Fi turned on or data transfer
Wi-Fi/WPS indicator
Network status indicator
Power indicator
/
LAN indicators
Blinking: WPS connection being set up.
Off: Wi-Fi turned off.
Blinking red fast: Subscriber Identity Module
Steady yellow: device registered with the
Steady green: device connected to the
Off: no signal received.
Steady on: device powered on.
Off: device powered off.
Steady on: Ethernet cable connected.
Blinking: data transfer in progress.
Off: Ethernet cable not connected.
6. LAN indicators
7. External antenna port
8. Telephone port
9. Power port
10. LAN ports
in progress.
(SIM) card unavailable (SIM card not
installed or malfunctioning, or PIN code not
verified).
network.
Internet.
2
Page 3

2 Installation
Installing the SIM Card
Step 1 Slide the card cover off.
Step 2 Insert the SIM card into the card slot. Ensure that the gold contact area
faces down and that the beveled edge of the SIM card aligns with that of
the card slot.
Step 3 Slide the card cover back onto the device.
Attention:
Before removing the SIM card, ensure that the device is powered off and
disconnected from the power outlet.
(Optional) Using the Table Stand
You can place the device on a flat surface such as a table or a desk, or hang it on
a wall. You can also use the table stand on the device to place it upright.
To use the table stand, insert its latches into the device's table stand slots, as
shown in the following figure.
Note:
To ensure good signal reception, place the device in a high place or near a
window.
To prevent interference caused by radio signals, place the device at least 1
meter (3.28 feet) away from other electrical devices.
3
Page 4
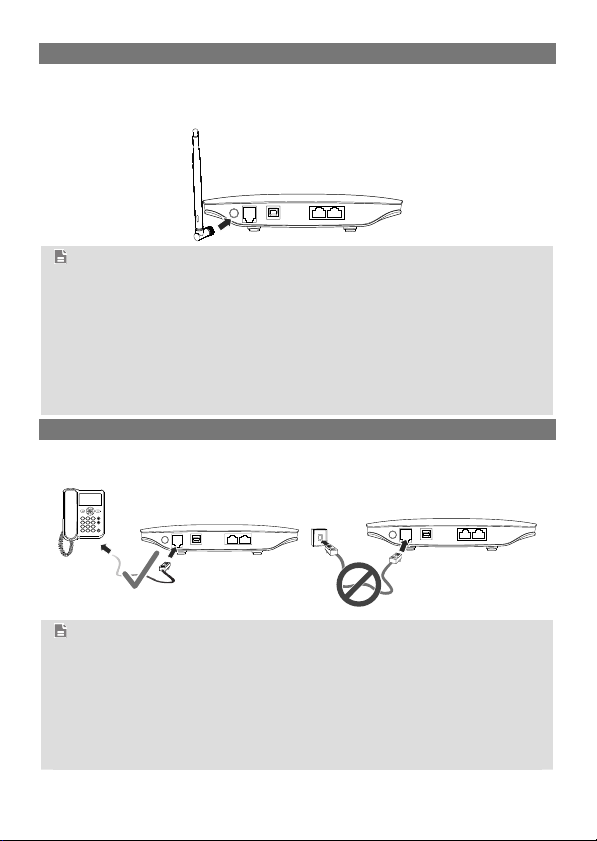
(Optional) Installing an External Antenna
In areas with poor network coverage, connect an external antenna to the device's
external antenna port. Screw the external antenna in fully, as shown in the
following figure.
Note:
Skip this section if you do not need to connect an external antenna to the
device.
Before using an external antenna, log in to the web management page
(http://192.168.1.1) and set antenna mode to external. For details, see the
help information on the web management page.
Only use the external antenna indoors.
You cannot switch between the internal antenna and the external antenna
while using a voice or data service.
(Optional) Connecting to a Telephone
If you want to use the device to make voice calls, connect the device to a
telephone, as shown in the following figure.
Note:
Skip this section if you do not plan to use the device's voice services.
Radio signals can interfere with telephone call connection and quality. To
eliminate the risk of possible interference, place the telephone at least 1
meter (3.28 feet) away from the device.
Do not connect the device to the telephone wall outlet (or any Public
Switched Telephone Network), which will cause excessive heat or even
damage the device.
4
Page 5
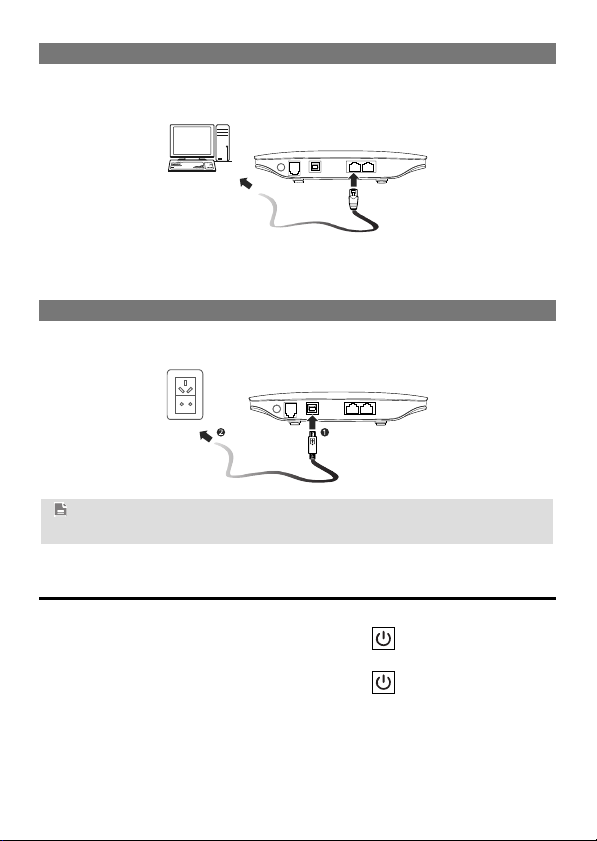
Connecting to a Computer
Use an Ethernet cable to connect a computer to one of the device's LAN ports, as
shown in the following figure.
When the connection between the device and the computer is set up, the device's
corresponding LAN indicator turns on.
Ensure that the Ethernet cable is no longer than 100 meters (328 feet).
Connecting to a Power Outlet
Connect a compatible power adapter to the device's power port, and then plug the
power adapter into a power outlet.
Note:
Using an incompatible power adapter may damage the device.
3 Powering the Device On or Off
After connecting to a power outlet, the device will power on automatically.
To manually power the device off, press and hold
off.
To manually power the device on, press and hold
on.
until all indicators turn
until all indicators turn
5
Page 6

4 Setting Up a Wireless Connection
Turning the Device's Wi-Fi On
By default, the device's Wi-Fi automatically turns on when the device is powered
on.
To manually turn Wi-Fi off, press and hold
release your finger.
To manually turn Wi-Fi on, press and hold until turns steady on.
turns off.
Setting Up a Wi-Fi Connection
Note:
Before setting up a Wi-Fi connection, ensure that a wireless network adapter
has been installed on your computer. If the wireless network adapter is
functioning correctly, you will be able to find a wireless network connection in
your computer's connection manager application.
Method 1: Set up a Wi-Fi connection.
Step 1 Ensure that
Step 2 Scan for available wireless network connections using your computer's
connection manager application.
Step 3 Connect to the wireless network that has the same service set
identification (SSID) as the device.
Note:
If a security mechanism has been enabled for the wireless network
connection, enter the correct Wi-Fi key.
The SSID and the Wi-Fi key are printed on the device label.
To protect your wireless network from unauthorized access, change the
SSID and Wi-Fi key a regular intervals. For details, see the help information
on the web management page.
Method 2: Set up a WPS connection.
If the client to which your device connects supports WPS, a Wi-Fi key is generated
automatically. For details about the client's operations, see its user guide.
To set up a WPS connection:
Step 1 Ensure that
Step 2 Press and hold
connection on your device.
Step 3 Activate the WPS connection on the client.
is steady on.
is steady on.
until blinks to activate the WPS
for 2 seconds, and then
6
Page 7

5 Using the Web Management Page
You can configure and manage the device settings using the web management
page.
Step 1 Launch a web browser, and enter http://192.168.1.1 in the address bar.
Step 2
Enter the password, and log in to the web management page. The
default password is admin.
Note:
To protect your device, only one user can log in to the web management
page at a time.
To protect your account, change the password promptly. For details, see
the help information on the web management page.
6 Accessing the Internet
After a connection between your device and the client is set up, you can access
the Internet using the modes listed in the following table.
Select an appropriate mode according to your data service charging plan. For
example, if you are charged according to the length of time you are connected to
the Internet, it is recommended that you select manual mode. For details about
your data service charging plan, contact your service provider.
Mode Description
Auto
Manual
On
Demand
After being powered on, the device will automatically connect to the
Internet. Once connected, the device will not automatically disconnect
from the Internet.
Log in to the web management page, and then connect to or
disconnect from the Internet as prompted.
After being powered on, if there is data being transferred, the device
will automatically connect to the Internet. If no data is transferred
within a pre-defined period, the device will automatically disconnect
from the Internet.
7
Page 8

7 Restoring Factory Defaults
If you are uncertain of which settings you have configured or changed, you can restore
the factory defaults that the device came with, and then reconfigure the device.
To restore the factory defaults, Use a sharp-pointed object to press and hold the RESET
button until all indicators (
After the factory defaults are restored, the device will restart automatically.
Attention:
Restoring factory defaults will delete all the device's user-defined settings and
restore all settings on the web management page to their defaults.
, and ) blink.
8 Further Tips
If the device does not work properly:
See the help information on the web management page.
Restart the device.
Restore the device to its factory defaults.
Contact your service provider.
8
Page 9

9 Safety Information
This section contains important information about the operation of your device. It
also contains information about how to use the device safely. Read this
information carefully before using your device.
Electronic Device
Do not use your device if using the device is prohibited. Do not use the device if
doing so causes danger or interference with other electronic devices.
Interference with medical equipment
Follow rules and regulations set forth by hospitals and health care facilities. Do
not use your device where prohibited.
Some wireless devices may affect the performance of hearing aids or
pacemakers. Consult your service provider for more information.
Pacemaker manufacturers recommend that a minimum distance of 15 cm be
maintained between a device and a pacemaker to prevent potential
interference with the pacemaker. If using a pacemaker, hold the device on the
side opposite the pacemaker and do not carry the device in your front pocket.
Areas with flammables and explosives
Do not use the device where flammables or explosives are stored (in a gas
station, oil depot, or chemical plant, for example). Using your device in these
environments increases the risk of explosion or fire. In addition, follow the
instructions indicated in text or symbols.
Do not store or transport the device in containers with flammable liquids, gases,
or explosives.
Operating environment
Avoid dusty, damp, or dirty environments. Avoid magnetic fields. Using the
device in these environments may result in circuit malfunctions.
Before connecting and disconnecting cables, stop using the device and
disconnect it from the power supply. Ensure that your hands are dry during
operation.
Place the device on a stable surface.
Keep the device away from electronic appliances that generate strong magnetic
or electric fields, such as a microwave oven or refrigerator.
During thunderstorms, power off your device and remove all cables connected
to it to protect against lightning strikes.
Do not use your device during thunderstorms to protect your device against any
danger caused by lightning.
Ideal operating temperatures are 0℃ to 45℃. Ideal storage temperatures are
℃ to 60℃.Extreme heat or cold may damage your device or accessories.
-30
Keep the device and accessories in a well-ventilated and cool area away from
direct sunlight. Do not enclose or cover your device with towels or other objects.
9
Page 10

Do not place the device in a container with poor heat dissipation, such as a box
or bag.
To protect your device or accessories from fire or electrical shock hazards,
avoid rain and moisture.
Keep the device away from sources of heat and fire, such as a heater,
microwave oven, stove, water heater, radiator, or candle.
Do not place any object, such as a candle or a water container, on the device. If
any foreign object or liquid enters the device, immediately stop using it, power it
off, and remove all cables connected to it. Then, contact an authorized service
center.
Do not block device openings. Reserve a minimum of 10 cm around the device
to dissipate heat.
Stop using your device or applications for a while if the device is overheated. If
skin is exposed to an overheated device for an extended period, low
temperature burn symptoms, such as red spots and darker pigmentation, may
occur.
Do not touch the device's antenna. Otherwise, communication quality may be
reduced.
Do not allow children or pets to bite or suck the device or accessories. Doing so
may result in damage or explosion.
Observe local laws and regulations, and respect the privacy and legal rights of
others.
The device should be installed and operated with a minimum distance of 20 cm
between the radiator and your body.
Keep the device in a place with good reception. The distance between the
device and other metal materials (such as metal brackets or metal doors and
windows) should be greater than 25 cm and the distance between the device
should be greater than 30 cm.
Child's safety
Comply with all precautions with regard to child's safety. Letting children play
with the device or its accessories may be dangerous. The device includes
detachable parts that may present a choking hazard. Keep away from children.
The device and its accessories are not intended for use by children. Children
should only use the device with adult supervision.
Accessories
Using an unapproved or incompatible power adapter, charger or battery may
cause fire, explosion or other hazards.
Choose only accessories approved for use with this model by the device
manufacturer. The use of any other types of accessories may void the warranty,
may violate local regulations and laws, and may be dangerous. Please contact
your retailer for information about the availability of approved accessories in
your area.
10
Page 11

Power adapter safety
The power plug is intended to serve as a disconnect device.
For pluggable devices, the socket-outlet shall be installed near the devices and
shall be easily accessible.
Unplug the power adapter from electrical outlets and the device when not in
use.
Do not drop or cause an impact to the power adapter. If it is damaged, take it to
an authorized service center for inspection.
If the power cable is damaged (for example, the cord is exposed or broken), or
the plug loosens, stop using it at once. Continued use may lead to electric
shocks, short circuits, or fire.
Do not touch the power cord with wet hands or pull the power cord to
disconnect the power adapter.
Do not touch the device or the power adapter with wet hands. Doing so may
lead to short circuits, malfunctions, or electric shocks.
If your power adapter has been exposed to water, other liquids, or excessive
moisture, take it to an authorized service center for inspection.
Ensure that the power adapter meets the requirements of Clause 2.5 in
UL60950-1 and has been tested and approved according to national or local
standards.
Cleaning and maintenance
During storage, transportation, and operation of the device, keep it dry and
protect it from collision.
Keep the device and accessories dry. Do not attempt to dry it with an external
heat source, such as a microwave oven or hair dryer.
Do not expose your device or accessories to extreme heat or cold. These
environments may interfere with proper function and may lead to fire or
explosion.
Avoid collision, which may lead to device malfunctions, overheating, fire, or
explosion.
If the device is not going to be used for an extended period of time, power it off,
and remove all cables connected to it.
If anything unusual occurs (for example, if the device emits smoke or any
unusual sound or smell), immediately stop using it, power it off, remove all
cables connected to it, and contact an authorized service center.
Do not trample, pull, or excessively bend any cable. Doing so may damage the
cable, causing the device to malfunction.
Before you clean or maintain the device, stop using it, stop all applications, and
disconnect all cables connected to it.
Do not use any chemical detergent, powder, or other chemical agents (such as
alcohol and benzene) to clean the device or accessories. These substances
may cause damage to parts or present a fire hazard. Use a clean, soft, and dry
cloth to clean the device and accessories.
11
Page 12

Do not place magnetic stripe cards, such as credit cards and phone cards, near
the device for extended periods of time. Otherwise the magnetic stripe cards
may be damaged.
Do not dismantle or remanufacture the device and its accessories. This voids
the warranty and releases the manufacturer from liability for damage. In case of
damage, contact an authorized service center for assistance or repair.
Emergency calls
The availability of emergency calls is subject to your cellular network quality,
service provider policy, and local laws and regulations. Never rely solely on your
device for critical communications like medical emergencies.
FCC Regulatory Compliance
This equipment has been tested and found to comply with the limits for a Class B
digital device, pursuant to Part 15 of the FCC Rules. These limits are designed to
provide reasonable protection against harmful interference in a residential
installation. This equipment generates, uses and can radiate radio frequency
energy and, if not installed and used in accordance with the instructions, may
cause harmful interference to radio communications. However, there is no
guarantee that interference will not occur in a particular installation. If this
equipment does cause harmful interference to radio or television reception, which
can be determined by turning the equipment off and on, the user is encouraged to
try to correct the interference by one or more of the following measures:
--Reorient or relocate the receiving antenna.
--Increase the separation between the equipment and receiver.
--Connect the equipment into an outlet on a circuit different from that to which the
receiver is connected.
--Consult the dealer or an experienced radio/TV technician for help.
This device complies with Part 15 of the FCC Rules. Operation is subject to the
following two conditions: (1) this device may not cause harmful interference, and
(2) this device must accept any interference received, including interference that
may cause undesired operation.
Caution: Any changes or modifications to this device not expressly approved by
Huawei Technologies Co., Ltd. for compliance could void the user's authority to
operate the equipment.
RF exposure warning
This equipment must be installed and operated in accordance with provided
instructions and the antenna(s) used for this transmitter must be installed to
provide a separation distance of at least 20 cm from all persons and must not be
co-located or operating in conjunction with any other antenna or transmitter. Endusers and installers must be provide with antenna installation instructions and
transmitter operating conditions for satisfying RF exposure compliance.
12
Page 13

Copyright © Huawei Technologies Co., Ltd.
2013. All rights reserved.
No part of this manual may be reproduced or transmitted in any form or by any
means without prior written consent of Huawei Technologies Co., Ltd. and its
affiliates ("Huawei").
The product described in this manual may include copyrighted software of Huawei
and possible licensors. Customers shall not in any manner reproduce, distribute,
modify, decompile, disassemble, decrypt, extract, reverse engineer, lease, assign,
or sublicense the said software, unless such restrictions are prohibited by
applicable laws or such actions are approved by respective copyright holders.
Trademarks and Permissions
, , and are trademarks or registered trademarks of Huawei
Technologies Co., Ltd.
Other trademarks, product, service and company names mentioned may be the
property of their respective owners.
Notice
Some features of the product and its accessories described herein rely on the
software installed, capacities and settings of local network, and therefore may not
be activated or may be limited by local network operators or network service
providers.
Thus, the descriptions herein may not exactly match the product or its accessories
which you purchase.
Huawei reserves the right to change or modify any information or specifications
contained in this manual without prior notice and without any liability.
DISCLAIMER
ALL CONTENTS OF THIS MANUAL ARE PROVIDED “AS IS”. EXCEPT AS
REQUIRED BY APPLICABLE LAWS, NO WARRANTIES OF ANY KIND, EITHER
EXPRESS OR IMPLIED, INCLUDING BUT NOT LIMITED TO, THE IMPLIED
WARRANTIES OF MERCHANTABILITY AND FITNESS FOR A PARTICULAR
PURPOSE, ARE MADE IN RELATION TO THE ACCURACY, RELIABILITY OR
CONTENTS OF THIS MANUAL.
TO THE MAXIMUM EXTENT PERMITTED BY APPLICABLE LAW, IN NO EVENT
SHALL HUAWEI BE LIABLE FOR ANY SPECIAL, INCIDENTAL, INDIRECT, OR
CONSEQUENTIAL DAMAGES, OR LOSS OF PROFITS, BUSINESS, REVENUE,
DATA, GOODWILL SAVINGS OR ANTICIPATED SAVINGS REGARDLESS OF
WHETHER SUCH LOSSES ARE FORSEEABLE OR NOT.
THE MAXIMUM LIABILITY (THIS LIMITATION SHALL NOT APPLY TO LIABILITY
FOR PERSONAL INJURY TO THE EXTENT APPLICABLE LAW PROHIBITS
SUCH A LIMITATION) OF HUAWEI ARISING FROM THE USE OF THE
PRODUCT DESCRIBED IN THIS MANUAL SHALL BE LIMITED TO THE
AMOUNT PAID BY CUSTOMERS FOR THE PURCHASE OF THIS PRODUCT.
13
Page 14

Import and Export Regulations
Customers shall comply with all applicable export or import laws and regulations
and be responsible to obtain all necessary governmental permits and licenses in
order to export, re-export or import the product mentioned in this manual including
the software and technical data therein.
Privacy Policy
To better understand how we protect your personal information, please see the
privacy policy at http://consumer.huawei.com/en
/privacy-policy/index.htm.
visit www.huaweidevice.com/worldwide/support/hotline for recently
Please
updated hotline and email address in your country or region.
96722321_01
14
 Loading...