

Page 1

HP VISUALIZE Linux Workstation
User’s Guide
PL-Class Workstations
Printed in USA September 1999
Manufacturing Part Number: A1296-90000
© Copyright 1999 Hewlett-Packard Company
Edition E0999
Page 2

Legal Notices
The information contained in this document is subject to change without
notice.
Hewlett-Packard makes no warranty of any kind with regard to this
material, including, but not limited to, the implied warranties of
merchantability and fitness for a particular purpose. Hewlett-Packard
shall not be liable for errors contained herein or for incidental or
consequential damages in connection with the furnishing, performance,
or use of this material.
Hewlett-Packard assumes no responsibility for the use or reliability of its
software on equipment that is not furnished by Hewlett-Packard.
This document contains proprietary information that is protected by
copyright. All rights reserved. No part of this document may be
photocopied, reproduced or translated to another language without the
prior written consent of Hewlett-Packard Company.
Trademark Acknowledgments
Adobe® Reader © 1987-1999 Adobe Systems Incorporated. All rights
reserved. Adobe and Acrobat are trademarks of Adobe Systems
Incorporated.
Red Hat®, the Red Hat “Shadow Man” logo, RPM, Maximum RPM, the
RPM logo, Linux Library, PowerTools, Linux Undercover, RHmember,
RHmember More, Rough Cuts, Rawhide and all Red Hat-based
trademarks and logos are trademarks or registered trademarks of
RedHat, Inc. in the United States and other countries.
Linux® is a registered trademark of Linus Torvalds.
Netscape® is a trademark of Netscape Communications Corporation.
PentiumTM is a trademark of Intel Corporation.
HP Printing Division:
Hewlett-Packard Company
3404 E. Harmony Road
Fort Collins, CO 80528-9599
USA
ii
Page 3

IMPORTANT HP Linux Warranty Information
HP has made every effort to ensure the accuracy of our
product testing. However, because each customer’s
environment is different from HP’s laboratory test
environment, it is the customer’sresponsibility to validate the
Year 2000 readiness of these products in their own
environment. Therefore, information about the Year 2000
status of HP products is provided “as is” without warranties of
any kind and is subject to change without notice. The
information provided here constitutes a Year 2000 Readiness
Disclosure for purposes of the Year 2000 Information and
Readiness Disclosure Act.
Hewlett-Packard makes no representation or warranty about
the Year 2000 readiness of non-HP products including
pre-installed operating systems or application software. Such
information, if any, was provided by the manufacturers of
those products and customers are urged to contact the
manufacturer directly to verify Year 2000 readiness.
ATTENTION: DUE TO THE NATURE OF LINUX
SOFTWARE, HP PROVIDES LINUX SOFTWARE “AS IS”
AND WITHOUT ANY WARRANTY WITH RESPECT TO
YEAR 2000 COMPLIANCE. LINUX MAY REQUIRE
CUSTOMER INSTALLATION OF SOFTWARE PATCHES
FOR YEAR 2000 COMPLIANCE AND MAY REQUIRE
ADDITIONAL PATCHESIN THE FUTURE. FOR RED HAT
LINUX, CUSTOMER IS URGED TO FREQUENTLY
REVIEW THE RED HAT WEB SITE FOR THE LATEST
YEAR 2000 INFORMATION AT:
®
http://www.redhat.com
iii
Page 4

iv
Page 5

Contents
v
Page 6

Chapter 1 Setting Up and Using Your
HP Visualize Linux Workstation 1
Unpacking Your HP Visualize Linux Workstation............................................. 2
Connecting the Mouse, Keyboard, Display and Printer ...................................... 3
Connecting to a Network .................................................................................... 4
Connecting Audio Accessories............................................................................ 5
Connecting an External SCSI Accessory............................................................. 7
Connecting the Power Cords ............................................................................... 9
Your HP Visualize Linux Workstation’s Hardware Control Panel................... 10
Starting and Stopping Your HP Visualize Linux Workstation.......................... 11
Starting Your Workstation for the First Time.............................................. 11
Initializing Your Software ........................................................................... 11
Creating Rescue Disk Set............................................................................. 12
Starting Your HP Visualize Linux Workstation.......................................... 13
Stopping Your HP Visualize Linux Workstation ........................................ 13
Additional Information and Help....................................................................... 14
Setting BIOS Passwords.................................................................................... 15
Setting an Administrator Password.............................................................. 15
Setting a User Password............................................................................... 16
Recycling an Old HP Workstation..................................................................... 18
Chapter 2 How to Install Accessories
In Your HP Visualize Linux Workstation 19
Supported HP Accessories................................................................................. 21
Removing and Replacing the Cover.................................................................. 22
Removing the Cover.................................................................................... 22
Replacing the Cover..................................................................................... 24
Moving the Power Supply ................................................................................. 26
Installing Memory.............................................................................................. 29
Main Memory Modules ............................................................................... 29
To install a main memory module:........................................................ 29
Installing Mass Storage Devices........................................................................ 32
Connecting Devices..................................................................................... 33
Installing a Hard Disk Drive in an Internal Shelf........................................ 36
Installing a Hard Disk Drive in a Front-Access Shelf ................................. 38
Completing the Installation of a Hard Disk Drive....................................... 42
Installing a Drive in a Front-Access Shelf .................................................. 43
vi
Page 7

Completing the Installation of a Drive................................................... 46
Installing Accessory Boards .............................................................................. 47
Installing the Board...................................................................................... 47
Installing a Processor......................................................................................... 50
Installing Drivers and Utilities........................................................................... 53
Chapter 3 Troubleshooting Your HP Visualize Linux Workstation ................... 55
Solving Problems............................................................................................... 56
HPBIOS Summary Screen........................................................................... 56
HP MaxiLife ................................................................................................ 56
If Your Workstation Does Not Start Properly ................................................... 57
Display is Blank and There Are No Error Messages................................... 57
If you are Unable to Change any Values in Setup....................................... 59
If a POST Error Message is Displayed........................................................ 59
If You Cannot Turn Off Your Workstation....................................................... 62
If Your Workstation Has a Hardware Problem.................................................. 63
Display Does Not Work Properly................................................................ 63
If Your Keyboard Does Not Work............................................................... 64
If Your Mouse Does Not Work ................................................................... 64
If Your Printer Does Not Work ................................................................... 64
If the Flexible Disk Drive Does Not Work.................................................. 66
If the Hard Disk Drive Does not Work........................................................ 66
If the CD-ROM Drive Has a Problem ......................................................... 66
The CD-ROM Drive Does not Work..................................................... 67
No Sound from the CD-ROM Drive...................................................... 68
The CD-ROM Drive is Idle ................................................................... 68
The CD-ROM Drive Does not Open..................................................... 69
If an Accessory Board Does not Work........................................................ 70
Using HP MaxiLife to Diagnose Problems ....................................................... 71
Other Features.............................................................................................. 72
Recovering Your HP Visualize Linux Workstation’s Operating System.......... 75
Chapter 4 Technical Information......................................................................... 77
Features.............................................................................................................. 78
System Specifications........................................................................................ 80
Power Consumption Information................................................................. 80
Maximum Loads Available for Accessory Slots................................... 80
IRQs, DMAs, and I/O Addresses................................................................. 80
vii
Page 8

Audio Features............................................................................................. 83
SCSI Features............................................................................................... 84
Network Features......................................................................................... 86
The Workstation’s Rear Connectors.................................................................. 87
System Connectors and Switches ...................................................................... 88
System Board Connectors............................................................................ 88
Internal Audio Connectors..................................................................... 89
System Board Switches................................................................................ 91
The HP BIOS Summary Screen and Setup Program......................................... 93
Viewing the HP BIOS Summary Screen..................................................... 93
Starting the HP BIOS Setup Program.......................................................... 93
Saving Your Changes and Leaving Setup ................................................... 95
Configuring Your Network Connection ............................................................ 96
Controlling the Network Security Features ................................................. 97
To enable starting from the network:..................................................... 97
Selecting the Boot Device Priority .............................................................. 97
Using the SCSI Configuration Utility................................................................ 99
Default Settings You Can Change............................................................... 99
Starting the SCSI Configuration Utility..................................................... 100
Main Menu................................................................................................. 100
Adapter Utilities Menu .............................................................................. 102
Adapter Setup Menu.................................................................................. 103
Device Selections Menu ............................................................................ 105
Device Setup Menu.................................................................................... 106
Exiting from the Configuration Utility...................................................... 107
Chapter 5 Hewlett Packard Support and Information Services......................... 109
Introduction...................................................................................................... 110
Your HP-Authorized Reseller.......................................................................... 111
Hewlett-Packard Information Services............................................................ 112
HP World Wide Web Site ......................................................................... 112
Ordering Drivers and BIOS on Diskette.......................................................... 113
HP Support Services........................................................................................ 115
Hewlett-Packard Telephone Support............................................................... 116
Lifeline Telephone Support ............................................................................. 118
Summary.......................................................................................................... 119
Hewlett-Packard Marketing Headquarters....................................................... 120
viii
Page 9

Appendix ARegulatory Information and Warranty.............................................. 121
Declaration of Conformity............................................................................... 122
Regulatory Information.................................................................................... 123
FCC (for USA only)................................................................................... 123
HP Hardware Warranty.................................................................................... 126
Three Year Limited Hardware Warranty................................................... 126
Limitation of Warranty.............................................................................. 127
Obtaining On-Site Warranty Service......................................................... 128
Customer Responsibilities ......................................................................... 129
Obtaining Parts Warranty Service ............................................................. 129
HP Telephone Support Services ................................................................ 129
HP Software Product License Agreement and
Software Product Limited Warranty.......................................................... 130
HP Software Product License Agreement ................................................. 130
HP Software Product Warranty ................................................................. 132
Appendix BPhysical Characteristics.................................................................... 135
Personal Workstation Characteristics.............................................................. 136
ix
Page 10

x
Page 11

Preface
This owner’s guide describes how to use your HP VISUALIZE Linux
PL-Class Workstation. This Workstation features the Red Hat Linux
Operating System, pre-installed by Hewlett-Packard.
The PL-Class Workstation is designed to perform such tasks as locally
executed IC design. It provides the computing power of a 500MHz Intel
xi
Page 12

Pentium III processor and supports up to 768MB of system memory. It is
equipped with dual SCSI controllers, single or dual 9GB internal discs,
and the ELSA GLoria Synergy+ graphics subsystem.
Red Hat Linux isa popular opensource operating system that gives you
the ability to develop custom tools and applications or select from a
growing number of commercial software and freeware solutions.
xii
Page 13

Special Notice for Users
The HP VISUALIZE Linux Workstation is made from a combination of
high performance Industry Standard components (for example, the Intel
Pentium III processor), popular HP value-added technologies and the
Red Hat Linux Operating System. The HP VISUALIZE Personal
Workstation also shares some important technologies with the HP
Kayak Workstations, including certain processor system board features.
Since these common technologies are used by the HP VISUALIZE
Workstations and the HP Kayak Workstations,your HP VISUALIZE Linux
Workstation will occasionally make reference to “HP Kayak PC
Workstations” or “HP Kayak XA-s.” This is particularly true during the
initial Power-On Self Test and when you see MaxiLife LCD messages.
Audience
This guide is intended for HP VISUALIZE Linux Workstation users who
want to:
• Set up the HP VISUALIZE Linux Workstation for the first time.
• Configure the HP VISUALIZE Linux Workstation.
• Troubleshoot problems on the HP VISUALIZE Linux Workstation.
• Add accessories to the HP VISUALIZE Linux Workstation.
• Find out where to get more information and support.
xiii
Page 14

Important Safety Information
WARNING If you have any doubt that you can lift the HP VISUALIZE Linux
Workstation or display safely, do not try to move it without help.
For your safety, always connect the equipment to a grounded
wall outlet. Always use a power cord with a properly grounded
plug, such as the one provided with this equipment, or one in
compliance with you national regulations. This HP VISUALIZE
Linux Workstation is disconnected from the power by removing
the power cord from the power outlet. This means the
Workstation must be located close to a power outlet that is easily
accessible.
For your safety, never remove the HP VISUALIZE Linux
Workstation’s cover without first removing the power cord from
the power outlet, and any connection to the telecommunications
network. Always replace the cover on the Workstation before
switching it on.
To avoid electric shocks, do not open the power supply. There are
no user-serviceable parts inside.
This HP VISUALIZE Linux Workstation is a class 1 laser product.
Do not attempt to make any adjustment to the laser units.
Important Ergonomic Information
It is strongly recommended that you read the ergonomic information
before using you HP VISUALIZE Linux Workstation.
xiv
Page 15

Installation Notice
Products designated in the applicable Hewlett-Packard price list as
customer-installable can be installed by computer-knowledgeable
customers who carefully read and follow the instructions provided.
Customers who elect to have the product installed by our field personnel
are charged the applicable field installation charge, as covered under the
standard terms and conditions. For more information, please contact
your local sales representative.
Revision History
The revision history for each edition of the manual is listed below:
Edition Revision History
E0999 First Printing
Problems, Questions, and Suggestions
If you have any problems or questions with our hardware or
documentation, please contact either your HP Response Center or your
local HP representative. If you have access to a web browser, you can get
the latest hardware patches at the following URL:
http://us-support.external.hp.com/
For further information about HP Linux program:
http://www.hp.com/visualize/products/linux
For more information about the Red Hat Operating System, see:
http://www.redhat.com
xv
Page 16

Documentation Conventions
Unless otherwise noted in the text, this guide usesthe following symbolic
conventions.
user-supplied values
screen display Information that the system displays, commands that
Enter Keycaps are presented with a special keycap font as
Italic words or characters in syntax and command
descriptions represent values that you must supply.
Italics are also used in text for emphasis.
you must use literally, and path names appear in this
typeface.
shown in the left column. (In this document, we refer
to the Enter key. On your keyboard, the key may be
labeled either Enter or Return.)
Electrostatic Discharge (ESD) Precautions
Electrostatic charges can damage the integrated circuits on printed
circuit boards. To prevent such damage from occurring, observe the
following precautions during board unpacking and installation:
• Stand on a static-free mat.
• Wear a static strap to ensure that any accumulated electrostatic
charge is discharged from your body to ground.
• Create a common ground for the equipment you are working on by
connecting the static-free mat, static strap, and peripheral units to
that piece of equipment.
• Keep uninstalled printed circuit boards in their protective antistatic
bags.
• Handle printed circuit boards by their edges, once you have removed
them from their protective antistatic bags.
xvi
Page 17

1 Setting Up and Using Your
HP VISUALIZE
Linux Workstation
1
Page 18
Setting Up and Using Your HP Visualize Linux Workstation
Unpacking Your HP Visualize Linux Workstation
Unpacking Your HP VISUALIZE Linux
Workstation
WARNING If you are in any doubt that you can lift the Workstation and the
display safely, do not try to move them without help.
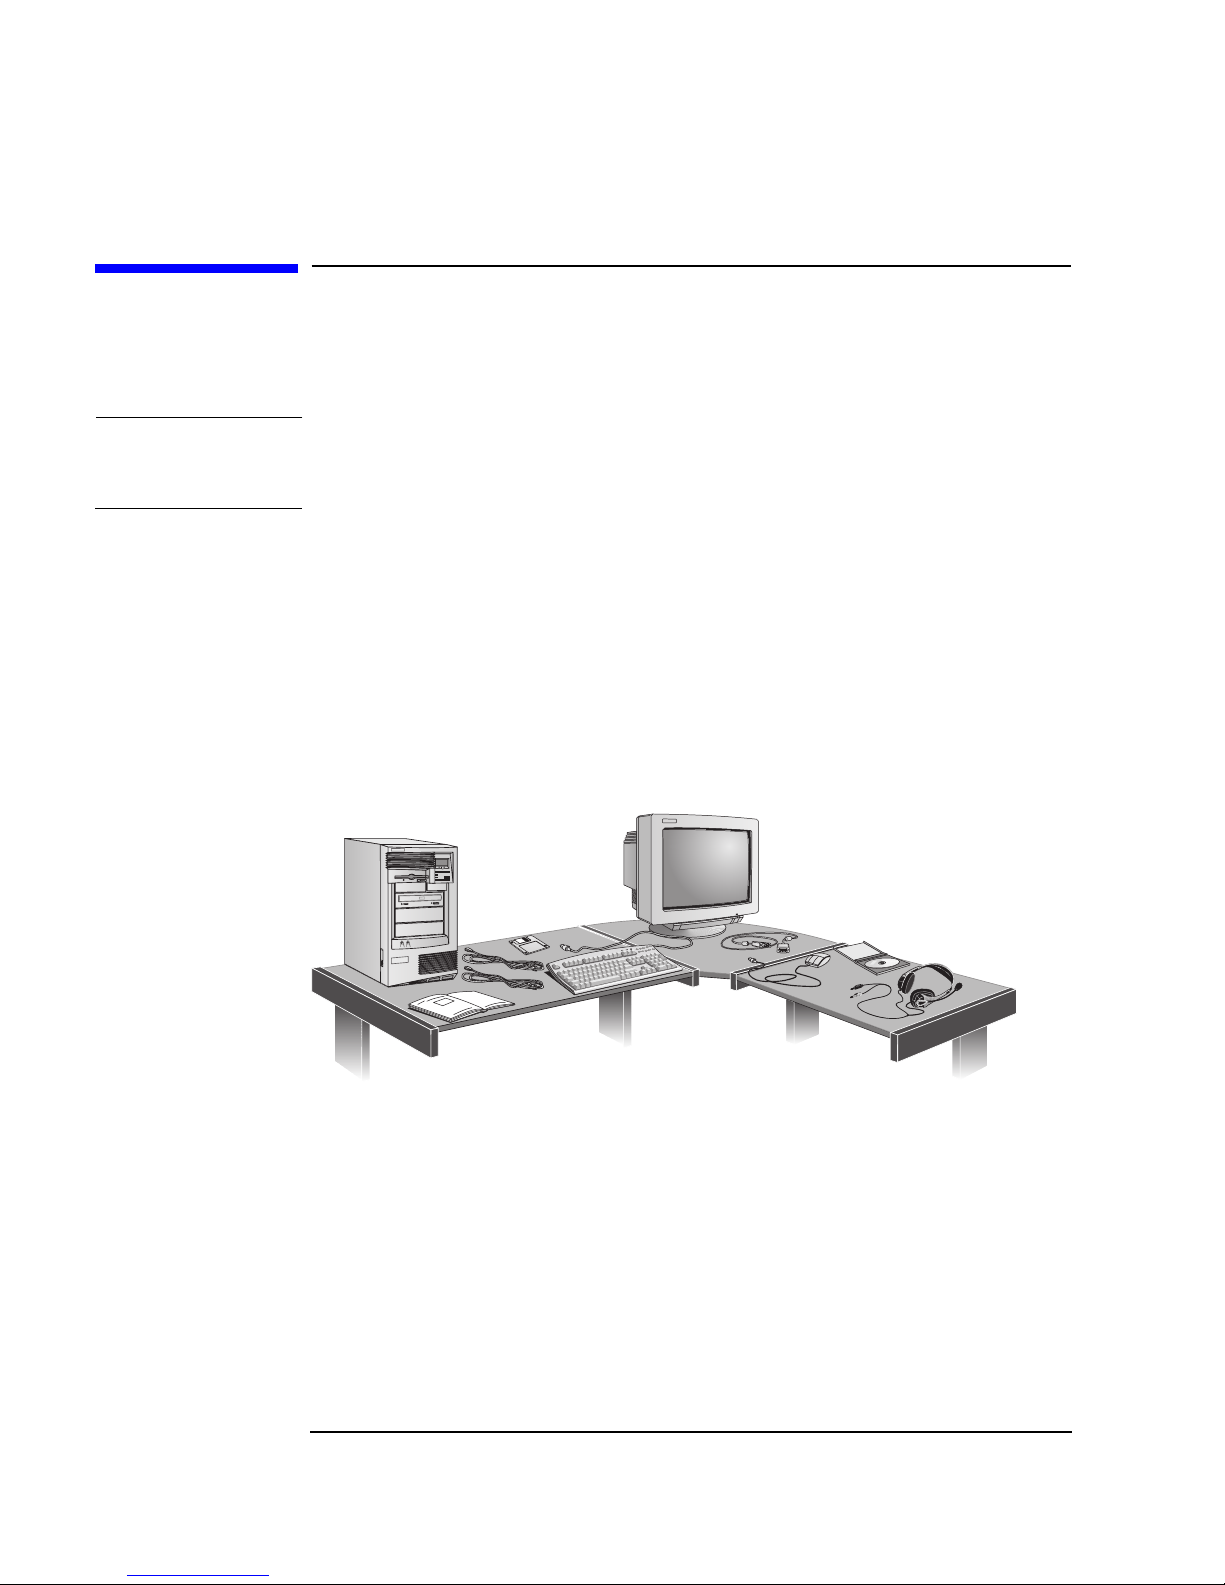
1. When you receive your Workstation, unpack all of the components:
˘ Computer and power cords
˘ Display and its video cable
˘ HP keyboard, mouse and headphones
˘ Manuals and CD-ROMs.
2. Place the Workstation on (or under) a sturdy desk with easily
accessible power outlets and enough space for the keyboard, mouse,
and any other accessories.
3. Position the Workstation so that its rear connectors are easily
accessible.
4. Place the display next to the computer.
Installation Tools No tools are required to install your Workstation. However, if you plan to
install a disk drive or an accessory board inside your Workstation, you
will need a flat-blade screwdriver. For more information on installing
accessories, refer to the chapter “How to Install Accessories Inside Your
HP VISUALIZE Linux Workstation.”
2 Chapter1
Page 19
Setting Up and Using Your HP Visualize Linux Workstation
Connecting the Mouse, Keyboard, Display and Printer
Connecting the Mouse, Keyboard, Display and
Printer
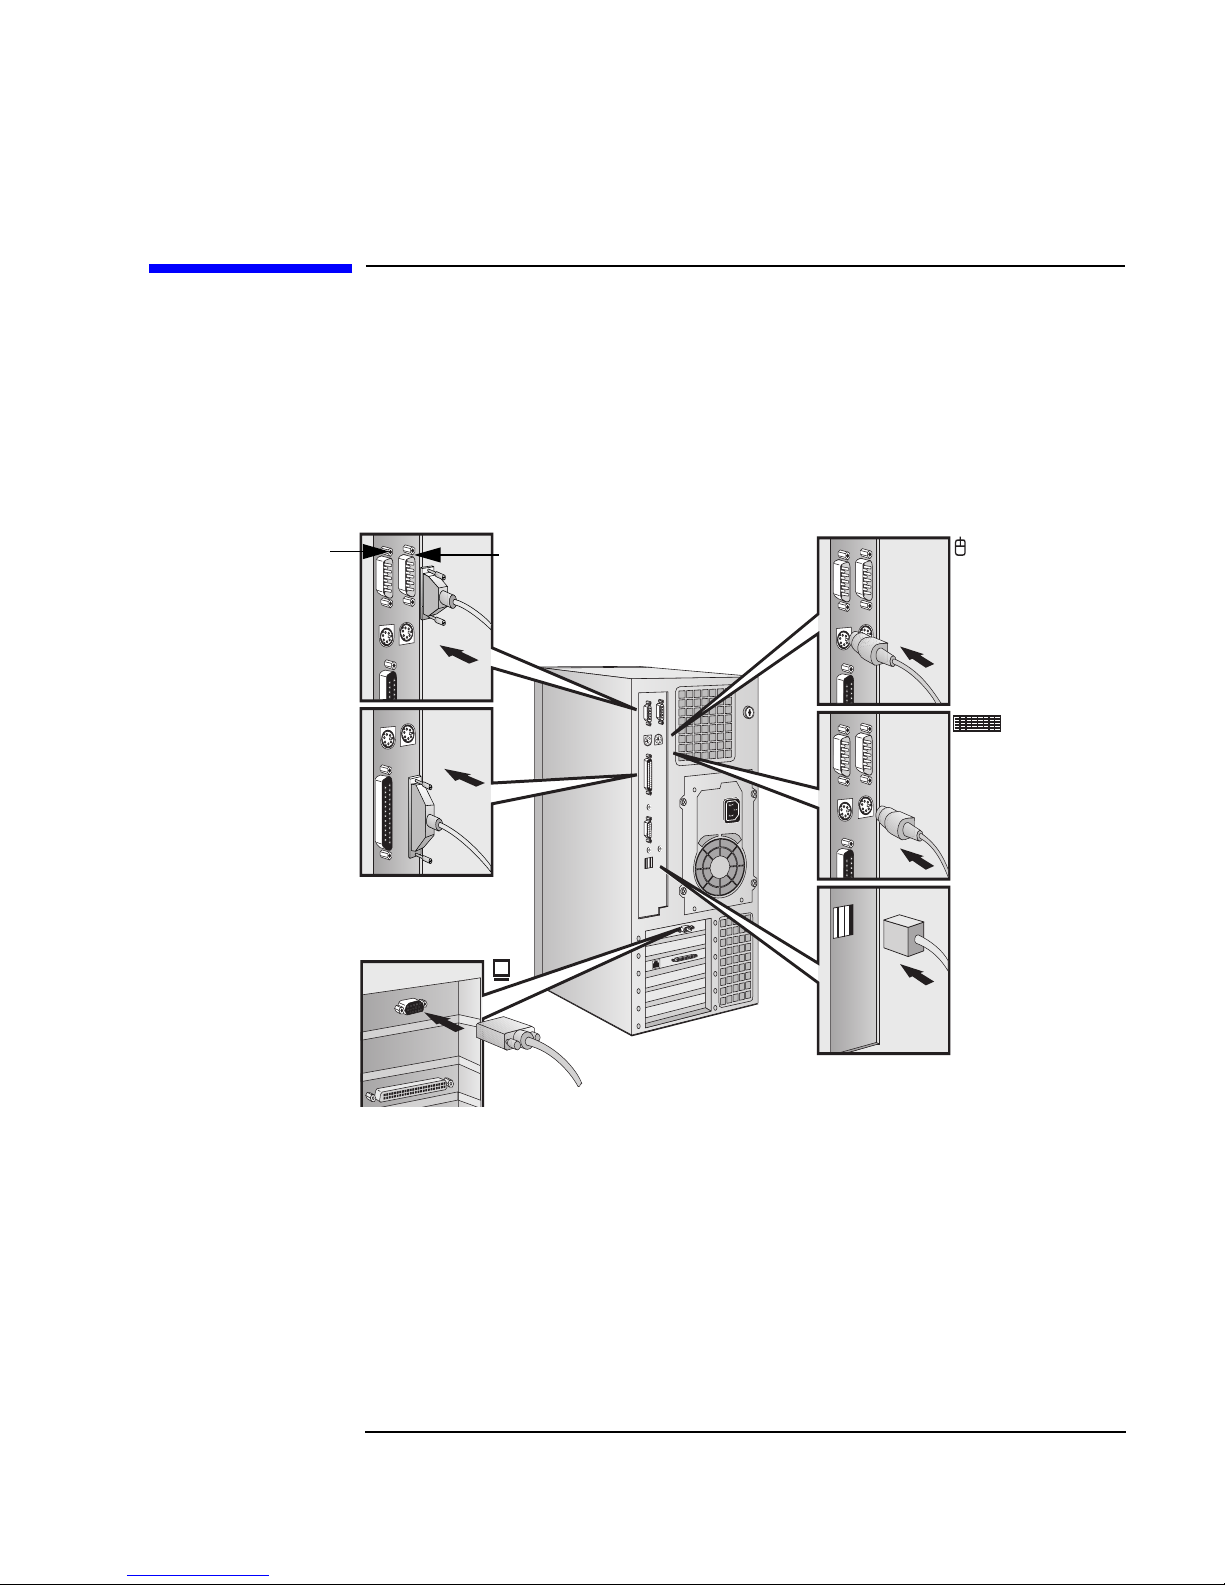
Connect the mouse, keyboard, and display to the back of the
Workstation. The connectors are shaped to go in one way only. Tighten
the display cable attachment screws.
Serial B
Port
Parallel
Connector
Monitor
Connector
Serial A
Port
Mouse
Connector
Keyboard
Connector
Connect the printer cable to the back of the computer and tighten the
attachment screws. Use the connector labeled:
• Parallel (25-pin parallel connector) for a parallel device.
• Serial A (9-pin serial connector) for a serial device.
• Serial B (9-pin serial connector) for a second serial device.
Chapter 1 3
Page 20
Setting Up and Using Your HP Visualize Linux Workstation
Connecting to a Network
Connecting to a Network
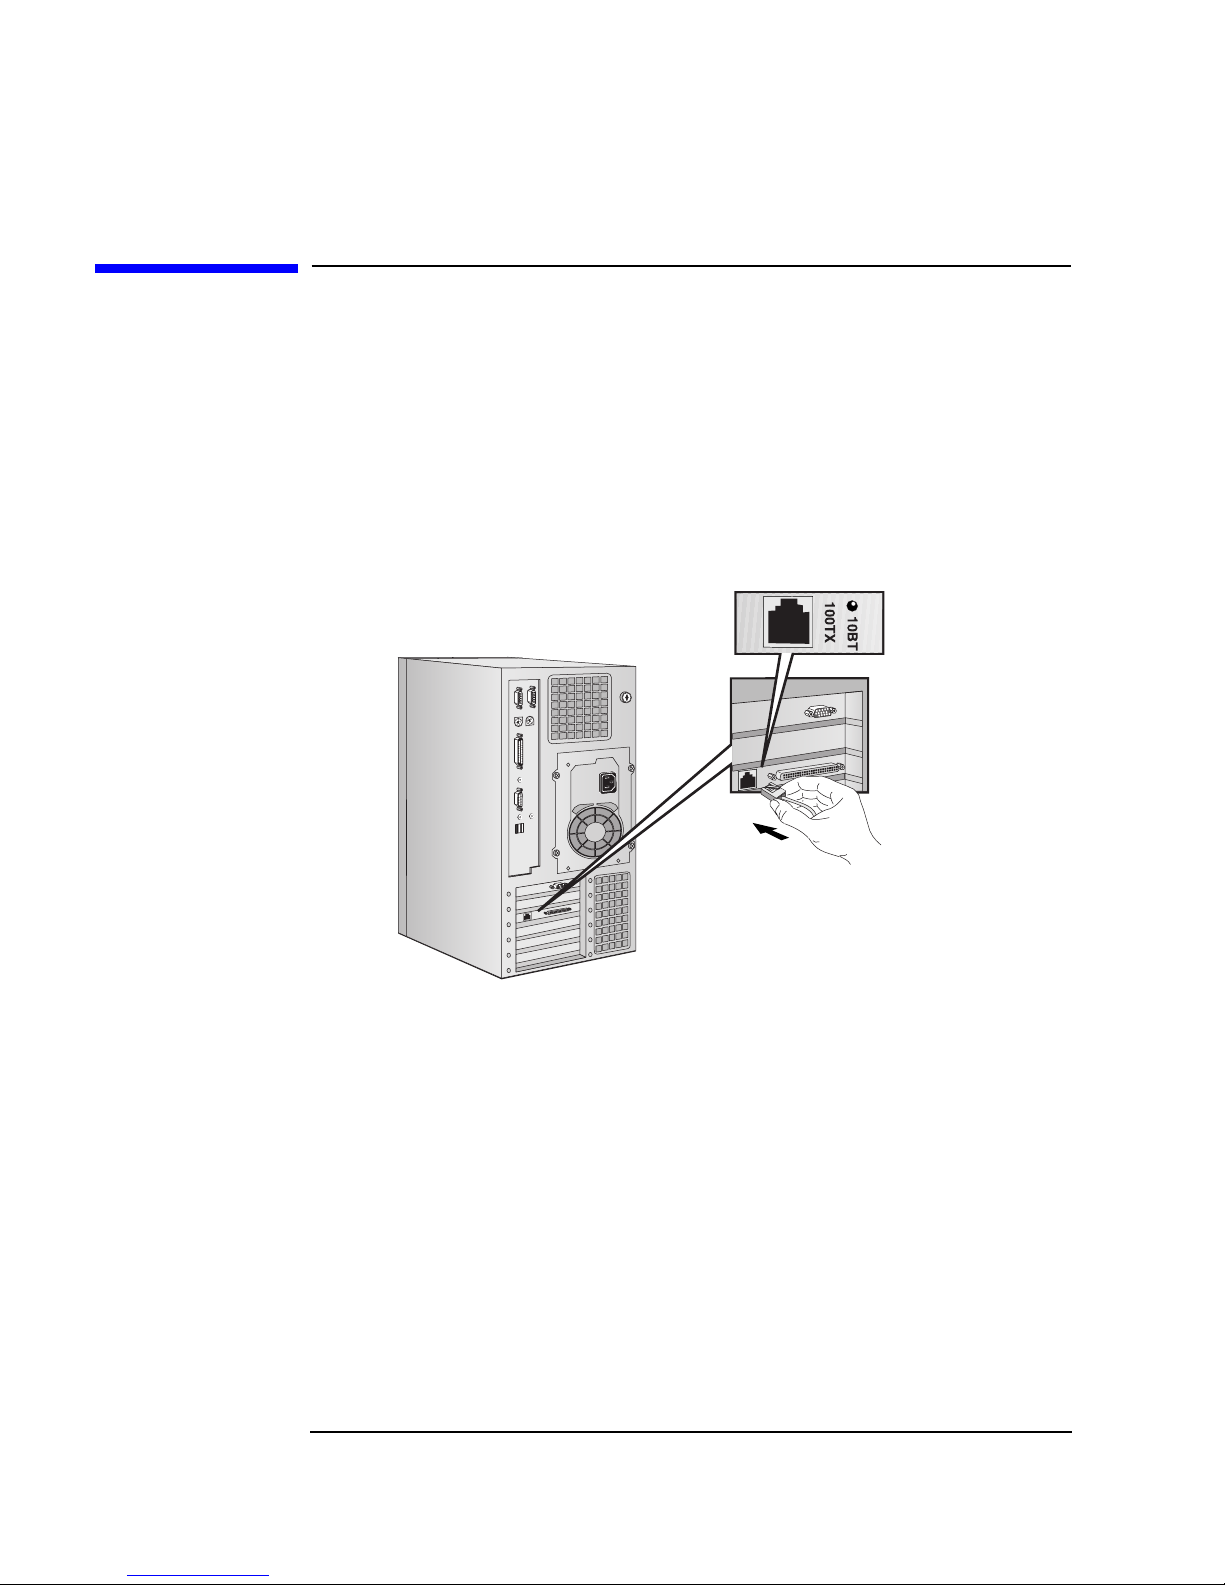
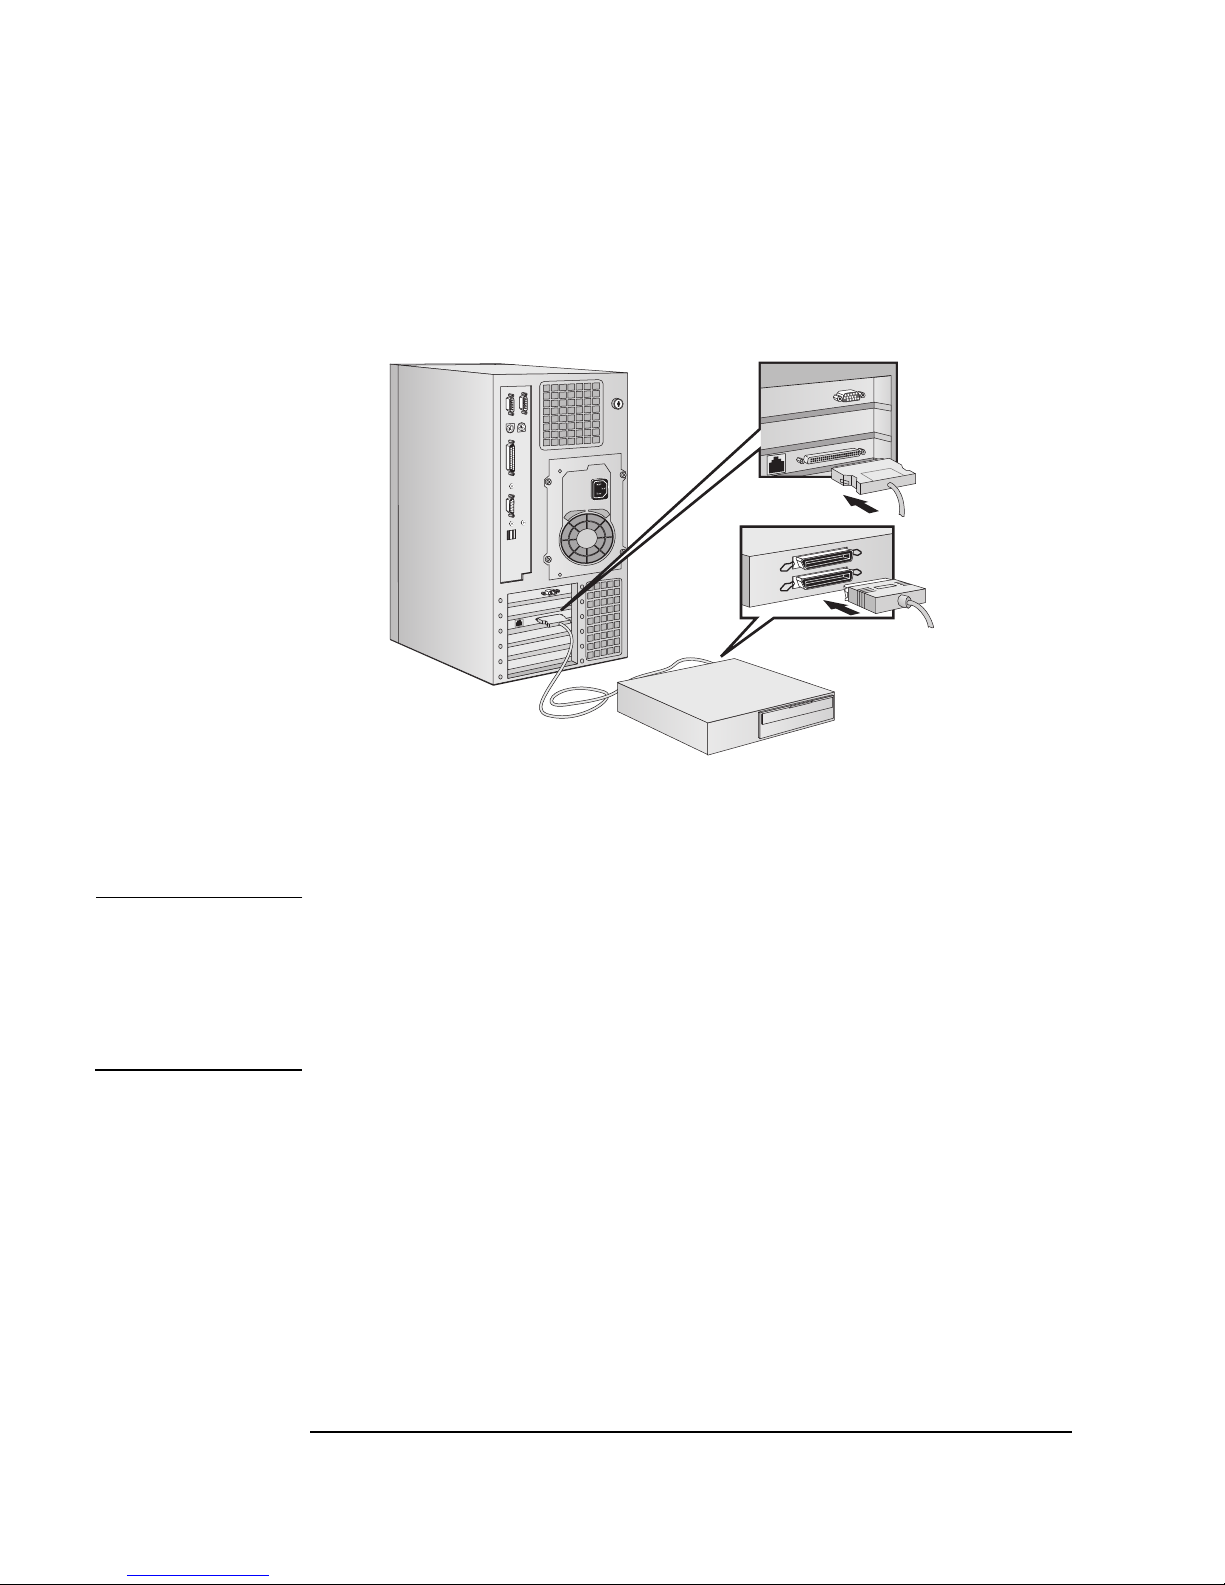
Your HP VISUALIZE Linux Workstation has a 10BT/100TX LAN interface
adapter.
The LAN adapter supports both 10 Mbit/s and 100 Mbit/s operations and
automatically detects which network type is being used.
1. Connect the RJ-45 plug on your network cable to the LAN connector
on the LAN Adapter. Push the plug into the connector until the plug
clicks into place.
The board shown here is a
combined SCSI/LAN board.
2. Attach the other end of the LAN cable to a hub (or into a wall socket
that is connected to a hub).
For further instructions on configuring your network connection, refer to
the section “Configuring Your Network Connection” in the chapter
“Technical Information.”
Let your Network Administrator know that you are connecting
your Workstation to the network.
4 Chapter1
Page 21
Setting Up and Using Your HP Visualize Linux Workstation
Connecting Audio Accessories
Connecting Audio Accessories
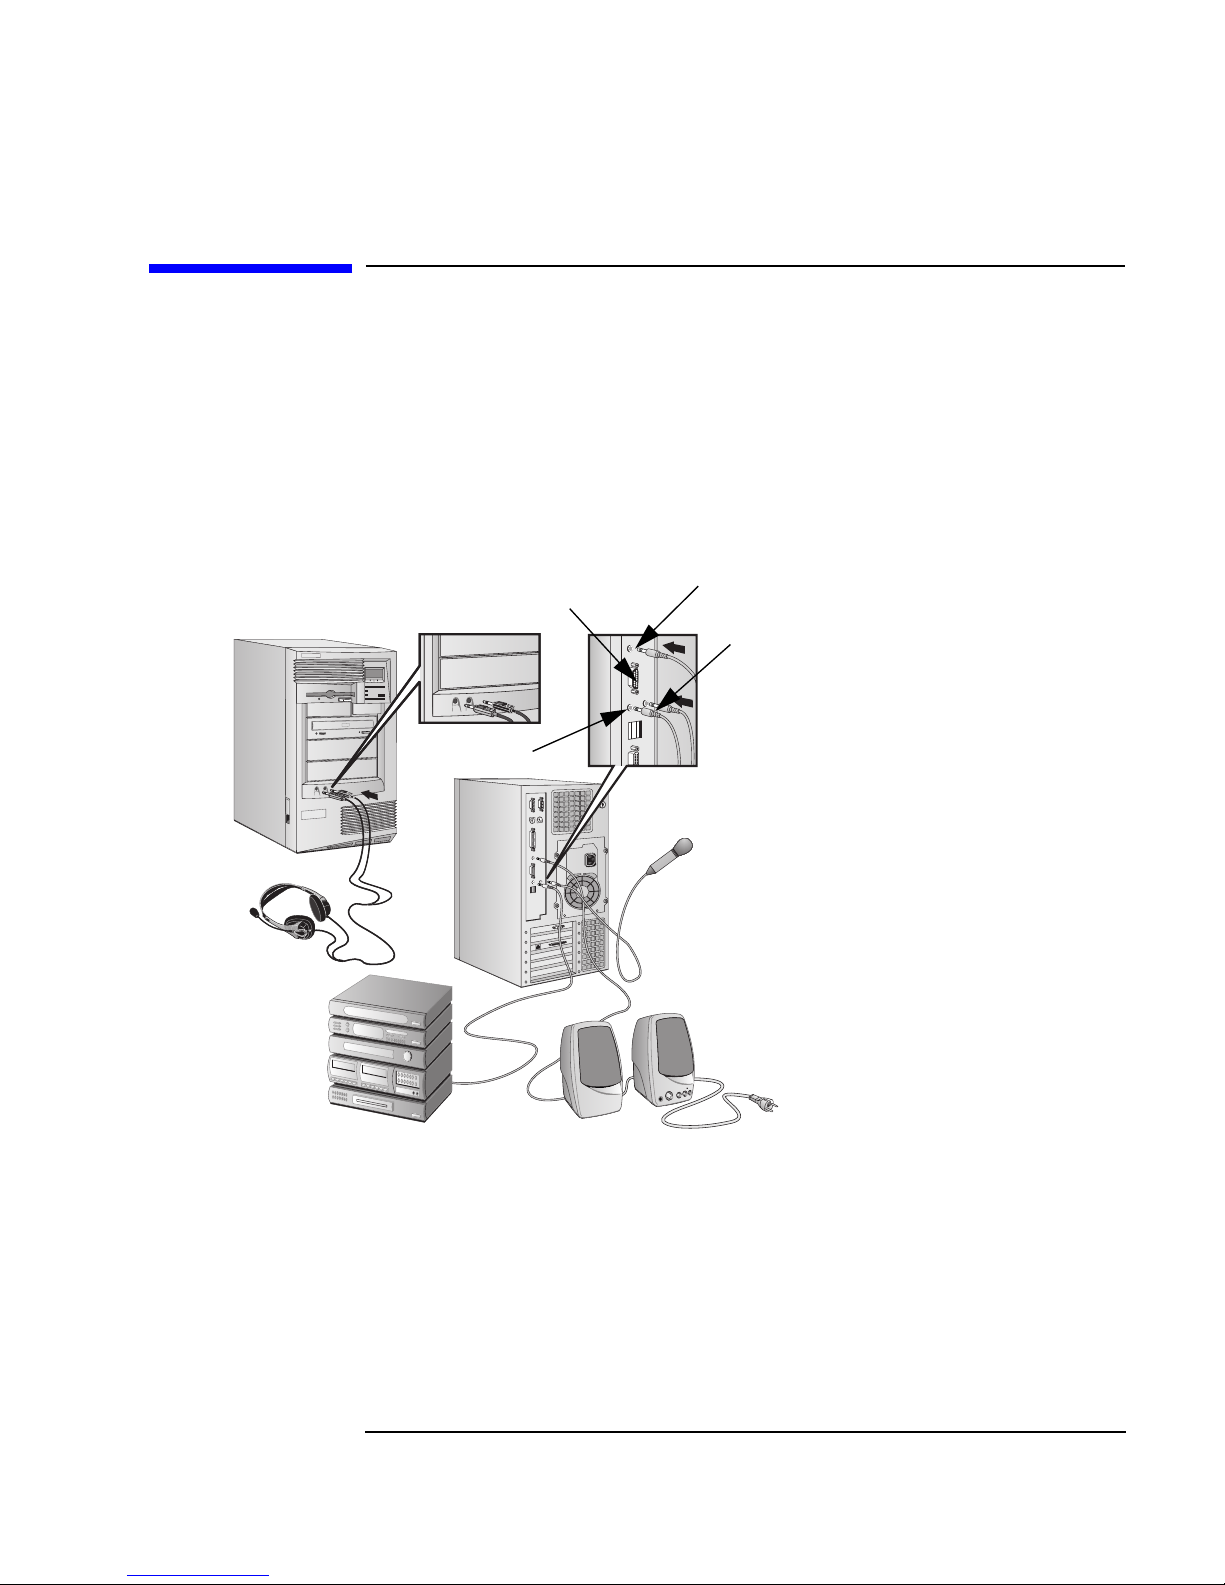
Your HP VISUALIZE Linux Workstation has a Headphone Out jack and a
Microphone In jack on the Audio Front Panel (see the section “System
Specifications” in the chapter “Technical Information” for more
information). A LINE IN jack, LINE OUT jack, MIC IN jack, and
MIDI/Joystick connector are located on the rear panel (see the section
“System Specifications” in the chapter “Technical Information” for
details).
Audio Front Panel
MIDI/Joystick
connector
LINE IN jack
LINE OUT jack
MIC IN jack
NOTE
The internal speaker and LINE
OUT jack on the rear panel of
your Workstation are
deactivated when you use the
Headphones jack on the Audio
Front Panel.
The internal speaker is
deactivated when you use the
LINE OUT jack.
External speakers you connect
should have a built-in power
supply.
The audio accessories shown
here (microphone, speakers,
and audio system) are not
supplied with your
Workstation.
Volume can be controlled
through the software volume
control.
Chapter 1 5
Page 22

Setting Up and Using Your HP Visualize Linux Workstation
Connecting Audio Accessories
WARNING To avoid discomfort from unexpected noise, always turn down
the volume before connecting headphones or speakers. Listening
to loud sounds for prolonged periods may permanently damage
your hearing.
Before putting on headphones, place them around your neck and
turn down the volume. When you put on the headphones, slowly
increase the volume until you find a comfortable listening level,
then leave the volume control in that position.
6 Chapter1
Page 23
Setting Up and Using Your HP Visualize Linux Workstation
Connecting an External SCSI Accessory
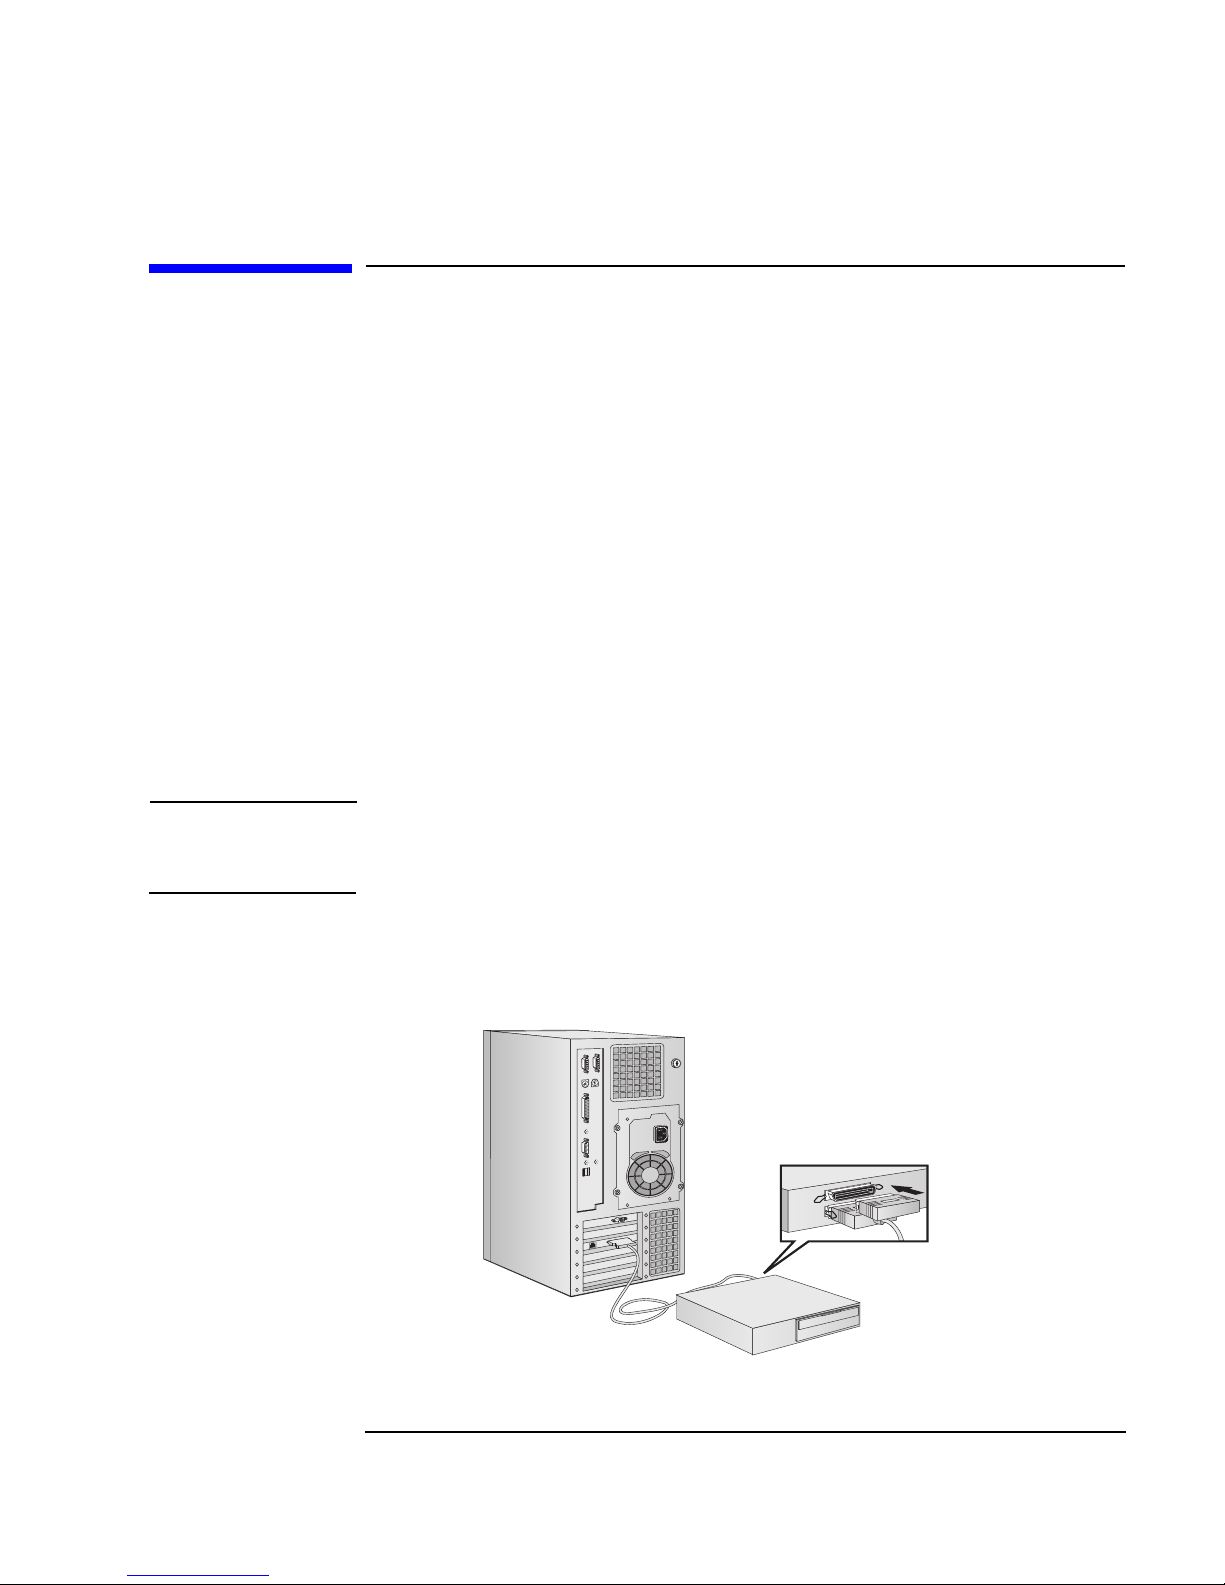
Connecting an External SCSI Accessory
Your HP VISUALIZE Linux Workstation is equipped with an UltraWide
16-bit SCSI connector for external SCSI devices.
When an external SCSI device is connected, the UltraWide 16-bit SCSI
controller automatically switches to non-Ultra mode (maximum capacity
of 20 MBs per second).
An external SCSI device is connected as follows:
1. You should assign an unused SCSI address to the accessory. SCSI
addresses range from 0 to 15 for wide 16-bit SCSI. The SCSI
address 0 is reserved for the first SCSI hard disk drive and SCSI
address 7 is reserved for SCSI controller (the default for narrow and
wide SCSI devices).
Refer to the manual provided with the SCSI accessory for
instructions on selecting a SCSI address.
NOTE You don’t need to set a SCSI address for Plug and Play SCSI devices
(SCSI devices which support the SCAM protocol).
2. Make sure the SCSI accessory is terminated correctly—either
internally or by a terminating resistor (refer to the manual provided
with the SCSI accessory).
Make sure the SCSI
accessory is terminated
Chapter 1 7
Page 24
Setting Up and Using Your HP Visualize Linux Workstation
Connecting an External SCSI Accessory
3. Connect the SCSI accessory to your Workstation’s external 16-bit
SCSI connector with a shielded SCSI cable.
4. Refer to the manual providedwith the SCSIaccessory to learnhow to
install any software that may be necessary to use it.
NOTE The total length of the external SCSI cables should not exceed 3 meters
(approximately 10 feet).
Contact your dealer to order shielded HP SCSI cables to connect external
SCSI accessories.
See the section “Installing Mass Storage Devices” in the chapter “How to
Install Accessories Inside Your HP VISUALIZE Linux Workstation” for
information on how to connect internal SCSI devices.
8 Chapter1
Page 25

Setting Up and Using Your HP Visualize Linux Workstation
Connecting the Power Cords
Connecting the Power Cords
1. Remove any warning labels that may be covering the computer’s
power connector on the rear of the computer.
2. Connect the power cords to the display and the computer. (The
connectors are shaped to go in one way only.)
Workstation
Power Connector
Monitor Power Connector
Grounded Outlet
3. Connect the display’s power cord and the computer’s power cord to
grounded outlets.
WARNING For your safety, always connect the equipment to a grounded
wall outlet. Always use a power cord with a properly grounded
plug, such as the one provided with this equipment, or one in
compliance with your national regulations. This Workstation is
disconnected from the power by removing the power cord from
the power outlet. This means the Workstation must be located
close to a power outlet that is easily accessible.
Chapter 1 9
Page 26
Setting Up and Using Your HP Visualize Linux Workstation
n
Your HP Visualize Linux Workstation’s Hardware Control Panel
Your HP VISUALIZE Linux Workstation’s
Hardware Control Panel
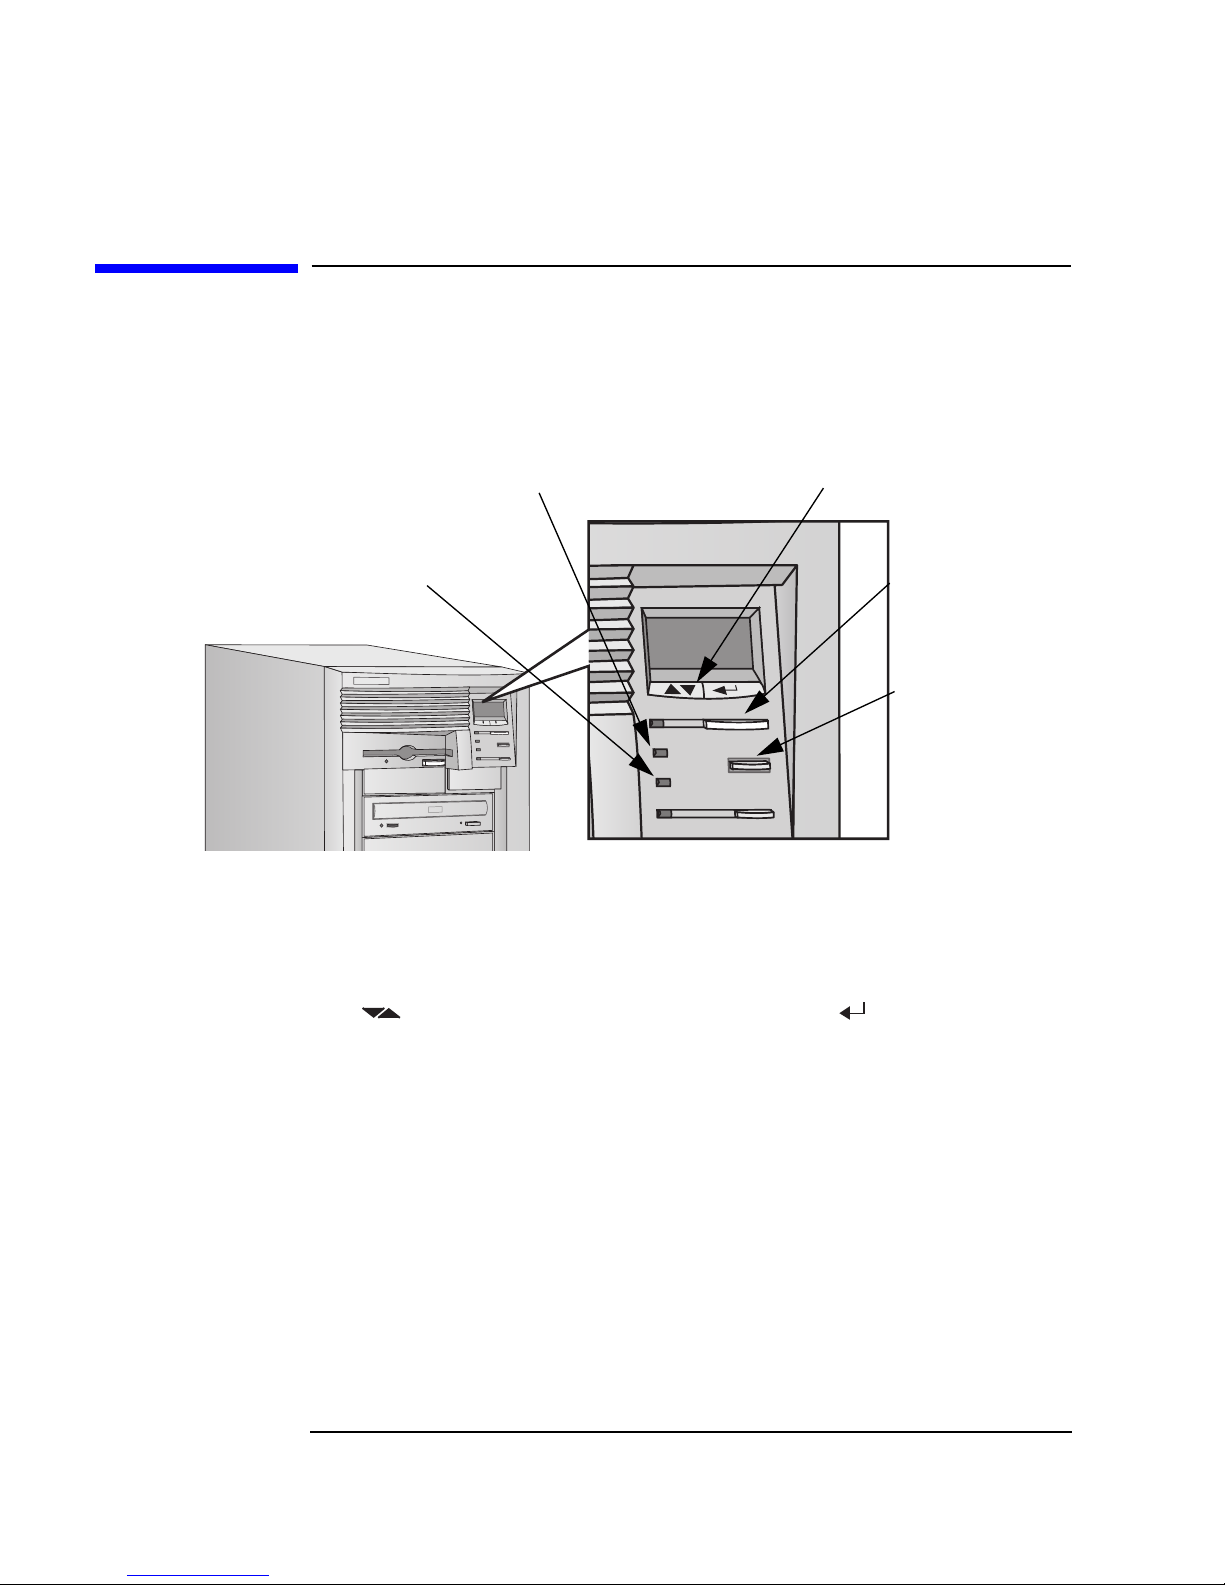
The hardware control panel is located on the front of your Workstation.
HP MaxLife and its
Liquid Crystal
Display (LCD)
Hard Disk Activity Light
Network Activity Light
LCD Control Buttons
Power On/Off Butto
and LED
Reset Button
HP MaxLife and it’s LCD helps you diagnose problems with your
Workstation and provides system information you may need to obtain
support. Press one of the LCD control buttons to display the menu.
Use to scroll through the menu items and to select the item
required. For more information on using the LCD, refer to the section
“Using HP MaxLife to Diagnose Problems” in the chapter
“Troubleshooting Your HP VISUALIZE Linux Workstation.”
Network Activity
Light
Hard Disk Activity
This light glows/flickers when your Workstation is accessing the
network.
This light glows/flickers when your hard disk drive is being accessed.
Light
10 Chapter1
Page 27
Setting Up and Using Your HP Visualize Linux Workstation
Starting and Stopping Your HP Visualize Linux Workstation
Starting and Stopping Your HP VISUALIZE
Linux Workstation
Starting Your Workstation for the First Time
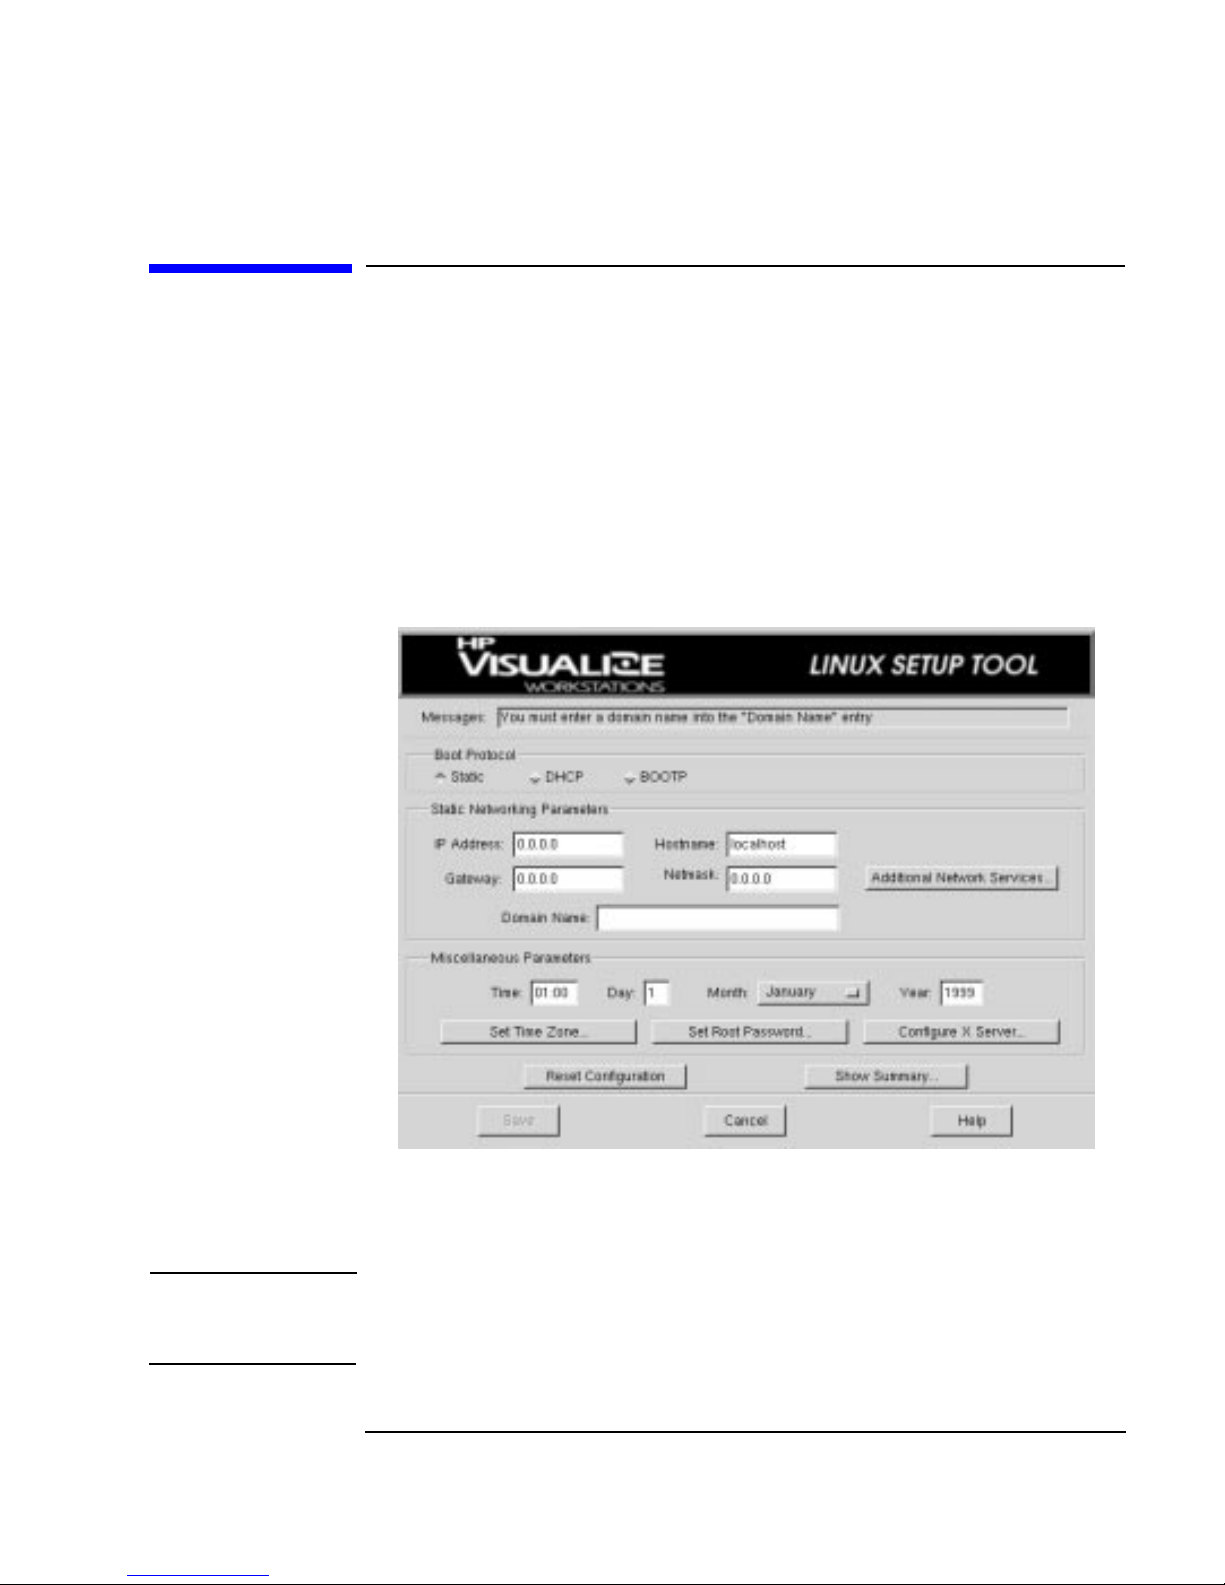
Your HP VISUALIZE Linux Workstation has preinstalled Red Hat Linux
and HP software. It is initialized the first time youstart theWorkstation.
The software initialization process takes a few minutes. Upon startup,
you will see the screen depicted below. Fill-in the information requested.
Initializing Your Software
NOTE Do NOT switch OFF the Workstation while the software is being
initialized—this could cause unexpected results.
Chapter 1 11
Page 28

Setting Up and Using Your HP Visualize Linux Workstation
Starting and Stopping Your HP Visualize Linux Workstation
To initialize your software:
1. Turn on the display first, and then the HP VISUALIZE Linux
Workstation.
When the Workstation is switched on, the Workstation performs a
Power-On-Self-Test (POST). Press if you want to view the POST
details in the HP BIOS Summary Screen (see the section “The HP
BIOS Summary Screen andSetup Program”in the chapter “Technical
Information”).
If an error is detected during the Power-On-Self-Test, the
Workstation will automatically display the error. You may be
prompted to press to start the Setup program to correct the error.
The HP Linux Setup Tool will then run. It allows you to enter
information. For example:
• The Boot Protocol, networking parameters, current date and time,
root password, etc.
2. While the Setup Toolis running, you can complete the Warranty
Registration card that came with this manual.
3. When you are finished entering information into the Setup Tool, click
OK and the Workstation will restart.
Creating Rescue Disk Set
It is very important that you create a rescue disk set for your preloaded
software and operating system, as soon as possible. HP recommends that
you use new diskettes for this purpose. To create these back-up diskettes,
follow instructions that appear in the HP Linux Setup and Recovery
Guide (HP Part Number A1297-90010) that was included with your
Workstation.
12 Chapter1
Page 29

Setting Up and Using Your HP Visualize Linux Workstation
Starting and Stopping Your HP Visualize Linux Workstation
Starting Your HP VISUALIZE Linux Workstation
1. Before you start your Workstation, first switch on the display.
2. Start your Workstation by pressing the power button on the front
panel.
When you switch on the computer, it carries out the Power-On-Self-Test
(POST). If you wish to view the POST details, press to get the HP
Summary Screen. If there is an error in the POST, the error will
automatically be displayed. For details, see the section “If a POST Error
Message is Displayed” in the chapter “Troubleshooting Your HP
Visualize Linux Workstation.”
If you have set a password in the Workstation’s Setup program, the
password prompt displays after the POST has completed. If the
Password prompt is displayed, type your password and press
to be able to use the Workstation.
Stopping Your HP VISUALIZE Linux Workstation
To stop the Workstation, make sure that you have exited all programs
and the operating system by running (as Root):
shutdown -h now
and then press the power button on the control panel. If you stop the
workstation without following these instructions, data loss or a
damaged file system may result.
Chapter 1 13
Page 30

Setting Up and Using Your HP Visualize Linux Workstation
Additional Information and Help
Additional Information and Help
After completing the Setup Tool and rebooting, your Workstation will
launch a special “Getting Started” program (see above) that will provide
access to several on-line documents and manuals. This program will
guide you to additional information regarding the Red Hat and HP
software.
14 Chapter1
Page 31

Setting Up and Using Your HP Visualize Linux Workstation
Setting BIOS Passwords
Setting BIOS Passwords
You can set two passwords, the Administrator (or Supervisor) password
and the User password, to provide two levels of protection for your HP
VISUALIZE Linux Workstation. You set both passwords using the Security
menu in the BIOS Setup program (refer to the section “The HP BIOS
Summary Screen and Setup Program” in the chapter “Technical
Information”).
Setting an Administrator Password
Set the Administrator password to protect the HP VISUALIZE Linux
Workstation’s configuration in the BIOS Setup. An Administrator
password can provide a power-on password prompt that prevents your
Workstation from being started or used in your absence. You can also
use this password to start the Workstation when the keyboard and
mouse are locked—you must type the password and press to
unlock the keyboard.
If you have set both an Administrator password and a User password,
and you enter theBIOS Setup program using the User password, you will
be restricted in your ability to change setup items. If you enter the Setup
program with an Administrator password, you will have no restrictions.
To set an Administrator password:
1. Start the BIOS Setup program (refer to the section “The HP BIOS
Summary Screen and Setup Program” in the chapter “Technical
Information”).
2. Select the Security menu.
3. Select the Administrator password submenu.
4. Choose the Set Administrator password setup item. You will be asked
to enter your password twice. Save your changes when you exit the
Setup program by selecting Exit, then Exit Saving Changes.
To remove the password, follow the same procedure as to set a password.
You will be asked to enter the existing password first. Then, for the new
password, leave the password field blank and press . To confirm
your choice, press a second time.
Chapter 1 15
Page 32

Setting Up and Using Your HP Visualize Linux Workstation
Setting BIOS Passwords
NOTE If you forget your password, refer to the section “If You Have Forgotten
Your Password” in the chapter “Troubleshooting Your HP VISUALIZE
Linux Workstation.”
Setting a User Password
A User password can only be set if an Administrator password has
already been set.
Set a User password to:
• Provide a power-on password prompt to prevent your Workstation
being started or used in your absence.
• Start the Workstation when the keyboard and mouse are locked—you
must type the password and press to unlock the keyboard
(refer to the section “The HP BIOS Summary Screen and Setup
Program” in the chapter “Technical Information”).
If you have set both an Administrator password and a User password,
and you enter the Setup program using the User password, you will be
restricted in your ability to change setup items. If you enter the Setup
program with an Administrator password, you will have no restrictions.
To set a User password:
1. Start the BIOS Setup Program.
2. Select the Security menu.
3. Select the User Password submenu.
4. Choose the Set User Password setup item. You will be asked to enter
your password twice. Save your changes when you exit the Setup
program by selecting Exit, then Exit Saving Changes.
16 Chapter1
Page 33

Setting Up and Using Your HP Visualize Linux Workstation
To remove the password, follow the same procedure as to set a password.
You will be asked to enter the existing password first. Then, for the new
password, leave the password field blank and press . To confirm
your choice, press a second time.
NOTE If you forget your password, refer to the section “If You Have Forgotten
Your Password” in the chapter “Troubleshooting Your HP VISUALIZE
Linux Workstation.”
Chapter 1 17
Page 34

Setting Up and Using Your HP Visualize Linux Workstation
Recycling an Old HP Workstation
Recycling an Old HP Workstation
HP has a strong commitment towards the environment. This HP
Workstation has been designed to respect the environment as much as
possible.
HP can take an old computer back for recycling when it reaches the end
of its useful life.
In several countries, HP has a product take-back program. Collected
equipment is sent to one of HP’s recycling facilities in Europe or the
USA. As many parts as possible are reused, the remainder are recycled.
Special care is taken with batteries and other potentially toxic
substances, which are reduced to non-harmful components through a
special chemical process.
If you require more details about HP’s product take-back program,
contact your dealer or your nearest HP Sales Office.
18 Chapter1
Page 35

2 How to Install Accessories
In Your HP VISUALIZE Linux
Workstation
19
Page 36

How to Install Accessories In Your HP Visualize Linux Workstation
This chapter explains how to install accessories, such as extra memory,
accessory boards, and additional disk drives, in your Workstation.
20 Chapter2
Page 37

Supported HP Accessories
h
This chapter describes how to install memory, mass storage devices, and
accessory boards in your computer.
Internal Mass
Storage Devices
Pack of five pairs of rails for
Front Access Devices:
- 3.5-inch disk drives
- 5.25-inch disk drives
How to Install Accessories In Your HP Visualize Linux Workstation
Supported HP Accessories
Main Memory Upgrades
DIMM slots for 100 MHz SDRAM:
- 128 MB
- 256 MB
Front Access Drives, for example:
- 3.5-inch 1.44 MB flexible disk drive
(one third height)
- 5.25-inch DDS tape drive (half heig
Up to six accessory boards
can be installed:
- One AGP slot (graphics)
- Three 32-bit PCI slots (one used by SCSI/LAN board)
- One combination PCI or ISA slot
- One 16-bit ISA slot
IMPORTANT Some of the accessories mentioned in this section reflect components that
were not fully qualified with the Linux Operating System by HP at the
time this manual was written. However, they are stated as being
supported by Red Hat Version 6.0.
Contact HP or your dealer for an up-to-date list of supported devices.
Chapter 2 21
Page 38

How to Install Accessories In Your HP Visualize Linux Workstation
Removing and Replacing the Cover
Removing and Replacing the Cover
WARNING For your safety, never remove the Workstation’s cover without
first removing the power cord from the power outlet, and any
connection to a telecommunications network. Always replace
the cover on the Workstation before switching it on again.
Removing the Cover
1. Switch off the display and computer.
2. Disconnect all power cables and any telecommunications cables.
3. If necessary, unlock the cover using the key on the back panel.
22 Chapter2
Page 39

How to Install Accessories In Your HP Visualize Linux Workstation
Removing and Replacing the Cover
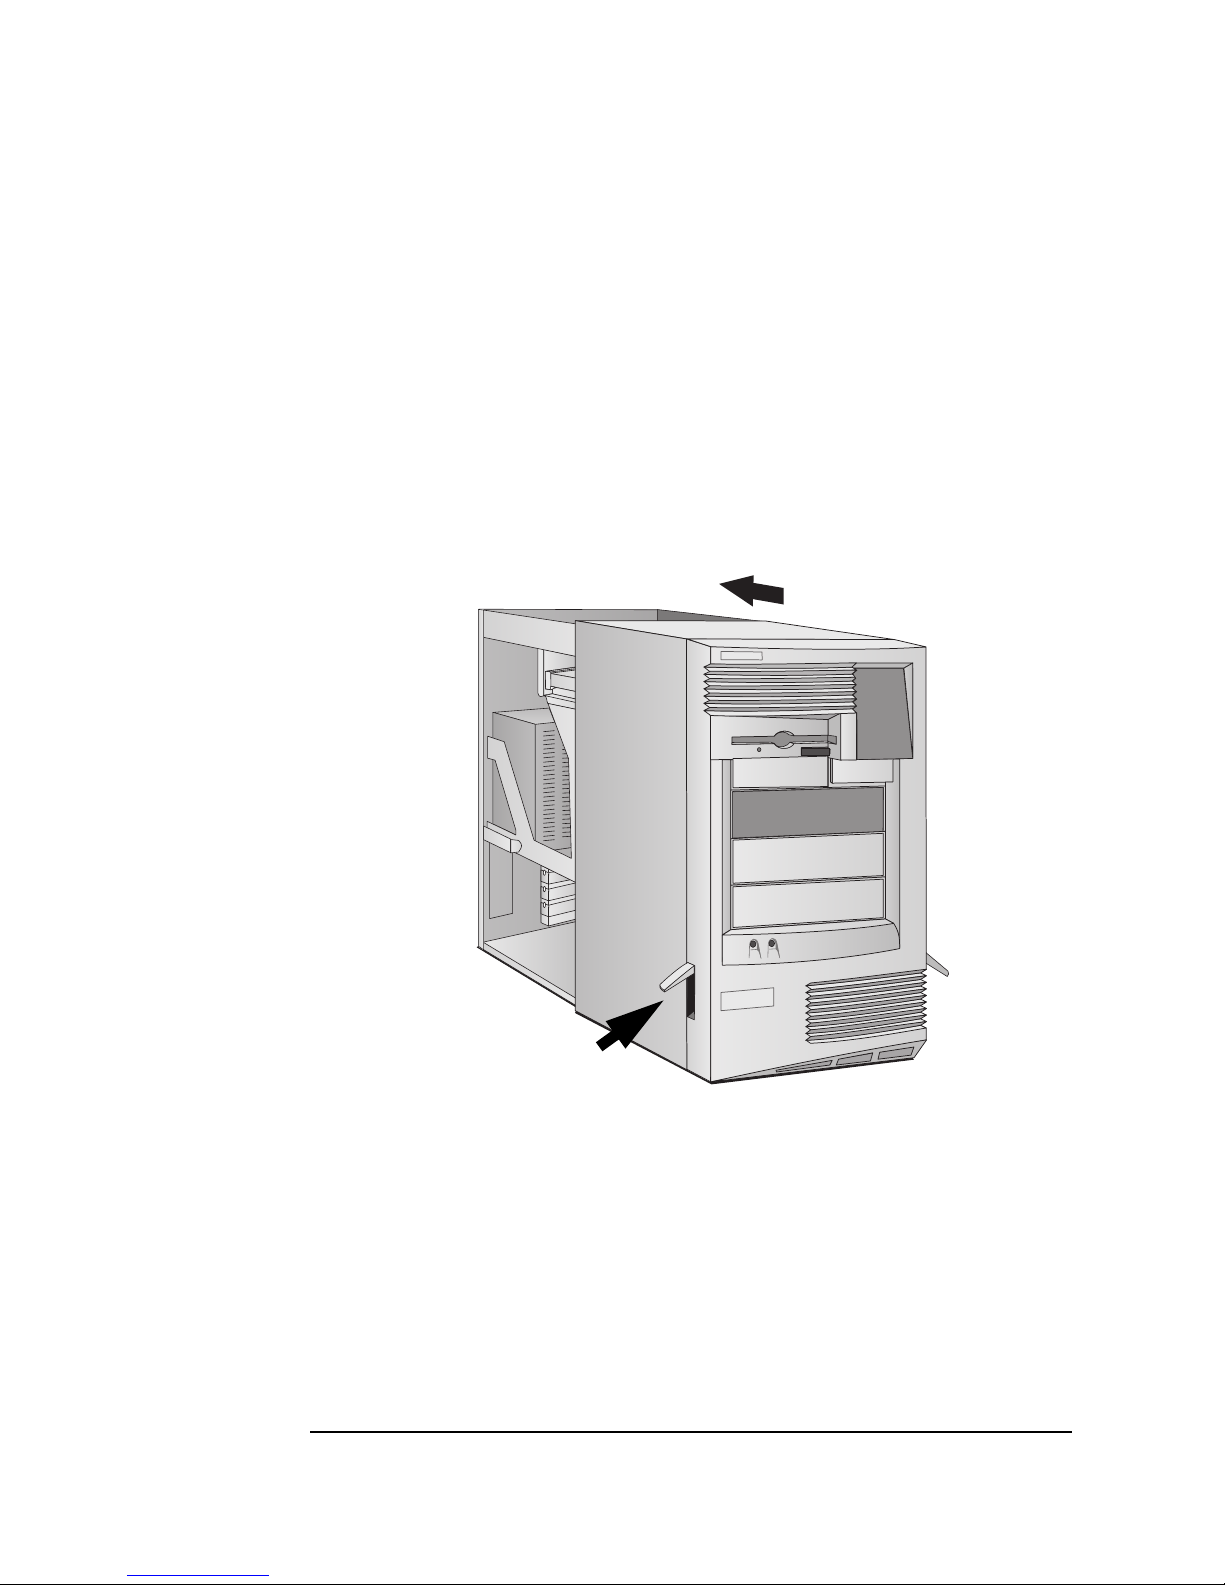
4. Lift the two latches on the front sides of the computer upwards.
5. Grasp the cover on the sides at the back of the computer and slide it
forwards and off the computer.
Chapter 2 23
Page 40
How to Install Accessories In Your HP Visualize Linux Workstation
Removing and Replacing the Cover
Replacing the Cover
1. Ensure that you have installed all your accessories and that all
internal cables are properly connected and safely routed.
2. Ensure that the two latches on the front sides of the cover are lifted
up, and that the lock is unlocked.
3. Slide the cover onto the computer, making sure that the two guides at
the bottom of the case slide into the two rails at the base of the
computer. Firmly slide the cover backwards into position.
24 Chapter2
Press here on both
sides of the
Workstation’s cover.
Page 41

How to Install Accessories In Your HP Visualize Linux Workstation
Removing and Replacing the Cover
4. Lower the latches on the front sides of the cover.
5. If required, lock the cover using the key provided.
6. Reconnect all the power cables.
Intrusion Monitor Your HP VISUALIZE Linux Workstation is equipped with an intrusion
monitor, which is located on the front of the Workstation, behind the
Hardware Control Panel. It is designed to detect whether your
Workstation has been opened since the last time it was used:
• If your Workstation has been opened, it is assumed that the system
configuration has changed and a full start-up check is carried out.
• If your Workstation has not been opened, it is assumed that the
system configuration has not changed and a reduced start-up check is
carried out.
Chapter 2 25
Page 42

Fan connection
to system board
How to Install Accessories In Your HP Visualize Linux Workstation
Moving the Power Supply
Moving the Power Supply
You can slide the power supply unit out of the computer to improve
access to the system board and the cables at the rear of the disk drives.
1. Disconnect the computer’s power cord and any telecommunications
cable.
2. Remove the computer’s cover (see the section “Removing and
Replacing the Cover”).
3. Remove the fan connection to the system board.
HP UltraFlow
Airflow
Guide
Retaining button
4. Press the retaining buttons on each side of the HP UltraFlow airflow
guide and lift it out of the Workstation’s case.
26 Chapter2
Page 43

How to Install Accessories In Your HP Visualize Linux Workstation
Moving the Power Supply
5. Unscrew the four self-retaining screws at the back of the power
supply.
Unscrew the
self-retaining screws
WARNING To avoid electrical shock, do not open the power supply.
6. Slide the power supply out of the computer until it stops—the power
supply unit remains connected to the computer.
Power Supply
Slide the power
supply unit clear
of the computer
Chapter 2 27
Page 44

How to Install Accessories In Your HP Visualize Linux Workstation
Moving the Power Supply
Replacing the
PowerSupply after
Installing
Accessories
1. Check that all internal cables are safely routed.
2. Slide the power supply back into the computer.
3. Tighten the four self-retaining screws.
4. Replace the HP UltraFlow airflow guide.
5. Reconnect the fan to the system board.
28 Chapter2
Page 45

How to Install Accessories In Your HP Visualize Linux Workstation
Installing Memory
Installing Memory
Main Memory Modules
If you need more main memory to run your application software, you can
install up to 768 MB of memory in three DIMM slots.
Main memory upgrades are available in single 128 MB and 256 MB ECC
SDRAM memory modules. You should note that only 100 MHz memory
modules should be used to upgrade your Workstation.
CAUTION Static electricity can damage electronic components. Turn off all
equipment. Do not let your clothes touch the accessory. To equalize the
static electricity, rest the accessory bag on top of the power supply while
you are removing the accessory from the bag. Handle the accessory as
little as possible and with care.
Fan connection
to system board
HP UltraFlow
Airflow
Guide
Retaining button
To install a main memory module:
1. Disconnect the computer’s power cord and any LAN or
telecommunications cable
2. Remove the computer’s cover (see the section “Removing and
Replacing the Cover”).
3. Remove the fan connection to the system board.
Chapter 2 29
Page 46
How to Install Accessories In Your HP Visualize Linux Workstation
Installing Memory
4. Press the retaining buttons on each side of the HP UltraFlow airflow
guide and lift it out of the Workstation’s case.
5. Remove the transparent airflow guide covering the processor sockets
(if needed).
6. Remove the floppy disk drive data cable from the system board.
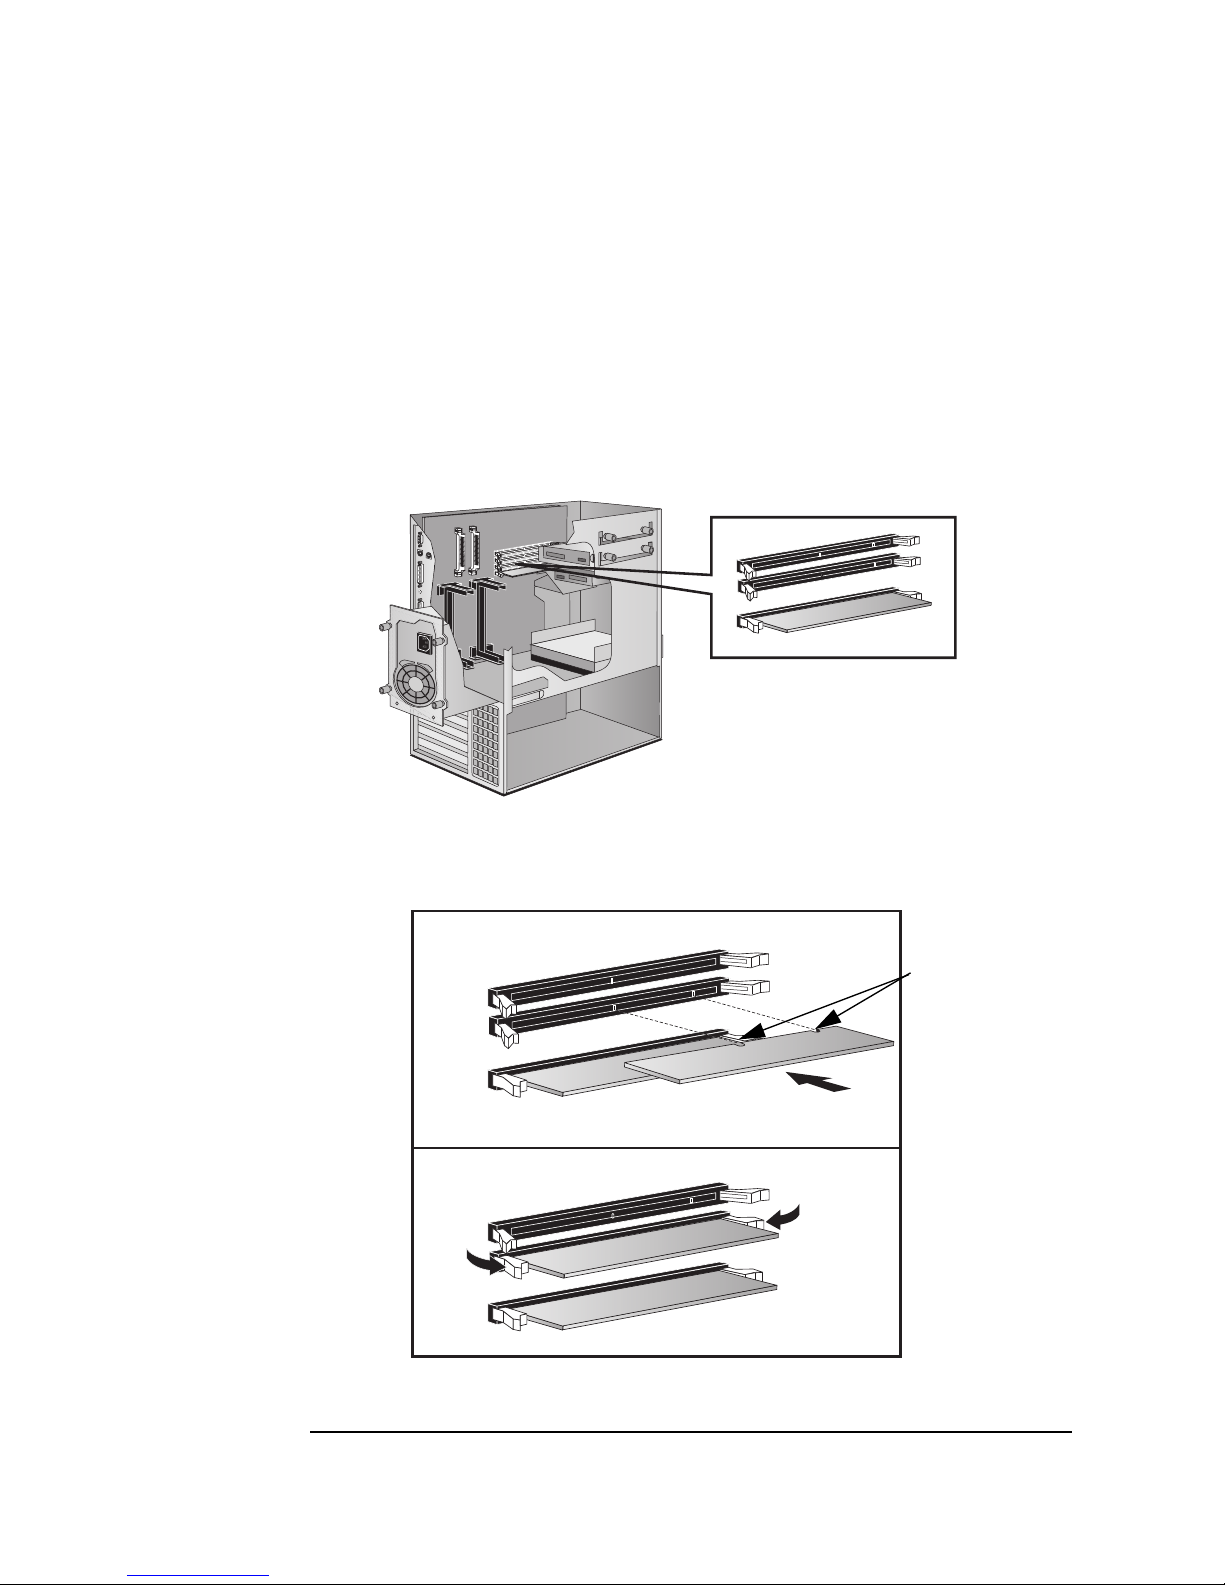
7. The location of the memory module slots is shown here.
8. Slide the memory module into the slot at 90˚ to the system board
Slide the memory module
into the slot at 90˚ to the
system board
Push the module until
the retaining clips click
into position
(with the cutouts furthest away from the processor).
Memory module
cutouts
30 Chapter2
Page 47

How to Install Accessories In Your HP Visualize Linux Workstation
Installing Memory
9. Firmly press the memory module completely into the connector until
the retaining clips click into position.
10.Repeat this procedure for each additional memory module you want
to install.
11.Install any other accessories if necessary, then replace all units
and reconnect all cables and power cords. Replace the cover (see
page 24).
12.Check the HP Summary Screen to verify the new configuration (refer
to the section “The HP Summary Screen and Setup Program” in the
chapter “Technical Information”).
Chapter 2 31
Page 48

How to Install Accessories In Your HP Visualize Linux Workstation
5
Installing Mass Storage Devices
Installing Mass Storage Devices
If you need extra mass storage space for your application software, you
can install additional mass storage devices.
The computer has two internal shelves (for hard disk drives) and five
front-access drive shelves (for front-access drives and hard disk drives).
Your computer is supplied with one 3.5-inch flexible disk drive and a CDROM drive. If your computer is supplied with a hard disk, the hard disk
will be installed in the second internal shelf
Two internal
shelves
Two shelves for 3.5inch drives
Three shelves for 5.2
inch drives
32 Chapter2
Page 49
How to Install Accessories In Your HP Visualize Linux Workstation
Installing Mass Storage Devices
Connecting Devices
If you add an IDE Zip drive, hard disk drive, CD-ROM drive, CD-RW
drive, or tape drive (NOTE: these devices were not fully qualified by HP
at the time this manual was written), you need to connect it to power and
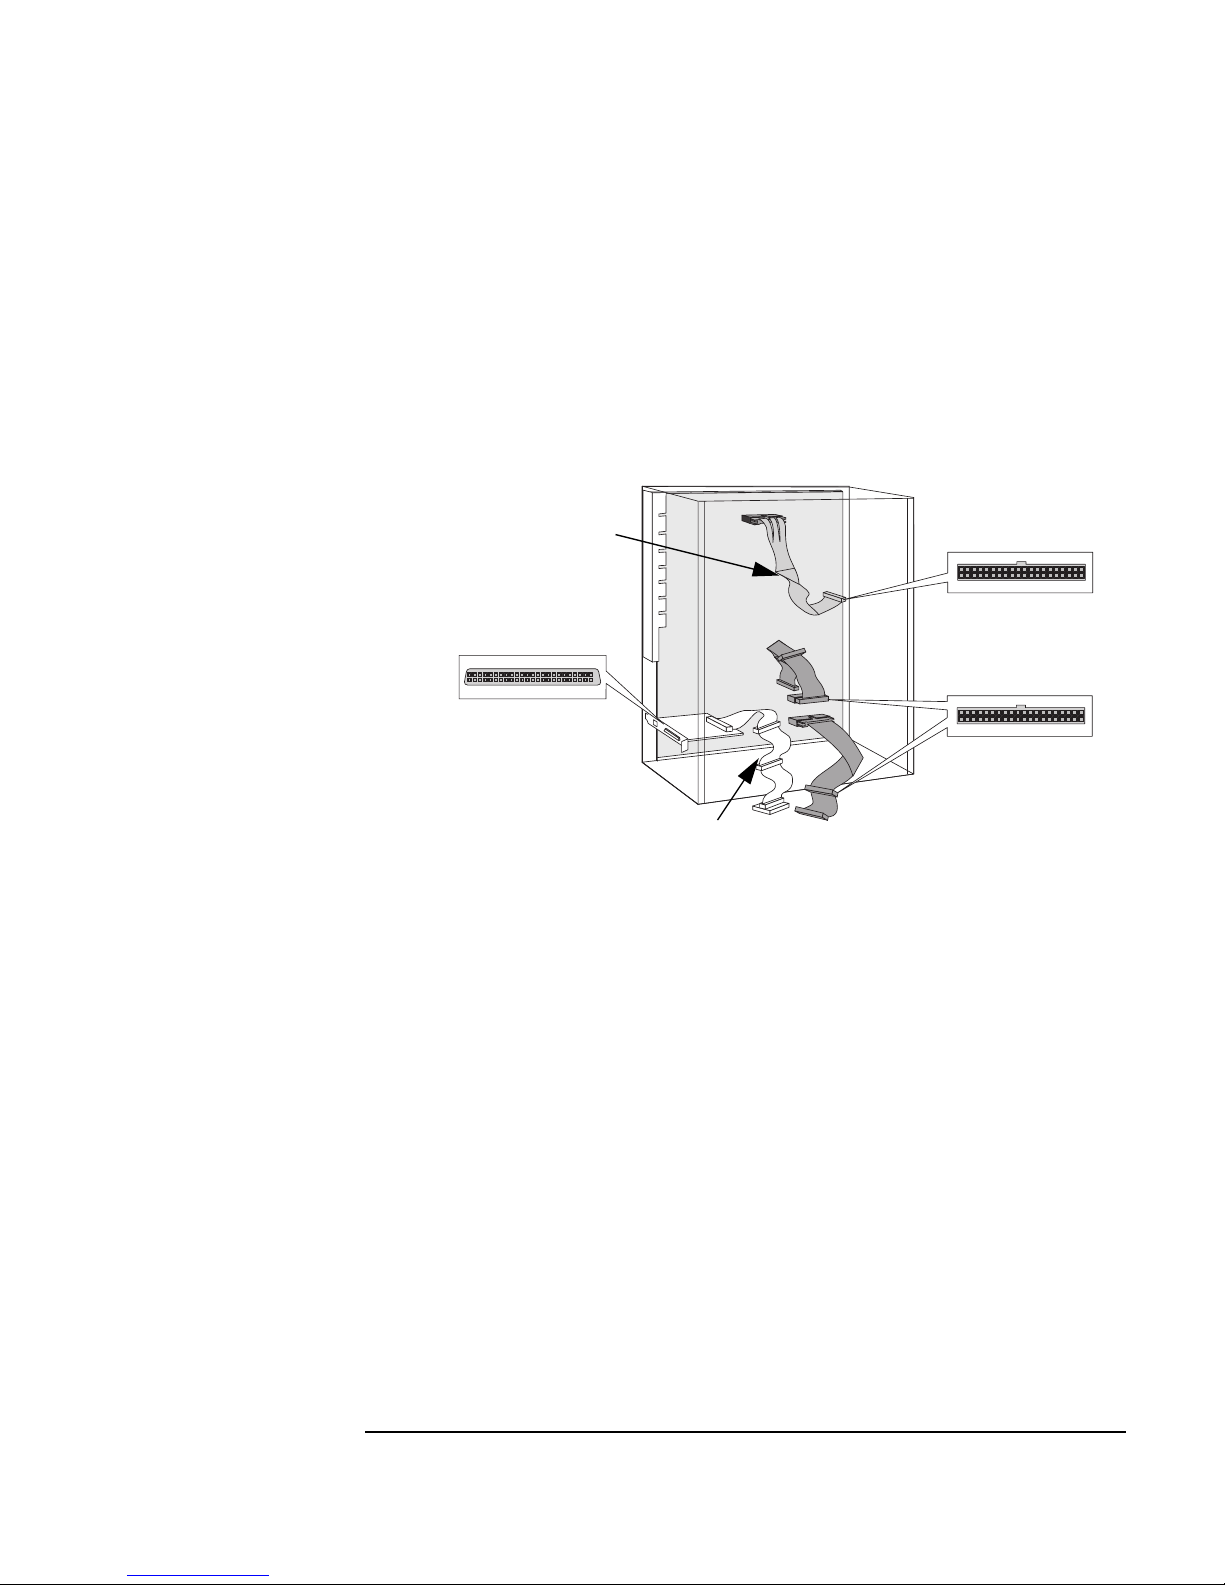
data cables. The data cables and connectors provided are shown below:
Cable with one connector for
3.5-inch Flexible Disk Drive
On selected models, a 16-bit
External 68-pin SCSI connector
34-pin connector
Cable with two 40-pin
connectors for IDE
Drives
Which Data
Connectors to Use
On selected models, an 8-bit SCSI with two
50-pin SCSI connectors
Your HP VISUALIZE Linux Workstation has the following cables and
connectors on the system board which may be used by mass storage
devices:
• A flexible disk drive cable with a single connector. This supports a
flexible disk drive (the connector is attached to the flexible disk drive
supplied).
• Two Ultra ATA/33 IDE drive connectors that support four fast IDE
devices. If you install aCD-ROM drive, CD-RW drive, a Zip drive, or a
third hard disk drive (NOTE: these devices were not fully qualified by
HP at the time this manual was written), connect it to this cable.
Chapter 2 33
Page 50

How to Install Accessories In Your HP Visualize Linux Workstation
Installing Mass Storage Devices
Which Power
Connectors to Use
There are two different types of power connectors—these are shown
below.
Power Cables for Hard Disk
Drives, Zip Drives, Tape Drives,
CD-RW, and CD-ROM Drives
Power Cable for 3.5-inch
Flexible Disk Drive
Some of the power connectors will already be connected to devices. If you
install a device that requires a different connector, the connector
converter should be supplied with the device.
Installing a Hard
Disk Drive
Before Installing
an
IDE Hard Disk
This Workstation has integratedDual Ultra ATA-33 IDE controllers and,
on selected models, an Ultra SCSI interface board.
• The Dual Ultra ATA-33 IDE controllers, on thePCI bus, support upto
four fast (33 MB per second) IDE devices.
• On selected models, the Ultra SCSI 16-bit interface board, installed
in a PCI slot, supports up to 13 external SCSI devices and
automatically switches to non-Ultra or standard mode.
Refer to the drive’s installation guide to see if you must set jumpers or if
there is a special installation procedure to follow.
34 Chapter2
Page 51

How to Install Accessories In Your HP Visualize Linux Workstation
Installing Mass Storage Devices
Before Installing a
SCSI Hard Disk
If you are installing an additional SCSI drive, you should assign an
unused SCSI address to this accessory. SCSI addresses range from 0 to 7
for Ultra narrow 8-bit SCSI and from 0 to 15 for Ultra wide 16-bit SCSI.
SCSI address 0 is used by the first SCSI hard disk drive and SCSI
address 7 is reserved for the integrated SCSI controller (the default for
narrow and wide SCSI devices).
NOTE You do not need to select a SCSI address for Plug and Play SCSI hard
disks (SCSI hard disks that support the SCAM protocol).
You should assign an unused SCSI address to the second SCSI hard disk
drive (for example, SCSI address 1).
The SCSI address is usually configured with jumpers on the SCSI hard
disk drive. Refer to the installation guide supplied with the drive for
information on selecting a SCSI address.
Some internal SCSI disk drives may have termination resistors that
must be removed or disabled before installation in your computer. Refer
to the drive’s installation guide for more details and to see if there is a
special installation procedure to follow.
Chapter 2 35
Page 52
How to Install Accessories In Your HP Visualize Linux Workstation
Installing Mass Storage Devices
Installing a Hard Disk Drive in an Internal Shelf
CAUTION The upper internal shelf can house a hard disk drive up to one inch (1”)
in height. For a larger disk drive than this, install the drive in one of the
front-access shelves as described on "Installing a Hard Disk Drive in a
Front-Access Shelf", on page 38.
1. Disconnect the computer’s power cord and any telecommunications
cable.
2. Remove the computer’s cover (see "Removing the Cover", on page 22).
3. Remove the fan connection to the system board (see the illustration
on page 26).
4. Press the retaining buttons on each side of the HP UltraFlow airflow
guide and lift it out of the Workstation’s case.
5. Slide the power supply out to improve access to the internal shelf (see
page 26).
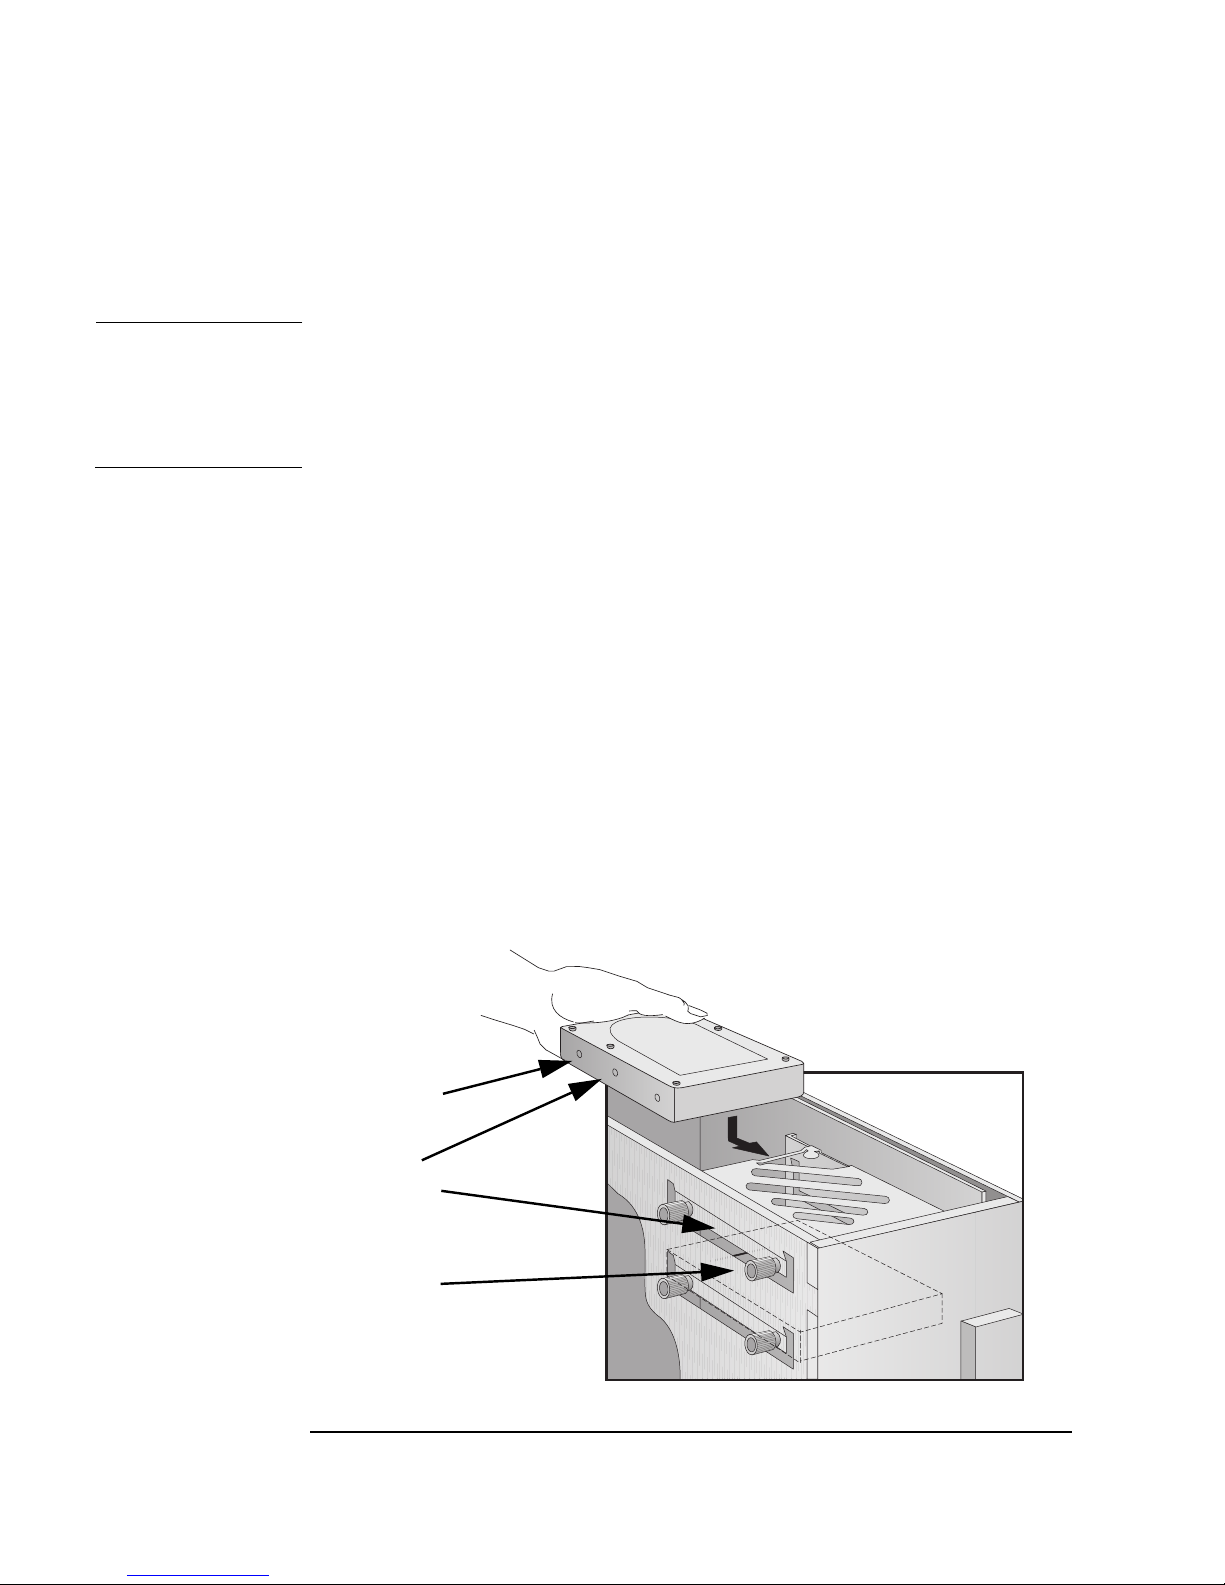
6. Slide the drive into position in the first internal shelf and align the
screw holes in the drive with the four self-retaining screws in the
drive shelf.
Screw hole
Align the hole in the drive
with the hole in the drive shelf
Self-retaining
screw
36 Chapter2
Page 53

How to Install Accessories In Your HP Visualize Linux Workstation
Installing Mass Storage Devices
7. Secure the drive with the four self-retaining screws.
8. Locate the appropriate data cable for the hard disk drive.
IDE drives should be connected to
a free IDE connector on the IDE
cables (you can add up to four IDE
devices).
Up to 13 external SCSI devices can be
connected to the external SCSI connector.
Narrow SCSI devices should be
connected to a free SCSI connector
on the SCSI cable (you can add up
to internal two SCSI devices).
Chapter 2 37
Page 54

How to Install Accessories In Your HP Visualize Linux Workstation
Installing Mass Storage Devices
9. Connect the power cable and the data cable to the rear of the drive.
(The connectors are shaped to go in one way only.)
Data Cable
Power Cable
10.Install any other accessories before completing the installation.
11.Turn to page 42 to complete the installation.
Installing a Hard Disk Drive in a Front-Access Shelf
1. Disconnect the computer’s power cord and any telecommunications
cable.
2. Remove the computer’s cover (see page 22).
3. Remove the fan connection to the system board (see the illustration
on page 26).
4. Press the retaining buttons on each side of the HP UltraFlow airflow
guide and lift it out of the Workstation’s case.
5. Slide out the power supply to provide better access to the disk drive
cables (see page 26).
38 Chapter2
Page 55

How to Install Accessories In Your HP Visualize Linux Workstation
Installing Mass Storage Devices
6. Unscrew and remove an unused drive tray.
Remove the
drive tray
Set the drive on
the tray
7. Mount the drive on the tray as shown below.
Fix the drive to
the tray
Chapter 2 39
Page 56

How to Install Accessories In Your HP Visualize Linux Workstation
Installing Mass Storage Devices
8. Slide the drive tray into the drive shelf and secure it.
Slide the drive tray
into the drive shelf
40 Chapter2
Page 57

How to Install Accessories In Your HP Visualize Linux Workstation
9. Locate the appropriate data cable for the disk drive.
IDE drives should be
connected to a free IDE
connector on the IDE
cables (you can add up
to four IDE devices).
Up to 13 external SCSI
devices can be connected to
the external SCSI connector.
Installing Mass Storage Devices
Narrow SCSI devices should be connected
to a free SCSI connector on the SCSI cable
(you can add up to two SCSI devices).
10.Connect the data and power cables to the rear of the device. (The
connectors are shaped to go in one way only.)
Data Cable
Power Cable
11.Slide the power supply back into position, and tighten the four selfretaining screws (see page 26).
Chapter 2 41
Page 58

How to Install Accessories In Your HP Visualize Linux Workstation
Installing Mass Storage Devices
12.Replace the HP UltraFlow airflow guide and reconnect the fan to the
system board (see the illustration on page 26).
13.Install any other accessories before replacing the cover and
completing the installation.
14.Follow the instructions below to complete the installation.
Completing the Installation of a Hard Disk Drive
When a SCSI Hard
Disk Drive Is
Installed
When an IDE Drive
Is Installed
1. Switch on the computer.
2. To ensure compatibility, use the FDISK utility to delete any
partitions on the new hard disk.
3. Re-boot the computer.
Refer to the operating system documentation for information on
formatting a drive.
1. Switch on the computer.
2. To display the device in POST, press while the Workstation restarts.
3. If an error message appears, follow the instructions provided by the
Error Message Utility. When prompted, press to run the Setup
program.
4. Select the Advanced menu, and the IDE Devices submenu. In the
Primary Master item, check that the details for the device have been
correctly detected by the Setup program.
5. Press to save and exit Setup.
Refer to the operating system documentation for information on
formatting a drive.
NOTE If an IDE drive is removed, switch on the computer. The system BIOS
will detect that the device is missing. Press to confirm that you want
to remove the device. The system configuration will be updated
automatically.
42 Chapter2
Page 59

How to Install Accessories In Your HP Visualize Linux Workstation
Installing Mass Storage Devices
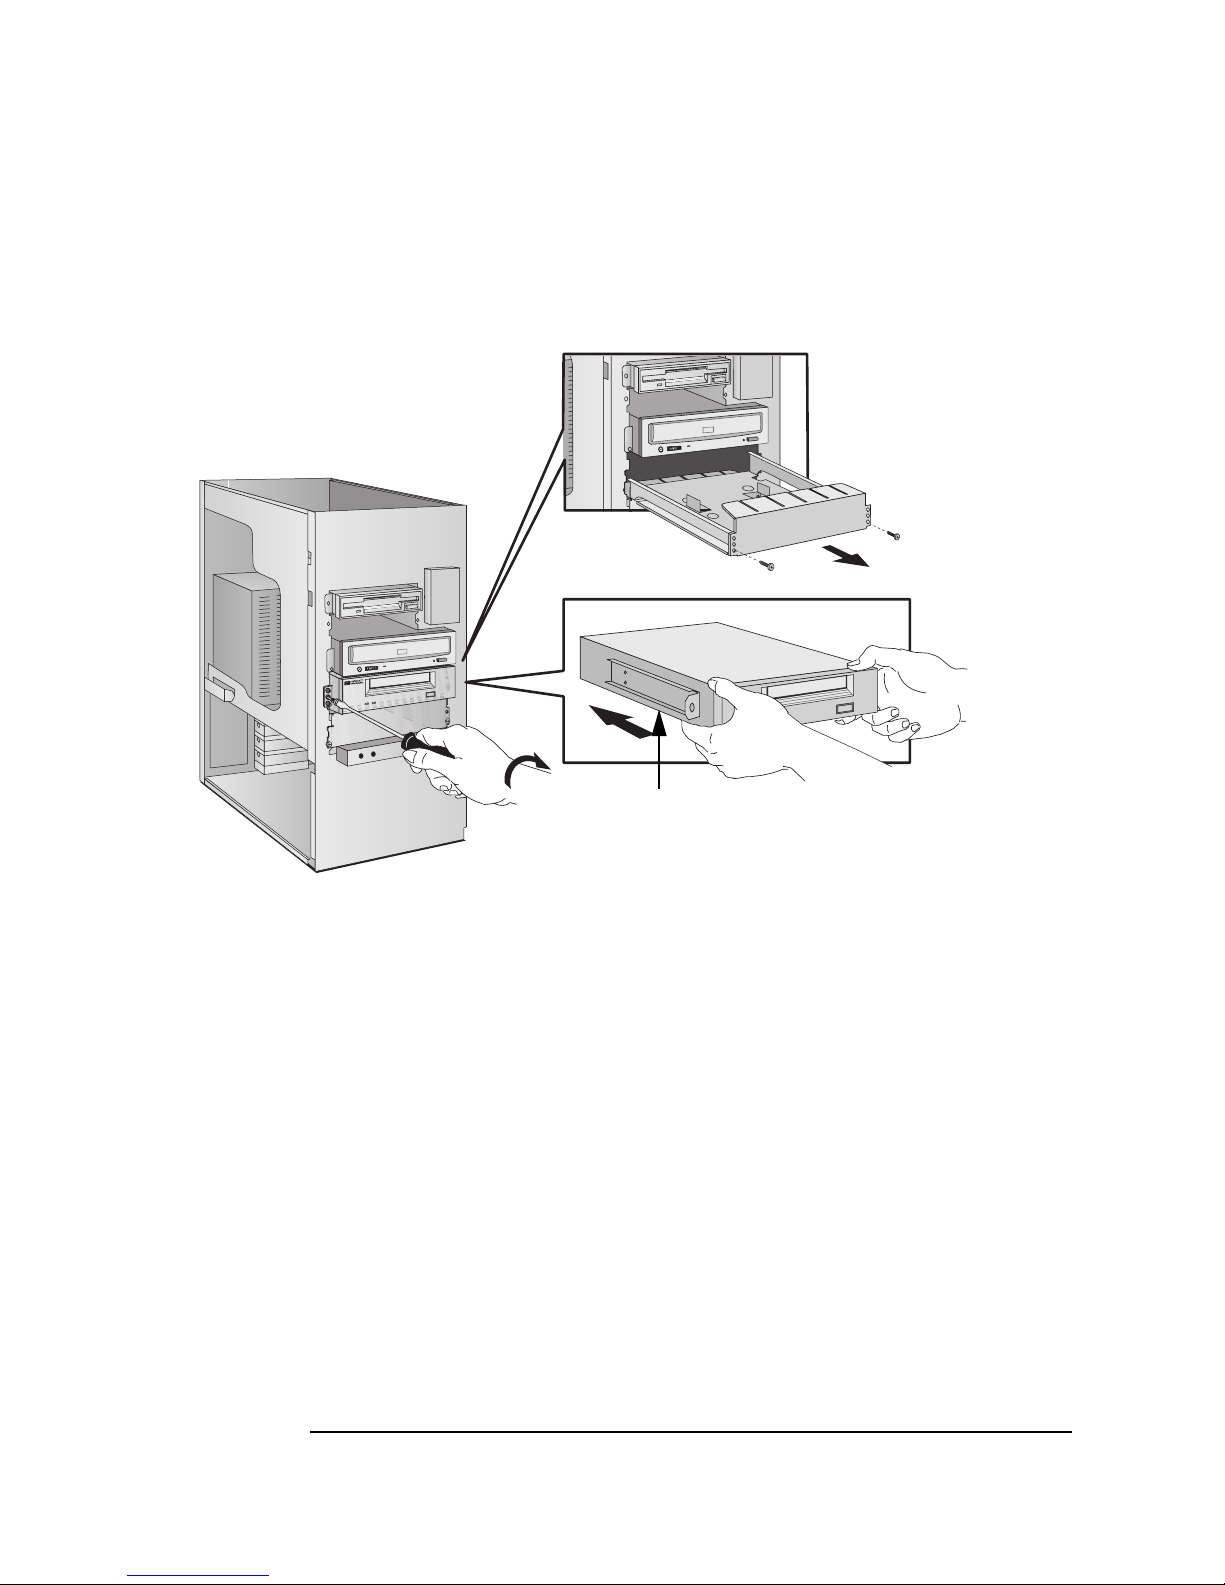
Installing a Drive in a Front-Access Shelf
These instructions explain how to install a drive (such as a flexible disk
drive, a CD-ROM drive, CD-RW drive, or a tape drive) in one of the frontaccess drive shelves. You should also refer to the manual supplied with
the drive for any additional installation instructions.
Before Installing
an
IDE Device
Before Installing a
SCSI Device
Refer to the drive’s installation guide to see if you must set jumpers or if
there is a special installation procedure to follow.
If you are installing a SCSI device, refer to the section “Before Installing
a SCSI Hard Disk” on page 35 before using the following instructions.
1. Disconnect the computer’s power cord and any telecommunications
cable.
2. Remove the computer’s cover (see page 22).
3. Slide out the power supply to provide better access to the disk drive
cables (see page 26).
Chapter 2 43
Page 60
How to Install Accessories In Your HP Visualize Linux Workstation
Installing Mass Storage Devices
If installing a drive in a 5.25-inch wide shelf, remove the drive tray and
put it in a safe place.
Remove the
drive tray if
installing a
5.25-inch
drive
Mounting Rails
Secure the drive
in position
Slide the drive
into position
Slide the drive into the shelf.
Secure the drive in position using the screws provided with the drive.
44 Chapter2
Page 61

Locate the appropriate data cable for the device.
Flexible Disk Drive
Up to 13 external SCSI
devices can be connected to
the external SCSI connector.
How to Install Accessories In Your HP Visualize Linux Workstation
Installing Mass Storage Devices
IDE drives should be
connected to a free
IDE channel cable
connector
(you can have up to
four IDE devices)
Narrow SCSI devices should be connected
to a free SCSI connector on the SCSI cable
(you can add up to two SCSI devices).
Connect the data and power cables to the rear of the device. (The
connectors are shaped to go in one way only.)
Data Cable
Power Cable
Chapter 2 45
Page 62

How to Install Accessories In Your HP Visualize Linux Workstation
Installing Mass Storage Devices
Slide the power supply back into position, and tighten the four selfretaining screws (see page 26).
Remove the plastic panel from the cover by pulling the panel from the
left and unhinging its right-hand side. Store the panel in a safe place.
When an IDE CDROM Drive Is
Installed
When a Flexible
Disk Drive Is
Installed
Unclipand lift out
the plastic panel
Install any other accessories before replacing the cover and completing
the installation.
Completing the Installation of a Drive
1. Switch on the computer and press when Setup appears.
2. In the Setup program, select the Advanced menu, the IDE Devices
submenu. Check that the CD-ROM drive has been detected on the
IDE channel.
3. Press to save and exit the program.
1. Switch on the computer and press when Setup appears.
2. In the Setup program, select the Advanced menu, the Flexible Disk
Drives submenu, and check that the drive has been detected.
3. Press to save and exit the program.
46 Chapter2
Page 63

How to Install Accessories In Your HP Visualize Linux Workstation
Installing Accessory Boards
Installing Accessory Boards
CAUTION Static electricity can damage electronic components. Turn OFF all
equipment. Don’t let your clothes touch the accessory. To equalize the
static electricity, rest the accessory bag on top of the computer while you
are removing the accessory from the bag. Handle the accessory as little
as possible and with care.
The Workstation has the following accessory board slots:
• Slot AT 2 (the bottom slot) for full-length 16-bit ISA boards
• Slot AT 1/PCI 4 for either a 16-bit ISA board or a full-length 32-bit
PCI board
• Slot PCI 3 for a full-length 32-bit PCI board
• Slot PCI 2 for a full-length 32-bit PCI board
• Slot PCI 1 for a full-length 32-bit PCI board
• Slot AGP for the video adapter board
Installing the Board
1. Disconnect the computer’s power cord and any LAN connection or
telecommunications cable.
NOTE PCI boards are configured automatically when installed in the
Workstation.
2. Remove the computer’s cover (see the section “Removing and
Replacing the Cover”) and carefully place the Workstation on its side.
3. Find an empty slot. You should refer to the section “System Board
Switches” in the chapter “Technical Information” to identify the
location of the slot type you want to use (ISA or PCI).
Some boards may have preferred locations and special installation
Chapter 2 47
Page 64

How to Install Accessories In Your HP Visualize Linux Workstation
Installing Accessory Boards
instructions detailed in their manuals.
1. Unscrew and remove the slot cover. Store it in a safe place. If the slot
cover is tight, loosen the screws on the adjacent slots.
Unscrew and remove
the slot cover
2. Hold the board horizontally by its “top” edge. Slide it into the board
guide of the chosen slot. Do not bend the board.
Slide the accessory
board into position
48 Chapter2
Page 65

How to Install Accessories In Your HP Visualize Linux Workstation
Installing Accessory Boards
3. Align the board’s connector with the slot’s socket. Firmly press the
board into the socket. Ensure the board’s connector engages
completely with the socket and does not touch components on other
boards.
4. Secure the board by replacing the slot cover screw. If you loosened the
screws on adjacent slots, remember to tighten them.
Secure the
board in
position
Install any other accessories before replacing the cover (see page 24).
Reconnect all cables and power cords.
Completing the
Installation of an
ISA Accessory
If you have installed an ISA accessory board that uses any interrupt, you
must run the Setup program and reserve the IRQ for the accessory
board. This allows PCI devices to be automatically configured.
Board
1. Turn on the Workstation and press when Setup appears.
2. In the Setup program, select the Advanced menu and the PCI Slot
Configuration submenu. A list of IRQs and the devices that use them
are displayed. Highlight the IRQ field you want to change, for
example IRQ 11.
3. You can use the space bar or press or to make the IRQ
available for PCI (Available) or make it unavailable for PCI
(Reserved).
4. Press to save any changes you made and exit the Setup program.
NOTE You should always leave at least one IRQ available for use by the
integrated PCI devices.
Chapter 2 49
Page 66

How to Install Accessories In Your HP Visualize Linux Workstation
Installing a Processor
Installing a Processor
Some operating systems support a second processor for enhanced
performance. Contact your authorized reseller for up-to-date
information.
NOTE The Setup program provides an option to disable the second processor.
1. Disconnect the computer’s power cord and any LAN or
telecommunications cable.
2. Remove the computer’s cover (see page 22).
3. Remove the fan connection to the system board.
Fan connection
to system board
HP UltraFlow
Airflow
Guide
Retaining button
4. Press the retaining buttons on each side of the HP UltraFlow airflow
guide and lift it out of the Workstation’s case.
5. Slide out the power supply to improve access to the processor sockets
(see page 26) and carefully place the Workstation on its side.
6. Remove the transparent airflow guide covering the processor sockets.
50 Chapter2
Page 67

How to Install Accessories In Your HP Visualize Linux Workstation
Installing a Processor
7. The system board has two processor sockets and a VRM slot for each
processor. If you are changing the existing processor, remove it from
the socket by squeezing the tabs at the top and bottom of the
processor and gently pulling the processor away from the system
board. Then remove the VRM for the processor.
If you are installing a processor in the second socket, remove the
terminator.
NOTE Installing a faster processor than the one supplied with your
Workstation will void the warranty.
1. Slide the new processor into the processor socket and push gently
until it snaps into place (the processor can only go in one way). If you
are installing a second processor, remove the card in the second
processor socket and slide the processor into the empty processor
socket (next to the existing processor).
VRM module
Processor
2. Insert the VRM for the processor in the VRM socket.
3. Replace the transparent section of the HP UltraFlow airflow guide
covering the processor sockets.
4. Slide the power supply back into the computer and tighten the four
self-retaining screws.
5. Turn the Workstation upright and replace the HP UltraFlow airflow
guide.
6. Reconnect the fan to the system board.
Chapter 2 51
Page 68

How to Install Accessories In Your HP Visualize Linux Workstation
Installing a Processor
Completing the
Installation of a
1. Verify that the system board bus speed switches are correctly
configured for the processor.
Processor
NOTE If two processors are installed, both must operate at the same bus speed
and processor speed. Refer to the manual supplied with the processor to
verify which bus and processor speeds are supported.
Switch1Switch2Switch3Switch4Switch5Bus
Speed
UP
1
UP UP DOWN UP 66 MHz 333 MHz
Processor
Speed
UP UP UP DOWN DOWN 66 MHz 350 MHz
UP UP DOWN UP UP 66 MHz 400 MHz
UP UP DOWN UP DOWN 66 MHz 450 MHz
UP UP DOWN DOWN UP 66 MHz 500 MHz
1. UP=OFF, DOWN=ON.
2. Install any other accessories before completing the installation of the
processor.
3. Replace the cover (see page 24).
4. Turn on the computer and check that the new processor is recognized
by the power-on system-test.
52 Chapter2
Page 69

How to Install Accessories In Your HP Visualize Linux Workstation
Installing Drivers and Utilities
Installing Drivers and Utilities
Once you have installed accessory boards and mass-storage devices on
your system, you will need to install their drivers. To install the latest
drivers or utilities for the HP VISUALIZE Linux Workstation go to the
following web site:
http://www.hp.com/visualize/support
Chapter 2 53
Page 70

How to Install Accessories In Your HP Visualize Linux Workstation
Installing Drivers and Utilities
54 Chapter2
Page 71

3 Troubleshooting Your HP
VISUALIZE Linux Workstation
This chapter deals with problems you may encounter when using your
Workstation.
55
Page 72

Troubleshooting Your HP Visualize Linux Workstation
Solving Problems
Solving Problems
This chapter can help you solve most problems you might have with your
Workstation.
If you are unable to solve your problem after following the advice in this
chapter, refer to the chapter “Hewlett-Packard Support and Information
Services.”
HPBIOS Summary Screen
The HP BIOS Summary Screen provides information about your
Workstation’s current configuration. To view the Summary Screen, press
just after your Workstation is turned on and while the logo is
displayed during the Power-on-Self-Test (POST). Refer to the section
“The HP BIOS Summary Screen and BIOS Setup Program” in the
chapter “Technical Information” for more information. Also, see the
section “Special Notice for Users” in this document’s Preface.
Using HP MaxiLife
to Diagnose
Problems
HP MaxiLife
You can use HP MaxiLife to help you diagnose problems with your
Workstation. For more information on using HP MaxiLife, refer to the
section “Using HP MaxiLife to Diagnose Problems.”
56 Chapter3
Page 73

Troubleshooting Your HP Visualize Linux Workstation
If Your Workstation Does Not Start Properly
If Your Workstation Does Not Start Properly
Use this section if your Workstation does not start properly when you
turn it on, and you experience one of the following symptoms:
• Your Workstation’s display is blank and there are no error messages.
• You cannot change any values in the Setup program.
• A POST error message is displayed.
• An error message and icon appears on the LCD screen (refer to
the section “Using HP MaxiLife to Diagnose Problems”).
Display is Blank and There Are No Error Messages
If your display is blank and there are no error messages when you turn
on your Workstation, follow this procedure:
Check External
Items
Check Internal
Items
1. Check the LCD screen (refer to the section “Using HP MaxiLife to
Diagnose Problems”).
2. Check external items.
3. Check internal items.
Be sure the following external items are functioning properly:
• Check that the computer and display are turned on. (The power light
should be illuminated.)
• Check the display’s contrast and brightness settings.
• Make sure that all cables and power cords are firmly plugged in.
• Make sure the power outlet is working.
If the Workstation still does not start properly, follow this procedure to
check the internal items:
1. Turn off the display, the computer, and all external devices.
2. Unplug all power cords and cables, noting their positions. Disconnect
Chapter 3 57
Page 74

Troubleshooting Your HP Visualize Linux Workstation
If Your Workstation Does Not Start Properly
the Workstation from any telecommunications network.
3. Remove the cover.
4. Check the following items:
LCD Error
Action Reference
Messages
Check all internal cables. Ensure they are correctly attached
Power CPU 1
Power CPU 2
Check that the processor and
VRM are correctly installed.
CPU Freq Check that the processor
speed switches have been set
correctly.
CPU error Reset the Workstation or
power-off the LAN.
Check that the memory
modules are correctly
installed.
and firmly in place.
Refer to the section “Installing a
Processor” in the chapter “How to
Install Accessories Inside Your
HP VISUALIZE Linux
Workstation.”
Refer to the section “System
Board Switches” in the chapter
“Technical Information.”
Refer to the section “Your
Workstation’s Hardware Control
Panel” in the chapter “Setting Up
and Using Your HP VISUALIZE
Linux Workstation.”
Refer to the section “Installing
Memory” in the chapter “How to
Install Accessories Inside Your
HP VISUALIZE Linux
Workstation.”
58 Chapter3
Check that accessory boards
are firmly seated in their
slots.
Verify that any switches and
jumpers on the accessory
boards are properly set.
Check that the switches on
the system board are
properly set.
Refer to in the section “Installing
Accessory Boards” in the chapter
“How to Install Accessories
Inside Your HP VISUALIZE Linux
Workstation.”
Refer to the manuals that came
with each board.
Refer to the section “System
Board Switches” in the chapter
“Technical Information.”
Page 75

Troubleshooting Your HP Visualize Linux Workstation
If Your Workstation Does Not Start Properly
LCD Error
Messages
Temp disk
Temp CPU
Temp IO slot
Fan CPU
Fan disk
Fan IO slot
Power supply Check that power supply is
5. Replace the cover.
Check fans and that air flow
guide is not blocked.
Check that fans are installed
correctly.
properly connected.
Action Reference
Refer to the section “Moving the
Power Supply” in the chapter
“How to Install Accessories
Inside Your HP VISUALIZE Linux
Workstation.”
Refer to the section “Moving the
Power Supply” in the chapter
“How to Install Accessories
Inside Your HP VISUALIZE Linux
Workstation.”
Refer to the side heading
“Replacing the Power Supply
after Installing Accessories” in
the chapter “How to Install
Accessories Inside Your HP
VISUALIZE Linux Workstation.”
Rebuild Your
Workstation’s
Components
6. Reconnect all cables and power cords.
7. Turn on the display and computer.
If your Workstation still does not start properly, remove all boards and
accessories, except the hard disk drive and video board. Start the
Workstation. If the Workstation now works, add the boards and
accessories one at a time to determine which one is causing the problem.
If you are Unable to Change any Values in Setup
Ensure that you are using the correct password.
If a POST Error Message is Displayed
The Power-On-System-Test (POST) can detect both an error and a
change to the configuration. In either case, an error code and short
description is displayed. Depending on the kind of error, you will have
one or more of these choices available on screen:
Chapter 3 59
Page 76

Troubleshooting Your HP Visualize Linux Workstation
If Your Workstation Does Not Start Properly
• Press to ignore the message and continue.
• Press to run Setup and correct a system configuration error. HP
recommends that you correct the error before proceeding, even if the
Workstation appears to start successfully.
• Press to accept (validate) the change and update Setup’s
configuration information.
• Press to see more details about the message. After viewing
these details, you will be returned to the original POST display
screen. If the message is actually a change to the configuration you
have made (for example, you have just removed some memory), you
can then press to accept the change and update Setup’s
configuration information. Otherwise, press to ignore the
message and continue, or press to run Setup and correct a system
configuration error. (The number of choices you will have available
are dependent on the kind of error.)
Clearing the
Workstation’s
Configuration
Memory
If the Workstation then starts, but POST still persists in reporting an
error, clear the current configuration memory values and reinstall the
built-in default values:
1. Turn off the Workstation, disconnect the power and cables, and
remove the cover. Disconnect the Workstation from any
telecommunications network.
a. Set the system board switch 6 (CLEAR CMOS) DOWN to clearthe
configuration.
b. Replace the cover, and reconnect only the power cable.
60 Chapter3
Page 77

Troubleshooting Your HP Visualize Linux Workstation
If Your Workstation Does Not Start Properly
c. Turn on the Workstation. This will erase the CMOS memory.
d. Wait until the Workstation has started. A message will be
displayed similar to this: “Configuration has been cleared, set
switch Clear CMOS to the open position before rebooting.”
e. Turn off the Workstation, disconnect the power cable, and remove
the cover.
f. Set the system board switch 6 (CLEAR CMOS) UP to retain the
configuration.
2. Replace the cover, and reconnect the power and cables.
3. Switch on the Workstation. An error message will be displayed
similar to the following:
On your monitor: On your Workstation’s LCD:
Incorrect Configuration Error! POST 0012
The Workstation will stop.Press (to view the system errors)
and then press .
4. Run Setup by pressing . CMOS default values will be
automatically downloaded and saved.
5. Make any other changes you want and press to save the
configuration and exit from Setup.
Chapter 3 61
Page 78

Troubleshooting Your HP Visualize Linux Workstation
If You Cannot Turn Off Your Workstation
If You Cannot Turn Off Your Workstation
Use this section if you cannot turn off your Workstation, the power
indication light is red, and you hear a “buzzing” sound.
• Check if your Workstation is locked, whereby “power-off” is not
allowed. You will need to enter a password to unlock the Workstation
(see the section “Setting Passwords” in the chapter “Setting Up and
Using Your HP VISUALIZE Linux Workstation” for more information).
CAUTION If you press the On/Off button for four seconds, the system will be
automatically turned off. Note that thisdoes not shut down theoperating
system properly and will likely result in data loss.
62 Chapter3
Page 79

Troubleshooting Your HP Visualize Linux Workstation
If Your Workstation Has a Hardware Problem
If Your Workstation Has a Hardware Problem
This section describes what to do if you have problems with your display,
disk drives, printer, accessory boards, keyboard, or mouse.
Display Does Not Work Properly
If Your Display Is
Blurred or
Unreadable
If Nothing Is
Displayed On the
Screen
If you haveselected the wrong display type in your operating system, the
display screen may become blurred or unreadable. To correct this
problem, select the correct display by using the procedures in the
operating system on your Workstation. Refer to your Workstation’s
operating system documentation for details.
If nothing is displayed on the screen, but the Workstation starts and the
keyboard, disk drives, and other peripheral devices seem to operate
properly:
• Check your Workstation’s LCD screen to help you diagnose the
problem.
• Make sure that the display is plugged in and switched ON.
• Check that the brightness and contrast controls are properly set.
• Ensure that the display video cable is correctly connected.
• Switch off the display, and unplug it from the power outlet.
• Disconnect the video cable and examine the video cable connector
pins. If the pins are bent, carefully straighten them.
• Check that the video upgrade is properly installed if you have one.
• If the display works correctly during the Power-On-Self-Test (POST),
but then goes blank, check to see if you have enough memory for the
video mode you have selected.
• If your screen’s refresh rate is set too high, the screen might be blank.
Check the refresh settings to ensure they are not too high.
Other Display
Problems
If the display image is not aligned with the screen, use the display’s
controls to center the image (refer to the display manual for
instructions). If the screens generated by the applications do not appear
to be correct, check the application’s manual to find out which video
Chapter 3 63
Page 80
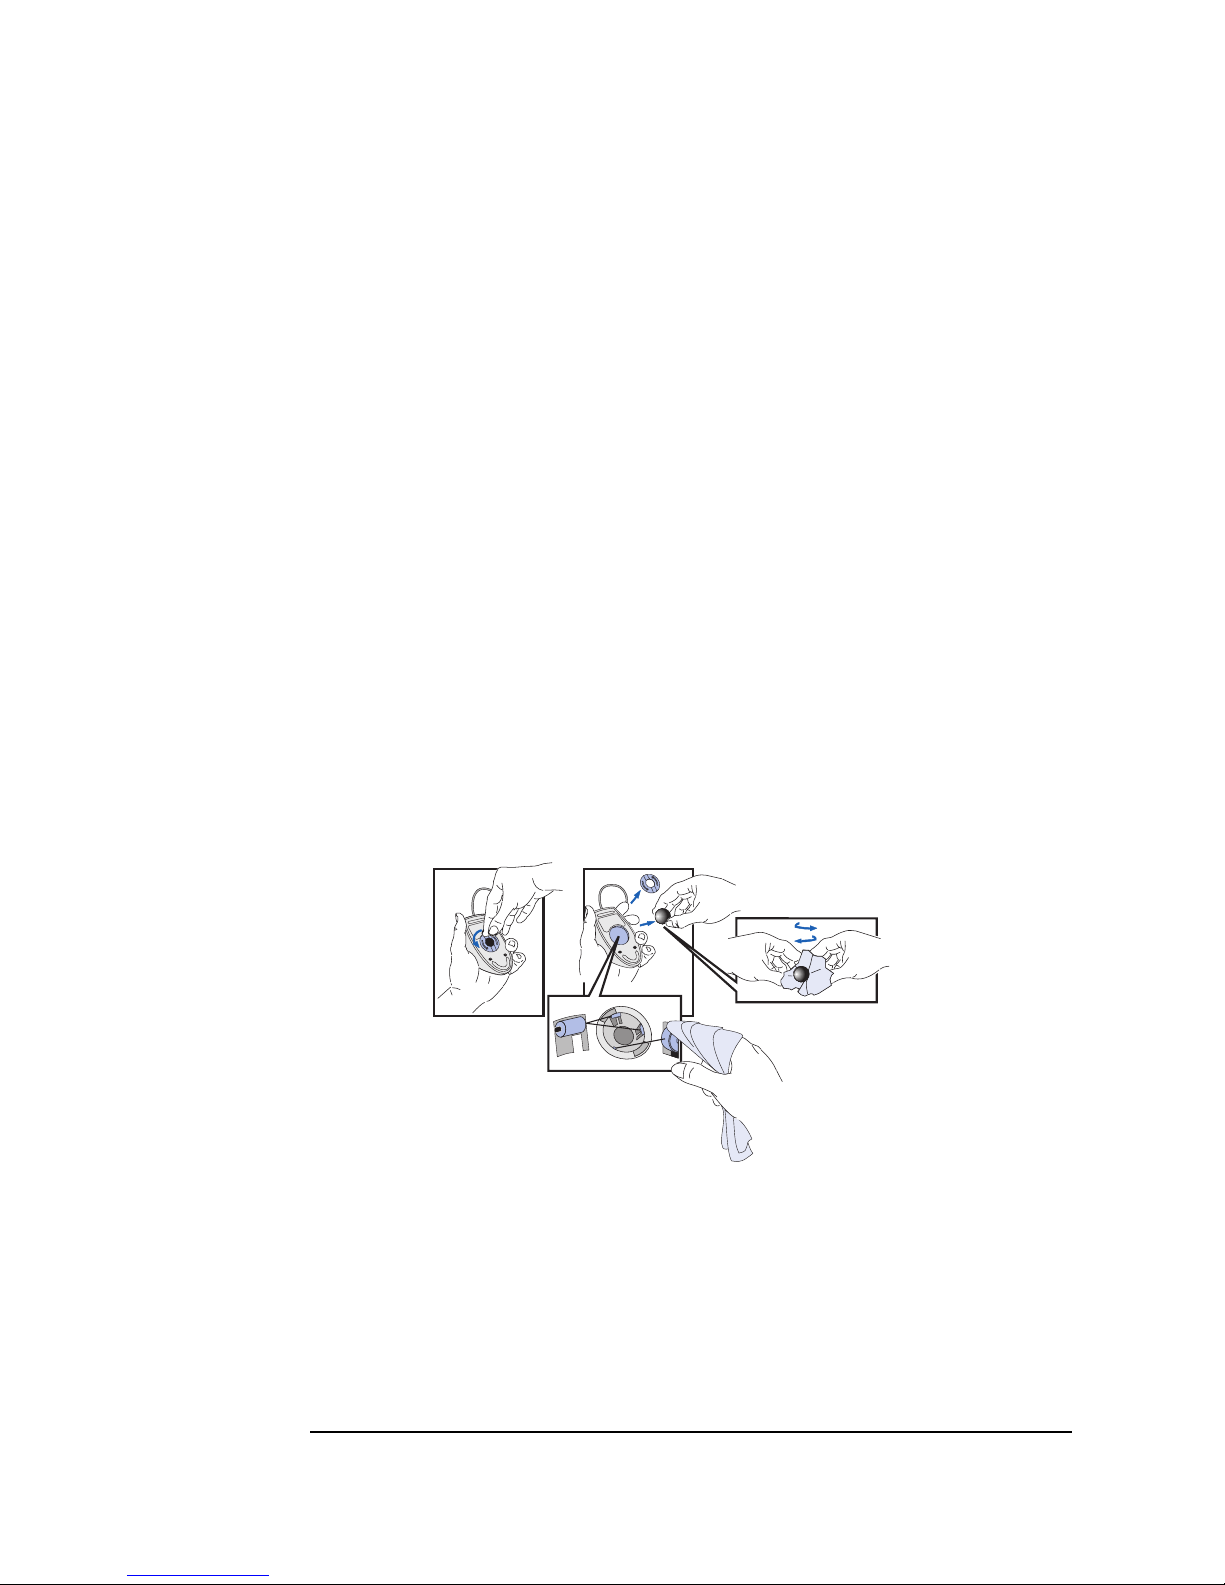
Troubleshooting Your HP Visualize Linux Workstation
If Your Workstation Has a Hardware Problem
standard is required. Also check your display manual to find out which
refresh rate is required. Use your operating system’s procedures, to
select the correct refresh rate.
If Your Keyboard Does Not Work
• Ensure that the keyboard is correctly connected (a keyboard icon will
be displayed on your screen if the keyboard is not connected).
• If you turn on your Workstation, the operating system boots, and the
keyboard is correctly connected but still not available, the power-on
password may be set to “keyboard locked”. You will need to enter a
password to unlock the keyboard and mouse. You can change this
setting in the Setup program. Refer to the Power Menu in the HP
Setup program.
If Your Mouse Does Not Work
• Ensure that the mouse is correctly connected.
• Clean the mouse ball and rollers as shown in the figure below (use a
non-residual contact cleaner).
Cleaning the mouse ball
Cleaning the mouse rollers
If Your Printer Does Not Work
• Make sure the printer’s power switch is ON.
• Verify that the power cord is plugged into the power outlet and the
printer.
64 Chapter3
Page 81

Troubleshooting Your HP Visualize Linux Workstation
If Your Workstation Has a Hardware Problem
• Verify that you have the correct cable for the printer. Make sure that
it is securely connected to the correct connector (port) on the
Workstation and printer.
• Check that the printer is online.
• Examine the paper feed mechanism for a paper jam.
• Make sure that the printer is configured correctly for the
Workstation and for the application.
1. Ensure the Workstation’s port has been correctly configured using
Setup.
2. Make sure the printer is correctly set up in your operating
system’s configuration.
3. Ensure the application program’s “print” menu has been correctly
set up. (Refer to the manual supplied with the application
software.)
• Check that the Workstation’s port is working properly by running
another peripheral connected to the port.
• If you receive an error message, refer to the printer’s manual for help.
Chapter 3 65
Page 82

Troubleshooting Your HP Visualize Linux Workstation
If Your Workstation Has a Hardware Problem
If the Flexible Disk Drive Does Not Work
• Check that you are using a formatted diskette and it is inserted
correctly.
• Check you are using a diskette that is the correct density.
• Check that the flexible disk drive is not disabled in the Setup
program (Advanced > Flexible Disk Drive).
• Check that the flexible disk drive is correctly configured in the Setup
program (Advanced > Flexible Disk Drive).
• Check that the Flexible Disks item and the Write on Flexible Disks
item are not set to locked in the Setup program (Security > Hardware Protection).
• Clean the flexible disk drive using a diskette cleaning kit.
• Check that the disk power and data cables are correctly connected.
If the Hard Disk Drive Does not Work
• Check that the disk power and data cables are correctly connected
(Refer to the section “Connecting Devices” in the chapter “How to
Install Accessories Inside Your HP VISUALIZE Linux Workstation”).
• For a SCSI drive, check the SCSI Interface settings in the Setup
program (Advanced > External\ Internal 16\8-bit SCSI (Symbios)
and in the Configure SCSI Utility).
If the Hard Disk
Activity Light
Does Not Work
If the hard disk activity light does not flicker when the Workstation is
accessing the hard disk drive:
• Check that the control panel connector is firmly attached to the
system board.
• Check that the disk power and data cables are correctly connected.
If the CD-ROM Drive Has a Problem
WARNING Be sure to disconnect the power cord and any
telecommunication cables from your computer before you
remove the cover to check the cable connections or jumper
settings.
66 Chapter3
Page 83

Troubleshooting Your HP Visualize Linux Workstation
If Your Workstation Has a Hardware Problem
To avoid electric shock and harm to your eyes by laser light, do
not open the CD-ROM drive enclosure. The drive should be
serviced by qualified service personnel only. Refer to the label on
the drive for power requirements and wavelength. Do not
attempt to make any adjustment to the unit. This Workstation is
a class 1 laser product.
The CD-ROM Drive Does not Work
• Check that the cables have been properly connected.
• Check that the CD-ROM is inserted in the drive.
• Check the IDE Devices configuration settings in the Setup program
(Advanced > IDE Devices).
• Check the Hardware Protection settings in the Setup program
(Security > Hardware Protection).
• Check the Boot Device Security settings in the Setup program
(Security > Boot Devices Security).
• Check that the Integrated Bus IDE Adapters item is set to Both in
the Setup program (Advanced > IDE Devices).
Chapter 3 67
Page 84

Troubleshooting Your HP Visualize Linux Workstation
If Your Workstation Has a Hardware Problem
No Sound from the CD-ROM Drive
If you are having problems with sound when playing a CD:
• Check that the volume control (if present) on the CD-ROM drive front
panel is not set to the minimum.
• Ensure that the disk in the drive is an audio disk and not a photo CD
or data CD.
• If using headphones or external speakers, check that they are
properly connected to the Audio Front Panel (not to the audio jack for
the CD-ROM).
• Check that the CD audio cable is correctly installed and is connected
to the system board.
The CD-ROM Drive is Idle
If the drive does not appear to be working, try mounting the disk using
the mount command.
68 Chapter3
Page 85

Troubleshooting Your HP Visualize Linux Workstation
If Your Workstation Has a Hardware Problem
The CD-ROM Drive Does not Open
If you have difficulty removing a CD-ROM disk from the CD-ROM drive
(during a power failure for example), you can use the manual eject
button. To eject a CD-ROM disk using the manual eject button, proceed
as follows:
1. If the CD-ROM drive manual eject button is not visible, remove the
front bezel covering the drive. The manual eject button is inside a
small hole in the front of the CD-ROM drive.
2. With a thin, solid rod, such as the end of a paper clip, push the drive’s
manual eject button.
Using the manual eject feature.
The picture shows two possible
locations of the manual eject button.
3. The drive door is released, opening slightly. Carefully pull it open
fully and retrieve the disk.
4. To close the drive door, push it gently closed without forcing it. The
drive door may not close completely until it is fully functional (for
example, when the power comes back on).
5. If required, replace the drive’s front bezel.
Chapter 3 69
Page 86

Troubleshooting Your HP Visualize Linux Workstation
If Your Workstation Has a Hardware Problem
If an Accessory Board Does not Work
Carry out the following checks:
• Check that the accessory board has been firmly installed in the slot.
• Check that the accessory board has been correctly configured.
• Check that the accessory board is not using memory, I/O addresses,
an IRQ, or DMA also used by the Workstation. Refer to the section
“IRQs, DMAs, and I/O Addresses Used by Your Workstation” in the
chapter “Technical Information” for more information.
70 Chapter3
Page 87

Troubleshooting Your HP Visualize Linux Workstation
Using HP MaxiLife to Diagnose Problems
Using HP MaxiLife to Diagnose Problems
Your HP LCD can help you to diagnose problems with your HP
VISUALIZE Linux Workstation, even when you are unable to get your
system and monitor working properly. Note that the messages in this
section make reference to the “HP Kayak Workstation.” For an
explanation of this, see the section “Special Notice for Users” in the
Preface of this document.
Pre-Boot Checks When you press your Workstation’s on/off button, HP MaxiLife will check
your system before it initiates the start-up sequence. You will see one of
the following screens on the LCD as these checks progress:
Note: Some error
messagesdisplayed
here may not be
available.
Error!
CPU Socket
Check that a CPU or
terminator is installed
in the CPU slots
Error!
Power CPU 2
Check processor 2
VRM installation.
Error!
No RAM
Check memory
installation.
HP KAYAK XA-s
Error!
Power supply
Check power supply and
power cable
connections.
Error!
Board PLL
Check system board.
Error!
RAM type
Check that RAM types
installed are compatible.
Error!
Power CPU 1
Check processor 1 VRM
installation.
Error!
BIOS
Flash new BIOS.
Error!
No Video
Checkthat graphics card
is installed correctly.
No errors occurred during
pre-boot. POST is
initiated.
Chapter 3 71
Page 88

Troubleshooting Your HP Visualize Linux Workstation
Using HP MaxiLife to Diagnose Problems
POST Phase Following these checks, the POST (Power-On Self Test) sequence is
initiated. One of the following screens will appear in this phase:
HP KAYAK XA-s
No errors occurred.
Error!
POST XXXX
A POST error occurred. Refer
to the section “If a POST Error
Message is Displayed” for
more information.
Other Features
HP MaxiLife can also be configured to:
• Display the configuration details of your Workstation required to
obtain support (System info.)
• Indicate POST (Power-On Self Test) steps during the power-on
phase (Boot steps)
• Perform diagnostic tests on your Workstation’s various hardware
components and display the results (Diags).
To configure your HP LCD:
1. Ensure that your Workstation’s power cord is connected to a
grounded outlet.
In this state, your Workstation’s hardware management chip is
active, even if your system is not powered on.
2. Press one of the LCD control buttons. The following menu is
displayed.
3. Use to scroll down through the menu items and to select the
required menu item.
72 Chapter3
System info
Boot steps
Next Go
Diags
Exit
Next Go
Page 89

Troubleshooting Your HP Visualize Linux Workstation
Using HP MaxiLife to Diagnose Problems
System Info. System information is displayed on the LCD one screen at a time and
should detail the following:
• Bios version
• Number & speed of processors
• Number and capacity of memory modules installed
• Serial Number
To view these details, use the button to scroll through the
information screens.
Boot Steps Where available, the Boot steps option will display all POST steps the
next time your Workstation is powered on. For support purposes, POST
steps are shown as POST codes and displayed on the LCD as follows:
HP KAYAK XA-s
POST Code 24
Post steps will be displayed on
the LCD the next time your
Workstation is powered on.
Diags If your Workstation is powered off when Diags is selected, the LCD
displays a second menu. To perform the diagnostics tests, select Power on
from this menu to enable the hardware management chip to assess the
status of your system’s components.
If your Workstation is already powered on, the diagnostic tests will be
performed as soon as you select Diags from the LCD’s main menu.
To view the test results for each system component, press the
control button.
If no component errors are detected, the following screen will appear.
COMPONENT
Next
No errors were detected.
If an error is detected, an error screen appears indicating the problem.
Chapter 3 73
Page 90

Troubleshooting Your HP Visualize Linux Workstation
To continue viewing the test results of the other system components,
press the control button.
COMPONENT
Next
For example, if there is a problem with a fan, an
alarm will sound and the following error screen
will appear. For more information, refer to the
side heading “Check Internal Items.”
Fan CPU
Next
When the diagnostic tests are complete, one of the following screens is
displayed.
Diagnostics:
Done FAIL
Exit
System errors were
detected.
Diagnostics:
Done OK
Exit
No errors were detected.
You can exit the test session by pressing the button.
74 Chapter3
Page 91

Troubleshooting Your HP Visualize Linux Workstation
Recovering Your HP Visualize Linux Workstation’s Operating System
Recovering Your HP VISUALIZE Linux
Workstation’s Operating System
If, for some reason, you should need to recover your HP VISUALIZE Linux
Workstation’s operating system (for example, a system crash, etc.), refer
to the HP Linux Setup and Recovery Guide (HP Part Number A1297-
90010). This manual, which is included with your Workstation, provides
complete information on how to re-install or recover your pre-installed
software.
Chapter 3 75
Page 92

Troubleshooting Your HP Visualize Linux Workstation
Recovering Your HP Visualize Linux Workstation’s Operating System
76 Chapter3
Page 93

4 Technical Information
This chapter provides technical information about your HP VISUALIZE
Linux Personal Workstation and includes information on the HP Setup
program.
77
Page 94

Technical Information
Features
Features
Feature: Description:
Processor (standard) Pentium III (single)
Cache Memory
(integrated in processor
package)
Main memory (size/speed) Upgradeable to 768 MB (SDRAM)
Video GLoria Synergy+ graphics card
LAN Ethernet 10BT/100TX LAN controller on PCI
Audio Integrated 16-bit high fidelity with high-end
Disk drive controller Dual Ultra ATA-33 IDE controllers, and on
Rear connectors • Mini-DIN mouse
• Level-One: 16 KB code, 16 KB data
• Level-Two: 512 KB
accessory board (on selected models, there is a
combined LAN/SCSI board).
mixing capability and SigmaDelta converters
selected models, an Ultra SCSI 16-bit interface
board (combined with the LAN)
• Mini-DIN keyboard
• 25-pin parallel
25-pin parallel connector • Mode: Centronics or bidirectional modes
78 Chapter4
• 9-pin serial (two, buffered)
• Joystick/MIDI
• LINE IN jack (3.5 mm)
• LINE OUT jack (3.5 mm)
• MIC IN jack (3.5 mm)
(ECP/EPP)
• Parallel port: 1 (378h, IRQ 7), 2 (278h, IRQ
5), or Off.
Page 95

Technical Information
Features
Feature: Description:
9-pin serial connectors • Standard: Two UART 16550 buffered serial
ports (both RS-232-C).
• Serial Ports A and B: 2F8h (IRQ 3), 2E8h
(IRQ 3), 3F8h (IRQ 4), 3E8h (IRQ 4), or
Off—
(if one port uses 2xxh, the other port must
use 3xxh).
Disk drive shelves Seven mass storage shelves supporting:
• Two front-access, third-height, 3.5-inch
drives
• Three front-access, half-height, 5.25-inch
drives
• Two internal 3.5-inch hard disk drives
System board connectors • One flexible disk drive connector
• One CD-ROM audio connector
• AUX connector
• Multimedia front panel connector
• Front panel MIC connector
• Internal speaker connector
• One external start connector
• External battery connector
Accessory slots • Three 32-bit PCI slots
• One 16-bit ISA (Industry Standard
Architecture) slot
• One combination ISA or PCI slot
Keyboard/Mouse • HP keyboard with mini-DIN connector
• HP mouse with mini-DIN connector
HP UltraFlow cooling
system
Cooling system with multiple temperatureregulated fans to optimize cooling
Chapter 4 79
Page 96

Technical Information
System Specifications
System Specifications
Power Consumption Information
Maximum power consumption 200 W
Typical consumption with:
• One processor installed
• Two processors installed
Off 2.5 W
Note that the power supply in your HP VISUALIZE Linux Workstation
continues to supply power to the CMOS memory, even when switched off.
NOTE When the Workstation is turned off with the power button on the front
panel, the power consumption falls below 5 Watts, but is not zero. The
special on/off method used by this Workstation considerably extends the
lifetime of the power supply. To reach zero power consumption in “off”
mode, either unplug the Workstation from the power outlet or use a
power block with a switch. You should be aware that, in this case, the
Workstation will lose its time settings within a few days.
Maximum Loads Available for Accessory Slots
approx. 99 W
approx. 85 W
The load limits for the ISA and PCI accessory slots are compliant with
ISA and PCI specifications. More details of permitted loads are provided
on the World Wide Web (refer to the section “HP World Wide Web Site” in
the chapter “Hewlett-Packard Support and Information Services” for
access details) in the support documentation section for your
Workstation.
IRQs, DMAs, and I/O Addresses
The IRQ, DMA, and I/O address mappings shown here are for a basic
80 Chapter4
Page 97

Technical Information
System Specifications
configuration. The resources used by your Workstation may vary,
depending on which accessory boards are bundled with the Workstation.
Resources are allocated by the system BIOS.
IRQs used by Workstation IRQ0
IRQ1
IRQ2
IRQ3
IRQ4
IRQ5
IRQ6
IRQ7
IRQ8
IRQ9
IRQ10
IRQ11
IRQ12
IRQ13
IRQ14
IRQ15
DMAs used by Workstation DMA 0
DMA 1
DMA 2
DMA 3
DMA 4
DMA 5
DMA 6
DMA 7
System timer
Keyboard controller
Free
COM2, COM4
COM1, COM3
AD1816, LPT2
Flexible disk drive controller
LPT1
Real-time clock
AD1816 MIDI
Mouse
Not connected
Integrated IDE controller
Integrated IDE controller
Capture
Playback
Flexible disk drive controller
LPT ECP
Cascade
free
free
free
Chapter 4 81
Page 98

Technical Information
System Specifications
I/O Addresses used by Workstation 0000 - 000F
0020 - 0021
002E - 002F
0040 - 0043
0060, 0064
0061
0070
0070 - 0071
0080
0081 - 0083, 008F
0092
0096 - 0097
00A0 - 00A1
00C0 - 00DF
00F0 - 00FF
0130 - 013F
0170 - 0177
01F0 - 01F7
0200
0220 - 0232
0278 - 027F
02E8 - 02EF
02F8 - 02FF
0330 - 0331
0372 - 0377
0378 - 037A
0388 - 038B
03B0 - 03DF
03E8 - 03EF
03F0 - 03F5
03F6
03F7
03F8 - 03FF
04D0 - 04D1
0678 - 067B
0778 - 077B
0CF8 - 0CFF
8000
8400
8800
DMA controller 1
Master interrupt controller
Configuration registers
Timer 1
Keyboard controller
Port B (speaker, NMI status and control)
Bit 7: NMI mask register
RTC and CMOS
Manufacturing port (POST card)
DMA low page register
PS/2 reset and Fast A20
Little Ben
Slave interrupt controller
DMA controller 2
Coprocessor error
AD1816 sound system
Free (IDE secondary channel)
IDE primary channel
AD1816 Joystick
AD1816 Sound Blaster
LPT 2
Serial port 4 (COM4)
Serial port 2 (COM2)
AD1816 MIDI
Free (Secondary flexible disk drive)
LPT1
AD1816 Adlib (FM)
VGA
COM3
Flexible disk drive controller
IDE primary channel
Flexible disk drive controller
COM1
Interrupt edge/level control
LPT2 ECP
LPT1 ECP
I configuration space
PIIX4 Power Management I/O space
NS317 ACPI Registers
PIIX4 SMBus I/O space
82 Chapter4
Page 99

Technical Information
System Specifications
Audio Features
Feature: Description:
Digitized Sounds • Compatible SoundBlaster® Pro Adlib®/OPL3®
• 16-bit and 8-bit stereo sampling from 4 kHz to
55.2 kHz
• Programmable sample rates with 1 Hz resolution
• Full duplex capture and playback at different
sample rates
• Up to six different simultaneous sample rates
• Dual Tune F DMA transfer on channel 0, 1, 2 or 3
• Automatic dynamic filtering for digital audio
recording and playback
Music Synthesizer • MPU401 compatible MIDI port
• Support for Hardware and Software Wave table
Synthesizer
• Integrated OPL3® compatible music synthesizer
Enhanced Stereo • Built-in “Phat Stereo” for enlargement of Stereo
Image
Mixer • MPC-3 audio mixer
• Input mixing sources: MIDI, microphone, LINE
IN, CD Audio, AUX Audio, and up to four
digitized sounds
• Output mixing of all audio sources to the LINE
OUT or integrated Workstation speaker
• Multiple source recording and Left/Right
channels mixing
• 32-level volume control for microphone, LINE
IN, CD Audio, AUX Audio and master volume
• 64-level volume control for digital sounds, wave
or PCM data
Chapter 4 83
Page 100

Technical Information
System Specifications
Feature: Description:
LINE IN • Input impedance: 4 ohms
• Input range: 0 to 1 Vrms
LINE OUT • Stereo output of 5 mW a channel with headphone
speakers (impedance >600 ohms)
MIDI/Joystick Interface • Built-in MIDI interface for connection to external
MIDI devices
• Sound Blaster and MPU-401 UART mode
compatible
• MIDI time-stamp for multimedia extension
• Input buffer: 64-byte FIFO
• Standard dual joystick port
Audio Front Panel • Microphone In jack
• Headphone Out jack
Microphone In jack • 20 dB gain preamplifier. The boost can be muted
with software
• 32-level programmable volume control
• Input impedance: 600 ohms
• Sensitivity: 30 mVpp to 283 mVpp
Headphone Out jack • Impedance: 32 ohms
SCSI Features
Feature: Description:
Controller • UltraWide 16-bit SCSI Controller on combined
PCI LAN/SCSI board.
84 Chapter4
 Loading...