

Page 1

HP VISUALIZE fx2+, fx4+, fx6+ and Texture
Module User’s Guide
Printed in USA June 2000
Manufacturing Part Number: HP Part No. A5021-90001
© Copyright 2000 Hewlett-Packard Company
Edition 0600
Page 2

Notice
The information contained in this document is subject to change without
notice.
Hewlett-Packard makes no warranty of any kind with regard to this
material, including, but not limited to, the implied warranties of
merchantability and fitness for a particular purpose. Hewlett-Packard
shall not be liable for errors contained herein or for incidental or
consequential damages in connection with the furnishing, performance,
or use of this material.
Hewlett-Packard assumes no responsibility for the use or reliability of its
software on equipment that is not furnished by Hewlett-Packard.
This document contains proprietary information that is protected by
copyright. All rights reserved. No part of this document may be
photocopied, reproduced or translated to another language without the
prior written consent of Hewlett-Packard Company.
Hewlett-Packard Company
3404 E. Harmony Road
Fort Collins, CO 80528-9599
USA
2
Page 3

Contents
1. HP Visualize fx2+, fx4+, fx6+ GraphicsCards and Texture Module
Introduction . . . . . . . . . . . . . . . . . . . . . . . . . . . . . . . . . . . . . . . . . . . . . . . .10
The HP Visualize fx+ Graphics Card . . . . . . . . . . . . . . . . . . . . . . . . . .10
The HP Visualize fx+ Texture Module . . . . . . . . . . . . . . . . . . . . . . . . .11
Important Safety Instructions. . . . . . . . . . . . . . . . . . . . . . . . . . . . . . . .12
Installing the HP Visualize fx+ Graphics Card. . . . . . . . . . . . . . . . . . . .13
Removing the Left-Side Panel. . . . . . . . . . . . . . . . . . . . . . . . . . . . . . . .14
Installing the HP Visualize fx+ Card . . . . . . . . . . . . . . . . . . . . . . . . . .17
Replacing the Left-Side Panel . . . . . . . . . . . . . . . . . . . . . . . . . . . . . . . .21
Updating the HP Visualize fx+ Driver . . . . . . . . . . . . . . . . . . . . . . . . .24
Configuring the HP Visualize fx+ Driver . . . . . . . . . . . . . . . . . . . . . . .25
Troubleshooting . . . . . . . . . . . . . . . . . . . . . . . . . . . . . . . . . . . . . . . . . . .33
Adding a Texture Module to Your fx+ Graphics Card . . . . . . . . . . . . . . .40
Removing the Left-Side Panel. . . . . . . . . . . . . . . . . . . . . . . . . . . . . . . .40
Removing the HP Visualize fx+ Graphics Card . . . . . . . . . . . . . . . . . .40
Installing the HP Visualize Texture Module . . . . . . . . . . . . . . . . . . . .42
Installing Your Graphics Card and Texture Module . . . . . . . . . . . . . .46
Replacing the Left-Side Panel . . . . . . . . . . . . . . . . . . . . . . . . . . . . . . . .48
Checking the Installation. . . . . . . . . . . . . . . . . . . . . . . . . . . . . . . . . . . .49
A. Regulatory Information and Warranty
Regulatory Information. . . . . . . . . . . . . . . . . . . . . . . . . . . . . . . . . . . . . . .52
FCC . . . . . . . . . . . . . . . . . . . . . . . . . . . . . . . . . . . . . . . . . . . . . . . . . . . . .53
HP Hardware Warranty . . . . . . . . . . . . . . . . . . . . . . . . . . . . . . . . . . . . . .54
HP Year 2000 Warranty. . . . . . . . . . . . . . . . . . . . . . . . . . . . . . . . . . . . .54
Three Year Limited Hardware Warranty . . . . . . . . . . . . . . . . . . . . . . .54
Limitation of Warranty . . . . . . . . . . . . . . . . . . . . . . . . . . . . . . . . . . . . .55
Limitation of Liability and Remedies . . . . . . . . . . . . . . . . . . . . . . . . . .55
Obtaining On-Site Warranty Service . . . . . . . . . . . . . . . . . . . . . . . . . .56
Customer Responsibilities . . . . . . . . . . . . . . . . . . . . . . . . . . . . . . . . . . .56
3
Page 4

Contents
Obtaining Parts Warranty Service. . . . . . . . . . . . . . . . . . . . . . . . . . . . 57
HP Telephone Support Services. . . . . . . . . . . . . . . . . . . . . . . . . . . . . . 57
HP Software Product License Agreement and
Software Product Limited Warranty . . . . . . . . . . . . . . . . . . . . . . 57
HP Software Product License Agreement . . . . . . . . . . . . . . . . . . . . . . 58
HP Software Product Limited Warranty . . . . . . . . . . . . . . . . . . . . . . . 59
4
Page 5

Preface
This guide describes how to configure and troubleshoot your HP
VISUALIZE fx2+, fx4+ and fx6+ Graphics Cards, herein referred to
generically as fx+.
Additional Information and Help
Formore information on your graphicscard and the accessories available
with this product, you can visit the following page on HP’s web site:
•HPVISUALIZE Personal Workstation product specifications, latest
drivers, FAQs, and support information:
http://www.hp.com/visualize/support
Electrostatic Discharge (ESD) Precautions
Electrostatic charges can damage the integrated circuits on printed
circuit boards. To prevent such damage from occurring, observe the
following precautions during board unpacking and installation:
• Stand on a static-free mat.
• Wear a static strap to ensure that any accumulated electrostatic
charge is discharged from your body to ground.
• Create a common ground for the equipment you are working on by
connecting the static-free mat, static strap, routing nodes, and
peripheral units to that piece of equipment.
• Keep uninstalled printed circuit boards in their protective antistatic
bags.
• Handle printed circuit boards by their edges, once you have removed
them from their protective antistatic bags.
5
Page 6

Important Safety Information
WARNING If you have any doubt that you can lift the HP VISUALIZE Personal
Workstation or display safely, do not try to move it without help.
For your safety, always connect the equipment to a grounded
wall outlet. Always use a power cord with a properly grounded
plug, such as the one provided with this equipment, or one in
compliance with you national regulations. This HP VISUALIZE
Personal Workstation is disconnected from the power by
removing the power cord from the power outlet. This means the
Personal Workstation must be located close to a power outlet
that is easily accessible.
For your safety, never remove the HP VISUALIZE Personal
Workstation’s cover without first removing the power cord from
the power outlet, and any connection to the telecommunications
network. Always replace the cover on the Personal Workstation
before switching it on.
To avoid electric shocks, do not open the power supply. There
are no user-serviceable parts inside.
This HP VISUALIZE Personal Workstation is a class 1 laser
product. Do not attempt to make any adjustment to the laser
units.
Before handling the HP VISUALIZE fx Graphics Card, first wait
until the board has cooled down completely. The graphics card
can become very hot during use.
6
Page 7

Installation Notice
Products designated in the applicable Hewlett-Packard price list as
customer-installable can be installed by computer-knowledgeable
customers who carefully read and follow the instructions provided.
Customers who elect to have the product installed by our field personnel
are charged the applicable field installation charge, as covered under the
standard terms and conditions. For more information, please contact
your local sales representative.
Revision History
The revision history for each edition of the manual is listed below:
Edition Revision History
E0600 Second Printing
7
Page 8

8
Page 9

1HPVISUALIZE fx2+, fx4+, fx6+
Graphics Cards and Texture
Module
9
Page 10
HP Visualize fx2+, fx4+, fx6+ Graphics Cards and Texture Module
Introduction
Introduction
This section contains brief overviews of the HP VISUALIZE fx+ Graphics
Card and the HP VISUALIZE fx+ Texture Module. This section then
provides important safety instructions that you should follow when
handling the HP VISUALIZE fx+ Card and Texture Module.
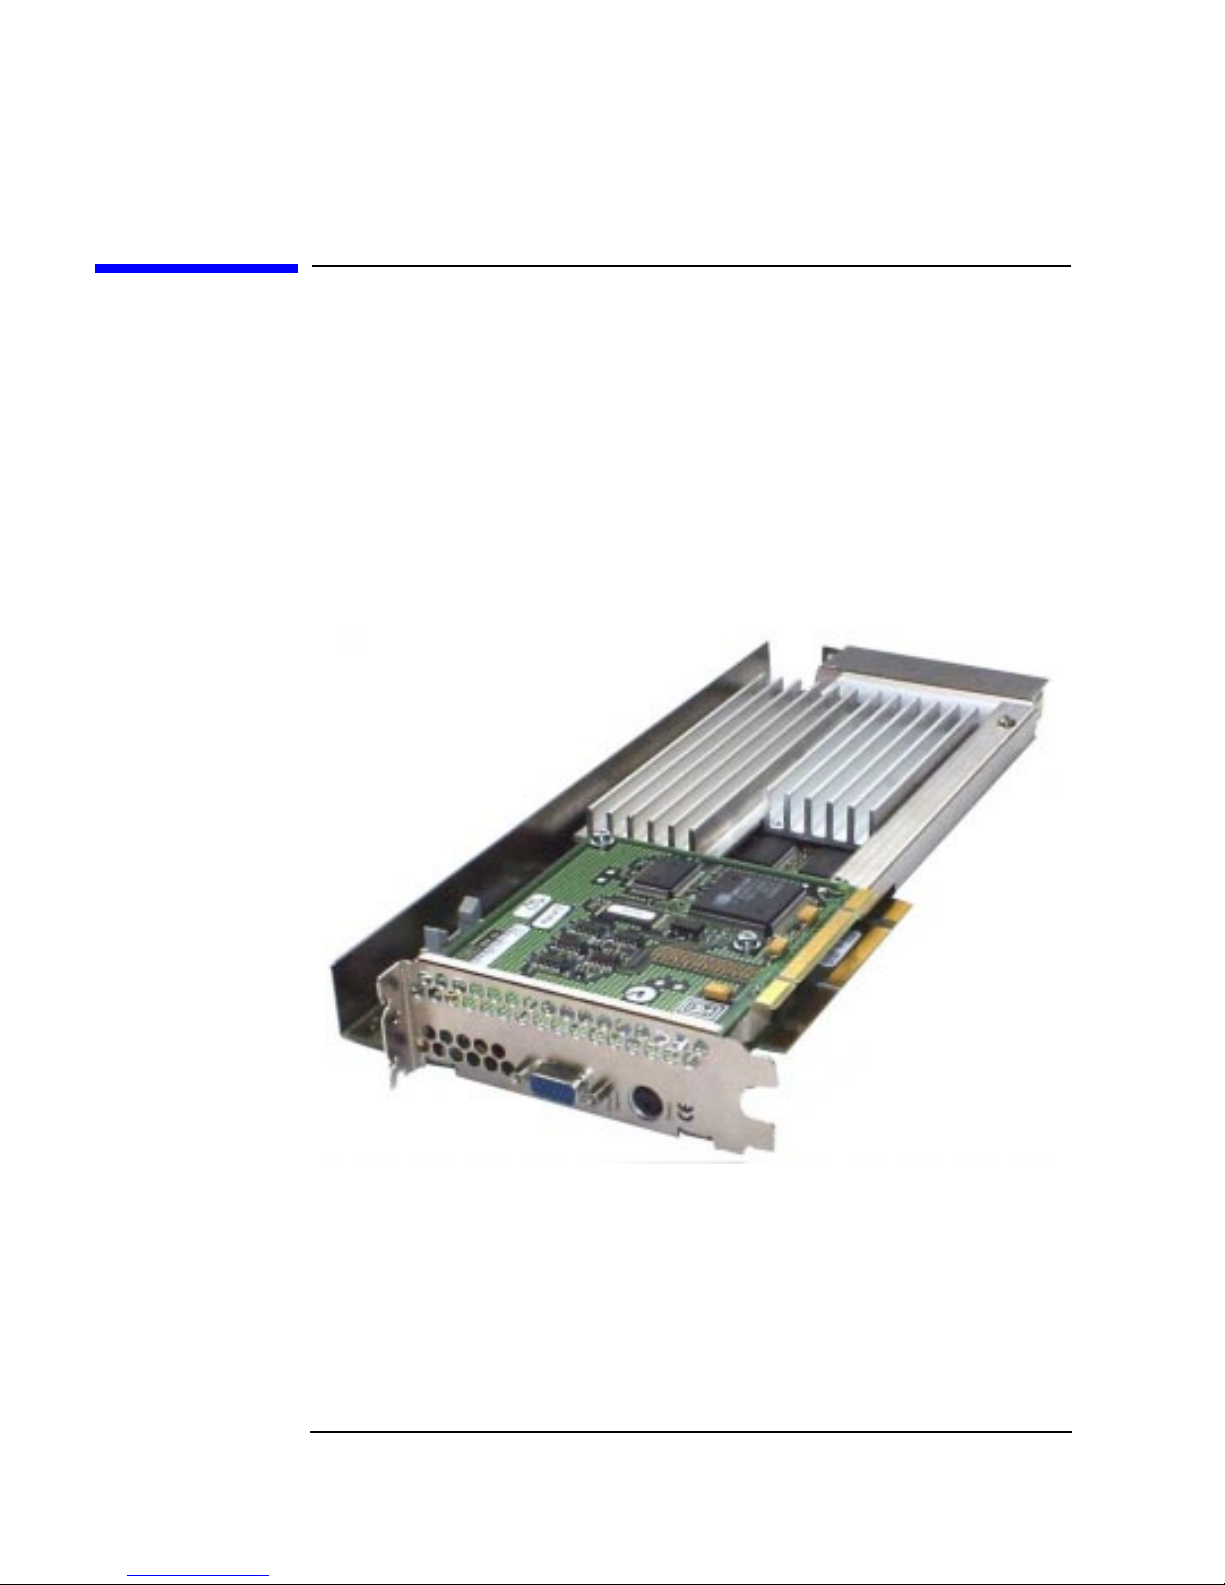
The HP VISUALIZE fx+ Graphics Card
The HP VISUALIZE fx+ Graphics Card is a high-end OpenGL graphics
card that features the latest high-performance 3D graphics technology.
10 Chapter1
Page 11

HP Visualize fx2+, fx4+, fx6+ Graphics Cards and Texture Module
Introduction
The OpenGL graphics card accelerates your 3D graphics design and
visualization and improves the quality of your graphics.
The HP VISUALIZE fx+ graphics subsystem occupies two accessory slots
in your Personal Workstation (one PCI and one AGP Pro). It brings you:
• A world-class geometry engine, using dedicated floating-point
processors based on PA-RISC technology
• 18MB SGRAM video memory
• Full OpenGL 1.1 hardware features and extensions support
• HP Color Recovery dithering
• Acceleration of the HP OpenGL occlusion culling extension.
• Stereo vision support
• Optional hardware texture accelerator module with 16MB SDRAM of
dedicated texture memory.
The HP VISUALIZE fx+ Texture Module
The HP VISUALIZE fx+ Texture Module is an add-on accessory for the HP
VISUALIZE fx+ Graphics card.
Chapter 1 11
Page 12

HP Visualize fx2+, fx4+, fx6+ Graphics Cards and Texture Module
Introduction
The HP VISUALIZE fx+ Texture Module provides:
• Accelerated hardware texture mapping
• 16MB dedicated SDRAM (Synchronous DRAM) memory for textures.
• Accelerated hardware accumulation buffer support.
Important Safety Instructions
CAUTION Static electricity can damage electronic components. Therefore, anytime
you handle an accessory such as the HP VISUALIZE fx+ graphics card or
Texture Module, you should use an electrostatic strap if you have one.
You should turn all equipment OFF. Do not let your clothes touch the
accessory. To equalize the static electricity, rest the antistatic bag on top
of the Personal Workstation while you are removing the accessory from
it. You should also handle the accessory as little as possible and with
care.
WARNING For your safety, never remove the Personal Workstation’s cover
panels without first removing the power cord from the power
outlet and any connection to a telecommunications network.
Always replace the cover panels on the Personal Workstation
before switching it on again.
Before handling the HP VISUALIZE fx+ Graphics card, first wait
until the card has cooled down completely before touching it.
The card can become very hot during use.
12 Chapter1
Page 13

HP Visualize fx2+, fx4+, fx6+ Graphics Cards and Texture Module
Installing the HP Visualize fx+ Graphics Card
Installing the HP VISUALIZE fx+ Graphics Card
This section contains the following subsections:
• Removing the Left-Side Panel
• Installing the HP VISUALIZE fx+ Graphics Card
• Replacing the Left-Side Panel
• Updating the HP VISUALIZE fx+ Driver
• Configuring the HP VISUALIZE fx+ Driver
• Troubleshooting
Chapter 1 13
Page 14
HP Visualize fx2+, fx4+, fx6+ Graphics Cards and Texture Module
Installing the HP Visualize fx+ Graphics Card
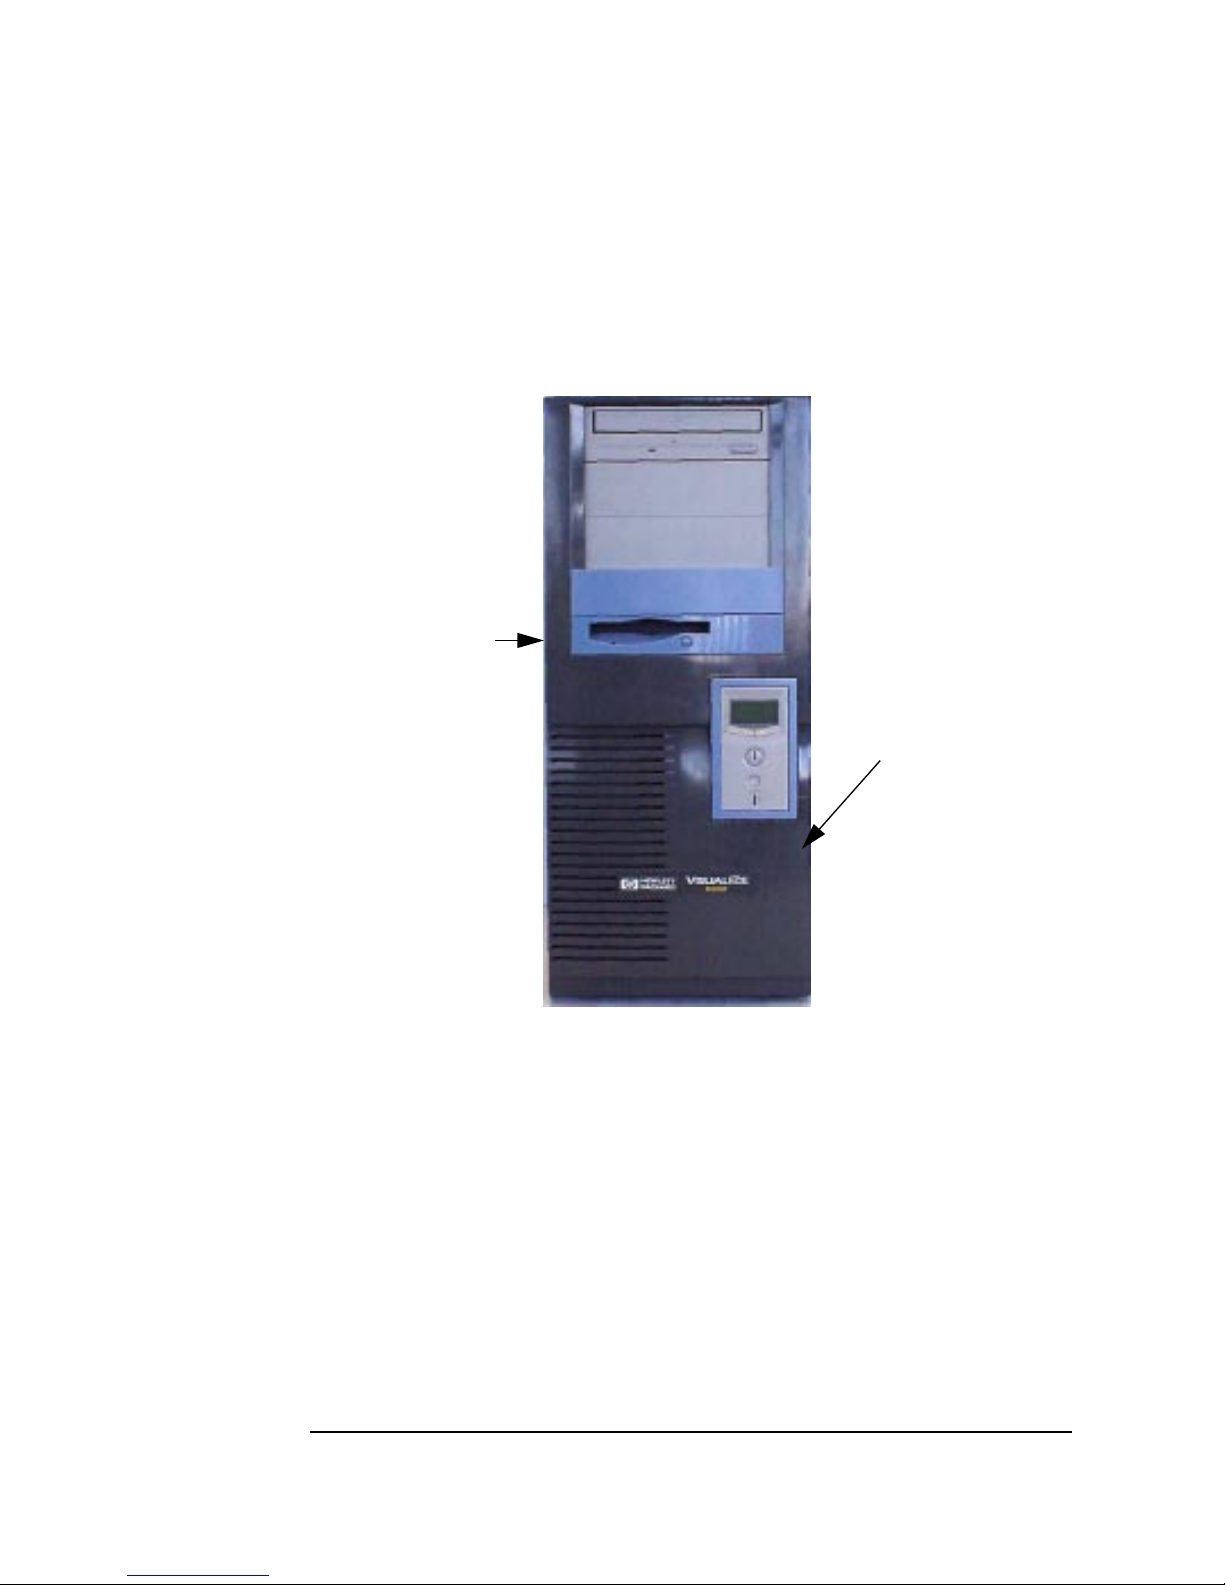
Removing the Left-Side Panel
The procedure in this section explains how to remove the left-side panel
of your Personal Workstation (use the Personal Workstation’s front panel
as the reference).
Left-Side Panel
Front Panel
14 Chapter1
Page 15
HP Visualize fx2+, fx4+, fx6+ Graphics Cards and Texture Module
Installing the HP Visualize fx+ Graphics Card
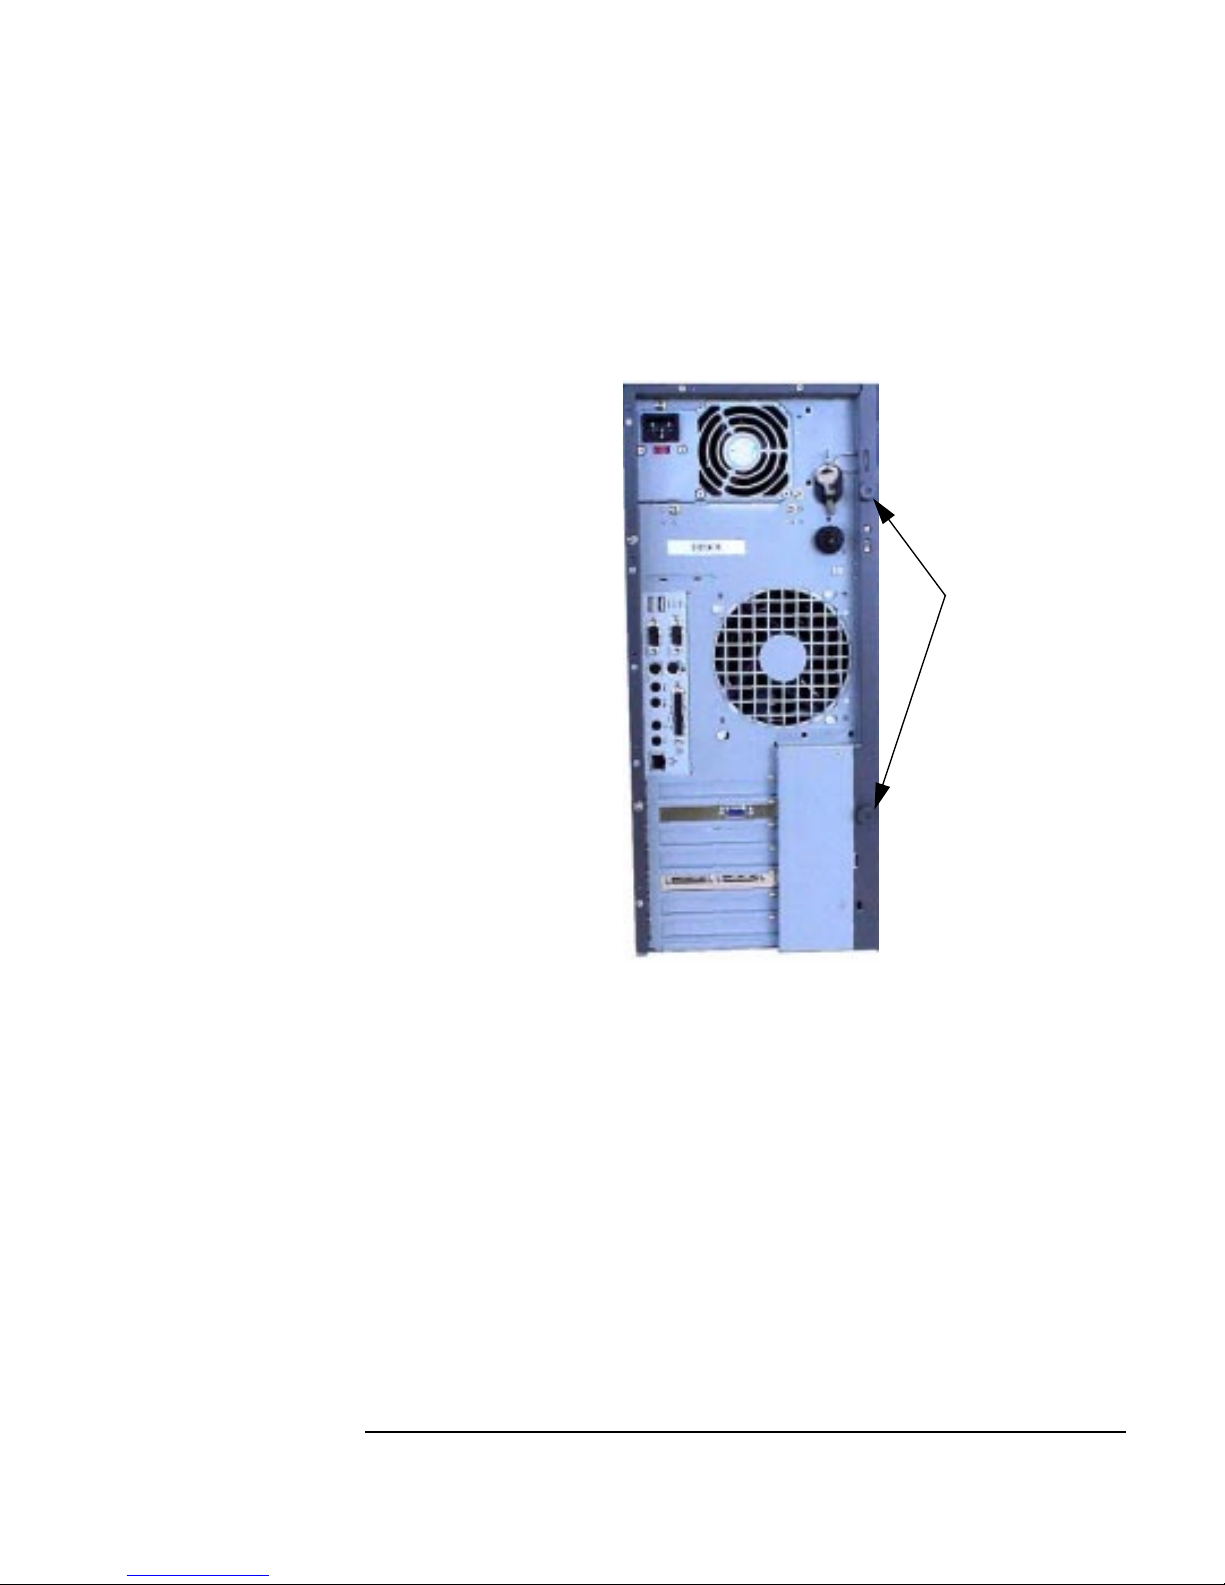
1. Remove the left-side panel’s two thumb screws, found at the back of
the unit. See Figure 1-1.
Figure 1-1 Removing the Left-Side Panel Thumb Screws
Thumb Screws
Chapter 1 15
Page 16
HP Visualize fx2+, fx4+, fx6+ Graphics Cards and Texture Module
Installing the HP Visualize fx+ Graphics Card
2. Slide the left-side panel toward the rear of the Personal Workstation
approximately 0.5 inches as shown in Figure 1-2.
Figure 1-2 Sliding the Left-Side Panel to the Rear of the Personal
Workstation
This gap is approximately
0.5 inches.
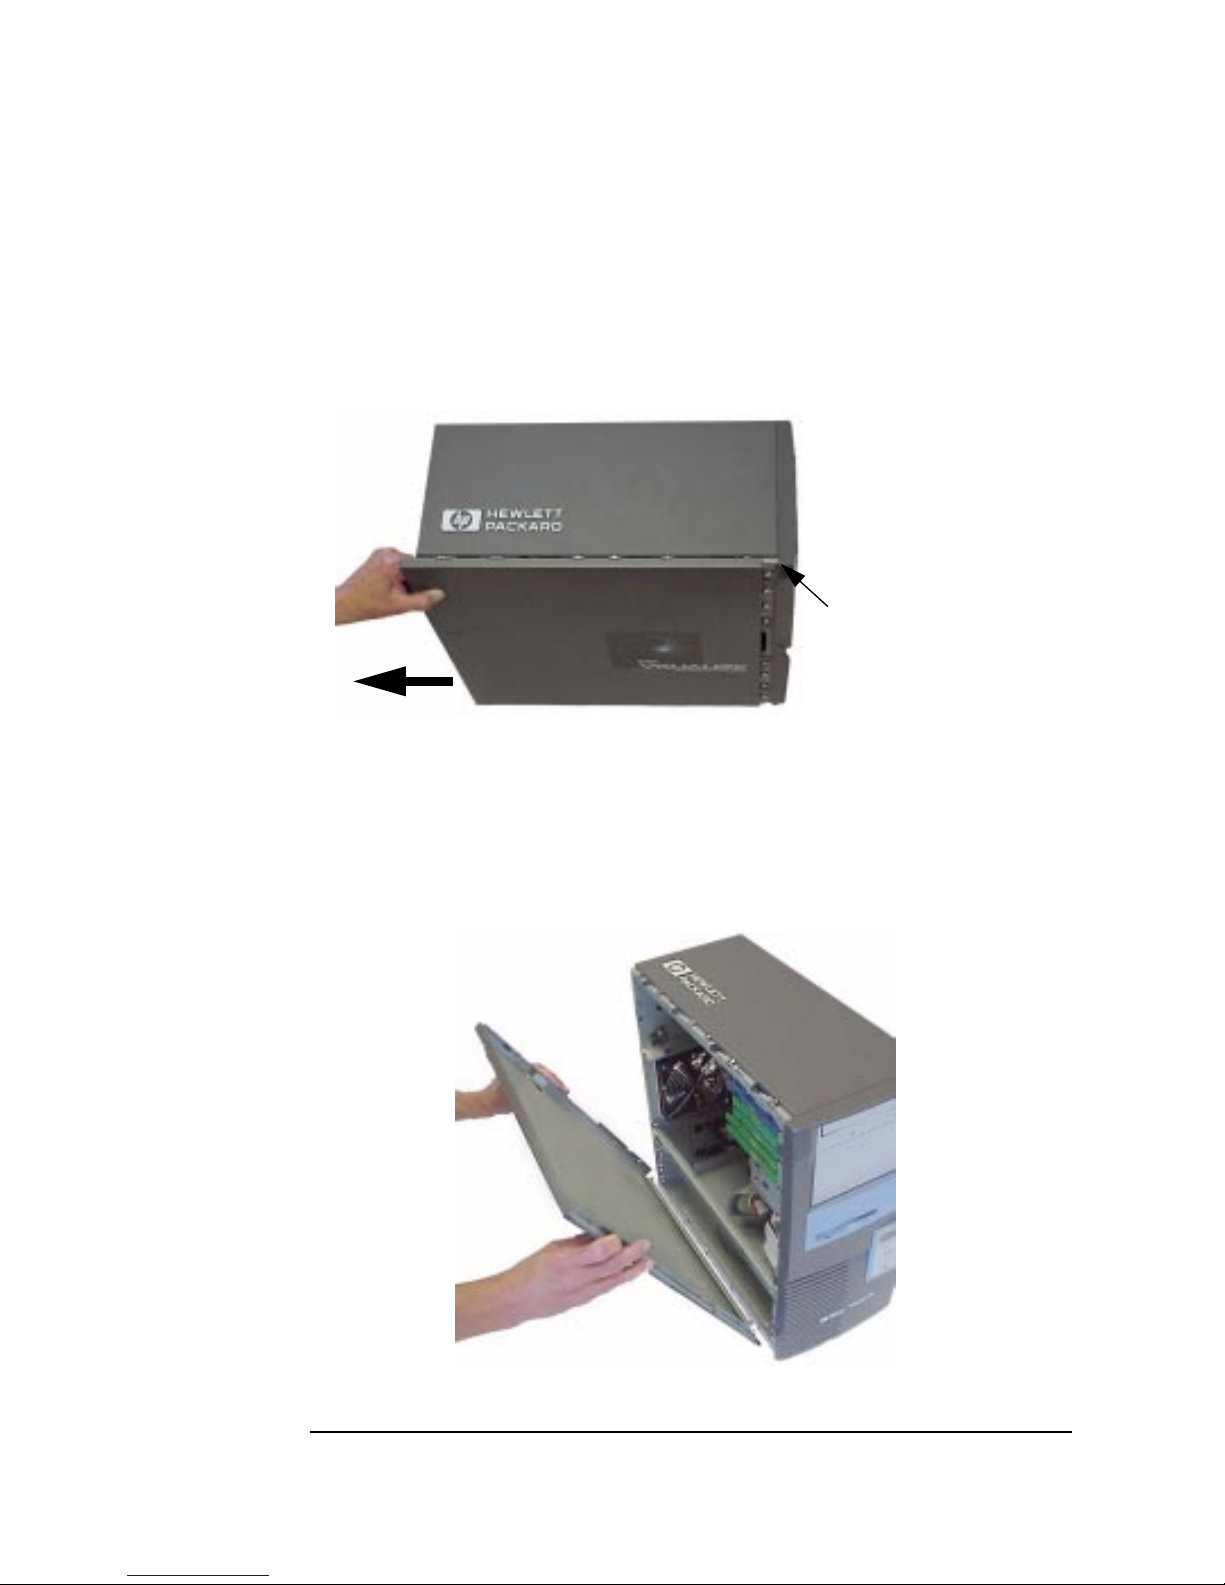
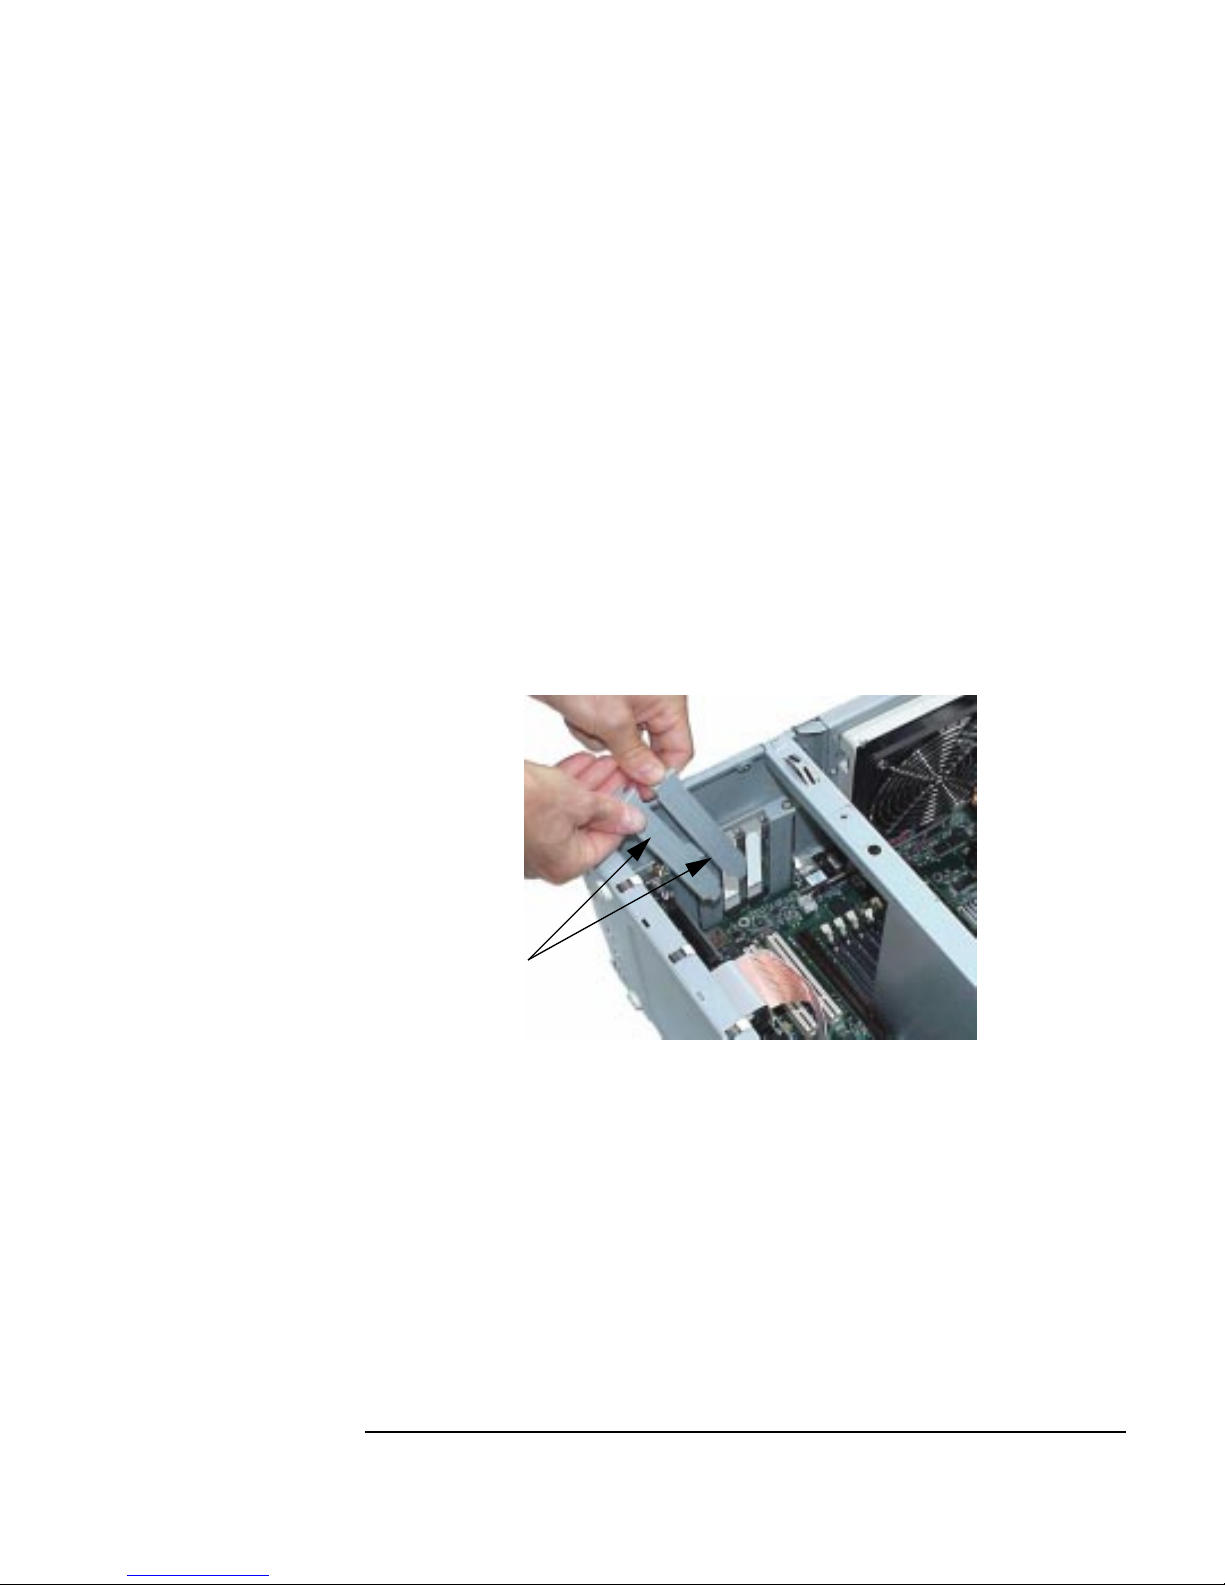
3. Remove the left-side panel by grasping the rear part of the panel as
shown in Figure 1-3 and pulling the panel outward. Next, lift the
panel up and away from the Personal Workstation, and place it where
its exterior surface cannot be damaged.
Figure 1-3 Removing the Left-Side Panel
16 Chapter1
Page 17
HP Visualize fx2+, fx4+, fx6+ Graphics Cards and Texture Module
Installing the HP Visualize fx+ Graphics Card
Installing the HP VISUALIZE fx+ Card
1. If your system already has a HP VISUALIZE fx+ card occupying the
AGP Pro and PCI accessory slots, please proceed to the section
“Removing the HP VISUALIZE fx+ Graphics Card.” If another vendor’s
card is occupying these slots, please follow this vendor’s directions for
removing the card before proceeding.
2. Ensure that all power cords and telecommunications cables are
disconnected.
3. Ensure thatall cables are correctly routedand flat against the system
so that they do not obstruct the HP VISUALIZE fx+ Graphics card.
Since the HP VISUALIZE fx+ Graphics Card occupies two accessory
slots (one AGP Pro and one PCI), it may be necessary to remove two
bulkhead blanks, using a Torx screwdriver.
Bulkhead Blanks
4. Place the Personal Workstation on its side.
Chapter 1 17
Page 18

HP Visualize fx2+, fx4+, fx6+ Graphics Cards and Texture Module
Installing the HP Visualize fx+ Graphics Card
5. Hold thecard with both hands, aligning the bulkhead edge of the card
with the empty bulkhead slot, and the right edge of the card with the
guide located to the right, on the plastic speaker and fan mount. Use
the slot as a guide to carefully slide the card down toward the AGP
Pro and PCI connectors on the system board.
Guide on
Fan Mount
6. Align the card’s AGP contact fingers and PCI contact fingers with
their appropriate system board connectors and push the card firmly
into position.
18 Chapter1
Page 19

HP Visualize fx2+, fx4+, fx6+ Graphics Cards and Texture Module
Installing the HP Visualize fx+ Graphics Card
7. Verify that the card’s contact fingers are fully seated in their
connectors before securing them with the three screws: two accessory
slot screws and one retaining screw. The retaining screw you need to
secure is located on the plastic speaker and fan mount as shown
below.
RRRetaining
Screw
Chapter 1 19
Page 20

HP Visualize fx2+, fx4+, fx6+ Graphics Cards and Texture Module
Installing the HP Visualize fx+ Graphics Card
The accessory slot screws which must be secured are located on the
bulkhead side of the chassis as shown below.
Accessory Slot Screw
20 Chapter1
Page 21

HP Visualize fx2+, fx4+, fx6+ Graphics Cards and Texture Module
Installing the HP Visualize fx+ Graphics Card
Replacing the Left-Side Panel
This section explains how to replace the left-side panel of your Personal
Workstation (use the Personal Workstation’s front control panel as the
reference). The inside view of this panel is shown to help you with the
terminology used in this manual.
Panel Hook (there are four)
Lock Latch
Panel Guide
Rear Edge of Panel
Left-Side Panel
Chapter 1 21
Page 22

HP Visualize fx2+, fx4+, fx6+ Graphics Cards and Texture Module
Installing the HP Visualize fx+ Graphics Card
To replace the left-side panel, follow this procedure:
1. Place the panel guide over the system’s inside-bottom edge, leaving a
half-inch gap between the front edge of the panel and the front of the
chassis.
Hook Slot (There are
four of them on this
edge. The four panel
hooks fit into these
slots.)
Panel Guide
System’s inside-bottom edge
0.5 inch gap
22 Chapter1
Page 23

HP Visualize fx2+, fx4+, fx6+ Graphics Cards and Texture Module
Installing the HP Visualize fx+ Graphics Card
2. Locate the four hook slots on the top edge of the system and align
these slots with the four panel hooks on the left-side panel. Next,
push the left-side panel inward (in the direction of the arrow). Note
that in some cases you might have to lift up slightly on the panel to
get the panel hooks to fit in the slots.
Gap is aprox.
0.5 inches
3. Screw the left-side panel thumb screws in place to complete the
left-side panel replacement on the Personal Workstation.
Thumb Screws
Chapter 1 23
Page 24

HP Visualize fx2+, fx4+, fx6+ Graphics Cards and Texture Module
Installing the HP Visualize fx+ Graphics Card
Updating the HP VISUALIZE fx+ Driver
HP updates the HP VISUALIZE fx+ Driver as needed to incorporate
feature and performance enhancements, or to fix problems found when
running specific applications.
You can download the latest version of the HP VISUALIZE fx+ driver from
HP’s web site:
http://www.hp.com/go/visualizesupport
After accessing the HP VISUALIZE Support web site, you will notice a
drop-down list of systems. Select the system you want to support, for
example, an X Class system. On the next screen, click on the Drivers
button. Scroll to the list entry for HP VISUALIZE fx4+ and fx6+ Open GL
Graphics Accelerator. Then click on the link to download the driver.
NOTE A README file is supplied with the driver. Please read it carefully as it
provides instructions to install the driver. Moreover, the information
contained in the README file supersedes any information contained in
this manual.
To update the driver, follow these instructions:
1. Create a temporary directory such as C:\TEMP\fx4+DRV\
2. Download the driver from HP’sweb site to a temporary folder on your
hard disk.
3. Run the executable file to decompress the contained files. You can do
this by double-clicking on the file in Windows Explorer.
Follow the instructions provided in the README file that comes with
the driver.
24 Chapter1
Page 25

HP Visualize fx2+, fx4+, fx6+ Graphics Cards and Texture Module
Installing the HP Visualize fx+ Graphics Card
Configuring the HP VISUALIZE fx+ Driver
You can configure the HP VISUALIZE fx+ driver using the Display
Properties dialog box.
To display the Display Properties dialog box, click Start, point to
Settings, and click Control Panel.InControl Panel, double-click
Display.
When the HP VISUALIZE fx+ driver is installed, the Display Properties
dialog box contains four extra panels:
• About
• Administrator
• Gamma Correction
• Options
If you want information on an item, Click “?” at the top of the dialog box.
To close the pop-up window, click inside it.
Chapter 1 25
Page 26

HP Visualize fx2+, fx4+, fx6+ Graphics Cards and Texture Module
Installing the HP Visualize fx+ Graphics Card
The About Panel
The About panel displays useful information, including the version of
the driver, OpenGL version and extensions, and the presence and size of
the texture memory module.
The figure above shows the About panel for an HP VISUALIZE fx+
Graphics card with driver version FX.00.01.14 and a 16 MByte texture
memory module installed.
26 Chapter1
Page 27

HP Visualize fx2+, fx4+, fx6+ Graphics Cards and Texture Module
Installing the HP Visualize fx+ Graphics Card
Driver Basic Configuration
The Options Panel
Configure the driver for the application you are using by selecting the
application name in the Application group box. When you select an
application, options in the Settings group box are automatically
configured for the selected application.
If your application is not listed, select *Compatibility Mode.
The Settings Panel
Use the Settings panel to change the screen resolution, number of colors
and refresh rate. ClickList All Modes to view all combinations ofcolors,
desktop area, and refresh frequency supported by the HP VISUALIZE fx+
Graphics card. If you select a mode, click Test to see if your choice is
compatible with your monitor.
You can display screen resolutions up to 1280×1024 in True Color(24 bit),
double-buffered mode.
Chapter 1 27
Page 28

HP Visualize fx2+, fx4+, fx6+ Graphics Cards and Texture Module
Installing the HP Visualize fx+ Graphics Card
Using a resolution of 1600×1200 you can obtain True Color(24 bit) in
single-buffered mode only. However, if the Color Recovery setting is
enabled in the Options panel, the 1600×1200 resolution is obtained as
12-bit color, double-buffered mode. HP Color Recovery uses an advanced
form of dithering to give near true color appearance.
Driver Advanced Configuration
The Options Panel
Table 1-1 Application Group Box
Option Description
Max Compatibility The “Max Compatibility setting provides
maximum compatibility for those applications that
mix OpenGL and Windows GDI rendering in
double-buffered windows, contrary to Microsoft
requirements. If your application is not listed,
choose this option.
Max Performance The “Max Performance” setting will provide the
maximum graphics throughput. However, many
applications may exhibit visual anomalies.
Custom The “Custom” setting becomes active when the
user manually modifies one or more settings. For
more information refer to “Creating Custom
Driver Configurations” in a subsequent section.
Application Name Select the application software you are using (for
example, SoftImage, Solidworks).
28 Chapter1
Page 29

HP Visualize fx2+, fx4+, fx6+ Graphics Cards and Texture Module
Installing the HP Visualize fx+ Graphics Card
NOTE Settings preceded with the “*” character, cannot be deleted by anyone,
including the system administrator.
Table 1-2 Setting Group Box
Option Description
No Tearing “No Tearing” preventsthe tearing effectseen when
rendering in the middle of a vertical refresh. The
tearing effect is a discontinuity in the image
appearing as a horizontal line, which is different
from frame to frame. Enabling this option is
similar to turning off “sync to vertical retrace” or
“wait forv blank” with other graphics cards. When
this option is enabled, performance may be
reduced because rendering waits for a vertical
refresh to finish. This is especially true for large
windows.
Fast Buffer Swaps “Fast Buffer Swaps” take advantage of HP’s
multi-buffer hardware. The hardware has a
physical front and back buffer that can be swapped
very quickly. For compatibility with some
applications, this option can be turned off, and the
back buffer copied to the front buffer instead.
Multi Buffer GDI This option causes GDI (NT Graphics Device
Interface) to draw to both the physical front and
back buffers. This is useful for applications which
use GDI to draw in an OpenGL window. This
option must be disabled for 2D benchmarking
purposes.
Quad Strips to Tri
Strips
Applications that fail to conform to the OpenGL
standard, by creating non-planar quad strips, may
render incorrectly with this driver. This option
causes quad strips to be converted to triangle
strips, so that the geometry will render correctly.
Chapter 1 29
Page 30

HP Visualize fx2+, fx4+, fx6+ Graphics Cards and Texture Module
Installing the HP Visualize fx+ Graphics Card
Table 1-2 Setting Group Box
Option Description
Color Recovery Color recovery usespatented HP technology andis
unique to HP VISUALIZE graphics cards. It
generates near true colorquality images from 8-bit
or 12-bit source in OpenGL context without the
grainy or patterned effect of 8-bit dithering.
Stereo Sync
Enabled
Hardware
Accumulation
Optimize DL
Execution
When this optionis set, stereo timing is enabled on
the video output port and stereo pixel formats are
made available to applications. Note that stereo
timing is only supported in True Color screen
formats of 1280×1024 and less in resolution.
Additionally, the stereo effect is greatly enhanced
at higher refresh rates, for example, 120 Hz.
Finally, note that the stereo effect will only be
visible when using appropriate stereographic
glasses or headsets.
For formats of 1280×1024 and less, this option
speeds the standard OpenGL functionality, which
requires texture memory on the optional texture
board. The following restrictions apply:only 8 bits
of resolution are provided per color component;
the accumulation buffer contains only unsigned
values; the result of operations from the
accumulation buffer to the color buffer are always
automatically copied back to the accumulation
buffer.
This option can improve the OpenGL display list
execution performance for some display lists. It
does this at the expense of a slightly increased
display list compilation time.
30 Chapter1
Page 31

HP Visualize fx2+, fx4+, fx6+ Graphics Cards and Texture Module
Table 1-2 Setting Group Box
Option Description
Installing the HP Visualize fx+ Graphics Card
RasterPos
Performance
NOOP Texture
Mapping
MRU Texture
Reload
This option canimprove the OpenGL performance
if an OpenGL application is using a large number
of calls to glRasterPos, g1Bitmap, glDrawPixels,
or glPushAttrib. This option can reduce
performance for applications that are not heavy
users of one of these calls, so it should only be
used if the appropriate conditions exist.
When this option is set, texture mapping becomes
NOOP (NO OPeration). All texture commands
sent by an application are ignored. If the texture
module is not installed, setting this option can be
useful tosimulate the performance withthe texture
module installed. However,visual results are poor,
and actual hardware acceleration with the texture
module will be slightly slower than this simulated
performance.
When this option is set, the most recently used
texture is replaced when texture memory is full.
This is most useful when many textures are used
sequentially, because it minimizes the number of
textures that are downloaded.
Object Space
Lighting
Shared Back
Buffer
Chapter 1 31
Enabling this feature optimizes lighting
performance at the expense of matrix change
performance. This may improve the performance
of some applications.
Enabling this feature sets OpenGL rendering to be
clipped only to the window boundaries, ignoring
any obscuring windows. This option should
normally not be set since it can cause unexpected
interactions between OpenGL applications. It
should only be set to improve the usage of the no
Redarw on Window Expose option in 3D Studio
MAX and Autocad 2000.
Page 32

HP Visualize fx2+, fx4+, fx6+ Graphics Cards and Texture Module
Installing the HP Visualize fx+ Graphics Card
The Administration Panel
The Administration panel is only available if the user has system
administrator privileges. From this panel, the system administrator can
enable the user to access the Gamma Correction and Options panels and
allow the user to change and save the HP VISUALIZE fx+ Custom
configuration.
The Gamma Correction Panel
Gamma correction is used to correct non-linearity in the phosphor
brightness of monitors. It can be used to improve the appearance of
antialiased lines, shaded graphic images, or scanned photographic
images that have not already been gamma corrected.
Creating Custom Driver Configurations
The Options panel allows you to create customizeddriver configurations
for the HP VISUALIZE fx+ graphics card. These configurations appear in
the Application group box.
To create a customized profile:
1. Set the desired options in the Settings group box. This will select the
*Custom setting in the Application group box.
2. Click the Save As button to save the current configuration. You are
prompted for a profile name.
3. Type a configuration name in the Save Configuration dialog box.
This name will appear in the Application group box.
Save As Button
Allows you to save the current *Custom configuration as a named
user-specific configuration.
Delete Button
Allows you to delete a custom configuration.
32 Chapter1
Page 33

HP Visualize fx2+, fx4+, fx6+ Graphics Cards and Texture Module
Installing the HP Visualize fx+ Graphics Card
Troubleshooting
This section describes how to troubleshoot problems that may arise with
your graphics subsystem. It also provides some tips on how to improve
the graphics performance.
Troubleshooting Video Problems
Problem: At boot time, the screen is blank and there are no error
messages.
Solution Explanation
Check that the computer and
display are turned on. (The
power light should be
illuminated.)
Check the display’s contrast
and brightness settings.
Make sure that all cables and
power cords are plugged in.
Make sure the power outlet is
working.
If possible, try another monitor
and set of cables.
Check the LCD screen of your
Personal Workstation. If the
LCD screenreports ‘Error -
No Video,’ check that the HP
VISUALIZE fx+ graphics card is
correctly inserted into the AGP
Pro and the PCI slots.
Useful routine checks,
especially if you have just
moved the Personal
Workstation.
Useful routine checks,
especially if you have just
moved the computer.
At boot time, the display’s
signal is provided by the VGA
daughter of yourHP VISUALIZE
fx+ graphicscard. MaxiLife can
check if the VGA daughter is
running properly.
Chapter 1 33
Page 34

HP Visualize fx2+, fx4+, fx6+ Graphics Cards and Texture Module
Installing the HP Visualize fx+ Graphics Card
Solution Explanation
If the LCD screen does not
report any error, try another
graphics card,if available.Even
if it is not an HP VISUALIZE fx+
graphics card, the boot
If the boot sequence is
displayed correctly using a
replacementgraphics card,your
HP VISUALIZE fx+ graphics
card may be faulty.
sequence should be displayed
using the VGA standard driver.
Problem: The computer boots in AGP, but the screen goes blank or is
corrupted when switching to high-resolution mode.
Solution Explanation
Remove the HP VISUALIZE fx+
graphics card and then re-insert
it. Ensure that the graphics card
is properly inserted in the AGP
MaxiLife does not detect this
error,as it onlychecks the VGA
controller that is located on the
PCI daughter.
Pro slot.
Check that your monitor
supports the HP VISUALIZE fx+
This problem may occur if you
have just changed your monitor.
graphics card resolution and
refresh rate selected. If the
monitor does not support the
selected resolution, boot in
VGA and then change your
settings.
34 Chapter1
Page 35

HP Visualize fx2+, fx4+, fx6+ Graphics Cards and Texture Module
Installing the HP Visualize fx+ Graphics Card
Solution Explanation
If the texture module is not
The figure below shows the
installed, check that a
terminator is present and firmly
connected.
location of the terminator. To
check if the terminator is firmly
connected, you may need to
removethe card’sstrengthening
bar and then replace it. (You
can use a Torx screwdriver or
a flat-blade screwdriver of the
correct size.)
Run the diagnostics tool. For more information on the
diagnostics tool, see the section
“Diagnostics Tool.”
Check that you are using the
correct video driver. The video
driver version is displayed in
the About panel.
you may have updated the HP
VISUALIZE fx+ driver with the
wrong version. The fx+ (fx4+
and fx6+) drivers use the form
FX.00.02.xx and the fx4
driver uses the form
FX.00.00.xx.
Chapter 1 35
Page 36

HP Visualize fx2+, fx4+, fx6+ Graphics Cards and Texture Module
Installing the HP Visualize fx+ Graphics Card
Problem: The computer boots correctly in VGA and High-resolution
mode, but visual anomalies are observed when using applications.
Solution Explanation
The driver may not be
optimized for the application
used. Open Display
Properties, select the Options
panel and select the appropriate
application. For more
When an application is
selected, the driver settings are
automatically configured for
optimum performance and
visual comfort for that
application.
information, see the section
“Driver Basic Configuration.”
Run the diagnostics tool. For more information on the
diagnostics tool, see the section
“Diagnostics Tool.”
Check the HP web site for an
updated driver version for your
application.
HP frequently updates the HP
VISUALIZE fx driver to
incorporate feature and
performance enhancements, or
http://www.hp.com/go/
visualizesupport
to fix problems found when
running specific applications.
36 Chapter1
Page 37

HP Visualize fx2+, fx4+, fx6+ Graphics Cards and Texture Module
Installing the HP Visualize fx+ Graphics Card
Diagnostics Tool
Your preloaded software includes a diagnostics tool to test your HP
VISUALIZE fx+ graphics card. This tool is also available on the HP
CD-ROM provided with your Personal Workstation and on the HP web
site: http://www.hp.com/go/visualizesupport.
The diagnostics tests include an in-depth check of the graphics ASICS,
frame buffer and texture module (if present).
CAUTION To run the diagnostics tools you must start Windows NT in VGA mode.
Chapter 1 37
Page 38

HP Visualize fx2+, fx4+, fx6+ Graphics Cards and Texture Module
Installing the HP Visualize fx+ Graphics Card
To run the diagnostics tool:
1. Shut down Windows NT and restart in VGA mode. You may receive a
message saying that the current display settings are not valid. Click
OK and then click the Cancel button in the Display Properties
dialog box.
2. Click the Start button.
3. Point to Programs.
4. Point to HP Diagnostics.
5. Click on HP VISUALIZE fx Diagnostics.
The diagnostics tool appears. Click Test All to test each of the card’s
modules. The results for each test are displayed on the right side of the
window.
Troubleshooting Performance Problems
Problem: Graphics performance is below expectations.
Solution Explanation
Check the HP web site for an
updated driver version for your
application.
HP frequently updates the HP
VISUALIZE fx driver to
incorporate feature and
performance enhancements, or
http://www.hp.com/go/
visualizesupport
The driver may not be
optimized for the application
used. Open Display
Properties, select the Options
panel and select the appropriate
application.
to fix problems found when
running specific applications.
When an application is
selected, the driver settings are
automatically configured for
optimum performance and
visual comfort for that
application.
38 Chapter1
Page 39

HP Visualize fx2+, fx4+, fx6+ Graphics Cards and Texture Module
Installing the HP Visualize fx+ Graphics Card
Solution Explanation
If the application used is
applying texture mapping, you
may need to install the texture
module.
You can simulate the
performance that would be
obtained by installing the
texture module by enabling the
NOOP option in the Settings
group box of the Options
panel.
If thetexture memorymodule is
not installed,texture mappingis
performed via the software.
Since this involves a very high
number of complex
calculations, the performance
impact can be significant.
Chapter 1 39
Page 40

HP Visualize fx2+, fx4+, fx6+ Graphics Cards and Texture Module
Adding a Texture Module to Your fx+ Graphics Card
Adding a Texture Module to Your fx+ Graphics
Card
This section contains the following sub-sections:
• Removing the Left-Side Panel
• Removing the HP VISUALIZE fx+ Graphics Card
• Installing the HP VISUALIZE Texture Module
• Installing Your Graphics Card and Texture Module
• Replacing the Left-Side Panel
• Checking the HP VISUALIZE Texture Module Installation
• Troubleshooting
Removing the Left-Side Panel
For information regarding the removal of the left-side panel of your
Personal Workstation, read the subsection “Removing the Left-Side
Panel” in the section “Installing the HP VISUALIZE fx+ Graphics Card.”
Removing the HP VISUALIZE fx+ Graphics Card
CAUTION Be very careful when handling the HP VISUALIZE fx+ Graphics Card.
Bumping, bending, or dropping the card can cause irreparable damage.
1. Ensure that all power cords and telecommunications cables are
disconnected.
2. Ensure that all cables are correctly routed and out of the way so that
they do not obstruct the removal of the HP VISUALIZE fx+ Graphics
Card.
3. Carefully place the Personal Workstation on its side.
40 Chapter1
Page 41

HP Visualize fx2+, fx4+, fx6+ Graphics Cards and Texture Module
Adding a Texture Module to Your fx+ Graphics Card
WARNING Before handling the HP VISUALIZE fx+ Graphics Card, first wait
until the card has cooled down completely before touching it.
The graphics card can become very hot during use.
4. Remove the two accessory card mounting screws located on the
bulkhead and the retaining screw located on the plastic mount for the
speaker and fan. Carefully ease the card up and out of the Personal
Workstation’s chassis using the card’s bulkhead and right edge.
CAUTION When sliding the card up, ensure that the card does not snag or catch
against the Personal Workstation’s chassis or cables.
5. Place the card on an antistatic bag. In case an antistatic bag is not
available, place the card on a static free surface.
Chapter 1 41
Page 42

HP Visualize fx2+, fx4+, fx6+ Graphics Cards and Texture Module
Adding a Texture Module to Your fx+ Graphics Card
Installing the HP VISUALIZE Texture Module
This section explains how to add the HP VISUALIZE Texture Module to
the HP VISUALIZE fx+ Graphics Card.
fx
+ Graphics Card
Texture Module
1. Remove the two screws from the card’s strengthening bar, and then
remove the strengthening bar from the HP VISUALIZE fx+ Graphics
Card. (You can use a Torx™ screwdriver or a flat-blade screwdriver of
the correct size.)
42 Chapter1
Strengthening BarScrew Screw
Page 43

HP Visualize fx2+, fx4+, fx6+ Graphics Cards and Texture Module
Adding a Texture Module to Your fx+ Graphics Card
2. Carefully remove the terminator from the HP VISUALIZE fx+ graphics
card. Store the terminator in a safe place (you may need it at a later
date).
Terminator
3. Before installing the texture module, ensure that all four corner
screws on the texture module are fully retracted and that the
terminator and strengthening bar are removed.
Terminator
Strengthening Bar and its screws
Chapter 1 43
Page 44

HP Visualize fx2+, fx4+, fx6+ Graphics Cards and Texture Module
Adding a Texture Module to Your fx+ Graphics Card
4. Carefully line up the connectors on the HP VISUALIZE Texture Module
and the HP VISUALIZE fx+ graphics card.
Texture Module connectors
fx
+ connectors
5. Then using both thumbs, press the texture module into place.
44 Chapter1
Page 45

HP Visualize fx2+, fx4+, fx6+ Graphics Cards and Texture Module
Adding a Texture Module to Your fx+ Graphics Card
6. Ensure that the connectors on the HP VISUALIZE fx+ Texture Module
are fully inserted beforesecuring it into place with the captive screws.
Note that you need to use the four captive screws located on the
texture module to mount it to the HP VISUALIZE fx+ graphics card.
The four captive screws will fit into the four screw standoffs on the
fx+ graphics card.
Standoff
Chapter 1 45
Page 46

HP Visualize fx2+, fx4+, fx6+ Graphics Cards and Texture Module
Adding a Texture Module to Your fx+ Graphics Card
Installing Your Graphics Card and Texture Module
1. Ensure that the system data cables are correctly routed and flat
against the system so that they do not obstruct the HP VISUALIZE fx+
Graphics Card.
2. Hold thecard’sbulkhead edge with your left handand the card’s right
edge with your right hand. Align the card and then slide it downward
toward the AGP Pro and PCI connectors, along the fan mount guide
on the right and the bulkhead openings on the left.
3. Align the cards’s AGP contact fingers and PCI contact fingers with
their appropriate system board connector slots and push the card
firmly into position.
46 Chapter1
Page 47

HP Visualize fx2+, fx4+, fx6+ Graphics Cards and Texture Module
Adding a Texture Module to Your fx+ Graphics Card
4. Verify that the card’s contact fingers are fully seated in their
connectors before securing them with the two accessory slot screws
and one retaining screw. The retaining screw that you need to secure
is located to the right, on the plastic speaker and fan mount as shown
below.
Chapter 1 47
Page 48

HP Visualize fx2+, fx4+, fx6+ Graphics Cards and Texture Module
Adding a Texture Module to Your fx+ Graphics Card
The accessory slot screws, which must be secured, are located on the
bulkhead side of the chassis as shown below.
Replacing the Left-Side Panel
For information regarding the replacement of the left-side panel of your
Personal Workstation, read the subsection “Replacing the Left-Side
Panel” in the section “Installing the HP VISUALIZE fx+ Graphics Card.”
48 Chapter1
Page 49

HP Visualize fx2+, fx4+, fx6+ Graphics Cards and Texture Module
Adding a Texture Module to Your fx+ Graphics Card
Checking the Installation
The HP VISUALIZE fx+ texture module is automatically detected by the
HP VISUALIZE fx+ driver. No software configuration is necessary. To
check that the Texture Module is correctly installed, follow these steps:
1. Switch on your Personal Workstation.
2. When in Windows NT, open the Display Properties window by
clicking the Start button, selecting Settings/Control Panel, and
double-clicking Display.
3. Click the About tab.
Installation
Verification
If the texture module was correctly installed, the About window will
contain the text: Hardware Texture Mapping: Installed.
To check that you have the latest version of this driver, refer to HP’s web
site at: http:/www.hp.com/go/visualizesupport.
Chapter 1 49
Page 50

HP Visualize fx2+, fx4+, fx6+ Graphics Cards and Texture Module
Adding a Texture Module to Your fx+ Graphics Card
50 Chapter1
Page 51

A Regulatory Information and Warranty
51
Page 52

Regulatory Information and Warranty
Regulatory Information
Regulatory Information
Declaration of Conformity
according to ISO/IEC Guide 22 and EN 45014
Manufacturer: Hewlett-Packard Company
Declares that the:
Product Name:
Model Number: A1277A, A1278A, A1279A, A5022A and A5023A
Product Options: All
3404 East Harmony Rd.
Fort Collins, CO 80528
USA
VisualizeGraphics Boards
Conforms to the following specifications:
Safety. IEC 950:1991+A1+A2+A3 / EN 60950:1992+A1+A2+A3
. CISPR 22: 1993+A1+A2 / EN 55022:1994+A1+A2 Class A conducted emissions
EMC
CISPR 22: 1997 / EN 55022:1998 Class A radiated emissions
EN 55024:1998 / EN 61000-4-2: 1999-4kV CD, 8 kV AD
EN 55024:1998 / EN 61000-4-3: 1995 - 10 v/m
EN 55024: 1998 / EN 61000-4-4: 1995 - 2 kV Signal, 4 kV Power Lines
US FCC Part 15, Level A
Japan VCCI Class A
and is certified by:
British Standards Institute: ISO 9002 for Hewlett-Packard
Australia/New Zealand AS/NZS 3548: 1995
HP Fort Collins CCQD HTC
Supplementary information:
The product herewith complies with the requirements of the following Directives and carries the CE marking
accordingly:
- the EMC directive 89/336/EEC and 92/31/EEC and 93/68/EEC
- the Low Voltage Directive 73/23/EEC and 93/68/EEC
This product was tested in a typical Hewlett-Packard workstation configuration.
Original signed by Ruth Lutes, Site Quality Manager, Fort Collins, CO, USA
For Compliance Information ONLY, contact:
European Contact: Your local Hewlett-Packard Sales and Service Office or Hewlett-Packard
GmbH, Department HQ-TRE Standard Europe, Herrenberger Straße 130,
D-71034 Böblingen (FAX: +49-7031-14-3143).
Americas Contact: Hewlett-Packard, Fort Collins Site Quality Manager, mail stop 46, 3404 E.
Harmony Rd. Bldg.6 Dock A, Fort Collins, CO 80528, USA
52 AppendixA
Page 53

Regulatory Information and Warranty
Regulatory Information
FCC
This equipment has been tested and found to comply with the limits for a Class A digital
device, pursuant to Part 15 of the FCC Rules and the Canadian Department of
Communications. These limits are designed to provide reasonable protection against
harmful interference in a residential installation. This equipment generates, uses and can
radiate radio frequency energy and, if not installed and used in accordance with the
instruction manual, may cause harmful interference to radio communications. Operation
of this equipment in a residential area is likely to cause harmful interference in which case
the user will be required to correct the interference at his own expense.
NOTE You are cautioned that any changes or modifications not expressly approved
in this manual could void your authority to operate this equipment.
If this equipment does cause harmful interference to radio or television reception, which
can be determined by turning the equipment off and on, the user is encouraged to try to
correct the interference by one or more of the following measures:
• Reorient or relocate the receiving antenna.
• Increase the separation between the equipment and receiver.
• Connect the equipment into an outlet on a circuit different from that to which the
receiver is connected.
• Consult the dealer or an experienced radio/TV technician for help.
Hewlett-Packard’s FCC Compliance Tests were conducted with HP-supported
peripheral devices and HP shielded cables, such as those you received with your
system. Changes or modifications not expressly approved by Hewlett-Packard could
void the user’s authority to operate the equipment.
Notice for Japan (Class A)
Appendix A 53
Page 54

Regulatory Information and Warranty
HP Hardware Warranty
HP Hardware Warranty
Important: This is your hardware product warranty statement. Please, read it carefully.
Warranty terms may be different in your country. If so, your Authorized HP Dealer or
Hewlett-Packard Sales and Service Office can give you details.
HP products may contain remanufactured parts equivalent to new in performance or may
have been subject to incidental use.
HP products external to the system processor unit —such as external storage subsystems,
displays, printers, and other peripherals— are covered by the applicable warranties for
those products; HP software is covered by the HP Software Product Limited Warranty
FOR CONSUMER TRANSACTIONS IN AUSTRALIA AND NEW ZEALAND: THE
WARRANTY TERMS CONTAINED IN THIS STATEMENT, EXCEPT TO THE EXTENT
LAWFULLY PERMITTED, DO NOT EXCLUDE, RESTRICT OR MODIFY AND ARE IN
ADDITION TO THE MANDATORY STATUTORY RIGHTS APPLICABLE TO THE SALE
OF THIS PRODUCT TO YOU.
HP Year 2000 Warranty
This HP Year 2000 Warranty is in addition to the HP Standard Commercial Warranties
contained in Exhibit E16, HP Terms and Conditions of Sale and Service. HP warrants that each
HP hardware, software, and firmware Product delivered under this HP Year 2000 Warranty will
be able to accurately process date data (including, but not limited to, calculating, comparing, and
sequencing) from, into, and between the twentieth and twenty-first centuries, and the years 1999
and 2000, including leap year calculations, when used in accordance with the Product
documentation provided by HP (including any instructions for installing patches or upgrades),
provided that all other products (e.g. hardware, software, firmware) used in combination with
such HP Product(s) properly exchange date data with it.
If the Specifications require that specific HP Products must perform as a system in accordance
with the foregoing warranty, then that warranty will apply to those HP Products as a system, and
Customer retains sole responsibility to ensure the Year 2000 readiness of its information
technology and business environment. The duration of this warranty extends through January
31, 2001. The remedies available under this warranty will be defined in, and subject to, the terms
and limitations of the warranties contained in HP’s standard commercial warranties. To the
extent permitted by local law, this warranty applies only to branded HP Products and not to
products manufactured by others that may be sold or distributed by HP. This HP Year 2000
Warranty applies only to HP Products shipped after the effective date, July 01, 1998, of this
warranty. Nothing in this warranty will be construed to limit any rights or remedies provided
elsewhere in the HP Terms and Conditions of Sale and Service with respect to matters other than
Year 2000 compliance.
Three Year Limited Hardware Warranty
Hewlett-Packard (HP) warrants this hardware product against defects in materials and
workmanship for a period of three years from receipt by the original end-user purchaser.
The three year warranty includes on-site service during the first year of use (freeparts and
labor), and parts service provided by an HP Service Center or a participating Authorized
54 AppendixA
Page 55

Regulatory Information and Warranty
HP Hardware Warranty
HP Personal Computer Dealer Repair Center, during the second and third years of use.
If HP receives notice of above defined defects during the warranty period, HP will either, at
its option, repair or replace products, which prove to be defective.
Should HP be unable to repair or replace the product within a reasonable amount of time,
the customer's alternate exclusive remedy shall be a refund of the purchase price upon
return of the product.
The system processor unit, keyboard, mouse, and Hewlett-Packard accessories inside the
system processor unit —such as video adapters, mass storage devices, and interface
controllers— are covered by this warranty.
This warranty is extended worldwide under certain conditions (please check with your
local HP office) to products purchased from HP or an Authorized HP Personal Computer
Dealer which are reshipped by the original purchaser either for use by the original
purchaser or provided as an incidental part of systems integrated by the original
purchaser. When available in the country ofuse, service is provided in the same manner as
if the product was purchased in that country and can only be provided in countries where
the product is designed to operate. If the product is not normally sold by HP in the country
of use, it must be returned to the country of purchase for service. Response time for on-site
service, and parts delivery turn-around time for parts service, are subject to changes from
standard conditions based upon non-local
parts availability.
Limitation of Warranty
The above warranty shall not apply to defects resulting from: misuse; unauthorized
modification; operation or storage outside the environmental specifications for the product;
in-transit damage; improper maintenance; or defects resulting from use of non-HP
software, accessories, media, supplies, consumables, or such items not designed for use
with the product.
Reloading the bundled or pre-loaded software on your Personal Workstation is not covered
by the HP warranty.
HP MAKES NO OTHER EXPRESS WARRANTY, WHETHER WRITTEN OR ORAL,
WITH RESPECT TO THIS PRODUCT. ANY IMPLIED WARRANTY OF
MERCHANTABILITY OR FITNESS IS LIMITED TO THE THREE-YEAR DURATION
OF THIS WRITTEN WARRANTY. SOME STATES OR PROVINCES DO NOT ALLOW
LIMITATIONS ON HOW LONG AN IMPLIED WARRANTY LASTS, SO THE ABOVE
LIMITATION OR EXCLUSION MAY NOT APPLY TO YOU.
This warranty gives you specific legal rights, and you may also have other rights, which
vary, from state to state, or province to province.
Limitation of Liability and Remedies
THE REMEDIES PROVIDED ABOVE ARE THE CUSTOMER'S SOLE AND
EXCLUSIVE REMEDIES. IN NO EVENT SHALL HP BE LIABLE FOR ANY DIRECT,
INDIRECT, SPECIAL, INCIDENTAL, OR CONSEQUENTIAL DAMAGES, WHETHER
BASED ON WARRANTY, CONTRACT, TORT, OR ANY OTHER LEGAL THEORY.
Appendix A 55
Page 56

Regulatory Information and Warranty
HP Hardware Warranty
The foregoing limitation of liability shall not apply in the event that any HP product sold
hereunder is determined by a court of competent jurisdiction to be defective and to have
directly caused bodily injury, death, or property damage; provided, that in no event shall
HP's liability for property damage exceed the greater of $50,000 or the purchase price of
the specific product that caused such damage.
Some states or provinces do not allow the exclusion or limitation of incidental or
consequential damages —including lost profit— so the above limitation or exclusion may
not apply to you.
Obtaining On-Site Warranty Service
To obtain on-site warranty service, the customer must contact an HP Sales and Service
Office(intheUS,calltheHPCustomerSupportCenterat(970)635-1000)ora
participating Authorized HP Personal Computer Dealer Repair Center. The customer
must be prepared to supply proof of the purchase date.
The system processor unit, keyboard, mouse, and Hewlett-Packard accessories inside the
system processor unit —such as video adapters, mass storage devices, and interface
controllers— are covered by this warranty.
During the on-site warranty period, customer-replaceable components may be serviced
through expedited part shipment. In this event, HP will prepay shipping charges, duty,
and taxes; provide telephone assistance on replacement of the component when necessary;
and pay shipping charges, duty, and taxes for any part that HP asks to be returned.
On-site visits caused by non-Hewlett-Packard products —whether internal or external to
the system processor unit— are subject to standard per-incident travel and labor charges.
On-site service for this product is restricted or unavailable in certain locations. In HP
Excluded Travel Areas— areas where geographical obstacles, undeveloped roads, or
unsuitable public transportation prohibit routine travel— service is provided on a
negotiated basis at extra charge.
Response time for HP on-site service in an HP Service Travel Area is normally next
business day (excluding HP holidays) for HP Travel Zones 1-3 (generally 100 miles or 160
Km from the HPoffice). Response time is second business day for Zones 4 and 5 (200 miles,
320 Km); third business day for Zone 6 (300 miles, 480 Km); and negotiated beyond Zone 6.
Worldwide Customer Support Travel information is available from any HP Sales and
Service Office.
Travel restrictions and response time for dealer or distributor service are defined by the
participating dealer or distributor.
Service contracts which provide after-hour or weekend coverage, faster response time, or
service in an Excluded Travel Area are often available from HP, an authorized dealer, or
authorized distributor at additional charge.
Customer Responsibilities
The customer may be required to run HP-supplied diagnostic programs before an on-site
visit or replacement part will be dispatched.
The customer is responsible for the security of its proprietary and confidential information
56 AppendixA
Page 57

Regulatory Information and Warranty
HP Hardware Warranty
and for maintaining a procedure external to the products for reconstruction of lost or
altered files, data, or programs.
The customer must provide: access to the product; adequate working space and facilities
within a reasonable distance of the product; access to and use of all information and
facilities determined necessary by HP to service the product; and operating supplies and
consumables such as the customer would use during normal operation.
A representative of the customer must be present at all times. The customer must state if
the product is being used in an environment which poses a potential health hazard to
repair personnel; HP or the servicing dealer may require that the product be maintained
by customer personnel under direct HP or dealer supervision.
Obtaining Parts Warranty Service
When parts warranty service applies, the customer may be required to run HP-supplied
diagnostic programs before a replacement part will be dispatched. The customer must be
prepared to supply proof of purchase.
The customer shall return some defective parts upon HP demand. In that case, HP will
prepay shipping charges for parts returned to the HP parts service center.
HP Telephone Support Services
HP Free telephone support for your Personal Workstation is available during the first year
from date of purchase. This service will also provide technical assistance with the basic
configuration and setup of yourHP V
ISUALIZE PersonalWorkstation and for the bundled or
pre-loaded operating system.
Telephone support is available at the end of the first year from date of purchase, via the
Lifeline program, which is a fee-based service (North America and Europe only).
HP does NOT provide telephone support for Personal Workstations configured as network
servers. We recommend HP NetServers for your network server requirements.
(Rev. 17/03/98)
HP Software Product License Agreement and Software Product
Limited Warranty
Your HP VISUALIZE Personal Workstation contains preinstalled software programs. Please
read the Software License Agreement before proceeding.
CAREFULLY READ THIS LICENSE AGREEMENT AND LIMITED WARRANTY
STATEMENT BEFORE PROCEEDING TO OPERATE THIS EQUIPMENT. RIGHTS IN
THE SOFTWARE ARE OFFERED ONLY ON THE CONDITION THAT THE
CUSTOMER AGREES TO ALL TERMS AND CONDITIONS OF THE LICENSE
AGREEMENT. PROCEEDING TO OPERATE THE EQUIPMENT INDICATES YOUR
ACCEPTANCE OF THESE TERMS AND CONDITIONS. IF YOU DO NOT AGREE WITH
THE TERMS OF THE LICENSE AGREEMENT, YOU MUST NOW EITHER REMOVE
THE SOFTWARE FROM YOUR HARD DISK DRIVE AND DESTROY THE MASTER
DISKETTES, OR RETURN THE COMPLETE COMPUTER AND SOFTWARE FOR A
FULL REFUND.
Appendix A 57
Page 58

Regulatory Information and Warranty
HP Hardware Warranty
PROCEEDING WITH CONFIGURATION SIGNIFIES YOUR ACCEPTANCE OF THE
LICENSE TERMS.
HP Software Product License Agreement
UNLESS OTHERWISE STATED BELOW, THIS HP SOFTWARE PRODUCT LICENSE
AGREEMENT SHALL GOVERN THE USE OF ALL SOFTWARE THAT IS PROVIDED
TO YOU, THE CUSTOMER, AS PART OF THE HP COMPUTER PRODUCT. IT SHALL
SUPERSEDE ANY NON-HP SOFTWARE LICENSE TERMS THAT MAY BE FOUND
ON-LINE, OR IN ANY DOCUMENTATION OR OTHER MATERIALS CONTAINED IN
THE COMPUTER PRODUCT PACKAGING.
Note: Operating System Software by Microsoft is licensed to you under the Microsoft End
User License Agreement (EULA) contained in the Microsoft documentation.
The following License Terms govern the use of the software:
USE. Customer may use the software on anyone computer. Customer may not networkthe
software or otherwise use it on more than one computer. Customer may not reverse
assemble or decompile the software unless authorized by law.
COPIES AND ADAPTATIONS. Customer may make copies or adaptations of the software
(a) for archival purposes or(b) when copying or adaptation is an essential step in the useof
the software with a computer so long as the copies and adaptations are used in no other
manner.
OWNERSHIP. Customer agrees that he/she does not have any title or ownership of the
software, other than ownership of the physical media. Customer acknowledges and agrees
that the software is copyrighted and protected under the copyright laws. Customer
acknowledges and agrees that the software may have been developed by a third party
software supplier named in the copyright notices included with the software, who shall be
authorized to hold the Customer responsible for any copyright infringement or violation of
this Agreement.
PRODUCT RECOVERY CD-ROM. If your computer was shipped with a product recovery
CD-ROM: (i) The product recovery CD-ROM and/or support utility software may only be
used for restoring the hard disk of the HP computer with which the product recovery
CD-ROM was originally provided.(ii) The use of any operating system software by
Microsoft contained in any such product recovery CD-ROM shall be governed by the
Microsoft End User License Agreement (EULA).
TRANSFER OF RIGHTS IN SOFTWARE. Customer may transfer rights in the software
to a third party only as part of the transfer of all rights and only if Customer obtains the
prior agreement of the third party to be bound by the terms of this License Agreement.
Upon such a transfer, Customer agrees that his/her rights in the software are terminated
and that he/she will either destroy his/her copies and adaptations or deliver them to the
third party.
SUBLICENSING AND DISTRIBUTION. Customer may not lease, sublicense the software
or distribute copies or adaptations of the software to the public in physical media or by
telecommunication without the prior written consent of Hewlett-Packard.
TERMINATION. Hewlett-Packard may terminate this software license for failure to
comply with any of these terms provided Hewlett-Packard has requested Customer to cure
58 AppendixA
Page 59

Regulatory Information and Warranty
HP Hardware Warranty
the failure and Customer has failed to do so within thirty (30) days of such notice.
UPDATES AND UPGRADES. Customer agrees that the software does not include updates
and upgrades which may be available from Hewlett-Packard under a separate support
agreement.
EXPORT CLAUSE. Customer agrees not to export or re-export the software or any copy or
adaptation in violation of the U.S. Export Administration regulations or other applicable
regulation.
U.S. GOVERNMENT RESTRICTED RIGHTS. Use, duplication, or disclosure by the U.S.
Government is subject to restrictions as set forth in subparagraph (c)(1)(ii) of the Rights in
Technical Data and Computer Software clause in DFARS 252.227-7013. Hewlett-Packard
Company, 3000 Hanover Street, Palo Alto, CA94304 U.S.A. Rights for non-DOD
U.S. Government Departments and Agencies are as set forth in FAR 52.227-19(c)(1,2).
HP Software Product Limited Warranty
THIS HP SOFTWARE PRODUCT LIMITED WARRANTY SHALL COVER ALL
SOFTWARE THAT IS PROVIDED TO YOU, THE CUSTOMER, AS PART OF THE HP
COMPUTER PRODUCT, INCLUDING ANY OPERATING SYSTEM SOFTWARE. IT
SHALL SUPERSEDE ANY NON-HP WARRANTY TERMS THAT MAY BE FOUND
ON-LINE, OR IN ANY DOCUMENTATION OR OTHER MATERIALS CONTAINED IN
THE COMPUTER PRODUCT PACKAGING.
Ninety-Day Limited Software Warranty. HP warrants for a period of NINETY (90) DAYS
from the date of the purchase that the software product will execute its programming
instructions when all files are properly installed. HP does not warrant that the software
will be uninterrupted or error free. In the event that this software product fails to execute
its programming instructions during the warranty period, Customer’s remedy shall be a
refund or repair. Should HP be unable to replace the media within a reasonable amount of
time, Customer’s alternate remedy shall be a refund of the purchase price upon return of
the product and all copies.
Removable Media (If supplied). HP warrants the removable media, if supplied, upon which
this product is recorded to be free from defects in materials and workmanship under
normal use for a period of NINETY (90) DAYS from the date of purchase. In the event the
media proves to be defective during the warranty period, Customer’s remedy shall be to
return the media to HP for replacement. Should HP be unable to replace the media within
a reasonable amount of time, Customer’s alternate remedy shall be a refund of the
purchase price upon return of the product and destruction of all other non removable
media copies of the software product.
Notice of Warranty Claims. Customer must notify HP in writing of any warranty claim not
later than thirty (30) days after the expiration of the warranty period.
Limitation of Warranty. HP makes no other express warranty, whetherwritten or oral with
respect to this product. Any implied warranty of merchantability or fitness for a particular
purpose is limited to the 90-day duration of this written warranty. Some states or
provinces do not allow limitations on how long an implied warranty lasts, so the above
limitation or exclusion may not apply to you. This warranty gives specific legal rights, and
you may also have other rights which vary from state to state, or province to province.
Appendix A 59
Page 60

Regulatory Information and Warranty
HP Hardware Warranty
Limitation of Liability and Remedies. THE REMEDIES PROVIDED ABOVE ARE
CUSTOMER’S SOLE AND EXCLUSIVE REMEDIES. IN NO EVENT SHALL HP BE
LIABLE FOR ANY DIRECT, INDIRECT, SPECIAL, INCIDENTAL OR
CONSEQUENTIAL DAMAGES (INCLUDING LOST PROFIT) WHETHER BASED ON
WARRANTY, CONTRACT, TORT OR ANY OTHER LEGAL THEORY. Some states or
provinces do not allow the exclusion or limitation of incidental or consequential damages,
so the above limitation or exclusion may not apply to you.
Obtaining Warranty Service. Warranty service may be obtained from the nearest HP sales
office or other location indicated in the owner’s manual or service booklet.
Consumer transactions in Australia and the United Kingdom: The disclaimers and
limitations above shall not apply and shall not affect the statutory rights of a Consumer.
(Rev. 19/11/96)
60 AppendixA
 Loading...