

Page 1

HP T750 G2, HP T750J,
HP T1000 G3, HP T1000J,
HP T1500 G3, and
HP T1500J UPS Models
Quick Start Card
Legal notices
© Copyright 2009 Hewlett-Packard Development Company, L.P.
The information contained herein is subject to change without notice. The
only warranties for HP products and services are set forth in the express
warranty statements accompanying such products and services. Nothing
herein should be construed as constituting an additional warranty. HP shall
not be liable for technical or editorial errors or omissions contained herein.
June 2009 (Second Edition)
505926-002
Overview
The HP T750 G2, HP T1000 G3, and HP T1500 G3 UPS models
feature a compact tower design and offer power protection for loads
up to 750 VA/500W, 1000 VA/670W, or 1400 VA/950W.
The HP T750J, HP T1000J, and HP T1500J UPS models feature a
compact tower design and offer power protection for loads up to
750 VA/500W, 1000 VA/680W, or 1200 VA/980W.
For more information about any of the topics covered in this
document, refer to the UPS user guide.
Important Safety Information
Save these instructions. This document contains important safety
instructions that should be followed during installation, operation,
and maintenance of the UPS and batteries.
DANGER: This UPS contains LETHAL VOLTAGES. All
repairs and service should be performed by
AUTHORIZED SERVICE PERSONNEL ONLY. There are
NO USER SERVICEABLE PARTS inside the UPS.
WARNING: This UPS contains its own energy source
(batteries). The output receptacles may carry live voltage
even when the UPS is not connected to an AC supply.
WARNING: To prevent personal injury from an earth
conductor leakage current:
• Do not operate the UPS while disconnected from the
utility power source.
• Disconnect load devices before disconnecting the
UPS from the utility power source.
WARNING: If the UPS requires any type of
transportation, disconnect the internal UPS batteries
before transporting.
Special Symbols
The following are examples of symbols used on the UPS to alert you
to important information:
RISK OF ELECTRIC SHOCK - Observe the warning
associated with the risk of electric shock symbol.
CAUTION: REFER TO OPERATOR’S MANUAL - Refer to
your operator’s manual for additional information, such as
important operating and maintenance instructions.
RJ-45 RECEPTACLE - For 230V units only: This receptacle
provides network interface connections. Do not plug
telephone or telecommunications equipment into this
receptacle.
LOAD ON/OFF – Press the button with this symbol to
energize the output receptacles (
to de-energize the output receptacles (
This symbol indicates that you should not discard the UPS
or the UPS batteries in the trash. The UPS may contain
sealed, lead–acid batteries. Batteries must be recycled.
For proper disposal, contact your local recycling/reuse or
hazardous waste center.
∼ indicator illuminates) or
∼ indicator is off).
Page 2
This symbol indicates that you should not discard waste
On/Off
electrical or electronic equipment (WEEE) in the trash.
For proper disposal, contact your local recycling/reuse
or hazardous waste center.
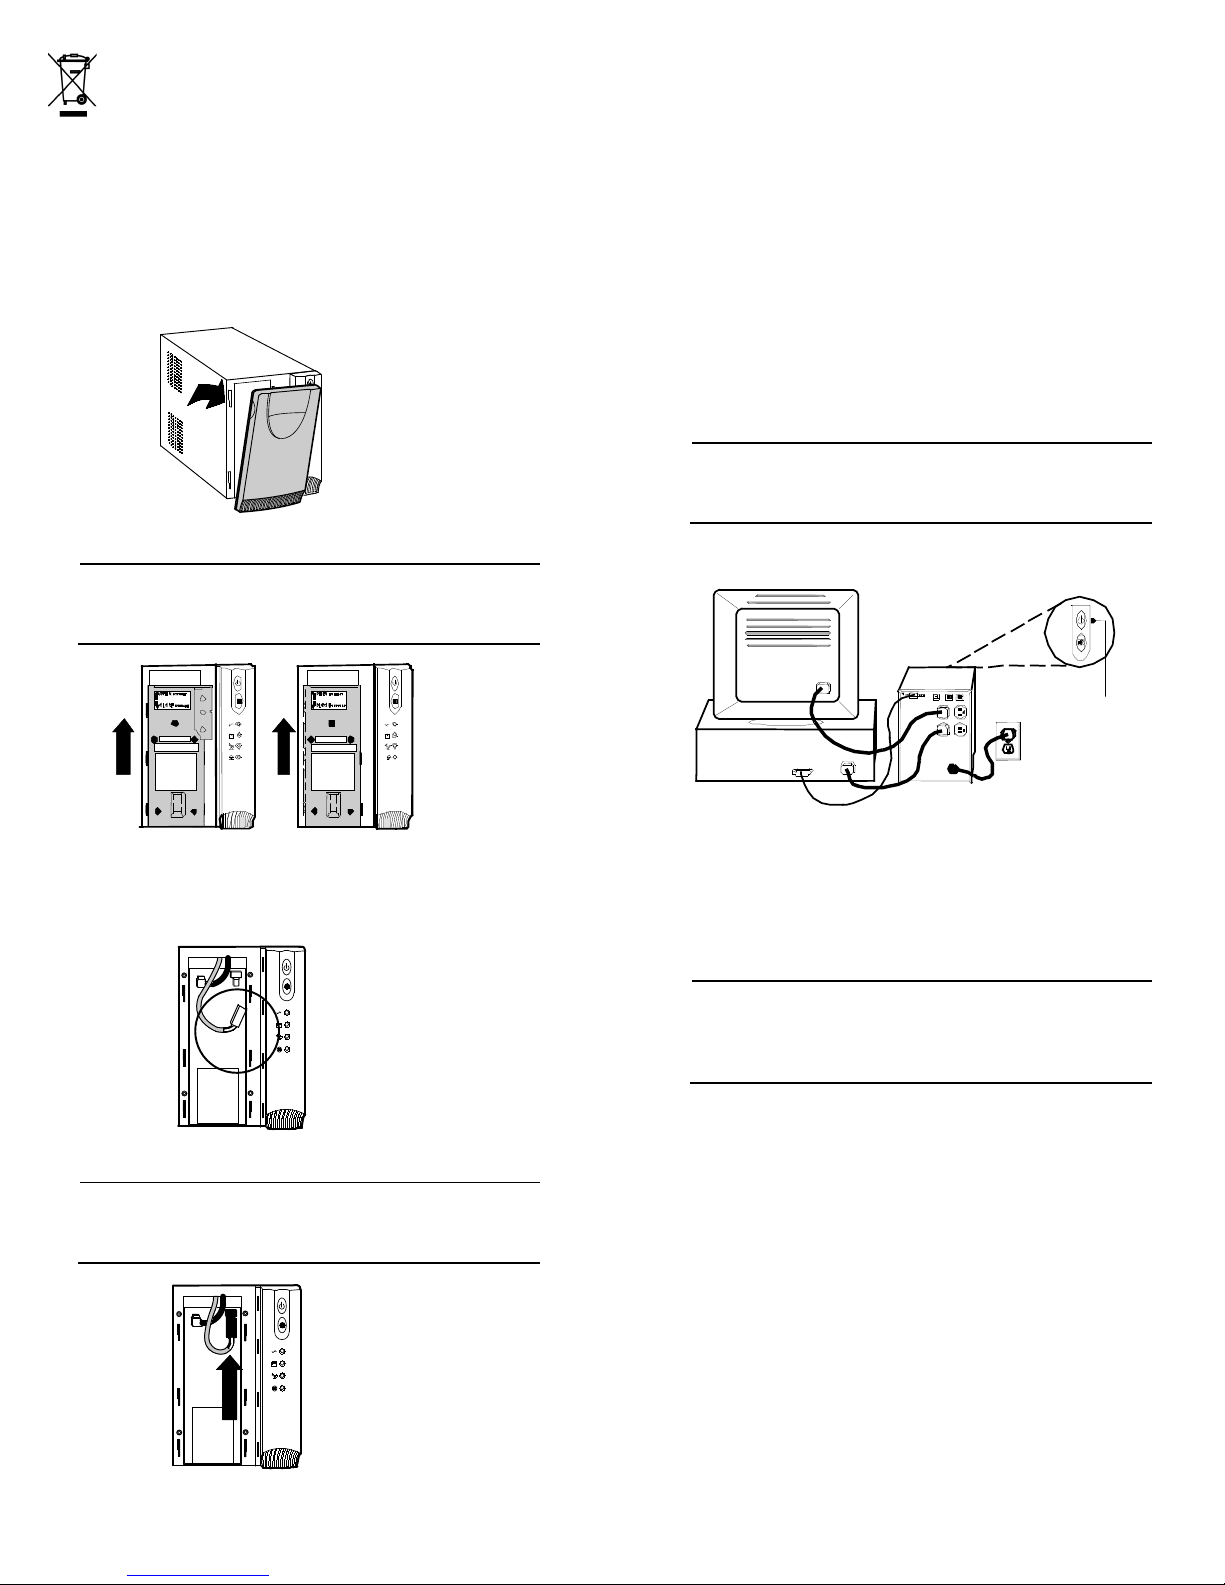
7. Replace the UPS front bezel.
Installing the UPS
Connecting the Internal Battery
To ensure proper battery operation, connect the internal battery.
1. Verify that the UPS power is off and unplugged.
2. Remove the UPS front bezel.
3. Slide up and remove the metal battery cover.
NOTE: For HP T750 G2, HP T750J, and HP T1000 G3
models, carefully remove the metal battery cover to avoid
damaging the battery disconnect blades.
To install the UPS:
1. If you are installing HP Power Manager software, first connect
your computer to the USB port or UPS communication port
using the supplied cable.
2. For 230V models only. Plug the detachable power cord into the
input connector on the UPS rear panel.
3. Plug the UPS power cord into a power outlet.
Verify that the circuit has an upstream overcurrent protection of
15A for 100–120V models or 10A for 230V models.
4. Plug the equipment to be protected into the UPS output
receptacles.
NOTE: DO NOT connect laser printers to the UPS
because of the exceptionally high power requirements of
the heating elements.
Figure 1 Typical UPS Installation (120V model shown)
HP T750 G2,
HP T750J, and
HP T1000 G3
4. Remove the protective label from the internal battery connector.
HP T1000J,
HP T1500 G3, and
HP T1500J
5. Connect the red wire to the positive (+) battery connector.
NOTE: A small amount of arcing may occur when
connecting the batteries. This is normal and does not
damage the unit or present any safety concern.
5. Press and hold the On/Off button until you hear the UPS
beep. The
power is available to the connected equipment. The UPS
conducts a self-test and enters Normal mode.
If the UPS beeps or a UPS alarm indicator stays on, refer to the
UPS user guide.
NOTE: The batteries charge to 90% capacity in
approximately 3 hours. However, to fully charge, HP
recommends that the batteries charge for 6 to 24 hours
after installation or long-term storage.
∼ (Power On) indicator illuminates indicating that
6. Replace the metal battery cover.
 Loading...