

Page 1

Hardware Reference Guide
HP MultiSeat Thin Client t150
Page 2

© Copyright 2010 Hewlett-Packard
Development Company, L.P. The information
contained herein is subject to change
without notice.
Microsoft and Windows are trademarks of
Microsoft Corporation in the U.S. and other
countries.
The only warranties for HP products and
services are set forth in the express warranty
statements accompanying such products and
services. Nothing herein should be
construed as constituting an additional
warranty. HP shall not be liable for technical
or editorial errors or omissions contained
herein.
This document contains proprietary
information that is protected by copyright.
No part of this document may be
photocopied, reproduced, or translated to
another language without the prior written
consent of Hewlett-Packard Company.
Hardware Reference Guide
HP MultiSeat Thin Client t150
First Edition (November 2010)
Document Part Number: 641566–001
Page 3

About This Book
WARNING! Text set off in this manner indicates that failure to follow directions could result in bodily
harm or loss of life.
CAUTION: Text set off in this manner indicates that failure to follow directions could result in damage
to equipment or loss of information.
NOTE: Text set off in this manner provides important supplemental information.
iii
Page 4

iv About This Book
Page 5

Table of contents
1 Front Panel Components ................................................................................................... 1
2 Rear Panel Components .................................................................................................... 2
3 Serial Number Location .................................................................................................... 3
Appendix A Specifications ................................................................................................... 4
Appendix B Security Provisions ............................................................................................ 6
HP MultiSeat Thin Client t150 Security Clip ................................................................................. 6
Securing the HP MultiSeat Thin Client t150 .................................................................. 6
Securing the HP MultiSeat Thin Client t150 in the Mounting Bracket ................................ 7
Cable Lock .............................................................................................................................. 8
Appendix C Mounting the HP MultiSeat Thin Client t150 ....................................................... 9
Mounting Bracket ..................................................................................................................... 9
Attaching the HP MultiSeat Thin Client t150 to the Mounting Bracket ............................... 9
Releasing the HP MultiSeat Thin Client t150 from the Mounting Bracket ......................... 10
Supported Mounting Options ................................................................................................... 11
Non-supported Mounting Option ............................................................................................. 13
Appendix D HP MultiSeat Thin Client t150 Operation ......................................................... 14
Routine HP MultiSeat Thin Client t150 Care ............................................................................... 14
Supported Orientations ........................................................................................................... 14
Non-supported Orientation ...................................................................................................... 16
Appendix E Electrostatic Discharge ..................................................................................... 17
Preventing Electrostatic Damage .............................................................................................. 17
Grounding Methods ............................................................................................................... 17
v
Page 6

Appendix F Shipping Information ...................................................................................... 18
Shipping Preparation .............................................................................................................. 18
Important Service Repair Information ........................................................................................ 18
Index ................................................................................................................................. 19
vi
Page 7
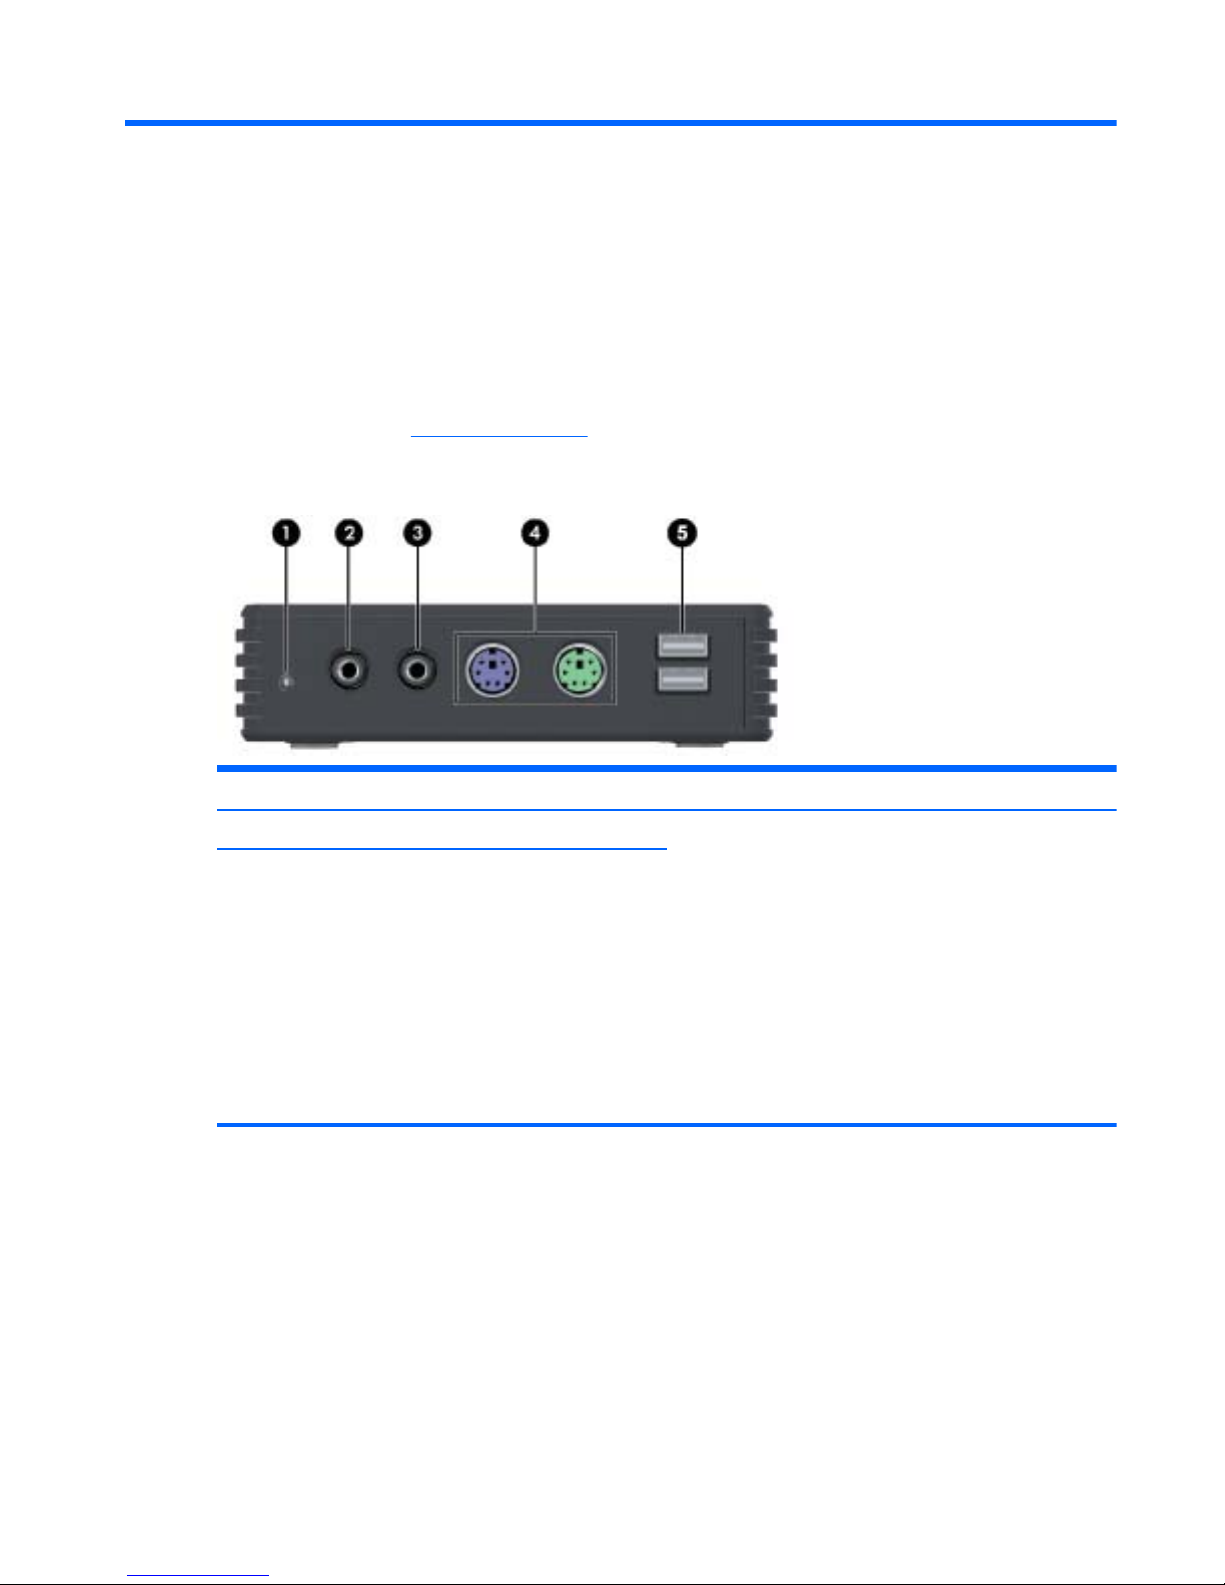
1 Front Panel Components
For more information, http://www.hp.com and search for your specific HP MultiSeat Thin Client t150
model to find the model-specific QuickSpecs.
Figure 1-1 Front panel components
(1) Power LED (4) PS/2 connectors (2)
(2) Line-out (headphone) audio connector (5) USB 2.0 connectors (2)
NOTE: If the optional DC adapter is not
connected, the HP MultiSeat Thin Client t150
supports only one 100 mA USB device (low power),
such as a flash drive.
If the optional DC adapter is connected to a working
power outlet or to the monitor, the t150 supports two
500 mA (high power) USB devices.
The HP LE1851w 18-inch Widescreen LCD Monitor
is the only HP monitor that can supply power to the
t150.
(3) Line-in (microphone) connector
1
Page 8
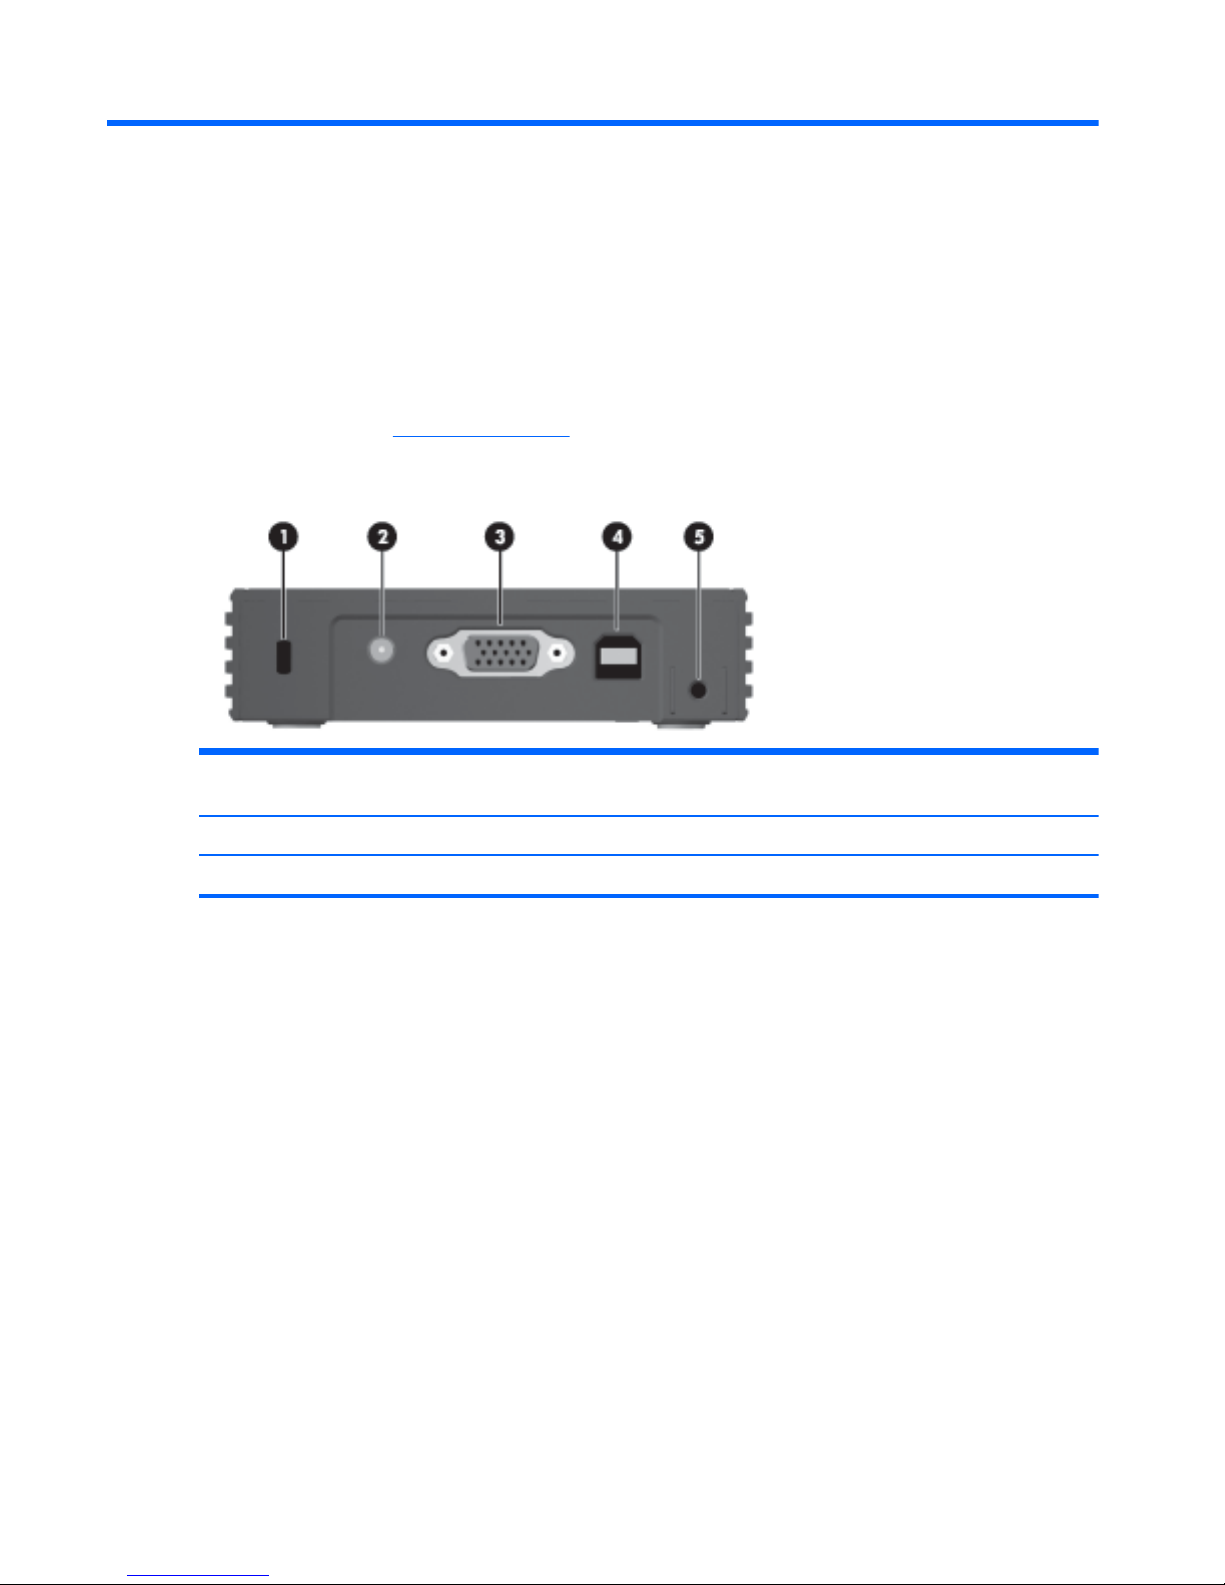
2 Rear Panel Components
For more information, http://www.hp.com and search for your specific HP MultiSeat Thin Client t150
model to find the model-specific QuickSpecs.
Figure 2-1 Rear panel components
(1) Cable lock slot (4) USB PC power connector to host PC (USB Type A/B
cable included)
(2) DC power connector (5) Security clip slot
(3) VGA connector
2 Chapter 2 Rear Panel Components
Page 9

3 Serial Number Location
Figure 3-1 Serial number location
Every HP MultiSeat Thin Client t150 includes a unique serial number located as shown in the following
illustration. Have this number available when contacting HP customer service for assistance.
3
Page 10

A Specifications
Table A-1 HP MultiSeat Thin Client t150
Dimensions
Width (side to side)
Height (without mounting bracket)
Height (with mounting bracket)
Depth (front to back)
111.7 mm
28.2 mm
34.8 mm
65.0 mm
4.40 in.
1.11 in
1.38 in
2.56 in.
Approximate Weight
Without mounting bracket
With mounting bracket
135.7 g
162.0 g
4.78 oz
5.71 oz
Temperature Range *
Operating**
(max. rate of change is 10° C per hour or 18° F per hour)
Nonoperating
(max. rate of change is 20° C per hour or 36° F per hour)
10° to 40° C
-30° to 60° C
50° to 104° F
-22° to 140° F
*Specifications are at sea level with altitude derating of
1° C/300m (1.8° F/1000ft) to a maximum of 3Km
(10,000ft), with no direct, sustained sunlight. Upper limit
may be limited by the type and number of options installed.
** The operating temperature range when the HP
MultiSeat Thin Client t150 is attached to a flat panel
using the mounting bracket is 50° to 95° F (10° to 35°
C).
4 Appendix A Specifications
Page 11

Table A-1 HP MultiSeat Thin Client t150 (continued)
Relative Humidity (non-condensing)
Operating
(max. wet bulb temperature is 28° C or 84.2° F)
Nonoperating
(max. wet bulb temperature is 38.7° C or 101.6° F)
10–90%
5–95%
10–90%
5–95%
Maximum Altitude (unpressurized)
Operating
(max. allowed rate of change is 457 m per minute or 1500
ft per minute)
Nonoperating
(max. allowed rate of change is 457 m per minute or 1500
ft per minute)
3,048 m
9,144 m
10,000 ft
30,000 ft
5
Page 12

B Security Provisions
HP MultiSeat Thin Client t150 Security Clip
The HP MultiSeat Thin Client t150 ships with a security clip which can be fastened to the rear panel of
the HP MultiSeat Thin Client t150. To prevent unauthorized removal of the HP MultiSeat Thin Client
t150, fasten a padlock through the clip and a cable.
Securing the HP MultiSeat Thin Client t150
Figure B-1 Securing the HP MultiSeat Thin Client t150
1. With the tab of the HP MultiSeat Thin Client t150 security clip pointing up, insert the HP MultiSeat
Thin Client t150 security clip between the guides on the back of the HP MultiSeat Thin Client t150
(1). Use the provided screw to fasten the security clip to the HP MultiSeat Thin Client t150 (2).
2. Insert a padlock through the loops of the security clip (3) and a cable.
6 Appendix B Security Provisions
Page 13

Securing the HP MultiSeat Thin Client t150 in the Mounting Bracket
Figure B-2 Securing the HP MultiSeat Thin Client t150 in the mounting bracket
1. With the tab of the HP MultiSeat Thin Client t150 security clip pointing down, insert the HP
MultiSeat Thin Client t150 security clip between the guides on the back of the HP MultiSeat Thin
Client t150 into the slot on the back of the mounting bracket (1). Use the provided screw to fasten
the security clip to the HP MultiSeat Thin Client t150 (2).
2. Insert a padlock through the loops of the security clip (3) and lock it to prevent access to the
security clip screw.
HP MultiSeat Thin Client t150 Security Clip 7
Page 14

Cable Lock
The HP MultiSeat Thin Client t150 is designed to accept a security cable lock. This cable lock prevents
unauthorized removal of the HP MultiSeat Thin Client t150. To order this option, visit the HP Web site
at
http://www.hp.com and search for your specific HP MultiSeat Thin Client t150 model.
Figure B-3 Securing the HP MultiSeat Thin Client t150
1. Locate the cable lock slot on the back panel.
2. Insert the cable lock into the slot, and then use the key to lock it.
8 Appendix B Security Provisions
Page 15

C Mounting the HP MultiSeat Thin
Client t150
Before mounting the HP MultiSeat Thin Client t150, be sure to attach the mounting bracket. See
Mounting Bracket on page 9 for more information.
Mounting Bracket
The HP MultiSeat Thin Client t150 ships with a mounting bracket which should be used to secure the HP
MultiSeat Thin Client t150 to various mounting solutions. The bracket incorporates four mounting points
on one side of the unit. These mounting points follow the VESA (Video Electronics Standards
Association) standard, which provides industry-standard mounting interfaces for Flat Displays (FDs),
such as flat panel monitors, flat displays, and flat TVs.
Attaching the HP MultiSeat Thin Client t150 to the Mounting
Bracket
1. Attach the mounting bracket to a supported mounting solution. See Supported Mounting Options
on page 11 for more information.
Figure C-1 Inserting the HP MultiSeat Thin Client t150 into the mounting bracket
2. Hold the HP MultiSeat Thin Client t150 so that the bottom of the unit will be next to the Mounting
Bracket and slide the HP MultiSeat Thin Client t150 front-first into the bracket.
3. Secure the HP MultiSeat Thin Client t150 to the mounting bracket. See
Securing the HP MultiSeat
Thin Client t150 in the Mounting Bracket on page 7
Mounting Bracket 9
Page 16

Releasing the HP MultiSeat Thin Client t150 from the Mounting
Bracket
Figure C-2 Removing the security clip
1. If there is a lock through the HP MultiSeat Thin Client t150 security clip on the back of the HP
MultiSeat Thin Client t150 , unlock and remove it (1).
2. Remove the screw holding the HP MultiSeat Thin Client t150 security clip (2) and remove the
security clip from the back of the mounting bracket (3).
Figure C-3 Removing the mounting bracket
3. Press the bracket lever away from the HP MultiSeat Thin Client t150 (1) and slide the unit out of
the mounting bracket (2).
10 Appendix C Mounting the HP MultiSeat Thin Client t150
Page 17

Supported Mounting Options
The following illustrations demonstrate some of the supported and not supported mounting options for
the mounting bracket.
●
You can mount the HP MultiSeat Thin Client t150 in the mounting bracket on the back of a flat
panel monitor stand.
Figure C-4 HP MultiSeat Thin Client t150 mounted on back of monitor stand
●
You can mount the HP MultiSeat Thin Client t150 in the mounting bracket on the back of a flat
panel monitor, if you have VESA holes available.
Figure C-5 HP MultiSeat Thin Client t150 mounted on back of monitor
●
You can mount the HP MultiSeat Thin Client t150 in the mounting bracket on a wall.
Supported Mounting Options 11
Page 18

Figure C-6 HP MultiSeat Thin Client t150 mounted on wall
●
You can mount the HP MultiSeat Thin Client t150 in the mounting bracket under a desk.
Figure C-7 HP MultiSeat Thin Client t150 mounted under desk
12 Appendix C Mounting the HP MultiSeat Thin Client t150
Page 19

Non-supported Mounting Option
CAUTION: Mounting the HP MultiSeat Thin Client t150 in an non-supported manner could result in
failure of the mounting bracket and damage to the HP MultiSeat Thin Client t150 and/or other
equipment.
Do not mount the HP MultiSeat Thin Client t150 on a flat panel monitor stand, between the panel and
the stand.
Figure C-8 Unsupported mounting position—HP MultiSeat Thin Client t150 between stand and
monitor
Non-supported Mounting Option 13
Page 20

D HP MultiSeat Thin Client t150
Operation
Routine HP MultiSeat Thin Client t150 Care
Use the following information to properly care for the HP MultiSeat Thin Client t150:
●
Never operate the HP MultiSeat Thin Client t150 with the outside panel removed.
●
Keep the HP MultiSeat Thin Client t150 away from excessive moisture, direct sunlight, and
extreme heat and cold. For information about the recommended temperature and humidity ranges
for the HP MultiSeat Thin Client t150, see
Specifications on page 4.
●
Keep liquids away from the HP MultiSeat Thin Client t150.
●
Turn off the HP MultiSeat Thin Client t150 and wipe the exterior with a soft, damp cloth as
needed. Using cleaning products may discolor or damage the finish.
Supported Orientations
HP supports the following orientations for the HP MultiSeat Thin Client t150.
CAUTION: You must adhere to HP-supported orientations to ensure your HP MultiSeat Thin Client
t150 functions properly.
●
If the HP MultiSeat Thin Client t150 is not to be mounted, only the horizontal orientation is
supported. Be sure to set the HP MultiSeat Thin Client t150 on its rubber feet.
14 Appendix D HP MultiSeat Thin Client t150 Operation
Page 21

Figure D-1 Horizontal orientation
●
You can lay the HP MultiSeat Thin Client t150 under a monitor stand with at least one inch of
clearance.
Figure D-2 Under monitor stand
Supported Orientations 15
Page 22

Non-supported Orientation
HP does not support the following orientation for the HP MultiSeat Thin Client t150.
CAUTION: Non-supported placement of the HP MultiSeat Thin Client t150 could result in operation
failure and/or damage to the devices.
CAUTION: The HP MultiSeat Thin Client t150 requires proper ventilation to maintain operating
temperature. Do not block the vents.
Do not put the HP MultiSeat Thin Client t150 in a drawer or other sealed enclosure. Do not place a
monitor or other object on top of the HP MultiSeat Thin Client t150. The HP MultiSeat Thin Client t150
requires proper ventilation to maintain operating temperatures.
Figure D-3 Do not put the HP MultiSeat Thin Client t150 in a drawer or other sealed enclosure
Figure D-4 Do not place a monitor on the HP MultiSeat Thin Client t150
16 Appendix D HP MultiSeat Thin Client t150 Operation
Page 23

E Electrostatic Discharge
A discharge of static electricity from a finger or other conductor may damage system boards or other
static-sensitive devices. This type of damage may reduce the life expectancy of the device.
Preventing Electrostatic Damage
To prevent electrostatic damage, observe the following precautions:
●
Avoid hand contact by transporting and storing products in static-safe containers.
●
Keep electrostatic-sensitive parts in their containers until they arrive at static-free workstations.
●
Place parts on a grounded surface before removing them from their containers.
●
Avoid touching pins, leads, or circuitry.
●
Always be properly grounded when touching a static-sensitive component or assembly.
Grounding Methods
There are several methods for grounding. Use one or more of the following methods when handling or
installing electrostatic-sensitive parts:
●
Use a wrist strap connected by a ground cord to a grounded HP MultiSeat Thin Client t150. Wrist
straps are flexible straps of 1 megohm +/- 10 percent resistance in the ground cords. To provide
proper grounding, wear the strap snug against the skin.
●
Use heelstraps, toestraps, or bootstraps at standing workstations. Wear the straps on both feet
when standing on conductive floors or dissipating floor mats.
●
Use conductive field service tools.
●
Use a portable field service kit with a folding static-dissipating work mat.
If you do not have any of the suggested equipment for proper grounding, contact an HP authorized
dealer, reseller, or service provider.
NOTE: For more information about static electricity, contact an HP authorized dealer, reseller, or
service provider.
Preventing Electrostatic Damage 17
Page 24

F Shipping Information
Shipping Preparation
Follow these suggestions when preparing to ship the HP MultiSeat Thin Client t150:
1. Turn off external devices connected to the HP MultiSeat Thin Client t150.
2. Disconnect the system components and external devices from their power sources, then from the
HP MultiSeat Thin Client t150.
3. Pack the system components and external devices in their original packing boxes or similar
packaging with sufficient packing material to protect them.
NOTE: For environmental nonoperating ranges, see Specifications on page 4.
Important Service Repair Information
In all cases, remove and safeguard all external options before returning the HP MultiSeat Thin Client
t150 to HP for repair or exchange.
18 Appendix F Shipping Information
Page 25

Index
A
altitude specifications 5
B
bracket, mounting 9
C
cable lock slot 2
cable lock, installing 8
cautions
HP MultiSeat Thin Client t150
orientation 14, 16
mounting HP MultiSeat Thin
Client t150 13
ventilation 16
components
front panel 1
rear panel 2
D
DC adapter, optional 1
DC power connector 2
dimensions 4
E
electrostatic discharge 17
F
front panel components 1
G
grounding methods 17
H
hardware specifications 4
headphone connector location 1
horizontal orientation 14
humidity specifications 5
I
installing
cable lock 8
M
microphone connector location 1
monitor 1
mounting bracket
attaching 9
removing 10
mounting HP MultiSeat Thin Client
t150 9
mounting options
on back of monitor stand 11
on wall 11
under desk 11
with flat panel on wall 11
N
non-supported orientations
in a drawer 16
under a monitor 16
O
options 8
P
power LED location 1
preventing electrostatic damage
17
PS/2 connectors location 1
R
rear panel components 2
relative humidity specifications 5
routine care 14
S
security 6
security clip
attaching 6
attaching to mounting bracket
7
security clip slot 2
serial number location 3
service repair 18
shipping preparation 18
specifications
altitude 5
dimensions 4
hardware 4
HP MultiSeat Thin Client t150
4
humidity 5
relative humidity 5
temperature 4
weight 4
supported mounting options 11
supported orientations
horizontal 14
under monitor stand 14
vertical 14
T
temperature specifications 4
U
unsupported mounting option 13
USB connectors 1
USB PC power connector
location 2
V
vertical orientation 14
VGA connector location 2
W
weight 4
Index
19
 Loading...