

Page 1

hp StorageWorks
web tools version 3.0.x/4.0.x
user guide
Part Number: AA–RS25A–TE
First Edition (October 2002)
Product Version: V3.0.x/V4.0.x
This user guide provides information to help you install and
understand Web Tools.
Page 2

© Hewlett-Packard Company, 2002. All rights reserved.
Hewlett-Packard Company makes no warranty of any kind with regard to this material, including, but
not limited to, the implied warranties of merchantability and fitness for a particular purpose.
Hewlett-Packard shall not be liable for errors contained herein or for incidental or consequential
damages in connection with the furnishing, performance, or use of this material.
This document contains proprietary information, which is protected by copyright. No part of this
document may be photocopied, reproduced, or translated into another language without the prior
written consent of Hewlett-Packard. The information contained in this document is subject to change
without notice.
HP, Compaq, and StorageWorks are trademarks of Hewlett-Packard Company in the U.S. and/or
other countries.
BROCADE, the Brocade B weave logo, Brocade: the Intelligent Platform for Networking Storage,
SilkWorm, and SilkWorm Express, are trademarks or registered trademarks of Brocade
Communications Systems, Inc. or its subsidiaries in the United States and/or in other countries.
All other product names mentioned herein may be trademarks of their respective companies.
Confidential computer software. Valid license from Compaq required for possession, use or copying.
Consistent with FAR 12.211 and 12.212, Commercial Computer Software, Computer Software
Documentation, and Technical Data for Commercial Items are licensed to the U.S. Government under
vendor's standard commercial license.
Hewlett-Packard Company shall not be liable for technical or editorial errors or omissions contained
herein. The information is provided “as is” without warranty of any kind and is subject to change
without notice. The warranties for Hewlett-Packard Company products are set forth in the express
limited warranty statements accompanying such products. Nothing herein should be construed as
constituting an additional warranty.
Printed in the U.S.A.
Web Tools Version 3.0.x/4.0.x User Guide
First Edition (October 2002)
Part Number: AA–RS25A–TE
Page 3

Contents
About this Guide
Intended Audience . . . . . . . . . . . . . . . . . . . . . . . . . . . . . . . . . . . . . . . . . . . . . . . . . . . . . xvii
Related Documentation . . . . . . . . . . . . . . . . . . . . . . . . . . . . . . . . . . . . . . . . . . . . . . . . . xvii
Document Conventions . . . . . . . . . . . . . . . . . . . . . . . . . . . . . . . . . . . . . . . . . . . . . . . . . xviii
Symbols in Text . . . . . . . . . . . . . . . . . . . . . . . . . . . . . . . . . . . . . . . . . . . . . . . . . . . . . . . xviii
Getting Help. . . . . . . . . . . . . . . . . . . . . . . . . . . . . . . . . . . . . . . . . . . . . . . . . . . . . . . . . . .xix
HP Technical Support . . . . . . . . . . . . . . . . . . . . . . . . . . . . . . . . . . . . . . . . . . . . . . . . xix
HP Storage Website. . . . . . . . . . . . . . . . . . . . . . . . . . . . . . . . . . . . . . . . . . . . . . . . . . xix
HP Authorized Reseller . . . . . . . . . . . . . . . . . . . . . . . . . . . . . . . . . . . . . . . . . . . . . . . . . . xix
1 Introducing Web Tools
Overview . . . . . . . . . . . . . . . . . . . . . . . . . . . . . . . . . . . . . . . . . . . . . . . . . . . . . . . . . . . . 1–1
Advantages of Web Tools . . . . . . . . . . . . . . . . . . . . . . . . . . . . . . . . . . . . . . . . . . . . 1–1
Capabilities of Web Tools. . . . . . . . . . . . . . . . . . . . . . . . . . . . . . . . . . . . . . . . . . . . 1–2
Web Tools Main Views. . . . . . . . . . . . . . . . . . . . . . . . . . . . . . . . . . . . . . . . . . . . . . 1–4
Fabric View. . . . . . . . . . . . . . . . . . . . . . . . . . . . . . . . . . . . . . . . . . . . . . . . . . . . 1–4
Switch View . . . . . . . . . . . . . . . . . . . . . . . . . . . . . . . . . . . . . . . . . . . . . . . . . . . 1–5
Port Information View . . . . . . . . . . . . . . . . . . . . . . . . . . . . . . . . . . . . . . . . . . . 1–8
2 Installing and Launching Web Tools
Requirements . . . . . . . . . . . . . . . . . . . . . . . . . . . . . . . . . . . . . . . . . . . . . . . . . . . . . . . . . 2–1
Switch Requirements. . . . . . . . . . . . . . . . . . . . . . . . . . . . . . . . . . . . . . . . . . . . . . . . 2–1
Workstation Requirements . . . . . . . . . . . . . . . . . . . . . . . . . . . . . . . . . . . . . . . . . . . 2–1
Installation . . . . . . . . . . . . . . . . . . . . . . . . . . . . . . . . . . . . . . . . . . . . . . . . . . . . . . . . . . . 2–2
Installing a Web Browser . . . . . . . . . . . . . . . . . . . . . . . . . . . . . . . . . . . . . . . . . . . . 2–3
Configuring the Web Browser. . . . . . . . . . . . . . . . . . . . . . . . . . . . . . . . . . . . . . . . . 2–3
Configuring Netscape Communicator . . . . . . . . . . . . . . . . . . . . . . . . . . . . . . . 2–3
Configuring Internet Explorer. . . . . . . . . . . . . . . . . . . . . . . . . . . . . . . . . . . . . . 2–3
iiiWeb Tools Version 3.0.x/4.0.x User Guide
Page 4

Contents
Installing the Java Plug-in on the Workstation . . . . . . . . . . . . . . . . . . . . . . . . . . . . 2–4
Installing the Java Plug-in on Solaris . . . . . . . . . . . . . . . . . . . . . . . . . . . . . . . . 2–4
Installing the Java Plug-in on Windows 2000 or NT . . . . . . . . . . . . . . . . . . . . 2–5
Launching Web Tools. . . . . . . . . . . . . . . . . . . . . . . . . . . . . . . . . . . . . . . . . . . . . . . . . . . 2–6
3 Fabric View
Fabric View Page . . . . . . . . . . . . . . . . . . . . . . . . . . . . . . . . . . . . . . . . . . . . . . . . . . . . . . 3–1
Buttons and Icons. . . . . . . . . . . . . . . . . . . . . . . . . . . . . . . . . . . . . . . . . . . . . . . . . . . 3–4
Fabric Events View. . . . . . . . . . . . . . . . . . . . . . . . . . . . . . . . . . . . . . . . . . . . . . . . . . . . . 3–7
Accessing Fabric Events View. . . . . . . . . . . . . . . . . . . . . . . . . . . . . . . . . . . . . . . . . 3–7
Fabric Topology View . . . . . . . . . . . . . . . . . . . . . . . . . . . . . . . . . . . . . . . . . . . . . . . . . . 3–9
Accessing Fabric Topology View . . . . . . . . . . . . . . . . . . . . . . . . . . . . . . . . . . . . . . 3–9
Name Server Table View . . . . . . . . . . . . . . . . . . . . . . . . . . . . . . . . . . . . . . . . . . . . . . . 3–11
Accessing Name Server Table View . . . . . . . . . . . . . . . . . . . . . . . . . . . . . . . . . . . 3–11
Zone Administration View V3.0.x (Optional Software) . . . . . . . . . . . . . . . . . . . . . . . 3–13
Accessing the Zone Administration View . . . . . . . . . . . . . . . . . . . . . . . . . . . . . . . 3–14
Switch/Port Level Zoning . . . . . . . . . . . . . . . . . . . . . . . . . . . . . . . . . . . . . . . . . . . 3–16
Port Alias Tab . . . . . . . . . . . . . . . . . . . . . . . . . . . . . . . . . . . . . . . . . . . . . . . . . 3–17
Port Zone Tab . . . . . . . . . . . . . . . . . . . . . . . . . . . . . . . . . . . . . . . . . . . . . . . . . 3–20
QuickLoop Tab . . . . . . . . . . . . . . . . . . . . . . . . . . . . . . . . . . . . . . . . . . . . . . . . 3–23
Port Fabric Assist Tab . . . . . . . . . . . . . . . . . . . . . . . . . . . . . . . . . . . . . . . . . . . 3–25
Port Config Tab . . . . . . . . . . . . . . . . . . . . . . . . . . . . . . . . . . . . . . . . . . . . . . . . 3–28
Zoning Configuration Analysis screen . . . . . . . . . . . . . . . . . . . . . . . . . . . . . . 3–31
WWN Level Zoning. . . . . . . . . . . . . . . . . . . . . . . . . . . . . . . . . . . . . . . . . . . . . . . . 3–32
WWN Aliases . . . . . . . . . . . . . . . . . . . . . . . . . . . . . . . . . . . . . . . . . . . . . . . . . 3–33
WWN Zone . . . . . . . . . . . . . . . . . . . . . . . . . . . . . . . . . . . . . . . . . . . . . . . . . . . 3–36
QuickLoop. . . . . . . . . . . . . . . . . . . . . . . . . . . . . . . . . . . . . . . . . . . . . . . . . . . . 3–38
WWN Fabric Assist. . . . . . . . . . . . . . . . . . . . . . . . . . . . . . . . . . . . . . . . . . . . . 3–40
WWN Config. . . . . . . . . . . . . . . . . . . . . . . . . . . . . . . . . . . . . . . . . . . . . . . . . . 3–43
AL_PA Level Zoning. . . . . . . . . . . . . . . . . . . . . . . . . . . . . . . . . . . . . . . . . . . . . . . 3–45
AL_PA Device Alias. . . . . . . . . . . . . . . . . . . . . . . . . . . . . . . . . . . . . . . . . . . . 3–46
AL_PA Device Zone . . . . . . . . . . . . . . . . . . . . . . . . . . . . . . . . . . . . . . . . . . . . 3–49
QuickLoop. . . . . . . . . . . . . . . . . . . . . . . . . . . . . . . . . . . . . . . . . . . . . . . . . . . . 3–51
AL_PA Device Config . . . . . . . . . . . . . . . . . . . . . . . . . . . . . . . . . . . . . . . . . . 3–53
Mixed Level Zoning. . . . . . . . . . . . . . . . . . . . . . . . . . . . . . . . . . . . . . . . . . . . . . . . 3–55
Alias. . . . . . . . . . . . . . . . . . . . . . . . . . . . . . . . . . . . . . . . . . . . . . . . . . . . . . . . . 3–56
Zone. . . . . . . . . . . . . . . . . . . . . . . . . . . . . . . . . . . . . . . . . . . . . . . . . . . . . . . . . 3–59
QuickLoop. . . . . . . . . . . . . . . . . . . . . . . . . . . . . . . . . . . . . . . . . . . . . . . . . . . . 3–61
iv Web Tools Version 3.0.x/4.0.x User Guide
Page 5

Contents
Fabric Assist . . . . . . . . . . . . . . . . . . . . . . . . . . . . . . . . . . . . . . . . . . . . . . . . . . 3–63
Config . . . . . . . . . . . . . . . . . . . . . . . . . . . . . . . . . . . . . . . . . . . . . . . . . . . . . . . 3–66
Zone Administration View V4.0.x (Optional Software) . . . . . . . . . . . . . . . . . . . . . . . 3–68
Accessing the Zone Administration View. . . . . . . . . . . . . . . . . . . . . . . . . . . . . . . 3–68
Administering Zoning . . . . . . . . . . . . . . . . . . . . . . . . . . . . . . . . . . . . . . . . . . . . . . 3–69
Zoning Schemes . . . . . . . . . . . . . . . . . . . . . . . . . . . . . . . . . . . . . . . . . . . . . . . . . . 3–69
Switch/Port Level Zoning . . . . . . . . . . . . . . . . . . . . . . . . . . . . . . . . . . . . . . . . . . . 3–70
Port Alias Tab . . . . . . . . . . . . . . . . . . . . . . . . . . . . . . . . . . . . . . . . . . . . . . . . . 3–71
Port Zone Tab . . . . . . . . . . . . . . . . . . . . . . . . . . . . . . . . . . . . . . . . . . . . . . . . . 3–74
Port Fabric Assist Tab. . . . . . . . . . . . . . . . . . . . . . . . . . . . . . . . . . . . . . . . . . . 3–76
Port Config Tab. . . . . . . . . . . . . . . . . . . . . . . . . . . . . . . . . . . . . . . . . . . . . . . . 3–79
Zoning Configuration Analysis screen . . . . . . . . . . . . . . . . . . . . . . . . . . . . . . 3–82
WWN Level Zoning . . . . . . . . . . . . . . . . . . . . . . . . . . . . . . . . . . . . . . . . . . . . . . . 3–83
WWN Aliases Tab . . . . . . . . . . . . . . . . . . . . . . . . . . . . . . . . . . . . . . . . . . . . . 3–84
WWN Zone. . . . . . . . . . . . . . . . . . . . . . . . . . . . . . . . . . . . . . . . . . . . . . . . . . . 3–87
QuickLoop . . . . . . . . . . . . . . . . . . . . . . . . . . . . . . . . . . . . . . . . . . . . . . . . . . . 3–89
WWN Fabric Assist . . . . . . . . . . . . . . . . . . . . . . . . . . . . . . . . . . . . . . . . . . . . 3–91
WWN Config . . . . . . . . . . . . . . . . . . . . . . . . . . . . . . . . . . . . . . . . . . . . . . . . . 3–94
AL_PA Level Zoning . . . . . . . . . . . . . . . . . . . . . . . . . . . . . . . . . . . . . . . . . . . . . . 3–96
Device Alias Tab. . . . . . . . . . . . . . . . . . . . . . . . . . . . . . . . . . . . . . . . . . . . . . . 3–97
Device Zone Tab. . . . . . . . . . . . . . . . . . . . . . . . . . . . . . . . . . . . . . . . . . . . . . 3–100
QuickLoop Tab . . . . . . . . . . . . . . . . . . . . . . . . . . . . . . . . . . . . . . . . . . . . . . . 3–102
Device Config Tab . . . . . . . . . . . . . . . . . . . . . . . . . . . . . . . . . . . . . . . . . . . . 3–104
Mixed Level Zoning . . . . . . . . . . . . . . . . . . . . . . . . . . . . . . . . . . . . . . . . . . . . . . 3–106
Alias Tab. . . . . . . . . . . . . . . . . . . . . . . . . . . . . . . . . . . . . . . . . . . . . . . . . . . . 3–107
Zone Tab . . . . . . . . . . . . . . . . . . . . . . . . . . . . . . . . . . . . . . . . . . . . . . . . . . . . 3–110
QuickLoop Tab . . . . . . . . . . . . . . . . . . . . . . . . . . . . . . . . . . . . . . . . . . . . . . . 3–112
Fabric Assist Tab . . . . . . . . . . . . . . . . . . . . . . . . . . . . . . . . . . . . . . . . . . . . . 3–114
Config Tab . . . . . . . . . . . . . . . . . . . . . . . . . . . . . . . . . . . . . . . . . . . . . . . . . . 3–117
4 Switch View
Switch View. . . . . . . . . . . . . . . . . . . . . . . . . . . . . . . . . . . . . . . . . . . . . . . . . . . . . . . . . . 4–1
Accessing Switch View. . . . . . . . . . . . . . . . . . . . . . . . . . . . . . . . . . . . . . . . . . . . . . 4–1
Switch Events View. . . . . . . . . . . . . . . . . . . . . . . . . . . . . . . . . . . . . . . . . . . . . . . . . 4–6
Accessing Switch Events View . . . . . . . . . . . . . . . . . . . . . . . . . . . . . . . . . . . . . . . . 4–7
vWeb Tools Version 3.0.x/4.0.x User Guide
Page 6

Contents
Fabric Watch View V3.0.x (Optional Software) . . . . . . . . . . . . . . . . . . . . . . . . . . . . . . 4–8
Accessing Fabric Watch View. . . . . . . . . . . . . . . . . . . . . . . . . . . . . . . . . . . . . . . . . 4–8
Alarm Notifications Tab . . . . . . . . . . . . . . . . . . . . . . . . . . . . . . . . . . . . . . . . . . . . . 4–9
Configure Thresholds. . . . . . . . . . . . . . . . . . . . . . . . . . . . . . . . . . . . . . . . . . . . . . . 4–11
Thresholds for the Environmental Classes . . . . . . . . . . . . . . . . . . . . . . . . . . . 4–13
Thresholds for the SFP Classes . . . . . . . . . . . . . . . . . . . . . . . . . . . . . . . . . . . . 4–13
Thresholds for the Remaining Classes . . . . . . . . . . . . . . . . . . . . . . . . . . . . . . 4–14
Current Settings Tab . . . . . . . . . . . . . . . . . . . . . . . . . . . . . . . . . . . . . . . . . . . . . . . 4–18
Fabric Watch View V4.0.x (Optional Software) . . . . . . . . . . . . . . . . . . . . . . . . . . . . . 4–19
Accessing Fabric Watch View. . . . . . . . . . . . . . . . . . . . . . . . . . . . . . . . . . . . . . . . 4–19
Fabric Watch View Tabs . . . . . . . . . . . . . . . . . . . . . . . . . . . . . . . . . . . . . . . . . . . . 4–20
Alarm Notifications Tab . . . . . . . . . . . . . . . . . . . . . . . . . . . . . . . . . . . . . . . . . . . . 4–20
Threshold Configurations. . . . . . . . . . . . . . . . . . . . . . . . . . . . . . . . . . . . . . . . . . . . 4–21
Threshold Configuration Tabs. . . . . . . . . . . . . . . . . . . . . . . . . . . . . . . . . . . . . 4–21
Area Configuration Tab. . . . . . . . . . . . . . . . . . . . . . . . . . . . . . . . . . . . . . . . . . 4–22
Element Configuration Tab . . . . . . . . . . . . . . . . . . . . . . . . . . . . . . . . . . . . . . . 4–24
Configuration Report Tab . . . . . . . . . . . . . . . . . . . . . . . . . . . . . . . . . . . . . . . . 4–25
Performance Monitor . . . . . . . . . . . . . . . . . . . . . . . . . . . . . . . . . . . . . . . . . . . . . . . . . . 4–26
Accessing the Performance Monitor . . . . . . . . . . . . . . . . . . . . . . . . . . . . . . . . . . . 4–26
Features . . . . . . . . . . . . . . . . . . . . . . . . . . . . . . . . . . . . . . . . . . . . . . . . . . . . . . . . . 4–27
Graph Types. . . . . . . . . . . . . . . . . . . . . . . . . . . . . . . . . . . . . . . . . . . . . . . . . . . . . . 4–28
Performance Monitor Menus . . . . . . . . . . . . . . . . . . . . . . . . . . . . . . . . . . . . . . . . . . . . 4–30
Actions Menu. . . . . . . . . . . . . . . . . . . . . . . . . . . . . . . . . . . . . . . . . . . . . . . . . . . . . 4–30
Display Canvas Configurations. . . . . . . . . . . . . . . . . . . . . . . . . . . . . . . . . . . . 4–30
Save Current Canvas Configuration . . . . . . . . . . . . . . . . . . . . . . . . . . . . . . . . 4–33
Resource Usage Display . . . . . . . . . . . . . . . . . . . . . . . . . . . . . . . . . . . . . . . . . 4–34
Print All Graphs. . . . . . . . . . . . . . . . . . . . . . . . . . . . . . . . . . . . . . . . . . . . . . . . 4–35
Performance Graphs Menu . . . . . . . . . . . . . . . . . . . . . . . . . . . . . . . . . . . . . . . . . . 4–37
Basic Monitoring. . . . . . . . . . . . . . . . . . . . . . . . . . . . . . . . . . . . . . . . . . . . . . . 4–37
Port Throughput Graph . . . . . . . . . . . . . . . . . . . . . . . . . . . . . . . . . . . . . . . . . . 4–38
Setting up a Port Throughput Graph . . . . . . . . . . . . . . . . . . . . . . . . . . . . . . . . 4–39
Switch Aggregate Throughput Graph . . . . . . . . . . . . . . . . . . . . . . . . . . . . . . . 4–39
Blade Aggregate Throughput Graph . . . . . . . . . . . . . . . . . . . . . . . . . . . . . . . . 4–40
Switch Throughput Utilization Graph. . . . . . . . . . . . . . . . . . . . . . . . . . . . . . . 4–41
Port Error Graph . . . . . . . . . . . . . . . . . . . . . . . . . . . . . . . . . . . . . . . . . . . . . . . 4–41
Switch Percent Utilization Graph . . . . . . . . . . . . . . . . . . . . . . . . . . . . . . . . . . 4–43
Ports Snapshot Error Graph. . . . . . . . . . . . . . . . . . . . . . . . . . . . . . . . . . . . . . . 4–44
vi Web Tools Version 3.0.x/4.0.x User Guide
Page 7

Contents
Advanced Monitoring V3.0.x (Optional Software) . . . . . . . . . . . . . . . . . . . . . . . . . . . 4–44
SID/DID Performance Graph . . . . . . . . . . . . . . . . . . . . . . . . . . . . . . . . . . . . . . . . 4–46
SCSI Commands Graph. . . . . . . . . . . . . . . . . . . . . . . . . . . . . . . . . . . . . . . . . . . . . 4–47
SCSI versus IP Graph . . . . . . . . . . . . . . . . . . . . . . . . . . . . . . . . . . . . . . . . . . . . . . 4–50
ALPA Error Graph . . . . . . . . . . . . . . . . . . . . . . . . . . . . . . . . . . . . . . . . . . . . . . . . 4–50
Advanced Monitoring V4.0.x (Optional Software) . . . . . . . . . . . . . . . . . . . . . . . . . . . 4–52
SID/DID Performance Graph . . . . . . . . . . . . . . . . . . . . . . . . . . . . . . . . . . . . . . . . 4–53
SCSI Commands Graph. . . . . . . . . . . . . . . . . . . . . . . . . . . . . . . . . . . . . . . . . . . . . 4–55
SCSI vs. IP Graph . . . . . . . . . . . . . . . . . . . . . . . . . . . . . . . . . . . . . . . . . . . . . . . . . 4–58
ALPA Error Graph . . . . . . . . . . . . . . . . . . . . . . . . . . . . . . . . . . . . . . . . . . . . . . . . 4–58
Additional Options. . . . . . . . . . . . . . . . . . . . . . . . . . . . . . . . . . . . . . . . . . . . . . . . . . . . 4–60
Right-Click Options. . . . . . . . . . . . . . . . . . . . . . . . . . . . . . . . . . . . . . . . . . . . . . . . 4–60
Tools Tips . . . . . . . . . . . . . . . . . . . . . . . . . . . . . . . . . . . . . . . . . . . . . . . . . . . . . . . 4–61
Administrative Interface V3.0.x. . . . . . . . . . . . . . . . . . . . . . . . . . . . . . . . . . . . . . . . . . 4–61
Accessing the Administrative Interface. . . . . . . . . . . . . . . . . . . . . . . . . . . . . . . . . 4–62
Switch Settings Tab. . . . . . . . . . . . . . . . . . . . . . . . . . . . . . . . . . . . . . . . . . . . . . . . 4–64
User Admin Tab . . . . . . . . . . . . . . . . . . . . . . . . . . . . . . . . . . . . . . . . . . . . . . . . . . 4–66
Firmware/Configuration File Administration Tab . . . . . . . . . . . . . . . . . . . . . . . . 4–68
SNMP Tab. . . . . . . . . . . . . . . . . . . . . . . . . . . . . . . . . . . . . . . . . . . . . . . . . . . . . . . 4–71
License Administration Tab . . . . . . . . . . . . . . . . . . . . . . . . . . . . . . . . . . . . . . . . . 4–74
Remote Switch Tab (Optional Software) . . . . . . . . . . . . . . . . . . . . . . . . . . . . . . . 4–75
QuickLoop Tab (Optional Software). . . . . . . . . . . . . . . . . . . . . . . . . . . . . . . . . . . 4–77
Configure Tab . . . . . . . . . . . . . . . . . . . . . . . . . . . . . . . . . . . . . . . . . . . . . . . . . . . . 4–79
Extended Fabric Tab (Optional Software). . . . . . . . . . . . . . . . . . . . . . . . . . . . . . . 4–83
Network Configuration Tab. . . . . . . . . . . . . . . . . . . . . . . . . . . . . . . . . . . . . . . . . . 4–85
Port Settings Tab . . . . . . . . . . . . . . . . . . . . . . . . . . . . . . . . . . . . . . . . . . . . . . . . . . 4–87
Routing Tab . . . . . . . . . . . . . . . . . . . . . . . . . . . . . . . . . . . . . . . . . . . . . . . . . . . . . . 4–89
Trunk Information Tab . . . . . . . . . . . . . . . . . . . . . . . . . . . . . . . . . . . . . . . . . . . . . 4–91
Report Tab . . . . . . . . . . . . . . . . . . . . . . . . . . . . . . . . . . . . . . . . . . . . . . . . . . . . . . . 4–92
Administrative Interface 4.0.x . . . . . . . . . . . . . . . . . . . . . . . . . . . . . . . . . . . . . . . . . . . 4–93
Accessing the Administrative Interface. . . . . . . . . . . . . . . . . . . . . . . . . . . . . . . . . 4–93
Switch Settings Tab. . . . . . . . . . . . . . . . . . . . . . . . . . . . . . . . . . . . . . . . . . . . . . . . 4–95
Network Config Tab . . . . . . . . . . . . . . . . . . . . . . . . . . . . . . . . . . . . . . . . . . . . . . . 4–98
Upload/Download Tab . . . . . . . . . . . . . . . . . . . . . . . . . . . . . . . . . . . . . . . . . . . . 4–100
SNMP Tab. . . . . . . . . . . . . . . . . . . . . . . . . . . . . . . . . . . . . . . . . . . . . . . . . . . . . . 4–104
License Administration Tab . . . . . . . . . . . . . . . . . . . . . . . . . . . . . . . . . . . . . . . . 4–107
Report Tab . . . . . . . . . . . . . . . . . . . . . . . . . . . . . . . . . . . . . . . . . . . . . . . . . . . . . . 4–109
Port Setting Tab. . . . . . . . . . . . . . . . . . . . . . . . . . . . . . . . . . . . . . . . . . . . . . . . . . 4–111
viiWeb Tools Version 3.0.x/4.0.x User Guide
Page 8

Contents
Configure Tab . . . . . . . . . . . . . . . . . . . . . . . . . . . . . . . . . . . . . . . . . . . . . . . . . . . 4–113
Routing Tab . . . . . . . . . . . . . . . . . . . . . . . . . . . . . . . . . . . . . . . . . . . . . . . . . . . . . 4–120
Remote Switch Tab (Optional Software). . . . . . . . . . . . . . . . . . . . . . . . . . . . . . . 4–123
Extended Fabric Tab . . . . . . . . . . . . . . . . . . . . . . . . . . . . . . . . . . . . . . . . . . . . . . 4–125
Trunk Information Tab (Optional Software) . . . . . . . . . . . . . . . . . . . . . . . . . . . . 4–128
Telnet Interface. . . . . . . . . . . . . . . . . . . . . . . . . . . . . . . . . . . . . . . . . . . . . . . . . . . . . . 4–130
Accessing the Telnet Interface. . . . . . . . . . . . . . . . . . . . . . . . . . . . . . . . . . . . . . . 4–130
Using the Telnet Interface . . . . . . . . . . . . . . . . . . . . . . . . . . . . . . . . . . . . . . . . . . 4–130
High Availability . . . . . . . . . . . . . . . . . . . . . . . . . . . . . . . . . . . . . . . . . . . . . . . . . . . . 4–131
Accessing the High Availability Interface . . . . . . . . . . . . . . . . . . . . . . . . . . . . . . 4–131
5 Port View
Port Information View V3.0.x . . . . . . . . . . . . . . . . . . . . . . . . . . . . . . . . . . . . . . . . . . . . 5–1
Accessing Port Information View . . . . . . . . . . . . . . . . . . . . . . . . . . . . . . . . . . . . . . 5–1
PortStats Tab . . . . . . . . . . . . . . . . . . . . . . . . . . . . . . . . . . . . . . . . . . . . . . . . . . . . . . 5–5
SFP Tab . . . . . . . . . . . . . . . . . . . . . . . . . . . . . . . . . . . . . . . . . . . . . . . . . . . . . . . . . . 5–7
Loop Tab . . . . . . . . . . . . . . . . . . . . . . . . . . . . . . . . . . . . . . . . . . . . . . . . . . . . . . . . . 5–8
Loop Diagnostics Dialog Box . . . . . . . . . . . . . . . . . . . . . . . . . . . . . . . . . . . . . . . . 5–11
Port Information View 4.0.x. . . . . . . . . . . . . . . . . . . . . . . . . . . . . . . . . . . . . . . . . . . . . 5–11
Accessing Port Information View . . . . . . . . . . . . . . . . . . . . . . . . . . . . . . . . . . . . . 5–11
PortStats Tab . . . . . . . . . . . . . . . . . . . . . . . . . . . . . . . . . . . . . . . . . . . . . . . . . . . . . 5–14
SFP Tab . . . . . . . . . . . . . . . . . . . . . . . . . . . . . . . . . . . . . . . . . . . . . . . . . . . . . . . . . 5–17
Loop Tab . . . . . . . . . . . . . . . . . . . . . . . . . . . . . . . . . . . . . . . . . . . . . . . . . . . . . . . . 5–20
Glossary
Index
Figures
1–1 Fabric View . . . . . . . . . . . . . . . . . . . . . . . . . . . . . . . . . . . . . . . . . . . . . . . . . . . . 1–5
1–2 Switch View of StorageWorks Core switch series switch . . . . . . . . . . . . . . . . 1–7
1–3 Switch View of StorageWorks 2 Gb SAN switch. . . . . . . . . . . . . . . . . . . . . . . 1–8
1–4 Port Information view . . . . . . . . . . . . . . . . . . . . . . . . . . . . . . . . . . . . . . . . . . . . 1–9
3–1 Detailed view of Fabric View . . . . . . . . . . . . . . . . . . . . . . . . . . . . . . . . . . . . . . 3–2
3–2 Summary view of Fabric View . . . . . . . . . . . . . . . . . . . . . . . . . . . . . . . . . . . . . 3–3
3–3 Detailed Fabric View. . . . . . . . . . . . . . . . . . . . . . . . . . . . . . . . . . . . . . . . . . . . . 3–4
3–4 Fabric Events view . . . . . . . . . . . . . . . . . . . . . . . . . . . . . . . . . . . . . . . . . . . . . . 3–8
3–5 Fabric Topology view . . . . . . . . . . . . . . . . . . . . . . . . . . . . . . . . . . . . . . . . . . . 3–10
viii Web Tools Version 3.0.x/4.0.x User Guide
Page 9

Contents
3–6 Name Server Table view. . . . . . . . . . . . . . . . . . . . . . . . . . . . . . . . . . . . . . . . . 3–12
3–7 Enter Network Password window. . . . . . . . . . . . . . . . . . . . . . . . . . . . . . . . . . 3–14
3–8 Zoning Selection window . . . . . . . . . . . . . . . . . . . . . . . . . . . . . . . . . . . . . . . . 3–15
3–9 Alias tab of the Switch/Port Level Zoning menu . . . . . . . . . . . . . . . . . . . . . . 3–17
3–10 The Port Zone tab of the Switch/Port level zoning menu. . . . . . . . . . . . . . . . 3–20
3–11 The QuickLoop tab of the Switch/Port Level Zoning menu. . . . . . . . . . . . . . 3–23
3–12 The Port Fabric Assist tab of the Switch/Port Level Zoning menu . . . . . . . . 3–25
3–13 The Port Config tab of the Switch/Port Level Zoning menu . . . . . . . . . . . . . 3–28
3–14 Zoning Configuration Analysis screen . . . . . . . . . . . . . . . . . . . . . . . . . . . . . . 3–31
3–15 WWN Alias tab of the WWN Level Zoning menu. . . . . . . . . . . . . . . . . . . . . 3–33
3–16 WWN Zone tab of the WWN Level Zoning menu. . . . . . . . . . . . . . . . . . . . . 3–36
3–17 QuickLoop tab of the WWN Level Zoning menu . . . . . . . . . . . . . . . . . . . . . 3–38
3–18 WWN Fabric Assist tab of the WWN Level Zoning menu . . . . . . . . . . . . . . 3–40
3–19 WWN Config tab of the WWN Level Zoning menu . . . . . . . . . . . . . . . . . . . 3–43
3–20 AL_PA Device Alias tab of the AL_PA Level Zoning menu . . . . . . . . . . . . 3–46
3–21 AL_PA Device Zone tab of the AL_PA Level Zoning menu. . . . . . . . . . . . . 3–49
3–22 QuickLoop tab of the AL_PA Level Zoning Menu . . . . . . . . . . . . . . . . . . . . 3–51
3–23 AL_PA Device Config tab of the AL_PA Level Zoning menu . . . . . . . . . . . 3–53
3–24 Alias tab of the Mixed Level Zoning menu . . . . . . . . . . . . . . . . . . . . . . . . . . 3–56
3–25 Zone tab of the Mixed Level Zoning menu . . . . . . . . . . . . . . . . . . . . . . . . . . 3–59
3–26 QuickLoop tab of the Mixed Level Zoning menu . . . . . . . . . . . . . . . . . . . . . 3–61
3–27 Fabric Assist tab of the Mixed Level Zoning menu . . . . . . . . . . . . . . . . . . . . 3–63
3–28 Config tab of the Mixed Level Zoning menu . . . . . . . . . . . . . . . . . . . . . . . . . 3–66
3–29 Zoning Selection view . . . . . . . . . . . . . . . . . . . . . . . . . . . . . . . . . . . . . . . . . . 3–69
3–30 Port Alias Tab of the Switch/Port Level Zoning menu. . . . . . . . . . . . . . . . . . 3–71
3–31 The Port Zone Tab of the Switch/Port Level Zoning menu . . . . . . . . . . . . . . 3–74
3–32 The Port Fabric Assist Tab of the Switch/Port Level Zoning menu. . . . . . . . 3–76
3–33 The Port Config Tab of the Switch/Port Level Zoning menu. . . . . . . . . . . . . 3–79
3–34 Zoning Configuration Errors analysis screen . . . . . . . . . . . . . . . . . . . . . . . . . 3–82
3–35 WWN Alias Tab of the WWN Level Zoning menu . . . . . . . . . . . . . . . . . . . . 3–84
3–36 WWN Zone Tab of the WWN Level Zoning menu . . . . . . . . . . . . . . . . . . . . 3–87
3–37 QuickLoop tab of the WWN Level Zoning menu . . . . . . . . . . . . . . . . . . . . . 3–89
3–38 WWN Fabric Assist Tab of the WWN Level Zoning menu. . . . . . . . . . . . . . 3–91
3–39 WWN Config Tab of the WWN Level Zoning menu. . . . . . . . . . . . . . . . . . . 3–94
3–40 AL_PA Device Alias Tab of the AL_PA Level Zoning menu. . . . . . . . . . . . 3–97
3–41 AL_PA Device Zone Tab of the Zoning > AL_PA Level menu . . . . . . . . . 3–100
3–42 QuickLoop Tab of the AL_PA Level Zoning menu. . . . . . . . . . . . . . . . . . . 3–102
3–43 AL_PA Device Config Tab of the AL_PA Level Zoning menu . . . . . . . . . 3–104
ixWeb Tools Version 3.0.x/4.0.x User Guide
Page 10

Contents
3–44 Alias Tab of the Mixed Level Zoning menu . . . . . . . . . . . . . . . . . . . . . . . . . 3–107
3–45 Zone Tab of the Mixed Level Zoning menu . . . . . . . . . . . . . . . . . . . . . . . . . 3–110
3–46 QuickLoop tab of the Mixed Level Zoning menu. . . . . . . . . . . . . . . . . . . . . 3–112
3–47 Fabric Assist tab of the Mixed Level Zoning menu . . . . . . . . . . . . . . . . . . . 3–114
3–48 Config Tab of the Mixed Level Zoning menu. . . . . . . . . . . . . . . . . . . . . . . . 3–117
4–1 The Switch View of StorageWorks Core switch series switch. . . . . . . . . . . . . 4–2
4–2 Switch View of StorageWorks 2 Gb SAN switch series. . . . . . . . . . . . . . . . . . 4–3
4–3 Switch Events view . . . . . . . . . . . . . . . . . . . . . . . . . . . . . . . . . . . . . . . . . . . . . . 4–7
4–4 The Alarm Notifications tab in the Fabric Watch view. . . . . . . . . . . . . . . . . . 4–10
4–5 The Configure Thresholds tab with the Environment Class selected
in the Fabric Watch view. . . . . . . . . . . . . . . . . . . . . . . . . . . . . . . . . . . . . . . . . 4–11
4–6 The Alarm Mechanism dialog box . . . . . . . . . . . . . . . . . . . . . . . . . . . . . . . . . 4–12
4–7 The Configure Thresholds tab with the Port Class selected in
Fabric Watch view. . . . . . . . . . . . . . . . . . . . . . . . . . . . . . . . . . . . . . . . . . . . . . 4–15
4–8 Configure Threshold tab with AL_PA Class selected in Performance view . 4–16
4–9 Configure Threshold tab with End-to-End class selected
in Performance view . . . . . . . . . . . . . . . . . . . . . . . . . . . . . . . . . . . . . . . . . . . . 4–17
4–10 Configure Threshold tab with Filter-Based Class selected in
Performance view . . . . . . . . . . . . . . . . . . . . . . . . . . . . . . . . . . . . . . . . . . . . . . 4–18
4–11 Current Settings tab in the Fabric Watch view . . . . . . . . . . . . . . . . . . . . . . . . 4–19
4–12 The Alarm Notifications tab in the Fabric Watch view. . . . . . . . . . . . . . . . . . 4–20
4–13 The Threshold Configuration tab with the Area Configuration selected in the
Fabric Watch view. . . . . . . . . . . . . . . . . . . . . . . . . . . . . . . . . . . . . . . . . . . . . . 4–22
4–14 Element Configuration tab of the Threshold Configuration window . . . . . . . 4–24
4–15 The Configuration Report tab of the Threshold Configuration tab . . . . . . . . . 4–25
4–16 Performance Monitor. . . . . . . . . . . . . . . . . . . . . . . . . . . . . . . . . . . . . . . . . . . . 4–26
4–17 Performance Monitor with graphs. . . . . . . . . . . . . . . . . . . . . . . . . . . . . . . . . . 4–27
4–18 Vertical Bar chart example . . . . . . . . . . . . . . . . . . . . . . . . . . . . . . . . . . . . . . . 4–28
4–19 Horizontal Bar Chart example. . . . . . . . . . . . . . . . . . . . . . . . . . . . . . . . . . . . . 4–29
4–20 Line Chart example . . . . . . . . . . . . . . . . . . . . . . . . . . . . . . . . . . . . . . . . . . . . . 4–29
4–21 Canvas Configuration List window. . . . . . . . . . . . . . . . . . . . . . . . . . . . . . . . . 4–31
4–22 Edit Port Throughput window. . . . . . . . . . . . . . . . . . . . . . . . . . . . . . . . . . . . . 4–33
4–23 Save Current Canvas Configuration window . . . . . . . . . . . . . . . . . . . . . . . . . 4–34
4–24 Resource Usage Display window of the Actions pull-down menu . . . . . . . . . 4–35
4–25 Applet dialog box . . . . . . . . . . . . . . . . . . . . . . . . . . . . . . . . . . . . . . . . . . . . . . 4–36
4–26 Print dialog box . . . . . . . . . . . . . . . . . . . . . . . . . . . . . . . . . . . . . . . . . . . . . . . . 4–36
4–27 Port Throughput graph example . . . . . . . . . . . . . . . . . . . . . . . . . . . . . . . . . . . 4–38
4–28 Switch Aggregate Throughput graph example . . . . . . . . . . . . . . . . . . . . . . . . 4–39
x Web Tools Version 3.0.x/4.0.x User Guide
Page 11

Contents
4–29 Blade Aggregate Throughput graph example. . . . . . . . . . . . . . . . . . . . . . . . . 4–40
4–30 Switch Throughput Utilization graph example. . . . . . . . . . . . . . . . . . . . . . . . 4–41
4–31 Port Error Setup window. . . . . . . . . . . . . . . . . . . . . . . . . . . . . . . . . . . . . . . . . 4–41
4–32 Port Error graph example . . . . . . . . . . . . . . . . . . . . . . . . . . . . . . . . . . . . . . . . 4–42
4–33 Switch Percent Utilization graph example . . . . . . . . . . . . . . . . . . . . . . . . . . . 4–43
4–34 Ports Snapshot Error graph . . . . . . . . . . . . . . . . . . . . . . . . . . . . . . . . . . . . . . . 4–44
4–35 SID/DID Performance Setup data entry window . . . . . . . . . . . . . . . . . . . . . . 4–46
4–36 SID/DID Performance graph example . . . . . . . . . . . . . . . . . . . . . . . . . . . . . . 4–47
4–37 SCSI graph data entry window . . . . . . . . . . . . . . . . . . . . . . . . . . . . . . . . . . . . 4–48
4–38 SCSI Write on a LUN per port graph example. . . . . . . . . . . . . . . . . . . . . . . . 4–49
4–39 SCSI versus IP graph example . . . . . . . . . . . . . . . . . . . . . . . . . . . . . . . . . . . . 4–50
4–40 ALPA Error Setup data entry window . . . . . . . . . . . . . . . . . . . . . . . . . . . . . . 4–50
4–41 ALPA Error graph example . . . . . . . . . . . . . . . . . . . . . . . . . . . . . . . . . . . . . . 4–52
4–42 SID/DID Performance Setup data entry window . . . . . . . . . . . . . . . . . . . . . . 4–54
4–43 SID/DID Performance graph example . . . . . . . . . . . . . . . . . . . . . . . . . . . . . . 4–55
4–44 SCSI graph data entry window . . . . . . . . . . . . . . . . . . . . . . . . . . . . . . . . . . . . 4–56
4–45 SCSI Write on a LUN per port graph example. . . . . . . . . . . . . . . . . . . . . . . . 4–57
4–46 SCSI versus IP graph example . . . . . . . . . . . . . . . . . . . . . . . . . . . . . . . . . . . . 4–58
4–47 ALPA Error Setup data entry window . . . . . . . . . . . . . . . . . . . . . . . . . . . . . . 4–58
4–48 ALPA Error graph example . . . . . . . . . . . . . . . . . . . . . . . . . . . . . . . . . . . . . . 4–59
4–49 The Enter Network Password dialog box . . . . . . . . . . . . . . . . . . . . . . . . . . . . 4–63
4–50 Switch Settings tab . . . . . . . . . . . . . . . . . . . . . . . . . . . . . . . . . . . . . . . . . . . . . 4–64
4–51 User Admin tab. . . . . . . . . . . . . . . . . . . . . . . . . . . . . . . . . . . . . . . . . . . . . . . . 4–66
4–52 Firmware/Configuration File Administration tab . . . . . . . . . . . . . . . . . . . . . . 4–69
4–53 SNMP tab . . . . . . . . . . . . . . . . . . . . . . . . . . . . . . . . . . . . . . . . . . . . . . . . . . . . 4–71
4–54 License Administration tab. . . . . . . . . . . . . . . . . . . . . . . . . . . . . . . . . . . . . . . 4–74
4–55 Remote Switch tab . . . . . . . . . . . . . . . . . . . . . . . . . . . . . . . . . . . . . . . . . . . . . 4–76
4–56 QuickLoop tab. . . . . . . . . . . . . . . . . . . . . . . . . . . . . . . . . . . . . . . . . . . . . . . . . 4–78
4–57 Configure tab. . . . . . . . . . . . . . . . . . . . . . . . . . . . . . . . . . . . . . . . . . . . . . . . . . 4–80
4–58 Extended Fabric tab . . . . . . . . . . . . . . . . . . . . . . . . . . . . . . . . . . . . . . . . . . . . 4–83
4–59 Network Configuration tab . . . . . . . . . . . . . . . . . . . . . . . . . . . . . . . . . . . . . . . 4–85
4–60 Port Settings tab . . . . . . . . . . . . . . . . . . . . . . . . . . . . . . . . . . . . . . . . . . . . . . . 4–87
4–61 Routing tab . . . . . . . . . . . . . . . . . . . . . . . . . . . . . . . . . . . . . . . . . . . . . . . . . . . 4–89
4–62 Trunking tab . . . . . . . . . . . . . . . . . . . . . . . . . . . . . . . . . . . . . . . . . . . . . . . . . . 4–91
4–63 Report tab . . . . . . . . . . . . . . . . . . . . . . . . . . . . . . . . . . . . . . . . . . . . . . . . . . . . 4–92
4–64 Switch Settings tab . . . . . . . . . . . . . . . . . . . . . . . . . . . . . . . . . . . . . . . . . . . . . 4–95
4–65 Network Configuration tab . . . . . . . . . . . . . . . . . . . . . . . . . . . . . . . . . . . . . . . 4–98
4–66 Upload/Download tab of the Administration view. . . . . . . . . . . . . . . . . . . . 4–101
xiWeb Tools Version 3.0.x/4.0.x User Guide
Page 12

Contents
4–67 SNMP tab . . . . . . . . . . . . . . . . . . . . . . . . . . . . . . . . . . . . . . . . . . . . . . . . . . . 4–104
4–68 License Administration tab . . . . . . . . . . . . . . . . . . . . . . . . . . . . . . . . . . . . . . 4–107
4–69 Report tab . . . . . . . . . . . . . . . . . . . . . . . . . . . . . . . . . . . . . . . . . . . . . . . . . . . 4–109
4–70 Port Setting tab . . . . . . . . . . . . . . . . . . . . . . . . . . . . . . . . . . . . . . . . . . . . . . . 4–111
4–71 Configure tab. . . . . . . . . . . . . . . . . . . . . . . . . . . . . . . . . . . . . . . . . . . . . . . . . 4–114
4–72 Routing tab . . . . . . . . . . . . . . . . . . . . . . . . . . . . . . . . . . . . . . . . . . . . . . . . . . 4–120
4–73 Remote Switch tab. . . . . . . . . . . . . . . . . . . . . . . . . . . . . . . . . . . . . . . . . . . . . 4–123
4–74 Extended Fabric tab. . . . . . . . . . . . . . . . . . . . . . . . . . . . . . . . . . . . . . . . . . . . 4–125
4–75 Trunking tab . . . . . . . . . . . . . . . . . . . . . . . . . . . . . . . . . . . . . . . . . . . . . . . . . 4–128
4–76 The Telnet Interface. . . . . . . . . . . . . . . . . . . . . . . . . . . . . . . . . . . . . . . . . . . . 4–130
4–77 High Availability window . . . . . . . . . . . . . . . . . . . . . . . . . . . . . . . . . . . . . . . 4–131
5–1 Port Information view . . . . . . . . . . . . . . . . . . . . . . . . . . . . . . . . . . . . . . . . . . . . 5–2
5–2 The PortStats tab in the Port Information view. . . . . . . . . . . . . . . . . . . . . . . . . 5–5
5–3 The SFP tab in the Port Information view. . . . . . . . . . . . . . . . . . . . . . . . . . . . . 5–7
5–4 The Loop tab in the Port Information view. . . . . . . . . . . . . . . . . . . . . . . . . . . . 5–8
5–5 Port Information view . . . . . . . . . . . . . . . . . . . . . . . . . . . . . . . . . . . . . . . . . . . 5–11
5–6 The PortStats tab in the Port Information view. . . . . . . . . . . . . . . . . . . . . . . . 5–14
5–7 The SFP tab in the Port Information view. . . . . . . . . . . . . . . . . . . . . . . . . . . . 5–17
5–8 The Loop tab in the Port Information view . . . . . . . . . . . . . . . . . . . . . . . . . . . 5–20
Tables
1 Document Conventions . . . . . . . . . . . . . . . . . . . . . . . . . . . . . . . . . . . . . . . . . . xviii
1–1 Monitoring and Managing the Entire Fabric. . . . . . . . . . . . . . . . . . . . . . . . . . . 1–2
1–2 Monitoring and Managing Individual Switches . . . . . . . . . . . . . . . . . . . . . . . . 1–3
1–3 Monitoring and Managing Individual Ports . . . . . . . . . . . . . . . . . . . . . . . . . . . 1–4
3–1 Button and Icons in the Control Panel. . . . . . . . . . . . . . . . . . . . . . . . . . . . . . . . 3–4
3–2 Fabric Events View Columns Descriptions. . . . . . . . . . . . . . . . . . . . . . . . . . . . 3–9
3–3 Fields in the Fabric Topology View . . . . . . . . . . . . . . . . . . . . . . . . . . . . . . . . 3–10
3–4 Name Server Table View Fields . . . . . . . . . . . . . . . . . . . . . . . . . . . . . . . . . . . 3–12
3–5 Name Server Table View Additional Columns. . . . . . . . . . . . . . . . . . . . . . . . 3–13
3–6 V3.0.x Zoning Schemes. . . . . . . . . . . . . . . . . . . . . . . . . . . . . . . . . . . . . . . . . . 3–15
3–7 Port Alias Tab Fields. . . . . . . . . . . . . . . . . . . . . . . . . . . . . . . . . . . . . . . . . . . . 3–18
3–8 Port Zone Tab Fields . . . . . . . . . . . . . . . . . . . . . . . . . . . . . . . . . . . . . . . . . . . . 3–21
3–9 QuickLoop Tab Fields. . . . . . . . . . . . . . . . . . . . . . . . . . . . . . . . . . . . . . . . . . . 3–24
3–10 Port Fabric Assist Tab Fields. . . . . . . . . . . . . . . . . . . . . . . . . . . . . . . . . . . . . . 3–26
3–11 Port Config Tab Fields . . . . . . . . . . . . . . . . . . . . . . . . . . . . . . . . . . . . . . . . . . 3–29
3–12 WWN Alias Tab Fields . . . . . . . . . . . . . . . . . . . . . . . . . . . . . . . . . . . . . . . . . . 3–34
3–13 WWN Zone Tab Fields . . . . . . . . . . . . . . . . . . . . . . . . . . . . . . . . . . . . . . . . . . 3–37
xii Web Tools Version 3.0.x/4.0.x User Guide
Page 13

Contents
3–14 QuickLoop Tab Fields . . . . . . . . . . . . . . . . . . . . . . . . . . . . . . . . . . . . . . . . . . 3–39
3–15 WWN Fabric Assist Tab Fields . . . . . . . . . . . . . . . . . . . . . . . . . . . . . . . . . . . 3–41
3–16 WWN Config Tab Fields . . . . . . . . . . . . . . . . . . . . . . . . . . . . . . . . . . . . . . . . 3–44
3–17 AL_PA Level Zoning Menu . . . . . . . . . . . . . . . . . . . . . . . . . . . . . . . . . . . . . . 3–47
3–18 AL_PA Device Zone Tab Fields. . . . . . . . . . . . . . . . . . . . . . . . . . . . . . . . . . . 3–50
3–19 QuickLoop Tab Fields . . . . . . . . . . . . . . . . . . . . . . . . . . . . . . . . . . . . . . . . . . 3–52
3–20 AL_PA Device Config Tab Fields . . . . . . . . . . . . . . . . . . . . . . . . . . . . . . . . . 3–54
3–21 Alias Tab Fields . . . . . . . . . . . . . . . . . . . . . . . . . . . . . . . . . . . . . . . . . . . . . . . 3–57
3–22 Zone Tab Fields . . . . . . . . . . . . . . . . . . . . . . . . . . . . . . . . . . . . . . . . . . . . . . . 3–59
3–23 QuickLoop Tab Fields . . . . . . . . . . . . . . . . . . . . . . . . . . . . . . . . . . . . . . . . . . 3–61
3–24 Fabric Assist Tab Fields . . . . . . . . . . . . . . . . . . . . . . . . . . . . . . . . . . . . . . . . . 3–64
3–25 Config Tab Fields . . . . . . . . . . . . . . . . . . . . . . . . . . . . . . . . . . . . . . . . . . . . . . 3–67
3–26 4.0.x Zoning Schemes. . . . . . . . . . . . . . . . . . . . . . . . . . . . . . . . . . . . . . . . . . . 3–70
3–27 Port Alias Tab Fields. . . . . . . . . . . . . . . . . . . . . . . . . . . . . . . . . . . . . . . . . . . . 3–72
3–28 Port Zone Tab Fields. . . . . . . . . . . . . . . . . . . . . . . . . . . . . . . . . . . . . . . . . . . . 3–75
3–29 Port Fabric Assist Tab Fields . . . . . . . . . . . . . . . . . . . . . . . . . . . . . . . . . . . . . 3–77
3–30 Port Config Tab Fields . . . . . . . . . . . . . . . . . . . . . . . . . . . . . . . . . . . . . . . . . . 3–80
3–31 WWN Alias Tab Fields. . . . . . . . . . . . . . . . . . . . . . . . . . . . . . . . . . . . . . . . . . 3–85
3–32 WWN Zone Tab Fields. . . . . . . . . . . . . . . . . . . . . . . . . . . . . . . . . . . . . . . . . . 3–88
3–33 QuickLoop Tab Fields . . . . . . . . . . . . . . . . . . . . . . . . . . . . . . . . . . . . . . . . . . 3–89
3–34 WWN Fabric Assist Tab Fields . . . . . . . . . . . . . . . . . . . . . . . . . . . . . . . . . . . 3–92
3–35 WWN Config Tab Fields . . . . . . . . . . . . . . . . . . . . . . . . . . . . . . . . . . . . . . . . 3–95
3–36 AL_PA Device Alias Tab Fields . . . . . . . . . . . . . . . . . . . . . . . . . . . . . . . . . . 3–98
3–37 AL_PA Device Zone Tab Fields. . . . . . . . . . . . . . . . . . . . . . . . . . . . . . . . . . 3–100
3–38 QuickLoop Tab Fields . . . . . . . . . . . . . . . . . . . . . . . . . . . . . . . . . . . . . . . . . 3–102
3–39 AL_PA Device Config Tab Fields . . . . . . . . . . . . . . . . . . . . . . . . . . . . . . . . 3–105
3–40 Alias Tab Fields . . . . . . . . . . . . . . . . . . . . . . . . . . . . . . . . . . . . . . . . . . . . . . 3–108
3–41 Zone Tab Fields . . . . . . . . . . . . . . . . . . . . . . . . . . . . . . . . . . . . . . . . . . . . . . 3–110
3–42 QuickLoop Tab Fields . . . . . . . . . . . . . . . . . . . . . . . . . . . . . . . . . . . . . . . . . 3–112
3–43 Fabric Assist Tab Fields . . . . . . . . . . . . . . . . . . . . . . . . . . . . . . . . . . . . . . . . 3–115
3–44 Config Tab Fields . . . . . . . . . . . . . . . . . . . . . . . . . . . . . . . . . . . . . . . . . . . . . 3–118
4–1 Switch Events View Fields . . . . . . . . . . . . . . . . . . . . . . . . . . . . . . . . . . . . . . . . 4–8
4–2 Configure Thresholds Tab Buttons. . . . . . . . . . . . . . . . . . . . . . . . . . . . . . . . . 4–12
4–3 Environmental Classes Thresholds . . . . . . . . . . . . . . . . . . . . . . . . . . . . . . . . . 4–13
4–4 SFP Classes Thresholds . . . . . . . . . . . . . . . . . . . . . . . . . . . . . . . . . . . . . . . . . 4–13
4–5 Remaining Classes Thresholds . . . . . . . . . . . . . . . . . . . . . . . . . . . . . . . . . . . . 4–14
4–6 Alarm Notifications Tab Fields. . . . . . . . . . . . . . . . . . . . . . . . . . . . . . . . . . . . 4–21
4–7 Configure Threshold Tab > Area Configuration Fields . . . . . . . . . . . . . . . . . 4–23
xiiiWeb Tools Version 3.0.x/4.0.x User Guide
Page 14

Contents
4–8 Element Thresholds Tab Fields . . . . . . . . . . . . . . . . . . . . . . . . . . . . . . . . . . . . 4–24
4–9 Display Canvas Configurations Fields . . . . . . . . . . . . . . . . . . . . . . . . . . . . . . 4–31
4–10 Resource Usage Display Fields. . . . . . . . . . . . . . . . . . . . . . . . . . . . . . . . . . . . 4–35
4–11 Graphs Displayed on a Basic Canvas . . . . . . . . . . . . . . . . . . . . . . . . . . . . . . . 4–37
4–12 3.0.x Graphs Displayed on an Advanced Canvas . . . . . . . . . . . . . . . . . . . . . . 4–44
4–13 4.0.x Graphs Displayed on an Advanced Monitoring Canvas . . . . . . . . . . . . 4–52
4–14 Options Available by Right-Clicking in a Graph . . . . . . . . . . . . . . . . . . . . . . 4–60
4–15 Tool Tips Information Available by Rolling Mouse Over Graph . . . . . . . . . . 4–61
4–16 Switch Settings Tab Fields . . . . . . . . . . . . . . . . . . . . . . . . . . . . . . . . . . . . . . . 4–65
4–17 User Admin Tab Fields . . . . . . . . . . . . . . . . . . . . . . . . . . . . . . . . . . . . . . . . . . 4–67
4–18 Firmware/Configuration File Administration Tab Fields . . . . . . . . . . . . . . . . 4–69
4–19 SNMP Tab Fields . . . . . . . . . . . . . . . . . . . . . . . . . . . . . . . . . . . . . . . . . . . . . . 4–72
4–20 License Administration Tab Fields . . . . . . . . . . . . . . . . . . . . . . . . . . . . . . . . . 4–74
4–21 Remote Switch Tab Fields. . . . . . . . . . . . . . . . . . . . . . . . . . . . . . . . . . . . . . . . 4–76
4–22 QuickLoop Tab Fields. . . . . . . . . . . . . . . . . . . . . . . . . . . . . . . . . . . . . . . . . . . 4–78
4–23 Configure Tab Fields. . . . . . . . . . . . . . . . . . . . . . . . . . . . . . . . . . . . . . . . . . . . 4–80
4–24 Extended Fabric Tab Fields. . . . . . . . . . . . . . . . . . . . . . . . . . . . . . . . . . . . . . . 4–84
4–25 Network Configuration Tab Fields . . . . . . . . . . . . . . . . . . . . . . . . . . . . . . . . . 4–86
4–26 Port Settings Tab Fields. . . . . . . . . . . . . . . . . . . . . . . . . . . . . . . . . . . . . . . . . . 4–88
4–27 Routing Tab Fields . . . . . . . . . . . . . . . . . . . . . . . . . . . . . . . . . . . . . . . . . . . . . 4–90
4–28 Switch Settings Tab Fields . . . . . . . . . . . . . . . . . . . . . . . . . . . . . . . . . . . . . . . 4–96
4–29 Network Configuration Tab Fields . . . . . . . . . . . . . . . . . . . . . . . . . . . . . . . . . 4–99
4–30 Upload/Download Tab Fields . . . . . . . . . . . . . . . . . . . . . . . . . . . . . . . . . . . . 4–102
4–31 SNMP Tab Fields . . . . . . . . . . . . . . . . . . . . . . . . . . . . . . . . . . . . . . . . . . . . . 4–105
4–32 License Adminstration Tab Fields. . . . . . . . . . . . . . . . . . . . . . . . . . . . . . . . . 4–108
4–33 Report Tab Fields . . . . . . . . . . . . . . . . . . . . . . . . . . . . . . . . . . . . . . . . . . . . . 4–110
4–34 Port Setting Tab Fields . . . . . . . . . . . . . . . . . . . . . . . . . . . . . . . . . . . . . . . . . 4–112
4–35 Configure Tab, Fabric Sub-tab Fields . . . . . . . . . . . . . . . . . . . . . . . . . . . . . . 4–115
4–36 Configure Tab, Virtual Channel Sub-tab Fields . . . . . . . . . . . . . . . . . . . . . . 4–116
4–37 Configure Tab, Arbitrated Loop Sub-tab Fields . . . . . . . . . . . . . . . . . . . . . . 4–117
4–38 Configure Tab, System Services Sub-tab Fields . . . . . . . . . . . . . . . . . . . . . . 4–118
4–39 Routing Tab Fields . . . . . . . . . . . . . . . . . . . . . . . . . . . . . . . . . . . . . . . . . . . . 4–121
4–40 Remote Switch Tab Fields. . . . . . . . . . . . . . . . . . . . . . . . . . . . . . . . . . . . . . . 4–124
4–41 Extended Fabric Tab Fields. . . . . . . . . . . . . . . . . . . . . . . . . . . . . . . . . . . . . . 4–126
4–42 Trunk Information Tab Fields . . . . . . . . . . . . . . . . . . . . . . . . . . . . . . . . . . . . 4–128
4–43 High Availability Window Fields . . . . . . . . . . . . . . . . . . . . . . . . . . . . . . . . . 4–131
5–1 Port Information View Fields . . . . . . . . . . . . . . . . . . . . . . . . . . . . . . . . . . . . . . 5–3
5–2 PortStats Tab Fields. . . . . . . . . . . . . . . . . . . . . . . . . . . . . . . . . . . . . . . . . . . . . . 5–5
xiv Web Tools Version 3.0.x/4.0.x User Guide
Page 15

Contents
5–3 Loop Tab Fields . . . . . . . . . . . . . . . . . . . . . . . . . . . . . . . . . . . . . . . . . . . . . . . . 5–9
5–4 Port Information View Fields . . . . . . . . . . . . . . . . . . . . . . . . . . . . . . . . . . . . . 5–12
5–5 PortStats Tab Fields . . . . . . . . . . . . . . . . . . . . . . . . . . . . . . . . . . . . . . . . . . . . 5–14
5–6 SFP Tab Fields . . . . . . . . . . . . . . . . . . . . . . . . . . . . . . . . . . . . . . . . . . . . . . . . 5–18
5–7 Loop Tab Fields . . . . . . . . . . . . . . . . . . . . . . . . . . . . . . . . . . . . . . . . . . . . . . . 5–21
xvWeb Tools Version 3.0.x/4.0.x User Guide
Page 16

Page 17

This guide provides information to help you:
• Understand and install Web Tools
• Configure and use Web Tools Fabric View
• Configure and use Web Tools Port View
• Contact technical support for additional assistance
Intended Audience
This book is intended for use by system administrators who are experienced with the
following:
• HP StorageWorks™ Fibre Channel SAN switches
• Fabric Operating System V3.0.x or later
Related Documentation
For a list of related documents included with this product, see the Related Documents
section of the Release Notes that came with your switch.
About this Guide
For the latest information, documentation, and firmware releases, please visit the
following StorageWorks website:
http://www.compaq.com/storage/productindexdisk.html
For information about Fibre Channel standards, visit the Fibre Channel Association
website, located at http://www.fibrechannel.com
.
xviiWeb Tools Version 3.0.x/4.0.x User Guide
Page 18
About this Guide
Document Conventions
The conventions included in Ta bl e 1 apply.
Table 1: Document Conventions
Element Convention
Cross-reference links Blue text: Figure 1
Key names, menu items, buttons, and
dialog box titles
File names, application names, and text
emphasis
User input, command names, system
responses (output and messages)
Variables Monospace, italic font
Website addresses Sans serif font (h
Symbols in Text
Bold
Italics
Monospace font
COMMAND NAMES are uppercase
unless they are case sensitive
ttp://thenew.hp.com)
These symbols may be found in the text of this guide. They have the following
meanings.
WARNING: Text set off in this manner indicates that failure to follow directions
in the warning could result in bodily harm or loss of life.
CAUTION: Text set off in this manner indicates that failure to follow directions could
result in damage to equipment or data.
IMPORTANT: Text set off in this manner presents clarifying information or specific instructions.
NOTE: Text set off in this manner presents commentary, sidelights, or interesting points of
information.
xviii Web Tools Version 3.0.x/4.0.x User Guide
Page 19

Getting Help
If you still have a question after reading this guide, contact an HP authorized service
provider or access our website: http://thenew.hp.com
HP Technical Support
In North America, call HP technical support at 1-800-652-6672, available 24 hours a
day, 7 days a week.
NOTE: For continuous quality improvement, calls may be recorded or monitored.
Outside North America, call HP technical support at the nearest location. Telephone
numbers for worldwide technical support are listed on the HP website:
http://thenew.hp.com/country/us/eng/contact_us.html
Be sure to have the following information available before calling:
• Technical support registration number (if applicable)
• Product serial numbers
• Product model names and numbers
About this Guide
.
.
• Applicable error messages
• Operating system type and revision level
• Detailed, specific questions
HP Storage Website
The HP storage website has the latest information on this product, as well as the latest
drivers. Access the HP storage website at: http://
storage.html. From this website, select the appropriate product or solution.
HP Authorized Reseller
For the name of your nearest HP Authorized Reseller:
• In the United States, call 1-800-345-1518.
• In Canada, call 1-800-263-5868.
• Elsewhere, access the HP website at http://thenew.hp.com/country/us/eng/
contact_us.html for locations and telephone numbers.
thenew.hp.com/country/us/eng/prodserv/
xixWeb Tools Version 3.0.x/4.0.x User Guide
Page 20

Page 21

This chapter provides the following information:
• Overview on page 1–1
• Advantages of Web Tools on page 1–1
• Capabilities of Web Tools on page 1–2
• Web Tools Main Views on page 1–4
Overview
Web Tools provides a graphical interface that allows the administrator to monitor and
manage entire fabrics and individual switches and ports from a standard workstation.
It is a standard product that runs on all StorageWorks switches running the V3.0.x or
4.0.x firmware streams.
NOTE: Web Tools is part of the switch’s firmware. The version of Web Tools is the same as the
version of the firmware.
1
Introducing Web Tools
Advantages of Web Tools
Web Tools is an excellent partner to the traditional Telnet commands, and in many
ways can provide faster and more effective results than can be achieved strictly
through a Command Line Interface (CLI).
The following are some of the features that make Web Tools an important part of the
switch management and administration process:
• Web Tools can be used from a standard workstation and provides the user the
advantage of being “virtually” in front of any fabric, switch, or port.
• Web Tools makes zoning a simple “click and drag” process, rather than having to
type out WWN addresses and port numbers to put in a configuration.
1–1Web Tools Version 3.0.x/4.0.x User Guide
Page 22
Introducing Web Tools
• Web Tools provides the “Performance Monitor” feature. This feature allows you
to view the status and traffic of a switch or port in seconds by easily creating a
variety of effective graphs.
• Web Tools is easy and intuitive to use.
Capabilities of Web Tools
Web Tools provides the following information:
• Monitoring and managing the entire fabric. See “Fabric View” on page 3–1.
• Monitoring and managing individual switches. See “Switch View” on page 4–1.
• Monitoring and managing individual ports. See “Port View” on page 5–1.
When monitoring and managing the entire fabric, Web Tools allows you to perform
the functions listed in Table 1–1.
Table 1–1: Monitoring and Managing the Entire Fabric
Task Page number
View the status of all the switches in the
fabric.
Access event logs for entire fabric. See “Fabric Events View” on
Set-up and manage Zoning functions
(optionally licensed).
Access to the Name Server Table. See “Name Server Table View” on
Access Telnet functions. See “Telnet Interface” on page 4–130.
Utilize switch beaconing for rapid
identification of a single switch in large
fabric environments.
Create and zone QuickLoops (optionally
licensed).
See “Fabric View” on page 3–1.
page 3–7.
See “Zone Administration View V3.0.x
(Optional Software)” on page 3–13.
See “Config Tab Fields” on
page 3–67.
page 3–11.
See “Beacon” on page 4–5.
See “Loop Tab” on page 5–8,
“Configure Tab” on page 4–113, or
“Zone Administration View V3.0.x
(Optional Software)” on page 3–13.
Feature not available on version 4.0.x.
1–2 Web Tools Version 3.0.x/4.0.x User Guide
Page 23

Introducing Web Tools
When monitoring and managing individual switches, Web Tools allows you to
perform the functions listed in Table 1–2.
Table 1–2: Monitoring and Managing Individual Switches
Task Page number
View summary information about each
switch.
View event logs for individual switches. See the “Switch Events View” on
Perform switch configuration and
administration.
Monitor switch and port performance. “Performance Monitor” on page 4–26.
Utilize the ability to upgrade Fabric OS
and license key administration.
Utilize report capability for switch
configuration information.
See the “Switch Events View” on
page 4–6.
page 4–6.
See the “Configure Tab” on
page 4–79, the “Configure Tab” on
page 4–113, and the “Switch Settings
Tab” on page 4–95.
See “Upload/Download Tab” on
page 4–100 and “License
Administration Tab” on page 4–107.
See “Report Tab” on page 4–109.
1–3Web Tools Version 3.0.x/4.0.x User Guide 1–3
Page 24
Introducing Web Tools
When monitoring and managing individual ports, Web Tools allows you to perform
the functions listed in Table 1–3.
Table 1–3: Monitoring and Managing Individual Ports
View the port status. See “PortStats Tab” on page 5–5 and
View information about GBIC (Gigabit
Interface Converter)/SFP (Small form
factor pluggable) Serial IDs.
View loop information. See “Loop Tab” on page 5–8,
View port performance, including frame
counts (frames in, frames out) and error
counts.
Task Page number
the “PortStats Tab” on page 5–14.
See “SFP Tab” on page 5–17 (3.0.x)
or the “SFP Tab” on page 5–17
(4.0.x).
“Configure Tab” on page 4–79, or
“Zone Administration View V3.0.x
(Optional Software)” on page 3–13.
Feature not available on 4.0.x.
See “The Configuration Report tab of
the Threshold Configuration tab” on
page 4–25.
Web Tools Main Views
Web Tools provides access to and information about a fabric through a number of
separate windows, called “views”, making it possible to manage and monitor several
aspects of a fabric at the same time.
The main views available through Web Tools are:
• Fabric View—Figure 1–1
• Switch View—Figure 1–2 and Figure 1–3
• Port Information View—Figure 1–4
Fabric View
This view displays a control panel that provides access to fabric-wide options, a panel
for each switch in the fabric, plus a legend that explains the meaning of the
background colors on the switch icons. Each panel contains an icon that represents the
switch itself, in addition to icons for Switch Events and the Administrative and Telnet
interfaces. The background color of the switch icon represents the status of that
particular switch or Integrated Fabric (as defined by the Status Legend provided in the
window).
1–4 Web Tools Version 3.0.x/4.0.x User Guide
Page 25
Introducing Web Tools
NOTE: Switch status is calculated approximately once every 15 seconds; however the initial
display does not occur until 30-60 seconds after the switch is booted. It is calculated from the
state of data structures in the switch, and stored as the variable switchStatus.
NOTE: For all statuses that are based on errors per time interval, any errors will not cause the
status to show faulty until the entire sample interval has passed.
See Figure 1–1 for an example of Fabric View. For information about the functions
that are accessible through Fabric View, see “Fabric View” on page 3–1.
Figure 1–1: Fabric View
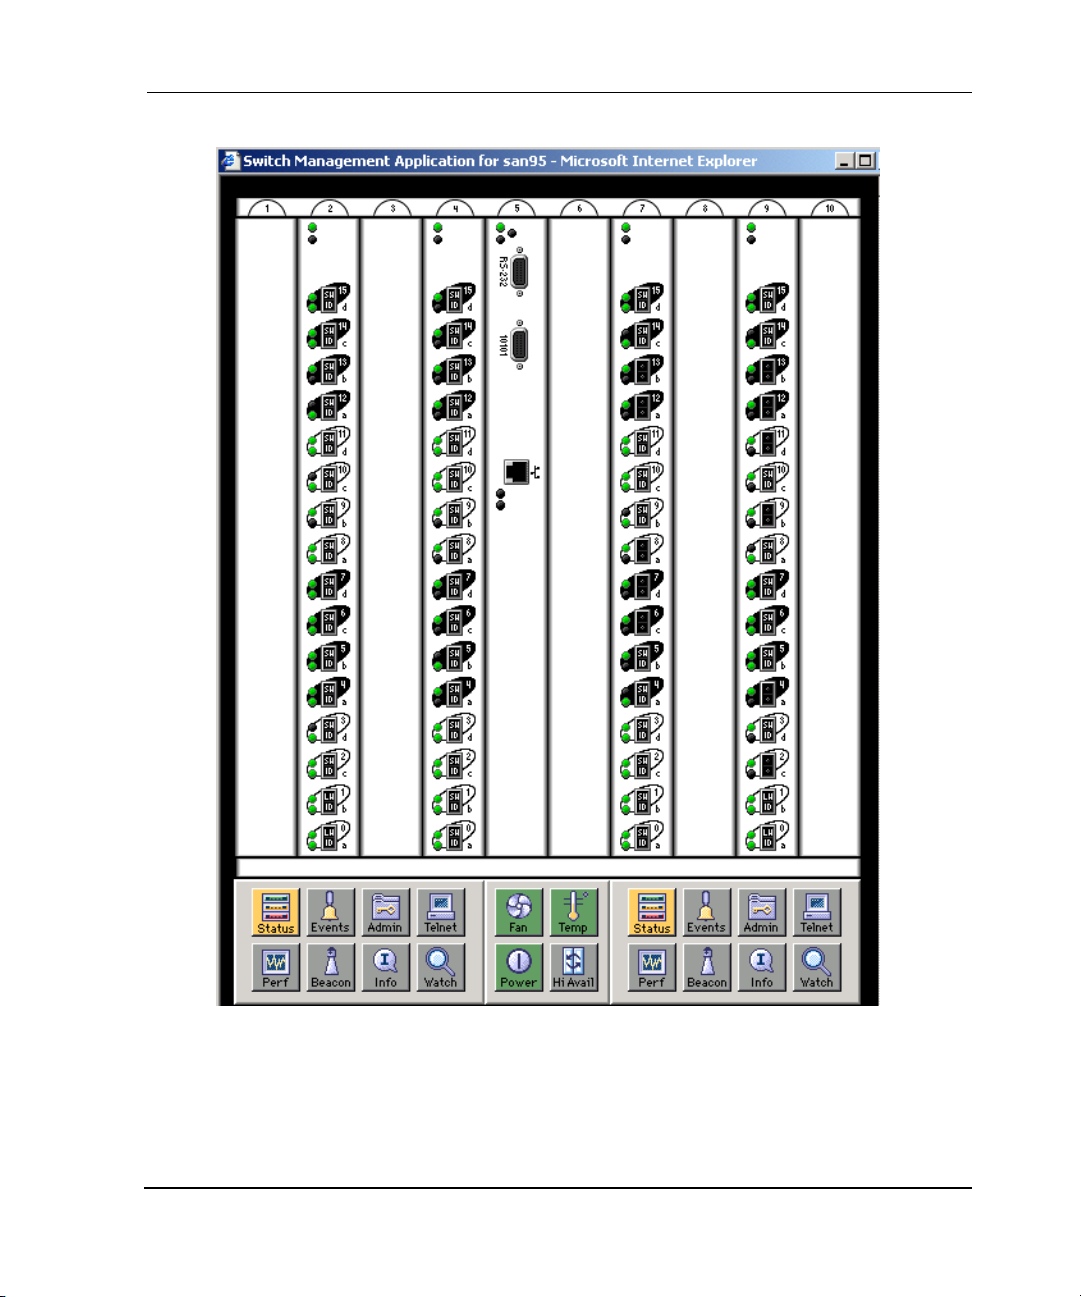
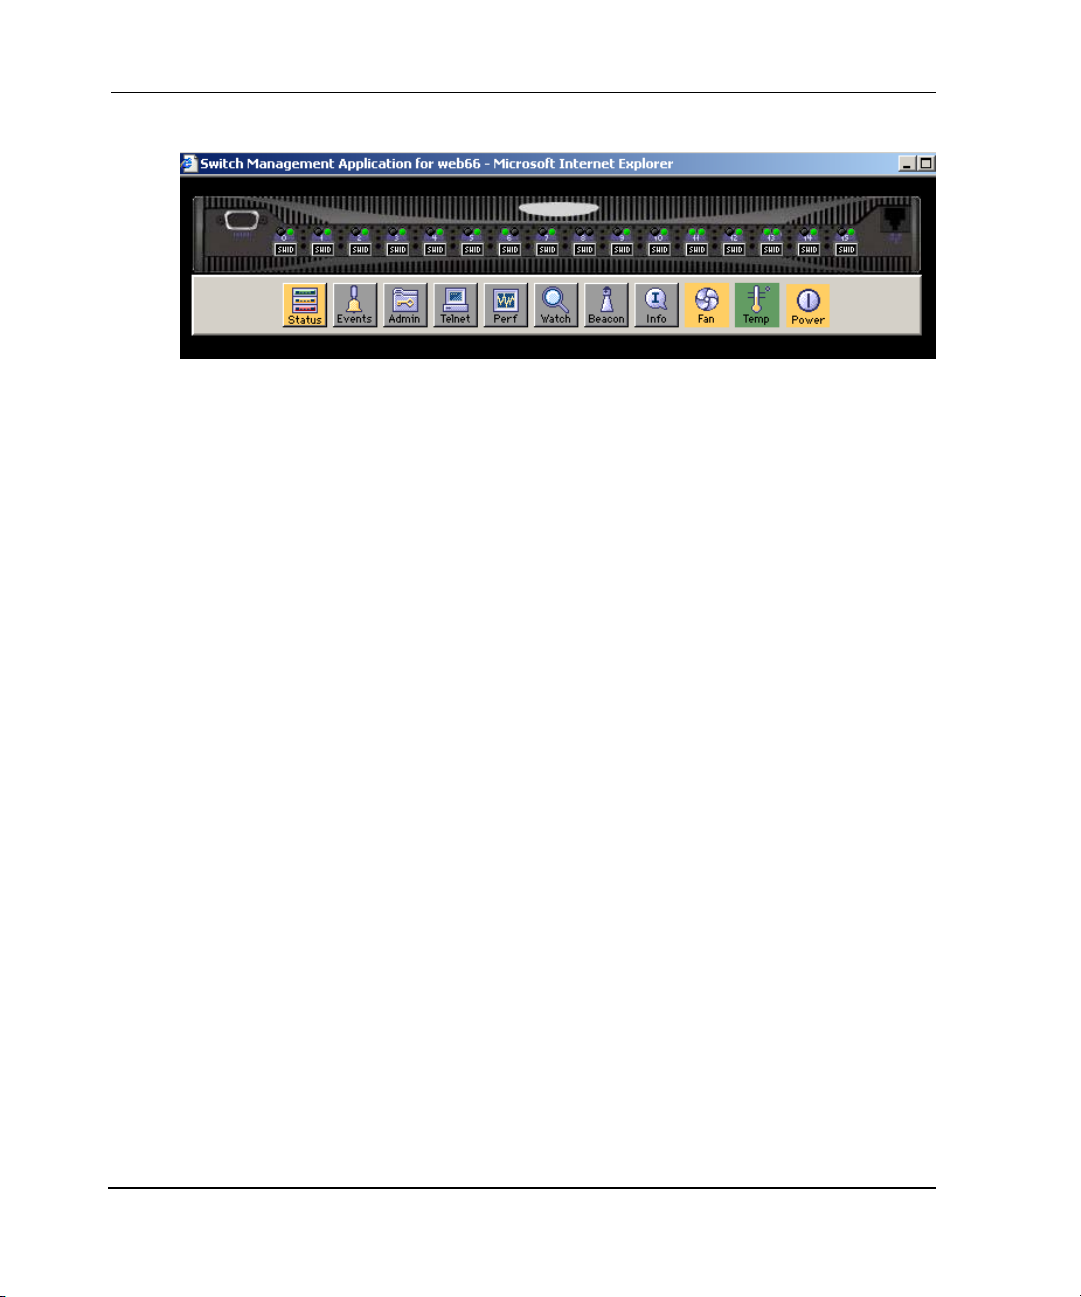
Switch View
Displays information about individual switches, including a real-time view of switch
status. Accessed by selecting the switch icon on a switch panel. The Switch View is
also the launch point for the Switch Events View, Telnet Interface, Fabric Watch View,
1–5Web Tools Version 3.0.x/4.0.x User Guide 1–5
Page 26

Introducing Web Tools
Administrative Interface, Performance View, and Port Information View. It includes
buttons that display the status of the switch fans, temperature monitors, switch info,
switch status, power supply, High Availability (for 4.0.x), and beacon.
See Figure 1–2 and Figure 1–3 for examples of Switch View. For information about
the functions that are accessible through the Switch View, see “Switch View” on
page 4–1.
1–6 Web Tools Version 3.0.x/4.0.x User Guide
Page 27
Introducing Web Tools
Figure 1–2: Switch View of StorageWorks Core switch series switch
1–7Web Tools Version 3.0.x/4.0.x User Guide 1–7
Page 28
Introducing Web Tools
Figure 1–3: Switch View of StorageWorks 2 Gb SAN switch
Port Information View
The Port Information View displays statistics and status for the selected port,
GBIC/SFP, or loop. Accessed by selecting the icon for the relevant port in Switch
View.
See Figure 1–4 for an example of Port View. For information about the functions that
are accessible through the Port View, see “Port Information View V3.0.x” on page 5–1
or “Port Information View 4.0.x” on page 5–11.
NOTE: The Slot tabs will only appear on an StorageWorks Core switch series switch view.
1–8 Web Tools Version 3.0.x/4.0.x User Guide
Page 29

Introducing Web Tools
Figure 1–4: Port Information view
NOTE: Each main view has several layers, or sub-views, that allow for more complex
functionality. For more information about what you can do with these views, see Chapter 3,
beginning with “Fabric View” on page 3–1.
1–9Web Tools Version 3.0.x/4.0.x User Guide 1–9
Page 30

Page 31

Installing and Launching Web Tools
This chapter provides the following information:
• Requirements on page 2–1
• Launching Web Tools on page 2–6
Requirements
The workstation and the switch must meet both specific requirements for the correct
operation of Web Tools.
Switch Requirements
Web Tools 4.0.x can be used to manage switches that meet the following
requirements:
• StorageWorks switches running firmware streams v.2.x, v.3.0.x, and v.4.0.x
• StorageWorks SAN series switches and StorageWorks Core switch series
switches. The SAN Switch Integrated/32 and SAN Switch Integrated/64 series
switches can be managed individually, but not as a group.
2
• Fabric OS installed
— Fabric OS V2.x or later must be installed to manage switches running 2x
series switches.
— Fabric OS V3.0.x or later must be installed to manage switches running 3x
series switches.
— Fabric OS V4.0.x must be installed to manage StorageWorks Core switch
series switches.
Workstation Requirements
The following items are required for the operation of Web Tools.
2–1Web Tools Version 3.0.x/4.0.x User Guide
Page 32

Installing and Launching Web Tools
• One of the following operating systems:
— Solaris 5.7, 5.8 or later
— Windows 98 (not guaranteed for 4.0.x), or 2000
—Windows NT 4.0
—Linux
• Adequate RAM (required for Windows operating systems only):
— 128 MB for fabrics of 10 switches or less
— 256 MB for fabrics of 20 switches or less
— 512 MB or more for over 20 switches
• 5 MB of free disk space
• Minimum 8 MB of video RAM is recommended
• One of the following web browsers:
— Netscape Communicator 4.7x or later.
— Internet Explorer 5.0 or later. Internet Explorer 5.5 Service Pack 6 is highly
recommended.
NOTE: The browser must be configured to work with Web Tools. For information about
how to do this, see “Installing a Web Browser” on page 2–3.
• The correct version of the Java Plug-in for the operating system:
— Windows 98, NT, or 2000: Java Plug-in version 1.2.2-008 or later. Java
Runtime Environment v1.2.1_01a is recommended for best results.
— Solaris: Java Plug-in version 1.2.2-02 for Solaris, and JRE 1,2,1 with patch.
Installation
Perform the following steps before you use Web Tools to manage your fabric:
• Install of one of the supported web browsers on the workstation, if not already
installed.
• Configure the web browser for use with Web Tools.
• Install the required Java Plug-in on the workstation, if not already installed.
2–2 Web Tools Version 3.0.x/4.0.x User Guide
Page 33

Installing a Web Browser
If not already installed, install one of the following browsers:
• Netscape Communicator 4.6x or later. It is available at
http://www.netscape.com
• Internet Explorer 4.01 or later (i.e., 5.5 Service Pack 2 or later is highly
recommended). It is available at:
http://www.microsoft.com
Configuring the Web Browser
Specific browser settings are required for the correct operation of Web Tools with
either Netscape Communicator or Internet Explorer.
Configuring Netscape Communicator
The web browser cache must be cleared after the installation of Fabric OS V4.0.x.
Some browsers use local cache copies of .jar files and/or image files to improve
performance (depending on the options selected in browser), which can cause
incorrect display in Web Tools.
Installing and Launching Web Tools
To remove cached files from Netscape Communicator:
1. Select Edit > Preferences
2. Click Advanced in the Category box to expand it, then click Cache.
3. On the Cache panel, click Clear Memory Cache.
4. Click Clear Disk Cache.
5. Click OK.
6. Exit and relaunch the browser.
Configuring Internet Explorer
Correct operation of Web Tools with Internet Explorer requires clearing the browser
cache after installation, and specifying the appropriate settings for browser refresh
frequency and process model.
2–3Web Tools Version 3.0.x/4.0.x User Guide 2–3
Page 34

Installing and Launching Web Tools
• The browser cache must be cleared after the installation of Fabric OS V4.0.x. The
browser may use local cache copies of .jar files and/or image files to improve
performance (depending on options selected in browser), which can cause
incorrect display.
To remove cached files from Internet Explorer:
a. Select Internet Options from the To ol s menu.
b. Select the General tab.
c. Click Delete Files... (under “Temporary Internet Files”).
d. Click OK, then exit and relaunch the browser.
• Browser pages must be refreshed at every visit to ensure the correct operation of
the Switch Admin feature.
To set the refresh frequency:
a. Select Internet Options from the To ol s menu.
b. Select the General tab and click Settings (under “Temporary Internet Files”).
c. Under “Check for newer versions of stored pages,” select “Every visit to the
page.”
• The correct Browser Process Model must be selected.
To select the Browser Process Model:
a. Select View > Internet Options if using Internet Explorer 4.0.x, or Tools >
Internet Options if using Internet Explorer 5.x.
b. Select the Advanced tab and click to expand the Browsing category.
c. Under “Browsing,” select “Browse in a new process” if using Internet
Explorer 4.0.x or 5.x.
Installing the Java Plug-in on the Workstation
A Java Plug-in must be installed on the workstation for the correct operation of Web
Tools. The required version depends on the operating system.
Installing the Java Plug-in on Solaris
Solaris workstations require both the Java Plug-in version 1.2.2-02 for Solaris and JRE
1,2,1 with patch.
2–4 Web Tools Version 3.0.x/4.0.x User Guide
Page 35

Installing and Launching Web Tools
To install the Java Plug-in on Solaris:
1. Locate the Java Plug-in on the Internet, such as at the Sun Microsystems website.
2. Follow the instructions to install the Java Plug-in for Solaris.
3. Set environment variable NPX_PLUGIN_PATH. For example:
C Shell:
setenv NPX_PLUGIN_PATH /plug-in path
(or could be added in .cshrc in home directory)
Bourne Shell:
NPX_PLUGIN_PATH=/plug-in path
export NPX_PLUGIN_PATH
(or could be added in .profile in home directory)
To install the patch on Solaris:
1. Go to the website at http://access1.sun.com
, use the Search option, enter the string
“108593” in the search field, and press Enter.
2. Follow the link to download the patch, and exit the browser when done.
3. Install the patch and reboot the system.
4. Relaunch the browser and enter the IP address of the switch.
Installing the Java Plug-in on Windows 2000 or NT
Windows 98, 2000 and NT workstations require Java Plug-in version 1.2.2-008 or
later. Java Runtime Environment v1.2.1_01a is recommended for best results.
To determine the version of the Java Plug-in installed on Windows 98, NT, or 2000,
and install if necessary:
1. Launch the Java Plug-in Control Panel from Start > Programs > Java Plug-in
Control Panel and turn on the Java Console.
2. Launch the web browser, enter the name or IP address of a switch running Fabric
OS v2.2 or later, and press Enter.
The switch launches the Java Plug-in console, which displays the Java Plug-in
version currently installed.
3. Determine whether the correct Java Plug-in version is installed, and install if
necessary:
2–5Web Tools Version 3.0.x/4.0.x User Guide 2–5
Page 36

Installing and Launching Web Tools
• If the correct version is installed, Web Tools is ready to use.
• If no Java Plug-in is installed, point the browser toward a switch running
Fabric OS V4.0.x, follow the link to the Sun Microsystems website, download
the correct Java Plug-in, then double-click the downloaded file to install the
plug-in.
• If an outdated version is currently installed, uninstall it, relaunch the browser,
enter the address of a switch running Fabric OS V4.0.x or later, follow the link
to the Sun Microsystems website, and download the new Java Plug-in.
Launching Web Tools
You can launch Web Tools once the Java Plug-in is installed on the client machine
browser.
To launch Web Tools:
1. Launch the Web browser from your host.
2. Enter the switch name or IP address in the URL field
For example:
http://switch name/
3. Press Enter.
Web Tools launches, displaying the default view, Fabric View.
2–6 Web Tools Version 3.0.x/4.0.x User Guide
Page 37

This chapter describes the views and interfaces available through the Fabric View of
Web Tools, which consist of the following:
• Fabric Events View on page 3–7
• Fabric Topology View on page 3–9
• Name Server Table View on page 3–11
• Zone Administration View V3.0.x (Optional Software) on page 3–13
• Zone Administration View V4.0.x (Optional Software) on page 3–68
NOTE: Switch/Fabric administration can be accomplished through different methods, such as
through Telnet, SNMP, and the Web, any of which can occur simultaneously.
Fabric View Page
The Fabric View is the first web page that displays when you connect to a switch.The
Fabric View provides access to specific information about each switch, in addition to
other options, and a legend explaining the colors used to indicate switch status.
3
Fabric View
To launch Web Tools and access Fabric View:
1. Launch the web browser.
2. Enter the switch name or IP address in the Location/Address field and press
Enter.
For example: http://switch name_or_ip
NOTE: This switch is assumed to be the local domain.
Web Tools launches, displaying Fabric View in detailed view as shown in
Figure 3–1. The Fabric View consists of two logical parts:
• Control Panel
• Switch Panel
3–1Web Tools Version 3.0.x/4.0.x User Guide
Page 38

Fabric View
Control Panel Switch Panel
Figure 3–1: Detailed view of Fabric View
To see the Summary view of the Fabric View, click the Summary View button on the
left side of the Fabric View.
Fabric View with the Summary View selected is displayed as shown in Figure 3–2.
3–2 Web Tools Version 3.0.x/4.0.x User Guide
Page 39

Figure 3–2: Summary view of Fabric View
Fabric View
Fabric View of an StorageWorks Core switch and StorageWorks 2 Gb SAN switch is
displayed as shown in Figure 3–3.
3–3Web Tools Version 3.0.x/4.0.x User Guide 3–3
Page 40

Fabric View
Figure 3–3: Detailed Fabric View
Buttons and Icons
Table 3–1 describes the buttons and icons found in the control panel of the Fabric
View.
Table 3–1: Button and Icons in the Control Panel
The Control Panel (on the left side of Figure 3–1)
Fabric Events Select to open Fabric Events View. The Fabric Events
View provides a running log of events in the fabric.
For additional information, see the “Fabric Events View”
on page 3–7.
3–4 Web Tools Version 3.0.x/4.0.x User Guide
Page 41

Fabric View
Table 3–1: Button and Icons in the Control Panel (Continued)
Fabric Topology Select to open Fabric Topology View. The Fabric
Topology View summarizes the physical configuration
of the fabric from the perspective of the “local domain”
(the domain of the switch entered as a URL in the web
browser).
For additional information, see the “Fabric Topology
View” on page 3–9.
Name Server Select to open Name Server Table View. The Name
Server Table View provides the name server entries
listed in the Simple Name Server database.
For additional information, see the “Name Server Table
View” on page 3–11.
Zone Admin Select to open Zone Administration View. This view is
available only if a Zoning license is installed (for
additional information, see the “Zone Administration
View V3.0.x (Optional Software)” on page 3–13 or
“Zone Administration View V4.0.x (Optional Software)”
on page 68.
Summary/Detail View Select this button to view either the Summary or Detail
version of Fabric View. The Summary version shows
abbreviated switch panels (see Figure 3–2). The
default view is Detail.
In the V3.0.x Fabric View, Summary and Detail appear
as one alternating button. In the 4.0.x Fabric View, the
Detail and Summary views appear as two separate
buttons.
Refresh Select to update the Fabric View to display the latest
changes. The Refresh button icon will flash when new
information when the fabric shown in the Fabric View is
not representative of the one that is actually present.
The Refresh button is only available on 4.0.x switches.
3–5Web Tools Version 3.0.x/4.0.x User Guide 3–5
Page 42

Fabric View
Table 3–1: Button and Icons in the Control Panel (Continued)
Status legend Defines meaning of colors visible in the background of
the switch icons. Each color indicates a different
operational state:
Green - Healthy
Yellow - Marginal (mix of good and faulty readings)
Red - Down (more than two faulty readings)
Gray - Unknown or unmonitored
If no data is available from a switch, the color displays
as gray.
NOTE: For all statuses that are based on errors per time
interval, any errors will not cause the status to show faulty
until the entire sample interval has passed.
The Switch Panel (on the right side of Figure 3–1)
Switch Select to open Switch View for the switch. Each switch
type is represented by a different icon. The background
color around the icon indicates the status of the switch
For information about this view, see “Switch View” on
page 4–1.
Events Select to open Switch Events View to display the switch
events log
For information about this view, see “Switch Events
View” on page 4–6.
Admin Select to open Switch Administration View.
Telnet Select to launch the Telnet Interface for the switch
For information about this view, see “Telnet Interface”
on page 4–130.
3–6 Web Tools Version 3.0.x/4.0.x User Guide
Page 43

Fabric View
Table 3–1: Button and Icons in the Control Panel (Continued)
Displayed only in 4.0.x
polled at: or
unreachable since:
Name: The name of the switch.
Fabric OS version: Version of Fabric OS installed on the switch.
Domain ID:
Ethernet IP:
Ethernet Mask: Ethernet subnetmask.
FCnet IP: Fibre channel IP address.
FCnet Mask: Fibre channel subnetmask.
Gateway IP: Gateway IP address.
WWN: Unique numeric identifier for the switch; assigned by
Time of the last status check, or if currently unavailable,
the time of the last successful status check.
A number that uniquely identifies the switch within the
fabric. Ethernet IP address.
Displayed only in 3.0
manufacturer.
Fabric Events View
The Fabric Events View provides a running log of events for all switches in the fabric.
Accessing Fabric Events View
1. Launch Web Tools, displaying Fabric View.
2. Select the Fabric Events icon.
For more information, see “Buttons and Icons” on page 3–4. The Fabric Events
View displays, as shown in Figure 3–4.
3–7Web Tools Version 3.0.x/4.0.x User Guide 3–7
Page 44

Fabric View
Figure 3–4: Fabric Events view
NOTE: To sort the events by a particular column, select the column header. To resize a column,
drag the column divider.
3–8 Web Tools Version 3.0.x/4.0.x User Guide
Page 45

Table 3–2 contains a description of the columns in the Fabric Events view.
Table 3–2: Fabric Events View Columns Descriptions
Switch Displays the name of switch.
Num... (number) Displays the event number for affected switch.
Time Displays the time of event.
Displays the number of consecutive occurrences of
Count
Level
Message Displays the description of event.
same event.
Displays the severity level of event:
1. panic (switch reboots)
1. critical
2. error
3. warning
4. information
5. debug
Fabric View
Fabric Topology View
The Fabric Topology View summarizes the physical configuration of the fabric from
the perspective of the “local domain” (the domain of the switch entered as a URL in
the web browser). This includes information about the “destination domains” (all
other domains in the fabric) and the paths between each destination domain and the
local domain.
Accessing Fabric Topology View
1. Launch Web Tools, displaying Fabric View.
2. Select the Fabric Topology icon.
For more information, see “Buttons and Icons” on page 3–4.
The Fabric Topology View displays as shown in Figure 3–5.
3–9Web Tools Version 3.0.x/4.0.x User Guide 3–9
Page 46

Fabric View
Figure 3–5: Fabric Topology view
Table 3–3 gives a description of the fields in the Fabric Topology view.
Table 3–3: Fields in the Fabric Topology View
View Fabric Topology
from Switch [switch
name]:
There are a total of [n]
domains in the fabric.
Local domain ID: Displays a number that uniquely identifies the local
Domain ID: (may be more
than one)
3–10 Web Tools Version 3.0.x/4.0.x User Guide
Lists the switch in the domain that is assumed to be
the local domain.
Displays the number of domains in the fabric.
switch within the fabric, and the name of the switch.
Displays a number that uniquely identifies the switch
within the fabric, and the name of the switch.
Page 47

Table 3–3: Fields in the Fabric Topology View (Continued)
Active Paths: Displays information about each destination
domain, including information about each of the
paths between that domain and the local domain.
Metric to Reach the
Domain:
For each Path: Displays the following for each path:
Destination Domain ID: Displays the ID of the destination domain that is
Destination World
Wide Name:
Number of Paths: Displays the number of active paths between the
Displays cost of reaching destination domain.
• Output Ports
• Input Ports
• Total Bandwidth
• Bandwidth Demand (only displayed in 4.0.x)
•Hop Count
•Flag
described in the lines following the ID. This
information and the two lines following it display for
each destination domain in the fabric.
Displays the WWN of the destination domain.
destination domain and the local domain.
Fabric View
Name Server Table View
The Name Server Table View provides the name server entries listed in the Simple
Name Server database. This includes all name server entries for the fabric, not only
those that are local to the local domain. Each row in the table represents a different
device.
Accessing Name Server Table View
1. Launch Web Tools, displaying Fabric View.
2. Select the Name Server icon.
For more information, see “Buttons and Icons” on page 3–4.
3–11Web Tools Version 3.0.x/4.0.x User Guide 3–11
Page 48

Fabric View
Figure 3–6: Name Server Table view
The Name Server Table View displays as shown in Figure 3–6.
NOTE: To sort the events by a particular column, click the column header. To resize a column,
drag the column divider.
Table 3–4 lists fields that are included in the Name Server Table view.
Table 3–4: Name Server Table View Fields
Auto Refresh Check to enable Auto Refresh or uncheck to disable.
Auto Refresh
Interval
Refresh Select to refresh the window immediately.
OK Select to close the window.
3–12 Web Tools Version 3.0.x/4.0.x User Guide
If Auto Refresh is checked, enter the number of seconds for
the refresh interval.
Page 49

Fabric View
The Name Server Table also includes the columns listed in Table 3–5.
Table 3–5: Name Server Table View Additional Columns
Domain # Displays the domain ID of the switch to which the device is
connected.
Port # Displays the number of the switch port to which the device
is connected.
Port ID Displays the port ID of the device (24-bit hexadecimal
value).
Port Type Displays the port type of the device (N for fabric direct
attached port or NL for fabric direct attached loop port).
Port WWN Displays the World Wide Name of the device port.
Node WWN Displays the World Wide Name of the device node.
Symbolic Name Displays the symbolic name of the device assigned
through the SCSI INQUIRY command.
FC4 Types Displays the Fibre Channel FC4 layer types supported by
the device, such as IP or FCP.
COS Displays the Fibre Channel classes of service supported
by the device.
Fabric Port Name Displays the name of the fabric port in use by the device.
Port IP Address Displays the IP address of the fabric port.
Hard Address Displays the hard address of the fabric port.
Member of Zones Displays the zones to which this device belongs. This
column does not update when the table is refreshed. To
view updated zoning information, close and reopen the
Name Server Table.
Zone Administration View V3.0.x (Optional Software)
A Zoning license and administrative privileges are required to access this view. If a
switch or device is added or removed from the network, it is necessary to save the
changes and relaunch the Zone Administration view for the changes to take effect.
NOTE: The following section is intended to describe Zoning configurations when using Web
Tools V3.0.x. For specific 4.0.x Zoning information, see “Zone Administration View V4.0.x
(Optional Software)” on page 3–68. For more detailed information about Zoning, refer to the HP
StorageWorks Zoning Version 3.0.x/4.0.x User Guide.
3–13Web Tools Version 3.0.x/4.0.x User Guide 3–13
Page 50

Fabric View
Accessing the Zone Administration View
1. Launch the web browser.
2. Enter the switch name or IP address in the Location/Address field and click Enter.
For example: http://switch name
This switch is assumed to be in the local domain.
Web Tools launches, displaying Fabric View.
3. Select Zone Admin.
A prompt displays requesting User Name and Password as shown in Figure 3–7.
Figure 3–7: Enter Network Password window
4. Enter User Name and Password.
5. Click OK.
The Zoning Selection menu displays, as shown in Figure 3–8.
NOTE: For information specific to QuickLoop to be available, the QuickLoop switch must
be the local domain.
3–14 Web Tools Version 3.0.x/4.0.x User Guide
Page 51

Figure 3–8: Zoning Selection window
Fabric View
A description of each of the zoning schemes is shown in Table 3–6.
Table 3–6: V3.0.x Zoning Schemes
Switch/Port Level
Zoning
WWN Level Zoning All aliases, zoning, and configuration file operations
AL_PA Level Zoning All aliases, zoning, and configuration file operations
Mixed Level Zoning In this mode, any object can be selected to be a
All alias, zoning and configuration file operations
must be on ports. Aliases, zones, and configuration
files which have objects other than ports cannot be
selected or operated on.
must be on WWNs. Aliases, zones, and configuration
files which have objects other than WWNs cannot be
selected or operated on.
must be on AL_PA in a QuickLoop. Aliases, zones,
and configuration files which have objects other than
AL_PAs in a QuickLoop cannot be selected or
operated on.
member of a zone, alias, or configuration file.
3–15Web Tools Version 3.0.x/4.0.x User Guide 3–15
Page 52

Fabric View
When administering Zoning, the following steps are recommended:
1. Define zone aliases to establish groupings.
2. Add zone members.
3. Place zones into one or more zone configurations.
4. Enable one of the zone configurations (only one can be enabled at a time).
There are three separate methods for adding members to a zone. Each method
corresponds to a zoning “mode,” and the combination of the methods corresponds to
an additional mode. Once a mode is selected, all operations on zones must use the
zoning object selected. Zoning operations must correspond to that mode, and any
zones, aliases, and configuration files which cannot be selected.
Switch/Port Level Zoning
Upon selecting the Switch/Port Level Zoning button from the Zoning Selection menu
and selecting OK, the Switch/Port Level Zoning menu with the Port Alias tab displays
as shown in Figure 3–9.
Following is a list of the tabs provided in the Switch/Port Level Zoning menu:
• Port Alias
•Port Zone
•QuickLoop
• Port Fabric Assist
• Port Config
3–16 Web Tools Version 3.0.x/4.0.x User Guide
Page 53

Port Alias Tab
The Port Alias tab shows only Domain/Ports that are in the fabric. This tab is used to
configure zones that consist only of Domain/Ports and aliases that contain only
Domain/Ports. The Port Alias tab is displayed as shown in Figure 3–9.
Fabric View
Figure 3–9: Alias tab of the Switch/Port Level Zoning menu
3–17Web Tools Version 3.0.x/4.0.x User Guide 3–17
Page 54

Fabric View
Table 3–7 gives descriptions of the fields on the Port Alias tab.
Table 3–7: Port Alias Tab Fields
Alias Name Select an existing alias name to be modified.
Create Alias Select to create a new alias. A new alias dialog
displays. Enter a new alias name that is unique. The
new alias name cannot contain spaces.
Delete Alias Select to delete the alias selected in the Alias Name
field. Deleting an alias automatically removes it from all
zones.
Rename Alias Select to rename the alias selected in the Alias Name
field. A dialog displays in which you can edit the alias
name. Renaming an alias automatically renames it in all
zones.
Member Selection List This field contains a list of potential alias members,
including switches, ports, WWNs, and QuickLoop
AL_PAs, and Fabric Assists.
Add Mem Select to add the item selected in the Member Selection
List to the Alias Members list. You can add individual
ports or an entire switch. If a switch is added, all ports
on the switch are added. To add a device WWN, select
either a node WWN (folder icon) or port WWN (blue
circle icon) from the WWN sub-tree.
Remove Mem Select to remove the member selected from the Alias
Name Members Selection list.
Alias Members This field lists the members of the alias selected in the
Alias Name field. The name of this list depends on the
name of the selected alias. If no alias is selected, the
name displays as “Null Members.”
Search Mem Select to search for a switch name, WWN, alias, zone,
or QuickLoop in the Member Selection List based on
the type of objects displayed in that list.
Add FA Host Click to add an FA Host that currently is not part of the
fabric.
Add Sw/Port Select to add a switch/port combination that currently is
not part of the fabric.
Add Switch/Port/Host Click to add a switch/port/host combination that
currently is not part of the fabric.
3–18 Web Tools Version 3.0.x/4.0.x User Guide
Page 55

Fabric View
Table 3–7: Port Alias Tab Fields (Continued)
Ref Zone Select to refresh the local zoning database copied from
the switch. This button automatically flashes red/gray if
the fabric zoning data is changed by another client.
A/D WWN Select to add or delete a WWN to or from all the aliases
and zones defined.
Rpl WWN Select to replace a WWN with another one in all aliases
and zones defined.
OK Applies the changes to the switch and exits the frame.
Apply Select to apply all changes made since the Zone
Administration View was opened, including changes
made on other tabs in the view. Changes cannot be
cancelled once applied.
Close Select to exit the frame without making any changes to
the switch.
Clr All Select to clear the zoning database, disable the
effective configuration (if there is one), and then commit
to the switch.
3–19Web Tools Version 3.0.x/4.0.x User Guide 3–19
Page 56

Fabric View
Port Zone Tab
Use the Port Zone tab to specify which ports on a switch are to be in the selected zone
and to create and manage zones. A zone can have one or multiple members, and can
include switches, ports, WWNs, aliases, and QuickLoop AL_PAs. The Port Zone tab
is shown in Figure 3–10.
Figure 3–10: The Port Zone tab of the Switch/Port level zoning menu
3–20 Web Tools Version 3.0.x/4.0.x User Guide
Page 57

Fabric View
Table 3–8 gives descriptions of the fields on the Port Zone tab.
Table 3–8: Port Zone Tab Fields
Zone Name To modify an existing zone, select a zone name.
Create Zone Select to create a new zone. A dialog displays in which you
can enter the name of the new zone. All names must be
unique and contain no spaces.
Delete Zone Select to delete the zone selected in the Zone Name field.
Deleting a zone automatically removes it from all zone
configurations.
Rename Zone Select to edit the name of the zone selected in the Zone
Name field. A dialog displays in which you can edit the
name of the zone.
Search Mem Select to search the list of potential zone members.
Member
Selection List
Add Mem Select to add the member selected in the Member Selection
Remove Mem Select to remove the selected member from the Zone name
[Zone name]
Members
Ref Zone Click to refresh the local zoning database copied from the
A/D WWN Click to add or delete a WWN to or from all the aliases and
Rpl WWN Click to replace a WWN with another one in all aliases and
A list of potential zone members, including switches, ports,
WWNs, aliases, and QuickLoop AL_PAs, and Fabric
Assists.
List to the Zone Members list. If an entire switch is selected,
all ports on the switch are added to the zone. You can also
select individual ports. To add a device WWN, select either
a node WWN (folder icon) or port WWN (blue circle icon)
from the WWNs sub-tree. To add an alias to the zone, select
it from the Aliases sub-tree (the alias must already exist).
Members list.
This field lists members of the zone selected in the Zone
Name field. The name of this list depends on the name of
the selected zone. If no zone is selected, the name displays
as “null Members.”
switch. This button automatically flashes red/gray if the
fabric zoning data is changed by another client.
zones defined.
zones defined.
3–21Web Tools Version 3.0.x/4.0.x User Guide 3–21
Page 58

Fabric View
Table 3–8: Port Zone Tab Fields (Continued)
OK Applies the changes to the switch and exits the frame.
Apply Click to apply all changes made since the Zone
Administration View was opened, including changes made
on other tabs in the view. Changes cannot be cancelled
once they are applied.
Close Click to exit the window without making any changes to the
switch.
Clr All Select to clear the zoning database, disable the effective
configuration (if there is one), and then commit to the
switch.
3–22 Web Tools Version 3.0.x/4.0.x User Guide
Page 59

QuickLoop Tab
A QuickLoop license is required to use this tab. You can use the QuickLoop tab to
create and manage QuickLoops if used in conjunction with Zoning. For information
on managing the QuickLoop feature separately, see “QuickLoop Tab (Optional
Software)” on page 4–77 in this document.
NOTE: QuickLoop feature is not supported by V4.0.x switches.
The QuickLoop tab is shown in Figure 3–11.
Fabric View
Figure 3–11: The QuickLoop tab of the Switch/Port Level Zoning menu
3–23Web Tools Version 3.0.x/4.0.x User Guide 3–23
Page 60

Fabric View
Table 3–9 gives descriptions of the fields on the QuickLoop tab.
Table 3–9: QuickLoop Tab Fields
QuickLoop Name To modify an existing QuickLoop, select a QuickLoop
name.
Create Qloop Click to create a new QuickLoop. A dialog displays in
which you can enter the name of the new QuickLoop. All
names must be unique and contain no spaces.
Delete Qloop Click to delete the QuickLoop selected in the QuickLoop
Name field. Deleting a QuickLoop automatically removes
it from all aliases, zones, and zone configurations,
including the associated AL_PAs.
Rename Qloop Click to edit the name of the QuickLoop selected in the
QuickLoop Name field. A dialog displays in which you can
edit the name of the QuickLoop.
Switch Selection List A list of the switches available to add to the QuickLoop.
Search Mem Click to search for a switch name, WWN, alias, zone, or
QuickLoop in the Switch Selection List based on the type
of objects displayed in that list.
Add Mem Click to add the switch selected in the Switch Selection
List to the QuickLoop Members list.
Remove Mem Click to remove the selected member from the QuickLoop
Name list.
[QuickLoop Name]
Members
A list of the members of the QuickLoop currently selected
in the QuickLoop Name field. The name of this list
depends on the name of the selected QuickLoop. If no
QuickLoop is selected, the name displays as “null
Members.”
Apply Click to apply all changes made since the Zone
Administration View was opened, including changes
made on other tabs in the view. Changes cannot be
cancelled once they are applied.
Close Click to cancel all changes since the changes were last
applied and to exit Zone Administration. Changes cannot
be cancelled once they are applied.
Clr All Select to clear the zoning database, disable the effective
configuration (if there is one), and then commit to the
switch.
3–24 Web Tools Version 3.0.x/4.0.x User Guide
Page 61

Port Fabric Assist Tab
Use the Port Fabric Assist tab to create and manage Fabric Assists. A QuickLoop
license is required to use this tab. The Port Fabric Assist tab is shown in Figure 3–12.
Fabric View
Figure 3–12: The Port Fabric Assist tab of the Switch/Port Level Zoning menu
3–25Web Tools Version 3.0.x/4.0.x User Guide 3–25
Page 62

Fabric View
A description of the fields on the Port Fabric Assist tab is provided in Table 3–10.
Table 3–10: Port Fabric Assist Tab Fields
FA Name Select the existing Port Fabric Assist name to be
modified.
Create FA Click to create a new Port Fabric Assist name. A
dialog displays. Enter the name of the new Port
Fabric Assist. All names must be unique and
contain no spaces.
Delete FA Click to delete the Port Fabric Assist selected in
the FA Name field. Deleting a Port Fabric Assist
automatically removes it from all aliases, zones,
and zone configurations, including the
associated AL_PAs.
Rename FA Click to edit the name of the Port Fabric Assist
selected in the FA Name field.
Member Selection List This field displays a list of members available to
add to the Port Fabric Assist list.
Add FA Host Click to add the selected item as a host to the
Port Fabric Assist name list. Only a domain port
or a WWN can be added as a host.
Add Mem Click to add the member selected in the Member
Selection List to the Port Fabric Assist name list.
Remove Mem Click to remove the selected member from the
Port Fabric Assist name list.
Search Mem Click to search for a switch name, WWN, alias,
zone, QuickLoop, or FA Zone in the Member
Selection List based on the type of objects
displayed in that list.
Add Switch/Port Click to add a switch/port combination that is not
currently part of the fabric.
Add Switch/Port/Host Click to add a switch/port/host combination that
currently is not part of the fabric.
3–26 Web Tools Version 3.0.x/4.0.x User Guide
Page 63

Table 3–10: Port Fabric Assist Tab Fields (Continued)
Fabric View
[Fabric Assist Name]
Members
This field displays a list of the members that
belong to the Port Fabric Assist currently
selected in the FA Name field. The name of this
list depends on the name of the Port Fabric
Assist selected. If no Port Fabric Assist is
selected, the name displays as “null Members.”
Ref Zone Click to refresh the local zoning database copied
from the switch. This button automatically
flashes red/gray if the fabric zoning data is
changed by another client.
A/D WWN Click to add or delete a WWN to or from all the
aliases, zones, and FA zones defined.
Rpl WWN Click to replace a WWN with another one in all
aliases, zones, and FA zones defined.
OK Click to apply changes made in this window and
exit the window.
Apply Click to apply all changes made including
changes made on other tabs in the view.
Changes in this window cannot be cancelled
once they are applied.
Close Click to exit the window without making any
changes to the switch.
Clr All Click to clear all aliases, zones, configs, or FA
zones locally on the switch.
3–27Web Tools Version 3.0.x/4.0.x User Guide 3–27
Page 64

Fabric View
Port Config Tab
Use the Port Config tab to create and manage zone configurations. Zone
configurations are used to enable or disable a group of zones at the same time. The
Port Config tab is shown in Figure 3–13.
Figure 3–13: The Port Config tab of the Switch/Port Level Zoning menu
3–28 Web Tools Version 3.0.x/4.0.x User Guide
Page 65

Fabric View
Table 3–11 gives descriptions of the fields and buttons that appear on the Port Config
tab.
Table 3–11: Port Config Tab Fields
Cfg Name Select an existing configuration to modify.
Create Cfg Click to create a new configuration. A dialog displays. Enter
the name of the new configuration. All names must be
unique and contain no spaces.
Delete Cfg Click to delete the configuration selected in the Cfg Name
field.
Rename Cfg Click to edit the name of the configuration selected in the Cfg
Name field.
Zone/QLoop
Selection List
Add Mem Click to add the switch selected in the Zone/QLoop Selection
Remove Mem Click to remove the selected member from the Config
Search Mem Click to search for a switch name, WWN, alias, zone, or
Config Members The members of the configuration selected in the Cfg Name
Enable Config Check to enable the configuration selected in the Cfg Name
Disable Zoning Check to disable zoning.
Analyze Config Analyzes the configuration that is selected along with its
Refresh Fabric Click to refresh the fabric view with the latest Domain/Port
Ref Zone Click to refresh the local zoning database copied from the
This field provides a list of the zones and QuickLoops
available to add to the configuration.
List to the Config Members list.
Members list.
QuickLoop in the Member Selection List based on the type of
objects displayed in that list.
field. The name of this list depends on the selection. Only
one configuration can be enabled at a time; if none are
enabled, zoning is not active in the fabric.
field, or uncheck to disable it.
member zones and aliases. A zoning configuration error
screen (see Figure 3–34) displays in the event of a conflict.
and WWN changes.
switch. This button automatically flashes red/gray if the fabric
zoning data is changed by another client.
3–29Web Tools Version 3.0.x/4.0.x User Guide 3–29
Page 66

Fabric View
Table 3–11: Port Config Tab Fields (Continued)
A/D WWN Click to add or delete a WWN to or from all the aliases, and
zones defined.
Rpl WWN Click to replace a WWN with another one in all aliases and
zones defined.
Apply Click to apply all changes made since the Zone
Administration View was opened, including changes made
on other tabs in the view. Changes cannot be cancelled once
they are applied.
Close Click to exit the window without making any changes to the
switch.
Ok Applies the changes to the switch and exits the window.
Clr All Select to clear the zoning database, disable the effective
configuration (if there is one), and then commit to the switch.
3–30 Web Tools Version 3.0.x/4.0.x User Guide
Page 67

Zoning Configuration Analysis screen
The Zoning Configuration Analysis screen displays a summary of the saved
configuration and attempts to point out some of the zoning conflicts before applying
the changes to the switch. Some of the potential errors it might catch are:
• Ports/WWNs/Devices that are part of the selected configuration, but not part of
the fabric.
• Zones with only a single member.
The Zoning Configuration Analysis screen is shown in Figure 3–14.
Fabric View
Figure 3–14: Zoning Configuration Analysis screen
3–31Web Tools Version 3.0.x/4.0.x User Guide 3–31
Page 68

Fabric View
WWN Level Zoning
With WWN Zoning, only World Wide Names are displayed on the tabs. This window
is used to configure aliases, zones, and configuration files. After selecting the WWN
Level Zoning button from the Zoning Selection menu and clicking OK, the WWN
Level Zoning menu displays.
Following is a list of the tabs provided in the WWN Level Zoning menu:
• WWN Alias
• WWN Zone
•QuickLoop
• WWN Fabric Assist
• WWN Config
3–32 Web Tools Version 3.0.x/4.0.x User Guide
Page 69

WWN Aliases
Use the WWN Alias tab to configure WWN Aliases.
The WWN Alias tab is shown in Figure 3–15.
Fabric View
Figure 3–15: WWN Alias tab of the WWN Level Zoning menu
3–33Web Tools Version 3.0.x/4.0.x User Guide 3–33
Page 70

Fabric View
Table 3–12 gives descriptions of the fields on the WWN Alias tab.
Table 3–12: WWN Alias Tab Fields
Alias Name Select an existing alias to modify.
Create Alias Click to create a new alias. A dialog displays in which
you can enter the name of the new alias. All names must
be unique and contain no spaces.
Delete Alias Click to delete the alias selected in the Alias Name field.
Deleting an alias automatically removes it from all zones.
Rename Alias Click to rename the alias selected in the Alias Name
field. A dialog displays in which you can edit the alias
name. Renaming an alias automatically renames it in all
zones.
Member Selection
List
A list of potential alias members, including switches,
ports, WWNs, and QuickLoop AL_PAs, and Fabric
Assists.
Alias Members This field lists the members of the alias selected in the
Alias Name field. The name of this list depends on the
name of the selected alias. If no alias is selected, the
name displays as “Null Members.”
Search Mem Click to search for a switch name, WWN, alias, zone, or
QuickLoop, in the Member Selection List based on the
type of objects displayed in that list.
Add FA Host Click to add the selected item as a host to the Members
list. Only a domain port or a WWN can be added as a
host.
Add Mem Click to add the item selected in the Member Selection
List to the Alias Members list. You can add individual
ports or an entire switch. If a switch is added, all ports on
the switch are added. To add a device WWN, select
either a node WWN (folder icon) or port WWN (blue
circle icon) from the WWN sub-tree.
Remove Mem Click to remove the selected member from the
Configuration name list.
Add WWN Click to add a WWN that currently is not part of the
Fabric.
3–34 Web Tools Version 3.0.x/4.0.x User Guide
Page 71

Fabric View
Table 3–12: WWN Alias Tab Fields (Continued)
Ref Zone Click to refresh the local zoning database copied from
the switch. This button automatically flashes red/gray if
the fabric zoning data is changed by another client.
A/D WWN Click to add or delete a WWN to or from all the aliases
and zones defined.
Rpl WWN Click to replace a WWN with another one in all aliases
and zones defined.
OK Click to apply the changes to the switch and exit the
window.
Apply Click to apply the changes to the switch.
Close Click to exit the window without making any changes to
the switch.
Clr All Select to clear the zoning database, disable the effective
configuration (if there is one), and then commit to the
switch.
3–35Web Tools Version 3.0.x/4.0.x User Guide 3–35
Page 72

Fabric View
WWN Zone
Use the WWN Zone tab to specify the members of the WWN Zone. In this window,
only switches and WWN are available to be selected as members of the zone.
The WWN Zone tab is shown in Figure 3–16.
Figure 3–16: WWN Zone tab of the WWN Level Zoning menu
3–36 Web Tools Version 3.0.x/4.0.x User Guide
Page 73

Fabric View
Table 3–13 gives descriptions of the fields on the WWN Zone tab.
Table 3–13: WWN Zone Tab Fields
Zone Name Select an existing zone member to modify.
Create Zone Click to create a new zone member.
Delete Zone Click to delete a zone member.
Rename
Zone
Member
Selection
List
Zone
Members
Search Mem Click to search for a switch name, WWN, alias, zone, or QuickLoop
Add Mem Click to add a member from the Member Selection list into the
Remove
Mem
Add WWN Click to add a WWN that is not currently part of the Fabric.
Ref Zone Click to refresh the local zoning database copied from the switch.
A/D WWN Click to add or delete a WWN to or from all the aliases and zones
Rpl WWN Click to replace a WWN with another one in all aliases and zones
OK Click to apply the changes to the switch and exit the switch.
Apply Click to apply the changes to the switch.
Close Click to exit the window without making any changes to the switch.
Clr All Select to clear the zoning database, disable the effective
Click to rename a zone member.
This field displays a list of potential zone members, including
switches, ports, WWNs, and QuickLoop AL_PAs, and Fabric
Assists.
This field lists the zone members selected in the Zone Name field.
The name on this list depends on the name of the selected zone
member. If a name is not selected, the name displays as “null
Members.”
in the Member Selection List based on the type of objects
displayed in that list.
Zone Member contents.
Click to remove a member from the Zone Member list.
This button automatically flashes red/gray if the fabric zoning data
is changed by another client.
defined
defined.
configuration (if there is one), and then commit to the switch.
3–37Web Tools Version 3.0.x/4.0.x User Guide 3–37
Page 74

Fabric View
QuickLoop
A QuickLoop license is required to use this tab. You can use the QuickLoop tab to
create and manage QuickLoops if used in conjunction with Zoning. For information
on managing the QuickLoop feature separately, see “Loop Tab” on page 5–8.
NOTE: The QuickLoop feature is not supported by 4.0.x switches.
The QuickLoop tab is shown in Figure 3–17.
Figure 3–17: QuickLoop tab of the WWN Level Zoning menu
3–38 Web Tools Version 3.0.x/4.0.x User Guide
Page 75

Fabric View
Table 3–14 provides a description of the fields on the QuickLoop tab.
Table 3–14: QuickLoop Tab Fields
QuickLoop Name Select an existing QuickLoop member to modify.
Create Qloop Click to create a new QuickLoop member.
Delete Qloop Click to delete a QuickLoop member.
Rename Qloop Click to rename a QuickLoop member.
Switch Selection List This field displays a list of potential QuickLoop members,
including switches, ports, WWNs, and QuickLoop
AL_PAs, and Fabric Assists.
QuickLoop Members This field contains a list of the zone members selected in
the QuickLoop Name field. The name on this list
depends on the name of the selected QuickLoop
member. If a name is not selected, the name displays as
“null Members.”
Search Mem Click to search for a switch name, WWN, Alias, Zone or
QuickLoop in the Member Selection List based on the
type of objects displayed in that list.
Add Mem Click to add a member from the member selection list
into the QuickLoop member contents.
Remove Mem Click to remove a member from the QuickLoop member
list when selected.
Ref Zone Click to refresh the local zoning database copied from
the switch. This button automatically flashes red/gray if
the fabric zoning data is changed by another client.
A/D WWN Click to add or delete a WWN to or from all the aliases
and zones defined.
Rpl WWN Click to replace a WWN with another one in all aliases
and zones defined.
OK Click to apply the changes to the switch and exit the
switch.
Apply Click to apply the changes to the switch.
Close Click to exit the window without making any changes to
the switch.
3–39Web Tools Version 3.0.x/4.0.x User Guide 3–39
Page 76

Fabric View
WWN Fabric Assist
Use the WWN Fabric Assist tab to create and manage WWN Fabric Assists. A
QuickLoop license is required to use this tab. The WWN Fabric Assist tab is shown in
Figure 3–18.
Figure 3–18: WWN Fabric Assist tab of the WWN Level Zoning menu
3–40 Web Tools Version 3.0.x/4.0.x User Guide
Page 77

Fabric View
Table 3–15 gives descriptions of the fields on the WWN Fabric Assist tab.
Table 3–15: WWN Fabric Assist Tab Fields
FA Name Select an existing WWN Fabric Assist name to
modify.
Create FA Click to create a new WWN Fabric Assist. A dialog
displays. Enter the name of the new WWN Fabric
Assist. All names must be unique and contain no
spaces.
Delete FA Click to delete the WWN Fabric Assist selected in
the FA Name field. Deleting a WWN Fabric Assist
automatically removes it from all aliases, zones,
and zone configurations, including the associated
AL_PAs.
Rename FA Click to edit the name of the WWN Fabric Assist
selected in the FA Name field.
Member Selection List This field displays a list of members available to
add to the WWN Fabric Assist.
Add FA Host Click to add the selected item as a host to the
WWN Fabric Assist name list. Only a domain port
or a WWN can be added as a host.
Add Mem Click to add the member selected in the Member
Selection List to the WWN Fabric Assist name list.
Remove Mem Click to remove the selected member from the
WWN Fabric Assist name list.
Search Mem Click to search for a switch name, WWN, alias,
zone, QuickLoop, or FA Zone in the Member
Selection List based on the type of objects
displayed in that list.
[WWN Fabric Assist Name]
FA Membe rs
A list of the members that belong to the WWN
Fabric Assist currently selected in the FA Name
field. The name of this list depends on the name of
the WWN Fabric Assist selected. If no WWN
Fabric Assist is selected, the name displays as
“null Members.”
3–41Web Tools Version 3.0.x/4.0.x User Guide 3–41
Page 78

Fabric View
Table 3–15: WWN Fabric Assist Tab Fields (Continued)
Ref Zone Click to refresh the local zoning database copy
from the switch. This button would automatically
flash red/gray if the fabric zoning data is changed
by another client.
Add WWN Click to add a WWN that is not currently part of the
Fabric.
Add WWN Host Click to add a WWN Host that is not currently part
of the Fabric.
A/D WWN Click to add/delete a WWN to/from all the aliases,
zones, and FA zones defined.
Rpl WWN Click to replace a WWN with another one in all
aliases, zones, and FA zones defined.
OK Select OK to the changes to the switch and exit
the window.
Apply Click to apply all changes made including changes
made on other tabs in the view. Changes cannot
be cancelled once they are applied.
Close Click to exit the window without making any
changes to the switch.
Clr All Select to clear the zoning database, disable the
effective configuration (if there is one), and then
commit to the switch.
3–42 Web Tools Version 3.0.x/4.0.x User Guide
Page 79

WWN Config
Use the WWN Config tab to specify which zones comprise a WWN Zone
Configuration file. The WWN Config tab is shown in Figure 3–19.
Fabric View
Figure 3–19: WWN Config tab of the WWN Level Zoning menu
3–43Web Tools Version 3.0.x/4.0.x User Guide 3–43
Page 80

Fabric View
Table 3–16 gives descriptions of the fields on the WWN Config tab.
Table 3–16: WWN Config Tab Fields
Cfg Name Select to modify an existing WWN configuration
name to be modified.
Create Cfg Click to create a new WWN configuration.
Delete Cfg Click to delete a WWN configuration.
Rename Cfg Click to rename a WWN configuration.
Zone/QLoop Selection List This field displays a list of Zone and QuickLoop
members available to add to the WWN
configuration.
Add Mem Click to add a member from the config members
list into the zone selection list.
Remove Mem Click to remove a member from the zone
selection list into the Config Member list.
Search Mem Click to search for a switch name, WWN, alias,
zone, or Qloop in the Zone Selection List based
on the type of objects displayed in that list.
Config Members This field displays a list of the members that
belong to the WWN Configuration currently
selected in the Cfg Name field. The name of this
list depends on the name of the WWN
configuration selected. If WWN configuration is
not selected, the name displays as “null
Members.”
Analyze Config Click to analyze the configuration that is selected
along with its member zones and aliases. A
zoning error screen (see Figure 3–14) appears in
the event of a conflict.
Enable Config If this option is checked, and the Apply button
pressed, the selected configuration would be
used for zoning the fabric.
Disable Config Click the Disable Config radio button to disable
the selected WWN Zone configuration.
Refresh Fabric Click to refresh the fabric view with the latest
Domain/Port and WWN changes.
3–44 Web Tools Version 3.0.x/4.0.x User Guide
Page 81

Fabric View
Table 3–16: WWN Config Tab Fields (Continued)
Ref Zone Click to refresh the local zoning database copied
from the switch. This button automatically flashes
red/gray if the fabric zoning data is changed by
another client.
A/D WWN Click to add/delete a WWN to/from all the aliases
and zones defined.
Rpl WWN Click to replace a WWN with another one in all
aliases and zones defined.
OK Applies the changes to the switch and exits the
switch.
Apply Click to apply all changes made including
changes made on other tabs in the view.
Changes cannot be cancelled once they are
applied.
Close Click to exit the window without making any
changes to the switch.
Clr All Select to clear the zoning database, disable the
effective configuration (if there is one), and then
commit to the switch.
AL_PA Level Zoning
AL_PA Level Zoning is a replacement for QuickLoop Zoning. With AL_PA Level
Zoning, only members of a QuickLoop can be a member of the zone. Zone members
are specified through their AL_PA. Upon selecting the AL_PA Level Zoning button
from the Zoning Selection window and clicking OK, the AL_PA Level Zoning menu
with the AL_PA Device Alias tab displays.
Figure 3–20 shows a typical AL_PA Device Alias tab of the AL_PA Zoning window.
Following is a list of the tabs provided in the AL_PA Level Zoning menu:
• Device Alias
• Device Zone
•QuickLoop
• Device Config
3–45Web Tools Version 3.0.x/4.0.x User Guide 3–45
Page 82

Fabric View
AL_PA Device Alias
Use the AL_PA Device Alias tab to create and manage QuickLoop configurations.
QuickLoop configurations are used to enable or disable a group of zones at the same
time.
The AL_PA Device Alias tab is shown in Figure 3–20.
Figure 3–20: AL_PA Device Alias tab of the AL_PA Level Zoning menu
3–46 Web Tools Version 3.0.x/4.0.x User Guide
Page 83

Fabric View
Table 3–17 gives descriptions of the fields on the AL_PA Device Alias tab.
M
Table 3–17: AL_PA Level Zoning Menu
Alias Name Select an existing alias name to modify.
Create Alias Click to create a new alias. A dialog displays. Enter the
name of the new alias. All names must be unique and
contain no spaces.
Delete Alias Click to delete the alias selected in the Alias Name field.
Deleting an alias automatically removes it from all zones.
Rename Alias Click to rename the alias selected in the Alias Name
field. A dialog displays in which you can edit the alias
name. Renaming an alias automatically renames it in all
zones.
Member Selection
List
Alias Members This field lists the members of the alias selected in the
Search Mem Click to search for a switch name, WWN, alias, zone, or
Add FA Host Click to add the selected item as a host to the Members
Add Mem Click to add a member from the Member Selection List to
Add Device Click to allow adding a device that currently is not part of
Remove Mem Click to remove the selected member from the Alias
Ref Zone Click to refresh the local zoning database copied from
A/D WWN Click to add or delete a WWN to or from all the aliases
This field displays a list of potential alias members,
including switches, ports, WWNs, QuickLoop AL_PAs,
and Fabric Assists.
Alias Name field. The name of this list depends on the
name of the selected alias. If no alias is selected, the
name displays as “Null Members.'
Qloop in the Member Selection List based on the type of
objects displayed in that list.
list. Only a domain port or a WWN can be added as a
host.
the Alias Members list.
the fabric.
Members list.
the switch. This button automatically flashes red/gray if
the fabric zoning data is changed by another client.
and zones defined.
3–47Web Tools Version 3.0.x/4.0.x User Guide 3–47
Page 84

Fabric View
Table 3–17: AL_PA Level Zoning Menu (Continued)
Rpl WWN Click to replace a WWN with another one in all aliases
and zones defined.
OK Click to apply the changes to the switch and exit the
switch.
Apply Click to apply the changes to the switch.
Close Click to exit the window without making any changes to
the switch.
Clr All Select to clear the zoning database, disable the effective
configuration (if there is one), and then commit to the
switch.
3–48 Web Tools Version 3.0.x/4.0.x User Guide
Page 85

AL_PA Device Zone
Use the AL_PA Device Zone tab to select members of a device zone. Members are
specified by their AL_PA. The AL_PA Device Zone tab is shown in Figure 3–21.
Fabric View
Figure 3–21: AL_PA Device Zone tab of the AL_PA Level Zoning menu
3–49Web Tools Version 3.0.x/4.0.x User Guide 3–49
Page 86

Fabric View
Table 3–18 gives descriptions of the fields on the AL_PA Device Zone tab.
Table 3–18: AL_PA Device Zone Tab Fields
Zone Name Select an existing zone member to modify.
Create Zone Click to create a new zone member.
Delete Zone Click to delete a zone member.
Rename Zone Click to rename a zone member.
Member Selection List This field displays a list of potential zone members,
including switches, ports, WWNs, and QuickLoop
AL_PAs, and Fabric Assists.
Zone Members This field lists the zone members selected in the Zone
Name field. The name on this list depends on the name
of the selected zone member. If a name is not selected,
the name displays as “null Members.”
Search Mem Click to search for a switch name, WWN, alias, zone, or
QuickLoop in the Member Selection List based on the
type of objects displayed in that list.
Add Device Click to add a device that currently is not part of the
Fabric.
Add Mem Click to add a member from the member selection list
into the Zone Members list.
Remove Mem Click to remove a member from the Zone Members List
when selected.
Ref Zone Click to refresh the local zoning database copied from
the switch. This button automatically flashes red/gray if
the fabric zoning data is changed by another client.
A/D WWN Click to add or delete a WWN to or from all the aliases
and zones defined
Rpl WWN Click to replace a WWN with another one in all aliases
and zones defined.
OK Click to apply the changes to the switch and exit the
switch.
Apply Click to apply the changes to the switch.
Close Click to exit the window without making any changes to
the switch.
3–50 Web Tools Version 3.0.x/4.0.x User Guide
Page 87

Table 3–18: AL_PA Device Zone Tab Fields (Continued)
Clr All Select to clear the zoning database, disable the
QuickLoop
A QuickLoop license is required to use this tab. Use the QuickLoop tab to create and
manage QuickLoops. For information on managing the QuickLoop feature separately,
see “Loop Tab” on page 5–8. The QuickLoop tab is shown in Figure 3–22.
Fabric View
effective configuration (if there is one), and then commit
to the switch.
Figure 3–22: QuickLoop tab of the AL_PA Level Zoning Menu
3–51Web Tools Version 3.0.x/4.0.x User Guide 3–51
Page 88

Fabric View
Table 3–19 gives descriptions of the fields on the QuickLoop tab.
Table 3–19: QuickLoop Tab Fields
QuickLoop Name Select an existing QuickLoop member name to modify.
Create Qloop Click to create a new QuickLoop member.
Delete Qloop Click to delete a QuickLoop member.
Rename Qloop Click to rename a QuickLoop member.
Switch Selection List This field displays a list of potential QuickLoop members,
including switches, ports, WWNs, and QuickLoop
AL_PAs, and Fabric Assists.
QuickLoop Members This field displays a list of the zone members selected in
the QuickLoop Name field. The name on this list depends
on the name of the selected QuickLoop member. If a
name is not selected, the name displays as “null
Members.”
Search Mem Click to search for a switch name, WWN, alias, zone, or
QuickLoop in the Member Selection List based on the
type of objects displayed in that list.
Add Mem Click to add a member from the member selection list
into the QuickLoop member contents.
Remove Mem Click to remove a member from the QuickLoop Members
list when selected.
Ref Zone Click to refresh the local zoning database copied from the
switch. This button automatically flashes red/gray if the
fabric zoning data is changed by another client.
A/D WWN Click to add or delete a WWN to or from all the aliases
and zones defined.
Rpl WWN Click to replace a WWN with another one in all aliases
and zones defined.
OK Click to apply the changes to the switch and exit the
switch.
Apply Click to apply the changes to the switch.
Close Click to exit the window without making any changes to
the switch.
3–52 Web Tools Version 3.0.x/4.0.x User Guide
Page 89

AL_PA Device Config
Use the AL_PA Device Config tab to specify the Device Zone that belongs to the
Device Zone Configuration file. All members of this configuration file must be Zones
consisting entirely of AL_PAs in a QuickLoop.The AL_PA Device Config tab is
shown in Figure 3–23.
Fabric View
Figure 3–23: AL_PA Device Config tab of the AL_PA Level Zoning menu
3–53Web Tools Version 3.0.x/4.0.x User Guide 3–53
Page 90

Fabric View
Table 3–20 gives descriptions of the fields on the AL_PA Device Config tab.
Table 3–20: AL_PA Device Config Tab Fields
Cfg Name Select an existing AL_PA Configuration name to
modify.
Create Cfg Click to create a new AL_PA configuration.
Delete Cfg Click to delete a AL_PA configuration.
Rename Cfg Click to rename a AL_PA configuration.
Zone/QLoop Selection List A list of Zone/QuickLoop members available to
add to the AL_PA configuration.
Add Mem Click to add a member from the Zone Selection
List into the Configuration Member List.
Remove Mem Click to remove a member from the Zone Selection
List into the Configuration Member List.
Search Mem Click to search for a switch name, WWN, alias,
zone, or Qloop in the Member Selection List based
on the type of objects displayed in that list.
AL_PA Config Members
name
This field displays a list of the members that
belong to the AL_PA Configuration currently
selected in the Cfg Name field. The name of this
list depends on the name of the AL_PA
configuration selected. If an AL_PA configuration
is not selected, the name displays as “null
Members.”
Analyze Config Click to analyze the configuration that is selected
along with its member zones and aliases, and
comes up with a zoning error screen (see
Figure 3–14) in the event of a conflict.
Enable Config Select this option and press the Apply button to
enable the selected config for zoning the fabric.
Disable Zoning Select this option and press the Apply button to
disable the selected config for zoning the fabric.
Refresh Fabric Click to refresh the fabric view with the latest
Domain/Port and WWN changes.
3–54 Web Tools Version 3.0.x/4.0.x User Guide
Page 91

Fabric View
Table 3–20: AL_PA Device Config Tab Fields (Continued)
Ref Zone Click to refresh the local zoning database copied
from the switch. This button automatically flashes
red/gray if the fabric zoning data is changed by
another client.
A/D WWN Click to add or delete a WWN to or from all the
aliases and zones defined.
Rpl WWN Click to replace a WWN with another one in all
aliases and zones defined.
OK Applies the changes to the switch and exits the
switch.
Apply Click to apply all changes made including changes
made on other tabs in the view. Changes cannot
be cancelled once they are applied.
Close Click to exit the window without making any
changes to the switch.
Clr All Select to clear the zoning database, disable the
effective configuration (if there is one), and then
commit to the switch.
Mixed Level Zoning
Mixed Level Zoning is provided for backward compatibility of pre-3.0.x zones. After
selecting the Mixed Level Zoning button from the Zoning Selection window and
clicking OK, the Mixed Level Zoning window with the Alias tab is displayed as
shown in Figure 3–24.
Following is a list of the tabs provided in the Mixed Level Zoning menu:
• Alias
•Zone
•QuickLoop
• Fabric Assist
•Config
3–55Web Tools Version 3.0.x/4.0.x User Guide 3–55
Page 92

Fabric View
Alias
Use the Alias tab to set up mixed aliases. The Alias tab is shown in Figure 3–24.
Figure 3–24: Alias tab of the Mixed Level Zoning menu
3–56 Web Tools Version 3.0.x/4.0.x User Guide
Page 93

Fabric View
A description of the fields on the Alias tab is shown in Table 3–21.
Table 3–21: Alias Tab Fields
Alias Name Select an existing alias to modify.
Create Alias Click to create a new alias. A dialog displays.Enter the
name of the new alias. All names must be unique and
contain no spaces.
Delete Alias Click to delete the alias selected in the Alias Name field.
Deleting an alias automatically removes it from all zones.
Rename Alias Click to rename the alias selected in the Alias Name field.
A dialog displays in which you can edit the alias name.
Renaming an alias automatically renames it in all zones.
Member Selection
List
This field displays a list of potential alias members,
including switches, ports, WWNs, QuickLoop AL_PAs,
and Fabric Assists.
Alias Members This field lists the members of the alias selected in the
Alias Name field. The name of this list depends on the
name of the selected alias. If no alias is selected, the
name displays as “Null Members.”
Search Mem Click to search for a switch name, WWN, alias, zone, or
Qloop in the Member Selection List based on the type of
objects displayed in that list.
Add FA Host Click to add the selected item as a host to the Members
list. Only a domain port or a WWN can be added as a
host.
Add Mem Click to add a member from the Member Selection List to
the Alias Members list.
Add Other Click to add a switch/port, WWN, or a device that
currently is not part of the fabric.
Add Other Host Click to add other Host that is not currently part of the
fabric.
Remove Mem Click to remove the selected member from the Alias
Members list.
Ref Zone Click to refresh the local zoning database copied from the
switch. This button automatically flashes red/gray if the
fabric zoning data is changed by another client.
3–57Web Tools Version 3.0.x/4.0.x User Guide 3–57
Page 94

Fabric View
Table 3–21: Alias Tab Fields (Continued)
A/D WWN Click to add or delete a WWN to or from all the aliases
and zones defined
Rpl WWN Click to replace a WWN with another one in all aliases
and zones defined.
OK Click to apply the changes to the switch and exit the
window.
Apply Click to apply the changes to the switch.
Close Click to exit the window without making any changes to
the switch.
Clr All Select to clear the zoning database, disable the effective
configuration (if there is one), and then commit to the
switch.
3–58 Web Tools Version 3.0.x/4.0.x User Guide
Page 95

Zone
Fabric View
Use the Zone tab to specify the member of a mixed zone. Mixed zone members can be
AL_PAs, ports, and WWNs. The Zone tab is shown in Figure 3–25.
Figure 3–25: Zone tab of the Mixed Level Zoning menu
Table 3–22 gives descriptions of the fields on the Zone tab.
Table 3–22: Zone Tab Fields
Zone Name Select an existing zone member to modify.
Create Zone Click to create a new zone member.
Delete Zone Click to delete a zone member.
Rename Zone Click to rename a zone member.
3–59Web Tools Version 3.0.x/4.0.x User Guide 3–59
Page 96

Fabric View
Table 3–22: Zone Tab Fields (Continued)
Member Selection List This field displays a list of potential zone members,
including switches, ports, WWNs, QuickLoop AL_PAs,
and Fabric Assists.
[Zone] Members This field displays a list of the zone members selected in
the Zone Name field. The name on this list depends on
the name of the selected zone member. If a name is not
selected, the name displays as “null Members.”
Search Mem Click to search for a switch name, WWN, alias, zone, or
QuickLoop in the Member Selection List based on the
type of objects displayed in that list.
Add Mem Click to add a member from the Member Selection List
into the Zone Member contents.
Remove Mem Click to remove a member from the zone member list
when selected.
Add Other Click to add a switch/port, WWN, or a device that
currently is not part of the Fabric.
Ref Zone Click to refresh the local zoning database copied from
the switch. This button automatically flashes red/gray if
the fabric zoning data is changed by another client.
A/D WWN Click to add or delete a WWN to or from all the aliases
and zones defined.
Rpl WWN Click to replace a WWN with another one in all aliases
and zones defined.
OK Click to apply the changes to the switch and exit the
switch.
Apply Click to apply the changes to the switch.
Close Click to exit the window without making any changes to
the switch.
Clr All Select to clear the zoning database, disable the
effective configuration (if there is one), and then commit
to the switch.
3–60 Web Tools Version 3.0.x/4.0.x User Guide
Page 97

QuickLoop
A QuickLoop license is required to use this tab. In conjunction with Zoning, use the
QuickLoop tab to create and manage QuickLoops. For information on managing the
QuickLoop feature separately, see “Loop Tab” on page 5–8 in this document. The
QuickLoop tab is shown in Figure 3–26.
Fabric View
Figure 3–26: QuickLoop tab of the Mixed Level Zoning menu
Table 3–23 gives descriptions of the fields on the QuickLoop tab.
Table 3–23: QuickLoop Tab Fields
QuickLoop Name Select an existing QuickLoop member to modify.
Create Qloop Click to create a new QuickLoop member.
Delete Qloop Click to delete a QuickLoop member.
3–61Web Tools Version 3.0.x/4.0.x User Guide 3–61
Page 98

Fabric View
Table 3–23: QuickLoop Tab Fields (Continued)
Rename Qloop Click to rename a QuickLoop member.
Switch Selection List This field displays a list of potential QuickLoop
members, including switches, ports, WWNs, and
QuickLoop AL_PAs, and Fabric Assists.
QuickLoop Members This field displays a list of the zone members selected in
the QuickLoop Name field. The name on this list
depends on the name of the selected QuickLoop
member. If a name is not selected, the name displays as
“null Members.”
Search Mem Click to search for a switch name, WWN, alias, zone, or
QuickLoop in the Member Selection List based on the
type of objects displayed in that list.
Add Mem Click to add a member from the member selection list
into the QuickLoop member contents.
Remove Mem Click to remove a member from the QuickLoop member
list when selected.
Ref Zone Click to refresh the local zoning database copied from
the switch. This button automatically flashes red/gray if
the fabric zoning data is changed by another client.
A/D WWN Click to add or delete a WWN to or from all the aliases
and zones defined.
Rpl WWN Click to replace a WWN with another one in all aliases
and zones defined.
OK Click to apply the changes to the switch and exit the
window.
Apply Click to apply the changes to the switch.
Close Click to exit the window without making any changes to
the switch.
Clr All Select to clear the zoning database, disable the
effective configuration (if there is one), and then commit
to the switch.
3–62 Web Tools Version 3.0.x/4.0.x User Guide
Page 99

Fabric Assist
Use the Fabric Assist tab to create and manage Fabric Assists. A QuickLoop license is
required to use this tab. The Fabric Assist tab is shown in Figure 3–27.
Fabric View
Figure 3–27: Fabric Assist tab of the Mixed Level Zoning menu
3–63Web Tools Version 3.0.x/4.0.x User Guide 3–63
Page 100

Fabric View
Table 3–24 gives descriptions of the fields on the Fabric Assist tab.
Table 3–24: Fabric Assist Tab Fields
FA Name Select an existing Fabric Assist name to be
modified.
Create FA Click to create a new Fabric Assist. A dialog
displays. Enter the name of the new Fabric
Assist. All names must be unique and contain no
spaces.
Delete FA Click to delete the Fabric Assist selected in the
FA Name field. Deleting a Fabric Assist
automatically removes it from all aliases, zones,
and zone configurations, including the
associated AL_PAs.
Rename FA Click to edit the name of the Fabric Assist
selected in the FA Name field.
Member Selection List This field displays a list of members available to
add to the Fabric Assist.
Add FA Host Click to add the selected item as a host to the
Fabric Assist name Members list. Only a domain
port or a WWN can be added as a host.
Add Mem Click to add the member selected in the Member
Selection List to the Fabric Assist name
Members list.
Remove Mem Click to remove the selected member from the
Fabric Assist name Members list.
Search Mem Click to search for a switch name, WWN, alias,
zone, QuickLoop, or FA Zone in the Member
Selection List based on the type of objects
displayed in that list.
Add Other Click to add a switch/port, WWN, or a device that
currently is not part of the Fabric.
Add Other Host Click to add other host that currently is not part
of the fabric.
3–64 Web Tools Version 3.0.x/4.0.x User Guide
 Loading...