

Page 1

HP StorageWorks
Modular Smart Array 20
User Guide
March 2004 (First Edition)
Part Number 347918-001
Page 2

© Copyright 2004 Hewlett-Packard Development Company, L.P.
The information contained herein is subject to change without notice. The only warranties for
HP products and services are set forth in the express warranty statements accompanying such
products and services. Nothing herein should be construed as constituting an additional
warranty. HP shall not be liable for technical or editorial errors or omissions contained herein.
HP StorageWorks Modular Smart Array 20 User Guide
March 2004 (First Edition)
Part Number 347918-001
HP StorageWorks Modular Smart Array 20 User Guide iii
Page 3

Contents
About This Guide
Audience Assumptions..................................................................................................... vii
Important Safety Information........................................................................................... vii
Symbols on Equipment .................................................................................................... vii
Symbols in Text.................................................................................................................ix
Getting Help ...................................................................................................................... ix
Technical Support....................................................................................................... ix
HP Website ...................................................................................................................x
Authorized Reseller ......................................................................................................x
Reader’s Comments ............................................................................................................x
Chapter 1
Enclosure Features
Chapter 2
Identifying the Enclosure Components
Enclosure......................................................................................................................... 2-1
Power Supply Unit .......................................................................................................... 2-3
Controller Module ........................................................................................................... 2-4
Drive and Drive Blank .................................................................................................... 2-5
Fan Assembly.................................................................................................................. 2-7
Chapter 3
Installing the Enclosure in a Rack
Preparing the Rack .......................................................................................................... 3-1
Removing the Enclosure Components ............................................................................ 3-1
Mounting the Enclosure in the Rack ............................................................................... 3-2
Page 4

Contents
Completing the Installation..............................................................................................3-7
Chapter 4
Configuring the Enclosure Drives
Chapter 5
Replacing Enclosure Components
Replacement Procedures..................................................................................................5-1
Disk Drive or Drive Blank ........................................................................................5-2
Fan Assembly............................................................................................................5-3
Power Supply Unit ....................................................................................................5-3
Controller Module.....................................................................................................5-3
Battery Packs (in the Controller Module) .................................................................5-4
Appendix A
Regulatory Compliance Notices
Federal Communications Commission Notice ...............................................................A-1
Class A Equipment...................................................................................................A-2
Class B Equipment...................................................................................................A-2
Declaration of Conformity for Products Marked with the FCC Logo, United States
Only..........................................................................................................................A-3
Modifications ...........................................................................................................A-3
Cables....................................................................................................................... A-3
Canadian Notice (Avis Canadien) ..................................................................................A-4
Class A Equipment...................................................................................................A-4
Class B Equipment...................................................................................................A-4
European Union Notice ..................................................................................................A-4
Japanese Notice...............................................................................................................A-5
Korean Notices ...............................................................................................................A-5
BSMI Notice................................................................................................................... A-6
Battery Replacement Notice ...........................................................................................A-6
Appendix B
Electrostatic Discharge
Preventing Electrostatic Damage.................................................................................... B-1
Grounding Methods to Prevent Electrostatic Damage.................................................... B-2
iv HP StorageWorks Modular Smart Array 20 User Guide
Page 5

Appendix C
Specifications
Physical Specifications....................................................................................................C-1
Power Specifications .......................................................................................................C-2
Environmental Specifications..........................................................................................C-2
Index
Contents
HP StorageWorks Modular Smart Array 20 User Guide v
Page 6

Page 7

This guide provides step-by-step instructions for installation and reference
information for operation of the HP StorageWorks Modular Smart Array 20
disk drive enclosure.
Audience Assumptions
This guide is for the person who installs, administers, and troubleshoots servers. HP
assumes you are qualified in the servicing of computer equipment and trained in
recognizing hazards in products with hazardous energy levels.
Important Safety Information
Before installing this product, read the Important Safety Information document
included with the server.
About This Guide
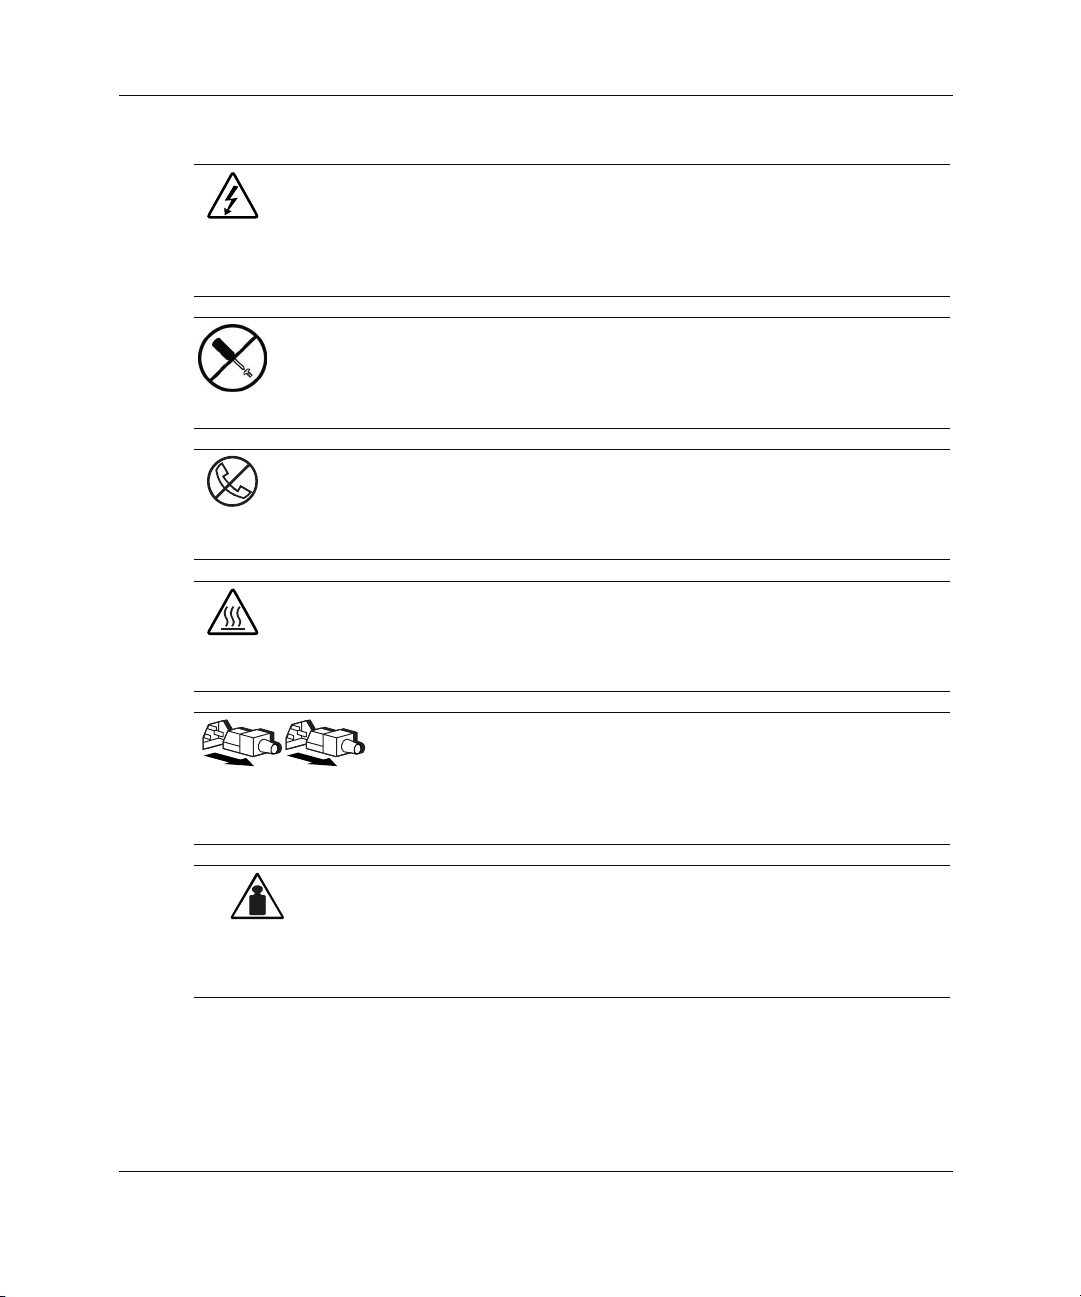
Symbols on Equipment
The following symbols may be placed on equipment to indicate the presence of
potentially hazardous conditions:
WARNING: This symbol, in conjunction with any of the following symbols,
indicates the presence of a potential hazard. The potential for injury exists if
warnings are not observed. Consult your documentation for specific details.
HP StorageWorks Modular Smart Array 20 User Guide vii
Page 8
About This Guide
Weight in kg
Weight in lb
This symbol indicates the presence of hazardous energy circuits or electric
shock hazards. Refer all servicing to qualified personnel.
WARNING: To reduce the risk of injury from electric shock hazards, do not
open this enclosure. Refer all maintenance, upgrades, and servicing to
qualified personnel.
This symbol indicates the presence of electric shock hazards. The area
contains no user or field serviceable parts. Do not open for any reason.
WARNING: To reduce the risk of injury from electric shock hazards, do not
open this enclosure.
This symbol on an RJ-45 receptacle indicates a network interface connection.
WARNING: To reduce the risk of electric shock, fire, or damage to the
equipment, do not plug telephone or telecommunications connectors into this
receptacle.
This symbol indicates the presence of a hot surface or hot component. If this
surface is contacted, the potential for injury exists.
WARNING: To reduce the risk of injury from a hot component, allow the
surface to cool before touching.
These symbols, on power supplies or systems, indicate that the
equipment is supplied by multiple sources of power.
WARNING: To reduce the risk of injury from electric shock,
remove all power cords to completely disconnect power from the
system.
This symbol indicates that the component exceeds the recommended
weight for one individual to handle safely.
WARNING: To reduce the risk of personal injury or damage to the
equipment, observe local occupational health and safety requirements
and guidelines for manual material handling.
viii HP StorageWorks Modular Smart Array 20 User Guide
Page 9
Symbols in Text
These symbols may be found in the text of this guide. They have the following
meanings.
WARNING: Text set off in this manner indicates that failure to follow directions
in the warning could result in bodily harm or loss of life.
CAUTION: Text set off in this manner indicates that failure to follow directions could
result in damage to equipment or loss of information.
IMPORTANT: Text set off in this manner presents essential information to explain a concept
or complete a task.
NOTE: Text set off in this manner presents additional information to emphasize or supplement
important points of the main text.
Getting Help
About This Guide
If you have a problem and have exhausted the information in this guide, you can get
further information and other help in the following locations.
Technical Support
In North America, call the HP Technical Support Phone Center at 1-800-652-6672.
This service is available 24 hours a day, 7 days a week. For continuous quality
improvement, calls may be recorded or monitored. Outside North America, call the
nearest HP Technical Support Phone Center. Telephone numbers for worldwide
Technical Support Centers are listed on the HP website, http://www.hp.com.
Be sure to have the following information available before you call HP:
• Technical support registration number (if applicable)
• Product serial number
HP StorageWorks Modular Smart Array 20 User Guide ix
Page 10

About This Guide
• Product model name and number
• Applicable error messages
• Add-on boards or hardware
• Third-party hardware or software
• Operating system type and revision level
HP Website
The HP website has information on this product as well as the latest drivers and flash
ROM images. You can access the HP website at http://www.hp.com.
Authorized Reseller
For the name of your nearest authorized reseller:
• In the United States, call 1-800-345-1518.
• In Canada, call 1-800-263-5868.
• Elsewhere, see the HP website for locations and telephone numbers.
Reader’s Comments
HP welcomes your comments on this guide. Send your comments and suggestions to
ServerDocumentation@hp.com.
x HP StorageWorks Modular Smart Array 20 User Guide
Page 11

1
Enclosure Features
The HP StorageWorks Modular Smart Array 20 (MSA20) is an Ultra320 host
connect disk drive enclosure that uses Serial ATA (SATA) drives. The MSA20
delivers a low-cost, high-capacity solution that is suitable for minimum I/O workload
situations such as storing reference data, archiving files, and performing disk-to-disk
backups.
You can connect the MSA20 to the external port of any sixth-generation Smart Array
controller or to an MSA1500 controller shelf (MSA1500 cs). These external
controllers enable you to configure the SATA drives in the MSA20 with RAID levels
of 0, 1+0, 5, or ADG.
The MSA20 also has an internal controller module with a battery-backed write cache.
The cache allows data to be transferred rapidly to the SATA drives, and the batterybacked feature protects data held in the cache for up to four days if power to the
enclosure is interrupted.
The enclosure components incorporate some important safety and redundancy
features. For example, if one power supply unit fails, the remaining functional unit
can temporarily provide enough power for a fully equipped enclosure. Similarly, if
one fan fails, the remaining fan runs at a faster speed, and can temporarily provide
enough cooling for a fully equipped enclosure. In either case, replace the failed
component as soon as possible to maximize the life expectancy of the remaining
power supply or fan.
For more information about features of the MSA20 enclosure, refer to the HP
website,
HP StorageWorks Modular Smart Array 20 User Guide 1-1
http://www.hp.com.
Page 12
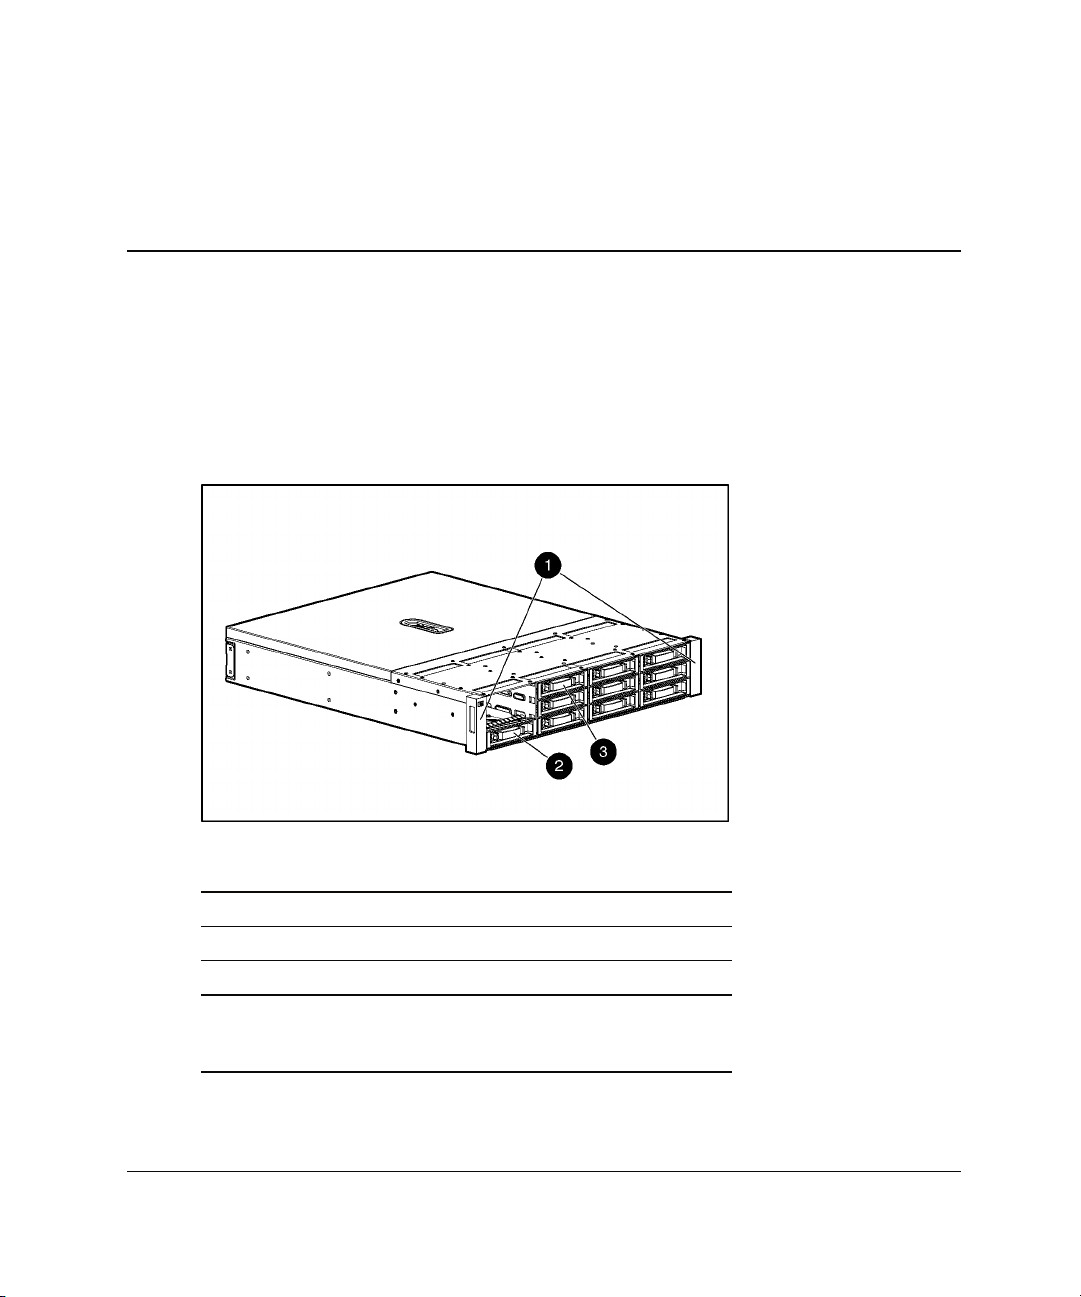
Enclosure
2
Identifying the Enclosure Components
Figure 2-1: Enclosure, front view
Item Description
1 Mounting bracket covers (bezel ears)
2 Drive blank in bay 3
3 Drive blank in bay 4
Note: The enclosure is shipped with 10 drive blanks. Insert
blanks into unused drive bays in a working enclosure so that the
correct enclosure airflow is maintained.
HP StorageWorks Modular Smart Array 20 User Guide 2-1
Page 13
Identifying the Enclosure Components
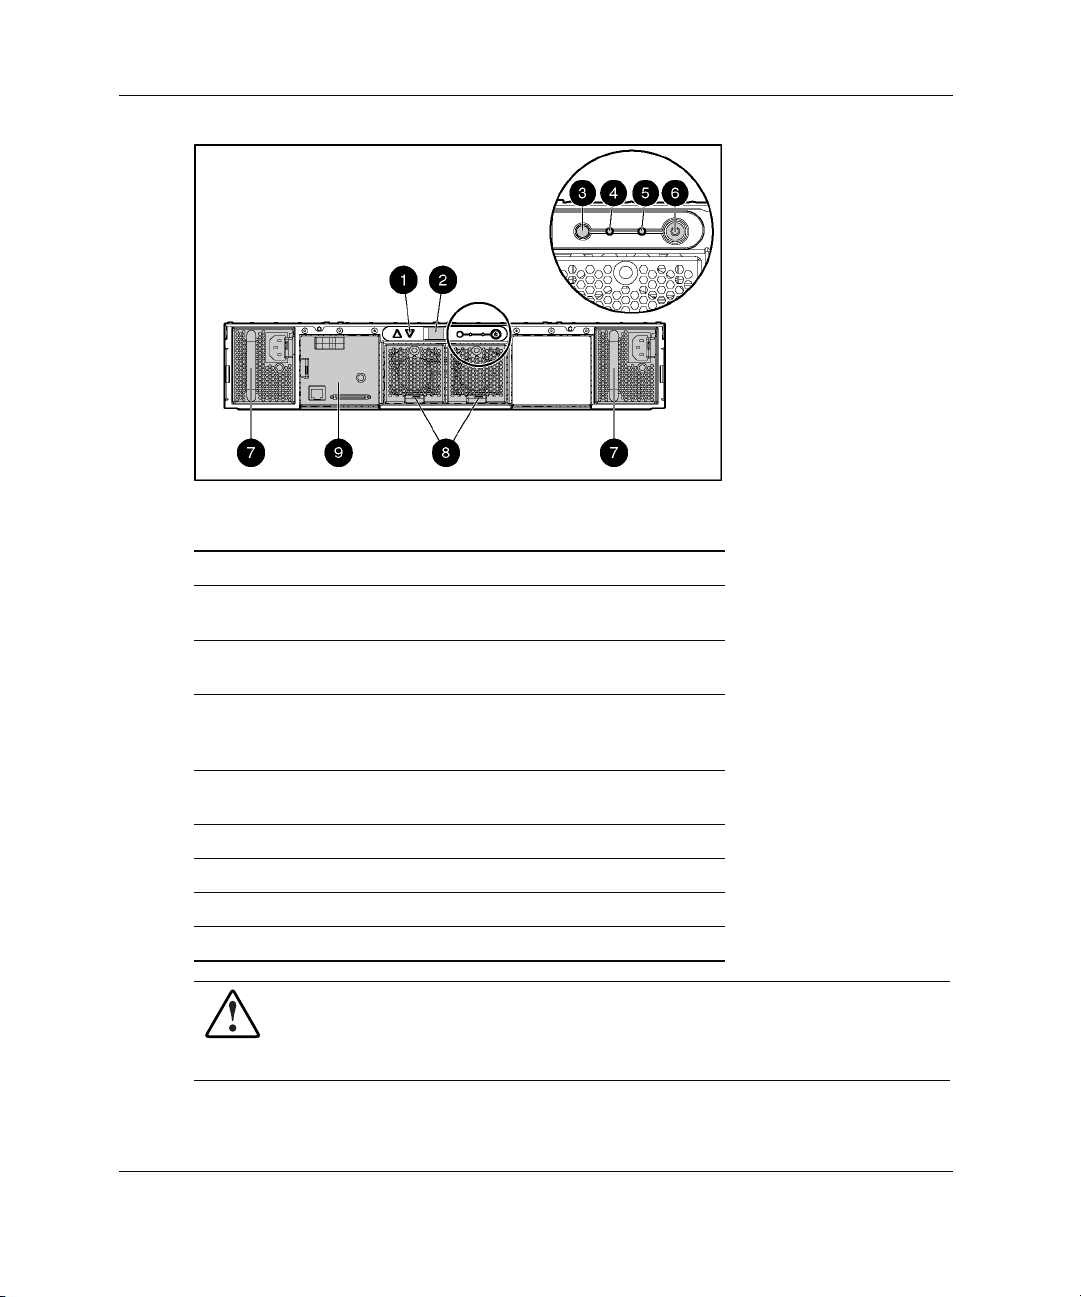
Figure 2-2: Enclosure, rear view
Item Description
1 Arrow buttons (for future use)
2 Enclosure ID display—In dicates the box ID number
assigned to the enclosure during drive configuration
3 Unit identification button— Causes the blue LED on all
drives in the enclosure to be illuminated
4 Enclosure Monitor status LED— Glows green to
indicate that the enclosure monitor (Global Service
Indicator, or GSI) is functional
5 Enclosure fault LED—Glows amber when any other
LED in the enclosure is amber, if the GSI is functional
6 Enclosure power button
7 Power supply units
8 Fan assemblies
9 Controller module
WARNING: Do not use the handles on the power supply units to lift or hold the
enclosure. These handles are designed only for holding the power supply
units or removing them from the enclosure, not for supporting the weight of
the enclosure.
2-2 HP StorageWorks Modular Smart Array 20 User Guide
Page 14
Power Supply Unit
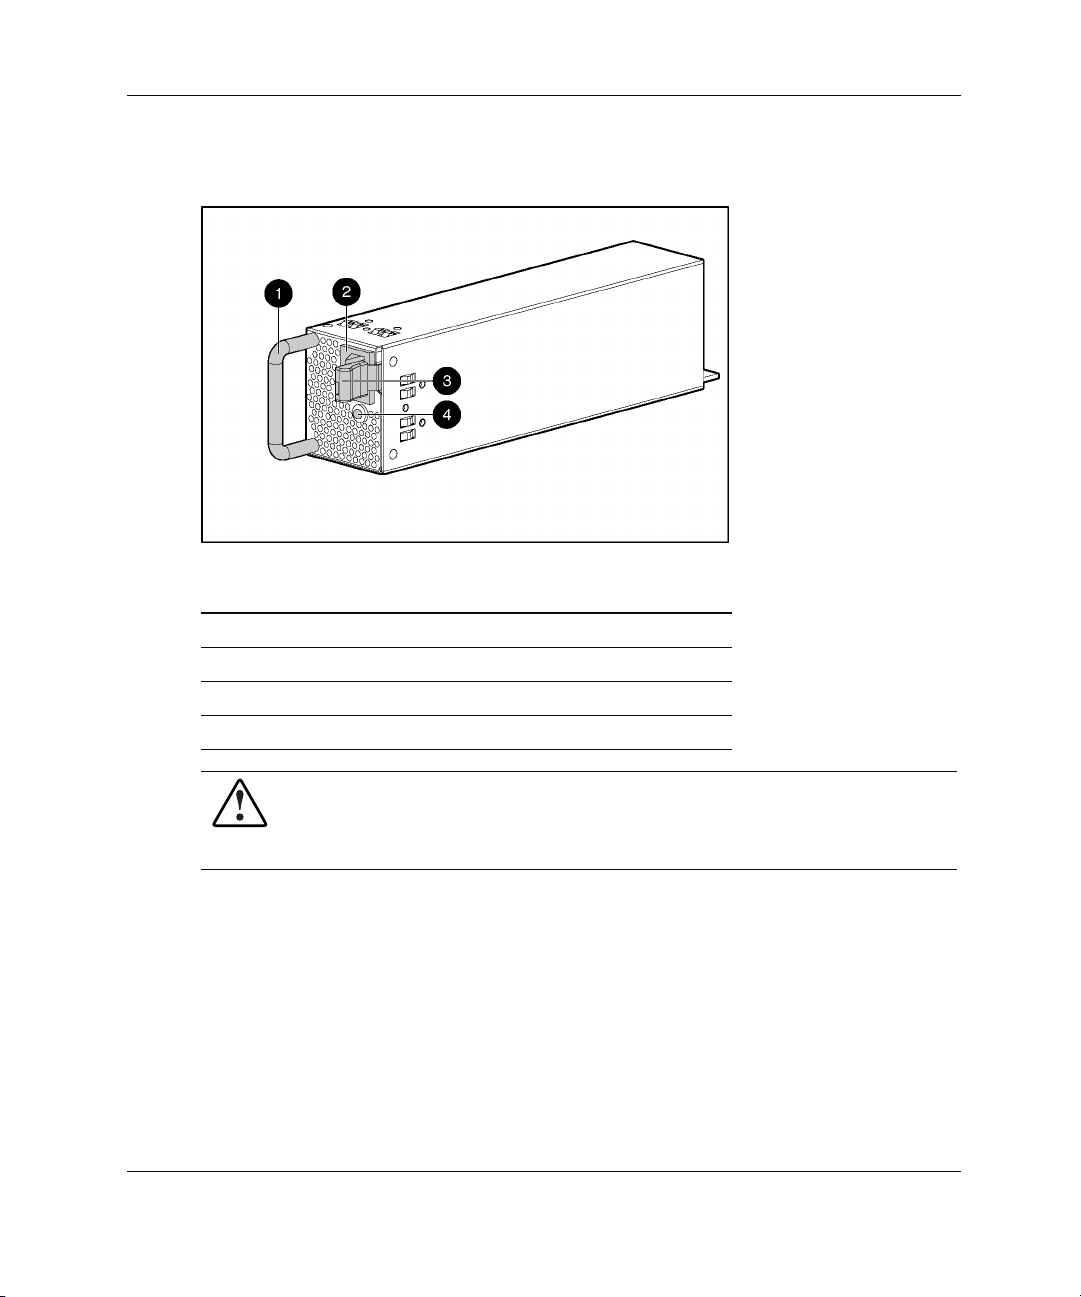
Figure 2-3: Power supply unit
Item Description
1 Handle
2 AC power inlet
3 Release lever
4 Bicolor status LED (green or amber)
WARNING: Do not use the handles on the power supply units to lift or hold the
enclosure. These handles are designed only for holding the power supply
units or removing them from the enclosure, not for supporting the weight of
the enclosure.
Identifying the Enclosure Components
HP StorageWorks Modular Smart Array 20 User Guide 2-3
Page 15

Identifying the Enclosure Components
Controller Module
Figure 2-4: Controller module
Item Description
1 Upper cache battery
2 Finger hook
3 Bicolor status LED (green or amber)
4 VHDCI connector (for connecting to a sixth-generation
Smart Array controller or an MSA1500 cs enclosure)
5 Service port (for HP service technicians only)
6 Release lever
7 Controller cache (lower cache battery just visible)
2-4 HP StorageWorks Modular Smart Array 20 User Guide
Page 16

Drive and Drive Blank
Figure 2-5: Drive (in carrier) and drive blank
Item Description
1 Drive carrier
2 Release lever
3 Release button
4 Fault/ID bicolor LED (amber or blue)
5 Online LED (green)
6 Drive blank
7 Release latch
Identifying the Enclosure Components
The blue ID LED illuminates when you press the unit identification button on the
rear of the enclosure. This LED also illuminates when the drive or an array
containing the drive is selected in a management application such as the HP Array
Configuration Utility (ACU).
The amber LED on a drive illuminates when the drive has failed or is predicted to fail
in the near future.
HP StorageWorks Modular Smart Array 20 User Guide 2-5
Page 17

Identifying the Enclosure Components
For more information about the meaning of the various hard drive LED illumination
patterns, refer to Table 2-1.
Table 2-1: Interpreting the Drive Status LEDs
Online LED
(green)
On, off, or
flashing
On, off, or
flashing
On Amber, flashing
On Off The drive is online, but it is not currently active.
Flashing
regularly (1 Hz)
Flashing
regularly (1 Hz)
Flashing
irregularly
Flashing
irregularly
Off Steadily amber A critical fault condition has been identified for this drive,
Off Amber, flashing
Off Off The drive is either offline, a spare, or not configured as
Fault/ID LED
(amber/blue)
Alternating
between amber
and blue
Steadily blue The drive is operating normally, and it has been selected
regularly (1 Hz)
Amber, flashing
regularly (1 Hz)
Off The drive is rebuilding, or it is part of an array that is
Amber, flashing
regularly (1 Hz)
Off The drive is active, and it is operating normally.
regularly (1 Hz)
Meaning
The drive has failed, or a predictive failure alert* has been
received for this drive. It has also been selected by a
management application.
by a management application.
A predictive failure alert* has been received for this drive.
Replace the drive as soon as possible.
The drive is part of an array that is undergoing capacity
expansion or stripe migration, but a predictive failure alert*
has been received for this drive. To minimize the risk of
data loss, do not replace the drive until the expansion or
migration is complete.
undergoing capacity expansion or stripe migration.
The drive is active, but a predictive failure alert* has been
received for this drive. Replace the drive as soon as
possible.
and the controller has placed it offline. Replace the drive
as soon as possible.
A predictive failure alert* has been received for this drive.
Replace the drive as soon as possible.
part of an array.
*Predictive failure alerts can occur only when the MSA20 is connected to a Smart Array controller.
For information about interpreting the drive fault LED when the MSA20 is connected to an
MSA1500 cs, refer to the release notes at http://www.hp.com/go/msa1500cs.
2-6 HP StorageWorks Modular Smart Array 20 User Guide
Page 18

Fan Assembly
Figure 2-6: Fan assembly
Item Description
1 Bicolor status LED (green or amber)
2 Release lever
Identifying the Enclosure Components
HP StorageWorks Modular Smart Array 20 User Guide 2-7
Page 19

Installing the Enclosure in a Rack
Installing the enclosure in a rack involves four steps:
• Preparing the rack
• Removing the enclosure components to make the enclosure more manageable
• Mounting the enclosure in the rack
• Completing the installation process (reinstalling the components and connecting
the power)
Preparing the Rack
The racks that HP supports for use with the MSA20 enclosure are the HP System E
racks and the HP 10000 Series racks. Other racks might also be suitable, but have not
been tested with the MSA20.
3
For information about setting up a rack, including appropriate warnings and cautions,
refer to the relevant rack user guide.
Before mounting the enclosure in a rack, confirm that the rack location meets the
environmental requirements for the enclosure as described in Appendix C.
Removing the Enclosure Components
IMPORTANT: The following abbreviated instructions are appropriate for removing the
components from an enclosure that is not being used. To remove individual components from
a working enclosure, refer to the complete instructions in Chapter 5.
HP StorageWorks Modular Smart Array 20 User Guide 3-1
Page 20

Installing the Enclosure in a Rack
• Controller module—Squeeze the finger hook and the release lever together
while pulling the module out of the enclosure.
• Disk drive—Press the release button, and then pull the release lever to remove
the drive from the enclosure.
• Drive blank—Squeeze the release latch while pulling the drive blank out of the
enclosure.
• Fan assembly—Lift the release lever upward while pulling it to remove the fan
assembly from the enclosure.
• Power supply unit—Squeeze the handle and the release lever together while
pulling the unit out of the enclosure.
Mounting the Enclosure in the Rack
WARNING: Use at least two people to move or install the enclosure.
For greater safety and easier installation, reduce the enclosure
weight by removing the disk drives, power supply units, controller
9 kg (20 lb) empty
24 kg (53 lb) full
module, and fan assemblies.
Each enclosure requires a vertical rack space of 2U (equivalent to 89 mm, or
3.5 inches).
1. Use the rack mounting template as a guide to indicate where on the rack the rails
for the enclosure are to be mounted.
a. At the front of the rack, with the front of the template facing you, align the
lower edge of the template with the bottom of the rack (or the top of the
previous rack component). Be sure that the lower edge of the template is
level.
3-2 HP StorageWorks Modular Smart Array 20 User Guide
Page 21

Installing the Enclosure in a Rack
b. Push the template tabs into the holes in the rack uprights to hold the template
in place.
c. Use a permanent marker pen to indicate the holes in the rack uprights into
which the scissor-like locking latches are to be inserted, as specified by the
template.
d. Repeat these steps to mark the back of the rack, using the information on the
back of the template as a guide to the required location of the locking latches
in this case.
2. If the holes in the rack uprights are round instead of square, remove the standard
pins from the rails and replace them with the round-hole pins provided in the rack
mounting hardware kit.
WARNING: The pins in the rails are load-bearing. Do not remove the pins
except to replace them with the pins for round-hole racks.
3. Identify the left (L) and right (R) rack rails by markings stamped into the rails.
HP StorageWorks Modular Smart Array 20 User Guide 3-3
Page 22

Installing the Enclosure in a Rack
4. Slide the front end of the right rack rail toward the inside front of the rack until
the locking latch engages with the marked hole in the front rack upright.
5. Extend the back end of the rail toward the inside rear of the rack until the locking
latch engages with the marked hole in the rear rack upright.
3-4 HP StorageWorks Modular Smart Array 20 User Guide
Page 23

Installing the Enclosure in a Rack
6. Loosen the locknut on the shipping bracket (1), and move the bracket to the
rearmost position on the rail (2).
7. Repeat steps 4 through 6 for the left rack rail.
8. Align the enclosure with the rails, and slide it into the rack.
HP StorageWorks Modular Smart Array 20 User Guide 3-5
Page 24

Installing the Enclosure in a Rack
9. Remove the mounting bracket covers (1), and tighten the thumbscrews to secure
the enclosure to the rack (2).
10. Replace the mounting bracket covers.
11. If you intend to move the rack while the enclosure is installed, adjust the
shipping brackets on each rail to secure the enclosure to the rack.
a. Loosen the shipping bracket locknut (1).
3-6 HP StorageWorks Modular Smart Array 20 User Guide
Page 25

Installing the Enclosure in a Rack
b. Slide the bracket forward until it engages with the enclosure chassis (2).
c. Tighten the locknut.
d. Repeat this procedure for the other rail.
Completing the Installation
1. Reinstall the components in the enclosure. For details, refer to Chapter 5.
2. Connect the VHDCI connector on the controller module to the output of an
MSA1500 cs or to the external connector of a sixth-generation Smart Array
controller in a server.
3. Connect the AC input socket of each power supply unit to separate AC power
sources.
4. Press the enclosure power button on the rear of the unit.
5. Confirm that the enclosure components are all functioning normally by observing
the condition of their status LEDs, which should all be green. If the amber LED
on any component is illuminated, the component needs attention for one of these
reasons:
— It has suffered a critical fault.
— It is not seated properly in the enclosure.
HP StorageWorks Modular Smart Array 20 User Guide 3-7
Page 26

Installing the Enclosure in a Rack
— In the case of a drive, it is predicted to fail in the near future (assuming that it
is seated properly in the enclosure).
— In the case of a power supply, it is not plugged in.
3-8 HP StorageWorks Modular Smart Array 20 User Guide
Page 27

4
Configuring the Enclosure Drives
The following tools are available for configuring the drives in an MSA20 enclosure:
• The HP Array Configuration Utility (ACU)—A versatile, browser-based utility
that provides you with maximum control over the configuration parameters
• The HP Option ROM Configuration for Arrays utility (ORCA)—A simple ROMbased utility that runs on all operating systems
• The MSA1500 cs Command Line Interface (CLI)—A tool for configuring and
managing an MSA1500 cs and its attached storage
NOTE: Old versions of ACU and ORCA do not support the MSA20. Before using one of these
utilities, upgrade the firmware and drivers on the external sixth-generation Smart Array
controller. The latest version of ACU is downloadable from the HP website, http://www.hp.com.
For further information about using ACU, or for conceptual information about arrays,
logical drives, and fault-tolerance methods, refer to the HP Array Configuration
Utility User Guide. This document is available on the Documentation CD provided in
the MSA20 kit.
For further information about using ORCA, and for a detailed comparison of the
features and capabilities of ORCA and ACU, refer to the user guide for the sixthgeneration controller to which the MSA20 is connected. This document is available
on the Documentation CD that was provided in the controller kit. Alternatively, you
can download a copy of the document from the appropriate controller-specific page
on the HP website,
For further information about using the CLI, refer to the MSA1500 cs documentation
http://www.hp.com/go/msa1500cs.
at
HP StorageWorks Modular Smart Array 20 User Guide 4-1
http://www.hp.com.
Page 28

5
Replacing Enclosure Components
All components are hot-pluggable. However, removing a component causes a
significant change in the airflow within the enclosure, and the enclosure could
overheat if a replacement component is not installed within a relatively short time.
• Before removing a component from the enclosure, be sure that a replacement
component is immediately available.
• If removing a drive, replace it with another drive or a drive blank to maintain the
correct airflow in the enclosure.
CAUTION: Be careful when replacing a drive. The drives in the enclosure are
fragile.
Replacement Procedures
The following general steps apply to all components. Detailed procedures for
removing individual components are given in the appropriate section of this chapter.
CAUTION: Before replacing a component, follow the precautions described in
Appendix B to minimize the possibility of damage from electrostatic discharge.
1. Remove the replacement component from its static-free container.
2. Check the label on the replacement component to be sure that it is of the correct
type.
3. Remove the defective component from the enclosure.
HP StorageWorks Modular Smart Array 20 User Guide 5-1
Page 29
Replacing Enclosure Components
4. Install the replacement component in the enclosure.
5. Observe the status LED of the replacement to confirm that the new component is
operating properly.
6. Place the defective component in the static-free container for shipment.
Disk Drive or Drive Blank
Removing a Drive Blank
Squeeze the release latch and hold it in while pulling the blank out of the enclosure.
Removing a Disk Drive
1. Press the release button.
2. Pull the drive out of the enclosure by about 3 cm (1 inch) so that it is
disconnected from the backplane connector.
CAUTION: A drive with a rapidly spinning disk can be difficult to hold securely.
To decrease the chance of dropping the drive, do not remove it completely from
the enclosure until the disk has stopped rotating. This usually takes a few
seconds.
3. When the disk is no longer spinning, remove the drive from the enclosure.
Installing a Drive Blank
Insert the drive blank into the enclosure, and push it in until it is firmly seated in the
enclosure.
Installing a Replacement Drive
CAUTION: Be careful when replacing a drive. The drives in the enclosure are
fragile.
1. Pull out the release lever on the drive as far as it can go.
5-2 HP StorageWorks Modular Smart Array 20 User Guide
Page 30

2. Insert the replacement drive into the bay until it can go no further. About 1 cm
(0.5 inch) of the drive protrudes from the bay.
3. Push the release lever all the way in. This action installs the drive completely in
the bay and seats it firmly against the connector in the enclosure.
4. Observe the drive status LEDs to confirm that the replacement drive is
functioning correctly.
Fan Assembly
1. Lift the release lever and pull the fan assembly out of the enclosure.
2. Slide the replacement fan assembly into the enclosure until it is firmly seated in
the enclosure.
3. Confirm that the fan starts operating immediately and that the status LED is
illuminated green.
Power Supply Unit
1. Disconnect the AC power cord from the defective power supply unit.
Replacing Enclosure Components
2. Squeeze the handle and the release lever together while pulling the defective
power supply unit out of the enclosure.
3. Insert the replacement power supply unit into the empty bay until it is firmly
seated in the enclosure.
4. Connect the AC power cord.
5. Confirm that the status LED on the replacement unit is illuminated green.
Controller Module
1. Back up the data on the system.
2. Stop data transfers.
3. Disconnect the VHDCI cable.
4. Squeeze the release lever and the finger hook together while pulling the
controller module out of the enclosure.
HP StorageWorks Modular Smart Array 20 User Guide 5-3
Page 31

Replacing Enclosure Components
5. Insert the replacement controller module into the enclosure until it is firmly
seated in the enclosure.
6. Connect the VHDCI cable to the connector on the new controller module.
CAUTION: To prevent damage to the cable connector, do not use excessive
force when tightening the thumbscrews on the connector.
7. Confirm that the status LED on the replacement module is illuminated green.
Battery Packs (in the Controller Module)
WARNING: There is a risk of explosion, fire, or personal injury if battery packs
are not properly handled. Refer to the Battery Replacement Notice in Appendix
A before installing or removing a battery pack.
IMPORTANT: After installing a new battery pack and replacing the controller module in the
enclosure, it may take up to 45 minutes for the battery to recharge and the battery-backed
write cache to become fully enabled.
To replace the upper battery pack (1):
1. Remove the controller module from the enclosure (for detailed instructions, refer
to the Controller Module section).
2. Loosen the thumbscrews (2).
5-4 HP StorageWorks Modular Smart Array 20 User Guide
Page 32

Replacing Enclosure Components
3. Slide the battery unit toward the rear of the controller module and lift it out.
4. On the back of the battery unit, push the two plastic retainer tabs upward through
the slots in the battery case (1).
5. Tilt the battery pack slightly away from the battery case (2).
6. Press down on the battery pack to expel it from the battery case (3).
To install the replacement upper battery pack, reverse the previous steps.
HP StorageWorks Modular Smart Array 20 User Guide 5-5
Page 33

Replacing Enclosure Components
To replace the lower battery pack:
1. Remove the upper battery unit. (You do not need to dismantle the upper unit
unless you must also replace the upper battery pack.)
2. Remove the cache board.
a. Open the ejector levers on each side of the memory module socket (1).
b. Pull the cache board out of the socket (2).
3. Push the plastic retainer tabs through to the other side of the cache board (3).
4. Lift the battery pack off the cache board.
To install the replacement lower battery pack, reverse the previous steps.
5-6 HP StorageWorks Modular Smart Array 20 User Guide
Page 34

Regulatory Compliance Notices
Federal Communications Commission Notice
Part 15 of the Federal Communications Commission (FCC) Rules and Regulations
has established Radio Frequency (RF) emission limits to provide an interference-free
radio frequency spectrum. Many electronic devices, including computers, generate
RF energy incidental to their intended function and are, therefore, covered by these
rules. These rules place computers and related peripheral devices into two classes, A
and B, depending upon their intended installation. Class A devices are those that may
reasonably be expected to be installed in a business or commercial environment.
Class B devices are those that may reasonably be expected to be installed in a
residential environment (for example, personal computers). The FCC requires
devices in both classes to bear a label indicating the interference potential of the
device as well as additional operating instructions for the user.
The FCC rating label on the device shows the classification (A or B) of the
equipment. Class B devices have an FCC logo or FCC ID on the label. Class A
devices do not have an FCC logo or FCC ID on the label. After the class of the
device is determined, refer to the corresponding statement in the following sections.
A
HP StorageWorks Modular Smart Array 20 User Guide A-1
Page 35

Regulatory Compliance Notices
Class A Equipment
This equipment has been tested and found to comply with the limits for a Class A
digital device, pursuant to Part 15 of the FCC Rules. These limits are designed to
provide reasonable protection against harmful interference when the equipment is
operated in a commercial environment. This equipment generates, uses, and can
radiate radio frequency energy and, if not installed and used in accordance with the
instructions, may cause harmful interference to radio communications. Operation of
this equipment in a residential area is likely to cause harmful interference, in which
case the user will be required to correct the interference at personal expense.
Class B Equipment
This equipment has been tested and found to comply with the limits for a Class B
digital device, pursuant to Part 15 of the FCC Rules. These limits are designed to
provide reasonable protection against harmful interference in a residential
installation. This equipment generates, uses, and can radiate radio frequency energy
and, if not installed and used in accordance with the instructions, may cause harmful
interference to radio communications. However, there is no guarantee that
interference will not occur in a particular installation. If this equipment does cause
harmful interference to radio or television reception, which can be determined by
turning the equipment off and on, the user is encouraged to try to correct the
interference by one or more of the following measures:
• Reorient or relocate the receiving antenna.
• Increase the separation between the equipment and receiver.
• Connect the equipment into an outlet on a circuit that is different from that to
which the receiver is connected.
• Consult the dealer or an experienced radio or television technician for help.
A-2 HP StorageWorks Modular Smart Array 20 User Guide
Page 36

Regulatory Compliance Notices
Declaration of Conformity for Products Marked with the FCC Logo, United States Only
This device complies with Part 15 of the FCC Rules. Operation is subject to the
following two conditions: (1) this device may not cause harmful interference, and (2)
this device must accept any interference received, including interference that may
cause undesired operation.
For questions regarding your product, contact us by mail or telephone:
• Hewlett-Packard Company
P. O. Box 692000, Mail Stop 530113
Houston, Texas 77269-2000
• 1-800-652-6672 (For continuous quality improvement, calls may be recorded or
monitored.)
For questions regarding this FCC declaration, contact us by mail or telephone:
• Hewlett-Packard Company
P. O. Box 692000, Mail Stop 510101
Houston, Texas 77269-2000
• 1-281-514-3333
To identify this product, refer to the part, series, or model number found on the
product.
Modifications
The FCC requires the user to be notified that any changes or modifications made to
this device that are not expressly approved by Hewlett-Packard Company may void
the user’s authority to operate the equipment.
Cables
Connections to this device must be made with shielded cables with metallic RFI/EMI
connector hoods in order to maintain compliance with FCC Rules and Regulations.
HP StorageWorks Modular Smart Array 20 User Guide A-3
Page 37

Regulatory Compliance Notices
Canadian Notice (Avis Canadien)
Class A Equipment
This Class A digital apparatus meets all requirements of the Canadian
Interference-Causing Equipment Regulations.
Cet appareil numérique de la classe A respecte toutes les exigences du Règlement sur
le matériel brouilleur du Canada.
Class B Equipment
This Class B digital apparatus meets all requirements of the Canadian
Interference-Causing Equipment Regulations.
Cet appareil numérique de la classe B respecte toutes les exigences du Règlement sur
le matériel brouilleur du Canada.
European Union Notice
Products with the CE Marking comply with both the EMC Directive (89/336/EEC)
and the Low Voltage Directive (73/23/EEC) issued by the Commission of the
European Community.
Compliance with these directives implies conformity to the following European
Norms (the equivalent international standards are in parentheses):
• EN55022 (CISPR 22) – Electromagnetic Interference
• EN55024 (IEC61000-4-2, 3, 4, 5, 6, 8, 11) – Electromagnetic Immunity
• EN61000-3-2 (IEC61000-3-2) – Power Line Harmonics
• EN61000-3-3 (IEC61000-3-3) – Power Line Flicker
• EN60950 (IEC950) – Product Safety
A-4 HP StorageWorks Modular Smart Array 20 User Guide
Page 38
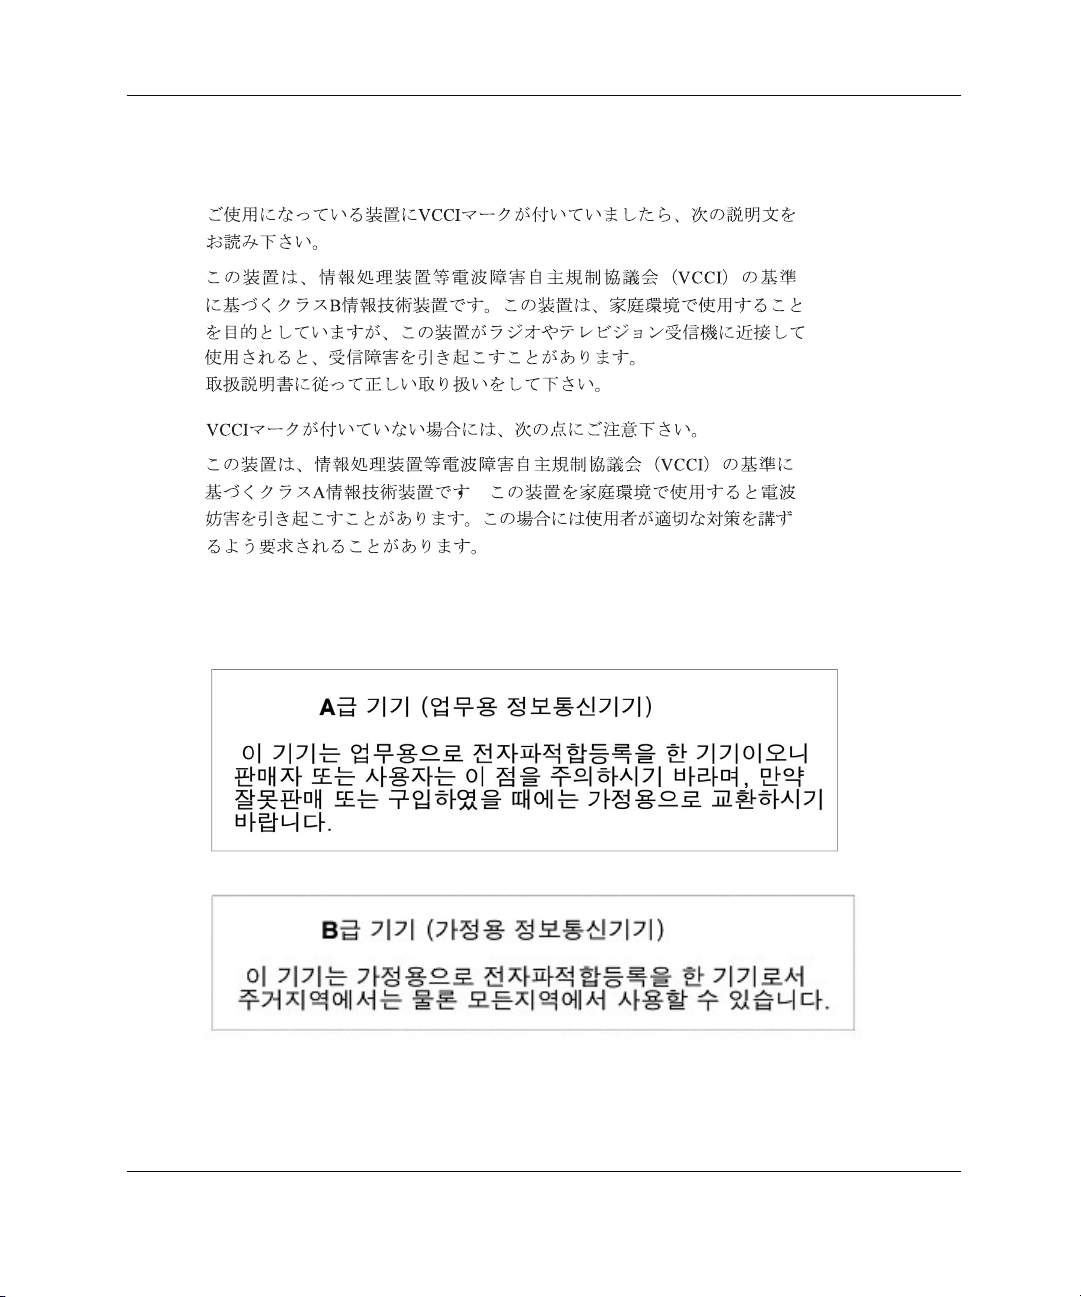
Japanese Notice
Korean Notices
Regulatory Compliance Notices
HP StorageWorks Modular Smart Array 20 User Guide A-5
Page 39

Regulatory Compliance Notices
BSMI Notice
Battery Replacement Notice
The controller cache uses a nickel metal hydride (NiMH) battery pack.
WARNING: There is a risk of explosion, fire, or personal injury if the battery
pack is not properly handled. To reduce this risk:
• Do not try to recharge the batteries if they are disconnected from the
controller.
• Do not expose the battery pack to water, or to temperatures higher than
60°C.
• Do not abuse, disassemble, crush, or puncture the battery pack.
• Do not short the external contacts.
• Replace the battery pack only with the designated HP spare.
Battery disposal should comply with local regulations. Alternatively, use
established parts return methods to return the battery pack to HP for disposal.
Batteries, battery packs, and accumulators should not be disposed of
together with the general household waste. To forward them to recycling or
proper disposal, use the public collection system or return them to HP, your
authorized HP Partners, or their agents.
For more information about battery replacement or proper disposal, contact your HP
authorized reseller or your authorized service provider.
A-6 HP StorageWorks Modular Smart Array 20 User Guide
Page 40

Electrostatic Discharge
Preventing Electrostatic Damage
A discharge of static electricity from a finger or other conductor may damage system
boards or other static-sensitive devices. This type of damage may reduce the life
expectancy of the device.
To prevent electrostatic damage when setting up the system or handling parts:
• Avoid hand contact by transporting and storing products in static-safe containers.
• Keep electrostatic-sensitive parts in their containers until they arrive at static-free
workstations.
• Place parts on a grounded surface before removing them from their containers.
• Avoid touching pins, leads, or circuitry.
B
• Always be properly grounded when touching a static-sensitive component or
assembly.
HP StorageWorks Modular Smart Array 20 User Guide B-1
Page 41

Electrostatic Discharge
Grounding Methods to Prevent Electrostatic Damage
There are several methods for grounding. Use one or more of the following methods
when handling or installing electrostatic-sensitive parts:
• Use a wrist strap connected by a ground cord to a grounded workstation or
computer chassis. Wrist straps are flexible straps with a minimum of 1 megohm
± 10 percent resistance in the ground cords. To provide proper ground, wear the
strap snug against the skin.
• Use heel straps, toe straps, or boot straps at standing workstations. Wear the
straps on both feet when standing on conductive floors or dissipating floor mats.
• Use conductive field service tools.
• Use a portable field service kit with a folding static-dissipating work mat.
If you do not have any of the suggested equipment for proper grounding, have an
authorized reseller install the part.
For more information on static electricity, or assistance with product installation,
contact your authorized reseller.
B-2 HP StorageWorks Modular Smart Array 20 User Guide
Page 42

Physical Specifications
Table C-1: Enclosure Specifications
C
Specifications
Dimensions Form
International (cm) US (in.)
Unpacked 59.7 x 48.8 x 8.8
In shipping carton 83.8 x 81.3 x 27.4 33.0 x 32.0 x 10.8 25 kg (55 lb) empty
23.5 x 19.2 x 3.5 14 kg (32 lb) empty
Weight
24 kg (53 lb) with components
34 kg (75 lb) with components
Table C-2: Specifications of Components
Dimensions Item
International (cm) US (in.)
Fan assembly 26.8 x 6.0 x 6.0 10.6 x 2.4 x 2.4 0.50 kg (1.10 lb)
Disk drive (in carrier) 18.5 x 11.0 x 2.6 7.3 x 4.3 x 1.0 0.75 kg (1.65 lb)
Controller module 32.6 x 7.9 x 7.1 12.8 x 3.1 x 2.8 1.4 kg (3.0 lb)
Power supply unit 32.0 x 6.4 x 7.7 12.6 x 2.5 x 3.0 1.80 kg (3.96 lb)
Weight
HP StorageWorks Modular Smart Array 20 User Guide C-1
Page 43

Specifications
Power Specifications
Table C-3: AC Input Requirements
Nominal Value Range
Frequency (±5%) 50 or 60 Hz 47 to 63 Hz
Voltage 110 or 240 V 90 to 254 V RMS
(autoranging)
Steady state
maximum current
Standby current 0.21 A at 240 V, 60 Hz
At 240 V: 1.8 A (one power supply) or 1.9 A (two
power supplies)
At 120 V: 3.7 A (one power supply) or 3.9 A (two
power supplies)
0.15 A at 120 V, 60 Hz
—
—
Environmental Specifications
Table C-4: Environmental Specifications
Operating Shipping or Storage
Ambient
temperature
Relative humidity
(noncondensing)
Air quality Fewer than 500,000 particles 0.5 micron or larger
Heat dissipation 1175 BTU/hr (345 W) —
10° to 35°C (50° to 95°F), with an average change
of less than 1°C per hour and a step change of
less than 3°C per hour
40% to 60%, with a step change of less than 10% 10% to 80%
per cubic foot (approximately 17,700 per liter)
–40° to 66°C
–40° to 150°F
—
C-2 HP StorageWorks Modular Smart Array 20 User Guide
Page 44

Index
A
ACU (Array Configuration Utility) 4-1
air quality C-2
ambient temperature C-2
array, configuring 4-1
authorized reseller x
B
batteries
recycling A-6
replacing 5-4
bay numbers 2-1
C
cables, FCC compliance statement for A-3
cache features 1-1
components, specifications of C-1
configuring an array 4-1
controller module
description of 2-4
location of 2-2
replacing 5-3
specifications of C-1
D
Declaration of Conformity A-3
dimensions
of components C-1
of enclosure C-1
disk drive
description of 2-5
replacing 5-2
specifications of C-1
drive blank
description of 2-5
replacing 5-2
drive carrier, description of 2-5
drive status LEDs 2-6
E
electrostatic damage, preventing B-1
enclosure
dimensions of C-1
installing 3-1
mounting in a rack 3-2
moving while in rack 3-6
operating environment C-2
rack space required for 3-2
specifications of C-1
storage conditions for C-2
weight of 3-2, C-1
environmental requirements C-2
HP StorageWorks Modular Smart Array 20 User Guide Index-1
Page 45

Index
F
fan assembly
description of 2-7
location of 2-2
replacing 5-3
specifications of C-1
fault-tolerance levels allowed 1-1
FCC (Federal Communications
Commission) notices A-1
G
grounding methods B-2
H
hard drive LEDs, interpreting 2-6
heat dissipation C-2
HP website x
humidity of environment C-2
L
LEDs on hard drive 2-6
O
operating environment C-2
ORCA (Option ROM Configuration for
Arrays) 4-1
P
particulate matter in air C-2
power input and output specifications C-2
power supply unit
description of 2-3
location of 2-2
replacing 5-3
specifications of C-1
R
RAID levels allowed 1-1
redundancy features 1-1
regulatory compliance notices A-1
relative humidity C-2
S
safety features 1-1
shipping bracket, location and use of 3-6
storing the enclosure C-2
symbols in text ix
symbols on equipment vii
T
technical support ix
temperature during normal operation C-2
thermal specifications C-2
W
website, HP x
weight
of components C-1
of enclosure C-1
Index-2 HP StorageWorks Modular Smart Array 20 User Guide
 Loading...