

Page 1

HP StorageWorks
1510i Modular Smart Array Command Line
Interface user guide
active/active firmware 2.x
Part number: 383074–002
econd edition: May 2008
S
Page 2

Legal and notice information
© Copyright 2005, 2008 Hewlett-Packard Development Company, L.P.
Confidential computer software. Valid license from HP required for possession, use or copying. Consistent with FAR 12.211 and
12.212, Commercial Computer Software, Computer Software Documentation, and Technical Data for Commercial Items are licensed
to the U.S. Government under vendor’s standard commercial license.
The information contained herein is subject to change without notice. The only warranties for HP products and services are set forth
in the express warranty statements accompanying such products and services. Nothing herein should be construed as constituting
an additional warranty. HP shall not be liable for technical or editorial errors or omissions contained herein.
Intel, Itanium, Pentium, Intel Inside, and the Intel Inside logo are trademarks or registered trademarks of Intel Corporation or its
subsidiaries in the United States and other countries.
Microsoft, Windows, Windows XP, and Windows NT are U.S. registered trademarks of Microsoft Corporation.
Adobe and Acrobat are trademarks of Adobe Systems Incorporated.
Java is a US trademark of Sun Microsystems, Inc.
Page 3

Contents
Aboutthisguide .......................... 9
Intendedaudience...................................... 9
Relateddocumentation.................................... 9
Documentconventionsandsymbols ............................. 10
HPtechnicalsupport.................................... 10
HP installation and configurationassistance ........................... 11
Subscriptionservice ..................................... 11
HPwebsites......................................... 11
Documentationfeedback ................................... 11
1 CLI setup and overview ....................... 13
CLIsetup......................................... 13
AccessingtheCLIthroughaSecureShell(SSH)connection.................. 13
AccessingtheCLIthroughaTelnetconnection ....................... 14
AccessingtheCLIthroughaserialconnection ....................... 15
CLIOverview....................................... 16
CLIcommandsyntax.................................. 16
Examplecommand ................................ 17
CLI commands in redundant configurations ........................ 17
CLIhelp ....................................... 17
Examplecommand ................................ 17
2Initialconfigurationsequence................... 19
Configurelogicaldrives .................................. 19
ConfiguringabasiciSCSIsetup(noaccesscontrolsorauthentication)............... 20
ConfiguringCHAPauthenticationforiSCSIconnections..................... 21
ConfiguringAccessControlsforLUNaccess.......................... 22
EnablingiSNSdiscoveryoftheiSCSItarget.......................... 22
EnableSLPdiscoveryoftheiSCSItarget............................ 23
Configurestaticmanagementsettings............................. 23
3 Command reference . ...................... 25
Commandoverview .................................... 25
CanonicaliSCSItarget................................. 25
Alphabeticallistingofcommands .............................. 26
acceptunit ...................................... 27
addacl_entry..................................... 28
addarp ....................................... 29
addinitiator ..................................... 30
addip........................................ 31
addisns_server .................................... 32
addportal ...................................... 33
addportal_group ................................... 34
addroute....................................... 35
addspare ...................................... 36
addtarget ...................................... 37
addunit ....................................... 38
bindportal...................................... 42
bindportal_group................................... 43
1510i Modular Smart Array Command Line Interface user guide
3
Page 4

bindunit....................................... 44
clearperf....................................... 45
deleteacl_entry.................................... 46
deletearp ...................................... 47
deleteinitiator..................................... 48
deleteip....................................... 49
deleteisns_server ................................... 50
deleteportal ..................................... 51
deleteportal_group .................................. 52
deleteroute...................................... 53
deletespare ..................................... 54
deletetarget ..................................... 55
deleteunit ...................................... 56
disablethis_controller|other_controller .......................... 58
download firmware .................................. 59
expandunit...................................... 65
extendunit...................................... 66
help......................................... 67
locate ........................................ 70
migrateunit...................................... 71
refreshisns_entries................................... 73
reset certificate .................................... 74
resetcontroller .................................... 75
resetmanagement_login ................................ 76
setacl........................................ 77
setauto_path_change ................................. 78
set certificate ..................................... 79
setdiscovery ..................................... 80
setglobals ...................................... 81
setinitiator...................................... 83
setinitiator_chap ................................... 84
setiscsi_keys ..................................... 85
setisns........................................ 87
setmanagement.................................... 88
setmanagement_login ................................. 90
setport........................................ 91
setpreferred_path................................... 92
setprompt ...................................... 93
setservice ...................................... 94
setsnmp....................................... 95
settarget_chap .................................... 96
setthis_controller|other_controller ............................ 97
setthis_controller_id|other_controller_id ......................... 98
setunit........................................ 99
setunit_id ...................................... 100
showacl_entry .................................... 101
showadu_page.................................... 102
showarp....................................... 103
showauto_path_change ................................ 104
showbox....................................... 105
showcacheinfo .................................... 106
show certificate .................................... 107
showdiscovery .................................... 108
showdisks ...................................... 109
showdrive_report ................................... 110
showeventlog..................................... 111
showglobals ..................................... 112
showinitiator..................................... 113
showip ....................................... 114
showiscsi_keys .................................... 115
4
Page 5

showisns....................................... 116
showisns_server.................................... 117
showmanagement................................... 118
showmib2...................................... 119
showperf ...................................... 120
showport ...................................... 121
showportal...................................... 122
showportal_group................................... 123
show profile ..................................... 124
showpreferred_path.................................. 125
showproxystats.................................... 126
showroute ...................................... 127
showservice ..................................... 128
showsnmp...................................... 129
showtarget...................................... 130
showtaskstats..................................... 131
showtech_support................................... 132
showtgt_stats..................................... 133
showthis_controller|other_controller ........................... 134
showunit....................................... 135
showunit_id ..................................... 137
showversion ..................................... 138
startperf....................................... 139
stopperf....................................... 140
unbindportal..................................... 141
unbindportal_group.................................. 142
unbindunit...................................... 143
A Storage overview . . . ..................... 145
Arraysandlogicaldrives.................................. 145
Fault-tolerancelevels.................................... 146
RAID0—nofaulttolerance ............................... 147
RAID1+0—drivemirroring ............................... 147
RAID5—distributeddataguarding............................ 148
RAID6—advanceddataguarding............................ 149
ComparisonofRAIDMethods................................ 149
ChoosingaRAIDlevel ................................... 150
Index .............................. 151
1510i Modular Smart Array Command Line Interface user guide
5
Page 6

Figures
1
2
3
4
5
Multiplephysicaldrives(D1,D2,andD3)inasystem ................ 145
Multiple physical drives (D1, D2, and D3) configured into one logical drive (L1) . . . . . 145
Data striping (S1-S4) and data blocks (B1-B12) on multiple physical drives (D1, D2, D3) . . 146
Two arrays (A1, A2) containing five logical drives (L1 through L5) spread across five physical
drives (D1 th
RAID1array,withtwophysicalharddrives(D1,D2)................. 147
roughD5) ............................. 146
6
RAID 1+0 arr
7
RAID 5 array, with three physical hard drives (D1, D2, D3) showing distributed parity
information(Px,y)................................ 148
8
RAID 6 array, with four physical hard drives (D1, D2, D3, D4) showing distributed parity
information(Px,y)(Qx,y)............................. 149
ay,witheightphysicalharddrives(D1throughD8) ........... 148
6
Page 7

Tables
1
2
3
4
5
6
7
Documentconventions.............................. 10
CLIspecialkeys ................................ 16
RAID0features ................................ 147
RAID1,RAID1+0features............................ 148
RAID5features ................................ 149
RAID 6 featur
SummaryofRAIDmethods............................ 150
es ................................ 149
8
Choosing a R
AIDlevel ............................. 150
1510i Modular Smart Array Command Line Interface user guide
7
Page 8

8
Page 9

About this guide
This document provides information to help you use the HP StorageWorks 1510i Modular Smart Array
(MSA1510i) Command Line Interface (CLI).
Intended audi
This guide is intended for users familiar with iSCSI storage networks and, in particular, with RFC3720. If
you prefer to use a Graphical User Interface (GUI), consider using the HP Storage Management Utility
(SMU), described in the HP Storage Management Utility user gu ide.
ence
Related documentation
ThefollowingdocumentsdescribetheMSA1510i:
• HP StorageWorks 1510i Modular Sm art Array installation and configuration roadmap poster
• HP StorageWorks 1510i Modular Smart Array iSCSI concepts and deployment guide
• HP StorageWorks 1510i Modular Smart Array installation and user guide
• HP StorageWorks 1510i Modular Smart Array maintenance and service guide
• H P StorageWorks 1510i Modular Smart Array Command Line Interface user guide
• H P StorageWorks Storage Management Utilit y user guide
ThesedocumentsareontheMSA1510iSupportCD,version2.0orlater,availableontheMSA1510i
support page: h
In addition to MSA1510i-specific documents, the following guide, available on the SAN Infrastructure
website: h
iSCSI networks:
• HP SAN Design reference guide
The following iSCSI-related technical information is available on the Internet Engineering Task Force
website: h
• RFC number 3720: Internet Small Computer Systems Interface (iSCSI)
• RFC number 3721: iSCSI Naming and Discovery
• RFC number 4171: Internet Storage Name Service (iSNS)
• RFCnumber2608:ServiceLocationProtocol(SLP)
• RFC number 3927: IPv4 Link-Local Addresses (Zeroconf)
ttp://www.hp.com/go/support.
ttp://www.hp.com/go/san, includes detailed, helpful information about Fibre Channel and
ttp://www.ietf.org/rfc.
The following VLAN document is available on the Institute of Electrical and Electronics Engineers website:
h
ttp://www.ieee802.org/1/pages/802.1Q.html.
• 802.1q for Virtual LANs:
1510i Modular Smart Array Command Line Interface user guide
9
Page 10

Document conventions and symbols
Table 1 Documen
Convention
Blue text: Table 1 Cross-reference links and e-mail addresses
Blue, underlined text: http://www.hp.com
Bold text
Italic text Text emphasis
Monospace text
Monospace, italic text
Monospac
e, bold text
t conventions
Element
Website addresses
• Keys that are pressed
• Text typed into a GUI element, such as a box
• GUI elements that are clicked or selected, such as
menu and list items, buttons, tabs, and check boxes
• File and directory names
• System output
• Code
• Commands, their arguments, and argument values
• Code variables
• Command variables
Emphasized monospace text
WARNING!
Indicates that failure to follow directions could result in bodily harm or death.
CAUTION:
Indicates that failure to follow directions could result in damage to equipment or data.
IMPORTANT:
Provides clarifying information or specific instructions.
NOTE:
Provides a
dditional information.
TIP:
Provides helpful hints and shortcuts.
HP technical support
For worldwide technical support information, see the HP support website: http://www.hp.com/support.
Before co
• Product model names and numbers
• Technical support registration number (if applicable)
• Product
ntacting HP, collect the following information:
serial numbers
10
About this guide
Page 11

• Error messages
• Operating system type and revision level
• Detailed questions
HP installation and configuration assistance
Storage management and networking knowledge is required to successfully install this product. If you are
not familiar with installing and configuring storage array systems, HP can install your system for you. For
more information, access the HP Services website: h
Portfolio banner, select Infrastructure Services > Network Storage Services.
Depending on your needs, different levels of assistance are available, such as:
• Storage depl
• Physical installation
• Logical disk design and configuration
• Service pla
• Service deployment
• Installation Verification Testing (IVT)
• Customer o
oyment
nning
rientation
ttp://www.hp.com/go/services. Under the Services
Subscription service
HP recommends that you register your product at the Subscriber’s Choice for Business website:
h
ttp://www.hp.com/go/e-updates.
After registering, you will receive e-mail notification of product enhancements, new driver versions,
firmware updates, and other product resources.
HP websites
For addi
•h
•http://www.hp.com/go/storage
•http:/
•http://www.hp.com/support/manuals
•http://www.hp.com/support/downloads
tional information, see the following HP websites:
ttp://www.hp.com
/www.hp.com/service_locator
Documentation feedback
HP welcomes your feedback.
To make comments and suggestions about product documentation, please send a message to
storagedocsFeedback@hp.com. All submissions become the property of HP.
1510i Modular Smart Array Command Line Interface user guide
11
Page 12

12
About this guide
Page 13

1CLIsetupandoverview
The Command Line Interface (CLI) is used to configure and manage the array controller and its storage.
Tasks include configuring logical storage units (LUNs), limiting access to storage, viewing system and
component information, configuring iSCSI elements, and setting up the management interface.
The CLI can also be used to display system setup information and status, and, provide information on
devices that are attached to the controller.
CLI setup
You can access the CLI in three ways:
• Accessing the CLI through a Secure Shell (SSH) connection
•Accessingt
• Accessing the CLI through a serial connection
NOTE:
For information about planning for and installing the MSA, connecting the hardware, and obtaining
the default IP address of the management port, see the
installat
ion and user guide
he CLI through a Telnet connection
HP StorageWorks 1510i Modular Smart Array
.
Accessing the CLI through a Secure Shell (SSH) connection
SSH provides the most secure way to access the CLI over a network. Data transmitted through SSH is
encrypted. Before using SSH, you must download and install an SSH connection utility. HP recommends
using a utility called PuTTY. The following procedure describes using PuTTY.
1. If necessary, download and install the PuTTY SSH connection utility. Use an Internet search engine
to locate the latest version of PuTTY.
1510i Modular Smart Array Command Line Interface user guide
13
Page 14
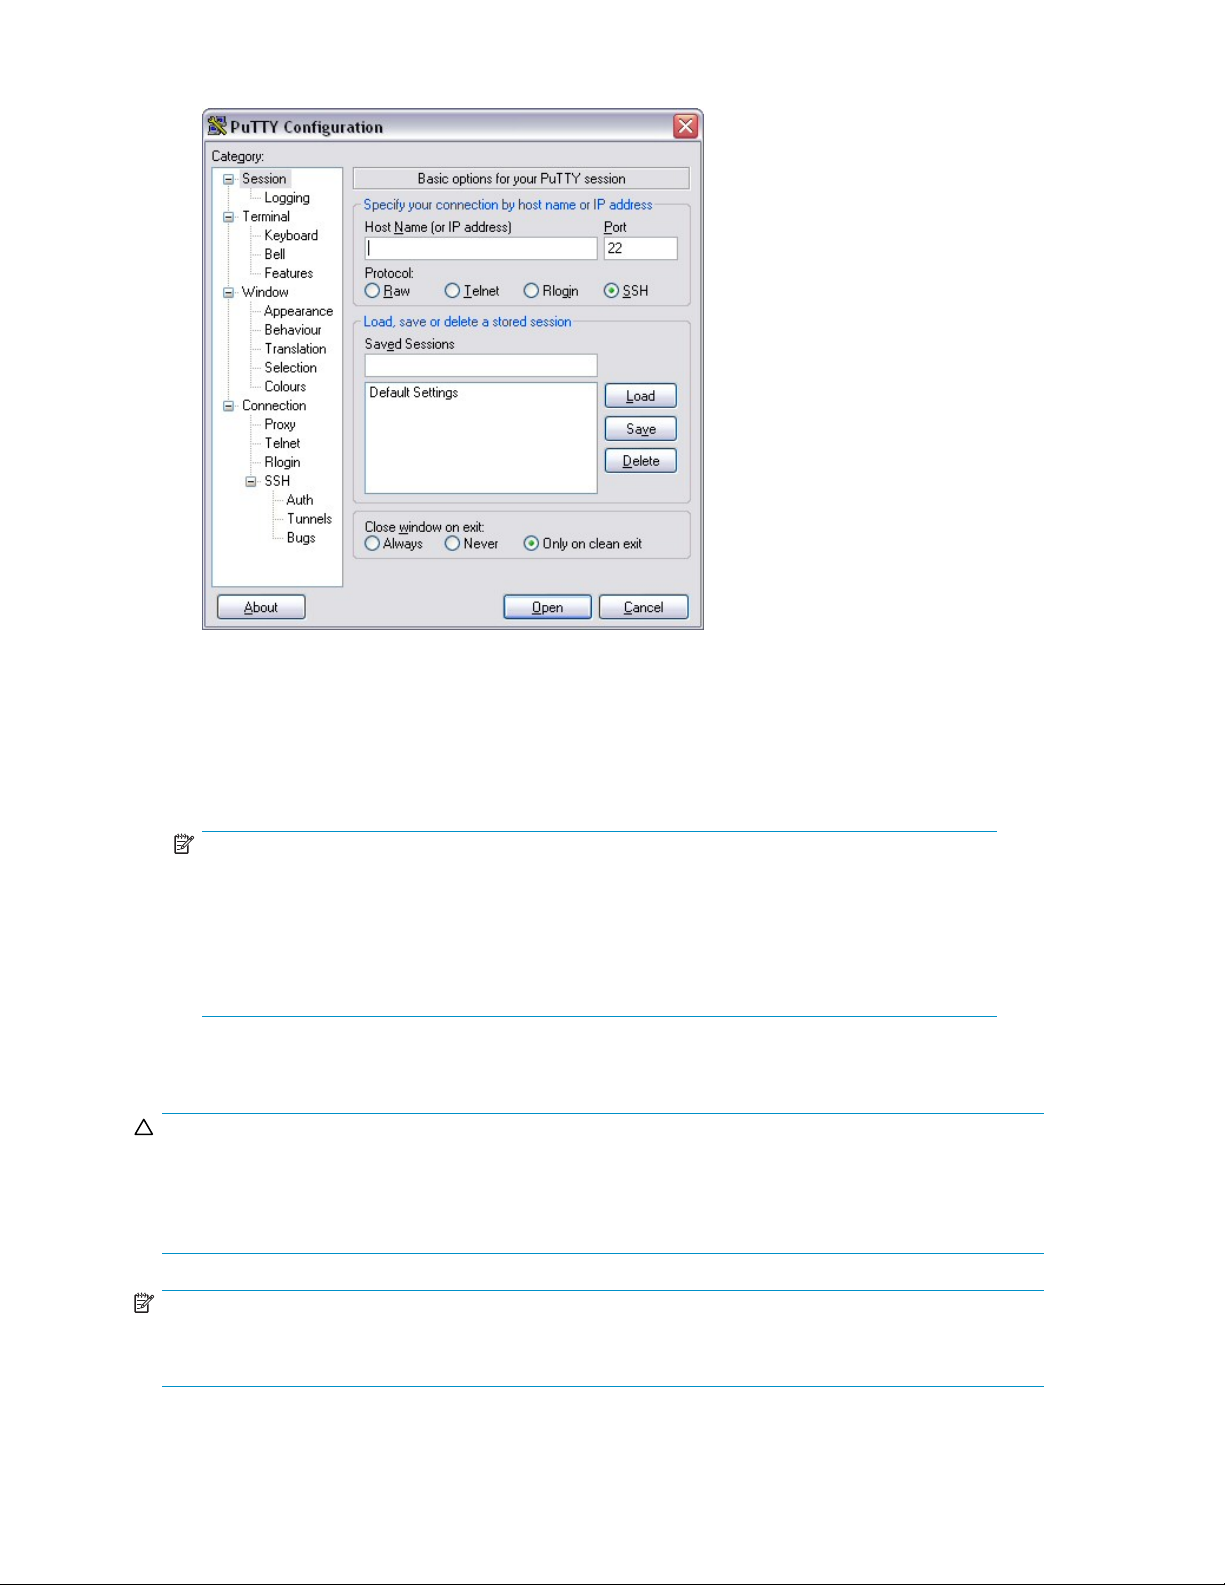
2. Launch PuTTY on a PC that is connected to the same LAN as the MSA1510i.
3. Enter the IP address of the MSA1510i management port in the Host Name (or IP address) field.
4. Verify that the SSH radio button is selected.
5. Click Open.
The SSH shell opens and you are prompted to log on.
6. Enter your username and password.
NOTE:
When using SSH, Telnet, or the HP Storage Management Utility (SMU) to connect to the
MSA1510i management port, you are required to log on. The factory default settings for
username and password are both root.Thefirst time you log in to the MSA1510i using the
default username and password, you are immediately prompted to enter a new username
and password. Follow the prompts to set the new username and password. To subsequently
changetheusernameandpasswordfromtheCLI,usetheset management_login command.
Accessing the CLI through a Telnet connection
CAUTION:
The Telnet protocol is not a secure method of transmitting data over a network. Because Telnet does not
encrypt data, anyone with the proper knowledge and tools can read information being sent over the
network. For this reason, HP recommends that you use SSH to connect to the MSA1510i over a network,
or use a serial connection to connect to the MSA1510i directly.
NOTE:
Telnet is disabled by default. To enable Telnet, use the SMU. For more information, see the
Management Utility user guide
14
CLI setup and overview
.
HP Storage
Page 15

1. Ensure that the Telnet interface is enabled. To enable Telnet, use the SMU. For more information, see
the HP Storage Management Utility user guide.
2. FromanyPCthatisconnectedtothesameLANastheMSA,clickStartRun to open the Run
dialog box.
3. Enter the following command:
telnet [<ip_address>]
where
[<ip_address>]
is the IP address of the MSA management port.
The Telnet shell opens and you are prompted to log on.
4. Enter your username and password.
NOTE:
When using SSH, Telnet, or the HP Storage Management Utility (SMU) to connect to the
MSA1510i management port, you are required to log on. The factory default settings for
root
usernameandpasswordareboth
default username and password, you are immediately prompted to enter a new username
and password. Follow the prompts to set the new username and password. To subsequently
change the username and password from the CLI, use the set management_login command.
.Thefirst time you log in to the MSA1510i using the
Accessing the CLI through a serial connection
Any terminal emulator program may be used to access the CLI, but the following instructions describe
using Windows HyperTerminal.
1. From the front of the MSA, connect one end of the custom serial cable (included in the shipping
carton of the MSA) to the serial port of the host computer. Connect the other end to the RJ-45Z
adapter on an MSA controller.
NOTE:
In dual-controller configurations, tasks can be performed through either MSA controller.
NOTE:
An additional or replacement custom serial cable can be ordered using part number
259992-001.
1510i Modular Smart Array Command Line Interface user guide
15
Page 16

2. Open your terminal emulation software. The following instructions demonstrate using HyperTerminal:
a. Click StartRun to open the Run dialog box. Type hypertrm.exe, and then click OK.When
accessed for the first time, the New Connection dialog box is displayed.
b. In the New Connection dialog box, type a name to associate with the connection between the
controller and the host server, and then click OK. The Connect To dialog box is displayed.
c. In the Connect To dialog box, expand the Connect using drop-down box, select the appropriate
COM port, and then click OK.TheCOMPropertiesdialogboxisdisplayed.
d. In the COM1 Properties dialog box, enter the following settings, and then click OK.
Option Setting
Bits per Second
Data bits
Parity
Stop bits
Flow contr
e. On the CLI Session screen, press Enter several times to display the command prompt (CLI>).
CLI Overview
Command strings are entered at the CLI prompt (CLI>). Commands must use a specific, preset syntax.
After a declarative command is entered and executed, the results are displayed at the CLI prompt.
When using the CLI, the following keystrokes have special functions:
Table 2 CLI special keys
Keyboard Keys
Ctrl+B left arrow Moves the cursor back one character
Ctrl+F right arrow
Ctrl+P
Ctrl+N down arrow
ol
Arrow Key
up arrow
19200
8
None
1
None
Function
Moves the cursor forward one character
Recalls the previous command in the
command buffer
Recalls the next command in the command
buffer
CAUTION:
The CLI uses a zero-based numbering system. For example, LUN numbers begin with 0.
CLI command syntax
The following syntax describes the basic command format used for all CLI commands:
verb noun <operand 1> <operand 2> ... <operand n>
The following conventions apply to all CLI commands:
• A basic command includes a word or phrase used to instruct the controller. Commands usually
containaverbwithanoun. EveryCLIcommandmustbeginwithabasiccommand.
• CLI command strings include the basic command plus specific command parameters. Some
parameters are required; others are optional.
• CLI commands are entered at the CLI prompt.
16
CLI setup and overview
Page 17

• Commandsarenotcasesensitiveandmustbetypedinfull.
• The CLI does not support line-continuation characters. If all characters of a command cannot
fit on one line of the CLI, the command wraps to the next line on the screen. The maximum
command length is 255 characters.
Example comma
The following
add unit 0 data=”disk101-disk103” raid_level=0
The basic command is add unit. The operands are:
• 0
• data=”disk101-disk103”
• raid_level=0
Some CLI comma
string is considered invalid. The syntax of the parameter value is uniquely defined for each CLI command,
but must be less than 20 alphanumeric characters.
Some CLI comm
operand is av
nd
command has three portions: the basic command and three operands:
nds require an operand. If operands are required but are not entered, the CLI command
ands support operands that modify the command, but are not required. If a modifying
ailable but not used, a default value is used.
CLI commands in redundant configurations
When a system has two controllers, the same firmware image is run on both controllers. The two
controllers communicate with each other through a PCI bus called the inter-controller link (ICL). Each
controller has a serial port and has a CLI available to users who connect the serial port to a serial terminal.
Some CLI commands are entered from one controller's CLI prompt but are for the other controller to
execute. Command syntax instructs the controller to accept user input, pass the command to the other
controller, and then display the result.
The following keywords are used in the CLI to indicate a specific controller:
• this_controller—refers to the controller that the CLI is connected to.
• other_controller—refers to the other controller in the MSA.
CLI help
Help commands can be used to display helpful information about CLI commands. Displayed information
may include a brief definition, required command syntax, available operands, the number of characters
for a comm
The basic command is help. If a noun or verb is also entered, the display is limited to information about
that specific command. If help is entered without a limiting noun or verb, the displayed lists all possible
command v
Example command
To see a list of all possible command verbs and command nouns, enter help without a command
verb or noun.
help
To see a list of all commands, use the display_all operand:
CLI> help display_all
To see information about a specific command, enter help followed by the command in question. The
following example displays information about the add unit command.
CLI> help add unit
and option value, or a list of allowed/disallowed characters.
erbs and then all possible command nouns.
1510i Modular Smart Array Command Line Interface user guide
17
Page 18

18
CLI setup and overview
Page 19

2 Initial configuration sequence
TheMSAcanbecompletelyconfiguredusingtheCLI.IfyouwanttousetheHPStorageManagement
Unit (SMU), but the factory default management network settings do not work in your environment, see
Configuring static management settings.
The example commands shown in this chapter are provided as a general reference and may differ from
the commands needed for your configuration. The examples show the command that is typed in at the
CLI prompt and the system response. For more information on the available options for each command,
see Command reference in this guide or the CLI online help.
When configuring the MSA for the first time, use the following sequence:
•Configure logical drives
•Configure a basic iSCSI setup
•Configue CHAP authentication for iSCSI connection for iSCSI connections
•Configure Access Controls for LUN access
• EnableiSNSdiscoveryoftheiSCSItarget
• Enable SLP discovery of the iSCSI target
•Configuring static management settings
Configure logical drives
Before creating any logical drives, ensure that all disk enclosures are physically connected to the MSA,
so that the disks are available for configuration.
1. [Optional] Verify that the disks are detected by the array controller using the show disks command:
CLI> sho
Disk List: (box,bay) (B:T:L) Size Speed Units
Enclosu
Disk101 (1,01) (0:03:01) 250.0GB 160 MB/s none
Disk102 (1,02) (0:03:02) 250.0GB 160 MB/s none
Disk103 (
Disk104 (1,04) (0:03:04) 250.0GB 160 MB/s none
Disk105 (1,05) (0:03:05) 250.0GB 160 MB/s none
Enclosur
Disk207 (2,07) (1:08:00) 72.8GB 160 MB/s none
Disk208 (2,08) (1:09:00) 72.8GB 160 MB/s none
Disk209 (
Disk210 (2,10) (1:11:00) 36.4GB 160 MB/s none
w disks
re 1: SATA (0:03:00) PROLIANT 8LCE 1.16
1,03) (0:03:03) 250.0GB 160 MB/s none
e 2: SCSI (1:06:00) PROLIANT 4LEE JB4F
2,09) (1:10:00) 72.8GB 160 MB/s none
1510i Modular Smart Array Command Line Interface user guide
19
Page 20

2. Configure a logical drive on a set of disks using the add unit command:
CLI> add unit 0 raid_level=5 data=disk101-disk105 size=100gb
Logical Unit size = 102398 MB
RAID overhead = 25597 MB
Total space occupied by new unit = 127995 MB
Free space left on this volume: = 1064201 MB
Unit 0 is created successfully.
3. Repeat the add unit command as needed, to configure the storage in to multiple logical drives.
Configuring a basic iSCSI setup (no access controls or
authentication)
The example commands in this section use the simplest syntax and many default parameters. You should
provide additional command arguments as required.
1. Create an IP address for iSCSI data trafficusingtheadd ip command:
CLI> add ip SA0
The IP address has been added successfully.
2. Repeat the add ip command as required to configure addresses on multiple ports. Ports on the
primary controller are named SA0 and SA1. If you have a redundant array controller, the ports
are named SB0
3. Use the add portal command to create an iSCSI portal that initiators will use to connect to the system:
CLI> add portal 20.20.20.5
The portal wa
Alias: portal1
4. Make a note of the portal alias, which is used in future commands to refer to the portal.
5. Create a por
CLI> add portal_group
The portal group was added successfully.
tal group using the add portal_group command:
20.20.20.5
and SB1.
s added successfully.
Alias: pg1
Tag: 0
6. Make a note of the portal group alias for use in future commands. Also make a note of the default
tag assigne
7. Create an iSCSI target using the add target command:
CLI> add target
The iSCSI ta
Name: iqn.1986-03.com.hp.storage.msa1510i.sga043600g.target1
Alias: target1
8. Make a note
9. Bind the portal to the portal group using the bind portal command:
CLI> bind portal portal1 pg1
The portal
20
Initial configuration sequence
d to the portal group.
rget was added successfully.
of the iSCSI target node name and alias for use in future commands.
was bound successfully to the portal group.
Page 21

10. Use the bind portal_group to bind the portal group to the iSCSI target just created:
CLI> bind portal_group pg1 target1
The portal group was bound successfully to the target.
11 . Bind logical drives to the iSCSI target using the bind unit command:
CLI> bind unit 0 target1 1
On Target target1:
LUN 1 mapped to Unit 0
Alias: lun1t1
12. Repeat the bind unit command as required to bind several logical drives to the target.
13 . Use the add initiator command to create an entry for the iSCSI initiator to enable it to access the
system:
CLI> add initiator iqn.1991-05.com.microsoft:myini.domain.com
The initiator was added successfully.
Name: iqn.1991-05.com.microsoft:myini.domain.com
Alias: initiator1
NOTE:
The iSCSI node name of your initiator can be found under the Initiator Settings tab of the Microsoft
iSCSI Initiator control panel window.
Configuration of a basic setup with a single iSCSI target, portal, and initiator is now complete. The
initiator has full access to the LUNs on the target and is not required to provide any authentication
information to log in.
Configuring CHAP authentication for iSCSI connections
NOTE:
The steps in this section assume that you already have a basic iSCSI setup configured.
1. Set up a target CHAP secret (password) for one-way authentication using the set target_chap
command:
CLI> set target_chap target1 mychapsecret123
The CHAP settings have been applied.
2. Activate CHAP authentication for the target using the set iscsi_keys command:
CLI> set iscsi_keys target1 authentication=chap
The new values were set successfully.
3. [Optional] Set up an initiator CHAP secret for mutual authentication using the set initiator_chap
command:
CLI> set initiator_chap initiator1 inichapsecret123
The CHAP settings have been applied.
1510i Modular Smart Array Command Line Interface user guide
21
Page 22

Configuring Access Controls for LUN access
NOTE:
The steps in this section assume that you already have a basic iSCSI setup configured.
1. Use the set acl command to enable Access Controls on the target:
CLI> set acl target1 on
Access Controls Enabled
on Target target1
2. Decide whether to grant the initiator access to all LUNs on the target, or to a specificLUN,and
then do one of the following:
To grant the initiator access to all LUNs on the target, use the add acl_entry command:
CLI> add acl_entry initiator1 target=target1
Allowed access to all LUNs
on Target target1
by Initiator initiator1
To grant the initiator access to a specificLUN,usetheadd acl_entry command:
CLI> add acl_entry initiator1 lun=lun1t1
Allowed Initiator initiator1
access to LUN lun1t1
NOTE:
If more LUNs are added to the target, repeat the add acl_entry command as required to
include them.
Enabling iSNS
NOTE:
The steps in this section assume that you already have a basic iSCSI setup configured.
To set up iSNS, you must first choose the method of discovering iSNS servers. Next, you must enable
iSNS on the iSCSI target.
• To use DHCP discovery of iSNS servers:
a. Bydefault,theMSA1510iusesDHCPtodiscoveriSNSservers.
b. Use the set discovery command to enable iSNS discovery on the iSCSI target.
CLI> set discovery target1 isns=enable
iSNS enabled
• To use SLP discovery of iSNS servers:
a. Use the set isns command to change the iSNS server discovery mode:
CLI> set isns server_discovery=slp
iSNS parameters set.
b. Use the set discovery command to enable iSNS discovery on the iSCSI target.
CLI> set discovery target1 isns=enable
discovery of the iSCSI target
22
Initial configuration sequence
Page 23

iSNS enabled
• To manually add iSNS servers
a. Use the set isns command to change the iSNS server discovery mode:
CLI> set isns server_discovery=manual
iSNS parameters set.
b. Use the add isns_server command to add the IP address of the iSNS server:
CLI> add isns_server 20.20.20.26
The iSNS server was added successfully.
Alias: isns1
c. Use the set discovery command to enable iSNS discovery on the iSCSI target.
CLI> set discovery target1 isns=enable
iSNS enabled
Enable SLP disc
NOTE:
Steps in this section assume that you already have a basic iSCSI setup configured.
Use the set discovery command to enable SLP discovery on the iSCSI target:
CLI> set discovery target1 slp=enable
SLP enabled
overy of the iSCSI target
Configure static management settings
To access the MSA1510i management functionality over a network that does not use DHCP, and on which
your management host cannot access the default zeroconf* IP address, you must set up a static IP address.
1. Configure management to use a static IP address using the set management command:
CLI> set management dhcp=disable ip=192.168.1.10/255.255.255.0
gateway=192.168.1.1
2. [Optional] If you have not done so already, configurealoginandpasswordforaccessing
management functionality using the set management_login command:
CLI> set management_login <user_ID><password>
where <user_ID>and<password> are your own unique settings.
3. [Optional] Switch management functionality to a different physical port using the set management
command:
CLI> set management port=MA1
1510i Modular Smart Array Command Line Interface user guide
23
Page 24

4. [Optional] If required, enable access to the CLI via Telnet (not recommended) using the set service
command:
CLI> set service telnet on
CAUTION:
TheTelnetprotocolisnotasecuremethodoftransmittingdataoveranetwork.Because
Telnet does not encrypt data, anyone with the proper knowledge and tools can read
information being sent over the network. For this reason, HP recommends that you use SSH
to connect to the MSA1510i over a network, or use a serial connection to connect to the
MSA1510i directly.
24
Initial configuration sequence
Page 25

3 Command reference
Command overview
TheCLIusesthefollowingbasictypesofcommands:
add
bind
delete
help
reset
set
show
NOTE:
For a complet
help display_
NOTE:
Some CLI commands for iSCSI objects refer to an
text string that refers to an object. In some cases, when an object is being added, if the alias is not
specified, it is automatically generated by the CLI. In other cases, you must specify the alias.
elistofavailablecommandtypes,usethefollowinghelp command:
all
Creates new configuration elements.
Creates assoc
Removes configuration elements.
Displays all possible commands or a detailed description of a specified
command.
Restores the d
Changes the value of configuration elements.
Displays detailed information about a configuration element or all configuration
elements in a table
iations between iSCSI elements.
efault values of configuration elements.
alias
.Thealiasisaneasy-to-remember16-character
Canonical iSCSI target
The predefined iSCSI target alias refers to the canonical iSCSI target, which is used during discovery.
It can be used to configure authentication for discovery sessions.
CLI commands that can refer to the canonical iSCSI target are set iscsi_keys, show iscsi_keys,andset
target_chap. Other commands produce an error if the canonical target is specified. For example,
it is not po
newpage pi
ssible to delete the canonical target.
1510i Modular Smart Array Command Line Interface user guide
25
Page 26

Alphabetical l
isting of commands
The following M
nl
accept unit, page 27
add acl_entry, page 28
add arp,page29
add initiator, page 30
add ip, page 31 set target_chap, page 96
add isns_server,page32 set this_controller|other_controller,page97
add portal,page33 set this_controller_id, page 98
add portal_group,page34
add route, page 35 set unit_id, page 100
add spare, page 36 show acl_entry, page 101
add target, page 37 show adu_page, page 102
add unit, page 38 show arp, page 103
bind portal, page 42 show auto_path_change,page104
bind portal_group, page 43 show box,page105
bind unit,p
clear perf,page45 show certificate, page 107
delete acl_entry, page 46 show discovery, page 108
delete arp,page47 show disks, page 109
delete initiator, page 48 show drive_report, page 110
delete ip, page 49 show eventlog, page 111
delete isns_server,page50 show globals, page 112
delete portal,page51 show initiator, page 113
delete por
delete route,page53 show iscsi_keys, page 115
delete spare, page 54 show isns, page 116
delete target,page55 show isns_server, page 117
delete unit, page 56 show management, page 118
disable this_controller|other_controller, page 58 show mib2, page 119
download firmware, page 59 show perf, page 120
expand unit, page 65 show port, page 121
extend unit, page 66 show portal,page122
help, page 67 show portal_group,page123
locate, page 70
migrate unit, page 71
refresh isns_entries, page 73
reset certificate, page 74
reset controller, page 75 show service, page 128
reset management_login, page 76 show snmp, page 129
set acl, page 77 show target,page130
set auto_path_change, page 78 show taskstats, page 131
set certificate, page 79
set discovery,page80 show tgt_stats,page133
set globals, page 81
set initiator, page 83
set initiator_chap, page 84 show unit_id, page 137
set iscsi_keys, page 85 show version, page 138
set isns, page 87
set management, page 88
set management_login,page90 unbind portal, page 141
set port, page 91
SA1510i CLI commands are included in this section:
set preferred_path, page 92
set prompt, page 93
set service,page94
set snmp,page95
set unit,page99
age 44
tal_group,page52
show cacheinfo, page 106
show ip,pa
show profile, page 124
show preferred_path,page125
show pro
show route, page 127
show tech_support,page132
show this_controller/other_controller, page 134
show unit, page 135
start perf, page 139
stop perf, page 140
ge 114
xystats,page126
newpage pi
26
Command reference
Page 27

accept unit
Description Changes the state of the unit back to VOLUME_OK. Use this command to
Syntax accept unit [<unit_number>]
Operands <unit_number>
Example
CLI> accept units
NOTE: Accept Unit will cause a temporary LUN path change to this controller.
[1970-01-04 15:46:39] SetPreferredPath start... owner=1, change_map=0x0, lun_to_
ctlr_map=0xFFFFFFFF
Media exchange completed successfully.
CLI> [1970-01-04 15:46:40] Quiescing host I/O for LUN map 0xFFFFFFFF... Host/pr
oxy I/O quiesced.
[1970-01-04 15:46:40] Quiescing cache (quick)... Cache quiesced.
[1970-01-04 15:46:40] Quiescing background I/O... Background quiesced.
[1970-01-04 15:46:40] Flipping ownership(s)... change_map=0x0, lun_to_ctlr_map=0
xFFFFFFFF
[1970-01-04 15:46:40] Processing work while quiesced... work processing complete
.
[1970-01-04 15:46:40] Resuming I/O... I/O Resumed.
accept media exchange on a unit previously marked as failed. The accept
unit and accept units commands are identical in functionality.
accept units
[Optional] The number of the unit to be reset. If no value is entered, all
units are res
et.
See also • add unit
• bind unit
• delete unit
• show unit
• set unit
• expand uni
• extend unit
• migrate unit
• set unit_
• show unit_id
• unbind unit
newpage pi
t
id
1510i Modular Smart Array Command Line Interface user guide
27
Page 28

add acl_entry
Description Grants an initiator access to an iSCSI target or specificLUN.Ifyouspecify
Syntax add acl_entry <initiator> target=<target>
Operands <initiator>
the mapped LUN alias, the initiator is granted access to the specified
mapped LUN. If you specify the target alias, all of the target’s mapped
LUNs become accessible to the initiator. If more LUNs are mapped to the
target at a la
NOTE:
If Access Con
-oradd acl_entry <initiator> lun=<lun>
The iSCSI alias name of the initiator.
target=<target>
The iSCSI alias name of the target.
lun=<lun>
The alias name of an existing mapped LUN.
ter time, use the add acl_entry command to include them.
trols are turned off, this command turns them on.
Example
CLI> add acl_entry initiator1 lun=lun1t1
Allowed Initiator initiator1 access to Mapped LUN lun1t1
See also • set acl
• delete acl_entry
• show acl_entry
• bind unit
• unbind unit
newpage pi
28
Command reference
Page 29

add arp
Description Adds a static ARP entry to ARP table of the storage ports. This is generally
used only for debugging purposes.
Syntax add arp <ip address><mac address>
Operands <ip address>
The IP address to map, in dotted notation.
<mac address
The associated MAC address, in the form AA:BB:CC:DD:EE:FF.
Example
CLI> add arp 1
The ARP entry
0.10.10.11 12:14:33:44:34:11
was added successfully.
See also • delete arp
• show arp
newpage pi
>
1510i Modular Smart Array Command Line Interface user guide
29
Page 30

add initiator
Description Adds an iSCSI
Syntax add initiator <name> [alias=<alias>]> [profile=<profile>]
Operands <name>
initiator entry to the initiator pool.
The fully qualified iSCSI name of the initiator (1-223 characters).
Example
alias=<alias
>
[Optional] The alias name (1-16 characters) of the initiator.
profile=<pro
file>
[Optional] The operating system profile to associate with the initiator, where
<profile> is one of the following entries:
windows—for Microsoft Windows servers.
linux—for Linux servers.
hp—for HP-UX
servers.
openvms—for OpenVMS servers.
tru64—for Tru64 UNIX servers.
solaris—for
Solaris servers.
netware—for Netware servers.
xp—for XP servers.
CLI> add ini
The initiat
Name: initia
Alias: alias
tiator initiator1.test alias=alias1.test profile=windows
or was added successfully.
tor1.test
1.test
See also • delete initiator
• show initia
tor
newpage pi
30
Command reference
Page 31

add ip
Description Assigns an IP address to the specified storage port.
Syntax add ip <port><ip[/<mask>]> [<vlan>]
Operands <port>
The storage port to which the address is bound. Options include: SA0,
SA1, SB0, or SB1.
<ip[/<mask>]|default>
The IP address in dotted notation. If default is entered instead of an IP
address, the
If a subnet ma
dotted notation or number of bits, and must be entered directly after the IP
address, separated with a slash (/) character (no spaces).
<vlan>
[Optional] The VLAN ID (1-4096) with which to associate the new IP
address. If n
Example
CLI> add ip sa0 10.0.8.224/255.255.0.0
The IP address has been added successfully.
default gateway will be used.
sk is included with the ip address, it must be entered in
oVLANisspecified, packets remain untagged.
See also • delete ip
• show ip
newpage pi
1510i Modular Smart Array Command Line Interface user guide
31
Page 32

add isns_server
Description Adds an iSNS server to the iSNS server pool.
Syntax add isns_server <ip> [port=<port>] [alias=<alias>]
Operands <ip>
Example
CLI> add isns_server 10.10.10.50 alias=server1.test
NOTE:
iSNS servers can be added with this command only when the iSNS
server discovery mode is set to
“set isns”onp
age 87.
manual
.Formoreinformation,see
The IP address of the iSNS server to add.
port=<port>
[Optional] The TCP port of the iSNS server. Defaults to 3205 if no value is
entered.
alias=<alias>
[Optional] An alias name for the iSNS server.
The iSNS server was added successfully.
Alias: server1.test
See also • delete isns_server
• show isns_server
• set isns
newpage pi
32
Command reference
Page 33

add portal
Description Adds a new port
al entry in the portal pool. To use the portal, it must be
bound to a portal group using the bind portal command.
Syntax add portal < ip
> [port=<port>] [alias=<alias>]
Operands <ip>
The IP addres
s of the portal in dotted notation. The IP address must have
been previously added using the add ip command.
port=<port>
[Optional] The TCP port number of the portal. Defaults to 3260 if not
defined.
alias=<alias>
[Optional] A short descriptive alias (1-16 characters) for the portal.
Example
CLI> add portal 10.0.8.223 alias=portal1.test
The portal was added successfully.
Alias: portal1.test
See also • bind portal
• delete portal
• show portal
newpage pi
1510i Modular Smart Array Command Line Interface user guide
33
Page 34

add portal_group
Description Adds a new portal group entry into the portal group pool. To use the portal
Syntax add portal_group alias=<alias > [tag=<tag>]
Operands alias=<alias>
Example
group, it must be bound to a target using the bind portal_group
command.
The alias name (1-16 characters).
tag=<tag>
[Optional] The decimal portal group tag in the portal group table (show
portal_grou
be only used
p will display the portal group tags). Portal group tags can
once per target. If no tag is specified, a default value is
generated that relates to the position in the portal group table.
CLI>add por
The portal g
Alias: grou
Tag: 5
tal_group alias=group4.test
roup was added successfully.
p4.test
See also • bind portal_group
• delete por
tal_group
• show portal_group
newpage pi
34
Command reference
Page 35

add route
Description Adds a static route to a controller. This command is generally used for
Syntax add route <ctlr><ip[/<mask>]|default><gateway>
Operands <ctlr>
debugging purposes.
NOTE:
There is one routing table per controller.
The controller that the route is for. Valid values are “A” or “B”.
<ip[/<mask>]|default>
The IP address in dotted notation. If default is entered instead of an IP
address, the default gateway will be used.
If a subnet mask is included with the ip address, it must be entered in
dotted notation or number of bits, and must be entered directly after the IP
address, separated with a slash (/) character (no spaces).
<gateway>
The default gateway for the network.
Example
CLI> add route A 10.10.10.10 10.10.10.140
The route was added successfully.
See also • delete route
• show route
newpage pi
1510i Modular Smart Array Command Line Interface user guide
35
Page 36

add spare
Description Causes the specifieddriveordrivestobeusedasasparebythespecified
Syntax add spare unit=<unit_number><diskrange>
Operands unit=<unit number>
Example
Tocausedrive109(box1inbaynumber9)tobeusedasasparebyunit2:
unit.
The unit (0-31) that will have access to the spare or spares. This is the
same number t
add unit command.
<diskrange>
Thedriveord
single disk
consecutiv
number (1-3) and <yy> is the bay number (01-14). For example:
•disk101
•disk101-d
• "disk101 disk112-disk202 disk314"
hatwasassignedtotheunitwhenitwascreatedwiththe
rivestoremovefromactiveuse. Therangecanincludea
, a series of consecutive disks, or multiple series of single or
e disks. Disks are identified as disk<xyy>, where <x>isthebox
isk105
CLI> add spare unit=2 disk109
See also • delete sp
• expand unit
newpage pi
are
36
Command reference
Page 37

add target
Description Adds a new target to the target pool. The target name must be world wide
Syntax add target [name=<name>] [alias=<alias>]
Operands name=<name>
Example
CLI> add target name=NewTarget1 alias=NewAlias1
unique. If all target elements are already configured (all slots are in use in
thetargetconfiguration table), an error is returned.
NOTE:
To bind logical units to target LUNs, use the bind unit command. To create
iSCSI portals to allow initiators access, use the add ip, add portal_group,
add portal, b
ind portal_group,andbind portal commands.
[Optional] A fully qualified iSCSI target name (1-223 characters). If no
iSCSI name is given, a default is generated.
alias=<alias>
[Optional] A fully qualified iSCSI alias name (1-16 characters).
The iSCSI target was added successfully.
Name: newtarget1
Alias: newalias1
See also • delete target
• show target
newpage pi
1510i Modular Smart Array Command Line Interface user guide
37
Page 38

add unit
Description Adds a new LUN comprised of one or more hard drives.
NOTE:
Maintain a record of the units as they are created. These Unit ID numbers
are used in other CLI commands. In addition to recording the unit
number, the dr
ives included, and the RAID type and size,
in which they are created.
Syntax add unit <unit_number> raid_level=<raid_level>
data=<diskrange> [spare=<diskrange>]
[stripe_size=<stripe_size>] [size=<size>GB|MB]
[max_boot=enable|disable] [cache=enable|disable]
Operands >unit_number>
ThenumbertoassigntothenewLUN(0-31).
raid_level=<raid_level>
The RAID fault-tolerance level to use. Use one of the following values:
• 0 = RAID 0 (no fault tolerance)
• 1 =RAID1(mirroring)
• 5 = RAID 5 (distributed parity)
• 6 = RAID 6 (Advanced Data Guarding)
record the order
NOTE:
If more than one pair of drives are included in a RAID 1 array, the
data is striped across the firsthalfofthedrivesinthearray,andthen
each drive is mirrored to a drive in the remaining half of the drives for
fault tolerance. This method is referred to as RAID 1+0.
data=<diskrange>
The disk or disks to be used as primary data disks in the LUN. See the
description of <diskrange>below.
spare=<diskrange>
[Optional] The disk or disks to be used as spare disks in the LUN. See the
description of <diskrange>below.
<diskrange>
The disks to include, including a single disk, a range of consecutive disks, or
multiple series of single or consecutive disks. (If multiple series of single or
consecutive disks is entered, the entry must be encased in quotation marks.)
Disks are identified as disk<xyy>, where <x> is the box number (1-8) and
<yy> is the bay number (01-14). For example:
disk101
•
disk101-disk105
•
"disk101 disk112-disk202 disk314"
•
38
stripe_size=<stripe_size>
Command reference
Page 39

[Optional]Thestripesizetoassign(inKB).Validvaluesare8,16,32,
64, 128, or 256 Kilobytes.
• RAID0usesstripesizes8,16,32,64,128,and256.Default:128KB.
• RAID1usesstripesizes8,16,32,64,128,and256.Default:128KB.
• RAID5usesstripesizes8,16,32,and64. Default:16KB.
• RAID ADG uses stripe sizes 8, 16, 32, and 64. Default: 16 KB.
size=<size>MB|GB
[Optional] How much of the available space on the indicated drives is
to be used for the LUN, where <size> represents the LUN size followed
by MB or GB (when GB is entered, all return displays are converted to
MB). If no size is specified, the maximum available space of the disks is
assigned to the unit.
max_boot= enable|disable
[Optional] The size of the boot partition. By default, max_boot is enabled.
• enable = 8 GB boot partition (default)
• disable = 4 GB boot partition
cache=enable|disable
[Optional] Determines whether to use the array controller cache for the
LUN. By default, cache is enabled.
• enable = Uses the array controller cache (default)
• disable = Does not use the array controller cache
Example 1
To create a single LUN from an individual drive or group of drives:
CLI> add unit 0 data=”disk101-disk107 disk110” raid_level=adg stripe_size=64
First volume to be configured on these drives.
Logical Unit size = 69460 MB
RAID overhead=0MB
Total space occupied by new unit = 69460 MB
Free space left on this volume=0MB
Unit 0 is created successfully.
newpage pi
1510i Modular Smart Array Command Line Interface user guide
39
Page 40

Example 2
To assign multiple LUNs from a drive or group of drives, use the add unit command and include
the size= command option. Repeat the command using a unique LUN ID for each LUN, along with
the desired size parameter.
CLI> add unit 1 data=”disk111-disk114” raid_level=5 stripe_size=32 size=1000mb
First volume to be configured on these drives.
The logical unit size has been adjusted by 4MB for optimal performance.
Logical Unit size = 996 MB
RAID overhead = 498 MB
Total space occupied by new unit = 1494 MB
Free space left on this volume = 24533 MB
Unit 1 is created successfully.
CLI> add unit 2 data=”disk111-disk114” raid_level=5 stripe_size=32 size=2000mb
Logical Unit size = 2000 MB
RAID overhead = 1000 MB
Total space occupied by new unit = 3000 MB
Free space left on this volume = 21533 MB
Unit 2 is created successfully.
CLI> add unit 3 data=”disk111-disk114” raid_level=5 stripe_size=16 size=4000mb
Logical Unit size = 4000 MB
RAID overhead = 2000 MB
Total space occupied by new unit = 6000 MB
Free space left on this volume = 15533 MB
Unit 3 is created successfully.
Example 3
To create a LUN and assign a spare at the same time, use the add unit command and include the
spare= command option.
NOTE:
More than one spare can be assigned to the same LUN, and the same spare can be available to
multiple LUNs.
CLI> add unit 4 data=”disk211-disk212” raid_level=1 spare=”disk213”
First volume to be configured on these drives.
Logical Unit size = 69460 MB
RAID overhead = 69460 MB
Total space occupied by new unit = 138920 MB
Free space left on this volume=0MB
Unit 4 is created successfully.
See also • bind unit
• delete unit
• show unit
• set unit
• accept unit
• expand unit
• extend unit
• migrate unit
• set unit_id
• show unit_id
• unbind unit
40
Command reference
Page 41

newpage pi
1510i Modular Smart Array Command Line Interface user guide
41
Page 42

bind portal
Description Binds an iSCSI
iSCSI target to which the portal group is bound.
Syntax bind portal <p
Operands <portal>
The alias nam
<pgroup>
Thealiasnameofthetargetportalgroup.
Example
CLI> bind portal portal1.test pgroup1.test
The portal was bound successfully to the portal group.
See also • add portal
• delete portal
• show portal
newpage pi
portal to a portal group. This allows initiators to access the
ortal><pgroup>
e of the portal to bind.
42
Command reference
Page 43

bind portal_group
Description Binds an iSCSI portal group to an iSCSI target, allowing any portals in the
Syntax bind portal_group <pgroup><target>
Operands <pgroup>
Example
CLI> bind portal_group pgroup1.test target1.test
The portal group was bound successfully to the target.
See also • add portal_group
newpage pi
portal group to be used to access the target. A portal group may only
be bound to one
Thealiasnameoftheportalgroup.
<target>
The alias nam
• delete portal_group
• show porta
target at a time.
eoftheiSCSItarget.
l_group
1510i Modular Smart Array Command Line Interface user guide
43
Page 44

bind unit
Description Binds a logical unit to a LUN on an iSCSI target. A unit can only be bound
to one target. The LUN number is seen by iSCSI initiators when they access
the target. Mu
ltiple iSCSI targets cannot have LUNs mapping to the same
unit.
Syntax bind unit <un
Operands <unit>
The logical u
nit to which the LUN is mapped (0-31).
<target>
ThealiasnameoftheiSCSItarget.
<lun>
The mapped LUN number on the target (1-32).
alias=<alias>
[Optional] An alias name for the mapped LUN.
Example
To bind LUN 2 to Unit 1:
CLI> bind unit 1 target1 2
On Target target1:
LUN 2 mapped to Unit 1
Alias: lun2t1
See also • add acl_entry
• delete acl_entry
• show target
• unbind unit
it><target><lun> [alias=<alias>]
newpage pi
44
Command reference
Page 45

clear perf
Description Resets the controller performance analysis data previously initiated with
the start perf
command.
Syntax
clear perf
Operands None
Example
CLI> clear pe
Performance
rf
Monitor reset.
See also • show perf
• start perf
• stop perf
newpage pi
1510i Modular Smart Array Command Line Interface user guide
45
Page 46

delete acl_entry
Description Deletes an entry from the Access Control List (ACL), removing initiator
permission to access to an iSCSI target or specificLUN.Ifyouspecifythe
LUN alias, the initiator is denied access to the specified mapped LUN. If
you specify t
he target alias, all LUNs mapped to that target are denied
access to the initiator.
Syntax delete acl_
-or-
delete acl_entry <initiator> lun=<lun>
Operands <initiator>
The iSCSI alias name of the initiator.
target=<target>
The iSCSI alias name of the target.
lun=<lun>
The alias name of the mapped LUN.
Example
CLI> delete
Denied Init
acl_entry initiator1 lun=lun1t1
iator initiator1 access to Mapped LUN lun1t1
See also • set acl
• add acl_en
try
• show acl_entry
• bind unit
• unbind uni
t
entry <initiator> target=<target>
newpage pi
46
Command reference
Page 47

delete arp
Description Deletes an entry from the ARP table. Each physical port has its own ARP
Syntax delete arp <ip address>
Operands <ip address>
Example
CLI> delete arp 10.10.10.11
The ARP entry was deleted successfully.
See also • add arp
table.
NOTE:
Only static AR
The IP address, in dotted notation, of the ARP entry to delete.
• show arp
P entries added with the add arp command may be deleted.
newpage pi
1510i Modular Smart Array Command Line Interface user guide
47
Page 48

delete initiator
Description Removes an initiator entry from the initiator pool.
Syntax delete initiator <initiator alias>
Operands <initiator alias>
Example
CLI> delete initiator alias1.test
The initiator was deleted successfully.
See also • add initiator
newpage pi
NOTE:
If Access Control is disabled, the initiator can still access iSCSI targets.
The alias name (1-16 characters) of the initiator.
• show initiator
48
Command reference
Page 49

delete ip
Description Deletes an IP a
Syntax delete ip <IP address>
Operands <IP address>
The IP address, in dotted notation, to delete.
Example
CLI> delete ip 10.0.8.224
The IP address was deleted successfully.
See also • add ip
• show ip
newpage pi
ddress and all associated iSCSI portals.
1510i Modular Smart Array Command Line Interface user guide
49
Page 50

delete isns_server
Description Deletes an iSNS server.
Syntax delete isns_s
Operands <iSNS server alias>
The alias name
Example
CLI> delete isns_server server1.test
The iSNS server was deleted successfully.
See also • add isns_server
• show isns_server
newpage pi
erver <iSNS server alias>
of the iSNS server to delete.
50
Command reference
Page 51

delete portal
Description Delete an iSCS
configuration
Syntax delete portal <portal alias>
Operands <portal a lias>
The alias of the portal to be deleted. Use the show portal command to
display alia
Example
CLI> delete portal portal1.test
The portal was deleted successfully.
See also • add portal
• bind portal
• show portal
newpage pi
I portal and removes associations to the portal group and IP
table.
snames.
1510i Modular Smart Array Command Line Interface user guide
51
Page 52

delete portal_group
Description Deletes an iSCSI portal group. Any portals in the portal group are
Syntax delete portal_group <portal group alias>
automatically unbound.
Operands <portal grou
The alias nam
Example
CLI> delete portal_group group1.test
The portal group was deleted successfully.
See also • add portal_group
• bind portal_group
• show portal
newpage pi
palias>
e of the portal group to be deleted.
_group
52
Command reference
Page 53

delete route
Description Deletes the specifiedrouteentryfromtheroutingtableforthespecified
Syntax delete route <ctlr><ip[/<mask>]|default >
Operands <ctlr>
controller.
The controller of the route to delete. Valid options are A and B.
<ip[/<mask>
The IP address in dotted notation. If default is entered instead of an IP
address, the default gateway will be used.
If a subnet mask is included with the ip address, it must be entered in
dotted notat
address, separated with a slash (/) character (no spaces).
Example
CLI> delete r
See also • add route
newpage pi
oute a 10.10.10.10 10.10.10.140
• show route
]|default>
ion or number of bits, and must be entered directly after the IP
1510i Modular Smart Array Command Line Interface user guide
53
Page 54

delete spare
Description Causes the specifieddrivetonolongerbeusedasasparebythespecified
Syntax delete spare unit=<unit><diskrange>
Operands <unit>
Example
To cause disk 109 (box 1 in bay number 9) to stop being used as a spare by unit 2:
CLI> delete spare unit=2 disk109
unit.
Theunit(0-31)thatwillnolongerhaveaccesstothespareorspares.This
isthesamenu
the ADD UNIT command.
<diskrange>
Thesparedri
single disk
consecutiv
number (1-3) and <yy> is the bay number (01-14). For example:
disk101
•
disk101-d
•
"disk101 disk112-disk202 disk314"
•
mber that was given to the unit when it was created with
ve or drives to remove from use. The range can include a
, a series of consecutive disks, or multiple series of single or
e disks. Disks are identified as disk<xyy>, where <x>isthebox
isk105
See also • add spare
• expand unit
newpage pi
54
Command reference
Page 55

delete target
Description Removes the ta
automatically unbound.
Syntax delete target
Operands <target alias>
The current i
Example
CLI> delete target NewAlias1
The iSCSI target was deleted successfully.
See also • add target
• show target
newpage pi
rget from the target pool. All associated portal groups are
<target alias>
SCSI target alias name (1-16 characters).
1510i Modular Smart Array Command Line Interface user guide
55
Page 56

delete unit
Description Deletes the LUN or LUNs. All resources used by, and settings associated
Syntax delete unit <unitrange> [-y]
Operands <unitrange>
with the unit are deleted.
NOTE:
After a LUN is deleted, its unit number remains unused until manually
assigned to a n
ew LUN. Unit numbers are not automatically reassigned
when a LUN is deleted.
The LUNs to delete. Unit numbers are from 0 to 31 and are the same
numbers that were given to the units when they were first created with the
add unit command.
The range of units can be a single number, a series of consecutive numbers,
or a series of single numbers or ranges separated by spaces. For example:
•0
•4-6
•“13-68”
NOTE:
If a series of units includes a unit that does not exist, this does not
produce an error. The command delete unit 0-5 will delete
units0,1,2,and5,evenifunits3and4donotexist.
-y
[Optional] If this switch is specified, the deletion occurs without user
confirmation. Usethisoptionwithcaution.
Example
To delete LUN 4:
CLI> delete unit 4
Data will be lost after the unit is deleted.
Do you still want to DELETE unit 4 (Y/N)? Y
Please wait while unit 4 is being deleted…
Unit 4 is deleted successfully.
See also • add unit
• bind unit
• show unit
• set unit
• accept unit
• expand unit
56
Command reference
Page 57

newpage pi
• extend unit
• migrate unit
• set unit_id
• show unit_id
• unbind unit
1510i Modular Smart Array Command Line Interface user guide
57
Page 58

disable this_controller|other_controller
Description In a dual-controller system, this command disables one of the controllers to
prepare it for removal. When a controller is disabled, all resources being
processed by that controller are automatically failed over to the remaining
controller. After a controller has been successfully disabled, the LCD panel
displays a me
ssage stating that it is safe for that controller to be removed.
Syntax
Operands
Example
CLI> disable other_controller
newpage pi
disable this_controller|other_controller [reboot]
this_controller
Disables the controller through which you are accessing the CLI.
other_cont
other_controller
Disables th
reboot
[Optional] I
roller will disable the other MSA controller.
e other MSA controller.
nstead of disabling the controller, it will be rebooted.
58
Command reference
Page 59

download firmware
Description Updates firmware on the MSA1510i controller or MSA1510i other
Syntax download firmware <mode>
Operands <mode >,wheremode equals one of the following:
components, or, updates firmware on the hard drive storage enclosures
attached to the rear of the MSA1510i.
IMPORTANT:
Before using this method to update the firmware,makenoteofthe
following:
•ThecustomCL
establish the serial connection to the MSA. This command is not
available through SSH or Telnet.
• The host com
• Although not used during the update, HP-UX environments must have
an MSA fiber link to a switch.
• Because this updating method uses a serial connection to the MSA,
it is substantially slower than other updating methods. The preferred
method of updating MSA1510i firmware is with the SMU. See the
Storage Management Utility user guide
I cable, shipped with the MSA, must be available to
puter must support the 1k Xmodem (Ymodem) protocol.
HP
for more information.
offline—uploads an MSA firmware file, used to update the MSA1510i
controller, fan modules, or Environmental Monitoring Unit. Supported for
useinsingleanddualcontrollerconfigurations, this option requires a
manual power-cycle of the MSA upon completion of the update.
online—uploads an MSA1510i controller firmware file, to update
MSA1510i controller firmware only. Supported for use in dual-controller
configurations only, this option automatically power-cycles the MSA upon
completion of the update.
xml <d|f>—uploads an inventory xml file,suchaswhenupdating
firmware on SCSI hard drives in attached SCSI storage enclosures.
Supported for use in single and dual controller configurations, this
option requires a manual power-cycle of the MSA upon completion of
the update.
d—uses the inventory xml file to downgrade the component.
f—uses the inventory xml file to update the component, such as when
updating xxx.
sc—uses a smart component to update a system component. Supported
for use in single and dual controller configurations, this option requires a
manual power-cycle of the MSA upon completion of the update.
Prerequisites
Before updating system firmware,makenoteofthefollowing:
1510i Modular Smart Array Command Line Interface user guide
59
Page 60

• When determining which MSA controller firmware version to use, review the requirements and
information in the Compatibility Matrix(es), release notes, and other MSA announcements.
• Because firmware updates require least one restart of the MSA array and its attached storage
enclosures, update system firmware only during a scheduled maintenance window.
• The following versions of Internet Explorer are supported:
•MSA1510ifirmware 1.30 or earlier: IE6.0
•MSA1510ifirmware 2.0 or later: IE7.0
• Before updating system firmware, stop all host traffic to the array controller.
• Before updating system firmware, make sure that a recent, known good backup of all data on
the MSA array is available.
• Before updating system firmware,makesurethatacopyoftheconfiguration, including the iSCSI
IP addressing and portal information, along with the hard drive, LUN, and target information is
available.
• If it has been more than six months since you restarted your MSA storage system, HP recommends
that you power-cycle the MSA (power off, and then power on) before updating the firmware to
ensure that you are working with a fresh system.
• For newly installed MSA, do not perform a firmware update until controller batteries are fully
charged.
• For existing MSA, do not perform a firmware update until you have confirmed that the “host
mode” or “profile” for each connection is correctly set. The host mode identifies the operating
system of each connection to the storage. Do not use the “default” setting. If the host mode is
not properly set, hosts may lose access to the storage or experience other difficulties after the
update. Depending on your operating system environment or user preference, the host mode is
set through the “connection” commands of the CLI or through the “ACL” settings of the SMU. For
more information, see the CLI or SMU user documents.
• In dual controller MSA1510i configurations, you MUST log off all redundant paths to the MSA
array prior to beginning a firmware update. The update will not succeed if redundant paths are
detected by the MPIO/DSM and may require multiple reboots to recover back to the original
firmware version. There could also be potential loss of connection of the Internet Explorer to the
management port if there are redundant paths during the flash update cycle.
• In dual controller MSA1510i configurations, only one of the two MSA controllers is updated
directly. The second MSA controller is updated (cloned) when the MSA is power-cycled near
the end of the updating procedure.
• Depending on the storage enclosure model attached to the MSA array (SATA or SCSI), you may
be able to update enclosure firmware or hard drive firmware through the MSA utility.
• After the update is complete, be sure to check the status of the MSA for unexpected issues.
After power-cycling the MSA array, verify the status of the connections, defined profile types,
redundancy settings, and storage configuration.
•
After the update is complete, power cycle the MSA and all of its attached hard drive storage
enclosures to activate the new firmware.
IMPORTANT:
If you encounter any problems during the firmware update process, stop and contact HP technical
support. See “HP technical support” on page 10 for support contact information.
Example
To update MSA controller firmware or MSA storage enclosure firmware:
60
Command reference
Page 61

1. Determine which version firmware is currently installed on the MSA by using one of the following
methods:
• With the array controller powered on, press the arrow buttons on the front of the controller until
the following message is displayed:
00 Array Controller Firmware ver <version>.
• From the MSA-CLI, enter the show version command. MSA1510i Firmware Revision is
included in the displayed system information.
2. Obtain the latest firmware files and save to a temporary location on the host:
a. Go to the MSA1510i support page: h
ttp://www.hp.com/support.
b. Select your language and operating system.
c. The display is updated to include a list of available downloads for the specified operating system.
d. If you are not yet registered, under the Subscribe to driver and support alerts banner, click Sign
up now to receive e-mail notifications about MSA firmware or hardware, driver and support
alerts, advisories, and notifications. This alert notification system is a one-way broadcasting
method used to distribute important notices about HP devices.
e. Click the title description of the download option to display important information about the
update.
•ClicktheDescription tab for a brief overview about the download.
•ClicktheRelease Notes tab for detailed information about the download, including
version information, compatibility information, a summary of changes, important notes,
service considerations, and installation precautions.
IMPORTANT:
Besuretoreviewtheonlinereleasenotesandreadmefiles for last-minute notifications
about the update.
f. After reviewing the release notes for update, click Download and follow the on-screen instructions
to save the download bundle to a temporary directory on the server.
NOTE:
For downloaded ISO images, create a CD from the downloaded ISO file using a CD
burning tool with the ability to burn a CD from an ISO file. Do not simply copy the
ISO file to a blank CD.
3. Schedule a maintenance window for the update.
4. Ensure
that there is a valid, recent backup of the system.
5. Stop all host traffictotheMSAarray.
6. If the MSA has not been restarted in the last six months, power cycle the array.
1510i Modular Smart Array Command Line Interface user guide
61
Page 62

7. Establish a serial connection to the CLI using an emulator program such as HyperTerminal.
NOTE:
the following example describes the HyperTerminal emulator program.
a. Connect the RJ-45Z end of the custom CLI configuration cable to the port on the front of the
controller. One custom CLI cable is shipped with the MSA.
b. Connect the DB9 end of the CLI cable to the serial port on the host server.
c. Set up a terminal emulator from the host computer using the following settings:
Serial port:
Bits per second:
Data bits:
Parity:
Stop bits:
Flow control:
any open COM port
8
19200
none
1
none
d. After opening the session, press Enter several times to display the CLI command prompt.
8. At the CLI prompt, enter the following command:
CLI> download firmware <offline|online|xml>
where:
62
Command reference
Page 63

9. On the menu bar at the top of the emulator window, select Transfer > Send File.
10. In the Send File window:
a. Click Bro
the firmwa
wse, navigate to the directory in which you placed the firmware files, and then select
re file.
b. Expand the Protocol drop-down box, and then select 1K Xmodem.
c. Click Send. A 1K Xmodem status window is displayed.
11 . Wait f
or a completion message to display.
ample, the following messages are displayed on the MSA controller LCD panel:
For ex
M S A 1510 i u p d a t e s :
0 updates:
MSA2
307 FIRMWARE FLASH DONE
313 FI
(Each
numb
RMWARE FLASH DONE ON BOX <n>
attached storage enclosure is updated one at a time, in sequential box
er order.)
NOTE:
Do not interfere with or cancel the download process. Interrupting the download process
might corrupt the firmware.
1510i Modular Smart Array Command Line Interface user guide
63
Page 64

12. Restart the MSA and its attached storage enclosures storage system by doing the following (newly
downloaded firmware cannot be accessed until the MSA is restarted):
a. Press and hold down the MSA Power On/Standby button for approximately five seconds to
place the MSA in Standby mode.
b. Power off all storage enclosures attached to the MSA.
c. Wait approximately two minutes to ensure that the hard disk drives in the enclosures stop
rotating.
d. Restart all storage enclosures attached to the MSA.
e. Wait approximately four minutes to allow the enclosures to complete their startup routines.
f. Press and release the MSA Power On/Standby button to restart the MSA.
g. Wait (up to eight minutes) for the STARTUP COMPLETE message to display on the MSA
controller LCD panel.
13. View the messages displayed on the array controller LCD panel during startup to confirm that the
firmware was installed successfully and that the array controller restarts successfully.
NOTE:
In dual-controller configurations, firmware on the two controllers is compared each time
theMSAchassisisrestarted.Iftheversionsaremismatched,thesystempromptstoclone
the firmware on the controller with the latest version over to the controller with the earlier
version firmware. (For the system to operate in a dual-controller mode, firmware on the
controllers must match.)
The following message is displayed on the LCD panel of the controller with the earlier
firmware:
07 CLONE FIRMWARE ? ‘<‘ = NO, ‘>’ = YES
Press the > button on the LCD panel to clone the firmware.Duringthecloningprocess,
informational messages are displayed on the controller LCD panels. When the cloning
process is complete, the just-updated controller automatically restarts.
newpage pi
64
Command reference
Page 65

expand unit
Description Adds a physical drive or drives to the LUN. This enables the specified unit
Syntax expand unit <unit><disk range>
Operands <unit>
and all units o
n the same volume to utilize more disks, effectively allowing
them to increase in size.
NOTE:
Because this command affects the entire array, all LUNs made from the
array are also affected.
Theunitnumber(0-31)ofanyoneoftheLUNswithinthetargetarray.Any
LUN in the array can be entered to identify the array; the space is added to
the array and not the LUN.
<diskrange>
A range of disks to be included in the LUN. Thisrangemustincludethe
pre-expansion disks as well as the additional disks to be added. The range
can include a single disk, a series of consecutive disks, or multiple series of
single or consecutive disks. Disks are identified as disk<xyy>, where <x>is
the box number (1-3) and <yy> is the bay number (01-14). For example:
disk101
•
disk101-disk105
•
"disk101 disk112-disk202 disk314"
•
Example
To expand the array containing unit 4:
CLI> expand unit 4 disk204-disk207
The actual new array capacity will be 3000MB.
The array with Unit 4 is being expanded.
Use “show unit 4” to monitor progress.
See also • add unit
• bind unit
• delete unit
• show unit
• set unit
• accept unit
• extend unit
• migrate unit
• set unit_id
• show unit_id
• unbind unit
newpage pi
1510i Modular Smart Array Command Line Interface user guide
65
Page 66

extend unit
Description Adds unused, available space in an array to the specified LUN.
Syntax extend unit <u
nit><sizing option>
Operands <unit>
The LUN to whic
hthespacewillbeadded.
<sizing option>, where sizing option equals one of the following:
add_size=<x
xxx>MB|GB—Specifies how much of the available space
in the array to add to the LUN, where <xxxx>representsthesize. You
must specify if the size is MB or GB. If no size is specified, the maximum
available sp
ace of the included disks is assigned to the array.
new_size=<xxxx>MB|GB—This option can be used instead of add_size
to enter the total new size of the LUN, where <xxxx>representsthesize.
YoumustspecifyifthesizeisMBorGB.
Example
To extend unit 2 by 1,000 MB:
CLI> extend unit 2 add_size=1000MB
The actual new volume size will be 1992MB.
Unit 2 is being extended.
Use “show unit 2” to monitor progress.
See also • add unit
• bind unit
• delete uni
t
• show unit
• set unit
• accept un
it
• expand unit
• migrate unit
• set unit
_id
• show unit_id
• unbind unit
newpage pi
66
Command reference
Page 67

help
Description Displays helpful information about CLI commands. Displayed information
may include a b
rief definition, required command syntax, available
operands, the number of characters for a command option value, or a list
of allowed/disallowed characters.
The basic comm
and is help. If a noun or verb is also entered, the display
is limited to information about that specific command. If help is entered
without a limiting noun or verb, the displayed lists all possible command
verbs and the
n all possible command nouns.
NOTE:
? may be enter
ed in place of the word help. ? and help are
interchangeable.
Syntax help [noun][verb][display_all]
Operands <noun>
[Optional] Displays a list of all command verbs that may follow that noun.
<verb>
[Optional] Displays a list of all command nouns that may follow that verb.
display_all
[Optional] Displays a list of all currently supported CLI commands.
Example help command and response
CLI> help
Possible command verbs:
? help add
copy change download
delete migrate expand
extend accept set
locate show disable
refresh bind unbind
reset start stop
clear override
Possible command nouns:
unit units profile
mode spare firmware
unit_id this_controller this_controller_id
other_controller other_controller_id globals
prompt disk bus
box all cancel
version disks tech_support
standby preferred_path auto_path_change
proxystats target_chap initiator_chap
discovery isns_server isns
isns_entries port ip
route arp acl
acl_entry initiator target
iscsi_keys portal_group portal
tgt_stats management service
certificate management_login snmp
1510i Modular Smart Array Command Line Interface user guide
67
Page 68

controller adu_page mib2
drive_report perf cacheinfo
taskstats debug eventlog
aculock
Specify command word:
Example help display all command and response
CLI> help display_all
Displaying list of all currently supported CLI commands:
? help
add unit add units
add spare download firmware
delete unit delete units
delete spare migrate unit
expand unit extend unit
accept unit accept units
set unit_id set this_controller
set this_controller_id set other_controller
set other_controller_id set globals
set prompt set unit
locate disk locate unit
locate bus locate box
locate all locate cancel
show unit show units
show unit_id show this_controller
show other_controller show version
show disks show globals
show box show profile
show tech_support disable other_controller
disable this_controller
show preferred_path set preferred_path
show auto_path_change set auto_path_change
show proxystats set target_chap
set initiator_chap set discovery
show discovery add isns_server
delete isns_server show isns_server
set isns show isns
refresh isns_entries set port
show port add ip
delete ip show ip
add route delete route
show route add arp
delete arp show arp
set acl add acl_entry
delete acl_entry show acl_entry
bind unit unbind unit
add initiator delete initiator
show initiator set initiator
add target delete target
show target set iscsi_keys
show iscsi_keys add portal_group
delete portal_group bind portal_group
unbind portal_group show portal_group
add portal delete portal
bind portal unbind portal
show portal show tgt_stats
set management show management
set service show service
set certificate reset certificate
show certificate set management_login
reset management_login set snmp
show snmp reset controller
show adu_page show mib2
show drive_report show tech_support
68
Command reference
Page 69

show perf start perf
stop perf clear perf
show cacheinfo show taskstats
set debug show eventlog
Example help add unit command and response
CLI> help add unit
Usage: ’add unit <#> raid_level=R
#={0-31} / R={0,1,5,6(ADG)} / X={positive integer} / S={8,16,32,64,128,256}
diskrange examples: DISK101
DISKxyy: x={1,2,3} (box #) / yy={01-14} (bay #)
ex: DISK111 - disk in box 1, bay 11
max_boot is enabled by default. it can be disabled for OS’s that don’t
support the creation of bootdrives > 4GB
cache is enabled by default. enables/disables cache for the new unit.
add unit creates a new logical unit using the specified settings
data=diskrange
[spare=diskrange]
[stripe_size=S]
[size=X<GB|MB>]
[max_boot=<enable/disable>]
[cache=<enable/disable>]
DISK101-DISK105
"DISK101 DISK112-DISK202 DISK314"
newpage pi
1510i Modular Smart Array Command Line Interface user guide
69
Page 70

locate
Description Helps you locate specific hardware by flashing the LEDs of the drives in the
requested hardware. These LEDs are visible from the front of the storage
enclosures.
Syntax locate <option> [time=<time>]
Operands <option>, wh
ALL—Flashes the LEDs of all drives connected to the MSA storage
sub-system.
BOX <x>—Flashes the LEDs of the drives in the specified box.
BUS <x>—Fla
where <x> is the bus number.
DISK <x>—Fl
number.
UNIT <x>—F
<x>istheunitnumber.
CANCEL—Di
time=<time>
] The length of time, in seconds, to flash the LEDs. If no value is
the default value of 30 seconds is used.
Example
To flash the
[Optional
specified,
drive LEDs in box 1 for 10 seconds:
ere option equals one of the following:
shes the LEDs of the drives connected to the specified bus,
ashes the LEDs of the specified drive, where <x>isthedrive
lashes the LEDs of the drives in the specified unit, where
scontinues the flashing of the drive LEDs.
CLI> locat
newpage pi
70
Command reference
e box 1 time=10
Page 71

migrate unit
Description Migrates an ex
move to an unsu
isting LUN from one RAID level to another. If you attempt to
pported RAID configuration for a LUN, an error message
is displayed.
NOTE:
Before changing the RAID level or stripe size of a LUN, verify there is
available, unused space on the array. Migrating from one RAID level
to another may require additional space for parity and organizational
purposes.
Syntax migrate unit <unit> raid_level=<raid level>
[stripe_size=<size>]
Operands <unit>
The number (0-31) of the LUN to modify.
raid_level=<raid level>
The RAID fault-tolerance level to use. RAID levels include:
• 0 = RAID 0 (no fault tolerance)
• 1 = RAID 1 (mirroring)
• 5 = RAID 5 (distributed parity)
• 6 = RAID 6 (Advanced Data Guarding)
NOTE:
If more than one pair of drives are included in a RAID 1 array, the
data is striped across the firsthalfofthedrivesinthearrayandthen
each drive is mirrored to a drive in the remaining half of the drives for
fault tolerance. This method is referred to as RAID 1+0.
stripe_size=<size>
[Optional]Thestripesizetoassign(inKB).Optionsinclude:
• RAID0usesstripesizes8,16,32,64,128,and256(Default:128KB)
• RAID1usesstripesizes8,16,32,64,128,and256(Default:128KB)
• RAID 5 uses stripe sizes 8, 16, 32, and 64 (Default: 16 KB)
• RAIDADGusesstripesizes8,16,32,and64(Default:16KB)
Example
Tomigrateunit0toRAID5withastripesizeof32KB:
CLI> migrate unit 0 raid_level=5 stripe_size=32
The RAID level of Unit 0 will now be 5.
Unit 0 is being migrated.
Use “show unit 0” to monitor progress.
See also • add unit
• bind unit
• delete unit
1510i Modular Smart Array Command Line Interface user guide
71
Page 72

newpage pi
• show unit
• set unit
• accept unit
• expand unit
• extend unit
• set unit_id
• show unit_id
• unbind unit
72
Command reference
Page 73

refresh isns_entries
Description Re-registers all iSNS-enabled targets with all iSNS servers.
Syntax
Operands None
Example
CLI> refresh isns_entries
Refreshed the iSNS entries.
newpage pi
refresh isns_
entries
1510i Modular Smart Array Command Line Interface user guide
73
Page 74

reset certificate
Description Removes the SSL certificate being used by the management interface and
resets the system to using an internally-generated, self-signed certificate.
Syntax
reset certifi
cate
Operands None
Example
CLI> reset certificate
WARNING: You are about to delete your SSL certificate from the system and
reset it to using a default self-signed certificate! Please ensure
you have backed up your certificate and private key if you need to use them
in the future!
Are you sure you want to proceed [Y/n]? Y
SSL certificate deleted.
See also • set certifica
te
• show certificate
newpage pi
74
Command reference
Page 75

reset controller
Description Restarts the MSA controller through which you are connecting to the CLI.
During this process, detailed progress and status information is displayed.
Syntax reset control
Operands <seconds>
[Optional] T
Example
CLI> reset controller 10
System will reboot in 10 seconds.
newpage pi
he number of seconds to delay before restarting the controller.
ler [<seconds>]
1510i Modular Smart Array Command Line Interface user guide
75
Page 76

reset management_login
Description Resets the man
This command is only available through the serial port CLI.
Syntax
Operands None
Example
CLI> reset management_login
Management login and password reset.
See also • set managem
newpage pi
reset managem
agement username and password to their factory defaults.
ent_login
ent_login
76
Command reference
Page 77

set acl
Description Sets access controls on or off for an iSCSI target.
NOTE:
When set acl disable is entered, all existing ACL entries on the
target are automatically deleted. All storage on the target is immediately
available to a
Syntax set acl <target> enable|disable
Operands <target>
ThealiasnameoftheiSCSItarget.
enable|disable
Specifies whether to enable or disable Access Controls.
Example
CLI> set acl target1.test disable
Access Controls Disabled on Target target1.test
See also • add acl_entry
• delete acl_entry
• show acl_entry
ll initiators.
newpage pi
1510i Modular Smart Array Command Line Interface user guide
77
Page 78

set auto_path_change
Description for dual-cont
I/O load balan
firmware may s
target, base
roller configurations only, turns on or off automatic, MSA-based
cing. If automatic path changes are enabled, the controller
ubsequently and automatically change controller paths for a
donI/Oload.
Syntax set auto_path_change enable|disable [prp=<#>] [mnr=<#>]
twl=<#>]
isables automatic path changes.
Operands
[twp=<#>] [
enable|disable
Enables or d
prp=<#>
The minimum
the percen
percent of proxied requests to trigger a path change, where
tage <#>isfrom51to100.
mnr=<#>
The minimum
number of requests issued to the LUN to trigger a path change.
twp=<#>
The minimum
time to wait after the system is powered on or restarted to
make any path changes, where <#>isfrom0to255minutes.
twl=<#>
The minimum time to wait for subsesquent path changes to the same LUN,
where <#> is from 0 to 255 minutes.
Example
CLI> set au
Implicit (
Implicit L
Minimum % o
Minimum nu
Minimum ti
Minimum ti
to_path_change mnr=100
automatic load-based) LUN ownership changes are currently ENABLED.
UN ownership change preferences are as follows:
f proxied requests to trigger implicit path change..: 75%
mber of requests to LUN before path change enabled...: 128
me to wait before changing ownership after power-up..: 30 minutes
me between ownership changes for LUN.................: 30 minutes
See also • show preferred_path
newpage pi
78
Command reference
Page 79

set certificate
Description Sets the SSL certificate to be used by the management interface. This is
used to load a real certificate in place of the default self-signed certificate
generated by the management interface.
When this command is executed, the user is prompted to paste in the
PEM-encoded d
ata for their certificate and private key.
Syntax
Operands None
See also • reset certi
newpage pi
set certificate
• show certificate
ficate
1510i Modular Smart Array Command Line Interface user guide
79
Page 80

set discovery
Description Enables or dis
ables SLP and iSNS discovery on an iSCSI target.
Syntax set discovery <target> [slp=enable|disable]
[isns=enable
|disable]
Operands <target>
Thealiasnameofthetarget.
slp=enable|disable
[Optional] Enables or disables SLP for this target. If this operand is not
specified, the current setting is kept.
isns=enable|disable
[Optional] Enable or disables iSNS for this target. If this operand is not
specified, the current setting is kept.
Example
CLI> set discovery target1.test slp=enable isns=disable
SLP enabled
iSNS disabled
See also • show discov
ery
newpage pi
80
Command reference
Page 81

set globals
Description Sets the expan
depending on the parameters specified.
NOTE:
All operands are optional, but at least one must be specified for the
command to be valid.
Syntax set globals [expand_priority=<priority>] [rebuild_prior-
ity=<priority>] [system_name=”<name>”] [read_cache=<r>]
[write_cache=<w>]
Operands expand_priority=<priority>
{Optional] The expand priority is used when expanding a LUN to set the
priority of LUN expansions in relation to input/output operations. See
below for detailed information about this setting.
rebuild_priority=<priority>
[Optional] The rebuild priority is used when rebuilding a LUN to set the
priority of an array rebuild in relation to input/output operations. See
below for detailed information about this setting.
Valid entries for priority include the following:
Low—expansion or rebuild takes place only when the array controller is
not busy handling normal I/O requests. This setting has minimal effect on
normal I/O operations. However, there is an increased risk that data will
be lost if another physical drive fails while the rebuild is in progress.
d priority, the read/write ratio, or the system name,
Medium—expansion or rebuild occurs for half of the time, and normal I/O
requests are handled during the rest of the time.
High—expansion or rebuild occurs at the expense of normal I/O
operations. Although system performance is affected, this setting provides
better data protection because the array is vulnerable to additional drive
failures for a shorter time.
system_name=”<name>”
[Optional] The new system name. The name can be up to 20 alphanumeric
characters plus these additional characters: space ! @ # * _ ( ) + : . / , -.
NOTE:
Quotation marks are required around the name.
read_cache=<r>
[Optional] The read cache as a percentage of the total cache. The value
of <r> must be between 0 and 100, and the sum of the read cache and
write cache must equal 100.
write_cache=<w>
1510i Modular Smart Array Command Line Interface user guide
81
Page 82

[Optional] The write cache as a percentage of the total cache. The value
of <w> must be between 0 and 100, and the sum of the read cache and
write cache must equal 100.
Example
CLI> set globals expand_priority=high rebuild_priority=high system_name=”MSA-1”
read_cache=50 write_cache=50
Global Parameters:
System Name: MSA-1
Rebuild Priority: HIGH
Expand Priority: HIGH
Total Cache: 256MB
50% Read Cache: 128MB
50% Write Cache: 128MB
See also • show globals
newpage pi
82
Command reference
Page 83

set initiator
Description Sets the profile (operating system) associated with the initiator. If the profile
Syntax set initiator <initiator> profile=<profile>
Operands <initiator>
is not set for an initiator, a default profile is assigned.
ThealiasnameoftheiSCSIinitiator.
profile=<profile>
The operating system profile to associate with the initiator, where <profile>
is one of the following entries:
windows—fo
linux—for Linux servers.
hp—for HP-UX servers.
openvms—fo
tru64—for Tru64 UNIX servers.
solaris—for solaris servers.
netware—fo
xp—for XP servers.
Example
LI> set initiator initiator1 profile=windows
The initiator profile has been changed.
See also • show initi
• show profile
rMicrosoftWindowsservers.
rOpenVMSservers.
r Netware servers.
ator
newpage pi
1510i Modular Smart Array Command Line Interface user guide
83
Page 84

set initiator_chap
Description Sets the CHAP secret (password) for an iSCSI initiator in mutual CHAP
Syntax set initiator_chap <initiator><secret>
Operands <initiator>
Example
To set the CHAP secret for initiator1 to inichapsecret123:
CLI> set initiator_chap initiator1 inichapsecret123
See also • set target_chap
newpage pi
authenticati
ThealiasoftheiSCSIinitiator.
<secret>
The CHAP secret (12–16 character password) for the initiator.
• add initiator
on.
84
Command reference
Page 85

set iscsi_keys
Description Sets iSCSI login parameter keys for an iSCSI target.
Syntax set iscsi_keys <target>[<parameter>=<setting>]
Operands <target>
NOTE:
For the optional parameter value, to reset all the keys to their default
values, enter default.
Specifies the alias name of the iSCSI target.
authentication=none|chap
(Default =none)
immediate_data=yes|no
(Default = yes)
initial_r2t=no|yes
(Default = no)
data_sequence_in_order=yes|no
Default = yes)
data_sequence_in_order=yes|no
Default = yes
header_digest=yes|no
Default = yes
data_digest=yes|no
Default = yes
first_burst_size=<value>
Value is a number from 512 to 8192. Default = 8192 (8KB).
max_burst_size=<value>
Value is a number from 512 to 65536. Default = 65536 (64KB).
logout_login_max_time=<value>
Value is a number from 1 to 3600 (seconds). Default = 2 seconds.
max_connections=<value>
Value is a number from 1 to 4. Default = 1.
max_out_r2t=<vlaue>
Value is a number from 1 to 8. Default = 8
<max_rx_pdu_length>
Value is a number from 512 to 65536. Default = 65536 (64KB)
1510i Modular Smart Array Command Line Interface user guide
85
Page 86

Example 1
CLI> set iscsi_keys target1 authentication=chap
The new values were set successfully.
Example 2
CLI> set iscsi_keys target1 default
The new values were set successfully.
See also • show iscsi_keys
• Canonical iSCSI target
newpage pi
86
Command reference
Page 87

set isns
Description Sets the iSNS parameters.
Syntax
Operands
Example
CLI> set isns enable server_discovery=dhcp
iSNS parameters set.
set isns [serv
ery=manual|dhcp|slp] [esi=<esi_port>] [entity=<en-
tity_name>]
service=enable|disable
[Optional] Enables or disables iSNS on the MSA1510i.
server_discovery=manual|dhcp|slp
[Optional] The method used to discover iSNS servers.
•Usemanual if
•Usedhcp if the iSNS servers are being discovered via DHCP.
•Useslp if the iSNS servers are being discovered via SLP.
esi=<esi_port>
[Optional] The TCP port used by the iSNS server for ESI monitoring. The
default port is 50000.
entity=<entity_name>
[Optional] The iSNS entity name for the MSA1510i. If no parameter is
specified, a
ice=enable|disable] [server_discov-
the iSNS servers are being added manually. (Default)
defaultentitynameiscreated.
See also • show isns
newpage pi
1510i Modular Smart Array Command Line Interface user guide
87
Page 88

set management
Description Sets global ma
Syntax set management [disable|enable] [port=<port>]
[dhcp=<dhcp>
[ip=<ip>[/<mask>]|default>] [gateway=<ip>] [dns1=<ip>]
[dns2=<ip>] [vlan=<vlan>] [ntp=<ip>]
Operands
NOTE:
Although all parameters are optional, at least one parameter must be
supplied for the command to be valid.
NOTE:
If a parameter is not specified then the current setting must not be
changed.
disable|enable
• disable—disables the management interface on the storage system.
All management interface settings are retained and may be restored by
later issuing a set management enabled command.
• enable—enables the management interface on the storage system if it
was previously disabled.
nagement interface settings for the system.
] [hostname=<name>] [domain=<domain>]
port=<port>
A valid management port name, such as MA0,tobeusedasthe
management interface port.
dhcp=<dhcp>
• on—activates DHCP for the management interface. This causes the
configured static IP address to be removed.
• off—deactivates DHCP for the management interface. The configured
static IP address is used, or if no static IP is configured, the system
defaults to a zeroconf setup.
hostname=<name>
The network host name for this system. For example, myarray.
domain=<domain>
The domain suffix for this system. For example, hp.com.
<ip[/<mask>]|default>
The IP address in dotted notation. If default is entered instead of an IP
address, the default gateway will be used.
If a subnet mask is included with the ip address, it must be entered in dotted
notation or number of bits and must be entered directly after the IP address,
separated with a slash (/) character (no spaces).
88
Command reference
Page 89

gateway=<ip>
The IP address, in doted notation.
dns1=<ip>
The IP address, in doted notation.
dns2=<ip>
The IP address, in doted notation.
vlan=<vlan>
The VLAN ID (1-4096, or none to disable VLAN tagging).
ntp=<ip>
The IP address, in doted notation.
Example 1
To set up the management interface to use port MA0, and to activate DHCP for the management interface:
CLI> set management port=MA0 dhcp=enable
Management settings changed.
Example 2
To set up the management interface to use port MA1 and to have the following properties:
• Static IP address = 10.11.1.2
• Netmask = 255.0.0.0 (8 bits set, class A)
CLI> set management port=MA1 ip=10.11.1.2/8
Management settings changed.
Example 3
To disable the management interface:
set management disabled
Management settings changed.
See also • set management_login
newpage pi
1510i Modular Smart Array Command Line Interface user guide
89
Page 90

set management_login
Description Configures the
interface. Th
password, and then enter the new username and password. If you have
forgotten your old password, use the reset management_login command,
or reset the password using the front panel display.
NOTE:
The default factory setting for both the username and password is
Theusernameandpasswordmustbechangedthefirst time you log on to
the MSA1510
Syntax
Operands None
See also • reset management_login
newpage pi
set management_login
• set management
• set service
login and password used to access the management
e command prompts you to enter your old username and
i.
root
.
90
Command reference
Page 91

set port
Description Enables or dis
NOTE:
By default, al
Syntax set port <port> enable|disable
Operands <port>
The name of the physical port. For example: SA0.
enable|disable
Enable or disable the port.
Example
To enable port SA1:
CLI> set port sa1 enable
The operation was successful.
See also • show port
newpage pi
ables a physical port.
lportsareenabled.
1510i Modular Smart Array Command Line Interface user guide
91
Page 92

set preferred_path
Description For dual-controller configurations only, this command either sets the
Syntax set preferred_path <controller><unit_list>
Operands <controller>
controllerownership(path)forthespecified LUNs, or, resets the preferred
path of the spe
this command
transfer of o
NOTE:
If auto_path
automatica
auto_path_change.
or
set preferred_path reset <unit_list>
The controller to assign as owner of the LUNs. Valid entries include:
this_controller, other_controller, controller=1,or
controller=2
reset
If reset is entered instead of a controller, ownership of the specified LUNs
is changed to the last explicity-set path.
cified LUNs to the last explicitly-set path. When executing
, please note that I/O will be delayed slightly during the
wnership.
_change is enabled, the firmware may subsequently,
lly change the path of the LUN. For more information see set
<unit_list>
The LUN or LUNs for which to set the path. An individual LUN or range
of LUNs may be entered. For example: 0-4 6 10 will include LUNs 0, 1,
2, 3, 4, 6, and 10.
Example
enter the cli display here.
See also • set auto_path_change
• show preferred_path
• show auto_path_change
newpage pi
92
Command reference
Page 93

set prompt
Description Changes the CLI prompt from the default of CLI>.
Syntax set prompt <new_prompt>
Operands <new_prompt
The text to use as the CLI prompt. The name can be up to 24 alphanumeric
characters.
Example
To change the CLI prompt to MSA-1:
CLI> set prompt MSA-1
MSA-1>
See also • set globals
• show globals
newpage pi
>
1510i Modular Smart Array Command Line Interface user guide
93
Page 94

set service
Description Configures the management interface network services.
Syntax set service <s
number>
Operands <service-na
The name of the management interface service. Valid entries include the
following:
telnet—Telnet-based CLI interface
ssh—SSH-based CLI interface
http—Unenc
https—SSL-encrypted web interface
snmp—SNMP agent
enable|dis
Enables or disables the service. The effect of this switch is service-specific
but likely involves starting and stopping listening on the service's network
port.
<port-number>
AvalidTCPo
service sho
service is desired.
me>
rypted web interface
able
r UDP port number (depending on the service) to which the
uld listen, otherwise enter default if the default port for the
ervice-name> enable|disable port=<port-
Example 1
To enable the HTTP service and set it to listen to non-standard port 8080:
CLI> set service http enable port=8080
Example 2
To disable the Telnet service:
CLI> set service telnet disable
See also • show servi
• set management
newpage pi
ce
94
Command reference
Page 95

set snmp
Description Configures the settings for the embedded SNMP agent.
NOTE:
Although all parameters are optional, at least one parameter must be
supplied for the command to be valid.
NOTE:
If a parameter is not specified then the current setting remains unchanged.
Syntax set snmp [community=<community>] [desc=<sysDescr>]
[location=<sysLocation>] [contact=<sysContact>]
[trap<n>=<dest-ip>[,<community>]]
Operands
NOTE:
All SNMP strings must be no longer than 255 characters, and they may
not contain spaces.
community=<community>
An SNMPv2 community string.
descr=<sysDescr>
The string for the SNMP sysDescr property.
location=<sysLocation>
The string for SNMP sysLocation property.
contact=<sysContact>
The string for SNMP sysContact property.
trap <c><n>=<dest-ip>[,<community>]
The trap destination table index and IP address.
Example
ThefollowingexamplesetstheSNMPagenttousethecommunitystringprivate, the system description
My MSA,thesystemlocationHouston, TX, and the contact name John Doe.Italsosetsthefirst trap
address to a community string of private, and a destination IP of 10 .2.1 .2 .
CLI> set snmp community=private desc="My MSA" location="Houston, TX"
contact="John Doe" trap0=10.2.1.2,private
SNMP parameters set
See also • show snmp
newpage pi
1510i Modular Smart Array Command Line Interface user guide
95
Page 96

set target_chap
Description Sets the CHAP secret (password) used to access an iSCSI target when
Syntax set target_chap <target><secret>
Operands <target>
Example
To set the CHAP secret on target1 to mychapsecret123:
CLI> set target_chap target1 mychapsecret123
See also • set initiator_chap
CHAP is enabled. To enable CHAP authentication on the target, use the set
iscsi_keys co
ThealiasnameoftheiSCSItarget.
<secret>
The CHAP secret (12–16 character password) used to access an iSCSI
target when CHAP is enabled.
• add initiator
• Canonical
mmand.
iSCSI target
newpage pi
96
Command reference
Page 97

set this_controller|other_controller
Description Sets the baud rate for the CLI serial port on the specified controller.
NOTE:
When using this command, you must also adjust the terminal speed on
your client to match the setting. In dual-controller configurations, each
controller has its own setting. Changing the speed on one controller does
notaffecttheothercontroller.
Syntax set this_controller terminal_speed <speed>
or
set other_controller terminal_speed <speed>
Operands
Example
set this_controller terminal_speed 57600
Set your terminal speed to 57600 now!Y/n?
newpage pi
this_controller
The controller to which the CLI session is connected.
other_controller
The other MSA controller.
terminal_speed <speed>
Thebaudrate,where<speed > is one of the following values: 9600,
19200, 38400,or57600.
1510i Modular Smart Array Command Line Interface user guide
97
Page 98

set this_controller_id|other_controller_id
Description Assigns a name or identifier to the controller.
Syntax set this_controller_id <identifier>
or
set other_controller_id <identifier>
Operands
Example
set other_controller_id “MSA1510i controller 2”
newpage pi
this_contro
The controller to which the CLI session is connected.
other_contro
The other MSA controller.
<identifier>
Thenametoassigntothespecified controller, where <identifier>isastring
of up to 230 alphanumeric characters or a decimal number in the range
of 0–65535. If the entry contains spaces, surround the entry in quotation
marks.
ller
ller
98
Command reference
Page 99

set unit
Description Enables or disables the array accelerator cache for a specificLUN.
Syntax set unit <unit
Operands <unit>
The number (0-
31) of the LUN to modify.
cache=enable|disable
Enables or dis
ables the use of the array accelerator cache for the specified
LUN.
Example 1
To enable the cache on unit 0:
CLI> set unit 0 cache=enable
Cache for unit 0 has been enabled.
Example 2
Todisablethecacheonunit1:
CLI> set unit 1 cache=disable
Cache for unit 0 has been enabled.
See also • add unit
• bind unit
• delete unit
• show unit
• accept unit
• expand unit
• extend uni
t
• migrate unit
• set unit_id
• show unit_
id
• unbind unit
> cache=enable|disable
newpage pi
1510i Modular Smart Array Command Line Interface user guide
99
Page 100

set unit_id
Description Assigns a unique user-friendly name (alias) to a LUN. A user-defined name
makes it easier to identify specific LUNs in other configuration procedures.
Syntax set unit_id <u
Operand<s unit>
The unit numb
<name>
The user-fri
to 230 alphan
through 655
are required.
Example
To assign the alias UnitZero to LUN number 0:
CLI> set unit_id 0 UnitZero
Device identifier "UnitZero" created.
See also • add unit
• bind unit
• delete unit
• show unit
• set unit
• accept unit
• expand un
• extend unit
• migrate unit
• show uni
• unbind unit
endly name (alias) to assign to the LUN. The ID can be up
it
t_id
nit number><name>
er (0-31) of the LUN.
umeric characters or a decimal number in the range of 0
35. If spaces are included within the name, quotation marks
newpage pi
100
Command reference
 Loading...