

HP StorageWorks 2000s, StorageWorks 1500s, StorageWorks 1200s, StorageWorks 500s User Manual
Page 1

User Guide
hp StorageWorks
iSCSI Feature Pack
Product Version: Version 1.5
First Edition (September 2004)
Part Number: T3662-90901
HP StorageWorks iSCSI Feature Pack for HP NAS products provides virtualization, allocation of disk
storage, and centralized management for iSCSI host applications.
Page 2

© Copyright 2004 FalconStor Software and Hewlett-Packard Development Company, L.P.
Hewlett-Packard Company makes no warranty of any kind with regard to this material, including, but not limited to, the implied
warranties of merchantability and fitness for a particular purpose. Hewlett-Packard shall not be liable for errors contained herein
or for incidental or consequential damages in connection with the furnishing, performance, or use of this material.
This document contains proprietary information, which is protected by copyright. No part of this document may be photocopied,
reproduced, or translated into another language without the prior written consent of Hewlett-Packard. The information contained
in this document is subject to change without notice. The only warranties for HP products and services are set forth in the express
warranty statements accompanying such products and services. Nothing herein should be construed as constituting an
additional warranty. HP shall not be liable for technical or editorial errors or omissions contained herein.
Hewlett-Packard Company shall not be liable for technical or editorial errors or omissions contained herein. The information is
provided “as is” without warranty of any kind and is subject to change without notice. The warranties for Hewlett-Packard
Company products are set forth in the express limited warranty statements for such products. Nothing herein should be construed
as constituting an additional warranty.
FalconStor is a registered trademark of FalconStor Software.
Microsoft®, MS-DOS®, MS Windows®, Windows®, and Windows NT® are U.S. registered trademarks of Microsoft
Corporation.
hp StorageWorks iSCSI Feature Pack User Guide
First Edition (September 2004)
Part Number: T3662-90901
Page 3

Contents
1 Introduction
HP StorageWorks iSCSI Feature Pack. . . . . . . . . . . . . . . . . . . . . 3
Getting Started . . . . . . . . . . . . . . . . . . . . . . . . . . . . . . . . 5
Getting Help
. . . . . . . . . . . . . . . . . . . . . . . . . . . . . . . . . . 7
2 Configuring Your iSCSI System
iSNS Configuration . . . . . . . . . . . . . . . . . . . . . . . . . . . . . . 8
Storage . . . . . . . . . . . . . . . . . . . . . . . . . . . . . . . . . . . . 9
Default Portal Template
License and Version Information
Server Configuration Files . . . . . . . . . . . . . . . . . . . . . . . . . . 12
Server Diagnostic File
. . . . . . . . . . . . . . . . . . . . . . . . . . . . 11
. . . . . . . . . . . . . . . . . . . . . . . 12
. . . . . . . . . . . . . . . . . . . . . . . . . . . . 13
3 Logical Units
Creating a New Logical Unit . . . . . . . . . . . . . . . . . . . . . . . . . 14
Importing a Logical Unit
Viewing Layout
. . . . . . . . . . . . . . . . . . . . . . . . . . . . . . . . 16
. . . . . . . . . . . . . . . . . . . . . . . . . . . . 15
Expanding a Logical Unit
Assigning/Unassigning a Host to a Logical Unit
Viewing Logical Unit Properties
Deleting Logical Units
4Hosts
Creating a New Host . . . . . . . . . . . . . . . . . . . . . . . . . . . . . 19
. . . . . . . . . . . . . . . . . . . . . . . . . . . 17
. . . . . . . . . . . . . . . . 17
. . . . . . . . . . . . . . . . . . . . . . . 18
. . . . . . . . . . . . . . . . . . . . . . . . . . . . 18
HP StorageWorks iSCSI Feature Pack User Guide 1
Page 4

Managing Host Initiators . . . . . . . . . . . . . . . . . . . . . . . . . . . 21
Managing the LUs Assigned to a Host
. . . . . . . . . . . . . . . . . . . . . 21
Managing Portals . . . . . . . . . . . . . . . . . . . . . . . . . . . . . . . 22
Viewing Host
Deleting Hosts
. . . . . . . . . . . . . . . . . . . . . . . . . . . . . . . . . 23
. . . . . . . . . . . . . . . . . . . . . . . . . . . . . . . . 23
5 Command Line Interface
Command Line Basics. . . . . . . . . . . . . . . . . . . . . . . . . . . . . 24
Global Options
Device Commands
File Storage Commands . . . . . . . . . . . . . . . . . . . . . . . . . . . . 29
Storage Pool Commands
Host Commands
Logical Unit Commands . . . . . . . . . . . . . . . . . . . . . . . . . . . . 37
Configuration Commands
. . . . . . . . . . . . . . . . . . . . . . . . . . . . . . . . 26
. . . . . . . . . . . . . . . . . . . . . . . . . . . . . . 27
. . . . . . . . . . . . . . . . . . . . . . . . . . . 30
. . . . . . . . . . . . . . . . . . . . . . . . . . . . . . . . 32
. . . . . . . . . . . . . . . . . . . . . . . . . . . 40
iSNS Commands
. . . . . . . . . . . . . . . . . . . . . . . . . . . . . . . 41
iSCSI Commands . . . . . . . . . . . . . . . . . . . . . . . . . . . . . . . 43
6 Glossary
2 HP StorageWorks iSCSI Feature Pack User Guide
Page 5

Introduction
With an ever-expanding need for storage, it has become increasingly desirable for small and
medium-sized businesses to consolidate and centralize all of their data.
While Windows-powered HP StorageWorks NAS products have addressed some of their
file-level needs, consolidation/centralization of block-level storage for applications such as
databases and messaging servers has been difficult for these businesses because of a lack
of resources to address the costs and complexity of supporting a Storage Area Network. As
a result, the majority of small and medium business databases and messaging servers are
still using direct attached storage and storage administrators are facing increasing
manageability problems.
The advent of a standard iSCSI protocol holds the promise of allowing these businesses to
have their applications access centralized storage using their existing, familiar IP network
infrastructure.
What is iSCSI?
You are probably already familiar with the Small Computer Systems Interface (SCSI) which
enables host computers to perform block-level data I/O to a variety of peripheral devices
(such as disk and tape devices and printers). The Internet SCSI (iSCSI) protocol adds
dimension to SCSI and eliminates the distance limitation associated with it by enabling
block-level I/O over the IP network.
With its ability to simply attach servers and storage devices into your existing network
infrastructure, iSCSI enables your organization to cost-effectively build and manage a
storage area network based on technologies (SCSI, IP) you already understand and use.
HP StorageWorks iSCSI Feature Pack
HP StorageWorks iSCSI Feature Pack for HP StorageWorks NAS products provides
virtualization, allocation of disk storage, and centralized management for iSCSI host
applications.
HP iSCSI Feature Pack is comprised of a Windows-compatible iSCSI target driver and an
iSNS (Internet Storage Name Service) server. All software management has been integrated
under a tabular “iSCSI” window in the Windows Server 2003
HP StorageWorks iSCSI Feature Pack User Guide 3
Web Administration
screen.
Page 6
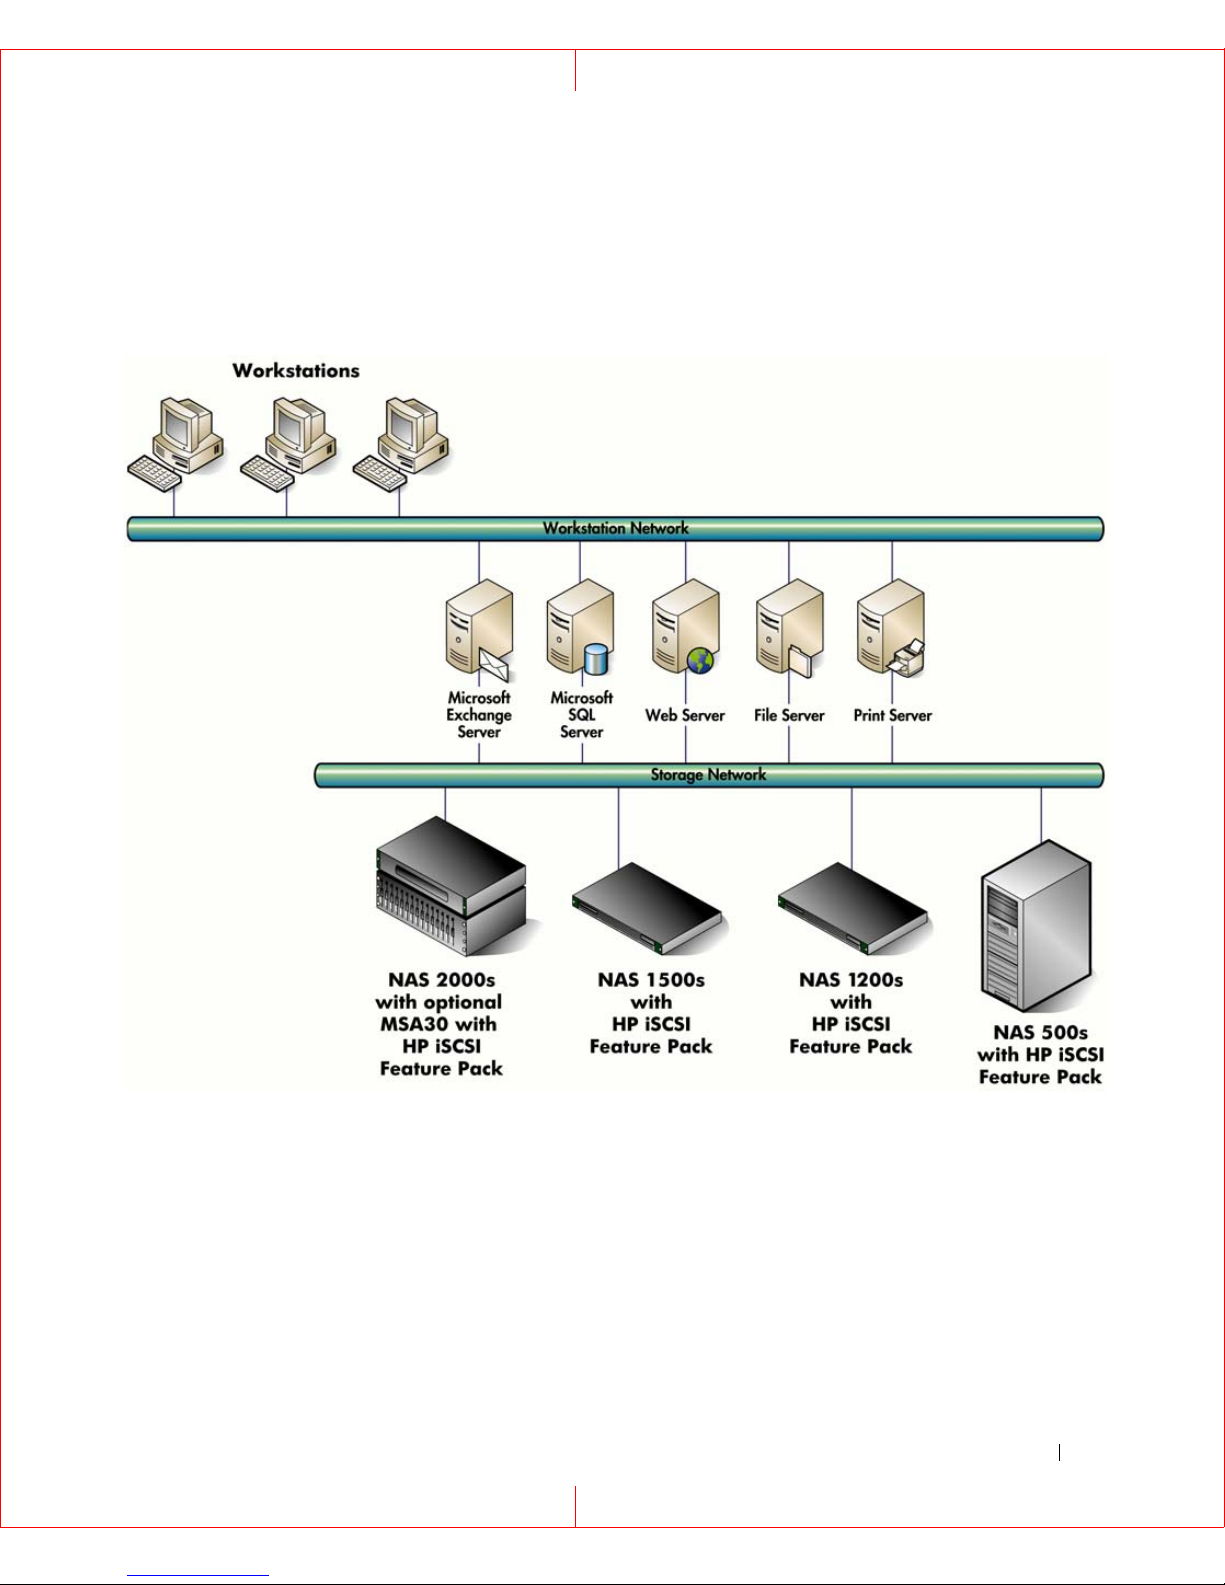
The following figure illustrates how your NAS system provides file-level storage for your
workstations, and how your iSCSI Feature Pack provides block-level storage for your
application and file servers.
HP StorageWorks iSCSI Feature Pack User Guide 4
Page 7

Getting Started
The following steps provide an overview of the tasks you must complete to configure your
system. To install the iSCSI Feature Pack software:
1. For systems with a DVD/CD-ROM drive:
a. Insert the iSCSI Feature Pack installation CD into your CD-ROM.
b. Click
For systems without a DVD/CD-ROM drive
2.
setup.exe
.
another system, or copy the CD across the network.
a. To share the CD from another system:
•
Insert the CD into another system and share out that system’s DVD/CD-ROM drive.
•
From the NAS storage server, map a drive to the CD share and install from it. You
can map to the DVD/CD share from your iSCSI storage server via Windows
Terminal Services client,or via Remote Desktop if you do not have a monitor on your
NAS storage server.
b. To copy the CD across the network:
•
Create a directory on the C: drive of the NAS system (e.g. C:\iSCSI), and make it a
share with Full Control (read/write permission).
•
Connect to the share from a remote system that has a CD-ROM drive using the
Microsoft File Explorer.
•
From the remote system, copy the contents of the CD-ROM to the share on the
NAS system.
•
On the NAS system, use My Computer or the File Explorer to browse the directory
that was created (e.g. C:\iSCSI). The contents of the iSCSI Feature Pack CD will
now be in the directory. Click
setup.exe
, you can either share the CD from
to start the installation.
If your system does not have a monitor, you can use the Windows 2000 Terminal
Services client or
Remote Desktop
Administration console) to install the software.
NOTICE: The name of your iSCSI Feature Pack system cannot exceed 15 characters. This is a
NetBIOS restriction. If your server name is longer, you must rename it before installing
the iSCSI Feature Pack software.
NOTICE: You must use the ANSI machine name for the iSCSI Feature Pack system if you are
running the system on a non-English language machine.
NOTE: Your system will be rebooted after the installation.
(available from the
HP StorageWorks iSCSI Feature Pack User Guide 5
Maintenance
tab in the Web
Page 8

3. Start your Web Administration console (consult your HP StorageWorks NAS server
documentation for instructions). An
iSCSI
tab appears on the Web Administration
console. All features related to the iSCSI Feature Pack can be found under this tab.
4. Click on the
Status: Information
message that appears at the top of the console. You
will see an alert that your iSCSI Feature Pack system has not been configured. Click to
configure the following:
•
Enter key codes to activate the iSCSI Feature Pack.
•
Specify an Internet Storage Name Service (iSNS) server. iSNS facilitates device
discovery in storage networks. For the iSCSI Feature Pack, iSNS facilitates the
naming, registration, and discovery of iSCSI Logical Units (LU) by host initiators. By
default, iSNS is disabled. If you have an external iSNS server, you can set the
system to use it. If you do not have an external iSNS server, you can use the local
one that is provided by the iSCSI Feature Pack (and runs as an independent
Windows service when enabled).
•
The HP NAS 500s, 1200s, and 1500s systems have a single pre-allocated LUN and
single file system. To allocate storage to the iSCSI target, create a virtual file-based
device using NTFS (NT File System) volume space. You will need to specify how
large it should be.
5. Install an iSCSI initiator on each of your host systems.
iSCSI initiator software/hardware is available from many sources and needs to be
installed and configured on all servers that will access shared storage.
•
For Windows hosts, you can download a software initiator from Microsoft’s website:
http://www.microsoft.com/windowsserversystem/storage/iscsi.mspx
•
For Linux hosts, you can download a software initiator from SourceForge.net:
http://sourceforge.net/projects/unh-iscsi
•
For NetWare hosts, you can download a software initiator from Novell’s website:
http://download.novell.com/pages/PublicSearch.jsp
6. Create your LUs. Refer to the Logical Units section for more details.
7. Add all of your hosts and assign them to your LUs. Refer to the Hosts section for more
details.
This document provides all of the information you need to get started with your iSCSI
Feature Pack.
HP StorageWorks iSCSI Feature Pack User Guide 6
Page 9

Getting Help
If you still have a question after reading this guide, contact an HP authorized service
provider or access our web site: http://www.hp.com.
HP Technical Support
Telephone numbers for worldwide technical support are listed on the following HP web site:
http://www.hp.com/support. From this web site, select the country of origin.
NOTE: For continuous quality improvement, calls may be recorded or monitored.
Be sure to have the following information available before calling:
•
Technical support registration number (if applicable)
•
Product serial numbers
•
Product model names and numbers
•
Applicable error messages
•
Operating system type and revision level
•
Detailed, specific questions
HP Storage Web Site
The HP web site has the latest information on this product, as well as the latest drivers.
Access the storage site at: http://www.hp.com/country/us/eng/prodserv/storage.html. From
this web site, select the appropriate product or solution.
HP Authorized Reseller
For the name of your nearest HP authorized reseller:
•
In the United States, call 1-800-345-1518
•
In Canada, call 1-800-263-5868
Elsewhere, see the HP web site for locations and telephone numbers:
http://www.hp.com.
HP StorageWorks iSCSI Feature Pack User Guide 7
Page 10

Configuring Your iSCSI System
When you select
available:
•
iSNS Configuration
•
Storage
•
Default Portal Template
•
License and Version Information
•
Server Configuration Files
•
Server Diagnostic File
Configuration
- Specify which iSNS Server to use.
- Manage iSCSI storage devices and pools.
from the main iSCSI screen, the following functions are
- Add/delete portals that will be assigned to hosts.
- Enter key codes for licensed components.
- Back up and restore the server configuration.
- Capture an X-ray for technical supprort.
iSNS Configuration
iSNS facilitates device discovery in storage networks. For the iSCSI Feature Pack, iSNS
facilitates the naming, registration, and discovery of iSCSI Logical Units (LU) by host
initiators.
By default, iSNS is disabled. If you have an external iSNS server, you can set the system to
use it. If you do not have an external iSNS server, you can use the local one that is provided
by the iSCSI Feature Pack. When enabled, it runs as an independent Windows service.
1. Select
2. Select
3. To use the local iSNS server, select
select
NOTE: If you do not enable iSNS, you will need to register client initiators with your iSCSI
Configuration
iSNS Configuration
Use remote iSNS at
Feature Pack. This enables the server to see the available initiators. Since this
procedure can vary by vendor, you should refer to the documentation provided by the
vendor.
from the main iSCSI screen.
.
Use local iSNS
and enter the server’s IP address.
or to use an external iSNS server,
HP iSCSI Feature Pack User Guide 8
Page 11

Storage
Storage includes both disk devices as well as storage pools:
•
Pools can be created from raw device hardware RAID sets. Each storage pool can be a
group of one or more physical devices. Any disk known to your Windows system that
does not have valid partition information is a candidate for a storage pool.
•
File-based devices can be created from files on a software volume.
Once created, LUs can be created from the pools/file-based device and assigned to hosts.
When you select
Storage
from the
Configuration
screen, you will see a list of all of your
existing iSCSI storage (except imported disks).
Creating a Storage Pool
1. Select
2. Select
3. Click
Configuration
Storage
New Pool
.
.
from the main iSCSI screen.
4. Enter a name for the pool.
5. Select one or more available devices to include in the pool.
Adding/Removing Devices From a Storage Pool
1. Click the checkbox to the left of the pool you want to modify.
2. Click
View Devices.
You will see a list of all iSCSI storage. Information about each device, including size,
type, and usage is included here. You can click on the device name to see how the
segments of the device are being used.
3. Select the devices that should be in this pool.
Merging Storage Pools
1. Click the checkbox(es) to the left of the pool(s) you want to merge.
You can select to merge two or more pools.
2. Click
Merge Pools.
3. Specify a name for the new pool.
Deleting a Storage Pool
NOTE: You can only delete a pool if it is empty or if all of the devices in the pool have zero usage.
HP iSCSI Feature Pack User Guide 9
Page 12

1. Click the checkbox(es) to the left of the pool(s) you want to delete.
2. Click
Delete Pool.
3. Click OK to confirm the deletion.
Creating a File-Based Device
1. Click
Create File Device.
2. Select the volume and specify how much space should be used from this volume.
Expanding a File-Based Device
If you did not use the entire volume to create your file-based device, you can expand it as
more storage is needed.
To expand a file-based device:
1. Click the checkbox to the left of the file-based device.
2. Click
Expand File Device
3. Indicate how much space to add and click
.
OK
.
Deleting a File-Based Device
NOTE: You can only disable a file-based device if it is not being used.
1. Click the checkbox to the left of the file-based device.
2. Click
Delete File Device.
3. Click OK to confirm.
Viewing Device Layout
You can see how the segments of a device are being used, including whether it contains
LUs.
To view device layout for an iSCSI storage device that is not in a pool:
1. Click the checkbox to the left of the device you want to view.
2. Click
View Device Layout.
HP iSCSI Feature Pack User Guide 10
Page 13

To view device layout for a storage pool:
1. Click the checkbox to the left of the pool you want to view.
2. Click
View Devices.
3. Click on the device name.
Adopting a Device
You can adopt a foreign iSCSI Feature Pack disk for the purposes of disaster recovery.
A foreign disk is a physical device containing iSCSI LUs previously set up on a different
iSCSI Feature Pack system. You might need to adopt a disk if an iSCSI Feature Pack
system is damaged and you want to import the server’s disks to a new system.
NOTICE: We highly recommend that you adopt a device into a new, clean iSCSI Feature Pack
system that does not have any LUs created.
1. Click
Adopt Devices
.
2. Select the device you would like to import.
3. Click
OK
.
You click the
Rescan
link to refresh the list of available devices.
Default Portal Template
Portals are access points used by hosts to communicate with the iSCSI Feature Pack. Each
portal is a combination of an IP address, port number, and port group number.
By default, the iSCSI Feature Pack assigns each new host one portal for each network
interface card (NIC) IP address used by the iSCSI Feature Pack, with the default iSCSI port
number 3260 and group 0.
The Default Portal Template screen lets you set the template that will be used when new
hosts are created. In other words, the portals listed on this screen will be offered to each new
host. You may then want to customize the portals for a specific host so that, for example,
each host uses a separate NIC or port.
To add/remove portals:
1. Select
2. Select
Configuration
Default Portal Template
3. To add a new portal, click
from the main iSCSI screen.
.
Add
, select an IP address, and enter a port number and port
group.
To delete a portal, click the checkbox to the left of it and click
HP iSCSI Feature Pack User Guide 11
Remove
.
Page 14

License and Version Information
To enter key codes for iSCSI Feature Pack components in order to activate the components:
1. Select
2. Select
Configuration
License and Version Information
from the main iSCSI screen.
.
A list of all licensed components is displayed.
3. Click
Add
.
4. Enter the key code for the component.
Server Configuration Files
Your iSCSI Feature Pack provides a convenient way to protect your configuration, including
host assignments and storage pools. You should save the configuration any time you
change it.
save the configuration
To
1. Select
2. Select
3. Click
Configuration
Server Configuration Files
Backup
to back up data to a local system.
4. Specify a location for the file.
perform the following steps:
from the main iSCSI screen.
.
You can restore your iSCSI Feature Pack configuration from a file that was created using
Backup
. Changes made since the configuration was last saved will not be included in the
restored configuration. In addition, actual LUs that may have been deleted after the
configuration was saved will not be re-created.
NOTE: Restoring a configuration will overwrite existing configuration files and you will lose your current
connection. The restoration function is for disaster recovery purposes and should not be used in
the day-to-day operation of the server.
To
restore the configuration
1. Select
2. Select
Configuration
Server Configuration Files
3. Locate the saved file and click
By default, the name of backed up file is:
perform the following steps:
from the main iSCSI screen.
.
Restore
.
iscsicfg.tgz
The iSCSI Feature Pack will be restarted once the restoration is complete.
HP iSCSI Feature Pack User Guide 12
Page 15

Server Diagnostic File
The iSCSI Feature Pack has a built-in diagnostic feature that captures information about
your server into a file that can be sent to HP’s technical support team.
To create a diagnostic File:
1. Select
2. Select
3. Select
Configuration
Server Diagnostic File
Create Diagnostic File
from the main iSCSI screen.
4. Specify a path for the file.
.
.
HP iSCSI Feature Pack User Guide 13
Page 16

Logical Units
A Logical Unit (LU) is a logically mapped disk device that is created from a physical device
or from a storage pool.
Hosts (file and application servers) do not have access to physical resources; they have
access only to LUs. This means that physical resources must be defined as LUs first, and
then assigned to hosts so they can access them.When a LU is assigned to a host, the host
views the LU as its own attached storage device.
LUs offer the added capability of disk expansion. Additional storage blocks can be allocated
from the LU’s physical device or storage pool and appended to the end of the existing LU
without erasing the data on the disk. Each LU may be expanded up to 2 TB.
When you select
LUs. Information about each LU is included here. To search for a specific LU, type its name
(or a few letters) and click
displayed.
From the
•
•
•
•
•
•
•
Logical Units
New
- Create a new LU and assign it to a host.
Import
Pack’s storage services.
Delete
View Layout
Expand
Hosts
Properties
- Import a hard drive with existing data to take advantage of the iSCSI Feature
- Delete a LU.
- Change the host assignment or access rights for a LU.
Logical Units
screen, the following functions are available:
- See where a LU’s components are located.
- Increase the size of a LU.
- View configuration of a LU or change the LU name.
from the main iSCSI screen, you will see a list of all existing
Go
. Only those LUs that match the letters you typed will be
Creating a New Logical Unit
NOTE: If you want a LU to include storage from multiple physical devices, you need to create a
storage pool before creating the LU. Refer to the Configuring Your iSCSI System section
for more details.
1. Select
2. Click
3. Enter a name for the new LU.
Logical Units
New
.
from the main iSCSI screen.
HP StorageWorks iSCSI Feature Pack User Guide 14
Page 17

4. Select the location of the storage for the LU.
The storage can be from a physical device or storage pool (composed of one or more
physical devices) or, for systems with external storage, from raw devices available to
the iSCSI Feature Pack.
If you need to modify your RAID system to allocate additional space for your LU, click
the link
the devices
5. Enter a
Click here to add raid set
.
Size
for the LU.
. Afterwards, click
Click here to force a rescan of
The minimum size for each LU is 20 MB.
6. Assign one or more hosts to the newly created LU and assign access rights for each.
•
No Access
•
Read Only
NOTE: If you set Read Only access rights for a LU that contains an NTFS partition, that partition
will only be readable in Windows 2003. The LU will not show up properly in Windows
versions prior to 2003.
•
Read/Write Exclusive
- This host cannot access this LU.
- This host will have read-only access to the LU.
- Only this host can access the LU. The host has both read
and write access. All others (including Read Only) will be denied access.
•
Read/Write Non-Exclusive
- Two hosts can connect at the same time with both
read and write access.
NOTICE: There is a potential for data corruption if you set the access rights to Read/Write Non-
Exclusive and you have multiple hosts writing to a device at the same time.
7. Confirm all information and click
NOTE: In order for a host to use the newly created LU, you will have to take operating system-
specific actions in order for the host to see the new storage. For example, with Windows
you must rescan disks via the system’s Computer Management (available through the
Control Panel). You will then need to write a signature, create a partition, and format the
drive so that the host can use it.
Finish
to create the LU.
Importing a Logical Unit
(This feature is only available on systems with external storage.) The Import feature allows
you to create a LU from an existing disk. Hard drives with existing data can be imported to
make use of the iSCSI Feature Pack’s functionality without any migration/copying or
modification of data.
HP StorageWorks iSCSI Feature Pack User Guide 15
Page 18

This can be useful for protecting your existing local iSCSI virtual disks (used for file sharing)
because it allows you to import each disk as a LU to take advantage of the iSCSI data
services.
Because imported disks are preserved intact, the devices are not virtualized and cannot be
expanded. Imported disks are all maintained in a one-to-one mapping relationship (one
physical disk equals one logical device). Unlike virtual devices, they cannot be combined or
divided into multiple LUs.
In order to import a hard disk, it must be one of the following:
•
Raw disk (no partitions)
•
Non-boot, non-virtual disk with volumes that are not mounted and do not contain any
iSCSI file devices
If you want to import a disk with existing data, you must unmount all volumes on the disk (i.e.
unassign all drive letters) in order to make it available for import.
To import a disk:
1. On the
2. Enter a
Logical Units
Name
for the LU that is being created.
screen, click
Import
.
3. Select the disk to import.
4. Select the location where the disk information will be stored.
NOTE: About 7 MB of disk space is needed to store information about the imported disk.
5. Click OK.
You will see the imported disk listed with your other LUs. The
Import
NOTICE: Once a disk is imported, it should not be mounted by the local operating system.
.
Type
will be listed as
Viewing Layout
You can see where a LU’s components are allocated (devices and sectors).
To view the layout:
1. On the
view.
2. Click
View Layout
Logical Units
screen, click the checkbox to the left of the LU that you want to
.
HP StorageWorks iSCSI Feature Pack User Guide 16
Page 19

Expanding a Logical Unit
Because virtualized LUs do not represent actual physical resources, they can be expanded
as more storage is needed. The LU can be increased in size by adding more blocks of
storage from unallocated space on the LU’s physical device or storage pool.
Remember that you will still need to repartition the virtual devices and adjust/create/resize
any file-systems on the partition after the virtual device is expanded. Because partition and
file-system formats are specific to the operating system that the host is running, you must
perform these tasks directly from the host. You can use tools like PartitionMagic
Volume Manager
TM
to add more drives to expand existing volumes on the fly in real time
(without application down time).
To expand a LU:
®
or Veritas
1. On the
Logical Units
screen, click the checkbox to the left of the LU that you want to
expand.
2. Click
3. Indicate how much space to add and click
NOTICE: In order for a host to access the newly expanded LU, you will have to take operating
Expand
system-specific actions. If you are using the Microsoft iSCSI initiator, you need to
launch the initiator software on the host machine and log off (from the Active
Sessions tab) and then log on (from the Available Targets tab). This will temporarily
disconnect the host.
.
OK
.
Assigning/Unassigning a Host to a Logical Unit
While you generally assign a host to a LU when you create the LU, at any time you can
change the host assignment. To do this:
1. On the
Logical Units
you want to change.
2. Click
Hosts
.
3. Assign one or more hosts to the LU and assign access rights for each.
screen, click the checkbox to the left of the LU whose assignment
If you change the access rights for a host, you must go to your initiator software and relogin to the server in order for the change to take effect. If you are using the Microsoft
iSCSI initiator, you need to launch the initiator software on the host machine and log off
HP StorageWorks iSCSI Feature Pack User Guide 17
Page 20

(from the
Active Sessions
tab) and then log on (from the
Available Targets
will temporarily disconnect the host.
NOTE: In order for an existing host to access this newly assigned LU, you will have to take
operating system-specific actions in order for the host to see the new storage. For
example, with Windows you must rescan disks via the system’s Computer Management
(available through the Control Panel). You will then need to write a signature, create a
partition, and format the drive so that the host can use it.
Viewing Logical Unit Properties
You can view the configuration of a LU or change the LU’s name. To do this:
tab). This
1. On the
Logical Units
screen, click the checkbox to the left of the LU whose properties
you want to view.
2. Click
3. If you want to change the LU’s name, type a new name in the box and click
Properties
.
OK
.
Deleting Logical Units
You can delete one or more LUs. All data on the LU will be deleted and the space occupied
by the LU will become available for a new LU.
NOTE: You should not delete a LU if a host is attached to it.
To delete a LU:
1. On the
Logical Units
delete.
2. Click
Delete.
3. Click OK to confirm the deletion.
screen, click the checkbox(es) to the left of the LU(s) you want to
HP StorageWorks iSCSI Feature Pack User Guide 18
Page 21

Hosts
Hosts are the file and application servers that access Logical Units (LU). When a LU is
assigned to a host, the host views the LU as its own attached storage device. Because LUs
appear as locally attached devices, applications (such as file servers, databases, Web and
e-mail servers) do not need to be modified to utilize the storage.
When you select
To search for a specific host, type its name (or a few letters) and click
that match the letters you typed will be displayed.
From the
•
•
•
•
•
•
Hosts
New
- Add a new host.
Delete
Initiators
Logical Units
Portals
Feature Pack.
Properties
- Delete existing hosts.
Hosts
screen, the following functions are available:
- Manage host initiators.
- Manage the IP portals that the host uses to communicate with the iSCSI
- View configuration of a host or change authentication type.
from the main iSCSI screen, you will see a list of all existing hosts.
Go
. Only those hosts
- Manage the LUs assigned to the host.
Creating a New Host
When you create a new host, you select its authentication mode, define its initiators, and
assign it LUs. By default, each new host is assigned one portal for each network interface
card (NIC) IP address used by the iSCSI Feature Pack. Hosts use portals to communicate
with the iSCSI Feature Pack. The portal that is initially assigned is determined by the
Default Portal Template
host is added, you can change its portal via the
, which can be modified from the
Portals
function, if necessary.
Configuration
screen. After a
To create a new host:
1. Select
2. Click
3. Enter a name for the host.
You must use the ANSI machine name for the host machine if you are running the
system on a non-English language machine.
4. Indicate how the host should connect to the server.
Hosts
New
from the main iSCSI screen.
.
HP StorageWorks iSCSI Feature Pack User Guide 19
Page 22

What you select depends on where the host is located and how secure you require your
connection to be. For most environments, the server IP address is sufficient and is the
most secure. However, if the host is remotely located across a firewall and you do not
have VPN access, you can use the Server DNS Name, assuming your iSCSI
initiator/HBA supports this. Note that using a VPN with the server address is the more
secure way to communicate across a WAN.
NOTE: The host name that the host communicates with the server as must be a public name
that can be pinged from the host.
5. Select the level of authentication between the Server and the Host Initiator(s):
•
Anonymous
•
CHAP
- Hosts must authenticate using Challenge Handshake Authentication
- No authentication.
Protocol (CHAP). You will have to enter a username and secret that the host must
know when connecting to the server.
•
Mutual CHAP
- Requires both the server and host to authenticate using CHAP. You
will have to enter a username and secret for both systems.
6. Select the iSCSI initiators that this host will use.
Known iSCSI initiators are listed in the dropdown box. If you do not see your initiator,
you can manually add it. You can also register your host initiators with your iSCSI
Feature Pack so that they become known to the iSCSI Feature Pack. If you are using
the Microsoft iSCSI initiator, run
Microsoft iSCSI Initiator
on the host machine. You
can find the program in the Control Panel or on your desktop (if you are the user that
installed it). Click
Add
on the
Target Portal s
tab and enter the IP address or name (if
resolvable) of the iSCSI Feature Pack. Use the default socket. If you get a message
that it has been rejected after you click OK to add, ignore it. Once the host attempts to
communicate with the iSCSI Feature Pack, information will be stored about the host’s
initiators.
If you are using a different iSCSI initiator (not the Microsoft iSCSI Initiator), refer to the
documentation that was provided by the vendor.
NOTE: A host can have multiple initiators, including network interface cards (NICs) and Host
Bus Adapters (HBAs). Be sure to select all initiators from the same host machine.
7. Assign one or more LUs to the newly created host and assign access rights for each.
•
No Access
•
Read Only
NOTE: If you set Read Only access rights for a LU that contains an NTFS partition, that partition
will only be readable in Windows 2003. The LU will not show up properly in Windows
versions prior to 2003.
- This host cannot access this LU.
- This host will have read-only access to the LU.
HP StorageWorks iSCSI Feature Pack User Guide 20
Page 23

•
Read/Write Exclusive
(including
•
Read/Write Non-Exclusive
Read Only
- Only one host can access this LU at a time. All others
) will be denied access.
- Two hosts can connect at the same time with both
read and write access.
NOTICE: There is a potential for data corruption if you set the access rights to Read/Write Non-
Exclusive and you have multiple hosts writing to a device at the same time.
NOTE: If you do not assign any LUs to this host, after the host is created, the Status field will
display Not Connected.
8. Confirm all information and click
The
Status
NOTE: In order for a host to use the newly created LU, you will have to take operating system-
specific actions in order for the host to see the new storage. For example, with Windows
you must rescan disks via the system’s Computer Management (available through the
Control Panel). You will then need to write a signature, create a partition, and format the
drive so that the host can use it.
field will display
Finish
Connected
to create the host.
if the host is assigned at least one LU.
Managing Host Initiators
The iSCSI Feature Pack can use an iSNS Server from any iSCSI Feature Pack to locate
existing iSCSI initiators. However, each initiator can only be associated with a single host.
To add or delete initiators for a host:
Host
1. On the
2. Click
Initiators
A list of existing initiators for this host is displayed along with any iSCSI initiator alias.
3. To add a new initiator, click
screen, click the checkbox to the left of the host that you want to manage.
.
Add.
You can then select from the automatically discovered initiators or you can manually
enter initiators.
4. To delete an initiator, click the checkbox to the left of it and click
Managing the LUs Assigned to a Host
To change a host’s LU assignments or access rights:
Host
1. On the
want to change.
2. Click
Logical Units
screen, click the checkbox to the left of the host whose assignment you
.
Remove
HP StorageWorks iSCSI Feature Pack User Guide 21
.
Page 24

3. Assign one or more available LUs to the host and assign access rights for each.
If you change the access rights for a host, you must go to your initiator software and relogin to the server in order for the change to take effect. If you are using the Microsoft
iSCSI initiator, you need to launch the initiator software on the host machine and log off
(from the
Active Sessions
tab) and then log on (from the
Available Targets
tab). This
will temporarily disconnect the host.
NOTE: In order for an existing host to access this newly assigned LU, you will have to take
operating system-specific actions in order for the host to see the new storage. For
example, with Windows you must rescan disks via the system’s Computer Management
(available through the Control Panel). You will then need to write a signature, create a
partition, and format the drive so that the host can use it.
Managing Portals
Portals are access points used by hosts to communicate with the iSCSI Feature Pack. Each
portal is a combination of an IP address, port number, and port group number.
The iSCSI Feature Pack assigns each new host one portal for each NIC IP address used by
the iSCSI Feature Pack. By default, the portal is a combination of the default iSCSI port
number 3260 and group 0. This default can be changed through the
Template
from the
Configuration
screen.
Default Portal
You may want to customize the portals for a specific host. For example, if you have four
NICs, you may want to assign two for your messaging server and two for your database so
that the communication traffic from one host does not overwhelm the other. Taking this
example further, you can put the NICs for your messaging server in the same group or in two
different groups. If they are in the same group, the host will communicate via both NICs,
providing redundancy should one NIC fail. If the NICs are put into separate groups, there will
be two independent paths with no redundancy.
You may also need to modify the port number that your portal uses. This would be
necessary if the default port number (3260) is used by another application or if your firewall
blocks the default port number.
NOTE: You should take care to remove any non-active portals from the list of portals for the
host. Otherwise, the host may encounter connection problems.
To add/delete the portals for a host:
Host
1. On the
2. Click
Portals
screen, click the checkbox to the left of the host that you want to manage.
.
A list of existing portals is displayed.
HP StorageWorks iSCSI Feature Pack User Guide 22
Page 25

3. To add a new portal, click
group.
You cannot change a portal; You can remove and then add a portal.
Add,
select an IP address and enter a port number and port
4. To delete a portal, click the checkbox to the left of it and click
Remove
.
Viewing Host
To view the configuration of a host or change the authentication type or host resolution:
Host
1. On the
to view.
2. Click
3. If you want to change the authentication type, select it and then enter the appropriate
NOTE: You cannot change the authentication type while the host is connected to a LU.
4. If you want to change how this host should connect to the server, select the resolution
Properties
username(s) and secret(s).
method.
screen, click the checkbox to the left of the LU whose properties you want
.
Deleting Hosts
You can delete one or more hosts. Any LU assignment to this host will be lost (but the data
on the LUs themselves remains intact). If you decide to re-create the host at a later time, you
will have to re-assign LUs to it.
NOTE: You should not delete a host if it is attached to a LU.
To delete a host:
Host
1. On the
2. Click
3. Click OK to confirm the deletion.
Delete.
screen, click the checkbox(es) to the left of the host(s) you want to delete.
HP StorageWorks iSCSI Feature Pack User Guide 23
Page 26

Command Line Interface
The iSCSI command line utility (iSCSICLI) provides a non-graphical interface for configuring
and querying the iSCSI system. The main purpose of the iSCSICLI is for use in
unattended/automated scripting through use of batch files and the Windows scheduler.
Command Line Basics
The iSCSICLI receives its input in the form of global options, commands, and parameters.
Generally these are supplied to the CLI in this order.
Any error messages are directed to standard error (stderr), whereas output from query-type
commands (for example, to show known hosts in the system) is directed to standard output
(stdout).
Command Line Overview
The basic command line usage model is:
iscsicli [/server:server] [/user:username] [/pw:password] [/q]
<command> <operation> [parameters]
As an example, to display a formatted list of all physical storage:
iscsicli device show
Global Options
These represent the command line options to control system wide modes and features of
the command line. These are required to be the first arguments provided to the CLI.
Command Classes
The command classes represent the primary operational categories of the command line.
Each category contains operations and parameters. Commands are entered directly on the
command line.
The primary command classes are:
Command Class Description Operations
Device Storage in the form of physical disks Reserve, release, adopt, rescan, layout,
show, showforeign
File Storage in the form of files Create, delete, expand, and show
HP StorageWorks iSCSI Feature Pack User Guide 24
Page 27

Command Class Description Operations
Pool Collection of one or more physical devices
or files
Host iSCSI host that makes use of the logical
units (LUs)
LU LUs (as viewed by a host) allocated from a
storage pool
Configuration Configuration settings Backup, restore, xray
iSNS iSNS settings Setmode and show
iSCSI iSCSI settings Add, remove, reset, show, addportal,
Create, delete, rename, add, remove,
merge, and show
Create, delete, add, remove, addportal,
removeportal, assign, unassign,
setaccess, setauth, setresolve, and show
Create, import, delete, rename, expand,
assign, unassign, setaccess, layout, and
show
removeportal, removeallportals, and
showportal
Command Parameters
Parameters are specified using the parameter name and the value separated by an equal
sign. For example:
Poolname=MyNewsPool
Parameter values that contain spaces must be enclosed in double-quotes:
“Poolname=My News Pool”
The parameter definition table contains a type field that can contain one of the following
values:
•
R – Required parameter
•
C – Conditional parameter, may be required based on other parameters
•
O – Optional parameter
Command Line Status
Success or failure of a requested operation can be determined through examination of the
command exit code: %ERRORLEVEL%
Possible return codes are:
•
0 – successful execution of request
•
1 – must run command as Administrators
•
2 – unable to login to iSCSI Feature Pack
HP StorageWorks iSCSI Feature Pack User Guide 25
Page 28

•
3 – invalid option
•
4 – invalid command
•
5 – invalid operation
•
6 – invalid parameter
•
7 – missing one or more required parameters
•
101 – remote iSCSI Feature Pack not found
•
102 - file i/o or system API failure
•
103 – failed to allocate memory
•
104 – internal failure (data corruption)
Global Options
iSCSICLI recognizes the following global options.
Remote iSCSI Feature Pack (/server)
Specify the iSCSI Feature Pack that you wish to query/configure. If no server is specified
then the operations are assumed to be directed to the machine your running the iSCSICLI
from; the local host. The complete definition of this option is:
/server:servername
Remote iSCSI Feature Pack User & Password (/user, /pw)
When configuring a remote iSCSI Feature Pack, the login credentials for this server will be
required. The complete definition of this option is:
/user:username /pw:password
Display Usage and Help (/h)
Show basic command line syntax.
Quiet Mode (/q)
Suppresses the output of informational and error messages to stderr. Success or failure of
the requested operation can be determined by examining the return code (see
Line Status
).
Command
HP StorageWorks iSCSI Feature Pack User Guide 26
Page 29

Device Commands
Physical storage represents physical disks and disk volumes.
The operation class name is:
device
Under the device operational class you can specify the following sub-operations:
reserve
Assign physical devices to an iSCSI Storage Pool.
Parameter Type Description
Device R The physical device to reserve for use by iSCSI. The format is:
adapter:bus:target:lun
Pool R Pool to add the storage into. The pool must already exist.
Example:
iscsicli device reserve device=0:0:0:2 pool=Pool1
release
Remove a physical device from an iSCSI Storage Pool.
Parameter Type Description
Device R The physical device to release (free) from use by iSCSI. The format
is:
adapter:bus:target:lun
Pool R Pool to remove the storage from. The pool must already own the
device.
Example:
iscsicli device release device=0:0:0:2 pool=Pool1
adopt
Adopt a foreign iSCSI disk for the purposes of disaster recovery.
Parameter Type Description
Device R The physical device to adopt. The format is:
adapter:bus:target:lun
Example:
iscsicli device adopt device=1:0:0:2
HP StorageWorks iSCSI Feature Pack User Guide 27
Page 30

rescan
Rescan all physical devices.
Example:
iscsicli device rescan
layout
Display the layout of resource segments on the device.
Parameter Type Description
Device R The physical device for which to display the layout. The format is:
adapter:bus:target:lun
Example:
iscsicli device layout device=0:0:0:2
show
Display physical devices, their status and pool associations.
Parameter Type Description
Device O The physical device to display. The format is:
adapter:bus:target:lun
If not specified, all physical devices will be displayed.
Example:
iscsicli device show device=0:0:0:2
showforeign
List disks available to be adopted.
Example:
iscsicli device showforeign
HP StorageWorks iSCSI Feature Pack User Guide 28
Page 31

File Storage Commands
File storage is used on systems where no unused physical disks and/or disk volumes are
available.
The operation class name is:
file
Under the device operational class you can specify the following sub-operations:
create
Create a file to be used by iSCSI.
Parameter Type Description
Volume R The volume to create the file storage for use by iSCSI. Use the
Device Show command to see the possible values.
Size O Size (in MB) of the file.
Default: available space
Example:
iscsicli file create volume="\\?\Volume{118be50e-eac1-11d7-a1f7505054503030}\" size=2048
delete
Remove a file from use and delete the file.
Parameter Type Description
Device R The physical file based device to delete. The format is:
adapter:bus:target:lun
Example:
iscsicli file delete device=0:0:0:2
expand
Expand a file used by iSCSI.
Parameter Type Description
Device R The physical file based device to expand. The format is:
adapter:bus:target:lun
Size R Size (in MB) of the file.
HP StorageWorks iSCSI Feature Pack User Guide 29
Page 32

Example:
iscsicli file expand device=0:0:0:2 size=1024
show
Display file and status.
Parameter Type Description
Device O The file device to display. The format is:
adapter:bus:target:lun
Example:
iscsicli file show
Storage Pool Commands
By default all physical storage, when reserved, exists within the context of a storage pool.
The storage pool can contain one or more physical storage devices of potentially dissimilar
categories: disk, volume or file. A storage pool must contain at least one device.
The operation class name is:
pool
Under the device operational class you can specify the following sub-operations:
create
Create a storage pool.
Parameter Type Description
Pool R Name of the new storage pool.
Device O The physical device to add to the newly created pool. The format is:
adapter:bus:target:lun
The storage must have been previously reserved.
Example:
iscsicli pool create pool=Pool1 device=0:0:0:1
HP StorageWorks iSCSI Feature Pack User Guide 30
Page 33

delete
Remove a storage pool.
Parameter Type Description
Pool R Name of the pool.
Example:
iscsicli pool delete pool=Pool2
rename
Rename a storage pool.
Parameter Type Description
Pool R Name of the pool.
Newname R New name of the pool.
Example:
iscsicli pool rename pool=Pool2 “newname=My Pool”
add
Add a physical device or file to a storage pool.
Parameter Type Description
Pool R Name of the pool.
Device C The physical device to add to the pool. The format is:
adapter:bus:target:lun
The storage must have been previously reserved.
Example:
iscsicli pool add pool=Pool1 device=0.0.0.4
remove
Remove a physical device or file from a storage pool.
Parameter Type Description
Pool R Name of the pool.
Device C The physical device to remove from the pool. The format is:
adapter:bus:target:lun
HP StorageWorks iSCSI Feature Pack User Guide 31
Page 34

Example:
iscsicli pool remove pool=Pool1 device=0.0.0.3
merge
Merge storage pools.
Parameter Type Description
Pool R Name of the first pool.
Pool2 R Name of the second pool.
Newname R Name for the merged pool.
Example:
iscsicli pool merge pool=Pool1 pool2=Pool2 “newname=My Pool”
show
Display pools.
Parameter Type Description
Pool O Name of the pool. If not specified, all pools will be displayed.
Example:
iscsicli pool show pool=Pool1
Host Commands
iSCSI hosts make use of
The operation class name is:
Under the host operational class you can specify the following sub-operations:
create
Define a new host.
Parameter Type Description
Host R Name of the new host.
Initiator R iSCSI initiator to associate with this host.
LUs
.
host
HP StorageWorks iSCSI Feature Pack User Guide 32
Page 35

Parameter Type Description
AuthMode O Authentication mode used by this host.
Choices: none, chap, mutualchap
Default: none
User C User name for chap and mutual chap authentication type.
Chap C Server/Target Chap secret for chap and mutual chap authentication
type.
MutualChap C Initiator/Host MutualChap secret for mutual chap authentication
type.
ResolveBy O How the host should connect to the server.
Choices: address, name
Default: address
dnsname C DNS server name.
Example:
iscsicli host create host=MyServer initiator=iqn.1991-
05.com.microsoft:myserver authmode=chap user=user1 chap=secret
ResolveBy=address
delete
Remove a defined host.
Parameter Type Description
Host R Name of the host.
Example:
iscsicli host delete host=MyServer
add
Add an iSCSI initiator to a host.
Parameter Type Description
Host R Name of the host.
Initiator R iSCSI initiator name to add.
Example:
iscsicli host add host=MySQLServer initiator=iqn.1991-
05.com.microsoft:mysqlserver
HP StorageWorks iSCSI Feature Pack User Guide 33
Page 36

remove
Remove an iSCSI initiator from a host.
Parameter Type Description
Host R Name of the host.
Initiator R iSCSI initiator name to remove.
Example:
iscsicli host remove host=MySQLServer initiator=iqn.1991-
05.com.microsoft:mysqlserver
addportal
Add an iSCSI portal to a host.
Parameter Type Description
Host R Name of the host.
Portal R iSCSI portal to add to the host. The format is:
ipaddress[:port[:group]]
Example:
iscsicli host addportal host=MySQLServer portal=10.1.11.72:3260:1
removeportal
Remove an iSCSI portal from a host.
Parameter Type Description
Host R Name of the host.
Portal R iSCSI portal to remove from the host. The format is:
ipaddress[:port[:group]]
Example:
iscsicli host removeportal host=MySQLServer portal=10.1.11.72:3260:1
assign
Assign a LU to a host.
Parameter Type Description
Host R Name of the host.
HP StorageWorks iSCSI Feature Pack User Guide 34
Page 37

Parameter Type Description
LU R LU to assign to the host.
AccessMode O Type of access to grant to hosts.
Choices: RO, RW, RWE
Default: RWE
Example:
iscsicli host assign host=MySQLServer lu=LU6 accessmode=RO
unassign
Remove the assignment of a LU from a host.
Parameter Type Description
Host R Name of the host.
LU R LU to unassign from the host.
Example:
iscsicli host unassign host=MySQLServer lu=LU6
setaccess
Change the access mode of a LU for a host.
Parameter Type Description
Host R Name of the host.
LU R LU to assign to the host.
AccessMode R Type of access to grant to hosts.
Choices: RO, RW, RWE
Example:
iscsicli host setaccess host=MySQLServer lu=LU6 accessmode=RWE
setauth
Change the authentication for the specified host.
Parameter Type Description
Host R Name of the host.
HP StorageWorks iSCSI Feature Pack User Guide 35
Page 38

Parameter Type Description
AuthMode O Authentication mode used by this host.
Choices: none, chap, mutualchap
Default: none
Chap C Server/Target Chap secret for chap and mutual chap authentication
type.
MutualChap C Initiator/Host Mutual Chap secret for mutual chap authentication
type.
Example:
iscsicli host setauth host=MySQLServer authmode=chap chap=secret
setresolve
Change the way the host connects to the server.
Parameter Type Description
Host R Name of the host.
ResolveBy R How the host should connect to the server.
Choices: address, name
Default: address
dnsname C DNS server name.
Example:
iscsicli host setresolve host=MyServer ResolveBy=address
show
Show information about one or more hosts.
Parameter Type Description
Host R Name of the host. If not specified, all hosts will be displayed.
Example:
iscsicli host show host=MySQLServer
HP StorageWorks iSCSI Feature Pack User Guide 36
Page 39

Logical Unit Commands
LUs are devices used by the iSCSI hosts.
The operation class name is:
logicalunit
or
lu
Under the LU operational class you can specify the following sub-operations:
create
Create a new LU.
Parameter Type Description
LU R Name of the new LU.
Pool or Disk R Pool or Disk to provide storage for the LU.
Size O Size (in MB) of the new LU.
Default: available space
Host O Host to assign to the LU.
AccessMode O Type of access to grant to hosts.
Choices: RO, RW, RWE
Default: RWE
Examples:
iscsicli lu create lu=LU4 pool=Pool1 size=1024 host=MySQLServer
accessmode=RO
iscsicli lu create lu=LU4 disk=0:2:2:2 size=1024 host=MySQLServer
accessmode=RW
import
Import a physical device as a new LU.
Parameter Type Description
LU R Name of the new LU.
Device R The physical device to import. The format is:
adapter:bus:target:lun
The storage must have been previously formatted by a supported
operating system.
Pool or Disk R Pool or Disk to store the header information for the imported physical
device.
Host O Host to assign the LU.
HP StorageWorks iSCSI Feature Pack User Guide 37
Page 40

Parameter Type Description
AccessMode O Type of access to grant to hosts.
Choices: RO, RW, RWE
Default: RWE
Example:
iscsicli lu import lu=LU5 pool=ImportLU5 host=MySQLServer accessmode=RO
iscsicli lu import lu=LU5 disk=0:2:2:2 host=MySQLServer accessmode=RO
delete
Delete a LU.
Parameter Type Description
LU R Name of the LU.
Example:
iscsicli lu delete lu=LU6
rename
Rename a LU.
Parameter Type Description
LU R Name of the LU.
Newname R New name of the LU.
Example:
iscsicli lu rename lu=LU6 newname=MyLU6
expand
Expand a LU.
Parameter Type Description
LU R Name of the LU.
Size R Size (in MB) to add to the LU.
Example:
iscsicli lu expand lu=LU6 size=4096
HP StorageWorks iSCSI Feature Pack User Guide 38
Page 41

assign
Assign a LU to an iSCSI host.
Parameter Type Description
LU R Name of the LU.
Host R Host to assign to the LU.
AccessMode O Type of access to grant to hosts.
Choices: RO, RW, RWE
Default: RWE
Example:
iscsicli lu assign lu=LU6 host=MySQLServer accessmode=RW
unassign
Remove the assignment of a LU from an iSCSI host.
Parameter Type Description
LU R Name of the LU.
Host R Host to unassign from the LU.
Example:
iscsicli lu unassign lu=LU6 host=MySQLServer2
setaccess
Change the access mode of a LU for an iSCSI host.
Parameter Type Description
LU R Name of the LU.
Host R Host to assign to the LU.
AccessMode R Type of access to grant to hosts.
Choices: RO, RW, RWE
Example:
iscsicli lu setaccess lu=LU6 host=MySQLServer accessmode=RO
HP StorageWorks iSCSI Feature Pack User Guide 39
Page 42

layout
Display the layout of the LU and its resources among the physical devices.
Parameter Type Description
LU R The LU for which to display the layout.
Example:
iscsicli lu layout lu=LU6
show
Display LU(s).
Parameter Type Description
LU O Name of the LU. If none specified, all LUs will be displayed.
Example:
iscsicli lu show lu=LU9
Configuration Commands
Configuration provides maintenance of the configuration data of the iSCSI Feature Pack.
The operation class name is:
configuration
Under the configuration class you can specify the following sub-operations:
backup
Backup the configuration data to a file.
Parameter Type Description
File R File to save the configuration data.
Example:
iscsicli configuration backup file=C:\MyBackups\iscsiserver.cfg
restore
Restore the configuration data from a file.
Parameter Type Description
File R File that contains the configuration data.
HP StorageWorks iSCSI Feature Pack User Guide 40
Page 43

Example:
iscsicli configuration restore file=C:\MyBackups\iscsiserver.cfg
xray
Create an xray file for technical support.
Parameter Type Description
File R File to save the xray information.
Example:
iscsicli configuration xray file=C:\support\iscsixray.cab
iSNS Commands
The iSCSI Feature Pack includes the ability to operate with a local iSNS Server as well as
other remote iSNS Servers.
The operation class name is:
isns
Under the iSNS operational class you can specify the following sub-operations:
setmode
Change iSNS settings.
Parameter Type Description
iSNSMode R iSNS Mode
Choices: Off, Local, Remote
IP C IP address of the remote iSNS Server.
Example:
iscsicli isns setmode isnsmode=off
iscsicli isns setmode isnsmode=local
iscsicli isns setmode isnsmode=remote ip=10.1.11.69
HP StorageWorks iSCSI Feature Pack User Guide 41
Page 44

show
Display iSCSI initiators or iSCSI targets listed in the iSNS database, or iSNS settings.
Parameter Type Description
Detail O Information to display
Choices: Settings, Initiators
Default: Settings
Example:
iscsicli isns show detail=targets
HP StorageWorks iSCSI Feature Pack User Guide 42
Page 45

iSCSI Commands
The operation class name is:
iscsi
Under the iSCSI operational class you can specify the following sub-operations:
add
Add license for a specified module that is installed on the iSCSI Feature Pack.
Parameter Type Description
License R License Keycode
Example:
iscsicli iscsi add license=12345678
remove
Remove a license for a specified module that is installed on the iSCSI Feature Pack.
Parameter Type Description
License R License Keycode
Example:
iscsicli iscsi remove license=12345678
show
Show the options installed on the iSCSI Feature Pack.
Parameter Type Description
Detail O Information to display
Choices: Version, Options
Default: Version
Example:
iscsicli iscsi show detail=version
HP StorageWorks iSCSI Feature Pack User Guide 43
Page 46

addportal
Add an iSCSI portal to the default global template. The portals within the global portal
template are assigned to a host when a host is created.
Parameter Type Description
Portal R iSCSI portal to add. The format is:
ipaddress[:port[:group]]
Global O Add the portal to all hosts as well as the default global template.
Choices: No, Yes
Default: No
Example:
iscsicli iscsi addportal portal=10.1.11.72:3260:1 global=yes
removeportal
Remove an iSCSI portal from the default global template. The portals within the global portal
template are assigned to a host when a host is created.
Parameter Type Description
Portal R iSCSI portal to remove. The format is:
ipaddress[:port[:group]]
Global O Delete the portal from all hosts as well as the default global template.
Choices: No, Yes
Default: No
Example:
iscsicli iscsi removeportal portal=10.1.11.72:3260:1 global=no
removeallportals
Remove all iSCSI portals from the default global template.
Example:
iscsicli iscsi removeallportals
showportal
Lists all portals within the global portal template.
Example:
iscsicli iscsi showportal
HP StorageWorks iSCSI Feature Pack User Guide 44
Page 47

Glossary
Host:
Internet Storage Name Service
For the iSCSI Feature Pack, iSNS facilitates the naming, registration, and discovery of iSCSI
Logical Units by host initiators. Your HP iSCSI Feature PackHP includes iSNS software that
can be activated if Microsoft's iSNS software is not available.
iSCSI Initiator
can have multiple initiators, depending upon the number of network interface cards (NICs)
that it has. However, each initiator can only be associated with a single host.
Logical Unit
that is created from a physical disk or from a storage pool.
Physical Disk
Raw disk
operating system and cannot be accessed by users (unlike with file systems).
Storage Pool
systems with external storage).
Virtual Disk
set configured by a hardware RAID controller or the Windows operating system. A virtual
disk is seen by the operating system as a single disk. When using hardware RAID, the RAID
functioning is hidden from the operating system.
File and application servers that access Logical Units.
(iSNS): Facilitates device discovery in storage networks.
: Devices which request, or initiate, iSCSI data writes and reads. Each host
(LU): The basic unit of iSCSI storage, a LU is a logically mapped disk device
: A single, physical hard disk.
: A portion of a physical disk. The contents of a raw disk are not managed by the
: A group of one or more physical devices from a hardware RAID set (on
: A collection of one or more physical disks that are members of the same RAID
HP StorageWorks iSCSI Feature Pack User Guide 45
Page 48

A
G
K
access rights, 15, 20
read only, 15, 20
read/write exclusive, 15, 21
read/write non-exclusive, 15,
21
authentication type, 20
anonymous, 20
CHAP, 20
mutual, 20
authorized reseller, HP, 7
B
base configuration, 3
C
configuration, 8
introduction, 8
create, 9
credential, 13
D
device layout
viewing, 10
F
file-based device
enabling, 10
expanding, 10
getting help, 7
getting started, 5
glossary, 45
H
host initiators
manage, 21
hosts
create new, 19
defined, 19
delete, 23
introduction, 19
properties, 23
HP
authorized reseller, 7
storage web site, 7
technical support, 7
I
initiator
defined, 45
initiators
manage, 21
introduction, 3
iSCSI storage, 9
iSNS, 8
configuration, 8
iSNS server, 21
keycodes, 12
L
license, 12
logical units, 19
assign, 17
create, 14
delete, 18
expand, 17
import, 15
introduction, 14
manage, 21
properties, 18
rescan disks, 15, 21
unassign, 17
view device layout, 16
O
overview
configuration, 8
hosts, 19
iSCSI Feature Pack, 3
logical units, 14
P
password
reset, 13
pool, 9, 15
add/remove devices, 9
configuration, 9
delete, 9
merge, 9
HP StorageWorks iSCSI Feature Pack User Guide 46
Page 49

47
portals
add/remove, 11
default, 11
manage, 22
properties, 23
R
raid set, 15
raw disk
defined, 45
rescan disks, 15, 21
S
server
restore configuration, 12
save configuration, 12
W
web sites
HP storage, 7
storage pool, 15
configuration, 9
T
technical support, HP, 7
terminology
host, 45
iSCSI initiator, 45
iSNS, 45
logical unit, 45
physical disk, 45
raw disk, 45
storage pool, 45
virtual disk, 45
47 HP StorageWorks iSCSI Feature Pack User Guide
 Loading...