

Page 1

User’s Guide
HP iPAQ rz1700 series
Document Part Number: 366075-001
May 2004
Page 2

© 2004 Hewlett-Packard Development Company, L.P.
HP, Hewlett Packard, and the Hewlett-Packard logo are trademarks of
Hewlett-Packard Company in the U.S. and other countries.
iPAQ is a trademark of Hewlett-Packard Development Company, L.P. in
the U.S. and other countries.
Microsoft, Windows, the Windows logo, Outlook, and ActiveSync are
trademarks of Microsoft Corporation in the U.S. and other countries.
HP iPAQ products are Powered by Microsoft® Windows 2003 ®.
SD Logo is a trademark of Secure Digital.
All other product names mentioned herein may be trademarks of their
respective companies.
Hewlett-Packard Company shall not be liable for technical or editorial
errors or omissions contained herein or for incidental or consequential
damages in connection with the furnishing, performance, or use of this
material. The information in this document is provided “as is” without
warranty of any kind, including, but not limited to, the implied warranties
of merchantability and fitness for a particular purpose, and is subject to
change without notice. The warranties for HP products are set forth in the
express limited warranty statements accompanying such products. Nothing
herein should be construed as constituting an additional warranty.
This document contains proprietary information that is protected by
copyright. No part of this document may be photocopied, reproduced, or
translated to another language without the prior written consent of
Hewlett-Packard Company.
WARNI NG: Text set off in this manner indicates that failure to
Å
follow directions could result in bodily harm or loss of life.
CAUTION: Text set off in this manner indicates that failure to follow
Ä
directions could result in damage to equipment or loss of information.
User’s Guide
HP iPAQ rz1700 series
First Edition (May 2004)
Document Part Number: 366075-001
Page 3

Contents
1 Getting to Know Your HP iPAQ
Identifying Product Components . . . . . . . . . . . . . . . . . . . 1–2
Front and Top Views . . . . . . . . . . . . . . . . . . . . . . . . . 1–2
Back and Bottom Views . . . . . . . . . . . . . . . . . . . . . . 1–4
Using the Stylus . . . . . . . . . . . . . . . . . . . . . . . . . . . . . . . . 1–5
Aligning the Screen . . . . . . . . . . . . . . . . . . . . . . . . . . 1–5
Adjusting Text Size . . . . . . . . . . . . . . . . . . . . . . . . . . 1–6
Changing the Screen from Portrait to Landscape Mode . .
1–6
Setting Date and Time . . . . . . . . . . . . . . . . . . . . . . . . . . . 1–6
Setting Time for Home and Locations You Visit . . . 1–6
Setting the Date . . . . . . . . . . . . . . . . . . . . . . . . . . . . . 1–7
Setting an Alarm . . . . . . . . . . . . . . . . . . . . . . . . . . . . 1–7
Entering Owner Information . . . . . . . . . . . . . . . . . . . . . . 1–8
Resetting the HP iPAQ. . . . . . . . . . . . . . . . . . . . . . . . . . . 1–9
Performing a Soft (“Normal”) Reset . . . . . . . . . . . . . 1–9
Performing a Hard (“Full”) Reset . . . . . . . . . . . . . . 1–10
Caring for Your Device . . . . . . . . . . . . . . . . . . . . . . . . . 1–12
2 Synchronizing with Your Computer
Using Microsoft ActiveSync . . . . . . . . . . . . . . . . . . . . . . 2–1
Installing ActiveSync . . . . . . . . . . . . . . . . . . . . . . . . 2–1
Synchronizing with Your Computer . . . . . . . . . . . . . 2–4
Changing Synchronization Settings. . . . . . . . . . . . . . 2–4
Manually Copying or Moving Files. . . . . . . . . . . . . . . . . 2–5
Installing a Program . . . . . . . . . . . . . . . . . . . . . . . . . . . . . 2–6
Backing up and Restoring Files . . . . . . . . . . . . . . . . . . . . 2–7
Synchronizing Links . . . . . . . . . . . . . . . . . . . . . . . . . . . . 2–7
Sending and Receiving Email Messages . . . . . . . . . . . . . 2–8
Sending a Meeting Request . . . . . . . . . . . . . . . . . . . . . . . 2–8
User’s Guide i
Page 4

3 Managing the Battery
Charging the Battery . . . . . . . . . . . . . . . . . . . . . . . . . 3–1
Checking the Battery . . . . . . . . . . . . . . . . . . . . . . . . . 3–3
Battery Saving Tips . . . . . . . . . . . . . . . . . . . . . . . . . . 3–3
4 Using the Screen
Using the HP Launch Screen (Select Models Only) . . . . 4–1
Using the Today Screen . . . . . . . . . . . . . . . . . . . . . . . . . . 4–2
Customizing the Today Screen . . . . . . . . . . . . . . . . . 4–3
Navigation Bar and Taskbar . . . . . . . . . . . . . . . . . . . 4–4
Status Icons . . . . . . . . . . . . . . . . . . . . . . . . . . . . . . . . 4–5
Popup Menus . . . . . . . . . . . . . . . . . . . . . . . . . . . . . . . 4–5
Sounds and Notifications. . . . . . . . . . . . . . . . . . . . . . 4–6
Creating Information . . . . . . . . . . . . . . . . . . . . . . . . . 4–7
Selecting Screen Orientation . . . . . . . . . . . . . . . . . . . 4–7
Adjusting Text Size . . . . . . . . . . . . . . . . . . . . . . . . . . . . . 4–7
Finding Information. . . . . . . . . . . . . . . . . . . . . . . . . . 4–8
Contents
5 Using Programs
Installing a Program. . . . . . . . . . . . . . . . . . . . . . . . . . 5–1
Minimizing a Program. . . . . . . . . . . . . . . . . . . . . . . . 5–1
Closing a Program . . . . . . . . . . . . . . . . . . . . . . . . . . . 5–1
Using HP Task Switch. . . . . . . . . . . . . . . . . . . . . . . . 5–2
Using Program Buttons . . . . . . . . . . . . . . . . . . . . . . . 5–4
Locking the Program Buttons . . . . . . . . . . . . . . . . . . 5–6
Using HP Profiles . . . . . . . . . . . . . . . . . . . . . . . . . . . 5–6
Using HP Image Zone . . . . . . . . . . . . . . . . . . . . . . . 5–11
Safekeeping Files in iPAQ File Store . . . . . . . . . . . 5–14
Backing Up Programs and Files . . . . . . . . . . . . . . . 5–15
Programs Available on the HP iPAQ . . . . . . . . . . . 5–16
6 Entering Information
Using the Input Panel to Enter Data. . . . . . . . . . . . . . . . . 6–1
User’s Guide ii
Page 5

Adjusting Word Suggestion Options . . . . . . . . . . . . . . . . 6–1
Using the On-screen Keyboard . . . . . . . . . . . . . . . . . . . . 6–3
Using Letter Recognizer . . . . . . . . . . . . . . . . . . . . . . . . . 6–3
Using Block Recognizer . . . . . . . . . . . . . . . . . . . . . . . . . 6–4
Using Microsoft Transcriber . . . . . . . . . . . . . . . . . . . . . . 6–5
Writing and Drawing on the Screen. . . . . . . . . . . . . . . . . 6–6
Converting Writing to Text . . . . . . . . . . . . . . . . . . . . . . . 6–6
Editing Text . . . . . . . . . . . . . . . . . . . . . . . . . . . . . . . . . . . 6–6
Word Recognition Tips . . . . . . . . . . . . . . . . . . . . . . . . . . 6–7
7 Expansion Cards
Using an Expansion Card. . . . . . . . . . . . . . . . . . . . . . . . . 7–1
Inserting/Removing a Secure Digital (SD) Expansion Card . .
7–1
Viewing the Contents of a Card . . . . . . . . . . . . . . . . . . . . 7–3
8 Connecting to the Internet
Browsing the Internet. . . . . . . . . . . . . . . . . . . . . . . . . . . . 8–1
Connecting to a Private Network . . . . . . . . . . . . . . . . . . . 8–2
Using the Favorites List . . . . . . . . . . . . . . . . . . . . . . . . . . 8–2
Contents
9 Troubleshooting
Common Problems. . . . . . . . . . . . . . . . . . . . . . . . . . . . . . 9–1
ActiveSync . . . . . . . . . . . . . . . . . . . . . . . . . . . . . . . . . . . . 9–4
Expansion Cards. . . . . . . . . . . . . . . . . . . . . . . . . . . . . . . . 9–6
. . . . . . . . . . . . . . . . . . . . . . . . . . . . . . . . . . . . . . . . . . . . . 9–6
A Regulatory Notices
Federal Communications Commission Notice. . . . . . . . . A–1
Declaration of Conformity for Products Marked with the
FCC Logo—United States only. . . . . . . . . . . . . . . . . A–2
Canadian Notice . . . . . . . . . . . . . . . . . . . . . . . . . . . . . . . . A–3
Avis Canadien . . . . . . . . . . . . . . . . . . . . . . . . . . . . . . . . . A–3
User’s Guide iii
Page 6

Japanese Notice . . . . . . . . . . . . . . . . . . . . . . . . . . . . . . . . A–3
Korean Notice . . . . . . . . . . . . . . . . . . . . . . . . . . . . . . . . . A–3
European Union Notice . . . . . . . . . . . . . . . . . . . . . . . . . . A–4
Battery Warning . . . . . . . . . . . . . . . . . . . . . . . . . . . . . . . . A–5
Equipment Warning . . . . . . . . . . . . . . . . . . . . . . . . . . . . . A–5
Airline Travel Notice . . . . . . . . . . . . . . . . . . . . . . . . . . . . A–6
B Specifications
System Specifications . . . . . . . . . . . . . . . . . . . . . . . . . . . B–1
Physical Specifications. . . . . . . . . . . . . . . . . . . . . . . . . . . B–2
Operating Environment . . . . . . . . . . . . . . . . . . . . . . . . . . B–2
Contents
User’s Guide iv
Page 7

1
Getting to Know Your HP iPAQ
Congratulations on purchasing your HP iPAQ. Use this guide to
learn about the device functionality.
You can find detailed information in the Help files on your HP
iPAQ. To access Help, from the Today screen, tap Start > Help,
and select a topic.
In addition, Microsoft Pocket PC Basics provides instructions on
operating the HP iPAQ. To locate Pocket PC Basics, from the
Tod ay screen, tap Start > Help > Pocket PC Basics.
User’s Guide 1–1
Page 8

Getting to Know Your HP iPAQ
Identifying Product Components
Front and Top Views
Microphone
Notification/Charge
Indicator
QVGA Color Display
Calendar
Windows Media*
Contacts
HP Image Zone*
* To access this function, press and hold for two seconds.
Secure Digital I/O (SDIO)
Expansion Slot
5-Way Navigation Button
Infrared Port
Messaging
Record*
Power Button
HP Profiles*
Stylus
Today Screen
Landscape/Portrait*
User’s Guide 1–2
Page 9

Getting to Know Your HP iPAQ
Component Description
Notification/Charge
Indicator
Microphone Record voice or sounds.
Secure Digital I/O (SDIO)
Expansion Slot
Infrared Port Wireless connection for data
Power Button Turn power on/off to device.
Amber or green indicator. Indicates
battery charge status and message
status.
Amber flash = charging
Amber solid = charged
Green flash = one or more
notification events have occurred
LED off = not charging and no
notification events
Note: When notification event occurs
during battery charging, the LED
changes to green and remains
green until the message has been
cleared or times out.
Supports Secure Digital (SD)
storage and expansion cards.
transfer.
Stylus Pull to remove, slide in to replace.
5-Way Navigation Button Use to navigate through dropdown
QVGA Color Display 3.5 in. high-contrast, color
Program Buttons For information on the dual function
User’s Guide 1–3
Use to tap or write on the screen.
menus and programs. Press down
to perform a task.
In Windows Media Player:
Play (center)
Next track (right)
Previous track (left)
Volu me up
Volu me do wn
touchscreen.
of the program buttons, see Chapter
5, “Using Programs.”
Page 10
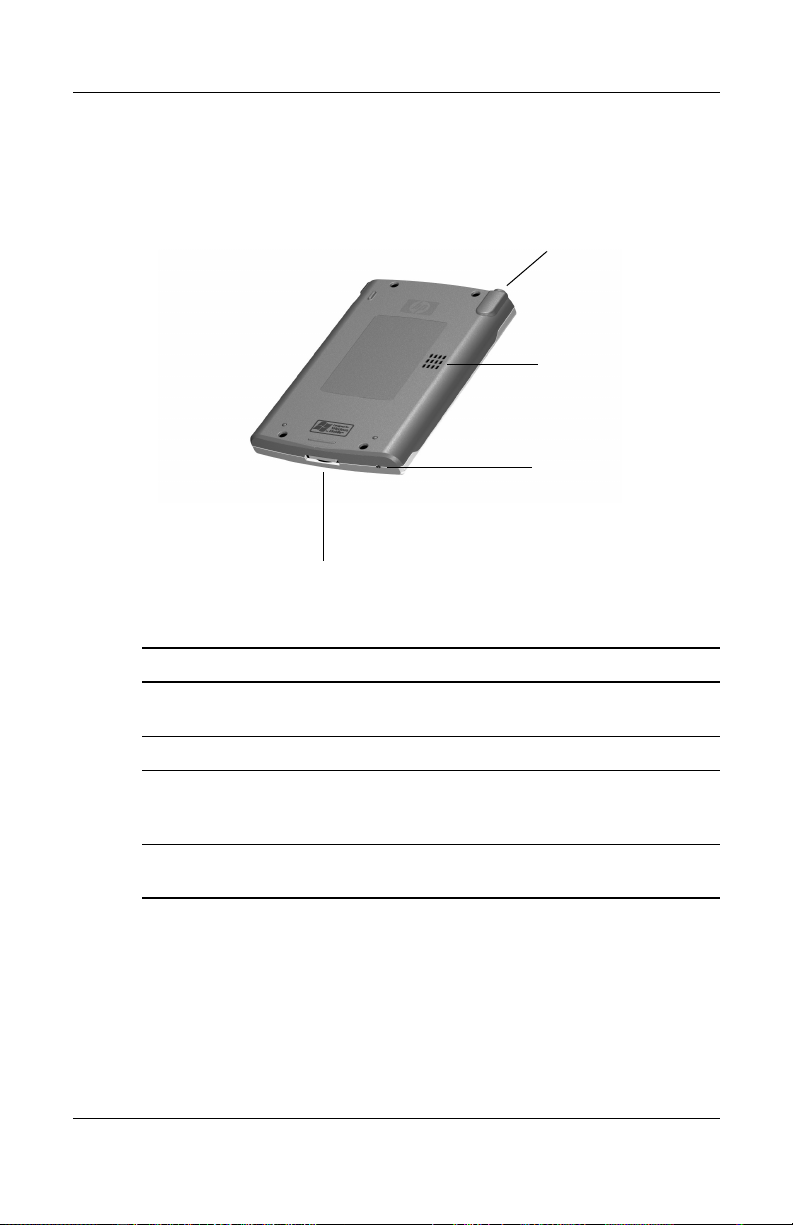
Back and Bottom Views
Universal Sync Connector
Getting to Know Your HP iPAQ
Headphone Jack
Speaker
Reset Button
Component Description
Headphone Jack 3.5 mm stereo audio jack for
Speaker Lets you listen to audio media.
Reset Button Press in with stylus to reset the
Universal Sync Connector Lets you synchronize with another
User’s Guide 1–4
listening to audio media.
device. See “Resetting the HP iPAQ”
later in this chapter.
computer/recharge the battery.
Page 11

Using the Stylus
You can use the stylus three ways:
Tap —Lightly touch the screen to select or open an item. Lift the
stylus after you tap an item. Tapping is equivalent to clicking an
item with the mouse on your computer.
Drag—Place the point of the stylus on the screen and drag an
item across the screen without lifting the stylus until you have
completed the selection. Dragging is equivalent to dragging with
the left mouse button pressed on your computer.
Tap and hold—Hold the stylus pointer on an item for a short
time until a menu displays. Tapping and holding is equivalent to
right-clicking your computer mouse button. When you tap and
hold, a circle of red dots appears around the stylus to indicate that
the menu will soon pop up.
CAUTION: To prevent damage to the screen, never tap or write on the
Ä
screen with any device other than the stylus that comes with the device,
or an approved replacement. If you lose or break your stylus, you can
order extras at www.hp.com/go/ipaqaccessories.
Getting to Know Your HP iPAQ
Aligning the Screen
The first time you turn on the HP iPAQ, you must align the
screen. You need to realign the screen if:
■
The device does not respond accurately to your taps.
■
You perform a full reset of your device.
To realign the screen:
1. From the Start menu, tap Settings > System tab > Screen.
2. Tap Align Screen and tap the crosshairs as they move on the
screen.
User’s Guide 1–5
Page 12

Getting to Know Your HP iPAQ
Adjusting Text Size
How much information you see on the screen depends on the text
size.
1. From the Start menu, tap Settings > System tab > Screen >
Text Size tab.
2. Drag the slider to the desired text size; then tap OK.
Changing the Screen from Portrait to Landscape Mode
To select Portrait or Landscape screen orientation:
1. From the Start menu, tap Settings > System tab > Screen.
2. Tap Portrait, Landscape (right-handed), or Landscape
(left-handed).
3. Tap OK.
Shortcut: Press and hold the Tod ay button for two seconds to
toggle between portrait and landscape modes.
Setting Date and Time
When you turn on your HP iPAQ for the first time, you are
requested to select your time zone. After setting the time zone,
you still need to set the time and date. The three settings are
located in the Clock Settings screen, and you can set them at the
same time.
Note:
your computer each time you connect them through ActiveSync.
Setting Time for Home and Locations You Visit
From the Start menu, tap Settings > System tab > Clock &
Alarms > Time tab.
User’s Guide 1–6
By default, the time on the HP iPAQ is synchronized with
Page 13

1. Tap either Home or Visiting.
2. Tap the time-zone down arrow, and select the appropriate
time zone from the dropdown list.
3. Tap the hour, minutes, or seconds, and use the Up and Down
arrows to adjust the time.
4. Tap AM or PM.
5. Tap OK.
6. Tap Ye s to save the time.
Setting the Date
1. From the Start menu, tap Settings > System tab > Clock &
Alarms.
2. Tap the down arrow by the date.
3. Tap the left or right arrow to select month and year.
4. Tap a day.
5. Tap OK.
6. Tap Ye s to save the date.
You need to reset your time zone, time, and date if:
Getting to Know Your HP iPAQ
■
The location time (Home or Visiting) needs to be changed.
■
All power to the HP iPAQ is lost, which removes all saved
settings.
■
You perform a full reset of your HP iPAQ.
Shortcut:
On the Tod ay screen, tap the Clock to set time
zone, time, and date.
Setting an Alarm
You can set up to three alarms in your device.
To set an alarm:
1. From the Start menu, tap Settings > System tab > Clock &
Alarms > Alarms tab.
User’s Guide 1–7
Page 14

Getting to Know Your HP iPAQ
2. Tap an alarm.
3. Tap the Description field and type a name for the alarm.
4. Tap the day of the week.
5. Tap the time. This opens the clock popup. You can use the Up
and Down arrows to select hours, minutes, seconds and AM
or PM. Or, tap and drag the hands of the clock to set the time;
then tap OK.
6. Tap the Alarms button; then tap the dropdown list to see
various types of alarms, and select their characteristics.
7. Tap OK.
Entering Owner Information
You can personalize your HP iPAQ by entering owner
information. To enter owner information:
1. From the Toda y screen, tap Start > Settings > Owner
Information > Identification tab.
2. Tap in the Name field. A keyboard appears at the bottom of
the screen. Tap on the characters to enter your name.
Note:
Recognizer, or Microsoft Transcriber to input information. For
more information, see Chapter 6, “Entering Information.”
User’s Guide 1–8
If you prefer, you can use Letter Recognizer, Block
3. Tap the other fields and continue entering information.
4. To display owner information at startup, tap the Options tab
and tap Identification information or Notes.
5. To type a note, tap the Notes tab.
6. Tap OK.
Page 15

Getting to Know Your HP iPAQ
Resetting the HP iPAQ
Performing a Soft (“Normal”) Reset
A soft reset does not erase any applications or saved data, but be
sure to save any unsaved data before performing a soft reset since
any unsaved data will be lost.
Perform a soft reset when:
■
You want to stop all running applications.
■
After installing a new application.
■
If your HP iPAQ stops responding.
To perform a soft reset:
1. Locate the Reset button.
2. Use the stylus to briefly press the Reset button. The HP iPAQ
restarts and displays the Toda y screen.
User’s Guide 1–9
Page 16
Getting to Know Your HP iPAQ
Performing a Hard (“Full”) Reset
Perform a hard reset when you want to clear all settings,
applications, and data from RAM (Random Access Memory,
where data and applications you have loaded are stored).
If the battery installed in your HP iPAQ discharges completely,
your HP iPAQ will operate as if a hard reset had been performed
once the battery has been recharged.
CAUTION: If you perform a hard reset, your HP iPAQ returns to its
Ä
default settings and loses all information (files, settings, etc.) that is not
recorded in ROM. Information stored in iPAQ File Store will not be lost.
For more information on using iPAQ File Store, see “Using the iPAQ File
Store Folder” in Chapter 5, “Using Programs.”
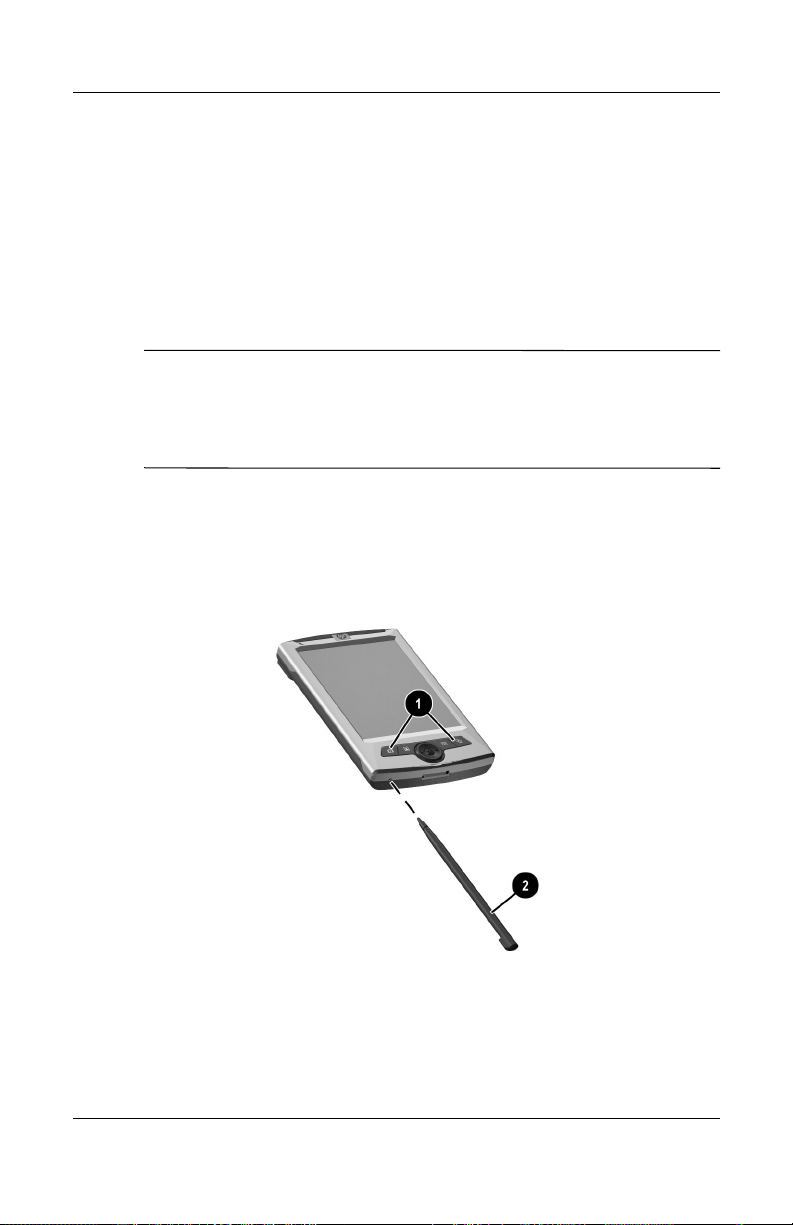
To perform a hard reset:
1. Press and hold buttons 1 and 4 on the front of the device 1
and, at the same time, with the stylus, briefly press the Reset
button 2 on the bottom of your HP iPAQ.
User’s Guide 1–10
Page 17

Getting to Know Your HP iPAQ
Note:
Verify the full reset by pressing the Power button. When
the HP iPAQ has been fully reset, it does not power on until the
battery is reactivated.
2. A hard reset deactivates the battery. The Power button does
not function until the battery is reactivated. To reactivate the
battery:
❏
Connect the AC Adapter to the HP iPAQ to charge the
device.
Or:
❏
Briefly press the Reset button with the stylus.
User’s Guide 1–11
Page 18

Caring for Your Device
To protect the screen of your HP iPAQ from damage, observe the
following practices:
■
Never tap or write on the screen with any device other than
the stylus that comes with the HP iPAQ or an approved
replacement. If you lose or break your stylus, you can order
extras at www.hp.com/go/ipaqaccessories.
■
When transporting your HP iPAQ in a purse, pocket,
briefcase, etc., ensure that the device does not get
compressed, bent, dropped, hit, or sat on.
■
When not in use, store your HP iPAQ in a case. You can
select from a wide variety of cases at
www.hp.com/go/ipaqaccessories or www.casesonline.com.
■
Do not place anything on top of your HP iPAQ.
■
Avoid scratching the surface of the screen or banging it
against hard objects.
■
Clean your HP iPAQ by wiping the screen and the exterior
with a soft, damp cloth lightly moistened with water.
Getting to Know Your HP iPAQ
CAUTION: To reduce the risk of damage to the internal components,
Ä
do not spray liquid directly on the screen or allow excess liquid to drip
inside your
screen may discolor the finish and damage it.
User’s Guide 1–12
HP iPAQ
. Using soap or other cleaning products on the
Page 19

Synchronizing with Your
Using Microsoft ActiveSync
Microsoft ActiveSync is a program you install on your desktop or
laptop computer to transfer data back and forth. In this manner,
you only have to input information once either at your computer
or your HP iPAQ. Using ActiveSync and the sync cable, you
connect your HP iPAQ and a computer to:
■
Copy files (data, audio or video) between your HP iPAQ and
up to two host computers so you always have the latest
information in all locations.
■
Install programs on your device.
■
Back up and restore files.
■
Synchronize links.
2
Computer
■
Send and receive email.
■
Request meetings.
Installing ActiveSync
These instructions assume the battery has been previously
charged.
CAUTION: The first time you synchronize, perform Steps 1 and 2
Ä
below (install Microsoft ActiveSync on your computer). Then, when
prompted to do so, connect your HP iPAQ to your computer.
User’s Guide 2–1
Page 20

Synchronizing with Your Computer
To install Microsoft ActiveSync on your computer:
1. Insert the Companion CD into the CD-ROM tray or slot in
your computer.
2. After the introduction displays, click Start Here. Follow the
Setup Wizard screen instructions.
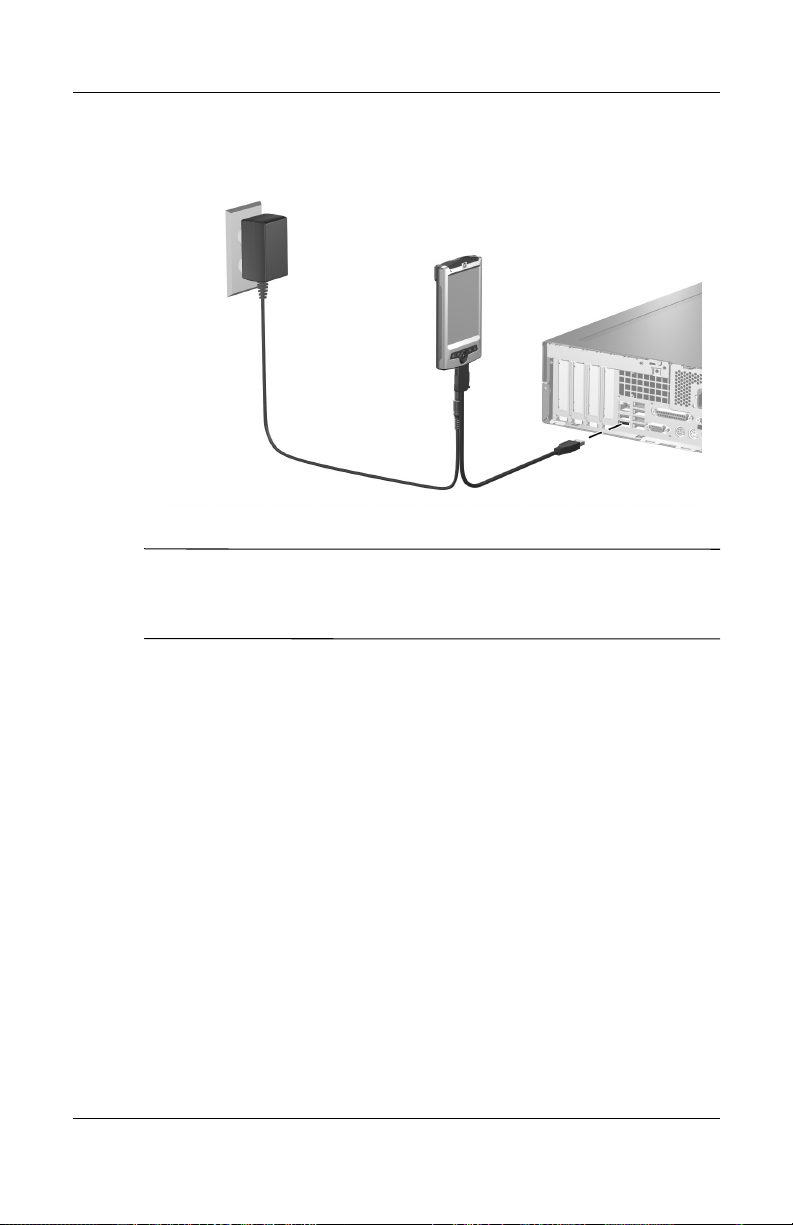
When prompted, connect your HP iPAQ and your personal
computer using the supplied cables in the following manner:
1. Insert the round connector on the AC Adapter cable into the
connector on the sync cable.
2. Insert the connector on the sync cable into the connector on
the bottom of the HP iPAQ.
3. Connect the AC Adapter cable into a standard electrical
outlet.
Note:
Do not connect the sync cable to the computer yet.
4. When instructed by Setup Wizard, connect the HP iPAQ to
the computer by inserting the USB plug on the sync cable
into a USB port on your computer.
User’s Guide 2–2
Page 21
Synchronizing with Your Computer
Note:
The HP iPAQ supports a serial connection. However, to
synchronize via a serial connection, you must use a serial sync
cable (sold separately.)
5. The Setup Wizard detects the programs on your computer,
and guides you step-by-step so you can install ActiveSync on
your computer and other optional programs on your device.
Once you are finished with the Setup Wizard, you can
disconnect the HP iPAQ from the computer.
User’s Guide 2–3
Page 22

Synchronizing with Your Computer
Synchronizing with Your Computer
Once ActiveSync is installed on your computer, you can:
■
Create an additional partnership with a second computer so
you can synchronize information.
■
Change the type of data (Contacts, Calendar, Messaging,
Tasks, Favorites, Files, Notes, or AvantGo) to synchronize.
Note:
To synchronize files, select files in your computer; then
drag and drop the files into the synchronization folder on your
device. If you named your HP iPAQ “PC1” when you created
your partnership, then the synchronized folder is named “PC1.”
When you synchronize, the files are automatically moved to and
from the PC1 folder.
Changing Synchronization Settings
You can modify the synchronization settings to:
■
Set a time for synchronization to occur.
■
Change the type of connection.
■
Select the types of files to synchronize.
■
Select the files and information you do not want to
synchronize (ex: email attachments).
■
Determine how conflicts between information on your HP
iPAQ and information on your computer are to be handled.
To modify synchronization settings:
1. On your computer, open ActiveSync by clicking Start >
Programs > Microsoft ActiveSync.
2. In ActiveSync, click Tools > Options.
a. In the Sync Options page, check the Mobile select items
to be synchronized.
User’s Guide 2–4
Page 23

Synchronizing with Your Computer
b. Click the Schedule tab to set the time for
synchronization.
c. Click the Rules tab to determine how conflicts between
information on your HP iPAQ and information on your
computer are to be handled.
3. Tap OK.
4. From the File menu, click Connection Settings... . Select the
type of connection to use between the HP iPAQ and the
computer.
Using the Serial Infrared (IR) Connection
Your HP iPAQ has an infrared port. If your computer has an
infrared port or an infrared USB adapter, you can synchronize
your HP iPAQ and your computer using an infrared connection
instead of the sync cable. The infrared connection option only
works on computers with Microsoft Windows 98SE, Me, 2000, or
XP operating systems.
To set up an infrared connection to your computer:
1. Follow your computer manufacturer’s instructions to set up
the infrared port.
2. Line up the HP iPAQ infrared port with the computer infrared
port so they are unobstructed and within 12 in. (30 cm) of
each other.
3. On your HP iPAQ, tap Start > ActiveSync > Too ls >
Connect via IR... . Synchronization begins automatically.
4. To disconnect, move the HP iPAQ and computer away from
each other, or tap the X in the upper right corner of the screen
on your device.
Manually Copying or Moving Files
You can copy or move files to and from your computer using
Explore in ActiveSync and Windows Explorer.
To copy a f ile:
User’s Guide 2–5
Page 24

Synchronizing with Your Computer
1. Connect your HP iPAQ and computer via the sync cable.
2. On your computer, right-click the Start menu.
3. In the popup menu, click Explore. This opens the file
hierarchy in your computer.
4. Browse through your folders and subfolders and locate a file
to be copied or moved to your HP iPAQ.
5. Once you find a file(s), leave the window open.
Note:
You cannot copy preinstalled files or system files.
6. On your computer, open ActiveSync by clicking Start >
Programs > Microsoft ActiveSync.
7. In ActiveSync, click Explore. This opens the file hierarchy in
your HP iPAQ (under the folder Mobile Device).
8. Go to My Pocket PC > My Documents and leave the
window open.
9. Drag and drop the file(s) between your computer and your
HP iPAQ. If you are prompted for permission to convert a file
so it can be used in the HP iPAQ, answer yes.
Note:
Moving file(s) into the My Documents folder (or into a
subfolder under My Documents) on your HP iPAQ assures that
the programs will locate them.
10. If you want, on your HP iPAQ, open File Explorer. Tap My
Device. See the file(s) you have just copied or moved.
Installing a Program
To install a program from your computer using ActiveSync:
1. Connect your HP iPAQ to your computer using the sync
cable.
2. Follow the instructions on the computer screen for installing
that particular program.
User’s Guide 2–6
Page 25

Synchronizing with Your Computer
3. Check the screen on your HP iPAQ to see if further steps are
necessary to complete the installation.
Backing up and Restoring Files
To help reduce the chance of losing information, you should back
up information to your computer regularly. For more information
on backing up and restoring information using Microsoft
ActiveSync, see Chapter 5, “Using Programs.”
Synchronizing Links
You can synchronize links to websites from the Favorites list on
your computer to view them offline with Pocket Internet
Explorer.
1. On your computer, open Internet Explorer.
2. Click Favorites to see the list of links to your favorite
websites.
3. To save a website link to Mobile Favorites, open the website
and click Create Mobile Favorite.
■
If you have selected “Favorites” as an information type to be
synchronized, ActiveSync copies your mobile favorite
to your HP iPAQ the next time you synchronize.
■
If you have not selected “Favorites” as an information type to
be synchronized, ActiveSync will not copy your mobile
favorite to your HP iPAQ the next time you synchronize.
To manually synchronize your favorite links, follow the
instructions in “Synchronizing with Your Computer” in
Chapter 2.
User’s Guide 2–7
Page 26

Synchronizing with Your Computer
Sending and Receiving Email Messages
You can send and receive email messages by synchronizing your
HP iPAQ with your computer using ActiveSync. When sending
and receiving email messages, the name of the current folder is
displayed at the bottom of the screen.
For more information on sending and receiving email using
ActiveSync, view Messaging Help by going to Start > Help >
Messaging.
Sending a Meeting Request
You can schedule a meeting and send a meeting request via
ActiveSync. You create the meeting information in Messaging
and the next time you synchronize with your computer, the
meeting request will be sent.
Note:
Outlook on their computer(s).
For more information, view Calendar Help by going to Start >
Help > View > All Installed Help > Calendar.
User’s Guide 2–8
The person(s) you invite must use Outlook or Pocket
Page 27

3
Managing the Battery
Your device is shipped with a partially charged internal battery.
It is recommended that you fully charge the device before setting
up the unit.
Note:
Even when not in use, the device uses battery power to run the
clock and maintain files. When at your desk, keep the device
plugged into an electrical outlet with the AC Adapter. When you
travel, carry with you the AC Adapter and sync cable.
CAUTION: Keep the battery charged. The programs and files you
Ä
install or create are stored in volatile RAM memory. If the battery
completely discharges, all user-installed programs and user data files
created will be erased and you will have to reinstall them. To prevent
losing valuable programs and files, keep the battery always charged.
Optionally, you can store a limited number of programs and files in the
iPAQ File Store folder so that if the battery completely discharges, they
will not be lost.
It can take up to four hours to fully charge the battery.
Charging the Battery
The AC Adapter works with any household electrical outlet. You
can also purchase an adapter that works with your vehicle
cigarette lighter or 12 Volt power outlet.
CAUTION: Use only the AC Adapter that came with your device to
Ä
charge it.
User’s Guide 3–1
Page 28

Managing the Battery
To charge the HP iPAQ:
1. Insert the round connector on the AC Adapter cable into the
connector on the sync cable.
2. Insert the connector on the sync cable into the connector on
the bottom of the device.
3. Connect the AC Adapter to a standard electrical outlet.
CAUTION: To avoid damaging your device or the AC Adapter, gently
Ä
align all connectors before inserting them.
4. The Notification/Charge Indicator blinks amber while the
battery is charging. When the indicator stops blinking and
turns solid amber, the unit is fully charged. It can take up to
four hours to fully charge the battery.
User’s Guide 3–2
Page 29

Checking the Battery
To view the battery gauge to see how much battery power
remains:
From the Start menu, tap Settings > System tab > Power. If the
battery is low, use the AC Adapter to connect the device to an
electrical outlet and recharge it to its full capacity.
Battery Saving Tips
To make your battery last as long as possible between charges,
there are certain settings you can change on your device.
Adjusting some or all of these will maximize battery life.
■
Leave your device connected to AC power at all times when
not using it.
■
Set the device to turn off after a short time of not being used.
Tap Start > Settings > System tab > Power > Advanced tab.
On battery power, set the device to power off in the shortest
acceptable time.
■
Dim the backlight. Tap Start > Settings > System tab >
Backlight > Brightness tab. Adjust the on battery brightness
level slider to dim the backlight.
Managing the Battery
■
Turn off the backlight. Tap Start > Settings > System tab >
Backlight > Battery Power tab; then set the backlight to turn
off the backlight soon after you stop using the device.
■
Set the device to receive incoming infrared beams manually.
Tap Start > Settings > Connections tab > Beam; then
uncheck Receive all incoming beams.
■
Assign a program button to turn off the screen display while
listening to music. Open Windows Media and tap Tools
>Settings > Buttons. From the Select Function dropdown
list, tap Screen Toggle. Press a program button and tap OK.
Then, when listening to music, press that program button to
turn off the screen display.
User’s Guide 3–3
Page 30

Using the Screen
Using the HP Launch Screen (Select Models Only)
On some models, when you first turn on your device, the Launch
screen is displayed. Use this screen to access the following
programs:
■
Music (Windows Media Player)
■
Contacts
■
Schedule (Calendar)
■
Photos (HP Image Zone)
4
User’s Guide 4–1
Page 31

Using the Screen
To change to the standard To da y screen:
1. Tap , or from the Start menu, tap Settings > Today >
Items tab.
2. Check or uncheck iPAQ Entertainment.
Note:
If iPAQ Entertainment is checked, no other Today
screen items will be visible.
3. Check other items you want to see on the Tod ay screen.
4. Tap OK.
Using the Today Screen
When you first turn on the device, the Tod ay screen displays
information such as date and time and the day’s schedule.
You can return to the Today screen from any program by tapping
Start > Today.
Tap for connectivity status.
Tap to open a program.
Tap to change date and time.
Tap to read messages.
Tap to read messages.
Tap to view tasks.
Tap to change volume or mute sounds.
Tap to view the next appointment.
Tap & hold to change time format.
Tap to set appointment or
view existing appointment.
Tap to enter owner info.
User’s Guide 4–2
Page 32

Customizing the Today Screen
You can customize the appearance of the Tod ay screen by:
■
Setting a theme for your device.
■
Using a picture as the background.
■
Selecting the items listed on the Tod ay screen.
To select a theme or a picture as a background:
1. Tap , or from the Start menu, tap Settings > Today >
Appearance tab.
2. Tap a theme from the list, or tap Use this picture as the
background and tap Browse.
3. To search through folders and subfolders for other pictures,
use File Explorer.
To change the order in which items appear on the To da y screen:
1. Tap , or from the Start menu, tap Settings > Today >
Items tab.
Using the Screen
2. Tap any item and tap either Move Up or Move Down.
3. Tap OK.
Note:
Date is always the first item listed. You cannot move
Date.
4. Tap Today timeout: and select the period of inactivity that
must pass before the Tod ay screen displays.
5. Tap OK.
User’s Guide 4–3
Page 33

Navigation Bar and Taskbar
The navigation bar displays connectivity status and the time.
The taskbar lists the menu tabs, buttons, and commands you have
available while you are using the current program.
Navigation bar
Tap to open a program.
Using the Screen
to open a recently
Tap to browse more programs.
Tap to customize settings.
on the running program.
used program.
Tap to view Help
Taskbar
Tap to create a new item.
Within each program, use the taskbar to perform tasks.
Tap to select Tap to select an
menu commands
input method.
User’s Guide 4–4
Page 34

Status Icons
You may see the following status icons displayed on the
navigation bar or taskbar. Tap the icon to view more information
related to the item.
Using the Screen
There is no active connection between the HP iPAQ and
the computer.
The HP iPAQ and a computer are connected. This icon
appears only when there is an active connection.
Microsoft ActiveSync is synchronizing your HP iPAQ with a
computer.
The speaker is on. Tap to mute sound.
The speaker is off. Tap to unmute sound.
This program is running. Tap to minimize it. (Minimizing
maintains a program open but not active on the screen.)
Your HP iPAQ and a computer are connected. This icon
appears only when there is an active connection.
Popup Menus
Popup menus allow you to perform an action on an item. To
perform an action on an item, tap and hold the stylus on the item.
When the menu pops up on the screen, tap the desired action. If
you change your mind, tap anywhere outside the menu to close it
without performing the action.
Main Popup Menu
Use the main popup menu to cut (move), copy, rename, and
delete an item, or to send an email or file to another device.
User’s Guide 4–5
Page 35

Sounds and Notifications
You can schedule various types of events (appointments, tasks,
email notification) and set an alarm as reminder so that at the
scheduled time or when you have a message, the indicator light
on the front of the device flashes green and or a sound is played.
To set alarms and sounds:
Go to Start > Settings > Sounds & Notifications.
■
Tap the Sounds tab and enable sounds for each event.
Using the Screen
■
Tap the Notifications tab and select a sound for each event.
User’s Guide 4–6
Page 36

Creating Information
From the Toda y screen, you can create various types of items:
1. Tap , or from the Start menu, tap Toda y > New.
■
Appointment
■
Contact
■
Excel Workbook
■
Message
■
Note
■
Task
■
Word document
2. In the popup menu, tap a task to create a new item.
3. Tap OK when you are finished.
Selecting Screen Orientation
Using the Screen
The screen can be viewed vertically or horizontally.
To select screen orientation:
From the Start menu, tap Settings > System tab > Screen.
Shortcut: To toggle screen position between portrait (vertical)
and landscape (horizontal) modes, tap and hold for two seconds
the Toda y button.
Adjusting Text Size
How much information you see on the screen depends on the text
size.
1. From the Start menu, tap Settings > System tab > Screen >
Text Size tab.
2. Drag the slider to the desired text size.
3. Tap OK.
User’s Guide 4–7
Page 37

Finding Information
You can search through the My Documents folder and any
subfolder you have created in your HP iPAQ.
To find a program or file:
1. From the Start menu, tap Programs > Find.
■
If you know the filename, tap Find: and type the filename.
■
If you do not know the exact filename but know the data type,
tap a data type from the dropdown list.
2. Tap Go.
3. In the results list, tap an item to open it.
Using the Screen
User’s Guide 4–8
Page 38

Installing a Program
You can install programs on your HP iPAQ using Microsoft
ActiveSync and the sync cable. You can install programs:
■
From your HP iPAQ or your computer by copying a program
file that has an .exe or .cef extension.
■
From another device if the program file has a .cab extension.
When installing programs, look for the correct version for your
HP iPAQ model and Windows Mobile Operating System. Follow
the installation instructions provided with the program.
Minimizing a Program
Minimizing a running program keeps it open, but not active on
your screen. To minimize a running program, tap the at the top
right of the screen.
5
Using Programs
Closing a Program
Programs automatically close based on available memory.
However, you can manually close a program to increase
performance.
To see a list of running programs to close:
1. From the Start menu, tap Settings > System tab > Memory.
2. Tap the Running Programs tab.
If you are running a program in the background, bring it to the
foreground by tapping Activate.
User’s Guide 5–1
Page 39

To close a program, tap the program and tap Stop.
To close all programs, tap Stop All.
Using HP Task Switch
HP Task Switch is an application that allows you to switch
between open programs, or to close one or all the running
programs.
By default, HP Task Switch runs in the background on your HP
iPAQ.
For help on HP Task Switch, go to Start > Help > View > All
Installed Help > HP Task Switch.
You can access HP Task Switch in two ways:
■
Tap the HP Task Switch icon (located in the lower right
corner of the Toda y screen taskbar).
Or:
■
Go to Start > Programs > HP Task Switch.
Using Programs
You can use HP Task Switch in one of two modes. To select the
task switching mode you prefer:
Go to Start > Programs > HP Task Switch > Settings.
User’s Guide 5–2
Page 40

Using Programs
The following screen displays:
If you select Icon pad, then the screen looks similar to the
following:
Shows the current
running program.
Tap to close all
running programs.
Tap to adjust settings.
Tap to switch
between programs.
User’s Guide 5–3
Page 41

If you select Menu on taskbar, the screen looks similar to the
following:
Using Program Buttons
By default, the buttons on the HP iPAQ open certain programs.
However, you can customize them to open different programs.
To assign a program to a button other than the default:
1. From the Toda y screen, tap Start > Settings > Buttons.
Using Programs
2. Tap a button.
3. In the Assign a program: dropdown list, tap the program you
wish to associate to a button.
The following table describes the default program buttons on the
HP iPAQ. Each button can be assigned up to two programs. The
primary program for the button can be accessed by briefly
User’s Guide 5–4
Page 42

Using Programs
pressing the button. The secondary program or function is
accessed by pressing and holding the button down for two
seconds.
Button Action To open a
program
Description
Press Calendar Schedule events and set
Press &
hold
Press Contacts Keep a list of friends and
Press &
hold
Press Messaging Receive and send Internet
Press &
hold
Windows
Media Player
HP Image Zone Display individual images
Record (in
Notes)
alarms as reminders. The
day’s events are displayed
on the Today screen.
Play digital audio and video
files.
colleagues.
and run slide shows.
Display images from a
digital camera SD storage
card.
email messages through
Messaging on your HP
iPAQ or your computer
after ActiveSync is
installed. To send and
receive email, you must
have an email address
provided by your Internet
Service Provider (ISP) or
employer.
Record voice or sounds as
a WAV file that can be
attached to a picture or
listened to by itself. By
default, recording is in the
Notes program.
(Continued)
User’s Guide 5–5
Page 43

(Continued)
Button Action To open a
program
Using Programs
Description
Press Today Home page from which all
Press &
hold
Press Power on/off Turns HP iPAQ on or off.
Press &
hold
Rotate Screen
(Portrait/Lands
cape)
HP Profiles Save characteristics
Locking the Program Buttons
To avoid accidentally pressing a program button:
1. Tap Start > Settings > Buttons > Lock tab.
2. Tap Disable all buttons except power button; then tap OK.
Note:
and turning on the unit unlocks the other program buttons.
The Power button cannot be locked. Pressing the button
features are accessed.
Toggle screen orientation
from vertical (portrait) to
horizontal (landscape).
(volume level, alarm and
backlight brightness) in
memory. Invoke a profile
according to your
surroundings. (Note: The
device must be on.)
Using HP Profiles
You can change your HP iPAQ settings quickly depending on
where you are at a given moment.
Use HP Profiles to:
■
Turn the HP iPAQ backlight on or off.
■
Turn the HP iPAQ screen display on or off.
User’s Guide 5–6
Page 44

Using Programs
■
Disable powering on the HP iPAQ from an application
button.
■
Turn off the HP iPAQ.
You can customize the profiles and store the settings in memory.
In this way, you can quickly invoke a setting with one tap.
Note:
This screen closes after a period of inactivity. If it closes
before you make your selection, tap and hold for two seconds the
Power button.
To launch HP Profiles:
■
Turn the HP iPAQ on; then press and hold the Power button
for two seconds. The HP Profiles menu screen is displayed.
Or:
■
Go to Start > Settings> System tab > HP Profiles.
Settings
Profiles
❏
To change Backlight settings, tap Backlight Off or On.
❏
To change Di s p l a y settings, tap Display Off or On.
❏
To lock or unlock the buttons, tap All Keys Lock.
❏
To power off the HP iPAQ, tap Suspend.
User’s Guide 5–7
Page 45

❏
To adjust the settings in a profile, tap Profiles Setting.
❏
To close the application, tap Exit.
Saving Settings in a Profile
The HP iPAQ comes with five profiles with different alert
volume, screen brightness, and power saving settings. You can
use them, rename them, or customize them:
❏
Silent
❏
Normal
❏
Meeting
❏
Outdoor
❏
User
You can rename these profiles, but you cannot delete them.
To rename a profile:
1. Go to Start > Settings> System tab > HP Profiles.
Using Programs
2. The Current profile is always the first profile displayed. Tap
any profile from the HP Profiles dropdown list.
3. Tap Rename.
4. When the keyboard and typing area pop up, type a new name.
5. Tap OK.
User’s Guide 5–8
Page 46

Tap an icon on the right of the screen to open a new screen where
you can change alerts volume, screen brightness, or how long the
device will stay on before it turns off.
Tap to adjust alarm volume.
Tap to adjust
screen brightness.
Tap to adjust pow e r
conservation settings.
Adjusting the Alert Volume in a Profile
1. From the HP Profiles dropdown list, select the profile you
wish to change and tap the Speaker icon.
2. On the volume screen, tap either Alerts On or Off.
3. Tap and drag the volume slider to the desired level. As you
move the slider, a sample alert is heard.
4. Tap OK.
Using Programs
Adjusting Brightness and Backlight On or Off in a Profile
The brightness of the display and whether the backlight is on or
off plays a major part in how long your battery lasts. You may
want to reduce brightness or set it to quickly power off when you
are not using the device.
To adjust backlight brightness:
User’s Guide 5–9
Page 47

Using Programs
1. Tap the Brightness icon.
2. Move the brightness level slider left or right.
3. Tap Turn off backlight if device is not used for and select a
period of time from the dropdown list.
4. Tap OK.
Setting the HP iPAQ to Turn Off After a Period of Inactivity
Having your HP iPAQ turned on plays a major part in how long
your battery will last. You may want to set the HP iPAQ so that it
turns off rather quickly when not in use.
To set the shutdown period:
1. Tap the Power icon.
2. Tap Turn off device if not used for and in the dropdown list,
tap a period of inactivity before the device powers off.
3. Tap OK.
User’s Guide 5–10
Page 48

Using HP Image Zone
You can use HP Image Zone to see photos or video clips and
organize them into slideshows or playlists. You can also add
audio files to images by recording voices or sounds and
associating them with an image.
Use HP Image Zone to:
■
View pictures stored on your HP iPAQ or storage card.
■
Record sounds with pictures.
■
View a slideshow.
Using Programs
Note:
For more information on using HP Image Zone, open HP
Image Zone, then tap > Help.
Managing Image Files
To access HP Image Zone:
From the Start menu, tap Programs > HP Image Zone.
The viewer always opens in browse mode, and you can see
miniatures of the pictures in the current folder.
To view pictures in a different folder:
1. Tap the Folders icon and tap a different folder.
2. Tap OK.
3. Once you find a picture you want to enlarge, tap its thumbnail
miniature to see a preview.
Viewing a Full-screen Picture
To view a picture full-screen, and to be able to zoom in or out:
1. Select the picture by tapping on its thumbnail.
2. Tap Tools > View Image, or tap on the preview window.
User’s Guide 5–11
Page 49

3. Zoom in or out using the toolbar icons. If the picture is too
large to fit on the screen, you can view sections of the picture
by dragging the stylus on the screen or by using the program
icons.
4. To view another picture, tap OK.
HP Image Zone Icons
Using Programs
Preview area
Thumbnails
Section of
image shown
The following table describes the HP Image Zone icons.
Icon Action
Zoom in and out on an image.
Start a slide show of images.
Navigate through folders.
Delete an image.
Record a wave file to accompany the displayed
image.
Send an image to another computer.
(Continued)
User’s Guide 5–12
Page 50

(Continued)
Icon Action
Send an image to a printer. (Note: This requires
an additional optional program.)
Scroll back and forth through the list of images.
Zoom in and out of an image.
Stretch and shrink an image.
See the size percentage of the image.
Drag the recording window.
Stop recording.
Start recording.
Play a recording.
Delete a recording.
Adding Sound to a Picture
You can add sound to a picture to listen to when you view the
picture. You can see when a picture has an audio file associated
with it by the speaker icon displayed in its thumbnail.
To add sound to a picture:
1. Select the picture by tapping on its thumbnail.
2. Tap the Cassette icon.
3. Tap the Record icon.
4. Speak into the microphone or record sounds.
5. Tap the Stop icon.
Using Programs
User’s Guide 5–13
Page 51

To change recording settings:
1. Tap Tools > Settings > Audio tab.
2. Tap a record setting.
3. Tap OK.
Creating a Slideshow
To create a slideshow, you must first group several images in a
folder.
1. Tap the Folders icon.
2. Tap the New Folder icon to create a new folder.
3. Type a name for the new folder.
4. Copy images from other folders into the new folder.
5. Start a slideshow of the images in the current folder by
tapping the Slideshow icon or by pressing the center of the
5-Way Navigation button.
During the slideshow, tap anywhere on the screen to display
controls to move forward or back through the slides, or to end the
slideshow.
To control how fast the slideshow rotates images, or to add
transition effects from one image to another:
1. Tap Tools > Settings > Slideshow tab.
Using Programs
2. Select settings and effects.
3. Tap OK.
Safekeeping Files in iPAQ File Store
Storing programs and files in the iPAQ File Store folder protects
them from being deleted in case you perform a full reset on the
HP iPAQ, or the battery discharges completely.
User’s Guide 5–14
Page 52

Using Programs
To store a file in iPAQ File Store:
1. Browse for programs and files in your HP iPAQ by tapping
Start > Programs > File Explorer > My Documents > My
Device.
2. Copy the programs or file(s) you want to store:
❏
To select one file to copy, tap and hold to highlight the
file.
❏
To select several files to copy, tap and drag to highlight
the files; then tap and hold the files.
3. In the popup, tap Copy.
4. Open iPAQ File Store by tapping Start > Programs > File
Explorer > My Documents > My Device > iPAQ File
Store.
5. Tap and hold anywhere on the screen. In the popup, tap
Paste.
It is a good idea to be aware of how much memory is available in
iPAQ File Store.
To determine the amount of memory:
1. Tap Start > Settings > System tab > Memory > Storage
Card tab.
2. Tap iPAQ File Store from the dropdown list to see the
amount of free space available.
Backing Up Programs and Files
Use Microsoft ActiveSync Backup to back up and restore
information on your HP iPAQ. To help reduce the chance of data
loss, perform a backup on a regular schedule.
Note:
ActiveSync from the Companion CD.
User’s Guide 5–15
Before using ActiveSync Backup, you must first install
Page 53

Backup/Restore Using ActiveSync
Close all programs on the device before performing a backup or
restore.
CAUTION: Restoring your information replaces the current information
Ä
on your device with the information in your backup.
To backup/restore:
1. Connect the HP iPAQ to your computer.
2. On your computer, open ActiveSync by clicking Start >
Programs > Microsoft ActiveSync.
3. In ActiveSync, click Tools > Backup/Restore.
4. Click the Backup or Restore tab, and click each option.
5. Click Backup Now or Restore Now.
Programs Available on the HP iPAQ
The following table lists programs included in your HP iPAQ. For
additional programs to install, see the Companion CD.
Using Programs
HP iPAQ Software Function
Experience HP iPAQ Run a video clip showing the capabilities of the
HP Asset Viewer Display device specifications such as memory,
HP Image Zone Display individual images and run slide shows.
User’s Guide 5–16
HP iPAQ.
and operating system, plus serial, model, and
product version numbers.
Also display images from the SD storage card
of a digital camera.
(Continued)
Page 54

(Continued)
HP iPAQ Software Function
Using Programs
HP Profiles Customize characteristics (alarm, volume,
HP Task Switch Switch between running programs.
iPAQ File Store Repository folder where programs and files are
SelfTest Run a diagnostic test on the device.
backlight and battery conservation settings)
and save them in memory. Invoke them
according to your surroundings.
protected from loss.
User’s Guide 5–17
Page 55

The following table lists Microsoft Windows Mobile software
programs included in your HP iPAQ.
Microsoft Windows Mobile
Software Function
Using Programs
Microsoft Windows Mobile
2003
ActiveSync Synchronize the information between the HP
Calculator Perform basic mathematical calculations.
Calendar Schedule and keep track of appointments,
Connections Connect the HP iPAQ to the Internet and
Contacts Keep track of friends and colleagues.
Games Play games. (Jawbreaker and Solitaire are
Messaging Send and receive Internet email messages
Operating system
iPAQ and computer so you have the latest
information in both locations. Be sure you
install ActiveSync on your computer before
connecting the sync cable and HP iPAQ to your
computer.
meetings, and other events, and set an alarm to
remind you of the appointments. See the
schedule in a daily to-do list on the Today
screen.
intranet to browse websites, send and receive
email, and synchronize information using
ActiveSync.
included.)
through Messaging on your HP iPAQ or your
computer after ActiveSync is installed. To send
and receive email, you must have an email
address provided by your Internet Service
Provider (ISP) or employer.
MSN Messenger Send and receive instant messages. (This
requires Internet access.)
(Continued)
User’s Guide 5–18
Page 56

(Continued)
Microsoft Windows Mobile
Software Function
Using Programs
Notes Create handwritten or typed notes, drawings,
Pocket Excel Create new workbooks or view and edit Excel
Pocket Internet Explorer Browse the Internet. Download webpages,
Pocket Word Create new documents or view and edit Word
Settings Obtain quick access to settings for the
Tasks Keep track of your to-do list.
Windows Media Player
9Series
and recordings.
spreadsheets created on your computer.
programs, and files via ActiveSync or by
connecting to the Internet.
documents created on your computer.
backlight, clock, memory, battery power, the
Today screen, password, alarm sounds and
notifications.
Play digital audio and video files.
User’s Guide 5–19
Page 57

Entering Information
Using the Input Panel to Enter Data
CAUTION: To avoid damaging the screen, always use a stylus.
Ä
Never use a pen or any type of metal pointer on the screen.
Various data input programs are available on the device. These
are:
■
On-screen keyboard
■
Letter Recognizer
■
Block Recognizer
■
Microsoft Transcriber
To use an input program, first open an application that accepts
user input such as Notes, Calendar, Contacts, or Tasks. Also,
from any Notes tab in Calendar, Contacts, or Tasks, you can open
an input program and use the stylus to draw and write on the
screen.
6
Note:
download from the Microsoft website.
Microsoft Transcriber is a free program that you can
Adjusting Word Suggestion Options
As you type or write, the HP iPAQ suggests words for you in a
box above the input panel.
You determine:
User’s Guide 6–1
Page 58

Entering Information
■
Whether words are suggested.
■
The number of letters you want to enter before a word is
suggested.
■
The number of suggested words per entry.
Note:
Word suggestion is not available in Microsoft Transcriber.
To change settings for word suggestions:
1. From the Start menu, tap Settings > Input > Word
Completion tab.
2. Tap the number of letters you want to type before a word is
suggested.
3. Tap the number of words you want suggested.
4. Tap OK.
Note:
If you do not want words suggested, remove the
checkmarks.
User’s Guide 6–2
Page 59

Entering Information
Using the On-screen Keyboard
Use the stylus to tap letters, numbers, and symbols on the
on-screen keyboard.
To type with the on-screen keyboard:
1. From any program, tap the up arrow next to the Input Panel
button and tap Keyboard to display a keyboard on the screen.
Tap t o see
symbols.
Input Panel
Note:
To see symbols, tap the
123
key.
2. Tap a letter, symbol, or number.
3. Tap the Return key.
Using Letter Recognizer
Use the stylus and Letter Recognizer to write letters, numbers,
and symbols on the screen. Create words and sentences in
uppercase, lowercase, and symbols.
To write with the stylus and Letter Recognizer:
User’s Guide 6–3
Page 60

Entering Information
1. From any program, tap the up arrow next to the Input Panel
button.
2. Tap Letter Recognizer.
3. Write a letter or symbol between the dashed line and
baseline.
a. To display in uppercase, write a letter between the hatch
marks labeled ABC.
b. To display in lowercase, write a letter between the hatch
marks labeled abc.
c. To use numbers, write a number or draw a symbol
between the hatch marks labeled 123.
What you write is converted to typed text on the screen.
Note:
For Letter Recognizer to work effectively, write characters
between the dashed line and baseline.
■
When writing a letter like “p,” write the tail portion below
the baseline and the top portion within the dashed line and
baseline.
■
When writing a letter like “b,” write the top portion above
the dashed line and the bottom portion within the dashed
line and baseline.
Note:
To view help on using Letter Recognizer, open the
program and tap the question mark next to the writing area.
Using Block Recognizer
Use the stylus and Block Recognizer to write letters, numbers,
and symbols in specific areas. Create words and sentences by
writing letters and numbers in specific areas.
To write with the stylus and Block Recognizer:
User’s Guide 6–4
Page 61

Entering Information
1. From any program, tap the up arrow next to the Input Panel
button.
2. Tap Block Recognizer.
3. Write a word, letter, or symbol between the hatch marks.
a. To type text, write a letter between the hatch marks
labeled “abc.”
b. To type numbers or symbols, write a number or symbol
between the hatch marks labeled “123.”
What you write is converted to typed text on the screen.
Note:
and tap the question mark on the bottom right of the screen.
For Character Recognizer Help, open Block Recognizer
Using Microsoft Transcriber
Use the stylus and Microsoft Transcriber (available free from the
Microsoft website) to write letters, numbers, and symbols on the
screen.
To write with the stylus and Microsoft Transcriber:
1. From any program, tap the up arrow next to the Input Panel
button.
2. Tap Transcri ber to display the Transcriber Intro help
screen. Teach Transcriber your style of writing by tapping the
“
a
” button on the taskbar to display the Letter Shapes
screen, and follow the instructions.
3. Tap OK.
4. Tap New.
5. Write on the screen. What you write is converted to text.
Note:
Transcriber and tap the question mark at the bottom of the screen.
For help on using Microsoft Transcriber, open Microsoft
User’s Guide 6–5
Page 62

Entering Information
Writing and Drawing on the Screen
Use the stylus to draw and write on the screen as if it were on
paper.
1. From the Start menu, tap Notes > New or tap the Notes tab
from within Calendar, Contacts, or Tasks.
2. Tap Pen to switch to writing mode.
3. Draw and write on the screen.
4. Tap OK.
Converting Writing to Text
You can convert writing to text when you write with the stylus in
the Notes program or from the Notes tab in Calendar, Contacts,
and Tasks.
To convert writing to text:
1. From the Start menu, tap Notes or tap the Notes tab from
within Calendar, Contacts, or Tasks.
2. Tap a note to open it.
3. Tap Tools > Recognize.
Note:
If a word is not recognized, it will not be converted.
Editing Text
You can correct your input at any time after you have written and
saved it as a file.
To enter corrections or changes:
1. Tap and hold the stylus next to text you want to edit.
2. Drag the stylus across the text to select it.
3. In the popup menu that opens, select a command.
User’s Guide 6–6
Page 63

Word Recognition Tips
Not all letters or words are recognized. When this occurs, they are
ignored. To increase the likelihood that an input programs will
recognize your writing, do the following:
■
Write neatly.
■
Tap Tools and increase the zoom level on the screen while
you enter input.
■
Clearly indicate the beginning and end of words by leaving
large gaps between words.
Entering Information
User’s Guide 6–7
Page 64

Expansion Cards
Using an Expansion Card
You can expand the memory and connectivity of your HP iPAQ
by using an expansion card to:
■
Add an SDIO camera or other SDIO accessories
■
Expand the memory on the device
7
Note:
included with your HP iPAQ.
To purchase an expansion card or other accessories, visit:
www.hp.com/go/ipaqaccessories.
Expansion cards must be purchased separately and are not
Inserting/Removing a Secure Digital (SD) Expansion Card
Before inserting the card into the expansion slot, remove the
protective card.
1. Locate the slot on the top of the device.
User’s Guide 7–1
Page 65

Expansion Cards
2. Remove the protective card by slightly pushing down on the
card 1.
3. When the protective card disengages and pops up 2, remove
it from the expansion slot.
CAUTION: To remove the protective card or an expansion card, first
Ä
push it in quickly and wait for it to pop up by itself so you can easily
remove it. Forcefully removing an expansion card might damage the
card and/or the HP iPAQ.
4. Insert the expansion card into the expansion slot and push it
in firmly 3.
Note:
follow the card manufacturer’s documentation for instructions on
how to install it.
User’s Guide 7–2
If the device does not recognize the expansion card, please
Page 66

Viewing the Contents of a Card
To view the contents of a card:
1. From the Start menu, tap Programs > File Explorer > My
Device.
2. Under My Device, select the card folder to see a list of files
or subfolders.
Expansion Cards
User’s Guide 7–3
Page 67

Connecting to the Internet
To connect to the Internet and send or receive email, you will
need to set up a remote connection using a Wi-Fi card or Secure
Digital Input/Output (SDIO) modem card (both sold separately).
You need to have one of these cards inserted in the expansion slot
on the device in order to access the Internet or to send and receive
email from the device.
Browsing the Internet
With Pocket Internet Explorer and a connection to the
Internet, you can view websites on your HP iPAQ by typing an
address or Universal Resource Locator (URL) in the Address bar.
8
Note:
images, and Java applets may not work correctly with Pocket
Internet Explorer without additional software.
To access the Web:
Note:
Bar to access it.
User’s Guide 8–1
Websites that use HTML 4.0, DHTML, animated GIF
1. From the Start menu, tap Internet Explorer > Address Bar.
If the address bar is not visible, tap View tab > Address
2. Enter an Internet address (URL) in the Address bar.
3. Tap Go to open the website URL you entered.
Page 68

Connecting to the Internet
Connecting to a Private Network
1. Before you start, be sure to have your Internet Service
Provider (ISP) phone number, username, and password. This
information can be obtained from your network
administrator.
2. Tap Start > Settings > Connections tab > Connections.
3. In My Work Network help, follow the instructions for each
type of connection.
Using the Favorites List
With Pocket Internet Explorer and a connection to the Internet,
you can view webpages you have previously visited and saved as
links in the Favorites list.
To save a website URL address as a link in Favorites while using
the HP iPAQ:
1. Open a webpage to save.
2. Tap and hold the page; then tap Add to Favorites.
To select a website from Favorites:
1. From the Start menu, tap Internet Explorer.
2. Tap Favorites and the website you want to view.
Note:
View > All Installed Help > Pocket Internet Explorer.
User’s Guide 8–2
For help on Pocket Internet Explorer, tap Start > Help >
Page 69

Use the following suggestions to troubleshoot problems with the
HP iPAQ. It is recommended that you print this chapter for quick
reference if you need to troubleshoot a problem.
Common Problems
Problem Solution
9
Troubleshooting
I cannot see
anything on the
screen.
My battery does
not keep
charged as long
as I would like.
The backlight
keeps turning
off.
User’s Guide 9–1
■
Be sure the HP iPAQ is powered on.
■
Be sure the HP iPAQ is connected to the AC Adapter,
and the AC Adapter is plugged into an electrical outlet.
■
Reset the HP iPAQ by using the stylus to briefly press
the Reset button.
■
Always keep the HP iPAQ connected to the AC Adapter
and an electrical outlet when not using it.
■
Dim the backlight. Tap Start > Settings > System tab >
Backlight > Brightness tab. In the backlight settings,
adjust the slider to a lower level. This conserves battery
power.
■
In Backlight Settings, increase the amount of time the
backlight stays on when not in use.
■
Select the option to turn on the backlight only when you
touch the screen or push a button.
(Continued)
Page 70

(Continued)
Problem Solution
Troubleshooting
I want to travel
with my HP
iPAQ.
I want to travel
internationally
with my HP
iPAQ.
I want to ship
my HP iPAQ to a
repair facility.
When I try to
open
Messaging,
I receive an
error or the
program hangs.
■
Back up your information to your computer using
ActiveSync.
■
Disconnect all external devices.
■
Take the AC Adapter with you.
■
Keep your HP iPAQ in a protective case in your carry-on
luggage. To purchase a case, visit:
www.hp.com/go/ipaqaccessories
or www.casesonline.com.
Be sure you have the plug adapter appropriate for the
country you are visiting.
1. Back up your information to your computer using
ActiveSync.
2. Disconnect all external devices.
3. Pack the HP iPAQ and any external devices requested
by Customer Support in protective packaging. Include
any additional documentation or items as instructed by
Customer Support.
Limit the number of email services you create.
I get an error
when I try to
record a note
in Calendar or
in Tasks.
User’s Guide 9–2
Try using a more compressed recording format in Calendar
or Tasks (8,000 Hz, Mono [8 KB/s] is the most compressed
format available). To switch to a more compressed recording
format, from the Today screen, tap Start > Settings > Input
> Options tab.
(Continued)
Page 71

(Continued)
Problem Solution
Troubleshooting
I want to see the
current date.
I cannot
see all my
appointments.
I cannot find
the document
or workbook
Isaved.
My HP iPAQ is
always asking
me for a
password.
I cannot find
files sent to me
by another
device.
1. From the Today screen, tap Start > Calendar.
2. Tap the Go to Today button at the top of the screen to
see today’s date.
Be sure the appointment you created is in the category you
have selected.
Pocket Word and Excel recognize and display documents in
only one folder below the My Documents folder. For
example, if you have created a subfolder under the
Personal folder in My Documents, the documents in that
sub folder are neither recognized nor displayed.
You must browse for your document or workbook by tapping
Start > Programs > File Explorer. Tap the subfolder you
created; your file should be in that folder.
Ta p Start > Settings > Password to be sure the password
settings are configured according to your preferences.
Look in the My Documents folder. The My Documents
folder is the default location used to receive files.
User’s Guide 9–3
Page 72

ActiveSync
To learn how to use Microsoft ActiveSync, see Chapter 2,
“Synchronizing with Your Computer.”
Problem Solution
Troubleshooting
I cannot connect
to my computer
using the sync
cable.
I connected my
HP iPAQ before
installing
Microsoft
ActiveSync.
■
Be sure you have installed Microsoft ActiveSync 3.7.1
or higher on your computer before connecting the HP
iPAQ to it.
■
Be sure your HP iPAQ is connected to the sync cable
and the cable is connected to your computer.
■
Be sure your HP iPAQ is securely connected and
making good contact with the sync cable connector.
■
Be sure you are running Microsoft Windows 98SE, Me,
2000, or XP, and you have installed Microsoft
ActiveSync 3.7.1 or a later version on your computer.
Also, be sure you are connecting directly to a USB port
on your computer and not through a USB hub.
■
Uninstall and reinstall ActiveSync.
■
If you run personal firewall software, disable it. If you
are then able to synchronize, see the firewall software
documentation for information on how to make
ActiveSync to bypass the firewall.
1. Disconnect the HP iPAQ from your computer.
2. On your computer running Windows 98 or 2000, click
Start > Settings > Control Panel > System. The
Device Manager opens automatically. Locate and select
the “unknown” USB device record and click Remove
(Uninstall in Windows 2000).
3. Restart your computer and allow it to detect the USB
device.
4. Install Microsoft ActiveSync 3.7.1 or higher.
5. Reconnect the HP iPAQ to the computer.
(Continued)
User’s Guide 9–4
Page 73

(Continued)
Problem Solution
Troubleshooting
Microsoft
ActiveSync
cannot locate
my HP iPAQ
when
I synchronize.
I cannot open
email in
Messaging after
I restore using
Microsoft
ActiveSync.
I tried to
synchronize
a workbook
and the file
is unresolved
in Microsoft
ActiveSync.
■
Be sure the HP iPAQ is on.
■
Be sure all cables are securely connected.
■
Disconnect your HP iPAQ from the sync cable, power
on the unit by pressing the Power button, then
reconnect it to the cable.
■
Reset the HP iPAQ by using the stylus to lightly press
the Reset button.
■
Check Connection Settings in ActiveSync on your
computer to ensure the communications port you are
using is active.
Use Microsoft ActiveSync to synchronize your HP iPAQ with
your computer. For more information, see Chapter 2,
“Synchronizing with Your Computer.”
Pocket Excel does not support all Excel formatting;
therefore, Microsoft ActiveSync cannot synchronize the file.
User’s Guide 9–5
Page 74

Expansion Cards
For more information on expansion cards, refer to Chapter 7,
“Expansion Cards.”
Problem Solution
Troubleshooting
I cannot get my
HP iPAQ
to recognize the
expansion card.
I cannot insert
my card.
I cannot remove
my SD card.
My HP iPAQ
cannot
recognize
my card.
■
Be sure you have inserted the appropriate card into the
appropriate slot.
■
Be sure you have firmly pushed the expansion card
down into the card slot of the HP iPAQ.
■
Be sure you have installed the drivers that came with
the expansion card.
■
Be sure the label is facing the front of the HP iPAQ.
■
Be sure you are not inserting the card at an angle.
■
Be sure you have inserted the connection area first.
To release the locking mechanism, you must first push in the
SD card. The card pops out slightly and is then easily
removed.
■
Be sure you have installed the drivers that came with
the expansion card you purchased.
■
Perform a normal reset of the HP iPAQ by using the
stylus to briefly press the Reset button.
User’s Guide 9–6
Page 75

A
Regulatory Notices
Federal Communications Commission Notice
This equipment has been tested and found to comply with the
limits for a Class B digital device, pursuant to Part 15 of the FCC
Rules. These limits are designed to provide reasonable protection
against harmful interference in a residential installation. This
equipment generates, uses, and can radiate radio frequency
energy and, if not installed and used in accordance with the
instructions, may cause harmful interference to radio
communications. However, there is no guarantee that interference
will not occur in a particular installation. If this equipment does
cause harmful interference to radio or television reception, which
can be determined by turning the equipment off and on, the user
is encouraged to try to correct the interference by one or more of
the following measures:
■
Reorient or relocate the receiving antenna
■
Increase the separation between the equipment and receiver
■
Connect the equipment into an outlet on a circuit different
from that to which the receiver is connected
■
Consult the dealer or an experienced radio or television
technician for help
User’s Guide A–1
Page 76

Regulatory Notices
Modifications
The FCC requires the user to be notified that any changes or
modifications made to this device that are not expressly approved
by Hewlett-Packard Company may void the authority to operate
the equipment.
Cables
Connections to this device must be made with shielded cables
with metallic RFI/EMI connector hoods in order to maintain
compliance with FCC Rules and Regulations.
Declaration of Conformity for Products
Marked with the FCC Logo—United
States only
This device complies with Part 15 of the FCC Rules. Operation is
subject to the following two conditions: (1) this device may not
cause harmful interference, and (2) this device must accept any
interference received, including interference that may cause
undesired operation.
For questions regarding your product, contact:
Hewlett-Packard Company
P. O. Box 692000, Mail Stop 530113
Houston, Texas 77269-2000
Or, call 1-800-652-6672
For questions regarding this FCC declaration, contact:
Hewlett-Packard Company
P. O. Box 692000, Mail Stop 510101
Houston, Texas 77269-2000
Or, call (281) 514-3333
To identify this product, refer to the Part, Series, or Model
number found on the product.
User’s Guide A–2
Page 77

Canadian Notice
This Class B digital apparatus meets all requirements of the
Canadian Interference-Causing Equipment Regulations.
Avis Canadien
Cet appareil numérique de la classe B respecte toutes les
exigences du Règlement sur le matériel brouilleur du Canada.
Japanese Notice
Regulatory Notices
Korean Notice
User’s Guide A–3
Page 78

European Union Notice
Products bearing the CE marking comply with the R&TTE
Directive (1999/5/EC), EMC Directive (89/336/EEC), and the
Low Voltage Directive (73/23/EEC) issued by the Commission of
the European Community. CE compliance of this computer is
valid only if powered with an HP-provided CE marked AC
Adapter.
Compliance with these directives implies conformity to the
following European Norms (in parentheses are the equivalent
international standards and regulations):
■
EN 55022 (CISPR 22)—Electromagnetic Interference
■
EN 55024 (IEC61000-4-2, 3, 4, 5, 6, 8, 11)—
Electromagnetic Immunity
■
EN61000-3-2 (IEC61000-3-2)—Power Line Harmonics
■
EN61000-3-3 (IEC61000-3-3)—Power Line Flicker
■
EN 60950 (IEC 60950)—Product Safety
■
ETS 300 328-2—Technical requirements for 2.4 GHz radio
equipment
Regulatory Notices
■
EN 301 489-1, -17—General EMC requirements for radio
equipment
User’s Guide A–4
Page 79

Battery Warning
WARNI NG: This computer contains an internal lithium-ion battery
Å
pack. To reduce the risk of fire or burns, do not disassemble, crush,
puncture, or dispose of in fire or water. Replacement should only be
done by an HP authorized service provider using the HP spare part
for this computer.
CAUTION: Danger of explosion if battery is incorrectly replaced.
Ä
Replace only with the same or equivalent type recommended by the
manufacturer. Dispose of used batteries according to the
manufacturer’s instructions.
Because of the type of battery used in your device, follow local
regulations regarding the safe disposal of the battery. Your vendor
can advise you on local regulations, and/or the existence of any
battery disposal programs in operation.
Equipment Warning
Regulatory Notices
WARNI NG: To reduce the risk of personal injury, electrical shock, fire
Å
or damage to the equipment:
■
Plug the AC Adapter into a grounded (earthed) electrical outlet that
is easily accessible at all times.
■
Disconnect power from the equipment by unplugging the
AC adapter from the electrical outlet or unplugging the
synchronization cable from the host computer.
■
Do not place anything on the AC Adapter cord or any of the other
cables. Arrange them so that no one may accidentally step on or
trip over them.
■
Do not pull on a cord or cable. When unplugging from the
electrical outlet, grasp the cord by the plug or, in the case of the AC
Adapter, grasp the AC Adapter and pull out from the electrical
outlet.
■
Do not use converter kits sold for appliances to power your HP
iPAQ.
User’s Guide A–5
Page 80

Airline Travel Notice
Use of electronic equipment aboard commercial aircraft is at the
discretion of the airline.
Regulatory Notices
User’s Guide A–6
Page 81

Specifications
System Specifications
System Feature Description
Processor 203 MHz Samsung 2410
RAM (Random
Access Memory)
SD I/O slot SD memory and SDIO card support
32 MB SDRAM
B
Display 3.5 in. transflective color TFT QVGA, 240 x 320 pixels,
Backlight Multi-level brightness adjustment
Audio Microphone, speaker, 3.5 mm stereo audio jack for
Infrared (IrDA) IrDA, SIR wireless data transfer up to 115.2 KB per
External Power 10 watt maximum output AC Adapter
Indicators 3-mode alarm notification indicates battery charge and
Battery 950 mAh 3.6 Volt Lithium-ion, internal, rechargeable
User’s Guide B–1
64K colors; portrait & landscape support
Windows Media and MP3 files
second at 12 in (30 cm) range
message status:
Flashing green LED & tone: message
Flashing amber LED: Battery is charging
Solid amber LED: Battery is charged
(Continued)
Page 82

(Continued)
System Feature Description
Specifications
Expansion
capabilities
Data transfer port USB 1.0
USB/serial
support
1 SDIO slot (4-bit) synchronization via 22-pin USB
connector (serial cable sold separately)
USB – supported
Serial – supported (serial cable sold separately)
Physical Specifications
US Metric
Length 4.47 in. 114 mm
Width 2.78 in. 70 mm
Depth 0.53 in. 13.4 mm
Weight 4.23 oz 120 g
Operating Environment
US Metric
Temperature Operating 32° to 104° F 0° to 40° C
Nonoperating –4° to 140° F –20° to 60° C
Relative Humidity Operating up to 80% up to 80%
Nonoperating up to 80% up to 80%
Maximum Altitude Operating 15,000 ft 0 – 4572 m
Nonoperating 40,000 ft 0 – 12,192 m
User’s Guide B–2
 Loading...