

Page 1

Site Preparation Guide
hp rp8400 Server Series
Second Edition
Manufacturing Part Number: A6093-96014
August 2002
USA
Page 2

ii
Page 3

Contents
iii
1. System Specifications
General . . . . . . . . . . . . . . . . . . . . . . . . . . . . . . . . . . . . . . . . . . . . . . . . . . . . . . . . . . . . . . . . . . . . . . . . . . . . . 3
Upgrading rp8400 Servers . . . . . . . . . . . . . . . . . . . . . . . . . . . . . . . . . . . . . . . . . . . . . . . . . . . . . . . . . . . . . 4
Upgrading the Server . . . . . . . . . . . . . . . . . . . . . . . . . . . . . . . . . . . . . . . . . . . . . . . . . . . . . . . . . . . . . . . . 4
Dimensions and Weights . . . . . . . . . . . . . . . . . . . . . . . . . . . . . . . . . . . . . . . . . . . . . . . . . . . . . . . . . . . . . . . 5
Component Dimensions . . . . . . . . . . . . . . . . . . . . . . . . . . . . . . . . . . . . . . . . . . . . . . . . . . . . . . . . . . . . . . 5
Component Weights . . . . . . . . . . . . . . . . . . . . . . . . . . . . . . . . . . . . . . . . . . . . . . . . . . . . . . . . . . . . . . . . . 5
Shipping Dimensions and Weights . . . . . . . . . . . . . . . . . . . . . . . . . . . . . . . . . . . . . . . . . . . . . . . . . . . . . 6
Electrical Specifications. . . . . . . . . . . . . . . . . . . . . . . . . . . . . . . . . . . . . . . . . . . . . . . . . . . . . . . . . . . . . . . . 7
Grounding . . . . . . . . . . . . . . . . . . . . . . . . . . . . . . . . . . . . . . . . . . . . . . . . . . . . . . . . . . . . . . . . . . . . . . . . . 7
Circuit Breaker . . . . . . . . . . . . . . . . . . . . . . . . . . . . . . . . . . . . . . . . . . . . . . . . . . . . . . . . . . . . . . . . . . . . . 7
System Power Requirements . . . . . . . . . . . . . . . . . . . . . . . . . . . . . . . . . . . . . . . . . . . . . . . . . . . . . . . . . . 7
Component Power Requirements. . . . . . . . . . . . . . . . . . . . . . . . . . . . . . . . . . . . . . . . . . . . . . . . . . . . . . . 8
Power Cords . . . . . . . . . . . . . . . . . . . . . . . . . . . . . . . . . . . . . . . . . . . . . . . . . . . . . . . . . . . . . . . . . . . . . . . 8
Power Distribution Unit (PDU) . . . . . . . . . . . . . . . . . . . . . . . . . . . . . . . . . . . . . . . . . . . . . . . . . . . . . . . . 8
Environmental Requirements . . . . . . . . . . . . . . . . . . . . . . . . . . . . . . . . . . . . . . . . . . . . . . . . . . . . . . . . . . . 9
Temperature and Humidity Specifications . . . . . . . . . . . . . . . . . . . . . . . . . . . . . . . . . . . . . . . . . . . . . . . 9
Acoustic Noise Specification. . . . . . . . . . . . . . . . . . . . . . . . . . . . . . . . . . . . . . . . . . . . . . . . . . . . . . . . . . 11
Air Flow. . . . . . . . . . . . . . . . . . . . . . . . . . . . . . . . . . . . . . . . . . . . . . . . . . . . . . . . . . . . . . . . . . . . . . . . . . 11
2. Electrical and Environmental Guidelines
Electrical Factors . . . . . . . . . . . . . . . . . . . . . . . . . . . . . . . . . . . . . . . . . . . . . . . . . . . . . . . . . . . . . . . . . . . . 15
Computer Room Safety. . . . . . . . . . . . . . . . . . . . . . . . . . . . . . . . . . . . . . . . . . . . . . . . . . . . . . . . . . . . . . 15
Electrical Load Requirements (Circuit Breaker Sizing). . . . . . . . . . . . . . . . . . . . . . . . . . . . . . . . . . . . 16
Power Quality . . . . . . . . . . . . . . . . . . . . . . . . . . . . . . . . . . . . . . . . . . . . . . . . . . . . . . . . . . . . . . . . . . . . . 16
Distribution Hardware . . . . . . . . . . . . . . . . . . . . . . . . . . . . . . . . . . . . . . . . . . . . . . . . . . . . . . . . . . . . . . 17
Grounding Systems. . . . . . . . . . . . . . . . . . . . . . . . . . . . . . . . . . . . . . . . . . . . . . . . . . . . . . . . . . . . . . . . . 18
System Installation Guidelines . . . . . . . . . . . . . . . . . . . . . . . . . . . . . . . . . . . . . . . . . . . . . . . . . . . . . . . 20
Environmental Elements . . . . . . . . . . . . . . . . . . . . . . . . . . . . . . . . . . . . . . . . . . . . . . . . . . . . . . . . . . . . . 21
Computer Room Preparation . . . . . . . . . . . . . . . . . . . . . . . . . . . . . . . . . . . . . . . . . . . . . . . . . . . . . . . . . 21
Cooling Requirements . . . . . . . . . . . . . . . . . . . . . . . . . . . . . . . . . . . . . . . . . . . . . . . . . . . . . . . . . . . . . . 21
Humidity Level . . . . . . . . . . . . . . . . . . . . . . . . . . . . . . . . . . . . . . . . . . . . . . . . . . . . . . . . . . . . . . . . . . . . 23
Dust and Pollution Control . . . . . . . . . . . . . . . . . . . . . . . . . . . . . . . . . . . . . . . . . . . . . . . . . . . . . . . . . . 24
Metallic Particulate Contamination . . . . . . . . . . . . . . . . . . . . . . . . . . . . . . . . . . . . . . . . . . . . . . . . . . . 24
Electrostatic Discharge (ESD) Prevention . . . . . . . . . . . . . . . . . . . . . . . . . . . . . . . . . . . . . . . . . . . . . . 25
Acoustics . . . . . . . . . . . . . . . . . . . . . . . . . . . . . . . . . . . . . . . . . . . . . . . . . . . . . . . . . . . . . . . . . . . . . . . . . 26
3. Facility Guidelines
Facility Characteristics . . . . . . . . . . . . . . . . . . . . . . . . . . . . . . . . . . . . . . . . . . . . . . . . . . . . . . . . . . . . . . . 28
Floor Loading . . . . . . . . . . . . . . . . . . . . . . . . . . . . . . . . . . . . . . . . . . . . . . . . . . . . . . . . . . . . . . . . . . . . . 28
Windows . . . . . . . . . . . . . . . . . . . . . . . . . . . . . . . . . . . . . . . . . . . . . . . . . . . . . . . . . . . . . . . . . . . . . . . . . 30
Space Requirements. . . . . . . . . . . . . . . . . . . . . . . . . . . . . . . . . . . . . . . . . . . . . . . . . . . . . . . . . . . . . . . . . . 31
Delivery Space Requirements . . . . . . . . . . . . . . . . . . . . . . . . . . . . . . . . . . . . . . . . . . . . . . . . . . . . . . . . 31
Operational Space Requirements . . . . . . . . . . . . . . . . . . . . . . . . . . . . . . . . . . . . . . . . . . . . . . . . . . . . . 31
Floor Plan Grid . . . . . . . . . . . . . . . . . . . . . . . . . . . . . . . . . . . . . . . . . . . . . . . . . . . . . . . . . . . . . . . . . . . . 31
Equipment Footprint Templates . . . . . . . . . . . . . . . . . . . . . . . . . . . . . . . . . . . . . . . . . . . . . . . . . . . . . . 32
Page 4

Contents
iv
4. Pre-installation Survey
Pre-installation Survey Content . . . . . . . . . . . . . . . . . . . . . . . . . . . . . . . . . . . . . . . . . . . . . . . . . . . . . . . . 35
Typical Installation Schedule . . . . . . . . . . . . . . . . . . . . . . . . . . . . . . . . . . . . . . . . . . . . . . . . . . . . . . . . . . 36
Site Inspection . . . . . . . . . . . . . . . . . . . . . . . . . . . . . . . . . . . . . . . . . . . . . . . . . . . . . . . . . . . . . . . . . . . . . . 37
Delivery Survey . . . . . . . . . . . . . . . . . . . . . . . . . . . . . . . . . . . . . . . . . . . . . . . . . . . . . . . . . . . . . . . . . . . . . 40
A. System Requirements Summary
Power Consumption and Air Conditioning. . . . . . . . . . . . . . . . . . . . . . . . . . . . . . . . . . . . . . . . . . . . . . . . 45
Power Consumption and Air Conditioning Requirement . . . . . . . . . . . . . . . . . . . . . . . . . . . . . . . . . . . . 47
Weight. . . . . . . . . . . . . . . . . . . . . . . . . . . . . . . . . . . . . . . . . . . . . . . . . . . . . . . . . . . . . . . . . . . . . . . . . . . . . 49
B. Conversion Factors
C. Templates
Equipment Footprint Templates . . . . . . . . . . . . . . . . . . . . . . . . . . . . . . . . . . . . . . . . . . . . . . . . . . . . . . . . 55
Computer Room Layout Plan . . . . . . . . . . . . . . . . . . . . . . . . . . . . . . . . . . . . . . . . . . . . . . . . . . . . . . . . . . 56
Index . . . . . . . . . . . . . . . . . . . . . . . . . . . . . . . . . . . . . . . . . . . . . . . . . . . . . . . . . . . . . . . . . . . . . . . 63
Page 5

Tab le s
v
Table 1-1. Server Component Dimensions . . . . . . . . . . . . . . . . . . . . . . . . . . . . . . . . . . . . . . . . . . . . . . 5
Table 1-2. System Component Weights. . . . . . . . . . . . . . . . . . . . . . . . . . . . . . . . . . . . . . . . . . . . . . . . . 5
Table 1-3. Shipping Dimensions and Weights . . . . . . . . . . . . . . . . . . . . . . . . . . . . . . . . . . . . . . . . . . . 6
Table 1-4. Power Requirements. . . . . . . . . . . . . . . . . . . . . . . . . . . . . . . . . . . . . . . . . . . . . . . . . . . . . . . 7
Table 1-5. System Power Requirements . . . . . . . . . . . . . . . . . . . . . . . . . . . . . . . . . . . . . . . . . . . . . . . . 8
Table 1-6. Power Cords. . . . . . . . . . . . . . . . . . . . . . . . . . . . . . . . . . . . . . . . . . . . . . . . . . . . . . . . . . . . . . 8
Table 1-7. Computer Environment . . . . . . . . . . . . . . . . . . . . . . . . . . . . . . . . . . . . . . . . . . . . . . . . . . . . 9
Table 1-8. Theoretical System Component Power Dissipation . . . . . . . . . . . . . . . . . . . . . . . . . . . . . 10
Table 1-9. Typical System Component Power Dissipation. . . . . . . . . . . . . . . . . . . . . . . . . . . . . . . . . 10
Table 2-1. Effect of Humidity on ESD Charge Levels . . . . . . . . . . . . . . . . . . . . . . . . . . . . . . . . . . . . 25
Table 3-1. Floor Loading Term Definitions. . . . . . . . . . . . . . . . . . . . . . . . . . . . . . . . . . . . . . . . . . . . . 28
Table 3-2. Typical Raised Floor Specifications . . . . . . . . . . . . . . . . . . . . . . . . . . . . . . . . . . . . . . . . . . 29
Table 4-1. Customer and Hewlett-Packard Information . . . . . . . . . . . . . . . . . . . . . . . . . . . . . . . . . . 37
Table 4-2. Site Inspection Checklist . . . . . . . . . . . . . . . . . . . . . . . . . . . . . . . . . . . . . . . . . . . . . . . . . . 37
Table A-1. Example Power Consumption (Theoretical Maximum) and Air Conditioning Requirement
Summary . . . . . . . . . . . . . . . . . . . . . . . . . . . . . . . . . . . . . . . . . . . . . . . . . . . . . . . . . . . . . . . . . . . . . . . 46
Table A-2. Power Consumption (Theoretical Maximum) and Air Conditioning Requirement
Summary . . . . . . . . . . . . . . . . . . . . . . . . . . . . . . . . . . . . . . . . . . . . . . . . . . . . . . . . . . . . . . . . . . . . . . . 46
Table A-3. Example Power Consumption (Typical) and Air Conditioning Requirement Summary 47
Table A-4. Power Consumption (Typical) and Air Conditioning Requirement Summary . . . . . . . . 47
Table A-5. Example Weight Summary . . . . . . . . . . . . . . . . . . . . . . . . . . . . . . . . . . . . . . . . . . . . . . . . 49
Table A-6. Weight Summary . . . . . . . . . . . . . . . . . . . . . . . . . . . . . . . . . . . . . . . . . . . . . . . . . . . . . . . . 49
Page 6

Table s
vi
Page 7

Figures
vii
Figure 1-1. Airflow Diagram . . . . . . . . . . . . . . . . . . . . . . . . . . . . . . . . . . . . . . . . . . . . . . . . . . . . . . . . 11
Figure 2-1. Raised Floor Metal Strip Ground System . . . . . . . . . . . . . . . . . . . . . . . . . . . . . . . . . . . . 19
Figure 4-1. Delivery Survey (Part 1) . . . . . . . . . . . . . . . . . . . . . . . . . . . . . . . . . . . . . . . . . . . . . . . . . . 41
Figure 4-2. Delivery Survey (Part 2) . . . . . . . . . . . . . . . . . . . . . . . . . . . . . . . . . . . . . . . . . . . . . . . . . . 42
Figure C-1. rp8400 Space Requirements . . . . . . . . . . . . . . . . . . . . . . . . . . . . . . . . . . . . . . . . . . . . . . 54
Figure C-2. rp8400 Cabinet Template. . . . . . . . . . . . . . . . . . . . . . . . . . . . . . . . . . . . . . . . . . . . . . . . . 57
Figure C-3. Planning Grid . . . . . . . . . . . . . . . . . . . . . . . . . . . . . . . . . . . . . . . . . . . . . . . . . . . . . . . . . . 58
Figure C-4. Planning Grid . . . . . . . . . . . . . . . . . . . . . . . . . . . . . . . . . . . . . . . . . . . . . . . . . . . . . . . . . . 59
Figure C-5. Planning Grid . . . . . . . . . . . . . . . . . . . . . . . . . . . . . . . . . . . . . . . . . . . . . . . . . . . . . . . . . . 60
Figure C-6. Planning Grid . . . . . . . . . . . . . . . . . . . . . . . . . . . . . . . . . . . . . . . . . . . . . . . . . . . . . . . . . . 61
Figure C-7. Planning Grid . . . . . . . . . . . . . . . . . . . . . . . . . . . . . . . . . . . . . . . . . . . . . . . . . . . . . . . . . . 62
Page 8

Figures
viii
Page 9

Preface
Page 10

x
Legal Notices
Hewlett-Packard makes no warranty of any kind with regard to this manual, including, but not limited to, the
implied warranties of merchantability and fitness for a particular purpose. Hewlett-Packard shall not be held
liable for errors contained herein or direct, indirect, special, incidental or consequential damages in
connection with the furnishing, performance, or use of this material.
Restricted Rights Legend. Use, duplication or disclosure by the U.S. Government is subject to restrictions
as set forth in subparagraph (c) (1) (ii) of the Rights in Technical Data and Computer Software clause at
DFARS 252.227-7013 for DOD agencies, and subparagraphs (c) (1) and (c) (2) of the Commercial Computer
Software Restricted Rights clause at FAR 52.227-19 for other agencies.
HEWLETT-PACKARD COMPANY 3000 Hanover Street Palo Alto, California 94304 U.S.A.
Copyright Notices. ©copyright 1983-2000 Hewlett-Packard Company, all rights reserved.
Reproduction, adaptation, or translation of this document without prior written permission is prohibited,
except as allowed under the copyright laws.
Trademark Notices UNIX is a registered trademark in the United States and other countries, licensed
exclusively through X/Open Company Limited.
Page 11

xi
Safety and Regulatory Information
For your protection, this product has been tested to various national and international regulations and
standards. The scope of this regulatory testing includes electrical/mechanical safety, radio frequency
interference, ergonomics, acoustics, and hazardous materials.Where applicable, approvals obtained from
third-party test agencies are shown on the product label.
Safety in Material Handling
WARNING Do not lift the server manually. To avoid physical injury you must use a mechanical
lifting device.
WARNING Each cell board weighs approximately 26.80 pounds (12.16 kg). Use care when lifting
to avoid physical injury.
USA Radio Frequency Interference
FCC Notice
The Federal Communications Commission (in CFR Part 15) has specified that the following notice be brought
to the attention of the users of this product.
NOTE This equipment has been tested and found to comply with the limits for a Class A digital
device, pursuant to Part 15 of the FCC Rules. These limits are designed to provide reasonable
protection against harmful interference when the equipment is operated in a commercial
environment. This equipment generates, uses, and can radiate radio frequency energy and, if
not installed and used in accordance with the instruction manual, may cause harmful
interference to radio communications. Operation of this equipment in a residential area is
likely to cause harmful interference in which case the user will be required to correct the
interference at his own expense.
The user is cautioned that changes or modifications not expressly approved by Hewlett-Packard could result
in the equipment being noncompliant with FCC Class A requirements and void the user’s authority to operate
the equipment.
Japanese Radio Frequency Interference
VCCI
This equipment is a Class A category (Information Technology Equipment to be used in commercial and /or
industrial areas) and conforms to the standards set by the Voluntary Control Council for Interference by
Information Technology Equipment aimed at preventing radio interference in commercial and/or industrial
areas.
Page 12

xii
Consequently, when used in a residential area or in an adjacent area thereto, radio interference may be
caused to radios and TV receivers, etc. Read the instructions for correct handling.
EMI Statement (European Union Only)
This is a Class A product. In a domestic environment this product may cause radio interference in which case
the user may be required to take adequate measures.
Digital Apparatus Statement (Canada)
This Class A digital apparatus meets all requirements of the Canadian Interference-Causing Equipment
Regulations.
BSMI (Taiwan)
This product is fully compliant to CNS 13438 (CISPR 22: 1993) Class A.
NOTE Electrical practices and suggestions in this guide are based on North American practices. For
countries outside North America, local electrical codes will take precedence over North
American electrical codes.
An example would be the recommendation that the PE (protective earthing) conductor be green
with yellow stripes. This requirement is a North American directive and does not override the
local code requirements for a country outside North America.
Local authority has jurisdiction [LAHJ] and should make the final decision regarding
adherence to country-specific electrical codes and guidelines.
Throughout this manual, the [LAHJ] acronym will be used to indicate Local Authority Has Jurisdiction.
Acoustics (Germany)
Acoustic Noise (A-weighted Sound Pressure Level LpA) measured at the bystander position, normal
operation, to ISO 7779: LpA = 57.3 dB.
Page 13

xiii
IT Power System
This product has not been evaluated for connection to an IT power system (an AC distribution system having
no direct connection to earth according to IEC 60950).
Installation Conditions
See installation instructions before connecting to the supply.
WARNING NORDIC Class 1 Equipment
Denmark: For tilslutning af de Ovrige ledere, se medfOlgende
installationsvejledning.
Sweden: Apparaten skall anslutas till jordat uttag, nar den ansluts till ett natverk.
WARNING This equipment is configured with multiple power sources. Hazardous voltages and
energy may be present even after the removal of a single input source. Trained
service personnel must follow guidelines stipulated in the service guidelines in the
hp rp8400 server series EPSS.
Lithium Battery Caution
CAUTION Danger of explosion if battery is incorrectly replaced. Replace only with the same or equivalent
type recommended by the manufacturer. Dispose of used batteries according to the
manufacturer’s instructions.
Associated Documents
The following documents provide more details on the topics presented in this manual:
• Standard for the Protection of Electronic Computer Data Processing Equipment, (NFPA75) National Fire
Protection Association
• EIA Standard RS-232-C, Electronic Industries Association
• Electrostatic Discharge Failures of Semiconductor Devices, Unger, B.A. 1981, Bell Laboratories
Page 14

xiv
Notational Conventions
WARNING Warnings highlight procedures or information necessary to avoid injury to
personnel. The warning should tell the reader exactly what will result from what
actions and how to avoid them.
CAUTION A caution highlights procedures or information necessary to avoid damage to equipment,
damage to software, loss of data, or invalid test results.
NOTE A note highlights supplemental information.
Page 15

xv
Page 16

xvi
Page 17

Chapter 1
1
1 System Specifications
This chapter describes the basic rp8400 configuration and its physical specifications and requirements:
• “Upgrading rp8400 Servers” on page 4 discusses the additional requirements resulting from upgrading
rp8400 Server systems.
• “Dimensions and Weights” on page 5 discusses the physical size and weight of the rp8400 components.
Page 18

Chapter 1
System Specifications
2
• “Electrical Specifications” on page 7 discusses the power requirements for the system.
• “Environmental Requirements” on page 9 discusses temperature and humidity, power dissipation, and air
flow information about the server.
Page 19

Chapter 1
System Specifications
General
3
General
This chapter provides the overall specifications of a rp8400 server system. The specifications are listed
throughout this chapter in an effort to define each specification as thoroughly as possible to ensure that all
data is considered to ensure a successful site preparation.
This section specifically summarizes these specifications to provide a general overview of the requirements of
the rp8400 system.
Page 20

Chapter 1
System Specifications
Upgrading rp8400 Servers
4
Upgrading rp8400 Servers
This section provides the details relating to upgrading a rp8400 Server system.
NOTE Ensure that the customer is aware of the iCOD email requirements. Refer to http://docs.hp.com
for more details.
Upgrading the Server
Space requirements remain the same, but power and cooling must be increased when upgrading within a
cabinet (adding additional cells, I/O, etc.).
Identify and plan for future upgrades and expansions. It is cost effective to provide the cooling and power
capability you may require later, even though you do not use it immediately.
Page 21
Chapter 1
System Specifications
Dimensions and Weights
5
Dimensions and Weights
This section provides dimensions and weights of the system components.
Component Dimensions
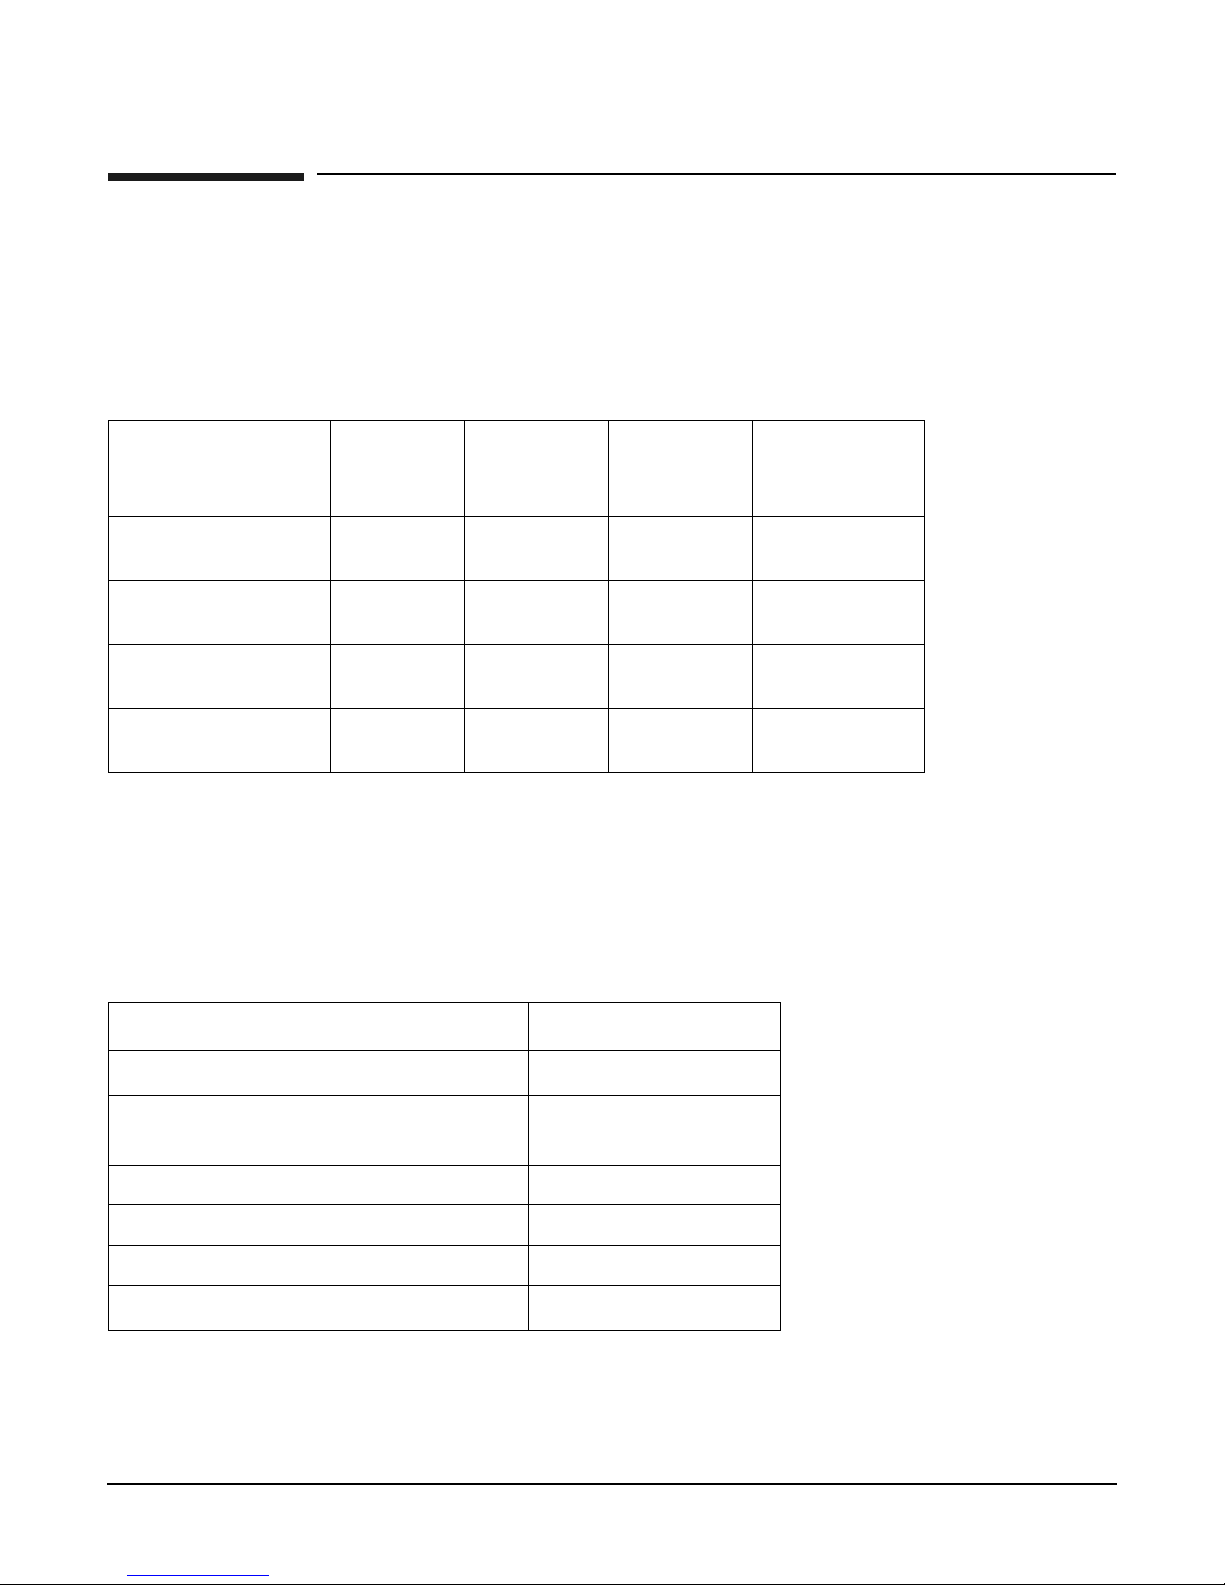
Table 1-1 lists the dimensions for the cabinet and components for a rp8400 server.
Component Weights
Table 1-2 lists the server and component weights. To determine the overall weight of your specific system, see
Table A-5 on page 49 and Table A-6 on page 49.
Table 1-1 Server Component Dimensions
Component
Width
(cm)
Depth/
Length
(cm)
Height
(cm)
Maximum
Quantity per
Cabinet
Cabinet 17.50
(44.50)
30.00
(76.20)
29.55
(75.00)
N/A
Cell board 15.98
(40.60)
20.46
(51.97)
3.56
(9.05)
4
Power Supplies
(BPS)
2.45
(6.22)
20.00
(50.80)
5.63
(14.29)
6
PCI Cards
a
a. The dimensions will vary depending on the PCI card installed. See respective
Product Support Plan for the PCI card dimensions.
varies
(varies)
varies
(varies)
varies
(varies)
16
Table 1-2 System Component Weights
Component Weight (kg)
Fully configured server (16-way)
a
a. This weight is representative of an rp8400 server before it is
installed in a rack.
368.00 lbs (166.92)
Fully configured server (16-way) installed
in a 2 meter cabinet
b
b. This weight is representative of an rp8400 server installed in
a 2 meter rack.
506.00 lbs (229.52)
Cell Board 26.80 lbs (12.16)
Chassis including skins and bezel 131.00 lbs (59.42)
Power Supply (BPS) 12.00 lbs (5.46)
PCI Card
c
varies lbs (varies)
Page 22

Chapter 1
System Specifications
Dimensions and Weights
6
Shipping Dimensions and Weights
Table 1-3 lists the dimensions and weights of the rp8400 server system cabinet with shipping pallet.
c. The weight will vary depending on the PCI card installed. See
respective Product Support Plan for the PCI card weight.
Table 1-3 Shipping Dimensions and Weights
Equipment
Width
(cm)
Depth/Len
gth (cm)
Height
(cm)
Weig h t
(kg)
rp8400 server on
shipping pallet
a b c
a. Shipping box, pallet, ramp, and container adds approximately 50 lbs to the
total system weight.
b. Size and number of miscellaneous pallets will be determined by the
equipment ordered by the customer.
c. Specifications given are for a fully loaded system.
40.00 in
(101.60)
48.00 in
(122.00)
86.50 in
(219.70)
506.00 lbs
(229.52)
Page 23
Chapter 1
System Specifications
Electrical Specifications
7
Electrical Specifications
This section provides electrical specifications for rp8400 servers.
Grounding
The site building shall provide a safety ground/protective earth for each AC service entrance to all rp8400
cabinets.
Install a PE (protective earthing) conductor that is identical in size, insulation material, and thickness to the
branch-circuit supply conductors. The PE conductor must be green with yellow stripes. The earthing
conductor described is to be connected from the unit to the building installation earth or, if supplied by a
separately derived system, at the supply transformer or motor-generator set grounding point.
Circuit Breaker
The Marked Electrical for the rp8400 server is 15 amps. The recommended circuit breaker size is 20 amps for
North America. For countries outside North America, consult your local electrical authority having
jurisdiction for the recommended circuit breaker size.
The rp8400 contains four C20 power receptacles located at the bottom rear bulkhead. A minimum of two
power cords must be used to maintain normal operation of the rp8400. A second set of two cords can be added
to improve system availability by protecting, for example, against power source failures or accidentally
tripped circuit breakers. The rp8400 is capable of receiving AC input from two different AC power sources.
System Power Requirements
Table 1-4 and Table 1-5 on page 8 list the AC power requirements for a rp8400 server. These tables provide
information to help determine the amount of AC power needed for your computer room. To determine the
overall power requirements of your specific system, see Table A-3 on page 47 and Table A-4 on page 47.
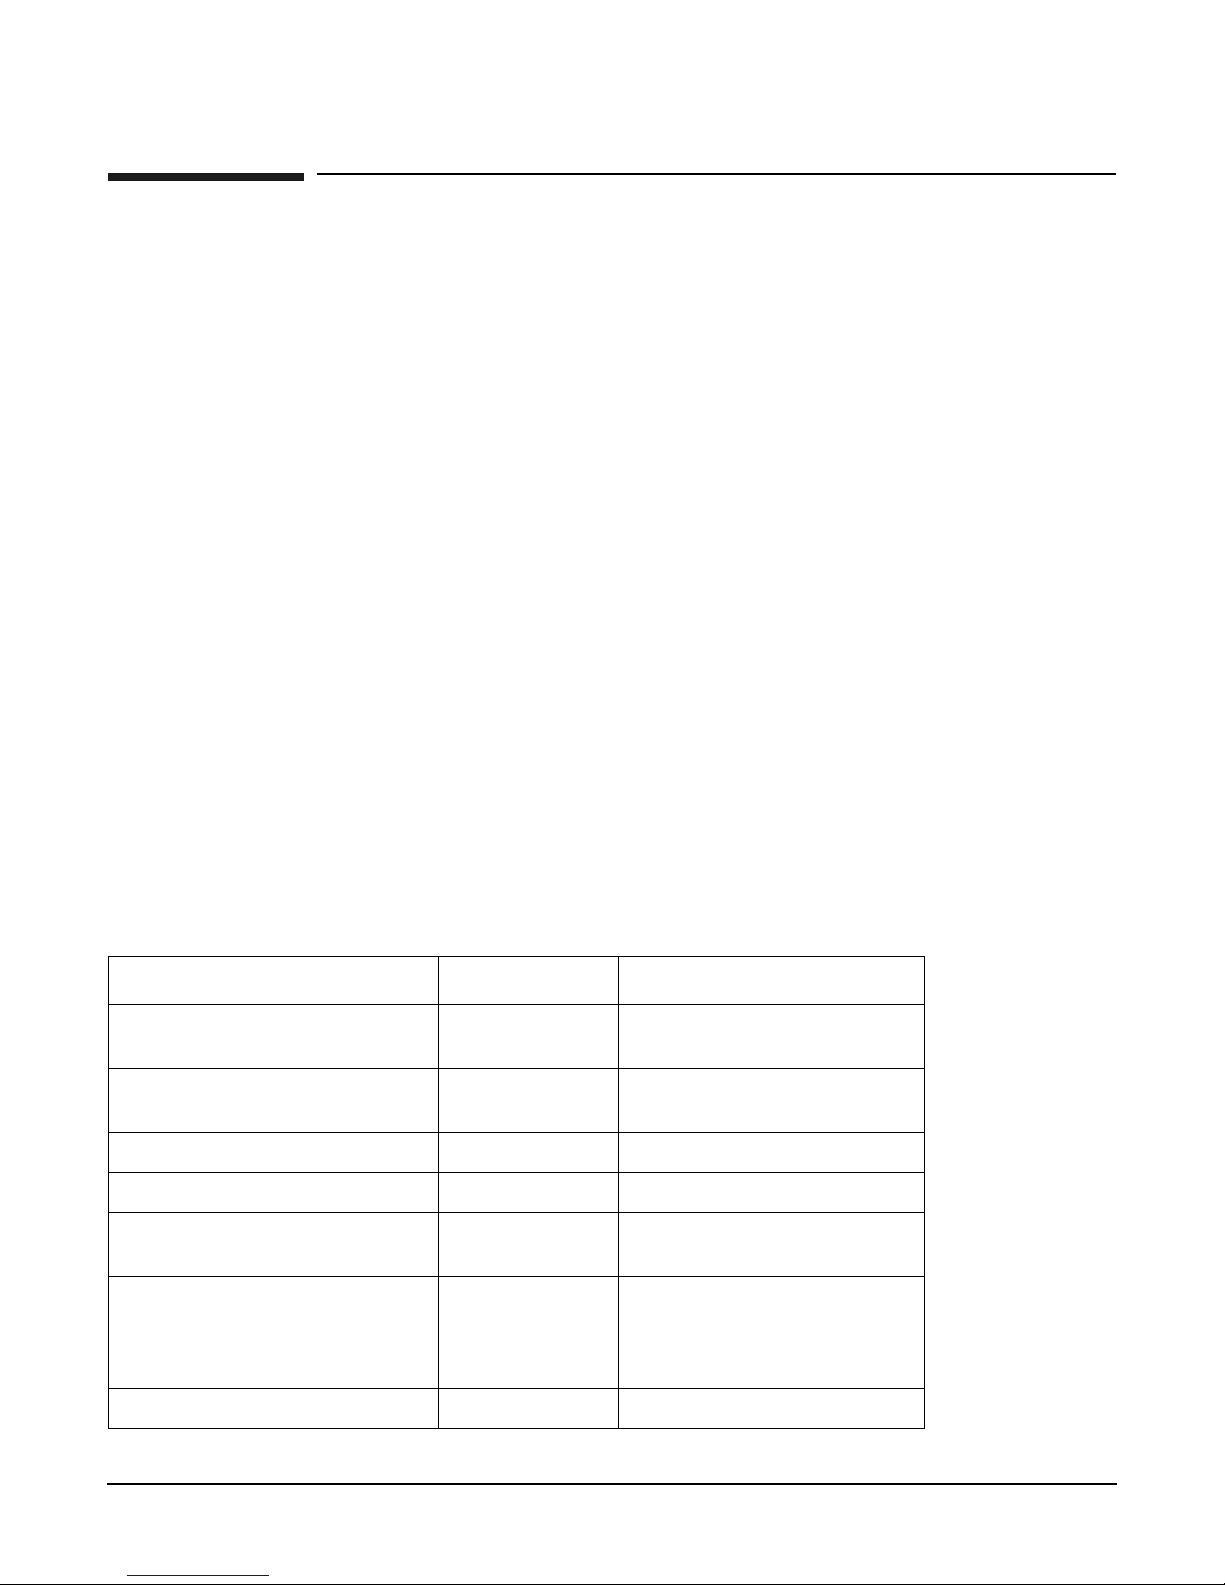
Table 1-4 Power Requirements
Requirements Value Comments
Nominal input voltage 200/208/220/230/
240 (VAC rms)
Frequency range (minimum maximum)
50 - 60 (Hz)
Number of phases 1
Maximum input current 15 (A rms) Per line cord
Maximum inrush current 54 (A peak) for
20 ms
Per line cord
Power factor correction >0.98
>0.95
At all loads of 50% - 100% of
supply rating
At all loads 0f 25% - 50% of
supply rating
Ground leakage current (mA) <3.0 (ma) Per line cord
Page 24

Chapter 1
System Specifications
Electrical Specifications
8
Component Power Requirements
Table 1-4 and Table 1-5 list the AC power requirements for a rp8400 server. These tables provide information
to help determine the amount of AC power needed for your computer room. To determine the overall power
requirements of your specific system, see Table A-3 on page 47 and Table A-4 on page 47.
Use Appendix A to determine the actual values required for your system.
Future upgrades may increase the Maximum Theoretical System Power to 6000 VA.
Maximum power is the sum of the worst case power consumption of every subsystem in the box, and should
be used to size worst case power consumption for facility installation. Typical power consumption numbers
are what HP engineers have measured running power intensive applications. These are generally lower than
maximum power numbers due to the fact that getting all of the subsystems in the box to simultaneously draw
maximum power for long durations being uncommon.
Power Cords
Table 1-6 lists the various power cables available for use with a rp8400 server. Each power cord is 15 feet (4.5
meters) in length with a IEC 60320-1 C19 female connector attached to one end.
Power Distribution Unit (PDU)
A 60-amp 3U high PDU may be used at customer sites to reduce the number of circuit breaker slots needed.
The North America E7683A PDU will have four 20A circuit breakers. The International E7684A PDU will
have four 16A circuit breakers. Two IEC 320-20 outlets are associated with each breaker providing a total of
eight IEC 320-20 outlets. The PDU will be 3U high and will be rack-mounted in the server cabinet
Documentation for installation will accompany the PDU. The documentation may also be found at the
external Rack Solutions Web site at http://www.hp.com/racksolutions. The internal Web site is
http://racksolutions.corp.hp.com. This PDU may be referred to as a Relocatable Power Tap outside HP.
Table 1-5 System Power Requirements
Power Required (50 - 60 Hz) VA Comments
Maximum configuration rp8400 Server PA8700 5035 Theoretical
Typical configuration rp8400 Server PA8700 3046 Typical
Table 1-6 Power Cords
Part Number Description Where Used
8120-6895 Stripped end, 240 volt International-Europe
8120-6897 Male IEC 309, 240 volt International
8121-0070 Male GB-1002, 240 volt China
8120-6899 Male CEE 7/7, 240 volt Continental Europe
8121-0558 Male ISI-32, 240 volt Israel
8120-6903 Male NEMA L6-20, 240 volt North America/Japan
Page 25

Chapter 1
System Specifications
Envir onmental Requirements
9
Environmental Requirements
This section provides the environmental, power dissipation, noise emission, and air flow specifications for the
rp8400 server.
Temperature and Humidity Specifications
Ambient intake air temperature is often different from ambient room temperature; you should measure the
operating temperature and humidity directly in front of the cabinet cooling air intakes rather than check only
ambient room conditions. Table 1-7 lists the computer room temperature and humidity specifications for
rp8400 servers.
NOTE Operating ranges refer to the ambient air temperature and humidity measured at the cabinet
cooling air intake vents.
Power Dissipation
This section describes the power dissipated by each component of the rp8400 server.
Cabinet Power Dissipation Table 1-8 lists the theoretical maximum power dissipations of the rp8400
server system. Table 1-9 lists typical power dissipation. To determine the power dissipations of your specific
system, refer to Table A-1 on page 46 and Table A-2 on page 46.
The entry for each component lists the individual power dissipation for the components that can be installed
in that cabinet.
The air conditioning data is derived from the following equations.
• Watts x (0.860) = kcal/hour
• Watts x (3.414) = Btu/hour
• Btu/hour divided by 12,000 = tons of refrigeration required
Table 1-7 Computer Environment
Parameter Operating Range
Recommended
Operating Range
Maximum Rate of
Change
Non-Operating
Range
Tempe rature
ab
a. Derate 1ο C/1000 feet above 5000 feet and up to 10,000 feet.
b. System also requires 960 CFM airflow.
5ο C to 35ο C (up to
5000 feet)
20ο C to 25ο C (up to
5000 feet)
10ο C/hr with tape
20ο C/hr without tape
-40ο C to +70ο C
Relative
Humidity
15% to 80% at 35ο C
noncondensing
40% to 60% at 35ο C
noncondensing
30% per hour
noncondensing
Page 26

Chapter 1
System Specifications
Environmental Requirements
10
Maximum power is the sum of the worse case power consumption of every subsystem in the box, and should
be used to size worse case power consumption. Typical power consumption numbers are what HP engineers
have measured running power intensive applications. These are generally lower than maximum power
numbers due to the fact that getting all of the subsystems in the box to simultaneously draw maximum power
for long durations is uncommon.
Table 1-8 Theoretical System Component Power Dissipation
Equipment
Watts
Dissipated
Theoretical
Maximum
kcal/Hour
Btu/
Hour
Ton s o f
Refrigeration
Chassis fans, System board and PCI
Board
426 366.36 1454.36 0.121
Cell Board 746 641.56 2546.84 0.212
PCI Card (Maximum 25W) 25 21.50 85.35 0.007
Power Supply (BPS) 125 107.50 426.75 0.036
DVD 20 17.20 68.28 0.006
Disk Drive 25 21.50 85.35 0.007
Core I/O 70 60.20 238.98 0.020
PCI Power Supply 47 40.42 160.458 0.013
Total maximum configuration
rp8400 Server (PA8700)
4934 4243.24 16844.68 1.404
Table 1-9 Typical System Component Power Dissipation
Equipment
Watts
Dissipated
Typical
kcal/Hour
Btu/
Hour
Ton s o f
Refrigeration
Chassis fans, System board and PCI
Board
330 283.80 1126.62 0.094
Cell Board 500 430.00 1707.00 0.142
PCI Card 10 8.60 34.14 0.003
Power Supply (BPS) 49 42.14 167.29 0.014
DVD 20 17.20 68.28 0.006
Disk Drive 25 21.50 85.35 0.007
Core I/O 29 24.94 99.006 0.008
PCI Power Supply 47 40.42 160.458 0.013
Total maximum configuration
rp8400 Server (PA8700)
2986 2567.96 10194.20 0.850
Page 27

Chapter 1
System Specifications
Envir onmental Requirements
11
Acoustic Noise Specification
The acoustic noise specification for the rp8400 server is as follows:
• 57.3 db (sound pressure level at bystander position)
The above level is appropriate for dedicated computer room environments, not office environments.
Care should be taken to understand the acoustic noise specifications relative to operator positions within the
computer room or when adding rp8400 servers to computer rooms with existing noise sources.
Air Flow
rp8400 servers require that the recommended cabinet air intake temperature be between 68ο F and 77ο F
(20ο C and 25ο C) at 960 CFM.
Figure 1-1 on page 11 illustrates the location of the inlet and outlet airducts on a single cabinet.
Figure 1-1 Airflow Diagram
Page 28

Chapter 1
System Specifications
Environmental Requirements
12
Page 29

Chapter 2
13
2 Electrical and Environmental Guidelines
This chapter provides guidelines for planning and preparing the site. Careful site planning and preparation
ensures trouble-free installation and reliable operation of rp8400 servers. Factors that may contribute to less
than optimal equipment operation are also highlighted.
• “Electrical Factors” on page 15 discusses computer room safety, electrical load requirements, power
quality, distribution hardware, and system installation guidelines.
Page 30

Chapter 2
Electrical and Environmental Guidelines
14
• “Environmental Elements” on page 21 discusses computer room preparation, cooling and humidity
requirements, dust and pollution control, electrostatic discharge prevention, and acoustics.
Page 31

Chapter 2
Electrical and Environmental Guidelines
Electrical Factors
15
Electrical Factors
Proper design and installation of a power distribution system for a rp8400 server requires specialized skills.
Those responsible for this task must have a thorough knowledge and understanding of appropriate electrical
codes and the limitations of the power systems for computer and data processing equipment.
In general, a well-designed power distribution system exceeds the requirements of most electrical codes. A
good design, when coupled with proper installation practices, produces the most trouble-free operation.
A detailed discussion of power distribution system design and installation is beyond the scope of this
document. However, electrical factors relating to power distribution system design and installation must be
considered during the site preparation process.
The electrical factors discussed in this section are:
• Computer room safety
• Electrical load requirements (circuit breaker sizing)
• Power quality
• Distribution hardware
• System installation guidelines
Computer Room Safety
Inside the computer room, fire protection and adequate lighting (for equipment servicing) are important
safety considerations. Federal and local safety codes govern computer installations.
Fire Protection
The National Fire Protection Association’s Standard for the Protection of Electronic Computer Data
Processing Equipment, NFPA 75, contains information on safety monitoring equipment for computer rooms.
Most computer room installations are equipped with the following fire protection devices:
•Smoke detectors
• Fire and temperature alarms
• Fire extinguishing system
Additional safety devices are:
• Circuit breakers
• An emergency power cutoff switch
• Devices specific to the geographic location i.e., earthquake protection
Lighting Requirements for Equipment Servicing
Adequate lighting and utility outlets in a computer room reduce the possibility of accidents during equipment
servicing. Safer servicing is also more efficient and, therefore, less costly.
For example, it is difficult to see cable connection points on the hardware if there is not enough light.
Adequate lighting reduces the chances of connector damage when cables are installed or removed.
Page 32

Chapter 2
Electrical and Environmental Guidelines
Electrical Factor s
16
The minimum recommended illumination level is 70 foot-candles (756 lumens per square meter) when the
light level is measured at 30 inches (76.2 cm) above the floor.
Electrical Load Requirements (Circuit Breaker Sizing)
NOTE Local authority has jurisdiction [LAHJ] and should make the final decision regarding
adherence to country- specific electrical codes and guidelines.
Table 1-4 on page 7 and Table 1-5 on page 8 summarizes electrical power load (kVa input) requirements for
rp8400 servers.
These tables provide load requirements for computers, but additional capacity should be added for equipment
upgrading or expansion.
It is always a good idea to derate power distribution systems for one or more of the following reasons:
• To avoid nuisance tripping from load shifts or power transients, circuit protection devices should never be
run above 80% of their root-mean-square (RMS) current ratings.
• Safety agencies derate most power connectors to 80% of their RMS current ratings.
Power Quality
This equipment is designed to operate over a wide range of voltages and frequencies. It has been tested and
shown to comply with EMC Specification EN50082. However, damage can occur if these ranges are exceeded.
Severe electrical disturbances can exceed the design specifications of the equipment.
Sources of Voltage Fluctuations
Voltage fluctuations, sometimes called glitches, affect the quality of electrical power. Common sources of these
disturbances are:
• Fluctuations occurring within the facility’s distribution system
• Utility service low-voltage conditions (such as sags or brownouts)
• Wide and rapid variations in input voltage levels
• Wide and rapid variations in input power frequency
• Electrical storms
• Large inductive sources (such as motors and welders)
• Faults in the distribution system wiring (such as loose connections)
• Microwave, radar, radio, or cell phone transmissions
Power System Protection
Computer systems can be protected from the sources of many of these electrical disturbances by using:
• A dedicated power distribution system
• Power conditioning equipment
• Over- and under-voltage detection and protection circuits
• Screening to cancel out the effects of undesirable transmissions
Page 33

Chapter 2
Electrical and Environmental Guidelines
Electrical Factors
17
• Lightning arresters on power cables to protect equipment against electrical storms
Every precaution has been taken during power distribution system design to provide immunity to power
outages of less than one cycle. However, testing cannot conclusively rule out loss of service. Therefore,
adherence to the following guidelines provides the best possible performance of power distribution systems
for rp8400 server equipment:
• Dedicated power source—Isolates server power distribution system from other circuits in the facility.
• Missing-phase and low-voltage detectors—Shuts equipment down automatically when a severe power
disruption occurs. For peripheral equipment, these devices are recommended but optional.
• Online uninterruptible power supply (UPS)—Keeps input voltage to devices constant and should be
considered if outages of one-half cycle or more are common. Refer to qualified contractors or consultants
for each situation.
Distribution Hardware
This section describes wire selection and the types of raceways (electrical conduits) used in the distribution
system.
Wire Selection
Use copper conductors instead of aluminum, as aluminum’s coefficient of expansion differs significantly from
that of other metals used in power hardware. Because of this difference, aluminum conductors can cause
connector hardware to work loose, overheat, and fail.
Raceway Systems (electrical conduits) [LAHJ]
Raceways (electrical conduits) form part of the protective ground path for personnel and equipment.
Raceways protect the wiring from accidental damage and also provide a heatsink for the wires.
Any of the following types may be used:
• Electrical metallic tubing (EMT) thin-wall tubing
• Rigid (metal) conduit
• Liquidtight with RFI shield grounded (most commonly used under raised floors)
Building Distribution
All building feeders and branch circuitry should be in rigid metallic conduit with proper connectors (to
provide ground continuity) Conduit that is exposed and subject to damage should be constructed of rigid
galvanized steel.
Page 34

Chapter 2
Electrical and Environmental Guidelines
Electrical Factor s
18
Grounding Systems
rp8400 servers require two methods of grounding:
• Power distribution safety grounding
• High frequency intercabinet grounding
Power Distribution Safety Grounding [LAHJ]
The power distribution safety grounding system consists of connecting various points in the power
distribution system to earth ground using green (green/yellow) wire ground conductors. Having these ground
connections tied to metal chassis parts that may be touched by computer room personnel protects them
against shock hazard from current leakage and fault conditions.
Power distribution systems consist of several parts. Hewlett-Packard recommends that these parts be solidly
interconnected to provide an equipotential ground to all points.
Main Building Electrical Ground The main electrical service entrance equipment should have an earth
ground connection, as required by applicable codes. Connections such as a grounding rod, building steel, or a
conductive type cold water service pipe provide an earth ground.
Electrical Conduit Ground All electrical conduits should be made of rigid metallic conduit that is securely
connected together or bonded to panels and electrical boxes, so as to provide a continuous grounding system.
Power Panel Ground Each power panel should be grounded to the electrical service entrance with green
(green/yellow) wire ground conductors. The green (green/yellow) wire ground conductors should be sized per
applicable codes (based on circuit over current device ratings).
NOTE The green wire ground conductor mentioned above may be a black wire marked with green
tape. [LAHJ]
Computer Safety Ground Ground all computer equipment with the green (green/yellow) wire included in
the branch circuitry. The green (green/yellow) wire ground conductors should be connected to the appropriate
power panel and should be sized per applicable codes (based on circuit over current device ratings).
Cabinet Performance Grounding (High Frequency Ground)
Signal interconnects between system cabinets require high frequency ground return paths. Connect all
cabinets to site ground.
NOTE In some cases power distribution system green (green/yellow) wire ground conductors are too
long and inductive to provide adequate high frequency ground return paths. Therefore, a
ground strap (customer-supplied) should be used for connecting the system cabinet to the site
grounding grid (customer-supplied). When connecting this ground, ensure that the raised floor
is properly grounded for high frequency.
Power panels located in close proximity to the computer equipment should also be connected to the site
grounding grid. Methods of providing a sufficiently high frequency ground grid are described in the next
sections.
Page 35

Chapter 2
Electrical and Environmental Guidelines
Electrical Factors
19
Raised Floor “High Frequency Noise” Grounding
If a raised floor system is used, install a complete signal grounding grid for maintaining equal potential over
a broad band of frequencies. The grounding grid should be connected to the equipment cabinet and electrical
service entrance ground at multiple connection points using a minimum #6 AWG (16mm2) wire ground
conductor. See Figure 2-1 on page 19 illustrates a metallic strip grounding system.
Hewlett-Packard recommends the following approaches:
• Excellent—Add a grounding grid to the subfloor. The grounding grid should be made of copper strips
mounted to the subfloor. The strips should be 0.032 in. (0.08 cm) thick and a minimum of 3.0 in. (8.0 cm)
wide.
Connect each pedestal to four strips using 1/4 in. (6.0 mm) bolts tightened to the manufacturer’s torque
recommendation.
• Better - A grounded #6 AWG minimum copper wire grid mechanically clamped to floor pedestals and
properly bonded to the building/site ground.
• Good—Use the raised floor structure as a ground grid. In this case, the floor must be designed as a ground
grid with bolted down stringers and corrosion resistive plating (to provide low resistance and attachment
points for connection to service entrance ground and rp8400 server equipment). The use of conductive
floor tiles with this style of grid further enhances ground performance.
Figure 2-1 Raised Floor Metal Strip Ground System
Ground wire
to power panel
Grounding clamp
Band and pedestal Grounding braid
to computer equipment
Grounding grid element
Hex bolt
Floor panel
11/30/99
60SP010A
Page 36

Chapter 2
Electrical and Environmental Guidelines
Electrical Factor s
20
Equipment Grounding Implementation Details
Connect all Hewlett-Packard equipment cabinets to the site ground grid as follows:
Step 1. Attach one end of each ground strap to the applicable cabinet ground lug.
Step 2. Attach the other end to the nearest pedestal base (raised floor) or cable trough ground point
(nonraised floor).
Step 3. Check that the braid contact on each end of the ground strap consists of a terminal and connection
hardware (a 1/4-in. (6.0-mm) bolt, nuts, and washers).
Step 4. Check that the braid contact connection points are free of paint or other insulating material and
treated with a contact enhancement compound (similar to Burndy Penetrox).
System Installation Guidelines
This section contains information about installation practices. Some common pitfalls are highlighted. Both
power cable and data communications cable installations are discussed.
NOTE In domestic installations, the proper receptacles should be installed prior to the arrival of
Hewlett-Packard equipment. Refer to the appropriate installation guide for installation
procedures.
Wiring Connections
Expansion and contraction rates vary among different metals. Therefore, the integrity of an electrical
connection depends on the restraining force applied. Connections that are too tight compress or deform the
hardware and causes it to weaken. This usually leads to high impedance preventing circuit breakers from
tripping when needed or can contribute to a buildup of high frequency noise.
CAUTION Connections that are too loose or too tight can have a high impedance that cause serious
problems, such as erratic equipment operation. A high impedance connection overheats and
sometimes causes fire or high temperatures that can destroy hard-to-replace components such
as distribution panels or system bus bars.
Wiring connections must be properly torqued. Many equipment manufacturers specify the proper connection
torque values for their hardware.
Ground connections must only be made on a conductive, nonpainted surface. When equipment vibration is
present, lock washers must be used on all connections to prevent connection hardware from working loose.
Data Communications Cables
Power transformers create high-energy fields in the form of electromagnetic interference (EMI). Heavy foot
traffic can create electrostatic discharge (ESD) that can damage electronic components. Route data
communications cables away from these areas. Use shielded data communications cables that meet approved
industry standards to reduce the effects of external fields.
Page 37

Chapter 2
Electrical and Environmental Guidelines
Environ mental Elements
21
Environmental Elements
The following environmental elements can affect a rp8400 server installation:
• Computer room preparation
• Cooling requirements
• Humidity level
• Air conditioning ducts
• Dust and pollution control
• Electrostatic discharge (ESD) prevention
• Acoustics (noise reduction)
Computer Room Preparation
The following guidelines are recommended when preparing a computer room for a rp8400 server system:
• Locate the computer room away from the exterior walls of the building to avoid the heat gain from
windows and exterior wall surfaces.
• When exterior windows are unavoidable, use windows that are double or triple glazed and shaded to
prevent direct sunlight from entering the computer room.
• Maintain the computer room at a positive pressure relative to surrounding spaces.
• Use a vapor barrier installed around the entire computer room envelope to restrain moisture migration.
• Caulk and vapor seal all pipes and cables that penetrate the envelope.
• Use at least a 12-inch raised floor system for minimum favorable room air distribution system (underfloor
distribution).
• Ensure a minimum clearance of 12 inches between the top of the server cabinet and the ceiling to allow
for return air flow and ensure that all ceiling tiles are in place.
• Allow 18 inches (or local code minimum clearance) from the top of the server cabinet to the fire sprinkler
heads.
Cooling Requirements
Air conditioning equipment requirements and recommendations are described in the following sections.
The power dissipations and required amount of air conditioning for peripherals are summarized in Table A-1
on page 46 and in Table A-3 on page 47.
Basic Air Conditioning Equipment Requirements
The cooling capacity of the installed air conditioning equipment for the computer room should be sufficient to
offset the computer equipment dissipation loads, as well as any space envelope heat gain. This equipment
should include:
• Air filtration
• Cooling or dehumidification
Page 38

Chapter 2
Electrical and Environmental Guidelines
Environmental Elements
22
• Humidification
• Reheating
•Air distribution
• System controls adequate to maintain the computer room within the operating ranges listed in Table 1-7
on page 9.
Lighting and personnel must also be included. For example, a person dissipates about 450 BTUs per hour
while performing a typical computer room task.
At altitudes above 10,000 feet (3048 m), the lower air density reduces the cooling capability of air conditioning
systems. If your facility is located above this altitude, the recommended temperature ranges may need to be
modified. For each 1000 feet (305 m) increase in altitude above 10,000 feet (up to a maximum of 15,000 feet),
subtract 1.5° F (0.83° C) from the upper limit of the temperature range listed in Table 1-7 on page 9.
Air Conditioning System Guidelines
The following guidelines are recommended when designing an air conditioning system and selecting the
necessary equipment:
• The air conditioning system that serves the computer room should be capable of operating 24 hours a day,
365 days a year. It should also be independent of other systems in the building.
• Consider the long-term value of computer system availability, redundant air conditioning equipment or
capacity.
• The system should be capable of handling any future computer system expansion.
• Air conditioning equipment air filters should have a minimum rating of 45% (based on “ASHRAE
Standard 52-76, Dust Spot Efficiency Test”).
• Introduce only enough outside air into the system to meet building code requirements (for human
occupancy) and to maintain a positive air pressure in the computer room.
Air Conditioning System Types
The following three air conditioning system types are listed in order of preference:
• Complete self-contained package unit(s) with remote condenser(s). These systems are available with up or
down discharge and are usually located in the computer room.
• Chilled water package unit with remote chilled water plant. These systems are available with up or down
discharge and are usually located in the computer room.
• Central station air handling units with remote refrigeration equipment. These systems are usually
located outside the computer room.
Basic Air Distribution Systems
A basic air distribution system includes supply air and return air.
An air distribution system should be zoned to deliver an adequate amount of supply air to the cooling air
intake vents of the computer system equipment cabinets. Supply air temperature should be maintained
within the following parameters:
• Ceiling supply system—From 55° F (12.8° C) to 60° F (15.6° C)
• Floor supply system—At least 60° F (15.6° C)
Page 39

Chapter 2
Electrical and Environmental Guidelines
Environ mental Elements
23
If a ceiling plenum return air system or a ducted ceiling return air system is used, the return air grill(s) in the
ceiling should be above the exhaust area or the exhaust row.
The following three types of air distribution system are listed in order of recommendation:
• Underfloor air distribution system—Downflow air conditioning equipment located on the raised floor of
the computer room uses the cavity beneath the raised floor as plenum for the supply air.
Perforated floor panels (available from the raised floor manufacturer) should be located around the front
of the system cabinets. Supply air emitted though the perforated floor panels is then available near the
cooling air intake vents of the computer system cabinets.
• Ceiling plenum air distribution system—Supply air is ducted into the ceiling plenum from upflow air
conditioning equipment located in the computer room or from an air handling unit (remote).
The ceiling construction should resist air leakage. Place perforated ceiling panels (with down discharge
air flow characteristics) around the front of the system cabinets. The supply air emitted downward from
the perforated ceiling panels is then available near the cooling air intake vents of the computer system
cabinets.
Return air should be ducted back to the air conditioning equipment though the return air duct above the
ceiling.
• Above ceiling ducted air distribution system—Supply air is ducted into a ceiling diffuser system from
upflow air conditioning equipment located in the computer room or from an air handling unit (remote).
Adjust the supply air diffuser system grilles to direct the cooling air downward around the front of the
computer system cabinets. The supply air is then available near the cooling air intake vents of the
computer system cabinets.
Air Conditioning System Installation
All air conditioning equipment, materials, and installation must comply with any applicable construction
codes. Installation of the various components of the air conditioning system must also conform to the air
conditioning equipment manufacturer’s recommendations.
Air Conditioning Ducts
Use separate computer room air conditioning duct work. If it is not separate from the rest of the building, it
might be difficult to control cooling and air pressure levels. Duct work seals are important for maintaining a
balanced air conditioning system and high static air pressure. Adequate cooling capacity means little if the
direction and rate of air flow cannot be controlled because of poor duct sealing. Also, the ducts should not be
exposed to warm air, or humidity levels may increase.
Humidity Level
Maintain proper humidity levels at 40 to 60% RH. High humidity causes galvanic actions to occur between
some dissimilar metals. This eventually causes a high resistance between connections, leading to equipment
failures. High humidity can also have an adverse affect on some magnetic tapes and paper media.
CAUTION Low humidity contributes to undesirably high levels of electrostatic charges. This increases the
electrostatic discharge (ESD) voltage potential. ESD can cause component damage during
servicing operations. Paper feed problems on high-speed printers are usually encountered in
low-humidity environments.
Low humidity levels are often the result of the facility heating system and occur during the cold season. Most
heating systems cause air to have a low humidity level, unless the system has a built-in humidifier.
Page 40

Chapter 2
Electrical and Environmental Guidelines
Environmental Elements
24
Dust and Pollution Control
Computer equipment can be adversely affected by dust and microscopic particles in the site environment.
Specifically, disk drives, tape drives, and some other mechanical devices can have bearing failures resulting
from airborne abrasive particles. Dust may also blanket electronic components like printed circuit boards
causing premature failure due to excess heat and/or humidity build up on the boards. Other failures to power
supplies and other electronic components can be caused by metallically conductive particles, including zinc
whiskers. These metallic particles are conductive and can short circuit electronic components. Use every
effort to ensure that the environment is as dust and particulate free as possible. See the following heading
titled “Metallic Particulate Contamination” for additional details.
Smaller particles can pass though some filters and over a period of time, cause problems in mechanical parts.
Small dust particles can be prevented from entering the computer room by maintaining the air conditioning
system at a high static air pressure level.
Other sources of dust, metallic, conductive, abrasive, and/or microscopic particles can be present. Some
sources of these particulates are:
• Subfloor shedding
• Raised floor shedding
• Ceiling tile shedding
These particulates are not always visible to the naked eye. A good check to determine their possible presence
is to check the underside of the tiles. The tile should be shiny, galvanized, and free from rust.
The computer room should be kept clean. The following guidelines are recommended:
• Smoking—Establish a no-smoking policy. Cigarette smoke particles are eight times larger than the
clearance between disk drive read/write heads and the disk surface.
• Printer—Locate printers and paper products in a separate room to eliminate paper particulate problems.
• Eating or drinking—Establish a no-eating or drinking policy. Spilled liquids can cause short circuits in
equipment such as keyboards.
• Tile floors—Use a dust-absorbent cloth mop rather than a dry mop to clean tile floors.
Special precautions are necessary if the computer room is near a source of air pollution. Some air pollutants,
especially hydrogen sulfide (H2S), are not only unpleasant but corrosive as well. Hydrogen sulfide damages
wiring and delicate sound equipment. The use of activated charcoal filters reduces this form of air pollution.
Metallic Particulate Contamination
Metallic particulates can be especially harmful around electronic equipment. This type of contamination may
enter the data center environment from a variety of sources, including but not limited to raised floor tiles,
worn air conditioning parts, heating ducts, rotor brushes in vacuum cleaners or printer component wear.
Because metallic particulates conduct electricity, they have an increased potential for creating short circuits
in electronic equipment. This problem is exaggerated by the increasingly dense circuitry of electronic
equipment.
Over time, very fine whiskers of pure metal can form on electroplated zinc, cadmium, or tin surfaces. If these
whiskers are disturbed, they may break off and become airborne, possibly causing failures or operational
interruptions. For over 50 years, the electronics industry has been aware of the relatively rare but possible
threat posed by metallic particulate contamination. During recent years, a growing concern has developed in
computer rooms where these conductive contaminants are formed on the bottom of some raised floor tiles.
Page 41

Chapter 2
Electrical and Environmental Guidelines
Environ mental Elements
25
Although this problem is relatively rare, it may be an issue within your computer room. Since metallic
contamination can cause permanent or intermittent failures on your electronic equipment, Hewlett-Packard
strongly recommends that your site be evaluated for metallic particulate contamination before installation of
electronic equipment.
Electrostatic Discharge (ESD) Prevention
Static charges (voltage levels) occur when objects are separated or rubbed together. The voltage level of a
static charge is determined by the following factors:
• Types of materials
•Relative humidity
• Rate of change or separation
Table 2-1 lists charge levels based on personnel activities and humidity levels.
Static Protection Measures
Follow these precautions to minimize possible ESD-induced failures in the computer room:
• Maintain recommended humidity level and airflow rates in the computer room.
• Install conductive flooring (conductive adhesive must be used when laying tiles).
• Use conductive wax if waxed floors are necessary.
• Ensure that all equipment and flooring are properly grounded and are at the same ground potential.
• Use conductive tables and chairs.
• Use a grounded wrist strap (or other grounding method) when handling circuit boards.
• Store spare electronic modules in antistatic containers.
Table 2-1 Effect of Humidity on ESD Charge Levels
Personnel Activity
a
a. Source: B.A. Unger, Electrostatic Discharge Failures of Semiconductor Devices
(Bell Laboratories, 1981)
Humidity
b
and Charge Levels (voltages)
c
b. For the same relative humidity level, a high rate of airflow produces higher
static charges than a low airflow rate.
c. Some data in this table has been extrapolated.
26% 32% 40% 50%
Person walking across a
linoleum floor
6,150 V 5,750 V 4,625 V 3,700 V
Person walking across a carpeted
floor
18,450 V 17,250 V 13,875 V 11,100 V
Person getting up from a plastic
chair
24,600 V 23,000 V 18,500 V 14,800 V
Page 42

Chapter 2
Electrical and Environmental Guidelines
Environmental Elements
26
Acoustics
Computer equipment and air conditioning blowers cause computer rooms to be noisy. Ambient noise level in a
computer room can be reduced as follows:
• Dropped ceiling—Cover with a commercial grade of fire-resistant, acoustic rated, fiberglass ceiling tile.
• Sound deadening—Cover the walls with curtains or other sound deadening material.
• Removable partitions—Use foam rubber models for most effectiveness.
Page 43

Chapter 3
27
3 Facility Guidelines
This chapter describes facility characteristics and provides guidelines for preparing the computer room.
• “Facility Characteristics” on page 28 discusses architectural issues.
• “Space Requirements” on page 31 discusses the amount of floor space required by the components.
Page 44

Chapter 3
Facility Guidelines
Facility Characteristics
28
Facility Characteristics
This section contains information about facility characteristics that must be considered for the installation or
operation of a rp8400 server. Facility characteristics are:
Refer to Appendix C for templates to aid in locating caster contact area and anti-tip feet locations. Templates
are also provided to locate required cutouts for cable routing.
• Floor loading
•Windows
• Altitude effects
Floor Loading
The computer room floor must be able to support the total weight of the installed computer system as well as
the weight of the individual cabinets as they are moved into position.
Floor loading is usually not an issue in nonraised floor installations. The information presented in this section
is directed toward raised floor installations.
NOTE An appropriate floor system consultant should verify any floor system under consideration for a
HP server installation.
Raised Floor Loading
Raised floor loading is a function of the manufacturer’s load specification and the positioning of the
equipment relative to the raised floor grid. While Hewlett-Packard cannot assume responsibility for
determining the suitability of a particular raised floor system, it does provide information and illustrations
for the customer or local agencies to determine installation requirements.
The following guidelines are recommended:
• Because many raised floor systems do not have grid stringers between floor stands, the lateral support for
the floor stands depends on adjacent panels being in place. To avoid compromising this type of floor
system while gaining under floor access, remove only one floor panel at a time.
• Larger floor grids (bigger panels) are generally rated for lighter loads.
CAUTION Do not position or install any equipment cabinets on the raised floor system until you have
carefully examined it to verify that it is adequate to support the appropriate installation.
Floor Loading Terms
Table 3-1 defines floor loading terms.
Table 3-1 Floor Loading Term Definitions
Term Definition
Dead load The weight of the raised panel floor system, including the
understructure. Expressed in lb/ft2 (kg/m2).
Page 45

Chapter 3
Facility Guidelines
Facility Characteristics
29
Average Floor Loading
The average floor load value, defined in Table 3-2, is not appropriate for addressing raised floor ratings at the
floor grid spacing level. However, it is useful for determining floor loading at the building level, such as the
area of solid floor or span of raised floor tiles covered by the rp8400 server footprint.
Typical Raised Floor Site
This section contains an example of a computer room raised floor system that is satisfactory for the
installation of a rp8400 server.
Based on specific information provided by Hewlett-Packard, Tate Access Floors has approved its Series 800
all-steel access floor with bolt-together stringers and 24 in. (61.0 cm) by 24 in. (61.0 cm) floor panels.
In the event that the flooring is being replaced or a new floor is being installed, Tate Access Floors
recommends its Series 1250 all-steel access floor with bolt-together stringers and 24 in. (61.0 cm) by 24 in.
(61.0 cm) floor panels be used to support the rp8400 installation.
NOTE If the specific floor being evaluated or considered is other than a Tate Series 800 floor, the
specific floor manufacturer must be contacted to evaluate the floor being used.
Table 3-2 lists specifications for the Tate Access Floors Series 800 raised floor system.
Live load The load that the floor system can safely support. Expressed
in lb/ft2 (kg/m2).
Concentrated load The load that a floor panel can support on a 1-in2 (6.45 cm2)
area at the panel’s weakest point (typically the center of the
panel), without the surface of the panel deflecting more than
a predetermined amount.
Ultimate load The maximum load (per floor panel) that the floor system can
support without failure. Failure expressed by floor panel(s)
breaking or bending.
Ultimate load is usually stated as load per floor panel.
Rolling load The load a floor panel can support (without failure) when a
wheel of specified diameter and width is rolled across the
panel.
Average floor load Computed by dividing total equipment weight by the area of
its footprint. This value is expressed in lb/ft2 (kg/m2).
Table 3-2 Typical Raised Floor Specifications
Item
a
Rating
Dead load 7 lb/ft 2 (34.2 kg/m2)
Live load 313 lb/ft 2 (1528.3 kg/m2)
Table 3-1 Floor Loading Term Definitions (Continued)
Term Definition
Page 46

Chapter 3
Facility Guidelines
Facility Characteristics
30
Windows
Avoid housing computers in a room with windows. Sunlight entering a computer room may cause problems.
Magnetic tape storage media is damaged if exposed to direct sunlight. Also, the heat generated by sunlight
places an additional load on the cooling system.
Concentrated load
b
1250 lb (567 kg)
Ultimate load 4000 lb (1814 kg) per
panel
Rolling load 400 lb (181 kg)
Average floor load 500 lb (227 kg)
a. From Table 3-1 on page 28
b. With 0.08 in (0.2 cm) of span maximum deflection
Table 3-2 Typical Raised Floor Specifications (Continued)
Item
a
Rating
Page 47

Chapter 3
Facility Guidelines
Space Requirements
31
Space Requirements
This section contains information about space requirements for a rp8400 server. This data should be used as
the basic guideline for space plan developments. Other factors, such as airflow, lighting, and equipment space
requirements must also be considered.
Delivery Space Requirements
There should be enough clearance to move equipment safely from the receiving area to the computer room.
Permanent obstructions, such as pillars or narrow doorways, can cause equipment damage.
Delivery plans should include the possible removal of walls or doors. The physical dimensions for applicable
computers and peripheral equipment are summarized in Table 1-3 on page 6.
Operational Space Requirements
Other factors must be considered along with the basic equipment dimensions. Reduced airflow around
equipment causes overheating, which can lead to equipment failure. Therefore, the location and orientation of
air conditioning ducts, as well as airflow direction, are important. Obstructions to equipment intake or
exhaust airflow must be eliminated.
The locations of lighting fixtures and utility outlets affect servicing operations. Plan equipment layout to take
advantage of lighting and utility outlets. Do not forget to include clearance for opening and closing equipment
doors.
Clearance around the cabinets must be provided for proper cooling airflow through the equipment.
The service area space requirements, outlined in Appendix C, are minimum dimensions. If other equipment is
located so that it exhausts heated air near the cooling air intakes of the computer system cabinets, larger
space requirements are needed to keep ambient air intake to the computer system cabinets within the
specified temperature and humidity ranges.
Space planning should also include the possible addition of equipment or other changes in space
requirements. Equipment layout plans should also include provisions for the following:
• Channels or fixtures used for routing data cables and power cables
• Access to air conditioning ducts, filters, lighting, and electrical power hardware
• Power conditioning equipment
• Cabinets for cleaning materials
• Maintenance area and spare parts
Floor Plan Grid
The floor plan grid is used to plan the location of equipment in the computer room. In addition to its use for
planning, the floor plan grid should also be used when planning the locations of the following items:
• Air conditioning vents
• Lighting fixtures
• Utility outlets
• Doors
Page 48

Chapter 3
Facility Guidelines
Space Requirements
32
• Access areas for power wiring and air conditioning filters
• Equipment cable routing
Copies of the floor plan grid are located in Appendix C.
Equipment Footprint Templates
Equipment footprint templates are provided in Appendix C to show basic equipment dimensions and space
requirements for servicing. Be sure to use the appropriate templates for the equipment that is to be installed.
The service areas shown on the template drawings are lightly shaded.
Removable copies of the equipment footprint templates are located in Appendix C. They should be used with
the floorplan grid to define the location of the equipment that will be installed in your computer room.
NOTE Photocopying typically changes the scale of drawings copied. If any templates are copied, then
all templates and floorplan grids must also be copied.
Page 49

Chapter 4
33
4 Pre-installation Survey
This chapter provides a site survey information packet consisting of an information form and checklists to be
used to evaluate a computer facility. The checklists should be completed and the information sheets and
information forms filled out by the customer and a Hewlett-Packard representative.
• “Pre-installation Survey Content” on page 35 describes the contents of the site survey information packet.
Page 50

Chapter 4
Pre-installation Survey
34
• “Typical Installation Schedule” on page 36 describes the proposed schedule of installation events.
• “Site Inspection” on page 37 provides the on-site inspection checklist.
• “Delivery Survey” on page 40 provides the delivery or installation requirement forms.
Page 51

Chapter 4
Pre-installation Survey
Pre-installation Survey Content
35
Pre-installation Survey Content
The site Pre-installation survey information is designed to identify problems that might occur before, during,
or after the installation of the system. It contains the following items:
• Pre-installation checklists—Verify that the customer site is ready for the equipment installation.
• Pre-installation survey information sheets—List customer name, address, and corresponding
Hewlett-Packard sales personnel.
• Pre-installation survey information forms—List delivery information and special instructions.
Page 52

Chapter 4
Pre-installation Survey
Typical Installation Schedule
36
Typical Installation Schedule
The following schedule lists the sequence of events for a typical system installation:
• 60 days before installation
— Floor plan design completed and mailed to Hewlett-Packard (if required to be an HP task)
• 30 days before installation
— Primary power and air conditioning installation completed
— Telephone and data cables installed
— Fire protection equipment installed
— Major facility changes completed
— Special delivery requirements defined
— Site inspection survey completed
— Delivery survey completed
— A signed copy of the site inspection and delivery survey mailed to Hewlett-Packard
— Site inspection and predelivery coordination meeting arranged with a Hewlett-Packard
representative to review the inspection checklist and arrange an installation schedule.
• 7 days before installation
— Final check made with an Hewlett-Packard site preparation specialist to resolve any last minute
problems
NOTE Not all installations follow a schedule like the one noted above. Sometimes, HP Servers are
purchased through another vendor which can preclude a rigid schedule. Other conditions could
also prevent following this schedule. For those situations, consider a milestone schedule.
• Site Preparation - schedule with the customer as soon as possible after the order is placed.
• Site Verification - schedule with the customer a minimum of one to two days before the HP
Server is scheduled to be installed.
Page 53

Chapter 4
Pre-installation Survey
Site Inspection
37
Site Inspection
Table 4-1 contains the basic Customer and Hewlett-Packard information.
Table 4-2 contains the Site Inspection Checklist.
Table 4-1 Customer and Hewlett-Packard Information
Customer Information
Name: Phone No:
Street Address: City
or
Town:
State or Province: Country
Zip or postal code:
Primary customer contact: Phone No.:
Secondary customer contact: Phone No.:
Traffic coordinator: Phone No.:
Hewlett-Packard information
Sales representative Order No:
Representative making survey Date:
Scheduled delivery date
Table 4-2 Site Inspection Checklist
Please check either Yes or No. If No, include comment# or date
Comment
or Date
Computer room
No. Area or condition Yes No
1. Is there a completed floor plan?
2. Is there adequate space for maintenance needs?
Front 36 in (91.4 cm) minimum, Rear 36 in
(91.4 cm) minimum are recommended
clearances.
3. Is access to the site or computer room
restricted?
4. Is the computer room structurally complete?
Expected date of completion?
5. Is a raised floor installed and in good condition?
Page 54

Chapter 4
Pre-installation Survey
Site Inspection
38
6. Is the raised floor adequate for equipment
loading?
7. Are there channels or cutouts for cable routing?
8. Is there a remote console telephone line
available with an RJ11 jack?
9. Is a telephone line available?
10. Are customer supplied peripheral cables and
LAN cables available and of the proper type?
11. Are floor tiles in good condition and properly
braced?
12. Is floor tile underside shiny or painted? If
painted, judge the need for particulate test.
Power and lighting
No. Area or condition Yes No
13. Are lighting levels adequate for maintenance?
14. Are there AC outlets available for servicing
needs? (i.e. vacuuming)
15. Does the input voltage correspond to equipment
specifications?
15A Is dual source power used? If so, identify type(s)
and evaluate grounding.
16 Does the input frequency correspond to
equipment specifications?
17. Are lightning arrestors installed inside the
building?
18. Is power conditioning equipment installed?
19. Is there a dedicated branch circuit for
equipment?
20. Is the dedicated branch circuit less than 250
feet (72.5 meters)?
21. Are the input circuit breakers adequate for
equipment loads?
Safety
No. Area or condition Yes No
Table 4-2 Site Inspection Checklist (Continued)
Please check either Yes or No. If No, include comment# or date
Comment
or Date
Page 55

Chapter 4
Pre-installation Survey
Site Inspection
39
22. Is there an emergency power shut-off switch?
23. Is there a telephone available for emergency
purposes?
24. Is there a fire protection system in the
computer room?
25. Is antistatic flooring installed?
26. Are there any equipment servicing hazards
(loose ground wires, poor lighting, etc.)?
Cooling
No. Area or condition Yes No
27. Can cooling be maintained between 20 °C and
55 °C (up to 5000 ft.)? Derate 1 °C/1000 ft.
above 5000 ft. and up to 10,000 ft.
28. Can temperature changes be held to 10 °C per
hour with tape media? Can temperature
changes be held to 20 °C per hour without tape
media?
29. Can humidity level be maintained at 40% to
60% at 35 °C noncondensing?
30. Are air conditioning filters installed and clean?
Storage
No. Area or condition Yes No
31. Are cabinets available for tape and disc media?
32. Is shelving available for documentation?
Training
No. Area or Condition
33 Are personnel enrolled in the System
Administrator’s Course?
34 Is on-site training required?
Table 4-2 Site Inspection Checklist (Continued)
Please check either Yes or No. If No, include comment# or date
Comment
or Date
Page 56

Chapter 4
Pre-installation Survey
Delivery Survey
40
Delivery Survey
The delivery survey form shown in Figure 4-1 on page 41 and Figure 4-2 on page 42 lists delivery or
installation requirements. If any of the items on the list apply, enter the appropriate information in the areas
provided on the form.
Special instructions or recommendations should be entered on the special instructions or recommendations
form. The following list gives examples of special instructions or issues:
• Packaging restrictions at the facility, such as size and weight limitations
• Special delivery procedures
• Special equipment required for installation, such as tracking or hoists
• What time the facility is available for installation (after the equipment is unloaded)
Page 57

Chapter 4
Pre-installation Survey
Delivery Survey
41
• Special security requirements applicable to the facility, such as security clearance
Figure 4-1 Delivery Survey (Part 1)
STREET DELIVERY
and width
of access door.
North
South
West
East
South
North
West
East
DOCK DELIVERY
DELIVERY CHECKLIST
Yes
No
Is dock large enough for a semitrailer?
Circle the location of the dock and give street name if different than address.
List height
Circle the location of access door and list street name if different than address.
List special permits (if required) for street delivery.
Permit type: Agency obtained from:
12/7/99
60SP018A
Page 58

Chapter 4
Pre-installation Survey
Delivery Survey
42
Figure 4-2 Delivery Survey (Part 2)
Depth
Width
Width
Width
STAIRS
Width
ELEVATOR
Height
Fill in the following information if an elevator is required to move equipment.
Capacity (lb or kg)
Please list number of flights and stairway dimensions.
Number of flights
11/24/99
60SP019A
Depth
Width
Width
Number of flights
Width
Width
Height
Page 59

Appendix A
43
A System Requirements Summary
This appendix summarizes the requirements that must be considered in preparing the site for a rp8400
server.
• “Power Consumption and Air Conditioning” on page 45 provides tables to determine the overall power
consumed and the air conditioning required for a specific system configuration.
Page 60

Appendi x A
System Requirements Summary
44
• “Power Consumption and Air Conditioning Requirement” on page 47 provides tables to determine the
overall power required for a specific system configuration.
• “Weight” on page 49 provides tables to determine the overall weight of a specific system configuration.
Page 61

Appendix A
System Requirements Summary
Power Consumption and Air Conditioning
45
Power Consumption and Air Conditioning
To determine the power consumed and the air conditioning required, follow the examples in Table A-1 and
Table A-3, then complete the entries in Table A-2 and Table A-4.
NOTE When determining power requirements you must consider any peripheral equipment that will
be installed during initial installation or as a later update. Refer to the applicable
documentation for such devices to determine the power and air-conditioning that is required to
support these devices.
Page 62

Appendi x A
System Requirements Summary
Power Consumption and Air Conditioning
46
Table A-1 Example Power Consumption (Theoretical Maximum) and Air
Conditioning Requirement Summary
Component Quantity
Multiply
Quantity
By:
Power
Dissipated
(kilowatts)
Air Conditioning
Required (tons)
(kilowatts/3.517
=tons)
Chassis 1 426 426.00 (.426) 0.121
Cell Board (PA8700) 4 746 2984.00 (2.984) 0.848
PCI Card (Maximum 25W) 16 25 400.00 (.400) 0.114
Power Supply (BPS) 6 125 750.00 (.750) 0.213
DVD 2 20 40.00 (.040) 0.011
Disk Drive 4 25 100.00 (.100) 0.028
Core I/O 2 70 140.00 (.140) 0.040
PCI Power Supply 2 47 94.00 (.094) 0.027
Tota l 4934.00 (4.934) 1.403
Table A-2 Power Consumption (Theoretical Maximum) and Air Conditioning
Requirement Summary
Component Quantity
Multiply
Quantity
By:
Power
Dissipated
(kilowatts)
Air Conditioning
Required (tons)
(kilowatts/3.517
=tons)
Chassis 1 426 426.00 (.426) 0.121
Cell Board (PA8700) 746
PCI Card (Maximum 25W) 25
Power Supply (BPS) 125
DVD 20
Disk Drive 25
Core I/O 70
PCI Power Supply 47
Tot a l
Page 63

Appendix A
System Requirements Summary
Power Consumpt ion and Air Conditioning Requirement
47
Power Consumption and Air Conditioning Requirement
Table A-3 Example Power Consumption (Typical) and Air Conditioning
Requirement Summary
Component Quantity
Multiply
Quantity
By:
Power
Dissipated
(kilowatts)
Air Conditioning
Required (tons)
(kilowatts/3.517
=tons)
Chassis 1 330 330.00 (0.33) 0.094
Cell Board (PA8700) 4 500 2000.0 (2.00) 0.569
PCI Card (25W max) 16 10 160.00 (0.16) 0.045
Power Supply (BPS) 6 49 294.00 (.294) 0.084
DVD 2 20 40.00 (0.04) 0.011
Disk Drive 2 25 50.00 (0.05) 0.014
Core I/O 2 29 58.00 (0.058) 0.016
PCI Power Supply 2 47 94.00 (0.094) 0.027
Tot a l 3026.00 (3.026) 0.860
Table A-4 Power Consumption (Typical) and Air Conditioning Requirement
Summary
Component Quantity
Multiply
Quantity
By:
Power
Dissipated
(kilowatts)
Air Conditioning
Required (tons)
(kilowatts/3.517
=tons)
Chassis 1 330 330.00 (0.33) 0.094
Cell Board (PA8700) 500
PCI Card (25W max) 10
Power Supply (BPS) 49
DVD 0
Disk Drive 25
Core I/O 29
PCI Power Supply 47
Tot a l
Page 64

Appendi x A
System Requirements Summary
Power Consumption and Air Conditioning Requirement
48
Maximum power is the sum of the worst case power consumption of every subsystem in the box, and should
be used to size worst case power consumption. Typical power consumption numbers are what HP engineers
have measured running power intensive applications. These are generally lower than maximum power
numbers due to the fact that getting all of the subsystems in the box to simultaneously draw maximum power
for long durations being uncommon.
Page 65

Appendix A
System Requirements Summary
Weight
49
Weight
To determine overall weight, follow the examples in Table A-5, then complete the entries in Table A-6.
Table A-5 Example Weight Summary
Component Quantity Multiply By Weight (kg)
Cell Boards 4 26.8 lbs
(12.16)
107.20 lbs
(48.64)
PCI Card (varies used A3739B here)
4 0.34 lbs
(0.153)
1.36 lbs
(0.61)
Power Supply (BPS) 6 12 lbs
(5.44)
72 lbs
(32.66)
DVD 2 2.2 lbs
(1.0)
4.4 lbs
(2.0)
Disk Drive 4 1.6 lbs
(0.73)
6.40 lbs
(2.90)
Chassis with skins
and front bezel cover
1 131 lbs
(59.42)
131 lbs
(59.42)
Total weight 322.36 lbs
(146.22)
Tab l e A- 6 We igh t S umm ary
Component Quantity Multiply By Weight (kg)
Cell Boards 26.8 lbs
(12.16)
lbs
()
PCI Card varies lbs
(varies)
lbs
()
Power Supply (BPS) 12 lbs
(5.44)
lbs
()
DVD 2.2 lbs
(1.0)
lbs
()
Disk Drive 1.6 lbs
(0.73)
lbs
()
Chassis with skins
and front bezel cover
131 lbs
(59.42)
lbs
()
Total weight lbs
()
Page 66

Appendi x A
System Requirements Summary
Weight
50
Page 67

Appendix B
51
B Conversion Factors
The conversion factors provided in this appendix are intended to ease data calculation for systems that do not
conform specifically to the configurations listed in this Site Preparation Guide.
Listed below are the conversion factors used in this document, as well as additional conversion factors which
may be helpful in determining those factors required for site planning:
Page 68

Appendi x B
Conversion Factors
52
• Refrigeration
— 1 watt = .86 kcal/h
— 1 watt = 3.413 Btu/h
— 1 watt = 2.843-4 tons
— 1 ton = 200 Btu/min
— 1 ton = 12,000 Btu/h
— 1 ton = 3,517.2 W
• Metric equivalents
— 1 centimeter = 0.3937 in
— 1 meter = 3.28 ft
— 1 meter = 1.09 yds
— 1 in. = 2.54 cm
— 1 ft = 0.305 m
— 1 CFM = 1.7m3/h
• kVA conversions, three ø
kVA = V × A × √3 ⁄ 1000
• kVA conversion, single ø
kVA = V × A ⁄ 1000
Page 69

Appendix C
53
C Templates
This appendix contains blank floor plan grids and equipment templates. Combine the necessary number of
floor plan grid sheets to create a scaled version of the computer room floor plan.
Page 70

Appendi x C
Te mp l at es
54
Figure C-1 on page 54 illustrates the overall dimensions required for a rp8400 system.
Figure C-1 rp8400 Space Requirements
Page 71

Appendix C
Te mp la te s
Equipment Footprint Templates
55
Equipment Footprint Templates
Equipment footprint templates are drawn to the same scale as the floor plan grid (1/4 inch = 1 foot). These
templates are provided to show basic equipment dimensions and space requirements for servicing.
The service areas shown on the template drawings are lightly shaded.
The equipment templates should be used with the floor plan grid to define the location of the equipment that
will be installed in your computer room.
NOTE Photocopying typically changes the scale of drawings copied. If any templates are copied, then
all templates and floor plan grids must also be copied.
Page 72

Appendi x C
Te mp l at es
Computer Room Layout Plan
56
Computer Room Layout Plan
Use the following procedure to create a computer room layout plan:
Step 1. Remove several copies of the floor plan grid.
Step 2. Cut and join them together (as necessary) to create a scale model floor plan of your computer room.
Step 3. Remove a copy of each applicable equipment footprint template.
Step 4. Cut out each template selected in Step 3; then place it on the floor plan grid created in Step 2.
Step 5. Position pieces until the desired layout is obtained; then fasten the pieces to the grid. Mark
locations of computer room doors, air conditioning floor vents, utility outlets, and so on.
Page 73

Appendix C
Te mp la te s
Computer Room Layout Plan
57
NOTE Attach a reduced copy of the completed floor plan to the site survey (Table 4-1 and Table 4-2)
located in Chapter 4, “Preinstallation Survey.” Hewlett-Packard installation specialist use this
floor plan during equipment installation.
Figure C-2 rp8400 Cabinet Template
Page 74

Appendi x C
Te mp l at es
Computer Room Layout Plan
58
Figure C-3 Planning Grid
Scale: 1/4 inch = 1 foot
12/20/99
60SP016A
Page 75

Appendix C
Te mp la te s
Computer Room Layout Plan
59
Figure C-4 Planning Grid
Scale: 1/4 inch = 1 foot
12/20/99
60SP016A
Page 76

Appendi x C
Te mp l at es
Computer Room Layout Plan
60
Figure C-5 Planning Grid
Scale: 1/4 inch = 1 foot
12/20/99
60SP016A
Page 77

Appendix C
Te mp la te s
Computer Room Layout Plan
61
Figure C-6 Planning Grid
Scale: 1/4 inch = 1 foot
12/20/99
60SP016A
Page 78

Appendi x C
Te mp l at es
Computer Room Layout Plan
62
Figure C-7 Planning Grid
Scale: 1/4 inch = 1 foot
12/20/99
60SP016A
Page 79

63
Index
A
air conditioning
system recommendations
, 22
air conditioning ducts, 23
air distribution system
room space return air
, 23
air ducts, 11
illustrated, 11
average floor loading, 29
B
basic air conditioning equipment requirements
, 21
basic air distribution systems, 22
C
circuit board dimensions and weight
, 5
circuit breaker, 7
component
power requirements
, 8
computer room layout plan, 56
computer room safety
fire protection
, 15
cooling requirements, 21
copyrights notices, x
D
data communications cables
, 20
dimensions and weights, 5
ducts, air conditioning, 23
E
electrical and environmental guidelines
, 13
air distribution system, 22
computer equipment grounds, 18
computer room safety
fire protection
, 15
dust and pollution control, 24
electrical conduit ground, 18
grounding systems, 18
lighting requirements, 15
main building electrical ground, 18
overview, 13
power distribution safety grounding, 18
power panel grounds, 18
power quality, 16
sources of electrical disturbances, 16
system installation guidelines, 20
electrical load requirements, 16
electrical specifications, 7
environmental elements, 21
acoustics, 26
air conditioning equipment requirements, 21
air conditioning recommendations, 22
air distribution systems, 22
computer room considerations, 21
cooling requirements, 21
dust and pollution control, 24
electrostatic discharge
prevention
, 25
humidity level, 23
static protection measures, 25
environmental requirements, 9
equipment footprint templates, 55
F
facility characteristics
, 28
facility guidelines
characteristics, 28
computer room layout, 56
equipment footprint templates, 32, 55
floor loading terms, 28
floor-plan grid, 31
operational space requirements, 31
typical raised floor site, 29
windows, 30
fire protection, 15
floor loading
raised floor, 28
G
grounding systems
, 18
electrical conduit ground, 18
raised floor installations, 19
H
humidity level
, 23
K
Keystone system
air ducts
, 11
computer room layout, 56
electrical and environmental guidelines, 13
environmental elements, 21
power system protection, 16
temperature and humidity specifications, 9
typical installation schedule, 36
upgrading, 4
L
legal notices
, x
lighting requirements, 16
M
main building electrical ground
, 18
N
noise emission specifications
, 11
P
power distribution hardware
, 17
power distribution safety grounding, 18
power distribution system
distribution hardware
, 17
power quality, 16
power requirements
component
, 8
Page 80

Index
64
power system protection
, 16
preinstallation survey, 33
R
raised floor
ground system, illustrated
, 19
grounding, 19
restricted rights notices, x
S
shipping dimensions and weights
, 6
site
inspection
, 37
sources of electrical disturbances, 16
space requirements, 31
computer room layout, 56
delivery space requirements, 31
equipment footprint templates, 55
system installation guidelines, 20
data communications cables, 20
wiring connections, 20
system specifications, 1
T
temperature and humidity specifications
, 9
trademark notices, x
typical installation schedule, 36
W
wiring
connections
, 20
 Loading...