

HP ProLiant DL160se, ProLiant DL170h, Smart Array B110i User Manual

HP Smart Array B110i SATA RAID Controller
User Guide
Part Number 531480-003
March 2010 (Third Edition)

© Copyright 2009, 2010 Hewlett-Packard Development Company, L.P.
The information contained herein is subject to change without notice. The only warranties for HP products and services are set forth in the express
warranty statements accompanying such products and services. Nothing herein should be construed as constituting an additional warranty. HP
shall not be liable for technical or editorial errors or omissions contained herein.
Microsoft and Windows are U.S. registered trademarks of Microsoft Corporation.
Intended audience
This document is for the person who installs, administers, and troubleshoots servers and storage systems. HP
assumes you are qualified in the servicing of computer equipment and trained in recognizing hazards in products
with hazardous energy levels.

Contents
Enabling and configuring the controller ........................................................................................... 5
Enabling the controller and setting the boot order ............................................................................................ 5
HP ProLiant 100 Series servers ............................................................................................................ 5
HP ProLiant 300 Series servers ............................................................................................................ 5
Configuring an array .................................................................................................................................... 6
Option ROM Configuration for Arrays.................................................................................................. 6
Array Configuration Utility .................................................................................................................. 7
Installing the HP Smart Array Hot Plug Advanced Pack for B110i license key ..................................................... 7
Installing a license key with ORCA ....................................................................................................... 8
Installing a license key with ACU ......................................................................................................... 9
Installing device drivers and Management Agents .......................................................................... 11
Installing device drivers ............................................................................................................................... 11
Windows operating systems .............................................................................................................. 11
Linux operating systems .................................................................................................................... 11
Installing Management Agents ..................................................................................................................... 11
Replacing, moving, or adding hard drives ..................................................................................... 13
Recognizing hard drive failure ..................................................................................................................... 13
Effects of a hard drive failure ............................................................................................................. 13
Compromised fault tolerance ............................................................................................................. 14
Recovering from compromised fault tolerance ..................................................................................... 14
Replacing hard drives ................................................................................................................................. 15
Guidelines ....................................................................................................................................... 15
Automatic data recovery (rebuild) ...................................................................................................... 15
Moving hard drives and arrays ................................................................................................................... 17
Adding drives ............................................................................................................................................ 18
Migrating hard drives to an optional Smart Array controller ............................................................ 19
Installing an optional Smart Array controller .................................................................................................. 19
Migrating hard drives to an optional Smart Array controller—Microsoft® Windows® ....................................... 19
Installing the Smart Array driver—Microsoft® Windows® .................................................................... 19
Completing the migration to an optional Smart Array controller—Microsoft® Windows® ........................ 20
Migrating hard drives to an optional Smart Array controller—Linux ................................................................. 20
Installing the Smart Array driver—Linux .............................................................................................. 21
Completing the migration to the Smart Array controller—Linux .............................................................. 21
Diagnosing array problems .......................................................................................................... 22
Diagnostic tools ......................................................................................................................................... 22
Electrostatic discharge ................................................................................................................. 23
Preventing electrostatic discharge ................................................................................................................ 23
Grounding methods to prevent electrostatic discharge .................................................................................... 23
Regulatory compliance notices ..................................................................................................... 24
Battery replacement notice .......................................................................................................................... 24
Taiwan battery recycling notice ................................................................................................................... 24
Acronyms and abbreviations ........................................................................................................ 25

Index ......................................................................................................................................... 26

Enabling and configuring the controller
Enabling the controller and setting the boot order
The HP Smart Array B110i SATA RAID Controller is not enabled by default and must be enabled in RBSU.
For more information on RBSU, see the HP ROM-Based Setup Utility User Guide on the Documentation CD
or the HP website (http://www.hp.com/support/smartstart/documentation
HP ProLiant 100 Series servers
To enable the controller and set boot order:
1. Power up the server.
2. When prompted during the start-up sequence, access RBSU by pressing the F10 key.
3. Select Advanced or Advanced Settings.
).
4. Select SATA Configuration or Hard Drive Configuration.
5. Change SATA #1 to RAID.
6. Return to the previous screen by pressing the Escape key.
7. Select the Boot Menu by pressing the right arrow key.
8. Select Hard Disk Drives.
9. To assign the HP Smart Array B110i SATA RAID Controller as the boot controller, set Ctrl 1 to HP
Smart Array B110i SATA RAID Controller.
10. Press the F10 key to save the setting and to exit RBSU.
HP ProLiant 300 Series servers
To enable the controller and set boot order:
1. Power up the server.
2. When prompted during the start-up sequence, access RBSU by pressing the F9 key.
3. Select Advanced Settings.
4. Select Embedded SATA RAID.
5. Select Enabled.
6. Return to the previous screen by pressing the Escape key.
7. Select Boot Controller Order.
8. To assign the HP Smart Array B110i SATA RAID Controller as the boot controller, set Ctrl 1 to HP
Smart Array B110i SATA RAID Controller.
9. Press the F10 key to save the settings and to exit RBSU.
Enabling and configuring the controller 5

Configuring an array
The HP Smart Array B110i SATA RAID Controller supports SATA drives only.
For the most efficient use of drive space, all drives within an array should have approximately the same
capacity. Each configuration utility treats every physical drive in an array as if it has the same capacity as
the smallest drive in the array. Any excess capacity of a particular drive cannot be used in the array.
Therefore, the capacity is unavailable for data storage.
The more physical drives that are in an array, the greater the probability that the array will experience a
drive failure during any given period. To reduce the risk of data loss that might occur when a drive fails,
configure all logical drives in an array with a suitable fault-tolerance (RAID) method.
The HP Smart Array B110i SATA RAID Controller supports up to two logical drives.
Newly created logical drives are invisible to the operating system. To make the new logical drives
available for data storage, format them using the instructions given in the operating system
Option ROM Configuration for Arrays
documentation.
Before installing an operating system, you can use the ORCA utility to create the first logical drive, assign
RAID levels, and establish online spare configurations.
The utility also provides support for the following functions:
• Reconfiguring one or more logical drives
• Viewing the current logical drive configuration
• Deleting a logical drive configuration
• Setting the controller to be the boot controller
If you do not use the utility, ORCA will default to the standard configuration.
For more information regarding array controller configuration, refer to the controller user guide.
For more information regarding the default configurations that ORCA uses, refer to the HP ROM-Based
Setup Utility User Guide on the Documentation CD.
The HP Smart Array B110i SATA RAID Controller does not support ORCA CLI.
To create a logical drive using ORCA:
1. Power up the server.
2. When prompted during the start-up sequence, access ORCA by pressing the F8 key.
3. Select Create Logical Drive.
The screen displays a list of all unconfigured physical drives and the valid RAID options for the
system.
4. Use the Arrow keys, Spacebar, and Tab key to navigate around the screen and set up the logical
drive, including an online spare drive, if one is required.
NOTE: You cannot use ORCA to configure one spare drive to be shared among several
5. Press the Enter key to accept the settings.
arrays. Only ACU enables you to configure shared spare drives.
Enabling and configuring the controller 6

6.
Press the F8 key to confirm the settings and save the new configuration.
After several seconds, the Configuration Saved screen appears.
7. Press the Enter key to continue.
Repeat this procedure to create additional logical drives.
Array Configuration Utility
ACU is a browser-based utility with the following features:
• Runs as a local application or remote service
• Supports assignment of online spares
• Suggests the optimum configuration for an unconfigured system
• Provides different operating modes, enabling faster configuration or greater control over the
configuration options
• Remains available any time that the server is on
• Displays on-screen tips for individual steps of a configuration procedure
• Beginning with ACU version 8.28.13.0, provides diagnostic functionality on the Diagnostics tab
(formerly known as Array Diagnostics Utility)
For optimum performance, the minimum display settings are 1024 × 768 resolution and 16-bit color.
Servers running Microsoft® operating systems require one of the following supported browsers:
• Internet Explorer 6.0 or later
• Mozilla Firefox 2.0 or later
For Linux servers, see the README.TXT file for additional browser and support information.
For more information, refer to the Configuring Arrays on HP Smart Array Controllers Reference Guide on
the Documentation CD or the HP website (http://www.hp.com
).
Installing the HP Smart Array Hot Plug Advanced
Pack for B110i license key
When installed and activated, the HP Hot Plug Advanced Pack license key enables the user to remove
and install hard drives without powering down the server.
For proper hot-plug operation, the following items are required:
• The HP Hot Plug Advanced Pack license key
• A drive cage backplane configured for the B110i SATA RAID controller
• A supported hard drive installed in the server
• One of the following drivers, depending on the operating system:
o Microsoft® Windows® driver version 6.10.x or later
o Red Hat Enterprise Linux driver version 1.2.4-x or later
o Novell SUSE SLES driver version 1.2.4-x or later
Enabling and configuring the controller 7

IMPORTANT: The license key is stored on the hard drive. If no hard drives are installed, the
license key cannot be installed.
Before installing the license key, be sure that hard drives are installed. For more information on installing
hard drives, see the server user guide.
To obtain the license key, see the entitlement certificate included with the HP Hot Plug Advanced Pack.
Depending on the method of delivery, the certificate is provided either in a sealed envelope or in an
email message.
To install the license key, use one of the following methods:
• Installing a license key with ORCA (on page 8)
• Installing a license key with ACU (on page 9)
Installing a license key with ORCA
To install a license key:
1. Power down the server, if necessary.
2. Power up the server.
POST runs.
During POST, all controllers in the server are initialized one at a time in the current boot order
sequence. If a controller is connected to one or more hard drives, a message appears during the
initialization process for that controller, prompting you to start ORCA.
3. At the ORCA prompt for the controller that you want to configure, press the F8 key.
IMPORTANT: If no hard drives are installed, then this option does not appear.
Enabling and configuring the controller 8
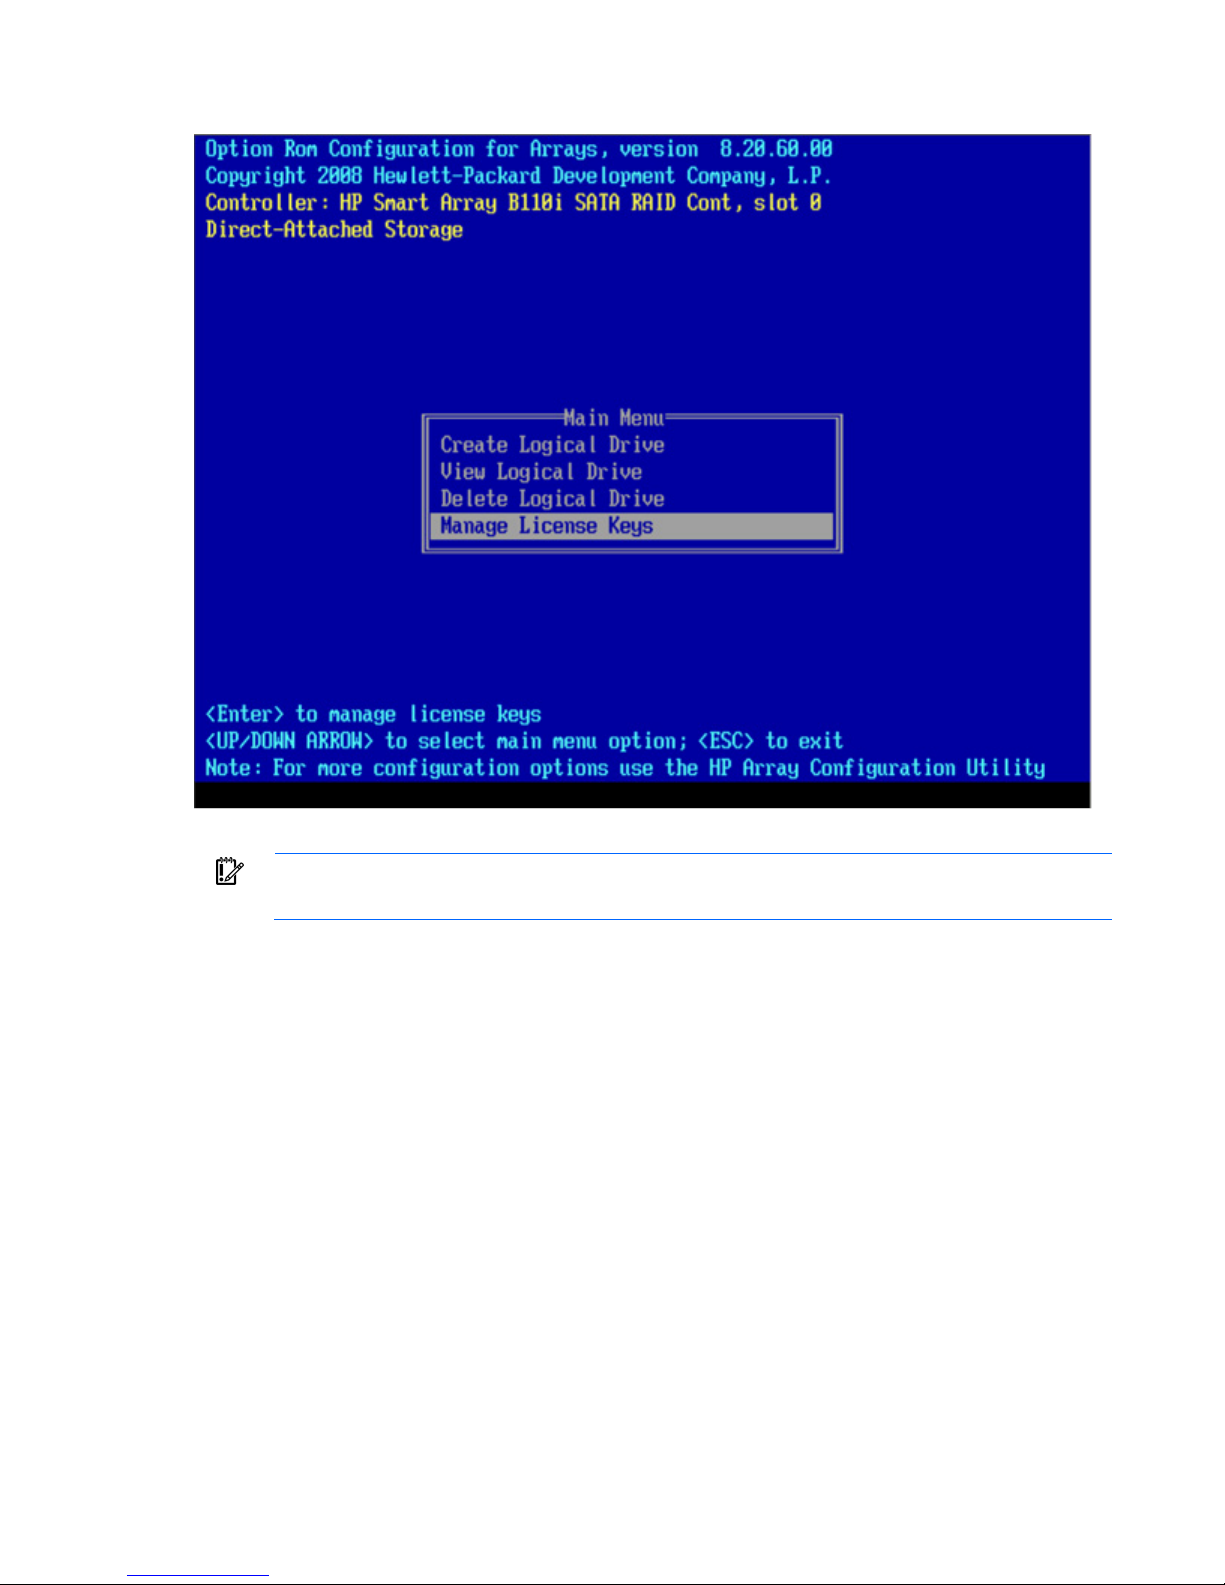
The ORCA main menu appears.
4. Select Manage License Keys.
IMPORTANT: If no hard drives are installed, then this option does not appear.
5. Under the License Key menu, select Add License Key.
6. Enter the license key in the space provided.
ORCA issues a notification after the license key activates successfully.
Installing a license key with ACU
To install a license key:
1. Power down the server, if necessary.
2. Power up the server.
Enabling and configuring the controller 9
 Loading...