

Page 1

HP Process Resource Manager User Guide
Version C.03.05
HP Part Number: B8733-90029
Published: February 2010
Page 2

© Copyright 1998-2010 Hewlett-Packard Development Company, L.P
Legal Notice
Confidential computer software. Valid license from HP required for possession, use, or copying. Consistent with FAR 12.211 and 12.212, Commercial
Computer Software, Computer Software Documentation, and Technical Data for Commercial Items are licensed to the U.S. Government under
vendor's standard commercial license.
The information contained herein is subject to change without notice. The only warranties for HP products and services are set forth in the express
warranty statements accompanying such products and services. Nothing herein should be construed as constituting an additional warranty. HP shall
not be liable for technical or editorial errors or omissions contained herein.
Intel and Itanium are trademarks or registered trademarks of Intel Corporation or its subsidiaries in the United States and other countries.
Microsoft and Windows are U.S. registered trademarks of Microsoft Corporation.
UNIX is a registered trademark of The Open Group.
Java is a US registered trademark of Sun Microsystems, Inc.
VERITAS, VERITAS SOFTWARE, the VERITAS logo, and all other VERITAS product names and slogans are trademarks or registered trademarks of
Symantec Corporation in the USA and/or other countries.
Page 3

Contents
Preface........................................................................................................8
New in this edition...................................................................................................................8
Supported platforms..................................................................................................................8
Notational conventions..............................................................................................................8
Associated documents ..............................................................................................................9
Providing feedback...................................................................................................................9
Support and patch policies......................................................................................................10
Training.................................................................................................................................10
1 Overview................................................................................................11
What is HP Process Resource Manager? ...................................................................................11
Introduction to PRM commands.................................................................................................12
Why use HP Process Resource Manager? .................................................................................13
Standard HP-UX resource allocation ....................................................................................14
How PRM can improve on standard allocation.......................................................................14
Balancing resource use between users..............................................................................14
Prioritizing resource use between users.............................................................................15
Prioritizing resource use for applications ..........................................................................15
Limiting resource consumption.........................................................................................16
Isolating resource use for applications and users...............................................................16
2 Understanding how PRM manages resources ..............................................17
How PRM controls resources....................................................................................................17
PRM groups......................................................................................................................17
Resource allocation............................................................................................................18
What are processor sets?...............................................................................................18
How processor sets work?..............................................................................................18
What are shares?.........................................................................................................19
How shares work..........................................................................................................19
Hierarchical PRM groups................................................................................................20
How PRM manages CPU resources...........................................................................................22
Example: PRM CPU resource management............................................................................23
CPU allocation and number of shares assigned.....................................................................24
Capping CPU resource use.................................................................................................24
How PRM manages CPU resources for real-time processes.......................................................25
Hyper-Threading................................................................................................................25
Multiprocessors and PRM....................................................................................................25
How PRM manages real memory resources................................................................................26
How HP-UX manages memory.............................................................................................26
Available memory..............................................................................................................27
How PRM controls memory usage........................................................................................27
Reducing memory shares....................................................................................................28
Capping memory use....................................................................................................28
Implementation of shares and caps..................................................................................28
Isolating a group’s private memory resources....................................................................29
How PRM manages shared memory................................................................................29
How PRM manages locked memory.................................................................................29
Example: memory management......................................................................................30
How resource allocations interact..............................................................................................31
Contents 3
Page 4

How PRM manages applications..............................................................................................31
How application processes are assigned to PRM groups at start-up...........................................32
How PRM handles child processes ......................................................................................32
Pattern matching for filenames.............................................................................................32
Pattern matching for renamed application processes...............................................................33
Precedence of PRM group assignments.................................................................................34
3 PRM configuration planning ......................................................................37
Using multiple configurations....................................................................................................37
Selecting a configuration model...............................................................................................37
Budget model configurations ..............................................................................................37
Application priority model configurations .............................................................................38
Identifying resource use ..........................................................................................................40
Quick analysis ..................................................................................................................40
Detailed analysis ..............................................................................................................41
Using prmanalyze to quickly identify resource use.......................................................................42
4 Setting up PRM .......................................................................................45
Installing PRM .......................................................................................................................45
Setting PRM to start automatically at reboot ...............................................................................45
5 Using PRM with HP System Management Homepage (SMH)..........................46
Quick start to using PRM’s SMH interface..................................................................................46
6 Using PRM with HP Systems Insight Manager (SIM).......................................48
What PRM tasks are available through SIM?..............................................................................48
Monitor PRM Groups..........................................................................................................48
Configure PRM Groups.......................................................................................................48
Display Resource Usage.....................................................................................................48
List Resource Availability.....................................................................................................48
Configuring user authorizations................................................................................................48
Role: PRM administrator......................................................................................................49
Role: PRM operator............................................................................................................49
Quick start to using PRM’s SIM interface....................................................................................49
7 Configuring and enabling PRM on the command line....................................51
Quick start to using PRM’s command-line interface......................................................................51
Configuring PRM....................................................................................................................52
The PRM configuration file...................................................................................................52
Configuration tips and requirements.....................................................................................53
Specifying PRM groups/controlling CPU resource use.............................................................54
Reserved PRM groups....................................................................................................54
Group/CPU record syntax..............................................................................................55
Adding/modifying PRM groups and CPU allocations ........................................................57
Capping CPU resource use.............................................................................................58
Removing groups/CPU allocations..................................................................................58
Controlling memory use......................................................................................................59
Memory record syntax...................................................................................................59
Private memory........................................................................................................59
Shared memory.......................................................................................................61
Adding/modifying private memory shares/caps ..............................................................62
4 Contents
Page 5

Adding/modifying shared memory allocations ................................................................62
Removing private memory shares ...................................................................................63
Removing shared memory allocations .............................................................................63
Isolating private memory for a group isolating memory using a text editor............................64
Controlling applications......................................................................................................65
Duplicate application records.........................................................................................65
Missing applications are ignored....................................................................................65
Application record syntax...............................................................................................65
Adding/modifying an application’s group assignment ......................................................67
Example: Grouping an application by its alternate names and functions..........................68
Example: Assigning a running application to another group ..........................................68
Removing an application’s group assignment ...................................................................68
Launching an application under PRM...............................................................................69
Launching an application in its assigned group............................................................70
Launching an application in a user-specified group ......................................................70
Launching a script under PRM.........................................................................................70
Launching a Java program under PRM.............................................................................71
Specifying PRM users ........................................................................................................71
User record syntax.........................................................................................................71
Adding/modifying a user’s group assignment ..................................................................73
Example: Changing the initial group of a user .............................................................74
Removing a user’s group assignment ...............................................................................74
Assigning secure compartments to PRM groups .....................................................................75
Compartment record syntax............................................................................................75
Adding/modifying a compartment’s group assignment .....................................................76
Removing a compartment’s group assignment ..................................................................76
Assigning Unix groups to PRM groupsassigning Unix group to PRM groupsconfiguring Unix group
resource allocationUnix group recordsspecifying Unix recordsrecordsUnix groupspecifying..........77
Unix group record syntax...............................................................................................77
Adding/modifying a Unix group’s PRM group assignment .................................................77
Removing a Unix group’s PRM group assignment ..............................................................78
Checking the configuration file ...........................................................................................79
Loading the PRM configuration ...........................................................................................79
Loading the PRM configuration with prmconfig..................................................................80
Enabling resource managers....................................................................................................80
Enabling resource managers with prmconfig..........................................................................81
Updating the configuration .....................................................................................................81
8 Fine-tuning your PRM configuration ............................................................83
Using prmanalyze to analyze your configuration.........................................................................83
Example: Locating system bottlenecks...................................................................................84
Example: High-level views of usage......................................................................................85
Example: Checking for patterns and configuration accuracy....................................................85
Using GlancePlus to analyze your configuration..........................................................................86
Analyzing memory use............................................................................................................87
9 Administering PRM...................................................................................89
Moving processes between PRM groups ...................................................................................89
Displaying application filename matches...................................................................................89
Displaying netgroup expansions ..............................................................................................90
Displaying accessible PRM groups ...........................................................................................91
Displaying state and configuration information...........................................................................91
Displaying application and configuration information .................................................................92
Contents 5
Page 6

Setting the memory manager’s polling interval...........................................................................92
Setting the interval with prmconfig........................................................................................92
Setting the application manager’s polling interval.......................................................................92
Setting the interval with prmconfig........................................................................................92
Disabling PRM ......................................................................................................................93
Disabling PRM with prmconfig.............................................................................................93
Resetting PRM .......................................................................................................................93
Resetting PRM with prmconfig..............................................................................................93
Monitoring PRM groups ..........................................................................................................93
Logging PRM memory messages ..............................................................................................94
Controlling memory logging with prmconfig..........................................................................94
Logging PRM application messages .........................................................................................94
Controlling application logging with prmconfig......................................................................94
Displaying groups’ allocated and used resources........................................................................95
Displaying user information .....................................................................................................95
Displaying available memory to determine number of shares........................................................95
Displaying number of cores to determine number of shares..........................................................96
Displaying past process information .........................................................................................96
Displaying current process information.......................................................................................96
Monitoring PRM with GlancePlus .............................................................................................97
Monitoring PRM with OpenView Performance Agent (OVPA) / OpenView Performance Manager
(OVPM).................................................................................................................................97
Automating PRM administration with scripts ...............................................................................98
Protecting the PRM configuration from reboots............................................................................98
Reconstructing a configuration file ............................................................................................99
Special case of interest: Client/server connections......................................................................99
Online cell operations...........................................................................................................100
Backing up PRM files............................................................................................................100
A Command reference...............................................................................101
prmagt prmagt commandsyntaxcommands prmagtsyntax...........................................................101
prmanalyze ........................................................................................................................102
prmavail displaying available memory with prmavail MEMmemorydisplaying available memory with
prmavailprmavail commandsyntaxcommands prmavailsyntax.....................................................105
prmconfigconfiguring prmconfig syntaxenabling PRM prmconfig syntaxdisabling PRM prmconfig
syntaxconfiguration displaying current configuration informationprmconfig command syntaxcommands
prmconfigsyntax...................................................................................................................106
prminitconfigprminitconfig commandsyntaxcommands prminitconfigsyntax...................................108
prmlist displaying PRM configuration file information with prmlistdisplaying user record information
with prmlistdisplaying group/CPU record information with prmlistdisplaying application record
information with prmlistprmlist commandsyntaxcommands prmlistsyntax.......................................109
prmloadconf prmloadconf commandsyntaxcommands prmloadconfsyntax....................................110
prmmonitorprmmonitor commandsyntaxcommands prmmonitorsyntax..........................................110
Differences in output from prmmonitor and top.....................................................................111
prmmove moving a process between groups prmmove syntaxprmmove commandsyntaxcommands
prmmovesyntax....................................................................................................................111
prmrecoverprmrecover commandsyntaxcommands prmrecoversyntax...........................................112
prmrunapplicationlaunchingprmrun syntaxlaunching an applicationin its assigned grouplaunching
an applicationin a user-specified grouplaunching an applicationin a user’s initial groupprmrun
commandsyntaxcommands prmrunsyntax.................................................................................112
prmsmhconfigprmsmhconfig commandsyntaxcommands prmsmhconfigsyntax...............................113
prm2scompprm2scomp commandsyntaxcommands prm2scompsyntaxSecure Resource Partitions.....114
scomp2prmscomp2prm commandsyntaxcommands scomp2prmsyntax........................................114
srpgensrpgen commandsyntaxcommands srpgensyntaxSecure Resource Partitions.........................114
6 Contents
Page 7

B HP-UX command/system call support........................................................116
C Monitoring PRM through SNMP...............................................................117
Accessing PRM’s SNMP data.................................................................................................118
Using OpenView’s snmpwalk............................................................................................118
Using OpenView’s xnmbrowser.........................................................................................119
Graphing resource usage.............................................................................................123
D Creating Secure Resource Partitions..........................................................126
E Using PRM with Serviceguard...................................................................127
F Using PRM with HP Integrity Virtual Machines.............................................129
G PRM error messages...............................................................................130
prmmonitor error messages ...................................................................................................130
prmconfig error messages .....................................................................................................131
prmmove error messages ......................................................................................................134
prmrun error messages .........................................................................................................136
prmlist error messages ..........................................................................................................138
prmloadconf error messages .................................................................................................140
prmrecover error messages ...................................................................................................140
prmavail error messages .......................................................................................................141
prmanalyze error messages ..................................................................................................142
prmagt error messages .........................................................................................................144
Glossary..................................................................................................145
Index.......................................................................................................148
Contents 7
Page 8

Preface
This document describes Release C.03.05 of HP Process Resource Manager (PRM).
The intended audience for this document is system administrators.
New in this edition
This edition includes information on the following changes and additions:
• Placement of processes in PRM groups based on real user IDs.
The prmconfig -M option now offers two modes for enabling and disabling process
placement based on real user ID: REALUIDON and REALUIDOFF. For more information, see
prmconfig(1).
• Support for IPv6.
Supported platforms
HP Process Resource Manager (PRM) Version C.03.05 supports the:
• HP-UX 11i v1 (B.11.11) operating system on HP 9000 servers
• HP-UX 11i v2 (B.11.23) and HP-UX 11i v3 (B.11.31) operating systems running on either
HP 9000 servers or HP Integrity servers
Notational conventions
This section describes notational conventions used in this document.
bold monospace
monospace
Brackets ( [ ] )
Curly brackets ({}),[LINEBREAK]Pipe
(|)
In command examples, bold monospace identifies input that must be typed
exactly as shown.
In paragraph text, monospace identifies command names, system calls, and
data structures and types. It also identifies PRM group names.
In command examples, monospace identifies command output, including error
messages.
In paragraph text, italic identifies titles of documents.italic
In command syntax diagrams, italic identifies variables that you must provide.italic
In command examples, square brackets designate optional entries.
The following command example uses brackets to indicate that the variable
output_file is optional:
command input_file [output_file]
In command syntax diagrams, text surrounded by curly brackets indicates a
choice. The choices available are shown inside the curly brackets, separated by
the pipe sign (|).
The following command example indicates that you can enter either a or b:
command {a | b}
In command examples, horizontal ellipses show repetition of the preceding items.Horizontal ellipses (...)
Keycap
File->New
8
Keycap indicates the keyboard keys you must press to execute the command
example.
Menu and menu items separated by an arrow (->) indicate a selection of menu
items starting from the menu bar.
Page 9

NOTE: A note highlights important supplemental information.
Associated documents
Associated documents include:
• HP PRM Version C.03.05 Release Notes
• prm(1) manpage
• prm1d(1) manpage
• prm2d(1) manpage
• prmagt(1) manpage
• prmanalyze(1) manpage
• prmavail(1) manpage
• prmconfig(1) manpage
• prminitconfig(1) manpage
• prmlist(1) manpage
• prmloadconf(1) manpage
• prmmonitor(1) manpage
• prmmove(1) manpage
• prmrecover(1) manpage
• prmrun(1) manpage
• prmconf(4) manpage
• prmsmhconfig(1) manpage
• prm2scomp(1) manpage
• scomp2prm(1) manpage
• srpgen(1) manpage
• HP-UX System Administrator’s Guide (HP-UX 11i v3)
• Managing Systems and Workgroups ( HP-UX 11i v1 and HP-UX 11i v2)
• Managing ServiceGuard
The HP-UX System Administrator’s Guide, Managing Systems and Workgroups, and the
Managing ServiceGuard documents, along with many other Hewlett-Packard documents, are
available on the web at http://docs.hp.com.
Providing feedback
• Email your feedback to the PRM development team at the following address:
prmfeedback@rsn.hp.com
• For a forum with other PRM users, visit the IT Resource Center’s forum for HP-UX
Workload/Resource Management:
http://forums.itrc.hp.com/cm/
• For the latest patch information, white papers, and documentation, visit the Process Resource
Manager web page:
http://www.hp.com/go/prm/
Associated documents 9
Page 10

Support and patch policies
The http://www.hp.com/go/prm site provides information on PRM’s support policy and patch
policy. These policies indicate the time periods for which this version of PRM is supported and
patched.
Training
HP offers a course in HP-UX resource management using PRM. For information, including a course
outline, visit:
http://www.hp.com/education/courses/u5447s.html
10
Page 11

1 Overview
This chapter introduces the basic concepts and functions of HP Process Resource Manager. It covers:
• “What is HP Process Resource Manager? ” (page 11)
• “Why use HP Process Resource Manager? ” (page 13)
What is HP Process Resource Manager?
Process Resource Manager (PRM) is a resource management tool used to control the amount of
resources that processes use during peak system load (at 100% CPU resource or 100% memory
resource). PRM can guarantee a minimum allocation of system resources available to a group of
processes through the use of PRM groups.
A PRM group is a collection of users and applications that are joined together and assigned certain
amounts of CPU and memory resource. The two types of PRM groups are FSS PRM groups and
PSET PRM groups. An FSS PRM group is the traditional PRM group, whose CPU entitlement is
specified in shares. This group uses the Fair Share Scheduler (FSS) in the HP-UX kernel within the
system’s default processor set (PSET). A PSET PRM group is a PRM group whose CPU entitlement
is specified by assigning it a subset of the system’s cores (PSET). (A core is the actual data-processing
engine within a processor. A single processor might have multiple cores. A core might support
multiple execution threads.) Processes in a PSET have equal access to CPU cycles on their assigned
cores through the HP-UX standard scheduler.
PRM has four managers:
CPU (processor time) Ensures that each PRM group is granted at least its allocation of
CPU resources. Optionally for FSS PRM groups, this resource
manager ensures no more than its capped amount of CPU
resources. For PSET PRM groups, processes are capped on CPU
resource usage by the number of cores assigned to the group.
MEM (memory) Can manage both private memory and shared memory.
• For private memory:
Ensures that each PRM group is granted at least its share, but
(optionally) no more than its capped amount of memory. You
can also specify memory shares be isolated so that a group’s
assigned memory shares cannot be loaned out to, or
borrowed from, other groups.
• For shared memory:
Ensures a PRM group is allocated a minimum number of
megabytes for use as shared memory.
APPL (application) Ensures that specified applications and their child processes run
in the appropriate PRM groups.
The managers control resources, user processes, compartment processes, and applications based
on records in the configuration. Each manager has its own record type. The most important records
are PRM group/CPU records, because all other records must reference these defined PRM groups.
The various records are described below.
Group/CPU Specifies a PRM group’s name and its CPU allocation. The two types of PRM
group records are FSS PRM group records and PSET PRM group records. An
FSS PRM group is the traditional PRM group, whose CPU entitlement is specified
in shares. This group uses the Fair Share Scheduler (FSS) in the HP-UX kernel
within the system’s default processor set (PSET). A PSET PRM group is a PRM
group whose CPU entitlement is specified by assigning it a subset of the system’s
What is HP Process Resource Manager? 11
Page 12

cores (PSET). Processes in a PSET have equal access to CPU cycles on their
assigned cores through the HP-UX standard scheduler.
Memory Specifies a PRM group’s memory allocation, either of private memory or shared
memory. There are two types of memory records:
• Private
Specifies a minimum amount of private memory. Optionally specifies a
cap on memory use as well as memory isolation (so that memory cannot
be loaned out or borrowed from other groups).
• Shared
Specifies a minimum amount of memory in megabytes for use as shared
memory for the processes in that PRM group.
PRM groups without a shared memory record default to PRM_SYS for shared
memory allocation.
Application Specifies an application (either explicitly or by regular expression) and the PRM
group in which the application should run. Optionally, it specifies alternate
names the application can take at execution. (Alternate names are most common
for complex programs such as database programs that launch many processes
and rename them.)
User Specifies a user or a collection of users (through a netgroup) and assigns the
user or netgroup to an initial PRM group. Optionally, it specifies alternate PRM
groups. A user or netgroup member then has permissions to use these PRM
groups with the prmmove and prmrun commands.
Unix group Maps existing Unix groups to PRM groups.
Compartment Maps existing secure compartments to PRM groups. (Use the optional HP-UX
feature Security Containment to create the secure compartment configurations.
You can also create compartment configurations using a PRM utility such as
srpgen or prm2scomp.)
For more detailed information on records, see the prmconf(4) manpage.
Introduction to PRM commands
PRM supports the commands below. For more information about a command, see its manpage or
the “Command reference” (page 101).
prmagt PRM’s read-only SNMP agent.
prmanalyze Allows you to analyze resource usage and contention to help plan PRM
configurations.
prmavail Displays estimated resource availability to help plan PRM configurations.
prmconfig Configures, enables, disables, and resets PRM. Also, validates PRM
configuration files and controls PRM’s message logging. You can also perform
these tasks using the PRM graphical interface in HP System Management
Homepage (SMH) or HP Systems Insight Manager (SIM).
prminitconfig Configure or unconfigure the PRM GUI to be available in HP Systems Insight
Manager (SIM).
prmlist Displays the current PRM group, memory, user, and application information.
prmloadconf Creates a PRM configuration file or updates an existing configuration file.
prmmonitor Monitors current PRM configuration and resource usage by PRM group.
prmmove Moves processes or groups of processes to another PRM group.
prmrecover Cleans up processes after abnormal memory manager termination.
12 Overview
Page 13

prmrun Runs an application in its assigned group or in a specified group.
prmsmhconfig Configure or unconfigure the PRM GUI to be available in HP System
Management Homepage (SMH).
prm2scomp Generates a minimal Security Containment configuration based on a PRM
configuration. (The Security Containment configuration defines secure
compartments. You can also create compartment configurations using the
PRM utility srpgen.)
Available starting with HP-UX 11i v2 (B.11.23).
scomp2prm Generates a minimal PRM configuration based on a Security Containment
configuration. (The Security Containment configuration defines secure
compartments.You can also create compartment configurations using a PRM
utility such as srpgen or prm2scomp.)
Available starting with HP-UX 11i v2 (B.11.23).
srpgen Generates Secure Resource Partitions by creating both a minimal Security
Containment configuration and a minimal PRM configuration based on your
input.
Available starting with HP-UX 11i v2 (B.11.23).
Why use HP Process Resource Manager?
The standard HP-UX CPU scheduler and memory manager allocate resources to processes based
on the assumption that all processes are of equal importance. PRM, however, allows the system
administrator to group processes and specify the level of importance for that group. PRM allocates
CPU resources, real memory resources (private and shared) to the group based on its assigned
importance.
Reasons to use PRM:
• Improve the response time for critical users and applications.
• Set and manage user expectations for performance.
• Allocate shared servers based on budgeting.
• Ensure that an application package in a Serviceguard cluster has sufficient resources on an
active standby system in the event of a failover.
• Ensure that critical users or applications have sufficient CPU and memory resources.
Users who at times run critical applications, may at other times engage in relatively trivial
tasks. These trivial tasks may be competing in the users’ PRM group with critical applications
for available CPU and real memory resources. For this reason, it is often useful to separate
applications into different PRM groups or create alternate groups for a user. You can assign
a critical application its own PRM group to ensure that the application gets the needed share
of resources.
• Restrict the CPU and real memory resources available to relatively low-priority users and
applications during times of heavy demand.
• Monitor resource consumption by users or applications.
Assigning a group of users or applications to separate PRM groups can be a good way to
keep track of the resources they are using. For information on various PRM reports, see
“Monitoring PRM groups ” (page 93).
Table 1 lists the resources that PRM can manage. For more information about how a resource is
managed, see “Understanding how PRM manages resources ” (page 17).
Why use HP Process Resource Manager? 13
Page 14
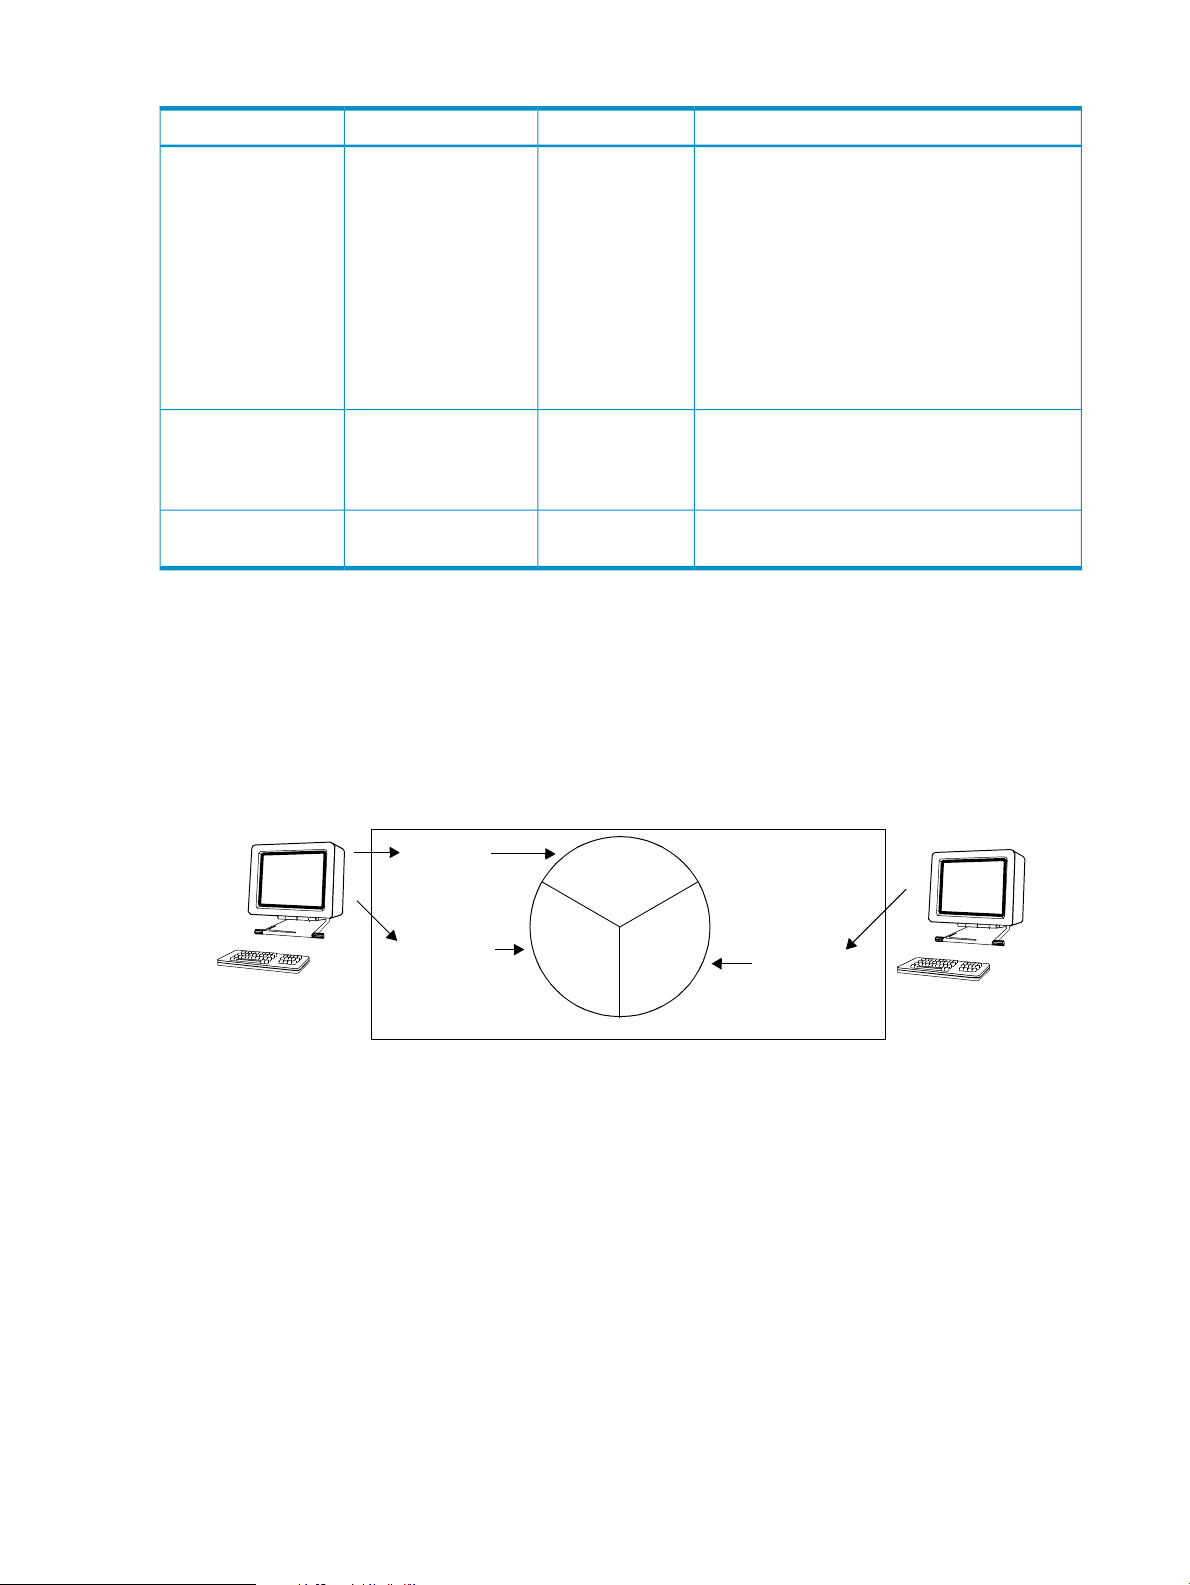
Table 1 Resources managed by PRM
User1
33.3%
33.3% 33.3%
User2
Process1
Process2
Process3
HP-UX server
Management algorithmCapSharesResource managed
CPU
Yes (for FSS PRM
groups)
YesReal memory (private)
Standard HP-UX resource allocation
Under standard HP-UX resource allocation, all processes are treated equally. Figure 1 illustrates
how a user, by starting multiple processes, can consume a majority of an available resource
because the processes each get equal amounts. As illustrated, User1 starts two processes and
User2 starts one process. Using HP-UX standard resource allocation, User1 could control two-thirds
of the available resource while User2 gets one-third, regardless of the importance of each process.
Yes[LINEBREAK](on
all groups in
CPUCAPON mode;
on a per-group
basis is also
available for
HP-UX 11i v3 and
later)
Yes
[LINEBREAK](on a
per-group basis)
N/AN/AReal memory (shared)
PRM allocates time slices to FSS PRM groups
proportional to their shares. When CPUCAPON
mode is enabled, the FSS PRM group is given
CPU time regardless of whether the time is
needed. With per-group capping, the CPU time
remains available to other PRM groups.
For PSET PRM groups, PRM allocates entire cores
to the group according to the current
configuration. CPU capping for PSET PRM groups
is a result of the number of cores assigned to the
group.
When the system is paging (real memory is
exhausted), if a PRM group is exceeding its
shares, the Memory Resource Groups (MRG)
kernel causes the process to page.
The amount of memory requested is set aside for
use as shared memory.
Figure 1 HP-UX standard resource allocation
How PRM can improve on standard allocation
Unlike the standard scheduler, PRM allows you to set priorities on your processes. The following
sections illustrate various ways you can use PRM to improve scheduling.
If multiple users or applications within a PRM group are competing for resources, standard HP-UX
resource management practices determine resource allocation.
Balancing resource use between users
Figure 2 shows how PRM can alter standard resource allocation and balance system resource use.
In the following scenario, a service provider wants each customer to have an equal share of the
machine. Each customer is assigned to a separate PRM group, which is given resource shares
equivalent to 50%. The resource being allocated could be either CPU or memory. This configuration
guarantees each PRM group 50% of the resource for any given interval. Thus, Customer2’s process
receives 50% of the resource; however, because Customer1’s group contains two processes, each
14 Overview
Page 15

of Customer1’s processes receive 25% of the resource. This scenario assumes that the three processes
GroupA
Customer1
Customer2
Process1
Process2
Process3
HP-UX server
50%
25%25%
GroupB
MGroup
User2
Process1
Process2
Process3
HP-UX server
75%
25%
EGroup
User1
fully consume the resource allocated to their groups.
Figure 2 Balancing resource use between users
Prioritizing resource use between users
Figure 3 illustrates how users’ access to resources can be prioritized using PRM. In this example,
two university departments both contributed to the purchase of a new computer. The math department
paid 25% of the cost, and the engineering department paid 75%. PRM groups are assigned
accordingly: 25% for the math PRM group MGroup and 75% for the engineering PRM group
EGroup. This implies that EGroup processes have priority over MGroup processes. Each group
has only one user: User1 is in MGroup; User2 is in EGroup. User1 is entitled to 25% of the
available resource, and User2 is entitled to 75%. This scenario assumes that the three processes
fully consume the resource allocated to their groups.
Prioritizing resource use for applications
Figure 3 Prioritizing resource use between users
Figure 4 illustrates a situation where two users and an application are assigned to separate PRM
groups. User1 and User2 are respectively assigned to GroupA and GroupB. Both groups are
given 25%. The critical application is assigned to GroupC, which is given 50%. Because of its
greater resource allocation, GroupC takes priority over GroupA and GroupB. This scenario
assumes that the processes fully consume the resource allocated to their groups.
Why use HP Process Resource Manager? 15
Page 16
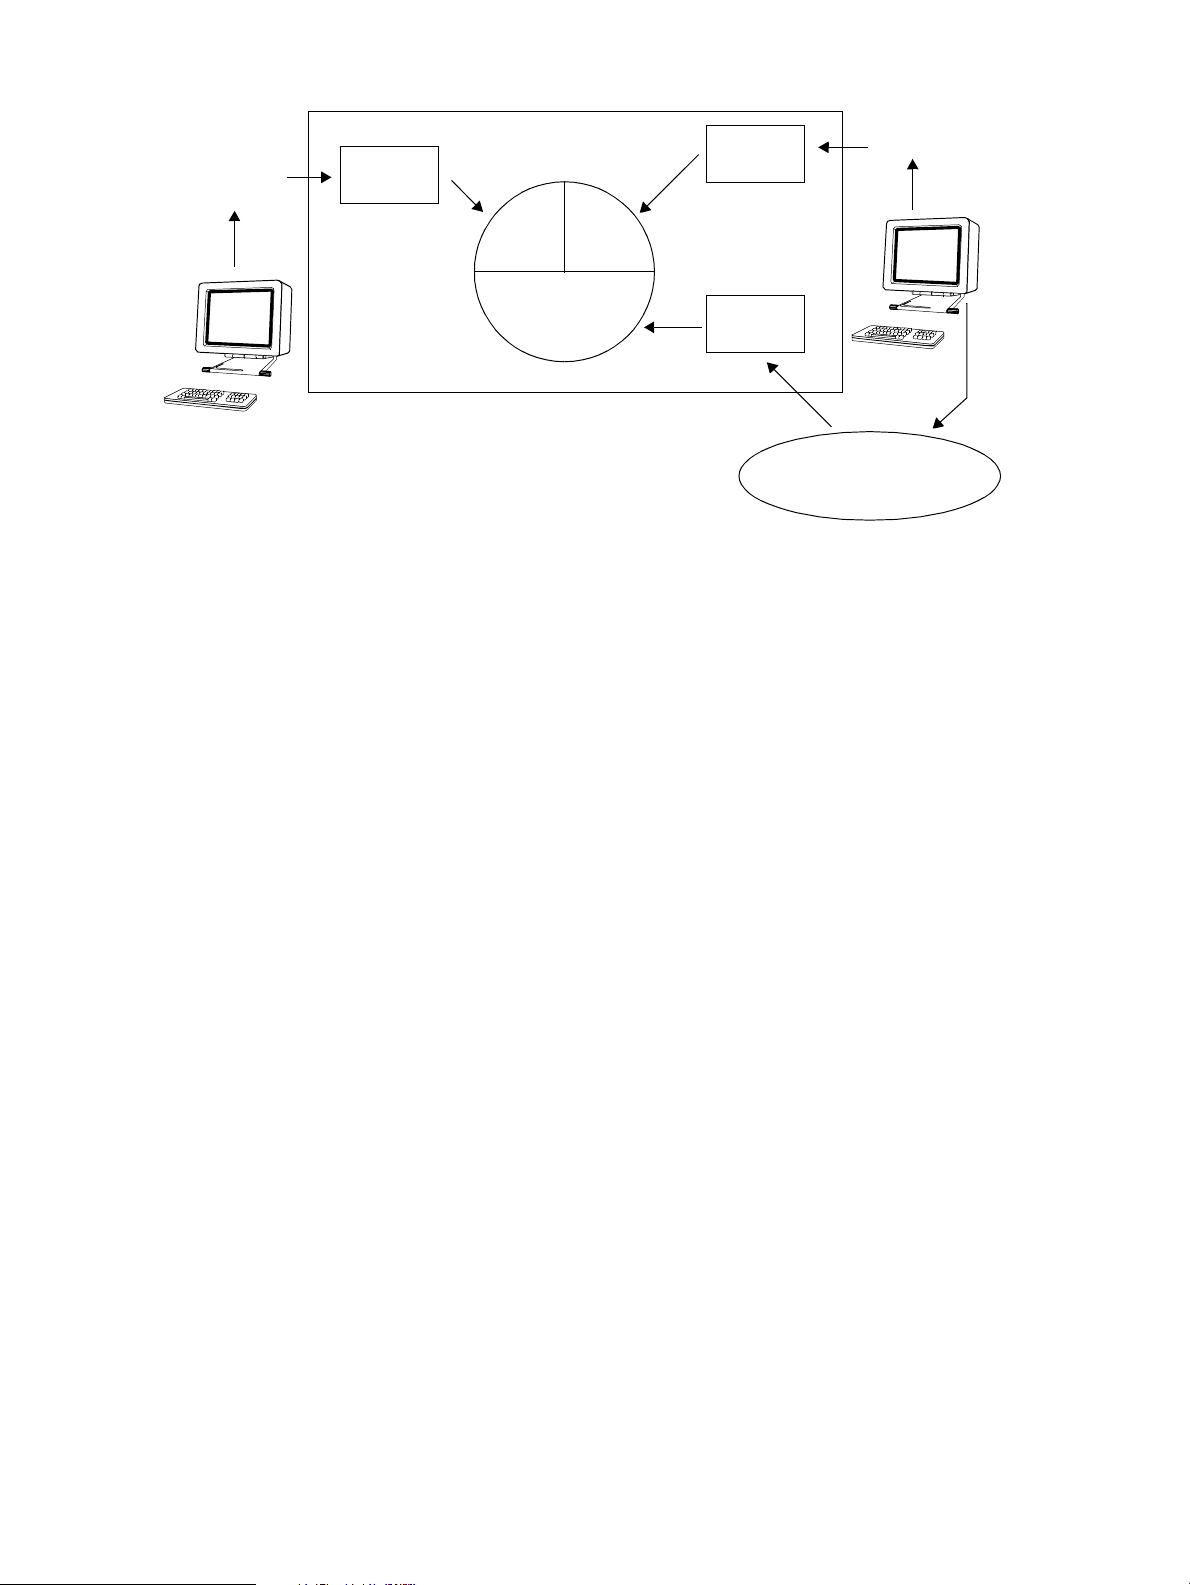
Figure 4 Prioritizing resource use for an application
GroupA
User1
User2
Process1
Process2
Process3
50%
25%25%
GroupB
Critical application
and its child processes
HP-UX server
GroupC
Limiting resource consumption
The following example describes a situation where a system administrator needs to limit resource
consumption.
A system administrator has determined that screen savers displaying fractal designs consume as
much CPU resource as permitted. To protect the system from these screen savers during the work
day, the administrator creates a PRM group for them. This PRM group limits CPU consumption—when
the system is at peak load—to 5%. When the system is not fully utilized, the screen savers can use
the available CPU resources. Whenever the CPU cycles are needed for productive work, the screen
savers cannot use more than 5% of the CPU resources.
Isolating resource use for applications and users
The following example describes a situation where a system administrator needs to isolate an
application in order to ensure dedicated memory and CPU cycles.
A system administrator has determined that his company’s credit card purchase system needs
dedicated memory and CPU resources for users who are buying products. To ensure the buyers
dedicated CPU cycles, the system administrator creates a PSET PRM group for buyers and assigns
one of the system’s four cores to the group. This guarantees the CPU cycles will be available to
buyers as needed. In addition, the system administrator chooses the memory isolation option to
prevent memory shares from being loaned out or borrowed from other groups. This ensures
immediate response time, rather than waiting for borrowed memory to be paged back in.
16 Overview
Page 17

2 Understanding how PRM manages resources
This chapter explains how PRM performs resource management. The following topics are covered:
• “How PRM controls resources” (page 17)
• “How PRM manages CPU resources” (page 22)
• “How PRM manages real memory resources” (page 26)
• “How resource allocations interact” (page 31)
• “How PRM manages applications” (page 31)
NOTE:
• PRM does not support disk bandwidth control on VxFS. The reason for this limitation is that
VxFS does not support the implementation of I/O disk bandwidth that PRM relies on. When
HP moved to VERITAS File System 4.1, the daemon invalidated this feature for all the current
HP-UX versions.
• If PRM is unable to start or run properly due to CPU or memory resources not being available,
it cannot manage your system’s resources.
How PRM controls resources
PRM places limits on resource use based on values specified in a configuration file. These values
always indicate a minimum amount and in some cases can indicate a maximum amount of a
resource.
NOTE: Do not use PRM with gang scheduling, which is the concurrent scheduling of multiple
threads from a single process as a group (gang).
PRM groups
PRM groups are integral to how PRM works. These groups are assigned per process and are
independent of any other groups, such as user groups that are defined in /etc/group. You assign
applications and users to PRM groups. PRM then manages each group’s CPU and real memory
resources (private and shared) according to the current configuration. If multiple users or applications
within a PRM group are competing for resources, standard HP-UX resource management determines
the resource allocation.
There are two types of PRM groups:
• FSS PRM groups are the traditional and most commonly used PRM group. These groups have
• PSET PRM groups are the second type of PRM group. In PSET PRM groups, the CPU entitlement
Because resource management is performed on a group level, individual users or applications
may not get the resources required in a group consisting of many users or applications. In such
cases, reduce the number of users and applications in the group or create a group specifically for
the resource-intensive user or application.
CPU and private memory resources allocated to them using the shares model. (Shared memory
is specified in megabytes.) FSS PRM groups use the Fair Share Scheduler in the HP-UX kernel
within the system’s default processor set (PSET).
is specified by assigning them a subset of the system’s cores—instead of using the shares
model. (A core is the actual data-processing engine within a processor. A single processor
might have multiple cores. A core might support multiple execution threads, as explained in
the section “Hyper-Threading” (page 25) ) The private memory allocation is still specified in
shares and shared memory is still in megabytes. Processes in a PSET PRM group have equal
access to CPU cycles through the HP-UX time-share scheduler.
How PRM controls resources 17
Page 18

Resource allocation
Resources are allocated to PRM groups differently depending on the resource and the type of PRM
group. For FSS PRM groups, resources are typically allocated in shares. For PSET PRM groups,
you allocate CPU resources using processor sets. Real memory resources are allocated in shares
(private memory) or megabytes (shared memory).
What are processor sets?
Processor sets allow cores on your system to be grouped together in a set by the system administrator
and assigned to a PSET PRM group. Once these cores are assigned to a PSET PRM group, they
are reserved for use by the applications and users assigned to that group. Using processor sets
allows the system administrator to isolate applications and users that are CPU-intensive, or that
need dedicated on-demand CPU resources.
How processor sets work?
Processor sets are a way of allocating dedicated CPU resources to designated applications and
users. At system initialization time, a default PSET is created. This default PSET initially consists of
all of your system’s cores. All FSS PRM group CPU allocation occurs in the default PSET. The system
administrator can create additional PSET PRM groups and assign cores, applications, and users
to those groups. Once cores are assigned to a PSET PRM group, they cannot be used by another
group until a new configuration is loaded.
NOTE: When you have PRM groups based on PSETs enabled:
• Do not modify the PSETs manually using the psrset command
• Do not adjust CPU counts in virtual partitions using the vparmodify command
• Do not adjust Instant Capacity (iCAP), Temporary Instant Capacity (TiCAP), or Pay Per Use
resources using the icapmodify or ppuconfig commands
• Do not perform online cell operations, using parolrad or any other interface, while PRM is
managing the system (For more information, see the WARNINGS section in the prmconfig(1)
manpage.)
Applications and users that are assigned to a PSET PRM group have dedicated CPU cycles from
the cores assigned to the group. Competition for CPU cycles within the processor set are handled
using the HP-UX time-share scheduler.
Table 2 (page 18) shows a 16-core system that has four FSS PRM groups defined within the default
PSET, and two additional system-administrator-defined PSET PRM groups. The default PSET contains
eight cores, one of which is core 0. This is the only core that is required to be in the default PSET.
The remaining cores in the default PSET are used by the PRM_SYS, OTHERS, Dev, Appl FSS PRM
groups. There are two databases on this system that each have four cores assigned to them. Unlike
the cores in the default PSET, the cores in the database PSET PRM groups are dedicated cores
using the HP-UX time-share scheduler. This creates isolated areas for the databases.
Table 2 Processor sets example
UseCore IDGroup NamePRM Group Type
FSS PRM groups (Default
PSET)
18 Understanding how PRM manages resources
Dev, Appl
0, 1, 4, 5, 8, 9 12, 13PRM_SYS, OTHERS,
System processes, general
users, and developers
Sales database2, 3, 6, 7SalesDBPSET PRM group
Financial database10, 11, 14, 15FinanceDBPSET PRM group
Page 19

What are shares?
Resource shares are the minimum amounts of a resource assigned to each PRM group in a PRM
configuration file (default name /etc/prmconf). For FSS PRM groups, you can assign CPU and real
memory shares, although only CPU share assignments are required. For PSET PRM groups, you
can only assign real memory in shares. For both types of groups, you can also specify shared
memory allocations.
In addition to minimum amounts, you can specify maximum amounts of of some resources that
PRM groups can use. For FSS PRM groups, you can specify maximum amounts of CPU and memory
resources. For PSET PRM groups, you can assign a maximum amount of memory; however, the
maximum amount of CPU resources available to the PRM group is based on the number of cores
assigned to the group. You can assign a maximum amount (known as caps) of memory to a PSET
PRM group. Shared memory allocations are static in size, so no caps are needed.
How shares work
A share is a guaranteed minimum when the system is at peak load. When the system is not at
peak load, PRM shares are not enforced—unless CPUCAPON mode is enabled, in which case CPU
shares are always enforced.
Valid values for shares are integers from one to MAXINT (the maximum integer value allowed for
the system). PRM calculates the sum of the shares, then allocates a percentage of the system resource
to each PRM group based on its shares relative to the sum.
Table 3 (page 19) shows how shares determine CPU resource percentage. The total number of
shares assigned is four. Divide each group’s number of shares by four to find that group’s CPU
resource percentage. This CPU resource percentage applies only to those cores available to FSS
PRM groups. If PSET PRM groups are configured, the cores assigned to them are no longer available
to the FSS PRM groups. In such a case, the CPU resource percentage would be based on a reduced
number of cores.
Table 3 Converting shares to percentages
CPU resource %CPU sharesPRM group
1/4 = 25.00%1GroupA
2/4 = 50.00%2GroupB
1/4 = 25.00%1OTHERS
Shares allow you to add or remove a PRM group to a configuration, or alter the distribution of
resources in an existing configuration, concentrating only on the relative proportion of resources
and not the total sum. For example, assume we add another group to our configuration in
Table 3 (page 19), giving us the new configuration in Table 4 (page 19). To give the new group
50% of the available CPU resource, we assign it four shares, the total number of shares in the old
configuration, thereby doubling the total number of shares in the new configuration.
Table 4 Altered configuration
CPU resource percentage determined by PRMCPU sharesPRM group
12.50%1GroupA
25.00%2GroupB
50.00%4GroupC
12.50%1OTHERS
How PRM controls resources 19
Page 20

Hierarchical PRM groups
In addition to the flat divisions of resources presented so far, you can nest FSS PRM groups inside
one another—forming a hierarchy of groups similar to a directory structure. Hierarchies allow you
to divide groups and allocate resources more intuitively than you can with flat allocations. Note
that PSET PRM groups cannot be part of a hierarchy.
When forming a hierarchy, any group that contains other groups is known as a parent group.
Naturally, the groups it contains are known as child groups. All the child groups of the same parent
group are called sibling groups. Any group that does not have child groups is called a leaf group.
There is also an implied parent group of all groups where the implied parent has 100% of the
resource to distribute.
Figure 5 (page 20) illustrates a configuration with hierarchical groups, indicating the parent, child,
sibling, and leaf PRM groups.
Figure 5 Parent, child, sibling, and leaf PRM groups
In Figure 2-1, parent groups are the Development and Development/Compilers groups.
There is also an implied parent group to the Finance, Development, and OTHERS groups. The
Development group has the children Development/Compilers, Development/Debuggers,
and Development/Profilers. The Compilers group is broken down further with two children
of its own: Development/Compilers/C and Development/Compilers/Fortran. These
two groups are also known as sibling groups. Leaf groups are groups that have no children. In
the illustration above, leaf groups include the Finance, Development/Debuggers, and OTHERS
groups, among others.
You specify resource shares for each group in a hierarchy. If a group has child groups, the parent
group’s resource shares are distributed to the children based on the shares they are assigned. If
a group has no children, it uses the shares. More explicitly, the percentage that a group’s shares
equate to is determined as follows:
1. Start at the top level in the hierarchy. Consider these groups as sibling groups with an implied
parent. This implied parent has 100% of the CPU resource to distribute. (Shares work the
same way for CPU and private memory resources.)
2. Add all the CPU shares of the first level of sibling groups together into a variable, TOTAL.
3. Each sibling group receives a percentage of CPU resources equal to its number of shares
divided by TOTAL.
20 Understanding how PRM manages resources
Page 21

4. If the sibling group has no child groups, it uses the CPU resources itself.
5. If the sibling group does have child groups, the CPU resource are distributed further based
on the shares assigned to the child groups. Calculate the percentages of the resource they
receive by repeating items 2 through 5.
Consider the example in Table 5 (page 21), which shows the PRM groups at the top-level.
Table 5 Hierarchical PRM groups—top level
Percent of system’s available CPU resourcesCPU sharesGroup
30.00%3Finance
50.00%5Development
20.00%2OTHERS
Table 6 (page 21) shows how the CPU resource percentages for the child groups of the Development
group are determined from their shares. It also shows how the child groups for the
Development/Compilers group further divide the CPU resources.
Table 6 Hierarchical PRM groups—Development’s child groups
Percent of system’s available CPU resourcesCPU sharesGroup
5/10 = 50.00% passed to child groups5Development
1Development/Debuggers
1Development/Profilers
2Development/Compilers
4Development/Compilers/C
4Development/Compilers/Fortran
1/4 of its parent’s CPU (50.00%) = 12.50%
of system CPU
1/4 of its parent’s CPU (50.00%) = 12.50%
of system CPU
2/4 of its parent’s CPU (50.00%) = 25.00%
passed to child groups
4/8 of its parent’s CPU (25.00%) = 12.50%
of system CPU
4/8 of its parent’s CPU (25.00%) = 12.50%
of system CPU
There is no requirement that the sum of the shares for a set of sibling groups be less than their
parent’s shares. For example, Table 6 (page 21)shows the Development/Compilers group has 2
shares, while the sum of the shares for its child groups is 8. You can assign any group any number
of shares between one and MAXINT (the system’s maximum integer value), setting the proportions
between groups as you consider appropriate.
The maximum number of leaf nodes is same as the maximum number of PRM groups you can have,
which is 64 or 256 (starting with HP-UX 11i v2 Update 2).
NOTE: Application records must assign applications only to leaf groups – not parent groups.
Similarly, user records must assign users only to leaf groups. For more information on these record
types, see “Controlling applications” (page 65) and “Specifying PRM users ” (page 71).
In group/CPU records, each PRM group—regardless of where it is in the hierarchy—must be
assigned resource shares.
Hierarchies offer a number of advantages, as explained below:
• Facilitates less intrusive changes – Similar to how shares in a flat configuration allow you to
alter one record while leaving all the others alone, hierarchies enable you to alter the hierarchy
in one area, leaving the rest unchanged.
• Enables you to use a configuration template – Create a configuration file that provides each
department access to the system, then distribute the configuration and assign resources giving
preference to certain departments on different machines.
How PRM controls resources 21
Page 22

• Allows continued use of percentages – If you prefer using percentages instead of shares, you
can assign each level in the hierarchy only 100 resource shares.
• Facilitates giving equal access – If you want each PRM group to have equal access to a
resource, simply assign each group the same number of shares. When you add a group, you
do not have to recalculate resources and divide by the new number of groups; just assign the
new group the same number of shares as the other groups. Similarly, removing a group does
not require a recalculation of resources; just remove the group.
• Allows for more intuitive groups – Hierarchies enable you to place similar items together, such
as all databases or a business entity/goal, and assign them resources as a single item.
• Enables making higher-level policy decisions – By placing groups in a hierarchy, you can
implement changes in policy or funding at a higher level in a configuration without affecting
all elements of the configuration.
• Facilitates system upgrades, capacity planning, and partitioning – If you are moving from a
two-core system to a four-core system, you can reserve the two additional cores by adding a
place-holder group at the top level in the hierarchy, assigning it shares equal to 50% of the
CPU resources, and enabling capping. This place-holder prevents users from getting a boost
in performance from the new cores, then being frustrated by poor performance when more
applications are added to the system.
The syntax for hierarchical groups is explained in “Group/CPU record syntax” (page 55).
By default, PRM utilities (prmconfig, prmlist, prmmonitor) include only leaf groups in their
output. Use the -h option to display information for parent groups as well.
How PRM manages CPU resources
This section describes how PRM manages CPU resources. To understand PRM’s CPU management,
it is useful to know how the standard HP-UX scheduler works.
The HP-UX scheduler chooses which process to run based on priority. Except for real-time processes,
the system dynamically adjusts the priority of a process based on resource requirements and
resources used. In general, when processes are not running, the HP-UX scheduler raises their
priorities; and while they are running, their priorities are lowered. The rate at which priority declines
during execution is linear. The rate at which priority increases while waiting is exponential, with
the rate of increase fastest when the CPU load is low and slowest when the CPU load is high.
When a process other than the current process attains a higher priority, the scheduler suspends
the current process and starts running the higher priority process.
Because the rate at which the priority increases is slowest when CPU load is high, the result is that
a process with a heavy demand for CPU time is penalized by the standard HP-UX scheduler as its
CPU resource use increases.
With PRM, you can reverse the effects of the standard scheduler. By placing users with greater
demands for CPU resources in an FSS PRM group with a higher relative number of CPU shares
than other groups, you give them a higher priority for CPU time. In a similar manner, you can
assign an application to an FSS PRM group with a higher relative number of shares. The application
will run in its assigned FSS PRM group, regardless of which user invokes it. This way you can
ensure that critical applications have enough CPU resources. You can also isolate applications
and users with greater demands for CPU resources by placing them in a PSET PRM group and
assigning the desired number of cores to the group. The applications and users will have dedicated
access to the cores in the PSET PRM group, ensuring CPU cycles when needed. This method of
isolating applications and users effectively creates a partition on your system.
PRM manages CPU resources by using the fair share scheduler (FSS) for FSS PRM groups. When
the PRM CPU manager is enabled, FSS runs for FSS PRM groups instead of the HP-UX standard
scheduler. When PSET PRM groups are configured, FSS still runs for FSS PRM groups, but the
standard HP-UX scheduler is used within PSET PRM groups.
22 Understanding how PRM manages resources
Page 23
PRM gives higher-priority FSS PRM groups more opportunities to use CPU time. Free CPU time is
available for use by any FSS PRM group and is divided up between FSS PRM groups based on
relative number of CPU shares. As a result, tasks are given CPU time when needed, in proportion
to their stated importance, relative to others with a demand.
PRM itself has low system overhead.
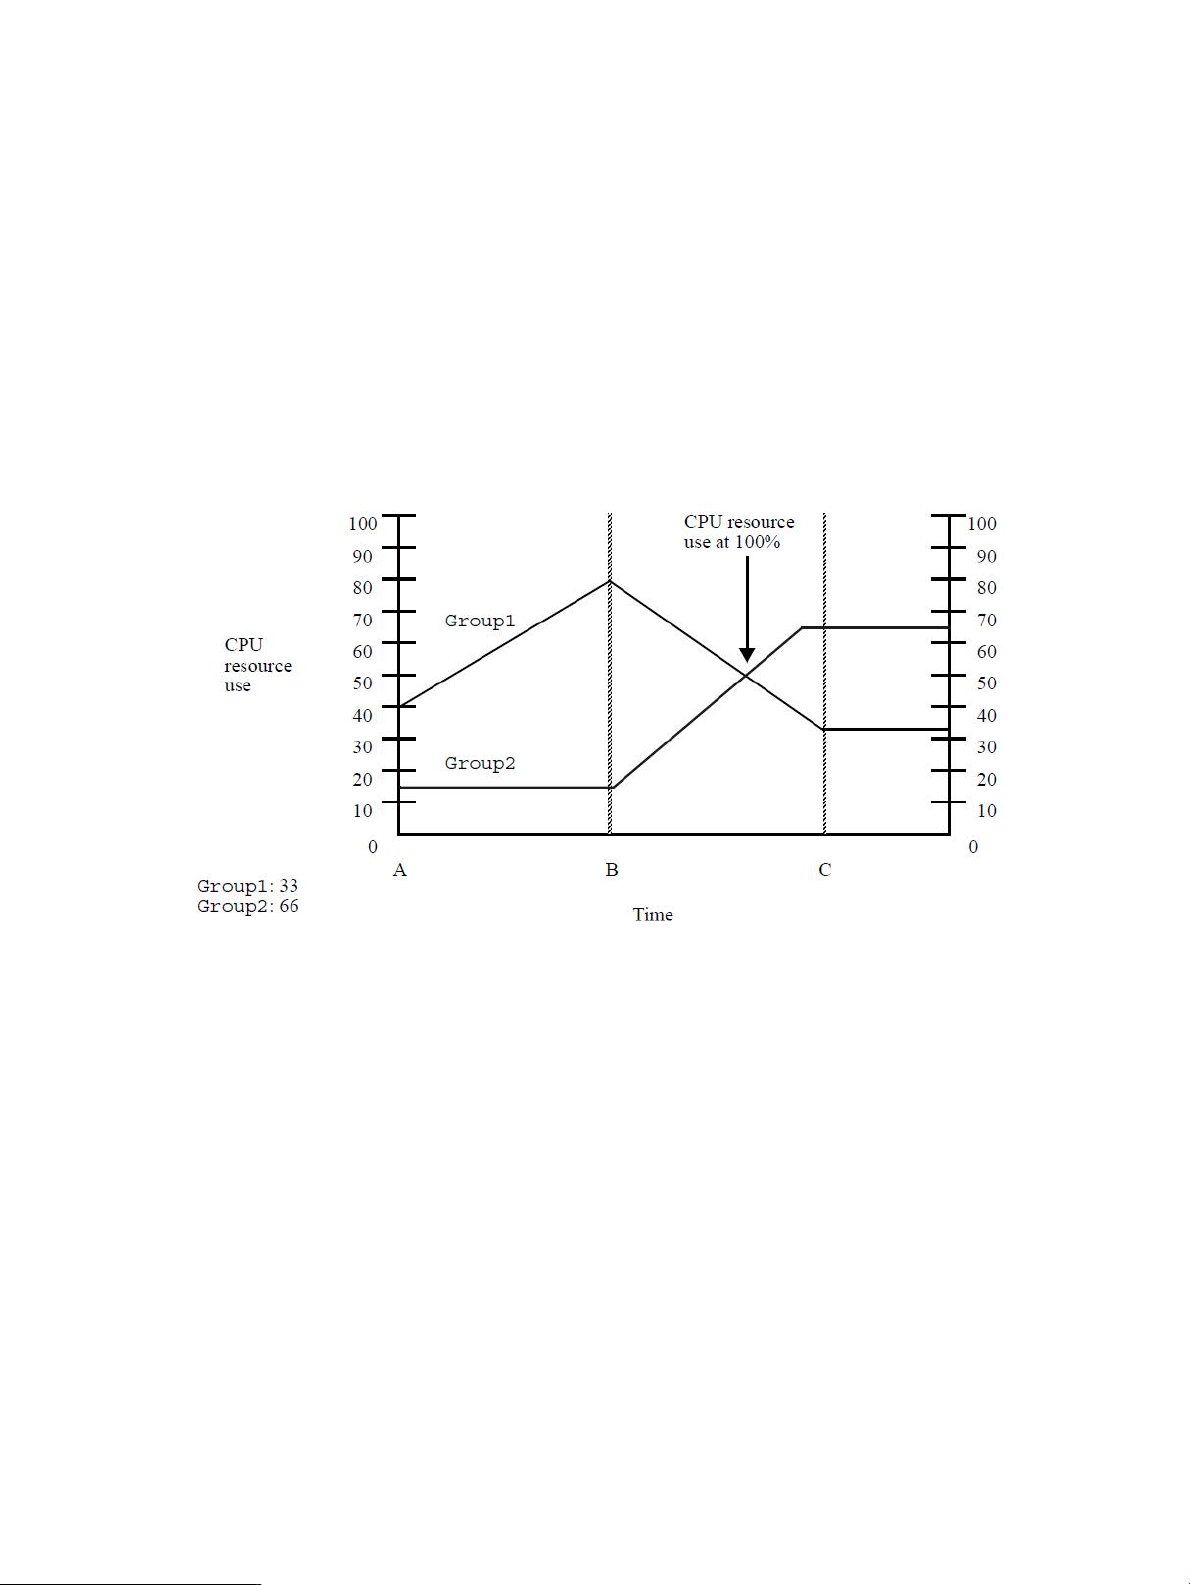
Example: PRM CPU resource management
Figure 2-2 illustrates PRM’s CPU resource management for two FSS PRM groups.
In this example, Group1 has 33 CPU shares, and Group2 has 66 CPU shares.
Note that the percentage of CPU resources referred to may not be total system CPU resources if
PSET PRM groups are configured. The percentage is of CPU resources available on the cores
assigned to the default PSET. If PSET PRM groups are not configured, then the available CPU
resources are the same as the system CPU resources.
Figure 6 PRM CPU resource management
At Time A:
• Group1 is using 40% of the available CPU resources, which is more than its share.
• Group2 is using 15% of the available CPU resources, which is less than its share.
• 45% of the available CPU resource are not used.
• PRM scheduling is not in effect.
At Time B:
• Group1’s processes are now using 80% of available CPU time, which consists of all of
Group1’s shares and an unused portion of Group2’s share.
• Group2 processes continue at a steady 15%.
• PRM scheduling is not in effect.
Between Time B and Time C:
• Group2’s demands start to increase.
• With available CPU resource use approaching 100%, PRM starts to have an effect on CPU
allocation.
• Both groups’ CPU resource use begins moving toward their assigned number of shares. In this
case, the increasing demand of Group2 causes Group1 to be pulled toward the 33% mark
despite its desire for more CPU resources.
How PRM manages CPU resources 23
Page 24

At Time C:
• CPU resource use for Group1 and Group2 is limited to the assigned shares.
After Time C:
• PRM holds each group to its assigned available CPU resource percentage until total available
CPU resource demand is less than 100%. This gives Group2 a priority for CPU resources
over Group1. In contrast, in the standard HP-UX scheduler, CPU time is allocated based upon
the assumption that all processes are of equal importance. Assuming there is one process
associated with each PRM group, the standard HP-UX scheduler would allocate each process
50% of the available CPU resources after Time C.
CPU allocation and number of shares assigned
When managing FSS PRM groups, PRM favors processes in groups with a larger number of CPU
shares over processes in groups with fewer CPU shares. Processes in FSS PRM groups with a larger
number of CPU shares are scheduled to run more often and are given more opportunities to consume
CPU time than processes in other FSS PRM groups. This preference implies that the process in an
FSS PRM group with a larger number of shares may have better response times with PRM than
with the standard HP-UX scheduler.
An FSS PRM group can use more than its configured CPU allocation when the system is at nonpeak
load—unless CPUCAPON mode is enabled or a per-group cap equal to its allocation has been
assigned. (For more information on capping options, see the next section, “Capping CPU resource
use” (page 24).)
Capping CPU resource use
PRM gives you two options for capping CPU resource use by FSS PRM groups:
• On a per-group basis
(Available for HP-UX 11i v3 and later.) For per-group capping, use the MAX field in the FSS
PRM group record (discussed in the section “Group/CPU record syntax” (page 55) ) for only
those groups you want to cap.
• For all FSS PRM groups in the configuration
The CPUCAPON mode, enabled through the prmconfig -M option discussed below, treats
the FSS PRM group’s minimum allocation as its maximum allocation.
When CPUCAPON mode is enabled, CPU capping is in effect for all user-configured FSS PRM
groups on a system—regardless of CPU load. Each FSS PRM group takes its entire CPU
allocation. Thus, no group can obtain more CPU resources.
The PRM_SYS group, however, is exempt from capping. If it gets CPU time and has no work,
the PRM scheduler immediately goes to the next FSS PRM group.
NOTE: Capping based on the CPUCAPON mode overrides per-group capping; however, using
both forms of capping at the same time is not recommended.
For PSET PRM groups, capping is a result of the number of cores assigned to the group.
Capping CPU usage can be a good idea when migrating users and applications to a new system.
When the system is first introduced, the few users on the system may become accustomed to having
all of the machine’s resources. However, by setting CPU caps early after the system’s introduction,
you can simulate the performance of the system under heavier use. Consequently, when the system
becomes more heavily used, performance is not noticeably less. For information on capping CPU
resource use, see “Specifying PRM groups/controlling CPU resource use” (page 54).
24 Understanding how PRM manages resources
Page 25

How PRM manages CPU resources for real-time processes
Although PRM is designed to treat processes fairly based upon their assigned shares, PRM does
not restrict real-time processes. Real-time processes using either the POSIX.4 real-time scheduler
(rtsched) or the HP-UX real-time scheduler (rtprio) keep their assigned priorities because timely
scheduling is crucial to their operation. Hence, they are permitted to exceed their group’s CPU
share and cap. The CPU resources they use are charged to their groups. Thus, they can prevent
other processes in their groups from running.
Hyper-Threading
Hyper-Threading, available starting with HP-UX 11i v3 (B.11.31), enables you to use multiple
execution threads per core. Each execution thread is a logical CPU.
PRM supports the Hyper-Threading feature for PSET PRM groups. When PRM creates new PSETs,
they inherit the Hyper-Threading state the system had before PRM was enabled. You can override
the inherited state, specifying the desired state in the PRM configuration using the PSET_ATTR field
in group records. For more information, see the section “Group/CPU record syntax” (page 55).
PRM sets the Hyper-Threading state for the default PSET, where FSS PRM groups are created, to
optimize workload performance.
NOTE: Do not change the value of a PSET’s LCPU attribute, using either psrset or kctune,
while PRM is running.
Multiprocessors and PRM
PRM takes into account architectural differences between multiprocessor (MP) and single-processor
systems.
In the case of memory management, Hewlett-Packard multiprocessor systems share the same
physical address space. Therefore PRM memory management is the same as on a single-processor
system.
However, in the case of CPU resource management, PRM makes accommodations for MP systems.
The normal HP-UX scheduling scheme for MP systems keeps the CPU load average at a uniform
level across the cores. PRM tries to even the mix of FSS PRM groups on each available CPU. (With
Hyper-Threading disabled, each core is seen as a CPU. With Hyper-Threading enabled, each core
can be seen as multiple, logical CPUs.) This is done by assigning each process in an FSS PRM
group to a different CPU, stepping round-robin through the available CPUs, with the CPUs being
cores or logical CPUs depending on whether Hyper-Threading is enabled. Only processes that
can be run or processes that are likely to run soon are actually assigned in this manner.
For example, on a two-way MP system with Hyper-Threading disabled, FSS PRM Group1 has two
active processes A and B, and FSS PRM Group2 has two active processes C and D. In this example,
PSET PRM groups are not configured. PRM assigns process A to the first core, process B to the
second core, process C to the first core, and finally process D to the second core—as shown in
Figure 7 (page 26).
How PRM manages CPU resources 25
Page 26

Figure 7 PRM’s process scheduling on MP systems (Hyper-Threading disabled)
If a process is locked down on a particular core, PRM does not reassign it, but does take it into
account when distributing other processes across the cores. PRM manages the CPU resource only
for the cores on a single system; it cannot distribute processes across cores on different systems.
As implied above, PRM provides a PRM group its entitlement on a symmetric-multiprocessing (SMP)
system with Hyper-Threading disabled by granting the group its entitlement on each core. If the
group does not have at least one process for each core, PRM compensates by proportionally
increasing the PRM group’s entitlements on cores where it does have processes. For example, a
PRM group with a 10% entitlement on a 4-core system, gets 10% of each core. If the group is
running on only one core because it has only one process, the 10% entitlements from the three
unused cores are given to the group on the core where it has the process running. Thus, it gets
40% on that one core.
NOTE: A PRM group on a system with Hyper-Threading disabled may not be able to get its
entitlement because it has too few processes. For example, if the PRM group above—with only
one single-threaded process—were to have a 50% entitlement for the 4-core system, it would never
get its entitlement. PRM would give the group an entitlement of 100% on two cores. However,
because the group has only the one thread, it can use only one core—resulting in a 25% entitlement.
How PRM manages real memory resources
Memory management refers to the rules that govern real and virtual memory and allow for sharing
system resources by user and system processes.
In order to understand how PRM manages real memory (both private and shared), it is useful to
understand how PRM interacts with standard HP-UX memory management.
How HP-UX manages memory
The data and instructions of any process (a program in execution) must be available to the core
by residing in real memory at the time of execution. Real memory is shared by all processes and
the kernel.
To execute a process, the kernel executes through a per-process virtual address space that has
been mapped into real memory. Memory management allows the total size of user processes to
exceed real memory by using an approach termed demand-paged virtual memory. Virtual memory
enables you to execute a process by bringing into real memory parts of the process only as needed
and pushing out parts of a process that have not been recently used.
26 Understanding how PRM manages resources
Page 27

The system uses a combination of paging and swapping to manage virtual memory. Paging involves
writing unreferenced pages from real memory to disk periodically.
Swapping takes place if the system is unable to maintain a large enough free pool of memory. In
such a case, entire processes are swapped. The pages associated with these processes can be
written out by the pager to secondary storage over a period of time.
The more real memory a system has available, the more data it can access and the more (or larger)
processes it can execute without having to page or cause swapping.
Available memory
A portion of real memory is always reserved for the kernel (/stand/vmunix) and its data structures,
which are dynamically allocated. In addition, memory is reserved for nonkernel system processes.
The amount of real memory that remains is available for user processes. This memory is known as
available memory and is the memory amount reported by prmavail. Available memory varies
over time. Because the size of the kernel varies depending on the number of interface cards, users,
and values of the tunable parameters, available memory varies from system to system.
For example, Table 7 (page 27) shows a system with 1024 Mbytes of physical memory.
Approximately 112 Mbytes of that memory is used by the kernel and its data structures, leaving
912 Mbytes of memory available for all processes, including system processes. In this example,
62 Mbytes are used by system processes, leaving 850 Mbytes of memory available for user
processes. PRM reserves 11% of the remaining memory in the example to ensure processes in
PRM_SYS have immediate access to needed memory. Although you cannot initially allocate this
reserve to your PRM groups, it is still available for your PRM groups to borrow from when needed.
So, in this example, the prmavail command would show 850 Mbytes of available memory before
PRM is configured, and 756 Mbytes of available memory after PRM is configured.
Table 7 Example of available memory on a 1024-Mbyte system
How PRM controls memory usage
PRM memory management allows you to prioritize how available memory is allocated to user and
application processes. This control enables you to ensure that critical users and applications have
enough real memory to make full use of their CPU time.
When PRM first starts and is configuring memory management, the PRM_SYS group (PRMID 0) is
in control of all usable memory on the system. The memory not needed by processes in PRM_SYS,
known as available memory, is the memory reported by prmavail. This remaining memory is
allocated to the other PRM groups, according to their entitlements. The amount of available memory
may fluctuate up or down based on the needs of the kernel, buffer cache, daemons, and other
processes in PRM_SYS.
PRM’s memory management is controlled by the daemon prm2d. This daemon uses an in-kernel
memory feature to partition memory (when a configuration is loaded), with each PRM group getting
a partition. Each partition includes x Mbytes of memory, where x Mbytes is equivalent to the
group’s entitled percent of the available memory or the requested, fixed-size shared memory
allocation. Each partition pages separately.
When system memory use is not at 100%, a PRM group that does not have its memory use capped
or isolated can freely borrow excess memory pages from other PRM groups. If a process requires
Memory typeMbyte
Physical memory available on the system1024
Memory available for all processes912
Memory available for user processes850
Memory available after PRM is configured756
How PRM manages real memory resources 27
Page 28

memory and its memory use is capped, processes in the same PRM group as the original process
are forced to page to free up memory.
When system memory use is at 100%, borrowed memory pages are returned to the owning PRM
groups if needed. The time involved for the borrowed memory pages to be returned is dependent
on the swap rate and the order in which old pages are paged out.
If a group is exceeding its memory shares on a system that is paging, prm2d uses proportional
overachievement logic. Overachievement for a group is the ratio of memory used to memory
entitlement. This value is then compared to the average overachievement of all groups. If a PRM
group is overachieving compared to the average, then the number of import pages for that group
is reduced. This allows other groups to start importing the newly available memory.
Groups are not allowed to exceed their memory caps.
NOTE: When an initial configuration requesting memory management is loaded (after installing
or resetting PRM), PRM initializes memory resource groups (MRGs) giving all usable memory to
PRM_SYS initially. Any free memory is then distributed to other PRM groups. This distribution of
memory for use by your PRM groups can be affected by:
• Heavy paging or swapping
• A single application using over half the lockable memory on the system
Such conditions may exist if memory-intensive applications start immediately after PRM is
configured—as may be the case with applications starting automatically at reboot.
You can possibly avoid these issues by:
• Starting these applications in their designated PRM groups with the prmrun command
• Using the PRM_SLEEP variable in your /etc/rc.config.d/prm file so that the application
manager and memory manager can place processes in their configured groups before the
heavy demand begins.
Reducing memory shares
If a PRM group’s memory share is reduced while the group is using most of its memory pages, the
reduction is not immediately visible. The memory must be paged out to the swap device. The time
involved for the reduction to take effect is determined by the memory transfer rate (for example, 2
Mbytes/second), and the order in which the old pages are paged out.
Therefore, when changing shares, give them time to take effect before implementing new shares
again.
Capping memory use
You can optionally specify a memory cap for a PRM group. This cap is a hard upper bound: a
PRM group cannot exceed its memory cap. Typically, you might choose to assign a memory cap
to a PRM group of relatively low priority, so that it does not place excessive memory demands on
the system. For information on setting a memory cap, see “Controlling memory use” (page 59) .
Implementation of shares and caps
In addition to specifying memory shares (a lower bound) for private memory, you can optionally
specify a memory cap (upper bound) for a PRM group.
It is important to note the difference between memory shares and a memory cap. Shares guarantee
the minimum amount of real memory that a group is allowed to consume at times of peak system
load. The memory cap is an upper bound.
28 Understanding how PRM manages resources
Page 29

Isolating a group’s private memory resources
In addition to specifying private memory shares, the prm2d memory manager allows you to
optionally specify a group’s private memory resources to be restricted from use by other groups
and processes on the system. This type of restriction is called memory isolation.
When a group’s memory shares are isolated, those memory shares cannot be loaned out to other
groups. Memory isolation also means that memory cannot be borrowed from other groups.
PRM allows groups that do not have memory isolation enabled to freely borrow memory from other
groups as needed. The lending groups are restricted in their giving by their physical entitlement
size. A group cannot lend its memory resources if memory isolation is enabled.
Memory isolation can be useful for applications that need dedicated memory resources, or that
tune their own memory needs based on their fixed allocation of resources.
How PRM manages shared memory
By default, all shared memory is allocated in the PRM_SYS group.
Starting with HP-UX 11i v2 Update 2 and PRM C.03.01, PRM can control shared memory allocations
on a PRM group basis. You only control shared memory for the groups that need it—you can omit
control for groups where shared memory control would not be helpful.
PRM does not allow borrowing or lending of shared memory as it is not beneficial. Similarly,
capping is not available for shared memory. You set a minimum size in megabytes for a group’s
shared memory allocation. (This allocation size is usually available from the configuration settings
for the consuming application, as is the case with the Oracle SGA size.)
How PRM manages locked memory
Real memory that can be locked (that is, its pages kept in memory for the lifetime of a process) by
the kernel, by the plock() system call, or by the mlock() system call, is known as lockable
memory.
Locked memory cannot be paged or swapped out. Typically, locked real memory holds frequently
accessed programs or data structures, such as critical sections of application code. Keeping them
memory-resident improves system performance. Lockable memory is extensively used in real-time
environments, like hospitals, where some processes require immediate response and must be
constantly available.
Locked memory is distributed based on the assigned memory shares. For example, assume a system
has 200 Mbytes of available memory, 170 Mbytes of which is lockable. Lockable memory divided
by available memory is 85%. If GroupA has a 50% memory share, it gets 100 Mbytes of real
memory. Of that amount, 85% (or 85 Mbytes) is lockable. Notice that 85 Mbytes/170 Mbytes is
50%, which is the group’s memory share. Figure 8 (page 30) illustrates this idea.
How PRM manages real memory resources 29
Page 30
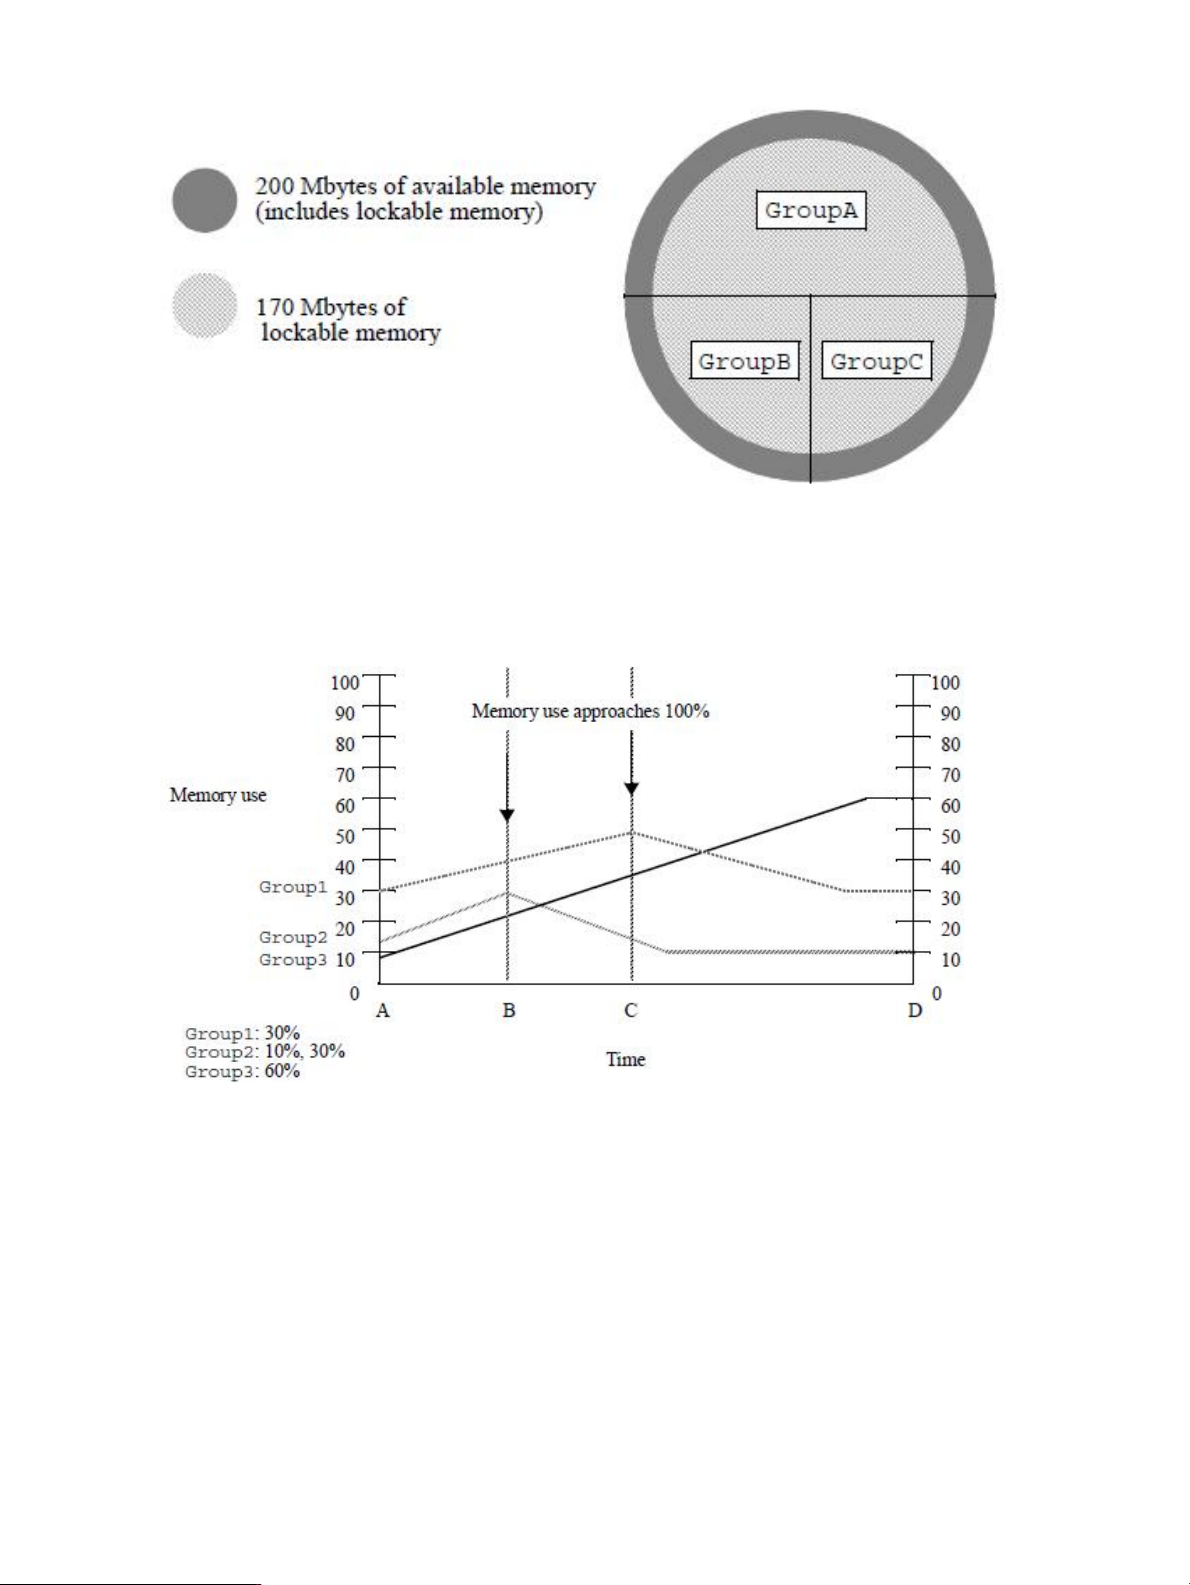
Figure 8 Locked memory distribution
Example: memory management
This example shows how the PRM memory manager prm2d manages the competing memory
demands of three PRM groups as system memory utilization approaches 100%.
Figure 9 Memory management
At Time A:
• There is plenty of memory available on the system for the processes that are running.
• Group1 is using its share, and Group2 is using slightly more than its share, borrowing excess
from Group3.
• Group3 is using much less than its share.
At Time B:
• System memory use approaches 100%.
• Group1 is borrowing excess memory from Group3.
• Group2 processes reach the group’s 30% memory cap. Consequently, Group2’s processes
are forced to page, causing a performance hit.
Between Time B and Time C, Group3’s demands continue to increase.
30 Understanding how PRM manages resources
Page 31

At Time C:
• System memory use is near 100%.
• Group3 is not getting sufficient memory and needs its loaned-out memory back. PRM then
determines which groups are overachieving with respect to their memory entitlement. In this
case, the increasing demand of Group3 causes Group1 and Group2 to be pulled toward
their shares of 30% and 10% respectively despite their desire for more memory. Group3 is
allowed to freely consume up to 60% of available memory, which it reaches at Time D.
After Time D:
• PRM now holds each group to its entitled memory percentage. If a group requests more
memory, the request is filled with pages already allocated to the group.
How resource allocations interact
You can assign different numbers of shares for CPU (for FSS PRM groups) and memory resources
to a PRM group depending on the group’s requirements for each type of resource. To optimize
resource use, it is important to understand the typical demands for resources within a PRM group.
For example, suppose the DesignTool application is assigned to PRM group DTgroup, and it is
the only application running in that group. Suppose also that the DesignTool application uses CPU
and memory resources in an approximate ratio of two to three. For optimal results, you should
assign the resource shares for DTgroup in the same ratio. For example, assign 10 CPU shares
and 15 memory shares or 20 CPU shares and 30 memory shares.
If the percentages assigned do not reflect actual usage, then a PRM group may not be able to fully
utilize a resource to which it is entitled. For instance, assume you assign 50 CPU shares and 30
memory shares to DTgroup. At times of peak system load, DTgroup is able to use only
approximately 20 CPU shares (although it is assigned 50 shares) because it is limited to 30 memory
shares. (Recall that DesignTool uses CPU and memory resources at a ratio of two to three.)
Conversely, if DTgroup is assigned 10 CPU shares and 30 memory shares, then at times of peak
system load, DTgroup is only able to utilize 15 memory shares (not its 30 shares), because it is
restricted to 10 CPU shares.
To use system resources in the most efficient way, monitor typical resource use in PRM groups and
adjust shares accordingly. You can monitor resource use with the prmanalyze command, the
prmmonitor command, or the optional HP product GlancePlus. For more information on
prmmonitor, see the prmmonitor(1) manpage.
For prmanalyze syntax information, see the section “prmanalyze ” (page 102). For usage
examples, see “Using prmanalyze to quickly identify resource use” (page 42) and “Using
prmanalyze to analyze your configuration” (page 83) .
How PRM manages applications
This section describes how PRM assigns processes to run in PRM groups. The following topics are
discussed:
• “How application processes are assigned to PRM groups at start-up” (page 32)
• “How PRM handles child processes ” (page 32)
• “Pattern matching for filenames” (page 32)
• “Pattern matching for renamed application processes” (page 33)
• “Precedence of PRM group assignments” (page 34)
When an application is started, it runs in the initial PRM group of the user that invoked it. If the
application is assigned to a PRM group by a record in the configuration file, the application
manager soon moves the application to its assigned group. A user who does not have access to
an application’s assigned PRM group can still launch the application as long as the user has
How resource allocations interact 31
Page 32

execute permission to the application. An application can be assigned to only one PRM group at
a time. Child processes inherit their parent’s PRM group. Therefore, all the application’s child
processes run in the same PRM group as the parent application by default.
You can explicitly place an application in a PRM group of your choosing with two commands.
Use the prmmove command to move an existing application to another group. Use the prmrun
command to start an application in a specified group.
These rules may not apply to processes that bypass login. See the section “Special case of interest:
Client/server connections” (page 99) for more details.
How application processes are assigned to PRM groups at start-up
Table 8 describes what PRM groups an application process is started in based on how the
application is started.
Table 8 PRM’s group assignments at process start-up
Process runs in PRM group as followsProcess initiated
By user
By at
By cron
Upon login
By prmrun {-gtargetgrp | -i}
By
prmrunapplication[LINEBREAK](-gtargetgrp
is not specified)
By prmmove {targetgrp| -i}
How PRM handles child processes
When they first start, child processes inherit the PRM groups of their parent processes. At
configurable polling intervals, the application manager checks the PRM configuration file against
all processes currently running. If any processes should be assigned to different PRM groups, the
application manager moves those applications to the correct PRM groups.
If you move a parent process to another PRM group (with the prmmove command), all of its child
processes remain in the original PRM group. If the parent and child processes should be kept
together, move them as a process group or by user login name.
Process runs in the user’s initial group. If the user does not have an initial
group, the process runs in the user default group, OTHERS. (If the process
has a compartment record, an application record, or a Unix group record,
it still starts in the invoking user’s initial group. However, the application
manager will soon move the process to its assigned group—with
compartment records taking precedence over application records, which
take precedence over Unix group records.)
Process runs in the PRM group specified by targetgrp or in the user’s
initial group. The PRM application manager cannot move a process started
in this manner to another group.
Process runs in the application’s assigned PRM group. If the application
does not have a group, an error is returned.
Process runs in the PRM group specified by targetgrp or in the user’s
initial group. The PRM application manager cannot move a process started
in this manner to another group.
Process runs in the parent process’s group.By another process
Pattern matching for filenames
Application filenames in application records can contain pattern matching notation as described
in the regexp(5) manpage. This feature allows you to assign all appropriate applications that reside
in a single directory to a PRM group—without creating an application record for each individual
application.
The wildcard characters ([, ], *, and ?) can be used to specify application filenames. However,
these characters cannot be used in directory names.
To assign all the applications in a directory to a PRM group, create an application record similar
to the following, with the filename specified only by an asterisk (*):
32 Understanding how PRM manages resources
Page 33

/opt/special_apps/bin/*::::GroupS
Filenames are expanded to their complete names when a PRM configuration is loaded. Explicit
application records take precedence over application records that use wildcards. If an application
without an explicit record is matched by several records that use pattern matching, the record
closest to the beginning of the configuration file is used.
Pattern matching for renamed application processes
Alternate names specified in application records can also contain pattern matching notation as
described in the regexp(5) manpage.
NOTE: Use pattern matching only when it is not practical to list all possible alternate names.
Many complex applications, such as database applications, may assign unique names to new
processes or rename themselves while running. For example, some database applications rename
processes based on the database instance, as shown in this list of processes associated with a
payroll database instance:
db02_payroll
db03_payroll
db04_payroll
dbsmon_payroll
dbwr_payroll
dbreco_payroll
To make sure all payroll processes are put in the same PRM group, use pattern matching in the
alternate names field of the application record, as shown below:
/usr/bin/database::::business_apps,db*payroll
For alternate names and pattern matching to work, the processes must share the same file ID. (The
file ID is based on the file system device and the file’s inode number.) PRM performs this check to
make sure that only processes associated with the application named in the application record
are put in a configured PRM group.
If there are multiple application records with alternate names that match an application name due
to redundant pattern matching resolutions, the “first” record to match the application name takes
precedence. For example, the application abb matches both of the following application records:
/opt/foo/bin/bar::::GroupA,a*
/opt/foo/bin/bar::::GroupB,*b
Because the *b record is first (based on ASCII dictionary order), the application abb would be
assigned to the PRM group GroupB.
You can also use an Extended Regular Expression, or ERE, as the alternate name in an application
record. (For more information, refer to the EXTENDED REGULAR EXPRESSION section in regexp(5)).
If you do so, the ERE should be the only alternate name in the record, and it should be within single
quotes. Other records can still have non-ERE alternate names for the same application. Note that
while non-ERE alternate names are matched against non-dash command-line arguments, Extended
Regular Expression alternate names are matched against the entire available command line. Note
that commas within an ERE are not separators for alternate names; they must match commas in
the command line.
NOTE: You cannot use colons in an ERE, as PRM uses colons for field separators.
If an ERE alternate name and a non-ERE alternate name both exist for the same application, the
non-ERE alternate name takes priority. If multiple ERE alternate names match, the “first” record to
match takes precedence. For example, the application abb matches both of the following application
records:
/opt/foo/bin/bar::::GroupA,’a.*’
/opt/foo/bin/bar::::GroupB,’.*b’
How PRM manages applications 33
Page 34

Because the ’.*b’ record is first (based on ASCII dictionary order), the application abb would
be assigned to the PRM group GroupB.
Knowing the names of all the processes spawned and renamed by the applications can help in
creating pattern matching that is only as general as it needs to be. Eliminate redundant name
resolutions whenever possible, and make sure pattern matching does not cause unwarranted moves.
For information on how alternate name pattern matching affects precedence, see the next section,
““Precedence of PRM group assignments” (page 34).”
Precedence of PRM group assignments
The PRM application manager checks that applications are running in the correct PRM groups
every interval seconds. The default interval is 30 seconds; however, you can change it as
explained in the section “Setting the application manager’s polling interval” (page 92).
The precedence of PRM record types—from highest to lowest—is:
1. Compartment record
2. Application record
3. User record
4. Unix group record
The PRM application manager goes through the following steps to determine in which PRM group
to place a process.
1. Manually moved processes
Leave manually moved processes (processes moved using prmrun or prmmove) in their
current PRM groups.
2. Compartment records
Move a process running in a secure compartment that is mapped to a PRM group using a
compartment record to the assigned PRM group.
3. Application records
If the file ID of the process matches the file ID for the full pathname of any application listed
in an application record in the current configuration, make the following checks:
a. If the process name is an exact match of an alternate name given in the application
record, move the application to the PRM group assigned in the record.
b. If the process name matches any of the alternate names specified by pattern (regular
expression) in application records, then:
• If it matches only one alternate name, move it to the PRM group specified in that
record.
• If it matches multiple alternate names specified by pattern, move the process to the
PRM group specified in the “first” matching record.
The “first” matching record is determined by sorting the alternate names specified
by pattern in lexicographical (ASCII dictionary) order.
c. Move the process to the PRM group specified in the application record that has no alternate
name.
4. Root processes
Move any process running as root to the PRM_SYS group (or to root’s initial group if explicitly
given in a user record).
5. User records
Move any process run by a nonroot user to the initial group assigned to the user in a user
record, assuming the initial group is other than (NONE).
34 Understanding how PRM manages resources
Page 35

6. Unix group records
If a record exists for the effective group ID of the process and the record indicates a PRM
group other than (NONE), move the process to the indicated PRM group.
7. Move the process to the OTHERS group.
To illustrate these rules, consider the following application records:
/bin/call_home::::GroupA
/bin/cal*::::GroupB
/bin/cal::::GroupC
/bin/c*::::GroupD
/bin/call_home::::GroupE,phone_home,tele*_home
/opt/foo/bin/bar::::GroupF
/opt/foo/bin/bar_none::::GroupG
/bin/call_home::::GroupZ,*home
Assume a user starts an application, my_favorite_app, without using prmrun:
% my_favorite_app
Because the application does not have an application record, it does not meet any of the criteria
above and starts in the invoking user’s PRM group.
Now assume the user starts the bar_none application, which has a record, but is started in a
group specified using prmrun.
% prmrun -g GroupA bar_none
In this case, the application manager determines that the application has been moved manually
and leaves it as is, in GroupA.
Next, assume the user launches the bar application, which also has an application record.
% bar
The application starts in the invoking user’s initial group. However, the application manager will
soon place the application in the group specified in the application record, GroupF.
The user then starts another program:
% phone_home
This application name is an exact match of an alternate name. If phone_home has the same file
ID as /bin/call_home, the phone_home process is placed in GroupE.
Another user on the system starts a program:
% telegraph_home
This application name matches two alternate names, both specified using regular expressions:
tele*_home and *home. Sorting based on the ASCII dictionary, the application matches *home
first. Assuming telegraph_home has the same file ID as /bin/call_home, it is placed in
GroupZ.
Starting one more program:
% call_home
The call_home command is matched by the first and eighth records. (The second and fourth
records do not match because PRM expands the regular expressions when the configuration is
loaded and finds call_home already has a record.) The eighth record takes precedence because
it has an alternate name, and the call_home process is placed in GroupZ.
NOTE: Be careful when constructing regular expressions: As shown with the eighth record above,
an expression that is not specific enough can override explicit application records.
Lastly, a user starts the following program:
% calendar
How PRM manages applications 35
Page 36

The second and fourth records both seem to match the calendar command. The expressions are
expanded in the order they appear in the configuration file. So, the second record is expanded
first and is used for the calendar process, placing it in GroupB.
36 Understanding how PRM manages resources
Page 37

3 PRM configuration planning
This chapter focuses on determining your PRM configuration needs. It explains:
• “Using multiple configurations” (page 37)
• “Selecting a configuration model” (page 37)
• “Identifying resource use ” (page 40)
• Using prmanalyze to quickly identify resource use
Using multiple configurations
Because PRM is configured using files, you can maintain numerous configurations using multiple
configuration files. These files are normally stored in the directory /etc/opt/prm/conf/, with the
owner set to hpsmh. You can then change your configuration at a particular time of day, on a
certain day of the week, or on any other schedule you can specify using the cron command.
As you read about the configuration models discussed in this chapter, remember that you can
change between the models by using multiple configuration files.
Specify a configuration file other than the default /etc/prmconf with the -f configfile option
to prmconfig or by selecting the alternate file in the PRM interface in HP System Management
Homepage or in HP Systems Insight Manager. For more information, see the section “prmconfig”
(page 106) or the online help.
Selecting a configuration model
Your PRM configuration should reflect some aspect of your business priorities. You may choose to
configure your system based on how much each user group funds the system (budget model).
Alternatively, you may configure the system to reflect the priorities of the applications that run on
it (application priority model). Perhaps, you will devise another configuration model.
In general, when planning a PRM configuration, you should determine:
1. Your total available memory, number of cores, number and throughput speed of disks.
2. Who the users are and what their needs are.
Whatever model you choose, it is important to identify the configuration model you want before
you begin to identify resource use and assign PRM groups and resource allocations.
Budget model configurations
In a budget model configuration, you create PRM groups and assign resource allocations that
reflect the funding each department provides for the system.
For example, suppose there are three departments using one four-core system:
• Department A with five users
• Department B with three users
• Department C with two users
If each department provides equal funding per user, a budget model configuration for PRM might
result in:
• User default group for guests and system administrator: [LINEBREAK]5 CPU shares and 5
memory shares
• Group A: 50 CPU shares, 50 memory shares
• Group B: 30 CPU shares, 30 memory shares
• Group C: 20 CPU shares, 20 memory shares
Using multiple configurations 37
Page 38

NOTE: Although the preceding example shows CPU and memory resources allocated equally
within each group, there is no requirement that these resource shares be equal.
If the funding from each department is done equally per department regardless of the number of
users, then an alternate budget model configuration for PRM might result in the following allocations:
• User default group for guests and system administrator: [LINEBREAK]5 CPU shares, 5 memory
shares
• Group A: 50 CPU shares, 50 memory shares
• Group B: 50 CPU shares, 50 memory shares
• Group C: 50 CPU shares, 50 memory shares
Another way of allocating the computing resources equally is to assign each department to an
isolated area using PSET PRM groups. In the following example, each department is allocated its
own core for CPU cycles. Memory is allocated equally using shares.
• User default group for guests and system administrator: 5 CPU shares, 5 memory shares
• Group A: Core 1, 50 memory shares
• Group B: Core 2, 50 memory shares
• Group C: Core 3, 50 memory shares
In the above example, you can also equally allocate memory shares using memory isolation. The
isolated groups will use only their entitlements. They will not loan out or borrow memory from other
groups.
NOTE: Although the preceding example shows each department receiving one core each, there
is no requirement that these PSET PRM groups allocate the same number of cores to each department.
Core 0, however, is reserved for FSS PRM groups within the default PSET.
Application priority model configurations
In an application priority model configuration, you create PRM groups and assign allocations that
reflect the relative importance of the application to your business as well as the resource needs of
the application. You can use tools such as prmanalyze, acctcom, and HP’s GlancePlus to help
you plan your configuration.
For example, suppose you have three departments that use a system. You have analyzed this
system over a period of time and observed the following list in order of descending priority:
• The sales department with five users running:
Order process application◦
◦ Word processing and miscellaneous tasks
◦ Mail application
• The planning department with three users running:
Inventory application◦
◦ Word processing and miscellaneous tasks
◦ Mail application
• The development department with two users running:
CAD design tool◦
◦ Debugging tools
◦ Compilers
38 PRM configuration planning
Page 39

◦ Word processing and miscellaneous tasks
◦ Mail application
Table 9 shows how much CPU and memory resources each application is using.
Table 9 CPU and memory resource usage
Application
and miscellaneous
Sales[LINEBREAK]CPU,
MEM
Planning CPU,
MEM
Total CPU useDevelopment[LINEBREAK]CPU,
MEM
Total memory
use
5%10%2%, 1%3%, 2%5%, 2%Mail
10%20%5%, 3%10%, 5%5%, 2%Word processing
15%20%--20%, 15%Order processing
15%10%-10%, 15%-Inventory
30%10%10%, 30%--Design tool
10%10%10%, 10%--Debugging tools
15%20%20%, 15%--Compilers
A resulting application priority configuration might be:
• Mail group (mail): [LINEBREAK]10 CPU shares, 5 memory shares
• User default group, word processing, and miscellaneous:[LINEBREAK]20 CPU shares, 10
memory shares
• Business applications group (order processing, inventory): [LINEBREAK]30 CPU shares, 30
memory shares
• Development tools group (design tool, debugger, compilers): [LINEBREAK]40 CPU shares, 55
memory shares
In this configuration, business applications are assigned to the business applications group, and
development tools are assigned to the development tools group. These two groups are given a
relatively large number of CPU and memory shares to ensure sufficient resources for the critical
applications during times of heavy system demand. Lower priority word processing and
miscellaneous tasks are run in the user default group, which has a small number of CPU and
memory shares. Mail, assigned to a separate group, is restricted to 10 CPU shares and 5 memory
shares during times of heavy system demand.
The work-load distribution can be refined further. If an application launches processes, the new
processes can be moved to different PRM groups. Thus, a database program that launches several
instances, for example, an inventory database and an order processing database, can have more
CPU and memory assigned to the order processing database. Create another group to give order
processing the 20 CPU shares it needs during peak processing times, and assign processes
associated with the order processing database to the new PRM group. Assign these processes
using an application record that has “order *” in the alternate name field. The application
manager moves the processes shortly after they are started by the main database application. The
new application priority would be:
• Mail group (mail): 10 CPU shares, 5 memory shares
• User default group, word processing, and miscellaneous: [LINEBREAK]20 CPU shares, 10
memory shares
• Order processing group (order processing): 20 CPU shares, 15 memory shares
• Inventory group (inventory): 10 CPU shares, 15 memory shares
• Development tools group (design tool, debugger, compilers): [LINEBREAK]40 CPU shares, 55
memory shares
Selecting a configuration model 39
Page 40

Suppose the business application group (order processing, inventory) runs a critical database that
requires on-demand, dedicated CPU cycles and memory. Create a PSET PRM group and assign
the appropriate number of cores to it. Also, isolate the group’s memory resources. The new
application priority would be:
• Mail group (mail): 10 CPU shares, 5 memory shares
• User default group, word processing, and miscellaneous: 20 CPU shares, 10 memory shares
• Business application group (order processing, inventory): Core 1 and 2; 50 isolated memory
shares
• Development tools group (design tool, debugger, compilers): 40 CPU shares, 55 memory
shares
NOTE: Because the business application group is a PSET PRM group using two of the system’s
cores, the FSS PRM groups get their CPU resource percentages calculated based on a reduced
number of cores.
Identifying resource use
After identifying the model you want to use to configure PRM, collect data to understand the
resources used in relation to that model. This includes CPU and memory resource needs for all the
PRM groups you plan to configure. You also need to know if your resource use pattern varies over
time, for example, reflecting business needs or cycles. For instance, do the needs of a particular
application change with your business cycle, such as activities at the end of a month, or do they
vary during a single day, from morning to afternoon to night operations?
Quick analysis
If you need to implement PRM immediately to provide adequate resources to critical applications
you could:
1. Identify CPU and memory resource needs for each application. For information on how to
collect this data, see “Using prmanalyze to quickly identify resource use” on (page 42) .
2. Create a PRM configuration file with a group for each high-priority application.
3. Assign all users to the user default group OTHERS (PRMID 1) as their initial group. (Use
prmloadconf -f to make these assignments automatically.)
For example, suppose you have three departments that use the system. However, the order
processing application used by the sales department is the most critical. The order processing
application uses up to 40% of the CPU resources and 30% of memory resources; the remainder
of the resources are distributed among the other applications.
A resulting configuration might be:
• User default group: 60 CPU shares, 70 memory shares
• Order processing group: 40 CPU shares, 30 memory shares
In this configuration, the order processing group is used only for the order processing application.
The user default group is configured as the initial group for users. Any applications other than
order processing are placed in the user default group and do not affect the order processing
application.
Suppose this is a 10-core system. Another configuration might use a PSET PRM group:
• User default group: 60 CPU shares, 70 memory shares
• Order processing group: Core 1, 2, 3, 4; 30 memory shares
In this configuration, the order processing group still has 40% of the total CPU resources, but four
specific cores are dedicated to it. The memory shares remain the same. Assuming this is not a
memory-intensive application, you do not need to isolate the memory shares.
40 PRM configuration planning
Page 41

Detailed analysis
The following steps outline a more detailed inspection of CPU and memory resource use. This
process is helpful to identify potential areas of conflict and ensure a workable PRM configuration.
The prmanalyze utility can be very useful for detailed investigation into resource use. For
information, see “Using prmanalyze to analyze your configuration” on (page 83) .
1. Collect resource data
To refine your configuration, collect the following data based on your configuration model
(either budget model or application priority model):
• The point in time (for example, time of day or time of month) that each potential PRM
group starts consuming CPU and memory resources.
• The length of time that each group consumes these resources.
• The amount of total resources consumed over time.
• Groups that have competing resource needs, that is, which users are actually trying to
use the same resource at the same time.
• The amount of resources that are being used by each group.
• The length of time that a potential conflict exists.
• If there is a high degree of probability that the conflict will occur when the CPU and
memory resources are fully utilized (100% load).
• If there is a cyclic pattern to conflicting groups contributing to 100% resource load.
• Each group’s proportion of CPU or memory resources at 100% load.
• If consuming groups are getting enough resource during times of 100% load.
• If response times are appropriate for representatives of each conflicting group.
2. Set up a preliminary configuration
With the preliminary data you have gathered, set up some PRM groups and assign them CPU
and memory resources, users, and applications, then observe system usage to determine:
• The PRM groups you need to match your configuration model.
• The initial and alternate PRM groups users need access to.
• The PRM groups that applications should be placed in to achieve a desired level of
performance.
3. Determine the resource allocations
To decide on the final resource allocation for your PRM groups:
1. Determine the allocations necessary for each group to get an appropriate level of
performance.
2. Separate out the highest level user groups.
3. Determine which user groups could demand lots of CPU and memory resources—if not
limited.
4. Extrapolate from current data to identify user groups that will have increased resource
needs in the future.
5. Determine the maximum CPU and memory resources that each group should get at peak
load.
Identifying resource use 41
Page 42

4. Make adjustments
After a trial period using the initial configuration, make adjustments to the configuration based
on the following:
1. Collect data again.
2. Does the data reflect what you want and expect?
3. Are there any new conflicts?
4. Are there any new user or business demands?
5. Are there specific times when you might benefit from changing your configurations
regularly?
Using prmanalyze to quickly identify resource use
The prmanalyze utility scans accounting files for information on the desired resource type (
memory or CPU) and orders the accounting records by the requested sort key (user, UNIX group,
command name, or PRMID).
This section focuses on the prmanalyze functionality that is relevant to quickly identifying resource
use. Command options are used, but not described, in this section. For information on the command,
see the section “prmanalyze ” (page 102).
NOTE: The following examples are for illustrative purposes only. They are not from an actual
machine.
1. Collect UNIX accounting data in a file (/var/adm/pacct by default) using accton filename
if you do not already have any accounting files. Ideally, collect the accounting data over a
period of one to seven days before using prmanalyze.
2. Use prmanalyze to create a summary CPU report, sorted by command and piped to a
reverse sort on the “% total” column:
#prmanalyze -s command -r cpu -p -t summary -1filename| sort -r +5
summary CPU report by command name : 57203 records processed
unique id processes ave secs peak secs total secs % total
mrkt_rsch 777 47198.00 13008184.00 2468339.00 34.03
financials 235 106583.00 24826696.00 1407889.00 19.41
web_browser 1359 12565.00 364533.00 1174329.00 16.19
sales_fcst 679 91231.00 788441.00 009676.00 13.92
f90com32 843 7573.00 104998.00 303193.00 4.18
vi 1743 1511.00 19840.00 125484.00 1.73
emacs 12 199219.00 639010.00 113879.00 1.57
The biggest CPU consumer is mrkt_rsch, a market research program. Because this program
helps determine priorities in product development, it should be placed in a PRM group of its
own. The second biggest consumer is financials. This is another critical program. It must
run to completion each day. It also gets its own PRM group. The next program, web_broswer,
also consumes a large amount of the CPU resources; however, it is not a critical application
and should not be allowed to consume 16% of the CPU resource during peak periods. It needs
to be placed in its own PRM group to restrict its resource use. The forecasting application
sales_fcst deserves its own PRM group to ensure it gets enough CPU resources. The last
three applications are not consuming significant amounts of CPU resources and do not require
their own PRM groups.
Creating PRM groups for the applications mentioned above, then assigning appropriate CPU
shares, the new PRM configuration is represented by Table 10.
42 PRM configuration planning
Page 43

Table 10 Initial configuration based on prmanalyze’s CPU report
CPU sharesPRM groupApplication
35Researchmrkt_rsch
20Financefinancials
5Webweb_browser
15Salessales_fcst
25OTHERSAll other applications
3. Generate group/CPU records and application records to implement the configuration decided
upon in Step 2.
4. Use prmanalyze to create a summary CPU report, sorted by user and piped to a reverse
sort on the “% total” column to determine if there are any critical users on the system that
may require their own PRM groups:
#prmanalyze -s uid -r cpu -x root -p -t summary -1filename| sort -r
+5
The -x root combination prevents prmanalyze from showing data for root processes,
which typically are placed in the PRM_SYS group (PRMID 0).
The output is omitted for brevity. However, assume the output shows that most of the sales
forecast data is entered by one or two users, consuming approximately 3% of the CPU
resources. For these users, create user records with sales_fcst as the initial PRM group.
Then increase the CPU shares for sales_fcst from 15 to 18.
Instead of adding a user record for each of these users, you could create only one user record.
This record would be for a new netgroup you define, say finance_dept. The netgroup
would include these users. Using a netgroup also simplifies updates when the staff changes.
For more information on using netgroups in user records, see “Specifying PRM users ” (page
71).
5. Use prmanalyze to create a summary memory report, sorted by command:
#prmanalyze -s command -r mem -p -t summary -1filename
summary memory report by command name : 2231 records processed
unique id processes ave KB peak KB KB minutes % total
mrkt_rsch 804 270.83 3132517.22 4273171.32 1.17
financials 759 4356.04 389279.46 107851933.76 29.53
f90com32 843 11921.09 16621.58 5003627.94 1.37
web_browser 98 8832.73 1076302.48 4930582.36 1.35
emacs 12 7.13 5009.34 3980988.79 1.09
vi 1743 7.00 7123.54 3688806.00 1.01
sales_fcst 779 349.81 1933.62 62490565.66 17.11
Based on this report, we can assign memory shares of 30 and 2 to the Finance and Web
PRM groups respectively. The peak usage is also worth noticing. The web_browser application
has a peak of approximately one Gbyte. This should be capped at 25% to prevent it from
consuming too much memory. Also, the research program peaks at three Gbytes, causing
poor response time for everyone. With a total of 4 Gbytes on the system, its group needs to
be limited. The Research PRM group is consequently capped at 50%. Table 11 shows the
configuration updated for memory management.
Table 11 Initial configuration based on prmanalyze’s memory report
3020Financefinancials
Using prmanalyze to quickly identify resource use 43
Memory capMemory sharesCPU sharesPRM groupApplication
50%1035Researchmrkt_rsch
Page 44

Table 11 Initial configuration based on prmanalyze’s memory report (continued)
Memory capMemory sharesCPU sharesPRM groupApplication
25%25Webweb_browser
2018Salessales_fcst
3822OTHERS
6. Generate memory records to implement the configuration decided upon in Step 5.
Use the data you have collected to configure PRM, as explained in Chapter 7.
44 PRM configuration planning
Page 45

4 Setting up PRM
This chapter explains how to set up PRM. It covers the following topics:
• “Installing PRM ” (page 45)
• “Setting PRM to start automatically at reboot ” (page 45)
Installing PRM
PRM is installed using the Software Distribution (SD) utilities. Installation of PRM typically requires
a kernel build and a reboot of the system. For more specific information, see the release notes,
which are available in the /opt/prm/newconfig/RelNotes/ directory. See the release notes on
http://docs.hp.com for the most up-to-date information.During installation, a minimal /etc/prmconf
file is created. After installation, PRM is unconfigured and disabled; the standard HP-UX resource
management still controls the system.
PRM is installed at /opt/prm/.
Setting PRM to start automatically at reboot
After rebooting your system, PRM is unconfigured and disabled if you have not previously configured
the PRM startup script.
To preserve your configuration across reboots, modify the variables in the PRM startup script
/etc/rc.config.d/prm to automatically configure PRM on reboot. This startup script configures PRM
using the file you specify in /etc/rc.config.d/prm. If you do not specify a file, PRM uses an internal
copy of the previous configuration file (either /var/tmp/PRM.prmconf or /var/tmp/PRM.prmconf.old
if PRM.prmconf is not present).
For information, see the file /etc/rc.config.d/prm or “Protecting the PRM configuration from reboots”
(page 98).
Installing PRM 45
Page 46

5 Using PRM with HP System Management Homepage
(SMH)
HP System Management Homepage (SMH) enables you to perform various system administration
tasks on a system through a single web interface. You can also configure and monitor PRM through
SMH.
Quick start to using PRM’s SMH interface
The following steps outline how to use PRM’s SMH interface. For more information on configuring
PRM using the SMH interface, see the PRM online help.
1. Determine which configuration model you are going to use.
For information on planning your configuration, see “PRM configuration planning ” (page
37).
2. Log in to HP System Management Homepage.
For more information, see the hpsmh(1M) manpage. Additional SMH documentation is available
on http://docs.hp.com by selecting the Network and Systems Management link.
3. Navigate to the PRM interface by following the links:
Tools -> Resource Management -> Manage PRM Groups
NOTE: If the above links are not present, run the following command:
#/opt/prm/bin/prmsmhconfig -c
and log in to SMH again as indicated in Step 2.
4. Create your configuration file.
For help in determining the resource allocations in your initial configuration, see “Using
prmanalyze to quickly identify resource use” on (page 42) .
For configuration tips, see “Configuration tips and requirements” (page 53).
To create configuration files, once you navigate to the PRM interface, select the Configure
tab.
For information on how to use SMH to create the configuration, see the online help.
5. Load the configuration.
There are two types of loads:
• Move processes to assigned groups
To initialize, moving user processes to the owners’ initial groups and moving applications
to their assigned groups
• Keep processes in current groups
To keep the existing assignments of users, processes, and groups
On the Configure tab, select the desired type of load and select the Load button. Any resource
managers needed based on the types of records in the configuration will be automatically
started.
6. Enable PRM.
On the Configure tab, in the Resource Manager Configuration area, change options as desired
for the loaded configuration file and then select the Apply button.
46 Using PRM with HP System Management Homepage (SMH)
Page 47

7. Confirm that the processes are running in the appropriate PRM groups:
#ps -efP
Quick start to using PRM’s SMH interface 47
Page 48

6 Using PRM with HP Systems Insight Manager (SIM)
This chapter discusses how you can use PRM with HP Systems Insight Manager (SIM), which
provides a single point of administration for multiple HP-UX systems. The PRM integration with HP
SIM allows system administrators at a SIM Central Management Server (CMS) to perform the
following PRM tasks on the nodes in the SIM cluster that have PRM installed:
• Monitor PRM Groups
• Configure PRM Groups
• Display Resource Usage
• List Resource Availability
What PRM tasks are available through SIM?
The following sections describe the PRM tasks available through SIM.
Monitor PRM Groups
Enables you to monitor PRM groups on the specified target nodes.
Configure PRM Groups
Enables you to create PRM groups on the specified target nodes.
Display Resource Usage
Executes the prmlist command on the specified target nodes. Command output as well as error
messages produced by prmlist are displayed in the SIM GUI.
For this task to display meaningful results, a valid configuration file must be loaded on the target
systems.
List Resource Availability
Executes the prmavail -p command on the specified target nodes. Command output as well as
error messages produced by prmavail -p are displayed on the SIM GUI.
This tool does not require a valid configuration on the target systems in order to produce meaningful
results.
Configuring user authorizations
You must be authorized in HP SIM to run the PRM tools. To configure user authorizations, you must
be logged into HP SIM as a user with Full Configuration Rights. Refer to mxuser(1M) for information
about viewing and setting configuration rights. Choose Options->Security->Users and Authorizations
from the HP SIM menu bar. Use the tabs to view and change the toolbox authorizations for each
user. For detailed information about creating and updating authorizations, refer to the HP SIM
online help. The following list defines the authorization provided by each of the toolboxes associated
with PRM:
PRM All Tools Authorize this toolbox on managed systems to allow users to monitor and
configure the PRM groups on those systems. Authorize on the CMS only if
the CMS will also be a managed system.
PRM Monitor Authorize this toolbox on managed systems to allow users to monitor the
PRM groups. Authorize on the CMS only if the CMS will also be a managed
system.
48 Using PRM with HP Systems Insight Manager (SIM)
Page 49

The following sections present examples showing how to configure authorizations based on the
user’s role.
Role: PRM administrator
With the authorizations from the table below, you can examine the configuration of all managed
systems through Virtualization Manager. You can monitor and configure the amount of CPU and
memory resources used by PRM groups on the CMS and managed systems.
Table 12 HP SIM toolboxes needed for PRM administrator role
Role: PRM operator
With the authorizations from the table below, you can examine the configuration of all managed
systems through Virtualization Manager. You can monitor the amount of CPU and memory resources
used by PRM groups on the CMS and managed systems. You cannot make any configuration
changes to the PRM groups.
Table 13 HP SIM toolboxes needed for PRM operator role
Systems AuthorizedToolbox
CMS and All Managed SystemsVSE Monitor
CMS and All Managed SystemsPRM All Tools
Systems AuthorizedToolbox
CMS and All Managed SystemsVSE Monitor
CMS and All Managed SystemsPRM Monitor
Quick start to using PRM’s SIM interface
The following steps outline how to use PRM’s SIM interface. For more information on configuring
PRM using the SIM interface, see the PRM online help.
1. Determine which configuration model you are going to use.
For information on planning your configuration, see “PRM configuration planning ” (page
37).
2. Log in to HP Systems Insight Manager by pointing your web browser to:
http://SIM_host:280
where SIM_host has SIM and the bundle PRMSIMTools C.03.03.01 or later installed.
SIM documentation is available on http://docs.hp.com by selecting the Network and Systems
Management link.
3. Navigate to the PRM interface by following the links:
Optimize -> Process Resource Manager -> Configure PRM Groups
NOTE: If the above links are not present, run the command
/opt/prm/bin/prminitconfig -a (or preferably /opt/vse/bin/vseinitconfig
-a if HP Virtual Server Environment Management Software A.03.00.00 or later is installed)
and log in to SIM again as indicated in Step 2. (Be aware that running vseinitconfig
-a will restart SIM.)
4. Create your configuration file.
For help in determining the resource allocations in your initial configuration, see “Using
prmanalyze to quickly identify resource use” on (page 42) .
Quick start to using PRM’s SIM interface 49
Page 50

For configuration tips, see “Configuration tips and requirements” (page 53).
To create configuration files, once you navigate to the PRM interface, select the Configure
tab.
For information on how to use SIM to create the configuration, see the online help.
5. Load the configuration.
There are two types of loads:
• Move processes to assigned groups
To initialize, moving user processes to the owners’ initial groups and moving applications
to their assigned groups
• Keep processes in current groups
To keep the existing assignments of users, processes, and groups
On the Configure tab, select the desired type of load and select the Load button. Any resource
managers needed based on the types of records in the configuration will be automatically
started.
6. Enable PRM.
On the Configure tab, in the Resource Manager Configuration area, change options as desired
for the loaded configuration file and then select the Apply button.
7. Confirm that the processes are running in the appropriate PRM groups:
#ps -efP
50 Using PRM with HP Systems Insight Manager (SIM)
Page 51

7 Configuring and enabling PRM on the command line
This chapter explains the tasks necessary to configure and enable PRM. Topics covered include:
• “Quick start to using PRM’s command-line interface” (page 51)
• “Configuring PRM” (page 52)
“The PRM configuration file” (page 52)◦
◦ “Configuration tips and requirements” (page 53)
◦ “Specifying PRM groups/controlling CPU resource use” (page 54)
◦ “Controlling memory use” (page 59)
◦ “Controlling applications” (page 65)
◦ “Specifying PRM users ” (page 71)
◦ “Assigning secure compartments to PRM groups ” (page 75)
◦ “Assigning Unix groups to PRM groups” (page 77)
◦ “Checking the configuration file ” (page 79)
◦ “Loading the PRM configuration ” (page 79)
• “Enabling resource managers” (page 80)
• “Updating the configuration ” (page 81)
Various PRM commands are mentioned in this chapter. See “Command reference” (page 101) for
information on these commands.
Quick start to using PRM’s command-line interface
The following steps outline how to use PRM’s command-line interface. Detailed information on
these topics is available in the remainder of the chapter.
1. Determine which configuration model you are going to use.
For information on planning your configuration, see “PRM configuration planning ” (page
37).
2. Create your configuration file. Use the prmloadconf command to create the default
/etc/prmconf configuration file (if it is not present).
For help in determining the resource allocations in your initial configuration, see “Using
prmanalyze to quickly identify resource use” on (page 42) .
3. Customize the configuration file manually in a text editor.
4. Check the syntax of the configuration file manually with -s or -c, as shown below. (The -c
checks are a subset of the -s checks.)
#prmconfig {-s | -c} [-fconfigfile]
Use the -f configfile option to specify a file other than the default /etc/prmconf.
5. Load the configuration using one of the commands below:
To initialize, moving user processes to the owners’ initial groups and moving applications to
their assigned groups, use the command:
#prmconfig -i [-fconfigfile]
To keep the existing assignments of users, processes, and groups, use the command:
#prmconfig -k [-fconfigfile]
Quick start to using PRM’s command-line interface 51
Page 52

6. Enable PRM:
#prmconfig -e
7. Confirm that the processes are running in the appropriate PRM groups:
#ps -efP
Configuring PRM
Configuring PRM is independent of enabling PRM. You can configure PRM without enabling it. In
such a state, PRM stamps processes with PRM group identifiers so that their resource usage can
be controlled when you enable the PRM CPU, memory, or application manager. For information
on how to enable PRM, see “Enabling resource managers” (page 80).
The following sections explain PRM’s configuration file and how to configure PRM.
The PRM configuration file
The PRM configuration file defines PRM groups and their resource shares. It also specifies which
PRM groups each user can access and which applications are assigned to PRM groups. The default
configuration file is /etc/prmconf; however, you can create and use alternate configuration files,
which are usually kept in the directory /etc/opt/prm/conf/, with the owner set to hpsmh.
The PRM configuration file contains the following record types:
• Group/CPU
• Memory
• Application
• User
• Compartment
• Unix group
Specify PRM groups and CPU allocations in group/CPU records. The configuration file must contain
a group/CPU record for each PRM group you want to create on your system. The file must also
contain a group/CPU record for any PRM group listed in a user or application record. Optionally,
define memory records to assign memory allocations for the groups. Use compartment records,
also optional, to map secure compartments to PRM groups. (Create secure compartment
configurations using the HP-UX feature Security Containment—or a PRM utility such as srpgen or
prm2scomp.) Use the optional Unix group records to map Unix groups on the system to PRM
groups.
Each PRM group is denoted by an identifier called a PRM group ID, or PRMID. The PRMID for an
FSS PRM group must be an integer between 0 and 63 (inclusive) or between 0 and 255 (inclusive)
starting with HP-UX v2 Update 2. PRMID 0 is reserved for the PRM_SYS group, and PRMID 1 is
reserved for the OTHERS group. PSET PRM group IDs are assigned by PRM. When using the PRM
interface in HP System Management Homepage or in HP Systems Insight Manager to create groups,
all PRMIDs are automatically assigned.
You do not need to specify PRM user records for all users on your system. Users without PRM user
records are automatically assigned to the user default group, OTHERS (PRMID 1).
Create application records for those applications requiring a certain level of resources. However,
you do not need to assign every application to a PRM group. An application without a PRM
application record runs in the initial PRM group of the invoking user.
For detailed syntax information on configuration files, see the prmconf(4) manpage.
52 Configuring and enabling PRM on the command line
Page 53

In addition to syntax requirements, it is important to keep the following configuration file requirements
in mind:
• PRM automatically assigns system processes to the group PRM_SYS (PRMID 0) and calculates
this group’s resource needs. You do not need to specify the PRM_SYS group in the PRM
configuration file.
NOTE: If you are configuring PRM to manage memory resources, the PRM configuration file
must not contain a PRM_SYS group. If the group is already present, delete it.
• The user default group, OTHERS (PRMID 1), is required in the PRM configuration file.
• Nonroot users cannot have access to the system group PRM_SYS (PRMID 0).
The default PRM configuration file, /etc/prmconf, is created automatically when you install PRM.
Execute the prmloadconf utility to create the /etc/prmconf file if it is not present. To create the
same configuration file with a name other than /etc/prmconf, use prmloadconf -f configfile,
specifying your preferred name in place of configfile. Keep alternate configuration files in the
directory /etc/opt/prm/conf/, with the owner set to hpsmh.
Use the configuration file created by prmloadconf as a template to establish your specific
configuration. Customize this file based on your configuration planning. Configuration planning
is discussed in “PRM configuration planning ” (page 37).
The generic configuration file contains:
• A PRM group/CPU record for the user default group, OTHERS (PRMID 1) and 100 CPU shares.
• A PRM user record for each user specified in the /etc/passwd file. Root users are assigned
to the group PRM_SYS. For each nonroot user, instead of placing the user in a PRM group,
a record is created using the placeholder (NONE). The typical PRM placement rules then
apply to the processes owned by the given user. (For information on the placement rules, see
“Precedence of PRM group assignments” (page 34).)
• On HP-UX 11i v2 (B.11.23) and later, a PRM compartment record for each active secure
compartment. Instead of mapping the compartment to a PRM group, each record uses the
placeholder (NONE). (You create secure compartments using the HP-UX feature Security
Containment. You can also create secure compartment configurations using a PRM utility such
as srpgen or prm2scomp.)
• A PRM Unix group record for each Unix group defined on the system. Instead of mapping
the Unix group to a PRM group, each record uses the placeholder (NONE).
If you add or modify users in /etc/passwd after installing PRM, execute prmloadconf to add
new PRM user records to your configuration file for the new or modified /etc/passwd entries.
These new PRM user records are created with the placeholder (NONE) instead of a PRM group.
Compartment records and Unix group records are also created. prmloadconf retains any
customization you have made to an existing configuration file.
Configuration tips and requirements
When altering a PRM configuration, keep in mind:
• Assigning memory shares to groups is optional. However, if do you assign memory shares,
you must assign them to all PRM groups. You cannot assign memory shares in a configuration
with PRM_SYS explicitly defined.
• The minimum CPU and memory shares are one. (Assigning one share is rarely a good idea
for any resource.)
• FSS PRM group PRMID numbers must be in a range from 0 to 63 or from 0 to 255 starting
with HP-UX 11i v2 Update 2. (PRMIDs for PSET PRM groups are assigned by PRM). PRMID 0
Configuring PRM 53
Page 54

is reserved for the system group, PRM_SYS. PRMID 1 is reserved for the user default group,
OTHERS. PRMID numbers must be uniquely assigned.
• PRM internally creates the group PRM_SYS (PRMID 0) and assigns system processes to it.
Therefore, you do not need to specify a PRM_SYS group in the PRM configuration file. If you
are upgrading an existing configuration file that contains a PRM_SYS group, delete this group.
• The PRMID 1 (default name OTHERS) group must appear in the PRM configuration file.
However, you do not need to assign any users to it.
• Users not listed in the configuration file will use the user default group, PRMID 1 (OTHERS),
as their initial group. If your implementation expects the user default group to carry a significant
load of users, the user default group should have an appropriate number of shares to meet
their needs.
• Root users can occupy any group.
• The configuration file must contain a group/CPU record for each PRM group you want to
create on your system and for all PRM groups listed in PRM user and application records.
• Do not set memory/CPU shares at opposite ends of the spectrum and expect to see the desired
percentages achieved. If a process cannot run, it cannot request I/O.
• Several NFS system processes run on behalf of network-generated requests. If these processes
consume substantial CPU and memory resources from the system group (PRM_SYS), consider
using the prmmove command to move these processes to their own PRM groups to free up
the system group.
• The internet services daemon, inetd, should be placed in a group other than the system
group if the services or their children are using too much CPU or memory resources.
• The user processes of some alternate login methods are not placed in their appropriate initial
PRM groups unless PRM’s application manager is running. See “Special case of interest:
Client/server connections” (page 99) for more information.
• Pattern matching of alternate names in application records should not generate redundant or
conflicting names.
Specifying PRM groups/controlling CPU resource use
You can change PRM groups and their CPU resource use as discussed in the following sections:
• “Adding/modifying PRM groups and CPU allocations ” (page 57)
• “Capping CPU resource use” (page 58)
• “Removing groups/CPU allocations” (page 58)
Reserved PRM groups
When defining your PRM groups, keep in mind that there are two groups reserved by PRM. The
reserved PRM group IDs (PRMIDs) are 0 and 1. The group designated by PRMID 0 is the PRM_SYS
group, or system group. This group is created automatically and serves as the PRM group for
system processes. When a PRM configuration is loaded, existing root logins stay in the PRM_SYS
group—unless they have a user record assigning them to other groups. Similarly, new root logins
are placed in PRM_SYS, unless a user record indicates otherwise.
By default, PRM gives PRM_SYS 100 CPU shares. If you assign 100 shares to the PRM groups
you create, PRM_SYS gets 50% (100/200) of the CPU resource. The PRM_SYS group must get
at least 20% of the CPU resource. Thus, if you assign more than 400 shares to your groups, the
total shares assigned is greater than 500, and the PRM_SYS group’s 100 shares do not represent
at least 20%. In this case, PRM scales the shares for your groups proportionately so they are less
than or equal to 400 shares.
54 Configuring and enabling PRM on the command line
Page 55

You can explicitly add the PRM_SYS (PRMID 0) group to a configuration file. However, if you
explicitly add the PRM_SYS group to a configuration file, it gets the CPU shares you assign it,
which must equate to at least 20%.
You cannot, however, assign memory shares to an explicitly defined PRM_SYS group. Consequently,
you also cannot specify memory shares for any other group in a configuration where the PRM_SYS
group is explicitly defined due to the required one-to-one correspondence between group/CPU
records and memory records. The PRM_SYS group is allowed to use as much memory as it needs.
If you do not explicitly add PRM_SYS to your configuration, it is created automatically and appears
in the output of prmmonitor -s and ps -P in parentheses: (PRM_SYS).
By default, all processes run by root (user ID of 0) are placed in the PRM_SYS group—unless the
processes have application records or are moved manually.
Do not consider the PRM_SYS group or its default shares when determining resource shares. The
shares you assign in a PRM configuration file divide what remains after PRM_SYS is granted its
resources. Typically, PRM_SYS resource use is minimal.
When CPU capping is enabled, the PRM scheduler does not schedule processes for the next PRM
group until the current group’s CPU time has elapsed. However, the PRM_SYS group is not required
to use its entire CPU time slice before the scheduler allocates time to the next PRM group. In effect,
this unused time is distributed to the other PRM groups according to their relative number of their
shares.
The PRMID 1 group, which is named OTHERS, is the default for users who do not have assigned
initial groups. You must explicitly define this group in your configuration file, although you do not
have to use the default name.
Group/CPU record syntax
This section explains the syntax of group/CPU records.
Group/CPU records specify PRM groups and their CPU allocations in your configuration file.
Group/CPU records have the following syntax for FSS PRM groups, hierarchical groups, and PSET
PRM groups, respectively:
GROUP:PRMID:SHARES:[MAX]:
GROUP:HIER:SHARES::
GROUP:PSET:::[CORES]:[CORE_LIST][:PSET_ATTR]
where
GROUP Specifies the PRM group name. The PRM group can be the traditional PRM group
(FSS PRM group) or a PSET PRM group.
The group name must contain at least one alphabetic character and contain no
more than 49 characters. Use names that are less than eight characters long for
optimal display when using the ps command.
In a hierarchy, an FSS PRM group’s full name is formed by combining its short
name with all of its ancestors’ group names, using a slash (“/”):
Development/Compilers/Fortran
You cannot use hierarchical grouping for PSET PRM groups.
Because PRM group names are limited to 49 characters, a hierarchy can have no
more than 25 components. Using single-character group names with each (but the
last) followed by a slash character (“/”), the hierarchy can go to a maximum depth
of 25 levels.
PRMID Specifies the FSS PRM group ID (PRMID). This number must be uniquely assigned
and can range from 0 to 63 or from 0 to 255 starting with HP-UX 11i v2 Update
2. (PRMID 0 is reserved. It is also known as the system group PRM_SYS and is
Configuring PRM 55
Page 56

automatically created by PRM. PRMID 1 is also reserved. It is known as the OTHERS
group and is the default for users without user records. You must create this group
explicitly.) PSET PRM group PRMIDs are assigned by PRM and are not specified
in the group record.
HIER Indicates the PRM group is a parent group in a hierarchy and that it has no PRMID.
The reserved group names OTHERS and PRM_SYS cannot be parent groups. Also,
you cannot use PRMID 0 for a child group. You can, however, use PRMID 1 for a
child group.
PSET Indicates the PRM group is a PSET PRM group. In this case, SHARES is not used.
Instead, use the CORES and CORE_LIST fields to specify the cores assigned to
the PSET.
NOTE: When you have PRM groups based on PSETs enabled:
• Do not modify the PSETs manually using the psrset command
• Do not adjust CPU counts in virtual partitions using the vparmodify command
• Do not adjust Instant Capacity (iCAP), Temporary Instant Capacity (TiCAP),
or Pay Per Use resources using the icapmodify or ppuconfig commands
• Do not perform online cell operations, using parolrad or any other interface,
while PRM is managing the system (For more information, see the WARNINGS
section in the prmconfig(1) manpage.)
SHARES Specifies the FSS PRM group’s CPU shares. Shares are integer values ranging from
one to MAXINT.
An FSS PRM group’s resource percentage is determined by its number of shares
relative to the sum of the shares for its set of sibling groups. If the total number of
shares is 100, each group’s shares represent the percent of CPU resources that
the group receives.
When CPUCAPON mode is enabled, the percentages computed from the SHARES
values of the FSS PRM groups are also used as caps. For information on this mode,
see the section “Capping CPU resource use” (page 58). You can enable per-group
CPU capping using the MAX field discussed next.
MAX (Available for HP-UX 11i v3 and later.) MAX is an upper bound for CPU consumption
for the FSS PRM group. It is an integer percent value, ranging from the percentage
determined by the group’s number of CPU shares to 100.
The sum of the max values in a configuration does not have to be 100%.
The percentage computed from the SHARES value, instead of the MAX value, is
used as the group’s upper bound when CPUCAPON mode is enabled. This mode
enables capping for all FSS PRM groups in the configuration. For more information
on this mode, see the prmconfig(1) manpage.
CORES Is the number of cores assigned to the PSET PRM group. (A core is the actual
data-processing engine within a processor. A single processor might have multiple
cores. A core might support multiple execution threads.) The range for this field is
from 0 to MAX_CORE-1. The number of cores must agree with the number of cores
in CORE_LIST, if CORE_LIST is specified. If it is not specified, PRM chooses
which cores to use. However, PRM does not guarantee to choose an optimal set
of cores.
CORE_LIST Is the comma-delimited list of core IDs for the cores to be assigned to the PSET PRM
group. You cannot specify core ID 0 in CORE_LIST. The number of cores specified
in the CORES field must match the number of cores listed in CORE_LIST.
56 Configuring and enabling PRM on the command line
Page 57

PSET_ATTR Passes attributes for the specified PSET to HP-UX. (For a complete attribute list, see
the -t option in the psrset(1M) manpage.) The only attribute currently available
is the logical CPU (Hyper-Threading) feature, available starting with HP-UX 11i v3
(B.11.31). Set this attribute as follows:
LCPU=ON Explicitly enables Hyper-Threading
LCPU=OFF Explicitly disables Hyper-Threading
If PSET_ATTR is not specified, a nondefault PSET inherits the
Hyper-Threading state the system had before PRM was enabled.
(The state from before PRM was enabled is used because PRM may
change the Hyper-Threading setting for PSET 0, where FSS PRM
groups are created, to optimize workload performance.)
Consider the following example group/CPU records:
# PRM group records
OTHERS:1:20::
databases:HIER:30::
databases/inventory:2:10::
databases/order:3:20::
development:4:40::
mailserver:5:10::
management:PSET:::2:3,4
These group/CPU records define:
• A user default group (PRMID 1) with the name OTHERS. This group is granted 20 CPU shares.
• A databases hierarchical FSS PRM group to house the inventory and order databases.
• An inventory FSS PRM group (PRMID 2) in the databases hierarchy. This group is granted
10 CPU shares.
• An order processing FSS PRM group (PRMID 3) in the databases hierarchy. This group is
granted 20 CPU shares.
• An FSS PRM group development (PRMID 4) with 40 CPU shares.
• An FSS PRM group mailserver (PRMID 5) with 10 CPU shares.
• A management PSET PRM group with two cores assigned. The specific cores assigned are
Core 3 and Core 4.
Adding/modifying PRM groups and CPU allocations
To add or modify a group/CPU record, follow these steps:
1. Open the desired configuration file in a text editor.
2. Add or modify a line specifying the group name, PRMID, HIER or PSET keyword, and CPU
allocations. Use the syntax shown below:
GROUP:PRMID:SHARES:[MAX]:
GROUP:HIER:SHARES::
GROUP:PSET:::[CORES]:[CORE_LIST][:PSET_ATTR]
and explained in the section “Group/CPU record syntax” (page 55).
3. Add or modify memory records as needed. For more information, see “Controlling memory
use” (page 59) .
4. Save the file and exit your editor.
5. Load the configuration using one of the following commands:
To initialize, moving user processes to the owners’ initial groups and moving applications to
their assigned groups, use the command:
Configuring PRM 57
Page 58

#prmconfig -i [-fconfigfile] {-s | -c}
To keep the existing assignments of users, processes, and groups, use the command:
#prmconfig -k [-fconfigfile] {-s | -c}
Use the -f configfile option to specify a file other than the default /etc/prmconf. The -s
option displays warnings regarding the configuration file. (The -c option displays a subset
of the -s warnings.)
6. Enable PRM’s CPU manager if it is not already enabled:
#prmconfig -e CPU
Alternatively, enable all PRM resource managers using prmconfig -e without any additional
arguments:
#prmconfig -e
Capping CPU resource use
CPU capping allows you to limit the amount of CPU resources that FSS PRM groups use. PRM
provides two types of CPU capping:
• On a per-group basis
(Available for HP-UX 11i v3 and later.) For per-group capping, use the MAX field in the FSS
PRM group record (discussed in the section “Group/CPU record syntax” (page 55)) for only
those groups you want to cap.
• For all FSS PRM groups in the configuration
The CPUCAPON mode, enabled through the prmconfig -M option, is discussed below. In
this mode, PRM treats the minimum allocation for each FSS PRM group as its maximum
allocation.
The syntax for a FSS group/CPU record is:
GROUP:PRMID:SHARES:[MAX]:
When you cap CPU resource use via CPUCAPON mode, the percentages computed from the SHARES
values of the FSS PRM groups are also used as caps. The mode is in effect for all user-configured
FSS PRM groups on a system when enabled, regardless of system load. This mode, however, does
not affect the PRM_SYS group. PSET PRM groups are capped on CPU resource use as a result of
the number of cores assigned to the group.
Turn on CPU capping by entering the command:
#prmconfig -M CPUCAPON
Turn off CPU capping by entering the command:
#prmconfig -M CPUCAPOFF
Using prmconfig -r or prmconfig -d CPU also turns CPU capping off.
Removing groups/CPU allocations
To remove group/CPU allocations with a text editor:
1. Open the configuration file in a text editor.
2. Remove the line corresponding to the group/CPU record you wish to remove. If the group is
a parent group, you will need to remove all the child groups first. Group/CPU records have
one of the following forms:
GROUP:PRMID:SHARES:[MAX]:
GROUP:HIER:SHARES::
GROUP:PSET:::[CORES]:[CORE_LIST][:PSET_ATTR]
58 Configuring and enabling PRM on the command line
Page 59

3. Remove or modify application, memory, or user records that referenced the PRM group removed
in Step 2.
4. Save the file and exit the text editor.
5. Load the configuration using one of the following commands:
To initialize, moving user processes to the owners’ initial groups and moving applications to
their assigned groups, use the command:
#prmconfig -i [-fconfigfile] {-s | -c}
To keep the existing assignments of users, processes, and groups, use the command:
#prmconfig -k [-fconfigfile] {-s | -c}
Use the -f configfile option to specify a file other than the default /etc/prmconf. The -s
option displays warnings regarding the configuration file. (The -c option displays a subset
of the -s warnings.)
6. Enable PRM’s CPU manager if it is not already enabled:
#prmconfig -e CPU
Alternatively, enable all PRM resource managers using prmconfig -e without any additional
arguments:
#prmconfig -e
Controlling memory use
You can define private memory shares and caps for existing PRM groups as well as allocate shared
memory as discussed in the following sections:
• “Adding/modifying private memory shares/caps ” (page 62)
• “Adding/modifying shared memory allocations ” (page 62)
• “Removing private memory shares ” (page 63)
• “Removing shared memory allocations ” (page 63)
• “Isolating private memory for a group ” (page 64)
Memory record syntax
This section explains the syntax of memory records. PRM can control allocation of both private
and shared memory. The PRM configuration file has separate record types for allocating memory,
based on whether the memory is private or shared. The syntax for each of these records is discussed
below.
NOTE: Do not perform online cell operations, using parolrad or any other interface, when
PRM is managing memory. For more information, see the WARNINGS section in the prmconfig(1)
manpage.
Private memory
Private memory records define real memory shares and caps. They also allow you to isolate the
memory of a group.
Memory records are optional. However, if you use PRM memory management, you must have one
memory record that corresponds to each group/CPU record. A memory record corresponds to a
group/CPU record when the PRMIDs or group names match.
Configuring PRM 59
Page 60

NOTE: Note that each memory record must be preceded by the #! characters. These lines are
not treated as comments.
A white paper, titled HP Process Resource Manager memory resource groups: Memory calculation,
on the web at http://h20338.www2.hp.com/hpux11i/downloads/5983-1676EN.pdf presents
a case study of setting memory allocations for PRM groups.
Use the following syntax to specify a memory record:
#!PRM_MEM:{PRMID|GROUP}:SHARES:[MAX]:::[[IMPORT]:[EXPORT]:]
where
#!PRM_MEM Indicates the start of a memory record.
PRMID | GROUP Is a PRM group ID or group name that corresponds to an existing group.
When specifying parents in a group hierarchy, use their names.
SHARES Specifies the group’s guaranteed proportion of available memory. Shares
are integer values ranging from one to MAXINT.
MAX (Optional) Specifies a cap (upper bound) for memory consumption for any
non-HIER PRM group. This integer value represents a percentage and must
be greater than or equal to the percentage determined by the group’s
number of memory shares. There is no requirement that the max values
total 100%.
IMPORT, EXPORT Allow a PRM group to borrow or lend memory resources. Leave both fields
blank to allow unrestricted borrowing and lending. (Leaving the fields blank
enables the proportional overachievement feature.) Assign both fields a
value of 0 to isolate a memory-critical group to ensure it gets exactly the
memory you give it.
You cannot set EXPORT to 0 for the OTHERS group.
NOTE: If you add memory records to the PRM configuration file, your configuration file must not
contain a PRM_SYS (PRMID 0) group. If the group is already present, delete it.
Consider the following example memory records:
# PRM memory records
#!PRM_MEM:1:10:25:::
#!PRM_MEM:databases:30::::
#!PRM_MEM:databases/inventory:15::::
#!PRM_MEM:3:15::::
#!PRM_MEM:4:55::::
#!PRM_MEM:5:5:15:::
#!PRM_MEM:6:20::::0:0:
The example shows:
• A memory record for PRMID 1 (group OTHERS), which specifies 10 memory shares. The
memory cap is 25%.
• The parent group databases starts a hierarchy and is granted 30 memory shares to be
divided by its child groups.
• A memory record for the databases/inventory group. Rather than using its name, we
could have used its PRMID, which is 2, as we see from the example in the section “Group/CPU
record syntax” (page 55). This record specifies 15 memory shares. No memory cap is set.
• A memory record for PRMID 3. We could have used the group’s name, databases/order,
in place of the PRMID. This record specifies 15 memory shares. No memory cap is set.
• A memory record for PRMID 4, which grants 55 memory shares. No memory cap is set.
60 Configuring and enabling PRM on the command line
Page 61

• A memory record for PRMID 5, which grants 5 memory shares. The memory cap is 15%.
• A memory record for PRMID 6, which grants 20 memory shares. The memory is isolated—the
group cannot loan or borrow available memory.
Shared memory
A shared memory record is a request that PRM try to keep a minimum number of megabytes of
physical memory available for use as shared memory for the specified PRM group. (As pages in
the shared memory segment are paged out, PRM will attempt to maintain the requested amount
of physical memory for the PRM group. To maintain the current PRM group’s physical memory,
memory in other PRM groups may be paged out more aggressively. PRM does not provide any
method for limiting the shared memory available to a PRM group.)
PRM groups without a shared memory record default to PRM_SYS for shared memory allocation.
NOTE: Note that each shared memory record must be preceded by the #! characters. These
lines are not treated as comments.
The shared memory control feature is supported on HP-UX 11i v2 Update 2 and later.
Use the following syntax to specify a shared memory record:
#!SHARED_MEM:{PRMID|GROUP}:MEGABYTES
where
#!SHARED_MEM Indicates the start of a shared memory record.
PRMID | GROUP Is a PRM group ID or group name for a group that already has a private
memory record. This group ID or group name cannot correspond to a parent
group in a PRM group hierarchy.
You can selectively specify shared memory records: Not every PRM group
must have one.
MEGABYTES Is the size of the desired shared memory allocation for the PRM group in
megabytes. This value serves as a request for a minimum allocation.
The size should reflect the needs of the application in the PRM group. Shared
memory management is optimized for one shared memory segment, such
as one Oracle SGA, per PRM group.
NOTE: If the PRM group uses a larger shared memory segment, it must
borrow the difference. It attempts to borrow the difference from its private
memory allocation first, then from other user-defined PRM groups, and then
from the PRM_SYS group. You should avoid this borrowing, if possible, by
determining how much shared memory a workload allocates and then setting
MEGABYTES to 1.1 times that size.
The minimum MEGABYTES value corresponds to the page size. (Page sizes
can be 4KB, 8KB, 16KB, or 64KB. You must have at least 256 pages, so
the minimum MEGABYTES values are 1, 2, 4, or 16 depending on the
system’s page size.) The maximum value is limited by the available megabyte
value reported by prmavail minus the MEGABYTES values for all shared
memory records and the megabyte value corresponding to the sum of the
SHARES amounts for all memory records.
Consider the following example memory records:
# PRM shared memory records
#!SHARED_MEM:2:10
#!SHARED_MEM:tools/compilers:10
Configuring PRM 61
Page 62

The example shows:
• A memory record for PRMID 2, which specifies 10 megabytes of memory.
• A memory record for the tools/compilers group. This record specifies 10 megabytes for
the group.
Adding/modifying private memory shares/caps
To add or modify a memory record, follow these steps:
1. Open the desired configuration file in a text editor.
2. Using the syntax shown below:
#!PRM_MEM:{PRMID|GROUP}:SHARES:[MAX]:::[[IMPORT]:[EXPORT]:]
and explained in the section “Memory record syntax” (page 59):
a. Add or modify a line specifying a PRMID or group name for an existing group.
b. Specify an integer number of shares.
c. Optionally, assign a memory cap. This cap must be greater than or equal to the percentage
represented by the number of shares specified in Substep b. (Memory caps do not have
to sum to 100%.)
d. Optionally, isolate the memory by specifying an IMPORT and EXPORT value of 0.
NOTE: You cannot set EXPORT to 0 for the OTHERS group.
3. Ensure that there is a one-to-one correspondence between the memory records and group/CPU
records.
4. Save the file and exit your editor.
5. Load the configuration using one of the commands below.
To initialize, moving user processes to the owners’ initial groups and moving applications to
their assigned groups, use the command:
#prmconfig -i [-fconfigfile] {-s | -c}
To keep the existing assignments of users, processes, and groups, use the command:
#prmconfig -k [-fconfigfile] {-s | -c}
Use the -f configfile option to specify a file other than the default /etc/prmconf. The -s
option displays warnings regarding the configuration file. (The -c option displays a subset
of the -s warnings.)
6. Enable PRM’s memory manager if it is not already enabled:
#prmconfig -e MEM
Alternatively, enable all PRM resource managers using prmconfig -e without any additional
arguments:
#prmconfig -e
Adding/modifying shared memory allocations
To add or modify a shared memory record, follow these steps:
1. Open the desired configuration file in a text editor.
2. Using the syntax shown below:
#!SHARED_MEM:{PRMID|GROUP}:MEGABYTES
and explained in the section “Memory record syntax” (page 59):
a. Add or modify a line specifying a PRMID or group name for an existing group.
b. Specify the size of the shared memory allocation in integer megabytes.
62 Configuring and enabling PRM on the command line
Page 63

3. Save the file and exit your editor.
4. Load the configuration using one of the commands below.
To initialize, moving user processes to the owners’ initial groups and moving applications to
their assigned groups, use the command:
#prmconfig -i [-fconfigfile] {-s | -c}
To keep the existing assignments of users, processes, and groups, use the command:
#prmconfig -k [-fconfigfile] {-s | -c}
Use the -f configfile option to specify a file other than the default /etc/prmconf. The -s
option displays warnings regarding the configuration file. (The -c option displays a subset
of the -s warnings.)
5. Enable PRM’s memory manager if it is not already enabled:
#prmconfig -e MEM
Alternatively, enable all PRM resource managers using prmconfig -e without any additional
arguments:
#prmconfig -e
Removing private memory shares
To remove a memory record manually:
1. Open the configuration file in a text editor.
2. Remove the line corresponding to the memory record you wish to remove. Memory records
have the following form:
#!PRM_MEM:{PRMID|GROUP}:SHARES:[MAX]:::[[IMPORT]:[EXPORT]:]
3. (Optional) Adjust the memory shares of the remaining records to ensure their resource
allocations are as desired.
4. Ensure there is still a one-to-one correspondence between memory records and group/CPU
records if there are any memory records still present in the configuration.
5. Save the file and exit the text editor.
6. Load the configuration using one of the following commands:
To initialize, moving user processes to the owners’ initial groups and moving applications to
their assigned groups, use the command:
#prmconfig -i [-fconfigfile] {-s | -c}
To keep the existing assignments of users, processes, and groups, use the command:
#prmconfig -k [-fconfigfile] {-s | -c}
Use the -f configfile option to specify a file other than the default /etc/prmconf. The -s
option displays warnings regarding the configuration file. (The -c option displays a subset
of the -s warnings.)
7. Enable PRM’s memory manager if it is not already enabled:
#prmconfig -e MEM
Alternatively, enable all PRM resource managers using prmconfig -e without any additional
arguments:
#prmconfig -e
Removing shared memory allocations
To remove a memory record manually:
1. Open the configuration file in a text editor.
Configuring PRM 63
Page 64

2. Remove the line corresponding to the shared memory record you wish to remove. Shared
memory records have the following form:
#!SHARED_MEM:{PRMID|GROUP}:MEGABYTES
3. Save the file and exit the text editor.
4. Load the configuration using one of the following commands:
To initialize, moving user processes to the owners’ initial groups and moving applications to
their assigned groups, use the command:
#prmconfig -i [-fconfigfile] {-s | -c}
To keep the existing assignments of users, processes, and groups, use the command:
#prmconfig -k [-fconfigfile] {-s | -c}
Use the -f configfile option to specify a file other than the default /etc/prmconf. The -s
option displays warnings regarding the configuration file. (The -c option displays a subset
of the -s warnings.)
5. Enable PRM’s memory manager if it is not already enabled:
#prmconfig -e MEM
Alternatively, enable all PRM resource managers using prmconfig -e without any additional
arguments:
#prmconfig -e
Isolating private memory for a group
To isolate memory for a group, follow these steps:
1. Open the desired configuration file in a text editor.
2. Using the syntax shown below:
#!PRM_MEM:{PRMID|GROUP}:SHARES:[MAX]:::[[IMPORT]:[EXPORT]:]
and explained in the section “Memory record syntax” (page 59):
a. Find the memory record in the configuration file you wish to modify.
b. Set the EXPORT and IMPORT fields to zero.
NOTE: You cannot set EXPORT to 0 for the OTHERS group.
3. Save the file and exit your editor.
4. Load the configuration using one of the following commands:
To initialize, moving user processes to the owners’ initial groups and moving applications to
their assigned groups, use the command:
#prmconfig -i [-fconfigfile] {-s | -c}
To keep the existing assignments of users, processes, and groups, use the command:
#prmconfig -k [-fconfigfile] {-s | -c}
Use the -f configfile option to specify a file other than the default /etc/prmconf. The -s
option displays warnings regarding the configuration file. (The -c option displays a subset
of the -s warnings.)
5. Enable PRM’s memory manager if it is not already enabled:
#prmconfig -e MEM
Alternatively, enable all PRM resource managers using prmconfig -e without any additional
arguments:
#prmconfig -e
64 Configuring and enabling PRM on the command line
Page 65

Controlling applications
You can specify the PRM group each application can run in as discussed in the following sections:
• “Adding/modifying an application’s group assignment ” (page 67)
You can remove an application’s group assignment as discussed in the following sections:
• “Removing an application’s group assignment ” (page 68)
Duplicate application records
Be careful to avoid duplicating application records. A duplicate record specifies the same
application and alternate name (if any) as another record, but uses a different PRM group. The
application is the same if the file ID or pathname matches. The file ID is based on the file system
device and inode number.
For example, in the records below, the two applications /usr/bin/mv and /bin/mv have the
same underlying file ID, but are assigned to two different PRM groups. Because of the ambiguity,
it is impossible to accurately predict which PRM group would get the application.
/usr/bin/mv::::GroupA
/bin/mv::::GroupB # duplicate record
In the next example, the application is now /usr/bin/mv in both records. However, the alternate
names cp and mv have been added to the records. These two records would be fine in the same
configuration file if the first record had only mv as an alternate name. In that case, /usr/bin/mv
would be placed in GroupA when invoked with the mv command and in GroupB when invoked
with the cp command. However, with cp as an alternate name in both records, we have another
ambiguity.
/usr/bin/mv::::GroupA,cp,mv
/usr/bin/mv::::GroupB,cp # duplicate record
It is possible to add duplicate application records when editing a configuration file. This happens
most often when working with large configuration files.
PRM checks for duplicate records when you load a configuration. If there are any duplicate records
in a configuration file, trying to load the file produces errors. In this case, remove the duplicate
records and load the configuration file again.
Missing applications are ignored
PRM ignores the application records for missing applications.
This functionality, as opposed to generating errors, is desirable when using a single configuration
for multiple systems that have different applications installed.
Applications records are also ignored if they reference applications on filesystems that are not
mounted at the time PRM is configured. Reload the PRM configuration with prmconfig when the
filesystem is present for the application records to take effect.
Application record syntax
This section explains the application record syntax.
Application records assign applications to PRM groups. Each record specifies an application and
the PRM group it and its child processes can run in. Application records are optional; if an
application does not have a record, it runs in the PRM group of the user who invoked it.
Specify application records using the following syntax:
APPLICATION::::GROUP[,ALT_NAME[,...,ALT_NAME]]
where
APPLICATION Specifies the full pathname of an executable application, the shell/interpreter
in the case of a script, or your Java binary—starting with a slash (/).
Configuring PRM 65
Page 66

NOTE: For scripts, the full path of the shell/interpreter used in the script must
appear in either the file /etc/shells or the file /opt/prm/shells.
For Java programs, the path of the Java being used—as displayed in ps
output—must appear in either /etc/shells or /opt/prm/shells. For an example,
see “Launching a Java program under PRM” (page 71).
You can use wildcards ([, ], ?, and *) to specify the filename, but not the
directory name. For more information on wildcards in application filenames,
see “Pattern matching for filenames” (page 32).
NOTE: If a specified application does not exist, PRM generates a warning.
This condition is a warning rather than an error so that you can use the same
configuration file on multiple machines.
GROUP Is the name of the PRM group in which the application will run.
NOTE: If GROUP is in a hierarchy, it must be a leaf group (a group with no
child groups). You cannot assign applications to parent groups. For example,
in the configuration below, TWO is a parent group and TWO/b is a leaf group.
#Group records
TWO:HIER:60::
TWO/b:3:50::
#Application records
/opt/appname/bin/exec1::::TWO # INVALID
/opt/appname/bin/exec2::::TWO/b # VALID
Consequently, TWO cannot be used in an application record.
ALT_NAME (Optional) Is an alternate name for the application assigned at execution. This
is common for complex programs such as database programs that launch many
processes and rename them. It is also common for shells and interpreters used
in scripts; the names of the scripts are considered alternate names.
Using alternate names, you can place the various processes of a single
application in different PRM groups.
For most binaries and scripts, ALT_NAME should match the first item in the
COMMAND column (that is, the command argument with no options) of the output
from the ps -ef command. For Java programs, it should match the first
argument to the Java binary that is not preceded by a dash ( - ) in the COMMAND
column. For more information, see ps(1).
The alternate name must share the file ID of the application named in the record.
Pattern matching notation can be used to designate a group of similarly named
processes. For more information on how to use wildcards and Extended Regular
Expressions in alternate names, see “Pattern matching for renamed application
processes” (page 33). For details on pattern matching expressions, see the
regexp(5) manpage.
If ALT_NAME is not specified for a record, that record matches all processes
with a file ID that matches the file ID of the application given by APPLICATION.
Consider the following example application records:
#PRM application records
/usr/bin/database::::business_apps,db_inventory,db_payroll
66 Configuring and enabling PRM on the command line
Page 67

/usr/bin/database::::order_process,db_orders,order_report*
/opt/perl/bin/perl::::scripts,report_formatter.pl
/usr/bin/mail::::mailserver
The example shows application records for:
• Processes renamed db_inventory and db_payroll by the executable /usr/bin/database
and assigned to the group business_apps.
• The process renamed db_orders by the executable /usr/bin/database and assigned to
the group order_process.
• The perl script report_formatter.pl, which is assigned to the group scripts.
• The application /usr/bin/mail, which is assigned to the group mailserver.
Adding/modifying an application’s group assignment
To add or modify an application’s PRM group assignment, follow these steps:
1. Open the desired configuration file in a text editor.
2. Using the syntax shown below:
APPLICATION::::GROUP[,ALT_NAME[,...,ALT_NAME]]
and explained in the section “Application record syntax” (page 65), add or modify an
application record as follows:
a. Specify the full pathname of the application.
b. Specify the group where the application should run.
c. Optionally, add or modify alternate names for the application.
3. Save the file and exit your editor.
4. Load the configuration using one of the following commands:
To initialize, moving user processes to the owners’ initial groups and moving applications to
their assigned groups, use the command:
#prmconfig -i [-fconfigfile] {-s | -c}
To keep the existing assignments of users, processes, and groups, use the command:
#prmconfig -k [-fconfigfile] {-s | -c}
Use the -f configfile option to specify a file other than the default /etc/prmconf. The -s
option displays warnings regarding the configuration file. (The -c option displays a subset
of the -s warnings.)
If you change an application’s group, using prmconfig -i resets all instances of the
application and its child processes to run in the newly assigned group.
With prmconfig -k, typically all of the application’s currently running processes continue
to execute in their current groups until:
• A prmmove is executed
• The application is restarted
• The application manager moves any processes that are not in their assigned groups
However, prmconfig -k does move a currently running application if:
• It is running in the system group (PRM_SYS) and that is not its assigned group
• The group it is running in is deleted in the new configuration
For more information on these options, see Table 14 (page 80).
Configuring PRM 67
Page 68

5. Enable PRM’s application manager if it is not already enabled:
#prmconfig -e APPL
Alternatively, enable all PRM resource managers using prmconfig -e without any additional
arguments:
#prmconfig -e
Example: Grouping an application by its alternate names and functions
To place an application in the same group as its alternate names, add the application’s name to
the list of alternate names. For example, to put the main database program in the group
order_process, add it to the list of alternate names in the record, as shown below:
#PRM application records
/usr/bin/database::::business_apps,db_inventory,db_payroll
/usr/bin/database::::order_process,db_orders,database
Example: Assigning a running application to another group
Assume the sales department purchased a new application called CustomerTrack to help them
track their customer base. Because the application does not have a record, it runs in the group of
the users that invoke it. Because everyone on the sales staff is assigned to the sales group,
CustomerTrack runs in the sales group.
However, due to the importance of this application as a sales tool, the PRM administrator decides
to assign it to the crit_apps group where it is assured sufficient resources.
The procedure to re-assign the application is outlined below.
1. Open the desired configuration file in a text editor.
2. Add an application record for CustomerTrack with crit_apps as the assigned group.
3. Configure PRM using -k to keep the existing assignments of users, processes, and groups:
# prmconfig -k
4. Wait for the application manager to automatically move the processes. This will take no longer
than 30 seconds, the default length of the application manager polling interval. Alternatively,
move the processes yourself as discussed below.
a. Find the process ID for CustomerTrack using the ps command:
# ps -efP | grep CustomerTrack
UID PRMID PID PPID C STIME TTY TIME COMMAND
root PRM_SYS 4435 4220 6 15:16:21 ttyp2 0:00 grep CustomerTrack
advisor4 sales 4418 4220 4 15:11:18 ttyp2 0:00 CustomerTrack
b. Move the CustomerTrack process and all its child processes by process group PID to the
PRM group crit_apps using prmmove:
# prmmove crit_apps -g 4418
5. Verify that CustomerTrack is running in the crit_apps group by using the ps command:
# ps -PR crit_apps
PRMID PID TTY TIME COMMAND
crit_apps 4418 ttyp2 0:00 CustomerTrack
crit_apps 4485 ttyp2 0:00 CustomerOrder
crit_apps 4492 ttyp2 0:00 Issue
Removing an application’s group assignment
To remove an application record with a text editor:
1. Open the configuration file in a text editor.
68 Configuring and enabling PRM on the command line
Page 69

2. Remove the line corresponding to the application record you wish to remove. Application
records have the following form:
APPLICATION::::GROUP[,ALT_NAME[,...,ALT_NAME]]
NOTE: You may have multiple records for a single application. Be sure to locate all records
for an application in the configuration file and remove the appropriate records.
3. Save the file and exit the text editor.
4. Load the configuration using one of the following commands:
To initialize, moving user processes to the owners’ initial groups and moving applications to
their assigned groups, use the command:
#prmconfig -i [-fconfigfile] {-s | -c}
To keep the existing assignments of users, processes, and groups, use the command:
#prmconfig -k [-fconfigfile] {-s | -c}
Use the -f configfile option to specify a file other than the default /etc/prmconf. The -s
option displays warnings regarding the configuration file. (The -c option displays a subset
of the -s warnings.)
5. Enable PRM’s application manager if it is not already enabled:
#prmconfig -e APPL
Alternatively, enable all PRM resource managers using prmconfig -e without any additional
arguments:
#prmconfig -e
Launching an application under PRM
There are two ways to start an application under PRM:
• Start the application as you normally would.
The application manager automatically moves it to the PRM group assigned in the PRM
configuration file. A user must have the correct permissions to run the application.
• Use the prmrun command. For example, to start the critical_app application in its
assigned group CriticalApp:
# prmrun critical_app
The PRM configuration file must contain one record that has no alternate process names for
this application. If there is no such record, prmrun fails with an error.
The prmrun command allows any user to run an application in its assigned group as defined
in the PRM configuration file, assuming the user has execute permission on the application.
This means that any user can execute this command, even if they do not have permission to
use the application’s assigned PRM group.
The prmrun -g command can be used to override the PRM configuration file and run the
application in a specific PRM group if the user has access to the PRM group.
If the application manager is not running, and you do not use prmrun to start the application, it
runs in the current PRM group of the user who invokes it.
When the application manager is enabled, any applications not running in their assigned PRM
groups are moved to their assigned groups. The exception is an application moved to a specific
PRM group with prmmove -g or one started in a specific group with prmrun -g. If an application
does not have an assigned PRM group, it runs in the group of the invoking user.
Configuring PRM 69
Page 70

Launching an application in its assigned group
/bin/ksh::::GroupA,foo
Name of PRM group that
script should run in
Name of script
Full path of shell
running script
contents
To launch an application in its assigned PRM group, you have two options:
• Start the application, then wait 30 seconds (the application manager’s default interval) to
allow it to place the application in its assigned group
• Follow the steps below:
1. Ensure the application has an assigned PRM group. If not, edit the PRM configuration file by
adding a record as explained in the section “Controlling applications” (page 65).
2. Execute prmconfig -k or prmconfig -i to update the configuration and start the
application manager if necessary.
3. Start the application using the prmrun command:
#prmrunapplication
Launching an application in a user-specified group
You can allow an application to run in its assigned PRM group, or you can use the prmrun
command to force the application to run in another group.
For example, to run the application CustomerOrder in the sales PRM group, execute the command:
#prmrun -g sales CustomerOrder
Permissions are checked to ensure the user executing the command can access the PRM group
sales. If the user does not have the group listed as the initial group or an alternate group in the
configuration file, an error condition occurs. The user must also have execute permission on the
application.
This command enables users to run applications in alternate PRM groups if they have permission
to do so. This command is useful for users with alternate groups and for root users.
To find out what PRM groups a user has access permission to, the user can enter the prmrun
command without any arguments:
#prmrun
User Bob can access the following:
sales
accounting
Launching a script under PRM
To always run a script in a specific PRM group, use an application record. In this record, specify
the full path of the shell or interpreter used in the script as the application. Also, give the
name—without the path—of the script as an alternate name.
For example, consider a script named foo that uses ksh to execute its contents. In this scenario,
an application record might look like this:
Figure 10 Application record for a shell script
70 Configuring and enabling PRM on the command line
Page 71

NOTE: The full path of the shell/interpreter used in the script must appear in either the file
/opt/java1.4/bin/IA64N/java::::GroupA,TrainDemo
Name of PRM group that
Java program should run in
Classname
Full path of the
being used,
Java binary
according to the
ps -ef output
/etc/shells or the file /opt/prm/shells.
Because the full pathname is not required for the script, a rogue user can get access to PRM
groups—that otherwise would not be accessible— by using the name of the script for new scripts
or wrappers.
If the script is not regularly used or is under development, you can use prmrun or prmmove to
place it in a PRM group. To have the script place itself in a PRM group, add the following line to
the script:
prmmove -p $$group_name
Launching a Java program under PRM
To always run a Java program in a specific PRM group, use an application record. In this record,
specify the full path of the Java binary as the application. Also, give the classname as an alternate
name. (Specifically, the alternate name you specify should match the first argument to the Java
binary that is not preceded by a dash ( - ) in the COMMAND column of the ps -ef output.)
For example, consider a Java program run with classname TrainDemo. In this scenario, an
application record might look like this:
Figure 11 Application record for a Java program
NOTE: The full path of the Java binary used must appear in either the file /etc/shells or the file
/opt/prm/shells.
For more information on specifying Java programs in application records, see “Application record
syntax” (page 65).
Specifying PRM users
You can add, modify, and remove users’ PRM group assignments as discussed in the following
sections:
• “Adding/modifying a user’s group assignment ” (page 73)
• “Removing a user’s group assignment ” (page 74)
PRM integrates with NIS by allowing you to specify netgroups in user records. For more information
on NIS, see the ypfiles(4) manpage.
NOTE: The processes of any nonroot user who does not have a user record are placed in the
User record syntax
default user group OTHERS (PRMID 1). If this placement is acceptable for a given user, do not
create a user record for that user name. If there is no user record for root, the record is automatically
created, placing root processes in the group PRM_SYS (PRMID 0).
This section explains the syntax of user records.
Configuring PRM 71
Page 72

User records specify PRM users and the groups they can access.
Use the following syntax when specifying a user record:
USER::::INITIALGROUP[,ALTERNATEGROUP[, ...]]
where
USER Is one of the following:
• A user’s login name
This name must correspond to the user’s name in password files that
can be accessed by the C function getpwnam, such as /etc/passwd.
If you assign processes that would typically run in PRM_SYS to another
group, be sure that group has sufficient resources. (For example, if
you are using memory records, be sure the group gets enough
memory.) Take particular care when creating user records for root as
such records will move essential system processes, such as inetd.
• +netgroup_name
netgroup_name must correspond to a list of login names in
/etc/netgroup. When a configuration is loaded, any user in
netgroup_name who does not have an explicit user record assumes
the INITIALGROUP and any ALTERNATEGROUPs of this record.
If a user who does not have an explicit user record is in multiple
netgroups, each with its own user record, the INITIALGROUP of the
first matching record (based on an ASCII dictionary sort) becomes the
user’s initial PRM group. All other groups become alternate groups.
If a user has an explicit user record and is in one or more netgroups
that have user records, the explicit record takes precedence.
PRM ignores any line in /etc/netgroup that has an empty user field.
NOTE: PRM only checks netgroup definitions when a configuration
is loaded. If you change your netgroup definitions, reload your
configuration so PRM is aware of the new definitions.
For an example of how netgroups affect PRM group assignments, see
“Displaying netgroup expansions ” (page 90).
INITIALGROUP Is the name of the initial PRM group for the user or netgroup. This is the
group the login program chooses when launching the user’s login shell.
Also, it is the group that cron chooses when scheduling jobs for the user.
ALTERNATEGROUP Is the name of one of the alternate PRM groups for the user or netgroup.
Alternate groups are groups other than the initial group that the user or
netgroup members are allowed to run processes in. The user or netgroup
members can start a process in an alternate group using prmrun or can
move an existing process to an alternate group using prmmove.Alternate
groups are not meaningful for root users because they have access to all
PRM groups.
72 Configuring and enabling PRM on the command line
Page 73

NOTE: If INITIALGROUP or ALTERNATEGROUP is in a hierarchy, it must be a leaf group (a
group with no child groups). You cannot assign users to parent groups. For example, in the
configuration below, TWO is a parent group and TWO/b is a leaf group.
#Group records
TWO:HIER:60::
TWO/b:3:50::
#User records
user1::::TWO # INVALID
user2::::TWO/b # VALID
Consequently, TWO cannot be used in a user record.
User records for nonroot users cannot contain the name of the PRM system group, PRM_SYS. The
second, third, and fourth fields of a user record must be null.
Consider the following example user records:
#PRM user records
sysadm::::OTHERS
engineer1::::development,OTHERS
user1::::OTHERS
user2::::sales
+marketing::::mktg
These user records define:
• An initial group of OTHERS for root user sysadm. (Recall that all root users have implicit
access rights to all groups.)
• An initial group of development and alternate group OTHERS for engineer1.
• An initial group of OTHERS for user1.
• Assuming user2 is in the marketing netgroup, the explicit user record for user2 takes
precedence over the marketing netgroup’s user record. Consequently, sales is the user’s
initial PRM group.
Adding/modifying a user’s group assignment
To add or modify a user record, follow these steps:
1. Open the desired configuration file in a text editor.
2. Using the syntax shown below:
USER::::INITIALGROUP[,ALTERNATEGROUP[, ...]]
and explained in the section “User record syntax” (page 71):
a. Add or modify a line specifying a netgroup or a user’s login name.
b. Add or modify an initial group.
c. (Optional) Add or modify the alternate groups.
3. Save the file and exit your editor.
4. Load the configuration using one of the following commands:
To initialize, moving user processes to the owners’ initial groups and moving applications to
their assigned groups, use the command:
#prmconfig -i [-fconfigfile] {-s | -c}
To keep the existing assignments of users, processes, and groups, use the command:
#prmconfig -k [-fconfigfile] {-s | -c}
Configuring PRM 73
Page 74

Use the -f configfile option to specify a file other than the default /etc/prmconf. The -s
option displays warnings regarding the configuration file. (The -c option displays a subset
of the -s warnings.)
NOTE: If you change a user’s initial group, using prmconfig -i resets the user’s processes.
With prmconfig -k, all of the user’s currently running processes continue to execute in their
current group until a prmmove is done or until the user logs in again. Any other processes
continue to run in their current group unless moved with prmmove. For more information on
these options, see Table 14 (page 80).
5. Enable PRM’s application manager if it is not already enabled:
#prmconfig -e APPL
Alternatively, enable all PRM resource managers using prmconfig -e without any additional
arguments:
#prmconfig -e
Example: Changing the initial group of a user
Consider this scenario in which a user’s initial group is changed. One of the sales advisors,
advisor6, has decided to change jobs and move to the purchasing department. The user’s login
does not change. However, in the PRM configuration file, advisor6 needs to be added to the
purchasing group and removed from the sales group. Also, the number of shares for the user’s
original and new groups need to be modified to meet each group’s anticipated resource needs.
One way to accomplish this change is to:
1. Update the configuration file in a text editor as follows:
a. Modify the number of shares for the purchasing and sales groups.
b. Modify the user record for advisor6 to specify an initial group of purchasing.
2. Load the updated configuration using -k to keep the existing assignments of users, processes,
and groups:
# prmconfig -k
3. Move all currently running processes for advisor6 to the PRM group purchasing using
prmmove:
#prmmove purchasing -u advisor6
Removing a user’s group assignment
To remove a user record manually:
1. Open the configuration file in a text editor.
2. Remove the line corresponding to the user record you wish to remove. User records have the
following form:
USER::::INITIALGROUP[,ALTERNATEGROUP[, ...]]
3. Save the file and exit the text editor.
4. Load the configuration using one of the following commands:
To initialize, moving user processes to the owners’ initial groups and moving applications to
their assigned groups, use the command:
#prmconfig -i [-fconfigfile] {-s | -c}
To keep the existing assignments of users, processes, and groups, use the command:
#prmconfig -k [-fconfigfile] {-s | -c}
74 Configuring and enabling PRM on the command line
Page 75

Use the -f configfile option to specify a file other than the default /etc/prmconf. The -s
option displays warnings regarding the configuration file. (The -c option displays a subset
of the -s warnings.)
5. Enable PRM’s application manager if it is not already enabled:
#prmconfig -e APPL
Alternatively, enable all PRM resource managers using prmconfig -e without any additional
arguments:
#prmconfig -e
Assigning secure compartments to PRM groups
Use the HP-UX feature Security Containment (available starting with HP-UX 11i v2) to create secure
compartments, which isolate files and processes. (You can also create secure compartment
configurations using a PRM utility such as srpgen or prm2scomp.)
You can add, modify, and remove assignments of secure compartments to PRM groups as discussed
in the following sections:
• “Adding/modifying a compartment’s group assignment ” (page 76)
• “Removing a compartment’s group assignment ” (page 76)
Compartment record syntax
This section explains the syntax of compartment records.
Compartment records assign secure compartments to the groups.
Use the following syntax when specifying a compartment record:
#!SCOMP:COMPARTMENT_NAME:{GROUP | (NONE)}
where
#!SCOMP Indicates the start of a compartment record. (The # character does not
denote the start of a comment in this case.)
COMPARTMENT_NAME Is the alphanumeric name (of no more than 255 characters) of an existing
secure compartment that you created using the HP-UX feature Security
Containment. (You can also create these compartments using a PRM
utility such as srpgen or prm2scomp.) The compartment must be active.
A compartment can have no more than one record.
This record type takes precedence over application records and user
records.
GROUP The PRM group to which the secure compartment is to be mapped. If
you are using group hierarchies, the group you specify must not have
any child groups.
(NONE) You can specify (NONE) in place of a group name if you would like to
explicitly show in your configuration file that a compartment is not to
be mapped to a PRM group.
Consider the following example compartment records:
#PRM compartment records
#!SCOMP:Comp1:development
#!SCOMP:Comp2:sales
#!SCOMP:Comp3:mktg
Configuring PRM 75
Page 76

These compartment records map:
• The compartment Comp1 into the group development
• The compartment Comp2 into the group sales
• The compartment Comp3 into the group mktg
Adding/modifying a compartment’s group assignment
To add or modify a compartment record, follow these steps:
1. Open the desired configuration file in a text editor.
2. Using the syntax shown below:
#!SCOMP:COMPARTMENT_NAME:{GROUP | (NONE)}
and explained in the section “Compartment record syntax” (page 75):
a. Add or modify a line specifying a compartment name.
b. Add or modify the group—or replace it with (NONE).
3. Save the file and exit your editor.
4. Load the configuration using one of the following commands:
To initialize, moving user processes to the owners’ initial groups and moving applications to
their assigned groups, use the command:
#prmconfig -i [-fconfigfile] {-s | -c}
To keep the existing assignments of users, processes, and groups, use the command:
#prmconfig -k [-fconfigfile] {-s | -c}
Use the -f configfile option to specify a file other than the default /etc/prmconf. The -s
option displays warnings regarding the configuration file. (The -c option displays a subset
of the -s warnings.)
5. Enable PRM’s application manager if it is not already enabled:
#prmconfig -e APPL
Alternatively, enable all PRM resource managers using prmconfig -e without any additional
arguments:
#prmconfig -e
Removing a compartment’s group assignment
To remove a compartment record manually:
1. Open the configuration file in a text editor.
2. Remove the line corresponding to the compartment record you wish to remove. Compartment
records have the following form:
#!SCOMP:COMPARTMENT_NAME:{GROUP | (NONE)}
3. Save the file and exit the text editor.
4. Load the configuration using one of the following commands:
To initialize, moving user processes to the owners’ initial groups and moving applications to
their assigned groups, use the command:
#prmconfig -i [-fconfigfile] {-s | -c}
To keep the existing assignments of users, processes, and groups, use the command:
#prmconfig -k [-fconfigfile] {-s | -c}
Use the -f configfile option to specify a file other than the default /etc/prmconf. The -s
option displays warnings regarding the configuration file. (The -c option displays a subset
of the -s warnings.)
76 Configuring and enabling PRM on the command line
Page 77

5. Enable PRM’s application manager if it is not already enabled:
#prmconfig -e APPL
Alternatively, enable all PRM resource managers using prmconfig -e without any additional
arguments:
#prmconfig -e
Assigning Unix groups to PRM groups
Unix groups are collections of users given Unix permissions as a whole. PRM allows you to map
Unix groups to PRM groups without having to specify each user in the Unix group. With a Unix
group record, any process running as a specific Unix group can be assigned to a PRM group.
You can add, modify, and remove assignments of Unix group to PRM groups as discussed in the
following sections:
• “Adding/modifying a Unix group’s PRM group assignment ” (page 77)
• “Removing a Unix group’s PRM group assignment ” (page 78)
Unix group record syntax
This section explains the syntax of Unix group records.
Unix group records assign Unix group to PRM groups.
Use the following syntax when specifying a Unix group record:
#!UXGRP:UNIX_GROUP_NAME:{GROUP | (NONE)}
where
#!UXGRP Indicates the start of a Unix group record. (The # character does not
denote the start of a comment in this case.)
UNIX_GROUP_NAME Is the alphanumeric name (of no more than 255 characters) of an existing
Unix group.
A Unix group can have no more than one record.
This record type yields precedence to application records, compartment
records, and user records.
GROUP The PRM group to which the Unix group is to be mapped. If you are using
group hierarchies, the group you specify must not have any child groups.
(NONE) You can specify (NONE) in place of a group name if you would like to
explicitly show in your configuration file that a Unix group is not to be
mapped to a PRM group.
Consider the following example Unix group records:
#PRM Unix group records
#!UXGRP:finance_dept:finance
#!UXGRP:users:(NONE)
#!UXGRP:mail:tools/mail
These Unix group records map:
• The Unix group finance_dept into the group finance
• The Unix group users into the placeholder (NONE)
• The Unix group mail into the group tools/mail
Adding/modifying a Unix group’s PRM group assignment
To add or modify a Unix group record, follow these steps:
Configuring PRM 77
Page 78

1. Open the desired configuration file in a text editor.
2. Using the syntax shown below:
#!UXGRP:UNIX_GROUP_NAME:{GROUP | (NONE)}
and explained in the section “Unix group record syntax” (page 77):
a. Add or modify a line specifying a Unix group name.
b. Add or modify the group—or replace it with (NONE).
3. Save the file and exit your editor.
4. Load the configuration using one of the following commands:
To initialize, moving user processes to the owners’ initial groups and moving applications to
their assigned groups, use the command:
#prmconfig -i [-fconfigfile] {-s | -c}
To keep the existing assignments of users, processes, and groups, use the command:
#prmconfig -k [-fconfigfile] {-s | -c}
Use the -f configfile option to specify a file other than the default /etc/prmconf. The -s
option displays warnings regarding the configuration file. (The -c option displays a subset
of the -s warnings.)
5. Enable PRM’s application manager if it is not already enabled:
#prmconfig -e APPL
Alternatively, enable all PRM resource managers using prmconfig -e without any additional
arguments:
#prmconfig -e
Removing a Unix group’s PRM group assignment
To remove a Unix group record:
1. Open the configuration file in a text editor.
2. Remove the line corresponding to the Unix group record you wish to remove. Unix group
records have the following form:
#!UXGRP:UNIX_GROUP_NAME:{GROUP | (NONE)}
3. Save the file and exit the text editor.
4. Load the configuration using one of the following commands:
To initialize, moving user processes to the owners’ initial groups and moving applications to
their assigned groups, use the command:
#prmconfig -i [-fconfigfile] {-s | -c}
To keep the existing assignments of users, processes, and groups, use the command:
#prmconfig -k [-fconfigfile] {-s | -c}
Use the -f configfile option to specify a file other than the default /etc/prmconf. The -s
option displays warnings regarding the configuration file. (The -c option displays a subset
of the -s warnings.)
5. Enable PRM’s application manager if it is not already enabled:
#prmconfig -e APPL
Alternatively, enable all PRM resource managers using prmconfig -e without any additional
arguments:
#prmconfig -e
78 Configuring and enabling PRM on the command line
Page 79

Checking the configuration file
Use prmconfig -s to perform validation without changing the current PRM configuration. This
can be helpful to validate a configuration file that will be activated by a script at a later time. To
specify a configuration file other than /etc/prmconf, use prmconfig -s -f configfile.
Validation checks for:
• Duplicate group names
• Duplicate user names
• Undefined groups in user access lists
• Mismatches between the users listed in the configuration file and the logins in the password
files accessible by the C function getpwnam
The checks are made when you save or load a configuration file.
Warnings reported in the check may indicate an invalid configuration. These warnings do not
prevent you from loading the configuration and enabling PRM. For example, you may not specify
all users in the PRM configuration file and mismatches may exist, but the file is still valid. Users not
specified in the PRM configuration file use the user default group OTHERS (PRMID 1) as their initial
group, and they have no alternate groups.
Loading the PRM configuration
Once you plan your configuration, install PRM, and create your custom configuration file, you are
ready to load your configuration.
Neither the prmconfig options for loading a configuration nor the GUI equivalents start PRM
management of resources; they only load your specific configuration. All existing and newly
spawned processes are stamped with their PRM group identifiers. However, standard HP-UX is still
managing resource allocation. prmconfig and the corresponding GUI menu items can be executed
regardless of whether PRM or the standard HP-UX resource management is currently being used.
When you load a configuration with prmconfig -i, prmconfig -k, or the GUI equivalents,
the configuration file is checked for errors. If errors are found, PRM issues error messages, and
does not change the configuration. Errors in the configuration file must be corrected before PRM
can be configured and enabled.
When the prmconfig -i, prmconfig -k, or GUI equivalents complete without finding errors,
an internal copy of the configuration file is made. This copy is used by the PRM commands as well
as the PRM-aware HP-UX commands while PRM is configured. (For information on these PRM-aware
commands, see “HP-UX command/system call support” (page 116).) Thus, the original configuration
file can be edited without disrupting PRM. However, to be safe, you should create a work copy
to make modifications to the configuration file.
If a PRM configuration is not already loaded, using either prmconfig -i or prmconfig -k
(or the GUI equivalents) moves all currently running processes, not owned by any root user, to their
owners’ initial groups. However, if a user’s initial group is not defined in the configuration file or
there is no record for the user, the processes are placed in OTHERS (PRMID 1), the user default
group. This occurs even if the PRM scheduler has not been enabled. Any configured application
is moved to the group assigned in the PRM configuration file.
If a PRM configuration is already loaded and some processes have been moved to alternate groups,
the two types of configuration loads have different results, as shown in Table 14.
Configuring PRM 79
Page 80

Table 14 Differences in loads when a configuration is already loaded
DescriptionCommand
prmconfig
-i[LINEBREAK](Initialize or
Move)
prmconfig
-k[LINEBREAK](Keep)
Loads a PRM configuration as follows:
• Places processes subject to compartment, application, user, or Unix group records in
their assigned PRM groups.
• Places all currently running processes—not owned by root—in their owners’ initial
groups, as defined in the owners’ user records. The initial group is OTHERS for nonroot
users without user records.
If root has a user record, root logins that occur after the load are placed in the PRM
group specified as the initial group in the user record. However, any root processes that
exist when the load happens are left as is, unless the process is executing in a group
that is deleted in the new configuration, in which case, the processes are moved to the
specified initial group.
Loads a PRM configuration, keeping all processes in their current PRM groups, with the
following exceptions:
• User processes running in PRM_SYS (the PRM system group) and processes running
in groups that do not exist in the new configuration
Each process is moved to the initial group of the process owner, as defined in the
configuration file. The initial group is PRM_SYS for root users without user records.
The initial group is OTHERS for nonroot users without user records.
• User processes where the initial group is a PSET PRM group—and at least one PSET
group in the configuration has specific cores assigned to it
Each process is moved to the initial group of its user as defined in the configuration
file.
• Application processes matching application records running in PRM_SYS or in a PSET
PRM group—and at least one PSET group in the configuration has specific cores
assigned to it
These processes are moved to the assigned groups when the application manager is
enabled.
This load does not negate any previous prmrun or prmmove commands.
Loading the PRM configuration with prmconfig
When loading a configuration, you have two options. To initialize on the load of a configuration,
moving user processes to the owners’ initial groups and moving applications to their assigned
groups, use the command:
#prmconfig -i [-fconfigfile] {-s | -c}
To keep the existing assignments of users, processes, and groups, use the command:
#prmconfig -k [-fconfigfile] {-s | -c}
Use the -f configfile option to specify a file other than the default /etc/prmconf. The -s
option displays warnings regarding the configuration file. (The -c option displays a subset of the
-s warnings.)
NOTE: After you load your configuration, you can enable PRM, as discussed in “Enabling resource
managers” (page 80).
Enabling resource managers
Enable PRM’s resource managers after you load your configuration.
80 Configuring and enabling PRM on the command line
Page 81

NOTE: Before or after enabling PRM, you can fine-tune your configuration. See the chapter
“Fine-tuning your PRM configuration ” (page 83) for details.
Enabling resource managers with prmconfig
To start all PRM resource managers (CPU, memory, and application), enter the following command:
#prmconfig -e
If there are no memory records, the memory manager is not started. However, even if there are
no application records, the application manager does start.
The prmconfig -e command controls only whether the PRM resource management is being used
and does not change the configuration. However, PRM must be configured (have a configuration
loaded) for this option to be valid.
When PRM is enabled, it takes precedence over standard HP-UX resource management when the
system is at peak load.
If you wish to enable PRM for one type of resource only, specify the appropriate keyword as shown
in Table 15.
Table 15 Enabling specific resource management on the command line
EnterTo enable PRM for
#prmconfig -e CPUCPU management only
#prmconfig -e MEMMemory management only
per-group capping, see “Group/CPU record syntax” (page
55).)
NOTE: You must enable the application manager to enforce application records, user records,
compartment records, and Unix group records.
Updating the configuration
To update your configuration, simply change your configuration file and load it. You do not need
to disable or reset PRM to make changes to your PRM configuration.
For small changes you can bring the configuration file into a text editor or a GUI, make the changes,
save the file, and then load the configuration with prmconfig or a GUI.
If you are adding a large number of new users to the configuration file, you can use prmloadconf
to add the users for you. For each user in the password file not already specified in the configuration
file, prmloadconf appends a PRM user record to the configuration file. The added record specifies
the user’s login name from the password file and the placeholder (NONE) instead of a PRM group.
After using prmloadconf, you may want to modify the user’s initial group and add alternate
groups. After changing the configuration file, you must still load the configuration using either
prmconfig or a GUI.
When using prmloadconf, if the configuration file already exists, elements of the existing file
are checked for suitability (such as the presence of the user default group). Use the -f option to
specify a configuration file other than /etc/prmconf.
If the new configuration deletes a group, then all currently running processes that were associated
with that group are moved to the owner’s initial group, and to the assigned groups for configured
applications. If a process owner does not have an initial group or its group does not exist in the
new configuration, the process is moved to the user default group OTHERS (PRMID 1). If the owner
of a process running in a group that is deleted is a root user, the process is moved to the system
#prmconfig -e APPLApplication management only
#prmconfig -e CPU -M CPUCAPONCPU capping for all FSS PRM groups (For information on
Updating the configuration 81
Page 82

group. The system group, PRM_SYS (PRMID 0), is automatically created by PRM, and system
processes run there by default.
Change your configuration file then load the new configuration, as indicated in the following steps:
1. Change the configuration using prmloadconf or as explained in “Configuring PRM” (page
52).
2. Load the configuration using one of the following commands.
To initialize, moving user processes to the owners’ initial groups and moving applications to
their assigned groups, use the command:
#prmconfig -i [-fconfigfile] {-s | -c}
To keep the existing assignments of users, processes, and groups, use the command:
#prmconfig -k [-fconfigfile] {-s | -c}
Use the -f configfile option to specify a file other than the default /etc/prmconf. The -s
option displays warnings regarding the configuration file. (The -c option displays a subset
of the -s warnings.)
3. Enable resource managers if they are not already enabled:
#prmconfig -e
82 Configuring and enabling PRM on the command line
Page 83

8 Fine-tuning your PRM configuration
This chapter describes the optional step of fine-tuning your PRM configuration.
To adjust your configuration, you may need to perform several iterations of identifying resource
use and assigning groups. Fundamentally, you need to understand what processes are run by what
users and the percentages of resources they consume. How you collect this data depends on how
your processes or system load varies from day to day.
You can use the following tools to track resource use:
• PRM monitor (accessed by the prmmonitor command) shows the percentage of CPU and
memory resources allocated to and used by PRM groups.
• prmanalyze analyzes accounting files for data on resource usage and contention.
• PerfView Analyzer analyzes how your system resources are used over time.
• GlancePlus pinpoints resource use in real-time and sets alarms.
• acctcom displays process accounting record information.
• PRM memory message logging.
This chapter discusses the use of prmanalyze, GlancePlus, and message logging.
Using prmanalyze to analyze your configuration
The prmanalyze utility scans accounting files for information on the desired resource type (memory
or CPU) and orders the accounting records by the requested sort key (user, UNIX group, command
name, or PRMID). Use prmanalyze to find patterns in resource usage, then change your PRM
configurations accordingly.
In addition, you can use prmanalyze—even when you are not using PRM—to perform resource
use analysis and capacity planning.
Use prmanalyze -f to list which features are available to PRM, such as in-kernel memory controls
and processor sets.
With prmanalyze, you can generate three classes of reports:
• Summary
This report is the default. It shows who consumes the resources and what the averages are
from a high level. It can help you identify what user or applications need to be restrained or
guaranteed more resources.
Use this report when creating a new PRM configuration.
The command to generate this report: prmanalyze -t summary
• Time-based (hourly, daily, weekly, monthly)
These reports provide data on resource use over a given time period for all the available
accounting data. These reports can help you determine what part of the day (hour, week, or
month) each resource is most used. They also identify the users and applications involved in
the resource consumption.
Use these reports when enhancing an initial configuration to give special attention to users or
applications. Also use these reports when creating multiple configurations to implement at
different times over a given interval.
Using prmanalyze to analyze your configuration 83
Page 84

The command to generate these reports: [LINEBREAK]prmanalyze -t {hourly |
daily | weekly | monthly}
• Conflict
This report provides the most detail, highlighting only the instances where resources are scarce
and users are in conflict.
Use this report when fine-tuning a configuration. This report catches items that are missed by
the time-based reports. After identifying conflicts, determine how much resource each PRM
group needed during each conflict. Then determine what percentage of the resource the PRM
group actually received. With this data, you can locate users and applications that are not
getting as much of the resource as they should. You can also locate the parties involved most
often and least often in the conflicts.
The command to generate this report: prmanalyze -t conflict
This section focuses on certain prmanalyze functionality. Command options are used, but not
described, in this section. For syntax information, see the section “prmanalyze ” (page 102).
NOTE: The examples below are for illustrative purposes only. They are not from an actual machine.
The “summary report” is omitted from the examples below to better focus on the other reports.
The examples assume you have an existing PRM configuration that you want to improve. The
prmanalyze utility can also be used to create an initial PRM configuration, as shown in “Using
prmanalyze to quickly identify resource use” on (page 42) .
NOTE: To use prmanalyze, you must have already collected UNIX accounting data in a file
(/var/adm/pacct by default) using accton filename.
Example: Locating system bottlenecks
The first example shows how one might locate system bottlenecks and fine-tune a configuration
with the aid of prmanalyze special reports.
Many of the interactive users assigned to the group OTHERS have complained that the system
response time is terrible in the afternoons. The administrator examines the summary reports generated
by prmanalyze, but sees nothing out of the ordinary. The administrator then looks more closely
at CPU resource use:
#prmanalyze -r cpu -1 -t hourly -s prmid myacct
The CPU hourly report, however, is normal. The OTHERS group is getting plenty of CPU resources
at all times. It has shares equaling 25%, but never demands more than 15%. So CPU resources
are not the problem. Next, examine memory:
#prmanalyze -r mem -E -1 -t hourly -s prmid myacct
The memory report does show that OTHERS is peaking out on memory use around 3pm. The
administrator then generates the same memory report, filtering out the known applications:
#prmanalyze -r mem -E -1 -t hourly -x web_browser -x financials
-x mrkt_rsch -x sales_fcst myacct
sorting chronological events
hourly memory report by command name begins at Wed Jul 7 15:27:00 1999
ave KB mem threshold 0.01
unique id ave KB peak KB KB minutes % total
Jul 7 15:00 51976.33 1.725E+05 3.119E+06
mail_reader 1082.25 3.861E+03 6.494E+04 2.08
84 Fine-tuning your PRM configuration
Page 85

java 608.99 1.107E+03 3.654E+04 1.17
debugger 50031.32 1.678E+05 3.002E+06 96.26
This report shows a debugger application consuming almost all the memory in OTHERS. This
prevents other users from getting useful work done. The administrator can use acctcom to find
the user running the debugger. If this user is a developer trying to locate a bug in the sales database
program, change the user record to place him in the Sales group. If he is unrelated to any of the
other activities on the machine, a separate group with low CPU/memory shares (taken from the
OTHERS allocation) and a memory cap might be in order.
Example: High-level views of usage
The next example assumes a new multiprocessor machine in a university environment. One way
to get a very high-level view of usage is to request a weekly or monthly report, setting the threshold
so high that no details come out. Because HP-UX limits accounting files to two Mbytes, several files
may need to be specified:
#prmanalyze -t weekly -d 16 *.acct98 Jan.acct99 Feb.acct99
weekly CPU report by command name begins at Thu Nov 5 13:48:00 1998
ave CPUs threshold 16.0
unique id ave CPUs peak CPUs total secs % total
Nov 1 0.00 0.00 0.00
Nov 8 0.00 0.02 1.61
Nov 15 0.01 1.11 4132.40
Nov 22 0.02 1.08 14136.57
Nov 29 0.02 1.53 9202.16
Dec 6 0.03 1.73 21125.86
Dec 13 0.02 0.75 14656.94
Dec 20 0.00 0.88 739.48
Dec 27 0.00 0.66 1243.89
Jan 3 0.00 0.63 2589.75
Jan 10 0.08 2.05 46000.07
Jan 17 0.09 7.58 53873.11
Jan 24 0.06 7.58 35398.47
Jan 31 0.07 9.34 68588.17
Feb 7 0.09 12.24 119510.85
One can see a definite progression here. Users gradually learn about the new machine and try it
out in 1998, with usage slacking over the holiday break. Then, at the start of the first 1999 semester,
usage increases dramatically. At this rate, all 16 cores will be busy by next week. The administrator
needs to take definite steps to ensure all user groups have a fair portion of the machine. Perhaps
the department should even consider ordering another system for the classes in question.
Example: Checking for patterns and configuration accuracy
In the following example, we assume a single-core system. Every so often, it is a good idea to
examine daily reports for patterns and configuration accuracy. For reports on recent data, it is a
good idea to add the -p flag to catch jobs that never exit or that run for several days:
#prmanalyze -s prmid -r cpu -p -t daily -x 0 filename
daily CPU report by PRM id begins at Thu Jul 8 10:11:00 1999
ave CPUs threshold 0.01
unique id ave CPUs peak CPUs total secs % total
Jul 8 0.20 0.89 17280.72
1 0.02 0.55 1195.84 11.59
2 0.09 0.88 7439.40 43.08
Using prmanalyze to analyze your configuration 85
Page 86

3 0.05 0.56 4116.09 23.82
4 0.01 0.14 1226.88 7.11
5 0.03 0.17 2479.65 14.36
Jul 9 0.22 0.87 19008.00
1 0.02 0.60 2208.72 11.62
2 0.09 0.87 7890.23 41.51
3 0.06 0.60 4833.73 25.43
4 0.01 0.15 1699.32 8.94
5 0.02 0.14 2442.53 12.85
Jul 10 0.09 0.88 7996.40
1 0.00 0.10 193.63 2.42
2 0.09 0.88 7348.53 91.89
3 0.00 0.08 180.96 2.26
4 0.00 0.04 198.73 2.48
5 0.00 0.01 74.50 4.15
This daily report indicates that the CPU resources are idle most of the time for this period. This is
normal for a business that only uses its computers from 9am to 5pm. During the week, the CPU
resource usage does not vary by more than about 10%, which is a good indication that the current
configuration is working. However, the report for Saturday, July 10th has what appears to be an
anomaly. Group 2 is taking up almost all the machine! Upon closer examination though, the
administrator finds that the total seconds used is about the same as every other day, but all the
other groups went virtually idle on the weekend. This application might be able to do its job even
faster if we took off the memory cap for group 2 only on the weekends. Because there is no
contention, a second configuration file could be created to repeal all memory records and change
the CPU allocations for the weekend.
Another item to note in the report is that group 1 (OTHERS) has bursts of high activity relative to
its normal levels. It may be worthwhile to do a CPU conflict report, excluding known applications,
to see who the offender is:
#prmanalyze -s command -r cpu -t conflict -1 -d .4 -x mrkt_rsch -x
financials
conflict CPU report by command name begins at Thu Jul 8 10:11:00 1999
ave CPUs threshold 0.40
unique id ave CPUs peak CPUs total secs % total
Jul 8 8:35 Jul 8 9:17 0.58 0.80 6102.48
mail_reader 0.50 0.56 5331.36 87.36
java 0.06 0.20 578.52 9.48
vi 0.02 0.09 155.52 2.55
It seems that in the morning, and then again after lunch, everyone in OTHERS is busy reading mail.
The administrator can track this usage. If it gets out of hand, the administrator can then isolate
mail_reader to its own PRM group.
Using GlancePlus to analyze your configuration
The following steps guide you in using GlancePlus to determine adjustments you may wish to make
to your configuration. GlancePlus has both a text interface (glance) and an X-Windows interface
(gpm).
Having PRM configured but not enabled allows you to track resource use by PRM group through
GlancePlus without having PRM actually control the use of these resources. GlancePlus allows you
to monitor CPU and memory resource usage.
86 Fine-tuning your PRM configuration
Page 87

NOTE: GlancePlus does not correctly track the PRM ID at the process level for HP-UX 11i v1
and later in versions C.02.65.00 through C.03.25.00. For correct metrics reporting for FSS PRM
groups, use GlancePlus Version C.03.35.00.
Also, GlancePlus returns incorrect data for the PRM_SYS group for PRM configurations with processor
sets defined. Use the prmmonitor command instead of GlancePlus if you are using PSET PRM
groups.
1. Load the PRM configuration you want to analyze with prmconfig -ie APPL if it is not
already loaded. This allows you to view the PRM Group List under the Reports menu in
GlancePlus.
2. Compare the PRM resource shares against the reported usage in GlancePlus during peak
activity. Select the PRM Group List under the Reports menu to see the active processes, users,
and their resource use. Determine if you need to adjust the shares or move users or processes
to different groups.
3. Change your PRM configuration based on your review of the GlancePlus data.
4. Load the changed PRM configuration with prmconfig -ie APPL. This load places processes
in the owners’ initial groups and each configured application in its assigned group.
5. Repeat Step 2, Step 3, and Step 4 as needed.
For information on using GlancePlus, see the GlancePlus online help.
Here is a sample of the GlancePlus information on PRM.
Figure 12 GlancePlus information on PRM
Analyzing memory use
The following steps guide you in using PRM’s logging facility to examine system memory use.
1. Load a PRM configuration with prmconfig -ie APPL if you have not already done so. Do
not enable the PRM resource manager at this time. (You can disable PRM with the prmconfig
-d command if it is already enabled.)
2. Log PRM memory messages by entering:
# prmconfig -L MEM
Analyzing memory use 87
Page 88

Alternatively, you can use the PRM interface in HP System Management Homepage or in HP
Systems Insight Manager to enable logging.
3. Check the /var/adm/syslog/syslog.log file to determine the percentage of available
memory that PRM groups are actually using.
Determine the memory manager’s PID:
#ps -ef | grep prm2d
Then check the file by performing a grep on the PID:
#tail -f /var/adm/syslog/syslog.log | grepPID_of_current_prm2d
4. Adjust memory shares and group assignments in the memory records section of the PRM
configuration file based on the information you gather.
5. Load the new PRM configuration with prmconfig -i to place processes in the owners’ initial
groups and each configured application in its assigned group. Re-check the
/var/adm/syslog/syslog.log file.
6. Repeat Step 3, Step 4, and Step 5 as needed.
7. Turn off memory logging once you are finished examining your processes’ memory
consumption. Use the following command:
#prmconfig -L MEM STOP
Alternatively, use the PRM interface in HP System Management Homepage or in HP Systems
Insight Manager to turn off logging.
88 Fine-tuning your PRM configuration
Page 89

9 Administering PRM
This chapter explains the tasks involved in the daily administration of PRM.
Various PRM commands are mentioned in this chapter. See “Command reference” (page 101) for
information on these commands.
Moving processes between PRM groups
This section explains how to move a process from one PRM group to another. You might want to
move a process to a different PRM group if it is either not getting enough of or using too much of
the resources allocated to its current group.
You can move processes by:
• Process ID
• Process group ID
• User login
To move a process:
1. Use ps -efP to get a list of all the processes on the system. This command shows the PRM
groups, PIDs, and parents of the processes.
2. Issue the prmmove command. The syntax is shown below:
prmmove [ targetgrp| -i ][-pPID... ][-gpgrp... ][-ulogin... ]
targetgrp cannot be a parent in a group hierarchy. When specifying a leaf group, you can
use either its PRMID or its group name.
Consider the following examples:
To move a process with process ID (PID) 100 to the PRM group with PRMID 2:
#prmmove 2 -p 100
To move the same process to your initial group, use the -i option:
#prmmove -i -p 100
To move multiple processes to your initial group:
#prmmove -i -p 100 -p 101 -p 102
To move the user’s shell (PID indicated by $$ below) to PRM group 15:
#prmmove 15 -g $$
To move all processes owned by user1 to PRM group projectX:
#prmmove projectX -u user1
NOTE: Be careful when using the -u option: Configured applications that were invoked by the
user (those assigned to a specific PRM group in the configuration file) are moved by this option as
well.
This has no effect on subsequent logins of user1. To move all of a user’s processes permanently,
change the user’s initial group in the configuration file, as discussed in the section “Specifying
PRM users ” (page 71).
Displaying application filename matches
Because application records allow wildcards in filenames, keeping track of all the applications
that a filename with wildcards matches can be difficult.
Moving processes between PRM groups 89
Page 90

The prmlist command with the -a option displays exactly this information, however. It also
shows each application’s PRM group assignment.
For example, consider a configuration that includes only one application record. This record,
shown below, places all applications in /bin/ that begin with the letter “b” in a PRM group named
Bapplications:
/bin/b*::::Bapplications
To get a listing of these applications, enter the command:
#prmlist -a
PRM Application Assigned Group Alternate Name(s)
------------------------------------------------------------------/bin/bfs Bapplications
/bin/bg Bapplications
/bin/basename Bapplications
/bin/bs Bapplications
/bin/bdiff Bapplications
/bin/bc Bapplications
/bin/banner Bapplications
/bin/batch Bapplications
/bin/bdf Bapplications
Displaying netgroup expansions
The combination of user records and multiple netgroup records can make determining a user’s
initial and alternate PRM groups difficult.
The prmlist command displays exactly this information. Using the prmlist -u +netgroup
option displays the data for only the specified netgroup.
For example, consider the following /etc/netgroup entries:
prime two three five # Define the first three
even zero two four # netgroups in terms of the
odd one three five # following netgroups
zero (, user0, )
one (, user1, )
two (, user2, )
three (, user3, )
four (, user4, )
five (, user5, )
Notice in the entries above that user2, user3, and user5 appear in multiple netgroups. Now
consider the following PRM configuration:
OTHERS:1:20::
even_PRM_group:2:25::
odd_PRM_group:3:25::
prime_PRM_group:4:25::
Five:5:5::
root::::PRM_SYS
guest::::OTHERS
user5::::Five
+even::::even_PRM_group
+odd::::odd_PRM_group
+prime::::prime_PRM_group
The configuration places members of the even netgroup in the PRM group even_PRM_group.
Similarly, members of the odd and prime netgroups are assigned to the PRM groups
odd_PRM_group and prime_PRM_group, respectively. The explicit user record for user5
assigns that user to the PRM group Five.
Using the prmlist command, we get all the group and alternate group assignments (a portion
of the output has been omitted for brevity):
#prmlist
90 Administering PRM
Page 91

PRM User Initial Group Alternate Group(s)
------------------------------------------------------------------
guest OTHERS
user0 even_PRM_group
user1 odd_PRM_group
user2 even_PRM_group prime_PRM_group
user3 odd_PRM_group prime_PRM_group
user4 even_PRM_group
user5 Five
root PRM_SYS
For the users who are members of multiple netgroups, their initial and alternate groups are
cumulative. For example, user2 is in the even and prime netgroups, with initial groups
even_PRM_group and prime_PRM_group, respectively. In this situation, the netgroup names
are sorted (based on the ASCII dictionary), and the netgroup at the top of the sort list is used to
determine user2’s initial PRM group. Thus, because even_PRM_group comes before
prime_PRM_group, even_PRM_group is used as the initial group. All other PRM groups specified
in the netgroups’ user records become alternate groups.
Here the -u option limits the output to the prime netgroup:
#prmlist -u +prime
PRM User Initial Group Alternate Group(s)
------------------------------------------------------------------
user5 Five
user3 odd_PRM_group prime_PRM_group
user2 even_PRM_group prime_PRM_group
Recall that user5 is in multiple netgroups. Based on the cumulative effect of netgroup membership
for user2 and user3, one would expect user5 to show an initial group and at least one alternate
group. However, user5 has an explicit user record, which takes precedence over any netgroup’s
user records.
Displaying accessible PRM groups
Use the prmmove command or the prmrun command with no options to display the PRM groups
you can access. As root, you have access to all PRM groups. Thus, as root, these commands list
all configured PRM groups.
Displaying state and configuration information
To print current configuration, state, and mode information, use the command:
#prmconfig
PRM configured from file: /etc/prmconf
File last modified: Sun Aug 15 11:59:50 1999
PRM CPU scheduler state: Enabled
PRM Group PRMID CPU Entitlement
----------------------------------------------
GroupA 2 55.00%
GroupB 3 15.00%
OTHERS 1 30.00%
PRM memory manager state: Enabled (polling interval: 10 seconds)
PRM User Initial Group Alternate Group(s)
------------------------------------------------------------------
root PRM_SYS
PRM application manager state: Disabled
Disk manager state: Disabled
Displaying accessible PRM groups 91
Page 92

For more information on prmconfig, see the section “prmconfig” (page 106).
Displaying application and configuration information
To display information from the current PRM configuration file, including application record
information, use the prmlist command. This command does not display state information.
#prmlist
PRM configured from file: /etc/prmconf
File last modified: Sun Aug 15 12:11:34 1999
PRM Group PRMID CPU Entitlement
---------------------------------------------GroupA 2 55.00%
GroupB 3 15.00%
OTHERS 1 30.00%
PRM User Initial Group Alternate Group(s)
-----------------------------------------------------------------root PRM_SYS
PRM Application Assigned Group Alternate Name(s)
------------------------------------------------------------------/bin/sh OTHERS
/usr/bin/man GroupB catman
For more information on prmlist, see the section “prmlist ” (page 109).
Setting the memory manager’s polling interval
The memory manager examines the use of memory on a regular basis to ensure PRM groups are
using memory as specified in the configuration. You can change the frequency of these examinations
by changing the polling interval of the manager.
The default polling interval for the memory manager is 10 seconds.
Change the interval on the command line as explained in the following section. You can also
change the interval in the PRM interface in HP System Management Homepage or in HP Systems
Insight Manager.
Setting the interval with prmconfig
To manually change the length of the polling interval, enter the following command, substituting
a numerical value for interval_in_seconds:
#prmconfig -Iinterval_in_secondsMEM
Setting the application manager’s polling interval
The application manager regularly examines all processes on the system to ensure applications
are running in the correct PRM groups. You can change the frequency of these examinations by
changing the polling interval of the manager.
The default polling interval for the application manager is 30 seconds.
Change the interval on the command line as explained in the following section. You can also
change the interval in the PRM interface in HP System Management Homepage or in HP Systems
Insight Manager.
Setting the interval with prmconfig
To manually change the length of the polling interval, enter the following command, substituting
a numerical value for interval_in_seconds:
#prmconfig -Iinterval_in_secondsAPPL
92 Administering PRM
Page 93

Disabling PRM
Disabling PRM does not change the PRM configuration—it only returns control to standard HP-UX
resource management. In other words, processes are still assigned a PRMID, but only the standard
HP-UX resource management determines what resources processes receive. Having PRM configured
but disabled allows you to track resource use by PRM group through prmanalyze, GlancePlus,
or acctcom without having PRM actually control the use of these resources.
Disabling PRM differs from resetting PRM in that:
• PRM daemons remain running
• Processes are tagged with the PRMIDs of their associated groups
To disable PRM on the command line and return to standard HP-UX resource management, see
the following section. You can also disable PRM in the PRM interface in HP System Management
Homepage or in HP Systems Insight Manager.
Disabling PRM with prmconfig
Disable PRM manually by entering the following command:
#prmconfig -d
Each resource manager can be disabled independently using the -d option followed by APPL,
CPU, or MEM.
Resetting PRM
When you reset PRM, it returns to its initial state. This is the state PRM is in after it is installed and
after the system is booted. Only the standard HP-UX resource management is in effect.
Reset PRM:
• Before shutting your system down (this saves a backup copy of your current configuration).
• Before installing a new version of PRM
• If PRM daemons crash or are killed
• If memory locks or internal shared memory structures fail
Resetting PRM differs from disabling PRM in that:
• PRM daemons are stopped
• Processes are no longer tagged with the PRMIDs of their associated groups
To reset PRM on the command line, erasing your current configuration and disabling PRM, see the
following section. You can also reset PRM in the PRM interface in HP System Management
Homepage or in HP Systems Insight Manager.
Resetting PRM with prmconfig
Reset and stop PRM manually by entering the following command:
#prmconfig -r
Monitoring PRM groups
To monitor and verify your PRM configuration, use the prmanalyze, prmconfig, prmlist,
prmmonitor, id, acctcom, or ps commands or the GlancePlus product.
Sample prmmonitor output is shown below:
Tue Mar 21 14:36:42 2000 Sample: 5 seconds
CPU scheduler state: Enabled
CPU CPU
Disabling PRM 93
Page 94

PRM Group PRMID Entitlement Used
____________________________________________________________
OTHERS 1 20.00% 20.08%
databases/inventory 2 10.00% 10.04%
databases/order 3 20.00% 19.88%
development 4 40.00% 39.96%
mailserver 5 10.00% 10.04%
PRM application manager state: Enabled (polling interval: 30 seconds)
Logging PRM memory messages
You can log PRM memory messages to a file. These messages contain information similar to that
of the prmmonitor command. Logging generates messages for every polling interval and can
consume a large amount of disk space. For information on changing this interval, see “Setting the
memory manager’s polling interval” (page 92).
Messages are logged in the file /var/adm/syslog/syslog.log.
You can control the logging of PRM memory messages on the command line as discussed in the
following section. You can also control logging in the PRM interface in HP System Management
Homepage or in HP Systems Insight Manager.
Controlling memory logging with prmconfig
To begin logging PRM memory messages, enter:
#prmconfig -L MEM
To stop logging PRM memory messages, enter:
#prmconfig -L MEM STOP
Logging PRM application messages
The application manager always logs the following to syslog:
• Initial execution interval
• Interval change, if any
• Enabling or disabling of the application manager
• Enabling or disabling of logging
You can enable further logging of applications, of alternate names, and of when and where they
are moved. Messages are logged in the file /var/adm/syslog/syslog.log. Logging generates
messages for every polling interval. For information on changing this interval, see “Setting the
application manager’s polling interval” (page 92).
To enable further logging on the command line, see the following section. You can also control
logging in the PRM interface in HP System Management Homepage or in HP Systems Insight
Manager.
Controlling application logging with prmconfig
To begin logging PRM application messages, enter:
#prmconfig -L APPL
To stop logging PRM application messages, enter:
#prmconfig -L APPL STOP
94 Administering PRM
Page 95

Displaying groups’ allocated and used resources
Using the prmmonitor command is the primary method to collect data on PRM group activity.
With PRM configured and enabled, use prmmonitor to print the following information:
• Date
• Time
• Length of sample intervals
• PRM state
• Group names
• PRMID
• Percentages of CPU and memory resources assigned
• Percentage of CPU and memory resources used by each PRM group for the specified interval
prmmonitor also includes some system information such as system name, operating system
version, hardware type, and current date.
To display the PRM memory and CPU resource statistics for one 30-second interval, enter the
command:
#prmmonitor 30 1
Tue Mar 21 15:08:19 2000 Sample: 30 seconds
CPU scheduler state: Enabled
CPU CPU
PRM Group PRMID Entitlement Used
____________________________________________________________
OTHERS 1 20.00% 20.00%
databases/inventory 2 10.00% 9.98%
databases/order 3 20.00% 20.00%
development 4 40.00% 40.00%
mailserver 5 10.00% 10.02%
PRM application manager state: Enabled (polling interval: 30 seconds)
There may be instances when the percentage of a resource used by a specific PRM group differs
from the percentage derived from its assigned number of shares for that resource. A group’s
resource use may be less than it is entitled to when the demand is not there, meaning there are
not enough ready processes in that group requesting the resource. On the other hand, a group
can consume more of the resource than it is entitled to when other groups in the configuration are
not active. The inactive group’s resource shares are split up automatically among the active groups.
Displaying user information
The id command with the -P option prints your PRM group ID (PRMID) in addition to your user
ID (UID) and group ID (GID). If the appropriate entry can be found in the internal copy of the
configuration file, the id command also prints the PRM group name.
# id -P
uid=411(user1) gid=200(group1) prmid=3(finance)
Displaying available memory to determine number of shares
The prmavail command displays the amount of memory available for user processes when the
MEM argument is specified:
# prmavail MEM
54300 real memory pages or 212 MB available (PRM estimate)
If prm2d is not running, this value is calculated by subtracting the memory used by the kernel,
system processes, and the system paging reserve from total real memory. The available memory
Displaying groups’ allocated and used resources 95
Page 96

decreases if prm2d is running, because PRM reserves 11% of the remaining memory to ensure
the processes in PRM_SYS have immediate access to needed memory.
This command is useful in determining memory shares. For example, if a PRM group receives 50
of the 100 memory shares assigned, the number of shares equates to 106 Mbytes on this system.
If that is too much or too little memory, the number of shares can be adjusted accordingly.
Displaying number of cores to determine number of shares
The prmavail command displays the number of cores when the CPU argument is specified:
# prmavail CPU
16 Cores
This command is useful in determining how much CPU resources a number of shares equates to
on a multiprocessor system. For example, 25 CPU shares out of a total of 100 shares assigned on
a 16-core system is roughly equivalent to 4 cores.
Displaying past process information
The acctcom command with the -P option prints the PRM group name in addition to the customary
acctcom information for all groups on the system. Adding the -R option and a PRM group name
displays information for that group. The following command displays history information about all
PRM groups:
#acctcom -P
COMMAND START END REAL CPU
NAME USER TTYNAME TIME TIME (SECS) (SECS) PRMID
ls root ttyp1 17:32:08 17:32:08 0.02 0.01 OTHERS
rm root ttyp1 17:32:25 17:32:25 0.25 0.02 OTHERS
registra root ? 17:33:04 17:33:04 0.04 0.04 PRM_SYS
vi dev1 ttyp2 17:33:07 17:33:35 28.20 0.05 develop
cpp.ansi dev1 ttyp2 17:33:49 17:33:49 0.04 0.01 develop
ccom dev1 ttyp2 17:33:49 17:33:49 0.16 0.13 develop
ld dev1 ttyp2 17:33:49 17:33:49 0.15 0.12 develop
cc dev1 ttyp2 17:33:49 17:33:49 0.41 0.02 develop
vi dev1 ttyp2 17:34:00 17:34:52 52.57 2.76 develop
hostname root ttyp1 17:35:56 17:35:56 0.01 0.01 OTHERS
ls root ttyp1 17:36:11 17:36:11 0.03 0.03 OTHERS
more root ttyp1 17:36:12 17:36:19 7.00 0.05 OTHERS
The prmanalyze utility is also useful for examining past process data. For syntax information,
see “prmanalyze” on (page 102) . For usage examples, see “Using prmanalyze to quickly
identify resource use” on (page 42) and “Using prmanalyze to analyze your configuration” on
(page 83) .
Displaying current process information
Using the ps command with the -P option adds a column listing each process’s PRM group by
name.
#ps -P
PRMID PID TTY TIME COMMAND
PRM_SYS 1047 ttyp2 0:01 sh
PRM_SYS 1046 ttyp2 0:02 rlogind
PRM_SYS 1081 ttyp2 0:00 ps
OTHERS 548 ? 0:20 sendmail
By using ps with the -l and -P options, the PRMID is printed instead of the PRM group name.
#ps -l -P
F S UID PRMID PID PPID C PRI NI ADDR SZ WCHAN TTY TIME COMD
1 S 0 1 3300 3299 0 158 20 65c180 78 418480 ttyp2 0:00 sh
1 R 0 0 3299 492 0 154 20 6a1d80 18 ttyp2 0:00 rlogind
96 Administering PRM
Page 97

1 R 0 1 3387 3300 15 181 20 662e80 17 ttyp2 0:00 ps
1 S 0 1 4418 4220 4 168 24 821280 982 7ffe6000 ttyp2 0:02 spy
The -R option, with a PRM group name or PRMID as an argument, displays the ps output for the
invoker’s processes belonging to the specified group.
#ps -R OTHERS
PID TTY TIME COMMAND
588 ? 0:05 sendmail
4418 ttyp2 0:02 tester
Monitoring PRM with GlancePlus
You can use HP’s optional performance and monitoring tool GlancePlus to:
• Display PRM reports
• Display resource use in real-time
• Set alarms to report when resource use is excessive
GlancePlus has both a text interface (glance) and an X-Windows interface (gpm). See the
GlancePlus help facility for details.
NOTE: GlancePlus does not correctly track the PRM ID at the process level for HP-UX 11i v1
and later in versions C.02.65.00 through C.03.25.00. For correct metrics reporting for FSS PRM
groups, use GlancePlus Version C.03.35.00 or later.
Also, GlancePlus returns incorrect data for the PRM_SYS group for PRM configurations with processor
sets defined. Use the prmmonitor command instead of GlancePlus if you are using PSET PRM
groups.
Monitoring PRM with OpenView Performance Agent (OVPA) / OpenView Performance Manager (OVPM)
You can treat your PRM groups as applications and then track their application metrics in OpenView
Performance Agent for UNIX as well as in OpenView Performance Manager for UNIX.
NOTE: NOTE: If you complete the procedure below, OVPA/OVPM will track application metrics
only for your PRM groups; applications defined in the parm file will no longer be tracked.
GlancePlus, however, will still track metrics for both PRM groups and applications defined in your
parm file.
To track application metrics for your PRM groups:
1. Edit /var/opt/perf/parm
Edit your /var/opt/perf/parm file so that the “log” line includes “application=prm” (without
the quotes). For example:
log global application=prm process dev=disk,lvm transaction
2. Restart the agent
With PRM running, execute the following command:
%mwa restart scope
Now all the application metrics will be in terms of PRM groups. That is, your PRM groups will be
“applications” for the purposes of tracking metrics.
Monitoring PRM with GlancePlus 97
Page 98

NOTE: The PRM groups must be enabled at the time the scopeux collector is restarted by the
mwa restart scope command. If PRM is not running, data for some—or all—PRM groups may
be absent from OpenView graphs and reports. Also, it may affect alarms defined in
/var/opt/perf/alarmdefs.
Automating PRM administration with scripts
To automate PRM administration, you can create scripts that use prmconfig, prmmove, and
prmmonitor.
If you want to use prmmonitor to report information that is later manipulated or analyzed by
other programs, use prmmonitor -t, directing the output to a logfile; then, create a script that
summarizes the output for system accounting.
If you need to change the CPU or memory shares during off hours, say for batch processing, create
a script to change the configuration and use cron to run the script. For example, you could use
multiple configuration files such as am_prmconf for daytime configuration and pm_prmconf for
nighttime configuration.
Protecting the PRM configuration from reboots
To preserve your configuration across boots, modify the variables in the PRM startup script
/etc/rc.config.d/prm to automatically configure PRM on reboot. This startup script uses the
configuration file you specify or the last active configuration file to configure PRM.
The variables in the /etc/rc.config.d/prm file, along with their default values, are:
PRM_CONFIG=0
PRM_CONFIG_FILE=/etc/prmconf
PRM_ENABLE=0
PRM_SLEEP=0
PRM_CAPPING=0
PRM_INT_APPL=0
PRM_INT_MEM=0
PRM_LOG_APPL=0
PRM_LOG_MEM=0
PRM_SNMPAGT=0
To configure PRM on reboot, set PRM_CONFIG equal to one:
PRM_CONFIG=1
To use a configuration file other than /etc/prmconf, set PRM_CONFIG_FILE equal to the name
of the new file:
PRM_CONFIG_FILE=/etc/opt/prm/conf/dayconf.prm
To enable the appropriate resource managers after PRM has been configured, set PRM_ENABLE
to one:
PRM_ENABLE=1
The PRM_ENABLE variable can be set to one only when PRM_CONFIG is set to one.
To specify a sleep period for PRM, allowing PRM daemons to stabilize when large memory
consumers are started immediately after PRM is configured, set PRM_SLEEP to the number of
seconds to sleep:
PRM_SLEEP=n
The PRM_SLEEP variable can be set only when PRM_CONFIG is set to one.
To enable PRM’s CPUCAPON mode, set the PRM_CAPPING variable equal to one:
PRM_CAPPING=1
The PRM_CAPPING variable can be set to one only when PRM_ENABLE is set to one.
98 Administering PRM
Page 99

To set the interval for the application manager, set PRM_INTL_APPL to the number of seconds
you want the interval to last:
PRM_INTL_APPL=seconds
To set the interval for the memory manager, set PRM_INTL_MEM to the number of seconds you
want the interval to last:
PRM_INTL_MEM=seconds
To log application manager messages to /var/adm/syslog/syslog.log, set PRM_LOG_APPL to
one:
PRM_LOG_APPL=1
To log memory manager messages to /var/adm/syslog/syslog.log, set PRM_LOG_MEM to one:
PRM_LOG_MEM=1
To start PRM’s SNMP agent on reboot, set PRM_SNMPAGT to one:
PRM_SNMPAGT=1
For more information on this agent, see Appendix C.
Reconstructing a configuration file
When PRM is configured, an internal copy of the configuration file is created as
/var/opt/prm/PRM.prmconf. If PRM is then reconfigured, this file is renamed
/var/opt/prm/PRM.prmconf.old, and a copy of the new configuration is created as
/var/opt/prm/PRM.prmconf. If PRM is reset after being configured, the /var/opt/prm/PRM.prmconf
file is renamed /var/opt/prm/PRM.prmconf.old.
These internal copies can be used as backups if your configuration file is lost or corrupted. Be
aware though that records for applications or users that were not present when the configuration
was loaded will not be in the files.
Table 16 shows when the various files are available.
Table 16 Internal copies of configuration files
Files availableState
NoneBoot-time
Load a configuration
Load a configuration when a
configuration is already
present
/var/opt/prm/PRM.prmconf (current configuration)[LINEBREAK]/var/tmp/PRM.prmconf
(configuration kept for legacy purposes)
/var/opt/prm/PRM.prmconf (current
configuration)[LINEBREAK]/var/opt/prm/PRM.prmconf.old (previous
configuration)[LINEBREAK]/var/tmp/PRM.prmconf (configuration kept for legacy
purposes)
/var/opt/prm/PRM.prmconf.old (previous configuration)Reset PRM
Backup copies of various files are available in /var/opt/prm/.
You may also see the files /var/opt/prm/PRM.prmconf.src and /var/opt/prm/PRM.prmconf.srcinfo
if, with a release prior to C.02.01, you have automatically started PRM at boot time through settings
in your /etc/rc.config.d/prm file. The PRM.prmconf.src file is used to configure PRM in such cases.
Special case of interest: Client/server connections
NOTE: The scenario described in this section applies only when the application manager is not
enabled. Prevent this scenario by enabling the manager using the prmconfig -e command.
In a client/server configuration, users attaching to a system via a socket connect (bypassing the
normal login procedure) all run as the same user (typically, root or other username). Because PRM
Reconstructing a configuration file 99
Page 100

uses login names to assign users to specific PRM groups, PRM is not able to distinguish between
users attaching to the system using socket connections.
Online cell operations
If you want to perform online cell operations, and:
• Your PRM configuration contains memory records
Stop memory management (prmconfig -d MEM), then after the online cell operation has
completed, restart memory management (prmconfig -e MEM).
• Your PRM configuration uses PSETs
Reset PRM (prmconfig -r), then after the online cell operation has completed, restart PRM
management (prmconfig -ie [-f file]).
For more information on online cell operations, see parolrad(1M).
Backing up PRM files
If you would like to make a backup of your PRM environment, be sure to back up the following
files:
• /etc/prmconf
The default PRM configuration file
• /etc/opt/prm/conf/*
The suggested location for additional PRM configurations. Files in this directory should have
the owner set to hpsmh.
• /opt/prm/conf/*
A location previously suggested for additional PRM configurations
• /etc/rc.config.d/prm
Configuration file used by /sbin/init.d/prm
• /etc/shells and /opt/prm/shells
Files used by PRM to ensure PRM’s application manager can differentiate shell scripts from
one another; these files can also help the application manager differentiate Java binaries
• /etc/cmpt/*.rules
File containing compartment rules configured for the system (This file is actually an HP-UX 11i
Security Containment file. If you have created Secure Resource Partitions, you will have a
*.rules file on your system, although not necessarily in /etc/cmpt/. The Security Containment
feature is available starting with HP-UX 11i v2.)
100 Administering PRM
 Loading...