

Page 1

HP Photosmart M22/M23
Digital Camera with HP Instant Share
Quick Start Guide
Guía de comienzo rápido
4" X 6" FRONT COVER
Page 2

TahitiUM.book Page 4 Sunday, January 4, 2004 2:47 PM
Page 3
EastwoodQSG.fm Page 1 Thursday, December 23, 2004 3:58 PM
HP Photosmart M22/M23
Digital Camera
with HP Instant Share
Quick Start Guide
English
1
Page 4
EastwoodQSG.fm Page 2 Thursday, December 23, 2004 3:58 PM
Legal Notices
© Copyright 2005 Hewlett-Packard Development Company, L.P.
The information contained herein is subject to change without notice. The only
warranties for HP products and services are set forth in the express warranty
statements accompanying such products and services. Nothing herein should
be construed as constituting an additional warranty. HP shall not be liable for
technical or editorial errors or omissions contained herein.
Windows® is a U.S. registered trademark of Microsoft Corporation.
SD logo is a trademark of its proprietor.
Important recycling information for our customers in the European Union: To
preserve the environment, this product must be recycled after its useful life as
required by law. The symbol below indicates that this product may not be
disposed in the general trash. Please return the product for proper recovery/
disposal to the authorized collection location nearest to you. For more
information regarding return and recycling of HP products generally, please
visit:
www.hp.com/hpinfo/globalcitizenship/environment/recycle/index.html
For future reference, please enter the following information:
Model Number (on the front of the camera)
Serial Number (10-digit number on the
bottom of the camera)
Date the camera was purchased
Printed in China
2 HP Photosmart M22/M23 Quick Start Guide
Page 5
EastwoodQSG.fm Page 3 Thursday, December 23, 2004 3:58 PM
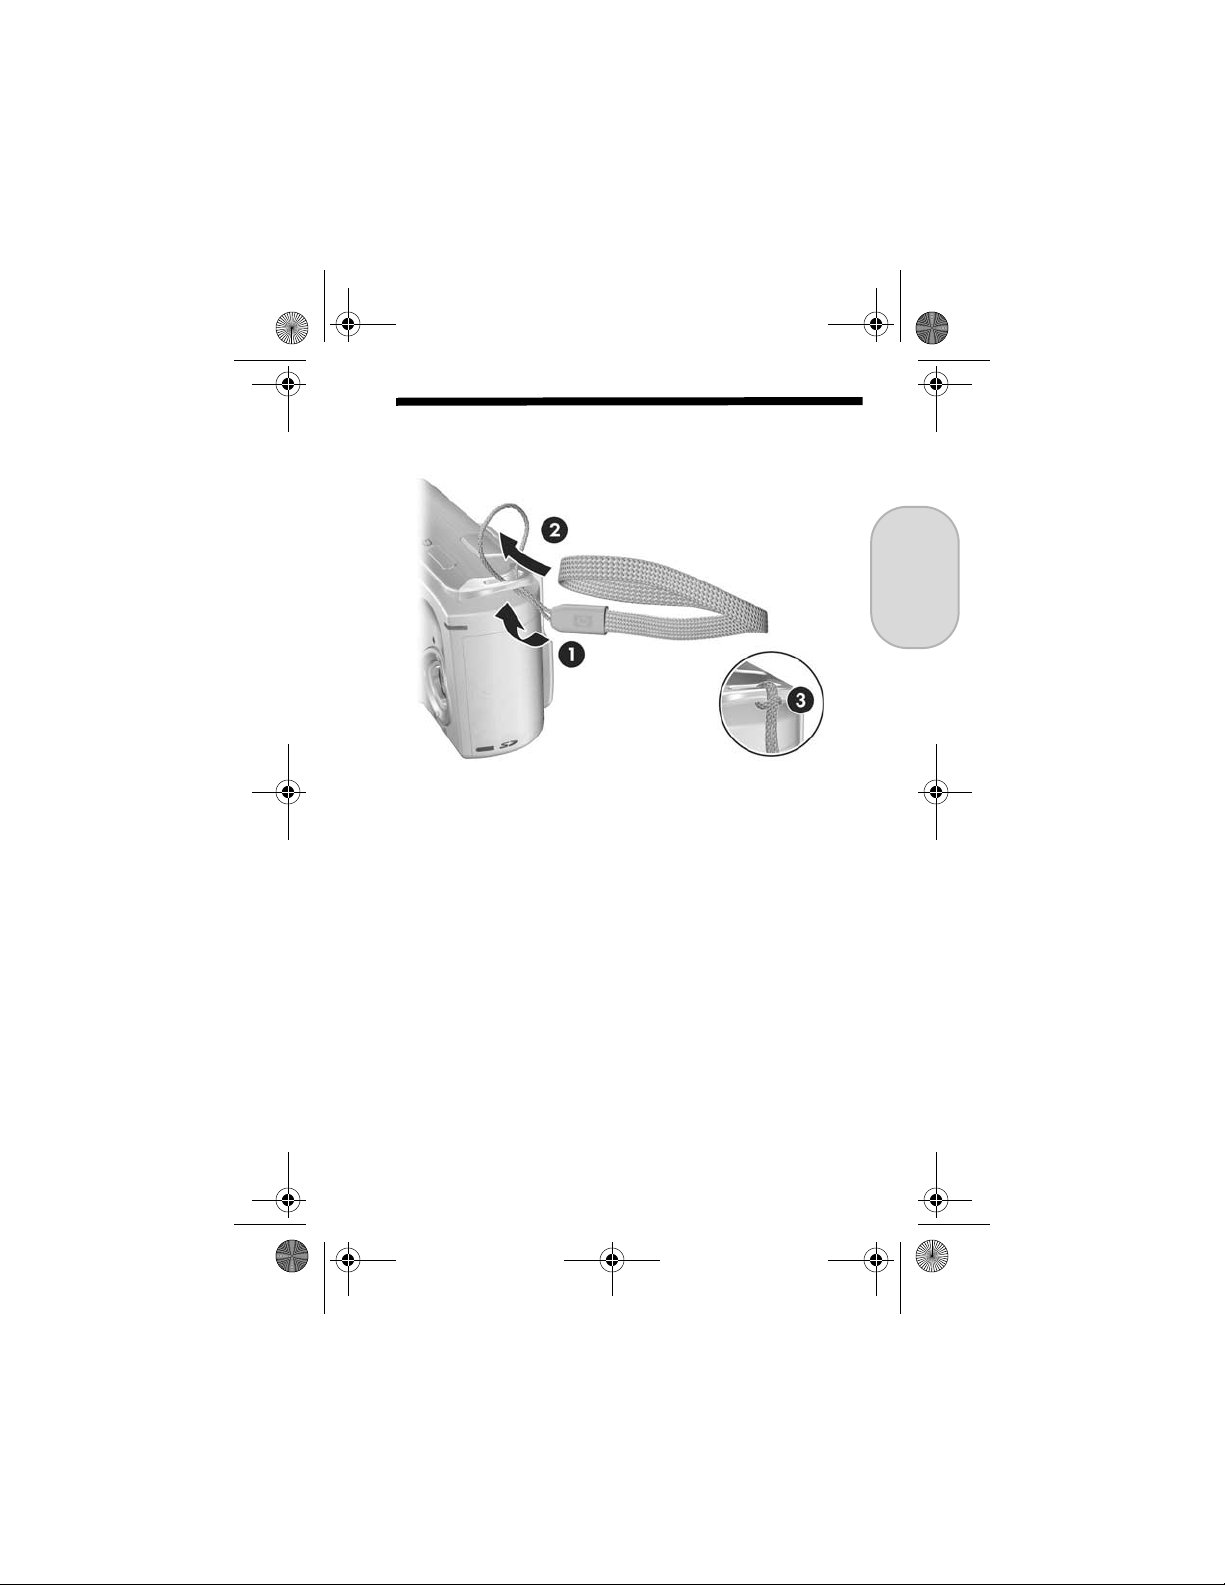
1. Attach the Wrist Strap
S Attach the wrist strap to the wrist strap mount on the side
of the camera as shown.
English
3
Page 6
EastwoodQSG.fm Page 4 Thursday, December 23, 2004 3:58 PM
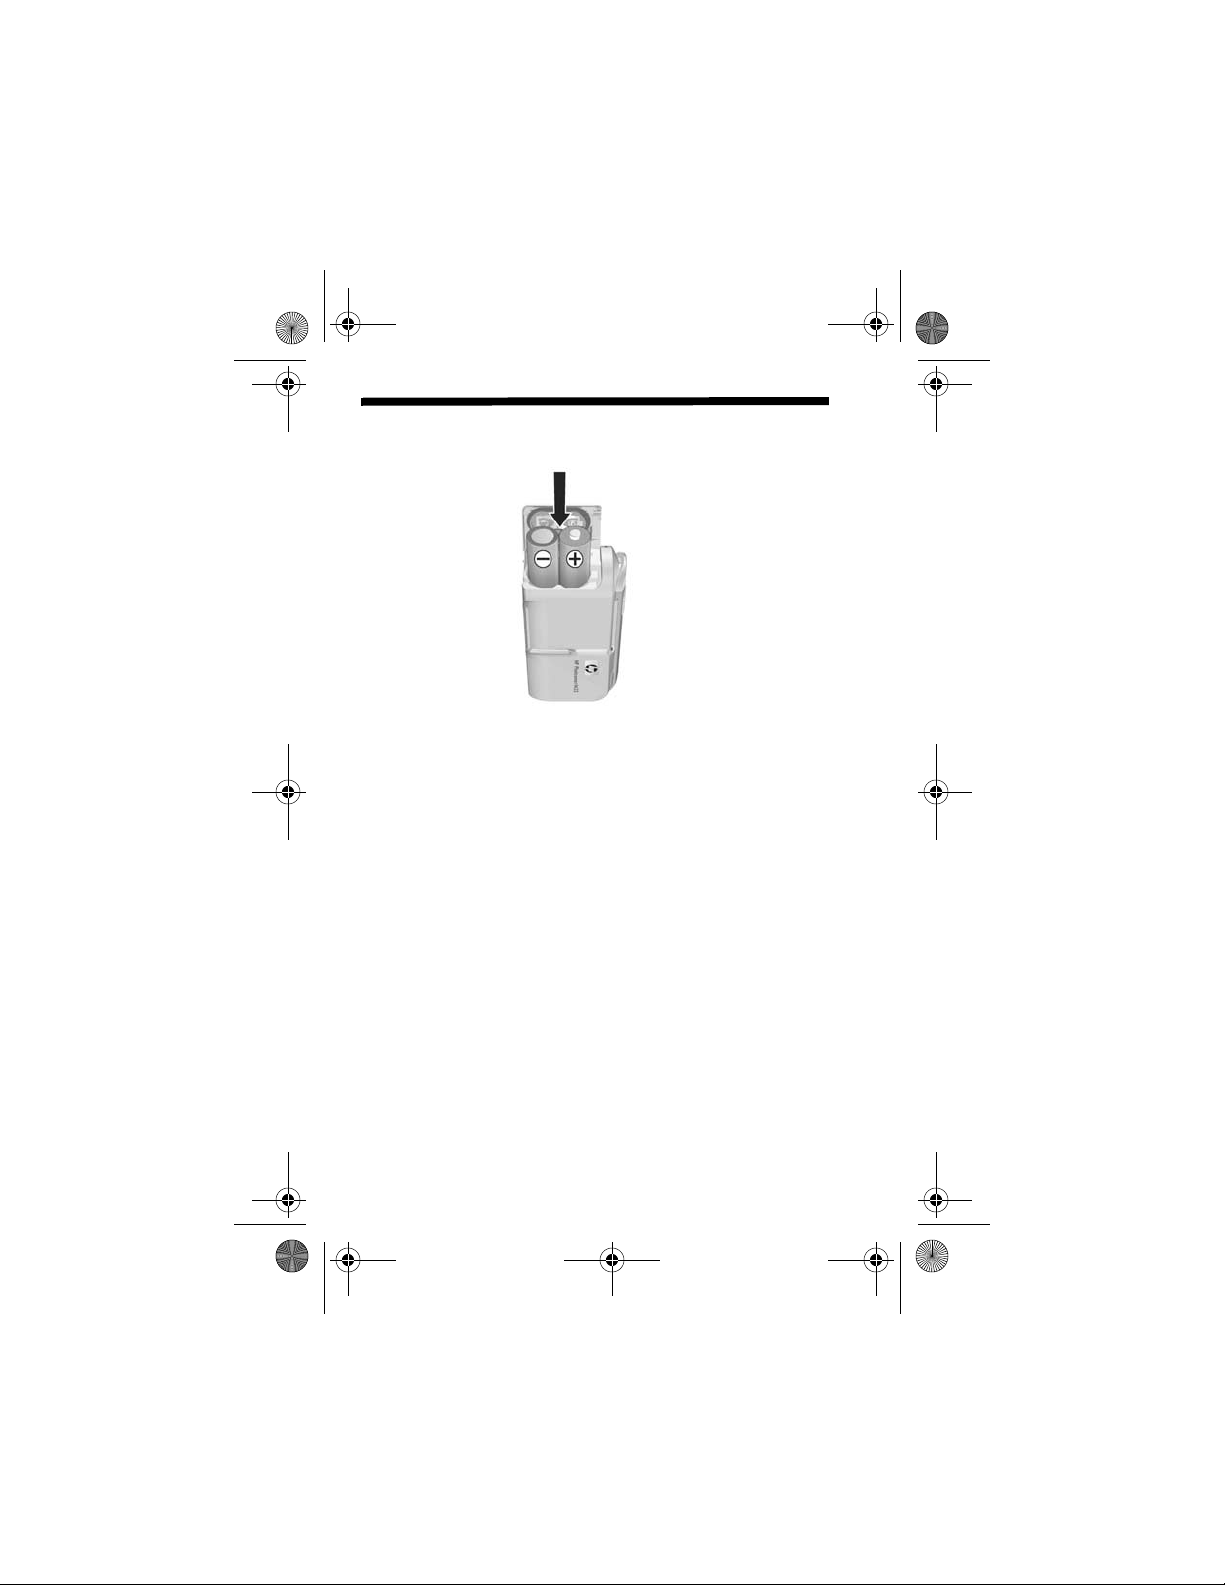
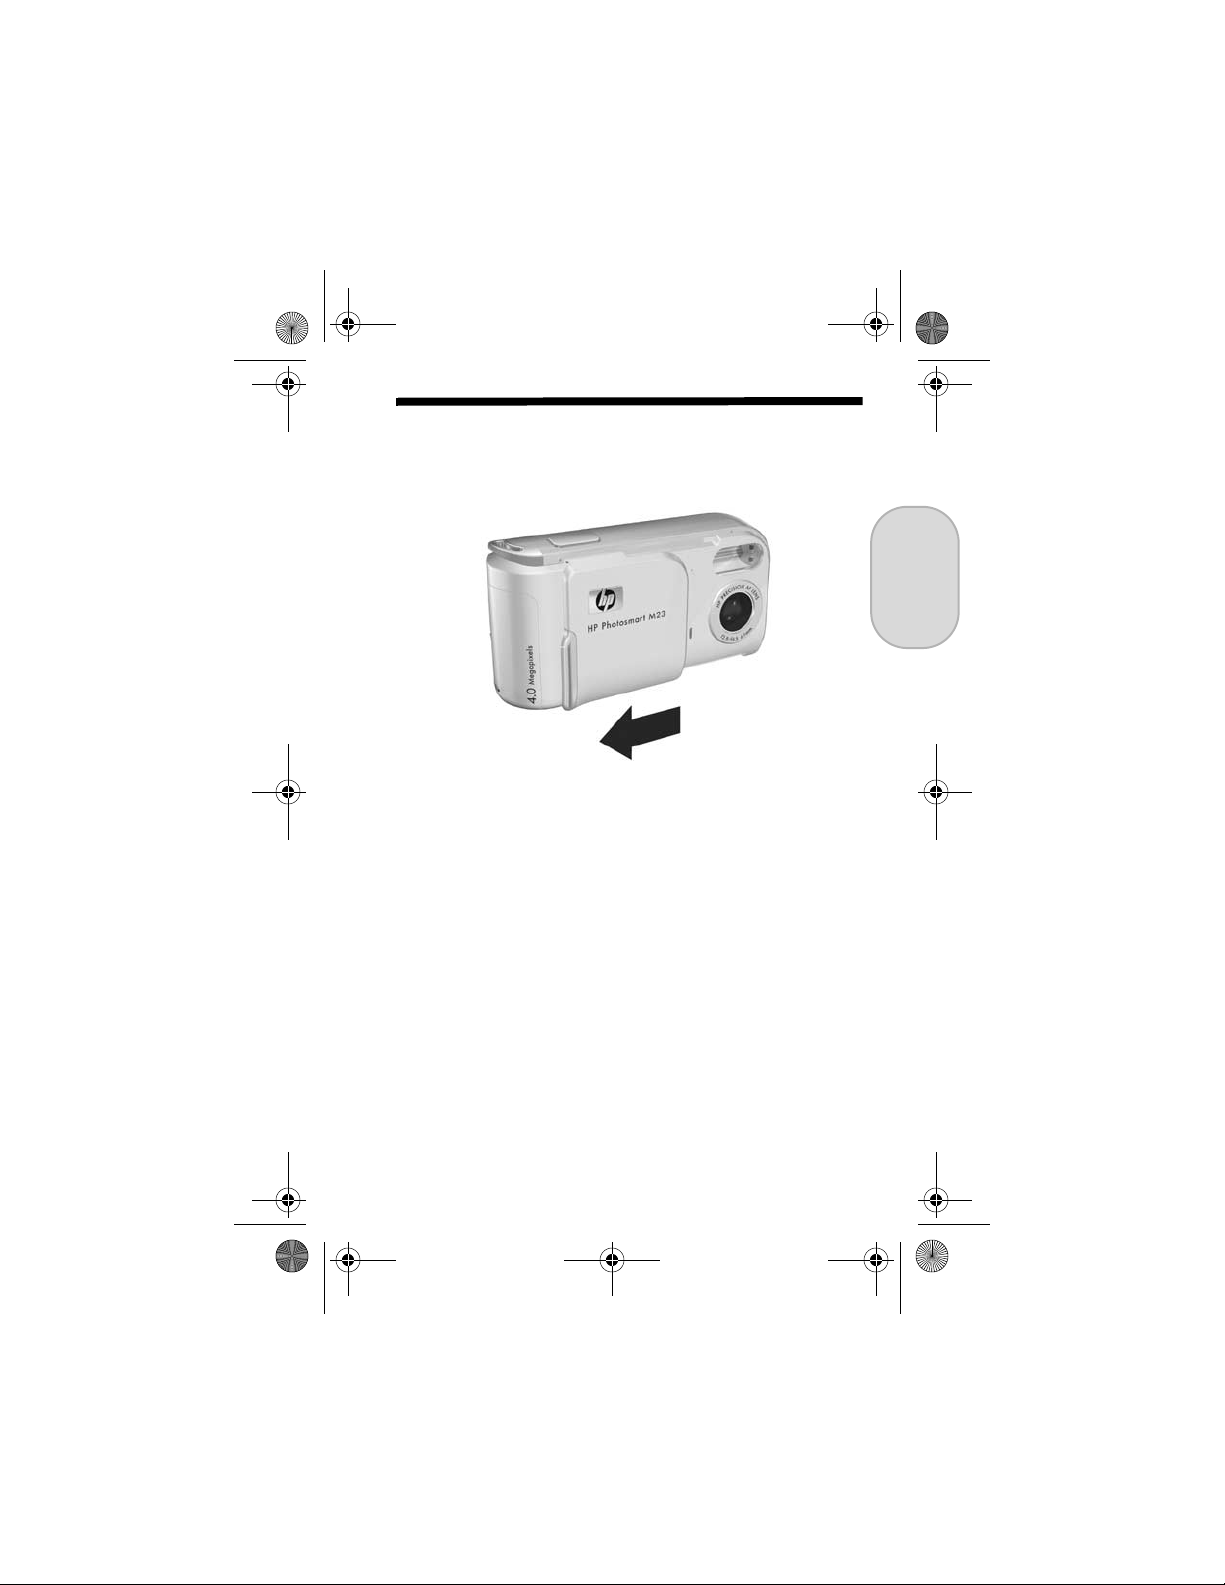
2. Install the Batteries
1. Open the Battery/Memory card door on the side of the
camera by sliding the door toward the front of the
camera.
2. Insert the batteries as indicated inside the door.
3. Close the Battery/Memory card door by pushing the
door down and sliding the door toward the back of the
camera until the door latches.
You can expect performance similar to the following from the
different types of AA batteries that work in your camera:
Alkaline (Starter Batteries) 30 to 70 shots
Lithium 180 to 320 shots
NiMH (rechargeable)
If you use NiMH (rechargeable) batteries, be
sure that you fully charge them before using them
in the camera.
120 to 240 shots
4 HP Photosmart M22/M23 Quick Start Guide
Page 7
EastwoodQSG.fm Page 5 Thursday, December 23, 2004 3:58 PM
3. Turn On the Camera
S To turn the camera on, slide the lens cover open until it
clicks, uncovering the lens. The Power/Memory light on
the back of the camera turns on solid green. The HP logo
also displays on the Image Display as the camera powers
up.
CAUTION: When sliding the lens cover, keep your fingers
clear of the lens. Fingerprints on the lens can impair the
quality of the picture.
English
5
Page 8
EastwoodQSG.fm Page 6 Thursday, December 23, 2004 3:58 PM
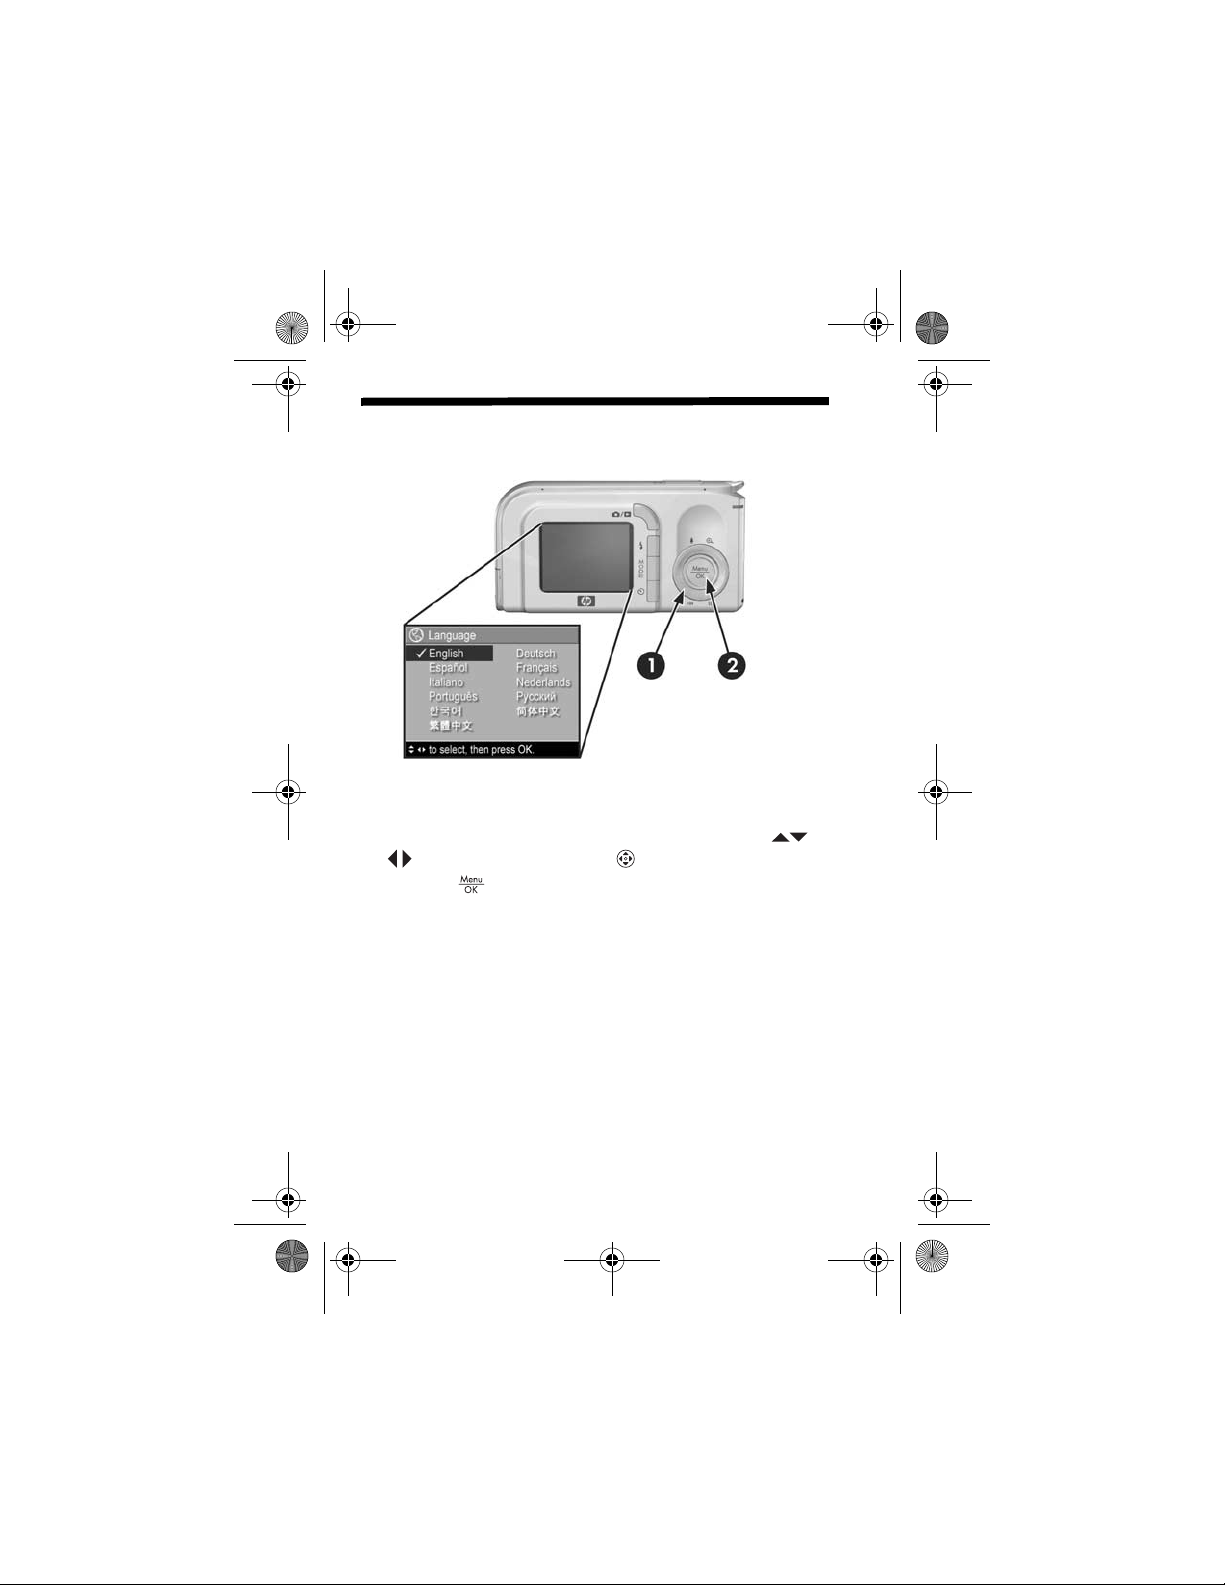
4. Choose the Language
The first time you turn the camera on, you are prompted to
choose a language.
1. Scroll to the language that you want by using the
buttons on the Controller .
2. Press the button to select the highlighted language.
6 HP Photosmart M22/M23 Quick Start Guide
Page 9
EastwoodQSG.fm Page 7 Thursday, December 23, 2004 3:58 PM
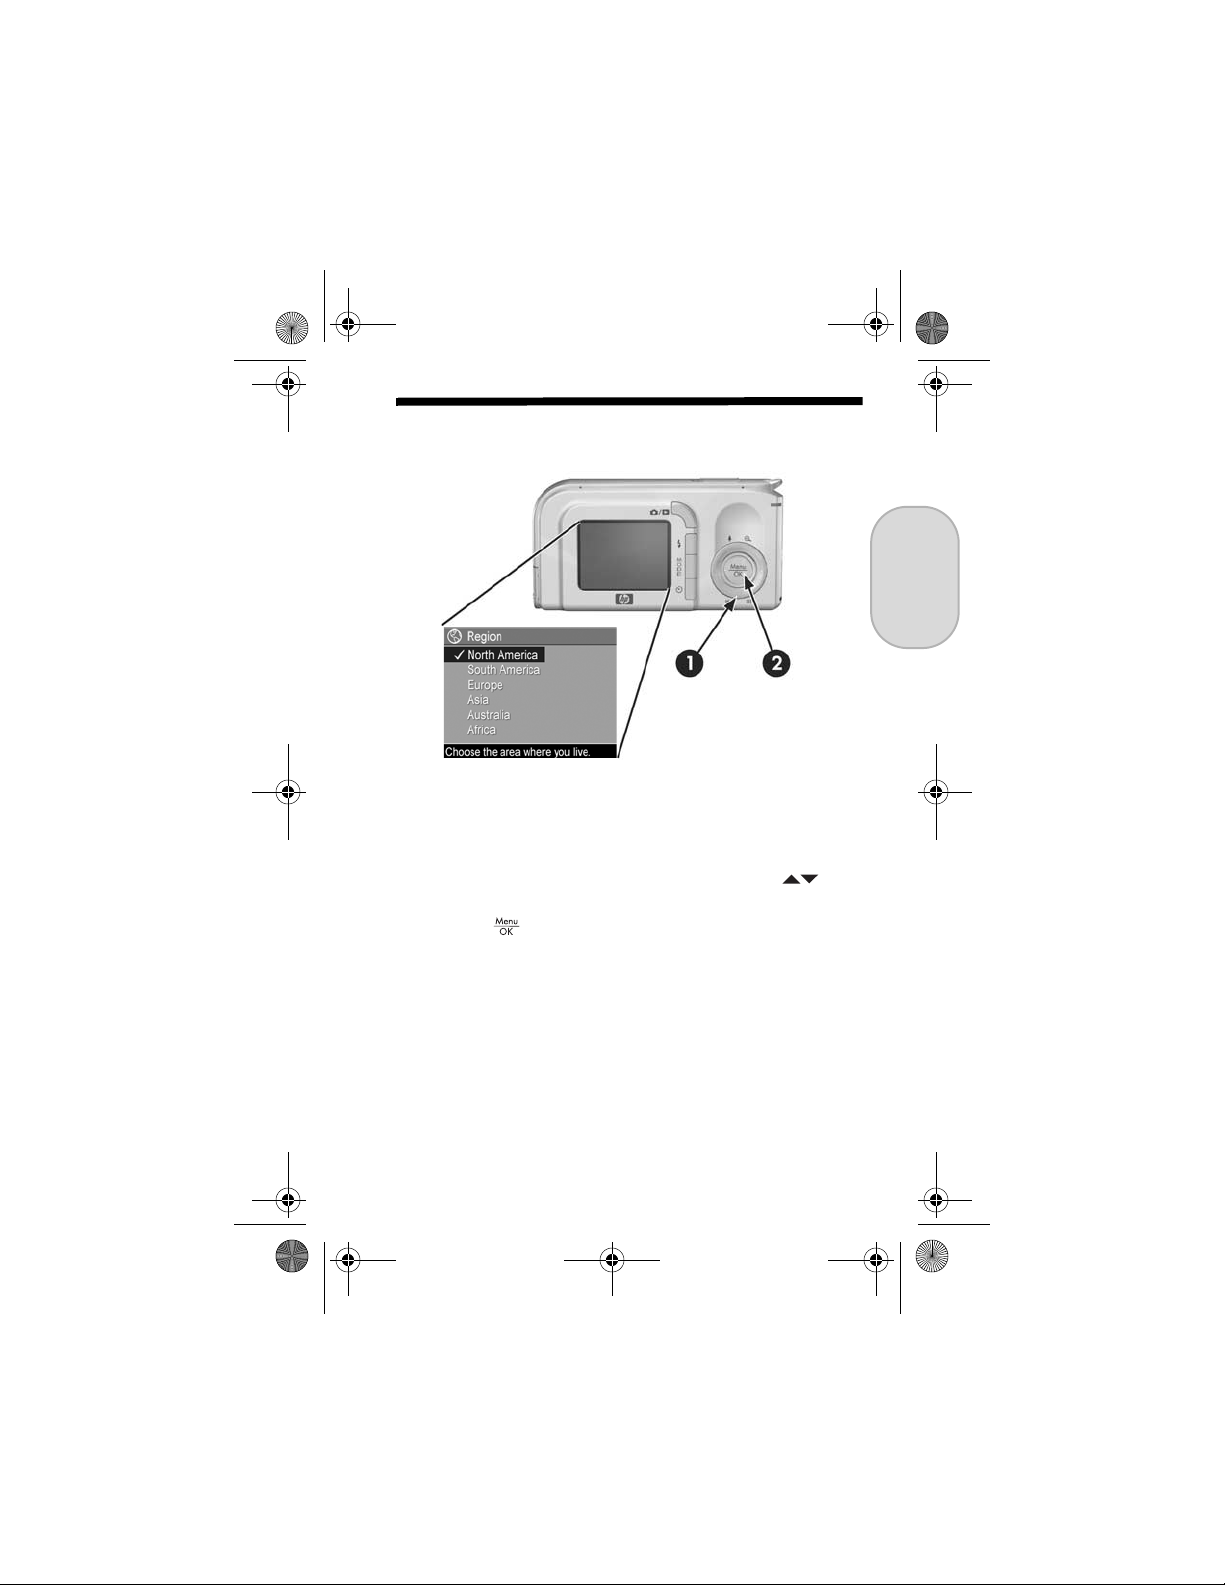
5. Set the Region
After choosing a language, you are prompted to choose the
continent where you live. The Language and Region settings
determine the date format and the format of the video signal
for displaying camera images on a television.
1. Scroll to the region that you want by using the
buttons.
2. Press the button to select the highlighted region.
English
7
Page 10
EastwoodQSG.fm Page 8 Thursday, December 23, 2004 3:58 PM
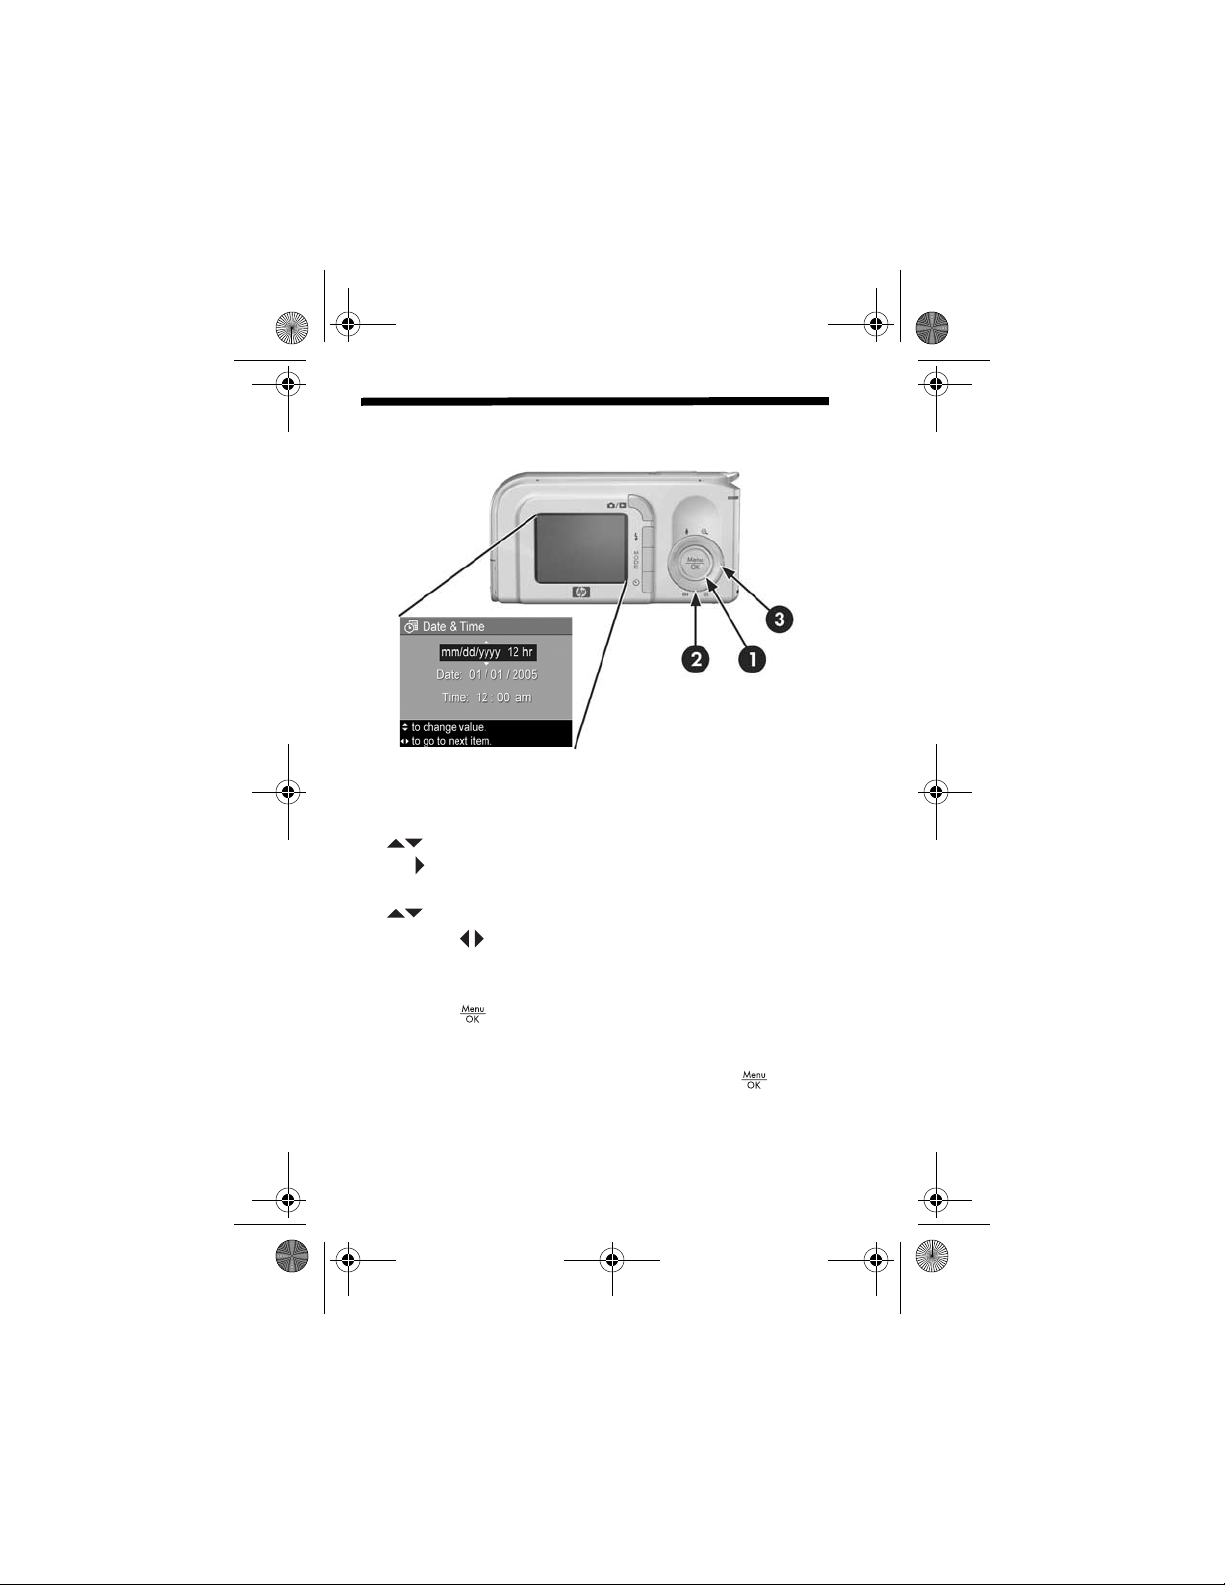
6. Set the Date and Time
You are now prompted to set the date and time.
1. The first item highlighted is the date and time format. If
you want to change the date and time format, use the
buttons. If the date and time format is correct, press
the button to move to the Date.
2. Adjust the value of the highlighted selection by using the
buttons.
3. Press the buttons to move to the other selections.
4. Repeat steps 2 and 3 until the date and time are set
correctly.
5. Press the button when you have entered the proper
values for the date and time. A confirmation screen
appears, asking if the correct date and time have been
set. If the date and time are correct, press the button
to select Yes.
8 HP Photosmart M22/M23 Quick Start Guide
Page 11
EastwoodQSG.fm Page 9 Thursday, December 23, 2004 3:58 PM
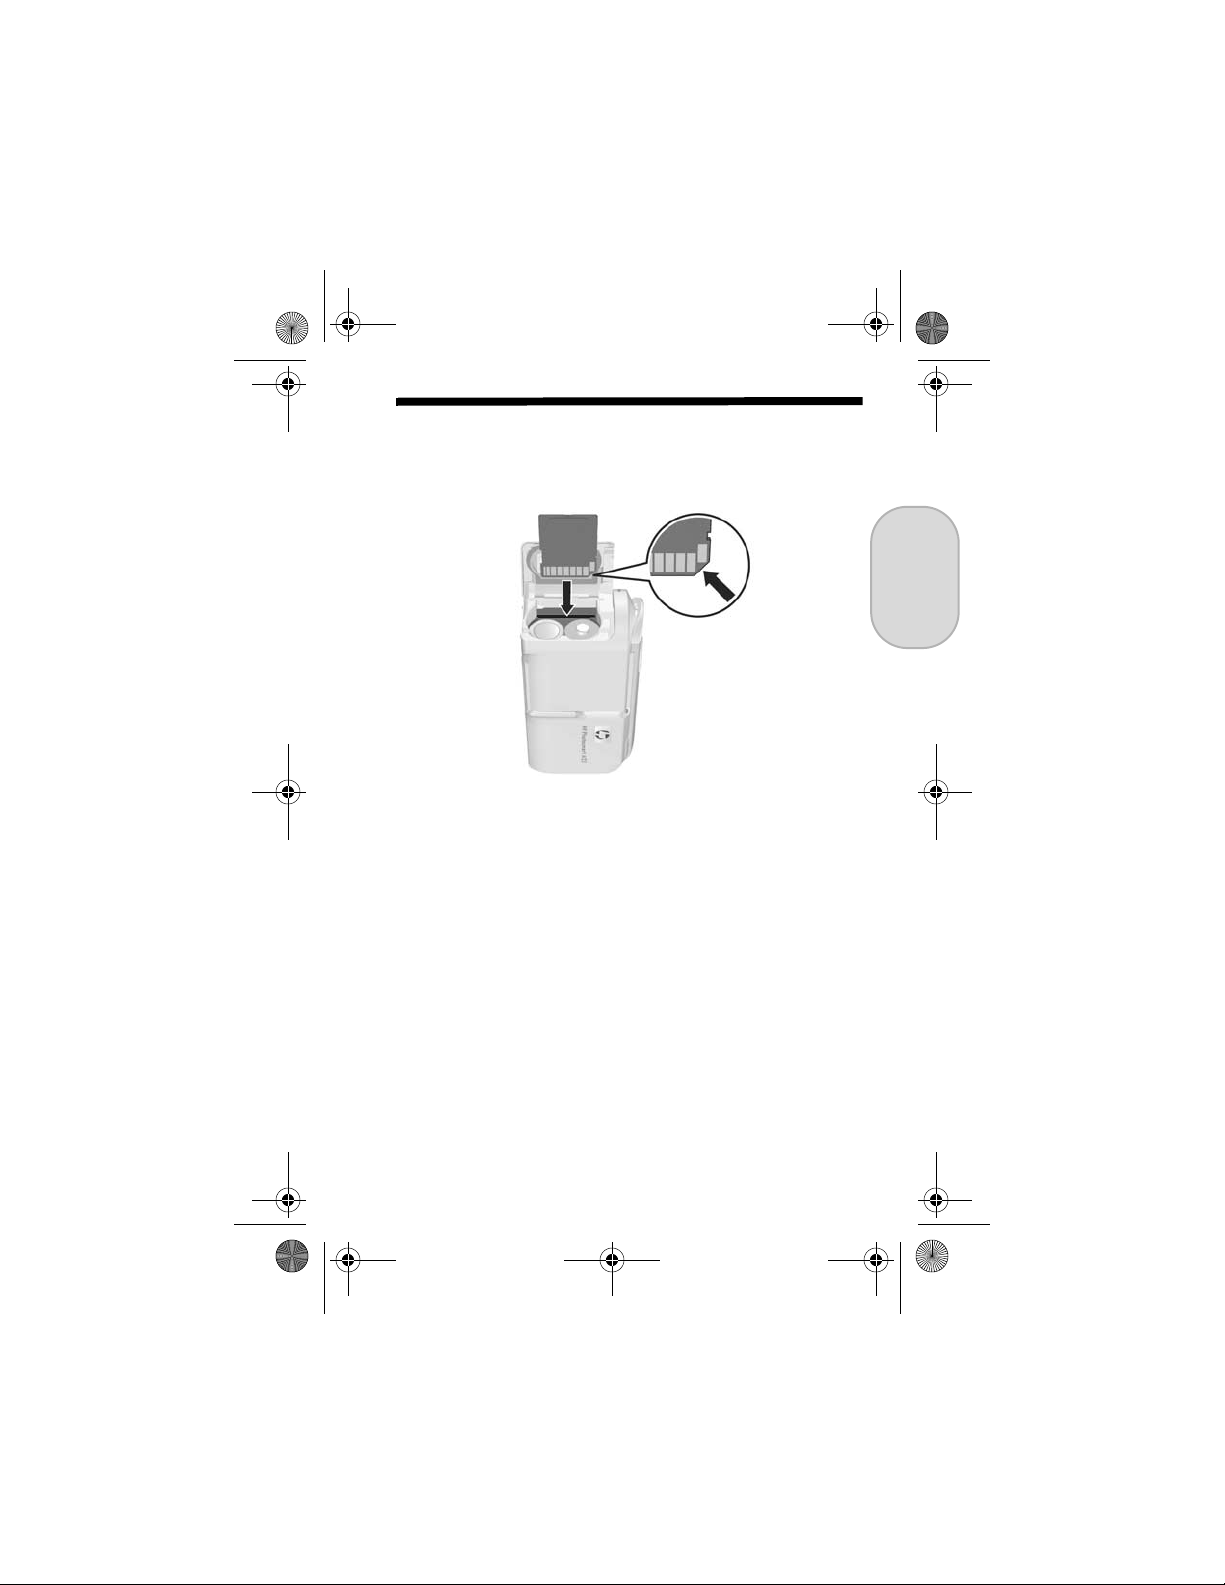
7. Install and Format a
Memory Card (Optional)
Your camera contains internal memory that allows you to
store images and video clips. However, you can use a
memory card (purchased separately) instead to store images
and video clips.
1. Turn off the camera and open the Battery/Memory card
door on the side of the camera.
2. Insert the memory card in the small slot behind the
batteries, with the notched side of the card going in first,
as shown. Make sure the memory card snaps into place.
3. Close the Battery/Memory card door and turn on the
camera.
English
9
Page 12
EastwoodQSG.fm Page 10 Thursday, December 23, 2004 3:58 PM
To help prevent corrupted cards and images, you should
format memory cards before you use them for the first time.
To format the memory card:
1. Press the button, then use the button to move to the
Playback Menu .
2. Press the button to highlight Delete, and then press the
button to display the Delete sub-menu.
3. Use the button to highlight Format Card, and then
press the button to display the Format Card
confirmation screen.
4. Press the button to highlight Yes, and then press the
button to format the card.
Formatting Card... appears in the Image Display while
the camera is formatting the memory card. When the
camera has completed the formatting, the Total Images
Summary screen is displayed.
To remove the memory card from the camera, first turn the
camera off. Then open the Battery/Memory card door, press
down on the top edge of the memory card, and it will spring
outward from the slot.
10 HP Photosmart M22/M23 Quick Start Guide
Page 13
EastwoodQSG.fm Page 11 Thursday, December 23, 2004 3:58 PM
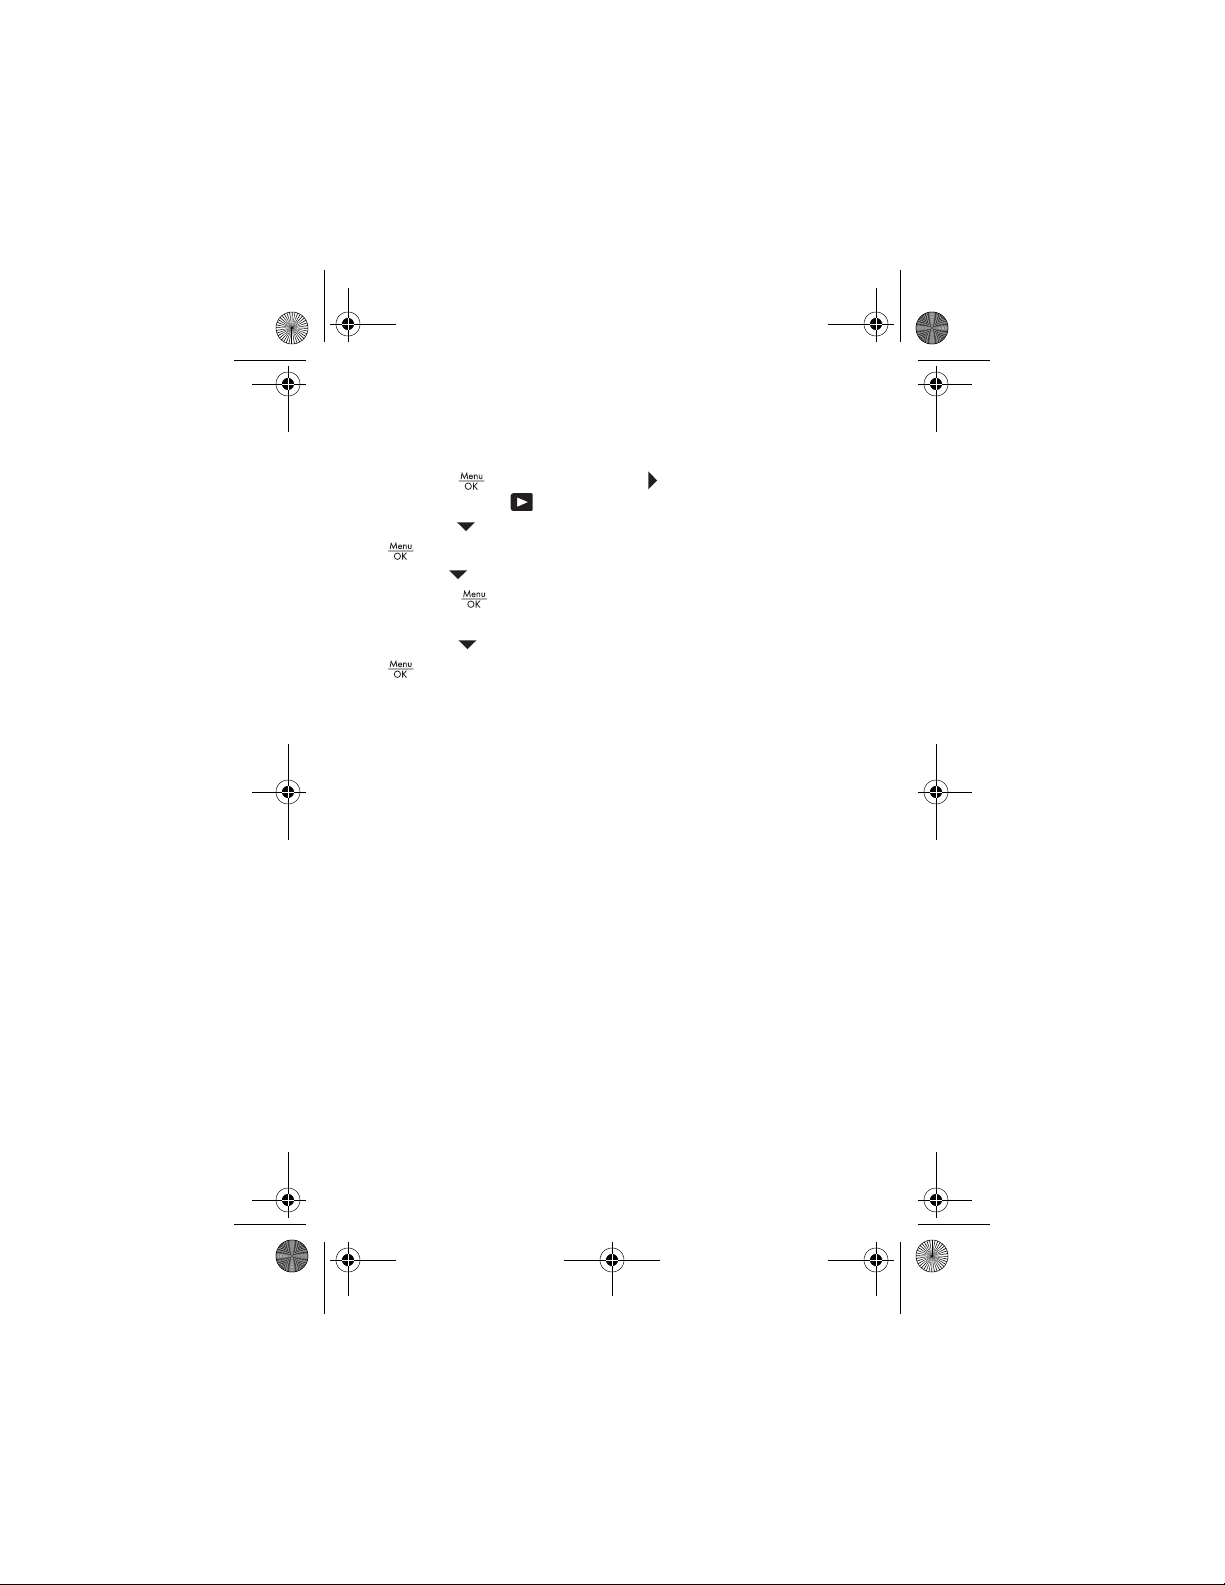
8. Take a Still Picture
1. Press the Live View/Playback button until the
Live View icon appears in the upper left corner of the
Image Display, then frame the subject for your picture in
the Image Display.
2. Hold the camera steady with both hands and press the
Shutter button on the top of the camera halfway down.
The camera measures and locks the focus and exposure.
The focus brackets in the Image Display turn solid green
when focus is locked.
3. Press the Shutter button all the way down to take the
picture. The camera beeps after taking the picture. The
image appears for several seconds on the Image Display.
English
11
Page 14
EastwoodQSG.fm Page 12 Thursday, December 23, 2004 3:58 PM
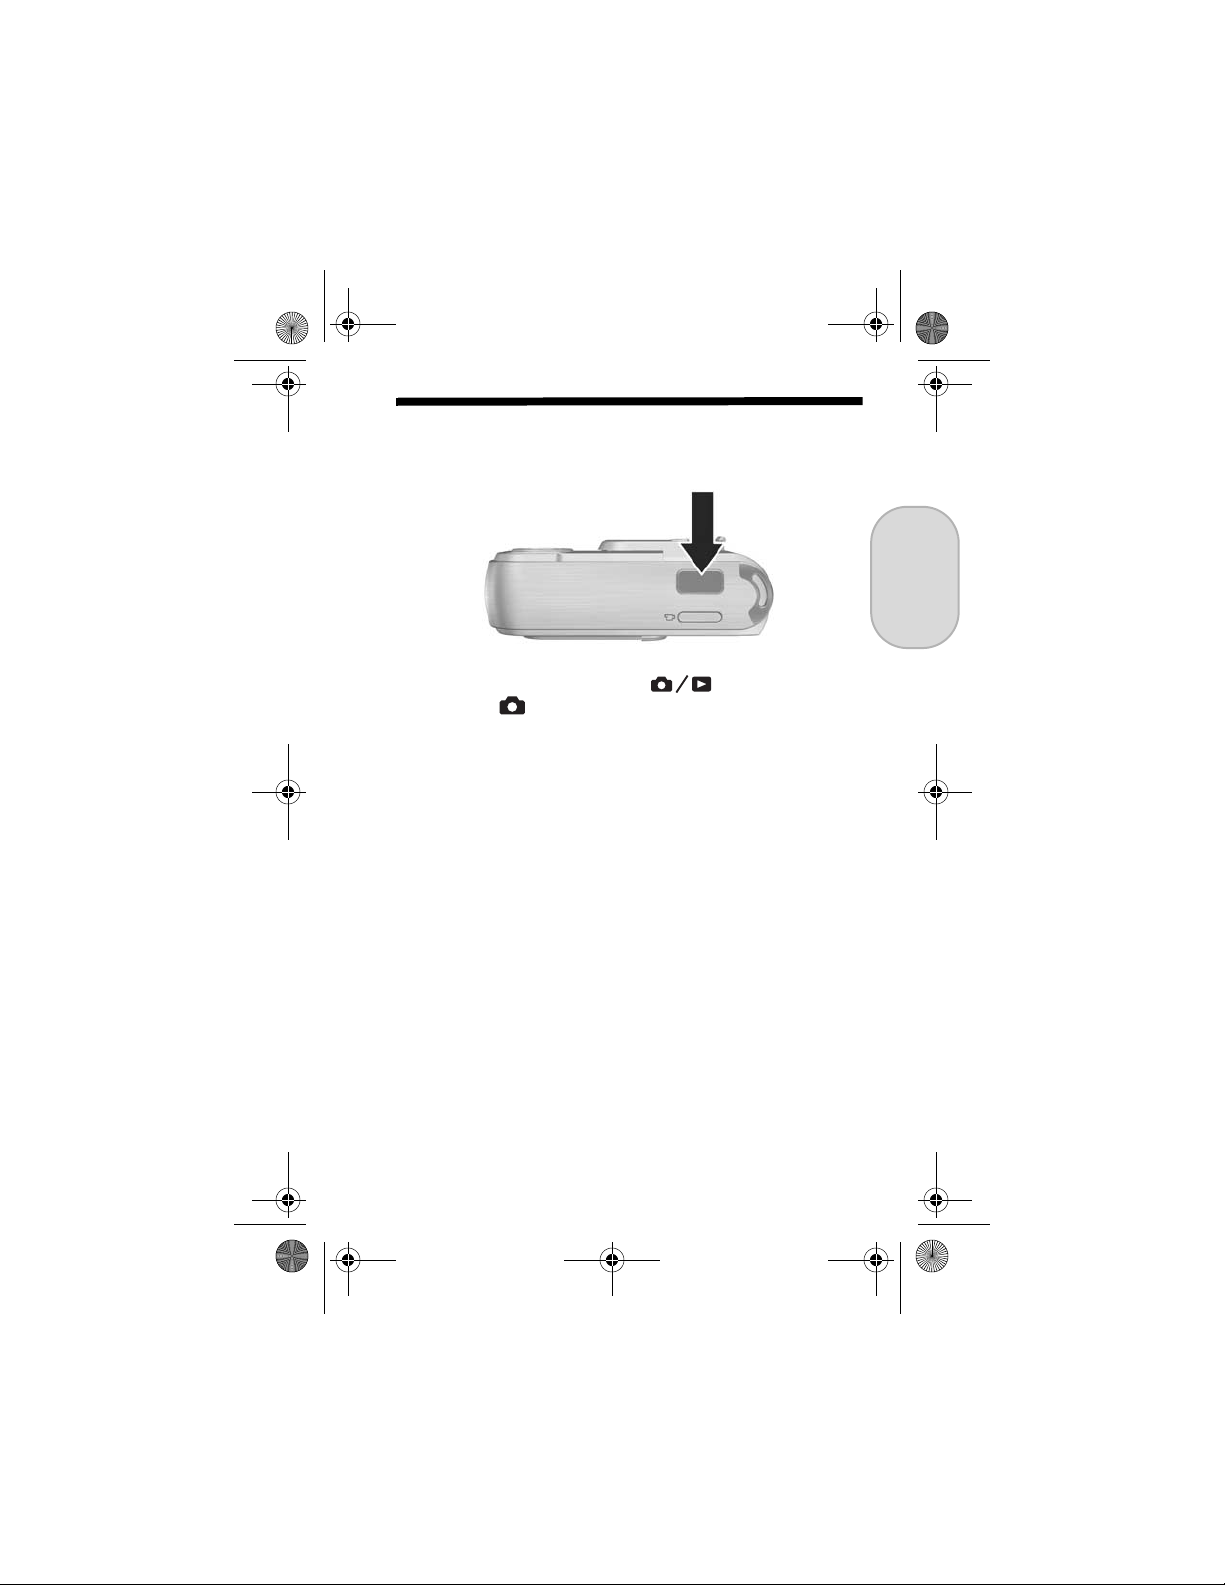
9. Record a Video Clip
1. Press the Live View/Playback button until the Live
View icon appears in the upper left corner of the
Image Display, then frame the subject for your picture in
the Image Display.
2. To start recording video, press and release the Video
button on the top of the camera.
3. To stop recording video, press and release the Video
button again; otherwise, the video will continue recording
until the camera runs out of memory.
12 HP Photosmart M22/M23 Quick Start Guide
Page 15

EastwoodQSG.fm Page 13 Thursday, December 23, 2004 3:58 PM
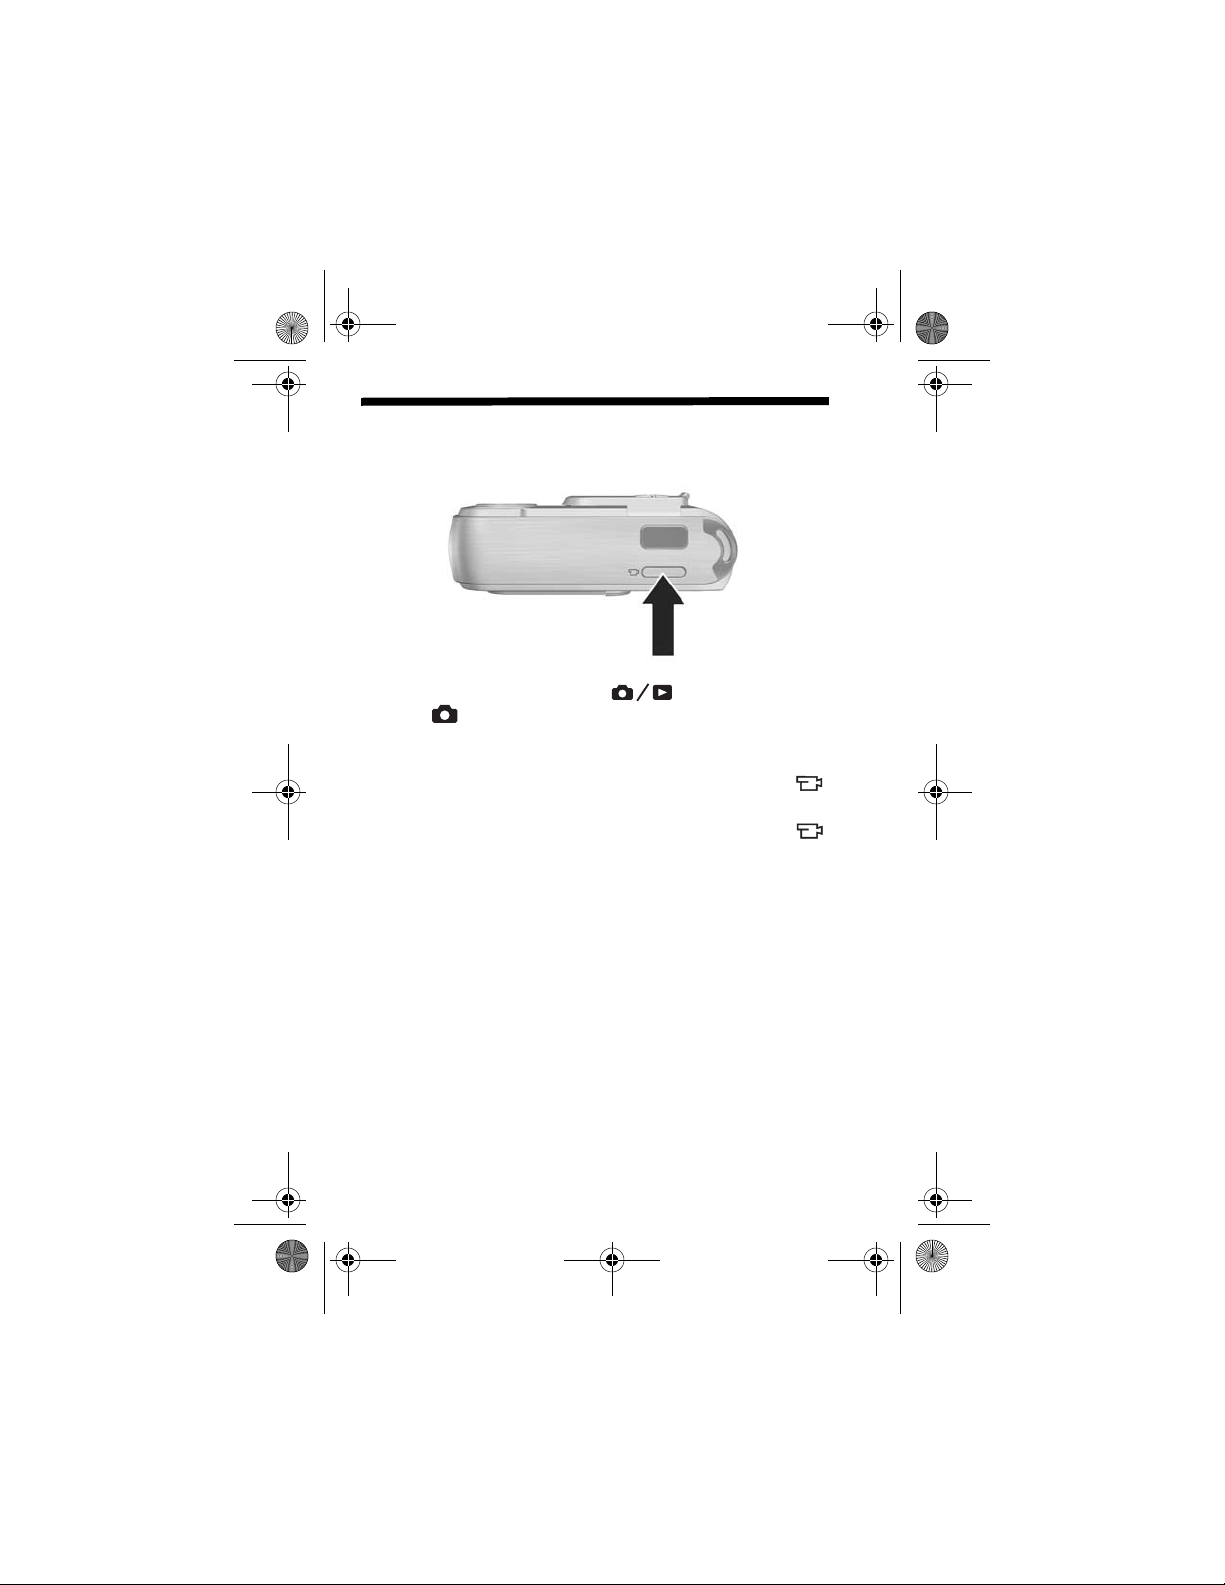
10. Review Images and
Video Clips
You will use Playback to review images and video clips.
1. Press the Live View/Playback button until the
Playback icon appears in the upper left corner of the
Image Display.
2. Use the buttons to scroll through your images and
video clips.
Video clips play automatically after the first frame of the
video clip displays for 2 seconds.
English
13
Page 16

EastwoodQSG.fm Page 14 Thursday, December 23, 2004 3:58 PM
11. Install the Software
The HP Image Zone software allows you to transfer images
from the camera, and then view, edit, print, or e-mail them.
Windows System Requirements
To install the HP Image Zone software, your computer must
have a minimum of 64MB of RAM, Windows 2000, XP, 98,
98 SE, or Me, and Internet Explorer 5.5 Service Pack 2 or
higher. If your computer meets these requirements, the
installation process installs either the full version of HP Image
Zone or HP Image Zone Express. HP Image Zone Express
lacks some features contained in the full version. For
example, with HP Image Zone Express you cannot set up HP
Instant Share destinations, as described in Set Up HP Instant
Share Destinations in the Camera (Optional).
14 HP Photosmart M22/M23 Quick Start Guide
Page 17

EastwoodQSG.fm Page 15 Thursday, December 23, 2004 3:58 PM
HP Image Zone Support
If you have trouble installing or using the HP Image Zone
software, see the HP Customer Support website for more
information: www.hp.com/support.
Windows
1. Close all programs and temporarily disable any virus
protection software running on your computer.
2. Insert the HP Image Zone software CD into the CD Drive
of your computer and follow the on-screen instructions. If
the installation window does not appear, click Start, click
Run, type D:\Setup.exe, where D
drive, then click OK.
3. When the HP Image Zone software has finished
installing, re-enable any virus protection software that you
disabled in step 1.
is the letter of your CD
Macintosh
1. Close all programs and temporarily disable any virus
protection software running on your computer.
2. Insert the HP Image Zone software CD into the CD drive
of your computer.
3. Double-click the CD icon on the computer desktop.
4. Double-click the installer icon, and then follow the on-
screen instructions.
5. When the HP Image Zone software has finished
installing, re-enable the virus protection software that you
disabled in step 1.
English
15
Page 18

EastwoodQSG.fm Page 16 Thursday, December 23, 2004 3:58 PM
12. Transfer Images to a
Computer
1. Turn off the camera, then connect the camera to the
computer either through the USB cable provided or
through the optional HP Photosmart M-series dock.
2. If using the USB cable, turn on the camera. If using the
dock, press the Save/Print button on the dock.
3. Follow the on-screen instructions to have the software
transfer the images from the camera to the computer.
4. Disconnect the camera from the computer.
16 HP Photosmart M22/M23 Quick Start Guide
Page 19

EastwoodQSG.fm Page 17 Thursday, December 23, 2004 3:58 PM
13. Set Up HP Instant Share
Destinations in the
Camera (Optional)
HP Instant Share lets you easily select still images in your
camera to be automatically sent to a variety of destinations,
such as e-mail addresses, the next time you connect the
camera to your computer. Use the following steps to set up
online destinations in your camera. You must have the full
version of the HP Image Zone software on your computer to
use this part of the HP Instant Share feature on your camera.
NOTE: You will need an Internet connection to complete this
procedure.
1. Turn on the camera, press the button, then use the
button to scroll to the HP Instant Share Menu .
2. Use the button to highlight HP Instant Share Setup...
, and then press the button. A message will
appear in the Image Display asking you to connect the
camera to your computer.
English
17
Page 20

EastwoodQSG.fm Page 18 Thursday, December 23, 2004 3:58 PM
3. Without turning off the camera, connect it to your
computer again using the same procedure you used in
the previous section, Transfer Images to a Computer.
4. The next step is slightly different on a Windows and
Macintosh computer:
• Windows: Connecting the camera to the computer
activates the HP Instant Share Setup program. If some
other dialog box appears, close that dialog box by
clicking Cancel. In the HP Instant Share Setup
program, click Start, then follow the on-screen
instructions to set up destinations on the computer and
save them to your camera.
• Macintosh: Connecting the camera to the computer
activates the HP Instant Share Setup Assistant. Click
Continue, then follow the on-screen instructions to set
up destinations on the computer and save them to your
camera.
5. Disconnect the camera from the computer, then go back
to the HP Instant Share Menu to check that the new
destinations are now in the camera. You can now mark
images in the camera to be sent to one or more of these
HP Instant Share destinations. See the section titled
Sending Images to Destinations in Chapter 4 of the
camera User's Manual for details about how to do this.
To learn how to view the User's Manual on the HP Image
Zone CD, see the next page of this Quick Start Guide.
18 HP Photosmart M22/M23 Quick Start Guide
Page 21

EastwoodQSG.fm Page 19 Thursday, December 23, 2004 3:58 PM
Getting Assistance
View the User’s Manual on CD
Your camera has many more valuable features that are
covered in detail in the User's Manual. These features
include HP adaptive lighting technology, in-camera red-eye
removal, 9 shooting modes, HP image advice, HP Instant
Share, direct printing capability, on-camera Help, camera
accessories, and much more. Copies of this camera User’s
Manual in several different languages are located on the
HP Image Zone software CD. To view the User’s Manual:
1. Insert the HP Image Zone software CD into the CD drive
of your computer.
2. On Windows: Click View User’s Manual on the Main
page of the CD installation screen.
On Macintosh: Look in the readme file in the docs folder
of the HP Image Zone software CD.
Additional Assistance
• For tips and tools to help you use your camera more
effectively, visit www.hp.com/photosmart.
• HP online service and support is your easy, fast, and
direct web resource for product assistance, diagnostics,
and driver downloads. It is your one stop source for all
service and support needs. Get award winning
assistance 24x7 at www.hp.com/support.
• For help with the HP Image Zone software, see the online
documentation.
English
19
Page 22

EastwoodQSG.fm Page 20 Thursday, December 23, 2004 3:58 PM
20 HP Photosmart M22/M23 Quick Start Guide
Page 23

EastwoodQSG_ESN.fm Page 1 Thursday, December 23, 2004 4:21 PM
Cámara digital
HP Photosmart M22/M23
con HP Instant Share
Guía de comienzo rápido
Español
1
Page 24

EastwoodQSG_ESN.fm Page 2 Thursday, December 23, 2004 4:21 PM
Avisos legales
© Copyright 2005 Hewlett-Packard Development Company, L.P.
La información que aparece en este documento está sujeta a cambios sin
previo aviso. Las únicas garantías de los productos y servicios de HP se
detallan en las declaraciones de garantía expresa que acompañan a dichos
productos y servicios. Nada de lo que aquí se contenga se considerará como
garantía adicional. HP no se hará responsable de los errores u omisiones
técnicos o editoriales aquí contenidos.
Windows® es una marca registrada de Microsoft Corporation.
El logotipo SD es una marca comercial de su propietario.
Información importante sobre reciclaje para nuestros clientes de la Unión
Europea: Para contribuir a la protección del medio ambiente, este producto
debe reciclarse por ley al final de su vida útil. El símbolo siguiente indica que
este producto no se puede tirar a la basura doméstica. Devuélvalo al centro
de recogida autorizado más próximo, donde se recuperará o eliminará
adecuadamente. Para obtener más información sobre la devolución y el
reciclaje de los productos HP, visite:
www.hp.com/hpinfo/globalcitizenship/environment/recycle/index.html
Introduzca la siguiente información para referencias futuras:
Número de modelo (en la parte delantera
de la cámara)
Número de serie (número de 10 dígitos en
la parte inferior de la cámara)
Fecha de adquisición de la cámara
Impreso en China
2 Guía de comienzo rápido de la HP Photosmart M22/M23
Page 25

EastwoodQSG_ESN.fm Page 3 Thursday, December 23, 2004 4:21 PM
1. Fijación de la muñequera
S Ajuste la muñequera en el soporte para la muñeca de la
parte lateral de la cámara, como se muestra en la
ilustración.
Español
3
Page 26

EastwoodQSG_ESN.fm Page 4 Thursday, December 23, 2004 4:21 PM
2. Instalación de las pilas
1. Abra la tapa de las pilas y de la tarjeta de memoria que
se encuentra en el lateral de la cámara. Para ello, deslice
la tapa hacia la parte delantera de la cámara.
2. Introduzca las pilas como se indica en el interior de la
tapa.
3. Cierre la tapa de las pilas/tarjeta de memoria
presionando hacia dentro y deslícela hacia la parte
trasera de la cámara hasta que quede cerrada.
Con los diferentes tipos de pilas AA que admite la cámara
obtendrá un rendimiento similar al indicado a continuación:
Alcalinas (pilas instaladas originalmente) De 30 a 70 fotografías
Litio De 180 a 320 fotografías
NiMH (recargables)
Si utiliza pilas de NiMH (recargables),
asegúrese de cargarlas completamente
antes de utilizarlas en la cámara.
De 120 a 240 fotografías
4 Guía de comienzo rápido de la HP Photosmart M22/M23
Page 27

EastwoodQSG_ESN.fm Page 5 Thursday, December 23, 2004 4:21 PM
3. Encendido de la cámara
S Para encender la cámara, abra la tapa del objetivo hasta
que oiga un clic y el objetivo quede al descubierto. El
indicador de alimentación/memoria de la parte trasera
de la cámara se enciende en verde. Al encenderse la
cámara, el logotipo de HP aparece en la pantalla de
imagen.
PRECAUCIÓN: Al deslizar la tapa del objetivo, procure no
tocar el objetivo con los dedos. Las huellas de dedos en
el objetivo pueden reducir la calidad de la imagen.
Español
5
Page 28

EastwoodQSG_ESN.fm Page 6 Thursday, December 23, 2004 4:21 PM
4. Elección del idioma
La primera vez que encienda la cámara deberá elegir un
idioma.
1. Desplácese hasta el idioma deseado con los
botones del controlador .
2. Presione el botón para seleccionar el idioma
resaltado.
6 Guía de comienzo rápido de la HP Photosmart M22/M23
Page 29

EastwoodQSG_ESN.fm Page 7 Thursday, December 23, 2004 4:21 PM
5. Selección de la región
Cuando haya elegido el idioma, deberá seleccionar el
continente en el que vive. Los ajustes de Idioma y Región
determinan la configuración de la fecha y la hora, y el
formato de la señal de vídeo para visualizar las imágenes
de la cámara en un televisor.
1. Desplácese hasta la región deseada con los
botones .
2. Presione el botón para seleccionar la región
resaltada.
Español
7
Page 30

EastwoodQSG_ESN.fm Page 8 Thursday, December 23, 2004 4:21 PM
6. Ajuste de fecha y hora
Se le pedirá que ajuste la fecha y la hora.
1. El primer elemento que aparece resaltado es el formato
de la fecha y la hora. Si desea cambiar el formato de la
fecha y la hora, utilice los botones . Si el formato es
correcto, presione el botón para pasar a la Fecha.
2. Ajuste el valor de la selección resaltada mediante los
botones .
3. Presione los botones para desplazarse a otras
selecciones.
4. Repita los pasos 2 y 3 hasta que haya configurado
correctamente la fecha y la hora.
5. Presione el botón una vez que haya introducido los
valores de fecha y hora correctos. Se abre una pantalla
de confirmación en la que se le pregunta si la fecha y
hora establecidas son correctas. Si es así, presione el
botón para seleccionar Sí.
8 Guía de comienzo rápido de la HP Photosmart M22/M23
Page 31

EastwoodQSG_ESN.fm Page 9 Thursday, December 23, 2004 4:21 PM
7. Instalación y formateado
de una tarjeta de
memoria (opcional)
La cámara digital dispone de memoria interna que le
permite almacenar imágenes y videoclips. Sin embargo,
también puede almacenarlos en una tarjeta de memoria
(adquirida por separado).
1. Apague la cámara y abra la tapa de las pilas y de la
tarjeta de memoria del lateral de la cámara.
2. Introduzca la tarjeta de memoria en la ranura pequeña
que se encuentra detrás de las pilas con el lado de la
muesca hacia abajo, tal como se muestra en la imagen.
Asegúrese de que encaja en su sitio.
3. Cierre la tapa y encienda la cámara.
Español
9
Page 32

EastwoodQSG_ESN.fm Page 10 Thursday, December 23, 2004 4:21 PM
Para evitar que se dañen las tarjetas y las imágenes, deberá
formatear las tarjetas antes de utilizarlas por primera vez.
Para formatear la tarjeta de memoria:
1. Presione el botón y después utilice para abrir el
Menú Reproducción .
2. Presione el botón para resaltar Eliminar y, a
continuación, presione el botón para abrir el
submenú Eliminar.
3. Utilice el botón para resaltar Formatear tarjeta y, a
continuación, para abrir la pantalla de confirmación
Formatear tarjeta .
4. Presione el botón para resaltar Sí y, a continuación,
pulse el botón para formatear la tarjeta.
El mensaje Formateando la tarjeta... aparece en la
pantalla de imagen mientras la cámara formatea la
tarjeta de memoria. Cuando la tarjeta se haya
formateado, se abre la pantalla de resumen de todas las
imágenes.
Para extraer la tarjeta de memoria de la cámara, primero
apague la cámara. Abra la tapa de las pilas/tarjeta de
memoria y presione el borde superior de la tarjeta, que
saltará fuera de la ranura.
10 Guía de comienzo rápido de la HP Photosmart M22/M23
Page 33

EastwoodQSG_ESN.fm Page 11 Thursday, December 23, 2004 4:21 PM
8. Toma de una imagen fija
1. Pulse el botón Vista en directo/Reproducción
hasta que aparezca el icono Vista en directo en la
esquina superior izquierda de la pantalla de imagen y, a
continuación, encuadre el sujeto de la imagen en la
pantalla de imagen.
2. Sujete la cámara firmemente con ambas manos y
presione el disparador de la parte superior de la cámara
hasta la mitad de su recorrido. La cámara mide y
bloquea el enfoque y la exposición. Los delimitadores de
enfoque de la pantalla de imagen cambian a verde
cuando el enfoque está bloqueado.
3. Presione el disparador hasta el final para tomar la
imagen. Se oye un pitido cuando la fotografía se ha
tomado. La imagen aparece durante unos segundos en la
pantalla de imagen.
Español
11
Page 34

EastwoodQSG_ESN.fm Page 12 Thursday, December 23, 2004 4:21 PM
9. Grabación de un
videoclip
1. Pulse el botón Vista en directo/Reproducción
hasta que aparezca el icono Vista en directo en la
esquina superior izquierda de la pantalla de imagen y, a
continuación, encuadre el sujeto de la imagen en la
pantalla de imagen.
2. Para empezar a grabar el vídeo, presione y suelte el
botón Vídeo , que se encuentra en la parte superior
de la cámara.
3. Para detener la grabación, presione y suelte otra vez el
botón Vídeo ; de lo contrario, el vídeo continúa
grabándose hasta que la cámara se quede sin memoria.
12 Guía de comienzo rápido de la HP Photosmart M22/M23
Page 35

EastwoodQSG_ESN.fm Page 13 Thursday, December 23, 2004 4:21 PM
10. Revisión de imágenes y
videoclips
Para revisar imágenes y videoclips se utiliza Reproducción.
1. Presione el botón Vista en directo/Reproducción
hasta que aparezca el icono Reproducción en la
esquina superior izquierda de la pantalla de imagen.
2. Utilice los botones para desplazarse por las
imágenes y los videoclips.
Cuando se muestra el primer fotograma de un videoclip
durante dos segundos, el videoclip se reproduce
automáticamente.
Español
13
Page 36

EastwoodQSG_ESN.fm Page 14 Thursday, December 23, 2004 4:21 PM
11. Instalación del software
El software HP Image Zone le permite transferir imágenes de
la cámara, visualizarlas, editarlas, imprimirlas o enviarlas
por correo electrónico.
Requisitos para un sistema con Windows
Para instalar el software HP Image Zone, deberá disponer
en su equipo de al menos 64 MB de RAM y tener instalado
Windows 2000, XP, 98, 98 SE o Me, e Internet Explorer 5.5
Service Pack 2 o posterior. Si su equipo cumple estos
requisitos, el proceso de instalación instalará la versión
completa de HP Image Zone o HP Image Zone Express.
HP Image Zone Express carece de algunas funciones que se
incluyen en la versión completa. Por ejemplo, con HP Image
Zone Express no podrá configurar los destinos de HP Instant
Share, como se describe en Configuración de los destinos de
HP Instant Share en la cámara (opcional).
14 Guía de comienzo rápido de la HP Photosmart M22/M23
Page 37

EastwoodQSG_ESN.fm Page 15 Thursday, December 23, 2004 4:21 PM
Asistencia técnica para HP Image Zone
Si tiene dificultades para instalar o utilizar el software
HP Image Zone, encontrará más información en el sitio Web
de asistencia técnica al cliente de HP:
www.hp.com/support.
Windows
1. Cierre todos los programas y desactive temporalmente
todos los programas antivirus que utilice en el equipo.
2. Introduzca el CD del software HP Image Zone en la
unidad de CD de su equipo y siga las instrucciones
mostradas en la pantalla. Si no se abre la pantalla de
instalación, en el menú Inicio, haga clic en Ejecutar y
escriba D:\Setup.exe, donde D
de CD-ROM y, a continuación, haga clic en Aceptar.
3. Cuando el software HP Image Zone se haya instalado,
vuelva a activar el programa antivirus que desactivó en el
paso 1.
es la letra de la unidad
Macintosh
1. Cierre todos los programas y desactive temporalmente
todos los programas antivirus que utilice en el equipo.
2. Introduzca el CD del software HP Image Zone en la
unidad de CD del equipo.
3. Haga doble clic en el icono del CD en el escritorio del
equipo.
4. Haga doble clic en el icono del instalador y, a
continuación, siga las instrucciones mostradas en la
pantalla.
5. Cuando el software HP Image Zone se haya instalado,
vuelva a activar el programa antivirus que desactivó en el
paso 1.
Español
15
Page 38

EastwoodQSG_ESN.fm Page 16 Thursday, December 23, 2004 4:21 PM
12. Transferencia de
imágenes al equipo
1. Apague la cámara y, a continuación, conéctela al
equipo mediante el cable USB suministrado o con la
base de acoplamiento HP Photosmart serie M opcional.
2. Si utiliza el cable USB, encienda la cámara. Si utiliza la
base de acoplamiento, pulse el botón Guardar/Imprimir
de la base.
3. Siga las instrucciones mostradas en la pantalla para que
el software transfiera las imágenes de la cámara al
equipo.
4. Desconecte la cámara del equipo.
16 Guía de comienzo rápido de la HP Photosmart M22/M23
Page 39

EastwoodQSG_ESN.fm Page 17 Thursday, December 23, 2004 4:21 PM
13. Configuración de los
destinos de HP Instant
Share en la cámara
(opcional)
Con HP Instant Share puede seleccionar de manera sencilla
imágenes fijas de la cámara para que se envíen
automáticamente a una variedad de destinos, como
direcciones de correo electrónico, la próxima vez que
conecte la cámara al equipo. Siga estos pasos para
configurar destinos en línea en la cámara. Debe tener
instalada en el equipo la versión completa de HP Image
Zone para poder utilizar esta parte de HP Instant Share en
la cámara.
NOTA: Deberá conectarse a Internet para completar este
proceso.
1. Encienda la cámara, presione el botón y utilice el
botón para ir al Menú HP Instant Share .
2. Utilice el botón para resaltar Conf. HP Instant Share...
y, a continuación, pulse el botón . Aparece un
mensaje en la pantalla de imagen en el que se le pedirá
que conecte la cámara al equipo.
Español
17
Page 40

EastwoodQSG_ESN.fm Page 18 Thursday, December 23, 2004 4:21 PM
3. Sin apagar la cámara, vuelva a conectarla al equipo
siguiendo el mismo procedimiento que utilizó en la
sección anterior, Transferencia de imágenes al equipo.
4. El siguiente paso dependerá de si su equipo utiliza
Windows o Macintosh:
• Windows: Al conectar la cámara al equipo, se activa
el programa Configuración de HP Instant Share. Si
aparece otro cuadro de diálogo, ciérrelo haciendo
clic en Cancelar. En el programa Configuración de
HP Instant Share, haga clic en Inicio y siga las
instrucciones mostradas en la pantalla para establecer
los destinos en el equipo y guardarlos en la cámara.
• Macintosh: Al conectar la cámara al equipo, se activa
el Asistente de configuración de HP Instant Share.
Haga clic en Continuar y siga las instrucciones
mostradas en la pantalla para establecer los destinos
en el equipo y guardarlos en la cámara.
5. Desconecte la cámara del equipo y vuelva al Menú
HP Instant Share para comprobar que los nuevos
destinos se han guardado en la cámara. Ahora podrá
marcar las imágenes de la cámara para enviarlas a uno
o más de estos destinos de HP Instant Share. Consulte la
sección titulada Envío de imágenes a destinos del
Capítulo 4 del Manual del usuario de la cámara para
obtener detalles sobre cómo hacerlo. Si desea
información sobre cómo visualizar el Manual del usuario
contenido en el CD de HP Image Zone, consulte la
siguiente página de esta Guía de comienzo rápido.
18 Guía de comienzo rápido de la HP Photosmart M22/M23
Page 41

EastwoodQSG_ESN.fm Page 19 Thursday, December 23, 2004 4:21 PM
Cómo obtener asistencia
Visualizar el Manual del usuario del CD
La cámara ofrece otras muchas funciones útiles que se
describen detalladamente en el Manual del usuario. Estas
funciones incluyen la tecnología de iluminación adaptable
de HP, eliminación de ojos rojos integrada, 9 modos de
fotografía, consejos de HP sobre imágenes, HP Instant
Share, capacidad de impresión directa, ayuda en la
cámara, accesorios para la cámara, y otras muchas más.
El CD del software HP Image Zone contiene copias del
Manual del usuario de la cámara en varios idiomas
diferentes. Para ver el Manual del usuario:
1. Introduzca el CD del software HP Image Zone en la
unidad de CD del equipo.
2. En Windows: Haga clic en Ver Manual del usuario en la
página principal de la pantalla de instalación del CD.
En Macintosh: Consulte el archivo léame que se
encuentra en la carpeta docs del CD del software
HP Image Zone.
Asistencia adicional
• Si desea sugerencias y herramientas que le ayuden a
utilizar la cámara de manera más eficaz, visite
www.hp.com/photosmart.
• El servicio y la asistencia en línea de HP son un recurso
rápido, directo y fácil de usar donde podrá obtener
asistencia para sus productos, diagnósticos y descargas
de controladores. Le ofrece una respuesta a todas sus
necesidades de servicio y asistencia. Obtenga una
asistencia galardonada las 24 horas del día, 7 días a la
semana, en www.hp.com/support.
• Si necesita ayuda para el software HP Image Zone,
consulte la documentación en línea.
Español
19
Page 42

EastwoodQSG_ESN.fm Page 20 Thursday, December 23, 2004 4:21 PM
20 Guía de comienzo rápido de la HP Photosmart M22/M23
Page 43

TahitiUM.book Page 4 Sunday, January 4, 2004 2:47 PM
Page 44

© 2005 Hewlett-Packard Development Company, L.P.
Printed in China
www.hp.com
*L1891−90103*
*L1891−90103*
L1891-90103
4" X 6" BACK COVER
 Loading...