

Page 1

HP Photosmart E427
Digital Camera
Quick Start Guide
Guía de comienzo rápido
Guia de Início Rápido
Page 2

www.hp.com/support
Argentina (Buenos Aires)
Argentina
Brasil (São Paulo)
Brasil
Canada
Chile
Colombia (Bogota)
Colombia
Costa Rica
Ecuador (Andinatel)
Ecuador (Pacifitel)
El Salvador 800-6160
Guatemala
Jamaica
Mexico (Mexico City)
Mexico
Pan ama
Paraguay
Per ú
Puerto Rico
República Dominicana
Trinidad & Tobago
United States
Uruguay
Venezuela
54-11-4708-1600
0-800-555-5000
55-11-4004-7751
0-800-709-7751
1-800-474-6836
800-360-999
571-606-9191
01-8000-51-4746-8368
0-800-011-1046
1-999-119
800-711-2884
1-800-225-528
800-711-2884
1-800-711-2884
1-800-711-2884
55-5258-9922
01-800-472-68368
1-800-711-2884
009 800 54 1 0006
0-800-10111
1-877-232-0589
1-800-711-2884
1-800-711-2884
1-800-474-6836
0004-054-177
0-800-474-68368
Page 3

HP Photosmart E427 Digital Camera
English
Page 4

Legal and notice information
© Copyright 2006 Hewlett-Packard Development Company,
L.P.
The information contained herein is subject to change without
notice. The only warranties for HP products and services are
English
set forth in the express warranty statements accompanying
such products and services. Nothing herein should be
construed as constituting an additional warranty. HP shall not
be liable for technical or editorial errors or omissions contained
herein.
Windows® is a U.S. registered trademark of Microsoft
Corporation.
SD Logo is a trademark of its proprietor.
Disposal of waste equipment by users in private
households in the European Union
This symbol on the product or on its packaging indicates
that this product must not be disposed of with your other
household waste. Instead, it is your responsibility to dispose of
your waste equipment by handing it over to a designated
collection point for the recycling of waste electrical and
electronic equipment. The separate collection and recycling of
your waste equipment at the time of disposal will help to
conserve natural resources and ensure that it is recycled in a
manner that protects human health and the environment. For
more information about where you can drop off your waste
equipment for recycling, please contact your local city office,
your household waste disposal service or the shop where you
purchased the product.
For future reference, enter the following information:
● Model Number (camera front): _________
● Serial Number (camera bottom): _________
● Purchase date: _________
Page 5

Contents
1 Getting started.....................................................4
Viewing the electronic User Guide.........................5
Camera top, back, and side...................................6
Camera front, bottom, and side.............................7
2 Setting up your camera.......................................8
Install the batteries.................................................8
Turn on the camera................................................9
Choose the language.............................................9
Set the date and time.............................................9
Install and format an optional memory card.........10
Install the software...............................................11
3 Taking pictures..................................................13
4 Reviewing and deleting images and video
clips.....................................................................14
Review images and video clips............................14
Delete an image...................................................14
5 Transferring and printing images.....................15
Transfer images...................................................15
Print images from the camera..............................15
6 Camera quick reference....................................17
English
3
Page 6

1
Getting started
This printed Quick Start Guide provides the information
you need to get started using the essential features of
English
your camera. For detailed information about camera
features, see the electronic User Guide.
Quick Start Guide Electronic User Guide
This printed guide will help
you to:
● Start using your camera
quickly
● Install the HP Photosmart
Software
● Become familiar with
your camera's basic
features
The electronic User Guide
includes:
● Descriptions of all the
camera features
● A description of icons on
the Image Display
● Using the camera without
installing HP Photosmart
Software
● Battery information,
including:
– Extending battery
life
– The different battery
types
– A description of the
power indicator
icons
● Getting assistance from
HP
● Troubleshooting
● Camera specifications
4 HP Photosmart E427 Digital Camera
Page 7

Viewing the electronic User Guide
The electronic User Guide is on the
HP Photosmart Software CD.
To view the User Guide:
1. Insert the HP Photosmart Software CD into the CD
drive of your computer.
2. On Windows: Click View User Guide on the main
page of the installation screen.
On Macintosh: Open the readme file in the docs
folder on the CD.
The electronic User Guide is also copied to your
computer when you install the HP Photosmart Software.
To view the User Guide after it has been installed on your
computer:
● On Windows: Open the HP Solution Center and
click on Help and Support.
● On Macintosh: Open the HP Device Manager and
select Camera User Guide from the Information
and Settings pop-up menu.
Getting assistance
● For tips and tools to help you use your camera more
effectively, visit www.hp.com/photosmart (English
only) or www.hp.com.
● For product assistance, diagnostics, and driver
downloads 24x7, visit www.hp.com/support.
● For help with the HP Photosmart Software, see the
software's online Help.
English
Getting started 5
Page 8
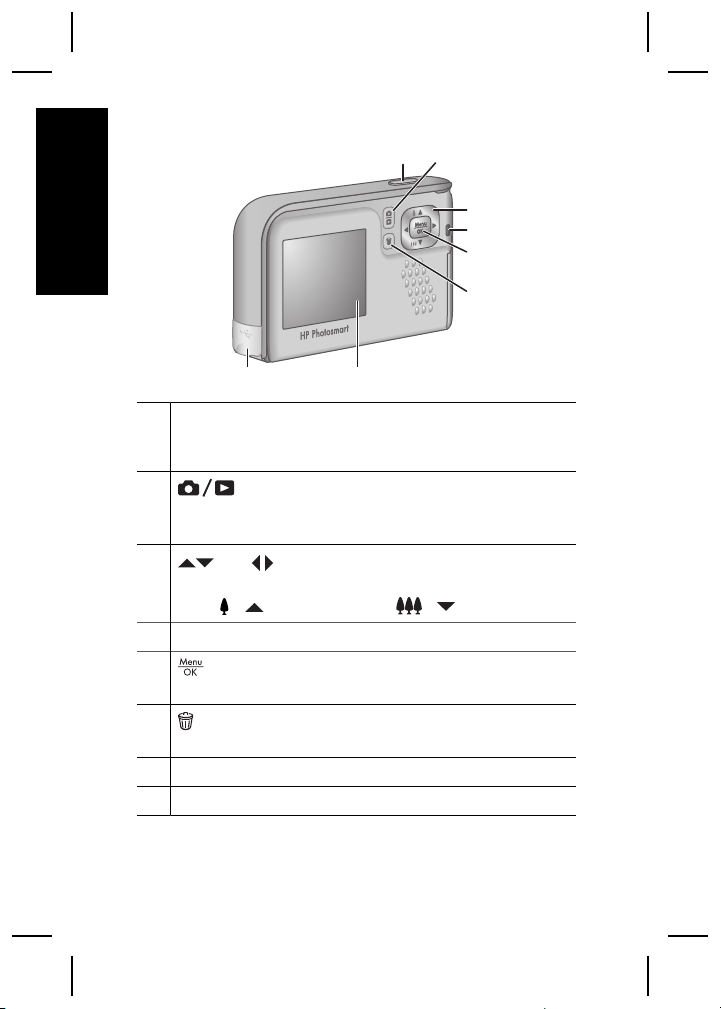
Camera top, back, and side
12
English
78
1 Shutter button—Captures images (see Taking pictures
on page 13) or records video clips (see the electronic
User Guide).
2
3
4 Power light.
5
6
7 Image Display.
8 USB connector.
Live View/Playback button—Switches
between Live View and Playback (see Live View and
Playback on page 17).
and buttons—Scroll through menus and
images and access digital zoom. While in Live View,
/ to zoom in; press / to zoom out.
press
button—Displays camera menus, selects options,
and confirms actions.
Delete button—Accesses the Delete function while
in Playback.
3
4
5
6
6 HP Photosmart E427 Digital Camera
Page 9

Camera front, bottom, and side
2 31
7
6
5
1 Self-Timer/Video light.
2 Flash.
3 Microphone.
4
Focus switch—Switches between Macro and
Normal focus.
5 Tripod mount.
6 Battery/Memory card door.
7 Lens cover/Power switch—Turns the camera on and off
and protects the lens while the camera is off.
4
English
Getting started 7
Page 10

2
Setting up your
camera
English
Install the batteries
1. Open the Battery/Memory card door
by sliding the door latch as indicated
on the Battery/Memory card door.
2. Insert the batteries.
3. Close the Battery/Memory card
door.
Note Turn the camera off before
removing the batteries. If using
rechargeable NiMH batteries, fully charge the batteries
before using them the first time.
Camera usage and battery type will affect
battery life. Alkaline batteries provide far less
battery life than either Photo Lithium or NiMH
batteries. For complete information, see Appendix A in
the electronic User Guide.
Number of shots
Battery
type
Alkaline 80 160 120 110
NiMH 140 230 200 200
Photo
Lithium
Minimum Maximum Average CIPA
300 600 375 375
8 HP Photosmart E427 Digital Camera
Page 11
The CIPA number is obtained using the standards
established by the Camera and Imaging Products
Association.
Turn on the camera
To turn on the camera, slide
the lens cover open until it
clicks, uncovering the lens.
To turn off the camera, slide
the lens cover closed until it
clicks, covering the lens.
Caution When sliding the lens cover, keep your
fingers clear of the lens. Fingerprints on the lens
can impair the quality of the picture.
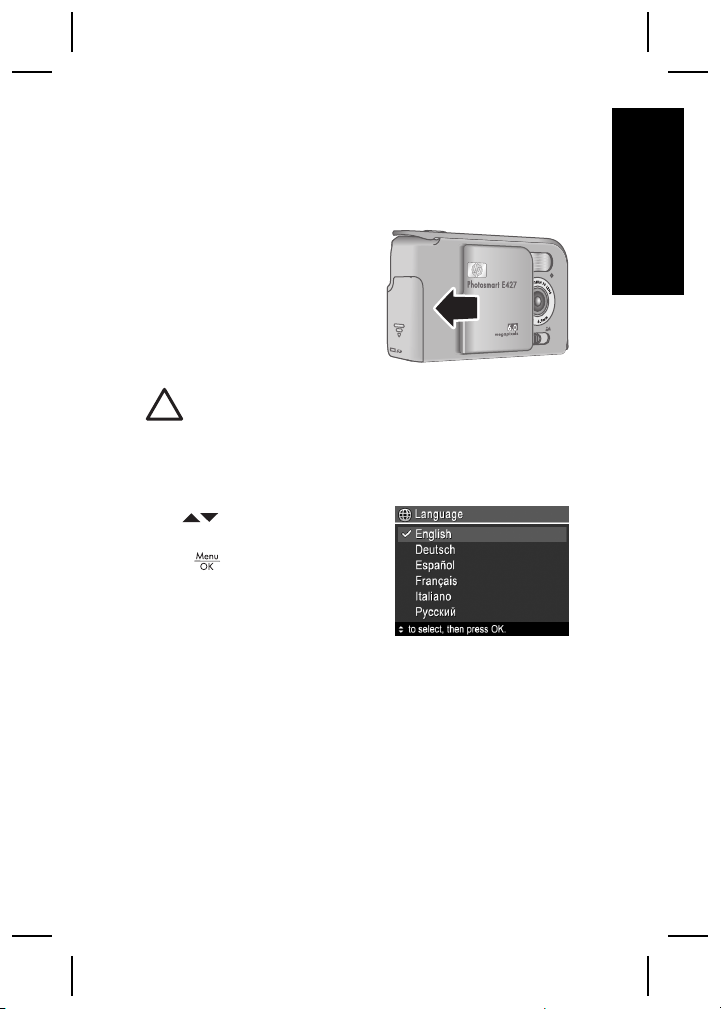
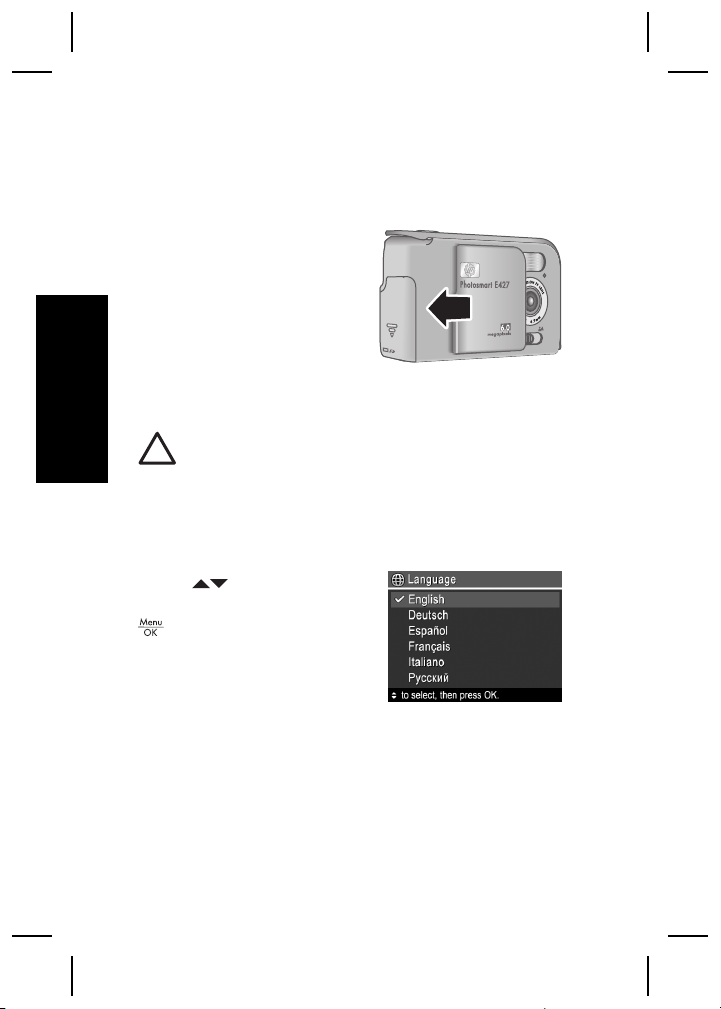
Choose the language
Use to choose the
language you want, then
press
.
Set the date and time
Accurately setting the date and time will help you locate
images once you have transferred them to your
English
Setting up your camera 9
Page 12
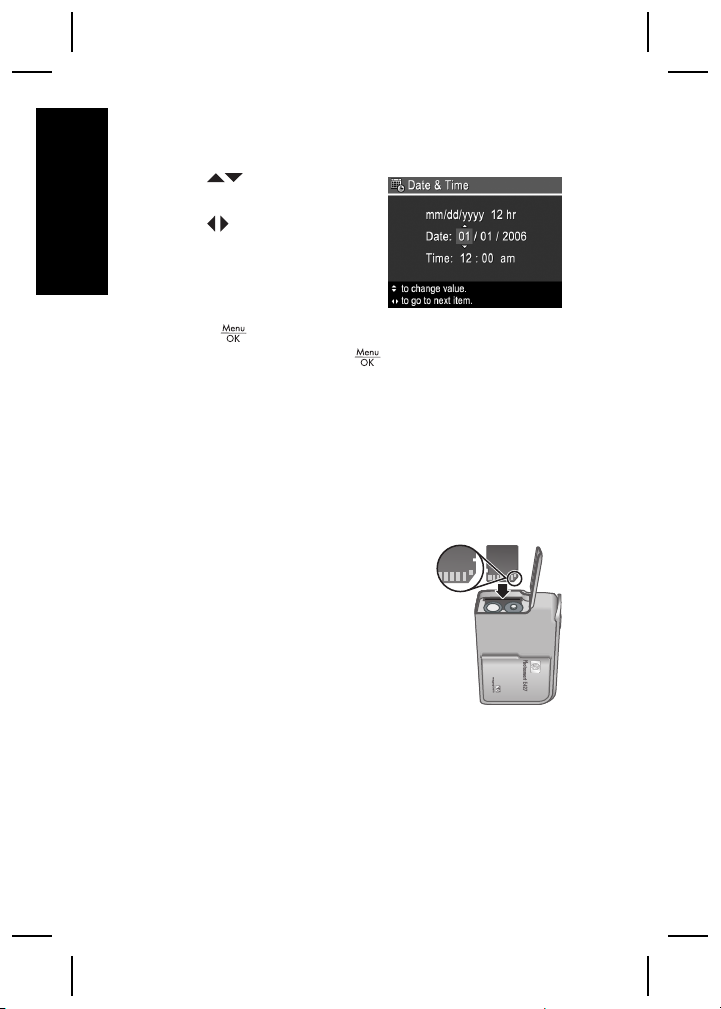
computer, and will ensure that images are accurately
marked if you use the date and time imprint feature.
1.
English
Use
highlighted value.
2. Use
other selections and
repeat Step 1 until the
date and time are set
correctly.
3.
Press
are correct, then press
to adjust the
to move to the
when the date, time, and format settings
again to confirm.
Install and format an optional
memory card
This camera supports standard and high speed, HPbranded Secure Digital (SD) memory cards, 16MB to
1GB.
1. Turn off the camera and open
the Battery/Memory card door.
2. Insert the optional memory card
in the smaller slot as shown.
Make sure the memory card
snaps into place.
3. Close the Battery/Memory card
door and turn on the camera.
Always format new memory cards before first use.
Formatting removes all images from the memory card,
10 HP Photosmart E427 Digital Camera
Page 13

so make sure to transfer existing images before
formatting.
1.
With the camera turned on, press
appears briefly in the upper right corner of the
Image display. This indicates you are in Playback.
2.
Press
3.
Use
sub-menu, then press
4.
Use
card.
Once you install a memory card, all new images and
video clips are stored on the card, rather than in internal
memory.
To use internal memory and view images stored there,
remove the memory card.
.
to select Format Card from the Delete
.
to select Yes, then press to format the
until
Install the software
The HP Photosmart Software provides features for
transferring images and video clips to your computer, as
well as features for modifying stored images (remove red
eyes, rotate, crop, resize, adjust image quality, and
more).
If you have trouble installing or using the HP Photosmart
Software, see the HP Customer Care website for more
information: www.hp.com/support.
English
Windows
Depending on your operating system, either you have
the option to install HP Photosmart Premier or
HP Photosmart Essential, or HP Photosmart Essential
installs automatically. HP Photosmart Premier includes
Setting up your camera 11
Page 14

additional functionality over the Essential version. See
chapter 1 in the electronic User Guide for a list of
differences.
1. Close all programs and temporarily disable any virus
English
protection software.
2. Insert the HP Photosmart Software CD into the CD
drive and follow the on-screen instructions. If the
installation window does not appear, click Start,
click Run, type D:\Setup.exe, where D is the letter
of your CD drive, then click OK.
3. When the software has finished installing, re-enable
virus protection software.
Macintosh
To install the HP Photosmart Mac software, your
Macintosh computer must meet the system
requirements as stated on the camera packaging.
1. Insert the HP Photosmart Software CD into the CD
drive.
2. Double-click the CD icon on the computer desktop.
3. Double-click the installer icon, then follow the on-
screen instructions.
12 HP Photosmart E427 Digital Camera
Page 15

3
Live View allows you to frame
pictures in the Image Display.
1.
2. Frame the subject for your picture.
3. Press the Shutter button to take the picture.
Note You can also record a video clip using the
Video shooting mode in the Capture menu. See the
electronic User Guide for instructions.
Taking pictures
Press
briefly in the upper right corner
of the Image Display. This
indicates you are in Live View.
until appears
English
Taking pictures 13
Page 16

4
Reviewing and
deleting images and
English
video clips
Review images and video clips
You can review and delete images and video clips in
Playback.
1.
Press
right corner of the Image Display. This indicates you
are in Playback.
2. Use
(video clips play automatically).
until appears briefly in the upper
to scroll through your images and video clips
Delete an image
You can delete individual images during Playback:
1.
Press
right corner of the Image Display. This indicates you
are in Playback.
2. Use
3.
Press
4.
Use
menu, then press
until appears briefly in the upper
to select an image or video clip.
.
to select This Image from the Delete sub-
.
14 HP Photosmart E427 Digital Camera
Page 17
5
Transferring and
printing images
Transfer images
If you have installed the HP Photosmart Software, use
this method to transfer images and video clips to your
computer. If you have not installed the HP Photosmart
Software, see the electronic User Guide for an alternate
method.
1. Connect the camera and
computer using the USB
cable that came with your
camera.
2. Turn on the camera and
follow the instructions on
the computer screen to
transfer the images. For
more information, see the Help feature in the
HP Photosmart Software.
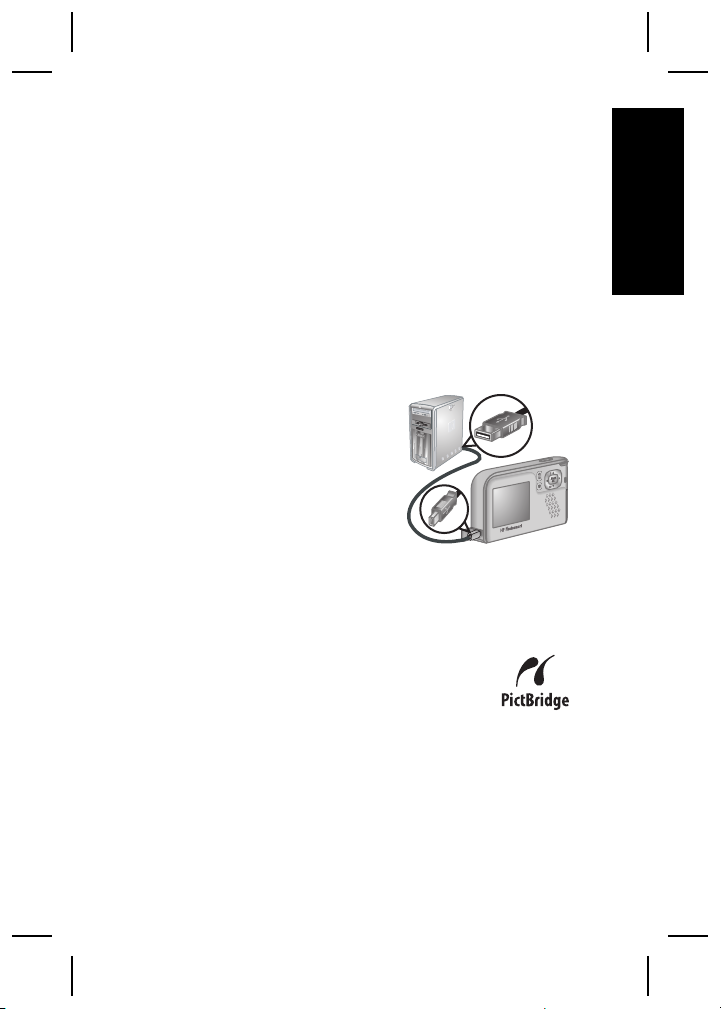
Print images from the camera
You can connect the camera to any
PictBridge-certified printer to print still
images.
1. Check that the printer is turned on, there is paper in
the printer, and there are no printer error messages.
English
Transferring and printing images 15
Page 18
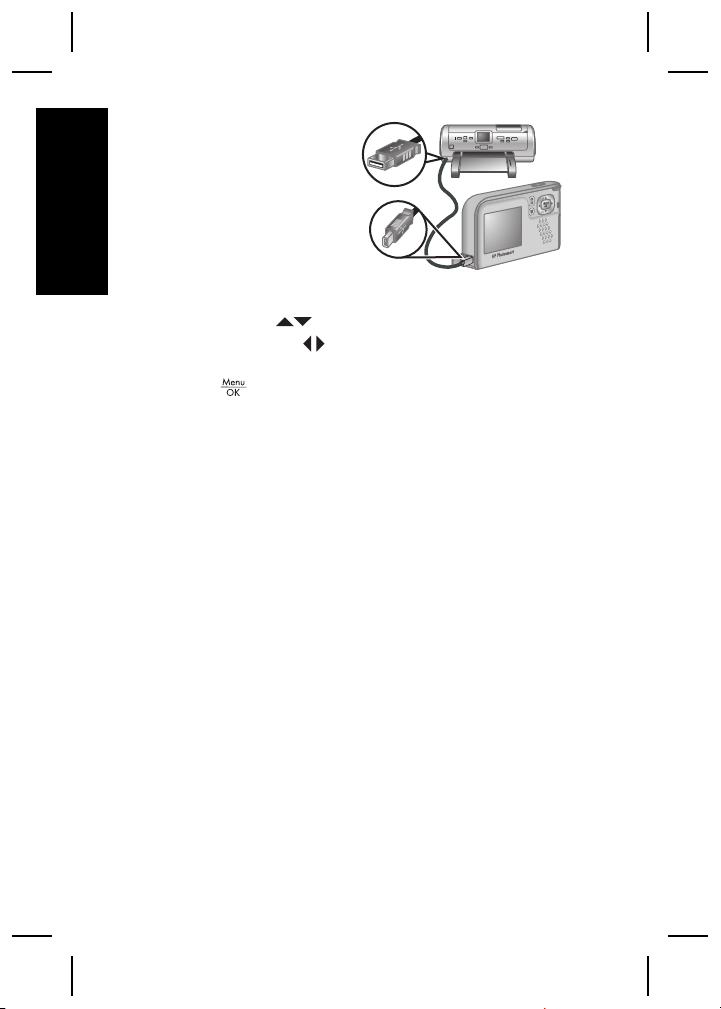
2. Connect the camera
and printer using the
USB cable that came
with your camera, then
turn on the camera.
English
3. When the camera is
connected to the
printer, the Print
Setup Menu displays on the camera. To change the
settings, use
option, then use
setting.
4.
Press
on the camera to select a menu
on the camera to change the
to begin printing.
16 HP Photosmart E427 Digital Camera
Page 19
6
Camera quick
reference
Use this chapter as a quick reference to camera
features. To learn more about these camera features,
refer to the electronic User Guide.
Live View and Playback
● Live View allows you to frame pictures and video
clips in the Image Display. To activate Live View,
press
right corner of the Image Display.
● Playback allows you review and delete images and
video clips. To activate Playback, press
corner of the Image Display.
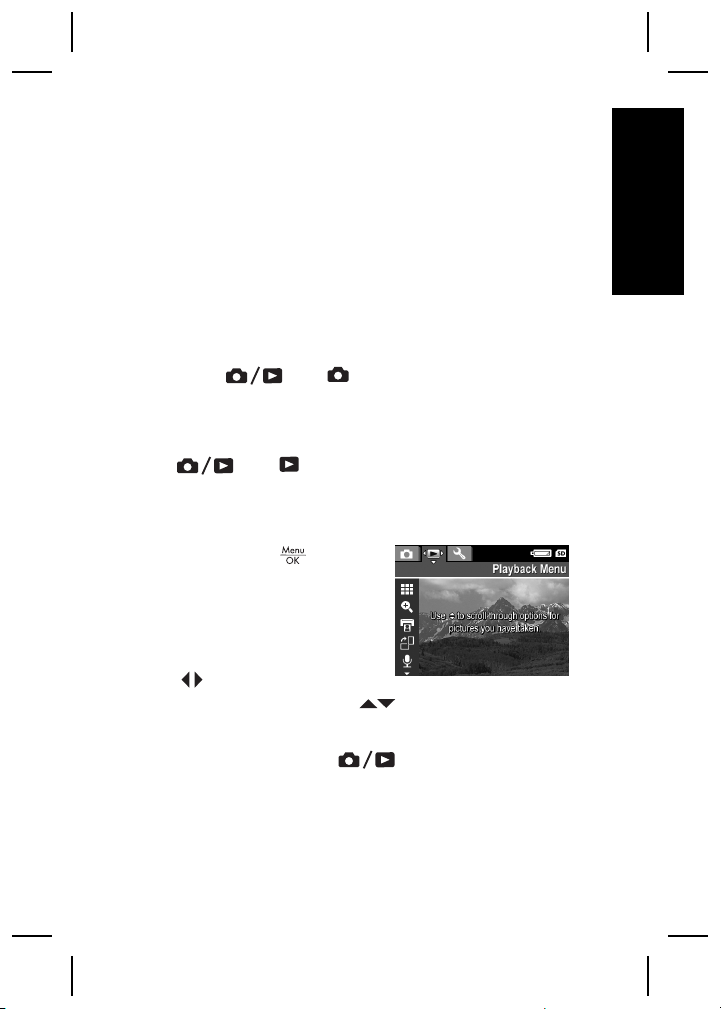
Menus
until appears briefly in the upper
until appears briefly in the upper right
English
When you press
either Playback or Live
View, you access the tabbed
camera menus, as shown in
the example screen.
Use
menu. Within a menu, use
selections.
To exit the menu, press
Camera quick reference 17
to move to the desired
from
to move to specific
at any time.
Page 20

Menus and options are:
Menu Options
Capture allows you to
adjust camera settings that
English
affect the characteristics of
future images and video clips
you capture with your camera.
Playback allows you to
review and manipulate
images and video clips you
have stored in the camera.
Setup allows you to
change the camera's
behavior.
● Shooting Mode (Auto
Mode, Self-Timer,
Landscape, Portrait,
Action, Sunset, Video).
● Flash Setting
● Image Quality
● Date & Time Imprint
● Exposure Compensation
● White Balance
● ISO Speed
● View Thumbnails
● Magnify
● Print
● Rotate
● Record Audio
● Move Images to Card...
● Display Brightness
● Camera Sounds
● Date & Time
● USB Configuration
● Language
● About...
18 HP Photosmart E427 Digital Camera
Page 21

Cámara digital HP Photosmart E427
Español
Page 22

Información legal y advertencias
© Copyright 2006 Hewlett-Packard Development Company,
L.P.
La información que aparece en este documento está sujeta a
cambios sin previo aviso. Las únicas garantías de los productos
y servicios de HP se detallan en las declaraciones de garantía
expresa que acompañan a dichos productos y servicios. Nada
de lo que aquí se contenga se considerará como garantía
adicional. HP no se hará responsable de los errores u
omisiones técnicos o editoriales aquí contenidos.
Windows® es una marca registrada de Microsoft Corporation.
El logotipo SD es una marca comercial de su
propietario.
Español
Eliminación de desechos de equipamiento por parte
de usuarios en domicilios particulares dentro de la
Unión Europea:
Este símbolo en el producto o en su embalaje indica que no
debe desecharlo con el resto de la basura de su domicilio. Bajo
su responsabilidad, debería deshacerse de los desechos de
equipamiento llevándolos a un punto de reciclaje de material
eléctrico y equipos electrónicos. La recolección y reciclaje por
separado de los desechos de equipamiento ayudará a
conservar los recursos naturales y asegurará que se recicle de
forma que proteja la salud y el medioambiente. Para más
información acerca de dónde puede reciclar estos desechos,
póngase en contacto con su ayuntamiento, con el servicio de
eliminación de desechos o recogida de basuras, o con la tienda
donde adquirió el producto.
Introduzca la siguiente información para referencias
futuras:
● Cómo determinar el número de modelo de la cámara (parte
frontal de la cámara): _________
● Número de serie (parte inferior de la cámara): _________
● Fecha de compra: _________
Page 23

Contenido
1 Introducción.........................................................4
Visualización de la Guía de usuario
electrónica..............................................................5
Cámara, parte superior, posterior y lateral............6
Cámara, parte frontal, inferior y lateral..................7
2 Configuración de la cámara................................9
Colocación de las pilas..........................................9
Encendido de la cámara......................................10
Selección del idioma............................................10
Ajuste de la fecha y la hora..................................10
Instalación y formateo de una tarjeta de
memoria opcional.................................................11
Instalación del software.......................................12
3 Toma de imágenes.............................................14
4 Revisión y eliminación de imágenes y
videoclips...........................................................15
Revisión de imágenes y videoclips......................15
Eliminación de una imagen..................................15
5 Transferencia e impresión de imágenes.........17
Transferencia de imágenes.................................17
Impresión de imágenes desde la cámara............17
6 Referencia rápida de la cámara........................19
Español
3
Page 24

1
Introducción
Esta guía impresa de comienzo rápido ofrece la
información necesaria para comenzar a utilizar las
funciones básicas de la cámara. Para obtener
información detallada sobre las funciones de la cámara,
consulte la Guía de usuario electrónica.
Guía de comienzo rápido Guía de usuario electrónica
Esta guía impresa le ayudará
a:
● Comenzar a utilizar la
Español
cámara rápidamente.
● Instalar el software
HP Photosmart.
● Conocer las funciones
básicas de su cámara
La Guía de usuario
electrónica incluye:
● Descripciones de todas
las funciones de la
cámara.
● Una descripción de los
iconos de la Pantalla de
imagen.
● Uso de la cámara sin
instalar el software
HP Photosmart.
● Información sobre las
pilas, además de:
– Duración de las pilas
ampliable.
– Los diferentes tipos
de pila.
– Una descripción de
los iconos
indicadores de
encendido.
● Asistencia de HP.
● Solución de problemas.
4 Cámara digital HP Photosmart E427
Page 25

● Especificaciones de la
cámara.
Visualización de la Guía de usuario
electrónica
La Guía de usuario electrónica se encuentra
en el HP Phososmart Software CD .
Para acceder a la Guía de usuario:
1. Introduzca el HP Photosmart Software CD en la
unidad de CD del equipo.
2. En Windows: haga clic en View User Guide (Ver
guía de usuario) en la página principal de la pantalla
de instalación.
En Macintosh: abra el archivo readme (léame) de
la carpeta docs del CD.
La Guía de usuario electrónica también se copia en el
equipo al instalar el software HP Photosmart. Para ver
la Guía de usuario después de instalarla en el equipo:
● En Windows: abra el Centro de soluciones HP y
haga clic en Ayuda y soporte técnico.
● En Macintosh: Abra el Administrador de
dispositivos HP y seleccione Guía del usuario de
la cámara del menú emergente Información y
configuración.
Asistencia
● Para disponer de sugerencias y herramientas que
le ayuden a hacer un uso más efectivo de la cámara,
visite la página Web www.hp.com/photosmart
(sólo en inglés) o www.hp.com.
Introducción 5
Español
Page 26

● Para obtener asistencia para el producto,
diagnósticos y descargas de controladores en
cualquier momento del día, los siete días de la
semana, visite www.hp.com/support.
● Para obtener ayuda con el software HP Photosmart,
consulte la ayuda en línea.
Cámara, parte superior, posterior y
lateral
12
3
Español
78
1 Botón del Disparador: captura imágenes (consulte
Toma de imágenes en la página 14) o graba videoclips
(consulte la Guía del usuario electrónica).
2
3
4 Indicador luminoso de encendido.
Botón Vista en directo/Reproducción: alterna
entre Vista en directo y Reproducción (consulte el
apartado Vista en directo y Reproducción en la
página 19).
y : Desplazarse por los menús y las imágenes
y acceder al zoom digital. En la Vista en directo,
/ para acercar; pulse / para alejar.
pulse
4
5
6
6 Cámara digital HP Photosmart E427
Page 27

5
Botón : muestra los menús de la cámara, selecciona
opciones y confirma acciones.
6
Botón Eliminar: accede a la función Eliminar en el
modo Reproducción.
7 Pantalla de imagen.
8 Conector USB.
Cámara, parte frontal, inferior y
lateral
2 31
7
6
5
1 Indicador luminoso del Temporizador automático/Vídeo.
2 Flash.
3 Micrófono.
4
Interruptor de Enfoque: conmuta entre enfoque
Macro y
5 Soporte de trípode.
Normal.
4
Español
Introducción 7
Page 28

6 Puerta de las pilas/tarjeta de memoria.
7 Tapa de la lente/interruptor de encendido: enciende y
apaga la cámara, y protege la lente cuando la cámara
está apagada.
Español
8 Cámara digital HP Photosmart E427
Page 29

2
Configuración de la
cámara
Colocación de las pilas
1. Abra la puerta de las pilas o de la
tarjeta de memoria; para ello,
deslice la lengüeta
correspondiente, como se indica en
dicha puerta.
2. Inserte las pilas.
3. Cierre la puerta de las pilas o de la
tarjeta de memoria.
Nota Apague la cámara antes de extraer las pilas. Si
emplea pilas NiMH recargables, cárguelas por completo
antes de utilizarlas por primera vez.
El uso de la cámara y el tipo de pila afectarán
a la duración de las pilas. Las pilas alcalinas
proporcionan menor duración que las pilas
NiMH o de litio. Para disponer de una información más
completa, consulte el Apéndice A de la Guía de usuario
electrónica.
Número de disparos
Tipo de
pila
Alcalinas 80 160 120 110
NiMH 140 230 200 200
Foto Litio 300 600 375 375
Mínimo Máximo Promedio CIPA
Español
Configuración de la cámara 9
Page 30
El número de CIPA se obtiene mediante las normas
establecidas por la asociación CIPA (del inglés, Camera
and Imaging Products Association).
Encendido de la cámara
Para encender la cámara,
abra la tapa del objetivo
hasta que oiga un clic y el
objetivo quede al
descubierto.
Para apagar la cámara,
cierre la tapa de la lente hasta que oiga un clic y la lente
quede cubierta.
Español
Precaución Al deslizar la tapa, procure no
tocar el objetivo con los dedos. Las huellas de
dedos en el objetivo pueden reducir la calidad de
la imagen.
Selección del idioma
Utilice para elegir el
idioma que desea y pulse
.
Ajuste de la fecha y la hora
El ajuste preciso de la fecha y la hora le ayudará a
localizar las imágenes una vez que las haya transferido
al equipo, y le garantizará que éstas queden marcadas
10 Cámara digital HP Photosmart E427
Page 31

con precisión si utiliza la función para estampar la fecha
y la hora.
1.
Utilice
valor resaltado.
2. Utilice
resto de selecciones y
repita el paso 1 hasta que
la fecha y la hora queden
establecidas
correctamente.
3.
Presione
formato sean correctos; seguidamente, vuelva a
presionar
para ajustar el
para pasar al
cuando los ajustes de fecha, hora y
para confirmar.
Instalación y formateo de una
tarjeta de memoria opcional
Esta cámara admite tarjetas de memoria Secure Digital
(SD) de alta velocidad estándares de marca HP, de 16
MB a 1 GB.
1. Apague la cámara y abra la
puerta de las pilas o de la tarjeta
de memoria.
2. Inserte la tarjeta de memoria
opcional en la ranura más
pequeña, como se muestra en la
ilustración. Asegúrese de que
encaja en su sitio.
3. Cierre la puerta de las pilas o de
la tarjeta de memoria y encienda la cámara.
Formatee siempre las tarjetas de memoria nuevas antes
de utilizarlas por primera vez. El formateo eliminará
todas las imágenes almacenadas en la tarjeta; así pues,
Español
Configuración de la cámara 11
Page 32

asegúrese de transferir las imágenes existentes antes
de formatearla.
1.
Con la cámara encendida, presione
aparezca un instante en la esquina superior
que
derecha de la Pantalla de imagen. Esto le indica que
se encuentra en la opción Reproducción.
2.
Presione
3.
Utilice
el submenú Eliminar. A continuación, presione
.
4.
Utilice
formatear la tarjeta.
Español
Una vez que se ha colocado una tarjeta de memoria,
todos los videoclips e imágenes nuevos se almacenarán
en la tarjeta, en lugar de en la memoria interna.
Para utilizar la memoria interna y ver las imágenes
almacenadas en ella, extraiga la tarjeta de memoria.
.
para seleccionar Formatear tarjeta en
para seleccionar Sí y presione para
Instalación del software
El software HP Photosmart ofrece funciones para
transferir imágenes y videoclips a su equipo, además de
funciones para modificar las imágenes almacenadas
(eliminar ojos rojos, rotar, recortar, redimensionar,
ajustar la calidad de imagen y más).
Si tiene dificultades para instalar o utilizar el software
HP Photosmart, encontrará más información en el sitio
Web de atención al cliente de HP:
www.hp.com/support.
Windows
Dependiendo del sistema operativo, podrá instalar
HP Photosmart Premier o HP Photosmart Essential, o
hasta
12 Cámara digital HP Photosmart E427
Page 33

HP Photosmart Essential se instalará automáticamente.
HP Photosmart Premier incluye otras funciones
adicionales que no ofrece la versión Essential. Consulte
el capítulo 1 de la Guía del usuario para conocer las
diferencias.
1. Cierre todos los programas y desactive
temporalmente el software antivirus.
2. Inserte el HP Photosmart Software CD en la unidad
de CD y siga las instrucciones que aparecen en
pantalla. Si no se abre la ventana de instalación,
haga clic en Inicio, Ejecutar y escriba D:
\Setup.exe, donde D equivale a la letra de la unidad
de CD. Por último, haga clic en Aceptar.
3. Una vez finalizada la instalación del software,
vuelva a activar el software antivirus.
Macintosh
Para instalar el software HP Photosmart para Mac, el
Macintosh deberá cumplir los requisitos del sistema
indicados en el embalaje de la cámara.
1. Introduzca el HP Photosmart Software CD en la
unidad de CD.
2. Haga doble clic en el icono del CD situado en el
escritorio del equipo.
3. Haga doble clic en el icono del programa de
instalación y, a continuación, siga las instrucciones
que aparecen en pantalla.
Español
Configuración de la cámara 13
Page 34

3
Vista en directo permite encuadrar
imágenes en la Pantalla de imagen.
1.
2. Encuadre el sujeto de la fotografía.
Español
3. Presione el botón del Disparador para tomar la
Nota También puede grabar un videoclip usando el
modo de fotografía Vídeo del menú Captura. Para
obtener más instrucciones, consulte la Guía del usuario
electrónica.
Toma de imágenes
Presione
aparezca un instante en la
esquina superior derecha de la
Pantalla de imagen. Esto le
indica que se encuentra en la opción Vista en
directo.
fotografía.
hasta que
14 Cámara digital HP Photosmart E427
Page 35

4
Revisión y
eliminación de
imágenes y
videoclips
Revisión de imágenes y videoclips
Puede revisar y eliminar imágenes y videoclips en el
modo Reproducción.
1.
Presione
en la esquina superior derecha de la Pantalla de
imagen. Esto le indica que se encuentra en la
opción Reproducción.
2. Utilice
videoclips (los videoclips se reproducen de forma
automática).
hasta que aparezca un instante
para desplazarse por las imágenes y los
Eliminación de una imagen
Es posible eliminar imágenes una por una mediante la
opción Reproducción:
1.
Presione
en la esquina superior derecha de la Pantalla de
imagen. Esto le indica que se encuentra en la
opción Reproducción.
2. Utilice
videoclip.
3.
Presione
Revisión y eliminación de imágenes y videoclips 15
hasta que aparezca un instante
para seleccionar una imagen o un
.
Español
Page 36

4.
Utilice
submenú Eliminar y presione
Español
para seleccionar Esta imagen en el
.
16 Cámara digital HP Photosmart E427
Page 37

5
Transferencia e
impresión de
imágenes
Transferencia de imágenes
Si tiene instalado el software HP Photosmart, siga este
procedimiento para transferir imágenes y videoclips al
equipo. Si no tiene instalado el software HP Photosmart,
busque un procedimiento alternativo en la Guía de
usuario electrónica.
1. Conecte la cámara al
equipo con el cable USB
que se incluye con el
dispositivo.
2. Encienda la cámara y siga
las instrucciones que
aparecen en la pantalla del
equipo para transferir las
imágenes. Para obtener más información, consulte
la función Ayuda del software HP Photosmart.
Impresión de imágenes desde la
cámara
Español
Puede conectar la cámara a cualquier
impresora con certificación PictBridge para
imprimir imágenes fijas.
1. Compruebe que la impresora está encendida, que
tiene papel y que no aparecen mensajes de error.
Transferencia e impresión de imágenes 17
Page 38

2. Conecte la cámara y la
impresora mediante el
cable USB incluido
con la cámara y a
continuación encienda
la cámara.
3. Cuando la cámara se
conecta a la
impresora, se abre el menú Configurar impresión
en la cámara. Para cambiar la configuración, utilice
los botones
opción de menú, y
configuración.
4.
Español
Presione
de la cámara para seleccionar una
para cambiar la
para comenzar a imprimir.
18 Cámara digital HP Photosmart E427
Page 39

6
Referencia rápida de
la cámara
Utilice este capítulo como una referencia rápida de las
funciones de la cámara. Para conocer a fondo estas
funciones, consulte la Guía de usuario electrónica.
Vista en directo y Reproducción
● La opción Vista en directo le permite encuadrar
fotografías y videoclips en la Pantalla de imagen.
Para activar la opción Vista en directo, presione
hasta que aparezca un instante en la
esquina superior derecha de la Pantalla de imagen.
● Reproducción permite revisar y eliminar imágenes
y videoclips. Para activar Reproducción, pulse
hasta que aparezca brevemente en la
esquina superior derecha de la Pantalla de imagen.
Menús
Español
Cuando se presiona
opción Reproducción o Vista
en directo, se obtiene acceso
a los menús de la cámara, en
forma de pestañas, como se
muestra en la pantalla de
ejemplo.
Utilice
de cada menú, emplee
selección específica.
Para salir del menú, presione
momento.
Referencia rápida de la cámara 19
para desplazarse al menú que desee. Dentro
en la
para moverse a una
en cualquier
Page 40

Los menús y las opciones son:
Menú Opciones
Captura le permite
ajustar la configuración de las
características de las
imágenes y videoclips que
tomará en un futuro con la
cámara.
Español
Reproducción permite
revisar y manipular imágenes
y videoclips que haya
guardado en la cámara.
La ficha Configurar le
permite cambiar el
comportamiento de la
cámara.
● Modo de fotografía
(Modo automático,
Temporizador
automático, Paisaje,
Retrato, Acción, Puesta
de sol, Vídeo).
● Configuración del flash
● Calidad imagen
● Estampado de fecha y
hora
● Compensación de
exposición
● Equilibrio de blanco
● Velocidad ISO
● Ver viñetas
● Ampliar
● Imprimir
● Rotar
● Grabar audio
● Mover imágs. a tarjeta...
● Brillo de pantalla
● Sonidos de cámara
● Fecha y hora
● Configuración USB
● Idioma
● Acerca de...
20 Cámara digital HP Photosmart E427
Page 41

Câmera digital HP Photosmart E427
Português
Page 42

Informações legais e avisos
© Copyright 2006 Hewlett-Packard Development Company,
L.P.
As informações aqui contidas estão sujeitas a alterações sem
aviso prévio. As únicas garantias para produtos e serviços da
HP são as estabelecidas nas declarações de garantia expressa
que acompanham tais produtos e serviços. Nenhuma
informação aqui contida pode ser considerada como uma
garantia adicional. A HP se isenta de responsabilidade por
erros técnicos ou editorais ou omissões aqui contidas.
Windows® é uma marca registrada da Microsoft Corporation
nos Estados Unidos.
O logotipo SD é uma marca comercial de seu
proprietário.
Descarte de equipamento residencial na União
Européia
Este símbolo no produto ou na embalagem indica que
ele não deve ser descartado juntamente com os demais lixos
domésticos. É de sua responsabilidade o descarte do
equipamento, levando-o a um local de coleta designado para
a reciclagem de equipamentos elétricos e eletrônicos usados.
A coleta e a reciclagem apropriadas de seu equipamento usado
no momento do descarte ajudarão a conservar os recursos
Português
naturais e a garantir que a reciclagem se dará de maneira a
proteger a saúde humana e o ambiente. Para mais informações
sobre onde deixar seu equipamento para reciclagem, por favor,
dirija-se à administração municipal, ao serviço de coleta de lixo
ou à loja onde você adquiriu o produto.
Para referência futura, preencha as seguintes
informações:
● Número do modelo (na frente da câmera): _________
● Número de série (na parte inferior da câmera): _________
● Data de aquisição: _________
Page 43

Conteúdo
1 Primeiros passos.................................................4
Visualizar a versão eletrônica do Guia do
Usuário...................................................................5
Partes superior, traseira e lateral da câmera
...............................................................................6
Partes frontal, inferior e lateral da câmera.............7
2 Preparar a câmera................................................9
Instalar as baterias.................................................9
Ligar a câmera.....................................................10
Escolher o idioma................................................10
Configurar data e hora.........................................10
Instalar e formatar cartão de memória
opcional................................................................11
Instalar o software................................................12
3 Tirar fotos...........................................................14
4 Rever e excluir imagens e clipes de vídeo
.............................................................................15
Rever imagens e clipes de vídeo.........................15
Excluir uma imagem............................................15
5 Transferir e imprimir imagens..........................16
Transferir imagens...............................................16
Imprimir imagens diretamente da câmera...........16
6 Referência rápida da câmera............................18
Português
3
Page 44

1
Primeiros passos
Este Guia de Início Rápido fornece as informações de
que você precisa para começar a usufruir dos principais
recursos da câmera. Para obter informações detalhadas
sobre os recursos da câmera, consulte a versão
eletrônica do Guia do Usuário.
Guia de Início Rápido Versão eletrônica do Guia
do Usuário
Este guia impresso irá ajudálo a:
● Iniciar rapidamente o uso
da câmera
● Instalar o software
HP Photosmart
● Conhecer os recursos
básicos da câmera
Português
A versão eletrônica do Guia
do Usuário inclui:
● Descrições de todos os
recursos da câmera
● Uma descrição dos
ícones do Visor de
imagens
● Instruções sobre o uso
da câmera sem instalar o
software HP Photosmart
● Informações sobre
baterias, incluindo:
– Como prolongar a
vida das baterias
– Os diferentes tipos
de baterias
– Uma descrição dos
ícones indicadores
de alimentação
● Orientações sobre como
obter assistência da HP
● Solução de problemas
4 Câmera digital HP Photosmart E427
Page 45

● Especificações da
câmera
Visualizar a versão eletrônica do
Guia do Usuário
A versão eletrônica do Guia do Usuário está
no HP Photosmart Software CD.
Para visualizar o Guia do Usuário:
1. Insira o HP Photosmart Software CD no
computador.
2. No Windows: Clique em Ver o Guia do Usuário na
página principal da tela de instalação.
No Macintosh: Abra o arquivo readme na pasta
docs no CD.
A versão eletrônica do Guia do Usuário também é
copiada para o computador, ao se instalar o software
HP Photosmart. Para visualizar o Guia do Usuário após
ele ter sido instalado no computador:
● No Windows: Abra a Central de Soluções HP e
clique em Ajuda e suporte.
● No Macintosh: Abra o Gerenciador de
dispositivos HP e selecione Guia do Usuário da
Câmera no menu suspenso Informações e
configurações.
Obter assistência
● Para obter dicas e ferramentas que o ajudem a
utilizar a câmera de maneira mais eficiente, visite
www.hp.com/photosmart (somente em inglês)
ou www.hp.com.
Português
Primeiros passos 5
Page 46

● Para ajuda com seu produto, diagnósticos e
download de drivers 24 horas por dia, visite
www.hp.com/support.
● Para obter ajuda com o software HP Photosmart,
veja a Ajuda online do software.
Partes superior, traseira e lateral da
câmera
12
3
4
5
6
78
1 Botão Obturador — Captura imagens (consulte Tirar
fotos na página 14) ou grava clipes de vídeo (consulte
Português
a versão eletrônica do Guia do Usuário).
2
Botão Exibição ao vivo/Reproduzir — Alterna
entre Exibição ao vivo e Reproduzir (consulte Exibição
ao vivo e Reproduzir na página 18).
3
4 Luz de Ligada.
e — Rolam por menus e imagens e acessam
o zoom digital. Quando estiver em Exibição ao vivo,
pressione
para dar menos zoom.
/ para dar mais zoom; pressione /
6 Câmera digital HP Photosmart E427
Page 47

5
6
7 Visor de imagens.
8 Conector USB.
— Exibe menus da câmera, seleciona opções e
confirma ações.
Botão Excluir — Acessa a função Excluir, estando
em Reproduzir.
Partes frontal, inferior e lateral da
câmera
2 31
7
6
5
1 Luz Timer interno/vídeo.
2 Flash.
3 Microfone.
4
Botão Foco — Alterna entre o foco Macro e o
Normal.
5 Encaixe para tripé.
4
Português
Primeiros passos 7
Page 48

6 Tampa da bateria/cartão de memória.
7 Tampa da lente/Chave Liga/Desliga - Liga e desliga a
câmera e protege a lente quando a câmera está
desligada.
Português
8 Câmera digital HP Photosmart E427
Page 49

2
Preparar a câmera
Instalar as baterias
1. Abra a tampa da bateria/cartão de
memória, deslizando a trava
conforme indicado na tampa.
2. Coloque as baterias.
3. Feche a tampa da bateria/cartão de
memória.
Nota Desligue a câmera antes de tirar
as baterias. Se estiver usando baterias
recarregáveis NiMH, carregue-as completamente antes
de usá-las pela primeira vez.
O tipo de uso da câmera e o tipo de bateria
afetam a vida útil da bateria. As baterias
alcalinas duram bem menos que as de lítio
para foto ou NiMH. Para obter informações completas,
consulte o Apêndice A da versão eletrônica do Guia do
Usuário.
Número de fotos
Tipo de
bateria
Alcalina 80 160 120 110
NiMH 140 230 200 200
Lítio para
foto
Mínimo Máximo Médio CIPA
300 600 375 375
Português
O número CIPA é obtido usando-se os padrões
estabelecidos pela Camera and Imaging Products
Association.
Preparar a câmera 9
Page 50

Ligar a câmera
Para ligar a câmera, deslize
a tampa da lente, até que ela
faça um clique, descobrindo
a lente.
Para desligar a câmera,
deslize a tampa da lente até
ouvir o clique, cobrindo a lente.
Cuidado Ao deslizar a tampa, mantenha os
dedos afastados da lente. Impressões digitais na
lente podem prejudicar a qualidade da imagem.
Escolher o idioma
Use para escolher o
idioma desejado; a seguir,
pressione
Configurar data e hora
Português
A configuração correta da data e da hora irá ajudá-lo a
localizar as imagens depois que elas forem transferidas
para o computador, e irá assegurar que as imagens
.
10 Câmera digital HP Photosmart E427
Page 51

sejam marcadas de maneira precisa, se você usar o
recurso de gravação de data e hora.
1.
Use
valor realçado.
2. Use
seleções e repita a Etapa
1 até que a data e a hora
estejam configuradas
corretamente.
3.
Pressione
hora e formato estiverem corretas e pressione
para ajustar o
para ir para outras
quando as configurações de data,
novamente para confirmar.
Instalar e formatar cartão de
memória opcional
Essa câmera é compatível com cartões de memória
padrão e de alta velocidade Secure Digital (SD) da
marca HP, de 16 MB até 1 GB.
1. Desligue a câmera e abra a
tampa da bateria/cartão de
memória.
2. Insira o cartão de memória
opcional no slot menor, como
demonstrado. Verifique se o
cartão de memória está
encaixado.
3. Feche a tampa da bateria/cartão
de memória e ligue a câmera.
Sempre formate os cartões de memória novos antes do
primeiro uso. A formatação exclui todas as imagens do
cartão de memória, portanto certifique-se de que as
Português
Preparar a câmera 11
Page 52

imagens existentes sejam transferidas antes da
formatação.
1.
Com a câmera ligada, pressione
apareça rapidamente no canto superior direito
do Visor de imagens. Isso indica que você está
em Reproduzir.
2.
Pressione
3.
Use
cartão), no submenu Delete (Excluir), e pressione
.
4.
Use
para formatar o cartão.
Uma vez instalado um cartão de memória, todas as
novas imagens e clipes de vídeo serão armazenados no
cartão e não na memória interna.
Para utilizar a memória interna e visualizar imagens nela
armazenadas, remova o cartão de memória.
.
para selecionar Format Card (Formatar
para selecionar Yes (Sim) e pressione
Instalar o software
O software HP Photosmart oferece recursos para
transferir imagens e clipes de vídeo para o computador,
Português
assim como recursos para modificar imagens
armazenadas (corrigir olhos vermelhos, girar, cortar,
redimensionar, ajustar qualidade da imagem, entre
outros).
Se você tiver problemas para instalar ou usar o software
HP Photosmart, consulte o site de Suporte ao Cliente
HP para mais informações: www.hp.com/support.
Windows
Dependendo do seu sistema operacional, você poderá
escolher entre a instalação do HP Photosmart Premier
até que
12 Câmera digital HP Photosmart E427
Page 53

e a do HP Photosmart Essential, ou a instalação do
HP Photosmart Essential será automática. O
HP Photosmart Premier inclui mais funcionalidades que
a versão Essential. Veja a lista de diferenças na versão
eletrônica do Guia do Usuário, capítulo 1.
1. Feche todos os programas e desabilite,
temporariamente, qualquer software antivírus.
2. Insira o HP Photosmart Software CD na unidade e
siga as instruções da tela. Se a janela de instalação
não for exibida, clique em Iniciar, Executar, digite
D:\Setup.exe, em que D é a letra da unidade de CD,
e clique em OK.
3. Quando a instalação do software for concluída,
reabilite o software antivírus.
Macintosh
Para poder instalar o software HP Photosmart Mac, o
Macintosh tem que atender os requisitos de sistema,
conforme descrito na embalagem da câmera.
1. Insira o HP Photosmart Software CD na unidade de
CD.
2. Na área de trabalho do computador, clique duas
vezes no ícone do CD.
3. Clique duas vezes no ícone do instalador e siga as
instruções da tela.
Português
Preparar a câmera 13
Page 54

3
A Exibição ao vivo permite
enquadrar fotos no Visor de
imagens.
1.
2. Enquadre o objeto/pessoa para sua foto.
3. Pressione o botão Obturador para tirar a foto.
Nota Você também pode gravar um clipe de vídeo
usando o modo de fotografia Video (Vídeo) no menu
Capture (Capturar). Consulte a versão eletrônica do
Guia do Usuário para instruções.
Português
Tirar fotos
Pressione
seja exibido no canto
superior direito do Visor. Isso
indica que a câmera está na Exibição ao vivo.
até que
14 Câmera digital HP Photosmart E427
Page 55

4
Rever e excluir
imagens e clipes de
vídeo
Rever imagens e clipes de vídeo
Você pode rever e excluir imagens e clipes de vídeo
em Reproduzir.
1.
Pressione
superior direito do Visor de imagens. Isso indica que
você está em Reproduzir.
2. Use
para percorrer as imagens e clipes de vídeo
(os clipes de vídeo são exibidos automaticamente).
Excluir uma imagem
até que seja exibido no canto
Você pode excluir imagens individuais enquanto estiver
em Reproduzir:
1.
Pressione
superior direito do Visor. Isso indica que você está
em Reproduzir.
2. Use
vídeo.
3.
Pressione
4.
Use
imagem) no submenu Delete (Excluir) e pressione
Rever e excluir imagens e clipes de vídeo 15
para selecionar uma imagem ou clipe de
para selecionar This Image (Esta
.
até que seja exibido no canto
.
Português
Page 56

5
Transferir e imprimir
imagens
Transferir imagens
Se você tiver instalado o software HP Photosmart, use
este método para transferir imagens e clipes de vídeo
para o computador. Se você não tiver instalado o
software HP Photosmart, consulte a versão eletrônica
do Guia do Usuário, para um método alternativo.
1. Conecte a câmera e o
computador, utilizando o
cabo USB que acompanha
a câmera.
2. Ligue a câmera e siga as
instruções da tela do
computador para transferir
as imagens. Para obter
mais informações, consulte o recurso Ajuda do
software HP Photosmart.
Português
Imprimir imagens diretamente da
câmera
Você pode conectar a câmera a qualquer
impressora compatível com PictBridge para
imprimir imagens.
1. Verifique se a impressora está ligada, se há papel e
se não há mensagens de erro da impressora.
16 Câmera digital HP Photosmart E427
Page 57

2. Conecte a câmera e a
impressora, utilizando
o cabo USB que
acompanha a câmera,
e ligue a câmera.
3. Quando a câmera
estiver conectada à
impressora, o Print
Setup Menu (Menu Configurar impressão) será
exibido na câmera. Para alterar as configurações,
use
menu e, a seguir, use os
na câmera para selecionar uma opção do
na câmera para alterar
a configuração.
4.
Pressione
para iniciar a impressão.
Português
Transferir e imprimir imagens 17
Page 58

6
Referência rápida da
câmera
Use este capítulo como uma referência rápida aos
recursos da câmera. Para aprender mais sobre esses
recursos da câmera, consulte a versão eletrônica do
Guia do Usuário.
Exibição ao vivo e Reproduzir
● A Exibição ao vivo permite enquadrar fotos e clipes
de vídeo no Visor de imagens. Para ativar a
Exibição ao vivo, pressione
seja exibido no canto superior direito do Visor de
imagens.
● Reproduzir permite rever e excluir imagens e clipes
de vídeo. Para ativar Reproduzir, pressione
até que seja exibido no canto superior
direito do Visor de imagens.
Menus
Quando você pressiona o
Português
em Reproduzir ou em
Exibição ao vivo, você
acessa os menus da câmera,
como demonstrado na tela de
exemplo.
Use
para ir até o menu desejado. Dentro de um
menu, use
para ir até as seleções específicas.
até que
Para sair do menu, pressione
18 Câmera digital HP Photosmart E427
a qualquer hora.
Page 59

Os menus e as opções são:
Menu Opções
Capture (Capturar)
permite ajustar as
configurações da câmera que
afetam as características de
futuras imagens e clipes de
vídeo capturados com a
câmera.
● Shooting Mode (Modo de
● Flash Setting
● Image Quality
● Date & Time Imprint
● Exposure Compensation
● White Balance (Balanço
● ISO Speed (Velocidade
fotografia): Auto Mode
(Modo automático), SelfTimer (Timer interno),
Landscape (Paisagem),
Portrait (Retrato), Action
(Ação), Sunset (Pôr-dosol), Video (Vídeo).
(Configuração do flash)
(Qualidade da imagem)
(Gravação de data e
hora)
(Compensação da
exposição)
de branco)
ISO)
Português
Referência rápida da câmera 19
Page 60

Menu Opções
Playback (Reproduzir)
permite rever e editar
imagens e clipes de vídeo
armazenados na câmera.
Setup (Configuração)
permite alterar o
comportamento da câmera.
Português
● View Thumbnails (Exibir
miniaturas)
● Magnify (Ampliar)
● Print (Imprimir)
● Rotate (Girar)
● Record Audio (Gravar
áudio)
● Move Images to Card...
(Mover imagens p/
cartão...)
● Display Brightness
(Brilho do visor)
● Camera Sounds (Sons
da câmera)
● Date & Time (Data e
hora)
● USB Configuration
(Configuração USB)
● Language (Idioma)
● About... (Sobre...)
20 Câmera digital HP Photosmart E427
Page 61

Page 62

Page 63

Page 64

*L2437−90005*
L2437-90005
 Loading...