


HP Photosmart E327 Digital Camera
User Guide

Legal and notice information
© Copyright 2005 Hewlett-Packard Development Company, L.P.
The information contained herein is subject to change without notice. The only
warranties for HP products and services are set forth in the express warranty
statements accompanying such products and services. Nothing herein should
be construed as constituting an additional warranty. HP shall not be liable for
technical or editorial errors or omissions contained herein.
Windows® is a U.S. registered trademark of Microsoft Corporation.
SD Logo is a trademark of its proprietor.

Contents
1 Getting started . . . . . . . . . . . . . . . . . . . . . . . 7
Setup . . . . . . . . . . . . . . . . . . . . . . . . . . . . . . . . 8
1 Install the batteries . . . . . . . . . . . . . . . . . . 8
2 Turn on the camera . . . . . . . . . . . . . . . . . 9
3 Choose the language . . . . . . . . . . . . . . . . 9
4 Set the date and time . . . . . . . . . . . . . . . 10
5 Install and format a memory card (optional) 11
6 Install the software . . . . . . . . . . . . . . . . . 12
Windows® . . . . . . . . . . . . . . . . . . . . . . 13
Macintosh. . . . . . . . . . . . . . . . . . . . . . . 13
Camera parts. . . . . . . . . . . . . . . . . . . . . . . . . . 14
Back of the camera . . . . . . . . . . . . . . . . . . . 14
Top of the camera . . . . . . . . . . . . . . . . . . . . 16
Front, left side, and bottom of the camera . . . 17
Camera states . . . . . . . . . . . . . . . . . . . . . . . . . 19
Camera menus. . . . . . . . . . . . . . . . . . . . . . . . . 19
2 Taking pictures and recording video clips. . . . 21
Using Live View . . . . . . . . . . . . . . . . . . . . . . . . 21
Taking still pictures . . . . . . . . . . . . . . . . . . . . . . 23
Recording video clips . . . . . . . . . . . . . . . . . . . . 24
Using digital zoom . . . . . . . . . . . . . . . . . . . . . . 25
Setting the flash . . . . . . . . . . . . . . . . . . . . . . . . 26
Using the focus modes. . . . . . . . . . . . . . . . . . . . 28
Using the self-timer settings . . . . . . . . . . . . . . . . 29
Using the Capture Menu . . . . . . . . . . . . . . . . . . 31
Shooting Modes . . . . . . . . . . . . . . . . . . . . . 32
Image Quality. . . . . . . . . . . . . . . . . . . . . . . 34
Date & Time Imprint. . . . . . . . . . . . . . . . . . . 36
EV Compensation . . . . . . . . . . . . . . . . . . . . 38
3Contents

White Balance . . . . . . . . . . . . . . . . . . . . . . 39
ISO Speed . . . . . . . . . . . . . . . . . . . . . . . . . 41
3 Reviewing images and video clips. . . . . . . . . 43
Using Playback. . . . . . . . . . . . . . . . . . . . . . . . . 43
Total Images Summary Screen. . . . . . . . . . . . 46
Using the Playback Menu. . . . . . . . . . . . . . . . . . 47
Delete . . . . . . . . . . . . . . . . . . . . . . . . . . . . 49
Viewing thumbnails . . . . . . . . . . . . . . . . . . . 50
Magnifying images . . . . . . . . . . . . . . . . . . . 51
Print . . . . . . . . . . . . . . . . . . . . . . . . . . . . . . 52
Rotate . . . . . . . . . . . . . . . . . . . . . . . . . . . . 53
Record Audio . . . . . . . . . . . . . . . . . . . . . . . 54
4 Transferring and printing images. . . . . . . . . . 55
Transferring images to a computer . . . . . . . . . . . 55
Printing images directly from the camera . . . . . . . 56
5 Using the Setup Menu . . . . . . . . . . . . . . . . . 59
Display Brightness . . . . . . . . . . . . . . . . . . . . . . . 60
Camera Sounds . . . . . . . . . . . . . . . . . . . . . . . . 61
Date & Time . . . . . . . . . . . . . . . . . . . . . . . . . . . 62
USB Configuration . . . . . . . . . . . . . . . . . . . . . . 63
Language. . . . . . . . . . . . . . . . . . . . . . . . . . . . . 64
Move Images to Card . . . . . . . . . . . . . . . . . . . . 65
Reset Settings . . . . . . . . . . . . . . . . . . . . . . . . . . 66
6 Troubleshooting and support. . . . . . . . . . . . . 67
Resetting the camera . . . . . . . . . . . . . . . . . . . . . 68
HP Photosmart Software. . . . . . . . . . . . . . . . . . . 69
Using your camera without installing the HP Photosmart
Software . . . . . . . . . . . . . . . . . . . . . . . . . . . . . 69
4
HP Photosmart E327 User Guide

Transferring images to a computer without
HP Photosmart Software . . . . . . . . . . . . . . . . 70
Connecting your camera as a digital camera 70
Using a memory card reader. . . . . . . . . . 71
Configuring the camera as a disk drive . . 74
Problems and solutions . . . . . . . . . . . . . . . . . . . 76
Error messages on the camera . . . . . . . . . . . . . . 88
Error messages on the computer . . . . . . . . . . . . . 98
Product support . . . . . . . . . . . . . . . . . . . . . . . 100
Helpful websites . . . . . . . . . . . . . . . . . . . . 100
Getting assistance . . . . . . . . . . . . . . . . . . . 100
A Managing batteries . . . . . . . . . . . . . . . . . . 103
Top points about batteries . . . . . . . . . . . . . . . . 103
Extending battery life. . . . . . . . . . . . . . . . . 104
Safety precautions for using batteries. . . . . . 104
Performance per battery type . . . . . . . . . . . . . . 106
Number of shots per battery type . . . . . . . . . . . 107
Power indicators. . . . . . . . . . . . . . . . . . . . . . . 108
Recharging NiMH batteries . . . . . . . . . . . . . . . 109
Safety precautions for recharging NiMH
batteries. . . . . . . . . . . . . . . . . . . . . . . . . . 111
Sleep time-out for power conservation . . . . . . . . 111
B Purchasing camera accessories . . . . . . . . . . 113
C Caring for your camera . . . . . . . . . . . . . . . 115
Basic camera care . . . . . . . . . . . . . . . . . . . . . 115
Cleaning the camera. . . . . . . . . . . . . . . . . . . . 117
Cleaning the camera lens. . . . . . . . . . . . . . 117
Cleaning the camera body and image display 118
D Specifications . . . . . . . . . . . . . . . . . . . . . . 119
Memory capacity . . . . . . . . . . . . . . . . . . . . . . 123
Contents
5

6
HP Photosmart E327 User Guide

1Getting started
Congratulations on your purchase of the HP Photosmart
E327 digital camera and welcome to the world of digital
photography!
This manual explains camera features you can use to ensure
great results while enjoying the photographic experience.
Some of these features are:
• Video and audio capability—Record video clips (see
page 24) or add audio clips to your still pictures (see
page 54).
• Transferring images to a computer—Easily transfer
images from your camera to your computer. See
page 55.
•Direct print—Print directly from your camera to any
PictBridge-certified printer without having to connect to
your computer. See page 56.
• Internal memory or memory card—Store images in your
camera’s internal memory or on an optional memory
card of your choice. See page 11.
Getting started
7

Setup
To locate a part on your camera (such as a button or a light)
while following the instructions in this section, see Camera
parts on page 14.
1. Install the batteries
1. Open the Battery/Memory card door on
the side of the camera by sliding the
door toward the front of the camera.
2. Insert the batteries as indicated inside
the door.
3. Close the Battery/Memory card door by
pushing the door down and sliding the
door toward the back of the camera until
the door latches.
For the performance of NiMH, Lithium, and
Alkaline batteries when used with this camera, see
Performance per battery type on page 106. For the number
of shots you can expect to get for each battery type based
on usage, see Number of shots per battery type on
page 107. For hints on optimizing battery performance, see
Appendix A, Managing batteries, starting on page 103.
TIP: If you use rechargeable NiMH batteries, you can
recharge the batteries in the optional HP Photosmart
quick recharger. For more information, see Appendix B,
Purchasing camera accessories, starting on page 113.
8
HP Photosmart E327 User Guide

2. Turn on the camera
To turn the camera on,
slide the lens cover open
until it clicks, uncovering
the lens. The Power/
Memory light on the back
of the camera turns on
solid green. The HP logo
also displays on the Image
Display as the camera
powers up.
To turn the camera off, slide the lens cover closed until it
clicks, covering the lens.
CAUTION: When sliding the lens cover, keep your fingers
clear of the lens. Fingerprints on the lens can impair the
quality of the picture. For information about cleaning the
lens, see Cleaning the camera on page 117.
3. Choose the language
The first time you turn the camera on, you are prompted to
choose a language.
1. Scroll to the language that you
want by using the
buttons on the Controller .
2. Press the button to select the
highlighted language.
TIP: If you need to change the language later, you can do
this with the Language setting in the Setup menu. See
Chapter 5, Using the Setup Menu.
Getting started
9

4. Set the date and time
The camera has a clock that records the date and time at
which you take each picture. This information is recorded in
the image properties, which you can see in Playback, when
viewing Image Advice, and when viewing the image on your
computer. You can also choose to have the date and time
imprinted on the image (see Date & Time Imprint on
page 36).
1. The first item highlighted is the
date and time format. If you want
to change the format, use the
buttons. If the date and time
format is correct, press the
button to move to the next
selection.
2. Adjust the value of the highlighted selection using the
buttons.
3. Press the buttons to move to the other selections.
4. Repeat Steps 2 and 3 until the date and time are set
correctly.
5. Press the button when you have entered the proper
values for the date and time. A confirmation screen
appears, asking if the correct date and time have been
set. If the date and time are correct, press the button
to select Yes.
If the date and time are incorrect, press the button to
highlight No, and then press the button. The Date &
Time screen appears again. Repeat Steps 1 through 5 to
set the correct date and time.
10
HP Photosmart E327 User Guide

TIP: If you need to change the date and time settings later,
you can do this with the Date & Time setting in the Setup
menu. See Chapter 5, Using the Setup Menu.
5. Install and format a memory card (optional)
Your camera contains internal memory that allows you to
store images and video clips. However, you can use a
memory card (purchased separately) instead to store images
and video clips. For more information about supported
memory cards, see Storage on page 121.
1. Turn off the camera and open
the Battery/Memory card
door on the side of the
camera.
2. Insert the memory card in the
small slot behind the batteries,
with the notched end of the
card going in first, as shown.
Make sure the memory card
snaps into place.
3. Close the Battery/Memory
card door and turn on the camera.
4. Press the button, then use the button to move to the
Playback Menu .
5. Press the button to highlight Delete, and then press the
button to display the Delete sub-menu.
6. Use the button to highlight Format Card, and then
press the button to display the Format Card
confirmation screen.
Getting started
11

7. Press the button to highlight Yes, and then press the
button to format the card.
Formatting Card... appears in the Image Display while
the camera is formatting the memory card. When the
camera has completed the formatting, the Total Images
Summary screen is displayed (see Total Images Summary
Screen on page 46).
To remove the memory card from the camera, first turn the
camera off. Then open the Battery/Memory card door, press
down on the top edge of the memory card, and it will spring
outward from the slot.
NOTE: When you install a memory card in the camera, all
new images and video clips will be stored on the card,
and you will no longer be able to view images stored in
the camera’s internal memory. To use internal memory
and view images stored there, remove the memory card,
or transfer the images from the internal memory to the
memory card (see Move Images to Card on page 65).
6. Install the software
The HP Photosmart Software allows you to transfer images.
NOTE: If you do not install the HP Photosmart Software, you
can still transfer images. For details, see Using your
camera without installing the HP Photosmart Software on
page 69.
NOTE: If you have trouble installing or using the
HP Photosmart Software, see the HP Customer Care
website: www.hp.com/support for more information.
12
HP Photosmart E327 User Guide

Windows®
To install the HP Photosmart Software successfully, your
computer must have a minimum of 64MB of RAM, Windows
x64, XP, 2000, 98, 98 SE, or Me, and Internet Explorer 5.5
Service Pack 2 or higher. Internet Explorer 6 is
recommended. If your computer meets these requirements,
the installation process installs either HP Photosmart Premier
(Windows XP only) or HP Photosmart Essential. For
differences between these, see HP Photosmart Software on
page 69.
1. Close all programs and temporarily disable any virus
protection software running on your computer.
2. Insert the HP Photosmart Software CD into the CD drive of
your computer and follow the on-screen instructions. If the
installation screen does not appear, click Start, click Run,
type D:\Setup.exe, where D is the letter of your CD drive,
then click OK.
3. When the HP Photosmart Software has finished installing,
re-enable the virus protection software you disabled in
Step 1.
Macintosh
1. Insert the HP Photosmart Software CD into the CD drive of
your computer.
2. Double-click the CD icon on the computer desktop.
3. Double-click the installer icon, and then follow the on-
screen instructions.
Getting started
13

Camera parts
Refer to the pages in parentheses after the part names in the
following tables for more information about those parts.
Back of the camera
1
#Name Description
1 Image Display
(page 21, 43)
2 Live
View/Playback
button
Allows you to frame pictures and video
clips using Live View and review them
afterward in Playback, and to view all the
menus.
• If Live View is displayed, allows you to
• If Playback is displayed, allows you to
• If the Image Display is off, but the
• If a menu is open in the Image Display,
2
switch to Playback.
switch to Live View.
camera is on, allows you to turn the
Image Display on.
allows you to close the menu.
3
8
7
4
5
6
14
HP Photosmart E327 User Guide

#Name Description
Flash button
3
(page 26)
4
Self-Timer
button (page 29)
5Power/Memory
light
6Battery/Memory
card door
(pages 8, 11)
7
8
button
(pages 31, 47)
Controller
with
buttons
and
Allows you to select between the different
flash settings.
Allows you to take a self-timer picture.
• Solid green—Camera is on.
• Blinking green—Camera is writing to
either the internal memory or an
installed memory card.
Allows access to insert and remove the
batteries and an optional memory card.
Allows you to display camera menus,
select menu options, and confirm certain
actions on the Image Display.
•
• buttons—Allows you to scroll
•
•
buttons—Allows you to scroll
vertically through menus.
horizontally through menus and
images on the Image Display.
Zoom In ( button)—While in Live
View, allows you to digitally zoom the
picture to a lower resolution while
taking still pictures (page 25).
Zoom Out ( button)—While in
Live View, allows you to digitally zoom
the picture to a higher resolution while
taking still pictures (page 25).
Getting started
15

Top of the camera
#Name Description
1 Shutter button
(page 23)
2 Wrist strap
mount
3
Video
button
(page 24)
Takes a picture.
Allows you to attach a wrist strap to the
camera.
Starts and stops recording a video clip.
1
2
3
16
HP Photosmart E327 User Guide

Front, left side, and bottom of the camera
2
1
7
6
#Name Description
1Lens cover/Power
switch (page 9)
2Self-Timer/Video
light
(pages 24, 29)
3Flash
(page 26)
4
USB
connector
(pages 55, 56)
Turns the camera on and off and protects
the lens when the camera is off.
Blinks during the count-down before
taking a picture when the camera is set to
Self-Timer. Also turns on solid when
recording video.
Provides additional light to improve
picture-taking.
Allows you to connect a USB cable from
the camera to a USB-enabled computer or
any PictBridge-certified printer.
3
5
4
Getting started
17

#Name Description
5Focus Mode
switch (page 28)
6 Tripod mount Allows you to mount the camera on a
7Microphone
(pages 24, 54)
Allows you to switch between Normal and
Macro focus mode.
tripod.
Records audio clips that are attached to
still images and the audio portion of
video clips.
18
HP Photosmart E327 User Guide

Camera states
Your camera has two main states that allow you to complete
certain tasks.
•Live View—Allows you to take still pictures and record
video clips. For information about using Live View ,
see Chapter 2, Taking pictures and recording video clips,
starting on page 21.
•Playback—Allows you to review the still images and
video clips that you capture. For information about using
Playback , see Chapter 3, Reviewing images and
video clips, starting on page 43.
To switch between Live View and Playback states, press the
Live View/Playback button.
Camera menus
Your camera has three menus that, when accessed, appear
in the Image Display on the back of the camera.
To access the menus, press the button, then use the
buttons to move to the menu you want. To select a menu
option, use the buttons to highlight it, then press the
button to display the menu option’s sub-menu and
modify the settings.
To exit a menu, you can do one of the following:
• Press the Live View/Playback button.
• Use the buttons to scroll to the EXIT menu option
and press the button.
TIP: In the Capture and Setup Menus, you can modify
settings by highlighting the menu option and using the
buttons to change the setting.
Getting started
19

The Capture Menu lets you
specify settings for taking a picture
such as image quality, ISO speed,
and imprinting the date and time on
the images. For information about
using this menu, see Using the
Capture Menu on page 31.
The Playback Menu lets you
magnify and rotate images, add
audio clips to images, select images
for printing, and delete images. For
information about using this menu,
see Using the Playback Menu on
page 47.
The Setup Menu lets you modify
configuration settings such as
display brightness, date and time,
and language, among others. It
also allows you to move images
from the internal memory to an
optional memory card. For
information about using this menu, see Chapter 5, Using the
Setup Menu, starting on page 59.
20
HP Photosmart E327 User Guide

2 Taking pictures and
recording video clips
Using Live View
The Image Display allows you to frame pictures and video
clips using Live View. To activate Live View when the Image
Display is off, press the Live View/Playback button
until the Live View icon appears in the upper left corner
of the Image Display.
TIP: To conserve battery life, the Image Display shuts down
during periods of inactivity when the camera is on. You
can activate the Image Display by pressing the Live View/
Playback button.
Taking pictures and recording video clips
21

The following table describes the information that is
displayed in Live View when the camera settings are at their
default values and an optional memory card is installed in
the camera. If you change other camera settings, icons for
those settings will also be displayed in Live View.
3
1
2
4
5
#Icon Description
1 Live View icon, indicating the camera is in Live View.
This icon displays for the first few seconds.
2 Indicates that a memory card is installed in the
3 Power indicator, such as this full battery level
4 12 Remaining pictures count (actual number depends on
5 5MP Image Quality setting (default is 5MP)
camera
indicator (see Power indicators on page 108)
the current Image Quality setting and how much
space remains in memory)
22
HP Photosmart E327 User Guide

Taking still pictures
To take a still picture:
1. Press the Live View/Playback
button until the Live View
icon appears in the upper left
corner of the Image Display, then
frame the subject for your picture in
the Image Display.
2. Press the Shutter button to take the picture. The camera
beeps after taking the picture.
TIP: Hold the camera with both hands and gently press the
Shutter button to reduce camera shake and prevent blurry
pictures.
After a picture is taken, the image appears for several
seconds on the Image Display. This is called Instant Review.
You can delete the image during Instant Review by pressing
the button, then selecting This Image in the Delete
sub-menu.
Taking pictures and recording video clips
23

Recording video clips
1. Press the Live View/Playback button until the Live
View icon appears in the upper left corner of the
Image Display, then frame the subject for your video
using the Image Display.
2. To start recording video, press and
release the Video button on the
top of the camera. A video
icon, REC, a video counter, and a
message instructing how to end the
video appear on the Image Display.
The Self-Timer/Video light turns on
solid red.
3. To stop recording video, press and release the Video
button again; otherwise, the video will continue recording
until the camera runs out of memory.
After recording has stopped, the first frame of the video clip
appears for three seconds on the Image Display. This is
called Instant Review. You can delete the video clip during
Instant Review by pressing the button, then selecting This
Image in the Delete sub-menu.
A video clip includes audio. To hear the audio portion of
your video clips, transfer them to your computer and use the
HP Photosmart software.
NOTE: Digital zoom is not available while recording video
clips.
24
HP Photosmart E327 User Guide
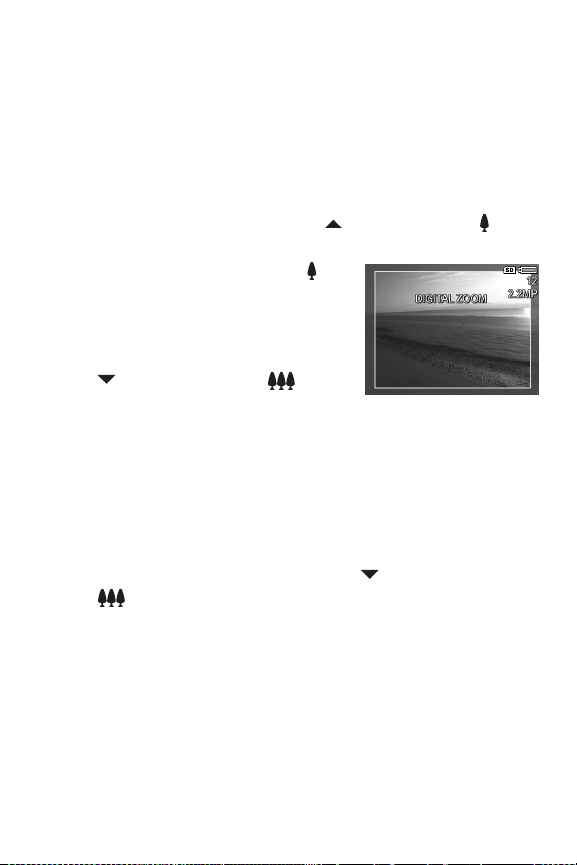
Using digital zoom
You can use digital zoom whenever you want to capture only
a portion of the scene in the Image Display. As you zoom in,
a yellow frame surrounds the portion of the scene you want
to capture, allowing you to eliminate unwanted portions of
the scene.
1. While in Live View, press the button (Zoom In icon)
to enter digital zoom.
2. Continue to press Zoom In
until a yellow frame surrounds
the area of the image you want
to capture. If you zoom in too far
and want to zoom out, press the
button (Zoom Out icon)
to enlarge the selection.
The resolution number on the right side of the screen also
becomes smaller as you digitally zoom. For example,
2.2MP appears in place of 5MP, indicating that the
image is being captured at a size of 2.2 Megapixels.
3. When the image is at the desired size, press the Shutter
button to take the picture.
4. To turn digital zoom off, press the button (Zoom Out
icon) until the yellow frame disappears.
NOTE: Digital zoom reduces the resolution of an image, so
your picture will tend to be more pixilated or grainy than
images taken without zoom. In situations where you need
higher quality (such as for printing), limit the use of digital
zoom.
NOTE: Digital zoom is not available while recording video
clips.
Taking pictures and recording video clips
25
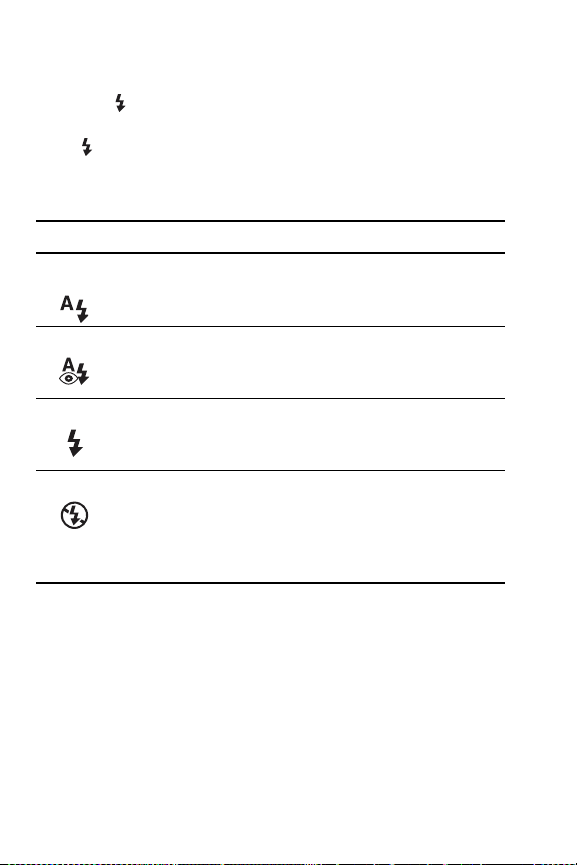
Setting the flash
The Flash button allows you to cycle through the flash
settings on the camera. To change the flash setting, press the
Flash button until the desired setting appears on the Image
Display. The following table describes each of the flash
settings on the camera.
Setting Description
Auto
Flash
Red-Eye
Flash On
Flash Off
NOTE: The flash is not available in Sunset mode nor is it
available while recording video clips.
If the flash setting is anything other than the default Auto
Flash setting, the icon for the setting will appear in the Live
View screen. The new setting remains in effect until it is
changed again or until the camera is turned off. The flash
setting resets to the default Auto Flash setting when you turn
the camera off.
The camera measures the light level and uses the flash
if necessary.
The camera measures the light level and uses the flash
with red-eye reduction if necessary (for a description of
red-eye reduction, see Red eye on page 27).
The camera always uses flash. If the light is behind your
subject, you can use this setting to increase the light on
the front of your subject. This is called fill-flash.
The camera will not use flash, no matter the lighting
conditions. Use this setting to capture poorly lit subjects
that are beyond the flash range. Exposure times may
be increased when using this setting, so you should use
a tripod to avoid blurry pictures from camera shake.
26
HP Photosmart E327 User Guide

Red eye
The red-eye phenomenon is caused by light from the flash
reflecting off the subjects’ eyes, which sometimes makes a
human’s eyes appear red or an animal’s eyes appear green
or white in the captured image. When you use a flash setting
with red-eye reduction, the camera flashes quickly up to three
times to cause the subject’s pupils to contract, thus reducing
the effect of the red-eye phenomenon, before the camera
uses the main flash. It will take longer to take a picture using
red-eye reduction, because the shutter is delayed for the
additional flashes. Therefore, make sure your subjects wait
for the additional flashes.
Taking pictures and recording video clips
27

Using the focus modes
Focus modes change the focal distance of the camera to
make it possible to take pictures of objects that are close to
or far away from the camera.
To change the focus mode, slide the Focus Mode switch on
the front of the camera. The following table describes both of
the focus mode settings on the camera.
Setting Description
Normal
Use Normal mode when you need to take pictures of
subjects more than 1 m (39 in) away.
Macro
28
Use Macro mode to take close-up pictures of subjects
less than 1 m (39 in) away. In this mode, the camera
will focus at a distance range of 60 cm to 1m
(24 to 39 in), and the Macro icon appears on the
image display.
HP Photosmart E327 User Guide

Using the self-timer settings
1. Secure the camera to a tripod or set it on a stable
surface.
2. Press the Timer button. Self-Timer appears in the
Image Display.
3. Frame the subject (see page 21).
4. The next steps depend on whether you are capturing a
still picture or recording a video clip.
For Still Pictures:
Press the Shutter button. A countdown appears on the
screen and the Self-Timer/Video light blinks for 10
seconds before the camera takes the picture.
For Video Clips:
To start recording video, press the Video button and
then release it. A 10-second countdown appears on the
Image Display. The Self-Timer/Video light on the front of
the camera then blinks for 10 seconds before the camera
starts recording the video.
To stop recording the video clip, press the Video
button again; otherwise, the video will continue recording
until the camera runs out of memory.
The self-timer setting resets to the default Normal setting after
the picture is taken or the video clip is recorded.
Taking pictures and recording video clips
29

TIP: If you are taking still images in low light with or without
a tripod, you can use the self-timer setting to avoid blurry
images caused by camera shake. Place the camera on a
steady surface or a tripod, frame your picture, then press
the Shutter button all the way down and remove your
hands from the camera. The camera will wait 10 seconds
before taking the image, eliminating any possibility of
your shaking the camera when you press the Shutter
button.
30
HP Photosmart E327 User Guide
 Loading...