

Page 1

HP Photosmart E217/E317
Digital Camera
Quick Start Guide
Page 2
TahitiUM.book Page 4 Sunday, January 4, 2004 2:47 PM
Page 3
Lee_Jackie_QSG.fm Page 1 Tuesday, March 29, 2005 4:32 PM
HP Photosmart
E217/E317
數位相機
快速入門指南
中文
1
Page 4

Lee_Jackie_QSG.fm Page 2 Tuesday, March 29, 2005 4:32 PM
法律通告
© Copyright 2005 Hewlett-Packard Development Company, L.P.
本文中的資訊如有修改,恕不另行通知。僅為 HP 產品與服務提供的保固在
此類產品與服務隨附的明確保固聲明中有述。不應將此處的任何資訊視為附
加保固。HP 對本手冊所包含的任何技術或編輯錯誤或遺漏不負任何責任。
Windows® 是 Microsoft Corporation 在美國的註冊商標。
SD 標誌是其所有人的商標。
致歐盟客戶的重要回收資訊:為保護環境,法律規定,此產品在使用壽命終
結後必須回收。下面的標誌表示此產品不能按照一般的垃圾來處理。請將產
品送回到距您最近的經授權收集站以便進行正確的回收/ 處理。如需關於 HP
產品返回與回收的一般資訊,請造訪:
www.hp.com/hpinfo/globalcitizenship/environment/recycle/index.html
為便於以後參考,請輸入下列資訊:
型號 (在相機正面)
序號 (相機底部的 10 位數字)
購買相機的日期
中國印製
2
HP Photosmart E217/E317 快速入門指南
Page 5

Lee_Jackie_QSG.fm Page 3 Tuesday, March 29, 2005 4:32 PM
1. 連接腕帶
S 如圖所示,將腕帶套到相機側面的腕帶扣環上。
中文
3
Page 6

Lee_Jackie_QSG.fm Page 4 Tuesday, March 29, 2005 4:32 PM
2. 安裝電池
1. 將相機側面的電池 / 記憶卡槽蓋朝相機的正面滑動,以
將其打開。
2. 如圖所示將電池插入電池蓋內。
3. 將電池 / 記憶卡槽蓋往下推,然後朝相機的背面滑動直
到槽蓋閂上,以將其關閉。
視所使用的 AA 電池類型而定,您的相機效能類似如下:
鹼性電池 (啟動用電池) 拍攝張數 80 到 130 張
鋰電池 拍攝張數 260 到 490 張
NiMH (可充電電池)
如果您使用 NiMH (可充電)電池,請確
定將電池完全充滿後再行使用。
拍攝張數 110 到 280 張
4
HP Photosmart E217/E317 快速入門指南
Page 7
Lee_Jackie_QSG.fm Page 5 Tuesday, March 29, 2005 4:32 PM
3. 啟動相機
S 若要啟動相機,請滑開鏡頭蓋直到發出喀噠聲,露出鏡
頭。相機背面的電源 / 記憶體指示燈會變成綠色。相機
啟動時,影像螢幕上也會顯示 HP 標誌。
注意: 滑動鏡頭蓋時,請注意不要讓手指碰到鏡頭。在鏡
頭上留下指紋會降低相片的品質。
中文
5
Page 8

Lee_Jackie_QSG.fm Page 6 Tuesday, March 29, 2005 4:32 PM
4. 選擇語言
首次啟動相機時,相機會提示您選擇語言。
1. 請使用控制器 上的 按鈕捲動到您所要的
語言。
2. 按下 按鈕選取反白的語言。
6
HP Photosmart E217/E317 快速入門指南
Page 9

Lee_Jackie_QSG.fm Page 7 Tuesday, March 29, 2005 4:32 PM
5. 設定日期和時間
現在,相機會提示您設定日期與時間。
1. 第一個反白的項目是日期和時間格式。如果您想要變更
日期與時間格式,請使用 按鈕。如果日期與時間
格式正確,請按 按鈕移動到日期。
2. 使用 按鈕可調整反白選項的值。
3. 按下 按鈕移到其他選項。
4. 重複步驟 2 和步驟 3,直到日期和時間設定正確。
5. 輸入正確的日期和時間值後,請按 按鈕 。隨後會出
現確認畫面,詢問是否已設定好正確的日期和時間。如
果日期和時間正確,請按 按鈕選取是。
中文
7
Page 10
Lee_Jackie_QSG.fm Page 8 Tuesday, March 29, 2005 4:32 PM
6. 安裝和格式化記憶卡
(選購)
您的相機有內部記憶體,可儲存影像和視訊剪輯。不過您也
可以使用記憶卡 (另外購買)來儲存影像及視訊剪輯。
1. 關閉相機並打開相機側面的電池 / 記憶卡槽蓋。
2. 如圖所示,將記憶卡插入電池後面的小插槽中,有凹槽
的一側先插入。確定記憶卡卡入到位。
3. 關閉電池 / 記憶卡槽蓋並啟動相機。
8
HP Photosmart E217/E317 快速入門指南
Page 11

Lee_Jackie_QSG.fm Page 9 Tuesday, March 29, 2005 4:32 PM
為了避免損壞記憶卡和影像,請在首次使用記憶卡前先格
式化記憶卡。若要格式化記憶卡:
1. 按下 按鈕,然後使用 按鈕移動到回放功能表 。
2. 按下 按鈕反白刪除,然後按 按鈕顯示刪除子功
能表。
3. 使用 按鈕反白格式化記憶卡,然後按 按鈕顯示
格式化記憶卡確認畫面。
4. 按下 按鈕反白是,然後按 按鈕格式化記憶卡。
相機格式化記憶卡的時候,影像螢幕上會顯示格式化記
憶卡中 ...。完成格式化之後,將會顯示 「影像總數摘
要」畫面。
若要取出相機中的記憶卡,請先關閉相機。然後打開電池 /
記憶卡槽蓋,將記憶卡的上緣往下壓,記憶卡便會從插槽
中彈出。
中文
9
Page 12

Lee_Jackie_QSG.fm Page 10 Tuesday, March 29, 2005 4:32 PM
7. 拍攝靜態相片
1. 按下即時檢視 / 回放 按鈕,直到即時檢視
圖示出現在影像螢幕的左上角,然後在影像螢幕中框選
您想要的相片主體。
2. 完全按下快門按鈕拍攝相片。相機在拍完相片後會發出
喀噠聲。影像會在影像螢幕中顯示數秒鐘。
訣竅: 在按下快門按鈕時,用雙手拿穩相機可以降低相機
的震動並防止產生模糊的相片。
10
HP Photosmart E217/E317 快速入門指南
Page 13

Lee_Jackie_QSG.fm Page 11 Tuesday, March 29, 2005 4:32 PM
8. 錄製視訊剪輯
1. 按下即時檢視 / 回放 按鈕,直到即時檢視
圖示出現在影像螢幕的左上角,然後在影像螢幕中框選
您想要的相片主體。
2. 若要開始錄製視訊,請按下相機頂部的視訊
後放開。
3. 若要停止錄製視訊,請再次按下視訊 按鈕然後放
開,否則視訊將持續錄製,直到相機的記憶體用完為止。
中文
按鈕然
11
Page 14

Lee_Jackie_QSG.fm Page 12 Tuesday, March 29, 2005 4:32 PM
9. 檢視影像和視訊剪輯
您可以使用回放來檢視影像和視訊剪輯。
1. 按下即時檢視 / 回放 按鈕,直到回放 圖示
出現在影像螢幕的左上角中。
2. 使用 按鈕來捲動影像和視訊剪輯。
視訊剪輯的第一個畫面顯示 2 秒以後,便會自動播放視
訊剪輯。
12
HP Photosmart E217/E317 快速入門指南
Page 15
Lee_Jackie_QSG.fm Page 13 Tuesday, March 29, 2005 4:32 PM
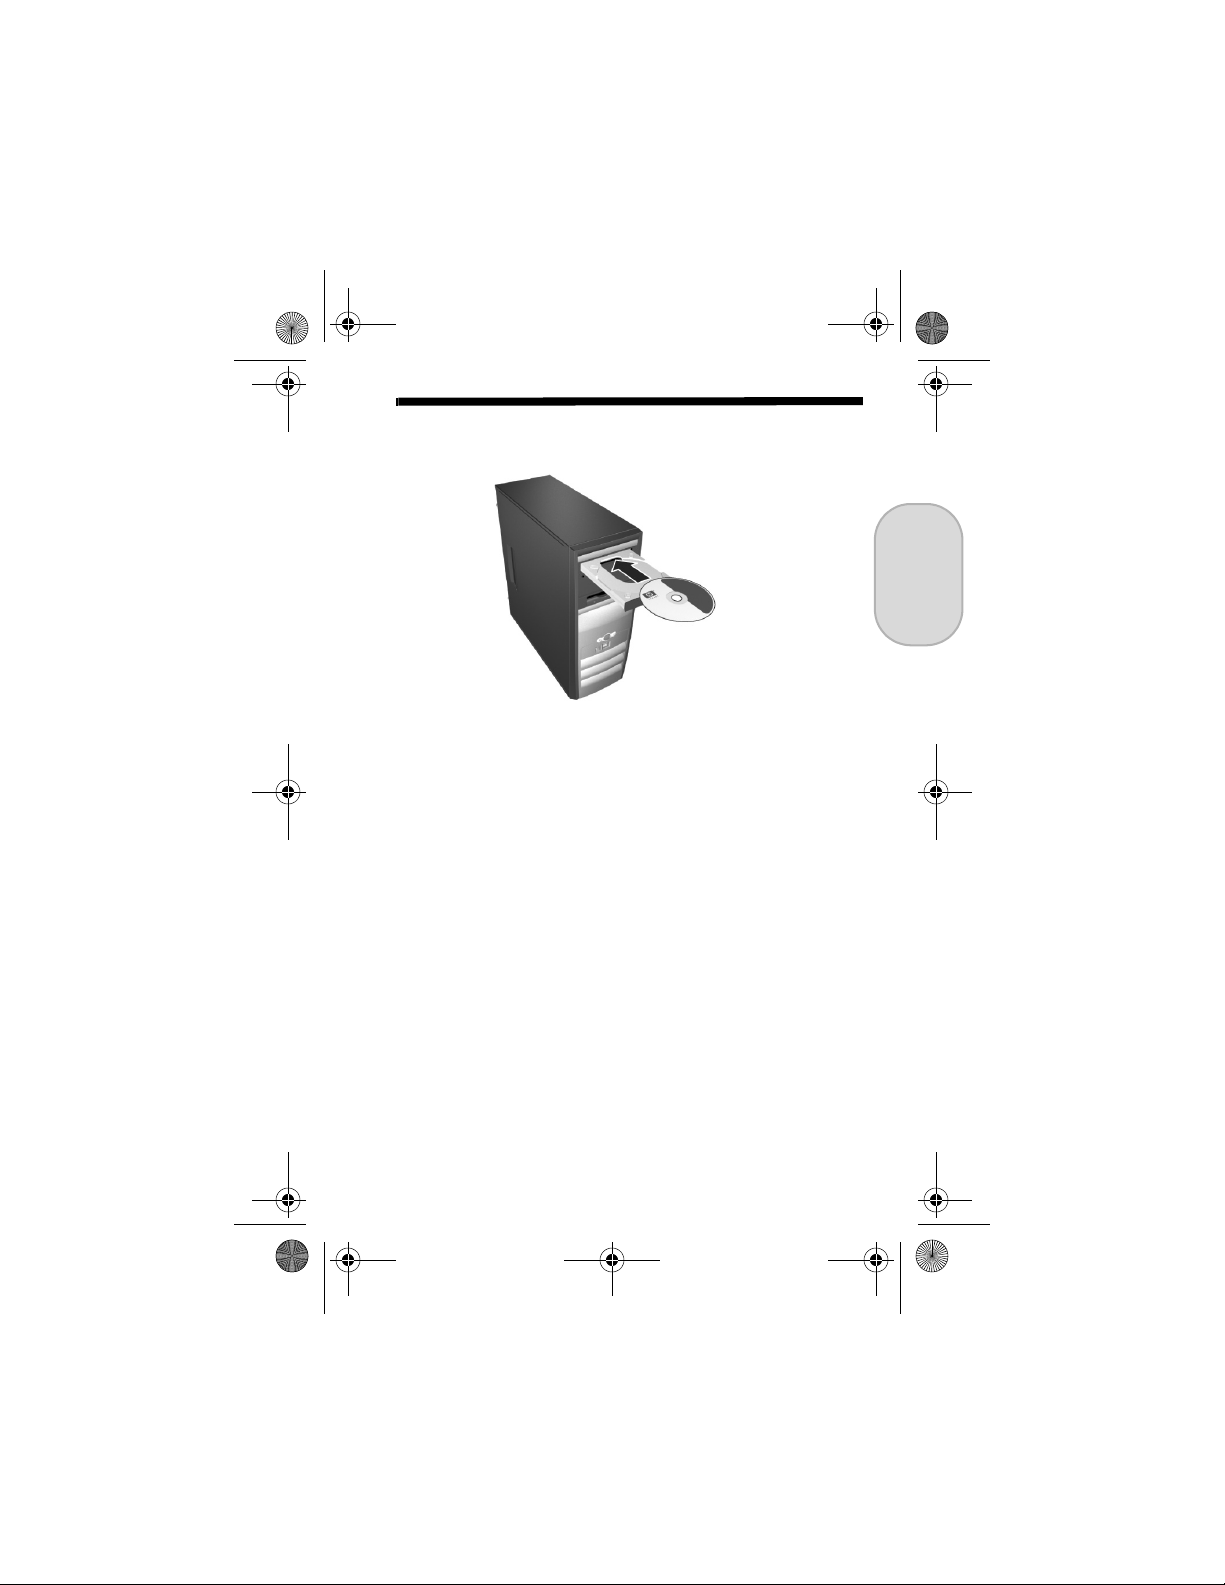
10. 安裝軟體
HP Image Zone 軟體可讓您傳輸相機中的影像,然後檢視、
編輯、列印或用電子郵件寄出這些影像。
如果您在安裝或使用 HP Image Zone 軟體時發生問題,請查閱
HP 客戶支援網站以取得詳細資訊:www.hp.com/support。
Windows
若要安裝 HP Image Zone 軟體,您的電腦必須至少有 64MB
的記憶體、Windows 2000、XP、98、98 SE 或 Me 以及 Internet
Explorer 5.5 Service Pack 2 或更高版本。如果您的電腦滿足上
述需求,安裝程序將會安裝完整版的 HP Image Zone,否則
將會安裝缺少部分完整版功能的 HP Image Zone Express。
1. 關閉所有程式,並暫時停用電腦上執行的所有病毒防護
軟體。
2. 將 HP Image Zone 軟體光碟插入您電腦的光碟機中,然
後依照螢幕上的指示進行。如果沒有出現安裝視窗,請
按一下開始、執行,然後輸入 D:\Setup.exe,此處的 D
是光碟機的字母代號,再按一下確定。
3. HP Image Zone 軟體完成安裝時,請重新啟用您在步驟 1
中停用的病毒防護軟體。
中文
13
Page 16

Lee_Jackie_QSG.fm Page 14 Tuesday, March 29, 2005 4:32 PM
Macintosh
若要成功安裝 HP Image Zone 軟體,您的 Macintosh 電腦必
須內建 USB、128 MB 的實體記憶體、Mac OSX v10.2 或更
高版本,以及 250 MB 的磁碟空間。
1. 關閉所有程式,並暫時停用電腦上執行的所有病毒防護
軟體。
2. 將 HP Image Zone 軟體光碟插入您電腦的光碟機中。
3. 連按兩下電腦桌面上的光碟圖示。
4. 連按兩下安裝程式圖示,然後依照畫面上的指示進行。
5. HP Image Zone 軟體完成安裝時,請重新啟用您在步驟 1
中停用的病毒防護軟體。
14
HP Photosmart E217/E317 快速入門指南
Page 17

Lee_Jackie_QSG.fm Page 15 Tuesday, March 29, 2005 4:32 PM
11. 傳輸影像至電腦
1. 關閉相機,然後使用附送的 USB 纜線將相機連接至電腦。
2. 請啟動相機。
3. 依照螢幕上的指示,使用軟體將影像從相機傳輸至電腦。
4. 中斷相機和電腦的連接。
中文
15
Page 18
Lee_Jackie_QSG.fm Page 16 Tuesday, March 29, 2005 4:32 PM
取得說明
檢視光碟上的使用者手冊
您的相機還有許多實用的功能,其說明可在 《使用者手冊》
中找到。這些功能包括 5 種拍攝模式、直接列印功能、相機
內含的 「說明」、相機配件和其他更多功能。若要檢視
《使用者手冊》:
1. 將 HP Image Zone 軟體光碟插入您電腦的光碟機中。
2. 在 Windows 上:於光碟安裝畫面的主頁上按一下檢視
《使用者手冊》。
在 Macintosh 上: 於 HP Image Zone 軟體光碟的 docs 資
料夾中查看 readme (讀我)檔案。
其他協助
• 如需能協助您更有效使用相機的訣竅及工具,請造訪
www.hp.com/photosmart。
• HP 線上服務與支援提供完整的產品協助、診斷和驅動程
式下載。www.hp.com/support 網站每週 7 天,每天 24
小時恭候您的造訪,隨時提供必要的協助。
• 如需 HP Image Zone 軟體的說明資訊,請參閱 HP Image
Zone 線上手冊。
• 如需可引導您瞭解相機的常用功能並提供基本數位攝影
訣竅的互動式學習體驗 (英文版),請使用軟體光碟安
裝並執行《互動式使用者手冊》(Interactive User's Guide)
程式。
16
HP Photosmart E217/E317 快速入門指南
Page 19
Lee_Jackie_QSG.fm Page 1 Tuesday, March 29, 2005 4:20 PM
HP Photosmart
E217/E317
数码相机
快速入门指南
中文
1
Page 20

Lee_Jackie_QSG.fm Page 2 Tuesday, March 29, 2005 4:20 PM
法律声明
© Copyright 2005 Hewlett-Packard Development Company, L.P.
本文档所含信息如有更改,恕不另行通知。 HP 产品和服务的唯一保修说明
已在产品和服务附带的保修声明中明确给出。本文档所包含的任何信息都不
应理解为附加保证。对于本文档所含的任何技术、编辑错误或遗漏, HP 不
承担任何责任。
Windows® 是 Microsoft Corporation 在美国的注册商标。
SD 徽标是其所有者的注册商标。
对欧盟客户的重要回收信息:为保护环境,本产品在到达使用寿命后必须依
法回收。下面的图示表示本产品不能作为一般垃圾处理。请将本产品送交离
您最近的授权回收中心进行正确的回收 / 处理。有关返回和回收 HP 产品的
一般性详细信息,请访问:
www.hp.com/hpinfo/globalcitizenship/environment/
recycle/index.html
有关进一步的参考,请输入下列信息:
型号 (位于相机前面)
序列号 (相机底部的 10 个数字)
相机购买日期
中国印刷
2
HP Photosmart E217/E317 快速入门指南
Page 21
Lee_Jackie_QSG.fm Page 3 Tuesday, March 29, 2005 4:20 PM
1. 连接相机带
S 如图所示,将相机带套到相机侧面的相机带固定环上。
中文
3
Page 22

Lee_Jackie_QSG.fm Page 4 Tuesday, March 29, 2005 4:20 PM
2. 安装电池
1. 将相机侧面的电池 / 存储卡盖向相机前面滑动以打开
此盖。
2. 按照说明将电池插入盖内。
3. 将电池 / 存储卡盖向下推,并将盖向相机后面滑动直到
盖锁定,以合上此盖。
在相机中使用不同类型的 AA 电池时,可望达到以下性能:
碱性电池 (起动器电池) 80 到 130 次拍摄
锂电池 260 到 490 次拍摄
镍氢电池 (可充电)
如果使用镍氢 (可充电)电池,请确保在
安装到相机中之前完全充电。
110 到 280 次拍摄
4
HP Photosmart E217/E317 快速入门指南
Page 23

Lee_Jackie_QSG.fm Page 5 Tuesday, March 29, 2005 4:20 PM
3. 开启相机
S 要开启相机,滑开镜头盖直至其发出咔塔声,从而露出
镜头。相机后面的电源 / 存储器指示灯呈现稳定的绿色。
相机启动时, HP 徽标也将在图像显示屏上显示。
小心: 滑动镜头盖时,手指不要碰到镜头。镜头上的指印
会降低照片质量。
中文
5
Page 24

Lee_Jackie_QSG.fm Page 6 Tuesday, March 29, 2005 4:20 PM
4. 选择语言
首次开启相机时,会提示您选择语言。
1. 使用控制器 上的 按钮滚动到要选择的语言。
2. 按 按钮选择突出显示的语言。
6
HP Photosmart E217/E317 快速入门指南
Page 25

Lee_Jackie_QSG.fm Page 7 Tuesday, March 29, 2005 4:20 PM
5. 设置日期和时间
现在提示您设置日期和时间。
1. 第一个突出显示的项目是日期和时间格式。如果要更改
日期和时间格式,请使用 按钮。如果日期和时间
格式正确,则按 按钮移动到 “日期”。
2. 使用 按钮调整突出显示的选项的值。
3. 按 按钮移动到其他选项。
4. 重复步骤 2 和 3,直到日期和时间设置正确。
5. 输入正确的日期和时间后,按 按钮。出现确认屏
幕,询问设置的日期和时间是否正确。如果日期和时间
正确,按 按钮选择是。
中文
7
Page 26

Lee_Jackie_QSG.fm Page 8 Tuesday, March 29, 2005 4:20 PM
6. 安装并格式化存储卡
(可选)
本款相机具有一个内部存储器,可用来存储图像和视频剪
辑。但您也可以使用存储卡 (需单独购买)来存储图像和
视频剪辑。
1. 关闭相机,打开相机侧面的电池 / 存储卡盖。
2. 如图所示,将存储卡插入电池后面的小插槽中,使有缺
角的一边先插入。确保存储卡卡入到位。
3. 合上电池 / 存储卡盖,然后开启相机。
8
HP Photosmart E217/E317 快速入门指南
Page 27

Lee_Jackie_QSG.fm Page 9 Tuesday, March 29, 2005 4:20 PM
为了帮助防止存储卡和图像损坏,应在首次使用存储卡之
前进行格式化。格式化存储卡:
1. 按 按钮,然后使用 按钮移动到回放菜单 。
2. 按 按钮突出显示删除,然后按 按钮显示删除子
菜单。
3. 使用 按钮突出显示格式化存储卡,然后按 按钮
显示格式化存储卡确认屏幕。
4. 按 按钮突出显示是,然后按 按钮格式化存储卡。
相机格式化存储卡时,图像显示屏中显示正在格式化存
储卡 ...。相机完成格式化后,将显示全部图像摘要屏幕。
若要从相机中取出存储卡,请先关闭相机。然后打开电池 /
存储卡盖,向下按存储卡的顶边,存储卡将从插槽中弹出。
中文
9
Page 28

Lee_Jackie_QSG.fm Page 10 Tuesday, March 29, 2005 4:20 PM
7. 拍摄静止照片
1. 按实时查看 / 回放 按钮,直到实时查看 图
标出现在图像显示屏的左上角,然后在图像显示屏中对
拍摄对象取景。
2. 完全按下快门按钮以拍摄照片。拍摄照片后相机发出哔
声。图像将在图像显示屏中显示几秒钟。
提示: 按快门按钮时要双手握住相机以减少相机震动,从
而防止照片模糊。
10
HP Photosmart E217/E317 快速入门指南
Page 29

Lee_Jackie_QSG.fm Page 11 Tuesday, March 29, 2005 4:20 PM
8. 录制视频剪辑
1. 按实时查看 / 回放 按钮,直到实时查看 图
标出现在图像显示屏的左上角,然后在图像显示屏中对
拍摄对象取景。
2. 要开始录制视频,按下相机顶部的视频 按钮然后再
松开。
3. 要停止录制视频,再次按下视频 按钮后松开;否则
将继续录制视频,直到相机存储容量用完。
中文
11
Page 30

Lee_Jackie_QSG.fm Page 12 Tuesday, March 29, 2005 4:20 PM
9. 查看图像和视频剪辑
可以使用回放来查看图像和视频剪辑。
1. 按实时查看 / 回放 按钮,直到回放 图标出
现在图像显示屏的左上角。
2. 使用 按钮滚动查看图像和视频剪辑。
视频剪辑的第一帧显示 2 秒钟后,视频剪辑将自动播放。
12
HP Photosmart E217/E317 快速入门指南
Page 31

Lee_Jackie_QSG.fm Page 13 Tuesday, March 29, 2005 4:20 PM
10. 安装软件
您可以使用 HP Image Zone 软件从相机传输图像,然后查
看、编辑、打印或用电子邮件来发送这些图像。
如果您在安装或使用 HP Image Zone 软件方面遇到问题,请
访问 HP 客户支持网站了解详细信息:
www.hp.com/support。
Windows
要安装 HP Image Zone 软件,计算机的 RAM 至少为 64MB,
操作系统为 Windows 2000、 XP、 98、 98 SE 或 Me,浏览器
为 Internet Explorer 5.5 Service Pack 2 或更高。如果计算机符
合这些要求,则安装进程将安装完整版 HP Image Zone ;否
则,该进程将安装 HP Image Zone Express,其中缺少完整版
中包含的某些功能。
1. 关闭所有程序,并暂时禁用计算机上运行的防病毒软件。
2. 将 HP Image Zone 软件 CD 插入计算机的 CD 驱动器,并
按照屏幕上的说明操作。如果未显示安装窗口,请依次
单击开始、运行,键入 D:\Setup.exe (其中, D 是 CD
驱动器的盘符),然后单击确定。
13
中文
Page 32

Lee_Jackie_QSG.fm Page 14 Tuesday, March 29, 2005 4:20 PM
3. 安装完 HP Image Zone 软件后,重新启用在步骤 1 中禁
用的防病毒软件。
Macintosh
要成功安装 HP Image Zone 软件,您的 Macintosh 计算机必
须具有内置 USB、128 MB 物理 RAM、Mac OSX v10.2 或更
高版本以及 250 MB 磁盘空间。
1. 关闭所有程序,并暂时禁用计算机上运行的防病毒软件。
2. 将 HP Image Zone 软件 CD 插入计算机的 CD 驱动器中。
3. 双击计算机桌面上的 CD 图标。
4. 双击安装程序图标,然后按照屏幕上的说明操作。
5. 安装完 HP Image Zone 软件后,重新启用在步骤 1 中禁
用的防病毒软件。
14
HP Photosmart E217/E317 快速入门指南
Page 33

Lee_Jackie_QSG.fm Page 15 Tuesday, March 29, 2005 4:20 PM
11. 将图像传输到计算机
1. 关闭相机,然后使用随附的 USB 电缆将相机连接到计
算机。
2. 开启相机。
3. 按照屏幕上的说明,通过软件将图像从相机传输到计算机。
4. 断开相机与计算机的连接。
中文
15
Page 34

Lee_Jackie_QSG.fm Page 16 Tuesday, March 29, 2005 4:20 PM
获得帮助
查看 CD 上的用户手册
您的相机还有更多有价值的功能,这些在用户手册中进行了
详细介绍。这些功能包括:5 种拍摄模式、直接打印功能、
相机上的帮助、相机附件等。查看用户手册:
1. 将 HP Image Zone 软件 CD 插入计算机的 CD 驱动器中。
2. 在 Windows 上:单击 CD 安装屏幕主页上的 View
User's Manual (查看用户手册)。
在 Macintosh 上: 查看 HP Image Zone 软件 CD 的 docs
文件夹中的 readme 文件。
更多帮助
• 关于有助于更有效地使用相机的提示和工具,请访问
www.hp.com/photosmart。
• HP 在线服务和支持是您获得所有产品支持、故障诊断和
驱动程序下载的一站式资源。您可以在 www.hp.com/
support 网站获得每周 7 天、每天 24 小时的专业支持与
帮助。
• 有关 HP Image Zone 软件的帮助,请参见 HP Image Zone
联机手册。
• 有关英语版的交互式学习体验 (将指导您学习使用相机
的一些最常用的功能并提供一些基本的数码拍摄技巧),
请从软件 CD 安装并运行 Interactive User's Guide (交互
式用户指南)程序。
16
HP Photosmart E217/E317 快速入门指南
Page 35

Lee_Jackie_QSG.fm Page 1 Tuesday, March 29, 2005 4:45 PM
HP Photosmart
E217/E317
디지털 카메라
퀵 스타트 가이드
한국어
1
Page 36

Lee_Jackie_QSG.fm Page 2 Tuesday, March 29, 2005 4:45 PM
법적 고지 사항
© COPYRIGHT 2005 HEWLETT-PACKARD DEVELOPMENT COMPANY, L.P.
본 문서에 포함된 정보는 통지 없이 변경될 수 있습니다. HP 제품의 보증은 해
당 제품 및 서비스와 함께 제공되는 보증서에 명시된 내용에만 적용됩니다.
이하의 어떤 내용도 추가 보증을 구성할 수 없습니다. HP는 이에 포함된 기술
적 또는 편집상의 오류 및 누락 내용에 대하여 책임지지 않습니다.
WINDOWS®는 MICROSOFT CORPORATION의 등록상표입니다.
로고는 해당 소유자의 상표입니다.
SD
유럽 연합(EU) 고객을 위한 중요한 재활용 정보: 환경을 보호하기 위해 이 제
품은 수명이 다하면 법에 따라 재활용해야 합니다. 아래 기호는 이 제품을 일
반 쓰레기로 폐기할 수 없음을 표시합니다. 제품의 적절한 재생 및 처리를 위
해 가까운 공인 수거지로 반환하십시오. 일반적인 HP 제품의 반환 및 재활용
에 대한 자세한
www.hp.com/hpinfo/globalcitizenship/environment/recycle/index.html
이후에 참조할 수 있도록 다음 정보를 입력하십시오 .
모델 번호(카메라 앞면에 있음)
일련 번호(카메라 밑면에 있는 10자리 숫자)
카메라를 구입한 날짜
내용을 보려면 다음 사이트를 방문하십시오.
인쇄: 중국
2
HP Photosmart E217/E317 퀵 스타트 가이드
Page 37

Lee_Jackie_QSG.fm Page 3 Tuesday, March 29, 2005 4:45 PM
1. 손목끈 연결
p 손목끈을 그림과 같이 카메라 측면의 손목끈 연결부에 연
결합니다.
한국어
3
Page 38

Lee_Jackie_QSG.fm Page 4 Tuesday, March 29, 2005 4:45 PM
2. 배터리 장착
1. 카메라의 측면에 있는 덮개를 카메라 앞쪽으로 밀어 배터
리/메모리 카드 덮개를 엽니다.
2. 덮개 안쪽에 표시된 지침에 따라 배터리를 넣습니다.
3. 덮개를 아래로 누르고 걸쇠가 잠길 때까지 카메라 뒤쪽으
로 밀어 배터리/메모리 카드 덮개를 닫습니다.
카메라에 사용할 수 있는 서로 다른 유형의 AA 배터리 성능
은 각각 다음과 같습니다.
알카라인(스타터 배터리) 80 ~ 130매 촬영
리튬 260 ~ 490매 촬영
NiMH(충전용)
NiMH(충전용) 배터리를 사용하는 경우에는 완
전히 충전한 후에 카메라에 사용해야 합니다.
110 ~ 280매 촬영
4
HP Photosmart E217/E317 퀵 스타트 가이드
Page 39

Lee_Jackie_QSG.fm Page 5 Tuesday, March 29, 2005 4:45 PM
3. 카메라 전원 켜기
p 카메라의 전원을 켜려면 렌즈 덮개를 찰깍 소리가 날 때
까지 완전히 열어 렌즈를 노출시킵니다. 카메라 뒷면의
전원/메모리 표시등이 녹색으로 켜집니다. 카메라 전원
이 켜지면 이미지 디스플레이에 로고가 표시됩니다.
주의: 렌즈 덮개를 밀 때 손가락이 렌즈에 닿지 않도록 주의
하십시오. 렌즈에 지문이 묻으면 사진 품질이 떨어질 수
있습니다.
한국어
5
Page 40

Lee_Jackie_QSG.fm Page 6 Tuesday, March 29, 2005 4:45 PM
4. 언어 선택
카메라를 처음으로 켜면 언어를 선택하라는 메시지가 나타
납니다.
1. 컨트롤러 의 단추를 사용하여 원하는 언어로
스크롤합니다.
2. 단추를 눌러 강조 표시된 언어를 선택합니다.
6
HP Photosmart E217/E317 퀵 스타트 가이드
Page 41

Lee_Jackie_QSG.fm Page 7 Tuesday, March 29, 2005 4:45 PM
5. 날짜 및 시간 설정
날짜와 시간을 설정하라는 메시지가 나타납니다.
1. 강조 표시된 첫 번째 항목이 날짜 및 시간 형식입니다. 날
짜 및 시간 형식을 변경하려면 단추를 사용합니다.
날짜 및 시간 형식이 올바르면 단추를 눌러 날짜로 이
동합니다.
2. 단추를 사용하여 강조 표시된 선택 항목의 값을 조
정합니다.
3. 다른 선택 항목으로 이동하려면 단추를 누릅니다.
4. 날짜와 시간이 올바르게
반복합니다.
5. 올바른 날짜 및 시간 값을 입력한 다음 단추를 누릅
니다. 날짜와 시간을 올바르게 설정했는지 묻는 확인 화
면이 나타납니다. 날짜와 시간이 올바르게 설정되었으면
단추를 누르고 예를 선택합니다.
설정될 때까지 2단계와 3단계를
한국어
7
Page 42

Lee_Jackie_QSG.fm Page 8 Tuesday, March 29, 2005 4:45 PM
6. 메모리 카드(선택 사양)
설치 및 포맷
카메라에는 이미지 및 비디오 클립을 저장할 수 있는 메모리
가 내장되어 있습니다. 그러나 메모리 카드(별도 구입)를 사
용하여 이미지와 비디오 클립을 저장할 수도 있습니다.
1. 카메라의 전원을 끄고 카메라 측면에 있는 배터리/메모
리 카드 덮개를 엽니다.
2. 그림과 같이 카드의 금이 있는 쪽이 먼저 들어가도록 하
여 배터리 뒤의 작은 슬롯에 메모리 카드를 삽입합니다.
카드가 제대로 끼워졌는지 확인합니다.
메모리
3. 배터리/메모리 카드 덮개를 닫고 카메라의 전원을 켭니다.
8
HP Photosmart E217/E317 퀵 스타트 가이드
Page 43

Lee_Jackie_QSG.fm Page 9 Tuesday, March 29, 2005 4:45 PM
카드 및 이미지 손상을 예방하려면 메모리 카드를 처음 사용
하기 전에 포맷해야 합니다. 메모리 카드를 포맷하려면 다음
을 수행합니다.
1. 단추를 누른 다음 단추를 사용하여 재생 메
뉴 로 이동합니다.
2. 단추를 눌러 삭제를 강조 표시한 다음 단추를 눌
러 삭제 하위 메뉴를 표시합니다.
3. 단추를 눌러 카드 포맷을 강조 표시한 다음
를 눌러 카드 포맷 확인 화면을 표시합니다.
4. 단추를 눌러 예를 강조 표시한 다음 단추를 눌러
카드를 포맷합니다.
카메라에서 메모리 카드를 포맷하는 동안 이미지 디스플
레이에 카드 포맷 중...이 나타납니다. 포맷이 완료되면
전체 이미지 요약 화면이 표시됩니다.
카메라에서 메모리 카드를 제거하려면 먼저 카메라의 전원
을 끕니다. 그런 다음 배터리/메모리 카드
덮개를 열고 메모
리 카드의 위쪽 가장자리를 누르면 메모리 카드가 슬롯 밖으
로 튀어 나옵니다.
단추
한국어
9
Page 44

Lee_Jackie_QSG.fm Page 10 Tuesday, March 29, 2005 4:45 PM
7. 정지 사진 촬영
1. 이미지 디스플레이의 왼쪽 윗부분에 라이브 뷰 아이
콘이 나타날 때까지 라이브 뷰/재생 단추를 누른
다음 이미지 디스플레이에서 촬영 피사체의 구도를 잡습
니다.
2. 셔터 단추를 끝까지 눌러 사진을 촬영합니다. 사진을 촬
영하면 카메라에서 삑 소리가 납니다. 이미지가 몇 초 동
안 이미지 디스플레이에 나타납니다.
팁: 카메라의 흔들림을 줄이고 사진이 흐릿해지지 않도록
하려면 셔터
합니다.
단추를 누를 때 양손으로 카메라를 잡아야
10
HP Photosmart E217/E317 퀵 스타트 가이드
Page 45

Lee_Jackie_QSG.fm Page 11 Tuesday, March 29, 2005 4:45 PM
8. 비디오 클립 녹화
1. 이미지 디스플레이의 왼쪽 윗부분에 라이브 뷰 아이
콘이 나타날 때까지 라이브 뷰/재생 단추를 누
른 다음 이미지 디스플레이에서 촬영 피사체의 구도를 잡
습니다.
2. 비디오 녹화를 시작하려면 카메라 위쪽의 비디오
추를 눌렀다가 놓습니다.
3. 비디오 녹화를 중지하려면 비디오
다가 놓습니다. 그렇지 않으면 카메라의 메모리가 꽉 찰
때까지 비디오 녹화가 계속됩니다.
단추를 다시 눌렀
단
한국어
11
Page 46

Lee_Jackie_QSG.fm Page 12 Tuesday, March 29, 2005 4:45 PM
9. 이미지 및 비디오 클립
확인
재생을 사용하여 이미지와 비디오 클립을 확인할 수 있습니다.
1. 이미지 디스플레이의 왼쪽 위 모서리에 재생 아이콘이
표시될 때까지 라이브 뷰/재생 단추를 누릅니다.
2. 단추를 사용하여 이미지와 비디오 클립을 스크롤합
니다.
2초 동안 첫 번째 프레임이 표시된 후 비디오 클립이 자동
으로 재생됩니다.
12
HP Photosmart E217/E317 퀵 스타트 가이드
Page 47

Lee_Jackie_QSG.fm Page 13 Tuesday, March 29, 2005 4:45 PM
10. 소프트웨어 설치
HP Image Zone 소프트웨어를 사용하면 카메라의 이미지를
전송한 다음 보고, 편집하고, 인쇄하거나 이메일로 보낼 수
있습니다.
HP IMAGE ZONE 소프트웨어의 설치 또는 사용에 문제가
있는 경우에는 HP 고객으뜸지원센터 웹 사이트
WWW.HP.COM/SUPPORT에서 자세한 내용을 참조하십시오.
Windows
한국어
HP IMAGE ZONE 소프트웨어를 설치하려면 컴퓨터 사양은
최소 64MB RAM, WINDOWS 2000, XP, 98, 98 SE 또는 ME
그리고 INTERNET EXPLORER 5.5 서비스 팩 2 이상이어야
합니다. 이러한 요구 사항에 맞는 컴퓨터의 경우에는 설치
과정에서 HP Image Zone 정품이 설치되고 그렇지 않은 경우
에는 정품에 포함된 일부 기능이 없는 HP Image Zone
Express가 설치됩니다.
1. 모든 프로그램을 닫고 컴퓨터에서 실행 중인 모든 바이러
스 백신 소프트웨어를 잠시 해제합니다.
13
Page 48

Lee_Jackie_QSG.fm Page 14 Tuesday, March 29, 2005 4:45 PM
2. 컴퓨터의 CD 드라이브에 HP IMAGE ZONE 소프트웨어
CD를 넣고 화면에 나타나는 지침대로 수행합니다. 설치
화면이 나타나지 않으면 시작, 실행을 차례로 누르고
D:\SETUP.EXE(여기서 D는 CD 드라이브 문자)를 입력한
후 확인을 누릅니다.
3. HP IMAGE ZONE 소프트웨어 설치가 끝나면 1단계에서
해제한 바이러스 백신 소프트웨어를 다시 활성화합니다.
Macintosh
MACINTOSH 컴퓨터에 HP Image Zone 소프트웨어를 제대
로 설치하려면 내장 USB, 128MB RAM, Mac OSX v10.2 이상
그리고 250MB의 디스크 공간이 필요합니다.
1. 모든 프로그램을 닫고 컴퓨터에서 실행 중인 모든 바이러
스 백신 소프트웨어를 잠시 해제합니다.
2. 컴퓨터의 CD 드라이브에 HP IMAGE ZONE 소프트웨어
CD를 넣습니다.
3. 컴퓨터 바탕 화면에서 CD 아이콘을 두 번 누릅니다.
4. 설치 관리자 아이콘을 두 번 누른 다음 화면에 표시되는
지침에 따릅니다.
HP IMAGE ZONE 소프트웨어 설치가 끝나면 1단계에서
5.
해제한 바이러스 예방 소프트웨어를 다시 활성화합니다.
14
HP Photosmart E217/E317 퀵 스타트 가이드
Page 49

Lee_Jackie_QSG.fm Page 15 Tuesday, March 29, 2005 4:45 PM
11. 컴퓨터로 이미지 전송
1. 카메라의 전원을 끄고 제공된 USB 케이블을 사용하여 카
메라를 컴퓨터에 연결합니다.
2. 카메라를 켭니다.
3. 화면에 표시되는 지침에 따라 카메라의 이미지를 컴퓨터
로 전송합니다.
4. 컴퓨터에서 카메라를 분리합니다.
한국어
15
Page 50

Lee_Jackie_QSG.fm Page 16 Tuesday, March 29, 2005 4:45 PM
고객 지원
CD에서 사용 설명서 보기
이 카메라에는 사용 설명서에 자세히 설명되어 있는 많은 유
용한 기능이 있습니다. 이러한 기능에는 5가지 촬영 모드, 직
접 인쇄 기능, 카메라 화면 도움말, 카메라 부속품 등이 포함
됩니다. 사용 설명서를 보려면 다음을 수행합니다.
1. 컴퓨터의 CD 드라이브에 HP IMAGE ZONE 소프트웨어
CD를 넣습니다.
2. Windows: CD 설치 화면의 시작 페이지에서 사용 설명서
보기를 클릭합니다.
MACINTOSH: HP Image Zone 소프트웨어 CD의
더에서 readme 파일을 확인합니다.
추가 지원
• 카메라를 보다 효율적으로 사용하기 위한 팁과 도구를 보
려면 www.hp.com/photosmart를 방문하십시오.
• HP 온라인 서비스 및 지원에서는 모든 제품 지원, 진단 및 드
라이버 다운로드를 모두 수행할 수 있습니다. www.hp.com/
support에서 연중 무휴로 지원을 받을 수 있습니다.
• HP Image Zone 소프트웨어 도움말은 HP Image Zone 온라
인 설명서를 참조하십시오.
• 가장 많이 사용되는 카메라 기능을 안내하고 기본적인 디
지털 사진 팁을 제공하는 대화형 학습(영문)을 체험하려
면 소프트웨어 CD에서 대화형 사용 가이드 프로그램을
설치하고 실행하십시오.
docs 폴
16
HP Photosmart E217/E317 퀵 스타트 가이드
Page 51

Lee_Jackie_QSG_e_4.fm Page 1 Tuesday, March 29, 2005 3:57 PM
HP Photosmart
E217/E317
Digital Camera
Quick Start Guide
1
English
Page 52

Lee_Jackie_QSG_e_4.fm Page 2 Tuesday, March 29, 2005 3:57 PM
Legal Notices
© Copyright 2005 Hewlett-Packard Development Company, L.P.
The information contained herein is subject to change without notice. The only
warranties for HP products and services are set forth in the express warranty
statements accompanying such products and services. Nothing herein should
be construed as constituting an additional warranty. HP shall not be liable for
technical or editorial errors or omissions contained herein.
Windows® is a U.S. registered trademark of Microsoft Corporation.
SD logo is a trademark of its proprietor.
Important recycling information for our customers in the European Union: To
preserve the environment, this product must be recycled after its useful life as
required by law. The symbol below indicates that this product may not be
disposed in the general trash. Please return the product for proper recovery/
disposal to the authorized collection location nearest to you. For more
information regarding return and recycling of HP products generally, please
visit:
www.hp.com/hpinfo/globalcitizenship/environment/recycle/index.html
For future reference, please enter the following information:
Model Number (on the front of the camera)
Serial Number (10-digit number on the
bottom of the camera)
Date the camera was purchased
Printed in China
2
HP Photosmart E217/E317 Quick Start Guide
Page 53

Lee_Jackie_QSG_e_4.fm Page 3 Tuesday, March 29, 2005 3:57 PM
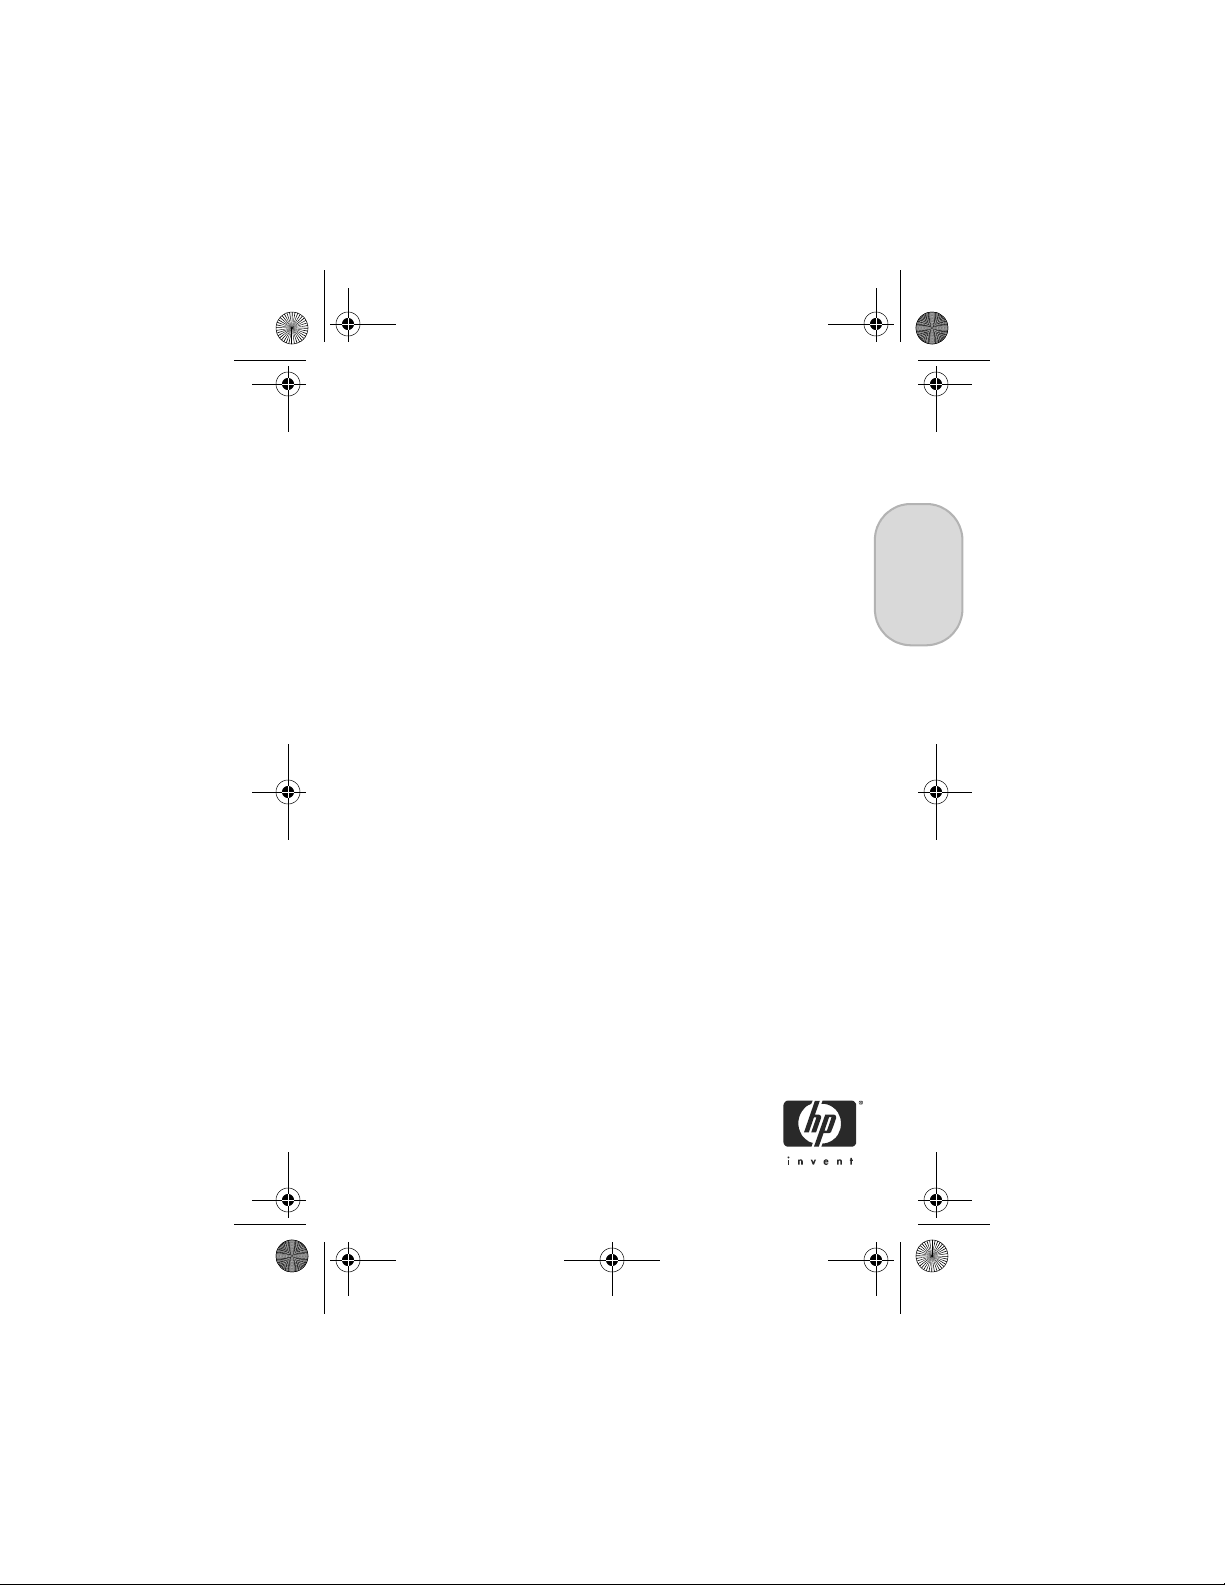
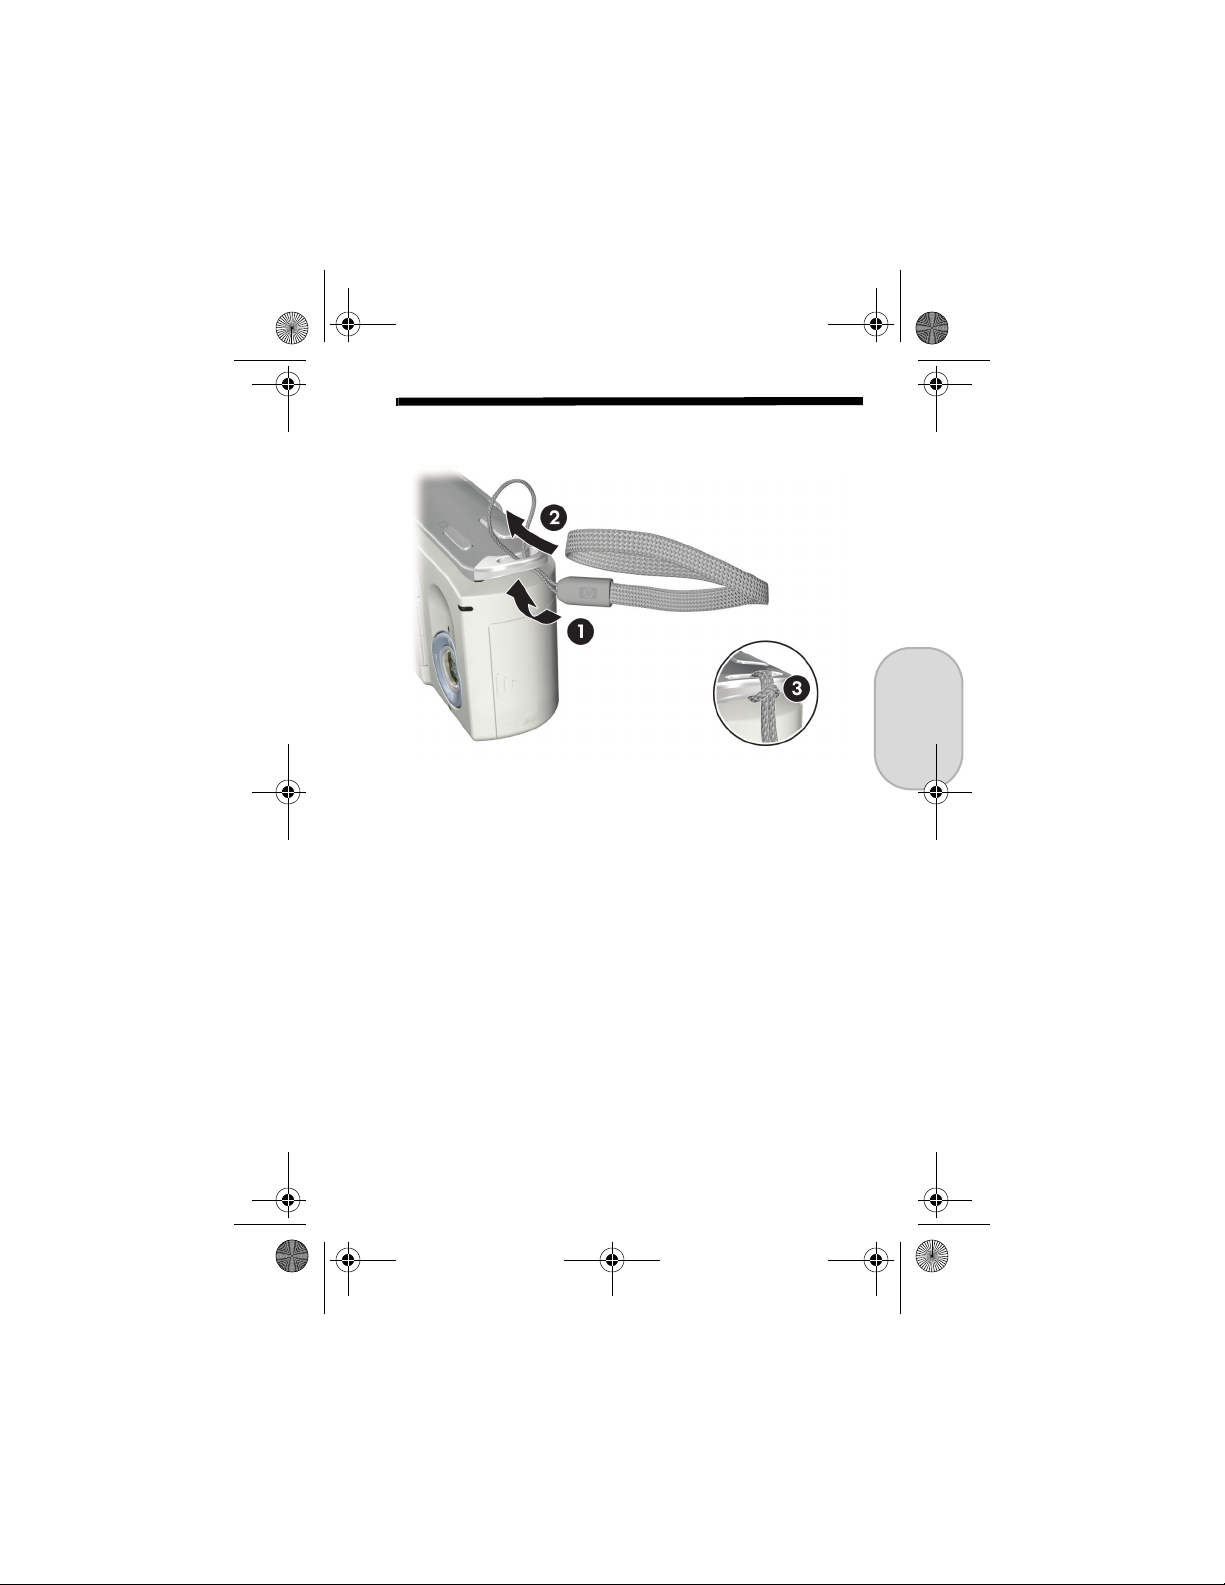
1. Attach the Wrist Strap
S Attach the wrist strap to the wrist strap mount on the side
of the camera as shown.
3
English
Page 54

Lee_Jackie_QSG_e_4.fm Page 4 Tuesday, March 29, 2005 3:57 PM
2. Install the Batteries
1. Open the Battery/Memory card door on the side of the
camera by sliding the door toward the front of the
camera.
2. Insert the batteries as indicated inside the door.
3. Close the Battery/Memory card door by pushing the
door down and sliding the door toward the back of the
camera until the door latches.
You can expect performance similar to the following from the
different types of AA batteries that work in your camera:
Alkaline (Starter Batteries) 80 to 130 shots
Lithium 260 to 490 shots
NiMH (1800)
If you use NiMH (rechargeable) batteries, be
sure that you fully charge them before using them
in the camera.
110 to 280 shots
4
HP Photosmart E217/E317 Quick Start Guide
Page 55

Lee_Jackie_QSG_e_4.fm Page 5 Tuesday, March 29, 2005 3:57 PM
3. Turn On the Camera
S To turn the camera on, slide the lens cover open until it
clicks, uncovering the lens. The Power/Memory light on
the back of the camera turns on solid green. The HP logo
also displays on the Image Display as the camera powers
up.
CAUTION: When sliding the lens cover, keep your fingers
clear of the lens. Fingerprints on the lens can impair the
quality of the picture.
5
English
Page 56

Lee_Jackie_QSG_e_4.fm Page 6 Tuesday, March 29, 2005 3:57 PM
4. Choose the Language
The first time you turn the camera on, you are prompted to
choose a language.
1. Scroll to the language that you want by using the
buttons on the Controller .
2. Press the button to select the highlighted language.
6
HP Photosmart E217/E317 Quick Start Guide
Page 57

Lee_Jackie_QSG_e_4.fm Page 7 Tuesday, March 29, 2005 3:57 PM
5. Set the Date and Time
You are now prompted to set the date and time.
1. The first item highlighted is the date and time format. If
you want to change the date and time format, use the
buttons. If the date and time format is correct, press
the button to move to the Date.
2. Adjust the value of the highlighted selection by using the
buttons.
3. Press the buttons to move to the other selections.
4. Repeat Steps 2 and 3 until the date and time are set
correctly.
5. Press the button when you have entered the proper
values for the date and time. A confirmation screen
appears, asking if the correct date and time have been
set. If the date and time are correct, press the button
to select Yes.
English
7
Page 58

Lee_Jackie_QSG_e_4.fm Page 8 Tuesday, March 29, 2005 3:57 PM
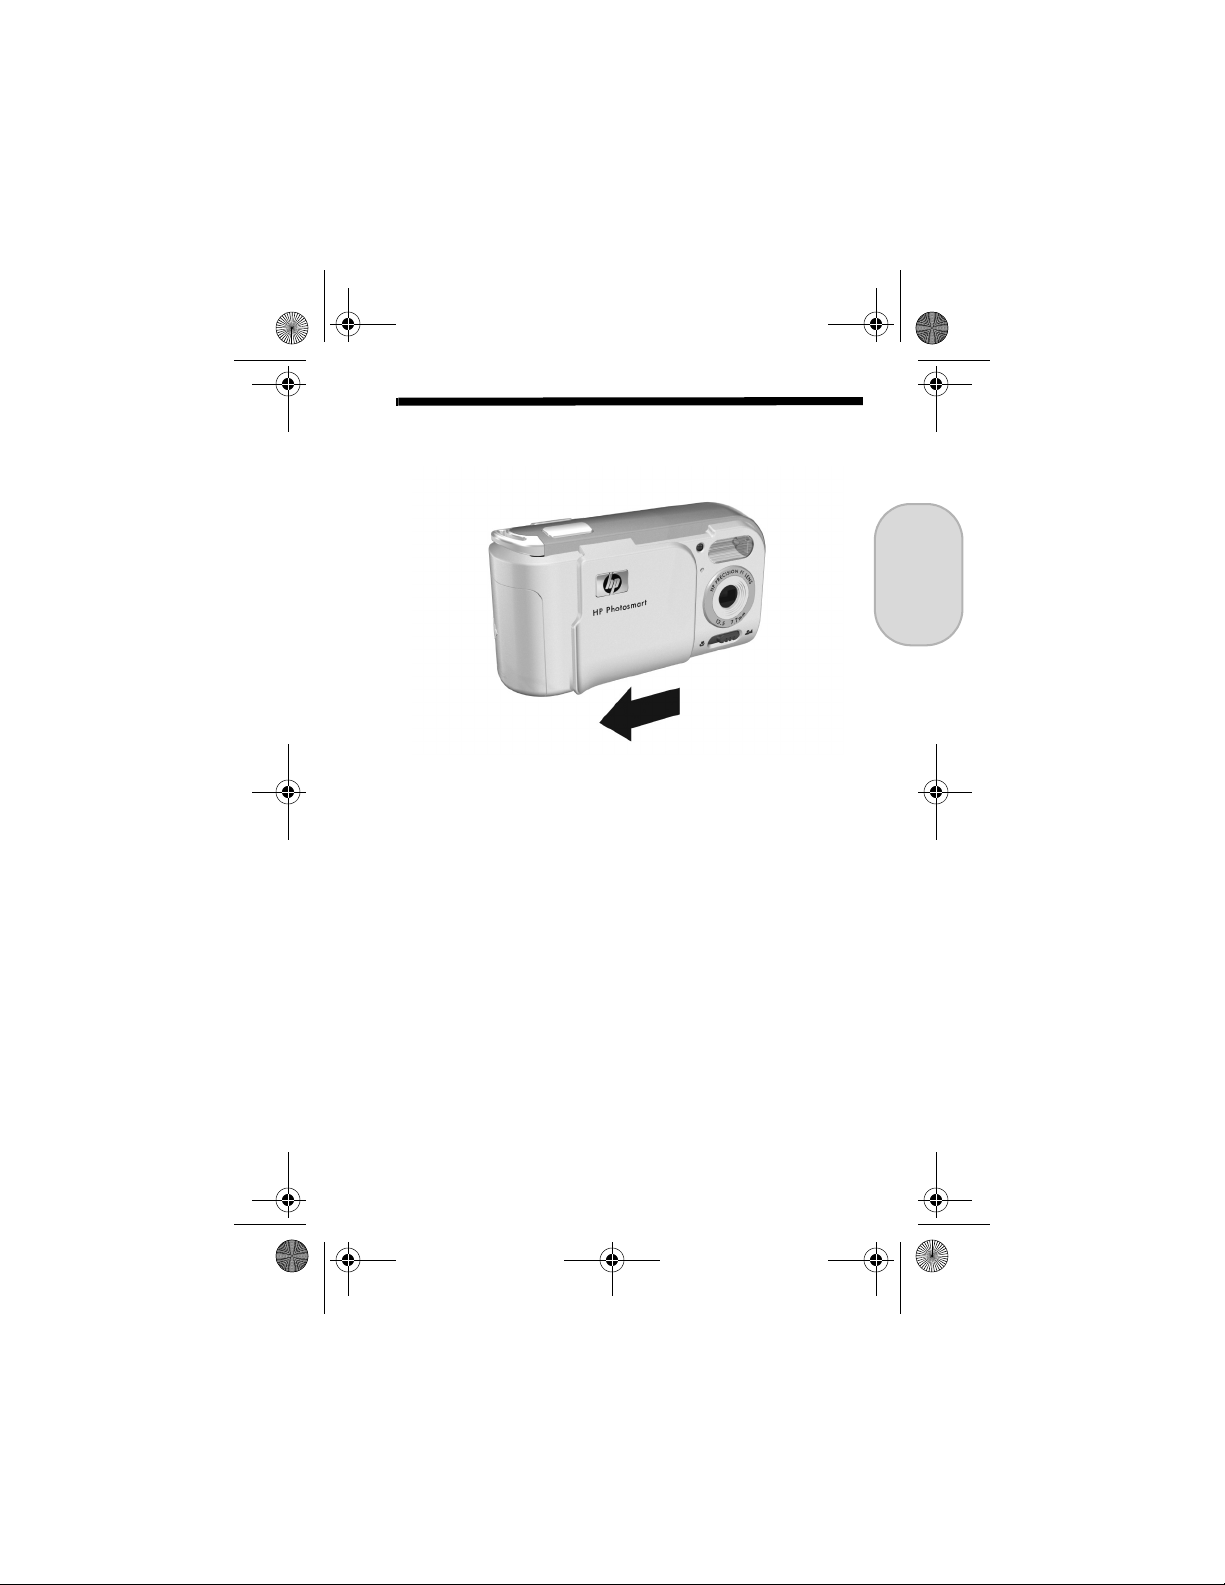
6. Install and Format a
Memory Card (Optional)
Your camera contains internal memory that allows you to
store images and video clips. However, you can use a
memory card (purchased separately) instead to store images
and video clips.
1. Turn off the camera and open the Battery/Memory card
door on the side of the camera.
2. Insert the memory card in the small slot behind the
batteries, with the notched side of the card going in first,
as shown. Make sure the memory card snaps into place.
3. Close the Battery/Memory card door and turn on the
camera.
8
HP Photosmart E217/E317 Quick Start Guide
Page 59

Lee_Jackie_QSG_e_4.fm Page 9 Tuesday, March 29, 2005 3:57 PM
To help prevent corrupted cards and images, you should
format memory cards before you use them for the first time.
To format the memory card:
1. Press the button, then use the button to move to the
Playback Menu .
2. Press the button to highlight Delete, and then press the
button to display the Delete sub-menu.
3. Use the button to highlight Format Card, and then
press the button to display the Format Card
confirmation screen.
4. Press the button to highlight Yes, and then press the
button to format the card.
Formatting Card... appears in the Image Display while
the camera is formatting the memory card. When the
camera has completed the formatting, the Total Images
Summary screen is displayed.
To remove the memory card from the camera, first turn the
camera off. Then open the Battery/Memory card door, press
down on the top edge of the memory card, and it will spring
outward from the slot.
9
English
Page 60

Lee_Jackie_QSG_e_4.fm Page 10 Tuesday, March 29, 2005 3:57 PM
7. Take a Still Picture
1. Press the Live View/Playback button until the Live
View icon appears in the upper left corner of the
Image Display, then frame the subject for your picture in
the Image Display.
2. Press the Shutter button all the way down to take the
picture. The camera beeps after taking the picture. The
image appears for several seconds on the Image Display.
TIP: Hold the camera with both hands when pressing the
Shutter button to reduce camera shake and prevent blurry
pictures.
10
HP Photosmart E217/E317 Quick Start Guide
Page 61

Lee_Jackie_QSG_e_4.fm Page 11 Tuesday, March 29, 2005 3:57 PM
8. Record a Video Clip
1. Press the Live View/Playback button until the
Live View icon appears in the upper left corner of the
Image Display, then frame the subject for your picture in
the Image Display.
2. To start recording video, press and release the Video
button on the top of the camera.
3. To stop recording video, press and release the Video
button again; otherwise, the video will continue recording
until the camera runs out of memory.
11
English
Page 62

Lee_Jackie_QSG_e_4.fm Page 12 Tuesday, March 29, 2005 3:57 PM
9. Review Images and
Video Clips
You will use Playback to review images and video clips.
1. Press the Live View/Playback button until the
Playback icon appears in the upper left corner of the
Image Display.
2. Use the buttons to scroll through your images and
video clips.
Video clips play automatically after the first frame of the
video clip displays for 2 seconds.
12
HP Photosmart E217/E317 Quick Start Guide
Page 63

Lee_Jackie_QSG_e_4.fm Page 13 Tuesday, March 29, 2005 3:57 PM
10. Install the Software
The HP Image Zone software allows you to transfer images
from the camera, and then view, edit, print, or e-mail them.
If you have trouble installing or using the HP Image Zone
software, see the HP Customer Support website for more
information: www.hp.com/support.
Windows
To install the HP Image Zone software, your computer must
have a minimum of 64MB of RAM, Windows 2000, XP, 98,
98 SE, or Me, and Internet Explorer 5.5 Service Pack 2 or
higher. If your computer meets these requirements, the
installation process installs the full version of HP Image Zone;
if not, the process installs the HP Image Zone Express, which
lacks some features contained in the full version.
1. Close all programs and temporarily disable any virus
protection software running on your computer.
2. Insert the HP Image Zone software CD into the CD Drive
of your computer and follow the on-screen instructions. If
13
English
Page 64

Lee_Jackie_QSG_e_4.fm Page 14 Tuesday, March 29, 2005 3:57 PM
the installation window does not appear, click Start, click
Run, type D:\Setup.exe, where D
is the letter of your CD
drive, then click OK.
3. When the HP Image Zone software has finished
installing, re-enable any virus protection software that you
disabled in Step 1.
Macintosh
To install the HP Image Zone software successfully, your
Macintosh computer must have built-in USB, 128 MB of
physical RAM, Mac OSX v10.2 or later, and 250 MB of disk
space.
1. Close all programs and temporarily disable any virus
protection software running on your computer.
2. Insert the HP Image Zone software CD into the CD drive
of your computer.
3. Double-click the CD icon on the computer desktop.
4. Double-click the installer icon, and then follow the on-
screen instructions.
5. When the HP Image Zone software has finished
installing, re-enable the virus protection software that you
disabled in Step 1.
14
HP Photosmart E217/E317 Quick Start Guide
Page 65

Lee_Jackie_QSG_e_4.fm Page 15 Tuesday, March 29, 2005 3:57 PM
11. Transfer Images to a
Computer
1. Turn off the camera, then connect the camera to the
computer through the USB cable provided.
2. Turn on the camera.
3. Follow the on-screen instructions to have the software
transfer the images from the camera to the computer.
4. Disconnect the camera from the computer.
15
English
Page 66

Lee_Jackie_QSG_e_4.fm Page 16 Tuesday, March 29, 2005 3:57 PM
Getting Assistance
View the User’s Manual on CD
Your camera has many more valuable features that are
covered in detail in the User's Manual. These features
include 5 shooting modes, direct printing capability, oncamera Help, camera accessories, and much more. To view
the User’s Manual:
1. Insert the HP Image Zone software CD into the CD drive
of your computer.
2. On Windows: Click View User’s Manual on the Main
page of the CD installation screen.
On Macintosh: Look in the readme file in the docs folder
of the HP Image Zone software CD.
Additional Assistance
• For tips and tools to help you use your camera more
effectively, visit www.hp.com/photosmart.
• HP online service and support is your one stop source for
all product assistance, diagnostics, and driver
downloads. Get award winning assistance 24x7 at
www.hp.com/support.
• For help with the HP Image Zone software, see the
HP Image Zone online manual.
• For an interactive learning experience (in English) that will
guide you through the most-used features of your camera
and provide basic digital photography tips, please install
and run the Interactive User's Guide program from your
software CD.
16
HP Photosmart E217/E317 Quick Start Guide
Page 67

TahitiUM.book Page 4 Sunday, January 4, 2004 2:47 PM
Page 68

© 2005 Hewlett-Packard Development Company, L.P.
Printed in China
www.hp.com
L2045-90104
 Loading...