

Page 1
Service Manual
HP OmniBook 2000, 5500, and 5700
Page 2

Notice
In a continuing effort to improve the quality of our products,
technical and environmental information in this document is
subject to change without notice.
Hewlett-Packard makes no warranty of any kind with regard to
this material, including, but not limited to, the implied warranties
of merchantability and fitness for a particular purpose. HewlettPackard shall not be liable for errors contained herein or for
incidental or consequential damages in connection with the
furnishing, performance, or use of this material.
Hewlett-Packard assumes no responsibility for the use or
reliability of its software on equipment that is not furnished by
Hewlett-Packard.
As an ENERGY STAR partner, HP has determined that these
products meet the ENERGY STAR guidelines for energy
efficiency.
All Certifications may not be completed at product introduction.
Please check with your HP reseller for certification status.
This equipment is subject to FCC rules. It will comply with the
appropriate FCC rules before final delivery to the buyer.
ENERGY STAR is a service mark of the U.S. Environmental
Protection Agency. IBM and OS/2 are registered trademarks
and TrackPoint is a trademark of International Business
Machines Corporation. Pentium and the Intel Inside logo are
registered trademarks and MMX is a trademark of Intel
Corporation. Photo CD is a registered trademark of Kodak
Corporation. Microsoft, MS-DOS, and Windows are registered
trademarks, and the Genuine Microsoft Products logo is a
trademark of Microsoft Corporation in the United States of
America and in other countries. Sound Blaster is a trademark of
Creative Technology Ltd.
Hewlett-Packard Company 1997.
All Rights Reserved. Reproduction, adaptation, or translation
without prior written permission is prohibited except as allowed
under copyright laws.
Printed in U.S.A.
5965-0262
Page 3

Table of Contents
List of Figures............................................................................................................................. iv
List of Tables............................................................................................................................... v
Introduction ................................................................................................................................ vi
Product Overview........................................................................................................................ 9
What’s New ...........................................................................................................................10
Product Features ................................................................................................................... 11
Product at a Glance...............................................................................................................14
Product Comparisons............................................................................................................. 19
Troubleshooting......................................................................................................................... 25
Power-On Self-Test ............................................................................................................... 26
Beep Codes........................................................................................................................ 26
Display Codes ....................................................................................................................27
OmniBook Diagnostics...........................................................................................................29
Running diagnostics ........................................................................................................... 29
User Interface.....................................................................................................................30
Special test hardware requirements....................................................................................31
Loop Back Connectors........................................................................................................32
Details on Individual Diagnostic Tests ................................................................................33
Test All ........................................................................................................................... 33
Display - (DISP.COM).....................................................................................................33
CPU - (CPU.EXE)...........................................................................................................34
RAM - (RAM.COM)......................................................................................................... 34
ROM - (ROM.EXE) ......................................................................................................... 34
PCMCIA - (PCMCIA.COM) .............................................................................................35
Internal IR - (FIRTEST.EXE)...........................................................................................35
Full 2 Unit IR Test - (FIRTEST.EXE)...............................................................................36
RS-232 Port - (RS232.COM)...........................................................................................37
Printer Port - (LPT.COM) ................................................................................................38
Hard Disk - (HDC.EXE)................................................................................................... 38
Floppy Disk - (FDC.EXE) ................................................................................................39
Battery - (BATTERY.EXE) ..............................................................................................39
Audio - (AUDIO.EXE)......................................................................................................39
Microphone - (MIKE.EXE)............................................................................................... 40
Joystick - (JOYSTICK.EXE)............................................................................................40
Icon LCD - (ICON.EXE) ..................................................................................................41
Keyboard - (KEYBD.EXE)...............................................................................................41
Pointing Device - (MOUSE.EXE) .................................................................................... 42
CD-ROM - (CDROM.EXE)..............................................................................................42
SCSI - (SCSI.EXE) ......................................................................................................... 43
Fan - (FAN.EXE).............................................................................................................43
Desktop Management Interface (DMI).................................................................................... 45
Description of DMI ..............................................................................................................45
Contents of the DMI Package.............................................................................................45
System Configuration Utility ...................................................................................................48
Main Configuration Screen.................................................................................................48
System Menu .....................................................................................................................49
Passwords Menu ................................................................................................................50
Disks Menu.........................................................................................................................51
Input/Output Menu..............................................................................................................52
Power Menu.......................................................................................................................54
Exit Menu........................................................................................................................... 56
Troubleshooting Tips..............................................................................................................57
Hardware Repair ....................................................................................................................... 63
ii
Page 4

Battery (End User Replaceable).............................................................................................64
Memory (End User Replaceable) ...........................................................................................65
Hard Disk Drive (End User Replaceable) .............................................................................. 67
Floppy Disk Drive (End User Replaceable) ............................................................................ 69
Small Parts (End User Replaceable)...................................................................................... 70
Expansion Door - F1125-60920..........................................................................................70
Display Contrast/Brightness Slider Button - F1371-60917................................................... 70
Door, Flash BIOS - F1371-60901 .......................................................................................70
Hard Drive Security Cover - F1320-40001.......................................................................... 70
I/O Door - F1350-60910 (OB2000 & OB5700), F1320-60928 (OB5500 only) ...................... 70
Memory Cover - F1320-60927 ............................................................................................70
PCMCIA Button Assembly - F1320-60949..........................................................................70
Plastic Feet - F1320-60929.................................................................................................70
Printer Port Door - F1125-60918......................................................................................... 70
Rubber Feet - F1320-60957................................................................................................70
Trackpoint Cap - F1320-60971.........................................................................................70
Display (HP Authorized Service Providers Only)....................................................................71
Display Labels....................................................................................................................74
Keyboard (HP Authorized Service Providers Only) ................................................................76
Icon Board (PCA PB-ICON) (HP Authorized Service Providers Only) .................................... 79
CPU Module (HP Authorized Service Providers Only)............................................................82
Logic PCA Board (PCA PB-586/IO Bracket) (HP Authorized Service Providers Only)............85
Programmable Flash BIOS IC (HP Authorized Service Providers Only).................................89
Video Memory (OB2000 & OB5700 Only) (HP Authorized Service Providers Only) ...............91
Other Components and Accessories (HP Authorized Service Providers Only)........................93
Appendix A - Technical Specifications .......................................................................................95
Mass Storage Specifications..................................................................................................95
Hard Disk Drive..................................................................................................................95
Floppy Disk Drive...............................................................................................................96
CD-ROM Drive................................................................................................................... 96
System Resources................................................................................................................. 97
System Interrupts ...............................................................................................................97
System Memory .................................................................................................................98
System Input/Output Addresses..........................................................................................98
DMA Channels ...................................................................................................................99
Appendix B - Hewlett-Packard Password Removal Policy........................................................ 100
Appendix C - Hewlett-Packard TFT Display Quality Statement................................................ 102
Appendix D - Assembly Sub-Component Breakout..................................................................103
Appendix E - Part Numbers.....................................................................................................111
iii
Page 5

List of Figures
Figure 1 - OmniBook 2000 and 5700 External Features ............................................................11
Figure 2 - OmniBook 2000 and 5700 External Features - continued..........................................12
Figure 3 - OmniBook 5500 External Features............................................................................13
Figure 4 - OmniBook 5500 External Features - continued.......................................................... 13
Figure 5 - OmniBook 2000, 5500, and 5700 Center Bay Modules..............................................14
Figure 6 - OmniBook 2000 and 5700 Exploded Diagram...........................................................15
Figure 7 - OmniBook 5500 Exploded Diagram........................................................................... 17
Figure 8 - Diagnostics User Interface.........................................................................................30
Figure 9 - Serial Loop Back Connector......................................................................................32
Figure 10 - Parallel Loop Back Connector .................................................................................32
Figure 11 - DMI Components.....................................................................................................46
Figure 12 - Main Configuration Screen......................................................................................48
Figure 13 - System Menu Screen ..............................................................................................49
Figure 14 - Passwords Menu Screen .........................................................................................50
Figure 15 - Disks Menu Screen..................................................................................................51
Figure 16 - Input/Output Menu Screen.......................................................................................52
Figure 17 - Power Menu Screen................................................................................................54
Figure 18 - Exit Menu Screen.................................................................................................... 56
Figure 19 - Removing the Battery ..............................................................................................64
Figure 20 - Removing Memory..................................................................................................65
Figure 21 - Removing the Hard Disk Drive ................................................................................67
Figure 22 - Hard Drive Case ......................................................................................................68
Figure 23 - Removing the Hard Drive Plastic Kit........................................................................68
Figure 24 - Removing the Floppy Disk Drive .............................................................................69
Figure 25 - Display Screws........................................................................................................ 72
Figure 26 - Icon Assembly Removal.......................................................................................... 72
Figure 27 - Display Cables ........................................................................................................73
Figure 28 - Display Flex Cable Position..................................................................................... 73
Figure 29 - 10.4" Display Label Placements ..............................................................................74
Figure 30 - 11.3" Display Label Placements ..............................................................................75
Figure 31 - 12.1" Display Label Placements ..............................................................................75
Figure 32 - Palmrest Assembly Removal...................................................................................76
Figure 33 - Keyboard Screws.....................................................................................................77
Figure 34 - Keyboard Removal ..................................................................................................78
Figure 35 - Upper Chassis Case Removal.................................................................................80
Figure 36 - Icon Board Removal ................................................................................................81
Figure 37 - CPU and CPU Fan Removal (OB2000 & OB5700 only)........................................... 83
Figure 38 - CPU and Heat Spreader Removal (OB5500 only) ...................................................84
Figure 39 - Additional Screw for Logic PCA Removal................................................................ 86
Figure 40 - Keyboard Shielding Plate Removal ......................................................................... 87
Figure 41 - Logic PCA Board Removal......................................................................................88
Figure 42 - Flash BIOS Door Removal......................................................................................89
Figure 43 - Flash BIOS IC Removal..........................................................................................90
Figure 44 - Replacing the Flash BIOS IC...................................................................................90
Figure 45 - Video Memory Removal..........................................................................................91
iv
Page 6

List of Tables
Table 1 - Additional Resources................................................................................................... vi
Table 2 - OmniBook 2000 and 5700 Parts Identification ............................................................16
Table 3 - OmniBook 5500 Parts Identification............................................................................18
Table 4 - POST Beep Codes.....................................................................................................26
Table 5 - POST Display Codes ..................................................................................................27
Table 6 - Dianostic Interface Available Keystrokes....................................................................31
Table 7 - Diagnostic Tests that Require Special Hardware......................................................... 31
Table 8 - System Menu Settings ................................................................................................49
Table 9 - Password Menu Settings ............................................................................................51
Table 10 - Disks Menu Settings.................................................................................................52
Table 11 - Input/Output Menu Settings ......................................................................................53
Table 12 - Power Menu Settings ................................................................................................54
Table 13 - Exit Menu Settings....................................................................................................56
Table 14 - OmniBook Troubleshooting Tips...............................................................................57
Table 15 - Battery Compatibility Matrix ......................................................................................64
Table 16 - Memory Compatibility Matrix....................................................................................65
Table 17 - Hard Drive Availability Matrix ................................................................................... 67
Table 18 - Display Compatibility Matrix .....................................................................................71
Table 19 - Display Label Compatibility Matrix............................................................................ 74
Table 20 - Icon Board Compatibility Matrix................................................................................79
Table 21 - CPU Module Compatibility Matrix.............................................................................82
Table 22 - Logic PCA Compatibility Matrix ................................................................................ 86
Table 23 - Other Repairable Components and Accessories.......................................................93
Table 24 - Hard Disk Drive Specifications..................................................................................95
Table 25 - Floppy Disk Drive Specifications...............................................................................96
Table 26 - CD-ROM Drive Specifications ..................................................................................96
Table 27 - System Interrupts for the OmniBook 2000 and 5700................................................. 97
Table 28 - System Interrupts for the OmniBook 5500 ................................................................ 97
Table 29 - System Memory Map for the OmniBook 2000 and 5700...........................................98
Table 30 - System Memory Map for the OmniBook 5500........................................................... 98
Table 31 - System I/O Addresses for the OmniBook 2000 and 5700..........................................98
Table 32 - System I/O Addresses for the OmniBook 5500.........................................................99
Table 33 - DMA Channels for the OmniBook 2000 and 5700..................................................... 99
Table 34 - DMA Channels for the OmniBook 5500 .................................................................... 99
v
Page 7

Introduction
This document provides reference information for the HP OmniBook 2000, 5500, and 5700. It is
intended to be used by HP-qualified service personnel to help with the installation, servicing, and
repair of these HP OmniBook PCs.
It is a self-paced guide designed to train you to install, configure, and repair the OmniBook
Notebook PC. You can follow it without having any equipment available.
The following table lists additional sources where supplementary information can be obtained.
Table 1 - Additional Resources
Resource Number/Address Comments
HP External Web http://www.hp.com/go/omnibookNo usage restriction
(http://www2.hp.com/go/omniboo
k provides a European mirror)
HP-MCD Internal Web http://webmcd.cv.hp.com Restricted to HP intranet access
only
America Online Keyword: HP Call (800) 827-6364 for
CompuServe
1
GO HP Call (800) 524-3388 for
HP Bulletin Board Service2(208) 344-1691 (US only) Refer to the latest Product
HP First (automated fax) (800) 333-1917 US and Canada
(801) 344-4809 Outside US and Canada
(800) 544-9976 Reseller support number (enter
HP Support Assist CD-
(800) 457-1762 US and Canada
ROM
(801) 431-1587 Outside US and Canada
HP MCD Service Engineer svc-eng_mcd@om.cv.hp.com Email address for service related
membership within the US
membership within the US
Support Plan for non-US BBS
numbers
outlet id number)
questions and issues
1
Baud rates = 300-28.8; Parity = E; Data bits = 7; Stop bits = 1
2
Baud rates = 300-28.8; Parity = N, Data bits = 8; Stop bits = 1
vi
Page 8

vii
Page 9

Page 10

Page 11

Product Overview
Part 1
• What’s New
• Product Features
• Product at a Glance
• Product Comparisons
Page 12

What’s New
The OmniBook 2000 is the newest OmniBook in the Desktop-to-Go Notebook PC series. It has
many of the same features as the OmniBook 5700 while still maintaining a lower price. The
following list compares and contrasts the OmniBook 2000 and OmniBook 5700.
Feature OmniBook 2000 OmniBook 5700
Processor
Cache no L2 cache
Memory expandable to 128MB expandable to 128MB
Display 12.1” TFT SVGA up to 16.7M colors
Video C&T 65554 64-bit accelerated
PC Card Cardbus support Cardbus support
System Chipset Opti Viper-N+ Opti Viper-N+
Desktop
Management
Interface
Advanced
Power
Management
Off States On, suspend, resume, hibernate and
133-MHz Intel Pentium with and
without MMX technology
16-KB or 32-KB L1 cache
12.1” DSTN SVGA up to 64K colors
graphics processor with 2M video
RAM and Zoom Video enabled
Pre-installed DMI 1.1 software Pre-installed DMI 1.1 software
APM 1.2 APM 1.2
full off
Intel Pentium P55C
150 MHz and 166 MHz with MMX
technology
512-KB L2 pipeline-burst
synchronous cache
32-KB L1 cache
12.1” TFT XGA and 12.1” TFT SVGA
up to 16.7M colors
C&T 65554 64-bit accelerated
graphics processor with 2M video
RAM and Zoom Video enabled
On, suspend, resume, hibernate and
full off
10
Page 13
Product Features
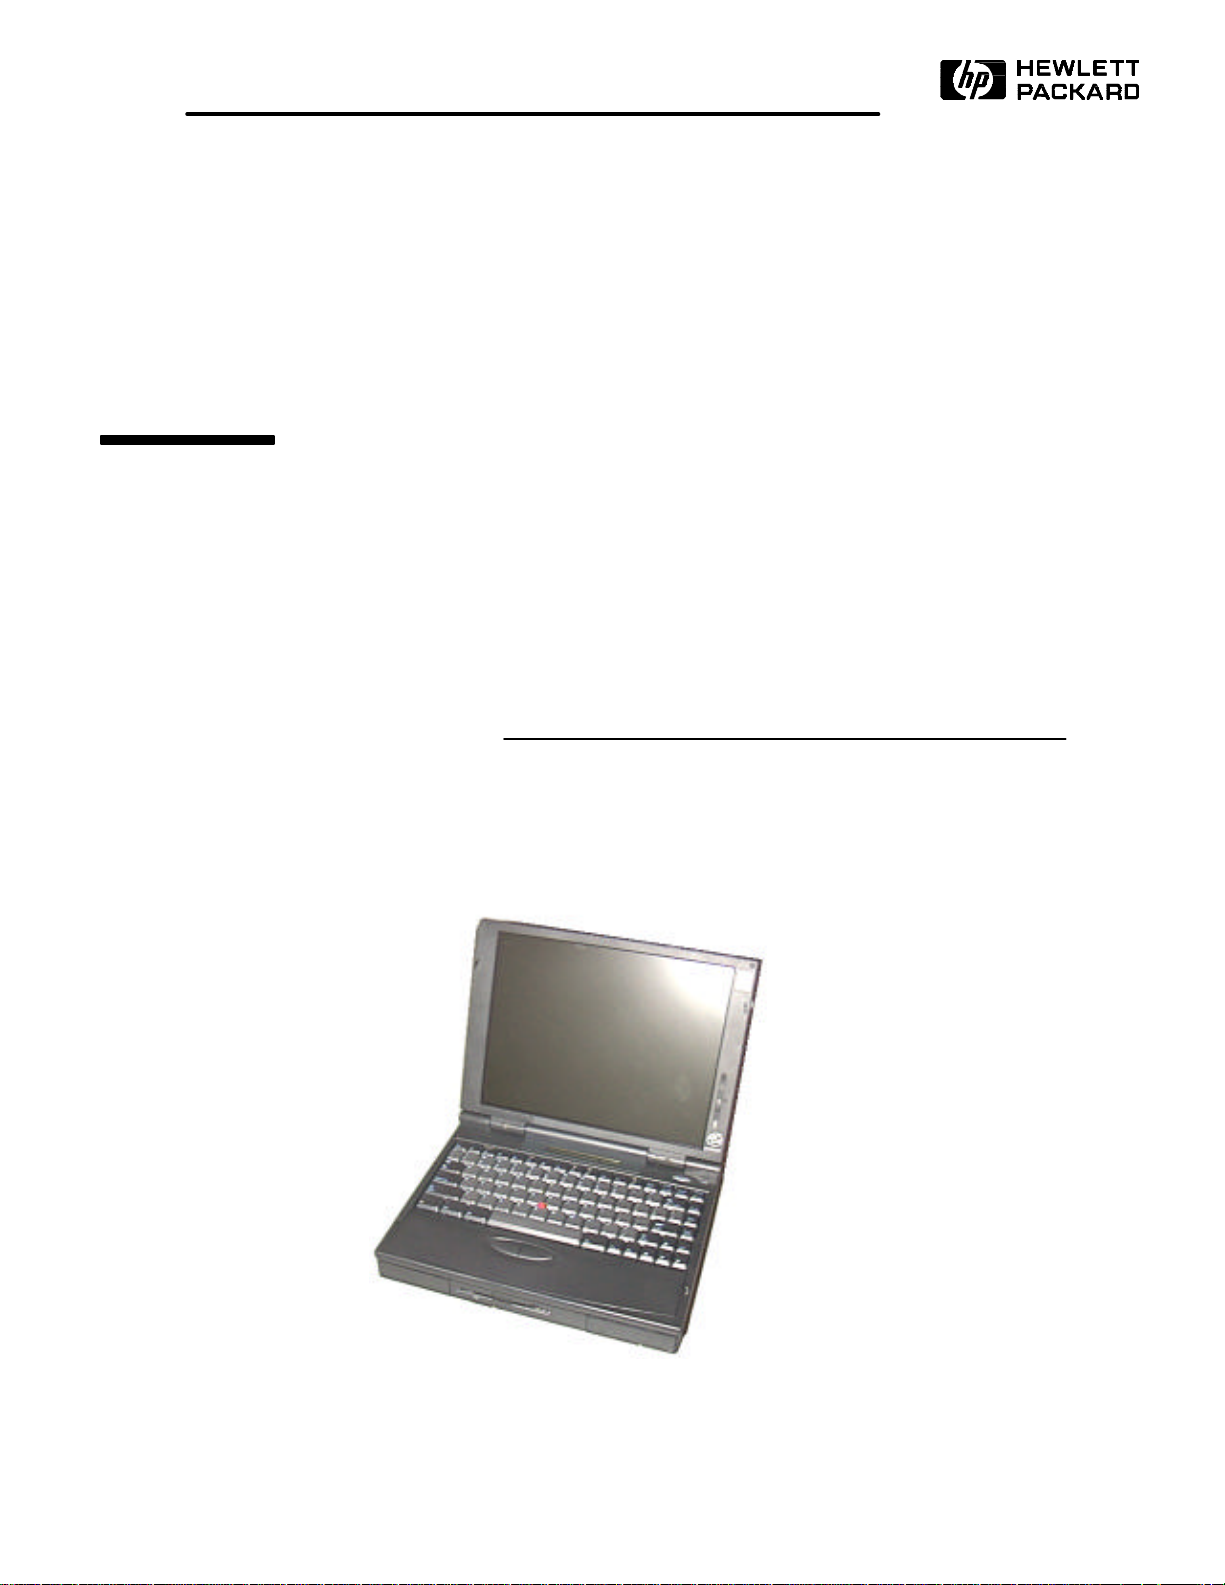
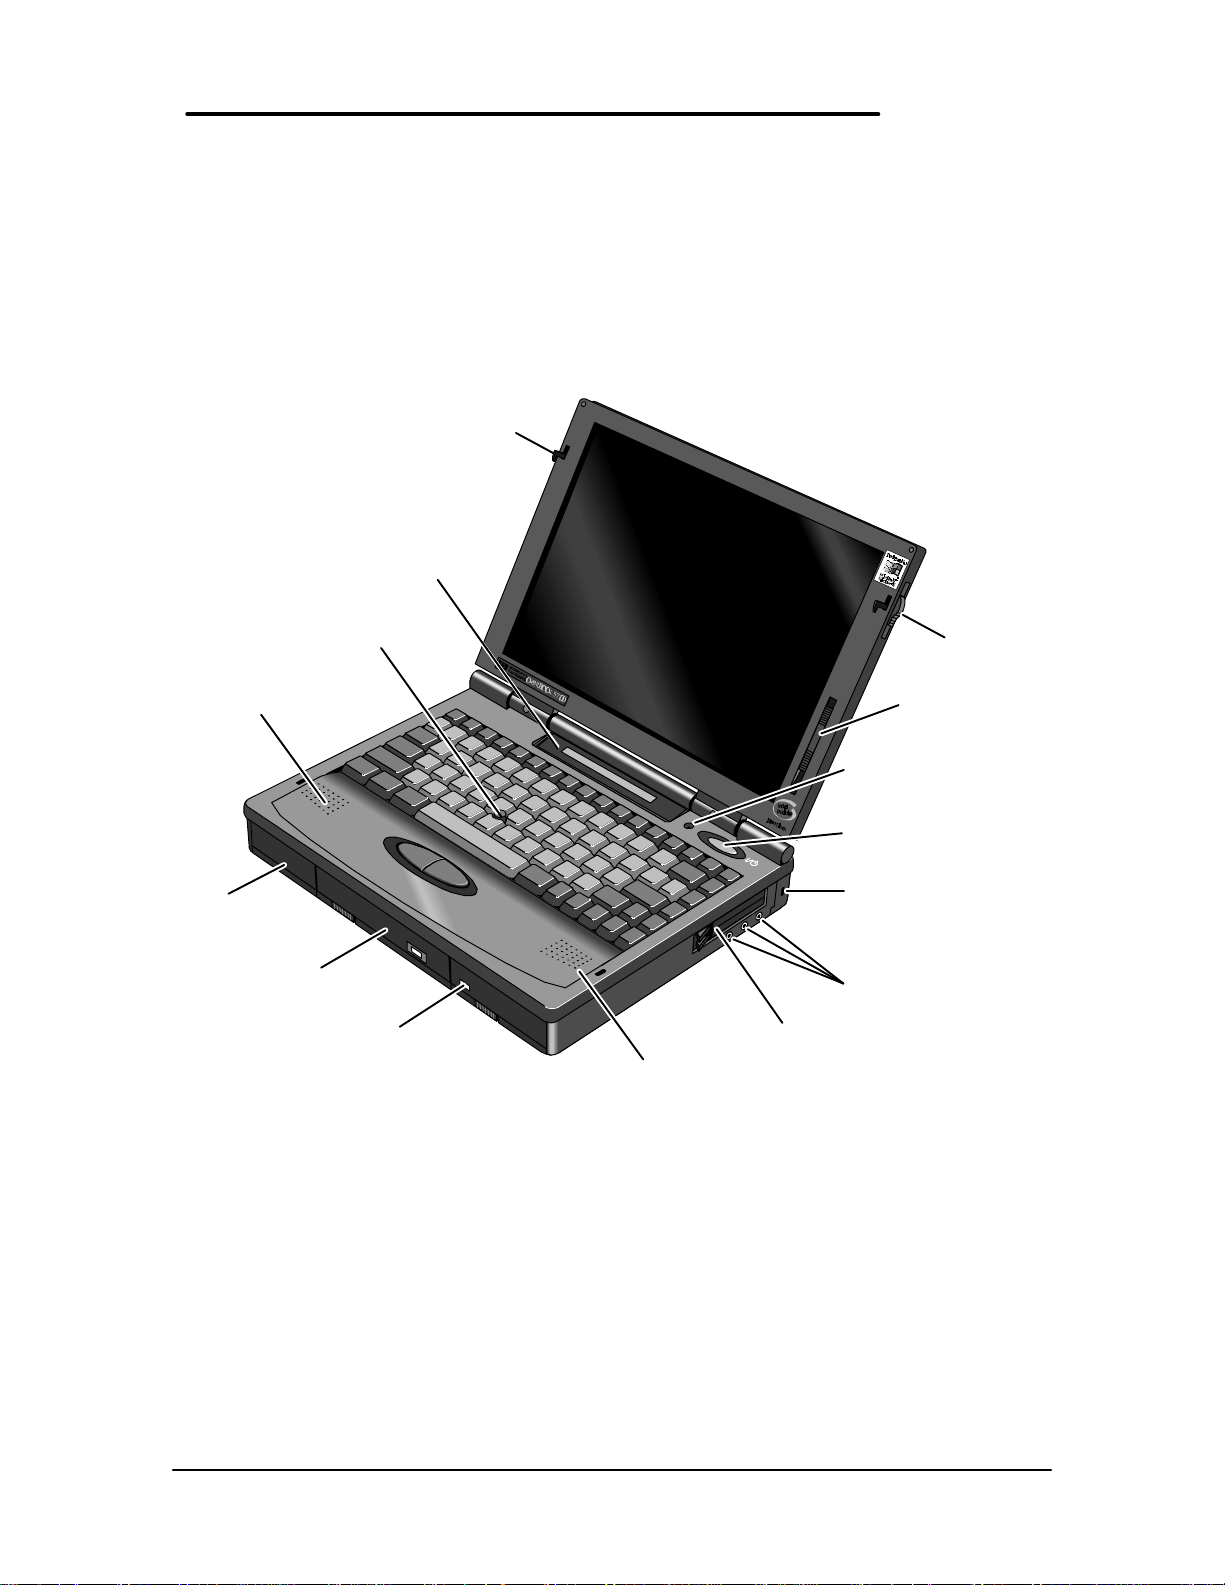
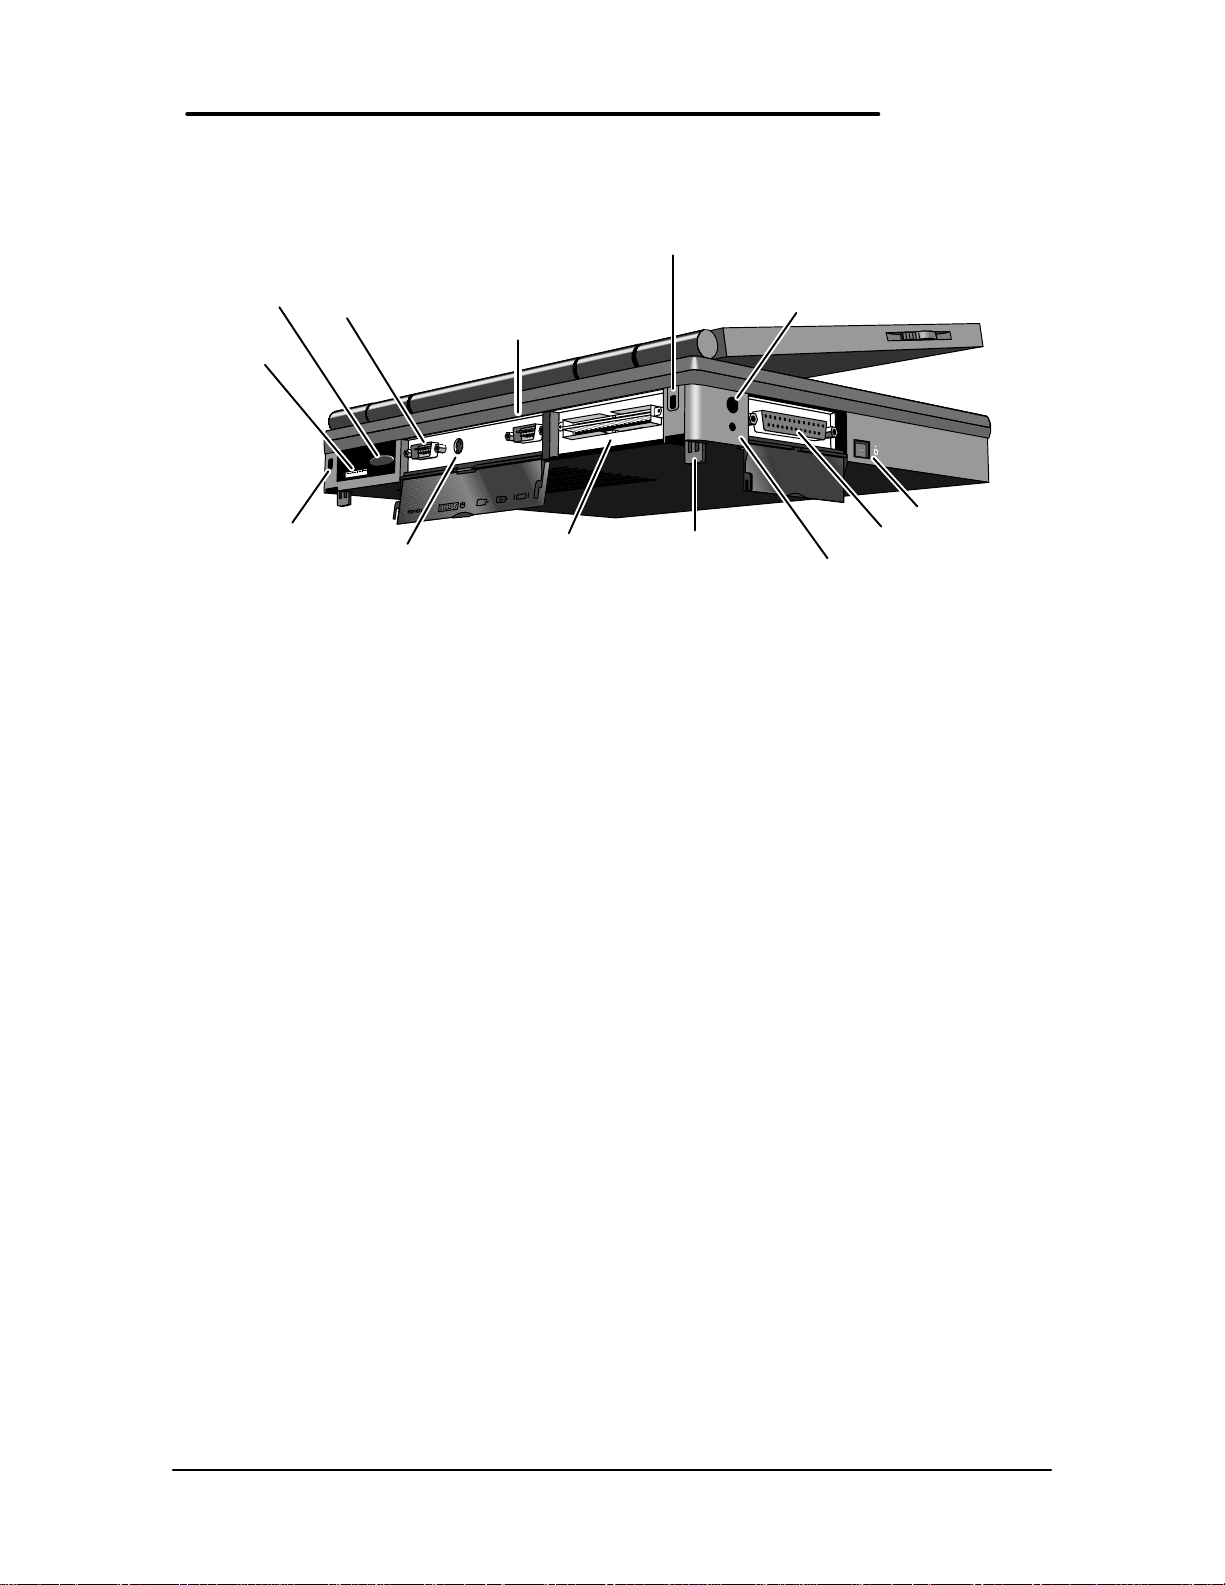
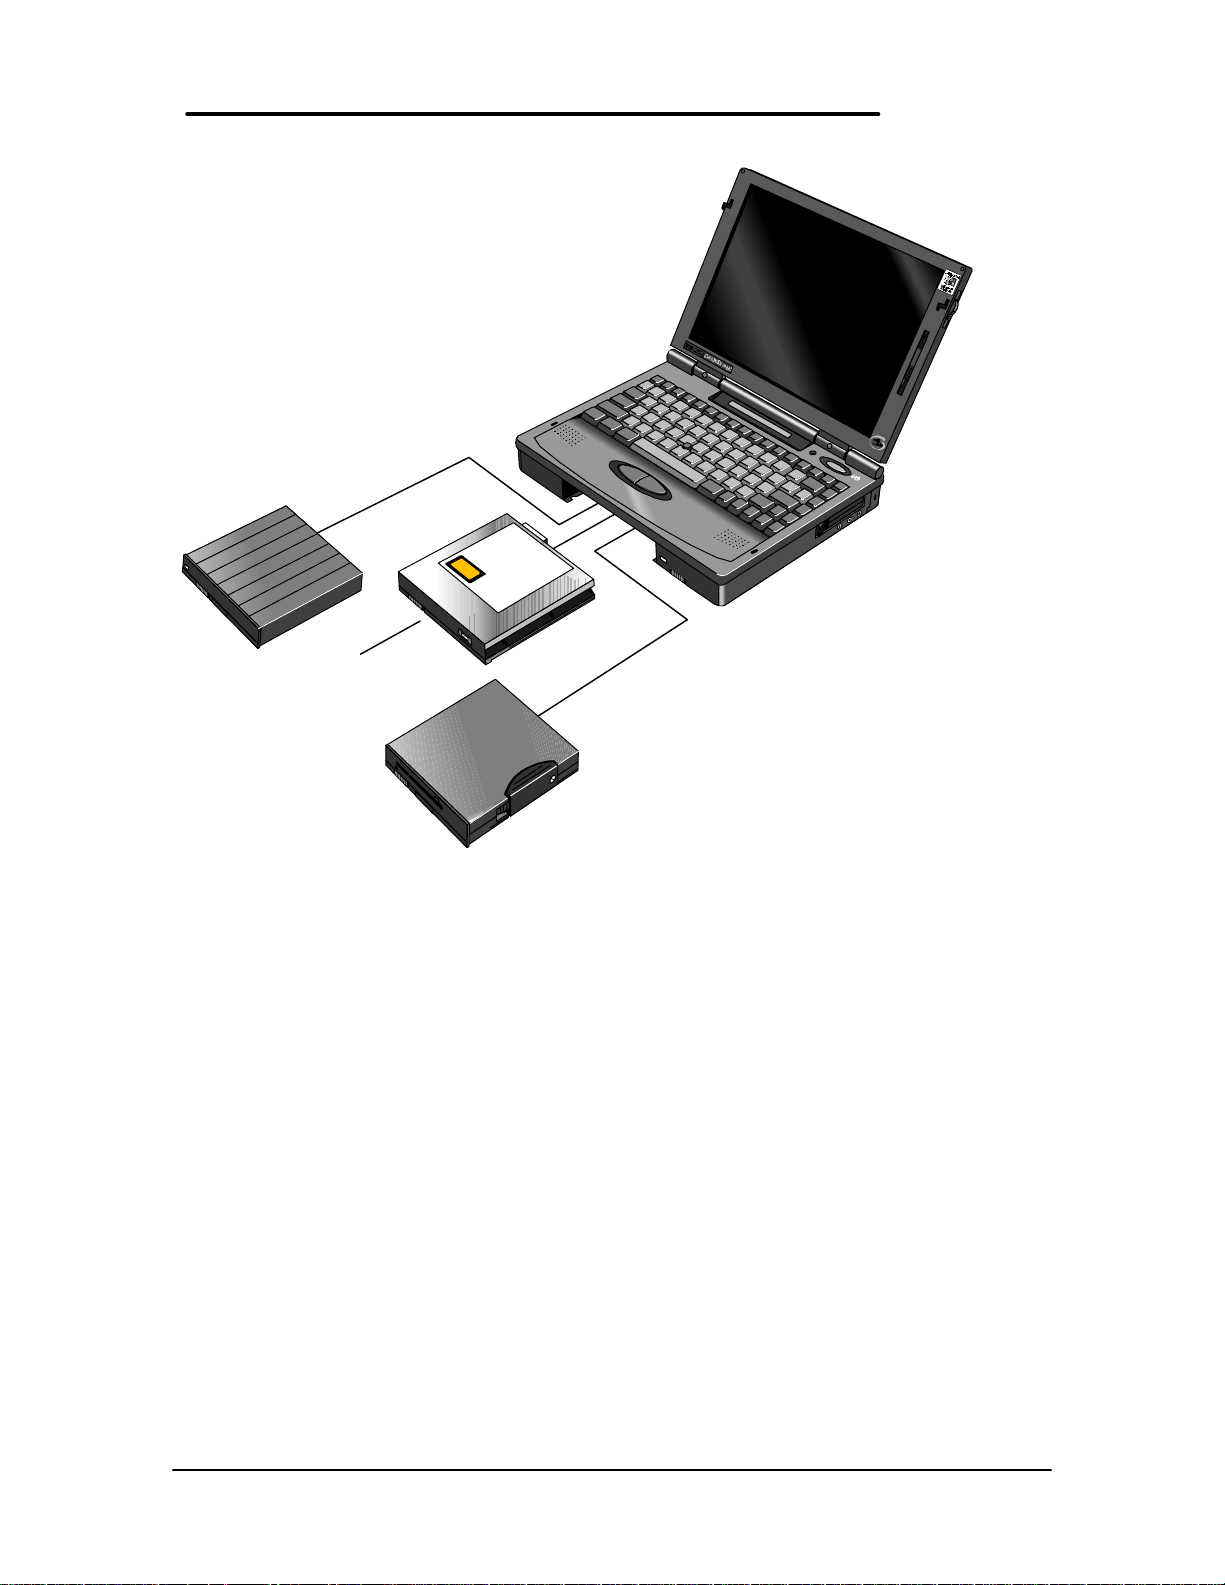
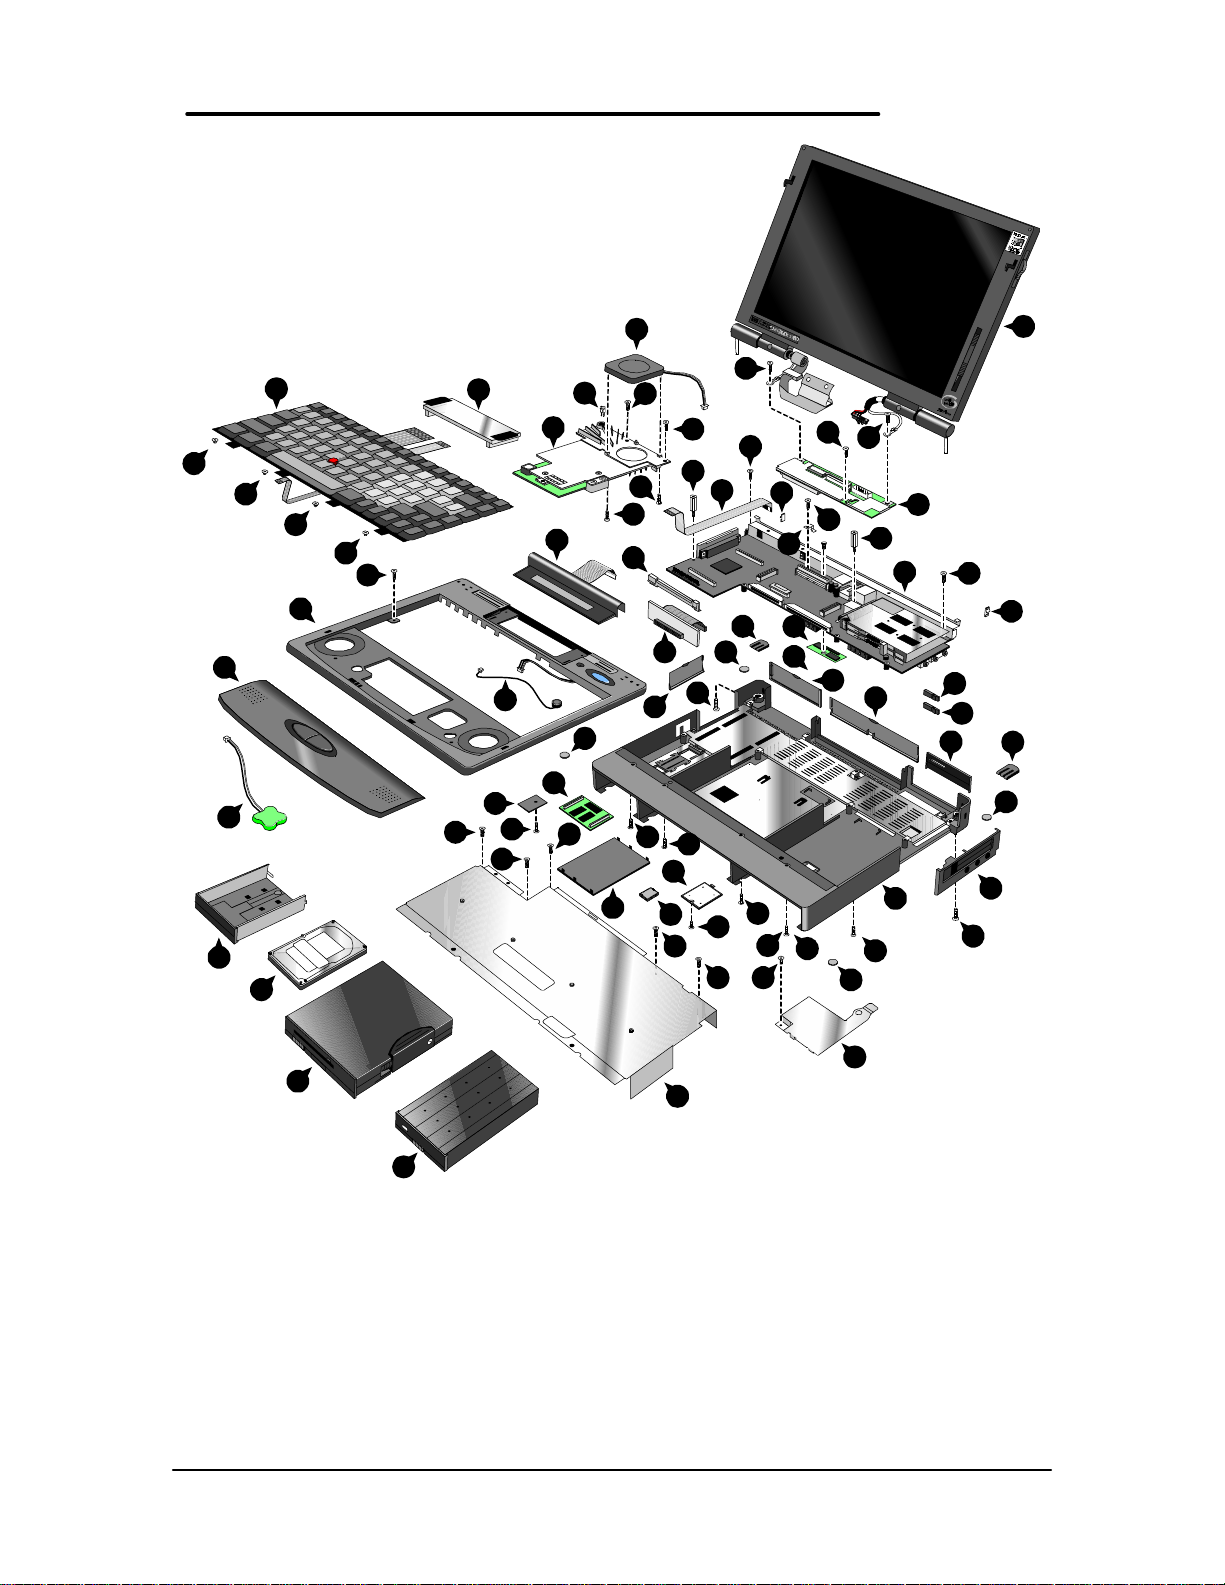
The first two illustrations (Figure 1 and Figure 2) point out the key external features of the
OmniBook 2000 and 5700. The second two illustrations (Figure 3 and Figure 4) point out the key
external features of the OmniBook 5500. Figure 5 on page 14 shows the accessories that can be
used in the center bay of the OmniBook 2000, 5500, and 5700.
Latch
Status
panel
Pointing
device
Latch
Speaker
Hard
drive
Floppy drive
(center bay
accessory slot)
Figure 1 - OmniBook 2000 and 5700 External Features
Battery
Speaker
Display
control(s)
Microphone
On/Suspend
button
Kensington lock
Audio
jacks
PC card
slots
11
Page 14
IR port
MIDI/Joystick
port
Kensington
lock
Figure 2 - OmniBook 2000 and 5700 External Features - continued
Serial port
Mouse or
Keyboard
VGA out
Docking
port
Kensington
lock
Tilt foot
AC adapter
Reset
button
Off button
Parallel
port
12
Page 15
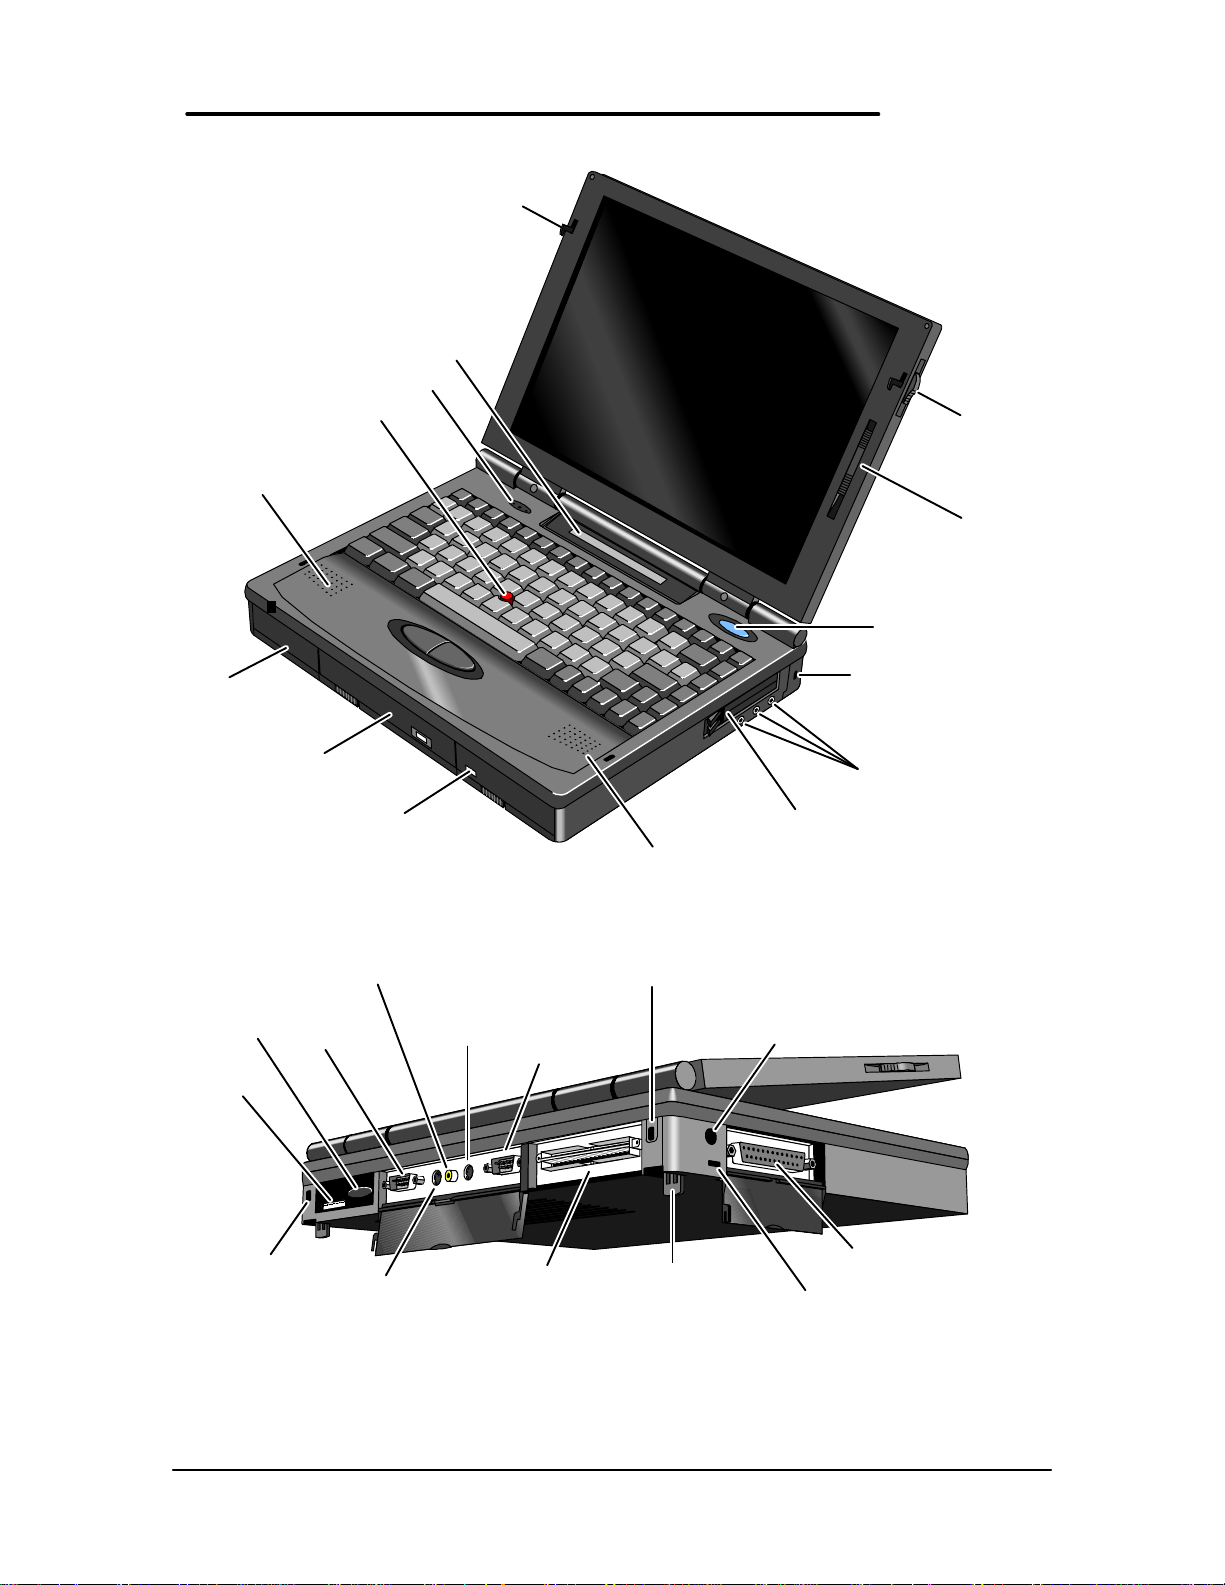
port
lock
Keyboard
button
Video out
f button
Kensington lock
IR port
MIDI/Joystick
Kensington
Serial port
VHS out
Mouse or
Latch
VGA out
Docking
port
Tilt foot
AC
Parallel
port
Reset
Figure 3 - OmniBook 5500 External Features
Pointing device
Speaker
Hard drive
Floppy drive
(center bay
accessory slot)
Figure 4 - OmniBook 5500 External Features - continued
Status panel
Microphone
Battery
Speaker
Latch
Display
control
On/Suspend/Of
Kensington lock
Audio jacks
PC card slots
13
Page 16
High-capacity
battery
CD-ROM
drive
Floppy disk
drive
Figure 5 - OmniBook 2000, 5500, and 5700 Center Bay Modules
Product at a Glance
PENTIUM
14
Page 17
22
28
4
44
8
45
23
46
27
15
50
46
13
46
51
11
46
37
43
16
43
26
41
17
5
35
1
43
25
39
14
40
38
33
12
34
43
7
21
38
45
47
44
10
35
36
43
43
18
6
32 52
37
38
38
37
38
37
43
44
30
48
29
9
19
24
42
35
3
31
20
43
18
31
32
35
2
44
49
Figure 6 - OmniBook 2000 and 5700 Exploded Diagram
15
Page 18
Table 2 - OmniBook 2000 and 5700 Parts Identification
Description Part Number Exchange Part # User Replace. OB5700 OB2000
1 Memory Module
8MB RAM F1134-60901 F1134-69001 Y
16MB RAM F1135-60901 F1135-69001 Y
32MB RAM F1136-60901 F1136-69001 Y
64MB RAM F1335-60901 F1335-69001 Y
2 Bezel F1320-60958 N
3 Card Bus Bracket F1350-60916 N
4 CPU Fan F1350-60906 N
5 CPU Module
CPU Module/150C F1350-60904 F1350-69004 N
CPU Module/166C F1350-60905 F1350-69005 N
CPU Module/P54C-133 F1371-60908 F1371-69008 N
CPU Module/P55C-133 (MMX) F1371-60909 F1371-69009 N
6 Dock Grounding Spring Plate F1320-60962 N
7 Door, Flash BIOS F1371-60901 Y
8 EMI Spring for LCD Hinge F1350-60913 N
9 Expansion Door F1125-60920 Y
10 FFC Cable T/B to M/B 10 PIN F1320-60950 N
11 3.5" floppy disk drive F1195-60901 Y
12 HDD-FPC Flex F1320-60961 N
13 Hard Disk Drive
HDD Drive 1.44GB F1375-60901 F1375-69001 Y
HDD Drive 2.0GB F1339-60901 F1339-69001 Y
HDD Drive 3.0GB F1348-60901 F1348-69001 Y
14 HDD PCB Bracket F1320-60965 N
15 HDD Plastic Kit F1350-60920 Y
16 HDD Security Cover F1320-40001 Y
17 Icon Assembly F1320-60918 N
18 I/O Bracket Grounding Clip F1350-60912 N
19 I/O Door F1350-60910 Y
20 IR Lens F1320-60952 N
21 KBD Shielding Plate F1320-60960 N
22 Keyboard * N
23 LCD Display
LCD Assy 12.1 TFT/X F1350-69002 F1350-69002 N
LCD Assy/SMG 12.1 TFT/S F1320-69094 F1320-69094 N
LCD Assy-12.1" DSTN F1371-60906 F1371-69006 N
24 Lower Chassis Case
25 Memory Cover Door F1320-60927 Y
26 Microphone Assembly F1081-60946 N
27 Palmrest2 Assembly F1320-60986 N
28 PCA - DC Power Supply F1350-60909 N
29 PCA PB-586/IO Bracket F1350-60901 F1350-69001 N
30 PCA PB-Icon Board
31 PCMCIA Button Assembly F1320-60949 Y
32 Plastic Foot F1320-60929 Y
33 Printer Port Door F1125-60918 Y
34 Prog Flash IC, BIOS F1371-60903 N
35 Rubber Foot F1320-60957 Y
36 Screw - BIOS Door F1371-60902 Y
37 Screw - CPU M2 X 4L F1320-60963 N
38 Screw - CPU M2.6 X 6L F1081-60942 N
39 Screw - FTB M2.6x10L F1350-60925 N
40 Screw - FTB M2.6x8L F1350-60926 N
41 Screw - HDD Door F1320-60919 Y
42 Screw - ISOF M2.6x6L F1350-60923 N
43 Screw - ISOP M2x6L Nyl F1350-60924 N
44 Screw - ISOP M2.6X8L NYLOK F1081-60939 N
45 Screw - ISOT M2.6x4L F1350-60927 N
46 Screw - Keyboard F1320-60920 N
47 Standoff-M2x11.75 Nyl F1350-60928 N
48 Standoff-M2x15L Nyl F1350-60929 N
49 Std Li-Ion Battery F1193-60902 Y
50 Sub Batt - NiMHd F1350-60921 N
51 Upper Chassis Case F1350-60915 N
52 Video RAM F1350-60922 N
Note, this is a partial parts list. For a complete parts list, please refer to Appendix E or the Product Support Plan.
*For a complete listing of available localized keyboards, refer to Appendix E or the Product Support Plan.
Lower Chassis Case - 5700 F1350-60914 N
Lower Chassis Case - 2000 F1371-60905 N
PCA PB-ICON/SVGA F1350-60907 N
PCA PB-ICON/XGA F1350-60908 N
PCA PB-ICON/DSTN F1371-60911 N
16
Page 19
17
42
42
21
42
47
42
36
28
36
36
15
36
43
41
34
39
40
26
36
5
17
39
3
40
30
44
29
41
9
36
36
13
2
16
22
39
17
27
10
46
37
37
12
32
4
18
35
36
23
14
19
31
31
32
35
1
40
35
7
37
33
34
39
40
37
37
39
20
26
35
25
11
38
39
39
8
6
45
39
24
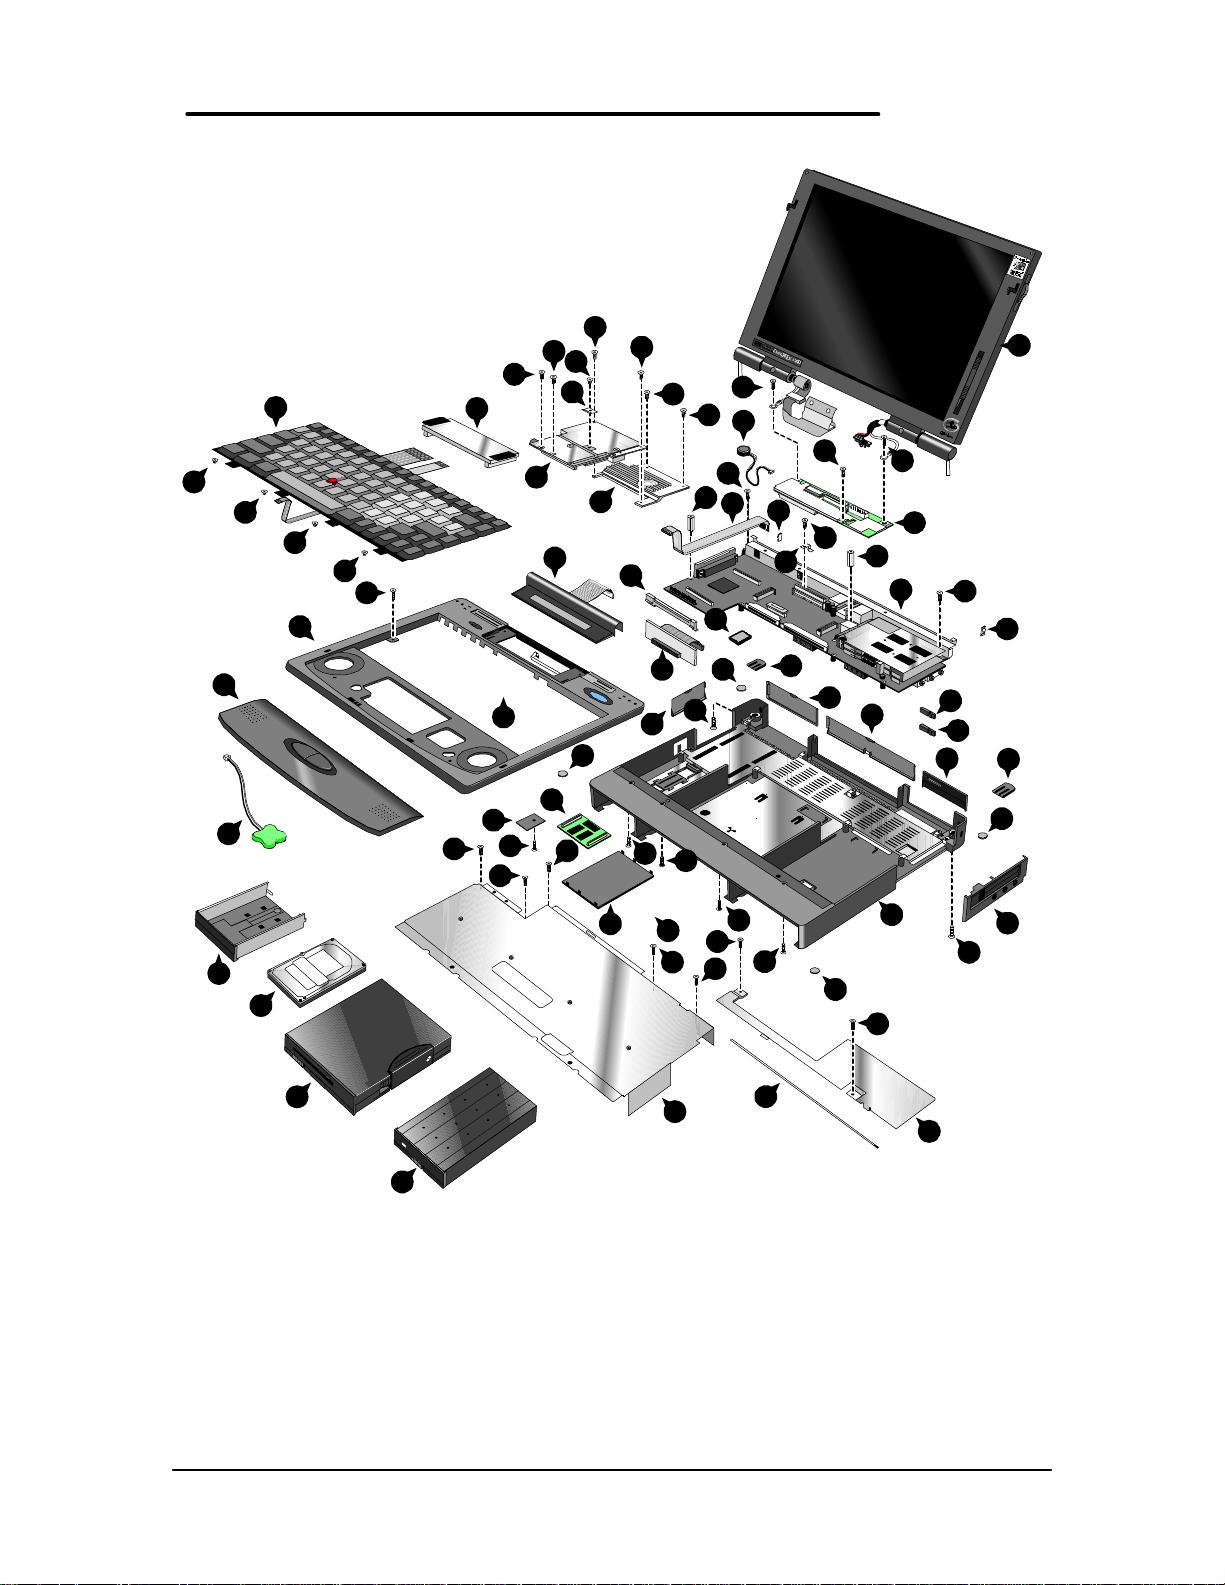
Figure 7 - OmniBook 5500 Exploded Diagram
17
Page 20

Table 3 - OmniBook 5500 Parts Identification
Description Part Number Exchange Part # User Replace.
1 Bezel F1320-60958 N
2 CPU Module
3 Dock Grounding Spring Plate F1320-60962 N
4 Expansion Door F1125-60920 Y
5 FFC Cable T/B to M/B 10 PIN F1320-60950 N
6 3.5" floppy disk drive F1195-60901 Y
7 HDD-FPC Flex F1320-60961 N
8 Hard Disk Drive
9 HDD PCB Bracket F1320-60965 N
10 HDD Plastic Kit F1320-60947 Y
11 HDD Security Cover F1320-40001 Y
12 Heat Pipe F1320-60964 N
13 Heat Pipe Bracket F1320-60972 N
14 Heat Pipe Spreader F1320-60921 N
15 Heat Sink F1320-60954 N
16 Icon Assembly F1320-60918 N
17 I/O Bracket Grounding Clip F1350-60912 N
18 I/O Door F1320-60928 Y
19 IR Lens F1320-60952 N
20 KBD Shielding Plate F1320-60960 N
21 Keyboard * N
22 LCD Display
23 Lower Chassis Case F1320-60930 N
24 Memory Cover Door F1320-60927 Y
25 Memory Module
26 Microphone Assembly F1081-60946 N
27 Palmrest2 Assembly F1320-60986 N
28 PCA - DC Power Supply F1320-60925 N
29 PCA PB-586/IO Bracket F1320-60926 F1320-69026 N
30 PCA PB-Icon Board
31 PCMCIA Button Assembly F1320-60949 Y
32 Plastic Foot F1320-60929 Y
33 Printer Port Door F1125-60918 Y
34 Prog Flash IC, BIOS F1321-60907 N
35 Rubber Foot F1320-60957 Y
36 Screw - CPU M2 X 4L F1320-60963 N
37 Screw - CPU M2.6 X 6L F1081-60942 N
38 Screw - HDD Door F1320-60919 Y
39 Screw - ISOP M2.0x6.0L Nylok F1350-60924 N
40 Screw - ISOP M2.6X8L Nylok F1081-60939 N
41 Screw - M2.6x4.0L F1350-60927 N
42 Screw - Keyboard F1320-60920 N
43 Standoff-M2x11.75 Nyl F1320-60951 N
44 Standoff-M2x15L Nyl F1320-60955 N
45 Std Li-Ion Battery F1193-60902 Y
46 Sub Battery 4.8v F1081-60925 N
47 Upper Chassis Case F1320-60931 N
Note, this is a partial parts list. For a complete parts list, please refer to Appendix E or the Product Support Plan.
*For a complete listing of available localized keyboards, refer to Appendix E or the Product Support Plan.
CPU Module/100C F1320-60901 F1320-69001 N
CPU Module/120C F1320-60902 F1320-69002 N
CPU Module/133C F1320-60903 F1320-69003 N
HDD Drive 810MB F1191-60901 F1191-69001 Y
HDD Drive 1.35GB F1192-60901 F1192-69001 Y
HDD Drive 2.0GB F1339-60901 F1339-69001 Y
LCD Assy 10.4” TST/S F1320-60904 F1320-69004 N
LCD Assy 11.3” DSTN/S F1320-60905 F1320-69005 N
LCD Assy 12.1" TFT/S F1320-60906 F1320-69006 N
LCD Assy-SMG 12.1" TFT/S F1320-60994 F1320-69094 N
8MB RAM F1134-60901 F1134-69001 Y
16MB RAM F1135-60901 F1135-69001 Y
32MB RAM F1136-60901 F1136-69001 Y
PCA PB-ICON F1320-60924 N
PCA PB-ICON/SMG F1320-60993 N
18
Page 21

Product Comparisons
HP OmniBook 5700 HP OmniBook 5500 HP OmniBook 2000
Size Closed
Weight
Processor
Bus Architecture
Cache
Display Size
Display
Resolution
Video Bus
Video RAM
VGA-out Support
29.5 x 22.6 x 4.9 cm
(11.6 x 8.9 x 1.93 in)
3.27 kg (7.2 lb) 3.4 kg (7.5 lb) 3.27 kg (7.2 lb)
166- or 150-MHz Intel Pentium
with MMX technology
32-bit PCI bus 32-bit PCI bus 32-bit PCI bus
512-KB burst-synchronous L2
cache
12.1-inch TFT 10.4- or 12.1-inch diagonal
XGA TFT 1024 x 768 x 64k
colors
SVGA TFT 800 x 600 x 16.7M
colors
PCI local bus video PCI local bus video PCI local bus video
2-MB video RAM 1-MB video RAM 2-MB video RAM
XGA-out supports up to 1024 x
768 x 64k colors
29.5 x 22.6 x 4.9 cm
(11.6 x 8.9 x 1.93 in)
100-, 120-, or 133-MHz Intel
Pentium processor
256-KB external L2 cache no L2 cache
TFT
11.3-inch diagonal DSTN
SVGA TFT 800 x 600 x 64K
colors
SVGA DSTN 800 X 600 X 256
colors
XGA-out supports up to 1024 x
768 x 256 colors
29.5 x 22.6 x 4.9 cm
(11.6 x 8.9 x 1.93 in)
133-MHz Intel Pentium with
and without MMX technology
12.1-inch diagonal TFT
12.1-inch diagonal DSTN
SVGA TFT 800 x 600 x 16.7M
colors
SVGA DSTN 800 x 600 x 64K
colors
XGA-out supports up to 1024 x
768 x 64k colors
Video Controller
Power
Battery Type
Battery Life
Recharge Rate
Advanced Power
Management
Chips and Technology 65554
controller (64-bit)
AC adapter 100 to 240 Vac (50
to 60 Hz) input; 12 Vdc, 3.3 A
output
14.4-Vdc, 2.5-AH rechargeable
Lithium-Ion battery
Optional, 14.4-Vdc, 3.75-AH
enhanced Lithium Ion battery
Up to 2.5 hours with one LiIon
battery (enhanced LiIon battery
adds up to 3.75 hours)
Battery recharges to high level
in 4 hours using AC adapter
while PC is on or off
Instant-on maintains computer
in ready-to-work state for weeks
on a full charge; returns you to
Chips and Technology 65548
controller (32-bit)
AC adapter 100 to 240 Vac (50
to 60 Hz) input; 12 Vdc, 3.3 A
output
14.4-Vdc, 2.5-AH rechargeable
Lithium-Ion battery
Optional, 14.4-Vdc, 3.75-AH
enhanced Lithium Ion battery
Up to 2.5 hours with one LiIon
battery (enhanced LiIon battery
adds up to 3.75 hours)
Battery recharges to high level
in 4 hours using AC adapter
while PC is on or off
Instant-on maintains computer
in ready-to-work state for
weeks on a full charge; returns
you to your application or file
Chips and Technology 65554
controller (64-bit)
AC adapter 100 to 240 Vac (50
to 60 Hz) input; 12 Vdc, 3.3 A
output
14.4-Vdc, 2.5-AH rechargeable
Lithium-Ion battery
Optional, 14.4-Vdc, 3.75-AH
enhanced Lithium Ion battery
Up to 2.5 hours with one LiIon
battery (enhanced LiIon battery
adds up to 3.75 hours)
Battery recharges to high level
in 4 hours using AC adapter
while PC is on or off
Instant-on maintains computer
in ready-to-work state for
weeks on a full charge; returns
you to your application or file
19
Page 22

HP OmniBook 5700 HP OmniBook 5500 HP OmniBook 2000
Removable
Modules
Hard Disk Drive
Floppy Disk Drive
CD-ROM Drive
Memory
your application or file instantly
2-minute low-battery warning
• Floppy disk drive
internal/external (can be
replaced with a second battery
or CD ROM drive)
• Hard disk drive
• RAM
• Battery
3.0-billion-byte or 2.0-billionbyte hard drives
Internal 3.5-inch, 1.44-MB,
standard; swaps with CD-ROM
or enhanced battery; usable
externally
Optional, internal, 10x Optional, internal, 10x Optional, internal, 10x
Self-refreshed FPM DRAM
16 or 32-MB models,
expandable to 128 MB
8-, 16-, 32-, and 64-MB RAM
modules available
instantly
2-minute low-battery warning
• Floppy disk drive
internal/external (can be
replaced with a second
battery or CD ROM drive)
• Hard disk drive
• RAM
• Battery
810-MB, 1.35-GB, or 2.0GB
hard disks
Internal 3.5-inch, 1.44-MB,
standard; swaps with CD-ROM
or enhanced battery; usable
externally
Self-refreshed FPM DRAM
8 or 16-MB models,
expandable to 64 MB
8-, 16-, and 32-MB RAM
modules available
instantly
2-minute low-battery warning
• Floppy disk drive
internal/external (can be
replaced with a second
battery or CD ROM drive)
• Hard disk drive
• RAM
• Battery
1.44-billion-byte or 2.0-billionbyte hard drives
Internal 3.5-inch, 1.44-MB,
standard; swaps with CD-ROM
or enhanced battery; usable
externally
Self-refreshed FPM DRAM
16 or 32-MB models,
expandable to 128 MB
8-, 16-, 32-, and 64-MB RAM
modules available
Audio
IO Ports
PCMCIA
16-bit with Sound Blaster Pro
and MIDI support
Stereo sound via two built-in
speakers
• 9-pin, 115,200-bps, RS-232
port
• 25-pin bidirectional ECP/EPP
parallel port
• XGA-out (up to 1024 x 768 x
64K)
• Fast-IR-IRDA compliant @
4Mbps
• Expansion bus connector
• PS/2 keyboard/mouse port
• Headphone/stereo-out port
• Stereo-in and microphone
ports
• MIDI/joystick port
One Type III PCMCIA slot (or
use as two Type II slots) with
3.3-V or 5-V support
Zoomed video support for lower
slot
CardBus support (both slots)
16-bit with Sound Blaster Pro
compatible and MIDI support
Stereo sound via two built-in
speakers
• 9-pin, 115,200 - b/s, RS-232
port
• 25-pin bidirectional ECP/EPP
parallel port
• XGA-out (up to 1024 x 768 x
256)
• Fast-IR-IRDA compliant @
4Mbps
• Expansion bus connector
• NTSC/PAL video-out port
(RCA and SVideo)
• PS/2 keyboard/mouse port
• Headphone/stereo-out port
• Stereo-in and microphone
ports
• MIDI/joystick port
One Type III PCMCIA slot (or
use as two Type II slots) with
3.3-V or 5-V support.
16-bit with Sound Blaster Pro
and MIDI support
Stereo sound via two built-in
speakers
• 9-pin, 115,200-bps, RS-232
port
• 25-pin bidirectional ECP/EPP
parallel port
• XGA-out (up to 1024 x 768 x
64K)
• Fast-IR-IRDA compliant @
4Mbps
• Expansion bus connector
• PS/2 keyboard/mouse port
• Headphone/stereo-out port
• Stereo-in and microphone
ports
• MIDI/joystick port
One Type III PCMCIA slot (or
use as two Type II slots) with
3.3-V or 5-V support
Zoomed video support for
lower slot
CardBus support (both slots)
Docking
20
Optional docking system with
one PCI/ISA and one ISA slot,
Optional docking system with
one PCI/ISA-and one ISA slot,
Optional docking system with
one PCI/ISA-and one ISA slot,
Page 23

HP OmniBook 5700 HP OmniBook 5500 HP OmniBook 2000
Pre-installed
Software
parallel, serial, XGA-out (up to
1024 x 768 x 64k), keyboard,
PS/2 mouse, MIDI/joystick,
audio and SCSI-2 ports.
Optional port replicator with
parallel, serial, video-out,
keyboard, PS/2 mouse,
MIDI/joystick, and audio ports
Microsoft Windows for
Workgroups 3.11 and MSDOS 6.22 co-loaded with
Microsoft Windows 95*
Windows 95-compatible Plug
and Play BIOS
Advanced Power Management
1.2
DMI 1.1 under Windows 95
with TopTools
HP PIM and Financial
Calculator
On-line documentation
parallel, serial, XGA-out (up to
1024 x 768 x 256), keyboard,
PS/2 mouse, MIDI/joystick,
audio and SCSI-2 ports.
Microsoft Windows for
Workgroups 3.11 and MSDOS 6.22 co-loaded with
Microsoft Windows 95*
Windows 95-compatible Plug
and Play BIOS
Advanced Power Management
1.1
HP PIM and Financial
Calculator
On-line documentation
parallel, serial, XGA-out (up to
1024 x 768 x 64K), keyboard,
PS/2 mouse, MIDI/joystick,
audio, and SCSI-2 ports.
Optional port replicator with
parallel, serial, video-out,
keyboard, PS/2 mouse,
MIDI/joystick, and audio ports.
Microsoft Windows for
Workgroups 3.11 and MSDOS 6.22 co-loaded with
Microsoft Windows 95*
Windows 95-compatible Plug
and Play BIOS
Advanced Power Management
1.2
DMI 1.1 under Windows 95
with TopTools
HP PIM and Financial
Calculator
On-line documentation
Security Features
Warranty
*(Note: Upon first boot, the end user must make a ONE-TIME selection between Windows 95 and Windows for Workgroups.
Later, if the end user desires the rejected operating system, the end user will need to acquire and pay for such product as a
separate transaction.)
• 2-level password protection
• Hardware-based hard drive
password
• Electronic serial number in
CMOS accessible through
DMI
• PC ID (tattooing)
• Kensington lock slots
3-year return-to HP for repair
(1-year on battery and
accessories)
• 2-level password protection
• PC ID (tattooing) and
serialization
• Drive lock
• Kensington lock slots
3-year return-to-HP for repair
for premium models; 1-year
return-to-HP for VL's (1-year on
battery and accessories)
• 2-level password protection
• Hardware-based hard drive
password
• Electronic serial number in
CMOS accessible through
DMI
• PC ID (tattooing)
• Kensington lock slots
3-year return-to HP for repair
(1-year on battery and
accessories)
21
Page 24

Page 25

Page 26

Page 27

Part 2
Troubleshooting
• Power-On Self-Test
• OmniBook Diagnostics
• Desktop Management Interface
• System Configuration Utility
• Troubleshooting Tips
Page 28

Power-On Self-Test
The OmniBook 2000, 5500, and 5700 BIOS includes a Power-On Self-Test (POST) facility that
tests a number of hardware and firmware items in the unit at each cold-start (BOOT or RESET).
The OmniBook self-test alone should not be used to diagnose a hardware problem. If the selftest results are absolutely clear and repeatable, confirm the results with at least two other nonself-test troubleshooting tools.
Within POST, there are three kinds of messages:
• Error Messages – These messages appear when there is a failure in hardware,
software, or firmware.
• Informational Messages – These messages provide information to the user but
require no action.
• Beep Codes – This kind of warning sounds when POST errors occur and the screen
is not yet available.
Beep Codes
These multiple beep codes indicate a failure in a simple test of:
• a portion of base memory
• flash BIOS checksum
• a portion of conventional memory
• a portion of extended memory
If the unit fails to boot
• all accessories are removed, including:
memory, floppy drive, docking station, modems and other PC Cards, printers,
external displays, pointing devices, and keyboard
• clean AC power is provided (no "chained" battery chargers or auto adapters), and
press reset.
If the unit still fails to boot, it requires service.
Beep codes are used to identify a POST error that occurs when the screen is not available.
Once the screen is operating, diagnostic messages are reported to the screen. There are beep
codes for both fatal and nonfatal system board errors.
Table 4 - POST Beep Codes
Beep Code Description
S-S-S-P-S-S-L-P The DMA page registers are faulty.
S-S-S-P-S-L-S-P The refresh circuitry is faulty
S-S-S-P-S-L-L-P The ROM checksum is incorrect
S-S-S-P-L-S-S-P The CMOS RAM test failed
S-S-S-P-L-S-L-P The DMA controller is faulty
S-S-S-P-L-L-S-P The interrupt controller failed
S-S-S-P-L-L-L-P The 8042 keyboard controller failed
S-S-L-P-S-S-S-P No video adapter was found
S-S-L-P-S-S-L-P No RAM installed. No message is displayed.
26
Page 29

Display Codes
There are a number of Power On Self Test (POST) tests that are performed after the Beep Code
tests. Failure of one or more of these tests will result in a displayed failure code (such as
03044). It is extremely important not to interpret a failure code immediately as a hardware
failure. The failure should be confirmed with a clean boot. A clean boot is defined as pressing
the reset button after removing all accessories (including memory, floppy drive, modems, PC
cards, and printers) and providing a reliable power source. Note, make sure the display is
adjusted to be visible.
Table 5 - POST Display Codes
Message Possible Cause
CLOCK NOT TICKING CORRECTLY The real time clock is not ticking.
COLOR/MONO SWITCH INCORRECT The COLOR/MONO switch on the system
board is incorrect for the installed
hardware.
CMOS CHECKSUM INVALID - RUN SCU CMOS RAM information has been
corrupted and needs to be reinitialized via
the System Configuration Utility.
CMOS FAILURE - RUN SCU CMOS RAM has lost power and needs to
be reinitialized via the System
Configuration Utility.
FLOPPY CONTROLLER FAILED The floppy controller failed to respond to
the reset command. Power down the
system and check all appropriate
connections. It the floppy controller
continues to fail, you may need to replace
it.
FLOPPY DISK TRACK 0 FAILED The floppy drive cannot read track 0 of
the floppy disk in the drive. Try another
diskette. If the problem persists, you may
need to replace the floppy drive.
FLOPPY INFORMATION INVALID - RUN SCU The drive parameters stored in CMOS do
not match the floppy drives detected in
the system.
HARD DISK CONTROLLER ERROR The hard disk controller failed to respond
to the reset command. Possible
solutions: 1) Check the drive parameters.
2) Power down the system and check all
appropriate connections. If the problem
persists, you may need to replace the
hard disk controller.
HARDWARE INFO DOES NOT MATCH VIDEO
CARD - RUN SCU
KEYBOARD CONTROLLER FAILURE The keyboard failed the self-test
KEYBOARD FAILURE The keyboard failed to respond to the
MACHINE IS LOCKED - TURN KEY The system will not continue the boot
The video adapter type specified in
CMOS RAM does not match the installed
hardware.
command. Check to see if the keyboard
controller is properly installed. If the
problem continues, replace the controller.
RESET ID Command.
27
Page 30

Message Possible Cause
sequence until you insert the key into the
key lock and turn it.
NO BOOTABLE FLOPPY DRIVE 0 INSTALLED No bootable floppy drive was detected.
Possible solutions: 1) Power down the
system and check all appropriate
connections, cables, etc. 2) In
configurations where no floppy drive is
installed, run System Configuration Utility
and make sure the diskette drive
configuration item is set to "None". 3)
Replace the diskette drive if necessary.
NO INTERRUPTS FROM TIMER 0 The periodic timer interrupt is not
occurring.
RAM PARITY ERROR AT LOCATION xxxx A RAM parity error occurred at the
specified (hexadecimal) location.
ROM AT xxxx (LENGTH YYYY) WITH NON-ZERO
CHECKSUM (zz)
TIME/DATE CORRUPT - RUN SCU The time and date stored in the real time
UNEXPECTED AMOUNT OF MEMORY - RUN SCU The amount of memory detected by
CMOS RAM TEST FAILED A walking built test of CMOS RAM
DMA CONTROLLER FAULTY A sequential read/write of the transfer
FAULTY DMA PAGE REGISTERS A walking bit read/write of the 16 DMA
FAULTY REFRESH CIRCUIT A continuous read/write test of port 61h
INTERRUPT CONTROLLER FAILED A sequential read/write of various
ROM CHECKSUM INCORRECT A checksum of the ROM BIOS does not
An illegal adapter ROM was located at the
specified address. An external adapter
(such as a video card) may be causing a
conflict.
clock have been corrupted, possibly by a
power loss.
POST does not match the amount
specified in CMOS RAM.
locations 0E (Hex) - 3F (Hex) failed.
count and transfer address registers within
the primary and secondary DMA
controllers failed.
controller page registers starting at
location 80 Hex failed.
found that bit 4 (Refresh Detect) failed to
toggle within an allotted amount of time.
Interrupt Controller registers failed.
match the byte value at F000:FFFF.
28
Page 31

OmniBook Diagnostics
The OmniBook diagnostics program provides a tool for diagnosing and isolating a hardware
problem. The diagnostics software is intended for use in concert with additional troubleshooting
methods to accurately determine the cause of trouble. The diagnostics program is not designed
for unassisted customer use. Unless otherwise indicated, all diagnostic tests and features are
available on the OmniBook 2000, 5500, and 5700.
All tests provided in the diagnostics program are designed to run following a clean boot of the
OmniBook. This ensures that the environment of the computer will be In a dependable state for
the diagnostics program to properly test the hardware components. The individual tests are nondestructive and are intended to preserve the state of the OmniBook. Reboot after completion of
any test to ensure proper loading of necessary drivers.
Running diagnostics
The diagnostic software must be executed from a DOS command-line following a clean boot.
For a system that normally boots to Windows for Workgroups, press F5 at bootup after the BIOS
displays the CPU speed. This will boot the OmniBook to a DOS command-line. For a Windows
95 system, press Shift-F5. The user interface may be invoked or individual tests can be initiated
from the command-line. When executed from the command-line, a test may or may not display
results, but always terminates with either a zero for success or a non-zero for failure (the DOS
errorlevel will be set accordingly). Non-zero results can be unique for each test (a result of 2
from a RAM test has a different meaning than a 2 from the serial test).
The diagnostic program is located in the c:\omnibook\diag directory. The main diagnostic
program (user interface) is invoked by typing diag at the command-line. The main program
looks for executables to perform individual tests using the same path with which it was invoked.
For example, if the program was initiated by typing c:\omnibook\diag\diag from the root
directory, then the diag directory will be searched for individual test programs.
Logging Test Results
Results can be logged to a file in the current drive and directory by pressing Alt-L. Only failures
are written to the file. The log file is in ASCII format with the following layout:
date time test label failure description
The main program performs the logging. When logging is enabled for the first time (via the
keyboard), the specified file is opened. If the file already exists, it is truncated. When logging is
disabled or the program is terminated, the file is closed.
Looping Tests
Any test, or selection of tests, can be made to repeat or loop. The loop count can be changed by
pressing Alt-C. The default count is 1; the maximum count is 9,999. A count of zero (0)
indicates infinite looping. The count that is set applies to all tests until DIAG is terminated or the
count is changed again.
Pressing the Backspace key will abort the looping sequence. The diagnostics program will check
the keyboard for the Backspace key between each test and each iteration. However, since many
29
Page 32

tests also read the keyboard and discard unexpected key presses, this feature may not work as
Version mm/dd/yy
Press ESC to exit
expected.
When looping is enabled (count 0 or greater than 1), the date and time is displayed as each test
is executed. The timestamp is displayed as the test begins and is over-written at completion.
The DIAG.INI file, located in the c:\omnibook\diag directory, contains a “Loop” entry for each
test. The value of the entry determines whether the test can be placed in looping mode as part
of a group of tests. A value of “1” enables looping in a group, while a ”0” disables this feature.
Regardless of this setting, looping will always be available when a test is initiated individually;
the Loop entry in DIAG.INI only affects looping on groups of test. In general, group looping is
disabled for the tests that require action by the tester such as the keyboard, mouse, and joystick
tests.
User Interface
The main diagnostic program provides a user interface where the following actions can be
performed:
• launch individual or groups of tests
• loop through a given set of tests n times or indefinitely
• optionally log failures to disk
An example of the user interface screen is displayed below. Note, on the OmniBook 5500, the
Full 2 Unit IR and Fan tests are not available. Also, the Internal IR test is referred to as the Fast
IR test on the OmniBook 5500.
Menu Status Comments Date Time
Test all
Display
CPU
RAM
ROM
Upper PCMCIA
Lower PCMCIA
Internal IR
Full 2 Unit IR
RS232 port
Printer port
Hard disk
Floppy disk
Battery
Audio
Microphone
Joystick
Icon LCD
Keyboard
Pointing Device
CD-ROM
SCSI
Fan
Use ↑ or ↓ keys to select a test then press ENTER to run, or press SPACE
to mark several tests, then press ENTER to run marked tests in loop.
Test message window
Figure 8 - Diagnostics User Interface
The current test will be displayed in inverse video. The Test message window is an area of the
screen, varying in size, that individual tests use for displaying messages. If used by a test, it
pops up and is then removed when the test completes. The Status column is used to display the
results of individual tests. Comments will be used for additional information. Date and Time are
used for looping tests.
30
Page 33

Keys are accepted from the keyboard, an external keyboard, or the serial port. The Alt key, used
in conjunction with the appropriate letter, will pop-up each menu on the screen. Refer to Table 6
for a description of each key that is available for use in the user interface.
Table 6 - Dianostic Interface Available Keystrokes
Key Description
Selecting Tests
Enter run the selected tests (marked or hightlighted)
Ctrl-Enter run the alternate selected tests (marked or highlighted).
See list of individual tests.
Space mark or select a test
Cursor Movement
End move highlight to end of test list
Home move highlight to beginning of list
Up Cursor move highlight to the previous test in list
Down Cursor move highlight to the next test in list
Miscellaneous
Alt-L toggle Logging on/off
Alt-C set loop Count
Backspace stops a looping test but leaves looping in effect
Esc return to previous level; used to exit dialogs; from the
main screen exits diagnostics causing a reset
Interpretation of test results
The test results will be displayed in the Status column of the user interface screen. Possible
results are OK, Done, User Abort, Failed or a brief message indicating the type of failure. OK
indicates that the test passed. Done indicates that the test has completed. See Details on
Individual Diagnostic Tests beginning on page 33 for more information on each individual test.
Special test hardware requirements
Several tests within the OmniBook diagnostics program require special hardware. If the
hardware is not present, the diagnostics will fail or not function properly. The below table lists
the tests that require special hardware.
Table 7 - Diagnostic Tests that Require Special Hardware
Test Required Hardware
Full 2 Unit
1
IR
Another OmniBook running the alternate (reflecting) 2 unit IR
test. See the Full 2 Unit IR test instructions on page 36.
RS-232 port RS-232 serial loop back connector (see page 32 for diagram).
Printer port Parallel port loop back connector (see page 32 for diagram).
Floppy disk Formatted floppy disk which is not write protected.
Joystick Joystick and F1181A port adapter.
CD-ROM CD in the CD-ROM drive.
SCSI The OmniBook must be docked.
1
Not available on the OmniBook 5500
31
Page 34

Loop Back Connectors
In order to run the RS232 serial port or parallel port self-test, a loop back connector is needed.
The loop back may be placed on either the OmniBook port or at the end of the corresponding
cable. This feature is also helpful in diagnosing a defective serial or parallel cable.
Loop back connectors may be purchased or easily constructed. The following illustrations
identify the correct pin-out configurations for the serial and parallel loop back connectors.
Figure 9 - Serial Loop Back Connector
Figure 10 - Parallel Loop Back Connector
32
Page 35

Details on Individual Diagnostic Tests
This section explains each test within the diagnostics program. Each test is listed along with its
command-line file name. A brief description of the test, command-line parameters, valid
keystrokes available during the test, and corresponding failure messages with error codes are
also given.
Note, the term “flushed” that is used in the keystrokes sections indicates that the key is read from
the key buffer and then discarded.
Test All
This is an easy way to run all the tests in sequence. However, looping does not work as
expected with the Test All selection. For example, if three tests are tagged for looping and Test
All is initiated, then the first two tests are executed only once. The last test in the sequence is
the only test that will be looped.
Display - (DISP.COM)
The Display test executes a sequence of patterns on the screen:
1. Tests video RAM, which leaves vertical lines in groups of 4.
2. Draws a box around the outside edge of the display, filling the center with black.
3. Fills the entire display with white.
4. Fills the entire display with a 10-pixel checkerboard.
5. Fills the display with horizontal lines on every 4th pixel, then steps the lines 3 times.
6. Fills the display with vertical lines on every 4th pixel, then steps the lines 3 times.
7. Draws 16 horizontal bars of different colors.
8. Draws 16 vertical bars of different colors.
9. Draws 4 horizontal shaded bands (red, green, blue, and white) with vertical tick marks.
DOS Parameter Explanation
1, 0, or none Wait for a key after each display pattern
2 or greater Don’t wait for a key
Valid Keystrokes Action
any key When the DOS parameter is set to wait for
a key, any key will step to the next display
pattern; the only way to exit the test is to
step through all patterns.
Esc Aborts the test and all other keys are
flushed.
Failure Message Error Code Meaning
User Aborted 1 User aborted test.
Failed 2 Video RAM is bad.
33
Page 36

CPU - (CPU.EXE)
The CPU test checks the general purpose registers by copying a bit pattern through each
register. Then a test of the Translation Lookaside Buffer is performed.
DOS Parameter Explanation
none
Valid Keystrokes Action
n/a The CPU test ignores the keyboard.
Failure Message Error Code Meaning
User Aborted 1 User aborted test.
Failed 2 The register test failed.
Failed 3 The CPU is in protected
mode, must clean boot.
Failed 4 The Translate Lookaside
Buffer test failed.
RAM - (RAM.COM)
The RAM test checks the base 640K of RAM first, then the remainder of memory.
DOS Parameter Explanation
none
Valid Keystrokes Action
Backspace Aborts the test, all other keys are flushed.
Failure Message Error Code Meaning
User Aborted 1 User aborted test.
Failed 3 Could not move to new code
segment. RAM is bad.
Failed 4 CPU protected mode bit set,
must clean boot.
ROM - (ROM.EXE)
The ROM test performs a 1-byte arithmetic checksum on the ROM block at address F000.
DOS Parameter Explanation
none
34
Page 37

Valid Keystrokes Action
n/a The ROM test ignores the keyboard.
Failure Message Error Code Meaning
User Aborted 1 User aborted test.
PCMCIA - (PCMCIA.COM)
The PCMCIA test sets up the TI CardBus controller chip, tests IRQ 3, and restores the chip.
DOS Parameter Explanation
0 Test lower slot
1 (or any non-0 value) Test upper slot
Valid Keystrokes Action
n/a The PCMCIA test ignores the keyboard.
Failure Message Error Code Meaning
User Aborted 1 User aborted test.
Failed 2 IRQ fail
Internal IR - (FIRTEST.EXE)
This test performs a minimal test of the IR chip but does not require a second OmniBook. The
Full 2 Unit IR test is a more thorough test and does require a second OmniBook (see next
section).
DOS Parameter Explanation
Internal Performs the internal (standalone) test.
Valid Keystrokes Action
n/a The Internal IR test ignores the keyboard.
Failure Message Error Code Meaning
Must clean boot 1 CPU protected mode bit set,
must clean boot.
Must undock 3 This test cannot run while
docked. Can also get this
error if the internal transmit
failed.
Failed 5 Receive fail or any other fail.
35
Page 38

Full 2 Unit IR Test - (FIRTEST.EXE)
The Full 2 Unit IR test is not available on the OmniBook 5500. This test requires two
OmniBooks: one on which the IR is known to be good, and the computer to be tested. The
computer that is being tested will transmit IR packets to the known good computer, which will
transmit (reflect) the packets back. This method ensures both transmitting and receiving
functions are checked on the computer under test.
The test checks 115200 baud, 1.152 Mbps, and 4 Mbps by sending 20 packets at each speed
and looping through the 3 speeds three times for a total of 60 packets at each speed. Every
received packet is checked byte for byte against the packet that was sent. Every packet must
pass or the test will fail.
To run the "Full 2 Unit IR" test, perform the following steps:
1. Clean boot both computers.
Windows 95 -- reboot and press <shift><F5> shortly before or after the
computer displays "Starting Windows 95".
Windows for Workgroups -- reboot and press <F5> while the boot menu
is displayed.
After clean booting, change to the c:\omnibook\diag directory.
2. Prepare the known good computer to reflect packets to the test unit.
Run DIAG.EXE and highlight "Full 2 Unit IR" and press
<CTRL> + <ENTER>. (When desired testing duration is
complete, press any key to abort the reflecting end of the test.)
3. Position the computer to be tested so that the IR port is in line with the IR port on the
known good unit. For a simple pass/fail test, run DIAG.EXE, highlight "Full 2 Unit IR"
and press <ENTER>.
DOS Parameter Explanation
Internal Performs the internal (standalone) loopback
test. This option does not test as much of
the IR hardware, but will work with just one
computer. Do not use this parameter with
any of the other parameters.
Reflect Initiates the "known good" reflecting end of
the full 2 unit test.
Baud=xxxxxx Sets the baud for the first speed tested
(defaults to 115200 baud). Unless
/PHYTEST is also used, the 1.152M and
4M speeds will always be tested. Type in
the full number for the baud to be tested
(type 1152000 for 1.152Mbps, 4000000 for
4Mbps). Note -- This parameter must be
used on both the known good reflecting
computer and the computer under test.
Both computers must start at the same
speed to be able to communicate.
Loops=xxxxx Sets the number of times to loop through
36
Page 39

the 3 speeds under test. Default = 3.
Phytest Limits the test to just one speed which can
be set with /BAUD. It also uses all null
bytes rather than random data. Default
speed = 115200 baud
Valid Keystrokes Action
any key Any keystroke will abort The Full 2 Unit IR
test.
Failure Message Explanation
OK The test passed.
Must clean boot A clean boot is required prior to the test
(see step 1 above).
User abort The test was aborted.
Must undock The test cannot run when the OmniBook is
docked.
No reflector unit The computer under test did not receive
back any of the packets it transmitted.
Either the known good computer is not
positioned properly or is not running the test
(see step 2 above).
Fail The test failed.
RS-232 Port - (RS232.COM)
NOTE:
The RS-232 Port test reads/writes to the COM1 serial port IER, baud divisor registers, and LCR.
It also checks for the loopback connector and sends a byte through the loopback connector at
each of the baud rates. The RS-232 Port test is hardcoded to test the UART at 3F8, therefore, it
can test only COM1.
DOS Parameter Explanation
none
Valid Keystrokes Action
n/a The RS-232 test ignores the keyboard.
Failure Message Error Code Meaning
User Aborted 1 User aborted test.
Failed 2 No loopback connector
No loopback 3 Sending bytes failed
No loopback 4 Register read/write test failed
This test requires a serial loopback connector to be connected to the serial
port.
37
Page 40

Printer Port - (LPT.COM)
NOTE:
The Printer Port test checks the data port by writing and reading different bytes 1000 times. The
loopback connector is tested by toggling data bits 0 and 1 and seeing if the PE bit gets set.
Finally, all of the loopback connections are tested.
DOS Parameter Explanation
none
Valid Keystrokes Action
n/a The Printer Port test ignores the keyboard.
Failure Message Error Code Meaning
User Aborted 1 User aborted test.
No loopback 3 Initial check for loopback
No loopback 4 Data port test failed.
No loopback 5 Loopback connector test
This test requires a parallel loopback connector to be connected to the
parallel port.
connector failed.
failed.
Hard Disk - (HDC.EXE)
The Hard Disk test verifies the presence of a hard disk, then reads/writes to the sectors. Within
the user interface of Diag, pressing the Enter key invokes a short test. The short test check 1%
of the cylinders and takes about a minute to complete. Pressing Ctrl-Enter runs the long test.
This checks 100% of the cylinders and takes about 1.5 hours to complete.
DOS Parameter Explanation
1, none Only test 1% of the cylinders
N Test N% of the cylinders
Valid Keystrokes Action
Esc Aborts the test, all other keys flushed.
Failure Message Error Code Meaning
User Aborted 1 Esc key pressed, or bad hard
drive
Failed 2 No hard disk
Failed 3 Hard drive controller failed.
38
Page 41

Floppy Disk - (FDC.EXE)
NOTE:
The Floppy Disk test checks for the presence of a floppy drive with a floppy disk. If a floppy disk
is not present in the drive, the test will prompt for one. At this point, a floppy disk must be
inserted to continue (a reboot is necessary to abort at this stage). The sectors on the floppy disk
are then tested. A complete test (100% of the sectors) takes about 1 minute and 38 seconds.
DOS Parameter Explanation
1, none Only test 1% of the sectors
N Test N% of the sectors
Valid Keystrokes Action
Esc Once the test begins testing the floppy disk,
Failure Message Error Code Meaning
User Aborted 1 Esc key pressed, read/write
This test requires a formatted floppy disk to be inserted in the floppy drive.
Esc will abort; all other keys are flushed.
fail, or write protected disk
Battery - (BATTERY.EXE)
The Battery test displays battery voltage, temperature, type, charging information, and CPU
temperature.
DOS Parameter Explanation
none
Valid Keystrokes Action
Esc The Battery test will run until the Esc key is
pressed; all other keys are flushed.
Failure Message Error Code Meaning
none n/a The test does not return an
error code.
Audio - (AUDIO.EXE)
The Audio test plays “Row, Row, Row Your Boat.” It is up to the tester to determine if the audio
fails or succeeds.
DOS Parameter Explanation
none
39
Page 42

Valid Keystrokes Action
n/a The Audio test ignores the keyboard.
Failure Message Error Code Meaning
User Aborted 1 User aborted test.
Failed 3 A sound chip configuration call
failed
Microphone - (MIKE.EXE)
Within the user interface of DIAG, the Microphone test records for a short time and then plays
back what was recorded (similar to the “Rec” parameter).
DOS Parameter Explanation
Rec Record and play back what was recorded
On Turns the microphone on
Off Turns the microphone off
Gainon Sets the gain bit in the sound chip
Gainoff Clears the gain bit in the sound chip
Squeal Turns the microphone on, sets the gain bit,
turns the volume all the way up (so it
squeals), waits for a key press, then turns off
the gain bit and the microphone.
Vol n Sets the microphone volume where n = 1 to
31 (31 being loudest)
Valid Keystrokes Action
n/a The Microphone test ignores the keyboard.
Any keys pressed will be executed when the
test finishes.
Failure Message Error Code Meaning
1 Parameter error
Joystick - (JOYSTICK.EXE)
NOTE:
The Joystick test prompts to press joystick buttons and to move the pointer to various positions.
DOS Parameter Explanation
none
40
This test requires a joystick and port adapter F1181A.
Page 43

Valid Keystrokes Action
Esc The Esc key will abort the Joystick test; all
other keys are flushed.
Failure Message Error Code Meaning
User Aborted 1 Pointer movement test
aborted with Esc
Failed 2 Joystick button test aborted
with Esc
Icon LCD - (ICON.EXE)
The Icon test illuminates each segment of the icons in the icon LCD, moving from left to right.
The test then flashes the entire panel three times. This is a visual test; no error codes are
returned.
DOS Parameter Explanation
none
Valid Keystrokes Action
n/a The Icon LCD test ignores the keyboard.
Any keys pressed will execute when the test
finishes.
Failure Message Error Code Meaning
User Aborted 1 User aborted test.
Keyboard - (KEYBD.EXE)
The Keyboard test consists of two types of tests: a full keyboard test, and a short keyboard test.
For the full test, press the keys from left to right, top to bottom starting with Esc. For the short
test, start with Pause/Break key and go clockwise around the outside of the keyboard and finish
at the Scroll Lock key. Both tests skip the Fn key.
A high-pitched beep after a key press means it was the correct key and a low-pitched beep
means it was incorrect. After an incorrect key is entered (low-pitched beep), the test allows four
more attempts at entering the correct key.
The “Display Mode” of the keyboard test will display the number of the key as each key is
pressed. The keys may be entered in any order. This mode is entered by pressing Esc during
the test (as long as Esc is not the next key in the key sequence to be tested). Pressing Esc
again exits display mode and resumes the keyboard test.
The DIAG.INI must be modified in order to invoke the short test within the user interface. Use
the corresponding parameter explained in the below DOS Parameters table.
41
Page 44

DOS Parameter Explanation
1 Perform the short test
any non-1 value Perform the full test
Valid Keystrokes Action
any key To abort the keyboard test, press five,
consecutive, incorrect keys.
Failure Message Error Code Meaning
User Aborted 1 User aborted test.
Pointing Device - (MOUSE.EXE)
The Pointing Device test prompts the tester to move the mouse cursor to four points on the
display. The left and right mouse buttons are then tested.
DOS Parameter Explanation
none
Valid Keystrokes Action
n/a The Pointing Device test ignores the
keyboard. Any keys pressed will execute
when the test finishes.
Failure Message Error Code Meaning
User Aborted 1 User aborted test.
Failed 2 Timed-out waiting for tester
action (10 seconds)
Failed 3 TrackPoint or H8 failed
CD-ROM - (CDROM.EXE)
NOTE:
The CD-ROM test checks the CD-ROM controller and IRQ 15. Then a block is read and verified
10 times followed by an eject test.
DOS Parameter Explanation
none
This test requires a CD to be inserted in the CD-ROM drive.
Valid Keystrokes Action
Esc The Esc key aborts the CD-ROM test; all
42
Page 45

other keys flushed.
Failure Message Error Code Meaning
User Aborted 1 User aborted test.
CD Not Ready 2 CD not ready, no CD in drive
H/W Error 3 Timeout waiting for IRQ
Drive Not
Present
Read Error 5 The read failed
4 CD drive not installed
SCSI - (SCSI.EXE)
NOTE:
The SCSI test checks for the presence of the PCI BIOS and SCSI controller. The test then
checks for the presence of a SCSI hard disk, resets it, and copies the file SCSI.EXE to it.
DOS Parameter Explanation
none
The OmniBook must be docked for this test to function properly.
Valid Keystrokes Action
n/a The SCSI test ignores the keyboard.
Failure Message Error Code Meaning
User Aborted 1 User aborted test.
Failed 2 File copy to SCSI hard drive
failed
Failed 3 PCI BIOS not present
Failed 4 SCSI controller not present
Failed 23 Error resetting the SCSI hard
drive
Fan - (FAN.EXE)
The Fan test is not available on the OmniBook 5500. This test turns on the fan for the specified
number of seconds. In the DIAG user interface, the Enter key instructs the test to run the fan for
two seconds, while Ctrl-Enter runs the fan for five seconds.
DOS Parameter Explanation
n Number of seconds to run the fan
(default=5)
Valid Keystrokes Action
any key Any key aborts the Fan test.
43
Page 46

Failure Message Error Code Meaning
User Aborted 1 User aborted test.
44
Page 47

Desktop Management Interface (DMI)
The Desktop Management Task Force (DMTF) was founded in 1992 by a group of leading
computer manufacturers, including Hewlett-Packard, to define a standard method of managing
the physical and logical components of personal computers. The result of these efforts is the
Desktop Management Interface (DMI). The DMI package is pre-installed on the OmniBook 2000
and 5700.
Description of DMI
DMI is basically a set of rules for accessing information about a personal computer. Using DMI,
an application program can determine, for example, which hardware and software components
are present in a personal computer, the operating system that is being used, and the number of
accessory board slots that are available. Using the DMI interface, a local or remote application
program can check what hardware and software components are installed on your computer,
how well they are working, and whether any needs replacing.
All this information is stored in a special Management Information Format (MIF) file, installed on
each personal computer as part of the DMI package. The MIF file specifies information about
components at two levels:
• Groups contain all the information concerning a particular hardware or software
component. If more than one component of the same type is present, as is often the
case with serial ports and hard disk drives, a group is repeated.
• Attributes are specific items of information relating to a group. Attributes of the Mouse
group, for example, include the number of mouse buttons and the name and version
number of the mouse driver being used.
Hewlett-Packard has developed a number of extensions to DMI to allow the enhanced features
of HP OmniBook Notebook PCs to be managed with DMI. These extensions cover:
• Administrator and user passwords.
• Tattooing: a string of characters that uniquely identifies the computer.
Note: The DMI software package included with the OmniBook can only be used with the HP
OmniBook Notebook PC.
For full details of the structure of the MIF file, including an explanation of the meaning of the
fields of groups and attributes and how to write an application program that accesses this
information, you can access the DMTF FTP server ftp.dmtf.org or the DMTF Web Pages at the
URL www.dmtf.org .
Contents of the DMI Package
The DMI software and associated documentation is supplied either pre-installed on the
OmniBook's hard disk drive or on two flexible disks. The contents of the package are the same
in both cases.
Since the information accessed by the DMI software is specific to a particular computer, it must
be installed on each computer separately.
45
Page 48

The following software is supplied with the DMI package:
Management Applications
Management Interface (MI)
Service Layer
Component Interface (CI)
MIF
Database
Management
console
Desktop
management
application
LAN
management
application
Modem
Word
processor
Hard disk
CD-ROM
Spreadsheet
Printer
Manageable Products
Installation
or setup
program
Support
application
• A Microsoft Windows utility, SETUP.EXE, to install and initialize the DMI software.
• A Windows utility, HP TopTools. After DMI is installed, this utility can be used to display
information about the computer through the DMI.
• A Management Information Format (MIF) file. This file contains information about
everything on the computer that can be controlled using DMI facilities, and is initialized
during installation.
• A component code, identifying the version of MIF file to use for specific models of HP
OmniBook Notebook PCs.
• Windows-compatible DMTF Service Layer software, which controls access to the DMI.
• A client agent. The HP Remote DMI Agent is a DMI application and also a network
server-side stream-based application. The Remote Agent is listening for Remote
Application connection requests. If the main window of the Remote Agent is hidden, then
no icon will appear on the screen when it is running.
Figure 11 provides a visual representation of the many components of the DMI package.
Figure 11 - DMI Components
46
Page 49

Installing the DMI Package from Windows 95
The DMI package is included with the OmniBook, but it must be properly installed before it can
be used. The following steps explain how.
Alternatively, to install the DMI from floppy disks:
• Copy the DMI software from the \omnibook\dirvers\win95\dmi directory of either the hard
disk or Recovery CD to two floppy diskettes (copy the contents of the \disk1 subdirectory to
diskette #1 and the contents of the \disk2 subdirectory to diskette #2).
• Start Windows 95, if it is not already running.
• Insert diskette #1 into the floppy drive.
• Select and run the SETUP program from the diskette #1.
To install the DMI preloaded on the hard disk:
• Start Windows 95, if it is not already running.
• Click on "Start".
• Go to "Programs - HP DMI".
• Select and run "SETUP".
Uninstalling the DMI Package from Windows 95
• Go to the HP DMI group.
• Launch the program "Uninstall DMI".
• Reboot the PC.
Using the DMI Interface
For a complete explanation of how to fully take advantage of DMI, the following documentation
is provided with the OmniBook:
• A README.TXT file.
• A Windows online help file describing Hewlett-Packard's implementation of DMI (group and
attribute definitions). Since not all Hewlett-Packard enhanced features are supported on all
models, this document also describes any restrictions that apply.
47
Page 50

System Configuration Utility
The System Configuration Utility (SCU) can be used to troubleshoot both software and hardware
issues. Settings in the SCU may cause unexpected results in the operation of the OmniBook or
installed applications. Battery charge and other system settings also can be verified with the
SCU. The SCU settings are identical for the OmniBook 2000, 5500, and 5700, except where
noted below.
The SCU is operating system independent and can be accessed by pressing F2 at boot-up or
Fn+F2 at any other time. Use the <Alt> key to activate the menus and the cursor keys to
navigate. The left mouse button, spacebar, and <Enter> key can also be used. The right mouse
button and the <Esc> key will cancel the current action.
Main Configuration Screen
The main configuration screen of the SCU reports several system settings. See Figure 12 for an
example of the main screen. The reported settings cannot be modified from the main screen;
the changes must be made from the corresponding menu.
Figure 12 - Main Configuration Screen
48
Page 51

System Menu
The system menu of the SCU provides an interface to modify several system settings. See
Figure 13 for an example of the system menu. An explanation of each system setting and the
corresponding options are provided in Table 8.
Figure 13 - System Menu Screen
Table 8 - System Menu Settings
Setting Parameters Default Comment
Date and Time… Day; Month; Year;
Hour; Minute; Second
Boot Devices…
Boot Device FDD First; HDD First FDD First Booting from HDD first is useful
for protecting a computer from
becoming infected by a bootsector virus.
Boot Configuration Full; Boot devices only;
Auto-detect
Auto-Detect Full configures all PnP devices;
Boot devices only is used with
Win95; Auto-detect will configure
for the loaded OS.
Fast Boot Selected; not selected Not selected Fast Boot skips RAM test.
Enable SCSI BIOS2Selected; not selected. Not selected. Note, this requires changing the
config.sys file. In Windows 3.11
enabling SCSI BIOS maximizes
available memory when a hard
disk drive is the only SCSI device.
hard disk sector 0 (partition sector)
Enable boot sector
virus check
2
Selected; not selected. Selected. Displays message during boot if
2
For the OmniBook 5500, this requires BIOS version 2.12 or later
49
Page 52

Setting Parameters Default Comment
changed since previous boot. A
change could indicate a virus.
Docking Messages Selected; not selected Not selected Enables warning messages at
DOCK and UNDOCK.
Passwords
PC Identification blank The text entered here (maximum
Internal Cache Selected; not selected Selected Enable internal CPU cache for
External Cache Selected; not selected Selected Enable external CPU cache for
See Figure 14 Passwords Menu
Screen on page 50
of 4 lines of 24 characters per line)
will be displayed at BOOT time.
Possible text: name, address,
phone number, company, or other
asset tracking information.
faster performance.
faster performance. This setting
is not available on the
OmniBook 2000.
Passwords Menu
The password option of the system menu provides an interface to enter and modify administrator
and user passwords. See Figure 14 for an example of the password menu. An explanation of
each password option is provided in Table 9.
Figure 14 - Passwords Menu Screen
50
Page 53

Table 9 - Password Menu Settings
Setting Parameters Default Comment
Passwords…
Password option…
Admin Password
required to:
Save modifications to
PC ID texts
Save Setup changes
none selected Admin Password is required before
proceeding beyond the selected
actions. The Admin Password (if
defined) is ALWAYS required to
save changes to these checkboxes.
User Password
required to:
Turn ON, Always;
Turn ON, after
FN+Suspend;
Undock;
Save Setup changes
none selected Password is required before
proceeding beyond the selected
actions, and is ALWAYS required
to save changes to these
checkboxes. Admin Password can
be used in place of any User
password.
Disable hard disk
drive lock
2
Selected; Not selected Not selected. Check to remove password locking
of the hard disk.
Set Admin password none Allows entry of Admin password.
Set User password none Allows entry of User password.
Disks Menu
The disks menu of the SCU provides an interface to modify floppy and hard disk drive
parameters. See Figure 15 for an example of the disks menu. An explanation of each disk
parameter is provided in Table 10.
Figure 15 - Disks Menu Screen
51
Page 54

Table 10 - Disks Menu Settings
Setting Parameters Default Comment
Disks
Floppy Disk Drive None
1.44 Mb
2.88 Mb
Hard Disk Drive None
Standard
Custom
Auto-ID
1.44 Mb
Auto-ID Select the configuration type of the hard disk.
‘Standard’ selects from a table of older drivers.
‘Custom’ allows manual modification of drive
parameters. ‘Auto-ID’ will attempt to
automatically type an IDE drive. (This screen
also reports # cylinders, # heads, sectors/track,
landing zone, write precomp, type code, and
size).
Input/Output Menu
The input/output menu of the SCU provides an interface to modify serial and parallel port
parameters and other external device settings. See Figure 16 for an example of the password
menu. An explanation of each password option is provided in Table 11.
Figure 16 - Input/Output Menu Screen
52
Page 55

Table 11 - Input/Output Menu Settings
Setting Parameters Default Comment
COM Ports…
Serial Port: None
COM1, Addr 3F8, IRQ 4
COM1, Addr 3F8, IRQ 4
COM2, Addr 2F8, IRQ 3
COM3, Addr 3E8, IRQ 4
COM4, Addr 2E8, IRQ 3
IR Port None
COM2, Addr 2F8, IRQ 3
COM1, Addr 3F8, IRQ 4
COM2, Addr 2F8, IRQ 3
COM3, Addr 3E8, IRQ 4
COM4, Addr 2E8, IRQ 3
LPT Port
Printer Port None
LPT1, Addr 378
LPT1, Addr 378
LPT2, Addr 278
LPT3, Addr 3BC
LPT Type
Port Definition Standard AT (Centronics)
Bidirectional (PS-2)
Bidirectional (PS-2)
Keyboard Setup…
Key Delay ¼ sec; ½ sec; ¾ sec; 1
sec
½ sec Select the delay period to
wait (after a key is
pressed) before it will
begin to repeat.
Key Repeat Rate 2 cps; 6 cps; 10 cps; 15
cps; 20 cps; 30 cps
10 cps Select the rate at which
keys will be repeated when
they are held down longer
than the Key Delay period.
Keyboard
Numlock
Selected, Not selected Not selected Start computer with NUM
LOCK enabled.
External Devices…
VGA Display
device
External VGA if attached,
LCD off;
Both external VGA and
LCD
External VGA if
attached, LCD off;
When ‘External VGA…’ is
selected, if an external
VGA monitor is detected, it
will be enabled and the
LCD will be turned off.
When ‘Both external VGA
and LCD’ is selected, both
are ALWAYS on.
Television Type NTSC; PAL NTSC Select the television type.
This setting is available
only on the OmniBook
5500.
Force recognition
of external VGA
Selected; Not selected Not selected Available only when Both
external VGA and LCD is
selected. This setting
not available on the
OmniBook 5500.
Enable External
FN Key
Selected; Not selected Selected When enabled, CTRL +
ALT on external keyboard
acts as FN key.
Ignore External Selected; Not selected Not selected
53
Page 56

Setting Parameters Default Comment
Pointing Device
Audio Port…
Audio volume 0-7 7
Beeper volume: 0-7 3 .
Power Menu
The power menu of the SCU provides an interface to modify various power management and
battery charging configurations3. See Figure 17 for an example of the password menu. An
explanation of each power option is provided in Table 12.
Figure 17 - Power Menu Screen
Table 12 - Power Menu Settings
Setting Parameters Default Comments
Power Controls
Power Saving Off/On On Enables power saving
techniques (APM).
Suspend Disable/Time
(1 - 30 minutes or never)
3 minutes When the system has been
idle for the selected period,
the computer will suspend.
This setting not available
on the OmniBook 5500.
Auto Hibernate
(Save-to-Disk)
Disable/Time
(6 hours to 7 days or never)
1 day If the system has been
suspended for the selected
period, the entire state of
the computer will be saved
3
The power management software in some operating systems can override the SCU settings. Under
these circumstances, changes to the power management settings may have to be made within the
operating system in addition to the SCU. Refer to the operating system manual or readme file.
54
Page 57

Setting Parameters Default Comments
to the hard disk, and the
computer will be fully
powered down.
HDD power-down Disable/Time
(1-30 minutes or never)
3 minutes The hard disk will be
powered down if there have
been no disk accesses for
the selected period. Hard
disk power will be restored
when the disk is needed
again.
CPU power-down Disable/Time
(512 ms-8 seconds or
never)
2 sec The CPU clock rate will be
reduced (i.e. slower
performance) if the system
has been idle for the
selected delay. The clock
rate will be restored when
system activity is detected.
Only applicable when APM
is inactive.
Enable hibernate
(Save-to-Disk)
Timeout during
screen activity
Selected; not selected Selected Enables hibernate (disable
to free up hard drive space).
Selected; not selected Not selected Allows timeout (suspend)
during screen activity (like
screen savers).
HDD power-down
when on AC
Selected; not selected Selected Allows the hard disk drive to
spin down while AC power
is connected.
Disable low battery
message
2
Selected; not selected Not selected Inhibits display of BIOS low
battery warning message.
Does not affect reporting of
battery status by operating
systems.
Battery Charging None
Most drained first
Most drained first
Least drained first
Battery #1 first
Battery #2 first
55
Page 58

Exit Menu
The exit menu of the SCU allows various methods of exiting the interface. See Figure 18 for an
example of the exit menu. An explanation of each exit option is provided in Table 13.
Figure 18 - Exit Menu Screen
Table 13 - Exit Menu Settings
Setting Parameters Default Comment
Save and Exit n/a n/a Save current settings and return
to previous work.
Save and Reboot n/a n/a Save current settings and reboot
so that settings take effect.
Exit (No Save) n/a n/a Exit without saving current
settings.
Default Settings n/a n/a Set current setup to default
settings.
Restore Settings n/a n/a Restore current setup to original
settings.
Version Info… n/a n/a Report current BIOS version
information.
56
Page 59

Troubleshooting Tips
Presented below is a table showing general guidelines for repairing units with specific failure
symptoms. The order of likely causes is based upon data gathered by HP from analysis of failed
modules. The suggested order of investigation is not mandatory but reflects the priority HP
would currently place on looking for the root cause.
Swapping of easily replaced modules with known good reference modules is the ideal way to
isolate the cause down to the module level. It is rare for more than one module to be
responsible for the same failure symptom. Therefore, replacement of more than one module for
a particular symptom should be the exception rather than the normal expectation.
After replacing modules, it is normal for some units to end up in a confused state and lock up
when ac power is applied. If this occurs, the reset button should be pressed to bring the
computer to a known state. If the unit still locks up or continues to lock up each time ac power is
applied, the unit needs additional analysis.
Table 14 - OmniBook Troubleshooting Tips
Symptom Call Center Likely Cause
(in order)
Battery
Won’t run on
battery — no bars
in battery icon
Battery won’t
charge — light
blinks
Battery won’t
charge — no
charge indicators
Hard Disk Drive
HDD doesn’t spin
at all
Display
Dark display — no
light
Video problems —
appears horizontal
hold is out
• Try known good
battery in suspect unit
• Try suspect battery in
known good unit
• Send in for repair
• Try known good
battery
• Send in for repair
• Try known good
battery in suspect unit
• Try suspect battery in
known good unit
• Send in for repair
• Verify known good
power source
• Reseat HDD
• Send in for repair
• Ensure
contrast/brightness
button is installed
properly
• Adjust
contrast/brightness
• Send in for repair
• Send in for repair • Display
• Battery
• PT-586
• Battery
• PT-586 • Possible solder problem
• PT-586
• HDD
• HDD flex
cable
• HDD plastic kit
• Broken
backlight tube
connector not
seated
Comments
on RT1
• If the HDD plastic kit is
bent or otherwise
misshapen, the HDD may
not function properly.
• Replace display
• Lift up icon assy — push
down on left display
connector.
57
Page 60

Symptom Call Center Likely Cause
(in order)
correctly.
Keyboard
Keyboard errors —
2 characters on a
keystroke instead
• Send in for repair • PT-586
• PT-DC
• Keyboard
of one
Keyboard errors —
no response from
key(s)
Keyboard doesn’t
• Send in for repair • PT-DC
• PT-586
• Keyboard
• Send in for repair • PT-586 • Damaged U10
respond, audio
slow, battery
problems
Unit Hangs or
Won’t Boot up
Won’t boot up &
no display
• Verify known good
power source
• Push reset button
• Try pulling RAM
module and re-
• PT-CPU
• RAM module
• PT-DC
• PT-586
• PT-ICON
inserting
• Send in for repair
Unit hangs at
Win95 screen
during boot
Unit locks up after
2-3 minutes
• Eliminate any s/w
configuration conflicts
• Send in for repair
• Run BIOS upgrade
program
• PT-586 • Possible burnt R92 hangs
• PT-ICON • Corrupt EEPROM — run
• Send in for repair
Unit goes into
• Send in for repair • PT-586 • Damaged U10
suspend after
“Bridge controller”
message, won’t
resume
TrackPoint/Cursor
Cursor pointer
drifts slightly.
• It is normal for the
cursor to drift slightly
• Keyboard and
palmrest.
as the circuit does
Cursor pointer
“flying” or drifting
excessively.
a self calibrate every
once in a while
• Send in for repair.
• Mismatched
palmrest and
keyboard pair
Cursor moves in
the opposite
direction of
TrackPoint
movement
Miscellaneous
Loses time
• Plug AC adapter into
• PT-586 PhilipsIC• Refer to Service Note
unit and let it charge
for at least 24 hours.
Comments
• Damaged U10
• Shorted pins on
connectors
• Possible bad connector
solder joints
• Swap with reference CPU
to check. Replace
original CPU if not fixed.
• Make sure RAM is seated
properly — remove and
re-install to check.
up audio IC
BIOS upgrade
• Be sure keyboards are
tested with the correct
palmrest. The latest
TrackPoint sensor (CTS)
must match up with a
CTS palmrest.
Mismatched keyboards
and palmrests result in
the cursor moving
in the opposite direction
of intended movement.
• Refer to Service Note
5500-04.
5500-01 for IC problem
58
Page 61

Symptom Call Center Likely Cause
(in order)
PCMCIA failure
Slow audio and
display
Computer gets hot
• Send in for repair if
still losing time.
• Check device manager
in Win95 for resource
conflicts
• Send in for repair
• Send in for repair • PT-CPU • Check for loose heat sink
• It is normal for the
computer to get
warm/hot especially
with 150 & 166 MHz
MMX CPU and if
charging the battery.
Try using the fold
down legs to raise the
back of the machine to
promote air flow.
• On OB2000 and
OB5700, ensure air
vents are clear.
• Send in for repair
• Sub-battery
Discharged
• Flex cable
(F1320-60950)
• PT-586 U46 or
Y3 crystal IC
• PT-586 • Also check for
• PT-586
• PT-CPU
• RAM modules
Comments
and 5500-07 for backup
battery problem (should
be >4.8V).
• Replace PT-586
configuration problems
screws — tightening
should fix
• Check CPU fan for
correct operation (use
OmniBook diag program).
• Check CPU fan for
correct operation (use
OmniBook diag program).
59
Page 62

Page 63

Page 64

Page 65

Part 3
Hardware Repair
• Battery
• Memory
• Hard Disk Drive
• Floppy Disk Drive
• Small Parts
• Display
• Keyboard
• Icon Board
• CPU Module
• Logic PCA Board
• Programmable Flash BIOS IC
• Video Memory
• Other Components and Accessories
CAUTION: Always provide proper grounding when performing any of the
following repairs. An electrostatic discharge may cause irreparable
damage to the OmniBook and its components.
Page 66

Battery
(End User Replaceable)
The OmniBook 2000 and 5700 must use the F1193B (F1193-60902) Standard Lithium Ion
battery or the F1194B (F1194-60902) Enhanced Lithium Ion battery. Both of these batteries are
fully compatible with the OmniBook 5500. Do not use either the F1193A (F1193-60901) or
F1194A (F1194-60901) battery in the OmniBook 2000 or 5700 as data corruption may occur
on the hard disk drive.
WARNING:
Table 15 - Battery Compatibility Matrix
Battery Description Part Number OB2000 OB5500 OB5700
F1193A Standard LiIon F1193-60901
F1193B Standard LiIon F1193-60902
F1194A Enhanced LiIon F1194-60901
F1194B Enhanced LiIon F1194-60902
Required Equipment
• none
Removal Procedure
1. Slide the battery release switch to the right and slide the battery out of its compartment. See
Figure 19 - note, this perspective is with the OmniBook upside down, which is not necessary.
Do not mutilate, puncture, or dispose of batteries in fire. The batteries can
burst or explode, releasing hazardous chemicals. A rechargeable battery
pack must be recycled or disposed of properly.
Figure 19 - Removing the Battery
Replacement Procedure
1. Reverse the above Removal Procedure.
64
Page 67

Memory
F1320-60927
(End User Replaceable)
CAUTION:
The table below lists each of the available memory modules for the OmniBook 2000, 5500, and
5700. The check marks indicate which memory modules are compatible with each OmniBook.
Table 16 - Memory Compatibility Matrix
Memory Part Number Exchange p/n OB2000 OB5500 OB5700
8-MB F1134-60901 F1134-69001
16-MB F1135-60901 F1135-69001
32-MB F1136-60901 F1136-69001
64-MB F1335-60901 F1335-69091
Required Equipment
• Flat-bladed prying device (or fingernail)
Removal Procedure
1. Exit all applications, including Windows.
2. Remove the ac adapter and battery(ies) from the OmniBook.
3. Use a flat-bladed prying device (or fingernail) to remove the cover from the memoryexpansion slot.
4. Pull out the memory board by lifting up on the removal tab. See Figure 20.
To avoid damage due to electrostatic discharge, handle the memory module
by the edges only.
Memory Cover
Figure 20 - Removing Memory
Memory Module
65
Page 68

Replacement Procedure
1. Align the memory module over the connector slots and firmly press into place.
CAUTION:
2. Replace cover and battery(ies) and reset the OmniBook.
Avoid pressing the center of the memory module. This action could crack
the board.
66
Page 69

Hard Disk Drive
(End User Replaceable)
Whereas all the hard disk drives are compatible between the OmniBook 2000, 5500, and 5700,
the table below indicates which hard drives were originally shipped with each corresponding
OmniBook.
Table 17 - Hard Drive Availability Matrix
Hard Drive Part Number Exchange p/n OB2000 OB5500 OB5700 Hard Drive
Plastic Kit Part #
810-MB F1191-60901 F1191-69001 F1320-60947
1.35-GB F1192-60901 F1192-69001 F1320-60947
2.1-GB F1339-60901 F1339-69001 F1350-60920
3.1-GB F1348-60901 F1348-69001 F1350-60920
1.44-GB F1375-60901 F1375-69001 F1350-60920
Required Equipment
• Small phillips screwdriver
Removal Procedure
1. Exit all applications, including Windows.
2. Turn the OmniBook off and remove the battery and ac adapter.
3. Remove the screw and Security Cover located at the back end of the hard disk drive. See
Figure 21.
Hard Drive Screw
F1320-60919
Hard Drive Security
Cover
F1320-40001
Figure 21 - Removing the Hard Disk Drive
4. Firmly slide the drive out of the compartment. This will take some force.
5. If the new hard drive does not have a plastic case, the old plastic case can be removed from
the old hard drive by removing the four screws on the bottom of the case. Depending on the
manufacturer of the replacement hard drive, the screw hole placement may vary. The
67
Page 70

plastic portion of the hard drive may need to be removed to gain access to the screws of the
plastic kit. See Figure 22.
6. Now, the hard drive can be slid out of the case. See Figure 23.
Figure 22 - Hard Drive Case
Hard Drive
Figure 23 - Removing the Hard Drive Plastic Kit
Replacement Procedure
1. Reverse the above Removal Procedure.
68
Hard Drive Plastic Kit
F1350-60920 - OB2000 & OB5700
F1320-60947 - OB5500 only
Page 71

Floppy Disk Drive
Switch
(End User Replaceable)
CAUTION:
Required Equipment
• none
Removal Procedure
1. Slide the release switch on the floppy disk drive to the right.
2. Pull the pull-tab firmly to remove the floppy drive from the compartment. See Figure 24 note, this perspective is with the OmniBook upside down, which is not necessary.
Floppy Disk Drive
F1195-60901
Do not remove the floppy disk drive while the OmniBook is actively reading
or writing to it. Wait until the disk is inactive.
Pull-tab
Release
Figure 24 - Removing the Floppy Disk Drive
Replacement Procedure
1. Reverse the above Removal Procedure.
69
Page 72

Small Parts
(End User Replaceable)
The following small parts are all end user replaceable. The procedures are the same for the
OmniBook 2000, 5500, and 5700, except where noted.
Expansion Door - F1125-60920
Open the door and flex the center of the door until the side-tabs are released. Reverse to
replace.
Display Contrast/Brightness Slider Button - F1371-60917
Use a blunt probe to gently pry the slider button from the display. To replace, align the button’s
prongs over the contrast/brightness post and press firmly into place.
Door, Flash BIOS - F1371-60901
On the OmniBook 2000, remove the screw securing the door and lift the door off the bottom
case. Replace the door and screw. The OmniBook 5700 will have this feature added at a
later date; the OmniBook 5500 will not.
Hard Drive Security Cover - F1320-40001
Use a small phillips screwdriver to remove the hard drive screw and security cover. Reverse to
replace.
I/O Door - F1350-60910 (OB2000 & OB5700), F1320-60928 (OB5500 only)
Open the door and flex the center of the door until the side-tabs are released. Reverse to
replace.
Memory Cover - F1320-60927
Use a flat-blade prying device or fingernail to pry the memory cover off. To replace, snap the
cover into position.
PCMCIA Button Assembly - F1320-60949
“Unfold” the button, grasp firmly, and pull free. Reverse to replace.
Plastic Feet - F1320-60929
Flip the foot into an “open” position. Twist the foot to remove. Reverse to replace.
Printer Port Door - F1125-60918
Open the door and flex the center of the door until the side-tabs are released. Reverse to
replace.
Rubber Feet - F1320-60957
Place a probe or similar device between the rubber foot and the plastic of the bottom case. Pry
upward to pop the foot out. To replace, firmly press the foot into the hole.
Trackpoint Cap - F1320-60971
Grasp the cap firmly and pull upward. Reserve to replace.
70
Page 73

Display
(HP Authorized Service Providers Only)
The below table summarizes the compatibility of displays between the OmniBook 2000, 5500,
and 5700. Please note, that the proper Icon Board must be matched with the corresponding
display type and manufacturer.
Table 18 - Display Compatibility Matrix
Display Part # Display Type OB2000 OB5500 OB5700 Icon Board
F1320-69004 10.4” TFT PCA PT-ICON F1320-60924
F1320-69005 11.3” DSTN PCA PT-ICON F1320-60924
F1320-69006 12.1” TFT Hitachi* PCA PT-ICON
PCA PB-ICON/SVGA3F1350-60907
F1320-69094 12.1” TFT Samsung* PCA PT-ICON/SMG2F1320-60993
PCA PB-ICON/SVGA3F1350-60907
F1350-69002 12.1” TFT XGA PCA PB-ICON/XGA F1350-60908
F1371-69006 12.1” DSTN PCA PB-ICON/DSTN F1371-60911
* At the time of this printing, Samsung is considered the primary supplier of 12.1” TFT displays. Unless
otherwise indicated, all 12.1” TFT SVGA orders should be placed against F1320-69094. However, this is
subject to change without notice.
Required Equipment
• Small phillips screwdriver
1
2
Part Number
F1320-60924
Removal Procedure
1. Exit all applications, including Windows.
2. Turn the OmniBook off and remove the battery and ac adapter.
3. Follow the Hard Disk Drive Removal Procedure on page 67.
4. Turn the unit over and remove the two display screws located under the plastic feet. See
Figure 25 on page 72.
5. Turn the unit back over and remove the Icon Assembly by applying pressure with the
thumbs. See Figure 26 on page 72. Note, it is helpful to lift up on the display slightly.
6. The Icon Assembly flex cable may be disconnected at this point to completely remove the
Icon Assembly, however, it is not necessary for the removal of the display.
7. With the Icon Assembly either removed or out of the way, disconnect the Display Cables
4
and the two Display Grounding Cables. See Figure 27 on page 73.
1
Refer to Table 20 - Icon Board Compatibility Matrix on page 79.
2
For the OmniBook 5500 only
3
For the OmniBook 2000 and 5700 only
4
The type of display cables (such as flex or wire harness) may vary depending on the type of display (such
as TFT or DSTN).
71
Page 74

Figure 25 - Display Screws
Display/Chassis
Screws
F1081-60939
(qty 2)
Figure 26 - Icon Assembly Removal
72
Page 75

Display
Grounding
Cable
Display
Cables
Display/Chassis
Screws
F1081-60939
(qty 2)
Display
Grounding
Cable
Figure 27 - Display Cables
Replacement Procedure
1. To replace, reverse the above Removal Procedure. Take care to properly position the
Display Flex Cable. It must be wrapped three times around the post. See Figure 28.
CAUTION:
To avoid crimping the icon assembly flex cable, ensure that it is tucked
inside of the icon assembly “tunnel.”
Figure 28 - Display Flex Cable Position
73
Page 76

Display Labels
The OmniBook replacement display must be affixed with four labels before it is suitable to return
to the customer. The below table summarizes the proper labels for each OmniBook and display
type. The illustrations that follow demonstrate the appropriate placement of the Windows 95,
Intel, and OmniBook model labels for each of the three display sizes available.
Table 19 - Display Label Compatibility Matrix
Display
Size/Type
OmniBook
Model
HP OmniBook
Label
Windows 95
Label
OmniBook
Model Label
Intel Inside
Label
12.1” DSTN SVGA 2000CS F1065-80005 7121-7353 F1371-60913 5182-5113
12.1” TFT SVGA 2000CT F1065-80005 7121-7353 F1371-60912 see footnote
11.3” DSTN SVGA 5500CS F1065-80005 7121-7353 F1320-60969 5182-5113
10.4” TFT SVGA
5500CT F1065-80005 7121-7353 F1320-60970 5182-5113
12.1” TFT SVGA
12.1” TFT SVGA 5700CT F1065-80005 7121-7353 F1350-60917 7121-7455
12.1” TFT XGA 5700CTX F1065-80005 7121-7353 F1350-60918 7121-7455
Windows 95 Label
5
OmniBook Model Label Intel Label
30 mm
Figure 29 - 10.4" Display Label Placements
5
7121-7455 for OmniBook with MMX Technology, 5182-5113 for OmniBook without MMX Technology
74
Page 77

Windows 95 Label
Windows 95 label.
in space permitted.
Align top edge with edge
of display opening.
OmniBook Model Label
Figure 30 - 11.3" Display Label Placements
Windows 95 Label
Intel Label
Center vertically between
brightness and bottom of
display panel.
Align with center of
Center vertically between
latch opening top edge and
rubber bumper bottom edge.
OmniBook Model Label
Figure 31 - 12.1" Display Label Placements
Intel Label
Align bottom edge with bottom
edge of display opening.
Center both labels horizontally
75
Page 78
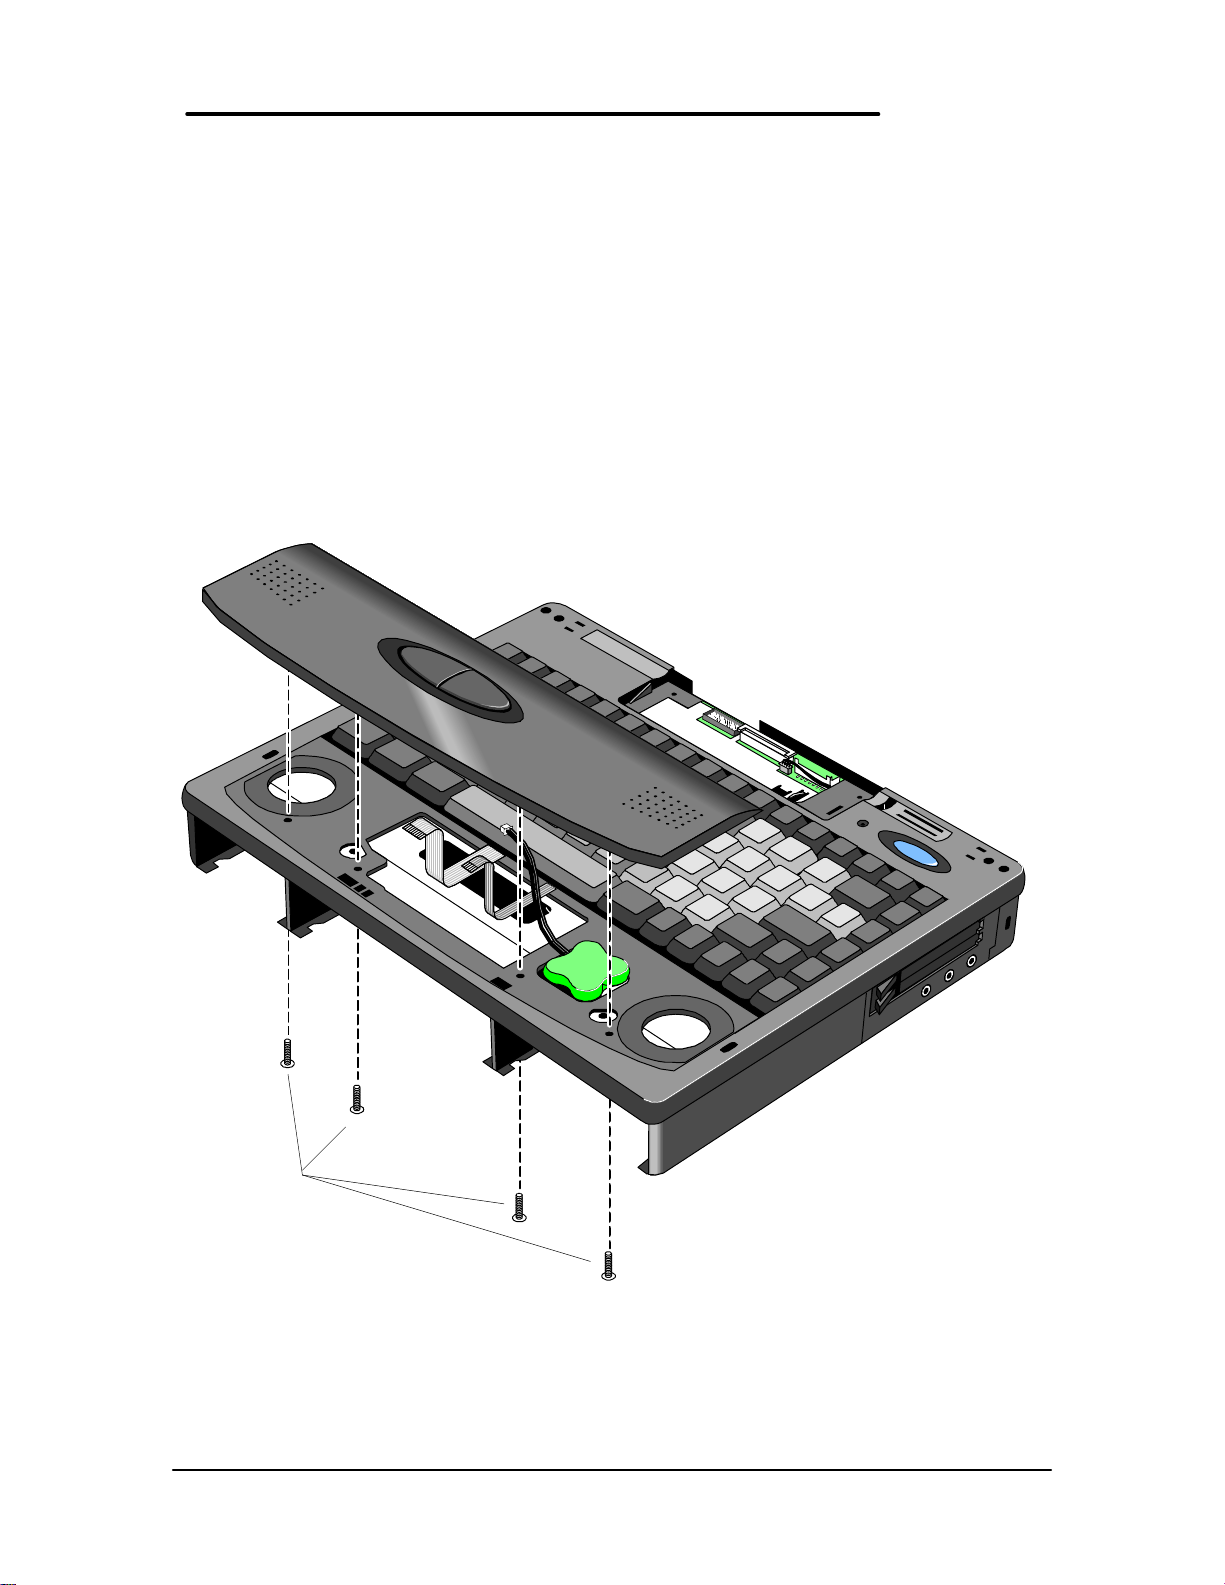
Keyboard
(HP Authorized Service Providers Only)
Required Equipment
• Small phillips screwdriver
Removal Procedure
1. Exit all applications, including Windows.
2. Turn the OmniBook off and remove the battery and ac adapter.
3. Follow the Hard Disk Drive Removal Procedure on page 67 and the Floppy Disk Drive
Removal Procedure on page 69 to remove these components.
4. Remove the four Palmrest Screws (see Figure 32 for the location of the screws – Note, the
Display is shown removed for illustrative purposes; it is not necessary for the repair
procedure).
Palmrest
Screws
F1081-60942
(qty 4)
Figure 32 - Palmrest Assembly Removal
76
Page 79

5. Flex the center of the Palmrest Assembly to release the side-tabs. Disconnect the Keyboard
Flex cable. The other two cables can remain in place, or disconnect to fully remove the
Palmrest Assembly.
6. Remove the four Keyboard Screws (see Figure 33 for the location of the screws).
Keyboard
Screws
F1320-60920
(qty 4)
Figure 33 - Keyboard Screws
7. Lift up the Keyboard – be sure to thread the Keyboard Flex Cable underneath the plastic of
the Upper Chassis Case.
8. To remove the Keyboard further, the DC Power Supply Board must be removed. Pull up
evenly on both tabs of the Power Board. See Figure 34.
CAUTION:
Applying uneven pressure when removing the Power Board may cause
damage to the connector pins.
77
Page 80

DC Power Supply Board
F1350-60909 - OB2000 & OB5700
F1320-60925 - OB5500 only
Figure 34 - Keyboard Removal
9. Disconnect the two flex cables from the Power Board.
Replacement Procedure
1. Reverse the above Removal Procedure. Take note to properly thread the Keyboard Flex
Cable underneath the plastic of the Upper Chassis Case.
78
Page 81

Icon Board (PCA PB-ICON)
(HP Authorized Service Providers Only)
The table below lists the icon boards compatible with the OmniBook 2000, 5500, and 5700. Note
the column indicating the matching LCD type (the icon boards and LCD types must not be
mismatched). There are no exchange part numbers for any of the icon boards.
Table 20 - Icon Board Compatibility Matrix
Icon Board Part Number OB2000 OB5500 OB5700 LCD Type/Mfg. LCD Part #
PCA PT-ICON F1320-60924 All/Hitachi see footnote
PCA PT-ICON/SMG F1320-60993 12.1 TFT/Samsung F1320-69094
PCA PB-ICON/SVGA F1350-60907 SVGA TFT F1320-69094
F1320-69006
PCA PB-ICON/XGA F1350-60908 XGA TFT F1350-69002
PCA PB-ICON/DSTN F1371-60911 DSTN F1371-69006
Required Equipment
• Small phillips screwdriver
Removal Procedure
1. Exit all applications, including Windows.
2. Turn the OmniBook off and remove the battery and ac adapter.
3. Follow the Display Removal Procedure on page 71 and the Keyboard Removal Procedure
on page 74 to remove these components.
4. Remove the Upper Chassis Case Screw and disconnect the On/Suspend Button and
Microphone Cables. Lift the Upper Chassis from the base of the unit. See Figure 35.
6
7
6
Also refer to Table 18 - Display Compatibility Matrix on page 71
7
F1320-69004 for 10.4” TFT, F1320-69005 for 11.3” DSTN, and F1320-69006 for 12.1” TFT
79
Page 82

F1320-60931 - OB5500 only
Upper Chassis
F1320-60963
Case Screw
Microphone
Cable
On/Suspend
Button Cable
Upper Chassis Case
F1350-60915 - OB2000 & OB5700
Figure 35 - Upper Chassis Case Removal
5. Remove the Icon Board Screw (see Figure 36). Gently rock the Icon Board back and forth to
free it from the connector.
80
Page 83

Icon Board Screw
F1320-60963
Icon Board
Figure 36 - Icon Board Removal
Replacement Procedure
1. Reverse the above Removal Procedure.
81
Page 84

CPU Module
(HP Authorized Service Providers Only)
The following table lists the various CPU modules for the OmniBook 2000, 5500, and 5700.
Table 21 - CPU Module Compatibility Matrix
CPU Module Part Number Exchange Part # OB2000 OB5500 OB5700
100C F1320-60901 F1320-69001
120C F1320-60902 F1320-69002
133C F1320-60903 F1320-69003
150C (MMX) F1350-60904 F1350-69004
166C (MMX) F1350-60905 F1350-69005
P54C-133 F1371-60908 F1371-69008
P55C-133 (MMX) F1371-60909 F1371-69009
Required Equipment
• Small phillips screwdriver
Removal Procedure
1. Exit all applications, including Windows.
2. Turn the OmniBook off and remove the battery and ac adapter.
3. Follow the Display Removal Procedure on page 71 and the Keyboard Removal Procedure
on page 74 to remove these components.
4. Remove the Upper Chassis Case Screw and disconnect the On/Suspend Button and
Microphone Cables. Lift the Upper Chassis Case from the base of the unit. See Figure 35
on page 80.
5a. For the OmniBook 2000 and 5700, follow these steps:
1) Remove the two CPU Screws (see Figure 37 on page 83 for the location of the screws)
and disconnect the CPU Fan Cable.
2) Gently rock the CPU Module back and forth to remove.
3) Remove the two CPU Fan Screws and the CPU Fan (see Figure 37 for the location of
the screws).
5b. For the OmniBook 5500, follow these steps:
1) Remove the two Heat Spreader Screws and lift away the Heat Spreader. Refer to
Figure 38 on page 84.
2) Remove the one Heat Pipe Bracket Screw and lift away the Heat Bracket.
3) Very carefully lift the Heat Pipe from the Keyboard Shielding Plate. Do not bend the
Heat Pipe as this will decrease its effectiveness.
4) Remove the two Heat Sink Screws and the four CPU Screws. Gently rock the CPU
back and forth to remove.
82
Page 85

CPU
F1350-60925
F1350-60926
Module
CPU Screws
F1350-60927
(qty 2)
CPU Fan
F1350-60906
CPU Fan
Screw
CPU Fan
Screw
Figure 37 - CPU and CPU Fan Removal (OB2000 & OB5700 only)
83
Page 86

Heat Pipe Bracket Screw
F1320-60963
Heat Pipe Bracket
F1320-60972
CPU Screws (4)
F1320-60963
CPU Module
Heat Spreader
Screw (left)
F1081-60942
Heat Spreader
Screw (right)
F1320-60963
Heat Spreader
F1320-60921
Heat Pipe
F1320-60964
Heat Sink
F1320-60954
Heat Sink
Screws (2)
F1350-60927
Figure 38 - CPU and Heat Spreader Removal (OB5500 only)
Replacement Procedure
1. Reverse the above Removal Procedure
84
Page 87

Logic PCA Board (PCA PB-586/IO Bracket)
(HP Authorized Service Providers Only)
The OmniBook 2000 and 5700 are shipped with an electronic serial number programmed in
EEPROM on the Logic PCA Board. This built-in serial number will help MIS managers in
tracking assets and software configuration. Serial numbers can also be used for security and in
tracking lost or stolen notebooks. The Desktop Management Interface (DMI) TopTools
application shipped with the OmniBook can be used to read the serial number locally and across
a network (requires HP OpenView network administration software architecture).
Programming the Electronic Serial Number
All replacement Logic PCA Boards will arrive without a serial number programmed in EEPROM.
The following procedure provides the steps necessary to program the electronic serial number
1. After installation of the replacement Logic PCA Board and upon reboot, the OmniBook will
halt with this prompt:
INVALID ELECTRONIC SERIAL NUMBER
PRESS ANY KEY TO CONTINUE
2. After a key is pressed, the OmniBook will continue a normal boot process. The HP
Authorized Service Provider must program a valid serial number before the OmniBook can
be shipped to the customer.
3. Boot the OmniBook to the DOS command-line an run the ESN.EXE program located in the
c:\omnibook\diag directory.
4. The ESN program will prompt for a valid serial number.
5. Enter the serial number located on the bottom of the OmniBook. Use uppercase letters to be
consistent with the appearance of the serial number on the OmniBook. The ESN program
will burn the serial number into EEPROM.
Overriding an Incorrect Electronic Serial Number
If an incorrect serial number is inadvertently burned into EEPROM, it can be corrected. Perform
the following steps:
1. Run the ESN.EXE program located in the c:\omnibook\diag directory.
2. The ESN program will prompt to confirm that the serial number is incorrect. It will then
generate a five (5) digit number key.
3. The HP Authorized Service Provider must contact Hewlett-Packard Technical Support at this
point.
4. HP Technical Support will ask for a CZ authorization number, or comparable credentials, and
the five (5) digit number (from step 2).
5. HP Technical Support will provide a validation key to the HP Authorized Service Provider.
6. Enter the validation key. This will erase the existing electronic serial number and prompt for
a new number.
7. Follow the above steps in Programming the Electronic Serial Number to enter the correct
serial number.
Note, updating the BIOS or software on the OmniBook will not affect the electronic serial
number.
85
Page 88

The following table summarizes the different logic PCA boards for the OmniBook 2000, 5500,
and 5700.
Table 22 - Logic PCA Compatibility Matrix
Logic PCA Part Number Exchange Part # OB2000 OB5500 OB5700
PCA PT-586 with
I/O Bracket
PCA PB-586 with
I/O Bracket
Required Equipment
• Small phillips screwdriver
• 5mm hexdriver
Removal Procedure
1. Exit all applications, including Windows.
2. Turn the OmniBook off and remove the battery, ac adapter. For the OmniBook 2000 and
5700 only, remove the Logic PCA Screw (see Figure 39 for location).
F1320-60926 F1320-69026
F1350-60901 F1350-69001
Logic PCA Screw
F1350-60923
(OB2000 & OB5700
Figure 39 - Additional Screw for Logic PCA Removal
3. Follow the CPU Module Removal Procedure on page 85 and the Icon Board Removal
Procedure on page 79 to gain access to the Logic PCA Board.
4. Now remove the Card Bus Bracket (OB2000 & OB5700 only) then the Keyboard Shielding
Plate (five screws). See Figure 40 on page 87 for location of the screws.
86
Page 89

5. To remove the Logic PCA Board from the Lower Chassis Case, three screws, two standoffs,
OB5700 only)
F1320-60960
the FFC Cable T/B to M/B, and the HDD-FPC Flex must first be removed. See Figure 41 on
page 88 for the location of these components. The IR Lens and Bezel are now accessible.
CAUTION:
Keyboard
Shielding Plate
Screws (qty 5)
F1350-60924
Keyboard
Shielding Plate
Apply even pressure to both sides of the HDD FPC Flex when removing or
replacing to avoid damage to the connector pins on the Logic PCA.
Card Bus
Bracket Screw
F1320-60963
(qty 1)
Card Bus Bracket
F1350-60916
(OB2000 &
Figure 40 - Keyboard Shielding Plate Removal
87
Page 90

Standoff
F1320-60962
F1350-60928
FFC Cable
T/B to M/B
F1320-60950
Screw
F1350-60924
Screw
F1350-60924
Dock Grounding
Spring Plate
Standoff
F1350-60929
Screw
F1350-60924
HDD to FPC Flex
F1320-60961
and Bracket
F1320-60965
Lower
Chassis
Case
Logic PCA
Board
IR Lens
F1320-60952
Bezel
F1320-60958
Figure 41 - Logic PCA Board Removal
Replacement Procedure
1. Reverse the above Removal Procedure.
88
Page 91

Programmable Flash BIOS IC
(HP Authorized Service Providers Only)
The replacement BIOS IC will contain enough basic BIOS programming to boot the OmniBook.
However, after replacing the IC, the BIOS must be reprogrammed. Hewlett-Packard prefers that
the system is programmed with the latest BIOS for the respective OmniBook. The latest BIOS
can be downloaded from the WWW (see Table 1 - Additional Resources on page vi).
Required Equipment
• Small phillips screwdriver
• 5mm hexdriver (OB5500 and OB5700 only)
• BIOS Insertion/Removal Tool (F1371-60904)
Removal Procedure
1. Exit all applications, including Windows.
2. Turn the OmniBook off and remove the battery and ac adapter.
3a. For the OmniBook 57008 and 5500, follow the Logic PCA Board Removal Procedure to
gain access to the BIOS IC. Turn the Logic PCA over and proceed with step four (4) below.
3b. For the OmniBook 2000, remove the Flash BIOS Door as shown in Figure 42.
Flash BIOS Door Screw
F1371-60902
Flash BIOS Door
F1371-60901
Figure 42 - Flash BIOS Door Removal
8
At a later date, the OmniBook 5700 will be compatible with the OmniBook 2000’s Lower Chassis Case.
At that time, removal of the Logic PCA will not be necessary to gain access to the Flash BIOS IC; it will be
accessible via the Flash BIOS Door as seen in Figure 42.
89
Page 92

4. Use a BIOS Insertion/Removal Tool to extract the BIOS IC from the Logic PCA. See Figure
F1371-60904
43 on page 90.
BIOS Insertion/Removal Tool
Programmable Flash BIOS IC
F1321-60907 (OB5500 only)
F1371-60903 (OB2000 & OB5700)
Figure 43 - Flash BIOS IC Removal
Replacement Procedure
1. Align the Flash BIOS IC with the slot on the Logic PCA. The IC is keyed to fit correctly.
2. Press down firmly on the IC to ensure a proper connection. See Figure 44.
3. Replace the remainder of the OmniBook components.
Figure 44 - Replacing the Flash BIOS IC
90
Page 93

Video Memory (OB2000 & OB5700 Only)
(HP Authorized Service Providers Only)
NOTE:
Required Equipment
• Small phillips screwdriver
• 5mm hexdriver
Removal Procedure
1. Exit all applications, including Windows.
2. Turn the OmniBook off and remove the battery and ac adapter.
3. Follow the Logic PCA Board Removal Procedure on page 85 to gain access to the Video
Memory.
4. Remove the one necessary screw on the Logic PCA Board. See Figure 45.
5. Rock the Video Memory Board gently back and forth to remove.
Only the OmniBook 2000 and 5700 contain video memory that is replaceable.
This repair procedure is not applicable for the OmniBook 5500.
Also be aware that the Video Memory Board contains only 1MB of the total 2MB of
video RAM on the system. The other 1MB of video RAM is integrated with the
Logic PCA Board. Therefore, to replace all of the video RAM, the Logic PCA
Board must be replaced (the replacement logic PCA will contain a new video RAM
board).
Video Memory Board
F1350-60922
Video RAM Screw
F1320-60963
Figure 45 - Video Memory Removal
Replacement Procedure
91
Page 94

1. Reverse the above Removal Procedure.
92
Page 95

Other Components and Accessories
(HP Authorized Service Providers Only)
The below table lists additional replaceable components and the disassembly procedure(s)
necessary to gain access to each. The accessories require a unit exchange (no repairable
parts), unless otherwise indicated.
Table 23 - Other Repairable Components and Accessories
Component Disassembly
Procedure(s)/page#
Bezel Logic PCA Board -
page 85
Card Bus Bracket Display - page 71
Keyboard - page 74
CD-ROM Drive The CD-ROM Drive contains
CPU Fan CPU Module - page
82
DC Power Supply
Board
Dock Grounding
Spring Plate
Docking System The Docking System
EMI Spring for LCD
Hinge
FFC Cable T/B to
M/B
HDD PCB Bracket Display - page 71
HDD-FPC Flex Display - page 71
Heat Pipe CPU Module - page
Heat Pipe Bracket CPU Module - page
Heat Pipe Spreader CPU Module - page
Heat Sink CPU Module - page
Keyboard - page 74 Small phillips
Icon Board - page 79 Small phillips
Display - page 71
Keyboard - page 74
Keyboard - page 74 Small phillips
Keyboard - page 74
Keyboard - page 74
82
82
82
82
Equipment Special Notes
Small phillips
screwdriver,
5mm hexdriver
Small phillips
screwdriver
Small phillips
screwdriver
screwdriver
screwdriver
Small phillips
screwdriver
screwdriver
Small phillips
screwdriver
Small phillips
screwdriver
Small phillips
screwdriver
Small phillips
screwdriver
Small phillips
screwdriver
Small phillips
screwdriver
The Upper Chassis must
also be removed.
no repairable components.
A unit exchange is required.
Remove the one screw
holding the Spring in place.
(F1189) does contain
repairable components.
Refer to the F1189-90008
manual for instructions.
The Upper Chassis must
also be removed. The
Hinge simply slips out of its
socket.
The Upper Chassis,
Keyboard Shielding Plate,
and Card Bus Bracket must
also be removed.
The Upper Chassis,
Keyboard Shielding Plate,
and Card Bus Bracket must
also be removed.
93
Page 96

Component Disassembly
Procedure(s)/page#
I/O Bracket
Grounding Clips
Icon Assembly Display - page 71 Small phillips
IR Lens Logic PCA Board -
Keyboard Shielding
Plate
Lower Chassis
Case
Palmrest Assembly Keyboard - page 74 Small phillips
Port Replicator The Port Replicator contains
Sub Battery Keyboard - page 74 Small phillips
Upper Chassis
Case
Logic PCA Board -
page 85
page 85
Display - page 71
Keyboard - page 74
Logic PCA Board -
page 85
Display - page 71
Keyboard - page 74
Equipment Special Notes
Small phillips
screwdriver,
5mm hexdriver
screwdriver
Small phillips
screwdriver,
5mm hexdriver
Small phillips
screwdriver
Small phillips
screwdriver,
5mm hexdriver
screwdriver
screwdriver
Small phillips
screwdriver
The Clips easily slide off
either side of the Logic PCA
Board.
The Display does not need
to be completely removed.
The Upper Chassis and
Card Bus Bracket must also
be removed.
The Keyboard does not
need to be completely
removed.
no repairable components.
A unit exchange is required.
The Sub Battery is
accessible once the
Palmrest is lifted up.
Remove the one screw and
disconnect the On/Suspend
and Microphone Cables.
94
Page 97

Appendix A - Technical Specifications
Mass Storage Specifications
Hard Disk Drive
The hard disk drive can be removed by the user for easy upgrades.
Hard drive manufacturers are subject to change without notice.
Table 24 - Hard Disk Drive Specifications
810-million-byte 1.35-billion-byte 1.44-billion-
byte
Manufacturer Toshiba Toshiba Toshiba Toshiba Toshiba
Interface ATA2 ATA2 ATA2 /ATA3 ATA2 /ATA3 ATA2 /ATA3
Recording
Method
Heads Peak Detect MR (Magneto
Average access
(read)
Track to track
seek
Full Track 25 ms 25 ms 25 ms 25 ms 25 ms
Average latency 7.14 ms 7.14 ms 7.14 ms 7.4 ms 6.18 ms
Rotational speed 4200 rev/m 4200 rev/m 4200 rev/m 4200 rev/m 4852 rev/m
Media Transfer
rate
Buffer to host 16.6 Mbytes/sec 16.6 Mbytes/sec 16.6 Mbytes/sec 16.6 Mbytes/sec 16.6
Buffer size 128KB (read and
Spindle start time 5 sec (typical) 5 sec (typical) 5 sec (typical) 5 sec (typical) 5 sec (typical)
Reliability:
MTBF: Poweron Hours
Unrecoverable
errors
Configuration:
Sector Size 512 Bytes 512 Bytes 512 Bytes 512 Bytes 512 Bytes
User Cylinders 2,920 3,650 5,160 5,160 5,020
Data Heads 6 6 4 6 10
Disks 3 3 2 3 5
PRML (Partial
Response
Maximum
likelihood)
13 ms 13 ms 13 ms 13 ms 13 ms
3 ms 3 ms 3 ms 3 ms 3 ms
24.7 (inner), 44.9
(Outer) Mbits/sec
write segmented
buffer)
300,000 hours 300,000 hours 300,000 hours 300,000 hours 300,000 hours
1.0E-13 bits
transfer
PRML (Partial
Response
Maximum
likelihood)
Resistive)
38.1 (inner), 54.8
(Outer) Mbits/sec
128KB (read and
write segmented
buffer)
1.0E-13 bits
transfer
PRML (Partial
Response
Maximum
likelihood)
MR (Magneto
Resistive)
38.6 (inner),
69.8 (Outer)
Mbits/sec
128KB (read
and write
segmented
buffer)
1.0E-13 bits
transfer
2.1-billion-byte 3.1-billionbyte
PRML (Partial
Response
Maximum
likelihood)
MR (Magneto
Resistive)
38.6 (inner),
69.8 (Outer)
Mbits/sec
128KB (read
and write
segmented
buffer)
1.0E-13 bits
transfer
PRML (Partial
Response
Maximum
likelihood)
MR (Magneto
Resistive)
43.8 (inner),
68.9 (Outer)
Mbits/sec
Mbytes/sec
128KB (read
and write
segmented
buffer)
1.0E-13 bits
transfer
95
Page 98

Floppy Disk Drive
The floppy disk drive can either be placed in the center bay slot or connected to the parallel port.
It is hot-swappable and is configured as drive A by default.
Floppy disk drive manufacturers are subject to change without notice.
Table 25 - Floppy Disk Drive Specifications
3.5-inch Floppy Drive
Manufacturer TEAC
Data Capacity 1.44MB (formatted)
2M (unformatted)
Data Transfer Rate 500k bits/sec 250k bits/sec
Disk Rotational Speed 300rpm
Track Density 135tpi
Cylinders 80
Track-to-track Time 3ms
Average Seek Time 94ms
Start Time 480ms
Average latency 100ms
Mean Time Between
Failures
Error Rate
Soft (recoverable) 1 or less per 109 bits read
Hard
(unrecoverable)
Seek 1 or less per 106 bits read
30,000 hours
1 or less per 10
12
724KB (formatted)
1M (unformatted)
bits read
CD-ROM Drive
The CD-ROM Drive is an accessory to the OmniBook. It is designed to operate only in the
center bay.
CD-ROM drive manufacturers are subject to change without notice.
Table 26 - CD-ROM Drive Specifications
6x CD-ROM Drive 10x CD-ROM Drive
Manufacturer Toshiba Toshiba
Transfer Rate 900K sustained 1710 KB/sec max
Buffer 128K 128K
Access Speed 190ms 150ms
Start-up Time 2.3 s (6x) 2.3 s (10x)
Seek Time 160ms 130ms
Modes CDROM (Mode 1&2), Photo CD, CD
Plus, CDXA, CD-I, Multisession
CDROM (Mode 1&2), Photo CD, CD
Plus, CDXA, CD-I, Multisession
96
Page 99

System Resources
Below are default values for system resources. To see other, non-default possibilities, use the
System Configuration Utility (SCU) which lists port and audio device configurations in the
Input/Output menu. For additional information on configuring system resources, refer to the
System Configuration Utility section on page 48.
The tables in this section show typical resource usage as set up by the OmniBook BIOS. Plugand-play operating systems, drivers, and SCU settings may change some of the entries.
System Interrupts
The following tables list the available interrupts for the OmniBook 2000, 5500, and 5700.
Table 27 - System Interrupts for the OmniBook 2000 and 5700
0 System timer
1 Keyboard
2 Redirect IRQ 9
3 COM2 (IR) and COM4 (free in Win95 when docked)
4 COM1 and COM3 (serial port)
5 Crystal sound
6 Floppy drive
7 LPT1 (parallel port)
8 Real-time clock
9 MIDI
10 PCI-type interrupt: CardBus (undocked) / SCSI (docked)
11 Free
12 Mouse
13 Coprocessor
14 Internal hard disk (primary IDE controller)
15 Internal CD-ROM (secondary IDE controller)
Table 28 - System Interrupts for the OmniBook 5500
0 System timer
1 Keyboard
2 Redirect IRQ 9
3 COM2 (serial IR) and COM4 (free in Win95 when docked)
4 COM1 and COM3 (serial port)
5 Crystal sound
6 Floppy drive
7 LPT1 (parallel port)
8 Real-time clock
9 MIDI
10 Fast IR (undocked)/AMD SCSI (docked)
11 Free
12 Mouse
13 Coprocessor
14 Internal hard disk (primary IDE controller)
97
Page 100

15 Internal CD-ROM (secondary IDE controller, free if no internal
CD)
System Memory
The following tables list the memory maps for the OmniBook 2000, 5500, and 5700.
Table 29 - System Memory Map for the OmniBook 2000 and 5700
C0000-CAFFF Chips & Technologies video BIOS
CB000-CBFFF Enhanced parallel port BIOS
CC000-CFFFF Free
D0000-D1FFF TI1131 PC Card Controller
D2000-E7FFF Free
E8000-FFFFF Plug-and play ISA, PCI, and System BIOS
Table 30 - System Memory Map for the OmniBook 5500
C0000-C9FFF Chips & Technologies video BIOS
CA000-CAFFF Enhanced parallel port BIOS
CB000-CFFFF Free
D0000-D1FFF Cirrus Logic PC Card Controller
D2000-E7FFF Free
E8000-EDFFF Plug-and play BIOS
EE000-EFFFF Plug-and-Play ISA
F0000-FFFFF System BIOS
System Input/Output Addresses
The following tables list the available I/O addresses for the OmniBook 2000, 5500, and 5700.
Table 31 - System I/O Addresses for the OmniBook 2000 and 5700
15C-15D Super I/O in Docking System
170-178 Secondary HDD controller (internal CD-ROM)
1F0-1F7 Internal hard disk
200-201 Joystick
220-22F Crystal sound
2F8-2FF COM2 (infrared port)
330-331 MPU 401 (MIDI)
378-37A LPT1 (printer port)
388-38B Sound
3B0-3BB VGA adapter
3C0-3DF VGA adapter
3E0-3E1 PC card bridge on PCI
3F0-3F5 Floppy controller
3F6 Primary HDD controller
3F8-3FF COM1 (serial port)
400-47F SCSI host controller
3000-300F IDE but mastering registers
6000-6FFF PC CardBus
8000-8FFF PC CardBus
98
 Loading...