

Page 1

Creating DVDs and CDs
With Your DVD Writer/CD Writer Drive
Page 2

The information in this document is subject to change without notice.
Hewlett-Packard® Company makes no warranty of any kind with regard to this material, including,
but not limited to, the implied warranties of merchantability and fitness for a particular purpose.
HP shall not be liable for errors contained herein or for incidental or consequential damages in
connection with the furnishing, performance, or use of this material. THE WARRANTY TERMS
CONTAINED IN THIS STATEMENT, EXCEPT TO THE EXTENT LAWFULLY PERMITTED, DO
NOT EXCLUDE, RESTRICT OR MODIFY AND ARE IN ADDITION TO ANY MANDATORY
STATUTORY RIGHTS APPLICABLE TO THE SALE OF THIS PRODUCT OR SERVICE TO YOU.
HP assumes no responsibility for the use or reliability of its software on equipment that is not
furnished by HP.
This document contains proprietary information that is protected by copyright. All rights are
reserved. No part of this document may be photocopied, reproduced, or translated to another
language without the prior written consent of HP.
Hewlett-Packard Company
P.O. Box 4010
Cupertino, CA 95015-4010
USA
© 2001-2003 Hewlett-Packard Development Company, L.P.
All rights reserved.
Hewlett-Packard is a registered trademark of Hewlett-Packard Company in the United States of
America and other countries/regions.
Other brand or product names are trademarks of their respective holders.
Page 3

Table of Contents
Creating DVDs and CDs .................................................................. 1
DVD Writer/CD Writer Drive Features ............................................. 1
Creating Music CDs with RecordNow! ............................................. 1
Creating CDs to Play in Your Car or Home CD Players..................................1
Creating CDs to Play on Your PC ................................................................2
About Creating a Music CD.......................................................................3
Storing Files on a DVD or CD .......................................................... 3
About Storing Data Files on Disc ................................................................4
Copying a DVD or CD ..................................................................... 4
Erasing a DVD or CD....................................................................... 5
Removing Files from a Recorded Data Disc ..................................................5
About Removing Files in RecordNow! .........................................................5
Creating DVD Movies ..................................................................... 6
Creating a Quick DVD Movie ....................................................................6
Creating a Custom DVD Movie........................................................ 8
Requirements for Capturing Video ..............................................................8
Capturing Video with ShowBiz 2................................................................8
Editing Video Files in ShowBiz 2 ................................................................9
Recording a DVD or VCD Movie with ShowBiz 2 .......................................10
Editing Recorded DVDs with ShowBiz 2 ........................................ 12
Playing Your Recorded DVD Movie ............................................... 12
Playing Your DVD in InterVideo WinDVD...................................................12
Playing Your DVD in Windows Media Player .............................................13
About Recording Video Files......................................................... 13
Disc Labels.............................................................................................13
Creating DVDs and CDs
iii
Page 4

Recording VHS Video Files onto DVDs........................................... 13
Creating Recovery CD/DVDs for the PC......................................... 13
Setting Automatic Recording Options............................................ 13
Compatibility Information............................................................. 14
Compatible File Formats.......................................................................... 15
Disc Quick Reference .................................................................... 15
Software Quick Reference ............................................................ 16
Troubleshooting............................................................................ 18
My Recording Failed............................................................................... 18
I Can’t Add Files to My Music CD ............................................................18
I Can’t Add Data Files to My DVD ............................................................ 18
My Music CD Won’t Play in My Stereo .....................................................19
The Titles of My Music Tracks Don’t Appear on My CD ...............................19
I Get an Error Message When I Try to Capture Video Files ..........................19
My PC Doesn’t Recognize My Digital Camcorder When I Try to
Capture Video Files ................................................................................19
My Movie Won’t Play on My DVD Player ..................................................19
Which Discs are Compatible With My DVD and CD Players?......................19
More Information ......................................................................... 19
iv Creating DVDs and CDs
Page 5
Creating DVDs and CDs
Creating Music CDs with
Your PC includes the DVD Writer/CD Writer,
which is a DVD and CD rewriteable optical drive.
This guide tells you about the optical drive features
and tells you about how to use some of the software
programs to create DVDs and CDs.
IMPORTANT: HP supports the lawful use of
technology and does not endorse or encourage the
use of our products for purposes other than those
permitted by national copyright law.
DVD Writer/CD Writer Drive
Features
The DVD Writer/CD Writer is a multipurpose
rewriteable optical drive that can:
• Record audio, data, and video files onto DVDs
or CDs.
• Create DVDs and VCDs that can be played on
most DVD-ROM drives and some home DVD
players.
• Record directly to a DVD or CD from a digital or
an analog video source, such as a digital video
camera, a TV tuner, or a VCR.
RecordNow!
NOTE: Burn is an industry term used to describe the
recording of information onto a DVD or CD. Optical
recording uses a laser beam to place information onto
the disc, thus the term burning.
You can use RecordNow! to create audio CDs to
play in your car or home CD player or on your PC.
Creating CDs to Play in Your Car
or Home CD Players
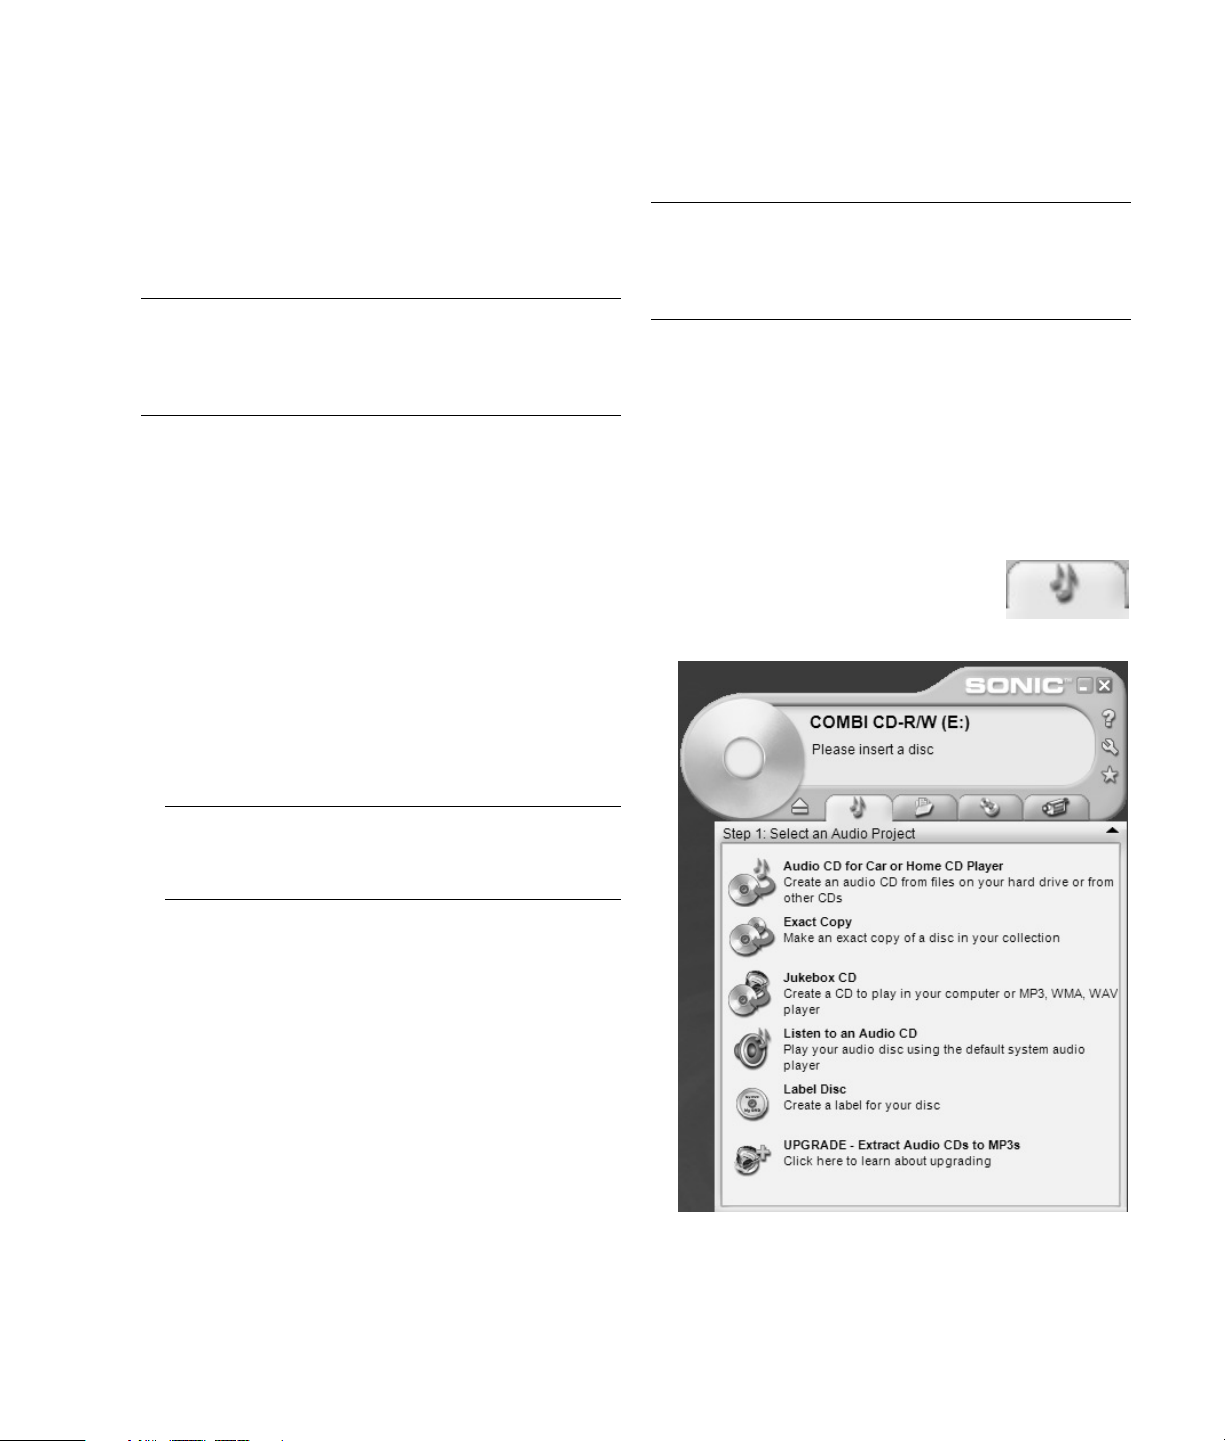
1 Click Start, choose All Programs, CD (DVD)
Recorder, RecordNow!, and then click
RecordNow! again.
2 Click the Audio Projects tab.
3 Select Audio CD for Car or Home
CD Player.
NOTE: Your PC must have an analog capture
card to capture video from an analog device such
as a VCR.
• Store, edit, and preserve video files from various
video sources.
• Store large amounts of data.
• Play DVD movies and music CDs.
• Read data DVDs and CDs.
Creating DVDs and CDs 1
Page 6
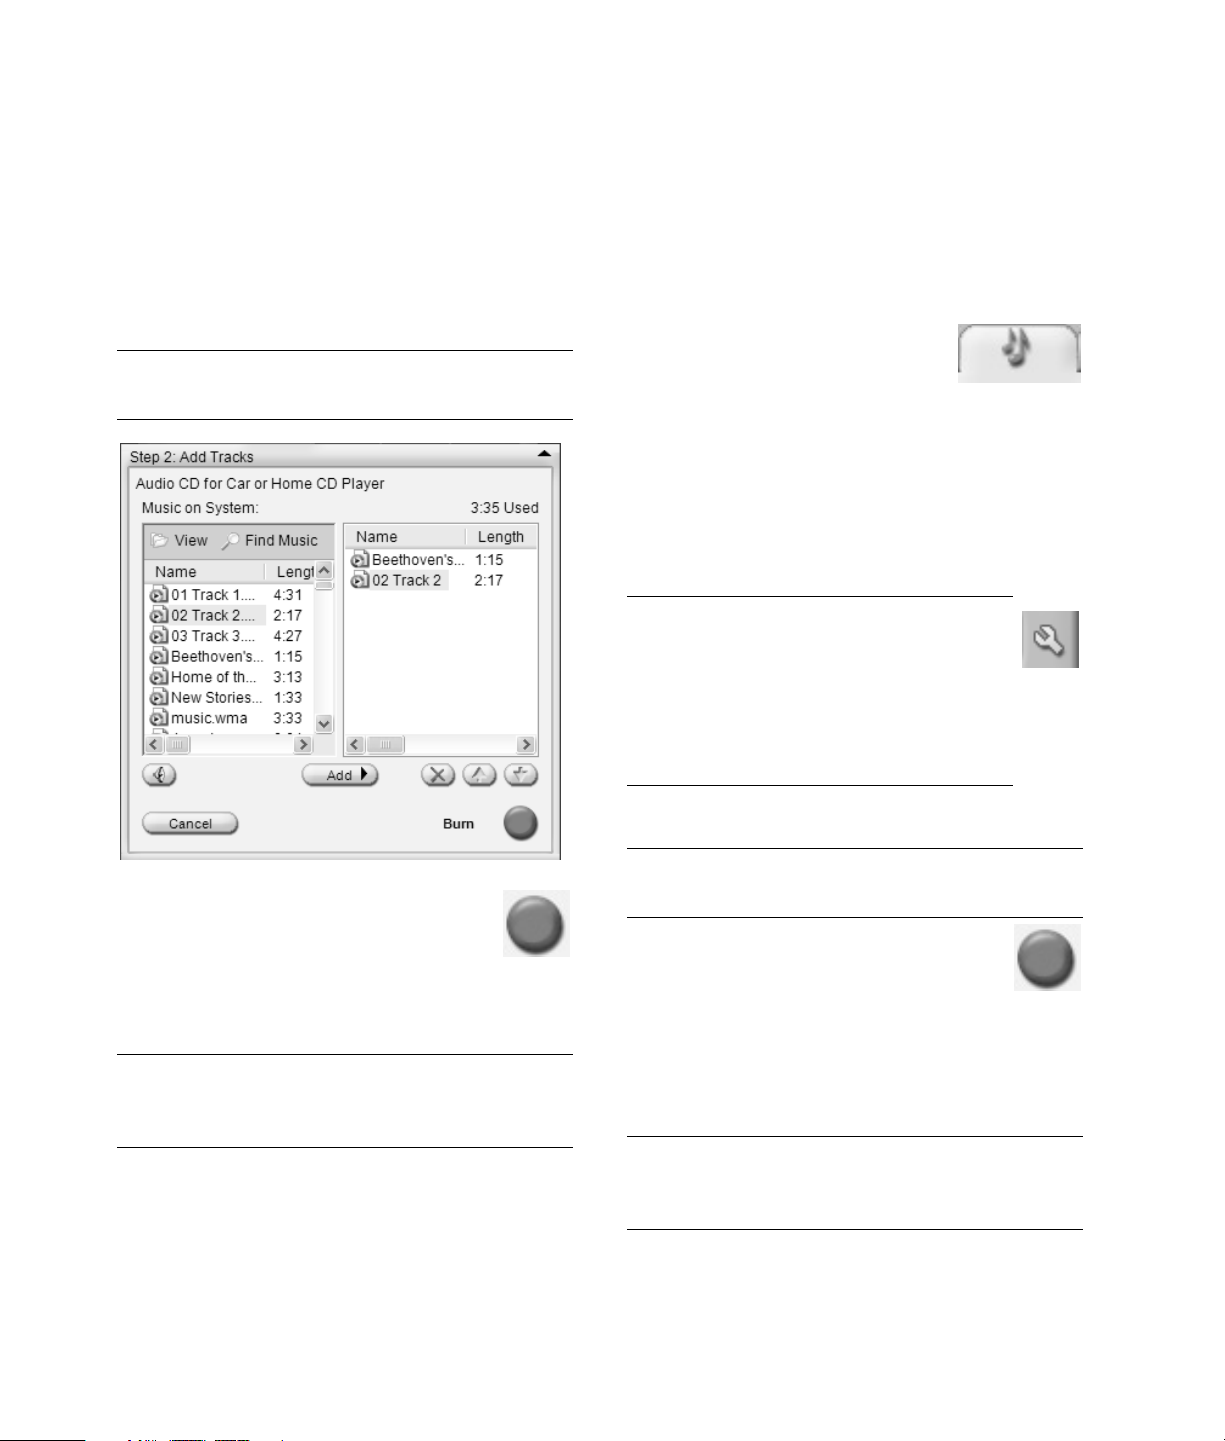
4 Insert a music CD. Select View and then select
your CD-ROM drive to view the tracks on
your CD.
Or
Click Find Music, and then click Browse to find
music files on your hard disk drive that you want
to record.
5 Select the tracks you want to record, and then
click Add.
NOTE: You can press Control (Ctrl) on your
keyboard to select more than one track.
Click ? and then select RecordNow! Help for more
information about recording music CDs with the
RecordNow! program
Creating CDs to Play on Your PC
1 Click Start, choose All Programs, CD (DVD)
Recorder, RecordNow!, and then click
RecordNow! again.
2 Click the Audio Projects tab.
3 Select Jukebox CD.
4 Click Find Music, and then click Browse to find
music files on your hard disk drive that you want
to record.
Or
Click Find Music, and then click Scan for Music.
RecordNow! searches your PC for all music files
and places them into the Music on System
window.
NOTE: RecordNow! scans for all audio
files, even the sounds from your operating
system. If you don’t want to display some
of these sounds, you can select the Options
icon (wrench), and then select the Audio
tab. Select Hide audio files shorter than
(in seconds), and then type in the seconds.
6 Click the Burn icon when you have
added all the audio files to your music
CD project.
7 Click Ye s.
8 When prompted, insert a blank CD-R or
CD-RW disc.
NOTE: If you want to play your music CD in your
home or car stereo, use a CD-R disc. CD-RW discs
may not play in some stereos.
9 Click OK. It is best not to use the PC while
recording.
10 Click Done when recording is complete.
2 Creating DVDs and CDs
5 Select the tracks you want to record, and then
click Add.
NOTE: You can press the Control (Ctrl) key to
select more than one track.
6 Click the Burn icon when you have
added all the audio files to your music
CD project.
7 Click Ye s.
8 When prompted, insert a blank CD-R or CD-RW
disc. If the CD-RW disc is not blank, RecordNow!
prompts you to erase it and then automatically
begins writing to it when it is erased.
NOTE: If you want to play your music CD in your
home or car stereo, use a CD-R disc. CD-RW discs
may not play in some stereos.
Page 7
9 Click OK. It is best not to use the PC while
recording.
10 Click Done when recording is complete.
Click ? and then select RecordNow! Help for more
information about recording music CDs with the
RecordNow! program.
About Creating a Music CD
IMPORTANT: HP supports the lawful use of
technology and does not endorse or encourage the
use of our products for purposes other than those
permitted by national copyright law.
When recording music files, it is important to
note that:
• To play your music CD in a home or car stereo, it
needs to be recorded as a music CD in CD Audio
(CDA) format, not as a data CD.
• You must record all music files in one recording
session because RecordNow! closes the CD after
recording is complete. Music files can be recorded
repeatedly onto a rewriteable (CD-RW) disc, but
all previously recorded music files must be erased
first.
• As you add music files in the recording session,
RecordNow! calculates and displays the amount
of recording time available to record additional
music files.
• You can’t record song titles unless you make an
exact copy of a music CD in your collection.
• If you try to record more than a standard CD can
hold, RecordNow! displays a message warning
you that all the tracks may not fit on your disc.
Storing Files on a DVD
or CD
Unlike music CDs, data DVDs and CDs can be
recorded in multiple sessions.
1 Click Start, choose All Programs, CD (DVD)
Recorder, RecordNow!, and then click
RecordNow! again.
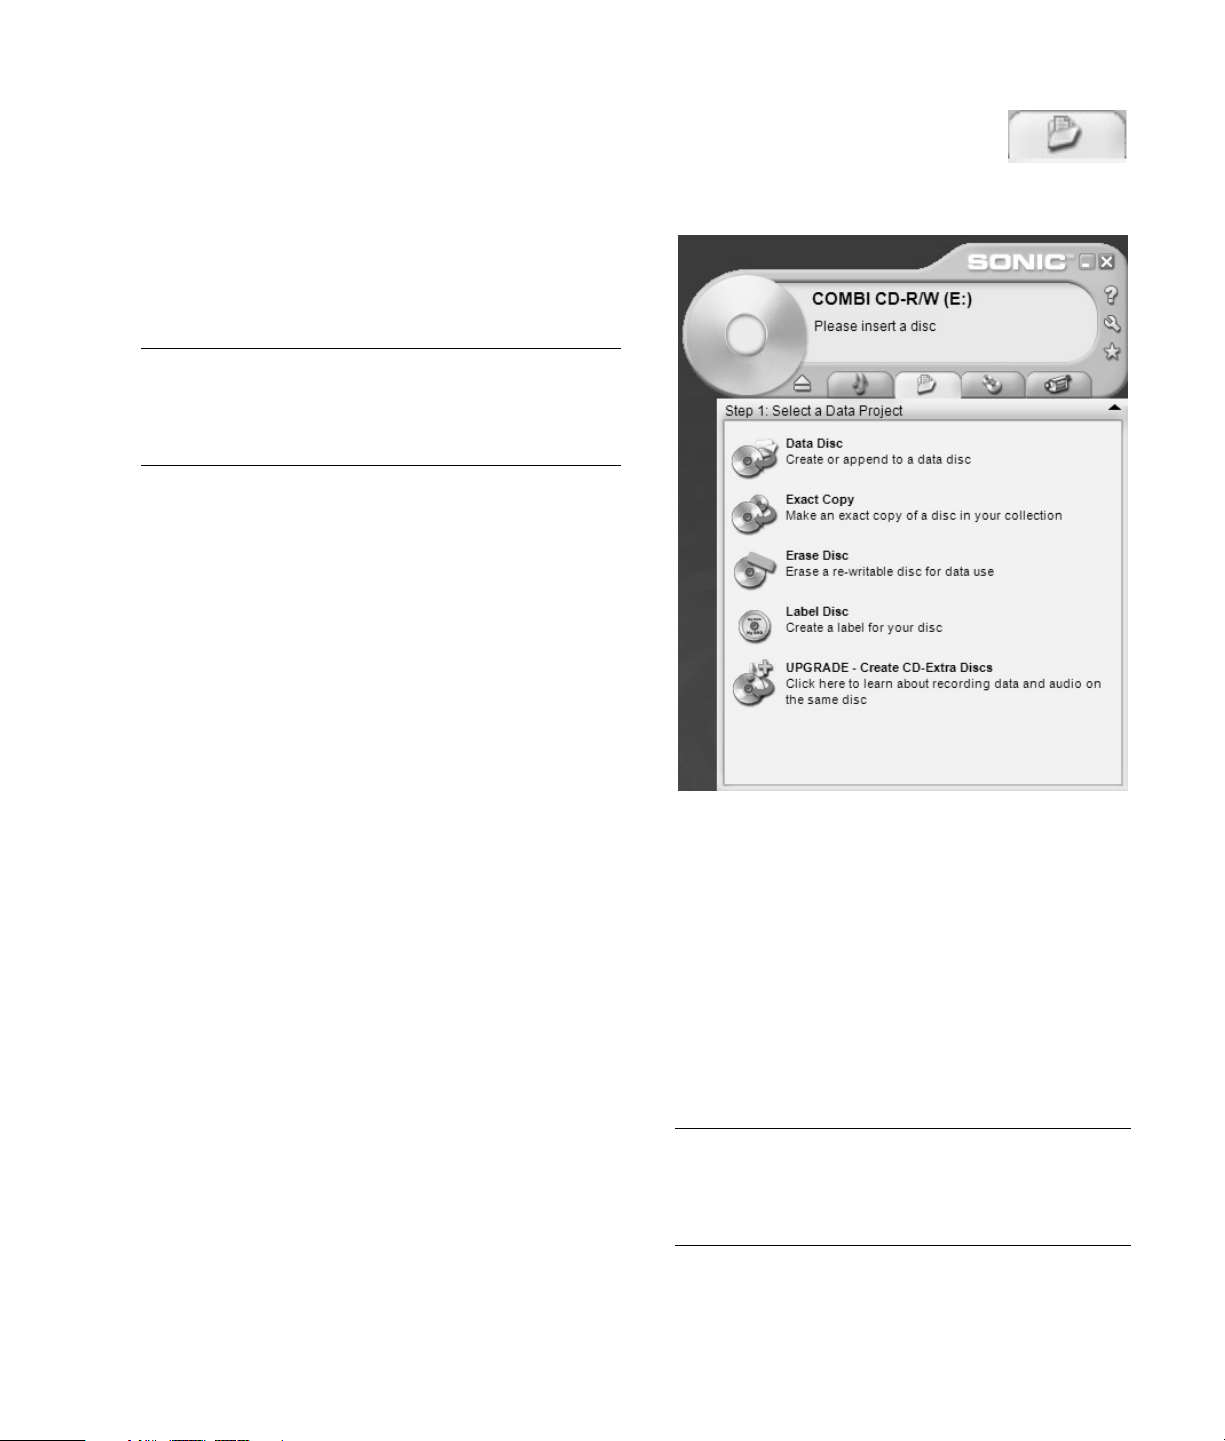
2 Select the Data Projects tab.
3 Insert a blank or appendable CD-R,
CD-RW, DVD+R, or DVD+RW disc into your
drive, and then click Data Disc.
• If the disc is blank, click Continue.
Or
• If the disc is full, insert a blank or another
appendable disc.
Or
• If you are adding files to a disc, follow onscreen
instructions. You may have to click Cancel, eject
the disc, insert it again, and then record.
Or
• If you are erasing a rewriteable disc, click
Continue.
NOTE: An appendable disc means additional files
can be added to it, as there is disc space available.
Recorded audio CDs are closed session discs
which are not appendable.
Creating DVDs and CDs 3
Page 8
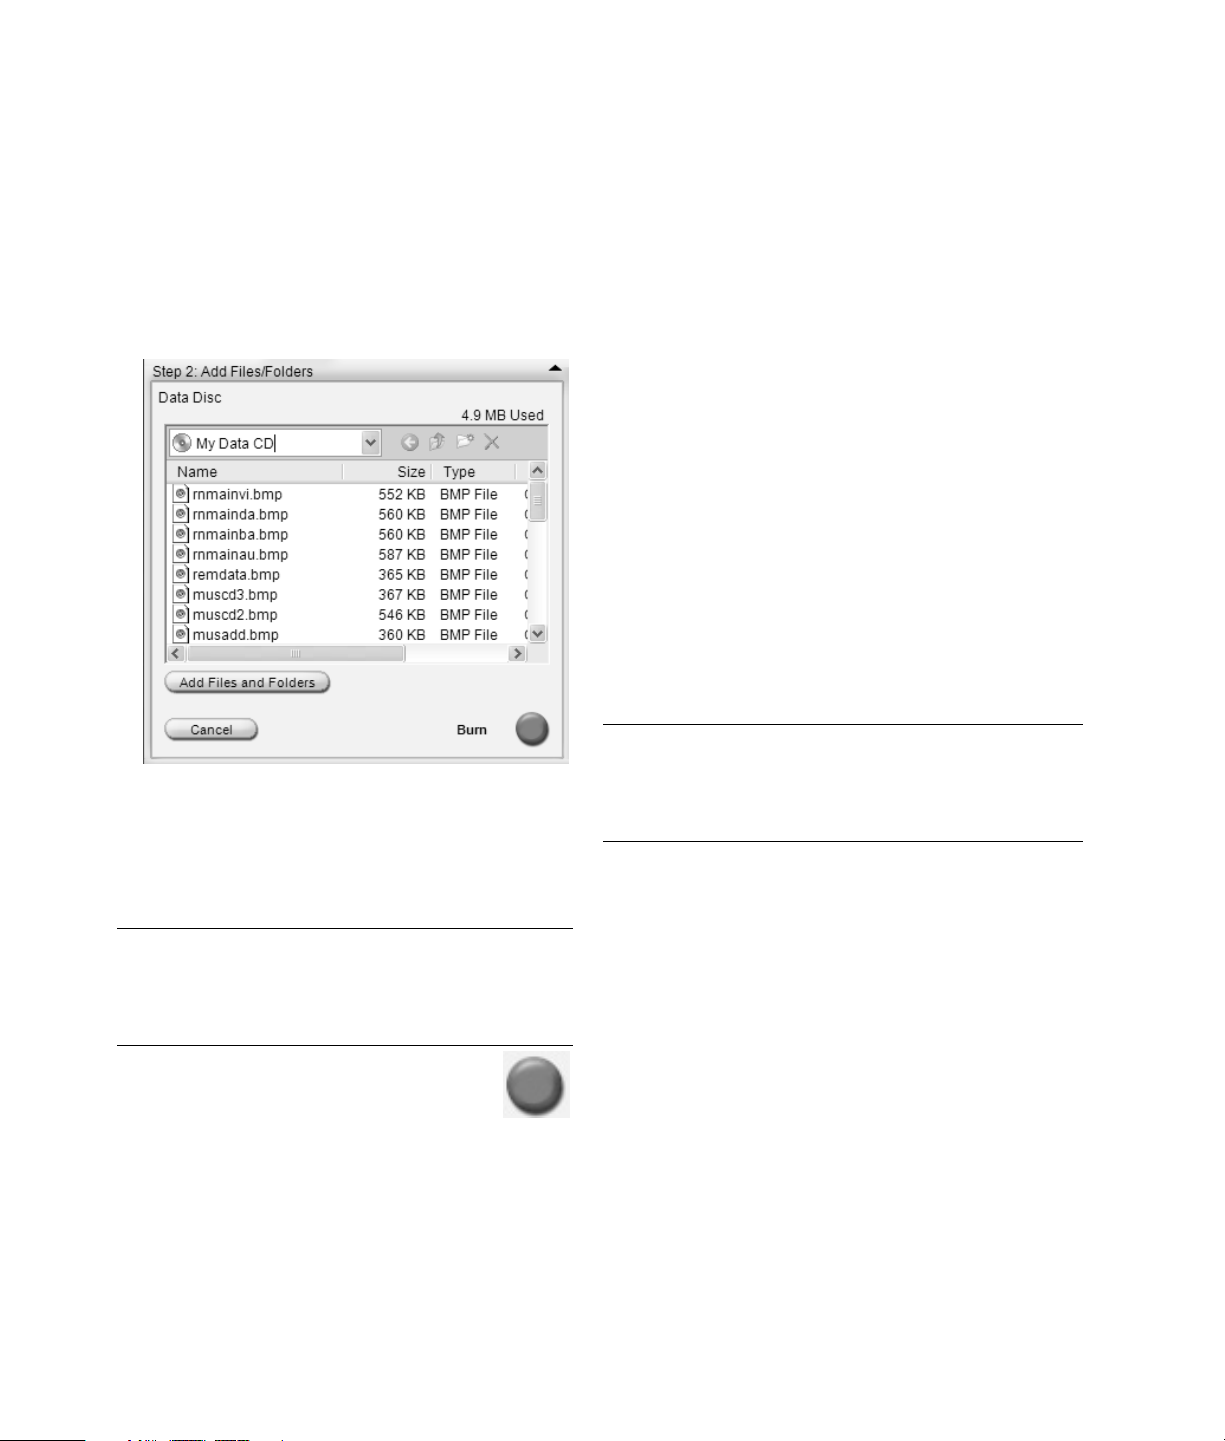
4 To name your disc, select Vol um e La b el , and then
type your name over it. RecordNow! will assign a
name based on the recording date if you don’t
type in a name.
5 Add your data files to the file selection window:
• Click the Add Files and Folders button, click
the browse folder icon to find and select your
file, and then click Add. Repeat this step until
all files are added.
About Storing Data Files on Disc
When storing data files on a disc, it is important to
note that:
• You can add new data files to a CD-R and a
DVD+R in a later recording session, until the disc
is full. With DVD+R discs, you need to select the
correct setting in RecordNow! to record files in
a later session. To do this, insert your recorded
DVD, open RecordNow!, click the Options icon
(wrench), select the Advanced tab, select the
recording option you want, and then click OK.
• When you record files that have the same name
as previously recorded files, RecordNow! updates
the file and the previous version is overwritten.
• RecordNow! allows you to change file names and
titles of files you want to record and files that were
previously recorded.
• As you select data files to record to your disc,
RecordNow! calculates and displays the amount
of recording space available on your disc.
Copying a DVD or CD
Or
• Drag your file from your desktop or from
anywhere in Windows Explorer into the file
selection window. Repeat this step until all files
are added.
NOTE: You can rename your files in the file
selection window by selecting and typing over the
current name. This does not affect the original files
on your hard disk drive.
6 Click the Burn icon when all of your files
have been added.
7 Click Done when recording is complete.
Click ? and then click RecordNow! Help for more
information about recording data files with the
RecordNow! program.
IMPORTANT: HP supports the lawful use of
technology and does not endorse or encourage the
use of our products for purposes other than those
permitted by national copyright law.
RecordNow! allows you to make a copy of a music
or data disc from your collection. You can’t copy
commercial DVDs because they are protected by
copyright laws and are encoded to prevent illegal
duplication.
To make a copy of a music or data disc from your
collection:
1 Click Start, choose All Programs, CD (DVD)
Recorder, RecordNow!, and then click
RecordNow! again.
2 Yo u c a n s ele ct t he Audio Projects, the
Data Projects or the Backup Projects tab.
3 Select Exact Copy.
4 Insert the CD or DVD you want to copy.
4 Creating DVDs and CDs
Page 9

5 Click the Burn icon.
6 Insert a blank DVD or CD into the drive,
and then click OK.
7 Click Done when the recording is complete.
Erasing a DVD or CD
You can use RecordNow! to erase music, data or
video files from rewriteable DVDs and CDs, leaving
almost all the disc space available for new
recordings.
If you try to record a video or music file to a
rewriteable disc that has files on it, the recording
program will prompt you to erase the disc first.
1 Click Start, choose All Programs, CD (DVD)
Recorder, RecordNow!, and then click
RecordNow! again.
2 Insert the DVD+RW or CD-RW you want to erase.
If an Auto Play window opens, click Cancel.
3 Select the Data Projects tab.
4 Click Erase Disc.
5 Click Ye s to confirm that you want to erase the
disc.
Removing Files from a Recorded
Data Disc
RecordNow! can’t erase files from recordable
(record once) DVDs or CDs, but files that have been
previously recorded can be removed. When you
remove a recorded file from a data DVD+R or CD-R,
the disc space is lost and can’t be used for new
recordings.
To remove data files from a recorded DVD or CD:
1 Click Start, choose All Programs, CD (DVD)
Recorder, RecordNow!, and then click
RecordNow! again.
2 Select the Data Projects tab.
3 Insert the disc from which you
want to remove files. If an Auto Play window
opens, click Cancel.
4 Click Data Disc.
5 Select the file you want to remove and
then click the Remove icon. You must
have at least one file on your data disc to
re-record it.
6 Click Ye s.
7 Click the Burn icon to save your data disc without
the files you removed.
8 Click Done when the recording is complete.
About Removing Files in
RecordNow!
When removing files in RecordNow!, it is important
to note:
• When you remove a recorded file from a data
DVD+R or CD-R, the disc space is lost and can’t
be used for new recordings.
• You can’t remove music files from previously
recorded music CDs, but you can remove
music files from the File Selection window in
RecordNow! before you record the files to your
disc.
• You must use a blank CD to create a music CD.
• If you delete files from the File Selection window
in RecordNow! before the disc is recorded,
available disc space is not affected. If you delete a
file from a DVD+R or CD-R after the disc is
recorded, available disc space is lost.
Creating DVDs and CDs 5
Page 10

Creating DVD Movies
Your DVD Writer/CD Writer drive allows you
to capture (copy), edit, and record your home
movies in a few easy steps by using the ArcSoft
ShowBiz
If you simply want to copy a video from your digital
camcorder to a DVD in the fewest steps, follow the
instructions in ”Creating a Quick DVD Movie.”
If you want to create a video project that combines
various video files and slideshows, and DVD menu
items, refer to the section ”Creating a Custom DVD
Movie.”
Both options allow you to re-edit your DVD movie
later if you choose.
®
2 software program.
3 When the Quick DVD wizard window opens,
select your drive and then click Next.
Creating a Quick DVD Movie
To create a quick DVD Movie by using ArcSoft
ShowBiz 2:
1 Click Start, choose All Programs, Video, ArcSoft
ShowBiz 2, and then click ShowBiz 2 Wizard. In
this window, select Create a “Quick DVD.”
2 Insert a blank DVD+R or DVD+RW disc into your
drive:
• If your DVD+RW disc has files on it, ShowBiz 2
prompts you to erase them. Click Yes to erase
the disc.
• If the DVD has data on it, the AutoPlay window
opens. If it does, click Cancel.
4 Connect your digital video camcorder or
other digital video device to the FireWire
(IEEE 1394) port on your PC. Make sure
your device is turned on and in playback mode.
If an AutoPlay window appears, click Cancel.
5 Select your video source from the drop-down list,
and then click Next.
6 Creating DVDs and CDs
Page 11

6 When the Design Your DVD window appears:
• Type a title for your video in the Title area.
• Type the date you want to appear in your
video file.
• Select a background for your DVD Menu from
the drop-down list.
• Place a check mark in the Create a backup copy of
video check box to save a copy to your hard disk
drive, and then click the folder icon next to the
checkbox.
7 When the Save As window appears, type in a file
name, select your file format from the drop-down
list, and then click OK. Your files are automatically
copied into the My Videos folder if you don’t
change the pathway. Click Next.
9 Click the Record button to begin recording your
video file.
10 Click the Stop button to end
recording or wait until the time you
specified ends.
11 If necessary, click Yes . ShowBiz 2 automatically
begins creating the DVD-formatted disc.
8 Use the onscreen digital camcorder
playback controls to find the place in your
video you want to begin recording to disc, and
then click the Pause button.
NOTE: If you set the ending point, ShowBiz 2
automatically ends recording after the amount of
time you specify. You can also manually stop the
recording if you choose.
12 ShowBiz 2 ejects your disc after the recording
process is complete.
Creating DVDs and CDs 7
Page 12

Creating a Custom
DVD Movie
The software included with your PC allows you to
create custom DVDs by including multiple source
videos and slideshows. In this section, you will learn
how to:
• Transfer your home video files to your hard disk
drive.
• Edit video files, and customize the look and layout
of the DVD menu.
• Record your video project file to DVD or CD.
Requirements for Capturing Video
You can copy (capture) video files to your hard disk
drive by using the ArcSoft ShowBiz 2 program. To
capture video, your PC also needs either a FireWire
(IEEE 1394) port to capture video from a digital video
(DV) camera or it needs an analog video capture card
to capture video from a TV, a VCR, or an analog
video camera.
To capture video files, you need to:
Capturing Video with ShowBiz 2
To transfer your digital (DV) video files to your hard
disk drive by using ArcSoft ShowBiz 2:
1 Connect your digital video camcorder or
other digital video device to the FireWire
(IEEE 1394) port on your PC. Make sure
your device is turned on and in playback (Play)
mode.
2 When the Digital Video Device window appears,
select DV Capture and Edit, and then click OK.
3 Make sure the Capture button is selected. Your
video file should appear in the preview window.
• Connect your digital video capture device
properly.
• Turn your device on and set it to playback mode.
• Make sure the program you want to use can detect
your digital or analog device.
NOTE: You may need to turn your device off and
on again for the program to detect it.
If your PC has both a digital and an analog video
capture card, make sure you select the correct video
source from within the video capture program. Refer
to the Help menu in the video capture program you
are using for more information about selecting your
video source.
4 Select the Playback button under the video file
display window to preview your video file before
you record it.
5 Select the Live button under the video display
window when you are ready to record your file.
6 Use the camcorder controls in the Video tab
to find the place in the video you want to
begin copying, and then click the Pause button.
7 Click the Record button to begin
capturing your video file.
8 Creating DVDs and CDs
Page 13

8 When the Save As window appears, select text and
type a file name, select your video format from the
drop-down list, set your capture duration (default
is 2 hours), click the Capture button, and then
click OK.
To edit your video files:
1 Click Start, choose All Programs, Video, ArcSoft
ShowBiz 2, and then click ShowBiz 2.
2 Select Get From Album.
3 Select the Edit button.
4 Select the album drop-down list and select your
captured video file.
9 Click the Stop button to stop
capturing your video file. Your
video file is processed and automatically saved to
your My Videos folder on your hard disk drive.
Once you save your video file, it appears in the
ShowBiz 2 main window.
10 You can preview your captured
video by clicking Playback in the
Capture window, and then select the Play button.
Editing Video Files in ShowBiz 2
Use the ArcSoft ShowBiz 2 Edit module to create
your customized video file. In the edit mode you can
add:
• Still images and video files.
• Audio and music tracks.
• Te xt e ffec ts.
• Scene transitions.
• Special effects.
You can then record your video project to disc later,
when you are ready. If you do not want to edit your
video files, you can skip to ”Recording a DVD or
VCD Movie with ShowBiz 2.”
5 If your video files are already on the hard disk
drive, select the Folder icon, browse and select
your video file, and then click Open.
6 Drag video files from the album or the Media area
to the storyboard or timeline area of the window.
Creating DVDs and CDs 9
Page 14

7 Select the editing tabs (Te x t , Transitions, and
Effects) to edit your video file. For text select your
options, and then click OK for each item you want
to change. For transitions and effects, select an
item and then drag it to the storyboard. Refer to
the Help menu in ShowBiz 2 for more information
about editing your video files.
10 Click Start. When the Save As window appears,
type in a file name and click Save. ShowBiz 2
processes your video file.
11 Click OK when the file has been captured
successfully.
12 Click File and then click Save Project to save your
video project onto your hard disk drive. This option
allows you to make additional changes to your
video files before recording them to disc or your
hard disk drive. Your captured video file appears in
the Album drop-down list in ShowBiz 2.
Refer to the Help menu in ShowBiz 2 for more
information about editing your video files.
Recording a DVD or VCD Movie
with ShowBiz 2
With ArcSoft ShowBiz 2 you can capture, edit, and
record video files to create DVDs and VCDs that can
be played in most DVD-ROM drives and in some
DVD players.
NOTE: In ShowBiz 2 you can combine several
video files into one ShowBiz 2 project, and then
record the entire DVD project file onto a DVD+R
or DVD+RW disc.
8 Click the Export button to copy your edited file to:
• Your hard disk drive
• Your digital video camera
• An e-mail file
• A VHS device (The PC requires a video card or
a capture card with S-video or composite out
and the VHS audio source needs to be
connected to the speaker out connector.)
NOTE: You can record your video file to DVD
without saving it to your hard disk drive by
clicking the Create button. See “To record DVD or
VCD with menus.”
9 Select your video type.
10 Creating DVDs and CDs
To record a VCD or DVD without
menus
1 Click Start, choose All Programs, Video, ArcSoft
ShowBiz 2, and then click ShowBiz 2.
2 Select Get From Album.
3 Select your video files from the album drop-down
list and drag them to the storyboard/timeline area
of the window.
Or
Open an existing ShowBiz 2 project by clicking the
File menu and selecting Open Project. Locate
your video project, select it, and then click Open.
Or
Click the Folder icon, browse to select your video
files, click Open, click OK, and then drag the
video file to the storyboard/timeline area.
4 Click the Create button.
Page 15

5 Select either the DVD-Video or Video CD tab.
6 Select Write a DVD to create a DVD without
menus.
7 In the Export to DVD or VCD window:
a Select your drive from the drop-down list.
b Type in a file name.
c Place a check in the Save a copy to disk check
box, if desired, and then select a location to
place your copy.
d Click OK.
1 Follow steps 1 through 5 in the previous
procedure, “Recording a DVD or VCD Movie
with ShowBiz 2.”
2 Select Design a DVD or Design a VCD.
8 Click Ye s.
9 Insert a blank CD or DVD. If the disc isn’t blank,
ShowBiz 2 prompts you to erase it before
recording your DVD. Follow any onscreen
instructions to complete the recording process.
The disc ejects automatically when recording is
complete.
To record a DVD or VCD with menus
If you want to add titles, frames, backgrounds, and
chapter buttons to your DVD or VCD, you can use
the customization buttons discussed in the following
procedure. If you select this option, you can add a
new background, and create chapter buttons or submenus.
3 Select the Media tab to add additional
video files to your DVD project. Select
your file, click the arrow button, and then
click Yes.
4 Select the Themes tab to select one of the DVD
menu backgrounds:
• Select the background and then click the arrow
button to add it as your DVD menu
background.
Or
• Click the New Background button, select a
picture from your hard disk drive, and then
click Open.
5 Click the Customize tab to select the style for your
menu buttons:
a Select a frame style, select your menu button,
and then click the arrow button to add it to
your DVD menu.
b Select a layout style and then click the arrow
button to add it to your DVD menu.
6 Click the Te x t tab to select the text of your DVD
title or menu buttons and then select your font
style.
7 Click the Set Chapters tab to select thumbnail
pictures for your chapter buttons and to set
chapter breaks in your video file.
8 Click the Write Disc tab, and then click the Start
button.
Creating DVDs and CDs 11
Page 16

9 Type a name for your video project, and then click
Save.
10 When the Write Disc options window opens, select
your settings, and then click OK.
11 Insert a blank CD or DVD. If the disc isn’t blank,
ShowBiz 2 prompts you to erase it before
recording your DVD. Follow any onscreen
instructions to complete the recording process.
The disc ejects automatically when recording is
complete.
Editing Recorded DVDs with
ShowBiz 2
The ArcSoft ShowBiz 2 program allows you to edit
your DVD projects after you have recorded them to
a disc. You can re-record changes back to the same
DVD+RW disc. If you recorded your video files to a
DVD+R, you must use a blank DVD+R disc to record
your changed video files.
NOTE: ShowBiz 2 cannot edit a recorded VCD.
Playing Your Recorded
DVD Movie
You can use InterVideo® WinDVD™ or the Windows
Media Player programs to play your recorded
movies.
Playing Your DVD in InterVideo
WinDVD
1 Insert your DVD or video CD (VCD) into a DVD
drive. Select Play DVD movie using InterVideo
WinDVD from the AutoPlay window, and then
click OK. The InterVideo WinDVD program opens
automatically.
Or
If the program doesn’t open, click Start, choose
All Programs, Video, Intervideo WinDVD
Player, and then click InterVideo WinDVD 4.
To edit a recorded DVD movie:
1 Insert the recorded DVD into the DVD Writer/
CD Writer drive. If the AutoPlay window appears,
select Take no action and then click OK.
2 Click Start, choose All Programs, Video, ArcSoft
ShowBiz 2, ShowBiz Wizard, select the Create
a DVD drop-down menu, and then click Edit
ShowBiz DVD Disc.
3 When the Browse for Folder window appears, select
the DVD Writer drive icon, and then click OK.
Or
If your disc is already in the drive and ArcSoft is
open, close the Browse for Folder window, click
the File menu and then select Edit ArcSoft
DVD disc.
4 Make changes to your video file.
5 Select the Write Disc tab, and then click Start.
6 Select Update Current Disc or Create a New Disc
and then click OK. Your rewriteable disc is
re-recorded.
7 Click OK to complete updating your disc, and
then click OK again.
2 Use the InterVideo WinDVD control panel to play
your DVD or VCD.
InterVideo WinDVD is able to display DVD menus
for both DVDs and VCDs.
12 Creating DVDs and CDs
Page 17

Playing Your DVD in Windows
Media Player
1 Insert your DVD into a DVD drive. Select Play
DVD Video using Windows Media Player from
the AutoPlay window and then click OK. You may
need to set up Windows Media Player the first
time you open it.
Or
If the program doesn’t open, click Start, choose
All Programs, and then click Windows Media
Player.
2 Use the Windows Media Player control panel to
play your DVD.
Recording VHS Video Files
onto DVDs
To record VHS video files onto DVDs:
• Your PC must have an analog capture card that
you can connect to a VCR or to another analog
video source.
• The video recording software must support analog
capture devices.
• You must connect a VCR to an analog video port
on the PC, open the video recording software,
select the proper video input device, and then
follow the onscreen instructions.
NOTE: The menu formatting of created video CDs
does not appear in Windows Media Player.
About Recording Video Files
Video quality depends on the quality of the source
files, the PC speed, and its graphics processing
ability.
If you need help creating or recording DVD movies,
refer to the Help files in the video editing and
recording programs.
NOTE: Your DVD Writer/CD Writer drive will
not copy commercially available DVD movies.
Most commercial DVDs are encoded to prevent
unauthorized duplication.
Disc Labels
WARNING: When labeling your DVDs, do
not use sticky labels. They can cause the
DVD to play erratically. Instead, write on
the DVD with a felt tip pen to label it.
Creating Recovery CD/DVDs
for the PC
For more information about creating Recovery
CDs/DVDs, refer to the User’s Guide that came with
your PC.
Setting Automatic Recording
Options
When you first insert a blank CD into your DVD
Writer/CD Writer drive, Microsoft
may give you options for the type of disc you insert.
NOTE: When you insert a blank DVD into your
DVD Writer/CD Writer drive, an options window
does not appear. You must open the program you
want to use with your DVD, and then perform an
action.
®
Windows® XP
Creating DVDs and CDs 13
Page 18

For example, if you insert a blank CD-RW disc, you
can select any of these options:
• Open writeable CD folder using Windows
Explorer.
• Create a disc using RecordNow!
• Take no action.
If this window of options does not appear, you can
click Start, My Computer, right-click the DVD
Writer/CD Writer drive icon, and then select one of
the available options.
You can also open a program before you insert a disc.
After the program is opened, select an action and
follow onscreen instructions within the program.
You can choose to have a specific action occur
automatically each time you insert a blank CD by
selecting the Always do the selected action box.
If you later decide that you want to change the
option you have set:
1 Click Start.
2 Click My Computer.
3 Right-click the DVD Writer/CD Writer drive icon
and select Properties.
4 Click the AutoPlay tab.
5 Click Select an action to perform, select an action,
and then click OK.
Or
Click Prompt me each time to choose an action,
and then click OK.
If you insert a blank or data disc, a window with
options for blank or data discs opens.
If the option you want is not listed, you can select
Take no action, and then click OK. The window
closes, and you can then manually select a different
option through the Start menu on the desktop.
Here are some of the other options you can choose:
• To view the files on the disc you inserted, click
Start, My Computer, and then right-click the
DVD Writer/CD Writer drive icon and choose
Explore.
• To view the files on the disc you inserted, click
Start, My Computer, and then double-click the
DVD Writer/CD Writer drive icon.
• To open a particular program, click Start, choose
All Programs, and then click the program you
want.
Compatibility Information
An important feature of the DVD Writer/ CD Writer
drive is its high level of compatibility with other
optical drives and CD and DVD players.
• The CDs that you create play in most home and
car stereos and in most computer DVD-ROM and
CD-ROM drives.
NOTE: CD-R discs are more compatible with home
and car stereos than CD-RW discs are.
• The DVDs that you create are compatible with
some DVD video players and with most computer
DVD-ROM drives.
Your DVD Writer/CD Writer drive is able to read
from and record to almost every type of optical disc.
Writing speed rates for the DVD Writer/CD Writer
drive are fast, allowing quick recording times.
14 Creating DVDs and CDs
Page 19

IMPORTANT: The DVD Writer/CD Writer drive
can’t record to DVD-R, DVD-RW, or DVD-RAM
discs. When recording, use DVDs that have a ”+” in
their names.
players than a DVD+RW disc is.
• Can be used to back up your hard disk drive files.
DVD+RW discs
• Are compatible with more DVD drives and
•
Compatible File Formats
Your DVD Writer/CD Writer drive can read and
record the following audio formats:
• WAV, MP3, WMA, and CDA for CDs
• WAV, MPEG-1, MPEG-2, WMA, and Layer 2 files
for DVDs
Your DVD Writer/CD Writer drive can read and
record the following video formats:
• MPEG-1 and MPEG-2
• AV I an d WM V
Disc Quick Reference
Can be erased and rewritten.
• Can hold up to 4.7 GB — equivalent of seven CDs.
• Record up to 2 hours of video files, depending on
the quality of the recording.
• Can be used to back up hard disk drive files that
you can update periodically.
CD-R discs
•
Can’t be erased or written to again. Some
programs, like RecordNow!, allow you to record
data in multiple sessions until the disc is full.
• Can hold about 80 minutes of music files, or up to
99 tracks.
• Can hold 700 MB of data, depending on the CD.
• Can be used to create storage discs for your hard
You can use DVD+RW, DVD+R, CD-RW, and CD-R
discs in the DVD Writer/CD Writer drive.
DVD+R discs
•
Can’t be erased or written to again. Some
programs, like RecordNow!, allow you to record
data in multiple sessions until the disc is full.
• Can’t edit a DVD+R that has been recorded as a
DVD movie.
• Hold up to 4.7 GB — the equivalent of seven CDs.
disk drive files.
CD-RW discs
•
Can be erased or rewritten.
• Can hold about 80 minutes of music files, or up to
99 tracks.
• Can hold 700 MB of data, depending on the CD.
• Can be used to create storage discs for your hard
disk drive files.
• Record up to 2 hours of video files, depending on
the quality of the recording.
Video Recording Length
Disc type
4.7 GB DVD+RW, DVD+R 180 minutes 120 minutes 60 minutes
700 MB CD-RW, CD-R 27 minutes 18 minutes 9 minutes
650 MB CD-RW, CD-R 24 minutes 16 minutes 8 minutes
Video quality setting
Good Better Best
NOTE: Video quality settings and recording lengths
may vary.
Creating DVDs and CDs 15
Page 20

Disc Feature and Compatibility
Disc
VCD DVD movie No Yes No Varies by model
NOTE: For the latest disc compatibility information
File type
Data No Yes No No CD-ROM
Music No Yes Yes Varies by model
Dat a Yes Yes N o N o CD-R
MP3 Music Yes Yes Varies by model Varies by model
Dat a Yes Yes N o N o CD-RW
MP3 Music Yes Yes Varies by model Varies by model
Data No Yes No No DVD-ROM
DVD movie No Yes No Yes
Dat a Yes Yes N o N o DVD+R
DVD movie Yes Yes No Varies by model
Dat a Yes Yes N o N o DVD+RW
DVD movie Yes Yes No Varies by model
Can be
recorded onto Plays in PC
Plays in home
or car stereo
Plays in home
DVD player
for your PC, check the following Web site:
http://www.hp.com
Optical Drive Quick Reference
Optical drive can
Read CDs, CD-Rs, and CD-RWs X X X X X
Read DVDs X X X
Read data on a CD X X X X X
Play music X X X X X
Record data or music to disc for
storage
View DVD movies X X X
Record DVD movies X
Play PC games X X X X X
Software Quick Reference
To open the DVD Writer/CD Writer software
programs, click Start on the taskbar, choose All
Programs, select the program folder, and then click
the program to open the software. Refer to the
CD-ROM CD-RW, CD-R DVD-ROM DVD+RW/+R
X X X
NOTE: You may have a software update CD included
Combo
CD-RW/DVD
with your PC. You may need to install this CD before
using the DVD Writer/CD Writer drive. To do this,
follow the installation instructions that came with
the CD.
following table to determine the best programs for
the tasks you want to do.
16 Creating DVDs and CDs
Page 21

The PC has various software programs preinstalled
that you can use with the DVD Writer/CD Writer
drive:
NOTE: Some programs listed above may not be
included with your PC model.
• Windows Media Player
• RealOne Player
• Windows Movie Maker 2.0
• InterVideo WinDVD
• RecordNow!
• ArcSoft ShowBiz 2
Software With this program you can
Windows Media
Player
RealOne Player
Windows
Movie Maker 2.0
InterVideo WinDVD
RecordNow!
• Play music CDs, MP3, and other audio files.
• Play DVD movies. (Windows Media Player can play DVDs only if another DVD player program,
such as InterVideo WinDVD, is installed.)
• Play Windows Movie Maker files.
• Record music files.
• Organize digital files into a library for recording or listening.
• Play music CDs, MP3, and other audio files.
• Play DVD movies. (RealOne Player can play DVDs only if another DVD player program, such as
InterVideo WinDVD, is installed.)
• Play video CDs.
• Record music files.
• Organize digital files into a library for recording or listening.
• Import audio, video, and other media files from a videotape, an audiotape, a Web camera, or a
television broadcast.
• Record audio and video files to create a video project that becomes a Windows Media source
file with a .wmv extension.
• Edit and preview files.
• Send movie in an e-mail or to a Web server.
• Add music files (MP3).
• Import audio files such as .mp3, .asf, or .wma; video files such as .wmv, .asf, .avi, or .mpg; or
image files such as .jpg or .gif.
• Can create AVI and WMV (Windows Media Video) files.
• Play DVD movies and video CDs (VCD).
• For more information about playing DVDs with InterVideo WinDVD, refer to the printed
information that came with your PC.
Record data and music files.
•
• Record a copy of an existing music or data CD to use on the PC.
• Create customized music CDs from CDs in your collection, or from WAV, MP3, or WMA files.
These CDs can be played in your home or car stereo.
• Copy and share data files.
• Copy short video files.
NOTE: Video files recorded with RecordNow! can be viewed on a PC but not on home DVD video
players.
Your PC comes with the following software
programs. Use this table to find out what you can do
within each program.
Creating DVDs and CDs 17
Page 22

Software With this program you can
ArcSoft ShowBiz 2
Capture digital and analog video files directly from a digital video (DV) camera, VCR, or other
•
analog capture device in a few steps.
NOTE: Your PC may not include an analog capture device.
• Assemble movies by capturing video clips and scenes into your video project.
• Edit your movies. Cut scenes and add music and sound effects, still images, text, video
transitions, and voice-overs.
• Preview movies during editing and before recording final files.
• Create video files, export them to your hard disk drive, to your digital video camera, to a VHS
tape or to an e-mail file, and then play them on your PC.
• Create video files, record them to DVDs and CDs, and then play them on some set-top DVD
players.
• Record video files to VCDs and DVDs.
• Create MPEG files.
Troubleshooting
My Recording Failed
If your recording failed, try the following and then
record your files again:
• Close all other programs and don’t perform any
tasks while recording.
• Enable Direct Memory Access (DMA) on your PC.
• Reduce maximum recording speed.
• Manually select a slower recording speed. Each
time you make a recording, RecordNow! selects
the optimum recording speed for your drive and
the disc you are using. Refer to the Help menu in
RecordNow! for more information about selecting
a slower recording speed.
• Make sure you select the correct drive before
recording. RecordNow! selects the first optical
drive it finds, but you can select the drive in
RecordNow! before you begin recording.
• Make sure you have enough space available on
your hard disk drive for RecordNow! to store a
temporary copy of your CD.
• RecordNow! can record only to the same disc type
it records from. For example, you can record a
DVD only to a DVD+R or DVD+RW disc, and you
can record a CD only to a CD-R or a CD-RW disc.
• When you create a DVD or CD, RecordNow! does
not let you add a track if it exceeds the available
space on your disc. Most CD-R discs can record
about 80 minutes. You can make space available
by removing one or more tracks from the list
before recording the remaining files to CD.
I Can’t Add Files to My Music CD
When recording a music CD, RecordNow! creates a
closed session CD, which means no additional files
can be added to that disc after the initial recording.
I Can’t Add Data Files to My DVD
When you create a data CD in RecordNow!, data files
can be added in later recording sessions until the disc
is full. If you want to record data to a DVD in
multiple sessions, you must set the correct recording
option.
To do this, insert your data disc, open
RecordNow!, click the Options icon
(wrench), select the Advanced tab, and then
select the multiple session recording option.
18 Creating DVDs and CDs
Page 23

My Music CD Won’t Play in
My Stereo
If your CD won’t play in your home or car stereo, try
the following:
• Use a CD-R, not a CD-RW disc.
• Try another CD brand or check to see if the brand
of disc works with your stereo. Check the
documentation that came with your CD player
and check the manufacturer’s Web site.
• If you are creating music CDs from MP3 or WMA
audio files, those files need to be converted to
WAV or CDA music files before recording.
• Use a CD instead of a DVD. You can record audio
files to a DVD to be played on your PC, but you
cannot create a music DVD to be played in a home
or car CD player.
The Titles of My Music Tracks
Don’t Appear on My CD
You must be connected to the Internet for the artist,
title, and track information to appear when playing
your music CD in Windows Media Player or when
recording your music CD in RecordNow! If you are
not connected to the Internet, the music tracks are
displayed as Track 1, Track 2, etc.
NOTE: Artist, title, and track information cannot be
recorded to disc in RecordNow!
I Get an Error Message When I
Try to Capture Video Files
If you have an analog and a digital capture device on
your PC, you may need to select your device before
capturing video files. Refer to the Help menu in the
video capturing program to find out how to change
your video device selection.
My PC Doesn’t Recognize My
Digital Camcorder When I Try to
Capture Video Files
to a FireWire (IEEE 1394) port on your PC, turn your
camcorder on, and then select the playback mode
before transferring video files to your hard disk
drive.
My Movie Won’t Play on My DVD
Player
Your DVD movie may be in a file format that your
DVD player can’t read. If you recorded your video
files as data, they will not have the proper format to
be played on your DVD player. Files must be
encoded in the proper DVD video format by using a
recording program such as ArcSoft ShowBiz 2 to
play in your DVD player.
Which Discs are Compatible With
My DVD and CD Players?
Go to the Web site of your DVD or CD player
manufacturer to find information about disc
compatibility.
More Information
For more information about your DVD Writer/
CD Writer drive and DVD Writer/CD Writer
software programs, refer to the:
• Printed User’s Guide included with your PC.
• Help menus within any of the programs included
with your PC.
• Web sites of software manufacturers (for the latest
program updates).
• Help and Support information located in the Start
menu on your desktop.
For technical support information, refer to your
Warranty & Support Guide.
For general information about products and services
and for answers to computer support questions, go
to the following Web site at:
http://www.hp.com
Before you can transfer your digital video files to
your PC, you must connect your camcorder properly
Creating DVDs and CDs 19
Page 24

 Loading...