

Page 1
HP LaserJet M1522 MFP Series – Manage and Maintain
Fill paper trays
How do I? Steps to perform
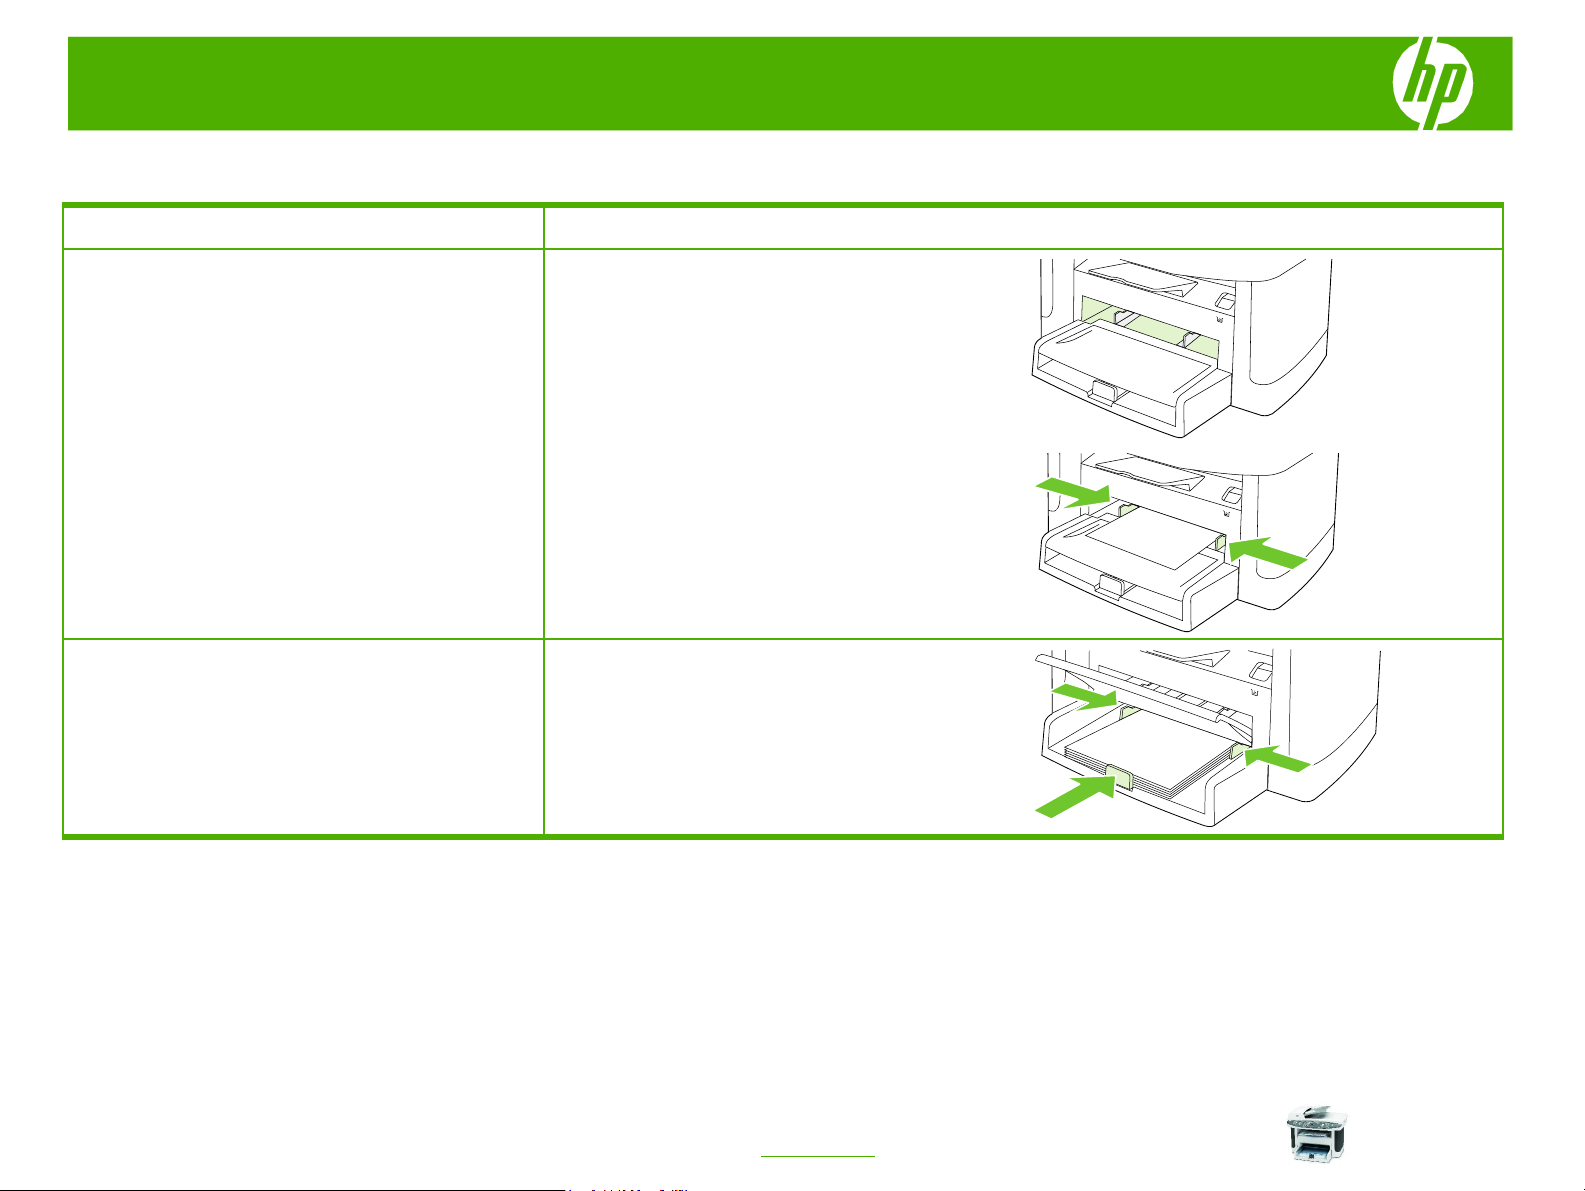
1 The priority input tray is accessed from the front of the
Load paper and print media
Priority input tray
NOTE: When you add new media, make sure that you
remove all of the media from the input tray and
straighten the stack of new media. Do not fan the media.
This reduces jams by preventing multiple sheets of
media from feeding through the product at one time
Load paper and print media
Tray 1
product. The product prints from the priority input tray
before attempting to print from tray 1.
2 Media guides ensure that the media is correctly fed
into the product and that the print is not skewed
(crooked on the media). When loading media, adjust
the media guides to match the width of the media that
you are using.
Load media with the top forward and the side to be
printed on facing up. Media guides ensure that the
media feeds correctly into the product and that the print
is not skewed. Tray 2 has side and rear media guides.
© 2007 Copyright Hewlett-Packard
Development Company, L.P.
1
www.hp.com
Page 2
HP LaserJet M1522 MFP Series – Manage and Maintain
Replace print cartridges
How do I? Steps to perform
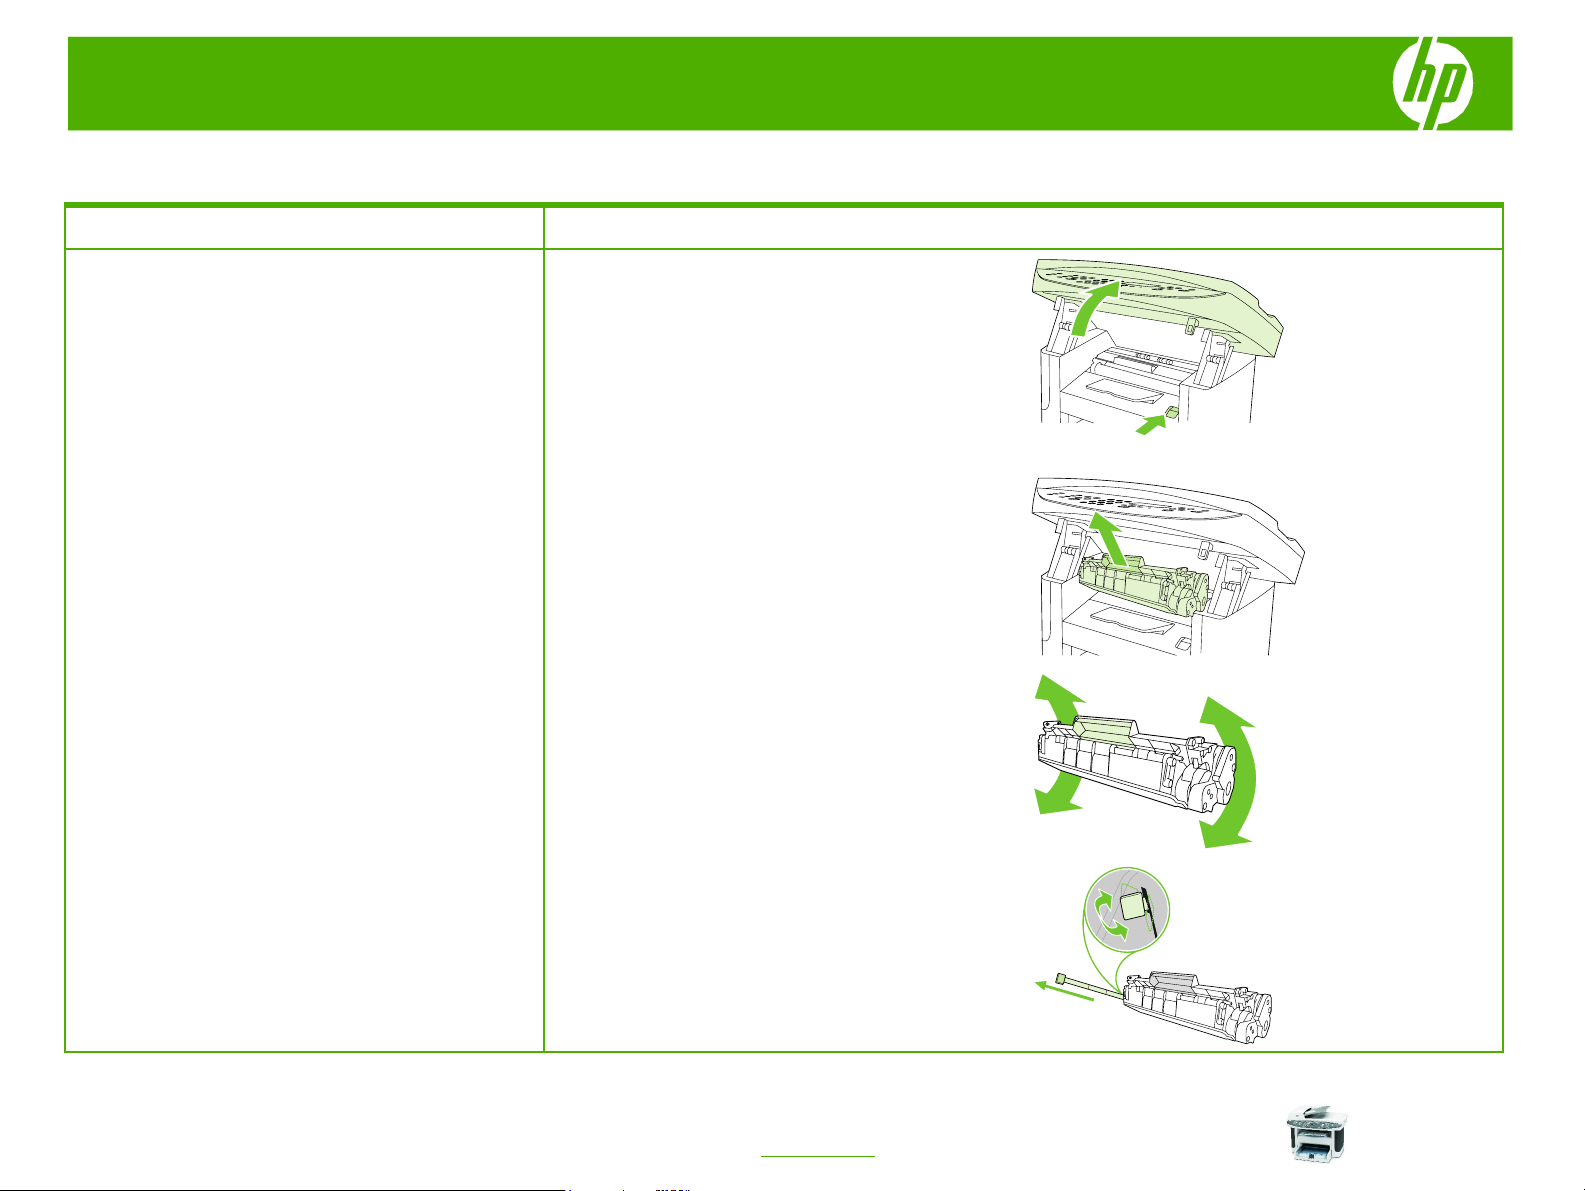
1 Open the print-cartridge door.
Replace print cartridges
CAUTION: If toner gets on any clothing, wipe it off with a
dry cloth and wash the clothing in cold water. Hot water
sets toner into the fabric.
3 Remove the new print cartridge from its packaging,
4 Remove the orange cover from the print cartridge, and
2 Grasp the handle on the print cartridge and then pull
the cartridge straight out to remove it. See the
recycling information inside the print cartridge box.
and then rock the print cartridge back and forth.
then pull the orange tab straight out to remove the
sealing tape.
© 2007 Copyright Hewlett-Packard
Development Company, L.P.
1
www.hp.com
Page 3
HP LaserJet M1522 MFP Series – Manage and Maintain
How do I? Steps to perform
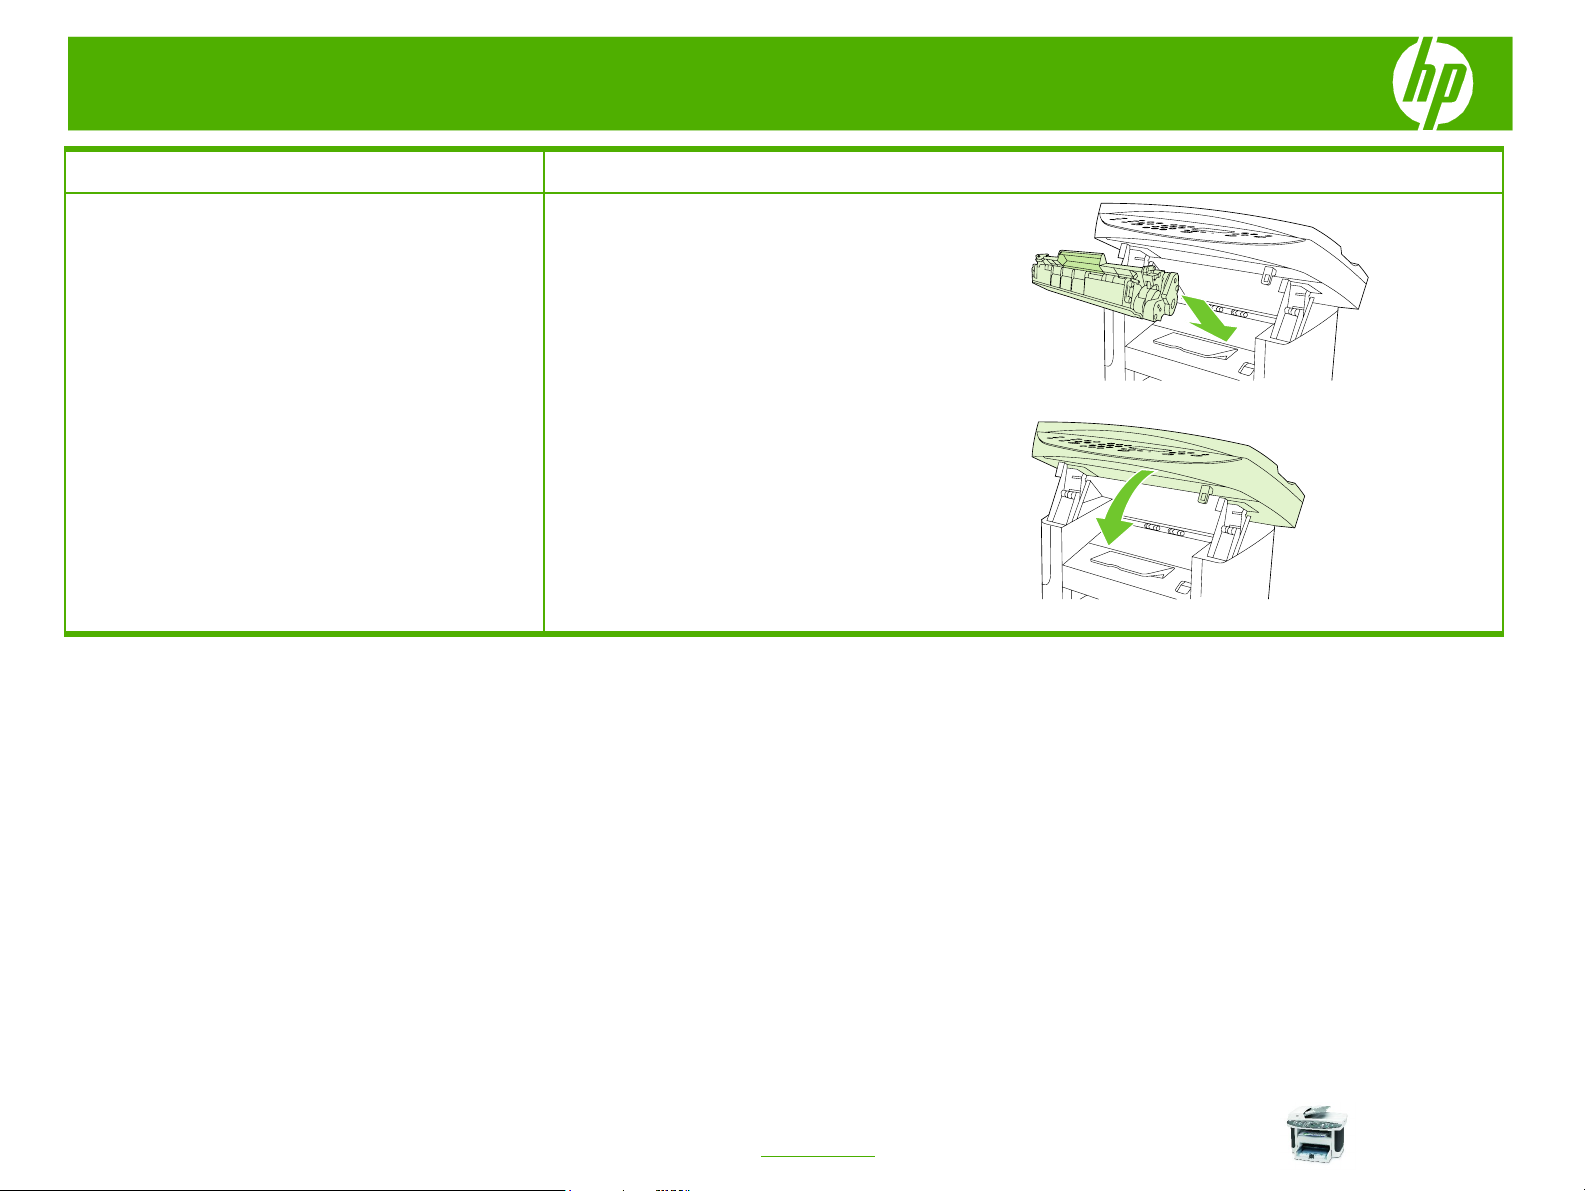
5 Insert the cartridge into the product until it is firmly in
Replace print cartridges (continued)
6 Close the print-cartridge door.
place.
© 2007 Copyright Hewlett-Packard
Development Company, L.P.
2
www.hp.com
Page 4

HP LaserJet M1522 MFP Series – Clear Jams
Clear paper jams
How do I? Steps to perform
1 Open the ADF cover.
Clear jams from the ADF
You are notified of a media jam by the Doc feeder jam
Clear, Reload message that appears on the product
control-panel display.
NOTE: Verify that any shipping tape inside the ADF has
been removed.
2 Remove the jam cleanout part. Using both hands, lift
up on the two handles until the part unsnaps. Rotate
and lift out the cleanout part and set it aside.
3 Lifting the green lever, rotate the pick mechanism until
it stays open.
4 Gently try to remove the page without tearing it. If you
feel resistance, go to the next step.
1
© 2007 Copyright Hewlett-Packard
Development Company, L.P.
www.hp.com
Page 5

HP LaserJet M1522 MFP Series – Clear Jams
How do I? Steps to perform
5 Open the ADF lid and gently loosen the media by
Clear jams from the ADF (continued)
Clear jams from the document feeder
2 Close the lid to the flatbed scanner.
using both hands.
1 When the media is free, gently pull it out in the
direction shown.
3 Lower the green lever.
© 2007 Copyright Hewlett-Packard
Development Company, L.P.
2
www.hp.com
Page 6

HP LaserJet M1522 MFP Series – Clear Jams
How do I? Steps to perform
4 Reinstall the cleanout part by inserting it as shown.
Clear jams from the document feeder
(continued)
5 Close the ADF lid.
Clear jams from the input-tray areas
Push down on the two tabs until the part snaps into
place. Install the cleanout part correctly, because
future jamming might occur if the cleanout part is not
replaced correctly.
1 Open the print-cartridge door.
CAUTION: Do not use sharp objects, such as tweezers or
needle-nose pliers, to remove jams. Damage caused by
sharp objects will not be covered by the warranty.
NOTE: Depending on where the jam is located, some of
the following steps might not be necessary.
© 2007 Copyright Hewlett-Packard
Development Company, L.P.
2 With both hands, grasp the side of the media that is
most visible (this includes the middle), and carefully
pull it free from the product.
3
www.hp.com
Page 7

HP LaserJet M1522 MFP Series – Clear Jams
How do I? Steps to perform
3 Close the print-cartridge door
Clear jams from the input-tray areas
(continued)
When removing jammed media, pull the jammed media
straight away from the product. Pulling jammed media out
of the product at an angle can damage the product.
7 Close tray 1 and the print-cartridge door.
4 Open tray 1.
5 With both hands, grasp the side of the media that is
most visible (this includes the middle), and carefully
pull it free from the product
6 If no media is visible, open the print-cartridge door,
remove the print cartridge, and rotate the upper media
guide. Carefully pull the media up and out of the
product.
© 2007 Copyright Hewlett-Packard
Development Company, L.P.
4
www.hp.com
Page 8

HP LaserJet M1522 MFP Series – Clear Jams
How do I? Steps to perform
With both hands, grasp the side of the media that is
Clear jams from the output bin
CAUTION: Do not use sharp objects, such as tweezers or
needle-nose pliers, to remove jams. Damage caused by
sharp objects will not be covered by the warranty.
Clear jams from the print-cartridge area
CAUTION: To prevent damage to the print cartridge,
minimize its exposure to direct light.
When removing jammed media, pull the jammed media
straight away from the product. Pulling jammed media out
of the product at an angle can damage the product.
most visible (this includes the middle), and carefully
pull it free from the product.
1 Open the print-cartridge door, and remove the print
cartridge.
2 With both hands, grasp the side of the media that is
most visible (this includes the middle), and carefully
pull it free from the product.
3 Replace the print cartridge and close the print-
cartridge door.
5
© 2007 Copyright Hewlett-Packard
Development Company, L.P.
www.hp.com
 Loading...