

Page 1

User’s Guide
HP iPAQ hx2000 Series Pocket PC
Document Part Number: 366426-001
August 2004
Note: Not all models described are
available in all regions. Model shown in
illustrations is iPAQ hx2700 Series Pocket
PC.
Page 2

© 2004 Hewlett-Packard Development Company, L.P.
HP, Hewlett Packard, and the Hewlett-Packard logo are trademarks of
Hewlett-Packard Company in the U.S. and other countries.
iPAQ is a trademark of Hewlett-Packard Development Company, L.P. in the
U.S. and other countries.
Microsoft, Windows, the Windows logo, Outlook, and ActiveSync are
trademarks of Microsoft Corporation in the U.S. and other countries.
TM
HP iPAQ Products are Powered by Windows Mobile
Pocket PC.
SD Logo is a trademark of Secure Digital.
Credant Logo is a trademark of Credant Technologies.
BluetoothTM is a trademark owned by the Bluetooth SIG, Inc.
All other product names mentioned herein may be trademarks of their
respective companies.
Hewlett-Packard Company shall not be liable for technical or editorial
errors or omissions contained herein. The information is provided “as is”
without warranty of any kind and is subject to change without notice. The
warranties for Hewlett-Packard products are set forth in the express limited
warranty statements accompanying such products. Nothing herein should
be construed as an additional warranty.
This document contains proprietary information that is protected by
copyright. No part of this document may be photocopied, reproduced, or
translated to another language without the prior written consent of
Hewlett-Packard Company.
2003 software for
WARNING: Text set off in this manner indicates that failure to
Å
follow directions could result in bodily harm or loss of life.
CAUTION: Text set off in this manner indicates that failure to follow
Ä
directions could result in damage to equipment or loss of information.
User’s Guide
HP iPAQ hx2000 Series Pocket PC
First Edition (August 2004)
Document Part Number: 366426-001
Page 3

Contents
1 Getting to Know Your iPAQ Pocket PC
Using the Stylus . . . . . . . . . . . . . . . . . . . . . . . . . . . . . . . . 1–1
Aligning the Screen . . . . . . . . . . . . . . . . . . . . . . . . . . . . . 1–2
Adjusting Text Size . . . . . . . . . . . . . . . . . . . . . . . . . . 1–3
Changing the Screen from Portrait to
Landscape Mode . . . . . . . . . . . . . . . . . . . . . . . . . . . . 1–3
Setting the Date and Time . . . . . . . . . . . . . . . . . . . . . . . . 1–3
Setting the Time for Home and Locations
You Are Visiting . . . . . . . . . . . . . . . . . . . . . . . . . . . . 1–4
Setting the Date . . . . . . . . . . . . . . . . . . . . . . . . . . . . . 1–4
Entering Owner Information . . . . . . . . . . . . . . . . . . . . . . 1–5
Resetting the Device . . . . . . . . . . . . . . . . . . . . . . . . . . . . 1–6
Performing a Soft Reset. . . . . . . . . . . . . . . . . . . . . . . 1–6
Performing a Hard Reset . . . . . . . . . . . . . . . . . . . . . . 1–7
Removing/Replacing the Flip Cover . . . . . . . . . . . . . . . . 1–8
Routine Care. . . . . . . . . . . . . . . . . . . . . . . . . . . . . . . . . . . 1–9
Traveling with your Pocket PC . . . . . . . . . . . . . . . . . . . 1–10
2 Synchronizing with Your Computer
Using Microsoft ActiveSync . . . . . . . . . . . . . . . . . . . . . . 2–1
Installing ActiveSync . . . . . . . . . . . . . . . . . . . . . . . . 2–1
Synchronizing Your Pocket PC with Your Computer . . . 2–4
Changing Synchronization Settings. . . . . . . . . . . . . . 2–4
Copying Files . . . . . . . . . . . . . . . . . . . . . . . . . . . . . . . . . . 2–6
Installing Programs . . . . . . . . . . . . . . . . . . . . . . . . . . . . . 2–7
User’s Guide i
Page 4

Contents
Backing up and Restoring Files . . . . . . . . . . . . . . . . . . . . 2–7
Sending and Receiving E-mail. . . . . . . . . . . . . . . . . . . . . 2–8
Requesting Meetings . . . . . . . . . . . . . . . . . . . . . . . . . . . . 2–8
3 Managing the Battery
Installing the Battery . . . . . . . . . . . . . . . . . . . . . . . . . . . . 3–2
Removing the Battery . . . . . . . . . . . . . . . . . . . . . . . . . . . 3–5
Charging with the AC Adapter . . . . . . . . . . . . . . . . . . . . 3–6
Charging with the HP Desktop Cradle and
AC Adapter . . . . . . . . . . . . . . . . . . . . . . . . . . . . . . . . . . . 3–8
Charging with the HP Desktop Cradle and
USB Cable . . . . . . . . . . . . . . . . . . . . . . . . . . . . . . . . . . . . 3–9
Manually Checking the Battery Charge Level. . . . . . . . 3–10
Power Saving Tips . . . . . . . . . . . . . . . . . . . . . . . . . . . . . 3–11
Changing the Backlight Settings . . . . . . . . . . . . . . . 3–12
Disabling Buttons . . . . . . . . . . . . . . . . . . . . . . . . . . 3–13
4 Learning the Basics
Using the Today Screen . . . . . . . . . . . . . . . . . . . . . . . . . . 4–1
Navigation Bar and Command Bar . . . . . . . . . . . . . . 4–2
Status Icons . . . . . . . . . . . . . . . . . . . . . . . . . . . . . . . . . . . 4–3
Pop-Up Menus . . . . . . . . . . . . . . . . . . . . . . . . . . . . . . . . . 4–4
Creating Information . . . . . . . . . . . . . . . . . . . . . . . . . 4–5
Customizing the Today Screen . . . . . . . . . . . . . . . . . 4–5
Changing the Screen Orientation . . . . . . . . . . . . . . . . . . . 4–7
Opening and Closing Applications . . . . . . . . . . . . . . . . . 4–8
Closing with iTask. . . . . . . . . . . . . . . . . . . . . . . . . . . 4–8
Closing Manually . . . . . . . . . . . . . . . . . . . . . . . . . . . 4–8
Installing Applications . . . . . . . . . . . . . . . . . . . . . . . . . . . 4–9
Deleting Applications. . . . . . . . . . . . . . . . . . . . . . . . . . . . 4–9
Backing Up Information . . . . . . . . . . . . . . . . . . . . . . . . 4–10
Using the iPAQ FIle Store Folder . . . . . . . . . . . . . . . . . 4–10
ii User’s Guide
Page 5

5 Learning Input Methods
Using Input Software . . . . . . . . . . . . . . . . . . . . . . . . . . . . 5–1
Changing Word Suggestion Options . . . . . . . . . . . . . 5–1
Using the On-Screen Keyboard. . . . . . . . . . . . . . . . . 5–4
Writing with the Stylus and the
Letter Recognizer . . . . . . . . . . . . . . . . . . . . . . . . . . . 5–5
Writing with the Stylus and Microsoft Transcriber . . . . . 5–6
Writing with the Stylus and Block Recognizer . . . . . 5–6
Drawing and Writing on the Screen . . . . . . . . . . . . . 5–7
6 Applications
Software Available on the HP iPAQ Pocket PC . . . . . . . 6–1
Installing Applications . . . . . . . . . . . . . . . . . . . . . . . . . . . 6–9
Removing Applications . . . . . . . . . . . . . . . . . . . . . . . . . . 6–9
Using TodayPanel Lite. . . . . . . . . . . . . . . . . . . . . . . . . . 6–10
Using HP Image Zone . . . . . . . . . . . . . . . . . . . . . . . . . . 6–12
Viewing Thumbnail Photos . . . . . . . . . . . . . . . . . . . 6–14
Viewing a Photo Full-Screen. . . . . . . . . . . . . . . . . . 6–15
Viewing a Slideshow . . . . . . . . . . . . . . . . . . . . . . . . 6–15
Printing Photos . . . . . . . . . . . . . . . . . . . . . . . . . . . . 6–16
E-mailing Photos . . . . . . . . . . . . . . . . . . . . . . . . . . . 6–16
Attaching a Sound File to a Photo . . . . . . . . . . . . . . 6–17
Backing Up and Restoring . . . . . . . . . . . . . . . . . . . . . . . 6–18
Using iPAQ Backup to Backup/Restore . . . . . . . . . 6–18
Using ActiveSync To Backup/Restore . . . . . . . . . . 6–19
Using iTask . . . . . . . . . . . . . . . . . . . . . . . . . . . . . . . . . . 6–19
Contents
7 Using Security Features
Using HP ProtectTools. . . . . . . . . . . . . . . . . . . . . . . . . . . 7–1
Setting Up Security . . . . . . . . . . . . . . . . . . . . . . . . . . 7–2
Using Your iPAQ Pocket PC with
HP ProtectTools. . . . . . . . . . . . . . . . . . . . . . . . . . . . . 7–7
Changing Your HP ProtectTools Settings . . . . . . . . 7–10
User’s Guide iii
Page 6

Contents
Using the Fingerprint Reader (not available on
all models) . . . . . . . . . . . . . . . . . . . . . . . . . . . . . . . . . . . 7–13
Learning to Enroll a Fingerprint . . . . . . . . . . . . . . . 7–13
Working with Fingerprints . . . . . . . . . . . . . . . . . . . 7–15
8 Using Wi-Fi (not available on all models)
Getting Acquainted with Wi-Fi . . . . . . . . . . . . . . . . . . . . 8–1
Powering Wi-Fi On or Off. . . . . . . . . . . . . . . . . . . . . 8–2
Automatically Connecting to a Network . . . . . . . . . . 8–3
Manually Entering New Network Settings . . . . . . . . 8–3
Searching for Networks to Access. . . . . . . . . . . . . . . 8–5
Managing Wireless Network Settings . . . . . . . . . . . . . . . 8–5
Viewing or Editing a Wireless Network . . . . . . . . . . 8–5
Deleting a Wireless Network. . . . . . . . . . . . . . . . . . . 8–6
Monitoring Signal Strength and Status . . . . . . . . . . . . . . 8–6
Advanced Network Settings. . . . . . . . . . . . . . . . . . . . . . . 8–7
Wi-Fi Terms. . . . . . . . . . . . . . . . . . . . . . . . . . . . . . . . . . . 8–7
Looking Up an IP Address . . . . . . . . . . . . . . . . . . . 8–10
Changing TCP/IP Settings. . . . . . . . . . . . . . . . . . . . 8–10
Changing DNS and WINS Settings. . . . . . . . . . . . . 8–11
Setting Up VPN Server Connections. . . . . . . . . . . . 8–12
Changing VPN Server Connections . . . . . . . . . . . . 8–13
Starting VPN Server Connections . . . . . . . . . . . . . . 8–14
Setting Up Proxy Server Settings . . . . . . . . . . . . . . 8–14
Wi-Fi Security Protocol Utilities . . . . . . . . . . . . . . . . . . 8–15
802.1X Certificate Enroller . . . . . . . . . . . . . . . . . . . 8–15
LEAP Registration Utility . . . . . . . . . . . . . . . . . . . . 8–16
9 Using Bluetooth
Getting Acquainted with Bluetooth . . . . . . . . . . . . . . . . . 9–2
Understanding Terms . . . . . . . . . . . . . . . . . . . . . . . . 9–3
Supported Services . . . . . . . . . . . . . . . . . . . . . . . . . . 9–4
Powering Bluetooth On or Off. . . . . . . . . . . . . . . . . . . . . 9–4
iv User’s Guide
Page 7

Contents
Working with Bluetooth Settings. . . . . . . . . . . . . . . . . . . 9–5
Opening Bluetooth Settings. . . . . . . . . . . . . . . . . . . . 9–5
Setting Accessibility Properties. . . . . . . . . . . . . . . . . 9–5
Enabling Bluetooth Services . . . . . . . . . . . . . . . . . . . 9–6
Setting a Shared Folder . . . . . . . . . . . . . . . . . . . . . . 9–10
Understanding Profiles . . . . . . . . . . . . . . . . . . . . . . 9–11
Working with Bluetooth Manager . . . . . . . . . . . . . . . . . 9–13
Opening Bluetooth Manager . . . . . . . . . . . . . . . . . . 9–13
Locating and Selecting a Device . . . . . . . . . . . . . . . 9–13
Connecting to Other Devices . . . . . . . . . . . . . . . . . . . . . 9–15
Identifying the Communications Port . . . . . . . . . . . 9–15
Establishing an ActiveSync Connection . . . . . . . . . 9–15
Establishing a Serial Connection. . . . . . . . . . . . . . . 9–17
Dial-Up Networking . . . . . . . . . . . . . . . . . . . . . . . . 9–18
Joining a Personal Area Network . . . . . . . . . . . . . . 9–19
Working with Files. . . . . . . . . . . . . . . . . . . . . . . . . . . . . 9–19
Creating a File Transfer Connection . . . . . . . . . . . . 9–20
Using Business Card Exchange. . . . . . . . . . . . . . . . 9–21
Opening a Connection . . . . . . . . . . . . . . . . . . . . . . . . . . 9–23
Viewing Connection Status . . . . . . . . . . . . . . . . . . . 9–23
Closing a Connection. . . . . . . . . . . . . . . . . . . . . . . . 9–24
Working with Connections . . . . . . . . . . . . . . . . . . . 9–24
10Connecting to the Internet
Connecting to a Private Network . . . . . . . . . . . . . . . . . . 10–2
Entering an Internet Address . . . . . . . . . . . . . . . . . . . . . 10–2
Using a Favorites List . . . . . . . . . . . . . . . . . . . . . . . . . . 10–3
11Expansion Cards
Installing a Secure Digital (SD) Expansion Card . . . . . 11–2
Removing a Secure Digital (SD) Expansion Card. . . . . 11–3
Installing a Compact Flash (CF) Expansion Card . . . . . 11–4
Removing a Compact Flash (CF) Expansion Card . . . . 11–5
Viewing the Content of Memory Cards . . . . . . . . . . . . . 11–5
User’s Guide v
Page 8

Contents
12Troubleshooting
Common Problems. . . . . . . . . . . . . . . . . . . . . . . . . . . . . 12–1
ActiveSync . . . . . . . . . . . . . . . . . . . . . . . . . . . . . . . . . . . 12–5
Expansion Cards. . . . . . . . . . . . . . . . . . . . . . . . . . . . . . . 12–7
Wi-Fi . . . . . . . . . . . . . . . . . . . . . . . . . . . . . . . . . . . . . . . 12–8
Bluetooth . . . . . . . . . . . . . . . . . . . . . . . . . . . . . . . . . . . 12–10
A Regulatory Notices
Federal Communications Commission Notice. . . . . . . . . A–1
Declaration of Conformity for products
marked with the FCC logo—United States only. . . . A–2
Canadian Notice . . . . . . . . . . . . . . . . . . . . . . . . . . . . . . . . A–3
Avis Canadien . . . . . . . . . . . . . . . . . . . . . . . . . . . . . . A–3
Japanese Notice . . . . . . . . . . . . . . . . . . . . . . . . . . . . . . . . A–3
Korean Notice . . . . . . . . . . . . . . . . . . . . . . . . . . . . . . . . . A–3
European Union Regulatory Notice . . . . . . . . . . . . . . . . . A–3
Battery Warning . . . . . . . . . . . . . . . . . . . . . . . . . . . . . . . . A–5
Equipment Warning . . . . . . . . . . . . . . . . . . . . . . . . . . . . . A–6
Airline Travel Notice . . . . . . . . . . . . . . . . . . . . . . . . . . . . A–7
Wireless Notices. . . . . . . . . . . . . . . . . . . . . . . . . . . . . . . . A–7
U.S. Regulatory Wireless Notice. . . . . . . . . . . . . . . . A–7
Canadian Regulatory Wireless Notice. . . . . . . . . . . . A–7
Japanese Regulatory Wireless Notice . . . . . . . . . . . . A–8
Brazilian Regulatory Wireless Notice . . . . . . . . . . . . A–8
B Specifications
System Specifications . . . . . . . . . . . . . . . . . . . . . . . . . . . B–1
Physical Specifications. . . . . . . . . . . . . . . . . . . . . . . . . . . B–3
Operating Environment . . . . . . . . . . . . . . . . . . . . . . . . . . B–3
vi User’s Guide
Page 9

Getting to Know Your iPAQ
Congratulations on purchasing your HP iPAQ hx2000 Series
Pocket PC. Use this guide to help you set up your Pocket PC and
to learn how it works.
Note: Press and hold the iTask button ( ) on the front of your
iPAQ Pocket PC to switch between the current application and the
last application you were running.
Using the Stylus
Your iPAQ Pocket PC comes with a stylus that you should use to
tap or write on your screen.
You can perform three basic actions using the stylus:
Tap —Lightly touch the screen to select or open an item. Lift the
stylus after you tap an item. Tapping is equivalent to clicking an
item with the mouse on your computer.
Drag—Place the point of the stylus on the screen and drag an
item across the screen without lifting the stylus until you have
completed the selection. Dragging is equivalent to dragging with
the left mouse button pressed on your computer.
1
Pocket PC
User’s Guide 1–1
Page 10

Tap and hold—Hold the stylus pointer on an item for a short
time until a menu displays. Tapping and holding is equivalent to
right-clicking your computer mouse button. When you tap and
hold, a circle of red dots appears around the stylus to indicate that
the menu will soon pop up.
CAUTION: To prevent damage to your iPAQ Pocket PC screen, never
Ä
use any device other than the stylus that comes with the Pocket PC
or an approved replacement to tap or write on the screen. If you
lose or break your stylus, you can order extras at
www.hp.com/go/ipaqaccessories.
Aligning the Screen
When the iPAQ Pocket PC is turned on for the first time, you are
guided through a screen alignment process. You must realign
your screen if:
■ The Pocket PC does not respond accurately to your taps.
■ You perform a full reset of your Pocket PC.
To realign the iPAQ Pocket PC screen:
1. From the Start menu, tap Settings > System tab > Screen
icon.
2. Tap the Align Screen button.
Shortcut: To access the Align Screen application without
tapping on the screen, press and hold the 5-Way Navigation
button, then press the Calendar button.
3. Tap the cross-hair object at each location. Be precise when
tapping the cross-hair object.
4. Tap OK.
Getting to Know Your iPAQ Pocket PC
User’s Guide 1–2
Page 11

Getting to Know Your iPAQ Pocket PC
Adjusting Text Size
How much information you see on the screen depends on the text
size. To adjust the text size:
1. Tap Start > Settings > System tab > Screen > Text Size tab.
2. Drag the slider to the desired text size; then tap OK.
Changing the Screen from Portrait to Landscape Mode
To select Portrait or Landscape screen orientation:
1. Tap Start > Settings > System tab > Screen.
2. Tap Portrait, Landscape (right-handed), or Landscape
(left-handed).
3. Tap OK.
Shortcut: Press and hold the Calendar button for two seconds to
toggle between portrait and landscape modes.
Note: The Wi-Fi antenna for the HP iPAQ is located in the top of
the device. If you cover up the top of the HP iPAQ after you have
turned on Wi-Fi, signal strength may be affected.
Setting the Date and Time
When you turn on your iPAQ Pocket PC for the first time, you are
requested to select your time zone. After setting the time zone,
you still need to set the time and date on your device. All three
settings are located in the Clock Settings screen and can be set
at the same time.
Note: By default, the time on the iPAQ Pocket PC is
synchronized with your computer each time the two devices
connect using ActiveSync.
User’s Guide 1–3
Page 12

Getting to Know Your iPAQ Pocket PC
Setting the Time for Home and Locations You Are Visiting
From the Start menu, tap Settings > System tab > Clock &
Alarms icon.
Shortcut: From the Tod ay screen, tap the Clock icon to set
the time.
1. Tap either Home or Visiting.
2. Tap the time-zone down arrow, and select the appropriate
time zone.
3. Tap the hour, minutes, or seconds, and use the up and down
arrows to adjust the time.
Shortcut: You can also adjust the time by moving the hands of
the clock with the stylus.
4. Tap AM or PM.
5. Tap OK.
6. Tap Ye s to save the clock settings.
Setting the Date
1. From the Start menu, tap Settings > System tab > Clock &
Alarms icon.
Shortcut: From the Tod ay screen, tap the Clock icon to set
the date.
2. Tap the down arrow by the date.
3. Tap the left or right arrow to select a month and year.
4. Tap a day.
5. Tap OK.
6. Tap Ye s to save the date settings.
User’s Guide 1–4
Page 13

Getting to Know Your iPAQ Pocket PC
You need to reset your time zone, time, and date if:
■ The location time (Home or Visiting) needs to be changed.
■ All power to the iPAQ Pocket PC is lost, which removes all
saved settings.
■ You perform a full reset of your iPAQ Pocket PC.
Shortcut: From the Tod ay screen, tap the Clock icon to set
the time zone, time, and date.
Entering Owner Information
You can personalize your iPAQ Pocket PC by entering owner
information. To enter owner information:
1. From the Tod ay screen, tap Start > Settings > Personal tab
> Owner Information.
Shortcut: From the Tod ay screen, tap Tap here to set owner
information.
2. Tap in the Name field. A keyboard appears at the bottom of
the screen. Tap on the characters to enter your name.
Note: If you prefer, you can use Letter Recognizer, Microsoft
Transcriber, or Block Recognizer to input information. Refer to
Chapter 5, “Learning Input Methods,” for more information.
3. Tap the Ta b key on the keyboard to move the cursor to the
next field.
4. Continue entering whatever information you want to include.
5. To display owner information at startup, tap the Options tab
and select the Identification information checkbox.
6. Tap on the Notes tab to enter any notes.
7. Tap OK to save the information and return to the Tod ay
screen.
User’s Guide 1–5
Page 14
Resetting the Device
Sometimes there is a need to reset your Pocket PC. Resetting the
device is known as performing a “soft” or “hard” reset.
Performing a Soft Reset
A soft reset stops all running applications, but does not erase any
programs or saved data. Be sure to save any unsaved data within
a running application before performing a soft reset.
Perform a soft reset to:
■ Stop all running applications
■ Install a new application
■ Restart the Pocket PC if it stops responding
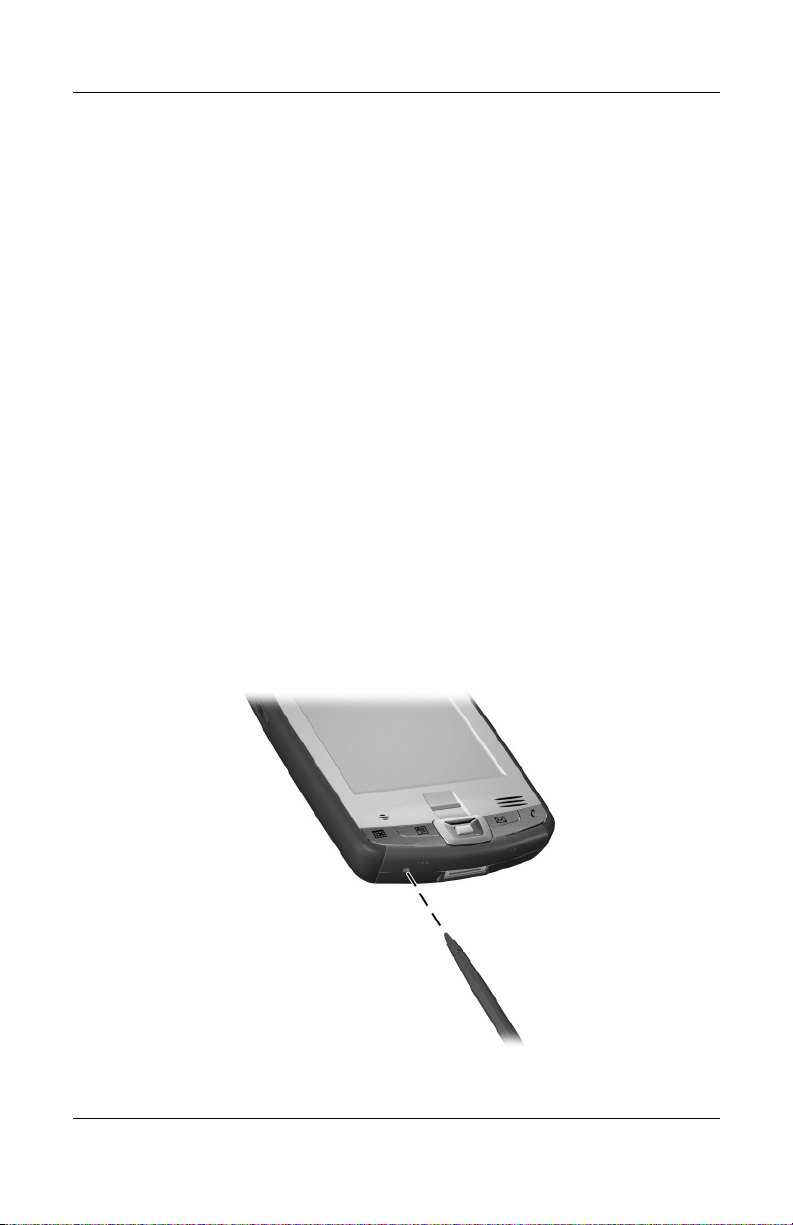
To perform a soft reset:
1. Locate the recessed Reset button on the bottom of your iPAQ
Pocket PC.
2. Use the stylus to lightly press the Reset button.
The Pocket PC restarts and displays the Tod a y screen.
Getting to Know Your iPAQ Pocket PC
User’s Guide 1–6
Page 15
Performing a Hard Reset
Perform a hard reset only when you want to clear all
user-installed settings, applications, and data from RAM
(Random Access Memory), where data and applications you have
loaded are stored.
CAUTION: If you perform a hard reset, your Pocket PC loses all data
Ä
and programs not saved in iPAQ File Store.
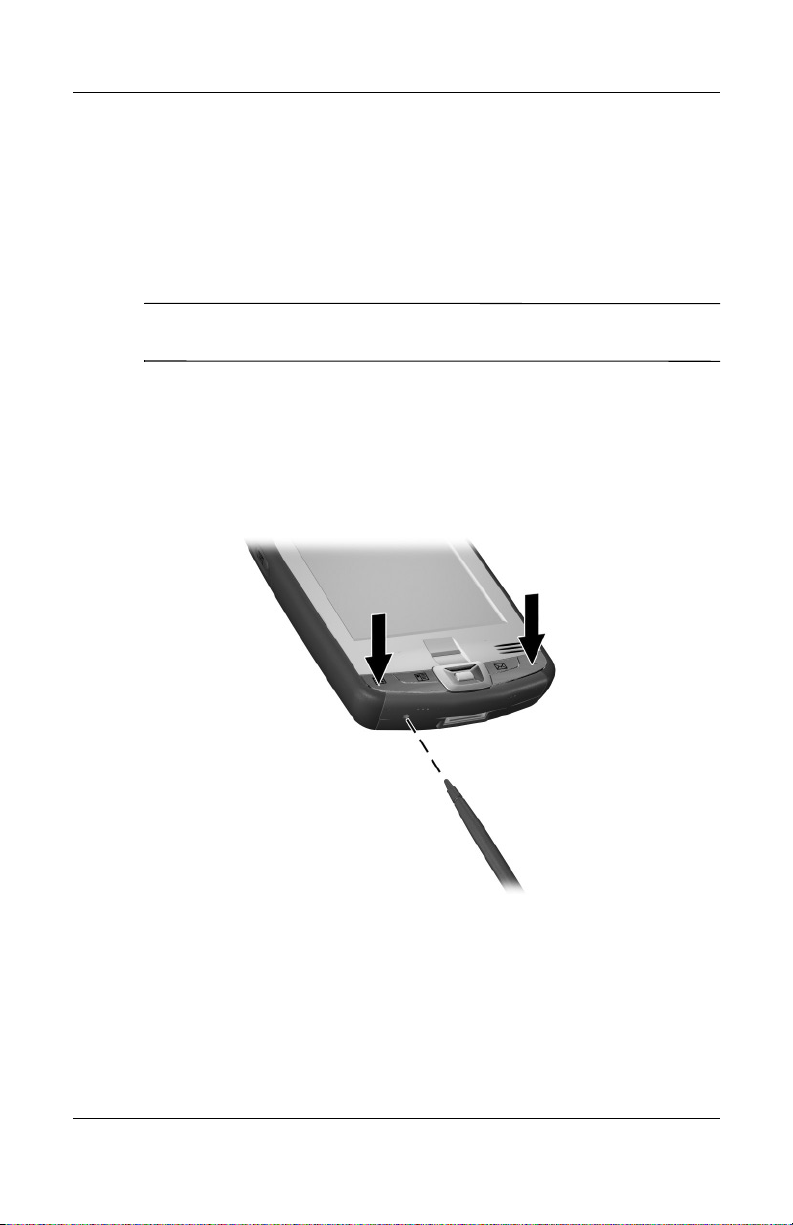
To perform a hard reset:
1. Press and hold down the Calendar and iTask buttons.
2. While holding down these buttons, use the stylus to
lightly press the Reset button on the bottom of the iPAQ
Pocket PC for about two seconds.
Getting to Know Your iPAQ Pocket PC
User’s Guide 1–7
Page 16

Getting to Know Your iPAQ Pocket PC
3. When the Pocket PC screen begins to fade, release the
Calendar and iTask buttons first, and then remove the stylus
from the Reset button.
Note: If you simultaneously push and hold the Reset, Calendar,
and iTask buttons for more than two seconds, the battery
disconnects. To restart the device, either plug the device into the
AC Adapter or press the Reset button again.
After performing a hard reset, you may need to reinstall
applications stored in iPAQ File Store to restore shortcuts and full
functionality.
4. The Pocket PC resets and powers on.
To return your iPAQ Pocket PC to factory settings after
performing a hard reset:
1. Tap Start > Programs > File Explorer > My Device.
2. Tap the iPAQ File Store folder to open it.
3. Tap Edit > Select All.
4. Tap and hold the selected files, then tap Delete.
5. Tap Ye s to delete all file in iPAQ File Store.
Removing/Replacing the Flip Cover
Your Pocket PC comes with a protective flip cover, which is
designed to protect your screen.
CAUTION: It is recommended that you leave on the flip cover;
Ä
however, you can remove it from the Pocket PC.
User’s Guide 1–8
Page 17
Getting to Know Your iPAQ Pocket PC
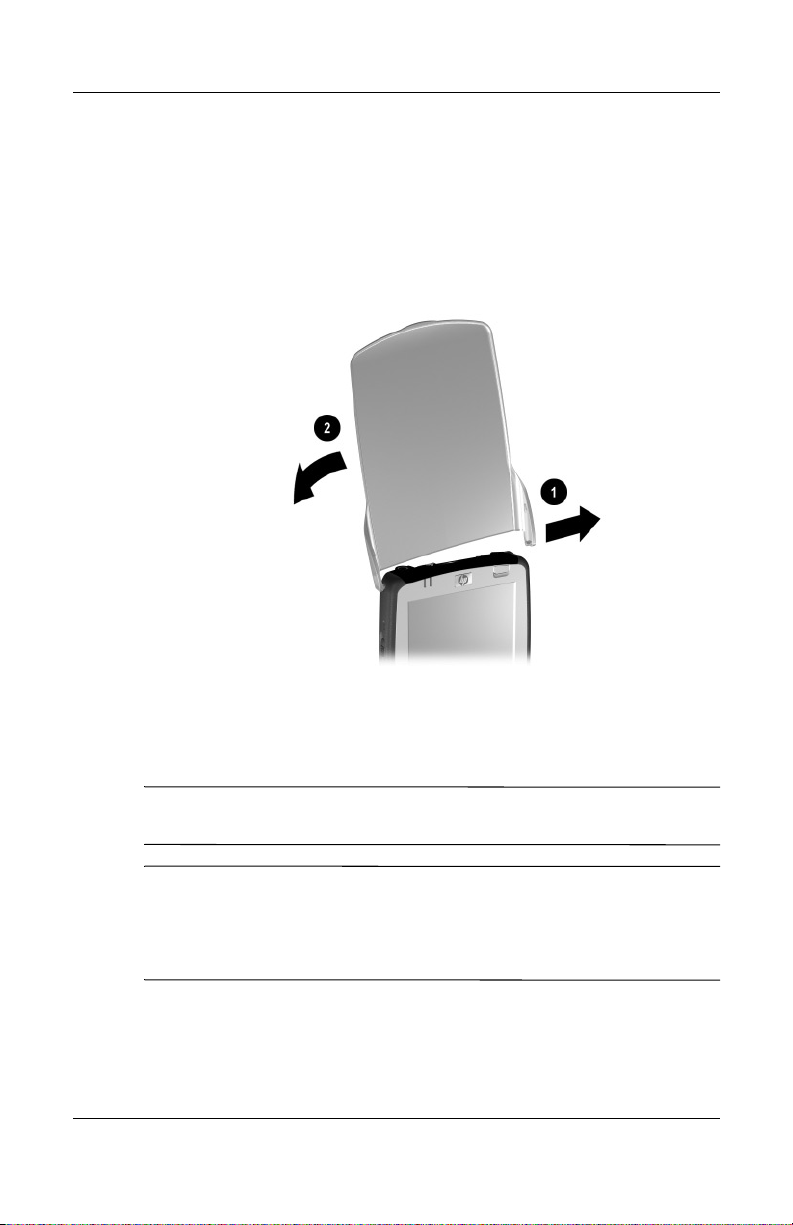
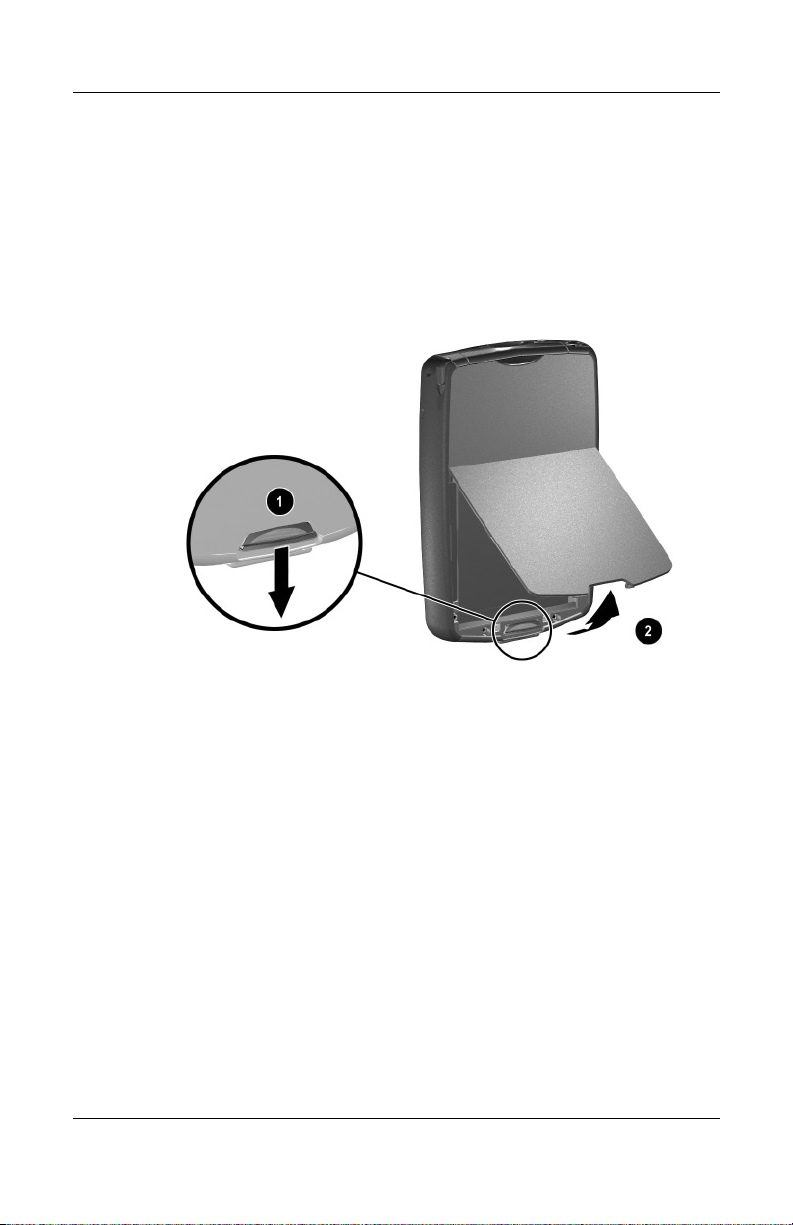
To remove the flip cover:
1. Open the flip cover.
2. Gently pull the flip cover away from one side of the device
1.
3. Pull the flip cover away from the other side of the device 2.
To replace the flip cover, reverse the steps above.
Routine Care
CAUTION: The screen of your iPAQ Pocket PC is made of glass and
Ä
can be damaged or broken by drops, impacts, or pressure.
Note: HP is not responsible for damage that occurs as a result of
your failure to follow the instructions that came with the HP
branded product. Refer to the warranty document inlcuded with
your iPAQ Pocket PC for more information.
User’s Guide 1–9
Page 18

Getting to Know Your iPAQ Pocket PC
You should observe the following practices to protect the screen
of your iPAQ Pocket PC from damage:
■ Do not sit on your iPAQ Pocket PC.
■ When transporting your iPAQ Pocket PC in a purse, pocket,
briefcase, etc., ensure the device does not get compressed,
bent, dropped, or hit.
■ When not in use, close the flip cover on your iPAQ Pocket
PC and store it in a case. You can select from a wide variety
of case options at www.hp.com/go/ipaqaccessories or
www.casesonline.com.
■ Do not place anything on top of your Pocket PC.
■ Do not bang your iPAQ Pocket PC against hard objects.
■ Never use any device other than the stylus that comes with
the Pocket PC or an approved replacement to tap or write on
the screen. If you lose or break your stylus, you can order
extras at www.hp.com/go/ipaqaccessories.
■ Clean your Pocket PC by wiping the screen and the exterior
with a soft, damp cloth lightly moistened only with water.
CAUTION: To reduce the risk of damage to the internal components,
do not spray liquid directly on the screen, or allow excess liquid to drip
Ä
inside your Pocket PC. Using soap or other cleaning products on the
screen might discolor the finish and damage it.
Traveling with your Pocket PC
Use the following guidelines when traveling with your Pocket
PC.
■ Back up your information.
■ Take a copy of your backup with you on an SD memory card.
■ Disconnect all external devices.
■ Take the AC Adapter and Charger Adapter with you.
User’s Guide 1–10
Page 19

Getting to Know Your iPAQ Pocket PC
■ Keep your Pocket PC in a protective case and keep it in your
carry-on luggage.
■ For air travel, be sure to turn off the Phone, Bluetooth, and
Wi-Fi. To turn off all wireless features, from the Tod ay
screen, tap Start > iPAQ Wireless > All Off.
■ If you are traveling internationally, be sure you have the plug
adapter appropriate for the country you are visiting.
User’s Guide 1–11
Page 20

Synchronizing with Your
Using Microsoft ActiveSync
Your device can be connected to a computer so you can transfer
files back and forth. In this way, you only have to input data once.
Microsoft ActiveSync is a synchronization program you install
on your desktop or laptop computer to:
■ Copy files (data, audio, or video) between your device and up
to two host computers so you always have the latest
information in all locations.
■ Install programs on your device
■ Back up and restore device information
■ Synchronize links
■ Send and receive e-mail
2
Computer
■ Request meetings
Installing ActiveSync
CAUTION: For synchronization to work properly, install Microsoft
Ä
ActiveSync on your computer (Steps 1 and 2 below) before you
connect your iPAQ Pocket PC to your computer (Step 3).
To install Microsoft ActiveSync on your host computer:
1. Insert the Companion CD into the CD tray or slot on your
computer.
User’s Guide 2–1
Page 21
Synchronizing with Your Computer
2. After the introductory screen displays, click Setup Wizard.
The Setup Wizard detects the programs on your computer,
and guides you step by step so you can install ActiveSync on
your computer as well as other programs on your Pocket PC.
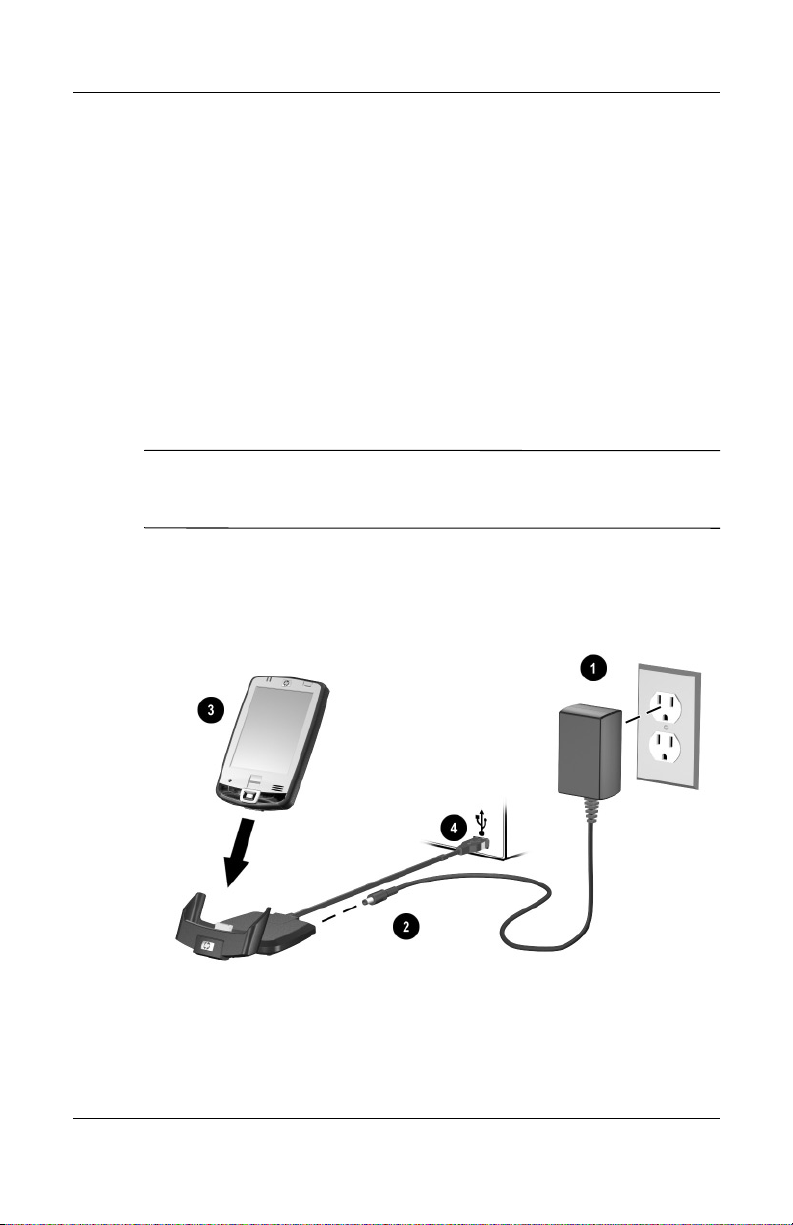
3. Follow the screen recommendations and when prompted,
connect your Pocket PC to your personal computer:
a. Plug the AC Adapter into an electrical outlet 1 and
connect the other end of the AC Adapter to the AC
connector on the HP Desktop Cradle 2.
b. Slide the bottom of your Pocket PC into the HP iPAQ
Cradle 3 and push firmly to seat it.
CAUTION: To avoid damaging your Pocket PC or the cradle, check to
Ä
be sure the Pocket PC and cradle connectors are properly aligned
before pushing the Pocket PC into the HP Desktop Cradle.
c. Connect the USB Cable to the USB port on your
computer 4.
User’s Guide 2–2
Page 22
Synchronizing with Your Computer
OR
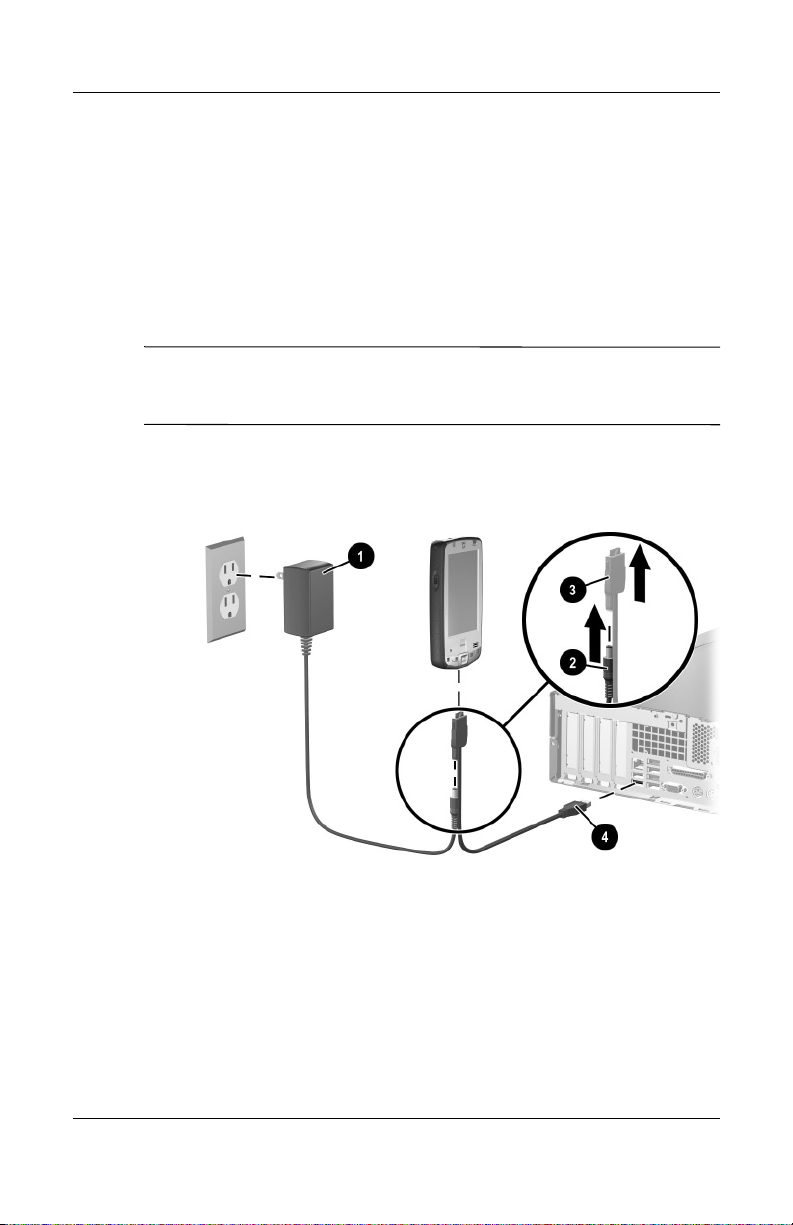
a. Plug the AC Adapter into an electrical outlet 1, then
connect the other end of the AC Adapter to the AC
connector on the Autosync Cable 2.
b. Connect the 22-pin connector on the Autosync Cable to
the universal sync connector on the bottom of your iPAQ
Pocket PC 3.
CAUTION: To avoid damaging your Pocket PC or the Autosync Cable,
check to be sure the Pocket PC and cable connectors are properly
Ä
aligned before pushing the cable into the universal sync connector.
c. Connect the other end of the Autosync Cable to the USB
port on your computer 4.
4. Once you are finished with the Setup Wizard, you can
disconnect the Pocket PC from the computer.
User’s Guide 2–3
Page 23

Synchronizing with Your Computer
Synchronizing Your Pocket PC with Your Computer
With ActiveSync installed on your computer, you can:
■ Use it any time to create an additional partnership so you can
synchronize information with up to two computers.
■ Add or delete the type of data (Contacts, Calendar,
Messaging, Tasks, Favorites, Files, Notes, and AvantGo) you
want synchronized with your Pocket PC.
Note: When you synchronize files, you can drag and drop the
selected files from your computer to the synchronized folder on
your iPAQ Pocket PC. If you named your device “PC1” when
you created your partnership, then the synchronized folder is
named “PC1.” When you synchronize, the files are automatically
moved to and from your iPAQ Pocket PC.
Changing Synchronization Settings
You can modify your synchronization settings for Microsoft
ActiveSync to:
■ Change when your iPAQ Pocket PC synchronizes with your
host computer.
■ Change the type of connection (serial, USB, or infrared) from
your iPAQ Pocket PC to your computer.
■ Select the files and information to synchronize.
■ Select the files and information you do not want to
synchronize (for example, e-mail attachments).
■ Determine how conflicts between information on your
iPAQ Pocket PC and information on your computer are to be
handled.
User’s Guide 2–4
Page 24

To change synchronization settings:
1. From the Start menu on your computer, click Programs >
Microsoft ActiveSync > Tools > Options.
a. On the Sync Options tab, select the files and information
to synchronize with your computer.
b. On the Schedule tab, select when your iPAQ Pocket PC
synchronizes with your computer.
c. On the Rules tab, determine how conflicts between
information on your iPAQ Pocket PC and information
on your computer are to be handled.
2. Tap OK when you are finished.
3. From the File menu, click Connection Settings. Select the
type of connection to be allowed between the iPAQ Pocket
PC and the computer.
Using the Infrared Connection
As an alternative to using the desktop cradle, you can
synchronize your Pocket PC and your computer using the
infrared connection if you have an infrared port or an infrared
USB adapter installed on your computer. The infrared connection
option works only on computers that have Microsoft Windows
98SE, Me, 2000, or XP operating systems installed.
To set up an infrared connection to a computer:
1. Synchronize your Pocket PC with your computer using the
desktop cradle before the first time you establish an
ActiveSync connection via infrared.
2. Follow your computer manufacturer’s instructions to install
and set up an infrared port.
3. Remove the Pocket PC from the cradle and line up the
infrared port with the computer infrared port so they are
unobstructed and within 12 inches (30.5 cm) of each other.
Synchronizing with Your Computer
User’s Guide 2–5
Page 25

4. Initiate a connection by tapping Start > Programs >
ActiveSync > Tools > Connect via IR. Synchronization
begins on your device.
5. To disconnect, move the devices away from each other or
tap X in the upper right of the screen to turn off.
Copying Files
You can copy files to and from your host computer using
Explore in ActiveSync and Windows Explorer.
To copy files:
1. Insert your iPAQ Pocket PC into the sync cable.
2. From the Start menu on your computer, click Programs >
Microsoft ActiveSync.
3. Click Explore.
4. Double-click the My Pocket PC.
5. On your computer, right-click the Start menu, and select
Explore.
6. Locate the file to be moved.
Synchronizing with Your Computer
Note: You cannot copy preinstalled files or system files.
7. Drag and drop your files between your iPAQ Pocket PC and
your computer. ActiveSync converts the files so that they can
be used by the Pocket Office programs, if necessary.
Note: Move your files directly into My Documents on your
iPAQ Pocket PC (or into a folder inside My Documents), so
the programs on your iPAQ Pocket PC can locate them.
User’s Guide 2–6
Page 26

Synchronizing with Your Computer
Installing Programs
To install programs on your iPAQ Pocket PC from your computer
using ActiveSync:
1. Connect your iPAQ Pocket PC to your computer using the
sync cable.
2. Follow the instructions on the screen.
3. Check the screen of your iPAQ Pocket PC to see if any
further steps are necessary to complete the installation.
Backing up and Restoring Files
To help reduce the chance of losing information, you should back
up information to your computer regularly. For more information
on backing up and restoring information using Microsoft
ActiveSync, refer to “Using ActiveSync to Backup/Restore” in
Chapter 6.
You can synchronize links to Web sites from the Favorites
list on your computer to view them offline with Pocket Internet
Explorer.
1. From the Start menu on your computer, click Programs
and double-click the Internet Explorer.
2. Click Favorites to see the list of links to your favorite Web
sites.
3. To save a Web site link to Mobile Favorites, open the Web
site and click Create Mobile Favorite.
If you select “Favorites” as an information type to be
synchronized, ActiveSync copies your mobile favorite
to your Pocket PC the next time you synchronize.
4. Follow the instructions in Synchronize information to
manually synchronize your favorite links.
User’s Guide 2–7
Page 27

Synchronizing with Your Computer
Sending and Receiving E-mail
You can send and receive e-mail messages by synchronizing your
iPAQ Pocket PC with your computer using ActiveSync. If you are
using ActiveSync to send and receive e-mail messages, the name
of the folder you are using is displayed at the bottom of the
screen. For more information on sending and receiving e-mail
using ActiveSync, from the Start menu, tap Help > Messaging.
Requesting Meetings
You can schedule a meeting and send a meeting request through
ActiveSync. For more information, from the Start menu, tap
Help > Calendar.
User’s Guide 2–8
Page 28

Managing the Battery
Your iPAQ Pocket PC is shipped with a rechargeable battery that
is partially charged. It is recommended that you fully charge the
Pocket PC battery before setting up the device, and recharge
regularly. Your Pocket PC uses some power to maintain files in
RAM and the clock. While working at your desk, keep the Pocket
PC and AC Adapter connected through the HP Desktop Cradle.
When you travel, it is recommended that you carry the AC
Adapter, Charger Adapter plug, or an optional spare battery with
you.
CAUTION: Use only an HP approved battery for your iPAQ Pocket
Ä
PC. Inserting a battery that does not comply with HP requirements might
cause the Pocket PC to malfunction and will void the HP iPAQ limited
warranty.
The iPAQ Pocket PC also has a small internal backup battery that
allows you to change the main battery without losing RAM data
(user-installed programs and data) as long as it is replaced within
15 minutes. The internal battery can only be removed by
qualified HP Technical Support.
3
User’s Guide 3–1
Page 29
Installing the Battery
To install the removable/rechargeable battery:
1. To remove the battery cover, press the battery release latch
down 1, then swing the battery door up and remove it from
the device 2.
Managing the Battery
User’s Guide 3–2
Page 30

Managing the Battery
2. Insert the right side of the battery into the right side of the
battery compartment, then press the left side of the battery
into place 3.
User’s Guide 3–3
Page 31

Managing the Battery
3. Insert the top of the battery cover into the top of the battery
compartment 4.
4. Press the bottom of the battery cover into place until it clicks
5.
CAUTION: The cover must be in place for the Pocket PC to operate. If
Ä
the battery cover is not in place when you press the Power button, the
Pocket PC will not power on.
Note: If the battery is fully discharged, you must connect the
AC Adapter to the Pocket PC to fully charge it before continuing.
It takes up to four hours to fully charge a completely drained
battery.
User’s Guide 3–4
Page 32

Removing the Battery
CAUTION: Before removing the battery, use iPAQ Backup or
Ä
ActiveSync to back up data on your Pocket PC.
Note: If you remove or replace the battery, your HP iPAQ will
perform a soft reset. Be sure to close all applications and save
data before removing the battery.
To remove the battery:
1. Press the battery release latch down 1.
2. Swing the battery door up and remove it from the device 2.
Managing the Battery
User’s Guide 3–5
Page 33

Managing the Battery
3. Lift the left side of the battery up and remove it from the
Pokcet PC.
CAUTION: Because most of the applications and data you install on
Ä
your Pocket PC are held in memory (RAM), you will need to reinstall
them if the battery completely discharges or if the battery is removed
from the device for more than a few minutes. Otherwise, when fully
charged, the internal backup battery saves the user-installed data for up
to 15 minutes when the standard battery is removed. Before removing
the battery, check to see that the internal backup battery is fully
charged by tapping Start > Settings > System tab > Power icon.
You do not need to reinstall applications and data installed in the iPAQ
File Store folder because they are saved in nonvolatile memory.
Charging with the AC Adapter
The standard AC Adapter works in a standard electrical outlet.
You can also charge your Pocket PC in your automobile with an
optional Automobile Adapter that works in your vehicle’s
electrical cigarette lighter or a 12-volt power outlet.
User’s Guide 3–6
Page 34

Managing the Battery
To purchase an optional Automobile Adapter, refer to the HP
Web site at:
CAUTION: Use only HP recommended AC adapters.
www.hp.com/go/ipaqaccessories.
Ä
To charge your Pocket PC using the AC Adapter:
1. Insert the AC Adapter plug into the AC Charger adapter 1.
2. Plug the AC Adapter into an electrical outlet 2.
3. Insert the AC Charger adapter into the bottom of the
Pocket PC 3.
CAUTION: To avoid damaging your Pocket PC or the AC Adapter,
check to be sure all connectors are properly aligned before connecting
Ä
them.
User’s Guide 3–7
Page 35

Managing the Battery
4. When the Power button indicator on the front of the Pocket
PC turns solid amber, the device is fully charged and you can
disconnect the AC Adapter. The approximate time to fully
charge a drained battery is four hours.
Note: A standard battery can be charged in about four hours; an
optional extended battery takes longer.
Charging with the HP Desktop Cradle and AC Adapter
Use the HP Desktop Cradle to charge your Pocket PC.
Note: It is not necessary to synchronize your Pocket PC before
charging it.
To charge your Pocket PC using the HP Desktop Cradle:
1. Plug the AC Adapter into an electrical outlet 1 and connect
the other end of the AC Adapter to the AC connector on the
HP Desktop Cradle 2.
2. Slide the bottom of your Pocket PC into the HP iPAQ
cradle 3 and push firmly to seat it.
CAUTION: To avoid damaging your Pocket PC or the cradle, check to
be sure the Pocket PC and cradle connectors are properly aligned
Ä
before pushing the Pocket PC into the HP Desktop Cradle.
User’s Guide 3–8
Page 36

Managing the Battery
Note: The amber charge light on the front of the Pocket PC
blinks while the battery is recharging and turns solid amber
(nonblinking) when the battery is fully charged.
Charging with the HP Desktop Cradle and USB Cable
An alternative method of charging the Pocket PC is to charge the
device by using a USB cable. However, because this charging
method drains the host battery (i.e., laptop), you must enable
USB charging on the Pocket PC before you can charge the
device.
To charge your Pocket PC using the HP Desktop Cradle and USB
Cable:
1. Turn on USB charging by tapping Start > Settings > System
tab > Power on the Pocket PC.
2. Select the USB Charging tab, and then check Use USB
Charging.
User’s Guide 3–9
Page 37

Managing the Battery
3. Tap OK once USB Charging has been enabled.
4. Connect one end of the USB sync cable to the bottom of the
Pocket PC.
5. Connect the USB cable to an available USB Port on your
USB powered device, such as a laptop.
Note: The Pocket PC charges slower when using an USB cable
than with an AC Adapter.
Manually Checking the Battery Charge Level
To manually monitor the battery power:
1. Tap Start > Settings > System tab.
2. Tap Power > Battery tab.
If the battery charge level is low, connect to AC power using
the HP Desktop Cradle and the AC Adapter, or change the
battery. For information on purchasing an optional standard or
extended battery, visit the HP Web site at
www.hp.com/go/ipaqaccessories.
User’s Guide 3–10
Page 38

To use a shortcut to view your battery charge level, tap the
Battery icon located in the TodayPanel Lite on the Today screen
plug in.
Battery Saving Tip: Tap Start > Settings > System tab > Power >
Advanced tab, then tap the Turn off device if not used for
checkbox and set it to turn your iPAQ Pocket PC off after a short
time of not being used.
CAUTION: It is recommended that you do not allow the battery
installed in your iPAQ Pocket PC to discharge completely. Doing so
does not harm your Pocket PC or battery; however, you will lose all
data not stored in File Store (ROM). Discharging the battery
completely is similar to performing a hard reset. Refer to “Performing
a Hard Reset” in Chapter 1 for more information.
Power Saving Tips
Here are some power saving tips to help save energy in your
Pocket PC battery.
■ Set the backlight to go off quickly (10 or 30 seconds) after
you stop using your Pocket PC, or implement Power Save
mode to turn off the backlight completely. For more
information, refer to “Changing the Backlight Settings” later
in this chapter.
Managing the Battery
Note: Adjusting the Backlight Brightness Level slider to the
lowest level that is still useable for the given lighting conditions
can be the single most important thing you can do to preserve
battery life.
■ Leave your Pocket PC connected to AC power at all times
when you’re not using it. For more information, refer to
“Charging with the AC Adapter” earlier in this chapter.
User’s Guide 3–11
Page 39

Managing the Battery
■ Leave your Pocket PC set to turn off after not being used for
a short time. Tap the Battery icon > Advanced tab. On
battery power, set the device to power off in the shortest
acceptable time.
■ Turn off all wireless activities when not in use. Refer to
“Powering Wi-Fi On or Off” in Chapter 8 and “Powering
Bluetooth On or Off” in Chapter 9.
■ Turn off the Receive all incoming beams setting and receive
infrared beams manually instead. Refer to Chapter 2,
“Synchronizing with Your Computer.”
■ You can program an Application Button to turn off the screen
when an MP3 is playing, thus saving battery power used to
run the screen. Tap Start > Programs > Windows Media >
Tools > Settings > Buttons. From the Select Function
drop-down list, tap Screen Toggle. Press a program button,
then tap OK. Then, when listening to music, press that
program button to turn off the screen display.
■ Power off your Pocket PC when it is being charged to allow it
to charge at a faster rate.
■ To ensure you always have battery power available, invest in
an extra Standard Battery or Extended Battery. These
batteries can be charged in the optional battery charger. To
purchase an extra battery and/or a battery charger, visit the
HP Web site at www.hp.com/go/ipaqaccessories.
Changing the Backlight Settings
Your new Pocket PC comes with an automatic brightness control
feature that saves up to 25% battery life. The Backlight icon
displays on the Today screen for easy accessibility. In addition to
using the TodayPanel Lite shortcut, you can access the Backlight
application by tapping Start > Settings > System tab >
Backlight.
User’s Guide 3–12
Page 40

To change the Backlight settings:
1. Tap Start > Settings > System tab > Backlight.
2. On the Battery Power tab, select the Turn off backlight if
device is not used for checkbox and enter the time duration
you want to pass before the backlight turns off.
3. Tap the External Power tab to change the backlight setting
for when you are using an external power source (e.g., cradle,
AC Adapter, etc.).
4. Tap the Brightness tab to change the brightness level on the
Pocket PC when using the Pocket PC on battery or external
power.
5. Tap OK when you are finished making your changes.
Note: The Backlight automatically turns on when you tap on the
screen or press a button.
Disabling Buttons
The Button Lock application allows you to disable all the buttons
on your Pocket PC, except the power button whenever the device
is in Standby mode. By enabling this feature, you can ensure the
device is not accidentally turned on, thus draining your battery.
Managing the Battery
To enable the button lock feature:
1. Tap Start > Settings > Personal tab > Buttons.
2. Tap the Lock tab and check Disable all buttons except
power button.
3. Tap OK.
User’s Guide 3–13
Page 41

Learning the Basics
Using the Today Screen
When you first turn on your iPAQ Pocket PC, the To da y screen
displays. You can also display it by tapping Start > Toda y. Use
the Tod ay screen to view:
■ Owner information
■ Upcoming appointments
■ Unread and unsent messages
■ Tasks that need to be completed
4
Tap to view
Programs menu
Tap to create a new item
User’s Guide 4–1
Tap to view Connections
Tap to change volume or mute all sounds
Tap to change date and time
Tap to read e-mail
Tap to set appointment or
view existing appointments
Tap to view and set Wi-Fi and
Bluetooth settings
Page 42

Navigation Bar and Command Bar
The Navigation Bar is located at the top of the screen. It displays
the Start button, active notifications (such as new e-mail, Wi-Fi
connection status, speaker status) and current time. Use the Start
menu to select a program.
Navigation Bar
Tap to select a program
Tap to select a program you used recently
Tap to see additional programs
Tap to customize settings
Learning the Basics
Tap for Bluetooth features
The Command bar is located at the bottom of the screen. The
New menu provides shortcuts in creating new appointments,
contacts, tasks, notes, etc. The Input panel button allows you to
enter text.
New button
Menu Buttons
actions
User’s Guide 4–2
Input panel button
Page 43

Status Icons
You may see the following status icons displayed on the
Navigation or Command bar. Tap the icon on the screen to view
more information related to the item.
Icon Status
Active connection to computer or wireless network.
Inactive connection to computer or wireless network.
Microsoft ActiveSync is synchronizing.
Speaker is on.
Speaker is off (or in mute position).
Learning the Basics
Battery power is low.
Battery power is very low.
E-mail, SMS or MMS messages received.
Instant messages received.
(Continued)
User’s Guide 4–3
Page 44

(Continued)
Icon Status
iPAQ Pocket PC is connected with the desktop cradle. This
icon appears only when there is an active connection.
iPAQ Wireless icon—Tap to display Wireless screen.
Provides a control center to turn all wireless activities on
and off, and to configure their settings.
Pop-Up Menus
Pop-up menus allow you to quickly perform an action. Use the
pop-up menu to cut, copy, rename, and delete an item, also send
an e-mail or send a file to another device.
To access a pop-up menu, tap and hold the stylus on the item on
which you want to perform the action. When the menu appears,
tap the desired action, or tap anywhere outside the menu to close
it without performing an action.
Learning the Basics
Tap and hold to display
the pop-up menu
Tap the action you want
Tap outside the menu to close
it without performing an action
User’s Guide 4–4
Page 45

Creating Information
From the Tod ay screen, you can create new information,
including:
■ Appointments
■ Contacts
■ Messages
■ Excel Workbook
■ Notes
■ Ta sk s
■ Word documents
1. From the Start menu, tap Tod ay > New at the bottom of the
screen.
2. Tap an option to create a new item.
3. Tap OK after you finish creating a new item.
Customizing the Today Screen
Learning the Basics
From the Settings Today screen, you can:
■ Add a picture as the background.
■ Select the information that appears on the To da y screen.
■ Select the To da y screen theme.
■ Set the order of the information.
■ Set when to see the To da y screen.
User’s Guide 4–5
Page 46

Learning the Basics
1. Tap Start > Settings > Personal tab > Today.
2. Select Use this picture as the background checkbox.
3. Tap Browse to select a picture from File Explorer.
4. Tap the Items tab to select or reorder the information on the
Tod ay screen.
5. Tap an item to highlight it.
User’s Guide 4–6
Page 47

Learning the Basics
6. Tap Move Up or Move Down to change the order of items on
the Tod ay screen.
Note: You cannot change the placement of the Date on the
Today screen.
7. Tap the down arrow associated with Today timeout
checkbox to determine how many hours must pass before the
Tod ay screen displays.
8. Tap OK.
Changing the Screen Orientation
You can change the screen orientation of your Pocket PC from
Portrait to Landscape mode.
To change the screen orientation of your Pocket PC:
1. Tap Start > Settings > System tab > Screen.
2. Tap Portrait, Landscape (right-handed), or Landscape
(left-handed).
3. Tap OK.
Shortcut: Press and hold the Calendar button for two seconds to
toggle between portrait and landscape modes.
User’s Guide 4–7
Page 48

Learning the Basics
Opening and Closing Applications
Open any application on your iPAQ Pocket PC from the
Start menu.
Note: You can also open an application by assigning it to an
Application Button. To assign Application Buttons, from the
Tod ay screen, tap Start > Settings > Personal tab > Buttons.
To open an application:
1. Tap Start > Programs.
2. Tap the desired application title or logo.
To minimize an open application, tap the x at the top right of the
screen.
Close applications either manually or by using iTask.
Note: Applications automatically close based on available
memory.
Closing with iTask
1. Press the iTask button (Application Button 4 on the lower
right side of your device).
2. Tap and hold the program to be closed.
3. From the pop-up menu, tap Close This Task.
Closing Manually
1. Tap Start > Settings > System tab > Memory > Running
Programs tab.
2. Tap Stop All or select a particular application, then tap Stop.
Note: To bring a currently running program to the foreground,
tap Activate.
User’s Guide 4–8
Page 49

Installing Applications
Install applications on your iPAQ Pocket PC from your:
■ Computer by using Microsoft ActiveSync.
■ iPAQ Pocket PC if the application file has a .cab extension.
■ iPAQ Pocket PC or your computer by copying an application
file that has an .exe or .cef extension.
To install more applications on your Pocket PC:
1. Use the HP Desktop Cradle to connect your Pocket PC to
your personal computer.
2. Follow the instructions in the Installation Wizard provided
with the program you want to install.
3. Check the screen on your Pocket PC to see if any further
steps are necessary to complete the program installation.
Deleting Applications
To delete applications on your Pocket PC:
1. Tap Start > Settings > System tab > Remove Programs.
Learning the Basics
2. Select the checkbox for the program(s) you want to remove,
then tap Remove.
Note: By removing an application from your Pocket PC, you
increase storage memory (used to store data and document files)
and program memory (used to run programs) on the device.
User’s Guide 4–9
Page 50

Learning the Basics
Backing Up Information
Use iPAQ Backup or Microsoft ActiveSync Backup to back up
and restore information on your iPAQ Pocket PC.
Note: Your iPAQ Pocket PC came preinstalled with iPAQ
Backup. However, you must install ActiveSync on your computer
before using ActiveSync Backup.
To help reduce the chance of losing information, you should back
up information on a regular schedule. For more information on
backing up your data, refer to “Using iPAQ Backup to
Backup/Restore” in Chapter 6.
Using the iPAQ FIle Store Folder
You can install programs and save files to the iPAQ File Store
folder, which is accessed from File Explorer on your iPAQ
Pocket PC.
Programs and files stored in iPAQ File Store are held in ROM
and are saved if you perform a full reset of your iPAQ Pocket PC
or if the battery discharges completely.
CAUTION: If you have HP ProtectTools enabled and forget your PIN or
Ä
password, resetting the device will result in loss of data stored in iPAQ
File Store. For more information on HP ProtectTools, refer to Chapter 7,
“Using Security Features.”
Some devices also come with High Speed File Store, a faster
version of iPAQ File Store. If your iPAQ Pocket PC has more
than 30 MB of File Store space, it is High Speed File Store. To
find out how much File Store memory is on your device, from the
Today screen, tap the Memory icon > Storage Card tab. Select
iPAQ File Store in the drop down list box. If the amount is 30
MB or more, then you have High Speed File Store.
User’s Guide 4–10
Page 51

Learning the Basics
To save to iPAQ File Store or High Speed File Store:
1. Copy the files to be saved to the iPAQ File Store folder.
2. Tap Start > Programs > File Explorer > My Device >
iPAQ File Store.
3. Paste the selected files.
CAUTION: If you format iPAQ File Store, do not perform a hard or soft
reset. Doing so may prevent your Pocket PC from operating normally. For
Ä
more information on formatting iPAQ File Store, refer to “Performing a
Hard Reset” in Chapter 1.
Note: Before saving files to the iPAQ File Store folder, it is a
good idea to determine how much memory is available in the
folder. To view the amount of memory, from the Tod ay screen,
tap the Memory icon > Storage Card tab, then select iPAQ File
Store from the drop down menu.
User’s Guide 4–11
Page 52

Learning Input Methods
Using Input Software
To input information to your Pocket PC, you can tap the
on-screen keyboard or write with the Letter Recognizer,
Microsoft Transcriber, or Block Recognizer in any application.
You can use the stylus to draw and write on the screen in the
Notes application and from any Notes tab in the Calendar,
Contacts, and Tasks applications.
CAUTION: To avoid damaging your iPAQ Pocket PC screen, always
Ä
use a stylus. Never use a pen or any type of metal pointer on the
screen.
Note: Microsoft Transcriber is a free program that you can
download from the Microsoft Web site.
5
Changing Word Suggestion Options
As you type or write, the Pocket PC suggests words for you in a
box above the keyboard, Letter Recognizer, or Block Recognizer,
but not in the Transcriber.
You determine:
■ If words are suggested.
■ The number of letters you enter before a word is suggested.
■ The number of words that are suggested per entry.
User’s Guide 5–1
Page 53

Learning Input Methods
To change settings for word suggestions:
1. Tap Start > Settings > Personal tab > Input.
2. Tap the Word Completion tab.
3. Tap the down arrow associated with letters and select the
number of letters you want to type before a word is
suggested.
t
User’s Guide 5–2
Page 54

Learning Input Methods
4. Tap the down arrow associated with words and select the
number of words you want suggested.
5. Tap OK.
Note: If you do not want any words suggested, remove the
checkmark by tapping the checkbox next to Suggest Words
When Entering Text.
User’s Guide 5–3
Page 55

Using the On-Screen Keyboard
Use the stylus to tap letters, numbers, and symbols on the
on-screen keyboard to enter typed text directly onto the screen.
1. From any application, tap the up arrow next to the Input
Panel icon.
2. Tap Keyboard to display a keyboard on the screen.
Learning Input Methods
Note: To see symbols, tap the 123 key.
3. Tap a letter, symbol, or number to enter information.
4. Tap OK.
User’s Guide 5–4
Page 56

Learning Input Methods
Writing with the Stylus and the Letter Recognizer
Use the stylus and Letter Recognizer to write letters, numbers,
and symbols on the screen. Create words and sentences by
writing in uppercase (ABC), lowercase (abc), and symbols (123)
as instructed here.
To write with the stylus and Letter Recognizer:
1. From any application, tap the up arrow next to the Input
Panel icon.
2. Tap Letter Recognizer.
3. Write a letter or symbol between the dashed line and
baseline.
❏ To display in uppercase, write a letter between the hatch
marks labeled ABC.
❏ To display in lowercase, write a letter between the hatch
marks labeled abc.
❏ Write a number or draw a symbol between the hatch
marks labeled 123.
What you write will be converted to text.
Note: For the Letter Recognizer to work effectively, write
characters between the dashed line and baseline.
■ If you are writing a letter like “p,” write the top portion
within the dashed line and baseline, and the tail portion
below the baseline.
■ If you writing a letter like “b,” write the bottom portion
within the dashed line and baseline, and the top portion
above the dashed line.
Note:To view help on using Letter Recognizer, open the program
and tap the question mark next to the writing area.
User’s Guide 5–5
Page 57

Learning Input Methods
Writing with the Stylus and Microsoft Transcriber
Use the stylus and Microsoft Transcriber to write words, letters,
numbers, and symbols anywhere on the screen.
1. From any application, tap the up arrow next to the Input
Panel icon.
2. Tap Transcriber to display the Transcriber Intro screen.
3. Tap OK.
4. Tap New at the bottom of the screen.
5. Begin writing on the screen. What you write will be
converted to text.
Note: To “teach” Transcriber your style of writing, tap on the
a” icon at the bottom of the screen to display the Letter Shapes
“
screen and follow the instructions.
Writing with the Stylus and Block Recognizer
Write letters, numbers, and symbols using the stylus and Block
Recognizer. Create words and sentences by writing letters and
numbers in specific areas.
1. From any application, tap the up arrow next to the Input
Panel button.
2. Tap Block Recognizer.
User’s Guide 5–6
Page 58

Learning Input Methods
3. Write a word, letter, or symbol between the hatch marks.
❏ To type text, write a letter between the hatch marks
labeled “abc.”
❏ To type numbers or symbols, write a number or symbol
between the hatch marks labeled “123.”
What you write will be converted to text.
Drawing and Writing on the Screen
Use the stylus as a pen to draw and write on the screen in the
Notes program or from the Notes tab in Calendar, Contacts,
or Tasks.
1. Tap Start > Programs > Notes > New.
2. Draw and write on the screen.
3. Tap the Pen icon.
4. Tap OK.
User’s Guide 5–7
Page 59

Converting Writing to Text
You can convert your writing to text when you write with the
stylus in the Notes program or from the Notes tab in:
■ Calendar
■ Contacts
■ Ta sk s
To convert writing to text:
1. From the Start menu, tap Notes or tap the Notes tab in
Calendar, Contacts, or Tasks.
2. Tap a note to open it.
3. Tap Tools.
4. Tap Recognize.
Note: To convert a particular word or phrase, highlight it before
you tap Recognize. If a word is not recognized, it will not be
converted.
Learning Input Methods
5. Tap OK.
User’s Guide 5–8
Page 60

Applications
Software Available on the HP iPAQ Pocket PC
The software programs described below are preinstalled on your
iPAQ Pocket PC. You can find detailed information for using this
software in the Help files located on your iPAQ Pocket PC. To
access these Help files, tap Start > Programs > Help and select
an application.
In addition, the Microsoft Pocket PC Basics Help provides
instructions on operating the Pocket PC. To locate Pocket PC
Basics, tap Start > Programs > Help > Pocket PC Basics.
Note: If your Pocket PC loses power, the preinstalled programs
are not deleted.
6
User’s Guide 6–1
Page 61

Applications
To access the following programs, tap Start, then the
name of the program, or tap directly on the Tod ay
screen.
Application Function
Microsoft Calendar Schedules appointments, meetings, and other
Microsoft Contacts Provides a list of colleagues and friends to e-mail
Microsoft Messaging Receives and sends Internet e-mail messages
Microsoft Pocket Internet
Explorer
Microsoft Tasks Tracks your to-do list.
TodayPanel Lite Allows you to quickly access the battery,
events, and sets an alarm to remind you of the
appointments. Appointments for the day are
displayed on the Today screen.
and telephone.
in Inbox on your iPAQ Pocket PC or your
computer if ActiveSync is installed. You must
have an e-mail address provided by your Internet
Service Provider (ISP) or employer to send and
receive e-mail.
Browses the Internet and downloads pages
through synchronization or by connecting to the
Internet.
memory, storage, and backlight option on your
Pocket PC.
User’s Guide 6–2
Page 62

To access the following programs, tap Start >
Programs, then the name of the program.
Application Function
Applications
Microsoft ActiveSync Synchronizes the information between your
Microsoft Calculator Performs calculations and converts currency.
Microsoft File Explorer Shows where files are located on your iPAQ
Microsoft Find Allows you to search for a particular file or file
How Do I...? Answers the most frequently asked questions
HP Image Zone Displays individual images and runs slide
HP Mobile Printing Enables mobile printing.
Games Contains games designed for play on the iPAQ
iPAQ Backup Allows you to back up your data to protect it
Pocket PC and computer so you have the
latest information in both locations. Be sure
you install ActiveSync on your computer
before connecting the cradle and iPAQ Pocket
PC to your computer.
Pocket PC or storage card(s).
folder on your iPAQ Pocket PC.
regarding your iPAQ Pocket PC.
shows. Also displays images from the SD
storage card of a digital camera.
Pocket PC.
from loss due to a drained battery, accidental
deletion, or hardware failure.
iTask Allows you to quickly access the most
User’s Guide 6–3
frequently used features on your iPAQ
Pocket PC.
(Continued)
Page 63

(Continued)
Applications
Application Function
Microsoft MSN Messenger Provides a chat environment which allows you
Microsoft Notes Creates handwritten or typed notes, drawings,
Microsoft Pocket Excel Able to create and edit workbooks or view and
Microsoft Pocket MSN Allows you to subscribe to a variety of popular
Microsoft Pocket Word Creates new documents or views and edits
Print Manager Allows you to manage your print jobs.
Microsoft Terminal Services
Client
Microsoft Windows Media
Player 9 Series
to see who is online, send and receive instant
messages, have an instant message
conversation with a group of contacts, tell
contacts that you are unavailable, and block
contacts from seeing your status or sending
you messages.
and recordings.
edit Excel workbooks created on your
computer.
MSN services for your Pocket PC.
Word documents created on your computer.
Logs onto your computer and uses all the
programs available on that computer from your
Pocket PC (Windows 2000 and XP or later).
Plays digital audio and video files in Windows
Media or MP3 format on your device.
User’s Guide 6–4
Page 64

Applications
To access the following programs, tap Start > Settings
> Personal tab, then tap the name of the program.
Application Function
Buttons Allows you to program the application buttons
HP ProtectTools Provides software security on the Pocket PC to
Input Define your input method, customize word
Menus Customize your Start menu or define a new
Owner Information Input information about yourself to distinguish
Sounds & Notifications Enables/disables sounds for various options
Today Select a theme for the Today screen
to open your most used programs, customize
the way your Up/Down control repeats, and
disable all buttons except the power button to
ensure the device is not accidentally turned on.
ensure there is little risk of losing sensitive
data. Allows you to use your fingerprint (not
available on some models), a PIN, and/or a
password to protect your data.
completion options, and define your typing
style.
menu.
your Pocket PC from others.
such as events, programs, screen taps, and
hardware buttons as well as defining when
notifications occur.
background and define which items appear on
the Today screen.
User’s Guide 6–5
Page 65

Applications
To access the following programs, tap Start > Settings
> Personal tab, then tap the name of the program.
Application Function
About Describes which version of Windows Mobile
Audio Defines audio settings.
Backlight Enables changes to the Pocket PC backlight
Certificates Allows you to use personal certificates to
Clocks & Alarms Allows you to select time zones, times, and dates
Enroll The HP Certificate Enroller allows you to
HP Asset Viewer Lists detailed information about your system and
HP Profiles Allows the user to change alerts (ring type and
2003 software is loaded on your iPAQ Pocket PC
and gives information on your Device ID and
applicable copyrights.
settings such as brightness, and conserving on
battery and external power.
positively identify yourself to others and gives
information on preinstalled root certificates.
for a home and a visiting location and set up
alarms.
download certificates from the HP Web site if you
have proper authorization.
its configuration.
tone or vibrate mode). For example, if you are in
a meeting, you can change the ring type for
incoming calls to vibrate.
iTask Settings Allows you to define the settings that will appear
when you press the iTask button on the front of
the device.
(Continued)
User’s Guide 6–6
Page 66

(Continued)
Applications
Application Function
Memory Review how much memory is available on your
Power See how much main and backup battery power
Regional Settings Define the language your device uses as well as
Remove Programs Allows you to uninstall programs you have
Screen Define the screen orientation, align the screen,
Self-Test Runs a basic diagnostic test on the device.
device or on a storage card. Also allows you to
review which programs are currently running and
stop or activate them.
is remaining on your device, define when the
device will turn off after not being used, and
define the standby period.
a number of other regional specifications such as
the way numbers, currency, time, and dates are
displayed.
installed yourself.
enable Clear Type, and define the size text
appears on your screen.
User’s Guide 6–7
Page 67

Applications
To access the following programs, tap Start > Settings
> Connections tab, then the name of the program.
Application Function
Beam Allows you to determine whether or not to
Bluetooth Turn Bluetooth on or off or establish a new
Bluetooth Phone Manager Manages Internet connections for your Pocket
Microsoft Connections Connects your Pocket PC to the Internet and
iPAQ Wireless Provides a centralized control to all wireless
LEAP Allows you to establish LEAP connection
Network Cards Configure your network adapters if you use
automatically receive all incoming infrared
beams.
Bluetooth connection.
PC in line with your cell phone and your cell
phone service provider. Also simplifies the
Bluetooth pairing procedure between your
Pocket PC and your cell phone.
intranet to browse Web sites, sends and
receives e-mail, and synchronizes information
using ActiveSync.
features on your Pocket PC. Allows you to turn
all wireless features on and off and configure
settings for the Wireless Local Area Network
(WLAN), Bluetooth, etc.
settings if your network uses this security
protocol.
your network card in two places such as work
and home.
User’s Guide 6–8
Page 68

Installing Applications
Install applications on your iPAQ Pocket PC from your:
■ Computer by using Microsoft ActiveSync
■ iPAQ Pocket PC if the application file has a .cab extension
■ iPAQ Pocket PC or your computer by copying an application
file that has an .exe or .cef extension
To install more applications on your Pocket PC:
1. Use the HP Desktop Cradle to connect your Pocket PC to
your personal computer.
2. Follow the instructions in the Installation Wizard provided
with the program you want to install.
3. Check the screen on your Pocket PC to see if any further
steps are necessary to complete the program installation.
Removing Applications
To remove applications on your Pocket PC:
1. Tap Start > Settings > System tab > Remove Programs.
Applications
2. Select the checkbox for the program(s) you want to remove,
and then tap Remove.
Note: By removing any application from your Pocket PC, you
increase storage memory (used to store data and document files)
and program memory (used to run programs) on the device.
User’s Guide 6–9
Page 69

Using TodayPanel Lite
TodayPanel Lite is a Today screen plug in that allows you to
quickly view and change a variety of options. The options you
can change are:
Icon Name Description
Applications
TodayPanel
Lite
Battery
power
Main
memory
Storage
card
memory
Backlight
Change the TodayPanel Lite options or the Today
screen settings.
View the amount of battery power remaining, set
the standby period, set the time duration for turning
off the Pocket PC, set the USB charging method.
View the amount of main memory available on the
Pocket PC. Also you can view, activate, and stop all
running programs from this screen.
View the amount of storage card memory available
or how much memory is allocated to iPAQ File
Store. Also you can view, activate, and stop all
running programs from this screen.
View and change the backlight options on the
Pocket PC.
User’s Guide 6–10
Page 70

Applications
To use TodayPanel Lite, from the To day screen, tap the icon of
your choice, make the appropriate changes, and tap OK.
TodayPanel Lite also has the flexibility to change the icons to
compact mode, as shown here, which allows more space on the
Today screen. Also, you can change memory and storage settings
to display as percentages instead of file sizes.
User’s Guide 6–11
Page 71

To change to compact mode:
1. Tap > Options to open the TodayPanel Lite application.
2. Tap the Display Mode listbox and select Compact.
3. Tap Bar Color... to change the color of the bar and tap OK.
To display the memory and storage as percentages:
1. Tap > Options to open the TodayPanel Lite application.
2. Tap the Display Memory as listbox or the Display Storage
as listbox and select the percentage listed.
3. Tap OK.
To remove the TodayPanel Lite from the Today screen:
1. Tap Start > Settings > Today icon > Items tab.
2. Uncheck the TodayPanel checkbox and tap OK.
Using HP Image Zone
Applications
When you use HP Image Zone you can review and share images
from your iPAQ Pocket PC. You can also print, send, record, and
e-mail images directly from your Pocket PC, or create slideshows
to share your pictures with friends and family.
User’s Guide 6–12
Page 72

Applications
When you launch the HP Image Zone, the following icons are
displayed on the bottom of the screen.
Icon Definition
Tap to view the photo in full screen.
Tap to start slideshow mode.
Tap to change folders.
Tap to delete photo.
Tap to record and attach an audio clip to the photo.
Tap to send the photo using your favorite method.
Tap to print using your favorite method.
User’s Guide 6–13
Page 73

Viewing Thumbnail Photos
To view a photo:
1. Tap Start > Programs > HP Image Zone.
Note: By default, the viewer opens in Browse mode. Browse
mode displays a thumbnail view of the photos in the current
folder.
2. Tap a thumbnail (i.e., a small representation of a larger
image) to select the photo. A preview of the photo and
information about it is displayed.
Applications
Note: To view photos in HP Image Zone, be sure your scroll bar
has been moved all the way to the left. Otherwise, you might not
be able to see other photos in the thumbnail view.
To view photos in a different folder:
1. Tap File in the Command bar, and then tap Open.
2. Select the folder you want.
3. Tap OK. HP Image Zone displays the photos from the new
file folder you selected.
User’s Guide 6–14
Page 74

Viewing a Photo Full-Screen
To view a photo full-screen and zoom in or out:
1. Tap Start > Programs > HP Image Zone.
2. Select the photo by tapping on its thumbnail.
3. Tap on the preview window or tap Tools > View Image.
4. Zoom in or out using the tool bar buttons. If the photos are
too large to fit on the screen, you can display other parts of
the photo by dragging the stylus on the screen.
5. Tap OK to close the View Image screen.
Viewing a Slideshow
You can view a slideshow of the photos in a specified folder.
1. Tap Start > Programs > HP Image Zone.
2. Tap Tools > View Slideshow.
3. Tap anywhere on the screen to display the on-screen controls.
You then can use the on-screen controls to move forward or
backward through the slides or to end the slideshow.
You can control slideshow display options, such as:
Applications
■ Sequence—the order in which photos are displayed
■ Delay—the amount of time each photo displays before the
slideshow moves to the next photo
■ Rotation—the slideshow can automatically rotate the photos
so they display on the full screen
■ Transition Effect—the method used by photos to exit and
enter the slideshow
To change slideshow settings:
1. Tap Start > Programs > HP Image Zone.
2. Tap Tools > Settings > Slideshow tab.
User’s Guide 6–15
Page 75

3. Select the settings and effects you want to use in your
slideshow.
4. Tap OK to exit the menu.
Printing Photos
You can print pictures from HP Image Zone using Print Manager.
To print a picture:
1. Tap Start > Programs > HP Image Zone.
2. Select the picture to be printed by tapping on its thumbnail.
3. Tap File > Print.
4. Select Print Manager or HP Instant Share Printing and
tap Next.
5. Follow the instructions on the screen to print your picture.
Note: For more information on using HP Image Zone, tap
Start > Programs > HP Image Zone > Help.
Applications
E-mailing Photos
Using HP Image Zone, you can e-mail photos to all of your
family and friends. To send photos as e-mail attachments:
1. Tap Start > Programs > HP Image Zone.
2. Select the photo you want to e-mail.
3. Tap the e-mail icon located at the bottom of the screen.
4. Tap E-mail Attachment, then Next.
5. Enter the e-mail address, then tap Send.
User’s Guide 6–16
Page 76

Attaching a Sound File to a Photo
To add sound to a photo:
1. Tap Start > Programs > HP Image Zone.
2. Select the photo to which you want to attach a sound file by
tapping on its thumbnail.
3. Tap the Cassette icon on the Command bar located at the
bottom of the screen.
4. Tap the Record button on the Sound toolbar.
Icon Name Function
Applications
Record
Stop
Play
Starts recording sound.
Stops the current recording.
Plays the recorded sound associated
with a selected photo.
Delete
Deletes the recorded sound associated
with a selected photo.
5. Speak into the microphone or record the sound you want to
associate with the photo.
6. Tap the Stop button on the Sound toolbar.
All photos with associated sound files have a speaker icon on the
thumbnail.
To change audio options:
1. Tap Start > Programs > HP Image Zone.
2. Tap Tools located on the Command bar at the bottom of the
screen.
3. Tap Settings > Audio tab.
User’s Guide 6–17
Page 77

4. Select your audio options.
❏ Codec settings: PCM or GSM 6.10.
◆ GSM 6.10 provides good voice recording and takes
up far less space than Pulse Code Modulation
(PCM).
◆ PCM provides better sound quality but may take up
to 86 times more storage space than GSM 6.10
recordings.
❏ Format: Select sound quality.
Higher sound quality recordings take up more storage
space.
5. Tap OK to exit this menu.
Backing Up and Restoring
Use iPAQ Backup or Microsoft ActiveSync Backup to back up
and restore information on your iPAQ Pocket PC.
Applications
Note: Your iPAQ Pocket PC came preinstalled with iPAQ
Backup. However, you must install ActiveSync on your computer
before using ActiveSync Backup.
To help reduce the chance of losing information, you should back
up information on a regular schedule.
CAUTION: Restoring your information replaces the current information
Ä
on your iPAQ Pocket PC with the information saved in your backup.
Using iPAQ Backup to Backup/Restore
To backup/restore using iPAQ Backup:
1. Tap Start > Programs > iPAQ Backup.
2. Tap the Backup tab or the Restore tab.
User’s Guide 6–18
Page 78

3. Select the files and folders to be backed up or restored.
4. Select file location for backed-up data.
5. Set backup or restore options and press OK.
6. Press the Backup or Restore button, and then press the Start
button on the next screen.
Using ActiveSync To Backup/Restore
Use Microsoft ActiveSync Backup to back up and restore
information on your HP iPAQ. To help reduce the chance of data
loss, perform a backup on a regular schedule.
Note: Before using ActiveSync Backup, you must first install
ActiveSync from the Companion CD.
Close all programs on your iPAQ Pocket PC before backing up or
restoring your information.
To backup/restore:
1. Connect the iPAQ Pocket PC to your computer.
Applications
2. From your computer, open Microsoft ActiveSync by clicking
Start > Programs > Microsoft ActiveSync.
3. In ActiveSync, click Tools > Backup/Restore.
4. Select the Backup or Restore tab, then choose your options.
5. Click Backup Now or Restore Now.
Using iTask
The iTask application, sometimes called iPAQ Task Manager,
allows you to quickly access the most frequently used features on
your iPAQ Pocket PC.
From iTask you can manage tasks that are already running,
launch new programs, and more. Each task that is currently
running on the Pocket PC shows up in a list.
User’s Guide 6–19
Page 79

Applications
Tap on a task to bring the current program into the foreground or
tap and hold to bring up the Task Menu.
To start iTask, tap Start > Programs > iTask.
User’s Guide 6–20
Page 80

Using Security Features
The widespread use of Pocket PCs has significantly increased
employee productivity. However, non-secured or inadequately
secured Pocket PCs are creating network security issues for the
corporate workplace when they connect to a secure network.
Valuable information is bypassing network security and being
stored on inadequately secured Pocket PCs. The HP ProtectTools
security features provide on-device security protection so there is
less risk of losing sensitive information on your Pocket PC.
Using HP ProtectTools
HP ProtectTools helps protect your Pocket PC by providing
authentication and encryption of email, calendar, contacts, notes,
tasks, and/or all files stored in the My Documents folder. It can
also be used to encrypt data stored on expansion cards.
When you enable HP ProtectTools, you have the option of
enrolling a fingerprint or entering a PIN and/or password to
access the Pocket PC. If you are unable to successfully swipe
your fingerprint or you forget your PIN or password, you can
access the device with a backup question and answer.
7
CAUTION: HP ProtectTools helps protect your Pocket PC and the
Ä
data stored on it. If you are unable to access your device with any of
the above methods, there is no way to unlock your device. You have
to restore your device to factory settings, resulting in the loss of all
data on your iPAQ Pocket PC, including data stored in iPAQ File
Store. It is recommended that you remember your PIN/password
and question/answer.
User’s Guide 7–1
Page 81

Setting Up Security
You should only need to set up security one time. You can make
changes to any of your security settings at a later time without
going through the setup procedure again. Refer to “Manage
Security Settings” later in this chapter for more information.
To set up security on your iPAQ Pocket PC:
1. Tap Start > Settings > Personal tab >HP ProtectTools.
2. The security configuration screen displays the message “Do
you want to configure HP ProtectTools security on your
device?” Tap Ye s.
3. On the Lock Settings screen, select your choices for the
following:
❏ Lock device—secures device by requiring your PIN or
password to authenticate access to the HP iPAQ.
❏ Log off—secures device by requiring your PIN or
password, stops running all programs, and encrypts your
data. You can also select the amount of time between
when you last used the device and when the data is
encrypted.
Using Security Features
Note: Because encryption/decryption can take some time, if you
use your device frequently, you may want to select a longer
period of time.
4. Tap Next.
5. From the Unlock Settings screen, select the method in which
you want to unlock your Pocket PC, along with the number of
attempts allowed for each setting:
❏ Simple 4-digit PIN—enter a minimum four-digit
number
❏ Password—enter a combination of numbers and/or
letters of any length
User’s Guide 7–2
Page 82

Using Security Features
❏ Strong alphanumeric password—enter a minimum of
eight characters including at least one uppercase letter,
one lowercase letter, and one number
❏ Fingerprint—successfully enroll a fingerprint
❏ Fingerprint OR PIN—successfully enroll a fingerprint
OR enter a minimum 4-digit PIN
❏ Fingerprint AND PIN—successfully enroll a
fingerprint AND enter a minimum 4-digit PIN
❏ Fingerprint OR Password—successfully enroll a
fingerprint OR enter a combination of numbers and/or
letters of any length
❏ Fingerprint AND Password—successfully enroll a
fingerprint AND enter a combination of numbers and/or
letters of any length
❏ Fingerprint OR Strong Password—successfully enroll
a fingerprint OR enter a minimum of eight characters
including at least one uppercase letter, one lowercase
letter, and one number
❏ Fingerprint AND Strong Password—successfully
enroll a fingerprint AND enter a minimum of eight
characters including at least one uppercase letter, one
lowercase letter, and one number
Note: The Fingerprint Reader options are not available on all
models.
6. Tap Next.
User’s Guide 7–3
Page 83

Using Security Features
7. From the Fail-Safe Settings screen:
❏ Select the number of attempts you have to answer your
hint question correctly.
❏ Select what the device should do if you fail to answer
your hint question correctly after the associated number
of attempts.
Note: It is recommended that you select the default, Pause
before retrying question.
❏ Select whether to keep security after a hard reset.
Note: It is recommended that you select this option to ensure that
the data stored in your iPAQ Pocket PC remains secure after a
hard reset.
8. Tap Next.
9. From the Encryption Settings screen:
❏ Select the encryption strength.
◆ Lite is the fastest but least secure algorithm.
◆ Blowfish is both fast and secure.
◆ Triple DES and AES are the most secure, but AES
encrypts data faster than Triple DES.
Note: It is recommended that you use the default, AES.
❏ Select which data you want encrypted. If you select to
have the My Documents folder encrypted, you can also
choose whether to encrypt media files (for example,
audio or video files). Media files often take longer to
encrypt and decrypt than other file types.
User’s Guide 7–4
Page 84

Using Security Features
❏ Select whether you want the encryption status displayed.
Selecting this option allows you to monitor the
encryption/decryption process. Refer to
“Encrypting/Decrypting Data” later in this chapter for
more information.
10. Tap Next.
11. From the Security Configuration Complete screen, tap
Continue to enroll your fingerprint, create your PIN or
password, and answer your hint question.
12. Prior to enrolling your fingerprint and/or entering your PIN
or password, you are asked for a passphrase. Tap OK, then
follow the onscreen instructions to create a passphrase.
Note: The passphrase is not something you need to remember on
a daily basis, but you should remember it for future reference. For
more information on passphrases, tap the More Information...
button.
13. Tap OK.
User’s Guide 7–5
Page 85

Using Security Features
14. If requested, swipe two fingers until you are told both are
enrolled successfully.
Note: The Fingerprint Reader is not available on all models.
For more information on enrolling fingerprints, refer to “Using
the Fingerprint Reader” later in this chapter. It is recommended
that you follow the instructions in the section “Using the
Fingerprint Reader” to successfully enroll your fingerprints.
15. Tap OK.
16. If requested, enter your PIN or password two times for
verification purposes.
17. From the Set up Passwords screen, select your hint question
by tapping the left and right arrow buttons near the question.
Answer the question two times for verification purposes.
User’s Guide 7–6
Page 86

Using Security Features
18. Tap OK. Your iPAQ Pocket PC resets itself after a few
seconds, or you can tap the Reset Device button to reset the
device immediately.
Note: After the device has completed the reset process, you are
asked for your fingerprint, PIN, and/or password before you can
begin using it again.
Using Your iPAQ Pocket PC with HP ProtectTools
Unlocking Your Pocket PC
The authentication method for unlocking your Pocket PC is as
follows:
■ Swipe your fingerprint and/or enter your PIN and/or
password when prompted. If you successfully enter the
requested information, the device unlocks.
■ After the number of attempts you selected during setup, if
you still do not successfully swipe your fingerprint and/or
enter your PIN and/or password correctly, you are prompted
to answer the hint question you defined. If you successfully
answer your hint question, the device unlocks.
Note: After you successfully authenticate, you are prompted to
reset any authentication information you didn't enter correctly.
For example, if you forgot your PIN, but successfully enter your
hint question/answer, you are prompted to enter a new PIN.
■ If you do not answer your hint question successfully and you
selected the Pause before retrying question option on the
Fail-Safe Settings screen, there is an increasing time delay
between hint question/answer attempts until you enter the
User’s Guide 7–7
Page 87

correct answer. If you have completely forgotten the answer
to your hint question and will not remember it with further
attempts, then you must tap the Reset Device button.
CAUTION: If you tap the Reset Device button, you lose all data on
Ä
the device, including the iPAQ File Store. If you choose this option, be
aware that resetting iPAQ File Store could take a long time after the
iPAQ initialization process has been completed. It is recommended that
you connect your device to AC power during this period to avoid
timeouts or loss of power.
If you perform a hard reset instead of tapping the Reset Device button
AND you selected Keep Security on the Fail-Safe Settings screen,
your iPAQ Pocket PC returns to its default settings and loses all
information (files, settings, etc.) except data stored in iPAQ File Store.
In this case, you must still answer your hint question to regain access to
your Pocket PC. For more information on performing a hard reset, refer
to Chapter 1, “Getting to Know Your iPAQ Pocket PC.”
Encrypting/Decrypting Data
If your iPAQ Pocket PC has been off for longer than the time you
selected during setup, your data is encrypted. When you turn the
device on, you are prompted to authenticate using your
fingerprint, PIN, and/or password. After successful
authentication, your data is decrypted. This may take a few
moments depending on the amount of data you chose to have
encrypted. However, encryption runs in the background, and you
can perform other tasks on your iPAQ Pocket PC during this
time.
Using Security Features
You can monitor the decryption process in two ways:
■ If you selected Display encryption status on the Encryption
Settings screen during setup, the HP ProtectTools window
displays the decryption status.
■ If you choose not to display this status, the
encryption/decryption process proceeds in the background,
allowing you to use your Pocket PC for other purposes.
User’s Guide 7–8
Page 88

Using Security Features
■ In either case, a blue lock icon appears in the Taskbar at the
bottom of the Today screen during decryption. When the icon
disappears, decryption is complete. Typically the Pocket PC
responds more slowly during the encryption/decryption
process.
You must authenticate yourself and wait for the decryption
process to complete before synchronizing using Microsoft
ActiveSync. If decryption is not complete before synchronization
begins, ActiveSync may not be initiated. To correct the problem,
disconnect and reconnect the device after decryption is complete.
If you enable Server Synchronization on ActiveSync, it is
recommended that you do not select a Mobile Schedule to
automatically initiate synchronization. Since authentication and
decryption are necessary when the Pocket PC is turned on,
automatic synchronization does not work properly when HP
ProtectTools is enabled. The same problem may also arise when
using other server-based synchronization products.
User’s Guide 7–9
Page 89

Using Security Features
Changing Your HP ProtectTools Settings
If you want to change any of your security information, you can
do so easily. Tap the yellow lock icon in the Taskbar at the
bottom of the Today screen.
Five options are displayed:
■ Lock Device
■ Logoff
■ Change Passwords
■ Manage Encrypted Folders
■ Manage Security Settings
Lock Device
Selecting this option allows you to manually lock your Pocket
PC, requiring authentication to access the device. Data and files
are not encrypted.
User’s Guide 7–10
Page 90

Logoff
Selecting this option allows you to manually log off your Pocket
PC, requiring authentication to access the device. Data and files
are encrypted.
Change Passwords
To change your fingerprint, PIN or Password:
1. Tap Change Passwords.
2. Swipe your finger or enter your current PIN or password to
authenticate yourself.
3. Select the information you want to change (Fingerprint,
PIN/password or Question/Answer pair), then tap the
Change button.
4. Follow the onscreen instructions to make the change.
Manage Encrypted Folders
By default, all data in the My Documents folder is encrypted.
Selecting Manage Encrypted Folders allows you to choose other
folders to store encrypted data. These can include data stored on
expansion cards.
Using Security Features
To select other folders to store encrypted data:
1. Tap Manage Encrypted Folders.
2. Tap Encrypted Folder at the bottom of the screen.
3. Tap Add.
4. Enter the name, location, and estimated size of the folder to
be encrypted.
Note: The size of the folder is its maximum size and cannot be
changed.
User’s Guide 7–11
Page 91

5. Tap OK. The device formats the new folder.
6. Tap OK.
Note: You cannot encrypt existing folders.
For more information on managing encrypted folders, refer to HP
ProtectTools Help. To access encryption Help, from the Today
screen, tap the Yellow Lock icon > Yellow Lock icon in
upper-left corner of the HP ProtectTools screen > Help >
Understanding encryption.
Manage Security Settings
You can disable security or make changes to any of the settings
you selected during setup.
To make changes to security settings:
1. Tap Manage Security Settings.
2. Swipe your finger or enter your PIN or password to
authenticate yourself.
Using Security Features
3. To disable security, tap the Disable Security button.
4. To change any previously selected security settings, tap the
appropriate tab at the bottom of the screen and follow the
onscreen instructions. The screens match those used during
the setup process. For more information, refer to“Setting Up
Security” earlier in this chapter.
5. Use the Programs tab to select any programs you do not
want to stop running when you log off. For more information,
tap the Programs tab, then tap Help at the bottom of the
screen.
User’s Guide 7–12
Page 92

Using Security Features
Using the Fingerprint Reader (not available on all models)
It is recommended that you complete the fingerprint reader
training on your iPAQ Pocket PC prior to setting security settings
to use a fingerprint.
Learning to Enroll a Fingerprint
Fingerprint Reader enrollment training is available on the iPAQ
Pocket PC to assist you in proper enrollment of your unique
fingerprint. To access the training, tap the Trainin g button when
the Fingerprint screen displays during HP ProtectTools setup.
Note: You can tap OK at the top of the screen at anytime to exit
the training.
To learn to enroll fingerprints:
1. During the HP ProtectTools setup process, when the
Fingerprint screen displays, tap the Training button.
2. Read the Training -- Swiping Tips screen.
3. Tap the double arrows button.
User’s Guide 7–13
Page 93

Using Security Features
4. Follow the on-screen demonstration to swipe a finger.
Note: If the finger swipe is acceptable, the oval frame turns
green and the message “Good. Please continue!” displays. If the
finger swipe is unacceptable, the oval frame turns red and the
message “Poor quality” or “No image. Try again!” displays.
5. Repeat the finger swiping exercise as prompted until you
have completed six out of eight successful swipes.
Note: You must perform six acceptable swipes to continue the
training.
6. Tap the double arrows button to continue to the Self-test.
7. Perform seven out of eight successful finger swipes in the
Self-test to complete the training.
8. Tap Finish to end the training and return to the Fingerprint
screen in HP ProtectTools setup.
User’s Guide 7–14
Page 94

Working with Fingerprints
HP ProtectTools suggests fingers for you to use during the
swiping activity. You can select a different finger at any time. To
select a different finger, tap the finger you want to swipe in the
Hand icon. The new finger is highlighted in light blue.
Note: It is recommended that you NOT enroll pinky fingers
since they can be difficult to enroll. Enrolling fingerprints from
your dominant hand tends to be easier.
It is recommended that you enroll at least two fingers (index
fingers are suggested). It can take between two and eight finger
swipes to enroll a fingerprint, depending on the fingerprint
quality.
Enrolling a Fingerprint
The Fingerprint screen uses color coding to display the status of
your fingerprint swipe.
Using Security Features
Fingerprint Status
If the color around the
oval is...
Blue No fingerprint has been taken for the
Green The fingerprint swipe was good quality.
Red The fingerprint swipe was poor quality.
User’s Guide 7–15
Then...
finger.
Page 95

Using Security Features
To enroll a fingerprint:
1. On the Fingerprint screen, use the diagram to tap the finger
that you are going to enroll.
2. Swipe the selected finger, as instructed.
User’s Guide 7–16
Page 96

Using Security Features
Note: Maintain a firm, consistent pressure against the sensor
when swiping a finger. One way to do this is to press your thumb
against the bottom of the iPAQ Pocket PC while swiping your
index finger. You should begin the swipe at the first joint of your
finger and continue downward with a smooth slow motion, taking
one to two seconds to complete the swipe.
If you need additional assistance at any time, tap the Training
button.
3. Monitor the status to see if your fingerprint was correctly
swiped.
4. Repeat steps 2 and 3 to continue enrolling your fingerprint.
5. When that fingerprint is enrolled successfully, repeat steps 1
through 4 to enroll a second fingerprint.
6. When both fingerprints are successfully enrolled, tap OK
twice to continue setting up HP ProtectTools.
User’s Guide 7–17
Page 97

Using Wi-Fi (not available on
all models)
Getting Acquainted with Wi-Fi
With wireless access, you do not need to use cables to connect
your HP iPAQ to the Internet. Instead, access points transmit data
to and from your wireless device. Your HP iPAQ can connect to
an 802.11b WLAN or connect directly to other WLAN-enabled
devices. With Wi-Fi, you can:
■ Access the Internet
■ Send and receive e-mail
■ Access corporate network information
■ Use virtual private networks (VPNs) for secure remote access
■ Use hotspots for wireless connectivity
8
Note: Use of dial-up and wireless Internet, e-mail, corporate
networks, and other wireless communications, such as
Bluetooth-enabled devices, may require separately purchased
additional hardware and other compatible equipment, in addition
to a standard Wi-Fi infrastructure and a separately purchased
service contract. Check with your service provider for availability
and coverage in your area. Not all web content may be available.
Some web content may require installation of additional software.
User’s Guide 8–1
Page 98

Using Wi-Fi (not available on all models)
Powering Wi-Fi On or Off
To use Wi-Fi on your HP iPAQ, you need to turn on Wi-Fi and set
up your device.
Note: The Wi-Fi antenna for the HP iPAQ is located in the top of
the device. If you cover up the top of the HP iPAQ after you have
turned on Wi-Fi, signal strength may be affected.
To turn the Wi-Fi on or off:
1. From the Tod ay screen, tap the iPAQ Wireless icon () in
the Command bar located at the bottom of the screen.
2. Tap the Wi-Fi button.
When Wi-Fi is powered on, the Wi-Fi icon on the iPAQ
Wireless screen turns from gray to amber, and the Wi-Fi
light-emitting diode (LED), located on the top left corner of
the device, flashes blue indicating one or more radios are on.
When a wireless connection is made, the Wi-Fi icon on the
iPAQ Wireless screen turns from amber to green.
Note: Even though the LED flashes blue to indicate Wi-Fi is
turned on, it does not necessarily mean a connection has been
established with another device or access point.
If Wi-Fi is off, the Wi-Fi icon turns from green or amber to
gray.
Note: Some Access Points and networks do not support one or
more of the power saving modes that are available. If you cannot
connect with a particular wireless network, try turning off the
Wi-Fi Power Save modes.
User’s Guide 8–2
Page 99

Using Wi-Fi (not available on all models)
Automatically Connecting to a Network
1. If one or more broadcast networks are present, the Network
Indicator icon ( ) appears in the Navigation bar. Tap the
network you want to connect to, and then tap whether the
network connects to the Internet (does not use proxy settings)
or Work (uses proxy settings).
2. If you are prompted for a Network Key (WEP), enter it and
tap Connect. If you are not sure, contact your network
administrator.
CAUTION: A new network that does not request an encryption key
may not be a secure network. To check whether an existing network uses
Ä
encryption, check the Encryption Status of the network. Tap Start >
iPAQ Wireless > Wi-Fi icon > Manager button. Refer to
“Monitoring Signal Strength and Status” later in this chapter for more
information.
Manually Entering New Network Settings
A wireless network can be added either when the network
is detected (the Network Indicator icon is showing in the
Navigation bar) or manually by entering setting information.
To manually add a wireless network:
1. Be sure Wi-Fi is powered on.
2. Tap the Connections icon ( or ) > Settings >
Advanced tab > Select Networks button.
3. Enter or select the network name (or tap New) you want to
use to either connect to the Internet using an ISP or a Virtual
Private Network (VPN) for work. Tap OK once completed.
4. Set up your Dialing Rules and Exceptions and press OK.
The next step is to setup your network interface cards.
5. From the iPAQ Wireless screen, tap > Settings.
User’s Guide 8–3
Page 100

Using Wi-Fi (not available on all models)
6. Select Add New... in the list box on the General tab to start
configuring wireless networks.
Note: If a network was detected in step 3, the SSID is
automatically entered and cannot be changed.
7. Enter a SSID into the Network Name box.
8. In the Connects to: box, select where your network connects
to (The Internet or Work).
9. If you want to connect to an ad-hoc connection, tap the This
is a device-to-device (ad-hoc) connection checkbox.
10. If authentication information is needed, from the Configure
Wireless Network screen, tap the Network Key tab.
Note: To determine whether authentication information is
needed, see your network administrator.
11. To configure the type of network authentication to use, select:
a. To use Shared Key authentication, tap the
Authentication (Shared mode) listbox. Type the
network key in the Network Key: box.
b. To use data encryption, tap the Data encryption
(WEP enabled) listbox.
c. If a network key is provided by your network
automatically, tap the The Key is provided for
me automatically checkbox.
12. For increased security, tap the 802.1x tab and select the Use
IEEE802.1x network access control checkbox. You should
only check this option if it is supported by your network
environment. Ask your network administrator if you are
unsure.
13. Select EAP type (PEAP or Smart Card/Certificate) from the
listbox.
14. Once you have completed entering the network settings, tap
OK twice to save your settings and exit this menu.
User’s Guide 8–4
 Loading...