

Page 1

HP IndiChrome Ink Mixing System
User guide
Page 2

HP IndiChrome Ink Mixing System
User guide
Page 3

© 2006 Copyright
Hewlett-Packard
Development Company,
L.P.
Reproduction, adaptation,
or translation without prior
written permission is
prohibited, except as
allowed under the
copyright laws.
The information contained
herein is subject to change
without notice.
The only warranties for HP
products and services are
set forth in the express
warranty statements
accompanying such
products and services.
Nothing herein should be
construed as constituting
an additional warranty. HP
shall not be liable for
technical or editorial errors
or omissions contained
herein.
directions provided by HP
in this and other
publications. All high
voltage power supplies and
laser sources are located
behind protective covers.
Warning labels are
attached to each protective
cover. Do not remove
covers.
Part Number :
CA294-02222
First Edition:
December 2006
HP, HP Indigo Press,
HP Indigo Press RIP, and
HP ElectroInk are
trademarks or registered
trademarks of HP.
Adobe® PostScript® is a
trademark of Adobe
Systems Incorporated.
MS Windows® and
Windows® are U.S.
registered trademarks of
Microsoft Corp.
All other products or name
brands are trademarks of
their respective holders.
The HP Indigo press is a
Class 1 Laser Product
containing high voltage
power supplies and laser
light sources. There is no
danger to persons or
equipment when the
system is operated in
accordance with the
Printed in Israel.
Page 4

Contents
1 Introduction
User guide introduction . . . . . . . . . . . . . . . . . . . . . . . . . . . . . . . . . . . . . . . . . . . . . 8
User guide structure . . . . . . . . . . . . . . . . . . . . . . . . . . . . . . . . . . . . . . . . . . . . . . . 8
Conventions used in this guide . . . . . . . . . . . . . . . . . . . . . . . . . . . . . . . . . . . . . . . 9
System requirements . . . . . . . . . . . . . . . . . . . . . . . . . . . . . . . . . . . . . . . . . . . . . 10
Hardware configuration . . . . . . . . . . . . . . . . . . . . . . . . . . . . . . . . . . . . . . . . . . . . 11
Consumables . . . . . . . . . . . . . . . . . . . . . . . . . . . . . . . . . . . . . . . . . . . . . . . . . . . 14
Important system information and limitations . . . . . . . . . . . . . . . . . . . . . . . . . . . 17
2 Safety and environment considerations
General warning . . . . . . . . . . . . . . . . . . . . . . . . . . . . . . . . . . . . . . . . . . . . . . . . . 20
Warning signs . . . . . . . . . . . . . . . . . . . . . . . . . . . . . . . . . . . . . . . . . . . . . . . . . . . 20
Material Safety Data Sheets (MSDS) . . . . . . . . . . . . . . . . . . . . . . . . . . . . . . . . . 20
Preventing eye irritation . . . . . . . . . . . . . . . . . . . . . . . . . . . . . . . . . . . . . . . . . . . 21
Electrical safety precautions . . . . . . . . . . . . . . . . . . . . . . . . . . . . . . . . . . . . . . . . 21
Emergency power cutoff . . . . . . . . . . . . . . . . . . . . . . . . . . . . . . . . . . . . . . . . . . . 21
Flammable liquids and fumes . . . . . . . . . . . . . . . . . . . . . . . . . . . . . . . . . . . . . . . 21
Handling and storing imaging oil and inks . . . . . . . . . . . . . . . . . . . . . . . . . . . . . 22
Waste disposal . . . . . . . . . . . . . . . . . . . . . . . . . . . . . . . . . . . . . . . . . . . . . . . . . . 22
3 Getting started
Overview . . . . . . . . . . . . . . . . . . . . . . . . . . . . . . . . . . . . . . . . . . . . . . . . . . . . . . . 24
Detailed Automatic Workflow . . . . . . . . . . . . . . . . . . . . . . . . . . . . . . . . . . . . . . . 26
Starting the ink mixing system (IMS) software . . . . . . . . . . . . . . . . . . . . . . . . . . 27
HP IndiChrome Wizard . . . . . . . . . . . . . . . . . . . . . . . . . . . . . . . . . . . . . . . . . . . . 28
Toolbar . . . . . . . . . . . . . . . . . . . . . . . . . . . . . . . . . . . . . . . . . . . . . . . . . . . . . . . . 28
Exiting the IMS software . . . . . . . . . . . . . . . . . . . . . . . . . . . . . . . . . . . . . . . . . . . 30
4 General procedures
Calibrating the electronic scale . . . . . . . . . . . . . . . . . . . . . . . . . . . . . . . . . . . . . . 32
Calibrating the spectrophotometer . . . . . . . . . . . . . . . . . . . . . . . . . . . . . . . . . . . 33
Performing a full calibration . . . . . . . . . . . . . . . . . . . . . . . . . . . . . . . . . . . . . 33
Performing the daily calibration . . . . . . . . . . . . . . . . . . . . . . . . . . . . . . . . . . 33
Draining the water from the dispensing unit . . . . . . . . . . . . . . . . . . . . . . . . . . . . 34
Adjusting the dispensing unit for the press . . . . . . . . . . . . . . . . . . . . . . . . . . . . . 35
Measuring a color . . . . . . . . . . . . . . . . . . . . . . . . . . . . . . . . . . . . . . . . . . . . . . . . 36
Selecting a PANTONE
Save the Ink Definition file . . . . . . . . . . . . . . . . . . . . . . . . . . . . . . . . . . . . . . 43
Saving the color’s workspace . . . . . . . . . . . . . . . . . . . . . . . . . . . . . . . . . . . . 44
Transferring the ink definition file to the press . . . . . . . . . . . . . . . . . . . . . . . . . . 46
All HP Indigo presses except for Indigo Sun computer-based presses . . . . 46
Indigo Sun computer-based presses . . . . . . . . . . . . . . . . . . . . . . . . . . . . . . 46
Preparing the basic inks . . . . . . . . . . . . . . . . . . . . . . . . . . . . . . . . . . . . . . . . . . . 47
Dispensing the ingredients . . . . . . . . . . . . . . . . . . . . . . . . . . . . . . . . . . . . . . . . . 48
Sealing the can . . . . . . . . . . . . . . . . . . . . . . . . . . . . . . . . . . . . . . . . . . . . . . . . . . 50
Shaking the can . . . . . . . . . . . . . . . . . . . . . . . . . . . . . . . . . . . . . . . . . . . . . . . . . 51
Visually comparing the printed color . . . . . . . . . . . . . . . . . . . . . . . . . . . . . . . . . . 53
Adjusting the ink mix from the printed output . . . . . . . . . . . . . . . . . . . . . . . . . . . 53
Accurate match. . . . . . . . . . . . . . . . . . . . . . . . . . . . . . . . . . . . . . . . . . . . . . . 54
®
color . . . . . . . . . . . . . . . . . . . . . . . . . . . . . . . . . . . . . . . 37
ENWW
3
Page 5

Match can be improved by a fix can . . . . . . . . . . . . . . . . . . . . . . . . . . . . . . . 55
Fix can would add too much ink to the ink tank . . . . . . . . . . . . . . . . . . . . . . 55
Improvement possible by changing optical density . . . . . . . . . . . . . . . . . . . 56
Undoing and redoing a measurement. . . . . . . . . . . . . . . . . . . . . . . . . . . . . . . . . 57
Changing the optical density (OD) spec value . . . . . . . . . . . . . . . . . . . . . . . . . . 57
Improving visual match by changing illuminant. . . . . . . . . . . . . . . . . . . . . . . . . . 58
Comparing different ink mix results. . . . . . . . . . . . . . . . . . . . . . . . . . . . . . . . . . . 60
Changing the ink on the press . . . . . . . . . . . . . . . . . . . . . . . . . . . . . . . . . . . . . . 61
5 Additional IMS procedures
Ready Mix colors . . . . . . . . . . . . . . . . . . . . . . . . . . . . . . . . . . . . . . . . . . . . . . . . 64
Detailed Ready Mix Workflow . . . . . . . . . . . . . . . . . . . . . . . . . . . . . . . . . . . . . . . 67
Continuing work on a previously defined mix color . . . . . . . . . . . . . . . . . . . . . . . 68
Manual color mixing . . . . . . . . . . . . . . . . . . . . . . . . . . . . . . . . . . . . . . . . . . . . . . 69
Detailed Manual Workflow . . . . . . . . . . . . . . . . . . . . . . . . . . . . . . . . . . . . . . . . . 70
Mixing a custom color . . . . . . . . . . . . . . . . . . . . . . . . . . . . . . . . . . . . . . . . . . . . . 71
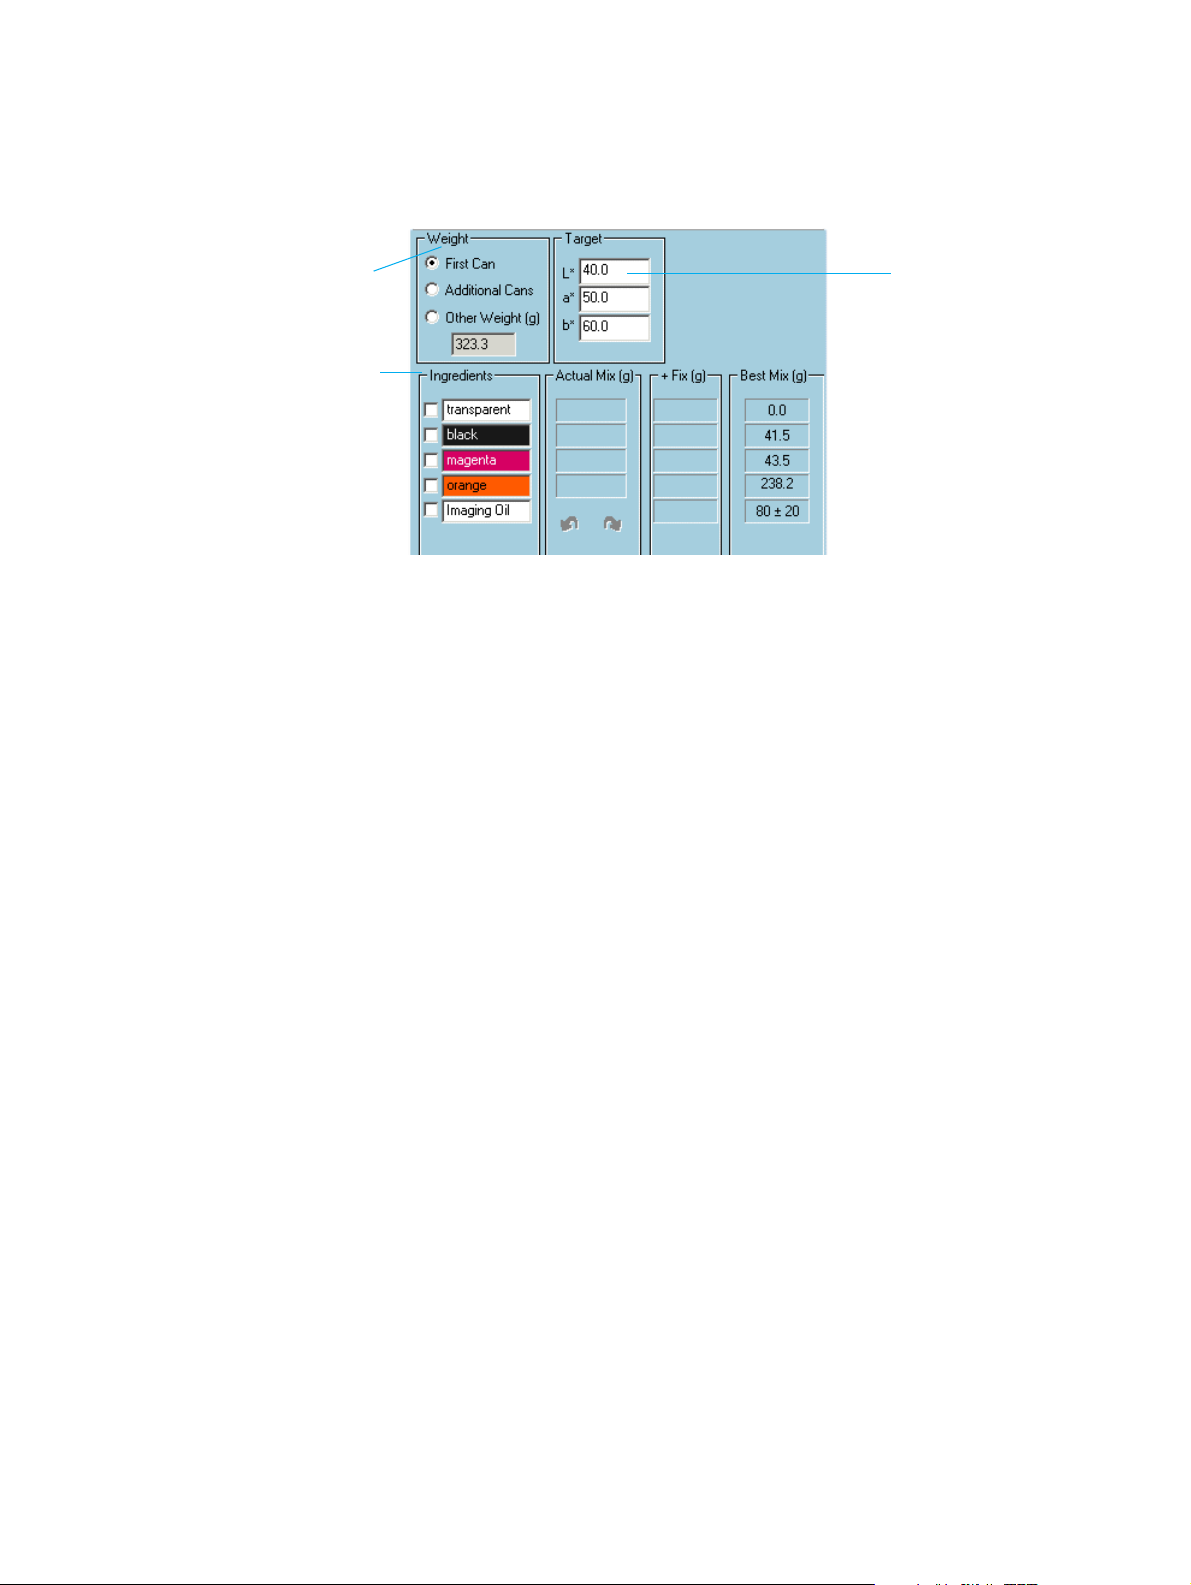
Using L* a* b* target values . . . . . . . . . . . . . . . . . . . . . . . . . . . . . . . . . . . . . 71
Measuring the color directly . . . . . . . . . . . . . . . . . . . . . . . . . . . . . . . . . . . . . 72
Excluding a basic color from the ink mix . . . . . . . . . . . . . . . . . . . . . . . . . . . . . . . 73
Adding a new substrate . . . . . . . . . . . . . . . . . . . . . . . . . . . . . . . . . . . . . . . . . . . 74
Importing .mix files (including previous-version ink mix files) . . . . . . . . . . . . . . . 76
Exporting and deleting ink workspace files . . . . . . . . . . . . . . . . . . . . . . . . . . . . . 77
Printing the color workspace details . . . . . . . . . . . . . . . . . . . . . . . . . . . . . . . . . . 77
Setting and displaying specific ink mix parameters . . . . . . . . . . . . . . . . . . . . . . 78
Color matching parameters . . . . . . . . . . . . . . . . . . . . . . . . . . . . . . . . . . . . . 78
HP Indigo press selection . . . . . . . . . . . . . . . . . . . . . . . . . . . . . . . . . . . . . . . 79
Ink print thickness. . . . . . . . . . . . . . . . . . . . . . . . . . . . . . . . . . . . . . . . . . . . . 79
Color information summary . . . . . . . . . . . . . . . . . . . . . . . . . . . . . . . . . . . . . 80
Increase/decrease view of 2D color space . . . . . . . . . . . . . . . . . . . . . . . . . . . . . 80
Zoom into 2D color space . . . . . . . . . . . . . . . . . . . . . . . . . . . . . . . . . . . . . . . . . . 81
Zoom by changing axes values . . . . . . . . . . . . . . . . . . . . . . . . . . . . . . . . . . . . . 81
View the 3D color space . . . . . . . . . . . . . . . . . . . . . . . . . . . . . . . . . . . . . . . . . . . 82
4 Contents
6 Customizing the look of the HP IndiChrome window
Introduction . . . . . . . . . . . . . . . . . . . . . . . . . . . . . . . . . . . . . . . . . . . . . . . . . . . . . 84
HP IndiChrome window customization . . . . . . . . . . . . . . . . . . . . . . . . . . . . . . . . 85
Changing the ink mix details panel background color . . . . . . . . . . . . . . . . . 85
Changing the 2D color space panel background color . . . . . . . . . . . . . . . . . 86
Changing the color name font . . . . . . . . . . . . . . . . . . . . . . . . . . . . . . . . . . . 86
Displaying the 2D color space background bitmap . . . . . . . . . . . . . . . . . . . 87
Saving and loading the HP IndiChrome window customization . . . . . . . . . . . . . 87
Saving the customization . . . . . . . . . . . . . . . . . . . . . . . . . . . . . . . . . . . . . . . 87
Loading a customization . . . . . . . . . . . . . . . . . . . . . . . . . . . . . . . . . . . . . . . . 88
Viewing and hiding the Toolbar and Status bar . . . . . . . . . . . . . . . . . . . . . . . . . 88
7 Help
Online help . . . . . . . . . . . . . . . . . . . . . . . . . . . . . . . . . . . . . . . . . . . . . . . . . . . . . 90
Useful links . . . . . . . . . . . . . . . . . . . . . . . . . . . . . . . . . . . . . . . . . . . . . . . . . . . . . 90
Program updates . . . . . . . . . . . . . . . . . . . . . . . . . . . . . . . . . . . . . . . . . . . . . . . . 90
ENWW
Page 6

Appendix A Special options, basic concepts, and spare parts
(all presses)
Special options . . . . . . . . . . . . . . . . . . . . . . . . . . . . . . . . . . . . . . . . . . . . . . . . . . 94
Setting the mix precision . . . . . . . . . . . . . . . . . . . . . . . . . . . . . . . . . . . . . . . 94
Window menu item usage . . . . . . . . . . . . . . . . . . . . . . . . . . . . . . . . . . . . . . 95
How to use the IMS graphic window . . . . . . . . . . . . . . . . . . . . . . . . . . . . . . 95
Decreasing ink thickness . . . . . . . . . . . . . . . . . . . . . . . . . . . . . . . . . . . . . . . 95
Using an old mix file for a new ink . . . . . . . . . . . . . . . . . . . . . . . . . . . . . . . . 95
Basic concepts . . . . . . . . . . . . . . . . . . . . . . . . . . . . . . . . . . . . . . . . . . . . . . . . . . 96
Color space . . . . . . . . . . . . . . . . . . . . . . . . . . . . . . . . . . . . . . . . . . . . . . . . . 96
DE*94 . . . . . . . . . . . . . . . . . . . . . . . . . . . . . . . . . . . . . . . . . . . . . . . . . . . . . . 96
Color gamut . . . . . . . . . . . . . . . . . . . . . . . . . . . . . . . . . . . . . . . . . . . . . . . . . 97
System file types . . . . . . . . . . . . . . . . . . . . . . . . . . . . . . . . . . . . . . . . . . . . . 97
Spare parts . . . . . . . . . . . . . . . . . . . . . . . . . . . . . . . . . . . . . . . . . . . . . . . . . . . . . 98
Can shaker . . . . . . . . . . . . . . . . . . . . . . . . . . . . . . . . . . . . . . . . . . . . . . . . . . 98
Dispensing unit . . . . . . . . . . . . . . . . . . . . . . . . . . . . . . . . . . . . . . . . . . . . . . . 99
Miscellaneous. . . . . . . . . . . . . . . . . . . . . . . . . . . . . . . . . . . . . . . . . . . . . . . 100
Appendix B Service and support
Index
ENWW
5
Page 7

6 Contents
ENWW
Page 8

1
Introduction
This chapter contains the following sections:
z
User guide introduction
z
User guide structure
z
Conventions used in this guide
z
System requirements
z
Hardware configuration
z
Consumables
z
Important system information and limitations
ENWW
7
Page 9

User guide introduction
It is often desirable to print with spot color inks in addition to the Cyan, Magenta, Yellow,
and Black (CMYK) process colors. The HP Indigo presses enable you to use such special
inks. The HP IndiChrome ink mixing system (IMS) gives you the capability of preparing
the special ink you require by mixing inks from a set of basic inks. Because the inks are
specially tailored to customer requirements, the inks are referred to as custom inks.
This user guide is suitable for the following HP Indigo presses and Indigo presses:
HP Indigo presses HP Indigo press 5000
Indigo presses UltraStream
User guide structure
This user guide is divided into the following chapters and appendices:
z
1. Introduction. Briefly describes the purpose of the HP IndiChrome ink mixing
system, explains the conventions used in this guide, lists the system requirements
and hardware configuration, lists the consumables that you can order from HP Indigo,
and gives relevant operating information.
z
2. Safety and environment considerations. Describes the safety precautions you
should take when operating the system.
z
3. Getting started. Shows you how to determine the workflow for ink mixing and how
to start and quit the HP IndiChrome ink mixing system software.
z
4. General procedures. Describes the procedures that are performed during the
various ink preparation steps: how to calibrate the electronic scale and
spectrophotometer, measure sample colors, adjust the air pressure of the dispensing
unit, prepare basic inks, dispense ingredients, and seal and shake cans.
z
5. Additional IMS procedures. Describes additional procedures and capabilities of
the HP IndiChrome ink mixing system software: including using Ready Mix colors,
continuing work on a previously defined mix color, manual color mixing, importing .mix
files, adjusting the view of the 2D color space and viewing the 3D color space.
z
Appendix A. Special options, basic concepts, and spare parts (all presses).
Explains special options and basic ink mixing concepts. A spare parts list is also
included.
Series
3000/4000/5000
and Indigo
UltraStream-based
HP Indigo press 3050
HP Indigo press 3000
HP Indigo press w3200
HP Indigo press ws4000
HP Indigo press ws4050
Publisher 4000
Series 1000/2000
and Indigo
TurboStream-based
HP Indigo press 1000
HP Indigo press ws2000
HP Indigo press s2000
TurboStream
Platinum
Omnius WebStream
Omnius MultiStream
Indigo Sun
computer-based
--
E-Print 1000
Omnius
Omnius CardPress
8 Chapter 1 Introduction
ENWW
Page 10

z
Appendix B. Service and support. Provides contact details for obtaining service
and support.
Conventions used in this guide
This guide uses the following documentation conventions:
z
Keyboard keys to press appear in all uppercase, for example: Press the SHIFT key.
z
Menu options appear in bold type, for example: From the File menu, click New.
z
Options in dialog boxes appear in bold type, for example: After selecting the options in
the Print dialog box, click OK.
z
References to other sections in the guide appear in quotes, for example: See
“Installation” on page 37.
z
Screen messages are displayed in a different font, for example: The Installation
Completed message appears.
ENWW
Conventions used in this guide 9
Page 11
Window sections
Often, a window is divided into sections. Each section has a name displayed at its top
border. A section may contain fields.
Section
Section
name
Fields within a section are referred to by first the section name, and then the field name,
separated by a slash (/). They appear in bold type. For example: enter a value in the
Target / L* field.
System requirements
z
HP IndiChrome ink mixing system software version 5.5.
z
HP Indigo press software version:
• For Indigo Sun computer-based presses, software version 4.0 or preferably 4.1.
• For Series 1000/2000 presses and TurboStream-based presses, software version
2.0 or higher.
• For Series 3000/4000/5000 presses and UltraStream-based presses, software
version 3.5 or higher.
• For HP Indigo press 5000, software version 7.0
z
Pentium® 133 MHz, or faster, computer; at least 16 MB RAM; Windows 95 or higher;
at least 5 MB free disk space; one free serial port; at least 16 bit or 64 K colors.
z
Operational Local Area Network (LAN): your computer and the HP Indigo press
computer must be nodes on the LAN.
This requirement is optional for Series 3000/4000/5000 presses, UltraStream-based
presses, Series 1000/2000 presses, and TurboStream-based presses.
Field
z
z
10 Chapter 1 Introduction
Compressed air (optional). The pressure/flow rate must be at least 4 bar/0.1 liter per
second, but no more than 10 bar.
The air tank must be equipped with an attached air hose. The end of the air hose
should have an attached female quick connector. The matching male quick connector
should have the standard 6.35 mm (0.25 inch) BSP thread. The male connector is
connected to the dispensing unit.
Work area that includes at least 2 by 0.7 m (6.56 by 2.3 ft) of tabletop space and at
least 0.7 by 1 m (2.3 by 3.28 ft) of floor space.
ENWW
Page 12
z
For Series 3000/4000/5000 and UltraStream-based presses, adequate space for the
BID washer. BID washer dimensions are:
width = 1.1 m (3.6 ft)
depth = 0.7 m (2.3 ft)
height = 1.2 m (3.94 ft)
z
Voltage: European kit: 235 VAC ±17 / 50 Hz
USA kit: 118 VAC ±8 / 60 Hz
Japanese kit: 103 VAC ±6 / 60 Hz, 115 VAC ±6 / 50 Hz
Hardware configuration
The HP IndiChrome ink mixing system contains the following hardware components:
z
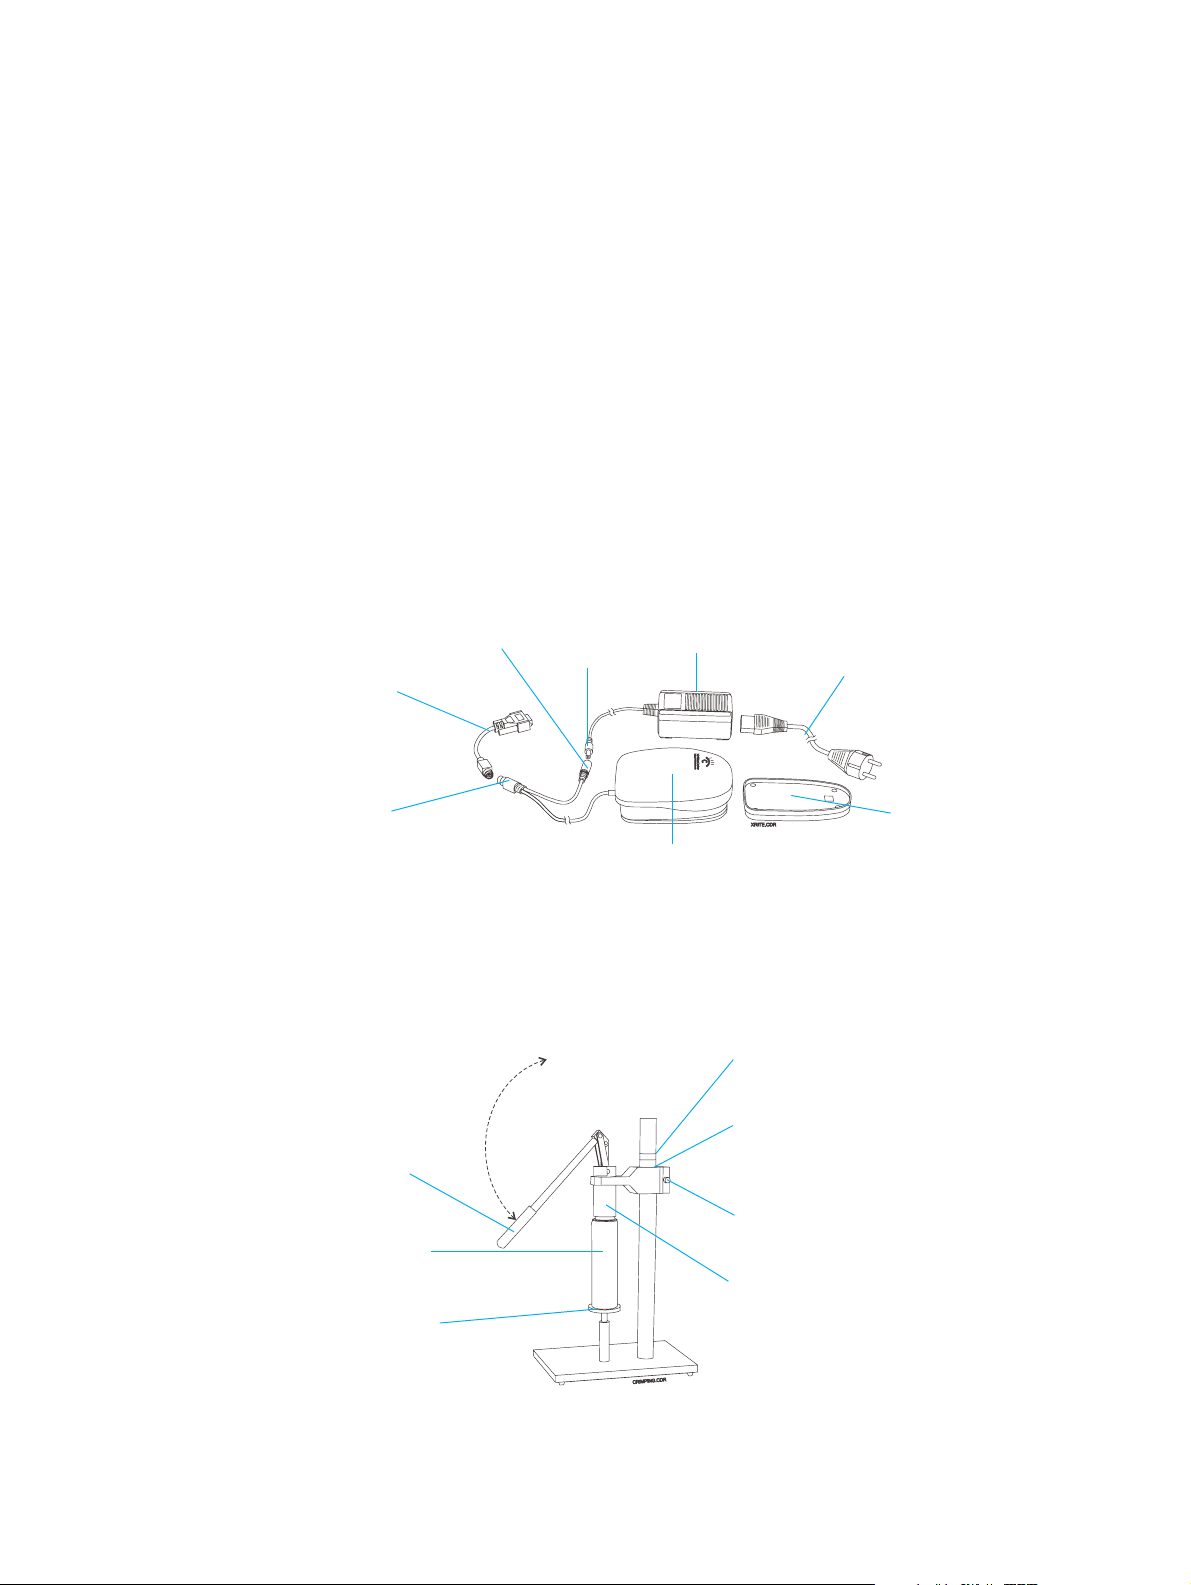
Spectrophotometer
The spectrophotometer measures colors. It is connected to a serial port on the
computer.
Second
plug
AC/DC
adapter
cord jack
AC/DC
adapter
Serial port
adapter
Main
connector
Spectrophotometer
Spectrophotometer components
z
Crimper
The crimper seals the receiving can with a valve.
Lever
Power
cord
Calibration
reference
base
Series 3000/4000/5000 and
UltraStream-based level
Series 1000/2000,
TurboStream-based, and
Sun computer-based level
ENWW
Allen screw
Ink can
Crimper
Round
can base
Crimper
Hardware configuration 11
Page 13
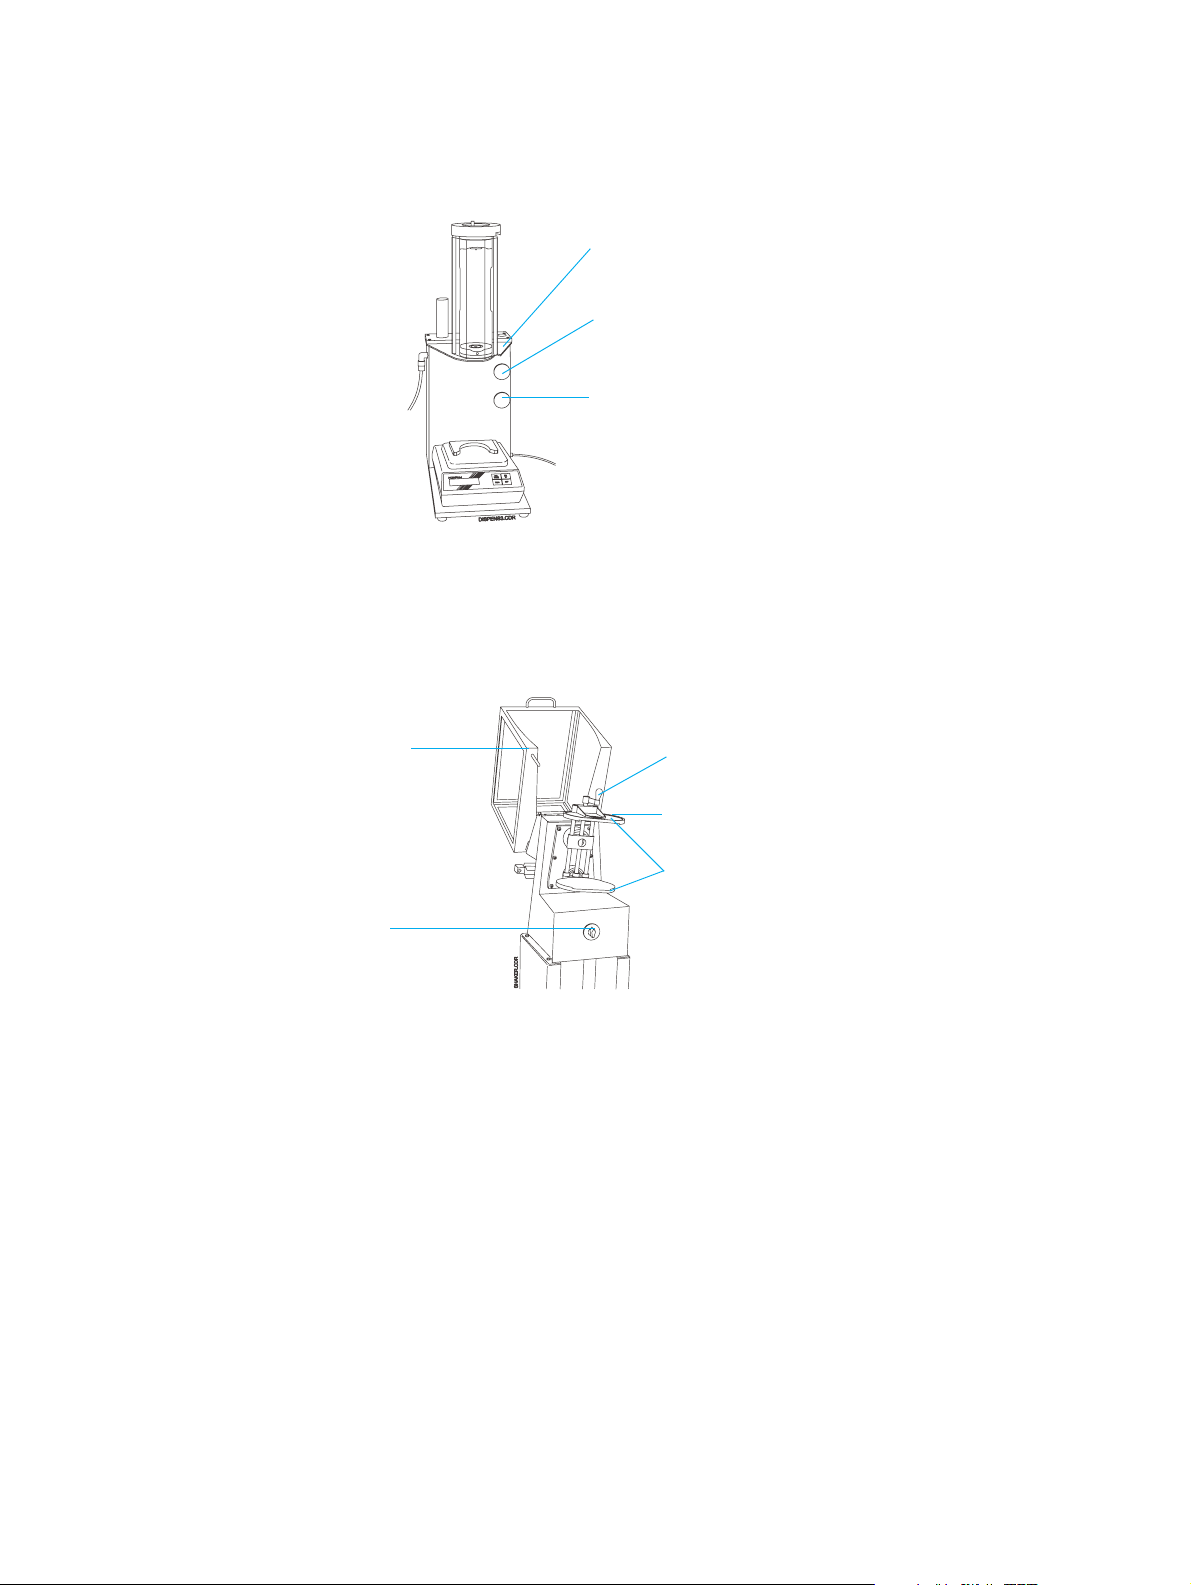
Dispensing unit
z
The dispensing unit dispenses basic inks into a receiving can.
Dispensing
unit
Coarse button
Fine button
Dispensing unit
z
Shaker
The shaker thoroughly mixes the prepared custom ink can.
Safety
cover
Timer
knob
Shaker
Plate
adjusting
handle
Upper plate
Shaker
plates
12 Chapter 1 Introduction
ENWW
Page 14
z
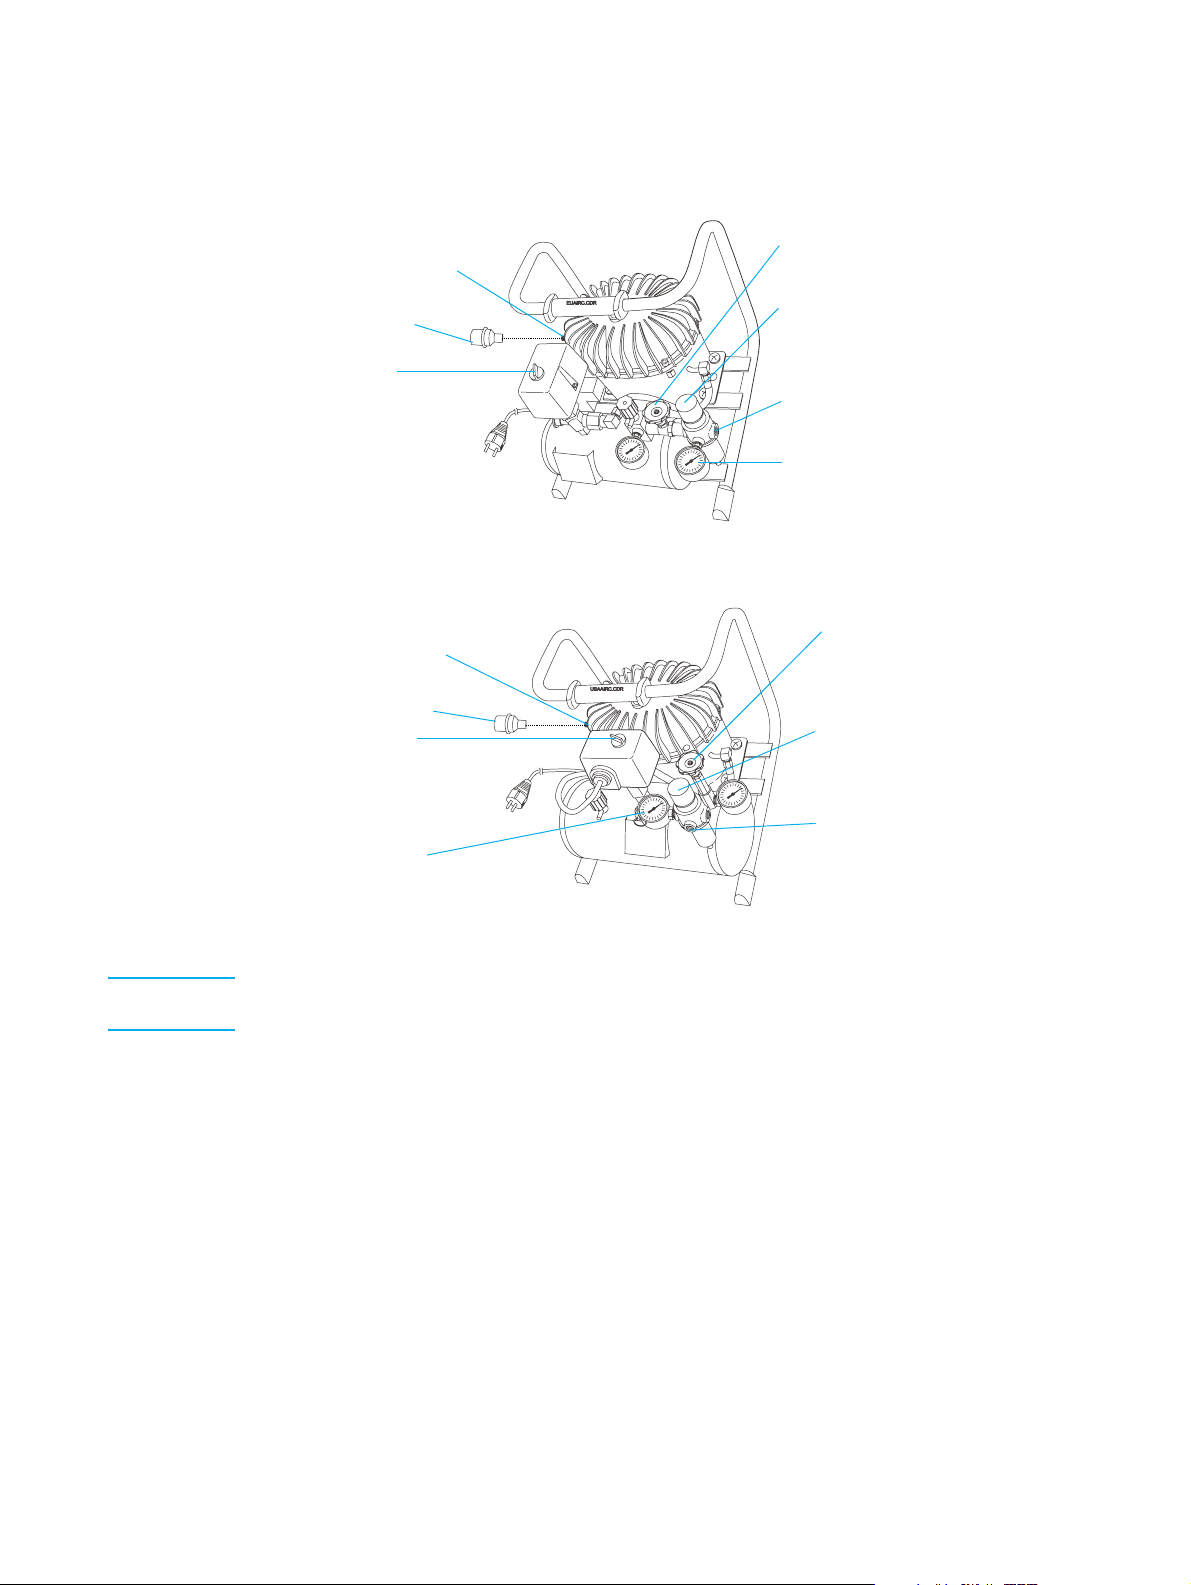
Air compressor
The air compressor is used for operating the dispensing unit.
Air inlet
Air filter
On/off
switch
European air compressor
Air inlet
Air filter
On/off
switch
Outlet
pressure
gauge
Air valve
Outlet
pressure
knob
Air outlet
Outlet
pressure
gauge
Air valve
Outlet
pressure
knob
Air outlet
USA / Japanese air compressor
Note The label on the on/off switch shows 250VAC. This value refers to the switch only and indicates
the upper limit of the supplied voltage.
ENWW
Hardware configuration 13
Page 15

Consumables
The following is a list of consumables that you can order from HP Indigo as the need
arises.
For Series 1000/2000 presses, Indigo TurboStream-based presses,
and Indigo Sun computer-based presses
Item Code Catalogue number Contents
HP ElectroInk:
Yellow Y MPS-2134-42 10 cans
Magenta M MPS-2133-42 10 cans
Cyan C MPS-2132-42 10 cans
Black K MPS-2131-42 10 cans
Orange 003 O MPS-2401-42 10 cans
Violet 065 V MPS-2465-42 10 cans
Bright Yellow 060 BY MPS-2460-42 10 cans
Blue 013 B MPS-2403-42 10 cans
Green 011 G MPS-2428-42 10 cans
Rhodamine 050 Rh MPS-2450-42 10 cans
Transparent 025 T MPS-2425-42 10 cans
Startup kit MKT-0510-41 Mixed cans (2) - MKT-0511-41
Empty cans (1) - MKT-0512-41
Mixed cans X MKT-0511-41 10 cans (O, V, BY, B, G, Rh, T, and
three empty cans)
Empty cans E MKT-0512-41 10 cans
14 Chapter 1 Introduction
ENWW
Page 16

For Series 5000 presses
Item Code Catalogue number Contents
Filter (for external filter kit) MFL-1901-01
HP ElectroInk:
Yellow Y Q4015A 10 cans
Magenta M Q4014A 10 cans
Cyan C Q4013A 10 cans
Black K Q4012A 10 cans
Orange 070 O Q4003A 10 cans
Violet 071 V Q4004A 10 cans
Bright Yellow 074 BY Q4007A 10 cans
Reflex Blue 075 RB Q4008A 10 cans
Green 072 G Q4005A 10 cans
Rhodamine 073 Rh Q4006A 10 cans
Transparent 076 T Q4009A 10 cans
Startup kit MKT-0510-51 Mixed cans (2) - MKT-0511-51
Empty cans (1) - MKT-0512-51
Mixed cans X MKT-0511-51 10 cans (O, V, BY, RB, G, Rh, T,
and three empty cans)
Empty cans E MKT-0512-51 10 cans
ENWW
Consumables 15
Page 17

For Series 3000/4000 presses and Indigo UltraStream-based presses
Item Code Catalogue number Contents
Filter (for external filter kit) MFL-1901-01
HP ElectroInk:
Yellow Y MPS-3134-43 10 cans
Magenta M MPS-3133-43 10 cans
Cyan C MPS-3132-43 10 cans
Black K MPS-3131-43 10 cans
Orange 070 O MPS-3135-43 10 cans
Violet 071 V MPS-3136-43 10 cans
Bright Yellow 074 BY MPS-3123-43 10 cans
Reflex Blue 075 RB MPS-3124-43 10 cans
Green 072 G MPS-3121-43 10 cans
Rhodamine 073 Rh MPS-3122-43 10 cans
Transparent 076 T MPS-3125-43 10 cans
Startup kit MKT-0510-51 Mixed cans (2) - MKT-0511-51
Empty cans (1) - MKT-0512-51
Mixed cans X MKT-0511-51 10 cans (O, V, BY, RB, G, Rh, T,
and three empty cans)
Empty cans E MKT-0512-51 10 cans
16 Chapter 1 Introduction
ENWW
Page 18

Important system information and limitations
z
The following procedures take some time to accomplish:
• Cleaning and preparing the ink tank may take between 40 and 60 minutes. You can
save 20 minutes on the Series 3000/4000/5000 or UltraStream-based press if you
use a replacement BID, ink pump, and ink tank.
• Ink formulation may take between 30 minutes (for one step) and 100 minutes (for
three to four steps).
z
Color accuracy:
• Gamut: In some cases, the target color may be outside the gamut of the
HP IndiChrome ink mixing system. This situation is characterized by having the
predicted best mix color differ from the target by a ∆E*
situation, the software guides you to achieve the mix that best resembles the target
color, regardless of what the predicted ∆E*
• Gloss: When the gloss of the target color sample is substantially different from the
printed color, it may be difficult to visually compare the two colors. For a glossier
target you can overcoat or laminate the printed sample with a glossy substance
before the comparison. You can even manually apply some imaging oil onto the
surface of the color to get the required temporary increase of the gloss or laminate
the sample with a transparent glossy scotch tape.
• Grey shades: In Sun computer-based presses with off-line densitometers, the LUT
of the custom color is the same as the LUT of Black. Therefore, the color shades
may not appear as linear as they should be.
• Double print: The HP IndiChrome ink mixing system software may suggest that
you formulate the ink for double printing. This occurs when the best mix color in
single print is not bright enough. If you print the separation of such ink twice, the
solid color effect is accurate but the color shades are not. Therefore, double print
should be used for printing solids only. If you double print shades, they are not
linear.
• Hot lamination: The printed colors may change during hot lamination, which may
be required when preparing PVC cards.
z
Mixing procedure:
• Ineffective mix: Some of the fix corrections may not improve the color. This reflects
the statistical nature of the corrective algorithm. In such cases, you may still expect
improvement of the color in successive corrections.
• Inaccurate mix: The color of the actual mix usually differs from the target color
more than the software prediction shows. This is mainly because of minute
contamination in the ink tank, inaccurate dispensing of the basic inks into the mix
can, and specific characteristics of the substrate in the print run. This is especially
true with colors that are outside the gamut.
• Precision in color adjustment: During the ink formulation stage, you are instructed
to correct the color by printing again with a modified optical density (OD) value.
Because of the limited precision of the color adjustment procedure, this instruction
may be repeated until the OD, as read by the spectrophotometer, is as required.
• Resending the ink parameter file: Do not send the ink parameter file to the press
more than once. If for some reason this has been done, you should use a first can
for recalibrating the ink density sensor.
94
is.
of more than zero. In this
94
ENWW
Important system information and limitations 17
Page 19

Resources:
z
• Initial ink amount: The amount of concentrated ink in the ink tank dispersion is
equivalent to almost one can. In order to print the job, you should prepare and
install at least one additional can. The weight of the ink in the can may be as small
as required for the print run. You must prepare at least one can of ink even if the
printing job consumes much less.
• Getting acquainted: To correctly operate the ink mixing system and take advantage
of its full range of features, experience and familiarity with the system is essential.
z
The following phenomena are caused by using Rhodamine ink:
• It causes the color of the squeegee (in Series 1000/2000, TurboStream-based, and
Sun computer-based presses) and the color of the developer (in Series
3000/4000/5000 and UltraStream-based presses) to change to yellow. However,
no deterioration of any other characteristics of the squeegee or developer is
expected.
• It causes an excess of particle residue to be found in the separator clean liquid and
on the blanket background.
Under normal circumstances, no degradation of print quality or machine reliability
is expected. When printing more than 1,000 pages with Rhodamine as one of the
separations or when printing with an ink mix containing a large percentage of
Rhodamine, slight contamination of other inks may occur. The expected color
shift will not be larger than ∆E*
94
= 1.5.
18 Chapter 1 Introduction
ENWW
Page 20

Safety and environment
2
considerations
This chapter contains the following sections:
z
General warning
z
Warning signs
z
Material Safety Data Sheets (MSDS)
z
Preventing eye irritation
z
Electrical safety precautions
z
Emergency power cutoff
z
Flammable liquids and fumes
z
Handling and storing imaging oil and inks
z
Waste disposal
EN
19
Page 21

General warning
WARNING! The HP IndiChrome ink mixing system should be operated only by personnel who have been
trained by an HP Indigo customer engineer. Operators should read and understand all operating
safety procedures presented here before attempting to use the system. Service and repairs
should be referred to an authorized customer engineer. Do not allow untrained personnel to
operate the HP IndiChrome ink mixing system. Follow the procedures properly at all times.
WARNING! If you have any questions regarding safe operation of the ink mixing system, cease operation
and contact HP Indigo.
Warning signs
Warning signs that clearly emphasize the dangers involved in operating and maintaining
the HP IndiChrome ink mixing system should be posted at the site.
The following texts are recommended:
z
To be operated by certified operators only.
z
Do not wear ties or other loose clothing or loose jewelry when operating and
maintaining the unit.
z
No smoking, open flames, or sources of ignition allowed!
z
Verify that the room is properly ventilated at all times.
z
Keep hands away from moving machine parts.
z
Ink and imaging oil are irritating to eyes and skin. Use rubber gloves.
z
Read and understand the MSDS sheets for the consumables used with the machine.
Material Safety Data Sheets (MSDS)
Material Safety Data Sheets (MSDS) are supplied for different HP ElectroInk colors and
the imaging oil.
You should keep the MSDS sheets that are supplied with the unit readily available in the
work area. These should be kept in a plastic folder for protection. The MSDS sheets
should be read, understood, and consulted for a full understanding of the consumables
being used with the machine.
20 Chapter 2 Safety and environment considerations
EN
Page 22

Preventing eye irritation
The HP IndiChrome ink mixing system uses inks and imaging oil that may irritate the skin
and eyes. In extreme cases of exposure, these substances may cause blindness.
As a precaution:
z
Wear protective eye covering. This is of particular importance during the custom ink
preparation.
z
Install eye wash stations within 7.6 m (25 ft) of areas where the ink and imaging oil
are handled, dispensed, or stored.
z
Provide eye wash liquid at the eye wash stations (available from most safety supply
companies) to comply with ANSI standard Z358.1-1990.
Electrical safety precautions
z
The shaker must be properly grounded at all times. Before operating the unit, ensure
that it is grounded in conformance with applicable electrical code standards for your
country/region. Do not operate the shaker if it is not properly grounded. If in doubt,
check with a licensed electrician or with your local HP Indigo office.
z
We recommend that you perform a weekly check of grounding cables.
Emergency power cutoff
Use one of the following methods to cut off power to the shaker in an emergency:
z
Pull the electric plug out of the wall.
z
Turn the timer to zero.
Flammable liquids and fumes
The HP IndiChrome ink mixing system uses flammable imaging oil. The following safety
procedures should be used when working with this substance:
z
Operate the unit in a well-ventilated room.
z
Do not smoke or introduce external sources of ignition such as pilot lights, open
flames, stoves, heaters, or halogen lights.
z
Avoid creating sparks (static, electrical, or mechanical) or introducing any
spark-producing equipment within 7.6 m (25 ft) of the system.
z
Clean up spills immediately after they occur and dispose of soaked cleaning materials
promptly in a covered waste bin.
EN
Preventing eye irritation 21
Page 23

Handling and storing imaging oil and inks
z
To avoid fire or explosion, store imaging oil and inks in a fireproof cabinet or in a
special combustible-liquids storage room. Only trained personnel should handle
imaging oil and inks. Refer to your local combustible material handling regulations.
z
When handling imaging oil and inks, wear safety glasses with side shields,
long-sleeved overalls, and protective gloves as indicated on the Material Safety Data
Sheets.
z
Do not drink or otherwise ingest imaging oil or inks.
Waste disposal
During the operation of the HP IndiChrome ink mixing system, you use consumables that
should be disposed of properly. Consult your local authorities to determine the correct
manner in which to dispose of the following wastes:
z
imaging oil and ink
z
spent ink cans
z
empty imaging oil containers
22 Chapter 2 Safety and environment considerations
EN
Page 24

3
Getting started
This chapter contains the following sections:
z
Overview
z
Detailed Automatic Workflow
z
Starting the ink mixing system (IMS) software
z
HP IndiChrome Wizard
z
To ol ba r
z
Exiting the IMS software
ENWW
23
Page 25
Overview
The HP IndiChrome Ink Mixing System (IMS) provides the following methods of
determining the ink weights required for producing a required color:
z
Automatic
z
Manual
z
Ready Mix
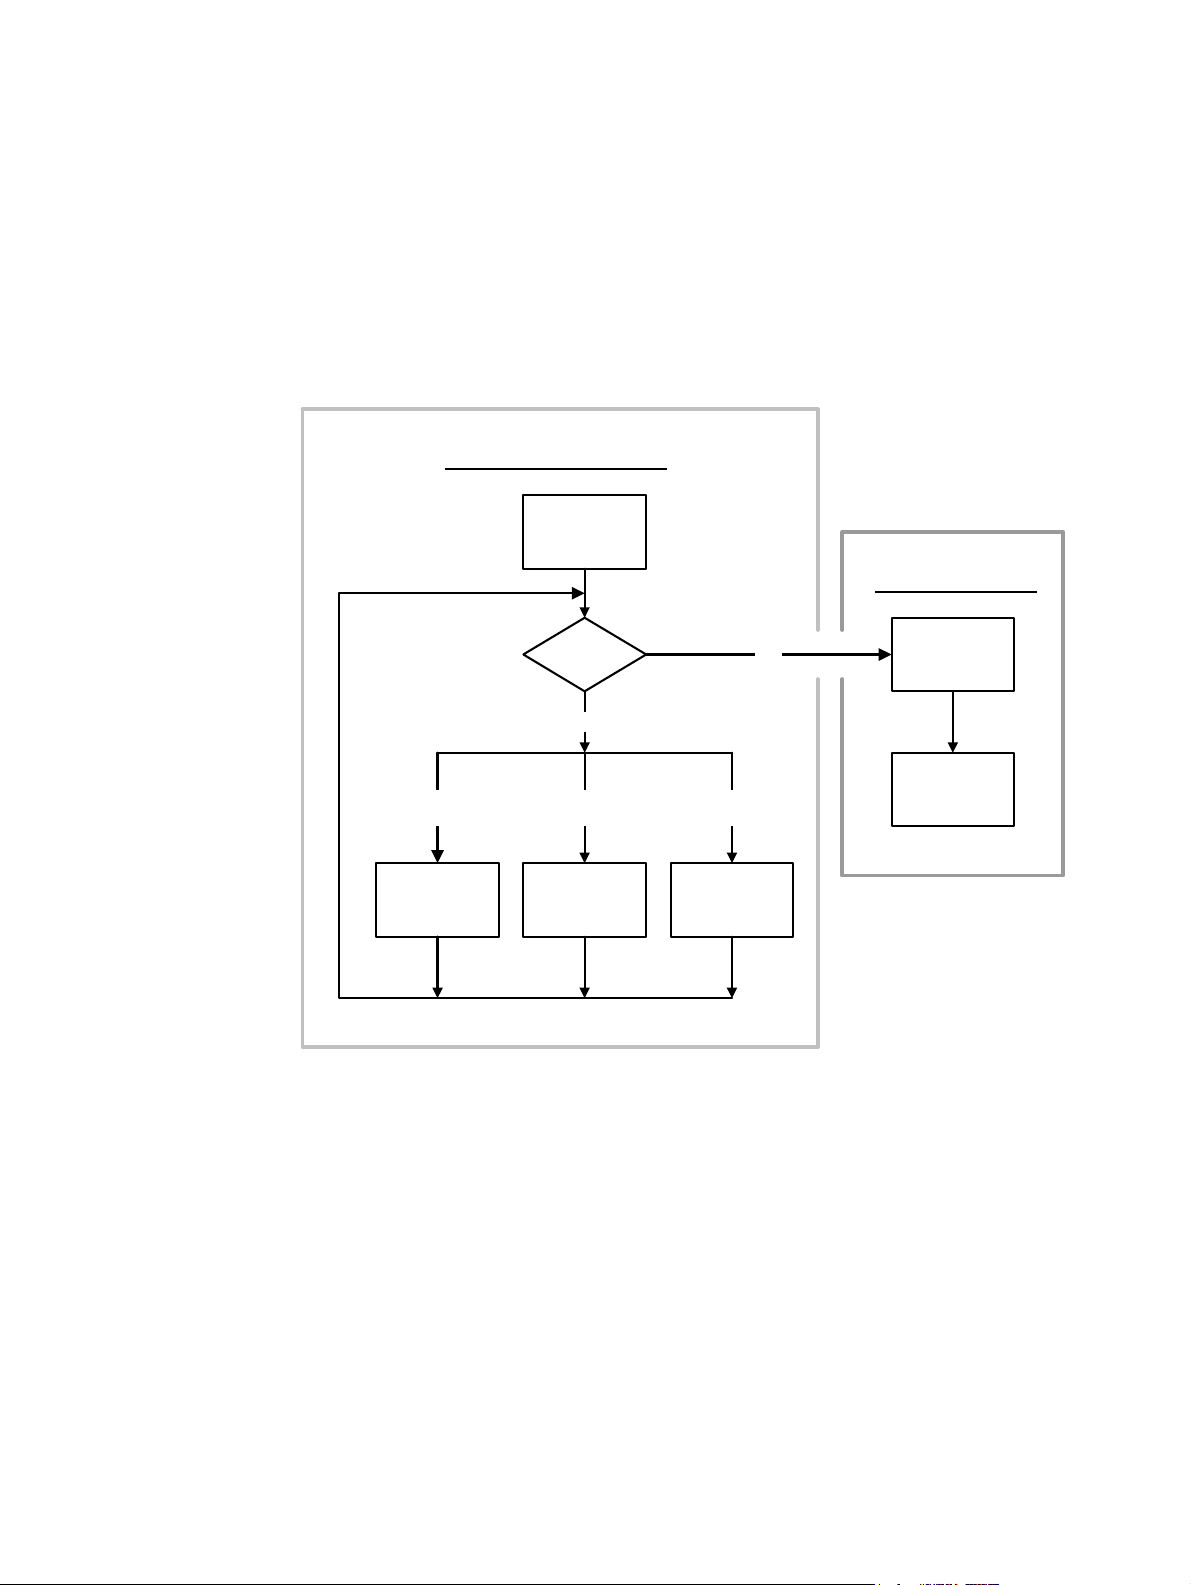
The Automatic method flow chart is displayed below.
INK FORMULATION
Prepare and test
first can
PRODUCTION
Prepare additional
cans
Prepare the RIP
for the digital print
Improve color by
changing OD
Change OD
spec value
Is color OK?
No
Improve color
with fix can
Prepare and test
fix can
Yes
Improve color with
new first can
Prepare and test
new first can
Ink formulation and production flow chart
In the Automatic method, you use the HP IndiChrome Ink Mixing System to prepare a
custom ink as follows:
1 Ink formulation:
a Determine (through measurement or PANTONE
®
color selection) the target color.
b Set the color match parameters (for example, substrate glossiness and type).
c Send the ink definition file to the HP Indigo press.
d Prepare and test a first can.
24 Chapter 3 Getting started
ENWW
Page 26

e If you are satisfied with the color, proceed to step 2 (Production).
If you are not satisfied with the color, the HP IndiChrome Ink Mixing System will
recommend improving the color in one of the following ways:
- If the color in the ink tank can be improved by adding a slightly different custom
ink, prepare and test a fix can.
- If the color in the tank cannot be improved by a fix can, prepare and test a new
first can.
- Changing the optical density at the press.
The HP IndiChrome Ink Mixing System repeats this step until you are satisfied with
the color.
2 Production: Prepare additional cans, prepare the press for printing with the custom
ink, and prepare the RIP (if necessary) to accept a print file with special colors.
In the Manual method, the HP IndiChrome Ink Mixing System does not determination the
ink weights. Thus the only possibility for correcting a color is through a fix can where the
ink weights used in the fix can is determined by the person preparing the color.
Note Once the Manual method is entered, there is no return to the Automatic (or Ready Mix) method.
In the Ready Mix method, the work in determining specific colors accurately has already
been done. Prepare a first can to calibrate the press and prepare additional cans for
production.
Note If you are not satisfied with the results of a Ready Mix color, you can change (fix) the color using
the Manual method.
ENWW
Overview 25
Page 27
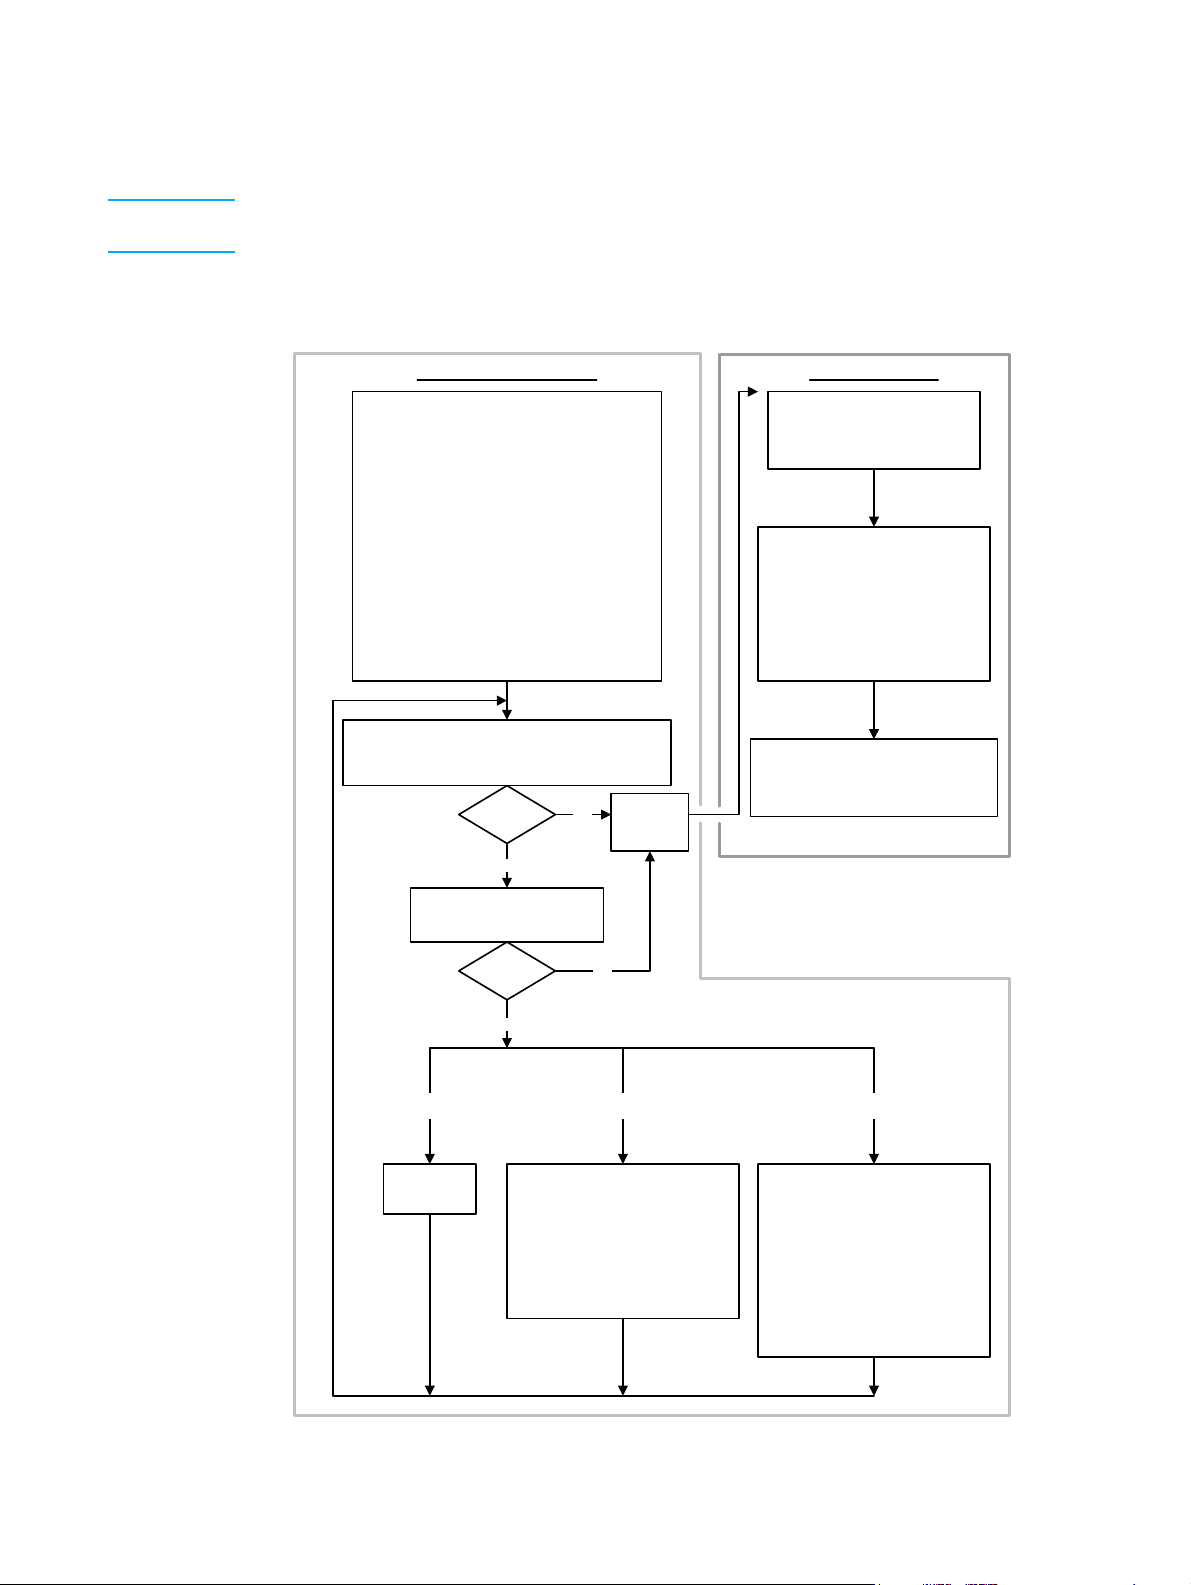
Detailed Automatic Workflow
Note The detailed workflows for the Ready Mix and Manual methods are found on pages 67 and 70
respectively.
Reference the detailed flowchart only after reading the detailed instructions in this user
guide at least once.
INK FORMULATION PRODUCTION
Prepare additional cans
·
Prepare the first can
·
Determine the target color and substrat e type
·
Set the IMS color mixi ng parameters
·
Send/save the ink definition file to the pr ess
·
Mix the ink
Prepare the basic inks
Dispense the ingredients
Seal and shake the can
·
Prepare the press for test printing
Transfer the ink definition file
Clean the ink system
Assign ink parameters to the target ink tank
Add imaging oil
Add ink
Perform flush
Calibrate the ink density sensor
Specify the can capacity
·
Dispense the ingredients
·
Seal and shake the can
Prepare the press for printing with
the custom ink
·
Clean the ink system
·
Assign ink parameters to the t arget ink
tank
·
Change the OD spec value
·
Calibrate the ink density sensor
·
Perform color adjustment
·
Print and compare the printed color to the expecte d color
Perform color adjustment
Select the sample print for comparison
Visually inspect the printed color
colors match?
No
Spectrophotometric compari son of
the printed color
colors match?
No
Improve color
by changing OD
Change the OD
spec value
Prepare a fix can
·
·
Yes
Yes
Improve color
Mix the ink
Prepare the basic inks
Dispense the ingredients
Seal and shake the can
Prepare the press for test printing
Add ink
Perform flush
·
Conclude
ink
formulation
with fix can
Prepare the RIP for the digital print
Save the used custom ink
Improve color with
new first can
Prepare a new first can
·
Mix the ink
Prepare the basic inks
Dispense the ingredients
Seal and shake the can
·
Prepare the press for test printing
Remove the previous ink
Add imaging oil
Add ink
Perform flush
Calibrate the ink density sensor
Detailed Automatic ink formulation and production flow chart
26 Chapter 3 Getting started
ENWW
Page 28
Starting the ink mixing system (IMS) software
To start the IMS software, double-click the Indimix V5.5 icon.
The following window appears:
hp IndiChrome window
The hp IndiChrome Wizard window is open when the IMS software starts.
Note If the X-Rite densitometer is not connected properly, a message appears informing you to
connect the densitometer, and restart the IMS software.
ENWW
Starting the ink mixing system (IMS) software 27
Page 29
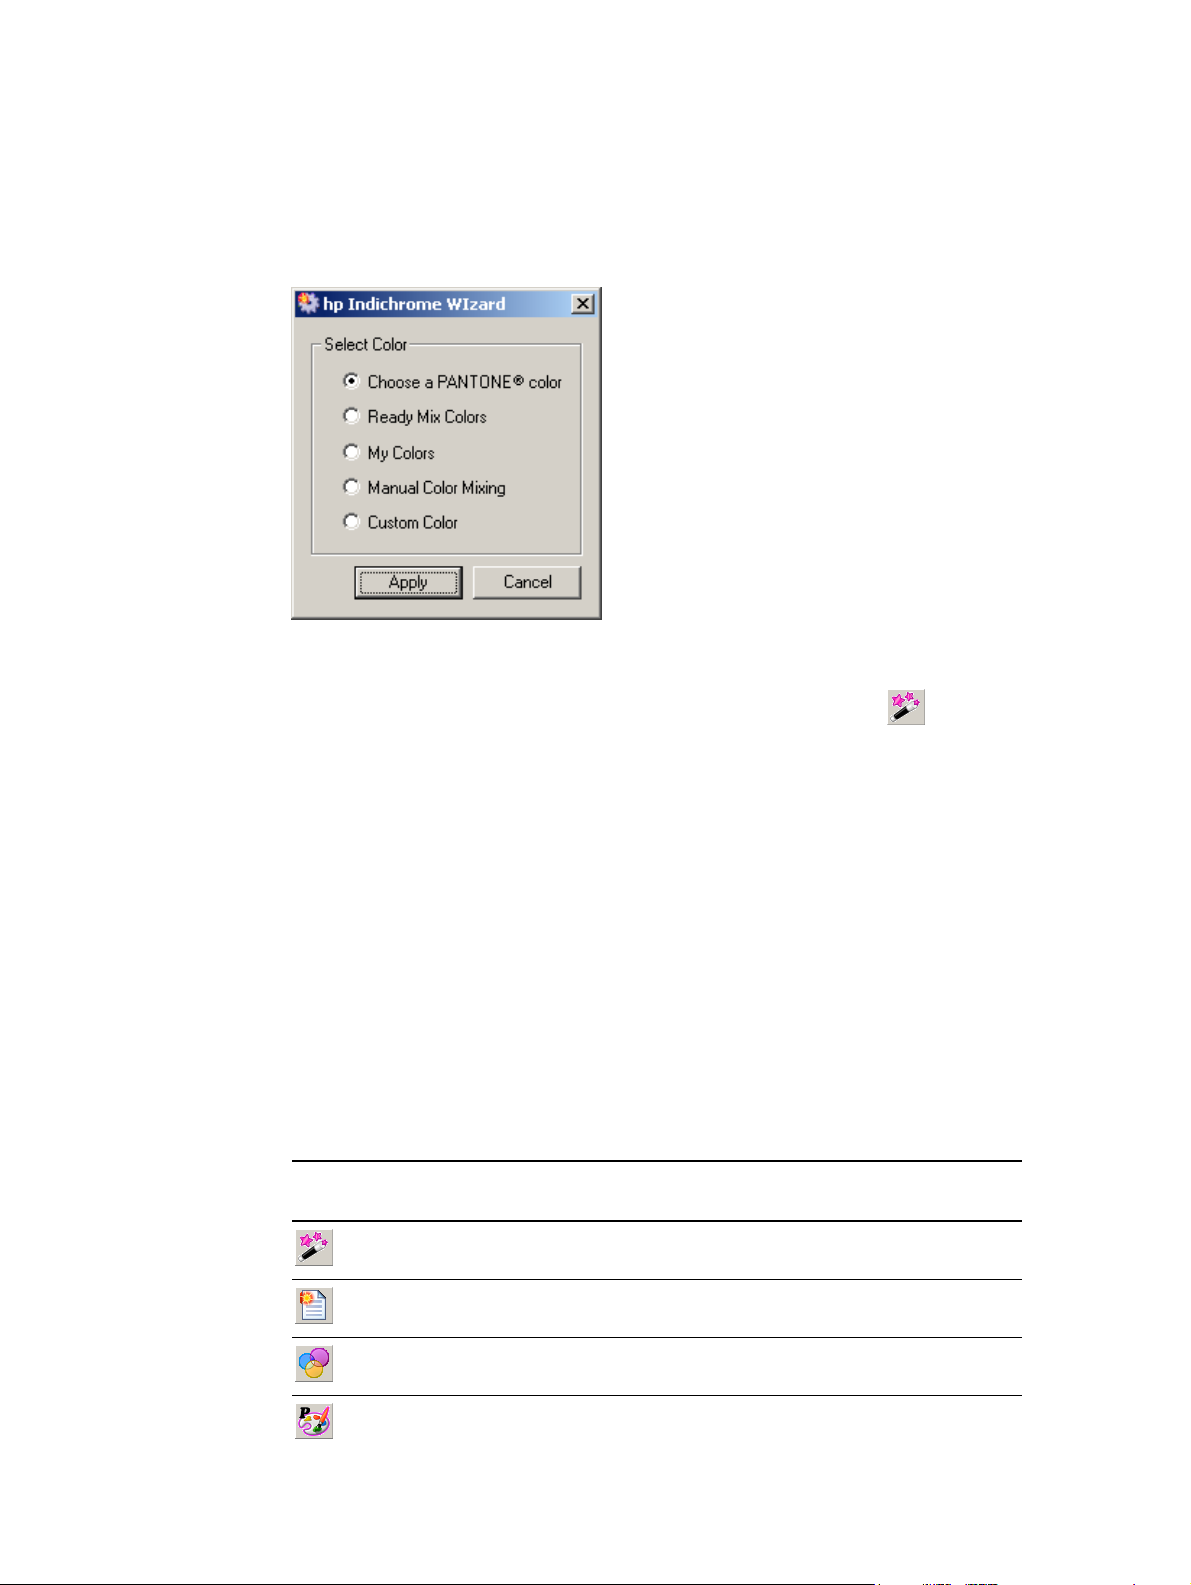
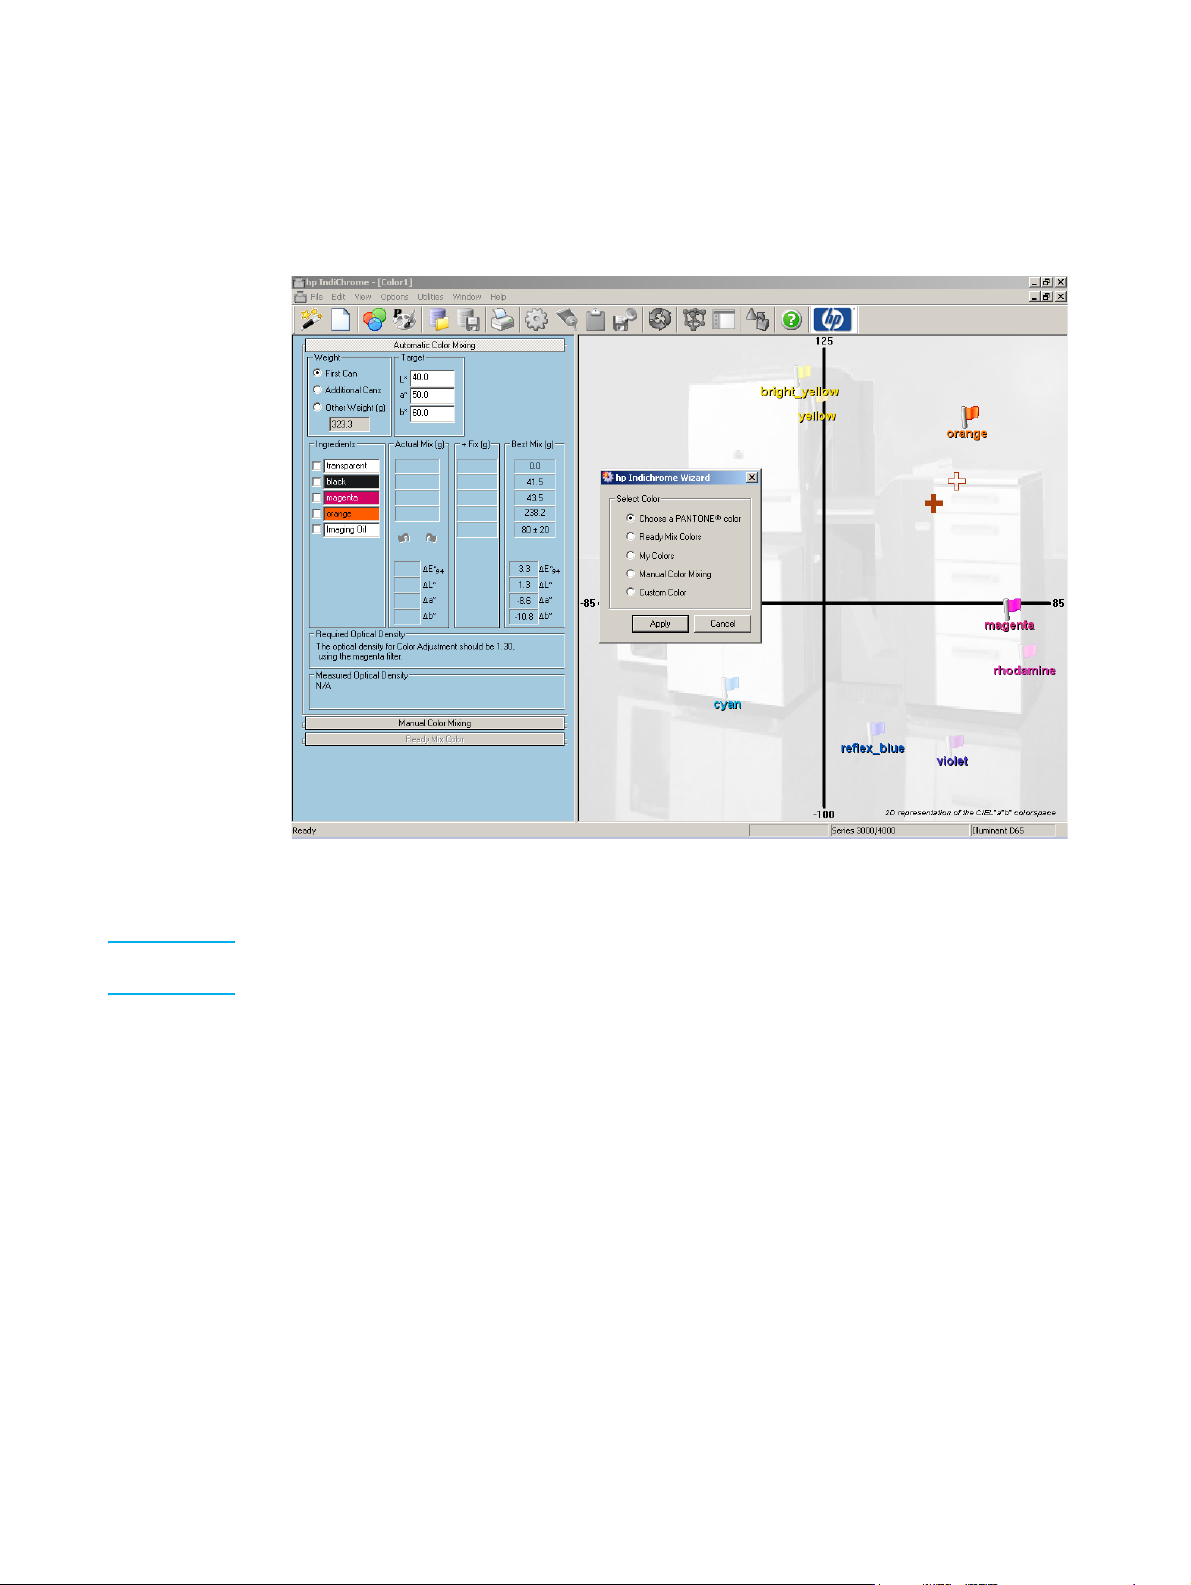
HP IndiChrome Wizard
The hp IndiChrome Wizard window provides access to the ink mixing procedure options
of the IMS software. It is especially useful when learning the MS software and to ensure
that the correct method is used for each ink mixing option.
hp IndiChrome Wizard window
The hp IndiChrome Wizard window opens when IMS software starts.
Toolbar
To open the hp IndiChrome Wizard window at other times, click the button.
The following ink mixing procedures are available:
z
Choosing a PANTONE® color (see page 37)
z
Ready Mix Colors (see page 64)
z
My Colors (see page 68)
z
Manual Color Mixing (see page 69)
z
Custom Color (see page 71)
The following buttons are available on the IMS Toolbar:
IMS Toolbar Buttons
Button Meaning Details
Open the hp IndiChrome wizard See "HP IndiChrome Wizard" on page 28.
28 Chapter 3 Getting started
Start a new color See "Measuring the color directly" on page 72.
Load a Ready Mix color See "Ready Mix colors" on page 64.
®
Choose a PANTONE
color See "Selecting a PANTONE® color" on page 37.
ENWW
Page 30

Button Meaning Details
Access the color environments
previously defined
Save the color environment See "Saving the color’s workspace" on page 44.
Print the 2D color environment See "Printing the color workspace details" on
Set the color matching
parameters
Set the thickness of the ink
layer
Display a summary of the color
information
Save the ink definition file See "Save the Ink Definition file" on page 43.
Checks for better results with
different illuminants
See "Continuing work on a previously defined
mix color" on page 68.
page 77.
See "Color matching parameters" on page 78.
See "Ink print thickness" on page 79.
See "Color information summary" on page 80.
See "Improving visual match by changing
illuminant" on page 58.
Set the axis range displayed in
the 2D color space
Show/Hide the ink mix details
panel
Display the 3D color space See "View the 3D color space" on page 82.
Display the help topics See "Online help" on page 90.
Program update See "Program updates" on page 90.
See "Zoom by changing axes values" on page
81.
See "Increase/decrease view of 2D color space"
on page 80.
ENWW
Toolbar 29
Page 31

Exiting the IMS software
To exit the IMS software, do the following steps:
1 On the File menu, click Exit. The Are you sure message appears.
Are you sure message
2 Click Yes.
If you changed any of the parameters affecting an ink mix, the following message
appears for each affected workspace:
Save changes message (example)
To save the changes, click Ye s , and click Save in the Save My Colors window.
30 Chapter 3 Getting started
ENWW
Page 32

4
General procedures
This chapter contains the following sections:
z
Calibrating the electronic scale
z
Calibrating the spectrophotometer
z
Draining the water from the dispensing unit
z
Adjusting the dispensing unit for the press
z
Measuring a color
z
Selecting a PANTONE® color
z
Transferring the ink definition file to the press
z
Preparing the basic inks
z
Dispensing the ingredients
z
Sealing the can
z
Shaking the can
z
Visually comparing the printed color
z
Adjusting the ink mix from the printed output
z
Undoing and redoing a measurement
z
Changing the optical density (OD) spec value
z
Comparing different ink mix results
z
Changing the ink on the press
ENWW
31
Page 33

Calibrating the electronic scale
Calibrate the electronic scale once a day.
1 Connect the scale to a power source, and press the On button. Allow a one-minute
warm up period.
Note Do not put the adjusting weight on the scale.
Adjusting
weight
Weighing
pan
LCD
display
Adjusting weight and scale
2 Press and hold the Cal/Mode button until the exact size (500.0) of the adjusting
weight appears flashing on the LCD display.
Note It may take up to two seconds for the scale to show results.
3 Press the Off button. The message CAL 0 appears on the display.
4 Place the adjusting weight in the center of the weighing pan. After a short while, the
message CAL F appears on the display for a short time.
The exact weight of the adjusting weight (that is, 500.0) should appear on the display
shortly afterwards.
If an adjusting error occurs or the wrong adjusting weight is used, the message
CAL E appears on the display. In this case, repeat this calibration procedure.
Cal/Mode
button
On button
Off button
5 Put the 500 g adjusting weight in a safe place.
32 Chapter 4 General procedures
ENWW
Page 34

Calibrating the spectrophotometer
Performing a full calibration
Before using the spectrophotometer for the first time, and once a month thereafter,
perform a full calibration as follows:
1 From the Utilities menu, click Calibrate Spectrophotometer, and Full Calibration.
2 Follow the instructions in the series of message windows that appear, clicking OK
after each message window.
Note For the Black Calibration test, make sure that you measure the dark area until the four vibrating
measurements end completely. This takes approximately 15 seconds.
If the Black calibration successful and the White calibration
successful messages appear on the screen, the full calibration was successful. If
not, repeat this procedure one more time before calling the customer engineer.
Performing the daily calibration
Calibrate the spectrophotometer once a day.
1 From the Utilities menu, click Calibrate Spectrophotometer, and Frequent
Calibration.
2 Follow the instructions in the window that appears.
Note For the White Calibration test, make sure that you measure the white reference area until the
single vibrating measurement ends completely. This takes approximately two seconds.
If the Calibration successful message appears on the screen, the daily
calibration was successful. If not, repeat this procedure one more time before calling
the customer engineer.
ENWW
Calibrating the spectrophotometer 33
Page 35

Draining the water from the dispensing unit
The dispensing unit removes water from the compressed air as it enters the unit. The
water should be drained at the end of each work day.
To drain the water from the dispensing unit, do the following:
1 Close the compressed air valve on the air compressor or compressed air pipe
(whichever you are using).
Transparent
safety door
Draining the dispensing unit
Dispensing
unit
Coarse
button
Water drainage
tube
Water
container
2 Close the transparent safety door.
3 Press and hold the Coarse button until all the excess air goes out of the dispenser.
4 Release the Coarse button. The water drains into the water container.
5 Empty the water container.
34 Chapter 4 General procedures
ENWW
Page 36

Adjusting the dispensing unit for the press
The Series 3000/4000/5000 and UltraStream-based presses use ink cans that are taller
than those used by the Series 1000/2000, TurboStream-based, and Sun computer-based
presses. Consequently, the dispensing unit must be adjusted to the height of the ink cans
used by the press for which you are preparing custom ink.
The dispensing unit can accommodate two nozzles: a short one for the Series
3000/4000/5000 and UltraStream-based presses and a long one for the Series
1000/2000, TurboStream-based, and Sun computer-based presses. The nozzle is
screwed onto the top can holder.
Long nozzle
Short nozzle
Ring
holder
Weighing
pan
P
S
I
D
Can holder
(top)
Nozzle
Nozzle
storage hole
Spacer ring
(Series 1000/2000,
TurboStream-based, and
Sun computer-based only)
R
D
C
.
L
Z
O
N
Adjusting the dispensing unit
When dispensing to an empty Series 3000/4000/5000 or UltraStream-based ink can,
place it directly on the weighing pan. When dispensing to an empty Series 1000/2000,
TurboStream-based, or Sun computer-based ink can, place it on a spacer ring on the
electronic scale weighing pan.
Note The nozzle that is not in use can be stored in the nozzle storage hole. Adapter rings (used when
shaking cans) that are not being used can be stored on the ring holder.
ENWW
Adjusting the dispensing unit for the press 35
Page 37

Measuring a color
The spectrophotometer samples color data from any clean, dry surface that is reasonably
flat and smooth. The target eye should be able to rest flat and steady on the sample area.
Because the opening is just 6 mm (0.24 inch) in diameter, it can rest sufficiently flat on
many curved surfaces.
As a general rule, surfaces with bulky, rough, or loose-weave textures do not provide good
results.
Head
Shoe
Spectrophotometer
To measure a color:
1 Clear the sample surface of any dirt, dust, or moisture.
Tar g e t e y e
White reference
area
Calibration
reference base
2 Place the spectrophotometer shoe directly on the surface, aligning the target eye
opening over a continuous patch of the desired color.
3 Press the spectrophotometer head down onto the shoe, and hold it closed.
4 Hold the head down until the spectrophotometer stops vibrating. Make sure that you
hold the spectrophotometer still for the entire measurement. Any movement affects
the reading accuracy.
5 Raise the spectrophotometer off the sample area, and carefully return it to its base.
36 Chapter 4 General procedures
ENWW
Page 38

Selecting a PANTONE® color
Instead of measuring a color using the spectrophotometer, you can select the PANTONE
color from a color list (if you know its name). The colors in the list are exactly the same as
those found in the PA NT ON E
or metallic colors.
To select the PANTONE
1 From the hp Indichrome Wizard window, select Choose a PANTONE
Apply. The PANTONE
Alternatively, click the button or from the Edit menu, click PANTONE
Simulations.
®
color, perform the following steps:
®
®
Color Formula Guide. The list does not contain fluorescent
®
color and click
Color Simulations window appears.
®
Color
PAN TO NE
®
Color Simulations window
Note If an "(R)" (the letter R within parentheses) appears next to the PANTONE® color name, the
color is available as a Ready Mix color (see "Ready Mix colors" on page 64).
2 If your PA NTO N E
®
Color Formula Guide is dated year 2000 or later, select the
IMS 5.2 compatible color option. Otherwise, select the IMS 4.1 compatible color
option.
3 Type the PANTONE
®
color name in the PANTONE field, or scroll and select the color
from the list.
4 Select the Coated, Uncoated, or Matte option. Choose whichever type most closely
matches the substrate.
ENWW
Selecting a PANTONE® color 37
Page 39

Note "Uncoated" is for substrates similar in gloss to copy paper. Matte can be used for substrates like
PVC.
If you use a 75° glossmeter, you can determine the gloss level as follows:
• above 50 percent gloss, click Glossy
• 15 to 50 percent gloss, click Matte
• below 15 percent gloss, click Uncoated.
5 Click Apply. If Uncoated was selected, the following message is displayed:
Very Matte Warning message
If the Configure Color Matching Parameters window appears, continue with step 8.
6 If the ink mix only matches the target color under specific lighting conditions, the
Warning! Metameric window appears.
Warning! Metamerism window
Two colors are considered metameric if under a specified illuminant, they appear
equivalent to the average eye. Under a different illuminant, the colors may vary.
Select the relevant illuminant, and click Apply:
• Outdoor lighting
• Indoor lighting
• Other illuminant
38 Chapter 4 General procedures
ENWW
Page 40

A selection of Outdoor lighting or Indoor lighting is matched in the Illuminant section of
the Configure Color Matching Parameters window (see step 8).
Note The level of metamerism is defined as the absolute difference between the following:
• The difference between the target and custom colors under "warm” light, such as an
incandescent light.
• The difference between the target and custom colors under “cold” light, such as D
If the level of metamerism is greater than the mix precision, the Metamerism warning window
appears. (See ‘Setting the mix precision’ on page 94 for an explanation of mix precision.)
7 If the target color is out-of-gamut at the regular thickness of the ink layer, the Increase
Thickness window appears. You can improve the color match by printing with a
greater ink thickness.
65
.
Increase Thickness window
Select the relevant ink thickness as follows, and click OK:
• Regular thickness refers to a single print of the custom color separation.
• Double print means that the custom color is required to be printed twice. The color
adjustment runs in single print mode, and the optical density (OD) spec reflects
this.
• Increase thickness refers to a single print with the ink thicknesses (minimum and
maximum) increased (the OD values are increased by 0.1).
The Configure Color Matching Parameters window appears.
ENWW
Selecting a PANTONE® color 39
Page 41

Configure Color Matching Parameters window
8 In the Illuminant section, select the type of lighting conditions that your customers use
to check their printed output.
9 In the Observer section, select the spectrophotometer's angle of measurement. The
default is 10°.
Note The practical difference between 10° and 2° is insignificant.
10 In the Color Difference section, select the parameter to be used to indicate the color
difference between the best or actual mix and the target color. See "∆E*
96 for an in-depth explanation of ∆E*
94
.
11 The Level of Gloss parameter contents matches the choice made in step 4. Select a
different value only if necessary.
12 Click the Substrates drop-down list. If the substrate is white, click Default substrate. If
the substrate is other than white, do one of the following:
• Select the substrate from the list that most closely matches your substrate.
• Add a new substrate (refer to "Adding a new substrate" on page 74).
" on page
94
40 Chapter 4 General procedures
ENWW
Page 42

13 Select the type of press on which this color will be installed.
If the press is one of the following, select the operating system of the press:
• Series 3000/4000
• Series 1000/2000
• Indigo TurboStream-based
HP Indigo Press section with Press Windows Version displayed
14 Click Apply. The Save Workspace message displays.
Save workspace dialog box
15 Click Yes. The Save My Colors window displays.
ENWW
Selecting a PANTONE® color 41
Page 43

Save My Colors window
The Save My Colors window provides a file name for the workspace of the mix color.
This name is the combination of the PANTONE
®
color name, the coating of the
substrate, and the press type.
You can edit the default file name. For example, if the mix color is to be printed using a
double print, edit the file name to indicate this requirement. This will ensure that the
name of the ink file will indicate to the operator that a double print is required.
16 Click Save.
Note For details on the Export File and Delete File procedures available from the Save My Colors
window, see "Exporting and deleting ink workspace files" on page -77.
42 Chapter 4 General procedures
ENWW
Page 44

Save the Ink Definition file
The HP Indigo press contains a separate ink definition file for each ink that is used. You
must save the ink definition file of the new custom ink to a network drive or to a disk so
that it is accessible by the HP Indigo press computer.
1 From the Utilities menu, click Save Ink Definition File; or click the button. The
Save Ink Definition File window appears.
Save Ink Definition File window
The Save Ink Definitions File window provides a file name for the ink definition file.
This name is the combination of the PANTONE
can edit the default file name.
Note The My Colors default location is C:\Program Files\IMS. This location can be opened by clicking
on Utilities, and Open Ink Definition File Folder.
2 Click Save. The following message appears:
Ink Definition File Created message
Note The filter color, mentioned in the message, is the filter with which the in-line densitometer
measures the custom color. If your press uses an off-line densitometer, the preferred filter color
appears in the Color Adjustment window.
®
color name and the press type. You
ENWW
Selecting a PANTONE® color 43
Page 45

3 Click OK. The following message appears:
Check imaging oil conductivity message
4 Click OK.
If the color is to be double printed, the following message appears:
Remember to double print message
Click OK.
Note Saving the ink definition file changes the color’s workspace. Stopping work on this color at this
time will generate a message to save changes to the color.
Saving the color’s workspace
1 From the File menu, click Save; or click the button. The Save My Colors window
displays.
44 Chapter 4 General procedures
ENWW
Page 46

Save My Colors window
2 Click Save. If the workspace was already saved under that file name, the following
message is displayed:
File Already Exists window
To continue with saving the workspace, click Yes.
ENWW
Selecting a PANTONE® color 45
Page 47

Transferring the ink definition file to the press
All HP Indigo presses except for Indigo Sun computer-based presses
1 (On the press) From the Options menu, click Ink List. The Ink List window appears.
2 Click Import. The Import ink definition window appears.
3 Select the network directory in which you saved the ink definition file on the IMS
computer.
If you saved the ink definition file to a disk and you want to load the file from that disk,
insert the disk into the press computer, and in this step select 3¾ Floppy (A:).
Note To see only the ink definition files, select On-Site Mixing (*.osm) in the Files of type field.
4 Select the ink definition file. The file must have the .osm extension.
5 Click Open.
6 Click Close.
Indigo Sun computer-based presses
1 Login (User Mode) as Supervisor to access the necessary options.
2 From the Config menu, click Colors Data Base. The Colors Data Base window
appears.
3 Click OnSite DB.
4 Click Read.
Note If the ink name that you sent from the IMS software already exists in any of the databases on
the press, the software automatically appends a number (1, 2, 3, and so on) to the ink name.
5 Select the ink definition file from the OnSite DB list, and click Add to Local Colors
DB. The selected file is added to the Local Colors DB list.
6 Click Quit to close the Color Data Base window.
46 Chapter 4 General procedures
ENWW
Page 48

Preparing the basic inks
1 Look at the Ingredients list to see which basic inks are needed for the target color
that you want to print.
Ingredients list
2 Place at least one can of each basic ink into the shaker. There should be no more
than four cans in the shaker.
Note The only cans that need shaking are those that have not been shaken in the past 24 hours.
Note If a basic ink can has been used previously, some imaging oil may spill out of the can during
shaking. To prevent this, wipe the bottom of the can with a tissue and cover the hole at the
bottom of the can with adhesive tape.
3 Operate the shaker to ensure that each basic ink is of uniform concentration.
See “Shaking the can” on page 51 for a detailed description of how to operate the
shaker.
ENWW
Preparing the basic inks 47
Page 49

Dispensing the ingredients
Note For a first can, new first can, and additional cans, use the weights shown in Best Mix (g). For
a fix can, use the weights shown in +Fix (g).
Best Mix (g) and +Fix (g) lists
1 Verify that the appropriate nozzle is installed in the dispensing unit and that the
spacer ring is used if necessary. See “Adjusting the dispensing unit for the press” on
page 35 for details.
2 Before dispensing any ink, place an empty receiving can or fix bottle on the weighing
pan of the electronic scale in the dispensing unit.
WARNING! Verify that the diaphragm is at the bottom (closed) end of the new empty receiving can by gently
pushing down on it with the rounded end of a spatula.
Note A fix bottle is sometimes used instead of an empty receiving can when preparing a fix can.
3 Open the transparent safety door of the dispensing unit, and insert the first or next
ingredient can listed in the Ingredients list. Close the safety door.
4 Press the red Tare button on the scale’s base to set the scale to zero. Do this each
time before dispensing ink from the different ingredient cans.
5 Dispense the quantity of ink specified in the weight fields (Best Mix (g) or +Fix (g))
for the ingredient can that you inserted in the dispensing unit.
Transparent
safety door
Weighing
pan
Tare button
Dispensing
unit
Coarse
button
Fine button
Electronic
scale
Dispensing unit
48 Chapter 4 General procedures
ENWW
Page 50

To dispense the ink quickly and accurately, do the following:
a For rapid dispensing, press the Coarse and Fine buttons.
Release the Coarse button (but not the Fine button) 5 to 10 g before the desired
weight.
b To dispense the last few grams incrementally, press the Coarse button in short
spurts while still pressing the Fine button.
Note The dispensing of transparent ink should be accurate to 3 g. All other inks should be accurate
to 0.4 g. If the amount added was more than required, you may remove the excess ink from the
receiving can or fix bottle with the spatula or a clean stick.
If the amount of ink to dispense is very small (2 g or less), the following alternate
dispensing method may be used:
a Dispense some ink into an empty ink can cover.
b Using a clean spatula, take small amounts of ink from the can cover and put them
into the receiving can until the required amount of ink is reached.
CAUTION Beware of sudden ink spills.
6 (Optional) Click the box in the check list that corresponds to the ingredient that you
have finished adding to the receiving can.
ENWW
Ingredients list
7 If you are dispensing into a receiving can, repeat steps 2 through 5 for all the other
ingredients (but not the imaging agent) listed in the Ingredients list in the order they
appear in the list.
If you are dispensing into a fix bottle, repeat steps 2 through 5 for all the other
ingredients (but not the imaging oil or the imaging agent) listed in the Ingredients list
in the order they appear in the list.
8 If you are dispensing into a receiving can, remove it from the dispenser.
If you are dispensing into a fix bottle, leave it in the dispenser.
9 For a first can and a new first can, add to the receiving can the amount of imaging
agent as shown next to the Ingredients / Imaging Agent field.
Dispensing the ingredients 49
Page 51

Sealing the can
1 If the crimper is set to the Series 3000/4000/5000 and UltraStream-based level and
Spacer ring
you are sealing a Series 1000/2000, TurboStream-based, or Sun computer-based
can, place the spacer ring on the round can base.
Series 3000/4000/5000 and
UltraStream-based level
Spacer ring
Round
can base
2 Raise the crimper lever all the way up.
3 Put a valve on top of the prepared ink can.
Valve
Ink can
Valve and prepared ink can
4 Push the round can base down, and carefully insert the can into the can crimper.
Make sure that the top of the can enters the crimper completely and that the can is
centered and flat on the round can base (or spacer ring if it is used) and not tilted.
50 Chapter 4 General procedures
ENWW
Page 52

Crimper
5 Seal the can by pulling the crimper lever down as far as possible.
6 Raise the crimper lever, and remove the can.
Shaking the can
Crimper
Lever
Ink can
Safety
cover
Timer
knob
Shaker with safety cover open
To use the shaker, perform the following steps:
1 Open the safety cover.
2 To allow easy insertion of cans into the shaker, manually rotate the shaker plates until
they are horizontal.
3 Rotate the plate adjusting handle counterclockwise to raise the upper plate.
4 Place an adapter ring on the valve side of the can, and insert the can into the shaker
with the valve facing up.
Plate
adjusting
handle
Upper
plate
Shaker
plates
Note You may insert up to four cans in the shaker. Position the cans in the central area of the shaker
plates.
ENWW
Shaking the can 51
Page 53

Adapter
ring
Valve
Ink can
Ink can
5 Rotate the plate adjusting handle clockwise to lower the upper plate until it touches
the loosest can.
Rotate the plate adjusting handle clockwise 1 to 1.5 more turns.
6 Close the safety cover.
7 Rotate the timer knob to the number of minutes required: three minutes for first and fix
cans or four minutes for additional cans.
Note Rotating the timer knob operates the shaker. You can stop the shaker by rotating the timer knob
back to 0.
8 When the shaking stops, open the safety cover, raise the upper plate, and remove the
cans.
9 For additional cans, shake the cans a second time by reinserting the cans with the
valves facing down, and repeating steps 5 through 8.
Note Adapter rings that are not being used can be stored on the ring holder on the dispenser.
52 Chapter 4 General procedures
ENWW
Page 54

Visually comparing the printed color
Use a light box to compare the printed sample color to the target color. The light standard
should be identical to the standard that you chose in "Selecting a PANTONE
8) on page 40.
If you are satisfied with the color match, you can select Additional Cans on the hp
IndiChrome window, which supplies the ink weights for 500 g cans.
If you are not satisfied with the color match or if you want to determine the
spectrophotometric results of the print, proceed to the next section “Adjusting the ink mix
from the printed output.”
Adjusting the ink mix from the printed output
1 With the IMS software running, measure the printed color with a spectrophotometer.
The Spectral Measurement window appears.
®
color" (step
Spectral Measurement window
2 Verify that the Actual Mixture of Inks option is selected. If not, select it.
Note If the Target Color option is selected and the Actual Mixture of Inks option is unavailable (grayed
out), do the following:
a Click Cancel.
b Perform the procedure in ‘Save the Ink Definition file’ on page 43.
c Restart this procedure (“Adjusting the ink mix from the printed output”).
3 Click Apply. A message appears which reports one of the following color comparison
results:
• Accurate match
• Match can be improved by a fix can
• Fix can would add too much ink to the ink tank
• Improvement possible by changing optical density
ENWW
Visually comparing the printed color 53
Page 55

Accurate match
The following message appears:
Accurate color match report
Close the message and the Additional Cans window appears.
Note An accurate color match report can be followed by a fix can improvement message (see page
55).
Note When the difference between the colors is less than1.0, the Additional cans window appears
without a preliminary accurate color match report.
Additional cans window
The choice is as follows:
z
Select Stop improving the formulation . . . and click Apply – at this stage, you can now
create cans of required ink color. (In the software, the Weight changes to Additional
cans and Best Mix displays the ink weights required for creating the additional cans.)
z
Select Continue improving the formulation and click Apply – try to improve the color
match by changing the optical density value on the press. The change optical density
message appears (see page 56).
54 Chapter 4 General procedures
ENWW
Page 56

Match can be improved by a fix can
The following message appears:
Fix can improvement possible report
Close the message and prepare and install the fix can. Print a new sample page and start
the comparison again from ‘Adjusting the ink mix from the printed output’ on page 53.
Note If the fix can requires less than 25 grams of ink, you can use a test tube provided with the IMS
software to mix the required ink quantity with imaging oil, and pour the mix into the ink tank.
This will save you from using of a full ink can.
Fix can would add too much ink to the ink tank
The following message appears:
ENWW
Compromise window
The calculated ink weights needed to correct printed color would add to much ink to the
ink tank. The choice is as follows:
z
Select Make a compromise correction . . . and click OK – create a compromise fix can
that won’t put too much ink in the ink tank. (The software displays the ink weights for
the "compromise" fix can.) Prepare and install the fix can. Print a new sample page
and start the comparison again from ‘Adjusting the ink mix from the printed output’ on
page 53.
z
Select Mix a new First Can . . . and click OK – instead of trying to "fix" the ink mix, you
can create a new "first" can. (The software displays the ink weight for the new "first"
can.) Prepare and install the new first can. Print a new sample page and start the
comparison again from ‘Adjusting the ink mix from the printed output’ on page 53.
Adjusting the ink mix from the printed output 55
Page 57

Improvement possible by changing optical density
The following message appears:
Undo Measurement window
The choice is as follows:
z
Select To make the improvement . . . and click Apply – change (on the press) the
optical density spec value for the ink to the value given in the Undo Measurement
window (see Changing the optical density (OD) spec value on page 57) and print
another sample page. Measure the color again. (The software resets the ink weights
to the values they had before the measurement.)
z
Select Let the software try to mathematically account for the error in optical density
and click Apply – the software displays fix can ink weights. Prepare and install the fix
can. Print a new sample page and start the comparison again from ‘Adjusting the ink
mix from the printed output’ on page 53.
56 Chapter 4 General procedures
ENWW
Page 58

Undoing and redoing a measurement
Measuring the color of a sample that you printed on the HP Indigo press causes many
field values to change. For example, the actual mix and best mix values change.
If you want to undo all the changes associated with such a color
measurement, perform one of the following:
●
From the Edit menu, click Undo the Last Actual Mix.
●
Click Undo.
If you want to reapply all the changes undone by the Undo command,
perform one of the following:
●
From the Edit menu, click Redo the Last Actual Mix.
●
Click Redo.
Changing the optical density (OD) spec value
Perform this procedure if Undo Measurement window displays (described on page 56) and
you want to improve the color by changing the optical density spec value on the press.
1 From the Consumables menu, click Install Ink. The Ink Installation Manager window
appears.
2 Click Custom Auto Color Adjust, and click Next.
3 Click Setup.
4 Type the optical density value (as indicated in the Undo Measurement window) for the
custom ink.
5 Click OK.
6 Click Print.
If you use an off-line densitometer, make sure that you measure the optical density
(OD) with the optical filter specified in the Manual Color Adjustment window.
7 Record the Measured/OD of 100% value from the Custom Auto Color Adjustment
window.
Note The measured OD value is very important for future printing. Record the value in a safe place.
8 Click Finish.
9 Return to ‘Adjusting the ink mix from the printed output’ on page 53, and continue
from there.
ENWW
Undoing and redoing a measurement 57
Page 59

Improving visual match by changing illuminant
Note Save the color mix workspace before applying this procedure.
If you feel the visible match needs improvement, click and the Which color to add
window opens.
Which Color to Add window
Select the color that you believe will give the best improvement. The IMS system checks
all the color results against different illuminants and if possible will recommend a more
appropriate illuminant for the viewing environment.
If the following message appears, click OK and the system will continue the check against
another illuminant.
No spectral information for target message
58 Chapter 4 General procedures
ENWW
Page 60

If a more appropriate illuminant is found the Change Illuminant window opens.
Change Illuminant window
The recommendation is to change the current illuminant and the default illuminant. Click
Apply.
If no appropriate illuminant change is found, the following message appears:
No illuminant gives requested correction message
Click OK.
ENWW
Improving visual match by changing illuminant 59
Page 61

Comparing different ink mix results
After each measurement, the result location is added to the 2D color space and the fix
weights are available to change the resultant color. Each subsequent measurement is
labeled by number.
To compare different ink mix results, do the following steps:
1 Right-click on one of the measurement results required for the comparison, and select
Properties from the pop-up menu: The Actual Mix window for that measurement
result appears.
The Actual Mix window displays the following details:
• The name linked to the measurement
• The ingredients of the mix as a percentage
• The optical density
• The change from the target color (∆E*
measurement (∆L*, ∆a*, ∆b*)
Note It may be required to zoom into the 2D color space to correctly differentiate and select the
different mix results. (See "Zoom into 2D color space" on page 81.)
2 Repeat step 1 for the other measurement results.
) and the difference from the previous
94
Measurement comparison example
3 Close the Actual Mix windows at the end of the comparison.
60 Chapter 4 General procedures
ENWW
Page 62

Changing the ink on the press
For information on the procedures necessary for changing inks on the press, refer to the
following manuals
Printer Manual Part number
HP Indigo press 1000 HP Indigo press 1000 user guide MNU-1650-51
HP Indigo press 1050 HP Indigo press 1050 user guide CA194-00230
HP Indigo press s2000 HP Indigo press s2000 user guide CA194-00070
HP Indigo press ws2000 HP Indigo press ws2000 user guide MNU-1651-51
HP Indigo press series 3000
HP Indigo press series 4000
a
Ink Replacement Kit user guide
UltraStream 2000
HP Indigo press 5000
a
HP Indigo press 5500
Upgraded HP Indigo press 5000
HP Indigo press 4050 value pack
HP Indigo press ws4500
a. See the last row of the table for exceptions.
b. These manuals are included in the HP IndiChrome Ink Mixing System.
Ink Replacement Kit for the HP Indigo
press 5000 user guide
b
On-Press Fast Ink Replacement for
HP Indigo press 5500, upgraded HP
Indigo press 5000, HP Indigo ws4050
value pack and HP Indigo ws4500
user guide
b
b
CA293-02280
CA294-02612
CA293-03240
ENWW
Changing the ink on the press 61
Page 63

62 Chapter 4 General procedures
ENWW
Page 64

5
Additional IMS procedures
This chapter contains the following sections:
z
Ready Mix colors
z
Detailed Ready Mix Workflow
z
Continuing work on a previously defined mix color
z
Manual color mixing
z
Detailed Manual Workflow
z
Mixing a custom color
z
Excluding a basic color from the ink mix
z
Adding a new substrate
z
Importing .mix files (including previous-version ink mix files)
z
Exporting and deleting ink workspace files
z
Printing the color workspace details
z
Setting and displaying specific ink mix parameters
z
Increase/decrease view of 2D color space
z
Zoom into 2D color space
z
Zoom by changing axes values
z
View the 3D color space
ENWW
63
Page 65

Ready Mix colors
Ready Mix colors are a list of commonly required colors. The HP IndiChrome ink mixing
system provides the ink weights for these colors directly without the need for test prints
and remeasurement.
To use a Ready Mix color, prepare a first can for calibration on the press and as many
additional cans as required for print use.
Note The ink definition file for each Ready Mix color is located in the Ready Mix folder in
C:\Program Files\IMS
To obtain the ink weights for a Ready Mix color, perform the following steps:
1 From the hp Indichrome Wizard window, select Ready Mix Colors and click Apply.
The Ready Mix window appears.
Alternatively, click the button.
Ready Mix window
Pay attention to the limitations and recommendations on this window.
2 Click Continue. The Load Ready Mix Colors window appears.
64 Chapter 5 Additional IMS procedures
ENWW
Page 66

Load Ready Mix Colors window
Note In the Load Ready Mix Colors window, the following abbreviations are used:
R – Ready Mix color
C – Coated paper
D – Double Print required.
3 Select the Ready Mix Color from the list and click Load.
The color appears on the color space and ink weight information is displayed under
the Ready Mix Color button.
ENWW
Ready Mix colors 65
Page 67

Ready Mix Colors data example
4 Click First Can to display the ink weights for the first can and click Additional Cans
to display the ink weights for the print cans.
Note The Ready Mix workspace cannot be saved. If required, Ready Mix workspaces can be moved
to manual color mixing. (See "Manual color mixing" on page 69.)
66 Chapter 5 Additional IMS procedures
ENWW
Page 68

Detailed Ready Mix Workflow
INK FORMULATION PRODUCTION
Prepare the first can
·
Determine the target color and substrate type
·
Check default IMS color mixing parameters against needs
·
Send the ink definition file to the press
·
Mix the ink
Prepare the basic inks
Dispense the ingredients
Seal and shake the can
·
Prepare the press for test printing
Transfer the ink defi nition file
Clean the ink system
Assign ink parameters to the target ink tank
Add imaging oil
Add ink
Perform flush
Calibrate the ink density sensor
·
Perform color adjustment and visually inspect the printed color
Click on Additional cans
Prepare additional cans
·
Specify the can capacity
·
Dispense the ingredients
·
Seal and shake the can
Prepare the press for printing with
the custom ink
·
Clean the ink system
·
Assign ink parameters to the target ink
tank
·
Change the OD spec value
·
Calibrate the ink density sensor
·
Perform color adjustment
Prepare the RIP for the digital print
Save the used custom ink
Detailed Ready Mix ink formulation method and production flow chart
ENWW
Detailed Ready Mix Workflow 67
Page 69

Continuing work on a previously defined mix color
To continue working on a previously defined color, load the workspace of the color from
"My Colors".
To load a previously defined color, perform the following steps:
1 From the hp Indichrome Wizard window, select My Colors and click Apply. The Load
My Colors window appears.
Alternatively, click the button or from the File menu, click Open.
Load My Colors window
2 Select the required mix color from the list and click Load. The mix color’s workspace
loads and the details are displayed.
The color is available for further work.
Note For details on the Export File and Delete File procedures available from the Load My Colors
window, see "Exporting and deleting ink workspace files" on page 77.
68 Chapter 5 Additional IMS procedures
ENWW
Page 70

Manual color mixing
At any point in the color matching process, the procedure of varying the color through
automatically determined fix can ink weights can be stopped and further changes can be
made manually – the fix can ink weights can be entered manually.
In addition, to work with an ink mix where only the mix weights are supplied requires
entering manual color mixing.
Note Once the manual process is entered, return to the automatic process for that color is not
available.
To enter manual color mixing, select Manual Color Mixing (on the hp Indichrome Wizard
window or the Ink mix details panel).
ENWW
Manual color mixing 69
Page 71

Detailed Manual Workflow
INK FORMULATION PRODUCTION
Prepare the first can
·
Determine the target color and substrate type
·
Set IMS color mixing parameters
·
Send/save the ink definition file to the press
·
Mix the ink
Prepare the basic inks
Dispense the ingredients
Seal and shake the can
·
Prepare the press for test printing
Transfer the ink definition file
Clean the ink system
Assign ink parameters to the target ink tank
Add imaging oil
Add ink
Perform flush
Calibrate the ink density sensor
·
Print and compare the printed color to the expected color
Perform color adjustment
Select the sample print for comparison
Visually inspect the printed color
colors match?
Prepare additional cans
·
Specify the can capacity
·
Dispense the ingredients
·
Seal and shake the can
Prepare the press for printing with
the custom ink
·
Clean the ink system
·
Assign ink parameters to the target ink
tank
·
Change the OD spec value
·
Calibrate the ink density sensor
·
Perform color adjustment
Prepare the RIP for the digital print
Save the used custom ink
·
Conclude
Yes
ink
formulation
No
Spectrophotometric comparison of
the printed color
colors match?
No. Improve color
with fix can
Yes
Prepare a fix can
·
Mix the ink
Prepare the basic inks
Dispense the ingredients
Seal and shake the can
·
Prepare the press for test printing
Add ink
Perform flush
Detailed Manual ink formulation method and production flow chart
70 Chapter 5 Additional IMS procedures
ENWW
Page 72

Mixing a custom color
The custom color option provides two methods for entering the target color information
when the PANTONE
z
Entering L*, a*, b* target values
z
Measuring the color spectrum directly from a printed page.
®
color is unknown:
Using L* a* b* target values
To obtain the ink weights for a custom color, perform the following steps:
1 From the hp Indichrome Wizard window, select Custom Color and click Apply. The
Create Custom Color window appears.
Create Custom Color window
2 Select the paper type.
3 Enter the L* a* b* target values and click Apply. The Configure Color Matching
Parameters window appears.
4 Continue with Selecting a PANTONE
®
color (step 8) on page 40.
ENWW
Mixing a custom color 71
Page 73

Measuring the color directly
1 From the hp Indichrome Wizard window, select Custom Color and click Apply. The
Create Custom Color window appears.
Alternatively, click the button, or from the File menu, click New.
2 Measure the target color directly using the X-Rite spectrophotometer. The Spectral
Measurement window appears.
Spectral Measurement window
3 Ensure that Targe t C olor is selected.
4 Click Apply. The Configure Color Matching Parameters window appears.
5 Continue with Selecting a PANTONE
®
color (step 8) on page 40.
72 Chapter 5 Additional IMS procedures
ENWW
Page 74

Excluding a basic color from the ink mix
Note Excluding a basic color only works in automatic color mixing procedures.
The basic colors, which are available for mixing new colors, are displayed with colored
flags on the 2D color space.
To make a basic color unavailable for the ink mix, do the following steps:
1 Right-click on the basic color and select Properties from the pop-up menu. The Edit
Basic Ink window appears.
Edit Basic Ink window
2 Clear the Active check box and click Apply.
The inactive color’s flag is changed to gray, and the color, if present in the ink mix, is
removed from the ink mix.
To restore the availability of a basic color, do the following steps:
1 Right-click on the basic color and select Properties from the pop-up menu. The Edit
Basic Ink window appears.
2 Set the Active check box and click Apply.
The color’s flag is restored to its color and the color is now available for the ink mix.
ENWW
Excluding a basic color from the ink mix 73
Page 75

Adding a new substrate
When selecting the substrate in the Configure Color Matching Parameters window (see
page 40 or page 78), if none of the substrates match the substrate for the print job, a new
substrate can be defined.
To define a new substrate, do the following steps:
1 Select Add new substrate from the Substrate list on the Configure Color Matching
Parameters window.
Substrate list
The Create New Substrate window appears.
74 Chapter 5 Additional IMS procedures
ENWW
Page 76

Create New Substrate window
2 Click the Browse button ( ). The Save As window appears.
3 Type a filename (preferably a name that refers to the substrate name). Do not type a
file extension; the software attaches the relevant file extension.
4 Click Save. The measure spectrum now message appears.
Measure spectrum now message
5 Click OK.
6 Measure the color of the substrate with the spectrophotometer. The SPECTRUM
RECEIVED message appears in the window below the Glossy Substrate Filename
field.
ENWW
Spectrum Received message
7 Click Apply. The new substrate (matching the substrate filename) is now available for
selection in the Substrate list of the Configure Color Matching Parameters window.
Adding a new substrate 75
Page 77

Importing .mix files (including previous-version ink mix files)
A .mix file is an ink mix workspace.
To import .mix files made for an HP Indigo press based on series 1000 or 2000, do the
following steps:
1 From the File menu, click Import > Import series 1000/2000 mix files. The Select
OS Type window appears.
Select OS Type window
2 Click XP or NT as applicable for the press.
3 Locate and select the .mix files to be imported and click Open. The message opens
reporting on the number of files successfully imported and advising that the ink
definition files should be re-created.
Imported successfully and recreate ink files message
4 Click OK.
To import .mix files made for a different HP Indigo press, do the following steps:
1 From the File menu, click Import > Import other press types mix files.
2 Locate and select the .mix files to be imported and click Open. The message opens
reporting on the number of files successfully imported and advising that the ink
definition files should be re-created.
3 Click OK.
76 Chapter 5 Additional IMS procedures
ENWW
Page 78

Exporting and deleting ink workspace files
Ink mix workspaces can be exported for use on other computers running the HP
IndiChrome ink mixing system.
Exporting and deleting of ink workspace files can be performed whenever the Load My
Colors or Save My Colors windows are open.
For example, to open the Load My Colors window, select (or from the File menu, click
Open).
Load My Colors window
Select the required mix workspace name and click Export File or Delete File as required.
Printing the color workspace details
To print the color workspace details, perform the following steps:
1 From the File menu, click Print. A standard Print window appears.
Alternatively, click the button.
2 Click Print. The print-out contains the details as seen on your screen.
ENWW
Exporting and deleting ink workspace files 77
Page 79

Setting and displaying specific ink mix parameters
Color matching parameters
Click the button. The Configure Color Matching Parameters window appears.
Configure Color Matching Parameters window
Options relating to the following color matching parameters can be set from this window:
z
Illuminant
z
Observer
z
Color difference
z
Substrate
z
HP Indigo Press
For information on these options, refer to page 40.
To accept any changes to the color matching parameters, click Apply.
78 Chapter 5 Additional IMS procedures
ENWW
Page 80

HP Indigo press selection
In addition to selecting the press through the Configure Color Matching Parameters
window, selecting and holding Printing Press Type from the Options menu displays the
following menu.
Printing Press Type menu item
1 Select the required press from the menu – the file structure of the Ink definition file is
altered as necessary.
Note Changing to Series 1000/2000, Indigo TurboStream-Based, or Indigo Sun Computer-Based
from one of the other presses causes the ink mixing system to discard the ink mix information
for the current color.
2 Save the current workspace.
Ink print thickness
Click the button. The Ink Layer Thickness window appears.
Ink Layer Thickness window
The following thickness options can be set from this window:
z
Regular
z
Double
z
Increase thickness
z
Decrease thickness
ENWW
To accept any changes to the ink layer thickness parameter, click Apply.
Setting and displaying specific ink mix parameters 79
Page 81

Color information summary
Click the button. The Summary window appears.
Alternatively, from the View menu, click Summary.
Summary window
The Summary window displays the settings of the Color Matching parameters.
Close the window to continue work.
Increase/decrease view of 2D color space
To increase the size of the 2D color space panel on your monitor, click . This hides the
color mixing information panel and allows the 2D color space panel to expand to the full
width of the window.
Click again to display the color mixing panel and reduce the 2D color space panel to
its previous size.
80 Chapter 5 Additional IMS procedures
ENWW
Page 82

Zoom into 2D color space
Click and drag the cursor across the relevant section of the 2D color space. When the
mouse button is released, the 2D color space automatically resizes to display only the
drag area.
Original View Zoom Result
Zoom into 2D color space
The axis values automatically change to show the reduced area of the 2D color space.
To return to the default view of the 2D color space, right click in the 2D color space panel
and select Restore Default Scale from the pop-up menu.
Zoom by changing axes values
To change the scale used in the 2D color space panel (and therefore change the portion
of the 2D color space displayed), perform the following steps:
1 Click . The Scale window appears.
Alternatively, from the View menu, click Scale.
ENWW
Scale window
2 Change the values in Axis Scale fields.
Zoom into 2D color space 81
Page 83

3 Click OK. The new axis values appear on the 2D color space panel and the view of
the color space is altered accordingly.
Note The size of the panel remains the same.
To return the axis values and the view of the 2D color space back to the default, perform
the following steps:
1 Click . The Scale window appears.
2 Click Restore Default.
3 Click OK.
View the 3D color space
The normal display of the ink color is done on a two-dimensional (2D) representation of
the CIE L*a*b* color space.
To display a 3D representation of the color space, perform the following steps:
1 Click in the 2D space
2 Click the button.
3D color space window
To rotate on an axis of the 3D color space, move the cursor left or right.
To change the axis used for rotation, press Tab.
To zoom in on the 3D color space, hold right-click and move the cursor to the left (to zoom
out) or to the right (to zoom in).
To move the 3D color space within its panel, CTRL-click and drag the cursor across the
color space.
Spheres (for example, ) are basic inks, cone-shaped objects (for example, ) are mix
inks.
To close the 3D color space window, select Close from the File menu.
82 Chapter 5 Additional IMS procedures
ENWW
Page 84

Customizing the look of the
6
HP IndiChrome window
This chapter contains the following sections:
z
Introduction
z
HP IndiChrome window customization
z
Saving and loading the HP IndiChrome window customization
z
Viewing and hiding the Toolbar and Status bar
ENWW
83
Page 85

Introduction
The submenu of the View menu’s Configuration menu option provides the means for
changing the look of the hp IndiChrome window.
Note The HP IndiChrome window always opens with the default look.
Bit map
Ink mix details
background
2D color space
background
Color name
font
HP IndiChrome window (customizable elements)
The HP IndiChrome window has the following customizable elements:
z
Ink mix details back ground color
z
2D color space background color (not specifically visible in the above figure)
z
Color name font
z
Visibility of the background bitmap
In addition, custimization sets can be saved and then loaded as preferred.
All these customization options are available from the Configuration submenu of the View
menu.
84 Chapter 6 Customizing the look of the HP IndiChrome window
ENWW
Page 86

HP IndiChrome window customization
Changing the ink mix details panel background color
1 From the Configuration submenu of the View menu, select Change Framework
Background Color. The Color window appears.
Color window
2 Select one of the default colors and click OK.
Alternatively, click Define Custom Colors. The Color window expands to allow for
custom color selection.
Color window (expanded)
ENWW
Click on the custom color or enter the HSL or RGB values. Click Add to Custom
Colors. The custom color appears in a Custom color rectangles. Select the required
rectangle and click OK.
HP IndiChrome window customization 85
Page 87

Changing the 2D color space panel background color
1 From the Configuration submenu of the View menu, select Change Axis
Background Color. The Color window appears.
Color window
2 Refer to step 2 on page 85 for details on using the Color window.
Note The default background color for the 2D color space panel is white.
Changing the color name font
1 From the Configuration submenu of the View menu, select Change Colors Font.
The Font window appears.
Font window
2 Select the font details you want for the color name display and click OK.
Note The default font for the color name in the 2D color space panel is 12-pt Futura Regular.
86 Chapter 6 Customizing the look of the HP IndiChrome window
ENWW
Page 88

Displaying the 2D color space background bitmap
The background bitmap displays behind the axis of the 2D color space panel when the
Show Bitmap Background menu item (on the Configuration submenu of the View
menu) is selected.
Saving and loading the HP IndiChrome window customization
Different customizations of the HP IndiChrome window can be saved and loaded as
required.
Note The HP IndiChrome window always opens with the default look.
Saving the customization
1 From the Configuration submenu of the View menu, select Save Configuration.
The Save View Configuration window appears.
Save View Configuration window
2 Type in a File name and Click Save.
Note You can set the custom configuration as default by choosing View, Configuration, Set Current
Settings as Default.
You can return to the original settings by choosing View, Configuration, Restore Original
Settings.
ENWW
Saving and loading the HP IndiChrome window customization 87
Page 89

Loading a customization
1 From the Configuration submenu of the View menu, select Load Configuration.
The Load View Configuration window appears.
Load View Configuration window
2 Select a configuration file and click Open.
Viewing and hiding the Toolbar and Status bar
To view or hide either the Tool bar or the Status bar, select (respectively) Toolbar or
Status Bar from the View menu.
HP IndiChrome window (Toolbar and Status bar)
Toolbar
Status bar
88 Chapter 6 Customizing the look of the HP IndiChrome window
ENWW
Page 90

7
Help
This chapter contains the following sections:
z
Online help
z
Useful links
z
Program updates
ENWW
89
Page 91

Online help
To access the on-line help, select Help Topics from the Help menu. The Help Topics
window appears.
Alternatively, click the button.
Help Topics window
This is a standard Windows Help Topics window, and after an initial standard database
creation step the help topics can be searched.
Useful links
The HP IndiChrome comes with a HTML page of useful links. To access this page, select
Useful Links from the Help menu.
Program updates
To access the web page for program updates, click the button.
90 Chapter 7 Help
ENWW
Page 92

ENWW
Program updates 91
Page 93

92 Chapter 7 Help
ENWW
Page 94

Special options, basic
A
concepts, and spare parts
(all presses)
This appendix contains the following sections:
z
Special options
z
Basic concepts
z
Spare parts
ENWW
93
Page 95

Special options
Setting the mix precision
Mix precision is a parameter that refers to the color difference (∆E*94) between the color
of the printed sample (actual mix) and the target color and to the difference between
∆E*
of the actual mix and the best mix.
94
The main impact of the mix precision is on the type of messages you receive from the
software. If the ∆E*
and the best mix, is less than the mix precision, you receive messages such as:
The Actual Mix is only xx units away from the target color. An
accurate formulation has been achieved.
With these messages, the software is merely suggesting that you complete the ink
formulation stage; they are not imperative instructions. You may decide to continue trying
to achieve a better match to the target color.
In addition, mix precision determines the degree of metamerism that brings up the
Metamerism window.
The default value of the mix precision is 1. You can set the mix precision value to the
maximum accepted ∆E*
Note See “∆E*94” on page 96 for an in-depth explanation of ∆E*94.
of the actual mix, or if the difference between ∆E*94 of the actual mix
94
value.
94
To set the mix precision, perform the following steps:
1 From the Options menu, click Advanced. The Advanced Options window appears.
Figure A-1. Advanced Options window
94 Chapter A Special options, basic concepts, and spare parts (all presses)
ENWW
Page 96

2 Type a value in the Precision of mix (∆E*
Note The value for the ∆E*94 can have values between 0.2 and 5, but setting a value less than 1
could take you longer to reach the required color.
3 From the File menu, click Save to update the ink mix file.
units) field, and click OK.
94
Window menu item usage
You can use the IMS Window menu item to view several mix files at one time. (See
“System file types” on page 97 for a description of mix files.) This enables you to compare
the ink formulation and ∆E*
values for two or more different colors.
94
How to use the IMS graphic window
The graphic display is an a*-b* plot (see “Color space” on page 96).
The target color is represented by a plus. The outlined plus represents the desired target.
The solid plus represents the best mix, which is the best achievable approximation to the
desired target. Often, the outlined and solid pluses lie one on top of the other, implying
that the target can be achieved precisely.
The actual mixes are represented by circles. An outlined circle represents the actual mix
that is currently in the ink tank. A solid circle represents a previous actual mix.
To view the formulation of the best mix or of an actual mix, right-click on the plus or circle
on the a*-b* plot.
To zoom in on a region, click and drag the mouse on that region. To restore the default
scale, right-click on the graphic display and select Restore Default Scale.
Decreasing ink thickness
If the print quality of the sample print (compared to the target color) is poor, the thickness
of the ink layer may be too large. You can decrease the ink layer thickness as follows:
1 Click Edit>Ink Layer Thickness or . The Ink Layer Thickness window appears.
2 Select Decrease thickness, and click OK.
Using an old mix file for a new ink
When you open the IMS software, a new mix file opens. If one of the previously saved mix
files includes colors that are similar to the color you want to prepare, import that mix file.
From the File menu, click Import. IMS uses any relevant mixes from the old file to add
accuracy to the initial formulation of the new ink.
See “System file types” on page 97 for a description of mix files.
ENWW
Special options 95
Page 97

Basic concepts
Color space
Every color can be represented by the CIELab coordinates: L*, a*, and b*.
The lightness, L*, indicates whether a color is light, such as Yellow, or dark, such as
Dark Blue. An L* value close to 100 indicates a very light color, whereas a value close to
zero indicates a very dark color.
The coordinate a* indicates the green or red content of a color. A negative value of a*
indicates a green color, whereas a positive value indicates a red color. Most colors used in
printing have values of a* between -80 and 80.
The coordinate b* indicates the blue or yellow content of a color. A negative value of b*
indicates a blue color, whereas a positive value indicates a yellow color. Most colors used
in printing have values of b* between -80 and 120.
The three coordinates L*, a*, and b* form a color space, which is a three-dimensional
space where every color is represented by a point in the space.
The chroma C* is a measure of the brightness of a color. Colors with large C* values are
referred to as bright (saturated) colors, whereas colors with small C* values are referred to
as dull colors.
C* is defined as:
C
∗
a∗()2b∗()
+=
2
∆E*
94
As a default, the HP IndiChrome ink mixing system uses ∆E*94 to quantify differences
between colors. If the value of ∆E*
the value of ∆E*
The CIE 1994 Color Difference Model defines ∆E*
CIELab ∆E*. The ∆E*
of saturated colors. Furthermore, ∆E*
perception of the difference between two colors is a direct function of ∆E*
dependant upon L*a*b*.
In the IMS software, ∆E*
best mix and the target color. The ∆E*
94
The ∆E* color difference is defined by:
is large, the two colors being compared are not similar.
94
color difference improves upon the CIELab ∆E* for color matching
94
and ∆E* refer to the color difference between the actual mix or
94
⎛
2**
⎜
+∆≡∆
LE
⎜
⎝
∆
C
+
baLE ∆+∆+∆≡∆
where:
***
LLL −≡∆
target
is small, the two colors being compared are similar. If
94
as a replacement of the more familiar
94
is more uniform than ∆E* in the sense that the
94
94
color difference is defined by:
94
*
C
2*2*2**
2
⎞
⎛
⎟
⎜
⎟
⎠
aaa −≡∆
+
***
target
⎜
+
⎝
*
*
∆
H
015.01045.01
C
2
⎞
⎟
*
⎟
targettarget
⎠
***
bbb −≡∆
target
and not
***
CCC −≡∆
target
L*, a*, and b* are the color coordinates of either best mix or actual mix.
96 Chapter A Special options, basic concepts, and spare parts (all presses)
2*2*2**
CbaH ∆−∆+∆≡∆
ENWW
Page 98

places greater weight on variations in lightness and hue and less weight on
∆E*
94
variations in saturation. For unsaturated colors, such as neutral greys, ∆E*
equivalent to ∆E*.
is roughly
94
The use of ∆E*
affects ink mixing results for saturated, out-of-gamut colors. These
94
colors are so bright that a precise match is not possible. For these colors, it is impossible
to simultaneously match the lightness, hue, and saturation. Since the lightness and hue
are visually more important than the saturation, these two quantities should be matched
as closely as possible. The use of ∆E*
ensures that the color you mix has roughly the
94
same lightness and hue as the target color at the expense of the saturation.
∆E*
is more uniform than ∆E*. For example, for ∆E*, a color difference of three units
94
between the target and the mixed color may be satisfactory for saturated colors, but
unsatisfactory for neutral colors, for which one unit may be the maximum acceptable
difference. This problem of uniformity is corrected by ∆E*
. A single criterion for ∆E*94
94
may be used for the entire color space. For example, a color difference of one unit may be
the maximum acceptable difference for the matching of both saturated and neutral colors.
Color gamut
The gamut of a printing device is the subspace of the color space that contains all the
colors that may be printed by the device. When a target color is found in the gamut of the
ink mixing system, the predicted ∆E*
When the target color is outside the gamut, IMS computes the best mix with the smallest
possible ∆E*
mixing system gamut. The ∆E*
. In this case, the color of the best mix is inside the envelope of the ink
94
94
the color distance of the target color from the gamut of the ink mixing system.
of the best mix versus the target color is zero.
94
value of the predicted best mix is therefore a measure of
System file types
The IMS software creates and uses the following types of files:
z
*.mix
This file contains the IMS screen information (environment). All of the information
seen on the IMS window is contained in the mix file. You should save a mix file for
each ink that you mix.
z
*.gls
*.mtt
*.pvc
These files contain the spectrums of given substrates. They are the library of
substrates that you add and use.
These files are used and/or created when choosing the substrate type.
z
Ink definition files (see “Transferring the ink definition file to the press” on page 46):
• For a Sun computer-based press, the ink definition file is sent directly to the
HP Indigo press.
• For all other types of presses, the ink definition file is saved on a network disk drive
with the .osm extension.
ENWW
Basic concepts 97
Page 99

Spare parts
Can shaker
Back
pad
Interlock
Motor,
motor belt,
and timer
(inside)
Timer knob
Base
pads
Figure A-2. Can shaker
Description Catalog number
Back pad MJX-1058-01
Front pad and
adhesive strip
Safety
cover
Upper
plate pad
Lower
plate pad
Base pad MJX-0971-01
Can adapter rings (6) MJX-0912-01
Front pad and adhesive strip MJX-0946-01
MJX-1234-01
Timer knob MKN-0016-01
Upper and lower plate pad MJX-1113-01
98 Chapter A Special options, basic concepts, and spare parts (all presses)
ENWW
Page 100

Dispensing unit
Air release
valve
Can holder
(top)
Nozzles
(short and long)
Transparent
safety door
Interlock
Can
Air tube
holder
(bottom)
Electronic
Spacer ring
scale
Water
tube
R
D
C
.
T
P
S
N
E
P
S
I
D
Figure A-3. Dispensing unit
Description Catalog number
Air compressor 115 VAC (USA) MFN-0204-10
Air compressor 230 VAC (Europe) MFN-0205-01
Air compressor 100 VAC (Japan) MFN-0206-01
Air and water tube (2 m) MJX-1212-01
Electronic scale kit MJX-1146-51
Nozzle, long MJX-1596-51
Nozzle, short MPX-9053-52
Spacer ring MJX-1595-01
ENWW
Spare parts 99
 Loading...