

Page 1

HP
PC Image Engineer
Image Library
System Administrator’s Guide
Image Library for
Vectra VL400
e-Vectra
English 1
Page 2

Notice
The information contained in this document is subject to change
without notice.
Hewlett-Packard makes no warranty of any kind with regard to this
material, including, but not limited to, the implied warranties of
merchantability and fitness for a particular purpose. Hewlett-Packard
shall not be liable for errors contained herein or for incidental or
consequential damages in connection with the furnishing, performance,
or use of this material.
This document contains proprietary information that is protected by
copyright. All rights are reserved. No part of this document may be
photocopied, reproduced, or translated to another language without the
prior written consent of Hewlett-Packard Company.
Microsoft
®, MS®
, MS-DOS
®, Windows and Windows NT®
registered trademarks of Microsoft Corporation.
Adobe
TM
and AcrobatTM are trademarks of Adobe Systems
Incorporated.
Hewlett-Packard France
Business Desktop Division
38053 Grenoble Cedex 9
France
2000 Hewlett-Packard Company
are U.S.
Page 3

This Manual
This manual is intended for MIS (Management Information Services),
IT (Information Technology), or system administrator personnel. A
good knowledge of Microsoft operating systems as well as software
deployment tools is required. You must have administrator privileges.
This manual provides guidelines for using the HP Image Library, which
is part of the HP PC Image Engineer.
What is the Image Library?
The Image Library is a CD-ROM that contains drivers and HP utilities
for HP PCs. The Image Library CD-ROM is the topic of this guide. This
CD-ROM is referred to as the full ‘Administrator Version’ of the Image
Library, to differentiate it from the Image Library & Diagnostics
System CD-ROM (described briefly on page v). The Image Library CDROM is intended for MIS, IT, or system administration personnel.
The drivers and utilities are packaged to enable you to perform
automatic installations on local PCs and also to update a server so that
you can perform remote installations using your own deployment or
maintenance solution or Microsoft SMS 2.0.
The Image Library can be useful during much of the PC’s lifecycle, for
instance:
During qualification of a disk image
•
For maintenance tasks, for example, using Microsoft SMS to perform
•
driver updates on remote PCs.
iii
Page 4

HP PC Image Engineer Products
The Image Library (Administrator version) is one part of HP PC Image
Engineer solutions. The HP PC Image Engineer suit comprises these
products:
❒ Image Creation and Recovery CD-ROM
❒ Image Library & Diagnostics System CD-ROM
❒ Image Library (Administrator version) CD-ROM
(described in this guide)
❒ Image Transition Tool.
NOTE Not all the Image Engineer products are packaged with each PC.
The range of language versions available may vary between tools.
Image Creation and Recovery CD-ROM
This CD-ROM is provided with most new HP PCs. It contains online
documentation fully explaining its use. With the latest, full-featured
version, you can:
Recover the operating system
•
Set disk partitioning parameters
•
Upgrade or downgrade the operating system (to the alternative
•
provided on the CD-ROMs)
Browse the operating system master files.
•
This CD-ROM can be used in cases where you must reinstall your
operating system and other software, after reformatting your hard disk.
This may be useful when you can not guarantee the integrity of you
software, for instance due to virus infection.
iv
Page 5

Image Library and Diagnostics System CD-ROM
This CD-ROM is included with your PC for most models and language
versions. It is used to carry out automated software recovery and/or
diagnostics on single PCs:
Recover all drivers, applications and HP utilities
•
Recover individual drivers
•
Run HP e-DiagTools, the hardware diagnostics utilities
•
Image Transition Tool
The Image Transition Tool is a CD-ROM software utility to help you
adapt an existing PC’s disk image to a new HP PC. Check availability
with your HP supplier, or on HP websites. For more information about
this tool, refer to the Image Transition Tool’s System Administrator’s
Guide.
v
Page 6

vi
Page 7

Contents
1 Getting Started
What is HP’s Image Library? . . . . . . . . . . . . . . . . . . . . . . . . . . . . . . . . 12
The Image Library CD-ROM . . . . . . . . . . . . . . . . . . . . . . . . . . . . . . . . . 13
Overview of the Library Contents . . . . . . . . . . . . . . . . . . . . . . . . . . . . . . . 13
Library Directory Structure. . . . . . . . . . . . . . . . . . . . . . . . . . . . . . . . . . . . 14
Language Versions . . . . . . . . . . . . . . . . . . . . . . . . . . . . . . . . . . . . . . . . . . . 14
System Requirements . . . . . . . . . . . . . . . . . . . . . . . . . . . . . . . . . . . . . . 15
LAN Card Drivers and Network Protocols. . . . . . . . . . . . . . . . . . . . . 19
Starting and Using the User Interface. . . . . . . . . . . . . . . . . . . . . . . . . 20
Creating a Hard Disk Copy of the Image Library . . . . . . . . . . . . . . . 22
2 Local Automatic Installation
What are the Automatic Installation Packages? . . . . . . . . . . . . . . . . 24
How to Perform a Local Installation . . . . . . . . . . . . . . . . . . . . . . . . . . 25
Installing Components Without the User Interface. . . . . . . . . . . . . . 34
Troubleshooting. . . . . . . . . . . . . . . . . . . . . . . . . . . . . . . . . . . . . . . . . . . 34
English vii
Page 8

3 Microsoft SMS
What is Microsoft SMS?. . . . . . . . . . . . . . . . . . . . . . . . . . . . . . . . . . . . 36
What is an SMS Package? . . . . . . . . . . . . . . . . . . . . . . . . . . . . . . . . . . 37
The HP Image Library SMS 2.0 Packages . . . . . . . . . . . . . . . . . . . . . . . . 37
How to Use the Image Library with Microsoft SMS . . . . . . . . . . . . 38
Phase 1: Copy the Drivers to the SMS Server . . . . . . . . . . . . . . . . . . . . . 39
Phase 2: Update the Required Client PCs . . . . . . . . . . . . . . . . . . . . . . . . 44
Customizing SMS Packages . . . . . . . . . . . . . . . . . . . . . . . . . . . . . . . . 45
Log Files . . . . . . . . . . . . . . . . . . . . . . . . . . . . . . . . . . . . . . . . . . . . . . . . 46
Uninstallation and Troubleshooting . . . . . . . . . . . . . . . . . . . . . . . . . . . . . 46
4 Copying Drivers and Utilities to a Server
What are the Automatic Installation Packages?. . . . . . . . . . . . . . . . 48
System Requirements . . . . . . . . . . . . . . . . . . . . . . . . . . . . . . . . . . . . . 49
How to Copy Drivers and Utilities to a Server . . . . . . . . . . . . . . . . . 50
Performing Remote Installations . . . . . . . . . . . . . . . . . . . . . . . . . . . . 55
Troubleshooting . . . . . . . . . . . . . . . . . . . . . . . . . . . . . . . . . . . . . . . . . . 56
viii English
Page 9

5 Support
Obtaining the Latest Versions of Drivers and Utilities . . . . . . . . . . . 58
Additional Information and Support. . . . . . . . . . . . . . . . . . . . . . . . . . 59
Legal Information
HP Software Warranty . . . . . . . . . . . . . . . . . . . . . . . . . . . . . . . . . . . . . 62
HP Software License Agreement . . . . . . . . . . . . . . . . . . . . . . . . . . . . . 63
English ix
Page 10

x English
Page 11

1
Getting Started
This chapter describes the Image Library, its contents, and how to start
using the Image Library CD.
Page 12

1 Getting Started
What is HP’s Image Library?
What is HP’s Image Library?
The Image Library is a CD-ROM that contains drivers and HP utilities
for specific HP PCs. The CD-ROM face or cover shows the target HP
PCs.
The Image Library can help you perform tasks such as:
Evaluating HP drivers and HP software utilities for the target HP PC.
•
Creating a completely new disk image for the target HP PC for
•
evaluation, qualification and deployment.
Installing and updating drivers and HP utilities on a server for later
•
deployment on remote target HP PCs.
The Image Library is designed so that you can:
Automatically install drivers and utilities on a target PC locally
•
Remotely copy drivers to a Microsoft SMS 2.0 server
•
Remotely copy drivers and utilities to a server.
•
12
Page 13

1 Getting Started
The Image Library CD-ROM
The Image Library CD-ROM
Overview of the Library Contents
The drivers and HP software utilities are provided in two different
formats:
Automatic packages. Each automatic package consists of a single
•
executable file.
SMS packages. These packages are in Microsoft SMS 2.0 format and
•
each package can consist of up to four files. Only the drivers (not the
HP utilities) are provided.
Each of these formats has its own directory substructure on the CDROM.
For Last Minute
Information
List of Components and
Version Numbers
Detailed Information on
CD Contents
For the latest information about the CD-ROM, consult the
LatestNews.htm file in the root directory of the CD-ROM.
To view a complete list of components available on the Image Library
CD, including the version number of each component, select the option
‘Quick Tour’ on the opening screen of the Image Library user interface.
For detailed information about each automatic package, such as notes,
version numbers, and supported platforms, use the Properties Button
on the user interface Component Selection screen.
13
Page 14

1 Getting Started
The Image Library CD-ROM
Library Directory Structure
NOTE The CD directory structure is described here to help you understand
the Image Library’s layout and contents. However, the exact layout may
differ from the one shown.
Within
\Packages, each subdirectory level corresponds to a
classification criteria.
Level234567
Subdirectory
of \Packages
Example or
possible values
Examples Automatic\NT4\Driver\LAN\3COM\L3c520ar
\Package
Type
Automatic
SMS
Sms\W98\Driver\Audio\Crystal\BIKU001
\Operating
System
NT4
W2000
W98
\Driver or
\Utility
Driver
Utility
\Type \Vendor \HPVersion
Audio, Video,
IDE,
DiagTools
HP, 3COM,
Intel,
Symbios
L3c520ar
Language Versions
For the Automatic packages, all language versions of the operating
system (that are shipped by HP) are supported.
The SMS packages support only the English version of the operating
system.
For more information about support for different operating system
language versions, consult the
each package. These files are accessible in the individual packages’
subdirectories.
14
LatestNews.htm file that comes with
Page 15

1 Getting Started
System Requirements
System Requirements
This version of the Image Library CD-ROM is available on two different
CDs, one for the HP Vectra VL400 and one for the HP e-Vectra. Only
these two target PCs are supported by this version of the Image
Library. In each case, the supported target PC is indicated on the CD
face.
Before using the Image Library, ensure that the target PC is compatible
with the version of CD you are using.
The target PC must have one of the following operating systems:
Windows NT 4.0 SP4, SP5 or SP6a
•
Windows 95 (VL400 only)
•
The supported software release corresponds to the latest SR
available for your language. For example, the latest SR in English is
SR 2.5 so this is the supported version.
What is a Target PC?
Windows NT
Administrator Rights
Windows 98 Second Edition
•
Windows 2000 Gold.
•
In this manual, a “target PC” refers to any PC on which you want to
install the drivers and software utilities. It does not refer to the SMS or
generic server which is used to distribute or deploy the drivers and
software utilities.
For target PCs running Windows NT 4 or Windows 2000, you must have
administrator rights.
15
Page 16

1 Getting Started
System Requirements
Preparing the Target PC
Vanilla Operating
System
How to Prepare the
Target PC
A ‘Vanilla Operating System’ must be installed before you can use the
Image Library.
The ‘Vanilla’ OS consists of a version of your Microsoft OS with the
minimum set of default drivers required for the PC to operate.
Installation of the Vanilla Operating System is described below.
To prepare your PC for the installation of drivers and HP utilities, we
recommend you use the Image Creation and Recovery CD-ROM that
came with your PC. Simply start the CD-ROM and follow the step by
step guide.
The Image Creation and Recovery CD-ROM includes options to
recreate the special HP Utility Partition on your hard-disk and reinstall
the operating system.
Alternatively, you can reinstall your operating system using the
Microsoft Operating System CD. However, the HP Utility Partition will
not be created if you use the Microsoft CD.
To prepare for use of the Image Library:
1 Start with a blank, formatted hard disk.
2 Using either the HP Image Creation and Recovery CD-ROM, or the
appropriate Microsoft Operating System CD, install one of the
following operating systems:
Windows NT 4.0 SP4, SP5 or SP6a
•
Windows 95, latest SR available (VL400 only)
•
Windows 98 Second Edition
•
Windows 2000.
•
16
Page 17

1 Getting Started
System Requirements
3 Copy the directory from your CD to the directory on your hard disc
as follows:
Using this installation CD Installing this
Operating System
HP Image Creation and
Recovery CD
The appropriate
Microsoft Operating
System CD
Windows NT4 windows_NT C:\i386
Windows 2000 windows_2000 C:\i386
Windows 98 windows_95 \Windows\Options\Cabs
Windows 95 windows_98 \Windows\Options\Cabs
Windows NT4 \i386 C:\i386
Windows 2000 \i386 C:\i386
Windows 98 \win98 \Windows\Options\Cabs
Windows 95 \win95 \Windows\Options\Cabs
Copy this directory
from the CD
To this directory on your PC
Hard Disk
3 (a) If you are using the Microsoft OS (install) CD:
If you installed Windows NT 4.0 or Windows 2000, copy the entire
\i386
If you installed Windows 95 create the
directory on the hard disk, then copy the contents of the
directory from the operating system CD to the hard disk.
\Windows\Options\Cabs
\Win95
directory from the operating system CD to this new directory.
If you installed Windows 98, create the
directory on the hard disk, then copy the contents of the
directory from the operating system CD to this new directory.
3 (b) If you are using the HP Image Creation and Recovery CD:
If you installed Windows NT 4.0 or Windows 2000, copy the entire
windows_NT or windows_2000 directory from the CD to the hard
disk directory
If you installed Windows 95 create the
directory on the hard disk, then copy the contents of the
windows_95 or windows_98 directory from the CD to this new
directory.
\Windows\Options\Cabs
\Win98
C:\i386.
\Windows\Options\Cabs
17
Page 18

1 Getting Started
System Requirements
If you installed Windows 98, create the \Windows\Options\Cabs
directory on the hard disk, then copy the contents of the
windows_98 directory from the CD to this new directory.
4 If you do not copy the operating system setup files to the hard disk
as described above, you will be prompted to insert the operating
system CD when using the Image Library.
No other software should be installed and no other operations should
be performed on the PC. until the reinstallation process is complete.
18
Page 19

1 Getting Started
LAN Card Drivers and Network Protocols
LAN Card Drivers and Network Protocols
When using the Image Library to install LAN card drivers, the following
network protocols are automatically installed for each operating
system.
Windows 95: NetBEUI + IPX/SPX
•
Windows 98/2000: TCP/IP (DCHP)
•
Windows NT 4: NetBEUI.
•
When LAN drivers are installed, a random hostname is automatically
generated to ensure that there is no conflict with any other PC on the
network
19
Page 20
1 Getting Started
Starting and Using the User Interface
Starting and Using the User Interface
Before using the Image Library for a local installation, ensure that the
target PC is compatible with the version of CD you are using. If you are
copying drivers and utilities to a server, ensure that the final target PCs
are compatible with the version of CD you are using. The CD face or
cover shows the target HP PC.
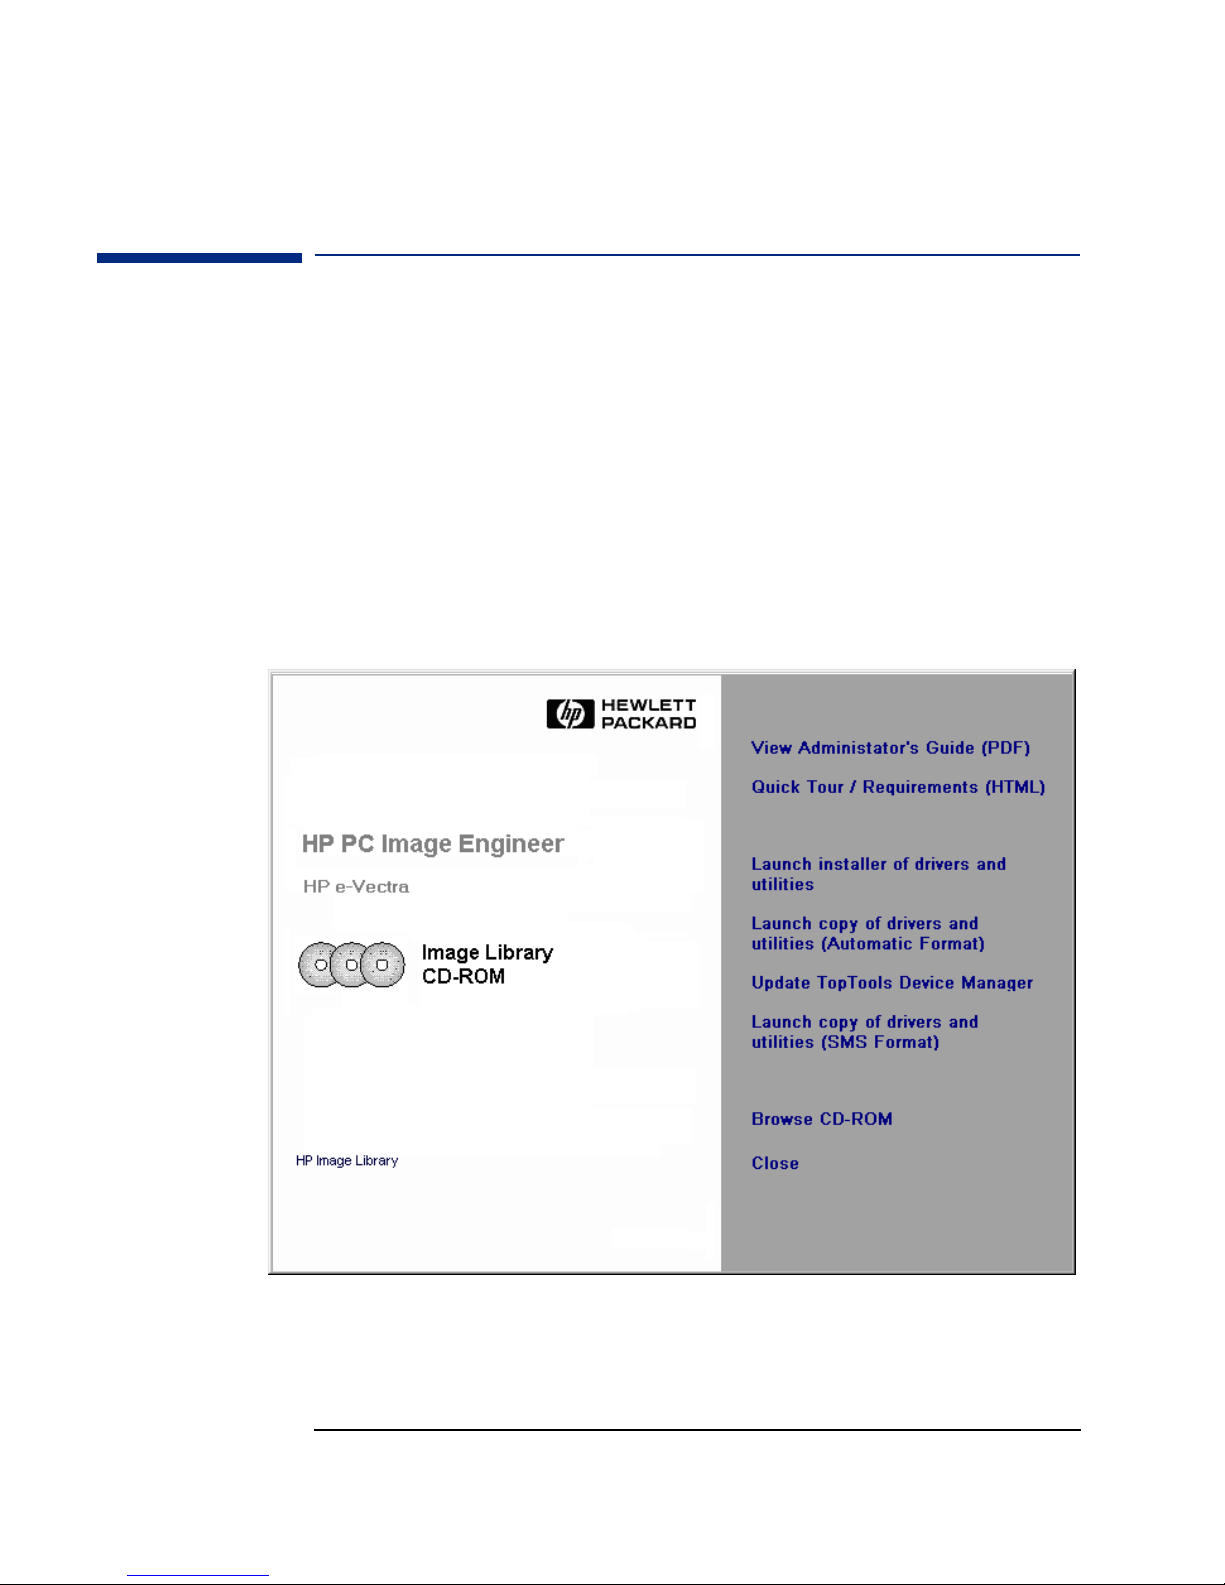
To start the user interface, insert the CD in the target PC or server. It
will start automatically. (You can also launch it manually by clicking
Start Run then entering FrontPanel.exe.) The following screen
will appear:
This example
shows the
e-Vectra
version.
20
Page 21

1 Getting Started
Starting and Using the User Interface
In this screen, you can:
View Administrator’s Guide (PDF)
•
This allows you to view the Image Library Administrator’s Guide
(this manual). It requires Adobe Acrobat Reader.
Quick Tour / Requirements (HTML)
•
This will provide a quick overview of the Image Library as well as the
system requirements. (You should make sure the system
requirements are satisfied before using the Image Library.)
Launch installer of drivers and utilities
•
Use this option to launch an automatic installation of drivers and
utilities on a local target PC. (This function is also available on the
Image Library & Diagnostics System CD.)
Refer to chapter 2, Local Automatic Installation.
Launch copy of drivers and utilities (Automatic Format)
•
Use this option to copy drivers and utilities to a network server. Once
complete, you can use your own deployment tools and methods to
install the drivers remotely on target PCs in the network.
Refer to chapter 4, Copying Drivers and Utilities to a Server.
Update TopTools Device Manager.
•
At the time this CD-ROM was released, no software packages for use
with the HP TopTools feature "Update System Software" were
available.
Using HP TopTools Device Manager, you are able to update the
system software database automatically from HP's support website
by using the command "Settings > System Software", then pressing
the button "Get Latest Support Info".
Launch copy of drivers and utilities (SMS Format)
•
Use this option to copy drivers and utilities to a Microsoft SMS 2.0
server. Once complete, you can use SMS to remotely install the
drivers on target PCs in the network.
Refer to chapter 3, Microsoft SMS.
Browse CD-ROM contents.
•
Close the Image Library user interface.
•
21
Page 22

1 Getting Started
Creating a Hard Disk Copy of the Image Library
Creating a Hard Disk Copy of the Image Library
You can copy the entire contents of the Image Library CD-ROM to a
hard disk. By making this available on the network, you make the
Image Library available to the entire network, to be used as needed.
Making the Image Library available on a hard disk drive has further
advantages:
Improved performance when using the Image Library
•
You can maintain your own up-to-date copy of the Image Library by
•
replacing older components with the latest component available on
the HP web site (
You must copy the entire Image Library CD contents, as is, to the
destination hard disk. Do not modify the directory structure in any
way. This will ensure it works correctly. Avoid the use of spaces in the
target directory path.
www.hp.com/go/vectrasupport).
Another alternative is to use a hard disk to maintain the latest version
as described above, then create your own Image Library CD using a CD
writer.
22
Page 23

2
Local Automatic Installation
This chapter describes the automatic installation of drivers and utilities
on a local target PC.
Page 24

2 Local Automatic Installation
What are the Automatic Installation Packages?
What are the Automatic Installation Packages?
An Automatic installation package is an executable file that installs a
software component automatically, without the need for user
intervention (called a “silent” installation in Windows 95 and an
“unattended” installation in Windows NT). You can:
Perform a local installation.
•
(Described in this chapter.)
Copy the update files to a server. Once the server is updated, you can
•
perform remote installations on client PCs using your software
deployment tool.
This is described in chapter 4, Copying Drivers and Utilities to a
Server.
24
Page 25

2 Local Automatic Installation
How to Perform a Local Installation
How to Perform a Local Installation
1 Insert the Image Library CD in the target PC. The user interface will
run automatically (or you can run it manually by clicking
Run then entering FrontPanel.exe).
The following screen appears.
Start
This example
shows the
e-Vectra
version.
25
Page 26

2 Local Automatic Installation
How to Perform a Local Installation
2 Click the option Launch installer of drivers and utilities.
The Image Library configuration check screen will appear as shown
here:
The Image Library program carries out an automatic verification of
the PC type and configuration. A check mark appears next to each
element in the list as it is confirmed.
If a problem is found during the configuration check, Image Library
will return a warning or error message. In this case, click the
Details button for further information.
Often, warnings are for your information only and are not errors;
these may be ignored at your discretion.
26
Page 27

2 Local Automatic Installation
How to Perform a Local Installation
3 When Image Library reports that the configuration check has been
carried out successfully, click
Next
to continue the installation
process.
You will be asked what level of installation you wish to use:
Minimum: Only drivers for the detected hardware will be installed
(no utilities are installed).
Custom: You will be prompted to select the components to be
installed. Choose this option to recover an individual driver.
Maximum (the default option): All HP drivers, HP utilities and HP
3d-party licensed applications will be installed. Select this option to
perform a full recovery of software as delivered originally by HP.
27
Page 28

2 Local Automatic Installation
How to Perform a Local Installation
4 Select the desired installation option and then Next.
If you chose a
If you chose a
Minimum or Maximum installation, go to step 7.
Custom
installation, the following screen appears.
The screen lists the drivers that are appropriate for the PC’s current
configuration.
28
Page 29

2 Local Automatic Installation
How to Perform a Local Installation
5 Select the desired driver or drivers. To ensure that all necessary
drivers are installed, select all the drivers.
If more than one driver exists for a single component, such as a LAN
card, an automatic selection is made based on the PC’s configuration,
and only the appropriate driver will be installed. If a selected
component requires the installation of another component, you will
be notified and asked to confirm that both components should be
installed.
For more information about any component, click the component
then click
Properties.
Once the selection in complete, click
appears.
Next. The following screen
29
Page 30

2 Local Automatic Installation
How to Perform a Local Installation
6 Select the desired HP utilities and third party applications.
For more information about any component, click the component
then click
Properties.
7 When you have chosen all the components you wish to install, (check
that your selection is complete) click
Next to start the installation
process.
NOTE If the Windows NT 4.0 Service Pack 6 setup file is detected, you will be
prompted to reinstall the Service Pack. A series of screens will guide you
through this process.
To install certain drivers, the PC may reboot several times before the
end of the installation process. When this is necessary, you will be
informed in the progress/status window. The installation process will
continue automatically after the reboot.
30
Page 31

2 Local Automatic Installation
How to Perform a Local Installation
8 The selected drivers and utilities are installed automatically. No user
intervention is required during this process. As the installation
progresses, the status of each component installation is shown.
You can use the Status column to check the progress of the
installation, and to verify that each component is correctly installed.
Any installation problems will be listed here.
CAUTION Do not use the keyboard or mouse during the installation. (You can,
however, click the
Do not remove the CD from the drive during the installation.
Cancel button to stop the installation.)
31
Page 32

2 Local Automatic Installation
How to Perform a Local Installation
9 When the installation process is complete, the following screen is
shown.
When you are satisfied the installation is correct, click
continue.
If you experienced difficulties during the process, you can also use
View Log File to check the current log file for more information.
32
Close
to
Page 33

2 Local Automatic Installation
How to Perform a Local Installation
10 To complete the installation process, a popup window will appear
containing a final status message. If no further actions are required,
click
OK to exit the installation program.
If you have no further drivers or HP utilities to install, remove the CD
from the drive so that the PC will reboot from the hard disk:
NOTE Windows NT
If the Service Pack (SP6) has not been automatically reinstalled, Image
Library will remind you at this point that you must re-apply the Service
Pack manually.
If you experienced difficulties during the installation process, or if a
component installation failed, you can check the log file
(
ImageLibrary.log, located in the hard drive’s root directory) for
more information.
33
Page 34

2 Local Automatic Installation
Installing Components Without the User Interface
Installing Components Without the User Interface
You can install individual drivers or software utilities from the Image
Library CD-ROM. To do this, locate the desired component for your
operating system, then run the
Setup.exe file.
For more information about the directory structure of the CD-ROM,
refer to page 14.
Troubleshooting
If you encountered any problems installing a component, you can try
•
to install it manually using the installation files that were copied to
the target PC’s hard disk in the
\Masters
directory.
Log File
Troubleshooting
Information
If you encountered any problems installing the LAN driver, you must
•
first remove the driver before trying to install it again. For example,
to do this in Windows NT 4.0, click
Panel
driver and click
, double-click Network, click the Adapters tab, select the
Remove.
Start Settings Control
After each component installation, the Image Library verifies that the
component installed correctly. These results are written in the log file
(
ImageLibrary.log
, located in the hard drive’s root directory).
In fact, the log file contains a complete trace of the installation process.
Therefore you should consult the log file for valuable troubleshooting
information.
34
Page 35

3
Microsoft SMS
This chapter describes how to copy the driver and utilities to your SMS
server. It also provides guidelines for updating remote target PCs in the
network using SMS.
Page 36

3 Microsoft SMS
What is Microsoft SMS?
What is Microsoft SMS?
Microsoft Systems Management Server (SMS) is a comprehensive
software tool that enables you to centrally manage PCs on a network of
any size.
It allows the network administrator to perform many tasks, including:
Hardware tracking and inventory
•
Software tracking and inventory, including metering
•
Software deployment on remote client PCs
•
Network topology discovery and mapping.
•
For information and support concerning SMS, connect to Microsoft’s
web site at
www.microsoft.com/smsmgmt.
36
Page 37

3 Microsoft SMS
What is an SMS Package?
What is an SMS Package?
SMS packages are the basic units that Microsoft SMS uses to distribute
software. The package is distributed remotely to client PCs where it
installs drivers or applications software.
The package includes an executable file to run the installation, as well
as the driver or application source files to install.
The HP Image Library SMS 2.0 Packages
Only the drivers, and not the HP utilities, are provided in SMS
packaged format.
The SMS packages provided by HP are not intended to cover all
possible network environments and configurations. Instead, they are
designed for installation on target PCs that have a “clean” operating
system (refer to “Preparing the Target PC” on page 16 for a full
explanation).
Each driver on the CD-ROM is provided in its own directory. The
directory contains several files:
.TXT file: a readme file describing the main features of the package.
.EXE
file: this file is the executable setup file. When run, it installs
the software component.
.SMS file: this file is used to distribute the .EXE setup file to the
target client PCs. It is a standard SMS package definition file.
.IPF file: this file contains the source code for the SMS Installer
script file used to create the package. Not all packages have this file.
HPInfo.ini file: this file contains detailed information about each
package, such as notes, version numbers, and supported platforms.
37
Page 38

3 Microsoft SMS
How to Use the Image Library with Microsoft SMS
How to Use the Image Library with Microsoft SMS
NOTE You can consult the WhatsNew.htm
driver or software utility.
Before starting, make sure the system requirements are satisfied and
you have prepared the target PC (refer to “System Requirements” on
page 15).
To use the Image Library with Microsoft SMS, there are two phases:
Phase 1: Copy the drivers and utilities to the SMS server.
Phase 2: Update the required remote target PCs using SMS.
files for information about the
38
Page 39

This example
shows the
e-Vectra
version.
3 Microsoft SMS
How to Use the Image Library with Microsoft SMS
Phase 1: Copy the Drivers to the SMS Server
1 Insert the Image Library CD in the SMS server. The user interface
will run automatically (or you can run it manually by clicking
Run then entering FrontPanel.exe).
The following screen appears.
Start
39
Page 40

3 Microsoft SMS
How to Use the Image Library with Microsoft SMS
2 Click Launch copy of drivers and utilities (SMS Format).
The following screen appears.
3 Click the check box to select the target PCs’ operating systems. If
you click
systems will be copied.
40
Next now, all available drivers for the chosen operating
Page 41

This example
shows
available
Windows NT
drivers for the
e-Vectra.
3 Microsoft SMS
How to Use the Image Library with Microsoft SMS
If required, you can select individual drivers for each operating
system. To do this, select the operating system by clicking it then
click
Details. A screen similar to the following appears.
Select or deselect the chosen drivers by clicking their check boxes
then click
You can also get detailed information about each component by
clicking
OK.
Info
.
41
Page 42

3 Microsoft SMS
How to Use the Image Library with Microsoft SMS
4 Once you have selected the desired operating systems and
components, click
Next
. The following screen appears.
5 Click
Browse and select the target directory.
The selected packages will be copied into a directory substructure in
the chosen target directory. Each package is placed in an individual
directory, using the same directory structure as the CD (refer to
page 14 for more information).
42
Page 43

3 Microsoft SMS
How to Use the Image Library with Microsoft SMS
6 Once you have chosen the desired target directory, click Next. The
following screen appears.
7 Click
Finish to copy the packages to the SMS server.
43
Page 44

3 Microsoft SMS
How to Use the Image Library with Microsoft SMS
Phase 2: Update the Required Client PCs
1 On the SMS server, under the
Packages
Package From Definition, using the
sub-tree, select New
.SMS file provided with
the package.
2 Under the package’s sub-tree structure created in step 2, select
Distribution Programs and create the desired distribution points
for that package.
3 Under the package’s sub-tree structure created in step 2, select
Automated, and in the Environment tab, select the Run with
administrative privileges
check box.
4 If you are installing a single software component, or if the component
is the last in the set of chosen components, then, under the package’s
sub-tree structure created in step 2, select
General tab, select the SMS reboots machine option.
Automated, and in the
This is to ensure that the client PC reboots after the installation.
If you are installing several packages, you must ensure that the PC
runs this package last. One way to do this is to delay the last
package to ensure that it is run last.
5 Under the
Advertisement of the Automated program for the set of target PCs,
Advertisement tree, select New and create an
informing them that you want to install the chosen software
component on their PCs.
44
Page 45

3 Microsoft SMS
Customizing SMS Packages
Customizing SMS Packages
You can customize the installation procedures of those SMS packages
that contain an
.IPF file.
To do this, edit and recompile the
.IPF files using the SMS Installer
Tool, as follows:
1 Run the Microsoft SMS Installer.
2 Open the
.IPF file provided in the Image Library package.
3 Modify the file as needed.
For example, change the destination directory of the files to be
installed by modifying the value assigned to the
(All areas of code that start with
with
== END BLOCKS == were developed by HP.)
4 Using the Installation Expert (
Select Installation Interface, then click the SMS tab.
•
Ensure that the
is selected and click
Select Advanced Configuration, then click the Settings tab.
•
In the
Installation EXE Name box, type the directory and
Create Packages Definition File checkbox
OK
.
== CUSTOM BLOCK == and end
View
menu), configure the following:
filename for the modified setup program, then click
MAINDIR
OK.
variable.
5 Compile the file to create a new setup program.
Refer to the SMS Installer 2.0 documentation for more details.
NOTE HP is unable to provide assistance on the use of SMS or the
customization of SMS packages.
45
Page 46

3 Microsoft SMS
Log Files
Log Files
Many of the HP SMS packages generate a log file when used. The log
filename is
destination directory that, depending on the package, can be either
Program Files\<Driver or Application Name>
Masters\<Driver or Application Name> directory.
Uninstallation and Troubleshooting
The log files contain the modifications made to the PC by the SMS
package and can be used to uninstall the package. They can also be
used to troubleshoot installation problems.
Install.log and it is stored on the target PC in a
or
46
Page 47

4
Copying Drivers and Utilities to a
Server
This chapter describes how to copy the automatic installation packages
for drivers and utilities to a server.
Page 48

4 Copying Drivers and Utilities to a Server
What are the Automatic Installation Packages?
What are the Automatic Installation Packages?
An Automatic installation package is an executable file that installs a
software component automatically, without the need for user
intervention (called a “silent” installation in Windows 95 and an
“unattended” installation in Windows NT). You can:
Perform a local installation.
•
This is described in chapter 2, Local Automatic Installation.
Copy the update files to a Windows NT server. Once the server is
•
updated, you can perform remote installations on client PCs using
your software deployment tool.
(Described in this chapter.)
Note that the Image Library does not perform remote installations.
Rather, it allows you to copy the Automatic installation packages to
a server so that you can then perform remote installations using your
own tools and methods.
48
Page 49

4 Copying Drivers and Utilities to a Server
System Requirements
System Requirements
Before starting, make sure the system requirements are satisfied and
you have prepared the target PC (refer to see “System Requirements”
on page 15).
Additionally, ensure that:
The server must have access to a CD-ROM or DVD drive, locally or
•
via the network.
The network is correctly configured and working on the target PCs.
•
You have administrator rights on the target PCs.
•
49
Page 50

4 Copying Drivers and Utilities to a Server
How to Copy Drivers and Utilities to a Server
How to Copy Drivers and Utilities to a Server
1 Insert the Image Library CD in the SMS server. The user interface
will run automatically (or you can run it manually by clicking
Run then entering FrontPanel.exe).
The following screen appears.
Start
This example
shows the
e-Vectra
version.
50
Page 51

4 Copying Drivers and Utilities to a Server
How to Copy Drivers and Utilities to a Server
2 Click Launch copy of driver and utilities (Automatic
Format)
. The following screen appears.
3 Click the check box to select the target PCs’ operating systems. If
you click
operating systems will be copied.
Next now, all available drivers and utilities for the chosen
51
Page 52

This example
shows
available
Windows NT
drivers for the
e-Vectra.
4 Copying Drivers and Utilities to a Server
How to Copy Drivers and Utilities to a Server
If required, you can select individual drivers and utilities for each
operating system. To do this, select the operating system by clicking
it then click
Details. A screen similar to the following appears.
Select or deselect the chosen drivers by clicking their check boxes.
To select individual utilities, click the
check boxes to select or deselect individual utilities.
Once complete, click
You can also get detailed information about each component by
clicking
52
Info.
OK
Utilities tab and click the
.
Page 53

4 Copying Drivers and Utilities to a Server
How to Copy Drivers and Utilities to a Server
4 Once you have selected the desired operating systems and
components, click
Next
. The following screen appears.
5 Click
NOTE The subdirectory structure corresponding to your selection will be
copied into the target directory. This means the you target directory will
contain a similar subdirectory tree as described insee “Library Directory
Structure” on page 14.
Browse and select the target directory.
53
Page 54

4 Copying Drivers and Utilities to a Server
How to Copy Drivers and Utilities to a Server
6 Once you have chosen the desired target directory, click Next. The
following screen appears.
7 Click
54
Finish to copy the packages to the server.
Page 55

4 Copying Drivers and Utilities to a Server
Performing Remote Installations
Performing Remote Installations
To perform a remote installation using the automatic packages, you
need a software deployment tool and correctly configured deployment
server. Also, the target client PCs must already be connected to the
LAN.
The procedure to use depends on the deployment software used. Refer
to your deployment software documentation for precise instructions.
As a rough guideline, the procedure is as follows:
1 Copy the selected software component files from the Image Library
CD to the deployment server (described in previous section).
2 Using your deployment tool, run the executable software component
files on the client PCs. The software components will be installed
remotely.
3 When you have finished installing all the required components,
reboot the client PCs remotely using your deployment tool.
55
Page 56

4 Copying Drivers and Utilities to a Server
Troubleshooting
Troubleshooting
If you encountered any problems installing a component, you can try
•
to install it manually using the installation files that were copied to
the target PC’s hard disk in the
If you encountered any problems installing the LAN driver, you must
•
\Masters
first remove the driver before trying to install it again. For example,
to do this in Windows NT 4.0, click
Panel
, double-click
driver and click
Network
Remove
, click the
.
Start Settings
directory.
Adapters
Control
tab, select the
56
Page 57

5
Support
This chapter contains support information for the HP Image Library.
Page 58

5 Support
Obtaining the Latest Versions of Drivers and Utilities
Obtaining the Latest Versions of Drivers and Utilities
Image Library
Updates
Standard Format
Updates
For the latest versions of drivers and utilities for this version of the
Image Library, consult HP’s web site at
www.hp.com/go/vectrasupport. When provided, these updates will
be in the usual Image Library package formats: Automatic and SMS
packages.
For the latest versions of drivers and utilities in standard (local
installation) format, consult HP’s web site at
www.hp.com/go/vectrasupport for Vectra PCs.
58
Page 59

Additional Information and Support
5 Support
Additional Information and Support
Online Documentation
Support
PC Documentation
The Image Library CD-ROM contains this manual in PDF (Adobe
Acrobat) format, located at
Guide.PDF.
Support for this product is provided by your HP-Authorized Support
Provider or Hewlett Packard. For information about HP Customer Care,
connect to
www.hp.com/go/support and click Assistance.
For support relating to the use of third party products, such as
software deployment tools or cloning tools, please contact the your
product vendor.
HP’s support web site www.hp.com/go/vectrasupport contains
numerous manuals (in PDF format) for HP PCs, as well technical tips
and other information.
59
Page 60

5 Support
Additional Information and Support
60
Page 61

Legal Information
Page 62

HP Software Warranty
HP Software Warranty
THIS WARRANTY STATEMENT TAKES PRECEDENCE OVER ANY OTHER SOFTWARE WARRANTY STATEMENT
INCLUDED WITH THIS PRODUCT.
Ninety-Day Limited Software Warranty
HP warrants for a period of NINETY (90) DAYS from the date of the delivery that the software product will execute its
programming instructions when all files are properly installed. HP does not warrant that the software will be
uninterrupted or error free. HP does not warrant to the performance of usefulness of any software provided with your
computer product. Unless otherwise expressly provided by HP, it is your own responsibility to obtain the latest version of
any software and support directly from the software owner or authorized distributor. In the event that this software
product fails to execute its programming instructions during the warranty period, Customer’s remedy shall be a refund
or repair. Should HP be unable to replace the media within a reasonable amount of time, Customer’s alternate remedy
shall be a refund of the purchase price upon return of the product and all copies.
Removable Media (If supplied)
HP warrants the removable media, if supplied, upon which this product is recorded to be free from defects in materials
and workmanship under normal use for a period of NINETY (90) DAYS from the date of purchase. In the event the
media proves to be defective during the warranty period, Customer’s remedy shall be to return the media to HP for
replacement. Should HP be unable to replace the media within a reasonable amount of time, Customer’s alternate
remedy shall be a refund of the purchase price upon return of the product and destruction of all other nonremovable
media copies of the software product.
Notice of Warranty Claims
Customer must notify HP in writing of any warranty claim not later than thirty (30) days after the expiration of the
warranty period.
The above warranty shall not apply to defects resulting from: misuse; unauthorized modification; operation or storage
outside the environmental specifications for the product; in-transit damage; improper maintenance; or defects resulting
from use of non-HP software, accessories, media, supplies, consumables, or such items not designed for use with the
product.
HP MAKES NO OTHER EXPRESS WARRANTY, WHETHER WRITTEN OR ORAL WITH RESPECT TO THIS
PRODUCT. ANY IMPLIED WARRANTY OF MERCHANTABILITY OR FITNESS FOR A PARTICULAR PURPOSE IS
LIMITED TO THE DURATION OF THE EXPRESS WARRANTY SET FORTH ABOVE. SOME STATES OR
PROVINCES DO NOT ALLOW LIMITATIONS ON HOW LONG AN IMPLIED WARRANTY LASTS, SO THE ABOVE
LIMITATIONS OR EXCLUSION MAY NOT APPLY TO YOU.
This warranty gives specific legal rights, and you may also have other rights which vary from state to state, or province to
province.
Limitation of Liability and Remedies
THE REMEDIES PROVIDED ABOVE ARE CUSTOMER’S SOLE AND EXCLUSIVE REMEDIES. IN NO EVENT SHALL
HP BE LIABLE FOR ANY DIRECT, INDIRECT, SPECIAL, INCIDENTAL OR CONSEQUENTIAL DAMAGES
(INCLUDING LOST PROFIT) WHETHER BASED ON WARRANTY, CONTRACT, TORT OR ANY OTHER LEGAL
THEORY. Some states or provinces do not allow the exclusion or limitation of incidental or consequential damages, so
the above limitation or exclusion may not apply to you.
62
Page 63

HP Software License Agreement
HP Software License Agreement
THE FOLLOWING TERMS GOVERN YOUR USE OF THE ENCLOSED SOFTWARE FILE(S) UNLESS YOU HAVE A
SEPARATE WRITTEN AGREEMENT WITH HP.
THE SOFTWARE IS OWNED AND COPYRIGHTED BY HP OR ITS THIRD PARTY SUPPLIERS.
YOUR LICENSE CONFERS NO TITLE OR OWNERSHIP IN THE SOFTWARE AND SHOULD NOT BE CONSTRUED A
SALE OF ANY RIGHT IN THE SOFTWARE.
HP’s THIRD PARTY SUPPLIERS MAY PROTECT THEIR RIGHTS IN THE EVENT OF ANY VIOLATION.
YOU MAY ONLY MAKE COPIES OR ADAPTATIONS OF THE SOFTWARE FOR ARCHIVAL PURPOSES OR WHEN
COPYING OR ADAPTATION IS AN ESSENTIAL STEP IN THE AUTHORIZED USE OF THE SOFTWARE.
YOU MAY NOT COPY THE SOFTWARE ONTO ANY BULLETIN BOARD OR SIMILAR SYSTEM.
HEWLETT-PACKARD DOES NOT AND CANNOT WARRANT THE INFORMATION, DOCUMENTATION, OR
SOFTWARE INCLUDED IN THESE FILES OR THE PERFORMANCE OR RESULTS OBTAINED BY USING THIS
INFORMATION, DOCUMENTATION, OR SOFTWARE.
TO THE EXTENT YOU USE OR IMPLEMENT THIS INFORMATION, DOCUMENTATION OR SOFTWARE IN YOUR
OWN SETTING, YOU DO SO AT YOUR OWN RISK. IN NO EVENT WILL HEWLETT-PACKARD COMPANY BE LIABLE
TO YOU FOR ANY DAMAGES ARISING FROM YOUR USE OR, YOUR INABILITY TO USE THIS INFORMATION,
DOCUMENTATION, OR SOFTWARE, INCLUDING ANY LOST PROFITS, LOST SAVINGS, OR OTHER INCIDENTAL
OR CONSEQUENTIAL DAMAGES, EVEN IF HEWLETT-PACKARD COMPANY HAS BEEN ADVISED OF THE
POSSIBILITY OF SUCH DAMAGES, OR FOR ANY CLAIM BY ANOTHER THIRD PARTY.
YOU MAY NOT DISASSEMBLE DECOMPILE OR DECRYPT THE SOFTWARE UNLESS HP’s PRIOR WRITTEN
CONSENT IS OBTAINED.
FURTHER ACCESS TO THE SOFTWARE FILES INDICATES YOUR ACCEPTANCE OF THE PRECEDING LICENSE
AGREEMENT.
63
Page 64

HP Software License Agreement
64
Page 65

Page 66

Created in
France 07/2000
 Loading...